
V1.0 05/2017
USER GUIDE
GUIDE UTILISATEUR
BENUTZERHANDBUCH
GUIDA UTENTE
GUÍA DEL USUARIO
GUIA DO USUÁRIO
HANDLEIDING
用戶指南
用户指南
ユーザーガイド
사용자 설명서


English ..............................................................................................4
Français ......................................................................................... 38
Deutsch ......................................................................................... 72
Italiano .......................................................................................106
Español ........................................................................................ 140
Português ................................................................................... 176
Nederlands ................................................................................208
P .......................................................................................242
.........................................................................................276
繁體中文 .....................................................................................309
简体中文 .....................................................................................342
日本語 ...........................................................................................375
한국어 ........................................................................................409

4
Your Parrot Disco-Pro AG™ contains the following elements:
1. A "Parrot Disco"™ drone;
2. A "Parrot CHUCK"™ autopilot system;
3. A “Parrot Skycontroller 2”™ lever. You can y your Parrot
Disco with the Parrot Skycontroller 2 by downloading the
FreeFlight Pro™ app to your smartphone or tablet. This
app is free of charge but might contain In-App Purchase
oers. It also allows you to calibrate your Parrot Disco;
4. A "Sequoia" sensor containing:
(A) A multispectral sensor that captures the light reected
by plants; and
(B) A sunshine sensor that records the intensity of light
emanating from the sun; and
5. Access to Airinov First™ services allowing you to obtain
your NDVI and zoning maps from the images captured
by the free Pix4Dcapture™ app to download to your
smartphone or tablet.

ENGLISH
5
DISCLAIMER
1. This Parrot Disco™ IS NOT A TOY and thus must not be
operated or used by children under the age of 14.
2. BEFORE USING your Parrot Disco:
(a) READ CAREFULLY this User Guide and all other
information and documentation available on www.parrot.
com, which may be updated from time to time without
any prior notice (referred hereafter as “Parrot
Documentation”). Pay PARTICULAR ATTENTION to the
paragraphs containing the symbol ;
(b) INFORM YOURSELVES ABOUT ALL APPLICABLE
REGULATIONS WITH RESPECT TO THE USE OF
DRONES AND ITS ACCESSORIES (referred hereafter as
“Applicable Regulations”); and
(c) BE AWARE that Parrot Disco may cause PROPERTY
DAMAGE, PERSONNAL INJURY or DEATH.
3. Please be aware that all videos and pictures which
are promoted by Parrot Drones SAS and its aliates
are made by and with professionals and experienced
pilots. ALWAYS REFER TO THE UPTODATE PARROT
DOCUMENTATION IF YOU HAVE ANY DOUBT
REGARDING THE USE OF YOUR PARROT DISCO AND
ITS ACCESSORIES.
4. TO THE EXTENT PERMITTED BY APPLICABLE LAW,
PARROT DRONES SAS, ITS AFFILIATES, AND THEIR
RESPECTIVE DISTRIBUTORS AND RETAILERS SHALL
NOT BE HELD LIABLE FOR ANY AND ALL DAMAGES
ARISING FROM OR IN CONNECTION WITH YOUR
NON-COMPLIANCE (OR THE NON-COMPLIANCE
OF THE PERSON USING YOUR PARROT DISCO) WITH
PARROT DOCUMENTATION OR ANY APPLICABLE
REGULATIONS.

6
PRESENTATION OF THE
PARROT DISCOPRO AG
PARROT DISCOPRO
Fin
Servomotor
Propeller Fin
Servomotor
Cowling
Fisheye camera
On/o button and indicator light

ENGLISH
7
CHUCK AUTOPILOT UNIT
Micro USB port
RC remote control port
Battery connector
Servomotor
connector
Central engine connector
Sequoia micro-USB
power port

8
PRESENTATION OF THE
PARROT SKYCONTROLLER 2
Antenna
Location of mobile device holder
On/O
button
Return home
Take o/Land
In ight: start/stop video recording
Settings menu: return
In ight:
take a photo
Settings menu:
validating
Settings
USB port

ENGLISH
9
Camera exposure
Display mode
Direct View / Immersive View
with FreeFlight Pro
Vertical orientation of the camera
USB port

10
PRESENTATION
OF THE SEQUOIA
Sequoia consists of a multispectral sensor and the
Sunshine Sensor irradiance sensor.
MULTISPECTRAL SENSOR
SUNSHINE SENSOR
Shutter and
indicator light
Micro USB
host port
Micro USB device
port
Near Infra-Red
Sensor
Red Sensor
Red-Edge
Sensor
Green
Sensor
RGB Sensor
Slot for an SD card
Ambient light
sensors
Micro USB
device port
The micro-USB host port of the multispectral
sensor must be connected to the micro-USB
device port of the Sunshine Sensor.

ENGLISH
11
BEFORE GETTING
STARTED
DOWNLOAD FREEFLIGHT PRO
AND PIX4DCAPTURE
Login to the App Store® or Google PlayTM and
download the free FreeFlight Pro and Pix4Dcapture
apps to your smartphone or tablet.
FreeFlight Pro is Parrot’s ocial application enabling
free drone ying.
Pix4Dcapture is the free app for generating a ight
plan to capture photos over an area of interest.
CHARGING THE PARROT
DISCOPRO'S BATTERY
The battery must be disconnected from the Parrot
Disco-Pro.
1. Select the plug (provided) for your country and
insert it into the charger.
2. Connect the cable to the charger.
3. Connect the battery to the charger's cable, and
then plug the charger into the mains.
The warning light is red while charging and then turns
green when the battery is charged.
The charging time is about 55 minutes for a ight time
of about 30 minutes.

12
CHARGING THE PARROT
SKYCONTROLLER 2 BATTERY
1. Take the adapter appropriate to your country and
x it on the charger.
2. Connect the charger cable to Parrot Skycontroller 2,
then plug the charger into the mains. The charge
time is approximately 1 hour 40 minutes for 4 hours
of use.
PREPARING THE PARROT DISCO
1. Remove the Parrot Disco-Pro's cowling.
2. Remove Sequoia, remove the protective lens cover
and place the battery in the slot provided.

ENGLISH
13
4. Close the Parrot Disco-Pro's cowling.
3. Replace the Sequoia and connect the battery to the
Parrot Disco-Pro. Then connect the Micro-USB device
cable from the Multispectral Sensor to the micro-USB
power port on Parrot CHUCK.

14
Attach the wings to the Parrot Disco-Pro.
Make sure that the n is fully slotted
into the servomotor arm.
ATTACHING THE WINGS
To remove the wings, pull on them.
Do not move the servomotors by hand.

ENGLISH
15
PREFLIGHT CHECKS
Before each ight with the Parrot Disco-Pro, carry
out the following checks:
REGULATIONS
Make sure that the use of Parrot Disco-Pro is
allowed where you are going to y.
Check the restrictions regarding the use of Wi-Fi®
frequencies in the place where you are going to y.
FLIGHT CONDITIONS
5 conditions to be complied with, without fail
1. Make sure you have at least 80 meters in
diameter of clear space for your Parrot Disco-
Pro to take o and land. Make sure the aireld
has no obstacles that may hinder piloting or
prevent visual ight.
2. Do not y the Parrot Disco-Pro at night.
3. Do not y the Parrot Disco-Pro over an urban
area or in certain places in the public domain
(for example: train stations, airports, etc.).
4. Check the weather to ensure good ight and
visual conditions. Do not y the Parrot Disco-
Pro in rain, fog, snow or wind of over 12 meters
per second or 43 km/h.
5. Make sure the ight altitude programmed
in Pix4Dcapture (entered in relation to take-
o point) is sucient to clear obstacles in the
surrounding area.

16
PARROT DISCOPRO
Make sure the Parrot Disco-Pro's wings are
properly secured (see the Attaching the wings
section).
Make sure the Parrot Disco-Pro's battery and your
remote control's battery are charged (see the
Fitting the battery section).
Make sure the Parrot Disco-Pro's cowling is
properly closed.
Make sure the Parrot Disco's warning light is
green. This means that the Parrot Disco has
detected the GPS signal.
Make sure the Sunshine Sensor is properly
exposed.
Check the ground conditions for landing the
Parrot Disco.
SEQUOIA
Make sure the protective cover is removed
before use.
Make sure that the Sequoia is connected to the
right micro-usb port of the Parrot CHUCK.
Make sure that the lenses are clean. Use the
microbre cloth (supplied) to clean them.
Free up enough memory (in the multispectral
sensor internal memory) so you can save all the
photos taken during the ight.

ENGLISH
17
Make sure that the two modules are properly
attached to the drone and that they are not likely to
come away during the ight.
Make sure that the micro USB device cable which
connects the drone to the multispectral sensor is
connected. Also check the micro-USB connection
between the sunshine sensor and the multispectral
sensor.
Make sure that the two sensors are calibrated.
For more information, see the Calibrating Sequoia
section.
Wait until the sunshine sensor indicator light is
green. When it is green this means that the GPS/
GNSS is enabled.
CONNECTING TO
THE PARROT DISCOPRO
CONNECTING THE PARROT
SKYCONTROLLER 2 TO THE PARROT
DISCO WITH FREEFLIGHT PRO
Place the Parrot Disco on a at surface.
1. Press the Parrot Disco-Pro's On/o button.
>The button ashes red then green once the
GPS is connected.
2. Press the On / O switch on the Parrot
Skycontroller 2.

18
3. Wait until the warning light is solid green.
You are connected to the Parrot Disco.
If the warning light continues to ash red, you need
to calibrate the Parrot Disco. To do this:
4. In the FreeFlight Pro
app, go to Fly & lm >
> Position, distances
and limits and press
Calibrate.
5. Calibrate the pitot
tube. To do this, stand
downwind and position
the Parrot Disco camera
to the ground.
6. Rotate the Parrot Disco
on the Z-axis (yaw).
7. Rotate the Parrot Disco
on the Y-axis (pitch).
8. Rotate the Parrot Disco
on the X-axis (roll).
>The warning light ashes
green. The Parrot Disco
is calibrated.
Z
Y
X

ENGLISH
19
CONNECTING YOUR PARROT
SKYCONTROLLER 2 TO YOUR
SMARTPHONE
1. Screw the smartphone holder onto the Parrot
Skycontroller 2.
B
A
B
A
You can rotate the holder to t your
smartphone’s dimensions. To do this,
press on it and rotate it to the right.
B
A
B
A

20
2. Press the right button on the holder to fully open it.
3. Position your smartphone on the holder.
B
A
BA
4. Tighten the holder on your smartphone.
5. Using your smartphone’s USB cable, connect your
smartphone to the Parrot Skycontroller 2’s USB port.
B
A

ENGLISH
21
LEFT CONTROL STICK
B
A
B
A
B
A
B
A
B
A
B
A
B
A
B
A
Accelerate
Slow down
RIGHT CONTROL
Descend
Climb
Turn right
Turn left
Right orbital
standby mode
Left orbital
standby mode
PILOTING MODES
PARROT SKYCONTROLLER 2
At any time during the execution of the ight plan
on Pix4Dcapture you can resume control of the
drone by pressing one of the controls on the Parrot
Skycontroller 2.

22
FLIGHT PLAN
CREATING A FLIGHT PLAN
IN PIX4DCAPTURE
At the rst launch, choose the Parrot Disco-Pro from
the list of drones, and then proceed to editing the
ight plan.
Grid: the drone quadrilles the area to be own over
in order to cover a major part of it.
When creating the ight plan, set
the start point and the landing
cone. For the landing zone, allow
a space of 200 m in length on a
cone of 30°.
For more detailed information on ight plans and
their creation go to the Pix4Dcapture support page:
Android:
https://www.parrot.com/uk/pix4dcapture-android
iOS:
https://www.parrot.com/uk/pix4dcapture-ios

ENGLISH
23
START THE FLIGHT PLAN
1. Turn on the Parrot Disco-Pro and connect it
to the Parrot Skycontroller 2. The connection
between the drone and the Parrot Skycontroller
2 is established automatically.
2. Connect your smartphone or tablet to the USB
port of the Parrot Skycontroller 2.
3. Launch the Pix4Dcapture app.
4. Select the type of mission on the main page.
5. Create the ight plan to perform.
6. Specify the start point "start waypoint" and the
landing cone.
7. Press on START
>A countdown starts to give you time to get into
position.
>The Parrot Disco-Pro is ready to take o after the
countdown and the engine starts. See section
Taking o.
>Once the ight plan is completed the drone
returns to the landing cone dened on the ight
plan and lands.

24
TAKING OFF
You must take o into the wind.
1. Stand facing upwind holding the body of the
Parrot Disco-Pro with one hand.
2. Make sure the Parrot Disco-Pro's engine is
completely clear.
3. In the Pix4Dapture app, after creating the ight
plan, press on Start.
In the case of free assisted control with Freeight Pro,
press the button on your Parrot Skycontroller 2 to
launch the take-o.
>The Parrot Disco-Pro engine starts to rotate and
reaches its maximum speed in 1 second.
4. Gently toss the Parrot Disco-Pro upward.

ENGLISH
25
>The Parrot Disco-Pro takes o. It goes up to
50 metres in altitude and then makes 60-metre
diameter circles.
N.B.: To stop the Parrot Disco-Pro's
engine, during the take-o phase,
press the button on your
Parrot Skycontroller 2 again.
If you do not toss the Parrot Disco-Pro
within 10 seconds of pressing ,
the engine shuts o. Press again on
to start a new take o procedure.

26
RETURN HOME
To bring the Parrot Disco-Pro back to its starting
point outside of a ight plan on Pix4Dcapture, press
the button on the Parrot Skycontroller 2.
> The Parrot Disco-Pro returns to its starting position, positions
itself at 50 m altitude, and circles 60 meters in diameter above
this position.
Point de départ
Make sure you are in an open environment.
PARROT
SKYCONTROLLER 2 :
LANDING
To avoid damaging the Parrot Disco-Pro, land on
a suitable surface, such as grass, for example.

ENGLISH
27
LINEAR LANDING
1. Position the Parrot Disco-Pro facing upwind.
2. Decrease the altitude of the Parrot Disco-Pro to
the maximum.
3. Press the button on the Parrot Skycontroller 2.
> The Parrot Disco-Pro descends in a straight line
and then straightens and lands softly.
During the descent of the Parrot
Disco-Pro, you can over-correct if
necessary: go up, go down, turn left
and turn right.
80 m
50 m
10 m
To cancel the landing, press the button on the
Parrot Skycontroller 2.
The Parrot Disco-Pro goes up to 50 meters and
makes 60-meter diameter circles.
Your landing strip must be at least 50 meters
long.

28
CIRCULAR LANDING
During circular landing, the Parrot Disco-Pro makes
sure, by itself, that it lands facing upwind so as to
limit its landing speed.
1. Make sure you have an area of at least 80 meters
in diameter to land the Parrot Disco-Pro.
2. Hovering in orbit, with the Parrot Skycontroller2,
press on .
> The Parrot Disco-Pro lands in a spiral.
80 m
50 m
10 m
Circular landing requires a lot of space.
LOSS OF CONNECTION
During a ight outside the ight plan with
Pix4Dcapture and in case of loss of connection,
the Parrot Disco-Pro makes circles of 60 meters in
diameter for a predened period (10 seconds by
default).

ENGLISH
29
If the connection is not restored, the Parrot Disco-
Pro returns to its starting position and then ies
at a 50-metre altitude and then makes 60-metre
diameter circles.
If the connection is not restored after 5 minutes, the
Parrot Disco-Pro performs a circular landing.
TURNING OFF
THE PARROT DISCOPRO
To turn o the Parrot Disco-Pro, press and hold down
the On/O button.
>The red light ashes, and then the Parrot Disco-
Pro turns o.
RETRIEVING
YOUR PHOTOS
During the ight, photos are stored on the internal
memory of the multispectral sensor.
1. Connect the multispectral sensor to your
computer.
2. Retrieve the photos taken during the ight.
If shooting is recorded on an SD memory card, you
can also use the Sunshine Sensor as an SD card
reader. To do this connect the sensor's micro USB
device port to your computer.
Do not remove the SD card when Sequoia is turned on.

30
DATA PROCESSING
WITH AIRINOV FIRST+
Go to http://parrot.airinov.com and follow the on-
screen steps for processing your data.
For more information go to
www.parrot.com/support
UPDATING
THE PARROT DISCOPRO
1. Connect your Parrot Skycontroller 2 to your
Parrot Disco-Pro.
2. Connect your smartphone or tablet to your
Parrot Skycontroller 2 via USB.
3. The FreeFlight Pro app starts automatically.
4. In the FreeFlight Pro app, press on Update.
5. The app searches for updates.
6. If the app nds an update le, select it and press
OK.
7. The application downloads the update le.
8. A pop-up window appears informing you that
the drone will restart.
9. Tap Exit.

ENGLISH
31
The Parrot Disco-Pro automatically restarts during
installation of the update. It may take several minutes.
Once the update is complete, the FreeFlight Pro
app automatically restarts.

32
WARNING LIGHT
INDICATIONS
Flashing blue The Parrot Disco-Pro is starting up.
Flashing green light The Parrot Disco-Pro has detected the GPS
signal and is ready to take o.
Flashing yellow light The Parrot Disco-Pro update is underway.
Do not turn o the Parrot Disco-Pro.
Flashing red and
blue
The Parrot Disco-Pro has detected a problem
with the battery.
> Contact your retailer or go to the Parrot
Disco-Pro support page on www.parrot.
com/support.
Flashing red light
The Parrot Disco-Pro has detected an engine
fault.
> An error message appears on the
FreeFlight Pro app.
Go to the error code table available at
www.parrot.com/support.
SPARE PARTS
You can buy spare parts for the Parrot Disco-Pro
from our online store: www.parrot.com.
For more information on the assembly of spare parts,
see the video tutorials on our support page.

ENGLISH
33
TECHNICAL
SPECIFICATIONS
SENSORS
• Ultrasound
• Altimeter
• Hi-speed vertical camera
• Pitot Tube: speed sensor
INERTIAL NAVIGATION SYSTEM
• Three-axis gyroscope
• Three-axis accelerometer
• Three-axis magnetometer
HARDWARE
• CPU Dual core ARM® Cortex® -A9
• Internal ash memory: 32GB
WIFI AND TRANSMISSIONS
• Network access point
• AC Wi-Fi, 2 dual band antennae (2.4 and 5 GHz), multiple inputs
and outputs
• Up to 2km of range with the Parrot Skycontroller 2
REMOVABLE BATTERY
• 3 cell 2700mAh / 25A LipoBattery
• Battery life: 45 minutes
• Rated voltage: 11.1V
• 21.6A continuous discharge
• 3.5A max charge
• Operating range: -20°C-60°C

34
SIZE
• Weight: 940 gr
• Size: 1150 mm x 580 mm x 120 mm
• Wingspan: 1150 mm
GPS
• Integrated GPS
• GPS + GLONASS
PERFORMANCE
• Engine: 1280kv
• Servomotor: 5V
• Option of installing an SBUS, SUMD, CPPM radio receiver
VIDEO & PHOTOS
• Full HD 1080p Camera
• Video feed: 360p / 720p
SOFTWARE
• Linux® & Open Source SDK for development
BATTERY CHARGER
• Input: 100-240V, 50h-60Hz, 1.2A
• Output: Max 12.6Vdc, 3.5A
• Maximum altitude: 2000m above sea level
• Operating range: 0°C-40°C
PARROT DISCO
• Operating range: 0°C-40°C
• Max current: 15A
• Rated voltage: 11.1V

ENGLISH
35
GENERAL INFORMATION
The Parrot Disco-Pro must be used in accordance with the civil aviation rules
for each country, and in places suited to its chosen progression in order to
always ensure the safety of people, animals and property.
Before ying your Parrot Disco-Pro, check the local civil aviation rules.
ACCESSORIES AND SPARE PARTS
Accessories and spare parts are available from your Parrot retailer or on
www.parrot.com.
PRECAUTIONS FOR USE AND MAINTENANCE
The pilot must, at all times, maintain eye contact with the Parrot Disco-Pro
and control its trajectory.
It may not be permitted to use the Parrot Disco in certain places in the public
domain (e.g. train station, airport, etc.) or on public roads.
As soon as the Parrot Disco's propeller is moving, it can cause damage to
people, animals or objects. Always stay a safe distance away from the Parrot
Disco. Always pay attention to the Parrot Disco's propeller during take-o.
Only use accessories specied by Parrot Drones SAS.
If sand or dust gets into the Parrot Disco, it may be irreparably damaged and
no longer function properly.
Do not use the Parrot Disco in adverse weather conditions (rain, strong wind
or snow) or when visibility is poor (at night).
Keep the Parrot Disco away from high voltage power lines, buildings or any
other potentially hazardous areas.
Do not use this device near liquids. Do not place the Parrot Disco on water or
on a wet surface as this could cause irreparable damage.
Avoid making the Parrot Disco undergo signicant changes in altitude.
Do not leave the Parrot Disco in the sun.
Risk of ingestion of small objects. The packaging is not part of the product
and must be discarded as a safety measure.
WIFI
Before you y your Parrot Disco, check the restrictions regarding the use of
Wi-Fi frequencies in the place where you are going to y it. Certain frequencies
may be restricted or prohibited. For instance, in some countries the use of the
5 GHz band for your Wi-Fi may be prohibited for outdoor locations.
WARNING REGARDING PRIVACY AND RESPECT FOR IMAGES
OF PROPERTY
Recording and broadcasting an individual's image without their permission may
constitute an invasion of privacy and you may be held liable. Ask permission
before lming people, especially if you intend to keep your recordings and/
or broadcast them. Do not broadcast degrading images which may aect an
individual's reputation or dignity.
Recording and broadcasting the image of property without permission from
its owner and or any third party holding intellectual property rights on the
property may constitute a violation of the property's image rights and you
may be held liable. Ask permission from its owner and/or any third party with
ownership rights.

36
BATTERY PARROT DISCO AND PARROT SKYCONTROLLER 2
WARNING: Failure to follow all the instructions may result in serious injury,
irreparable damage to the battery and may cause a re, smoke or explosion.
Always check the battery's condition before charging or using it. Replace the
battery if it has been dropped, or in case of odour, overheating, discolouration,
deformation or leakage. Never use anything other than the approved LiPo
charger to charge the battery. Always use a balancing charger for LiPo cells
or a LiPo cell balancer. It is recommended that you do not to use any other
charger than the one provided with the product. Never trickle charge or
charge under 2.5 V per cell. The temperature of the battery should never
exceed 60°C (140°F) otherwise the battery may become damaged or ignited.
Never charge on a ammable surface, near ammable products or inside a
vehicle (preferably place the battery in a non-ammable and non-conductive
container). Never leave the battery unattended during the charging process.
Never disassemble or modify the housing's wiring, or puncture the cells.
Always ensure that the charger output voltage corresponds to the voltage of
the battery. Do not short circuit the batteries. Never expose the LiPo battery
to moisture or direct sunlight, or store it in a place where temperatures could
exceed 60 °C (car in the sun, for example). Always keep it out of reach of
children.
WARNING
RISK OF EXPLOSION IF THE PARROT DISCO BATTERY
IS REPLACED WITH AN INCOMPATIBLE BATTERY.
DISPOSE OF USED BATTERIES ACCORDING TO INSTRUCTIONS.
WARRANTY
To nd out about the warranty conditions, please refer to the Terms and
Conditions of Sale of the retailer where you purchased the Parrot Disco-Pro
AG.
HOW TO RECYCLE THIS PRODUCT
This symbol on the product or its documentation indicates that it must
not be disposed of with household waste. Uncontrolled waste disposal
may harm the environment or human health. Please separate your
device from other types of waste to recycle it responsibly. This will help
to foster the sustainable re-use of material resources. Please contact your
retailer or your local council to seek information about how to recycle the Parrot
Disco, the Parrot Skycontroller 2 and the Sequoia.
DECLARATION OF CONFORMITY EU PARROT DISCOPRO
This device can be used in: DE, AT, BE, BG, CY, HR, DK, ES, EE, FI, FR,
GR, HU, IE, IT, LV, LT, LU, MT, NL, PL, PT, CZ, RO, GB, SK, SI, SE.
The outdoor use restriction in member states of the European Union
relates only to the rst in the 5GHz band (5150-5250MHz).
PARROT DRONES, 174 quai de Jemmapes, 75010 Paris, France, declares
on its sole responsibility that the product described in the present guide
complies with technical standards EN301489-1, EN301489-17, EN300440-1,
EN300328, EN300893, EN300440-2, EN60950-1, EN62321 in compliance
with the provisions of R&TTE directive 1999/5/EC, the low voltage directive
2014/35/EU and the ROHS Directive 2011/65/EC.
http://www.parrot.com/ce/?parrot-disco

ENGLISH
37
DECLARATION OF CONFORMITY PARROT SKYCONTROLLER 2
This device can be used in: DE, AT, BE, BG, CY, HR, DK, ES, EE, FI, FR, GR, HU,
IR, IT, LV, LT, LU, MT, NL, PL, PT, CZ, RO, GB, SK, SI, SE.
Parrot DRONES, 174 quai de Jemmapes, 75010 Paris, France, hereby declares
that it is solely responsible for the compliance of the product described in
this user guide with technical standards, EN 301489-17, EN300328, EN71-1,
EN71-2, EN71-3, EN62115, EN 50566: 2013 (SAR) under the provisions of the
Radio Equipment Directive (RED) 2014/53/EU and the General Product Safety
Directive 2014/35/EU.
http://www.parrot.com/ce/?skycontroller-2
DECLARATION OF CONFORMITY IN CANADA PARROT
DISCOPRO
This device complies with the Industry Canada RSS applicable to license-
exempt radio apparatus. Operation is permitted subject to the following
two conditions: (1) the apparatus must not produce interference, and (2) the
apparatus user must accept any radio interference subjected to even if the
said interference is likely to compromise its operation. This category B digital
device is compliant with the NMB-003 standard of Canada.
DECLARATION OF CONFORMITY IN USA/CANADA PARROT
SKYCONTROLLER 2
This device complies with the Industry Canada RSS applicable to license-
exempt radio apparatus. Operation is permitted subject to the following two
conditions: (1) the device must not produce interference, and (2) the user
of the device must accept any radio interference encountered, even if the
interference is likely to compromise operations.
FCC/IC
To comply with the FCC/IC RF exposure guidelines for transmission
equipment, a distance of at least 20cm must be maintained between the
product antenna and individuals. To remain compliant you are recommended
not to use the product at any distance less than this.
TRADEMARKS
Parrot and the Parrot logos are trademarks of Parrot S.A.
Parrot Disco-Pro AG, Parrot Skycontroller, Sequoia, Parrot C.H.U.C.K as well as
their respective logos are trademarks of Parrot Drones SAS.
App Store is a trademark of Apple Inc.
Google Play and Google Maps are trademarks of Google Inc.
Wi-Fi® is a registered trademark of Wi-Fi Alliance®
Linux is a trademark of Linus Torvalds registered in the USA and other
countries.
Pix4D and Pix4Dcapture are registered trademarks of Pix4D SA.
Airinov and Airinov First are trademarks or registered trademarks of Airinov
SAS.
All other trademarks mentioned in this guide are the property of their
respective owners.
MANUFACTURER INFORMATION
The Parrot Disco-Pro, Parrot Skycontroller 2 and
Sequoia are manufactured by: Parrot Drones SAS -
174 Quai de Jemmapes - 75010 Paris (France) - Corporate and Trade Register
of Paris 808 408 074 - www.parrot.com

38
Votre Parrot Disco-Pro AG™ contient les éléments suivants :
1. Un drone « Parrot Disco »™ ;
2. Un système d’autopilotage « Parrot C.H.U.C.K »™ ;
3. Une manette « Parrot Skycontroller 2 »™. Vous pouvez
piloter votre Parrot Disco avec le Parrot Skycontroller
2 en téléchargeant sur votre smartphone ou tablette
l’application FreeFlight Pro™. Cette application est
gratuite mais peut contenir des In-App Purchase. Elle
permet également de procéder à la calibration de votre
Parrot Disco ;
4. Un capteur « Sequoia »™ contenant :
(a) Un capteur multispectral qui capture la lumière que les
plantes rééchissent; et
(b) Un capteur sunshine qui enregistre l’intensité de la
lumière émanant du soleil ; et
5. Un accès aux services Airinov First+™ vous permettant
d’obtenir vos cartes NDVI et de zonage à partir des
captures d’images réalisées par l’application gratuite
Pix4Dcapture™ à télécharger sur votre smartphone ou
tablette.

FRANÇAIS
39
AVERTISSEMENT
1. Parrot Disco N’EST PAS UN JOUET. Il ne doit donc pas être
utilisé ou manipulé par un enfant âgé de moins de 14 ans.
2. AVANT TOUTE UTILISATION du Parrot Disco :
(a) LISEZ ATTENTIVEMENT ce Guide Utilisateur ainsi que
toutes les informations et documentations disponibles sur
www.parrot.com, qui peuvent être mises à jour à tout
moment et sans avertissement préalable (ci-après
« Documentation de Parrot »). Une ATTENTION
PARTICULIERE doit être prêtée aux paragraphes contenant
le symbole ;
(b) INFORMEZ-VOUS SUR LES REGLEMENTATIONS
APPLICABLES CONCERNANT L’UTILISATION DES DRONES
ET DE LEURS ACCESSOIRES (ci-après « Réglementations
Applicables ») ; et
(c) AYEZ A L’ESPRIT que le Parrot Disco est susceptible
d’exposer les autres et vous-même à DES DOMMAGES
MATERIELS ET/OU CORPORELS, pouvant notamment
entrainer des blessures graves voire mortelles.
3. Veuillez noter que les vidéos et photos qui font l’objet
de promotions et campagnes publicitaires par Parrot
Drones SAS et ses liales ont été réalisées par et avec des
professionnels et des pilotes expérimentés. MERCI DE
TOUJOURS VOUS REFERER AUX DERNIERES MISES A
JOUR DE LA DOCUMENTATION DE PARROT EN CAS DE
DOUTE RELATIF A L’UTILISATION DE VOTRE PARROT
DISCO ET DE SES ACCESSOIRES.
4. DANS LES LIMITES DU DROIT APPLICABLE, PARROT
DRONES SAS, SES FILIALES, ET LEURS DISTRIBUTEURS ET
DETAILLANTS RESPECTIFS NE SAURAIENT ETRE TENUS
RESPONSABLES POUR TOUT PREJUDICE RESULTANT OU
EN LIEN AVEC LE NON RESPECT DE LA DOCUMENTATION
DE PARROT OU DES REGLEMENTATIONS APPLICABLES
PAR VOUS-MEME OU PAR TOUTE PERSONNE UTILISANT
VOTRE PARROT DISCO.

40
PRÉSENTATION DU
PARROT DISCOPRO AG
PARROT DISCOPRO
Aileron
Servomoteur
Hélice Aileron
Servomoteur
Capot
Caméra Fisheye
Bouton on/o et voyant lumineux

FRANÇAIS
41
MODULE AUTOPILOTE C.H.U.C.K
Port micro-USB
Port pour télécommande RC
Connecteur batterie
Connecteur
servos
Connecteur moteur central
Port micro-USB
d’alimentation du Sequoia

42
PRÉSENTATION DU
PARROT SKYCONTROLLER 2
Antenne
Emplacement du support pour appareil mobile
Bouton
On/O
Retour au point de décollage
Décoller/
Atterrir
En vol : démarrer /arrêter l’enregistrement vidéo
Menu Paramètres : retour
En vol :
prendre une photo
Menu Paramètres :
valider
Paramètres
Port USB

FRANÇAIS
43
Exposition de la caméra
Mode d’achage
Vue directe / Vue immersive
avec FreeFlight Pro
Orientation verticale de la caméra
Port USB

44
PRÉSENTATION
DU SEQUOIA
Sequoia se compose d’un capteur multispectral et
d’un capteur d’irradiance Sunshine Sensor.
CAPTEUR MULTISPECTRAL
SUNSHINE SENSOR
Déclencheur
et voyant
lumineux
Port micro-USB
host
Port micro-USB
device
Capteur Proche
Infra-Rouge
Capteur
Rouge
Capteur
Red-Edge
Capteur
Vert
Capteur RGB
Emplacement pour
une carte SD
Capteurs de lumière
ambiante
Port micro-USB
device
Le port micro-USB host du capteur multispectral
doit être relié au port micro-USB device du
Sunshine Sensor.

FRANÇAIS
45
AVANT DE COMMENCER
TÉLÉCHARGER FREEFLIGHT PRO
ET PIX4DCAPTURE
Connectez-vous sur l’App Store® ou sur Google Play,
et téléchargez les applications gratuites FreeFlight
Pro et Pix4Dcapture sur votre smartphone ou sur
votre tablette.
FreeFlight Pro est l’application ocielle de Parrot
permettant le pilotage libre du drone.
Pix4Dcapture est l’application gratuite permettant de
générer un plan de vol pour capturer des photos au
dessus d’une zone d’intérêt.
CHARGER LA BATTERIE
DU PARROT DISCOPRO
La batterie doit être déconnectée du Parrot Disco-
Pro.
1. Sélectionnez la prise fournie correspondante à
votre pays et insérez-la sur le chargeur.
2. Connectez le câble au chargeur.
3. Branchez la batterie au câble du chargeur puis
branchez lechargeur sur le secteur.
Le voyant lumineux est rouge pendant la charge puis
passe au vert lorsque la batterie est chargée.
Le temps de charge est de 55 minutes environ pour un
temps de volde 30 minutes environ.

46
CHARGER LA BATTERIE DU
PARROT SKYCONTROLLER 2
1. Sélectionnez l’adaptateur correspondant à votre
pays et xez-le sur le chargeur.
2. Connectez le câble du chargeur au Parrot
Skycontroller 2, puis branchez le chargeur au
secteur. Le temps de chargement est d’environ
1h40 pour 4 heures d’utilisation.
PREPARER LE PARROT DISCO
1. Retirez le capot du Parrot Disco-Pro.
2. Retirez Sequoia, enlevez la coque de protection pour
les lentilles et placez la batterie dans l’emplacement
prévu à cet eet.

FRANÇAIS
47
4. Refermez le capot du Parrot Disco-Pro.
3. Remettre en place le sequoia et branchez la batterie
au Parrot Disco-Pro. Puis branchez le câble micro-
USB device du Capteur Multispectral sur le port
d’alimentation micro-USB sur Parrot C.H.U.C.K.

48
Fixez les ailes sur le Parrot Disco-Pro.
Assurez-vous que l’aileron est entièrement
emboité dans le bras du servomoteur.
FIXER LES AILES
Pour retirer les ailes, tirez dessus.
Ne bougez pas les servomoteurs à la main.

FRANÇAIS
49
VÉRIFICATIONS
AVANT VOL
Avant chaque session de vol avec le Parrot Disco-
Pro, procédez aux vérications suivantes :
RÉGLEMENTATION
Vériez que l’utilisation du Parrot Disco-Pro est
autorisée sur votre lieu de vol.
Renseignez-vous sur les restrictions d’utilisation
des fréquences Wi-FI® de votre lieu de vol.
CONDITIONS DE VOL
5 conditions à respecter impérativement
1. Assurez-vous que vous disposez d’un espace
dégagé d’au moins 80 mètres de diamètre pour
le décollage et l’atterrissage du Parrot Disco-
Pro. Vériez que le terrain de vol ne comporte
pas d’obstacle qui pourrait gêner le pilotage ou
empêcher le vol à vue.
2. Ne pilotez pas le Parrot Disco-Pro de nuit.
3. Ne pilotez pas le Parrot Disco-Pro au-dessus
d’une zone urbaine ou dans certains lieux du
domaine public (ex : gare, aéroport...).
4. Vériez les conditions météorologiques an
de garantir de bonnes conditions de vol et de
prises de vues. Ne pilotez pas le Parrot Disco-
Pro par temps de pluie, de brouillard, de neige
ou de vent de plus de 12 mètres par seconde
ou 43 km/h.

50
5. Veillez à ce que l’altitude de vol programmée
sur Pix4Dcapture (prise par rapport au point
de décollage) soit susante pour éviter les
obstacles aux alentours.
PARROT DISCOPRO
Assurez-vous que les ailes du Parrot Disco-Pro
sont correctement xées (voir la section Fixer les
ailes).
Assurez-vous que la batterie du Parrot Disco-Pro et
la batterie de votre télécommande sont chargées
(voir la section Installer la batterie).
Assurez-vous que le capot du Parrot Disco-Pro est
correctement fermé.
Assurez-vous que le voyant lumineux du Parrot
Disco clignote en vert. Cela signie que le Parrot
Disco a détecté le signal GPS.
Assurez-vous que le Sunshine Sensor est bien
exposé.
Vériez l’état du terrain pour l’atterrissage du
Parrot Disco.
SEQUOIA
Assurez-vous que la coque de protection est
retirée avant l’utilisation.
Assurez-vous que le Sequoia est branché sur le
port micro-usb droit du Parrot C.H.U.C.K.
Assurez-vous que les objectifs sont propres.
Utilisez le chion microbre (fourni) pour les
nettoyer.

FRANÇAIS
51
Libérez assez de mémoire (dans la mémoire
interne du capteur multispectral) an d’enregistrer
toutes les photos prises pendant le vol.
Assurez-vous que les deux modules sont
correctement xés au drone et qu’ils ne risquent
pas de se détacher durant le vol.
Assurez-vous que le câble micro-USB device qui
relie le drone au capteur multispectral est branché.
Vériez aussi le branchement micro-USB entre le
sunshine sensor et le capteur multispectral.
Assurez-vous que les deux capteurs sont calibrés.
Pour plus d’informations, voir la section Calibrer
Sequoia.
Attendez que le voyant lumineux du sunshine
sensor soit vert. Lorsqu’il est vert, cela signie que
le GPS/GNSS est activé.
SE CONNECTER
AU PARROT DISCOPRO
CONNECTER LE PARROT
SKYCONTROLLER 2 AU PARROT
DISCO AVEC FREEFLIGHT PRO
Posez le Parrot Disco sur une surface plane.
1. Appuyez sur le bouton On/O du Parrot Disco-
Pro.
>Le voyant lumineux clignote rouge puis vert
une fois le signal GPS xé.

52
2. Appuyez sur le switch On/O du Parrot
Skycontroller 2.
3. Patientez jusqu’à ce que le voyant lumineux soit
vert xe.
Vous êtes connecté au Parrot Disco-Pro.
Si le voyant lumineux continue de clignoter rouge,
vous devez calibrer le Parrot Disco-Pro. Pour cela :
4. Dans l’application FreeFlight Pro, allez dans Fly
& Film > > Position,
distances et limites et
appuyez sur Calibrer.
5. Calibrez la sonde
pitot. Pour cela, placez
vous dos au vent et
positionnez la caméra
du Parrot Disco-Pro vers
le sol.
6. Faites pivoter le Parrot
Disco sur l’axe Z (yaw/
lacet).
7. Faites pivoter le Parrot
Disco-Pro sur l’axe Y
(pitch/tangage).
8. Faites pivoter le Parrot
Disco-Pro sur l’axe X
(roll/roulis).
>Le voyant lumineux
clignote vert. Le Parrot
Disco-Pro est calibré.
Z
Y
X

FRANÇAIS
53
CONNECTER VOTRE
SMARTPHONE AU
PARROT SKYCONTROLLER 2
1. Vissez le support pour smartphone sur le Parrot
Skycontroller 2.
B
A
B
A
Vous pouvez faire pivoter le support
pour l’adapter aux dimensions de votre
smartphone. Pour cela, appuyez dessus et
faites-le pivoter à droite.
B
A
B
A

54
2. Appuyez sur le switch à droite du support pour l’ouvrir
complètement.
3. Positionnez votre smartphone sur le support.
B
A
BA
4. Resserrez le support sur votre smartphone.
5. A l’aide du câble USB de votre smartphone,
connectez votre smartphone au port USB du Parrot
Skycontroller 2.
B
A

FRANÇAIS
55
COMMANDE GAUCHE
B
A
B
A
B
A
B
A
B
A
B
A
B
A
B
A
Accélérer
Ralentir
COMMANDE DROITE
Descendre
Monter
Tourner à droite
Tourner à gauche
Vol stationnaire
en orbite droite
Vol stationnaire
en orbite gauche
MODES DE PILOTAGE
PARROT SKYCONTROLLER 2
A tout moment lors de l’exécution du plan de vol
sur Pix4Dcapture vous pouvez reprendre le contrôle
du drone en appuyant sur une des commandes du
Parrot Skycontroller 2.

56
PLAN DE VOL
CRÉER UN PLAN DE VOL AVEC
PIX4DCAPTURE
Au premier lancement, choisir le Parrot Disco-Pro
dans la liste des drones, puis passez à l’édition du
plan de vol.
Grid : le drone quadrille la zone à survoler an d’en
recouvrir une majeure partie.
Lors de la création du plan de
vol, dénissez le point de départ
et le cône d’atterrissage. Pour la
zone d’atterrissage, prévoyez un
espace de 200 m de long sur un
cône de 30°.
Pour plus d’informations sur les plans de vol et savoir
comment les créer, consultez la page support de
Pix4Dcapture :
Android :
https://www.parrot.com/uk/pix4dcapture-android
iOS :
https://www.parrot.com/uk/pix4dcapture-ios

FRANÇAIS
57
DÉMARRER LE PLAN DE VOL
1. Allumez le Parrot Disco-Pro et connectez-le
au Parrot Skycontroller 2. La connection entre
le drone et le Parrot Skycontroller 2 s’établit
automatiquement.
2. Connectez votre smartphone ou tablette au
port USB du Parrot Skycontroller 2.
3. Lancez l’application Pix4Dcapture.
4. Sélectionnez le type de mission sur la page
principale.
5. Créez le plan de vol à eectuer.
6. Indiquez le point de démarrage « start
waypoint» et le cône d’atterrisage.
7. Appuyez sur START.
>Un compte à rebours se lance an de vous laisser
le temps de vous mettre en position.
>Le Parrot Disco-Pro est prêt à décoller après le
compte à rebours, le moteur se lance. Voir la
section Décoller.
>Une fois le plan de vol terminé le drone rejoint
le cône d’atterrissage déni sur le plan de vol et
atterrit.

58
DÉCOLLER
Vous devez décoller face au vent.
1. Placez-vous face au vent en maintenant le corps
du Parrot Disco-Pro d’une main.
2. Assurez-vous que le moteur du Parrot Disco-Pro
est complètement dégagé.
3. Dans l’application Pix4Dcapture, après avoir
crée le plan de vol, appuyer sur Start.
En cas de pilotage libre assisté avec Freeight
Pro, appuyez sur le bouton de votre Parrot
Skycontroller 2 pour lancer le décollage.
>Le moteur du Parrot Disco-Pro commence
à tourner et atteint sa vitesse maximale en
1seconde.
4. Lancez le Parrot Disco-Pro légèrement vers le
haut.

FRANÇAIS
59
>Le Parrot Disco-Pro décolle. Il s’élève à 50 mètres
d’altitude puis eectue des cercles de 60 mètres
de diamètre.
Note : Pour arrêter le moteur du Parrot
Disco-Pro dans la phase de décollage,
appuyez à nouveau sur le bouton
de votre Parrot Skycontroller 2.
Si vous ne lancez pas le Parrot Disco-
Pro 10 secondes après avoir appuyé
sur , le moteur se coupe. Appuyez
à nouveau sur pour démarrer une
nouvelle procédure de décollage.

60
RETOUR AU POINT
DE DÉPART
Pour faire revenir le Parrot Disco-Pro à son point de
départ en dehors d’un plan de vol sur Pix4Dcapture,
appuyez sur le bouton du Parrot Skycontroller 2.
> Le Parrot Disco-Pro revient vers sa position de départ, se place
à 50 m d’altitude, et fait des cercles de 60 mètres de diamètre
au-dessus de cette position.
Point de départ
Assurez-vous que vous vous trouvez dans un
environnement dégagé.
ATTERRIR
An de ne pas endommager le Parrot Disco-Pro,
atterrissez sur une surface adaptée, comme de
l’herbe par exemple.
ATTERRISSAGE LINÉAIRE
1. Positionnez le Parrot Disco-Pro face au vent.
2. Diminuez l’altitude du Parrot Disco-Pro au
maximum.

FRANÇAIS
61
3. Appuyez sur le bouton du Parrot Skycontroller 2.
> Le Parrot Disco-Pro descend en ligne droite puis
se remet droit et atterrit doucement.
Note : Lors de la descente du Parrot
Disco-Pro, vous pouvez le surpiloter si
nécessaire : monter, descendre, tourner
à gauche et tourner à droite.
80 m
50 m
10 m
Pour annuler l’atterrissage, appuyez sur le bouton
de votre Parrot Skycontroller 2.
Le Parrot Disco-Pro s’élève à 50 mètres et fait des
cercles de 60 mètres de diamètre.
Votre piste d’atterrissage doit mesurer au moins
50 mètres.
ATTERRISSAGE CIRCULAIRE
Pendant l’atterrissage circulaire, le Parrot Disco-Pro
s’assure seul d’arriver au sol face au vent an de
limiter sa vitesse d’atterrissage.
1. Assurez-vous que vous disposez d’une zone
d’au moins 80 mètres de diamètre pour faire
atterrir le Parrot Disco.

62
2. En vol stationnaire en orbite, avec le Parrot
Skycontroller 2, appuyez sur .
> Le Parrot Disco-Pro atterrit en spirale.
80 m
50 m
10 m
L’atterrissage circulaire demande beaucoup
d’espace.
PERTE DE CONNEXION
Pendant le vol en dehors du plan de vol avec
Pix4Dcapture et en cas de perte de connexion,
le Parrot Disco-Pro fait des cercles de 60 mètres
de diamètre pendant une période prédénie
(10secondes par défaut).
Lorsque la connexion n’est pas rétablie, le Parrot
Disco-Pro revient vers sa position de départ, se
place à 50 m d’altitude puis fait des cercles de 60
mètres de diamètre.
Si la connexion n’est toujours pas rétablie au bout
de 5 minutes, le Parrot Disco-Pro eectue un
atterrissage circulaire.

FRANÇAIS
63
ETEINDRE LE PARROT
DISCO
Pour éteindre le Parrot Disco-Pro, appuyer sur le
bouton On/O.
>Le voyant lumineux clignote en rouge, puis le
Parrot Disco-Pro s’éteint.
RÉCUPÉRER
VOS PHOTOS
Pendant le vol, les photos sont enregistrées sur la
mémoire interne du capteur multispectral.
1. Branchez le capteur multispectral sur votre
ordinateur.
2. Récupérez les photos prises lors de la session
de vol.
Si les prises de vues sont enregistrées sur une carte
mémoire SD, vous pouvez aussi utiliser le Sunshine
Sensor comme lecteur de carte SD. Pour cela,
connectez le port micro-USB device du capteur à
votre ordinateur.
Ne pas retirer la carte SD lorsque Sequoia est allumé.

64
TRAITEMENT DES
DONNÉES AVEC AIRINOV
FIRST+
Rendez-vous sur http://parrot.airinov.com et suivez
les étapes à l’écran pour le traitement de vos
données.
Pour plus d’informations rendez-vous sur
www.parrot.com/support
METTRE À JOUR
LE PARROT DISCO
1. Connectez votre Parrot Skycontroller 2 à votre
Parrot Disco-Pro.
2. Connectez votre smartphone ou tablette à votre
Parrot Skycontroller 2 via USB.
3. L’application FreeFlight Pro se lance
automatiquement.
4. Dans l’application FreeFlight Pro, appuyez sur
Mise à jour.
5. L’application recherche les mises à jour.
6. Si l’application trouve un chier de mise à jour,
sélectionnez-le et appuyez sur OK.
7. L’application télécharge le chier de mise à jour.
8. Une fenêtre pop-up apparaît et vous informe du
redémarrage du drone.

FRANÇAIS
65
9. Appuyez sur Sortir.
Le Parrot Disco-Pro redémarre automatiquement
pendant l’installation de la mise à jour. Cela peut
prendre plusieurs minutes. Une fois la mise à jour
terminée, l’application FreeFlight Pro redémarre
automatiquement.

66
COMPORTEMENT
DU VOYANT LUMINEUX
Clignote bleu Le Parrot Disco-Pro est en cours de
démarrage.
Clignote vert Le Parrot Disco-Pro a détecté le signal GPS
et est prêt à décoller.
Clignote jaune
La mise à jour du Parrot Disco-Pro est en
cours.
Ne pas éteindre le Parrot Disco-Pro.
Clignote rouge et
bleu
Le Parrot Disco-Pro a détecté un problème
au niveau de la batterie.
> Contactez votre revendeur ou rendez-
vous sur la page support du Parrot Disco-
Pro sur www.parrot.com/support.
Clignote rouge
Le Parrot Disco-Pro a détecté une erreur
moteur.
> Un message d’erreur apparaît sur
l’application FreeFlight Pro. Rendez-vous
sur le tableau des codes erreur disponible
sur www.parrot.com/support.
PIÈCES DÉTACHÉES
Vous pouvez acheter les pièces détachées du Parrot
Disco-Pro sur notre boutique en ligne : www.parrot.com.
Pour plus d’informations sur le montage des pièces
détachées, consultez les tutoriels vidéo sur notre
page support.

FRANÇAIS
67
SPÉCIFICATIONS
TECHNIQUES
CAPTEURS
• Ultrason
• Altimètre
• Caméra verticale hi-speed
• Sonde Pitot : capteur de vitesse
SYSTÈME DE NAVIGATION INERTIELLE
• Gyroscope à trois axes
• Accéléromètre à trois axes
• Magnétomètre à trois axes
MATÉRIEL
• CPU Dual core ARM® Cortex® -A9
• Mémoire ash interne : 32 Go
WIFI ET TRANSMISSIONS
• Point d’accès de réseau
• Type Wi-Fi ac, 2 antennes bi-bande (2,4 et 5GHz), entrées
et sorties multiples
• Jusqu’à 2 km de portée avec le Parrot Skycontroller 2
BATTERIE AMOVIBLE
• 2700 mAh / 25A 3 cellules LipoBattery
• Autonomie de la batterie : 45 minutes
• Tension nominale : 11,1V
• 21,6A en décharge continue
• Charge à 3,5A max
• Plage de fonctionnement : -20°C-60°C

68
DIMENSIONS
• Poids : 940 gr
• Taille : 1150 mm x 580 mm x 120 mm
• Envergure : 1150 mm
GPS
• GPS intégré
• GPS + GLONASS
PERFORMANCE
• Moteur : 1280kv
• Servomoteur : 5V
• Possibilité d’installer un récepteur RF SBUS, SUMD, CPPM
VIDEO & PHOTOS
• Caméra Full HD de 1080p
• Flux vidéo : 360p / 720p
LOGICIEL
• Linux® & Open source SDK pour le développement
CHARGEUR
• Input : 100-240V, 50h-60Hz, 1.2A
• Output : Max 12,6Vdc, 3.5A
• Altitude maximale : 2000 m au-dessus du niveau de la mer
• Plage de fonctionnement : 0°C-40°C
PARROT DISCO
• Plage de fonctionnement : 0°C-40°C
• Courant max : 15A
• Tension nominale : 11,1V

FRANÇAIS
69
INFORMATIONS GÉNÉRALES
Le Parrot Disco doit être utilisé conformément aux règles de l’aviation civile de
chaque pays, et dans des lieux adaptés à son évolution choisis pour assurer en
permanence la sécurité des personnes, des animaux et des biens.
Avant de faire voler votre Parrot Disco, vériez les règles de l’aviation civile
locale.
ACCESSOIRES ET PIÈCES DE RECHANGE
Des accessoires et pièces de rechange sont disponibles auprès de votre
revendeur Parrot ou depuis le site www.parrot.com.
PRÉCAUTIONS D’UTILISATION ET ENTRETIEN
Le pilote doit, à tout instant, conserver un contact visuel avec le Parrot Disco et
contrôler sa trajectoire.
L’utilisation du Parrot Disco dans certains lieux du domaine public (par ex: gare,
aéroport,…) ou sur la voie publique peut ne pas être autorisée.
Dès que L’hélice du Parrot Disco est en mouvement, elle peut causer des
dommages aux personnes, aux animaux ou aux objets. Gardez toujours une
distance de sécurité avec le Parrot Disco. Faites toujours attention à l’hélice du
Parrot Disco lors de la phase de décollage. Utilisez uniquement les accessoires
spéciés par Parrot Drones SAS.
Si du sable ou de la poussière pénètre dans le Parrot Disco, celui-ci peut ne plus
fonctionner correctement, de manière irréversible.
N’utilisez pas le Parrot Disco dans des conditions météorologiques défavorables
(pluie, vent fort, neige, brouillard) ou lorsque les conditions de visibilité sont
insusantes (nuit).
Maintenez le Parrot Disco à l’écart de lignes de haute tension, bâtiments ou
toute autre zone potentiellement dangereuse.
N’utilisez pas cet appareil à proximité de substances liquides. Ne posez pas
le Parrot Disco sur l’eau ou sur une surface humide, cela pourrait causer des
dommages irréversibles.
Evitez de faire subir au Parrot Disco des changements d’altitude trop importants.
Ne laissez pas le Parrot Disco au soleil.
Risque d’ingestion de petits éléments. Les emballages ne font pas partie du
produit et doivent être jetés par mesure de sécurité.
WIFI
Avant de piloter votre Parrot Disco, renseignez-vous sur les restrictions
d’utilisation des fréquences Wi-FI de votre lieu de vol. Certaines fréquences
peuvent être restreintes ou interdites. Dans certains pays, par exemple,
l’utilisation de la bande Wi-FI 5 GHz peut être interdite en extérieur.
MISE EN GARDE CONCERNANT LE RESPECT DE LA VIE PRIVÉE
ET RESPECT DE L’IMAGE DES BIENS
Enregistrer et diuser l’image d’une personne sans son autorisation peut constituer
une atteinte à sa vie privée et être susceptible d’engager votre responsabilité.
Demandez l’autorisation avant de lmer des personnes, notamment, si vous
souhaitez conserver vos enregistrements et/ou les diuser. Ne diusez pas
d’images dégradantes ou pouvant porter atteinte à la réputation ou à la dignité
d’une personne.
Enregistrer et diuser l’image d’un bien sans l’autorisation de son propriétaire
et/ou de tout tiers disposant de droits de propriété intellectuelle sur le bien peut
constituer une atteinte au droit à l’image du bien et être susceptible d’engager
votre responsabilité. Demandez l’autorisation à son propriétaire et/ou de tout
tiers disposant de droit de propriété.

70
BATTERIE PARROT DISCO ET PARROT SKYCONTROLLER 2
ATTENTION : Le non-respect de l’ensemble des instructions peut provoquer des
blessures graves, endommager de façon irréversible la batterie et provoquer un
incendie, un dégagement de fumée ou une explosion.
Toujours vérier l’état de la batterie avant de la charger ou de l’utiliser.
Remplacer la batterie si elle a subi un choc, ou en cas d’odeur, de surchaue,
de décoloration, de déformation ou de fuite. Ne jamais rien utiliser pour
charger la batterie à l’exception d’un chargeur approuvé LiPo. Toujours utiliser
un chargeur à équilibrage de cellules LiPo ou un équilibreur de cellules LiPo.
Il est recommandé de ne pas utiliser un autre chargeur que celui fourni avec
le produit. Ne jamais eectuer de chargement à régime lent, ou en dessous
de 2,5 V par cellule. La température de la batterie ne doit jamais excéder les
60 °C (140 °F) sinon la batterie pourrait être endommagée ou s’enammer. Ne
jamais eectuer de charge sur un support inammable, à proximité de produits
inammables ou à l’intérieur d’un véhicule (placer de préférence la batterie dans
un récipient non inammable et non conducteur). Ne jamais laisser la batterie
sans surveillance durant le processus de charge. Ne jamais désassembler ou
modier le câblage du boîtier, ou percer les cellules. Toujours s’assurer que
la tension de sortie du chargeur corresponde à la tension de la batterie. Ne
pas mettre de batteries en court-circuit. Ne jamais exposer la batterie LiPo à
l’humidité ou directement au soleil, ou dans un endroit où la température peut
dépasser 60°C (voiture en plein soleil par exemple). Toujours tenir hors de
portée des enfants.
ATTENTION
RISQUE D’EXPLOSION SI LA BATTERIE DU PARROT DISCO EST
REMPLACÉE PAR UNE BATTERIE NON COMPATIBLE.
ELIMINEZ LES BATTERIES USAGÉES SELON LES INSTRUCTIONS.
GARANTIE
Pour connaître les conditions de garanties, merci de vous référer aux Conditions
Générales de vente du revendeur auprès de qui vous avez acheté le Parrot
Disco-Pro AG.
COMMENT RECYCLER CE PRODUIT
Ce symbole sur le produit ou sa documentation indique qu’il ne doit pas
être éliminé en n de vie avec les autres déchets ménagers. L’élimination
incontrôlée des déchets pouvant porter préjudice à l’environnement ou à
la santé humaine, veillez à le séparer des autres types de déchets et le
recycler de façon responsable. Vous favoriserez ainsi la réutilisation durable des
ressources matérielles. Nous vous invitons à contacter votre revendeur ou à vous
renseigner auprès de votre mairie an de savoir où et comment le Parrot Disco, le
Parrot Skycontroller 2 et le Sequoia peuvent être recyclés.
DÉCLARATION DE CONFORMITÉ UE PARROT DISCOPRO
Cet appareil peut être utilisé en : DE, AT, BE, BG, CY, HR, DK, ES, EE, FI, FR,
GR, HU, IE, IT, LV, LT, LU, MT, NL, PL, PT, CZ, RO, GB, SK, SI, SE.
La restriction de l’utilisation en extérieur dans les pays membres de l’Union
Européenne ne concerne que la première sous bande de la bande 5Ghz (5150-
5250MHz).
Parrot DRONES, 174 quai de Jemmapes, 75010 Paris, France, déclare sous son
unique responsabilité que le produit décrit dans le présent guide utilisateur
est en conformité avec les normes techniques, EN301489-1, EN301489-17,
EN300440-1, EN300328, EN300893, EN300440-2, EN60950-1, EN62321 suivant
les dispositions de la directive R&TTE 1999/5/CE , la directive Basse Tension
2014/35/UE et la directive ROHS 2011/65/CE.
http://www.parrot.com/ce/?parrot-disco

FRANÇAIS
71
DÉCLARATION DE CONFORMITÉ UE PARROT SKYCONTROLLER 2
Cet appareil peut être utilisé en : DE, AT, BE, BG, CY, HR, DK, ES, EE, FI, FR, GR,
HU, IR, IT, LV, LT, LU, MT, NL, PL, PT, CZ, RO, GB, SK, SI, SE.
Parrot DRONES, 174 quai de Jemmapes, 75010 Paris, France, déclare sous son
unique responsabilité que le produit décrit dans le présent guide utilisateur est
en conformité avec les normes techniques, EN 301489-17, EN300328, EN71-1,
EN71-2, EN71-3, EN62115, EN 50566 : 2013 (SAR) suivant les dispositions de
la directive RED 2014/53/UE et la directive de sécurité générale de produits
2014/35/EU. http://www.parrot.com/ce/?skycontroller-2
DÉCLARATION DE CONFORMITÉ CANADA PARROT DISCO
PRO
Le présent appareil est conforme aux CNR d’Industrie Canada applicables
aux appareils radio exempts de licence. L’exploitation est autorisée aux deux
conditions suivantes : (1) l’appareil ne doit pas produire de brouillage, et (2)
l’utilisateur de l’appareil doit accepter tout brouillage radioélectrique subi,
même si le brouillage est susceptible d’en compromettre le fonctionnement.
Cet appareil numérique de la classe B est conforme à la norme NMB-003 du
Canada.
DÉCLARATION DE CONFORMITÉ CANADA PARROT
SKYCONTROLLER 2
Le présent appareil est conforme aux CNR d’Industrie Canada applicables
aux appareils radio exempts de licence. L’exploitation est autorisée aux deux
conditions suivantes : (1) l’appareil ne doit pas produire de brouillage, et (2)
l’utilisateur de l’appareil doit accepter tout brouillage radioélectrique subi,
même si le brouillage est susceptible d’en compromettre le fonctionnement
FCC/IC
Pour répondre aux exigences relatives à l’exposition RF de la FCC/IC pour les
appareils de transmission, une distance d’au moins 20cm doit être maintenue
entre l’antenne du produit et les personnes. Pour assurer la conformité,
l’utilisation à une distance inférieure n’est pas recommandée.
MARQUES
Parrot et les logos Parrot sont des marques de Parrot S.A.
Parrot Disco-Pro AG, Parrot Disco, Parrot Skycontroller, Sequoia, Parrot
C.H.U.C.K ainsi que leurs logos respectifs sont des marques de Parrot Drones
SAS.
App Store est une marque de service d’Apple Inc.
Google Play et Google Maps sont des marques de Google Inc.
Wi-Fi® est une marque enregistrée par Wi-Fi Alliance®
Linux est une marque de Linus Torvalds enregistrée aux USA et dans d’autres
pays.
Pix4D et Pix4Dcapture sont des marques déposées par Pix4D SA.
Airinov et Airinov First+ sont des marques de commerce ou des marques
déposées par Airinov SAS.
Toutes autres marques mentionnées dans ce guide sont la propriété de leurs
titulaires respectifs.
INFORMATIONS FABRICANT
Le Parrot Disco-Pro, Parrot Skycontroller 2 et Sequoia sont fabriqués par : Parrot
Drones SAS - 174 Quai de Jemmapes - 75010 Paris (France) - RCS Paris 808 408
074 - www.parrot.com

72
Ihre Parrot Disco-Pro AG™ umfasst folgende Elemente:
1. Eine Drohne „Parrot Disco“™;
2. Ein Autopiloten-System „Parrot C.H.U.C.K “™;
3. Ein Joypad „Parrot Skycontroller 2“™. Indem Sie die
App FreeFlight Pro™ auf Ihr Smartphone oder Tablett
herunterladen, können Sie Ihre Parrot Disco mit dem
Parrot Skycontroller 2 steuern. Diese App ist gratis, kann
jedoch In-App Purchases enthalten. Mit ihr können Sie
auch Ihre Parrot Disco kalibrieren;
4. Einen Sensor „Sequoia“™, der folgendes umfasst:
(a) Einen Multispektralsensor, der das von den Panzen
reektierte Licht einfängt; und
(b) Einen Sonnenscheinsensor, der die Intensität des
Sonnenlichts speichert; und
5. Einen Zugang zu den Diensten Airinov First+™, mit
denen Sie Ihre NDVI- und Gebietskarten ausgehend von
den Bildaufzeichnungen, die mit der kostenlosen und auf
Ihr Smartphone oder Tablet herunterzuladenden App
Pix4Dcapture™ gemacht wurden, erhalten können.

DEUTSCH
73
WARNUNG
1. Die Parrot Disco IST KEIN SPIELZEUG. Sie darf von Kindern
unter 14 Jahren weder benutzt noch gehandhabt werden.
2. VOR JEDER BENUTZUNG der Parrot Disco:
(a) Dieses Benutzerhandbuch und alle auf www.parrot.com
erhältlichen Informationen und Produktdokumentationen
AUFMERKSAM DURCHLESEN, diese können jederzeit und
ohne vorherige Ankündigung aktualisiert werden
(nachfolgend als „Dokumentation von Parrot“ bezeichnet).
BESONDERE AUFMERKSAMKEIT erfordern die Abschnitte
mit dem Symbol ;
(b) INFORMIEREN SIE SICH ÜBER DIE GELTENDEN GESETZE
BEZÜGLICH DER BENUTZUNG VON DROHNEN UND
IHREM ZUBEHÖR (nachfolgend als „Geltende Gesetze“
bezeichnet); und
(c) DENKEN SIE DARAN, dass die Parrot Disco für andere
und für Sie selbst zum Risiko für SACH- UND/ODER
KÖRPERSCHÄDEN führen kann, die schwerwiegende und
sogar tödliche Verletzungen nach sich ziehen können.
3. Bedenken Sie bitte, dass die in der Werbung und in den
Werbekampagnen von Parrot Drones SAS und seinen
Filialen verwendeten Videos und Fotos von und mit Pros
und erfahrenen Piloten hergestellt wurden. BEZIEHEN
SIE SICH BEI JEGLICHEM ZWEIFEL HINSICHTLICH DER
BENUTZUNG IHRER PARROT DISCO UND IHRES ZUBEHÖRS
BITTE IMMER AUF DIE LETZTEN AKTUALISIERUNGEN DER
DOKUMENTATION VON PARROT.
4. IM RAHMEN DES GELTENDEN RECHTS ÜBERNEHMEN
PARROT DRONES SAS, IHRE FILIALEN UND IHRE JEWEILIGEN
VERTREIBER UND EINZELHÄNDLER KEINERLEI HAFTUNG
FÜR SCHÄDEN, DIE DURCH ODER IM ZUSAMMENHANG
MIT DER NICHTBEACHTUNG DER DOKUMENTATION VON
PARROT ODER DER GELTENDEN GESETZE DURCH SIE
SELBST ODER JEGLICHE ANDERE PERSONEN, DIE IHRE
PARROT DISCO BENUTZEN, VERURSACHT WERDEN.

74
ÜBERSICHT ÜBER IHRE
PARROT DISCOPRO AG
PARROT DISCOPRO
Flügel
Servomotor
Propeller Flügel
Servomotor
Abdeckung
Fisheye-
Kamera
On/O-Schalter und Leuchtanzeige

DEUTSCH
75
AUTOPILOTMODUL C.H.U.C.K
Micro-USB-Anschluss
Anschluss für die
Fernbedienung vom Typ RC
Akku-Anschluss
Servo-Konnektor
Mittelmotor-Konnektor
Micro-USB-Ladeanschluss
von Sequoia

76
ÜBERSICHT
ÜBER DEN PARROT
SKYCONTROLLER 2
Antenne
Stelle der Halterung für Mobilgeräte
On/O-
Knopf
Rückkehr zum Startpunkt
Starten/
Landen
Während des Fluges: Videoaufnahme starten/ stoppen
Menü Einstellungen: Rückkehr
Während des Fluges:
Foto aufnehmen
Menü Einstellungen:
bestätigen
Einstellungen
USB-
Anschluss

DEUTSCH
77
Kameraausrichtung
Anzeigemodus
Direktansicht / Immersivansicht
mit FreeFlight Pro
Vertikale Ausrichtung der Kamera
USB-Anschluss

78
ÜBERSICHT ÜBER SEQUOIA
Sequoia besteht aus einem Multispektralsensor
und einem Sonnenscheinsensor zur Messung der
Bestrahlungsstärke.
MULTISPEKTRALSENSOR
SONNENSCHEINSENSOR
Auslöser und
Leuchtanzeige
Micro-USB-
Anschluss
Micro-USB-
Anschluss
NIR-Sensor
Roter
Sensor
Red-Edge-
Sensor
Grüner
Sensor
RGB-Sensor
SD-Kartenschacht
Umgebungslichtsensor
Micro-USB-
Anschluss
Der Micro-USB-Anschluss des Multispektralsensors
muss mit dem Micro-USB-Anschluss des Sonnen-
scheinsensors verbunden werden.

DEUTSCH
79
VOR DEM START
FREEFLIGHT PRO UND
PIX4DCAPTURE HERUNTERLADEN
Verbinden Sie sich mit dem App Store® oder Google
Play und laden Sie die kostenlosen Apps FreeFlight
Pro und Pix4Dcapture auf Ihr Smartphone oder Ihr
Tablet herunter.
FreeFlight Pro ist die ozielle App von Parrot, die die
freie Steuerung der Drohne ermöglicht.
Pix4Dcapture ist die kostenlose App, mit der man
einen Flugplan zur Aufnahme von Fotos über einem
bestimmten Bereich von Interesse erstellen kann.
AUFLADEN DES AKKUS DER PARROT
DISCOPRO
Der Akku muss von der Parrot Disco-Pro getrennt
sein.
1. Wählen Sie den Ihrem Land entsprechenden
(mitgelieferten) Adapter und stecken Sie ihn auf das
Ladegerät.
2. Schließen Sie das mitgelieferte Kabel an das
Ladegerät an.
3. Schließen Sie den Akku an das Kabel des Ladegeräts
an und verbinden Sie dann das Ladegerät mit dem
Stromnetz.
Während des Ladevorgangs leuchtet die Leuchtanzeige
rot. Wenn der Akku geladen ist, leuchtet sie grün.
Die Ladezeit beträgt etwa 55 Minuten für eine
Flugdauer von etwa 30 Minuten.

80
LADEN DES AKKUS DES
PARROT SKYCONTROLLER 2
1. Wählen Sie den Ihrem Land entsprechenden
Adapter und befestigen Sie ihn am Ladegerät.
2. Schließen Sie das Kabel des Ladegeräts an den
Parrot Skycontroller 2 an und verbinden Sie dann
das Ladegerät mit dem Stromnetz. Die Ladezeit
beträgt etwa 1Std. 40Min. für eine Nutzungsdauer
von 4 Stunden.
VORBEREITEN DER PARROT DISCO
1. Nehmen Sie die Abdeckung der Parrot Disco-Pro ab.
2. Nehmen Sie Sequoia ab, entfernen Sie die Schutzkappe
für die Linsen und legen Sie den Akku in das hierfür
vorgesehene Fach.

DEUTSCH
81
4. Schließen Sie die Abdeckung der Parrot Disco-Pro
wieder.
3. Sequoia wieder anbringen und den Akku an die Parrot
Disco-Pro anschließen. Verbinden Sie anschließend
das Micro-USB-Kabel des Multispektralsensors mit
dem Micro-USB-Anschluss am Parrot C.H.U.C.K.

82
Befestigen Sie die Flügel an der Parrot Disco-Pro.
Vergewissern Sie sich, dass der Flügel vollständig
im Arm des Servomotors eingerastet ist.
ANBRINGEN DER FLÜGEL
Ziehen Sie an den Flügeln, um sie wieder abzunehmen.
Bewegen Sie die Servomotoren nicht mit der Hand.

DEUTSCH
83
CHECKLISTE VOR DEM START
Vor jeder Flugsession mit der Parrot Disco-Pro
überprüfen Sie bitte folgende Punkte:
GESETZGEBUNG
Überprüfen Sie, dass der Gebrauch der Parrot
Disco-Pro an Ihrem Flugort gestattet ist.
Informieren Sie sich über die für Wi-Fi® -Frequenzen
geltenden Einschränkungen an Ihrem Flugort.
FLUGBEDINGUNGEN
5 Bedingungen sind zwingend einzuhalten
1. Vergewissern Sie sich, dass Sie für den Start und
die Landung der Parrot Disco-Pro über eine freie
Fläche mit einem Durchmesser von mindestens
80 Metern verfügen. Überprüfen Sie, dass sich
auf dem Fluggelände kein Hindernis bendet,
das die Steuerung behindern oder den
Sichtug verhindern könnte.
2. Steuern Sie die Parrot Disco-Pro nicht im Dunkeln.
3.
Fliegen Sie mit der Parrot Disco-Pro nicht über
einem Stadtgebiet oder in bestimmten öentlichen
Bereichen (z.B.: Bahnhof, Flughafen…).
4. Überprüfen Sie die Wetterbedingungen, um
gute Flugbedingungen und eine gute Sicht
zu gewährleisten. Fliegen Sie mit der Parrot
Disco-Pro nicht bei Regen, Nebel, Schnee oder
starkem Wind mit über 12 Metern pro Sekunde
bzw. 43 km/h.

84
5. Achten Sie darauf, dass die auf Pix4Dcapture
(im Verhältnis zum Startpunkt) programmierte
Flughöhe ausreichend groß ist, um Hindernisse
in der Umgebung zu vermeiden.
PARROT DISCOPRO
Vergewissern Sie sich, dass die Flügel der Parrot
Disco-Pro ordnungsgemäß befestigt sind (siehe
Abschnitt Anbringen der Flügel).
Vergewissern Sie sich, dass die Akkus der Parrot
Disco-Pro und Ihrer Fernbedienung geladen sind
(siehe Abschnitt Einlegen des Akkus).
Stellen Sie sicher, dass die Abdeckung der Parrot
Disco-Pro ordnungsgemäß geschlossen ist.
Achten Sie darauf, dass die Leuchtanzeige der
Parrot Disco-Pro grün leuchtet. Das bedeutet,
dass die Parrot Disco-Pro das GPS-Signal geortet
hat.
Vergewissern Sie sich über die ordnungsgemäße
Ausrichtung des Sonnenscheinsensors.
Überprüfen Sie den Zustand des Landegeländes
für die Parrot Disco-Pro.
SEQUOIA
Vergewissern Sie sich vor dem Gebrauch, dass die
Schutzlinse entfernt wurde.
Stellen Sie sicher, dass Sequoia mit dem rechten Micro-
USB-Anschluss von Parrot C.H.U.C.K verbunden ist.
Vergewissern Sie sich, dass die Objektive sauber
sind. Verwenden Sie zur ihrer Reinigung das im

DEUTSCH
85
Lieferumfang enthaltene Mikrofasertuch.
Schaen Sie ausreichend Speicherplatz (im
internen Speicher des Multispektralsensors), um
sämtliche während des Fluges aufgenommenen
Fotos zu speichern.
Stellen Sie sicher, dass die beiden Module
ordnungsgemäß an der Drohne befestigt sind, und
dass sie sich während des Fluges nicht lösen können.
Vergewissern Sie sich, dass das Micro-USB-
Kabel, das die Drohne mit dem Multispektralsensor
verbindet, angeschlossen ist. Prüfen Sie weiterhin
den Micro-USB-Anschluss zwischen dem
Sonnenscheinsensor und dem Multispektralsensor.
Vergewissern Sie sich, dass die beiden Sensoren
kalibriert sind. Lesen Sie für weitere Informationen
den Abschnitt Sequoia kalibrieren.
Warten Sie, bis die Leuchtanzeige des
Sonnenscheinsensors grün leuchtet. Wenn sie grün
leuchtet, bedeutet das, dass das GPS-/GNSS-Signal
aktiviert ist.
VERBINDUNG ZUR PARROT
DISCOPRO HERSTELLEN
PARROT SKYCONTROLLER 2
ÜBER FREEFLIGHT PRO MIT DER
PARROT DISCO VERBINDEN
Stellen Sie die Parrot Disco-Pro auf eine ebene
Oberäche.

86
1. Drücken Sie auf den Knopf On/O der Parrot Disco-Pro.
>Der Knopf blinkt erst rot, und wenn der Empfang des
GPS-Signals stabil ist, blinkt er grün.
2. Drücken Sie auf den On/O-Knopf des Parrot
Skycontroller 2.
3. Warten Sie, bis die grüne Leuchtanzeige dauerhaft
leuchtet.
Sie sind mit der Parrot Disco-Pro verbunden.
Wenn die Leuchtanzeige weiterhin rot blinkt, müssen Sie die
Parrot Disco-Pro kalibrieren. Dazu:
1. Gehen Sie in der App FreeFlight
Pro in Fly & Film > > Position,
Entfernungen
und Begrenzungen
und
drücken Sie auf Kalibrieren.
2. Kalibrieren Sie die
Staudrucksonde. Stellen Sie sich
hierzu mit dem Rücken gegen den
Wind und richten Sie die Kamera
der Parrot Disco-Pro in Richtung
Boden.
3. Drehen Sie die Parrot Disco -Pro
um die Z-Achse (yaw/ Gier-Achse).
4. Drehen Sie die Parrot Disco -Pro
um die Y-Achse (pitch/ Nick-
Achse).
5. Drehen Sie die Parrot Disco-Pro
um die X-Achse (Roll-Achse).
>Die Leuchtanzeige blinkt grün.
Die Parrot Disco-Pro ist kali-
briert.
Z
Y
X

DEUTSCH
87
VERBINDUNG IHRE SMART
PHONES MIT DEM PARROT SKY
CONTROLLER 2
1. Schrauben Sie die Smartphone-Halterung an den
Parrot Skycontroller 2.
B
A
B
A
Sie können die Halterung drehen, um sie den
Maßen Ihres Smartphones anzupassen. Hierzu
drücken Sie darauf und drehen Sie sie nach
rechts.
B
A
B
A

88
2. Drücken Sie auf den Knopf an der rechten Seite der
Halterung, um sie vollständig zu önen.
3. Legen Sie Ihr Smartphone auf die Halterung.
B
A
BA
4. Spannen Sie Ihr Smartphone fest in die die
Halterung.
5. Verbinden Sie Ihr Smartphone über sein USB-Kabel
mit dem USB-Anschluss des Parrot Skycontroller 2.
B
A

DEUTSCH
89
LINKER JOYSTICK
B
A
B
A
B
A
B
A
B
A
B
A
B
A
B
A
Beschleunigen
Abbremsen
RECHTER JOYSTICK
Absteigen
Aufsteigen
Nach rechts drehen
Nach links drehen
Schwebeug mit
Umlaufbahn rechts
Schwebeug auf
Umlaufbahn links
STEUERMODI
PARROT SKYCONTROLLER 2
Sie können während der Ausführung des Flugplans
auf Pix4Dcapture die Kontrolle über die Drohne
zurückgewinnen, wenn Sie auf einen der Befehle des
Parrot Skycontroller 2 drücken.

90
FLUGPLAN
ERSTELLUNG EINES FLUGPLANS
MIT PIX4DCAPTURE
Wählen Sie beim ersten Start die Parrot Disco-Pro
in der Liste der Drohnen aus, gehen Sie dann zur
Bearbeitung des Flugplans über.
Grid: Die Drohne teilt den zu überiegenden Bereich
in Zonen ein, um einen Grossteil davon abzudecken.
Legen Sie bei der Erstellung des
Flugplans den Ausgangspunkt
und den Landekegel fest. Planen
Sie eine 200 m lange Landeäche
mit einem Kegel von 30° ein.
Für weitere Informationen zu den Flugplänen und
ihre Erstellung konsultieren Sie bitte die Hilfe-Seite
von Pix4Dcapture:
Android:
https://www.parrot.com/uk/pix4dcapture-android
iOS:
https://www.parrot.com/uk/pix4dcapture-ios

DEUTSCH
91
FLUGPLAN STARTEN
1. Schalten Sie die Parrot Disco-Pro ein und
verbinden Sie sie mit dem Parrot Skycontroller 2.
Die Verbindung zwischen der Drohne und dem
Parrot Skycontroller 2 wird automatisch aufgebaut.
2. Verbinden Sie Ihr Smartphone oder Tablet mit dem
Micro-USB-Anschluss des Parrot Skycontroller 2.
3. Starten Sie die App Pix4Dcapture.
4. Wählen Sie auf der Hauptseite die Art des
Einsatzes aus.
5. Erstellen Sie den Flugplan.
6. Geben Sie den Startpunkt „start waypoint“ und
den Landekegel an.
7. Drücken Sie auf START.
>Ein Countdown startet, damit Sie Zeit haben, sich in
Position zu begeben.
>Die Parrot Disco-Pro ist nach dem Countdown
bereit zum Start, der Motor startet. Siehe Abschnitt
Starten.
>Wenn der Flugplan vollendet ist, steuert die Drohne
den auf dem Flugplan denierten Landekegel an
und landet.

92
STARTEN
Sie müssen gegen den Wind starten.
1. Stellen Sie sich gegen den Wind, wobei Sie
den Rumpf der Parrot Disco-Pro mit einer Hand
festhalten.
2. Vergewissern Sie sich, dass der Motor der Parrot
Disco-Pro vollständig frei ist.
3. Drücken Sie nach Erstellung des Flugplans in
der App Pix4Dcapture auf Start.
Bei der freien Steuerung mit Hilfe von FreeFlight
Pro drücken Sie auf den Knopf Ihres Parrot
Skycontroller 2, um zu starten.
>Der Motor der Parrot Disco-Pro beginnt zu
laufen, und innerhalb einer Sekunde erreicht er
seine maximale Geschwindigkeit.
4. Geben Sie der Parrot Disco-Pro einen leichten
Schwung nach oben.

DEUTSCH
93
>Die Parrot Disco-Pro hebt ab. Sie iegt auf eine
Höhe von 50 Metern über dem Boden, dann
kreist sie in einem Durchmesser von 60 Metern.
Hinweis: Um den Motor der Parrot
Disco-Pro während der Startphase
auszuschalten, drücken Sie erneut auf den
Knopf Ihres Parrot Skycontroller 2.
Wenn Sie der Parrot Disco-Pro nicht
innerhalb von 10 Sekunden, nachdem Sie
auf gedrückt haben, einen Schwung
nach oben geben, schaltet sich der Motor
aus. Drücken Sie erneut auf , um einen
neuen Startvorgang zu starten.

94
RÜCKKEHR ZUM
AUSGANGSPUNKT
Um die Parrot Disco-Pro außerhalb eines Flugplans auf
Pix4Dcapture an ihren Ausgangspunkt zurückzusteuern,
drücken Sie die Taste des Parrot Skycontroler 2.
> Die Parrot Disco-Pro iegt an ihren Ausgangspunkt zurück und
kreist hier auf einem Durchmesser von 60 Metern auf einer
Höhe von 50 Metern.
Point de départ
Vergewissern Sie sich, dass Sie sich in einer
freien Umgebung benden.
PARROT
SKYCONTROLLER2
:LANDEN
Um eine Beschädigung der Parrot Disco-Pro zu
vermeiden, landen Sie bitte auf einer geeigneten
Fläche, wie zum Beispiel im Gras.

DEUTSCH
95
LINEARE LANDUNG
1. Richten Sie die Parrot Disco-Pro gegen den Wind.
2. Verringern Sie die Höhe der Parrot Disco-Pro
soweit wie möglich.
3. Drücken Sie den Knopf des Parrot
Skycontroller 2.
> Die Parrot Disco-Pro sinkt geradlinig nach unten,
richtet sich dann wieder gerade aus und landet
sanft.
Hinweis: Während des Sinkugs der
Parrot Disco-Pro können Sie sie bei
Bedarf steuern: nach oben oder unten
iegen, nach links und nach rechts
drehen.
80 m
50 m
10 m
Um die Landung zu stoppen, drücken Sie den Knopf
Ihres Parrot Skycontroller 2.
Die Parrot Disco-Pro steigt auf 50 Meter und kreist
auf einem Durchmesser von 60 Metern.
Ihre Landebahn muss mindestens 50 Meter lang
sein.

96
ZIRKULARE LANDUNG
Während der zirkularen Landung stellt die Parrot
Disco-Pro allein sicher, dass Sie gegen den Wind auf
dem Boden landet, um ihre Landungsgeschwindigkeit
zu verringern.
1. Stellen Sie sicher, dass Sie über einen Bereich von
mindestens 80 Metern Durchmesser verfügen,
wenn Sie die Parrot Disco-Pro landen lassen.
2. Im Schwebeug mit Umlaufbahn mit dem Parrot
Skycontroller 2 drücken Sie auf .
> Die Parrot Disco-Pro landet spiralförmig.
80 m
50 m
10 m
Zur zirkularen Landung wird viel Platz benötigt.
VERBINDUNGSVERLUST
Während des Fluges außerhalb des Flugplans mit
Pix4Dcapture und im Falle eines Verbindungsverlustes
kreist die Parrot Disco
-Pro
mit einem Durchmesser
von 60 Metern für die Dauer eines vorab festgelegten
Zeitraums (Standardeinstellung 10 Sekunden).
Wenn die Verbindung nicht wiederhergestellt ist, kehrt

DEUTSCH
97
die Parrot Disco
-Pro
zu ihrem Ausgangspunkt zurück und
kreist auf einem Durchmesser von 60 Metern auf einer
Höhe von 50 Metern.
Wenn die Verbindung nach 5 Minuten nicht
wiederhergestellt ist, landet die Parrot Disco-Pro zirkular.
AUSSCHALTEN
DER PARROT DISCO
Zum Ausschalten der Parrot Disco-Pro drücken Sie
auf den On/O-Knopf.
>Die Leuchtanzeige blinkt rot, dann schaltet sich
die Parrot Disco-Pro aus.
ABRUFEN IHRER FOTOS
Die Fotos werden während des Fluges auf dem
internen Speicher des Multispektralsensors
gespeichert.
1. Verbinden Sie den Multispektralsensor mit Ihrem
Computer.
2. Rufen Sie die während der Flugsession
aufgenommenen Fotos ab.
Wenn die Aufnahmen auf einer SD-Speicherkarte
gespeichert sind, können Sie auch den
Sonnenscheinsensor als SD-Kartenlesegerät nutzen.
Verbinden Sie hierzu den Micro-USB-Anschluss des
Sensors mit Ihrem Computer.
Entfernen Sie die SD-Karte nicht, solange Sequoia
eingeschaltet ist.

98
DATENBEARBEITUNG
MIT AIRINOV FIRST+
Gehen Sie auf http://parrot.airinov.com und folgen
Sie den Schritten auf dem Bildschirm, um Ihre Daten
zu bearbeiten.
Gehen Sie für weitere Informationen auf
www.parrot.com/support
UPDATE DER
PARROT DISCOPRO
1. Verbinden Sie Ihren Parrot Skycontroller 2 mit
Ihrer Parrot Disco-Pro.
2. Verbinden Sie Ihr Smartphone oder Tablet über
USB mit Ihrem Parrot Skycontroller 2.
3. Die App FreeFlight Pro startet automatisch.
4. Drücken Sie in der App FreeFlight Pro auf
Aktualisierung.
5. Die App sucht nach Updates.
6. Wenn die App eine Update-Datei ndet, wählen
Sie sie aus und drücken Sie auf OK.
7. Die App lädt die Update-Datei herunter.
8. Ein Popup-Fenster wird geönet und informiert
Sie über den Neustart der Drohne.
9. Drücken Sie auf Verlassen.

DEUTSCH
99
Die Parrot Disco-Pro startet während der Installation
der Aktualisierung automatisch neu. Dies kann
mehrere Minuten dauern. Sobald die Aktualisierung
beendet ist, startet die App FreeFlight Pro
automatisch neu.

100
VERHALTEN DER
LEUCHTANZEIGE
Blaues Blinken Die Parrot Disco-Pro startet.
Grünes Blinken Die Parrot Disco-Pro hat das GPS-Signal
geortet und ist bereit zum Start.
Gelbes Blinken Das Update der Parrot Disco-Pro läuft.
Die Parrot Disco-Pro nicht ausschalten.
Rotes und blaues
Blinken
Die Parrot Disco-Pro hat ein Akku-Problem
erkannt.
> Wenden Sie sich an Ihren Händler oder
gehen Sie auf die Support-Seite der Parrot
Disco-Pro auf www.parrot.com/support.
Rotes Blinken
Die Parrot Disco-Pro hat ein Motorproblem
erkannt.
> In der App FreeFlight Pro wird eine
Fehlermeldung angezeigt. Gehen Sie zur
Tabelle mit den Fehlermeldungen, die auf
www.parrot.com/support verfügbar ist.
ERSATZTEILE
Ersatzteile für die Parrot Disco-Pro können Sie in
unserem Online-Shop erwerben: www.parrot.com.
Weitere Informationen zum Einbau der Ersatzteile
nden Sie in den Videoanleitungen auf unserer
Support-Seite.

DEUTSCH
101
TECHNISCHE DATEN
SENSOREN
• Ultraschall
• Höhenmesser
• Vertikale Hi-Speed-Kamera
• Staudrucksonde: Geschwindigkeitssensor
INERTIALES NAVIGATIONSSYSTEM
• 3-Achsen-Gyroskop
• 3-Achsen-Beschleunigungssensor
• 3-Achsen-Magnetometer
HARDWARE
• CPU Dual core ARM® Cortex® -A9
• Interner Flash-Speicher: 32 GB
WIFI WLAN UND TRANSMISSIONEN
• Netz-Zugangspunkt
• Wi-Fi ac, 2 Bi-Band-Antennen (abgestimmt auf 2,4 und 5 GHz),
Mehreingang – Mehrausgang (MIMO)
• Bis zu 2 km Reichweite mit dem Parrot Skycontroller 2
HERAUSNEHMBARER AKKU
• 2700mAh/ 25 A 3-Zellen-LiPo-Akku
• Betriebsdauer des Akkus: 45 Minuten
• Nennspannung: 11,1V
• 21,6A bei kontinuierlicher Entladung
• Ladung mit max. 3,5A
• Betriebsbereich: -20°C – 60°C

102
MASSE
• Gewicht: 940 gr
• Größe: 1150 mm x 580 mm x 120 mm
• Spannweite: 1150 mm
GPS
• Integriertes GPS
• GPS + GLONASS
LEISTUNG
• Motor: 1280kv
• Servomotor: 5V
• Möglichkeit zur Installation eines RF SBUS, SUMD,
CPPM-Empfängers
VIDEO & FOTOS
• Full-HD-Kamera mit 1080p
• Video-Stream: 360p / 720p
SOFTWARE
• Linux® & SDK Open source für die Entwicklung
LADEGERÄT
• Input: 100-240V, 50h-60Hz, 1.2A
• Output: Max 12,6Vdc, 3.5A
• Maximale Höhe: 2000 m über dem Meeresspiegel
• Betriebsbereich: 0°C-40°C
PARROT DISCO
• Betriebsbereich: 0°C-40°C
• Max. Stromstärke: 15A
• Nennspannung: 11,1V

DEUTSCH
103
ALLGEMEINE INFORMATIONEN
Die Parrot Disco muss unter Beachtung der Regeln der Zivilluftfahrt jedes
Landes verwendet werden. Sie darf nur in dafür geeigneten Bereichen
eingesetzt werden, um jederzeit die Sicherheit von Personen, Tieren und
Gegenständen zu gewährleisten.
Bitte überprüfen Sie die Regeln der örtlichen Zivilluftfahrt, bevor Sie die
Parrot Disco iegen lassen.
ZUBEHÖR UND ERSATZTEILE
Zubehör und Ersatzteile sind bei Ihrem Parrot-Händler oder auf der
Internetseite www.parrot.com erhältlich.
VORSICHTSMASSNAHMEN UND WARTUNG
Die Person, die sie steuert, muss die Parrot Disco zu jedem Zeitpunkt im Auge
behalten und ihre Flugbahn überwachen.
Die Verwendung der Parrot Disco an gewissen öentlichen Orten (z.B.
Bahnhof, Flughafen, ...) oder auf der Straße ist möglicherweise nicht erlaubt.
Sobald der Propeller der Parrot Disco in Bewegung ist, kann er Schäden an
Menschen, Tieren oder Gegenständen verursachen. Halten Sie immer einen
gebührenden Sicherheitsabstand zur Parrot Disco. Achten Sie während der
Startphase immer auf den Propeller der Parrot Disco. Verwenden Sie nur das
von Parrot Drones SAS vorgegebene Zubehör.
Wenn Sand oder Staub in die Parrot Disco eindringen, kann es sein, dass sie
unwiderruich nicht mehr ordnungsgemäß funktioniert.
Verwenden Sie die Parrot Disco nicht bei ungünstigen Witterungsbedingungen
(Regen, Sturm, Schnee, Nebel) oder bei unzureichenden Sichtbedingungen
(Nacht).
Halten Sie die Parrot Disco von Hochspannungsleitungen, Gebäuden oder
sonstigen potentiell gefährlichen Bereichen fern.
Verwenden Sie dieses Gerät nicht in der Nähe von üssigen Substanzen.
Legen Sie die Parrot Disco nicht in Wasser oder auf feuchte Oberächen, dies
könnte zu unwiderruichen Schäden führen.
Vermeiden Sie es, die Parrot Disco großen Höhenschwankungen auszusetzen.
Legen Sie die Parrot Disco nicht in die Sonne.
Gefahr des Verschluckens von Kleinteilen. Die Verpackungen gehören nicht
zum Produkt und müssen aus Sicherheitsgründen entsorgt werden.
WIFI
Erkundigen Sie sich vor dem Start Ihrer Parrot Disco über die
Nutzungsbeschränkungen der WLAN-(Wi-Fi-)Frequenzen an Ihrem
Flugstandort. Bestimmte Frequenzen können Einschränkungen unterliegen
oder verboten sein. In einigen Ländern kann zum Beispiel die Nutzung des
Wi-5-GHz-Bands im Freien verboten sein.
WARNHINWEIS ZUR WAHRUNG DER PRIVATSPHÄRE UND
ZUM RESPEKT FREMDEN EIGENTUMS
Wenn Sie Bilder einer Person ohne deren Erlaubnis aufnehmen und
verbreiten, kann dies deren Privatsphäre verletzten, wofür Sie verantwortlich
gemacht werden können. Bevor Sie Personen lmen, fragen Sie diese nach
ihrer Erlaubnis, insbesondere, wenn Sie die Aufnahmen behalten und/ oder
verbreiten möchten. Verbreiten Sie keine entwürdigenden Bilder oder solche,
die dem Ruf oder der Würde einer Person schaden könnten.
Die Aufnahme und Verbreitung des Bildes einer Sache ohne die Erlaubnis

104
ihres Eigentümers und/ oder einer dritten Person, welche die Rechte geistigen
Eigentums dieser Sache besitzt, kann die Verletzung des Rechts am Bild der
Sache darstellen, wofür Sie verantwortlich gemacht werden können. Fragen
Sie ihren Eigentümer und/ oder dritte Personen, die das Eigentumsrecht
besitzen, um Erlaubnis.
AKKU PARROT DISCO UND PARROT SKYCONTROLLER 2
VORSICHT: Die Nichtbeachtung der Anweisungen kann schwere Verletzungen zur
Folge haben, den Akku unwiderruich beschädigen und einen Brand auslösen,
Rauchentwicklung oder eine Explosion verursachen.
Den Zustand des Akkus immer kontrollieren, bevor er geladen oder verwendet
wird. Den Akku austauschen, wenn er heruntergefallen ist, ungewöhnlich
riecht, sich überhitzt, verfärbt oder verformt ist bzw. ausläuft. Verwenden Sie
immer ein ausschließlich für LiPo-Akkus zugelassenes Ladegerät. Verwenden
Sie immer ein Ladegerät mit Ausgleichsregler für LiPo-Zellen oder einen LiPo-
Zellenbalancer. Es wird empfohlen, nur das mit dem Gerät gelieferte Ladegerät
zu verwenden. Nicht dauerladen und nicht unter 2,5 V pro Zelle auaden. Die
Temperatur des Akkus darf niemals 60°C (140°F) überschreiten, andernfalls
könnte er beschädigt werden oder sich entzünden. Führen Sie die Ladung
niemals auf einer brennbaren Fläche, in der Nähe von brennbaren Stoen
oder in einem Fahrzeug durch (legen Sie den Akku vorzugsweise in einen nicht
brennbaren und nichtleitenden Behälter). Lassen Sie den Akku während des
Ladevorgangs niemals unbeaufsichtigt. Nehmen Sie die Gehäuseverkabelung
niemals auseinander, und verändern Sie sie auch nicht. Beschädigen Sie
die Zellen nicht. Stellen Sie immer sicher, dass die Ausgangsspannung des
Ladegeräts mit der Spannung des Akkus übereinstimmt. Die Akkus dürfen
keinen Kurzschluss erleiden. Setzen Sie den LiPo-Akku nie Feuchtigkeit oder
direkter Sonneneinstrahlung aus, und legen Sie ihn nicht an eine Stelle, wo
die Temperatur 60°C überschreiten kann (z.B. Auto in praller Sonne). Immer
außerhalb der Reichweite von Kindern aufbewahren.
VORSICHT
WENN DER AKKU DER PARROT DISCO DURCH EINEN NICHT
KOMPATIBLEN AKKU ERSETZT WIRD, BESTEHT EXPLOSIONSGEFAHR.
ENTSORGEN SIE DIE GEBRAUCHTEN AKKUS VORSCHRIFTSMÄSSIG.
GARANTIE
Die Garantiebedingungen nden Sie in den allgemeinen Verkaufsbedingungen
des Händlers, bei dem Sie die Parrot Disco-Pro AG gekauft haben.
PRODUKTENTSORGUNG
Dieses Symbol auf dem Produkt bzw. die Produktunterlagen weisen
darauf hin, dass es nach Ende der Nutzungsdauer nicht mit den
anderen Haushaltsabfällen entsorgt werden darf. Da die unkontrollierte
Entsorgung von Abfällen der Umwelt oder der menschlichen
Gesundheit schaden kann, trennen Sie diese bitte von anderen Abfällen und
führen Sie sie dem Recycling zu. Auf diese Weise fördern Sie die nachhaltige
Wiederverwendung der Materialressourcen. Bitte wenden Sie sich an Ihren
Händler oder Ihre Stadtverwaltung, um sich darüber zu informieren, wo und wie
die Parrot Disco, der Parrot Skycontroller 2 und Sequoia wiederverwertet werden
können.
EUKONFORMITÄTSERKLÄRUNG PARROT DISCOPRO
Dieses Gerät darf verwendet werden in: DE, AT, BE, BG, CY, HR, DK, ES,
EE, FI, FR, GR, HU, IE, IT, LV, LT, LU, MT, NL, PL, PT, CZ, RO, GB, SK, SI, SE.
Die Nutzungseinschränkung außerhalb der Mitgliedsstaaten

DEUTSCH
105
der Europäischen Union betrit nur das erste Unterband des 5Ghz-
Frequenzbandes (5150-5250MHz).
Parrot DRONES, 174 quai de Jemmapes, 75010 Paris, Frankreich, erklärt auf
eigene Verantwortung, dass das in der vorliegenden Gebrauchsanweisung
beschriebene Produkt den folgenden technischen Normen entspricht:
EN301489-1, EN301489-17, EN300440-1, EN300328, EN300893, EN300440-2,
EN60950-1, EN62321 gemäß den Bestimmungen der Richtlinie R&TTE
1999/5/EG, der Niederspannungsrichtlinie 2014/35/EG und der Richtlinie
RoHS 2011/65/EU.
http://www.parrot.com/ce/?parrot-disco
KONFORMITÄTSERKLÄRUNG PARROT SKYCONTROLLER 2
Dieses Gerät darf verwendet werden in: DE, AT, BE, BG, CY, HR, DK, ES, EE, FI,
FR, GR, HU, IR, IT, LV, LT, LU, MT, NL, PL, PT, CZ, RO, GB, SK, SI, SE.
Parrot Drones SAS, 174 quai de Jemmapes, 75010 Paris, Frankreich, erklärt auf
eigene Verantwortung, dass das in der vorliegenden Gebrauchsanweisung
beschriebene Produkt den folgenden technischen Normen entspricht: EN
301489-17, EN300328, EN71-1, EN71-2, EN71-3, EN62115, EN50566: 2013
(SAR) gemäß den Bestimmungen der Richtlinie RED 2014/53/EU und der
Richtlinie über allgemeine Produktsicherheit 2014/35/EU. http://www.parrot.
com/ce/?skycontroller-2
FCC/IC
Um den Ansprüchen der Belastungsrichtlinien FCC/IC RF für
Übertragungsgeräte zu entsprechen, muss ein Mindestabstand von 20 cm
zwischen der Antenne des Produkts und Personen eingehalten werden.
Zur Gewährleistung der Konformität wird von einer Verwendung mit einer
geringeren Entfernung abgeraten.
MARKEN
Parrot und die Parrot Logos sind eingetragene Markenzeichen der Parrot S.A.
Parrot Disco-Pro AG, Parrot Disco, Parrot Skycontroller, Sequoia, Parrot
C.H.U.C.K sowie ihre jeweiligen Logos sind Marken der Parrot Drones SAS.
App Store ist eine Dienstleistungsmarke von Apple Inc.
Google Play und Google Maps sind Marken von Google Inc.
Wi-Fi® ist eine eingetragene Marke der Wi-Fi-Alliance®
Linux ist eine Marke von Linus Torvalds, eingetragen in den USA und in
anderen Ländern.
Pix4D und Pix4Dcapture sind eingetragene Marken der Pix4D SA.
Airinov und Airinov First+ sind Handelsmarken oder eingetragene Marken
der Airinov SAS.
Alle anderen in diesem Handbuch erwähnten Marken sind Eigentum ihrer
jeweiligen Besitzer.
HERSTELLERINFORMATIONEN
Parrot Disco-Pro, Parrot Skuyconroller 2 und Sequoia
werden hergestellt von: Parrot Drones SAS -
174 Quai de Jemmapes - 75010 Paris (Frankreich) - RCS Paris 808 408 074 -
www.parrot.com

106
Il tuo Parrot Disco-Pro AG™ contiene gli elementi seguenti:
1. Un drone "Parrot Disco"™;
2. Un sistema di pilotaggio automatico "Parrot C.H.U.C.K"™;
3. Un controller "Parrot Skycontroller 2"™. Puoi pilotare il
tuo Parrot Disco con il Parrot Skycontroller 2 scaricando sul
tuo smartphone o tablet l'applicazione FreeFlight Pro™.
Questa applicazione è gratuita, ma può contenere In-App
Purchase. Permette anche di procedere alla calibrazione
del Parrot Disco;
4. Un sensore "Sequoia"™ contenente:
(A) Un sensore multispettrale che cattura la luce che viene
riessa dalle piante; e
(b) Un sensore sunshine che registra l'intensità della luce
proveniente dal sole; e
5. Un accesso ai servizi Airinov First+™ che consente
di ottenere le mappe NDVI e la suddivisione in zone a
partire dalle foto scattate con l'applicazione gratuita
Pix4Dcapture™ da scaricare su smartphone o tablet.

ITALIANO
107
ATTENZIONE
1. Parrot Disco NON È UN GIOCATTOLO. Esso non deve
quindi essere usato o manipolato da bambini sotto i 14 anni.
2. PRIMA DI OGNI UTILIZZO del Parrot Disco:
(a) LEGGI ATTENTAMENTE questa Guida d'uso rapida e
tutte le informazioni e la documentazione disponibili su
www.parrot.com, che possono essere aggiornate in qualsiasi
momento e senza preavviso (di seguito "Documentazione
di Parrot"). Una ATTENZIONE PARTICOLARE deve essere
prestata ai paragra che contengono il simbolo ;
(b) INFORMATI SULLA NORMATIVA APPLICABILE
RIGUARDANTE L'UTILIZZO DEI DRONI E DEI LORO
ACCESSORI (di seguito "Normativa applicabile"); e
(c) TIENI PRESENTE che il Parrot Disco può esporre gli altri
e te stesso a DANNI MATERIALI E/O LESIONI FISICHE, che
in particolare possono provocare ferite gravi o mortali.
3. Si prega di notare che i video e le foto che sono oggetto di
promozioni e campagne pubblicitarie di Parrot Drone SAS e
delle sue liali sono stati realizzati da e con professionisti e
piloti esperti. SI PREGA DI FARE SEMPRE RIFERIMENTO AGLI
ULTIMI AGGIORNAMENTI DELLA DOCUMENTAZIONE DI
PARROT IN CASO DI DUBBI SULL'UTILIZZO DI PARROT
DISCO E DEI SUOI ACCESSORI.
4. NELLA MISURA IN CUI CIÒ SIA PERMESSO DALLA LEGGE
APPLICABILE, PARROT DRONES SAS, LE SUE FILIALI E
I SUOI DISTRIBUTORI E RIVENDITORI RISPETTIVI NON
POTRANNO ESSERE RITENUTI RESPONSABILI PER
EVENTUALI DANNI DERIVANTI O CONNESSI AL MANCATO
RISPETTO DELLA DOCUMENTAZIONE DI PARROT O
DELLA NORMATIVA APPLICABILE DA PARTE DELL'UTENTE
O DI CHIUNQUE ALTRO UTILIZZI IL PARROT DISCO.

108
PRESENTAZIONE DEL
PARROT DISCOPRO AG
PARROT DISCOPRO
Alettone
Servomotore
Elica Alettone
Servomotore
Cofano
Fotocamera
Fisheye
Pulsante on/o e spia luminosa

ITALIANO
109
MODULO PILOTA AUTOMATICO C.H.U.C.K
Porta micro-USB
Porta per telecomando RC
Connettore batteria
Connettore
servomotori
Connettore motore
centrale
Porta micro-USB di
alimentazione del Sequoia

110
PRESENTAZIONE
DEL PARROT
SKYCONTROLLER 2
Antenna
Alloggio del supporto per dispositivo mobile
Pulsante
On/O
Ritorno al punto di decollo
Decollare/
Atterrare
In volo: avviare /interrompere la registrazione video
Menù Impostazioni: indietro
In volo: scattare una foto
Menù Impostazioni:
convalidare
Impostazioni
Orientamento verticale della fotocamera
Porta USB

ITALIANO
111
Esposizione della fotocamera
Modalità di visualizzazione
Visione diretta / Visione
immersiva con FreeFlight Pro
Orientamento verticale della fotocamera
Porta USB

112
PRESENTAZIONE
DEL SEQUOIA
Sequoia è costituito da un sensore multispettrale e
dal sensore di irraggiamento Sunshine Sensor.
SENSORE MULTISPETTRALE
SUNSHINE SENSOR
Pulsante
di accensione
e indicatore luminoso
Porta micro-
USB host
Porta micro-USB
device
Sensore ad
infrarossi vicini
Sensore
Rosso
Sensore
Red-Edge
Sensore
Verde
Sensore RGB
Slot per scheda SD
Sensori di luce ambientale
Porta micro-USB
device
La porta micro-USB host del sensore multispettrale
deve essere collegata alla porta micro-USB device
del Sunshine Sensor.

ITALIANO
113
PRIMA DI INIZIARE
SCARICARE FREEFLIGHT PRO
E PIX4DCAPTURE
Accedi ad App Store® o Google Play e scarica le
applicazione gratuite FreeFlight Pro e Pix4Dcapture
sul tuo smartphone o tablet.
FreeFlight Pro è l'applicazione uciale di Parrot che
consente il pilotaggio libero del drone.
Pix4Dcapture è l'applicazione gratuita che consente
di generare un piano di volo per scattare foto sopra
una zona di interesse.
CARICARE LA BATTERIA
DEL PARROT DISCOPRO
La batteria deve essere scollegata dal Parrot
Disco-Pro.
1. Seleziona la presa in dotazione corrispondente al
tuo paese e inseriscila nel caricatore.
2. Connetti il cavo al caricatore.
3. Collega la batteria al cavo del caricatore, poi
collega il caricatore alla rete elettrica.
L'indicatore luminoso è rosso durante la carica e
diventa verde quando la batteria è carica.
Il tempo di carica è di circa 55 minuti per un tempo di
volo di circa 30 minuti.

114
CARICARE LA BATTERIA
DEL PARROT SKYCONTROLLER 2
1. Seleziona l'adattatore corrispondente al tuo paese
e ssalo al caricatore.
2. Connetti il cavo del caricatore al Parrot Skycontroller
2, poi collega il caricatore alla rete elettrica. Il
tempo di ricarica è di circa 1:40 per 4 ore di utilizzo.
PREPARARE IL PARROT DISCO
1. Rimuovi il cofano del Parrot Disco-Pro.
2. Rimuovi Sequoia, togli il coperchio di protezione per
le lenti e colloca la batteria nel vano previsto a tale
scopo.

ITALIANO
115
4. Richiudi il cofano del Parrot Disco-Pro.
3. Rimetti in posizione Sequoia e collega la batteria
al Parrot Disco-Pro. Quindi collega il cavo micro-
USB device del Sensore Multispettrale alla porta di
alimentazione micro-USB su Parrot C.H.U.C.K.

116
Fissa le ali al Parrot Disco-Pro.
Assicurati che l'alettone sia completamente
incastrato nel braccio del servomotore.
FISSARE LE ALI
Per rimuovere le ali, tira su.
Non muovere i servomotori a mano.

ITALIANO
117
VERIFICHE PRIMA
DEL VOLO
Prima di ogni sessione di volo con il Parrot Disco-
Pro, esegui le veriche seguenti:
NORME VIGENTI
Verica che l'uso del Parrot Disco-Pro sia
consentito nel tuo luogo di volo.
Informati sulle restrizioni di utilizzo delle frequenze
Wi-FI® nel tuo luogo di volo.
CONDIZIONI DI VOLO
5 condizioni da rispettare imperativamente
1. Assicurati di avere uno spazio libero di almeno
80 metri di diametro per il decollo e l'atterraggio
del Parrot Disco-Pro. Verica che il terreno di
volo non abbia ostacoli che possano disturbare
il pilotaggio o impedire il volo a vista.
2. Non pilotare il Parrot Disco-Pro di notte.
3. Non pilotare il Parrot Disco-Pro sopra un'area
urbana o in alcuni luoghi di pubblico dominio
(ad esempio: stazione ferroviaria, aeroporto...).
4. Verica le condizioni meteorologiche al ne
di garantire buone condizioni di volo e di
inquadratura. Non pilotare il Parrot Disco-Pro in
caso di pioggia, nebbia, neve o vento superiore
a 12 metri al secondo o 43 km/h.

118
5. Assicurati che l'altitudine di volo programmata
su Pix4Dcapture (presa in relazione al punto di
decollo) sia suciente ad evitare gli ostacoli nei
dintorni.
PARROT DISCOPRO
Assicurati che le ali del Parrot Disco-Pro siano
correttamente ssate (vedere la sezione Fissare
le ali).
Assicurati che la batteria del Parrot Disco-Pro e la
batteria del telecomando siano cariche (vedere la
sezione Installare la batteria).
Assicurati che il cofano del Parrot Disco-Pro sia
chiuso correttamente.
Assicurati che l'indicatore luminoso del Parrot
Disco lampeggi in verde. Ciò signica che il
Parrot Disco-Pro ha rilevato il segnale GPS.
Assicurati che il Sunshine Sensor sia ben esposto.
Controlla lo stato del terreno per l'atterraggio del
Parrot Disco.
SEQUOIA
Assicurati che il coperchio di protezione sia stato
rimosso prima dell'uso.
Assicurati che Sequoia sia collegato alla porta
micro-USB destra del Parrot C.H.U.C.K.
Assicurati che gli obiettivi siano puliti. Utilizza il
panno in microbra (in dotazione) per pulirli.

ITALIANO
119
Libera suciente memoria (nella memoria
interna del sensore multispettrale) per registrare
tutte le foto scattate durante il volo.
Assicurati che entrambi i moduli siano
correttamente ssati al drone e che non rischino di
staccarsi durante il volo.
Assicurati che il cavo micro-USB device che
collega il drone al sensore multispettrale sia
collegato. Controlla anche il collegamento micro-
USB tra il sunshine sensor e il sensore multispettrale.
Assicurati che entrambi i sensori siano calibrati.
Per ulteriori informazioni, vedi la sezione Calibrare
Sequoia.
Attendi che l'indicatore luminoso del sunshine
sensor sia verde. Quando è verde, signica che il
GPS/GNSS è attivato.
COLLEGARSI AL PARROT
DISCOPRO
COLLEGARE IL PARROT
SKYCONTROLLER 2 AL PARROT
DISCO CON FREEFLIGHT PRO
Posiziona il Parrot Disco su una supercie piana.
1. Premi il pulsante On/O del Parrot Disco-Pro.
>L'indicatore luminoso lampeggia in rosso e poi
in verde una volta che il segnale GPS è ssato.

120
2. Premi l'interruttore On/O del Parrot
Skycontroller 2.
3. Attendi che l'indicatore luminoso sia verde sso.
Ora sei collegato al Parrot Disco-Pro.
Se l'indicatore luminoso continua a lampeggiare in
rosso, calibra il Parrot Disco-Pro. Per fare questo:
4. Nell'applicazione FreeFlight Pro, vai in Fly &
Film > > Posizione,
distanze e limiti e premi
Calibrare.
5. Calibra la sonda Pitot.
Per fare questo, mettiti
con le spalle rivolte al
vento e posiziona la
fotocamera del Parrot
Disco-Pro rivolta verso il
suolo.
6. Fai ruotare il Parrot
Disco-Pro sull'asse Z
(yaw/imbardata).
7. Fai ruotare il Parrot
Disco-Pro sull'asse Y
(pitch/beccheggio).
8. Fai ruotare il Parrot Disco
-Pro sull'asse X (roll/
rollio)
>L'indicatore luminoso
lampeggia in verde. Il Parrot Disco-Pro è
calibrato.
Z
Y
X

ITALIANO
121
COLLEGARE LO SMARTPHONE
AL
PARROT SKYCONTROLLER 2
1. Avvita il supporto per smartphone sul Parrot
Skycontroller 2.
B
A
B
A
Puoi far ruotare il supporto per adattarlo
alle dimensioni del tuo smartphone. Per
fare questo, premi e fallo ruotare a destra.
B
A
B
A

122
2. Premi il pulsante a destra del supporto per aprirlo
completamente.
3. Posiziona lo smartphone sul supporto.
B
A
BA
4. Stringi il supporto sullo smartphone.
5. Utilizzando il cavo USB dello smartphone, collega lo
smartphone alla porta USB del Parrot Skycontroller 2.
B
A

ITALIANO
123
COMANDO SINISTRO
B
A
B
A
B
A
B
A
B
A
B
A
B
A
B
A
Accelerare
Rallentare
COMANDO DESTRO
Scendere
Salire
Girare a destra
Girare a sinistra
Volo stazionario
in orbita destra
Volo stazionario
in orbita sinistra
MODALITÀ DI PILOTAGGIO
PARROT SKYCONTROLLER 2
In qualsiasi momento durante l'esecuzione del
piano di volo su Pix4Dcapture è possibile riprendere
il controllo del drone, premendo uno dei comandi
del Parrot Skycontroller 2.

124
PIANO DI VOLO
CREARE UN PIANO DI VOLO CON
PIX4DCAPTURE
Al primo lancio, seleziona il Parrot Disco-Pro nella
lista dei droni e procedi alla creazione del piano di
volo.
Grid: il drone quadriglia l'area da sorvolare al ne di
coprirne la maggior parte.
Durante la creazione del piano di
volo, imposta il punto di partenza
e il cono di atterraggio. Per la
zona di atterraggio, prevedi uno
spazio di 200 m di lunghezza e un
cono di 30°.
Per ulteriori informazioni sui piani di volo e come
crearli, vedi la pagina di supporto di Pix4Dcapture:
Android:
https://www.parrot.com/uk/pix4dcapture-android
iOS:
https://www.parrot.com/uk/pix4dcapture-ios

ITALIANO
125
AVVIARE IL PIANO DI VOLO
1. Accendi il Parrot Disco-Pro e collegalo al
Parrot Skycontroller 2. La connessione tra il
drone e il Parrot Skycontroller 2 viene stabilita
automaticamente.
2. Collega il tuo smartphone o tablet alla porta
USB del Parrot Skycontroller 2.
3. Lancia l'applicazione Pix4Dcapture.
4. Seleziona il tipo di missione sulla pagina
principale.
5. Crea il piano di volo da eettuare.
6. Indica il punto di partenza "start waypoint" e il
cono di atterraggio.
7. Premi START.
>Parte un conto alla rovescia che lascia il tempo di
mettersi in posizione.
>Il Parrot Disco-Pro è pronto a decollare dopo il
conto alla rovescia, il motore si avvia. Vedere la
sezione Decollare.
>Una volta che il piano di volo è terminato, il drone
raggiunge il cono di atterraggio denito sul piano
di volo e atterra.

126
DECOLLARE
Devi far decollare rivolto al vento.
1. Posizionati rivolto al vento tenendo il corpo del
Parrot Disco-Pro con una mano.
2. Assicurati che il motore del Parrot Disco-Pro sia
del tutto libero di girare.
3. Nell'applicazione Pix4Dcapture, dopo aver
creato il piano di volo, premi Start.
In caso di pilotaggio libero assistito con FreeFlight
Pro, premi il pulsante del tuo Parrot Skycontroller2
per avviare il decollo.
>Il motore del Parrot Disco-Pro inizia a ruotare e
raggiunge la sua velocità massima in 1 secondo.
4. Lancia il Parrot Disco-Pro leggermente verso
l'alto.

ITALIANO
127
>Il Parrot Disco-Pro decolla. Sale a 50 metri di
altezza, quindi esegue cerchi di 60 metri di
diametro.
Nota: per spegnere il motore del Parrot
Disco-Pro nella fase di decollo, premi
di nuovo il pulsante del Parrot
Skycontroller 2.
Se non lanci il Parrot Disco-Pro
10secondi dopo aver premuto ,
il motore si spegne. Premi di nuovo
per iniziare una nuova procedura
di decollo.

128
RITORNO AL PUNTO
DI PARTENZA
Per riportare il Parrot Disco-Pro al suo punto di
partenza al di fuori di un piano di volo su Pix4Dcapture,
premi il pulsante del Parrot Skycontroller 2.
> Il Parrot Disco-Pro torna in direzione della sua posizione di
partenza, si posiziona a 50 metri di altezza ed eettua cerchi di
60 metri di diametro al di sopra di questa posizione.
Point de départ
Assicurati di trovarti in un ambiente libero da
ostacoli.
PARROT
SKYCONTROLLER 2 :
ATTERRARE
Per evitare di danneggiare il Parrot Disco-Pro,
atterra su una supercie adatta, come un prato
erboso, per esempio.

ITALIANO
129
ATTERRAGGIO LINEARE
1. Posiziona il Parrot Disco-Pro rivolto al vento.
2. Riduci l'altitudine del Parrot Disco-Pro al massimo.
3. Premi il pulsante del Parrot Skycontroller 2.
> Il Parrot Disco-Pro scende in linea retta, poi si
raddrizza e atterra dolcemente.
Nota: Durante la discesa del Parrot
Disco-Pro, puoi correggere i suoi
movimenti se necessario: salire,
scendere, girare a sinistra e girare
a destra.
80 m
50 m
10 m
Per annullare l'atterraggio, premi il pulsante del
Parrot Skycontroller 2.
Il Parrot Disco-Pro sale a 50 metri e fa cerchi di
60metri di diametro.
La pista di atterraggio deve misurare almeno
50metri.

130
ATTERRAGGIO CIRCOLARE
Durante l'atterraggio circolare, il Parrot Disco-Pro si
assicura solo di raggiungere terra con faccia al vento
per limitare la velocità di atterraggio.
1. Assicurati di disporre di una supercie di almeno
80 metri di diametro per far atterrare il Parrot
Disco-Pro.
2. In volo stazionario in orbita, con il Parrot
Skycontroller 2, premi .
> Il Parrot Disco-Pro atterra in spirale.
80 m
50 m
10 m
L'atterraggio circolare richiede molto spazio.
PERDITA DI CONNESSIONE
Durante il volo al di fuori del piano di volo con
Pix4Dcapture e in caso di perdita di connessione,
Parrot Disco-Pro fa cerchi di 60 metri di diametro per
un periodo predenito (10 secondi per impostazione
predenita).
Se la connessione non viene ripristinata, il Parrot

ITALIANO
131
Disco-Pro ritorna nella sua posizione di partenza,
quindi si posiziona a 50 metri di altitudine e fa cerchi
di 60metri di diametro.
Se la connessione non viene ripristinata entro
5 minuti, il Parrot Disco-Pro esegue un atterraggio
circolare.
SPEGNERE
IL PARROT DISCOPRO
Per spegnere il Parrot Disco-Pro, tieni premuto il
pulsante On/O.
>L'indicatore luminoso lampeggia in rosso, quindi
il Parrot Disco-Pro si spegne.
RECUPERARE LE FOTO
Durante il volo, le foto vengono memorizzate nella
memoria interna del sensore multispettrale.
1. Collega il sensore multispettrale al computer.
2. Recupera le foto scattate durante la sessione di
volo.
Se gli scatti sono registrati su una scheda di memoria
SD, puoi anche utilizzare il Sunshine Sensor come
lettore di scheda SD. A tal ne, collega la porta
micro-USB device del sensore al computer.
Non rimuovere la scheda SD mentre Sequoia è acceso.

132
ELABORAZIONE DEI DATI
CON AIRINOV FIRST+
Visita http://parrot.airinov.com e segui le istruzioni
sullo schermo per elaborare i dati.
Per maggiori informazioni visita
www.parrot.com/support
AGGIORNARE
IL PARROT DISCOPRO
1. Collega il Parrot Skycontroller 2 al Parrot Disco-Pro.
2. Collega lo smartphone o il tablet a Parrot
Skycontroller 2 tramite USB.
3. L'applicazione FreeFlight Pro viene lanciata
automaticamente.
4. Nell'applicazione FreeFlight Pro, premi
Aggiornamento.
5. L'applicazione cerca gli aggiornamenti.
6. Se l'applicazione trova un le di aggiornamento,
selezionalo e premi OK.
7. L'applicazione scarica il le di aggiornamento.
8. Una nestra pop-up appare per avvisare che il
drone viene riavviato.
9. Premi Esci.

ITALIANO
133
Il Parrot Disco-Pro si riavvia automaticamente durante
l'installazione dell'aggiornamento. L'operazione
potrebbe richiedere diversi minuti. Una volta
terminato l'aggiornamento, l'applicazione FreeFlight
Pro si riavvia automaticamente.

134
COMPORTAMENTO
DELL'INDICATORE
LUMINOSO
Lampeggia in blu Il Parrot Disco-Pro si sta avviando.
Lampeggia in verde Il Parrot Disco-Pro ha rilevato il segnale GPS
ed è pronto a decollare.
Lampeggia in giallo
L'aggiornamento del Parrot Disco-Pro
è in corso.
Non spegnere il Parrot Disco-Pro.
Lampeggia in rosso
e blu
Il Parrot Disco-Pro ha rilevato un problema
a livello della batteria.
> Contatta il tuo rivenditore o visita la
pagina di supporto del Parrot Disco-Pro
su www.parrot.com/support.
Lampeggia in rosso
Il Parrot Disco-Pro ha rilevato un errore
del motore.
> Appare un messaggio di errore
sull'applicazione FreeFlight Pro. Vai alla
tabella dei codici di errore disponibile
su www.parrot.com/support.
PEZZI DI RICAMBIO
Puoi acquistare i pezzi di ricambio del Parrot Disco-
Pro nel nostro negozio online: www.parrot.com.
Per ulteriori informazioni sul montaggio dei pezzi di
ricambio, guarda i video tutorial sulla nostra pagina
di supporto.

ITALIANO
135
SPECIFICHE TECNICHE
SENSORI
• Ultrasuono
• Altimetro
• Fotocamera verticale hi-speed
• Sonda Pitot: sensore di velocità
SISTEMA DI NAVIGAZIONE INERZIALE
• Giroscopio a tre assi
• Accelerometro a tre assi
• Magnetometro a tre assi
HARDWARE
• CPU Dual core ARM® Cortex® -A9
• Memoria ash interna: 32 GB
WIFI E TRASMISSIONI
• Punto di accesso alla rete
• Tipo Wi-Fi ac, 2 antenne dual band (2,4 e 5GHz), entrate e uscite
multiple
• Fino 2 km di portata con il Parrot Skycontroller 2
BATTERIA RIMOVIBILE
• 2700mAh / 25A 3 celle LipoBattery
• Autonomia della batteria: 45 minuti
• Tensione nominale: 11,1V
• 21,6A in scarica continua
• Caricamento a 3,5A max
• Intervallo di funzionamento: -20°C-60°C

136
DIMENSIONI
• Peso: 940 gr
• Misure: 1150 mm x 580 mm x 120 mm
• Apertura alare: 1150 mm
GPS
• GPS integrato
• GPS + GLONASS
PRESTAZIONE
• Motore: 1280kv
• Servomotore: 5V
• Possibilità di installare un ricevitore RF SBUS, SUMD, CPPM
VIDEO & FOTO
• Fotocamera Full HD 1080p
• Flusso video: 360p / 720p
SOFTWARE
• Linux® & Open source SDK per lo sviluppo
CARICATORE
• Input: 100-240V, 50h-60Hz, 1.2A
• Output: Max 12,6Vdc, 3.5A
• Altitudine massima: 2000 m sopra il livello del mare
• Intervallo di funzionamento: 0°C-40°C
PARROT DISCO
• Intervallo di funzionamento: 0°C-40°C
• Corrente max: 15A
• Tensione nominale: 11,1V

ITALIANO
137
INFORMAZIONI GENERALI
Il Parrot Disco deve essere utilizzato secondo le regole dell'aviazione civile
di ogni paese, e in luoghi adatti alla sua evoluzione, scelti per garantire
costantemente la sicurezza di persone, animali e cose.
Prima di far volare il tuo Parrot Disco, verica le regole dell'aviazione civile
locale.
ACCESSORI E PEZZI DI RICAMBIO
Accessori e pezzi di ricambio sono disponibili presso il tuo rivenditore Parrot
o sul sito www.parrot.com.
PRECAUZIONI D'USO E MANUTENZIONE
Il pilota deve, in ogni momento, mantenere il contatto visivo con il Parrot
Disco e controllare la sua traiettoria.
L'utilizzo del Parrot Disco in alcuni luoghi di pubblico dominio (ad esempio:
stazione, aeroporto, ...) o su strada pubblica può non essere consentito.
Non appena l'elica del Parrot Disco è in movimento, può causare danni a
persone, animali o cose. Mantieni sempre una distanza di sicurezza dal Parrot
Disco. Presta sempre attenzione all'elica del Parrot Disco durante la fase di
decollo. Usa esclusivamente gli accessori specicati da Parrot Drones SAS.
Se sabbia o polvere penetrano nel Parrot Disco, questo potrebbe non
funzionare più correttamente in modo irreversibile.
Non utilizzare il Parrot Disco in condizioni meteorologiche sfavorevoli
(pioggia, vento forte, neve, nebbia) o quando le condizioni di visibilità sono
insucienti (notte).
Tieni il Parrot Disco lontano da linee ad alta tensione, edici o altre zone
potenzialmente pericolose.
Non utilizzare questo apparecchio vicino a sostanze liquide. Non posare il
Parrot Disco sull'acqua o su una supercie umida, perché ciò potrebbe
causare danni irreversibili.
Evita di sottoporre il Parrot Disco a cambiamenti di altitudine eccessivi.
Non lasciare il Parrot Disco al sole.
Rischio di ingestione di piccoli elementi. Gli imballaggi non fanno parte del
prodotto e devono essere eliminati come misura di sicurezza.
WIFI
Prima di utilizzare il Parrot Disco, informati sulle restrizioni d'uso delle
frequenze Wi-Fi del tuo luogo di volo. Alcune frequenze potrebbero essere
limitate o vietate. In alcuni paesi, per esempio, l'uso della banda Wi-Fi 5 GHz
può essere vietato all'esterno.
AVVERTENZA IMPORTANTE SUL RISPETTO DELLA PRIVACY E
DELL'IMMAGINE DEI BENI
Registrare e trasmettere l'immagine di una persona senza il suo consenso
può costituire una violazione della sua privacy e può chiamare in causa la tua
responsabilità. Chiedi il permesso prima di lmare le persone, soprattutto se
desideri conservare e/o pubblicare le registrazioni. Non pubblicare immagini
degradanti o che possono danneggiare la reputazione o la dignità di una
persona.
Registrare e pubblicare l'immagine di un bene senza l'autorizzazione del suo

138
proprietario e/o di terzi che dispongono di diritti di proprietà intellettuale sul
bene può costituire una violazione del diritto all'immagine del bene e può
chiamare in causa la tua responsabilità. Chiedi il permesso al suo proprietario
e/o a terzi titolari del diritto di proprietà.
BATTERIA PARROT DISCO E PARROT SKYCONTROLLER 2
ATTENZIONE: Il mancato rispetto di tutte le istruzioni può causare lesioni gravi,
danneggiare in maniera irreversibile la batteria e provocare un incendio, fumo o
un'esplosione.
Verica sempre lo stato della batteria prima di caricarla o utilizzarla. Sostituisci
la batteria se ha subito un urto o in caso di odore, surriscaldamento,
scolorimento, deformazione o perdite. Non usare mai nulla per caricare
la batteria ad eccezione di un caricatore approvato LiPo. Usa sempre un
caricatore a bilanciamento di celle LiPo o un equilibratore di celle LiPo. Si
raccomanda di non utilizzare un caricatore diverso da quello fornito con
il prodotto. Non caricare a regime lento o al di sotto di 2,5V per cella. La
temperatura della batteria non deve mai superare i 60 °C (140 °F) altrimenti
la batteria potrebbe essere danneggiata o prendere fuoco. Non caricare mai
su una supercie inammabile, vicino a prodotti inammabili o all'interno
di un veicolo (posizionare preferibilmente la batteria in un contenitore non
inammabile e non conduttivo). Non lasciare mai incustodita la batteria
durante il processo di ricarica. Non smontare o modicare mai il cablaggio
del guscio esterno e non forare le celle. Assicurati sempre che la tensione di
uscita del caricatore corrisponda alla tensione della batteria. Non mettere le
batterie in corto circuito. Non esporre mai la batteria LiPo all'umidità o alla
luce solare diretta, o in un luogo dove le temperature possono superare i
60 °C (in auto in pieno sole, ad esempio). Tenere sempre fuori dalla portata
dei bambini.
ATTENZIONE
RISCHIO DI ESPLOSIONE SE LA BATTERIA DEL PARROT DISCO VIENE
SOSTITUITA CON UNA BATTERIA NON COMPATIBILE.
SMALTISCI LE BATTERIE USATE SECONDO LE ISTRUZIONI.
GARANZIA
Per conoscere le condizioni di garanzia, si prega di fare riferimento alle
Condizioni generali di vendita del rivenditore presso il quale è stato
acquistato il Parrot Disco-Pro AG.
COME RICICLARE QUESTO PRODOTTO
Il simbolo sul prodotto o sulla sua documentazione indica che non
deve essere smaltito a ne vita con i riuti domestici. Lo smaltimento
incontrollato dei riuti può causare danni all'ambiente o alla salute
umana, pertanto accertarsi di separare questo prodotto dagli altri tipi
di riuti e di riciclarlo in maniera responsabile. In questo modo, promuoverai
il riutilizzo sostenibile delle risorse materiali. Ti invitiamo a contattare il tuo
rivenditore o a informarti presso il tuo municipio per sapere dove e come il
Parrot Disco, il Parrot Skycontroller 2 e il Sequoia possono essere riciclati.
DICHIARAZIONE DI CONFORMITÀ UE PARROT DISCOPRO
Questo apparecchio può essere utilizzato in: DE, AT, BE, BG, CY, HR, DK,
ES, EE, FI, FR, GR, HU, IE, IT, LV, LT, LU, MT, NL, PL, PT, CZ, RO, GB, SK,
SI, SE.
La limitazione d'uso all'aperto nei paesi membri dell'Unione europea riguarda
solo la prima sottobanda della banda 5GHz (5150-5250MHz).

ITALIANO
139
Parrot DRONES, 174 quai de Jemmapes, 75010 Parigi, Francia, dichiara sotto
la sua unica responsabilità che il prodotto descritto in questo manuale utente
è conforme alle norme tecniche EN301489-1, EN301489-17, EN300440-1,
EN300328, EN300893, EN300440-2, EN60950-1, EN62321 secondo le
disposizioni della direttiva R&TTE 1999/5/CE, della direttiva Bassa Tensione
2014/35/UE e della direttiva ROHS 2011/65/CE.
http://www.parrot.com/ce/?parrot-disco
DICHIARAZIONE DI CONFORMITÀ PARROT SKYCONTROLLER 2
Questo apparecchio può essere utilizzato in: DE, AT, BE, BG, CY, HR, DK, ES,
EE, FI, FR, GR, HU, IR, IT, LV, LT, LU, MT, NL, PL, PT, CZ, RO, GB, SK, SI, SE.
Parrot DRONES, 174 quai de Jemmapes, 75010 Parigi, Francia, dichiara
sotto la sua unica responsabilità che il prodotto descritto in questo manuale
utente è conforme alle norme tecniche EN 301489-17, EN300328, EN71-1,
EN71-2, EN71-3, EN62115, EN 50566: 2013 (SAR) secondo le disposizioni della
direttiva RED 2014/53/UE e della direttiva di sicurezza generale dei prodotti
2014/35/EU.
http://www.parrot.com/ce/?skycontroller-2
FCC/IC
Per soddisfare le esigenze relative all'esposizione alle radiofrequenze della
FCC/IC per i dispositivi di trasmissione, una distanza minima di 20cm deve
essere mantenuta tra l'antenna del prodotto e le persone. Per garantire la
conformità, l'utilizzo a una distanza inferiore non è raccomandato.
MARCHI
Parrot e i loghi Parrot sono marchi registrati di Parrot S.A.
Parrot Disco-Pro AG, Parrot Disco, Parrot Skycontroller, Sequoia, Parrot
C.H.U.C.K nonché i relativi loghi sono marchi di Parrot Drones SAS.
App Store è un marchio di servizio di Apple Inc.
Google Play e Google Maps sono marchi di Google Inc.
Wi-Fi® è un marchio registrato di Wi-Fi Alliance®
Linux è un marchio di Linus Torvalds registrato negli USA e in altri paesi.
Pix4D e Pix4Dcapture sono marchi depositati di Pix4D SA.
Airinov e Airinov First+ sono marchi commerciali o marchi depositati di
Airinov SAS.
Tutti gli altri marchi citati in questa guida sono di proprietà dei rispettivi
proprietari.
INFORMAZIONI SUL FABBRICANTE
Parrot Disco, Parrot Skycontroller 2 e Sequoia sono fabbricati da: Parrot
Drones SAS - 174 Quai de Jemmapes - 75010 Parigi (Francia) - RCS Paris 808
408 074 - www.parrot.com

140
Parrot Disco-Pro AG™ contiene los siguientes elementos:
1. Un dron Parrot Disco™.
2. Un sistema de autopilotaje Parrot C.H.U.C.K.™.
3. Un mando Parrot Skycontroller 2™. Puedes pilotar el
Parrot Disco con Parrot Skycontroller 2 descargando la
aplicación FreeFlight Pro™ en tu móvil o tableta. Esta
aplicación es gratuita, pero puede contener funciones
de compra dentro de la aplicación (In-app purchase).
Asimismo, permite calibrar el Parrot Disco.
4. Un sensor Sequoia™ que contiene:
(a) Un sensor multiespectral que capta la luz que reejan
las plantas;
(b) Un sensor Sunshine que registra la intensidad de la luz
del sol.
5. Acceso a los servicios Airinov First+™ que permiten
obtener tarjetas NDVI y de zonicación a partir de
capturas de imágenes realizadas con la aplicación gratuita
Pix4Dcapture™, que se puede descargar en un móvil o
una tableta.

ESPAÑOL
141
ADVERTENCIA
1. Parrot Disco NO ES UN JUGUETE. Los niños menores de
14 años no deben usarlo ni manipularlo.
2. ANTES DE CUALQUIER USO del Parrot Disco, hay que:
(a) LEER ATENTAMENTE este manual, así como toda la
información y documentación disponible en www.parrot.com,
porque se puede actualizar en cualquier momento sin previo
aviso (en adelante, la «Documentación de Parrot»). Se debe
prestar PARTICULAR ATENCIÓN a los párrafos que contienen
el símbolo ;
(b) INFORMARSE SOBRE LA LEGISLACIÓN VIGENTE
RELATIVA AL USO DE DRONES Y SUS ACCESORIOS (en
adelante, las «Normas aplicables»); y
(c) TENER PRESENTE que el Parrot Disco es susceptible
de exponer a las otras personas y al propio usuario a
DAÑOS FÍSICOS O MATERIALES, que pueden provocar
lesiones graves, incluso mortales.
3. Nótese que los vídeos y fotografías que forman parte
de las promociones y campañas publicitarias de Parrot
Drones SAS y sus liales han sido realizados por y con
profesionales y pilotos experimentados. EN CASO DE
DUDA SOBRE EL USO DEL PARROT DISCO Y SUS
ACCESORIOS, CONVIENE CONSULTAR LAS ÚLTIMAS
ACTUALIZACIONES DE LA DOCUMENTACIÓN PARROT.
4. DENTRO DE LOS LÍMITES ESTABLECIDOS EN EL
DERECHO APLICABLE, PARROT DRONES SAS,
SUS FILIALES, DISTRIBUIDORES Y MINORISTAS
RESPECTIVOS NO PUEDEN CONSIDERARSE
RESPONSABLES POR NINGÚN PERJUICIO QUE RESULTE
O ESTÉ RELACIONADO CON LA NO OBSERVANCIA
DE LA DOCUMENTACIÓN DE PARROT O LAS NORMAS
APLICABLES POR PARTE DEL COMPRADOR O USUARIO
DEL PARROT DISCO.

142
PRESENTACIÓN DEL
PARROT DISCOPRO AG
PARROT DISCOPRO
Alerón
Servomotor
Hélice Alerón
Servomotor
Cubierta
Cámara ojo
de pez (Fisheye)
Botón de encendido y piloto luminoso

ESPAÑOL
143
MÓDULO AUTOPILOTO C.H.U.C.K.
Puerto micro USB
Puerto para mando
de radiocontrol
Conector de la batería
Conector
servos
Conector motor central
Puerto micro USB de
alimentación del Sequoia

144
PRESENTACIÓN
DEL PARROT
SKYCONTROLLER 2
Antena
Ubicación del soporte para el aparato móvil
Botón
On/O
Regreso al punto de despegue
Despegar/
aterrizar
En vuelo: iniciar/detener la grabación en vídeo
Menú Ajustes: volver
En vuelo:
hacer una foto
Menú Ajustes:
conrmar
Ajustes
Puerto USB

ESPAÑOL
145
Exposición de la cámara
Modo de visualización
Visión directa/visión inmersiva
con FreeFlight Pro
Orientación vertical de la cámara
Puerto USB

146
PRESENTACIÓN
DE SEQUOIA
Sequoia se compone de un sensor multiespectral y
un sensor de irradiancia Sunshine.
SENSOR MULTIESPECTRAL
SENSOR SUNSHINE
Disparador
y piloto
luminoso
Puerto micro
USB antrión
Puerto micro USB
dispositivo
Sensor infrarrojo
cercano
Sensor rojo
Sensor rojo
extremo
Sensor
verde
Sensor RGB
Ranura para
tarjeta SD
Sensores de luminosidad
ambiental
Puerto micro
USB dispositivo
El puerto micro USB antrión del sensor
multiespectral se debe conectar con el puerto
micro USB dispositivo del sensor Sunshine.

ESPAÑOL
147
ANTES DE COMENZAR
DESCARGAR FREEFLIGHT PRO
Y PIX4DCAPTURE
Conéctate a la App Store® o Google Play™ para
descargar las aplicaciones gratuitas FreeFlight Pro y
Pix4Dcapture en tu móvil o tableta.
FreeFlight Pro es la aplicación ocial de Parrot que
permite pilotar libremente el dron.
Pix4Dcapture es una aplicación gratuita que permite
generar un plan de vuelo para sacar fotos por encima
de una zona de interés.
CARGAR LA BATERÍA
DEL PARROT DISCOPRO
La batería tiene que estar desconectada del Parrot
Disco-Pro.
1. Selecciona el enchufe que se corresponda a tu país
y conéctalo al cargador.
2. Conecta el cable al cargador.
3. Conecta la batería al cable del cargador y enchufa
el cargador a la corriente.
El piloto luminoso se enciende en rojo durante la carga
y se pone en verde cuando la batería está cargada.
El tiempo de carga ronda los 55 minutos para un
tiempo de vuelo de unos 30 minutos.

148
CARGAR LA BATERÍA DEL
PARROT SKYCONTROLLER 2
1. Selecciona el adaptador que se corresponda a tu
país y enchúfalo al transformador.
2. Conecta el cable del cargador al Parrot Skycontroller
2 y enchufa el cargador a la corriente. El tiempo de
la carga es de 1 h 40 min aproximadamente para
4horas de uso.
PREPARAR EL
PARROT DISCOPRO
1. Retira la cubierta del Parrot Disco-Pro.
2. Retira el Sequoia, quita la carcasa de protección
de lentes y coloca la batería en el compartimento
previsto a tal efecto.

ESPAÑOL
149
4. Vuelve a cerrar la cubierta del Parrot Disco-Pro.
3. Vuelve a colocar el Sequoia y conecta la batería
al Parrot Disco-Pro. Conecta el cable micro USB
dispositivo del sensor multiespectral al puerto de
alimentación micro USB del Parrot C.H.U.C.K.

150
Coloca las alas en el Parrot Disco-Pro.
Comprueba que el alerón esté bien encajado
en el brazo del servomotor.
FIJACIÓN DE LAS ALAS
Tira de las alas si quieres quitarlas.
No muevas los servomotores con las manos.

ESPAÑOL
151
VERIFICACIONES
ANTES DEL VUELO
Antes de cada sesión de vuelo con Parrot Disco-Pro,
hay que llevar a cabo estas comprobaciones:
LEGISLACIÓN
Comprueba que el uso del Parrot Disco-Pro esté
autorizado allí donde vayas a volar con él.
Infórmate sobre las restricciones de utilización de
las frecuencias Wi-Fi® allí donde vayas a volar.
CONDICIONES DE VUELO
Las 5 condiciones que debes respetar
obligatoriamente son:
1. Asegúrate de disponer de una zona despejada
de al menos 80 metros de diámetro para el
despegue y aterrizaje del Parrot Disco-Pro.
Comprueba que el terreno de vuelo esté
libre de obstáculos que puedan entorpecer el
pilotaje o impedir seguir el vuelo con la vista.
2. No pilotes el Parrot Disco-Pro de noche.
3. No pilotes el Parrot Disco-Pro por encima de
una zona urbana o en determinados lugares de
dominio público (estaciones, aeropuertos…).
4. Comprueba las condiciones meteorológicas
para asegurarte de volar en buenas condiciones
y sacar buenas imágenes. No pilotes el Parrot
Disco-Pro en caso de lluvia, niebla, nieve o
viento de más de 12m/s o 43km/h.

152
5. Procura que la altitud de vuelo programada en
Pix4Dcapture (calculada con respecto al punto
de despegue) sea suciente para evitar los
obstáculos de los alrededores.
PARROT DISCOPRO
Comprueba que las alas del Parrot Disco-Pro
estén correctamente colocadas (véase el apartado
Fijación de las alas).
Comprueba que la batería del Parrot Disco-Pro
y la del mando a distancia estén cargadas (véase
Cargar la batería).
Comprueba que la cubierta del Parrot Disco-Pro
esté bien cerrada.
Comprueba que el piloto luminoso del Parrot
Disco esté parpadeando en verde, porque signica
que el Parrot Disco-Pro ha detectado la señal GPS.
Comprueba que el sensor Sunshine esté bien
expuesto.
Comprueba el estado del terreno para el
aterrizaje del Parrot Disco-Pro.
SEQUOIA
No te olvides de retirar la carcasa de protección
antes de la utilización.
Comprueba que el Sequoia esté conectado al
puerto micro USB del Parrot C.H.U.C.K.
Comprueba que los objetivos estén limpios.
Utiliza el paño de microbra suministrado para

ESPAÑOL
153
limpiarlos.
Libera suciente memoria (de la memoria interna
del sensor multiespectral) para poder almacenar
todas las fotos que saques durante el vuelo.
Comprueba que los dos módulos estén
correctamente colocados en el dron y que no
corren el riesgo de soltarse durante el vuelo.
Comprueba que el cable micro USB dispositivo
esté correctamente conectado al sensor
multiespectral. Comprueba que el cable micro
USB esté correctamente conectado entre el sensor
Sunshine y el sensor multiespectral.
Comprueba que ambos sensores estén
calibrados. Para más información, ver el apartado
«Calibrar Sequoia».
Espera a que se ilumine en verde el piloto
del sensor Sunshine, porque signica que se ha
activado el GPS/GNSS.
CONECTARSE AL
PARROT DISCOPRO
CONECTAR PARROT
SKYCONTROLLER 2 AL PARROT
DISCO CON FREEFLIGHT PRO
Apoya el Parrot Disco sobre una supercie plana.
1. Pulsa en el botón de encendido del Parrot

154
Disco-Pro.
>El piloto luminoso parpadea en rojo y después en
verde cuando capta la señal GPS.
2. Pulsa en el interruptor de encendido del Parrot
Skycontroller 2.
3. Espera a que el piloto luminoso permanezca
iluminado en verde.
Parrot Disco-Pro ya está conectado.
Si el piloto luminoso sigue parpadeando en rojo,
tendrás que calibrar el Parrot Disco-Pro. Para eso:
4. En la aplicación FreeFlight
Pro, entra en Fly & Film >
> Posición, distancias y
límites y pulsa en Calibrar.
5. Calibra la sonda Pitot:
colócate de espaldas al
viento y dirige la cámara
del Parrot Disco-Pro hacia
el suelo.
6. Gira el Parrot Disco-
Pro sobre el eje Z (yaw/
movimiento lateral).
7. Gira el Parrot Disco-Pro
sobre el eje Y (pitch/
cabeceo).
8. Gira el Parrot Disco-Pro
sobre el eje X (roll/balance).
>El piloto luminoso parpadea
en verde. Parrot Disco-Pro
ya está calibrado.
Z
Y
X

ESPAÑOL
155
CONECTAR EL MÓVIL AL
PARROT SKYCONTROLLER 2
1. Atornilla el soporte para móvil en el Parrot
Skycontroller 2.
B
A
B
A
Gira el soporte para adaptarlo a las
dimensiones de tu móvil. Solo tienes que
pulsar encima y girarlo hacia la derecha.
B
A
B
A

156
2. Pulsa en el botón de la derecha del soporte para abrirlo
por completo.
3. Coloca el móvil en el soporte.
B
A
BA
4. Vuelve a ajustar el soporte al móvil.
5. Con el cable USB del móvil, conecta el móvil al
puerto USB del Parrot Skycontroller 2.
B
A

ESPAÑOL
157
MANDO IZQUIERDO
B
A
B
A
B
A
B
A
B
A
B
A
B
A
B
A
Acelerar
Ralentizar
MANDO DERECHO
Bajar
Subir
Girar a la derecha
Girar a la izquierda
Vuelo estacionario
en órbita derecha
Vuelo estacionario
en órbita izquierda
MODOS DE PILOTAJE
PARROT SKYCONTROLLER 2
En cualquier momento durante la ejecución del plan
de vuelo con Pix4Dcapture, se puede retomar el
control del dron pulsando en uno de los mandos de
Parrot Skycontroller 2.

158
PLAN DE VUELO
CREAR UN PLAN DE VUELO
CON PIX4DCAPTURE
En el primer lanzamiento, selecciona Parrot Disco-
Pro en la lista de drones y entra en la edición del
plan de vuelo.
Grid: el dron cuadricula la zona que va a sobrevolar
para recubrirla en su mayor parte.
Durante la creación del plan
de vuelo, dene el punto de
despegue y la zona de aterrizaje.
Para la zona de aterrizaje,
conviene prever un espacio de
200m de longitud con un ángulo
de 30°.
Dispones de más información sobre los planes de
vuelo y su creación en la página de asistencia de
Pix4Dcapture:
Android:
https://www.parrot.com/uk/pix4dcapture-android
iOS:
https://www.parrot.com/uk/pix4dcapture-ios

ESPAÑOL
159
INICIAR EL PLAN DE VUELO
1. Enciende el Parrot Disco-Pro y conéctalo al
Parrot Skycontroller 2. La conexión entre el
dron y Parrot Skycontroller 2 se establece
automáticamente.
2. Conecta el móvil o la tableta al puerto USB del
Parrot Skycontroller 2.
3. Abre la aplicación Pix4Dcapture.
4. Selecciona el tipo de misión en la página
principal.
5. Crea el plan de vuelo que quieras efectuar.
6. Indica el punto de despegue «start waypoint» y
el ángulo de aterrizaje.
7. Pulsa en START.
>Empezará una cuenta atrás para que te dé tiempo
a ponerte en posición.
>Cuando se termine la cuenta atrás, Parrot Disco-
Pro estará listo para despegar y arrancará el
motor. Ver el apartado Despegue.
>Una vez terminado el plan de vuelo, el dron
alcanzará la zona de aterrizaje denida en el plan
de vuelo y aterrizará.

160
DESPEGUE
Tienes que despegar de cara al viento.
1. Colócate frente al viento sujetando el cuerpo
del Parrot Disco-Pro con una mano.
2. Comprueba que el motor del Parrot Disco-Pro
esté completamente despejado.
3. En la aplicación Pix4Dcapture, pulsa en Start
después de haber creado el plan de vuelo.
En caso de pilotaje libre asistido con FreeFlight Pro,
pulsa en el botón del Parrot Skycontroller 2 para
iniciar el despegue.
>El motor del Parrot Disco-Pro empieza a girar y
alcanza su velocidad máxima en 1 segundo.
4. Lanza el Parrot Disco-Pro ligeramente hacia
arriba.

ESPAÑOL
161
>Parrot Disco-Pro despega. Asciende a 50 metros
de altitud y efectúa círculos de 60 metros de
diámetro.
Observación: Para detener el motor
del Parrot Disco-Pro durante el
despegue, vuelve a pulsar en el botón
del Parrot Skycontroller 2.
Si tardas más de 10 segundos en lanzar
el Parrot Disco-Pro después de haber
pulsado en , el motor se parará.
Pulsa otra vez en para volver a
empezar el procedimiento de despegue.

162
REGRESO AL
PUNTO DE DESPEGUE
Para que Parrot Disco-Pro regrese a su punto
de despegue al margen de un plan de vuelo en
Pix4Dcapture, basta con pulsar el botón en Parrot
Skycontroller 2.
> Parrot Disco-Pro regresa a su punto de despegue, se sitúa a
50 m de altitud y efectúa círculos de 60m de diámetro encima
de esa posición.
Point de départ
Comprueba que te encuentres en un entorno
despejado.
PARROT
SKYCONTROLLER 2 :
ATERRIZAJE
Conviene aterrizar el Parrot Disco-Pro sobre una
supercie adaptada para que no se dañe, por
ejemplo, sobre hierba.

ESPAÑOL
163
ATERRIZAJE LINEAL
1. Posiciona el Parrot Disco-Pro frente al viento.
2. Reduce al máximo la altitud del Parrot Disco-Pro.
3. Pulsa en el botón del Parrot Skycontroller 2.
> Parrot Disco-Pro desciende en línea recta y se
endereza para aterrizar suavemente.
Observación: Durante el descenso del
Parrot Disco-Pro, también puedes hacer
algunas maniobras de pilotaje: subir,
bajar, girar a la izquierda y girar a la
derecha.
80 m
50 m
10 m
Para anular el aterrizaje, pulsa en el botón del
Parrot Skycontroller 2.
Parrot Disco-Pro asciende hasta los 50 metros y se
mueve en círculos de 60m de diámetro.
La pista de aterrizaje tiene que medir al menos
50 metros.
ATERRIZAJE CIRCULAR
Durante el aterrizaje circular, Parrot Disco-Pro se
encarga de llegar por sí solo al suelo frente al viento

164
para limitar la velocidad del aterrizaje.
1. Asegúrate de disponer de una zona de al
menos 80 metros de diámetro para que aterrice
el Parrot Disco-Pro.
2. En el vuelo estacionario en órbita con Parrot
Skycontroller 2, pulsa en .
> Parrot Disco-Pro aterriza en espiral.
80 m
50 m
10 m
El aterrizaje circular requiere disponer de mucho
espacio.
PÉRDIDA DE CONEXIÓN
Durante el vuelo al margen del plan de vuelo con
Pix4Dcapture y en caso de pérdida de conexión,
Parrot Disco-Pro efectúa círculos de 60 metros
de diámetro durante un período predenido
(10 segundos por defecto).
Si la conexión no se vuelve a restablecer, Parrot
Disco-Pro regresa a su posición de salida y vuela en
círculos de 60 metros de diámetro a 50 metros de
altitud.

ESPAÑOL
165
Si la conexión se sigue sin restablecer al cabo de
5 minutos, Parrot Disco-Pro efectúa un aterrizaje
circular.
APAGAR
EL PARROT DISCO
Mantén pulsado el botón de encendido para apagar
el Parrot Disco-Pro.
>El piloto luminoso parpadea en rojo y el Parrot
Disco-Pro se apaga.
RECUPERAR LAS FOTOS
Durante el vuelo, las fotos se van almacenando en la
memoria interna del sensor multiespectral.
1. Conecta el sensor multiespectral a un ordenador.
2. Recupera las fotos que hayas sacado durante el
vuelo.
En el caso de almacenar las fotos en una tarjeta de
memoria SD, también se puede utilizar el sensor
Sunshine como lector de tarjetas SD. Basta con
conectar el puerto micro USB dispositivo del sensor
a un ordenador.
No extraigas la tarjeta SD cuando Sequoia esté
encendido.

166
TRATAMIENTO DE DATOS
CON AIRINOV FIRST+
Consulta http://parrot.airinov.com y sigue los pasos
indicados en pantalla relativos al tratamiento de los
datos.
Más información en www.parrot.com/support
ACTUALIZAR
EL PARROT DISCOPRO
1. Conecta tu Parrot Skycontroller 2 a tu Parrot
Disco-Pro.
2. Conecta el móvil o la tableta a tu Parrot
Skycontroller 2 a través de USB.
3. La aplicación FreeFlight Pro se inicia
automáticamente.
4. En la aplicación FreeFlight Pro, pulsa en
Actualización.
5. La aplicación comenzará a buscar
actualizaciones.
6. Si la aplicación encuentra alguna actualización,
selecciónala y pulsa en OK.
7. La aplicación descargará el archivo de
actualización.
8. Aparecerá una ventana emergente para
informarte de que el dron se va a reiniciar.

ESPAÑOL
167
9. Pulsa en Salir.
Parrot Disco-Pro se reiniciará automáticamente
durante la instalación de la actualización. Este
procedimiento puede tardar unos minutos.
Terminada la actualización, la aplicación FreeFlight
Pro se reiniciará automáticamente.

168
COMPORTAMIENTO
DEL PILOTO LUMINOSO
Parpadeo en azul Parrot Disco-Pro se está encendiendo.
Parpadeo en verde Parrot Disco-Pro ha detectado la señal GPS
y está listo para despegar.
Parpadeo
en amarillo
Actualización del Parrot Disco-Pro en curso.
No apagues el Parrot Disco-Pro.
Parpadeo en
rojo y azul
Parrot Disco-Pro ha detectado un problema
relacionado con la batería.
> Ponte en contacto con la tienda o
consulta la página de asistencia técnica
del Parrot Disco-Pro en www.parrot.com/
support.
Parpadeo en rojo
Parrot Disco-Pro ha detectado un error en
el motor.
> Aparecerá un mensaje en la aplicación
FreeFlight Pro. Consulta el cuadro de
códigos de error en www.parrot.com/
support.
ACCESORIOS
Puedes comprar repuestos del Parrot Disco-Pro en
nuestra tienda en línea: www.parrot.com.
Si necesitas más información sobre el montaje de
piezas de repuesto, consulta los vídeos de nuestra
página web, en la sección «Soporte».

ESPAÑOL
169
CARACTERÍSTICAS
TÉCNICAS
SENSORES
• Ultrasonido
• Altímetro
• Cámara vertical de alta velocidad
• Sonda Pitot: sensor de velocidad
SISTEMA DE NAVEGACIÓN INERCIAL
• Giroscopio de tres ejes
• Acelerómetro de tres ejes
• Magnetómetro de tres ejes
MATERIAL
• CPU Dual core ARM® Cortex® -A9
• Memoria Flash interna: 32GB
WIFI® Y TRANSMISIONES
• Punto de acceso de red
• Tipo Wi-Fi® ac, 2 antenas bibanda (2,4 y 5GHz), entradas y salidas
múltiples
• Hasta 2km de alcance con Parrot Skycontroller 2
BATERÍA EXTRAÍBLE
• 2700mAh / 25A de 3 células LipoBattery
• Autonomía de la batería: 45 min
• Tensión nominal: 11,1 V
• 21,6 A en descarga continua
• Carga a 3,5A como máximo
• Intervalo de funcionamiento: -20°C a 60°C

170
MEDIDAS
• Peso: 940 g
• Dimensiones: 1150 × 580 × 120 mm
• Envergadura: 1150 mm
GPS
• GPS integrado
• GPS + GLONASS
EFICIENCIA
• Motor: 1280 kv
• Servomotor: 5 V
• Posibilidad de instalar un receptor RF SBUS, SUMD, CPPM
VÍDEO Y FOTOS
• Cámara Full HD de 1080p
• Flux vídeo: 360p / 720p
SOFTWARE
• Linux® y Open source SDK para desarrolladores
CARGADOR
• Entrada: 100-240V, 50-60Hz, 1,2 A
• Salida: 12,6 Vdc máximo, 3,5 A
• Altitud máxima: 2000m por encima del nivel del mar
• Intervalo de funcionamiento: 0-40°C
PARROT DISCO
• Intervalo de funcionamiento: 0-40°C
• Corriente máxima: 15 A
• Tensión nominal: 11,1 V

ESPAÑOL
171
INFORMACIÓN GENERAL
Parrot Disco debe utilizarse de conformidad con las normas de aviación civil
de cada país y en lugares adaptados a su vuelo, velando en todo momento
por la seguridad de las personas, los animales y los bienes.
Antes de echar a volar el Parrot Disco, conviene informarse de las normas
locales de aviación civil.
ACCESORIOS Y REPUESTOS
Dispones de accesorios y repuestos en las tiendas distribuidoras de Parrot o
bien en la página www.parrot.com.
PRECAUCIONES DE USO Y MANTENIMIENTO
Parrot Disco es un aeromodelo diseñado para nes recreativos y de ocio. El
piloto debe mantener el contacto visual en todo momento con el Parrot Disco
y controlar su trayectoria.
Es posible que no esté autorizada la utilización del Parrot Disco en
determinados lugares de dominio público (estaciones, aeropuerto…) o en
la vía pública.
En cuanto la hélice del Parrot Disco esté en movimiento, puede provocar
daños a personas, animales u objetos. Mantén siempre una distancia de
seguridad con el Parrot Disco. Ten cuidado con la hélice del Parrot Disco
durante la fase de despegue. Utiliza únicamente los accesorios especicados
por Parrot Drones, SAS.
El Parrot Disco podría dejar de funcionar correctamente y de forma irreversible
si le entrara polvo o arena.
No utilices el Parrot Disco en condiciones meteorológicas adversas (lluvia,
viento fuerte, nieve o niebla) o cuando las condiciones de visibilidad no sean
sucientes (de noche).
Mantén el Parrot Disco alejado de las líneas de alta tensión, edicios o
cualquier otra zona potencialmente peligrosa.
No utilices este aparato cerca de sustancias líquidas. No poses el Parrot
Disco sobre el agua ni sobre supercies húmedas, porque podría sufrir daños
irreversibles.
Procura que el Parrot Disco no se someta a cambios bruscos de altitud.
No dejes el Parrot Disco al sol.
Riesgo de ingestión de elementos pequeños. El embalaje no forma parte del
producto y se debe tirar a la basura como medida de precaución.
WIFI®
Antes de pilotar el Parrot Disco, conviene informarse de las restricciones de
utilización de las frecuencias Wi-Fi® allí donde se tenga la intención de volar.
Algunas frecuencias podrían estar prohibidas o restringidas. Por ejemplo, en
algunos países, se puede prohibir el uso de la banda Wi-Fi 5 GHz al aire libre.
ADVERTENCIA SOBRE EL RESPETO DE LA VIDA PRIVADA Y EL
RESPETO DE LA IMAGEN DE LOS BIENES
Grabar y difundir imágenes de una persona sin su autorización puede
constituir un delito contra la vida privada y ser susceptible de comprometer la
responsabilidad del usuario del dron. Hay que pedir permiso antes de grabar
a personas, sobre todo cuando se pretende conservar esas grabaciones o
publicarlas. No se deben difundir imágenes denigrantes o que puedan afectar
a la reputación o la dignidad de una persona.

172
Grabar y difundir la imagen de un bien sin la autorización de su propietario o
de un tercero que disponga de los derechos de propiedad intelectual sobre
ese bien puede constituir un delito contra el derecho a la imagen del bien
y ser susceptible de comprometer la responsabilidad del usuario. Solicita
autorización a su propietario o a quien posea los derechos de propiedad.
BATERÍA PARROT DISCO Y PARROT SKYCONTROLLER 2
ADVERTENCIA: El incumplimiento de estas instrucciones puede provocar lesiones
graves, dañar la batería de manera irreversible y provocar un incendio, emanación
de humo o explosión.
Recuerda comprobar siempre el estado de la batería antes de cargarla o
utilizarla. Hay que cambiar la batería si sufre algún golpe o en casos de malos
olores, sobrecalentamiento, descoloración, deformación o fuga. No se debe
utilizar nunca un cargador que no esté aprobado LiPo para cargar la batería.
Hay que utilizar un cargador con equilibrador de células LiPo o un equilibrador
de células LiPo. Se recomienda utilizar únicamente el cargador suministrado
con el producto. No se debe efectuar la carga a régimen lento, por debajo de
los 2,5 V por célula. La temperatura de la batería no debe superar nunca los
60 °C (140 °F) para evitar que se dañe o se iname. No se debe cargar nunca
la batería sobre un soporte inamable ni cerca de productos inamables o en
el interior de un vehículo (se recomienda colocar la batería en un recipiente
no inamable y no conductor). No dejar nunca la batería sin supervisión
durante el proceso de carga. No se debe desmontar ni modicar nunca el
cableado de la caja ni perforar las células. Conviene comprobar siempre que
la tensión de salida del cargador se corresponda con la tensión de la batería.
No poner nunca las baterías en cortocircuito. No exponer nunca la batería
LiPo a la humedad ni directamente al sol, ni tampoco en un lugar donde la
temperatura pueda superar los 60 °C (un coche a pleno sol, por ejemplo).
Mantener siempre alejada del alcance de los niños.
ADVERTENCIA
RIESGO DE EXPLOSIÓN SI LA BATERÍA DEL PARROT DISCO
SE SUSTITUYE POR UNA BATERÍA NO COMPATIBLE.
RESPETA LAS INSTRUCCIONES PARA DESHACERTE DE LAS BATERÍAS.
GARANTÍA
Si quieres conocer las condiciones de la garantía, consulta las «Condiciones
generales de venta» del distribuidor en donde hayas comprado el Parrot
Disco-Pro AG.
RECICLAJE DEL PRODUCTO
Este símbolo en el producto o su documentación indica que, al nal de
su vida útil, no debe desecharse con los residuos domésticos. Dado
que la eliminación no controlada de desechos puede perjudicar el
medioambiente o la salud de los seres humanos, hay que separarlo de
los otros residuos y reciclarlo de manera responsable. De este modo, se
contribuye al reaprovechamiento sostenible de los recursos materiales. Ponte
en contacto con la tienda o solicita información en tu ayuntamiento para saber
cómo y dónde se puede reciclar el Parrot Disco, el Parrot Skycontroller 2 y el
Sequoia.

ESPAÑOL
173
DECLARACIÓN DE CONFORMIDAD UE PARROT DISCOPRO
Este aparato se puede utilizar en: DE, AT, BE, BG, CY, HR, DK, ES, EE, FI,
FR, GR, HU, IE, IT, LV, LT, LU, MT, NL, PL, PT, CZ, RO, GB, SK, SI, SE.
La restricción de uso en exteriores en los países miembro de la Unión
Europea solo afecta a la primera subbanda de la banda 5 GHz (5150-
5250MHz).
PARROT DRONES, sita en 174 quai de Jemmapes, 75010 París (Francia),
declara bajo su única responsabilidad que el producto descrito en el
presente manual cumple con las normas técnicas EN301489-1, EN301489-17,
EN300440-1, EN300328, EN300893, EN300440-2, EN60950-1 y EN62321 según
las disposiciones de la directiva 1999/5/CE sobre equipos radioeléctricos,
la directiva 2014/35/UE sobre material eléctrico destinado a utilizarse con
determinados límites de tensión y la directiva 2011/65/UE sobre restricciones
de sustancias peligrosas en aparatos eléctricos y electrónicos.
http://www.parrot.com/ce/?parrot-disco
DECLARACIÓN DE CONFORMIDAD PARROT
SKYCONTROLLER 2
Este aparato se puede utilizar en: DE, AT, BE, BG, CY, HR, DK, ES, EE, FI, FR,
GR, HU, IR, IT, LV, LT, LU, MT, NL, PL, PT, CZ, RO, GB, SK, SI, SE.
Parrot Drones, sito en 174, quai de Jemmapes, 75010 París (Francia), declara
bajo su única responsabilidad que el producto descrito en el presente manual
del usuario cumple con las normas técnicas EN 301489-17, EN300328, EN71-
1, EN71-2, EN71-3, EN62115, EN 50566: 2013 (SAR), de conformidad con las
disposiciones de la Directiva RED 2014/53/UE y la directiva sobre seguridad
general de productos 2014/35/EU. http://www.parrot.com/ce/?Skycontroller-2
FCC/IC
Para responder a las exigencias relativas a la exposición RF de la FCC/IC
para los equipos de transmisión, se debe mantener al menos una distancia
de 20 cm entre la antena del producto y las personas. Para garantizar la
conformidad, no se recomienda su uso a una distancia inferior.
MARCAS
Parrot y los logotipos de Parrot son marcas que pertenecen a Parrot, S. A.
Parrot Disco-Pro AG, Parrot Disco, Parrot Skycontroller, Sequoia, Parrot
C.H.U.C.K. y sus logotipos respectivos son marcas de Parrot Drones, SAS.
App Store es una marca de servicio de Apple Inc.
Google Play y Google Maps son marcas de Google Inc.
Wi-Fi® es una marca registrada de Wi-Fi Alliance®
Linux es una marca de Linus Torvalds registrada en Estados Unidos y otros
países.
Pix4D y Pix4Dcapture son marcas registradas de Pix4D SA.
Airinov y Airinov First+ son marcas comerciales o registradas de Airinov SAS.
Todas las marcas mencionadas en esta guía son propiedad de sus respectivos
dueños.
INFORMACIÓN DEL FABRICANTE
Parrot Disco, Parrot Skycontroller 2 y Sequoia están fabricados por: Parrot
Drones, SAS. 174, quai de Jemmapes; 75010 París (Francia). Inscrita en el
Registro mercantil de París con el n.º 808 408 074. www.parrot.com

174
O Parrot Disco-Pro AG™ inclui os seguintes elementos:
1. Um drone «Parrot Disco»™ ;
2. Um sistema de piloto automático «Parrot C.H.U.C.K »™ ;
3. Uma manete «Parrot Skycontroller 2»™. Pode pilotar o
Parrot Disco com o Parrot Skycontroller 2 transferindo
para o smartphone ou tablet a aplicação FreeFlight
Pro™. Esta aplicação é gratuita, mas pode conter In-App
Purchase. Esta permite também proceder à calibração do
Parrot Disco;
4. Um sensor «Sequoia»™ incluindo:
(a) Um sensor multiespectral que capta a luz reetida
pelas plantas; e
(b) Um sensor sunshine que regista a intensidade da luz
do sol; e
5. Um acesso aos serviços Airinov First+™ que lhe permite
obter os cartões NDVI e de zonagem a partir das
capturas de imagens realizadas pela aplicação gratuita
Pix4Dcapture™, a transferir para o smartphone ou tablet.

PORTUGUÊS
175
AVISO
1. Parrot Disco NÃO É UM BRINQUEDO. Como tal, este não
deve ser usado ou manuseado por uma criança com menos
de 14 anos.
2. ANTES DE QUALQUER UTILIZAÇÃO do Parrot Disco:
(a) LEIA ATENTAMENTE este Guia de Utilização Rápida bem
como todas as informações e documentações disponíveis em
www.parrot.com, as quais podem ser atualizadas a qualquer
momento e sem aviso prévio (doravante «Documentação de
Parrot»). Uma ATENÇÃO PARTICULAR deve ser prestada aos
parágrafos que contêm os símbolos ;
(b) INFORME-SE SOBRE OS REGULAMENTOS APLICÁVEIS
RELATIVOS À UTILIZAÇÃO DE DRONES E DOS SEUS
ACESSÓRIOS (doravante «Regulamentos Aplicáveis»); e
(c) TENHA EM MENTE que o Parrot Disco é suscetível de
expor os outros e a si próprio a DANOS MATERIAIS E/OU
CORPORAIS, podendo mesmo provocar ferimentos graves
ou fatais.
3. Tenha em atenção que os vídeos e fotos que são objeto de
promoções e campanhas publicitárias por parte de Parrot
Drones SAS e das suas liais foram realizados por e com
prossionais e pilotos experientes. EM CASO DE DÚVIDAS
RELACIONADAS COM A UTILIZAÇÃO DO SEU PARROT
DISCO E DOS SEUS ACESSÓRIOS, AGRADECEMOS QUE
CONSULTE SEMPRE AS ÚLTIMAS ATUALIZAÇÕES DA
DOCUMENTAÇÃO DE PARROT.
4. NOS LIMITES DA LEGISLAÇÃO APLICÁVEL, PARROT
DRONES SAS, AS SUAS FILIAIS E OS SEUS DISTRIBUIDORES
E RESPETIVOS RETALHISTAS NÃO SERÃO CONSIDERADOS
RESPONSÁVEIS POR QUALQUER DANO RESULTANTE
DE OU RELACIONADO COM A INOBSERVÂNCIA DA
DOCUMENTAÇÃO DE PARROT OU DOS REGULAMENTOS
APLICÁVEIS POR SI PRÓPRIO OU POR QUALQUER OUTRA
PESSOAS QUE UTILIZA O SEU PARROT DISCO.

176
APRESENTAÇÃO DO
PARROT DISCOPRO AG
PARROT DISCOPRO
Aileron
Servomotor
Hélice Aileron
Servomotor
Capota
Câmara Fisheye
Botão ligar/desligar
e indicador luminoso

PORTUGUÊS
177
MÓDULO PILOTO AUTOMÁTICO
C.H.U.C.K
Porta micro-USB
Porta para telecomando RC
Conector da bateria
Conectores
servos
Conector do motor central
Porta micro-USB para
alimentação do Sequoia

178
APRESENTAÇÃO
DO PARROT
SKYCONTROLLER 2
Antena
Localização do suporte para o dispositivo móvel
Botão
ligar/
desligar
Regressar ao ponto de partida
Descolar/
Aterrar
Em voo: iniciar/parar a gravação de vídeo
Menu de denições: regresso
Em voo:
tirar uma foto
Menu de denições:
validar
Denições
Porta USB

PORTUGUÊS
179
Exposição da câmara
Modo de visualização
Vista direita/Vista imersiva
com FreeFlight Pro
Orientação vertical da câmara
Porta USB

180
APRESENTAÇÃO
DO SEQUOIA
O Sequoia é composto por um sensor multiespectral
e por um sensor de irradiação Sunshine.
SENSOR MULTIESPECTRAL
SUNSHINE SENSOR
Acionador
e indicador
luminoso
Porta micro-
USB host
Porta micro-USB
device
Sensor perto infravermelhos
Sensor
vermelho
Sensor
Red-Edge
Sensor
verde
Sensor RGB
Ranhura para
um cartão SD
Sensores de luz ambiente
Porta micro-USB
device
A porta micro USB host do sensor multiespectral
deve ser ligada à porta micro USB device do
Sunshine Sensor.

PORTUGUÊS
181
ANTES DE COMEÇAR
TRANSFERÊNCIA DA FREEFLIGHT
PRO E PIX4DCAPTURE
Conecte-se à App Store® ou a Google Play e transra
as aplicações gratuitas FreeFlight Pro e Pix4Dcapture
para o seu smartphone ou tablet.
FreeFlight Pro é a aplicação ocial da Parrot que
permite a pilotagem livre do drone.
Pix4Dcapture é a aplicação gratuita que permite gerar
um plano de voo para captar fotograas sobre uma
zona de interesse.
CARREGAR A BATERIA
DO PARROT DISCOPRO
A bateria deve ser desconectada do Parrot Disco-
Pro.
1. Selecione a cha fornecida correspondente ao seu
país e inseri-a no carregador.
2. Ligue o cabo ao carregador.
3. Conecte a bateria ao cabo do carregador e, em
seguida, conecte o carregador à corrente.
O indicador luminoso ca a vermelho durante o
carregamento e, em seguida, passa a verde quando
a bateria está carregada.
O tempo de carregamento é de cerca de 55 minutos
para um tempo de voo de aproximadamente
30minutos.

182
CARREGAR A BATERIA DO
PARROT SKYCONTROLLER 2
1. Selecione o adaptador correspondente ao seu país
e insira-o no carregador.
2. Ligue o cabo do carregador ao Parrot Skycontroller
2 e, em seguida, o carregador à corrente. O tempo
de carregamento é de cerca de 1h40 para 4 horas
de utilização.
PREPARAR O
PARROT DISCOPRO
1. Retire a capota do Parrot Disco-Pro.
2. Retire o Sequoia, retire a tampa de proteção das lentes
e coloque a bateria no compartimento.

PORTUGUÊS
183
4. Volte a fechar a capota do Parrot Disco-Pro.
3. Volte a colocar o Sequoia e ligue a bateria ao Parrot
Disco-Pro. De seguida, ligue o cabo micro USB device
do sensor multiespectral à porta de alimentação
micro USB do Parrot C.H.U.C.K.

184
Fixe as asas ao Parrot Disco-Pro.
Assegure-se de que o aileron está totalmente
encaixado no braço do servomotor.
FIXAR AS ASAS
Para retirar as asas, puxe por cima.
Não mova os servomotores à mão.

PORTUGUÊS
185
VERIFICAÇÕES ANTES
DO VOO
Antes de cada sessão de voo com o Parrot Disco-
Pro, proceda às seguintes vericações:
REGULAMENTAÇÃO
Conrme que a utilização do Parrot Disco-Pro
está autorizada no seu local de voo.
Informe-se sobre as restrições de utilização de
frequências Wi-FI® do seu local de voo.
CONDIÇÕES DE VOO
5 Condições a respeitar imperativamente
1. Certique-se de que dispõe de um espaço livre
com pelo menos 80 metros de diâmetro para
a descolagem e aterragem do Parrot Disco-
Pro. Verique se o terreno não tem qualquer
obstáculo que possa perturbar a pilotagem ou
impedir a vista do voo.
2. Não pilote o Parrot Disco-Pro à noite.
3. Não pilote o Parrot Disco-Pro por cima de uma
zona urbana ou em determinados locais de
domínio público (ex.: estações, aeroporto...).
4. Verique as condições meteorológicas para
garantir boas condições de voo e de recolha de
vista. Não pilote o Parrot Disco-Pro com tempo
chuvoso, de nevoeiro, de neve ou de vento
superior a 12 m/s ou 43 km/h.

186
5. Certique-se de que a altitude de voo
programada em Pix4Dcapture (obtida por
referência ao ponto de decolagem) é suciente
para evitar os obstáculos nas proximidades.
PARROT DISCOPRO
Certique-se de que as asas de Parrot Disco-Pro
estão correntemente xadas (ver a secção Fixar
as asas).
Certique-se de que a bateria do Parrot Disco-Pro
e a bateria do seu telecomando estão carregadas
(ver a secção Instalar a bateria).
Certique-se de que a capota do Parrot Disco-
Pro está correntemente fechada.
Certique-se de que o indicador luminoso do
Parrot Disco-Pro está verde. Isto signica que o
Parrot Disco-Pro detetou o sinal GPS.
Certique-se de que o Sunshine Sensor tem uma
exposição correta.
Verique o estado do terreno para a aterragem
do Parrot Disco-Pro.
SEQUOIA
Assegure-se de que a tampa de proteção é
retirada antes da utilização.
Assegure-se de que o Sequoia está ligado à
porta micro USB direita do Parrot C.H.U.C.K.
Certique-se de que as objetivas estão limpas.
Utilize um pano de microbras (incluído) para as

PORTUGUÊS
187
limpar.
Liberte memória suciente (na memória interna
do sensor multiespectral) para registar todas as
fotograas captadas durante o voo.
Assegure-se de que os dois módulos estão
corretamente xados ao drone e que não correm o
risco de se separarem durante o voo.
Assegure-se de que o cabo micro USB que
liga o drone ao sensor multiespectral está ligado.
Verique, também, a ligação micro USB entre o
Sunshine Sensor e o sensor multiespectral.
Certique-se de que os dois sensores estão
calibrados. Para mais informações, consulte a
secção Calibrar o Sequoia.
Aguarde até que o indicador luminoso do
Sunshine Sensor que verde. Quando este se
ilumina a verde, indica que o GPS/GNSS está
ativado.
LIGAR AO
PARROT DISCOPRO
CONECTAR O PARROT
SKYCONTROLLER 2 AO PARROT
DISCO COM FREEFLIGHT PRO
Coloque o Parrot Disco-Pro sobre uma superfície
plana.
1. Prima o botão On/O do Parrot Disco-Pro.

188
>O botão pisca a vermelho e depois a verde
quando o sinal GPS tiver sido xado.
2. Prima o botão On/O do Parrot Skycontroller 2.
3. Aguarde até que o indicador luminoso que
xamente a verde.
Está conectado ao Parrot Disco-Pro.
Se o indicador luminoso
continuar a piscar a
vermelho, deverá calibrar o
Parrot Disco-Pro. Para isso:
4. Na aplicação FreeFlight
Pro, aceda a Fly &
Film > > Posição,
distâncias e limites e
prima em Calibrar.
5. Calibrar a sonda de
Pitot. Para isto, coloque
de costas para o vento
e aponte a câmara do
Parrot Disco-Pro para o
chão.
6. Faça o Parrot Disco-Pro
rodar sobre o eixo Z
(yaw/desvio de rota).
7. Faça o Parrot Disco-Pro
rodar sobre o eixo Y
(pitch/inclinação longitudinal).
8. Faça o Parrot Disco-Pro rodar sobre o eixo X
(roll/oscilação).
>O indicador luminoso pisca a verde. O Parrot
Disco-Pro está calibrado.
Z
Y
X

PORTUGUÊS
189
CONECTAR O SEU SMARTPHONE
AO
PARROT SKYCONTROLLER 2
1. Enrosque o suporte para o smartphone no Parrot
Skycontroller 2.
B
A
B
A
Pode girar o suporte para o adaptar às
dimensões do seu smartphone. Para isso,
pressione em coma e faça-o rodar para a
direita.
B
A
B
A

190
2. Pressione o botão à direita do suporte para o abrir
completamente.
3. Posicione o seu smartphone no suporte.
B
A
BA
4. Volte a apertar o suporte no seu smartphone.
5. Com o cabo USB do seu smartphone, conecte o seu
smartphone à porta USB do Parrot Skycontroller 2.
B
A

PORTUGUÊS
191
COMANDO ESQUERDO
B
A
B
A
B
A
B
A
B
A
B
A
B
A
B
A
Acelerar
Abrandar
COMANDO DIREITO
Descer
Subir
Virar à direita
Virar à esquerda
Voo estacionário
em órbita direita
Voo estacionário
em órbita esquerda
MODOS DE PILOTAGEM
PARROT SKYCONTROLLER 2
Em qualquer momento durante a execução do
plano de voo no Pix4Dcapture pode recuperar o
controlo do drone premindo um dos comandos do
Parrot Skycontroller 2.

192
PLANO DE VOO
CRIAR UM PLANO DE VOO
EM PIX4DCAPTURE
No primeiro lançamento, selecione Parrot Disco-Pro
na lista de drones e avance para a edição do plano
de voo.
Grid: O drone faz uma grelha sobre a zona a
sobrevoar de modo a cobrir o máximo possível.
Durante a criação do plano de
voo, dena o ponto de partida
e o cone de aterragem. Reserve
um espaço com 200 m de
comprimento num cone de 30º
para a zona de aterragem.
Para mais informações sobre os planos de voo e a sua
criação, consulte a página de ajuda de Pix4Dcapture:
Android:
https://www.parrot.com/uk/pix4dcapture-android
iOS:
https://www.parrot.com/uk/pix4dcapture-ios

PORTUGUÊS
193
INICIAR O PLANO DE VOO
1. Ligue o Parrot Disco-Pro e conecte-o ao Parrot
Skycontroller 2. A conexão entre o drone
e o Parrot Skycontroller 2 é estabelecida
automaticamente.
2. Ligue o smartphone ou tablet à porta USB do
Parrot Skycontroller 2.
3. Inicie a aplicação Pix4Dcapture.
4. Selecione o tipo de missão na página principal.
5. Crie o plano de voo a realizar.
6. Indique o ponto de início «start waypoint» e o
cone de aterragem.
7. Prima em START.
>Inicia-se a contagem decrescente para lhe dar
tempo de se colocar em posição.
>O Parrot Disco-Pro está pronto para descolar
após a contagem decrescente e o motor arranca.
Consulte a secção Descolar.
>Uma vez terminado o plano de voo, o drone
dirige-se para o cone de aterragem denido no
plano de voo e aterra.

194
DESCOLAR
Deve descolar de feição ao vento.
1. Posicione-se de feição ao vento segurando o
corpo do Parrot Disco-Pro com uma mão.
2. Certique-se que o motor do Parrot Disco-Pro
está totalmente desengatado.
3. Na aplicação Pix4Dcapture, depois de ter criado
o plano de voo, prima em Start.
Em caso de pilotagem livre assistida com o Freeight
Pro, prima o botão do Parrot Skycontroller 2 para
iniciar a descolagem.
>O motor do Parrot Disco-Pro começa a virar e
atinge uma velocidade máxima em 1 segundo.
4. Lance o Parrot Disco-Pro ligeiramente para
cima.

PORTUGUÊS
195
>O Parrot Disco-Pro descolou. Eleva-se a uma
altitude de 50 metros e, em seguida, efetua
círculos com 60 metros de diâmetro.
Nota: Para parar o motor do Parrot
Disco-Pro na fase de descolagem,
prima novamente o botão do seu
Parrot Skycontroller 2.
Se não lançar o Parrot Disco-Pro
10segundos depois de ter premido ,
o motor desliga-se. Prima novamente
para iniciar um novo procedimento
de descolagem.

196
REGRESSO AO PONTO
DE PARTIDA
Para fazer com que o Parrot Disco-Pro regresse
ao ponto de partida ignorando um plano de voo
no Pix4Dcapture, prima o botão do Parrot
Skycontroller 2.
> O Parrot Disco-Pro regressa à posição de partida, coloca-se a
50 m de altitude e começa a fazer círculos com 60 metros de
diâmetro sobre essa posição.
Point de départ
Certique-se de que se encontra num ambiente
livre.
PARROT
SKYCONTROLLER 2 :
ATERRAR
Para não danicar o Parrot Disco-Pro, aterre sobre
uma superfície adaptada, como relvada, por
exemplo.

PORTUGUÊS
197
ATERRAGEM LINEAR
1. Posicione o Parrot Disco-Pro de feição para o
vento.
2. Diminua a altitude do Parrot Disco-Pro ao
máximo.
3. Prima o botão do Parrot Skycontroller 2.
> O Parrot Disco-Pro desce em linha reta e,
em seguida, reposiciona-se direito e aterra
suavemente.
Nota: Durante a descida do Parrot
Disco-Pro, pode pilotá-lo, se
necessário: subir, descer, virar à
esquerda e virar à direita.
80 m
50 m
10 m
Para cancelar a aterragem, prima o botão do
Parrot Skycontroller 2.
O Parrot Disco-Pro sobe a 50 metros e efetua círculos
com 60 metros de diâmetro.
A pista de aterragem deve medir pelo menos
50metros.

198
ATERRAGEM CIRCULAR
Durante a aterragem circular, o Parrot Disco-Pro
certica-se apenas de chegar ao solo de feição ao
vento para limitar a velocidade de aterragem.
1. Certique-se de que dispõe de uma zona de,
pelo menos, 80 metros de diâmetro para fazer o
Parrot Disco-Pro aterrar.
2. Em voo estacionário em órbita, com o Parrot
Skycontroller 2, prima em .
> O Parrot Disco-Pro aterra em espiral.
80 m
50 m
10 m
A aterragem circular requer muito espaço.
PERDA DE LIGAÇÃO
Durante o voo fora do plano de voo com a
Pix4Dcapture e em caso de perda de ligação, o
Parrot Disco-Pro faz círculos com 60 metros de
diâmetro durante um período predenido (10
segundos, por predenição).
Caso a ligação não seja restabelecida, o Parrot

PORTUGUÊS
199
Disco-Pro regressa à posição de partida, coloca-se
a 50 m de altitude e faz círculos com 60 metros de
diâmetro.
Caso a ligação não seja restabelecida ao m de
5 minutos, o Parrot Disco-Pro efetua uma aterragem
circular.
DESLIGAR
O PARROT DISCOPRO
Para desligar o Parrot Disco-Pro, prima o botão On/O.
>O indicador luminoso pisca a vermelho e, em
seguida, o Parrot Disco-Pro desliga-se.
RECUPERAR AS
FOTOGRAFIAS
Durante o voo, as fotograas são registadas na
memória interna do sensor multiespectral.
1. Ligue o sensor multiespectral ao computador.
2. Recupere as fotograas captadas durante a
sessão de voo.
Se as fotograas estiverem gravadas num cartão de
memória SD, pode utilizar o Sunshine Sensor como
leitor do cartão SD. Para isto, ligue a porta micro
USB do dispositivo do sensor ao computador.
Não retire o cartão SD enquanto o Sequoia estiver
iluminado.

200
PROCESSAMENTO
DOS DADOS COM
O AIRINOV FIRST+
Visite http://parrot.airinov.com e siga as instruções
no ecrã para processar os seus dados.
Para mais informações, visite
www.parrot.com/support
ATUALIZAR
PARROT DISCOPRO
1. Conecte o Parrot Skycontroller 2 ao Parrot
Disco-Pro.
2. Ligue o smartphone ou tablet ao Parrot
Skycontroller 2 por USB.
3. A aplicação FreeFlight Pro inicia-se
automaticamente.
4. Na aplicação FreeFlight Pro, prima Atualizar.
5. A aplicação procura as atualizações.
6. Se a aplicação encontrar um cheiro de
atualização, selecione-o e prima OK.
7. A aplicação descarrega o cheiro de atualização.
8. Uma janela pop-up é apresentada para o
informar sobre o reinício do drone.
9. Prima Sair.

PORTUGUÊS
201
O Parrot Disco-Pro reinicia-se automaticamente
durante a instalação da atualização. Esta operação
pode demorar alguns minutos. Uma vez terminada
a atualização, a aplicação FreeFlight Pro reinicia-se
automaticamente.

202
COMPORTAMENTO DO
INDICADOR LUMINOSO
Azul intermitente O Parrot Disco-Pro está reiniciar-se.
Verde intermitente O Parrot Disco-Pro detetou o sinal de GPS
e está pronto a descolar.
Intermitência
amarela
A atualização do Parrot Disco-Pro está em
curso.
Não desligue o Parrot Disco-Pro.
Vermelho e azul
intermitentes
O Parrot Disco-Pro detetou um problema ao
nível da bateria.
> Contacte o revendedor ou visite
a página de suporte do Parrot Disco-Pro
em www.parrot.com/support.
Vermelho
intermitente
O Parrot Disco-Pro detetou um erro no
motor.
> A aplicação FreeFlight Pro apresenta
uma mensagem de erro. Consulte
a tabela de códigos de erro disponível
em www.parrot.com/support.
PEÇAS SOBRESSALENTES
Pode comprar as peças sobressalentes do Parrot
Disco-Pro na nossa loja online: www.parrot.com.
Para mais informações sobre a montagem das peças
amovíveis, consulte os tutoriais em vídeo na nossa
página de apoio.

PORTUGUÊS
203
ESPECIFICAÇÕES
TÉCNICAS
SENSORES
• Ultrassom
• Altímetro
• Câmara vertical de alta velocidade
• Sonda Piloto: Sensor de velocidade
SISTEMA DE NAVEGAÇÃO INERCIAL
• Giroscópio de três eixos
• Acelerómetro de três eixos
• Magnetómetro de três eixos
MATERIAL
• CPU Dual core ARM® Cortex® -A9
• Memória ash interna: 32 Go
WIFI E TRANSMISSÕES
• Ponto de acesso de rede
• Tipo Wi-Fi ac, 2 antenas bi-banda (2,4 e 5GHz), múltiplas entradas
e saídas
• Até 2 km de alcance com o Parrot Skycontroller 2
BATERIA AMOVÍVEL
• Bateria Lipo 2700 mAh / 3 pilhas 25 A
• Autonomia da bateria: 45 minutos
• Tensão nominal: 11,1V
• 21,6A em descarga contínua
• Carga a 3,5A máx
• Faixa de funcionamento: -20°C-60°C

204
DIMENSÕES
• Peso: 940 g
• Tamanho: 1150 mm x 580 mm x 120 mm
• Envergadura: 1150 mm
GPS
• GPS incorporado
• GPS + GLONASS
DESEMPENHO
• Motor: 1280kv
• Servomotor: 5V
• Possibilidade de instalar um recetor RF SBUS, SUMD, CPPM
VÍDEO E FOTOGRAFIAS
• Câmara Full HD de 1080p
• Flux vídeo: 360p / 720p
SOFTWARE
• Linux® & Open source SDK para o desenvolvimento
CARREGADOR
• Entrada: 100-240V, 50h-60Hz, 1.2A
• Saída: Máx. 12,6Vdc, 3,5A
• Altitude máxima: 2000m acima do nível do mar
• Faixa de funcionamento: 0°C-40°C
PARROT DISCO
• Faixa de funcionamento: 0°C-40°C
• Corrente máx.: 15A
• Tensão nominal: 11,1V

PORTUGUÊS
205
INFORMAÇÕES GERAIS
O Parrot Disco deve ser utilizado em conformidade com as regras da aviação
civil do seu país e nos locais adaptados à sua evolução escolhidos para
garantir em permanência a segurança das pessoas, animais e bens.
Antes de colocar o seu Parrot Disco a voar, consulte as regras da aviação
civil locais.
ACESSÓRIOS E PEÇAS DE SUBSTITUIÇÃO
Os acessórios e peças de substituição encontram-se disponíveis no seu
revendedor Parrot ou a partir do site www.parrot.com.
PRECAUÇÕES DE UTILIZAÇÃO E MANUTENÇÃO
O piloto deve, em todos os momentos, manter contacto visual com o Parrot
Disco e controlar a sua trajetória.
A utilização do Parrot Disco em determinados locais de domínio público (por
ex., estações, aeroporto, etc.) ou na via pública pode ser proibida.
A partir do momento que a hélice do Parrot Disco entra em movimento, esta
pode causar danos a pessoas, animais ou objetos. Mantenha sempre uma
distância de segurança com o Parrot Disco. Preste sempre à hélice do Parrot
Disco durante a fase de descolagem. Utilize apenas acessórios especicados
por Parrot Drones SAS.
Caso areia ou pó penetre no Parrot Disco, este poderá não funcionar mais
corretamente, de forma irreversível.
Não utilizar o Parrot Disco em condições meteorológicas desfavoráveis
(chuva, vento forte, neve) nem em condições de visibilidade insucientes
(noite).
Mantenha o Parrot Disco afastado de linhas de alta tensão, edifícios ou
qualquer outra zona potencialmente perigosa.
Não utilize este aparelho perto de substâncias líquidas. Não coloque o Parrot
Disco sobre a água ou sobre uma superfície húmida, isso poderia causar
danos irreversíveis.
Evite submeter o Parrot Disco a mudanças muito grandes de altitude.
Não deixe o Parrot Disco ao sol.
Risco de ingestão de peças pequenas. As embalagens não fazem parte do
produto e devem ser eliminadas por motivos de segurança.
WIFI
Antes de pilotar o Parrot Disco, informe-se sobre restrições de utilização de
frequências Wi-Fi no seu local de voo. Determinadas frequências podem ser
restringidas ou proibidas. Em determinados países, por exemplo, o uso da
banda Wi-Fi 5 GHz poderá ser proibido ao ar livre.
ADVERTÊNCIA RELATIVA AO RESPEITO PELA PRIVACIDADE E
RESPEITO PELA IMAGEM DOS BENS
Gravar e transmitir a imagem de uma pessoa sem a sua autorização podem
constituir uma violação à sua privacidade e ser suscetível de implicar a sua
responsabilidade. Peça autorização antes de lmar as pessoas, especialmente,
caso deseje guardar as suas gravações e/ou divulgá-las. Não transmita imagens
degradantes ou que possam prejudicar a reputação ou a dignidade de uma
pessoa.
Gravar e difundir a imagem de um bem sem a permissão do seu proprietário

206
e/ou de quaisquer terceiros que possuam direitos de propriedade intelectual
sobre esse bem pode constituir uma violação do direito à imagem do bem
e ser suscetível de implicar a sua responsabilidade. Peça autorização ao seu
proprietário e/ou a quaisquer terceiros que possuam direitos de propriedade.
BATERIA PARROT DISCO E PARROT SKYCONTROLLER 2
ATENÇÃO: O desrespeito de todas as instruções pode resultar em ferimentos
graves, provocar danos irreversíveis na bateria e provocar um incêndio, emissão
de fumo ou uma explosão.
Verique sempre o estado da bateria antes de a carregar ou usar. Substitua
a bateria caso esta tenha sofrido um choque, ou em caso de cheiro, se
sobreaquecimento, descoloração, deformação ou fuga. Nunca utilize nada
para carregar a bateria que não seja um carregador aprovado LiPo. Use
sempre um carregador de equilíbrio de células LiPo ou um equilibrador
de células LiPo. Recomendamos que não utilize qualquer outro carregador
que não seja o fornecido com o produto. Nunca realize o carregamento em
regime lento, ou inferior a 2,5 V por célula. A temperatura da bateria nunca
deve ultrapassar os 60 °C (140 °F), caso contrário esta poderá car danicada
ou incendiar-se. Nunca realize o carregamento sobre um suporte inamável,
perto de produtos inamáveis ou dentro de um veículo (de preferência,
coloque a bateria num recipiente não inamável e não condutor). Nunca
abandone a bateria sem vigilância durante o processo de carregamento.
Nunca desmonte ou modique a cablagem da caixa nem perfure as células.
Verique sempre se a tensão de saída do carregador corresponde com a
tensão da bateria. Não coloque as pilhas em curto-circuito. Não exponha
a bateria LiPo à humidade ou diretamente ao sol, ou num local onde a
temperatura pode exceder os 60°C (veículo em plena exposição ao sol, por
exemplo). Manter fora do alcance das crianças.
ATENÇÃO
RISCO DE EXPLOSÃO CASO A BATERIA DO PARROT DISCO SEJA
SUBSTITUÍDA POR UMA BATERIA NÃO COMPATÍVEL.
ELIMINE AS BATERIAS USADAS DE ACORDO COM AS INSTRUÇÕES.
GARANTIA
Para conhecer as condições de garantia consulte as Condições gerais de
venda do revendedor onde comprou o Parrot Disco-Pro AG.
COMO RECICLAR ESTE PRODUTO
Este símbolo no produto ou respetiva documentação indica que este
não deve ser eliminado no m de vida juntamente com os resíduos
domésticos. A eliminação não controlada de resíduos podem implicar
danos para o ambiente ou a saúde humana, certique-se que o separa
de outros tipos de resíduos e o recicla de forma responsável. Deste modo
estará a promover a reutilização sustentável dos recursos materiais.
Convidamo-lo a entrar em contacto com o seu revendedor ou a informar-se
junto da sua junta de freguesia para saber onde e como o Parrot Disco, o Parrot
Skycontroller 2 e o Sequoia podem ser reciclados.
DECLARAÇÃO UE DE CONFORMIDADE PARROT DISCOPRO
Este aparelho pode ser utilizado em: DE, AT, BE, BG, CY, HR, DK, ES, EE,
FI, FR, GR, HU, IE, IT, LV, LT, LU, MT, NL, PL, PT, CZ, RO, GB, SK, SI, SE.
A restrição de utilização em espaços ao ar livre nos países membros da
União Europeia refere-se apenas à primeira sub-banda da banda de 5 GHz
(5150-5250 MHz).

PORTUGUÊS
207
PARROT DRONES, 174 quai de Jemmapes, 75010 Paris, France, declara por
sua exclusiva responsabilidade que o produto descrito no presente guia
do utilizador está em conformidade com as normas técnicas, EN301489-1,
EN301489-17, EN300440-1, EN300328, EN300893, EN300440-2, EN60950-1,
EN62321 de acordo com o disposto na diretiva R&TTE 1999/5/CE e na
diretiva relativa à Tensão baixa 2014/35/CE, bem como com a diretiva RoHS
2011/65/UE.
http://www.parrot.com/ce/?parrot-disco
DECLARAÇÃO DE CONFORMIDADE PARROT
SKYCONTROLLER 2
Este aparelho pode ser utilizado em: DE, AT, BE, BG, CY, HR, DK, ES, EE, FI,
FR, GR, HU, IR, IT, LV, LT, LU, MT, NL, PL, PT, CZ, RO, GB, SK, SI, SE.
Parrot DRONES, 174 quai de Jemmapes, 75010 Paris, França, declara sob
sua exclusiva responsabilidade que o produto descrito no presente guia
do utilizador está em conformidade com as normas técnicas EN 301489-
17, EN300328, EN71-1, EN71-2, EN71-3, EN62115, EN 50566: 2013 (SAR)
de acordo com as disposições da diretiva RED 2014/53/EU e a diretiva
de segurança geral de produtos 2014/35/EU. http://www.parrot.com/
ce/?skycontroller-2
FCC/IC
Para responder aos requisitos relativos à exposição RF da FCC/IC para os
aparelhos de transmissão, deve-se manter uma distância de pelo menos
20cm entre a antena do produto e as pessoas. Para garantir a conformidade,
a utilização a uma distância inferior não é recomendada.
MARCAS
Parrot e os logótipos Parrot são marcas registadas de Parrot S.A.
Parrot Disco-Pro AG, Parrot Disco, Parrot Skycontroller, Sequoia, Parrot
C.H.U.C.K bem como os respetivos logotipos são marcas registadas de Parrot
Drones SAS.
A App Store é uma marca de serviço de Apple Inc.
Google Play e Google Maps são marcas de Google Inc.
Wi-Fi® é uma marca registada por Wi-Fi Alliance®
Linux é uma marca de Linus Torvalds registada nos EUA e noutros países.
Pix4D e Pix4Dcapture são marcas registadas da Pix4D SA.
Airinov e Airinov First+ são marcas comerciais ou marcas registadas da
Airinov SAS.
Todas as outras marcas mencionadas neste guia são propriedade dos seus
respetivos titulares.
INFORMAÇÕES DO FABRICANTE
O Parrot Disco, Parrot Skycontroller 2 e Sequoia são fabricados por: Parrot
Drones SAS - 174 Quai de Jemmapes - 75010 Paris (França) - RCS Paris 808
408 074 - www.parrot.com

208
Uw Parrot Disco-Pro AG™ bestaat uit de volgende onderdelen:
1. Een drone “Parrot Disco”™ ;
2. Een zelfbesturingssysteem “Parrot C.H.U.C.K “™ ;
3. Een “Parrot Skycontroller 2 “™ joystick. U kunt de Parrot
Disco besturen met de Parrot Skycontroller 2 door
de applicatie FreeFlight Pro™ te downloaden op uw
smartphone of tablet. Deze applicatie is gratis maar kan
In-App Purchases bevatten. Met de applicatie kunt u ook
uw Parrot Disco kalibreren;
4. Een “Sequoia”™ sensor met:
(a) Een multispectrale sensor die licht dat planten
weerspiegelen opvangt; en
(b) Een sunshine sensor die de lichtintensiteit van de zon
registreert; en
5. Toegang tot de diensten van Airinov First+™ waarmee
u uw NDVI- en zonekaarten mee kunt verkrijgen op
basis van de beeldopnames gemaakt door de gratis
applicatie Pix4Dcapture™ dat u kunt downloaden op uw
smartphone of tablet.

NEDERLANDS
209
WAARSCHUWING
1. Parrot Disco IS GEEN SPEELGOED. Dit apparaat dient dus
niet gebruikt of gemanipuleerd te worden door kinderen
onder de 14 jaar.
2. VOOR GEBRUIK VAN de Parrot Disco:
(a) LEES deze handleiding AANDACHTIG door evenals alle
informatie en documentatie beschikbaar op www.parrot.com,
die op elk moment geüpdatet kunnen worden zonder
voorafgaande kennisgeving (hierna “Parrot-documentatie”).
BIJZONDERE AANDACHT dient geschonken te worden aan
de paragrafen met het symbool ;
(b) GA ALTIJD NA WELKE VOORSCHRIFTEN GELDEN
MET BETREKKING TOT GEBRUIK VAN DRONES EN DE
ACCESSOIRES (hierna “Geldende voorschriften”); en
(c) REALISEER dat de Parrot Disco MATERIELE SCHADE
EN/OF LICHAMELIJK LETSEL kan veroorzaken voor uzelf of
anderen. Dit letsel kan zeer ernstig en zelfs dodelijk zijn.
3. Houd er rekening mee dat de video’s en foto's die in
de aanbiedingen en reclame van Parrot Drones SAS en
haar dochterondernemingen gebruikt worden, door
professionelen en ervaren dronebestuurders zijn opgenomen.
HOUD U ALTIJD AAN DE MEEST RECENTE VERSIE VAN DE
PARROT-DOCUMENTATIE IN GEVAL VAN TWIJFEL MET
BETREKKING TOT HET GEBRUIK VAN UW PARROT DISCO
EN ACCESSOIRES.
4. BINNEN DE GRENZEN VAN DE VAN TOEPASSING
ZIJNDE WETTEN, PARROT DRONES SAS, DE
DOCHTERONDERNEMINGEN EN HUN RESPECTIEVELIJKE
DISTRIBUTEURS EN VERKOPERS ZULLEN NIET
AANSPRAKELIJK WORDEN GESTELD VOOR WELKE
SCHADE DAN OOK DIE VOORTVLOEIT UIT OF VERBAND
HOUDT MET HET NIET-NALEVEN VAN DE PARROT-
DOCUMENTATIE OF DE GELDENDE REGELGEVING DOOR
UZELF OF DE PERSOON DIE UW PARROT DISCO GEBRUIKT.

210
PRESENTATIE VAN DE
PARROT DISCOPRO AG
PARROT DISCOPRO
Vleugelspits
Servomotor
Propeller Vleugel
Servomotor
Behuizing
Fisheye
camera
On/o-knop en lampje

NEDERLANDS
211
C.H.U.C.K STUURAUTOMAAT
MODULE
Micro-USB poort
Poort voor
afstandsbediening
Aansluiting batterij
Servo-aansluiting
Aansluiting voor
de centrale motor
Micro-USB-poort
van de Sequoia

212
PRESENTATIE VAN DE
PARROT SKYCONTROLLER 2
Antenne
Positie van de mobiele apparatuur houder
On/O
-knop
Terug naar het beginpunt
Opstijgen/
Landen
Tijdens de vlucht: video-opname starten/stoppen
Menu Instellingen: terug
Tijdens de vlucht:
een foto nemen
Menu Instellingen:
Valideren
Instellingen
USB-poort

NEDERLANDS
213
Positionering
van de camera
Weergavemodus
Directe weergave/weergave
van omgeving met FreeFlight Pro
Verticale oriëntatie van de camera
USB-poort

214
PRESENTATIE
VAN DE SEQUOIA
Sequoia bestaat uit een multispectrale sensor en een
stralingssensor Sunshine Sensor.
MULTISPECTRALE SENSOR
SUNSHINE SENSOR
Ontspanner
en lampje
Micro-USB
poort host
Micro-USB poort
device
Infrarode sensor
dichtbij
Rode
sensor
Rode sensor
Edge
Groene
sensor
RGB sensor
Sleuf voor
de SD-kaart
Sensors voor
omgevingslicht
Micro-USB poort
device
De micro-USB poort host van de multispectrale
sensor dient verbonden te zijn met de micro-USB
poort device van de Sunshine Sensor.

NEDERLANDS
215
INLEIDING
DOWNLOAD FREEFLIGHT PRO
EN PIX4DCAPTURE
Ga naar de App Store® of naar Google Play en
download de gratis applicaties FreeFlight Pro en
Pix4Dcapture op uw smartphone of tablet.
FreeFlight Pro is de ociële applicatie van Parrot
waarmee de drone vrij bestuurd kan worden.
Pix4Dcapture is de gratis applicatie waarmee u een
vliegplan kunt aanmaken om foto’s te nemen boven
een bepaald gebied.
LAAD DE BATTERIJ OP VAN
DE PARROT DISCOPRO
De batterij moet niet aangesloten zijn op de Parrot
Disco-Pro.
1. Kies de stekker geschikt voor uw land en doe deze
in de oplader.
2. Sluit de meegeleverde kabel aan de oplader.
3. Sluit de batterij aan op de kabel van de oplader en
steek de oplader in het stopcontact.
Het lampje is rood tijdens het opladen maar wordt
groen als de batterij opgeladen is.
Opladen duurt ongeveer 55 minuten voor een vliegtijd
van ongeveer 30 minuten.

216
DE BATTERIJ OPLADEN VAN
DE PARROT SKYCONTROLLER 2
1. Selecteer de adapter geschikt voor uw land en sluit
deze aan op de oplader.
2. Sluit de kabel van de oplader aan op de Parrot
Skycontroller 2 en doe de oplader in het stopcontact.
Het opladen duurt ongeveer 1u40, daarna kan het
apparaat 4 uur gebruikt worden.
DE PARROT DISCOPRO
GEREEDMAKEN
1. Haal de behuizing van de Parrot Disco-Pro.
2. Verwijder de Sequoia, haal de bescherming van
de lenzen en installeer de batterij in het daarvoor
bestemde compartiment.

NEDERLANDS
217
4. Doe de behuizing weer op de Parrot Disco-Pro.
3. De sequoia terugdoen en de batterij aansluiten op
de Parrot Disco-Pro. Sluit daarna de micro-USB kabel
van de multispectrale sensor aan op de micro-USB
stopcontact op Parrot C.H.U.C.K.

218
Bevestig de vleugels op de Parrot
Disco-Pro.
Zorg ervoor dat de vleugelspits compleet
in de arm van de servomotor zit.
DE VLEUGELS BEVESTIGEN
Trek aan de vleugels om ze te verwijderen.
Beweeg de servomotoren niet handmatig.

NEDERLANDS
219
CONTROLES
VOOR DE VLUCHT
Voor elke vlucht met de Parrot Disco-Pro dient u de
volgende controles uit te voeren:
REGELGEVING
Ga na of het gebruik van de Parrot Disco-Pro
toegestaan is op de uitgekozen vluchtlocatie.
Check de beperkingen op het gebruik van de
Wi-Fi
®
frequenties voor de uitgekozen vluchtlocatie.
VLUCHTVOORWAARDEN
5 voorwaarden die absoluut nageleefd dienen te
worden
1. Zorg ervoor dat u een open plek van ten minste
80 meter doorsnede kunt gebruiken voor het
opstijgen en landen van de Parrot Disco-Pro.
Ga na of het terrein geen obstakels bevat
die het besturen van of het zicht op de drone
zouden kunnen belemmeren.
2. Gebruik de Parrot Disco-Pro niet ‘s nachts.
3. Gebruik de Parrot Disco-Pro niet boven een
bebouwde zone of op bepaalde openbare
locaties (bijv: station, vliegveld ...).
4. Raadpleeg het weerbericht om goede
vluchtcondities en beeldopnames te
garanderen. Gebruik de Parrot Disco-Pro niet
als het regent, mistig is, als het sneeuwt of hard
waait (meer dan 12 m/sec of 43 km/u).

220
5. Zorg ervoor dat de vluchthoogte op
Pix4Dcapture correct geprogrammeerd is
om obstakels in de omgeving te vermijden
(opname in relatie tot opstijgpunt).
PARROT DISCOPRO
Zorg ervoor dat de vleugels van de Parrot Disco-
Pro goed bevestigd zijn (zie de rubriek De
vleugels bevestigen).
Zorg ervoor dat de batterij van de Parrot Disco-
Pro en de batterij van uw afstandsbediening
opgeladen zijn (zie de rubriek Installeren van de
batterij).
Zorg ervoor dat de behuizing van de Parrot Disco-
Pro goed gesloten is.
Zorg ervoor dat het lampje van de Parrot Disco-
Pro groen knippert. Dit betekent dat de Parrot
Disco het GPS-signaal opgevangen heeft.
Zorg ervoor dat de Sunshine Sensor goed belicht
wordt.
Controleer de conditie van het landingsterrein
voor de Parrot Disco.
SEQUOIA
Zorg ervoor dat de beschermende behuizing
voor gebruik wordt verwijderd.
Zorg ervoor dat de Sequoia aangesloten is op de
rechter micro-usb-poort van de Parrot C.H.U.C.K.
Zorg ervoor dat de lenzen schoon zijn. Gebruik
het (meegeleverde) microvezeldoekje om de lenzen

NEDERLANDS
221
te reinigen.
Maak voldoende geheugen vrij (in het interne
geheugen van de multispectrale sensor) om alle
tijdens de vlucht genomen foto’s op te slaan.
Zorg ervoor dat de twee modules goed op de
drone bevestigd zijn en dat ze niet kunnen losraken
tijdens de vlucht.
Zorg ervoor dat de kabel van het micro-
USB-apparaat, die de drone verbindt met de
multispectrale sensor, aangesloten is. Controleer
ook de micro-USB-verbinding tussen de Sunshine
Sensor en de multispectrale sensor.
Zorg ervoor dat de twee sensors gekalibreerd
zijn. Voor meer informatie, ga naar de rubriek
Sequoia kalibreren.
Wacht tot het lampje van de Sunshine Sensor
groen is. Een groen lampje betekent dat de GPS/
GNSS geactiveerd is.
AANSLUITING OP
PARROT DISCOPRO
DE PARROT SKYCONTROLLER 2
AANSLUITEN OP DE PARROT
DISCO MET FREEFLIGHT PRO
Plaats de Parrot Disco-Pro op eenplat oppervlak.
1. Druk op de On/O-knop van de Parrot Disco-
Pro.

222
>Het lampje knippert eerst rood en daarna
groen als het GPS-signaal ontvangen is.
2. Druk op de On/O-knop van de Parrot
Skycontroller 2.
3. Wacht totdat het lampje groen blijft.
U bent nu aangesloten op de Parrot Disco-
Pro.
Als het lampje rood blijft knipperen, dient u de Parrot
Disco-Pro te kalibreren.
Hiervoor:
4. In de FreeFlight Pro-
applicatie, ga naar Fly
& Film > > Positie,
afstanden en grenzen
en druk op Kalibreren.
5. Kalibreer de pitotsensor.
Hiervoor gaat u met uw
rug in de wind staan en
houd u de camera van
de Parrot Disco-Pro naar
de grond gericht.
6. Zet de Parrot Disco-Pro
op de Z-as (yaw).
7. Zet de Parrot Disco-Pro
op de Y-as (pitch).
8. Zet de Parrot Disco-Pro
op de X-as (roll).
>Het lampje knippert
groen. De Parrot Disco-Pro is gekalibreerd.
Z
Y
X

NEDERLANDS
223
UW SMARTPHONE AANSLUI
TEN OP DE
PARROT SKYCONTROLLER 2
1. Schroef de houder voor smartphone op de Parrot
Skycontroller 2.
B
A
B
A
U kunt de houder draaien om deze aan
te passen aan de afmetingen van uw
smartphone. Op de houder drukken en
deze naar rechts draaien.
B
A
B
A

224
2. Druk op de knop rechts van de houder om deze
compleet te openen.
3. Plaats uw smartphone op de houder.
B
A
BA
4. Schroef de houder vast om uw smartphone.
5. Met behulp van de USB-kabel van uw smartphone
sluit uw uw smartphone aan op het USB-portaal
van de Parrot Skycontroller 2.
B
A

NEDERLANDS
225
LINKERKNOP
B
A
B
A
B
A
B
A
B
A
B
A
B
A
B
A
Versnellen
Afremmen
RECHTERKNOP
Dalen
Stijgen
Naar rechts
Naar links
Stationaire vlucht
rechtsom
Stationaire vlucht
linksom
BESTURINGSMODI
PARROT SKYCONTROLLER 2
Op elk moment tijdens het uitvoeren van het
vliegplan op Pix4Dcapture, kunt u de controle over
de drone terugnemen door op een van de knoppen
van de Parrot Skycontroller 2 te drukken.

226
VLIEGPLAN
EEN VLIEGPLAN AANMAKEN
MET PIX4DCAPTURE
Bij een eerste gebruik de Parrot Disco-Pro selecteren
in de lijst met drones en daarna naar de bewerking
van een vliegplan gaan.
Grid: de drone zet de zone af waar het over moet
vliegen om het grootste gedeelte te dekken.
Tijdens het aanmaken van het
vliegplan dient u het vertrekpunt
en landingshoek aan te geven.
Reken een ruimte van 200 meter
lang en een hoek van 30° voor de
landingszone.
Voor meer informatie over vliegplannen en
het aanmaken van vliegplannen, raadpleeg de
supportpagina van Pix4Dcapture:
Android:
https://www.parrot.com/uk/pix4dcapture-android
iOS:
https://www.parrot.com/uk/pix4dcapture-ios

NEDERLANDS
227
HET VLIEGPLAN STARTEN
1. Zet de Parrot Disco-Pro aan en sluit deze aan op
de Parrot Skycontroller 2. De verbinding tussen
de drone en de Parrot Skycontroller 2 komt
automatisch tot stand.
2. Sluit uw smartphone of tablet aan op de USB-
poort van de Parrot Skycontroller 2.
3. Start de Pix4Dcapture-applicatie.
4. Selecteer het opdrachttype op de hoofdpagina.
5. Maak het uit te voeren vliegplan aan.
6. Geef het startpunt aan “start waypoint” en de
landingshoek.
7. Druk op START.
>De applicatie begint nu met aftellen zodat u tijd
hebt zich te installeren.
>De Parrot Disco-Pro is na het aftellen klaar om
op te stijgen, de motor start. Zie de rubriek
Opstijgen.
>Als het vliegplan eenmaal voltooid is, gaat de
drone naar de landingshoek die op het vliegplan
bepaald is en landt.

228
OPSTIJGEN
Stijg tegen de wind op.
1. Ga tegen de wind in staan en houd de romp van
de Parrot Disco in één hand.
2. Zorg ervoor dat de motor van de Parrot Disco-
Pro compleet vrij is.
3. Druk in de Pix4Dcapture-applicatie, na het
aanmaken van het vliegplan, op Start.
Indien u Freeight Pro gebruikt voor de vrije
besturing van de drone, druk dan op de knop
van uw Parrot Skycontroller 2 om het opstijgen te
starten.
>De motor van de Parrot Disco-Pro begint te
draaien en bereikt zijn maximale snelheid binnen
1 seconde.
4. Richt de Parrot Disco-Pro licht naar boven.

NEDERLANDS
229
>De Parrot Disco-Pro stijgt nu op. Het apparaat
gaat op een hoogte van 50 meter vliegen en
maakt rondjes van 60 meter doorsnede.
Opmerking: Om de motor van de
Parrot Disco-Pro te stoppen in de
opstijgfase drukt u opnieuw op de
knop van uw Parrot Skycontroller 2.
Als u de Parrot Disco-Pro niet binnen
10seconden lanceert nadat u op
hebt gedrukt, dan slaat de motor af.
Druk weer op om het opstijgen
opnieuw te starten.

230
TERUG NAAR
HET BEGINPUNT
Om de Parrot Disco-Pro terug te laten komen naar het
vertrekpunt buiten het vliegplan op Pix4Dcapture om,
drukt u op de knop van de Parrot Skycontroller 2.
> De Parrot Disco-Pro gaat dan terug naar het startpunt, blijft
op 50 meter hoogte hangen en maakt rondjes van 60 meter
doorsnede boven dit punt.
Point de départ
Zorg ervoor dat u zich in een open omgeving
bevindt.
PARROT
SKYCONTROLLER 2 :
LANDEN
Land op een geschikt oppervlak, bijvoorbeeld op
het gras, zodat de Parrot Disco-Pro niet
beschadigd wordt.

NEDERLANDS
231
LINEAIRE LANDING
1. Plaats de Parrot Disco-Pro tegen de wind in.
2. Breng de hoogte van de Parrot Disco-Pro zoveel
mogelijk terug.
3. Druk op de knop van de Parrot Skycontroller 2.
> De Parrot Disco-Pro daalt in een rechte lijn en
positioneert zich weer horizontaal voor een
zachte landing.
Opmerking: Tijdens het dalen van de
Parrot Disco-Pro kunt u de drone
bijsturen: stijgen, dalen, naar links en
naar rechts draaien.
80 m
50 m
10 m
Voor het annuleren van de landing drukt u op de
knop van uw Parrot Skycontroller 2.
De Parrot Disco-Pro gaat op een hoogte van
50 meter vliegen en maakt rondjes van 60 meter
doorsnede.
Uw landingsbaan moet tenminste 50 meter lang
zijn.

232
CIRCULAIRE LANDING
Tijdens de circulaire landing zorgt de Parrot Disco-
Pro er zelf voor tegen de wind in te landen zodat de
landingssnelheid beperkt wordt.
1. Zorg ervoor dat u zich op een locatie van ten
minste 80 meter doorsnede bevindt om de
Parrot Disco-Pro te laten landen.
2. In geval van een stationaire vlucht in de
bepaalde baan, met de Parrot Skycontroller 2,
druk op .
> De Parrot Disco-Pro landt in een spiraalbeweging.
80 m
50 m
10 m
De circulaire landing vergt veel meer plaats.
VERLIES VAN
DE VERBINDING
Tijdens de vlucht buiten het vliegplan met
Pix4Dcapture en indien de verbinding wordt
verbroken, gaat de Parrot Disco-Pro een bepaalde
tijd (standaard 10 seconden) rondjes van 60 meter

NEDERLANDS
233
doorsnede vliegen.
Als de verbinding niet hersteld wordt, gaat de Parrot
Disco-Pro terug naar het beginpunt, blijft op 50
meter hoogte hangen en zal rondjes gaan vliegen
van 60meter doorsnede.
Als de verbinding na 5 minuten nog steeds niet
hersteld is, maakt de Parrot Disco-Pro een circulaire
landing.
DE PARROT DISCO
UITZETTEN
Druk op de On/O knop om de Parrot Disco-Pro uit
te zetten.
>Het lampje knippert rood en daarna gaat de
Parrot Disco-Pro uit.
UW FOTO’S OPHALEN
Tijdens de vlucht worden de foto’s op het interne
geheugen van de multispectrale sensor opgeslagen.
1. Sluit de multispectrale sensor aan op uw
computer.
2. Haal de foto’s op die tijdens de vlucht genomen
zijn.
Als de opnames op een SD-geheugenkaart zijn
opgeslagen kunt u ook Sunshine Sensor gebruiken
als SD-kaartlezer. Hiervoor sluit u de micro-USB
poort device van de sensor aan op uw computer.
Verwijder de SD-kaart niet als Sequoia aan staat.

234
VERWERKING VAN
DE GEGEVENS
MET AIRINOV FIRST+
Ga naar http://parrot.airinov.com en volg de
instructies op het scherm voor de verwerking van uw
gegevens.
Voor verdere informatie, raadpleeg
www.parrot.com/support
DE PARROT DISCOPRO
UPDATEN
1. Sluit uw Parrot Skycontroller 2 aan op uw Parrot
Disco-Pro.
2. Sluit uw smartphone of tablet aan op uw Parrot
Skycontroller 2 via USB.
3. De FreeFlight Pro-applicatie start automatisch.
4. Druk in de FreeFlight Pro-applicatie op Update.
5. De applicatie zoekt naar updates.
6. Indien de applicatie een update-bestand vindt,
selecteer deze dan en druk op OK.
7. De applicatie downloadt het update-bestand.
8. Een pop-upvenster wordt weergegeven en
informeert u over het herstarten van de drone.

NEDERLANDS
235
9. Druk op Verlaten.
De Parrot Disco-Pro herstart automatisch tijdens de
installatie van de update. Dit kan enkele minuten
duren. Als de update voltooid is, start de FreeFlight
Pro-applicatie automatisch opnieuw.

236
WERKING VAN HET
CONTROLELAMPJE
Knippert blauw De Parrot Disco-Pro is bezig met opstarten.
Knippert groen De Parrot Disco-Pro heeft het GPS-signaal
gevonden en is klaar om op te stijgen.
Knippert geel
Parrot Disco-Pro wordt momenteel
geüpdatet.
De Parrot Disco-pro niet uitzetten.
Knippert rood
en blauw
De Parrot Disco-Pro heeft een probleem met
de batterij opgemerkt.
> Neem contact op met uw verkoper of
raadpleeg de helppagina voor de Parrot
Disco-Pro op www.parrot.com/support.
Knippert rood
De Parrot Disco-Pro heeft een fout met de
motor opgemerkt.
> Er wordt een foutbericht weergegeven
op de FreeFlight Pro-applicatie. De tabel
met foutcodes kan geraadpleegd worden
op www.parrot.com/support.
RESERVEONDERDELEN
U kunt de reserveonderdelen voor de Parrot Disco-
Pro via onze online winkel kopen: www.parrot.com.
Voor meer informatie over het monteren van de
reserveonderdelen, raadpleeg de instructievideo’s
op onze helppagina.

NEDERLANDS
237
TECHNISCHE
SPECIFICATIES
SENSORS
• Ultrasoon
• Hoogtemeter
• Verticale hi-speed camera
• Pitot sonde: snelheidssensor
TRAAGHEIDSNAVIGATIESYSTEEM
• Gyroscoop met drie assen
• Versnellingsmeter met drie assen.
• Magnetometer met drie assen
MATERIAAL
• CPU Dual core ARM® Cortex® -A9
• Intern ash-geheugen: 32 GB
WIFI EN TRANSMISSIE
• Netwerk toegangspunt
• Type Wi-Fi ac, 2 dualband antennes (2,4 en 5GHz), meerdere in-
en uitgangen
• Tot 2 km bereik met de Parrot Skycontroller 2.
UITNEEMBARE BATTERIJ
• 2700mAh / 25A 3-cel Lipo batterij
• Autonomie van de batterij: 45 minuten
• Nominale spanning: 11,1V
• 21,6A bij constante ontlading
• Opladen 3,5A max.
• Werkbereik: -20°C-60°C

238
AFMETINGEN
• Gewicht: 940 g
• Grootte: 1150 mm x 580 mm x 120 mm
• Reikwijdte: 1150 mm
GPS
• Geïntegreerde GPS
• GPS + GLONASS
PRESTATIES
• Motor: 1280kv
• Servomotor: 5V
• Mogelijkheid een RF SBUS, SUMD, CPPM-ontvanger te installeren
VIDEO & FOTO’S
• Full HD camera met 1080p
• Videostream: 360p / 720p
SOFTWARE
• Linux® & Open source SDK voor de ontwikkeling
OPLADER
• Input: 100-240V, 50h-60Hz, 1.2A
• Output: Max 12,6Vdc, 3.5A
• Maximale hoogte: 2000 m boven de zeespiegel
• Werkbereik: 0°C-40°C
PARROT DISCO
• Werkbereik: 0°C-40°C
• Max. spanning: 15A
• Nominale spanning: 11,1V

NEDERLANDS
239
ALGEMENE INFORMATIE
De Parrot Disco moet gebruikt worden in overeenstemming met de regels
voor de burgerluchtvaart van toepassing in elk land en op plaatsen die
geschikt zijn voor deze activiteit zodat de veiligheid van personen, dieren en
goederen gewaarborgd kan worden.
Voordat u uw Parrot Disco laat vliegen, raadpleeg de lokale regels voor de
burgerluchtvaart.
ACCESSOIRES EN RESERVEONDERDELEN
Accessoires en reserveonderdelen zijn verkrijgbaar via uw Parrot-dealer of via
de website www.parrot.com.
VOORZORGSMAATREGELEN VOOR GEBRUIK EN ONDERHOUD
De bestuurder moet altijd visueel contact houden met de Parrot Disco en het
traject beheersen.
Het gebruik van de Parrot Disco kan verboden zijn op bepaalde openbare
locaties (bijvoorbeeld: station, vliegveld...) of op de openbare weg.
Zodra de propeller van de Parrot Disco beweegt, kan deze personen of dieren
verwonden en goederen beschadigen. Behoud altijd een veiligheidsafstand
met de Parrot Disco. Pas altijd op de propeller van de Parrot Disco tijdens het
opstijgen. Gebruik alleen accessoires die door Parrot Drones SAS aanbevolen
worden.
Als zand of stof in de Parrot Disco komt, kan het zijn dat het apparaat
permanent beschadigd is en dus niet meer goed functioneert.
Gebruik de Parrot Disco niet bij slecht weer (regen, harde wind, sneeuw, mist)
of als de zichtbaarheid slecht is (‘s nachts).
Bewaar een veilige afstand tussen de Parrot Disco en hoogspanningslijnen,
gebouwen of een andere potentieel gevaarlijke zone.
Gebruik dit apparaat niet in de buurt van vloeistoen. Plaats de Parrot Disco
niet op het water of op een vochtig oppervlak, dit kan permanente schade
veroorzaken.
Vermijd te grote hoogteverschillen tijdens het vliegen met de Parrot Disco.
Laat de Parrot Disco niet in de zon staan.
Inslikkingsgevaar van kleine onderdelen. De verpakkingen maken geen deel
uit van het product en dienen te worden weggegooid.
WIFI
Check de beperkingen op het gebruik van de Wi-Fi frequenties voor de
uitgekozen vluchtlocatie voordat u met uw Parrot Disco begint te vliegen.
Sommige frequenties kunnen beperkt of verboden zijn. Bijvoorbeeld, in
bepaalde landen is het gebruik van de Wi-Fi 5 GHz-band buiten verboden.
WAARSCHUWING MET BETREKKING TOT PRIVACY EN RECHT
OP EEN AFBEELDING
Het opnemen en publiceren van een portret van een persoon zonder zijn/haar
toestemming kan gezien worden als een inbreuk op de privacy van die persoon
waarvoor u verantwoordelijk kan worden gesteld. Vraag om toestemming
voordat u mensen lmt, met name als u de opnames wilt bewaren en/of wilt
publiceren. Publiceer geen vernederende beelden of beelden die de reputatie
of de waardigheid van een persoon kunnen schaden.
Het opnemen en publiceren van een afbeelding van een goed zonder
toestemming van de eigenaar en/of een derde partij die het intellectuele
eigendom over het goed bezit, kan gezien worden als inbreuk op het recht

240
op een afbeelding waarvoor u verantwoordelijk kan worden gesteld. Vraag
toestemming aan de eigenaar en/of aan de derde die de eigendomsrechten
bezit.
BATTERIJ PARROT DISCO EN PARROT SKYCONTROLLER 2
PAS OP: Het niet naleven van al deze instructies kan ernstig letsel veroorzaken, de
batterij permanent beschadigen en brand, rook of een ontplong veroorzaken.
Controleer altijd de conditie van de batterij voordat u deze oplaadt of
gebruikt. Vervang de batterij als deze gevallen is, indien de batterij vreemd
ruikt, oververhit, verkleurt, vervormt of lekt. Gebruik altijd een goedgekeurde
LiPo-oplader voor het opladen van de batterij. Gebruik altijd een LiPo oplader
met gekalibreerde cellen of een LiPo celkalibrator. Wij raden u aan geen
andere lader te gebruiken dan het exemplaar dat bij het product geleverd is.
Nooit onder laagspanning opladen of onder 2.5V per cel. De temperatuur van
de batterij mag nooit de 60 °C (140 °F) overschrijden. Een hogere temperatuur
kan de batterij beschadigen of verbranden. Laad de batterij nooit op, op
een ontvlambare ondergrond, dicht bij ontvlambare producten of in een
voertuig (plaats de batterij bij voorkeur in een onbrandbaar en niet geleidend
recipiënt). Laat de batterij nooit opladen zonder toezicht. Nooit de kabel of
de behuizing demonteren of wijzigen, of de cellen doorboren. Zorg ervoor
dat de uitgangsstroom van de oplader overeenkomt met de spanning van de
batterij. De batterij nooit kortsluiten. De LiPo batterij nooit blootstellen aan
vocht of direct zonlicht of in een omgeving plaatsen waar de temperatuur de
60°C kan overschrijden (een auto in de volle zon bijvoorbeeld). Altijd buiten
bereik van kinderen houden.
PAS OP
RISICO OP ONTPLOFFING ALS DE BATTERIJ VAN DE PARROT DISCO
VERVANGEN WORDT DOOR EEN NIETCOMPATIBELE BATTERIJ.
GOOI GEBRUIKTE BATTERIJEN WEG VOLGENS DE INSTRUCTIES.
GARANTIE
Voor de garantievoorwaarden raadpleegt u de Algemene Verkoopvoorwaarden
van de verkoper bij wie u de Parrot Disco-Pro AG hebt gekocht.
RECYCLEN VAN HET PRODUCT
Het symbool op het product of de documentatie geeft aan dat dit
apparaat niet weggegooid mag worden met het gewone huisvuil. Het
ongecontroleerd lozen van afval kan het milieu of de gezondheid
schaden. Gelieve het afval te scheiden en op verantwoordelijke wijze
te recycleren. Dit bevordert het duurzaam hergebruik van het materiaal. We
nodigen u uit contact op te nemen met uw dealer of bij uw gemeentehuis na
te vragen hoe de Parrot Disco, de Parrot Skycontroller 2 en de Sequoia gerecycled
kunnen worden.
VERKLARING VAN OVEREENSTEMMING EU PARROT DISCO
PRO
Dit apparaat kan gebruikt worden in: DE, AT, BE, BG, CY, HR, DK, ES, EE,
FI, FR, GR, HU, IE, IT, LV, LT, LU, MT, NL, PL, PT, CZ, RO, GB, SK, SI, SE.
De gebruiksbeperkingen buiten in de lidstaten van de Europese Unie
betreen enkel de eerste subband van de band 5Ghz (5150-5250MHz).
Parrot DRONES, 174 quai de Jemmapes, 75010 Paris, Frankrijk verklaart onder
zijn verantwoordelijkheid dat het product, beschreven in deze handleiding,
overeenstemt met de technische normen, EN301489-1, EN301489-17,
EN300440-1, EN300328, EN300893, EN300440-2, EN60950-1, EN62321

NEDERLANDS
241
volgens de bepalingen van de richtlijn R&TTE 1999/5/EG , de richtlijn voor
laagspanning 2014/35/EG en de RoHS-richtlijn 2011/65/EG.
http://www.parrot.com/ce/?parrot-disco
VERKLARING CONFORMITEIT PARROT SKYCONTROLLER 2
Dit apparaat kan gebruikt worden in: DE, AT, BE, BG, CY, HR, DK, ES, EE, FI,
FR, GR, HU, IR, IT, LV, LT, LU, MT, NL, PL, PT, CZ, RO, GB, SK, SI, SE.
Parrot DRONES, 174 quai de Jemmapes, 75010 Parijs, Frankrijk verklaart
onder volledige verantwoordelijkheid dat het product beschreven in deze
gebruikershandleiding in overeenstemming is met de technische normen EN
301489-17, EN300328, EN71-1, EN71-2, EN71-3, EN62115, EN 50566: 2013
(SAR) volgens de bepalingen van richtlijn RED 2014/53/EU en de richtlijn
betreende algemene productveiligheid 2014/35/EU. http://www.parrot.
com/ce/?skycontroller-2
FCC/IC
Om te voldoen aan de vereisten met betrekking tot de blootstelling aan
radiofrequenties van de FCC/IC voor uitzendingsapparatuur, dient een
minimale afstand van 20 cm worden aangehouden tussen de antenne van het
product en de personen. Om aan deze eis te voldoen, wordt gebruik op een
kleinere afstand niet aangeraden.
MERKEN
Parrot en de logo's van Parrot zijn geregistreerde merken van Parrot S.A.
Parrot Disco-Pro AG, Parrot Disco, Parrot Skycontroller, Sequoia, Parrot
C.H.U.C.K en de respectievelijke logo’s zijn merken van Parrot Drones SAS.
App Store is een handelsmerk van Apple Inc.
Google Play en Google Maps zijn merken van Google Inc.
Wi-Fi® is een handelsmerk gedeponeerd door Wi-Fi Alliance®
Linux is een merk van Linus Torvalds, geregistreerd in de VS en andere landen.
Pix4D en Pix4Dcapture zijn merken gedeponeerd door Pix4D SA.
Airinov en Airinov First+ zijn handelsmerken of merken gedeponeerd door
Airinov SAS.
Alle andere merken die in deze handleiding vermeld staan, zijn eigendom van
de respectievelijke eigenaren.
INFORMATIE OVER DE FABRIKANT
De Parrot Disco, Parrot Skycontroller 2 en Sequoia worden vervaardigd door:
PARROT DRONES SAS - 174 Quai de Jemmapes - 75010 Parijs (Frankrijk) -
RCS Paris 808 408 074 - www.parrot.com

242
Parrot Disco-Pro AG™
:
1. «Parrot Disco»™;
2. «Parrot C.H.U.C.K »™;
3. «Parrot
Skycontroller 2»™. Parrot Disco
Parrot Skycontroller 2
FreeFlight Pro™,
.
,
(In-App Purchase). ,
Parrot Disco;
4. «Sequoia»™, :
() ,
;
(b) ,
;
5. Airinov First+™,
(NDVI) ,
Pix4Dcapture™,
.

243
РУССКИЙ
1. Parrot Disco .
-
14 .
2. Parrot Disco:
(a)
www.
parrot.com,
( «Техническая
документация Parrot»).
, ;
(b)
( «Применимые законодательные
нормы »);
(c) , Parrot Disco
/
,
.
3. , ,
,
Parrot Drones SAS
,
.
PARROT
DISCO
PARROT.
4. ,
, PARROT DRONES
SAS, ,
,
PARROT
,
PARROT DISCO.

244
PARROT
DISCOPRO AG
PARROT DISCOPRO
Fisheye
/ –

245
РУССКИЙ
C.H.U.C.K.
micro-USB
Sequoia
micro-USB

246
PARROT
SKYCONTROLLER 2
On/O
/
: /
:
:
:
USB-

247
РУССКИЙ
/
FreeFlight Pro
USB-

248
SEQUOIA
Sequoia
.
micro-USB
« »
micro-USB
« »
RGB-
SD
micro-USB
« »
micro-USB « »
micro-USB
« » .

249
РУССКИЙ
FREEFLIGHT PRO
PIX4DCAPTURE
App Store® Google Play
FreeFlight Pro
Pix4Dcapture .
FreeFlight Pro
Parrot .
Pix4Dcapture
,
.
PARROT DISCOPRO
Parrot Disco-Pro.
1.
.
2. .
3. ,
.
;
.
55 ;
— 30 .

250
PARROT SKYCONTROLLER 2
1.
.
2.
Parrot Skycontroller 2,
.
1 40 ,
— 4 .
PARROT DISCO
1. Parrot Disco-Pro.
2. Sequoia,
.

251
РУССКИЙ
4. Parrot Disco-Pro.
3. Sequoia
Parrot Disco-Pro.
micro-USB
micro-USB « » Parrot
C.H.U.C.K.

252
Disco-Pro.
,
.
, .
.

253
РУССКИЙ
Parrot Disco-Pro
:
,
Parrot Disco-Pro.
Wi-FI® .
5 ,
1. , Parrot Disco-Pro
80 ,
. ,
,
.
2. Parrot Disco-Pro .
3. Parrot Disco-Pro
(,
).
4.
,

254
.
Parrot Disco-Pro , ,
12 / (43 /).
5. ,
Pix4Dcapture ,
,
.
PARROT DISCOPRO
, Parrot Disco-
Pro (.
« »).
, Parrot Disco-Pro
(.
« »).
, Parrot Disco-Pro
.
, Parrot
Disco-Pro . ,
Parrot Disco-Pro GPS.
,
.
Parrot Disco-Pro
.
SEQUOIA
.

255
РУССКИЙ
Sequoia
micro-USB Parrot C.H.U.C.K.
.
.
,
.
,
.
, micro-USB « »,
, .
micro-USB.
.
« Sequoia».
,
. , GPS/GNSS .

256
DISCOPRO
PARROT
SKYCONTROLLER 2 PARROT
DISCOPRO
FREEFLIGHT PRO
Parrot Disco-Pro
.
On/O Parrot Disco-Pro.
> GPS
,
.
1. / (On/
O) Parrot Skycontroller 2.
2. ,
.
, Parrot Disco-Pro
.
, Parrot
Disco-Pro. :
1. FreeFlight Pro Fly
& Film > > ,
«».
2. .
Parrot

257
РУССКИЙ
Z
Y
X
Disco-Pro .
1. Parrot Disco-
Pro Z (yaw/
).
2. Parrot Disco
-Pro
- Y (pitch/
).
3. Parrot Disco
-Pro
- X (roll/
).
>
. Калибровка
Parrot Disco-Pro
произведена.

258
-
1.
B
A
B
A
B
A
B
A

259
РУССКИЙ
2.
3.
B
A
BA
4.
B
A

260
B
A
B
A
B
A
B
A
B
A
B
A
B
A
B
A
PARROT SKYCONTROLLER 2
Pix4Dcapture
, Parrot
Skycontroller 2.

261
РУССКИЙ
PIX4DCAPTURE
Parrot
Disco-Pro ,
.
Grid:
.
. 200
, 30°.
Pix4Dcapture:
Android:

262
https://www.parrot.com/uk/pix4dcapture-android
iOS:
https://www.parrot.com/uk/pix4dcapture-ios
1. Parrot Disco-Pro
Parrot Skycontroller 2.
Parrot Skycontroller 2
.
1.
USB Parrot Skycontroller 2.
1. Pix4Dcapture.
2. .
3. .
4. «start waypoint»
.
1. START.
>
,
.
>
. Parrot Disco-Pro . .
«».
>
.

263
РУССКИЙ
ВЗЛЕТ
Поставьте дрон лицом к ветру.
1. Parrot Disco-
Pro .
2. , Parrot Disco-Pro
.
3.
Start Pix4Dcapture.
Freeight Pro
Parrot Skycontroller 2.
> Parrot Disco-Pro
1 .
4. Parrot Disco-Pro
.
>Parrot Disco-Pro .
50
,
60 .
:
Parrot Disco-Pro
,
Parrot Skycontroller 2.
Parrot Disco-Pro
10
, .
,
.

264
Parrot Disco-Pro
Pix4Dcapture,
Parrot Skycontroller
2.
> Parrot Disco-Pro ,
50
60 .
Point de départ
,
.
Parrot Disco-Pro
, , .
1. Parrot Disco-Pro .
2. Parrot Disco-
Pro.

265
РУССКИЙ
3. Parrot Skycontroller 2.
> Parrot Disco-Pro
,
.
: Parrot
Disco-Pro -
, ..
, ,
.
80 m
50 m
10 m
Parrot
Skycontroller 2.
Parrot Disco-Pro
50 ,
60 .
50 .
Parrot Disco-Pro
,
.

266
1. , Parrot Disco-Pro
80, .
2. ,
Parrot
Skycontroller 2.
> Parrot Disco-Pro .
80 m
50 m
10 m
.
Pix4Dcapture Parrot Disco-Pro
60
(
10 ).
, Parrot
Disco-Pro ,
50

267
РУССКИЙ
60 .
5 , Parrot
Disco-Pro .
PARROT DISCOPRO
Parrot Disco-Pro,
/ (On/O).
> Parrot Disco-Pro
,
.
.
1.
.
2.
.
SD,
SD.
micro-USB « ».
SD
Sequoia.

268
AIRINOV
FIRST+
http://parrot.airinov.com
.
:
www.parrot.com/support.
PARROT
DISCO
1. Parrot Skycontroller 2 Parrot
Disco-Pro.
1.
USB Parrot Skycontroller 2.
1. FreeFlight Pro
.
1. FreeFlight Pro
«Обновление».
2.
.
3. ,
OK.
4. .
5.
.

269
РУССКИЙ
6. «Выход».
Parrot Disco-Pro
.
.
FreeFlight Pro .

270
Parrot Disco-Pro.
Parrot Disco-Pro GPS
.
Parrot Disco-Pro.
Parrot Disco-Pro.
Parrot
Disco-Pro.
> В таком случае обратитесь к продавцу
или посетите страницу технической
поддержки по Parrot Disco-Pro на сайте
www.parrot.com/support.
Parrot
Disco-Pro.
> В приложении FreeFlight Pro
отображается сообщение об ошибке.
Ознакомьтесь с таблицей кодов ошибок на
сайте www.parrot.com/support.
Parrot Disco-Pro
- www.parrot.com.
.

271
РУССКИЙ
:
•
•
•
• :
•
•
•
• : ARM® Cortex® -A9
• -: 32
WIFI
•
• Wi-Fi AC, 2 (2,4 5 ),
• Parrot Skycontroller 2 2
• 3- Li-o 2700 · / 25
• : 45
• : 11,1
• 21,6 A
• 3,5 A
• : -20°C 60°C

272
• : 940
• : 1150 580 120
• : 1150
GPS
• GPS
• GPS + GLONASS
• : 1280
• : 5
• SBUS, SUMD, CPPM
:
• Full HD 1080p
• : 360p / 720p
:
• Linux®
• : 100–240 , 50–60 , 1,2 A
• : . 12,6 . , 3,5 A
• : 2000
• : 0°C 40°C
PARROT DISCO
• : 0°C 40°C
• : 15 A
• : 11,1

273
РУССКИЙ
Parrot Disco
,
, .
Parrot Disco
.
Parrot - www.parrot.com.
Parrot Disco
.
Parrot Disco
(, )
.
Parrot Disco
, .
Parrot Disco.
Parrot Disco .
Parrot Drones SAS .
Parrot Disco
.
Parrot Disco ( ,
, , ) (,
).
Parrot Disco
, .
. Parrot
Disco ,
.
Parrot
Disco.
Parrot Disco .
.
. .
WIFI
Parrot Disco
Wi-FI® .
. ,
5 Wi-Fi
.
.
/ ,

274
,
. ,
.
/ ,
,
.
/ ,
.
PARROT DISCO SKYCONTROLLER 2
:
, .
.
, ,
, .
, -
(Li-Po).
-
.
.
2,5 .
60°C (140°F),
.
, .
,
.
.
, . ,
. .
LiPo .
,
60°C (, ).
.
!
PARROT DISCO .
.
, Parrot Disco-Pro
AG.
,
.
.

275
РУССКИЙ
.
. Parrot Disco,
Parrot Skycontroller 2 Sequoia
.
CE
:
, , , , , , , ,
, , , , , , ,
, , , , , , ,
, , , , , .
5 (5150-5250
) -
.
PARROT DRONES, : 174 quai de Jemmapes, 75010
Paris, France (), ,
, ,
EN301489-1, EN301489-17, EN300440-
1, EN300328, EN300893, EN300440-2, EN60950-1, EN62321
R&TTE 1999/5/CE, 2014/35/UE
ROHS 2011/65/CE.
http://www.parrot.com/ce/?parrot-disco
FCC/
IC
, 20
.
.
Parrot Parrot PARROT S.A.
Parrot Disco-Pro AG, Parrot Disco, Parrot Skycontroller, Sequoia, Parrot C.H.U.C.K.
Parrot
Drones SAS.
App Store Apple Inc.
Google Play Google Maps Google Inc.
Wi-Fi® Wi-Fi
Alliance®
Linux ,
.
Pix4D Pix4Dcapture
Pix4D SA.
Airinov Airinov First+
Airinov SAS.
.
Parrot Disco, Parrot Skycontroller 2 Sequoia :
Parrot Drones SAS, : 174 quai de Jemmapes, 75010
Paris, France (), -
808 408 074 - www.parrot.com.

276
Parrot Disco-Pro AG™
1 .Parrot Disco
2 .Parrot C.H.U.C.K
3 . Parrot Skycontroller 2
FreeFlight Pro™
4 .Sequoia
5 .Airinov First+™
Pix4Dcapture™

ةيبرعلا
277
1 .
14
2 .:
Parrot
3 .
4 .

278

ةيبرعلا
279

280

ةيبرعلا
281

282

ةيبرعلا
283
®
1 .
2 .
3 .
55
30

284
1 .
2 .
01:40
4
.1
.2

ةيبرعلا
285
.4
.3

286

ةيبرعلا
287
Wi-FI®
5
1 .
80
2 .
3 .
4 .
43
5 .

288

ةيبرعلا
289
1 .
2 .
3 .
.Parrot Disco

290
4 . > > Fly & Film
5 .
6 .
7 .
8 .
.Parrot Disco
Z
Y
X

ةيبرعلا
291
1 .
B
A
B
A
B
A
B
A
2 .
3 .

292
B
A
BA
4 .
5 .
B
A

ةيبرعلا
293
B
A
B
A
B
A
B
A
B
A
B
A
B
A
B
A

294
Grid
30
:

ةيبرعلا
295
1 .
2 .
3 .Pix4Dcapture
4 .
5 .
6 .start waypoint
7 ..START

296
1 .
2 .
3 .
Start
4 .

ةيبرعلا
297
50
60
10

298
50
60
Point de départ
1 .
2 .
3 .

ةيبرعلا
299
80 m
50 m
10 m
50
60
50
1 . 80
2 .

300
80 m
50 m
10 m
1060
6050
5

ةيبرعلا
301
1 .
2 .

302
1 .
2 .
3 .
4 .
5 .
6 .
OK
7 .
8 .
9 .

ةيبرعلا
303
Parrot Disco-Pro
www.parrot.com/support
.FreeFlight Pro
www.parrot.com/support

304
®®
WI-FI
5
3
45
60

ةيبرعلا
305
5801150
1150
5
1080
360
®
40
40
15

306
WI-FI
Wi-FI

ةيبرعلا
307
)PARROT SKYCONTROLLER 2PARROT DISCO
60
140
60
5

308
1
FCC/IC
®Wi-Fi®
408808

309
繁體中文
您的Parrot Disco-Pro AG™包含以下組件:
1. 一個“Parrot Disco”™無人機;
2. 一個“Parrot C.H.U.C.K”™自動導航系統;
3. 一個“Parrot Skycontroller 2”™操縱桿。您可將
FreeFlight Pro™應用程序下載到您的智能手機或平板電腦
上,並通過Parrot Skycontroller 2導航您的Parrot Disco。
該應用程序是免費的,但可能含有In-App Purchase。它
還可執行Parrot Disco校準程序;
4. 一個“Sequoia”™傳感器包括:
(a) 一個多光譜傳感器,它能捕捉植物反射光;以及
(b) 一個陽光傳感器,它能記錄太陽發出的光線強度;
以及
5. 訪問Airinov First+™服務,您可以獲得您的“植被
指數”(NDVI)圖和區劃,只需通過免費應用程序
Pix4Dcapture™拍攝的圖像即可,您可將該程序免費下載
到您的智能手機或平板電腦上。

310
警告
1. Parrot Disco不是玩具。因此禁止14歲以下兒童使用或操
作。
2. 在使用Parrot Disco前:
(a) 請認真閱讀本用戶指南以及www.parrot.com上提供的
所有信息和文件,這些信息和文件隨時可能在無預先通知
的情況下更新(下稱“Parrot文件”)。對於帶有符號的
段落應給予特別注意 ;
(b) 請了解關於無人機及其配件使用的適用法規(下稱“
適用法規”);以及
(c) 警惕Parrot Disco可能對您和他人造成物產損失和/或
人身傷害,尤其可能導致重傷,甚至死亡。
3. 請注意,Parrot Drones SAS公司及其分公司所發布的宣
傳、廣告視頻和照片均由專業人員和資深領航員完成。
如果對PARROT DISCO及其配件的使用有懷疑,請參
閱“PARROT文件”的最新更新。
4. 在適用法律的限制範圍內,由於違反“PARROT文件”
或“適用法規”而造成的任何損失,無論是您本人使用或
他人使用您的PARROT DISCO,PARROT DRONES SAS
公司、其分公司、其經銷商和零售商對此不承擔任何責
任。

311
繁體中文
PARROT DISCOPRO AG
介紹
PARROT DISCOPRO
副翼
伺服發動機
螺旋槳 副翼
伺服發動機
防護罩
Fisheye相機
On/O按鈕和指示燈

312
C.H.U.C.K自動駕駛模塊
Micro-USB端口
遙控端口
電池接口
伺服接口
中央發動機接口
Sequoia的Micro-USB
電源端口

313
繁體中文
PARROT
SKYCONTROLLER 2介紹
天線
移動設備支架插槽
On/O
按鈕
返回出發點
起飛/降落
飛行中:開始/停止錄像
參數設置菜單:返回
飛行中:拍攝照片
參數設置菜單:確認
參數設置
USB端口

314
相機曝光
顯示模式
直接視圖/通過FreeFlight Pro身
臨其境的視圖
相機垂直方向
USB端口

315
繁體中文
SEQUOIA介紹
Sequoia包含一個多光譜傳感器和一個輻照陽光傳感
器。
多光譜傳感器
陽光傳感器
快門和指示燈
Micro-USB
主設備端口
Micro-USB從設備
端口
近紅外傳感器
紅色傳感器
紅邊傳感器
綠色傳感器
RGB三原色傳感器
SD卡的插槽
環境光傳感器
Micro-USB從設
備端口
多光譜傳感器的Micro-USB主設備端口應與陽光傳
感器的Micro-USB從設備端口相連。

316
開始前
請下載FREEFLIGHT PRO
和PIX4DCAPTURE
登錄App Store® 或Google Play,將FreeFlight Pro
和Pix4Dcapture應用程序免費下載至智能手機或平板
電腦。
FreeFlight Pro是Parrot 的官方應用程序,用於無人機
的自由領航。
Pix4Dcapture是一款免費應用程序,它能夠在一個興
趣區域之上生成飛行計劃,以便拍攝照片。
為PARROT DISCOPRO的電池充電
電池應與Disco-Pro斷開。
1. 請選擇您的國家適用的插頭(隨帶),並將其插入
充電器。
2. 將導線與充電器連接。
3. 將電池與充電器導線連接,然後將充電器接入電網充
電。
充電時指示燈為紅色,充滿後變為綠色。
充電時長約55分鐘,此後可飛行大約30分鐘。

317
繁體中文
為PARROT SKYCONTROLLER 2的
電池充電
1. 選擇適合您國家的轉換插頭,並將其接入充電器。
2. 將充電器的導線與Parrot Skycontroller 2連接,然
後將充電器接入電網充電。充電時長約1小時40分
鐘,此後可使用4小時。
準備PARROT DISCO
1. 請取下Parrot Disco-Pro的防護罩。
2. 請取下Sequoia,揭下透鏡的保護殼,將電池放在指
定位置。

318
4. 關閉Parrot Disco-Pro防護罩。
3. 重新放回Sequoia,並將Parrot Disco-Pro的電池通
電。然後,將多光譜傳感器的Micro-USB從設備導線
插入Parrot C.H.U.C.K上的Micro-USB電源端口。

319
繁體中文
請將機翼固定在Parrot Disco-Pro上。
請確保副翼完全嵌入伺服發動機的臂端裡。
固定機翼
為了取下機翼,請向上拉動。
請勿用手移動伺服發動機。

320
飛行前的檢查
在Parrot Disco-Pro每次執飛前,請檢查以下事項:
法規
請確認飛行地是否允許使用Parrot Disco-Pro。
了解飛行地Wi-Fi®頻率使用限制規定。
飛行條件
務必遵守的五項條件
1. 確保擁有一塊最少直徑為80米的空間,以供
Parrot Disco-Pro起飛和降落。檢查飛行場地無
任何妨礙飛行或影響觀察飛行的障礙物。
2. 請勿在夜間執飛Parrot Disco-Pro。
3. 請勿於市區上空或某些公共場所(如火車站、
飛機場等...)上空執飛Parrot Disco-Pro。
4. 了解天氣狀況,以保證良好的飛行和拍照條
件。請勿在以下天氣中執飛Parrot Disco-Pro:
雨天、霧天、雪天,或風速超過每秒12米或43
公里/小時。
5. 注 意 在 Pix4Dcapture上設定的飛行高度(與起
飛點相比),它應足以避開周圍障礙物。

321
繁體中文
PARROT DISCOPRO
請確保正確固定Parrot Disco-Pro的機翼(參見
“固定機翼”部分)。
請確保Parrot Disco-Pro電池及遙控器電池已充
滿電(參見“安裝電池”部分)。
請確保Parrot Disco-Pro的防護罩正確關閉。
請確保Parrot Disco的指示燈為綠色閃爍。這表
明Parrot Disco檢測到GPS信號。
請確保陽光傳感器曝光良好。
請檢查地面情況,以確保Parrot Disco的降落。
SEQUOIA
在使用前,請確保保護殼被取下。
請確保Sequoia連接到Parrot C.H.U.C.K右側的
Micro-USB端口。
請確保鏡頭清潔乾淨。請使用超細纖維布(隨
帶)清潔鏡頭。
釋放足夠的內存(在多光譜傳感器的內存中),
以確保保存飛行中拍攝的所有照片。
請確保兩個模塊正確固定在無人機上,確保它們
不會在飛行中脫落。

322
請確保連接無人機與多光譜傳感器的Micro-USB
從設備導線已插上。請檢查陽光傳感器和多光譜傳
感器之間的Micro-USB導線的連接情況。
請確保這兩個傳感器已進行校準。欲了解更多信
息,請參見“Sequoia校準”部分。
請等待陽光傳感器的指示燈顯示綠色。當指示燈
變綠,這表明GPS/GNSS已開啟。
連接至PARROT
DISCOPRO
通過FREEFLIGHT PRO將
PARROT SKYCONTROLLER 2
連接至PARROT DISCO
將Parrot Disco-Pro置於平地上。
1. 按下Parrot Disco-Pro的On/O按鈕。
>指示燈出現紅色閃爍,一旦GPS信號固定後,
指示燈變綠色。
2. 按下Parrot Skycontroller 2的On/O按鈕。
3. 耐心等待指示燈變為常綠。
現已連接好Parrot Disco。
如指示燈持續紅色閃爍,應重新校準Parrot Disco-
Pro。為此應:

323
繁體中文
4. 在FreeFlight Pro應用程
序中,前往Fly & Film
> > 位置、距離和限
制,然後按下校準。
5. 請校準皮託管。為此,
面朝風向,然後將Parrot
Disco的相機向地面定
位。
6. 沿Z軸(yaw/水平轉動)
旋轉Parrot Disco-Pro。
7. 沿Y軸(pitch/前後翻
動)旋轉Parrot Disco-
Pro。
8. 沿X軸(roll/垂直轉動)
旋轉Parrot Disco-Pro。
>指示燈為綠色閃爍。
Parrot Disco-Pro 校準完
畢。
Z
Y
X

324
將智能手機接到PARROT SKYCONTROL-
LER 2上
1. 將智能手機的底座旋緊在Parrot Skycontroller 2上.
B
A
B
A
您可以旋轉底座,使其與智能手機的尺寸相匹
配。具體操作是手按其上,並向右旋轉。
B
A
B
A
2. 按下底座的右邊按鈕,將其完全打開

325
繁體中文
3. 將智能手機放在底座上。
4. 使底座夾緊智能手機。
5. 使用智能手機的USB數據線,將智能手機接到 Parrot
Skycontroller 2 的USB端口。
B
A
B
A
BA

326
左側
B
A
B
A
B
A
B
A
B
A
B
A
B
A
B
A
加速
減速
右側
下降
上升
右轉
左轉
右軌道懸停
左軌道懸停
領航模式
PARROT SKYCONTROLLER 2
在Pix4Dcapture執行飛行計劃時,您可以隨時恢復對
無人機的控制,按下Parrot Skycontroller 2的其中一
個控件即可。

327
繁體中文
飛行計劃
通過PIX4DCAPTURE創建一份飛行計
劃
第一次啟用時,請在無人機列表中選擇Parrot Disco-
Pro,然後進行飛行計劃編輯。
Grid:無人機以來回往返路線飛行,從而覆蓋主要的
飛行區域。
在創建飛行計劃時,請設置起飛
點和降落錐。針對降落區域,請
以30°錐形為準,預留出長度200
米的空間。
欲了解有關飛行計劃及其創建的更多信息,請參閱
Pix4Dcapture支持頁面:
Android :
https://www.parrot.com/uk/pix4dcapture-android
iOS :
https://www.parrot.com/uk/pix4dcapture-ios

328
啟動飛行計劃
1. 開啟Parrot Disco-Pro,並與Parrot Skycontroller
2連接。無人機與Parrot Skycontroller 2之間的
連接將自動建立。
2. 將您的智能手機或平板電腦連接至Parrot
Skycontroller 2的USB端口。
3. 啟動Pix4Dcapture應用程序。
4. 在主頁上,選擇任務類型。
5. 創建要進行的飛行計劃。
6. 指明起飛點“開始航點”和降落錐。
7. 點擊START。
>為了留有時間各就各位,將開始倒計時。
>倒計時結束後,Parrot Disco-Pro起飛準備就緒,
發動機啟動。參見“起飛”部分。
>一旦飛行計劃結束,無人機將回到飛行計劃上已
設置的降落錐,並降落。

329
繁體中文
起飛
您應面朝風向執行起飛。
1. 您應面朝風向定位,同時一手持Parrot Disco-
Pro的機身。
2. 請確保Parrot Disco-Pro的發動機完全無阻。
3. 在Pix4Dcapture應用程序中,在創建飛行計劃
後,按下Start。
如果是通過Freeflight Pro進行自由領航,請按下
Parrot Skycontroller 2的按鈕 ,以便啟動起飛。
>Parrot Disco-Pro的發動機開始轉動,並在1秒內
達到其最大速度。
4. 略微向上開啟Parrot Disco-Pro。

330
>Parrot Disco-Pro起飛。它升到50米的高度,然後
以60米為直徑盤旋飛行。
注意:為了在起飛階段,停止Parrot
Disco-Pro的發動機,請再次按下Parrot
Skycontroller 2的按鈕 。
如果您不啟動Parrot Disco-Pro,在按下
按鈕 10秒後,發動機會停止。再次按
下按鈕 ,以便重新啟動起飛程序。

331
繁體中文
返回出發點
在Pix4Dcapture飛行計劃之外,為了讓Parrot Disco-
Pro返回出發點,請按下Parrot Skycontroller 2上的
按鈕 。
>Parrot Disco-Pro返回出發位置,並在50米高度,以60米為直
徑,在該位置上方盤旋飛行。
Point de départ
請確保您位於無障礙物的開放空間。
降落
為避免損壞Parrot Disco-Pro,請於合適的地表降
落,比如草地上。
直線降落
1. 將Parrot Disco-Pro面朝風向
2. 將Parrot Disco-Pro的高度降低至最大程度。

332
3. 按下Parrot Skycontroller 2的按鈕
>Parrot Disco-Pro直線下降,然後調整到垂直位置
並緩慢下降。
注意:Parrot Disco-Pro下降時,如果需
要,您可以過度操控:上升、下降、左
轉和右轉。
80 m
50 m
10 m
為了取消降落,請按下Parrot Skycontroller 2的按
鈕 。
Parrot Disco-Pro上升至50米並以60米為直徑盤旋
飛行。
您的降落跑道應至少有50米。

333
繁體中文
盤旋降落
盤旋降落時,Parrot Disco-Pro獨自頂風到達地面,
從而限制其降落速度。
1. 確保Parrot Disco降落時有80米直徑的空間。
2. 軌道懸停時,利用Parrot Skycontroller 2,請按
下 。
>Parrot Disco-Pro螺旋下降著陸。
80 m
50 m
10 m
盤旋降落需許多空間。
失去連接
在Pix4Dcapture飛行計劃以外,如果飛行中出現失
去連接的情況,Parrot Disco會以60米為直徑盤旋飛
行,該盤旋會在預先設置的時間內持續(默認為10
秒)。
如無法重新建立連接,Parrot Disco返回出發點,並
在50米高度,以60米為直徑盤旋飛行。
如5分鐘內未重建連接,Parrot Disco-Pro將執行盤旋
降落。

334
PARROT DISCO關機
為了關閉Parrot Disco-Pro,請長按On/O按鈕。
>指示燈呈紅色閃爍,然後Parrot Disco關機。
獲取照片
在飛行中,照片被保存在多光譜傳感器的內存中。
1. 將多光譜傳感器與電腦連接。
2. 獲取在飛行過程中拍攝的照片。
如果拍攝照片保存在一張SD卡中,您也可以將陽光
傳感器作為SD卡的讀取器使用。為此,請將傳感器
的Micro-USB從設備端口連到電腦上。
當Sequoia開啟時,請勿取出SD卡。
利用AIRINOV FIRST+
處理數據
請訪問http://parrot.airinov.com,然後遵照屏幕顯示
的步驟來處理您的數據。
欲了解更多信息,請訪問www.parrot.com/support

335
繁體中文
PARROT DISCO更新
1. 將Parrot Skycontroller 2與Parrot Disco-Pro
相連。
2. 通過USB導線,將智能手機或平板電腦與Parrot
Skycontroller 2相連。
3. FreeFlight Pro應用程序自動啟動。
4. 在FreeFlight Pro應用程序中,按下更新。
5. 應用程序搜索更新文件。
6. 如果應用程序找到一個更新文件,請選擇該文
件,並按下OK。
7. 應用程序下載更新文件。
8. 出現一個彈出窗口,並通知您無人機將重啟。
9. 按下退出
在更新文件安裝過程中,Parrot Disco-Pro將自
動重啟。該過程可能持續幾分鐘。一旦更新完
畢,FreeFlight Pro應用程序將自動重啟。

336
指示燈變化
藍色閃爍 Parrot Disco-Pro啟動中。
綠色閃爍 Parrot Disco-Pro監測到GPS信號,並準備好
起飛。
黃色閃爍 Parrot Disco-Pro更新中。
請勿關閉Parrot Disco-Pro。
紅色和藍色閃爍
Parrot Disco-Pro監測到電量方面的問題。
> 請聯繫您的經銷商或訪問www.parrot.com/
support網站的支持頁面。
紅色閃爍
Parrot Disco-Pro監測到發動機錯誤。
> 在FreeFlight Pro應用程序上出現一條錯誤
信息。請參閱www.parrot.com/support網站上
的錯誤代碼表。
零件
您可在我們的網上商店購買Parrot Disco-Pro零
件:www.parrot.com。
欲了解有關零件安裝的更多信息,請參閱支持頁面的
視頻教程。

337
繁體中文
技術規格
傳感器
• 超聲
• 高度儀
• 高速立式相機
• 皮託管:速度傳感器
慣性導航系統
• 三軸陀螺儀
• 三軸加速計
• 三軸地磁儀
設備
• 雙核CPU ARM® Cortex® -A9
• 內閃存:32Go
WIFI及傳輸
• 網絡接入點
• 接入Wi-Fi類型,2根雙頻天線(2.4和5GHz),多信道輸入輸出
• 配合Parrot Skycontroller 2使用,覆蓋範圍可達2公里
可拆卸電池
• 3節2700 mAh/25A LiPo鋰電池
• 電池續航時間:45分鐘
• 額定電壓:11.1V
• 持續放電電流21.6A
• 最大充電電流3.5A
• 工作適宜溫度:-20°C-60°C

338
尺寸
• 重量:940 gr
• 大小:1150mm×580mm×120mm
• 翼展:1150mm
GPS
• 內置GPS
• GPS+GLONASS
性能
• 發動機:1280kv
• 伺服發動機:5V
• 可安裝RF SBUS接收器、SUMD、CPPM
視頻和照片
• 1080P高清相機
• 視頻流:360p/720p
軟件
• Linux®&開源SDK
充電器
• 輸入電壓:100-240V,50h-60Hz,1.2A
• 輸出電壓:最大12.6Vdc,3.5A
• 最高海拔:海平面以上2000米
• 工作適宜溫度:0°C-40°C
PARROT DISCO
• 工作適宜溫度:0°C-40°C
• 最大電流:15A
• 額定電壓:11.1V

339
繁體中文
一般信息
Parrot Disco的使用應遵守各國家的民航規則,並在適合所選飛行的區域執
飛,以便始終確保人員、動物、物產安全。
在Parrot Disco執飛前,請了解當地民航規則。
附件與零配件
可於Parrot零售商處或www.parrot.com網站購買附件和零配件。
使用和保養注意事項
駕駛員應始終目視跟踪Parrot Disco並控制其飛行軌跡。
在某些公共場所(如火車站、飛機場等)或公共道路上使用Parrot Disco可能
不被允許。
一旦Parrot Disco螺旋槳處於運行狀態,它可能會對人員、動物或物體造成傷
害。始終與Parrot Disco保持安全距離。起飛階段始終要警惕Parrot Disco的
螺旋槳。僅可使用Parrot Drones SAS公司指定專用零配件。
如沙粒或灰塵進入Parrot Disco,這將可能導致Parrot Disco無法再正常運
行,影響可能無法逆轉。
請勿在雨天、強風、雪天等惡劣天氣條件下或能見度不足時(夜間)使用
Parrot Disco。
飛行時,請遠離高壓線、建築物或具潛在危險的其他區域。
請勿在液態物質附近使用本設備。請勿將Parrot Disco放在水邊或潮濕表面,
這可能導致不可逆的損壞。
請避免讓Parrot Disco承受劇烈的高度變化。
請勿將Parrot Disco放在陽光下。
切勿吞嚥小零件,危險!包裝不屬於產品的一部分,丟棄時請遵守相關安全規
定。
WIFI
使用Parrot Disco前,請了解飛行地Wi-Fi®頻率使用限制規定。某些頻率可能
受限或被禁止。比如,在某些國家,在室外禁止使用Wi-Fi 5 GHz頻段。
請尊重他人隱私和物產影像權。
未經當事人許可錄製和傳播他人影像可能構成對他人隱私的侵犯,您因此要承
擔相應責任。在攝製和錄製前,請徵詢當事人許可,尤其是如果您希望保存
和/或傳播錄製內容時。請勿傳播有辱人格或可能影響他人聲譽或尊嚴的影像。
未經物產所有者許可,錄製和傳播物產圖像可能構成對他人影像權的侵犯,您
因此要承擔相應責任。請在拍攝物產前,先徵求物主和/或物產知識產權所有
人的許可。
電池(PARROT DISCO和PARROT SKYCONTROLLER 2)

340
注意:未能遵守使用說明的操作可能導致嚴重人身傷害,對電池造成不可逆轉的
損壞,並引發火災、冒煙或爆炸。
在充電或使用前,請仔細檢查電池情況。如電池遭受衝擊,或有異味、過
熱、變色、變形、出現洩漏等異常現象,應立即更換。切勿使用其他充電器
為電池充電,經認可的LiPo鋰充電器除外。始終使用與LiPo鋰電池對等的充
電器或與LiPo鋰電池對等的設備。不建議使用產品隨帶充電器以外的其它充
電器。嚴禁涓流充電,嚴禁低於2,5伏每單位的充電。電池溫度永遠不能超過
60°C(140°F),否則電池可能受損或著火。切勿在可燃燒表面、可燃物附
近或車內充電(最好將電池放在不易燃和不導電的容器內)。切勿在無人監
視的情況下為電池充電。嚴禁拆卸或修改佈線或穿透基本構成單位。始終確保
充電器的輸出電壓與電池的電壓相符。切勿將電池置於短路狀態。請勿將LiPo
鋰電池置於潮濕、陽光直曬或溫度可能超過60°C的地方(比如暴晒下的汽車
內)。始終將電池放在兒童接觸不到的地方。
注意
如果用不兼容的電池替代PARROT DISCO的電池,這可能引起爆炸。
丟棄廢棄電池時,請遵守相關規定。
保修
如需了解保修條款,請參閱向您出售Parrot Disco-Pro AG經銷商提供的一般
銷售條款。
如何回收該產品
本產品上或使用手冊上的這一標誌表示:在本產品達到使用壽命後,不
應與其他生活垃圾一起丟棄。隨意丟棄垃圾會對環境或人體健康造成不
良影響。請將本品與其他類型的垃圾分開,並以負責的方式進行回收處
理。這一做法會促進物質資源的可持續再利用。我們建議您聯繫向您出售產品
的經銷商或向您所在地的市政府進行諮詢,以便了解在哪裡、如何回收Parrot
Disco、Parrot Skycontroller 2和Sequoia。
歐盟合規聲明
該設備可在以下國家使用:德國、奧地利、比利時、保加利亞、塞浦路
斯、克羅地亞、丹麥、西班牙、愛沙尼亞、芬蘭、法國、希臘、匈牙
利、愛爾蘭、意大利、拉托維亞、立陶宛、盧森堡、馬耳他、荷蘭、波蘭、葡
萄牙、捷克、羅馬尼亞、英國、斯洛伐克、斯洛文尼亞、瑞典。
歐盟成員國對室外頻率的使用限制:僅能使用低於5Ghz頻段的第一子頻段
(5150-5250MHz)。
Parrot Drones公司:174 quai de Jemmapes, 75010 Paris, France,作
為唯一責任人聲明:根據R&TTE 1999/5/CE法令、低電壓2014/35/UE法令和
ROHS 2011/65/CE法令的規定,在本用戶指南中描述的產品符合以下技術標
準:EN301489-1、EN301489-17、EN300440-1、EN300328、EN300893、
EN300440-2、EN60950-1、EN62321。
http://www.parrot.com/ce/?parrot-disco
加拿大合規聲明

341
繁體中文
本設備符合加拿大工業部適用於免證書無線電設備的無線電標準規範。其使用
必須滿足以下兩個條件:(1)該設備不應造成信號干擾,(2)使用者必須接受
所受到的任何無線電干擾,即使這一干擾可能妨礙該設備的正常運行。該B類
數碼設備符合加拿大NMB-003標準。
加拿大工業部聯邦通信委員會
為符合加拿大工業部聯邦通信委員會關於通訊設備在射頻暴露方面的要求,本
產品的天線應與人員之間保持至少20厘米的距離。為確保符合這一規定,不
建議在低於該距離的條件下使用本品。
商標
Parrot以及Parrot標識是Parrot S.A.公司商標。
Parrot Disco-Pro AG、Parrot Disco、Parrot Skycontroller、Sequoia、Parrot
C.H.U.C.K及各自品牌標識為Parrot Drones SAS公司商標。
App Store為Apple Inc.公司服務部門的商標。
Google Play和Google Maps為Google Inc.谷歌公司的商標。
Wi-Fi®為Wi-Fi Alliance®
Linux是Linus Torvalds在美國和其它國家登記註冊的商標。
Pix4D和Pix4Dcapture是Pix4D SA公司註冊的商標。
Airinov和Airinov First+是Airinov SAS公司的商業標識或註冊商標。
本用戶指南中提及的其它商標分別歸其相應所有者所有。
製造商信息
Parrot Disco和Sequoia由以下廠家製造:Parrot Drones SAS公司,地址:
174 Quai de Jemmapes - 75010 Paris(法國);法國企業註冊號:Paris
808 408 074;網址:www.parrot.com

342
您的Parrot Disco-Pro AG™包含以下组件:
1. 一个“Parrot Disco”™无人机;
2. 一个“Parrot C.H.U.C.K”™自动导航系统;
3. 一个“Parrot Skycontroller 2”™操纵杆。您可将
FreeFlight Pro™应用程序下载到您的智能手机或平板电脑
上,并通过Parrot Skycontroller 2导航您的Parrot Disco。
该应用程序是免费的,但可能含有In-App Purchase。它
还可执行Parrot Disco校准程序;
4. 一个“Sequoia”™传感器包括:
(a) 一个多光谱传感器,它能捕捉植物反射光;以及
(b) 一个阳光传感器,它能记录太阳发出的光线强度;
以及
5. 访问Airinov First+™服务,您可以获得您的“植被
指数”(NDVI)图和区划,只需通过免费应用程序
Pix4Dcapture™拍摄的图像即可,您可将该程序免费下载
到您的智能手机或平板电脑上。

343
简体中文
警告
1. Parrot Disco不是玩具。因此禁止14岁以下儿童使用或操作。
2. 在使用Parrot Disco前:
(a) 请认真阅读本用户指南以及www.parrot.com上提供
的所有信息和文件,这些信息和文件随时可能在无预先通
知的情况下更新(下称“Parrot文件”)。对于带有符号
的段落应给予特别注意 ;
(b) 请了解关于无人机及其配件使用的适用法规(下称
“适用法规”);以及
(c) 警惕Parrot Disco可能对您和他人造成物产损失和/或
人身伤害,尤其可能导致重伤,甚至死亡。
3. 请注意,Parrot Drones SAS公司及其分公司所发布的
宣传、广告视频和照片均由专业人员和资深领航员完
成。如果对Parrot Disco及其配件的使用有怀疑,请参
阅“PARROT文件”的最新更新。
4. 在适用法律的限制范围内,由于违反“PARROT文件”
或“适用法规”而造成的任何损失,无论是您本人使用或
他人使用您的Parrot Disco,PARROT DRONES SAS公
司、其分公司、其经销商和零售商对此不承担任何责任。

344
PARROT DISCOPRO AG
介绍
PARROT DISCOPRO
副翼
伺服发动机
螺旋桨 副翼
伺服发动机
防护罩
Fisheye相机
On/O按钮和指示灯

345
简体中文
C.H.U.C.K自动驾驶模块
Micro-USB端口
遥控端口
电池接口
伺服接口
中央发动机接口
Sequoia的Micro-USB
电源端口

346
PARROT
SKYCONTROLLER 2介绍
天线
移动设备支架插槽
On/O
按钮
返回出发点
起飞/降落
飞行中:开始/停止录像
参数设置菜单:返回
飞行中:拍摄照片
参数设置菜单:确认
参数设置
USB端口

347
简体中文
相机曝光
显示模式
直接视图 / 通过FreeFlight Pro
身临其境的视图
相机垂直方向
USB端口

348
SEQUOIA介绍
Sequoia包含一个多光谱传感器和一个辐照阳光传感
器。
多光谱传感器
阳光传感器
快门和指示灯
Micro-USB主
设备端口
Micro-USB从设备
端口
近红外传感器
红色传
感器
红边传感器
绿色传感器
RGB三原色传感器
SD卡的插槽
环境光传感器
Micro-USB从设
备端口
多光谱传感器的Micro-USB主设备端口应与阳光传
感器的Micro-USB从设备端口相连。

349
简体中文
开始前
请下载FREEFLIGHT PRO和
PIX4DCAPTURE
登录App Store® 或Google Play,将FreeFlight Pro
和Pix4Dcapture应用程序免费下载至智能手机或平板
电脑。
FreeFlight Pro是Parrot 的官方应用程序,用于无人机
的自由领航。
Pix4Dcapture是一款免费应用程序,它能够在一个兴
趣区域之上生成飞行计划,以便拍摄照片。
为PARROT DISCOPRO的电池充电
电池应与Disco-Pro断开。
1. 请选择您的国家适用的插头(随带),并将其插入
充电器。
2. 将导线与充电器连接。
3. 将电池与充电器导线连接,然后将充电器接入电网充
电。
充电时指示灯为红色,充满后变为绿色。
充电时长约55分钟,此后可飞行大约30分钟。

350
为PARROT SKYCONTROLLER 2的
电池充电
1. 选择适合您国家的转换插头,并将其接入充电器。
2. 将充电器的导线与Parrot Skycontroller 2连接,然
后将充电器接入电网充电。充电时长约1小时40分
钟,此后可使用4小时。
准备PARROT DISCOPRO
1. 请取下Parrot Disco-Pro的防护罩。
2. 请取下Sequoia,揭下透镜的保护壳,将电池放在指
定位置。

351
简体中文
4. 关闭Parrot Disco-Pro防护罩。
3. 重新放回Sequoia,并将Parrot Disco-Pro的电池通
电。然后,将多光谱传感器的Micro-USB从设备导线
插入Parrot C.H.U.C.K上的Micro-USB电源端口。

352
请将机翼固定在Parrot Disco-Pro上。
请确保副翼完全嵌入伺服发动机的臂端里。
固定机翼
为了取下机翼,请向上拉动。
请勿用手移动伺服发动机。

353
简体中文
飞行前的检查
在Parrot Disco-Pro每次执飞前,请检查以下事项:
法规
请确认飞行地是否允许使用Parrot Disco-Pro。
了解飞行地Wi-Fi®频率使用限制规定。
飞行条件
务必遵守的五项条件
1. 确保拥有一块最少直径为80米的空间,以供
Parrot Disco-Pro起飞和降落。检查飞行场地无
任何妨碍飞行或影响观察飞行的障碍物。
2. 请勿在夜间执飞Parrot Disco-Pro。
3. 请勿于市区上空或某些公共场所(如火车站、
飞机场等...)上空执飞Parrot Disco-Pro。
4. 了解天气状况,以保证良好的飞行和拍照条
件。请勿在以下天气中执飞Parrot Disco-Pro:
雨天、雾天、雪天,或风速超过每秒12米或43
公里/小时。
5. 注 意 在 Pix4Dcapture上设定的飞行高度(与起
飞点相比),它应足以避开周围障碍物。

354
PARROT DISCOPRO
请确保正确固定Parrot Disco-Pro的机翼(参见
“固定机翼”部分)。
请确保Parrot Disco-Pro电池及遥控器电池已充满
电(参见 “安装电池” 部分)。
请确保Parrot Disco-Pro的防护罩正确关闭。
请确保Parrot Disco的指示灯为绿色闪烁。这表
明Parrot Disco检测到GPS信号。
请确保阳光传感器曝光良好。
请检查地面情况,以确保Parrot Disco的降落。
SEQUOIA
在使用前,请确保保护壳被取下。
请确保Sequoia连接到Parrot C.H.U.C.K右侧的
Micro-USB端口。
请确保镜头清洁干净。请使用超细纤维布(随
带)清洁镜头。
释放足够的内存(在多光谱传感器的内存中),
以确保保存飞行中拍摄的所有照片。

355
简体中文
请确保两个模块正确固定在无人机上,确保它们
不会在飞行中脱落。
请确保连接无人机与多光谱传感器的Micro-USB
从设备导线已插上。请检查阳光传感器和多光谱传
感器之间的Micro-USB导线的连接情况。
请确保这两个传感器已进行校准。欲了解更多信
息,请参见“Sequoia校准”部分。
请等待阳光传感器的指示灯显示绿色。当指示灯
变绿,这表明GPS/GNSS已开启。
连接至PARROT DISCOPRO
通过FREEFLIGHT PRO将
PARROT SKYCONTROLLER 2连接
至PARROT DISCO
将Parrot Disco-Pro置于平地上。
1. 按下Parrot Disco-Pro的On/O按钮。
>指示灯出现红色闪烁,一旦GPS信号固定后,
指示灯变绿色。
2. 按下Parrot Skycontroller 2的On/O按钮。
3. 耐心等待指示灯变为常绿。
现已连接好Parrot Disco-Pro。
如指示灯持续红色闪烁,应重新校准Parrot Disco-
Pro。为此应:

356
4. 在FreeFlight Pro应用程
序中,前往Fly & Film
> > 位置、距离和限
制,然后按下校准。
5. 请校准皮托管。为此,
面朝风向,然后将Parrot
Disco的相机向地面定
位。
6. 沿Z轴(yaw/水平转动)
旋转Parrot Disco-Pro。
7. 沿Y轴(pitch/前后翻
动)旋转Parrot Disco-
Pro。
8. 沿X轴(roll/垂直转动)
旋转Parrot Disco-Pro。
>指示灯为绿色闪
烁。Parrot Disco-Pro 校
准完毕。
Z
Y
X

357
简体中文
将智能手机连接至PARROT SKYCON-
TROLLER2
1. 将智能手机托架拧紧到Parrot Skycontroller2上。
B
A
B
A
可旋转托架使其适合智能手机的尺寸大小。 揿
按托架上方向右旋转即可。
B
A
B
A
2. 按托架右侧按钮使之完全打开。

358
3. 将智能手机放在托架上。
4. 重新上紧托架。
5. 使用USB线将智能手机连接至Parrot
Skycontroller2的USB接口上。
B
A
BA
B
A

359
简体中文
左侧
B
A
B
A
B
A
B
A
B
A
B
A
B
A
B
A
加速
减速
右侧
下降
上升
右转
左转
右轨道悬停
左轨道悬停
领航模式
PARROT SKYCONTROLLER 2
在Pix4Dcapture执行飞行计划时,您可以随时恢复对
无人机的控制,按下Parrot Skycontroller 2的其中一
个控件即可。

360
飞行计划
通过PIX4DCAPTURE创建一份飞行
计划
第一次启用时,请在无人机列表中选择Parrot Disco-
Pro,然后进行飞行计划编辑。
Grid:无人机以来回往返路线飞行,从而覆盖主要的
飞行区域。
在创建飞行计划时,请设置起飞
点和降落锥。针对降落区域,请
以30°锥形为准,预留出长度200
米的空间。
欲了解有关飞行计划及其创建的更多信息,请参阅
Pix4Dcapture支持页面:
Android :
https://www.parrot.com/uk/pix4dcapture-android
iOS :
https://www.parrot.com/uk/pix4dcapture-ios

361
简体中文
启动飞行计划
1. 开启Parrot Disco-Pro,并与Parrot Skycontroller
2连接。无人机与Parrot Skycontroller 2之间的
连接将自动建立。
2. 将您的智能手机或平板电脑连接至Parrot
Skycontroller 2的USB端口。
3. 启动Pix4Dcapture应用程序。
4. 在主页上,选择任务类型。
5. 创建要进行的飞行计划。
6. 指明起飞点“开始航点”和降落锥。
7. 点击START。
>为了留有时间各就各位,将开始倒计时。
>倒计时结束后,Parrot Disco-Pro起飞准备就绪,
发动机启动。参见“起飞”部分。
>一旦飞行计划结束,无人机将回到飞行计划上已
设置的降落锥,并降落。

362
起飞
您应面朝风向执行起飞。
1. 您应面朝风向定位,同时一手持Parrot Disco-
Pro的机身。
2. 请确保Parrot Disco-Pro的发动机完全无阻。
3. 在Pix4Dcapture应用程序中,在创建飞行计划
后,按下Start。
如果是通过Freeflight Pro进行自由领航,请按下
Parrot Skycontroller 2的按钮 ,以便启动起飞。
>Parrot Disco-Pro的发动机开始转动,并在1秒内
达到其最大速度。
4. 略微向上开启Parrot Disco-Pro。

363
简体中文
>Parrot Disco-Pro起飞。它升到50米的高度,然后
以60米为直径盘旋飞行。
注意:为了在起飞阶段,停止Parrot
Disco-Pro的发动机,请再次按下Parrot
Skycontroller 2的按钮 。
如果您不启动Parrot Disco-Pro,在按下
按钮 10秒后,发动机会停止。再次按
下按钮 ,以便重新启动起飞程序。

364
返回出发点
在Pix4Dcapture飞行计划之外,为了让Parrot Disco-
Pro返回出发点,请按下Parrot Skycontroller 2上的
按钮 。
>Parrot Disco-Pro返回出发位置,并在50米高度,以60米为直
径,在该位置上方盘旋飞行。
Point de départ
请确保您位于无障碍物的开放空间。
降落
为避免损坏Parrot Disco-Pro,请于合适的地表降
落,比如草地上。
直线降落
1. 将Parrot Disco-Pro面朝风向
2. 将Parrot Disco-Pro的高度降低至最大程度。

365
简体中文
3. 按下Parrot Skycontroller 2的按钮
>Parrot Disco-Pro直线下降,然后调整到垂直位置
并缓慢下降。
注意:Parrot Disco-Pro下降时,如果需
要,您可以过度操控:上升、下降、左
转和右转。
80 m
50 m
10 m
为了取消降落,请按下Parrot Skycontroller 2的按钮
。
Parrot Disco-Pro上升至50米并以60米为直径盘旋飞
行。
您的降落跑道应至少有50米。

366
盘旋降落
盘旋降落时,Parrot Disco-Pro独自顶风到达地面,
从而限制其降落速度。
1. 确保Parrot Disco降落时有80米直径的空间。
2. 轨道悬停时,利用Parrot Skycontroller 2,请按
下 。
>Parrot Disco-Pro螺旋下降着陆。
80 m
50 m
10 m
盘旋降落需许多空间。
失去连接
在Pix4Dcapture飞行计划以外,如果飞行中出现失
去连接的情况,Parrot Disco会以60米为直径盘旋飞
行,该盘旋会在预先设置的时间内持续(默认为10
秒)。
如无法重新建立连接,Parrot Disco返回出发点,并
在50米高度,以60米为直径盘旋飞行。
如5分钟内未重建连接,Parrot Disco-Pro将执行盘旋
降落。

367
简体中文
PARROT DISCO关机
为了关闭Parrot Disco-Pro,请长按On/O按钮。
>指示灯呈红色闪烁,然后Parrot Disco关机。
获取照片
在飞行中,照片被保存在多光谱传感器的内存中。
1. 将多光谱传感器与电脑连接。
2. 获取在飞行过程中拍摄的照片。
如果拍摄照片保存在一张SD卡中,您也可以将阳光
传感器作为SD卡的读取器使用。为此,请将传感器
的Micro-USB从设备端口连到电脑上。
当Sequoia开启时,请勿取出SD卡。
利用AIRINOV FIRST+处理
数据
请访问http://parrot.airinov.com,然后遵照屏幕显示
的步骤来处理您的数据。
欲了解更多信息,请访问www.parrot.com/support

368
PARROT DISCO更新
1. 将Parrot Skycontroller 2与Parrot Disco-Pro相
连。
2. 通过USB导线,将智能手机或平板电脑与Parrot
Skycontroller 2相连。
3. FreeFlight Pro应用程序自动启动。
4. 在FreeFlight Pro应用程序中,按下更新。
5. 应用程序搜索更新文件。
6. 如果应用程序找到一个更新文件,请选择该文
件,并按下OK。
7. 应用程序下载更新文件。
8. 出现一个弹出窗口,并通知您无人机将重启。
9. 按下退出
在更新文件安装过程中,Parrot Disco-Pro将自
动重启。该过程可能持续几分钟。一旦更新完
毕,FreeFlight Pro应用程序将自动重启。

369
简体中文
指示灯变化
蓝色闪烁 Parrot Disco-Pro启动中。
绿色闪烁 Parrot Disco-Pro监测到GPS信号,并准备好
起飞。
黄色闪烁 Parrot Disco-Pro更新中。
请勿关闭Parrot Disco-Pro。
红色和蓝色闪烁
Parrot Disco-Pro监测到电量方面的问题。
> 请联系您的经销商或访问www.parrot.com/
support网站的支持页面。
红色闪烁
Parrot Disco-Pro监测到发动机错误。
> 在FreeFlight Pro应用程序上出现一条错误
信息。请参阅www.parrot.com/support网站
上的错误代码表。
零件
您可在我们的网上商店购买Parrot Disco-Pro零件:
www.parrot.com。
欲了解有关零件安装的更多信息,请参阅支持页面的
视频教程。

370
技术规格
传感器
• 超声
• 高度仪
• 高速立式相机
• 皮托管:速度传感器
惯性导航系统
• 三轴陀螺仪
• 三轴加速计
• 三轴地磁仪
设备
• 双核CPU ARM® Cortex® -A9
• 内闪存:32Go
WIFI及传输
• 网络接入点
• 接入Wi-Fi类型,2根双频天线(2.4和5GHz),多信道输入输出
• 配合Parrot Skycontroller 2使用,覆盖范围可达2公里
可拆卸电池
• 3节2700 mAh/25A LiPo锂电池
• 电池续航时间:45分钟
• 额定电压:11.1V
• 持续放电电流21.6A
• 最大充电电流3.5A
• 工作适宜温度:-20°C-60°C

371
简体中文
尺寸
• 重量:940 gr
• 大小:1150mm×580mm×120mm
• 翼展:1150mm
GPS
• 内置GPS
• GPS+GLONASS
性能
• 发动机:1280kv
• 伺服发动机:5V
• 可安装RF SBUS接收器、SUMD、CPPM
视频和照片
• 1080P高清相机
• 视频流:360p/720p
软件
• Linux®&开源SDK
充电器
• 输入电压:100-240V,50h-60Hz,1.2A
• 输出电压:最大12.6Vdc,3.5A
• 最高海拔:海平面以上2000米
• 工作适宜温度:0°C-40°C
PARROT DISCO
• 工作适宜温度:0°C-40°C
• 最大电流:15A
• 额定电压:11.1V

372
一般信息
Parrot Disco的使用应遵守各国家的民航规则,并在适合所选飞行的区域执
飞,以便始终确保人员、动物、物产安全。
在Parrot Disco执飞前,请了解当地民航规则。
附件与零配件
可于Parrot零售商处或www.parrot.com网站购买附件和零配件。
使用和保养注意事项
驾驶员应始终目视跟踪Parrot Disco并控制其飞行轨迹。
在某些公共场所(如火车站、飞机场等)或公共道路上使用Parrot Disco可能
不被允许。
一旦Parrot Disco螺旋桨处于运行状态,它可能会对人员、动物或物体造成伤
害。始终与Parrot Disco保持安全距离。起飞阶段始终要警惕Parrot Disco的
螺旋桨。仅可使用Parrot Drones SAS公司指定专用零配件。
如沙粒或灰尘进入Parrot Disco,这将可能导致Parrot Disco无法再正常运
行,影响可能无法逆转。
请勿在雨天、强风、雪天等恶劣天气条件下或能见度不足时(夜间)使用
Parrot Disco。
飞行时,请远离高压线、建筑物或具潜在危险的其他区域。
请勿在液态物质附近使用本设备。请勿将Parrot Disco放在水边或潮湿表面,
这可能导致不可逆的损坏。
请避免让Parrot Disco承受剧烈的高度变化。
请勿将Parrot Disco放在阳光下。
切勿吞咽小零件,危险!包装不属于产品的一部分,丢弃时请遵守相关安全规
定。
WIFI
使用Parrot Disco前,请了解飞行地Wi-Fi®频率使用限制规定。某些频率可能
受限或被禁止。比如,在某些国家,在室外禁止使用Wi-Fi 5 GHz频段。
请尊重他人隐私和物产影像权。
未经当事人许可录制和传播他人影像可能构成对他人隐私的侵犯,您因此要承
担相应责任。在摄制和录制前,请征询当事人许可,尤其是如果您希望保存
和/或传播录制内容时。请勿传播有辱人格或可能影响他人声誉或尊严的影像。
未经物产所有者许可,录制和传播物产图像可能构成对他人影像权的侵犯,您
因此要承担相应责任。请在拍摄物产前,先征求物主和/或物产知识产权所有
人的许可。
电池(PARROT DISCO和PARROT SKYCONTROLLER 2)

373
简体中文
注意:未能遵守使用说明的操作可能导致严重人身伤害,对电池造成不可逆转的
损坏,并引发火灾、冒烟或爆炸。
在充电或使用前,请仔细检查电池情况。如电池遭受冲击,或有异味、过
热、变色、变形、出现泄漏等异常现象,应立即更换。切勿使用其他充电器
为电池充电,经认可的LiPo锂充电器除外。始终使用与LiPo锂电池对等的充
电器或与LiPo锂电池对等的设备。不建议使用产品随带充电器以外的其它充
电器。严禁涓流充电,严禁低于2,5伏每单位的充电。电池温度永远不能超过
60°C(140°F),否则电池可能受损或着火。切勿在可燃烧表面、可燃物附
近或车内充电(最好将电池放在不易燃和不导电的容器内)。切勿在无人监
视的情况下为电池充电。严禁拆卸或修改布线或穿透基本构成单位。始终确保
充电器的输出电压与电池的电压相符。切勿将电池置于短路状态。请勿将LiPo
锂电池置于潮湿、阳光直晒或温度可能超过60°C的地方(比如暴晒下的汽车
内)。始终将电池放在儿童接触不到的地方。
注意
如果用不兼容的电池替代PARROT DISCO的电池,这可能引起爆炸。
丢弃废弃电池时,请遵守相关规定。
保修
如需了解保修条款,请参阅向您出售Parrot Disco-Pro AG经销商提供的一般
销售条款。
如何回收该产品
本产品上或使用手册上的这一标志表示:在本产品达到使用寿命后,不
应与其他生活垃圾一起丢弃。随意丢弃垃圾会对环境或人体健康造成不
良影响。请将本品与其他类型的垃圾分开,并以负责的方式进行回收处
理。这一做法会促进物质资源的可持续再利用。我们建议您联系向您出售产品
的经销商或向您所在地的市政府进行咨询,以便了解在哪里、如何回收Parrot
Disco、Parrot Skycontroller 2和Sequoia。
欧盟合规声明
该设备可在以下国家使用:德国、奥地利、比利时、保加利亚、塞浦路
斯、克罗地亚、丹麦、西班牙、爱沙尼亚、芬兰、法国、希腊、匈牙
利、爱尔兰、意大利、拉托维亚、立陶宛、卢森堡、马耳他、荷兰、波兰、葡
萄牙、捷克、罗马尼亚、英国、斯洛伐克、斯洛文尼亚、瑞典。
欧盟成员国对室外频率的使用限制:仅能使用低于5Ghz频段的第一子频段
(5150-5250MHz)。
Parrot Drones公司:174 quai de Jemmapes, 75010 Paris, France,作
为唯一责任人声明:根据R&TTE 1999/5/CE法令、低电压2014/35/UE法令和
ROHS 2011/65/CE法令的规定,在本用户指南中描述的产品符合以下技术标
准:EN301489-1、EN301489-17、EN300440-1、EN300328、EN300893、
EN300440-2、EN60950-1、EN62321。
http://www.parrot.com/ce/?parrot-disco

374
加拿大合规声明
本设备符合加拿大工业部适用于免证书无线电设备的无线电标准规范。其使用
必须满足以下两个条件:(1)该设备不应造成信号干扰,(2)使用者必须接受
所受到的任何无线电干扰,即使这一干扰可能妨碍该设备的正常运行。该B类
数码设备符合加拿大NMB-003标准。
加拿大工业部联邦通信委员会
为符合加拿大工业部联邦通信委员会关于通讯设备在射频暴露方面的要求,本
产品的天线应与人员之间保持至少20厘米的距离。为确保符合这一规定,不
建议在低于该距离的条件下使用本品。
商标
Parrot以及Parrot标识是Parrot S.A.公司商标。
Parrot Disco-Pro AG、Parrot Disco、Parrot Skycontroller、Sequoia、Parrot
C.H.U.C.K及各自品牌标识为Parrot Drones SAS公司商标。
App Store为Apple Inc.公司服务部门的商标。
Google Play和Google Maps为Google Inc.谷歌公司的商标。
Wi-Fi®为Wi-Fi Alliance®
Linux是Linus Torvalds在美国和其它国家登记注册的商标。
Pix4D和Pix4Dcapture是Pix4D SA公司注册的商标。
Airinov和Airinov First+是Airinov SAS公司的商业标识或注册商标。
本用户指南中提及的其它商标分别归其相应所有者所有。
制造商信息
Parrot Disco和Sequoia由以下厂家制造:Parrot Drones SAS公司,地址:
174 Quai de Jemmapes - 75010 Paris(法国);法国企业注册号:Paris
808 408 074;网址:www.parrot.com

375
日本語
お客様のParrot Disco-Pro AG™には、以下が同梱されていま
す。
1. ドローン「Parrot Disco™」一台、
2. 自動操縦システム「Parrot C.H.U.C.K」™
3. 操縦パネル「Parrot Skycontroller 2 ™」一台。アプリ
FreeFlight Pro™をスマートフォンあるいはタブレット
にダウンロードすることで、お客様のParrot Discoを
Parrot Skycontroller 2を利用して操縦することが可能に
なります。このアプリは無料ですが、In-App Purchase
が含まれていることがあります。またこれてParrot
Discoのキャリブレーションを行うこともできます。
4. 「 Sequoia」™には以下が含まれています。
(a)植物が反射する光を感知するマルチスペクトラムセ
ンサー及び
(b)太陽光線の照度を記録するSunshine sensor
5. 撮影した画像からNDVIインデックスマップと地帯区分
を作成するAirinov First+™。画像はスマートフォンある
いはタブレットにダウンロードできる無料アプリケーシ
ョンPix4Dcapture™を使って撮影します。

376
警告:
1. Parrot Discoは玩具でありません。そのため、この製品
は14歳未満の子供によって操作されてはなりません。
2. Parrot Discoを使用する前に、
(a)このユーザーガイドと、インターネットサイト
www.parrot.com にて入手できる全ての情報と文書をよ
くお読みになってください。このサイトの内容は予告無
しに更新されることがあります(これらの情報と文書を
まとめて「Parrot が発行している文書」と呼びます)。
このマークが表示されている項目に、特にご留意くださ
い。
(b)ドローンとその付属品の使用に適用される法規制に
ついて情報を得てください(それらの法規制をまとめて
「適用される法規制」と呼びます)。そして、
(c) Parrot Discoは第三者とお客様自身に物質的あるいは
身体的損害を与えることがあり、場合によっては大けが
や死亡事故を引き起こす可能性があることを意識してく
ださい。
3. Parrot Drones SASとその関連会社によって、販売促進
と広告キャンペーンを目的に作成されたビデオと写真
は、専門家と経験のあるパイロットの協力によるもので
あることにご留意ください。PARROT DISCOとその付属
品の使用に関し疑問がある場合は、Parrot が発行してい
る文書の最新版を常に読むようにしてください。
4. 適用される法の範囲内において、PARROT DRONES
SAS、その関連会社、販売者、小売業者は、PARROT
DISCOを利用するお客様自身あるいは全てのユーザーが
Parrotが発行している文書あるいは適用される法規制を
直接的あるいは間接的に守らなかったことにより発生し
た、いかなる損害について責任を負うものではありませ
ん。

377
日本語
PARROT DISCOPRO AG
製品概要
PARROT DISCOPRO
補助翼
サーボモーター
プロペラ 補助翼
サーボモーター
カバー
魚眼レンズカ
メラ
on/oボタンと表示ランプ

378
C.H.U.C.K自動操縦モジュール
マイクロUSBポート
RCリモコン用ポート
バッテリーコネクター
サーボコネク
ター
センターモーターコネクター
SequoiaのマイクロUSB
電源ポート

379
日本語
PARROT
SKYCONTROLLER 2
の概要
アンテナ
モバイル端末の取付けアタ
ッチメントの位置
On/O
離陸地点に戻る
離陸する/
着陸する
飛行中:動画録画を開始/停止
設定メニュー:戻る
飛行中:
写真を撮影する
設定メニュー:
確認し、送信する
諸設定
USBポート

380
カメラの露出
表示モード
FreeFlight Proで直視型/
没入型の画像
カメラの垂直方向
USBポート

381
日本語
SEQUOIAの概要
Sequoiaは、マルチスペクトラムセンサーと放射照
度センサーであるSunshine Sensorにて構成されて
います。
マルチスペクトルセンサー
SUNSHINE SENSOR
シャッターと
表示ランプ
マイクロUSBポ
ートホスト
マイクロUSBポー
トデバイス
近赤外線セン
サー
レッド光線
センサー
レッドエッジ
光線センサー
グリーン
センサー
RGBセンサー
SDメモリーカード
スロット
環境光センサー
マイクロUSBポ
ートデバイス
マルチスペクトラルセンサーのマイクロUSBポー
ト(ホスト)は、Sunshine SensorのマイクロUSB
ポート(デバイス)に必ず接続します。

382
始める前に
FREEFLIGHT PROと
PIX4DCAPTUREをダウンロー
ドします。
App Store®もしくはGoogle Playにアクセスし、
無料のアプリケーションFreeFlight Proと
Pix4Dcaptureをスマートフォンあるいはタブレット
にダウンロードします。
FreeFlight Pro は、ドローンの自由操縦を可能にす
るParrotの公式アプリです。
Pix4Dcapture は、調査したい区域の上空で撮影する
ための自律飛行プログラムを作成する無料のアプリ
ケーションです。
PARROT DISCOPROのバッテリー
を充電する
Parrot Disco-Proのバッテリーが非接続になって
いることを確認してください。
1. お客様の国に該当する差込みプラグ(同梱されて
います)をお選びになり、充電器に差し込みま
す。
2. ケーブルを充電器につないでください。
3. バッテリー を充 電 器 のケ ーブルにつないで から、充電
器 を コン セ ント に 接 続 しま す。
表示ランプが充電中には赤色になり、充電が完了す
ると緑色に変わります。
約55分の充電で、約30分間使用することができま
す。

383
日本語
PARROT SKYCONTROLLER 2
のバッテリーを充電する
1. お客様の国に該当するアダプターをお選びにな
り、充電器に固定します。
2. 充電器のケーブルをParrot Skycontroller 2に接続
し、充電器をコンセントに差し込みます。約1時間
40分の充電で、4時間使用することができます。
PARROT DISCOの準備をします。
1. Parrot Disco-Proのカバーを取り外します。
2. Sequoiaを取り出し、レンズの保護カバーを外し、
バッテリー取付け位置にバッテリーを差込みます。

384
4. Parrot Disco-Proのカバーを取付けます。
3. Sequoiaを定位置に取り付け、バッテリーをParrot
Disco-Proに接続します。マルチスペクトラルセン
サーのマイクロUSBデバイスケーブルを、Parrot
C.H.U.C.K.のマイクロUSB電源ポートに接続します。

385
日本語
Parrot Disco-Proに翼を取付けます。
補助翼がサーボモーターに完全にはめ込まれて
いるのをご確認ください。
翼を固定します。
翼を取り外すには、これを引き抜いてください。
サーボモーターを手で動かさないでください。

386
飛行前の確認
各飛行セッションに先立って、Parrot Disco-Proの
次の点を確認してください。
法規について
飛行を予定している場所において、Parrot
Disco-Proの飛行が許可されているか確認してく
ださい。
飛行場所でWi-Fi®周波の使用が制限されていな
いか確認してください。
飛行の条件
以下の5つの条件を必ず守ってください。
1. Parrot Disco-Proの離着陸に際しては、直径80
メートル四方の空間が開けていることを確認
してください。飛行区域に、視界と飛行を妨
げる障害物がないことを確認してください。
2. Parrot Disco-Proを、夜間に飛行させないでく
ださい。
3. Parrot Disco-Proを、都市部や駅や空港などの
公共の場では飛行させないでください。
4. 最適な飛行及び撮影条件を得るため、気象情
報をご確認ください。Parrot Disco-Proは、
雨、霧、雪、秒速12mもしくは時速43km以上
の風が見られる際には、飛行させないでくだ
さい。
5. Pix4Dcaptureで作成した飛行プログラムの高度
(離陸地点から計算)が、周辺の障害物を避け
るのに十分であることをご確認ください。

387
日本語
PARROT DISCOPRO
Parrot Disco-Proの翼が正しく固定されているこ
とを確認してください(「翼を固定する」ページ参
照)。
Parrot Disco-Proのバッテリーならびにリモコン
が充電されていることを確認してください(「バ
ッテリーを設置する」ページ参照)。
Parrot Disco-Proのカバーが正しく閉められてい
ることを確認してください。
Parrot Discoの表示ランプが緑色に点滅してい
るか確認してください。それは、Parrot Disco
がGPS信号を検出したことを示しています。
Sunshine Sensorに日光が当たっているのをご
確認ください。
Parrot Discoが正しく着陸できるよう地表面が
整っているかご確認ください。
SEQUOIA
使用する前に、保護カバーが外されているのを
ご確認ください。
Sequoiaが、Parrot C.H.U.C.K.の右側のマイ
クロUSBポートに接続されているかご確認くださ
い。
カメラのレンズに汚れが無いかご確認くださ
い。同梱されているマイクロファイバーを使って
汚れを取り去ってください。
飛行中に全ての写真を撮影できるよう、マルチス
ペクトルセンサーの内蔵メモリーのメモリー容量を
十分に確保してください。

388
2つのモジュールがドローンにしっかり固定され
ているのを確認し、飛行中に外れることがないよう
にしてください。
マイクロUSB デバイス側がケーブルでドローン
とマルチスペクトルセンサーを接続しているかご確
認ください。Sunshine sensorとマルチスペクトラル
センサーがマイクロUSBケーブルで正しく接続され
ているかもご確認ください。
2つのモジュールがキャリブレーションされてい
るかご確認ください。詳細につきましては「Sequoia
をキャリブレーションする」の項をご覧ください。
Sunshine sensorの緑色のランプが点くのをお待
ちください。GPS/GNSS位置測定機能がオンになる
と、ランプが緑色に光ります。
PARROT DISCOPRO
を接続する
PARROT SKYCONTROLLER 2と
PARROT DISCOを、FREEFLIGHT
PROを利用して接続する
Parrot Discoを平らな面に置きます
1. Parrot Disco-ProのOn/Oボタンを押します。
>表示ランプが赤く点滅し、GPSが安定する
と、緑色に変化します。
2. Parrot Skycontroller 2のOn/Oボタンを押し
ます。

389
日本語
3. 表示ランプが緑色に継続して光るまで待ちます。
Parrot Discoが接続されました。
表示ランプが赤く点滅し続ける場合には、Parrot
Discoをキャリブレーションする必要があります。
キャリブレーションの方法:
4. アプリケーション
FreeFlight Pro を開
き、Fly & Film > >
位置、距離、限界にアク
セスし、キャリブレーシ
ョンするを押します。
5. ピトーセンサーをキャリ
ブレーションします。そ
れには、風に背を向けて
立ち、Parrot Discoのカ
メラを地面に向けます。
6. Parrot DiscoをZ軸上で
回転させます(上下軸回
り、ヨーイング)。
7. Parrot DiscoをY軸上で
回転させます(縦回り、
ピッチング)。
8. Parrot DiscoをX軸上で
回転させます(横回り、
ローリング)。
>表示ランプが緑色に点滅します。Parrot Discoの
キャリブレーションが完了しました。
Z
Y
X

390
PARROTSKYCONTROLLER2をスマート
フォンに接続する
1. Parrot Skycontroller 2にスマートフォン用サポー
ト台を固定します。
B
A
B
A
スマートフォンのサイズに合わせて回転させてく
ださい。 そのためには、上部をおさえながら右
サイドに回します。
B
A
B
A

391
日本語
2. サポート台の右サイドのボタンを押し、完全に開き
ます。
3.スマートフォンをサポート台上に置きます。
B
A
BA
4.スマートフォンをサポート台に固定します。
5.スマートフォンのUSBケーブルで、スマートフォン
とParrotSkycontroller2を接続します。
B
A

392
操縦パネル左側
B
A
B
A
B
A
B
A
B
A
B
A
B
A
B
A
加速する
減速する
操縦パネル右側
下降する
上昇する
右に飛行する
左に飛行する
右軌道での滞空
左軌道での滞空飛行
操縦モード
PARROT SKYCONTROLLER 2
Pix4Dcaptureの自律飛行プログラムの実行中いつ
でも、Parrot Skycontroller 2のコマンドのどれか
を押すことでドローンを再び操縦することができま
す。

393
日本語
自律飛行プログラム
PIX4DCAPTUREを使って自律飛行
プログラムを作成する
最初に始動させる時に、ドローンのリストから
Parrot Disco-Proを選択し、自律飛行プログラムの
作成に進みます。
Grid:ドローンは撮影区域の大部分を覆うように碁
盤目状に飛行します。
自律飛行プログラムを作成する
際に、開始地点と着陸進入コ
ースを決めます。着陸区域とし
て、30°の角度に200mの距離に
渡って着陸するのに十分な場所
を確保してください。
自律飛行プログラムとその作成方法についての詳し
い情報は、次のPix4Dcaptureのサポートのページ
をご参照ください。
Android:
https://www.parrot.com/uk/pix4dcapture-android
iOS:
https://www.parrot.com/uk/pix4dcapture-ios

394
飛行プログラムを開始する
1. Parrot Disco-Proのスイッチをオンにし、Parrot
Skycontroller 2に接続してください。ドローンと
Parrot Skycontroller 2は、自動的に接続されま
す。
2. スマートフォンあるいはタブレットをParrot
Skycontroller 2のUSBポートに接続します。
3. アプリケーションPix4Dcaptureを始動させます。
4. メインページにて、ミッションのタイプ を選択
します。
5. 実行させる自律飛行プログラムを作成します。
6. プログラムの開始地点「start waypoint」と下降
角度を指定します。
7. START
>ユーザーが開始する位置に構えられるよう、カウ
ントダウンが始まります。
>カウントダウンの後、Parrot Disco-Proは飛行の準
備ができ、モーターが回転し始めます。離陸する
のページをご参照ください。
>自律飛行プログラムを終了すると、飛行プログラ
ムの着陸進入コースに入り、着陸します。

395
日本語
離陸する
離陸は向かい風で行います。
1. 風が吹いている方向に向かって立ち、Parrot
Disco-Proの本体を片手で持ちます。
2. Parrot Disco-Proのモーター周辺に接触する物
がないことを確認してください。
3. アプリケーションPix4Dcaptureにて自律飛行プ
ログラムを作成後、Startボタンを押します。
Freeflight Proを使って自由飛行させる場合は、
Parrot Skycontroller 2のボタン を押して離陸を開
始します。
>Parrot Disco-Proのモーターが回転し始め、1秒
で最高速度に達します。
4. Parrot Disco-Proをやや上に向けて放ちます。

396
>Parrot Disco-Proが離陸します。そして空中50m
に上昇した後、直径60mの円を描きます。
注意事項:Parrot Disco-Proのモーターを
停止させるには、Parrot Skycontroller 2
のボタン を再度押してください。
ボタン を押した後、10秒以内に
Parrot Disco-Proを放たなかった場合、
モーターは停止します。その場合は、
再度ボタン を押して、離陸を開始さ
せます。

397
日本語
出発地点に戻る
Parrot Disco-Proを、Pix4Dcaptureで作成したプ
ログラム外の出発地点に戻らせるには、Parrot
Skycontroller 2のボタン を押してください。
>Parrot Disco-Proは出発地点に戻り、その位置で50mの高度
を保ちつつ直径60mの円を描きます。
Point de départ
周囲に障害物が無いかご確認ください。
着陸する
Parrot Disco-Proを破損させないよう、草地など
の着陸に適した場所に着陸させてください。
直線着陸
1. Parrot Disco-Proを向い風になるよう位置させ
ます。
2. Parrot Disco-Proの高度を最低限にまで下げて
ください。

398
3. Parrot Skycontroller 2の ボタンを押します。
>Parrot Disco-Proが直線距離で下降し、まっすぐ
に静かに着陸します。
注意事項:Parrot Disco-Proの下降時に
は、動きをコントロールすることができ
ます。(上昇、下降、左回転、右回転)
80 m
50 m
10 m
着陸をキャンセルするには、Parrot Skycontroller 2
のボタン を押します。
Parrot Disco-Proが空中50mに上昇し、直径60mの
円を描きます。
ドローンの滑走路は少なくとも50mなければな
りません。
円状着陸
円状着陸の際には、着陸速度を緩めるため
に、Parrot Disco-Proがひとりでに向かい風になる
ように着陸します。
1. Parrot Disco-Proを着陸させるには、最低直径
80mの空間が必要です。

399
日本語
2. Parrot Skycontroller 2を使って軌道での滞空を
させている時は、 を押してください。
>Parrot Disco-Proがらせん状に着陸します。
80 m
50 m
10 m
円状着陸には広い空間が必要とされます。
接続の切断
Pix4Dcaptureで作成したプログラムを利用せずに
飛行している間に接続が切れた場合、Parrot Disco-
Proは直径60mの円を事前に設定してある時間中描
き続けます(デフォルトで10秒に設定してありま
す)。
接続が回復しない場合、Parrot Disco-Proは出発地
点に戻り、50mの高度を保ちつつ直径60mの円を
描きます。
5分経過しても接続が回復しない場合には、Parrot
Disco-Proが円状着陸を行います。

400
PARROT DISCOPROをオ
フにする
Parrot Disco-Proをオフにするには、On/Oボタン
を長押しします。
>表示ランプが赤く点滅した後に、Parrot Disco-
Proがオフになります。
撮影した写真を取り込む
飛行中は、マルチスペクトラムセンサーの内蔵メモ
リーに写真が保存されます。
1. マルチスペクトラムセンサーをお客様のコンピ
ューターに接続してください。
2. 飛行中に撮影された写真を取り込むことができ
ます。
SDメモリーカードに写真が保存された場
合、Sunshine SensorをSDメモリーカードのリーダ
ーとして利用することができます。それには、セン
サーのマイクロUSB デバイスとコンピューターを
接続してください。
Sequoiaのスイッチが入っている間は、SDメモリー
カードを抜き取らないでください。

401
日本語
AIRINOV FIRST+
を使ったデータ処理
http://parrot.airinov.com にアクセスし、画面に表
示されるデータ処理の手順に従ってください。
詳細につきましては、インターネットサイト
www.parrot.com/supportにアクセスしてください。
PARROT DISCOPRO
を更新する
1. Parrot Skycontroller 2をParrot Disco-Proに接
続します。
2. USBポートから、スマートフォンあるいはタブ
レットをParrot Skycontroller 2に接続してくだ
さい。
3. アプリケーションFreeFlight Proが自動的に始
動します。
4. アプリケーションFreeFlight Pro内で、更新す
るを押します。
5. アプリケーションは更新内容を検索します。
6. アプリケーションが更新されたファイルを検出
した場合、それを選択してOKを押してくださ
い。
7. アプリケーションがアップロードファイルをダ
ウンロードします。
8. ポップアップウィンドウが開き、ドローンの再
起動を通知します。

402
9. 移動するを押してください。
Le Parrot Disco-Proは、更新内容のインストール
中に自動的に再起動します。それには数分かかるこ
とがあります。更新が終わると、アプリケーション
FreeFlight Proが自動的に再起動します。

403
日本語
表示ランプについて
青色ランプが点灯 Le Parrot Disco-Proは始動中です。
緑色に点滅 Parrot Disco-ProがGPS信号を検出し、離陸
の準備ができたことを示しています。
黄色に点滅
Parrot Disco-Proの更新を実行しています。
Parrot Disco-Proの電源を切らないでくだ
さい。
赤と青に点滅
Parrot Disco-Proがバッテリーに関するトラブ
ルを感知したことを示しています。
> 販売者に問い合わせるか、
www.parrot.com/support
のParrot Disco-Pro
のサポートページから情報を得てください。
赤色に点滅
Parrot Disco-Proがモーターに関するエラー
を感知したことを示しています。
> アプリケーションFreeFlight Proにエラ
ーメッセージが表示されます。その場合
は、www.parrot.com/supportに記載されて
いるエラーコードの詳細をご参照ください。
交換可能部品
Parrot Disco-Proの交換部品は、インターネットサ
イトwww.parrot.comから購入可能です。
交換部品の取付けに関する詳細は、サポートページ
のチュートリアルビデオをご覧ください。

404
技術仕様
センサー
• 超音波
• 高 度 計
• ハイスピード垂直カメラ
• パイロット測定計:速度センサー
慣性飛行システム
• 3軸ジャイロスコープ
• 3軸加速度計
• 3軸磁力計
内蔵情報処理機器
• CPU Dual core ARM® Cortex® -A9
• 内蔵フラッシュメモリー:32 Go
WIFI通信と通信能力
• ネットワークアクセスポイント
• Wi-Fi acタイプ、バイバンドアンテナ(2.4と5GHz)、複数のイン
プットとアウトプット
• Parrot Skycontroller 2と2 kmまでの通信距離
取り外し式バッテリー
• 2700 mAh / 25A 3セルリチウムポリマーバッテリー
• バッテリー持続能力:45分
• 電圧力:11.1V
• 継続放電力21.6A
• Charge à 3,5A max
• 機能範囲:マイナス20°Cから60°C

405
日本語
重量と寸法
• 重量:940g
• 寸法:1150 mm x 580 mm x 120 mm
• 翼幅:1150 mm
GPS
• 内蔵GPS
• GPS + GLONASS
性能
• モーター:1280kv
• サーボモーター:5V
• RF SBUS、SUMD、CPPM受信器取り付け可
ビデオと写真
• 1080pフルHDカメラ
• ビデオストリーミング:360p/720p
ソフトウェア
• Linux®とOpen source SDK
充電器
• インプット:100-240V、50h-60Hz、1.2A
• アウトプット:最大12,6Vdc、3.5A
• 最大高度:海抜2000m
• 機能範囲:0°Cから40°C
PARROT DISCO
• 機能範囲:0°Cから40°C
• 最大電流:15A
• 公称電圧力:11.1V

406
総合情報
Parrot Discoは、常に第三者、動物、所有物の安全を確保するため、各国の民
間航空の規則に従い、その飛行に適した区域にて利用されなければなりませ
ん。
Parrot Discoを飛行させる前に、関係する地域の民間航空規則をご確認くださ
い。
アクセサリーと交換パーツ
アクセサリーと交換パーツは、インターネットサイトwww.parrot.comもし
くはParrot製品販売店から購入可能です。
使用上の注意とメンテナンス
操縦者は、飛行中にParrot Discoが視界内にとどまっているように留意し、そ
の航路をコントロールしてください。
Parrot Discoの使用は、駅や空港などの特定の公共の場では禁止されているこ
とがあります。
Parrot Discoは、そのプロペラが動き出した瞬間から、第三者、動物、物品に
損害を生じる可能性を有します。Parrot Discoとの間には、常に安全な距離を
確保してください。離陸時にはParrot Discoのプロペラによく注意してくださ
い。Parrot Drones SASに指定された付属品のみを使用してください。
Parrot Disco内にほこりや砂が入った際には、正常な機能が決定的に損なわれ
る可能性があります。
Parrot Discoは、悪天候時(雨、強風、雪、霧)や、夜間などの視野が十分では
ない時には使用しないでください。
Parrot Discoは、高電圧、建物、危険性を有する場所から常に距離をおくよう
にしてください。
液体の近くでこの機器を使用しないでください。Parrot Discoを水上、湿っ
た表面に置かないでください。正常な機能が決定的に損なわれる可能性があ
ります。
Parrot Discoを急激な高度変化にさらさないでください。
Parrot Discoを直射日光のもとに放置しないでください。
小さなパーツは、誤飲のおそれがあります。パッケージは製品の一部ではあ
りません。安全のために廃棄してください。
WIFI
飛行場所で、Wi-Fi周波の使用が制限されていないか確認してください。一部
の周波数域は制限されているか禁止されている可能性があります。例えば、
一部の国においてはWi-Fi 5 GHzの周波数を屋外で利用することは禁止され
ています。
プライバシー権、肖像権の順守に関する注意点
許可を得ることなく第三者のイメージを撮影して公表することは、プライベ
ートの損害として法的に追及される可能性があります。公表する意思を持っ
た写真や動画に第三者が写る場合には、撮影に先立ってその許可を求めるよ

407
日本語
うにしてください。第三者の名誉棄損となるような画像は公表してはなりま
せん。
所有主あるいは知的所有権者の許可なしに、物品を撮影することは、物品の
イメージ侵害として法的に追及される可能性があります。所有主、知的財産
権保有者の許可を事前に求めてください。
バッテリー(PARROT DISCOとPARROT SKYCONTROLLER 2)
注意 これらの指示に背いた場合には、重傷を招いたり、バッテリーを決定的
に破損したり、火災、噴煙、爆発を生じさせる可能性があります。
バッテリーを充電、使用する際には、その状態をよく確認してください。
バッテリーが衝撃を受けた、匂いを発する、過度に熱を帯びる、色落ち、変
形、もれが見られる場合には、別のものと交換してください。LiPo用充電器
以外のものは決して使わないでください。LiPo用の充電器、もしくはLiPo電
池バランサーのみを使用します。製品付属のバッテリー以外のものを使用し
ないことが推奨されます。スローチャージ、2,5ボルト以下の充電は決して行
わないでください。バッテリーの温度は60°C (140°F) を超えてはなりま
せん。その温度を超えると、バッテリーの破損や発火を招く可能性がありま
す。引火するおそれのある物の上や近く、乗り物内では充電しないでくださ
い(バッテリーは引火や伝達性のない容器の中にしまうようにします)。監視
のない状態で充電を行わないでください。ケーブルケースを改造、分解した
り、電池に穴をあけたりしないでください。充電器の出力電力と、バッテリ
ーの電力が対応しているようにご注意ください。バッテリーをショートさせ
ないでください。LiPoバッテリーは、湿度や直射日光にさらさないでくださ
い。直射日光下の60度を超える環境(車内など)も避けてください。子供の手
の届かないところに保管してください。
注意
PARROT DISCOのバッテリーを互換性の無いバッテリーに交換すると、
爆発する危険性があります。
使用済みのバッテリーは、指示に従って廃棄してください。
保証
保証条件を知るには、お客様がParrot Disco-Pro AGを購入した、販売者の利
用規約をご参照ください。
この製品をリサイクルする方法について
製品あるいは製品の付属書類に表示されているこのマークは、その製
品が使えなくなった際に家庭ごみとして廃棄してはならないことを示
しています。製品に適していない廃棄方法は、環境や人の健康に害を
及ぼすことがあるため、責任を持って他の廃棄物と分別しリサイクルしてく
ださい。それにより、製品を資源として長期に渡り再利用することができま
す。お客様が利用した販売者あるいは市役所に連絡して、Parrot
Disco、Parrot Skycontroller 2とSequoiaをどこでどのようにリサイクルでき
るかお尋ねください。

408
EU適合宣言書
この機器は以下の国において利用が可能です。ドイツ、オーストリア、
ベルギー、ブルガリア、キプロス、クロアチア、デンマーク、スペイ
ン、エストニア、フィンランド、フランス、ギリシャ、ハンガリー、アイル
ランド、イタリア、ラトビア、リトアニア、ルクセンブルク、マルタ、オラ
ンダ、ポーランド、ポルトガル、チェコ、ルーマニア、イギリス、スロバキ
ア、スロベニア、スエーデン。
欧州連合の加盟国における屋外での利用規制は、5Ghzの始まりのサブバンド
(5150-5250MHz)のみに適用されます。
Parrot DRONES、174 quai de Jemmapes、75010 Paris、France は、このユ
ーザーガイドに記載されている製品が、R&TTE 1999/5/CE指令、2014/35/UE
低電圧指令、ROHS 2011/65/CE指令に準拠する技術規格EN301489-1、
EN301489-17、EN300440-1、EN300328、EN300893、EN300440-2、
EN60950-1、EN62321に適合することを、その責任において宣言します。
http://www.parrot.com/ce/?parrot-disco
カナダにおける適合宣言書
当器具は、ライセンスを免除された無線機器に適用される、カナダ産業の
CNRに適合しています。器具の生産、販売は、次の2つの条件を満たすこと
により許可されています。(1)器具は電波妨害を引き起こしてはならないこと
(2)器具のユーザーは、電波妨害が器具の作動に悪影響を及ぼすことがあっ
ても、それによって発生する全ての事象を自己責任によって受け入れること
このクラスBのデジタル器具は、カナダの規格NMB-003に適合しています。
FCC/IC無線認証
伝送装置の高周波(RF)に関するFCC/IC無線認証の要求事項を満たすには、
装置のアンテナと人の間の距離は最低限20cm保たれていなければなりませ
ん。その距離を下回って使用することは認証に適合せず、推奨されません。
商標
ParrotならびにParrotのロゴは、Parrot株式会社に帰属します。
Parrot Disco-Pro AG、Parrot Disco、Parrot Skycontroller、Sequoia、Parrot
C.H.U.C.Kの各製品ならびにロゴは、Parrot Drones SASの商標です。
App Storeは、Apple Inc.のサービスメーカーです。
Google PlayとGoogle Mapsは、Google Inc.の商標です。
Wi-Fi ®は、Wi-Fi Alliance®によって登録された商標です。
Linuxは、Linus Torvaldsの商標で、アメリカとその他の国に登録されています。
Pix4DとPix4Dcaptureは、Pix4D SAの登録商標です。
Airinov と Airinov First+ は、Airinov SASが登録したトレードマークあるい
は商標です。
本書に記載されているその他の商標は、それぞれの所有主に帰属します。
製造者に関する情報
以下が、Parrot DiscoとSequoiaの製造者です。Parrot Drones SAS - 174 Quai de
Jemmapes - 75010 Paris(フランス)- RCS Paris 808 408 074 - www.parrot.com

409
한국어
귀하가 구입하신 Parrot Disco-Pro AG™ 의 구성품은 다음과
같습니다.
1. "Parrot Disco"™ 드론
2. " Parrot C.H.U.C.K "™ 자동 조종 시스템
3. "Parrot Skycontroller 2 "™ 조종기. 스마트폰이나 태블릿에
FreeFlight Pro™ 애플리케이션을 내려받으면 Parrot
Skycontroller 2로 Parrot Disco를 조종하실 수 있습니다.
애플리케이션은 무료이지만 In-App Purchase가 포함되어
있을 수 있습니다. 애플리케이션을 이용해 Parrot Disco를
보정할 수도 있습니다.
4. " Sequoia"™ 센서는 구성품이 다음과 같습니다.
(a) 식물이 반사하는 빛을 포착하는 멀티 스펙트럼 센서
및
(b) 태양에서 방출되는 빛의 강도를 기록하는 Sunshine
Sensor 및
5. Airinov First+™ 서비스 액세스 권한. 사용자의
스마트폰이나 태블릿에 내려받은 무료 애플리케이션
Pix4Dcapture™을 사용해 촬영한 캡처 이미지를 갖고
NDVI(정규식생지수) 지도를 작성하고 분포 구역을 나눌
수 있게 해주는 서비스.

410
경고
1. Parrot Disco는 장난감이 아니므로 14세 미만의 아동이
사용하거나 조작해서는 안 됩니다.
2. Parrot Disco 사용 전 주의사항:
(a) 이 사용자 설명서와 www.parrot.com에 공개되어 있는
정보 및 문서자료를 모두 정독하십시오. 이들 정보와
문서자료들은 언제든지 사전 통지 없이 업데이트될 수
있습니다(이하 "Parrot 문서자료"). 기호가 포함된
항목에 특히 주의하십시오.
(b) 드론 및 부속품의 사용과 관련해 적용되는 법규를
숙지하십시오(이하 "적용되는 법규"). 아울러
(c) Parrot Disco가 사용자 자신과 타인에게 대인 피해 및/
또는 대물 손괴를 초래해 심각한 상해를 입히거나 죽음에
이르게 할 수 있음을 명심하십시오.
3. Parrot Drones SAS와 계열사들이 진행하는 프로모션과
광고 캠페인의 대상이 되는 동영상과 사진은 모두
전문가와 관록 있는 조종사들의 노력으로 제작되었음을
알려드립니다. PARROT DISCO 및 부속품의 사용과
관련해 궁금한 사항이 있으면 언제든지 최신 업데이트된
PARROT 문서자료를 참조하십시오.
4. 귀하와 다른 모든 제삼자가 PARROT DISCO를 사용하는
과정에서 PARROT 문서자료의 내용이나 적용되는 법규를
준수하지 않거나 위반해서 피해가 발생할 경우, 해당
법률이 허용하는 범위 안에서 PARROT DRONES SAS
와 계열사, 유통업체, 소매업체는 그런 피해에 대해 일체
책임이 없음을 알려드립니다.

411
한국어
PARROT DISCOPRO AG
부분 명칭
PARROT DISCOPRO
보조날개
서보모터
프로펠러 보조날개
서보모터
덮개
Fisheye 카메라
On/O 버튼과 표시등

412
자동 조종 모듈 C.H.U.C.K
마이크로USB 포트
원격조정 리모컨 포트
배터리 커넥터
서보 커넥터
중앙 모터 커넥터
Sequoia의 마이크로USB
전원 포트

413
한국어
PARROT
SKYCONTROLLER 2
부분 명칭
안테나
모바일 장치 거치대
On/O
버튼
출발 지점으로 귀환
이륙/착륙
비행 중: 동영상 녹화 시작/중지
설정값 메뉴: 뒤로가기
비행 중 :
사진 촬영
설정값 메뉴 :
확인
설정값
USB 포트

414
카메라 노출
디스플레이 모드
라이브뷰 / FreeFlight Pro를 통한
일인칭시점뷰
세로 방향 카메라
USB 포트

415
한국어
SEQUOIA 부분 명칭
Sequoia는 멀티 스펙트럼 센서와 조도 센서 Sunshine
Sensor로 구성됩니다.
멀티 스펙트럼 센서
SUNSHINE SENSOR
셔터와 표시등
마이크로USB
호스트 포트
마이크로USB 장치
포트
근적외선 센서
적색 센서
레드엣지
센서
녹색 센서
RGB 센서
SD카드 슬롯
조도 센서
마이크로USB
장치 포트
멀티 스펙트럼 센서의 마이크로USB 호스트 포트가
Sunshine Sensor의 마이크로USB 장치 포트에
연결되어야 합니다.

416
시작 전 준비 사항
FREEFLIGHT PRO와
PIX4DCAPTURE 내려받기
App Store® 또는 Google Play에서 무료 애플리케이션
FreeFlight Pro와 Pix4Dcapture를 스마트폰이나
태블릿에 내려받습니다.
FreeFlight Pro는 드론을 자유자재로 조종할 수 있게
도와주는 Parrot의 공식 애플리케이션입니다.
Pix4Dcapture는 관심 지역 상공에서의 사진
촬영을 위해 비행 계획을 만들 수 있는 무료
애플리케이션입니다.
PARROT DISCOPRO
배터리 충전하기
배터리를 Parrot Disco-Pro에서 분리해야 합니다.
1. 사용자의 국가에 적합한 플러그(제품과 함께 제공)
를 골라 충전기에 끼웁니다.
2. 충전기에 케이블을 연결합니다.
3. 충전기 케이블에 배터리를 연결한 다음 충전기를
전원 콘센트에 꽂습니다.
충전 중일 때는 표시등이 빨간색이었다가 충전이
완료되면 초록색으로 바뀝니다.
배터리 충전 시간은 약 55분이고 한 번 충전으로 약 30
분 동안 비행할 수 있습니다.

417
한국어
PARROT SKYCONTROLLER 2
배터리 충전하기
1. 사용자의 국가에 맞는 어댑터를 선택해 충전기에
꽂습니다.
2. 충전기의 케이블을 Parrot Skycontroller 2에 연결한
다음 충전기를 전원 콘센트에 꽂습니다. 충전
시간은 약 1시간 40분이고 한 번 충전으로 4시간
동안 사용할 수 있습니다.
PARROT DISCO 준비하기
1. Parrot Disco-Pro의 덮개를 엽니다.
2. Sequoia 센서를 분리해 렌즈 보호용 덮개를 뺀 다음
배터리 슬롯에 배터리를 넣습니다.

418
4. Parrot Disco-Pro의 덮개를 다시 덮습니다.
3. Sequoia 센서를 제자리에 다시 끼우고 배터리를 Parrot
Disco-Pro에 연결합니다. 그런 다음 멀티 스펙트럼
센서의 마이크로USB 장치 케이블을 Parrot C.H.U.C.K
에 있는 마이크로USB 전원 포트에 연결합니다.

419
한국어
Parrot Disco-Pro에 양쪽 날개를 모두
끼웁니다.
보조날개를 서보모터의 팔 속으로 끼워
넣습니다.
날개 부착하기
날개를 잡아당기면 뺄 수 있습니다.
손에 서보모터를 들고 움직이지 마십시오.

420
비행 전 점검 사항
Parrot Disco-Pro를 날리기 전에 항상 다음 사항을
확인하십시오.
관련 법규
비행 장소에서 Parrot Disco-Pro의 사용이
허용되어 있는지 확인하십시오.
비행 장소에서 Wi-FI® 주파수를 사용하는 데
제약이 있는지 미리 알아보십시오.
비행 조건
다음의 5가지 조건을 반드시 준수하십시오
1. Parrot Disco-Pro가 이착륙하려면 최소 직경 80
미터의 공터를 확보해야 합니다. 비행 장소에
드론의 순조로운 진행을 방해하거나 시야를
가로막아 모니터링에 장애가 되는 것이 없는지
확인하십시오.
2. Parrot Disco-Pro로 야간 비행을 하지 마십시오.
3. 도심 시가지나 일부 공공장소(예: 역, 공항 등)의
상공으로 Parrot Disco-Pro를 날리지 마십시오.
4. 비행과 촬영이 양호한 조건에서 순조롭게
이루어질 수 있도록 일기예보를 확인하십시오.
우천, 안개, 강설 또는 풍속이 초속 12미터,
43km/h 이상일 때 Parrot Disco-Pro로 비행을
하지 마십시오.
5. Pix4Dcapture에 프로그래밍 되어 있는 (이륙
지점 대비) 고도가 주변 장애물을 피하기에
충분해야 합니다.

421
한국어
PARROT DISCOPRO
Parrot Disco-Pro의 날개를 올바르게 끼우십시오
(날개 부착하기 항목 참조).
Parrot Disco-Pro의 배터리와 리모컨 배터리를
충전하십시오 (배터리 설치하기 항목 참조).
Parrot Disco-Pro의 덮개를 올바르게 닫으십시오.
Parrot Disco의 표시등이 초록색으로 깜박거려야
합니다. 이는 Parrot Disco-Pro가 GPS 신호를
감지했다는 뜻입니다.
Sunshine Sensor가 제대로 노출되어 있어야
합니다
Parrot Disco-Pro가 착륙할 곳의 상태를
점검합니다
SEQUOIA
사용 전에 보호용 덮개를 떼어 놓으십시오.
Sequoia를 Parrot C.H.U.C.K의 오른쪽 마이크로
USB 포트에 연결합니다.
렌즈가 모두 청결해야 합니다. 렌즈를 닦으려면
마이크로화이버 헝겊 (제품과 함께 제공) 을
사용합니다.
비행 중에 촬영한 사진이 모두 저장될 수 있도록
(멀티 스펙트럼 센서의 내장 메모리 속) 저장 공간을
넉넉히 확보합니다.
두 모듈이 비행 중에 떨어지지 않도록 드론에
단단히 고정합니다.

422
드론과 멀티 스펙트럼 센서를 연결하는 마이크로
USB 장치 케이블이 전원에 제대로 연결되어야
합니다. Sunshine Sensor와 멀티 스펙트럼 센서
사이의 마이크로USB 연결도 확인합니다.
두 센서가 모두 보정되어 있어야 합니다. 자세한
내용은 Sequoia 보정하는 법 항목을 참조하십시오.
Sunshine Sensor의 표시등이 초록색으로 바뀔
때까지 기다립니다. 표시등이 초록색이 되면 GPS/
GNSS가 켜졌다는 뜻입니다.
PARROT DISCOPRO에
연결하기
FREEFLIGHT PRO를 이용해
PARROT SKYCONTROLLER 2를
PARROT DISCO에 연결하는 법
Parrot Disco를 평평한 지면에 올려놓습니다.
1. Parrot Disco-Pro의 On/O 버튼을 누릅니다.
>표시등이 빨간색으로 깜박거리다가 GPS
신호가 잡히면 초록색으로 바뀝니다.
2. Parrot Skycontroller 2의 On/O 스위치를
누릅니다.
3. 표시등에 초록색 불이 들어올 때까지
기다립니다.
Parrot Disco-Pro에 연결되었습니다.

423
한국어
표시등이 계속 빨간색으로 깜박거리면 Parrot Disco-
Pro를 보정해야 합니다. 방법은 다음과 같습니다.
4. FreeFlight Pro
애플리케이션에서
Fly & Film > >
위치, 거리 및 한계로
가서 조정하기를
누릅니다.
5. 피토 프로브를
보정합니다.
이를 위해 바람을
등진 위치에서
Parrot Disco-Pro
의 카메라가 땅을
향하게 합니다.
6. Parrot Disco-Pro를
Z축 (요/yaw) 으로
회전시킵니다.
7. Parrot Disco-Pro
를 Y축 (피치/pitch)
으로 회전시킵니다.
8. Parrot Disco-Pro를
X축 (롤/roll) 으로 회전시킵니다.
>표시등이 초록색으로 깜박거립니다. Parrot
Disco-Pro가 보정되었습니다.
Z
Y
X

424
PARROT SKYCONTROLLER 2에 스
마트폰 연결하는 법
1. 스마트폰 거치대를 Parrot Skycontroller 2에
장착하십시오.
B
A
B
A
스마트폰의 크기에 맞춰 거치대를 회전시킬 수
있습니다. 그러려면 거치대를 눌러 오른쪽으로
돌리십시오.
B
A
B
A

425
한국어
2. 거치대를 완전히 열려면 거치대의 오른쪽에 있는
버튼을 누르십시오.
3. 거치대에 스마트폰을 올려 놓습니다.
B
A
BA
4. 스마트폰에 맞춰 거치대를 조여줍니다.
5. 스마트폰의 USB 케이블을 이용해 스마트폰을 Parrot
Skycontroller 2의 USB 포트에 연결합니다.
B
A

426
조종기 왼쪽
B
A
B
A
B
A
B
A
B
A
B
A
B
A
B
A
가속
감속
조종기 오른쪽
하강
상승
오른쪽으로
방향 전환
왼쪽으로 방향 전환
오른쪽 궤도에서
호버링
왼쪽 궤도에서
호버링
조종 모드
PARROT SKYCONTROLLER 2
Pix4Dcapture에서 비행 계획을 실행하다가 Parrot
Skycontroller 2의 조종기를 누르면 언제든지 다시
드론을 조종할 수 있습니다.

427
한국어
비행 계획
PIX4DCAPTURE를 이용해 비행
계획 만드는 법
애플리케이션을 처음 실행할 때 드론 목록에서
Parrot Disco-Pro를 선택한 다음 비행 계획 편집으로
넘어갑니다
Grid : 드론이 비행해야 할 대부분의 영역에서 격자
모양으로 비행합니다.
비행 계획을 만들 때 출발 지점과
착륙용 원추표면을 지정합니다.
착륙 지점의 경우, 전방 각도 30°,
길이 200미터의 원추형 공간을
미리 확보해야 합니다.
비행 계획과 작성 방법에 대해 자세한 내용은
Pix4Dcapture 지원 페이지를 참조하십시오.
Android :
https://www.parrot.com/uk/pix4dcapture-android
iOS :
https://www.parrot.com/uk/pix4dcapture-ios

428
비행 계획 시작하기
1. Parrot Disco-Pro의 전원을 켠 다음 Parrot
Skycontroller 2에 연결합니다. 드론과
Parrot Skycontroller 2의 연결은 자동으로
이루어집니다.
2. 사용자의 스마트폰이나 태블릿을 Parrot
Skycontroller 2의 USB 포트에 연결합니다.
3. 애플리케이션 Pix4Dcapture를 실행합니다.
4. 메인 페이지에서 미션의 유형을 선택합니다.
5. 실행할 비행 계획을 만듭니다
6. 시작 지점 "start waypoint"와 착륙용 원추표면을
지정합니다.
7. START
>사용자가 비행 태세에 들어가도록 카운트다운이
시작됩니다.
>카운트다운에 이어 Parrot Disco-Pro의 이륙
준비가 끝나면 엔진이 작동됩니다. 이륙하기
항목을 참조하십시오.
>비행 계획의 미션이 끝나면 비행 계획에 지정되어
있는 착륙용 원추표면에 와서 내려 앉습니다.

429
한국어
이륙하기
바람이 불어오는 쪽을 향해 이륙해야 합니다.
1. 한 손에 Parrot Disco-Pro의 동체를 잡고 바람이
불어오는 쪽을 바라보고 위치를 잡습니다.
2. Parrot Disco-Pro의 엔진이 완전히 노출되어
있어야 합니다.
3. Pix4Dcapture 애플리케이션에서 비행 계획을
만든 다음 Start를 누릅니다.
FreeFlight Pro의 도움을 받아 조종하는 경우, Parrot
Skycontroller 2의 버튼을 눌러 이륙합니다.
>Parrot Disco-Pro의 엔진이 가동되면 1초 만에
최대 속도에 도달합니다.
4. Parrot Disco-Pro를 공중으로 살짝 띄웁니다.

430
>Parrot Disco-Pro가 이륙합니다. 50미터 상공으로
날아올라 직경 60미터의 원을 그립니다.
참고: 이륙 단계에서 Parrot Disco-Pro의
엔진을 멈추려면 Parrot Skycontroller 2
의 버튼을 한 번 더 누릅니다.
사용자가 Parrot Disco-Pro를 공중으로
띄우지 않으면 버튼을 누르고 나서
10초 후에 엔진이 저절로 꺼집니다.
이륙 과정을 다시 시작하려면 을
다시 누릅니다.

431
한국어
출발 지점으로 귀환
Parrot Disco-Pro를 Pix4Dcapture 상의 비행
계획에서 벗어나 출발 지점으로 돌아오게 하려면
Parrot Skycontroller 2의 버튼을 누릅니다.
> Parrot Disco-Pro가 출발 지점으로 돌아와 고도 50미터
상공에서 직경 60미터의 원을 그립니다.
Point de départ
주변에 장애물이 없는 탁 트인 장소인지
확인합니다.
착륙하기
Parrot Disco-Pro가 파손되지 않도록 적절한 장소,
예를 들어 풀밭과 같은 곳에 착륙시키십시오.
직선 착륙
1. Parrot Disco-Pro가 바람이 불어오는 쪽을
향하도록 위치를 잡습니다.
2. Parrot Disco-Pro의 고도를 최대한 낮춥니다.

432
3. Parrot Skycontroller 2의 버튼을 누릅니다.
> Parrot Disco-Pro가 직선으로 반듯하게 내려와
가볍게 착륙합니다.
참고: Parrot Disco-Pro가 내려앉을 때
필요하면 조종기로 직접 상승, 하강,
좌회전, 우회전 등을 실행할 수
있습니다.
80 m
50 m
10 m
착륙을 취소하려면 Parrot Skycontroller 2의
버튼을 누릅니다.
Parrot Disco-Pro가 50미터 상공으로 날아올라 직경
60미터의 원을 그립니다.
착륙 활주로는 길이가 최소 50미터라야 합니다.
원형 착륙
원형 착륙 시, Parrot Disco-Pro가 감속을 위해
스스로 바람을 정면으로 받는 위치를 잡아 지상에
내려 앉습니다.
1. Parrot Disco를 착륙시키려면 착륙 장소의
직경이 최소 80미터가 되어야 합니다.

433
한국어
2. 궤도 호버링 상태에서 Parrot Skycontroller 2의
를 누릅니다.
> Parrot Disco-Pro가 나선을 그리면서 착륙합니다.
80 m
50 m
10 m
원형 착륙 시에는 공간이 많이 필요합니다.
연결이 끊어졌을 경우
Pix4Dcapture에 지정된 비행 계획 밖에서 비행하는
동안 연결이 끊어지면 Parrot Disco가 정해져 있는
시간 동안(기본 10초) 직경 60미터의 원을 그립니다.
연결이 복원되지 않으면 Parrot Disco가 출발
지점으로 돌아와 50미터 상공에서 직경 60미터의
원을 그립니다.
5분이 지나도 여전히 연결이 복원되지 않으면 Parrot
Disco-Pro가 원형 착륙을 수행합니다.

434
PARROT DISCO 전원 끄기
Parrot Disco-Pro의 전원을 끄려면 On/O 버튼을
누릅니다.
>표시등이 빨간색으로 깜박거리다가 Parrot Disco
가 꺼집니다.
사진 가져오기
비행 중에는 사진이 멀티 스펙트럼 센서의 내장
메모리에 저장됩니다.
1. 멀티 스펙트럼 센서를 컴퓨터에 연결합니다.
2. 비행 중 촬영된 사진을 가져옵니다.
촬영된 사진들이 SD 메모리 카드에 저장되어 있다면
sunshine sensor를 SD 카드 리더기로 사용할 수
있습니다. 그러려면 센서의 마이크로USB 장치
포트를 컴퓨터에 연결해야 합니다.
Sequoia 센서가 켜진 상태에서 SD 카드를 꺼내지 마
십시오.

435
한국어
AIRINOV FIRST+를
이용한 데이터 처리
http://parrot.airinov.com에 가서 화면에 표시되는
단계에 따라 진행하면 데이터를 처리할 수 있습니다.
자세한 내용은 www.parrot.com/support를
참조하십시오.
PARROT DISCO
업데이트하기
1. Parrot Skycontroller 2를 Parrot Disco-Pro에
연결합니다.
2. USB를 통해 스마트폰이나 태블릿을 Parrot
Skycontroller 2에 연결합니다.
3. FreeFlight Pro 애플리케이션이 자동 실행됩니다.
4. FreeFlight Pro 애플리케이션에서 업데이트를
누릅니다.
5. 애플리케이션이 업데이트를 검색합니다.
6. 애플리케이션이 업데이트 파일을 찾으면 OK를
선택합니다.
7. 애플리케이션이 업데이트 파일을 내려받습니다.
8. 팝업창이 뜨면서 드론을 다시 시작한다고
알려줍니다.
9. 나가기

436
업데이트를 설치하는 동안 Parrot Disco-Pro가
자동으로 다시 시작됩니다. 몇 분 정도 시간이 걸릴
수 있습니다. 업데이트가 완료되면 FreeFlight Pro
애플리케이션이 다시 시작됩니다.

437
한국어
표시등의 기능과 의미
파란색으로 점멸 Parrot Disco-Pro가 실행되는 중.
초록색으로 점멸 Parrot Disco-Pro가 GPS 신호를 감지했으며
이륙 준비가 되었음.
노란색으로 점멸 Parrot Disco-Pro 업데이트 중.
Parrot Disco-Pro의 전원을 끄지 말 것.
빨간색과
파란색으로 점멸
Parrot Disco-Pro의 배터리에서 문제가
발견됨.
> 대리점에 문의하거나 www.parrot.com/
support의 Parrot Disco-Pro 지원 페이지
참조.
빨간색으로 점멸
Parrot Disco-Pro가 엔진 이상 발견.
> FreeFlight Pro 애플리케이션에 오류 메시지
나타남. www.parrot.com/support 페이지의
오류 코드표 참조.
예비 부품
Parrot Disco-Pro의 부품은 온라인샵에서 구입할 수
있습니다. 주소는 www.parrot.com.
예비 부품 조립에 대한 자세한 내용은 고객지원
페이지의 동영상 자습서를 참조하십시오.

438
기술 사양
센서
• 초음파
• 고도계
• 고속 수직 카메라
• 피토 프로브: 속도 센서
관성 항법 시스템
• 삼축 자이로스코프
• 삼축 가속도계
• 삼축 자력계
하드웨어
• CPU 듀얼코어 ARM® Cortex® -A9
• 내장 플래시 메모리: 32GB
WIFI 및 통신
• 네트워크 액세스 포인트
• ac 규격 지원의 무선 Wi-Fi, 듀얼 밴드 안테나 2개(2.4GHz 및
5GHz), 다중입출력(MIMO)
• Parrot Skycontroller 2 사용 시 도달 범위 최대 2km
착탈식 배터리
• 2700mAh / 25A 3셀 Lipo배터리
• 배터리 수명: 45분
• 정격 전압: 11.1V
• 21.6A 연속 방전
• 충전율 최대 3.5A
• 작동 온도: -20°C~60°C

439
한국어
크기
• 중량: 940g
• 사이즈: 1150mm x 580mm x 120mm
• 날개 폭: 1150mm
GPS
• 내장 GPS
• GPS + GLONASS
성능
• 엔진: 1280kv
• 서보모터: 5V
• 장착 가능 수신기 RF SBUS, SUMD, CPPM
동영상 & 사진
• 1080p 풀HD 카메라
• 동영상 스트리밍: 360p / 720p
소프트웨어
• Linux® & 개발자를 위한 오픈소스 SDK
충전기
• Input : 100-240V, 50h-60Hz, 1.2A
• Output : 최대 12.6Vdc, 3.5A
• 최고 고도: 해발 2000m
• 작동 온도: 0°C~40°C
PARROT DISCO
• 작동 온도: 0°C~40°C
• 최대소비전류: 15A
• 정격 전압: 11.1V

440
일반사항
어떤 경우에도 사람과 동물, 재산을 안전하게 보호할 수 있도록 Parrot Disco를
비행 코스로 적합한 장소에서 각국의 민간항공 규정을 준수해 사용하십시오.
Parrot Disco로 비행을 하기 전에 현지 민간항공 규정을 확인하십시오.
부속품과 교체용 부품
부속품과 교체용 부품은 가까운 Parrot 대리점이나 웹사이트 www.parrot.com
에서 구입하실 수 있습니다.
사용상 주의사항과 관리
조종사는 Parrot Disco를 한 순간도 시야에서 놓치지 말고 비행 경로를
통제해야 합니다.
일부 공공장소(예: 역, 공항 등)나 거리에서는 Parrot Disco를 사용하지 못할
수 있습니다.
Parrot Disco의 프로펠러가 돌아가기 시작하면 사람, 동물, 사물에
손해나 손괴를 입힐 수 있습니다. Parrot Disco 사용 시 항상 안전 거리를
유지하십시오. 이륙 단계에서 항상 Parrot Disco의 프로펠러를 조심하십시오.
Parrot Drones SAS가 지정한 부속품만 사용하십시오.
Parrot Disco에 모래나 먼지가 들어가면 올바르게 작동하지 않고 돌이킬 수
없는 고장이 생길 수 있습니다.
기상 조건이 나쁠 때(강우, 강풍, 강설, 안개)나 충분히 확보되지 않을 때
(야간) 는 Parrot Disco를 사용하지 마십시오.
Parrot Disco가 고압선이나 건물 등 잠재적으로 위험한 곳에 가까이 다가가지
않도록 거리를 유지하십시오.
물이나 액상 물질 근처에서 사용하지 마십시오. Parrot Disco를 물 위나 축축한
곳에 올려놓지 마십시오. 돌이킬 수 없는 고장의 원인이 될 수 있습니다.
Parrot Disco의 고도를 급격하게 바꾸지 마십시오.
Parrot Disco를 직사광선 아래 방치하지 마십시오.
크기가 작은 부품을 입에 넣어 삼킬 위험이 있습니다. 포장 패키지는 제품의
일부가 아니며 안전 상 조치를 한 다음 폐기해야 합니다.
WIFI
Parrot Disco로 비행을 하기 전에 비행 장소에서 Wi-Fi 주파수를 사용하는 데
제약이 있는지 미리 알아보십시오. 경우에 따라 사용이 제한되거나 금지되어
있는 주파수가 있을 수 있습니다. 일부 국가는 야외에서 5GHz 대역 Wi-Fi의
사용을 금지하고 있습니다.
사생활과 사유재산의 이미지 존중에 관한 주의사항
타인의 이미지를 허가 없이 기록, 배포하는 것은 사생활 침해에 해당하며 그에
상응한 책임을 져야 합니다. 기록 내용을 보관 및/또는 배포하려면 타인의
모습을 촬영하기 전에 허락을 받으십시오. 타인의 품위를 훼손하고 평판이나
존엄성을 해칠 수 있는 이미지를 배포하지 마십시오.
사유재산의 소유자 및/또는 사유재산에 대해 지적재산권을 가진 제삼자의
허락을 받지 않고 이미지를 기록하고 배포하는 것은 사유재산의 초상권
침해에 해당하며 그에 상응한 책임을 져야 합니다. 소유자 및/또는 재산권을
가진 제삼자의 허락을 받으십시오.

441
한국어
배터리(PARROT DISCO 및 PARROT SKYCONTROLLER 2)
주의사항: 설명서의 내용을 모두 지키지 않으면 심각한 부상을 초래하거나
배터리에 돌이킬 수 없을 정도의 손상을 유발하거나 화재, 연기, 폭발을 일으킬
수 있습니다.
충전 또는 사용 전에 항상 배터리의 상태를 확인하십시오. 배터리에 충격이
가해졌거나 냄새가 나거나 과열, 변색, 변형, 누출이 발생하면 배터리를
교체하십시오. 배터리 충전 시 정품 LiPo 충전기 이외에 다른 것은 절대
사용하지 마십시오. 항상 LiPo 셀 오토 밸런싱 충전기나 LiPo 셀 밸런서를
사용하십시오. 제품과 함께 제공된 것 이외에 다른 충전기는 사용하지 않는
것이 좋습니다. 세류 충전을 하거나 셀 당 2.5V 미만으로 충전하지 마십시오.
배터리의 온도가 60°C(140°F)를 넘어서는 안 됩니다. 과열되면 배터리가
손상되거나 불이 붙을 수 있습니다. 가연성 지지대 위, 가연성 제품 근처 또는
차량 안에서 충전을 하지 마십시오(되도록이면 배터리를 불연성, 비전도성
용기에 넣어 두십시오). 배터리 충전 중에 지켜보는 사람이 없는 상태로
방치하지 마십시오. 배터리의 배선을 개조하거나 수정하거나 셀을 분해하지
마십시오. 충전기의 출력 전압을 항상 배터리의 전압에 맞추십시오. 배터리가
합선되지 않도록 주의하십시오. LiPo 배터리를 습기나 직사광선에 노출시키지
말고 온도가 60℃ 이상으로 올라가는 장소(예를 들어, 땡볕 아래 세워진
자동차)에 두지 마십시오. 항상 어린이의 손이 닿지 않는 곳에 보관하십시오.
주의사항
PARROT DISCO의 배터리를 비호환 배터리로
교체할 경우 폭발의 위험이 있습니다.
다 쓴 배터리는 설명서 내용에 따라 폐기하십시오.
보증
보증 조건을 확인하려면 Parrot Disco-Pro AG를 구입한 대리점의 일반 판매
약관을 참조하시기 바랍니다.
제품의 재활용
제품이나 문서자료에 있는 이 그림기호는 수명이 다한 제품을 가정용
쓰레기와 함께 배출하면 안 된다는 뜻입니다. 폐기물을 함부로
배출하면 환경이나 사람의 건강에 해를 끼칠 수 있으므로 다른 유형의
폐기물과 분리한 뒤 책임감 있는 방법으로 재활용하시기 바랍니다.
그래야 물적 자원의 지속 가능한 재사용을 촉진할 수 있습니다. Parrot Disco,
Parrot Skycontroller 2, Sequoia를 어디서 어떻게 재활용할 수 있는지
알아보려면 제품을 구입한 대리점이나 가까운 관공서에 문의하시기 바랍니다.
EU 적합성 선언
본 장치를 사용할 수 있는 국가는 다음과 같습니다. 독일, 오스트리아,
벨기에, 불가리아, 키프로스, 크로아티아, 덴마크, 스페인, 에스토니아,
핀란드, 프랑스, 그리스, 헝가리, 아일랜드, 이탈리아, 라트비아,
리투아니아, 룩셈부르크, 몰타, 네덜란드, 폴란드, 포르투갈, 체코, 루마니아,
영국, 슬로바키아, 슬로베니아, 스웨덴.
유럽연합(EU) 회원국에서 실외 사용 시 5Ghz 대역의 첫 번째 부대역(5150-
5250MHz)에 한해 제한이 적용됩니다.
PARROT DRONES(주소: 174 quai de Jemmapes, 75010 Paris, 프랑스)는 본
사용설명서에 기술된 제품이 유럽통신지침 R&TTE 1999/5/CE, 저전압기기
지침 2014/35/UE, ROHS 지침 2011/65/UE 조항에 의거하여 EN301489-1,
EN301489-17, EN300440-1, EN300328, EN300893, EN300440-2, EN60950-1,
EN62321 기술 규격에 적합함을 책임 있게 선언합니다.
http://www.parrot.com/ce/?parrot-disco

442
캐나다 적합성 선언
본 장치는 면허 불요 무선 설비에 적용되는 IC(캐나다 산업부) RSS 기준에
적합합니다. 다음의 두 가지 조건을 충족하면 사용이 허용됩니다. (1) 장치가
전파 방해를 초래해서는 안 됩니다. (2) 장치의 사용자가 전파 방해로 인해
기능에 이상이 생길 수 있어도 전파 혼신을 수용해야 합니다. 이 디지털
장치는 클래스 B에 속하며 캐나다의 NMB-003규격에 적합합니다.
FCC/IC
데이터 통신 전송 장비에 대한 FCC/IC의 RF(무선주파수) 노출 요건을
충족하기 위해 이 장비를 작동시킬 때 신체와 제품 안테나 사이에 최소 20cm
의 거리를 유지해야 합니다. 적합성 보장을 위해 그보다 가까운 거리에서는
사용하지 않는 것이 좋습니다.
상표
Parrot과 Parrot의 로고들은 Parrot S.A.의 상표입니다.
Parrot Disco-Pro AG, Parrot Disco, Parrot Skycontroller, Sequoia, Parrot
C.H.U.C.K와 각각의 로고들은 Parrot Drones SAS의 상표입니다.
App Store는 Apple Inc의 서비스 상표입니다.
Google Play와 Google Maps는 Google Inc의 상표입니다.
Wi-Fi®는 Wi-Fi Alliance®
Linux는 미국 및 기타 국가에 등록되어 있는 Linus Torvalds의 상표입니다.
Pix4D와 Pix4Dcapture는 Pix4D SA의 등록상표입니다.
Airinov와 Airinov First+는 Airinov SAS의 트레이드마크 또는 등록상표입니다.
본 설명서에 언급된 그 밖의 모든 상표는 각각 해당 소유자의 자산입니다.
제조사 정보
Parrot Disco와 Sequoia의 제조사는 다음과 같습니다. Parrot Drones SAS
- 174 Quai de Jemmapes - 75010 Paris (프랑스) - RCS Paris 808 408 074 -
www.parrot.com


-
 1
1
-
 2
2
-
 3
3
-
 4
4
-
 5
5
-
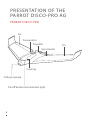 6
6
-
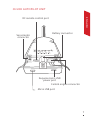 7
7
-
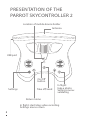 8
8
-
 9
9
-
 10
10
-
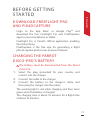 11
11
-
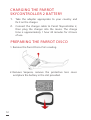 12
12
-
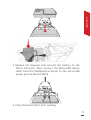 13
13
-
 14
14
-
 15
15
-
 16
16
-
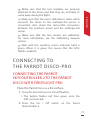 17
17
-
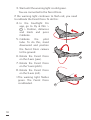 18
18
-
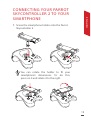 19
19
-
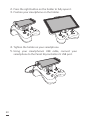 20
20
-
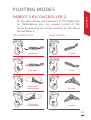 21
21
-
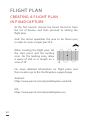 22
22
-
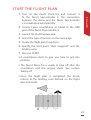 23
23
-
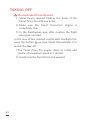 24
24
-
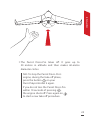 25
25
-
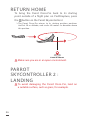 26
26
-
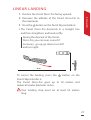 27
27
-
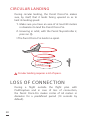 28
28
-
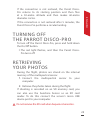 29
29
-
 30
30
-
 31
31
-
 32
32
-
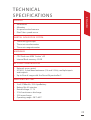 33
33
-
 34
34
-
 35
35
-
 36
36
-
 37
37
-
 38
38
-
 39
39
-
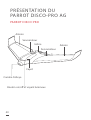 40
40
-
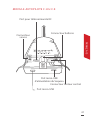 41
41
-
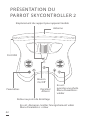 42
42
-
 43
43
-
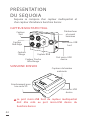 44
44
-
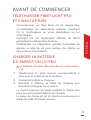 45
45
-
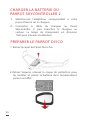 46
46
-
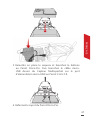 47
47
-
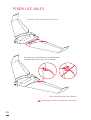 48
48
-
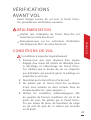 49
49
-
 50
50
-
 51
51
-
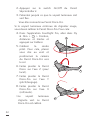 52
52
-
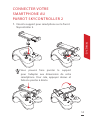 53
53
-
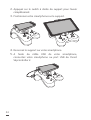 54
54
-
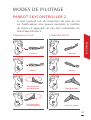 55
55
-
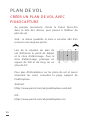 56
56
-
 57
57
-
 58
58
-
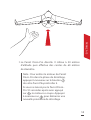 59
59
-
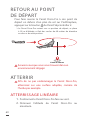 60
60
-
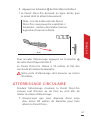 61
61
-
 62
62
-
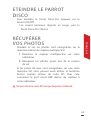 63
63
-
 64
64
-
 65
65
-
 66
66
-
 67
67
-
 68
68
-
 69
69
-
 70
70
-
 71
71
-
 72
72
-
 73
73
-
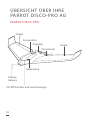 74
74
-
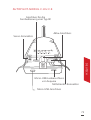 75
75
-
 76
76
-
 77
77
-
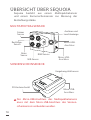 78
78
-
 79
79
-
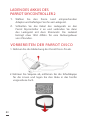 80
80
-
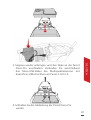 81
81
-
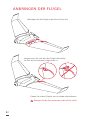 82
82
-
 83
83
-
 84
84
-
 85
85
-
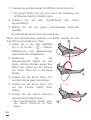 86
86
-
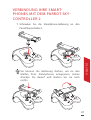 87
87
-
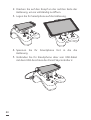 88
88
-
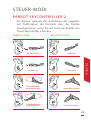 89
89
-
 90
90
-
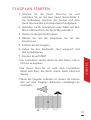 91
91
-
 92
92
-
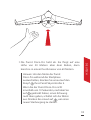 93
93
-
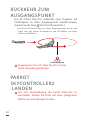 94
94
-
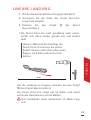 95
95
-
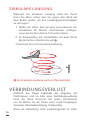 96
96
-
 97
97
-
 98
98
-
 99
99
-
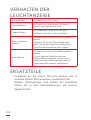 100
100
-
 101
101
-
 102
102
-
 103
103
-
 104
104
-
 105
105
-
 106
106
-
 107
107
-
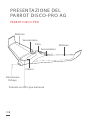 108
108
-
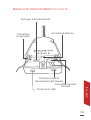 109
109
-
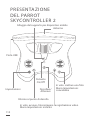 110
110
-
 111
111
-
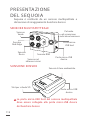 112
112
-
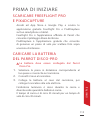 113
113
-
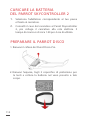 114
114
-
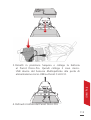 115
115
-
 116
116
-
 117
117
-
 118
118
-
 119
119
-
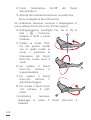 120
120
-
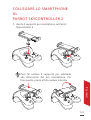 121
121
-
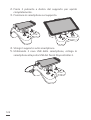 122
122
-
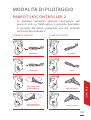 123
123
-
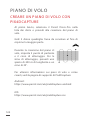 124
124
-
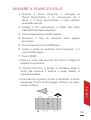 125
125
-
 126
126
-
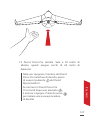 127
127
-
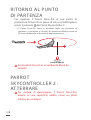 128
128
-
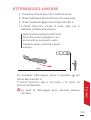 129
129
-
 130
130
-
 131
131
-
 132
132
-
 133
133
-
 134
134
-
 135
135
-
 136
136
-
 137
137
-
 138
138
-
 139
139
-
 140
140
-
 141
141
-
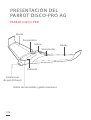 142
142
-
 143
143
-
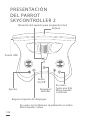 144
144
-
 145
145
-
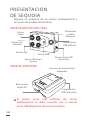 146
146
-
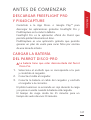 147
147
-
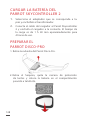 148
148
-
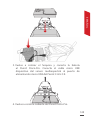 149
149
-
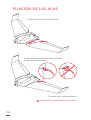 150
150
-
 151
151
-
 152
152
-
 153
153
-
 154
154
-
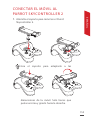 155
155
-
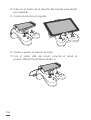 156
156
-
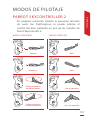 157
157
-
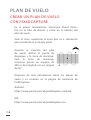 158
158
-
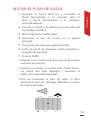 159
159
-
 160
160
-
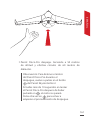 161
161
-
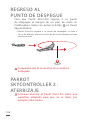 162
162
-
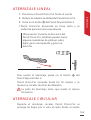 163
163
-
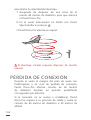 164
164
-
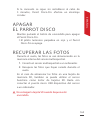 165
165
-
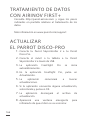 166
166
-
 167
167
-
 168
168
-
 169
169
-
 170
170
-
 171
171
-
 172
172
-
 173
173
-
 174
174
-
 175
175
-
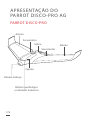 176
176
-
 177
177
-
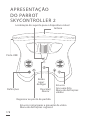 178
178
-
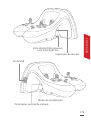 179
179
-
 180
180
-
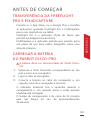 181
181
-
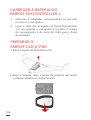 182
182
-
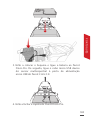 183
183
-
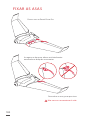 184
184
-
 185
185
-
 186
186
-
 187
187
-
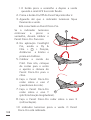 188
188
-
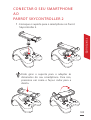 189
189
-
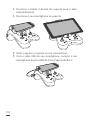 190
190
-
 191
191
-
 192
192
-
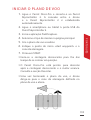 193
193
-
 194
194
-
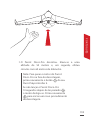 195
195
-
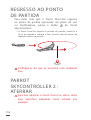 196
196
-
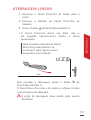 197
197
-
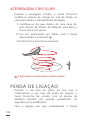 198
198
-
 199
199
-
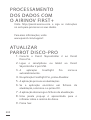 200
200
-
 201
201
-
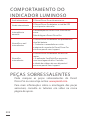 202
202
-
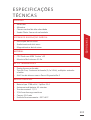 203
203
-
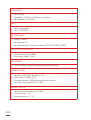 204
204
-
 205
205
-
 206
206
-
 207
207
-
 208
208
-
 209
209
-
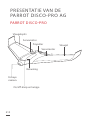 210
210
-
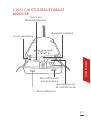 211
211
-
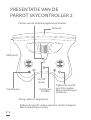 212
212
-
 213
213
-
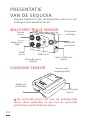 214
214
-
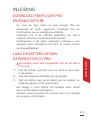 215
215
-
 216
216
-
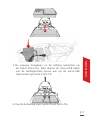 217
217
-
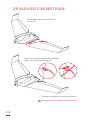 218
218
-
 219
219
-
 220
220
-
 221
221
-
 222
222
-
 223
223
-
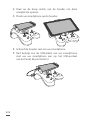 224
224
-
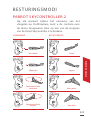 225
225
-
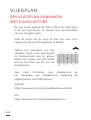 226
226
-
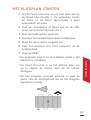 227
227
-
 228
228
-
 229
229
-
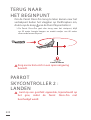 230
230
-
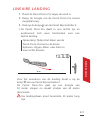 231
231
-
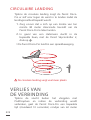 232
232
-
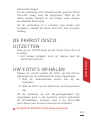 233
233
-
 234
234
-
 235
235
-
 236
236
-
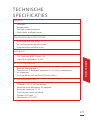 237
237
-
 238
238
-
 239
239
-
 240
240
-
 241
241
-
 242
242
-
 243
243
-
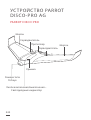 244
244
-
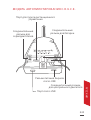 245
245
-
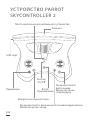 246
246
-
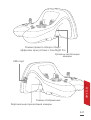 247
247
-
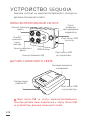 248
248
-
 249
249
-
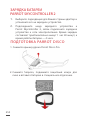 250
250
-
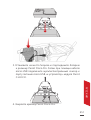 251
251
-
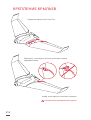 252
252
-
 253
253
-
 254
254
-
 255
255
-
 256
256
-
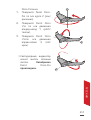 257
257
-
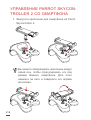 258
258
-
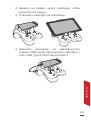 259
259
-
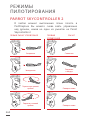 260
260
-
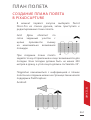 261
261
-
 262
262
-
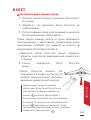 263
263
-
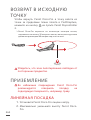 264
264
-
 265
265
-
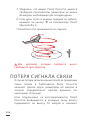 266
266
-
 267
267
-
 268
268
-
 269
269
-
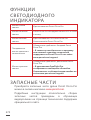 270
270
-
 271
271
-
 272
272
-
 273
273
-
 274
274
-
 275
275
-
 276
276
-
 277
277
-
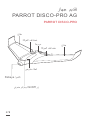 278
278
-
 279
279
-
 280
280
-
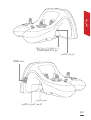 281
281
-
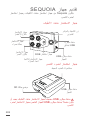 282
282
-
 283
283
-
 284
284
-
 285
285
-
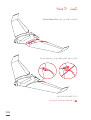 286
286
-
 287
287
-
 288
288
-
 289
289
-
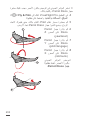 290
290
-
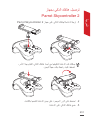 291
291
-
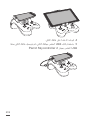 292
292
-
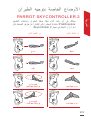 293
293
-
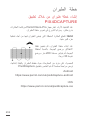 294
294
-
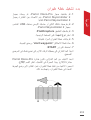 295
295
-
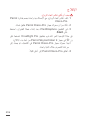 296
296
-
 297
297
-
 298
298
-
 299
299
-
 300
300
-
 301
301
-
 302
302
-
 303
303
-
 304
304
-
 305
305
-
 306
306
-
 307
307
-
 308
308
-
 309
309
-
 310
310
-
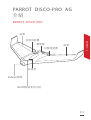 311
311
-
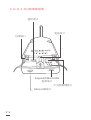 312
312
-
 313
313
-
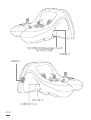 314
314
-
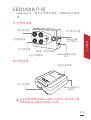 315
315
-
 316
316
-
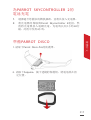 317
317
-
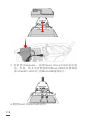 318
318
-
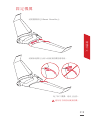 319
319
-
 320
320
-
 321
321
-
 322
322
-
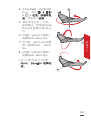 323
323
-
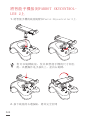 324
324
-
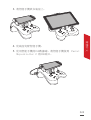 325
325
-
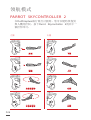 326
326
-
 327
327
-
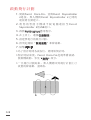 328
328
-
 329
329
-
 330
330
-
 331
331
-
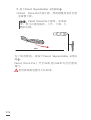 332
332
-
 333
333
-
 334
334
-
 335
335
-
 336
336
-
 337
337
-
 338
338
-
 339
339
-
 340
340
-
 341
341
-
 342
342
-
 343
343
-
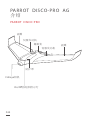 344
344
-
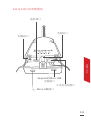 345
345
-
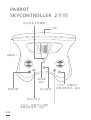 346
346
-
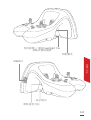 347
347
-
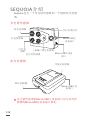 348
348
-
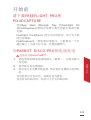 349
349
-
 350
350
-
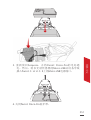 351
351
-
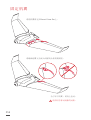 352
352
-
 353
353
-
 354
354
-
 355
355
-
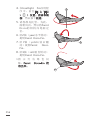 356
356
-
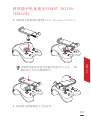 357
357
-
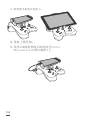 358
358
-
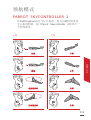 359
359
-
 360
360
-
 361
361
-
 362
362
-
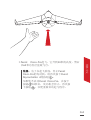 363
363
-
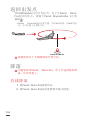 364
364
-
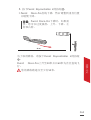 365
365
-
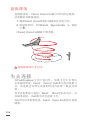 366
366
-
 367
367
-
 368
368
-
 369
369
-
 370
370
-
 371
371
-
 372
372
-
 373
373
-
 374
374
-
 375
375
-
 376
376
-
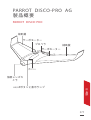 377
377
-
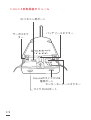 378
378
-
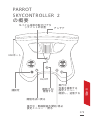 379
379
-
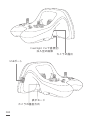 380
380
-
 381
381
-
 382
382
-
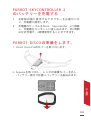 383
383
-
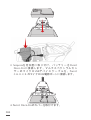 384
384
-
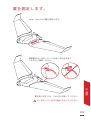 385
385
-
 386
386
-
 387
387
-
 388
388
-
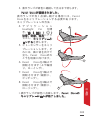 389
389
-
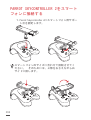 390
390
-
 391
391
-
 392
392
-
 393
393
-
 394
394
-
 395
395
-
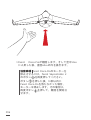 396
396
-
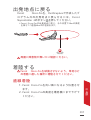 397
397
-
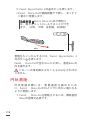 398
398
-
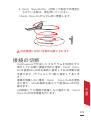 399
399
-
 400
400
-
 401
401
-
 402
402
-
 403
403
-
 404
404
-
 405
405
-
 406
406
-
 407
407
-
 408
408
-
 409
409
-
 410
410
-
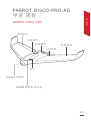 411
411
-
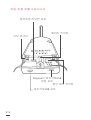 412
412
-
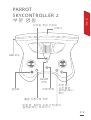 413
413
-
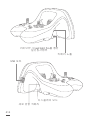 414
414
-
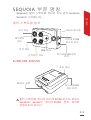 415
415
-
 416
416
-
 417
417
-
 418
418
-
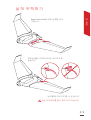 419
419
-
 420
420
-
 421
421
-
 422
422
-
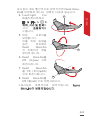 423
423
-
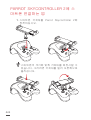 424
424
-
 425
425
-
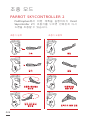 426
426
-
 427
427
-
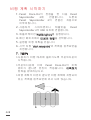 428
428
-
 429
429
-
 430
430
-
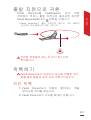 431
431
-
 432
432
-
 433
433
-
 434
434
-
 435
435
-
 436
436
-
 437
437
-
 438
438
-
 439
439
-
 440
440
-
 441
441
-
 442
442
-
 443
443
-
 444
444


en otros idiomas
- français: Parrot Disco Pro AG Manuel utilisateur
- italiano: Parrot Disco Pro AG Manuale utente
- português: Parrot Disco Pro AG Manual do usuário
- 日本語: Parrot Disco Pro AG ユーザーマニュアル
Artículos relacionados
-
Parrot Disco FPV Manual de usuario
-
-
-
-
-
-
-
Parrot Zik Guía de inicio rápido