JVC SP-PW105WD Manual de usuario
- Categoría
- Altavoces
- Tipo
- Manual de usuario
La página se está cargando...

20 cm
20 cm
15 cm15 cm
20 cm
10 cm
– G1 –
Warnings, Cautions and Others
CAUTION
To reduce the risk of electrical shocks, fire, etc.:
1. Do not remove screws, covers or cabinet.
2. Do not expose this appliance to rain or moisture.
Caution –– POWER switch
This apparatus is provided with a POWER switch to be able to minimize
power consumption for safe use. Therefore,
1. When doing initial setting, complete all the connections required, connect
the mains plug into the wall outlet, and set the POWER switch
to ON.
2. When not in use, set the POWER switch to OFF.
3. Disconnect the mains plug to shut the power off completely. The POWER
switch in any position do not disconnect the mains line.
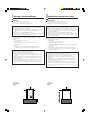
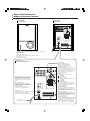
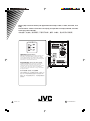
Caution: Proper Ventilation
To avoid risk of electric shock and fire, and to prevent damage, locate the
apparatus as follows:
1 Front:
No obstructions and open spacing.
2 Sides/ Top/ Back:
No obstructions should be placed in the areas shown by the
dimensions below.
3 Bottom:
Place on the level surface. Maintain an adequate air path for
ventilation by placing on a stand with a height of 10 cm or more.
Caution
• Do not block the ventilation openings or holes.
(If the ventilation openings or holes are blocked by a
newspaper or cloth, etc., the heat may not be able to get out.)
• Do not place any naked flame sources, such as lighted candles, on the
apparatus.
• When discarding batteries, environmental problems must be considered
and local rules or laws governing the disposal of these batteries must be
followed strictly.
• Do not use this apparatus in a bathroom or places with water. Also do not
place any containers filled with water or liquids (such as cosmetics or
medicines, flower vases, potted plants, cups, etc.) on top of this apparatus.
Side view
Vista lateral
Front view
Vista delantera
Advertencias, precauciones y notas
PRECAUCIÓN
Para reducir el riesgo de incendios, descargas eléctricas, etc.:
1. No retire los tornillos, las cubiertas o la caja.
2. No exponga este aparato a la lluvia o la humedad.
Precaución – Conmutador POWER
Este aparato está provisto de un conmutador POWER capaz de reducir el
consumo de energía al mínimo para un uso seguro. Por consiguiente,
1. Cuando realice los ajustes iniciales, efectúe todas las conexiones requeridas,
conecte el enchufe de la red en el tomacorriente de pared, y ajuste el
conmutador POWER a ON.
2. Cuando no esté en uso, ajuste el conmutador POWER a OFF.
3. Extraiga el enchufe del tomacorriente para desconectar la alimentación por
completo. La línea de la red no se desconecta en ninguna de las posiciones
del conmutador POWER.
Precaución: Ventilación apropiada
Para evitar riesgos de incendios o de descargas eléctricas u otros daños, coloque
el aparato de la siguiente manera:
1. Parte delantera:
Sin obstrucciones y con espacio abierto.
2. Laterales/parte superior/parte trasera:
No debe haber ninguna obstrucción dentro de las áreas indicadas por las
dimensiones de abajo.
3. Parte inferior:
Debe instalarse sobre una superficie nivelada. Para una ventilación
adecuada, colóquelo sobre un soporte de 10 cm o más de altura para
permitir el paso de aire.
PRECAUCIÓN
• No obstruya las rendijas o los orificios de ventilación.
(Si las rendijas o los orificios de ventilación quedan tapados con un
periódico, un trozo de tela, etc., no se podrá disipar el calor).
• No ponga sobre el aparato ninguna llama al descubierto, como velas
encendidas.
• Cuando tenga que descartar las pilas, tenga en cuenta los problemas
ambientales y observe estrictamente los reglamentos o las leyes locales
sobre disposición de las pilas.
• No utilice este aparato en el cuarto de baño o en lugares donde hay agua.
Tampoco coloque ningún recipiente que contenga agua u otros líquidos
(frascos de cosméticos o medicinas, floreros, macetas, vasos, etc.) encima
de este aparato.
La página se está cargando...

– 1 –
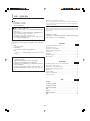
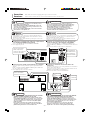
Confirming Supplied Accessories
Confirmación de los accesorios suministrados
Before use, check that you have received all of the following items, which are
supplied with the unit.
Como primer paso, compruebe que tiene todos los elementos siguientes, que se
suministran con la unidad.
Precautions for installation
•
Leave much space in the front.
•
Leave at least 15 cm of space on the sides.
•
Leave at least 20 cm of space on top.
•
Leave at least 20 cm of space in the rear.
Precauciones sobre la instalación
•
Deje mucho espacio libre en la parte delantera
•
Deje por lo menos 15 cm de espacio en los costados.
•
Deje por lo menos 20 cm de espacio en la parte superior.
•
Deje por lo menos 20 cm de espacio en la parte trasera.
Leave at least 15 cm
of space
Deje por lo menos
15 cm de espacio
•
Signal Cord (1)
•
Cable de señal (1)
•
Speaker Cord (2)
•
Cable del altavoz (2)
•
Foot (4)
•
Pata (4)
•
To prevent deformation or discoloration of the cabinet, do
not install the unit where it is exposed to direct sunlight or
high humidity, and avoid installation near air conditioning
outlets.
•
Para evitar la deformación o la alteración de color de la caja,
no instale la unidad en un sitio expuesto a la luz directa del
sol o a la alta humedad ni cerca de las bocas de salidas del
aire acondicionado.
•
Speaker vibrations may cause howling. Place the unit as far
away from the player as possible.
•
Las vibraciones del altavoz pueden producir aullido.
Coloque la unidad lo más lejos posible del tocadiscos.
•
Take the occurrence of earthquakes or other physical shocks
into consideration when selecting the installation place, and
secure the unit thoroughly.
•
Al decidir el sitio de instalación de la unidad, tenga en
cuenta las eventualidades tales como los terremotos y otros
golpes físicos y asegúrela firmemente para evitar que se
voltee.
•
This unit is magnetically shielded so as not to cause color distortions on color
television sets. However, depending on the installation method, color
distortions may occur. Please pay attention to the following points when
installing the unit.
1. When placing these speakers near a TV set, turn off the TV’s main power
switch or unplug it before installing the speakers.
Wait at least 30 minutes after the system is installed before turning on the
TV’s power.
2. If another speaker system has been set up near the TV set, that system may
cause color unevenness in the TV’s picture.
3. In spite of the shielded design of these speakers, some types of TV’s may
be affected by them. If this happens, move the speakers a short distance
form the TV set.
•
Esta unidad está aislada magnéticamente para evitar la distorsión de color en
los televisor a color. Sin embargo, dependiendo del método de instalación,
puede producirse distorsión de color. Preste atención a los puntos siguientes
cuando instale la unidad.
1. Al colocar los altavoces cerca de un televisor, desactivar el interruptor de
alimentación principal del televisor o desconectarlo antes de instalar los
altavoces.
Esperar por lo menos 30 minutos después de instalar el sistema y antes de
activar la alimentación del televisor.
2. Si otro sistema del altavoz ha sido instalado cerca del televisor, este sistema
puede causar una desigualdad de color en la imagen de televisor.
3. A pesar de la protección de estos altavoces, algunos tipos de televisores
pueden ser afectados por ellos. En este caso, mover los altavoces a una
distancia corta de la unidad del televisor.
•
When setting the speaker system, affixing the feet to the cabinet base is
recommended in order to cope with unsteadiness, etc.
The setting surface may slightly discolor depending on the material when
setting the unit using the supplied feet for an extensive period.
•
Cuando instale el sistema de altavoces, se recomienda colocar las patas en la
base de la caja para asegurar una mayor estabilidad, etc.
Dependiendo del material, la superficie de instalación podría sufrir una ligera
pérdida de color tras haber dejado la unidad con las patas suministradas
durante un tiempo prolongado.
To maintain the look of the unit
Wipe with a dry, soft cloth if the cabinet or control panel should become dirty.
If very dirty, apply a small amount of water or neutral detergent to the cloth and
wipe clean. Then wipe with a dry cloth.
Para mantener la apariencia externa de la unidad
Si se ensucia la caja o el panel de control, limpie con un paño suave y seco.
Si está muy sucio, limpie con un paño humedecido con agua o detergente neutro,
y seque con un paño seco.
Good manners when listening to stereo
When you are listening to music on a stereo system, please
listen at volume that will not disturb your neighbors. At night,
in particular, even soft sounds spread easily to the surround-
ings. Please shown consideration and close windows, or listen
using headphones, etc. in order to maintain a pleasant living
environment.
The symbol shown here is the Sound Etiquette symbol mark.
Respete las reglas de convivencia cuando escucha música
estereofónica
Cuando escucha música estereofónica, ajuste el volumen de manera tal que no
moleste a sus vecinos. Especialmente, tenga en cuenta que de noche, incluso los
sonidos suaves tienden a propagarse a los alrededores. Por favor sea considerado
con sus vecinos y cierre las ventanas o escuche la música con los auriculares, etc.
y contribuya a mantener un entorno de vida placentero.
El símbolo mostrado es la señal de “ética del sonido”.
Improving the sound field
•
If the speakers are facing a solid wall or glass door, etc., it is
recommended to furnish the wall with materials that absorb
sound, for example by hanging up heavy curtains, to prevent
generation of reflections and standing waves.
Mejoramiento del campo acústico
•
Si los altavoces están frente a una pared sólida o una puerta de vidrio, etc., se
recomienda cubrir la pared con un material que absorba el sonido, por
ejemplo, con cortinas pesadas, para evitar que se produzcan resonancia y
ondas estacionarias.
Precautions for Use
Precauciones sobre el uso
Precautions for Installation
Precauciones sobre la instalación
Sound etiquette
S
T
A
N
D
B
Y
/
O
N
S
P
-
P
W
1
0
0
P
O
W
E
R
E
D
S
U
B
W
O
O
F
E
R
Leave at least 20 cm of space
Deje por lo menos 20 cm de espacio
Leave at least 20 cm
of space
Deje por lo menos
20 cm de espacio
Foot
Pata
Base
Base

– 2 –
RIGHT
RIGHT
RIGHT
LEFT/MONO
LEFT
RIGHT
LEFT
TO MAIN
SPEAKERS
RIGHT
RIGHT
RIGHT
LEFT/MONO
LEFT
RIGHT
LEFT
TO MAIN
SPEAKERS
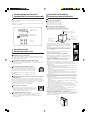
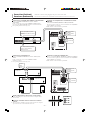
Names of Parts and Functions
Nombres de las partes y funciones
Front Panel
Panel delantero
Rear Panel
Panel trasero
This lights when the power is ON, and when the unit is in the standby mode.
Red: Standby mode
Green: ON mode
Lámpara de alimentación
Se enciende mientras la unidad está encendida o en espera.
Rojo: Modo de espera
Verde: Modo de encendido
Amp Section
Sección del amplificador
INPUT (LOW-LEVEL)
You can connect the subwoofer output
terminal, MONO output terminal, or line
output terminals of the amplifier, etc., here.
(For details, see “Connections” on the next
page.)
INPUT (LOW-LEVEL)
Se utiliza para conectar el terminal de
salida del subwoofer, el terminal de salida
MONO, o los terminales de salida de línea
del amplificador, etc.
(Para más información, consulte
“Conexiones” en la página siguiente).
POWER button
Turns the unit ON/OFF.
Botón de alimentación (POWER)
Se utiliza para encender/apagar la unidad.
VOLUME knob
Used to adjust the volume.
Mando de volumen (VOLUME)
Se utiliza para ajustar el volumen.
AC power cord
Cable de alimentación de CA
PHASE button
Used to obtain a rich bass sound.
: NORMAL
: REVERSE
Botón de fase (PHASE)
Se utiliza para obtener un sonido con mayor riqueza de graves.
: NORMAL
: REVERSE
CROSSOVER FREQUENCY knob
This adjusts tonal linkage with the main speaker system.
(For details, refer to [Operation] in Page 5.)
Perilla de frecuencia de cruce (CROSSOVER FREQUENCY)
Ajusta el encadenamiento tonal con el sistema de
altavoces principales. (Para los detalles, refiérase a
[Funcionamiento] en la página 5.
INPUT (HIGH-LEVEL)
This is connected to the speaker output
terminals of the amplifier, etc. when there is
no subwoofer output terminal on the
connecting amplifier, etc.
INPUT (HIGH-LEVEL)
Se conecta a los terminales de salida de
altavoz del amplificador, etc., cuando no se
dispone de terminal de salida de subwoofer
en el amplificador a conectar, etc.
TO MAIN SPEAKERS
When an amplifier without subwoofer output
terminal is connected to the INPUT
(HIGH-LEVEL), this is connected to the main
speaker system. (For details, see “Connec-
tions” on the next page.)
TO MAIN SPEAKERS
Cuando conecte un amplificador sin terminal
de salida de subwoofer al terminal de INPUT
(HIGH-LEVEL), se conecta al sistema de
altavoces principales. (Para los detalles,
véase “Conexiones” en la página siguiente).

– 3 –
RIGHT
RIGHT
RIGHT
LEFT/MONO
LEFT
RIGHT
LEFT
TO MAIN
SPEAKERS
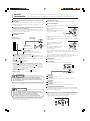
Connections
Conexiones
Make all the connections before plugging the AC power cord into an AC outlet.
Realice todas las conexiones antes de conectar el cable de alimentación de CA en la toma de CA.
Connecting to an amplifier with subwoofer output terminal
or an amplifier with MONO output terminal
Connect to the LEFT/MONO terminal of INPUT (LOW-LEVEL).
•
Use the supplied signal cord.
Conexión con un amplificador provisto de terminal de
salida de subwoofer o de terminal de salida MONO
Conecte al terminal LEFT/MONO de la INPUT (LOW-LEVEL). (Los
terminales LEFT (izq.) y RIGHT (der.) se encuentran mezclados dentro de la
unidad).
•
Para la conexión, utilice los cables de altavoces suministrados.
Connecting to the speaker output terminals of an amplifier
Connect the speaker cords in parallel to the speaker output terminals on the
amplifier.
Be sure to confirm and match the RIGHT and LEFT speaker terminals with
the + and - polarities when connecting.
•
Use the supplied speaker cords for the connection.
Conexión a los terminales de salida de altavoz del
amplificador
Los cables de altavoz deben ser conectados paralelamente a los terminales de
salida de altavoz del amplificador.
Al efectuar la conexión, asegúrese de hacer coincidir los terminales derecho
(RIGHT) e izquierdo (LEFT) con las polaridades + y -.
•
Para la conexión, utilice el cable de señal suministrado.
• Antes de conectarlo a un amplificador, asegúrese de
desconectar previamente la alimentación del amplificador.
• No conecte simultáneamente la INPUT (LOW-LEVEL) y la
INPUT (HIGH-LEVEL) de esta unidad. De hacerlo, se
incrementarán los ruidos y se producirán averías.
• No conecte la INPUT (LOW-LEVEL) de esta unidad a los
terminales REC OUT de un amplificador, etc.
• Before connecting to an amplifier, be sure that the power is
turned OFF on the amplifier side.
• INPUT (LOW-LEVEL) and INPUT (HIGH-LEVEL) on this unit
cannot be used simultaneously. Doing so will increase noise
and could result in damage.
• Do not connect INPUT (LOW-LEVEL) on this unit to the REC
OUT terminals of an amplifier, etc.
Si el amplificador, etc. que se va a conectar dispone de terminal de salida de
subwoofer y de terminales de salida de línea, se recomienda efectuar la
conexión al terminal de salida de subwoofer.
Asimismo, si no se dispone de ninguno de los dos terminales, efectúe la
conexión a los terminales de salida de altavoz.
If the amplifier, etc. to be connected to is equipped with both subwoofer
output terminal and line output terminals, it is recommended to connect to
the subwoofer output terminal.
Also, if neither of these output terminals is provided, please connect to the
speaker output terminals.
Subwoofer output terminal
(MONO output terminal)
Terminal de salida de subwoofer
(terminal de salida MONO)
INPUT (LOW-LEVEL)
LEFT/MONO terminal
INPUT (LOW-LEVEL)
Terminal LEFT/MONO
RIGHT
RIGHT
RIGHT
LEFT/MONO
LEFT
RIGHT
LEFT
TO MAIN
SPEAKERS
Speaker output terminals
Terminales de salida de altavoz
INPUT (HIGH-LEVEL)
RIGHT
INPUT (HIGH-LEVEL)
RIGHT
INPUT (HIGH-LEVEL)
LEFT
INPUT (HIGH-LEVEL)
LEFT
• PRECAUTIONS TO BE TAKEN BEFORE USING THE SPEAKER
TERMINAL (TO MAIN SPEAKERS) OF THIS UNIT
• When you connect a speaker to the speaker terminal of this
unit (TO MAIN SPEAKERS), be absolutely sure to connect the
speaker that is within the indicated range of speaker imped-
ance of the amplifier to be connected to the (INPUT [HIGH-
LEVEL]) terminal.
• If any speaker other than those within the indicated range
should be connected, the amplifier connected to the (INPUT
[HIGH-LEVEL]) terminal can result in malfunction
• PRECAUCIONES A TOMAR ANTES DE UTILIZAR EL TERMINAL
DE ALTAVOZ (TO MAIN SPEAKERS) DE ESTA UNIDAD
• Cuando conecte un altavoz al terminal de altavoz de esta
unidad (TO MAIN SPEAKERS), asegúrese de verificar que su
impedancia se encuentra dentro del margen de impedancia de
altavoz indicado en el amplificador que se va a conectar al
terminal (INPUT [HIGH-LEVEL]).
• Si se conecta un altavoz que no esté dentro del margen
indicado, podrá producirse un mal funcionamiento del
amplificador conectado al terminal ([INPUT [HIGH-LEVEL].
CAUTION
PRECAUCION
MEMO
NOTA
CAUTION
PRECAUCION

– 4 –
Connections (Continued)
Conexiones (Continuación)
Make all the connections before plugging the AC power cord into an AC outlet.
Efectúe todas las conexiones antes de desenchufar el cable de alimentación de CA de la toma de CA.
Conexión con un amplificador con terminales de salida
LINE OUT
Conecte a los terminales RIGHT y LEFT/MONO de INPUT (LOW-LEVEL).
Al conectar el cable, asegúrese de verificar los terminales derecho (RIGHT) e
izquierdo (LEFT), respectivamente.
•
Utilice cables de conexión vendidos separadamente.
Connecting to a preamplifier set
Connect to the RIGHT and LEFT/MONO terminals of INPUT (LOW-
LEVEL).
Be sure to connect the correct cord to the RIGHT and LEFT
terminals, respectively.
•
Use separately purchased connecting cords.
Conexión a un juego de preamplificador
Conecte a los terminales RIGHT y LEFT/MONO de INPUT (LOW-LEVEL).
Al conectar el cable, asegúrese de verificar los terminales derecho (RIGHT) e
izquierdo (LEFT), respectivamente.
•
Utilice cables de conexión vendidos separadamente.
Set the voltage selector switch to the correct voltage
•
Be sure that the AC power cord is disconnected before setting the voltage
selectors switch.
Ajuste del conmutador selector de tensión a la tensión
correcta
•
Antes de ajustar el conmutador selector de tensión, asegúrese de comprobar
que esté desconectado el cable de alimentación de CA.
RIGHT
RIGHT
RIGHT
LEFT/MONO
LEFT
RIGHT
LEFT
RIGHT
LEFT
TO MAIN
SPEAKERS
Sound output (LINE OUT) (LEFT)
Salida de sonido (LINE OUT) (LEFT)
(Izquierda)
Sound output (LINE OUT) (RIGHT)
Salida de sonido (LINE OUT)
(RIGHT) (Derecha)
INPUT (LOW-LEVEL)
LEFT/MONO
INPUT (LOW-LEVEL)
LEFT/MONO
INPUT (LOW-LEVEL)
RIGHT
INPUT (LOW-LEVEL)
RIGHT
RIGHT
RIGHT
RIGHT
LEFT/MONO
LEFT
RIGHT
LEFT
RIGHT LEFT
TO MAIN
SPEAKERS
OUTPUT
Salida
(OUTPUT)
INPUT (LOW-LEVEL)
RIGHT
INPUT (LOW-LEVEL)
RIGHT
INPUT (LOW-LEVEL)
LEFT/MONO
INPUT (LOW-LEVEL)
LEFT/MONO
Preamplifier
Preamplificador
Power amplifier
Amplificador de potencia
Connecting to an amplifier with LINE OUT output terminals
Connect to the RIGHT and LEFT/MONO terminals of INPUT
(LOW-LEVEL).
Be sure to connect the correct cord to the RIGHT and LEFT terminals,
respectively. (The LEFT and RIGHT terminals are mixed inside the unit.)
•
Use separately purchased connecting cords.

– 5 –
Operation
Funcionamiento
When all the connections to the amplifier, etc. are completed, plug the AC power cord into an AC outlet.
Después de finalizar la conexión con el amplificador, etc., enchufe el cable de alimentación de CA en una toma de CA.
Connecting the AC power cord (after all connections have
been made)
When connecting to the AC OUTLET on an amplifier, ensure that the AC
OUTLET is capable of delivering a power that is larger than the power consump-
tion (30 W) of this unit.
Conexión con el cable de alimentación de CA (después de
realizar todas las conexiones)
Cuando conecte a la toma de CA (AC OUTLET) de un amplificador, asegúrese
de que la capacidad de suministro de energía de esta toma de CA sea mayor que
el consumo de energía de esta unidad (30 W).
•
Front panel
•
Panel delantero
• POWER button
ON : Power is ON.
OFF : Power is OFF.
• Botón POWER
ON : La alimentación está conectada.
OFF: La alimentación está desconectada.
• lamp (with auto power on/off function)
When the POWER button is pressed to ON, the lamp lights up green. If
about 4 to 8 minutes elapse with no signals, the mode switches to the standby
mode, and the lamp lights red.
When audio signals are input, the mode automatically becomes the ON mode,
and the lamp lights green.
ON mode : lamp lights green.
Standby mode : lamp lights red.
• Lámpara (con función de activado/desactivado automático)
Al poner el botón POWER en la posición ON, la lámpara se enciende en
verde. Si no se introduce ninguna señal durante un lapso superior a aprox. 4 -
8 minutos, la unidad se pone en espera, y la lámpara se enciende en rojo.
Al ingresar las señales de audio, la alimentación se conecta automáticamente,
y la lámpara se enciende en verde.
Modo de encendido (ON) : La lámpara se enciende en verde.
Modo en espera : La lámpara se enciende en rojo.
Adjusting the volume
Adjust the volume level of this unit to match those of the main speakers.
Ajuste del volumen
Ajuste el nivel de volumen de este altavoz de manera que quede balanceado
con los otros altavoces.
1. Turn the VOLUME knob on this unit to the
“MIN” position.
1. Gire el mando VOLUME de esta unidad
hacia la posición “MIN”.
2. Adjust the volume of the amplifier to your normal listening level, and play a
music source.
2. Ajuste el volumen del amplificador al nivel de audición normal, y reproduzca
la fuente musical.
3. Turn the VOLUME knob on this unit to
balance the volume with the main
speakers.
3. Gire la perilla VOLUME de esta unidad
para equilibrar el volumen con los
altavoces principales.
•
After balancing the volume of this unit and the main speakers, use the
amplifier volume to adjust the volume of this unit in the same manner as the
main speakers.
•
Después de equilibrar el volumen de esta unidad y de los altavoces
principales, utilice el volumen del amplificador para ajustar el volumen de esta
unidad, de la misma manera que para los altavoces principales.
PHASE button
Set this button to obtain a rich bass.
Botón PHASE
Utilice este botón para obtener una mayor riqueza de graves.
• PHASE button
: NORMAL
(Normally used in this position.)
: REVERSE
(Use in this position when the bass sound is otherwise insufficient.)
• Botón PHASE
: NORMAL
(Normalmente utilice esta posición)
: REVERSE
(Utilice esta posición cuando los tonos graves sean insuficientes).
CROSSOVER FREQUENCY knob
Use this knob to adjust the relationship of sound between this unit and main
speakers. Set the frequency high if the main speakers are small and they lack
low (less than 200 Hz) frequencies.
Perilla de frecuencia de cruce (CROSSOVER FREQUENCY)
Utilice este botón para ajustar la relación de sonido entre esta unidad y los
altavoces principales. Ajuste a frecuencia alta si los altavoces principales son
pequeños y faltan frecuencias bajas (menos de 200Hz).
CAUTION
If the VOLUME knob on this unit is near MIN, the amplifier’s
sound volume is 0, or the sound signals from the amplifier are
exceptionally low, the mode is not switched from the standby
mode to the ON mode.
• To completely cut off the power to this unit, press the POWER button on the
rear panel to the “OFF” position, and disconnect the power cord from the AC
outlet.
Turning the Power ON
Encendido
• Para desconectar completamente la alimentación de esta unidad, oprima el
botón de alimentación del lado trasero para ponerlo en “OFF” y desenchufe el
cable de alimentación de la toma de CA.
No se efectuará la conmutación entre el modo de espera al
modo de encendido cuando el mando VOLUME de esta unidad
esté cerca de MIN., cuando el volumen de sonido del
amplificador está en 0, o cuando las señales acústicas
procedentes del amplificador sean extremadamente bajas.
PRECAUCION
•
Rear panel
•
Panel trasero
Volume
Valumen

– 6 –
Troubleshooting
Solución de problemas
Power does not come on.
La unidad no se enciende
No sound is heard.
No se escucha sonido.
Howling is generated.
Se produce aullido.
Is the AC power cord disconnected from the AC outlet?
¿El cable de alimentación está desenchufado de la toma
de CA?
Is the VOLUME knob turned to the “MIN” position?
Connections are incorrect, or loose?
¿El mando VOLUME está girado a la posición “MIN” ?
¿Las conexiones están flojas o incorrectas?
Was installation performed correctly?
Is the volume too loud?
¿La instalación fue realizada correctamente?
¿El volumen es demasiado elevado?
Plug the AC power cord firmly into the AC outlet.
Enchufe correctamente el cable de alimentación de CA
a la toma de CA.
Turn the VOLUME knob to a suitable volume is found.
Check the connections and make necessary corrections.
(See pages 3-4.)
Gire el mando VOLUME y ajústelo a un volumen
adecuado.
Verifique las conexiones y efectúe las correcciones
necesarias. (Consulte las páginas 3-4)
Check the installation. (See page 1.)
Turn the VOLUME knob in the direction of “MIN” until
howling is no longer generated.
Verifique la instalación. (Consulte la página 1.)
Gire el mando VOLUME en la dirección “MIN” hasta
que deje de escucharse el aullido.
Specifications
Especificaciones
Symptom
Síntomas
Possible Cause
Causa posible
Action
Acción correctiva
Type
Speaker unit
Frequency range
Input impedance
Input terminals
Power requirements
Output power of built-in amp
Power consumption
Power consumption in standby mode
Dimensions
Mass
Accessories
: Powered subwoofer
Bass-reflex type,
(magnetically shielded type)
: 16.0 cm (6 - 5/16 in.) cone × 1
: 25 Hz ~ 200 Hz
: 50 kΩ (LOW-LEVEL)
1 kΩ (HIGH-LEVEL)
: INPUT (LOW-LEVEL)
INPUT (HIGH-LEVEL)
: 110/127/230 V , 50 Hz/60 Hz
: 60 W (30 Hz, 4 Ω, 10 % THD)
: 30 W
: 5.6 W
: 226 mm (width) × 315 mm
(height) × 376 mm (depth)
: 9.9 kg (21.8 lbs)
: Speaker cord (2)
Signal cord (1)
Foot (4)
Tipo
Unidades de altavoces
Gama de frequencias
Impedancia de entrada
Terminales de entrada
Requisitos de potencia
Potencia de salida del amp. incorporado
Consumo de energía
Consumo de energía en el modo de
espera
Dimensiones
Peso
Accesorios
: Subwoofer motriz
Tipo bass-reflex, (Tipo blindado
magnéticamente)
: cono de 16,0 cm × 1
: 25 Hz – 200 Hz
: 50 kΩ (LOW-LEVEL)
1 kΩ (HIGH LEVEL)
: INPUT (LOW-LEVEL)
INPUT (HIGH LEVEL)
: 110/127/230 V , 50 Hz/60 Hz
: 60 W (30 Hz, 4 Ω, 10 % THD)
: 30 W
: 5,6 W
: 226 mm × 315 mm × 376 mm
(An/Al/F)
: 9,9 kg
: Cable de altavoz (2)
Cable de señal (1)
Pata (4)

VICTOR COMPANY OF JAPAN, LIMITED
EN. SP. CH.
RIGHT
RIGHT
RIGHT
LEFT/MONO
LEFT
RIGHT
LEFT
TO MAIN
SPEAKERS
Mains (AC) Line Instruction (not applicable for Europe, U.S.A., Canda, Australia, and
U.K.)
Instrucciones sobre la línea de la red (CA) (no aplicable a Europa, EE.UU., Canadá,
Australia y Reino Unido).
IMPOPRTANT for mains (AC) line
BEFORE PLUGGING IN, do check that your mains (AC)
line voltage corresponds with the position of the voltage
selector switch provided on the outside of this equipment
and, if different, reset the voltage selector switch, to prevent
from damage or risk of fire/electric shock.
NOTA IMPORTANTE sobre la línea de la red (CA)
ANTES DE ENCHUFAR, verifique que la tensión de la
línea de la red (CA) corresponde con la posición del
conmutador selector de tensión provisto en la parte exterior
del equipo. Si no corresponde, reajuste el conmutador
selector de tensión para evitar daños o riesgos de incendio/
descargas eléctricas.
0402NSMPRIJSC
Transcripción de documentos
Warnings, Cautions and Others Advertencias, precauciones y notas CAUTION PRECAUCIÓN To reduce the risk of electrical shocks, fire, etc.: 1. Do not remove screws, covers or cabinet. 2. Do not expose this appliance to rain or moisture. Para reducir el riesgo de incendios, descargas eléctricas, etc.: 1. No retire los tornillos, las cubiertas o la caja. 2. No exponga este aparato a la lluvia o la humedad. Caution –– POWER switch Precaución – Conmutador POWER This apparatus is provided with a POWER switch to be able to minimize power consumption for safe use. Therefore, 1. When doing initial setting, complete all the connections required, connect the mains plug into the wall outlet, and set the POWER switch to ON. 2. When not in use, set the POWER switch to OFF. 3. Disconnect the mains plug to shut the power off completely. The POWER switch in any position do not disconnect the mains line. Este aparato está provisto de un conmutador POWER capaz de reducir el consumo de energía al mínimo para un uso seguro. Por consiguiente, 1. Cuando realice los ajustes iniciales, efectúe todas las conexiones requeridas, conecte el enchufe de la red en el tomacorriente de pared, y ajuste el conmutador POWER a ON. 2. Cuando no esté en uso, ajuste el conmutador POWER a OFF. 3. Extraiga el enchufe del tomacorriente para desconectar la alimentación por completo. La línea de la red no se desconecta en ninguna de las posiciones del conmutador POWER. Caution: Proper Ventilation To avoid risk of electric shock and fire, and to prevent damage, locate the apparatus as follows: 1 Front: No obstructions and open spacing. 2 Sides/ Top/ Back: No obstructions should be placed in the areas shown by the dimensions below. 3 Bottom: Place on the level surface. Maintain an adequate air path for ventilation by placing on a stand with a height of 10 cm or more. Precaución: Ventilación apropiada Para evitar riesgos de incendios o de descargas eléctricas u otros daños, coloque el aparato de la siguiente manera: 1. Parte delantera: Sin obstrucciones y con espacio abierto. 2. Laterales/parte superior/parte trasera: No debe haber ninguna obstrucción dentro de las áreas indicadas por las dimensiones de abajo. 3. Parte inferior: Debe instalarse sobre una superficie nivelada. Para una ventilación adecuada, colóquelo sobre un soporte de 10 cm o más de altura para permitir el paso de aire. Caution • Do not block the ventilation openings or holes. (If the ventilation openings or holes are blocked by a newspaper or cloth, etc., the heat may not be able to get out.) • Do not place any naked flame sources, such as lighted candles, on the apparatus. • When discarding batteries, environmental problems must be considered and local rules or laws governing the disposal of these batteries must be followed strictly. • Do not use this apparatus in a bathroom or places with water. Also do not place any containers filled with water or liquids (such as cosmetics or medicines, flower vases, potted plants, cups, etc.) on top of this apparatus. PRECAUCIÓN • No obstruya las rendijas o los orificios de ventilación. (Si las rendijas o los orificios de ventilación quedan tapados con un periódico, un trozo de tela, etc., no se podrá disipar el calor). • No ponga sobre el aparato ninguna llama al descubierto, como velas encendidas. • Cuando tenga que descartar las pilas, tenga en cuenta los problemas ambientales y observe estrictamente los reglamentos o las leyes locales sobre disposición de las pilas. • No utilice este aparato en el cuarto de baño o en lugares donde hay agua. Tampoco coloque ningún recipiente que contenga agua u otros líquidos (frascos de cosméticos o medicinas, floreros, macetas, vasos, etc.) encima de este aparato. Front view Vista delantera 前视图 Side view Vista lateral 侧视图 20 cm 20 cm 15 cm 15 cm 20 cm 10 cm – G1 – Confirming Supplied Accessories Confirmación de los accesorios suministrados Precautions for installation Before use, check that you have received all of the following items, which are supplied with the unit. much space in the front. • Leave at least 15 cm of space on the sides. • Leave at least 20 cm of space on top. • Leave • Leave at least 20 cm of space in the rear. Precauciones sobre la instalación mucho espacio libre en la parte delantera • Deje por lo menos 15 cm de espacio en los costados. • Deje por lo menos 20 cm de espacio en la parte superior. • Deje • Deje por lo menos 20 cm de espacio en la parte trasera. Como primer paso, compruebe que tiene todos los elementos siguientes, que se suministran con la unidad. • • Speaker Cord (2) Cable del altavoz (2) • • Signal Cord (1) Cable de señal (1) • • Precautions for Installation Precauciones sobre la instalación Leave at least 20 cm of space Deje por lo menos 20 cm de espacio Leave at least 15 cm of space Deje por lo menos 15 cm de espacio Foot (4) Pata (4) STAND BY/ON SP-PW10 0 POWERE D SUBWOO FER Leave at least 20 cm of space Deje por lo menos 20 cm de espacio prevent deformation or discoloration of the cabinet, do • To not install the unit where it is exposed to direct sunlight or • Precautions for Use Precauciones sobre el uso • • • To maintain the look of the unit Wipe with a dry, soft cloth if the cabinet or control panel should become dirty. If very dirty, apply a small amount of water or neutral detergent to the cloth and wipe clean. Then wipe with a dry cloth. • Para mantener la apariencia externa de la unidad Si se ensucia la caja o el panel de control, limpie con un paño suave y seco. Si está muy sucio, limpie con un paño humedecido con agua o detergente neutro, y seque con un paño seco. • Good manners when listening to stereo When you are listening to music on a stereo system, please listen at volume that will not disturb your neighbors. At night, in particular, even soft sounds spread easily to the surroundings. Please shown consideration and close windows, or listen using headphones, etc. in order to maintain a pleasant living environment. The symbol shown here is the Sound Etiquette symbol mark. Sound etiquette • Respete las reglas de convivencia cuando escucha música estereofónica Cuando escucha música estereofónica, ajuste el volumen de manera tal que no moleste a sus vecinos. Especialmente, tenga en cuenta que de noche, incluso los sonidos suaves tienden a propagarse a los alrededores. Por favor sea considerado con sus vecinos y cierre las ventanas o escuche la música con los auriculares, etc. y contribuya a mantener un entorno de vida placentero. El símbolo mostrado es la señal de “ética del sonido”. Improving the sound field the speakers are facing a solid wall or glass door, etc., it is • Ifrecommended to furnish the wall with materials that absorb sound, for example by hanging up heavy curtains, to prevent generation of reflections and standing waves. Mejoramiento del campo acústico • • los altavoces están frente a una pared sólida o una puerta de vidrio, etc., se • Sirecomienda cubrir la pared con un material que absorba el sonido, por ejemplo, con cortinas pesadas, para evitar que se produzcan resonancia y ondas estacionarias. high humidity, and avoid installation near air conditioning outlets. Para evitar la deformación o la alteración de color de la caja, no instale la unidad en un sitio expuesto a la luz directa del sol o a la alta humedad ni cerca de las bocas de salidas del aire acondicionado. Speaker vibrations may cause howling. Place the unit as far away from the player as possible. Las vibraciones del altavoz pueden producir aullido. Coloque la unidad lo más lejos posible del tocadiscos. Take the occurrence of earthquakes or other physical shocks into consideration when selecting the installation place, and secure the unit thoroughly. Al decidir el sitio de instalación de la unidad, tenga en cuenta las eventualidades tales como los terremotos y otros golpes físicos y asegúrela firmemente para evitar que se voltee. This unit is magnetically shielded so as not to cause color distortions on color television sets. However, depending on the installation method, color distortions may occur. Please pay attention to the following points when installing the unit. 1. When placing these speakers near a TV set, turn off the TV’s main power switch or unplug it before installing the speakers. Wait at least 30 minutes after the system is installed before turning on the TV’s power. 2. If another speaker system has been set up near the TV set, that system may cause color unevenness in the TV’s picture. 3. In spite of the shielded design of these speakers, some types of TV’s may be affected by them. If this happens, move the speakers a short distance form the TV set. Esta unidad está aislada magnéticamente para evitar la distorsión de color en los televisor a color. Sin embargo, dependiendo del método de instalación, puede producirse distorsión de color. Preste atención a los puntos siguientes cuando instale la unidad. 1. Al colocar los altavoces cerca de un televisor, desactivar el interruptor de alimentación principal del televisor o desconectarlo antes de instalar los altavoces. Esperar por lo menos 30 minutos después de instalar el sistema y antes de activar la alimentación del televisor. 2. Si otro sistema del altavoz ha sido instalado cerca del televisor, este sistema puede causar una desigualdad de color en la imagen de televisor. 3. A pesar de la protección de estos altavoces, algunos tipos de televisores pueden ser afectados por ellos. En este caso, mover los altavoces a una distancia corta de la unidad del televisor. When setting the speaker system, affixing the feet to the cabinet base is recommended in order to cope with unsteadiness, etc. The setting surface may slightly discolor depending on the material when setting the unit using the supplied feet for an extensive period. Cuando instale el sistema de altavoces, se recomienda colocar las patas en la base de la caja para asegurar una mayor estabilidad, etc. Dependiendo del material, la superficie de instalación podría sufrir una ligera pérdida de color tras haber dejado la unidad con las patas suministradas durante un tiempo prolongado. Foot Pata Base Base –1– Names of Parts and Functions Nombres de las partes y funciones Front Panel Panel delantero Rear Panel Panel trasero RIGHT LEFT/MONO RIGHT RIGHT LEFT RIGHT LEFT TO MAIN SPEAKERS This lights when the power is ON, and when the unit is in the standby mode. Red: Standby mode Green: ON mode Lámpara de alimentación Se enciende mientras la unidad está encendida o en espera. Rojo: Modo de espera Verde: Modo de encendido Amp Section Sección del amplificador VOLUME knob Used to adjust the volume. Mando de volumen (VOLUME) Se utiliza para ajustar el volumen. RIGHT INPUT (LOW-LEVEL) You can connect the subwoofer output terminal, MONO output terminal, or line output terminals of the amplifier, etc., here. (For details, see “Connections” on the next page.) LEFT/MONO RIGHT INPUT (LOW-LEVEL) Se utiliza para conectar el terminal de salida del subwoofer, el terminal de salida MONO, o los terminales de salida de línea del amplificador, etc. (Para más información, consulte “Conexiones” en la página siguiente). RIGHT LEFT RIGHT LEFT SPEAKERS TO MAIN POWER button Turns the unit ON/OFF. Botón de alimentación (POWER) Se utiliza para encender/apagar la unidad. AC power cord Cable de alimentación de CA –2– CROSSOVER FREQUENCY knob This adjusts tonal linkage with the main speaker system. (For details, refer to [Operation] in Page 5.) Perilla de frecuencia de cruce (CROSSOVER FREQUENCY) Ajusta el encadenamiento tonal con el sistema de altavoces principales. (Para los detalles, refiérase a [Funcionamiento] en la página 5. PHASE button Used to obtain a rich bass sound. : NORMAL : REVERSE Botón de fase (PHASE) Se utiliza para obtener un sonido con mayor riqueza de graves. : NORMAL : REVERSE INPUT (HIGH-LEVEL) This is connected to the speaker output terminals of the amplifier, etc. when there is no subwoofer output terminal on the connecting amplifier, etc. INPUT (HIGH-LEVEL) Se conecta a los terminales de salida de altavoz del amplificador, etc., cuando no se dispone de terminal de salida de subwoofer en el amplificador a conectar, etc. TO MAIN SPEAKERS When an amplifier without subwoofer output terminal is connected to the INPUT (HIGH-LEVEL), this is connected to the main speaker system. (For details, see “Connections” on the next page.) TO MAIN SPEAKERS Cuando conecte un amplificador sin terminal de salida de subwoofer al terminal de INPUT (HIGH-LEVEL), se conecta al sistema de altavoces principales. (Para los detalles, véase “Conexiones” en la página siguiente). Connections Conexiones Make all the connections before plugging the AC power cord into an AC outlet. Realice todas las conexiones antes de conectar el cable de alimentación de CA en la toma de CA. CAUTION PRECAUCION • Before connecting to an amplifier, be sure that the power is turned OFF on the amplifier side. • INPUT (LOW-LEVEL) and INPUT (HIGH-LEVEL) on this unit cannot be used simultaneously. Doing so will increase noise and could result in damage. • Do not connect INPUT (LOW-LEVEL) on this unit to the REC OUT terminals of an amplifier, etc. • Antes de conectarlo a un amplificador, asegúrese de desconectar previamente la alimentación del amplificador. • No conecte simultáneamente la INPUT (LOW-LEVEL) y la INPUT (HIGH-LEVEL) de esta unidad. De hacerlo, se incrementarán los ruidos y se producirán averías. • No conecte la INPUT (LOW-LEVEL) de esta unidad a los terminales REC OUT de un amplificador, etc. MEMO NOTA If the amplifier, etc. to be connected to is equipped with both subwoofer output terminal and line output terminals, it is recommended to connect to the subwoofer output terminal. Also, if neither of these output terminals is provided, please connect to the speaker output terminals. Si el amplificador, etc. que se va a conectar dispone de terminal de salida de subwoofer y de terminales de salida de línea, se recomienda efectuar la conexión al terminal de salida de subwoofer. Asimismo, si no se dispone de ninguno de los dos terminales, efectúe la conexión a los terminales de salida de altavoz. Connecting to an amplifier with subwoofer output terminal or an amplifier with MONO output terminal Conexión con un amplificador provisto de terminal de salida de subwoofer o de terminal de salida MONO Connect to the LEFT/MONO terminal of INPUT (LOW-LEVEL). Conecte al terminal LEFT/MONO de la INPUT (LOW-LEVEL). (Los terminales LEFT (izq.) y RIGHT (der.) se encuentran mezclados dentro de la unidad). Para la conexión, utilice los cables de altavoces suministrados. • Use the supplied signal cord. • Subwoofer output terminal (MONO output terminal) INPUT (LOW-LEVEL) LEFT/MONO terminal Terminal de salida de subwoofer (terminal de salida MONO) RIGHT LEFT/MONO INPUT (LOW-LEVEL) Terminal LEFT/MONO RIGHT Connecting to the speaker output terminals of an amplifier • RIGHT LEFT RIGHT LEFT TO MAIN SPEAKERS Conexión a los terminales de salida de altavoz del amplificador Connect the speaker cords in parallel to the speaker output terminals on the amplifier. Be sure to confirm and match the RIGHT and LEFT speaker terminals with the + and - polarities when connecting. Use the supplied speaker cords for the connection. • Los cables de altavoz deben ser conectados paralelamente a los terminales de salida de altavoz del amplificador. Al efectuar la conexión, asegúrese de hacer coincidir los terminales derecho (RIGHT) e izquierdo (LEFT) con las polaridades + y -. Para la conexión, utilice el cable de señal suministrado. Speaker output terminals INPUT (HIGH-LEVEL) RIGHT INPUT (HIGH-LEVEL) RIGHT Terminales de salida de altavoz INPUT (HIGH-LEVEL) LEFT INPUT (HIGH-LEVEL) LEFT RIGHT LEFT/MONO RIGHT CAUTION RIGHT LEFT RIGHT LEFT TO MAIN SPEAKERS PRECAUCION • PRECAUTIONS TO BE TAKEN BEFORE USING THE SPEAKER TERMINAL (TO MAIN SPEAKERS) OF THIS UNIT • When you connect a speaker to the speaker terminal of this unit (TO MAIN SPEAKERS), be absolutely sure to connect the speaker that is within the indicated range of speaker impedance of the amplifier to be connected to the (INPUT [HIGHLEVEL]) terminal. • If any speaker other than those within the indicated range should be connected, the amplifier connected to the (INPUT [HIGH-LEVEL]) terminal can result in malfunction • PRECAUCIONES A TOMAR ANTES DE UTILIZAR EL TERMINAL DE ALTAVOZ (TO MAIN SPEAKERS) DE ESTA UNIDAD • Cuando conecte un altavoz al terminal de altavoz de esta unidad (TO MAIN SPEAKERS), asegúrese de verificar que su impedancia se encuentra dentro del margen de impedancia de altavoz indicado en el amplificador que se va a conectar al terminal (INPUT [HIGH-LEVEL]). • Si se conecta un altavoz que no esté dentro del margen indicado, podrá producirse un mal funcionamiento del amplificador conectado al terminal ([INPUT [HIGH-LEVEL]. –3– Connections (Continued) Conexiones (Continuación) Make all the connections before plugging the AC power cord into an AC outlet. Efectúe todas las conexiones antes de desenchufar el cable de alimentación de CA de la toma de CA. Connecting to an amplifier with LINE OUT output terminals • Connect to the RIGHT and LEFT/MONO terminals of INPUT (LOW-LEVEL). Be sure to connect the correct cord to the RIGHT and LEFT terminals, respectively. (The LEFT and RIGHT terminals are mixed inside the unit.) Use separately purchased connecting cords. Conexión con un amplificador con terminales de salida LINE OUT • Conecte a los terminales RIGHT y LEFT/MONO de INPUT (LOW-LEVEL). Al conectar el cable, asegúrese de verificar los terminales derecho (RIGHT) e izquierdo (LEFT), respectivamente. Utilice cables de conexión vendidos separadamente. Sound output (LINE OUT) (LEFT) INPUT (LOW-LEVEL) LEFT/MONO INPUT (LOW-LEVEL) LEFT/MONO Salida de sonido (LINE OUT) (LEFT) (Izquierda) RIGHT LEFT/MONO RIGHT LEFT RIGHT RIGHT LEFT LEFT RIGHT TO MAIN SPEAKERS INPUT (LOW-LEVEL) RIGHT INPUT (LOW-LEVEL) RIGHT Sound output (LINE OUT) (RIGHT) Salida de sonido (LINE OUT) (RIGHT) (Derecha) • Connecting to a preamplifier set Conexión a un juego de preamplificador Connect to the RIGHT and LEFT/MONO terminals of INPUT (LOWLEVEL). Be sure to connect the correct cord to the RIGHT and LEFT terminals, respectively. Use separately purchased connecting cords. Conecte a los terminales RIGHT y LEFT/MONO de INPUT (LOW-LEVEL). Al conectar el cable, asegúrese de verificar los terminales derecho (RIGHT) e izquierdo (LEFT), respectivamente. Utilice cables de conexión vendidos separadamente. • OUTPUT Salida (OUTPUT) INPUT (LOW-LEVEL) LEFT/MONO INPUT (LOW-LEVEL) LEFT/MONO Preamplifier Preamplificador RIGHT LEFT/MONO RIGHT RIGHT LEFT RIGHT Power amplifier LEFT Amplificador de potencia RIGHT Set the voltage selector switch to the correct voltage sure that the AC power cord is disconnected before setting the voltage • Be selectors switch. Ajuste del conmutador selector de tensión a la tensión correcta de ajustar el conmutador selector de tensión, asegúrese de comprobar • Antes que esté desconectado el cable de alimentación de CA. –4– LEFT TO MAIN SPEAKERS INPUT (LOW-LEVEL) RIGHT INPUT (LOW-LEVEL) RIGHT Operation Funcionamiento When all the connections to the amplifier, etc. are completed, plug the AC power cord into an AC outlet. Después de finalizar la conexión con el amplificador, etc., enchufe el cable de alimentación de CA en una toma de CA. Connecting the AC power cord (after all connections have been made) Adjusting the volume Adjust the volume level of this unit to match those of the main speakers. When connecting to the AC OUTLET on an amplifier, ensure that the AC OUTLET is capable of delivering a power that is larger than the power consumption (30 W) of this unit. Conexión con el cable de alimentación de CA (después de realizar todas las conexiones) Cuando conecte a la toma de CA (AC OUTLET) de un amplificador, asegúrese de que la capacidad de suministro de energía de esta toma de CA sea mayor que el consumo de energía de esta unidad (30 W). Ajuste del volumen Ajuste el nivel de volumen de este altavoz de manera que quede balanceado con los otros altavoces. 1. Turn the VOLUME knob on this unit to the “MIN” position. 1. Gire el mando VOLUME de esta unidad hacia la posición “MIN”. Volume Valumen Turning the Power ON Encendido panel • Front • Panel delantero panel • Rear • Panel trasero 2. Adjust the volume of the amplifier to your normal listening level, and play a music source. 2. Ajuste el volumen del amplificador al nivel de audición normal, y reproduzca la fuente musical. 3. Turn the VOLUME knob on this unit to balance the volume with the main speakers. • • POWER button ON : Power is ON. OFF : Power is OFF. 3. Gire la perilla VOLUME de esta unidad para equilibrar el volumen con los altavoces principales. • Botón POWER ON : La alimentación está conectada. OFF: La alimentación está desconectada. balancing the volume of this unit and the main speakers, use the • After amplifier volume to adjust the volume of this unit in the same manner as the lamp (with auto power on/off function) When the POWER button is pressed to ON, the lamp lights up green. If about 4 to 8 minutes elapse with no signals, the mode switches to the standby mode, and the lamp lights red. When audio signals are input, the mode automatically becomes the ON mode, and the lamp lights green. ON mode : lamp lights green. Standby mode : lamp lights red. main speakers. de equilibrar el volumen de esta unidad y de los altavoces • Después principales, utilice el volumen del amplificador para ajustar el volumen de esta unidad, de la misma manera que para los altavoces principales. PHASE button Set this button to obtain a rich bass. Botón PHASE Utilice este botón para obtener una mayor riqueza de graves. • Lámpara (con función de activado/desactivado automático) Al poner el botón POWER en la posición ON, la lámpara se enciende en verde. Si no se introduce ninguna señal durante un lapso superior a aprox. 4 8 minutos, la unidad se pone en espera, y la lámpara se enciende en rojo. Al ingresar las señales de audio, la alimentación se conecta automáticamente, y la lámpara se enciende en verde. Modo de encendido (ON) : La lámpara se enciende en verde. Modo en espera : La lámpara se enciende en rojo. • PHASE button : NORMAL (Normally used in this position.) : REVERSE (Use in this position when the bass sound is otherwise insufficient.) CAUTION If the VOLUME knob on this unit is near MIN, the amplifier’s sound volume is 0, or the sound signals from the amplifier are exceptionally low, the mode is not switched from the standby mode to the ON mode. • Botón PHASE : NORMAL (Normalmente utilice esta posición) : REVERSE (Utilice esta posición cuando los tonos graves sean insuficientes). • To completely cut off the power to this unit, press the POWER button on the rear panel to the “OFF” position, and disconnect the power cord from the AC outlet. CROSSOVER FREQUENCY knob Use this knob to adjust the relationship of sound between this unit and main speakers. Set the frequency high if the main speakers are small and they lack low (less than 200 Hz) frequencies. PRECAUCION No se efectuará la conmutación entre el modo de espera al modo de encendido cuando el mando VOLUME de esta unidad esté cerca de MIN., cuando el volumen de sonido del amplificador está en 0, o cuando las señales acústicas procedentes del amplificador sean extremadamente bajas. Perilla de frecuencia de cruce (CROSSOVER FREQUENCY) Utilice este botón para ajustar la relación de sonido entre esta unidad y los altavoces principales. Ajuste a frecuencia alta si los altavoces principales son pequeños y faltan frecuencias bajas (menos de 200Hz). • Para desconectar completamente la alimentación de esta unidad, oprima el botón de alimentación del lado trasero para ponerlo en “OFF” y desenchufe el cable de alimentación de la toma de CA. –5– Troubleshooting Solución de problemas Symptom Síntomas Possible Cause Causa posible Action Acción correctiva Power does not come on. Is the AC power cord disconnected from the AC outlet? Plug the AC power cord firmly into the AC outlet. La unidad no se enciende ¿El cable de alimentación está desenchufado de la toma de CA? Enchufe correctamente el cable de alimentación de CA a la toma de CA. No sound is heard. Is the VOLUME knob turned to the “MIN” position? Turn the VOLUME knob to a suitable volume is found. Connections are incorrect, or loose? Check the connections and make necessary corrections. (See pages 3-4.) ¿El mando VOLUME está girado a la posición “MIN” ? Gire el mando VOLUME y ajústelo a un volumen adecuado. ¿Las conexiones están flojas o incorrectas? Verifique las conexiones y efectúe las correcciones necesarias. (Consulte las páginas 3-4) Was installation performed correctly? Check the installation. (See page 1.) Is the volume too loud? Turn the VOLUME knob in the direction of “MIN” until howling is no longer generated. ¿La instalación fue realizada correctamente? Verifique la instalación. (Consulte la página 1.) ¿El volumen es demasiado elevado? Gire el mando VOLUME en la dirección “MIN” hasta que deje de escucharse el aullido. No se escucha sonido. Howling is generated. Se produce aullido. Specifications Especificaciones Type : Powered subwoofer Bass-reflex type, (magnetically shielded type) Speaker unit : 16.0 cm (6 - 5/16 in.) cone × 1 Frequency range : 25 Hz ~ 200 Hz Input impedance : 50 kΩ (LOW-LEVEL) 1 kΩ (HIGH-LEVEL) Input terminals : INPUT (LOW-LEVEL) INPUT (HIGH-LEVEL) Power requirements : 110/127/230 V , 50 Hz/60 Hz Output power of built-in amp : 60 W (30 Hz, 4 Ω, 10 % THD) Power consumption : 30 W Power consumption in standby mode : 5.6 W Dimensions : 226 mm (width) × 315 mm (height) × 376 mm (depth) Mass : 9.9 kg (21.8 lbs) Accessories : Speaker cord (2) Signal cord (1) Foot (4) Tipo : Subwoofer motriz Tipo bass-reflex, (Tipo blindado magnéticamente) Unidades de altavoces : cono de 16,0 cm × 1 Gama de frequencias : 25 Hz – 200 Hz Impedancia de entrada : 50 kΩ (LOW-LEVEL) 1 kΩ (HIGH LEVEL) Terminales de entrada : INPUT (LOW-LEVEL) INPUT (HIGH LEVEL) Requisitos de potencia : 110/127/230 V , 50 Hz/60 Hz Potencia de salida del amp. incorporado : 60 W (30 Hz, 4 Ω, 10 % THD) Consumo de energía : 30 W Consumo de energía en el modo de : 5,6 W espera Dimensiones : 226 mm × 315 mm × 376 mm (An/Al/F) Peso : 9,9 kg Accesorios : Cable de altavoz (2) Cable de señal (1) Pata (4) –6– Mains (AC) Line Instruction (not applicable for Europe, U.S.A., Canda, Australia, and U.K.) Instrucciones sobre la línea de la red (CA) (no aplicable a Europa, EE.UU., Canadá, Australia y Reino Unido). 市电电源(交流电)使用说明(不适用于欧洲、美国、加拿大、澳大利亚以及英国) RIGHT LEFT/MONO RIGHT IMPOPRTANT for mains (AC) line RIGHT LEFT RIGHT LEFT TO MAIN SPEAKERS BEFORE PLUGGING IN, do check that your mains (AC) line voltage corresponds with the position of the voltage selector switch provided on the outside of this equipment and, if different, reset the voltage selector switch, to prevent from damage or risk of fire/electric shock. NOTA IMPORTANTE sobre la línea de la red (CA) ANTES DE ENCHUFAR, verifique que la tensión de la línea de la red (CA) corresponde con la posición del conmutador selector de tensión provisto en la parte exterior del equipo. Si no corresponde, reajuste el conmutador selector de tensión para evitar daños o riesgos de incendio/ descargas eléctricas. 有关市电电源(交流电)的注意事项 在插入电源插头之前,务请确保市电电源(交流电)的 电压与位于本设备外侧的电压选择开关的位置相一致。 如果不一致,则应重新设定该开关,以免因起火/触电而 造成损害。 EN. SP. CH. VICTOR COMPANY OF JAPAN, LIMITED 0402NSMPRIJSC-
 1
1
-
 2
2
-
 3
3
-
 4
4
-
 5
5
-
 6
6
-
 7
7
-
 8
8
-
 9
9
-
 10
10


JVC SP-PW105WD Manual de usuario
- Categoría
- Altavoces
- Tipo
- Manual de usuario
en otros idiomas
- English: JVC SP-PW105WD User manual