
INFORMATION / INFORMATIONEN /
INFORMATION
GB D
F
GB
D
F
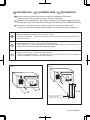
Please follow the instructions below for step 9 of Installation Instructions.
Keep this sheet with the instruction book for future reference.
9. Remove the screw F from the oven as shown in Fig. 5
Install the intake duct
4
to the rear of the oven with two screws F and E (removed at step 7)
as shown in Fig. 6.
9. Die Schraube F wie in Fig. 5 gezeigt vom Gerät abnehmen.
Den Ansaugkanal
4
wie in Fig. 6 gezeigt mit den beiden Schrauben F und E (unter Schritt 7
abgenommen) an der Rückseite des Gerätes befestigen.
9. Retirer la vis F du four, comme le montre la figure 5.
Installer le conduit d'aspiration
4
à l'arrière du four au moyen des deux vis F et E (retirées au
cours de l'opération 7), comme le montre la figure 6.
GB
D
F
Bewahren Sie dieses Blatt für die künftige Einsicht bei der Bedienungsanleitung auf.
Bitte befolgen Sie die unten stehenden Anweisungen für den Schritt 9 der Installationsanleitung.
Conservez cette feuille avec la notice pour pouvoir vous en servir plus tard.
Suivez les instructions ci-dessus pour l'étape 9 des Instructions pour l'Installation.
Fig. 5
E
Fig. 6
F
Hole for the power supply cord
Öffnung für Netzkabel
Découpe pour le cordon d´alimentation
4
E
F
TINS-A874WRRZ

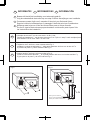
9. Verwijder de schroef F van de oven zoals u in Afb. 5 ziet.
Plaats het inlaatkanaal
4
met de twee schroeven F en E (die u in stap 7 heeft verwijderd) aan
de achterkant van de oven zoals u in Afb. 6 ziet.
9. Togliete la vite F dal forno, come mostrato nella Fig. 5.
Installate il condotto di aspirazione
4
sulla parte posteriore del forno con le due viti F e
E (rimosse al passo 7), come mostrato nella Fig. 6.
9. Quite el tornillo F del horno tal como indica la Fig. 5.
Instale el conducto de admisión
4
en la parte posterior del horno con los dos tornillos F y
E (que quitó en el paso 7), tal como indica la Fig. 6.
Fig. 5
E
Fig. 6
F
Opening voor het netsnoer
Foro per il cavo di alimentazione
Orificio para el cable de alimentación
4
E
F
INFORMATIE /
INFORMAZIONI / INFORMACIÓN
NL
I E
NL
I
E
NL
I
E
Bewaar dit blad bij de handleiding voor toekomstig gebruik.
Volg de onderstaande instructies op voor stap 9 van de Aanwijzingen voor installatie.
Conservare questo foglio con il manuale di istruzioni per riferimento futuro.
Seguire le istruzioni sottostanti per il passaggio 9 delle Istruzioni per l'installazione.
Mantenga esta hoja con el libro de instrucciones para su futura consulta.
Por favor, siga las instrucciones proporcionadas a continuación para el paso 9 de
las Instrucciones de instalación.
Transcripción de documentos
GB GB D F INFORMATION / D INFORMATIONEN / F INFORMATION Please follow the instructions below for step 9 of Installation Instructions. Keep this sheet with the instruction book for future reference. Bewahren Sie dieses Blatt für die künftige Einsicht bei der Bedienungsanleitung auf. Bitte befolgen Sie die unten stehenden Anweisungen für den Schritt 9 der Installationsanleitung. Conservez cette feuille avec la notice pour pouvoir vous en servir plus tard. Suivez les instructions ci-dessus pour l'étape 9 des Instructions pour l'Installation. GB 9. Remove the screw F from the oven as shown in Fig. 5 Install the intake duct 4 to the rear of the oven with two screws F and E (removed at step 7) as shown in Fig. 6. D 9. Die Schraube F wie in Fig. 5 gezeigt vom Gerät abnehmen. Den Ansaugkanal 4 wie in Fig. 6 gezeigt mit den beiden Schrauben F und E (unter Schritt 7 abgenommen) an der Rückseite des Gerätes befestigen. F 9. Retirer la vis F du four, comme le montre la figure 5. Installer le conduit d'aspiration 4 à l'arrière du four au moyen des deux vis F et E (retirées au cours de l'opération 7), comme le montre la figure 6. Fig. 6 Fig. 5 F F E Hole for the power supply cord Öffnung für Netzkabel Découpe pour le cordon d´alimentation E 4 TINS-A874WRRZ NL NL I E NL INFORMATIE / I INFORMAZIONI / E INFORMACIÓN Bewaar dit blad bij de handleiding voor toekomstig gebruik. Volg de onderstaande instructies op voor stap 9 van de Aanwijzingen voor installatie. Conservare questo foglio con il manuale di istruzioni per riferimento futuro. Seguire le istruzioni sottostanti per il passaggio 9 delle Istruzioni per l'installazione. Mantenga esta hoja con el libro de instrucciones para su futura consulta. Por favor, siga las instrucciones proporcionadas a continuación para el paso 9 de las Instrucciones de instalación. 9. Verwijder de schroef F van de oven zoals u in Afb. 5 ziet. Plaats het inlaatkanaal 4 met de twee schroeven F en E (die u in stap 7 heeft verwijderd) aan de achterkant van de oven zoals u in Afb. 6 ziet. I 9. Togliete la vite F dal forno, come mostrato nella Fig. 5. Installate il condotto di aspirazione 4 sulla parte posteriore del forno con le due viti F e E (rimosse al passo 7), come mostrato nella Fig. 6. E 9. Quite el tornillo F del horno tal como indica la Fig. 5. Instale el conducto de admisión 4 en la parte posterior del horno con los dos tornillos F y E (que quitó en el paso 7), tal como indica la Fig. 6. Fig. 5 Fig. 6 F F E Opening voor het netsnoer Foro per il cavo di alimentazione Orificio para el cable de alimentación E 4-
 1
1
-
 2
2


en otros idiomas
- français: Sharp EBR99ST Le manuel du propriétaire
- italiano: Sharp EBR99ST Manuale del proprietario
- English: Sharp EBR99ST Owner's manual
- Deutsch: Sharp EBR99ST Bedienungsanleitung
