
OWNER’S MANUAL / MANUAL DEL PROPIETARIO
ASSEMBLY AND OPERATING INSTRUCTIONS
INSTRUCCIONES DE ARMADO Y OPERACIÓN
COOKER FRYER
™
NOT FOR COMMERCIAL USE. / NO ES PARA USO COMERCIAL.
READ THIS MANUAL
LEA ESTE MANUAL
This instruction manual
contains important information
necessary for the proper
assembly and safe use of the
appliance. Read and follow all
warnings and instructions
before assembling and using
the appliance. Follow all
warnings and instructions
when using the appliance.
FOR ALL 815-4010 SERIES.
PARA TODAS LAS SERIES
815-4010.
NOTICE TO INSTALLER:
LEAVE THESE INSTRUCTIONS
WITH THE OWNER FOR FUTURE
REFERENCE.
NOTE:
Pre-attached metal plate on
product with safety warnings.
(Do not remove this plate.)
AVISO PARA EL
INSTALADOR:
ENTREGUE ESTAS
INSTRUCCIONES AL
PROPIETARIO PARA
REFERENCIA FUTURA.
KEEP THIS MANUAL FOR FUTURE REFERENCE
CONSERVE ESTE MANUAL PARA FUTURAS REFERENCIAS
Este manual de instrucciones
contiene importante información
necesaria para el montaje
adecuado y para el uso seguro
del electrodoméstico. Lea y
cumpla con todas las
instrucciones y advertencias
antes de instalar y de utilizar este
electrodoméstico. Siga todas las
instrucciones y advertencias
cuando utilice este
electrodoméstico.
NOTA:
Placa de metal preanexada en
el producto con advertencias
de seguridad. (No quitar esta
placa).

1
1. Never operate this appliance unattended.
2. Never operate this appliance within 10 feet (3m) of any structure, combustible
material or other gas cylinder.
3. Never operate this appliance within 25 feet (7.5m) of any flammable liquid.
4. Do not fill cooking vessel beyond maximum fill line.
5. Never allow the oil/grease to get hotter than 400°F (200°C). If the temperature
exceeds 400°F (200°C) or if oil begins to smoke, immediately turn the burner or gas
supply OFF.
6. Heated liquids remain at scalding temperatures long after the cooking process. Never
touch cooking appliance until liquids have cooled to 115°F (45°C) or less.
7. If a fire should occur keep away from the appliance and immediately call your Fire
Department. Do not attempt to extinguish an oil/grease fire with water.
Failure to follow these instructions could result in fire, explosion or burn hazard
which could cause property damage, personal injury or death.
DANGER
IF YOU SMELL GAS:
1. Shut off gas to the appliance at the LP cylinder.
2. Extinguish any open flame.
3. If odor continues, keep away from the appliance and immediately call your Fire Department.
Failure to follow these instructions could result in fire or explosion
which could cause property damage, personal injury or death.
WARNING
a) DO NOT store a spare LP cylinder under or near this appliance.
b) Never fill the cylinder beyond 80% full.
c) If the information in (a) and (b) are not followed exactly, a fire causing death or
serious injury may occur.
DANGER
THE PURPOSE OF THIS SAFETY ALERT SYMBOL IS TO ATTRACT YOUR
ATTENTION TO POSSIBLE HAZARDS AS YOU ASSEMBLE AND USE YOUR COOKER.
WHEN YOU SEE THE SAFETY ALERT SYMBOL
PAY CLOSE ATTENTION TO THE INFORMATION WHICH FOLLOWS!

2
General Warnings. . . . . . . . . . . . . . . . . . . . . . . . . . . . . . . . . . . . . . . . . . . . . . . . . . . . . . . . . . . . . . 3-4
Installation and LP Cylinder Specifications and Safe Use . . . . . . . . . . . . . . . . . . . . . . . . . . . . . . 5–7
Connecting LP Cylinder and Hose / Regulator to Cooker. . . . . . . . . . . . . . . . . . . . . . . . . . . . . . . . . 8
Leak Testing . . . . . . . . . . . . . . . . . . . . . . . . . . . . . . . . . . . . . . . . . . . . . . . . . . . . . . . . . . . . . . . . . . 8-9
Pre-start Check List. . . . . . . . . . . . . . . . . . . . . . . . . . . . . . . . . . . . . . . . . . . . . . . . . . . . . . . . . . . . . 10
Lighting Instructions. . . . . . . . . . . . . . . . . . . . . . . . . . . . . . . . . . . . . . . . . . . . . . . . . . . . . . . . . . 10–11
Operating Cooker and How to determine proper amount of oil . . . . . . . . . . . . . . . . . . . . . . . . . 12-13
Burner Assembly/Maintenance . . . . . . . . . . . . . . . . . . . . . . . . . . . . . . . . . . . . . . . . . . . . . . . . . . . . 13
Parts List and Assembly Instructions . . . . . . . . . . . . . . . . . . . . . . . . . . . . . . . . . . . . . . . . . . . . . 14-16
Warranty Information . . . . . . . . . . . . . . . . . . . . . . . . . . . . . . . . . . . . . . . . . . . . . . . . . . 34-Back Cover
TABLE OF CONTENTS
FOR COVERS, ACCESSORIES AND OTHER PRODUCTS, PLEASE VISIT US ONLINE AT:
DANGER: Indicates an imminently hazardous situation which, if not avoided, will result in death or serious injury.
WARNING: Be alert to the possibility of serious bodily injury if the instructions are not followed. Be sure to read and
carefully follow all of the messages.
CAUTION: Indicates a potentially hazardous situation which, if not avoided, may result in minor or moderate injury.
CALIFORNIA PROPOSITION 65 WARNING
This product contains chemicals, including lead in the brass of certain component parts, that are
known to the State of California to cause cancer, and birth defects or other reproductive harm.
Wash hands after handling. When used, this product emits fuel combustion chemicals that are
known to the State of California to cause cancer, and birth defects or other reproductive harm.
Follow all instructions in this manual and use only in well ventilated, outdoor area.

WARNING
• This appliance shall be used OUTDOORS only. Do NOT use in a building, home, garage,
balcony, porch, tent or any other enclosed area. Cookers shall not be used on or under
apartment or condominium balcony or deck. Do NOT install or use in or on recreational
vehicles and/or boats.
• When cooking, the cooker must be on a level, stable, noncombustible surface in an area clear
of combustible material. An asphalt surface (blacktop) may not be acceptable for this purpose.
• Do not use on combustible flooring or surfaces.
• Do NOT operate appliance any closer than 10 feet from any combustible materials including
walls or railings or under overhead construction as these materials could ignite should grease
fire occur.
• This appliance is not for frying turkeys. The maximum size cooking vessel/pot for frying with
this appliance using grease or oil is 10 quarts. The maximum size pot for boiling (water,
vegetable, stock, etc.) is 80 quarts.
• Smoking oil is an indication that the oil is too hot and may ignite. Oil ignites at varying
temperatures; therefore, never allow the oil to exceed 400°F
(200°C)
and NEVER LEAVE HEATING
OIL UNATTENDED.
• Carefully monitor the temperature of the oil with the thermometer and regulate the temperature
so that it does not reach the "Fire Hazard" zone on the thermometer. If necessary, turn the gas
OFF to the appliance to allow the oil to cool.
• When cooking with oil or grease, the thermometer provided MUST be used. Follow
instructions in this manual for proper installation and use of the thermometer. If the
thermometer supplied with this fryer/boiler has been lost or damaged, a replacement
thermometer must be obtained before using this fryer. Use only replacement thermometer
# 072-0005-0. This thermometer can be obtained by contacting The Brinkmann Corporation
at 1-800-527-0717.
• Test the thermometer before each use by inserting it into a cooking vessel of boiling water and
ensure that it registers approximately 212°F +/- 20˚F (100°C +/- 10˚C). If the thermometer does
not function properly, a replacement thermometer must be obtained before using this cooker.
This thermometer can be obtained by contacting The Brinkmann Corporation at
1-800-527-0717.
• If the temperature exceeds 400°F (200°C) or if oil begins to smoke, immediately turn the burner
or gas supply OFF and wait for the temperature to decrease to less than 350°F (175°C) before
relighting burner. (See instructions on page 11 for relighting.) If there is a lid (cover), do not
remove the lid as oxygen will feed a fire.
• Hot oil or water can cause severe burns and permanent disfigurement; use caution and
common sense when operating this product.
• Never use a cooking vessel larger than 80 quarts or one that does not fit within the retaining
brackets of this appliance. Never use a cooking vessel less than 12.5 inches in diameter. Adjust
retaining brackets to fit as close as possible without touching the pot, approximately 1/4 inch.
• Do not leave the appliance unattended. Keep children and pets away from the appliance at all
times. Carefully monitor all activity around cooker to avoid burns or other injuries. Do not wear
loose clothing or allow long hair to hang freely while lighting or using cooker.
• Use caution when walking or standing near cooker as splattered oil may have created a slick
surface. Do not walk between cooker and propane tank as this creates a trip hazard. Tripping
over the hose could overturn the cooker or knock cooking vessel of hot liquid from cooker
causing severe burns.
• Avoid bumping of or impact with the appliance to prevent spillage or splashing of hot
cooking liquid.
3
GENERAL WARNINGS

4
WARNING
• Never drop food or accessories into hot cooking liquid. Lower food and accessories slowly into
the cooking liquid in order to prevent splashing or overflow. When removing food from the
appliance care shall be taken to avoid burns from hot cooking liquids.
• Never overfill the cooking vessel with oil, grease or water. Follow instructions in this manual for
establishing proper oil, grease or water levels. (see page 12)
• In the event of rain, snow, hail, sleet or other forms of precipitation while cooking with
oil/grease, cover the cooking vessel immediately and turn off the appliance burner and
gas supply. Do not attempt to move the appliance or cooking vessel.
• Introduction of water or ice from any source into the oil/grease may cause overflow and severe
burns from hot oil and water splatter.
When frying with oil/grease, all food products MUST be
completely thawed and towel dried before being immersed in the cooker.
• Do not place empty cooking vessel on the appliance while in operation as it could melt. Use
caution when placing anything in cooking vessel while the appliance is in operation.
Do NOT
use lid when heating or cooking with oil.
• Do not move the appliance when in use. Allow the cooking vessel to cool to 115˚F (45˚C)
before moving or storing.
• This appliance will be hot during and after use. Use insulated oven mitts or gloves for
protection from hot surfaces or splatter from cooking liquids.
• When cooking with oil/grease, have a type BC or ABC fire extinguisher readily available. In the
event of an oil/grease fire immediately call the Fire Department. Do not attempt to extinguish
with water. A Type BC or ABC fire extinguisher may, in some circumstances, contain the fire.
• Check all gas connections by following directions in the "Gas Leak Testing" section on page
8-9 of this manual. Never test for gas leaks with a lighted match or open flame. Do not operate
this cooker with a gas leak.
• Do not store or use gasoline or other liquid/aerosols with flammable vapors in the vicinity of
this cooker.
• Storage of this appliance indoors is permissible only if the cylinder is disconnected and
removed from the appliance and left outdoors. Cylinders must be stored outdoors out of the
reach of children and must not be stored in a building, garage or any other enclosed area.
• The pressure regulator and hose assembly supplied with the appliance must be used.
Replacement pressure regulators and hose assemblies may be purchased by calling
1-800-527-0717. Position propane tank and cooker, as illustrated on page 10, to protect hose
from contact with hot surfaces which could create a leak. Never use a hose that shows signs
of cracking or damage. Replace hose every two years.
•
DO NOT use external electrical sources with this appliance.
• Clean and inspect the hose before each use of the appliance. If there is evidence of abrasion,
wear, cuts or leaks, the hose must be replaced prior to the appliance being used. Only use
replacement hose # 155-4010-0. This hose can be obtained by contacting The Brinkmann
Corporation at 1-800-527-0717. Replace hose at least every two years.
Keep the fuel supply
hose away from any heated surfaces.
• The use of alcohol, prescription or non-prescription drugs may impair your ability to
properly assemble or safely operate this appliance. Use caution and common sense.
• This appliance is not intended for and should never be used as a heater.
• Do not use this cooker for other than its intended purpose. Properly dispose of
packaging materials.
• Combustion by-products from the use of this product contain chemicals known to the State of
California to cause cancer, birth defects, or other reproductive harm.
• Children can fall
into cooking vessel and drown in even a small amount of liquid. Keep
cooking vessel out of reach of children. Do not store cooking vessel with liquid inside.
• Only use replacement/accessory parts manufactured by The Brinkmann Corporation. Repairs
should be performed by The Brinkmann Corporation.

5
WARNING
LP GAS CYLINDER (NOT SUPPLIED WITH THIS COOKER)
The LP (Liquid Propane) gas cylinder specifically designed to be used with this cooker must
have a 20 lb. (9.1 kg) capacity incorporating a Type 1 cylinder valve and an over-filling protection
device (OPD).
• DO NOT connect this cooker to an existing #510 POL cylinder valve with Left Hand threads.
The Type 1 valve can be identified with the large external threads on the valve outlet.
• DO NOT connect to a propane cylinder exceeding this capacity.
• DO NOT connect to a cylinder that uses any other type of valve connection device.
CYLINDER SPECIFICATIONS:
When purchasing or exchanging a cylinder for your gas cooker, it must be constructed and marked in
accordance with the specifications for LP gas cylinders of the U.S. Department of Transportation
(DOT) or the National Standard of Canada, CAN/CSA-B339, Cylinders, Spheres and Tubes for the
Transportation of Dangerous Goods as applicable with a listed over-filling prevention device (OPD).
INSTALLATION INFORMATION:
The installation of this appliance must be in accordance with:
All applicable local codes, or in the absence of local codes, either:
• National Fuel Gas Code/ANSI Z223.1/NFPA 54
• Storage and Handling of Liquefied Petroleum Gases, ANSI/NFPA 58
• Natural Gas and Propane Installation Code CSA B149.1
To check your local codes, see your local LP gas dealer or natural gas company.
This cooker was not intended to be connected to a natural gas supply line.
The cylinder must also be equipped with:
• A shut-off valve terminating in a Type 1 gas cylinder valve outlet.
• A Type 1 valve that prevents gas flow until a positive seal is obtained.
• An arrangement for vapor withdrawal.
• A collar to protect the cylinder shut-off valve.
• A safety relief device having direct communication with the vapor space of the cylinder.
• A listed over-filling prevention device (OPD).
CARBON MONOXIDE HAZARD
This appliance can produce carbon
monoxide which has no odor.
Using it in an enclosed space can kill you.
Never use this appliance in an enclosed
space such as a camper, tent, car or
home.

6
• Turn off the cylinder valve when your cooker is not in use.
• Handle the tank with care.
• Always secure the cylinder in an upright position.
• Never connect an unregulated LP gas cylinder to your cooker.
• DO NOT expose LP gas cylinders to excessive heat or ignition sources.
• DO NOT store a spare LP gas cylinder near your cooker.
• Allow only qualified LP gas dealers to fill or repair your LP gas cylinder.
• DO NOT allow the cylinder to be filled beyond 80% capacity.
• Read and follow all warnings and instructions that are on the cylinder and that accompany this
product.
• Never store a spare LP gas cylinder near your cooker. This could cause excess pressure to be
expelled through the vapor relief valve resulting in fire, explosion, or severe personal injury,
including death.
Note: PROPANE GAS IS HEAVIER THAN AIR AND WILL COLLECT IN LOW AREAS.
PROPER VENTILATION IS EXTREMELY IMPORTANT.
• Keep the ventilation opening(s) of the LP gas cylinder enclosure free and clear from
obstructions and debris.
• DO NOT insert any foreign objects into the valve outlet. Damage to the back-check could
result. A damaged back-check can cause a leak, possibly resulting in explosion, fire, severe
bodily harm, or death.
WARNING
DANGER
WARNING
FILLING THE LP GAS CYLINDER:
• Allow only qualified LP gas dealers to properly fill or repair your LP gas cylinder.
• New tanks should be purged prior to filling; inform LP gas dealer if you are using a new tank.
• DO NOT allow the cylinder to be filled beyond 80% capacity. Over-filled tanks can create a
dangerous condition. Over-filled tanks can build up pressure and cause the relief valve to expel
propane gas vapors. The vapor is combustible and if it comes in contact with a spark source or
flame, an explosion causing severe burns, bodily harm, or death could occur.
• Always use a protective cylinder cap when cooker is not connected to cylinder.
• If you exchange a cylinder with a qualified exchange program, be sure the cylinder has
a Type 1 valve and an over-filling prevention device (OPD).

HOSE AND REGULATOR:
Your cooker is equipped with a Type 1 connection device
with the following features:
1. The system will not allow gas flow from the cylinder until
a positive connection to the valve has been made.
Note: The cylinder valve must be turned off before any
connection is made or removed.
2. A thermal device that will shut off the gas flow if the device
is subject to temperatures above 240°F to 300°F (115°C to
150°C). If this should happen, remove the entire regulator
assembly and dispose of properly. A replacement regulator
assembly can be purchased by contacting Brinkmann at
1-800-527-0717. The cause of the excessive heat should be
determined and corrected before using your cooker again.
3. A flow limiting device, when activated, restricts the flow
of gas to 10 cubic feet per hour.
• Never use your cooker without leak testing all gas connections and hoses. See the section on
"Leak Testing" in this manual for proper procedures.
The pressure regulator and hose assembly supplied with your gas cooker is designed to work with
an LP gas supply cylinder.
• DO NOT attempt to connect it to any other fuel supply source such as a natural gas line.
• DO NOT use any other pressure regulator/hose assembly other than the one supplied with your
cooker.
• DO NOT attempt to adjust or repair the regulator. A replacement regulator can be supplied by
contacting Brinkmann. The regulator is designed to operate at a maximum output pressure of
10 psi ( pounds/square inch).
During assembly and/or replacement of the gas cylinder, keep the gas supply hose free of kinks and/or
damage.
Visually inspect the hose assembly prior to each use for evidence of damage, excess wear, or
deterioration. If found, replace the assembly before using your cooker. Only the Brinkmann supplied
replacement should be used.
WARNING
WARNING
7

WARNING
DANGER
8
CONNECTING HOSE AND REGULATOR TO AN LP GAS CYLINDER
• Insure the cylinder valve is CLOSED prior to connecting the LP gas cylinder to your cooker. Turn
the regulator control knob clockwise to properly close the valve. Read and follow all
instructions and warnings on the supply hose safety tags. Read and follow all warnings in this
manual concerning the safe use of LP gas cylinders and the hose and regulator before
connecting cylinder to cooker. Read and follow all warnings on the LP cylinder.
1. Check that the cylinder valve is closed by turning the
knob clockwise.
2. Remove the protective plastic cap from the cylinder valve
and the connection device.
3. Insert the nipple of connection device into the valve outlet.
Insure that the device is centered properly.
4. Turn the large coupling nut clockwise by hand and tighten
to a full stop. Take care not to cross thread the coupling nut
onto the cylinder valve. Do not over-tighten the knob onto
the valve. Do not use tools to tighten connection.
Note: If you are unable to make the connection,
repeat steps 3 and 4.
5. Check that the hose does not contain kinks, does not come
into contact with sharp edges, and does not contact
surfaces that may become hot during use.
6. Leak check all fittings before lighting your cooker. See section on "Leak Testing" in this manual.
LEAK TESTING:
To prevent fire or explosion hazard:
• DO NOT smoke or permit ignition sources in the area while conducting a leak test.
• Perform test OUTDOORS only in a well ventilated area.
• Never perform a leak test with a match or open flame.
• Never perform a leak test while the cooker is in use or while cooker is still hot.
WHEN TO PERFORM A LEAK TEST:
• After assembling your cooker and before lighting for the first time, even if purchased fully
assembled.
• Every time the LP gas cylinder is refilled or if any of the gas components are replaced.
• Any time your cooker has been moved.
• At least once per year or if your cooker has not been used for more than 60 days.
WARNING

GAS LEAK TESTING:
1. Create a mixture of 50% water and 50% liquid
dishwashing soap.
2. To turn on the fuel supply, turn the cylinder
valve knob one turn counterclockwise.
3. Apply the soap water mixture to the following:
Supply tank (cylinder) weld
Connection nut to cylinder valve
Back side of connection nut to brass
nipple
Brass nipple connection into regulator
Regulator connection to gas supply
hose
Gas supply hose connection to
burner assembly
The full length of gas supply hose
Cylinder valve to cylinder
4. Check each place listed (A-H) for growing
bubbles which indicates a leak.
5. Turn OFF gas supply at cylinder valve.
6. Turn ON control knob to release gas pressure in hose.
7. Turn control knob to OFF position.
8. Tighten any leaking connections.
9. Repeat soapy water test until no leaks are detected. DO NOT use the cooker if leaks cannot be stopped.
Contact a qualified gas appliance repair service.
10. Turn OFF gas supply at cylinder valve until you are ready to use your cooker.
11. Wash off soapy residue with cold water and towel dry.
12. Wait 5 minutes to allow all gas to evacuate the area before lighting cooker.
Note: The leak test must be performed in an area that has adequate lighting in order to see if
bubbles are developing. DO NOT use a flashlight to check for bubbles.
9
IMP
ORTANT SAFEG
UAR
D
•
D
O
N
O
T
R
E
M
O
V
E
T
H
I
S
T
A
G
•
T
U
R
N
G
AS
O
N
A
N
D
O
U
S
I
N
G
V
A
L
V
E
O
N
L
.
P
.
G
A
S
T
A
N
K
.
U
S
E
T
H
I
S
R
E
D
C
O
N
T
R
O
L
V
A
L
V
E
F
O
R
F
L
A
M
E
A
D
J
U
S
T
M
E
N
T
O
N
L
Y
.
A
B
C
D
E
F
G
H
A
B
C
D
E
F
G
H
Watch For Bubbles

10
Property damage, bodily harm, severe burns, and death could result from failure to follow these
safety steps. These steps should be performed after the cooker has been assembled, stored,
moved, cleaned, or repaired. DO NOT operate this cooker until you have read and understand ALL
of the warnings and instructions in this manual.
PRE-START CHECK LIST:
• Insure that the cooker is properly assembled.
• Inspect the gas supply hose for burns, chaffing, kinks, and proper routing before each use. Hose
should be at least 3 inches from hot surfaces.
• Leak check all gas connections and hose. See section on "Leak Testing".
• Ensure that all electrical supply cords are properly grounded and are kept away from this appliance,
water and hot surfaces. Do not use external electrical sources with this appliance.
• Position your cooker on level ground in a well ventilated location, a safe distance from combustible
materials, buildings and overhangs. Propane cylinder should be positioned upwind from cooker so
the heat of the cooker does not reach cylinder.
WARNING Hose is a trip hazard. Do not walk between cooker and cylinder.
Note: Due to the intense heat from burner, it is normal for discoloration to occur on cooker during the
first few uses.
LIGHTING INSTRUCTIONS:
Follow the instructions exactly. Read and follow all warnings and instructions in this manual before
using your cooker.
1. Make sure the regulator control knob and cylinder valve are in the OFF positions.
2. Turn on the fuel supply by rotating the cylinder valve counterclockwise to full open.
3. Open regulator control valve by turning clockwise until fully open.
4. DO NOT stand with head, body, or arms over the cooker when lighting.
WARNING
12 ft.
20"
(50.8cm)
Wind Direction
10 ft.
Hose is a trip hazard.

5. Strike and place a wooden match through lighting hole to approximately
1/2" (1 to 2 cm) from the burner.
6. If burner does NOT ignite immediately, turn the regulator control knob and
cylinder valve to OFF, wait 5 minutes for gas to evacuate and repeat steps
1 through 5 until burner ignites.
7. If the burner does not light within the first few attempts, there is a problem
with the gas supply. Turn off the gas at the burner and cylinder. DO NOT
attempt to operate the cooker until the problem is found and corrected.
HOW TO REIGNITE BURNER:
It is recommended to place lid over cooking vessel before reigniting burner to avoid burns from
splashes. Follow steps 1 through 5 above, to reignite burner. Use caution when lighting the burner, as
hot oil from cooking vessel may have splattered and run down the sides of the unit creating a slick
surface.
BURNER FLAME CHECK
Adjust flame height using regulator control
knob. Rotate air shutter to achieve mostly
blue flame. The air shutter mounted on the
front of your burner helps to control the amount
of air that mixes with the LP gas. A blue flame
with little or no yellow flame provides the
best heat. Adjust the air shutter until the
desired flame is achieved.
Note: Make sure the male fitting on the cooker is screwed into the air shutter and tightened securely. Do not
over-tighten as the air shutter needs to move freely in order to adjust air intake. Check the attachment
for proper connection every time propane tank is connected to cooker.
TURNING OFF THE COOKER:
1. Turn OFF the LP cylinder valve.
2. Turn regulator control knob to the OFF position.
Note: Turn off LP cylinder first to prevent gas from
being left in the system under pressure.
3. To disconnect valve regulator/hose assembly, turn the
large regulator coupling counter-clockwise by hand.
WARNING
• The LP cylinder valve should always be in the OFF
or closed position when the cooker is not in use.
11
4”
2”
0”
Yellow
Blue
Burner Hole
I
M
P
O
R
T
A
N
T
S
A
F
E
G
U
A
R
D
•
D
O
N
O
T
R
E
M
O
V
E
T
H
I
S
T
A
G
•
T
U
R
N
G
A
S
O
N
A
N
D
O
F
F
U
S
I
N
G
V
A
L
V
E
O
N
L
.
P
.
G
A
S
T
A
N
K
.
U
S
E
T
H
I
S
R
E
D
C
O
N
T
R
O
L
V
A
L
V
E
F
O
R
F
L
A
M
E
A
D
J
U
S
T
M
E
N
T
O
N
L
Y
.
To turn off the LP cylinder
valve, turn knob clockwise
until it stops.
I
M
P
O
R
T
A
N
T
S
A
F
E
G
U
A
R
D
•
D
O
N
O
T
R
E
M
O
V
E
T
H
I
S
T
A
G
•
T
U
R
N
G
A
S
O
N
A
N
D
O
F
F
U
S
I
N
G
V
A
L
V
E
O
N
L
.
P
.
G
A
S
T
A
N
K
.
U
S
E
T
H
I
S
R
E
D
C
O
N
T
R
O
L
V
A
L
V
E
F
O
R
F
L
A
M
E
A
D
J
U
S
T
M
E
N
T
O
N
L
Y
.
Lighter Hole
Regulator Control Knob
Rotating
Air Shutter
Air Opening

Read, understand and follow all warnings and instructions contained in this manual. DO NOT skip
any of the warnings and instructions contained in the preceding sections of this manual.
• Never leave heating liquid unattended - it can ignite.
• Smoking oil is an indication that the oil is too hot and may ignite. Oil ignites at varying temperatures;
therefore, never allow the oil to exceed 400˚F and NEVER LEAVE HEATING OIL UNATTENDED.
• Never allow oil to reach "Fire Hazard" zone on the thermometer.
• Never exceed maximum fill line on cooking vessel.
• Make sure cooker is at least 10 ft from all combustible materials including overhangs.
• Aluminum pots will melt if placed over burner empty.
• Never leave oil unattended during preheating or cooking process as it can ignite and hot oil is extremely
hazardous and should be monitored at all times.
• Use extreme care when lowering or removing food from hot oil or liquid.
HOW TO DETERMINE PROPER AMOUNT OF OIL
(For Use With Cooking Vessels That Do not Have Maximum Fill Line).
Never use a cooking vessel larger than 80 quarts or one that does not fit within the
retaining brackets of the cooker stand. Never use a cooking vessel smaller than 12.5”
diameter.
1. Place the food product in the holder. (strainer basket)
2. Place the food product and holder into the empty vessel.
3. Fill the vessel with water just until the food product is completely submerged.There must be a minimum
of 3 inches between the water level and top of the vessel.)
4. Remove the food product from the vessel and either mark the level on the side of the vessel or
measure the amount of water in the vessel.
5. Remove the water and completely dry the vessel and the food product.
6. This is the amount of cooking oil the vessel is to be filled with to cook the food product.
WARNING
OPERATING INSTRUCTIONS
D
I
S
H
W
A
S
H
E
R
S
A
F
E
1
0
0
1
5
0
2
0
0
2
5
0
3
0
0
3
5
0
4
0
0
5
0
2
0
0
1
0
0
1
5
0
°
F
R
°
C
1“
Thermometer
10 Quart Pot
Clip
Step 1:
Determine the amount of oil required by following instructions
above. If cooking with water or other liquid, you can use the
same method described above using slightly more or less,
depending on your cooking needs.
WARNING: Fryer thermometer should not be inserted into
food or touching food when measuring temperature of cook-
ing oil. End of thermometer should be at least one inch
below oil level.
Step 2:
Place pot with liquid on fryer. Make sure thermometer is
clipped to side of pot if cooking with oil. Do not use lid when
heating or cooking with oil. Bring liquid to the desired cooking
temperature (325°F-350°F) (162°C-175°C) for frying. Never
leave heating liquid unattended. It can ignite. Carefully
monitor temperature and never allow oil to reach “Fire Hazard”
zone on thermometer.
12

BURNER ASSEMBLY/MAINTENANCE
• Keep appliance area clear and free from combustible materials, gasoline and other flammable vapors
and liquids.
• Although your burner is constructed of cast iron, it may rust as a result of the extreme heat and
acids from cooking foods. Regularly inspect the burner for cracks, abnormal holes, and other signs
of corrosion damage. If found, replace the burner.
WARNING: DO NOT obstruct the flow of combustion and ventilation air. Burner tube can become
blocked by spiders and other insects building their nests. A blocked burner tube can
prevent gas flow to the burner and could possibly result in a burner tube fire. To clean
the Burner Assembly follow these instructions to clean and/or replace parts of burner
assembly or if you have trouble igniting the cooker.
1. Turn gas off at regulator control knob and LP cylinder valve.
2. Disconnect hose regulator from burner assembly.
3. Use a narrow bottle brush or a stiff wire bent into a small hook to run through the burner tube.
Note: Wear eye protection when cleaning burner.
4. Check each port to make sure air comes out each hole.
5. Wire brush entire outer surface of burner to remove food residue and dirt.
6. If burner is damaged, obtain a replacement burner.
7. Reinstall burner, heat shield and retaining nut on
support strap inside burner stand.
CLEANING & GENERAL MAINTENANCE
• Check and tighten any loose hardware before
each use.
• Clean appliance with mild dishwashing detergent,
hot water and sponge. A soft bristle brush can
also be used.
• Inspect entire appliance including hose & regulator
and replace any damaged or worn parts. Use only
parts specified by The Brinkmann Corporation.
13
Spider Webs
WARNING: When using 10 quart pot & basket,
always hang basket directly over pan on the hang
tab. This allows hot liquid to drain back into the pan.
Hanging the basket in any other way could cause
the pan to tip over, spilling hot liquid. 10 quart pot &
basket and stock pot with strainer basket are NOT
to be used for frying turkeys.
Step 3:
Cook food to desired doneness. Carefully lift strainer
basket up to allow liquid to drain back into pot (use
hang tab for pan and basket). Carefully remove food.
Allow liquid to cool to 115°F (45°C) or below before
moving cooking vessel.
Step 4:
Always turn propane cylinder valve off first, then turn
the regulator control knob off. Allow fryer and oil to
cool completely. Never attempt to drain liquid or move
pot until liquid has cooled below 115°F (45°C) -
severe burns could result.
Stock Pot & Strainer Basket
(sold separately)
Not for frying turkeys
Pot & Basket Set
Not for frying turkeys

14
FOR COVERS, ACCESSORIES AND OTHER PRODUCTS, PLEASE VISIT US ONLINE AT:
D
I
S
H
W
A
S
H
E
R
S
A
F
E
100
150
200
250
300
350
400
50
200
100 150
°F
R
°C
ASSEMBLY INSTRUCTIONS
READ ALL SAFETY WARNINGS & ASSEMBLY INSTRUCTIONS CAREFULLY
BEFORE ASSEMBLING OR OPERATING YOUR COOKER.
Inspect contents of the box to ensure all parts are included and undamaged.
FOR MISSING PARTS, PLEASE CALL CUSTOMER SERVICE AT 1-800-527-0717.
(Proof of purchase will be required.)
Tools required to assemble your cooker:
Adjustable wrench or the following wrench:
• 10mm Open end wrench
• Screwdriver
1 Cooker Bottom Ring
1 Burner Assembly
4 Legs (Pre-attached Metal Plate with Safety
Warnings.-Do Not Remove this Plate)
1 Hose & Regulator
1 Spring
1 Bottom Heat Shield
1
2
3
4
5
6
8
9
10
11
13
7
(Proof of purchase will be required.)
Inspect contents of the box to ensure all parts are included and undamaged.
12
1
7
2
4
6
8
5
13
10
3
12
9
11
PARTS LIST:
1 Strainer Basket
1 Handle
1 Cooker Body
3 Retaining Brackets
1 6” Fry Thermometer
4 Heat Shields
1 10 Quart Pot

INSTALLATION STEPS
Step 1
Attach burner, air damper, spring and hose
by threading the burner onto the hose as
illustrated.
Step 2
Attach leg to cooker bottom ring frame first,
using one M6 x 8 mm bolt. Then, attach to
cooker body using two M6 x 8 mm bolts.
Repeat for other three legs.
Step 3
Attach the retaining bracket to the cooker
body using two M6 x 8 mm bolts. Remove
pre-attached wing nut from bracket, adjust
bracket to hold pot width, tighten bracket
using the wing nut. Repeat for other two
brackets.
Note: For 10, 24 and 30 quart pots install the
brackets as illustrated to the left. The 42,
60 and 80 quart pot, the brackets must be
turned 180˚ so that the vertical part of the
bracket is the furthest away from the rim.
Step 4
Remove the nut from the bottom of the
burner. Then set the burner on the mounting
strap inside the cooker stand, attach the
bottom heat shield below the strap and secure
with the nut.
Burner
15
Retaining Bracket
Wing Nut

Step 5
Attach outside heat shields with L-bracket
using one M6 x 8 mm bolt as illustrated.
Repeat for other three heat shields.
STRAINER BASKET ASSEMBLY
Step 1
Line up handle with bolt holes on basket and
insert three bolts and nuts inside as
illustrated then tighten securely.
16
Assembled
Heat Shield

17
1. Nunca deje funcionando este aparato desatendido.
2. Nunca opere este aparato a menor distancia de los 10 pies (3m) de cualquier
estructura, material combustible u otro cilindro de gas.
3. Nunca opere este aparato a una distancia menor a los 25 pies (7,5m) de cualquier
líquido inflamable.
4. No llene la olla más allá de su línea de llenado.
5. Nunca permita que el aceite/grasa supere los 400ºF (200ºC). Si la temperatura
excediese los 400ºF (200ºC) o si el aceite comenzara a humear, apague el quemador o
suministro de gas inmediatamente.
6. Los líquidos calentados permanecen a temperaturas hirvientes mucho después del
proceso de cocción. Nunca toque el aparato para cocinar antes de que los líquidos
se hayan enfriado a 115ºF (45ºC) o inferior.
7. Si ocurriese un incendio, manténgase alejado del aparato e inmediatamente llame al
Departamento de Bomberos. No intente extinguir con agua un incendio de
aceite/grasa.
La falta de cumplimiento de estas instrucciones puede ocasionar incendios explosiones
que podrían causar daños a la propiedad, lesiones personales o la muerte.
PELIGRO
SI HUELE GAS:
1. Cierre el gas del aparato desde el cilindro LP (Propano Líquido).
2. Extinga cualquier llama abierta.
3. Si los olores persistiesen, manténgase alejado del aparato y llame a su Departamento de Bomberos.
La falta de cumplimiento de estas instrucciones puede ocasionar incendios o explosiones
que podrían causar daños a la propiedad, lesiones personales o la muerte.
ADVERTENCIA
a) NO almacene un cilindro LP extra debajo o cerca del aparato.
b) Nunca llene el cilindro más del 80%.
c) Si no se cumpliese con la información de (a) y (b) de manera precisa, podría
ocasionar un incendio causando la muerte o lesiones graves.
PELIGRO
EELL PPRROOPPÓÓSSIITTOO DDEE EESSTTEE SSÍÍMMBBOOLLOO DDEE AALLEERRTTAA DDEE SSEEGGUURRIIDDAADD EESS EELL DDEE AATTRRAAEERR
SSUU AATTEENNCCIIÓÓNN AA LLOOSS PPOOSSIIBBLLEESS PPEELLIIG
GRROOSS CCUUAANNDDOO AARRMMEE YY UUSSEE SSUU CCOOCCIINNAA..
¡¡CCUUAANNDDOO VVEEAA EELL SSÍÍMMBBOOLLOO DDEE AALLEERRTTAA DDEE SSEEGGUURRIIDDAADD
PPRREESSTTEE MMAAYYOORR AATTEENNCCIIÓÓNN AA LLAA IINNFFOORRMMAACCIIÓÓNN QQUUEE SSIIGGUUEE!!

18
Advertencias generales . . . . . . . . . . . . . . . . . . . . . . . . . . . . . . . . . . . . . . . . . . . . . . . . . . . . . . . 19-20
Instalación, especificaciones y uso seguro del cilindro de propano líquido. . . . . . . . . . . . . . . . 21-23
Conexión del cilindro de propano líquido y de la manguera / regulador a la cocina . . . . . . . . . . . 24
Pruebas de detección de fugas . . . . . . . . . . . . . . . . . . . . . . . . . . . . . . . . . . . . . . . . . . . . . . . . . 24-25
Lista de verificación preliminar al encendido. . . . . . . . . . . . . . . . . . . . . . . . . . . . . . . . . . . . . . . . . . 26
Instrucciones de encendido . . . . . . . . . . . . . . . . . . . . . . . . . . . . . . . . . . . . . . . . . . . . . . . . . . . . 26-27
Funcionamiento de la Cocina y Como determinar la cantidad apropiada de aceite . . . . . . . . . 28-29
Asamblea del Quemador/mantenimiento apropiados . . . . . . . . . . . . . . . . . . . . . . . . . . . . . . . . . . . 29
Lista de partes e instrucciones de armado . . . . . . . . . . . . . . . . . . . . . . . . . . . . . . . . . . . . . . . . 30-32
Información de la garantía . . . . . . . . . . . . . . . . . . . . . . . . . . . . . . . . . . . . . . . . . . 34-Cubierta trasera
ÍNDICE
PELIGRO: Indica una situación peligrosa inminente la cual, si no se evita, producirá lesiones
graves o aún la muerte.
ADVERTENCIA: Manténgase alerta a la posibilidad de lesiones corporales graves si no se siguen
las instrucciones. Asegúrese de leer y seguir cuidadosamente todos los mensajes.
PRECAUCIÓN: Indica una situación posiblemente peligrosa la cual, si no se evita, puede producir
lesiones menores o moderadas.
PARA CUBIERTAS, ACCESORIOS Y OTROS PRODUCTOS, FAVOR DE VISITARNOS POR LA RED
MUNDIAL EN:
CALIFORNIA PROPOSICIÓN 65 ADVERTENCIA
Este producto contiene químicos, incluyendo el plomo en el estaño en ciertas partes de sus
componentes, conocido en el estado de California porque producen cáncer y defectos de
nacimiento u otros daños reproductivos. Lávese las manos después de manejarlo. Cuando se usa,
este producto emite químicos de combustión de combustible que son conocidos en el estado de
California porque producen cáncer y defectos de nacimiento u otros daños reproductivos. Siga
todas las instrucciones en este manual y úselo solamente en un área bien ventilada en exteriores.

19
ADVERTENCIA
• Este electrodoméstico debe utilizarse en EXTERIORES únicamente. NO lo use dentro de un edificio,
casa, garage, balcón, porche, carpa ni ninguna otra área cerrada. Las Freidoras/Hervidores no deben
usarse sobre ni debajo de plataformas o balcones de condominios o apartamentos. NO instale ni
utilice el producto en o sobre vehículos ni embarcaciones recreativas.
• Al cocinar, la freidora/hervidor debe hacerlo sobre una superficie nivelada, estable, no combustible
en un área despejada de materiales combustibles. Una superficie asfáltica (asfalto) puede no resultar
aceptable para este propósito.
• No utilizar sobre pisos o superficies combustibles.
• NO opere el electrodoméstico a menos de 10 pies de distancia de cualquier material combustible,
incluyendo paredes o rieles o debajo de construcciones encima de la cabeza ya que estos materiales
podrían encenderse en caso de existir un incendio ocasionado por grasa.
•
Esta aparato no es para freír pavos. El tamaño máximo que cocina el recipiente/olla para freír
con este aparato usando la grasa o el aceite es 10 cuartos de galón. La olla de tamaño máximo
para hervir (agua, vegetal, etc.) es 80 cuartos de galón.
• El aceite humeante indica que el aceite está demasiado caliente y puede prenderse fuego. El aceite
se enciende en temperaturas variables; por lo tanto, nunca permita que el aceite exceda los 400ºF
(200ºC) y NUNCA DEJE EL ACEITE CALENTÁNDOSE SIN SUPERVISIÓN.
• Monitoree cuidadosamente la temperatura del aceite con un termómetro y regule la temperatura para
que no alcance la zona de "Peligro de Incendio" en el termómetro. Si fuese necesario, APAGUE el
gas del electrodoméstico para dejar que el aceite se enfríe.
• Al cocinar con aceite o grasa, se DEBE utilizar el termómetro provisto. Siga las instrucciones de este
manual para una adecuada instalación y uso del termómetro. Si el termómetro suministrado con esta
freidora/hervidor se hubiese extraviado o dañado, deberá obtener un termómetro de reemplazo antes
de usar esta freidora. Sólo use el termómetro de repuesto Nº 072-0012-0. Este termómetro se puede
obtener contactándose con The Brinkmann Corporation al 1-800-527-0717.
• Pruebe el termómetro antes de cada uso insertándolo dentro de una olla con agua hirviendo y
asegúrese de que registre aproximadamente 212°F +/- 20°F (100°C +/- 10°C). Si el termómetro no fun
cionara correctamente, deberá reemplazar el termómetro antes de utilizar esta freidora. Sólo use el
termómetro de repuesto Nº
072-0005-0
. Este termómetro se puede obtener contactándose con
The Brinkmann Corporation al 1-800-527-0717.
• Si la temperatura excediese los 400°F (200°C) o si el aceite comenzara a humear, inmediatamente
APAGUE el quemador o suministro de gas y espere a que la temperatura sea inferior a los 350°F
(175°C) antes de volver a encender el quemador. (Para volver a encender, remítase a las instrucciones
de la página 26). Si existiese una tapa (cubierta), no la quite ya que el oxígeno alimentará el fuego.
• El aceite o agua caliente pueden provocar serias quemaduras y desfiguración permanente, utilice la
precaución y el sentido común al operar este producto.
• Nunca utilice un recipiente de cocinar de 80 cuartos de galón más grandes o uno que no quepa
dentro de los soportes de retención de este aparato. Nunca utilice un recipiente de cocinar
menos de 12.5 pulgadas en diámetro. Ajuste la retención de los soportes al ajuste tan cerca
como sea posible pero sin tocar la olla, aproximadamente 1/4 pulgada.
• No deje el electrodoméstico sin supervisión. Mantenga a los niños y mascotas alejados del
electrodoméstico todo el tiempo. Monitoree cuidadosamente las actividades alrededor de la freidora
para evitar quemaduras u otras lesiones. No use ropa holgada ni deje que el cabello largo cuelgue
libremente mientras encienda o usa la freidora.
• Sea precavido al caminar o pararse cerca de la freidora ya que las salpicaduras de aceite pueden
haber creado una superficie resbaladiza. No camine entre la cocina y el tanque de propano ya que
esto crea peligro de tropezar. Si tropezara con la manguera podría dar vuelta la cocina o hacer caer
el recipiente con el líquido caliente ocasionando quemaduras graves.
• Evite golpear o impactar con el electrodoméstico para prevenir derramamientos o salpicaduras del
líquido caliente de la cocción.
• Nunca arroje los alimentos ni accesorios dentro del líquido caliente de la cocción. Descienda los
alimentos y accesorios lentamente dentro del líquido de cocción para prevenir derramamientos o
desbordes. Al extraer los alimentos del electrodoméstico se debe ser cuidadoso para evitar que
maduras ocasionadas por los líquidos calientes de la cocción.
ADVERTENCIAS GENERALES

20
ADVERTENCIA
• Nunca llene en exceso la olla con aceite, grasa o agua. Siga las instrucciones de este manual para
establecer los niveles adecuados de aceite, grasa o agua. (consulte la página 28)
• En el caso de lluvias, nieve, granizo, aguanieve u otras formas de precipitación mientras está cocinan
do con aceite/grasa, cubra la olla inmediatamente y apague el quemador y el suministro de gas del
electrodoméstico. No intente mover el electrodoméstico u olla.
• La introducción de agua o hielo proveniente de cualquier fuente dentro del aceite/grasa puede causar
saturación y quemaduras graves debido a las salpicaduras del aceite caliente y el agua. Al freír con
aceite/grasa, todos los productos alimenticios DEBEN estar completamente descongelados y seca
dos con toallas antes de ser sumergirlos en la freidora.
• No coloque la olla vacía sobre el electrodoméstico mientras esté funcionando ya que podría
derretirse. Use la precaución al introducir elementos en la olla mientras el electrodoméstico esté
funcionando. NO use tapa al calentar o cocinar con aceite.
• No traslade el electrodoméstico cuando esté en uso. Deje que la olla se enfríe a 115ºF (45ºC) antes de
trasladarla o almacenarla.
• Este electrodoméstico permanecerá caliente durante y después de su uso. Utilice guantes aislantes
para horno o guantes de protección para superficies calientes o salpicaduras de líquidos de cocción.
• Al cocinar con aceite/grasa, tenga disponible y a mano un extintor tipo BC o ABC. En caso de
incendio del aceite/grasa llame inmediatamente al Departamento de Bomberos. No intente extinguir
con agua. Un extintor del Tipo BC o ABC puede, en algunas circunstancias, contener el incendio.
• Verifique todas las conexiones de gas siguiendo las instrucciones de la sección de "Prueba de
Detección de Fugas de Gas" en la página 24-25 de este manual. Nunca compruebe las fugas de gas
con un fósforo encendido o llama abierta. No opere esta freidora al haber una fuga de gas.
• No almacene ni use gasolina ni ningún otro líquido/aerosol con vapores inflamables en la proximidad
de esta freidora.
• El almacenamiento de este electrodoméstico en interiores es permisible sólo si se desconecta y
remueve el cilindro del electrodoméstico y se lo deja en el exterior. Los cilindros deben almacenarse
en exteriores, fuera del alcance de los niños y no deben almacenarse dentro de edificios, garages ni
ninguna otra área cerrada.
• Se debe usar el montaje de la manguera y regulador de presión suministrado con el
electrodoméstico. Los repuestos de los montajes de mangueras y reguladores de presión pueden
comprarse llamando al 1-800-527-0717. Ubique el tanque de propano y la cocina como se ilustra en
la página 27 para evitar que la manguera entre en contacto con las superficies calientes pudiendo
ocasionar una fuga. Nunca utilice una manguera que muestre signos de agrietamiento o daño.
Reemplace la manguera cada dos años.
• NO utilice fuentes eléctricas externas con este electrodoméstico.
• Limpie e inspeccione la manguera antes de cada uso del electrodoméstico. Si hubiese evidencias de
abrasión, desgaste, cortes o fugas, debe reemplazar la manguera antes de usar el electrodoméstico.
Sólo use el repuesto de manguera Nº 155-4000-0. Esta manguera puede obtenerse contactándose
con The Brinkmann Corporation al 1-800-527-0717. Reemplace la manguera al menos cada dos años.
Mantenga la manguera de suministro del combustible alejada de las superficies calientes.
• El uso de alcohol, drogas recetadas o no, pueden deteriorar su capacidad de ensamblar adecuada
mente o de operar con seguridad este electrodoméstico. Utilice la precaución y el sentido común.
• Este electrodoméstico no está diseñado y nunca debiera usarse como calentador.
• No utilice esta freidora para otros usos distintos para los que fue diseñada. Deseche los materiales
del embalaje en forma adecuada.
• Los subproductos de combustión, derivados del uso de este producto, contienen sustancias
químicas que el Estado de California reconoce como causantes de cáncer, defectos congénitos u
otros daños reproductivos.
• Los niños pueden caerse dentro de la olla y ahogarse, aun en cantidades pequeñas de líquido.
Mantenga la olla alejada del alcance de los niños. No almacene la olla con líquido en su interior.
• Sólo utilice repuestos/piezas accesorias fabricados por The Brinkmann Corporation. Las
reparaciones deben ser realizadas por The Brinkmann Corporation.

ADVERTENCIA
EL CILINDRO DE GAS LP (NO ESTÁ PROVISTO CON ESTA FREIDORA)
El cilindro de gas LP (Propano Líquido), específicamente diseñado para ser usado con esta
freidora, debe tener 20 libras (9,1 kg) de capacidad, una válvula de cilindro Tipo 1 y un
dispositivo de protección de la sobresaturación (OPD) incorporados.
• NO conecte esta freidora a una válvula del cilindro existente Nº 510 POL con roscas para Mano
Izquierda. La válvula Tipo 1 puede identificarse por las grandes roscas externas en la salida de
la válvula.
• NO conecte el producto a un cilindro de propano que exceda esta capacidad.
• NO lo conecte a un cilindro que utilice cualquier otro tipo de dispositivo de conexión de
válvulas.
ESPECIFICACIONES DEL CILINDRO:
Al comprar o cambiar el cilindro de la freidora a gas, el mismo debe estar construido y marcado de
acuerdo con las especificaciones para los cilindros de gas LP (Propano Líquido) del DOT
(Departamento de Transportes de los E.U.A.) o el Estándar Nacional de Canadá, CAN/CSA-B339,
Cilindros, Esferas y Tubos para el Transporte de Mercaderías Peligrosas, según corresponda, con el
dispositivo indicado de prevención de la sobresaturación (OPD).
INFORMACIÓN PARA LA INSTALACIÓN:
La instalación de este electrodoméstico debe realizarse de acuerdo con:
Todos los códigos locales correspondientes o, ante la ausencia de códigos locales, ya sea:
• El Código de Gas Combustible Nacional/ANSI Z223.1/NFPA 54
• Almacenamiento y Manipulación de Gases de Petróleo Licuado, ANSI/NFPA 58
• Código de Instalación del Gas Natural y del Propano CSA B149.1
Para verificar sus códigos locales, consulte con su representante de gas LP local o con la compañía
de gas natural. Esta freidora no está diseñada para ser conectada a la línea de suministro de gas
natural.
El cilindro debe estar equipado con:
• Una válvula de cierre que termine en una salida de válvula del cilindro de gas Tipo 1.
• Una válvula de Tipo 1 que previene el flujo de gas hasta obtener un sello positivo.
• Una configuración para la remoción de vapores.
• Una pieza en forma de anillo para proteger la válvula de cierre del cilindro.
• Un dispositivo de seguridad de alivio que tenga comunicación directa con la zona de vapor del cilindro.
• Un dispositivo indicado para la prevención de la sobresaturación (OPD).
21

22
• Cierre la válvula del cilindro cuando no use su freidora.
• Manipule el tanque con cuidado.
• Siempre asegure el cilindro en una posición vertical.
• Nunca conecte a su freidora un cilindro de gas LP sin reglamentar.
• NO exponga cilindros de gas LP al calor excesivo o a fuentes de ignición.
• NO almacene un cilindro de gas extra cerca de su freidora.
• Sólo permita que representantes de gas LP calificados llenen o reparen su cilindro de gas LP.
• NO permita que el cilindro sea llenado superando el 80% de su capacidad.
• Lea y siga todas las instrucciones y advertencias que están en el cilindro y que acompañan a
este producto.
• Nunca almacene un cilindro de gas LP extra cerca de su freidora. Esto podría causar una
excesiva presión que sería extraída a través de la válvula de alivio de vapores pudiendo
provocar incendios, explosiones o lesiones personales graves, incluyendo la muerte.
Nota: EL GAS PROPANO ES MÁS PESADO QUE EL AIRE Y SE ACUMULA EN LAS ÁREAS
BAJAS. ES EXTREMADAMENTE IMPORTANTE TENER UNA VENTILACIÓN ADECUADA.
• Mantenga la/las abertura/s de ventilación del cilindro de gas LP libres y despejadas de
obstáculos y basuras.
• NO inserte ningún objeto extraño dentro de la salida de la válvula. Podría causar daño en la
retención de retroceso. Una retención de retroceso dañada podría ocasionar fugas, causando
posibles explosiones, incendios, lesiones físicas severas o la muerte.
ADVERTENCIA
PELIGRO
ADVERTENCIA
PARA LLENAR EL CILINDRO DE GAS LP:
• Sólo permita que representantes de gas LP calificados llenen o reparen su cilindro de gas LP.
• Los tanques nuevos deben purgarse antes de llenarlos; informe al representante de gas LP si
estuviese utilizando un tanque nuevo.
• NO permita que el cilindro sea llenado superando el 80% de su capacidad. Los tanques
sobresaturados pueden generar condiciones peligrosas. Los tanques sobresaturados pueden
acumular presión y hacer que la válvula de alivio expulse vapores de gas propano. El vapor es
combustible y si llegara a entrar en contacto con una fuente de chispas o llamas, podría
ocasionar una explosión que causaría quemaduras graves, daños físicos o la muerte.
• Siempre use la tapa protectora del cilindro cuando la freidora no se encuentre conectada al
cilindro.
• Si intercambiase un cilindro con un programa de cambio calificado, asegúrese de que el cilindro
tenga la válvula Tipo 1 y un dispositivo de prevención de la sobre saturación (OPD).

MANGUERA Y REGULADOR:
Su freidora está equipada con un dispositivo de conexión
de Tipo 1 con las siguientes características:
1. El sistema no permitirá el flujo de gas proveniente del
cilindro hasta no haber realizado una conexión positiva con
la válvula.
Nota: La válvula del cilindro debe cerrarse antes de
realizar o quitar cualquier conexión.
2. Un dispositivo térmico cerrará el flujo de gas si el
dispositivo experimentara temperaturas superiores de
240ºF a 300ºF (de 115ºC a 150ºC). Si esto ocurriese, quite
todo el montaje del regulador y deséchelo de manera
apropiada. Los repuestos del montaje del regulador
pueden comprarse contactándose con Brinkmann al
1-800-527-0717. Se debe determinar y corregir la causa
del calor excesivo antes de volver a usar su freidora.
3. A flow limiting device, when activated, restricts the flow
of gas to 10 cubic feet per hour.
• Nunca use su freidora sin antes haber verificado todas las mangueras y conexiones de gas.
Consulte la sección de "Pruebas de Detección de Fugas" en este manual para cumplir con los
procedimientos apropiados.
El montaje de la manguera y regulador de presión provistos con su freidora a gas está diseñado
para trabajar con un cilindro de suministro de gas LP.
• NO intente conectarlo a ninguna otra fuente de suministro de gas tal como la línea de gas
natural.
• NO utilice ningún otro montaje de manguera/regulador de presión que no sea el suministrado
con su freidora.
• NO intente ajustar ni reparar el regulador. El repuesto del regulador puede obtenerse
contactándose con Brinkmann. El regulador está diseñado para operar a una presión de salida
máxima de 5 psi (libras/pulgada cuadrada).
Durante el montaje y/o reemplazo del cilindro de gas, mantenga la manguera del suministro de gas libre
de retorcimientos y/o daños.
Inspeccione visualmente el montaje de la manguera antes de cada uso para detectar daños, desgaste
excesivo o deterioro. De encontrarlos, reemplace el montaje antes de usar la freidora. Sólo debe usar
repuestos suministrados por Brinkmann.
ADVERTENCIA
ADVERTENCIA
23

ADVERTENCIA
PELIGRO
24
PARA CONECTAR LA MANGUERA Y EL REGULADOR A UN CILINDRO DE GAS LP
• Asegúrese de que la válvula del cilindro esté CERRADA antes de conectar el cilindro de gas LP
a su freidora. Gire la perilla de control del regulador hacia la derecha para cerrar la válvula
apropiadamente. Lea y siga todas las instrucciones y advertencias que se encuentran en las
etiquetas de seguridad de la manguera de suministro. Lea y siga todas las advertencias de este
manual concernientes al uso seguro de los cilindros de gas LP y de la manguera y regulador
antes de conectar el cilindro a la freidora. Lea y siga todas las advertencias de los cilindros de
gas LP.
1. Verifique que la válvula del cilindro esté cerrada girando la
perilla hacia la derecha.
2. Quite la tapa plástica protectora de la válvula del cilindro y
del dispositivo de conexión.
3. Inserte la boquilla del dispositivo de conexión dentro de la
salida de la válvula. Asegúrese de que el dispositivo esté
correctamente centrado.
4. Gire con la mano la tuerca grande de acoplamiento hacia la
derecha y ajuste al finalizar. Tenga cuidado de no enroscar
la tuerca de acoplamiento a la válvula del cilindro. No ajuste
en exceso la perilla de la válvula. No utilice herramientas
para ajustar la conexión.
Nota: Si no hubiese podido realizar la conexión, repita los
pasos 3 y 4.
5. Verifique que la manguera no esté retorcida, que no entre
en contacto con bordes cortantes ni se contacte con
superficies que puedan calentarse durante el uso.
6. Verifique las fugas en todas las adaptaciones antes de encender la freidora. Consulte la sección de
"Pruebas de Detección de Fugas" en este manual.
PRUEBAS DE DETECCIÓN DE FUGAS:
Para prevenir los peligros vinculados con los incendios o explosiones:
• NO fume ni permita fuentes de ignición en el área donde está realizando la prueba de
detección de fugas.
• Realice la prueba en EXTERIORES solamente, en un área bien ventilada.
• Nunca realice una prueba de detección de fugas con un fósforo o llama abierta.
• Nunca realice una prueba de detección de fugas mientras la freidora esté en uso o mientras la
freidora esté aun caliente.
CUÁNDO REALIZAR UNA PRUEBA DE DETECCIÓN DE FUGAS:
• Después de haber ensamblado su freidora y antes de encenderla por primera vez, aun si la
hubiese comprado completamente armada.
• Cada vez que se llena el cilindro de gas LP o si se reemplazara cualquiera de los componentes
de gas.
• Siempre que haya trasladado su freidora.
• Al menos una vez al año si su freidora no hubiese sido utilizada por más de 60 días.
ADVERTENCIA

PRUEBAS DE DETECCIÓN DE FUGAS
DE GAS:
1. Cree una mezcla con 50% de agua y 50% de
jabón líquido para lavar la vajilla.
2. Para abrir el suministro del combustible,
haga girar la perilla de la válvula del cilindro
una vuelta hacia la izquierda.
3. Aplique la mezcla de agua jabonosa a lo
siguiente:
Soldadura del tanque (cilindro) de
suministro
Tuerca de conexión a la válvula del
cilindro
Parte posterior de la tuerca de conexión
a la boquilla de bronce
Conexión de la boquilla de bronce al
regulador
Conexión del regulador a la manguera
de suministro de gas
Conexión de la manguera de suministro
de gas al montaje del quemador
Manguera de suministro de gas en toda
su longitud
Válvula del cilindro al cilindro
4. Verifique cada lugar enumerado (A-H) para detectar burbujas crecientes que indican una fuga de gas.
5. CIERRE el suministro de gas desde la válvula del cilindro.
6. ABRA la perilla de control para liberar la presión del gas de la manguera.
7. CIERRE la perilla de control.
8. Ajuste las conexiones que tengan fugas.
9. Repita la prueba del agua jabonosa hasta que ya no se detecten fugas. NO utilice la freidora si no se
hubieran podido detener las fugas. Contáctese con un servicio calificado de reparación de
electrodomésticos a gas.
10. CIERRE el suministro de gas desde la válvula del cilindro hasta que esté dispuesto a usar su freidora.
11. Lave los residuos jabonosos con agua fría y seque con una toalla.
12. Espere 5 minutos para que todo el gas se evacue del área antes de encender la freidora.
Nota: La prueba de detección de fugas debe realizarse en un área que tenga la iluminación adecuada
para poder comprobar si se producen burbujas. NO use linternas para detectar las burbujas.
25
A
B
C
D
E
F
G
H
Observe Si se Originan Burbujas
IMPOR
TANT SAFEG
UARD
•
D
O
N
O
T
R
E
M
O
V
E
T
H
I
S
T
A
G
•
T
U
R
N
G
A
S
O
N
A
N
D
O
U
S
I
N
G
V
A
L
V
E
O
N
L
.
P
.
G
A
S
T
A
N
K
.
U
S
E
T
H
I
S
R
E
D
C
O
N
T
R
O
L
V
A
L
V
E
F
O
R
F
L
A
M
E
A
D
J
U
S
T
M
E
N
T
O
N
L
Y
.
A
B
C
D
E
F
G
H

26
La falta de cumplimiento con estos pasos de seguridad podría ocasionar daño a la propiedad,
lesiones físicas, quemaduras graves y la muerte. Estos pasos deben ser realizados después de
haber instalado, almacenado, trasladado, limpiado o reparado la freidora. No opere esta freidora
hasta no haber leído y comprendido TODAS las instrucciones y advertencias de este manual.
INICIE UNA LISTA DE COMPROBACIÓN:
• Asegúrese de que la freidora esté armada como corresponde.
• Inspeccione la manguera de suministro de gas para detectar quemaduras, rozamientos,
retorcimientos y enrutamiento adecuado antes de cada uso. La manguera debe estar al menos a 3
pulgadas de distancia de las superficies calientes.
• Verifique las fugas en todas las conexiones de gas y en la manguera. Consulte la sección de
"Pruebas de Detección de Fugas".
• Asegúrese de que todos los cables de alimentación eléctrica estén debidamente conectados a tierra
y que estén lejos del electrodoméstico, del agua y de las superficies calientes. No utilice fuentes
eléctricas externas con este electrodoméstico.
• Coloque su freidora a nivel del suelo en un lugar bien ventilado, a una distancia prudente de los
materiales combustibles, acumulaciones y excedentes. El cilindro de propano debe ubicarse con el
viento contrario a la freidora para que el calor de la freidora no alcance el cilindro.
ADVERTENCIA La manguera es un peligro vinculado con los tropiezos. No camine entre la freidora y el
cilindro.
Nota: Debido al intenso calor proveniente del quemador, es normal que la freidora se decolore durante
los primeros usos.
INSTRUCCIONES DE ENCENDIDO:
Siga las instrucciones con exactitud. Lea y siga todas las instrucciones y advertencias de este
manual antes de usar su freidora.
1. Asegúrese de que la perilla de control y la válvula del cilindro se encuentren CERRADAS.
2. Abra el suministro de combustible girando la válvula del cilindro hacia la izquierda hasta que esté
completamente abierta.
3. Abra la válvula de control del regulador girando hacia la derecha hasta que esté completamente
abierta.
4. NO permanecer con la cabeza, armazón o brazos sobre la freidora cuando esté encendida.
ADVERTENCIA
12 pies
10 pies
20"
(50.8cm)
Dirección del Viento
La manguera es un peligro
vinculado con los tropiezos.

5. Encienda y coloque un fósforo de madera a través del orificio de encendido
aproximadamente a 1/2 pulgada (de 1 a 2 cm) de distancia del quemador.
6. Si el quemador NO se encendiera inmediatamente, CIERRE la perilla de
control del regulador y la válvula del cilindro, espere 5 minutos para que el gas
se evacue y repita los pasos del 1 al 5 hasta que el quemador se encienda.
7. Si el quemador no se encendiera en los primeros intentos, existe un problema
con el suministro de gas. Cierre el gas del quemador y del cilindro. NO intente
operar la freidora hasta que no se haya detectado y corregido el problema.
CÓMO VOLVER A ENCENDER EL QUEMADOR:
Se recomienda colocar la tapa sobre la olla antes de volver a encender el quemador para evitar
quemaduras por las salpicaduras. Siga los pasos del 1 al 5 arriba mencionados para volver a encender el
quemador. Sea precavido al encender el quemador ya que el aceite caliente proveniente de la olla puede
haber salpicado y haberse deslizado sobre los costados de
la unidad creando una superficie resbaladiza.
VERIFICACIÓN DE LA LLAMA DEL QUEMADOR
Ajuste la altura de la llama utilizando la perilla de control del
regulador. Rote los obturadores de aire para lograr una llama
azul en su mayor parte. El apagador de aire, ubicado en la
parte en frente de su quemador, le ayuda a controlar la
cantidad de aire que se mezcla con el gas LP. La llama azul
con poca o ninguna llama amarilla brinda el mejor calor. Ajuste
el apagador de aire hasta que se logre la llama deseada.
Nota: Asegúrese de que la adaptación macho de
la freidora esté atornillada dentro del
regulador de aire y ajustado de manera segura. No lo ajuste en exceso ya que el regulador de aire necesita
moverse libremente para regular la admisión del aire. Verifique la fijación para lograr una adecuada
conexión cada vez que el tanque de propano sea conectado a la freidora.
PARA APAGAR LA FREIDORA:
1. CIERRE la válvula del cilindro LP.
2. CIERRE la perilla de control el regulador.
Nota: Primero cierre el cilindro LP para prevenir que el
gas quede en el sistema bajo presión.
3. Para desconectar el montaje de manguera/regulador de la
válvula, gire hacia la izquierda el acoplador grande del
regulador a mano.
ADVERTENCIA
• La válvula del cilindro LP debe estar siempre CERRADA
cuando no se use la freidora.
27
Obturador Giratorio
del Aire
Respiradero
I
M
P
O
R
T
A
N
T
S
A
F
E
G
U
A
R
D
•
D
O
N
O
T
R
E
M
O
V
E
T
H
I
S
T
A
G
•
T
U
R
N
G
A
S
O
N
A
N
D
O
F
F
U
S
I
N
G
V
A
L
V
E
O
N
L
.
P
.
G
A
S
T
A
N
K
.
U
S
E
T
H
I
S
R
E
D
C
O
N
T
R
O
L
V
A
L
V
E
F
O
R
F
L
A
M
E
A
D
J
U
S
T
M
E
N
T
O
N
L
Y
.
Para cerrar la válvula del cilindro
LP, gire la perilla hacia la
derecha hasta que se detenga.
4”
2”
0”
Amarillo
Azul
Orificio del Quemador
I
M
P
O
R
T
A
N
T
S
A
F
E
G
U
A
R
D
•
D
O
N
O
T
R
E
M
O
V
E
T
H
I
S
T
A
G
•
T
U
R
N
G
A
S
O
N
A
N
D
O
F
F
U
S
I
N
G
V
A
L
V
E
O
N
L
.
P
.
G
A
S
T
A
N
K
.
U
S
E
T
H
I
S
R
E
D
C
O
N
T
R
O
L
V
A
L
V
E
F
O
R
F
L
A
M
E
A
D
J
U
S
T
M
E
N
T
O
N
L
Y
.
Perilla de Control del Regulador
Orificio Encendedor

Lea, comprenda y siga todas las instrucciones y advertencias contenidas en este manual. NO omita
ninguna instrucción ni advertencia contenida en las secciones precedentes de este manual.
• Nunca deje el aceite líquido desatendido - podría encenderse.
• El aceite humeante indica que el aceite está demasiado caliente y puede prenderse fuego. El aceite se
enciende en temperaturas variables; por lo tanto, nunca permita que el aceite exceda los 400ºF y
NUNCA DEJE EL ACEITE CALENTÁNDOSE SIN SUPERVISIÓN.
• Nunca deje que el aceite alcance la zona de "Peligro de Incendio" en el termómetro.
• Nunca exceda la línea máxima de llenado de la olla.
• Asegúrese de que la freidora se encuentre al menos a 10 pies de los materiales combustibles,
incluyendo los excedentes.
• Las ollas de aluminio se derretirán si se las coloca vacías sobre el quemador.
• Le llevará aproximadamente unos 20 a 30 minutos precalentar su aceite. Nunca deje el aceite desaten
dido durante los procesos de precalentamiento o cocción ya que puede encenderse y el aceite caliente
es extremadamente peligroso por lo que debe monitorearlo todo el tiempo.
• Tenga sumo cuidado al incorporar o extraer los alimentos del aceite o líquido caliente.
CÓMO DETERMINAR LA CANTIDAD ADECUADA DE ACEITE
(Para Utilizar con Ollas que No Tengan la Línea de Llenado Máxima). Nunca use una
olla más grande que 80 cuartos o una que no se adapte dentro de los soportes de la
olla del pedestal de la cocina. Nunca use una olla de un diámetro menor a 12,5
pulgadas o una olla que no entre en contacto total con el sensor
térmico de cierre.
1. Coloque el producto alimenticio en del soporte. (Pedestal o cesto colador para pavos)
2. Coloque el producto alimenticio y el soporte dentro del recipiente vacío.
3. Llene el recipiente con agua hasta que el producto alimenticio quede apenas cubierto. (Debe haber un
mínimo de 3 pulgadas entre el nivel del agua y la parte superior de la olla).
4. Extraiga el producto alimenticio de la olla y marque el nivel al costado del recipiente o bien mida la
cantidad de agua del recipiente.
5. Extraiga el agua y seque completamente la olla y el producto alimenticio.
6. Esta es la cantidad de aceite que necesita para cocinar el producto.
ADVERTENCIA
INSTRUCCIONES DE FUNCIONAMIENTO
28
D
I
S
H
W
A
S
H
E
R
S
A
F
E
1
0
0
1
5
0
2
0
0
2
5
0
3
0
0
3
5
0
4
0
0
5
0
2
0
0
1
0
0
1
5
0
°
F
R
°
C
1“
Termómetro
Olla de 10 Cuartos
Pasador
Paso 1:
Determine la cantidad de aceite requerida por las instrucciones
arriba. Si cocina con agua o otro líquido, usted puede utilizar el
mismo método descrito arriba usando levemente más o menos,
dependiendo de sus necesidades de cocinar.
ADVERTENCIA: El termómetro de la freidora debe
insertarse dentro del alimento o estar en contacto con el
alimento cuando se mide la temperatura del aceite de la
cocción. El extremo del termómetro debe permanecer al
menos a una pulgada por debajo del nivel del aceite.
Paso 2:
Coloque la olla con el líquido en el sartén. Cerciórese de que el
termómetro esté acortado al lado de la olla si cocine con aceite.
No utilice la tapa al calentar o cocinando con aceite. Traiga el
líquido a la temperatura de cocción deseada (325ºF-350ºF)
(162ºC-175ºC) para freír. Nunca deje el líquido caliente
desatendido. Puede encender. Supervise cuidadosamente la
temperatura y nunca permita que el aceite alcance “Zona del
Riesgo de Incendios” en el Termómetro.

MONTAJE/MANTENIMIENTO DEL QUEMADOR
• Mantenga el área despejada y libre de materiales combustibles, gasolina u otros vapores y líquidos inflamables.
• A pesar de que su quemador está construido con hierro fundido, puede oxidarse como resultado del intenso
calor y de los ácidos provenientes de los alimentos de cocción. Inspeccione habitualmente el quemador
para detectar grietas, orificios anormales y otras señales de daños por corrosión. De encontrarlos,
reemplace el quemador.
ADVERTENCIA: NO obstruya el flujo de combustión ni el aire de la ventilación. El tubo del que
mador puede bloquearse debido a las arañas y otros insectos que construyen allí sus
nidos. Un tubo de quemador bloqueado puede prevenir que el gas fluya hasta el quemador
ocasionando posiblemente un incendio en el tubo del quemador. Para limpiar el Montaje
del Quemador, siga estas instrucciones para limpiar y/o reem plazar las piezas del montaje
del quemador o si tuviese problemas al encender la freidora.
1. Cierre el gas con la perilla de control del regulador y la válvula del cilindro LP.
2. Desconecte el regulador de la manguera del montaje del quemador.
3. Utilice un cepillo angosto para botellas o un alambre rígido doblado en forma de gancho para que pueda
recorrer el tubo del quemador.
Nota: Use protección ocular al limpiar el quemador.
4. Verifique cada puerto para asegurarse de que el aire salga por cada orificio.
5. Frote con un cepillo de alambre toda la superficie del quemador para remover los residuos de alimentos y la
suciedad.
6. Si el quemador estuviera dañado, obtenga un repuesto del mismo.
7. Reinstale el quemador, el escudo térmico y las tuerca de sujeción
en la tira de apoyo dentro del pedestal del quemador.
LIMPIEZA Y MANTENIMIENTO GENERAL
• Verifique y ajuste todas las piezas flojas antes de cada uso.
• Limpie el electrodoméstico con detergente suave para lavar la
vajilla, agua caliente y esponja. También se puede usar un cepillo
de cerdas duras.
• Inspeccione todo el electrodoméstico incluyendo la manguera y el
regulador y reemplace toda pieza dañada o gastada. Sólo use las
piezas especificadas por The Brinkmann Corporation.
29
ADVERTENCIA: Al usar La olla y Canasta de 10 cuartos,
siempre cuelgue el cesto directamente sobre la solapa
para colgar de la cacerola. Esto permite que el líquido
caliente se escurra dentro de la cacerola nuevamente.
Colgar el cesto en cualquier otro lugar puede ocasionar la
caída de la cacerola y el derramamiento del líquido
caliente. La olla y Canasta de 10 cuartos y el cesto
colador de 7 pulgadas NO deben usarse para freír pavos.
Paso 3
Cocine la comida al gusto. Cuidadosamente levante el
colador para que el líquido drene nuevamente dentro de la
olla (use la lengüeta de la caída para la cacerola y la
cesta). Quite cuidadosamente el alimento. Permita que el
líquido refresque a 115ºF (45ºC) o abajo antes de
recipiente de cocinar móvil.
Paso 4
Apague siempre la válvula del cilindro del propano
primero, después apague la perilla de control de
regulador. Permita que el sartén y el aceite se refresquen
totalmente. Nunca intente drenar el líquido o mover la olla
hasta que el líquido se haya refrescado debajo de grados
de 115ºF (45ºC) quemaduras severas podría resultar.
Olla y Canasta Colador
(se vende por separado)
No es para freír pavos
Conjunto de Olla y Canasta
No es para freír pavos

30
Herramientas necesarias para armar su cocina:
Llave inglesa ajustable o la siguiente llave inglesa:
• Llave Inglesa para Tuercas de 10 mm
• Destornillador
INSTRUCCIONES DE MONTAJE
LEA TODAS LAS INSTRUCCIONES DE MONTAJE Y LAS ADVERTENCIAS DE SEGURIDAD
CUIDADOSAMENTE ANTES DE ARMAR U OPERAR SU COCINA.
Inspeccione los contenidos de la caja para asegurarse de que todas las partes estén incluidas y no tengan daños.
PARA PIEZAS FALTANTES, POR FAVOR LLAME AL SERVICIO DE ATENCIÓN
AL CLIENTE AL 1-800-527-0717.
(Se requerirá una prueba de la compra)
(Se requerirá una prueba de la compra.)
Inspeccione los contenidos de la caja para asegurarse de que todas las partes estén incluidas y no tengan daños.
PARA CUBIERTAS, ACCESORIOS Y OTROS PRODUCTOS, FAVOR DE VISITARNOS POR LA RED MUNDIAL EN:
D
I
S
H
W
A
S
H
E
R
S
A
F
E
100
150
200
250
300
350
400
50
200
100 150
°F
R
°C
1 Anillo Inferior de la Cocina
1 Asamblea de la Hornilla
4 Piernas (Placa de Metal Preanexada con
Advertencias de Seguridad. -No Quite esta Placa)
1 Manguera y Regulado
1 Resorte
1 Escudo Térmico Inferior
1
2
3
4
5
6
8
9
10
11
13
7
12
1
7
2
4
6
8
5
13
10
3
12
9
11
LISTA DE PIEZAS:
1 Cesto Colador
1 Manija
1 Cuerpo de la Cocina
3
Soporte de la Retención
1 6" Termómetro para Freir
4 Escudos Térmicos Exteriores
1 Olla de 10 Cuartos

31
PASOS DE INSTALACIÓN
Paso 1
Ate la hornilla, el apagador de aire, el resorte
y la manguera roscando la hornilla sobre la
manguera según lo ilustrado.
Paso 2
Ate la pierna a la cuaderna de la parte
inferior de la cocina primero, usando un
perno M6 x 8 mm. Entonces, ate el cuerpo
de la cocina usando dos pernos M6 x 8
mm. Repita para otras tres piernas.
Nota: Para las ollas de 10, 24 y 30 cuartos de
galón instalan los soportes según lo
ilustrado a la izquierda. Las ollas de 42,
60 y 80 cuartos de galón los soportes
deben ser 180º dados vuelta de modo
que la pieza vertical del soporte sea la
más lejos del borde.
Paso 3
Ate el soporte de la olla al cuerpo de la
cocina usando dos pernos M6 x 8 mm.
Quite la tuerca de ala pre-atada al soporte,
ajuste el soporte para llevar a cabo anchura
de la olla, apriete el soporte usando la
tuerca de ala. Repita para otros dos
soportes.
Paso 4
Quite la tuerca de la parte inferior de la
hornilla. Después fije la hornilla en la correa
del montaje dentro del soporte de la cocina,
ate el escudo térmico inferior debajo de la
correa y asegúrelo con la tuerca.
Hornilla
Soporte de la Retención
Tuerca de Ala

32
Paso 5
Ate los escudos térmicos exteriores con el
soporte-L usando un perno M6 x 8 mm según
lo ilustrado. Repita para otros tres escudos
térmicos.
ASSAMBLEA CANASTA COLADOR
Paso 1
Alinee la manija con los orificios de los pernos
en la canasta y inerta tres pernos y tuercas
segun lo ilustrado luego apriete con
seguridad.
Armado
Escudo Térmic

33

GARANTÍA LIMITADA DE 90 DÍAS
For 90 days from date of purchase, The Brinkmann Corporation warrants the 10 Quart Pot & Basket against defects due to
workmanship or materials to the original purchaser. The Brinkmann Corporation’s obligations under this warranty are limited to the following guidelines:
• This warranty does not cover 10 Quart Pot & Basket that have been altered/modified or damaged due to:
normal wear, rust, abuse, improper maintenance and/or improper use.
• This warranty does not cover surface scratching or heat damage to the finish, which is considered normal wear.
• The Brinkmann Corporation may elect to repair or replace damaged units covered by the terms of this warranty.
• This warranty extends to the original purchaser only and is not transferable or assignable to subsequent purchasers.
The Brinkmann Corporation requires reasonable proof of purchase. Therefore, we strongly recommend that you retain your sales receipt or invoice. To
obtain repair or replacement of your 10 Quart Pot & Basket under the terms of this warranty, please call Customer Service Department at
1-800-527-0717 for a Return Authorization Number and further instructions. A receipt or proof of purchase will be required. A Return Authorization
Number must be clearly marked on the outside of the box. Any 10 Quart Pot & Basket returned to Brinkmann must include your name, address and
telephone number. Please make sure the item is properly packed, postage prepaid, and insured. The Brinkmann Corporation will not be responsible for
any 10 Quart Pot & Basket forwarded to us without a Return Authorization Number.
EXCEPT AS ABOVE STATED, THE BRINKMANN CORPORATION MAKES NO OTHER EXPRESS WARRANTY.
THE IMPLIED WARRANTIES OF MERCHANTABILITY AND FITNESS FOR A PARTICULAR PURPOSE ARE LIMITED IN DURATION TO 90 DAYS FROM THE DATE
OF PURCHASE. SOME STATES DO NOT ALLOW LIMITATIONS ON HOW LONG AN IMPLIED WARRANTY LASTS, SO THE ABOVE LIMITATION MAY NOT APPLY
TO YOU.
ANY LIABILITY FOR INDIRECT, INCIDENTAL OR CONSEQUENTIAL DAMAGES ARISING FROM THE FAILURE OF THE COOKING VESSEL WITH 10 QUART POT &
BASKET TO COMPLY WITH THIS WARRANTY OR ANY IMPLIED WARRANTY IS EXCLUDED. CUSTOMER ACKNOWLEDGES THAT THE PURCHASE PRICE
CHARGED IS BASED UPON THE LIMITATIONS CONTAINED IN THE WARRANTY SET OUT ABOVE. SOME STATES DO NOT ALLOW THE EXCLUSION OR
LIMITATION OF INCIDENTAL OR CONSEQUENTIAL DAMAGES, SO THE ABOVE LIMITATION OR EXCLUSION MAY NOT APPLY TO YOU. THIS WARRANTY GIVES
YOU SPECIFIC LEGAL RIGHTS, AND YOU MAY ALSO HAVE OTHER RIGHTS WHICH VARY FROM STATE TO STATE.
90 DAY LIMITED WARRANTY
Durante 90 días a partir de la fecha de compra, The Brinkmann Corporation le garantiza al comprador original que la Olla de 10 Cuartos de Galén y
Cesta está libre de defectos en la mano de obra o materiales. Las obligaciones de The Brinkmann Corporation en esta garantía se limitan a las
siguientes pautas:
• Esta garantía no cubre las Cocinas que hayan sido alteradas/modificadas o dañadas debido a: el desgaste normal, oxidación, abuso,
mantenimiento inadecuado y/o uso inadecuado.
• Esta garantía no cubre las superficies rayadas o acabados dañados por el calor, lo cual es considerado como desgaste normal.
• The Brinkmann Corporation puede elegir reparar o reemplazar las unidades dañadas cubiertas por los términos de esta garantía.
• Esta garantía se extiende al comprador original únicamente y no es transferible ni asignable a compradores sucesivos.
The Brinkmann Corporation requiere una razonable prueba de compra. Por lo tanto, le recomendamos encarecidamente que guarde el recibo o la
facturación de su compra. Para obtener reparaciones o reemplazos de su Olla de 10 Cuartos de Galén y Cesta bajo los términos de esta garantía, por
favor llame al Departamentos de Servicios de Atención al Cliente al 1-800-527-0717 para obtener un Número de Autorización de Devolución y más
instrucciones. Se requerirá un recibo o prueba de compra. El Número de Autorización de Devolución debe estar claramente marcado en la
parte exterior de la caja. Las Cocinas devueltas a Brinkmann deben incluir su nombre, dirección y número telefónico. Por favor asegúrese de que la
cocina haya sido adecuadamente empaquetada, con correo prepagado y asegurada. The Brinkmann Corporation no se hará responsable de las
devoluciones de ninguna cocina que se hayan enviado sin el Número de Autorización de Devolución.
EXCEPTUANDO LO ARRIBA ESTABLECIDO, THE BRINKMANN CORPORATION NO OTORGA NINGUNA OTRA GARANTÍA EXPRESA.
LAS GARANTÍAS DE COMERCIALIZACIÓN Y ADECUACIÓN IMPLÍCITAS PARA UN USO PARTICULAR ESTÁN LIMITADAS EN SU DURACIÓN A LOS 90 DÍAS A
PARTIR DE LA FECHA DE COMPRA. ALGUNOS ESTADOS NO PERMITEN LIMITACIONES EN LA DURACIÓN DE UNA GARANTÍA IMPLÍCITA, DE MODO QUE
LAS LIMITACIONES ANTERIORES PUEDEN NO APLICARSE A SU CASO EN PARTICULAR.
CUALQUIER RESPONSABILIDAD POR DAÑOS INDIRECTOS, INCIDENTALES O EMERGENTES QUE SURJAN POR FALLAS DE LA OLLA DE 10 CUARTOS DE
GALÉN Y CESTA DE ESTA GARANTÍA O DE CUALQUIER OTRA GARANTÍA IMPLÍCITA QUEDA EXCLUIDA. EL CLIENTE RECONOCE QUE EL PRECIO DE
COMPRA COBRADO SE BASA EN LAS LIMITACIONES CONTENIDAS EN LA GARANTÍA ARRIBA EXPUESTA. ALGUNOS ESTADOS NO PERMITEN LA
EXCLUSIÓN O LIMITACIÓN DE DAÑOS INCIDENTALES O CONSECUENTES, POR LO QUE LAS LIMITACIONES O EXCLUSIONES ANTERIORES PODRÍAN NO
APLICARSE A SU CASO. ESTA GARANTÍA LE OTORGA DERECHOS LEGALES ESPECÍFICOS Y TAMBIÉN PUEDE GOZAR DE OTROS DERECHOS QUE VARÍAN
DE UN ESTADO A OTRO.
34

©2009 The Brinkmann Corporation
4215 McEwen Road
Dallas, Texas 75244 U.S.A.
FOR COVERS, ACCESSORIES AND OTHER PRODUCTS, PLEASE VISIT US ONLINE AT:
PARA CUBIERTAS, ACCESORIOS Y OTROS PRODUCTOS, FAVOR DE VISITARNOS POR LA RED MUNDIAL EN:
140-4010-S
0509, 0909, 0211
Por un año, a partir de la fecha de compra, The Brinkmann Corporation garantiza al comprador original de la Olla con Pedestal y Soporte para Pavos
contra defectos debido a la mano de obra o materiales. Las obligaciones de The Brinkmann Corporation en esta garantía se
limitan a las siguientes pautas:
• Esta garantía no cubre las Ollas con Pedestal y Soporte para Pavos que hayan sido alteradas/modificadas o dañadas debido a: el desgaste normal,
oxidación, abuso, mantenimiento inadecuado y/o uso inadecuado.
• Esta garantía no cubre las superficies rayadas o acabados dañados por el calor, lo cual es considerado como desgaste normal.
• The Brinkmann Corporation puede elegir reparar o reemplazar las unidades dañadas cubiertas por los términos de esta garantía.
• Esta garantía se extiende al comprador original únicamente y no es transferible ni asignable a compradores sucesivos.
The Brinkmann Corporation requiere una razonable prueba de compra. Por lo tanto, le recomendamos encarecidamente que guarde el recibo o l
a facturación de su compra. Para obtener reparaciones o reemplazos de su Olla con Pedestal y Soporte para Pavos que se encuentren bajo los
términos de esta garantía, por favor llamar al Departamento de Reparaciones para el Cliente al 1-800-527-0717 para obtener un Número de
Autorización de Devolución o para recibir más instrucciones. Se requerirá un recibo o prueba de compra. El Número de Autorización de
Devolución debe estar claramente marcado en la parte exterior de la caja. Todas las devoluciones realizadas a Brinkmann de la Olla con Pedestal
y Soporte para Pavos deben incluir su nombre, dirección y número telefónico. Por favor asegúrese de que el artículo haya sido adecuadamente
empaquetado, con correo prepagado y asegurado. The Brinkmann Corporation no se hará responsable de las devoluciones del ninguna Olla con el
Pedestal y Soporte para Pavos que se hayan enviado sin el Número de Autorización de Devolución.
EXCEPTUANDO LO ARRIBA ESTABLECIDO, THE BRINKMANN CORPORATION NO OTORGA NINGUNA OTRA GARANTÍA EXPRESA.
LAS GARANTÍAS DE COMERCIALIZACIÓN Y ADECUACIÓN IMPLÍCITAS PARA UN PROPÓSITO PARTICULAR ESTÁN LIMITADAS EN SU DURACIÓN A UN AÑO A
PARTIR DE LA FECHA DE COMPRA. ALGUNOS ESTADOS NO PERMITEN LIMITACIONES EN LA DURACIÓN DE UNA GARANTÍA IMPLÍCITA, DE MODO QUE
LAS LIMITACIONES ANTERIORES PUEDEN NO APLICARSE A SU CASO EN PARTICULAR.
TODA RESPONSABILIDAD POR LOS DAÑOS INDIRECTOS, INCIDENTALES O EMERGENTES QUE SURJAN POR LAS FALLAS DE LA COCINA PARA CUMPLIR
CON ESTA GARANTÍA O CON CUALQUIER GARANTÍA IMPLÍCITA QUEDA EXCLUIDA. EL CLIENTE RECONOCE QUE EL PRECIO DE COMPRA COBRADO SE
BASA EN LAS LIMITACIONES CONTENIDAS EN LA GARANTÍA ARRIBA EXPUESTA. ALGUNOS ESTADOS NO PERMITEN LA EXCLUSIÓN O LIMITACIÓN DE
DAÑOS INCIDENTALES O CONSECUENTES, POR LO QUE LAS LIMITACIONES O EXCLUSIONES ANTERIORES PODRÍAN NO APLICARSE A SU CASO. ESTA
GARANTÍA LE OTORGA DERECHOS LEGALES ESPECÍFICOS Y TAMBIÉN PUEDE GOZAR DE OTROS DERECHOS QUE VARÍAN DE UN ESTADO A OTRO.
GARANTÍA LIMITADA DE UN AÑO
ONE YEAR LIMITED WARRANTY
Owner’s Manual for Model:
Manual del Propietario para el Modelo:
815-4010-S
For one year from date of purchase, The Brinkmann Corporation warrants the Cooker against defects due to workmanship or materials to the original
purchaser. The Brinkmann Corporation’s obligations under this warranty are limited to the following guidelines:
• This warranty does not cover Cooker that have been altered/modified or damaged due to: normal wear, rust, abuse, improper maintenance and/or improper
use.
• This warranty does not cover surface scratching or heat damage to the finish, which is considered normal wear.
• The Brinkmann Corporation may elect to repair or replace damaged units covered by the terms of this warranty.
• This warranty extends to the original purchaser only and is not transferable or assignable to subsequent purchasers.
The Brinkmann Corporation requires reasonable proof of purchase. Therefore, we strongly recommend that you retain your sales receipt or invoice. To
obtain repair or replacement of your Cooker under the terms of this warranty, please call Customer Service Department at
1-800-527-0717 for a Return Authorization Number and further instructions. A receipt or proof of purchase will be required. A Return
Authorization Number must be clearly marked on the outside of the box. Cookers returned to Brinkmann must include your name, address and
telephone number. Please make sure the cooker is properly packed, postage prepaid, and insured. The Brinkmann Corporation will not be responsible
for any cookers forwarded to us without a Return Authorization Number.
EXCEPT AS ABOVE STATED, THE BRINKMANN CORPORATION MAKES NO OTHER EXPRESS WARRANTY.
THE IMPLIED WARRANTIES OF MERCHANTABILITY AND FITNESS FOR A PARTICULAR PURPOSE ARE LIMITED IN DURATION TO ONE YEAR FROM THE
DATE OF PURCHASE. SOME STATES DO NOT ALLOW LIMITATIONS ON HOW LONG AN IMPLIED WARRANTY LASTS, SO THE ABOVE LIMITATION MAY NOT
APPLY TO YOU.
ANY LIABILITY FOR INDIRECT, INCIDENTAL OR CONSEQUENTIAL DAMAGES ARISING FROM THE FAILURE OF THE COOKER TO COMPLY WITH THIS
WARRANTY OR ANY IMPLIED WARRANTY IS EXCLUDED. CUSTOMER ACKNOWLEDGES THAT THE PURCHASE PRICE CHARGED IS BASED UPON THE
LIMITATIONS CONTAINED IN THE WARRANTY SET OUT ABOVE. SOME STATES DO NOT ALLOW THE EXCLUSION OR LIMITATION OF INCIDENTAL OR
CONSEQUENTIAL DAMAGES, SO THE ABOVE LIMITATION OR EXCLUSION MAY NOT APPLY TO YOU. THIS WARRANTY GIVES YOU SPECIFIC LEGAL RIGHTS,
AND YOU MAY ALSO HAVE OTHER RIGHTS WHICH VARY FROM STATE TO STATE.
-
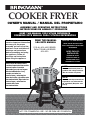 1
1
-
 2
2
-
 3
3
-
 4
4
-
 5
5
-
 6
6
-
 7
7
-
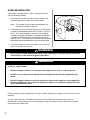 8
8
-
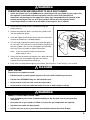 9
9
-
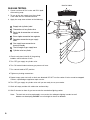 10
10
-
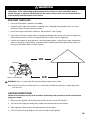 11
11
-
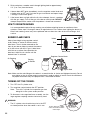 12
12
-
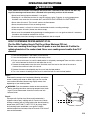 13
13
-
 14
14
-
 15
15
-
 16
16
-
 17
17
-
 18
18
-
 19
19
-
 20
20
-
 21
21
-
 22
22
-
 23
23
-
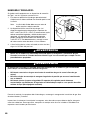 24
24
-
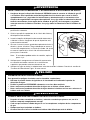 25
25
-
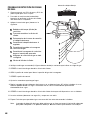 26
26
-
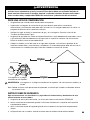 27
27
-
 28
28
-
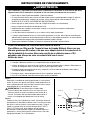 29
29
-
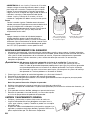 30
30
-
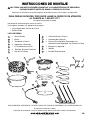 31
31
-
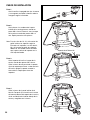 32
32
-
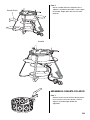 33
33
-
 34
34
-
 35
35
-
 36
36


