
PUSH BUTTON BODY-JET WALL BAR KIT
Model 58101-3101 58101-3104
KIT DE BARRA DE DUCHA CON FUNCIóN A CHORRO,
ACCIONADA POR BOTóN, DE MONTAJE EN PARED
Modelo 58101-3101 58101-3104
JET CORPOREL MURAL AVEC BOUTON POUSSOIR KIT DE BARRE
Modèles 58101-3101 58101-3104
Installation Instructions/Warranty Information
Caution: Protect product surface from wrench marks by covering wrench with a soft cloth or tape.
Instrucciones de Instalación/Información de la Garantía
Precaución: Para proteger el acabado contra las marcas de las llaves, cúbrelas con un paño suave o cinta.
Directives d’installation et renseignements sur la garantie
Attention: Protégez le fini contre les marques de clé en couvrant la clé d’un chiffon doux ou de ruban adhésif.
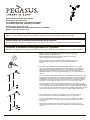
1.
Remove the existing showerhead and shower arm (Counterclockwise) with
a wrench. Clean the shower arm thread.
Quite la regadera existente (gire de izquierda a derecha) con una llave.
Limpie las roscas del brazo de la regadera
Retirez la pomme de douche et le bras de douche existants à l'aide d'une clé
(en tournant dans le sens antihoraire). Nettoyez le filetage du bras de
douche.
615
± 5 mm
690±5mm
615
± 5 mm
690±5mm
2. Placement of the lower bracket should be between approximately 24 1/2" (619mm)
and 27 1/4" (690mm) below the shower arm. the rough-in position of the shower arm
can vary, and will determine the actual position of the lower bracket. be sure that the
lower bracket will not interfere with the tub spout in tub & shower applications.
determine the desired location for the bracket and drill a 1/4" hole. insert anchor into
the hole.
La colocación del soporte inferior debe hacerse aproximadamente entre 619 mm o 690 mm
por debajo del brazo de la ducha. la posición interna del brazo de la ducha puede variar y
determinará la posición real del soporte inferior. asegúrate de que el soporte inferior
no interfiera con el caño de la tubería si se usa para tina y ducha. determina la ubicación
deseada del soporte y taladra un orificio de 0,63 cm. coloca el anclaje en el orificio.
Le support inférieur doit être positionné entre 619 mm (24,5 po) et 690 mm (27,25 po) en
dessous du bras de douche. la position brute du bras de douche peut varier et déterminera
la position réelle du support inférieur. assurez-vous que le support inférieur ne gênera pas
le bec de baignoire pour les ensembles baignoire-douche. déterminez l'emplacement souhaité
pour le support et percez un trou de 6,35 mm (1/4 po). insérez la cheville dans le trou.
3. Place lower bracket onto the wall. insert screws through holes until they make
contact with the anchors. tighten with screwdriver, but do not over tighten.
Coloca el soporte inferior en la pared. coloca los tornillos a través de los orificios
hasta que hagan contacto con los anclajes. apriétalos con el destornillador, pero
no demasiado.
Placez le support inférieur sur le mur. insérez les vis dans les orifices jusqu'à ce
qu'elles entrent en contact avec les chevilles. serrez avec un tournevis mais ne serrez
pas trop.
1

Cleaning and Care:
Care should be given to the cleaning of this product.
To clean this product, Simply wipe gently with a
damp cloth and mild soap.
Use a dry towel to blot the product dry. DO NOT
use abrasive cleaners as
this can cause damage to the finish and void the
warranty.
Limpieza y Mantenimiento:
Este producto debe limpiarse. Límpielo con un paño
húmedo y jabón suave. Usa una toalla para secarlo.
NO USAR limpiadores abrasivos porque pueden
causar daños al acabado.
Nettoyage et entretien :
Nettoyer ce produit avec soin.
Pour le nettoyer, essuyer simplement avec un
chiffon humide et un savon doux.
Utiliser une serviette sèche pour essuyer le produit.
NE PAS utiliser de nettoyants abrasifs car
ils pourraient endommager le fini et annuler la
garantie.
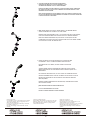
4. Slide the shower bar through the mounting bracket.
attach hand shower hose to the bottom threads of the
shower bar by threading on in a clockwise movement.
Introduce la barra de ducha a través del soporte de montaje. sujeta la manguera
del cabezal de ducha a las roscas de la barra de la ducha enroscándola con un
movimiento hacia la derecha.
Faites glisser la barre de douche à travers le support de fixation. attachez le tuyau
de la douche téléphone au filetage inférieur de la barre de douche en le vissant dans
le sens des aiguilles d'une montre.
5. Wrap thread sealant tape or apply thread sealant to shower arm threads.
tighten shower bar onto shower.do not over tighten.
Envuelve cinta selladora para roscas o coloca sellador en las roscas del brazo
de la ducha. aprieta la barra de la ducha en la ducha. no aprietes demasiado.
Enroulez le ruban d’étanchéité pour joints filetés ou appliquez de la pâte
d'étanchéité pour joints filetés sur le filetage du bras de douche. serrez la barre
de douche sur la douche. ne serrez pas trop.
6. Attach the free end of the head shower hose to the hand shower
by threading it on in a clockwise movement. hand tighen only.
Note:thread tape is not needed, the seal is made by the included
washer.
Sujeta el extremo libre de la manguera del cabezal de ducha a la ducha
manual enroscándola con un movimiento hacia la derecha. ajústalo sólo
manualmente.
No se necesita cinta para roscas, el sello se hace con la arandela incluida.
Attachez l'extrémité libre du tuyau de la pomme de douche sur la douche tél
éphone en la vissant dans le sens des aiguilles d'une montre. serrez à la
main uniquement.
Enrober de ruban d'étanchéité n'est pas nécessaire, l'étanchéité est assurée
par la rondelle fournie.
7. Place the hand shower into hand shower holder.
Coloca la ducha manual en su soporte.
Placez la douche à main dans son support à main.
0 00
7.6
7 6 7 6
2

3
-
 1
1
-
 2
2
-
 3
3


en otros idiomas
- français: Pegasus 58101-3104 Guide d'installation
- English: Pegasus 58101-3104 Installation guide
Artículos relacionados
Otros documentos
-
Glacier Bay 58002-5001 Guía de instalación
-
-
-
Allen + Roth 873X-5604 Manual de usuario
-
 AquaSource 58101-4201 Guía de instalación
-
-
