Sony ICD-TX800 Instrucciones de operación
- Tipo
- Instrucciones de operación

IC Recorder
ICD-TX800
Operating Instructions
GB
ES
© 2017 Sony Corporation Printed in China
4-699-321-52(2)
ICD-TX800 4-699-321-52(2)
Refer to the Help Guide
This is the Operating Instructions, which provides you with
instructions on the basic operations of the IC recorder.
The Help Guide is an online manual.
Refer to the Help Guide when you would like to know
further details, operations and possible solutions when a
problem occurs.
http://rd1.sony.net/help/icd/t80/h_ce/
Check the supplied items
• IC Recorder (1)
• Remote control* (1)
• Stereo headphones (1)
• Dedicated headphone cable (1)
• USB cable (1)
• Carrying case (1)
• Operating Instructions (this sheet)
• Warranty card
• Application Software, Sound Organizer 2 (Installer file
stored in the built-in memory so that you can install it to
your computer.)
* A button type lithium battery is already installed.
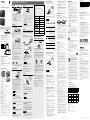
Parts and controls
IC recorder Remote control
Your IC recorder has a built-in
clip on its back.
You can hook it onto
something, such as the hem
of a pocket.
Built-in microphones
Operation indicator
Display window
Bluetooth indicator*¹
USB connector cover
USB/Headphone connector (inside the USB connector
cover)
STOP button
HOLD•POWER switch*²
REC button
/DPC (Digital Pitch Control) button
Built-in antenna*³
STOP button
Operation indicator
HOLD switch
(review/fast backward) button
BACK/ HOME button*⁴
(play/enter) button*⁵
REC button
(cue/fast forward) button
OPTION button
/
A-B (repeat A-B) button
VOL –/+ (volume –/+) button*⁵
T-MARK (track mark) button
RESET button*⁶
Strap hole (No strap is supplied with your IC recorder.)
Battery case*⁷
*¹ The indicator changes in color or flashes to indicate the status of the
Bluetooth function or the Bluetooth pairing (device registration).
*² Sliding the HOLD•POWER switch to “POWER” and holding it for 8
seconds or longer restarts your IC recorder. Before restarting the
IC recorder, make sure the operating indicator is unlit. For detailed
instructions, refer to the Help Guide.
*³ When using the remote control, do not cover the built-in antenna, for
example with your hand, so as not to disturb the wireless connection
with the IC recorder.
*⁴ Press this button once to display the previous screen. Press and hold it
to display the HOME menu screen.
*⁵ There is a tactile dot on the (play/enter) button and next to “+” on
the VOL –/+ (volume –/+) button.
*⁶ Press this button when the remote control seems not working.
*⁷ A button type lithium battery is already installed.
¼ Your IC recorder is not equipped with built-in speakers.
Let’s try out your new IC recorder
Charge
Charge the IC recorder.
Using the supplied USB cable, connect the USB/
Headphone connector inside the USB connector cover to
a USB port of a running computer. Charging starts.
When the battery is fully charged, the battery indicator
will indicate “
.”
Disconnect the IC recorder.
Make sure that the message “Accessing” is no longer
on the display window. Then refer to the Help Guide to
remove the IC recorder safely.
Power on
IC recorder
Slide and hold the HOLD•POWER switch on the IC recorder
in the direction toward “POWER” until the window display
appears.
To power off, slide the HOLD•POWER switch on the IC
recorder to “POWER” and hold it until “Power Off” appears on
the display window.
Remote control
Operation indicator
Slide the HOLD switch away from “HOLD.”
To power on the remote control, press any one of the buttons
on the remote control. When the operation indicator on the
remote control stops flashing, operations with the remote
control are available.
The remote control is not equipped with the power button.
It automatically powers off in the following cases:
• if the wireless connection is not established with the IC
recorder and you leave the remote control unused for about
5 minutes
• if the wireless connection is established with the IC recorder
and
– you power off the IC recorder
– you leave the remote control unused for about 2 hours
To use the remote control for operations after it powers off,
follow the above procedure to power on the remote control,
and then press your desired button on the remote control
once again.
To prevent unintentional operations (HOLD)
The IC recorder and the remote control are each equipped
with the switch to hold the operation.
Slide the HOLD•POWER switch on the IC recorder or the HOLD
switch on the remote control in the direction of “HOLD.”
IC recorder Remote control
¼ To release the IC recorder or the remote control from the Hold
status, slide the HOLD•POWER switch towards the center or the
HOLD switch away from
“HOLD,” respectively.
Initial settings
Buttons to use (on the remote control)
Display window (on the IC recorder)
Select
(
//
/
)
Enter
When you power on your IC recorder for the first time, the
“Configure Initial Settings” screen appears on the display
window of the IC recorder. Use the remote control to make
initial settings, such as selecting the display language, setting
the clock, and turning on/off the beep sound.
Slide the HOLD switch away from “HOLD” to release
the remote control from the HOLD status.
Remove the yellow label from the back of the remote
control when you use it for the first time.
When “Configure Initial Settings” screen appears,
press any button on the remote control.
If the operation indicator on the remote control is
flashing, wait until it stops flashing before proceeding to
the next step.
Press to start the initial settings.
Select the display language.
You can select from the following languages:
Deutsch (German), English*, Español (Spanish), Français
(French), Italiano (Italian), Русский (Russian), Türkçe
(Turkish)
* Default setting
Set the current year, month, day, hour, and minute.
¼ To go back to the previous clock setting item, press BACK/
HOME.
Select “Next.”
Select “Yes” or “No” to turn on or off the beep sound.
When the initial settings finish, the completion message
and then the HOME menu screen appears.
Notes
• You can hear the beep sound only through the headphones
connected to your IC recorder.
• You can change any of the initial settings at any time later. For
detailed instructions, refer to the Help Guide.
Using the HOME menu
You can use the HOME menu for a variety of operations,
including locating and playing a recorded file and changing
the settings of your IC recorder.
Buttons to use (on the remote control)
Display window (on the IC recorder)
Select (
/
)
Enter
BACK/HOME
¼ To use the HOME menu, you need to operate the remote
control.
Press and hold BACK/HOME.
The HOME menu screen appears on the display window
of the IC recorder.
The HOME menu items are aligned in the following
sequence.
Recorded
Files
Record SettingsREC
Remote
Back
to XX*
Music
Select your desired function from the following:
Music
You can select and play one of the files
you have imported from a computer.
To locate a music file, select “All Songs,”
“Albums,” “Artists,” or “Folders.”
When importing files, be sure to import
them into the MUSIC folder.
Recorded
Files
You can select and play one of the
files you have recorded with your IC
recorder. To locate a recorded file,
select “Latest Recording,” “Search by
REC Date,” “Search by REC Scene,” or
“Folders.”
Record
You can display the record standby
screen, and then start recording.
REC Remote
You can display the menu screen for
REC Remote that uses the Bluetooth
function.
Additionally, you can turn on/off the
Bluetooth function or make device
registration (pairing) for using REC
Remote.
Settings
You can display the Settings menu
screen and change various settings on
the IC recorder.
Back to XX*
You can go back to the screen that
was displayed before the HOME menu
screen.
* The function you are currently using is displayed in “XX.”
¼ Press STOP to return to the screen displayed before you
entered the HOME menu.
Using the OPTION menu
You can use the OPTION menu to perform a variety of
functions, including changing the settings of your IC
recorder.
The available items differ depending on the situation.
Buttons to use (on the remote control)
Display window (on the IC recorder)
Select (/)
Enter
OPTION
¼ To use the OPTION menu, you need to operate the remote
control.
Select your desired function from the HOME menu,
and then press OPTION.
Select the menu item for which you want to
change the setting.
Select your desired setting option.
Copying files from your
ICrecorder to a computer
You can copy the files and folders from your IC recorder to a
computer to store them.
Follow the instructions in “Charge” to connect your
IC recorder to a computer.
Drag and drop the files or folders you want to
copy from “IC RECORDER” to the local disk on the
computer.
Disconnect your IC recorder from the computer.
Installing Sound Organizer 2
Install Sound Organizer on your computer.
Sound Organizer allows you to exchange files between your
IC recorder and your computer.
Songs imported from music CDs and other media, MP3 and
other audio files imported to a computer can also be played
and transferred to the IC recorder.
Notes
• Sound Organizer is compatible with Windows computers only.
Itis not compatible with Mac.
• This IC recorder is compatible with Sound Organizer 2 only.
• If you format the built-in memory, all data stored there will be
deleted. (The Sound Organizer software installer will also be
deleted.)
¼
• When installing Sound Organizer, log in to an account with
administrator privileges.
• The installation procedure varies depending on the Windows
version. The following procedure uses Windows 7 as an
example.
Follow the instructions in “Charge” to connect your
IC recorder to a computer.
Make sure the IC recorder is successfully detected
by the computer.
“Connecting” appears and stays on the IC recorder's
display window while the IC recorder is connected to
the computer.
Go to the [Start] menu, click [Computer], and then
double-click [IC RECORDER] - [FOR WINDOWS].
Double-click [SoundOrganizer_V2001] (or
[SoundOrganizer_V2001.exe]).
Follow the computer's on-screen instructions.
Make sure that you accept the terms of the license
agreement, select [I accept the terms in the license
agreement], and then click [Next].
Record
Buttons to use (on the IC recorder)
Built-in microphones
STOP
REC
Operation indicator
¼
• To start recording, you can operate either the IC recorder or the
remote control.
• Before you start recording, make sure that the HOLD status is
released.
• You can select a operation scene for each situation by selecting
“Scene Select” in the OPTION menu with the remote control.
Turn the IC recorder so that its built-in microphones
point in the direction of the recording source.
Press REC.
Make sure that the operation indicator on the IC recorder
lights in red, indicating that recording has started.
Press STOP to stop recording.
Recording stops and “Saving...” appears on the display
window.
Listen
Your IC recorder is not equipped with a built-in speaker. For
audio listening, you need to connect the stereo headphones
(supplied) to the IC recorder with the dedicated headphone
cable (supplied). For playback operations, use the remote
control.
Listening preparation
Connect the stereo headphones to the USB/Headphone
connector on the IC recorder with the dedicated headphone
cable.
To start playback
Buttons to use (on the remote control)
Display window (on the IC recorder)
Select
(
//
/
)
Enter
STOP
BACK/HOME
VOL –/+ button
While watching the display window on the IC
recorder, operate the remote control to select
“ Recorded Files” from the HOME menu.
Select “Latest Recording,” “Search by REC Date,”
“Search by REC Scene,” or “Folders.”
Select your desired file.
Playback starts.
Press VOL + or VOL - to adjust the volume.
Press STOP to stop playback.
¼ Right after you stopped recording, you can press to play the
file you have just recorded.
To add a track mark
You can add a track mark at a point at which you want to
divide a file later or locate during playback. You can add a
maximum of 98 track marks to each file.
You can also add track marks during recording.
Delete
Buttons to use (on the remote control)
Display window (on the IC recorder)
Enter
OPTION
Select
(
//
/
)
¼ To delete a file, you need to operate the remote control.
Note
Once a file is deleted, you cannot restore it.
While watching the display window on the IC
recorder, operate the remote control to select the file
you want to delete from the list of recorded files or
play back the file you want to delete.
Select “Delete a File” from the OPTION menu.
“Delete?” appears and the selected file starts playing for
your confirmation.
Select “Yes.”
“Please Wait” appears and stays until the selected file is
deleted.
When the [Setup Type] window appears, select
[Standard] or [Custom], and then click [Next].
Follow the instructions on the screen and set the
installation settings when you select [Custom].
When the [Ready to Install the Program] window
appears, click [Install].
The installation starts.
When the [Sound Organizer has been installed
successfully.] window appears, check [Launch
Sound Organizer Now], and then click [Finish].
Note
You may need to restart your computer after installing
Sound Organizer.
Replacing the battery of the
remote control
When the indicator on the remote control lights in red,
the battery is running out of power. Follow these steps to
replace the battery. Be sure to use the button type lithium
battery, CR2032, for replacement.
Turn over the remote control to face it down.
Push and hold the tab () toward the groove (),
insert your fingernail into the groove (), and
then pull out the battery case.
Remove the battery.
Place the new battery with the + side facing up.
Insert the battery case back into the remote
control.
Press the RESET button on the back of the remote
control.
Press any button on the remote control (the
operation indicator on the remote control flashes
alternately in blue and red) to power it on, and
then power on the IC recorder.
When the operation indicator on the remote control
stops flashing, operations with the remote control are
available.
Precautions
On power
• IC Recorder
DC 3.7V : the built-in rechargeable lithium-ion battery
DC 5.0V : when charged using USB
Rated current consumption : 500mA
• Remote Control
DC 3V : CR2032 (Button type lithium battery)
On safety
Do not operate the unit while driving, cycling or operating
any motorized vehicle.
On handling
• Do not leave the unit in a location near heat sources, or
in a place subject to direct sunlight, excessive dust or
mechanical shock.
• Should any solid object or liquid fall into the unit, remove
the battery and have the unit checked by qualified
personnel before operating it any further.
• When using your IC recorder, remember to follow the
precautions below in order to avoid warping the cabinet
or causing the IC recorder to malfunction.
– Do not sit down with the IC recorder in your back pocket.
– Do not put your IC recorder into a bag with the
headphones/earphones cord wrapped around it and
subject the bag to strong impact.
• Be careful not to allow water to splash on the unit. The
unit is not waterproof. In particular, be careful in the
following situations.
– When you have the unit in your pocket and go to the
bathroom, etc.
When you bend down, the unit may drop into the water
and may get wet.
– When you use the unit in an environment where the unit
is exposed to rain, snow, or humidity.
– In circumstances where you get sweaty. If you touch the
unit with wet hands or if you put the unit in the pocket
of sweaty clothes, the unit may get wet.
• Listening with this unit at high volume may affect your
hearing.
• For traffic safety, do not use this unit while driving or
cycling.
• Do not use this unit at a place where the inability to hear
surrounding sounds may present a danger.
• You may feel pain in your ears if you use the headphones
when the ambient air is very dry.
This is not because of a malfunction of the headphones,
but because of static electricity accumulated in your body.
You can reduce static electricity by wearing non-synthetic
clothes that prevent the emergence of static electricity.
On noise
• Noise may be heard when the unit is placed near an AC
power source, a fluorescent lamp or a mobile phone
during recording or playback.
• Noise may be recorded when an object, such as your
finger, etc., rubs or scratches the unit during recording.
On maintenance
To clean the exterior, use a soft cloth slightly moistened in
water. Then use a soft dry cloth to wipe the exterior. Do not
use alcohol, benzine or thinner.
If you have any questions or problems concerning your unit,
please consult your nearest Sony dealer.
Notes on the Bluetooth function
• Bluetooth wireless technology allows connection at a
distance of up to about 10 m. However, the effective range
may vary depending on obstructions (people, metals,
walls, etc.) or signal status.
• Because Bluetooth and wireless LAN (IEEE802.11b/g)
devices use the same frequency (2.4 GHz), signal
interference may occur, resulting in communication
speed decrease, noise, or inability to connect, if Bluetooth
communications are used near a wireless LAN device. In
such cases, take the following measures.
– Perform Bluetooth communications at least 10 m away
from the wireless LAN device when connecting your IC
recorder and a Bluetooth device.
– Place your IC recorder and the Bluetooth device as close
together as possible.
– Turn off the wireless LAN device when performing
Bluetooth communications within about 10 m of a
wireless LAN device.
• Radio waves emitted from a Bluetooth device may affect
the operation of equipment such as electronic medical
devices. Turn off your IC recorder and other Bluetooth
devices in the following locations as failure to do so may
cause an accident.
– In hospitals, near priority seats on trains, in airplanes, in
places such as gasoline stations where flammable gases
are present, near automatic doors or fire alarms.
• If the operation indicator on the remote control keeps
flashing and the remote control seems not working, you
may be able to solve this by having your IC recorder and
the remote control registered with each other once again.
For detailed instructions on the device registration, refer to
the Help Guide.
Notes on the operations
• When the button operations of the remote control do not
work, check if:
– the IC recorder is powered.
By default, the IC recorder will automatically power off
if you leave it unused for 30 minutes.
– the remote control is released from the HOLD status.
– the wireless connection process with the IC recorder is
in progress.
The operation indicator on the remote control flashes
while the wireless connection is being established.
• You can check the indication of the operation indicator
on the remote control for the status of the remote
control.
Indication of the
operation indicator
Status of the remote
control
Flashes twice in blue*.
Powered on.
Lights in blue for 2
seconds.
Powered off.
Flashes four times in blue*.
Resetting of the remote
control is complete.
Stays lit in red.
Not operable due to
battery shortage.
Flashes alternately in blue
and red.
Device registration process
is in progress.
Flashes twice in blue*
repeatedly.
Wireless connection
process is in progress.
Flashes once in blue*.
Wireless connection is
established and button
operations are available.
* When the battery is running out of power, the operation indicator on
the remote control lights in red.
Operations with the
smartphone (REC Remote)
Buttons to use (on the remote control)
Display window (on the IC recorder)
Select
(
//
/
)
Enter
With the BLUETOOTH® function of your IC recorder, you can
operate your IC recorder (recording, changing the recording
settings, etc.) using a smartphone.
To operate your IC recorder using a smartphone
You need to install REC Remote on the smartphone and make
a pairing between the smartphone and your IC recorder.
Pairing means having Bluetooth devices registered with each
other to establish a wireless connection for the first time.
To make a pairing with the IC recorder using REC Remote, you
need the latest version of REC Remote. If your smartphone
has REC Remote already installed, be sure to upgrade it to the
latest version.
Search Google Play or App Store for REC Remote and
install it on the smartphone.
On the IC recorder, select “REC Remote”- “Add Device
(Pairing)” from the HOME menu with the remote
control and follow the on-screen instruction to turn
on the Bluetooth function.
On the smartphone, start REC Remote and select
“ICD-TX800” (your IC recorder) from the available
device list. For detailed instructions, refer to the help
of REC Remote and the manual supplied with the
smartphone.
Now you can use the smartphone for IC recorder
operations.
Note
The device registration (pairing) information is cleared in the
following cases. You need to pair the devices once again.
- The settings on the IC recorder, the smartphone, or both devices
are reset to the default settings, for example, due to initialization.
- The device registration (pairing) information is deleted, for
example, during the course of a repair service.
To turn on or off the Bluetooth function of your
IC recorder
Select “REC Remote” - “Bluetooth ON/OFF” from the
HOME menu.
To turn on the Bluetooth function, select “ON.” To
turn it off, select “OFF.”
¼ Turning off the Bluetooth function conserves battery power.
WARNING
• Do not expose the batteries (battery pack or batteries
installed) to excessive heat such as sunshine, fire or the
like for a long time.
• Do not dismantle, open or shred secondary cells or
batteries.
• Do not expose cells or batteries to heat or fire. Avoid
storage in direct sunlight.
• In the event of a cell leaking, do not allow the liquid to
come in contact with the skin or eyes. If contact has been
made, wash the affected area with copious amounts of
water and seek medical advice.
• Secondary cells and batteries need to be charged before
use. Always refer to the manufacturer’s instructions or
equipment manual for proper charging instructions.
• After extended periods of storage, it may be necessary to
charge and discharge the cells or batteries several times
to obtain maximum performance.
• Dispose of properly.
• Do not ingest battery, Chemical Burn Hazard. The remote
control supplied with this product contains a coin/button
cell battery. If the coin/button cell battery is swallowed,
it can cause severe internal burns in just 2 hours and can
lead to death.
Keep new and used batteries away from children. If the
battery compartment does not close securely, stop using
the product and keep it away from children.
If you think batteries might have been swallowed or
placed inside any part of the body, seek immediate
medical attention.
CAUTION
Danger of explosion if battery is incorrectly replaced.
Replace only with the same or equivalent type.
Risk of explosion if battery is replaced by an incorrect type.
Dispose of used batteries according to the instructions.
Notice for the customers: the following information
is only applicable to equipment sold in the countries
applying EU directives
Manufacturer: Sony Corporation, 1-7-1 Konan Minato-ku
Tokyo, 108-0075 Japan
For EU product compliance: Sony Belgium, bijkantoor van
Sony Europe Limited, Da Vincilaan 7-D1, 1935 Zaventem,
Belgium
Hereby, Sony Corporation declares that this equipment is in
compliance with Directive 2014/53/EU.
The full text of the EU declaration of conformity is available
at the following internet address:
http://www.compliance.sony.de/
This radio equipment is intended to be used with the
approved version of software that are indicated in the EU
Declaration of Conformity. The software loaded on this
radio equipment is verified to comply with the essential
requirements of the Directive 2014/53/EU.
You can view the software version by selecting
“
Settings” - “Common Settings” - “System Information”
from the HOME menu.
To prevent possible hearing damage, do not listen at high
volume levels for long periods.
The validity of the CE marking is restricted to only those
countries where it is legally enforced, mainly in the
countries EEA (European Economic Area).
Disposal of waste batteries and electrical
and electronic equipment (applicable in
the European Union and other European
countries with separate collection systems)
This symbol on the product, the battery or on the
packaging indicates that the product and the battery shall
not be treated as household waste. On certain batteries
this symbol might be used in combination with a chemical
symbol. The chemical symbols for mercury (Hg) or lead
(Pb) are added if the battery contains more than 0.0005%
mercury or 0.004% lead. By ensuring these products and
batteries are disposed of correctly, you will help prevent
potentially negative consequences for the environment
and human health which could otherwise be caused by
inappropriate waste handling. The recycling of the materials
will help to conserve natural resources.
In case of products that for safety, performance or data
integrity reasons require a permanent connection with
an incorporated battery, this battery should be replaced
by qualified service staff only. To ensure that the battery
and the electrical and electronic equipment will be treated
properly, hand over these products at end-of-life to the
applicable collection point for the recycling of electrical and
electronic equipment. For all other batteries, please view
the section on how to remove the battery from the product
safely. Hand the battery over to the applicable collection
point for the recycling of waste batteries. For more detailed
information about recycling of this product or battery,
please contact your local Civic Office, your household waste
disposal service or the shop where you purchased the
product or battery.
Specifications
Capacity (User available capacity*¹*²)
16 GB (approx. 12.80 GB = 13,743,895,347 Byte)
Maximum recording time*³ (Built-in memory)
The maximum recording time of all the folders is as follows.
LPCM 44.1 kHz/16 bit (STEREO) 21 hours 35 minutes
MP3 192 kbps (STEREO) 159 hours
MP3 128 kbps (STEREO) 238 hours
MP3 48 kbps (MONO) 636 hours
Battery Life
• IC recorder (a built-in rechargeable lithium-ion battery)
REC Mode Recording
Playback with
the headphones
Recording with
REC Remote
LPCM
44.1kHz/16bit
Approx. 12
hours
Approx. 10
hours
Approx. 6
hours
MP3 192 kbps
Approx. 15
hours
Approx. 12
hours
Approx. 6
hours
MP3 128 kbps
Approx. 15
hours
Approx. 12
hours
Approx. 6
hours
MP3 48 kbps
Approx. 15
hours
Approx. 12
hours
Approx. 6
hours
• Remote control (an installed button type lithium battery)
Approx. 1 year*⁴
Dimensions (w/h/d) (not incl. projecting parts and
controls)
• IC recorder
Approx. 38.0 mm × 38.0 mm × 13.7 mm
• Remote control
Approx. 38.0 mm x 38.0 mm x 10.8 mm
Mass
• IC recorder
Approx. 22 g
• Remote control
Approx. 15 g (including a button type lithium battery)
The display window turns off
automatically
The “Screen Off Timer” setting on your IC recorder is set
to “30sec” by default to save battery power. If you leave
both the IC recorder and the remote control unused for
30 seconds, the display window will turn off, but you
can still perform any button operations. To turn the
display window back on, press BACK/HOME or slide the
HOLD•POWER switch on the IC recorder to “HOLD” and
then slide it back to the original (center) position.
¼ You can keep the display window from turning off or
change the default setting to another timer interval. Press
and hold BACK/HOME and select “
Settings” -
“Common Settings” - “Screen Off Timer,” and then select
“No Auto Screen Off,” “15sec,” “30sec,” “1min,” “3min,” or
“5min.”
Temperature/Humidity
Operating temperature 5°C - 35°C
Operating humidity 25% - 75%
Storage temperature -10°C - +45°C
Storage humidity 25% - 75%
*¹ A small amount of the built-in memory is used for file management and
therefore not available for user storage.
*² When the built-in memory is formatted with the IC recorder.
*³ Default settings for the recording scenes.
*⁴ The battery life is given only for reference purposes. It also varies
depending on factors such as usage conditions and ambient
temperatures.
Bluetooth specification
• Communication system: Bluetooth specification version 4.0
• Maximum communication range: Line of sight approx. 10m*
• Frequency band: 2.4 GHz band (2.4000 GHz - 2.4835 GHz)
• Maximum output power:
– IC Recorder
< 8 dbm (2400 - 2483.5 MHz)
– Remote control
< 0 dbm (2400 - 2483.5 MHz)
* The range may vary depending on the communication environment.
Trademarks and licenses
• Microsoft, Windows and Windows Media are registered
trademarks or trademarks of Microsoft Corporation in the
United States and/or other countries.
• MPEG Layer-3 audio coding technology and patents
licensed from Fraunhofer IIS and Thomson.
• Google Play and Android are trademarks of Google LLC.
• Apple, the Apple logo, iPhone and Mac are trademarks of
Apple Inc., registered in the U.S. and other countries.
App Store is a service mark of Apple Inc., registered in the
U.S. and other countries.
• Use of the Made for Apple badge means that an accessory
has been designed to connect specifically to the Apple
product(s) identified in the badge, and has been certified
by the developer to meet Apple performance standards.
Apple is not responsible for the operation of this device or
its compliance with safety and regulatory standards.
• Compatible iPhone models
iPhone7, iPhone7Plus, iPhoneSE, iPhone6s,
iPhone6sPlus, iPhone6, iPhone6Plus, iPhone5s,
iPhone5c, iPhone5
• The BLUETOOTH® word mark and logos are registered
trademarks owned by Bluetooth SIG, Inc. and any use of
such marks by Sony Corporation is under license. Other
trademarks and trade names are those of their respective
owners.
All other trademarks and registered trademarks are
trademarks or registered trademarks of their respective
holders. Furthermore, “™” and “®” are not mentioned in
each in this manual.
This product is protected by certain intellectual property
rights of Microsoft Corporation. Use or distribution of such
technology outside of this product is prohibited without
a license from Microsoft or an authorized Microsoft
subsidiary.
The “Sound Organizer 2” uses software modules as shown
below:
Windows Media Format Runtime
Notes on the License
This IC recorder comes with software that are used based
on licensing agreements with the owners of that software.
Based on requests by the owners of copyright of these
software applications, we have an obligation to inform you
of the following. Please read the following sections.
Licenses (in English) are recorded in the built-in memory
of your IC recorder. Establish a Mass Storage connection
between the IC recorder and a computer to read licenses in
the “LICENSE” folder.
On GNU GPL/LGPL applied software
The software that is eligible for the following GNU General
Public License (hereinafter referred to as “GPL”) or GNU
Lesser General Public License (hereinafter referred to as
“LGPL”) are included in the IC recorder.
This informs you that you have a right to have access to,
modify, and redistribute source code for these software
programs under the conditions of the supplied GPL/LGPL.
Source code is provided on the web. Use the following URL
to download it.
http://www.sony.net/Products/Linux/
We would prefer you do not contact us about the contents
of source code.
Licenses (in English) are recorded in the built-in memory
of your IC recorder. Establish a Mass Storage connection
between the IC recorder and a computer to read licenses in
the “LICENSE” folder.

Grabadora IC
ICD-TX800
Manual de instrucciones
GB
ES
© 2017 Sony Corporation Printed in China
ICD-TX800 4-699-321-52(2)
Consulte la Guía de ayuda
Este es el Manual de instrucciones en el cual se ofrecen
instrucciones sobre las operaciones básicas de la
grabadora IC.
La Guía de ayuda es un manual en línea.
Consulte la Guía de ayuda cuando quiera conocer más
detalles, las operaciones y las posibles soluciones cuando
ocurra algún problema.
http://rd1.sony.net/help/icd/t80/h_ce/
Compruebe los elementos
suministrados
• Grabadora IC (1)
• Mando a distancia* (1)
• Auriculares estéreo (1)
• Cable de auriculares dedicado (1)
• Cable USB (1)
• Estuche de transporte (1)
• Manual de instrucciones (esta hoja)
• Tarjeta de garantía
• Software de aplicación, Sound Organizer 2 (Archivo del
instalador almacenado en la memoria incorporada para
que pueda instalarlo en su ordenador.)
* Ya está instalada una pila de litio tipo botón.
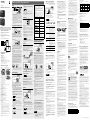
Componentes y controles
Grabadora IC Mando a distancia
La grabadora IC tiene una
pinza incorporada en su parte
posterior.
Puede engancharla en algo,
como el dobladillo de un bolsillo.
Micrófonos incorporados
Indicador de funcionamiento
Ventana de visualización
Indicador de Bluetooth*¹
Cubierta del conector USB
Conector USB/auriculares (interior de la cubierta del
conector USB)
Botón STOP
Interruptor HOLD•POWER*²
Botón REC (grabación)
Botón /DPC (Digital Pitch Control)
Antena incorporada*³
Botón STOP
Indicador de funcionamiento
Interruptor HOLD
Botón (revisión/retroceso rápido)
Botón
BACK/ HOME*⁴
Botón (reproducción/entrar)*⁵
Botón REC (grabación)
Botón (búsqueda/avance rápido)
Botón OPTION
Botón /
A-B (repetición A-B)
Botón VOL –/+ (volumen –/+)*⁵
Botón T-MARK (marca de pista)
Botón RESET*⁶
Orificio para correa (No se suministra correa con la
grabadora IC.)
Compartimiento de la pila*⁷
*¹ El indicador cambia de color o parpadea para indicar el estado de
la función Bluetooth o el emparejamiento (Bluetooth (registro de
dispositivo).
*² Al deslizar el interruptor HOLD•POWER hasta “POWER” y mantenerlo
allí durante 8 segundos o más, se reiniciará la grabadora IC. Antes
de reiniciar la grabadora IC, asegúrese de que el indicador de
funcionamiento esté apagado. Para las instrucciones detalladas,
consulte la Guía de ayuda.
*³ Cuando utilice el mando a distancia, no cubra la antena incorporada,
por ejemplo con la mano, para no perturbar la conexión inalámbrica
con la grabadora IC.
*⁴ Pulse este botón una vez para visualizar la pantalla anterior.
Manténgalo pulsado para visualizar la pantalla del menú HOME.
*⁵ Hay un punto táctil en el botón (reproducción/entrar) y al lado de
“+” del botón VOL –/+ (volumen –/+).
*⁶ Pulse este botón cuando parezca que el mando a distancia no funciona.
*⁷ Ya está instalada una pila de litio tipo botón.
¼ La grabadora IC no está equipada con altavoces
incorporados.
Vamos a probar la nueva grabadora IC
Carga
Cargue la grabadora IC.
Utilizando el cable USB suministrado, conecte el conector
USB/auriculares del interior de la cubierta del conector
USB a un puerto USB de un ordenador en funcionamiento.
Se iniciará la carga.
Cuando la batería se haya cargado completamente, el
indicador de energía restante de la batería mostrará “
”.
Desconecte la grabadora IC.
Asegúrese de que en la ventana de visualización ya no
esté mostrándose el mensaje “Accessing”. A continuación,
consulte la Guía de ayuda para extraer la grabadora IC de
forma segura.
Conexión de la alimentación
Grabadora IC
Mantenga deslizado el interruptor HOLD•POWER de la
grabadora IC en el sentido de “POWER” hasta que aparezca la
ventana de visualización.
Para desconectar la alimentación, deslice el interruptor
HOLD•POWER de la grabadora IC hasta “POWER” y sujételo
hasta que en la ventana de visualización aparezca “Power
Off”.
Mando a distancia
Indicador de
funcionamiento
Deslice el interruptor HOLD alejándolo de “HOLD”.
Para conectar la alimentación del mando a distancia, pulse
cualquiera de los botones del mismo. Cuando el indicador de
funcionamiento del mando a distancia deje de parpadear, las
operaciones con el mismo estarán disponibles.
El mando a distancia no está equipado con botón de
alimentación.
Su alimentación se desconectará automáticamente en los
casos siguientes:
• Si no se establece la conexión inalámbrica con la grabadora
IC y deja el mando a distancia sin utilizar durante unos 5
minutos
• Si la conexión inalámbrica se establece con la grabadora IC y
– desconecta la alimentación de la grabadora IC
– deja el mando a distancia sin utilizar durante unas 2 horas
Para utilizar el mando a distancia después de que se haya
desconectado su alimentación, siga el procedimiento anterior
para conectar la alimentación del mando a distancia, y
después, vuelva a pulsar el botón deseado del mismo.
Para evitar el funcionamiento no intencionado (HOLD)
La grabadora IC y el mando a distancia están equipados con
el interruptor para mantener la operación.
Deslice el interruptor HOLD•POWER de la grabadora IC o el
interruptor HOLD del mando a distancia en el sentido de
“HOLD”.
Grabadora IC Mando a distancia
¼ Para anular el estado HOLD de la grabadora IC o del mando a
distancia, deslice el interruptor HOLD•POWER hacia el centro o
el interruptor HOLD alejándolo de “HOLD”, respectivamente.
Ajustes iniciales
Seleccionar
(//
/
)
Entrar
Ventana de visualización (en la grabadora IC)
Botones a utilizar (en el mando a
distancia)
Cuando conecte la alimentación de la grabadora IC por
primera vez, en la ventana de visualización aparecerá la
pantalla “Configure Initial Settings”. Utilice el mando a
distancia para realizar ajustes iniciales, como selección
el idioma de la pantalla, ajuste del reloj, y activación/
desactivación del pitido.
Deslice el interruptor HOLD alejándolo de “HOLD”
para anular el estado HOLD del mando a distancia.
Retire la etiqueta amarilla de la parte posterior del mando
a distancia cuando lo utilice por primera vez.
Cuando aparezca la pantalla “Configure Initial
Settings”, pulse cualquiera de los botones del mando
a distancia.
Si el indicador de funcionamiento del mando a distancia
está parpadeando, espere hasta que deje de parpadear
antes de ir al paso siguiente.
Pulse para comenzar los ajustes iniciales.
Seleccione el idioma de visualización.
Puede seleccionar entre los idiomas siguientes:
Deutsch (Alemán), English* (Inglés), Español, Français
(Francés), Italiano(Italiano), Русский (Ruso), Türkçe (Turco)
* Ajuste predeterminado
Ajuste el año, el mes, el día, la hora, y los minutos
actuales.
¼ Para volver al elemento anterior de ajuste del reloj, pulse
BACK/HOME.
Seleccione “Next”.
Utilización del menú HOME
Puede utilizar el menú HOME para gran variedad de
operaciones, incluyendo localización y reproducción de un
archivo grabado y cambio de los ajustes de la grabadora IC.
Seleccionar
(
/
)
Entrar
BACK/HOME
Ventana de visualización (en la grabadora IC)
Botones a utilizar (en el mando a distancia)
¼ Para utilizar el menú HOME, tendrá que accionar el mando a
distancia.
Mantenga pulsado BACK/HOME.
En la ventana de visualización de la grabadora IC
aparecerá la pantalla del menú HOME.
Los elementos del menú HOME se alinearán en la
secuencia siguiente.
Recorded
Files
Record SettingsREC
Remote
Back
to XX*
Music
Seleccione la función deseada entre las siguientes:
Music
Permite seleccionar y reproducir uno
de los archivos importados desde un
equipo.
Para localizar un archivo de música,
seleccione “All Songs”, “Albums”,
“Artists”, o “Folders”.
Cuando importe archivos, asegúrese
de hacerlo a la carpeta MUSIC.
Recorded
Files
Permite seleccionar y reproducir
uno de los archivos grabados con la
grabadora IC.
Para localizar un archivo grabado,
seleccione “Latest Recording”, “Search
by REC Date”, “Search by REC Scene”, o
“Folders”.
Record
Permite visualizar la pantalla de espera
de grabación, y después iniciar la
grabación.
REC Remote
Puede visualizar la pantalla de menú
para REC Remote que utiliza la función
Bluetooth.
Además, puede activar/desactivar la
función Bluetooth o realizar el registro
de dispositivos (emparejamiento) para
utilizar REC Remote.
Settings
Permite visualizar la pantalla del menú
Settings y cambiar varios ajustes de la
grabadora IC.
Back to XX*
Permite regresar a la pantalla
visualizada antes de la pantalla del
menú HOME.
* La función que esté utilizando en ese momento se mostrará
en lugar de “XX”.
¼ Pulse STOP para regresar a la pantalla visualizada antes de
haber entrado en el menú HOME.
Utilización del menú OPTION
Puede utilizar el menú OPTION para realizar gran variedad
de funciones, incluyendo el cambio de los ajustes de la
grabadora IC.
Los elementos disponibles varían dependiendo de la
situación.
Entrar
OPTION
Seleccionar
(/)
Ventana de visualización (en la grabadora IC)
Botones a utilizar (en el mando a distancia)
¼ Para utilizar el menú OPTION, tendrá que accionar el mando
a distancia.
Seleccione la función deseada en el menú HOME, y
después pulse OPTION.
Seleccione el elemento del menú cuyo ajuste
desee cambiar.
Seleccione la opción de ajuste deseada.
Copia de archivos desde la
grabadora IC a un ordenador
Puede copiar archivos y carpetas desde la grabadora IC a
un ordenador para su almacenamiento.
Para conectar la grabadora IC a un ordenador, siga
las instrucciones de “Carga”.
Arrastre y coloque los archivos o carpetas que
desee copiar desde “IC RECORDER” al disco local
del ordenador.
Desconecte la grabadora IC del ordenador.
Instalación de Sound Organizer 2
Instale Sound Organizer en el equipo.
Sound Organizer le permite intercambiar archivos entre la
grabadora IC y el equipo.
Las canciones importadas de CD de música y otros medios,
los archivos de MP3 y otros archivos de audio importados
a un equipo también se pueden reproducir y transferir a la
grabadora IC.
Notas
• Sound Organizer solo es compatible con equipos de Windows.
No es compatible con Mac.
• Esta grabadora IC solo es compatible con Sound Organizer 2.
• Si formatea la memoria interna, todos los datos almacenados
en ella se borrarán. (El instalador del software Sound
Organizer también se borrará.)
¼
• Al instalar Sound Organizer, inicie una sesión con una cuenta
con privilegios de administrador.
• El procedimiento de instalación variará dependiendo de la
versión de Windows. En el procedimiento siguiente se utiliza,
a modo de ejemplo, Windows 7.
Para conectar la grabadora IC a un ordenador, siga
las instrucciones de “Carga”.
Asegúrese de que el equipo haya detectado con
éxito la grabadora IC.
Mientras la grabadora IC esté conectándose al equipo,
en el visor de la grabadora IC se mostrará “Connecting”.
Vaya al menú [Inicio], haga clic en [Equipo], y
después haga doble clic en [IC RECORDER] - [FOR
WINDOWS].
Seleccione “Yes” o “No” para activar o desactivar el
pitido.
Cuando haya finalizado los ajustes iniciales, aparecerá el
mensaje de finalización y, a continuación, la pantalla del
menú HOME.
Notas
• El pitido solamente podrá oírse a través de los auriculares
conectados a la grabadora IC.
• Puede cambiar cualquiera de los ajustes iniciales más adelante
en cualquier momento. Para las instrucciones detalladas,
consulte la Guía de ayuda.
Grabación
Micrófonos
incorporados
STOP
REC
Indicador de
funcionamiento
Botones a utilizar (en la grabadora IC)
¼
• Para iniciar la grabación, puede utilizar la grabadora IC o el
mando a distancia.
• Antes de comenzar a grabar, asegúrese de que el estado HOLD
esté anulado.
• Puede seleccionar una escena de operación para cada situación
seleccionando “Scene Select” en el menú OPTION con el mando
a distancia.
Gire la grabadora IC de forma que sus micrófonos
incorporados apunten en la dirección de la fuente de
grabación.
Pulse REC.
Asegúrese de que el indicador de funcionamiento de la
grabadora IC esté encendido en rojo, indicando que la
grabación se ha iniciado.
Para detener la grabación, pulse STOP.
La grabación se detendrá y en la ventana de visualización
aparecerá “Saving...”.
Escucha
La grabadora IC no está equipada con un altavoz incorporado.
Para la escucha de audio, deberá conectar los auriculares
estéreo (suministrados) a la grabadora IC con el cable de
auriculares dedicado (suministrado). Para las operaciones de
reproducción, utilice el mando a distancia.
Preparativos para la escucha
Conecte los auriculares estéreo al conector USB/auriculares
de la grabadora IC con el cable de auriculares dedicado.
Para iniciar la reproducción
Seleccionar
(//
/
)
Entrar
STOP
BACK/HOME
Botón VOL –/+
Ventana de visualización (en la grabadora IC)
Botones a utilizar (en el mando a distancia)
Observando la ventana de visualización de la
grabadora IC, accione el mando a distancia para
seleccionar “ Recorded Files” en el menú HOME.
Seleccione “Latest Recording”, “Search by REC Date”,
“Search by REC Scene”, o “Folders”.
Seleccione el archivo deseado.
La reproducción comienza.
Pulse VOL + o VOL - para ajustar el volumen.
Para detener la reproducción. pulse STOP.
¼ Después de detener la grabación, podrá pulsar para
reproducir el archivo que acaba de grabar.
Para añadir una marca de pista
Puede añadir una marca de pista en un punto en el que
desee dividir un archivo más tarde o localizar durante la
reproducción. Puede añadir hasta un máximo de 98 marcas
de pista en cada archivo.
También puede añadir marcas de pista durante la grabación.
Borrado
Entrar
OPTION
Seleccionar
(//
/
)
Ventana de visualización (en la grabadora IC)
Botones a utilizar (en el mando a distancia)
¼ Para borrar un archivo, tendrá que accionar el mando a
distancia.
Nota
Después de borrar un archivo, ya no podrá restaurarlo.
Observando la ventana de visualización de la
grabadora IC, accione el mando a distancia para
seleccionar el archivo que desee borrar de la lista de
archivos grabados o reproducir el archivo que desee
borrar.
Seleccione “Delete a File” en el menú OPTION.
Aparecerá “Delete?” y el archivo seleccionado comenzará
a reproducirse para proceder a su confirmación.
Seleccione “Yes”.
Aparecerá “Please Wait” y permanecerá hasta que se haya
borrado el archivo seleccionado.
Haga doble clic en [SoundOrganizer_V2001] (o
[SoundOrganizer_V2001.exe]).
Siga las instrucciones en pantalla del equipo.
Asegúrese de aceptar los términos del acuerdo
de licencia, seleccione [I accept the terms in the
license agreement], y después haga clic en [Next].
Cuando aparezca la pantalla [Setup Type],
seleccione [Standard] o [Custom], y después haga
clic en [Next].
Siga las instrucciones en pantalla y, cuando haya
seleccionado [Custom], establezca los ajustes de
instalación.
Cuando aparezca la ventana [Ready to Install the
Program], haga clic en [Install].
Se iniciará la instalación.
Cuando aparezca la ventana [Sound Organizer
has been installed successfully.], marque [Launch
Sound Organizer Now], y después haga clic en
[Finish].
Nota
Después de instalar Sound Organizer, es posible que
necesite reiniciar su equipo.
Sustitución de la pila del mando
a distancia
Cuando el indicador del mando a distancia se encienda
en rojo, la pila estará quedándose sin energía. Realice los
pasos siguientes para sustituir la pila. Para la sustitución,
asegúrese de utilizar una pila de litio tipo botón, CR2032.
Dé la vuelta al mando a distancia para encararlo
hacia abajo.
Mantenga presionada la lengüeta () hacia la
ranura (), inserte una uña en la ranura (), y
después extraiga el compartimiento de la pila.
Quite la pila.
Coloque la nueva pila con el lado + encarado hacia
arriba.
Inserte el compartimiento de la pila en el mando a
distancia.
Pulse el botón RESET de la parte posterior del
mando a distancia.
Pulse cualquier botón del mando a distancia
(el indicador de funcionamiento del mando a
distancia parpadeará alternativamente en azul
y rojo) para conectar su alimentación, y después
conecte la alimentación de la grabadora IC.
Cuando el indicador de funcionamiento del mando a
distancia deje de parpadear, las operaciones con el
mismo estarán disponibles.
Precauciones
Alimentación
• Grabadora IC
3,7 V CC: batería de iones de litio recargable incorporada
5,0 V CC: cuando se cargue utilizando USB
Consumo nominal de corriente: 500 mA
• Mando a distancia
3 V CC: CR2032 (Pila de litio tipo botón)
Seguridad
No utilice la unidad mientras conduce, va en bicicleta o
utiliza cualquier vehículo motorizado.
Manejo
• No deje la unidad cerca de fuentes de calor, ni en lugares
expuestos a la luz solar directa, polvo excesivo o golpes
mecánicos.
• Si se introduce algún objeto sólido o penetra algún líquido
en la unidad, quite la pila/batería y haga revisar la unidad
por personal cualificado antes de seguir utilizándola.
• Cuando utilice la grabadora IC, tenga presente las
siguientes precauciones para no deformar la carcasa o
provocar una avería.
– Evite sentarse si la grabadora IC se encuentra en el
bolsillo trasero de los pantalones.
– No introduzca la grabadora IC en una bolsa con el cable
de los auriculares enrollado alrededor del dispositivo ni
someta la bolsa a fuertes impactos.
• Tenga cuidado de que no salpique agua sobre la unidad.
La unidad no es impermeable. Sobre todo, tenga cuidado
en las situaciones siguientes.
– Cuando tenga la unidad en el bolsillo y vaya al cuarto de
baño, etc.
Al agacharse, la unidad podría caer al agua y mojarse.
– Cuando use la unidad en entornos en los que queda
expuesta a lluvia, nieve o humedad.
– En situaciones donde sude bastante. Si toca la unidad
con las manos mojadas o si mete la unidad en el bolsillo
de unos pantalones húmedos por el sudor, la unidad
podría humedecerse.
• Si usa la unidad a un volumen alto, puede sufrir daños en
los oídos.
• Por razones de seguridad vial, no utilice la unidad
mientras conduce o va en bicicleta.
• No utilice esta unidad en un lugar donde la incapacidad
de escuchar sonidos circundantes pueda representar un
peligro.
• Puede notar que le duelen los oídos si usa los auriculares
cuando el aire ambiente está muy seco.
Esto no se debe a un funcionamiento incorrecto de los
auriculares, sino a la electricidad estática acumulada en
el cuerpo humano. Puede reducir la electricidad estática
llevando ropa de tejidos no sintéticos que impidan la
formación de electricidad estática.
Ruido
• Si se coloca la unidad cerca de una fuente de alimentación
de ca una lámpara fluorescente o un teléfono móvil
durante la reproducción o la grabación, es posible que
oiga ruido.
• Si algún objeto, como su dedo, frota o araña la superficie
de la unidad durante la grabación, es posible que se grabe
ruido.
Mantenimiento
Para limpiar el exterior, utilice un paño suave ligeramente
humedecido con agua. Luego utilice un trapo suave y
seco para secar el exterior. No emplee alcohol, bencina ni
diluyente.
Si tiene problemas o preguntas acerca de esta unidad,
consulte al distribuidor Sony más cercano.
Notas sobre la función Bluetooth
• La tecnología inalámbrica Bluetooth permite la conexión
a una distancia de hasta 10 m. Sin embargo, el alcance
efectivo puede variar dependiendo de obstrucciones
(personas, metales, paredes, etc.) o del estado de la señal.
• Debido a que los dispositivos Bluetooth y de LAN
inalámbrica (IEEE802.11b/g) utilizan la misma frecuencia
(2,4 GHz), pueden producirse interferencias de señal,
lo que resulta en disminución de la velocidad de
comunicación, ruido, o incapacidad para conectarse, si
las comunicaciones Bluetooth se utilizan cerca de un
dispositivo de LAN inalámbrica. En estos casos, tome las
medidas siguientes.
– Realice comunicaciones Bluetooth a una distancia
mínima de 10 m del dispositivo de LAN inalámbrica
cuando conecte la grabadora IC y un dispositivo
Bluetooth.
Notas acerca de las operaciones
• Cuando las operaciones con los botones del mando a
distancia no funcionen, compruebe si:
– la alimentación de la grabadora IC está conectada.
De forma predeterminada, la alimentación de la
grabadora IC se desconectará automáticamente si no
se utiliza durante 30 minutos.
– se ha anulado el estado HOLD del mando a distancia.
– el proceso de conexión inalámbrica con la grabadora IC
está en curso.
El indicador de funcionamiento del mando a distancia
parpadeará mientras esté estableciéndose la conexión
inalámbrica.
• Puede comprobar el estado del mando a distancia con la
indicación del indicador de funcionamiento del mismo.
Indicación del indicador
de funcionamiento
Estado del mando a
distancia
Parpadea dos veces en
azul*.
Alimentación conectada.
Se enciende en azul
durante 2 segundos.
Alimentación
desconectada.
Parpadea cuatro veces en
azul*.
El restablecimiento del
mando a distancia ha
finalizado.
Permanece encendido en
rojo.
No funciona debido a
insuficiencia de batería.
Parpadea alternativamente
en azul y rojo.
El proceso de registro del
dispositivo está en curso.
Parpadea repetidamente
dos veces en azul*.
El proceso de conexión
inalámbrica está en curso.
Parpadea una vez en azul*.
La conexión inalámbrica
está establecida y las
operaciones de los
botones están disponibles.
* Cuando la batería se agote, el indicador de funcionamiento del mando
a distancia se encenderá en rojo.
Operaciones con un teléfono
inteligente (REC Remote)
Seleccionar
(//
/
)
Entrar
Ventana de visualización (en la grabadora IC)
Botones a utilizar (en el mando a distancia)
Con la función BLUETOOTH® de la grabadora IC, podrá
controlar su grabadora IC (grabación, cambio de ajustes de
grabación, etc.) utilizando un teléfono inteligente.
Para controlar la grabadora IC utilizando un teléfono
inteligente
Tendrá que instalar REC Remote en el teléfono inteligente y
realizar un emparejamiento entre el teléfono inteligente y la
grabadora IC.
Emparejamiento significa registrar dispositivos Bluetooth
entre sí para establecer una conexión inalámbrica por primera
vez.
Para realizar un emparejamiento con la grabadora IC con
REC Remote, necesitará la última versión de REC Remote. Si
el teléfono inteligente ya tiene instalada la aplicación REC
Remote, asegúrese de actualizarla a la última versión.
Busque la aplicación REC Remote en Google Play o
App Store e instálela en el teléfono inteligente.
En la grabadora IC, seleccione “REC Remote”- “Add
Device (Pairing)” en el menú HOME con el mando a
distancia y siga las instrucciones que aparezcan en la
pantalla para activar la función Bluetooth.
En el teléfono inteligente, inicie REC Remote y
seleccione “ICD-TX800” (la grabadora IC) en la lista
de dispositivos disponibles. Con respecto a las
instrucciones detalladas, consulte la ayuda de REC
Remote y el manual suministrado con el teléfono
inteligente.
Ahora podrá utilizar el teléfono inteligente para
operaciones de la grabadora IC.
Nota
La información de registro de dispositivos (emparejamiento) se
borrará en los casos siguientes. Tendrá que volver a emparejar los
dispositivos.
- Los ajustes de la grabadora IC, el teléfono inteligente, o ambos
dispositivos se restablecerán a los predeterminados debido, por
ejemplo, a la inicialización.
- La información de registro de dispositivos (emparejamiento)
se borrará, por ejemplo, durante el curso de un servicio de
reparación.
Para activar o desactivar la función Bluetooth de
la grabadora IC
Seleccione “REC Remote” - “Bluetooth ON/OFF” en el
menú HOME.
Para activar la función Bluetooth, seleccione “ON”.
Para desactivarla, seleccione “OFF”.
¼ La desactivación de la función Bluetooth conservará la energía
de la batería.
– Coloque la grabadora IC y el dispositivo Bluetooth lo
más cerca posible entre sí.
– Cuando realice comunicaciones Bluetooth a unos 10 m
de un dispositivo de LAN inalámbrica, desconecte la
alimentación del mismo.
• Las ondas de radio emitidas desde un dispositivo
Bluetooth pueden afectar el funcionamiento de equipos
tales como dispositivos médicos electrónicos. Apague
la grabadora IC y otros dispositivos Bluetooth en los
lugares siguientes, ya que si no lo hace, podría causar un
accidente.
– En hospitales, cerca de asientos prioritarios de trenes, en
aviones, en lugares como estaciones de gasolina donde
hay gases inflamables, y cerca de puertas automáticas o
alarmas de incendio.
• Si el indicador de funcionamiento del mando a distancia
sigue parpadeando y el mando a distancia parece no
funcionar, es posible que pueda solucionar esto volviendo
a registrar la grabadora IC y el mando a distancia entre sí.
Para las instrucciones detalladas sobre el registro de
dispositivos, consulte la Guía de ayuda.
ADVERTENCIA
• No exponga las pilas (batería o pilas instaladas) a calor
excesivo como la luz del sol, fuego o similares durante
mucho tiempo.
• No desmonte, abra, ni destruya pilas o baterías.
• No exponga pilas o baterías a calor ni a fuego. Evite el
almacenamiento a la luz solar directa.
• En el caso de fuga de una pila, no permita que el líquido
entre en contacto con la piel o los ojos. Si se produce el
contacto, lávese la zona afectada con cantidades copiosas
de agua y solicite atención médica.
• Las baterías deberán cargarse antes de utilizarlas.
Consulte siempre las instrucciones del fabricante o el
manual del equipo para obtener las instrucciones de
carga adecuadas.
• Después de largos períodos de almacenamiento, puede
ser necesario cargar y descargar las baterías varias veces
para obtener el máximo rendimiento.
• Deshágase de las pilas/baterías de forma adecuada.
• No ingiera pilas/baterías, ya que existiría el riesgo de
quemadura química. El mando a distancia suministrado
con este producto contiene una pila tipo botón. Si se traga
la pila tipo botón, puede causar quemaduras internas
severas en solo 2 horas que pueden conducir a la muerte.
Mantenga las pilas/baterías nuevas y usadas alejadas de
los niños. Si el compartimento de la pila no se cierra bien,
deje de utilizar el producto y manténgalo alejado de los
niños.
Si cree que alguien ha ingerido o colocado dentro de
cualquier parte del cuerpo pilas/baterías, solicite atención
médica inmediata.
PRECAUCIÓN
Peligro de explosión si la pila/batería se sustituye
incorrectamente.
Sustitúyala solamente por otra del mismo tipo.
Riesgo de explosión si la pila/batería se sustituye por otra
de tipo incorrecto. Deshágase de las pilas/baterías usadas
de acuerdo con las instrucciones.
Aviso para los clientes: la siguiente información solo
es pertinente para los equipos vendidos en países que
aplican las directivas de la UE.
Fabricante: Sony Corporation, 1-7-1 Konan Minato-ku Tokyo,
108-0075 Japón Para la conformidad del producto en la
UE: Sony Belgium, bijkantoor van Sony Europe Limited, Da
Vincilaan 7-D1, 1935 Zaventem, Bélgica
Por la presente, Sony Corporation declara que este equipo
es conforme con la Directiva 2014/53/UE.
El texto completo de la declaración UE de conformidad está
disponible en la dirección Internet siguiente:
http://www.compliance.sony.de/
Este equipo de radio está destinado a utilizarse con
la versión aprobada de software que se indica en la
Declaración de Conformidad de la UE. El software cargado
en este equipo de radio está verificado para cumplir con los
requisitos esenciales de la Directiva 2014/53/CE.
Podrá ver la versió del software seleccionando
“
Settings” - “Common Settings” - “System Information”
en el menú HOME.
Para evitar un posible daño del sistema auditivo, no
escuche con niveles de volumen altos durante largos
periodos de tiempo.
La validez de la marca CE se limita solo a los países en los
que se aplique legalmente, principalmente en los países del
Espacio Económico Europeo (EEE).
Tratamiento de las baterías y equipos
eléctricos y electrónicos al final de su
vida útil (aplicable en la Unión Europea
y en países europeos con sistemas de
tratamiento selectivo de residuos)
Este símbolo en el producto, en la batería o en el embalaje
indica que el producto y la batería no pueden ser tratados
como un residuo doméstico normal. En algunas baterías
este símbolo puede utilizarse en combinación con un
símbolo químico. El símbolo químico del mercurio (Hg)
o del plomo (Pb) se añadirá si la batería contiene más
del 0,0005% de mercurio o del 0,004% de plomo. Al
asegurarse de que estos productos y baterías se desechan
correctamente, usted ayuda a prevenir las consecuencias
potencialmente negativas para el medio ambiente y la
salud humana que podrían derivarse de la incorrecta
manipulación. El reciclaje de materiales ayuda a conservar
los recursos naturales.
En el caso de productos que por razones de seguridad,
rendimiento o mantenimiento de datos sea necesaria una
conexión permanente con la batería incorporada, esta
batería solo deberá ser reemplazada por personal técnico
cualificado para ello. Para asegurarse de que la batería será
tratada correctamente, entregue estos productos al final
de su vida útil en un punto de recogida para el reciclado de
aparatos eléctricos y electrónicos. Para las demás baterías,
consulte la sección donde se indica cómo extraer la batería
del producto de forma segura. Deposite la batería en el
correspondiente punto de recogida para el reciclado de
baterías. Para recibir información detallada sobre el reciclaje
de este producto o de la batería, póngase en contacto
con el ayuntamiento, el punto de recogida más cercano
o el establecimiento donde ha adquirido el producto o la
batería.
Especificaciones
Capacidad (Capacidad disponible del usuario*¹*²)
16 GB (aprox. 12,80 GB = 13 743 895 347 bytes)
Tiempo máximo de grabación*³ (Memoria incorporada)
El tiempo máximo de grabación de todas las carpetas es el
siguiente.
LPCM 44,1 kHz/16 bit (STEREO) 21 horas 35 minutos
MP3 192 kbps (STEREO) 159 horas
MP3 128 kbps (STEREO) 238 horas
MP3 48 kbps (MONO) 636 horas
La ventana de visualización se
apaga automáticamente
El ajuste “Screen Off Timer” de la grabadora está establecido
a “30sec” de forma predeterminada para ahorrar energía
de la batería. Si deja tanto la grabadora IC como el mando
a distancia sin utilizar durante 30 segundos, la ventana de
visualización se apagará, pero todavía se podrá realizar
cualquier operación de botones. Para volver a activar la
ventana de visualización, pulse BACK/HOME o deslice el
interruptor HOLD•POWER de la grabadora IC hasta “HOLD”
y después deslícelo de nuevo hasta su posición original
(centro).
¼ Puede evitar que la ventana de visualización se apague o
que el ajuste predeterminado cambie a otro intervalo de
temporizador. Mantenga pulsado BACK/HOME y
seleccione “
Settings” -“Common Settings” - “Screen
Off Timer”, y después seleccione “No Auto Screen Off”,
“15sec”, “30sec”, “1min”, “3min”, o “5min”.
Duración de la batería
• Grabadora IC (una batería de iones de litio recargable
incorporada)
REC Mode Grabación
Reproducción con
los auriculares
Grabación con
REC Remote
LPCM
44,1kHz/16bit
Aprox. 12
horas
Aprox. 10 horas Aprox. 6 horas
MP3 192 kbps
Aprox. 15
horas
Aprox. 12 horas Aprox. 6 horas
MP3 128 kbps
Aprox. 15
horas
Aprox. 12 horas Aprox. 6 horas
MP3 48 kbps
Aprox. 15
horas
Aprox. 12 horas Aprox. 6 horas
• Mando a distancia (una pila de litio tipo botón instalada)
Aprox. 1 año*⁴
Dimensiones (an/al/prf) (sin incluir las partes ni
controles salientes)
• Grabadora IC
Aprox. 38,0 mm × 38,0 mm × 13,7 mm
• Mando a distancia
Aprox. 38,0 mm x 38,0 mm x 10,8 mm
Peso
• Grabadora IC
Aprox. 22 g
• Mando a distancia
Aprox. 15 g (incluyendo una pila de litio tipo botón)
Temperatura/Humedad
Temperatura de funcionamiento 5°C - 35°C
Humedad de funcionamiento 25% - 75%
Temperatura de almacenamiento -10°C - +45°C
Humedad de almacenamiento 25% - 75%
*
1
Una pequeña cantidad de la memoria interna se utiliza para la
gestión de los archivos y, por lo tanto, no está disponible para el
almacenamiento.
*
2
Cuando la memoria interna se formatea con la grabadora IC.
*
3
Ajustes predeterminados para la grabación de escenas.
*
4
La duración de la pila/batería se ofrece solamente con fines de
referencia. También variará dependiendo de factores tales como
condiciones de uso y temperatura ambiente.
Especificación de Bluetooth
• Sistema de comunicación: Especificación de Bluetooth
versión 4,0
• Alcance máximo de comunicación: Línea de visión aprox.
10 m*
• Banda de frecuencias: Banda de 2,4 GHz (2,4000 GHz –
2,4835 GHz)
• Potencia máxima de salida:
– Grabadora IC
< 8 dbm (2 400 - 2 483,5 MHz)
– Mando a distancia
< 0 dbm (2 400 - 2 483,5 MHz)
* El alcance puede variar dependiendo del entorno de comunicación.
Marcas comerciales y licencias
• Microsoft, Windows y Windows Media son marcas
comerciales registradas o marcas comerciales de
Microsoft Corporation en Estados Unidos y/o en otros
países.
• Tecnología de codificación de audio MPEG Layer-3 y
patentes con licencia de Fraunhofer IIS y Thomson.
• Google Play and Android son marcas comerciales de
Google LLC.
• Apple, el logotipo Apple, iPhone y Mac son marcas
comerciales de Apple Inc., registradas en Estados Unidos
y otros países.
App Store es una marca de servicio de Apple Inc.
• El uso de la insignia Made for Apple significa que
un accesorio ha sido diseñado para conectarse
específicamente al producto o a los productos Apple
identificados en la insignia, y ha sido certificado por el
fabricante de que cumple las normas de rendimiento
de Apple. Apple no se hace responsable por el
funcionamiento de este dispositivo o su cumplimiento
con normas de seguridad y regulatorias.
• Modelos iPhone compatibles
iPhone7, iPhone7Plus, iPhoneSE, iPhone6s,
iPhone6sPlus, iPhone6, iPhone6Plus, iPhone5s,
iPhone5c, iPhone5
• La marca y los logotipos BLUETOOTH® son marcas
registradas propiedad de Bluetooth SIG, Inc. y cualquier
uso de dichas marcas por parte de Sony Corporation
está bajo licencia. Otras marcas comerciales y nombres
comerciales son los de sus respectivos propietarios.
Todas las demás marcas comerciales y marcas comerciales
registradas son marcas comerciales o marcas comerciales
registradas de sus respectivos propietarios. Además, “™”
and “®” no se mencionan en cada caso en este manual.
This product is protected by certain intellectual property
rights of Microsoft Corporation. Use or distribution of such
technology outside of this product is prohibited without
a license from Microsoft or an authorized Microsoft
subsidiary.
“Sound Organizer 2” utiliza los módulos de software que se
indican a continuación:
Windows Media Format Runtime
Notas acerca de la licencia
La grabadora IC viene con programas de software sujetos
a contratos de licencia con sus propietarios. De acuerdo
con lo solicitado por los propietarios del copyright de estas
aplicaciones de software, estamos obligados a informarle
de lo siguiente. Le rogamos que lea las secciones
siguientes.
Las licencias (en inglés) están guardadas en la memoria
incorporada de la grabadora IC. Conecte la grabadora IC a
un ordenador para leer las licencias de la carpeta “LICENSE”.
Acerca del software al que se aplican las licencias GNU
GPL/LGPL
En esta grabadora IC se incluye software que puede optar
a la siguiente licencia GNU General Public License (en
adelante referida como “GPL”) o GNU Lesser General Public
License (en adelante referida como “LGPL”).
Esto le informa de que tiene derecho a acceder a, modificar
y redistribuir el código fuente para estos programas de
software bajo las condiciones de la licencia GPL/LGPL
suministrada.
El código fuente se proporciona a través de internet. Puede
descargarlo de la siguiente dirección URL:
http://www.sony.net/Products/Linux/
Es preferible que no se ponga en contacto con nosotros en
relación con el contenido del código fuente.
Las licencias (en inglés) están guardadas en la memoria
incorporada de la grabadora IC. Conecte la grabadora IC a
un ordenador para leer las licencias de la carpeta “LICENSE”.
-
 1
1
-
 2
2


Sony ICD-TX800 Instrucciones de operación
- Tipo
- Instrucciones de operación
en otros idiomas
Artículos relacionados
-
Sony ICD-SX2000 Instrucciones de operación
-
-
-
Sony ICD-PX370 Instrucciones de operación
-
Sony ICD-UX570 Manual de usuario
-
Sony ICD UX560 Manual de usuario
-
-
Sony ICD-PX470 Instrucciones de operación
-
Sony ICD TX660 Manual de usuario