
ICD-PX470
GB
ES
© 2016 Sony Corporation Printed in China
Grabadora IC
Manual de instrucciones
ICD-PX470
4-595-544-61(1)
Consulte la Guía de ayuda
Este es el Manual de instrucciones en el cual se ofrecen instrucciones sobre
las operaciones básicas de la grabadora IC.
La Guía de ayuda es un manual en línea.
Consulte la Guía de ayuda cuando quiera conocer más detalles, las
operaciones y las posibles soluciones cuando ocurra algún problema.
http://rd1.sony.net/help/icd/p47/h_uc/
Compruebe los componentes
suministrados
•Grabadora IC (1)
•Pilas alcalinas LR03 (tamano AAA) (2)
•Manual de instrucciones (esta hoja)
•Software de la aplicación, Sound Organizer 2 (Archivo del instalador
almacenado en la memoria interna para poder instalarlo en su equipo.)
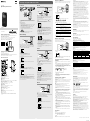
Partes y controles
Micrófonos incorporados (estéreo) (izquierdo)
Micrófonos incorporados (estéreo) (derecho)
Indicador de funcionamiento
Ventana de visualización
Botón REC/PAUSE (grabación/pausa)
Botón STOP
Botón de control ( DPC (Digital Pitch Control),
A-B (repetición
A-B)/ (revisión/retroceso rápido), (búsqueda/avance rápido))
Botón (reproducción/entrar)*
Botón
BACK/ HOME ( : pulse, : mantenga pulsado)
Botón T-MARK (marca de pista)
Botón OPTION
Altavoz incorporado
Orificio para correa (No se suministra correa con la grabadora IC.)
Compartimento del conector USB
Toma (auriculares)
Toma (micrófono) (PLUG IN POWER)*
Botón VOL –/+ (volumen –/+)*
Cubierta de la ranura
Ranura para tarjeta microSD (La ranura para tarjeta se encuentra dentro
de la cubierta.)
Lengüeta deslizante USB
InterruptorHOLD•POWER
Compartimento de las pilas
* El botón (reproducción/entrar), botón VOL –/+ (volumen –/+), y la toma (micrófono)
(PLUG IN POWER) poseen un punto táctil. Utilice el punto táctil como referencia cuando
opere la grabadora IC.
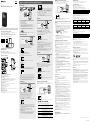
Vamos a probar la nueva grabadora IC
Encendido
Deslice y levante la tapa del compartimiento de las pilas,
inserte pilas alcalinas LR03 (tamaño AAA) con la polaridad
correcta, y cierre la tapa.
Conecte la alimentación.
Para conectar la alimentación
DesliceysujeteelinterruptorHOLD•POWERenelsentidode
“POWER”hastaqueaparezcalaventanadevisualización.
Para desconectar la alimentación, deslice el interruptor
HOLD•POWERhasta“POWER”ysujételohastaqueenlaventanade
visualizaciónaparezca“PowerOff”.
Para evitar el funcionamiento no intencionado (HOLD)
DesliceelinterruptorHOLD•POWERenelsentidode“HOLD”.
¼ Para anular el estado HOLD de la grabadora IC, deslice el interruptor
HOLD•POWERhaciaelcentro.
Ajustes iniciales
Seleccionar
(/)
Entrar
Cuando encienda la grabadora IC por primera vez, en el visor aparecerá
“ConfigureInitialSettings”.Acontinuaciónpuedeseleccionarelidioma
del visor, ajustar el reloj, y activar/desactivar el pitido.
Seleccione “Yes” para iniciar los ajustes iniciales.
Seleccione el idioma del visor.
Puede seleccionar los idiomas siguientes:
English* (inglés), Español, Français (francés)
* Ajuste predeterminado
Ajuste el año, mes, día, hora, y minutos actuales.
¼ Para volver al elemento de ajuste del reloj anterior, pulse BACK/
HOME.
Seleccione “Next”.
Seleccione “ON” u “OFF” para activar o desactivar el pitido.
Cuando finalicen los ajustes iniciales, aparecerá el mensaje de
terminación y después la pantalla del menú HOME.
¼
•Puede cambiar cualquiera de los ajustes iniciales en cualquier momento
posterior. Con respecto a las instrucciones detalladas, consulte la Guía de
ayuda.
•Cuando reinserte las pilas, o cuando reemplace las pilas por otras nuevas,
aparecerá la ventana de visualización de ajuste del reloj, y se visualizará la
fecha y hora aproximadas de la última vez que operó la grabadora IC antes
de quitar las pilas. Vuelva a ajustar el reloj a la fecha y hora correctas.
•Para comprobar la fecha y la hora actuales después de los ajustes iniciales,
desliceelinterruptorHOLD•POWERenelsentidode“HOLD”.
Grabación
Micrófonos incorporados
STOP
REC/PAUSE
Seleccionar
(/)
Entrar
¼
•Antes de comenzar a utilizar la grabadora IC, asegúrese de que el
interruptorHOLD•POWERestéenlaposicióndelpuntocentral.
•Puede seleccionar una escena de grabación para cada situación
seleccionando“SceneSelect”enelmenúOPTION.
Los archivos de audio grabados se almacenarán de forma
predeterminadaen“FOLDER01”bajo“ RecordedFiles”.
Seleccione “ Record” en el menú HOME.
En la ventana de visualización aparecerá la pantalla de espera de
grabación.
Seleccione la carpeta en la que desee almacenar los archivos
grabados.
Para almacenar los archivos de audio en una carpeta que no sea
“FOLDER01”creeunanuevacarpetaycambielacarpetadedestino
de almacenamiento por la nueva. Para las instrucciones detalladas,
consulte la Guía de ayuda.
Gire la grabadora IC de forma que sus micrófonos
incorporados apunten en la dirección de la fuente de
grabación.
Pulse REC/PAUSE.
Se iniciará la grabación, en la ventana de visualización aparecerá
“REC”,yelindicadordefuncionamientoseencenderáenrojo.
La grabación no se iniciará al mantener pulsado REC/PAUSE.
Al hacer esto, la grabadora entrará en pausa para grabación.
Durante la grabación se mostrará la guía del nivel de grabación ().
Ajuste la orientación de los micrófonos incorporados, la distancia
desde la fuente de sonido, o la sensibilidad de los micrófonos de
forma que el nivel de entrada indicado mediante permanezca a
3/6 o 4/6, que se adapta al rango óptimo, como se ilustra arriba.
Pulse STOP para detener la grabación.
Enlaventanadevisualizaciónaparece“Saving...”,ydespuésvuelve
a la pantalla de espera de grabación.
Después de detener la grabación, podrá pulsar para reproducir
el archivo que acaba de grabar.
Escucha
Seleccionar
(
//
/
)
Entrar
VOL –/+
(volumen –/+)
Los archivos de audio grabados se almacenarán de forma
predeterminadaen“FOLDER01”bajo“ RecordedFiles”.
Seleccione “ Recorded Files” en el menú HOME.
Seleccione “Folders” - “Built-In Memory” - “FOLDER01”, y
después pulse .
Para escuchar los archivos de audio grabados almacenados en una
tarjetamicroSD,seleccione“Folders”-“SDCard”.
Seleccione el archivo deseado.
La reproducción comienza.
Pulse STOP para detener la reproducción.
¼
•Pulse VOL -/+ para ajustar el volumen.
•El altavoz integrado sirve principalmente para comprobar los archivos de
audio grabados.
Si encuentra que el volumen no es suficientemente fuerte o tiene dificultad
en entender lo que oiga, utilice auriculares (no suministrados).
•Cuandoseleccione“
RecordedFiles”,enlaventanadevisualización
aparecerán las categorías de búsqueda de archivos. Puede seleccionar
entrelascategoríasdebúsqueda“LatestRecording”,“SearchbyRECDate”,
“SearchbyRECScene”,o“Folders”.
Para añadir una marca de pista
Puede añadir una marca de pista en un punto en el que desee dividir un
archivo más tarde o localizar durante la reproducción. Puede añadir un
máximode98marcasdepistaacadaarchivo.
También puede añadir marcas de pista durante la grabación.
Borrado
OPTION
Seleccionar
(/)
Entrar
Nota
Una vez borrado un archivo, no es posible recuperarlo.
Seleccione el archivo que desee borrar de la lista de archivos
grabados, o reproduzca el archivo que desee borrar.
Seleccione “Delete a File” en el menú OPTION.
Aparecerá“Delete?”yseiniciarálareproduccióndelarchivo
seleccionado para su confirmación.
Seleccione “Yes”.
Aparecerá“PleaseWait”ypermaneceráhastaqueseborreel
archivo seleccionado.
Utilización del menú OPTION
Puede utilizar el menú OPTION para realizar gran variedad de funciones,
incluyendo el cambio de los ajustes de la grabadora IC.
Los elementos disponibles varían dependiendo de la situación.
OPTION
Seleccionar
(/)
Entrar
Seleccione la función deseada en el menú HOME, y después pulse
OPTION.
Seleccione el elemento del menú cuyo ajuste desee cambiar.
Seleccione la opción de ajuste deseada.
Copia de archivos de la grabadora IC a un
equipo
Puede copiar los archivos y carpetas de la grabadora IC a un equipo para
almacenarlos.
Deslice la lengüeta deslizante USB en el sentido de la flecha, e
inserte el conector USB en el puerto USB de un ordenador que
esté encendido.
Arrastre y coloque los archivos o carpetas que desee copiar desde
“IC RECORDER” o “MEMORY CARD” al disco local del ordenador.
Para copiar un archivo o carpeta (Arrastrar y colocar)
1 Haga clic y, sin soltar,
2 arrastre,
3 y después coloque.
IC RECORDER o
MEMORYCARD
El ordenador
Asegúrese de que en la ventana de visualización de su grabadora
IC no esté mostrándose “Accessing”, y después desconecte la
grabadora IC del ordenador.
Instalación de Sound Organizer 2
Instale Sound Organizer en el equipo.
Sound Organizer le permite intercambiar archivos entre la grabadora IC y el
equipo.
Las canciones importadas de CD de música y otros medios, los archivos de
MP3 y otros archivos de audio importados a un equipo también se pueden
reproducir y transferir a la grabadora IC.
Notas
•Sound Organizer solo es compatible con equipos de Windows. No es
compatible con Mac.
•Esta grabadora IC solo es compatible con Sound Organizer 2.
•Si formatea la memoria interna, todos los datos almacenados se borrarán.
(También se borrará el software Sound Organizer.)
¼ Al instalar Sound Organizer, inicie una sesión con una cuenta con privilegios
de administrador.
Deslice la lengüeta deslizante USB en el sentido de la flecha, e
inserte el conector USB en el puerto USB de un ordenador que
esté encendido.
Asegúrese de que el equipo haya detectado con éxito la
grabadora IC.
Mientras la grabadora IC esté conectándose al equipo, en el visor de la
grabadoraICsemostrará“Connecting”.
Vaya al menú [Inicio], haga clic en [Equipo], y después haga doble
clic en [IC RECORDER] - [FOR WINDOWS].
Haga doble clic en [SoundOrganizer_V2001] (o [SoundOrganizer_
V2001.exe]).
Siga las instrucciones en pantalla del equipo.
Asegúrese de aceptar los términos del acuerdo de licencia,
seleccione [I accept the terms in the license agreement], y
después haga clic en [Next].
Cuando aparezca la pantalla [Setup Type], seleccione [Standard] o
[Custom], y después haga clic en [Next].
Siga las instrucciones en pantalla y, cuando haya seleccionado [Custom],
establezca los ajustes de instalación.
Cuando aparezca la ventana [Ready to Install the Program], haga
clic en [Install].
Se iniciará la instalación.
Cuando aparezca la ventana [Sound Organizer has been installed
successfully.], marque [Launch Sound Organizer Now], y después
haga clic en [Finish].
Nota
Después de instalar Sound Organizer, es posible que necesite reiniciar su
equipo.
Precauciones
Alimentación
DC 3,0 V: Utilice dos pilas alcalinas LR03 (tamaño AAA)
DC 2,4 V: Utilice dos baterías recargables NH-AAA
DC 5,0 V: cuando utilice adaptador de ca USB
Consumo nominal de corriente: 500 mA
Seguridad
No utilice la unidad mientras conduce, va en bicicleta o utiliza cualquier
vehículo motorizado.
Manejo
•No deje la unidad cerca de fuentes de calor, ni en lugares expuestos a la
luz solar directa, polvo excesivo o golpes mecánicos.
•Si se introduce algún objeto sólido o líquido en la unidad, extraiga las
pilas y haga revisar la unidad por personal cualificado antes de seguir
utilizándola.
•Cuando utilice la grabadora IC, tenga presente las siguientes precauciones
para no deformar la carcasa o provocar una avería.
– Evite sentarse si la grabadora IC se encuentra en el bolsillo trasero de los
pantalones.
– No introduzca la grabadora IC en una bolsa con el cable de los
auriculares enrollado alrededor del dispositivo ni someta la bolsa a
fuertes impactos.
•Tenga cuidado de que no salpique agua sobre la unidad. La unidad no es
impermeable. Sobre todo, tenga cuidado en las situaciones siguientes.
– Cuando tenga la unidad en el bolsillo y vaya al cuarto de baño, etc.
Al agacharse, la unidad podría caer al agua y mojarse.
– Cuando use la unidad en entornos en los que queda expuesta a lluvia,
nieve o humedad.
– En situaciones donde sude bastante. Si toca la unidad con las manos
mojadas o si mete la unidad en el bolsillo de unos pantalones húmedos
por el sudor, la unidad podría humedecerse.
•Si usa la unidad a un volumen alto, puede sufrir daños en los oídos. Por
razones de seguridad vial, no utilice la unidad mientras conduce o va en
bicicleta.
•Puede notar que le duelen los oídos si usa los auriculares cuando el aire
ambiente está muy seco. Esto no se debe a un funcionamiento incorrecto
de los auriculares, sino a la electricidad estática acumulada en el cuerpo
humano. Puede reducir la electricidad estática llevando ropa de tejidos no
sintéticos que impidan la formación de electricidad estática.
Ruido
•Si se coloca la unidad cerca de una fuente de alimentación de ca una
lámpara fluorescente o un teléfono móvil durante la reproducción o la
grabación, es posible que oiga ruido.
•Si algún objeto, como su dedo, frota o araña la superficie de la unidad
durante la grabación, es posible que se grabe ruido.
Mantenimiento
Para limpiar el exterior, utilice un paño suave ligeramente humedecido con
agua. Luego utilice un trapo suave y seco para secar el exterior. No emplee
alcohol, bencina ni diluyente.
Si tiene problemas o preguntas acerca de esta unidad, consulte al
distribuidor Sony más cercano.
ADVERTENCIA
No exponga las pilas (el cartucho de pilas o las pilas instaladas) a un calor
excesivo tal como la luz del sol, fuego o algo similar durante un periodo
largo de tiempo.
PRECAUCIÓN
Riesgo de explosión si la pila se sustituye por un tipo incorrecto.
Deseche las pilas usadas de acuerdo con las instrucciones.
Especificaciones
Capacidad (Capacidad disponible del usuario*¹*²)
4GB(aprox.3,20GB=3435973837bytes)
Tiempo máximo de grabación (Memoria incorporada)
El tiempo máximo de grabación de todas las carpetas es el siguiente.
LPCM 44.1 kHz/16 bit 5 horas 20 minutos
MP3 192 kbps*³ 39 horas 45 minutos
MP3128kbps 59 horas 35 minutos
MP348kbps(MONO) 159 horas
Nota
Cuando vaya a grabar de forma continua durante un período de tiempo
prolongado, es posible que necesite reemplazar las pilas por otras nuevas en
medio de la grabación. Para los detalles sobre la duración de las pilas/baterías,
consulte Duración de las pilas/baterías.
El tiempo de grabación máximo indicado en la tabla anterior se ofrece solo como
referencia.
Duración de las pilas/baterías
Cuando utilice pilas alcalinas LR03 (SG) (tamaño AAA) Sony (JEITA)*
4
*
5
REC Mode Grabación
Reproducción
con el altavoz
incorporado*
6
Reproducción con
los auriculares
LPCM 44.1 kHz/16 bit Aprox. 40 horas Aprox. 16 horas Aprox. 37 horas
MP3 192 kbps Aprox. 55 horas Aprox.18horas Aprox. 43 horas
Cuando utilice baterías recargables NH-AAA (JEITA)*
4
*
5
REC Mode Grabación
Reproducción
con el altavoz
incorporado*
6
Reproducción con
los auriculares
LPCM 44.1 kHz/16 bit Aprox. 34 horas Aprox. 12 horas Aprox. 29 horas
MP3 192 kbps Aprox. 40 horas Aprox. 14 horas Aprox. 34 horas
Dimensiones (ancho/alto/largo) (sin incluir proyecciones ni controles)
(JEITA)*⁴
Aprox.38,3mm×114,1mm×19,3mm
Peso (JEITA)*
4
Aprox. 74 g (incluyendo dos pilas alcalinas LR03 (tamaño AAA))
Temperatura/Humedad
Temperatura de funcionamiento 5°C - 35°C
Humedad de funcionamiento 25% - 75%
Temperatura de almacenamiento -10°C - +45°C
Humedad de almacenamiento 25% - 75%
Tarjetas de memoria compatibles
Tarjetas microSDHC de 4 GB a 32 GB
Nota
Las tarjetas microSDXC no son compatibles con su grabadora IC.
*
1
Una pequeña cantidad de la memoria interna se utiliza para la gestión de los archivos y, por
lo tanto, no está disponible para el almacenamiento.
*
2
Cuando la memoria interna se formatea con la grabadora IC.
*
3
Ajustes predeterminados para la grabación de escenas.
*
4
Valor medido obtenido según el estándar de JEITA (Japan Electronics and Information
Technology Industries Association)
*
5
La duración de la batería puede acortarse dependiendo de cómo se utilice la grabadora IC.
*
6
Cuando se reproduzca música a través del altavoz incorporado con el nivel de volumen
ajustado a 27.
Marcas comerciales
•Microsoft, Windows, Windows Vista y Windows Media son marcas
comerciales registradas o marcas comerciales de Microsoft Corporation en
Estados Unidos y/o en otros países.
•Mac OS es una marca comercial de Apple Inc., registrada en Estados
Unidos y otros países.
•Tecnología de codificación de audio MPEG Layer-3 y patentes con licencia
de Fraunhofer IIS y Thomson.
•Los logotipos microSD, microSDHC y microSDXC son marcas comerciales
de SD-3C, LLC.
Todas las demás marcas comerciales y marcas comerciales registradas son
marcas comerciales o marcas comerciales registradas de sus respectivos
propietarios.Además,“™”and“®”nosemencionanencadacasoeneste
manual.
This product is protected by certain intellectual property rights of Microsoft
Corporation. Use or distribution of such technology outside of this product
is prohibited without a license from Microsoft or an authorized Microsoft
subsidiary.
“SoundOrganizer2”utilizalosmódulosdesoftwarequeseindicana
continuación:
Windows Media Format Runtime
Licencia
Notas acerca de la licencia
La grabadora IC viene con programas de software sujetos a contratos de licencia
con sus propietarios. De acuerdo con lo solicitado por los propietarios del
copyright de estas aplicaciones de software, estamos obligados a informarle de
lo siguiente. Le rogamos que lea las secciones siguientes.
Las licencias (en inglés) están guardadas en la memoria interna de la grabadora
IC. Conecte la grabadora IC a un ordenador para leer las licencias de la carpeta
“LICENSE”.
Acerca del software al que se aplican las licencias GNU GPL/LGPL
En esta grabadora IC se incluye software que puede optar a la siguiente licencia
GNUGeneralPublicLicense(enadelantereferidacomo“GPL”)oGNULesser
GeneralPublicLicense(enadelantereferidacomo“LGPL”).
Esto le informa de que tiene derecho a acceder a, modificar y redistribuir el
código fuente para estos programas de software bajo las condiciones de la
licencia GPL/LGPL suministrada.
El código fuente se proporciona a través de internet. Puede descargarlo de la
siguiente dirección URL:
http://www.sony.net/Products/Linux/
Es preferible que no se ponga en contacto con nosotros en relación con el
contenido del código fuente.
Las licencias (en inglés) están guardadas en la memoria interna de la grabadora
IC. Conecte la grabadora IC a un ordenador para leer las licencias de la carpeta
“LICENSE”.
Utilización del menú HOME
Puede utilizar el menú HOME para gran variedad de operaciones,
incluyendo localización y reproducción de un archivo grabado y cambio de
los ajustes de la grabadora IC.
BACK/ HOME
Seleccionar
(
/
)
Entrar
Mantenga pulsado BACK/HOME.
Aparecerá la pantalla del menú HOME.
Los elementos del menú HOME aparecerán en la secuencia siguiente.
Recorded
Files
Record Settings Back to
XX*
Music
*Lafunciónqueestéutilizandoenesemomentosemostraráenlugarde“XX”.
Seleccione la función deseada entre las siguientes:
Music
Permite seleccionar y reproducir uno de los archivos
importados desde un equipo.
Paralocalizarunarchivodemúsica,seleccione“All
Songs”,“Albums”,“Artists”,o“Folders”.
Recorded Files
Permite seleccionar y reproducir uno de los archivos
grabados con la grabadora IC.
Paralocalizarunarchivograbado,seleccione“Latest
Recording,”“SearchbyRECDate,”“SearchbyREC
Scene,”o“Folders”.
Record
Permite visualizar la pantalla de espera de
grabación, y después iniciar la grabación.
Settings
Permite visualizar la pantalla del menú Settings y
cambiar varios ajustes de la grabadora IC.
Back to XX*
Permite regresar a la pantalla visualizada antes de la
pantalla del menú HOME.
* La función que esté utilizando en ese momento se
mostraráenlugarde“XX”.
¼ Pulse STOP para regresar a la pantalla visualizada antes de haber entrado en
el menú HOME.


 1
1
 2
2


Sony ICD-PX370 Instrucciones de operación
Sony ICD-PX470 Manual de usuario
Sony ICD-TX650 Guía de inicio rápido
Sony ICD-SX2000 Instrucciones de operación
Sony ICD-UX543 Guía de inicio rápido
Sony ICD-UX560 Instrucciones de operación