Kicker KMXL El manual del propietario
- Categoría
- Altavoces de coche
- Tipo
- El manual del propietario


2English
Contents
Overview ..........................3
Specifications .............................4
Installation ........................5
Wiring Configuration ....................5
LED Wiring Configuration ............6
Mounting ....................................7
Mounting: KMXL65 in 2014–Newer
Harley Davidson® FLHT ...............9
Mounting: KMXL69 in
46HDBL69 Saddle Bag Lids ..... 12
Warranty ........................13
Garantía | Garantie ..........48
48KMXL-c

3English
Overview
IMPORTANT SAFETY WARNING
PROLONGED CONTINUOUS OPERATION OF AN AMPLIFIER, SPEAKER, OR
SUBWOOFER IN A DISTORTED, CLIPPED OR OVER-POWERED MANNER
CAN CAUSE YOUR AUDIO SYSTEM TO OVERHEAT, POSSIBLY CATCHING
FIRE AND RESULTING IN SERIOUS DAMAGE TO YOUR COMPONENTS
AND/OR VEHICLE. AMPLIFIERS REQUIRE UP TO 4 INCHES (10CM) OPEN
VENTILATION. SUBWOOFERS SHOULD BE MOUNTED WITH AT LEAST 1
INCH (2.5CM) CLEARANCE BETWEEN THE FRONT OF THE SPEAKER AND
ANY SURFACE. KICKER PRODUCTS ARE CAPABLE OF PRODUCING SOUND
LEVELS THAT CAN PERMANENTLY DAMAGE YOUR HEARING! TURNING UP A
SYSTEM TO A LEVEL THAT HAS AUDIBLE DISTORTION IS MORE DAMAGING
TO YOUR EARS THAN LISTENING TO AN UNDISTORTED SYSTEM AT THE
SAME VOLUME LEVEL. THE THRESHOLD OF PAIN IS ALWAYS AN INDICATOR
THAT THE SOUND LEVEL IS TOO LOUD AND MAY PERMANENTLY DAMAGE
YOUR HEARING. PLEASE USE COMMON SENSE WHEN CONTROLLING
VOLUME.
The KICKER KMXL speakers are the ultimate
full-range speakers for marine and outdoor
environments that money can buy. Whether
upgrading an existing audio system or decking out
a new one, these coaxial speakers featuring a horn-
loaded tweeter can be mounted in free air locations
or in KICKER’s award-winning line of marine tower
enclosures. The KMXL deliver top-quality sound while
taking the punishment of being out on the open water
or exposed to the elements. As always, KICKER uses
advanced materials and construction techniques
to ensure optimal performance for years to come.
We hope you have the chance to combine these
new coaxial speakers with our whole line of marine
products, including subwoofers and amplifiers, for the
best audio experience money can buy!

4English
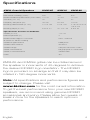
Specifications
KMXL Coaxial Speakers KMXL65 KMXL8 KMXL69
Woofer [in, mm] 6-1/2, 165 8, 200 6x9, 160x230
Peak Power Handling [ Watts] 300 500 300
Recommended Amplifier Power [Watts RMS] 15-150 15-250 15-150
Sensitivity [1W, 1m] 92 93 92
Frequency Response [Hz] 90–20k 60–20k 70–20k
Mounting Hole Diameter [in, mm] 5-7/16,139 6-5/8, 168 5-13/16 X 8-9/16
148 X 218
Mounting Depth [in, mm] 3-3/16, 81 3-11/16, 93 3-3/8, 85
Specifications Common to All Models
Tweeter [in, mm] 1.25, 32
Rated Impedance [Ω] 4
Recommened Highpass Crossover 80Hz 12/octave
for Maximum Power Handling
Tweeter Magnet Material Neodymium
Tweeter Dome Material Aluminum
Tweeter Design Compression Driver & Horn
Woofer Cone Material Polypropylene & Carbon Fiber
Woofer Surround Material Treated Cloth
Grilles Yes
Note: All specifications and performance figures are
subject to change. Please visit
www.kicker.com for the most current information.
To get the best performance from your new KICKER
speakers, we recommend using genuine KICKER
accessories and wiring. Please allow two weeks of
break-in time for the speakers to reach optimum
performance.
KMXL65 and KMXL8 grilles can be rotated around
the speaker in increments of 45-degrees to achieve
the desired KICKER logo orientation. The KICKER
logo is provided on a badge so that it may also be
rotated in 180-degree increments.

5English
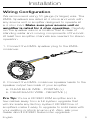
Wiring Configuration
We recommend using 16 gauge (or larger) wire. The
KMXL Speakers are rated at 4 ohms and work with
any source unit or amplifier designed to operate at
a 4 ohm load. Make sure your source unit or
amplifier is rated for 4 ohm operation. Carefully
run the speaker wire in a location that is clear of
standing water and moving components of the boat.
At least two amplifier channels are needed for stereo
operation
1. Connect the KMXL speaker plug to the KMXL
crossover.
Pro Tip: You’re a KICKER KXM amplifier and a
few cables away from a full system upgrade that
will dominate any factory system! KICKER line of
amplifiers make it easy to upgrade to solid bass with
your existing or stock source unit. Also, ask your
dealer about KICKER Subwoofer upgrades.
Installation
2. Connect the KMXL crossover speaker leads to the
speaker output terminals of your amplifier.
a. CLEAR BLUE WIRE - POSITIVE (+)
b. CLEAR BLACK WIRE - NEGATIVE (-)

6English
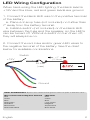
LED Wiring Configuration
When hard-wiring the LED lighting, the black lead is
+12V and the blue, red and green leads are ground.
1. Connect the black LED wire to the positive terminal
of the battery.
a. Place a 2-amp fuse (not included) no further than
7” away from the battery terminal.
b. Install a switch (not included) on the black LED
wire between the fuse and the speaker, so the LED’s
can be turned off. Without a switch to turn them off,
they will always be on.
2. Connect the red, blue and/or green LED wires to
the negative terminal of the battery. See the chart
below for available combinations.
12V
Ground
+12V
Switch
2A fuse
(max)
≤7”
(17.5cm)
battery
Color Combinations: Splice and combine the ground wires to yield a different color.
Wires Connected to Negative Terminal LED Color
Red Red
Green Green
Blue Blue
Red/Green Lime Green
Red/Blue Magenta
Blue/Green Aquamarine
Red/Green/Blue Blue-White

7English
Mounting
The sound produced by the KMXL coaxials is
directional. Find the best location for stereophonic
sound. If necessary, add more KMXL coaxial
speakers to the system to help distribute and balance
the sound-stage.
After determining the best mounting locations,
carefully check the areas where the mounting
hardware will be placed. If a mounting location does
not already exist, cut a hole in the desired location
using the templates from the KMXL product page
at KICKER.com. If necessary, pre-drill the mounting
screw holes using a 7/64” (2.5mm) bit following the
template. For KMXL65 and KMXL8 only: Note the
screw holes that will be used to secure the grille
in the desired orientation. Install four screws in the
other holes not to be used for the grille to secure the
speaker to the surface.
Use masking tape to help prevent damage to the
paint in the locations to be cut or drilled. If you are
mounting the speaker to a surface made from thin,
soft material such as aluminum, use the provided
stainless steel speed nuts to provide threads for the
stainless steel mounting screws. If the speaker cut-
out locations require you to cut metal, avoid structural
metal and braces. If the panel cannot support the
weight of the speaker, an optional reinforcing ring may
be fastened or adhered to it.
Make sure the mounting screws and speed nuts will
not puncture the fuel cell, wiring, or interfere with any
mechanical parts on the underside of the mounting
surface. If the supplied hardware is not applicable
to your installation, some other means of securely
attaching the speakers to the boat must be used,
such as the KMTC Towers.

8English
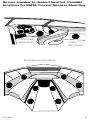
Mounted in the Bow
Mounted
Mid-Ship Stern
Mounted
Secure speaker to desired location. Possible
locations for KMXL Coaxial Speaker Mounting

9English
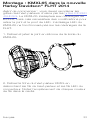
Mounting: KMXL65 in 2014–Newer
Harley Davidson® FLHT
Before You Begin: You must replace the factory
speaker grilles with KICKER 45HDSG grilles.
The KMXL65 will fit in FLHT fairings, but requires
modification that removes the LED bridge and gasket.
KMXL65 LED lighting will not work in the FLHT
fairings.
1. Remove and discard the silicone gasket from the
flange of the KMXL65.
2. Remove the KMXL Speaker Plug by unpinning the
speaker wires and LED wires from the connector.
Note the cavity location of each wire color.

10English
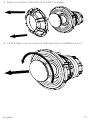
3. Remove and discard the LED bridge.
4. Unthread, remove and discard the installed horn.

11English
5. Install the provided short horn into the speaker.
6. Remove the factory grilles from the inner fairing.
7. Install the KICKER 45HDSG grilles in the inner
fairing.
8. Route the wires though the enclosure and install
the speakers into the fairing’s enclosures.
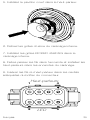
9. Insert the speaker wire leads into the correct
cavities of the connector housing.
1
8
4
5
Speakers
LEDs

12English
Mounting: KMXL69 in 46HDBL69
Saddle Bag Lids
The KMXL69 bolts directly into the KICKER
46HDBL69 saddle bag lids. Discard the grilles for
mounting in this application.
1. Install the KMXL69 speakers into the Kicker
46HDBL69 saddle bag lids per the 46HDBL69
Installation Instructions.
2. Extend the speakers wires considering the
mounting location of the crossover.
1 - 16AWG Clear Blue
2 - 16AWG Clear Black
3 - 16AWG Clear Insulation Silver
4 - 16AWG Clear Insulation Gold
5 - 22AWG Blue
6 - 22AWG Red
7 - 22AWG Green
8 - 22AWG Black

13English
Warranty
When purchased from an Authorized KICKER Dealer, KICKER
warrants this product to be free from defects in material and
workmanship under normal use for a period of TWO (2) YEARS from
date of original purchase with receipt. If this product is identified as
“Refurbished” or “B Goods”, the warranty is limited to a period of
THREE (3) MONTHS from the date of original purchase. In all cases
you must have the original receipt. Should service be necessary
under this warranty for any reason due to manufacturing defect
or malfunction during the warranty period, KICKER will repair or
replace (at its discretion) the defective merchandise with equivalent
merchandise. Warranty replacements may have cosmetic scratches
and blemishes. Discontinued products may be replaced with more
current equivalent products. This warranty is valid only for the original
purchaser and is not extended to owners of the product subsequent
to the original purchaser. Any applicable implied warranties are limited
in duration to a period of the express warranty as provided herein
beginning with the date of the original purchase at retail, and no
warranties, whether express or implied, shall apply to this product
thereafter. Some states do not allow limitations on implied warranties;
therefore, these exclusions may not apply to you. This warranty gives
you specific legal rights; however you may have other rights that vary
from state to state.
WHAT TO DO IF YOU NEED WARRANTY OR SERVICE:
Defective merchandise should be returned to your local Authorized
Stillwater Designs (KICKER) Dealer for warranty service. Assistance
in locating an Authorized Dealer can be found at www.KICKER.com
or by contacting Stillwater Designs directly. You can confirm that
a dealer is authorized by asking to see a current authorized dealer
window decal.
If it becomes necessary for you to return defective merchandise
directly to Stillwater Designs (KICKER), call the KICKER Customer
Service Department at (405) 624-8510 for a Return Merchandise
Authorization (RMA) number. Package only the defective items in a
package that will prevent shipping damage, and return to:
Stillwater Designs
3100 North Husband St
Stillwater, OK 74075

14English
The RMA number must be clearly marked on the outside of the
package. Please return only defective components. The return
of functioning items increases your return freight charges. Non-
defective items will be returned freight collect to you. For example,
if a subwoofer is defective, only return the defective subwoofer, not
the entire enclosure. Include a copy of the original receipt with the
purchase date clearly visible, and a “proof-of-purchase” statement
listing the Customer’s name, Dealer’s name and invoice number, and
product purchased. Warranty expiration on items without proof-of-
purchase will be determined from the type of sale and manufacturing
date code. Freight must be prepaid; items sent freight-collect, or
COD, will be refused.
WHAT IS NOT COVERED?
This warranty is valid only if the product is used for the purpose for
which it was designed. It does not cover:
o Damage due to improper installation
o Subsequent damage to other components
o Damage caused by exposure to moisture, excessive heat,
chemical cleaners, and/or UV radiation
o Damage through negligence, misuse, accident or abuse. Repeated
returns for the same damage may be considered abuse
o Any cost or expense related to the removal or reinstallation of
product
o Speakers damaged due to amplifier clipping or distortion
o Items previously repaired or modified by any unauthorized repair
facility
o Return shipping on non-defective items
o Products with tampered or missing barcode labels
o Products with tampered or missing serial numbers
o Products returned without a Return Merchandise Authorization
(RMA) number
o Products purchased from an UNAUTHORIZED dealer
o Freight Damage
o The cost of shipping product to KICKER
o Service performed by anyone other than KICKER
HOW LONG WILL IT TAKE?
KICKER strives to maintain a goal of one-week service for all
acoustics (subwoofers, midrange drivers, tweeters, crossovers, etc)
returns. Delays may be incurred if lack of replacement inventory or
parts is encountered. Failure to follow these steps may void your
warranty. Any questions can be directed to the KICKER Customer
Service Department at (405) 624-8510. Contact your International
KICKER dealer or distributor concerning specific procedures for your
country’s warranty policies.

15Español
Contenido
Descripción general ........16
Especificaciones ......................17
Instalación ......................18
Configuración del cableado .......18
Configuración del cableado LED 19
Montaje ....................................20
Montaje: KMXL65 en motocicletas Har-
ley Davidson® FLHT versiones 2014 en
adelante ...................................22
Montaje: KMXL69 en las tapas de alforja
46HDBL69 ...............................25
Garantía | Garantie ..........48

16Español
Descripción general
ADVERTENCIA IMPORTANTE DE SEGURIDAD
LA OPERACIÓN CONTINUA Y PROLONGADA DE UN AMPLIFICADOR,
ALTAVOZ O SUBWOOFER EN UNA FORMA DISTORSIONADA, CORTADA O
CON DEMASIADA POTENCIA PUEDE RECALENTAR SU SISTEMA DE AUDIO
Y LLEGAR A INCENDIARLO, ESTO PODRÍA CAUSAR DAÑOS SERIOS A
SUS COMPONENTES Y/O VEHÍCULO. LOS AMPLIFICADORES REQUIEREN
DE UN MÁXIMO DE 4 PULGADAS (10 CM) DE VENTILACIÓN ABIERTA. LOS
SUBWOOFERS DEBEN INSTALARSE CON AL MENOS 1 PULGADA (2.5
CM) DE ESPACIO ENTRE LA PARTE FRONTAL DEL ALTAVOZ Y CUALQUIER
SUPERFICIE. ¡LOS PRODUCTOS KICKER TIENEN LA CAPACIDAD DE
PRODUCIR NIVELES DE SONIDO QUE PUEDEN DAÑAR DE FORMA
PERMANENTE SU AUDICIÓN! AUMENTAR EL VOLUMEN DE UN SISTEMA
HASTA UN NIVEL QUE GENERE DISTORSIÓN AUDIBLE ES MÁS DAÑINO
PARA SUS OÍDOS QUE ESCUCHAR UN SISTEMA SIN DISTORSIONES AL
MISMO NIVEL DE VOLUMEN. EL UMBRAL DEL DOLOR ES SIEMPRE UN
INDICADOR DE QUE EL NIVEL DE SONIDO ES DEMASIADO ELEVADO Y
PUEDE DAÑAR PERMANENTEMENTE SU AUDICIÓN. UTILICE EL SENTIDO
COMÚN CUANDO CONTROLE EL VOLUMEN.
Los altavoces KMLX KICKER son los altavoces de
gama completa más avanzados para ambientes
marinos y exteriores que el dinero puede comprar.
Si se actualiza un sistema de audio existente o se
instala uno nuevo, estos altavoces coaxiales con un
tweeter instalado en la bocina pueden montarse en
ubicaciones al aire libre o en la línea galardonada
de carcasas para torres marinas de KICKER. El
KMXL ofrece sonido de máxima calidad y, al mismo
tiempo, elimina los problemas que se generan al
estar en aguas abiertas o expuesto a la intemperie.
Como siempre, KICKER utiliza materiales y técnicas
de construcción avanzadas para garantizar un
desempeño óptimo por muchos años. Esperamos
que tenga la oportunidad de combinar estos nuevos
altavoces coaxiales con nuestra línea completa de
productos para uso en altamar, como subwoofers y
amplificadores, ¡para tener la mejor experiencia de
audio que el dinero pueda comprar!

17Español
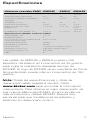
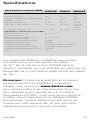
Especificaciones
Altavoces coaxiales KMXL KMXL65 KMXL8 KMXL69
Woofer [pulgadas, mm] 6-1/2, 165 8, 200 6 x 9,
160 x 230
Manejo de potencia máxima [Watts] 300 500 300
Potencia recomendada para el amplificador
[Watts RMS]
15-150 15-250 15-150
Sensibilidad [1W, 1m] 92 93 92
Respuesta de frecuencia [Hz] 90–20k 60–20k 70–20k
Diámetro del orificio de montaje
[pulgadas, mm]
5-7/16,139 6-5/8, 168 5-13/16 X
8-9/16
148 X 218
Profundidad de montaje [pulgadas, mm] 3-3/16, 81 3-11/16, 93 3-3/8, 85
Especificaciones aplicables a todos los modelos
Tweeter [pulgadas, mm] 1.25, 32
Impedancia nominal [Ω] 4
Crossover de paso alto recomendado para un
manejo de potencia máximo
80Hz 12/octava
Material del imán del Tweeter Neodimio
Material del domo del Tweeter Aluminio
Diseño del Tweeter Controlador de compresión y bocina
Material del cono del Woofer Polipropileno y fibra de carbono
Material envolvente del Woofer Paño tratado
Rejillas Sí
Nota: Todas las especificaciones y cifras de
desempeño están sujetas a cambio. Visite
www.kicker.com para encontrar la información
más reciente. Para obtener el mejor desempeño de
sus nuevos altavoces KICKER, le recomendamos
usar accesorios y cables KICKER. Espere dos
semanas para que los altavoces se adapten y
alcancen su desempeño óptimo.
Las rejillas de KMXL65 y KMXL8 pueden rotar
alrededor del altavoz en incrementos de 45 grados
para lograr la orientación deseada del logo de
KICKER. El logo de KICKER va en una placa de forma
tal que también pueda rotar en incrementos de 180
grados.

18Español
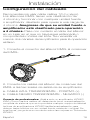
Configuración del cableado
Recomendamos usar cable calibre 16 (o mayor).
Los altavoces KMXL tienen una clasificación de
4ohmios y funcionan con cualquier unidad fuente
o amplificador diseñado para operar a una carga de
4ohmios. Asegúrese de que su unidad fuente o
amplificador esté clasificado para operación
a 4ohmios. Pase con cuidado el cable del altavoz
en un lugar en el que no haya agua estancada o
componentes móviles del bote. Se necesitan al
menos dos canales del amplificador para la operación
estéreo
1. Conecte el conector del altavoz KMXL al crossover
del KMXL.
Consejo de profesionales: ¡Está a solo un amplificador KICKER
KXM y unos cuantos cables de distancia de tener una actualización
completa de sistema que se impondrá a cualquier equipo de fábrica!
La línea de amplificadores KICKER facilita la actualización para
obtener bajos sólidos con su unidad fuente existente u original. De
igual forma, pregunte a su vendedor sobre las mejoras en Subwoofer
KICKER.
Instalación
2. Conecte los cables del altavoz de crossover del
KMXL a las terminales de salida de su amplificador.
a. CABLE AZUL TRANSPARENTE - POSITIVO (+)
b. CABLE NEGRO TRANSPARENTE - NEGATIVO (-)

19Español
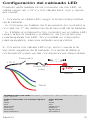
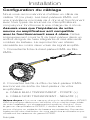
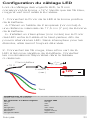
Configuración del cableado LED
Cuando esté realizando la conexión de los LED, el
cable negro es +12V y los cables azul, rojo y verde
son tierra.
1. Conecte el cable LED negro a la terminal positiva
de la batería.
a. Coloque un fusible de 2amperios (no incluido) a
no más de 7" de distancia de la terminal de la batería.
b. Instale un interruptor (no incluido) en el cable LED
negro entre el fusible y el altavoz, de forma tal que
pueda apagar los LED. Si no instala un interruptor
para apagarlos, siempre estarán encendidos.
2. Conecte los cables LED rojo, azul o verde a la
terminal negativa de la batería. Consulte la tabla a
continuación para ver las combinaciones disponibles.
12V
Tierra
+12 V
Interruptor
Fusible de 2 A
(máx.)
≤7"
(17.5 cm)
batería
Combinaciones de color: empalme y combine los cables de tierra para lograr un
color diferente.
Cables conectados a la terminal negativa Color del LED
Rojo Rojo
Verde Verde
Azul Azul
Rojo/verde Verde limón
Rojo/azul Magenta
Azul/verde Aguamarina
Rojo/verde/azul Azul-Blanco

20Español
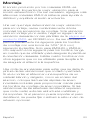
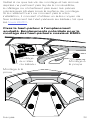
Montaje
El sonido producido por los coaxiales KMXL es
direccional. Encuentre la mejor ubicación para el
sonido estereofónico. De ser necesario, agregue más
altavoces coaxiales KMLX al sistema para ayudar a
distribuir y equilibrar el audio envolvente.
Una vez que haya determinado la mejor ubicación
para el montaje, revise cuidadosamente dónde
colocará los accesorios de montaje. Si la ubicación
para el montaje ya no existe, haga un agujero en la
ubicación deseada con las plantillas de la página del
producto KMXL en KICKER.com. De ser necesario,
perfore previamente los agujeros para los tornillos
de montaje con una broca de 7/64" (2.5mm)
siguiendo la plantilla. Solo para KMXL65 y KMXL8:
con respecto a los agujeros para los tornillos, tenga
en cuenta que se utilizarán para asegurar la parrilla en
la orientación deseada. Instale cuatro tornillos en los
otros agujeros que no se utilizarán para la rejilla a fin
de asegurar el altavoz a la superficie.
Use cinta de enmascarar para evitar que se dañe la
pintura de las ubicaciones que cortará o perforará.
Si va a montar el altavoz en una superficie de un
material blando y delgado, como es el caso del
aluminio, coloque las tuercas rápidas de acero
inoxidable incluidas para proporcionar roscas para
los tornillos de montaje de acero inoxidable. Si las
ubicaciones de las aberturas del altavoz requieren
que corte metal, evite las estructuras metálicas y
los soportes. Si el panel no puede soportar el peso
del altavoz, se puede fijar o adherir a este un aro de
refuerzo opcional.

21Español
Montado en proa
Montado en
el centro de la
embarcación
Montado
en popa
Fije el altavoz en la ubicación deseada.
Posibles ubicaciones para montar el altavoz
coaxial KMXL
Asegúrese de que los tornillos de montaje y las
tuercas rápidas no perforen la celda de combustible,
el cableado, o que interfieran con las piezas metálicas
que se ubican en la parte inferior de la superficie de
montaje. Si los accesorios provistos no son útiles
para su instalaciones, deben emplearse otros medios
para fijar de manera segura los altavoces al bote,
como las Torres KMTC.

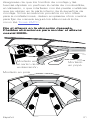
22Español
Montaje: KMXL65 en motocicletas
Harley Davidson® FLHT versiones
2014 en adelante
Antes de comenzar: debe reemplazar las parrillas
para altavoces de fábrica por las parrillas 45HDSG de
KICKER. El KMXL65 encajará en los carenados FLHT,
pero será necesario retirar el puente y junta del LED.
Las luces LED del KMXL65 no funcionarán en los
carenados FLHT.
1. Retire y deseche la junta de silicona de la brida del
KMXL65.
2. Retire el conector del altavoz KMXL
desprendiendo los cables del altavoz y los cables
LED del conector. Tenga en cuenta dónde se ubica el
color de cada cable.

23Español
3. Retire y deseche el puente LED.
4. Desenrosque, retire y deseche la bocina instalada.

24Español
5. Instale la bocina corta suministrada en el altavoz.
6. Retire las parrillas de fábrica del carenado interior.
7. Instale las parrillas 45HDSG de KICKER en el
carenado interior.
8. Enrute los cables a través de la carcasa e instale
los altavoces en las carcasas del carenado.
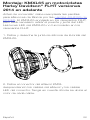
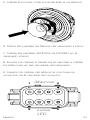
9. Inserte los cables del altavoz en los huecos
correctos de la carcasa del conector.
1
8
4
5
Altavoces
Luces
LED

25Español
Montaje: KMXL69 en las tapas de
alforja 46HDBL69
El KMXL69 se atornilla directamente en las tapas
de alforja KICKER 46HDBL69. En esta aplicación,
descarte las parrillas para montaje.
1. Instale los altavoces KMXL69 en las tapas
de alforja Kicker 46HDBL69 de acuerdo con las
instrucciones de instalación de 46HDBL69.
2. Alargue los cables de los altavoces teniendo en
cuenta la ubicación de montaje del crossover.
1 - Azul transparente 16 AWG
2 - Negro transparente 16 AWG
3 - Plateado aislante transparente 16 AWG
4 - Dorado aislante transparente 16 AWG
5 - Azul 22 AWG
6 - Rojo 22 AWG
7 - Verde 22 AWG
8 - Negro 22 AWG

26Français
Contenu
Présentation ...................27
Spécifications ...........................28
Installation ......................29
Configuration du câblage ..........29
Configuration du câblage LED ...30
Montage ..................................31
Montage: KMXL65 dans la nouvelle
Harley Davidson® FLHT 2014 ....33
Montage: KMXL69 dans les
couvercles des sacoches
cavalières 46HDBL69 ...............36
Garantía | Garantie ..........48

27Français
Présentation
AVERTISSEMENT DE SÉCURITÉ IMPORTANT
UNE UTILISATION CONTINUE ET PROLONGÉE D'UN AMPLIFICATEUR,
D'UN HAUT-PARLEUR OU D'UN CAISSON DE GRAVES AVEC UN SON
DISTORDU, ÉCRÊTÉ OU EXCESSIF PEUT FAIRE SURCHAUFFER VOTRE
SYSTÈME AUDIO, QUI RISQUE DE PRENDRE FEU ET DE CAUSER DE
SÉRIEUX DÉGÂTS À VOS COMPOSANTS ET/OU VOTRE VÉHICULE. LES
AMPLIFICATEURS REQUIÈRENT UN ÉVENT D'AÉRATION JUSQU'À 10CM
(4POUCES). LES CAISSONS DE GRAVES DOIVENT ÊTRE MONTÉS AVEC AU
MOINS 2,5CM (1POUCE) D'ÉCART ENTRE L'AVANT DU HAUT-PARLEUR ET
TOUTE SURFACE. LES PRODUITS KICKER SONT CAPABLES DE PRODUIRE
DES NIVEAUX SONORES POUVANT ENDOMMAGER VOTRE AUDITION
DE MANIÈRE IRRÉVERSIBLE! LE RÉGLAGE D'UN SYSTÈME À UN NIVEAU
PRODUISANT UNE DISTORSION AUDIBLE ENDOMMAGE DAVANTAGE
L'AUDITION QUE L'ÉCOUTE D'UN SYSTÈME SANS DISTORSION AU MÊME
VOLUME. LE SEUIL DE LA DOULEUR INDIQUE TOUJOURS QUE LE NIVEAU
SONORE EST TROP ÉLEVÉ ET POURRAIT ENDOMMAGER VOTRE AUDITION
DE MANIÈRE IRRÉVERSIBLE. VEUILLEZ RÉGLER LE VOLUME SONORE EN
FAISANT PREUVE DE BON SENS.
Les haut-parleurs KICKER KMXL sont les
meilleurs haut-parleurs à spectre intégral pour
les environnements marins et extérieurs qu'on
puisse acheter. Que vous souhaitiez améliorer un
système audio existant ou en installer un nouveau,
ces haut-parleurs sont conçus pour être installés
dans des espaces à l'air libre ou sur la gamme
primée de tours de son marines de KICKER. Les
haut-parleurs KMXL produisent un son de qualité
supérieure tout en supportant les contraintes liées à
la navigation ou à l'exposition aux éléments. Comme
toujours, KICKER fait appel à des matériaux et des
techniques de construction de pointe pour garantir
des performances optimales pendant de nombreuses
années. Nous espérons que vous aurez l'occasion
d'associer ces nouveaux haut-parleurs coaxiaux à
notre gamme complète de produits nautiques, y
compris les caissons de basses et les amplificateurs,
pour vivre la meilleure expérience audio qui soit!

28Français
Spécifications
Haut‑parleurs coaxiaux KMXL KMXL65 KMXL8 KMXL69
Haut-parleur de graves [mm; pouces] 165; 6-1/2 200; 8 160x230;
6x9
Puissance en crête [W] 300 500 300
Puissance d'amplificateur recommandée [W RMS] 15-150 15-250 15-150
Sensibilité [1W, 1m] 92 93 92
Réponse en fréquence [Hz] 90–20k 60–20k 70–20k
Diamètre du trou de montage [mm; pouces] 139; 5-7/16 168; 6-5/8 148 X 218
5-13/16 X
8-9/16
Profondeur de montage [mm; po] 81; 3-3/16 93; 3-11/16 85; 3-3/8
Spécifications communes à tous les modèles
Haut-parleur d'aigus [mm; po] 32; 1,25
Impédance nominale [Ω] 4
Filtre passe-haut recommandé pour une
puissance admissible maximum
80Hz 12/octave
Matériau de bobine du haut-parleur d'aigus Néodyme
Matériau du dôme du HP d'aigus Aluminium
Conception du haut-parleur d'aigus Haut-parleur à compression et pavillon
Matériau du cône du haut-parleur de graves Polypropylène et fibre de carbone
Matériau d'enveloppe du haut-parleur de graves Tissu traité
Grilles Oui
Remarque: toutes les spécifications et valeurs
de performance sont sujettes à modification.
Veuillez vous rendre sur www.kicker.com
pour les informations les plus récentes. Pour tirer
les meilleures performances de vos nouveaux
haut-parleurs KICKER, nous vous recommandons
d'utiliser des accessoires et du câblage KICKER
authentiques. Veuillez laisser deux semaines de
rodage aux haut-parleurs afin de leur permettre
d'atteindre leurs performances optimales.
Les grilles des KMXL65 et KMXL8 peuvent être
tournées autour du haut-parleur par paliers
de 45° afin d'orienter le logo KICKER dans la
direction souhaitée. Le logo KICKER est placé sur un
badge afin de pouvoir être lui aussi tourné par paliers
de 180°.

29Français
Configuration du câblage
Nous vous recommandons d'utiliser un câble de
calibre16 (ou plus). Les haut-parleurs KMXL ont
une impédance nominale de 4ohms et fonctionnent
avec tous types de sources ou d'amplificateurs
conçus pour fonctionner à une charge de 4ohms.
Assurez-vous que l'impédance de votre
source ou amplificateur soit compatible
avec le fonctionnement sous 4ohms. Faites
soigneusement courir le fil du haut-parleur dans un
endroit éloigné de l'eau stagnante et des éléments
mobiles du bateau. La reproduction en stéréo
nécessite au moins deux voies de signal amplifié.
1. Connectez la fiche du haut-parleur KMXL au filtre
KMXL.
Astuce de pro: il ne vous manque plus qu'un amplificateur KICKER
KXM et quelques câbles pour bénéficier d'une mise à niveau totale
de votre installation, qui surpassera tout système d'origine! Avec
la gamme d'amplificateurs KICKER, il devient facile de doter votre
source d'origine ou existante de basses surpuissantes. Demandez
également à votre distributeur de vous parler des améliorations que
constituent les caissons de graves KICKER.
Installation
2. Connectez les fils du filtre du haut-parleur KMXL
aux bornes de sortie du haut-parleur de votre
amplificateur.
a. CÂBLE BLEU TRANSPARENT - POSITIF (+)
b. CÂBLE NOIR TRANSPARENT - NÉGATIF (-)

30Français
Configuration du câblage LED
Lors du câblage des voyants LED, le fil noir
correspond à la borne +12V, tandis que les fils bleu,
rouge et vert sont reliés à la masse.
1. Connectez le fil noir de la LED à la borne positive
de la batterie.
a. Placez un fusible de 2 ampères (non inclus) à
une distance maximale de 17,5cm (7po) de la borne
de la batterie.
b. Installez un interrupteur (non inclus) sur le fil noir
des LED entre le fusible et le haut-parleur, afin de
pouvoir éteindre les LED. Sans interrupteur pour les
éteindre, elles seront toujours allumées.
2. Connectez les fils rouge, bleu et/ou vert de la
LED à la borne négative de la batterie. Consultez
les combinaisons disponibles dans le tableau
ci-dessous.
12V
Terre
+12V
Commutateur
Fusible 2A
(max.)
≤7po
(17,5cm)
Batterie
Combinaisons de couleurs: les fils de terre doivent être épissés et combinés pour
obtenir une couleur différente.
Fils connectés à la borne négative Couleur LED
Rouge Rouge
Vert Vert
Bleu Bleu
Rouge/Vert Vert citron
Rouge/Bleu Magenta
Bleu/Vert Aigue-marine
Rouge/Vert/Bleu Bleu-Blanc

31Français
Montage
Le son produit par les coaxiaux KMXL est
directionnel. Trouvez le meilleur emplacement pour le
son stéréophonique. Si nécessaire, ajoutez d'autres
haut-parleurs coaxiaux KMXL au système pour mieux
répartir et équilibrer la scène sonore.
Après avoir déterminé les meilleurs emplacements
de montage, vérifiez soigneusement les zones où le
matériel de montage sera placé. Si l'emplacement
de montage n'existe pas encore, percez un trou à
l'endroit souhaité en utilisant les modèles figurant
sur la page du produit KMXL sur KICKER.com. Si
nécessaire, pré-percez les trous des vis de montage
en utilisant un foret de 2,5mm (7/64ede po) en
suivant le modèle. Pour les KMXL65 et KMXL8
uniquement: notez les trous des vis qui seront
utilisés pour fixer la grille selon l'orientation souhaitée.
Installez quatre vis dans les autres trous qui ne seront
pas utilisés sur la grille pour fixer le haut-parleur sur la
surface.
Utilisez du ruban de masquage pour éviter
d'endommager la peinture aux endroits à découper
ou à percer. Si vous montez le haut-parleur sur
une surface en matériau mince et souple, comme
l'aluminium, utilisez les écrous rapides en acier
inoxydable inclus pour créer des filets pour les vis de
montage en acier inoxydable. Si les emplacements
de découpe des haut-parleurs vous obligent à couper
du métal, évitez les structures et renforts métalliques.
Si le panneau ne peut pas supporter le poids du
haut-parleur, un anneau de renfort optionnel peut être
fixé ou collé sur celui-ci.

32Français
Veillez à ce que les vis de montage et les écrous
rapides ne perforent pas la pile à combustible,
le câblage ou n'interfèrent pas avec les pièces
mécaniques situées sous la surface de montage.
Si le matériel fourni ne convient pas à votre
installation, il convient d'utiliser un autre moyen de
fixer solidement les haut-parleurs au bateau, tel que
les tours KMTC.
Montage à la
proue
Montage
au milieu
du bateau
Montage à
la poupe
Fixez le haut-parleur à l'emplacement
souhaité. Emplacements potentiels pour le
montage des haut-parleurs coaxiaux KMXL

33Français
Montage: KMXL65 dans la nouvelle
Harley Davidson® FLHT 2014
Avant de commencer: vous devez remplacer les
grilles des haut-parleurs d'usine par les grilles KICKER
45HDSG. Le KMXL65 s'adaptera aux carénages de
la FLHT, mais cela nécessitera des modifications pour
retirer le joint et le pont de LED. L'éclairage LED du
KMXL65 ne fonctionnera pas sur les carénages de la
FLHT.
1. Retirez et jetez le joint en silicone de la bride du
KMXL65.
2. Retirez la fiche du haut-parleur KMXL en
débrochant les fils du haut-parleur et les fils LED du
connecteur. Notez l'emplacement de chaque couleur
de fils dans la cavité.

34Français
3. Retirez et jetez le pont de LED.
4. Desserrez, retirez et jetez le pavillon installé.

35Français
5. Installez le pavillon court dans le haut-parleur.
6. Retirez les grilles d'usine du carénage interne.
7. Installez les grilles KICKER 45HDSG dans le
carénage interne.
8. Faites passer les fils dans l'enceinte et installez les
haut-parleurs dans les enceintes du carénage.
9. Insérez les fils du haut-parleur dans les cavités
adéquates du boîtier du connecteur.
1
8
4
5
Haut‑parleurs
LED

36Français
Montage: KMXL69 dans les cou-
vercles des sacoches cavalières
46HDBL69
Le KMXL69 se fixe directement dans les couvercles
des sacoches cavalières du KICKER 46HDBL69.
Jetez les grilles pour monter cette application.
1. Installez les haut-parleurs KMXL69 dans les
couvercles des sacoches cavalières Kicker
46HDBL69 en suivant les instructions d'installation du
46HDBL69.
2. Déployez les fils des haut-parleurs en fonction de
l'emplacement de montage du filtre.
1 - 16AWG Bleu transparent
2 - 16AWG Noir transparent
3 - 16AWG Argent isolation transparent
4 - 16AWG Or isolation transparent
5 - 22AWG Bleu
6 - 22AWG Rouge
7 - 22AWG Vert
8 - 22AWG Noir

37Deutsche
Inhalt
Übersicht .......................38
Spezifikationen .........................39
Installation ......................40
Konfiguration der Verkabelung ... 40
Konfiguration der
LED-Verkabelung ......................41
Montage ..................................42
Montage: KMXL65 in die neuere
Harley Davidson® FLHT2014 ....44
Montage: KMXL69 in 46HDBL69
Satteltaschendeckel .................47
Garantía | Garantie ..........48

38Deutsche
Übersicht
WICHTIGER SICHERHEITSHINWEIS
LÄNGERER DAUERBETRIEB EINES VERSTÄRKERS, LAUTSPRECHERS ODER
SUBWOOFERS IN VERZERRTER, BESCHNITTENER ODER ÜBERSTEUERTER
FORM KANN ZU EINER ÜBERHITZUNG IHRES AUDIOSYSTEMS FÜHREN,
DAS MÖGLICHERWEISE FEUER FÄNGT UND ZU SCHWEREN SCHÄDEN
AN IHREN KOMPONENTEN UND/ODER IHREM FAHRZEUG FÜHRT.
VERSTÄRKER BENÖTIGEN BIS ZU 10CM (4ZOLL) OFFENE BELÜFTUNG.
SUBWOOFER SOLLTEN MIT EINEM ABSTAND VON MINDESTENS 2,5CM
(1ZOLL) ZWISCHEN DER VORDERSEITE DES LAUTSPRECHERS UND EINER
OBERFLÄCHE MONTIERT WERDEN. KICKER-PRODUKTE SIND IN DER LAGE,
SCHALLPEGEL ZU ERZEUGEN, DIE IHR GEHÖR DAUERHAFT SCHÄDIGEN
KÖNNEN! WENN SIE EIN SYSTEM AUF EINEN PEGEL AUFDREHEN, DER
HÖRBARE VERZERRUNGEN AUFWEIST, SCHADET DIES IHREN OHREN MEHR
ALS WENN SIE EIN UNVERZERRTES SYSTEM MIT DERSELBEN LAUTSTÄRKE
HÖREN. DIE SCHMERZGRENZE IST IMMER EIN INDIKATOR DAFÜR, DASS
DER SCHALLPEGEL ZU LAUT IST UND IHR GEHÖR DAUERHAFT SCHÄDIGEN
KANN. BITTE BENUTZEN SIE BEIM EINSTELLEN DER LAUTSTÄRKE IHREN
GESUNDEN MENSCHENVERSTAND.
KMXL-Lautsprecher von KICKER sind die ultimativen
Fullrange-Lautsprecher für die Schifffahrt und für
Outdoor-Umgebungen, die man für Geld kaufen
kann. Ganz gleich, ob Sie ein vorhandenes
Audiosystem aufrüsten oder ein neues einrichten:
Diese Koaxiallautsprecher mit horngeladenem
Hochtöner können im Freien oder in den
preisgekrönten Marine Tower-Gehäusen von KICKER
montiert werden. Die KMXL liefern erstklassige
Klangqualität– auch unter rauen Bedingungen wie
etwa auf offenem Wasser oder bei schlechtem
Wetter. Wie immer verwendet KICKER fortschrittliche
Materialien und Konstruktionstechniken, um eine
optimale Leistung für die kommenden Jahre zu
gewährleisten. Wir hoffen, dass Sie die Chance
haben, diese neuen Koaxiallautsprecher mit unserer
gesamten Palette von Produkten für die Schifffahrt,
einschließlich Subwoofern und Verstärkern, zu
kombinieren, um das beste Audioerlebnis zu erhalten,
das man für Geld kaufen kann!

39Deutsche
Spezifikationen
KMXL‑Koaxiallautsprecher KMXL65 KMXL8 KMXL69
Tieftöner [Zoll / mm] 6-1/2, 165 8, 200 6x9 / 160x230
Spitzenbelastbarkeit [Watt] 300 500 300
Empfohlene Verstärkerleistung [Watt RMS] 15-150 15-250 15-150
Empfindlichkeit [1W, 1m] 92 93 92
Frequenzgang [Hz] 90–20.000 60–20.000 70–20.000
Montagebohrung Durchmesser [Zoll / mm] 5-7/16,139 6-5/8, 168 5-13/16 X
8-9/16
148 X 218
Montagetiefe [Zoll / mm] 3-3/16, 81 3-11/16, 93 3-3/8, 85
Spezifikationen für alle Modelle
Hochtöner [Zoll / mm] 1,25, 32
Nennimpedanz [Ω] 4
Empfohlene Hochpassfrequenzweiche für
maximale Leistung
80Hz 12/Oktaven
Material des Hochtöner-Magneten Neodym
Material der Hochtöner-Kalotte Aluminium
Hochtöner-Design Kompressionstreiber und Horn
Material der Subwoofer-Membran Polypropylen und Kohlefaser
Umgebungsmaterial des Subwoofers Behandelter Stoff
Schutzgitter Ja
Hinweis: Alle Spezifikationen und Leistungsangaben
können sich ändern. Die aktuellsten Informationen
finden Sie auf www.kicker.com. Um die beste
Leistung aus Ihren neuen KICKER-Lautsprechern
herauszuholen, empfehlen wir die Verwendung von
Original-KICKER-Zubehör und -Kabeln. Damit die
Lautsprecher ihre optimale Leistung erreichen, sollten
Sie eine Einspielzeit von zwei Wochen einplanen.
Die KMXL65- und KMXL8-Schutzgitter lassen sich
in 45-Grad-Schritten um den Lautsprecher drehen,
um die gewünschte Position des KICKER-Logos zu
erreichen. Das KICKER-Logo ist auf einer Plakette
angebracht, sodass es auch in 180-Grad-Schritten
gedreht werden kann.

40Deutsche
Konfiguration der Verkabelung
Wir empfehlen die Verwendung von Draht mit einer
Stärke von 16Gauge (oder mehr). Die KMXL-
Lautsprecher sind für 4Ohm ausgelegt und
funktionieren mit jedem Quellgerät oder Verstärker, der
für den Betrieb an einer 4-Ohm-Last ausgelegt ist.
Vergewissern Sie sich, dass Ihr Quellgerät oder
Verstärker für den 4-Ohm-Betrieb ausgelegt
ist. Führen Sie das Lautsprecherkabel vorsichtig an
einer Stelle entlang, die frei von stehendem Wasser
und beweglichen Komponenten des Bootes ist.
Für den Stereobetrieb werden mindestens zwei
Verstärkerkanäle benötigt.
1. Schließen Sie den Stecker des KMXL-
Lautsprechers an die KMXL-Frequenzweiche an.
Profi-Tipp: Ein KXM-Verstärker von KICKER und ein paar Kabel
genügen, um ein komplettes System-Upgrade zu realisieren, das
jedes Werkssystem in den Schatten stellt! Mit den Verstärkern
der KICKER-Produktreihe können Sie Ihr vorhandenes oder
serienmäßiges Quellgerät problemlos auf solide Bässe aufrüsten.
Fragen Sie Ihren Händler auch nach KICKER Subwoofer-Upgrades.
Installation
2. Schließen Sie die Lautsprecherkabel
der KMXL-Frequenzweiche an die
Lautsprecherausgangsanschlüsse Ihres Verstärkers
an.
a. DURCHSICHTIGES BLAUES KABEL – PLUS (+)
b. DURCHSICHTIGES SCHWARZES KABEL – MINUS (-)

41Deutsche
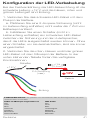
Konfiguration der LED-Verkabelung
Bei der Festverdrahtung der LED-Beleuchtung ist die
schwarze Leitung +12V und die blauen, roten und
grünen Leitungen sind Erdung.
1. Verbinden Sie das schwarze LED-Kabel mit dem
Pluspol der Batterie.
a. Platzieren Sie eine 2-Ampere-Sicherung (nicht
im Lieferumfang enthalten) nicht weiter als 7Zoll vom
Batteriepol entfernt.
b. Installieren Sie einen Schalter (nicht im
Lieferumfang enthalten) am schwarzen LED-Kabel
zwischen der Sicherung und dem Lautsprecher,
damit die LEDs ausgeschaltet werden können. Ohne
einen Schalter, um sie auszuschalten, sind sie immer
eingeschaltet.
2. Verbinden Sie die roten, blauen und/oder grünen
LED-Kabel mit dem Minuspol der Batterie. In der
unten stehenden Tabelle finden Sie verfügbare
Kombinationen.
12V
Erdung
+12V
Schalter
2-A-Sicherung
(max.)
≤7Zoll
(17,5cm)
Batterie
Farbkombinationen: Verspleißen und kombinieren Sie die Erdungsdrähte, um eine
andere Farbe zu erhalten.
Kabel am Minuspol angeschlossen LED-Farbe
Rot Rot
Grün Grün
Blau Blau
Rot/Grün Limettengrün
Rot/Blau Magenta
Blau/Grün Aquamarin
Rot/Grün/Blau Blauweiß

42Deutsche
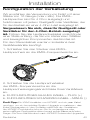
Montage
Der von den KMXL-Koaxiallautsprechern erzeugte
Klang ist direktional. Finden Sie den besten Standort
für stereophonen Klang. Fügen Sie dem System bei
Bedarf weitere KMXL-Koaxiallautsprecher hinzu, um
die Klangbühne zu verteilen und auszugleichen.
Nachdem Sie die besten Montageorte ermittelt
haben, überprüfen Sie sorgfältig die Bereiche,
in denen die Montagehardware platziert werden
soll. Wenn noch kein Montageort vorhanden ist,
schneiden Sie mithilfe der Schablonen von der
KMXL-Produktseite auf KICKER.com ein Loch an der
gewünschten Stelle ein. Falls erforderlich, bohren
Sie die Löcher für die Befestigungsschrauben mit
einem 7/64-Zoll-Bit (2,5mm) gemäß der Schablone
vor. Nur für KMXL65 und KMXL8: Bitte beachten
Sie die Schraubenlöcher, die zur Befestigung des
Schutzgitters an der gewünschten Stelle verwendet
werden. Bringen Sie vier Schrauben in den anderen
Löchern an, die nicht für das Schutzgitter verwendet
werden, um den Lautsprecher an der Oberfläche zu
befestigen.
Verwenden Sie Abdeckband, um Beschädigungen
der Lackierung um die zu schneidenden oder zu
bohrenden Stellen zu vermeiden. Wenn Sie den
Lautsprecher auf einer Oberfläche aus dünnem,
weichem Material wie Aluminium montieren, verwenden
Sie die mitgelieferten Schraubenmuttern aus
Edelstahl, um Gewinde für die Befestigungsschrauben
aus Edelstahl bereitzustellen. Wenn Sie für die
Aussparungen der Lautsprecher Metall schneiden
müssen, vermeiden Sie strukturelles Metall und
Verstrebungen. Wenn die Verkleidung das Gewicht des
Lautsprechers nicht tragen kann, kann ein optionaler
Verstärkungsring befestigt oder aufgeklebt werden.

43Deutsche
Stellen Sie sicher, dass die Befestigungsschrauben
und Einsteckmuttern die Brennstoffzelle und die
Verkabelung nicht durchstechen oder mechanische
Teile auf der Unterseite der Montagefläche stören.
Wenn die mitgelieferte Hardware nicht für Ihre
Installation geeignet ist, müssen andere Mittel zur
sicheren Befestigung der Lautsprecher am Boot
verwendet werden, etwa die KMTC Tower.
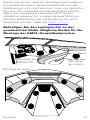
Montage am Bug
Montage am
Mittelschiff Montage
am Heck
Befestigen Sie den Lautsprecher an der
gewünschten Stelle. Mögliche Stellen für die
Montage der KMXL-Koaxiallautsprecher

44Deutsche
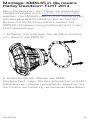
Montage: KMXL65 in die neuere
Harley Davidson® FLHT2014
Bevor Sie beginnen: Sie müssen die werkseitigen
Lautsprechergitter durch KICKER 45HDSG-Gitter
ersetzen. Der KMXL65 passt in FLHT-Verkleidungen,
erfordert aber eine Modifikation, bei der die LED-
Brücke und die Dichtung entfernt werden. Die
KMXL65 LED-Beleuchtung funktioniert nicht in den
FLHT-Verkleidungen.
1. Entfernen und entsorgen Sie die Silikondichtung
vom Flansch des KMXL65.
2. Entfernen Sie den Stecker des KMXL-
Lautsprechers, indem Sie die Lautsprecher- und LED-
Kabel aus dem Stecker herausziehen. Beachten Sie
die Position der Vertiefung der einzelnen Kabelfarben.

45Deutsche
3. Entfernen und entsorgen Sie die LED-Brücke.
4. Lösen, entfernen und entsorgen Sie das montierte
Horn.

46Deutsche
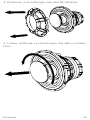
5. Montieren Sie das bereitgestellte kurze Horn in den
Lautsprecher.
6. Entfernen Sie die werkseitigen Schutzgitter von der
Innenverkleidung.
7. Montieren Sie die KICKER 45HDSG-Gitter in der
Innenverkleidung.
8. Führen Sie die Kabel durch das Gehäuse und
installieren Sie die Lautsprecher im Gehäuse der
Verkleidung.
9. Führen Sie die Lautsprecherkabel in die richtigen
Vertiefungen des Steckergehäuses ein.
1
8
4
5
Lautsprecher
LEDs

47Deutsche
Montage: KMXL69 in 46HDBL69
Satteltaschendeckel
Der KMXL69 wird direkt in den KICKER 46HDBL69
Satteltaschendeckel geschraubt. Entsorgen Sie die
Schutzgitter für die Montage in dieser Anwendung.
1. Installieren Sie die KMXL69-Lautsprecher in den
Kicker 46HDBL69-Satteltaschendeckeln gemäß der
46HDBL69-Installationsanleitung.
2. Verlängern Sie die Lautsprecherkabel gemäß des
Montageorts der Frequenzweiche.
1 - 16AWG Durchsichtig Blau
2 - 16AWG Durchsichtig Schwarz
3 - 16AWG Durchsichtig Isolierung Silber
4 - 16AWG Durchsichtig Isolierung Gold
5 - 22AWG Blau
6 - 22AWG Rot
7 - 22AWG Grün
8 - 22AWG Schwarz

48Deutsche
stillwaterdesigns
P.O. Box 459
Stillwater, Oklahoma 74076
USA
(405) 624–8510
Garantía | Garantie
Contact your International KICKER dealer or distributor concerning specific procedures for your
country’s warranty policies.
Our goods come with guarantees that cannot be excluded under the Australian Consumer Law.
You are entitled to a replacement or refund for a major failure and for compensation for any other
reasonably foreseeable loss or damage. You are also entitled to have the goods repaired or replaced
if the goods fail to be of acceptable quality and the failure does not amount to a major failure.
GARANTÍA INTERNACIONAL Versión Español
Comuníquese con su concesionario o distribuidor KICKER internacional para obtener infor ación
sobre procedimientos específicos relacionados con las normas de garantía de su país.
La frase “combustible para vivir la vida Livin’ Loud™ a todo volumen” se refiere al entusiasmo por la
vida que la marca KICKER de estéreos de automóvil representa y a la recomendación a nuestros
clientes de que vivan lo mejor posible (“a todo volumen”) en todo sentido. La línea de altavoces y
amplificadores KICKER es la mejor del mercado de audio de automóviles y por lo tanto representa el
“combustible” para vivir a todo volumen en el área de “estéreos de automóvil” de la vida de nuestros
clientes. Recomendamos a todos nuestros clientes que obedezcan todas las reglas y reglamentos
locales sobre ruido en cuanto a los niveles legales y apropiados de audición fuera del vehículo.
INTERNATIONALE GARANTIE Deutsche Version
Nehmen Sie mit Ihren internationalen KICKER-Fachhändler oder Vertrieb Kontakt auf, um Details über
die Garantieleistungen in Ihrem Land zu erfahren.
Der Slogan “Treibstoff für Livin’ Loud” bezieht sich auf die mit den KICKER-Autostereosystemen
assoziierte Lebensfreude und die Tatsache, dass wir unsere Kunden ermutigen, in allen Aspekten
ihres Lebens nach dem Besten (“Livin’ Loud”) zu streben. Die Lautsprecher und Verstärker von
KICKER sind auf dem Markt für Auto-Soundsysteme führend und stellen somit den “Treibstoff” für
das Autostereoerlebnis unserer Kunden dar. Wir empfehlen allen unseren Kunden, sich bezüglich der
zugelassenen und passenden Lautstärkepegel außerhalb des Autos an die örtlichen Lärmvorschriften
zu halten.
GARANTIE INTERNATIONALE Version Française
Pour connaître les procédures propres à la politique de garantie de votre pays, contactez votre
revendeur ou distributeur International KICKER.
L’expression “ carburant pour vivre plein pot “ fait référence au dynamisme de la marque KICKER
d’équipements audio pour véhicules et a pour but d’encourager nos clients à faire le maximum
(“ vivre plein pot “) dans tous les aspects de leur vie. Les haut-parleurs et amplificateurs KICKER
sont les meilleurs dans le domaine des équipements audio et représentent donc pour nos client
le “ carburant pour vivre plein pot “ dans l’aspect “ installation audio de véhicule “ de leur vie. Nous
encourageons tous nos clients à respecter toutes les lois et réglementations locales relatives aux
niveaux sonores acceptables à l’extérieur des véhicules.
-
 1
1
-
 2
2
-
 3
3
-
 4
4
-
 5
5
-
 6
6
-
 7
7
-
 8
8
-
 9
9
-
 10
10
-
 11
11
-
 12
12
-
 13
13
-
 14
14
-
 15
15
-
 16
16
-
 17
17
-
 18
18
-
 19
19
-
 20
20
-
 21
21
-
 22
22
-
 23
23
-
 24
24
-
 25
25
-
 26
26
-
 27
27
-
 28
28
-
 29
29
-
 30
30
-
 31
31
-
 32
32
-
 33
33
-
 34
34
-
 35
35
-
 36
36
-
 37
37
-
 38
38
-
 39
39
-
 40
40
-
 41
41
-
 42
42
-
 43
43
-
 44
44
-
 45
45
-
 46
46
-
 47
47
-
 48
48


Kicker KMXL El manual del propietario
- Categoría
- Altavoces de coche
- Tipo
- El manual del propietario
En otros idiomas
- français: Kicker KMXL Le manuel du propriétaire
- English: Kicker KMXL Owner's manual
- Deutsch: Kicker KMXL Bedienungsanleitung
Documentos relacionados
-
Kicker KM604 Manual de usuario
-
Kicker 2015 PSC65 Coaxial Speakers El manual del propietario
-
Kicker PS5250 Manual de usuario
-
-
-
-
-
-
-
Kicker KSS269 El manual del propietario