Completely read instructions before proceeding with installation.
• Installation requires two people when lifting and installing the door
• Use appropriate protective equipment
• Children should not be allowed to play with the door
• Failure to install door properly could result in an injury
• Do not open or operate door until instructed
NOTE: Larson Manufacturing Company is not responsible for accidents or injury resulting
from the use or installation of this product.
Lea completamente las instrucciones antes de proceder con la instalación.
• La instalación requiere de dos personas al levantar e instalar la puerta
• Use equipo protector adecuado
• No se debe permitir que los niños jueguen con la puerta
• La instalación inadecuada de la puerta pudiera ocasionar una lesión
• No abra la puerta hasta que se le indique
NOTA: Larson Manufacturing Company no es responsable por accidentes o lesiones resultantes del uso
o instalación de este producto.
202221026
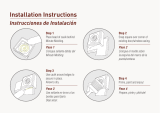
RS Platinum Collection
STORM DOOR INSTALLATION
Colección de Platino RS
INSTALACIÓN DE PUERTA
CONTRA TORMENTA
Installation Questions?
Replacement Parts?
WE CAN ASSIST YOU.
Contact us at LARSONdoors.com or 888-483-3768
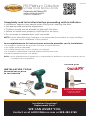
INSTALLATION TOOLS
Herramientas para
la instalación
202302397
HANDLE SET
choose your
SOLD SEPARATELY
Se vende por separado.
Vendu séparément.

2
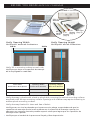
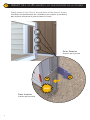
BEFORE YOU BEGIN ANTES DE COMENZAR
Verify 3/4-in mounting surface on each side.
Verifique que haya una superficie de montaje
de ¾ de pulgada en cada lado
Verify doorway is plumb with a level or plumb bob, ensuring the vertical mounting surfaces
are plumb with the top mounting surface. Openings with sidelites may require shimming to
achieve plumb mounting surfaces.
Verify doorway threshold is clean and free of debris.
Verifique con un nivel o plomada que la puerta esté a plomo, asegurándose de que las
superficies de montaje vertical estén a plomo con la superficie de montaje superior. Las
aberturas con ventanas laterales pueden requerir calzas para lograr que las superficies de
montaje estén a plomo.
Verifique que el umbral de la puerta esté limpio y libre de partículas.
Provided
Verify Opening Width Verify Opening Height
5/32-in Allen
Wrench
#2
Square
Drive
3-in
Screws
(Qty 4)
2-in
Screws
(Qty 4)
Sill Clips
(Qty 3)
Se suministra
Verifique el ancho de la abertura
Verifique el alto de la abertura
3/4-in
3/4-in
Door Sizes
Dimensiones de la puerta
Opening Width
Ancho de la abertura
Opening Height
Alto de la abertura
32-in x 81-in 31 7/8-in – 32 3/8-in 80-in – 81-in
36-in x 81-in 35 7/8-in – 36 3/8-in 80-in – 81-in

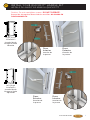
PLATINUM DOOR 3
3-in screw (Qty 4)
4-in
4-in
1 1/2-in
1 1/2-in
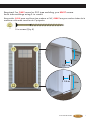
Required: For ONLY wood or PVC type molding, you MUST secure
both side moldings using 3-in screws.
Requerido: SOLO para moldura tipo madera o PVC, DEBES asegure ambos lados de la
moldura utilizando tornillos de 3 pulgadas.

4
1
INSERT SILL CLIPS INSERTE LOS SUJETADORES DE LA SOLERA
Evenly space sill clips (Qty 3) along bottom of the door as shown.
Distribuya uniformemente los sujetadores de la solera (Cantidad 3)
por la parte inferior de la puerta como se ilustra.
Exterior de la puerta
Interior de la puerta
SNAP
A
B
Door Interior
Door Exterior

PLATINUM DOOR 5
2
INSTALL YOUR QUICKFIT
™
HANDLE SET
INSTALE SU JUEGO DE MANIJA QUICKFIT™
Caution: Do not overtighten screws. DO NOT OPERATE.
Exterior de
la puerta
Exterior de
la puerta
Interior de
la puerta
Interior de
la puerta
Precaución: No apriete demasiado los tornillos. NO PONGA EN
FUNCIONAMIENTO.
Right Hinge
Installation
Left Hinge
Installation
Instalación de
bisagra al lado
derecho
Instalación de
bisagra al lado
izquierdo
Door
Interior
Door
Interior
Door
Exterior
Door
Exterior

6
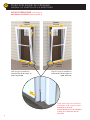
3
POSITION DOOR IN OPENING
UBIQUE LA PUERTA EN LA ABERTURA
DO NOT OPEN DOOR until Step 6.
Push door tight to molding
and open side screw covers.
NO ABRA LA PUERTA hasta el paso 6.
Presione la puerta
ajustadamente en la moldura
y abra las cubiertas de los
tornillos.
Center Center
Center
Centro Centro
Centro
Center
Centro
Left Hinge Installation
Instalación de bisagra al
lado izquierdo
Right Hinge Installation
Instalación de bisagra al
lado derecho

PLATINUM DOOR 7
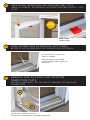
4
5
SECURE DOOR ASEGURE LA PUERTA
CLOSE SCREW COVERS
CIERRE LAS CUBIERTAS DE LOS TORNILLOS
Left Hinge Installation Shown
Se ilustra la instalación de la bisagra izquierda
While holding door in place, secure
preloaded screws A-F (Qty 12) from
the bottom up.
Required: For ONLY wood or PVC type
molding, you MUST attach 2-in screws
in predrilled holes between screws
A&B and E&F.
Mientras retiene la puerta en su lugar,
asegure los tornillos previamente
ubicados A-F (Cantidad 12) desde la
parte inferior hacia la superior.
Requerido: SOLO para moldura tipo
madera o PVC, DEBES asegure ambos
lados de la moldura utilizando tornillos
de 3 pulgadas.
C C
D D
E E
A A
F F
B B
SNAP
2-in screw (Qty 4)

8
6
7
8
OPEN DOOR, REMOVING RED SPACERS AND CLIPS
ABRA LA PUERTA, RETIRANDO LOS ESPACIADORES ROJOS Y LOS
CLIPS.
TRIM TRANSITION EXTENDERS (OPTIONAL)
RECORTE LOS EXTENSORES DE TRANSICIÓN (OPCIONAL)
REMOVE TAPE BACKING AND POSITION
TRANSITION PLATE
RETIRE EL RESPALDO DE LA CINTA Y UBIQUE LA PLACA DE
TRANSICIÓN
Both Sides
Ambos lados
For a tailored fit, trim both
sides as needed.
Para un ajuste a la medida,
recorte ambos lados según sea
necesario.
A
B
Left Hinge Installation Shown
Se ilustra la instalación de la bisagra izquierda
CLICK

9
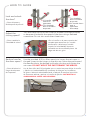
Adjust the
closing speed?
Reduce how far
the door opens?
¿Cómo cambiar la
velocidad de cierre?
¿Cómo disminuir el
rango de abertura
de la puerta?
Turn the screw on top of the closer to increase (counterclockwise)
or decrease (clockwise) the speed of the door using a flathead
screwdriver. Do not turn more than three turns.
Use the provided 5/32-in Allen wrench to loosen the set screw in
the pad closest to the hinges in the drip cap. Move the pad toward
the handle side to the desired hold-open position and tighten the
set screw. DO NOT MOVE THE PAD TOWARD THE HINGES.
Gire el tornillo en la parte superior del
cerrador para aumentar (en sentido
antihorario) o disminuya (sentido
horario) la velocidad de la puerta
utilizando un destornillador plano. No
haga más de tres giros.
Use la llave Allen de 5/32 pulgadas que se suministra para aflojar el tornillo
y fijación en la almohadilla más cercana a las bisagras en la cubierta
de goteo. Mueva la almohadilla hacia el lado de la manija a la posición
de mantener abierta y apriete el tornillo de fijación. NO MUEVA LA
ALMOHADILLA HACIA LAS BISAGRAS.
F
A
S
T
E
R
S
L
O
W
E
R
Lock and unlock
the door?
¿Cómo bloquear y
desbloquear la puerta?
PARA
CERRAR
LOCK
1
2
Lift handle
Levante la
agarradera
Turn deadbolt
Gire la cerradura
de pestillo
1
2
Pull handle down
Hale la
agarradera
hacia abajo
Turn deadbolt
Gire la cerradura
de pestillo
PARA
ABRIR
UNLOCK
HOW TO GUIDE

10
HOW TO GUIDE
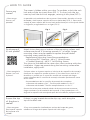
Fix doorway if
it’s not plumb?
Fig. 1 Fig. 2
Ensure the top
of the door is
sealed?
¿Cómo arreglar la
puerta si no está
a plomo?
¿Cómo asegurar
que la parte superior
de la puerta está
sellada?
Attach shims along top or bottom of the mounting surfaces until
surfaces are plumb. If shimming exceeds ¼” in height, longer
mounting screws may be needed to replace the pre-loaded
mounting screws near the shims.
Replacement Mounting Screw Recommendations:
• Wood and PVC Openings - #6 x 2” Wood Screws
• Cladded Openings - #6 x 2” Self-Drilling Screws
Trim shims to hide behind the storm door, then continue with door
installation. If gaps are present along the mounting surface after
installation, apply caulk.
If there is a gap located above the drip cap, caulk along the
top of the black seal.
Coloque calzas en la parte superior o inferior de las superficies de montaje
hasta que las superficies queden a plomo. Si las calzas tienen más de ¼”
de altura, es posible que se necesiten tornillos de montaje más largos
como reemplazo de los tornillos de montaje colocados previamente cerca
de las calzas.
Recomendaciones de los tornillos de montaje de reemplazo:
• Aberturas de madera y PVC - Tornillos para madera n.o 6 x 2”
• Aberturas de fachada - Tornillos autoperforantes n.o 6 x 2”
Recorte las calzas para ocultarlas detrás de la puerta contra tormentas,
luego continuar con la instalación de la puerta. Si hay separaciones a lo
largo de la superficie de montaje después de la instalación, aplique masilla.
Si hay una separación localizada por encima de la tapa de goteo,
calafatee a lo largo de la parte superior del sello negro.
Access my
screen?
¿Cómo tengo
acceso a mi
pantalla?
The screen is hidden within your door. To ventilate, unlock the sash
lock and pull the top insert down (FIG 1). To close, push the top
insert up until the sash lock engages, securing it into place (FIG 2).
La pantalla está oculta dentro de su puerta. Para ventilar, destrabe el cerrojo
de banda y hale la parte superior del inserto hacia abajo (FIG 1). Para cerrar,
empuje la parte superior del inserto hacia arriba hasta que el cerrojo de banda
se enganche, asegurándolo en su lugar (FIG 2).

11
LIMITED LIFETIME WARRANTY
PLATINUM DOOR WARRANTY DETAIL
This warranty applies to the original homeowners of owner-occupied residential properties and
covers manufacturing defects only. During the life of the door, Larson Manufacturing Company
will warrant manufacturer’s defects as listed below. A shipping and processing fee may apply.
DOOR FRAME AND HINGES: LARSON
®
warrants the door frame and mounting rails to be free
from defects in manufacturing, materials, paint adhesion, or workmanship, under normal use,
for the life of the door.
COMPONENTS: LARSON warrants the components of the door, including hardware, retainer
strips, screw covers, closers, locksets (mechanical operation and finish), to be free from defects
in manufacturing, materials, tarnishing and workmanship for a period of one year from the
date of original retail purchase. Notwithstanding the forgoing, nothing contained herein shall
cover damage to the glass or screen, such as cracks, scratching, or other items of normal wear
and tear.
In the event of a defect in manufacturing, materials or workmanship within the limited
warranty period specified above, and upon written proof of purchase, LARSON, at its option,
will provide a replacement component or provide a credit toward a replacement product,
as long as the original consumer purchaser owns the home in which the door was initially
installed. Installation is not included.
PLATINUM DOOR WARRANTY LIMITATIONS:
Notwithstanding the foregoing, this warranty shall not apply to, and Larson shall not be liable
for any losses, resulting from the following:
• Alterations or modifications of door frame and hinges or any components will void any
warranty provided herein.
• Damage or breakage to the screen/glass insert is not covered under warranty.
• Acts of God.
• Damages resulting from improper installation or misuse.
• Glass breakage due to settling of the foundation of the home.
• Losses resulting from water and flooding damage.
• Damage caused by chemicals or other airborne pollutants, including but not limited to salt or
acid rain.
• Labor costs and other indirect costs of replacing components or door frame and hinges.
Your exclusive remedy is limited to the repair and replacement of the defective component,
door frame or hinge.
Any implied warranty, including the implied warranty or fitness of a particular use or purpose
and the implied warranty of merchantability, is limited in duration to the express warranty
provided herein unless a shorter period is permitted by law. LARSON shall not be liable for
incidental, indirect or consequential damages to the building, its contents or its occupants,
however arising. This Limited Warranty contains all the provisions of your remedies. LARSON’s
liability is limited to the provisions of this Limited Warranty, whether any claim against it is based
on strict liability, negligence, breach of warranty, if this limited warranty shall fail its essential
purpose, or any other theory or cause of action.

12
LIMITED LIFETIME WARRANTY
GARANTÍA LIMITADA DE LA VIDA ÚTIL DE LA PUERTA DE PLATINO
Esta garantía se aplica a los propietarios residenciales originales de las propiedades residencias
ocupadas por el propietario y solo ampara los defectos de fabricación. Durante la vida de la
puerta, Larson Manufacturing Company garantizará los defectos de fabricación como se indica
a continuación. Se puede aplicar una tarifa de envío y procesamiento.
MARCO DE LA PUERTA Y BISAGRAS: LARSON
®
garantiza que el marco de la puerta y los rieles
de montaje están libres de defectos de fabricación, materiales, adhesión de pintura, o mano de
obra, de acuerdo al uso normal, durante la vida de la puerta.
COMPONENTES: LARSON garantiza que los componentes de la puerta, incluyendo los
herrajes, bandas de retención, coberturas de los tornillos, cerradores, juegos de cerraduras
(funcionamiento mecánico y acabado) están libres de defectos de fabricación, materiales,
falta de brillo y mano de obra durante un período de un año a partir de la fecha de la compra
minorista original. No obstante lo anterior, nada de lo contenido aquí cubrirá daño al vidrio o
malla, tal como grietas, rayaduras u otros elementos de uso y desgaste natural.
En caso de un defecto de fabricación, materiales o mano de obra dentro del período de
garantía especificado anteriormente, y con la prueba escrita de compra, LARSON, a su elección
proporcionará un componente de reemplazo o un crédito hacia el reemplazo del producto,
en tanto que el comprador consumidor original sea el propietario de la vivienda en la cual la
puerta fue instalada inicialmente. La instalación no está incluida.
LIMITACIONES DE GARANTÍA DE LA PUERTA DE PLATINO:
Independientemente de lo anterior, esta garantía no se aplicará a, y Larson no será responsable
de ninguna pérdida, resultante de lo siguiente:
• Alteraciones o modificaciones al marco de la puerta y las bisagras o cualesquiera
componentes anularán la garantía que se proporciona aquí.
• Daño o rotura del inserto de malla/vidrio no está amparado en la garantía salvo como se
describió según las disposiciones de PROTECCIÓN CONTRA ROTURAS.
• Hechos fortuitos.
• Daños resultantes de la instalación inadecuada o uso indebido.
• Rotura del vidrio ocasionada por el asentamiento de los cimientos de la vivienda.
• Pérdidas resultantes por causa de daños producidos por el agua o una inundación.
• Daño ocasionado por químicos u otros contaminantes del aire, incluyendo pero no limitados
a la sal o la lluvia ácida.
• Costos de mano de obra y otros costos indirectos de reemplazo de componentes o marco
de puerta y bisagras.
Su recurso exclusivo está limitado a la reparación y reemplazo del componente, marco de
puerta o bisagra defectuoso.
Cualquier garantía implícita, incluyendo la garantía implícita o adecuación para un uso o
propósito en particular y la garantía implícita de mercantibilidad, está limitada en duración
a la garantía expresa proporcionada aquí a menos que la ley permita un período más corto.
LARSON no será responsable de daños incidentales, indirectos o resultantes a la edificación,
su contenido o sus ocupantes que puedan surgir. Esta Garantía Limitada contiene todas las
disposiciones de sus recursos. La responsabilidad de LARSON se limita a las disposiciones de
esta Garantía Limitada, independientemente de cualquier reclamo contra ella que esté basado
en la responsabilidad estricta, negligencia, incumplimiento de la garantía si esta garantía
limitada dejara de cumplir su finalidad esencial, o cualquier otra teoría o causa de acción.
-
 1
1
-
 2
2
-
 3
3
-
 4
4
-
 5
5
-
 6
6
-
 7
7
-
 8
8
-
 9
9
-
 10
10
-
 11
11
-
 12
12


LARSON 45604362L Guía de instalación
- Tipo
- Guía de instalación
- Este manual también es adecuado para
en otros idiomas
- English: LARSON 45604362L Installation guide
Artículos relacionados
-
LARSON 45904362R Guía de instalación
-
LARSON 45018361L Guía de instalación
-
LARSON 1467910257 Guía de instalación
-
-
-
-
-
-
-