
www.tc-helicon.com - www.youtube.com/tchelicon
(EN) Introduction
VoiceTone C1 offers correction, HardTune and Gender effects in an easy-to-use footpedal.
This product is ideal for singers who seek ultimate pitch accuracy in live performance and recording. It
also produces the infamous “Cher” effect where pitch correction is used as a robot-type effect. A
Gender control adds to the mayhem to make your voice deeper (male) or thinner (female>alien).
• Super-simple setup and control
• “Mild to Wild” correction possible by varying the Attack control
• Flexible guide methods include Key control, Chromatic (no key), and chordal instrument in/thru.
• Instrument Thru has ground lift to minimize buzz/hum.
• Mic Control feature works with optional TC-Helicon MP-75 mic to add “on-mic” effect switching.
• USB connection to computer for easy firmware updates, news and tips via the free VoiceSupport
application.
• Balanced XLR in and out with phantom power for condenser microphones.
Connecting
MIC jack - Connect your mic here using a balanced XLR cable.
Phantom power is always on.
OUT jack - Connect to your PA mixer, another VoiceTone pedal
or powered speaker.
Power in - Connect the supplied 12VDC power supply.
Optional:
USB - Connect to a computer running the TC-Helicon
VoiceSupport application for registration, latest version and tips.
INST IN - Chords played on this instrument will be recognized
when the Key selector is set to Chromatic.
INST OUT - Connect to a PA or guitar amp to hear your
instrument.
PA
PA
• Turn down your PA when making all connections
• The latest version of VoiceSupport is available free from www.tc-helicon.com/voicesupport
• The USB connection does not provide power to the unit
• If you hear hum from your PA or amp, push the GRND LIFT in. Otherwise, it should remain out.
First Setup and Use
1. Turn down your PA’s master volume.
2. Connect your mic and PA as shown in the diagram first, then plug in the AC adaptor. For live
performance, a USB connection to a computer is not required.
3. Set the key to C, Attack control to Hard and the Gender control to the center notch.
Optional - Connect an instrument as shown to guide correction and override the Key selector.
4. Sing into your mic while adjusting the MIC GAIN control so that the input level LED flashes green.
Brief flashes of red on the LED on your loudest singing are ok.
5. Ensure that the effect is on (center LED is lit).
6. Sing while turning up your PA volume to a comfortable level.
As you sing, you will hear your voice jumping from pitch to pitch in the key of C major. Play an
instrument or accompaniment in the same key to hear the HardTune effect in context. Now you can
experiment with the controls before reading the Effect Descriptions section below.
Phantom Power
There is no switch to enable phantom power on the VoiceTone singles. Phantom power is available
when the product is powered. Microphones that don’t require phantom power will operate properly.
Always apply power as the last connection step and ensure your PA is muted. This will reduce the
chance of audio pops that could harm your equipment.
Effect Descriptions
Key control - Setting this control to your song’s accompaniment key is essential for HardTune and
pitch correction to be musically useful. While this selector only offers major keys, you are able to select
relative minor keys according to the chart following:
In the key of C, the Natural Minor has a G# where Dorian has an A. The CH (chromatic) setting works
with accompaniment in any key. It is used with a slow attack control setting for subtle, overall pitch cor-
rection. When an instrument is connected, the CH setting enables chord recognition.
Attack control - At left, no pitch correction is heard, allowing Gender-only effects. Up to the notch are
useful pitch correction attack rates. Towards the Hard setting tuning becomes an effect.
Gender control - The center notch setting is neutral (no gender). The left side offers thickened, “male”
gender effects. To the right are “female” to “alien” gender effects. These can be used in combination
with correction if desired.
INST IN - A chordal instrument (with no effects) such as a guitar will guide the correction to match your
music. This is the most flexible method because key alone may not match all your songs.
Major C C# D D# E F F# G G# A A# B
Natural Minor Am A#m Bm Cm C#m Dm D#m Em Fm F#m Gm G#m
Dorian Minor Dm D#m Em Fm F#m Gm G#m Am A#m Bm Cm C#m
2. Install VoiceSupport on your computer.
3. Connect your product via USB to your computer.
4. Run VoiceSupport.
5. Read the news, click on tabs and browse the features of the application.
Using the Mic Control Feature
Mic Control allows you to turn effects on and off from the optional TC-Helicon MP-75 microphone. Push
the MIC CONTROL switch in to allow remote on/off control on any or all pedals in a chain. When Mic
Control is not desired, ensure the switch is out. Using multiple pedals requires the control signal pass
through feature to be enabled on all but the last pedal. To enable or disable this feature, hold the effect
footswitch and the switch on the mic for 3 seconds.
Tips for Avoiding Feedback
• Ensure your monitor and/or PA speakers don’t aim directly at the front of your mic
• Sing close to the mic, even touching the grill with your lips
• Try a super-cardioid dynamic mic such as TC-Helicon’s MP-70 and MP-75
• Set your PA channel EQ and graphic EQ flat
• Have your band play quieter on stage.
FAQ
Why am I hearing distortion?
Likely the MIC GAIN knob is set too high. Ensure that the Input LED is green most of the time with only
brief and rare peaks of red.
Can I use the product on an auxiliary send/return?
Yes. You will need balanced XLR to TRS cables to do so. Ensure that the MIC GAIN knob is set to
minimum to accept the line level signal from your mixer.
Will I need a DI box to connect to a mixer?
No.
Why is the effect turning the effect on and off by itself?
This can happen when you have the MIC CONTROL knob pushed in and you are connected to a mixer
with “pseudo balanced” outputs. Unless you are using only the specific TC-Helicon mic with the Mic
Control feature, the MIC CONTROL knob should be out.
Important Safety Instructions
1 Read these instructions.
2 Keep these instructions.
3 Heed all warnings.
4 Follow all instructions.
5 Do not use this apparatus near water.
6 Clean only with dry cloth.
7 Do not block any ventilation openings. Install in accor-
dance with the manufacturer’s instructions.
8 Do not install near heat sources such as radiators, heat
registers, stoves, or other apparatus (including ampli-
fiers) that produce heat.
9 Only use attachments/accessories specified by the
manufacturer.
10 Refer all servicing to qualified service personnel.
Servicing is required when the apparatus has been
damaged in any way, such as power-supply cord or
plug is damaged, liquid has been spilled or objects
have fallen into the apparatus, the apparatus has been
exposed to rain or moisture, does not operate normally,
or has been dropped.
Warning!
• To reduce the risk of fire or electrical shock, do not
expose this equipment to dripping or splashing and
ensure that no objects filled with liquids, such as vases,
are placed on the equipment.
• Do not install in a confined space.
Service
• All service must be performed by qualified personnel.
Caution:
You are cautioned that any change or modifications not
expressly approved in this manual could void your
authority to operate this equipment.
EMC/EMI
This equipment has been tested and found to comply with
the limits for a Class B Digital device, pursuant to part 15
of the FCC rules.
These limits are designed to provide reasonable protection
against harmful interference in residential installations.
This equipment generates, uses and can radiate radio
frequency energy and – if not installed and used in
accordance with the instructions – may cause harmful
interference to radio communications. However, there is
no guarantee that interference will not occur in a particular
installation. If this equipment does cause harmful
interference to radio or television reception – which can be
determined by turning the equipment off and on –, the
user is encouraged to try correcting the interference by
one or more of the following measures:
• Reorient or relocate the receiving antenna.
• Increase the separation between the equipment and
the receiver.
• Connect the equipment to an outlet on a circuit
different from the one to which the receiver is
connected.
• Consult the dealer or an experienced radio/TV
technician for help.
For the customers in Canada:
This Class B digital apparatus complies with Canadian
ICES-003. Cet appareil numérique de la classe B est
conforme à la norme NMB-003 du Canada.
¡Precaución!
• Para reducir el riesgo de incendios o descargas eléctri-
cas, no permita que este aparato quede expuesto a
salpicaduras y asegúrese de no colocar sobre él
ningún objeto que contenga líquidos, como un jarrón,
para evitar que se pueda derramar.
• No instale este aparato dentro de un espacio confina-
do, como encastrado en una librería.
Reparaciones
• Cualquier reparación debe ser realizada únicamente
por personal de un servicio técnico oficial.
Atención:
Le advertimos que cualquier cambio o modificación que
no aparezca aprobada expresamente en este manual
puede anular su autorización a utilizar este aparato.
A la hora de sustituir la pila, siga cuidadosamente las
instrucciones sobre manejo de la misma que aparecen en
este manual.
Attention Danger!
• Pour éviter tout risque d’électrocution ou d’incendie, ne
pas exposer cet appareil à quelque source liquide
(goûtes d’eau, projections liquides,etc.) et veillez à ne
poser aucun objet contenant un liquide sur l’appareil.
• Do not install in a confined space.
Service
• Confiez toutes les opérations de maintenance à un
personnel qualifié.
Attention:
Toute modification apportée à l’appareil et qui n’est pas
expressément préconisée dans ce manuel invalide votre
droit à utiliser cet appareil.
Lors du remplacement de la pile, suivez attentivement les
instructions spécifiées dans ce manuel.
VoiceTone C1
USER’S MANUAL
BEDIENUNGSANLEITUNG
MANUAL DE INSTRUCCIONES
MANUALE D’USO
MODE D’EMPLOI
www.tchelicon.com - Prod. No: E60515211
Achtung!
• Um die Gefahr eines Feuers oder eines elektrischen
Schlages zu vermeiden, dürfen Sie dieses Gerät
keinem tropfendem Wasser oder Spritzwasser ausset-
zen. Stellen Sie keine mit Flüssigkeiten gefüllten
Behältnisse – wie beispielsweise Vasen – auf diesem
Gerät ab.
• Montieren Sie das Gerät nicht in einem vollständig
geschlossenen Behälter oder Gehäuse.
Wartung
• Alle Wartungsarbeiten müssen von einem hierfür quali-
fizierten Servicetechniker durchgeführt werden.
Achtung:
Änderungen an diesem Gerät, die im Rahmen dieser
Anleitung nicht ausdrücklich zugelassen wurden, können
das Erlöschen der Betriebserlaubnis für dieses Gerät zur
Folge haben.
Folgen Sie beim Auswechseln der Batterie den
Anweisungen zur Handhabung von Batterien in dieser
Bedienungsanleitung.
Attenzione!
• Per ridurre il rischio di incendio o scossa elettrica, non
esporre questo dispositivo allo sgocciolamento o agli
schizzi di alcun liquido. Non posizionare sul dispositivo
oggetti contenenti liquidi, come vasi o bicchieri.
• Non installare in uno spazio ristretto.
Assistenza
• Ogni intervento tecnico deve essere effettuato solo da
personale qualificato.
Cautela:
Si avverte che qualsiasi cambiamento e modifica non
espressamente approvata in questo manuale può
annullare la vostra autorità di utilizzo del dispositivo.
Per sostituire la batteria, seguire attentamente le
procedure fornite all’interno di questo manuale.
Using Multiple VoiceTone Single Pedals
It is possible (even encouraged!) to use more than one VoiceTone pedal at a time. You will only need to
adjust the MIC GAIN control of the first pedal in the chain. On the rest, MIC GAIN should be set to the
minimum (fully left) position.
The order of the pedals is important. See the following table showing 2, 3 and 4 pedal combinations.
2 Pedals D1 > R1 T1 > D1 C1 > D1 3 Pedals T1 > D1 > R1 T1 > C1 > R1
T1 > C1 T1 > R1 C1 > R1 C1 > D1 > R1 T1 > C1 > R1
4 Pedals T1 > C1 > D1 > R1
The VoiceSupport Application
VoiceSupport is your way of getting the most from your TC-Helicon product, as well as letting your
product grow with firmware updates. VoiceSupport includes:
• Access to firmware updates and new features
• Videos, artist profiles, tips & tricks
• Registration of your product
To access the VoiceSupport application:
1. Download VoiceSupport from www.tc-helicon.com/voicesupport.
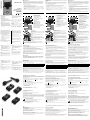
1 - Effect on/off footswitch
2 - Instrument Thru to amp/PA
3 - Instrument ground lift: in=lifted
4 - Mic input level control
5 - Key selector including Chromatic (CH)
6 - Attack speed control
7 - Gender control
8 - Balanced XLR mic input
9 - Balanced XLR mono output
10 - Power in
11 - USB connector to computer
12 - Input level LED; green=signal, red=clip
13 - Effect on/off via optional mic (MP-75): in=on
14 - Guide instrument input jack
15 - Effect active LED indicator
1
2
5
8 9 10 11
12
13
4
3
14
15
6
7
www.tc-helicon.com - www.youtube.com/tchelicon
(DE) Einleitung
Das VoiceTone C1 bietet Tonhöhenkorrektur, HardTune- und Gender-Effekte in Form eines leicht zu bedienenden
Fußpedals.
Dieses Gerät ist perfekt für Sänger, die weder auf der Bühne noch im Studio auf eine perfekt klingende Intonation ver-
zichten wollen. Es kann außerdem den berühmt-berüchtigten „Cher-Effekt“ erzeugen, bei dem die Tonhöhenkorrektur zu
einem roboterhaften Klangbild führt. Mit dem Gender-Regler können Sie Ihre Stimme außerdem voller/männlicher oder
auch dünner (weiblich oder ganz fremdartig) klingen lassen.
• Extrem einfache Einrichtung und Steuerung
• Pitch-Correction-Effekte können mit dem Attack-Regler von „subtil“ bis „abgefahren“ variiert werden
• Steuerung der Tonhöhenkorrektur durch Auswahl einer Tonart, chromatisch (keine Tonart) oder durch ein
Akkordinstrument
• Ground-Lift-Funktion zur Unterdrückung von Brummschleifen für Instrument Thru-Buchse
• Mic Control-Funktion: Der Effekt kann mit dem Mikrofon TC-Helicon MP-75 (separat erhältlich) an-/abgeschaltet
werden.
• Per USB an Computer anschließbar – für einfache Firmware-Updates, News und Tipps mit Hilfe der kostenlosen
Software VoiceSupport
• Symmetrischer XLR-Ausgang und -Eingang mit Phantomspeisung für Kondensatormikrofone
Anschlüsse vornehmen
MIC-Buchse: Schließen Sie an diese Buchse mit Hilfe eines symmetri-
schen XLR-Kabels Ihr Mikrofon an. Die Phantomspeisung am
Mikrofoneingang ist permanent aktiv.
OUT-Buchse: Verbinden Sie das Gerät über diese Buchse mit Ihrem PA-
Mischer, einem Aktivmonitor oder einem weiteren VoiceTone-Pedal.
Netzeingang: Schließen Sie hier das mit dem Gerät gelieferte Netzteil (12
V Gleichspannung) an.
Optional:
USB: Verbinden Sie das Gerät über ein USB-Kabel mit einem Computer,
auf dem die Software VoiceSupport von TC-Helicon läuft, um das Produkt
zu registrieren, die neueste Software und wichtige Tipps zu erhalten.
INST IN: Akkorde, die Sie auf einem an diese Buchse angeschlossenen
Instrument spielen, werden erkannt, wenn der Tonart-Drehregler auf CH
(chromatisch) steht.
INST OUT: Verbinden Sie diese Buchse mit Ihrem Verstärker oder der PA,
um das an die Buchse INST IN angeschlossene Instrument zu hören.
PA
PA
• Wenn Sie die Verbindungen zu diesem Gerät herstellen (Audio, USB, Stromversorgung), sollte Ihre PA stummgeschaltet sein.
• Sie können die neueste Version der Software VoiceSupport kostenlos von www.tc-helicon.com/voicesupport herunterladen.
• Das Gerät wird über die USB-Verbindung nicht mit Strom versorgt.
• Wenn Sie aus Ihrem Verstärker oder der PA ein Netzbrummen hören, drücken Sie die Ground-Lift-Taste. Ansonsten sollte die Taste
nicht gedrückt sein.
Konfiguration und Inbetriebnahme
1. Senken Sie zunächst den Pegel an Ihrem Verstärker oder der PA ab.
2. Schließen Sie das Gerät zunächst entsprechend der Abbildung an Ihr Mikrofon und Ihre PA an und stecken Sie dann
das Netzteil in eine Steckdose. Die USB-Verbindung wird beim Live-Einsatz nicht benötigt.
3. Stellen Sie den Tonart-Drehregler auf „C“, den Attack-Drehregler auf „Hard“ und den Gender-Drehregler in die
Mittelposition.
Sie können außerdem entsprechend der Darstellung ein Instrument anschließen, um die Tonhöhenkorrektur damit zu
steuern. Diese Steuerung hat Vorrang vor der gewählten Tonart.
4. Singen Sie in Ihr Mikrofon und passen Sie mit dem Regler MIC GAIN die Eingangsempfindlichkeit so an, dass die
Eingangspegel-Leuchtdiode grün leuchtet. An lauten Stellen darf die LED auch kurzfristig rot leuchten.
5. Schalten Sie den Effekt mit dem Fußtaster an, wenn er nicht schon angeschaltet ist. Wenn der Effekt angeschaltet
ist, leuchtet die mittlere Leuchtdiode.
6. Singen Sie, während Sie den Pegel an Ihrer Verstärkeranlage erhöhen, bis der gewünschte Pegel erreicht ist.
Sie werden hören, dass die Noten, die Sie singen, auf die Töne der C-Dur-Tonleiter korrigiert werden. Spielen Sie auf
einem an das Gerät angeschlossenen Instrument oder spielen Sie einen Backing-Track ein, um den HardTune-Effekt im
Zusammenhang zu hören. Sie können jetzt ein wenig mit den Reglern experimentieren, bevor Sie die den Abschnitt
„Beschreibungen der Effekte“ lesen.
Phantomspeisung
Bei den Produkten der VoiceTone Singles-Serie ist kein Schalter zum Aktivieren der Phantomspeisung erforderlich. Die
Phantomspeisung steht sofort zur Verfügung, wenn das Gerät angeschaltet wird. Mikrofone, für die keine
Phantomspeisung erforderlich ist, können problemlos verwendet werden. Schließen Sie das Gerät erst dann an die
Stromversorgung an, wenn Sie alle anderen Verbindungen vorgenommen haben, und achten Sie darauf, dass die PA zu
diesem Zeitpunkt stummgeschaltet ist. Sie vermindern auf diese Weise das Risiko von Störgeräuschen, die Ihr
Equipment beschädigen könnten.
Beschreibungen der Effekte
Steuerung der Tonart: Damit die Tonhöhenkorrektur und der HardTune-Effekt musikalisch sinnvolle Ergebnisse liefern,
müssen Sie den Key-Regler passend zu Ihrem Song einstellen. Der Drehregler erlaubt nur die Einstellung der Dur-
Tonarten, aber Sie können ggf. anhand der folgenden Tabelle die entsprechenden Moll-Tonarten ermitteln.
Beim natürlichen Moll auf dem Grundton C ist die sechste Stufe ein G#, während es im dorischen Modus ein A ist. Die
Einstellung „CH“ (= chromatisch) eignet sich für jede Tonart. Wenn Sie den Attack-Drehregler auf einen langsamen Wert
einstellen, können Sie die chromatische Einstellung für eine subtile Tonhöhenkorrektur verwenden, ohne zu jedem Song
erst die richtige Tonart zu wählen. Wenn Sie ein Instrument angeschlossen haben, aktivieren Sie mit der Einstellung
„CH“ die Akkorderkennung.
Attack-Drehregler: Wenn Sie den Regler an den linken Anschlag drehen, erfolgt keine Tonhöhenkorrektur, und nur die
gewählte Gender-Einstellung wird hörbar. Drehen Sie den Regler weiter in Richtung der Mittelposition, um eine
Tonhöhenkorrektur zu erhalten. Drehen Sie den Regler weiter in Richtung „Hard“, um stattdessen einen deutlich als sol-
chen erkennbaren Effekt zu erzielen.
Gender-Drehregler: Die Mittelstellung ist neutral (keine Beeinflussung der Stimmcharakteristik). Wenn Sie den Regler
nach links drehen, klingt die Stimme voller und maskuliner. Wenn Sie den Regler nach rechts drehen, klingt die Stemme
Dur C C# D D# E F F# G G# A A# B
Naturl. Moll Am A#m Bm Cm C#m Dm D#m Em Fm F#m Gm G#m
Dorisch Dm D#m Em Fm F#m Gm G#m Am A#m Bm Cm C#m
So erhalten und verwenden Sie die Software VoiceSupport:
1. Laden Sie die Software VoiceSupport von www.tc-helicon.com/voicesupport herunter.
2. Installieren Sie VoiceSupport auf Ihrem Computer.
3. Verbinden Sie Ihr Gerät über ein USB-Kabel mit Ihrem Computer.
4. Starten Sie die Software VoiceSupport.
5. Lesen Sie neue Informationen zu Ihrem Produkt, klicken Sie auf die Register (Tabs) und machen Sie sich mit den
Leistungsmerkmalen der Software vertraut.
Wie Sie die Funktion Mic Control verwenden
Mit Mic Control können Sie das (separat erhältliche) Mikrofon TC-Helicon MP-75 verwenden, um Effekte an- und abzu-
schalten. Drücken Sie den MIC CONTROL an einem Pedal, um dessen Effekt mit dem Mikrofon ein- oder auszuschal-
ten. Sie können diesen Schalter bei einem oder mehreren Pedalen aktivieren. Wenn Sie die Funktion Mic Control nicht
verwenden wollen, achten Sie darauf, dass der MIC CONTROL-Schalter bei diesem Pedal nicht gedrückt ist. Wenn Sie
mit mehreren Pedalen arbeiten, muss die Durchleitung des Steuersignals bei allen Pedalen (nur nicht beim letzten
Pedal) aktiviert sein. Um die Durchleitung des Steuersignals an- oder abzuschalten, halten Sie den Taster des
Fußpedals und den Schalter am Mikrofon drei Sekunden lang gedrückt.
Wie Sie Rückkopplungen vermeiden
• Achten Sie darauf, dass Ihr Monitor und/oder die Lautsprecher Ihrer PA nicht direkt auf die Vorderseite
Ihres Mikrofons abstrahlen.
• Singen Sie so nah wie möglich an Ihrem Mikrofon.
• Verwenden Sie ein dynamisches Mikrofon mit Supernierencharakteristik wie zum Beispiel ein MP-70 oder MP-75 von
TC-Helicon.
• Stellen Sie den Kanal-EQ oder den grafischen Equalizer Ihrer PA auf eine flache Kennlinie ein.
• Wenn keine andere Maßnahme hilft, muss die Band leiser spielen beziehungsweise ihre Bühnenmonitore leiser stel-
len.
Häufige Fragen und Antworten
Warum kommt es zu Verzerrungen?
Wahrscheinlich ist der Regler MIC GAIN auf einen zu hohen Wert eingestellt. Stellen Sie die Eingangsempfindlichkeit so
ein, dass die Input-Leuchtdiode meist grün und nur selten/kurz rot leuchtet.
Kann ich dieses Gerät auch in einem Effektweg (Aux Send/Return) betreiben?
Ja. Sie benötigen hierfür symmetrische XLR-auf-TRS-Adapterkabel. Um das Linepegel-Signal von Ihrem Mischpult kor-
rekt zu verarbeiten, sollten Sie den Regler MIC Gain auf den kleinsten Wert (linker Anschlag) einstellen.
Benötige ich eine DI-Box, um dieses Gerät an einem Mischpult zu betreiben?
Nein.
Warum schaltet das Gerät selbsttätig den Effekt ein oder aus?
Dies kann geschehen, wenn Sie den Schalter MIC CONTROL aktiviert haben und das Gerät mit einem Mischpult ver-
bunden haben, das mit „pseudosymmetrischen“ Ausgängen ausgestattet ist. Sie sollten den Schalter MIC CONTROL nur
aktivieren, wenn Sie ein Mikrofon von TC-Helicon verwenden, das die Funktion Mic Control unterstützt.
femininer und – bei hohen Werten – fremdartig. Sie können diese Gender-Variation mit der Tonhöhenkorrektur zu inte-
ressanten Effekten kombinieren.
INST IN: Sie können mit einem (unverzerrten) Akkordinstrument die Tonart vorgeben, die zur Tonhöhenkorrektur Ihrer
Stimme verwendet werden. Dies ist der flexibelste Ansatz, da Sie durch Vorgeben der Tonart mit dem Key-Drehregler
möglicherweise nicht alle Ihre Songs abdecken können.
Mit mehreren VoiceTone Single-Pedalen arbeiten
Sie können (und sollten!) mehr als ein VoiceTone-Pedal gleichzeitig einsetzen. Dabei müssen Sie die
Eingangsempfindlichkeit nur mit dem Drehregler MIC GAIN des ersten Pedals im Signalweg einstellen. Bei den folgen-
den Pedalen drehen Sie den Regler MIC GAIN an den linken Anschlag.
Es ist wichtig, dass Sie die Pedale in der richtigen Reihenfolge anordnen. Die folgende Tabelle zeigt die sinnvollen
Anordnungen für zwei, drei und vier Pedale.
2 Pedale D1 > R1 T1 > D1 C1 > D1 3 Pedale T1 > D1 > R1 T1 > C1 > R1
T1 > C1 T1 > R1 C1 > R1 C1 > D1 > R1 T1 > C1 > R1
4 Pedale T1 > C1 > D1 > R1
Die VoiceSupport-Software
Mit der Software VoiceSupport können Sie den größtmöglichen Nutzen aus Ihrem TC-Helicon-Produkt ziehen. Außerdem
ermöglicht diese Software es Ihnen, von Aktualisierungen der Software Ihres Gerätes (Firmware) zu profitieren.
VoiceSupport bietet die folgenden Features:
• Zugriff auf Firmware-Aktualisierungen und neue Leistungsmerkmale
• Videos, Künstlerprofile, Tipps und Tricks
• Registrierung Ihres Produkts
1 Fußtaster Effekt ein/aus
2 Instrument Thru-Buchse (zu Verstärker/PA)
3 Ground Lift-Taste (gedrückt: aktiv)
4 Gain-Regler Mikrofoneingang
5 Tonart-Drehregler (Einstellung CH = chromatisch)
6 Attack Speed-Drehregler
7 Gender-Drehregler
8 Mikrofoneingang (symmetrisch/XLR)
9 Monoausgang (symmetrisch/XLR)
10 Netzeingang
11 USB-Anschluss zur Verbindung mit einem Computer
12 Eingangspegel-LED (grün = Signal, rot = übersteuert)
13 Mic Control (Effekt über optionales Mikro MP-75 steu-
ern. Gedrückt: aktiv)
14 Eingangsbuchse für steuerndes Instrument
15 Aktivitätsanzeige-LED
1
2
5
8 9 10 11
12
13
4
3
14
15
6
7
1
2
5
8 9 10 11
12
13
4
3
14
15
6
7
www.tc-helicon.com - www.youtube.com/tchelicon
(ESP) Introducción
El VoiceTone C1 le ofrece efectos de corrección, HardTune y Gender en un pedal muy sencillo.
Este producto es ideal para aquellos cantantes que estén buscando la máxima precisión de tono en
actuaciones en directo y en estudio. También produce el famoso efecto “Cher” en el que la corrección
de tono se usa como un efecto de tipo robot. Un control Gender (“género”) añade la posibilidad de
hacer que su voz sea más profunda (masculina) o fina (femenina>alien).
• Configuración y control súper sencillos.
• Puede conseguir una corrección “de suave a salvaje” modificando el control de ataque.
• Unos flexibles métodos guía que incluyen control de clave, cromático (sin clave) y entrada/thru de
acorde de instrumento.
• La toma Instrument Thru tiene anulación de toma de tierra para minimizar los zumbidos.
• Función Mic Control que actúa con el micro opcional TC-Helicon MP-75 para añadir un efecto de
conmutación “on-mic”.
• Conexión USB a ordenador para una más fácil actualización de firmware, volcado de novedades y
consejos a través de la aplicación gratuita VoiceSupport.
• Entrada y salida en XLR balanceado con alimentación fantasma para micros condensadores.
Conexión
Toma MIC - Conecte aquí su micrófono usando un cable XLR
balanceado. La alimentación fantasma siempre está activa.
Toma OUT - Conecte esta toma a su mezclador PA, otro pedal
VoiceTone o altavoz autoamplificado.
Toma de corriente - Conecte el adaptador 12 V DC incluido.
Opcional:
USB - Conéctelo a un ordenador que use el programa TC-
Helicon VoiceSupport para registros, volcados y otros.
INST IN - Los acordes que toque en su instrumento serán
reconocidos cuando el selector Key esté ajustado a Chromatic.
INST OUT - Conéctelo a un sistema PA o amplificador de
guitarra para escuchar su instrumento.
PA
PA
• Reduzca al mínimo el volumen de su PA antes de realizar las conexiones
• Puede conseguir gratis la última versión del VoiceSupport en www.tc-helicon.com\voicesupport
• La conexión USB no sirve como fuente de alimentación para la unidad
• Si detecta zumbidos en su PA o amplificador, pulse el interruptor GRND LIFT. En el resto de casos,
déjelo sin pulsar.
Configuración inicial y funcionamiento
1. Reduzca al mínimo el volumen master de su sistema PA.
2. Primero conecte su micro y sistema PA tal como le mostramos en el diagrama de arriba y conecte
después de adaptador. Para actuaciones en vivo no es necesaria la conexión USB al ordenador.
3. Ajuste la clave a C, el control Attack a Hard y el Gender a su muesca central.
Opcional - Conecte un instrumento como mostramos arriba para hacer de guía de la corrección y
que quede anulado el selector Key.
4. Cante en el micro mientras ajusta el control MIC GAIN de forma que el piloto de nivel de entrada
parpadee en verde. Un breve parpadeo en rojo del piloto en las partes más potentes es correcto.
5. Asegúrese de que el efecto esté activado (piloto central iluminado).
6. Cante mientras sube el volumen de su PA hasta un nivel cómodo.
Conforme canta escuchará su voz pasando de un tono a otro en la clave de do mayor. Toque su
instrumento o un acompañamiento en la misma clave para escuchar el efecto HardTune en su
contexto. Experimente después con los controles mientras lee las secciones siguientes.
Alimentación fantasma
En estos pedales VoiceTone no hay interruptor de la alimentación fantasma. Estará activa en cuanto
encienda la unidad. Los micros que no requieran este tipo de alimentación también funcionarán
correctamente. Siempre conecte el adaptador como paso final y asegúrese de que su PA esté al
mínimo. Esto reducirá la posibilidad de chasquidos que podrían dañar su equipo.
Descripción de los efectos
Control Key - El ajuste de este control a la clave del acompañamiento de su canción es esencial para
que la corrección de tono y el HardTune sea musicalmente útiles. Aunque este selector solo le ofrece
claves mayores, puede elegir claves menores relativas de acuerdo a esta tabla
En la clave de do (C), el Menor natural tiene un sol sostenido (G#) donde la dórica tiene un la (A). El
ajuste CH (cromático) actúa con acompañamiento en cualquier clave. Se usa con un ajuste lento del
control Attack para una corrección de tono global sutil. Cuando tenga un instrumento conectado, el
ajuste CH permite el reconocimiento de acordes.
Control Attack - En su tope izquierdo no escuchará ninguna corrección de tono, lo que permitirá solo
efectos de “género”. En la muesca central encontrará velocidades de ataque de corrección de tono
muy útiles. Hacia el ajuste Hard la afinación se convierte en un efecto.
Control Gender - El ajuste de muesca central es el valor neutral (sin “género” o “sexo”). El lado
izquierdo le ofrece efectos de mayor grosor, más “masculinos”. A la derecha están los efectos de tipo
“femenino” o “alienígena”. Si quiere, puede usar esto con los efectos de corrección.
INST IN - Un instrumento que pueda generar acordes (sin efectos), como una guitarra, le ayudará a
Mayor C C# D D# E F F# G G# A A# B
Menor natural Am A#m Bm Cm C#m Dm D#m Em Fm F#m Gm G#m
Menor dórica Dm D#m Em Fm F#m Gm G#m Am A#m Bm Cm C#m
Para acceder al programa VoiceSupport:
1. Descárguese el VoiceSupport de la página web www.tc-helicon.com/voicesupport.
2. Instale el VoiceSupport en su ordenador.
3. Conecte su producto al ordenador vía USB.
3. Ejecute el VoiceSupport.
4. Lea las novedades, haga clic en las pestañas y muévase por las distintas funciones.
Uso de la función Mic Control
Esta función le permite activar o desactivar los efectos desde el micrófono opcional TC-Helicon MP-75.
Pulse el mando MIC CONTROL para permitir el control remoto on/off de cualquiera de los pedales de
la cadena, o de todos ellos. Cuando no quiera usar esta función Mic Control, asegúrese de que no
quede pulsado el interruptor. El uso de varios pedales requiere que la función “pass through” de la
señal de control esté activada en todos los pedales excepto en el último. Para activar o desactivar esta
función, mantenga pulsado el pedal de efecto y el interruptor del micro durante 3 segundos.
Consejos para evitar la realimentación (feedback)
• Asegúrese de que sus monitores y/o altavoces PA no apunten directamente hacia el micro
• Cante cerca del micro, incluso tocando su parrilla con los labios
• Pruebe a utilizar un micro dinámico super-cardioide como el MP-70 y MP-75 de TC-Helicon
• Ajuste el EQ del canal del PA y el EQ gráfico a una respuesta plana
• Haga que el resto del grupo toque un poco más suave en el escenario.
FAQ - resolución de problemas
¿Por qué escucho distorsión?
Probablemente el ajuste de mando MIC GAIN será demasiado alto. Asegúrese de que el piloto Input
se ilumine en verde la mayor parte del tiempo y en rojo solo de forma muy ocasional.
¿Puedo usar este producto en un envío/retorno auxiliar?
Sí. Necesitará disponer de cables XLR a TRS balanceados para hacerlo. Asegúrese de que el mando
MIC GAIN esté al mínimo para aceptar la señal de nivel de línea de su mezclador.
¿Necesito una caja DI para conectar esta unidad a un mezclador?
No.
¿Por qué el efecto se conecta y desconecta por su cuenta?
Esto puede ocurrir cuando tenga el mando MIC CONTROL pulsado y tenga la unidad conectada a un
mezclador con salidas “pseudo balanceadas”. Saldo que esté usando el micro específico de TC-
Helicon con la función Mic Control activa, este mando MIC CONTROL no debe estar pulsado.
guiar la corrección para adaptarla a su música. Esto es el método más flexible dado que el control solo
con el mando Key no se adaptará a todas sus canciones.
Uso de varios pedales VoiceTone Single
Puede (e incluso ¡lo recomendamos!) usar más de un pedal VoiceTone a la vez. Solo necesitará
ajustar el control MIC GAIN del primer pedal de la cadena. En el resto, debería ajustar MIC GAIN al
mínimo (tope izquierdo).
El orden de los pedales es importante. Vea en la tabla siguiente combinaciones de 2, 3 y 4 pedales.
2 pedales D1 > R1 T1 > D1 C1 > D1 3 pedales T1 > D1 > R1 T1 > C1 > R1
T1 > C1 T1 > R1 C1 > R1 C1 > D1 > R1 T1 > C1 > R1
4 pedales T1 > C1 > D1 > R1
El programa VoiceSupport
El VoiceSupport es su puerta de entrada para sacar el máximo partido a su unidad TC-Helicon, así
como para hacer que dicho producto crezca con actualizaciones de firmware. Este programa incluye:
• Acceso a actualizaciones de firmware y nuevas funciones
• Videos, perfiles de músicos, trucos y consejos
• Registro de su producto
1 - Pedal on/off de efectos
2 - Instrument Thru a amplificador/PA
3 - Anulación de toma de tierra: dentro=anulado
4 - Control de nivel de entrada MIC GAIN
5 - Selector de clave incluyendo cromático (CH)
6 - Control de velocidad de ataque
7 - Control Gender (“género”)
8 - Entrada de micro XLR balanceada
9 - Salida mono en XLR balanceado
10 - Toma de corriente
11 - Conector USB a ordenador
12 - Piloto de nivel de entrada; verde=señal,
rojo=saturación
13 - On/off de efecto vía micro opcional (MP-75):
micro está conectado=activado
14 - Toma de entrada de instrumento guía
15 - Indicador de efecto activo
La página se está cargando ...
Transcripción de documentos
VoiceTone C1 (EN) Introduction (DE) Einleitung (ESP) Introducción VoiceTone C1 offers correction, HardTune and Gender effects in an easy-to-use footpedal. Das VoiceTone C1 bietet Tonhöhenkorrektur, HardTune- und Gender-Effekte in Form eines leicht zu bedienenden Fußpedals. Dieses Gerät ist perfekt für Sänger, die weder auf der Bühne noch im Studio auf eine perfekt klingende Intonation verzichten wollen. Es kann außerdem den berühmt-berüchtigten „Cher-Effekt“ erzeugen, bei dem die Tonhöhenkorrektur zu einem roboterhaften Klangbild führt. Mit dem Gender-Regler können Sie Ihre Stimme außerdem voller/männlicher oder auch dünner (weiblich oder ganz fremdartig) klingen lassen. • Extrem einfache Einrichtung und Steuerung • Pitch-Correction-Effekte können mit dem Attack-Regler von „subtil“ bis „abgefahren“ variiert werden • Steuerung der Tonhöhenkorrektur durch Auswahl einer Tonart, chromatisch (keine Tonart) oder durch ein Akkordinstrument • Ground-Lift-Funktion zur Unterdrückung von Brummschleifen für Instrument Thru-Buchse • Mic Control-Funktion: Der Effekt kann mit dem Mikrofon TC-Helicon MP-75 (separat erhältlich) an-/abgeschaltet werden. • Per USB an Computer anschließbar – für einfache Firmware-Updates, News und Tipps mit Hilfe der kostenlosen Software VoiceSupport • Symmetrischer XLR-Ausgang und -Eingang mit Phantomspeisung für Kondensatormikrofone El VoiceTone C1 le ofrece efectos de corrección, HardTune y Gender en un pedal muy sencillo. This product is ideal for singers who seek ultimate pitch accuracy in live performance and recording. It also produces the infamous “Cher” effect where pitch correction is used as a robot-type effect. A Gender control adds to the mayhem to make your voice deeper (male) or thinner (female>alien). • • • • • • USER’S MANUAL BEDIENUNGSANLEITUNG MANUAL DE INSTRUCCIONES MANUALE D’USO MODE D’EMPLOI Super-simple setup and control “Mild to Wild” correction possible by varying the Attack control Flexible guide methods include Key control, Chromatic (no key), and chordal instrument in/thru. Instrument Thru has ground lift to minimize buzz/hum. Mic Control feature works with optional TC-Helicon MP-75 mic to add “on-mic” effect switching. USB connection to computer for easy firmware updates, news and tips via the free VoiceSupport application. Balanced XLR in and out with phantom power for condenser microphones. • 1 2 3 4 5 6 7 Read these instructions. Keep these instructions. Heed all warnings. Follow all instructions. Do not use this apparatus near water. Clean only with dry cloth. Do not block any ventilation openings. Install in accordance with the manufacturer’s instructions. 8 Do not install near heat sources such as radiators, heat registers, stoves, or other apparatus (including amplifiers) that produce heat. 9 Only use attachments/accessories specified by the manufacturer. 10 Refer all servicing to qualified service personnel. Servicing is required when the apparatus has been damaged in any way, such as power-supply cord or plug is damaged, liquid has been spilled or objects have fallen into the apparatus, the apparatus has been exposed to rain or moisture, does not operate normally, or has been dropped. • • • Configuración y control súper sencillos. Puede conseguir una corrección “de suave a salvaje” modificando el control de ataque. Unos flexibles métodos guía que incluyen control de clave, cromático (sin clave) y entrada/thru de acorde de instrumento. La toma Instrument Thru tiene anulación de toma de tierra para minimizar los zumbidos. Función Mic Control que actúa con el micro opcional TC-Helicon MP-75 para añadir un efecto de conmutación “on-mic”. Conexión USB a ordenador para una más fácil actualización de firmware, volcado de novedades y consejos a través de la aplicación gratuita VoiceSupport. Entrada y salida en XLR balanceado con alimentación fantasma para micros condensadores. • • • • www.tc-helicon.com - www.youtube.com/tchelicon www.tc-helicon.com - www.youtube.com/tchelicon Important Safety Instructions Este producto es ideal para aquellos cantantes que estén buscando la máxima precisión de tono en actuaciones en directo y en estudio. También produce el famoso efecto “Cher” en el que la corrección de tono se usa como un efecto de tipo robot. Un control Gender (“género”) añade la posibilidad de hacer que su voz sea más profunda (masculina) o fina (femenina>alien). Warning! • To reduce the risk of fire or electrical shock, do not expose this equipment to dripping or splashing and ensure that no objects filled with liquids, such as vases, are placed on the equipment. • Do not install in a confined space. 1 - Effect on/off footswitch 8 7 9 10 11 2 - Instrument Thru to amp/PA 12 5 Service • All service must be performed by qualified personnel. 7 3 - Instrument ground lift: in=lifted 6 4 13 8 9 10 11 6 4 - Mic input level control 12 5 5 - Key selector including Chromatic (CH) 6 - Attack speed control 4 13 7 - Gender control Caution: You are cautioned that any change or modifications not expressly approved in this manual could void your authority to operate this equipment. 3 14 2 3 8 - Balanced XLR mic input 9 - Balanced XLR mono output 15 EMC/EMI This equipment has been tested and found to comply with the limits for a Class B Digital device, pursuant to part 15 of the FCC rules. 14 2 15 10 - Power in 11 - USB connector to computer 1 Fußtaster Effekt ein/aus 2 Instrument Thru-Buchse (zu Verstärker/PA) 3 Ground Lift-Taste (gedrückt: aktiv) 4 Gain-Regler Mikrofoneingang 5 Tonart-Drehregler (Einstellung CH = chromatisch) 6 Attack Speed-Drehregler 7 Gender-Drehregler 8 Mikrofoneingang (symmetrisch/XLR) 9 Monoausgang (symmetrisch/XLR) 10 Netzeingang 11 USB-Anschluss zur Verbindung mit einem Computer 12 Eingangspegel-LED (grün = Signal, rot = übersteuert) 13 Mic Control (Effekt über optionales Mikro MP-75 steuern. Gedrückt: aktiv) 14 Eingangsbuchse für steuerndes Instrument 15 Aktivitätsanzeige-LED 12 - Input level LED; green=signal, red=clip These limits are designed to provide reasonable protection against harmful interference in residential installations. This equipment generates, uses and can radiate radio 13 - Effect on/off via optional mic (MP-75): in=on 1 1 14 - Guide instrument input jack www.tc-helicon.com - www.youtube.com/tchelicon 1 - Pedal on/off de efectos 8 7 9 10 11 2 - Instrument Thru a amplificador/PA 3 - Anulación de toma de tierra: dentro=anulado 6 4 - Control de nivel de entrada MIC GAIN 12 5 4 13 3 14 5 - Selector de clave incluyendo cromático (CH) 6 - Control de velocidad de ataque 7 - Control Gender (“género”) 8 - Entrada de micro XLR balanceada 9 - Salida mono en XLR balanceado 2 15 10 - Toma de corriente 11 - Conector USB a ordenador 12 - Piloto de nivel de entrada; verde=señal, rojo=saturación 13 - On/off de efecto vía micro opcional (MP-75): micro está conectado=activado 1 14 - Toma de entrada de instrumento guía 15 - Effect active LED indicator 15 - Indicador de efecto activo frequency energy and – if not installed and used in accordance with the instructions – may cause harmful interference to radio communications. However, there is no guarantee that interference will not occur in a particular installation. If this equipment does cause harmful interference to radio or television reception – which can be determined by turning the equipment off and on –, the user is encouraged to try correcting the interference by one or more of the following measures: • Reorient or relocate the receiving antenna. • Increase the separation between the equipment and the receiver. • Connect the equipment to an outlet on a circuit different from the one to which the receiver is connected. • Consult the dealer or an experienced radio/TV technician for help. For the customers in Canada: This Class B digital apparatus complies with Canadian ICES-003. Cet appareil numérique de la classe B est conforme à la norme NMB-003 du Canada. ¡Precaución! • Para reducir el riesgo de incendios o descargas eléctricas, no permita que este aparato quede expuesto a salpicaduras y asegúrese de no colocar sobre él ningún objeto que contenga líquidos, como un jarrón, para evitar que se pueda derramar. • No instale este aparato dentro de un espacio confinado, como encastrado en una librería. Reparaciones • Cualquier reparación debe ser realizada únicamente por personal de un servicio técnico oficial. Atención: Le advertimos que cualquier cambio o modificación que no aparezca aprobada expresamente en este manual puede anular su autorización a utilizar este aparato. A la hora de sustituir la pila, siga cuidadosamente las instrucciones sobre manejo de la misma que aparecen en este manual. Attention Danger! • Pour éviter tout risque d’électrocution ou d’incendie, ne pas exposer cet appareil à quelque source liquide (goûtes d’eau, projections liquides,etc.) et veillez à ne poser aucun objet contenant un liquide sur l’appareil. • Do not install in a confined space. PA Achtung! • Um die Gefahr eines Feuers oder eines elektrischen Schlages zu vermeiden, dürfen Sie dieses Gerät keinem tropfendem Wasser oder Spritzwasser aussetzen. Stellen Sie keine mit Flüssigkeiten gefüllten Behältnisse – wie beispielsweise Vasen – auf diesem Gerät ab. • Montieren Sie das Gerät nicht in einem vollständig geschlossenen Behälter oder Gehäuse. Optional: USB - Connect to a computer running the TC-Helicon VoiceSupport application for registration, latest version and tips. INST IN - Chords played on this instrument will be recognized when the Key selector is set to Chromatic. INST OUT - Connect to a PA or guitar amp to hear your instrument. Per sostituire la batteria, seguire attentamente le procedure fornite all’interno di questo manuale. • • • Lors du remplacement de la pile, suivez attentivement les instructions spécifiées dans ce manuel. The latest version of VoiceSupport is available free from www.tc-helicon.com/voicesupport The USB connection does not provide power to the unit If you hear hum from your PA or amp, push the GRND LIFT in. Otherwise, it should remain out. 1. Turn down your PA’s master volume. 2. Connect your mic and PA as shown in the diagram first, then plug in the AC adaptor. For live performance, a USB connection to a computer is not required. 3. Set the key to C, Attack control to Hard and the Gender control to the center notch. Optional - Connect an instrument as shown to guide correction and override the Key selector. 4. Sing into your mic while adjusting the MIC GAIN control so that the input level LED flashes green. Brief flashes of red on the LED on your loudest singing are ok. 5. Ensure that the effect is on (center LED is lit). 6. Sing while turning up your PA volume to a comfortable level. As you sing, you will hear your voice jumping from pitch to pitch in the key of C major. Play an instrument or accompaniment in the same key to hear the HardTune effect in context. Now you can experiment with the controls before reading the Effect Descriptions section below. 1. Senken Sie zunächst den Pegel an Ihrem Verstärker oder der PA ab. 2. Schließen Sie das Gerät zunächst entsprechend der Abbildung an Ihr Mikrofon und Ihre PA an und stecken Sie dann das Netzteil in eine Steckdose. Die USB-Verbindung wird beim Live-Einsatz nicht benötigt. 3. Stellen Sie den Tonart-Drehregler auf „C“, den Attack-Drehregler auf „Hard“ und den Gender-Drehregler in die Mittelposition. Sie können außerdem entsprechend der Darstellung ein Instrument anschließen, um die Tonhöhenkorrektur damit zu steuern. Diese Steuerung hat Vorrang vor der gewählten Tonart. 4. Singen Sie in Ihr Mikrofon und passen Sie mit dem Regler MIC GAIN die Eingangsempfindlichkeit so an, dass die Eingangspegel-Leuchtdiode grün leuchtet. An lauten Stellen darf die LED auch kurzfristig rot leuchten. 5. Schalten Sie den Effekt mit dem Fußtaster an, wenn er nicht schon angeschaltet ist. Wenn der Effekt angeschaltet ist, leuchtet die mittlere Leuchtdiode. 6. Singen Sie, während Sie den Pegel an Ihrer Verstärkeranlage erhöhen, bis der gewünschte Pegel erreicht ist. Sie werden hören, dass die Noten, die Sie singen, auf die Töne der C-Dur-Tonleiter korrigiert werden. Spielen Sie auf einem an das Gerät angeschlossenen Instrument oder spielen Sie einen Backing-Track ein, um den HardTune-Effekt im Zusammenhang zu hören. Sie können jetzt ein wenig mit den Reglern experimentieren, bevor Sie die den Abschnitt „Beschreibungen der Effekte“ lesen. There is no switch to enable phantom power on the VoiceTone singles. Phantom power is available when the product is powered. Microphones that don’t require phantom power will operate properly. Always apply power as the last connection step and ensure your PA is muted. This will reduce the chance of audio pops that could harm your equipment. Effect Descriptions Key control - Setting this control to your song’s accompaniment key is essential for HardTune and pitch correction to be musically useful. While this selector only offers major keys, you are able to select relative minor keys according to the chart following: G G# A A# B Natural Minor Am A#m Bm Cm C#m Dm D#m Em Fm F#m Gm G#m Dur C C# D D# E F F# G G# A A# B Dorian Minor Dm D#m Em Fm F#m Gm G#m Am A#m Bm Cm C#m Naturl. Moll Am A#m Bm Cm C#m Dm D#m Em Fm F#m Gm G#m Install VoiceSupport on your computer. Connect your product via USB to your computer. Run VoiceSupport. Read the news, click on tabs and browse the features of the application. Using the Mic Control Feature Mic Control allows you to turn effects on and off from the optional TC-Helicon MP-75 microphone. Push the MIC CONTROL switch in to allow remote on/off control on any or all pedals in a chain. When Mic Control is not desired, ensure the switch is out. Using multiple pedals requires the control signal pass through feature to be enabled on all but the last pedal. To enable or disable this feature, hold the effect footswitch and the switch on the mic for 3 seconds. Tips for Avoiding Feedback • • • Steuerung der Tonart: Damit die Tonhöhenkorrektur und der HardTune-Effekt musikalisch sinnvolle Ergebnisse liefern, müssen Sie den Key-Regler passend zu Ihrem Song einstellen. Der Drehregler erlaubt nur die Einstellung der DurTonarten, aber Sie können ggf. anhand der folgenden Tabelle die entsprechenden Moll-Tonarten ermitteln. F# To access the VoiceSupport application: 1. Download VoiceSupport from www.tc-helicon.com/voicesupport. 2. 3. 4. 5. Beschreibungen der Effekte F • Access to firmware updates and new features • Videos, artist profiles, tips & tricks • Registration of your product • Ensure your monitor and/or PA speakers don’t aim directly at the front of your mic • Sing close to the mic, even touching the grill with your lips Try a super-cardioid dynamic mic such as TC-Helicon’s MP-70 and MP-75 Set your PA channel EQ and graphic EQ flat Have your band play quieter on stage. FAQ www.tchelicon.com - Prod. No: E60515211 Why am I hearing distortion? Likely the MIC GAIN knob is set too high. Ensure that the Input LED is green most of the time with only brief and rare peaks of red. Can I use the product on an auxiliary send/return? Yes. You will need balanced XLR to TRS cables to do so. Ensure that the MIC GAIN knob is set to minimum to accept the line level signal from your mixer. Will I need a DI box to connect to a mixer? No. Why is the effect turning the effect on and off by itself? This can happen when you have the MIC CONTROL knob pushed in and you are connected to a mixer with “pseudo balanced” outputs. Unless you are using only the specific TC-Helicon mic with the Mic Control feature, the MIC CONTROL knob should be out. 1. Reduzca al mínimo el volumen master de su sistema PA. 2. Primero conecte su micro y sistema PA tal como le mostramos en el diagrama de arriba y conecte después de adaptador. Para actuaciones en vivo no es necesaria la conexión USB al ordenador. 3. Ajuste la clave a C, el control Attack a Hard y el Gender a su muesca central. Opcional - Conecte un instrumento como mostramos arriba para hacer de guía de la corrección y que quede anulado el selector Key. 4. Cante en el micro mientras ajusta el control MIC GAIN de forma que el piloto de nivel de entrada parpadee en verde. Un breve parpadeo en rojo del piloto en las partes más potentes es correcto. 5. Asegúrese de que el efecto esté activado (piloto central iluminado). 6. Cante mientras sube el volumen de su PA hasta un nivel cómodo. Conforme canta escuchará su voz pasando de un tono a otro en la clave de do mayor. Toque su instrumento o un acompañamiento en la misma clave para escuchar el efecto HardTune en su contexto. Experimente después con los controles mientras lee las secciones siguientes. Descripción de los efectos E VoiceSupport is your way of getting the most from your TC-Helicon product, as well as letting your product grow with firmware updates. VoiceSupport includes: Puede conseguir gratis la última versión del VoiceSupport en www.tc-helicon.com\voicesupport La conexión USB no sirve como fuente de alimentación para la unidad Si detecta zumbidos en su PA o amplificador, pulse el interruptor GRND LIFT. En el resto de casos, déjelo sin pulsar. diesem Zeitpunkt stummgeschaltet ist. Sie vermindern auf diese Weise das Risiko von Störgeräuschen, die Ihr Equipment beschädigen könnten. D# The VoiceSupport Application • Reduzca al mínimo el volumen de su PA antes de realizar las conexiones • • • En estos pedales VoiceTone no hay interruptor de la alimentación fantasma. Estará activa en cuanto encienda la unidad. Los micros que no requieran este tipo de alimentación también funcionarán correctamente. Siempre conecte el adaptador como paso final y asegúrese de que su PA esté al mínimo. Esto reducirá la posibilidad de chasquidos que podrían dañar su equipo. D The order of the pedals is important. See the following table showing 2, 3 and 4 pedal combinations. 2 Pedals D1 > R1 T1 > D1 C1 > D1 3 Pedals T1 > D1 > R1 T1 > C1 > R1 T1 > C1 T1 > R1 C1 > R1 C1 > D1 > R1 T1 > C1 > R1 4 Pedals T1 > C1 > D1 > R1 Opcional: USB - Conéctelo a un ordenador que use el programa TCHelicon VoiceSupport para registros, volcados y otros. INST IN - Los acordes que toque en su instrumento serán reconocidos cuando el selector Key esté ajustado a Chromatic. INST OUT - Conéctelo a un sistema PA o amplificador de guitarra para escuchar su instrumento. Bei den Produkten der VoiceTone Singles-Serie ist kein Schalter zum Aktivieren der Phantomspeisung erforderlich. Die Phantomspeisung steht sofort zur Verfügung, wenn das Gerät angeschaltet wird. Mikrofone, für die keine Phantomspeisung erforderlich ist, können problemlos verwendet werden. Schließen Sie das Gerät erst dann an die Stromversorgung an, wenn Sie alle anderen Verbindungen vorgenommen haben, und achten Sie darauf, dass die PA zu C# It is possible (even encouraged!) to use more than one VoiceTone pedal at a time. You will only need to adjust the MIC GAIN control of the first pedal in the chain. On the rest, MIC GAIN should be set to the minimum (fully left) position. Toma de corriente - Conecte el adaptador 12 V DC incluido. Alimentación fantasma C Using Multiple VoiceTone Single Pedals PA Phantomspeisung Major In the key of C, the Natural Minor has a G# where Dorian has an A. The CH (chromatic) setting works with accompaniment in any key. It is used with a slow attack control setting for subtle, overall pitch correction. When an instrument is connected, the CH setting enables chord recognition. Attack control - At left, no pitch correction is heard, allowing Gender-only effects. Up to the notch are useful pitch correction attack rates. Towards the Hard setting tuning becomes an effect. Gender control - The center notch setting is neutral (no gender). The left side offers thickened, “male” gender effects. To the right are “female” to “alien” gender effects. These can be used in combination with correction if desired. INST IN - A chordal instrument (with no effects) such as a guitar will guide the correction to match your music. This is the most flexible method because key alone may not match all your songs. Toma OUT - Conecte esta toma a su mezclador PA, otro pedal VoiceTone o altavoz autoamplificado. Configuración inicial y funcionamiento Konfiguration und Inbetriebnahme Phantom Power Conexión Toma MIC - Conecte aquí su micrófono usando un cable XLR balanceado. La alimentación fantasma siempre está activa. Wenn Sie die Verbindungen zu diesem Gerät herstellen (Audio, USB, Stromversorgung), sollte Ihre PA stummgeschaltet sein. Sie können die neueste Version der Software VoiceSupport kostenlos von www.tc-helicon.com/voicesupport herunterladen. Das Gerät wird über die USB-Verbindung nicht mit Strom versorgt. Wenn Sie aus Ihrem Verstärker oder der PA ein Netzbrummen hören, drücken Sie die Ground-Lift-Taste. Ansonsten sollte die Taste nicht gedrückt sein. First Setup and Use Service • Confiez toutes les opérations de maintenance à un personnel qualifié. Attention: Toute modification apportée à l’appareil et qui n’est pas expressément préconisée dans ce manuel invalide votre droit à utiliser cet appareil. • • • • • Turn down your PA when making all connections Folgen Sie beim Auswechseln der Batterie den Anweisungen zur Handhabung von Batterien in dieser Bedienungsanleitung. Cautela: Si avverte che qualsiasi cambiamento e modifica non espressamente approvata in questo manuale può annullare la vostra autorità di utilizzo del dispositivo. PA Power in - Connect the supplied 12VDC power supply. Achtung: Änderungen an diesem Gerät, die im Rahmen dieser Anleitung nicht ausdrücklich zugelassen wurden, können das Erlöschen der Betriebserlaubnis für dieses Gerät zur Folge haben. Assistenza • Ogni intervento tecnico deve essere effettuato solo da personale qualificato. MIC-Buchse: Schließen Sie an diese Buchse mit Hilfe eines symmetrischen XLR-Kabels Ihr Mikrofon an. Die Phantomspeisung am Mikrofoneingang ist permanent aktiv. OUT-Buchse: Verbinden Sie das Gerät über diese Buchse mit Ihrem PAMischer, einem Aktivmonitor oder einem weiteren VoiceTone-Pedal. Netzeingang: Schließen Sie hier das mit dem Gerät gelieferte Netzteil (12 V Gleichspannung) an. Optional: USB: Verbinden Sie das Gerät über ein USB-Kabel mit einem Computer, auf dem die Software VoiceSupport von TC-Helicon läuft, um das Produkt zu registrieren, die neueste Software und wichtige Tipps zu erhalten. INST IN: Akkorde, die Sie auf einem an diese Buchse angeschlossenen Instrument spielen, werden erkannt, wenn der Tonart-Drehregler auf CH (chromatisch) steht. INST OUT: Verbinden Sie diese Buchse mit Ihrem Verstärker oder der PA, um das an die Buchse INST IN angeschlossene Instrument zu hören. OUT jack - Connect to your PA mixer, another VoiceTone pedal or powered speaker. PA PA Anschlüsse vornehmen MIC jack - Connect your mic here using a balanced XLR cable. Phantom power is always on. Wartung • Alle Wartungsarbeiten müssen von einem hierfür qualifizierten Servicetechniker durchgeführt werden. Attenzione! • Per ridurre il rischio di incendio o scossa elettrica, non esporre questo dispositivo allo sgocciolamento o agli schizzi di alcun liquido. Non posizionare sul dispositivo oggetti contenenti liquidi, come vasi o bicchieri. • Non installare in uno spazio ristretto. PA Connecting Dorisch Dm D#m Em Fm F#m Gm G#m Am A#m Bm Cm C#m Beim natürlichen Moll auf dem Grundton C ist die sechste Stufe ein G#, während es im dorischen Modus ein A ist. Die Einstellung „CH“ (= chromatisch) eignet sich für jede Tonart. Wenn Sie den Attack-Drehregler auf einen langsamen Wert einstellen, können Sie die chromatische Einstellung für eine subtile Tonhöhenkorrektur verwenden, ohne zu jedem Song erst die richtige Tonart zu wählen. Wenn Sie ein Instrument angeschlossen haben, aktivieren Sie mit der Einstellung „CH“ die Akkorderkennung. Attack-Drehregler: Wenn Sie den Regler an den linken Anschlag drehen, erfolgt keine Tonhöhenkorrektur, und nur die gewählte Gender-Einstellung wird hörbar. Drehen Sie den Regler weiter in Richtung der Mittelposition, um eine Tonhöhenkorrektur zu erhalten. Drehen Sie den Regler weiter in Richtung „Hard“, um stattdessen einen deutlich als solchen erkennbaren Effekt zu erzielen. Gender-Drehregler: Die Mittelstellung ist neutral (keine Beeinflussung der Stimmcharakteristik). Wenn Sie den Regler nach links drehen, klingt die Stimme voller und maskuliner. Wenn Sie den Regler nach rechts drehen, klingt die Stemme Control Key - El ajuste de este control a la clave del acompañamiento de su canción es esencial para que la corrección de tono y el HardTune sea musicalmente útiles. Aunque este selector solo le ofrece claves mayores, puede elegir claves menores relativas de acuerdo a esta tabla Mayor C C# D D# E F F# G G# A A# B Menor natural Am A#m Bm Cm C#m Dm D#m Em Fm F#m Gm G#m Menor dórica Dm D#m Em Fm F#m Gm G#m Am A#m Bm Cm C#m En la clave de do (C), el Menor natural tiene un sol sostenido (G#) donde la dórica tiene un la (A). El ajuste CH (cromático) actúa con acompañamiento en cualquier clave. Se usa con un ajuste lento del control Attack para una corrección de tono global sutil. Cuando tenga un instrumento conectado, el ajuste CH permite el reconocimiento de acordes. Control Attack - En su tope izquierdo no escuchará ninguna corrección de tono, lo que permitirá solo efectos de “género”. En la muesca central encontrará velocidades de ataque de corrección de tono muy útiles. Hacia el ajuste Hard la afinación se convierte en un efecto. Control Gender - El ajuste de muesca central es el valor neutral (sin “género” o “sexo”). El lado izquierdo le ofrece efectos de mayor grosor, más “masculinos”. A la derecha están los efectos de tipo “femenino” o “alienígena”. Si quiere, puede usar esto con los efectos de corrección. INST IN - Un instrumento que pueda generar acordes (sin efectos), como una guitarra, le ayudará a femininer und – bei hohen Werten – fremdartig. Sie können diese Gender-Variation mit der Tonhöhenkorrektur zu interessanten Effekten kombinieren. INST IN: Sie können mit einem (unverzerrten) Akkordinstrument die Tonart vorgeben, die zur Tonhöhenkorrektur Ihrer Stimme verwendet werden. Dies ist der flexibelste Ansatz, da Sie durch Vorgeben der Tonart mit dem Key-Drehregler möglicherweise nicht alle Ihre Songs abdecken können. guiar la corrección para adaptarla a su música. Esto es el método más flexible dado que el control solo con el mando Key no se adaptará a todas sus canciones. Mit mehreren VoiceTone Single-Pedalen arbeiten Puede (e incluso ¡lo recomendamos!) usar más de un pedal VoiceTone a la vez. Solo necesitará ajustar el control MIC GAIN del primer pedal de la cadena. En el resto, debería ajustar MIC GAIN al mínimo (tope izquierdo). Sie können (und sollten!) mehr als ein VoiceTone-Pedal gleichzeitig einsetzen. Dabei müssen Sie die Eingangsempfindlichkeit nur mit dem Drehregler MIC GAIN des ersten Pedals im Signalweg einstellen. Bei den folgenden Pedalen drehen Sie den Regler MIC GAIN an den linken Anschlag. Es ist wichtig, dass Sie die Pedale in der richtigen Reihenfolge anordnen. Die folgende Tabelle zeigt die sinnvollen Anordnungen für zwei, drei und vier Pedale. 2 Pedale D1 > R1 T1 > D1 C1 > D1 3 Pedale T1 > D1 > R1 T1 > C1 > R1 T1 > C1 T1 > R1 C1 > R1 C1 > D1 > R1 T1 > C1 > R1 4 Pedale T1 > C1 > D1 > R1 Uso de varios pedales VoiceTone Single El orden de los pedales es importante. Vea en la tabla siguiente combinaciones de 2, 3 y 4 pedales. 2 pedales D1 > R1 T1 > D1 C1 > D1 3 pedales T1 > D1 > R1 T1 > C1 > R1 T1 > C1 T1 > R1 C1 > R1 C1 > D1 > R1 T1 > C1 > R1 4 pedales T1 > C1 > D1 > R1 Die VoiceSupport-Software El programa VoiceSupport Mit der Software VoiceSupport können Sie den größtmöglichen Nutzen aus Ihrem TC-Helicon-Produkt ziehen. Außerdem ermöglicht diese Software es Ihnen, von Aktualisierungen der Software Ihres Gerätes (Firmware) zu profitieren. VoiceSupport bietet die folgenden Features: • Zugriff auf Firmware-Aktualisierungen und neue Leistungsmerkmale • Videos, Künstlerprofile, Tipps und Tricks • Registrierung Ihres Produkts El VoiceSupport es su puerta de entrada para sacar el máximo partido a su unidad TC-Helicon, así como para hacer que dicho producto crezca con actualizaciones de firmware. Este programa incluye: So erhalten und verwenden Sie die Software VoiceSupport: 1. Laden Sie die Software VoiceSupport von www.tc-helicon.com/voicesupport herunter. 2. Installieren Sie VoiceSupport auf Ihrem Computer. 3. Verbinden Sie Ihr Gerät über ein USB-Kabel mit Ihrem Computer. 4. Starten Sie die Software VoiceSupport. 5. Lesen Sie neue Informationen zu Ihrem Produkt, klicken Sie auf die Register (Tabs) und machen Sie sich mit den Leistungsmerkmalen der Software vertraut. Para acceder al programa VoiceSupport: 1. Descárguese el VoiceSupport de la página web www.tc-helicon.com/voicesupport. 2. Instale el VoiceSupport en su ordenador. 3. Conecte su producto al ordenador vía USB. 3. Ejecute el VoiceSupport. 4. Lea las novedades, haga clic en las pestañas y muévase por las distintas funciones. Wie Sie die Funktion Mic Control verwenden Mit Mic Control können Sie das (separat erhältliche) Mikrofon TC-Helicon MP-75 verwenden, um Effekte an- und abzuschalten. Drücken Sie den MIC CONTROL an einem Pedal, um dessen Effekt mit dem Mikrofon ein- oder auszuschalten. Sie können diesen Schalter bei einem oder mehreren Pedalen aktivieren. Wenn Sie die Funktion Mic Control nicht verwenden wollen, achten Sie darauf, dass der MIC CONTROL-Schalter bei diesem Pedal nicht gedrückt ist. Wenn Sie mit mehreren Pedalen arbeiten, muss die Durchleitung des Steuersignals bei allen Pedalen (nur nicht beim letzten Pedal) aktiviert sein. Um die Durchleitung des Steuersignals an- oder abzuschalten, halten Sie den Taster des Fußpedals und den Schalter am Mikrofon drei Sekunden lang gedrückt. Wie Sie Rückkopplungen vermeiden • • • • • Achten Sie darauf, dass Ihr Monitor und/oder die Lautsprecher Ihrer PA nicht direkt auf die Vorderseite Ihres Mikrofons abstrahlen. Singen Sie so nah wie möglich an Ihrem Mikrofon. Verwenden Sie ein dynamisches Mikrofon mit Supernierencharakteristik wie zum Beispiel ein MP-70 oder MP-75 von TC-Helicon. Stellen Sie den Kanal-EQ oder den grafischen Equalizer Ihrer PA auf eine flache Kennlinie ein. Wenn keine andere Maßnahme hilft, muss die Band leiser spielen beziehungsweise ihre Bühnenmonitore leiser stellen. Häufige Fragen und Antworten Warum kommt es zu Verzerrungen? Wahrscheinlich ist der Regler MIC GAIN auf einen zu hohen Wert eingestellt. Stellen Sie die Eingangsempfindlichkeit so ein, dass die Input-Leuchtdiode meist grün und nur selten/kurz rot leuchtet. Kann ich dieses Gerät auch in einem Effektweg (Aux Send/Return) betreiben? Ja. Sie benötigen hierfür symmetrische XLR-auf-TRS-Adapterkabel. Um das Linepegel-Signal von Ihrem Mischpult korrekt zu verarbeiten, sollten Sie den Regler MIC Gain auf den kleinsten Wert (linker Anschlag) einstellen. Benötige ich eine DI-Box, um dieses Gerät an einem Mischpult zu betreiben? Nein. Warum schaltet das Gerät selbsttätig den Effekt ein oder aus? Dies kann geschehen, wenn Sie den Schalter MIC CONTROL aktiviert haben und das Gerät mit einem Mischpult verbunden haben, das mit „pseudosymmetrischen“ Ausgängen ausgestattet ist. Sie sollten den Schalter MIC CONTROL nur aktivieren, wenn Sie ein Mikrofon von TC-Helicon verwenden, das die Funktion Mic Control unterstützt. • Acceso a actualizaciones de firmware y nuevas funciones • Videos, perfiles de músicos, trucos y consejos • Registro de su producto Uso de la función Mic Control Esta función le permite activar o desactivar los efectos desde el micrófono opcional TC-Helicon MP-75. Pulse el mando MIC CONTROL para permitir el control remoto on/off de cualquiera de los pedales de la cadena, o de todos ellos. Cuando no quiera usar esta función Mic Control, asegúrese de que no quede pulsado el interruptor. El uso de varios pedales requiere que la función “pass through” de la señal de control esté activada en todos los pedales excepto en el último. Para activar o desactivar esta función, mantenga pulsado el pedal de efecto y el interruptor del micro durante 3 segundos. Consejos para evitar la realimentación (feedback) • • Asegúrese de que sus monitores y/o altavoces PA no apunten directamente hacia el micro • Cante cerca del micro, incluso tocando su parrilla con los labios Pruebe a utilizar un micro dinámico super-cardioide como el MP-70 y MP-75 de TC-Helicon • • Ajuste el EQ del canal del PA y el EQ gráfico a una respuesta plana Haga que el resto del grupo toque un poco más suave en el escenario. FAQ - resolución de problemas ¿Por qué escucho distorsión? Probablemente el ajuste de mando MIC GAIN será demasiado alto. Asegúrese de que el piloto Input se ilumine en verde la mayor parte del tiempo y en rojo solo de forma muy ocasional. ¿Puedo usar este producto en un envío/retorno auxiliar? Sí. Necesitará disponer de cables XLR a TRS balanceados para hacerlo. Asegúrese de que el mando MIC GAIN esté al mínimo para aceptar la señal de nivel de línea de su mezclador. ¿Necesito una caja DI para conectar esta unidad a un mezclador? No. ¿Por qué el efecto se conecta y desconecta por su cuenta? Esto puede ocurrir cuando tenga el mando MIC CONTROL pulsado y tenga la unidad conectada a un mezclador con salidas “pseudo balanceadas”. Saldo que esté usando el micro específico de TCHelicon con la función Mic Control activa, este mando MIC CONTROL no debe estar pulsado.-
 1
1
-
 2
2


TC-Helicon Voice Tone C1 Vocal-Prozessor El manual del propietario
- Tipo
- El manual del propietario
- Este manual también es adecuado para
En otros idiomas
Documentos relacionados


Otros documentos
-
TC HELICON VOICETONE X1 El manual del propietario
-
-
TC HELICON PERFORM-V Guía de inicio rápido
-
TC HELICON VOICETONE H1 El manual del propietario
-
-
-
-
-
-
TCHELICOM GO XLR MINI Guía de inicio rápido