
Printed in China
Eitiempo estimado de la enasamblaje 10 a 20 minutos.
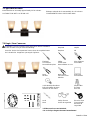
3 Light Wall sconce
Estimated time of assembly approximately 10-20 mi
nutes.
SUITABLE FOR WET LOCATION USE
CONVENIENTE PARA USO EN UBICAION
TO Begin / Para Comenzar
WARNING: Review important safety instructions before installation.
Check to make sure you have the following: Required Helpful
Atención: Revise las impo
rtantes instrucciones de seguridad antes Requiere útil
de la instalación. Asegúre
se que teng
alo
siguiente:
Flathead Philips Wire Strippers
Screw driver Sc
rew driver Pelacables
Destornillado
r plano Destornillador en cruz
Pliers Wire Cutters Soft Cloth
Alicates Pinza de Cort
ar Paño blando
Alambre
Step Ladder
Escalera
3-100 Watt Medium Base
Bulb 3 bombillas de base
mediana de 100 vatios
de mano
Level Safety Glasses Electrical Tape
Nivel Gafas de se
guridad Cinta aislante
Electrica de
se
gu
ridad
* All these tools are not included.
* No se incluye
ninguna de estas herramientas!

Printed in China
El tiempo estimado de la ensamblaje 10 a 20 minutos.
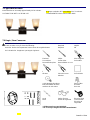
3 Light Wall sconce
Estimated time of assembly approximately 10-20 mi
nutes.
SUITABLE FOR WET LOCATION USE CONVENIENTE PARA USO EN UBICAION
TO Begin / Para Comenzar
WARNING: Review important safety instructions before installation.
Check to make sure you have the following: Required Helpful
Atención: Revise las import
antes instrucciones de seguridad antes Requiere útil
de la instalación. Asegúrese que tengalo siguie
nte:
Flathead Philips Wire Strippers
Screw driver Screw driver
Pelacables
Destornillador plano
Destornillador en cruz
Pliers Wire Cutters Soft Cloth
Alicates Pinza de Cortar
Paño blando
Alambre
Step Ladder
Escalera
3-100 Watt Medium Base
Bulb 3 bombillas de base
mediana de 100 vatios
de mano
Level Safety Glasses Electrical Tape
Nivel Gafas de seg
uridad Cinta aislante
Electrica de
se
gur
idad
* All these tools are not included.
* No se incluye ninguna de est
as herramientas!

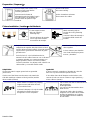
Preparation / Preparación
Shut off main power at the circuit Remove old fixture.
breaker or fuse panel before Disconnect wiring.
removing old fixture.
Desconectar la fuenta de Quitar el artefacto existente.
alimentación principal (Main Power) Desconectar los cables.
en el disyuntor o en el tabl
ero de
fusibles antes de quitar el viejo
artefacto.
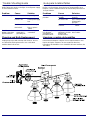
Fixture Installation / Instalacón del Artefacto
Fix the support screws Attach mounting strip to
with
nuts onto the junction box using mounting
mounting strip. screws.
Conecte la barra de montaje a
Conecte la barra de montaje la caja
de sailda usando los
con la caja salida usando tornillos.
Los tornillos de montaje.
Strip 3/4” of insulation from wire ends. Twist Attach wire nuts. Tape nuts and
stripped ends together with pliers black to black wires together.
(power) white to white (neutral). Snip ends. Attach
copper wire to ground wire and attach to green Colo
car tuercas p
ara alambre.
ground screw. Usar cinta aislante para juntar
tuercas y alambres.
Pelar 3/4 inch (2 cm) el aislamiento de los
extremos de los cables. Retorcer con un alicate lo
s extremos p
elados uno contra otro Negro con
Negro (positivo), blanco con blanco (neutro).
Cortar los extremos. Se adjunta cable cobreño con
cabl
e molido y con tornillo
molido verde.
Helpful Hint: Ayuda útil:
If necessary attach copper ground wire to grounded. Si fuera necesario, empalmar el alambre de cobre de
junction box tierra a la caja de
conexiones puesta a tierra.
If wires out of the fixture are the same color, attach the Si los cables fuera de la lámpara son del mismo color
side with markings or letters to black (positive) and the conecte el lado con marcas o letras a negro (positivo) y
other to white (neutral). el otro a blanco (neutro).
Attach fixture to outlet box by aligning
support screws with holes in base,
secure
with ball nuts.
Conecte la lampara a la caja de salida
alineando
los tornillos de apoyo.
Asegurelos con los casquetes.
Place shade onto the socket and secure
with socket ring
Install light bulbs.
Use only 3-100 Watt medium-base
bulbs or less.
Coloque el v
idrio sobre el sokete y
asegurelo con el anillo del
el sokete.
Instalar las bombillas en el sokete.
Use 3 bombillas de base mediana,
de 100 vatios.
Printed in China

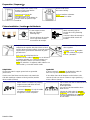
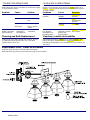
Preparation / Preparación
Shut off main power at the circuit Remove old fixture.
breaker or fuse panel before Disconnect wiring.
removing old fixture.
Desconecte la fuente de Quite el artefacto existente.
alimentación principal Desconecte los cables.
en el disyuntor o en el tablero de
fusibles antes de quitar el viejo
artefacto.
Fixture Installation / Instalacón del Artefacto
Fix the support screws Attach mounting strip to
with
nuts onto the junction box using mounting
mounting strip. screws.
Conecte la barra de montaje a
Conecte la barra de montaje la caja
de sailda usando los
con la caja salida usando tornillos.
Los tornillos de montaje.
Strip 3/4” of insulation from wire ends. Twist Attach wire nuts. Tape nuts and
stripped ends together with pliers black to black wires together.
(power) white to white (neutral). Snip ends. Attach
copper wire to ground wire and attach to green Coloque tuercas de alambre.
ground screw. Use cinta aislante para juntar
tuercas y alambres.
Pele 2 cm. del aislamiento de los
extremos de los cables. Retuerza con un alicate lo
s extremos pelado
s uno contra otro Negro con
Negro (positivo), blanco con blanco (neutro).
Corte los extremos. Se adjunta cable cobreño con
cable molido y con tornillo molido verde.
Helpful Hint: Ayuda útil:
If necessary attach copper ground wire to grounded. Si fuera necesario, empalme el alambre de cobre de
junction box tierra a la caja de
conexiones puesta a tierra.
If wires out of the fixture are the same color, attach the Si los cables fuera de la lámpara son del mismo color
side with markings or letters to black (positive) and the conecte el lado con marcas o letras a negro (positivo) y
other to white (neutral). el otro a blanco (neutro).
Attach fixture to outlet box by aligning
support screws with holes in base,
secure
with ball nuts.
Conecte la lámpara a la caja de salida
alineando
los tornillos de apoyo.
Asegúrelos con los casquetes.
Place shade onto the socket and secure
with socket ring
Install light bulbs.
Use only 3-100 Watt medium-base
bulbs or less.
Coloque el vidrio sobre el enchufe y
asegúrelo con el anillo del
el enchufe.
Instalar las bombillas en el enchufe.
Use 3 bombillas de base mediana,
de 100 vatios.
Printed in China

Trouble Shooting Guide Guía para localizar fallas
Minor problems often can be fixed without an electrician. Los problemas menores, a menudo se pueden arreglar sin
Before doing Any work on the light, shut off power supply Ilamar a un Electricista. Antes de hacer ningun trabajo en su
to avoid electrical shock. lampara, cortar el
Abastecimiento de electricidad para evitar un
choque eléctrico
.
Problem Cause Solution Problema Causa Solucion
Bulbs won’t light Bulb is burnt out Replace light bulb Las bombillas no Se ha quemado la Reemplazar la
prenden. bombilla. b
ombilla.
Power is off. Check if power supply Se corto la luz. Ver si esta prendido.
is on. El interruptor
principal.
Bad wire connection. Check wiring. H ala Cheque s ay una m ar lo
conexion.
cables.
Bad switch. Test or replace
switch.
Fuse blows or circuit Crossed wires or Check wiring El fusible se quema, Hay cruce de Chequear la conexion
breaker trips when power wire is connections. lo e disyuntor alambres,o el cable de los cables
light is turned on. grounding out.. desengancha al. positivo esta
prender las luces. Puesto a tierra.
Cleaning and Bulb Replacement Limpieza y cambio de bombillas
Desconecte la lámpara. Limpiar con un trapo humedo o usar
Unplug lamp, wipe with a damp cloth cleaner. Do not
use abrasives.Bulb replacement: Use 3-100 Watt
medium-base bulb or less.
liquido de limpiar ventanas. No use materials
abrasivos.
Reemplazo de bombillas: Use 3 bombilla de base mediana, de
100 vatios.

Trouble Shooting Guide Guía para localizar fallas
Minor problems often can be fixed without an electrician. Los problemas menores, a menudo se pueden arreglar sin
Before doing Any work on the light, shut off power supply Ilamar a un Electricista. Antes de hacer ningún trabajo en su
to avoid electrical shock. lámpara, corte el Abastecimiento de electricidad para evitar un
choque eléctrico.
Problem Cause Solution Problema Causa Solución
Bulbs won’t light Bulb is burnt out Replace light bulb Las bombillas no Se ha quemado la Reemplace la
prenden. bom
billa. bombilla.
Power is off. Check if power supply Se corto la luz. Vea si esta prendido.
is on. El interruptor
principal.
Bad wire connection. Check wiring. Hay una mala Cheque los
conexión. cables.
Bad switch. Test or replace
switch.
Fuse blows or circuit Crossed wires or Check wiring El fusible se quema, Hay cruce de Cheque la conexión
breaker trips when power wire is connections. lo e disyuntor alambres,o el cable de los cables
light is turned on. grounding out.. desengancha al. positivo esta
prender las luces. Puesto a tierra.
Cleaning and Bulb Replacement Limpieza y cambio de bombillas
Unplug lamp, wipe with a damp cloth cleaner. Do not
use abrasives.Bulb replacement: Use 3-100 Watt
medium-base bulb or less.
Desconecte la lámpara. Limpie con un trapo húmedo o use
liquido de limpiar ventanas
. No use materiales abrasivos.
Reemplazo de bombillas: Use 3 bombilla de base mediana, de
100 vatios.
Replacement Parts / Piezas de Recambio
Keep this guide handy for ordering replacement parts.
Mantenga esta guia práctica para ordenan las piezas de recambio.
Printed in China

I
ns
t
rucc
i
ones
D
e
S
egur
id
a
d
¡ALERTA! PARA SU PROTECCION Y SEGURIDAD –
Lea con cuidado y entienda la información escrita en este
manual a
ntes de Iniciar el ensamblaje o instalación. Negación
de hacerlo podría resultar en un choque eléctrico, incendio, u
otros danos que pueden ser peligrosos y hasta fatales.
1. Todas las conexiones deben estar de acuerdo con sus
códi
gos locales, ordenanzas, o el código eléctrico nacional
(NEC).Contacte su departamento municipal de construcción
para informarse de sus códigos locales, permisos, y/o
inspecciones.
ADVERTENCIA: RIESGO DE INCENDIO – LA MAYORÍA DE
RESIDENCIAS CONSTRUIDAS ANTES DE 1985 TIENEN
CABLES DE ALIMENTACIÓN CON CAPACIDAD TÉRMICA
DE 60▫. CONSULTE CON UN ELECTRICISTA CALIFICADO
ANTES DE LA INSTALACIÓN.
2. CORTE LA ELECTRICIDAD en la caja principal de
fusibles(o la caja del disyuntor) antes de comenzar la
instalación por apagando el disyuntor o quitando el fusible.
3. NO CONECTE este articulo a un sistema eléctrico que no
tenga medi
os de situarlo a tierra. Nunca use un articulo en
un sistema de dos cables que no este puesto a tierra.
ADVERTENCIA: INSTALANDO UN APARATO EN UN
SISTEMA ELECTRICO SIN TENER MEDIOS PROPIOS DE
PUESTA A TIERRA PUEDE PERMITIR QUE TODAS LAS
PARTES DEL APARATO CARGEN CORIENTE ELECTRICA
SI CUALQUIER DE LOS CABLES DEL APARATO,
CONEXIONES DE CABLES O EMPLAMES SE ROMPEN,
CORTAN, O AFLOJAN DURANTE EL MONTAR O
OPERCAION NORMAL DEL APARATO. DEBAJO DE ESTAS
CONDICIONES, CUALQUIER PERSONA QUE SE PONGA
EN CONTACTO CON EL APARATO ESTA SUJETO A
CHOQUE ELECTRICO, QUE PUEDE CAUSAR DAÑOS
GRAVES O MUERTE.
4. Si usted no esta seguro que su sistema de alumbre tiene
medio
s para puesta tierra. NO INTENTE de instalar este
aparato. Contacte un electricista licenciado y calificado para
información con consideraciones de medios propios como
requeridos por el código eléctrico local en su área.
5. NO CONECTE el cable de tierra pelado o el de aislante
verde al
negro (POSITIVO) portador de electricidad o al blanco
neutro proveniente de las casa.
ADVERTENCIA: EL CONECTAR EL CABLE DE TIERRA
PELADO O VERDE DEL APARATO AL NEGRO O AL
BLANCO DE LA CASA, PUEDE HACER QUE TODAS LAS
PARTES METÁLICAS DEL APARTO SE ELECTRIFIQUEN.
BAJO ESTAS CONDICIONES, CUALQUIER PERSONA QUE
SE PONGA EN CONTACTO CON EL APARATO RECIBIRÁ
UN CHOQUE ELÉCTRICO QUE PUEDE CAUSAR DANOS
GRAVES O LA MUERTE.
6. NO CUELGUE ningún aparato de los alambres eléctricos de
la casa. Un aparato siempre debe montarse directamente a
una caja de salida o a una barra para aparatos previamente
montados sobre la caja de salida.
ADVERTENCIA LOS CABLES DE CONEXIÓN NO
SOPORTAN EL PESO DE UN APARATO. EL COLGAR UN
APARATO DE LOS CABLES DE LA CASA Y LOS
CONECTADORES RESULTAN EN LA CAÍDA DEL APARATO
Y LA POSIBILIDAD DE DANOS PERSONALES Y EL
PELIGRO DE CHOQUE ELÉCTRICO O INCENDIO.
7. Todos los aparatos deben sujetarse a una caja de salida
que e
ste sujeta a la estructura de edificio. NO INTENTE
sujetar el aparato solamente al cielo raso. El cielo raso no
tiene la fuerza para soportar el peso de aparato. El aparato se
puede caer y causar danos personales.
8. TENGA CUIDADO de no dañar o cortar el aislamiento (la
cubi
erta) de cables durante la instalación del aparato. NO
PERMITA que los cables hagan contacto con cualquier
superficie que tenga una orilla afilada. El hacerlo puede dañar
o cotar el aislamiento de cables, que puede causar danos
grab
es o muerte de choque eléctrico.
9. NO USE focos (bombillas) que tengan vatios mas altos de
los vatios má
ximo indicados en el aparato. El usar focos
(bombillas) de mas vatios que especificados aumentaría la
temperatura y provocara un riesgo de incendio.
10. Si se utiliza un interruptor reductor de intensidad de la luz
con e
ste aparato, obtenga consejo de un profesional para
determinar el tipo correcto y el amperaje necesario.
Para servicio al cliente, contacte:
Safety Instructions
WARNING: FOR PROTECTION AND SAFETY –
Carefully read and understand the information given in
this manu
al before beginning the assembly and installation.
Failure to do so could lead to electric shock, fire or other
injuries which could be hazardous or even fatal.
1. All electrical connections must be in agreement with local
cod
es, ordinances or the national electric code (NEC).
Contact your municipal building department to learn about
your local codes, permits and/or inspections. WARNING:
RISK OF FIRE – MOST DWELLINGS BUILT BEFORE 1985
HAVE SUPPLY WIRE RATED FOR 60℃. CONSULT A
QUALIFIED ELECTRICIAN BEFORE INSTALLATION.
2. TURN OFF ELECTRICITY at main fuse box (or circuit
brea
ker box) before beginning installation by switching circuit
breaker off or removing fuse.
3. DO NOT connect this fixture to an electrical system that
doe
s not provide a means for equipment grounding. Never
use a fixture in a two-wire system that is not grounded.
WARNING: INSTALLING A FIXTURE INTO AN
ELECTRI
CAL SYSTEM NOT HAVING A PROPER
GROUNDING MEANS COULD ALLOW ALL METAL PARTS
OF THE FIXTURE TO CARRY ELECTRICAL CURRENT IF
ANY OF THE FIXTURE WIRES. WIRE CONNECTIONS OR
SPLICES BECOME BROKEN. CUT OR LOOSE DURING
THE MOUNTING OR NORMAL OPERATION OF THE
FIXTURE. UNDER THIS CONDITION, ANYONE COMING
IN CONTACT WITH THE FIXTURE IS SUBJECT TO
ELECTRICAL SHOCK, WHICH COULD CAUSE SERIOUS
INJURY OR DEATH.
4. If you are not sure your lighting system has a grounding
means
. DO NOT attempt to install this fixture. Contact a
qualified, licensed electrician for information with regards to
proper grounding methods as required by the local
electrical code in your area.
5. DO
NOT connect the bare or green insulation fixture
grou
nd wire to the black (HOT) current-carrying or white
neutral house wire.
WARNING: CONNECTION OF
THE BARE OR GREEN
FIXTURE GROUND WIRE TO THE BLACK OR WHITE
HOUSE WIRES MAY ALLOW ALL METAL PARTS OF THE
FIXTURE TO CARRY ELECTRICAL CURRENT. UNDER
THIS CONDITION ANYONE COMING IN CONTACT WITH
THE FIXTURE WILL RECEIVE ELECTRICAL SHOCK,
WHICH COULD CAUSE SERIOUS INJURY OR DEATH.
6. DO NOT suspend any fixture by the house wires. A fixture
must always b
e mounted directly to an outlet box or to a
mounting strip, which is first attached to the outlet box.
WARNING: WIRE CONNECTORS WILL NOT SUPPORT
THE WEIGHT
OF A FIXTURE. SUSPENDING A FIXTURE
BY THE HOUSE WIRES AND WIRE CONNECTORS WILL
RESULT IN THE FIXTURE FALLING, WITH THE
POSSIBILITY OF PERSONAL INJURY AND DANGER OF
ELECTRICAL SHOCK OR FIRE.
7. All fixtures must be mounted to an outlet box that is
sup
ported by the building structure. DO NOT attempt to
support the fixture by ceiling board alone. Ceiling board alone
does not have the strength to support the weight of the fixture.
The fixture may fall and cause personal injury.
8. BE CAREFUL not to damage or cut the wire insulation
(covering) during fixture installation. DO NOT permit wires to
contact any surface having a sharp edge. To do so may
damage or cut the wire insulation, which could cause serious
injury or death from electric shock.
9. DO NOT use lamps (bulbs) having a greater wattage than
the maximum value st
ated on the fixture. The use of a higher
wattage lamp(s) than specified will increase temperature and
cause risk of fire.
10. If a dimmer control switch is used with this fixture, obtain
profe
ssional advice to determine the correct type and
electrical ratin
g
re
q
uired.
Printed in China
-
 1
1
-
 2
2
-
 3
3
-
 4
4
-
 5
5
-
 6
6
-
 7
7


Bel Air Lighting 20332 BK Instrucciones de operación
- Tipo
- Instrucciones de operación
- Este manual también es adecuado para
En otros idiomas
Documentos relacionados
Otros documentos
-
Filament Design CLI-JB515F-BK Guía de instalación
-
Filament Design CLI-JB545PHB-519P-BK Guía de instalación
-
-
Home Decorators Collection HDI-4015-BK Guía de instalación
-
 Secure Home SH-4150-MB Guía de instalación
-
Portfolio FOC8012AH-2 BK Guía de instalación
-
Secure Home SH-4266-SA Manual de usuario
-
Home Decorators Collection 25395-20 Guía de instalación
