Andis Company SL II AND SL3 Manual de usuario
- Categoría
- Cortapelos
- Tipo
- Manual de usuario
Este manual también es adecuado para
La página se está cargando ...

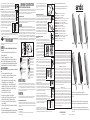
IMPORTANT SAFEGUARDS
When using an electrical appliance, basic precautions should always be followed, including the
following: Read all instructions before using the Andis Trimmer.
DANGER: To reduce the risk of electric shock:
1. Do not reach for an appliance that has fallen into water. Unplug immediately.
2. Do not use while bathing or in a shower.
3. Do not place or store appliance where it can fall or be pulled into a tub or sink.
Do not place in or drop into water or other liquid.
4. Always unplug this appliance from the electrical outlet immediately after using.
5. Unplug this appliance before cleaning, removing, or assembling parts.
WARNING: To reduce the risk of burns, fire, electric shock, or injury to
persons:
1. An appliance should never be left unattended when plugged in.
2. Close supervision is necessary when this appliance is used by, on, or near
children and invalids.
3. Use this appliance only for its intended use as described in this manual. Do not
use attachments not recommended by Andis.
4. Never operate this appliance if it has a damaged cord or plug, if it is not work-
ing properly, if it has been dropped or damaged, or dropped into water. Return
the appliance to an Andis Service Center for examination or repair.
5. Keep the cord away from heated surfaces.
6. Never drop or insert any object into any opening.
7. Do not use outdoors or operate where aerosol (spray) products are being used
or where oxygen is being administered.
8. Do not use this appliance with a damaged or broken blade or comb, as injury to
the skin may occur.
9. To disconnect turn control to “off” then remove plug from outlet.
10. If this trimmer has means for grounding, connect to a properly grounded outlet
only. See Grounding Instructions.
SAVE THESE INSTRUCTIONS
THIS PRODUCT IS INTENDED FOR PROFESSIONAL USE
(These instructions only apply for trimmers that have a 2-prong plug). To reduce the risk of electric shock, this appliance has a
polarized plug (one blade is wider than the other). This plug will fit in a polarized outlet only one way. If the plug does not fit fully in
the outlet, reverse the plug. If it still does not fit, contact a qualified electrician to install the proper outlet. Do not change the plug in
any way.
GROUNDING INSTRUCTIONS
(These instructions only apply for trimmers that have a 3-prong plug). This appliance should be grounded. In the event of an electri-
cal short circuit, grounding reduces the risk of electric shock by providing an escape wire for the electric current. This appliance is
equipped with a cord having a grounding wire with an appropriate grounding plug. The plug must be plugged into an outlet that is
properly installed and grounded in accordance with all local codes and ordinances.
DANGER: Improper use of the grounding plug can result in a risk of electric shock.
If repair or replacement of the cord or plug is necessary, do not connect the grounding wire to either flat-blade terminal. The wire with
insulation having an outer surface that is green with or without yellow stripes is the grounding wire. Check with a qualified electrician
or serviceman if the grounding instructions are not completely understood, or if in doubt as to whether the appliance is properly
grounded. Do not modify the plug provided; if it will not fit the outlet, have the proper outlet installed by a qualified electrician. This
appliance is for use on a nominal 120-volt circuit, and has a grounding plug (Diagram A). A temporary adapter, (Diagrams B & C) may
be used to connect this plug to a 2-pole receptacle (Diagram B) if a properly grounded outlet is not available. The temporary adapter
should be used only until a properly grounded outlet (Diagram A) can be installed by a qualified electrician. The green colored rigid
ear, lug, or the like extending from the adapter must be connected to a permanent ground such as a properly grounded outlet-box
cover. Whenever the adapter is used, it must be held in place by a metal screw.
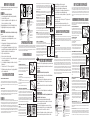
OPERATING INSTRUCTIONS
Please read the following instructions before using your new Andis Trimmer. Give it the care that a fine precision built instrument de-
serves and it will give you years of service. Before starting trimmer remove blade guard (some models may not have a blade guard).
Plug cord into electrical outlet, operate at 120 volt, 60 cycle AC electrical current or as noted on the unit. To start trimmer move switch
button to on position, to stop, move switch button back to original position. After using your Andis Trimmer, rewrap cord and store in
a safe place. Some of the “basic” uses for a trimmer are illustrated below:
USER MAINTENANCE
The internal mechanism of your trimmer has been permanently lubricated at the factory. Other than the recommended maintenance
described in this manual, no other maintenance should be performed, except by Andis Company or an Andis Authorized Repair
Service Station.
POWER ADJUSTMENT FOR MODEL SLII and SL3
Your Andis Trimmer has been adjusted to line voltage at the factory. However,
because of voltage variations it may be necessary to adjust the power setting
for your area. If the power adjustment is off, you will usually notice a “clatter”,
when the trimmer is “on” or introduced into the hair. (It is normal for your
trimmer to “clatter” for an instant when initially turned on).
TO ADJUST YOUR TRIMMER:
1. Oil the blades (Diagram E).
2. The power screw is located in the lower part of the housing opposite the switch (Diagram D).
3. Turn your trimmer “on”.
4. Using a standard screw driver that fits the slot, turn the powescrew counter clock-
wise until the trimmer clatters continuously. Then turn the screw clockwise carefully
until the clatter ceases.
5. Your trimmer is now adjusted to its optimum power setting.
CARE AND SERVICING OF YOUR ANDIS TRIMMER BLADES
Blades should be oiled before, during, and after each use. If your trimmer blades leave streaks or slows down,
it’s a sure sign blades need oil. The trimmer should be held in a position shown (Diagram F) to prevent oil
from getting into motor. Place a few drops of Andis Trimmer Oil on the front and side of the cutter blades
(Diagram E). Wipe excess oil off blades with a soft dry cloth. Spray lubricants contain insufficient oil for good
lubrication, but are an excellent trimmer coolant. Always replace broken or nicked blades to prevent injury.
You can clean the excess hair from your blades by using a small brush or worn out tooth brush. To clean the
blades we suggest to immerse the blades only into a shallow pan of Andis Trimmer Oil, while the trimmer is
running. Any excess hair and dirt that has accumulated between the blades should come out. After cleaning,
turn your trimmer off and dry blades with a dry cloth and start clipping again.
REPLACEMENT (REMOVAL) OF BLADE SET FOR MODEL
SL II AND SL3
Your Andis SL II Trimmer consists of a preset tension assem-
bly on the blade set. To remove blade set from your trimmer,
unplug trimmer from electrical outlet. Turn the trimmer
upside down so teeth of blades are facing down. You may
wish to set the trimmer on a flat surface while performing
these operations. Using a philips type screwdriver, unscrew
the two blade screws (Diagram G). Remove blade set from trimmer. Install new blade set, making sure the blade
yoke cradles the armature pin on trimmer (Diagram H). There is no need to adjust blade tension before use, as
tension has been preset at the factory. Align screw holes of blade set to screw inserts on trimmer housing. Replace
the screws. Before tightening down blade screws, check alignment of blade set to housing, making sure that they
are parallel. Tighten down screws.
PLEASE NOTE: Persons familiar with replacing and adjusting Andis Outliner II, T-Outliner, T-Edjer, Edjer Trimmer
blades, please read the following blade replacement instructions. Those persons not familiar with this procedure,
please return trimmer to your supplier or Andis Authorized Repair Station
for blade replacement and adjustment.
For Model GO, AE: To remove blade set from your trimmer, unplug
your trimmer from the electrical outlet. Turn the trimmer upside down
so the teeth of blades are facing down. You may wish to set the trimmer
on a flat surface while performing these operations. Using a philips type
screwdriver, unscrew the two blade screws (Diagram I). Remove blade set
from trimmer. To install your new trimmer blade set, align hole in upper
blade (smaller of the two blades) and center over nylon roller (ball) of
the trimmer’s tension spring (Diagram J). Align screw holes of lower blade (larger of the two blades) to
armature screw holes (Diagram I). While holding blade in place, replace blade screws; do not tighten down
completely. Turn trimmer over and align the blade set parallel to the trimmer’s upper housing.
IMPORTANT: Check blade alignment, making sure the teeth of the upper blade rest slightly below the
upper edge of teeth on lower blade. Failure to check the position of blade may cause cutting or scratching
of your client’s skin when trimming. Tighten down blade screws firmly. If after turning on the trimmer you notice the
hair guard is hitting the upper blade (Diagram K) loosen (with standard screwdriver) hair guard screws slightly and
adjust hair guard away from the upper blade approximately 1/32”. Tighten down hair guard screws.
FOR MODEL GO & GO SQUARE TRIMMERS ONLY
Attaching The Clipper Combs (Some models do not have attachment combs)
The clipper comb blade attachments mount easily. Just snap them on. Snap them off. Combs help guide hair to
cutting blades and give you precise control of hair lengths. Each comb allows a
different length of cut which is indicated on the combs: 1/16”, 1/8”, 1/4”, and 3/8”.
You can always set blades for a coarser cut by attaching any of the four snap-on
blade attachments (Diagram L). To use a blade attachment, slip the cutter blade
teeth into blade attachment (Diagram M). Snap blade attachment down, they snap
on and off easily (Diagram N). These attachments guide hair into the trimmer
blades and give you precise control of hair lengths. The length of trim is indicated
on the blade attachment: 1/16”, 1/8”, 1/4”, and 3/8”.
PRECAUCIONES IMPORTANTES
Al utilizar un artefacto eléctrico, siempre deben seguirse las precauciones básicas de
seguridad, que incluyen las siguientes: Lea todas las instrucciones antes de usar la
recortadora Andis.
PELIGRO:
Para reducir el riesgo de descarga eléctrica:
1. Si un artefacto se ha caído al agua, no trate de sacarlo. Desenchúfelo inmediatamente.
2. No lo utilice al bañarse o ducharse.
3. No coloque ni almacene el artefacto donde pueda caerse en una bañera o un
lavabo, o ser halado dentro de éstos. No lo coloque ni lo deje caer en agua
u otro líquido.
4. Siempre desenchufe este artefacto del tomacorriente eléctrico inmedi atamente
después de usarlo.
5. Desenchufe este artefacto antes de limpiar, desmontar o ensamblar las piezas.
ADVERTENCIA: Para reducir el riesgo de quemaduras, incendio,
descarga eléctrica o lesiones a las personas:
1.
Un artefacto nunca debe dejarse desatendido mientras está enchufado.
2. Es necesario una supervisión muy de cerca cuando este artefacto sea usado
por, en o cerca de niños y personas inválidas.
3. Utilice este artefacto exclusivamente para su uso propuesto, tal como se
describe en este manual. No utilice accesorios no recomendados por Andis.
4. Nunca opere este artefacto si su cable eléctrico o enchufe está
dañado, si no está funcionando correctamente o si se ha dejado caer, si se ha
dañado o si se ha caído en el agua. Devuelva el artefacto a una Centro de
Espãnol
Servicio de Andis para su verificación o reparación.
5. Mantenga el cable eléctrico lejos de las superficies calentadas.
6. Nunca deje caer ni inserte ningún objeto en ninguna abertura.
7. No lo utilice al aire libre, ni lo opere donde se estén usando productos en
aerosol (nebulizados) o donde se esté administrando oxigeno.
8. No utilice este artefacto con una hoja o peine dañado o roto, ya que se podrían
ocasionar lesiones en la piel.
9. Para desconectar, coloque el control en la posición “off” y luego desconecte el
enchufe del tomacorriente.
10. Si esta recortadora tiene medios para la conexión a tierra, conéctela
únicamente a un tomacorriente correctamente conectado a tierra. Consulte las
instrucciones de conexión a tierra.
GUARDE ESTAS INSTRUCCIONES
ESTE PRODUCTO ESTÁ DESTINADO A USO PROFESIONAL
(Estas instrucciones sólo corresponden a las recortadoras que tienen un enchufe de 2 patillas.) Para reducir el riesgo de descargas
eléctricas, este artefacto tiene un enchufe polarizado (una patilla es más ancha que la otra). Este enchufe encajará en un tomacorriente
polarizado de una sola manera. Si el enchufe no puede insertarse completamente en el tomacorriente, invierta el enchufe. Si aún no
puede insertarse, póngase en contacto con un electricista calificado para instalar el tomacorriente apropiado. No cambie el enchufe de
manera alguna.
INSTRUCCIONES DE CONEXIÓN A TIERRA
(Estas instrucciones sólo corresponden a las recortadoras que tienen un enchufe de 3 patillas.) Este aparato debe estar conectado a
tierra. En el caso de un cortocircuito eléctrico, la conexión a tierra reduce el riesgo de descarga eléctrica al proporcionar un cable de
escape para la corriente eléctrica. Este aparato tiene un cable con un hilo de conexión a tierra y el enchufe apropiado de conexión a
tierra. El enchufe debe enchufarse en un tomacorriente correctamente instalado y conectado a tierra de acuerdo con todos los códigos
y ordenanzas locales.
PELIGRO: Un uso incorrecto del enchufe de conexión a tierra puede ocasionar un riesgo de descarga eléctrica.
Si es necesario reparar o reemplazar el cable o enchufe, no conecte el hilo de conexión a tierra a ninguno de los terminales de hoja
plana. El hilo sin aislamiento que tiene una superficie externa verde con o sin rayas amarillas es el hilo de conexión a tierra. Consulte
con un electricista o técnico calificado si no comprende completamente las instrucciones de conexión a tierra o si tiene dudas si el
aparato ha sido conectado correctamente a tierra. No modifique el enchufe provisto; si no encaja en el tomacorriente, solicite que un
electricista calificado instale el tomacorriente correcto. Este aparato sirve para usarse en un circuito nominal de 120 voltios, y tiene
un enchufe de conexión a tierra (Diagrama A). Puede usarse un adaptador temporal (Diagramas B y C) para conectar este enchufe a
un receptáculo bipolar (Diagrama B) si no está disponible un tomacorriente correctamente conectado a tierra. El adaptador temporal
sólo debe usarse hasta que un electricista calificado pueda instalar un tomacorriente correctamente conectado a tierra (Diagrama A).
La oreja u orejeta rígida de color verde o cualquier elemento similar que se extienda desde el adaptador deberá conectarse a una tierra
permanente tal como la cubierta de una caja de tomacorrientes correctamente conectada a tierra. Cada vez que se utilice el adaptador,
deberá mantenerse en posición mediante un tornillo metálico.
INSTRUCCIONES DE OPERACIÓN
Sírvase leer las instrucciones siguientes antes de usar su nueva recortadora Andis. Si brinda el cuidado que se merece a este instru-
mento fino construido con precisión, obtendrá muchos años de servicio. Antes de arrancar la recortadora, desmonte el protector de la
hoja (es posible que algunos modelos no tengan un protector de la hoja). Enchufe en el tomacorriente eléctrico, opere a una corriente
eléctrica de CA de 120 voltios y 60 ciclos, o según se indique en la unidad. Para arrancar la recortadora, mueva el botón interruptor a
la posición de encendido; para detenerla, vuelva a poner el botón interruptor en la posición original. Después de usar su recortadora
Andis, vuelva a enrollar el cable y almacénela en un lugar seguro. Algunos de los usos “básicos” para una recortadora se ilustran a
continuación:
MANTENIMIENTO POR PARTE DEL USUARIO
El mecanismo interno de su recortadora ha sido lubricado de manera permanente en la fábrica. No debe realizarse ningún tipo de
mantenimiento que no fuera el mantenimiento recomendado en este manual, salvo por Andis Company o por una Estación de Servicio
de Reparación Autorizada de Andis.
AJUSTE ELÉCTRICO PARA EL MODELO SL & SL3
Su recortadora Andis ha sido ajustada al voltaje de línea en la fábrica. Sin
embargo, debido a las variaciones de voltaje, es posible que resulte necesario
modificar el ajuste de potencia para su área. Si el ajuste de potencia está
apagado, por lo general observará un “traqueteo”, cuando la recortadora está
“encendida” o se introduce en el pelo. (Es normal que la recortadora “traquetee”
durante un instante en el momento inicial de encendido).
PARA AJUSTAR SU RECORTADORA:
1. Lubrique las hojas (Diagrama E).
2. El tornillo de encendido se encuentra en la parte inferior de la caja,
frente al interruptor (Diagrama D).
3. Encienda la recortadora.
4. Usando un destornillador estándar que encaje en la ranura, gire el tornillo de encen-
dido hacia la izquierda hasta que la recortadora traquetee continuamente. Luego gire el
tornillo hacia la derecha con sumo cuidado hasta que cese el traqueteo.
5. Su recortadora ahora está ajustada a su óptimo ajuste de potencia.
CUIDADO Y MANTENIMIENTO DE SUS HOJAS RECORTADORAS ANDIS
Las hojas deben lubricarse antes, durante y después de cada uso. Si las hojas de su recortadora dejan
manchas o si se reduce su velocidad, es un indicio certero de que las mismas necesitan aceite. La recortadora
debe sujetarse en la posición mostrada (Diagrama F) para evitar que el aceite penetre en el motor. Coloque
unas pocas gotas de Aceite Andis para recortadoras en las partes frontal y laterales de las hojas cortadoras
(Diagrama E). Limpie el exceso de aceite de las hojas usando un paño suave seco. Los lubricantes en aerosol
contienen una cantidad insuficiente de aceite para lograr una buena lubricación, pero son un excelente refrig-
erante para la recortadora. Siempre reemplace las hojas rotas o melladas para evitar lesiones. Puede limpiar
el exceso de cabello de sus hojas usando un cepillo pequeño o un cepillo de dientes gastado. Para limpiar las
hojas, sugerimos sumergir sólo las hojas en una bandeja de
poca profundidad de Aceite para Recortadoras Andis, mientras
la recortadora esté en funcionamiento. Debe eliminarse todo
exceso de cabello o suciedad que se hubiera acumulado entre
las hojas. Después de la limpieza, apague la recortadora y
seque las hojas con un paño seco y comience a recortar una
vez más.
REEMPLAZO (DESMONTAJE) DEL CONJUNTO DE HOJAS
Para el modelo SL & SL3
Su recortadora Andis SL II consta de un conjunto de tensión prestablecido en el conjunto de las hojas. Para
desmontar el conjunto de hojas de la recortadora, desenchufe primero la recortadora del tomacorriente eléctrico.
Voltee la recortadora, de modo que los dientes de las hojas queden orientados hacia abajo. Tal vez prefiera colocar
la recortadora sobre una superficie plana al efectuar estos procedimientos. Usando un destornillador tipo Phillips,
destornille los dos tornillos de las hojas (Diagrama G). Retire el conjunto de las hojas de la recortadora. Instale
un nuevo conjunto de hojas, asegurándose de que el yugo de la hoja contenga el pasador de la armadura en la
recortadora (Diagrama H).
No hay necesidad de ajustar la tensión de la hoja antes del uso, ya que
ésta ha sido ajustada en la fábrica. Alinee los orificios para los tornillos del
conjunto de hojas para atornillar los insertos en la caja de la recortadora.
Reemplace los tornillos. Antes de apretar completamente los tornillos de
las hojas, compruebe la alineación del conjunto de hojas con respecto a
la caja, asegurándose de que estén paralelos. Apriete completamente los
tornillos.
TENGA EN CUENTA LO SIGUIENTE: Las personas familiarizadas con el
reemplazo y ajuste de las hojas para recortadoras Andis Outliner II, T-Out-
liner, T-Edjer y Edjer deberán leer las siguientes instrucciones de reemplazo de las hojas. Aquellas personas no familiarizadas con este
procedimiento deberán devolver la recortadora al proveedor o a una Estación de Reparación Autorizada de Andis para el reemplazo y
ajuste de las hojas.
Para los modelos GO, AE: Para desmontar el conjunto de hojas de la recortadora, desenchufe primero la recortadora del tomacor-
riente eléctrico Voltee la recortadora, de modo que los dientes de las hojas queden orientados hacia abajo. Le recomendamos que al
efectuar estos procedimientos coloque la recortadora sobre una superficie plana. Usando un destornillador tipo Phillips, destornille
los dos tornillos de las hojas (Diagrama I). Retire el conjunto de las hojas de la recortadora. Para instalar su nuevo conjunto de hojas
de la recortadora, alinee el orificio en la hoja superior (la menor de las dos hojas) y centre sobre el rodillo de nilón (bola) del resorte
Diagram A Diagram B Diagram C
GROUNDING PIN
GROUNDED
OUTLET
GROUNDED
OUTLET
BOX
METAL
SCREW
ADAPTER
TAB FOR
GROUNDING
SCREW
SHAVES BACK OF NECK–
Extra fine blade takes just
the right amount of hair…
thoroughly shaves neck in
seconds.
SHAPES HAIRLINE–
Trimmer cuts a sharp
hairline. Helps you give a neat,
smooth shave right
up to the line.
TRIMS AROUND THE
EARS–Extra fine blade and nar-
row head makes shaping and
trimming hairline around ears
fast and easy.
FINISHES SIDEBURNS–
The trimmer’s cutting
head makes a clean,
level,professional line.
A few upward strokes
shaves hair below line
POWER
SCREW
C
L
O
C
K
W
I
S
E
C
L
O
C
K
W
I
S
E
C
O
U
N
T
E
R
Diagram D
OILOIL
OIL
Diagram E
Diagram F
STAINLESS
BLADE SCREWS
Diagram G
BLADE
YOKE
ARMATURE
PIN
Diagram H
BLADE SCREWS
Diagram I
HOLE IN
UPPER
BLADE
LOWER
BLADE
BLADE
UPPER
BLADE
NYLON
ROLLER (BALL)
BLADE SCREWS
Diagram J
HAIR
GUARD
Diagram K
Diagram L
Diagram M
Diagram N
Diagrama A Diagrama B Diagrama C
PASADOR DE
CONEXIÓN A TIERRA
TOMACORRIENTE
CONECTADO
A TIERRA
CAJA DE
TOMACORRIENTES
CONECTADOS
A TIERRA
TORNILLO
METÁLICO
ADAPTADOR
LENGÜETA PARA
EL TORNILLO
DE CONEXIÓN
A TIERRA
AFEITA LA PARTE POSTE-
RIOR DEL CUELLO– Una hoja
extra fina recoge la cantidad
correcta de cabello y afeita el
cuello completamente en pocos
segundos.
DA FORMA A LA LÍNEA DEL
PELO– La recortadora corta una
línea del pelo nítida. Le ayuda
a afeitar prolija y suavemente
hasta la línea del pelo.
RECORTA ALREDEDOR DE LAS
OREJAS– La hoja extra fina y el
cabezal angosto permiten con-
formar y recortar la línea del pelo
alrededor de las orejas de manera
rápida y fácil.
PERMITE EL ACABADO DE LAS
PATILLAS– El cabezal de corte de
la recortadora permite crear una
línea del pelo limpia, pareja y con
aspecto profesional. Unos pocos
movimientos ascendentes afeitan el
pelo por debajo de esta línea.
TORNILLO
MECÁNICO
H
A
C
I
A
L
A
D
E
R
E
C
H
A
H
A
C
I
A
L
A
I
Z
Q
U
I
E
R
D
A
Diagrama D
ACEITE ACEITE
ACEITE
Diagrama E
Diagrama F
STAINLESS
TORNILLOS DE
LA HOJA
Diagrama G
YUGO DE
LA HOJA
PASADOR DE
LA ARMADURA
Diagrama H
TORNILLOS DE
LA HOJA
Diagrama I
TORNILLOS DE
LA HOJA
ORIFICIO
EN LA
HOJA
SUPERIOR
HOJA
INFERIOR
HOJA
HOJA
SUPERIOR
RODILLO DE
NILÓN (BOLA)
Diagrama J
Transcripción de documentos
SAVE THESE INSTRUCTIONS THIS PRODUCT IS INTENDED FOR PROFESSIONAL USE (These instructions only apply for trimmers that have a 2-prong plug). To reduce the risk of electric shock, this appliance has a polarized plug (one blade is wider than the other). This plug will fit in a polarized outlet only one way. If the plug does not fit fully in the outlet, reverse the plug. If it still does not fit, contact a qualified electrician to install the proper outlet. Do not change the plug in any way. GROUNDING INSTRUCTIONS (These instructions only apply for trimmers that have a 3-prong plug). This appliance should be grounded. In the event of an electrical short circuit, grounding reduces the risk of electric shock by providing an escape wire for the electric current. This appliance is equipped with a cord having a grounding wire with an appropriate grounding plug. The plug must be plugged into an outlet that is properly installed and grounded in accordance with all local codes and ordinances. DANGER: Improper use of the grounding plug can result in a risk of electric shock. If repair or replacement of the cord or plug is necessary, do not connect the grounding wire to either flat-blade terminal. The wire with insulation having an outer surface that is green with or without yellow stripes is the grounding wire. Check with a qualified electrician or serviceman if the grounding instructions are not completely understood, or if in doubt as to whether the appliance is properly grounded. Do not modify the plug provided; if it will not fit the outlet, have the proper outlet installed by a qualified electrician. This appliance is for use on a nominal 120-volt circuit, and has a grounding plug (Diagram A). A temporary adapter, (Diagrams B & C) may be used to connect this plug to a 2-pole receptacle (Diagram B) if a properly grounded outlet is not available. The temporary adapter should be used only until a properly grounded outlet (Diagram A) can be installed by a qualified electrician. The green colored rigid ear, lug, or the like extending from the adapter must be connected to a permanent ground such as a properly grounded outlet-box cover. Whenever the adapter is used, it must be held in place by a metal screw. SHAVES BACK OF NECK– Extra fine blade takes just the right amount of hair… thoroughly shaves neck in seconds. Diagram C SHAPES HAIRLINE– Trimmer cuts a sharp hairline. Helps you give a neat, smooth shave right up to the line. TRIMS AROUND THE EARS–Extra fine blade and narrow head makes shaping and trimming hairline around ears fast and easy. FINISHES SIDEBURNS– The trimmer’s cutting head makes a clean, level,professional line. A few upward strokes shaves hair below line FOR MODEL GO & GO SQUARE TRIMMERS ONLY OPERATING INSTRUCTIONS Please read the following instructions before using your new Andis Trimmer. Give it the care that a fine precision built instrument deserves and it will give you years of service. Before starting trimmer remove blade guard (some models may not have a blade guard). Plug cord into electrical outlet, operate at 120 volt, 60 cycle AC electrical current or as noted on the unit. To start trimmer move switch button to on position, to stop, move switch button back to original position. After using your Andis Trimmer, rewrap cord and store in a safe place. Some of the “basic” uses for a trimmer are illustrated below: USER MAINTENANCE The internal mechanism of your trimmer has been permanently lubricated at the factory. Other than the recommended maintenance described in this manual, no other maintenance should be performed, except by Andis Company or an Andis Authorized Repair Service Station. Diagram D POWER ADJUSTMENT FOR MODEL SLII and SL3 N POWER SCREW K E R I S E W S E Your Andis Trimmer has been adjusted to line voltage at the factory. However, because of voltage variations it may be necessary to adjust the power setting for your area. If the power adjustment is off, you will usually notice a “clatter”, when the trimmer is “on” or introduced into the hair. (It is normal for your trimmer to “clatter” for an instant when initially turned on). T C L O C 1. Oil the blades (Diagram E). 2. The power screw is located in the lower part of the housing opposite the switch (Diagram D). Diagram E 3. Turn your trimmer “on”. Diagram F 4. Using a standard screw driver that fits the slot, turn the powescrew counter clockwise until the trimmer clatters continuously. Then turn the screw clockwise carefully until the clatter ceases. 5. Your trimmer is now adjusted to its optimum power setting. CARE AND SERVICING OF YOUR ANDIS TRIMMER BLADES Blades should be oiled before, during, and after each use. If your trimmer blades leave streaks or slows down, Diagram G it’s a sure sign blades need oil. The trimmer should be held in a position shown (Diagram F) to prevent oil from getting into motor. Place a few drops of Andis Trimmer Oil on the front and side of the cutter blades (Diagram E). Wipe excess oil off blades with a soft dry cloth. Spray lubricants contain insufficient oil for good lubrication, but are an excellent trimmer coolant. Always replace broken or nicked blades to prevent injury. STAINLESS You can clean the excess hair from your blades by using a small brush or worn out tooth brush. To clean the blades we suggest to immerse the blades only into a shallow pan of Andis Trimmer Oil, while the trimmer is running. Any excess hair and dirt that has accumulated between the blades should come out. After cleaning, BLADE SCREWS turn your trimmer off and dry blades with a dry cloth and start clipping again. OIL ARMATURE PIN Your Andis SL II Trimmer consists of a preset tension assembly on the blade set. To remove blade set from your trimmer, unplug trimmer from electrical outlet. Turn the trimmer upside down so teeth of blades are facing down. You may wish to set the trimmer on a flat surface while performing these operations. Using a philips type screwdriver, unscrew Diagram H Espãnol PRECAUCIONES IMPORTANTES Al utilizar un artefacto eléctrico, siempre deben seguirse las precauciones básicas de seguridad, que incluyen las siguientes: Lea todas las instrucciones antes de usar la recortadora Andis. PELIGRO: Para reducir el riesgo de descarga eléctrica: K OIL TO ADJUST YOUR TRIMMER: REPLACEMENT (REMOVAL) OF BLADE SET FOR MODEL SL II AND SL3 Attaching The Clipper Combs (Some models do not have attachment combs) The clipper comb blade attachments mount easily. Just snap them on. Snap them off. Combs help guide hair to Diagram L cutting blades and give you precise control of hair lengths. Each comb allows a different length of cut which is indicated on the combs: 1/16”, 1/8”, 1/4”, and 3/8”. You can always set blades for a coarser cut by attaching any of the four snap-on blade attachments (Diagram L). To use a blade attachment, slip the cutter blade teeth into blade attachment (Diagram M). Snap blade attachment down, they snap on and off easily (Diagram N). These attachments guide hair into the trimmer Diagram M Diagram N blades and give you precise control of hair lengths. The length of trim is indicated on the blade attachment: 1/16”, 1/8”, 1/4”, and 3/8”. BLADE YOKE OIL 1. Si un artefacto se ha caído al agua, no trate de sacarlo. Desenchúfelo inmediatamente. 2. No lo utilice al bañarse o ducharse. 3. No coloque ni almacene el artefacto donde pueda caerse en una bañera o un lavabo, o ser halado dentro de éstos. No lo coloque ni lo deje caer en agua u otro líquido. 4. Siempre desenchufe este artefacto del tomacorriente eléctrico inmedi atamente después de usarlo. 5. Desenchufe este artefacto antes de limpiar, desmontar o ensamblar las piezas. ADVERTENCIA: Para reducir el riesgo de quemaduras, incendio, descarga eléctrica o lesiones a las personas: 1. Un artefacto nunca debe dejarse desatendido mientras está enchufado. 2. Es necesario una supervisión muy de cerca cuando este artefacto sea usado por, en o cerca de niños y personas inválidas. 3. Utilice este artefacto exclusivamente para su uso propuesto, tal como se describe en este manual. No utilice accesorios no recomendados por Andis. 4. Nunca opere este artefacto si su cable eléctrico o enchufe está dañado, si no está funcionando correctamente o si se ha dejado caer, si se ha dañado o si se ha caído en el agua. Devuelva el artefacto a una Centro de GUARDE ESTAS INSTRUCCIONES ESTE PRODUCTO ESTÁ DESTINADO A USO PROFESIONAL (Estas instrucciones sólo corresponden a las recortadoras que tienen un enchufe de 2 patillas.) Para reducir el riesgo de descargas eléctricas, este artefacto tiene un enchufe polarizado (una patilla es más ancha que la otra). Este enchufe encajará en un tomacorriente polarizado de una sola manera. Si el enchufe no puede insertarse completamente en el tomacorriente, invierta el enchufe. Si aún no puede insertarse, póngase en contacto con un electricista calificado para instalar el tomacorriente apropiado. No cambie el enchufe de manera alguna. INSTRUCCIONES DE CONEXIÓN A TIERRA (Estas instrucciones sólo corresponden a las recortadoras que tienen un enchufe de 3 patillas.) Este aparato debe estar conectado a tierra. En el caso de un cortocircuito eléctrico, la conexión a tierra reduce el riesgo de descarga eléctrica al proporcionar un cable de escape para la corriente eléctrica. Este aparato tiene un cable con un hilo de conexión a tierra y el enchufe apropiado de conexión a tierra. El enchufe debe enchufarse en un tomacorriente correctamente instalado y conectado a tierra de acuerdo con todos los códigos y ordenanzas locales. PELIGRO: Un uso incorrecto del enchufe de conexión a tierra puede ocasionar un riesgo de descarga eléctrica. Si es necesario reparar o reemplazar el cable o enchufe, no conecte el hilo de conexión a tierra a ninguno de los terminales de hoja plana. El hilo sin aislamiento que tiene una superficie externa verde con o sin rayas amarillas es el hilo de conexión a tierra. Consulte con un electricista o técnico calificado si no comprende completamente las instrucciones de conexión a tierra o si tiene dudas si el aparato ha sido conectado correctamente a tierra. No modifique el enchufe provisto; si no encaja en el tomacorriente, solicite que un electricista calificado instale el tomacorriente correcto. Este aparato sirve para usarse en un circuito nominal de 120 voltios, y tiene un enchufe de conexión a tierra (Diagrama A). Puede usarse un adaptador temporal (Diagramas B y C) para conectar este enchufe a un receptáculo bipolar (Diagrama B) si no está disponible un tomacorriente correctamente conectado a tierra. El adaptador temporal sólo debe usarse hasta que un electricista calificado pueda instalar un tomacorriente correctamente conectado a tierra (Diagrama A). La oreja u orejeta rígida de color verde o cualquier elemento similar que se extienda desde el adaptador deberá conectarse a una tierra permanente tal como la cubierta de una caja de tomacorrientes correctamente conectada a tierra. Cada vez que se utilice el adaptador, deberá mantenerse en posición mediante un tornillo metálico. CAJA DE TOMACORRIENTES CONECTADOS A TIERRA TOMACORRIENTE CONECTADO A TIERRA Diagrama A AFEITA LA PARTE POSTERIOR DEL CUELLO– Una hoja extra fina recoge la cantidad correcta de cabello y afeita el cuello completamente en pocos segundos. RECORTA ALREDEDOR DE LAS OREJAS– La hoja extra fina y el cabezal angosto permiten conformar y recortar la línea del pelo alrededor de las orejas de manera rápida y fácil. Diagrama B LENGÜETA PARA EL TORNILLO DE CONEXIÓN A TIERRA Diagrama C DA FORMA A LA LÍNEA DEL PELO– La recortadora corta una línea del pelo nítida. Le ayuda a afeitar prolija y suavemente hasta la línea del pelo. PERMITE EL ACABADO DE LAS PATILLAS– El cabezal de corte de la recortadora permite crear una línea del pelo limpia, pareja y con aspecto profesional. Unos pocos movimientos ascendentes afeitan el pelo por debajo de esta línea. Diagrama D AJUSTE ELÉCTRICO PARA EL MODELO SL & SL3 Su recortadora Andis ha sido ajustada al voltaje de línea en la fábrica. Sin embargo, debido a las variaciones de voltaje, es posible que resulte necesario modificar el ajuste de potencia para su área. Si el ajuste de potencia está apagado, por lo general observará un “traqueteo”, cuando la recortadora está “encendida” o se introduce en el pelo. (Es normal que la recortadora “traquetee” durante un instante en el momento inicial de encendido). TORNILLO MECÁNICO 1. Lubrique las hojas (Diagrama E). 2. El tornillo de encendido se encuentra en la parte inferior de la caja, frente al interruptor (Diagrama D). 3. Encienda la recortadora. 4. Usando un destornillador estándar que encaje en la ranura, gire el tornillo de encendido hacia la izquierda hasta que la recortadora traquetee continuamente. Luego gire el tornillo hacia la derecha con sumo cuidado hasta que cese el traqueteo. 5. Su recortadora ahora está ajustada a su óptimo ajuste de potencia. UIERDA IZQ LA A HACIA L PARA AJUSTAR SU RECORTADORA: DE ACEITE ACEITE ACEITE Diagrama E Diagrama F CUIDADO Y MANTENIMIENTO DE SUS HOJAS RECORTADORAS ANDIS Las hojas deben lubricarse antes, durante y después de cada uso. Si las hojas de su recortadora dejan Diagrama G manchas o si se reduce su velocidad, es un indicio certero de que las mismas necesitan aceite. La recortadora debe sujetarse en la posición mostrada (Diagrama F) para evitar que el aceite penetre en el motor. Coloque unas pocas gotas de Aceite Andis para recortadoras en las partes frontal y laterales de las hojas cortadoras STAINLESS (Diagrama E). Limpie el exceso de aceite de las hojas usando un paño suave seco. Los lubricantes en aerosol contienen una cantidad insuficiente de aceite para lograr una buena lubricación, pero son un excelente refrigerante para la recortadora. Siempre reemplace las hojas rotas o melladas para evitar lesiones. Puede limpiar TORNILLOS DE el exceso de cabello de sus hojas usando un cepillo pequeño o un cepillo de dientes gastado. Para limpiar las LA HOJA hojas, sugerimos sumergir sólo las hojas en una bandeja de PASADOR DE poca profundidad de Aceite para Recortadoras Andis, mientras LA ARMADURA la recortadora esté en funcionamiento. Debe eliminarse todo exceso de cabello o suciedad que se hubiera acumulado entre las hojas. Después de la limpieza, apague la recortadora y seque las hojas con un paño seco y comience a recortar una YUGO DE vez más. LA HOJA REEMPLAZO (DESMONTAJE) DEL CONJUNTO DE HOJAS Diagrama H Para el modelo SL & SL3 ADAPTADOR TORNILLO METÁLICO PASADOR DE CONEXIÓN A TIERRA MANTENIMIENTO POR PARTE DEL USUARIO El mecanismo interno de su recortadora ha sido lubricado de manera permanente en la fábrica. No debe realizarse ningún tipo de mantenimiento que no fuera el mantenimiento recomendado en este manual, salvo por Andis Company o por una Estación de Servicio de Reparación Autorizada de Andis. A Diagram B I persons: 1. An appliance should never be left unattended when plugged in. 2. Close supervision is necessary when this appliance is used by, on, or near children and invalids. 3. Use this appliance only for its intended use as described in this manual. Do not use attachments not recommended by Andis. 4. Never operate this appliance if it has a damaged cord or plug, if it is not work- ing properly, if it has been dropped or damaged, or dropped into water. Return the appliance to an Andis Service Center for examination or repair. 5. Keep the cord away from heated surfaces. 6. Never drop or insert any object into any opening. 7. Do not use outdoors or operate where aerosol (spray) products are being used or where oxygen is being administered. 8. Do not use this appliance with a damaged or broken blade or comb, as injury to the skin may occur. 9. To disconnect turn control to “off” then remove plug from outlet. 10. If this trimmer has means for grounding, connect to a properly grounded outlet only. See Grounding Instructions. Diagram A W WARNING: To reduce the risk of burns, fire, electric shock, or injury to GROUNDING PIN C O C L U O C 1. Do not reach for an appliance that has fallen into water. Unplug immediately. 2. Do not use while bathing or in a shower. 3. Do not place or store appliance where it can fall or be pulled into a tub or sink. Do not place in or drop into water or other liquid. 4. Always unplug this appliance from the electrical outlet immediately after using. 5. Unplug this appliance before cleaning, removing, or assembling parts. TAB FOR GROUNDING SCREW INSTRUCCIONES DE OPERACIÓN Sírvase leer las instrucciones siguientes antes de usar su nueva recortadora Andis. Si brinda el cuidado que se merece a este instrumento fino construido con precisión, obtendrá muchos años de servicio. Antes de arrancar la recortadora, desmonte el protector de la hoja (es posible que algunos modelos no tengan un protector de la hoja). Enchufe en el tomacorriente eléctrico, opere a una corriente eléctrica de CA de 120 voltios y 60 ciclos, o según se indique en la unidad. Para arrancar la recortadora, mueva el botón interruptor a la posición de encendido; para detenerla, vuelva a poner el botón interruptor en la posición original. Después de usar su recortadora Andis, vuelva a enrollar el cable y almacénela en un lugar seguro. Algunos de los usos “básicos” para una recortadora se ilustran a continuación: CH DANGER: To reduce the risk of electric shock: METAL SCREW Servicio de Andis para su verificación o reparación. 5. Mantenga el cable eléctrico lejos de las superficies calentadas. 6. Nunca deje caer ni inserte ningún objeto en ninguna abertura. 7. No lo utilice al aire libre, ni lo opere donde se estén usando productos en aerosol (nebulizados) o donde se esté administrando oxigeno. 8. No utilice este artefacto con una hoja o peine dañado o roto, ya que se podrían ocasionar lesiones en la piel. 9. Para desconectar, coloque el control en la posición “off” y luego desconecte el enchufe del tomacorriente. 10. Si esta recortadora tiene medios para la conexión a tierra, conéctela únicamente a un tomacorriente correctamente conectado a tierra. Consulte las instrucciones de conexión a tierra. RE When using an electrical appliance, basic precautions should always be followed, including the following: Read all instructions before using the Andis Trimmer. the two blade screws (Diagram G). Remove blade set from trimmer. Install new blade set, making sure the blade Diagram I yoke cradles the armature pin on trimmer (Diagram H). There is no need to adjust blade tension before use, as tension has been preset at the factory. Align screw holes of blade set to screw inserts on trimmer housing. Replace the screws. Before tightening down blade screws, check alignment of blade set to housing, making sure that they are parallel. Tighten down screws. PLEASE NOTE: Persons familiar with replacing and adjusting Andis Outliner II, T-Outliner, T-Edjer, Edjer Trimmer blades, please read the following blade replacement instructions. Those persons not familiar with this procedure, BLADE SCREWS please return trimmer to your supplier or Andis Authorized Repair Station BLADE for blade replacement and adjustment. NYLON ROLLER (BALL) For Model GO, AE: To remove blade set from your trimmer, unplug your trimmer from the electrical outlet. Turn the trimmer upside down UPPER BLADE so the teeth of blades are facing down. You may wish to set the trimmer LOWER HOLE IN BLADE on a flat surface while performing these operations. Using a philips type UPPER BLADE screwdriver, unscrew the two blade screws (Diagram I). Remove blade set from trimmer. To install your new trimmer blade set, align hole in upper Diagram J BLADE SCREWS blade (smaller of the two blades) and center over nylon roller (ball) of the trimmer’s tension spring (Diagram J). Align screw holes of lower blade (larger of the two blades) to armature screw holes (Diagram I). While holding blade in place, replace blade screws; do not tighten down HAIR completely. Turn trimmer over and align the blade set parallel to the trimmer’s upper housing. GUARD IMPORTANT: Check blade alignment, making sure the teeth of the upper blade rest slightly below the Diagram K upper edge of teeth on lower blade. Failure to check the position of blade may cause cutting or scratching of your client’s skin when trimming. Tighten down blade screws firmly. If after turning on the trimmer you notice the hair guard is hitting the upper blade (Diagram K) loosen (with standard screwdriver) hair guard screws slightly and adjust hair guard away from the upper blade approximately 1/32”. Tighten down hair guard screws. ADAPTER GROUNDED OUTLET BOX A GROUNDED OUTLET HAC I IMPORTANT SAFEGUARDS Diagrama I Su recortadora Andis SL II consta de un conjunto de tensión prestablecido en el conjunto de las hojas. Para desmontar el conjunto de hojas de la recortadora, desenchufe primero la recortadora del tomacorriente eléctrico. Voltee la recortadora, de modo que los dientes de las hojas queden orientados hacia abajo. Tal vez prefiera colocar la recortadora sobre una superficie plana al efectuar estos procedimientos. Usando un destornillador tipo Phillips, destornille los dos tornillos de las hojas (Diagrama G). Retire el conjunto de las hojas de la recortadora. Instale un nuevo conjunto de hojas, asegurándose de que el yugo de la hoja contenga el pasador de la armadura en la TORNILLOS DE LA HOJA recortadora (Diagrama H). HOJA No hay necesidad de ajustar la tensión de la hoja antes del uso, ya que RODILLO DE NILÓN (BOLA) ésta ha sido ajustada en la fábrica. Alinee los orificios para los tornillos del conjunto de hojas para atornillar los insertos en la caja de la recortadora. HOJA SUPERIOR Reemplace los tornillos. Antes de apretar completamente los tornillos de HOJA ORIFICIO INFERIOR las hojas, compruebe la alineación del conjunto de hojas con respecto a EN LA HOJA la caja, asegurándose de que estén paralelos. Apriete completamente los SUPERIOR tornillos. TORNILLOS DE Diagrama J LA HOJA TENGA EN CUENTA LO SIGUIENTE: Las personas familiarizadas con el reemplazo y ajuste de las hojas para recortadoras Andis Outliner II, T-Outliner, T-Edjer y Edjer deberán leer las siguientes instrucciones de reemplazo de las hojas. Aquellas personas no familiarizadas con este procedimiento deberán devolver la recortadora al proveedor o a una Estación de Reparación Autorizada de Andis para el reemplazo y ajuste de las hojas. Para los modelos GO, AE: Para desmontar el conjunto de hojas de la recortadora, desenchufe primero la recortadora del tomacorriente eléctrico Voltee la recortadora, de modo que los dientes de las hojas queden orientados hacia abajo. Le recomendamos que al efectuar estos procedimientos coloque la recortadora sobre una superficie plana. Usando un destornillador tipo Phillips, destornille los dos tornillos de las hojas (Diagrama I). Retire el conjunto de las hojas de la recortadora. Para instalar su nuevo conjunto de hojas de la recortadora, alinee el orificio en la hoja superior (la menor de las dos hojas) y centre sobre el rodillo de nilón (bola) del resorte-
 1
1
-
 2
2


Andis Company SL II AND SL3 Manual de usuario
- Categoría
- Cortapelos
- Tipo
- Manual de usuario
- Este manual también es adecuado para