RainPoint ITV105 Manual de usuario

Tipo
Manual de usuario
USER MANUAL
Model: ITV105
English Español
Email
seice@rainpointus.com
WhatsApp
+1 626-780-5952
Free Hotline
US: 1-833-381-5659 (EN)
EU: +44 800-808-5337 (EN DE)
Save the user manual for future reference
If you have any questions, please contact us to get suppo
WARM TIPS
PLEASE READ BEFORE USING
FOR ANY PROBLEMS DURING USE, PLEASE CONTACT US:
Web: www.rainpointonline.com
Email: seice@rainpointus.com
WhatsApp: +1 626-780-5952
US Free Hotline(English):
+1 833-381-5659(MON-FRI 9:30 AM-5:30 PM PST)
UK Free Hotline(English Deutsch):
+44 800-808-5337(MON-FRI 9:00 AM-5:00 PM CET )
Don’t use the water timer when the temperature is
below 37°F(3°C), and please store the timer indoors
to avoid potential freezing damage.
The lter traps di paicles, preventing them from
entering the timer and causing clogging. Please
clean the lter regularly and replace it if worn.
To ensure a longer lifespan, please use 2 new AAA
alkaline batteries (not included). Don’t mix new and
old alkaline, standard (carbon-zinc), or rechargeable
batteries.
Only use with clean cold water.
Please activate the water timer before rst use or
after a period of inactivity (Refer to page 6:
ACTIVATE THE TIMER BEFORE USE).
- 01 -
EN
PRODUCT OVERVIEW
At A GLANCE
BIG LCD
SCREEN
OK/MANUAL
BUTTON
DIAL
DELAY/+
BUTTON - BUTTON
FILTER
HOSE TAP
CONNECTION
OUTLET
Rotate the dial to customize your watering schedule.
DIAL:
OK / MANUAL BUTTON:
DELAY / + BUTTON :
- BUTTON :
Use "OK" to conrm the time.
Use "+" to adjust the time. When the
Use "-" to adjust the time.
When the dial is turned to "ON", press and hold "MANUAL"
to water manually.
dial is turned to "ON", press and hold "DELAY" to activate
Rain Delay.
- 02 -
EN
SPECIFICATION
SET CLOCK
DIAL POSITION FUNCTION
Working Water Pressure
Max Flow Rate
0.5bar-8bar (7.25 psi-116.03 psi)
10 Gal/Min (35L/Min)
Waterproof Level IP54
Working Temperature 37.4℉-122℉ (3℃-50℃)
Watering Frequency Eve 1-12 hours or
eve 1-7 days
Water Inlet
Water Outlet
Watering Duration From 1 minute to 3 hours 59
minutes (4 hours)
NH (US) for 3/4" taps
For 3/4" standard garden hose
BSP(EU) for 3/4" or 1" taps
Power By 2 AAA (1.5V) alkaline batteries
(Not Included)
Set the current time
(US defaults to 12-hour clock)
Determine how long to water
(water duration)
Choose how often you will
water (water frequency)
START TIME
HOW LONG
HOW OFTEN
Timer runs according to
your customized schedule
Turn o all watering
ON
OFF
Select what time you would
like to sta watering
- 03 -
EN
PRODUCT INSTALLATION
INSTALLING THE BATTERIES
Note:
Install the batte tray cover securely after installing the batte
to ensure waterproong.
When the timer is not used for a long time, please remove the
batteries and dispose of them properly.
Replace batteries when the low batte indicator appears on
display.
Don’t dispose of batteries in re. Batteries may explode or leak.
To ensure a longer lifespan, please use 2 new AAA alkaline
batteries (not included). Don’t mix new and old alkaline,
standard (carbon-zinc), or rechargeable batteries.
1) Remove the batte compament
cover on the back of the timer.
2) Inse 2 new AAA (1.5V) alkaline
batteries (not included).
3) Put the batte compament cover
back on the timer and press rmly to
make sure it is completely sealed.
- 04 -
EN
INSTALLING THE TIMER
Note:
1) Turn o the garden faucet.
2) Wrap Teon Tape around the faucet threads.
3) Screw the timer to the garden faucet
and make the display as veical as
possible to the ground to prevent
rainwater from accumulating and
leaking into the interior.
4) Wrap Teon Tape around the threads
of the timer outlet.
5) Screw the garden hose to the timer
outlet.
6) Turn on the faucet after programming
the timer.
Tips: If the connection between the timer and the faucet or hose is not
tight or leaking, wrap more Teon Tape(thread seal tape) to make them
tight.
Please do not use tools, only install the timer by hand.
When expecting freezing temperatures, timers should be removed
from the hose faucet and stored indoors to avoid potential freeze
damage.
Please install the lter properly and
keep it clean as follows.
- 05 -
EN
Note:
ACTIVATE THE TIMER BEFORE USE
Please activate the device before using it for the first time or
after a period of inactivity.
Activation steps:
When testing, please keep away from the water timer outlet to
avoid being splashed and wet.
1. Keep the garden faucet turned o.
2. Turn the timer dial to "ON".
3. Press and hold the "MANUAL" button for
3-5s to enter Manual Watering Mode.
4. When the screen ashes, press the "OK"
button to run manual watering.
5. After hearing the "click" sound or waiting for
about 5 secs, the valve in the timer is
opened, then turn the dial to "OFF" to close
the valve.
6. Repeat step 2 - 5 for 3-5 times.
7. Test: Turn on the faucet a little bit, and then
repeat step 2-5 to check if the water ow
out or shut o as expected.
If yes, the timer valve is normal, please use it with condence!
If not, please repeat the above steps several times or contact
RAINPOINT suppo team immediately.
- 06 -
EN
PROGRAMMING YOUR TIMER
1) Turn the dial to SET CLOCK.
2) Use the "+" and "-" buttons to set the current exact time, including
AM and PM.(US defaults to 12-hour clock, EU defaults to 24-hour
clock)
3) Use the "OK" button to conrm and switch between hours or
minutes.
4) Turn the dial clockwise to save the changes in this STEP and go to
next STEP.
Tips: When the setup of this STEP is nished, please turn the dial to
save the changes instead of press the "OK" button. If you press
the "OK" button after setting, it will return to the previous setting
instead of saving it.
STEP 1: SET CLOCK
- 07 -
EN
1) Turn dial to START TIME.
2) Use the "+" and "-" buttons, to set the time you want to sta
watering, including AM and PM.
4) Turn the dial clockwise to save the changes in this STEP and go to
next STEP.
3) Use the "OK" button to switch time ( Hours or Minutes).
Tips: When the setup of this STEP is nished, please turn the dial to
save the changes instead of press the "OK" button. If you press
the "OK" button after setting, it will return to the previous setting
instead of saving it.
STEP 2: START TIME
- 08 -
EN
1) Turn dial to HOW LONG.
2) Use the "+" and "-" buttons, to select watering duration from
1 minute to 3 hours 59 minutes.
4) Turn the dial clockwise to save the changes in this STEP and go to
next STEP.
3) Using the "OK" button to switch time ( Hours or Minutes).
Tips: When the setup of this STEP is nished, please turn the dial to
save the changes instead of press the "OK" button. If you press
the "OK" button after setting, it will return to the previous
setting instead of saving it.
STEP 3: HOW LONG
- 09 -
EN
1) Turn the dial to HOW OFTEN.
2) Use "+" and "-" buttons, to set your watering frequency. You
can choose to water eve 1 to 12 hours, or eve 1 to 7 days.
3) Turn the dial clockwise to save the changes in this STEP and go to
next STEP.
EVERY
WEEK
SUNDAY MONDAY TUESDAY WEDNESDAY THURSDAY FRIDAY SATURDAY

WEEK
ONE
WEEK
TWO
WEEK
ONE
WEEK
TWO

SUNDAY MONDAY TUESDAY WEDNESDAY THURSDAY FRIDAY SATURDAY

Tips: When the setup of this STEP is nished, please turn the dial to
save the changes instead of press the "OK" button. If you press
the "OK" button after setting, it will return to the previous
setting instead of saving it.
STEP 4: HOW OFTEN
- 10 -
EN
1) Turn dial to "ON".
2) The LCD screen will display the current time and the next time to
sta watering.
5
Current Time Next Watering Sta Time
CONGRATULATIONS!
Your timer has now been programmed successfully. It will sta
watering automatically based on the programmed sta time,
duration and frequency.
Now you can keep the faucet turned on and trust the timer to do
the watering!
STEP 5: AUTOMATIC WATERING
- 11 -
EN
ADDITIONAL FUNCTIONS
RAIN DELAY
1) With the dial on "ON", press "DELAY" button for 3-5s to sta the
delay watering function.
2) There will be a delay period on the screen which default " "24H
You can press button "+" or "-" to choose the delay period from
24H, 48H, and 72H.
Rain delay allows you to postpone watering for a set period of time,
and it will not interrupt your original schedule.
To access the rain delay, follow the steps below.
Setting rain delay 24/48/72H Peorming rain delay
3) Press "OK" button to run the delay function after selecting the
delay time, and all watering plans will be skipped during this period.
4) To remove rain delay, hold the "DELAY" button for 3-5s again to
resume your programmed watering schedule.
Please remember to press the "OK" button after selecting the
rain delay time to sta the rain delay program. Otherwise, the
rain delay setting will automatically exit after the screen ashes
for 3-5s.
Note:
- 12 -
EN
MANUAL / HAND WATERING
Peorming manual wateringSetting manual watering
1min~8hrs
This function allows you to manually water without interrupting your set
watering schedule. To access this feature, please follow the steps below.
Please remember to press the "OK" button after setting the
manual watering time to sta manual watering. Otherwise, the
manual watering setting will be automatically exited after the
screen ashes for about 3-5s.
Note:
1) Turn the dial to "ON".
2) Press and hold the "MANUAL" button for 3-5s to enter the Manual
Watering Mode.
3) Press the "+" or "-" buttons to adjust the manual watering time from
1 minute to 8 hours.
(The default manual watering time is 10 minutes.)
4) After setting the watering time, press the "OK" button to sta
manual watering and the pattern will be displayed on the screen.
5) If you need to stop the manual watering, please hold the "MANUAL"
button for 3-5s to exit the manual watering mode and restore the
original watering program.
(Or you can turn the dial to "OFF" to stop the manual watering, but
please remember to turn the dial to "ON" again to restore the
original watering program.)
- 13 -
EN
OFF MODE
BATTERY STATUS
1) If you wish to stop the watering plan for an extended period,
turn the dial to "OFF". (Your settings are saved)
2) The timer will not water automatically while in OFF mode. (The
screen will display the word OFF in large letters).
3) To sta watering automatically again, turn the dial back to "ON"
to resume your programmed watering schedule.
Full Low Power
When the low batte indicator appears on display. the valve
will close automatically to avoid leakage. Please replace the
batte in time in case of interrupting the normal operation.
Batte Status will be displayed as following:
- 14 -
EN
Problem Possible Cause Possible Solution
1. No lter or not be
placed horizontally
2. The faucet is not the
standard 3/4"
The water inlet
leakage
1. Long time in storage
and transpoation
make the valve
inactive
2. Valve blockage
1. After setting manual
watering or rain delay
time, without pressing
OK button to save and
run.
The water
won't stop/ow
out
No response
for manual/rain
delay function
1. Keep the tap turned
o and turn the timer
dial to ON;
2. Run the manual
watering for 5-7s and
stop it;
3. Repeat the Step 2 for 3
to 5 times;
4. T using it normally.
1. Press OK button again
after the time is set to
conrm.
1. Mixed use of old and
new batteries
2. Use the carbon
batteries or
rechargeable
batteries
Sho batte
life
1. Use new alkaline
batteries.
2. Rechargeable batteries
and carbon batteries
have a sho life, use
the alkaline batteries
instead of them.
1. Add a lter and make
sure it's placed
horizontally in the inlet.
2. Make sure the faucet
is a standard 3/4" faucet.
3. Wrap Teon tape on the
tap making it tight.
- 15 -
TROUBLESHOOTING
EN
1. Filter blockage
2. Inlet pressure not
sucient to suppo
watering needs
Low water
pressure
LCD screen
does not
display
1. The batte is
exhausted
2. The display is
exposed to direct
sunlight
1. Replace new 2*AAA
alkaline batteries and
installed correctly.
2. Avoid direct sunlight,
and obsee if the
batte is too low.
1. Check if the lter is
clogged, if so, clean
or replace the lter.
2. Make sure the timer is
installed properly and
not cross-threaded.
3. Installation of a
booster pump or other
auxilia equipment of
increasing pressure.
If you need help in using the timer, please feel free to contact us.
US Free Hotline(English): +1 833-381-5659
(MON-FRI 9:30 AM-5:30 PM PST)
UK Free Hotline(English Deutsch): +44 800-808-5337
(MON-FRI 9:00 AM-5:00 PM CET )
Email: seice@rainpointus.com
WhatsApp: +1 626-780-5952
- 16 -
EN
CLEANING YOUR TIMER
filter
After a period of use, impurities or di in the water may accumulate in
the timer. Therefore, the timer should be cleaned regularly to ensure its
proper operation.
Please follow these steps to clean the timer.
1. Turn o the garden faucet and remove the timer. Check whether the
lter at the timer water inlet has accumulated impurities.
2. If the lter is diy, please take it out of the timer and rinse it with
running water.
3. Turn on the Manual Watering Mode of the timer to open the valve
and check whether the water pipe of the timer is blocked. If it is
blocked, please clean it gently with a small cleaning brush.
- 17 -
EN
WARNINGS
1) For outdoor use only. Placing the timer in the sheltered outdoors will
prolong its lifetime.
2) To avoid damage, please tighten it without using tools.
3) The lter should be placed horizontally in the water inlet to prevent
leakage.
4) When low power, please replace the batteries to avoid the
interruption of normal operation; when replacing the batteries,
please make sure that the batte tray is d.
5) When the timer is not in use, please remove the batteries and store
it indoors.
6) Don’t use the timer under the temperature more than 120℉(50℃),
or less than 38℉(3℃).
7) Don’t subject the product to extreme force and shock.
8) Severe electrical shock could result if water is sprayed into outlets or
sources of electrical current. Never immerse the product in water.
This product is MADE IN CHINA and conforms to the national standards
of the United States, Britain, Germany and France. Please use this
product correctly. If it needs to be discarded, please properly dispose
according to the national requirements. Please protect the
environment.
EC REP
NAME:VIAJE ELECTRONIC COMPANY LIMITED
ADDRESS:E588, 13 ADELAIDE ROAD, DUBLIN,
D02 P950, IRELAND
- 18 -
EN
WARRANTY
CUSTOMER SERVICE
RainPoint provides a 1-year warranty against manufacturing defects in
materials and workmanship from the date of purchase.
During the warranty period , we’ll replace free of charge the product
found to be defective under reasonable use and seice as determined
solely by RainPoint.
To place a warranty request, please email us with your order ID at
seice@rainpointus.com and we’ll respond within 24 hours.
LOT NO.: XXXXX (on the back of the timer)
US Free Hotline(English): +1 833-381-5659
(MON-FRI 9:30 AM-5:30 PM PST)
UK Free Hotline(English Deutsch): +44 800-808-5337
(MON-FRI 9:00 AM-5:00 PM CET )
Email: seice@rainpointus.com
WhatsApp: +1 626-780-5952
Still have trouble with setup , please search for " RainPoint " on Youtube
for installation videos!
If the user manual doesn’t have what you're looking for or you need
other help, please contact us before returning the product to the store
and let us know the LOT NO. of your device.
- 19 -
EN
RECOMENDACIONES
LEER ANTES DE USAR
SI TIENE ALGÚN PROBLEMA DURANTE EL USO, POR FAVOR
CONTACTE A SOPORTE EN:
Sitio web: www.rainpointonline.com
Correo Electrónico: seice@rainpointus.com
WhatsApp: +1 626-780-5952
Línea de Atención Gratuita de EEUU (Inglés):
+1 833-381-5659(LUN-VIE 9:30 AM-5:30 PM PST)
Linea de Atención Gratuita del RU(Inglés Alemán):
+44 800-808-5337(LUN-VIE 9:00 AM-5:00 PM CET)
- 20 -
No utilice el temporizador de agua cuando la
temperatura sea por debajo de 37°F (3°C), y por favor
guarde el temporizador en el interior para evitar
posibles daños por congelación.
El ltro atrapa las paículas de suciedad, evitando
que entren entren en el temporizador y causen
atascos. Por favor, limpie el ltro regularmente y
sustitúyalo si está desgastado
Para garantizar una mayor vida útil, utilice 2 pilas
alcalinas AAA nuevas (no incluidas). No mezcle pilas
nuevas y alcalinas, estándar (carbono-zinc) o
recargables.
Por favor, active el temporizador de riego antes del
primer uso o después de un periodo de inactividad
(Consulte la página 25 :ACTIVAR EL TEMPORIZADOR
ANTES DEL USO).
Utilice solo con agua limpia y fría.
ES
PANORAMICA DEL PRODUCTO
EN UN VISTAZOE
PANTALLA
LCD
BOTÓN OK/
MANUAL
DIAL
BOTÓN DELAY/+ BOTÓN-
FILTRO
GRIFO DE
MANGUERA
ZONA 1
- 21 -
• DIAL: Gire el dial para personalizar su programa de riego.
• BOTÓN OK / MANUAL:Utilice "OK" para conrmar la hora.Cuando
el dial esté en "ON", mantenga presionado "MANUAL" para regar
manualmente.
BOTÓN DELAY/+:Utilice "+" para ajustar el tiempo. Cuando el dial
esté en "ON", mantenga pulsado "DELAY" para activar Retraso por
lluvia.
• BOTÓN -: Utilice "-" para ajustar la hora.
ES
ESPECIFICACIÓNES
SET CLOCK
POSICIÓN DEL DIAL FUNCTION
Presión de Agua de Trabajo
Flujo Máximo.
0.5 bar-8 bar (7.25 psi-116.03 psi)
10 Gal/Min (35L/Min)
Nivel de impermeabilidad IP54
Temperatura de trabajo 37.4℉-122℉ (3℃-50℃)
Frecuencia de riego Cada 1-12 horas o
cada 1-7 días
Entrada de agua
Salida de agua
Duración del riego De 1 minuto a 3 horas y 59
minutos (4 horas)
Para manguera de jardín
estándar de 3/4"
NH (US) para grifos de 3/4"
BSP (UE) para grifos de 3/4" o 1
Alimentación 2 baterias alcalinas AAA(1.5 V)
(No incluidas)
Establezca la hora actual
(los valores predeterminados
de US son de 12 horas)
Determine cuánto tiempo
regar (duración del riego)
Elija la frecuencia con la que
regar (frecuencia de riego)
START TIME
HOW LONG
HOW OFTEN
El temporizador funciona
según su horario personalizado
Apague todo el riego
ON
OFF
Seleccione la hora a la que
desea comenzar a regar
- 22 -
ES
INSTALACIÓN DEL PRODUCTO
INSTALANDO LAS BATERÍAS
Nota:
- 23 -
1) Retire la tapa del compaimento
de las baterias en la pae
posterior del temporizador.
2) Introduzca 2 baterias alcalinas
AAA (1.5 V) nuevas (no incluidas).
3) Vuelva a colocar la tapa del
compaimento de las baterias en
el temporizador y presione
rmemente para asegurarse de
que está completamente cerrado.
Instale la tapa del compatimento de las baterías de forma segura
después de la instalación para garantizar la impermeabilización.
Cuando el temporizador no se utilice durante mucho tiempo,
retire labaterias y deséchelas de forma adecuada.
Sustituya las baterías cuando el indicador de batería baja
aparece en la pantalla.
No deseche las baterías en el fuego. Las baterías pueden explotar
o tener fugas.
Para garantizar una vida útil más larga, utilice 2 baterias alcalinas
AAA nuevas (no incluidas). No mezcle baterias alcalinas, estándar
(carbón-zinc) nuevas y viejas o baterias recargables.
ES
INSTALACIÓN DEL TEMPORIZADOR
1) Cierra el grifo del jardín.
2) Envuelva la cinta de teón alrededor de
las roscas del grifo.
3) Atornille el temporizador al grifo del jardín y
coloque la pantalla lo más veical posible al
suelo para evitar que el agua de lluvia se
acumule y se ltre en el interior.
4) Envuelva la cinta de teón alrededor de las
roscas de la salida del temporizador.
5) Atornille la manguera de jardín a la salida del
temporizador.
6) Abra el grifo después de programar el
temporizador.
Consejo: Si la conexión entre el temporizador y el grifo o la manguera
no está apretada o tiene fugas, envuelva más cinta de teón (cinta
para sellar roscas) para que queden bien apretadas.
- 24 -
ES
Nota:
Nota:
ACTIVAR EL TEMPORIZADOR ANTES DEL USO
Active el dispositivo antes de usarlo por primera vez o después de
un período de inactividad.
Pasos de activación:
Al realizar la prueba, manténgase alejado de la salida del
temporizador de agua para evitar ser salpicado y mojado.
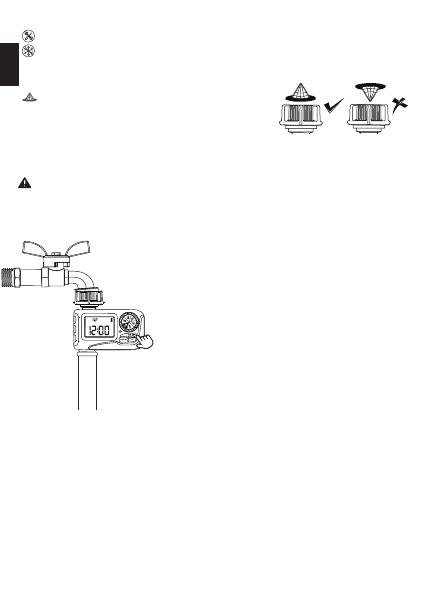
1. Mantenga el grifo del jardín cerrado.
2. Gire el dial del temporizador en "ON".
3. Mantenga presionado el botón "MANUAL"
durante 3 a 5 segundos para ingresar al
modo de riego manual.
4. Cuando la pantalla parpadee, pulse el botón
"OK" para ejecutar el riego manual.
5. Después de escuchar el sonido de "click" o
esperar unos 5 segundos, la válvula en el
temporizador se abre, luego gire el dial en
"OFF" para cerrar la válvula.
6. Repita los pasos 2 a 5 de 3 a 5 veces.
7. Prueba: abra un poco el grifo y luego repita
los pasos 2-5 para comprobar si el agua
uye o se cierra como se espera.
No utilice herramientas, instale el temporizador a mano.
Cuando se esperen temperaturas bajo cero, los temporizadores
deben retirarse del grifo de la manguera y guardarse en el interior
para evitar posibles daños por congelamiento.
Instale el ltro correctamente y manténgalo
limpio como se muestra en la imagen de la
derecha.
En caso armativo, la válvula del temporizador es normal,
¡utilícela con conanza!
De lo contrario, repita los pasos anteriores varias veces o comuníquese
con el equipo de sopoe de RAINPOINT de inmediato.
- 25 -
ES
PROGRAMACIÓN DEL TEMPORIZADOR
1) Gire el dial a "SET CLOCK"
2) Utilice los botones "+" y "-" para congurar la hora exacta actual,
incluidos AM y PM.(En EE.UU. se utiliza por defecto el reloj de 12
horas, en la UE el de 24 horas)
3) Use el botón "OK" para conrmar y cambiar entre horas o minutos.
4) Gire el dial en el sentido de las agujas del reloj para guardar los
cambios en este PASO y pasar al siguiente PASO.
Consejo: Cuando nalice la conguración de este PASO, gire el dial
para guardar los cambios en lugar de presionar el botón
"OK". Si presiona el botón "OK" después de la conguración,
volverá a la conguración anterior en lugar de guardarla.
PASO 1: AJUSTAR EL RELOJ
- 26 -
ES
Consejo: Cuando nalice la conguración de este PASO, gire el dial
para guardar los cambios en lugar de presionar el botón
"OK". Si presiona el botón "OK" después de la conguración,
volverá a la conguración anterior en lugar de guardarla.
PASO 2: HORA DE INICIO
- 27 -
1) Gire el dial a "START TIME".
2) Use los botones "+" y "-" para congurar la hora a la que desea
comenzar a regar, incluidas AM y PM
3) Use el botón "OK" para cambiar la hora (Horas o Minutos).
4) Gire el dial en el sentido de las agujas del reloj para guardar los
cambios en este PASO y pasar al siguiente PASO.
Consejo: Cuando nalice la conguración de este PASO, gire el dial
para guardar los cambios en lugar de presionar el botón "OK". Si
presiona el botón "OK" después de la conguración, volverá a la
conguración anterior en lugar de guardarla.
ES
Consejo: Cuando nalice la conguración de este PASO, gire el dial
para guardar los cambios en lugar de presionar el botón
"OK". Si presiona el botón "OK" después de la congurción,
volverá a la conguración anterior en lugar de guardarla.
PASO 3: CUÁNTO TIEMPO
- 28 -
1) Gire el dial a "HOW LONG" .
2) Use los botones "+" y "-" para seleccionar la duración del riego de
1 minuto a 3 horas y 59 minutos.
3) Use el botón "OK" para cambiar la hora (horas o minutos).
4) Gire el dial en el sentido de las agujas del reloj para guardar los
cambios en este PASO y pasar al siguiente PASO.
ES
1) Gire el dial a "HOW OFTEN".
2) Utilice los botones "+" y "-" para congurar la frecuenciade riego.
Puede optar por regar cada 1 a 12 horas, o cada 1 a 7 días.
3) Gire el dial en el sentido de las agujas del reloj para guardar los
cambios en este PASO y pasar al siguiente PASO.
CADA
SEMANA
DOMINGO LUNES MARTES MIÉRCOLES JUEVES VIERNES SÁBADO
CADA 1 DÍA
SEMANA
UNO
SEMANA
DOS
SEMANA
UNO
SEMANA
DOS
CADA 2 DÍA
CADA 3 DÍA
Consejo: Cuando nalice la conguración de este PASO, gire el dial
para guardar los cambios en lugar de presionar el botón
"OK". Si presiona el botón "OK" después de la conguración,
volverá a la conguración anterior en lugar de guardarla.
PASO 4: CON QUÉ FRECUENCIA
- 29 -
Ejemplos de frecuencia de riego cada 1 día, cada 2 días y
cada 3 días
DOMINGO LUNES MARTES MIÉRCOLES JUEVES VIERNES SÁBADO
ES
1) Gire el dial a "ON".
2) La pantalla LCD mostrará la hora actual y la próxima vez que
comience a regar.
5
Tiempo actual Próxima hora de inicio del riego
FELICITACIONES!
Su temporizador ha sido programado con éxito. Comenzará a regar
automáticamente en base a la hora de inicio, a la duración y a la
frecuencia programadas.
Ahora puede mantener el grifo abieo y conar en que el
temporizador haga el riego!
PASO 5: RIEGO AUTOMÁTICO
- 30 -
ES
FUNCIONES ADICIONALES
MODO RETRASO POR LLUVIA
Conguración de rain delay
24/48/72H
Realización rain delay
No olvide pulsar el botón "OK" después de seleccionar el tiempo
de retardo por lluvia para iniciar el programa de rain delay. De lo
contrario, la conguración de rain delay se desactiva
automáticamente después de que la pantalla parpadee durante
3-5 segundos.
Nota:
- 31 -
El rain delay le permite posponer el riego durante un período de
tiempo determinado y no interrumpirá su programa original.
Para acceder al rain delay, siga los pasos a continuación.
1) Con el dial en "ON", presione el botón "DELAY" durante 3-5 s
para iniciar la función de riego retardado.
2) Habrá un período de retraso en la pantalla cuyo valor
predeterminado es "24H". Puede presionar el botón "+" o "-"
para elegir el período de retraso entre 24H, 48H y 72H.
3) Presione el botón "OK" para ejecutar la función de retraso
después de seleccionar el tiempo de retraso, y todos los planes
de riego se omitirán durante este período.
4) Para eliminar la funcion rain delay, mantenga presionado el
botón "DELAY" durante 3-5 segundos nuevamente para
reanudar su programa de riego programado.
ES
RIEGO MANUAL
Realización de riego manual.Conguración del riego manua
1min~8hrs
Esta función le permite regar manualmente sin interrumpir su programa
de riego establecido. Para acceder a esta función, siga los pasos a
continuación.
Recuerde presionar el botón "OK" después de congurar el
tiempo de riego manual para iniciar el riego manual. De lo
contrario, la conguración de riego manual se desactiva
automáticamente después de que la pantalla parpadee
durante unos 3-5 segundos.
Nota:
1) Gire el dial a "ON".
2) Mantenga presionado el botón "MANUAL" durante 3-5 segundos
para ingresar a la modalidad de riego manual.
3) Presione los botones "+" o "-" para ajustar el tiempo de riego manual
desde 1minuto a 8 horas.(El tiempo de riego manual predeterminado
es de 10 minutos.)
4) Después de congurar el tiempo de riego, presione el botón "OK"
para iniciar el riego manual y el símbolo se mostrará en la pantalla.
5) Si necesita detener el riego manual, mantenga presionado el botón
"MANUAL" durante 3-5 segundos para salir de la modalidad de riego
manual y restaurar el programa de riego original.(O puede girar el
dial a "OFF" para detener el riego manual, pero recuerde volver a
girar el dial a "ON" para restaurar el programa de riego original.)
- 32 -
ES
MODALIDAD OFF
ESTADO DE LAS BATERÍAS
1)
2)
3)
Baterias cargadas Bateria bajar
El estado de las baterías se mostrará de la siguiente manera
- 33 -
Si desea detener el plan de riego durante un período prolongado,
gire el dial a "OFF". (Su conguración se guarda)
El temporizador no regará automáticamente mientras esté en
modalidad OFF. (La pantalla mostrará la palabra OFF en letras
grandes.)
Para comenzar a regar automáticamente nuevamente, gire el dial
nuevamente a "ON" para reanudar su programa de riego
programado.
Cuando aparezca el indicador de batería baja en la pantalla, la
válvula se cerrará automáticamente para evitar fugas. Por favor,
sustituya la batería a tiempo en caso de interrumpir el
funcionamiento normal.
ES
Problema Posible Causa Posible Solución
Fuga de agua
de la entrada
El agua no se
detiene/uye
No hay
respuesta
para la función
manual/
rain delay
Agregue un ltro y
asegúrese de que esté
colocado horizontalmente
en la entrada.
Asegúrese de que el grifo
sea un grifo estándar de
3/4"
Envuelva la cinta de teón
en el grifo para que quede
apretado.
1.
2.
3.
- 34 -
RESOLUCIÓN DE PROBLEMAS
1.
2.
No hay el ltro
o no se ha
colocado
horizontal
mente
El grifo no es
el estándar de
3/4"
1.
2.
El largo tiempo
dealmace
namiento y el
transpoe hace
que la válvula
esté inactiva
Bloqueo de la
válvula
Conguracion del
riego manual o el
tiempo de rain
delay, sin presionar
el botón OK para
guardar y ejecutar.
1. Presione el botón OK
nuevamente después de
congurar la hora para
conrmar.
Mantenga el grifo cerrado
y encienda el dial del
temporizador;
Ejecute el riego manual
durante 5-7 segundos y
deténgalo;
Repita el Paso 2 de 3 a 5
veces;
Intenta usarlo
normalmente.
1.
2.
3.
4.
ES
Si necesita ayuda para utilizar el temporizador, no dude en ponerse
en contacto con nosotros.
Teléfono gratuito US (inglés):+1 833-381-5659
(LUN-VIE 9:30 AM-5:30 PM PST)
Teléfono gratuito UK (inglés Alemán):+44 800-808-5337
(LUN-VIE 9:00 AM-5:00 PM CET)
Correo electrónico: seice@rainpointus.com
WhatsApp:+1 626-780-5952
- 35 -
Coa
duración
de la batería
Baja presión
de agua
La pantalla
LCD no
visualiza nada
Uso mixto de
baterías viejas y
nuevas
Uso de baterías de
carbón o baterías
recargables
1.
2.
Bloqueo del ltro
La presión de
entrada no es
suciente para
satisfacer las
necesidades de
riego
1.
2.
La batería
está agotada
La pantalla es tá
expuesta a la
luz solar directa
1.
2.
Usar baterias alkalinas
nuevas
Las baterias recargables y las
baterías de carbono tienen
una duración coa, utilice las
pilas alcalinas en lugar de
ellas
1.
2.
Verique si el ltro está
obstruido, si es así, limpie o
reemplace el ltro.
Asegúrese de que el
temporizador esté instalado
correctamente y que no
tiene rosca cruzada.
Instale una bomba de
refuerzo u otro equipo
auxiliar de aumento de
presión.
1.
2.
3.
Sustituye las baterias con
2*AAA alcalinas e instálalas
correctamente.
Evite la luz solar directa y
obsee si la batería está
demasiado baja.
1.
2.
ES
LIMPIEZA DEL TEMPORIZADOR
filter
Después de un período de uso, las impurezas o la suciedad del agua
pueden acumularse en el temporizador. Por lo tanto, el temporizador
debe limpiarse regularmente para garantizar su correcto funciona-
miento.
Siga estos pasos para limpiar el temporizador.
1. Cierra el grifo del jardín y quita el temporizador. Compruebe si el el
ltro de la entrada de agua del temporizador ha acumulado
impurezas.
2. Siel ltro está sucio, sáquelo del temporizador y enjuáguelo con agua
corriente.
3. Active la Modalidad de Riego Manual del temporizador para abrir la
válvula y verique si el tubo de agua del temporizador está
bloqueado. Si está bloqueado, límpielo suavemente con un pequeño
cepillo de limpieza.
- 36 -
ES
ADVERTENCIAS
Sólo para uso en exteriores. Colocar el temporizador en el
exterior protegido prolongará su vida útil.
Para evitar daños, apriételo sin usar herramientas.
El ltro debe colocarse horizontalmente en la entrada de agua
para evitar fugas.
Cuando la energía de las baterías es baja, por favor reemplace las
baterías para evitar la interrupción del funcionamiento normal;
cuando sustituya las baterias asegúrese de que el
compaimiento de las baterias esté seca.
Cuando el temporizador no esté en uso, retire las baterías y
guárdelo en el interior.
No use el temporizador a una temperatura superior
a 120 ℉ (50 ℃), o menos de 38 ℉ (3 ℃).
No someta el producto a fuerza y golpes extremos.
Podrían producirse graves descargas eléctricas si se rocía
agua en las tomacorriente o fuentes de corriente eléctrica.
Nunca sumerja el producto en agua.
1)
2)
3)
4)
5)
6)
7)
8)
Este producto está HECHO EN CHINA y cumple con los estándares
nacionales.de Estados Unidos, Gran Bretaña, Alemania y Francia. Utilice
este producto correctamente. Si es necesario desecharlo, deséchelo
correctamente de acuerdo con los requisitos nacionales. Por favor
protege el ambiente.
EC REP
NOMBRE:VIAJE ELECTRONIC COMPANY LIMITED
DIRECCIÓN:E588, 13 ADELAIDE ROAD, DUBLIN,
D02 P950, IRELAND
Correo electrónico: VIAJEELE@outlook.com
- 37 -
ES
GARANTÍA
SERVICIO DE ATENCIÓN AL CLIENTE
RainPoint ofrece una garantía de 1 año contra defectos de fabricación
en materiales y mano de obra a pair de la fecha de compra
Durante el período de garantía, reemplazaremos sin cargo el producto
que se encuentre defectuoso bajo un uso y seicio razonables según lo
determine únicamente RainPoin.
Para solicitar la garantía, envíenos un correo electrónico con su número
de pedido a seice@rainpointus.com y le responderemos en un plazo
de 24 horas.
NÚM. DE LOTE: XXXXX (en la pae posterior del temporizador)
Teléfono gratuito US (inglés):+1 833-381-5659
(LUN-VIE 9:30 AM-5:30 PM PST)
Teléfono gratuito UK (inglés Alemán):+44 800-808-5337
(LUN-VIE 9:00 AM-5:00 PM CET)
Correo electrónico: seice@rainpointus.com
WhatsApp:+1 626-780-5952
Si todavía tiene problemas con la conguración, busque "RainPoint" en
Youtube para ver videos de instalación.
Si el manual de usuario no tiene lo que está buscando o necesita otra
ayuda, comuníquese con nosotros antes de devolver el producto a la
tienda y háganos saber el NÚMERO DE LOTE. de su dispositivo.
- 38 -
ES
Need Help?
Scan the QR code to
get fast suppo
Please contact us
US Free Hotline: +1 833-381-5659
(MON-FRI: 09:30 AM-5:30 PM PST)
UK Free Hotline: +44 800-808-5337
(MON-FRI: 09:00 AM-5:00 PM CET)
Email: seice@rainpointus.com
WhatsApp: +1 626-780-5952
  • Page 1 1
  • Page 2 2
  • Page 3 3
  • Page 4 4
  • Page 5 5
  • Page 6 6
  • Page 7 7
  • Page 8 8
  • Page 9 9
  • Page 10 10
  • Page 11 11
  • Page 12 12
  • Page 13 13
  • Page 14 14
  • Page 15 15
  • Page 16 16
  • Page 17 17
  • Page 18 18
  • Page 19 19
  • Page 20 20
  • Page 21 21
  • Page 22 22
  • Page 23 23
  • Page 24 24
  • Page 25 25
  • Page 26 26
  • Page 27 27
  • Page 28 28
  • Page 29 29
  • Page 30 30
  • Page 31 31
  • Page 32 32
  • Page 33 33
  • Page 34 34
  • Page 35 35
  • Page 36 36
  • Page 37 37
  • Page 38 38
  • Page 39 39
  • Page 40 40

RainPoint ITV105 Manual de usuario

Tipo
Manual de usuario

En otros idiomas