Küppersbusch CBM6330.0S Manual de usuario
- Tipo
- Manual de usuario

Lesen Sie unbedingt die Gebrauchsanleitung
und den Montageplan vor Aufstellung,
Installation sowie Inbetriebnahme.
Please read the users and installation
instructions carefully before installation
of the appliance and before starting to use it.
Service und Kundendienst
Telefon: 0209 – 401 631
Email: [email protected]
DE PT
EN ES CBM6330.0
BEDIENUNGSANWEISUNG
mit Montageanweisungen
INSTRUCTIONS FOR USE
and installation

2
Sicherheitshinweise
Allgemein
Beachten Sie bitte ALLE Sicherheitshinweise!
Achtung, Überhitzungsgefahr!
Während des Backofeneinsatzes darf der Backofenboden nicht
mit Alufolie abdeckt werden! Außerdem dürfen keine Töpfe,
Pfannen oder Ähnliches darauf abgestellt werden! Andernfalls
entsteht ein Wärmestau, der das Emaille beschädigen würde.
Während seines Einsatzes wird der Backofen heiß. Wenn sich das Gehäuse erwärmt,
schaltet der Kühllüfter ein, um das Gehäuse abzukühlen. Der Kühllüfter bleibt so lange in
Betrieb, bis sich das Gehäuse abgekühlt hat, d. h. auch nachdem das Gerät abgeschaltet
ist. Die vom Lüfter erzeugten Geräusche sind normale Funktionsgeräusche und kein
Anzeichen einer Störung.
Bereitet man im Backofen ein Gericht mit Alkohol oder Hefe zu, bildet sich bei den
Heißluftpro- grammen Essiggeruch. Sollte dieser Geruch störend sein, ist ein Programm
ohne Lüfter, wie z.B. Ober-/Unterhitze, zu wählen.
Ihr elektronischer Backofen ist mit Touch-Control-Technologie ausgestattet. Zur Bedienung
müssen die Symbole auf dem Glas nur mit Finger berührt werden. Die Touch-Control-
Empfi ndlichkeit passt sich ständig den Umgebungsbedingungen an. Beim Anschluss des
Backofens an die Stromversorgung ist darauf zu achten, dass die Glasfläche der
Schalterfront sauber und frei von evtl. Hindernissen ist.
Reagiert der Backofen bei der Glasberührung mit dem Finger nicht ordnungsgemäß, muss
er von der Stromversorgung getrennt und dann erneut angeschlossen werden. Auf diese
Art stellen sich die Sensoren automatisch ein und reagieren wieder auf den Fingerdruck.
Einschalten und Betrieb
Ausschließlich KÜPPERSBUSCH Kochfelder wurden für den Einsatz über einem
KÜPPERSBUSCH Backöfen konstruiert und getestet. Die Verwendung anderer Kochfelder
ist nicht gestattet.
Alle Eingriffe oder Reparaturen des Geräts, einschließlich des Austauschs des
Strom- kabels, müssen von Mitarbeitern des zugelassenen technischen
Kundendienstes und unter Verwendung von Originalersatzteilen erfolgen.
Reparaturen oder Eingriffe seitens anderer Personen können Beschädigungen oder
Fehlfunktionen im Gerät verursachen und die Sicherheit der Personen gefährden.
Verhindern Sie, dass sich Kinder während des Garvorgangs dem Ofen nähern, da hohe
Temperaturen entstehen.
Kinder müssen unter Aufsicht sein, um sicherzustellen, dass sie nicht mit dem Gerät
spielen können.
Dieses Gerät ist nicht für Personen (einschließlich Kinder) vorgesehen, deren körperliche,
sensorische oder geistige Fähigkeiten eingeschränkt sind, oder die keine Erfahrung oder
entsprechende Kenntnisse besitzen, es sei denn, sie werden von einem Zuständigen für
ihre Sicherheit überwacht oder sie haben Anweisungen für den Gebrauch dieses Geräts
erhalten.

3
deutsch
Backofen
Schalten Sie Ihren Backofen aus, wenn eine Störung vorliegt.
Die Backofentür muss während des Betriebs immer geschlossen sein.
Der Hersteller haftet für keine Backofenverwendung, die nicht der Zubereitung von
Nahrungs- mitteln im Haushalt dient.
Verwenden Sie den Backofen nur, wenn er in einem Möbelstück eingebaut ist.
Bewahren Sie kein Öl, Fett oder brennbare Materialien im Backofeninneren auf, da sie
beim Einschalten des Backofens eine Gefahrenquelle darstellen.
Stützen und setzen Sie sich nicht auf die geöffnete Backofentür, da diese beschädigt
werden und außerdem Ihre Sicherheit gefährdet werden könnte.
Um Speisen zuzubereiten, schieben Sie bitte das im Lieferumfang enthaltene Blech bzw.
den Rost auf die im Backofeninneren vorgesehenen Seitenführungen. Blech und Rost
können teilweise herausgezogen werden, wodurch Sie leichter an die sich darauf
befindlichen Speisen gelangen.
Stellen Sie bitte keine Behälter oder Speisen auf den Backofenboden. Verwenden Sie
dafür immer Bleche oder Roste.
Gießen Sie während des Betriebs kein Wasser auf den Backofenboden. Das Emaille
könnte dadurch beschädigt werden.
Öffnen Sie während des Garvorgangs die Ofentür so wenig wie möglich, um den Stromver-
brauch zu senken.
Tragen Sie bei der Handhabung von Speisen in Ihrem Backofen Handschuhe.
Bei Zubereitungen mit hohem Flüssigkeitsgehalt ist es normal, dass sich auf der
Backofentür Kondensationen bilden.
Vor dem ersten Gebrauch
Verpackungsmaterial und altes Gerät entsorgen.
Entsorgen Sie bitte die Transportverpackung umweltgerecht.
In Deutschland wird die Transportverpackung in dem Geschäft, in dem das Gerät
erworben wurde, zurückgegeben. Durch die Rückführung des Verpackungsmaterials in
den Material- kreislauf wird Rohmaterial gespart und weniger Abfall erzeugt. Alte Geräte
enthalten noch Wertstoffe. Geben Sie Ihr altes Gerät an einer Sammelstelle für Wertstoffe
ab. Alte Geräte müssen vor ihrer Entsorgung unbrauchbar gemacht werden. Auf diese Art
wird deren Miss- brauch verhindert.
Typenschild
Wenn Sie auf den Kundendienst zurückgreifen müssen
oder Ersatzteile bestellen möchten, müssen die Angaben
auf dem Typenschild genannt werden.
Das Typenschild befindet sich auf der gelassen Seite über
einer Seitenleiste und ist beim Öffnen der Backofentür
sichtbar.

4
Reinigungshinweise
Lesen Sie dieses Kapitel bitte vollständig durch, bevor Sie das Gerät zum ersten Mal
einschalten.
Bei sachgerechter Reinigung und regelmäßiger Pflege kann Ihr Backofen jahrelang schön und
sauber bleiben. Wir haben hier einige Hinweise zusammengestellt, damit Sie die einzelnen
Oberflächen gründlich und schonend pflegen und reinigen können.
Für alle Oberflächen
Lebensgefahr!
Zur Reinigung des Geräts dürfen keine Dampf- und/oder
Druckreiniger eingesetzt werden! Das Gerät könnte derart
beschädigt werden, dass Lebensgefahr entstehen könnte.
Verbrennungsgefahr!
Lassen Sie das Gerät vor der Reinigung mindestens so lange
abkühlen, bis Sie es mit der Hand berühren können.
Reinigen Sie das Gerät nach jedem Gebrauch. Flecken oder Reste, die nicht entfernt
wurden, können beim nächsten Aufheizen des Geräts festbrennen. Oftmals können die so
entstande- nen Flecken oder Reste nicht mehr spurlos entfernt werden.
Reinigen Sie bei leichten Verschmutzungen die Flächen mit einem Tuch, einer weichen
Bürste oder einem Schwamm sowie mit warmem Wasser und etwas Reinigungsmittel.
Waschen Sie sie mit kaltem Wasser ab, damit keine Reinigungsmittelreste verbleiben, die
Verfärbungen oder Flecken verursachen könnten. Trocken Sie die Flächen anschließend
mit einem Tuch ab.

5
deutsch
Bei hartnäckigeren Flecken finden Sie in den folgenden Abschnitten Hinweise für die einzelnen
Flächen und Elemente.
Reinigen Sie auf keinen Fall mit
aggressiven oder bleichenden Reinigungsmitteln, die aktiven
Sauerstoff, Chlor und sonstige ätzende Bestandteile enthalten.
kratzenden Reinigungsmitteln wie Scheuermitteln, Stahlwolle,
verseifter Stahlwolle, harten Bürsten, Metalltopfkratzern,
Kunststoffschwämmen oder Schwämmen mit kratzender Oberfläche
(Scheuerseite).
Bestimmungsgemäßer Gebrauch
Der Backofen ist zum Kochen, Braten, Backen, Grillen und Warmhalten von Speisen bestimmt.
Der Backofen darf nur verwendet werden, wenn er in einem geeigneten Möbelstück eingebaut
ist. Verwenden Sie den Backofen ausschließlich wie in dieser Gebrauchsanleitung
beschrieben. Jede andere Verwendung gilt als nicht bestimmungsgemäß und kann zu Sach-
oder sogar Personenschäden führen. Der Hersteller übernimmt keine Haftung für Schäden, die
durch nicht bestimmungsgemäßen Gebrauch entstanden sind.
Der Backofen ist ausschließlich zur Verwendung im privaten Haushalt bestimmt. Eine
gewerbliche Nutzung ist ausgeschlossen. Der Backofen eignet sich nicht zum Beheizen
eines Raums. Die Leuchte im Backofen ist nur zur Beleuchtung des Garraums vorgesehen und
nicht als Raumbeleuchtung. Die Backofentür darf nicht als Stütze, Sitzfläche oder Auflage
verwendet werden.
Das Gerät darf nur für seinen bestimmungsgemäßen Gebrauch
verwendet werden!

6
Backofenbeschreibung
Bedienblende
Kühlluftaustritt
Grillwiderstand
Befestigung am
Einbauschrank
Blechhalterungen
Lampe
Rost
Rückwand
Backblech
Umluft
Scharnier
Backofendichtung
Innenscheibe
Tür
Bedienfeld
Funktionswahlschalter
Temperaturwahlschalter
Anzeige
Tasten

7
deutsch
Funktionswahlschaltersymbole
Backofenfunktionen
UNTERHITZE
TURBO + UNTERHITZE
AUSSCHALTEN DES
BACKOFENS
TURBO
NORMAL
ECO
MAXIGRILL
MICROWELLE + HEISSLUFT
NORMAL MIT UMLUFT
MICROWELLE + GRILL
MAXIGRILL MIT UMLUFT
MICROWELLE
Ausgangsleistung Mikrowelle
Ausgangsleistung Mikrowelle
Lebensmittel
200
Langsames Auftauen von empfindlichen Speisen, zum Auftauen und
Weitergaren.
400
Garen von Fleisch, Fisch und Reis
Schnelles Auftauen kleiner Mengen, Babykost z.B. Milchfläschchen.
600
Erhitzen und Garen von Gerichten.
800
Garen von Gemüse und Kartoffeln.
Garen von Aufläufen und Fertiggerichten.
Kleine Mengen erhitzen und garen.
1000
Flüssigkeiten erhitzen.
In der zu Ihrem Backofen gehörenden
Anleitung zum Garen finden Sie eine
Beschreibung der einzelnen Funktionen.

8
Anzeige Beschreibung
TASTEN
, und : Ermöglichen das
Programmieren der Funktionen
: Ermöglichen der Funktionen zu starten.
: Ermöglichen der Funktionen zu stoppen.
SYMBOLE
TIMER: Leuchtet, wenn die Timer-
Funktion gewählt wird. Nach einer gewissen
Zeit erzeugt er ein akustisches Signal. Der
Backofen wird nicht ausgeschaltet, wenn die
Zeit abgelaufen ist. Diese Funktion kann
auch genutzt werden, wenn der Backofen am
Garen ist.
und PROGRAMMIERUNG: Sie
leuchten, um anzuzeigen, dass der Backofen
programmiert ist (Dauer, Ende oder gesamt).
Garzeit-Dauer: Ermöglicht das
Garen während einer gewählten Zeit.
Danach schaltet sich der Backofen
automatisch aus.
Garzeit-Ende: Ermöglicht das Garen
bis zu einer vorab eingestellten Uhrzeit.
Danach schaltet sich der Backofen
automatisch aus.
und Garzeit-Dauer und Garzeit-
Ende: Ermöglicht die Einstellung der
Dauer und Endzeit des Garvorgangs. Der
Backofen schaltet sich automatisch für
die vorab eingestellte Garzeit (Dauer) ein
und schaltet sich automatisch beim
Erreichen der eingestellten Zeit (Garzeit-
Ende) ab.
SICHERHEITSVERRIEGELUNG: Zeigt
an, dass die Touch-Tasten der Schaltuhr
gesperrt sind, um zu verhindern, dass sie
von Kleinkindern manipuliert werden können.
Sonstige Funktionen
HEIZEN: Zeigt an, dass der Ofen Wärme
auf die Speisen überträgt.
AUFTAUEN NACH ZEIT: Leuchtet
während der auftauen nach zeit funktion.
AUFTAUEN NACH GEWICHT:
Leuchtet während der auftauen nach gewicht
funktion.
ZEITEINSTELLUNG
Wenn Sie den Backofen an das Netz
anschließen, blinkt auf der Uhr die
Anzeige 12:00.
Drücken oder um die Stunden
einzustellen.
Die Empfindlichkeit der Touch-Tasten
passt sich ständig den
Umgebungsbedingungen an. Wenn Sie
den Ofen an das Stromnetz anschließen,
müssen Sie darauf achten, dass die
Oberfläche des Bedienfeldes sauber und
frei von Hindernissen ist.
Sollte die Uhr bei Berührung der Tasten
nicht richtig reagieren, ist der Ofen vom
Stromnetz zu trennen und nach einem
Augenblick wieder anzuschließen. Auf
diese Weise stellen sich die Sensoren
automatisch richtig ein und reagieren
wieder auf Berührung mit dem Finger.

9
deutsch
Drücken Sie um die Stunden zu
bestätigen.
Drücken oder um die Minuten
einzustellen
Drücken Sie um die Minuten zu
bestätigen.
Wenn Sie die Uhrzeit ändern möchten,
müssen Sie oder berühren, bis die
Uhrzeit blinkt. Berühren Sie und
folgen Sie den im obigen Punkt
beschriebenen Schritten.
UHR AUSBLENDEN/ANZEIGEN
Wenn du die Uhr verstecken willst
drücken Sie 5 Sekunden lang
gedrückt halten.
Wenn Sie die Uhr wieder sehen möchten,
halten Sie die nochmals 5 Sekunden
lang gedrückt.
Bedienung des Backofens
MANUELLER BETRIEB
Nach Einstellung der Uhrzeit ist der
Backofen funktionsbereit. Wählen Sie
eine Garfunktion und eine Temperatur.
Sie sehen, dass das Symbol während
des Garens leuchtet, um die
Wärmeübertragung auf das Essen
anzuzeigen. Dieses Symbol erlischt,
wenn die gewählte Temperatur erreicht
ist.
Zum Ausschalten des Backofens müssen
Sie die Schalter auf die Position auf die
Position stellen.
BACKOFENFUNKTION MIT
ZEITSCHALTUNG
Programmierung des Timers
1. Berühren Sie oder , bis das Symbol
auf dem Display blinkt, und drücken
Sie . Auf dem Display erscheint 0_00.
2. Wählen Sie die Zeitdauer, nach deren
Ablauf der Timer ertönen soll, indem Sie
oder drücken. Danach ertönen zur
Bestätigung 2 aufeinander folgende
Pieptöne und der Countdown ab dem
Im Falle eines Stromausfalls wird die
gesamte Programmierung der
elektronischen Uhr gelöscht und auf der
Uhr blinkt die Anzeige 12:00. Sie müssen
die Uhr dann wieder einstellen und
erneut programmieren.
Bei Modellen mit elektronischer
Temperatureinstellung erscheint die
Temperatur auf der Uhranzeige, sobald
der Wahlschalter gedreht wird.
Nachdem die Temperatur ausgewählt
wurde, erscheint wieder automatisch die
Uhrzeit auf der Anzeige.
Wenn Sie mit dem Garen beginnen, zeigt
Ihr Backofen als Defaultwert die
Gesamtdauer des laufenden
Garvorgangs an, wenn die Gardauer
oder die Garzeit-Endes nicht eingestellt
ist.

10
gewählten Zeitpunkt wird angezeigt. Das
Symbol blinkt langsam.
3. Wenn die Zeit zu Ende ist, ertönt 90
Sekunden lang ein akustisches Signal
und das Symbol blinkt schnell.
4. Berühren Sie eine beliebige Taste, um
das akustische Signal zu stoppen. Im
selben Moment schaltet sich das Symbol
aus.
Wenn Sie die Timer-Zeit ändern möchten,
Sie die Touchtaste oder , bis das
Symbol auf dem Display blinkt und die
Stunden nicht blinken, dann drücken Sie
und müssen Sie die gezeigten Schritte
erneut ausführen. Wenn Sie auf den Timer
zugreifen, erscheint die aktuell verbleibende
Zeit. Diese kann geändert werden.
Programmierung der Gardauer
1. Wählen Sie mit den Backofenschaltern
eine Funktion und eine Gartemperatur.
2. Berühren Sie oder , bis das Symbol
auf dem Display blinkt, und drücken
Sie . Auf dem Display erscheint 0_00.
3. Wählen Sie die Zeitdauer, nach deren
Ablauf der Timer ertönen soll, indem Sie
oder drücken. Danach ertönen zur
Bestätigung 2 aufeinander folgende
Pieptöne und es wird der Countdown ab
dem gewählten Zeitpunkt angezeigt. Das
Symbol blinkt.
4. Nach Ablauf der Garzeit schaltet sich der
Backofen aus, es ertönt ein akustisches
Signal und das Symbol blinkt.
5. Berühren Sie , um das akustische
Signal zu stoppen und das Symbol
auszuschalten. Der Backofen schaltet
sich wieder ein.
6. Stellen Sie die Schalter auf die
Ausschaltstellung des Backofens.
Sie können jederzeit die restliche Gardauer
ändern, indem Sie oder berühren, bis
das Symbol schnell blinkt. Berühren Sie
anschließend , um die Zeit zu ändern.
Programmierung des Garzeit-Endes
1. Wählen Sie eine Garfunktion und -
temperatur.
2. Berühren Sie die Touchtaste oder ,
bis das Symbol auf dem Display
blinkt, und drücken Sie . Auf dem
Display erscheint 0_00.
3. Wählen Sie die Zeitdauer, nach deren
Ablauf der Timer ertönen soll, indem Sie
oder drücken. Danach ertönen zur
Bestätigung 2 aufeinander folgende
Pieptöne und es wird der Countdown ab
dem gewählten Zeitpunkt angezeigt. Das
Symbol blinkt.
4. Nach Ablauf der programmierten Zeit
schaltet sich der Backofen aus, es ertönt
ein akustisches Signal und das Symbol
blinkt.
5. Berühren Sie , um das akustische
Signal zu stoppen und das Symbol
auszuschalten. Der Backofen schaltet
sich wieder ein.
6. Stellen Sie die Schalter uf die
Ausschaltstellung des Backofens.
Bei der Timerfunktion schaltet sich der
Backofen nach Ablauf der
programmierten Dauer nicht ab.
Bei der Timerfunktion wird die
verbleibende Zeit permanent auf dem
Display angezeigt. Wenn diese Funktion
programmiert ist, kann weder die Uhrzeit
noch die Gesamtzeit des
programmierten Garvorgangs angezeigt
werden.

11
deutsch
Sie können jederzeit die restliche Gardauer
ändern, indem Sie oder berühren, bis
das Symbol schnell blinkt. Berühren Sie
anschließend , um die Zeit zu ändern.
Programmierung der Gardauer und des
Garzeit-Endes
1. Wählen Sie eine Garfunktion und -
temperatur.
2. Berühren Sie oder bis das Symbol
auf dem Display blinkt , bis das
Symbol auf dem Display blinkt . Auf
dem Display erscheint 0_00.
3. Wählen Sie die Gardauer, indem Sie
oder berühren. Anschließend ertönen
2 aufeinanderfolgende Pieptöne und die
ver bleibende Garzeit wird auf dem
Display angezeigt und das Symbol
blinkt.
4. Bestätigen Sie die Eingabe durch
Drücken .
5. Berühren Sie oder , bis das Symbol
auf dem Display blinkt, und drücken
Sie . Auf dem Display erscheint 0_00.
6. Wählen Sie die Endzeit des Garens,
indem Sie oder berühren.
Anschließend ertönen 2
aufeinanderfolgende Pieptöne und die
aktuelle Uhrzeit wird auf dem Display
angezeigt.
7. Der Backofen bleibt ausgeschaltet und
die Symbole und leuchten weiter.
Ihr Backofen ist nun programmiert.
8. Wenn die eingestellte Uhrzeit des
Garbeginns erreicht ist, schaltet sich der
Backofen ein und führt den Garvorgang
während der vorgewählten Zeit durch.
9. Während des Garvorgangs wird die
Restgarzeit angezeigt und das Symbol
blinkt.
10. Nach Ablauf der programmierten Zeit
schaltet sich der Backofen aus, es ertönt
ein akustisches Signal und das Symbol
blinkt schnell.
11. Berühren Sie , um das akustische
Signal zu stoppen und das Symbol
auszuschalten. Der Backofen schaltet
sich wieder ein.
12. Stellen Sie die Schalter auf Position
um den Ofen auszuschalten.
Sie können jederzeit die restliche Gardauer
ändern, indem Sie oder berühren, bis
das Symbol schnell blinkt. Berühren Sie
anschließend , um die Zeit zu ändern.
MIKROWELLE
1. Drehen Sie den Betriebswahlschalter in
die Position Mikrowelle.
2. Das Anzeige zeigt die 0_30 (Schnellstart-
Funktion) standardmäßig. Drücken Sie
oder bis das Anzeige 1_00
anzeigt.
3. Bestätigen Sie die Eingabe durch
Drücken .
4. Das Anzeige zeigt die Standard-Kochzeit
an. Drücken Sie oder um die
gewünschte Betriebsdauer zu
bestimmen.
5. Bestätigen Sie die Eingabe durch
Drücken .
6. Das Anzeige zeigt die Standard-Power-
Einstellung an. Stellen Sie mit den Tasten
oder die benötigte Leistungsstufe
ein.
7. Bestätigen Sie die Eingabe durch
Drücken .
8. Betätigen Sie die . Das Gerät beginnt
zu arbeiten.
SCHNELLSTART
1. Drehen Sie den Betriebswahlschalter in
die Position Mikrowelle.
2. Drücken Sie die . Das Gerät setzt sich
sofort in Betrieb für 30 Sekunden in der

12
Mikrowellenfunktion bei der maximalen
Leistung.
3. Wenn Sie die Dauerzeit erhöhen
möchten, drücken Sie wieder die .
Jedes Mal, wenn die taste gedrückt wird,
wird die Laufzeit in 30 Sekunden erhöht.
AUFTAUEN NACH ZEIT
1. Drehen Sie den Betriebswahlschalter in
die Position Mikrowelle.
2. Drücken Sie oder bis das Symbol
auf dem Anzeige erscheint.
3. Bestätigen Sie die Eingabe durch
Drücken .
4. Das Anzeige zeigt die Standard-Auftauen
zeit an. Drücken Sie die oder um
die gewünschte Betriebsdauer zu
bestimmen.
5. Betätigen Sie die . Das Gerät beginnt
zu arbeiten
AUFTAUEN NACH GEWICHT
1. Drehen Sie den Betriebswahlschalter in
die Position Mikrowelle.
2. Drücken Sie oder bis das Symbol
auf dem Anzeige erscheint.
3. Bestätigen Sie die Eingabe durch
Drücken .
4. Auf der Anzeige blinkt nun das Symbol
für die Nahrungsmittelart F01. Drücken
Sie oder um die Nahrungsmittelart
einzustellen.
5. Bestätigen Sie die Eingabe durch
Drücken .
6. Nun blinkt der Gewichtswert auf der
Anzeige. Drücken Sie oder um das
Gewicht einzustellen.
7. Betätigen Sie die . Das Gerät beginnt
zu arbeiten
Die nachfolgende Tabelle beschreibt die
hinterlegten Programme der Funktion
Auftauen nach Gewicht, mit Angabe der
Gewichtsintervalle, Auftauzeitintervalle und
Wartezeiten (um eine einheitlichere
Temperatur des Auftaugutes zu
gewährleisten):
Prog.
Lebens-
mittel
Gewicht
(Kg)
Zeit
(Min.)
Warte-zeit
(Min.)
F01
Fleisch
0.10 – 2.00
2:10 – 43
20 – 30
F02
Geflügel
0.10 – 2.50
2:20 – 58
20 – 30
F03
Fisch
0.10 – 2.00
2 – 40
20 – 30
F04
Obst
0.10 – 0.50
2:36 – 13
10 – 20
F05
Brot
0.10 – 0.80
2:25 – 19
10 – 20
Kombinierte Funktionen
1. Drehen Sie den Betriebswahlschalter in
die Position Mikrowelle + herkömmliche
Funktion.
2. Das Anzeige zeigt die Standard-Kochzeit
an. Bestätigen Sie die Eingabe durch
Drücken .
3. Drücken Sie die Tasten oder um
die gewünschte Betriebsdauer zu
bestimmen.
Siehe Kochen Guide für Beratung über
Abtauzeiten.
Wenn das Display das Wort "Turn"
anzeigt, die Tür öffnen, das Essen
drehen und drücken, um
fortzufahren.
Wenn das Display das Wort "Turn"
anzeigt, die Tür öffnen, das Essen
drehen und drücken, um
fortzufahren.

13
deutsch
4. Bestätigen Sie die Eingabe durch
Drücken .
5. Das Anzeige zeigt die Standard-Power-
Einstellung an. Stellen Sie mit den Tasten
oder die benötigte Leistungsstufe
ein.
6. Bestätigen Sie die Eingabe durch
Drücken .
7. Betätigen Sie die . Das Gerät beginnt
zu arbeiten.
Sicherheitsfunktionen
SICHERHEITSVERRIEGELUNG
Diese Funktion kann während des
Backofenbetriebs jederzeit gewählt werden.
Um die Funktion zu aktivieren, berühren Sie
die Taste und halten diese gedrückt, bis
Sie 1 Piepton hören und auf dem Anzeige
das Symbol erscheint. Die
Uhr ist blockiert.
Wenn der Backofen ausgeschaltet ist und
Sie die Kindersicherung aktivieren, gart der
Backofen auch dann nicht, wenn Sie eine
Garfunktion wählen.
Wenn Sie diese Funktion aktivieren, während
Sie mit dem Ofen backen oder braten,
blockieren Sie nur die Handhabung des
elektronischen Timers.
Um die Funktion auszuschalten, berühren
Sie die Taste und halten diese gedrückt,
bis Sie 1 Piepton hören.
AUSSTELLUNGS-MODUS
Der Ausstellungs-Modus wird in
Ausstellungsräumen verwendet, wo den
Kunden die Funktion der Ofen gemäß der
Beschreibung von jeder Funktion präsentiert
wird, ohne aber die Heizfunktionen zu
aktivieren.
Um die Ausstellungs-Modus zu aktivieren,
berühren Sie und . gleichzeitig.
Um die Funktion auszuschalten, berühren
Sie und nochmals.
Die temperatur können gerändert werden
jederzeit durch drehen
Temperaturwahlschalter.
Die maximale Leistung, die ausgewählt
werden kann, beträgt 600 W.

14
Safety Warnings
General advice
Follow ALL the safety warnings!
Caution, Danger of overheating!
When using the oven, do not cover the bottom with aluminium
foil or place pots, frying pans or the like inside. If this happens,
the oven will overheat, causing damage to the enamel.
The oven becomes hot when in use. The cooling fan turns on when the oven overheats.
The cooling fan will remain on until the oven has cooled down, even after the appliance
has been turned off. The noises made by the fan are normal and do not mean that it is
damaged.
When preparing a dish with alcohol or yeast with settings that use hot air, there may be a
vinegary smell. If the smell is unpleasant, use a function that does not include the fan, such
as top/bottom heat.
The electronic clock features Touch-Control technology. To operate, simply touch the glass
control symbols with your fi ngertip. The touch control sensitivity continuously adapts to
changing conditions. Make sure that the glass surface of the control panel is clean and free
of any obstacles when turning on the oven.
If the oven does not respond correctly when you touch the glass, you will need to turn off
the oven for a few seconds and then turn it back on after a few seconds. Doing this causes
the sensors to adjust automatically so that they will react once more to fi ngertip control.
Connection and use
Only KÜPPERSBUSCH hobs have been manufactured and tested for use over a
KÜPPERSBUSCH oven. Do not use other hobs.
Any handling or repair to the appliance, including replacement of the feed cable, should be
carried out by authorised Technical Service Personnel using original spare parts. Repairs
or handling by others may damage the appliance or cause malfunctioning that could be
hazardous to your safety
Do not allow children to come near the oven while in use as it can reach very high
temperatures.
Children should be supervised to ensure they do not play with the appliance.
This appliance is not for use by persons (including children) with reduced physical,
sensorial or mental capacity, or those lacking experience and knowledge, except if they
have been supervised and instructed regarding use of the device by a person responsible
for their safety.

15
english
Oven
The oven must always be operated with the door closed.
The manufacturer takes no responsibility for any use of the oven other than for the home
preparation of food.
Only use the oven after it has been installed inside the kitchen unit.
Do not store oil, fats or inflammable materials inside the oven. This may be dangerous if
the oven is turned on.
Do not lean or sit on the open oven door. You could damage it, as well as endangering
your safety.
In order to cook food in the oven, place the tray or grid shelf supplied with it over the shelf
runners inside the oven cavity. The tray and grid shelf have a system to make their partial
outward movement easy for food handling.
Do not place containers or food on the bottom surface of the oven. Always use the trays
and grid.
Do not pour water on the bottom surface of the oven when in use; this may damage the
enamel. Open the oven door as little as possible during cooking. This will reduce power
consumption.
Use protective oven gloves when performing operations inside the oven.
It is normal for condensation to occur on the oven door when cooking dishes with a high
liquid content.
Before first use
Remove packaging and the old appliance.
Remove packaging and recycle in an environmentally-friendly way.
By returning the packaging material, raw materials are saved and also fewer waste
products are generated. Old appliances still contain valuable material. Leave your old
appliance at a collection point for valuable materials. Old appliances must be rendered
inoperative before disposing of them in order to prevent improper use.
Technical information
If you need to contact the after-sales service or order
spare parts, you must provide the technical information
supplied.
The oven’s technical information is on the left, on the side
frame. You can see it when the door is open.

16
Cleaning and care
Please read this chapter before using the appliance for the fi rst time.
If it is cleaned as it should be and regularly cared for, the oven should stay beautiful and as
good as new for many years. Here is a series of instructions that allow you to care for and
clean all of the surfaces thoroughly, without damaging them.
For all surfaces
Danger of death
Do not use steam and/or pressure cleaning devices on the oven.
The appliance could become damaged and may create a
situation where there is danger of death
Danger of burning!
Leave the appliance to cool until you can touch it with your hand
before cleaning it.
Clean the appliance after each use. Stains or baked-on food that have not been removed
may burn the next time the appliance heats up. Often, these types of stains or dirt cannot
be removed without leaving marks.
If there are light stains, clean the surfaces with a cloth, brush or soft sponge and hot water
and some dishwashing detergent. Rinse with cold water so that there is no detergent left
which might decolour the surface or cause more stains. Dry with a cloth immediately after.

17
english
Here are some instructions for more diffi cult-to-remove stains concerning the different surfaces
and elements.
Never clean with
aggressive products or bleaches that contain active oxygen, chlorine or
other corrosive ingredients.
cleaning products that can cause scratches, such as abrasive agents, steel
wool, soapy steel wool, hard brushes, metal scourers, plastic sponges or
sponges with a surface that scratches (scouring side)
Use of the oven
The oven is determined for the cooking, roast, baking, and keeping warm of dishes.
Use the oven only if inserted in a suitable piece of furniture. Use the oven exclusively as
described in these instructions for use. Any other use is not in accordance with the
requirements and can lead to material damages or even personal damages. The manufacturer
assumes no liability for damages which have originated from not designated use.
The oven is determined exclusively for the use in the private household. A commercial use is
excluded. The oven is not suited for heating a room. The light in the oven is planned only to the
lighting of the done space and not as a room lighting. The oven door is only the close the oven.
Use the oven only for cooking, roasting, baking, and keeping
warm of dishes!

18
Description of the appliance
Control panel
Air cooling outlet
Grill element
Unit mounting
Tray supports
Lamp
Grid shelf
Back Wall Panel
Tray
Fan
Hinge
Oven Seal
Inner Glass
Door
Control panel
Function control dial
Temperature control dial
Display
Touch keys

19
english
Control Panel
Oven Functions
LOWER ELEMENT
TURBO + LOWER ELEMENT
OVEN SWITCH-OFF
TURBO
CONVENTIONAL
ECO
MAXIGRILL
MICROWAVE + HOT AIR
CONVENTIONAL WITH FAN
MICROWAVE + GRILL
MAXIGRILL WITH FAN
MICROWAVE
Microwaves Power Levels
Microwave power output
Foods
200
Slow defrosting for delicate foods; keeping food hot
400
Cooking with little heat; boiling rice
Rapid defrosting, heating baby food
600
Heating and cooking food
800
Cooking vegetables and food
Cooking and heating carefully,
Heating and cooking small portions of food
1000
Rapidly heating liquids
For a description of how to use each of
the features, see the cooking guide that
comes with your oven.

20
Display description
KEYS
, and : Enable you to program
the functions.
: Enable you to start the cooking
functions.
: Enable you to stop the cooking
functions.
SYMBOLS
WARNING TIMER: Lights up when the
clock/timer is selected. Generates an
acoustic signal when the time is up. The
oven does not turn off at the end of the timer
period. This function can also be used while
the oven is cooking.
and PROGRAMING: Lights up to
indicate that the oven is programed (cooking
time, stop time or total).
Cooking Time: This program allows
you to program the cooking time, after
which the oven will turn off automatically.
Cooking Stop Time: This setting
allows you to program the time for
cooking to stop, after which the oven will
turn off automatically.
and Cooking Time and Cooking
Stop Time: This setting allows you to
program the cooking time and cooking
stop time. The oven switches on
automatically at the set time and operates
for the selected cooking time (Cooking
Time). It then switches off automatically
at the indicated time (Cooking Stop
Time).
SAFETY BLOCK: Indicates that the
touch keys are blocked, preventing
modifications by small children.
Other functions
HEATING: Indicates that the oven is
transmitting heat to the food.
DEFROSTING BY TIME: Lights up while
the defrosting by time function is on.
DEFROSTING BY WEIGHT: Lights up
while the defrosting by weight function is on.
SETTING THE TIME
When you plug the oven, you will see the
clock flashing 12:00.
Press or to adjust the hours.
Press to confirm the hours.
Press or to adjust the minutes.
Press to confirm the minutes.
If you wish to modify the time, press
or until the time starts flashing. Press
The sensivity of the touch keys adapts
continually to environmental conditions.
Make sure the surface of the control
panel is clean and free of obstacles
when plugging in the oven.
If the display does not respond correctly
when you touch the keys, unplug the
oven for a few seconds and then plug it
in again. Doing this causes the sensors
to adjust automatically so that they will
react once more to fingertip control.

21
english
and follow the instructions in the
previous points.
HIDING AND UN-HIDING THE CLOCK
If you wish to hide the clock press for
5 seconds.
If you wish to see the clock on the display
again, press for 5 seconds.
Oven use
OVEN FUNCTIONS
After setting the clock, the oven is ready
for use. Select a cooking function with the
function selector dial and temperature
with the temperature control dial.
You will notice that the symbol lights up
during cooking to indicate that heat is
being transmitted to the food. This symbol
disappears when the selected
temperature has been reached.
Set the controls to to turn off the
oven.
OVEN TIMER OPERATION
Programing the buzzer
1. Touch or until the symbol on
the display starts flashing, then press
. The indication “0_00” will appear on the
display.
2. Select the time after which you want the
alarm to sound by pressing or . You
will hear 2 beeps to confirm that the time
has been set and the clock will start
counting down from the selected time.
The symbol will flash slowy.
3. Once the time has expired, an acoustic
signal will sound for 90 seconds and the
symbol will flash quickly.
4. Touch any key to stop the alarm. The
symbol will then disappear.
If you wish to modify the time on the buzzer,
press or until the flash and the
hours are not flashing; then press and
repeat the steps shown. Upon entering the
In the event of power failure, the clock
settings will be erased and 12:00 will
flash on the clock display. Reset it and
program again.
In models with an electronic temperature
control, when the selector switch is
turned, the display will show the
temperature.
After selecting the temperature, the
clock will automatically reappear.
When a cooking cycle begins, the oven
will automatically display the total the
time for the cycle progress, if the
cooking time or cooking stop time have
not been set.
With the Buzzer function, the oven will
not turn off when the time expires.

22
timer control, the time currently remaining will
appear which you will be able to adjust.
Programing Cooking Time
1. Select a function and a cooking
temperature using the oven commands.
2. Press or until the symbol on
the display starts flashing, then press
. The indication “0_00” will appear on the
display.
3. Select the time after which you want the
alarm to sound by pressing or . You
will hear 2 beeps to confirm that the time
has been set and the clock will start
counting down from the selected time.
The symbol will flash.
4. Once the cooking time is up, the oven will
turn off, an alarm will sound and the
symbol will flash.
5. Press to stop the alarm and turn off
the symbol. The oven will switch on
again.
6. Set the controls to position to turn off
the oven.
You can change the remaining cooking time
at any time by touching or until the
symbol starts to flash. Press to change
the time.
Programing the Cooking Stop Time
1. Select a cooking function and a
temperature.
2. Press or until the symbol on
the display starts flashing, then press
. The indication “0_00” will appear on
the display.
3. Select the time after which you want the
alarm to sound by pressing or . You
will hear 2 beeps to confirm that the time
has been set and the clock will start
counting down from the selected time.
The symbol will flash.
4. When the cycle is finished, the oven will
turn itself off, an alarm will sound and the
symbol will flash.
5. Press to stop the alarm and turn off
the symbol. The oven will switch on
again.
6. Set the controls to position to turn off
the oven.
You can change the remaining cooking time
at any time by touching or until the
symbol starts to flash. Press to change
the time.
Programing the Cooking Time and
Cooking Stop Time
1. Select a cooking function and a
temperature.
2. Press or until the symbol on
the display starts flashing, then press
. The indication “0_00” will appear on
the display.
3. Select the cooking time by touching or
. You will hear 2 beeps, the remaining
time will appear on the display and the
symbol will flash.
4. Press to select the option.
5. Press or until the symbol on
the display starts flashing, then press
. The indication “0_00” will appear on
the display.
6. Select the cooking end time by pressing
or .
7. The oven will remain disconnected with
the and symbols lit up. The oven
is now programed.
With the Buzzer function, the remaining
time will show permanently on the
display. With this programed function, it
is not possible to view the time or the
total programed cooking time.

23
english
8. When it is time to start cooking, the oven
will turn on and will operate for the
programed time.
9. While cooking, the remaining cooking
time will be displayed and the symbol
will flash slowly.
10. When the cooking time is up, the oven
will turn off, a buzzer will sound, and the
symbol will flash quickly.
11. Press to stop the buzzer and turn off
the symbol. The oven will switch on
again.
12. Set the controls to position to turn off
the oven.
You can change the remaining cooking time
at any time by touching or until the
symbol starts to flash quickly. Press to
change the time.
MICROWAVE
1. Select the microwave function.
2. The display shows 00:30 (Quick start
function) by default. Press or until
the display shows 1:00.
3. Press to confirm.
2. The display shows the default cooking
time. Select the desired cooking time by
pressing or .
3. Press to confirm.
4. The display shows the default Power
setting. Select the desired power setting
by pressing or .
5. Press to confirm.
6. Press to start the microwave function
with the desired parameters.
QUICK START
1. Select the microwave function.
2. Press and the microwave starts
immediately to operate in the Microwave
function at maximum power for 30
seconds.
3. If you want to increase the operating time
press again. Each time you press this
key the operating time will be increased
by 30 seconds.
DEFROST BY TIME
1. Select the microwave function.
2. Press or until the symbol
appears on the display.
3. Press to select the option.
4. The display shows the default defrost
time. Select the desired cooking time by
pressing or .
5. Press to start the defrost by time
function with the desired parameters.
DEFROST BY WEIGHT
1. Select the microwave function.
2. Press or until the symbol
appears on the display.
3. Press to select the option.
4. The display shows “F01” blinking as
default. Select the desired defrost option
by pressing or .
5. Press to confirm.
See Cooking Guide for advice on
defrosting times.
When the display shows the word
press to continue.
When the display shows the word
press to continue.

24
6. The display shows default weight
blinking. Select the desired weight by
pressing or .
7. Press to start the defrost by weight
function with the desired parameters.
The following table shows the defrosting by
weight function programs, indicating weight
intervals, and defrosting and standing times
(in order to ensure the food is of a uniform
temperature):
Prog.
Food
Weight
(kg)
Time
(min)
Standing
time (min)
F01
Meat
0.10 – 2.00
2:10 – 43
20 – 30
F02
Poultry
0.10 – 2.50
2:20 – 58
20 – 30
F03
Fish
0.10 – 2.00
2 – 40
20 – 30
F04
Fruit
0.10 – 0.50
2:36 – 13
10 – 20
F05
Bread
0.10 – 0.80
2:25 – 19
10 – 20
COMBINED FUNCTIONS
1. Select a microwave + conventional oven
function with the function selector.
2. The display shows the default cooking
time. Press to select.
3. Select the desired cooking time by
pressing or .
4. Press to confirm.
5. The display shows the default Power
setting. Select the desired power setting
by pressing or .
6. Press to confirm.
7. Press to start the function with the
desired parameters.
Safety instructions
SAFETY BLOCK
This function can be selected at any time
while using the oven.
To activate the function, press for a few
seconds until you hear a beep and the
symbol appears on the display. The oven is
locked.
If the oven is off and you activate the safety
block function, the oven will not work even if
a cooking function is selected.
If this function is activated while you are
cooking, it will only lock the display and keys.
To deactivate the safety block function, press
for a few seconds until you hear a beep.
SHOWROOM MODE
The showroom mode is used in showrooms,
to show the clients how the oven works as
described in every function, but there’s no
activation of the heating loads.
To activate the showroom mode press
and .
To deactivate the function press and
again.
The temperature can be changed
anytime rotating the temperature control
dial.
The maximum power that can be
selected is 600 W.
When the display shows the word
press to continue.

25
español
Advertencias de seguridad
Recomendaciones generales
¡Siga TODAS las advertencias de seguridad!
¡Atención, peligro de sobrecalentamiento!
Al utilizar el horno no se debe cubrir la parte inferior del mismo
con papel de aluminio, ni colocar cazuelas, sartenes u objetos
similares. Si esto sucede, el horno se sobrecalentará, lo cual
dañaría el esmalte.
El horno se calienta cuando se utiliza. Cuando el horno se sobrecalienta el ventilador de
refrigeración se pone en marcha. Se mantendrá en marcha hasta que el horno se haya
enfriado, incluso después de que se haya apagado. Los ruidos producidos por el
ventilador son normales, propios de su funcionamiento, y no constituyen una avería.
Al preparar un plato con alcohol o levadura con programas que utilizan aire caliente podría
aparecer un olor a vinagre. Si el olor resulta molesto, utilice un programa sin ventilador,
como calor superior/inferior.
El reloj electrónico incorpora la tecnología Touch-Control. Para usarlo, simplemente toque
los símbolos del panel de mandos con el dedo. La sensibilidad del Touch-Control se
adapta según cambian las condiciones. Asegúrese de que la superficie de cristal del panel
de mandos esté siempre limpia y libre de obstáculos cuando encienda el horno.
Si al tocar el cristal con el dedo, el horno no responde correctamente necesitará apagar el
horno y volver a encenderlo cuando transcurran unos pocos segundos. Esto hace que los
sensores se ajusten automáticamente y reaccionarán de nuevo al tocarlos con el dedo.
Conexión y funcionamiento
Solo las placas KUPPERSBUSCH han sido fabricadas y comprobadas para su uso en un
horno KUPPERSBUSCH. No utilice otras placas.
Cualquier manipulación o reparación del aparato, incluida la sustitución del cable de
alimenta- ción, solo debe realizarse por personas del Servicio de Asistencia Técnica
autorizado, utilizando repuestos originales. Las reparaciones o manipulaciones por
terceros pueden ocasionar daños en el horno o causar un mal funcionamiento, poniendo
en peligro su seguridad.
No deje que los niños se acerquen al horno durante su uso, ya que se alcanzan
temperaturas muy elevadas.
Vigile a los niños para asegurarse de que no juegan con el horno.
Este electrodoméstico no está diseñado para su uso por personas (incluidos niños) con
capacidades físicas, sensoriales o mentales reducidas, o que carezcan de experiencia o
conocimiento, salvo si se le vigila o se les han proporcionado instrucciones relativas al uso
por parte de una persona responsable de su seguridad.

26
Horno
El horno siempre tiene que funcionar con la puerta cerrada.
El fabricante no se responsabiliza del empleo del horno para otros usos que no sean la
preparación de alimentos en el hogar.
Utilice el horno únicamente cuando esté instalado en el interior del mueble de cocina.
No guarde aceite, grasas o productos inflamables dentro del horno. Podría ser peligroso si
el horno se enciende.
No se apoye ni se siente en la puerta del horno cuando esté abierta. Podría dañarlo y
poner en riesgo su propia seguridad.
Para cocinar cualquier alimento, introduzca la bandeja o parrilla que se suministra en las
guías laterales del interior del horno. La bandeja y la parrilla poseen un sistema que
facilitar su extracción parcial para manipular los alimentos.
No coloque recipientes ni alimentos directamente sobre la base del horno. Emplee
siempre las bandejas y la rejilla.
No vierta agua en la base del horno durante su funcionamiento, ya que esto podría dañar
el esmalte. Durante la cocción, abra la puerta lo menos posible. Así reducirá el consumo
de energía.
Emplee guantes de protección cuando necesite manipular alimentos dentro del horno.
En platos con un alto contenido de líquido es normal que se produzca condensación en la
puerta.
Antes del primer uso
Retire el material de embalaje y el antiguo electrodoméstico
Retire el embalaje y recíclelo según la normativa de protección del medio ambiente.
El retorno de los materiales de embalaje economiza materias primas y reduce la
generación de residuos. Los electrodomésticos antiguos todavía contienen materiales
valiosos. Deposite su electrodoméstico antiguo en un punto limpio para aprovechar los
materiales. Los electrodomésticos antiguos deben ser inutilizados antes deshacerse de
ellos para evitar un uso inadecuado de los mismos.
Información técnica
En caso de tener que recurrir al Servicio de posventa o de
encargar piezas de repuesto, debe proporcionar la
información técnica suministrada.
Esta información se encuentra en la parte esquierda del
horno, en el marco lateral. Queda visible cuando la puerta
está abierta.

27
español
Limpieza y cuidados
Lea este capítulo por completo antes de utilizar el electrodoméstico por primera vez.
Si se limpia de manera adecuada y con regularidad, se mantendrá limpio y en buen estado
durante muchos años. Aquí tiene una serie de indicaciones que le permitirán cuidar y limpiar a
fondo todas las superficies sin dañarlas.
Para todas las superficies
¡Peligro de muerte!
No utilice a aparatos de limpieza a presión o de vapor para
limpiar el horno. El electrodoméstico podría resultar dañado, lo
que podría ocasionar peligro de muerte.
¡Peligro de quemaduras!
Antes de limpiarlo, deje enfriar el horno, como mínimo, hasta
que pueda tocarlo con la mano.
Limpie el horno después de cada uso. Las manchas o restos de comida que no hayan sido
retirados pueden arder la siguiente vez que caliente el horno. A menudo, este tipo de man-
chas o de suciedad ya no se puede eliminar sin dejar marcas.
En caso de manchas pequeñas, limpie las superficies con un paño, un cepillo o una
esponja suave y agua caliente con un poco de detergente. Enjuague con agua fría para
que no quede ningún resto de detergente que pueda producir decoloración o manchas. A
continuación seque la superficie con un paño.

28
Aquí tiene algunas instrucciones para manchas más difíciles localizadas en las superficies y
elementos del horno.
No limpie en ningún caso con:
productos de limpieza agresivos o blanqueantes que contengan oxígeno
activo, cloro u otros componentes corrosivos.
productos de limpieza que produzcan arañazos, como agentes abrasivos,
lana de acero, lana de acero enjabonada, cepillos duros, estropajos de
metal, esponjas de plástico o esponjas con una superficie que arañe (el
lado del estropajo).
Uso del horno
El horno está diseñado para cocinar, asar, hornear y mantener calientes los platos.
Utilice el horno solo cuando esté instalado en el interior del mueble de cocina. Utilice el horno
únicamente tal y como se explica en estas instrucciones de uso. Cualquier uso del mismo que
no se realice de acuerdo con ellas puede provocar daños materiales o incluso personales. El
fabricante no asume ninguna responsabilidad por los daños que producidos por el uso
inadecuado.
El horno está diseñado únicamente para su uso doméstico. Su uso comercial queda excluido.
El horno no está diseñado para calentar una habitación. La luz del horno está diseñada
únicamente para iluminar el interior del horno, no para iluminar una habitación. La puerta del
horno sirve únicamente para cerrar el horno.
¡Utilice el horno solo para cocinar, asar, hornear y mantener
calientes los platos!

29
español
Descripción del horno
Frente de mandos
Salida de aire de
refrigeración
Resistencia de grill
Fijación al mueble
Soporte bandejas
Lámpara
Parrilla
Panel trasero
Bandeja
Turbina
Bisagra
Junta de horno
Cristal interior
Puerta
Frontal de mandos
Selector de funciones
Selector de temperaturas
Display
Teclas touch

30
Símbolos del selector de funciones
Funciones del horno
SOLERA
TURBO + SOLERA
DESCONEXIÓN DEL HORNO
TURBO
CONVENCIONAL
ECO
MAXIGRILL
MICROONDAS + AIRE
CALIENTE
CONVENCIONAL CON TURBINA
MICROONDAS + GRILL
MAXIGRILL CON TURBINA
MICROONDAS
Niveles de Potencia de las microondas
Potencia Salida Microondas
Alimentos
200
Descongelación lenta para alimentos delicados; mantener caliente
400
Cocinar con poco calor; rehogar arroz
Descongelación rápida
600
Derretir mantequilla
Calentar alimento para bebé
800
Cocinar verduras y alimentos
Cocinar y calentar cuidadosamente,
Calentar y cocinar pequeñas cantidades
Calentar alimentos delicados
1000
Cocinar y calentar rápidamente líquidos y alimentos precocinados,
For a description of how to use each of
the features, see the cooking guide that
comes with your oven.

31
español
Descripción del display
TECLAS
, y : Permiten la programación
de las funciones del reloj electrónico.
: Permite empezar las funciones de
cocinados.
: Permite detener las funciones de
cocinados.
SÍMBOLOS
AVISADOR: Iluminado al seleccionar la
función avisador del reloj. Genera una señal
acústica al cabo del tiempo. El horno no se
apagará cuando acabe el tiempo. Esta
función también se puede utilizar cuando el
horno esté cocinando.
y PROGRAMACIÓN: Iluminados
para indicar que el horno está programado
(duración, fin o total).
Duración del Cocinado Permite
cocinar durante un tiempo seleccionado,
a continuación el horno se apagará de
forma automática.
Hora de Finalización del Cocinado:
Permite cocinar hasta una hora
establecida, a continuación el horno se
apagará de forma automática.
y Duración y Fin del Cocinado:
Permite programar la duración y la hora
de finalización del cocinado. El horno se
pondrá en marcha de forma automática
para cocinar durante el tiempo
seleccionado (Duración) y se apagará de
forma automática a la hora que le haya
indicado (Fin del Cocinado).
BLOQUEO DE SEGURIDAD: Indica que
las teclas del display están bloqueadas,
evitando la manipulación por parte de niños
pequeños.
Otras funciones
CALENTAMIENTO: Indica que el horno
está transmitiendo calor al alimento.
DESCONGELACIÓN POR TIEMPO: Se
ilumina mientras la función de
descongelación por tiempo está en
funcionamiento.
DESCONGELACIÓN POR PESO: Se
ilumina mientras la función de
descongelación por peso está en
funcionamiento.
La sensibilidad de las teclas se adapta
continuamente a las condiciones
ambientales. Al conectar el horno a la
red tenga la precaución que la superficie
del frontal de mandos esté limpia y libre
de cualquier obstáculo.
Si al tocar las teclas, el reloj no responde
correctamente entonces es necesario
que desconecte el horno de la red
eléctrica y tras un instante vuelva a
conectarlo. De esta forma los sensores
se habrán ajustado automáticamente y
reaccionarán de nuevo al tocar con el
dedo.

32
AJUSTE DEL RELOJ
Al conectar su horno, observará que en el
reloj aparece parpadeando la indicación
12:00.
Pulse o para ajustar las horas
Pulse para validar las horas.
Pulse o para ajustar los minutos.
Pulse para validar los minutos.
Si desea modificar la hora, pulse o
hasta que la hora empiece a parpadear.
Pulse y siga las instrucciones de los
puntos anteriores.
OCULTAR/MOSTRAR EL RELOJ
Si no desea ver la hora en la pantalla
pulse durante 5 segundos.
Si desea volver a mostrar el reloj, pulse
durante 5 segundos.
Manejo del horno
FUNCIONAMIENTO MANUAL
Tras poner el reloj en hora, su horno está
listo para cocinar. Seleccione una función
de cocinado y una temperatura.
Observará que el símbolo se ilumina
durante el cocinado para indicar la
transmisión de calor al alimento. Este
símbolo se apaga cuando se alcanza la
temperatura seleccionada.
Para apagar el horno, ponga los mandos
en posición .
FUNCIONAMIENTO TEMPORIZADO DEL
HORNO
Programación del avisador
1. Toque o hasta que parpadee el
símbolo en la pantalla y pulse .
En la pantalla se verá la indicación 0_00.
2. Seleccione el tiempo tras el cual desea
que el reloj avise, tocando o .
Sonarán 2 beep seguidos como
confirmación y se mostrará la cuenta
atrás a partir del tiempo elegido. El
símbolo parpadeará lentamente.
3. Cuando finalice el tiempo, sonará una
señal acústica durante 90 segundos y el
símbolo parpadeará rápidamente.
En caso de un corte de suministro
eléctrico, se borrará toda la
programación de su reloj electrónico y
aparecerá parpadeando la indicación
12:00 en el reloj. Deberá ponerlo en hora
y programarlo de nuevo.
En modelos con regulación electrónica
de temperatura, al girar el selector, se
mostrará la temperatura en la pantalla
del reloj.
Una vez seleccionada la temperatura, la
pantalla volverá automáticamente a
mostrar el reloj.
Cuando inicie un cocinado, por defecto
su horno mostrará el tiempo que el
horno lleva cocinando, si se ha ajustado
la duración del cocinado o la hora de
finalización del cocinado.

33
español
4. Toque cualquier tecla para detener la
señal acústica, en ese momento el
símbolo se apagará.
Si desea modificar el tiempo del avisador,
presione o hasta que parpadee el
símbolo y las horas no estén
papadeando, después pulse y realice
los pasos mostrados nuevamente. Al
acceder al temporizador, aparecerá el tiempo
restante actual el cual podrá modificar.
Programación de la Duración del
Cocinado
1. Seleccione una función y una
temperatura de cocinado mediante los
mandos del horno.
2. Toque o hasta que parpadee el
símbolo en la pantalla y pulse .
En la pantalla se verá la indicación 0_00.
3. Seleccione el tiempo tras el cual desea
que el reloj avise, tocando o .
Sonarán 2 beep seguidos como
confirmación y se mostrará la cuenta
atrás a partir del tiempo elegido. El
símbolo parpadeará lentamente.
4. Transcurrida la duración del cocinado, el
horno se desconectará, sonará una señal
acústica y el símbolo parpadeará.
5. Toque en para detener la señal
acústica y apagar el símbolo
encendiéndose el horno de nuevo.
6. Ponga los mandos en posición para
apagar el horno.
En cualquier momento usted puede modificar
el tiempo restante de cocinado, tocando o
hasta que el símbolo parpadee
rápidamente. A continuación toque para
modificar el tiempo.
Programación de la Hora de Finalización
del Cocinado
1. Seleccione una función y una
temperatura de cocinado.
2. Toque o hasta que parpadee el
símbolo en la pantalla y pulse .
En la pantalla se verá la indicación 0_00.
3. Seleccione el tiempo tras el cual desea
que el reloj avise, tocando o .
Sonarán 2 beep seguidos como
confirmación y se mostrará la cuenta
atrás a partir del tiempo elegido. El
símbolo parpadeará.
4. Alcanzada la hora de finalización
programada, el horno se desconectará,
sonará una señal acústica y el símbolo
parpadeará.
5. Toque en sensor para detener la
señal acústica y apagar el símbolo ,
encendiéndose el horno de nuevo.
6. Ponga los mandos en posición para
apagar el horno.
En cualquier momento usted puede modificar
el tiempo restante de cocinado, tocando o
hasta que el símbolo parpadee
rápidamente. A continuación toque para
modificar el tiempo.
Programación de la Duración y Fin del
Cocinado
1. Seleccione una función y una
temperatura de cocinado.
Con la función Avisador, al finalizar el
tiempo programado el horno no se
apagará.
Con la función Avisador, el tiempo
restante se mostrará en la pantalla de
forma permanente. Con esta función
programada, no es posible visualizar la
hora ni el tiempo total de cocinado
programado.

34
2. Toque o hasta que parpadee el
símbolo en la pantalla y pulse .
En la pantalla se verá la indicación 0_00.
3. Seleccione el tiempo tras el cual desea
que el reloj avise, tocando o .
Sonarán 2 beep seguidos como
confirmación y se mostrará la cuenta
atrás a partir del tiempo elegido. El
símbolo parpadeará.
4. Pulse la tecla para validar.
5. Toque o hasta que parpadee el
símbolo en la pantalla y pulse .
En la pantalla se verá la indicación 0_00.
6. Ajuste la hora de finalización del
cocinado, tocando o .
7. El horno permanecerá desconectado y
con los símbolos y iluminados.
Su horno está programado.
8. Cuando se alcance la hora de comienzo
del cocinado, el horno se pondrá en
marcha y se realizará el cocinado durante
el tiempo seleccionado.
9. Durante el cocinado se mostrará el
tiempo restante de cocinado y el símbolo
parpadeará.
10. Alcanzada la hora de finalización que se
había programado, el horno se
desconectará, sonará una señal acústica
y el símbolo parpadeará.
11. Toque cualquier sensor para detener la
señal acústica y apagar el símbolo
encendiéndose el horno de nuevo.
12. Ponga los mandos en posición para
apagar el horno.
En cualquier momento usted puede modificar
el tiempo restante de cocinado, tocando o
hasta que el símbolo parpadee
rápidamente. A continuación toque para
modificar el tiempo.
MICROONDAS
1. Gire el selector de funciones y colóquelo
en la posición de microondas.
2. El display muestra 0_30 (Función de
inicio rápido) por defecto. Pulse o
hasta que parpadee 1_00.
3. Pulse la tecla para validar.
4. El display muestra la duración del
cocinado por defecto. Con los botones
o seleccione en la duración
deseada.
5. Pulse la tecla para validar.
6. El display muestra la potencia por
defecto. Con los botones o
seleccione la potencia deseada.
7. Pulse la tecla para validar.
8. Pulse la tecla para empezar la
función microondas con los parámetros
seleccionados.
INICIO RÁPIDO
1. Gire el selector de funciones y colóquelo
en la posición de microondas
2. Pulse el microondas empezará
inmediatamente a funcionar en la función
de microondas a la máxima potencia
durante 30 segundos.
3. Si desea aumentar el tiempo de
funcionamiento, vuelva a pulsar la tecla
. El tiempo de funcionamiento
aumenta en 30 segundos todas las veces
que pulsar la tecla .
DESCONGELACIÓN POR TIEMPO
1. Gire el selector de funciones y colóquelo
en la posición de microondas
2. Toque o hasta que parpadee el
símbolo en la pantalla.
3. Pulse la tecla para validar.
4. La pantalla muestra la duración por
defecto de la descongelación por tiempo.
Con los botones o seleccione la
duración deseada.
5. Pulse la tecla para empezar la
función descongelación por tiempo con
los parámetros seleccionados.

35
español
DESCONGELACIÓN POR PESO
1. Gire el selector de funciones y colóquelo
en la posición de microondas
2. Toque o hasta que parpadee el
símbolo en la pantalla.
3. Pulse la tecla para validar.
4. La pantalla muestra «F01» parpadeando
por defecto. Con los botones o
seleccione la opción de descongelación
deseada.
5. Pulse la tecla para validar.
6. La pantalla muestra parpadeando por
defecto el peso. Con los botones o
seleccione el peso deseado.
7. Pulse la tecla para empezar la
función descongelación por peso con los
parámetros seleccionados.
La tabla siguiente muestra los programas de
Descongelar por peso, indicando rangos de
peso y tiempos de cocción y
descongelamiento (para garantizar que la
temperatura de la comida sea uniforme):
Prog.
Alimento
Peso (kg)
Tiempo
(min)
Tiempo de
cocción
(min)
F01
Carne
0.10 – 2.00
2:10 – 43
20 – 30
F02
Aves
0.10 – 2.50
2:20 – 58
20 – 30
Prog.
Alimento
Peso (kg)
Tiempo
(min)
Tiempo de
cocción
(min)
F03
Pescado
0.10 – 2.00
2 – 40
20 – 30
F04
Frutas
0.10 – 0.50
2:36 – 13
10 – 20
F05
Pan
0.10 – 0.80
2:25 – 19
10 – 20
FUNCIONES COMBINADAS
1. Gire el selector de funciones y colóquelo
en la posición de al función microondas +
horno convencional.
2. El display muestra la duración del
cocinado por defecto.
3. Pulse la tecla para selecionar.
4. Con los botones o seleccione en la
duración deseada.
5. Pulse la tecla para validar.
6. El display muestra la potencia por
defecto. Con los botones o
seleccione la potencia deseada.
7. Pulse la tecla para validar.
8. Pulse la tecla para empezar la
función con los parámetros
seleccionados.
La potencia máxima que se puede
seleccionar es 600 W.
Consulte el Guía de cocinados para
obtener consejos de tiempos de
descongelación.
Cuando la pantalla muestre la palabra
alimentos y presionar para continuar.
Cuando la pantalla muestre la palabra
alimentos y presionar para continuar.
La temperatura se puede cambiar en
cualquier momento girando el Selector
de temperaturas.

36
Funciones de seguridad
BLOQUEO DE SEGURIDAD
Esta función se puede seleccionar en
cualquier momento durante el uso del horno.
Para activar la función, toque en la tecla
de forma prolongada hasta que escuche 1
beep sonoro y el símbolo aparezca en la
pantalla. El reloj está bloqueado.
Si el horno está apagado y activa la
seguridad niños, el horno no cocinará
aunque seleccione una función de cocinado.
Si mientras cocina con el horno, activa esta
función, sólo bloqueará la manipulación del
reloj electrónico.
Para desactivar la función, toque en la tecla
de forma prolongada hasta que escuche
1 beep sonoro.
MODO SHOWROOM
El modo showroom se utiliza en las
presentaciones para enseñar a los clientes el
funcionamiento de cada una de las funciones
del horno, pero sin activar los ciclos de
calentamiento.
Para activar el modo showroom pulse y
en simultáneo.
Para desactivar la función pulse y de
nuevo.

37
português
Avisos de segurança
Conselhos gerais
Respeite TODOS os avisos de segurança!
Atenção: perigo de sobreaquecimento!
Ao utilizar o forno, não tape o fundo com papel de alumínio nem
coloque tachos, frigideiras ou outros utensílios semelhantes no
interior. Se o fizer, o forno pode sobreaquecer, causando danos
no esmalte.
O forno fica quente quando está em funcionamento. A ventoinha de refrigeração liga-se
quando o forno sofre um sobreaquecimento. A ventoinha de refrigeração permanece
ligada até que o forno arrefeça, mesmo depois de o aparelho ter sido desligado. O ruído
emitido pela ventoinha é normal e não significa que existam danos no forno.
Ao preparar pratos com álcool ou levedura, com funções que utilizem ar quente, pode
libertar-se um cheiro avinagrado. Se o cheiro for desagradável, utilize uma função que não
inclua a ventoinha, como o aquecimento da parte inferior e superior.
O relógio eletrónico está equipado com tecnologia de controlo tátil. Para operar o relógio,
basta tocar nos símbolos de controlo no vidro com a ponta do dedo. A sensibilidade do
controlo tátil adapta-se às condições. Certifique-se de que a superfície em vidro do painel
de controlo está limpa e desobstruída quando ligar o forno.
Se o forno não responder adequadamente quando tocar no vidro, desligue o forno durante
alguns segundos e volte a ligá-lo. Assim, os sensores vão ajustar-se automaticamente,
para que possam voltar a reagir ao controlo tátil.
Ligação e utilização
Apenas os fogões KÜPPERSBUSCH foram fabricados e testados para serem utilizados
por cima de um forno KÜPPERSBUSCH. Não utilize outros fogões.
Qualquer manipulação ou reparação do aparelho, incluindo a substituição do cabo de
alimentação, deve ser efetuada apenas pelo pessoal técnico autorizado e utilizando peças
originais. A reparação ou manipulação efetuadas por outras pessoas podem danificar o
aparelho e levar ao mau funcionamento do mesmo, pondo em risco a sua segurança.
Não permita a presença de crianças pequenas perto do forno quando este está em
funcionamento, uma vez que pode atingir temperaturas muito elevadas.
As crianças devem ser supervisionadas para garantir que não brincam com o aparelho.
Este aparelho não deve ser utilizado por pessoas (incluindo crianças) com capacidades
físicas, sensoriais ou mentais reduzidas, ou por pessoas que não tenham a devida
experiência e conhecimento, exceto se forem supervisionadas e se lhes forem fornecidas
as instruções necessárias relativas à utilização do aparelho por uma pessoa responsável
pela sua segurança.

38
Forno
O forno deve funcionar sempre com a porta fechada.
O fabricante não se responsabiliza pela utilização do forno para outros fins que não a
preparação de alimentos em casa.
Utilize o forno apenas depois de este estar instalado na respetiva unidade na cozinha.
Não guarde óleos, gorduras ou materiais inflamáveis dentro do forno. Isso pode ser
perigoso quando o forno for ligado.
Não se sente nem se apoie na porta do forno quando esta estiver aberta. Pode danificá-la
e pôr em risco a sua segurança.
Para preparar alimentos no forno, coloque o tabuleiro ou a grelha fornecidos nas ranhuras
de encaixe dentro do forno. O tabuleiro e a grelha têm um sistema que torna mais fácil o
movimento de retirada parcial para um melhor manuseamento dos alimentos.
Não coloque recipientes ou alimentos na superfície inferior do forno. Utilize sempre o
tabuleiro e a grelha.
Não verta água na superfície inferior do forno quando este está em funcionamento, uma
vez que pode danificar o esmalte. Abra a porta do forno o menos possível durante o
cozinhado. Isso reduz o consumo de energia.
Utilize luvas de proteção quando efetuar operações dentro do forno.
É normal que ocorra alguma condensação na porta do forno quando estiver a cozinhar
pratos com um conteúdo mais líquido.
Antes da primeira utilização
Retire as embalagens e o aparelho antigo.
Retire as embalagens e recicle-as de uma forma ecológica.
Se devolver o material das embalagens, as matérias-primas são guardadas e é gerado
menos desperdício. Os aparelhos antigos ainda contêm materiais que podem ser
aproveitados. Leve o seu aparelho antigo a um ponto de recolha para o aproveitamento
desses materiais. Os aparelhos antigos devem ficar inoperantes antes de serem
descartados, para evitar a utilização não apropriada dos mesmos.
Informações técnicas
Se precisar de contactar o serviço pós-venda ou
encomendar peças sobresselentes, deve indicar as
informações técnicas fornecidas com o aparelho.
As informações técnicas do forno encontram-se à
esquerda, na estrutura lateral. Consegue visualizá-las com
a porta aberta.

39
português
Limpeza e cuidados
Leia este capítulo antes de utilizar o aparelho pela primeira vez.
Se o forno for limpo de forma correta e com a frequência adequada, vai permanecer em bom
estado e como novo durante muitos anos. Abaixo, apresentamos uma série de instruções para
o cuidado e a limpeza das superfícies do forno sem as danificar.
Para todas as superfícies
Perigo de morte!
Não utilize dispositivos de limpeza a vapor e/ou pressão para
limpar o forno. O aparelho pode ficar danificado e criar uma
situação que apresente perigo de morte.
Perigo de queimaduras!
Deixe o aparelho arrefecer até poder tocar com as mãos antes de
o limpar.
Limpe o aparelho após cada utilização. As manchas ou os restos de alimentos que não
forem removidos podem queimar-se na próxima vez que o forno for utilizado. Muitas
vezes, essas manchas ou restos de alimentos não podem ser removidos sem deixar
marcas.
Se existirem apenas pequenas manchas, limpe as superfícies com um pano, uma escova
ou uma esponja macia, água quente e um pouco de detergente da loiça. Depois, passe
água fria para que não fiquem restos de detergente que podem descolorar a superfície e
causar mais manchas. Seque de imediato com um pano.

40
Eis algumas instruções para a limpeza de manchas mais difíceis nas diferentes superfícies e
elementos.
Nunca limpe com
produtos abrasivos ou lixívias que contenham oxigénio ativo, cloro ou
outros ingredientes corrosivos.
produtos de limpeza que risquem, como agentes abrasivos, palha de
aço, esfregões com sabão, escovas duras, esfregões em aço
inoxidável, esponjas plásticas ou esponjas com uma superfície que
risque (lado do esfregão).
Utilização do forno
O forno foi concebido para cozinhar, assar e cozer e para manter os alimentos quentes.
Utilize o forno apenas se este estiver devidamente colocado numa peça de mobiliário
adequado.
Utilize o forno apenas de acordo com as instruções de utilização indicadas. Qualquer outra
utilização não está em conformidade com os requisitos e pode causar danos materiais e até
ferimentos. O fabricante não se responsabiliza por quaisquer danos causados pela utilização
indevida do aparelho.
O forno foi concebido para utilização exclusiva em residências privadas. Não foi concebido
para uma utilização comercial. O forno não é adequado para aquecer divisões. A luz do forno
destina-se apenas à iluminação do espaço de cozedura e não à iluminação da divisão. A porta
do forno destina-se apenas a fechar o forno.
Utilize o forno apenas para cozinhar, assar, cozer e manter os
alimentos quentes!

41
português
Descrição do forno
Painel de comandos
Saída de ar de refrigeração
Resistência do grill
Fixação ao móvel
Apoio dos tabuleiros
Lâmpada
Grelha
Painel traseiro
Tabuleiro
Turbina
Dobradiça
Junta de forno
Vidro interior
Porta
Painel de comandos
Seletor de funções
Seletor de temperatura
Visor
Teclas touch

42
Símbolos do seletor de funções
Funções do forno
RESISTÊNCIA INFERIOR
TURBO + RESISTÊNCIA INFERIOR
DESLIGAR O FORNO
TURBO
CONVENCIONAL
MODO ECOLÓGICO
MAXIGRILL
MICROONDAS + AR QUENTE
CONVENCIONAL COM
TURBINA
MICROONDAS + GRILL
MAXIGRILL COM TURBINA
MICROONDAS
Níveis de Potências das Micro-ondas
Potência das micro-ondas
Alimentos
200
Descongelação lenta para alimentos delicados; manter quente.
400
Cozinhar com pouco calor; refogar arroz.
Descongelação rápida.
600
Aquecer e cozinhar alimentos.
800
Cozinhar legumes e alimentos. Cozinhar e aquecer cuidadosamente.
Aquecer e cozinhar pequenas quantidades. Aquecer alimentos
delicados.
1000
Cozinhar e aquecer rapidamente líquidos e alimentos pré
confeccionados.
Para uma descrição da utilização de cada
uma das funções, consulte o guia de
cozinhados fornecido com o seu forno.

43
português
Descrição do visor
TECLAS
, e : Permitem a programação
das funções.
: Permite iniciar as funções de cozinhado.
: Permite parar as funções de cozinhado.
SÍMBOLOS
AVISADOR: Ilumina-se quando é
selecionada função de avisador do relógio.
Gera um sinal acústico no final do tempo
programado. O forno não se desligará
quando termina o tempo. Esta função
também pode ser utilizada quando o forno
estiver a cozinhar.
e PROGRAMAÇÃO: Iluminam-se
para indicar que o forno está programado
(duração, fim ou total).
Duração do cozinhado: Permite
cozinhar durante um tempo selecionado
e a seguir o forno desligar-se-á de forma
automática.
Hora de finalização do cozinhado:
Permite cozinhar até uma hora
estabelecida e a seguir o forno desligar-
se-á de forma automática.
e Duração e finalização do
cozinhado: Permite programar a
duração e a hora de finalização do
cozinhado. O forno ligar-se-á de forma
automática para cozinhar durante o
tempo selecionado (Duração) e desligar-
se-á automaticamente na hora indicada
(Finalização do cozinhado).
Bloqueio de segurança: Indica que as
teclas touch do relógio estão bloqueadas,
evitando a sua manipulação por parte de
crianças pequenas.
Outras funções
AQUECIMENTO: Indica que o forno está
a transmitir calor ao alimento.
DESCONGELAÇÃO POR TEMPO:
Ilumina-se durante a função de
descongelação por tempo
DESCONGELAÇÃO POR PESO:
Ilumina-se durante a função de
descongelação por peso.
A sensibilidade das teclas touch adapta-
se continuamente às condições
ambientais. Ao ligar o forno à corrente, é
necessário ter o cuidado de garantir que
a superfície do vidro da parte da frente
dos comandos está limpa e livre de
qualquer obstáculo.
Se, ao tocar nas teclas, o relógio não
responder corretamente, é necessário
desligar o forno da rede elétrica e voltar
a ligá-lo algum tempo depois. Desta
forma os sensores ajustar-se-ão
automaticamente e reagirão novamente
ao tocar com o dedo.

44
Acertar a hora
Ao ligar o forno, observará que no relógio
aparece a piscar a indicação 12:00.
Pressione ou para acertar as
horas.
Pressione para confirmar as horas.
Pressione ou para ajustar os
minutos.
Pressione para confirmar os
minutos.
Se pretender alterar a hora, pressione
ou até que a indicação da hora fique
intermitente. Pressione e siga os
passos descritos no ponto anterior.
OCULTAR O RELÓGIO
Para ocultar o relógio pressione a tecla
durante 5 segundos.
Para voltar a mostrar o relógio pressione
novamente a tecla durante 5
segundos.
Manuseamento do forno
FUNCIONAMENTO MANUAL
Após acertar a hora do relógio, o seu
forno está pronto para cozinhar.
Selecione uma função de cozinhado e
uma temperatura.
Poderá verificar que o símbolo se
ilumina durante o cozinhado para indicar
a transmissão de calor ao alimento. Este
símbolo apaga-se quando é atingida a
temperatura selecionada.
Para desligar o forno, coloque os
comandos na posição .
FUNCIONAMENTO DO TEMPORIZADOR
DO FORNO
Programação do avisador
1. Pressione ou até que o símbolo
fique intermitente no visor e
pressione . No visor será exibida a
indicação 00_00.
2. Selecione o tempo, após o qual pretende
que o relógio avise, pressionando em
ou . Ouvirá 2 beeps seguidos como
confirmação e será exibida a contagem
decrescente do tempo definido. O
símbolo piscará lentamente.
No caso de um corte de corrente
elétrica, será apagada toda a
programação do relógio eletrónico e
aparecerá a piscar no relógio a indicação
12:00. Deverá acertar a hora e
programá-lo de novo.
Em modelos com regulação eletrónica
de temperatura, a temperatura é
apresentada no ecrã do relógio ao rodar
o seletor.
Assim que a temperatura for
selecionada, o relógio volta a ser
apresentado automaticamente no ecrã.
Quando inicia um cozinhado, por defeito
o forno irá mostrar o tempo total do
cozinhado em curso., caso não tenha
sido selecionado um tempo de
cozinhado ou tempo de final de
cozinhado.

45
português
3. Quando terminar o tempo, será emitido
um sinal acústico durante 90 segundos e
o símbolo piscará mais rapidamente.
4. Pressione qualquer tecla para parar o
sinal sonoro, nesse momento o símbolo
apagar-se-á.
Caso pretenda alterar o tempo do avisador,
pressione ou até que no visor o
simbolo fique intermitente e as horas
paradas, de seguida pressione e siga
novamente os passos descritos. Ao aceder
ao temporizador, será exibido o tempo
restante atual, que poderá ser alterado.
Programação da Duração do Cozinhado
1. Selecione uma função e uma
temperatura de cozinhado através dos
comandos do forno.
2. Pressione ou até que o símbolo
fique intermitente no visor e
pressione . No visor será exibida a
indicação 00_00.
3. Selecione o tempo, após o qual pretende
que o relógio avise, pressione ou .
Ouvirá 2 beeps seguidos como
confirmação e será exibida a contagem
decrescente do tempo definido. O
símbolo piscará.
4. Decorrida a duração do cozinhado, o
forno desligar-se-á, soará um sinal
sonoro e o símbolo piscará.
5. Pressione para parar o sinal sonoro e
apagar o símbolo ligando de novo o
forno.
6. Coloque os comandos na posição
para desligar o forno.
Pode alterar o tempo de cozinhado restante
a qualquer momento, bastando para tal
premir ou até que o símbolo
comece a piscar rapidamente. De seguida,
pressione para alterar o tempo.
Programação da Hora de Finalização do
Cozinhado
1. Selecione uma função e uma
temperatura de cozinhado.
2. Pressione ou até que o símbolo
fique intermitente no visor e prima
. No visor será exibida a indicação
0_00.
3. Selecione o tempo, após o qual pretende
que o relógio avise, pressione ou .
Ouvirá 2 beeps seguidos como
confirmação e será exibida a contagem
decrescente do tempo definido. O
símbolo piscará.
4. Assim que for atingida a hora de
finalização programada, o forno desligar-
se-á, será emitido um sinal sonoro e o
símbolo piscará.
5. Prima para parar o sinal sonoro e
apagar o símbolo , ligando de novo o
forno.
6. Coloque os comandos na posição
para desligar o forno.
Pode alterar o tempo de cozinhado restante
a qualquer momento, bastando para tal
pressionar ou até que o símbolo
comece a piscar rapidamente. De seguida,
prima para alterar o tempo.
Com a função Avisador, o forno não se
desligará quando terminar o tempo
programado.
Com a função Avisador, o tempo
restante será permanentemente exibido
no visor. Com esta função ativada, não é
possível visualizar a hora nem o tempo
total programado para o cozinhado.

46
Programação da Duração e Finalização do
Cozinhado
1. Selecione uma função e uma
temperatura de cozinhado.
2. Pressionando ou até que o
símbolo fique intermitente no visor e
prima . No visor será exibida a
indicação 0_00.
3. Selecione a duração do cozinhado,
tocando em ou . Posteriormente,
soarão 2 beeps seguidos e será exibido o
tempo restante no visor e o símbolo
piscará.
4. Pressione para confirmar
5. Pressione ou até que o símbolo
fique intermitente no visor e prima
. No visor será exibida a indicação
0_00.
6. Selecione a hora de finalização do
cozinhado, premindo ou .
7. O forno permanecerá desligado e com os
símbolos e iluminados. O seu
forno está programado.
8. Quando for alcançada a hora de início do
cozinhado, o forno entrará em
funcionamento e o cozinhado decorrerá
durante o tempo selecionado.
9. Durante o cozinhado será exibido o
tempo de cozinhado restante e o símbolo
piscará.
10. Assim que for atingida a hora de
finalização programada, o forno desligar-
se-á, será emitido um sinal sonoro e o
símbolo piscará.
11. Prima para parar o sinal sonoro e
apagar o símbolo , ligando de novo o
forno.
12. Coloque os comandos na posição
para desligar o forno.
Pode alterar o tempo de cozinhado restante
a qualquer momento, bastando para tal
premir ou até que o símbolo
comece a piscar rapidamente. De seguida,
prima para alterar o tempo.
MICROONDAS
1. Rode o seletor de funções para a posição
Micro-ondas
2. No visor é exibido 0_30 (função de inicio
rápido) por padrão de funcionamento.
Pressione ou até ser exibido 1_00
no visor.
3. Pressione para confirmar.
4. No visor é exibido o tempo padrão de
funcionamento. Com as teclas ou
ajuste a duração desejada.
5. Pressione para confirmar.
6. No visor é exibida a potência padrão de
funcionamento. Com as teclas ou
ajuste a potência desejada.
7. Pressione para confirmar.
8. Pressione para iniciar a função micro-
ondas com os parâmetros desejados.
INICIO RÁPIDO
1. Rode o seletor de funções para a posição
Micro-ondas.
2. Pressione e o forno começa a
funcionar na função Micro-ondas à
potência máxima durante 30 segundos.
3. Caso pretenda aumentar o tempo de
funcionamento pressione novamente a
tecla . Cada vez que esta tecla for
premida o tempo de funcionamento será
aumentado em 30 segundos.
DESCONGELAÇÃO POR TEMPO
1. Rode o seletor de funções para a posição
Micro-ondas.
2. Pressione ou até que o símbolo
apareça no display.
3. Pressione para confirmar.

47
português
4. No visor é exibido o tempo de
descongelação padrão. Com as teclas
ou ajuste a duração desejada.
5. Pressione para iniciar a função
descongelação por tempo com os
parâmetros desejados.
DESCONGELAÇÃO POR PESO
1. Rode o seletor de funções para a posição
Micro-ondas.
2. Pressione ou até que o símbolo
apareça no visor.
3. Pressione para confirmar.
4. No visor é exibido “F01” a piscar como
padrão. Selecione a opção de
descongelação desejada, pressionando
ou .
5. Pressione para confirmar.
6. No visor é exibido o peso padrão. Com
as teclas ou ajuste o peso
desejado.
7. Pressione para iniciar a função
descongelação por peso com os
parâmetros desejados.
A tabela seguinte mostra os programas para
descongelar por peso, indicando os
intervalos de peso e tempos de
descongelação e de conservação (para
assegurar que os alimentos mantêm uma
temperatura uniforme):
Prog.
Alimento
Peso
(kg)
Tempo
(min.)
Tempo de
conservação
(min.)
F01
Carne
0.10 – 2.00
2:10 – 43
20 – 30
F02
Aves
0.10 – 2.50
2:20 – 58
20 – 30
F03
Peixe
0.10 – 2.00
2 – 40
20 – 30
F04
Fruta
0.10 – 0.50
2:36 – 13
10 – 20
F05
Pão
0.10 – 0.80
2:25 – 19
10 – 20
FUNÇÕES COMBINADAS
1. Selecione a função de micro-ondas +
função convencional com o seletor de
funções.
2. No visor é exibido o tempo padrão de
funcionamento. Com as teclas ou
ajuste a duração desejada.
3. Pressione para confirmar.
4. No visor é exibida a potência padrão de
funcionamento. Com as teclas ou
ajuste a potência desejada.
5. Pressione para confirmar.
6. Pressione para iniciar a função com
os parâmetros desejados.
Consulte o Guia de cozinhados para
sugestões de tempos de descongelação.
Quando no visor mostrar a palavra
pressione para continuar.
A temperatura pode ser alterada a
qualquer altura ao rodar o seletor de
temperatura.
Quando no visor mostrar a palavra
pressione para continuar.
A potência máxima que pode ser
selecionada é de 600 W.

48
Funções de segurança
BLOQUEIO DE SEGURANÇA
Esta função pode ser selecionada a qualquer
momento durante a utilização do forno.
Para ativar a função, prima a tecla
durante alguns segundos até que soe 1 sinal
sonoro e o símbolo seja exibido no
visor. O forno está bloqueado.
Se o forno estiver desligado e a segurança
para crianças estiver ativa, o forno não
cozinhará mesmo que selecione uma função
de cozinhado.
Caso ative esta função enquanto estiver a
utilizar o forno, apenas bloqueará a
manipulação do relógio eletrónico.
Para desativar a função, pressione a tecla
durante alguns segundos até que soe 1
sinal sonoro.
MODO SHOWROOM
O modo showroom é utilizado em
showrooms, para demonstrar aos clientes
como funciona o forno tal como descrito em
todas as funções, mas não são ativadas as
cargas de aquecimento.
Para ativar o modo showroom pressione
e em simultâneo.
Para desativar a função pressione e
novamente.


Küppersbusch Hausgeräte GmbH
Postfach 10 01 32, D-45801 Gelsenkirchen,
Küppersbuschstraße 16, D-45883 Gelsenkirchen
Telefon: (0209) 401-0, Telefax: (0209) 401-303
www.kueppersbusch.de
Teka Austria GmbH
Eitnergasse 13, A-1230 Wien
Telefon: (01) 86680-15, Telefax: (01) 86680-50
www.kueppersbusch.at
1632185-c
K02-180174/01
FR
-
 1
1
-
 2
2
-
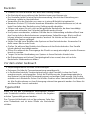 3
3
-
 4
4
-
 5
5
-
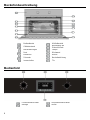 6
6
-
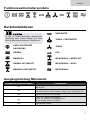 7
7
-
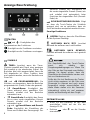 8
8
-
 9
9
-
 10
10
-
 11
11
-
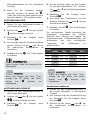 12
12
-
 13
13
-
 14
14
-
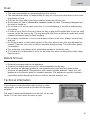 15
15
-
 16
16
-
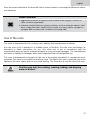 17
17
-
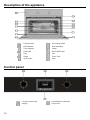 18
18
-
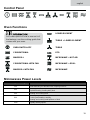 19
19
-
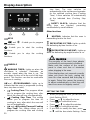 20
20
-
 21
21
-
 22
22
-
 23
23
-
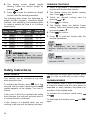 24
24
-
 25
25
-
 26
26
-
 27
27
-
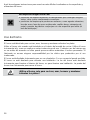 28
28
-
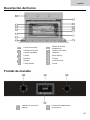 29
29
-
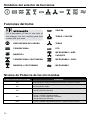 30
30
-
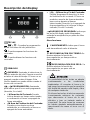 31
31
-
 32
32
-
 33
33
-
 34
34
-
 35
35
-
 36
36
-
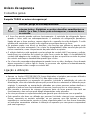 37
37
-
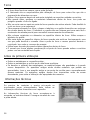 38
38
-
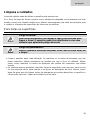 39
39
-
 40
40
-
 41
41
-
 42
42
-
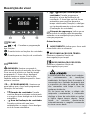 43
43
-
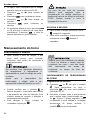 44
44
-
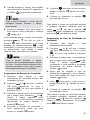 45
45
-
 46
46
-
 47
47
-
 48
48
-
 49
49
-
 50
50
-
 51
51
-
 52
52


Küppersbusch CBM6330.0S Manual de usuario
- Tipo
- Manual de usuario
en otros idiomas
- English: Küppersbusch CBM6330.0S User manual
- Deutsch: Küppersbusch CBM6330.0S Benutzerhandbuch
- português: Küppersbusch CBM6330.0S Manual do usuário
Artículos relacionados
Otros documentos
-
Teka HLC 8440 C Manual de usuario
-
Teka HSB 638 El manual del propietario
-
Teka HLF-840 Manual de usuario
-
-
Teka HBC 535 Manual de usuario
-
Teka HLF 940 Manual de usuario
-
-
Teka HLB 8400 Manual de usuario
-
Teka HSB 615 Manual de usuario