La página se está cargando...

Instructivo
Flujo de aire:
Velocidad:
Área máxima:
Clase de aislamiento térmico de los devanados del
motor:
Para uso interior.
10 444 mm3/h
300 r/min (RPM)
15 m2 - 20 m2
ESPECIFICACIONES
127 V~ 60 Hz 65 W
LEA ESTAS INSTRUCCIONES ANTES DE INSTALAR:
IMPORTANTE: Antes de instalar, interrumpir el paso de
energía mediante el interruptor de circuito o fusible.
Asegurar que el circuito no esté energizado y que el área
esté libre de humedad antes de iniciar la instalación.
El gancho para colgar del techo debe instalarse
correctamente, todo el cableado debe hacerse por un
electricista calificado. No instalar el ventilador muy cerca
de la puerta de entrada, por lo menos debe haber
0,90 m desde el final de las aspas. Instalar el ventilador
alto sobre el nivel del piso, por lo menos a 3 m sobre el
piso. Nunca tratar de detener las aspas del ventilador
cuando esté funcionando.
ATENCIÓN
Clase E
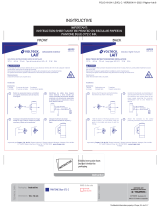
ENSAMBLE
1. Pasar los cables a través del tubo.
2. Instalar el tubo en el árbol de motor y asegurar en su
sitio usando los tornillos y los pernos. (una arandela
sencilla, arandela de presión, tuerca y chaveta).
3. Apretar con firmeza el tornillo y el perno usando un
desarmador o una llave como se muestra. El no
apretar con firmeza va a ocasionar un ruido anormal,
vibración o menor vida útil del producto.
4. Inserte los cables en el conector y apriete.
5. Posteriormente colocar las tapas inferior y superior
en el tubo.
6. Fijar el gancho en el techo usando tornillos
independientes de la caja de conexión. Después
ensamblar el tubo en el gancho.
7. Fijar las tapas usando un desarmador.
Consumo de energía eléctrica
Consumo de energía
Por unidad de tiempo en condiciones
normales de operación del aparato.
Consumo de energía en espera
En unidad de tiempo del aparato
Con base en 24 horas de uso continuo
1 560 Wh/día
No aplica
IP20
1
INSTALACIÓN DEL CONTROL
1. Desatornillar la tapa del control.
2. Conectar los cables a través del orificio de entrada
como se ve en el diagrama.
3. Montar el control sobre la pared o sobre un bloque
de madera.
Caja de cables
Línea
Neutro
CorrienteControl
Oricio para cable
Corriente eléctrica Control del motor
LIMPIEZA
1. Utilizar sólo un paño suave.
2. No utilizar solventes o productos químicos.
3. Nunca dejar que los líquidos penetren al producto.
Este producto no se destina para utilizarse por personas
(incluyendo niños) cuyas capacidades físicas, sensoriales
o mentales sean diferentes o estén reducidas, o carezcan
de experiencia o conocimiento, a menos que dichas
personas reciban una supervisión o capacitación para el
funcionamiento del aparato por una persona responsable
de su seguridad. Los niños deben supervisarse para
asegurar que ellos no empleen los aparatos como
juguete.
Tornillo
Arandela
Chaveta
Arandela
de presión
Tuerca
2
Tuerca
3
4
Techo
Gancho
del ventilador
Tornillos
Caja de salida
5 6 7
Instructive
Air flow:
Speed:
Maximum area:
Thermal insulation class of the motor windings:
Indoor use.
10 444 mm3/h
300 r/min (RPM)
15 m2 - 20 m2
TECHNICAL PARAMETER
127 V~ 60 Hz 65 W
READ THESE INSTRUCTIONS BEFORE INSTALLING
Before installing, disconnect the power supply with the
circuit breaker or fuse. Ensure that the circuit is not
energized and that the area is free of humidity before
starting the installation.
The ceiling hook must be properly installed, all wiring
must be done by a qualified electrician. Do not install
the fan too close to the front door, there should be at
least 3 ft from the end of the blades. Install the fan high
above the floor, at least 10 ft above the floor. Never try
to stop the fan blades while they are running.
CAUTION
Class E
ASSEMBLY
1. Pass the cables through the pipe.
2. Install the tube on the motor shaft and secure in place
using the screws and bolts.
(a single washer, lock washer, nut and cotter).
3. Firmly tighten the screw and bolt using a screwdriver
or wrench as shown. Failure to tighten firmly will cause
abnormal noise, vibration or shorter product life.
4. Insert the cables into the connector and tighten.
5. Then place the upper and lower covers on the pipe.
6. Fix the hook to the ceiling using screws separate from
the connection box. Then assemble the tube on the
hook.
7. Fix the covers using a screwdriver.
IP20
1
INSTALLATION OF THE CONTROL
1. Unscrew the control cover.
2. Connect the wires through the input hole as shown in
the diagram.
3. Mount the control on the wall or on a wood block.
CLEANING
1. Use only a soft cloth.
2. Do not use solvents or chemical products.
3. Never let liquids penetrate the product.
This product is not intended for use by persons (including
children) whose physical, sensory or mental abilities are
different or reduced, or who do not have experience or
knowledge, unless such persons are supervised or trained
in the operation of the device by a person responsible
for their safety. Children should be supervised to ensure
that they do not use the devices as toys.
2
Nut
3
4
5 6 7
Electric power consumption
Energy consumption
Per unit of time under conditions
normal operation of the appliance.
1 560 Wh/day
Standby power consumption
In unit of device time
Based on 24 hours of continuous use
Not applicable
Screw
Washer
Cotter
lock
washer
Nut
Ceiling
Fan hook Screws
Outlet box
Imported by Truper, S.A. de C.V. Parque Industrial 1,
Jilotepec, Edo. de Méx. C.P. 54240 Made in China,
Tel.: 76 1782 9100. www.truper.com
07-2021
Importado por Truper, S.A. de C.V. Parque Industrial 1,
Jilotepec, Edo. de Méx. C.P. 54240 Hecho en China,
Tel.: 76 1782 9100. www.truper.com
07-2021
Cable box
Line
Neutral
CurrentControl
Cable hole
Electric current Engine control
Ventilador de techo
46560
VENT-56
46560
VENT-56
Ceiling fan
INSTRUCTIVE
YOU MUST PUT IT INSIDE THE COLOR BOX
IMPORTANT:
INSTRUCTIVE MUST BE PRINTED ON REGULAR
PAPER IN PANTONE BLUE 072 C INK.
Instructive
Fold the instructive
sheet and put it
inside the color box.
“Condential Information property of Truper, S.A. de C.V."
TECHNICAL DATA
IMAGES / LINKS
SOFTWARE: Illustrator CC
MAC & PC Platform compatible
21 x 13.5 cm
Instructive
INKS & die cuts
Packaging:
Dimensions:
CUT-LINE
(Do not print)
PANTONE Blue 072 C
FRONT BACK
Folio 14536 / Level I / Version 07-2021 / Page 8 of 9
/