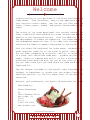
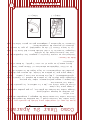
El Aroma AIC-224W es una máquina para hacer helados a la antigua que te permite disfrutar de tus helados, yogures congelados, sorbetes y gelatos favoritos en pocos minutos. Con su motor eléctrico y su manivela manual, podrás elegir cómo hacer tu helado, ya sea con la comodidad del motor o con la diversión de hacerlo a mano. Además, su recipiente para el helado es extraíble, lo que facilita su limpieza y almacenamiento.
El Aroma AIC-224W es una máquina para hacer helados a la antigua que te permite disfrutar de tus helados, yogures congelados, sorbetes y gelatos favoritos en pocos minutos. Con su motor eléctrico y su manivela manual, podrás elegir cómo hacer tu helado, ya sea con la comodidad del motor o con la diversión de hacerlo a mano. Además, su recipiente para el helado es extraíble, lo que facilita su limpieza y almacenamiento.


-
 1
1
-
 2
2
-
 3
3
-
 4
4
-
 5
5
-
 6
6
-
 7
7
-
 8
8
-
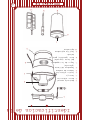 9
9
-
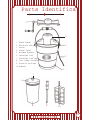 10
10
-
 11
11
-
 12
12
-
 13
13
-
 14
14
-
 15
15
-
 16
16
-
 17
17
-
 18
18
-
 19
19
-
 20
20
-
 21
21
-
 22
22
-
 23
23
-
 24
24
-
 25
25
-
 26
26
-
 27
27
-
 28
28
-
 29
29
-
 30
30
-
 31
31
-
 32
32


Aroma AIC-224 Manual de usuario
- Categoría
- Fabricantes de helados
- Tipo
- Manual de usuario
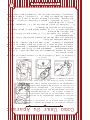
El Aroma AIC-224W es una máquina para hacer helados a la antigua que te permite disfrutar de tus helados, yogures congelados, sorbetes y gelatos favoritos en pocos minutos. Con su motor eléctrico y su manivela manual, podrás elegir cómo hacer tu helado, ya sea con la comodidad del motor o con la diversión de hacerlo a mano. Además, su recipiente para el helado es extraíble, lo que facilita su limpieza y almacenamiento.
en otros idiomas
- English: Aroma AIC-224 User manual
Artículos relacionados
Otros documentos
-
GE 681131067652 El manual del propietario
-
Nostalgia CICM2AS Manual de usuario
-
-
West Bend OLD-FASHIONED ICE CREAM MAKER Manual de usuario
-
-
Back to Basics OLD-FASHIONED ICE CREAM MAKER El manual del propietario
-
-
Hamilton Beach 68990 Manual de usuario
-
-