Signature Hardware 447829 Guía de instalación
- Categoría
- Artículos sanitarios
- Tipo
- Guía de instalación
Este manual también es adecuado para

1
1.800.221.3379
PENDLETON
CENTERSET BATHROOM FAUCET
GRIFO DE BAÑO CENTERSET PENDLETON
SKU: 948568
REVISED 12/12/2019
CODES: SHWSCPT400
GETTING STARTED
BEFORE YOU BEGIN
We recommend consulting a professional if you are
unfamiliar with installing plumbing fixtures. Signature
Hardware accepts no liability for any damage to the
faucet, plumbing, sink, counter top, or for personal
injury during installation.
Observe all local plumbing and building codes.
Unpack and inspect the faucet for shipping damage.
If any damage is found, contact our Customer
Relations team at 1-800-221-3379.
Ensure that you have gathered all the required
materials that are needed for the installation.
TOOLS AND MATERIALS:
HERRAMIENTAS Y MATERIALES:
ANTES DE COMENZAR
Le recomendamos que consulte a un profesional si no
sabe cómo instalar accesorios de plomería. Signature
Hardware no asume ninguna responsabilidad con
respecto a los daños causados al inodoro, sistema de
plomería, suelo o daños personales durante
la instalación.
Cumpla con todas las normas locales de plomería y
construcción.
Retire el inodoro del empaque y verifique si se
produjeron daños durante el envío. Si encuentra algún
daño, comuníquese con nuestro equipo de Servicio al
cliente al 1-800-221-3379.
CÓMO COMENZAR
Asegúrese de haber reunido todos los materiales
necesarios para la instalación.
Basin Wrench
Llave de grifo
Silicone Sealant
(100% Neutral Cure)
Sellador de silicona
(100% curado neutro)
Safety Glasses
Gafas de seguridad
Plumbers Tape
Cinta Selladora
Para Rosca
Adjustable Wrench
Llave Ajustable
2 Flexible
Supply Line
2 Línea de
suministro flexible

2
1.800.221.3379
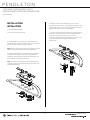
INSTALLATION
INSTALACIÓN
3. Make connections to water lines. Use 1/2" IPS
faucet connections (2) or use supply line coupling nuts
(3) with 3/8" O.D. ball-nose riser (1). Use wrenches to
tighten connections. Do not overtighten.
3. Conecta a las líneas de suministro. Usa conexiones de
grifos de 1/2" IPS (2) o las tuercas de acoplamiento de
líneas de suministro incluidas (3) con un tubos
montantes de bola de diámetro exterior de 3/8" (1). Usa
llaves para apretar las conexiones. No aprietes
demasiados.
1. Shut off water supplies.
1. Cierra el suministro de agua.
2. Place gasket (1) on bottom of new faucet. Place
faucet through mounting holes in sink. Secure faucet
to sink using mounting nuts (2) provided.
Note: If the sink surface is uneven or irregular, silicone
sealant may be used to create a watertight seal.
2. Coloque el empaque (1) in la parte inferior de la llave.
Coloque la llave de agua a través de los agujeros de
instalación en el fregadero. Fije la llave al fregadero con
las contratuercas (2) proporcionadas.
Nota: Si la superficie del lavamanos está dispareja o es
irregular, se puede utilizar sellador de silicona para crear
un sellado hermético.
PENDLETON
CENTERSET BATHROOM FAUCET
GRIFO DE BAÑO CENTERSET PENDLETON
SKU: 948568
2
1
3
2
1

3
1.800.221.3379
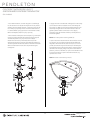
4. To install the drain, remove stopper (1) and flange
(2). Screw brass nut (3) all the way down. Push plastic
washer (4) and gasket (5) down. Unscrew pivot nut (6)
from the pop-up body and remove the seal washers
(7). Take off the spring clip (9) from horizontal rod (8).
Remove tailpiece (10) from pop-up body.
4. Para instalar el desagüe, retire el tapón (1) y la brida (2).
Enrosca la tuerca de latón (3) hasta el límite. Empuja la
arandela de plástico (4) y la junta (5) hacia abajo.
Desenrosca la tuerca pivotante (6) del cuerpo del
desagüe emergente y retira las arandelas de sellado (7).
Saca el sujetador de resorte (9) de la varilla horizontal (8).
Retira el tubo extensor (10) del cuerpo del desagüe
emergente.
5. Apply silicone to underside of flange (2). Insert body
(1) into drain hole from below sink. Screw flange (2)
into body (1). With pivot (3) facing toward faucet, pull
assembly straight down into drain hole and secure
gasket, plastic washer and brass nut (5). Apply
plumbers’ tape to threads at the top of tailpiece (4)
and hand tighten.
Note: Don’t drop silicone onto gasket (5).
5. Aplica silicona en el lado inferior de la brida (2). Inserta
el cuerpo (1) en el orificio de drenaje desde abajo del
fregadero. Atornilla la brida (2) en el cuerpo (1). Con el
pivote (3) de frente al grifo, hala el cuerpo del desagüe
emergente de forma recta hacia abajo y hacia el interior
del orificio de drenaje y asegura la junta, la arandela de
plástico y la tuerca de latón (5). Aplica cinta selladora a las
roscas en el extremo superior del tubo extensor (4) y
aprieta con la mano.
Nota: No eches silicona en la junta (5).
PENDLETON
CENTERSET BATHROOM FAUCET
GRIFO DE BAÑO CENTERSET PENDLETON
SKU: 948568
3
2
1
4
5
10
9
8
6
7
3
2
1
4
5

4
1.800.221.3379
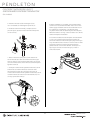
6. Install horizontal rod (2) and stopper (3) as
non-removable (4). Hand tighten pivot nut (1).
6. Instala la varilla horizontal (2) y el tapón (3) en la
posición fija (4). Aprieta la tuerca del orificio del pivote
con la mano (1).
7. Place one end of spring clip (1) onto the end of
horizontal rod (2). Insert horizontal rod (2) through a
hole on strap (3). Connect the other end of spring clip
(1) to horizontal rod (2). Insert lift rod (4) into strap and
tighten screw (5).
7. Coloque un extremo del sujetador de resorte (1) en el
extremo de la varilla horizontal (2). Coloca la varilla
horizontal (2) a través de un orificio en la correa (3).
Conecta el otro extremo del sujetador de resorte (1) en la
varilla horizontal (2). Inserta la vara del aireador (4) en la
correa y aprieta el tornillo (5).
PENDLETON
CENTERSET BATHROOM FAUCET
GRIFO DE BAÑO CENTERSET PENDLETON
SKU: 948568
8. After installation is complete, remove the aerator
(1) with a coin (2) to flush the water lines. Turn on the
water supply and allow both hot and cold water to run
for at least one minute each. This flushes away
any debris that could cause damage to internal parts.
While the water is running, check for leaks. Turn off the
water and replace the aerator.
8. Cuando la instalación esté completa, retire el aireador
(1) con una moneda (2) para descargar las líneas de
suministro. Abre el suministro de agua y deja correr agua
fría y caliente durante al menos un minuto cada una. Esto
enjuagará cualquier suciedad que podría dañar las
piezas internas. Con el chorro abierto, verifica que no
haya fugas. Cierra el suministro de agua y vuelve a
colocar el aireador.
3
2
1
4
5
3
2
1
4
2
1

5
1.800.221.3379
9. If faucet leaks from spout, shut off the water
supplies and replace the cartridge.
Note: Install cartridge correctly for proper handle
rotation.
9. Si el grifo gotea en la llave, cierre las líneas de
suministro de agua y reemplace el cartucho.
Nota: Instale correctamente el cartucho para asegurar la
rotación adecuada de la manija.
Note
This product is engineered to meet the EPA
Water Sense flow requirement. The flow rate is
governed by the aerator or flow controller. If
replacement is ever required, be sure to replace it with
a Water Sense compliant aerator or flow controller to
retain the water conserving flow rate of this product.
Nota
Ce produit est conçu pour respecter les exigences de
débit d’eau du programme Water Sense de l’ EPA. Le
débit est réglé par l’aérateur et le régulateur. Si une pièce
doit être remplacée, assurez-vous d'utiliser un aérateur
ou un régulateur de remplacement conforme à
Water Sense a n de conserver le taux de débit de ce
produit.
PENDLETON
CENTERSET BATHROOM FAUCET
GRIFO DE BAÑO CENTERSET PENDLETON
SKU: 948568
Transcripción de documentos
P E N D L E TO N CENTERSET BATHROOM FAUCET GRIFO DE BAÑO CENTERSET PENDLETON SKU: 948568 BEFORE YOU BEGIN TOOLS AND MATERIALS: HERRAMIENTAS Y MATERIALES: We recommend consulting a professional if you are unfamiliar with installing plumbing fixtures. Signature Hardware accepts no liability for any damage to the faucet, plumbing, sink, counter top, or for personal injury during installation. Basin Wrench Adjustable Wrench Llave de grifo Llave Ajustable Observe all local plumbing and building codes. Plumbers Tape Cinta Selladora Para Rosca Unpack and inspect the faucet for shipping damage. If any damage is found, contact our Customer Relations team at 1-800-221-3379. ANTES DE COMENZAR Safety Glasses Gafas de seguridad Le recomendamos que consulte a un profesional si no sabe cómo instalar accesorios de plomería. Signature Hardware no asume ninguna responsabilidad con respecto a los daños causados al inodoro, sistema de plomería, suelo o daños personales durante la instalación. Silicone Sealant 2 Flexible (100% Neutral Cure) Supply Line Sellador de silicona 2 Línea de suministro flexible (100% curado neutro) Cumpla con todas las normas locales de plomería y construcción. Retire el inodoro del empaque y verifique si se produjeron daños durante el envío. Si encuentra algún daño, comuníquese con nuestro equipo de Servicio al cliente al 1-800-221-3379. GETTING STARTED Ensure that you have gathered all the required materials that are needed for the installation. CÓMO COMENZAR Asegúrese de haber reunido todos los materiales necesarios para la instalación. REVISED 12/12/2019 CODES: SHWSCPT400 1 1.800.221.3379 P E N D L E TO N CENTERSET BATHROOM FAUCET GRIFO DE BAÑO CENTERSET PENDLETON SKU: 948568 INSTALLATION INSTALACIÓN 3. Make connections to water lines. Use 1/2" IPS faucet connections (2) or use supply line coupling nuts (3) with 3/8" O.D. ball-nose riser (1). Use wrenches to tighten connections. Do not overtighten. 1. Shut off water supplies. 3. Conecta a las líneas de suministro. Usa conexiones de grifos de 1/2" IPS (2) o las tuercas de acoplamiento de líneas de suministro incluidas (3) con un tubos montantes de bola de diámetro exterior de 3/8" (1). Usa llaves para apretar las conexiones. No aprietes demasiados. 1. Cierra el suministro de agua. 2. Place gasket (1) on bottom of new faucet. Place faucet through mounting holes in sink. Secure faucet to sink using mounting nuts (2) provided. Note: If the sink surface is uneven or irregular, silicone sealant may be used to create a watertight seal. 2. Coloque el empaque (1) in la parte inferior de la llave. Coloque la llave de agua a través de los agujeros de instalación en el fregadero. Fije la llave al fregadero con las contratuercas (2) proporcionadas. Nota: Si la superficie del lavamanos está dispareja o es irregular, se puede utilizar sellador de silicona para crear un sellado hermético. 1 3 2 1 2 2 1.800.221.3379 P E N D L E TO N CENTERSET BATHROOM FAUCET GRIFO DE BAÑO CENTERSET PENDLETON SKU: 948568 4. To install the drain, remove stopper (1) and flange (2). Screw brass nut (3) all the way down. Push plastic washer (4) and gasket (5) down. Unscrew pivot nut (6) from the pop-up body and remove the seal washers (7). Take off the spring clip (9) from horizontal rod (8). Remove tailpiece (10) from pop-up body. 5. Apply silicone to underside of flange (2). Insert body (1) into drain hole from below sink. Screw flange (2) into body (1). With pivot (3) facing toward faucet, pull assembly straight down into drain hole and secure gasket, plastic washer and brass nut (5). Apply plumbers’ tape to threads at the top of tailpiece (4) and hand tighten. 4. Para instalar el desagüe, retire el tapón (1) y la brida (2). Enrosca la tuerca de latón (3) hasta el límite. Empuja la arandela de plástico (4) y la junta (5) hacia abajo. Desenrosca la tuerca pivotante (6) del cuerpo del desagüe emergente y retira las arandelas de sellado (7). Saca el sujetador de resorte (9) de la varilla horizontal (8). Retira el tubo extensor (10) del cuerpo del desagüe emergente. Note: Don’t drop silicone onto gasket (5). 5. Aplica silicona en el lado inferior de la brida (2). Inserta el cuerpo (1) en el orificio de drenaje desde abajo del fregadero. Atornilla la brida (2) en el cuerpo (1). Con el pivote (3) de frente al grifo, hala el cuerpo del desagüe emergente de forma recta hacia abajo y hacia el interior del orificio de drenaje y asegura la junta, la arandela de plástico y la tuerca de latón (5). Aplica cinta selladora a las roscas en el extremo superior del tubo extensor (4) y aprieta con la mano. 1 Nota: No eches silicona en la junta (5). 8 2 9 5 4 2 6 7 3 5 10 1 3 4 3 1.800.221.3379 P E N D L E TO N CENTERSET BATHROOM FAUCET GRIFO DE BAÑO CENTERSET PENDLETON SKU: 948568 6. Install horizontal rod (2) and stopper (3) as non-removable (4). Hand tighten pivot nut (1). 8. After installation is complete, remove the aerator (1) with a coin (2) to flush the water lines. Turn on the water supply and allow both hot and cold water to run for at least one minute each. This flushes away any debris that could cause damage to internal parts. While the water is running, check for leaks. Turn off the water and replace the aerator. 6. Instala la varilla horizontal (2) y el tapón (3) en la posición fija (4). Aprieta la tuerca del orificio del pivote con la mano (1). 8. Cuando la instalación esté completa, retire el aireador (1) con una moneda (2) para descargar las líneas de suministro. Abre el suministro de agua y deja correr agua fría y caliente durante al menos un minuto cada una. Esto enjuagará cualquier suciedad que podría dañar las piezas internas. Con el chorro abierto, verifica que no haya fugas. Cierra el suministro de agua y vuelve a colocar el aireador. 3 4 2 1 7. Place one end of spring clip (1) onto the end of horizontal rod (2). Insert horizontal rod (2) through a hole on strap (3). Connect the other end of spring clip (1) to horizontal rod (2). Insert lift rod (4) into strap and tighten screw (5). 7. Coloque un extremo del sujetador de resorte (1) en el extremo de la varilla horizontal (2). Coloca la varilla horizontal (2) a través de un orificio en la correa (3). Conecta el otro extremo del sujetador de resorte (1) en la varilla horizontal (2). Inserta la vara del aireador (4) en la correa y aprieta el tornillo (5). 1 2 4 5 1 3 2 4 1.800.221.3379 P E N D L E TO N CENTERSET BATHROOM FAUCET GRIFO DE BAÑO CENTERSET PENDLETON SKU: 948568 9. If faucet leaks from spout, shut off the water supplies and replace the cartridge. Note: Install cartridge correctly for proper handle rotation. 9. Si el grifo gotea en la llave, cierre las líneas de suministro de agua y reemplace el cartucho. Nota: Instale correctamente el cartucho para asegurar la rotación adecuada de la manija. Note This product is engineered to meet the EPA Water Sense flow requirement. The flow rate is governed by the aerator or flow controller. If replacement is ever required, be sure to replace it with a Water Sense compliant aerator or flow controller to retain the water conserving flow rate of this product. Nota Ce produit est conçu pour respecter les exigences de débit d’eau du programme Water Sense de l’ EPA. Le débit est réglé par l’aérateur et le régulateur. Si une pièce doit être remplacée, assurez-vous d'utiliser un aérateur ou un régulateur de remplacement conforme à Water Sense a n de conserver le taux de débit de ce produit. 5 1.800.221.3379-
 1
1
-
 2
2
-
 3
3
-
 4
4
-
 5
5


Signature Hardware 447829 Guía de instalación
- Categoría
- Artículos sanitarios
- Tipo
- Guía de instalación
- Este manual también es adecuado para
en otros idiomas
Artículos relacionados
-
Signature Hardware SHWSCPT107PN Guía de instalación
-
-
-
-
-
-
-
-
-