Kenmore 66569682990 El manual del propietario
- Categoría
- Microondas
- Tipo
- El manual del propietario
Este manual también es adecuado para

Owner's Guide
Guia del usuario
\
Microwave Hood Combination
Combinaci6n Microondas Campana
Warranty ....... ............ ....................... 2
Sears Service .................................. 2
Microwave Oven Safety ................ 3-4
Installation Requirements ................ 5
Removing and Replacing the
Microwave Oven ............................ 6-7
Getting to Know Your
Microwave Oven .............................. 8
Using Your Microwave Oven ............ 21
Caring for Your Microwave Oven ...... 34
Cooking Guide .................................. 37
Questions and Answers .................... 39
Troubleshooting ................................ 40
Index .................................................. 42
Secci6n en Espa_ol .......................... 43
Sears Toll-Free Numbers ....Back Cover
4619-652-58586/8169532 S,_.Ro.b_.,_Co.._,,.e,t_ILSOI"_U.SA MODEL/MODELO 69682/7/9

Microwave Oven Warranty
FULL ONE-YEAR WARRANTY ON MICROWAVE OVEN
For one year from the date of purchase, if this Kenmore Microwave Oven fails due to a defect in material or
workmanship, Sears will repair it free of charge.
FULL FIVE-YEAR WARRANTY ON THE MAGNETRON
For five years from the date of purchase, if the magnetron in this Kenmore Microwave Oven fails due to a defect
in material or workmanship, Sears will repair it free of charge.
The above warranty coverage applies only to Microwave Ovens which are used for private household purposes.
WARRANTY SERVICE IS AVAILABLE BY SIMPLY CONTACTING THE NEAREST SEARS STORE OR
SERVICE CENTER IN THE UNITED STATES.
This warranty applies only while this product is in use in the United States.
This warranty gives you specific legal fights, and you may also have other rights which vary from state to state.
Sears, Roebuck and Co., For service call:
OepL 817WA, 1-800-4-REPAIR
Hoffman Estates, IL 60179 1-800-473-7247
Sears Service
"We service what we sell"
"We service what we sell" is our assurance to you that you can depend on Sears for service because Sears
Service is flat[onwide.
Your Sears Kanmore Microwave Oven has added value when you consider that Sears has a service unit near
you, staffed by Sears Trained Technicians - professional technicians specifically trained on Sears Kenmore
Microwave Ovens, having the parts, tools, and equipment to insure that we meet our pledge to you -
"We service what we sell!"
To further add to the value of your microwave oven,
buy a Sears Maintenance Agreement.
Sears Kenmore Microwave Ovens are designed, manufactured, and tested for years of dependable operation.
Yet, any modern appliance may require service from time to time. A Sears Maintenance Agreement is more
than an extension of the Warranty. It provides complete protection from unexpected repair bills and undue
inconvenience. It assures you of maximum efficiency from your Microwave Oven.
Hero's a comparative Warranty and Maintenance Agreement chart showing you the benefrts of a Sears
Microwave Oven Maintenance Agreement.
YEARS OF OWNERSHIP COVERAGE 1ST YR. 2ND YR. THRU 51"1-1.YR.
Replacement of defective parts other than magnetron W MA
Replacement of magnetron W W
Annual preventative maintenance check at your request MA MA
W - WARRANTY
MA - MAINTENANCE AGREEMENT
Contact your Sears salesperson or local Sears Service Center today and purchase a Sears Maintenance
Agreement.
Keep this book and the sales slip together in a safe place for future reference.
2

Microwave Oven Safety
Your safety and the safety of others is very important.
We have provided many importantsafety messagesin this manual and on yourappliance. Alwaysread and
obey all safety messages.
This is the safety alert symbol.
This symbol alerts you to hazards that can kill or hurt you and others.
All safety messages will be preceded by the safety alert symbol and the word "DANGER" or
"WARNING." These words mean:
You w_ be killed or seriously injured if you don't
follow instructions.
You can be killed or seriously injured ifyou don't
follow instructions.
All safetymessages will identifythe hazard, tell you how to reduce the chance of injury,and tell you what can
happen ifthe instructionsare notfollowed.
IMPORTANT SAFETY INSTRUCTIONS
When using electricalappliancesbasic safety precautionsshould be followed,includingthe following:
WARNING - To reduce the risk of burns,
electric shock, fire, injury to persons or exposure
to excessive microwave energy:
• Read all instructions before using the
microwave oven.
• Read and follow the specific "PRECAUTIONS TO
AVOID POSSIBLE EXPOSURE TO EXCESSIVE
MICROWAVE ENERGY" found in this section.
• The microwave oven must be grounded.
Connect only to properly grounded outlet. See
"GROUNDING INSTRUCTIONS" found at the end
of this section.
• Install or locate the microwave oven only in
accordance with the providedinstallation
instructions.
• Some products such as whole eggs and sealed
containers- for example, closed glass jars -
may explode and shouldnot be heated inthe
microwaveoven.
• Usethe microwave oven onlyfor its intended use
as described in this manual. Do not use corrosive
chemicals or vapors in the microwaveoven. This
type of oven is specificallydesigned to heat,
cook, or dry food. It is not designed for industrial
or laboratory use.
• As with any appliance, close supervisionis
necessary when used by children.
• Do not operate the microwaveoven if it has a
damaged cord or plug, if it is not working properly,
or if it has been damaged or dropped.
• The microwave oven should be serviced only by
qualified service personnel. Call an authorized
service company for examination, repair or
adjustment.
• Do not cover or block any openings on the
microwave oven.
• Do not store this microwave oven outdoors.
Do not use the microwaveoven near water - for
example, near a kitchen sink, in a wet basement,
or near a swimming pool, and the like.
• Do not immerse cord or plug in water.
• Keep cord away from heated surfaces.
• Do not let cord hang over edge of table or counter.
• See door surface cleaning instructions in the
"Caring for Your Microwave Oven" section.
• Do not mount over a sink.
• Do not store anything directly on top of the
microwave oven when the microwave oven is
in operation.
- SAVE THESE INSTRUCTIONS -
continued on next page
3

IMPORTANT SAFETY INSTRUCTIONS
• To reduce the risk of fire in the oven cavity:
- Do not overcook food. Carefully attend the
microwave oven if paper, plastic, or other
combustible materLals are placed inside the
oven to facilitate cooking.
- Remove wire twist-ties from paper or plastic
bags before placing bag in oven.
- If materials inside the oven should ignite, keep
oven door closed, turn oven off, and disconnect
the power cord, or shut off power at the fuse
or circuit breaker panel.
- Do not use the cavity for storage purposes. Do
not leave paper products, cooking utensils, or
food in the cavity when not in use.
• Suitable for use above both gas and electric
cooking equipment.
• Intended to be used above ranges with maximum
width of 36 inches.
• Clean VentilatingHoods Frequently - Grease
should not be allowedto accumulate on hood
• When flaming foods underthe hood,turnthe fan
on.
• Use care when cleaningthe vent-hoodfilter.
Corrosive cleaning agents, such as lye-based
oven cleaners, may damage the filter.
• Oversized foods or oversizedmetal utensilsshould
not be inserted inthe microwaveoven as they may
create a fire or riskof electricshock.
Do not clean with metal scouringpads. Pieces can
burn off the pad and touch electrical parts involving
a risk of electric shock.
• Do not use paper products when applianceis
operated in the "PAN BROWN" mode.
• Do not store any materialsother than
manufacturer'srecommendedaccessoriesinthis
oven when not in use.
Do not cover racksor any other part of the oven
with metal foil. This willcause overheatingof the
oven.
or filter.
- SAVE THESE INSTRUCTIONS -
PRECAUTIONS TO AVOID POSSIBLE EXPOSURE TO
EXCESSIVE MICROWAVE ENERGY
(a)Do not attempt to operatethis oven with the
door open since open-door operation can result
in harmful exposure to microwave energy,it is
important not to defeator tamper with the safety
interlocks.
(b)Do not place any object between the oven front
face and the door or allow soil or cleaner residue
to accumulate on sealing surfaces.
(c)Do not operate the oven ifit is damaged. It is
particularly importantthatthe oven door close
properly and that there is no damage tothe:
(1) door (bent),
(2) hinges and latches (brokenor loosened),
(3) door seals and sealing surfaces.
(d) The oven shouldnot be adjusted or repairedby
anyone except properlyqualifiedservicepersonnel.

Installation Requirements
Before installing your microwave hood combination, make sure your location meets these requirements. See
the installation Instructions for details.
Electrical requirements
Observe all governing codes and ordinances.
A 120-Volt, 60-Hz, AC-only, 15- or 20-amp fused
electrical supply is required. (A time-delay fuse is
recommended.) It is recommended that a separate
circuit serving only this appliance be provided.
Electrical Shock Hazard
Plug into a grounded 3 prong outlet.
Do not remove ground prong.
Do not use an adapter.
Do not use an extension cord.
Failure to follow these instructions can
result in death, fire, or electrical shock.
GROUNDING INSTRUCTIONS
For all cord-connected appliances:
The microwave oven must be grounded.
In the event of an electrical short circuit, grounding
reduces the risk of electric shock by providing an
escape wire for the electric current. The microwave
oven is equipped with a cord having a grounding
wire with a grounding plug. The plug must be
plugged into an outlet that is properly installed and
grounded.
WARNING: Improperuse of the grounding
plug can resultin a risk of electric shock.
Consult a qualified electricianor serviceman
ifthe groundinginstructionsare not completely
understood, or if doubt exists as to whether the
microwave oven is propedygrounded.
Do not usean extension cord. Ifthe powersupply
cord istoo short, have a qualified electricianor
servicemaninstallan outlet nearthe microwave
oven.
5

Removing and Replacing
the Microwave uven
If you need to removeyour Microwave Hood
Combinationfor any reason,follow these simple
steps:
To remove:
1. Unplug microwaveoven or disconnectpower.
2. Remove filtersand
ventgdlle.
• IffiltersA are
installed,pushin at
_ the tab and slide
filterto theoutside
edge to remove.
• Remove the two
screwsB from
the top of the
microwaveoven
cabinet (thescrews located closestto the front
comers). Do not remove the screws located
towards the center of the cabinet.
• Remove the vent grilleC. Set the screwsand
gdlleaside. (If gdllecannotbe removed, see
Step 4.)
3. After removingall
oven contents,
includingthe
turntableand
support, tape the
door in the closed
position.Then
removethe two
belts D securing
the microwaveoven
to the upper
cabinet.
4. Hold microwave
hood combination in
place with one hand.
Pull hook E to release
microwave hood from
mounting plate. If grille
cannot be removed
(seeStep 2), insert a
thin looped wire or
similar tool through an
opening in grille to
pull hook.
5. Grasp the microwave
oven cabinet. Rotate
the microwaveoven
downward. (Be careful
that door does not
swingopen.)
6. Lift Offthe support
tabs F at the bottom
of the mounting plate.
Set the microwave
oven aside on a
protectedsurface.

Removing and replacing the microwave oven (cont.)
To replace:
1. Carefully lift microwave oven and hang it on the
support tabs at the bottom of the mounting plate.
2, Rotate the front of the microwave oven cabinet
downward. Thread the power supply cord
through the power supply cord hole in the
bottom of the upper cabinet.
3. Rotate the microwave oven towards the cabinet.
Push the microwave oven against the mounting
)late until locking latch snaps into the cabinet.
2boff-_ -_" _"
4. Replace the two
bolts secudng the
microwave oven to
the upper cabinet.
5. Untape the door and replace the turntable and
support.
6. Replace the vent grille.
7. Replace the two screws in the top of microwave
oven cabinet (the screws located closest to front
corners).
8. Tighten the two bolts securing the microwave
hood to the upper cabinet until there is no gap
between the upper cabinet and microwave hood.
9. Reinstall filters (see "Installing and caring for the
filters" in the "Caring for Your Microwave Oven"
section, if needed).
10. Plug in microwave oven or reconnect power.

Getting to Know Your
Microwave Oven
This section discusses the concepts behind microwave cooking. It also shows you the basics you need to
know to operate your microwave oven. Please read this information before you use your microwave oven.
How your microwave oven works
Microwave ovens are safe. Microwave energy is
not hot. It causes food to make its own heat, and
it's this heat that cooks the food.
Microwaves are like TV waves or light waves. You
cannot see them, but you can see what they do.
A magnetron in the microwave oven produces
microwaves. The microwaves move into the oven
where they contact food as it turnson the
turntable.
The glass turntable of your microwaveoven lets
microwaves passthrough. Thenthey bounce off a
metal floor,back throughthe glassturntable, and
are absorbed bythe food.
Magnetron
Oven cavity
Metal floor Glass turntable
8

How your microwave oven works (cont.)
Microwaves pass throuc
h most glass, paper, and
plastics without heating
them so food absorbs
the energy. Microwaves
bounce off metar
containers so food does
not absorb the energy.
Microwaves may not
reach the center of a
roast. The heat spreads
to the center from the
outer,cooked areas
just as in regularoven
cooking. Thisisone of
the reasonsfor letting
some foods (for
example, roasts
or baked potatoes)
stand for a while after cooking, or for stirringsome
foods during the cookingtime.
The microwaves disturb water molecules in the
food. As the molecules bounce around bumping
into each other, heat is made, like rubbing your
hands together. This is the heat that does the
cooking.
NOTE: Do not deep fry in the oven. Microwavable
cook_,are is not suitable and it is difficult to
maintain appropriate deep frying temperatures.
For the best cooking results
• Always cook food for the shortest cooking time
recommended. Check to see how the food is
cooking. If needed, touch ADD ONE MINUTE while
the oven is operating or after the cooking cycle is
over (see the "Using ADD ONE MINUTE" section).
• To help make sure the food is evenly cooked, stir,
turn over, or rearrange the food about halfway
through the cooking time.
• If you do not have a cover for a dish, use wax
paper, or microwave-approved paper towels or
plastic wrap. Remember to turn back a corner of
the plastic wrap 1/4 to 1/2 inch (6 mm to 1.2 cm)
to vent steam during heating or cooking.
Radio interference
Using yourmicrowave oven may cause interference
to your radio,33/,or similarequipment. When there
is interference,youcan reduce itor remove it by:
• Cleaning the door and sealingsurfaces of
the oven.
• Adjustingthe receivingantenna of the radio
or television.
• Moving the radio or TV away from the microwave
oven.
• Plugging the microwave oven into a different
outlet so that the microwave oven and radio or TV
are on different branch circuits.
Testing your microwave oven
Totest the oven put about 1 cup of
cold water ina glass container inthe
oven. Close the door and make sure
it latches. Followthe directionsin
=Cooking at high cook power" inthe
=Using YourMicrowave Oven"
sectionto set the oven to cook for 2 minutes.
When the time is up, the water should be heated.

Testing your dinnerware or cookware
Test dinnerware or
cookware before
using, To test a dish for
safe use, put it into the
even with a cup of water
beside it. Cook at 100%
cook power for 1 minute.
If the dish gets hot and
water stays cool, do
not use it.
Some dishes (melamine, some ceramic dinnenNare,
etc.) absorb microwave energy, becoming too hot to
handle and slowing cooking times. Cooking in metal
containers not designed for microwave use could
damage the oven, as could containers with hidden
metal (twist-ties, foil lining, staples, metallic glaze
or trim).
Operating tips
Never lean on the
door or allow a child to
swing on it when the
door is open.
Do not starta
microwave ovenwhen it
is empty. Product life
may be shortened.
If you practice
programming the oven,
put a containerof water
in the oven.
Use hot pads.
Microwave energy does
not heat containers, but
the heat from the food
can make the container
hot.
Do not use newspaper
or other printed paper
inthe oven.
Do not dry flowers,
fruit, herbs, wood,
paper, gourds, or
clothes in the oven.
It is normal for the oven door to look wavy afterthe
oven has been running for a while.
I
Do not try to melt
paraffin wax in the oven.
Paraffinwax willnot
melt ina microwave
oven because itallows
microwavesto pass
through it.
10

Operating tips (cont.)
Do not operate the
microwave oven unless
the glass turntable is
securely in place and
can rotate freely. The
turntable can rotate in
either direction.
Make sure the turntable is correct-side up in the
oven. Handle your turntable with care when
removing it from the oven to avoid possibly breaking
it. If your turntable cracks or breaks, contact Sears
for a replacement.
When you use a browning dish, the browning
dish bottom must be at least 3/16 inch (5 mm) above
the turntable. Follow the directionssupplied with the
browningdish.
Never cook or reheat
a whole egg inside
the shell. Steam
buildupin whole eggs
may cause them to
burst, and possibly
damage the oven.
Slice hard-boiled eggs
before heating. In rare
cases, poached eggs
have been knownto
explode. Cover poached eggs and allow a
standingtime of I minute before cutting intothem.
For best results, stir
any liquid several
times during heating
or reheating. Liquids
heated in certain
containers (especially
containers shaped like
cylinders) may become
overheated. The liquid
may splash out with a
loud noise during or
after heating or when adding ingredients (coffee
granules, tea bags, etc.). "l-his can harm the oven.
Microwaves may not reach the center of a roast.
The heat spreadsto the center from the outer,
cooked areasjust as in regularoven cooking. This
is one of the reasonsfor lettingsome foods (for
example, roasts or baked potatoes)stand for a
whileafter cooking, or for stirringsome foods
duringthe cooking time.
Do not deep fry in the oven. Microwavable
utensilsare not suitable and it is difficultto maintain
appropriatedeep-frying temperatures.
Do not overeook
potatoes. At the end
of the recommended
cooking time, potatoes
should be slightly firm
because they will
continue cooking during
standing time. After
reiorowaving, let
potatoes stand for 5
minutes. They will finish
cooking while standing.
Electrical connection
Circuit breaker
or fuse box
If your electric power
line or outlet voltage is
less than 110 volts,
cooking times may be
longer. Have a qualified
electrician check your
electrical system.
11

Microwave oven features
@@
@ @
Your microwave oven is designed to make your
cooking experience as enjoyable and productive as
possible. To help get you up and running quickly,
the following is a list of the oven's basic features:
1. Door Handle. Pull to open door.
2. Door Safety Lock System. The oven will not
operate unless the door is securely cJosed.
3. Window with Metal Shield. Shield prevents
microwaves from escaping. It is designed as a
screen to allow you to view food as it cooks.
4. Cooking Rack. Use for extra space when
cooking in more than one container at the same
time. See Page 16 for more information.
5. Glass Turntable (PN 4393751) (not shown).
Included in oven cavity - see below for
installation instructions. This turntable turns
food as it cooks for more even cooking. It must
be in the oven during operation for best cooking
results. The turntable is sunken into the cavity
floor to give you more cooking space and better
cooking results. See Pages 8, 11,34, 39, and 41
for more details.
6. Charcoal and Grease Filters. Included in oven
cavity. See Page 35 for installation instructions
and cleaning information.
7. Cooktop/Countertop LighL Turn on to light your
cooktop or countertop or turn on as a night light.
See Page 17 for more information.
8, Cooking Guide Label. Use as a quick reference
for Auto Cook, Auto Reheat, Auto Defrost,
and Sensor Cook settings.
9. Exhaust Fan and Cooktop Light Switches.
See Page 17 for more information.
10. Control Panel. Touch the pads on this panel to
perform all functions. See Pages 13-15 for more
information.
11. Vent Grille.
12. Oven Cavity Light.
13. Microwave Inlet Cover.
14. Model and Serial Number Plate. See Page 41
for more information.
To install turntable and support:
Fit the hub (PN 4393754
Raised,
curved_
Hub_
Supp__..
onto the shaft.
• Place the support
(PN 4393752) on the
cavity bottom.
• Place the turntable on
the hub. Make sure
the raised, curved
lines in the center of
the turntable bottom
are between the three
"spokes" of the hub.
• The rollers(PN 4393753) on the supportshouldfit
insidethe ridgeon the bottom of the turntable.
• The turntableturnsboth clockwiseand counter-
clockwise.This isnormal.
12

Control panel features
1. Display. This display includes a clock and
indicators to tell you the time of day, cooking time
settings, and cooking functions you chose,
2. POPCORN. Touch this pad to pop one of 3 bag
sizes of popcorn, without entering a cook power
or time. The oven's sensor will tell the oven how
long to cook depending on the amount of humidity
it detects from the popcorn. See Page 32 for more
information.
3. BEVERAGE. Touchthis pad to heat 1 or 2
8-ounce (237 ml)cups of a beverage, without
enteringa cook poweror time.The oven'ssensor
willtell the oven how longto heat dependingon
the amount of humidityitdetects from the
beverage.See Page 32 for more information.
4. BAKED POTATO.Touchthis pad to bake 1 to4
potatoes,withoutenteringa cook power ortime.
The oven'ssensorwilltell the oven howlong to
cook dependingon the amountof humidityit
detectsfrom the potato(es).See Page 32 for more
information.
5. FRESH VEGETABLE. Touch this pad to cook
1 to 4 cups (237 to 946 ml) of a fresh vegetable,
without entedng a cook power or time.The oven's
sensor will tell the oven how long to cook
depending on the amount of humidity it detects
from the vegetables. See Page 32 for more
information.
6. FROZEN VEGETABLE. Touchthis pad to cook 1
to 4 cups (237 to946 mL) of a frozen vegetable,
withoutenteringa cook poweror time. The oven's
sensorwilltell the oven how long to cook
dependingon the amountof humidityitdetects
fromthe vegetables.See Page 32 for more
information.
7. FROZEN ENTREE. Touch thispad to cooka 10-
or 20-ounce (284 or 567 g) frozen entree, without
entedng a cook poweror tJme.The oven'ssensor
willtell the oven howlong to cook dependingon
the amountof humidityitdetects from the frozen
entree. See Page 32 for more information.
8. DINNER PLATE. Touchthis pad to heat a dinner
plate offood, withoutenteringa cook poweror
time.The oven'ssensorwilltell the oven how long
to heat dependingon the amountof humidityit
detectsfrom the food.See Page 32 for more
information.
g, SOUP. Touchthis pad to heat 1 to 4 cups (237 to 15.
946 ml) ofsoup, withoutenteringa cook poweror
time.The oven's sensor willtell the oven how long
to heat dependingon the amount of humidityit
detectsfrom the soup.See Page 32 for more 16.
information.
10. SURE SIMMER. Touchthis pad to simmersoups, 17.
casseroles, stews,and other liquidfoods. See
Page 31 for more information.
®
®
@
@
@
11. AUTO COOK. Touchthispad to cook
microwaveblefoods withoutenteringtimesand
cook powers.See Page 26 for more information.
12. AUTO DEFROST. Touch thispad todefrost
frozen foods, withoutenteringtimes and cook
powers.See Page 28 for more information.
13. AUTO REHEAT. Touchthis pad to reheat
microwavablefoods withoutenteringtimes and
cook powers.See Page 27 for more information.
14. HOLD WARM. Touchthispad to keephot,cooked
foods safelywarm in yourmicrowaveovenfor up
to99 minutes, 99 seconds. HOLD WARM can be
used by itself,or it can automatically follow a
cookingcycle. See Page 33 for more information.
ADD ONE MINUTE. Touchthis pad to cookfor
1 minute,at 100% cook power,orto add an
extra minuteto yourcookingcycleat the set
cook power. See Page 20 for more information.
CLOCK. Touchthis pad toenter the correct
time of day.See Page 18 for more information.
KITCHEN TIMER. Touch this pad to set or
cancel the Kitchen Timer. See Page 19 for more
information.
continued on next page
13

Control panel features (cont.)
18. Number pads. TouchNumber pads to enter
cookingtimes, cook powers, quantities, weights,
or food categories.
19. COOK TIME. Touchthis pad followed by
Number pads to set a cookingtime. See
Pages 21, 22, 23, and 24 for more information.
20. POWER. Touchthis pad after the cookingtime
has been set, followed by a Number pad to set
the amount of microwaveenergy released to
cook the food. Also touch this pad to lengthen
or shorten a preset cooking time. See Pages 20
and 22 for more information.
21. TURNTABLE ON/OFF. Touchthis pad to turn
yourturntable on and off.See Page 15 for more
information.
22. START/ENTER. Touchthis pad to start a
function. See Page 15 for more information.
23. OFF/CANCEL Touchthis pad to erase an
incorrectcommand, cancel a programdudng
cooking, or to clearthe display.See Page 15
for more information.
24. VENT FAN ON/OFF. Touchthis pad to tum the
fan on or off. See Page 17 for more information.
25. 5 FAN SPEEDS. Touchthe "up" pad to increase
fan speed and the "down" pad to decrease fan
speed. See Page 17 for more information.
26. LIGHT ON/NIGHT/OFF. Touchthis pad to turn
the light or night lighton or off. See Page 17 for
more information.
NOTES:
• If you have entered all settings for a function but
do not touch START/ENTER in 5 seconds, the
START? indicator light will show.
• For nonsensor functions, if you open the door
while the oven is on end then shut the door within
15 minutes, the START? indicator light will show.
Touch START/ENTER to continue, ff you open the
door when sensor cooking, cooking is cancelled
and you have to start over.
Audible signals
Your microwave oven comes with audible signals
that can guide you when setting and using
your oven:
• _ A programming tone will sound each time
you touch a pad.
• L_ one long tone signals the end of a Kitchen
Timer countdown.
• IFourtonessignaltheendof
a cooking cycle.
• I"_)))II_J Two quick, short tones sound once
every minute for the first 15 minutes after an
end-of-cooking signal as a reminder if the food
has not been removed from the oven.
• _]'_)))_ Two quick, short tones will sound while
_m
entering and exiting from a hidden feature (for
example, Child Lock) or time of day.
• I_1_1_ Three tones sound if you have
made an incorrect entry.
To disable the programming tone:
TOUCH
CSD
and hold for 5 seconds
To turn the programming tone back on:
TOUCH
CSD
and hold for 5 seconds
To disable all audible signals except the
end-of-timer and hidden feature signals:
TOUCH
• If you choose a function but do not press another
command pad within 1 minute, the display returns
to the time of day and you have to start over.
and hold for 5 seconds
To tum signals back on:
TOUCH
and hold for 5 seconds
NOTE: Two tones willsoundwhen audiblesignals
ere turned on or off.
14

Control panel features (cont.)
Interrupting cooking
You can stop the oven during a cycle by opening
the door. The oven stops heating and the fan
stops, but the light stays on. To restart cooking,
close the door and
TOUCH
If you do not want to continue cooking:
• Close the door and the light goes off.
OR
• TOUCH
NOTE: Before setting a function, touch
OFF/CANCEL to make sure no other function is on.
Heating more than one plate of food
When heating plates of food with a cook time that
you set, you can heat
two 10-1/4-inch (26 cm)
plates side by side or
one dish larger than the
turntable. You can heat
2 more plates on the
Cooking Rack for a
possible total of 4 plates.
For best results, halfway
through cooking turn the
plates halfway around
until the food in the front
is in the back. Do the same when heating a larger
(9- to 13-inch [23 to 33 cm]) casserole. When heating
4 dinner plates turn as described above and switch
the top plates with the bottom plates.
To heat 2 bottom plates together or one larger
dish, the turntableshouldnut be
turning.You can shutthe turntable
off by touchingTURNTABLEON/OFF.
"TURNTABLE OFF" appearson the
display.If you touch TURNTABLE ON/OFF before
startingto set the cooking function, youroven will
prompt you to enter a cooking time withoutyou
needingto touch COOK TIME. Yourturntablewill be
turned back on when cooking isover or when you
touch OFF/CANCEL.
NOTE: You cannot turn off the turntablewhen using
an "auto" function.
Using the child lock
The Child Lock locks the control panel so
children cannot use the microwave oven when
you do not want them to.
To lock the oontrol panel:
TOUCH
and hold for 5 seconds
Two tones will sound and _ will appear on the
display. When the control panel is locked, 3 tones
will sound and LOCK will appear when you touch
any pad except for EXHAUST FAN and LIGHT.
To unlock the control panel:
TOUCH
and hold for 5 seconds
Two tones will sound and _ will be cleared from
the display.
Using the demo/learning feature
You can set your microwave oven to display your
commands as you enter them without turning the
magnetron on. This feature helps you learn to use
your oven without actually cooking food.
TO set the demo/leaming feature:
TOUCH
and hold for 5 seconds
Two tones willsound and a small"d" willappear
on the display.
To cancel the demo/learning feature:
TOUCH
and hold for 5 seconds
Two tones will sound and the small =d" will
disappear from the display.
15

Using the cooking rack
The Cooking Rack gives you extra space when
cooking in more than one container at the same
time.
If you need a replacement rack, you can order
one from your Sears Service Center, or by calling
1-800-366-7278. Make sure to have your model
number when ordering.
Inserting the rack
f lllllllt\\
Insertthe rack
securelyinto the rack
supportson the side
walls of the oven.
NOTES:
• Use oven mitts to remove items from microwave
oven.
• Do not store the metal rack in the oven.Arcing
and damage to theoven could resultif someone
accidentallystartsthe oven.
• Do not operate theoven with the metal rack
stored on the floorofthe oven. Damage to the
interiorfinishwillresulL
• Use rack only inthe microwaveoven.
• Do not use reck withbrowningdish.
• Do not let food containeron racktouch thetop
or sides of the oven.
• Do not cook foodsdirectJyon rack. Putthem in
microwave-safe containersfirst.
• Do not place a metalcooldng containeron rack.
• Use the CookingRack only when cookingat
more than one level.
16

Using the exhaust fan
The pads on the bottom right of the control panel
control the 5-speed exhaust fan.
NOTES:
• Two seconds after the last time you touch VENT
FAN, the display returns to the previous display.
• The first time you turn on the fan after connecting
the microwave oven to power, the fan will start at
speed !. The next time the fan is turned on, ff will
start at the last speed used.
1. Tumon the fan and choose fan speed.
Touch the "up" pad to increase fan speed.
Touch the "down" pad to decrease fan speed.
The display will show "FAN" and a number from
1 to 5 to indicate fan speed.
NOTE: If the temperature from the range or
cooktop below the oven gets too hot, the
exhaust fan in the vent hood willautomatically
turn on at the HIGH settingto protectthe oven.
It may stay on up to an hour to cool the oven.
When this occurs, the VENT FAN pad will not
turn the fan off.
TOUCH
i l^l
sr-M SPEDS
2. Turn off fan when desired.
TOUCH
Using the cooktop/countertop light
The pad on the bottom right of the control panel
controls the cooktop/countertop light.
1. Tum on light.
TOUCH
(once for regular light, twice fo_ night light)
2. Turn off light when desired. TOUCH
I1 or 2 more times, depending on light setting)
17

Setting the clock
When your microwave oven is first plugged in, or
after a power failure, the display will flash ":". If a
time of day is not set, =:" will flash until you touch
any pad.
1. Touch CLOCK.
NOTES:
• If you touch in an invalid time and touch CLOCK,
3 tones will sound. Enter the correct time.
• If you touch OFF/CANCEL while setting the clock,
the display will show the last time of day set.
• To turn off the clock, touch CLOCK, Number pad
0, and CLOCK again, the set time will disappear
and ":" will show on the display.
TOUCH
8
YOU SEE
2. Enter the time of day.
Example for 12:00:
3. Complete your entry.
TOUCH
TOUCH
8
ON
YOU SEE
YOU SEE
18

Using the kitchen timer
You can use your microwave oven as a kitchen
timer. Use the Kitchen Timer for timing up to
99 minutes, 99 seconds.
NOTE: The oven can operate while the Kitchen Timer
is in use. To see the Kitchen Timer while the oven is
cooking, touch KITCHEN TIMER.
1. Touch KITCHEN TIMER. TOUCH YOU SEE
2. Enter the time to be counted down.
Example for 1 minute, 30 seconds:
NOTE: If you enter more than 4 digits, the first
4 digits will disappear and the following digit(s)
will appear on the right side as you enter them.
TOUCH YOU SEE
3. Start the countdown.
NOTE: if you do not do this step within 5
seconds of doing Step 2, "START?" will appear.
You then have 1 minute to touch KITCHEN
TIMER or START/ENTER before the display
returns to the time of day.
At the end of the countdown:
TOUCH
ON
YOU SEE
YOU SEE
(one long tone willsound)
To cancel the kitchen timer:.
Dudng the countdown:
TOUCH
OR
YOU SEE
(Umeofday)
19

Using ADD ONE MINUTE
ADD ONE MINUTE lets you cook food for 1 minute
at 100% cook power or add an extra minute to your
cooking time cycle. You can also use it to extend
cooking time cycles in multiples of 1 minute, up to
99 minutes.
NOTES:
• To extend cooking time cycles in multiples of
1 minute, touch ADD ONE MINUTE repeatedly
during cooking.
• After closing the door, you can enter ADD ONE
MINUTE without having to touch START/ENTER.
• If you touch ADD ONE MINUTE during cooking,
the oven will cook at the currently selected cook
power. If you touch ADD ONE MINUTE after
cooking is over, the oven will cook at 100%
cook power. You can also change the cook power
after you touch ADD ONE MINUTE by touching
POWER, Number pads for the new cook power,
and START/ENTER.
• You can use ADD ONE MINUTE only for the cook
time function.
1. Make sure the food is in the oven.
2. Touch ADD ONE MINUTE.
Example for cooking for 1 minute:
TOUCH YOU SEE
Changing preset cooking times
If a preset cooking time is too long or too short,
you can lengthen or shorten the cooking time after
choosing AUTO COOK, AUTO REHEAT, AUTO
DEFROST, or SENSOR COOK (except for the
POPCORN setting). For an auto function, you can
only change cooking times after entering a food
quantity, but before cooking starts. For sensor
cooking, you can only change cooking times within
20 seconds after choosing the food type.
For example, in AUTO REHEAT,after choosing the
type of food and entedng the quantity:
To lengthen cooking time:
TOUCH
once
YOU SEE
To shorten cookingtime:
TOUCH
To reset to the original cooking time:
TOUCH
_r_-_ Umes
(example for auto reheat)
YOU SEE
YOU SEE
2O

Using Your Microwave Oven
This section gives you instructions for operating each function. Please read these instructions carefully.
Cooking at high cook power
1. Put your food in the oven and close the door.
2- Touch COOK TIME. TOUCH YOU SEE
3. Enter the cookingtime.
Example for I minute, 30 seconds:
4. Start the oven.
TOUCH
TOUCH
YOU ,SEE
YOU ,SEE
At the end of the cooking time:
YOU SEE
Changing ins'emc'dons
You can change the cool_ _e any l_e
during cooking by repe_b_ S'leps 2, _ and 4.
(fearteaes wmm:mnd)
21

Cooking at different cook powers
The following chart gives the percentage of cook
power each Number pad stands for, and the cook
power name usually used. It also tells you when to
use each cook power. Follow recipe or food package
instructions if available.
For best results, some recipes call for different cook
powers. The lower the cook power, the slower the
cooking. Each Number pad also stands for a
different percentage of cook power. Many
microwave cookbook recipes tell you by number,
percent, or name which cook power to use. NOTE: Refer to a reliable cookbook for cooking times.
COOK POWER NAME WHEN TO USE IT
10=-100% of full power High . Quick heating many convenience foods and
(automatic) foods with high water content, such as soups
and beverages
• Cooking small tender pieces of meat, ground
meat, poultry pieces, fish fillets, and most
vegetables
9--90% of full power • Heating cream soups
-8=80% of full power • Heating rice, pasta, or stirrable casseroles
7=70% of full power Medium-High • Cooking and heating foods that need a cook
power lower than high (for example, whole fish
and meat loaf) or when food is cooking too fast
• Reheating a single serving of food
6--_% of full power • Cooking sensitive foods, such as cheese and egg
dishes, pudding, and custards
• Cooking nonstirrable casseroles, such as lasagna
-5=50% of full power Medium • Cooking ham, whole poultry, and pet roasts
• Melting chocolate
-4=40% of full power • Sirnmedng stews
• Heating pastries
3--30% of full power Medium-Low, ° Defrosting foods, such as bread, fish, meats,
Defrost poultry, and precooked foods
2--20% of full power • Softening butter, cheese, and ice cream
1=10% of full power Low • Keeping food warm
• Taking chil_-out of fruit
NOTE: Once cook time has been entered you can also use the POWER pad as a second Kitchen Timer
by entering "0" for the cook power. The oven will count down the cooking time you set without cooking.
22

Cooking at different cook powers (cont.)
1.Put your food in the oven and close the door.
2.Touch COOK TIME. TOUCH YOU SEE
3.Enter the cooking time.
Example for 7 minutes, 30 seconds:
4.Set the cook power.
Example for 50% cook power:
5.Start the oven.
TOUCH
TOUCH
TOUCH
C2D
OR
(repeat until desired
cook power appears)
TOUCH
YOU SEE
YOU SEE
YOU SEE
YOU SEE
At the end of the cookingtime:
Changing instructions
You can change Ule cooking time or cook power
any time during cooking by repeaUng Steps 2, 3
and/or 4 and 5.
YOU SEE
(four tones will sound)
23

Cooking in stages
For best results, some recipes call for one cook
power for a certain length of time, and another
cook power for another length of time. Your oven
can be set to change from one to another
automatically, for up to 3 stages.
You can set your chosen cook functions in any
order. However, if you use AUTO DEFROST it must
be the first stage.
NOTE: You cannot sensorcook with stages.
1. Put your food in the oven and close the door.
2. Touch COOK TIME. TOUCH YOU SEE
3. Enter the cooking time for the first stage. YOU SEE
Example for 7 minutes, 30 seconds:
TOUCH
4. Set the cook power for the first stage.
TOUCH
YOU SEE
Example for 50% cook power:. TOUCH YOU SEE
OR
(repeat until desired
cook power appears)
5. Repeat Steps 2, 3, and 4 to set the cookingtime
and cook power for each additionalstage.
24

Cooking in stages (cont.)
6. Start the oven.
TOUCH YOU SEE
After the first stage is over, the next stage(s)
will count down.
At the end of the cooking time:
(first stage, when cooking
with 2 stages)
YOU SEE
Changing instructions
You can change cooking times or cook powers
for a stage any time after that stage starts by
repeating Steps 2, 3 and/or 4 and 5.
(four tones will sound}
25

Using AUTO COOK
You can cook microwavable foods just by choosing
a category end quantity. AUTO COOK has preset
times end cook powers for 5 categories (see chart
below).
To use AUTO COOK, follow the steps below:
1. Touch
once
You see
2. Touch AUTO COOK 1 to 5 times to choose the
type of food.
vegetables
OR twice
Touch a Number pad to choose the type of food.
vegetables
You see
Example
for canned
vegetables
3. Touch one or more Number pads to enter the
quantity. This step is not needed for the Rice
setting.
Example
for 1 cup
You see
Example
for I cup
4. Touch
You see
(countdowntime
mayvary)
NOTES:
• If you do not enter a quantitywithin 2 seconds,
AUTO COOK will prompt you to choose a
quantity.Youthen haveI minuteto enter a
quantity and to touchSTART/ENTER. Ifyou do
not do so, AUTO COOK will be canceled.
• If you touch AUTO COOK 6 times, the display
returnsto the Rice setting.
• If you need moreor lesscookingtime, do not
touch AUTO COOK again. Touch POWER before
you touch START/ENTER.(See =Changing preset
cookingtimes" inthe "Getting to Know"section.
• When cooking bacon, keep in mind that
differencesin the amountof fat, meat, thickness
and curingprocesswillaffect how bacon is
cooked. Also, regularslicedbacon averages
about 16 slicesper pound.
This chart shows you how to choose a type of food end the amounts you can choose for each type.
TOUCH OR TOUCH AMOUNTS YOU
FOOD AUTO COOK* NUMBER PAD CAN CHOOSE
Rico once 1 0.5 to 2 cups**
(sensor) (118 ml to 473 ml)
Canned Vegetables twice 2 1 to 4 cups (237 ml to 946 ml)
Bacon 3 times 3 1 to 6 pieces, average thickness
Cereal (instant) 4 times 4 1 to 4 servings
French Toast (frozen) 5 times 5 1 to 4 pieces
°YoumusttouchAUTOCOOKonce_ choosingthefoodtype.
"Because thisfoodiscookedbythesensor,youdon_needtoenteraquantity."111eamountshownbereistheamou_ _ _
cook.AfteryouchoosetbefoodtypeandtouchSTARTFcNTER,"SENSE"appearsonthedispisy.Also,thesenso¢_ 2
minutes,30 secondstowarmupafterI_e ovenisconnectedtopoweroraftera powerfailure,ff _ _ _ _ng d_ng
thewarm-up,"SENSE_showsonthedisplayuntilthewarm-upisover.Microwaveenecgywillnotbe turnedonun_lthesensor
is WafTn.
26

Using AUTO REHEAT
You can reheat microwavable foods just by
choosing a category and quantity. AUTO REHEAT
has preset times and cook powers for 4 categories
(see chart below).
To use AUTO REHEAT, follow the steps below:
1. Touch
once
You see
2. Touch AUTO REHEAT 1 to 4 times to choose
thetype offood.
_ xample for
casserole
OR 3 times
Touch a Number pad to choose the type
of food.
_ xample for
casserole
You ,see
Example for
casserole
3. Touch a Number pad to enter the quantity.
Example for
1 cup
You see
Example for
1cup
4. Touch
YOU see
(countdown
time may
vary)
NOTES:
• If you do not enter a quantity within 2 seconds,
AUTO REHEAT will prompt you to choose a
quantity, You then have 1 minute to enter a quantity
and to touch START/ENTER. If you do not do so,
AUTO REHEAT will be canceled.
• If you touch AUTO REHEAT 5 times, the display
returns to the Pizza Slice setting.
• If you need more or less cooking time, do not touch
AUTO REHEAT again. Touch POWER before you
touch START/ENTER. (See "Changing preset
cooking times" in the "Getting to Know" section.)
• When reheating a large (4 oz [113 g]) muffin or
bagel use the 2-piece setting. The 1-piece setting
warms 1 regular-size muffin or bagel, or 2 small
dinner rolls.
This chart shows you how to choose a type of food and the amounts you can choose for each type.
TOUCH TOUCH AMOUNTS YOU
FOOD AUTO REHEAT" OR NUMBER PAD CAN CHOOSE
Pizza Slice** once 1 1 to 3 slices, 5 oz (142 g) each
(sensor)
Sauce** twice 2 1 to 4 cups (237 ml to 946 ml)
(sensor)
Casserole 3 times 3 1 to 4 cups (237 ml to 946 ml)
Baked Goods 4 times 4 1 to 6 pieces, 2 oz (57 g) each
you must touch AUTO REHEAT once before choo_ng the food type.
After you choose the food type and quantity and touch START/ENTER, "SENSE" appears on the display. Also, the sensor
needs 2 minutes, 30 seconds to warm up after the oven is connected to power or after a power failure. If you start sensor
cooking during the warm-up, "SENSE" shows on the display until the warm-up is over. Microwave energy will not be turned on
until the sensor is warm.
27

Using AUTO DEFROST
You can defrost food by choosing a category and
setting a weight. AUTO DEFROST has preset times
and cook powers for 3 categories (see chart below).
To use AUTO DEFROST, follow the steps below:
1. Touch
once
You see
2. Touch AUTODEFROST1 to 3 timesto choose
the typeoffood.
_ Example for meats
once
OR
Touch a Number pad to choose the type
of food. _ Example for meats
You see
Example
for meats
4. Touch
You see
)
(countdown
time may vary)
NOTES:
• If you do not enter a weight within 2 seconds,
AUTO DEFROST will prompt you to enter a weight.
You then have 1 minute to enter a weight and to
touch START/ENTER. If you do not do so, AUTO
DEFROST will be canceled.
• If you enter a weight higher than the highest weight
allowed for your food setting, 3 tones will sound
and "RETRY" will appear on the display when you
touch START/ENTER.
• If you touch AUTO DEFROST 4 times, the display
returns to the Meats setting.
• If you need more or less defrosting time, do not
touch AUTO DEFROST again. Touch POWER
before you touch START/ENTER. (See "Changing
preset cooking times" in the "Getting to Know"
section.)
• See the "Auto defrost chart" later in this section
for defrosting directions for each food.
• To defrost items not listed in the "Auto defrost
chart," use 30% cook power. Refer to a reliable
cookbook for defrosting information.
3. Touch Number pad(s) to enter the weight.
Example for 1.1 Ibs
tlt_ce
You see
Example
for 1.1 Ibs
For even, complete defrosting
• The shape of the package affects how quickly food
will defrost. Shallow packages will defrost more
quickly than a deep block.
• As food begins to defrost, separate the pieces.
Separated pieces defrost more evenly.
• Use small pieces of aluminum foil to shield parts
of food such as chicken wings, leg tips, fish tails,
or areas that start to get warm. Make sure the foil
does not touch the sides, top, or bottom of
the oven.
This chart shows you how to choose a type of food and the weights you can set for each type.
TOUCH OR TOUCH WEIGHTS YOU CAN SET
FOOD AUTO DEFROST* NUMBER PAD (tenths of a pound)
Meats once 1 .1 to 6.6 (45 g to 2994 g)
Poultry twice 2 .1 to 6.6 (45 g to 2994 g)
Fish 3 times 3 .1 to 4.4 (45 g to 1998 g)
* YoumusttouchAUTODEFROSToncebeforechoosingthefoodtype.
28

Auto defrost chart
Meat setting
FOOD
Beef
Ground Beef, Bulk
Ground Beef, Patties
Round Steak, Tenderloin Steak,
Pot Roast, Chuck Roast, Rib
Roast, Rolled Rump Roast
Stew Beef
Lamb
Cubes for Stew
Chops (1 inch [2.5 cm] thick)
Pork
Chops (1/2 inch [13 turn] thick),
Hot Dogs, Spareribs, Country-
Style Ribs, Loin Roast (Boneless),
Sausage, Links
Sausage, Bulk
SPECIAL INSTRUCTION£
Meat of irregular shape and large, fatty cuts of meat should have the
narrow or fatty areas shielded with foil at the beginning of a defrost cycle.
Do not defrost less than 1/4 Ib (133 g).
Do not defrost less than two 4 oz (133 g) patties.
Place on a microwavable roasting rack.
Place in a microwavable baking dish.
Place in a microwavable baking dish.
Place on a microwavable roasting rack,
Place on a microwavable masting rack.
Place in a microwavablebaking dish.
Fish setting
FOOD
Fish
Fillets
Steaks
Whole
Shell Fish
Crabmeat,
Lobster Tails,
Shrimp, Scallops
SPECIAL INSTRUCTIONS
Place in a microwavable baking dish. Carefully separate fillets under
cold water.
Place in a microwavablebaking dish. Run cold water over to finishdefrosting.
Place in a microwavable baking dish. Cover head and tail with foil; do
not let foil touchsides of microwaveoven. Finishdefrostingby
immersingin coldwater.
Place in a microwavablebaking dish.
continued on next page
29

Auto defrost chart (cont.)
Poultry setting
FOOD SPECIAL INSTRUCTIONS
Chicken
Whole Place chicken breast-side up on a microwavable roasting rack. Finish defrosting
(up to 9-1/2 Ibs [4.3 kg]) by immersing in cold water. Remove giblets when chicken is partially defn_ted.
Cut Up Place on a micmwavable roasting rack.
Finish defrosting by immersing in cold water.
Cornish Hens
Whole Place on a microwavable roasting rack. Finish defrosting by immersing in cold water.
Turkey
Breast Place on a microwavable roasting rack. Finish defrosting by immersing in cold water.
(under 6 Ibs [2.7 g])
Defrosting tips
• When usingAUTO DEFROST,you need to enter
the net weight (theweight ofthe food minus
the contained. Enterthe weightto the nearest
1/10 Ib (45 g).
• Only useAUTO DEFROST for raw food.
AUTO DEFROST gives bestresultswhen the
food to be thawed is completely frozen. Ifthe
food ispartiallydefrosted,always set a lower
food weight (fora shorterdefrostingtime)to
preventcookingthe food.
• For better results,a preset standingtime is
included in the defrostingtime. Thismay makethe
defrostingtime seem longerthan expected.(For
more informationon standingtime, see the
"Microwave cookingtips" in the "CookingGuide"
section.)
Weight conversion chart
Youare probably used to food weights as beingin
poundsand ouncesthat arefractions of a pound
(forexample 4 ouncesequals 1/4 pound). Howev_,
inorder to enter food weight in AUTO DEFROST,
you must specify pounds and tenths of a pound.
Ifthe weighton the food package is infractionsofa
pound, youcan usethe followingchart toconvertthe
we|ghtto dedmals.
DECIMAL WEIGHT EQUIVALENT OUNCE WEIGHT EQUIVALENT GRAM WEIGHT
.10 1.6 45
.20 3.2 91
.25 One-Quarter Pound 4.0 113
.30 4.8 136
.40 6.4 181
.50 One-Half Pound 8.0 227
.60 9.6 272
.70 11,2 318
.75 Three-Quarters Pound 12.0 340
.80 12.8 363
.90 14.4 408
1.00 One Pound 16.0 454
3O

Using SURE SIMMER
Your microwave oven lets you simmer soups,
casseroles, Stews, and other liquid foods. All you
do is set a simmer time and your oven will bring
your food to a boil and then simmer it for the time
you specify.
NOTES:
• You cannot change the cook power or doneness
for SURE SIMMER.
• This function uses the sensor. The sensor needs 2
minutes, 30 seconds to warm up after the oven is
connected to power or after a power failure. If you
start SURE SIMMER duringthe warm-up, micro-
wave energywill not be turned on untilthe sensor
is warm.
• When cooking vegetables, increase amount of
water to 1/4 to 1/2 cup (60 to 125 mL).
• Cover dish with a hard lid, i.e., the lid that
comes with the dish or a dinner plate. Do not use
plastic wrap.
1. Place the food in the oven and shut the door.
2. Touch SURE SIMMER. TOUCH YOU SEE
3. Touch Number pads to enter the simmer time. TOUCH YOU SEE
Example for 30 minutes:
Touch START/ENTER.
The oven willbring the food to a boil
TOUCH
YOU SEE
The food will then simmer for the time you set.
YOU SEE
When simmering foods like pasta
Use a container that can hold enough water to
cover the food completely when cooking, such as a
3_luart (12-cup [2,84 I]) casserole with a lid. When
cooking pasta or noodles, add 1 tbsp (15 mr) oil to
the water before boiling. Use the following method.
Place containerwith water in the oven and follow
Steps 2-4, settingthe simmertime at 1 second. At
the end of the signal, place the food in the water end
stir untilcompletely covered by water. Cover. Repeat
Steps 2-4, settingthe simmer time you want.
Changing instructions
YOU can change the simmering time while
simmering by repeating Steps 2, 3, and 4.
31

Sensor cooking
Food releases humidity during cooking/heating.
How much humidity food releases is affected by
the quantity, temperature, and shape of the food.
Your microwave oven has a sensor that detects
this humidity. The amount of humidity detected
tells the oven how long to cook or heat your food.
You can sensor cook when preparing any of 8
typos of food. Just touch the pad for the food you
want to cook or heat (see the chart below).
To sensor cook:
1. Touch a SENSOR COOK pad.
I BAKJE0_ Example for bakedPOTATO potato
You see
{until cooking
time is
estimated)
(=MAX" appears
every 3 seconds)
NOTES:
• You do not need to touch START/ENTER to
start the oven. The oven will start cooking/
heating when you touch one of the
SENSOR COOK pads.
• If you need more or less cooking time, do not
touch the selected SENSOR COOK pad again.
Touch POWER within 20 seconds after choosing
the food type. (See "Changing preset cooking
times" in the "Getting to Know" section.)
You cannot change preset cooking times for
POPCORN.
• The sensor needs 2 minutes, 30 seconds to warm
up after the oven is connected to power or after a
power failure. If you start sensor cooking during
the warm-up, =SENSE" shows on the display until
the warm-up is over. Microwave energy will not be
turned on until the sensor is warm.
• When cooking foods for a long time, allow the
oven to cool down before sensor cooking again.
Popcorn brands make a difference
How well your popcorn cooks will depend on the
brand of popcorn and how much fat it has in it. Try
several brands to decide which pops the best. For
best results, use fresh bags of popcorn.
This chart shows you how to choose a type of food and the amount you can choose for each type.
PAD INSTRUCTIONS AMOUNT
Popcorn* Pop only1 package at a time. If you are usinga 3.5 oz (100 g), 3.0 oz (85 g),
microwavepopcorn popper,follow manufacturer's 1.75 oz (50 g)
instructions.
Baked Beforebaking, rememberto pierce the potato with a 1 to 4 potatoes
Potato fork several times. After cooking, let the potato (10 oz [284 g]to 13 oz [369 g]
stand 5 minutesto finishcooking, each)
Fresh Prepareas you want, wash, but do not dry 1 to 4 cups (237 ml to 946 ml)
Vegetable vegetables. Place vegetablesin a correct-size
microwavablecontainer. Add 2 to 4 tbsp (30 to
60 ml)water. Cover with plasticwrap and vent.
Frozen Remove from package, rinseofffrost under 1 to 4 cups (237 ml to 946 m0
Vegetable runningwater. Placevegetables ina correct-size
microwavable container.Add 2 to 4 tbsp (30 to 60
ml) water. Cover with plasticwrap and vent.
Frozen Entree Loosenthe coveringfor venting. 10- or 20-ounce (284 g or 568 g)
Beverage* Do not cover.The shape ofthe mug willaffect how 1 or 2 8-ounce (237 ml)cups
the contentsheat - if narrowand tall, contents may
be hotter;,if more open area on top (i.e., 1-cup
[237 ml]measuringcup)contents may be cooler.
Dinner Plate Placefood to be heated on a dinnerplate or similar 1 serving(or I plate)(0.5 to 1 Ib
dish. Cover with plasticwrap and vent. [.2 k to .45 k])
Soup Placesoup to be heated ina correct-size microwav- 1 to 4 cups (237 mlto 946 ml)
able container.Cover with plastic wrap and vent.
* The display does not show cookingtime for this setting. "SENSE" stays on the display untilcookingis
finished.
32

Using HOLD WARM
You can safely keep hot, cooked food warm in
your microwave oven for up to 99 minutes,
99 seconds (about 1 hour, 40 minutes). You can
use HOLD WARM by itself, or to automatically
follow a cooking cycle.
NOTES:
• HOLD WARM operates for up to 99 minutes,
99 seconds.
• Opening the oven door cancels HOLD WARM.
Close the door and touch HOLD WARM, then
touch START/ENTER if additional HOLD WARM
Food cooked covered should be covered during
HOLD WARM.
Pastry items (pies, turnovers, etc.) should be
uncovered during HOLD WARM.
Complete meals kept warm on a dinner plate
should be covered during HOLD WARM.
Do not use more than one complete HOLD WARM
cycle (about 1 hour, 40 minutes). The quality of
some foods will suffer with extended time.
time is desired.
1. Put hot, cooked food in the oven and close
the door,
2. Touch HOLD WARM. TOUCH YOU SEE
3. Start the oven. TOUCH YOU SEE
To make HOLD WARM automatically
follow another cycle:
• While entering cooking instructions, touch
HOLD WARM before touching START/ENTER,
or during cooking,
• When the last cooking cycle is over,you will hear
two tones. "WARM" will come on while the oven
continuesto run.
33

Caring for Your Microwave
ven
To make sure your microwave oven looks good and works well for a long time, you should maintain it propedy.
For proper care, please follow these instructions carefully.
For interior surfaces:
Wash often with warm,
sudsy water and a
sponge or soft cloth.
Use only mild, nonabra-
sive soaps or a mild
detergent. Be sure to
keep the areas clean
where the door and
oven frame touch
when closed. Wipe well
with clean water. Over time, stains can occur on the
surfaces as the result of food particles spattaring
during cooking. This is normal.
For stubborn soil,
boil a cup of water in
the oven for 2 or 3
minutes. Steam will
soften the soil. To get
rid of odors inside the
oven, boil a cup of
water with some lemon
juice or vinegar in it.
Glass turntable
To clean turntable and
turntable support, wash
in mild, sudsy water; for
heavily soiled areas use
a mild cleanser and
scouring sponge. The
turntable and turntable
support are dishwasher
safe.
Cleaning the cooking rack
" Wash by hand with a
mild detergent and a
softsponge or nylon
scrub brush.Dry
completely.
. • Do not useabrasive
scrubbers or cleansers
to clean rack.
• The rack is dishwasher
safe.
For exterior surfaces
and control panel: Use
a soft cloth with spray
glass cleaner. Apply the
spray glass cleaner to
the soft cloth; do not
spray directly on the
oven.
NOTE: Abrasive
cleansers, steel-wool
pads, gritty wash
cloths, some paper towels, etc., can damage the
control panel and the interior and exterior oven
surfaces.
34

Installing and caring for the filters
The grease (silver aluminum) filters should be
removed and cleaned often, at least once a month.
The charcoal filter cannot be cleaned and
should be replaced every 6 to 12 months.
NOTE: Your microwave hood combination comes
with a chamoal (black fiber) filter installed behind the
aluminum grease filter. The charcoal filter helps
remove odors and provide clean recirculated air.
You may remove the charcoal filter if venting to the
outside.
You can order replacements (PN 4393690) from your
nearest Sears Service Center.
Electrical Shock Hazard
Disconnect power before removing filters.
Replace all panels before operating.
Failure to do so can result in death
or electrical shock.
Removing, cleaning, and replacing
1. Unplug microwave oven or disconnect power.
2. To remove the
grease (silver
aluminum) filters,
grasp tab and pull
filter towards the
opposite side. Pull
the filter downward
to remove.
Tab=
CharCOal flltor
3. To remove the
charcoal (black
fiber) filters, gently
bend back the
metal tabs on the
back of the grease
filter and pull the
charcoal filter out.
To replace the
charcoal fUters,
align the charcoal
filterover the grease filter.Gently bend the metal
tabs on the back of the grease filterover the
charcoalfilter.
NOTE: Use care in bending metaltabs so as not to
breakthem off.
4. Soak grease filters in
hot water and a mild
detergent. Scrub and
swish to remove
embedded dirt and
grease. Rinse well
and shake to dry.
Do not use ammonia,
corrosive cleaning
agents such as lye-
based oven cleaners,
or place in a dishwasher. The filter will turn black
or could be damaged.
To replace the grease
filters, slide each filter
into the outer side of
the filter opening.
Make sure you are
sliding in the side of
the filter that does net
have the tab. Hold the
T.b= tab with your other
hand. Push up the tab
side of the filter and
slide the filter to the other side of the opening to
leck into place.
6. Reconnect power or plug in microwave oven.
NOTE: Do not operate the vent fan without the
filters in place.
35

Replacing the cooktop and oven lights
The cooktop light
1. Unplug microwave oven or disconnect power.
2. Remove the bulb
cover mounting screw
and carefully remove
the cover.
Mounting
screw
3. Replace bulb(s) with candelabra-base 30-watt
bulb(s) (PN 4393681) available from your
Sears Service Center.
4. Replace the bulb cover and mounting screw.
5. Plug in microwave oven or reconnect power.
The oven light
1. Unplug microwave oven or disconnect power.
2. Remove the two vent
grille mountingscrews
located above the
cover (thetwo outer
screws).
5, Replace the bulb with a candelabra-base
30-watt bulb (PN4393681) availablefromyour
Sears Service Center.
6. Close the bulb cover.
'7. Slide the top of the vent
grille into place. Push
the bottom until it snaps
into place. Replace the
mounting screws.
3. Tip the grilleforward,
then lift out to remove.
8. Plug in microwave oven or reconnect power.
4. Lift up the bulb cover.
36

Cooking Guide
Microwave cooking tips
Amount of food
• If you increase or decrease the amount of food
you prepare, the time it takes to cook that food
will alSO change. For example, if you double a
recipe, add a little more than half the original
cooking time. Check for doneness and, if
necessary, add more time in small increments.
Starting temperature of food
• The lower the temperature of the food being
put into the microwave oven, the longer it takes
to cook. Food at room temperature will be
reheated more quickly than food at refrigerator
temperature.
Composition of food
• Food with a lot of fat and sugar will be heated
faster than food containing a lot of water. Fat and
sugar will also reach a higher temperature than
water in the cooking process.
• The more dense the food, the longer it takes
to heat. "Very dense" food like meat takes longer
to reheat than lighter, more porous food like
sponge cakes.
Size and shape
• Smaller pieces of food will cook faster than
larger pieces. Also, same-shaped pieces cook
more evenly than different-shaped pieces.
• With foods that have different thicknesses,
the thinner parts will cook faster than the thicker
parts. Place the thinner parts of chicken wings
and legs in the center of the dish.
Stirring, turning foods
• Stirring and turning foods spreads heat quickly
to the center of the dish and avoids overcooking
at the outer edges of the food,
Covering food
Cover food to:
• Reduce splattering
• Shorten cooking times
*Keep food moist
You can use any covering that lets microwaves pass
through.
Releasing pressure in foods
• Several foods (for example: baked potatoes,
sausages, egg yolks, and some fruits) are tightly
covered by a skin or membrane. Steam can build
up under the membrane during cooking, causing
the food to burst. To relieve the pressure and to
prevent bursting, pierce these foods before
cooking with a fork, cocktail pick, or toothpick.
Using standing time
• Always allow food to stand after cooking.
Standing time after defrosting and cooking allows
the temperature to evenly spread throughout the
food, improving the cooking results.
• The length of the standing time depends on
how much food you are cooking and how dense
it is. Sometimes it can be as short as the time it
takes you to remove the food from the oven and
take it to the serving table. However, with larger,
denser food, the standing time may be as long
as 10 minutes.
continued on next page
37

Microwave cooking tips (cont.)
Arranging food
For best results, place food evenly on the plate.
You can do this in several ways:
• If you are cooking several items of the same
food, such as baked potatoes, place them in a
ring pattern for uniform cooking.
• When cooking foods of uneven shapes or
thickness, such as chicken breasts, place the
smaller or thinner area of the food towards the
center of the dish where it will be heated last.
• Layer thin slices of meat on top of each other.
• When you cook or reheat whole fish, score
the skin - this prevents cracking.
• Do not let food or a container touch the top
or sides of the oven. This will prevent possible
arcing.
Using aluminum foil
Metal containers should not be used in a
microwave oven. There are, however, some
exceptions, if you have purchased food which is
prepackaged in an aluminum foil container, refer
to the instructions on the package. When using
aluminum foil containers, cooking times may be
longer because microwaves will only penetrate the
top of the food.
If you use aluminum containers without package
instructions, follow these guidelines:
• Place the container in a glass bowl and add some
water so that it covers the bottom of the container,
not more than 1/4 inch (6 ram) high. This ensures
even heating of the container bottom.
• Always remove the lid to avoid damage to
the oven.
• Use only undamaged containers.
• Do not use containerstallerthan 3/4 inch(19 mm).
• Container must be at leasthalffilled.
• To avoid arcing, there mustbe a minimum
1/4 inch(6 ram) between the aluminumcontainer
and the wallsof the oven and also between two
aluminumcontainers.
• Always place the containeron the turntable.
• Reheating food inaluminumfoilcontainersusually
takes up to double the time comparedto reheating
in plastic, glass, china,or paper containers.The
time when food is ready willvarydepending upon
the type of containeryou use.
• Let food stand for 2 to 3 minutes after heating so
that heat isspread evenly throughoutcontainer.
Cooking you should not do in your
microwave oven
• Do not do canningof foods inthe oven. Closed
glass jars may explode, resultingindamage to
the oven or possiblepersonalinjury.
• Do not use the microwaveovento sterilizeobjects
(baby bottles,etc.). Itis difficultto keep the oven at
the hightemperature needed for safe sterilization.
38

Questions and Answers
QUESTIONS
Can I operate my microwave oven without the
tumtabte or turn the turntable over to hold a
large dish?
ANSWERS
You can turn off the turntable to heat 2 dinner
plates side by side or one dish that's larger than
the turntable. However, if you only need to heat one
plate on the turntable, keep the turntable on for
best cooking results. Also, you should not turn over
the turntable. A plate used on the turntable must fit
on it when the turntable is correct side up.
Can I use a rack in my microwave oven so that I You can use a rack only if the rack is supplied
may reheat or cook on two levels at a time? with your microwave oven. If you use a rack not
supplied with the microwave oven, you can get poor
cocking performance and/or arcing.
Can I use either metal or aluminum pans in my You can use aluminum foil for shielding (use
microwave oven? small, flat pieces), small skewers, end shallow
foil trays (if tray is 3/4 inch [19 ram] deep or less
and at least half filled with food to absorb
microwave energy). Never allow metal to touch walls
or door. (For more information, see "Using aluminum
foil" in the "Cooking Guide" section.)
Is it normal for the turntable to turn in Yes. The turntable rotates clockwise or counter-
either direction? clockwise, depending on the rotation of the
motor when the cooking cycle begins.
Sometimes the door of my microwave oven This appearance is normal and does not affect the
appears wavy. Is this normal? operation of your oven.
What are the humming noises that I hear when my You hear the sound of the transformer when the
microwave oven is operating? magnetron tube cycles on.
Why does the dish become hot when I microwave As the food becomes hot it will conduct the heat
food in it? I thought that this should not happen, to the dish. Be prepared to use hot pads to remove
food after cooking.
What does "standing time" mean? "Standing time" means that food should be
removed from the oven and covered for additional
time to allow it to finish cooking. This frees the oven
for other cooking.
Why does steam come out of the air exhaust vent? Steam is normally produced during cooking. The
microwave oven has been designed to vent this
steam out the vent.
Can I pop popcorn in my microwave oven?
How do I get the best results?
Yes. Pop packaged microwave popcorn
followingmanufacturer's guidelinesor usethe
sensorPOPCORN pad. Do not use regularpaper
bags. Use the "listening test" by stoppingthe
oven as soon as the popping slowsto a =pop"
every1 or 2 seconds. Do not repop unpopped
kernels. Do not pop popcorn in glass cookware.
39

Troubleshooting
Most cooking problems often are caused by little things you can find and fix withouttoolsof any kind. Check
the lists below and on the nextpage beforecalling for assistance or service.If you stillneed help, see the
"Sears Toll-FreeNumbers"section on Back Cover.
Microwave oven does not work
PROBLEM CAUSE
Nothing works.
• The power supply cord is not plugged intoa live circuitwith the proper
voltage. (See the "Electrical requirements"sectionon Page5 and the
"Electrical connection"sectionon Page 11.)
• A householdfuse has blown or a circuitbreaker hastripped.
=The electric company has had a powerfailure.
The microwave oven
will not run.
• You are using the oven as a timer.TouchOFF/CANCEL to cancelthe
KitchenTimer.
°The door isnot firmlyclosed and latched.
=Youdid nottouch START/ENTER.
• Youdid not follow directionsexactly.
•An operationthat you set eadieris stillrunning.TouchOFF/CANCEL to
cancel that operation.
Cooking times
PROBLEM
CAUSE
Food is notcooked
enough.
• The electricsupply to your home or wall outlets islow or lower than normal.
Yourelectric company can tell you if the linevoltage islow.Yourelectrician
or servicetechnician can tell you ifthe outletvoltage is low.
• The cook power is not at the recommended setting. Check the chart on
Page22.
"You havenot allowed enough cookingtimefor the amountof food being
cooked. Largeramounts of food need longercookingtimes.
The display shows a time • The oven door is not closedcompletely.
counting down but the • You haveset the controls as a kitchentimer.TouchOFF/CANCEL to cancel
oven isnot cooking, the KitchenTimer.
4O

Turntable
PROBLEM
The turntable will
not turn.
CAUSE
• You have turned off the turntable. (See the "Heating more than one plate of
food" section on Page 15,)
• The turntable is not correctly in place. It should be correct-side up and
sitting firmly on the center shaft.
• The support is not operating correctly. Remove the turntable end restart the
oven. If the support still does not move, call an authorized service technician
for repair. Cooking without the turntable can give you poor results.
Tones
PROBLEM
Youdonothearthe
pmgmmmingor
end-of-cycletone.
CAUSE
• Youhave not enteredthe correct command.
• You haveturned off the tone. See the "Audible signals"section on Page 14.
Display messages
PROBLEM CAUSE
The display is flashing ":". • There has been a power interruption. Reset the clock. (See the "Setting the
clock" section on Page !8.)
If none of these itemsare causing your problem, see the "Sears Toll-Free Numbers" sectionon Back Cover.
Please record your model's information. ModelNumber
Whenever you call to request service for your appliance, Serial Number
you need to know your complete model number and
sedal number. You can find this information on the Purchase Date
model and sedal number label/plate (see "Microwave Dealer Name
oven features" in the "Getting to Know" section). Also, Dealer Address
record the other information shown in the next column.
Dealer Phone
41

Index
This index is alphabetical. It contains all the topics included in this manual, along with the page(s) on which
you can find each topic.
TOPIC PAGE TOPIC PAGE
ALUMINUM FOIL ........................................................ 39 FILTERS .................................................................... 35
AUDIBLE SIGNALS .................................................. 14 HOWYOUR MICROWAVE OVEN WORKS .............. 8-9
CARING FOR YOUR MICROWAVE OVEN .............. 34 INSTALLATION REQUIREMENTS ............................ 5-6
CHARTS
Autocook................................................................ 26
Auto defrost .................................................... 28-30
Auto reheat .......................................................... 27
Cook powers ........................................................ 22
Sensor cook .......................................................... 32
Weight conversion ................................................ 30
CONTROL PANEL .............................................. 13-15
ADD ONE MINUTE ................................................ 20
AUTO COOK .......................................................... 26
AUTO DEFROST .................................................. 28
AUTO REHEAT ...................................................... 27
BAKED POTATO .................................................... 32
BEVERAGE ............................................................ 32
Changing preset cooking times ............................20
Child lock ................................................................ 15
CLOCK .................................................................... 18
COOK TIME ........................................ 21, 22, 23, 24
Cooking at different cook powers ..................22, 23
Cooking at high cook power ................................21
Demo/fearning feature .......................................... 15
DINNER PLATE ...................................................... 32
Display .................................................................. 13
Fan ........................................................................ 17
FRESH VEGETABLE .............................................. 32
FROZEN ENTREE.................................................. 32
FROZEN VEGETABLE .......................................... 32
HOLD WARM .......................................................... 33
Interruptingcooking .............................................. 15
Kitchen timer ........................................................ 19
Light ...................................................................... 17
Number pads ........................................................ 14
OFF/CANCEL ........................................................ 14
POPCORN ............................................................ 32
POWER ................................................................ 24
Sensor cooking ...................................................... 32
SOUP ...................................................................... 32
Stage cooking .................................................. 24-25
START/ENTER ................................................ 14,15
SURE SIMMER ...................................................... 33
TURNTABLE ON/OFF ............................................ 15
LIGHTS
Replacing .............................................................. 36
Using .................................................................... 17
PARTS AND FEATURES
Cooking guide label .............................................. 12
Cooking rock ........................................ 12, 16, 34, 39
Door handle .......................................................... 12
Door safety lock system ........................................ 12
Magnetron ........................................................ 8, 39
Microwave inlet cover.............................................. 12
Model and serial number plate ............................ 12
Oven cavity light...................................................... 12
Turntable .................................... 8, 11, 12, 34, 39, 41
Vent grille .............................................................. 12
Window ................................................................ 12
QUESTIONS AND ANSWERS ................................ 39
RACK ...................................................... 12, 16, 34, 39
RADIO INTERFERENCE ............................................ 9
REPLACING COOK'FOP AND OVEN LIGHTS ........ 36
SAFETY ........................................................ 2-4, 10-11
SERVICE .................................................................... 2
STANDING TIME .......................................... 30, 37, 39
TESTING YOUR DINNERWARE
OR COOKWARE ........................................................ 10
TESTING YOUR MICROWAVE OVEN ........................ 9
TIPS
Cooking ............................................................ 37-38
Defrosting .............................................................. 30
Popcorn.................................................................. 32
TOLL-FREE NUMBERS ............................ Back Cover
TROUBLESHOOTING ........................................ 40-41
WARRANTY ................................................................ 2
ELECTRICAL REQUIREMENTS ............................5, 11
EXHAUST FAN ........................................................ 17
42

Guia del usuario
\
Combinaci6n Microondas Campana
Tabla de contenidos
Garantia ............................................... .44
Servicio Sears ...................................... 44
Seguridad del horno
de microondas ............................... .45-46
Requisitos de instalaci6n .................... 47
Desmontar y reinstalar el homo de
microondas ...................................... 48-49
Conozca su horno
de microondas ...................................... 50
C6mo uUlizar su horno
de microondas ...................................... 64
C6mo ©uidar su homo
de microondas ...................................... 80
Gu|a de €ocina ..................................... .83
Preguntas y respuestas ........................ 85
Soluci6n de problemas ........................ 86
|ndice .................................................... 88
Liame sin €osto ...................... Contratapa
43

Garantia del horno de
microondas
GARANTIA TOTAL POR UN AI_IO PARA HORNO DE MICROONDAS
Si en un periodo de un aSo a partir de la fecha de compra, este Homo de Microondas Kenmore sufriera algu-
na fella debido a defectos en su material o mano de obra, Sears Io reparara sin cargo.
GARANTJA TOTAL POR CINCO AI_IOS PARA EL MAGNETRON
Si en un pedodo de cinco aSos a partir de la fecha de compra, el magnetr6n de este Homo de Microondas
Kenmore sufriera alguna falfa debido a defectos en su material o mano de obra, Sears Io reparara sin cargo.
La cobertura de esta garantfa incluye solamente hornos para uso dom_stico.
PODR/_. HACER EFECTIVA ESTA GARANTiA CON SOLO PONERSE EN CONTACTO CON LA TIENDA
SEARS O EL CENTRO DE SERVIClO MAS CERCANO EN LOS ESTADOS UNIDOS.
Esta garantia tiene validez siempre y cuando este producto est_ en uso en los Estados Unidos.
Esta garantia le otorga derechos legales especfficos que podr_an verier de un estado a otto.
Sears, Roebuck and Co., Pare servicio Ilame al teldfono:
Dept. 817WA, 1-800-4-REPAIR
Hoffman Estates, IL 60179 1-800-473-7247
Servicio Sears
"Damos servicio a Io que vendemos"
"Damos servicio a Io que vendemos", es asi como le asegurarnos que puede contar con Sears pare cualquier
servicio porque el Servicio Sears se ofrece a nivel nacional.
Su Homo de Microondas Kenmore de Sears adquiere un valor agregado considerando que Sears tiene una
unidad de servicio cerca de usted, atendida por t_cnicos capacitados por Sears - tdcnicos profesionales
especializados en Hornos de Microondas Kenmore de Sears y cuentan con las partes, herramientas y equipo
para asegurar el cumplimiento de nuestro compromiso con usted - "iDamos servicio a Io que vendemos!"
Para agregar valor a su horno de microondas,
adquiera un Contrato de mantenimiento Sears.
Los hornos de microondas Kenmore de Sears estdn dise_ados, fabricados y probados para durar a_os de
operaciones confiables. Sin embargo, cualquier articulo moderno puede requedr mantenimiento ocasional-
mente. Un Contrato de mantenimiento Sears es mds que una extensi6n de la garantia. Pmporciona proteccibn
total contra gastos imprevistos por reparaciones inesperadas y molestias innecesarias. Le asegura m_ximo
rendimiento a su homo de microondas.
A continuacibnle presentamos una tabla comparative de Garant_ay Contrato de mantenimiento lacual le
muestra las ventajas del Contrato de mantenimiento Sears pare hornos de microondas.
A_IOS DE COBERTURA DE PROPIEDAD 1ER AI;IO Del 2s-AI_IOal 5.eAI_O
Cambio de partes defectuosasque no sea el magnetrbn G CM
Cambio del rnagnetrbn G G
Revisi6n anualde mantenimientopreventivocuando usted Io solicite CM CM
G - GARANT_
CM - CONTRATO DE MANTENIMIENTO
Consulte a su representante de ventas Sears o a su Centro de servicio Sears local hoy mismo y adquiera un
Contrato de mantenimiento Sears.
Guarde este libro y la factura de venta juntos en algdn lugar seguro para
consultas futuras.
44

Seguridad del horno de
microondas
Su seguridad y la seguridad de los dem;_s es muy importante.
Hemos incluidomuchosmensajes importantesde seguridaden este manualyen su electrc<lomestico.Lea
y obedezca siempretodos los mensajes de seguridad.
Este es el simbolode advertencia de seguridad.
Este simbolo le llama la atenci6nsobrepeligros que pueden ocasionar la muerte o una lesi6n
a usted y a los dembs.
Todos los mensajes de seguridad irdn pracedidos por el sfmbolo de advertencia de seguridad
y la palabra "PELIGRO" o "ADVERTENCIA". EEstespalabras significan:
Si no slgue las instrucciones, usted modr_
o sufrird una lesion grave.
Si no sigue las instrucclonee, u___Lt__Jp_
morir o sufrir una leslbn grave.
Todos los mensajes de seguridad identificar&nel peligro,le informar&ncbmo reducir las posibilidades
de sufrir una lesi6n y Io que puede suceder si no sigue les instrucciones.
INSTRUCClONES IMPORTANTES DE SEGURIDAD
AI usar aparatos electrodom@sticos deben seguirse pmcauciones bdsicas de seguddad, incluyendo las
siguientes:
ADVERTENCIA - para reducirel riesgo de
quemaduras, choque el_ctrico, incendio,lesiones
a personas o exposicibn excesivaa laenergfadel
homo de microondes:
• Antes de usar su homo, lea cuidadosamente
todas lasinstrucciones.
• Lea y siga las "PRECAUCIONES PAPA EVITAR
LA POSIBLE EXPOSICI6N EXCESIVAA LA
ENERGfA DEL HORNO DE MICROONDAS" que
se encuentraen esta seccibn.
• Elhomo de microondasdebe estar conectado
a tierra. Condctelo t_nicamenteen un
tomacorrientapuesto a tierra. Vet
"INSTRUCCIONES DE CONEXI6N A TIERPA"
que se encuentranal final de esta seccibn.
* Instale o coloqueel homo de rnicroondas
,',nicamentede acuerdo con lasinstruccionesde
instalacibnprovistas.
- Algunosproductostales como los huevos
enterosen sucdscara y los recipientessellados
- por ejemplo,tarrosde vidriocerrados -
pueden explotar y no deben set calentadosen
el homo de microondas.
• Useel homo de microondas s61opara los fines
descritos en este manual. No use substancies
quimicas ni vapores corrosivosen el homo de
microondas.Este tipo de homo ha sido
dise_ado especfflcamentepara calentar, cocinar
osecar los alimentos.No ha sido disehado para
uso industrialo en laboratorios.
• Cornocon cualquieraparato electroclom6stico,
es necesario supervisarrigumsamenteel uso
del homo de microondes por ni_os.
• No opere el homo de micmondas si Ueneun
cable o enchufe daSado, si no funciona
debiclamente,si ha sido da_ado o si se ha
caido.
• $61oun miembro calificadodel personal
de serviciopuede reparar este homo de
microondes.Uame a una compa_fa de servicio
autorizada para examinar,reparar o regulareste
homo de microondas.
• No cubra ni bloquee ning_norificiodel homo de
microondes.
- GUARDE ESTAS INSTRUCCIONES -
45

INSTRUCCIONES IMPORTANTES DE SEGURIDAD
• No guarde el homo de microondas al aim libre.
No Io use ceroa del agua - per ejemplo, cerca
del fregadero, en un sbtano hL_medo, o cerca de
una piscina o lugares semejantes.
• No sumerja el cable o el enchufe en agua.
• Mantenga el cable de alimentacibn alejado de
las superficies calientes.
• No deje que el cable cuelgue del borde de una
mesa o superficie.
• Vea las instrucciones de c6mo limpiar la
superficie de la puerta en la seccibn "C6mo
cuidar su herno de microondas".
• No Io instale sobre un fregadero.
• No guarde ning_n objeto directamente sobre la
parte superior del homo de microondas cuando
el homo de microondas est_ en funcionamiento.
• Para reducir el riesgo de incendio en la cavidad
del homo:
- No cocine demasiado los alimentos. Vigile
cuidadosamente el homo de microondas si se
coloca dentro del mismo, papel, pl_stico o
cuatquier material combustible para facilitar
la cocci6n.
- Quite los alambres que sujetan las bolsas de
papel o de plastico antes de colocarlas en el
homo.
- Si los materiales dentro del homo prenden
fuego, mantenga cerrada la puerta del homo,
ap&guelo y desconecte el cable de
alimentacibn, o corte la energfa en el panel de
fusibles o en el interruptcr de cirouitos.
- No use la cavidad del homo de microondas
para guardarobjetos. No deje productos de
papel, utensiliosde cocina o alimentosen la
oavidad cuando no est_ usando el aparato.
•Adecuado para uso sobreequiposde cocina de
gas y et_ctrfcos.
• Para usarse sobrecocinas con anchura mdxima
de 36 pulgadas.
• Limpie con frecuencia lascampanas extractoras
- no debe dejarseque la grasa se acumuleen la
campana o en elfiltro.
• Cuando est_ cocinandoalimentos con llama
debajo de la campana, encienda el ventilador.
• Umpie con cuidado el filtrode la campana
extractora. Los productos de limpieza
corrosivos,tales como los limpiadoresde
homo a base de lejia,pueden daSar elfiltro.
=No se deben introduciren el homode
microondas comidasvoluminosasni utensilios
metalicos muy grandesya que pueden producir
un incendio o riesgode choque elL_ctdco.
•No limpie el hornode microondascon esponjillas
met&licas para frsgar.I_aspiezas puedenquemar
laesponjillay tocar partes el_tdcas Io que
implicada riesgode choque elL,ctrico.
• No use productosde papel cuando el aparato
este en funcionamiento en el modo de "PAN
BROWN".
• No guarde en este homo, cuando no este en
funcionamiento, ning0n material que no sean los
accesories recomendados por el fabricante.
• No cubra las rejillas ni ninguna otra parte del
homo con papel metalico. Esto hada que el
homo se sobrecaliente.
- GUARDE ESTAS INSTRUCCIONES -
PRECAUCIONES PARA EVITAR LA POSIBLE
EXPOSICION EXCESIVA A LA ENERG|A DE LAS
MICROONDAS
(a) No trate de poner en funcionamiento este homo
de microondas con la puerta abierta, pues esto
puede causar la exposicibn perjudicial a la
energia del microondas. Es importante no
desactivar ni forzar los intercierres de seguridad.
(b) No coloque ning_n objeto entre la care frontal
del homo y la puerta ni deje que se acumulen
residuos de polvo o de productos de limpieza en
las superficies de sellado.
(c) No use el homo siestd daSado. Es muy
importante que la puertadel homo se cierre
debidamente y que no estdn daJ_ados:
(1) La puerta(doblada),
(2) Las bisagrasy pestillos(quebradoso flojos),
(3) Los cierreshermdticosde lapuerta o las
superficiesde sellado.
(d) El homo no debe serregulado ni reparado por
ninguna persona que no sea un miembro
calificado del personal de servicio.
46

Requisitos de instalaci6n
Antes de instalar la combinacibn microondas campana, asegOrese de que el lugar seleccionado cumpla con los
siguientes requisitos. Para detalles, consulte las instrucciones de instalacibn.
Requisitos el ctricos
Cumpla con todos los cbdigos y reglamentos
vigentes. Se requiere un suministro electrico de
120 voltios, 60 hertz, s61o de CA, 15 6 20
amperios con fusible. (Se recoroienda un fusible
de retardo). Se recomienda el uso de un circuito
electrico independiente para la alimentacibn de
este aparato.
Peligro de Choque Electrico
Conecte a un contacto de pared de conexi6n
a tierra de 3 terminales.
No quite el terminal de conexibn a tierra.
No use un adaptador.
No use un cable el_=ctricode extensi6n.
No seguir estas instrucciones puede
ocasionar la muerte, incendio o choque
eldctrico.
INSTRUCCIONES DE CONEXION A TIERRA
Para todos los aparatos electroodoro_sticos
conectados con cable de alimentaci6n:
Este homo de microondas debe ser conectado a
tierra. En caso de un cortocircuito el_trico, la
conexi6n a tierra reduce el riesgo de un choque
eldctdco al proporcionar un alambre de escape a la
corriente eldctrica. El homo de microondas estd
equipado con un cable de alimentaci6n provisto de
una alarnbre de ¢onexi6n a tierra con un enchufe
de conexibn a tierra. El enchufe debe ser
conectado a un toroacorriente debidamente
instalado y conectado a tierra.
No use cordbn de extension. Si el cable de
aliroentaci6n el_ctdca es muy corto, haga que un
electdcista calificado o un t_=cnicode servicio instale
un tomacorriente cerca del homo de microondas.
ADVERTENCIA: El use indebidode la
conexibna tierra puede ocasionar fiesgo de
choque el_ctrico.
Consultecon unelectricista calificado o t_=cnico
de servicio sino entiende completamente las
instruccionesde conexibn a tierra o si tiene dudas
sobresi el homo de microondas estb conectado a
tierra correctamente.
47

Desmontar y reinstalar el
horno de microondas
Peligro de Peso Excesivo
Use dos o rods personas papa mover
o instalar el horno de microondas.
No seguir esta instrucci6n puede ocasionar
una herida a la espalda u otra herida.
Si necesitadesmontarsu CombinacibnMicroondas
Campana poralgQnmotivo, siga estos sencillos
pasos:
Para desmontan
1. Desenchufeel homo de micmondas o
desconecteel suministmde energia.
2. Quite los flltms y la
rejilla de ventilaci6n.
• Si los fiitms A
est_n instalados,
presione hacia
dentin, la lengLieta
y deslice el fiitro a
la orilla para
quitarlo.
• Quite los dos tor
nillos B de la
parte superiordel gabinete del homode
microondas(lostornillosubicadosrods cercade
las esquinasdel fi'ente). No quite los tomillosque
se encuentranrods hacia el centre del gabinete.
• Quite la rejillade ventilacibnC. Ponga a un lado
los tornillosy la rejilla.(Si no se puede quitar la
reiilla,vea el paso 4).
I1_ 1_ If "
III-
3. Despubs de vaciar
completamente el
interiordel homo,
incluyendo el plato
giratodo y el
soporte, sellela
puerta con Ginta
adhesiva. Quite los
dos pernos D que
aseguran el homo
de microondasa la
parte superiordel
gabinete.
I
4. Sujete con la mano,
en su lugar, la
combinaci6n
micmondas
campana. Jale el
gancho E para
separar la campana
del homo de la placa
de montaje. Si no se
puede quitar la rejilla
(vet el Paso 2), inserte
un alambredelgadoenlazado o un instrumento
similara tray,s de unoriflcio de la rejillapara jalar
el gancho.
I
5. Tome el gabinete
del homo de
microondas. Gire el
homo de microondas
hacia abajo. (Tenga
cuidado para evitar
que la puerta se abra
de gotpe.)
6. Levantelas lengLietas
de soporte Fen la
parte de abajo de la
placa donde se
monta. Pongael
homo de microondas
en una superficie
protegida.
48

Desmontar y reinstalar el horno de microondas (cont.)
Para reinstalar:
1, Levante cuidadosamente el homo de microondas
y cu61guelo de las leng_etas de soporte en la
parte de abajo de la placa donde se monta.
2. Gire ia parte del frente del gabinete del homo
de microondas hacia abajo. Pase el cable de
corriente a tray,s del orificio para el cable de
corriente al fondo del gabinete superior.
3.Gire el homo de microondas hacia el gabinete.
Empuje el homo de microondas contra la placa
de montaje hasta que los pernos de seguridad
produzcan un chasquido al entrar al gabinete.
4.Atornille los dos
pemos de seguddad del
homo de microondas
que Io sujetan al
gabinete superior.
5, Retire la cinta adhesiva, y coloque los soportes
y el plato giratorio en sus posiciones.
6. Coloque la rejilla de ventilaci6n.
7. Coloque los dos tornillos en la parte superior
del gabinete del homo de microondas (los
tornitlos ubicados mas cerca de las esquinas
del frente),
8.Apdete los dos pemos que aseguran la
campana del homo de microondas al gabinete
superior hasta que no haya espacio entre el
gabinete superior y la campana del horno.
9. Reinstate los filtros (consulte "C6mo instalar y
cuidar los filtros", en la secci6n "C6mo cuidar
su homo de microondas" en caso de ser
ne(;esario).
10. Enchufe el homo de microondas o reconecte el
surninistro de energia.
49

Conozca su horno de
microondas
Esta secci6n trata acerca de los conceptos que encierra la cooina con microondas. Tambi_n le muestra los
conceptos basicos que necesita conocer para operar su homo de microondas. Por favor, lea esta informaci6n
antes de utilizar su homo de microondas.
C6mo funciona su horno de microondas
Los hornos de microondas son seguros. La
energia por microondas no es caliente. Provoca
que la comida produzca su propiocalory es este
calor elque cuece los alimentos.
Las microondas son como las ondas de "fV o
como las ondasde luz. Usted no las puede ver,
pero sive Io que hacen.
El magnetr6n en el homo de microondas pro-
duce microondas.Las microondasse mueven
haoiael interiordel homo donde hacen contacto
con la comida mientrasque _sta gira enel plato
giratorio.
/I\
Interior del homo
El plato giratorio de vidriode su homo de
microondas permite pasar las microondas.Luego
rebotan contra lasuperficiemet&lica,regresanal
plato giratoriode viddo y despu_s lasabsorben
los alimentos.
Superlicie de metal Plato glratorio
5O

C6mo funciona su horno de microondas (cont.)
I.as microondas pasan
a travdsdel vidno,papel
y plasticosin calentar-
los,asi que son los
alimentos losque
absorben la energia.
Las microondasrebotan
contra los recipientesde
metal, aM que la comida
no Iogra_osorber la
energfa.
AI rostizar,es posible
que las microondas no
alcancen el centrode la
pieza de came. Elcalor
se distribuye hacia el
centro desde las
extedores cocidastal
y como sucede el
cocinar con homos.
tradicionales. Esta es
una de las razones para
dejar reposaralgunosafimentos(porejempl0,
piezasrostizadaso papas homeadas) untiempo
_lespu_s de cocinados o para _noveralgunos
al[mentosdurante eltiempo de cocci6n.
Lasmicmondasalteranlas r;noldcu!asdel agua en
la comida.AI rebotalrlas m_las unascontra
otras,se prodUceel calor, com0-cuandojuntasus
manosy lasftota. Est_ees el'Calorque cocina.
NOTA:No ilia alimentos en el homo. Los recipiente_s
para microondasno son apmpiados para freir y
adem_s resultamuy dificilmantener la temperatura
necesana.
Para obtener mejores resultados al
cocinar
• Siempre cocine los alimentos en el tiempo minimo
recomendado. Revise cdmo se va cociendo la
comida. Si es neceserio, oprima el bot6n ADD ONE
MINUTE (UN MINUTO MAS) mientras el homo se
encuentra en operaci6n o despu6s de que haya
concluidoel ciclo de cocci6n (yea la seccibn
"Cbrno utilizarADD ONE MINUTE" en la p_gina
63).
• Para asegurarseque los alimentos est_n
completamente cocidos, mmu6velos o volt6elos
o reorganicelosa la mitad del tiempo de coccidn.
• Si no tiene la tapa de un recipiente, usepapel
encerado o toallas de papel para microondaso
envolturasde pldsticopara microondas. Recuerde
hacer un doblez de 1/4" a 1/2" (6 mm a 1.2 cm) en
una esquina de la envolturade pl&sticopara
ventilar el vapor al calentar o cocinar.
Interferencia con ondas de radio
AI usar su homo de microondas, se puede
producir una interfetenciaen su radio,"IV o
equipossimilares.Cuando haya interferencia,la
puede reduciro efiminarhaciendo unoo variosde
los siguientesmovimientos:
• Limpiela puerta y losempaques del homo.
• Ajuste laantena receptora del radioo televisibn.
• Aleje el radio o TV del homo de microondas.
•Conecte el homo de rnicmondas en un
tomacordente diferente para que el homo
de mioroondas y el radio o "IVest_n en
distintoscircuitosel_ctricos.
C6mo probar su horno de microondas
Para probar el homo ponga una taza de agua fda
en un recipiente de vidrio dentin del
homo. Cierre la puerta y asegt_rese
de que cierre h_camente. Siga
las instrucciones en =C6rno cocinar
a un nivel alto de energia" en la
p_gina 64 de la seccibnde =Chino utilizarsu homo
de micmondas"para prograrnarel homo a que
cocine pot 2 rninutos.Cuando el tiempo termine, el
agua deberd estar caliente.
51

C6mo probar su vajiUa y recipientes de cocina
Pruebe su vajilla y sus recipientes antes de
usados. Para
comprobar que
un plato se pueda usar
en el microondas,
col6quelo dentro del
homo junto con una
taza de agua. Cocine
a1100% de la energia
de cocci6n durante
1 minuto. Si el plato
se calienta y el agua
permanece fn'a, no
Io use.
Algunos platos (de melamina, algunas vajillas de
cer&mica, etc.) absorben la energia de microondas,
calentdndose demasiado, como para manejarlos y
retardan los tiempos de coccion. El cocinar en
recipientes de metal no diseSados para uso en
microondas podria daSar el homo, al igual que los
recipientes con metal no visible (con alambres de
sujeci6n, con recubrimientos de aluminio, grapas o
aros y decorados metdlicos).
Medidas de seguridad de operaci6n
Nunca se recargue en
lapuerta ni permita que
un niSocuelgue de ella
cuando est_ abierta.
No encienda el homo de
microondascuando estd
vacfo. La vida de este
producto podria
acortarse.
Si practicar c6mo
programar el homo,
ponga un recipiente con
agua en el mismo.
Use guantes
de cocina.
La energia de
microondas no calienta
directamente los
recipientes, pero el
calor de los alimentos
puede hacer que el
recipiente se caliente.
No utiliceperibdicosni
ning,',notro papel con
impresi6nen el homo.
No seque flores, fruta,
hierbas, madera, papel,
jicaras, ni mpa en el
homo.
Es comt3n que la puerta del homo se yea ondulada
despuds de haber funcionado durante cierto tiempo.
i
No trate de derretircera
parafina enel homo. La
parafina nose derrite en
el homo porque permite
que lasmicroondasla
traspasen.
52

Medidas de seguridad de operaci6n (cont.)
No opere el homo de
microondas a menos
que el plato giratorio
est_ bien asegurado
en su lugar y pueda
girar libremente. El
plato giratorio debe
poder gimr en cualquier
direccibn.
Asegdrese de que el plato giratorio se encuentre
correctamente cara arriba dentro deJ horno.
Maneje su plato giratorio cuidadosamente al
sacarlo del homo para evitar que se rompa. Si
su plato giratorio Ilegase a estrellarse o a rornperse,
contacte a Sears para que se Io cambie.
Cuando utilice un recipiente para dorar, la
parte inferior de _ste deber& estar, al menos, a
3/16 pulgadas (5 ram) por ardba del plato giratorio.
Siga las instrucciones que se incluyen en el plato
para dorar.
] Nunca cocine orecaliente un huevo
entero con todo y
cascar6n, La
acumulacibn de vapor
dentro de un huevo
entero puede provocar
que explote y
posiblemente dar3e el
homo. Rebane los
huevos cocidos
antes de calentarlos. Se ha sabido queen raras
ocasiones los huevos poch_ explotan. Cubra los
huevos poch_ y d6jelos reposar durante 1 minutos
antes de abridos.
Para mejores
resultados, mueva
cualquier Ifquido
varias veoes durante
el calentamiento o el
recalentamiento.
Los liquidos que se
calientan en ciertos
recipientes
(especialmente
recipientes en forma
de cilindro) pueden sobrecalentarse. El Ifquido
puede salpicar haciendo un fuerte ruido al
calentarlo o despu_s de hacerlo, o al agregar
ciertoe ingredientes (granos de caf_, bolsas de te,
etc.). Esto puede dafiar el homo.
AI rostizar,es posibleque las micrm)ndas no
alcancen el centrode la piezade came. El calor
se distribuyehacia el centrodesde las breas
exteriorescocidastal y como sucede al cocinar
con homostradicionales. Esta es una de las
razones para dejarreposar algunosalimentos(pot
ejemplo, piezas rostizadaso papas homeaclas)un
tiempo despu_sde cocinadoso para mover
algunosalimentosdurante el tiempo de coccibn.
No fria alimentos en el homo. Los recipientes
para microondas no son apropiados para freiry
ademds resultamuy dificilmantenerla temperatura
necesaria.
No cueza las papas
demasiado. Cuando
termine el tiempo de
coccion recomendado,
las papas deber_m
estar ligeramante
firmes porclue se
seguir_ cocinando
durante el tiempo de
reposo. Despu6s de
¢ocinarlas en el
microondas, d_jelas reposardurante 5 minutos.
Terminar_nde cocerse mientrasreposen.
Conexi6n el( ctrica
Si el voltaje de su linea de energia el_-trica o
Intenuptor de
dmuitos o
tomacorriente es
menor a 110 voltios,
lostiempos de coccibn
ser-'anmayores. Haga
que un electncista
calificado revisesu
instalacibnelL=ctdca.
53

Funciones del horno de microondas
Su homo de microondas est& disefiado para
hacer que su experiencia en la cocina sea Io m&s
placentera y productiva posible. Para ayudarle a
estar preparado y listo r&pidamente, la siguiente
es una tista de las funciones b&sicas de su homo
de microondas:
1. Asa do la puerta. Jale para abrir la puerta.
2. Sistema de seguro para la puerta. El homo
no operara a menos que la puerta este cerrada
o asegurada.
3. Ventana con protecci6n de metal. La
protecci6n de metal evita que se escapen
las microondas. Est,. disefiada en forma de
ventana para permitirle ver los alimentos
mientras se cocinan.
4. Pan'ilia de cocci6n. Uso de espacio extra
cuando cocina en rods de un recipiente a
la vez. Vea la p_gina 59 para mayor
informacibn.
5. Plato giratorio de vidrio (N0mem de parte
4393751) (no se muestra). Incluido en
el interior del homo, vea mas adelante las
instrucciones de instalacibn. Este plato giratorio
da vuelta a los alimentos mientras los cocina
para una coccibn m_s uniforme. Para mejores
resultados, el plato deberd estar dentro del
homo mientras estd operando. El plato giratorio
eat& hundido en el piso del intedor del homo
para dade un mayor espacio para cocinar y
obtener mejores resultados. Vea las pdginas 50,
53, 56, 58, 80, 86 y 88 para mayoms detatles.
6. Filtros de carbbn y grasa. Incluidos en el
interiordel homo.Vea las p&ginas81-82 para
instruccionesde instalaci6ny limpieza.
7. Luz de la superficie para cocinar. Enciendala
luz para iluminarla superliciepara cocinaro
utilicelacomo una luznocturna.Vea la pdgina60
para mayor informacibn.
8. Etiqueta de gu|a de cocina. Utilicelapara
referenciasrdpidaspara Coccibnautom&tica,
Recalentado autom_.tJco,Descongelado
automdtico,y programacibnde Coccibn
porsensor.
9. Interruptores del extractor y de la luz de la
superficie para cocinar. Vea la pagina60 para
mayorinformacibn.
10. Panel de control. Opdma losbotonesen este
panel para realizartodas lasfunciones.Vea
lasp&ginas55-58 para mayor informaci6n.
11. Rejilla de ventilaci6n.
12. Luz interior del homo.
13. Cubierta interna del homo de microondas.
14. Placa con roodelo y nOmero de aerie. Vea la
pdgina 87 para mayor informacibn.
54

Funciones del horno de microondas (cont.)
Para instalar el plato giratorio en
su soporte:
Lineascurvas
relieve
i_rte _E_
• Inserte el centro
(Nt3mero de parte
4393754) en
el eje.
• Coloque el soporte
(Nt3mem de parte
4393752) en el rondo
de la cavidad.
• Coloque el plato
giratorio en el centro.
Cemi6rese de que las
curvas en relievedel centre de la parte
inferiordel plato giratorioest6n entre los tres
"rayos" del centro.
• Las rodillos (Nemero de parte 4393753) del soporte
deber&n entrar en el carril de la parte inferior del
plato giratorio.
• El plato giratorf, o rota Io mismo en el sentido de las
maneciUas del reloj que en sentido contrario. Esto
es normal.
Partes del panel de control
1. Display (Pantalla). Esta pantalla incluyeun reloj
e indicadores que le permiten saber la hora, la
programacibndel tiempode coccibny las
funciones de coosibnque usted elige.
2. POPCORN (Palomitas de maiz). Presioneeste
bot6n para preparar palomitas de maiz (en 1
bolsade los 3 tamaSos especiales para
microondas)sin necesidad de introduciruna
energiaa tiempo de coccion. El sensordel
homo calcular_ cu&ntotiempo debe cocinar
dependiendo de la cantidad de humedad que
detecte de las palomitas. Vea la pdgina78 para
mayor informaci6n.
3. BEVERAGE (Bebidas). Presione este botbn
para calentar1 b 2 tazas de 8-onzas (237 ml)de
bebida sin necesidad de introducinuna energia
o de tiempo de coccibn. Elsensordel homo
calcular&cudnto tiempo debe calentar,
dependiendode la cantidad de humedad que
detecte de la bebide. Vea la p&gina78 para
mayorinformacibn.
4. BAKED POTATO (Papas al homo). Presione
este botbn para homear de 1 a 4 papas sin
necesidad de introduciruna energia o tiempo
de coccibn.El sensor del homo calculardcudn-
to tiempo debe cocinar dependiendo de la can-
tidad de humeclad que detecte de la(s)papa(s):
Vea la p_gina 78 para mayor informacibn.
5. FRESH VEGETABLE (Vegetales frescos).
Presioneeste botbn para cocinar de 1 a 4 tazas
(237 a 946 ml) de vegetales frescos sin necesi-
dad de intt_lucir una energt'ao tiempo de coc-
ci6n. Elsensordel home calculara cudnto tiem-
po debe cocinar dependiendo de lacantidad de
humedad que detecte de los vegetales. Vea la
pdgina78 para mayor informacibn.
®
®
@
I Z)( 8)( g )
@
conUnOa en la sigulente p&gina
55

Funciones del panel de control (cont.)
6FROZEN VEGETABLE (Vegetales
congelados). Presione este botbn para cocinar
de 1 a 4 tazas (237 a 946 ml) de vegetales
congelados sin necesidad de introducir una
energia o tiempo de coccibn. El sensor del
homo calculara cuanto tiempo debe cocinar,
dependiendo de la cantidad de humedad que
detecte de los vegetales. Vea la pagina 78 para
mayor informacibn.
7J:ROZEN ENTREE (Alimentos congelados).
Presione este boton para cocinar alimentos
congelados de 10 6 20 onzas (284 o 587 gr) sin
necesidad de introducir una energfa o tiempo de
coccibn. El sensor del homo csiculara
cu_.nto tiempo debe cocinar, dependiendo de la
oantidad de humedad que detecte de los
alimentos. Vea la pagina 78 para mayor
informaci6n.
8.DINNER PLATE (Platillo completo). Presione
este bot6npara calentarun platoconalimento,
sin necesidadde introduciruna energia o tiempo
de coccibn.El sensordel homo calcular_cuanto
tiempo debe calentar,dependiendode la
cantidad de humedadque detectedel alimento.
Vea la p&gina78 para mayor informaci6n.
9.SOUP (Sopas). Presione este botbn para
calentar de 1 a 4 tazas (237 a 946 ml) de sopa
sin necesidad de introducir una energia o
tiempo de coccibn.El sensor del homo calcular&
cu_nto tiempo debe calentar, dependiendo de la
cantidad de humedad que detecte de la sopa.
Vea la p_.gina78 para mayor informaci6n.
10.SURE SIMMER (Cocinar a fuego lento).
Presioneeste bot6npara cocinara fuego lento
sopas, guisados,caldosy otrosalimentos
Ifquidos.Vea lapdgina76 para mayor
informacibn.
11.AUTO COOK (Cocci6n autom_ica). Presione
este botbnpara cocinaalimentosespeciales
para microondassin necesidadde introducir
tiemposo energias de coccibn.Vea la p_gina69
para mayorinformacibn.
12.AUTO DEFROST (Descongelado autom&tico).
Presione este botbnpara descongelaralimentos
sin necesidadde introducirtiemposo energfas
de cocci6n.Vea la p&gina72 para mayor
informaci6n.
13.AUTO REHEAT (Recalentado autom_tico).
Presione este botbnpara recalentaralimentos
especiales para microondassinnecesidadde
introducirtiemposo energias de coccibn.
Vea la p_gina71 para mayorinformacibn.
14, HOLD WARM (Mantener caliente). Presione
este bctbnpara mantenercalientessus
alimentosen suhomode microondashastapor
99 minutos,99 segundos.HOLD WARM puede
utilizarseen forma independienteo puedeseguir
autom_.Ucamentea unciclode cocci6n.Vea la
p_gina 79 para mayorinformacibn.
15.ADD ONE MINUTE (Un minuto m;is).
Presione este botbnpara cocinarporun
minutoa1100% de energia de coccibno para
agregar un minutoextraa su ciclode cocci6n
en la energia de coccion que ustedhaya
programado.Vea la pagina 63 para mayor
informaci6n.
16.cLOCK (Reloi). Presione este botbn para
introducir la horacorrecta. Vea la p&gina61
para mayorinformacibn.
17.KITCHEN TIMER (Cronbmetro de cocina)o
Presioneeste bot6n para activaro cancelar el
cronbmetm de cocina. Vea la p_gina 62 para
mayor informaci6n.
18.Botones numdricos. Presionelos botones
num_ricospara introducirtiemposde coccibn,
energias de coccibn, cantidades,pesos o
categorias de alimentos.
19.cOOK TIME (TIempo de cocclbn). Presione
este bot6n seguidopot los botonesnumdricos
para programarun tiempode coccibn. Vea las
pdginas64, 66, y 67 para mayorinformacibn.
20.POWER (Energia). Presioneeste botbn
despuesde que el tiempode coccibnhayasido
establecido,seguidode un botbnnum@rico
para establecerla cantidad de energia de
microondasliberadas para cocinarlos
alimentos.Tambidnpresioneeste botbnpara
aumentaro disminuir un tiempode coccibn
preestablecido.Vea lasp&ginas63 y 65 para
mayor informaci6n.
21.TURNTABLE ON/OFF (Encendido/apagado
de plato giratorio). Presioneeste botbnpara
encender o apagar el platogiratoriode su
homo.Vea la pagina 88 para mayor
informaci6n.
22.START/ENTER (Encendedictroducir).
Presione este botbn para iniciaruna funcibn.
Vea la p&gina57 para mayorinformacibn.
23.OFF/CANCEL (Apagar/cancelar). Presione
este botbnpara borraruna instruccibn
incorrecta,cancelar un programadurantela
coccibno para borrarla pantalla.Vea lap&gina
57 para mayorinformaci6n.
24.VENT FAN ON/OFF (Encendido/spagado de
venUlador). Presioneeste botbnpara encender
o apagar el ventilador.Vea la p&gina60 para
mayor infomraci6n.
25.5 SPEED FAN(5 velocldades del
extractor). Presione el botbn"up"
(aumentar) para incrementarla velocidaddel
ventilador,y el botbn "down" (disminuir)para
reducir lavelocidaddel ventilador.Vea la
p&gina60 para mayor informacibn.
26. UGHT ON/NIGHT/OFF (Encendido/apagado
de luz y luz nocturna). Presioneeste botbn
para encendero apagar laluz y la luznocturna.
Vea la p_gina60 para mayorinformaci6n.
56

Funciones del panel de control (cont.)
NOTAS:
• Si intiedujo los valores para una funcibn pero
no oprimib START/ENTER en 5 segundos,
aparecera el indicador START? (INICIAR?).
• Para funciones sin sensor, si abre la puerta
mientres el homo est& encendido y luego la
cierra en un periodo de 15 minutos, se
encender_ la luz del indicador de START?.
Optima START/ENTER para continuar. Si abre la
puerta cuando est_ cocinando con sensor, se
cancelard la cocci6n y tendra que volver a
empezar.
• Si elige una funciSn pero no opdme otto botbn
de comando en un minuto, la pantalla regresar&
a la hora del dia y tendra que empezar de
nuevo.
Se_ales Sonoras
Su homo de microondas emite se_ales sonoras
que |e pueden guiar at programar o utilizar su
homo:
• [_] Un tono de programacibn senar_ cada vez
que oprima un botbn
• r_ un tono largo indica que terminb la cuenta
regresiva del cmnbmetm de la cocina.
• I "))))II_-II_l "))))I Cuatro tonos indican que
terminb el ciclo de coccibn.
• [_]i'_ Dos tonos cortos y r_.pidos suenan
cada minuto durante los primeros 15 minutes
despu_s de la seSal de fin de ¢iclo de ¢occion
como recordatodo si no se han sacado los
alimentos del homo.
• I'_l_-I Dos tonos cortos y r,apidos sonardn
al entrar y salir de una funcibn no visible, (por
ejemplo, seguro para niSos), hora del dla.
• r_l_l] -))))j Sonardn ties tones si hizo una
entrada err6nea.
Para desacUvar las se_ales sonoras:
OPRIMA
CSD
_r'_r_e 5 segundos
Pare a_d_ de nuevo:
Para desactivar todas las se_ales sonoras
excepto la de fin del cron6metro y funciones
no visib_es:
OPRIMA
durante 5 segundos
Para activar de nuevo las se_ates:
OPRIMA
CSD
durante 5 segundos
NOTA: Dos tones senardn cuando se activen o
desactiven la seSales sonoras.
Cbmo interrumpir la coccibn
Puede detener el funcionamiento del homo
durante un ciclo si abre la puerta. El homo deja
de catentar y se detiene et extractor pero la |uz
permanece encendida. Para reiniciar la coccibn
cierre la puerta y.
OPRIMA
Si no desea continuar cocinando:
• Cierre la puerta y se apagar_t la luz.
O
• OPRIMA
NOTA: Antes de programar una funcibnoptima
OFF/CANCEL (APAGAR/CANCELAR)para
asegurarsede que no estd activa ningunaotra
funcibn.
OPRIMA
CSD
durante 5 _undos
57

Funciones del panel de control (cont.)
Cbmo calentar mds de un plato con
alimentos
Cuando calienta platos con alimentos a un tiempo
i de cocci6n de su
eleccibn, usted podrd
calentar dos platos de
10-1/4 pulgadas
(26 cm) juntos o un
plato mds grande que el
plato giratorio. Usted
podra oalentar 2 platos
m_ls en la pardlla de
cocci6n para tener un
total posible de 4
platos. Para mejores resultados, a la mitad de la
cocci6n gire los platos de manera que los
alimentos de enfrente ahora se encuentren atrds.
Haga Io mismo cuando caliente una cacerola rods
grande (9 a 13 pulgadas [23 a 33 crn]). Cuando
caliente 4 platos extendidos, girelos tal y como se
describi6 anteriormente y cambie los dos platos de
amba por los dos de abajo.
Para calentar 2 platos juntos en la parte de abajo
o un plato m_s grande, el plato
giratorio no deberd estar en
movimiento. Puede apagar el plato
giratorio con s61o tocar TURNTABLE ON/OFE
Aparecerd "TURN TABLE OFF" en la pantalla. Si
oprime TURNTABLE ON/OFF antes de comenzar
a programar la funoion de cocci6n, su homo le
solicitard que introduzca un tiempo de cocci6n
sin necesidad de que usted oprima COOK TIME.
Su plato giratorie regresara a su posicibn original
cuando la cocci6n haya terminado o cuando
oprima OFF/CANCEL
NOTA: No puede apagar el plato giratorio cuando
este utilizando alguna funci6n autom&tica.
Cbmo utilizar el seguro para ni_os
El seguro para nifios bloquea el panel de control
para que los ni_os no puedan utilizar el homo de
microondas si usted no desea que Io hagan.
Para bloquear el panel de control:
OPRIMA
durante 5 segundos
Se escuoharan dos tonos y _ aparecerd en la
pantalla. Cuando se haya bloqueado el panel,
se escuchardn 3 tonos y aparecerd LOCK
(BLOQUEAR) cuando optima cualesquiera
de los botones a excepcibn de EXHAUST
FAN y LIGHT.
Para desbloquear el panel de control:
OPRIMA
durante 5 segundos
Se escuchar_n dos tonos y PI se eliminard de
la pantalla.
Cbmo utilizar la funci6n
demostraci6n/aprendizaje
Puede programar su homo de microondas para
visualizar las instrucciones conforrne las vaya
introduciendo sin tener que encender el
magnetrbn. Esta funci6n le ayudar_ a aprender
o6mo utilizar su homo sin necesidad de cocinar
alimentos realmente.
Para programar la funcibn demostraci6n
aprendizaje:
OPRIMA
durante 5 segundos
Sonaran dos tonos y aparecerduna "d" pequeSa
en la pantalla.
Para cancelar la funci6n demostraci6n/apren-
dizaje:
OPRIMA
dumn_ 5 ,_jurH:los
Se escuchar_n dos tones y desaparecer_ la "d"
de la pantalla.
58

C6mo utilizar la parrilla de cocci6n
La parrilla de coccibn le proporciona un espacio
adicional para cocinar en mbs de un recipiente a
la vez.
Si necesita una parrilla de repuesto, puede
ordenar una a su Centro de Servicio Sears, o
Ilamando al 1-800-366-7278 para EE.UU.
Asegurese de tener a la mano el n0mero de
modelo cuando ordene.
Cbmo colocar la parrilla
i oloque la parrilla
hasta que se
encuentre bien firme
en los soportes para
_ 3 la parrilla que se
encuentran en las
_ paredes laterales del
homo.
NOTAS:
• Use guantes para homos para sacar alimentos
del homo de microondas.
• No deje la parrilla metalica en el homo. Podria
ocasionarse una descarga el_ctrica o dafiar
el homo si alguien enciende el homo
accidentalrnente,
• No opere el homo con Ja pardUa met_.lica en el
piso del homo. Esto dafiar{a el acabado interior.
• Utilice la parrilla solamente en el homo de
rnicroondas.
• No utilicela parrillacon el recipiente para dorar.
• No permitaque el recipiente con alimentos que
se encuentre en la parrillatoque las partes
superiory laterales del homo.
• No cocine alimentos directamente sobre
la parrilla.Colbquelos en recipientesespeciales
para homos de microondas.
• No coloque recipientesrnet_licospara cocinar
sobrela parrilla.
• Utilice la parrillade coccibn solamente cuando
cocine a m_s de un nivel.
59

Utilizar el extractor
Los botones en la parte inferior derecha del panel
de control sirven para manejar el extractor de 5
velocidades.
NOTAS:
• Dos segundos despu_s de que presione VENT
FAN, la pantalla regresar& a su aspecto anterior.
• La primera vez que encienda el extractor despu_s
de conectar el homo de microondas, funcionar& a
la velocidad 1. La siguiente vez que encienda el
extractor, funcionard con la t31timavelocidad que
se haya utilizado.
1. Encienda el EXTRACTOR y seleccione la
velocidad del extractor.
Presione el bot6n "^" (aumentar)para
incrementarla velocidaddel extractor.
Presioneel bot6n "v" (disminuir)para
reducirla velocidaddel extractor. La pantalla
mostrar&"FAN" (EXTRACTOR)y un nOmemde
1 a 5 para indicarla velocidad del extractor.
NOTA: Si la temperatura procedente de las
hornillas o la superficie para preparar los
alimentos sube demasiado, debajo del homo,
el extractor en el conducto de ventilacibn se
encendera autom_ticamente en estado HIGH
(ALTO) para proteger el homo. El EXTRACTOR
puede seguir trabajendo hasta per una hora
para enfriar el homo. Cuando esto suceda, el
extractor no pod_ apagarse con el botbn
VENT FAN (EXTRACTOR).
OPRIMA
Ivl^l
5 FANSPEEDS
2. Apague el extractor cuando Io desee. OPRIMA
C6mo utilizar la luz para la superficie de preparaci6n
de alimentos
El bot6n en la parte inferiorderecha del panel
de control regula la luz para la superficiede
preperacibnde alimentos.
1. Encienda la luz.
OPRIMA
(una vez para luz estdndar y dos
veces para luz noctuma)
2. Apague la luz cuando Io desee. OPRIMA
(1 6 2 veces, dependiendo de la
programaci6n de la luz)
6O

C6mo programar el reloj
Cuando conecte por primera vez su homo de
microondas o despu#.s de una falla el_ctrica, la
pantalla desplegar_ el signo =:" de manera
intermitente. Si no se programa una hora, e! signo
":", destellar_ hasta que presione algOn bot6n.
NOTAS:
• Si selecciona una hora no v&lida y oprime
CLOCK (RELOJ), se escuchar&n 3 tonos.
Introduzca la hora correcta.
• Si oprime OFF/CANCEL (APAGAR/CANCELAR)
al programar el reloj, la pantalla desplegar_ la
Qltima hora que se programb del dia.
• Para apagar el reloj, opdma CLOCK, el nemero 0
y CLOCK nuevamente, la hora que se habia
programado desaparecer& y aparecera el signo
":" en la pantalla
1. Oprima CLOCK.
OPRIMA USTED VEP,_
2. Introduzca la hora del dia.
Ejemplo para las 12:00:
3. Termine la programaci6n.
OPRIMA
OPRIMA
0
o
US'rEDVERA
USTEDVlERA
61

C6mo utilizar el cron6metro
Puede utilizar su homo de microondas como un
cronometro. Utilice el cronbmetro para cronometrar
hasta 99 minutos y 99 segundos.
1. Oprima KITCHEN TIMER.
NOTA: El homo puede funcionar mientras se
utiliza el cronbmetro. Para ver el cron6metro
mientras funciona el homo, oprima KITCHEN TIMER
(CRONOMETRO).
OPRIMA USTED VEP_
2. Programe el tiempoa contar en forma regresiva.
Por ejemplo, para 1 minuto, 30 segundos:
NOTA: Si programa mds de 4 d{gitos,
desapareceran los primeros 4 y aparecer&n
los siguientesdigitosa la derecha a medida que
usted los va introduciendo.
OPRIMA
USTED VER/_,
3. Inicie la cuenta regresiva.
OPRIMA
NOTA: Si no realiza este paso dentro de los {K T HEnNI
5 segundos despu6s de realizar el paso 2,
aparecera "START?(_,INIClAR?)". Despu_s O
tendr& 1 minuto para oprimir START/ENTER
(INICIAR/INTRODUCIR) o para opdmir KITCHEN
TIMER (CRON6METRO) antes de que la pantalla
vuelva a la hora def dia.
USTEDVER._
USTEDVER/_
AI final de la cuenta regresiva:
(se escuchar_ un tono largo)
Para cancelar el cronbmetro:
Durante la cuenta regresiva:
OPRIMA
o
USTED VER_
62
_omdeld_)

C6mo utilizar ADD ONE MINUTE (UNMINUTO MAS)
ADD ONE MINUTE permite cocinar los alimentos
durante 1 minuto a un nivel de energia de coccibn
de 100%, o bien, agregar un minuto extra aJciclo
de coccibn. Tambi_n Io puede utilizar para pmlon-
gar los ciclos de coccibn en mOltiplos de
1 minuto, hasta 99 minutos.
NOTAS:
• Para prolongar los ciclos de coccibn en mt_ltiplos
de I minuto, oprima ADD ONE MINUTE
repetJdamente durante la cocck_n.
• Des_ de cerrar la puerta, puede introducir
ADD ONE MINUTE_ sin tenet que opdmir
START/ENTER (INICIAR/INTRODUCIR).
1. Cerelbrese de que la comida est_ dentro del homo.
• Si oprime ADD ONE MINUTE durante la cocci6n,
el homo cocina_ al nivel de energia de coccibn
seleccionada previamente. Si oprime ADD ONE
MINUTE despuds de haber terminado la coccibn,
el homo cocinar_ ai nivel de energia de coccibn
del 100%. Puede cambiar la temperatura de
coccibn si oprime POWER (ENERGY,), despues de
haber oprimido el botbn ADD ONE MINUTE, y
luego oprimir los botones num_ic_s para
determinar la nueva temperature de cocelbn, y
finalmente START/ENTER (INICIAR/INTRODUCIR).
• Puede utilizar ADD ONE MINUTE sblo para la
funcibn de ciclo de coccibn.
2. Opdma ADD ONE MINUTE.
Elemplo,para cocinar durante 1 minuto:
OPRUMA USTEDvr=RA
C6mo cambiar los tiempos de cocci6n preestablecidos
Si el tiempo de coccibn preestableciclo es funcibn AUTOMATICA, usted sblo puede cambiar el
demasiade largo o corto, puede aumentarlo o tiempo de coccibn despues de int]oducir una
disrninuido de_ de seleccionar AUTO COOK, cantidad de alimestos, pero antes de que inicle la
AUTO REHEAT, AUTO Di_cROST, o SENSOR COOK coccibn. Para coccibn con SENSOR, usted sblo
(excepto para la posici6n de POPCORN), PARA una puede cambier el tiempo de coccion dentro de 20
minutes despu_s de seleccibnar el tipo de coccion.
Pot ejemplo, en AUTO REHEAT,despu_s de
seleccionarel tipo de alimestoe introducirlacantidad:
Para prolongarel tiempo de coccibn:
OPRIMA USTEDVERA
ulta vez
Para reducirel tiempo de coccibn:
(ejemplopara recalent_
OPIRIMA USTIED VERA
do6 veces
Para restablecer el tiempo de coesi6n original: OR:lIMA
USTEDVEPa_
63

C6mo utilizar su horno de
microondas
Esta secci6n le proporciona las instrucciones para operar cada funcion. Por favor, lea cuidadosamente estas
instrucciones.
C6mo cocinar a un nivel alto de energia
1.Coloque la comida dentro del homo y cierre
la puerta.
2. Oprima COOK TIME (TIEMPO DE COCClON).
OPRIMA
3. Introduzca el tiempo de cocci6n.
Ejemplo para I minuto, 30 segundos:
OPRIMA USTED VERA
4. Encienda el homo. OPRIMA
AI terminar el tiempo de coccibn:
C6mo cambiar las instrucciones
Puede cambiar el tiempo de cocci6n en
cualquier momento durante la cocci6n si
repite los pasos 2, 3 y 4.
64
U_DVERA
(seescuchar_ncuatro
tonos)

C6mo cocinar a diferentes niveles de energia de
cocci6n
Para mejores resultados, algunas _ecetas
requieren diferentes nivele_ de energia de
coccibn. Mientras menor sea la energia de
coccibn, m&s lenta serd _sta. Cada n6mero en el
panel corresponde tambi_n a un porcentaje
distinto de la energia de cocci6n. Muchas recetas
en los recetarios de hornos de mieroondas le
indican por nQmero, porcentaje o norobre, el nivel
de energia de coccibn que debe utilizar.
El siguiente esquema le proporciona el porcentaje
de energfa de coccibn papa cada nQmero en el panel
correspondiente, as{ coroo el nombre de la energ{a
de cocci6n que se utiliza mas coroQnmente. Tambi6n
le indica cu&ndo utilizar cada uno de los niveles de
energia de coccion. Siga las instrocciones de la ceta
o del empaque, si las tiene.
NOTA: Consulte un recetario confiable para obtener
los tiempos de cocci6n.
ENERGiA DE COCCI(_N NOMBRE CUANDO SE UTIUZA
10=100% de la energ{a total Alta • Para calentar r_lpidamente muchos alimentos
(autom&tica) de f&cil preparacibn y aliroentos con alto
contenido de agua, tales como sopas y bebidas
• Para cocinar trozos pequeSos de came suave,
carne molida, piezas de aves, flletas de
pescado y la mayoria de las verduras
9=90% de la energia total • Para calentar sopa croroas
8=80% de la energia total • Para calentar arroz, pasta o platillos el homo
que se derraman
7=70% de la energia total Media-Alta ° Para cocinar y calentar elimentos que
necesiten una energia de coccibn menor que
la alta (por ejemplo, pascado entero y pastel
de came) o cuando la comida se est_
cocinando deroasiado rdpido.
• Para volver a calentar una sola porcibn de
comida
6=60% de la energfa total • Para cocinar alimentos que requieran
cuidados especiales, tales coroo queso y
platillos a base de huevo, budines y natillas
• Para cocinar platillos que no se derraman,
tales como la lasa_a
5=50% de la energfa total Media • Para cocer jambn, ayes enteras y asados a
fuego lento
• Para derretir chocolate
4=40% de la energia total • Para cocer a fuego lento los estofados
• Para calentar pastas
3-_30% de la energia total Media-Baja, • Para descongelar alimentos, tales como pan,
Descongelar peseado, cames, aves y elimentos precocidos
2=20% de la energia total • Para suavizar mantequilla, queso y helados
1=10% de ta energia total Baja • Para mantener la comida caliente
• Para quitarle Io fifo alas frutas
NOTA: DespuL=s de que haya introducido el Uempo de coccibn, tambi_m podrd utilizar el botbn de
POWER (ENERGIA) como un segundo cron_netro de cocina si introduce "0" como energia de coccibn.
El homo contar& en forma regresiva el tiempo de coccibn que establecib sin cocinar.
conUnt_a en la siguient_ i_gina
65

C6mo cocinar a diferentes energ|as de cocci6n (cont.)
1. Coloque su comida en el homo y cierre la puerta.
2. Optima COOK TIME (TIEMPO DE COCCION).
OPRIMA USTED VER.&.
3. Introduzcael tiempo de coccibn.
Por ejemplo, para 7 minutos, 30 segundos:
4. Establezca el nivel de energia de cocci6n.
OPRIMA
OPRIMA
USTED VEI:_
USTED_
Por ejemplo, para un nivel de energ{a de
coccibn del 50%:
OPRIMA USTED_
O
(repita esta operaci6n hasta
que aparezca el nivel de
energ(a de cocck_ deseado)
66

C6mo cocinar a diferentes energias de cocci6n (cont.)
5. Encienda el homo. OPRIMA USTED VERA
r STAF_T'-'_
AI terminar el tiempo de coccibn:
C6mo cambiar las instrucciones
Puede cambiar el tiempo o la energla de cocciGn
en cualquier momento si repite los pasos 2, 3
y/6 4y.5.
C6mo cocinar por pasos
U_D_
(se escuchar_n cuatm
tonos)
Puede programar sos funcionesde coccibnen
cualquierorden.Sin embargo, si utilizaAUTO
DEFROST (DESCONGELADO AUTOMATICO),
_ste deberd ser el primer paso a realizar.
Para mejoresresultados,algunas recetasrequieren
una energia de coccibn para un determinado lapso
de tiempo y otra energia de coccibn para otto lapso
de tiempo. Puede programarsu homo para cam-
biar de un nivelde energiaa otto automdticarnente
NOTA: No puede utilizarel sensorcuandococina
hasta trespasos diferentes.
por pasos.
1. Coloque la comida en el homo y cierrela puerta.
2. Opdma COOK TIME ('FIEMPO DE COCCI_N). OPRIMA USTED VERA
3. Introduzcael tiempo de coccibn 10amel OPRIMA USTED VEFL4
primer paso.
Por ejemplo, _ 7 minutos,30 segundos:
€ontinUa en la siguiente I_gina
67

C6mo cocinar por pasos (cont.)
4. Establezca la energia de coccibn para el OPRIMA
primer paso. (_
USTEDVERA
Ejemplo, para un nivel de energia de cocci6n
del 50%:
OPRIMA
o
q_ a_r_ 1<3ene_n_
USTED VERA
5. Repita los pasos 2, 3 y 4 para programar el tiempo
y la energia de coccibn para cada paso adicional.
6. Encienda el homo. OPRIMA USTED VEP_
Despu_s de haber completado el primer paso,
los siguientes se contar_n de manera regresiva.
AI terminar el tiempo de coccibn:
(elprimerpasosicocinaen
dospasos)
USTED VERA
Cbmo cambiar las instrucciones
Puede cambiar los tiempos de cocci6n o los
niveles de energ|a de un paso en cualquier
momento despu_s de que se inicie el proceso,
si repite los pasos 2, 3 y/6 4 y 5.
68
(se escuchardn 4 tonos)

C6mo utilizar AUTO COOK (COCClbN AUTOMATICA)
Puede cocinar alimentos preparados para hornos
de microondas seleccionando simplemente una
cantidad y categoria. AUTO COOK tiene tiempos
y niveles de energ{a de coccibn preestablecidos
para 5 categorias (ver el esquema siguiente).
Para utilizar AUTO COOK, siga estos pasos:
1. Optima
una vez
Usted
verb
2. Oprima AUTO COOK de 1 a 5 veces para
seleccionarel tipo de alimento.
_ Ejemplo para
arroz
dos veces
O
Oprima un nQmero del panel para seleccionar
el tipo de alimento.
Usted
verd
(_ EJ_dmuP/Ospar_.
tadas
Ejemplo para
verduras en
la tadas
3. Oprima uno o m&s n_meros del panel para
introducir la cantidad. Este paso no es nece-
sario para la programaci6n de Rice (arroz).
Usted
ver_
Ejemplo parauna taza
Ejemplo para
una taza
4. Optima
Usted
verd
0a cuenta
regreshra
puede variar)
NOTAS:
• Si no introduceuna cantidad en 2 segundos,
AUTO COOK le solicitarbque elija una cantidad.
Tendrb1 minuto para introducir la cantidad y para
oprimirSTART/ENTER.De no set as{,AUTO
COOK se cancelarb.
• Sioprime AUTO COOK 6 veces, la pantalla
volverbal programapara arroz.
• Si necasita rodso menos tiempo de coccibn,no
opdma el botbn AUTO COOK nuevamente.
Oprima el bot6n POWER antes de oprimir
START/ENTER.(Vea "Chino carnbiartiempos de
coccibn preestablecidos"en la secci6n "Conozca
su homo de microondas").
• Cuando cocine tocino, tenga en cuenta que las
diferenciasde grasa, came, espesor y procesos
de curado afectarbnla coccibn del tocino.
Generalmente los trozos regulatesde tocino
promedian aproximadamente 16 rebanadas
pot libra.
contin0a en la slguiente p_gina
69

C6mo utilizar AUTO COOK (COCCION AUTOMATICA) (cont.)
Este tabla le muestra c6mo seleccionar un tipo de alirnento y las cantidades que puede elegir para cada tipo.
OPRIMA U OPRIMA EL NOMERO
ALIMENTO AUTO COOK* DEL PANEL CANTIDADES QUE PUEDE ELEGIR
Arroz una vez 1 0.5 a 2 tazas" (118 ml a 473 ml)
(sensor)
Verduras enlatadas 2 veces 2 1 a 4 tazas (237 ml a 946 ml)
Tocino 3 veces 3 1 a 6 piezas, espesornormal
Cereal (instantdneo) 4 veces 4 1 a 4 porciones
Tostadasa la frencesa 5 veces 5 1 a 4 piezas
(¢ongeladas}
* Debe oprimirAUTO COOK una vez antes de elegir el tipo de comida.
- Ya que este elimento se cocina pot rnedio del sensor,no es necesario que introduzca la informacibn de lacantidad. La cantidad
que se muestra aquf es la _ que puede cocinar. Despu_ de que selecciona el tipo de elimento y lie oprime START/ENTER,
aparace "SENSE" (SENSOR) en la pantal!a. AdermLs,el sensor requiem 2 minutosy 30 segundos para prepararse despu_s de que
se conecta el homo o despu_=sde una falla eldctrica. Si usted comie_za a cocinar pot sensor durante este tiernpo de preparacibn,
la palabra =SENSE* (SENSOR) aparece en la pantalla hasta que se completa dicha preparacide. B mictoondas no funcionara
hasta que el sensor est_ listo.
7O

Cbmo utilizar AUTO REHEAT (RECALENTADOAUTOMATICO)
Puede volver a calentar alimentos preparados
para homos de microondas simplemente
seleccionando una cantidad y categoria. AUTO
REHEAT tiene tiempos y niveles de energia de
coccion preestablecidos para 4 categorias (ver la
tabla siguiente).
Para utilizar AUTO REHEAT, siga estos pasos:
1. Optima
una vez
Usted
verd
3. Oprima un n_mero del panel para introducir
la cantidad.
Ejemplo paraltaza
Usted
vera Ejemplo para
1 taza
4. Optima
Usted
verd
(la cuenta
regresiva puede
variar)
2. Oprima AUTO REHEAT de 1 a 4 veces para
elegir el tipo de comida.
_ Ejemplo para
piatillos al homo
3 veces
O
Optima un nQmero del panel para elegir el tipo
de comida.
Ejemplo paraplatillos al homo
Usted
verd
Ejemplo papa
platillos al
homo
NOTAS:
• Si no introduce una cantidad en 2 segundos,
AUTO REHEAT le solicitard que elija una
cantidad. Tendrd 1 minuto papa introducir una
cantidad y pulsar START/ENTER
(INICIAR/INTRODUClR). De no ser asi, AUTO
REHEAT se cancelar&.
• Si pulsa AUTO REHEAT 5 veces, la pantalla
volvar& al programa para rebanada de pizza.
• Si necesita mas, o menos tiempo de cocci6n, no
optima AUTO REHEAT nuevamante. Optima el
botbn de POWER (ENERG[A) antes de opdmir
START/ENTER. (Vea "Chino cambiar los tiempos
de cocci6n preestablecidos" en la seccibn
"Conozca su homo de microondas").
• Cuando caliente nuevamente un muffin o bagel
grande (4 onzas [113 gr]), utilice el programa para
2 piezas. El programa para I pieza calienta
1 muffin o bagel de tamafio regular, d 2 panes
de cenar pequefios.
Esta tabla le mostrar6 cbmo elegir el tipo de comida y las cantidades que puede seleccionar para cada
tipa.
O
OPRIMA OPRIMA BN CANTIDADES QUE PUEDE
COMIDA AUTO REHEAT* NOMERO DEL PANEL ELEGIR
Rebanada de pizza** una vez 1 1 a 3 rebanadas, 5 onzas
(sensor) (142 gr) cada una
Salsa** (sensor) dos veces 2 1 a 4 tazas (237 ml a 946 ml)
Guisados 3 veces 3 1 a 4 tazas (237 ml a 946 ml)
Alimentos homeados 4 veces 4 1 a 6 piezas, 2 onzas (57 gr)
cada una
Debe oprimirAUTO REHEAT una vez antes de elegir el tipo de comidaL
Despuds de que seleceloneel _0o y la cantidad de elimento y opdme START/ENTER (INICIAR/INTRO), apmece =SENSE" (SENSOR)
en la pantella. Ademd=s,el sensor requiere 2 minutos y 30 segundosparapmpararse despuds de que se_-_ecta el homo o de_
de una faJlaeldctdc_ Si usted comie_za a cocinar pot sensordurante este tiempo de Wepatacibn, aparece la palabra "SENSE"
(SENSOR) en la pantalla hasta que se completa dicha pn_oaracl6n.[] mioroondas no funcionar_ hasta que el sensor est_ listo.
71

C6mo utilizar AUTO DEFROST (DESCONGELADOAUTOMATICO)
Puede descongelar alimentos si elige una 4. Oprima
categoda y establece un peso. AUTO DEFROST
tiene tiempos y niveles de energia de coccibn
preestablecidos para 3 categoHas (vea la tabla Usted
siguiente), ver_
Para utilizar AUTO DEFROST, realice los
siguientes paso_
1. Oprima
Ulla YeZ
Usted
ver_
2. Oprima AUTO DEFROST de I a 3 veces para
seleccionar et tipo de comida.
Ejemplo para
carnes
una vez
U
Oprima un n0merodel panel para elegir el tipo
de comida.
Ejemplo para carries
U_ed
vera
_ernpto para
_rrl_
3. Oprima el(los) n0mero(s) de bot6n para
introducir el peso.
dos_
Usted
ver_
Ejemplo para 1.1 Ibs
Ejemp_ para
1.1Ibs
(cuentaregresiva
puedevariar)
NOTAS:
• Si no introduce un peso en 2 segundos, AUTO
DEFROST le soScitar_ que introduzca un peso.
Tendrd I minuto para introducir el peso y para
opdmir START/ENTER (INICIAPJINTRODUCIR).
De no ser asi, AUTO DEFROST se cancelara.
• Si introduce un peso mayor que el peso mds alto
permitido para su programaci6n de alimentos, se
escuchar'_n 3 tonos y aparecer_ en la pantalla
"RETRY" (REINTENTAR) cuando oprima
START/ENTER.
• Si oprime AUTO DEFROST 4 veces, la
pantalla volverd el programa para Cames.
• Si necesda rnbs o menos tiempo de
descongelado, no oprima AUTO DEFROST
nuevamente. Oprima el botbn de POWER
(ENERGiA) antes de opdmir START/ENTER.
(Vea "Cbmo cambiar los niveles de energia
de coccibn preestablecidos" en la seccibn
"Conozca su homo de microondes').
• Vea la =Tabla de descongelado automdtico"
m_s adelante en esta seccibn para vet las
instrucciones para descongelar cada alimento.
• Para descongelar los articulos que no se
encuentren en la tabla =descongelado
automdtico," utilice el 30% de la energia
de coccibn. Con.suRe un recetario confiable
para obtenef informaci6n acerca de la
descongelacibn.
Para un descongelado parejo y
completo
• La forma del empaque afecta la rapide_ con la
que se descongelarSanlos alimentes. Los
empaquescon poca profund'_adse
descongelar_n mbs rdpido que un envase
pmfundo.
• Separe las piezes conforme empiecen a
descongelarselos alimentos.Laspiezes
separadases desnongelande rnanoram_s
uniforme.
• Utilice pequer_os pedazos de pape/aluminio 10am
protegerpartesde losalimentostelescomoelas
de pore:),los _ de las paras,colesde
pescado o las _nas que empiecen a calentame.
de que el papel aluminio no toque los
lados,el rondoo la parte supeder delhomo.
72

C6mo utilizar AUTO DEFROST (DESCONGELADO
AUTOMATICO) (cont.)
Esta tabla le indica la manera de elegir el tipo de comida y los pesos que puede establecer para cada tipo.
OPRIMA U OPRIMA EL NUMERO PESOS QUE PUEDE ESTABLECER
COMIDA AUTO DEFROST* DEL PANEL (en d_cimas de libra)
Cames una vez 1 0.1 a 6.6 (45 gr a 2994 gr)
Ayes dos veces 2 0.1 a 6.6 (45 gr a 2994 gr)
Pescado 3 veces 3 0.1 a 4.4 (45 gr a 1998 gr)
* DebeopdmirAUTODEFROSTunavezantesdeelegireltipode comida.
Tabla de descongelado autom tico
Programaci6n para carnes
AUMENTO
INSTRUCCIONES ESPECIALES
Came de res
Came molida
Came molida,Tortitas
Medallones, Lomo en bisteces,
Estofadoal homo, Estofadode
espaldilla,Estofadode rollos
de came
Estofado
Co_em
Cubos para estofado
Chuletas (1 pulgada [2.5 cm]
de grueso)
Cerdo
Chuletas (1/2 pulgada [13 mm]
de grueso), Hot Dogs, Costillas
de cerdo, Costillas estilo
campestre, Esto'fado de Iomo
(sin hueso), Salchicha
Salchichbn
Se deben cubdrcon papel atuminiolas partes grasosaso angostas de
carnes grandes de forma irregular y cortes de came grasosa al inicio de
los ciclosde descongelado.
No descongele menos de 1/4 de libra (133 gr).
No descongele menos de dos tortitas de 4 onzas (133 gr).
Coloque en una parrilla para rostizar en microondas.
Coloque en un plat6n para hornear en microondas.
Coloque en un platbn para homear en microondas.
Coloque en una parrilla para rostizar en microondas.
Coloque en una parrilla para rostizar en microondas.
Coloque en un platbn para hornear en microondas.
continr, a en la siguiente ptgina
73

Tabla de descongelado autom tico (cont.)
Programaci6n para pescados
ALIMENTO
Pescados
Filetes
Bisteces
Entero
Manscos
Cangrejo, Colas
delangosta,
Camar6n, Callo
de hacha
INSTRUCCIONES ESPECIALES
Coloque en un plat6n para hornear en microondas. Separe
cuidadosamente los filetes bajo agua fda.
Cotoque en un plat6n para homear en microondas. Haga cower
agua fr{a sobre el pescado para terminar de descongelar.
Coloque en un plat6n para hornear en microondas. Cubra la cabeza
y la cola con papel aluminio. No deje que el paper toque los lados
del homo. Para terminar de descongelar sumerja en agua fHa.
Coloque en un plat6n para homear en microondas.
Programacibn para aves
ALIMENTO INDICACIONES ESPECIALES
Polio
Entero
(hasta 9-1/2 Ibs [4.3 Kg])
Coloque el polio con la pechuga hacia ardbaen una parrilla
especial para rostizarpara microondas.Terminede descongelado
sumergiendoloen agua fda. Retire lasmenudenciascuando el polio
est_ parcialmentedescongelado.
En piezas Colbquelo en una parrillapara rostizaren microondas.
Terminede descongeladosumergi_ndoloen agua fria.
Codomices
Enteras Colbquelasen una parrillapara rostizaren microondas.Terminede
descongelarlassumergi_ndolasen agua fria.
Pavo
Pechuga
(menosde 6 Ibs _.7 grD
Colbquelo en una parrilla para rostizaren microondas.Terminede
descongeladosumergidndoloen agua fria.
74

Consejos de descongelado
• Cuando utilice AUTO DEFROST,
(DESCONGELADO AUTOMATICO), necesita
introducir el peso neto (el peso del alimento
menos el del recipiente). Introduzca el peso Io
m_.s cercano a 1/10 Ib (45 g).
• $61o utilice el AUTO DEFROST para alimentos
crudos. AUTO DEFROST le brinda los mejores
resultados cuando el alimento a descongelar
est_l completamente congelado. Si el alimento
est_l parcialmente descongelado, siempre
programe un peso menor (para un periodo de
descongelamiento menor), para evitar que el
alimento se cueza.
• Para obtener mejores resultados, se incluye un
tiempo de reposo preestablecido en el periodo
de descongelamiento. Esto pudiera hacer que el
tiempo de descongelamiento parezca m&s largo
de Io esperado. (Para mayor informaci6n acerca
del peHodo de reposo, consulte la secci6n
"Consejos para cocinar con microondas," an la
seccion "Guia de cocina").
Tabla de conversibn de peso
Probablemente est6 usted acostumbrado a que el
peso de los alimentos se describa en libras y onzas
que son fracciones de 1 libra (por ejemplo 4 onzas
equivalen a 1/4 de libra). Sin embargo, para poder
programar el peso del alimento en el AUTO
DEFROST, debe especificado en libras y d_cimas
de libra.
Si el peso en el empaque del alimento so expresa
en fracciones de libra, usted puede utilizar la
siguiente tabla para convertir el peso a dL=cimas.
PESO EN D_CIMAS PESO EQUIVALENTE EN ONZAS PESO EQUWALENTE EN GRAMOS
0.10 1.6 45
O.2O 3.2 91
0.25 Un cuarto de libra 4.0 113
0.30 4.8 136
0.40 6.4 181
0.50 Media libra 8.0 227
0.60 9.6 272
0.70 11.2 318
0.75 Tres cuartos de libra 12.0 340
0.80 12.8 363
0.90 14.4 408
1.00 Una libra 16.0 454
75

Utilizar SURE SIMMER (A FUEGO LENTO)
Su homo de microondas le permite calentar a fuego
lento sopas, guisado, caldos y otros alimentos
I{quidos. Lo 6nico que tiene que hacer es establecer
el tiempo de coccion a fuego lento y su homo hara
hervir sos alimentos y luego los mantendra a fuego
lento durante el tiempo que haya especificado.
NOTAS:
• No puede cambiar la energie de cocci6n de
SURE SIMMER.
• Esta funci6n utilizael sensor.El sensorrequiere
2 minutos y 30 segundospara prepararsedespu_s
de que se conecta el homoo despudsde unafalla
elL=ctrica.Si iniciael procesode SURE SIMMER
durante lapreparacibn,el microondasno fun-
cionardhastaque el sensorest_ listo.
• Cuando cocinevegetales,aumente lacantidad de
agua de 1/4 a 1/2 de t_a (60 a 125 ml).
• Cubra los platilloscon una tapadera sblida,podria
hacersecon la cubierta que acompafiael platillo
o con un plato. No utilicepldstico.
1. Coloque los elimentos dentro del homo y cierre
la puerta.
2. Oprima SURE SIMMER. USTED VER._
OPRIMA
3. Optima los botonos nOmedcos para introducir
el tiempo de cocoibn a fuego lento.
Ejemplo para 30 minutos:
4. Optima START/ENTER.
El horn6 har_ hervir los alimentos.
OPRIMA
OPRIMA
USI'ED VE
U_D_
Despu_s los alimentos se mantendrdn a fuego
lento durante el tiempo que haya asignado.
U_D_
76

Utilizar SURE SIMMER (A FUEGO LENTO) (cont.)
Cuando cocine a fuego lento
alimentos como pasta
Utiliceun recipientelo suficientementeamplio
para que pueda contener agua hesta que cubra
por completo losalimentos cuando se ccoinen,tal
como una cacerola de 3 cuartos de galbn (12 tazes
[2.84 ml])con tapa. Cuando cocine pasta o fideos,
agregue 1 cuacharada (15 ml) de aceite al agua
antes de poneda a hervir.Utiliosel siguiente
procedimiento.
Coloque el recipientecon agua en el homo y siga
losI:_sos 2-4, programeel tiempo de cocoibna
fuego lento a 1 segundo. ,ajfinalde la sepal,
coloque losalimentos en el agua y mueva hasta que
est_mcubiertospot completo.Tape el recipiente.
Repitalos pasos 2-4, programandoel tiempo que
desee.
Cambiar las instrucciones
Ueted puede cambiar el tiempo de cocci6n a
fuego lento durante el proceso del mismo el
repetir los pasos 2, 3 y 4.
Cocci6n por sensor
Los alimentos liberanhumedad durante la cocoibn
o calentamiento. La cantidad de humedad que
liberandepende de lacantidad, temperaturay
forma del alimento. Su homo de microondes tiene
un sensorque detsota la humedad. Lacantidad
de humedadque se detecta le indica alhomo pot
cuarrlotiempo debe cocinar o calentar sus
alimentos. Puede cocinar pot sensorcuando
prepara cualquierade los 8 tipos de alimentos.
Sblo presioneel botbn para el tipo de alimento
que deseecocinar o calentar (vea la tabla a
continuacibn).
Para cocinar por sensor:.
1. Oprima un bot6n de SENSOR COOK
(cocoi6n pot sensor).
Ejemt_ot_m
Usted ve
(hasta_
_cocck_)
("MAX"aparece
cada 3 segundos)
NOTAS:
• No necesita oprimirSTART/ENTER(INICIAR/
INTRO) para encender el homo. El homo
comenzar_ a cocinar o calentarcuando presione
unode los botones de SENSOR COOK (COCCION
POR SENSOR).
• Sirequiem m_s o menos tiempo de coccion, no
optima el bot6n SENSOR COOK otra vez. Optima
POWER (ENERGiA)dentro de los 20 segundos
despu_s de selecclonarel tipo de alimento.(Vea
=C6mocambiar los tiempos de coccibn
preestablecidos"an la ssocibn =Conozca su homo
de microondes'). No puede cambiar el tiempo de
coccibn para POPCORN.
• Eisensor requiere2 minutosy 30 segundospara
prepararsedespm_sde que se conecta el homo o
despu_sde una falla de electricidad.Si comienza a
cocinar porsensor durante la preparacibn,aparece
"SENSE" (SENSOR) en tapantalla hasta que se
complete la preparacibn. Elmicroondas no fun-
cionardhasta que el sensorest_ preparado.
• Cuando se cocinen los alimentos por un tiempo
pmlongado, deje que se enfrie elhomo antes de
volvera cocinar por sensor.
Los tipos de palomitas de maiz
hacen la diferencia
Elqu_ tan bien se hagan las palomitasdepende del
tipode palomitas y de la cantidad de grasa que
contengan. Experimente con diferentestipos de
palomitas de maiz para decidircublesse hacen
mejor.Pard un mejorresultadou_lice paquetes de
palomitas de maiz mbsfrescos.
conUn£m en la siguiente I_gina
77

Cocci6n por sensor (cont.)
ista tabla muestra cbmo seleccionarun tipo de alimento y la cantidad que puede elegirpara cada tipo.
BOT(_N INSTRUCCIONES CANTIDAD
Popcorn Preparesblo un paquete a la vez. Si utitiza 3.5 oz (100 gr),3.0 oz (85 gr),
(Palomitasde maiz)* un paquete de palomitasde maiz con plato 1.75 oz (50 gr)
integradopara microondas,siga las
instruccionesdel fabdcante.
Baked potato Antesde hornear,recuerdeque debe picar 1 a 4 papas
(Papas al homo) laspapas vadas veces con un tenedor. (10 oz [284 gr] a 13 oz [369 gr]
Despues de cocinar,deje reposarlos cada una)
papas durante 4 minutospara que
terminende cocinarse.
Fresh vegetable Prepare la cantidad que desee, lave, pero 1 a 4 tazas (237 mla 946 ml)
(Verdurasfrescas) no seque las verduras.Coloque las
verdurasen un recipientepara microondas
de tama_o adecuado. Acjreguede 2 a 4
cucharadas(30 a 60 ml)de agua. Cubra
con pl_tico y permita Taventilacibn.
Frozen vegetable Saque las verduras del paquete, elimine el 1 a 4 tazas (237 mla 946 mr)
(Verduras hielodebajo de un chorrode agua.
congeladas) Coloque lasverdurasen un recipientepara
micmondasde tamaSoadecuado. Agregue
de 2 a 4 cucharadas(30 a 60 ml)de agua.
Cubra con plastico y permitala ventilacibn.
Frozen entree Deje ligeramentedestapado para permitir 10 b 20-onza (284 gr b 568 gr)
(Alimentos la ventilacion.
congelados)
Beverage (Bebidas)* No cubra las bebidas. Laforma del vaso 1 b 2 tazas de 8-onz_s (237 ml)
afecta laforma en que se calienta el
contenido- si es angostoy alto, el
contenidopuede calentarsemas, si la
parte superiores rods ancha (porejemplo
unataza [237 ml])elcontenido puecle
quedar mdstibio.
Dinner plate Coloqueelalimentoque se vaa calentaren 1 pomibn(b 1 platillo)(0.5 a 1 Ib
(Platillocompleto) el platoextendidoo enunplatoparecido. [.2 Kg a .45 KgD
Cubracon pldsticoy permitalaventilacibn.
Soup Coloquela sopa que se va a calentar en un 1 a 4 tazas(237 ml a 946 ml)
(Sopas) recipientepara microondasadecuado.
Cubra con pldsticoy permitala ventilacibn.
* La pantalla no muestra eltiempo de coccibn para esta programacibn."SENSE" (SENSOR) permanece
en la pantalla hastaque se complete la coccibn.
78

C6mo utilizar HOLD WARM (CONSERVAR CALIENTE)
Usted puede de manera segura conservar calientes
los alimentos cocinados en su homo de microon-
das hasta pot 99 minutos, 99 segundos (alrededor
de 1 hora, 40 minutos). Puede utilizar HOLD WARM
pot s{ solo, o bien siguiendo autom&ticamente a un
ciclo de cocci6n.
NOTAS:
• HOLD WARM opera hasta por 99 minutos,
99 segundos.
• Abrir la puerta del homo cancela HOLD WARM.
Cierre la puerta y optima HOLD WARM; en segui-
da, optima START/ENTER (INIClAPJINTRODUClR)
si requiere rn&s tiempo para la funcibn HOLD
WARM.
• Los alimentos que se cocinen tapados deber_m
mantenerse cubiertos al utilizar HOLD WARM.
• En pasteleria, los pasteles, volteados, etc., deben
destaparse cuando se use HOLD WARM.
• Para mantener calientes los alimentos, deben
cubrirse cuando so use HOLD WARM.
• No utilice m_ls de un ciclo de HOLD WARM
(alrededor de 1 hora, 40 minutos). La calidad de
algunos alimentos se deteriora si se excede de
este tiempo.
1. Ponga el alimento caliente cocinado en el homo
y cierre la puerta.
2. Oprima HOLD WARM. OPRIMA USTED VEFL_
3. Encianda el homo.
OPRIMA USTED VEI:_
Para hacer que HOLD WARM siga
automdticamente a otro ciclo:
• Mientras est_ programando las instrucciones para
cocinar, opdma HOLD WARM antes de oprimir
START/ENTER, o durante el ciclo de coccibn.
• Cuando termine el 131timociclo de coccibn
escuchar&dos tonos. Aparecer&la palabra
"WARM" (=CAUENTE")miantras el homo
continuatrabajando,
79

C6mo cuidar su horno de
microondas
Para asegurarse de que su homo de microondas se vea y funcione bien por mucho tiempo, debe darle el
mantenimiento apropiado. Para un cuidado adecuado, por favor siga cuidadosamente estas instrucciones.
Para las superficies
interiores: Lave
frecuentemeste con
agua tibia jabonosa y
una esponja o lienzo
suave. Utilice solamente
jabones suaves, no
abresivos o un deter-
gente suave.
Asegdrese de
mantener limpias las
_,reas donde la puerta y el marco del homo
convergen cuando est_ cerrado. Umpie bien con
agua limpia. Con el tiempo pueden apaPecer
manchas en las superficies debido a particulas de
comida salpicadas al cocinar. Esto es normal.
Para manchas dificiles,
hierva una taza de agua
en el homo durante 2 6
3 minutos. El vapor
suavizard las manchas.
Para eliminar olores
dentro del homo, hierva
una taza de agua con
jugo de limbn o vinagre.
Plato giratono
plato gimtorio
Para limpiar el plato
giratorio y el soporte del
plato giratorio, I&vese
con agua suave jabonosa;
para _u'eas muy
machadas, utilice un
limpiador suave y una
esponja para taflar. El
plato giratorio y el
soperte del plato giratorio
son resistentes a
lavavajillas.
C6mo limpiar la parrilla de coccibn
• L_vese a mano COn
un detergente y
esponja suaves o un
cepillo de nylon.
S6clueseper
completo.
• No utilice fibres o
limpiadores abrasivos
para limpiar la pan'ilia.
• La parilla es resistente
a lavavajillas.
-- Para las superficies
_ exteriores y el panel
do control: Utilice un
lienzo suave con
limpiador de cdstales
en aerosol. Aplique el
limpiador de cristales
en aerosol en el lienzo
suave; no Io aplique
directamente en el
homo.
NOTA: Los limpiadores abrasivos, fibras de
acero o lana, trapes viejos, algunas toallas de
panel de control y las
superficies interiores y exteriores del homo.
8O

C6mo instalar y cuidar los filtros
Se deben quitar con frecuencia los filtros de grasa
(aluminio plateado) para limpiados, al menos una
vez al mes. El filtro de carbbn no se puede
limpiar y debe reemplazarse siempre que
transcurran entre 6 a 12 meses.
NOTA: la combinacibn microondas campana viene
con un filtro de carbbn (fibra negra) instalado detr&s
del filtro de grasa de a[uminio. El filtro de carbbn
ayuda a eliminar oloros y proporciona aire limpio
recirculado. Usted puede quitar el filtro de carb6n
si el homo tiene salida al exterior.
Usted puede pedir piezas de reemptazo
(PN 4393690) al Centro de Servicio Sears m&s
cercarto.
Peligro de Choque Eldctrico
Peligro de choque el6ctrico
Desconecte el suministro de energfa antes de
quitar los filtros.
Vuelva a colocar todos los paneles antes de
hacer funcionar el homo de microondas.
No seguir estas instrucciones puede
ocasionar la muerte o un choque el_rico.
Cbmo quitar, limpiar y reinstalar los
filtros
1. Desenchufe el horno de mieroondas o
desconecte el suministro de energ{a electrica.
2. Para quitar los filtros
de grasa (aluminio
plateado), sujete la
leng_eta y jale el filtro
hacia el lado opuesto.
Jale el filtro hacia
abajo para quitarlo.
Tabs
3. Para quitar los fil
Chatcmd _t_
tros de carbbn (fibra
negra), doble hacia
atr_s suavemente las
leng0etas met&licas
en la parte posterior
del filtro de grasa y
jale el filtro de carbbn
para sacado.
Para volver a
colocar los filtros de
carbbn, alinee el filtro de carbbn sobre el filtro
de grasa. Doble suavemente las leng0etas de
metal en la parte trasera del firm de grasa sobre
el filtro de carbbn.
NOTA: Doble las leng(_etasde metal con
cuidadopara no quebrarilas.
4. Remoje los filtros de
grasa en agua
caliente y un
detergente suave.
Restddguelosy
agitelos para eliminar
la sueiedad incrusta
da. Enju&guelosbien
y sac,',dalospara que
se sequen. No use
amoniaco, agentes
de limpieza corrosivos como limpiadores de
homo con base de lejfa ni los coloque en la
m&quina lavavajillas. El filtro se pondr_ negro
o podria da_arse.
5. PaPa volver a
colocar los filtros de
grasa, deslice cada
filtro dentro del lade
exterior del orificio
para filtros. Aseg_rese
de deslizar el lado del
fiitro que no tiene la
T=_ leng(]eta. Sujete la
leng(_eta con la otra
mano. Empuje hacia
arriba el lado del fittro con la lengiJeta y deslice
el filtro hacia el otro lado del odficio para que
encaje en su lugar.
6. Vuelva a conectar el suministrode energia o
enchufe el homo de microondas.
NOTA: No haga funcionarel extractor sinque los
filtrosest_n en su lugar.
81

C6mo cambiar las luces del horno y de la superficie
para preparaci6n de alimentos
La luz de la superficie para
preparacibn de alimentos
1. Desenchufe el homo de microondas o
desconecte el suministro de energia.
2. Quite el tomillo de
montaje de la cubierta
del foco y retireta con
cuidado.
Tomillo
de montaje
3. Cambie el(los) foco(s) per uno de 30 watts con
portaldmparas (Nt_mero de parte 4393681),
el cual poede conseguir en su centro de servicio
Sears mds cercano.
4. Vuelva a colocar la cubierta del foco y el tornillo
de montaje.
5. Enchufe el homo de microondas o reconecte el
suministro de energia.
La luz del homo
1. Desenchufe el homo de microondas o
desconecte el suministrode energia.
2. Quite los dos
tornillosde montaje
de las rejillasde
ventilaci6n que se
encuentran
arriba de lacubierta
(los dos tornillos
extedores).
3. Recorra la rejilla
hacia adelante y
lev&ntelapara
quitarla.
4. Levante la cubierta
del foco.
_.ubierta del foco
5. Cambie elfoco por uno de 30 watts con
portal_mparas(NOmerode parte 4393681),
el cual puedeconseguiren sucentrode
servicioSears m&scercano.
6. Cierre lacubierta del foco.
7. Deslicela parte
superiorde la rejillade
ventilaci6na su lugar.
Oprima la parte inferior
hasta que quede
perfectamente
colocada. Vuelvaa
colocar los
tomillosde montaje.
8. Enchufe el homo de microondas o reconecte el
suroinistro de energia.
82

Guia de cocina
Consejos para cocinar con microondas
Cantidad de alimentos
• Si usted incrementa o disroinuye la cantidad
de alimentos que prepara, el tiempo que toma
para cocinados tambi_n cambiard. Pot ejemplo,
si duplica las cantidades de una receta, agregue
un poco rods de la roitad del tiempo original
para cocimiento. Verifique el t_rmino de
cocimiesto y si es necesario incremente el
tiempo an per{odos peque_os.
Temperatura inicial de los alimentos
• Mientras mds baja sea la temperatura de los
alimentos al momento de introducidos al horno
de microondas, mayor serd el tiempo de
coccibn. Los alimentos a temperatura ambiente
se recalentar_n con mayor rapidez que los
reffigerados.
Composici6n de los alimentos
• Los alimentos con mucha grasa y az,',car se
calantaran con mayor rapidez qua aquellos que
contengan mucha agua. La grasa y el azticar
tambi_n alcanzardn una temperatura m_ts alta
que el agua en el proceso de coccibn.
• Mientras mds densos sean los alimentos,
mayor serd su tiempo de calentamiento. "Los
alimentos muy densos" como la came, toman
rods tiernpo para volver a calentarse que otros
rods ligeros, rods porosos como los pasteles
esponjados.
Tama_o y forma
• Los pedazos mds pequefios de aliroentos se
cocer_n m_s rapidamente que los grandes. De
igual manera, los pedazos con forma similar
entre s{ se cocinar_n mas uniformemente que
los que tienen formas distintas.
• En alimentos que tienen distintos grosores,
las partes mds delgadas se cocinaran con
mayor rapidez que las mas gruesas. Coloque
las partes rods delgadas de las alas y pieroas de
polio en el cantro del plato.
Mover y voltear los alimentos
• AI mover y voltear los alimentos, el calor
se distribuye r_lpidamente hacia el centro del
plato, con lo que se evita el sobrecocimiento
en las oriUas.
Cbmo cubrir los alimentos
Cubra los alimentos par'a:
• Evitar que salpiquen
• Reducir los tiempos de cocci6n
• Evitar que tos alimentos se resequen
Cualquier cubierta que utilice para tapados, debe
permitir el paso de las microondas.
C6mo liberar la presi6n en los
alimentos
• Algunos aliroentos (porejeroplo:papas al
homo, salchichas,yemas de huevo, y algunas
frutas) est_n cubiertosfirmemente por una piel
o merobrana. Se podHa formar vapor bajo la
membrana durante la coccibn, Io que pmvocaria
que los alimentos explotaran. Con el fin de
disminuirdicha presibny evitar que exploten,
haga pequefias incisiones en los alimentoscon
un tenedor o un palillo antes de cocinarlos.
Cbmo utUizar el tiempo de reposo
• Siempre deje reposar los alimentos despu_s
de cocinados. El dejar reposar los alimentos
despu_s de haberse descongelado o cocinado
permite que la temperatura se distribuya
uniformemente para mejorar el resultado en la
cocci6n.
• El tiempo de reposo que destine dependera de
la cantidad de los alimentos que vaya a cocinar
as{ como de su densidad. Algunas veces este
tiempo puede sar tan breve como el que toma
para sacar los alimentos del homo y Ilevarlos a
la mesa. Sin embargo, en alimentos de mayor
densidacl yen cantidacles tambidn mayores, el
tiempo de reposo puede Ilegar a sar hasta de
10 minutos.
contin,',a en la siguieste p_tglna
83

Consejos para cocinar con microondas (cont.)
Acomodo de los alimentos
Para obtener mejores resultados, coloque los
alimentos uniformemente en el plato. Puede
hacedo de distintas maneras:
• Si estd cocinando varios alimentos iguales,
tales como papas al horno, col6quelas en
forma circular para obtener un cocimiento
uniforme.
• Cuando cocine alimentos con formas o
grosores irregulares tales como pechugas de
polio, coloque tas partes m&s pequefias o
delgadas de los alimentos hacia el centro del
plato, lugar al que el calor Ilegar& al final.
• Acomode las rebanadas delgadas de came
en capas una sobre la otra.
• Cuando cocine o recaliente un pescado
entero, haga cortes en la piel - para evitar
que se agriete.
=No permita que los alimentos o recipientes
toquen las paredes det homo. Esto es con el
fin de evitar posibles descargas elL=ctricas.
C6mo utilizar el papel aluminio
No deberdn utilizarse recipientes de metal en un
homo de microondas. Aunque existen algunas
excepciones. Si se trata de alimentos
preempacados en alg6n recipiente de papel
aluminio siga las instrucciones impresas en el
empaque. Cuando se utilizan recipientes de papel
aluminio, los tiempos de cocci6n podrian set rods
largos debido a que las microondas solamente
penetrardn en la parte superior de los alimentos.
Si utiliza recipientes de aluminio sin instrucciones en
el empaque, tome en cuenta Io siguiente:
• Coloque el recipiente dentro de otto de vidrio y
afiada un Ix)co de agua de tal manera que cubra
el fondo del mismo a no rods de 1/4 de pulgada
(6 mm) de alto. Esto asegurar_ un calerttamiento
uniforme hasta el fondo del recipiente.
• Quite siempre la tapa para evitar dafiar el
homo.
• Utilice solamente recipientes en buen estado.
• No utilice recipientes con una profundidad
mayor que 3/4 pulgada (19 mm).
• El recipiente debe estar Ileno pot Io menos
hasta la mitad.
• Para evitar descargas el_ctricas debe existir
un minimo de 1/4 pulgada(6mm) entre el
recipientede aluminio y las paredes del homo,
Io mismo entre dos recipientesde aluminio.
• Coloque siempre el recipientesobre el plato
giratorio.
• Generalmente toma el doble de tiempo
recalentar alimentos enrecipientesde papel
aluminiocomparadocon el que toma el hacerlo
en recipientesde pldstico,vidrio,porcelanao
pal)el. Eltiempo en que un alimento est&listo
variar_dependiendo del tipo de recipienteque
utilice.
• Deje reposar los alimentos de 2 a 3 minutos
despu_s de calentarlos para que el calor se
distdbuya de manera uniforme por todo el
recipiente.
Lo que no deberd cocinar en su
homo de microondas
• No elabore conservasen el homo. Losfrascos
de viddocerrados pueden explotar y causar
dafios al homo o lastimara alguien.
• No utiliceel homo de microondaspard
esterilizarobjetos (bibemnes,etc). Es dificil
mantener el homo a latemperatura necesaria
para una estedlizacibnsegura.
84

Preguntas y respuestas
PREGUNTAS RESPUESTAS
&Puedo poner en operaci6n mi homo de
microondas sin el plato giratodo o voltear _ste
para colocar un plato m_s grande?
Usted puede apagar el plato giratorio para calentar
dos platillos completos lado a lado o uno m&s
grande que el plato giratorio. Sin embargo, si s6to
necesita calentar un platillo sobre el plato giratorio,
mant_ngalo en su lugar para obtener mejores
resultados. Adem&s, no voltee el plato giratorio.
Un plato puesto sobre el plato giratorio debe quedar
dentro del mismo cuando el plato giratorio est&
correctamente con el lado hacia arriba.
&Puedo utilizar una parrilla en mi homo de
microondas para poder r_=calentar o cocinar en
dos nivelea al miamo tiempo?
_,Puedoutilizar cazuelos de metal o aluminio
indistintamente en mi homo de microondas?
Puede utilizar una parrilla solo si _sta forma pare
de su homo de microondas. Si utiliza una parrilla
ajena a su homo de microondas podria obtener
resultados poco satisfactodos y/o provocar una
descarga electrica.
Puede utilizar papel aluminio para pmteccibn
(utilice pedazos pequeSos y sin arrugas),alambres
para brochetas y charolas de papel aluminiopoco
profundas(si lacharola tiene 3/4 de pulgada [19 mm
de profundidado menos, debe Ilenarse al menos
hastala mitad con alimentos para absorberla
energia de las microondas). Nunca permitaque
metalalguno toque lasparedes o ta puerta. (Para
mayorinforrnacibnconsulte "Cbmo utiUzarpapel
aluminio"en la secci6n "Guia para cocinar").
&Esnormal que et plato giratoriose mueva en SL El plato giratoriose mueve en el sentido de las
cualquier direccibn? manecillas del reloj o en direccibn contraria, esto
depende de la rotacibndel motor al momento de
iniciarse el ciclo de coccibn.
Algunasveces la puerta de mi homo de Estaapariencia es normal y no afecta el
microondas se ve ondulada.&Esesto normal? funcionamiento de su horno.
&Qu_ son esos zumbidos que se oyen cuando mi Lo que usted escucha es el ruido del transformador
homo de microondas est_lfuncionando? cuando el tubo magnetr6n est_ en movimiento.
&Por qu_ se calienta el plato cuando cocino en AI calentarse los alimentos estos conducir_n el calor
_1?Pens_ que esto no debeda suceder, al plato. Tenga a la mano guantes o almohadillas
alslantes para sacar los alimentos despu_s de
cocinarlos.
&Que significa "tiempo de reposo"? "riempo de reposo" significaque los alimentos
deben retirarse del homo y cubrirse durante un
tiempo adicional para permitir que la coccibn
termine. Esto deja libre el homo para cocinar otros
alimentos.
_,Porqu6 sale vapor por la salidadel extractor? Es normal que se produzca vapor al cocinar.El
homo de microondas ha sido dise_ado para sacar
este vapor por la salidadel extractor.
_,Puedo hacer palomitas de malz en mi homo de
microondas?_,Cbmo puedo obtener los mejores
resultados?
SL Haga palomitas de malz especiales para homo de
microondas siguiendo las instrucciones del fabricante i
o utilizando el botbn POPCORN (PALOMrrAs). No
utilice bolsas de papel normales. Utilice la "prueba
de o|do" deteniendo la operacibn del homo tan
pronto como el sonido de los granos reventando
decrezca a un "pop" cada 1 6 2 segundos. No
vuelva a cocinar los granos que no hayan reventado.
No haga palomitas en recipientes de vidrio.
85

Soluci6n de problemas
Muchos de los problemas al cocinar se deben generalmente a pequeSos detalles que puede eneontrar y
arreglar sin necesidad de herramientas de ning6n tipo. Verifique la lista que aparece en esta p&gina y la
siguiente antes de solicitar alg_n tipo de servicio. Si despues de esto todavia necesita ayuda consulte la
seccibn "Llame sin costo de Sears" en la pagina 92.
El horno de microondas no funciona
PROBLEMA CAUSA
Nada funciona.
• El cable no est& conectado a un circuito con el voltaje adecuado. (Consulte
las secciones: "Requisitos el6ctricos" en la p&gina 47 y "Conexi6n elL_'trica"
en la pdgina 53.)
• Se quem6 un fusible domestico o se desconect6 un interruptor de circuitos.
• La compaSia de luz tuvo una falla de energ{a.
El homo de microondas
no funciona.
• Estd utilizando el homo como cron6metro. Oprima el bot6n OFF/CANCEL
(APAGAR/CANCELAR) para desactivar el cronbmetro.
• La puerta no esta bien cerrada ni asegurada.
• No opdmi6 START/ENTER (INIClAR/INTRODUClR).
• No sigui6 las instrucciones al pie de la letra.
• Una operaci6n que inici6 anteriormente todavia no termina. Optima
OFF/CANCEL para cancelar la operaci6n.
Tiempos de cocci6n
PROBLEMA
La comida no est_
bien cocida.
CAUSA
• Elsuministrode energiaeldctdca de sucasa o de loscontactosen las
paredes es bajo, o m_s ddbilde Io normal.La compar3fade luz puede
decidesiel voltajede linea est&bajo. Su electricistao tL,cnico de servicio
pueden decidesi el voltajede salidaest&bajo.
• Elnivelde energiade coccibn no se program6 seg,',nlasrecomendaciones.
Verifiquela tabla en la p&gina65.
• No programbeltiempo suficientepara la cantidad de alimentosa cocinarse.
A cantidadesmayores de alimentos,mayorestiempos de coccibn.
La pantalla muestra un con-•
teo de tiempo decreciente •
pero el homo no cocina.
La puerta det homo no estd completamente cerrada.
Programblos controlespara la funci6nde cronbmetm. Oprima
OFF/CANCEL para cancelar el cron6metro.
86

Plato giratorio
PROBLEMA
El plato giratorio
no gira.
CAUSA
• Ha apagado la funcibn del plato giratorio (TURNTABLE ON/OFF). (Consulte
ta secci6n "Cbmo calentar m&s de un plato con alimentos" en la p&gina
58).
• El plato giratorio no est& colocado correctamente, Debe estar con el lado
correcto hacia arriba y descansar firmemente sobre el eje del centro.
• El soporte no funciona correctamente. Retire el plato giratorio y vuelva a
iniciar la operacibn del homo. Si el soporte ann no se mueve, Ilame al
t_cnico autorizado para su reparacibn, Cooinar sin e! plato giratorio puede
produoir resultados poco satisfactorios,
Tonos
PROBLEMA CAUSA
No se escucha eltono
de programacibn o de
fin de ciclo.
• No introdujola instruccibncorrecta.
• Desactiv6 el tono. (Verla seccibn"Sefiales sonoras"en la p_gina 57.)
Visualizar mensajes
I PROBLEMA
La pantalla parpadea ":".
CAUSA
• Hubo una interrupcibnde energfael_:_-tdca.Vuelva a programar el reloj.
(Veala seccibn =Chino programarel reloj" en la pdgina61.)
Si nada de Io antedor es lacausa del problema vea lasecci6n "Llame sin costo a SEARS" en Contratapa.
Por favor, registre la informaci6n de su modelo.
Siempreque Ilame para solicitarserviciopara su
aparato, necesitatener a la mano los n0meros
completos de modelo y serie. Puede encontraresta
informacibnen la placa/etiqueta del modelo y nOmero
de sede (vea "Funcionesdel homo de microondas" en
la seccibn "Conozca su homo de microondas").
Tambi_n registrela informacibnadicionalque aparece
en la siguientecolumna.
Ndmero de modelo
Nttmero de serle.
Fecha de compra
Nombre del dlstrlbuidor
Dlreccl6n del dlstrlbuldor
TelMono del dlstrlbuldor
87

f
Indice
Eete indice se encuentra en orden alfabetico. Contiene todos los temas incluidos en este manual, junto con
la(s) pagina(s) en las cuales usted podr& encontrar cada tema.
TEMA PAGINA
COMO CAMBIAR LAS LUCES DEELHORNG Y
DE LA SUPERFfCIE PARAPREPARACION
DE ALIMENTOS .................................................... 82-63
COMO CUIDAR SU HORNO
DE MICROONDAS .................................................... 66
COMO FUNCIONA SU HORNO
DE MICROONDAS ................................................ 50-51
CC)MO PROBAR SU HORNO
DE MICROONDAS .................................................... 51
C(_MO PROBAR SU VAJILLAO RECIPIENTES
DE COCINA ................................................................ 52
CONSEJOS
C6mo cocinar .................................................... 84-85
C6mo descongelar ............................................ 72, 76
Palomitae de ma{z .................................................. 77
EXTRACTOR .............................................................. 60
FILTROS ................................................................ 81-82
GARANTiA .................................................................. 44
INSTRUCClONES DE INSTALAClON ................ 47-49
INTERFERENCIA DE RADIO .................................... 51
LUCES
Cbmo reemplazarlas .......................................... 82-83
C6mo utilizarlas ...................................................... 60
LLAME SIN COSTO .................................................. 90
PANEL DE CONTROL .......................................... 55-58
ADD ONE MINUTE (Un minuto m&s) ....................63
AUTO COOK (Cocci6n autom&tica) ........................69
AUTO DEFROST
(Desoongelado automdtico) .................................... 72
AUTO REHEAT (Recalentado autom&tico) ............71
BAKED POTATO(Papas al homo) ........................78
BEVERAGE (Bebidas) ............................................ 78
Botones numericos ................................................ 56
Cbmo cambiar los tiempos de cocci6n
pre-establecidoe ...................................................... 63
C6mo cocinar a diferentas niveles
energias de cocci6n .......................................... 65-67
C6mo cocinar a un nivel alto de energfa................64
C6mo cocinar por pesos .................................... 67-69
C6mo interrumpir la cocci6n .................................. 57
Cron6metro ............................................................ 62
Extractor .................................................................. 60
TEMA PAGINA
FROZEN ENTREE (Ptatillos congelados) .............. 78
FROZEN VEGETABLE (Verduras congeladas) ...... 78
Funci6n Demost raci6n/aprendizaje ........................ 58
HOLD WARM (Mantener caliente) .......................... 79
Luz .............................................................. 60, 82-83
OFF/CANCEL (Apagar/Cancelar) .......................... 57
Pantalla .................................................................. 55
POPCORN (Palomitas de maiz) ........................... 78
POWER (Energia) ...................................... 63, 65-67
RELOJ .................................................................... 61
Seguro para ni5os .................................................. 58
START/ENTER (Activar/Introducir) ........................ 57
TIEMPO DE COCClON .............................. 64, 66, 67
TURNTABLE ON/OFF
(Activar/Desactivar el plato giratorio) ...................... 58
PAPEL ALUMINIO ...................................................... 85
PARRILLA ............................................................ 59, 86
PARTES Y FUNClONES
Asa de la puerta .................................................... 54
Etiqueta de la guia para cocinar ............................ 54
Magnetron ........................................................ 50, 86
Parrilla de cocci6n ............................................ 54, 59
Placa con modelo y nemero de serie .................... 54
Plato giratorio ..............51,53, 54, 56, 58, 80, 86, 88
Rejilla de ventilaci6n .............................................. 54
Sistema de seguro para la puerta .......................... 54
Ventana .................................................................. 54
PREGUNTAS Y RESPUESTAS .................................. 86
REQUISITOS ELECTRICOS ................................ 47, 53
SEGURIDAD .............................................. 45-47, 52-53
SEI_IALES SONORAS ................................................ 57
SERVlClO .................................................................. 44
SOLUClON DE PROBLEMAS .............................. 87-88
TABLAS
Auto cook (Cocci6n automdtica)............................ 70
Auto defrost (Descongelado autom/ltico) ..........73-74
Auto reheat (Recalentado autom&tico) .................. 71
Cocci6n per sensor ................................................ 78
Conversiones de peso ............................................ 75
Energias de cocci6n .............................................. 65
TIEMPO DE REPOSO .................................. 75, 84, 86
88

89

90

91

For the repair or replacement parts you need
Call 7 am - 7 pm, 7 days a week
Para las reparaciones o refacciones que usted necesita
Llame de 7 am - 7 pm, los 7 dias de la semana
1-800-366-PART
(1-800-366-7278)
For in-home major brand repair service
Call 24 hours a day, 7 days a week
Para servicios de reparaciones en
su hogar de las principales marcas
Llame las 24 horas del dia, los 7 dias de la semana
1.800.4-MY-HOMEsM
(1-800-469-4663)
For the location of a Sears Parts and Service Center
in your area
Call 24 hoursa flay, 7 daysa week
Para localizar un Centro de
Refacciones y Servicio Sears en su firea
Llame las24 horasdel dia, los 7 diasde la semana
1-800-488-1222
For information on'p'm'cll"_in'g'a'Se:_s'M'ainie'nance Agreement
or to inquire about an existing Agreement
Call9am- 5pm,Monday- Saturday
Para informaci6n sobra la compra de un Contrato de
Mantenimiento Sears o para indagar sobre un Acuerdo existente
Llame de 9 am- 5 pro,de lunesa s;_bado
1-800-827-6655
The Service Side of Sears."
El lado de servicios de Seam."
4619-652-58586/8169532 _ _o_r_,._o _ ch._a_
-
 1
1
-
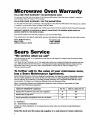 2
2
-
 3
3
-
 4
4
-
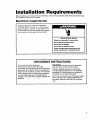 5
5
-
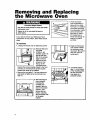 6
6
-
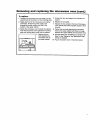 7
7
-
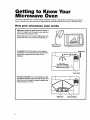 8
8
-
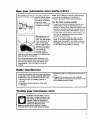 9
9
-
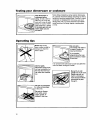 10
10
-
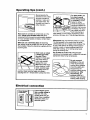 11
11
-
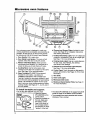 12
12
-
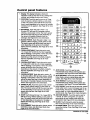 13
13
-
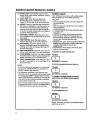 14
14
-
 15
15
-
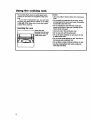 16
16
-
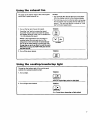 17
17
-
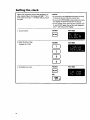 18
18
-
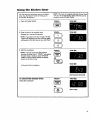 19
19
-
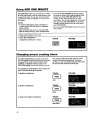 20
20
-
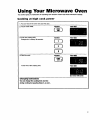 21
21
-
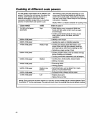 22
22
-
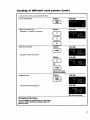 23
23
-
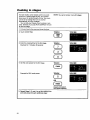 24
24
-
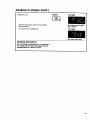 25
25
-
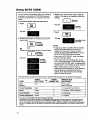 26
26
-
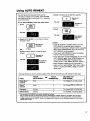 27
27
-
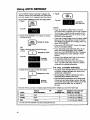 28
28
-
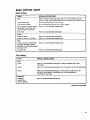 29
29
-
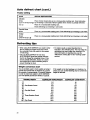 30
30
-
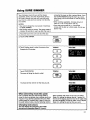 31
31
-
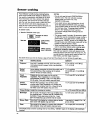 32
32
-
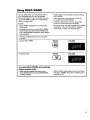 33
33
-
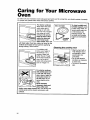 34
34
-
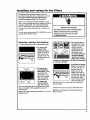 35
35
-
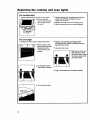 36
36
-
 37
37
-
 38
38
-
 39
39
-
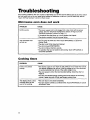 40
40
-
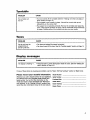 41
41
-
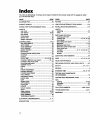 42
42
-
 43
43
-
 44
44
-
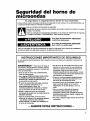 45
45
-
 46
46
-
 47
47
-
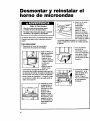 48
48
-
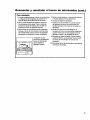 49
49
-
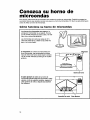 50
50
-
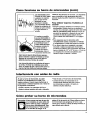 51
51
-
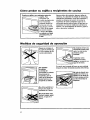 52
52
-
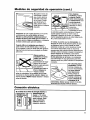 53
53
-
 54
54
-
 55
55
-
 56
56
-
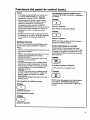 57
57
-
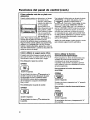 58
58
-
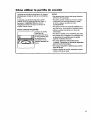 59
59
-
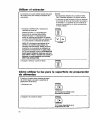 60
60
-
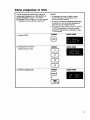 61
61
-
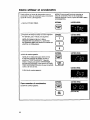 62
62
-
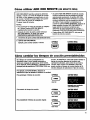 63
63
-
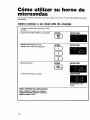 64
64
-
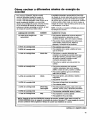 65
65
-
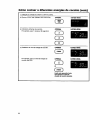 66
66
-
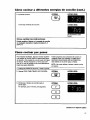 67
67
-
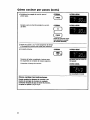 68
68
-
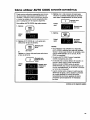 69
69
-
 70
70
-
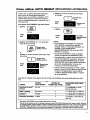 71
71
-
 72
72
-
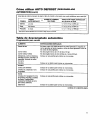 73
73
-
 74
74
-
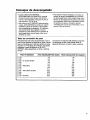 75
75
-
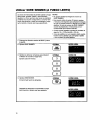 76
76
-
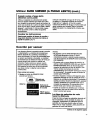 77
77
-
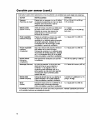 78
78
-
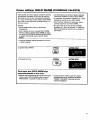 79
79
-
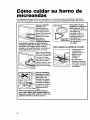 80
80
-
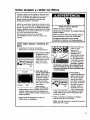 81
81
-
 82
82
-
 83
83
-
 84
84
-
 85
85
-
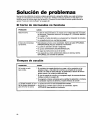 86
86
-
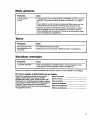 87
87
-
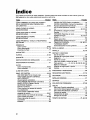 88
88
-
 89
89
-
 90
90
-
 91
91
-
 92
92


Kenmore 66569682990 El manual del propietario
- Categoría
- Microondas
- Tipo
- El manual del propietario
- Este manual también es adecuado para
en otros idiomas
- English: Kenmore 66569682990 Owner's manual
Artículos relacionados
-
Kenmore 66568602991 El manual del propietario
-
Kenmore 66569619991 El manual del propietario
-
Kenmore 665.60629 El manual del propietario
-
-
Kenmore 72162644200 El manual del propietario
-
Kenmore 721.63653 Manual de usuario
-
-
-
-