
/ PL / WENTYLATOR POKOJOWY / EN / STAND FAN / DE / STANDVENTILATOR
/ RU / ВЕНТИЛЯТОР КОМНАТНЫЙ / ES / VENTILATORE DA CAMERA / FR / VENTILATEUR DE PIECE
/ IT / VENTILATORE DA CAMERA
Eldom Sp. zo.o. • ul. Pawła Chromika 5a • 40-238 Katowice, POLAND
tel: +48 32 2553340 • fax: +48 32 2530412 • www.eldom.eu
WG100toll


3
/PL/ Usuwanie wyeksploatowanych urządzeń elektrycznych i elektronicznych (dotyczy krajów Unii Europejskiej i innych krajów
europejskich zwydzielonymi systemami zbierania odpadów).
Ten symbol na produkcie lub jego opakowaniu oznacza, że produkt nie powinien być zaliczany do odpadów domowych. Należy go przekazać do
odpowiedniego punktu, który zajmuje się zbieraniem irecyklingiem urządzeń elektrycznych ielektronicznych. Prawidłowe usunięcie produktu
zapobiegnie potencjalnym negatywnym konsekwencjom dla środowiska naturalnego izdrowia ludzkiego wynikających zobecności substancji
niebezpiecznych wprodukcie. Urządzenie elektryczne należy oddać tak, aby ograniczyć jego ponowne użycie iwykorzystanie. Jeżeli wurządzeniu
znajdują się baterie należy je wyjąć ioddać do punktu składowania osobno. URZĄDZENIA NIE WRZUCAĆ DO POJEMNIKA NA ODPADY KOMUNALNE.
Recykling materiałów pomaga wzachowaniu surowców naturalnych. Aby uzyskać szczegółowe informacje orecyklingu tego produktu, należy się
skontaktować zwładzami lokalnymi, rmą świadczącą usługi oczyszczania lub sklepem, wktórym produkt został kupiony.
/EN/ The disposal of used electrical and electronic equipment (applies to European Union countries and other European countries with
separate waste-collection systems).
This symbol on the product or its packaging indicates that it should not be classied as household waste. It should be handed over to an appropriate
company dealing with the collection and recycling of electrical and electronic equipment. The correct disposal of the product will prevent potential
negative consequences for the environment and human health resulting from hazardous substances present in the product. Electrical devices
must be handed over to restrict their re-use and further treatment. If the device contains batte ries, remove them, and hand them over to astorage
point separately. DO NOT THROW EQUIPMENT INTO THE MUNICIPAL WASTE BIN. Material recycling helps to preserve natural resources. For detailed
information on how to recycle this product, please contact your local authority, the recycling company, or the shop where you bought it.
/DE/ Entsorgung von gebrauchten Elektro- bzw. Elektronikgeräten (gilt für Länder der Europäischen Union und andere europäische
Länder mit getrennten Abfallsammelsystemen).
Dieses Symbol auf dem Produkt oder seiner Verpackung weist darauf hin, dass das Produkt nicht als Hausmüll entsorgt werden darf. Übergeben
Sie Elektroschrott an die entsprechende Sammel- und Recyclingstelle für Elektro- bzw. Elektronikgeräte. Die ordnungsgemäße Entsorgung
des Produkts verhindert mögliche negative Folgen für die Umwelt und die menschliche Gesundheit, die sich aus den im Produkt enthaltenen
gefährlichen Stoen ergeben können. Das elektrische Gerät muss so übergeben werden, dass die Wiederverwendung und der weitere Gebrauch
eingeschränkt sind. Falls sich Batterien im Gerät benden, entfernen Sie diese und übergeben Sie sie separat an die Sammelstelle. NICHT IN DEN
HAUSMÜLL WERFEN. Das Recycling von Materialien trägt zur Schonung der natürlichen Ressourcen bei. Detaillierte Informationen zum Recycling
dieses Produkts erhalten Sie bei Ihren örtlichen Behörden, dem Entsorgungsbetrieb oder dem Geschäft, in dem Sie dieses Produkt gekauft haben.
/RU/ Утилизация вышедшего из эксплуатации электрического и электронного оборудования (относится к странам Европейского
Союза и другим европейским странам с системами раздельного сбора отходов).
Этот символ на продукте или его упаковке означает, что продукт не следует рассматривать как бытовые отходы. Его следует направить
в соответствующий пункт сбора и последующей переработки электрического и электронного оборудования. Правильная утилизация
продукта предотвратит возможные негативные последствия для окружающей среды и здоровья человека, связанные с наличием в
продукте опасных веществ. Электрическое устройство должно быть передано для утилизации таким образом, чтобы ограничить его
повторное использование. Если в устройстве имеются батарейки, извлеките их и передайте в место сбора отдельно. НЕ ВЫБРАСЫВАЙТЕ
ОБОРУДОВАНИЕ В КОНТЕЙНЕР ДЛЯ БЫТОВЫХ ОТХОДОВ. Повторная переработка материалов помогает сохранить природные ресурсы.
Для получения подробной информации о том, как утилизировать данное изделие, обратитесь в местный орган власти, компанию,
занимающуюся уборкой мусора, или в магазин, в котором вы приобрели данный продукт.
/ES/ Eliminación de residuos de aparatos eléctricos y electrónicos (aplicable alos países de la Unión Europea y aotros países europeos
que poseen sistemas aislados de recogida de residuos).
Este símbolo en el producto oen su embalaje indica que el producto no debe clasicarse como residuo doméstico. Hay que entregarlo en un
punto autorizado de recogida y reciclaje de aparatos eléctricos y electrónicos. La eliminación adecuada del producto prevendrá las posibles
consecuencias negativas para el medio ambiente y la salud humana derivadas de la presencia de sustancias peligrosas en el producto. El dispositivo
eléctrico debe ser entregado de manera que se pueda limitar su reutilización y reuso. Si hay pilas en el aparato, hay que quitarlas y entregarlas por
separado al punto de almacenamiento. NO TIRAR EL DISPOSITIVO EN EL CUBO DE BASURA MUNICIPAL. El reciclaje de materias ayuda apreservar los
recursos naturales. Para obtener la información especíca sobre el reciclaje de este producto, póngase en contacto con las autoridades locales, con
un proveedor de servicios de reciclaje ocon la tienda en la que lo compró.
/ IT / Smaltimento dei riuti di apparecchiature elettriche ed elettroniche (applicabile nell’Unione Europea e in altri paesi europei con
sistemi di raccolta dierenziata).
Questa immagine sul prodotto o sul suo imballaggio indica che il prodotto non deve essere smaltito insieme agli altri riuti domestici. Restituire
il dispositivo a un centro di raccolta e riciclaggio appropriato per apparecchiature elettriche ed elettroniche. Il corretto smaltimento del prodotto
permette di evitare possibili danni all’ambiente o alla salute umana derivanti dalla presenza di sostanze pericolose nel prodotto. Smaltire
l’apparecchio elettrico in modo da limitarne il riutilizzo e il riuso. Se sono presenti batterie, devono essere rimosse e smaltite separatamente. NON
SMALTIRE L’APPARECCHIO NEL CONTENITORE DEI RIFIUTI URBANI. Il riciclaggio dei materiali aiuta a conservare le risorse naturali. Per informazioni
dettagliate sul riciclaggio di questo prodotto, contattare l’autorità locale, il fornitore del servizio di pulizia o il negozio dove è stato acquistato
questo prodotto.
/ FR / L'élimination des équipements électriques et électroniques usagés (applicable dans l'Union européenne et dans les autres pays
européens disposant de systèmes de collecte sélective).
Ce symbole sur le produit ou son emballage indique que le produit ne doit pas être traité comme un déchet ménager. Il doit être remis à un
point de collecte approprié pour le recyclage des appareils électriques et électroniques. L'élimination correcte du produit permettra d'éviter
les conséquences négatives potentielles pour l'environnement et la santé humaine résultant de la présence de substances dangereuses dans
le produit. Le matériel électrique doit être remis de manière à limiter sa réutilisation et son utilisation. S’il y a des piles dans l’appareil, retirez-
les et déposez-les dans un lieu de stockage séparé. NE JETEZ PAS CET APPAREIL DANS LES ORDURES MÉNAGÈRES. Le recyclage des matériaux
contribue à préserver les ressources naturelles. Pour des informations détaillées sur le recyclage de ce produit, veuillez contacter votre autorité
locale, l’entreprise fournissant des services de nettoyage ou le magasin où vous avez acheté le produit.

4
WSKAZÓWKI BEZPIECZEŃSTWA
Przed pierwszym użyciem należy uważnie zapoznać się
z całością treści niniejszej instrukcji.
Zachowaj wszystkie ostrzeżenia i wskazówki dotyczące
bezpieczeństwa, aby móc skorzystać z nich w przyszłości.
1. Przewód przyłączeniowy należy podłączyć do sieci
elektrycznej o parametrach zgodnych z podanymi
na tabliczce znamionowej.
2. Należy zwrócić uwagę na to, by do jednego obiegu prądu
nie włączać za dużo odbiorników.
3. Aby wyłączyć urządzenie z sieci nigdy nie ciągnąć
za przewód, zawsze używać wtyczki.
4. Urządzenie wyłącznie do użytku domowego.
5. Urządzenie ustawić na płaskim i suchym podłożu.
6. Nie wkładać palców ani żadnych przedmiotów w otwory
wlotu i wylotu.
7. Nie stawiać urządzenia przy firanach i zasłonach.
8. Pracujący wentylator należy mieć zawsze w zasięgu wzroku,
zwłaszcza gdy w pobliżu znajdują się dzieci.
9. Nie pozostawiać pracującego urządzenia bez nadzoru.
10. Niniejszy sprzęt może być użytkowany przez dzieci w wieku
co najmniej 8 lat i przez osoby o obniżonych możliwościach
fizycznych, umysłowych i osoby o braku doświadczenia
i znajomości sprzętu, jeżeli zapewniony zostanie nadzór lub
instruktaż odnośnie do użytkowania sprzętu w bezpieczny
sposób, tak aby związane z tym zagrożenia były zrozumiałe.
Dzieci nie powinny bawić się sprzętem. Dzieci bez nadzoru
nie powinny wykonywać czyszczenia i konserwacji sprzętu.
11. Nie rozpylać w pobliżu pracującego urządzenia środków
owadobójczych lub podobnych.
12. Nie używać w wysokiej temperaturze (powyżej 40°C),
w miejscach o podwyższonej wilgotności (np. łazienka)
i w miejscach zagrożonych wybuchem.
13. Przed włączeniem urządzenia należy się upewnić czy wszystkie
jego elementy są odpowiednio zamontowane. W żadnym
wypadku nie włączać urządzenia przed złożeniem.
14. Nie zakrywać siatki zabezpieczającej.
15. Nie wieszać na urządzeniu ubrań ani żadnych przedmiotów.
16. Nie wolno używać urządzenia z uszkodzonym przewodem
przyłączeniowym. Aby zapobiec niebezpieczeństwu musi
on zostać wymieniony w Serwisie Producenta.
17. Napraw sprzętu może dokonać jedynie autoryzowany
punkt serwisowy. Wszelkie modernizacje lub stosowanie
innych niż oryginalne części zamiennych lub elementów
urządzenia jest zabronione i zagraża bezpieczeństwu
użytkowania.
18. Nie zanurzać urządzenia ani wtyczki sieciowej w wodzie
lub innych cieczach. Zagrożenie życia na skutek porażenia
prądem! Jeśli jednak tak się stanie, natychmiast wyjąć
wtyczkę z gniazdka, a następnie zlecić sprawdzenie
urządzenia ekspertowi przed ponownym użyciem.
19. Nigdy nie wyjmować wtyczki z gniazdka, ciągnąc za kabel
sieciowy lub mokrymi rękami.
20. Upewnić się, że kabel sieciowy nie zwisa nad ostrymi
krawędziami ani nie dopuścić do jego uwięzienia.
21. Nie używać, ani nie przechowywać urządzenia na wolnym
powietrzu.
22. Nie kierować strumienia powietrza na ludzi przez długi czas.
23. Firma Eldom Sp. z o. o. nie ponosi odpowiedzialności
za ewentualne szkody powstałe w wyniku niewłaściwego
używania urządzenia.
OSTRZEŻENIE: Niewłaściwe użytkowanie urządzenia może
spowodować obrażenia ciała.
UWAGA: Woreczek foliowy może stanowić niebezpieczeństwo
–aby uniknąć uduszenia workiem należy przechowywać go
z daleka od niemowląt i małych dzieci.
•GWARANCJA
−urządzenie przeznaczone jest do użytku prywatnego w gospodarstwie
domowym,
−nniieemmoożżeebbyyććuużżyywwaanneeddoocceellóówwzzaawwooddoowwyycchh,,
−gwarancja traci ważność w przypadku nieprawidłowej obsługi.
Warunki gwarancji podane są w załączniku.

5
WSKAZÓWKI BEZPIECZEŃSTWA
Przed pierwszym użyciem należy uważnie zapoznać się
z całością treści niniejszej instrukcji.
Zachowaj wszystkie ostrzeżenia i wskazówki dotyczące
bezpieczeństwa, aby móc skorzystać z nich w przyszłości.
1. Przewód przyłączeniowy należy podłączyć do sieci
elektrycznej o parametrach zgodnych z podanymi
na tabliczce znamionowej.
2. Należy zwrócić uwagę na to, by do jednego obiegu prądu
nie włączać za dużo odbiorników.
3. Aby wyłączyć urządzenie z sieci nigdy nie ciągnąć
za przewód, zawsze używać wtyczki.
4. Urządzenie wyłącznie do użytku domowego.
5. Urządzenie ustawić na płaskim i suchym podłożu.
6. Nie wkładać palców ani żadnych przedmiotów w otwory
wlotu i wylotu.
7. Nie stawiać urządzenia przy firanach i zasłonach.
8. Pracujący wentylator należy mieć zawsze w zasięgu wzroku,
zwłaszcza gdy w pobliżu znajdują się dzieci.
9. Nie pozostawiać pracującego urządzenia bez nadzoru.
10. Niniejszy sprzęt może być użytkowany przez dzieci w wieku
co najmniej 8 lat i przez osoby o obniżonych możliwościach
fizycznych, umysłowych i osoby o braku doświadczenia
i znajomości sprzętu, jeżeli zapewniony zostanie nadzór lub
instruktaż odnośnie do użytkowania sprzętu w bezpieczny
sposób, tak aby związane z tym zagrożenia były zrozumiałe.
Dzieci nie powinny bawić się sprzętem. Dzieci bez nadzoru
nie powinny wykonywać czyszczenia i konserwacji sprzętu.
11. Nie rozpylać w pobliżu pracującego urządzenia środków
owadobójczych lub podobnych.
12. Nie używać w wysokiej temperaturze (powyżej 40°C),
w miejscach o podwyższonej wilgotności (np. łazienka)
i w miejscach zagrożonych wybuchem.
13. Przed włączeniem urządzenia należy się upewnić czy wszystkie
jego elementy są odpowiednio zamontowane. W żadnym
wypadku nie włączać urządzenia przed złożeniem.
14. Nie zakrywać siatki zabezpieczającej.
15. Nie wieszać na urządzeniu ubrań ani żadnych przedmiotów.
16. Nie wolno używać urządzenia z uszkodzonym przewodem
przyłączeniowym. Aby zapobiec niebezpieczeństwu musi
on zostać wymieniony w Serwisie Producenta.
17. Napraw sprzętu może dokonać jedynie autoryzowany
punkt serwisowy. Wszelkie modernizacje lub stosowanie
innych niż oryginalne części zamiennych lub elementów
urządzenia jest zabronione i zagraża bezpieczeństwu
użytkowania.
18. Nie zanurzać urządzenia ani wtyczki sieciowej w wodzie
lub innych cieczach. Zagrożenie życia na skutek porażenia
prądem! Jeśli jednak tak się stanie, natychmiast wyjąć
wtyczkę z gniazdka, a następnie zlecić sprawdzenie
urządzenia ekspertowi przed ponownym użyciem.
19. Nigdy nie wyjmować wtyczki z gniazdka, ciągnąc za kabel
sieciowy lub mokrymi rękami.
20. Upewnić się, że kabel sieciowy nie zwisa nad ostrymi
krawędziami ani nie dopuścić do jego uwięzienia.
21. Nie używać, ani nie przechowywać urządzenia na wolnym
powietrzu.
22. Nie kierować strumienia powietrza na ludzi przez długi czas.
23. Firma Eldom Sp. z o. o. nie ponosi odpowiedzialności
za ewentualne szkody powstałe w wyniku niewłaściwego
używania urządzenia.
OSTRZEŻENIE: Niewłaściwe użytkowanie urządzenia może
spowodować obrażenia ciała.
UWAGA: Woreczek foliowy może stanowić niebezpieczeństwo
– aby uniknąć uduszenia workiem należy przechowywać go
z daleka od niemowląt i małych dzieci.
•GWARANCJA
−urządzenie przeznaczone jest do użytku prywatnego w gospodarstwie
domowym,
−nniiee mmoożżee bbyyćć uużżyywwaannee ddoo cceellóóww zzaawwooddoowwyycchh,,
−gwarancja traci ważność w przypadku nieprawidłowej obsługi.
Warunki gwarancji podane są w załączniku.

6
INSTRUKCJA OBSŁUGI
WENTYLATOR POKOJOWY WG100
PL
INSTRUKCJA OBSŁUGI
WENTYLATOR POKOJOWY WG100
•OPIS OGÓLNY
1. Obejma
2. Siatka ochronna – front
3. Nakrętka zabezpieczająca
śmigło
4. Śmigło
5. Nakrętka zabezpieczająca
siatkę
6. Siatka ochronna – tył
7. Trzpień
8. Obudowa silnika
9. Korpus
10. Panel sterowania
11. Przewód
12. Blokada
13. Rura przedłużająca
14. Pierścień regulacji wysokości
15. Rura bazowa
16. Podstawa
17. Pilot
•DANE TECHNICZNE
−moc: 45W
−napięcie zasilania:
220-240V~ 50/60Hz
•PANEL STEROWANIA (10)
SPEED/ON – włączenie wentylatora, sterowanie prędkością pracy
OFF – wyłączenie urządzenia
TIMER – włączenie/wyłączenie automatycznego wyłączenia
MODE – wybór zaprogramowanych trybów pracy
L, M, H – kontrolki prędkości pracy wentylatora (niska, średnia, wysoka)
NAT, NOR, SLP – kontrolki trybu pracy (naturalny, normalny, nocny)
4H, 2H, 1H, 0.5H – kontrolki ustawienia czasu automatycznego wyłączenia
•PILOT (17)
LAMP – włączenie/wyłączenie wskaźników na panelu sterowania
SWING – włączenie/wyłączenie oscylacji
TIME – włączenie/wyłączenie automatycznego wyłączenia
SPEED/ON – włączenie wentylatora, sterowanie prędkością pracy
MODE – wybór zaprogramowanych trybów pracy
OFF – wyłączenie urządzenia
•PRZEZNACZENIE
Wentylator WG100 przeznaczony jest do poprawy komfortu termicznego w pomieszczeniach
mieszkalnych. Przy jego pomocy powietrze zostaje wprawione w ruch, zapewniając tym samym
przyjemne odczucie chłodzenia.
•UŻYTKOWANIE
−Przed użyciem należy sprawdzić czy urządzenie jest kompletne i nieuszkodzone.
−Przed pierwszym użyciem należy urządzenie rozpakować i złożyć poszczególne elementy.
−Połączyć rurę (15) z podstawą (16) – rys. 1
−Wysunąć rurę (13) i zablokować ją pierścieniem (14).
−Korpus (9) połączyć z rurą (13) i zablokować dokręcając blokadę (14).
−Na trzpień (7) nasunąć tylną siatkę (6).
−Otwory siatki (6) dopasować do zaczepów na obudowie silnika (8) i przymocować nakrętką
(5).
−Na trzpień (7) nasunąć śmigło (4) i zamocować je nakrętką (3).
−Poluzować śrubę w obejmie (1), a następnie obejmę (1) założyć na zamontowaną siatkę (6).
−Przednią siatkę (2) wpasować w obejmę (1) i zabezpieczyć dokręcając śrubę w obejmie (1)
do oporu.
−Złożone urządzenie ustawić na stabilnej i równej powierzchni.
−Wyregulować wysokość. Poluzować pierścień (14), wsunąć lub wysunąć rurę (13) na
wymaganą wysokość, a następnie zablokować dokręcając pierścień (14).
−Ustawić kąt nachylenia czaszy.
−Rozwinąć całkowicie przewód.
•OBSŁUGA
Wszystkie zmiany ustawień potwierdzane są sygnałem dźwiękowym.
Przyciskiem OFF można wyłączyć wszystkie funkcje urządzenia od razu.
−Urządzenie podłączyć do sieci zgodnej z parametrami podanymi na powyżej.
−Włączyć urządzenie przyciskiem „SPEED/ON” i naciskając ustalić prędkość pracy – zapali się
kontrolka (L, M, lub H),
−za pomocą przycisków na panelu sterowania lub pilocie wybrać dodatkowo inne funkcje.
−Aby wyłączyć należy nacisnąć przycisk „OFF”
•TRYBY PRACY
NAT – tryb naturalny
•Za pomocą przycisku „SPEED/ON” włączyć wentylator.
•Naciskać przycisk „MODE”, aż zapali się kontrolka „NAT”.
•Wentylator będzie cyklicznie zmieniał szybkość obrotów od najwyższych do
najniższych.
NOR – tryb normalny
•Za pomocą przycisku „SPEED/ON” włączyć wentylator i wybrać prędkość pracy.
•Naciskać przycisk „MODE”, aż zapali się kontrolka „NOR”.
•Wentylator będzie pracował z wybraną prędkością.
rys. 1

7
INSTRUKCJA OBSŁUGI
WENTYLATOR POKOJOWY WG100
•OPIS OGÓLNY
1. Obejma
2. Siatka ochronna – front
3. Nakrętka zabezpieczająca
śmigło
4. Śmigło
5. Nakrętka zabezpieczająca
siatkę
6. Siatka ochronna – tył
7. Trzpień
8. Obudowa silnika
9. Korpus
10. Panel sterowania
11. Przewód
12. Blokada
13. Rura przedłużająca
14. Pierścień regulacji wysokości
15. Rura bazowa
16. Podstawa
17. Pilot
•DANE TECHNICZNE
−moc: 45W
−napięcie zasilania:
220-240V~ 50/60Hz
•PANEL STEROWANIA (10)
SPEED/ON – włączenie wentylatora, sterowanie prędkością pracy
OFF – wyłączenie urządzenia
TIMER – włączenie/wyłączenie automatycznego wyłączenia
MODE – wybór zaprogramowanych trybów pracy
L, M, H – kontrolki prędkości pracy wentylatora (niska, średnia, wysoka)
NAT, NOR, SLP – kontrolki trybu pracy (naturalny, normalny, nocny)
4H, 2H, 1H, 0.5H – kontrolki ustawienia czasu automatycznego wyłączenia
•PILOT (17)
LAMP – włączenie/wyłączenie wskaźników na panelu sterowania
OSC. – włączenie/wyłączenie oscylacji
TIME – włączenie/wyłączenie automatycznego wyłączenia
SPEED/ON – włączenie wentylatora, sterowanie prędkością pracy
MODE – wybór zaprogramowanych trybów pracy
OFF – wyłączenie urządzenia
• PRZEZNACZENIE
Wentylator WG100 przeznaczony jest do poprawy komfortu termicznego w pomieszczeniach
mieszkalnych. Przy jego pomocy powietrze zostaje wprawione w ruch, zapewniając tym samym
przyjemne odczucie chłodzenia.
• UŻYTKOWANIE
− Przed użyciem należy sprawdzić czy urządzenie jest kompletne i nieuszkodzone.
− Przed pierwszym użyciem należy urządzenie rozpakować i złożyć poszczególne elementy.
− Połączyć rurę (15) z podstawą (16) – rys. 1
− Wysunąć rurę (13) i zablokować ją pierścieniem (14).
− Korpus (9) połączyć z rurą (13) i zablokować dokręcając blokadę (14).
− Na trzpień (7) nasunąć tylną siatkę (6).
− Otwory siatki (6) dopasować do zaczepów na obudowie silnika (8) i przymocować nakrętką
(5).
− Na trzpień (7) nasunąć śmigło (4) i zamocować je nakrętką (3).
− Poluzować śrubę w obejmie (1), a następnie obejmę (1) założyć na zamontowaną siatkę (6).
− Przednią siatkę (2) wpasować w obejmę (1) i zabezpieczyć dokręcając śrubę w obejmie (1)
do oporu.
− Złożone urządzenie ustawić na stabilnej i równej powierzchni.
− Wyregulować wysokość. Poluzować pierścień (14), wsunąć lub wysunąć rurę (13) na
wymaganą wysokość, a następnie zablokować dokręcając pierścień (14).
− Ustawić kąt nachylenia czaszy.
− Rozwinąć całkowicie przewód.
• OBSŁUGA
Wszystkie zmiany ustawień potwierdzane są sygnałem dźwiękowym.
Przyciskiem OFF można wyłączyć wszystkie funkcje urządzenia od razu.
− Urządzenie podłączyć do sieci zgodnej z parametrami podanymi na powyżej.
− Włączyć urządzenie przyciskiem „SPEED/ON” i naciskając ustalić prędkość pracy – zapali się
kontrolka (L, M, lub H),
− za pomocą przycisków na panelu sterowania lub pilocie wybrać dodatkowo inne funkcje.
− Aby wyłączyć należy nacisnąć przycisk „OFF”
• TRYBY PRACY
NAT – tryb naturalny
• Za pomocą przycisku „SPEED/ON” włączyć wentylator.
• Naciskać przycisk „MODE”, aż zapali się kontrolka „NAT”.
• Wentylator będzie cyklicznie zmieniał szybkość obrotów od najwyższych do
najniższych.
NOR – tryb normalny
• Za pomocą przycisku „SPEED/ON” włączyć wentylator i wybrać prędkość pracy.
• Naciskać przycisk „MODE”, aż zapali się kontrolka „NOR”.
• Wentylator będzie pracował z wybraną prędkością.
rys. 1

8
SLP – tryb nocny
•Za pomocą przycisku „SPEED/ON” włączyć wentylator i wybrać prędkość pracy.
•Naciskać przycisk „MODE”, aż zapali się kontrolka „SLP”.
•Wentylator będzie się cyklicznie włączał i wyłączał – działanie z wybraną prędkością.
•DODATKOWE FUNKCJE
OSCYLACJA – aktywacja możliwa tylko z pilota
•Za pomocą przycisku „SPEED/ON” włączyć wentylator i wybrać prędkość pracy.
•Nacisnąć przycisk „SWING” na pilocie.
•Wentylator będzie pracował z wybraną prędkością.
•Aby wyłączyć funkcję należy nacisnąć przycisk „SWING” na pilocie.
TIMER
•Funkcja ta umożliwia ustawienie czasu po upływie, którego nastąpi automatyczne
wyłączenie urządzenia.
•Funkcję można uruchomić tylko, gdy urządzenie jest włączone.
•Za pomocą przycisku „SPEED/ON” włączyć wentylator i wybrać prędkość pracy.
•Nacisnąć przycisk „TIME” na pilocie lub „„TIME” na panelu sterowania.
o1 raz – ustawienie automatycznego wyłączenia za pół godziny – zapali się kontrolka
„0.5H”,
o2 razy – ustawienie automatycznego wyłączenia za 1 godzinę – zapali się kontrolka
„1H”,
o3 razy – wyłączenie za 1,5 godziny – zapalą się kontrolki „1H” i „0.5H ”,
o4 razy – wyłączenie za 2 godziny – zapali się kontrolka „2H”,
o5 razy – wyłączenie za 2,5 godzin – zapalą się kontrolki „2H” i „0.5H”,
o6 razy – wyłączenie za 3 godzin – zapalą się kontrolki „1H” i „2H”,
o7 razy – wyłączenie za 3,5 godziny – zapalą się kontrolki „1H” i „2H”, „0.5H”,
o8 razy – wyłączenie za 4 godzin – zapala się kontrolka „4H”,
o9 razy – wyłączenie za 4,5 godziny – zapalą się kontrolki „4H” i „0.5H”,
o10 razy – wyłączenie za 5 godzin – zapalą się kontrolki „4H” i „1H”,
o11 razy – wyłączenie za 5,5 godziny – zapalą się kontrolki „4H”, „1H” i „0.5H”,
o12 razy – wyłączenie za 6 godzin – zapalą się kontrolki „4H” i „2H”,
o13 razy – wyłączenie za 6,5 godzin – zapalą się kontrolki „4H”, „2H” i „0.5H”,
o14 razy – wyłączenie za 7 godzin – zapalą się kontrolki „4H”, „2H” i „1H”,
o15 razy – wyłączenie za 7,5 godziny – zapalą się kontrolki „4H”, „2H”, „1H” i „0.5H”,
•Wentylator będzie pracował z wybraną prędkością.
•CZYSZCZENIE I KONSERWACJA
−Przed rozpoczęciem czyszczenia urządzenia należy odłączyć urządzenie od sieci i poczekać,
aż śmigło się zatrzyma.
−Urządzenia nie wolno zanurzać w wodzie
−Urządzenie przetrzeć wilgotną szmatką, a następnie wytrzeć do sucha.
−Ściągnąć przednią siatkę, śmigło oraz tylną siatkę – elementy przetrzyj wilgotną szmatką,
a następnie wytrzeć do sucha.
−Nie używać do czyszczenia silnych lub niszczących powierzchnię środków czystości.
•OCHRONA ŚRODOWISKA
−Urządzenie jest zbudowane z materiałów, które mogą być poddane ponownemu
przetwarzaniu lub recyklingowi.
−Należy je przekazać do odpowiedniego punktu, który zajmuje się zbieraniem i recyklingiem
urządzeń elektrycznych i elektronicznych.
SAFETY INSTRUCTIONS
Before first use, please thoroughly read the entire
manual.
It is recommended to keep this instructions manual
for future reference.
1. The cord should be plugged into the power supply
of parameters indicated in the data plate.
2. Please, do not plug too many appliances to a single
electric circuit.
3. WARNING: do not use close to bathtubs, showers,
swimming pools and other water containers.
4. The unit is designed to operate at a household.
5. Place the unit on a flat and dry surface.
6. Do not inert fingers or any other objects into the inlet
and outlet holes.
7. Do not place the unit near cushions or curtains.
8. Working fan must be always supervised, especially,
when there are children nearby.
9. Leaving a room where a fan operates, switch it off.
10. Do not spray any insect killers or similar agents near
the operating fan.
11. Do not use the appliance under high temperature
(exceeding 40oC), in localizations where the humidity
rate is high (e.g. bathroom) and localizations where
explosive atmosphere occurs.
12. Before switching the unit on make sure all its elements
are correctly fixed. Under no circumstances one may
switch the unit on before it has been completely
assembled!

9
SLP – tryb nocny
• Za pomocą przycisku „SPEED/ON” włączyć wentylator i wybrać prędkość pracy.
• Naciskać przycisk „MODE”, aż zapali się kontrolka „SLP”.
• Wentylator będzie się cyklicznie włączał i wyłączał – działanie z wybraną prędkością.
• DODATKOWE FUNKCJE
OSCYLACJA – aktywacja możliwa tylko z pilota
• Za pomocą przycisku „SPEED/ON” włączyć wentylator i wybrać prędkość pracy.
• Nacisnąć przycisk „OSC” na pilocie.
• Wentylator będzie pracował z wybraną prędkością.
• Aby wyłączyć funkcję należy nacisnąć przycisk „OSC” na pilocie.
TIMER
• Funkcja ta umożliwia ustawienie czasu po upływie, którego nastąpi automatyczne
wyłączenie urządzenia.
• Funkcję można uruchomić tylko, gdy urządzenie jest włączone.
• Za pomocą przycisku „SPEED/ON” włączyć wentylator i wybrać prędkość pracy.
• Nacisnąć przycisk „TIME” na pilocie lub „„TIME” na panelu sterowania.
o 1 raz – ustawienie automatycznego wyłączenia za pół godziny – zapali się kontrolka
„0.5H”,
o 2 razy – ustawienie automatycznego wyłączenia za 1 godzinę – zapali się kontrolka
„1H”,
o 3 razy – wyłączenie za 1,5 godziny – zapalą się kontrolki „1H” i „0.5H ”,
o 4 razy – wyłączenie za 2 godziny – zapali się kontrolka „2H”,
o 5 razy – wyłączenie za 2,5 godzin – zapalą się kontrolki „2H” i „0.5H”,
o 6 razy – wyłączenie za 3 godzin – zapalą się kontrolki „1H” i „2H”,
o 7 razy – wyłączenie za 3,5 godziny – zapalą się kontrolki „1H” i „2H”, „0.5H”,
o 8 razy – wyłączenie za 4 godzin – zapala się kontrolka „4H”,
o 9 razy – wyłączenie za 4,5 godziny – zapalą się kontrolki „4H” i „0.5H”,
o 10 razy – wyłączenie za 5 godzin – zapalą się kontrolki „4H” i „1H”,
o 11 razy – wyłączenie za 5,5 godziny – zapalą się kontrolki „4H”, „1H” i „0.5H”,
o 12 razy – wyłączenie za 6 godzin – zapalą się kontrolki „4H” i „2H”,
o 13 razy – wyłączenie za 6,5 godzin – zapalą się kontrolki „4H”, „2H” i „0.5H”,
o 14 razy – wyłączenie za 7 godzin – zapalą się kontrolki „4H”, „2H” i „1H”,
o 15 razy – wyłączenie za 7,5 godziny – zapalą się kontrolki „4H”, „2H”, „1H” i „0.5H”,
• Wentylator będzie pracował z wybraną prędkością.
• CZYSZCZENIE I KONSERWACJA
− Przed rozpoczęciem czyszczenia urządzenia należy odłączyć urządzenie od sieci i poczekać,
aż śmigło się zatrzyma.
− Urządzenia nie wolno zanurzać w wodzie
− Urządzenie przetrzeć wilgotną szmatką, a następnie wytrzeć do sucha.
− Ściągnąć przednią siatkę, śmigło oraz tylną siatkę – elementy przetrzyj wilgotną szmatką,
a następnie wytrzeć do sucha.
− Nie używać do czyszczenia silnych lub niszczących powierzchnię środków czystości.
• OCHRONA ŚRODOWISKA
− Urządzenie jest zbudowane z materiałów, które mogą być poddane ponownemu
przetwarzaniu lub recyklingowi.
− Należy je przekazać do odpowiedniego punktu, który zajmuje się zbieraniem i recyklingiem
urządzeń elektrycznych i elektronicznych.
SAFETY INSTRUCTIONS
Before first use, please thoroughly read the entire
manual.
It is recommended to keep this instructions manual
for future reference.
1. The cord should be plugged into the power supply
of parameters indicated in the data plate.
2. Please, do not plug too many appliances to a single
electric circuit.
3. WARNING: do not use close to bathtubs, showers,
swimming pools and other water containers.
4. The unit is designed to operate at a household.
5. Place the unit on a flat and dry surface.
6. Do not inert fingers or any other objects into the inlet
and outlet holes.
7. Do not place the unit near cushions or curtains.
8. Working fan must be always supervised, especially,
when there are children nearby.
9. Leaving a room where a fan operates, switch it off.
10. Do not spray any insect killers or similar agents near
the operating fan.
11. Do not use the appliance under high temperature
(exceeding 40oC), in localizations where the humidity
rate is high (e.g. bathroom) and localizations where
explosive atmosphere occurs.
12. Before switching the unit on make sure all its elements
are correctly fixed. Under no circumstances one may
switch the unit on before it has been completely
assembled!

10
13. Do not cover the protective mesh.
14. Do not use the appliance as a hanger.
15. In case the power cord is damaged it must be replaced
by the manufacturer’s authorized service center.
16. The device can be used by children aged 8 and older
and by persons with limited physical, sensory or mental
capabilities, or persons without sufficient experience
and knowledge only under supervision or if previously
instructed on the safe use of the appliance and the
possible risks. Children shall not play with the appliance.
Cleaning and maintenance that are the responsibility of
the user shall not be carried out by children without
supervision. Protect the appliance and the power cord
against children under 8 years old.
17. The device can be repaired only by authorized service
center. Any upgrades or any use of non-original spare
parts or equipment components is prohibited and
endanger the safety of use.
18. Eldom Sp. z o. o. is not liable for any damage resulting
from improper use of the appliance.
WARNING: Improper use of the appliance may cause injury
WARNING: Plastic bag can be dangerous, to avoid danger
of suffocation keep this bag away from babies and children.
•WARRANTY
−This appliance is designed for domestic use only.
−It cannot be used for professional purposes or for other than the intended use.
−Improper use will nullify the guarantee.
INSTRUCTION MANUAL
STAND FAN WG100
•GENERAL DESCRIPTION
1. Bracket
2. Protective net - front
3. Propeller locking nut
4. Propeller
5. Safety nut net
6. Protective net - rear
7. Mandrel
8. Motor housing
9. Body
10. Control panel
11. Cable
12. Lock
13. Extension tube
14. Height adjustment ring
15. Base tube
16. Base
17. Remote control
•TECHNICAL DATA
−power: 45W
−supply voltage:
220-240V~ 50/60Hz
•CONTROL PANEL (10)
SPEED/ON - fan on, speed control
OFF - switching off the device
TIMER - switching on/off of automatic switching off
MODE - selection of programmed operation modes
L, M, H - fan speed control (low, medium, high)
NAT, NOR, SLP - operating mode indicator lights
(natural, normal, night)
4H, 2H, 1H, 0.5H - indicators of automatic shut-off time setting
•REMOTE CONTROL (17)
LAMP - lamp on/off
OSC. - oscillation on/off
TIME - on/off of automatic switch off
SPEED/ON - fan on/off, control of operating speed
MODE - selection of programmed operation modes
OFF - switching off the device

11
OPERATING INSTRUCTION
STAND FAN WG100 EN
13. Do not cover the protective mesh.
14. Do not use the appliance as a hanger.
15. In case the power cord is damaged it must be replaced
by the manufacturer’s authorized service center.
16. The device can be used by children aged 8 and older
and by persons with limited physical, sensory or mental
capabilities, or persons without sufficient experience
and knowledge only under supervision or if previously
instructed on the safe use of the appliance and the
possible risks. Children shall not play with the appliance.
Cleaning and maintenance that are the responsibility of
the user shall not be carried out by children without
supervision. Protect the appliance and the power cord
against children under 8 years old.
17. The device can be repaired only by authorized service
center. Any upgrades or any use of non-original spare
parts or equipment components is prohibited and
endanger the safety of use.
18. Eldom Sp. z o. o. is not liable for any damage resulting
from improper use of the appliance.
WARNING: Improper use of the appliance may cause injury
WARNING: Plastic bag can be dangerous, to avoid danger
of suffocation keep this bag away from babies and children.
•WARRANTY
−This appliance is designed for domestic use only.
−It cannot be used for professional purposes or for other than the intended use.
−Improper use will nullify the guarantee.
INSTRUCTION MANUAL
STAND FAN WG100
•GENERAL DESCRIPTION
1. Bracket
2. Protective net - front
3. Propeller locking nut
4. Propeller
5. Safety nut net
6. Protective net - rear
7. Mandrel
8. Motor housing
9. Body
10. Control panel
11. Cable
12. Lock
13. Extension tube
14. Height adjustment ring
15. Base tube
16. Base
17. Remote control
•TECHNICAL DATA
−power: 45W
−supply voltage:
220-240V~ 50/60Hz
•CONTROL PANEL (10)
SPEED/ON - fan on, speed control
OFF - switching off the device
TIMER - switching on/off of automatic switching off
MODE - selection of programmed operation modes
L, M, H - fan speed control (low, medium, high)
NAT, NOR, SLP - operating mode indicator lights
(natural, normal, night)
4H, 2H, 1H, 0.5H - indicators of automatic shut-off time setting
•REMOTE CONTROL (17)
LAMP - lamp on/off
SWING - oscillation on/off
TIME - on/off of automatic switch off
SPEED/ON - fan on/off, control of operating speed
MODE - selection of programmed operation modes
OFF - switching off the device

12
•INTENDED USE
Fan WG100 is designed to improve thermal comfort in living spaces. With its help, the air is
set in motion, thus providing a pleasant cooling sensation.
•USE
−Before use, check that the unit is complete and undamaged.
−Before first use, unpack the appliance and assemble the individual components.
−Connect the tube (15) to the base (16) - fig. 1
−Slide out the tube (13) and lock it with the ring (14).
−Connect the body (9) to the tube (13) and lock by tightening the lock (14).
−Slide the rear mesh (6) onto the stem (7).
−Align the holes of the net (6) with the hooks on the motor housing (8) and fix with the nut
(5).
−Slide the propeller (4) onto the stem (7) and fix it with the nut (3).
−Loosen the bolt in the bracket (1), then put the bracket (1) on the mounted net (6).
−Fit the front net (2) into the bracket (1) and secure by tightening the screw in the bracket
(1) as far as it will go.
−Place assembled unit on a stable and level surface.
−Adjust height. Loosen the ring (14), slide the tube (13) in or out to the required height and
then lock by tightening the ring (14).
−Adjust the angle of the canopy.
−Unwind the cable completely.
•OPERATION
−All setting changes are confirmed with a beep.
−With the OFF button you can switch off all functions of the device at once.
−Connect the device to the mains according to the parameters given above.
−Switch on the appliance using the "SPEED/ON" button and by pressing it set the speed -
the indicator light (L, M, or H) will light up.
−Using the buttons on the control panel or remote control additionally select other
functions.
−To switch off press the "OFF" button.
•MODES OF OPERATION
NAT - natural mode
•Press the "SPEED/ON" button to switch on the fan.
•Press the "MODE" button until the "NAT" light comes on.
•The fan will cycle the speed from highest to lowest.
NOR - Normal mode
•Use the "SPEED/ON" button to switch on the fan and select the operating speed.
•Press the "MODE" button until the "NOR" light comes on.
•The fan will run at the selected speed.
Fig. 1
SLP -night mode
•Press the "SPEED/ON" button to switch on the fan and select the operating speed.
•Press the "MODE" button until the "SLP" light comes on.
•The fan will cycle on and off -operating at the selected speed.
•ADDITIONAL FUNCTIONS
OSCILLATION -activation possible only from remote control
•Use the "SPEED/ON" button to switch on the fan and select the operating speed.
•Press the "OSC" button on the remote control.
•The fan will run at the selected speed.
•To deactivate the function, press the "OSC" button on the remote control.
TIMER
•This function allows you to set a time after which the unit will automatically switch
off.
•The function can only be activated when the unit is switched on.
•Use the "SPEED/ON" button to switch on the fan and select the operating speed.
•Press the "TIME" button on the remote control or ""TIME" on the control panel.
o1 time -setting of automatic switch off in half an hour -the "0.5H" light will
come on,
o2 times -setting automatic switch off in 1 hour -"1H" indicator light will come
on,
o3 times -switch off in 1.5 hours -"1H" and "0.5H " indicator lights will come on,
o4 times -switch off in 2 hours -"2H" indicator light will come on,
o5 times -switch off in 2.5 hours -"2H" and "0.5H" indicator lights will come on,
o6 times -switch off in 3 hours -"1H" and "2H" indicator lights will come on,
o7 times -switch off in 3.5 hours -"1H" and "2H", "0.5H" indicator lights will come
on,
o8 times -switch off in 4 hours -"4H" indicator light comes on,
o9 times -switch off in 4.5 hours -"4H" and "0.5H" indicator lights will come on,
o10 times -switch off in 5 hours -the "4H" and "1H" lights will come on,
o11 times -switch off in 5.5 hours -the "4H", "1H" and "0.5H" lights will come on,
o12 times -switch off in 6 hours -the "4H" and "2H" lights will come on,
o13 times -switch off in 6.5 hours -the "4H", "2H" and "0.5H" lights will come on,
o14 times -off in 7 hours -the "4H", "2H" and "1H" lights will come on,
o15 times -switch off in 7.5 hours -the "4H", "2H", "1H" and "0.5H" lights will
come on.
•The fan will run at the selected speed.
•CLEANING AND MAINTENANCE
−Unplug the appliance from the mains and wait for the propeller to stop before cleaning.
−The appliance must not be submerged in water
−Wipe the unit with a damp cloth and then wipe dry.
−Remove the front net, propeller and rear net -wipe the components with a damp cloth
and then wipe dry.
−Do not use strong or surface-damaging cleaners to clean. Do not use any aggressive
cleaning agents.
•ENVIRONMENTAL PROTECTION
−The appliance is made of materials which can be recycled.
−It should be handed over to the applicable collection point for the recycling of electrical
and electronic equipment.

13
•INTENDED USE
Fan WG100 is designed to improve thermal comfort in living spaces. With its help, the air is
set in motion, thus providing a pleasant cooling sensation.
•USE
−Before use, check that the unit is complete and undamaged.
−Before first use, unpack the appliance and assemble the individual components.
−Connect the tube (15) to the base (16) - fig. 1
−Slide out the tube (13) and lock it with the ring (14).
−Connect the body (9) to the tube (13) and lock by tightening the lock (14).
−Slide the rear mesh (6) onto the stem (7).
−Align the holes of the net (6) with the hooks on the motor housing (8) and fix with the nut
(5).
−Slide the propeller (4) onto the stem (7) and fix it with the nut (3).
−Loosen the bolt in the bracket (1), then put the bracket (1) on the mounted net (6).
−Fit the front net (2) into the bracket (1) and secure by tightening the screw in the bracket
(1) as far as it will go.
−Place assembled unit on a stable and level surface.
−Adjust height. Loosen the ring (14), slide the tube (13) in or out to the required height and
then lock by tightening the ring (14).
−Adjust the angle of the canopy.
−Unwind the cable completely.
•OPERATION
−All setting changes are confirmed with a beep.
−With the OFF button you can switch off all functions of the device at once.
−Connect the device to the mains according to the parameters given above.
−Switch on the appliance using the "SPEED/ON" button and by pressing it set the speed -
the indicator light (L, M, or H) will light up.
−Using the buttons on the control panel or remote control additionally select other
functions.
−To switch off press the "OFF" button.
•MODES OF OPERATION
NAT - natural mode
•Press the "SPEED/ON" button to switch on the fan.
•Press the "MODE" button until the "NAT" light comes on.
•The fan will cycle the speed from highest to lowest.
NOR - Normal mode
•Use the "SPEED/ON" button to switch on the fan and select the operating speed.
•Press the "MODE" button until the "NOR" light comes on.
•The fan will run at the selected speed.
Fig. 1
SLP - night mode
•Press the "SPEED/ON" button to switch on the fan and select the operating speed.
•Press the "MODE" button until the "SLP" light comes on.
•The fan will cycle on and off - operating at the selected speed.
•ADDITIONAL FUNCTIONS
OSCILLATION - activation possible only from remote control
•Use the "SPEED/ON" button to switch on the fan and select the operating speed.
•Press the "SWING" button on the remote control.
•The fan will run at the selected speed.
•To deactivate the function, press the "SWING" button on the remote control.
TIMER
•This function allows you to set a time after which the unit will automatically switch
off.
•The function can only be activated when the unit is switched on.
•Use the "SPEED/ON" button to switch on the fan and select the operating speed.
•Press the "TIME" button on the remote control or ""TIME" on the control panel.
o1 time - setting of automatic switch off in half an hour - the "0.5H" light will
come on,
o2 times - setting automatic switch off in 1 hour - "1H" indicator light will come
on,
o3 times - switch off in 1.5 hours - "1H" and "0.5H " indicator lights will come on,
o4 times - switch off in 2 hours - "2H" indicator light will come on,
o5 times - switch off in 2.5 hours - "2H" and "0.5H" indicator lights will come on,
o6 times - switch off in 3 hours - "1H" and "2H" indicator lights will come on,
o7 times - switch off in 3.5 hours - "1H" and "2H", "0.5H" indicator lights will come
on,
o8 times - switch off in 4 hours - "4H" indicator light comes on,
o9 times - switch off in 4.5 hours - "4H" and "0.5H" indicator lights will come on,
o10 times - switch off in 5 hours - the "4H" and "1H" lights will come on,
o11 times - switch off in 5.5 hours - the "4H", "1H" and "0.5H" lights will come on,
o12 times - switch off in 6 hours - the "4H" and "2H" lights will come on,
o13 times - switch off in 6.5 hours - the "4H", "2H" and "0.5H" lights will come on,
o14 times - off in 7 hours - the "4H", "2H" and "1H" lights will come on,
o15 times - switch off in 7.5 hours - the "4H", "2H", "1H" and "0.5H" lights will
come on.
•The fan will run at the selected speed.
•CLEANING AND MAINTENANCE
−Unplug the appliance from the mains and wait for the propeller to stop before cleaning.
−The appliance must not be submerged in water
−Wipe the unit with a damp cloth and then wipe dry.
−Remove the front net, propeller and rear net - wipe the components with a damp cloth
and then wipe dry.
−Do not use strong or surface-damaging cleaners to clean. Do not use any aggressive
cleaning agents.
•ENVIRONMENTAL PROTECTION
−The appliance is made of materials which can be recycled.
−It should be handed over to the applicable collection point for the recycling of electrical
and electronic equipment.

14
SICHERHEITSANWEISUNGEN
Vor der ersten Verwendung machen Sie sich bitte mit dem
Inhalt dieser Anleitung vertraut.
Bewahren Sie diese Betriebsanleitung zum späteren
Nachschlagen auf.
1. Das Anschlusskabel muss an ein elektrisches Netz mit den
auf dem Typenschild angegebenen Parametern
angeschlossen werden.
2. Es muss darauf geachtet werden, dass nicht zu viele Geräte
an einen Stromkreis angeschlossen werden.
3. Um das Gerät vom Netz zu trennen, ziehen Sie niemals am
Kabel, sondern immer am Stecker.
4. Das Gerät ist nur für den Hausgebrauch bestimmt.
5. Stellen Sie das Gerät auf eine ebene und trockene Fläche.
6. Stecken Sie weder Finger noch andere Gegenstände in die
Ein- und Auslassöffnungen.
7. Stellen Sie das Gerät nicht in der Nähe von Vorhängen oder
Gardinen auf.
8. Halten Sie den funktionierenden Ventilator immer in
Sichtweite, besonders wenn Kinder in der Nähe sind.
9. Lassen Sie das funktionierende Gerät nicht unbeaufsichtigt.
10. Dieses Gerät kann von Kindern im Alter von mindestens 8
Jahren und von Personen mit eingeschränkten körperlichen
und geistigen Fähigkeiten und mangelnder Erfahrung und
Kenntnis des Geräts benutzt werden, wenn eine Aufsicht
oder eine Einweisung in die sichere Benutzung des Geräts
erfolgt, so dass die damit verbundenen Risiken verstanden
werden. Kinder sollten nicht mit den Geräten spielen.
Unbeaufsichtigte Kinder sollten keine Reinigungs- oder
Wartungsarbeiten an den Geräten durchführen.
11. Sprühen Sie keine Insektizide oder ähnliches in der Nähe
von Arbeitsgeräten.
12. Nicht bei hohen Temperaturen (über 40 °C), in Bereichen mit
hoher Luftfeuchtigkeit (z. B. Badezimmer) und in
explosionsgefährdeten Bereichen verwenden.
13. Vergewissern Sie sich vor dem Einschalten des Geräts, dass
alle Komponenten richtig zusammengebaut sind.
14. Schalten Sie das Gerät niemals ein, bevor es
zusammengebaut ist.
15. Das Sicherheitsnetz darf nicht abgedeckt werden.
16. Hängen Sie keine Kleidungsstücke oder andere
Gegenstände an das Gerät.
17. Verwenden Sie das Gerät nicht mit einem beschädigten
Anschlusskabel. Um Gefahren zu vermeiden, muss sie von
der Kundendienststelle des Herstellers ausgetauscht
werden.
18. Reparaturen am Gerät dürfen nur von einer autorisierten
Servicestelle durchgeführt werden. Jegliche Nachrüstung
oder die Verwendung von nicht originalen Ersatzteilen oder
Komponenten des Geräts ist verboten und gefährdet die
Sicherheit des Gebrauchs.
19. Tauchen Sie das Gerät oder den Netzstecker nicht in Wasser
oder andere Flüssigkeiten. Es besteht Lebensgefahr durch
Stromschlag! Ziehen Sie in diesem Fall jedoch sofort den
Stecker aus der Steckdose und lassen Sie das Gerät von
einem Fachmann überprüfen, bevor Sie es wieder benutzen.
20. Ziehen Sie den Stecker niemals durch Ziehen am Netzkabel
oder mit nassen Händen aus der Steckdose.
21. Achten Sie darauf, dass das Netzkabel nicht über scharfe
Kanten hängt oder eingeklemmt wird.
22. Verwenden oder lagern Sie das Gerät nicht im Freien.
23. Richten Sie den Luftstrom nicht über einen längeren
Zeitraum auf Personen.
24. Eldom Sp. z o. o. haftet nicht für Schäden, die durch
unsachgemäßen Gebrauch des Geräts entstehen.
WARNUNG: Die unsachgemäße Verwendung des Geräts
kann zu Verletzungen führen.
VORSICHT!
Plastiktüten können gefährlich sein! Erstickungsgefahr!
Bewahren Sie die Tüte sicher vor Kindern auf!
•UMWELTSCHUTZ
−Das Gerät ist aus wieder verwendbaren oder recyclebaren Stoffen gebaut.
−Es soll an einer entsprechenden für Recycling elektrischer und elektronischer Geräte
zuständigen.
−Sammelstelle abgegeben werden-

15
SICHERHEITSANWEISUNGEN
Vor der ersten Verwendung machen Sie sich bitte mit dem
Inhalt dieser Anleitung vertraut.
Bewahren Sie diese Betriebsanleitung zum späteren
Nachschlagen auf.
1. Das Anschlusskabel muss an ein elektrisches Netz mit den
auf dem Typenschild angegebenen Parametern
angeschlossen werden.
2. Es muss darauf geachtet werden, dass nicht zu viele Geräte
an einen Stromkreis angeschlossen werden.
3. Um das Gerät vom Netz zu trennen, ziehen Sie niemals am
Kabel, sondern immer am Stecker.
4. Das Gerät ist nur für den Hausgebrauch bestimmt.
5. Stellen Sie das Gerät auf eine ebene und trockene Fläche.
6. Stecken Sie weder Finger noch andere Gegenstände in die
Ein- und Auslassöffnungen.
7. Stellen Sie das Gerät nicht in der Nähe von Vorhängen oder
Gardinen auf.
8. Halten Sie den funktionierenden Ventilator immer in
Sichtweite, besonders wenn Kinder in der Nähe sind.
9. Lassen Sie das funktionierende Gerät nicht unbeaufsichtigt.
10. Dieses Gerät kann von Kindern im Alter von mindestens 8
Jahren und von Personen mit eingeschränkten körperlichen
und geistigen Fähigkeiten und mangelnder Erfahrung und
Kenntnis des Geräts benutzt werden, wenn eine Aufsicht
oder eine Einweisung in die sichere Benutzung des Geräts
erfolgt, so dass die damit verbundenen Risiken verstanden
werden. Kinder sollten nicht mit den Geräten spielen.
Unbeaufsichtigte Kinder sollten keine Reinigungs- oder
Wartungsarbeiten an den Geräten durchführen.
11. Sprühen Sie keine Insektizide oder ähnliches in der Nähe
von Arbeitsgeräten.
12. Nicht bei hohen Temperaturen (über 40 °C), in Bereichen mit
hoher Luftfeuchtigkeit (z. B. Badezimmer) und in
explosionsgefährdeten Bereichen verwenden.
13. Vergewissern Sie sich vor dem Einschalten des Geräts, dass
alle Komponenten richtig zusammengebaut sind.
14. Schalten Sie das Gerät niemals ein, bevor es
zusammengebaut ist.
15. Das Sicherheitsnetz darf nicht abgedeckt werden.
16. Hängen Sie keine Kleidungsstücke oder andere
Gegenstände an das Gerät.
17. Verwenden Sie das Gerät nicht mit einem beschädigten
Anschlusskabel. Um Gefahren zu vermeiden, muss sie von
der Kundendienststelle des Herstellers ausgetauscht
werden.
18. Reparaturen am Gerät dürfen nur von einer autorisierten
Servicestelle durchgeführt werden. Jegliche Nachrüstung
oder die Verwendung von nicht originalen Ersatzteilen oder
Komponenten des Geräts ist verboten und gefährdet die
Sicherheit des Gebrauchs.
19. Tauchen Sie das Gerät oder den Netzstecker nicht in Wasser
oder andere Flüssigkeiten. Es besteht Lebensgefahr durch
Stromschlag! Ziehen Sie in diesem Fall jedoch sofort den
Stecker aus der Steckdose und lassen Sie das Gerät von
einem Fachmann überprüfen, bevor Sie es wieder benutzen.
20. Ziehen Sie den Stecker niemals durch Ziehen am Netzkabel
oder mit nassen Händen aus der Steckdose.
21. Achten Sie darauf, dass das Netzkabel nicht über scharfe
Kanten hängt oder eingeklemmt wird.
22. Verwenden oder lagern Sie das Gerät nicht im Freien.
23. Richten Sie den Luftstrom nicht über einen längeren
Zeitraum auf Personen.
24. Eldom Sp. z o. o. haftet nicht für Schäden, die durch
unsachgemäßen Gebrauch des Geräts entstehen.
WARNUNG: Die unsachgemäße Verwendung des Geräts
kann zu Verletzungen führen.
VORSICHT!
Plastiktüten können gefährlich sein! Erstickungsgefahr!
Bewahren Sie die Tüte sicher vor Kindern auf!
• UMWELTSCHUTZ
− Das Gerät ist aus wieder verwendbaren oder recyclebaren Stoffen gebaut.
− Es soll an einer entsprechenden für Recycling elektrischer und elektronischer Geräte
zuständigen.
− Sammelstelle abgegeben werden-

16
BEDIENUNGSANLEITUNG
STANDVENTILATOR WG100
DE
BEDIENUNGSANLEITUNG
STANDVENTILATOR WG100
•ALLGEMEINE BESCHREIBUNG
1. Klemme
2. Schutzgitter - vorne
3. Propeller-Befestigungsmutter
4. Propeller
5. Netzsicherungsmutter
6. Schutznetz - zurück
7. Stift
8. Motorgehäuse
9. Körper
10. Schalttafel
11. Kabel
12. Blockade
13. Verlängerungsrohr
14. Höheneinstellring
15. Grundrohr
16. Base
17. Fernbedienung
•TECHNISCHE DATEN
−Leistung: 45W
−Versorgungsspannung:
220-240V~ 50/60Hz
•SCHALTTAFEL (10)
SPEED/ON - Einschalten des Ventilators, Regelung der Betriebsgeschwindigkeit
OFF - Ausschalten des Geräts
TIMER - Ein- und Ausschalten der automatischen Abschaltung
MODE - Auswahl der programmierten Betriebsarten
L, M, H - Steuerung der Lüftergeschwindigkeit (niedrig, mittel, hoch)
NAT, NOR, SLP - Betriebsartensteuerung (Natur, Normal, Nacht)
4H, 2H, 1H, 0.5H - Steuerung der automatischen Abschaltzeiteinstellung
•FERNBEDIENUNG (17)
LAMP - Ein- und Ausschalten der Hintergrundbeleuchtung
des Bedienfelds
SWING - Oszillation ein/aus
TIME - automatische Abschaltzeit ein/aus
SPEED/ON - Lüfter ein/aus, Steuerung der
Betriebsgeschwindigkeit
MODE - Auswahl der programmierten Betriebsarten
OFF - Ausschalten des Geräts
•BESTIMMUNG
Der Ventilator WG100 wurde entwickelt, um
den thermischen Komfort in Wohnräumen zu
verbessern. Mit seiner Hilfe wird die Luft in
Bewegung gesetzt und sorgt so für ein
angenehmes Kühlgefühl.
•MONTAGE
−Überprüfen Sie vor der Benutzung, ob das Gerät vollständig und unbeschädigt ist.
−Packen Sie das Gerät vor dem ersten Gebrauch aus und setzen Sie die einzelnen
Komponenten zusammen.
−Verbinden Sie das Rohr (15) mit dem Sockel (16) - Abb. 1
−Schieben Sie das Rohr (13) heraus und verriegeln Sie es mit dem Ring (14).
−Verbinden Sie das Gehäuse (9) mit dem Rohr (13) und verriegeln Sie es durch Anziehen des
Verschlusses (14).
−Schieben Sie das hintere Netz (6) auf den Vorbau (7).
−Richten Sie die Löcher des Netzes (6) mit den Haken am Motorgehäuse (8) aus und
befestigen Sie es mit der Mutter (5).
−Schieben Sie den Propeller (4) auf den Schaft (7) und befestigen Sie ihn mit der Mutter (3).
−Lösen Sie die Schraube in der Halterung (1), dann setzen Sie die Halterung (1) auf das
montierte Netz (6).
−Setzen Sie das vordere Netz (2) in die Halterung (1) ein und befestigen Sie es, indem Sie die
Schraube in der Halterung (1) bis zum Anschlag anziehen.
−Stellen Sie das zusammengebaute Gerät auf eine stabile und ebene Fläche.
−Höhe einstellen. Lösen Sie den Ring (14), schieben Sie das Rohr (13) in die gewünschte Höhe
und arretieren Sie es durch Anziehen des Rings (14).
−Stellen Sie den Winkel der Kabinenhaube ein.
−Ziehen Sie das Rohr vollständig aus.
•ARBEIT DES GERÄTS
−Alle Änderungen an den Einstellungen werden durch ein Tonsignal bestätigt.
−Mit der OFF-Taste können alle Gerätefunktionen auf einmal deaktiviert werden.
−Verbinden Sie das Gerät gemäß den oben angegebenen Parametern mit dem Netzwerk.
−Schalten Sie das Gerät mit der „SPEED/ON“-Taste ein und stellen Sie die Geschwindigkeit
durch Drücken ein – die Anzeige (L, M oder H) leuchtet auf,
−mit den Tasten auf dem Bedienfeld oder der Fernbedienung zusätzlich weitere Funktionen
auswählen.
−Zum Ausschalten drücken Sie die „OFF“-Taste.
•BETRIEBSARTEN
NAT – natürlicher Modus
•Drücken Sie die Taste "SPEED/ON", um den Ventilator einzuschalten.
•Drücken Sie die Taste "MODE", bis die Leuchte "NAT" aufleuchtet.
•Das Gebläse wechselt von der höchsten zur niedrigsten Geschwindigkeit.
NOR – Normaler Modus
•Mit der Taste "SPEED/ON" schalten Sie den Ventilator ein und wählen die
Betriebsgeschwindigkeit.
•Drücken Sie die Taste "MODE", bis die Leuchte "NOR" aufleuchtet.
•Das Gebläse läuft mit der gewählten Geschwindigkeit.
SLP – Nachtmodus
•Drücken Sie die Taste "SPEED/ON", um den Ventilator einzuschalten und die
Betriebsgeschwindigkeit zu wählen.
•Drücken Sie die Taste "MODE", bis die Leuchte "SLP" aufleuchtet.
•Das Gebläse schaltet sich mit der gewählten Geschwindigkeit ein und aus.
Abb. 1

17
BEDIENUNGSANLEITUNG
STANDVENTILATOR WG100
• ALLGEMEINE BESCHREIBUNG
1. Klemme
2. Schutzgitter - vorne
3. Propeller-Befestigungsmutter
4. Propeller
5. Netzsicherungsmutter
6. Schutznetz - zurück
7. Stift
8. Motorgehäuse
9. Körper
10. Schalttafel
11. Kabel
12. Blockade
13. Verlängerungsrohr
14. Höheneinstellring
15. Grundrohr
16. Base
17. Fernbedienung
• TECHNISCHE DATEN
− Leistung: 45W
− Versorgungsspannung:
220-240V~ 50/60Hz
• SCHALTTAFEL (10)
SPEED/ON - Einschalten des Ventilators, Regelung der Betriebsgeschwindigkeit
OFF - Ausschalten des Geräts
TIMER - Ein- und Ausschalten der automatischen Abschaltung
MODE - Auswahl der programmierten Betriebsarten
L, M, H - Steuerung der Lüftergeschwindigkeit (niedrig, mittel, hoch)
NAT, NOR, SLP - Betriebsartensteuerung (Natur, Normal, Nacht)
4H, 2H, 1H, 0.5H - Steuerung der automatischen Abschaltzeiteinstellung
• FERNBEDIENUNG (17)
LAMP - Ein- und Ausschalten der Hintergrundbeleuchtung
des Bedienfelds
OSC. - Oszillation ein/aus
TIME - automatische Abschaltzeit ein/aus
SPEED/ON - Lüfter ein/aus, Steuerung der
Betriebsgeschwindigkeit
MODE - Auswahl der programmierten Betriebsarten
OFF - Ausschalten des Geräts
• BESTIMMUNG
Der Ventilator WG100 wurde entwickelt, um
den thermischen Komfort in Wohnräumen zu
verbessern. Mit seiner Hilfe wird die Luft in
Bewegung gesetzt und sorgt so für ein
angenehmes Kühlgefühl.
• MONTAGE
− Überprüfen Sie vor der Benutzung, ob das Gerät vollständig und unbeschädigt ist.
− Packen Sie das Gerät vor dem ersten Gebrauch aus und setzen Sie die einzelnen
Komponenten zusammen.
− Verbinden Sie das Rohr (15) mit dem Sockel (16) - Abb. 1
− Schieben Sie das Rohr (13) heraus und verriegeln Sie es mit dem Ring (14).
− Verbinden Sie das Gehäuse (9) mit dem Rohr (13) und verriegeln Sie es durch Anziehen des
Verschlusses (14).
− Schieben Sie das hintere Netz (6) auf den Vorbau (7).
− Richten Sie die Löcher des Netzes (6) mit den Haken am Motorgehäuse (8) aus und
befestigen Sie es mit der Mutter (5).
− Schieben Sie den Propeller (4) auf den Schaft (7) und befestigen Sie ihn mit der Mutter (3).
− Lösen Sie die Schraube in der Halterung (1), dann setzen Sie die Halterung (1) auf das
montierte Netz (6).
− Setzen Sie das vordere Netz (2) in die Halterung (1) ein und befestigen Sie es, indem Sie die
Schraube in der Halterung (1) bis zum Anschlag anziehen.
− Stellen Sie das zusammengebaute Gerät auf eine stabile und ebene Fläche.
− Höhe einstellen. Lösen Sie den Ring (14), schieben Sie das Rohr (13) in die gewünschte Höhe
und arretieren Sie es durch Anziehen des Rings (14).
− Stellen Sie den Winkel der Kabinenhaube ein.
− Ziehen Sie das Rohr vollständig aus.
• ARBEIT DES GERÄTS
− Alle Änderungen an den Einstellungen werden durch ein Tonsignal bestätigt.
− Mit der OFF-Taste können alle Gerätefunktionen auf einmal deaktiviert werden.
− Verbinden Sie das Gerät gemäß den oben angegebenen Parametern mit dem Netzwerk.
− Schalten Sie das Gerät mit der „SPEED/ON“-Taste ein und stellen Sie die Geschwindigkeit
durch Drücken ein – die Anzeige (L, M oder H) leuchtet auf,
− mit den Tasten auf dem Bedienfeld oder der Fernbedienung zusätzlich weitere Funktionen
auswählen.
− Zum Ausschalten drücken Sie die „OFF“-Taste.
• BETRIEBSARTEN
NAT – natürlicher Modus
• Drücken Sie die Taste "SPEED/ON", um den Ventilator einzuschalten.
• Drücken Sie die Taste "MODE", bis die Leuchte "NAT" aufleuchtet.
• Das Gebläse wechselt von der höchsten zur niedrigsten Geschwindigkeit.
NOR – Normaler Modus
• Mit der Taste "SPEED/ON" schalten Sie den Ventilator ein und wählen die
Betriebsgeschwindigkeit.
• Drücken Sie die Taste "MODE", bis die Leuchte "NOR" aufleuchtet.
• Das Gebläse läuft mit der gewählten Geschwindigkeit.
SLP – Nachtmodus
• Drücken Sie die Taste "SPEED/ON", um den Ventilator einzuschalten und die
Betriebsgeschwindigkeit zu wählen.
• Drücken Sie die Taste "MODE", bis die Leuchte "SLP" aufleuchtet.
• Das Gebläse schaltet sich mit der gewählten Geschwindigkeit ein und aus.
Abb. 1

18
•WEITERE FUNKTIONEN
OSCILLATION – Aktivierung nur über die Fernbedienung möglich
•Mit der Taste "SPEED/ON" schalten Sie den Ventilator ein und wählen
die Betriebsgeschwindigkeit.
•Drücken Sie die Taste "SWING" auf der Fernbedienung.
•Das Gebläse läuft mit der gewählten Geschwindigkeit.
•Um die Funktion zu deaktivieren, drücken Sie die Taste "SWING" auf der
Fernbedienung.
TIMER
•Mit dieser Funktion können Sie die Zeit einstellen, nach der sich das Gerät automatisch
ausschaltet.
•Die Funktion kann nur aktiviert werden, wenn das Gerät eingeschaltet ist.
•Mit der Taste "SPEED/ON" schalten Sie den Ventilator ein und wählen die
Betriebsgeschwindigkeit.
•Drücken Sie die Taste "TIME" auf der Fernbedienung oder ""TIME" auf dem Bedienfeld.
o1 Mal - Einstellung der automatischen Abschaltung in einer halben Stunde - die
Leuchte "0.5H" leuchtet auf,
o2 Mal - Einstellung der automatischen Abschaltung nach 1 Stunde - die
Kontrollleuchte "1H" leuchtet auf,
o3 Mal - Ausschalten nach 1,5 Stunden - die Kontrollleuchten "1H" und "0.5H "
leuchten auf,
o4 Mal - Ausschalten in 2 Stunden - die Kontrollleuchte "2H" leuchtet auf,
o5 Mal - Ausschalten nach 2,5 Stunden - die Kontrollleuchten "2H" und "0.5H"
leuchten auf,
o6 Mal - Ausschalten nach 3 Stunden - die Kontrollleuchten "1H" und "2H" leuchten
auf,
o7 Mal - aus in 3,5 Stunden - die Leuchten "1H" und "2H", "0,5H" leuchten auf,
o8-mal - Ausschalten in 4 Stunden - Kontrollleuchte "4H" leuchtet auf,
o9 Mal - aus in 4,5 Stunden - die Lichter "4H" und "0,5H" leuchten auf,
o10 Mal - Ausschalten in 5 Stunden - die Lichter "4H" und "1H" leuchten auf,
o11 Mal - Ausschalten in 5,5 Stunden - die Lichter "4H", "1H" und "0,5H" leuchten
auf,
o12 Mal - Ausschalten in 6 Stunden - die Lichter "4H" und "2H" leuchten auf,
o13 Mal - Ausschalten nach 6,5 Stunden - die Lichter "4H", "2H" und "0,5H" leuchten
auf,
o14 Mal - aus in 7 Stunden - leuchten die Anzeigen "4H", "2H" und "1H" auf,
o15 Mal - aus in 7,5 Stunden - leuchten die Anzeigen "4H", "2H", "1H" und "0,5H" auf,
•Das Gebläse läuft mit der gewählten Geschwindigkeit.
•REINIGUNG UND WARTUNG
−Trennen Sie das Gerät vom Stromnetz und warten Sie, bis der Propeller stillsteht, bevor
Sie das Gerät reinigen.
−Das Gerät darf nicht in Wasser getaucht werden.
−Wischen Sie das Gerät mit einem feuchten Tuch ab und wischen Sie es anschließend
trocken.
−Entfernen Sie das vordere Netz, den Propeller und das hintere Netz - wischen Sie die Teile
mit einem feuchten Tuch ab und wischen Sie sie anschließend trocken.
−Verwenden Sie zur Reinigung keine scharfen oder oberflächenschädigenden
Reinigungsmittel.
•GARANTIE
−Das Gerät ist für den Privatgebrauch im Haushalt bestimmt.
−Es darf nicht für berufliche Zwecke benutzt werden.
−Bei unrichtiger Bedienung erlischt die Garantie.
МЕРЫ БЕЗОПАСНОСТИ
Рекомендуется сохранить это руководство
пользованияна будущее.
Перед первым использованием внимательно прочтите
данную инструкцию.
1. Соединительный кабель должен быть подключен к
электрической сети с параметрами, указанными на
заводской табличке.
2. Необходимо следить за тем, чтобы не подключать
слишком много приборов к одной цепи.
3. Чтобы отключить прибор от сети, никогда не тяните за
кабель, всегда используйте вилку.
4. Прибор предназначен только для бытового
использования.
5. Поместите прибор на ровную и сухую поверхность.
6. Не вставляйте пальцы или какие-либо предметы во
входные и выходные отверстия.
7. Не ставьте прибор рядом с занавесками или
портьерами.
8. Всегда держите работающий вентилятор на виду,
особенно когда рядом находятся дети.
9. Не оставляйте работающий прибор без присмотра.
10. Данное оборудование может использоваться детьми в
возрасте не менее 8 лет и людьми с ограниченными
физическими и умственными способностями и
отсутствием опыта и знаний об оборудовании, если
обеспечен надзор или инструктаж о том, как безопасно
использовать оборудование, чтобы были понятны
связанные с ним риски. Дети не должны играть с
оборудованием. Дети без присмотра взрослых не
должны заниматься чисткой или обслуживанием
оборудования.
11. Не распыляйте инсектициды или аналогичные средства
вблизи рабочего оборудования.
12. Не используйте при высоких температурах (выше 40°C),
в местах с повышенной влажностью (например, в ванной
комнате) и во взрывоопасной атмосфере.

19
• WEITERE FUNKTIONEN
OSCILLATION – Aktivierung nur über die Fernbedienung möglich
• Mit der Taste "SPEED/ON" schalten Sie den Ventilator ein und wählen die
Betriebsgeschwindigkeit.
• Drücken Sie die Taste "OSC" auf der Fernbedienung.
• Das Gebläse läuft mit der gewählten Geschwindigkeit.
• Um die Funktion zu deaktivieren, drücken Sie die Taste "OSC" auf der Fernbedienung.
TIMER
• Mit dieser Funktion können Sie die Zeit einstellen, nach der sich das Gerät automatisch
ausschaltet.
• Die Funktion kann nur aktiviert werden, wenn das Gerät eingeschaltet ist.
• Mit der Taste "SPEED/ON" schalten Sie den Ventilator ein und wählen die
Betriebsgeschwindigkeit.
• Drücken Sie die Taste "TIME" auf der Fernbedienung oder ""TIME" auf dem Bedienfeld.
o 1 Mal - Einstellung der automatischen Abschaltung in einer halben Stunde - die
Leuchte "0.5H" leuchtet auf,
o 2 Mal - Einstellung der automatischen Abschaltung nach 1 Stunde - die
Kontrollleuchte "1H" leuchtet auf,
o 3 Mal - Ausschalten nach 1,5 Stunden - die Kontrollleuchten "1H" und "0.5H "
leuchten auf,
o 4 Mal - Ausschalten in 2 Stunden - die Kontrollleuchte "2H" leuchtet auf,
o 5 Mal - Ausschalten nach 2,5 Stunden - die Kontrollleuchten "2H" und "0.5H"
leuchten auf,
o 6 Mal - Ausschalten nach 3 Stunden - die Kontrollleuchten "1H" und "2H" leuchten
auf,
o 7 Mal - aus in 3,5 Stunden - die Leuchten "1H" und "2H", "0,5H" leuchten auf,
o 8-mal - Ausschalten in 4 Stunden - Kontrollleuchte "4H" leuchtet auf,
o 9 Mal - aus in 4,5 Stunden - die Lichter "4H" und "0,5H" leuchten auf,
o 10 Mal - Ausschalten in 5 Stunden - die Lichter "4H" und "1H" leuchten auf,
o 11 Mal - Ausschalten in 5,5 Stunden - die Lichter "4H", "1H" und "0,5H" leuchten
auf,
o 12 Mal - Ausschalten in 6 Stunden - die Lichter "4H" und "2H" leuchten auf,
o 13 Mal - Ausschalten nach 6,5 Stunden - die Lichter "4H", "2H" und "0,5H" leuchten
auf,
o 14 Mal - aus in 7 Stunden - leuchten die Anzeigen "4H", "2H" und "1H" auf,
o 15 Mal - aus in 7,5 Stunden - leuchten die Anzeigen "4H", "2H", "1H" und "0,5H" auf,
• Das Gebläse läuft mit der gewählten Geschwindigkeit.
• REINIGUNG UND WARTUNG
− Trennen Sie das Gerät vom Stromnetz und warten Sie, bis der Propeller stillsteht, bevor
Sie das Gerät reinigen.
− Das Gerät darf nicht in Wasser getaucht werden.
− Wischen Sie das Gerät mit einem feuchten Tuch ab und wischen Sie es anschließend
trocken.
− Entfernen Sie das vordere Netz, den Propeller und das hintere Netz - wischen Sie die Teile
mit einem feuchten Tuch ab und wischen Sie sie anschließend trocken.
− Verwenden Sie zur Reinigung keine scharfen oder oberflächenschädigenden
Reinigungsmittel.
• GARANTIE
− Das Gerät ist für den Privatgebrauch im Haushalt bestimmt.
− Es darf nicht für berufliche Zwecke benutzt werden.
− Bei unrichtiger Bedienung erlischt die Garantie.
МЕРЫ БЕЗОПАСНОСТИ
Рекомендуется сохранить это руководство
пользованияна будущее.
Перед первым использованием внимательно прочтите
данную инструкцию.
1. Соединительный кабель должен быть подключен к
электрической сети с параметрами, указанными на
заводской табличке.
2. Необходимо следить за тем, чтобы не подключать
слишком много приборов к одной цепи.
3. Чтобы отключить прибор от сети, никогда не тяните за
кабель, всегда используйте вилку.
4.
Прибор предназначен только для бытового
использования.
5. Поместите прибор на ровную и сухую поверхность.
6. Не вставляйте пальцы или какие-либо предметы во
входные и выходные отверстия.
7. Не ставьте прибор рядом с занавесками или
портьерами.
8. Всегда держите работающий вентилятор на виду,
особенно когда рядом находятся дети.
9. Не оставляйте работающий прибор без присмотра.
10. Данное оборудование может использоваться детьми в
возрасте не менее 8 лет и людьми с ограниченными
физическими и умственными способностями и
отсутствием опыта и знаний об оборудовании, если
обеспечен надзор или инструктаж о том, как безопасно
использовать оборудование, чтобы были понятны
связанные с ним риски. Дети не должны играть с
оборудованием. Дети без присмотра взрослых не
должны заниматься чисткой или обслуживанием
оборудования.
11. Не распыляйте инсектициды или аналогичные средства
вблизи рабочего оборудования.
12. Не используйте при высоких температурах (выше 40°C),
в местах с повышенной влажностью (например, в ванной
комнате) и во взрывоопасной атмосфере.

20
13. Перед включением прибора убедитесь, что все его
компоненты правильно собраны. Никогда не включайте
прибор до его сборки.
14. Не закрывайте защитную сетку.
15. Не вешайте одежду или какие-либо предметы на прибор.
16.
Не используйте прибор с поврежденным
соединительным кабелем. Во избежание опасности его
необходимо заменить в сервисном центре
производителя.
17. Ремонт оборудования может выполняться только в
авторизованном сервисном центре. Любая
модернизация или использование неоригинальных
запасных частей или компонентов прибора запрещены
и ставят под угрозу безопасность использования.
18. Не погружайте прибор или сетевую вилку в воду или
другие жидкости. Опасность смерти от поражения
электрическим током! Однако если это произошло,
немедленно выньте вилку из розетки и обратитесь к
специалисту, чтобы он проверил прибор, прежде чем
использовать его снова.
19. Никогда не вынимайте вилку из розетки, потянув за
сетевой кабель или мокрыми руками.
20. Следите за тем, чтобы сетевой кабель не свисал через
острые края и не защемлялся.
21. Не используйте и не храните устройство на открытом
воздухе.
22. Не направляйте поток воздуха на людей в течение
длительного времени.
23. Компания Eldom Sp. z o. o. не несет ответственности за
любой ущерб, возникший в результате неправильного
использования устройства.
ПРЕДУПРЕЖДЕНИЕ:Неправильное использованиеустройства может
привести к травмам.
ПРИМЕЧАНИЕ: Пластиковый пакет может представлять опасность - во
избежание удушья сумку следует держать подальше от младенцев и
маленьких детей!
•ЗАЩИТА ОКРУЖАЮЩЕЙ СРЕДЫ
−прибор изготовлен из материалов, которые могут использованы вторично,
−передайте прибор в специализированный пункт для дальнейшей утилизации.
ИНСТРУКЦИЯ ПО ЭКСПЛУАТАЦИИ
ВЕНТИЛЯТОР КОМНАТНЫЙ WG100
•ОБЩЕЕ ОПИСАНИЕ
1. Кронштейн
2. Защитная сетка - передняя часть
3. Стопорная гайка пропеллера
4. Пропеллер
5. Защитная гайка сеть
6. Защитная сетка - задняя часть
7. Болт
8. Корпус двигателя
9. Тело
10. Панель управления
11. Кабель
12. Замок
13. Удлинительная трубка
14. Кольцо регулировки высоты
15. Базовая труба
16. Базовая труба
17. Дистанционное управление
•ТЕХНИЧЕСКИЕ ДАННЫЕ
−мощность: 45W
−напряжение питания:
220-240V ~ 50/60Hz
•ПАНЕЛЬ УПРАВЛЕНИЯ (10)
SPEED/ON - включение вентилятора, регулировка скорости
OFF - выключение устройства
TIMER - включение/выключение автоматического выключения
MODE - выбор запрограммированных режимов работы
L, M, H - регуляторы скорости вентилятора (низкая, средняя, высокая)
NAT, NOR, SLP - регуляторы рабочего режима (естественный, нормальный, ночной)
4H, 2H, 1H, 0.5H - регуляторы настройки времени автоматического отключения
•ДИСТАНЦИОННОЕ УПРАВЛЕНИЕ (17)
LAMP - включение/выключение подсветки панели управления
OSC. - включение/выключение осцилляции
TIME - включение/выключение автоматического отключения
SPEED/ON - включение/выключение вентилятора,
управление рабочей скоростьюt
MODE - выбор запрограммированных режимов работы
OFF - выключение устройства

21
ИНСТРУКЦИЯ ПО ЭКСПЛУАТАЦИИ
ВЕНТИЛЯТОР КОМНАТНЫЙ WG100 RU
13. Перед включением прибора убедитесь, что все его
компоненты правильно собраны. Никогда не включайте
прибор до его сборки.
14. Не закрывайте защитную сетку.
15. Не вешайте одежду или какие-либо предметы на прибор.
16. Не используйте прибор с поврежденным
соединительным кабелем. Во избежание опасности его
необходимо заменить в сервисном центре
производителя.
17. Ремонт оборудования может выполняться только в
авторизованном сервисном центре. Любая
модернизация или использование неоригинальных
запасных частей или компонентов прибора запрещены
и ставят под угрозу безопасность использования.
18. Не погружайте прибор или сетевую вилку в воду или
другие жидкости. Опасность смерти от поражения
электрическим током! Однако если это произошло,
немедленно выньте вилку из розетки и обратитесь к
специалисту, чтобы он проверил прибор, прежде чем
использовать его снова.
19. Никогда не вынимайте вилку из розетки, потянув за
сетевой кабель или мокрыми руками.
20. Следите за тем, чтобы сетевой кабель не свисал через
острые края и не защемлялся.
21. Не используйте и не храните устройство на открытом
воздухе.
22. Не направляйте поток воздуха на людей в течение
длительного времени.
23. Компания Eldom Sp. z o. o. не несет ответственности за
любой ущерб, возникший в результате неправильного
использования устройства.
ПРЕДУПРЕЖДЕНИЕ:Неправильное использованиеустройства может
привести к травмам.
ПРИМЕЧАНИЕ: Пластиковый пакет может представлять опасность -во
избежание удушья сумку следует держать подальше от младенцев и
маленьких детей!
•ЗАЩИТА ОКРУЖАЮЩЕЙ СРЕДЫ
−прибор изготовлен из материалов, которые могут использованы вторично,
−передайте прибор в специализированный пункт для дальнейшей утилизации.
ИНСТРУКЦИЯ ПО ЭКСПЛУАТАЦИИ
ВЕНТИЛЯТОР КОМНАТНЫЙ WG100
•ОБЩЕЕ ОПИСАНИЕ
1. Кронштейн
2. Защитная сетка - передняя часть
3. Стопорная гайка пропеллера
4. Пропеллер
5. Защитная гайка сеть
6. Защитная сетка - задняя часть
7. Болт
8. Корпус двигателя
9. Тело
10. Панель управления
11. Кабель
12. Замок
13. Удлинительная трубка
14. Кольцо регулировки высоты
15. Базовая труба
16. Базовая труба
17. Дистанционное управление
•ТЕХНИЧЕСКИЕ ДАННЫЕ
−мощность: 45W
−напряжение питания:
220-240V ~ 50/60Hz
•ПАНЕЛЬ УПРАВЛЕНИЯ (10)
SPEED/ON - включение вентилятора, регулировка скорости
OFF - выключение устройства
TIMER - включение/выключение автоматического выключения
MODE - выбор запрограммированных режимов работы
L, M, H - регуляторы скорости вентилятора (низкая, средняя, высокая)
NAT, NOR, SLP - регуляторы рабочего режима (естественный, нормальный, ночной)
4H, 2H, 1H, 0.5H - регуляторы настройки времени автоматического отключения
• ДИСТАНЦИОННОЕ УПРАВЛЕНИЕ (17)
LAMP - включение/выключение подсветки панели управления
SWING - включение/выключение осцилляции
TIME - включение/выключение автоматического отключения
SPEED/ON - включение/выключение вентилятора,
управление рабочей скоростьюt
MODE - выбор запрограммированных режимов работы
OFF - выключение устройства

22
•НАЗНАЧЕНИЕ
Вентилятор WG100 предназначен для улучшения теплового комфорта в жилых
помещениях. С его помощью воздух приводится в движение, обеспечивая приятное
ощущение охлаждения.
•МОНТАЖ
−Перед использованием убедитесь, что устройство комплектно и не повреждено.
−Перед первым использованием устройства распакуйте и соберите отдельные
компоненты.
−Соедините трубу (15) с основанием (16) - рис. 1
−Выдвиньте трубку (13) и зафиксируйте ее кольцом (14).
−Соедините корпус (9) с патрубком (13) и зафиксируйте, затянув замок (14).
−Наденьте заднюю сетку (6) на штифт (7).
−Совместите отверстия сетки (6) с защелками на корпусе двигателя (8) и закрепите
гайкой (5).
−Наденьте гребной винт (4) на штифт (7) и закрепите его гайкой (3).
−Ослабьте винт в хомуте (1), а затем наденьте хомут (1) на установленную сетку (6).
−Вставьте переднюю сетку (2) в зажим (1) и закрепите ее, затянув винт в зажиме (1) до
упора.
−Поместите сложенное устройство на устойчивую и ровную поверхность.
−Отрегулируйте высоту. Ослабьте кольцо (14), вставьте или удлините трубу (13) на
необходимую высоту, а затем зафиксируйте ее, затянув кольцо (14).
−Отрегулируйте угол навеса.
−Полностью размотайте шнур.
•РАБОТА УСТРОЙСТВА
−Все изменения настроек подтверждаются звуковым сигналом.
−Кнопку OFF можно использовать для одновременного отключения всех функций
устройства.
−Подключите устройство к сети в соответствии с указанными выше параметрами.
−Включите устройство кнопкой «SPEED/ON» и установите скорость нажатием –
загорится индикатор (L, M или H),
−с помощью кнопок на панели управления или пульте дистанционного управления
дополнительно выберите другие функции.
−Для выключения нажмите кнопку «OFF»
•РЕЖИМЫ РАБОТЫА
NAT – естественный режим
•Включите вентилятор кнопкой «SPEED/ON».
•Нажимайте кнопку «MODE», пока не загорится индикатор «NAT».
•Вентилятор будет циклически изменять скорость вращения от самой высокой до
самой низкой.t.
NOR – ормальный режим
•Используйте кнопку «SPEED/ON», чтобы включить вентилятор и выбрать рабочую
скорость.
•Нажимайте кнопку «MODE», пока не загорится индикатор «NOR».
•Вентилятор будет работать на выбранной скорости.
рис. 1
SLP –ночной режим
•Используйте кнопку «SPEED/ON», чтобы включить вентилятор и выбрать рабочую
скорость.
•Нажимайте кнопку «MODE», пока не загорится индикатор «SLP».
•Вентилятор будет включаться и выключаться, работая на выбранной скорости.
•ДОПОЛНИТЕЛЬНЫЕ ВОЗМОЖНОСТИN
ОСЦИЛЛЯЦИЯ -активация возможна только с пульта дистанционного управления
•Используйте кнопку «SPEED/ON», чтобы включить вентилятор и выбрать рабочую
скорость.
•Нажмите кнопку «OSC» на пульте дистанционного управления. Вентилятор будет
работать на выбранной скорости.
•Чтобы отключить функцию, нажмите кнопку «OSC» на пульте дистанционного
управления.
ТАЙМЕР
•Эта функция позволяет установить время, по истечении которого устройство
автоматически выключится.
•Функцию можно запустить только при включенном устройстве. Используйте
кнопку «SPEED/ON», чтобы включить вентилятор и выбрать рабочую скорость.
•Нажмите кнопку «ВРЕМЯ» на пульте дистанционного управления или кнопку
«ВРЕМЯ» на панели управления.
o1 раз -установка автоматического отключения через полчаса -загорится
индикатор "0,5Ч",
o2 раза -установка автоматического отключения через 1 час -загорится
индикатор "1H",
o3 раза -отключение через 1,5 часа -загорятся лампочки "1H" и "0,5H",
o4 раза -отключение через 2 часа -загорится индикатор "2H",
o5 раз -отключение через 2,5 часа -загорятся индикаторы "2H" и "0,5H",
o6 раз -выключение через 3 часа -загорятся индикаторы "1H" и "2H",
o7 раз -отключение через 3,5 часа -загорятся индикаторы "1H" и "2H", "0,5H",
o8 раз -отключение через 4 часа -загорается индикатор "4H",
o9 раз -выключение через 4,5 часа -загорятся индикаторы "4H" и "0,5H",
o10 раз -выключение через 5 часов -загорятся индикаторы "4H" и "1H",
o11 раз -выключение через 5,5 часов -загорятся индикаторы "4H", "1H" и "0,5H",
o12 раз -выключение через 6 часов -загорятся индикаторы "4H" и "2H",
o13 раз -выключение через 6,5 часов -будут гореть индикаторы "4H", "2H" и
"0,5H",
o14 раз -выключение через 7 часов -загорятся индикаторы "4H", "2H" и "1H",
o15 раз -выключение через 7,5 часов -загорятся "4H", "2H", "1H" и "0,5H".
•Вентилятор будет работать на выбранной скорости.
•ЧИСТКА И ОБСЛУЖИВАНИЕ
−Перед очисткой устройства отключите устройство от сети и дождитесь остановки
пропеллера. Устройство нельзя погружать в воду.
−Протрите устройство влажной тканью, а затем вытрите насухо.
−Снимите переднюю сетку, пропеллер и заднюю сетку -протрите элементы влажной
тканью, а затем вытрите насухо.
−Не используйте для очистки сильнодействующие или разрушающие поверхность
чистящие средства.
GARANTIE
−устройство предназначено только для домашнего использования,
−в случае неправильной эксплуатации гарантия не является действительной.

23
•НАЗНАЧЕНИЕ
Вентилятор WG100 предназначен для улучшения теплового комфорта в жилых
помещениях. С его помощью воздух приводится в движение, обеспечивая приятное
ощущение охлаждения.
•МОНТАЖ
−Перед использованием убедитесь, что устройство комплектно и не повреждено.
−Перед первым использованием устройства распакуйте и соберите отдельные
компоненты.
−Соедините трубу (15) с основанием (16) - рис. 1
−Выдвиньте трубку (13) и зафиксируйте ее кольцом (14).
−Соедините корпус (9) с патрубком (13) и зафиксируйте, затянув замок (14).
−Наденьте заднюю сетку (6) на штифт (7).
−Совместите отверстия сетки (6) с защелками на корпусе двигателя (8) и закрепите
гайкой (5).
−Наденьте гребной винт (4) на штифт (7) и закрепите его гайкой (3).
−Ослабьте винт в хомуте (1), а затем наденьте хомут (1) на установленную сетку (6).
−Вставьте переднюю сетку (2) в зажим (1) и закрепите ее, затянув винт в зажиме (1) до
упора.
−Поместите сложенное устройство на устойчивую и ровную поверхность.
−Отрегулируйте высоту. Ослабьте кольцо (14), вставьте или удлините трубу (13) на
необходимую высоту, а затем зафиксируйте ее, затянув кольцо (14).
−Отрегулируйте угол навеса.
−Полностью размотайте шнур.
•РАБОТА УСТРОЙСТВА
−Все изменения настроек подтверждаются звуковым сигналом.
−Кнопку OFF можно использовать для одновременного отключения всех функций
устройства.
−Подключите устройство к сети в соответствии с указанными выше параметрами.
−Включите устройство кнопкой «SPEED/ON» и установите скорость нажатием –
загорится индикатор (L, Mили H),
−с помощью кнопок на панели управления или пульте дистанционного управления
дополнительно выберите другие функции.
−Для выключения нажмите кнопку «OFF»
•РЕЖИМЫ РАБОТЫА
NAT –естественный режим
•Включите вентилятор кнопкой «SPEED/ON».
•Нажимайте кнопку «MODE», пока не загорится индикатор «NAT».
•Вентилятор будет циклически изменять скорость вращения от самой высокой до
самой низкой.t.
NOR – ормальный режим
•Используйте кнопку «SPEED/ON», чтобы включить вентилятор и выбрать рабочую
скорость.
•Нажимайте кнопку «MODE», пока не загорится индикатор «NOR».
•Вентилятор будет работать на выбранной скорости.
рис. 1
SLP – ночной режим
•Используйте кнопку «SPEED/ON», чтобы включить вентилятор и выбрать рабочую
скорость.
•Нажимайте кнопку «MODE», пока не загорится индикатор «SLP».
•Вентилятор будет включаться и выключаться, работая на выбранной скорости.
•ДОПОЛНИТЕЛЬНЫЕ ВОЗМОЖНОСТИN
ОСЦИЛЛЯЦИЯ - активация возможна только с пульта дистанционного управления
•Используйте кнопку «SPEED/ON», чтобы включить вентилятор и выбрать рабочую
скорость.
•Нажмите кнопку «SWING» на пульте дистанционного управления. Вентилятор будет
работать на выбранной скорости.
•Чтобы отключить функцию, нажмите кнопку «SWING» на пульте дистанционного
управления.
ТАЙМЕР
•Эта функция позволяет установить время, по истечении которого устройство
автоматически выключится.
•Функцию можно запустить только при включенном устройстве. Используйте
кнопку «SPEED/ON», чтобы включить вентилятор и выбрать рабочую скорость.
•Нажмите кнопку «ВРЕМЯ» на пульте дистанционного управления или кнопку
«ВРЕМЯ» на панели управления.
o 1 раз - установка автоматического отключения через полчаса - загорится
индикатор "0,5Ч",
o 2 раза - установка автоматического отключения через 1 час - загорится
индикатор "1H",
o 3 раза - отключение через 1,5 часа - загорятся лампочки "1H" и "0,5H",
o 4 раза - отключение через 2 часа - загорится индикатор "2H",
o 5 раз - отключение через 2,5 часа - загорятся индикаторы "2H" и "0,5H",
o 6 раз - выключение через 3 часа - загорятся индикаторы "1H" и "2H",
o 7 раз - отключение через 3,5 часа - загорятся индикаторы "1H" и "2H", "0,5H",
o 8 раз - отключение через 4 часа - загорается индикатор "4H",
o 9 раз - выключение через 4,5 часа - загорятся индикаторы "4H" и "0,5H",
o 10 раз - выключение через 5 часов - загорятся индикаторы "4H" и "1H",
o 11 раз - выключение через 5,5 часов - загорятся индикаторы "4H", "1H" и "0,5H",
o 12 раз - выключение через 6 часов - загорятся индикаторы "4H" и "2H",
o 13 раз - выключение через 6,5 часов - будут гореть индикаторы "4H", "2H" и
"0,5H",
o 14 раз - выключение через 7 часов - загорятся индикаторы "4H", "2H" и "1H",
o 15 раз - выключение через 7,5 часов - загорятся "4H", "2H", "1H" и "0,5H".
•Вентилятор будет работать на выбранной скорости.
•ЧИСТКА И ОБСЛУЖИВАНИЕ
−Перед очисткой устройства отключите устройство от сети и дождитесь остановки
пропеллера. Устройство нельзя погружать в воду.
−Протрите устройство влажной тканью, а затем вытрите насухо.
−Снимите переднюю сетку, пропеллер и заднюю сетку - протрите элементы влажной
тканью, а затем вытрите насухо.
−Не используйте для очистки сильнодействующие или разрушающие поверхность
чистящие средства.
GARANTIE
−устройство предназначено только для домашнего использования,
−в случае неправильной эксплуатации гарантия не является действительной.

24
SEGURIDAD
Se recomienda conservar este manual de instrucciones para
futuras consultas.
Antes del primer uso, lea atentamente todo el contenido
de este manual.
1. El cable de conexión debe conectarse a una red eléctrica con
los parámetros indicados en la placa de características.
2. Hay que tener cuidado de no conectar demasiados aparatos
a un mismo circuito.
3. Para desconectar el aparato de la red eléctrica no tire nunca
del cable, utilice siempre el enchufe.
4. El aparato es sólo para uso doméstico.
5. Coloque el aparato sobre una superficie plana y seca.
6. No introduzca los dedos ni ningún objeto en las aberturas
de entrada y salida.
7. No coloque el aparato cerca de cortinas o visillos.
8. Mantenga siempre a la vista el ventilador en
funcionamiento, especialmente cuando haya niños cerca.
9. No deje el aparato en funcionamiento sin vigilancia.
10. Este equipo puede ser utilizado por niños de al menos 8
años de edad y por personas con capacidades físicas y
mentales reducidas y con falta de experiencia y
conocimiento del equipo, si se proporciona supervisión o
instrucciones sobre cómo utilizar el equipo de forma segura
para que se comprendan los riesgos asociados. Los niños no
deben jugar con el equipo. Los niños no supervisados no
deben realizar tareas de limpieza o mantenimiento del
equipo.
11. No pulverizar insecticidas o similares cerca del equipo de
trabajo.
12. No utilizar a temperaturas elevadas (superiores a 40°C), en
zonas de alta humedad (por ejemplo, cuartos de baño) ni en
atmósferas explosivas.
13. Antes de encender el aparato, asegúrese de que todos sus
componentes están correctamente montados.
14. No encienda nunca el aparato antes de que esté montado.
15. No cubra la red de seguridad.
16. No cuelgue ropa ni objetos en el aparato.
17. No utilice el aparato con un cable de conexión dañado.
Debe sustituirse en el Centro de Servicio del Fabricante para
evitar peligros.
18. Las reparaciones del aparato sólo pueden ser efectuadas
por un centro de servicio autorizado. Cualquier mejora o
utilización de piezas de repuesto o componentes no
originales del aparato está prohibida y pone en peligro la
seguridad de uso.
19. No sumerja el aparato ni el enchufe en agua u otros líquidos.
Peligro de muerte por descarga eléctrica. No obstante, si
esto ocurre, desenchufe inmediatamente el aparato de la
toma de corriente y hágalo revisar por un experto antes de
volver a utilizarlo.
20. No desenchufe nunca el aparato tirando del cable de
alimentación o con las manos mojadas.
21. Asegúrese de que el cable de alimentación no cuelgue de
bordes afilados ni quede atrapado.
22. No utilice ni almacene la unidad al aire libre.
23. No dirija el flujo de aire hacia las personas durante largos
periodos de tiempo.
24. Eldom Sp. z o.o. no se hace responsable de los daños
causados por un uso inadecuado del aparato.
ADVERTENCIA:
El uso inadecuado del aparato puede causar lesiones
personales.
NOTA:
La bolsa de plástico puede suponer un peligro: para evitar el
riesgo de asfixia, la bolsa debe guardarse fuera del alcance
de los bebés y niños pequeños!

25
SEGURIDAD
Se recomienda conservar este manual de instrucciones para
futuras consultas.
Antes del primer uso, lea atentamente todo el contenido
de este manual.
1. El cable de conexión debe conectarse a una red eléctrica con
los parámetros indicados en la placa de características.
2. Hay que tener cuidado de no conectar demasiados aparatos
a un mismo circuito.
3. Para desconectar el aparato de la red eléctrica no tire nunca
del cable, utilice siempre el enchufe.
4. El aparato es sólo para uso doméstico.
5. Coloque el aparato sobre una superficie plana y seca.
6. No introduzca los dedos ni ningún objeto en las aberturas
de entrada y salida.
7. No coloque el aparato cerca de cortinas o visillos.
8. Mantenga siempre a la vista el ventilador en
funcionamiento, especialmente cuando haya niños cerca.
9. No deje el aparato en funcionamiento sin vigilancia.
10. Este equipo puede ser utilizado por niños de al menos 8
años de edad y por personas con capacidades físicas y
mentales reducidas y con falta de experiencia y
conocimiento del equipo, si se proporciona supervisión o
instrucciones sobre cómo utilizar el equipo de forma segura
para que se comprendan los riesgos asociados. Los niños no
deben jugar con el equipo. Los niños no supervisados no
deben realizar tareas de limpieza o mantenimiento del
equipo.
11. No pulverizar insecticidas o similares cerca del equipo de
trabajo.
12. No utilizar a temperaturas elevadas (superiores a 40°C), en
zonas de alta humedad (por ejemplo, cuartos de baño) ni en
atmósferas explosivas.
13. Antes de encender el aparato, asegúrese de que todos sus
componentes están correctamente montados.
14. No encienda nunca el aparato antes de que esté montado.
15. No cubra la red de seguridad.
16. No cuelgue ropa ni objetos en el aparato.
17. No utilice el aparato con un cable de conexión dañado.
Debe sustituirse en el Centro de Servicio del Fabricante para
evitar peligros.
18. Las reparaciones del aparato sólo pueden ser efectuadas
por un centro de servicio autorizado. Cualquier mejora o
utilización de piezas de repuesto o componentes no
originales del aparato está prohibida y pone en peligro la
seguridad de uso.
19. No sumerja el aparato ni el enchufe en agua u otros líquidos.
Peligro de muerte por descarga eléctrica. No obstante, si
esto ocurre, desenchufe inmediatamente el aparato de la
toma de corriente y hágalo revisar por un experto antes de
volver a utilizarlo.
20. No desenchufe nunca el aparato tirando del cable de
alimentación o con las manos mojadas.
21. Asegúrese de que el cable de alimentación no cuelgue de
bordes afilados ni quede atrapado.
22. No utilice ni almacene la unidad al aire libre.
23. No dirija el flujo de aire hacia las personas durante largos
periodos de tiempo.
24. Eldom Sp. z o.o. no se hace responsable de los daños
causados por un uso inadecuado del aparato.
ADVERTENCIA:
El uso inadecuado del aparato puede causar lesiones
personales.
NOTA:
La bolsa de plástico puede suponer un peligro: para evitar el
riesgo de asfixia, la bolsa debe guardarse fuera del alcance
de los bebés y niños pequeños!

26
MANUAL DE USUARIO
VENTILADOR DE HABITACIÓN WG100
ES
INSTRUCCIONES DE USO
VENTILADOR DE HABITACIÓN WG100
•DESCRIPCIÓN GENERAL
1. Abrazadera
2. Rejilla protectora frontal
3. Tuerca de fijación de la hélice
4. Hélice
5. Tuerca de seguridad de la malla
6. Rejilla protectora trasera
7. Alfiler
8. Carcasa del motor
9. Cuerpo
10. Panel de control
11. Cable
12. Bloqueo
13. Tubo de extensión
14. Anillo de ajuste de altura
15. Tubería base
16. Base
17. Control remoto
•ESPECIFICACIONES TÉCNICAS
−potencia: 45W
−tensión de alimentación:
220-240V~ 50/60Hz
•PANEL DE CONTROL (10)
SPEED/ON - encender el ventilador, controlar la velocidad de funcionamiento
OFF - apagar el dispositivo
TIMER - habilitar/deshabilitar el apagado automático
MODE - selección de modos de funcionamiento programados
L, M, H - controles de velocidad del ventilador (baja, media, alta)
NAT, NOR, SLP - controles de modo de operación (natural, normal, noche)
4H, 2H, 1H, 0.5H - controles de configuración de tiempo de apagado automático
•CONTROL REMOTO (17)
LAMP - encender/apagar la retroiluminación del panel de control
SWING - oscilación encendido/apagado
TIME - habilitar/deshabilitar el apagado automático
SPEED/ON - encender el ventilador,
controlar la velocidad de funcionamiento
MODE - selección de modos de funcionamiento programados
OFF - apagar el dispositivo
•DESTINO
El ventilador WG100 está diseñado
para mejorar el confort térmico en los
espacios habitables. Con su ayuda, el
aire se pone en movimiento,
proporcionando así una agradable
sensación de frescor.
•MONTAJE
−Antes de usar, verifique que el dispositivo esté completo y no dañado.
−Antes de utilizar el dispositivo por primera vez, desembale y monte los componentes
individuales.
−Conectar el tubo (15) con la base (16) - Fig. 1
−Extraiga el tubo (13) y bloquéelo con el anillo (14).
−Conectar el cuerpo (9) con el tubo (13) y bloquearlo apretando la traba (14).
−Deslice la red trasera (6) en el pasador (7).
−Hacer coincidir los agujeros de la malla (6) con los enganches de la carcasa del motor (8) y
fijar con la tuerca (5).
−Deslice la hélice (4) sobre el pasador (7) y fíjela con la tuerca (3).
−Afloje el tornillo de la abrazadera (1) y luego coloque la abrazadera (1) en la red instalada
(6).
−Coloque la red frontal (2) en la abrazadera (1) y asegúrela apretando el tornillo en la
abrazadera (1) hasta que haga tope.
−Coloque el dispositivo plegado sobre una superficie estable y nivelada.
−Ajuste la altura. Afloje el anillo (14), inserte o extienda el tubo (13) a la altura requerida y
luego bloquéelo apretando el anillo (14).
−Ajuste el ángulo de la capota.
−Desenrolle el cable por completo.
•FUNCIONAMIENTO DEL APARATO
−Todos los cambios en la configuración se confirman con una señal de sonido.
−Con el botón "OFF" puede apagar todas las funciones del dispositivo a la vez.
−Conecte el dispositivo a la red de acuerdo con los parámetros indicados anteriormente.
−Encienda el dispositivo con el botón "SPEED/ON" y configure la velocidad presionando: el
indicador (L, M o H) se encenderá, use los botones en el panel de control o el control remoto
para seleccionar funciones adicionales.
−Para apagar, presione el botón "OFF".
•MODOS DE FUNCIONAMIENTO
NAT – modo natural
•Encienda el ventilador con el botón "SPEED/ON".
•Pulse el botón "MODE" hasta que se encienda el piloto "NAT".
•El ventilador pasará de la velocidad más alta a la más baja.
NOR – modo normal
•Utilice el botón "SPEED/ON" para encender el ventilador y seleccionar la velocidad de
funcionamiento.
•Pulse el botón "MODE" hasta que se encienda la luz "NOR".
•El ventilador funcionará a la velocidad seleccionada.
SLP – modo nocturno
•Utilice el botón "SPEED/ON" para encender el ventilador y seleccionar la velocidad de
funcionamiento.
•Presione el botón "MODE" hasta que se encienda la luz "SLP".
•El ventilador se encenderá y apagará - operación a la velocidad seleccionada.
Abb. 1

27
INSTRUCCIONES DE USO
VENTILADOR DE HABITACIÓN WG100
• DESCRIPCIÓN GENERAL
1. Abrazadera
2. Rejilla protectora frontal
3. Tuerca de fijación de la hélice
4. Hélice
5. Tuerca de seguridad de la malla
6. Rejilla protectora trasera
7. Alfiler
8. Carcasa del motor
9. Cuerpo
10. Panel de control
11. Cable
12. Bloqueo
13. Tubo de extensión
14. Anillo de ajuste de altura
15. Tubería base
16. Base
17. Control remoto
• ESPECIFICACIONES TÉCNICAS
− potencia: 45W
− tensión de alimentación:
220-240V~ 50/60Hz
• PANEL DE CONTROL (10)
SPEED/ON - encender el ventilador, controlar la velocidad de funcionamiento
OFF - apagar el dispositivo
TIMER - habilitar/deshabilitar el apagado automático
MODE - selección de modos de funcionamiento programados
L, M, H - controles de velocidad del ventilador (baja, media, alta)
NAT, NOR, SLP - controles de modo de operación (natural, normal, noche)
4H, 2H, 1H, 0.5H - controles de configuración de tiempo de apagado automático
• CONTROL REMOTO (17)
LAMP - encender/apagar la retroiluminación del panel de control
OSC. - oscilación encendido/apagado
TIME - habilitar/deshabilitar el apagado automático
SPEED/ON - encender el ventilador,
controlar la velocidad de funcionamiento
MODE - selección de modos de funcionamiento programados
OFF - apagar el dispositivo
• DESTINO
El ventilador WG100 está diseñado
para mejorar el confort térmico en los
espacios habitables. Con su ayuda, el
aire se pone en movimiento,
proporcionando así una agradable
sensación de frescor.
• MONTAJE
− Antes de usar, verifique que el dispositivo esté completo y no dañado.
− Antes de utilizar el dispositivo por primera vez, desembale y monte los componentes
individuales.
− Conectar el tubo (15) con la base (16) - Fig. 1
− Extraiga el tubo (13) y bloquéelo con el anillo (14).
− Conectar el cuerpo (9) con el tubo (13) y bloquearlo apretando la traba (14).
− Deslice la red trasera (6) en el pasador (7).
− Hacer coincidir los agujeros de la malla (6) con los enganches de la carcasa del motor (8) y
fijar con la tuerca (5).
− Deslice la hélice (4) sobre el pasador (7) y fíjela con la tuerca (3).
− Afloje el tornillo de la abrazadera (1) y luego coloque la abrazadera (1) en la red instalada
(6).
− Coloque la red frontal (2) en la abrazadera (1) y asegúrela apretando el tornillo en la
abrazadera (1) hasta que haga tope.
− Coloque el dispositivo plegado sobre una superficie estable y nivelada.
− Ajuste la altura. Afloje el anillo (14), inserte o extienda el tubo (13) a la altura requerida y
luego bloquéelo apretando el anillo (14).
− Ajuste el ángulo de la capota.
− Desenrolle el cable por completo.
• FUNCIONAMIENTO DEL APARATO
− Todos los cambios en la configuración se confirman con una señal de sonido.
− Con el botón "OFF" puede apagar todas las funciones del dispositivo a la vez.
− Conecte el dispositivo a la red de acuerdo con los parámetros indicados anteriormente.
− Encienda el dispositivo con el botón "SPEED/ON" y configure la velocidad presionando: el
indicador (L, M o H) se encenderá, use los botones en el panel de control o el control remoto
para seleccionar funciones adicionales.
− Para apagar, presione el botón "OFF".
• MODOS DE FUNCIONAMIENTO
NAT – modo natural
• Encienda el ventilador con el botón "SPEED/ON".
• Pulse el botón "MODE" hasta que se encienda el piloto "NAT".
• El ventilador pasará de la velocidad más alta a la más baja.
NOR – modo normal
• Utilice el botón "SPEED/ON" para encender el ventilador y seleccionar la velocidad de
funcionamiento.
• Pulse el botón "MODE" hasta que se encienda la luz "NOR".
• El ventilador funcionará a la velocidad seleccionada.
SLP – modo nocturno
• Utilice el botón "SPEED/ON" para encender el ventilador y seleccionar la velocidad de
funcionamiento.
• Presione el botón "MODE" hasta que se encienda la luz "SLP".
• El ventilador se encenderá y apagará - operación a la velocidad seleccionada.
Abb. 1

28
•FUNCIONES ADICIONALES
OSCILACIÓN - activación posible solo desde el mando a distancia
•Utilice el botón "SPEED/ON" para encender el ventilador y seleccionar la velocidad
de funcionamiento.
•Presiona el botón "SWING" en el control remoto.
•El ventilador funcionará a la velocidad seleccionada.
•Para desactivar la función, presione el botón "SWING" en el control remoto.
TEMPORIZADOR
•Esta función le permite establecer el tiempo después del cual el dispositivo se apagará
automáticamente.
•La función solo se puede iniciar cuando el dispositivo está encendido.
•Utilice el botón "SPEED/ON" para encender el ventilador y seleccionar la velocidad de
funcionamiento.
•Presione el botón "TIME" en el control remoto o el botón "TIME" en el panel de control.
o1 vez - programando el apagado automático en media hora - se encenderá el
piloto "0.5H",
o2 veces - ajuste de desconexión automática en 1 hora - se encenderá el indicador
luminoso "1H",
o3 veces - apagar en 1,5 horas - se encenderán los indicadores luminosos "1H" y
"0,5H ",
o4 veces - apagar en 2 horas - el indicador luminoso "2H" se encenderá,
o5 veces - apagar en 2,5 horas - se encenderán los indicadores luminosos "2H" y
"0,5H",
o6 veces - apagar en 3 horas - se encenderán los indicadores luminosos "1H" y "2H",
o7 veces - apagado en 3,5 horas - se encenderán las luces "1H" y "2H", "0,5H",
o8 veces - apagado en 4 horas - el indicador luminoso "4H" se enciende,
o9 veces - apagado en 4,5 horas - se encenderán las luces "4H" y "0,5H",
o10 veces - apague en 5 horas - las luces "4H" y "1H" se encenderán,
o11 veces - apagar en 5,5 horas - se encenderán las luces "4H", "1H" y "0,5H",
o12 veces - apague en 6 horas - las luces "4H" y "2H" se encenderán,
o13 veces - apague en 6,5 horas - se encenderán las luces "4H", "2H" y "0,5H",
o14 veces - apagado en 7 horas - se encenderán las luces "4H", "2H" y "1H",
o15 veces - apagado en 7,5 horas - se encenderán las luces "4H", "2H", "1H" y "0,5H".
•El ventilador funcionará a la velocidad seleccionada.
•LIMPIEZA Y MANTENIMIENTO
−Antes de limpiar el dispositivo, desconéctelo de la red eléctrica y espere hasta que la hélice
se detenga.
−El dispositivo no debe sumergirse en agua.
−Limpie el dispositivo con un paño húmedo y luego séquelo.
−Retire la red delantera, la hélice y la red trasera; limpie los elementos con un paño húmedo
y luego séquelos. no use agentes de limpieza fuertes o que destruyan la superficie para
limpiar.
•GARANTIE
−el aparato está destinado para un uso privado doméstico,
−no se puede utilizar para fines profesionales,
−la garantía se anula en caso de un uso incorrecto.
CONSEILS DE SÉCURITÉ
Il est recommandé de conserver ce manuel pour référence
ultérieure.
Lire attentivement les instructions avant d’utiliser le produit.
1. Le câble de connexion doit être raccordé à un réseau
électrique dont les paramètres sont indiqués sur la plaque
signalétique.
2. Il faut veiller à ne pas brancher trop d'appareils sur un
même circuit.
3. Pour déconnecter l'appareil du secteur, ne tirez jamais sur
le câble, utilisez toujours la fiche.
4. L'appareil est destiné à un usage domestique uniquement.
5. Placez l'appareil sur une surface plane et sèche.
6. N'insérez pas les doigts ou tout autre objet dans les
ouvertures d'entrée et de sortie.
7. Ne placez pas l'appareil à côté de rideaux ou de draperies.
8. Gardez toujours le ventilateur en marche à portée de vue,
surtout lorsque des enfants sont présents.
9. Ne laissez pas l'appareil en fonctionnement sans
surveillance.
10. Cet équipement peut être utilisé par des enfants âgés d'au
moins 8 ans et par des personnes ayant des capacités
physiques et mentales réduites et un manque d'expérience
et de connaissance de l'équipement, si une supervision ou
des instructions sont fournies sur la façon d'utiliser
l'équipement en toute sécurité afin que les risques associés
soient compris. Les enfants ne doivent pas jouer avec
l'équipement. Les enfants non surveillés ne doivent pas
effectuer le nettoyage ou l'entretien de l'équipement.
11. Ne pas pulvériser d'insecticides ou autres à proximité de
l'équipement de travail.
12. Ne pas utiliser à des températures élevées (supérieures à
40°C), dans des endroits très humides (par exemple la salle
de bain) et dans des atmosphères explosives.
13. Avant de mettre l'appareil en marche, assurez-vous que
tous ses composants sont correctement assemblés.

29
• FUNCIONES ADICIONALES
OSCILACIÓN - activación posible solo desde el mando a distancia
• Utilice el botón "SPEED/ON" para encender el ventilador y seleccionar la velocidad de
funcionamiento.
• Presiona el botón "OSC" en el control remoto.
• El ventilador funcionará a la velocidad seleccionada.
• Para desactivar la función, presione el botón "OSC" en el control remoto.
TEMPORIZADOR
• Esta función le permite establecer el tiempo después del cual el dispositivo se apagará
automáticamente.
• La función solo se puede iniciar cuando el dispositivo está encendido.
• Utilice el botón "SPEED/ON" para encender el ventilador y seleccionar la velocidad de
funcionamiento.
• Presione el botón "TIME" en el control remoto o el botón "TIME" en el panel de control.
o 1 vez - programando el apagado automático en media hora - se encenderá el
piloto "0.5H",
o 2 veces - ajuste de desconexión automática en 1 hora - se encenderá el indicador
luminoso "1H",
o 3 veces - apagar en 1,5 horas - se encenderán los indicadores luminosos "1H" y
"0,5H ",
o 4 veces - apagar en 2 horas - el indicador luminoso "2H" se encenderá,
o 5 veces - apagar en 2,5 horas - se encenderán los indicadores luminosos "2H" y
"0,5H",
o 6 veces - apagar en 3 horas - se encenderán los indicadores luminosos "1H" y "2H",
o 7 veces - apagado en 3,5 horas - se encenderán las luces "1H" y "2H", "0,5H",
o 8 veces - apagado en 4 horas - el indicador luminoso "4H" se enciende,
o 9 veces - apagado en 4,5 horas - se encenderán las luces "4H" y "0,5H",
o 10 veces - apague en 5 horas - las luces "4H" y "1H" se encenderán,
o 11 veces - apagar en 5,5 horas - se encenderán las luces "4H", "1H" y "0,5H",
o 12 veces - apague en 6 horas - las luces "4H" y "2H" se encenderán,
o 13 veces - apague en 6,5 horas - se encenderán las luces "4H", "2H" y "0,5H",
o 14 veces - apagado en 7 horas - se encenderán las luces "4H", "2H" y "1H",
o 15 veces - apagado en 7,5 horas - se encenderán las luces "4H", "2H", "1H" y "0,5H".
• El ventilador funcionará a la velocidad seleccionada.
• LIMPIEZA Y MANTENIMIENTO
− Antes de limpiar el dispositivo, desconéctelo de la red eléctrica y espere hasta que la hélice
se detenga.
− El dispositivo no debe sumergirse en agua.
− Limpie el dispositivo con un paño húmedo y luego séquelo.
− Retire la red delantera, la hélice y la red trasera; limpie los elementos con un paño húmedo
y luego séquelos. no use agentes de limpieza fuertes o que destruyan la superficie para
limpiar.
• GARANTIE
− el aparato está destinado para un uso privado doméstico,
− no se puede utilizar para fines profesionales,
− la garantía se anula en caso de un uso incorrecto.
CONSEILS DE SÉCURITÉ
Il est recommandé de conserver ce manuel pour référence
ultérieure.
Lire attentivement les instructions avant d’utiliser le produit.
1. Le câble de connexion doit être raccordé à un réseau
électrique dont les paramètres sont indiqués sur la plaque
signalétique.
2. Il faut veiller à ne pas brancher trop d'appareils sur un
même circuit.
3. Pour déconnecter l'appareil du secteur, ne tirez jamais sur
le câble, utilisez toujours la fiche.
4. L'appareil est destiné à un usage domestique uniquement.
5. Placez l'appareil sur une surface plane et sèche.
6. N'insérez pas les doigts ou tout autre objet dans les
ouvertures d'entrée et de sortie.
7. Ne placez pas l'appareil à côté de rideaux ou de draperies.
8. Gardez toujours le ventilateur en marche à portée de vue,
surtout lorsque des enfants sont présents.
9. Ne laissez pas l'appareil en fonctionnement sans
surveillance.
10. Cet équipement peut être utilisé par des enfants âgés d'au
moins 8 ans et par des personnes ayant des capacités
physiques et mentales réduites et un manque d'expérience
et de connaissance de l'équipement, si une supervision ou
des instructions sont fournies sur la façon d'utiliser
l'équipement en toute sécurité afin que les risques associés
soient compris. Les enfants ne doivent pas jouer avec
l'équipement. Les enfants non surveillés ne doivent pas
effectuer le nettoyage ou l'entretien de l'équipement.
11. Ne pas pulvériser d'insecticides ou autres à proximité de
l'équipement de travail.
12. Ne pas utiliser à des températures élevées (supérieures à
40°C), dans des endroits très humides (par exemple la salle
de bain) et dans des atmosphères explosives.
13. Avant de mettre l'appareil en marche, assurez-vous que
tous ses composants sont correctement assemblés.

30
14. Ne mettez jamais l'appareil en marche avant qu'il ne soit
assemblé.
15. Ne pas couvrir le filet de sécurité.
16. Ne suspendez pas de vêtements ou d'objets sur l'appareil.
17. N'utilisez pas l'appareil avec un câble de connexion
endommagé. Il doit être remplacé par le centre de service
du fabricant pour éviter tout danger.
18. Les réparations de l'appareil ne peuvent être effectuées
que par un centre de service agréé. Toute mise à niveau ou
utilisation de pièces de rechange ou de composants non
originaux de l'appareil est interdite et compromet la
sécurité d'utilisation.
19. Ne plongez pas l'appareil ou la fiche secteur dans l'eau ou
dans d'autres liquides. Risque de mort par électrocution !
Toutefois, si cela se produit, débranchez immédiatement la
fiche de la prise et faites contrôler l'appareil par un expert
avant de le réutiliser.
20. Ne retirez jamais la fiche de la prise en tirant sur le câble
d'alimentation ou avec des mains mouillées.
21. Veillez à ce que le câble d'alimentation ne pende pas sur
des bords tranchants et ne se coince pas.
22. Ne pas utiliser ou stocker l'appareil à l'air libre.
23. Ne dirigez pas le flux d'air vers des personnes pendant de
longues périodes.
24. Eldom Sp. z o. o. ne peut être tenu responsable de tout
dommage résultant d'une utilisation inappropriée de
l'appareil.
AVERTISSEMENT : Une mauvaise utilisation de l’appareil
peut entraîner des blessures corporelles.
NOTE : Un sac en plastique peut être dangereux – pour
éviter la strangulation le sac doit être tenu hors de portée
des bébés et des jeunes enfants!
MANUALE DI ISTRUZIONI
VENTILATEUR DE PIECE WG100
•DESCRIPTION GÉNÉRALE
1. Serrer
2. Filet de protection - avant
3. Écrou de fixation de l'hélice
4. Hélice
5. Écrou de fixation de maille
6. Filet de protection - dos
7. Épingler
8. Boîtier du moteur
9. Corps
10. Panneau de commande
11. Câble
12. Blocus
13. Tube d'extension
14. Anneau de réglage de la hauteur
15. Tuyau de base
16. Base
17. Télécommande
•CARACTÉRISTIQUES TECHNIQUES
−puissance: 45W
−tension d’alimentation:
220-240V~ 50/60Hz
•PANNEAU DE COMMANDE (10)
SPEED/ON - allumer le ventilateur, contrôler la vitesse de fonctionnement
OFF -éteindre l'appareil
TIMER - activer/désactiver l'arrêt automatique
MODE - sélection des modes de fonctionnement programmés
L, M, H - commandes de vitesse du ventilateur (basse, moyenne, élevée)
NAT, NOR, SLP - commandes de mode de fonctionnement (naturel, normal, nuit)
4H, 2H, 1H, 0.5H - commandes de réglage de l'heure d'arrêt automatique
•TÉLÉCOMMANDE (17)
LAMP -allumer/éteindre le rétroéclairage
du panneau de commande
OSC. - oscillation marche/arrêt
TIME - activer/désactiver l'arrêt automatique
SPEED/ON - allumer le ventilateur,
contrôler la vitesse de fonctionnement
MODE - sélection des modes de fonctionnement programmés
OFF - éteindre l'appareil

31
FR
MANUEL D’UTILISATION
VENTILATEUR DE PIECE WG100
14. Ne mettez jamais l'appareil en marche avant qu'il ne soit
assemblé.
15. Ne pas couvrir le filet de sécurité.
16. Ne suspendez pas de vêtements ou d'objets sur l'appareil.
17. N'utilisez pas l'appareil avec un câble de connexion
endommagé. Il doit être remplacé par le centre de service
du fabricant pour éviter tout danger.
18. Les réparations de l'appareil ne peuvent être effectuées
que par un centre de service agréé. Toute mise à niveau ou
utilisation de pièces de rechange ou de composants non
originaux de l'appareil est interdite et compromet la
sécurité d'utilisation.
19. Ne plongez pas l'appareil ou la fiche secteur dans l'eau ou
dans d'autres liquides. Risque de mort par électrocution !
Toutefois, si cela se produit, débranchez immédiatement la
fiche de la prise et faites contrôler l'appareil par un expert
avant de le réutiliser.
20. Ne retirez jamais la fiche de la prise en tirant sur le câble
d'alimentation ou avec des mains mouillées.
21. Veillez à ce que le câble d'alimentation ne pende pas sur
des bords tranchants et ne se coince pas.
22. Ne pas utiliser ou stocker l'appareil à l'air libre.
23. Ne dirigez pas le flux d'air vers des personnes pendant de
longues périodes.
24. Eldom Sp. z o. o. ne peut être tenu responsable de tout
dommage résultant d'une utilisation inappropriée de
l'appareil.
AVERTISSEMENT : Une mauvaise utilisation de l’appareil
peut entraîner des blessures corporelles.
NOTE : Un sac en plastique peut être dangereux –pour
éviter la strangulation le sac doit être tenu hors de portée
des bébés et des jeunes enfants!
MANUALE DI ISTRUZIONI
VENTILATEUR DE PIECE WG100
•DESCRIPTION GÉNÉRALE
1. Serrer
2. Filet de protection - avant
3. Écrou de fixation de l'hélice
4. Hélice
5. Écrou de fixation de maille
6. Filet de protection - dos
7. Épingler
8. Boîtier du moteur
9. Corps
10. Panneau de commande
11. Câble
12. Blocus
13. Tube d'extension
14. Anneau de réglage de la hauteur
15. Tuyau de base
16. Base
17. Télécommande
•CARACTÉRISTIQUES TECHNIQUES
−puissance: 45W
−tension d’alimentation:
220-240V~ 50/60Hz
•PANNEAU DE COMMANDE (10)
SPEED/ON - allumer le ventilateur, contrôler la vitesse de fonctionnement
OFF - éteindre l'appareil
TIMER - activer/désactiver l'arrêt automatique
MODE - sélection des modes de fonctionnement programmés
L, M, H - commandes de vitesse du ventilateur (basse, moyenne, élevée)
NAT, NOR, SLP - commandes de mode de fonctionnement (naturel, normal, nuit)
4H, 2H, 1H, 0.5H - commandes de réglage de l'heure d'arrêt automatique
•TÉLÉCOMMANDE (17)
LAMP - allumer/éteindre le rétroéclairage
du panneau de commande
SWING - oscillation marche/arrêt
TIME - activer/désactiver l'arrêt automatique
SPEED/ON - allumer le ventilateur,
contrôler la vitesse de fonctionnement
MODE - sélection des modes de fonctionnement programmés
OFF - éteindre l'appareil

32
•UTILISATION PREVUE DE L'APPAREIL
Le ventilateur WG100 est conçu pour
améliorer le confort thermique dans les
espaces de vie. Avec son aide, l'air est
mis en mouvement, procurant ainsi une
agréable sensation de refroidissement.
•ASSEMBLAGE DE L'APPAREIL
−Avant utilisation, vérifiez que l'appareil est complet et non endommagé.
−Avant d'utiliser l'appareil pour la première fois, déballez et assemblez les différents
composants.
−Relier le tuyau (15) à la base (16) - Fig. 1
−Faites glisser le tube (13) et verrouillez-le avec la bague (14).
−Relier le corps (9) au tuyau (13) et le verrouiller en serrant le verrou (14).
−Faites glisser le filet arrière (6) sur l'axe (7).
−Faites correspondre les trous de la grille (6) avec les crochets du carter du moteur (8) et fixez
avec l'écrou (5).
−Glisser l'hélice (4) sur l'axe (7) et la fixer avec l'écrou (3).
−Desserrez la vis de la pince (1), puis placez la pince (1) sur le filet installé (6).
−Monter le filet avant (2) dans le collier (1) et le fixer en serrant la vis du collier (1) jusqu'en
butée.
−Placez l'appareil plié sur une surface stable et plane.
−Ajustez la hauteur. Desserrez la bague (14), insérez ou prolongez le tuyau (13) à la hauteur
requise, puis verrouillez-le en serrant la bague (14).
−Ajustez l'angle de la canopée.
−Déroulez complètement le cordon.
•FONCTIONNEMENT DE L'APPAREIL
−Toutes les modifications de paramètres sont confirmées par un signal sonore.
−Avec le bouton "OFF", vous pouvez désactiver toutes les fonctions de l'appareil en même
temps
−Connectez l'appareil au réseau conformément aux paramètres indiqués ci-dessus.
−Allumez l'appareil avec le bouton "SPEED/ON" et réglez la vitesse en appuyant sur - le
voyant (L, M ou H) s'allume, utilisez les boutons du panneau de commande ou de la
télécommande pour sélectionner des fonctions supplémentaires.
−Pour éteindre, appuyez sur le bouton "OFF".
•MODES DE FONCTIONNEMENT
NAT – mode naturel
•Allumez le ventilateur avec le bouton "SPEED/ON".
•Appuyez sur le bouton "MODE" jusqu'à ce que le voyant "NAT" s'allume.
•Le ventilateur passera par la vitesse de rotation du plus haut au plus bas.
NOR – mode normal
•Utilisez le bouton "SPEED/ON" pour allumer le ventilateur et sélectionner la vitesse de
fonctionnement.
•Appuyez sur le bouton "MODE" jusqu'à ce que l'indicateur "NOR" s'allume.
•Le ventilateur fonctionnera à la vitesse sélectionnée.
SLP – mode nuit
•Utilisez le bouton "SPEED/ON" pour allumer le ventilateur et sélectionner la vitesse de
fonctionnement.
•Appuyez sur le bouton "MODE" jusqu'à ce que le voyant "SLP" s'allume.
•Le ventilateur s'allumera et s'éteindra - fonctionnement à la vitesse sélectionnée.
Abb. 1
•FONCTIONS SUPPLÉMENTAIRES
OSCILLATION -activation possible uniquement à partir de la télécommande
•La touche "SPEED/ON" permet de mettre le ventilateur en marche et de sélectionner
la vitesse de fonctionnement.
•Appuyez sur le bouton "OSC" de la télécommande.
•Le ventilateur fonctionnera à la vitesse sélectionnée.
•Pour désactiver la fonction, appuyez sur la touche "OSC" de la télécommande.
TIMER
•Cette fonction permet de régler l'heure après laquelle l'appareil s'éteint
automatiquement.
•La fonction ne peut être activée que lorsque l'appareil est allumé.
•La touche "SPEED/ON" permet de mettre le ventilateur en marche et de sélectionner
la vitesse de fonctionnement.
•Appuyez sur la touche "TIME" de la télécommande ou ""TIME" du panneau de
commande.
o1 fois -réglage de l'arrêt automatique en une demi-heure -l'indicateur "0.5H"
s'allume,
o2 fois -réglage de l'arrêt automatique en 1 heure -l'indicateur "1H" s'allume,
o3 fois -arrêt en 1,5 heure -les voyants "1H" et "0,5H" s'allument,
o4 fois -arrêt en 2 heures -l'indicateur "2H" s'allume,
o5 fois -arrêt en 2,5 heures -les voyants "2H" et "0,5H" seront allumés,
o6 fois -arrêt en 3 heures -les voyants "1H" et "2H" seront allumés,
o7 fois -arrêt en 3,5 heures -les voyants "1H" et "2H", "0,5H" seront allumés,
o8 fois -arrêt en 4 heures -indicateur "4H" s'allume,
o9 fois -arrêt en 4,5 heures -les voyants "4H" et "0,5H" seront allumés,
o10 fois -arrêt en 5 heures - les voyants "4H" et "1H" seront allumés,
o11 fois -arrêt en 5,5 heures -les voyants "4H", "1H" et "0,5H" seront allumés,
o12 fois -arrêt en 6 heures -les voyants "4H" et "2H" seront allumés,
o13 fois -arrêt en 6,5 heures -les voyants "4H", "2H" et "0,5H" seront allumés,
o14 fois -arrêt en 7 heures -les voyants "4H", "2H" et "1H" seront allumés,
o15 fois -arrêt en 7,5 heures -"4H", "2H", "1H" et "0,5H" s'allumeront.
•Le ventilateur fonctionnera à la vitesse sélectionnée.
•NETTOYAGE ET ENTRETIEN
−Prima di pulire il dispositivo, scollegare il dispositivo dalla rete e attendere fino a quando
l'elica si ferma.
−Il dispositivo non deve essere immerso in acqua.
−Pulisci il dispositivo con un panno umido e poi asciugalo.
−Rimuovere la rete anteriore, l'elica e la rete posteriore -pulire gli elementi con un panno
umido e poi asciugare.
−non utilizzare detergenti aggressivi o che distruggono la superficie per la pulizia.
•GARANTIE
−L'appareil est destiné à un usage domestique privé.
−Il ne peut être utilisé à des fins professionnelles.
−Une utilisation abusive ou en contradiction avec ce mode d’emploi annule la garantie.

33
•UTILISATION PREVUE DE L'APPAREIL
Le ventilateur WG100 est conçu pour
améliorer le confort thermique dans les
espaces de vie. Avec son aide, l'air est
mis en mouvement, procurant ainsi une
agréable sensation de refroidissement.
•ASSEMBLAGE DE L'APPAREIL
−Avant utilisation, vérifiez que l'appareil est complet et non endommagé.
−Avant d'utiliser l'appareil pour la première fois, déballez et assemblez les différents
composants.
−Relier le tuyau (15) à la base (16) - Fig. 1
−Faites glisser le tube (13) et verrouillez-le avec la bague (14).
−Relier le corps (9) au tuyau (13) et le verrouiller en serrant le verrou (14).
−Faites glisser le filet arrière (6) sur l'axe (7).
−Faites correspondre les trous de la grille (6) avec les crochets du carter du moteur (8) et fixez
avec l'écrou (5).
−Glisser l'hélice (4) sur l'axe (7) et la fixer avec l'écrou (3).
−Desserrez la vis de la pince (1), puis placez la pince (1) sur le filet installé (6).
−Monter le filet avant (2) dans le collier (1) et le fixer en serrant la vis du collier (1) jusqu'en
butée.
−Placez l'appareil plié sur une surface stable et plane.
−Ajustez la hauteur. Desserrez la bague (14), insérez ou prolongez le tuyau (13) à la hauteur
requise, puis verrouillez-le en serrant la bague (14).
−Ajustez l'angle de la canopée.
−Déroulez complètement le cordon.
•FONCTIONNEMENT DE L'APPAREIL
−Toutes les modifications de paramètres sont confirmées par un signal sonore.
−Avec le bouton "OFF", vous pouvez désactiver toutes les fonctions de l'appareil en même
temps
−Connectez l'appareil au réseau conformément aux paramètres indiqués ci-dessus.
−Allumez l'appareil avec le bouton "SPEED/ON" et réglez la vitesse en appuyant sur - le
voyant (L, M ou H) s'allume, utilisez les boutons du panneau de commande ou de la
télécommande pour sélectionner des fonctions supplémentaires.
−Pour éteindre, appuyez sur le bouton "OFF".
•MODES DE FONCTIONNEMENT
NAT – mode naturel
•Allumez le ventilateur avec le bouton "SPEED/ON".
•Appuyez sur le bouton "MODE" jusqu'à ce que le voyant "NAT" s'allume.
•Le ventilateur passera par la vitesse de rotation du plus haut au plus bas.
NOR – mode normal
•Utilisez le bouton "SPEED/ON" pour allumer le ventilateur et sélectionner la vitesse de
fonctionnement.
•Appuyez sur le bouton "MODE" jusqu'à ce que l'indicateur "NOR" s'allume.
•Le ventilateur fonctionnera à la vitesse sélectionnée.
SLP – mode nuit
•Utilisez le bouton "SPEED/ON" pour allumer le ventilateur et sélectionner la vitesse de
fonctionnement.
•Appuyez sur le bouton "MODE" jusqu'à ce que le voyant "SLP" s'allume.
•Le ventilateur s'allumera et s'éteindra - fonctionnement à la vitesse sélectionnée.
Abb. 1
•FONCTIONS SUPPLÉMENTAIRES
OSCILLATION - activation possible uniquement à partir de la télécommande
•La touche "SPEED/ON" permet de mettre le ventilateur en marche et de
sélectionner la vitesse de fonctionnement.
•Appuyez sur le bouton "SWING" de la télécommande.
•Le ventilateur fonctionnera à la vitesse sélectionnée.
•Pour désactiver la fonction, appuyez sur la touche "SWING" de la télécommande.
TIMER
•Cette fonction permet de régler l'heure après laquelle l'appareil s'éteint
automatiquement.
•La fonction ne peut être activée que lorsque l'appareil est allumé.
•La touche "SPEED/ON" permet de mettre le ventilateur en marche et de sélectionner
la vitesse de fonctionnement.
•Appuyez sur la touche "TIME" de la télécommande ou ""TIME" du panneau de
commande.
o1 fois - réglage de l'arrêt automatique en une demi-heure - l'indicateur "0.5H"
s'allume,
o2 fois - réglage de l'arrêt automatique en 1 heure - l'indicateur "1H" s'allume,
o3 fois - arrêt en 1,5 heure - les voyants "1H" et "0,5H" s'allument,
o4 fois - arrêt en 2 heures - l'indicateur "2H" s'allume,
o5 fois - arrêt en 2,5 heures - les voyants "2H" et "0,5H" seront allumés,
o6 fois - arrêt en 3 heures - les voyants "1H" et "2H" seront allumés,
o7 fois - arrêt en 3,5 heures - les voyants "1H" et "2H", "0,5H" seront allumés,
o8 fois - arrêt en 4 heures - indicateur "4H" s'allume,
o9 fois - arrêt en 4,5 heures - les voyants "4H" et "0,5H" seront allumés,
o10 fois - arrêt en 5 heures - les voyants "4H" et "1H" seront allumés,
o11 fois - arrêt en 5,5 heures - les voyants "4H", "1H" et "0,5H" seront allumés,
o12 fois - arrêt en 6 heures - les voyants "4H" et "2H" seront allumés,
o13 fois - arrêt en 6,5 heures - les voyants "4H", "2H" et "0,5H" seront allumés,
o14 fois - arrêt en 7 heures - les voyants "4H", "2H" et "1H" seront allumés,
o15 fois - arrêt en 7,5 heures - "4H", "2H", "1H" et "0,5H" s'allumeront.
•Le ventilateur fonctionnera à la vitesse sélectionnée.
•NETTOYAGE ET ENTRETIEN
−Prima di pulire il dispositivo, scollegare il dispositivo dalla rete e attendere fino a quando
l'elica si ferma.
−Il dispositivo non deve essere immerso in acqua.
−Pulisci il dispositivo con un panno umido e poi asciugalo.
−Rimuovere la rete anteriore, l'elica e la rete posteriore - pulire gli elementi con un panno
umido e poi asciugare.
−non utilizzare detergenti aggressivi o che distruggono la superficie per la pulizia.
•GARANTIE
−L'appareil est destiné à un usage domestique privé.
−Il ne peut être utilisé à des fins professionnelles.
−Une utilisation abusive ou en contradiction avec ce mode d’emploi annule la garantie.

34
ISTRUZIONI DI SICUREZZA
Si consiglia di conservare il presente manuale d’uso per
il futuro riferimento.
Leggere attentamente il manuale di istruzioni prima
dell’uso.
1. Il cavo di collegamento deve essere collegato a una rete
elettrica con i parametri indicati sulla targhetta.
2. È necessario prestare attenzione a non collegare troppe
utenze a un unico circuito.
3. Per scollegare l'apparecchio dalla rete elettrica non tirare
mai il cavo, ma utilizzare sempre la spina.
4. L'apparecchio è destinato esclusivamente all'uso
domestico.
5. Posizionare l'apparecchio su una superficie piana e asciutta.
6. Non inserire le dita o altri oggetti nelle aperture di ingresso
e di uscita.
7. Non collocare l'apparecchio vicino a tende o tendaggi.
8. Tenere sempre in vista il ventilatore funzionante,
soprattutto quando ci sono bambini.
9. Non lasciare l'apparecchio in funzione incustodito.
10. Questa apparecchiatura può essere utilizzata da bambini di
almeno 8 anni e da persone con ridotte capacità fisiche e
mentali e senza esperienza
e conoscenza
dell'apparecchiatura, a condizione che venga fornita una
supervisione o un'istruzione su come utilizzare
l'apparecchiatura in modo sicuro, in modo da comprendere
i rischi associati. I bambini non devono giocare con
l'attrezzatura. I bambini non sorvegliati non devono
effettuare la pulizia o la manutenzione dell'apparecchiatura.
11. Non spruzzare insetticidi o simili vicino alle attrezzature di
lavoro.
12. Non utilizzare a temperature elevate (superiori a 40°C), in
ambienti ad alta umidità (ad es. bagno) e in atmosfere
esplosive.
13. Prima di accendere l'apparecchio, accertarsi che tutti i suoi
componenti siano correttamente assemblati.
14. Non accendere mai l'apparecchio prima che sia stato
montato.
15. Non coprire la rete di sicurezza.
16. Non appendere abiti o oggetti all'apparecchio.
17. Non utilizzare l'apparecchio con un cavo di collegamento
danneggiato. Per prevenire un pericolo, deve essere
sostituiti dal servizio di assistenza del produttore.
18. Le riparazioni dell'apparecchiatura possono essere
effettuate solo da un centro di assistenza autorizzato.
Qualsiasi modifica o utilizzo di parti di ricambio o
componenti non originali dell'apparecchio è vietata e
compromette la sicurezza d'uso.
19. Non immergere l'apparecchio o la spina di alimentazione
nell'acqua. o altri liquidi. Pericolo di morte per scossa
elettrica! In ogni caso, se ciò dovesse accadere, è necessario
rimuovere immediatamente la spina dalla presa e far
controllare l'apparecchio da un esperto prima di utilizzarlo
nuovamente.
20. Non rimuovere mai la spina dalla presa tirando il cavo di
alimentazione o con le mani bagnate.
21. Assicurarsi che il cavo di alimentazione non sia appeso a
spigoli vivi o che non rimanga intrappolato.
22. Non utilizzare o conservare l'unità all'aria aperta.
23. Non dirigere il flusso d'aria verso le persone per lunghi
periodi di tempo.
24. Eldom Sp. z o. o. non è responsabile di eventuali danni
derivanti da un uso improprio del dispositivo.
AVVERTIMENTO: L’uso improprio del dispositivo può
causare lesioni al corpo.
ATTENZIONE: Il sacchetto di plastica può essere pericoloso:
per evitare il soffocamento con il sacchetto, tenerlo lontano
da neonati e piccoli bambini!

35
ISTRUZIONI DI SICUREZZA
Si consiglia di conservare il presente manuale d’uso per
il futuro riferimento.
Leggere attentamente il manuale di istruzioni prima
dell’uso.
1. Il cavo di collegamento deve essere collegato a una rete
elettrica con i parametri indicati sulla targhetta.
2. È necessario prestare attenzione a non collegare troppe
utenze a un unico circuito.
3. Per scollegare l'apparecchio dalla rete elettrica non tirare
mai il cavo, ma utilizzare sempre la spina.
4. L'apparecchio è destinato esclusivamente all'uso
domestico.
5. Posizionare l'apparecchio su una superficie piana e asciutta.
6. Non inserire le dita o altri oggetti nelle aperture di ingresso
e di uscita.
7. Non collocare l'apparecchio vicino a tende o tendaggi.
8. Tenere sempre in vista il ventilatore funzionante,
soprattutto quando ci sono bambini.
9. Non lasciare l'apparecchio in funzione incustodito.
10. Questa apparecchiatura può essere utilizzata da bambini di
almeno 8 anni e da persone con ridotte capacità fisiche e
mentali e senza esperienza e conoscenza
dell'apparecchiatura, a condizione che venga fornita una
supervisione o un'istruzione su come utilizzare
l'apparecchiatura in modo sicuro, in modo da comprendere
i rischi associati. I bambini non devono giocare con
l'attrezzatura. I bambini non sorvegliati non devono
effettuare la pulizia o la manutenzione dell'apparecchiatura.
11. Non spruzzare insetticidi o simili vicino alle attrezzature di
lavoro.
12. Non utilizzare a temperature elevate (superiori a 40°C), in
ambienti ad alta umidità (ad es. bagno) e in atmosfere
esplosive.
13. Prima di accendere l'apparecchio, accertarsi che tutti i suoi
componenti siano correttamente assemblati.
14. Non accendere mai l'apparecchio prima che sia stato
montato.
15. Non coprire la rete di sicurezza.
16. Non appendere abiti o oggetti all'apparecchio.
17. Non utilizzare l'apparecchio con un cavo di collegamento
danneggiato. Per prevenire un pericolo, deve essere
sostituiti dal servizio di assistenza del produttore.
18. Le riparazioni dell'apparecchiatura possono essere
effettuate solo da un centro di assistenza autorizzato.
Qualsiasi modifica o utilizzo di parti di ricambio o
componenti non originali dell'apparecchio è vietata e
compromette la sicurezza d'uso.
19. Non immergere l'apparecchio o la spina di alimentazione
nell'acqua. o altri liquidi. Pericolo di morte per scossa
elettrica! In ogni caso, se ciò dovesse accadere, è necessario
rimuovere immediatamente la spina dalla presa e far
controllare l'apparecchio da un esperto prima di utilizzarlo
nuovamente.
20. Non rimuovere mai la spina dalla presa tirando il cavo di
alimentazione o con le mani bagnate.
21. Assicurarsi che il cavo di alimentazione non sia appeso a
spigoli vivi o che non rimanga intrappolato.
22. Non utilizzare o conservare l'unità all'aria aperta.
23. Non dirigere il flusso d'aria verso le persone per lunghi
periodi di tempo.
24. Eldom Sp. z o. o. non è responsabile di eventuali danni
derivanti da un uso improprio del dispositivo.
AVVERTIMENTO: L’uso improprio del dispositivo può
causare lesioni al corpo.
ATTENZIONE: Il sacchetto di plastica può essere pericoloso:
per evitare il soffocamento con il sacchetto, tenerlo lontano
da neonati e piccoli bambini!

36
IT MANUALE DI ISTRUZIONI
VENTILATORE DA CAMERA WG100
MANUALE DI ISTRUZIONI
VENTILATORE DA CAMERA WG100
•DESCRIZIONE GENERALE
1. Morsetto
2. Rete protettiva - anteriore
3. Dado fissaggio elica
4. Elica
5. Dado di fissaggio della rete
6. Rete protettiva - retro
7. Spillo
8. Vano motore
9. Corpo
10. Pannello di controllo
11. Filo
12. Blocco
13. Tubo di prolunga
14. Anello di regolazione dell'altezza
15. Tubo di base
16. Base
17. Telecomando
•DATI TECNICI
−potenza: 45W
−tensione di alimentazione:
220-240V~ 50/60Hz
•PANNELLO DI CONTROLLO (10)
SPEED/ON - accensione della ventola, controllo della velocità di funzionamento
OFF - spegnimento del dispositivo
TIMER - abilita/disabilita lo spegnimento automatico
MODE - selezione delle modalità operative programmate
L, M, H - controlli velocità ventola (bassa, media, alta)
NAT, NOR, SLP - comandi modalità di funzionamento (naturale, normale, notturno)
4H, 2H, 1H, 0.5H - controlli di impostazione del tempo di spegnimento automatico
•TELECOMANDO (17)
LAMP - accensione/spegnimento della retroilluminazione
della centrale
SWING - oscillazione on/off
TIME - abilita/disabilita lo spegnimento automatico
SPEED/ON - accensione della ventola, controllo della velocità
di funzionamento
MODE - selezione delle modalità operative programmate
OFF - spegnimento del dispositivo
•DESTINO
Il ventilatore WG100 è progettato per
migliorare il comfort termico negli spazi
abitativi. Con il suo aiuto, l'aria viene
messa in movimento, fornendo così una
piacevole sensazione di raffreddamento.
•MONTAGGIO
−Prima dell'uso, controllare che il dispositivo sia completo e non danneggiato.
−Prima di utilizzare il dispositivo per la prima volta, disimballare e assemblare i singoli
componenti.
−Collegare il tubo (15) con la base (16) - Fig. 1
−Sfilare il tubo (13) e bloccarlo con l'anello (14).
−Collegare il corpo (9) al tubo (13) e bloccarlo avvitando il fermo (14).
−Far scorrere la rete posteriore (6) sul perno (7).
−Far coincidere i fori della rete (6) con i fermi del corpo motore (8) e fissare con il dado (5).
−Infilare l'elica (4) sul perno (7) e fissarla con il dado (3).
−Allentare la vite nel morsetto (1), quindi posizionare il morsetto (1) sulla rete installata (6).
−Inserire la rete anteriore (2) nel morsetto (1) e fissarla avvitando la vite nel morsetto (1) fino
all'arresto.
−Posizionare il dispositivo piegato su una superficie stabile e piana.
−Regola l'altezza. Allentare la ghiera (14), inserire o prolungare il tubo (13) all'altezza
desiderata, quindi bloccarlo serrando la ghiera (14).
−Regola l'angolazione del baldacchino.
−Srotolare completamente il cavo.
•UTILIZZO DEL DISPOSITIVO
−Tutte le modifiche alle impostazioni sono confermate da un segnale acustico.
−Con il pulsante "OFF" è possibile disattivare contemporaneamente tutte le funzioni del
dispositivo
−Collegare il dispositivo alla rete in base ai parametri sopra indicati.
−Accendere il dispositivo con il pulsante "SPEED/ON" e impostare la velocità premendo -
l'indicatore (L, M o H) si illuminerà, utilizzare i pulsanti sul pannello di controllo o sul
telecomando per selezionare funzioni aggiuntive.
−Per spegnere, premere il pulsante "OFF".
•MODOS DE FUNCIONAMIENTO
NAT – modalità naturale
•Accendere il ventilatore con il pulsante "SPEED/ON".
•Premere il pulsante "MODE" finché la spia "NAT" non si accende.
•La ventola passerà attraverso la velocità di rotazione dalla più alta alla più bassa.
NOR – modalità normale
•Utilizzare il pulsante "SPEED/ON" per accendere il ventilatore e selezionare la velocità
di funzionamento.
•Premere il pulsante "MODE" finché non si accende l'indicatore "NOR".
•Il ventilatore funzionerà alla velocità selezionata.
SLP – modalità notturna
•Utilizzare il pulsante "SPEED/ON" per accendere il ventilatore e selezionare la velocità
di funzionamento.
•Premere il pulsante "MODE" fino all'accensione della spia "SLP".
•La ventola si accenderà e si spegnerà - funzionerà alla velocità selezionata.
Abb. 1

37
MANUALE DI ISTRUZIONI
VENTILATORE DA CAMERA WG100
• DESCRIZIONE GENERALE
1. Morsetto
2. Rete protettiva - anteriore
3. Dado fissaggio elica
4. Elica
5. Dado di fissaggio della rete
6. Rete protettiva - retro
7. Spillo
8. Vano motore
9. Corpo
10. Pannello di controllo
11. Filo
12. Blocco
13. Tubo di prolunga
14. Anello di regolazione dell'altezza
15. Tubo di base
16. Base
17. Telecomando
• DATI TECNICI
− potenza: 45W
− tensione di alimentazione:
220-240V~ 50/60Hz
• PANNELLO DI CONTROLLO (10)
SPEED/ON - accensione della ventola, controllo della velocità di funzionamento
OFF - spegnimento del dispositivo
TIMER - abilita/disabilita lo spegnimento automatico
MODE - selezione delle modalità operative programmate
L, M, H - controlli velocità ventola (bassa, media, alta)
NAT, NOR, SLP - comandi modalità di funzionamento (naturale, normale, notturno)
4H, 2H, 1H, 0.5H - controlli di impostazione del tempo di spegnimento automatico
• TELECOMANDO (17)
LAMP - accensione/spegnimento della retroilluminazione
della centrale
OSC. - oscillazione on/off
TIME - abilita/disabilita lo spegnimento automatico
SPEED/ON - accensione della ventola, controllo della velocità
di funzionamento
MODE - selezione delle modalità operative programmate
OFF - spegnimento del dispositivo
• DESTINO
Il ventilatore WG100 è progettato per
migliorare il comfort termico negli spazi
abitativi. Con il suo aiuto, l'aria viene
messa in movimento, fornendo così una
piacevole sensazione di raffreddamento.
• MONTAGGIO
− Prima dell'uso, controllare che il dispositivo sia completo e non danneggiato.
− Prima di utilizzare il dispositivo per la prima volta, disimballare e assemblare i singoli
componenti.
− Collegare il tubo (15) con la base (16) - Fig. 1
− Sfilare il tubo (13) e bloccarlo con l'anello (14).
− Collegare il corpo (9) al tubo (13) e bloccarlo avvitando il fermo (14).
− Far scorrere la rete posteriore (6) sul perno (7).
− Far coincidere i fori della rete (6) con i fermi del corpo motore (8) e fissare con il dado (5).
− Infilare l'elica (4) sul perno (7) e fissarla con il dado (3).
− Allentare la vite nel morsetto (1), quindi posizionare il morsetto (1) sulla rete installata (6).
− Inserire la rete anteriore (2) nel morsetto (1) e fissarla avvitando la vite nel morsetto (1) fino
all'arresto.
− Posizionare il dispositivo piegato su una superficie stabile e piana.
− Regola l'altezza. Allentare la ghiera (14), inserire o prolungare il tubo (13) all'altezza
desiderata, quindi bloccarlo serrando la ghiera (14).
− Regola l'angolazione del baldacchino.
− Srotolare completamente il cavo.
• UTILIZZO DEL DISPOSITIVO
− Tutte le modifiche alle impostazioni sono confermate da un segnale acustico.
− Con il pulsante "OFF" è possibile disattivare contemporaneamente tutte le funzioni del
dispositivo
− Collegare il dispositivo alla rete in base ai parametri sopra indicati.
− Accendere il dispositivo con il pulsante "SPEED/ON" e impostare la velocità premendo -
l'indicatore (L, M o H) si illuminerà, utilizzare i pulsanti sul pannello di controllo o sul
telecomando per selezionare funzioni aggiuntive.
− Per spegnere, premere il pulsante "OFF".
• MODOS DE FUNCIONAMIENTO
NAT – modalità naturale
• Accendere il ventilatore con il pulsante "SPEED/ON".
• Premere il pulsante "MODE" finché la spia "NAT" non si accende.
• La ventola passerà attraverso la velocità di rotazione dalla più alta alla più bassa.
NOR – modalità normale
• Utilizzare il pulsante "SPEED/ON" per accendere il ventilatore e selezionare la velocità
di funzionamento.
• Premere il pulsante "MODE" finché non si accende l'indicatore "NOR".
• Il ventilatore funzionerà alla velocità selezionata.
SLP – modalità notturna
• Utilizzare il pulsante "SPEED/ON" per accendere il ventilatore e selezionare la velocità
di funzionamento.
• Premere il pulsante "MODE" fino all'accensione della spia "SLP".
• La ventola si accenderà e si spegnerà - funzionerà alla velocità selezionata.
Abb. 1

38
•FUNZIONI AGGIUNTIVE
OSCILLAZIONE - attivazione possibile solo da telecomando
•Utilizzare il pulsante "SPEED/ON" per accendere il ventilatore e selezionare la
velocità di funzionamento.
•Premere il pulsante "SWING" sul telecomando.
•Il ventilatore funzionerà alla velocità selezionata.
•Per disabilitare la funzione premere il tasto "SWING" sul telecomando.
TIMER
•Questa funzione consente di impostare il tempo dopo il quale il dispositivo si
spegnerà automaticamente.
•La funzione può essere avviata solo quando il dispositivo è acceso.
•Utilizzare il pulsante "SPEED/ON" per accendere il ventilatore e selezionare la velocità
di funzionamento.
•Premere il pulsante "TIME" sul telecomando o il pulsante "TIME" sul pannello di
controllo.
o1 volta - impostando lo spegnimento automatico in mezz'ora - l'indicatore "0.5H"
si accenderà,
o2 volte - impostando lo spegnimento automatico in 1 ora - l'indicatore "1H" si
accenderà,
o3 volte - spegnimento in 1,5 ore - le luci "1H" e "0.5H" si accendono,
o4 volte - spegnimento in 2 ore - l'indicatore "2H" si accende,
o5 volte - spegnimento in 2,5 ore - le luci "2H" e "0.5H" saranno accese,
o6 volte - spegnimento in 3 ore - le luci "1H" e "2H" saranno accese,
o7 volte - spegnimento in 3,5 ore - le luci "1H" e "2H", "0.5H" saranno accese,
o8 volte - spegnimento in 4 ore - l'indicatore "4H" si accende,
o9 volte - spegnimento in 4,5 ore - le luci "4H" e "0.5H" saranno accese,
o10 volte - spegnimento in 5 ore - le luci "4H" e "1H" saranno accese,
o11 volte - spegnimento in 5,5 ore - le luci "4H", "1H" e "0.5H" saranno accese,
o12 volte - spegnimento in 6 ore - le luci "4H" e "2H" saranno accese,
o13 volte - spegnimento in 6,5 ore - le luci "4H", "2H" e "0.5H" saranno accese,
o14 volte - spegnimento in 7 ore - le luci "4H", "2H" e "1H" saranno accese,
o15 volte - spegnimento in 7,5 ore - "4H", "2H", "1H" e "0.5H" si illumineranno.
•Il ventilatore funzionerà alla velocità selezionata.
•LIMPIEZA Y MANTENIMIENTO
−Prima di pulire il dispositivo, scollegare il dispositivo dalla rete e attendere fino a quando
l'elica si ferma.
−Il dispositivo non deve essere immerso in acqua.
−Pulisci il dispositivo con un panno umido e poi asciugalo.
−Rimuovere la rete anteriore, l'elica e la rete posteriore - pulire gli elementi con un panno
umido e poi asciugare.
−non utilizzare detergenti aggressivi o che distruggono la superficie per la pulizia.
•GARANTIE
−Questo prodotto è stato concepito per il solo uso domestico, in privato.
−Non deve essere usato per scopi professionali.
−La garanzia garanzia decade in caso di trattamento improprio.

39
• FUNZIONI AGGIUNTIVE
OSCILLAZIONE - attivazione possibile solo da telecomando
• Utilizzare il pulsante "SPEED/ON" per accendere il ventilatore e selezionare la velocità
di funzionamento.
• Premere il pulsante "OSC" sul telecomando.
• Il ventilatore funzionerà alla velocità selezionata.
• Per disabilitare la funzione premere il tasto "OSC" sul telecomando.
TIMER
• Questa funzione consente di impostare il tempo dopo il quale il dispositivo si
spegnerà automaticamente.
• La funzione può essere avviata solo quando il dispositivo è acceso.
• Utilizzare il pulsante "SPEED/ON" per accendere il ventilatore e selezionare la velocità
di funzionamento.
• Premere il pulsante "TIME" sul telecomando o il pulsante "TIME" sul pannello di
controllo.
o 1 volta - impostando lo spegnimento automatico in mezz'ora - l'indicatore "0.5H"
si accenderà,
o 2 volte - impostando lo spegnimento automatico in 1 ora - l'indicatore "1H" si
accenderà,
o 3 volte - spegnimento in 1,5 ore - le luci "1H" e "0.5H" si accendono,
o 4 volte - spegnimento in 2 ore - l'indicatore "2H" si accende,
o 5 volte - spegnimento in 2,5 ore - le luci "2H" e "0.5H" saranno accese,
o 6 volte - spegnimento in 3 ore - le luci "1H" e "2H" saranno accese,
o 7 volte - spegnimento in 3,5 ore - le luci "1H" e "2H", "0.5H" saranno accese,
o 8 volte - spegnimento in 4 ore - l'indicatore "4H" si accende,
o 9 volte - spegnimento in 4,5 ore - le luci "4H" e "0.5H" saranno accese,
o 10 volte - spegnimento in 5 ore - le luci "4H" e "1H" saranno accese,
o 11 volte - spegnimento in 5,5 ore - le luci "4H", "1H" e "0.5H" saranno accese,
o 12 volte - spegnimento in 6 ore - le luci "4H" e "2H" saranno accese,
o 13 volte - spegnimento in 6,5 ore - le luci "4H", "2H" e "0.5H" saranno accese,
o 14 volte - spegnimento in 7 ore - le luci "4H", "2H" e "1H" saranno accese,
o 15 volte - spegnimento in 7,5 ore - "4H", "2H", "1H" e "0.5H" si illumineranno.
• Il ventilatore funzionerà alla velocità selezionata.
• LIMPIEZA Y MANTENIMIENTO
− Prima di pulire il dispositivo, scollegare il dispositivo dalla rete e attendere fino a quando
l'elica si ferma.
− Il dispositivo non deve essere immerso in acqua.
− Pulisci il dispositivo con un panno umido e poi asciugalo.
− Rimuovere la rete anteriore, l'elica e la rete posteriore - pulire gli elementi con un panno
umido e poi asciugare.
− non utilizzare detergenti aggressivi o che distruggono la superficie per la pulizia.
• GARANTIE
− Questo prodotto è stato concepito per il solo uso domestico, in privato.
− Non deve essere usato per scopi professionali.
− La garanzia garanzia decade in caso di trattamento improprio.

KARTA GWARANCYJNA
WAŻNA ZDOWODEM ZAKUPU
WENTYLATOR POKOJOWY
WG100
pieczęć sklepu idata sprzedaży
Sprzęt przeznaczony do użytku domowego
OPIS NAPRAWY 1
pieczątka punktu usługowego
OPIS NAPRAWY 2
pieczątka punktu usługowego
OPIS NAPRAWY 3
pieczątka punktu usługowego
OPIS NAPRAWY 4
pieczątka punktu usługowego
WENTYLATOR POKOJOWY
WG100
pieczęć sklepu: 1
data sprzedaży:
WENTYLATOR POKOJOWY
WG100
pieczęć sklepu: 2
data sprzedaży:
WENTYLATOR POKOJOWY
WG100
pieczęć sklepu: 3
data sprzedaży:
WENTYLATOR POKOJOWY
WG100
pieczęć sklepu: 4
data sprzedaży:
-
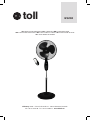 1
1
-
 2
2
-
 3
3
-
 4
4
-
 5
5
-
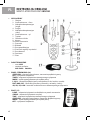 6
6
-
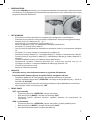 7
7
-
 8
8
-
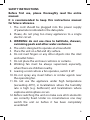 9
9
-
 10
10
-
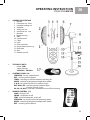 11
11
-
 12
12
-
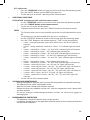 13
13
-
 14
14
-
 15
15
-
 16
16
-
 17
17
-
 18
18
-
 19
19
-
 20
20
-
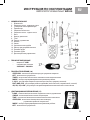 21
21
-
 22
22
-
 23
23
-
 24
24
-
 25
25
-
 26
26
-
 27
27
-
 28
28
-
 29
29
-
 30
30
-
 31
31
-
 32
32
-
 33
33
-
 34
34
-
 35
35
-
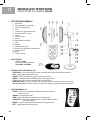 36
36
-
 37
37
-
 38
38
-
 39
39
-
 40
40


en otros idiomas
- français: ELDOM WG100 TOLL Manuel utilisateur
- italiano: ELDOM WG100 TOLL Manuale utente
- English: ELDOM WG100 TOLL User manual
- Deutsch: ELDOM WG100 TOLL Benutzerhandbuch
- русский: ELDOM WG100 TOLL Руководство пользователя
- polski: ELDOM WG100 TOLL Instrukcja obsługi