
131000
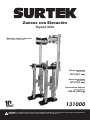
Zancos con Elevación
Drywall Stilts
Manual de Usuario y Garantía.
User’s Manual and Warranty.
ATENCIÓN: Lea, entienda y siga las instrucciones de seguridad contenidas en este docuemnto, antes de operar esta herramienta.
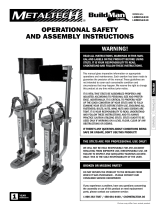
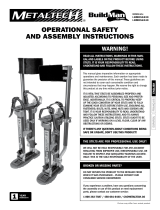
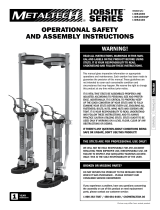
WARNING: Read, understand and follow the safety rules in this document, before operating this tool.
Elevación mínima
Minimum lift
18” (45,7 cm)
Elevación máxima
Maximum lift
30” (76,2 cm)
Capacidad de Soporte
Support capacity
230 lb (105 kg)

2
ESPAÑOL
Favor de leer cuidadosamente antes de ensamblar
y usar, esto es fundamental para su seguridad y la
prolongación de vida de su producto.
ENSAMBLE
1. Insertar el tubo curveado en el hueco localizado
en el costado inferior de los zancos y coloque el
tornillo y tuerca correspondientes.
2. Colocar casquillos de la suela superior de los
zancos, utilizando los tornillos correspondientes.
3. Posicione casquillos de acuerdo a la medida del
pie, mientras mas pequeño sea el pie, el casquillo
deberá ir mas adelante o vicerversa.
4. Insertar la parte inferior de los tubos de la
abrazadera para pantorrilla a la parte superior del
tubo curveado.
5. Para asegurarse de que los tubos están
correctamente colocadas, las abrazaderas deberán
tomar la forma de las piernas.
PRECAUCIONES AL OPERAR
1. PASOS DE SEGURIDAD AL SUJETAR
•Los 6 hoyos del casquillo de la planta del pie son
utilizados para ajustar la distancia del casquillo y las
cintas de amarre.
•Al utilizar los zancos, primero amarre las cuerdas
de las piernas y después las cuerdas del arco y dedos
del pie.
•Al quitarse los zancos realice el proceso inverso,
es decir, primero desamarre las cuerdas del arco y
dedos del pie; y después desamarre las cuerdas de
las piernas.
2. BALANCE TRASERO Y DELANTERO
Para evitar que los zancos se balanceen hacia adelante
ó atrás, usted debera de colocar los casquillos de la
suela en la posición correcta. De lo contrario causará
un desnivel y puede llegar a perder el balance.
•Ajustar de manera correcta los tubos de la
abrazadera de acuerdo al tamaño de su pantorrilla,
estos pueden ser girados hacia delante o hacia atrás.
3. AJUSTE EN LA ALTURA
Para ajustar la altura de los zancos, se deben de
remover los tornillos tipo mariposa, comenzar a
ajustar los zancos a la altura deseada y posteriormente
volver a colocar los tornillos.
MANTENIMIENTO
SE RECOMIENDA HACER UNA INSPECCIÓN PROFUNDA DE
LOS ZANCOS:
•Lubricar los resortes de manera leve.
•Reemplazo de los componentes frágiles o desgastados.
•Reemplazo de las cuerdas de atado de suelas, piernas y
punta del pie.
•Reemplazo de los tornillos tipo mariposa.
ADVERTENCIA
INSPECCIONAR RIGUROSAMENTE ANTES DE COMENZAR A
OPERAR
1. Asegúrese de que los zancos esten completamante fuera
de cualquier signo de peligro, así como también de que
todos los tornillos y cuerdas estén bien apretados.
2. Asegúrese de que a cada paso que vaya a dar, el piso este
completamente limpio, no trabaje en áreas rodeadas de
piedras , cables eléctricos, vidrios o tubos.
3. Reemplace cualquier componente de los zancos dañado o
excesivamente gastado.
4. Mantener todas las cuerdas debidamente atadas y
aseguradas.
5. Al montarse en los zancos, debe de atar primeramente las
cuerdas de las piernas.
6. Remover cualquier cosa de las suelas que pueda causar
tracción.
PRECAUCIÓN
1. No utilice los zancos sin tener la instrucción apropiada
sobre su uso adecuado.
2. No utilice los zancos en caso de que los componentes estén
excesivamente gastados o modificados.
3. No camine sobre superficies con agua o aceite.
4. No utilice los zancos en áreas con grava suelta, lodosa o
terreno excesivamente flojo.
5. No trabaje en áreas que haya cables eléctricos, tubería
conduit, vidrio, etc.
6. No utilice los zancos en andamios, tablones o superficies
inestables.
7. No cargue objetos pesados cuando esta utilizando los
zancos.
8. No corra o camine rápido con los zancos puestos.
9. No eleve los zancos más de lo necesario para cada ocasión.
10. No utilice los zancos bajo efectos del alcohol o drogas.
11. Caminar solamente en superficies duras y niveladas.
12. Cubrir o tapar cualquier orificio que haya en el suelo.
13. Caminar solamente hacia el frente, para regresar de
dirección debe de hacer vuelta en “U”
14. Para subir ó bajar escaleras debe de quitarse los zancos.
15. Reciba asistencia al momento de tomar objetos que estén
en el suelo, es recomendable que si va utilizar herramientas,
prepare una mochila o un porta herramientas adecuado
para evitar estar tomando instrumentos al estar utilizando
los zancos.

3
ENGLISH
Please read carefully before assembly and use, it is
essential to your product.
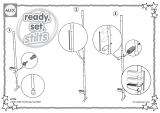
ASSEMBLY
1. Insert lower strut tubes up through botton of the
tube clamps.
2. Slide the upper strut tubes down over the lower strut
tubes and though the tube clamps. Position so the leg
bands are just above the large portion of the leg calves.
3. Position de tube clamps in the clamps bracket
slots, according to you calf size, so the stilts will stand
straight when mouted, and tighten well. Attach the
heel brackets to the footplates.
4. Attach lower strut tubes to the inter-lock bracket.
5. Conection with attached cap screw & nylon lock nut.
Tighten well when assembly is complete.
OPERATING CAUTIONS
1. STRAP TIGHTENING
•The six holes in the footplates are used to adjust the
distance between the footplate and the heel bracket.
•Please buckle leg straps first, and then buckle arch and toe
straps when wearing.
•Please unbuckle arch and toe straps first, and the unbuckle
leg straps when dismounting.
2. FORWARD/BACKWARD BALANCE
•If stilts lean forward, loosen the tube clamps and rotate
the leg -bands & strut tubes toward the rear, and tighten
clamps.
This adjustment is to insure proper forward and backward
balance. The balance of stilts is controlled by is middle
part of entire spring assembly. Any artificially forward or
backward pitch will destroy the balance.
Never bend leg bands.
•If your body leans forward, please adjust the spring
adjuster on the lower coil spring.
•Whereas, if your body leans backward, please adjust the
spring adjust the spring adjuster on theupper coil spring.
•The clam brackets beside the tube clamps are used to
keep the balance of the stilts. In addition, workman could
adjust the clamp brackets to make the stilts suitable for the
thickness of its snank.
3. HEIGHT ADJUSTMENT
Position the side pole holder in the side pole bracket slots
according to your calf size. So the stilts will stand straight
when mounted.
Remove wing bolts. Evenly raise the stilt legs to the desired
height, align the wing blowholes in the legs and extension
tubes, install wing bolts, and tighten well.
MAINTENANCE
DO INSPECT STILTS THOROUGHLY BEFORE USE, AND YOU
SHOULD MANTAIN THE CALF:
•Lubricate the action spring components lightly.
•Replacement of the fragile components.
•Replacement of the wing bolts.
•Replacement of the arch straps.
WARNING
INSPECT STILTS THOROUGHLY BEFORE USE
1.-Make sure that the structure is free of any sign of damage,
and there is no excessive wear at the connection points.
2. Make certain that each step completely clears the floor, as
you must never drag or shuffle your feet. Don´t work in or
around loose wire, rope, electric cords, paper sacks, broken
glass, conduit, etc.
3.- Replace any damaged or excessively worn stilts
components before use.
4. Keep all straps tightly fastened and secured.
5. Fasten the upper leg strap first when putting on stilts.
6. Remove anything from the soles, which could cause loss
of traction.
CAUTION
1.-Don´t wear stilts without having the proper instruction on
the use of them
2.-Don´t wear stilts that have damaged excessively worn or
modified components.
3.-Don´t walk on oily or otherwise slippery surfaces.
4.-Don´t wear on sandy, rocky, uneven, muddy or excessively
soft terrain.
5.-Don´t work in or around loose wire, rope, electric cords,
paper sacks, broken glass, conduit etc.
6.-Don´t walk on secondary scaffolding, benches, planks,
stools, etc.
7.-Don´t carry heavy loads while walking on stilts.
8.-Don´t run or walk fast on stilts.
9.-Don´t wear stilts that are taller than necessary.
10.-Don´t wear stilts while under the influence of drugs or
alcohol.
11. Walk only on suitable hard surface and level terrain.
12. Cover or guard floor openings, stairwells, etc.
13. Walk forward only, making a ”U” turn to reverse your
direction.
14. Remove stilts when climbing or descending stairs.
15. Receive assistance when picking up objects from the
floor.

131000
Póliza de garantía. Este producto está garantizado por URREA HERRAMIENTAS PROFESIONALES, S.A. DE C.V., km 11,5 Carr. A El Castillo, 45680 El
Salto, Jalisco. UHP900402Q29, Teléfono 01 33 3208-7900 contra defectos de fabricación y mano de obra con su reposición o reparación sin cargo
por el período de 10 años. Para hacer efectiva esta garantía, deberá presentar el producto acompañado de su comprobante de compra en el lugar de
adquisición del producto o en el domicilio de nuestra planta mismo que se menciona en el primer párrafo de esta garantía. En caso de que el producto
requiera de partes o refacciones acuda a nuestros distribuidores autorizados. Los gastos que se deriven para el cumplimiento de esta garantía serán
cubiertos por Urrea Herramientas Profesionales, S.A. de C.V. Esta garantía no será efectiva en los siguientes casos:
a).- Cuando el producto haya sido utilizado en condiciones distintas a las normales.
b).- Cuando el producto hubiera sido alterado de su composición original o reparado por personas no autorizadas por el fabricante o importador
respectivo.
This product has a 10 years warranty by Urrea Herramientas Profesionales S.A. de C.V. against any manufacturing defect, with its repair or replacement
during its life expectancy.
The warranty is not applicable if the product does not show the URREA brand, if the product is worn out by its daily use, shows signs of abuse, damage,
its original composition has been altered, or specifies a different warranty. In order to make the warranty effective, the product must be taken to the
company or to the place of purchase along with its receipt.
IMPORTADO POR / IMPORTED BY: URREA HERRAMIENTAS PROFESIONALES S.A. DE C.V. km 11,5 Carretera a El Castillo, C.P. 45680 El Salto, Jalisco,
México Tel. 01 (33) 3208-7900 Made in China / Hecho en China R.F.C. UHP900402Q29 04-B15
Sello del Distribuidor
Fecha de compra: / /
-
 1
1
-
 2
2
-
 3
3
-
 4
4


En otros idiomas
- English: Surtek 131000 Owner's manual
Documentos relacionados
Otros documentos
-
 MetalTech BuildMan I-BMDS2440 Manual de usuario
-
 Alex Toys 0A771W Instrucciones de operación
-
 MetalTech BuildMan I-BMDS2440 Manual de usuario
-
 MetalTech I-IDS2440 Manual de usuario
-
Samsung YH-920 Manual de usuario
-
-
URREA LI812 User Manual And Warranty
-
Eaton Portfolio DRT8B Installation Instructions Manual
-
-


