Emerson MWI1212SS El manual del propietario
- Categoría
- Microondas
- Tipo
- El manual del propietario


EN
2
PRECAUTIONS TO AVOID POSSIBLE
EXPOSURE TO EXCESSIVE
MICROWAVE ENERGY
(a) Do NOT attempt to operate this oven with the door open since open-door operation can
result in harmful exposure to microwave energy.
It is important not to defeat or tamper with the safety interlocks.
(b) Do NOT place any object between the oven front face and the door or allow soil or cleaner
residue to accumulate on sealing surfaces. Wipe the sealing area frequently with a mild
detergent, rinse and wipe dry. Never use abrasive powders or pads.
(c) Do NOT operate the oven if it is damaged.
It is particularly important that the oven door close properly and that there is no damage to
the: (1) Door (bent), (2) Hinges and Latches (broken or loosened), (3) Door seals and sealing
surfaces.
(d) The oven should not be adjusted or repaired by anyone except properly qualified service
personnel.
(e) For more safety tips, visit following FDA website:
https://www.fda.gov/consumers/consumer-updates/5-tips-using-your-microwave-oven-safely
Precautions to Avoid Possible Exposure to
Excessive Microwave Energy
2
Important Safety Instructions
3
Cooking Guide 16
Safety Precaution
4
The Principles of Microwave Cooking 16
Food Characteristics 16
Federal Communications Commission
Radio Frequency Interference Statement
6
Microwave Techniques 16
Grounding Instructions
7
Hot Snacks and Appetizers 17
Installation
7
Seafood 17
Care of Your Microwave Oven
8
Meats 18
How to Use Your Microwave Oven Safely
10
Poultry 18
Location of Controls
11
Eggs & Cheese 19
Operation
12
Soup 20
12
Vegetables 20
12
Casseroles 20
13
Sauces 21
13
Sandwiches 21
14
Pasta and Grains 22
14
Cereals 22
15
Convenience Foods 22
15
Desserts 23
15
Specifications 24
Setting the Clock
Power
Two Stage Cooking
Defrost
Auto Cook
Auto Cook Menu Chart
Kitchen Timer
Express Cook
Stop/Clear
Start/+30s
Child Lock
15
Before You Call for Service 24
Limited Warranty 25
CONTENTS
15

EN
3
FOR HOUSEHOLD USE ONLY.
SAVE THESE INSTRUCTIONS
When using electrical appliances basic safety precautions should
be followed, including the following:
WARNING – To reduce the risk of burns, electric shock, fire, injury to
persons, or exposure to excessive microwave energy:
1.
Read all instructions before using this appliance.
2.
Read and follow the specific "PRECAUTIONS TO AVOID
POSSIBLE EXPOSURE TO EXCESSIVE MICROWAVE
ENERGY" section.
3.
This appliance must be grounded. Connect only to properly grounded
outlet. See "GROUNDING INSTRUCTIONS" section.
4.
Install or locate this appliance only in accordance with the provided
installation instructions.
5.
Some products such as whole eggs and sealed containers (for
example, closed glass jars) may explode and should not be heated in
this oven.
6.
Use this appliance only for its intended use as described in this manual.
Do NOT use corrosive chemicals or vapors in this appliance. This type
of oven is specifically designed to heat, cook, or dry food. It is not
designed for industrial or laboratory use.
7.
As with any appliance, close supervision is necessary when used by
children.
8.
Do NOT operate this appliance if it has a damaged cord or plug, if it is
not working properly, or if it has been damaged or dropped.
9.
This appliance should be serviced only by qualified service personnel.
Contact the nearest authorized service facility for examination, repair,
or adjustment.
10.
Do NOT cover or block any openings on this appliance.
11.
Do NOT store or use
this
appliance
outdoors.
Do NOT use this product
near water, for example, near a kitchen sink, in a wet basement, or near a
swimming pool, or similar locations.
12.
Do NOT immerse cord or plug in water.
13.
Keep cord away from heated surfaces.
14.
Do NOT let cord hang over edge of table or counter.
15.
When cleaning surfaces of door and oven that come together when
closing the door, use only mild, non-abrasive soaps, or detergents
applied with a sponge or soft cloth.
16.
To reduce the risk of fire in the oven cavity:
IMPORTANT SAFETY INSTRUCTIONS

EN
4
(a) Do NOT overcook food. Carefully attend appliance if paper, plastic,
or other combustible materials are placed inside the oven to
facilitate cooking.
(b) Remove wire twist-ties from paper or plastic bags before placing
bag in oven.
(c) If materials inside the oven ignite, keep oven door closed, turn oven
off, and disconnect the power cord, or shut off power at the fuse or
circuit breaker panel.
(d) Do NOT use the cavity for storage purposes. Do NOT leave paper
products, cooking utensils, or food in the cavity when not in use.
17.
Do NOT use this microwave oven to heat corrosive chemicals (for
example, sulfides and chlorides). Vapors from such corrosive
chemicals may interact with the contact and springs of the safety
interlock switches, thereby rendering them inoperable.
18.
Keep the spatter shield (waveguide cover) clean at all times. Wipe the
oven interior with a soft damp cloth after each use. If you leave grease
or fat anywhere in the cavity it may overheat, smoke or even catch fire
when next using the oven.
19.
Liquids, such as water, coffee, or tea are able to be overheated beyond
the boiling point without appearing to be boiling due to surface tension
of the liquid. Visible bubbling or boiling when the container is removed
from the microwave oven is not always present. THIS COULD
RESULT IN VERY HOT LIQUIDS SUDDENLY BOILING OVER WHEN
THE CONTAINER IS DISTURBED OR A UTENSIL IS INSERTED
INTO THE LIQUID. To reduce the risk of injury to persons:
1. Do NOT overheat the liquid.
2. Stir the liquid both before and halfway through heating it.
3. Do NOT use straight-sided containers with narrow necks.
4. After heating, allow the container to stand in the microwave oven
for a short time before removing the container.
5. Use extreme care when inserting a spoon or other utensil into the
container.
General Use
1. Do NOT attempt to tamper with or make any adjustments or repairs to door,
control panel or any other part of the oven. Do NOT remove outer panel
from oven. Repairs should only be done by qualified service personnel.
2. Do NOT operate the oven empty. The microwave energy will reflect
continuously throughout the oven if no food or water is present to absorb
energy.
3. If a fire occurs in the oven, touch the Pause/Cancel button and LEAVE THE
DOOR CLOSED. Disconnect the power cord, or shut off power at the fuse
SAFETY PRECAUTIONS

EN
5
or circuit breaker panel.
4. Do NOT attempt to dry clothes, newspapers or other materials in the oven.
They may catch on fire.
5. Do NOT use recycled paper products. Recycled paper towels, napkins and
waxed paper can contain metal flecks which may cause arcing or ignite.
Paper products containing nylon or nylon filaments should be avoided, as
they may ignite.
6. Some styrofoam trays (like those that meat is packaged on) have a thin
strip of metal embedded on the bottom. When microwaved, the metal can
burn the floor of the oven or ignite a paper towel.
7. Avoid inserting nails, wire, etc. through any holes in the unit during
operation. Never insert a wire, nail or any other metal objects through the
holes on the cavity or any other holes or gaps, because such objects
may cause electric shock and microwave leakage.
8. This appliance is not intended for use by persons (including children) with
reduced physical, sensory or mental capabilities, or lack of experience and
knowledge, unless they have been given supervision or instruction
concerning use of the appliance by a person responsible for their safety.
9. The appliances are not intended to be operated by means of an external
timer or separate remote-control system.
10. The temperature of accessible surfaces may be high when the
appliance is operating.
CAUTION: HOT SURFACE
Utensils
1. METAL CONTAINERS or dishes with metallic rims should not be used.
Arcing may occur.
2. METAL TWIST-TIES may not be used in the microwave oven.
3. Do NOT use SEALED JARS or NARROW NECK bottles for cooking or
reheating. They may shatter.
4. Do NOT use CONVENTIONAL THERMOMETERS in the microwave oven.
They may cause arcing.
5. Remove PLASTIC STORE WRAPS before cooking or defrosting foods in the
oven.
6. For FURTHER INFORMATION on proper cooking utensils, refer to the
COOKING GUIDE section.
Food
1. Never use your microwave oven for HOME CANNING. The oven is not
designed to permit proper canning. Improperly canned food may spoil and
be dangerous to consume.
2. COOKING TIMES given in the cooking guide are approximate. Factors that

EN
6
may affect cooking are starting temperature, altitude, volume, size and shape
of food and utensils used. As you become familiar with the oven, you will be
able to adjust for these factors.
3. It is better to UNDERCOOK RATHER THAN OVERCOOK foods. If food is
undercooked, it can always be returned to the oven for further cooking. If
food is overcooked, nothing can be done. Always start with minimum cooking
times.
4. SMALL QUANTITIES of food or foods with LOW MOISTURE content can
burn, dry out or catch on fire if cooked too long.
5. Do NOT boil eggs in their shell. Pressure may build up and the eggs may
explode.
6. Potatoes, apples, egg yolks, whole acorn squash and sausage are some
examples of foods with NONPOROUS SKINS. These must be pierced before
cooking to prevent bursting.
7. POPCORN must be popped in a microwave corn popper. Microwave popped
corn produces a lower yield than conventional popping. Do NOT use oven for
popcorn unless popped in a microwave approved popcorn utensil or unless
it’s commercially packaged and recommended especially for microwave
ovens. Do NOT use oil unless specified by the manufacturer.
8. Do NOT attempt to deep fat fry in your oven.
9. HEATED LIQUIDS can ERUPT if not mixed with air. Do NOT heat liquids in
your microwave oven without first stirring.
10. Do NOT use paper towels to cover food as they can ignite.
WARNING: This equipment generates and uses ISM frequency energy
and if not installed and used properly, in strict accordance with the
manufacturer's instructions, may cause interference to radio and television
reception.
It has been type-tested and found to comply with limits for an ISM
Equipment pursuant to part 18 of FCC Rules, which are designed to
provide reasonable protection against such interference in a residential
installation.
However, there is no guarantee that interference will not occur in a particular
installation. If this equipment Does cause interference to radio or television
reception, which can be determined by turning the equipment off and on,
the user is encouraged to try to correct the interference by one or more of
the following:
* Reorient the receiving antenna of radio or television.
* Relocate the Microwave oven with respect to the receiver.
* Move the microwave oven away from the receiver.
FEDERAL COMMUNICATIONS COMMISSION RADIO
FREQUENCY INTERFERENCE STATEMENT

EN
7
*Plug the microwave oven into a different outlet so that microwave
oven and receiver are on different branch circuits.
THE MANUFACTURER is not responsible for any radio or TV interference
caused by UNAUTHORIZED MODIFICATION to this microwave oven. It is
the responsibility of the user to correct such interference.
ARCING
If you see arcing, press the “Pause/Cancel” button and correct the problem.
Arcing is the microwave term for sparks in the oven.
Arcing is caused by:
*Metal or foil touching the side of the oven.
*Foil not molded to food (upturned edges act like antennas).
*Metal, such as twist-ties, poultry pins, or gold rimmed dishes, in the
microwave.
*Recycled paper towels containing small metal pieces being used in
the microwaves.
*Burnt (carbonized) food residue or grease spattered inside of
cabinet.
DO NOT LEAVE OVEN UNATTENDED WHILE COOKING!
This appliance must be grounded. In the event of an electrical short
circuit, grounding reduces the risk of electric shock by providing an
escape wire for the electric current. This appliance is equipped with a
cord having a grounding wire with a grounding plug. The plug must be
inserted into an outlet that is properly installed and grounded.
1. Steady, flat location: When positioning the microwave oven, it should
be set on a steady, flat surface.
2. Ventilation: DO NOT BLOCK AIR VENTS. If they are blocked during
operation, the oven may overheat and eventually cause oven failure. For
proper ventilation, KEEP THREE INCHES OF SPACE BETWEEN THE
OVENS TOP, SIDES, REAR AND THE AREA WHERE THE UNIT IS TO
BE INSTALLED.
GROUNDING INSTRUCTIONS
INSTALLATION
WARNING: Improper use of the grounding plug can result in a risk of electric shock. Consult a
qualified electrician or service personnel if the grounding instructions are not completely understood,
or if Doubt exists as to whether the appliance is properly grounded.
If it is necessary to use an extension cord, use only a three wire extension cord that has a three
blade grounding plug, and a three slot receptacle that will accept the plug on the appliance. The
marked rating of the extension cord should be equal to or greater than the electrical rating of the
appliance.

EN
8
3. Radio and TV reception: Poor television reception and radio
interference may result if the oven is located close to a TV, radio,
antenna, or antenna wire. Position the oven as far from them as possible.
4. Temperature and moisture: Keep the oven away from hot air, steam
or splashing liquids when choosing a place to locate it, otherwise, the
unit’s operation may be adversely affected, causing it to break down.
5. Power supply:
*Check your local power source. This microwave oven requires a 120V,
60Hz ,15Amp power supply.
*Use a receptacle that will accept the ground prong.
(a) A short power supply cord is provided to reduce the risks resulting
from becoming entangled in or tripping over a longer cord.
(b) Longer cord sets or extension cords are available and may be used
if care is exercised in their use.
(c) If a long cord or extension cord is used, (1) the marked electrical
rating of the cord set or extension cord should be at least as great
as the electrical rating of the appliance, (2) the extension cord must
be a grounding-type 3-wire cord, and (3) the longer cord should be
arranged so that it will not drape over the counter top or tabletop
where it can be pulled on by children or tripped over unintentionally.
6. Examine the oven for any damage such as: Dents, a misaligned door,
broken door or a dent in the cavity. If any of the above are visible, DO
NOT INSTALL THE UNIT. Notify the dealer immediately.
1. Disconnect the AC plug from the outlet before cleaning.
2. The oven should be cleaned regularly and have any food scraps
removed.
3. Keep the inside of the oven clean. When food spatters or spilled liquids
adhere to oven walls, wipe with a damp cloth. Mild detergent may be
used if the oven gets very dirty. The use of harsh detergent or abrasives
When using a 3-pronged plug
3-pronged
Receptacle
3-pronged
plug
Receptacle
Box Cover
When using a grounding adapter, make sure the
receptacle box is fully grounded.
Grounding Lead
Screw
Receptacle
Grounding Receptacle
Adapter Box Cover
CARE OF YOUR MICROWAVE OVEN

EN
9
is not recommended.
4. The outside oven surface should be cleaned with soap and water. Then
wiped dry with a soft cloth. To prevent damage to the operating parts
inside the oven, water should not be allowed to seep into the ventilation
slots. If the Control Panel becomes dirty or wet, clean with a soft, dry
cloth. Do NOT use harsh detergents or abrasives on Control Panel.
5. If steam accumulates on both sides of the oven door, wipe with a soft
cloth. This may occur when
the microwave oven is
operated under high humidity
conditions and this is not an
indication of a malfunction in
the unit.
6. It is occasionally necessary to
remove the glass tray for
cleaning. Wash the tray in warm, sudsy water or in a dishwasher.
7. The roller guide and oven cavity floor should be cleaned regularly to
avoid excessive noise. Simply wipe the bottom surface of the oven with
mild detergent water or window cleaner and dry. The roller guide may
be washed in mild, sudsy water or in the dishwasher.
Roller Guide
1. The ROLLER GUIDE and
oven floor should be cleaned
frequently to prevent
excessive noise.
2. The ROLLER GUIDE MUST
ALWAYS be used for
cooking together with the
Glass Tray.
Glass Tray
1. Do NOT operate the oven
without the Glass Tray in
place.
2. Do NOT use any other Glass
Tray with this oven.
3. If the Glass Tray is hot, ALLOW IT TO COOL before cleaning it or
placing in water.
4. Do NOT cook directly on the Glass Tray.
Glass Tray Roller Guide

EN
10
Although your oven is provided with safety features, it is important to
observe the following:
a) It is important not to defeat or tamper with safety interlocks.
b) Do NOT place any object between the oven face and the door or allow residue
to accumulate on sealing surfaces. Wipe the sealing area frequently with a
mild detergent, rinse and wipe dry. Never use abrasive powders or pads.
c) When opened, the door must not be subjected to strain, for example, a child
hanging on an open door or any load which could cause the oven to fall
forward and cause injury and damage to the door. Do NOT operate the oven
if it is damaged, until it has been repaired by a qualified person. It is
particularly important that the oven door close properly and that there is no
damage to the following:
(1) Door (bent), (2) Hinges and Latches (broken or loosened), (3) Door seals
and sealing surfaces.
d) The oven should not be adjusted or repaired by anyone except properly
qualified service personnel.
NT
HOW TO USE YOUR MICROWAVE OVEN SAFELY

EN
11
Popcorn Potato Beverage
Pizza Reheat Frozen
Vegetable
Meat Soup Kitchen
Timer
Power Defrost Time
Cook
EXPRESS COOK
123
456
789
STOP 0START
Clear Clock +30s
Hold
LOCATION OF CONTROLS
1.
Door Latches – When the door is
closed, they will automatically lock
shut. If the door is opened while the
oven is operating, the magnetron
will automatically shut off.
2.
Door Screen – Allows viewing of
food. The screen is designed so
that light can pass through, but not
the microwaves.
3.
Roller Guide – Supports the glass
cooking tray. Must always be in
proper position before operating
the oven.
4.
Rotating Axis/Coupler – The
glass cooking tray (turntable) sits
on the axis, which coupled with the
motor underneath to rotate the
glass cooking tray.
5.
Glass Cooking Tray (Turntable)
–Made of special heat resistant
glass. The tray must always be in
proper position before operating
the oven. Do NOT cook food
directly on the tray.
6.
Control Panel – The control
buttons are shown on the right.
(
–
C M B U to
a p
T B U t s t
k t f
Power Button
– U t s t e
t e t d t e
b w e
e
7.
Spatter Shield (Waveguide Cover)
(Do NOT remove) – Protects the
microwave outlet from splashes of
cooking foods.
8.
Display
9.
Auto Cook Menu Button – Used to
select an Auto Cook program.
10.
Kitchen Timer Button – Used to set
the kitchen timer function.
11.
Power Button – Used to set a power
level.
12.
Defrost Button – Used to set the
oven to estimate the defrosting time
or by weight entered.
13.
Time Cook Button – Used to set tim
or weight.
–
15.
Stop/Clear Button – Used t o stop and/
or clear a cooking program.
16.
START/+30s Button – Used to start or
add 30 seconds cooking time f or each
press of the button.
17.
Clock Button – Used to set the clock.
Alert: Please clean microwave oven often. Failure to do so may create a fire
hazard and void the warranty.
7

EN
12
1. SETTING THE CLOCK
The display lights up when plugged in power supply, it enters standby mode
and shows 1:00.
In standby mode, press and hold the “CLOCK/0” button to enter clock
setting mode. Press the “0~9” number buttons to input the clock time directly.
It is a 12-hour clock, the input is valid only when set between 1:00~12:59.
•Once the four digits are entered, the clock’s digits stop flashing and
the selected time is saved. If the “START” button is pressed after the
four digits are saved, the microwave oven starts cooking for 30
seconds.
•If only three digits are entered, you need to press the “START/+30s”
button to save the time set and resume to standby mode.
2. POWER
There are ten microwave power levels, 100P, 90P, 80P, 70P, 60P, 50P, 40P,
30P, 20P and 10P, respectively. Press the “Power” button repeatedly and
select the desired microwave power, or press “0~9” number buttons to select
the desired microwave power. Press the “1” button for 10P microwave power,
press the “2” button for 20P microwave power, and in the case of 10P, press
the “0” button to select 100P microwave power. Press the "TIME COOK"
button to enter the cooking time input mode, and then press “0~9” number
buttons to enter the time, the maximum time that can be input is 99:99. After
entering the cooking time, press “START/+30s” button to start cooking. A
buzzing sound goes off to notify completion of the operation. The display
flashes ‘End’, and keeps flashing till you press STOP or the door is open.
High
Power
100% and 90% power output (Applicable for quick and
thorough cooking)
Medium
High
Power
80% and 70% power output (Applicable for medium express
cooking)
Medium
Power 60% and 50% power output (Applicable for steaming food)
Medium
Low
Power
40% and 30% power output (Applicable for defrosting food)
Low
Power 20% and 10% power output (Applicable for keeping warm)
OPERATION

EN
13
a. The max. time which can be set is 99 minutes and 99 seconds.
c. Never operate the microwave oven while empty.
d. At the maximum microwave power, the oven will automatically lower the
power after a certain time of cooking to lengthen the service life.
e. If you turn the food during operation, press the “START/+30s” button once
and the preset cooking procedure will continue.
f. If you intend to remove the food before the preset time, you must press the
“STOP/Clear” button once to clear the preset procedure to avoid unintended
operation of next time use.
3. TWO STAGE COOKING
After setting the microwave power and time as described, do not press the
"START/+30s" button, but directly press the POWER button to set the second
stage.
Press the “POWER” button continuously and select the desired microwave
power of stage 2, or press “0~9” number buttons to select the desired
microwave power. Press the “1” button for 10P microwave power, press the
“2” button for 20P microwave power, and in the case of 10P, press the “0”
button to select 100P microwave power. Press the "TIME COOK" button to
enter the cooking time input state, and then press “0~9” number buttons to
enter the time, the maximum time that can be input is 99:99. After entering the
cooking time, press “START/+30s” button to start cooking. The microwave
oven will first run the program in stage 1, and then run the program in stage 2
after stage 1. A buzzing sound goes off to notify completion of the operation.
4. DEFROST
There are two defrost modes: dEF1 and dEF2, respectively. dEF1 to defrost by
weight and dEF2 to defrost by time. Press the “Defrost” button once to defrost
by weight or press the “Defrost” button twice to defrost by time, the display
screen displays “dEF1” or “dEF2”. The minimum weight for auto defrost by
weight (dEF1) is 4 oz. The maximum weight is 100 oz. Press 0~9 number
buttons to enter the desired time to defrost by time. The maximum time to
defrost by time (dEF2) that can be entered is 99:99. After entering the weight or
time, press the “START/+30s” button to start cooking. Press the “STOP/CLEAR”
button once to stop cooking or press twice to cancel the cooking program. The
unit beeps three times and the display blinks, and shows “End” when the
cooking cycle is completed. The dEF1 defrost mode by weight will have beeping
sounds to prompt the food to be turned over during defrosting.
Below is some food defrosting time advice:
dEF1 For defrosting, the weight range from 4 to 100oz.
dEF2 For defrosting, the maximum time is 99:99

EN
14
a. It is necessary to turn over the food during operation to obtain uniform
effect.
b. Usually defrosting will need longer time than that of cooking the food.
c. If the food can be cut by knife, the defrosting process can be considered
completed.
d. Microwave penetrates around 4cm into most food
e. Defrosted food should be consumed as soon as possible, it is NOT
recommended to refreeze defrosted food.
5. AUTO COOK
There are eight automatic cooking menus: popcorn, potato, beverage, pizza,
reheat, frozen vegetable, meat and soup respectively. Select the desired
menu, press the corresponding button repeatedly to select the desired food
weight, and the display shows the corresponding weight setting. Press the
“START/+30s” button to start cooking. A buzzing sound goes off to notify
completion of the operation.
No. Food/Type Method
A.1 Popcorn The optional weights are 1.75oz, 3.0oz and
3.5oz.
A.2 Potato The optional weights are 9.0oz, 18.0oz and
27.0oz.
A.3 Beverage The optional weights are 1 cup, 2 cups or 3
cups, each one about 8.0oz.
A.4 Pizza The optional weights are 4.0oz, 8.0oz and
14.0oz.
A.5 Reheat The optional weights are 7.0oz, 14.0oz,
21.0oz, 28.0oz and 35.0oz.
A.6 Frozen Vegetable The optional weights are 4.0oz, 8.0oz and
16.0oz.
A.7Meat The optional weights are 7.0oz, 14.0oz,
21.0oz, 28.0oz and 35.0oz.

EN
15
A.8Soup The optional weights are 4.0oz, 8.0oz,
12.0oz and 16.0oz.
a. The temperature of food before cooking would be 68-77°F. Higher or
lower temperature of the food before cooking would require increase or
decrease of cooking time.
b. The temperature, weight and shape of food will largely influence the
cooking effect. If any deviation has been found to the factor noted on above
menu, you can adjust the cooking time for best result.
6. KITCHEN TIMER
In standby mode, press the “Kitchen Timer” button to enter the timer mode.
The countdown function icon and "0:00" will show on the display screen.
Press the “0 ~ 9” number buttons to input the time. The maximum time that
can be input is 99:99. After setting the time, press the "START/+ 30s" button
to start the countdown. A buzzing sound goes off to notify completion of the
countdown.
7. EXPRESS COOK
In standby mode, you can directly press the “1~6” number buttons to start the
microwave oven. The working time is 1~6 minutes, that is, press 1 to work for 1
minute, press 2 to work for 2 minutes, and so on. After select the time, press
“START/+30s” button to start cooking, a buzzing sound goes off to notify
completion of the operation.
8. STOP/CLEAR
In the process of cooking settings, you can press the “STOP/Clear” button to
cancel the settings and return to standby mode. In the process of microwave oven
cooking, you can press the “STOP/Clear” button to make a pause. In the standby
state, you can press the “STOP/Clear” button again to cancel the function and
return to standby mode.
9. START/+30s
After setting the cooking time or food weight, press the “START/+30s” button to
start microwave oven immediately. In working state, you can press the
“START/+30s” button to increase time, press one time to increase 30 seconds, but
the menu mode and weight defrosting mode cannot adjust time. In pause state,
you can press the “START/+30s” button to continue the microwave oven before
cooking mode.
10. CHILD LOCK FUNCTION
The Child Lock prevents unwanted oven operation by small children.
The oven can be set so that the control panel is deactivated or locked.
• TO LOCK: Press and hold the “STOP” button for three seconds in standby mode.
All buttons will then be locked and inoperative.
• TO UNLOCK: Press and hold the “STOP” button for three seconds while in
CHILD LOCK mode. All buttons will be unlocked and reactiveated.

EN
16
THE PRINCIPLES OF MICROWAVE COOKING
Microwaves are a form of high frequency radio waves similar to those used by a radio including AM,
FM and CB. Electricity is converted into microwave energy by the magnetron tube. From the
magnetron tube, microwave energy is transmitted to the oven where it is reflected, transmitted and
absorbed by the food.
Reflection: Microwaves are reflected by metal just as a ball is bounced off of a wall. For this reason, metal
utensils are not suitable for use in the microwave. A combination of stationary interior walls and a rotating
metal turntable or stirrer fan helps assure that the microwaves are well distributed within the oven cavity to
produce even cooking.
Transmission: Microwaves pass through some materials such as paper, glass and plastic much like sunlight
shining through a window. Because these substances do not absorb or reflect the microwave energy, they are
ideal materials for microwave oven cooking containers.
Absorption: During cooking, microwaves will be absorbed by food. They penetrate to a depth of about 3/4 to
1 1/2 inches. Microwave energy activates the molecules in the food (especially water, fat and sugar), and heat
is produced. If you vigorously rub your hands together, you will feel heat produced by friction. The internal
cooking of larger foods is done by conduction as the heat which is produced by friction is conducted to the
middle of the food. Foods also continue to cook by conduction during standing time.
FOOD CHARACTERISTICS
Quantity: The amount of food placed in a microwave oven has a direct effect on the cooking time. Small
amounts of food or liquid require less cooking time than larger amounts of the same substance. As quantity
increases, concentration decreases.
Size: Small pieces cook faster than large ones. To speed cooking, cut pieces smaller than two inches (5 cm),
so microwaves can penetrate to the middle from all sides. Pieces which are similar in size and shape cook
more evenly.
Shape: Many foods are uneven, like a chicken, ribs or broccoli. The thin parts will cook faster than the thick
parts, while uniformly thick foods cook evenly. To compensate for irregular shapes, place thin pieces toward
the center of the dish and thicker pieces toward the edge of the dish.
Starting Temperature: Frozen or refrigerated foods take longer to cook than foods at room temperature.
Bone and Fat: Because bones conduct heat, the side of the meat the bone is on will cook first, while boneless
cuts cook slower but more evenly. Fat attracts microwaves. The middle of these foods is cooked by heat
conduction.
Moisture Content: Microwaves are attracted by moisture. Naturally moist foods absorb microwaves better
than dry ones. Add a minimum of liquid to moist foods, as excess water slows cooking.
Density: The density of food determines how easily the microwaves can penetrate and how quickly it will cook.
Porous foods, like chopped beef or mashed potatoes, microwave faster than dense ones like steak or whole
potatoes.
Piercing: Steam builds up pressure in foods which are tightly covered by a skin or membrane. Pierce potatoes,
egg yolks and chicken livers to prevent bursting.
MICROWAVE TECHNIQUES
Stirring: Stir foods from outside to center of dish once or twice during cooking to equalize heat and speed
microwaving. Foods will not burn or stick, so there’s no need to stir constantly as you do in conventional cooking.
Arrangement: Arrange foods with thin or delicate ends, like drumsticks or asparagus spears, with the thick or
tougher portions to the outside of the dish. The parts which need more cooking will receive more energy, so food
will microwave evenly.
Spacing: Individual foods, such as baked potatoes and cupcakes will cook more evenly if placed in the oven an
equal distance apart. When possible, arrange foods in a circular pattern. Similarly, when placing foods in a baking
dish, arrange around the outside of the dish, not lined up next to each other. Food should not be stacked on
top of each other.
Rearrangement: Rearrange overlapping areas, like tails of long fish fillets, from top to bottom, and closely packed
pieces, like meatballs, from the outside to the center of the dish.
Standing Time: Standing time is especially important in microwave cooking. Microwave energy creates heat in
the outer layers of the food. As a result of normal conduction, the food continues to cook for a few minutes after
removal from the oven. Letting roasts, large whole vegetables, casseroles and cakes stand to finish cooking
COOKING GUIDE

EN
17
allows the middles to cook completely without overcooking, drying or toughening the outsides.
Covering: Covering speeds cooking time, retains moisture, tenderizes, insures even cooking and prevents
spattering. Casserole lids or plastic wrap are used for a tighter seal. Vent plastic by turning back one edge at the
side of dish to form a narrow slot where excess steam can escape. Various degrees of moisture retention are
also obtained by using wax paper or microwave-safe paper towels.
Browning: Microwave energy cooks some foods so quickly that the fats and sugars within the food do not have
time to caramelize and give a "browned" appearance. Browning agents do not affect the quality of microwaved
foods, but can add color and flavor. For meats and poultry, use bouquet sauce diluted with water or melted butter,
soy, Worcestershire, barbecue or steak sauce, a sprinkling of paprika or dry gravy mix; jelly glaze or crumb
coating. Frosting and topping finish cakes and breads. Top casseroles at the end of microwaving with grated
cheese or crumbs.
HOT SNACKS AND APPETIZERS
Hot appetizers can be prepared very quickly in the microwave oven.
Many appetizers may be cooked on the serving platter, provided the platter does not have metal trim. A time
saving tip – prepare these foods ahead of time, refrigerate or freeze, and refresh in the oven at serving time.
A plate of appetizers will take only seconds to refresh.
Cheese melts very rapidly and will toughen if overcooked, so watch foods combined with cheese closely so
that overcooking will not occur. As soon as cheese starts to bubble, cooking is completed.
Appetizers that have a crisp pastry exterior are best prepared in a conventional oven.
To prepare appetizers wrapped in bacon, it will be necessary to precook the bacon and then wrap around the
foods. Oysters wrapped in bacon are easier to prepare in the broiler of your conventional oven.
Seafood mixtures can be prepared in serving shells as microwave energy will pass through the seafood shells
without heating. Aluminum foil should not be used for shells.
If spreads are placed on crackers, care should be taken not to overcook as moisture from the food will cause
crackers to become soggy. Crackers used for spreads should be very dry and crisp. This helps avoid
sogginess. Heat only until spread is at serving temperature.
The time required to heat all appetizers will depend on the amount of food, and the number and the type of
dish selected. Remember the food will become very hot even if the dish is cool. Cheese mixtures retain heat
longer when heated with microwave energy.
SEAFOOD
Guide for Cooking Seafood
Microwaving is one of the easiest and most efficient ways of preparing fish and seafood, which stay delicate
and tender with quick, moist cooking. Overcooking dries out and toughens seafood, so you should check it
after the minimum time. If thick pieces like fish steaks or lobster tails are done on the outside, but still slightly
translucent in the middle, let them stand for a few minutes; internal heat will complete the cooking.
Food
Power
Level
Cooking Time Standing
Time
Special Notes
Whole Fish
(1 lb. to 1 1/2 lbs.)
100
7 - 8 min.
5 min.
Turn over after half the time.
Fish Fillet
(1 lb.)
100
6 - 7 min.
4 - 5 min.
Turn over after half the time.
Some Foods Do Not Microwave Well
Eggs in Shells and hard boiled eggs can burst.
Pancakes do not crust, but they reheat well. Fully-prepared, frozen pancakes are available for
microwaving.
Deep Fat Frying can cause burns.
Bottles with narrow necks may shatter if heated.
Pop Popcorn only in special microwave poppers. Do NOT use oil unless specified by the manufacturer, or
heat longer than recommended. Never pop popcorn in paper bags or glass utensils or directly on the glass
tray.

EN
18
Fish Steak
1 inch thick
( 1 lb.)
100
5 - 6 min.
5 - 6 min.
Turn over after half the time.
Cover with microwaveable cover.
Shrimp
(1 lb.)
100
3 - 4 min.
5 min.
Rearrange once during cooking.
Cover with microwaveable cover.
Sea Scallops
(1 lb.)
80
7 - 8 min.
5 min.
Rearrange once during cooking.
Cover with microwaveable cover.
MEATS
Guide for Cooking Meats
Roasts, chops, hamburgers and small cuts of tender meat cook beautifully in the microwave oven. Most roasts
can be cooked rare, medium rare or even well done in less than one hour. Less tender cuts of meat such as
pot roast can be simmered fork-tender in a sauce or gravy. Tough cuts that require slow cooking will do better
in a conventional oven. A large piece of meat, especially if the shape is uneven, should be turned over
occasionally for uniform roasting.
Meat
Power
Level
Cooking Time
(per lb)
Standing
Time
Special Notes
Beef Roast
Rare
80
6 - 8 min.
5 - 7 min.
Medium
80
8 - 10 min.
10 - 15 min.
Turn over after half the time.
Well
80
10 - 12 min.
10 - 15 min.
Pork Roast
Bone-in
80
13 - 16 min.
10 min.
Cover with microwaveable cover.
Boneless
80
17 - 19 min.
10 - 15 min.
Turn over after half the time.
Lamb Roast
Bone-in Medium 80
Well 80
Boneless Medium 80
Well 80
7 - 9 min.
10 - 12 min.
9 - 11 min.
12 - 14 min.
10 - 12 min.
10 - 15 min.
10 - 12 min.
10 - 15 min.
Turn over after half the time.
Beef Patties (3
2 patties
1/2 oz) each
100 3 - 5 min.
5 - 7 min.
Turn over and rearrange after
4 patties
100
4 - 6 min.
5 - 7 min.
half the time.
Meat Loaf
(2 lbs.) 100 18 - 20 min. 10 - 12 min. Cover with microwaveable cover.
Bacon
Slices (4 strips)
(1 slice; weight:
100 6 - 7 min. —
Cover with microwaveable cover.
1 oz., length: 11 in.)
Ham
Slices (1 in. thick)
80 6 - 7 min. 5 - 7 min. Cover with microwaveable cover.
4 slices
POULTRY (To obtain a browned skin result – please see instructions for GRILL/COMBI cooking)
Guide for Cooking Poultry
Chicken is one of the most popular foods and microwaving chicken is one of the best uses of your microwave
oven. Chicken stays juicy and tender in the microwave oven. However, juiciness prevents browning because
chicken crisps and browns only when the skin dries out enough to change color. Standing time is important,
because it allows the interior to finish cooking without toughening the delicate breast meat.
Poultry Power Cooking Time Standing Special Notes
Level (per lb.)
Time
Chicken whole
100
8 - 10 min.
10 - 15 min.
Place breast side up on
roasting rack. Let stand,
Chicken cut up
100
8 - 9 min.
7 - 10 min.

EN
19
Turkey
80
9 - 11 min.
10 -15 min.
covered, before serving.
Cornish Hens
100
9 - 11 min.
7 - 10 min.
Turkey Breast
80
9 - 10 min.
5 - 7 min.
Rearrange once during cooking.
Cover with microwaveable cover.
EGGS & CHEESE
Guide for Cooking Eggs & Cheese
•CHEESE
Cheese melts quickly and smoothly. When serving cheese as an appetizer, flavor is at peak when served at
room temperature. Use a low power level for melting. Cheese melts best when shredded and heated with
milk or other liquids. Stir cheese mixtures several times for even heating.
•EGGS
Eggs cook differently by microwave. The high fat content of egg yolks absorbs energy, so yolks cook faster
than whites. It's easy to poach eggs in a microwave oven, but if you want soft yolks, remove eggs from the
oven before whites are completely cooked. A brief standing time allows whites to set without overcooking
yolks. Check eggs for completion of cooking early, they toughen when overcooked.
When eggs and yolks are mixed together for omelets, scrambled eggs or custards, they cook more evenly
and need less stirring than during conventional cooking methods.
Do not try to cook eggs in the shell. Steam can build up inside the shells, causing them to burst.
Scrambled Eggs
6 2 Tbsp. 4 Tbsp. 3 - 4 min. Cook as directed in chart, breaking up
and stirring eggs twice. Let stand,
covered, before serving.
Poached Eggs
Eggs Water Cook Water Cook Eggs Standing Procedure
on Power 100 on Power 80
Time
1 1 1/2 cups
4 - 6 min. 1 min. 2 min.
2 1 1/2 cups
4 - 6 min. 1 1/2 - 2 min. 2 min.
4 2 cups 6 - 7 min. 2 1/2 - 3 min. 2 min.
Place water into medium casserole. Cook
at High until boiling. Break eggs, one at a
time, into separate dish, pierce yolk once
with wooden pick and slip egg carefully into
hot water, cook as directed in chart.
Eggs
Butter
Milk or
Water
Cook on
Power 100
Procedure
2
1 Tbsp.
2 Tbsp.
1 - 2 min.
Place butter in small casserole and melt.
4
1 Tbsp.
2 Tbsp.
2 - 3 min.
Add eggs and milk, scrambling with fork.

20
SOUPS
Guide for Cooking Soups
Satisfy appetites with savory soups prepared in your microwave oven. Adapt your favorites by using similar
cooking times and techniques.
Food Power
Level
Cooking Time Standing
Time
Special Notes
Canned Condensed
Cream style, Bean, Pea
or Mushroom (10 1/2 -
11 1/2 oz)
With Water
100
5 - 6 min.
2 - 3 min.
Stir halfway through
With Milk
80
6 - 7 min.
2 - 3 min.
cooking time. Cover with
microwaveable cover.
Dry Soup Mix
100
then
6 - 8 min.
2 - 3 min.
Add water. Cover with
microwaveable cover.
1 envelope (10 1/2 oz.)
50
3 - 4 min.
Stir twice.
Broth (10 1/2 oz.)
100
5 - 6 min.
2 - 3 min.
Stir twice. Cover with
microwaveable cover.
VEGETABLES
Guide for Cooking Fresh Vegetables
Nutrition research indicates that many microwaved vegetables and fruits lose less water soluble vitamin C than
when cooked conventionally. This is due to shorter cooking time and to the fact that less cooking water is needed
when microwaving fruits and vegetables. Best of all, vegetables keep their fresh color, texture and flavor.
Vegetables should be microwaved covered with vented plastic wrap or a casserole lid. Vegetables cooked in
their skins, such as potatoes, are already so tightly covered that they should be pricked with a fork before cooking
in order to release excess steam. To assure even cooking, vegetables should be cut in uniform pieces and stirred
during the cooking time. Always add salt to water before adding vegetables. Reduce time a minute or two for
crisp-tender texture. Increase time for very soft texture. Remember to allow standing time of two to five minutes
after cooking because, as most foods do, vegetables will continue to cook after they are removed from the
microwave oven.
Food
Water
Amount
Cook on
Power 100
Standing
Time
Special Notes
Asparagus
Spears (1 lb.)
1/4 cup
7 - 8 min.
2 min.
Medium Casserole. Rearrange
Cuts (1 lb.)
1/2 cup
7 - 8 min.
2 min.
once.
Fresh green beans (1/2 lb.)
1/4 cup
6 - 7 min.
2 min.
Stir twice.
Frozen green beans (1/2 lb.)
2 Tbsp.
7 1/2 - 8 1/2 min.
2 min.
Stir twice.
Green Peas (2 cups) 1/4 cup 6 - 7 min. 2 min. Small casserole. Stir twice.
Broccoli (2 cups)
1/4 cup
6 - 7 min.
2 min.
Medium casserole.
Rearrange once during cooking.
Brussels Sprouts (1 lb.)
1/4 cup
8 - 9 1/2 min.
2 - 3 min.
Medium casserole. Stir once.
Cabbage (1 lb.)
1/4 cup
7 - 8 min.
2 - 5 min.
Rearrange once during cooking.
Cauliflower pieces (1 head) 1/4 cup 8 - 9 min. 2 - 5 min. Cover with microwaveable cover.
Stir once.
Mushroom slices (1/2 lb.)
2 Tbsp.
5 - 6 min.
2 - 3 min.
Small casserole. Stir once.
CASSEROLES
Casseroles may require occasional stirring to distribute heat. They cook more evenly when made with
ingredients of similar size and shape. Because of their shorter cooking time, casseroles cooked in the microwave

21
oven generally need less liquid. Casseroles with cream and cheese sauces, or meats which need slower cooking
to tenderize, cook best on power level 40.
When cooking a favorite casserole, make two and freeze the second for future use. Line a casserole or baking
dish with plastic wrap. Transfer the cooked food to the lined container and freeze. As soon as the food is frozen
in the shape of the dish, remove it and wrap with freezer paper. Later it can be unwrapped and returned to the
container for defrosting and heating.
Dry Casserole Mixtures
Many prepared box type casseroles are available on the grocery shelves. Many have freeze dried foods or
evaporated foods included. Cooking periods are so short there may not be time for the foods to absorb the
moisture sufficiently and reconstitute the foods. To prepare this type, boil the amount of water recommended on
the package. Add the noodles (when included), cover and cook for approximately 10 minutes. Allow noodles to
stand covered for an additional 10 minutes, rinse with warm water and drain. Then follow package directions for
preparing the mix. Reheat four to six minutes before serving.
SAUCES
Guide for Cooking Sauces
Sauces boil over rapidly, especially those that contain milk. As soon as the door is opened, cooking stops. If
ingredients are not taken directly from the refrigerator, cooking time will be less than given in the recipe. Stir
sauce quickly, about every 30 seconds to eliminate lumps. Be sure to use a container twice the size of the
amount of liquid to prevent boiling over.
A wooden spoon may be left in the dish while sauce is cooking for easy stirring. If sauce is stirred slowly, cooking
time may require about 15 seconds longer. If desired, a one-quart glass measure may be used to prepare some
sauces.
Brown Gravy
Amount Fat from
Drippings
Flour Liquid or
Drippings
Cook on
Power 100
Special Notes
1 cup, thin 1 Tbsp
1
Tbsp
1 cup
2 1/2 - 3 1/2
min.
Cook on Full power as
directed or until thickened,
stirring once.
Let stand, covered, before
serving.
med. 1 Tbsp
1
Tbsp
1 cup 3 - 4 min.
thick 1 Tbsp
1
Tbsp
1 cup 3 - 4 min.
White Sauce
Amount Butter Flour Milk Cook Cook Special Notes
Butter Sauce
1 cup, thin 1 Tbsp 1 Tbsp 1 cup 30 sec.
2 1/2- 3 1/2 min. Cook on Full power as directed
med. 2 Tbsp 2 Tbsp 1 cup 1 min. 2 1/2- 3 1/2 min. or until thickened, stirring once.
thick 3 Tbsp 3 Tbsp 1 cup 1 min. 3 - 4 min. Let stand, covered, before serving.
.
SANDWICHES, INCLUDING HAMBURGERS AND HOT DOGS
Guide for Heating Sandwiches
Sandwiches heat very quickly because, being porous, they have a low density. Since the filling is usually more
dense than the bread or rolls, the filling determines the heating time. Surprisingly, the filling will always be
hotter than the bread feels. Care must be taken not to overcook as the bread will become tough. Use several
thin slices of meat. Thin slices heat more quickly and are better than one thick slice. The slow heating thick slice
often causes the bread to overcook before the meat is hot. Sandwiches may be placed on a paper plate, napkin
or paper towel to be warmed. The sandwich should be covered with a microwave-safe paper towel. Remove
wrapping immediately after warming. Already-baked frozen breads and rolls may be used for sandwiches. The
filling, however, should be thawed first. Toasted bread is fine for sandwiches and provides a firm base. The toast
is warmed only; no further browning occurs.

EN
COOKING GUIDE
(
CONTINUED
)
22
Food
Amount
Cook
on Power 100
Special Notes
Sandwich
1
1 min.
(6 oz.)
2
1 1/2 - 2 min.
Place on microwaveable plate.
4
3 - 4 min.
Hamburger
1
1 min.
Cover with microwaveable cover.
(4 oz.)
4
3 - 4 min.
Hot Dog
(2 oz.)
4
1 1/2 - 2 min.
Cover with microwave-safe
paper towel.
Sloppy Joe
4
4 min.
Place on microwaveable plate.
PASTA & GRAINS
Guide for Cooking Pasta and Grains
Raw long grain rice takes time to rehydrate. Microwaving time is a little shorter than conventional, but the
greatest advantage is the ease with which you can prepare fluffy rice without sticking or burning. Cooked rice
and pasta reheat easily in the microwave oven without loss of flavor or texture. No extra water is needed to
prevent sticking or drying, so there's no danger of overcooking rice and pasta or thinning sauces.
Food
Hot
Water
Salt
Oil or
Butter
Power
Level
Cooking
Time
Standing
Time
Pasta (8 oz)
Egg Noodles
4 cups
1 tsp.
1 Tbsp.
100
6 1/2 - 7 1/2 min.
2 - 5 min.
Macaroni
4 cups
1 tsp.
1 Tbsp.
100
8 - 10 min.
2 - 5 min.
Spaghetti
4 cups
1 tsp.
1 Tbsp.
100
8 - 10 min.
2 - 5 min.
Lasagna Noodles
4 cups
1 tsp.
1 Tbsp.
100
12 - 14 min.
2 - 5 min.
Rice, Long Grain
White Rice (1 cup) 2 cups 1 tsp. 1 tsp.
100
then
80
6 - 7 min.
10 - 13 min.
5 - 7 min.
Brown Rice (1 cup) 2 cups 1/2 tsp. 1 tsp.
100
then
80
6 - 7 min.
23 - 28 min.
5 - 7 min.
CEREALS
Microwaveable hot cereals can be cooked directly in the cereal bowl and make cleaning up easy.
CONVENIENCE FOODS
Frozen Foods
A large variety of frozen foods, special dishes and dinners are available and the selections continue to
increase. The market is changing rapidly, therefore it is impossible to list the foods and types available and
recommend cooking procedures. In this book we can only give general directions to assist you.
T.V. Dinners
To prepare a T.V. dinner, follow the maker’s instructions for use with microwave ovens. To cook a T.V. dinner
will require approximately five to seven minutes for the food to thaw and heat to serving temperature
(depending on the types of food). Allow plastic wrap to remain over the dish for two minutes to allow heat to
equalize. Dinners that contain mashed potatoes have presented a bit of a problem due to the large compact
mass of this particular food. You may want to remove about half the mashed potatoes after defrosting is
started, then spread the remaining potatoes over the individual section of the tray. Heat the removed mashed
potatoes in an individual dish. For foods that should be crisp when cooking is completed, remove the plastic
wrap and use the broiler of a conventional oven to crisp the food.

23
Individual Frozen Foods
These may be commercially prepared or frozen at home. Place the container of frozen food in the oven and
heat only until the food starts to defrost and can be removed easily. Empty contents into a casserole or serving
dish and continue to defrost and heat. Do not heat foods in deep foil containers. To crisp and brown special
toppings, use the broiler of a conventional oven. If allowed to heat to serving temperature in a plastic container,
the container will warp or melt from the high heat of food.
Frozen Foods in Cooking Pouches or Boilable Bags
To prepare these foods, slit the plastic bag. An X-type cut will help remove the food at the end of cooking time.
Place the cut side down on a serving dish (with no metal trim). Heat foods other than vegetables for about
three minutes. Frozen vegetables require about eight to nine and a half minutes of cooking time. Allow the
pouch bag to remain over the food for about two minutes to allow time for the heat to equalize. Foods prepared
in cheese or white sauce should be removed from the pouch and placed in a glass casserole dish and stirred
to prevent overcooking of the sauce around the edges of the dish.
Complete Meals from Table Leftovers
Complete meals from leftovers can be prepared in advance. Foods can be frozen and ready for quick heating
in the oven at any time. Choose foods suitable for freezing and put serving portions on paper, glass or china
(no metal trim) plates. Wrap with recommended freezer paper and freeze quickly. When apportioning the
servings of food on the plate, use approximately the same amount of each kind of food for more even heating.
Mashed potatoes will heat quicker if spread slightly and hollowed, with a pat of butter in the center. To prevent
small pieces of vegetables, corn, peas, etc., from dehydrating during heating, mound well near the center of
the plate.
DESSERTS
There's always time to make dessert with a microwave oven. Fruit desserts have a remarkably fresh flavor
and texture. Microwaved cakes are higher and more tender than conventionally baked; since cakes are usually
frosted, browning is unimportant. Microwaved pie crusts are exceptionally tender and flaky, while delicate
custards and puddings are easy to prepare.
Guide for Cooking Cakes
Food
Power
Level
Cooking Time
Standing
Time
Special Notes
Cake, round
100
4 - 6 min.
2 - 5 min.
Pour into greased and wax
(Mixed9 inch)
80
5 - 7 min.
paper lined cake dish.
Ring or Angel Food Cake
80
6 - 7 min.
2 - 5 min.
Cover with wax paper.
Muffin (6 muffins)
40
5 - 7 min.
2 - 5 min.
Rearrange once.
Custard (6 servings)
40
11 - 13 min.
5 - 7 min.
Rearrange once.
Baking
•
Bar cookies work best. Greasing or lining of the microwaveable baking dish is optional.
•
If insufficient browning disturbs you, frost, glaze or add food coloring to white or yellow batters.
•
A microwaveable cookie sheet can be made by covering cardboard with waxed paper.
•
Round glass baking dishes, and fluted or smooth microwaveable ring molds work best for cakes. You can
make a microwaveable ring mold of your own by placing a medium-size glass in the center of a round glass
baking dish.
•
Because your cakes will rise higher in microwave cooking, never fill microwaveable cake pans more than
half full.
•
Reduce baking powder and soda by approximately one-fourth when converting a conventional recipe.
•
Fill paper-lined muffin cups to only half full which allows for muffins to rise more than normal.
•
You can prepare your own "brown 'n serve" breads and rolls by baking them ahead of time in the microwave
oven. Then, place them in a conventional oven to brown prior to serving.
•
Breads and rolls should be reheated to the point where they are warm to the touch. Overheating or
overcooking makes bread tough and rubbery.
•
When making yeast bread in a microwave oven, choose a recipe with cornmeal, whole wheat flour, or rye
flour to achieve a richer color.

24
SPECIFICATIONS
Item
Rating Specification
Power Supply
120V~ 60Hz
Power Consumption
1300W (10.8A)
Output Power
1000W
Oven Capacity
1.2 cubic feet
Outside Dimensions
20.4 (W) x 15.7 (D) x 12.8 (H) inches
Net Weight
24.7 lb
BEFORE
YOU
CALL
FOR
SERVICE
Refer to the following checklist before you call for service.
If the oven Does not work:
1.
Check that the power cord is securely plugged in.
2.
Check that the door is firmly closed.
3.
Check that the cooking time is set.
4.
Check for a blown circuit fuse or tripped main circuit breaker in your house.
5.
Check that the Child Lock feature is not engaged.
If there is sparking in the cavity:
Check the containers, dishes or utensils in the oven and make sure they are not metal or have metal
trim.
EN
Emerson Radio Corp.
Consumer Affairs Dept.
959 Route 46 East
Suite 210, 2nd Floor
Parsippany, NJ 07054

25
LIMITED WARRANTY
Emerson Radio Corp. warrants this product to be free from manufacturing defects in original material, including
original parts, and workmanship under normal home use and conditions (“manufacturing defect”) for a period of
one (1) year from date of original purchase in, and if used in the United States. Should service be necessary under
this warranty, Emerson will provide the following at our Return Repair Facility provided the manufacturing defect is
verified along with the date of purchase:
∗
Repair service for one (1) year from date of original purchase at no charge for labor and parts.
∗
Replacement of a defective magnetron for seven (7) years from date of original purchase (labor not included after
initial twelve (12) months).
To Receive Authorization to Return a Defective Item, please contact Emerson Customer Service at
1-800-898-9020. Have your Model number, Serial Number and dated Proof of Purchase with you when you call.
In the event the product must be returned to Emerson:
∗
Pack the unit in a well-padded heavy corrugated box. Please insure the item is well padded to avoid damage
while in transit back to our facility. If the item incurs damage, it will NOT be replaced and the consumer will be
responsible for return freight costs to receive their same unit back.
∗
Enclose your check or money order payable to Emerson Radio in the amount of $15 to cover return shipping
and handling costs.
∗
Enclose a note with your name, address, phone number, Return Authorization number and brief reason for
returning the unit.
∗
Enclose a copy of your proof of purchase (warranty service will not be provided without dated proof of
purchase).
∗
Ship the unit prepaid via UPS or parcel post (SHIP INSURED and obtain a tracking number).
NOTE:
This warranty Does not cover:
(a) Damage to equipment not properly connected to the product.
(b) Cost incurred in the shipping of the product to and from Emerson’s Return Facility.
(c) Damage or improper operation of unit caused by customer abuse, misuse, negligence or failure to follow
operating instructions (including cleaning instructions) provided with the product.
(d) Ordinary adjustments to the product which can be performed by customer as outlined in the owner’s manual.
(e) Products not purchased in the United States.
(f) Damage to product if used outside the United States.
THIS WARRANTY IS NON-TRANSFERABLE AND APPLIES ONLY TO THE ORIGINAL PURCHASER AND
DOES NOT EXTEND TO SUBSEQUENT OWNERS OF THE PRODUCT. ANY APPLICABLE IMPLIED
WARRANTIES, INCLUDING THE WARRANTY OF MERCHANTABILITY, ARE LIMITED IN DURATION TO A
PERIOD OF THE EXPRESSED WARRANTY AS PROVIDED HEREIN BEGINNING WITH THE DATE OF
ORIGINAL PURCHASE AT RETAIL AND NO WARRANTIES, WHETHER EXPRESSED OR IMPLIED, SHALL
APPLY TO THE PRODUCT THEREAFTER. EMERSON MAKES NO WARRANTY AS TO THE FITNESS OF THE
PRODUCT FOR ANY PARTICULAR PURPOSE OR USE.
THE EXTENT OF EMERSON RADIO CORP’S LIABILITY UNDER THIS LIMITED WARRANTY IS THE REPAIR
OR REPLACEMENT PROVIDED ABOVE AND, IN NO EVENT, SHALL EMERSON RADIO CORP’S LIABILITY
EXCEED THE PURCHASE PRICE PAID BY THE PURCHASER OF THE PRODUCT. UNDER NO
CIRCUMSTANCES SHALL EMERSON RADIO CORP. BE LIABLE FOR ANY LOSS, DIRECT, INDIRECT,
INCIDENTAL, SPECIAL, OR CONSEQUENTIAL DAMAGE ARISING OUT OF OR IN CONNECTION WITH THE
USE OF THIS PRODUCT. THIS WARRANTY IS VALID ONLY IN THE UNITED STATES OF AMERICA.
THIS WARRANTY GIVES YOU SPECIFIC LEGAL RIGHTS. HOWEVER, YOU MAY HAVE OTHER RIGHTS
WHICH MAY VARY FROM STATE TO STATE. SOME STATES DO NOT ALLOW LIMITATIONS ON IMPLIED
WARRANTIES OR EXCLUSION OF CONSEQUENTIAL DAMAGE, THEREFORE THESE RESTRICTIONS MAY
NOT APPLY TO YOU.
15-01-1402M
The serial number can be found on the back cabinet. We suggest that you record the serial number of your unit in
the space below for future reference.
Model Number:
MWI1212SS
Serial Number:
EN

PART NO.: MWI1212SS-20231115-02


SP
2
2
3
Guía de cocción 16
4
16
16
6
16
7
17
7
17
8
18
10
18
11
19
Precauciones para evitar exposición a exceso
de energía de microondas
Instrucciones de seguridad importantes
Precauciones de seguridad
Declaración de la Comisión Federal de
Comunicaciones respecto a interferencias
Instrucciones para puesta a tierra
Instalación
Cuidados con su horno microondas
Cómo usar su horno microondas de forma segura
Ubicación de los controles
Operación 12
20
12
20
12
20
13
21
13
21
14
22
14
22
15
22
15
Noción de cocción en microondas
Características de los alimentos
Tpcnicas de microondas
Aperitivos y bocadillos calientes
Mariscos
Carnes
Aves
Huevos y Quesos
Sopas
Vegetales
Casseroles
Salsas
Sándwiches
Pastas y Granos
Cereals
Alimentos Preparados
Postres 23
15
24
Setting the Clock
Potencia
Cocción en dos etapas
Descongelar
Cocción automática
Menú cocción automática
Temporizador de cocina
Cocción exprés
Stop/Clear
Start/+30s
Bloqueo para niños
15
24
Especificaciones
Antes de llamar para solicitar servicio
Garantía limitada 25
CONTENIDO
15

SP
3
INSTRUCCIONES IMPORTANTES DE SEGURIDAD
Lea todas las instrucciones antes de utilizar este aparato.
Lea y siga las
en la página 2.
que se encuentran
3.
Este electrodoméstico debe estar conectado a tierra. Conéctelo solo a la toma de
corriente correctamente conectada a tierra. Consulte
que se encuentra en la página 7.
4.
Instale o sitúe este dispositivo solo de acuerdo con las instrucciones de instalación
proporcionadas.
5.
Algunos productos, como los huevos enteros y los recipientes sellados (por
ejemplo, frascos de vidrio cerrados) pueden explotar y no deben calentarse en este
horno.
6.
Utilice este electrodoméstico sólo para el uso previsto descrito en este manual.
utilice productos químicos corrosivos ni vapores en este aparato. Este tipo de
horno está diseñado específicamente para calentar, cocinar o secar alimentos. No
está diseñado para uso industrial o de laboratorio.
7.
Al igual que con cualquier electrodoméstico, es necesaria una estrecha supervisión
cuando lo usan niños.
8.
utilice este aparato si tiene un cable o enchufe dañado, si no funciona
correctamente o si se ha dañado o se ha caído.
9.
Este electrodoméstico debe ser reparado únicamente por personal de servicio
cualificado. Póngase en contacto con el centro de servicio autorizado más cercano
para un análisis, reparación o ajuste.
10.
cubra ni bloquee ninguna abertura de este aparato electrodoméstico.
11.
guarde ni use este aparato al aire libre. NO use este producto cerca del agua,
por ejemplo, cerca de un fregadero de cocina, en un sótano húmedo o cerca de
una piscina o lugares similares.
12.
sumerja el enchufe o el cable en el agua.
13.
Mantenga el cable alejado de superficies calientes.
14.
deje que el cable cuelgue sobre el borde de la mesa o mostrador.
15.
Cuando limpie las superficies del horno y puerta se juntan al cerrar la puerta, use
solo jabones suaves y aplicados con una esponja o un paño suave no use
abrasivos.
16.
Para reducir el riesgo de incendios en la cavidad del horno:

SP
4
(a)
cocine demasiado los alimentos. Si se coloca papel, plástico u otros materiales
combustibles dentro del horno para facilitar la cocción, vigile cuidadosamente al
aparato.
(b)
Retire los lazos de torsión de alambre de las bolsas de papel o plástico antes de
colocar la bolsa en el horno.
(c)
Si los materiales dentro del horno se encienden, mantenga la puerta del horno
cerrada, apague el horno y desconecte el cable de alimentación, o apague la
alimentación en el fusible o panel de Interruptor automático.
(d)
utilice la cavidad para fines de almacenamiento. NO deje productos de papel,
utensilios de cocina o alimentos en la cavidad cuando no estén en uso.
17.
use este horno microondas para calentar productos químicos corrosivos (por
ejemplo, sulfuros y cloruros). Los vapores de tales productos químicos corrosivos
pueden interactuar con el contacto y los resortes de las inter-conectores de
seguridad, lo que los hace inoperables.
18.
Mantenga limpio el protector contra salpicaduras (cubierta de guía de microondas)
en todo momento. Limpie el interior del horno con un paño suave y húmedo
después de cada uso. Si deja grasa o residuos de comida en cualquier lugar de la
cavidad, puede sobrecalentarse, humear o incluso incendiarse la próxima vez que
use el horno.
19.
Los líquidos, como el agua, el café o el té, pueden sobrecalentarse más allá del
punto de ebullición sin parecer que están hirviendo debido a la tensión superficial
del líquido. El burbujeo o la ebullición visibles cuando se retira el recipiente del
horno de microondas no siempre están presentes. ESTO PODRÍA PROVOCAR
QUE LOS LÍQUIDOS MUY CALIENTES HIERVAN REPENTINAMENTE CUANDO
SE ALTERA EL RECIPIENTE O SE INSERTA UN UTENSILIO EN EL LÍQUIDO.
1.
sobrecaliente el líquido.
2.
Revuelva el líquido antes y a la mitad del calentado.
3.
use recipientes rectos y con cuellos estrechos.
4.
Después de calentar, deje que el recipiente permanezca en el horno de
microondas por un corto tiempo antes de retirar el recipiente.
5.
Tenga mucho cuidado al insertar una cuchara u otro utensilio en el recipiente.
PRECAUCIONES DE SEGURIDAD
1.
NO intente maniobrar ni realizar ajustes o reparaciones en la puerta, el panel de
control o cualquier otra parte del horno. NO retire el panel exterior del horno. Las
reparaciones solo deben ser realizadas por personal de servicio calificado.
2.
NO opere el horno vacío. La energía del microondas se reflejará continuamente en
todo el horno si no hay comida o agua presente para absorber la energía.
3.
Si se produce un incendio en el horno, toque el botón Pause/Cancel
Pausa/Cancelar) y DEJE LA PUERTA CERRADA. Desconecte el cable de
alimentación o apague la alimentación en el panel de fusibles o Interruptor
automático.

SP
5
4. NO intente secar ropa, periódicos u otros materiales en el horno. Podrían
incendiarse.
5. NO utilice productos de papel reciclado. Las toallas de papel recicladas, servilletas
y el papel encerado pueden contener partículas de metal que pueden causar arcos
eléctricos o ignición. Se deben evitar los productos de papel que contienen nylon o
filamentos de nylon, ya que pueden incendiarse.
6. Algunas bandejas de espuma de poli-estireno (como en las que se envasa la
carne) tienen una delgada tira de metal incrustada en la parte inferior. Cuando se
calienta en el microondas, el metal puede quemar las paredes del horno o
encender toallas de papel.
7. Evite insertar clavos, alambre, etc. a través de cualquier orificio de la unidad
durante la operación. Nunca inserte un alambre, clavo o cualquier otro objeto
metálico a través de los orificios de la cavidad o cualquier otro agujero o hueco, ya
que tales objetos pueden causar descargas eléctricas y fugas de microondas.
8. Este aparato no está destinado a ser utilizado por personas con capacidades
físicas, sensoriales o mentales reducidas, o falta de experiencia y conocimiento,
(incluidos niños) a menos que hayan recibido supervisión o instrucciones sobre el
uso del aparato por parte de una persona responsable de su seguridad.
9. Los aparatos no están diseñados para ser operados por medio de un temporizador
externo o un sistema de control remoto separado.
10. La temperatura de las superficies accesibles puede ser alta cuando el aparato está
funcionando.
1. NO SE DEBEN UTILIZAR RECIPIENTES METÁLICOS ni platos con llantas
metálicas. Puede producirse arqueo eléctrico.
2. Los TWIST-TIES METÁLICOS (cuerdas metálicas) no se deben de utilizar en el
horno microondas.
3. NO utilice frascos SELLADOS o botellas de CUELLO ESTRECHO para cocinar o
recalentar. Pueden estallar o romperse.
4. NO utilice TERMÓMETROS CONVENCIONALES dentro del horno microondas.
Pueden causar arcos eléctricos.
5. Retire las ENVOLTURAS PLÁSTICAS DE LA TIENDA antes de cocinar o
descongelar los alimentos en el horno.
6. Para MÁS INFORMACIÓN sobre los utensilios de cocina adecuados, consulte la
GUÍA DE COCINA en la página 16.
1. Nunca use su horno de microondas para ENLATADO CASERO. El horno no está
diseñado para permitir un enlatado adecuado. Los alimentos enlatados
incorrectamente pueden echarse a perder y ser peligrosos de consumir
2. Los TIEMPOS DE COCCIÓN indicados en la guía de cocción son aproximados.
Los factores que pueden afectar la cocción son la temperatura inicial, la altitud, la
cantidad, el tamaño y la forma de los alimentos y utensilios utilizados. A medida
que se familiarice con el horno, podrá ajustarse a estos factores.

SP
6
3.
Es mejor COCINAR POCO EN LUGAR DE COCINAR DEMASIADO los alimentos.
Si los alimentos están poco cocidos, siempre se pueden devolver al horno para
cocinarlos. Si la comida está demasiado cocida, no se puede hacer nada. Siempre
comience con tiempos mínimos de cocción.
4.
PEQUEÑAS CANTIDADES de alimentos o alimentos con bajo contenido de
humedad pueden quemarse, secarse o incendiarse si se cocinan demasiado
tiempo.
5.
NO hierva los huevos en su cáscara. La presión puede acumularse y los huevos
pueden explotar.
6.
Papas, manzanas, yemas de huevo, calabaza bellota entera y salchichas son
algunos ejemplos de alimentos con CASCARAS NO porosas. Estos deben
perforarse antes de cocinarlos para evitar que exploten.
7.
Las palomitas de maíz deben introducirse en un utensilio para palomitas de maíz
para microondas. El maíz reventado por microondas produce un rendimiento más
bajo que el reventado convencional. NO use horno para palomitas de maíz a
menos que se coloquen en un utensilio de palomitas de maíz aprobado para
microondas o a menos que esté empaquetado comercialmente y recomendado
especialmente para hornos de microondas. NO use aceite a menos que lo
especifique el fabricante.
8.
NO intente freír grasas o lardos en el horno.
9.
Los LÍQUIDOS CALENTADOS pueden ENTRAR en erupción si no se mezclan con
aire. NO caliente líquidos en el horno microondas sin antes agitarlos o moverlos.
DECLARACIÓN DE INTERFERENCIA DE FRECUENCIA
Este equipo genera y utiliza energía de frecuencia ISM y si no se instala y utiliza
correctamente, en estricta conformidad con las instrucciones del fabricante, puede causar interferencias
en la recepción de radio y televisión
Se ha probado y se ha comprobado que cumple con los límites para un equipo ISM de conformidad con
la parte 18 de las Reglas de la FCC, que están diseñadas para proporcionar protección razonable contra
dicha interferencia en una instalación residencial.
Sin embargo, no hay garantía de que no se produzcan interferencias en una instalación en particular. Si
este equipo causa interferencia en la recepción de radio o televisión, lo que se puede determinar
apagando y encendiendo el equipo, se recomienda al usuario que intente corregir la interferencia
mediante uno o más de los siguientes:
Reoriente la antena receptora de radio o televisión.
Reubique el horno microondas con respecto al receptor.
Aleje el horno microondas del receptor.
Enchufe el horno de microondas en una toma de corriente diferente para que el horno de
microondas y el receptor estén en circuitos de derivación diferentes.

SP
7
EL FABRICANTE no se hace responsable de ninguna interferencia de radio o TV causada por
MODIFICACIÓN NO AUTORIZADA a este horno microondas. Es responsabilidad del usuario corregir
dicha interferencia.
Si ve arcos, presione el botón
(Pausa / Cancelar
término de microondas para las chispas en el horno. El arco es causado por:
es el
Metal o papel de aluminio tocando el costado del horno.
Las Lámina no moldeadas en los alimentos (los bordes invertidos actúan como antenas).
Metal, como lazos retorcidos, alfileres de aves de corral o platos con borde dorado, en el
microondas.
INSTRUCCIONES DE CONEXIÓN A TIERRA
INSTRUCCIONES PARA CONECCIÓN A TIERRA
INSTALACIÓN
1.
Al colocar el horno de microondas, debe colocarse
sobre una superficie estable y plana.
2.
NO BLOQUEE LAS SALIDAS DE AIRE. Si se bloquean durante la
operación, el horno puede sobrecalentarse y eventualmente causar la falla del
horno. Para una ventilación adecuada, MANTENGA TRES PULGADAS DE
ESPACIO ENTRE LA PARTE SUPERIOR, LOS LADOS, LA PARTE TRASERA
DEL HORNO Y EL ÁREA DONDE SE INSTALARÁ LA UNIDAD.
ARCOS ELECTRICOS

SP
8
3. Recepción de televisión pobre e interferencia de radio
pueden resultar si el horno está ubicado cerca de un televisor, radio, antena o
antena de cable. Coloque el horno lo más lejos posible de ellos.
4. Mantenga el horno alejado del aire caliente, vapor o
salpicaduras de líquidos al elegir un lugar para ubicarlo, de lo contrario, el
funcionamiento de la unidad puede verse afectado negativamente, causando que
se descomponga.
5.
Compruebe la fuente de alimentación local. Este horno de microondas requiere
una fuente de alimentación de 120V, 60Hz, 15Amp.
Utilice un receptáculo que acepte clavijas con tierra.
(a) Se proporciona un cable de alimentación corto para reducir los riesgos
resultantes de enredarse o tropezar con un cable más largo.
(b) Hay juegos de cables más largos o cables de extensión disponibles y se
pueden usar si se tiene cuidado en su uso.
(c) Si se utiliza un cable largo o un cable de extensión, (1) la clasificación eléctrica
marcada del juego de cables o el cable de extensión debe ser mayor o tan
grande como la clasificación eléctrica del aparato, (2) el cable de extensión
debe ser un cable de 3 alambres que tenga conexión a tierra, y (3) el cable
más largo debe estar colocado de modo que no se ponga sobre la encimera o
la mesa donde niños puedan tirar de él o tropezar involuntariamente.
6. : abolladuras, la puerta
desalineada, puerta rota o abolladuras en la cavidad. Si alguno de los daños
anteriores es visible, . Notifique al distribuidor
inmediatamente.
CUIDADOS CON SU HORNO MICROONDAS
1. Desconecte el enchufe de CA de la toma de corriente antes de limpiarlo.
2. El horno debe limpiarse regularmente y eliminar cualquier residuo de
comida.

SP
9
3. Mantenga limpio el interior del horno cuando las salpicaduras de alimentos
o los líquidos derramados se adhieran a las paredes del horno. Limpie con
un paño húmedo. Se puede usar detergente suave si el horno se ensucia
mucho. No se recomienda el uso de detergentes o abrasivos fuertes.
4. La superficie exterior del horno debe limpiarse con agua y jabón. Luego se
seca con un paño suave. Para evitar daños en las partes operativas dentro
del horno, no se debe permitir que el agua se filtre en las ranuras de
ventilación. Si el panel de control se ensucia o se moja, limpie con un paño
suave y seco. NO utilice detergentes o abrasivos fuertes en el Panel de
control.
5. Si se acumula vapor a ambos lados de la puerta del horno, limpie con un
paño suave. Esto puede ocurrir cuando el horno
de microondas funciona en condiciones
de alta humedad y esto no es una indicación
de un mal funcionamiento de la unidad.
6. Ocasionalmente es necesario retirar el plato de vidrio
para limpiarlo.
Lave el plato con agua tibia y jabón o en un lavavajillas.
7. La guía de rodillos y la superficie inferior de la cavidad
del horno deben limpiarse regularmente para evitar ruidos excesivos.
Simplemente limpie la superficie del horno con poca agua y jabón suave o
limpiador de ventanas y séquelo. La guía de rodillos se puede lavar con
agua y jabón suave o en el lavavajillas.
1. La GUÍA DE RODILLOS y superficie inferior
del horno deben limpiarse con frecuencia
para evitar ruidos excesivo.
2. La GUÍA DE RODILLOS SIEMPRE deberá
utilizarse junto con el plato de vidrio.
1. NO opere el horno sin la bandeja (plato) de vidrio
en su lugar.
2. NO utilice ningún otro plato de vidrio con este horno.
3. Si el plato de vidrio está caliente, DEJE QUE SE ENFRÍE antes de
limpiarlo o colocarlo en agua.
4. NO cocine directamente en la bandeja (plato) de vidrio.

SP
10
CÓMO USAR SU HORNO MICROONDAS DE FORMA SEGURA
(a) Es importante no derrotar o manipular los inter-conectores de seguridad.
(b) NO coloque ningún objeto entre la puerta frontal del horno y la puerta, ni permita
que se acumulen residuos en las superficies de sellado. Limpie el área de sellado
con frecuencia con un detergente suave, enjuague y seque. Nunca use polvos
abrasivos o almohadillas.
(c) Al abrir, la puerta no debe estar sometida a tensión, por ejemplo, un niño colgado
de la puerta abierta o cualquier carga que pueda hacer que el horno caiga hacia
adelante y causar lesiones y daños a la puerta. NO opere el horno si está dañado,
hasta que haya sido reparado por una persona calificada. Es particularmente
importante que la puerta del horno se cierre correctamente y que no haya daños
en lo siguiente:
(1) Pu a (doblada), (2) Bisagras y pestillos (rotos o flojos), (3) Sellos de puertas y
superficies de sellado rotos o en mal estado.
(d) El horno no debe ser ajustado o reparado por nadie, excepto por personal de
servicio debidamente calificado.

SP
11
UBICACIÓN DE CONTROLES
1.
Cerrojos de puerta – Cuando la
puerta está cerrada, los cerrojos se
cerraránautomáticamente. Si la puerta
se abre mientras el horno está
funcionando, elmagnetrón se apagará
automáticamente.
2.
Pantalla de la puerta – Permite la
visualización de alimentos. La
pantallaestá diseñada para que la luz
pueda pasar, pero no las microondas.
3.
Guía de rodillos – Sostiene el plato de
vidrio de cocción. Debe estarsiempre
en la posición correcta antes de operar
el horno.
4.
Eje giratorio / acoplador– El plato de
vidrio de cocción, (plataforma giratoria)
se sostiene en el eje, que se combina
con el motor para hacer girar la bandeja
de cocción de vidrio.
5.
Plato de Vidrio de cocción – (plato
giratorio) - Hecho de vidrio
especialresistente al calor. El plato
debe estar siempre en la posición
correcta antesde operar el horno. NO
cocine los alimentos directamente
sobre el plato devidrio giratorio.
6.
Panel de controles: Los botones del
panel de controles se muestran a la
derecha.
7.
Escudo contra salpicaduras – (Cubierta
de guía de microondas) (NO remover):
Protege el suministro de microondas
contra salpicaduras de comida durante la
cocción de alimentos.
8.
Pantalla
9.
Auto Cook Menu Button: Se utiliza para
seleccionar un programa cocción
automática.
10.
Temporizador de cocina – se utiliza para
ajustar el temporizador de cocina.
11.
Power Button: Se utiliza para crear un
nivel de potencia de cocción.
12.
Defrost Button : Se usa para configurar o
estimar el tiempo de descongelación por
peso o tiempo ingresado.
13.
Time Cook Button: Se utiliza parainstaurar
el tiempo o el peso.
14.
Teclas numéricas : Se utilizan para ingresar
el tiempo de cocción, el temporizador de
cocina, etc. Las teclas numéricas del 1 al 6 se
utilizan tambien para la función rápida(Express
cook).
15.
Stop/Clear Button: Se utiliza para pausar
oborrar un programa de cocción.
16.
START/+30s – Utilícelo para iniciar la
cocción o añadir 30 segundos de tiempo
de cocción por cada pulsación del botón.
17.
Boton Reloj: Se utiliza apra ajustar el
reloj.
Alerta: Limpie el horno microondas con frecuencia. El no hacerlo puede crear un
riesgo de incendio y puede anular la garantía.
Popcorn Potato Beverage
Pizza Reheat Frozen
Vegetable
Meat Soup Kitchen
Timer
Power Defrost Time
Cook
EXPRESS COOK
123
456
789
STOP 0START
Clear Clock +30s
Hold 7

SP
12
1. AJUSTE DEL RELOJ
La pantalla se ilumina cuando se conecta a la fuente de alimentación (CA),
entra en modo de espera y la pantalla muestra 1:00.
IEn el modo de espera, presione y mantenga presionado el botón "CLOCK / 0"
para ingresar al modo de configuración del reloj. Presione los botones
numéricos del "0 ~ 9" para ingresar la hora del reloj directamente. Es un reloj
de 12 horas, la entrada es válida solo cuando se establece entre 1:00 ~ 12:59.
•Una vez ingresados los cuatro dígitos, los dígitos del reloj dejan de
parpadear y se guarda la hora seleccionada. Si se presiona el botón
"START" después de guardar los cuatro dígitos, el horno microondas
comienza a cocinar durante 30 segundos.
•Si solo se ingresan tres dígitos, debe presionar el botón "START/+30s"
para guardar la hora establecida y reanudar el modo de espera.
2. POTENCIA
Hay diez niveles de potencia de microondas, 100P, 90P, 80P, 70P, 60P, 50P,
40P, 30P, 20P y 10P, respectivamente. Presione el botón "POWER"
repetidamente y seleccione la potencia de microondas deseada, o presione
los botones numéricos del "0 ~ 9" para seleccionar la potencia de microondas
deseada. Presione el botón "1" para una potencia de microondas de 10P,
presione el botón "2" para una potencia de microondas de 20P. y cuando
este en 10P, presione el botón "0" para seleccionar la potencia de
microondas de 100P.Presione el botón "TIME COOK" para ingresar al modo
de entrada del tiempo de cocción y luego presione los botones numéricos "0
~ 9" para ingresar el tiempo. El tiempo máximo que se puede ingresar es
99:99. Después de ingresar el tiempo de cocción, presione el botón "INICIO /
+ 30 s" para comenzar a cocinar. El horno emite un sonido para notificar la
finalización de la operación. La pantalla parpadea en 'End' y sigue
parpadeando hasta que presiona STOP o se abre la puerta.
100% y 90% de potencia de salida (aplicable para
una cocción rápida y completa)
80% y 70% de potencia de salida (aplicable para cocción
exprés media)
60% y 50% de potencia de salida (aplicable para cocinar
alimentos al vapor)
40% y 30% de potencia de salida (aplicable para
descongelar alimentos)
20% y 10% de potencia de salida (aplicable para mantener
los alimentos calientes)
OPERACIÓN
Alta
potencia
Potencia
media Alta
Potencia
Media
Potencia
media baja
Baja
potencia

SP
13
a. El tiempo máximo que se puede instaurar es de 99 minutos y 99 segundos.
b. Nunca opere el horno de microondas mientras esté vacío.
c. A la potencia máxima de microondas, el horno bajará automáticamente la
potencia después de un cierto tiempo de cocción para alargar una útil duración.
d. Si gira los alimentos durante la operación, presione el botón "START / +30s"
una vez y continuará el procedimiento de cocción preestablecido.
e. Si tiene la intención de retirar el alimento antes del tiempo preestablecido,
debe presionar el botón “STOP/Clear” una vez para borrar el procedimiento
preestablecido para evitar una operación no intencionada de la próxima vez que
lo use.
3. COCCIÓN EN DOS ETAPAS
Después de configurar la potencia y el tiempo del microondas como se describe,
no presione el botón "START / +30s", presione directamente el botón "POWER"
para configurar la segunda etapa. Presione el botón "POWER" continuamente y
seleccione la potencia de microondas deseada de la etapa 2, o presione los
botones numéricos del "0 ~ 9" para seleccionar la potencia de microondas
deseada. Presione el botón "1" para una potencia de microondas de 10P, presione
el botón"2" para una potencia de microondas de 20P y, y cuando este en 10P,
presione el botón "0" para seleccionar la potencia de microondas de 100P.
Presione el botón "TIME COOK" para ingresar el tiempo de cocción y luego
presione los botones numéricos del "0 ~ 9" para ingresar el tiempo. El tiempo
máximo que se puede ingresar es 99: 99. Después de ingresar el tiempo de
cocción, presione el botón "START / +30s"para comenzar a cocinar. El horno de
microondas primero ejecutará el programa en la etapa 1 y luego ejecutará el
programa en la etapa 2 después de la etapa 1. Se emite un sonido para notificar la
finalización de la operación.
4. DESCONGELAR
Hay dos modos de descongelación: dEF1 y dEF2, respectivamente. dEF1 para
descongelar por peso y dEF2 para descongelar por tiempo. Presione el botón
“Defrost” una vez para descongelar por peso o presione el botón “Defrost” dos
veces para descongelar por tiempo, la pantalla muestra "dEF1" o "dEF2". El peso
mínimo para la descongelación automática por peso (dEF1) es de 4 oz. El peso
máximo es de 100 oz. Presione los botones numéricos del 0 ~ 9 para ingresar el
tiempo deseado para descongelar por tiempo. El tiempo máximo de descongelación
por tiempo (dEF2) que se puede introducir es de 99:99. Después de ingresar el
peso o el tiempo, presione el botón "START / +30s"para comenzar a cocinar.
Presione el botón "STOP / CLEAR" una vez para detener la cocción o presione dos
veces para cancelar el programa de cocción. La unidad emite tres sonidos y la
pantalla parpadea y muestra "End" cuando se completa el ciclo de cocción. El modo
de descongelación por peso dEF1 tendrá sonidos para indicar que se voltee la
comida durante la descongelación.
A continuación se muestran algunos consejos sobre el tiempo de descongelación
de alimentos:
dEF1 Para la descongelación, el peso varía de 4 a 100 oz.
dEF2 Para la descongelación, el tiempo varía de 99 segundos a 99 minutos
PRECAUCIÓN

EN
14
a. Es necesario voltear los alimentos durante la operación para obtener un
efecto uniforme.
b. Por lo general la descongelación necesitará más tiempo que el de
cocinar los alimentos.
c. Si el alimento se puede cortar con cuchillo, el proceso de
descongelación se puede considerar completado.
d. Las microondas penetran alrededor de 4 cm en la mayoría de los
alimentos.
e. Los alimentos descongelados deben consumirse lo antes posible, NO
se recomienda volver a congelar los alimentos descongelados.
5. COCCIÓN AUTOMÁTICA
Hay ocho menús de cocción automática: palomitas de maíz, papas,
bebidas, pizza, recalentamiento, verduras congeladas, carne y sopa
respectivamente. Seleccione el menú deseado, presione el botón
correspondiente repetidamente para seleccionar el peso deseado de los
alimentos y la pantalla mostrará el ajuste de peso correspondiente. Presione
el botón "START / +30s" para comenzar a cocinar. Se emite un sonido para
notificar la finalización de la operación.
No. Botón Peso / Porción
A.1 Palomitas de maíz Los pesos opcionales son: 1.75 oz, 3.0 oz
y 3.5 oz
A.2 Papas Los pesos opcionales son: 9.0 oz, 18.0
oz y 27.0 oz
A.3 Bebidas
Las porciones opcionales son 1 taza, 2 tazas
y 3 tazas (aproximadamente 8.0 oz por
taza)
A.4 Pizza Los pesos opcionales son: 4.0 oz, 8.0
oz y 14.0 oz
A.5 Recalentamiento Los pesos opcionales son: 7.0oz,
14.0oz, 21.0oz, 28.0oz y 35.0oz.
A.6 Vegetales
congelados
Los pesos opcionales son: 4.0 oz,
8.0 oz y 16.0 oz
A.7Carne Los pesos opcionales son: 7.0oz,
14.0oz, 21.0oz, 28.0oz y 35.0oz.
PRECAUCIÓN

SP
15
A.8Sopa Los pesos opcionales son: 4.0oz,
8.0oz, 12.0oz y 16.0oz.
a. La temperatura de los alimentos antes de cocinarlos sería de 68-77°F. Una
temperatura más alta o más baja de los alimentos antes de cocinarlos requeriría un
aumento o disminución del tiempo de cocción.
b. La temperatura, el peso y la forma de los alimentos influirán en gran medida en
el efecto de cocción. Si se ha encontrado alguna variación en el factor indicado en
el menú anterior, puede ajustar el tiempo de cocción para obtener un mejor
resultado.
6. TEMPORIZADOR DE COCINA
En el modo de espera, presione el botón “Kitchen Timer” para ingresar al modo de
temporizador. El icono de la función de cuenta regresiva y "0:00" se mostrarán en la pantalla.
Presione los botones numéricos del "0 ~ 9" para ingresar la hora. El tiempo máximo que se
puede introducir es 99:99. Después de configurar la hora, presione el botón "START / + 30s"
para iniciar la cuenta regresiva. Se escucha un sonido para notificar la finalización de la cuenta
regresiva.
7. COCCIÓN EXPRÉS
En el modo de espera, puede presionar directamente los botones numéricos del "1 ~ 6" para
encender el horno microondas. El tiempo de trabajo es de 1 ~ 6 minutos, es decir, presione 1
para que trabaje durante 1 minuto, presione 2 para que trabaje durante 2 minutos, y así
sucesivamente. Después de seleccionar la hora, presione el botón "START / +30s" para
comenzar a cocinar, se emite un sonido para notificar la finalización de la operación.
8. STOP/CLEAR
En el proceso de configuración de cocción, puede presionar el botón "STOP / Clear" para
cancelar la configuración y volver al modo de espera. En el proceso de cocción en horno
microondas, puede presionar el botón "STOP/Clear" para hacer una pausa. Mientras está en
estado de espera, puede presionar el botón "STOP / Clear" nuevamente para cancelar la función
y volver al modo de espera.
9. START/+30s (Iniciar/+30s)
Después de ajustar el tiempo de cocción o el peso de los alimentos, presione el botón "START/
+30s" para encender el horno microondas inmediatamente. En estado de funcionamiento, puede
presionar el botón "START / + 30s" para aumentar el tiempo, presionar una vez para aumentar
30 segundos, pero el modo de menú y el modo de descongelación de peso no pueden ajustar el
tiempo. Mientras está en pausa, puede presionar el botón "START / + 30s" para continuar con el
horno microondas antes del modo de cocción.
10. BLOQUEO PARA NIÑOS
La función de bloqueo para niños evita el funcionamiento no deseado del horno por parte de
niños pequeños. El horno se puede configurar para que el panel de control esté desactivado o
bloqueado.
PRECAUCIÓN
•PARA BLOQUEAR: Mantenga presionado el botón “STOP/Clear” durante tres segundos
en modo de espera. Todos los botones estarán bloqueados y no funcionarán.
•PARA DESBLOQUEAR: Mantenga presionado el botón “STOP/Clear” durante tres
segundos mientras está en modo BLOQUEO INFANTIL. Todos los botones se
desbloquearán y reactivarán.

16
GUÍA DE COCCIÓN
Las microondas son reflejadas por el metal al igual que una pelota rebota en una pared. Por esta razón, los utensilios
metálicos no son adecuados para su uso en el microondas. Una combinación de paredes interiores estacionarias y una plataforma
giratoria de metal o un ventilador agitador ayuda a asegurar que las microondas estén bien distribuidas dentro de la cavidad del
horno para producir una cocción uniforme.
Las microondas pasan a través de algunos materiales como papel, vidrio y plástico al igual que la luz solar que
brilla a través de una ventana. Debido a que estas sustancias no absorben ni reflejan la energía del microondas, son materiales
ideales para los recipientes de cocción de hornos de microondas.
Durante la cocción, las microondas serán absorbidas por los alimentos. Penetran a una profundidad de
aproximadamente 3/4 a 1 1/2 pulgadas. La energía de microondas activa las moléculas en los alimentos (especialmente agua,
grasa y azúcar), y se produce calor. Si se frota vigorosamente las manos, sentirá el calor producido por la fricción. La cocción
interna de alimentos más grandes se realiza por conducción, ya que el calor que se produce por fricción se conduce al centro de
los alimentos. Los alimentos también continúan cocinándose por conducción durante el tiempo que están erectos.
La cantidad de alimento colocado en un horno de microondas tiene un efecto directo en el tiempo de cocción.
Pequeñas cantidades de alimentos o líquidos requieren menos tiempo de cocción que cantidades más grandes de la misma
sustancia. A medida que aumenta la cantidad, la concentración disminuye.
Las piezas pequeñas se cocinan más rápido que las grandes. Para acelerar la cocción, corte trozos de menos de dos
pulgadas (5 cm), de modo que las microondas puedan penetrar hacia el centro desde todos los lados. Las piezas que son
similares en tamaño y forma se cocinan de manera más uniforme.
Muchos alimentos son desiguales, como un pollo, costillas o brócoli. Las partes delgadas se cocinarán más rápido que las
partes gruesas, mientras que los alimentos uniformemente gruesos se cocinarán uniformemente. Para compensar las formas
irregulares, coloque piezas delgadas hacia el centro del plato y piezas más gruesas hacia el borde del plato.
ambiente.
Los alimentos congelados o refrigerados tardan más en cocinarse que los alimentos a temperatura
Debido a que los huesos conducen el calor, el lado de la carne en el que está el hueso se cocinará primero,
mientras que los cortes deshuesados se cocinan más lentamente pero de manera más uniforme. La grasa atrae a las microondas.
El centro de estos alimentos se cocina por conducción de calor.
Las microondas son atraídas por la humedad. Los alimentos naturalmente húmedos absorben las
microondas mejor que los secos. Agregue un mínimo de líquido a los alimentos húmedos, ya que el exceso de agua ralentiza la
cocción.
La densidad de los alimentos determina la facilidad con que las microondas pueden penetrar y la rapidez con que se
cocinarán. Los alimentos porosos, como la carne picada o el puré de papas, se calientan en el microondas más rápido que los
densos como el bistec o las papas enteras. Perforación: El vapor acumula presión en los alimentos que están bien cubiertos por
una piel o membrana. Perfore las papas, las yemas de huevo y los hígados de pollo para evitar que se rompan.
Revuelva los alimentos del exterior al centro del plato una o dos veces durante la cocción para igualar el calor y
acelerar el microondas. Los alimentos no se queman ni se pegan, por lo que no hay necesidad de revolver constantemente como
lo hace en la cocina convencional.
Organice los alimentos con extremos delgados o delicados, como muslos o espárragos, con las porciones gruesas
o más duras hacia el exterior del plato. Las partes que necesitan más cocción recibirán más energía, por lo que los alimentos se
calentarán en el microondas de manera uniforme
.
Los alimentos individuales, como las papas al horno y los pastelillos, se cocinarán de manera más uniforme si se
colocan en el horno a la misma distancia. Cuando sea posible, organice los alimentos en un patrón circular. Del mismo modo, al
colocar alimentos en una fuente para hornear, colóquelos alrededor del exterior del plato, no alineados uno al lado del otro. Los
alimentos no deben apilarse uno encima del otro.
Reorganice las áreas superpuestas, como colas de filetes de pescado largos, de arriba a abajo, y piezas muy
compactas, como albóndigas, desde el exterior hasta el centro del plato.
El tiempo de reposo es especialmente importante en la cocción en microondas. La energía de microondas
crea calor en las capas externas de los alimentos. Como resultado de la conducción normal, la comida continúa cocinándose
durante unos minutos después de sacarla del horno. Dejar reposar asados, verduras enteras grandes, guisos y pasteles para
terminar de cocinar permite que los medios se cocinen completamente sin cocinar demasiado, secar o endurecer los exteriores.
La cubierta acelera el tiempo de cocción, retiene la humedad, ablanda, asegura incluso la cocción y evita las
salpicaduras. Las tapas de la cazuela o la envoltura de plástico se utilizan para un sellado más apretado. Ventile el plástico
girando hacia atrás un borde al lado del plato para formar una ranura estrecha donde el exceso de vapor pueda escapar. También
se obtienen varios grados de retención de humedad mediante el uso de papel encerado o toallas de papel aptas para microondas.
La energía de microondas cocina algunos alimentos tan rápidamente que las grasas y azúcares dentro de los alimentos
no tienen tiempo para caramelizarse y dar una apariencia "dorada". Los agentes de dorado no afectan la calidad de los alimentos
calentados en el microondas, pero pueden agregar color y sabor. Para carnes y aves, use salsa bouquet diluida con agua o
mantequilla derretida, soja, Worcestershire, barbacoa o salsa de carne, una pizca de pimentón o mezcla de salsa seca; Glaseado de
gelatina o recubrimiento de migajas. Glaseado y cobertura terminan pasteles y panes. Cubra las cazuelas al final del ciclo c on
queso rallado o migas.
SP

SP
17
GUÍA DE COCCIÓN (CONTINUACIÓN)
APERITIVOS Y APERITIVOS CALIENTES
Los aperitivos calientes se pueden preparar muy rápidamente en el horno microondas. Muchos aperitivos se pueden
cocinar en el plato de servir, siempre que el plato no tenga incrustación de metal. Un consejo para ahorrar tiempo:
prepare estos alimentos con anticipación, refrigere o congele, y enfríelos dentro del horno antes de servir. Un plato de
aperitivos tardará solo unos segundos en enfriarse.
El queso se derrite muy rápidamente y se endurecerá si se cocina demasiado, así que observe de cerca los alimentos
combinados con queso para que no se cocine demasiado. Tan pronto como el queso comienza a burbujear, se completa
la cocción. Los aperitivos que tienen un exterior de pastelería crujiente se preparan mejor en un horno convencional. Para
preparar aperitivos envueltos en tocino, será necesario pre-cocinar el tocino y luego envolver los alimentos. Las ostras
envueltas en tocino son más fáciles de preparar en el asador de su horno convencional.
Las mezclas de mariscos se pueden preparar en conchas para servir, ya que la energía de microondas pasará a través
de las conchas de mariscos sin calentarse. El papel de aluminio no debe usarse para conchas. Si se colocan productos
para untar en galletas saladas, se debe tener cuidado de no cocinar demasiado, ya que la humedad de los alimentos
hará que las galletas se empapen. Las galletas saladas utilizadas para untar deben estar muy secas y crujientes. Esto
ayuda a evitar que se humedezcan demasiado. Calentar solo hasta que la propagación esté a temperatura de servicio. El
tiempo requerido para calentar todos los aperitivos dependerá de la cantidad de comida, y el número y el tipo de plato
seleccionado. Recuerde que la comida se calentará mucho incluso si el plato está frío. Las mezclas de queso retienen el
calor por más tiempo cuando se calientan con energía de microondas.
Guía para cocinar mariscos El microondas es una de las formas más fáciles y eficientes de preparar pescados y
mariscos, que se mantienen delicados y tiernos con una cocción rápida y húmeda. La cocción excesiva seca y endurece
los mariscos, por lo que debe revisarlos después del tiempo mínimo. Si las piezas gruesas como filetes de pescado o
colas de langosta se hacen en el exterior, pero aun ligeramente translúcidas en el medio, déjelas reposar durante unos
minutos; El calor interno completará la cocción.
y huevos duros pueden estallar en el microondas.
no forman costra, pero se recalientan bien. Panqueques congelados o
Completamente preparados están disponibles para recalentar en microondas.
puede causar quemaduras.
con cuellos estrechos pueden romperse y estallar si se calientan.
se puede hacer solo en opper especiales para microondas. No use
Aceite a menos que lo especifique el fabricante, ni caliente más tiempo de lo
Recomendado. Nunca coloque palomitas de maíz en bolsas de papel o utensilios de
Vidrio o directamente en la bandeja de vidrio.

SP
18
GUÍA DE COCCIÓN (CONTINUACIÓN)
Guía para cocinar carnes, asados, chuletas, hamburguesas y pequeños cortes de carne tierna se cocinan
maravillosamente en el horno de microondas. La mayoría de los asados se pueden cocinar, término medio o incluso bien
cocinado en menos de una hora. Los cortes de carne menos tiernos, como el asado de olla, se pueden hervir a fuego
lento en una salsa o salsas. Los cortes resistentes que requieren una cocción lenta funcionarán mejor en un horno
convencional. Un trozo grande de carne, especialmente si la forma es desigual, debe voltearse ocasionalmente para un
asado uniforme.
Voltear a mitad del tiempo
Roja
80
6 - 8 min.
5 - 7 min.
Termino Medio
80
8 - 10 min.
10 - 15 min.
Bien Cocida
80
10 - 12 min.
10 - 15 min.
Cúbrase con tapa para microondas
Voltear a mitad del tiempo
Voltear a mitad del tiempo
Con Hueso
80
13 - 16 min.
10 min.
Sin Hueso
80
17 - 19 min.
10 - 15 min.
Con Hueso Termino Medio
80
7 - 9 min.
10 - 12 min.
Bien Cocinado
80
10 - 12 min.
10 - 15 min.
Sin Hueso Termino Medio
80
9 - 11 min.
10 - 12 min.
Bien Cocinado
80
12 - 14 min.
10 - 15 min.
Voltear y reacomodar a mitad
del tiempo
Cúbrase con tapa para microondas
2 Hamburguesas
100
3 - 5 min.
5 - 7 min.
4 Hamburguesas
100
4 - 6 min.
5 - 7 min.
Relleno de Carne Molida
(2 lbs.)
100
18 - 20min.
10 - 12 min.
Cantidad (4 tiras) 100 6 - 7 min.
(1 rebanada; peso:
1 oz., 11 .00")
Cúbrase con tapa para microondas
Cúbrase con tapa para microondas
Rebanadas (grosor 1") 4
rebanadas
80 6 - 7 min. 5 - 7 min.
Guía para cocinar pollo, Las aves es uno de los alimentos más populares y el pollo en el microondas es uno de los
mejores usos de su horno de microondas. El pollo se mantiene jugoso y tierno en el horno de microondas. Sin embargo,
la jugosidad evita que se doren excepto cuando la piel se seca lo suficiente como para cambiar de color. El tiempo de
reposo es importante, ya que permite que el interior termine de cocinarse sin endurecer la delicada carne de pechuga.
Pollo Entero
100
8 - 10 min.
10 - 15 min.
Coloque la pechuga hacia arriba
Trozos de Pollo
100
8 - 9 min.
7 - 10 min.
Use rejilla para cocinar y deje reposar
Pavo
80
9 - 11 min.
10 -15 min.
Cúbrase antes de servir
Codornices
100
9 - 11 min.
7 - 10 min.
Pechuga de Pavo 80 9 - 10 min. 5 - 7 min.
Reacomode y Cúbrase con tapa para
microondas

SP
19
Los quesos se derriten rápida y suavemente. Cuando se sirve queso como aperitivo, el sabor está en su punto máximo cuando se sirve a
temperatura ambiente. Utilice un nivel de potencia bajo para la fusión. El queso se derrite mejor cuando se tritura y se calienta con leche u otros
líquidos. Revuelva las mezclas de queso varias veces para que se calienten uniformemente.
Los huevos se cocinan de manera diferente por microondas. El alto contenido de grasa de las yemas de huevo absorbe
energía, por lo que las yemas se cocinan más rápido que las claras. Es fácil escalfar huevos en un horno de microondas,
pero si desea yemas suaves, retire los huevos del horno antes de que las claras estén completamente cocidas. Un breve
tiempo de reposo permite que las claras se fijen sin cocinar demasiado las yemas. Revise los huevos para completar la
cocción temprano, se endurecen cuando están demasiado cocidos. Cuando los huevos y las yemas se mezclan para
tortillas, huevos revueltos o natillas, se cocinan de manera más uniforme y necesitan menos agitación que durante los
métodos de cocción convencionales. No intente cocinar huevos con cáscara. El vapor puede acumularse dentro de las
cascaras, haciendo que estallen.
1 1 Cucharada 2 Cucharada 1 - 2 min.
Coloque el agua en una cazuela mediana. Cocine a
fuego alto hasta que hierva, rompa los huevos uno a
la vez en un plato separado. Perfore la yema con un
pico de madera y pase el huevo con cuidado por
agua caliente, cocine como se indica en la tabla.
2 1 Cucharada 2 Cucharada 2 - 3 min.
4 2 Cucharada 4 Cucharada 3 - 4 min.
1 1 1/2 Tazas 4- 6 min. 1 min. 2 min.
Coloque el agua en una cazuela mediana. Cocine a
fuego alto hasta que hierva, rompa los huevos uno a
la
vez. En un plato separado, perfore la yema con un
pico
de madera.
Pase el huevo con cuidado por agua caliente, cocine
como se indica en la tabla.
2 1 1/2 Tazas 4- 6 min. 1 1/2 - 2 min 2 min.
4 2 Tazas 6- 7 min. 2 1/2 - 3 min. 2 min.
Satisfaga el apetito con deliciosa sopas preparadas en su horno de microondas. Adapta tus sopas favoritas usando
tiempos y técnicas de cocción similares.
Tipo de Comida
Nivel de
Potencia
Tiempo de cocción
Tiempo de
Espera
Notas Especiales
Condensados Enlatados
Crema de Frijoles o
Champiñones (10 1/2 - 11
1/2 oz.)
Con Agua
Con Leche
100
80
5 - 6 min.
6 - 7 min.
2 - 3 min.
2 - 3 min.
Revuelva a la mitad del
tiempo de Coccion, Cúbrala
con unat apa para
microondas.
Mezcla de sopas
deshidratadas
100
6 - 7 min.
2 - 3 min.
Agregue Agua, cúbrala. con una
tapa para microondas
1 sobre de (10 1/2 oz.)
50
3 - 4 min.
Revuélvalo dos veces
Caldo (10 1/2 oz.)
100
4 - 5 min.
2 - 3 min.
Revuélvalo dos veces, cúbralo
con. una tapa para microondas.
GUÍA DE COCCIÓN (CONTINUACIÓN)

SP
20
La investigación nutricional indica que muchas verduras y frutas calentadas en el microondas pierden menos vitamina C
soluble en agua que cuando se cocinan convencionalmente. Esto se debe al menor tiempo de cocción y al hecho de que
se necesita menos agua de cocción al calentar frutas y verduras en el microondas. Lo mejor de todo es que las verduras
mantienen su color, textura y sabor frescos. Las verduras deben de ser cubiertas con una envoltura de plástico ventilada
o una tapa de cazuela de plástico ventilada dentro del microondas. Las verduras cocidas en su pele, como las papas,
están bien cubiertas y deben pincharse con un tenedor antes de cocinarlas para liberar el exceso de vapor. Para asegurar
una cocción uniforme, las verduras deben cortarse en trozos uniformes y agitarse durante el tiempo de cocción. Siempre
agregue sal al agua antes de agregar verduras. Reduzca el tiempo uno o dos minutos para obtener una textura crujiente y
tierna. Aumente el tiempo para una textura suave. Recuerde dejar reposar de dos a cinco minutos después de cocinar
porque, como lo hacen la mayoría de los alimentos, las verduras continuarán cocinándose después de que se retiren del
horno de microondas.
Espárragos
Puntas (1 lb.)
1/4 taza
7 - 8 min.
2 min.
Cacerola Mediana. reacomodar
una vez
Cortes (1 lb.)
1/2 taza
7 - 8 min.
2 min.
Frijoles Frescos Verdes
(1/2 lb.)
1/4 taza 6 - 7 min. 2 min. Revuelva dos veces
Frijoles Verdes
Congelados (1/2 lb.)
2 cucharadas 7 1/2 - 8 1/2 min. 2 min. Revuelva dos veces
Chicharos verdes(2
tazas)
1/4 taza 6 - 7 min. 2 min. Cacerola pequeña. Revuelva dos veces.
Brócoli (2 tazas) 1/4 taza 6 - 7 min. 2 min.
Cacerola mediana
Reacomodar durante el tiempo de cocción
Col de Bruselas (1 lb.) 1/4 taza 8 - 9 1/2 min. 2 - 3 min. Cacerola mediana. Revuelva una vez
Repollo (1 lb.)
1/4 taza
7 - 8 min.
2 - 5 min.
Reacomodar durante el tiempo de cocción
Piezas de Coliflor (1
cabeza) 1/4 taza 8 - 9 min. 2 - 5 min.
Cúbrase con tapa para microondas, Revuelva
una vez.
Champiñones en
rebanadas (1/2 lb.)
2 cucharadas 5 - 6 min. 2 - 3 min. Cacerola pequeña, revuelva una vez.
Las cazuelas pueden requerir agitación ocasional para distribuir el calor. Se cocinan de manera más uniforme cuando se hacen con
ingredientes de tamaño y forma similares. Debido a su menor tiempo de cocción, las cazuelas cocinadas en el horno de microondas
generalmente necesitan menos líquido. Cazuelas con salsas de crema y queso, o carnes que necesitan una cocción más lenta para
ablandarse, cocinan mejor en el nivel de potencia 40. Cuando cocine una cazuela favorita, haga dos y congele la segunda para usarla en el
futuro. Alinee la Cazuela o fuente para hornear con envoltura de plástico. Transfiera los alimentos cocinados al recipiente forrado y
congélelos. Tan pronto como la comida se congele en la forma del plato, retírela y envuélvala con papel para congelador. Más tarde se
puede desenvolver y devolver al contenedor para descongelar y calentar.
Muchas cazuelas preparadas tipo caja están disponibles en los estantes de los supermercados. Muchos tienen alimentos liofilizados o
alimentos evaporados incluidos. Los períodos de cocción son tan cortos que puede que no haya tiempo para que los alimentos absorban la
humedad lo suficiente y reconstituyan los alimentos. Para preparar este tipo, hierva la cantidad de agua recomendada en el paquete.
Agregue los fideos (cuando estén incluidos), cubra y cocine durante aproximadamente 10 minutos. Deje que los fideos permanezcan
cubiertos durante 10 minutos adicionales, enjuague con agua tibia y escurra. Luego siga las instrucciones del paquete para preparar la
mezcla. Recalentar de cuatro a seis minutos antes de servir.
GUÍA DE COCCIÓN (CONTINUACIÓN)

SP
21
GUÍA DE COCCIÓN (CONTINUACIÓN)
Las salsas hierven rápidamente, especialmente aquellas que contienen leche. Tan pronto como se abre la puerta, la cocción se detiene. Si
los ingredientes no se toman directamente del refrigerador, el tiempo de cocción será menor que el indicado en la receta. Revuelva la salsa
rápidamente, aproximadamente cada 30 segundos para eliminar los grumos. Asegúrese de usar un recipiente dos veces más grande que la
cantidad de líquido para evitar que hierva. Se puede dejar una cuchara de madera en el plato mientras se cocina la salsa para remover
fácilmente. Si la salsa se agita lentamente, el tiempo de cocción puede requerir unos 15 segundos más. Si lo desea, se puede usar una
medida de vidrio de un cuarto de galón para preparar algunas salsas.
1 Tasa,
Salsa delgada
1 Cucharada 1 Cucharada 1 Taza 30 segundos 2 1/2-3 1/2 min.
Cocine a plena potencia según
las indicaciones
o hasta que espese,
revolviendo una vez
Deje reposar, tapadlo antes de
servir.
Salsa Mediana
2 Cucharadas
2 Cucharadas
1 Taza
1 min.
2 1/2-3 1/2 min.
Salsa Espesa
3 Cucharadas
3 Cucharadas
1 Taza
1 min.
3 -4 Mins.
1 Tasa,
Salsa delgada
1 Cucharada
1
Cucharada
1 Taza
2 1/2-3 1/2 min.
Cocine a plena potencia
según las indicaciones
o hasta que espese,
revolviendo una vez
Deje reposar, tapadlo,
antes de servir.
Salsa Mediana
1 Cucharada
1
Cucharada
1 Taza
3-4 min.
Salsa espesa
1 Cucharada
1
Cucharada
1 Taza
3-4 min.
Los sándwiches se calientan muy rápidamente porque, al ser porosos, tienen una baja densidad. Dado que el relleno suele ser más denso
que el pan o los panecillos, el relleno determina el tiempo de calentamiento. Sorprendentemente, el relleno siempre estará más caliente de
lo que se siente el pan. Se debe tener cuidado de no cocinar demasiado ya que el pan se volverá duro. Use varias rebanadas finas de
carne. Las rodajas finas se calientan más rápidamente y son mejores que una rebanada gruesa. La rebanada gruesa de calentamiento lento
a menudo hace que el pan se cocine demasiado antes de que la carne esté caliente. Los sándwiches se pueden colocar en un plato de
papel, servilleta o toalla de papel para calentar. El sándwich debe cubrirse con una toalla de papel apta para microondas. Retire la envoltura
inmediatamente después del calentamiento. Los panes y panecillos congelados ya horneados se pueden usar para sándwiches. El relleno,
sin embargo, debe descongelarse primero. El pan tostado está bien para sándwiches y proporciona una base firme. La parte tostada se
calienta solamente; No se produce más tostado.
Sándwich
(6 oz.)
1
2
4
1 min.
1 1/2-2 min.
3 - 4 m i n .
Coloque en plato para microondas
Hamburguesa
1
1 min. Cúbrase con tapa para microondas
Cúbrase con papel para microondas
Coloque en plato para microondas
(4 oz.)
4
3 - 4 m i n .
Perro Caliente (2 oz.)
4
1 1/2-2 min.
Sándwich Sloppy Joe
4
4 min.

SP
22
GUÍA DE COCCIÓN (CONTINUACIÓN)
El arroz crudo de grano largo tarda en rehidratarse. El tiempo de microondas es un poco más corto que el convencional,
pero la mayor ventaja es la facilidad con la que puedes preparar arroz esponjoso sin pegarse ni quemarlo. El arroz cocido
y la pasta se recalientan fácilmente en el horno microondas sin pérdida de sabor o textura. No se necesita agua adicional
para evitar que se pegue o se seque, por lo que no hay peligro de cocinar demasiado el arroz y la pasta o diluir las
salsas.
Fideos de huevo
4 tazas
1 cucharada
1 cucharada
100
6 1/2 - 7 1/2 min.
2 - 5 min.
Macarrones
4 tazas
1 cucharada
1 cucharada
100
8 - 10 min.
2 - 5 min.
Espagueti
4 tazas
1 cucharada
1 cucharada
100
8 - 10 min.
2 - 5 min.
Fideos para
Lasaña
4 tazas
1 cucharada
1 cucharada
100
12 - 14 min.
2 - 5 min.
100
6 - 7 min.
Arroz Blanco
(1 taza)
2 tazas
1 cucharada
1 cucharada
después
5 - 7 min.
80
10 - 13 min.
Arroz café (1 taza)
2 tazas
1 cucharada
1 cucharada
100
después
80
6 - 7 min.
23 - 28 min.
5 - 7 min.
Los cereales calientes aptos para microondas se pueden cocinar directamente en el recipiente de cereales y facilitan la
limpieza.
,
Una gran variedad de platos especiales y cenas están disponibles y las selecciones continúan aumentando. El mercado
está cambiando rápidamente, por lo tanto, es imposible enumerar los alimentos y tipos disponibles y recomendar
procedimientos de cocción. En este libro sólo podemos dar instrucciones generales para ayudarle.
Para preparar una cena de televisión, siga las instrucciones del fabricante para cocinar con hornos microondas. Para
cocinar una cena de televisión se requerirá aproximadamente de cinco a siete minutos para que la comida se descongele
y se caliente a la temperatura para cocinarse (dependiendo de los tipos de alimentos). Permita que la envoltura de
plástico permanezca sobre el plato durante dos minutos para permitir que el calor se iguale. Las cenas que contienen
puré de papas han presentado un pequeño problema debido a la gran masa compacta de este alimento en particular. Es
posible que desee quitar aproximadamente la mitad del puré de papas después de comenzar la descongelación, luego
extienda las papas restantes sobre la sección individual de la bandeja. Calienta el puré de papas retirado en un plato
individual. Para los alimentos que deben estar crujientes cuando se completa la cocción, retire la envoltura de plástico y
use el asador de un horno convencional para que los alimentos queden crujientes.
Estos pueden ser preparados comercialmente o congelados en casa. Coloque el recipiente de alimentos congelados en
el horno y caliente solo hasta que los alimentos comiencen a descongelarse y se puedan quitar fácilmente. Vacíe el
contenido en una cazuela o plato para servir y continúe descongelando y calentando. No caliente los alimentos en
recipientes de papel de aluminio. Para cocinar superficies especiales crujientes y doradas, use el asador de un horno
convencional. Si se que se caliente en un recipiente de plástico a la temperatura de cocción, el recipiente se deformará o
se derretirá por el alto calor de los alimentos. Tenga cuidado.
Para preparar estos alimentos, corte la bolsa de plástico. Un corte tipo X ayudará a retirar la comida al final del tiempo de
cocción. Coloque el lado cortado hacia abajo en un plato para servir (sin adornos de metal). Caliente los alimentos que no
sean verduras durante unos tres minutos. Las verduras congeladas requieren alrededor de ocho a nueve minutos y medio
de tiempo de cocción. Permita que la bolsa permanezca sobre la comida durante unos dos minutos para dar tiempo a que
el calor se iguale uniformemente. Los alimentos preparados en queso o salsa blanca deben retirarse de la bolsa y
colocarse en una cazuela de vidrio y revolverse para evitar la cocción excesiva de la salsa alrededor de los bordes del
plato.

SP
23
GUÍA DE COCCIÓN (CONTINUACIÓN)
Las sobras de comidas completas se pueden preparar con anticipación. Los alimentos se pueden congelar y preparar
para calentarlos rápidamente en el horno en cualquier momento. Elija alimentos adecuados para congelar y ponga
porciones en platos de papel, vidrio o porcelana (sin adornos metálicos). Envuelva con el papel congelador recomendado
y congele rápidamente. Al distribuir las porciones de alimentos en el plato, use aproximadamente la misma cantidad de
cada tipo de alimento para un calentamiento más uniforme. El puré de papas se calentará más rápido si se extiende
ligeramente y se ahueca con una palmadita de mantequilla en el centro. Para evitar que pequeños trozos de verduras,
maíz, guisantes, etc., se deshidraten durante el calentamiento, amontona bien cerca del centro del plato.
Siempre hay tiempo para hacer el postre con un horno de microondas. Los postres de frutas tienen un sabor y textura
notablemente frescos. Los pasteles calentados en el microondas son más altos y más tiernos que los horneados
convencionalmente; Dado que los pasteles suelen estar helados, el dorado no es importante. Las cortezas de pastel en el
microondas son excepcionalmente tiernas y escamosas, mientras que las delicadas natillas y pudines son fáciles de
preparar.
Pastel redondo
(Mesclado 9")
100
80
4 - 6
5 - 7
m i n .
m i n .
2 - 5
m i n .
Verter en un plato
para pasteles
engrasado y forrado
con papel encerado
Pastel redondo o
pastel
comida
de Angel
80
6 - 7
m i n .
2 - 5
m in.
Cubra con papel
encerado
Panecillos o muffins
(6 piezas)
50
5 - 7
m i n .
2 - 5
m in.
Reorganice una vez
Natillas (6 piezas)
50
11 - 13 min.
5 - 7
m in.
Reorganice una vez
Las galletas de barra para hornear funcionan mejor. El engrase o revestimiento de la fuente para hornear apta para microondas
es opcional.
Si el dorado insuficiente de la galleta no le satisface, glasea o agregue escarcha o colorante de alimentario a las masas blancas o
amarillas.
Se puede hacer una
bandeja
para
microondas cubriendo el cartón
con
papel
encerado.
Las placas redondas de vidrio para hornear y los moldes de anillo estriados o lisos para microondas funcionan mejor para los
pasteles. Puede hacer su propio molde de anillo para microondas colocando un vaso de tamaño mediano en el centro de una
fuente redonda de vidrio para hornear.
Debido a que sus pasteles elevarán el volumen más alto en la cocción en microondas, nunca llene las sartenes para microondas
a más de la mitad.
Reduzca el polvo de hornear y el bicarbonato de sodio en aproximadamente un cuarto al convertir una receta convencional.
Llene las tazas de muffins forradas con papel hasta la mitad de su capacidad, lo que permite que los muffins aumenten más de lo
normal.
Puede preparar sus propios panes y panecillos "dorados y listos horneándolos con anticipación en el horno de microondas.
Luego, colóquelos en un horno convencional para dorar antes de servir.
Los panes y panecillos deben recalentarse hasta el punto en que estén calientes al tacto. El sobrecalentamiento o la cocción
excesiva hacen que el pan sea duro y pegajoso.
Al hacer pan de levadura en un horno de microondas, elija una receta con harina de maíz, harina de trigo integral o harina de
centeno para lograr un mejor color.

SP
24
Fuente de alimentación
120V ~ 60Hz
Consumo de energía 1300W
Potencia de salida de microondas 1000W
Capacidad del horno 1.2pies cúbicos
Dimensiones exteriores 20.4(W) x 15.7 (D) x 12.8 (H) (pulgadas)
Peso 24.7 lb
Compruebe que el cable de alimentación esté bien enchufado.
Compruebe que la puerta esté bien cerrada.
Compruebe que el tiempo de cocción está establecido.
Verifique si hay un fusible fundido o si el interruptor esta disparado en el panel de su casa.
Compruebe que la función Bloqueo para niños no esté activada.
ESPECIFICACIONES

SP
25
GARANTIA LIMITADA
Emerson Radio Corp. garantiza que este producto está libre de defectos de fabricación en el material original, incluidas las piezas originales, y
mano de obra bajo el uso y las condiciones normales del hogar ("defecto de fabricación") por un período de un (1) año a partir de la fecha de compra
original, y si se usa en, los Estados Unidos. En caso de que sea necesario el servicio bajo esta garantía, Emerson proporcionará lo siguiente en
nuestro Centro de reparación de devoluciones, siempre que se verifique el defecto de fabricación junto con la fecha de compra:
*Servicio de reparación por un (1) año a partir de la fecha de compra original sin cargo por mano de obra y piezas.
*Reemplazo de un magnetrón defectuoso por siete (7) años a partir de la fecha de compra original (mano de obra no incluida después de los doce
(12) meses iniciales).
Para recibir autorización para devolver un artículo defectuoso, comuníquese con el Servicio al cliente de Emerson al 1-800-898-9020. Tenga su
número de modelo, número de serie y comprobante de compra fechado con usted cuando llame.
En caso de que el producto deba devolverse a Emerson:
*Empaque la unidad en una caja corrugada, fuerte y bien acolchada. Asegúrese de que el artículo esté bien embalado para evitar daños mientras
está en tránsito de regreso a nuestras instalaciones. Si el artículo sufre daños, NO será reemplazado y el consumidor será responsable de los
costos de flete de devolución para recibir su misma unidad de vuelta.
*Adjunte su cheque o giro postal pagadero a Emerson Radio por un monto de $15.00 para cubrir los costos de envío y manejo de devolución.
*Adjunte una nota con su nombre, dirección, número de teléfono, número de autorización de devolución y una breve razón para devolver la unidad.
*Adjunte una copia de su comprobante de compra (el servicio de garantía no se proporcionará sin un comprobante de compra fechado).
*El Envío de la unidad tendrá que ser pre pagada a través de UPS o paquete postal (ENVIELO ASEGURADO) y obtenga un número de para darle
seguimiento a su envió)
(a) Esta garantía no cubre: Daños a equipos no conectados correctamente al producto.
(b) Costo incurrido en el envío del producto hacia y desde el Centro de devolución de Emerson.
(c) Daños o funcionamiento incorrecto de la unidad causados por abuso del cliente, mal uso, negligencia o
incumplimiento de las instrucciones de funcionamiento (incluidas las instrucciones de limpieza) proporcionadas
con el producto.
(d) Ajustes ordinarios al producto realizados por el cliente como se describe en el manual del propietario.
(e) Productos no comprados en los Estados Unidos.
(f) Daños al producto si se usa fuera de los Estados Unidos.
ESTA GARANTÍA NO ES TRANSFERIBLE Y SE APLICA SOLO AL COMPRADOR ORIGINAL Y NO SE EXTIENDE A LOS
PROPIETARIOS POSTERIORES DEL PRODUCTO. CUALQUIER GARANTÍA IMPLÍCITA APLICABLE, INCLUIDA LA
GARANTÍA DE COMERCIABILIDAD, ESTÁ LIMITADA EN DURACIÓN A UN PERÍODO DE LA GARANTÍA EXPRESADA
SEGÚN LO DISPUESTO EN ESTE DOCUMENTO A PARTIR DE LA FECHA DE COMPRA ORIGINAL EN EL COMERCIO
MINORISTA Y NO SE APLICARÁN GARANTÍAS, YA SEAN EXPRESAS O IMPLÍCITAS, AL PRODUCTO A PARTIR DE
ENTONCES. EMERSON NO OFRECE NINGUNA GARANTÍA EN CUANTO A LA IDONEIDAD DEL PRODUCTO PARA
NINGÚN PROPÓSITO O USO EN PARTICULAR.
EL ALCANCE DE LA RESPONSABILIDAD DE EMERSON RADIO CORP. BAJO ESTA GARANTÍA LIMITADA ES LA
REPARACIÓN O REEMPLAZO PROVISTO ANTERIORMENTE Y, EN NINGÚN CASO, LA RESPONSABILIDAD DE
EMERSON RADIO CORP. EXCEDERÁ EL PRECIO DE COMPRA PAGADO POR EL COMPRADOR DEL PRODUCTO.
BAJO NINGUNA CIRCUNSTANCIA EMERSON RADIO CORP. SERÁ RESPONSABLE DE NINGUNA PÉRDIDA, DAÑO
DIRECTO, INDIRECTO, INCIDENTAL, ESPECIAL O CONSECUENTE QUE SURJA DE O EN CONEXIÓN CON EL USO
DE ESTE PRODUCTO. ESTA GARANTÍA ES VÁLIDA ÚNICAMENTE EN LOS ESTADOS UNIDOS DE AMÉRICA.
ESTA GARANTÍA LE OTORGA DERECHOS LEGALES ESPECÍFICOS. SIN EMBARGO, ES POSIBLE QUE TENGA
OTROS DERECHOS QUE PUEDEN VARIAR DE UN ESTADO A OTRO. ALGUNOS ESTADOS NO PERMITEN
LIMITACIONES SOBRE GARANTÍAS IMPLÍCITAS O EXCLUSIÓN DE DAÑOS CONSECUENTES, POR LO TANTO,
ESTAS RESTRICCIONES PUEDEN NO APLICARSE EN SU CASO.
El número de serie se puede encontrar en la parte posterior del gabinete. Le sugerimos que registre el número de serie
de su unidad en el espacio a continuación para futuras referencias.
Número de modelo: MWI1212SS
Número de serie:

EMERSON PART NO.: MWI1212SS-20231115-02 Printed in China
-
 1
1
-
 2
2
-
 3
3
-
 4
4
-
 5
5
-
 6
6
-
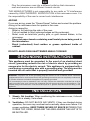 7
7
-
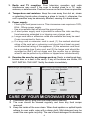 8
8
-
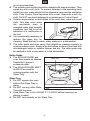 9
9
-
 10
10
-
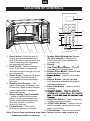 11
11
-
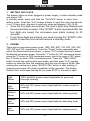 12
12
-
 13
13
-
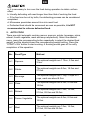 14
14
-
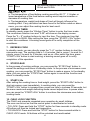 15
15
-
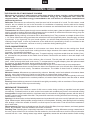 16
16
-
 17
17
-
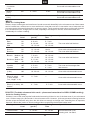 18
18
-
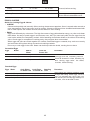 19
19
-
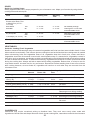 20
20
-
 21
21
-
 22
22
-
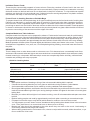 23
23
-
 24
24
-
 25
25
-
 26
26
-
 27
27
-
 28
28
-
 29
29
-
 30
30
-
 31
31
-
 32
32
-
 33
33
-
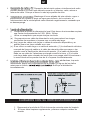 34
34
-
 35
35
-
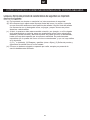 36
36
-
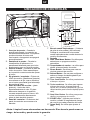 37
37
-
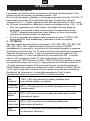 38
38
-
 39
39
-
 40
40
-
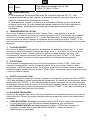 41
41
-
 42
42
-
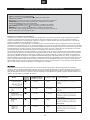 43
43
-
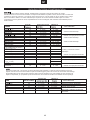 44
44
-
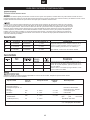 45
45
-
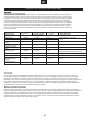 46
46
-
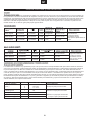 47
47
-
 48
48
-
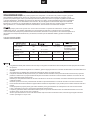 49
49
-
 50
50
-
 51
51
-
 52
52


Emerson MWI1212SS El manual del propietario
- Categoría
- Microondas
- Tipo
- El manual del propietario
En otros idiomas
- English: Emerson MWI1212SS Owner's manual