Telefunken MO21-SFE 44L CTL El manual del propietario
- Tipo
- El manual del propietario

FOUR POSABLE ELECTRIQUE 44L
MO21-SFE

FRANÇAIS
INSTRUCTIONS DE SÉCURITÉ
LIRE IMPÉRATIVEMENT CE MODE D’EMPLOI ET LE CONSERVER
AFIN DE POUVOIR LE CONSULTER ULTÉRIEUREMENT. DANS LE
CAS OÙ VOUS CÉDEZ CET APPAREIL Á UN TIERS, N’OUBLIEZ PAS
DE FOURNIR CETTE NOTICE AVEC L’APPAREIL.
CET APPAREIL EST DESTINÉ Á ETRE UTILISÉ DANS DES
APPLICATIONS DOMESTIQUES ET ANALOGUES TELLES QUE:
o DES COINS CUISINES RÉSERVÉS AU PERSONNEL DANS DES
MAGASINS, BUREAUX ET AUTRES ENVIRONNEMENTS
PROFESSIONNELS;
o DES FERMES;
o L’UTILISATION PAR LES CLIENTS DES HÔTELS, MOTELS ET
AUTRES ENVIRONNEMENTS Á CARACTERE RÉSIDENTIEL;
o DES ENVIRONNEMENTS DE TYPE CHAMBRES D’HÔTES.
TOUTE UTILISATION AUTRE QUE CELLE PRÉVUE POUR CET
APPAREIL, PAR EXEMPLE UNE UTILISATION COMMERCIALE, EST
INTERDITE. UNE UTILISATION NON CONFORME AU MODE
D’EMPLOI DÉGAGERAIT LA MARQUE DE TOUTE RESPONSABILITÉ
ET ENTRAÎNERAIT LA PERTE DE LA GARANTIE.
CET APPAREIL PEUT ÊTRE UTILISÉ PAR DES ENFANTS AGÉS D'AU
MOINS 8 ANS ET PAR DES PERSONNES AYANT DES CAPACITÉS
PHYSIQUES, SENSORIELLES OU MENTALES RÉDUITES OU UN
MANQUE D’EXPÉRIENCE ET DE CONNAISSANCES Á CONDITION
QU’ELLES AIENT REÇU UNE SUPERVISION OU DES INSTRUCTIONS
CONCERNANT L’UTILISATION DE L’APPAREIL EN TOUTE SÉCURITÉ
ET QU’ELLES COMPRENNENT LES DANGERS ENCOURUS. LES
ENFANTS NE DOIVENT PAS JOUER AVEC L’APPAREIL. LE
NETTOYAGE ET L’ENTRETIEN NE DOIVENT PAS ÊTRE RÉALISÉS

FRANÇAIS
PAR DES ENFANTS, SAUF S’ILS ONT PLUS DE 8 ANS ET QU’ILS
SONT SURVEILLÉS.
MAINTENIR L’APPAREIL ET SON CORDON HORS DE PORTÉE DES
ENFANTS DE MOINS DE 8 ANS.
LES ENFANTS NE DOIVENT PAS JOUER AVEC L’APPAREIL.
SI LE CÂBLE D’ALIMENTATION EST ENDOMMAGÉ, IL DOIT ÊTRE
REMPLACÉ PAR LE FABRICANT, SON SERVICE APRÈS-VENTE OU
DES PERSONNES DE QUALIFICATION SIMILAIRE AFIN D’ÉVITER
UN DANGER.
CET APPAREIL N’EST PAS DESTINÉ Á ÊTRE MIS EN
FONCTIONNEMENT AU MOYEN D’UNE MINUTERIE EXTÉRIEURE
OU PAR UN SYSTÈME DE COMMANDE Á DISTANCE SÉPARÉ.
LES SURFACES SONT DE NATURE Á CHAUFFER
PENDANT L'UTILISATION.
EN CE QUI CONCERNE LA FAÇON DE NETTOYER LES SURFACES EN
CONTACT AVEC LES ALIMENTS, RÉFÉREZ-VOUS AU PARAGRAPHE
CI-APRES DE LA NOTICE « MAINTENANCE ET NETTOYAGE ».
EN CE QUI CONCERNE LES DURÉES DE FONCTIONNEMENT ET LES
RÉGLAGES DE CUISSON, RÉFÉREZ-VOUS AU PARAGRAPHE CI-
APRÈS DE LA NOTICE « MISE EN SERVICE ET UTILISATION ».
MISE EN GARDE
APRÈS AVOIR DEBALLÉ VOTRE APPAREIL, ASSUREZ-VOUS
D’ABORD QU’IL N’A PAS ÉTÉ ABIMÉ. SI VOUS AVEZ UN DOUTE,
N’UTILISEZ PAS VOTRE APPAREIL, ET CONSULTEZ UNE PERSONNE
COMPÉTENTE.

FRANÇAIS
N’UTILISEZ JAMAIS D’ACCESSOIRES OU DE PIÈCES D’UN AUTRE
FABRICANT. L’UTILISATION DE CE TYPE D’ACCESSOIRES OU DE
PIÈCES ENTRAÎNE L’ANNULATION DE LA GARANTIE.
L’APPAREIL NE DOIT PAS ÊTRE UTILISÉ S’IL A CHUTÉ, S’IL
PRÉSENTE DES DOMMAGES APPARENTS, S’IL FUIT OU PRÉSENTE
DES ANOMALIES DE FONCTIONNEMENT.
DÉBRANCHEZ TOUJOURS LE PRODUIT EN CAS DE LONGUE
PÉRIODE SANS UTILISATION.
ENLEVEZ BIEN TOUS LES ÉLÉMENTS DE L’EMBALLAGE, ET NE
LAISSEZ PAS LES ÉLÉMENTS TELS QUE LES SACS PLASTIQUES, DU
POLYSTYRÈNE OU DES ÉLASTIQUES Á PORTÉE DES ENFANTS. CES
ÉLÉMENTS POURRAIENT ÊTRE DANGEREUX POUR EUX.
APRÈS DÉBALLAGE DE L’APPAREIL, ASSUREZ-VOUS DE POSER
L’APPAREIL SUR UNE SURFACE PLANE ET STABLE NE CRAIGNANT
PAS LA CHALEUR. VÉRIFIEZ QUE VOUS LAISSEZ UNE LIBRE
CIRCULATION DE L’AIR TOUT AUTOUR DE VOTRE APPAREIL.
RESPECTEZ ENTRE L’APPAREIL ET TOUT PLAN MURAL, UNE
DISTANCE DE 50CM VERS LE HAUT ET DE 50CM SUR LES COTÉS.
CET APPAREIL DOIT ÊTRE CONNECTÉ Á UNE PRISE RELIÉE Á LA
TERRE. SI VOUS DEVEZ UTILISER UNE RALLONGE, UTILISEZ
IMPÉRATIVEMENT UN MODÈLE EQUIPÉ D’UNE PRISE DE TERRE.
VÉRIFIEZ QUE LE VOLTAGE MARQUÉ SUR LA PLAQUE
SIGNALÉTIQUE CORRESPOND BIEN Á CELUI DE VOTRE
INSTALLATION. SI CE N’EST PAS LE CAS, N’UTILISEZ PAS VOTRE
APPAREIL, ET CONSULTEZ UNE PERSONNE COMPÉTENTE.
ASSUREZ-VOUS QUE L’INSTALLATION ÉLECTRIQUE EST
SUFFISANTE POUR ALIMENTER UN APPAREIL DE CETTE
PUISSANCE.

FRANÇAIS
PRENEZ TOUTES LES PRÉCAUTIONS NÉCESSAIRES POUR ÉVITER
QU’UNE PERSONNE NE SE PRENNE LES PIEDS DANS LE CÂBLE OU
SA RALLONGE.
AVANT TOUTE OPÉRATION DE NETTOYAGE, DÉBRANCHEZ ET
LAISSEZ REFROIDIR L’APPAREIL COMPLÈTEMENT.
NE JAMAIS PLONGER L’APPAREIL, SON FIL ÉLECTRIQUE ET SA
PRISE DE COURANT DANS L’EAU OU AUTRE LIQUIDE.
NE LE METTEZ PAS SUR D’AUTRES APPAREILS.
POUR VOTRE SECURITÉ, NOUS VOUS RECOMMANDONS DE NE
JAMAIS LAISSER VOTRE APPAREIL DANS UN ENDROIT EXPOSÉ
AUX INTEMPÉRIES ET A L’HUMIDITÉ.
NE JAMAIS UTILISER L’APPAREIL COMME CHAUFFAGE
D’APPOINT.
NE LAISSEZ PAS VOTRE APPAREIL BRANCHÉ SANS L’UTILISER.
IL EST CONSEILLÉ D’EXAMINER RÉGULIÈREMENT LE CÂBLE
D’ALIMENTATION POUR DÉCELER TOUT SIGNE DE
DÉTÉRIORATION ÉVENTUELLE, ET L’APPAREIL NE DOIT PAS ÊTRE
UTILISÉ SI LE CABLE EST ENDOMMAGÉ.
NE LAISSEZ PAS LE CORDON D’ALIMENTATION PENDRE DE LA
TABLE OU DU PLAN DE TRAVAIL SUR LEQUEL LE PRODUIT EST
POSÉ.
NE BRANCHEZ PAS LE PRODUIT ET N’APPUYEZ PAS SUR LES
BOUTONS DU PANNEAU DE COMMANDE SI VOS MAINS SONT
MOUILLÉES.
N’UTILISEZ PAS L’APPAREIL LES PIEDS NUS OU MOUILLÉS.
AVANT TOUTE OPÉRATION DE NETTOYAGE OU D’ENTRETIEN,
DÉBRANCHEZ L’APPAREIL POUR COUPER L’ALIMENTATION
ÉLECTRIQUE.

FRANÇAIS
PENDANT SON FONCTIONNEMENT, ÉVITEZ DE DÉPLACER
L’APPAREIL.
N’UTILISEZ PAS L’APPAREIL PROCHE DES RIDEAUX, MOBILIERS
TEXTILES OU PRODUITS INFLAMMABLES.
AVANT D’UTILISER L’APPAREIL, ASSUREZ-VOUS DE POSER
L’APPAREIL SUR UNE SURFACE STABLE NE CRAIGNANT PAS LA
CHALEUR.
LA TEMPÉRATURE DES SURFACES EST ÉLEVÉE PENDANT LE
FONCTIONNEMENT DE L’APPAREIL, CE QUI PEUT PROVOQUER
DES BRÛLURES. NE TOUCHEZ PAS LES SURFACES CHAUDES DE
L’APPAREIL (PARTIES MÉTALLIQUES ACCESSIBLES ET VITRE EN
VERRE).
EN COURS D’UTILISATION DE VOTRE APPAREIL, VEUILLEZ PENSER
Á TOUJOURS UTILISER LA POIGNÉE ET UNE PAIRE DE GANTS
POUR OUVRIR L’APPAREIL.
NE CHAUFFEZ PAS D’ALIMENTS EN BOUTEILLE OU EN BOÎTE NON
ADAPTÉS Á LA CUISSON EN FOUR ; CAR CES RÉCIPIENTS
POURRAIENT SE CASSER ET VOUS BRÛLER.
MANIPULEZ AVEC PRÉCAUTION LA PORTE EN VERRE DE VOTRE
APPAREIL : TOUT CHOC BRUTAL OU CHOCS THERMIQUES
EXCESSIFS PEUVENT GÉNÉRER LA CASSE DE LA VITRE.
S’IL ARRIVAIT QUE CERTAINES PARTIES DE L’APPAREIL OU QUE
CERTAINS ALIMENTS EN COURS DE CUISSON DANS L’APPAREIL
S’ENFLAMMENT ; NE TENTEZ JAMAIS DE LES ÉTEINDRE AVEC DE
L’EAU. ÉTOUFFEZ LES FLAMMES AVEC UN LINGE HUMIDE OU
UTILISEZ UN EXTINCTEUR EN ORIENTANT LE JET VERS L’APPAREIL
DANS LE SENS DU VENT.

FRANÇAIS
NE RANGEZ PAS DE PRODUITS INFLAMMABLES Á PROXIMITÉ OU
SOUS LE MEUBLE OÚ EST RANGÉ L’APPAREIL. NE FAITES PAS
FONCTIONNER L’APPAREIL A PROXIMITÉ DE MATÉRIAUX
INFLAMMABLES TELS QUE STORES, RIDEAUX, TENTURES, ETC.
NE PLACEZ JAMAIS DE PAPIER, CARTON OU PLASTIQUE DANS
L’APPAREIL AINSI QUE SUR SON DESSUS.
N’INTRODUISEZ RIEN DANS LES GRILLES DE VENTILATION ET NE
LES OBSTRUEZ PAS.
AVANT TOUTE OPÉRATION DE NETTOYAGE, VEUILLEZ TOUJOURS
ATTENDRE AU MINIMUM UNE HEURE QUE L’APPAREIL SOIT
FROID ET DÉBRANCHÉ.
NE SOULEVEZ PAS ET NE DÉPLACEZ PAS LE PRODUIT EN COURS
D’UTILISATION POUR ÉVITER TOUT RISQUE DE BRÛLURE.
NORMES DE SÉCURITÉ
CET APPAREIL EST CONFORME AUX DIRECTIVES ET NORMES
EN VIGUEURS.

FRANÇAIS
SOMMAIRE
DESCRIPTION .............................................................................................. 1
MISE EN SERVICE ET UTILISATION .............................................................. 2
Avant toute première utilisation ...................................................... 2
Utiliser votre appareil ...................................................................... 2
NETTOYAGE ET ENTRETIEN ......................................................................... 7
INFORMATION TECHNIQUE ........................................................................ 8
ENVIRONNEMENT ET RECYCLAGE .............................................................. 8

FRANÇAIS
1
DESCRIPTION
1. Poignée
2. Porte vitrée
3. Résistances chauffantes
4. Pieds
5. Bouton sélecteur fonctions chaleur
tournante et rôtisserie
6. Bouton sélecteur de thermostat
7. Indicateur lumineux de fonctionnement
8.
8. Bouton sélecteur mode de cuisson
9. Bouton minuteur
10. Plat lèchefrite
11. Grille
12. Poignée pour grille ou lèchefrite
13. Tournebroche
14. Poignée pour tournebroche

FRANÇAIS
2
MISE EN SERVICE ET UTILISATION
Avant toute première utilisation
1. Après avoir installé votre appareil sur une surface plate et stable.
2. Retirez toutes les étiquettes, les films de protection et tous les éléments de
calage ainsi que l’autocollant qui se trouvent sur et dans l’appareil.
3. Branchez l’appareil à une prise terre.
4. Avant toute première utilisation il est impératif de faire chauffer l’appareil à
vide afin de faire brûler la graisse de protection et d’éliminer les fumées et
odeurs qui se dégagent normalement d’un appareil neuf. Les étapes suivantes
vous indiquent la marche à suivre :
a. Mettez la grille et le plat lèchefrite à l’intérieur du four
b. Tournez le bouton de thermostat sur 200°C
c. Tournez le bouton de sélecteur de mode de cuisson et sélectionnez .
d. Mettez le minuteur sur 10 minutes.
e. L’indicateur lumineux de fonctionnement s’illumine pour vous avertir
que l’appareil est en cours de chauffe.
f. Aérez la pièce pendant cette opération.
g. Dès que vous entendez la minuterie indiquant la fin de la cuisson,
éteignez toutes les commandes de l’appareil.
h. Laissez refroidir l’appareil avant de nettoyer le four à l’aide d’un chiffon
humide et laver les accessoires (grille et lèchefrite) avec une éponge
humidifiée avec du liquide lave-vaisselle.
A NOTER: Des odeurs et des particules peuvent provenir de l’appareil lors des
premières utilisations. Ceci est normal et cessera rapidement.
Utiliser votre appareil
Vérifiez que l’appareil soit bien branché à une prise terre. Mettez votre
préparation dans le four avec les accessoires adéquats puis suivez les étapes
indiquées ci-dessous :

FRANÇAIS
3
1. Réglage du thermostat
Pour régler la température de cuisson, tournez le
bouton de thermostat dans le sens des aiguilles d'une
montre et sélectionnez la température appropriée en
fonction du plat que vous allez cuisiner.
2. Bouton sélecteur mode de cuisson
Pour régler le mode de cuisson, tournez le bouton sélecteur
mode de cuisson dans le sens des aiguilles d'une montre et
sélectionnez le mode de cuisson approprié en fonction du
plat que vous allez cuisiner.
Position Arrêt
Position cuisson voûte pour dorer, griller par le
dessus vos aliments
Position cuisson sole avec le fonctionnement de la
résistance du bas
Position cuisson voûte et sole avec le
fonctionnement des deux résistances
3. Bouton minuterie
Le bouton minuterie vous permet de régler votre temps de cuisson
de 0 à 60 min. Pour régler le temps de cuisson, tournez le bouton
minuterie dans le sens des aiguilles d'une montre et sélectionnez
le temps de cuisson approprié en fonction du plat que vous allez
cuisiner. Dès que vous activez le minuteur, le témoin indicateur de
fonctionnement s’allume indiquant que le four est en marche.
Lorsque le temps programmé est écoulé, le minuteur émet un son
pour annoncer la fin de cuisson et le four s’arrêtera
automatiquement de cuire. Vous pouvez éteindre le four
manuellement pendant la cuisson en tournant le minuteur dans le
sens inverse des aiguilles d’une montre jusqu’à la position 0.
A noter : Votre mini four est équipé de l’éclairage intérieur. Ce dernier est activé lors de la
mise en marche du bouton minuterie.

FRANÇAIS
4
4. Bouton sélecteur fonction chaleur tournante et /ou rôtisserie
Ce bouton vous permet d’utiliser la fonction chaleur tournante
et / ou rôtisserie en simultané avec les différents modes de
cuisson.
Position arrêt
Position chaleur tournante
Position rôtisserie
Position rôtisserie et chaleur tournante
Utiliser la fonction chaleur tournante et/ou rôtisserie avec les différents modes de cuisson :
o Tournez le bouton sélecteur fonction chaleur tournante et / ou rôtisserie ; sélectionnez la
position fonction désirée. Puis réglez le mode de cuisson en tournant le bouton sélecteur
mode de cuisson dans le sens des aiguilles d'une montre et sélectionnez le mode de
cuisson approprié en fonction du plat que vous allez cuisiner
Sélection mode
Type de cuisson
+
Chaleur tournante et position cuisson voûte pour dorer, griller par le dessus
vos aliments pour une meilleure répartition de la chaleur.
+
Chaleur tournante et position cuisson sole avec le fonctionnement de la
résistance du bas pour une meilleure répartition de la chaleur.
+
Chaleur tournante et position cuisson voûte et sole avec le fonctionnement
des deux résistances pour une meilleure répartition de la chaleur.
+
Fonction rôtissoire et position cuisson voûte pour dorer, griller par le dessus
vos aliments.
+
Fonction rôtissoire et position cuisson sole avec le fonctionnement de la
résistance du bas.
+
Fonction rôtissoire et position cuisson voûte et sole avec le fonctionnement
des deux résistances.
+
Chaleur tournante avec fonction rôtissoire et position cuisson voûte pour
dorer, griller par le dessus vos aliments pour une meilleure répartition de la
chaleur.

FRANÇAIS
5
+
Chaleur tournante avec fonction rôtissoire et position cuisson sole avec le
fonctionnement de la résistance du bas pour une meilleure répartition de la
chaleur.
+
Chaleur tournante avec fonction rôtissoire et position cuisson voûte et sole
avec le fonctionnement des deux résistances pour une meilleure répartition
de la chaleur.
Quelques conseils pour obtenir un usage optimum de votre four :
Ne pas surchargez le four.
Bien placez les aliments au centre de l’appareil.
N’ouvrez pas la porte trop fréquemment pendant la cuisson pour éviter les déperditions
de chaleur.
Jetez un coup d’œil de temps en temps à vos plats pendant cuisson.
Utiliser la fonction chaleur tournante et/ou rôtisserie avec les différents modes de
cuisson :
Mise en place de votre tournebroche :
Ne jamais préchauffer votre four pour éviter tout risque de brûlure ! Et toujours utiliser
la poignée du tournebroche pour sortir la viande du four.
Mettez d’abord le plat-lèchefrite dans le four au dernier cran à son niveau le plus bas (1).
Dévisser les deux broches se situant sur le tournebroche et embrochez le poulet au centre
du tournebroche en vérifiant qu’il ne dépasse pas les repères 2 et 3. Veillez à ce que le
poulet soit bien ficelé. Remettez les deux broches, les piquer dans la viande et visser
fermement tout en veillant à ce qu’elles ne dépassent pas les repères 2 et 3.
Positionnez le tournebroche en le rentrant dans ses deux encoches ; vérifiez qu’il soit bien
enclenché avant de démarrer votre cuisson.

FRANÇAIS
6
5. Utilisation des poignées
Positionnez les crochets de la partie
inférieure de la poignée sur le centre
de la grille (comme sur la photo ci-
contre).
Positionnez les crochets de la partie
supérieure de la poignée sur le centre
de la grille (comme sur les photos ci-
contre).
Positionnez les encoches de la poignée
au emplacement prévues du
tournebroche (comme sur les photos
ci-contre).
Attention : Bien veillez à positionner la poignée au centre afin d’éviter un danger et manipulez
avec précaution.
Pour les plats lourds, nous vous conseillons d’utiliser un gant anti-chaleur à la place de la poignée,
pour récupérer votre plat.

FRANÇAIS
7
NETTOYAGE ET ENTRETIEN
Votre four est équipé de parois internes autonettoyantes qui s’activent
automatiquement à chaque fonctionnement. Toute éclaboussure
survenant pendant la cuisson et entrant en contact avec le revêtement
autonettoyant est oxydée en cours de cuisson.
Note : Pour ne pas endommager le revêtement autonettoyant, évitez
l’emploi des éponges métalliques et des produits d’entretiens abrasifs.
Vérifiez que toutes les commandes de votre four sont en arrêt.
Débranchez l’appareil de sa prise.
Toujours laissez l’appareil refroidir au minimum une heure avant de
démarrer l’opération de nettoyage.
Retirez la grille et le plat-lèchefrite, les lavez avec une éponge imbibée
de liquide lave-vaisselle à pH neutre puis les rincez à l’eau avant de
les sécher (air libre ou avec un chiffon).
Nettoyez la surface intérieure et extérieure avec un chiffon doux ou
une éponge imbibée avec un produit à Ph neutre. N’utilisez jamais
d’éponges métalliques, d’objets tranchants ou pointus pour retirer les
dépôts dans le four.
Pour nettoyer la porte vitrée, utilisez un chiffon imbibé avec un
produit spécial « Vitres » puis séchez la vitre avec un chiffon sec et
propre.
Ne passez jamais le four sous l’eau du robinet.
Pensez à nettoyer régulièrement votre four afin d’enlever les dépôts
de nourriture et de graisse sur les parois pour optimiser son
fonctionnement.
ATTENTION : Avant toute opération de nettoyage manuelle, veuillez toujours attendre
au minimum une heure que votre four soit froid et débranché ! N’utilisez pas de produits
toxiques et agressifs tel que alcools à brûler, décapants industriels, solvants pour nettoyer
votre four car ces derniers risquent de l’endommager.

FRANÇAIS
8
INFORMATION TECHNIQUE
Modèle
MO21-SFE
Capacité
44L
Tension d’alimentation
220V-240V ~50Hz/60Hz
Puissance
2000W
ENVIRONNEMENT ET RECYCLAGE
La directive européenne sur les Déchets des Equipements Electriques et Electroniques
(DEEE), exige que les appareils ménagers usages ne soient pas jetés dans le flux
normal des déchets municipaux. Les appareils usagés doivent être collectés
séparément afin d'optimiser le taux de récupération et le recyclage des matériaux qui
les composent, et réduire l'impact sur la santé humaine et l'environnement.
Le symbole de la poubelle barrée est apposé sur tous les produits pour rappeler les obligations
de collecte séparée. Les consommateurs devront contacter les autorités locales ou leur
revendeur concernant la démarche à suivre pour l'enlèvement de leur vieil appareil.
Lorsqu’il ne fonctionnera plus, ne jetez pas l’appareil avec les ordures ménagères mais déposez-
le dans un centre de collecte agréé afin qu’il puisse être recyclé. Vous contribuerez ainsi à la
protection de l’environnement.
Importé par Vestel France, 17 rue de la Couture – 94563 Rungis CEDEX
Cette notice est aussi disponible sur le site suivant: http://pieces-detachees.sogedis.fr/
Pour en savoir plus :
www.quefairedemesdechets.fr

OVEN 44L
MO21-SFE

ENGLISH
SAFETY WARNINGS
READ CAREFULLY THE INSTRUCTIONS BEFORE INSTALLING AND
USING THIS APPLIANCE. IN THE CASE YOU RESELL THIS
APPLIANCE, PLEASE MAKE SURE TO PROVIDE THIS INSTRUCTION
MANUAL TO YOUR BUYER.
THIS APPLIANCE IS INTENDED TO BE USED IN HOUSEHOLD AND
SIMILAR APPLICATIONS SUCH AS:
o STAFF KITCHEN AREAS IN SHOPS, OFFICES AND OTHER
WORKING ENVIRONMENTS;
o FARM HOUSES;
o BY CLIENTS IN HOTELS, MOTELS AND OTHER RESIDENTIAL TYPE
OF ENVIRONMENTS;
o BED AND BREAKFAST TYPE ENVIRONMENTS.
IT SHOULD NOT BE USED FOR ANY OTHER PURPOSE OR IN ANY
OTHER APPLICATION, SUCH AS FOR NON-DOMESTIC USE OR IN A
COMMERCIAL ENVIRONMENT. ANY COMMERCIAL USE,
INAPPROPRIATE USE OR FAILURE TO COMPLY WITH THE
INSTRUCTIONS, THE MANUFACTURER ACCEPTS NO
RESPONSIBILITY AND THE GUARANTEE WILL NOT APPLY.
THIS APPLIANCE CAN BE USED BY CHILDREN AGED FROM 8 YEARS
AND ABOVE AND PERSONS WITH REDUCED PHYSICAL, SENSORY
OR MENTAL CAPABILITIES OR LACK OF EXPERIENCE AND
KNOWLEDGE IF THEY HAVE BEEN GIVEN SUPERVISION OR
INSTRUCTION CONCERNING USE OF THE APPLIANCE IN A SAFE
WAY AND UNDERSTAND THE HAZARDS INVOLVED. CHILDREN
SHALL NOT PLAY WITH THE APPLIANCE. CLEANING AND USER
MAINTENANCE SHALL NOT BE MADE BY CHILDREN UNLESS THEY
ARE OLDER THAN 8 AND SUPERVISED.

ENGLISH
KEEP THE APPLIANCE AND ITS CORD OUT OF REACH OF
CHILDREN LESS THAN 8 YEARS.
CHILDREN SHALL NOT PLAY WITH THE APPLIANCE.
IF THE SUPPLY CORD IS DAMAGED, IT MUST BE REPLACED BY THE
MANUFACTURER, ITS SERVICE AGENT OR SIMILARLY QUALIFIED
PERSONS IN ORDER TO AVOID A HAZARD.
APPLIANCES ARE NOT INTENDED TO BE OPERATED BY MEANS OF
AN EXTERNAL TIMER OR A SEPARATE REMOTE CONTROL SYSTEM.
SURFACES ARE LIABLE TO GET HOT DURING USE.
FOR THE DETAILS ON HOW TO CLEAN SURFACES IN CONTACT
WITH FOOD, PLEASE SEE SECTION “CLEANING AND
MAINTENANCE”.
REGARDING THE INFORMATION FOR OPERATING TIMES AND
SETTING, THANKS TO REFER TO THE BELOW PARAGRAPH OF THE
MANUAL “SET-UP AND USE”.
SAFETY CAUTIONS
AFTER UNPACKING THE APPLIANCE, MAKE SURE IT IS NOT
DAMAGED. IN CASE OF DOUBT, DO NOT USE THE APPLIANCE
AND CONTACT YOUR SUPPLIER OR A QUALIFIED TECHNICIAN.
THE USE OF ACCESSORY AND ATTACHMENTS NOT
RECOMMENDED BY THE MANUFACTURER MAY CAUSE INJURIES.
ALWAYS UNPLUG THE APPLIANCE IF NOT USING IT FOR A PERIOD
OF TIME.
THE APPLIANCE MUST NOT BE USED IF IT HAS BEEN DROPPED, IF
IT HAS ANY VISIBLE DAMAGE, IF IT LEAKS OR IF IT FUNCTIONS

ENGLISH
ABNORMALLY IN ANY WAY.
REMOVE ALL PACKAGING AND DO NOT LEAVE THE PACKAGING
MATERIAL SUCH AS PLASTIC BAGS, POLYSTYRENE AND ELASTIC
BANDS IN EASY REACH OF CHILDREN AS THEY MAY CAUSE
SERIOUS INJURIES.
AFTER UNPACKING YOUR APPLIANCE, MAKE SURE YOU HAVE
PUT IT ON A FLAT, STABLE AND HEAT-RESISTANT WORK PLAN OR
KITCHEN COUNTER WHICH CAN ALSO STAND A MINIMUM
TEMPERATURE OF 90°C. CHECK YOU HAD LEAVE ENOUGH SPACE
BETWEEN YOUR APPLIANCE AND SURROUNDING WALL TO LET
THE AIR CIRCULATE AROUND THE OVEN, THERE SHOULD BE AT
LEAST 50CM ON THE TOP AND 20CM ON SIDES.
THIS APPLIANCE MUST BE EARTHED. IF YOU NEED TO USE AN
EXTENSION LEAD, IT IS IMPORTANT THAT YOU USE A MODEL
FITTED WITH AN EARTH PLUG.
CHECK THAT THE VOLTAGE MARKED ON THE RATING PLATE
MATCHES TO YOUR LOCAL SUPPLY. IF NOT THE CASE, DO NOT
USE THE APPLIANCE AND SEEK FOR EXPERT ADVICE.
CHECK THAT YOUR ELECTRICAL INSTALLATION IS SUFFICIENT FOR
SUPPLYING AN APPLIANCE OF THIS WATTAGE.
TAKE ALL NECESSARY MEASURE WITH CORDS AND EXTENSIONS
TO AVOID ANY INJURIES WHILE IN USE.
NEVER IMMERSE IN WATER OR ANY OTHER LIQUID THIS
APPLIANCE, ITS ELECTRIC PLUG AND CORD.
ALWAYS UNPLUG THE APPLIANCE AND LET IT COOL DOWN
COMPLETELY BEFORE ANY CLEANING OPERATION.

ENGLISH
FOR YOUR OWN SAFETY, WE RECOMMEND YOU NEVER LEAVE
THE APPLIANCE IN A PLACE THAT IS EXPOSED TO HUMIDITY OR
INCLEMENT WEATHER CONDITION.
NEVER USE APPLIANCE AS AN ADDITIONAL HEATING SOURCE.
DO NOT PUT THIS APPLIANCE ON TOP OF OTHERS.
NEVER LEAVE APPLIANCE PLUGGED IN WHEN NOT IN USE.
THE SUPPLY CORD SHOULD BE REGULARLY EXAMINED FOR
SIGNS OF DAMAGE AND THE APPLIANCE IS NOT TO BE USED IF
THE CORD IS DAMAGED.
NEVER PLUG THE APPLIANCE AND TOUCH THE THERMOSTAT
WITH WET HANDS.
NEVER USE THE APPLIANCE WITH BARE OR WET FEET.
NEVER UNPLUG THE APPLIANCE BY PULLING THE POWER CABLE.
ALWAYS UNPLUG THE APPLIANCE FROM THE MAINS SOCKET.
NEVER MOVE THE APPLIANCE WHEN IN USE.
DO NOT USE THE APPLIANCE CLOSE TO ANY FABRICS.
WHEN IN USE, THE SURFACES OF YOUR APPLIANCE CAN REACH
VERY HIGH TEMPERATURES, WHICH MAY CAUSE BURNS. DO NOT
TOUCH THE HOT SURFACES OF THE APPLIANCE (ACCESSIBLE
METAL PARTS AND GLASS DOOR).
THE APPLIANCE MUST BE USED AND PLACED ON A FLAT, STABLE,
HEAT AND WATER RESISTANT SURFACE.
WHEN IN USE, ALWAYS THINK OF USING THE DOOR HANDLE AND
A PAIR OF GLOVES TO OPEN THE DOOR.
DO NOT REHEAT ANY FOOD PACKAGED IN GLASS BOTTLE OR
TINS, THEY ARE NOT SUITABLE TO BE USED IN AN OVEN AND
COULD BROKE INSIDE THE OVEN.
HANDLE WITH CARE THE DOOR OF YOUR OVEN: ANY STRONG

ENGLISH
SHOCK OR EXCESSIVE THERMAL CONSTRAINTS MAY CAUSE THE
GLASS TO BREAK.
IN THE CASE OF SOME PARTS OF THE OVEN OR FOODS DURING
THE COOKING CATCH FIRE, DO NOT ATTEMPT TO EXTINGUISH IT
WITH WATER. USE A DAMP CLOTH OR A BLANKET TO CHOKE THE
FLAMES OR USE AN EXTINGUISHER BY SPRAYING THE FOAMS
TOWARDS THE OVEN AND ON THE SAME DIRECTION THAN THE
WIND.
DO NOT STORE ANY FLAMMABLE PRODUCTS CLOSE TO OR
UNDER THE UNIT WHERE YOU PLACED THE OVEN. DO NOT PLACE
AND USE THE OVEN CLOSE TO ANY FURNITURE WITH FABRICS,
CURTAINS OR DRAPES.
DO NOT PUT PAPER, CARDBOARD OR PLASTIC IN THE APPLIANCE
AND DO NOT PLACE ANYTHING ON TOP (USTENSILS, RACKS,
OBJECTS, ETC.).
DO NOT PUT ANYTHING INTO THE VENTILATION SLITS, OR
OBSTRUCT THEM.
NEVER LEAVE THE OVEN UNATTENDED WHEN IN USE AND UNTIL
IT HAS COOLED DOWN (AROUND 1 HOUR).
BEFORE ANY CLEANING OPERATION, WAIT UNTIL THE
APPLIANCE IS COMPLETELY COLD AND HAS BEEN UNPLUGGED
FOR AT LEAST 1 HOUR.
DO NOT LIFT OR MOVE THE APPLIANCE WHEN IN USE TO AVOID
BURNS.
STANDARDS
THIS APPLIANCE IS CONFORMED TO CURRENT DIRECTIVES
AND STANDARDS.

ENGLISH
TABLE OF CONTENTS
DESCRIPTION .............................................................................................. 1
SET-UP AND USE ......................................................................................... 2
Before first use ......................................................................................... 2
Using your appliance ................................................................................ 2
CLEANING AND MAINTENANCE .................................................................. 6
TECHNICAL INFORMATION ......................................................................... 7
ENVIRONMENT AND RECYCLING ................................................................ 8

ENGLISH
1
DESCRIPTION
1. Door handle
2. Glass door
3. Heating elements
4. Feet
5. Convector and/or rotisserie function
button
6. Thermostat button
7. Light indicator
8.
8. Cooking method button
9. Timer button
10. Gril/roasting pan
11. Wire grill rack
12. Tray handle
13. Rotisserie spit
14. Rotisserie spit handle

ENGLISH
2
SET-UP AND USE
Before first use
1. Place your appliance on a flat and stable surface.
2. Remove any sticker, protective foil or storage cover on and inside the oven
3. Plug your appliance into a earth socket.
4. Before the firts use, always heat up the empty oven to burn the protective fat
and to eliminate smells when you buy new appliances. Follow the below steps:
a. Put the grill pan and the wire rack into the oven.
b. Turn the thermostat button and select 200°C.
c. Turn the cooking section button and choose .
d. Set the timer at 10min.
e. The light indicator illuminate to indicate the oven is functioning.
f. Air the room during this operation.
g. You will hear a buzz sound when it’s finished, turn off all the buttons.
h. Let the oven cool down before starting to clean the oven with a damp
cloth. To clean the accessories (wire rack and grill pan) you can use a
sponge humidified with a dishwashing liquid.
NOTE: It is normal that strange odor comes out from the unit for the first use. This
will cease after a short while.
Using your appliance
Always check you have plugged your oven into an earth socket. Put your
preparation into the oven, then follow the below steps:
1. Thermostat setting
To set the suitable cooking temperature for your dish,
turn the thermostat button clockwise then select the
suitable temperature for your dish.

ENGLISH
3
2. Cooking method setting
To set the suitable cooking method for your dish, turn the
cooking selection button clockwise then select the suitable
cooking method for your dish.
OFF position
Upper heating position, perfect for toasting or grilling
some bread
Lower heating position, that position means the
heating of the lower heating elements
Upper and lower heating position, that position
means the heating of the both heating elements
3. Timer setting
The timer button allows you to set up the correct time for your
dish. To set the suitable time for your dish, turn the timer button
clockwise then select the suitable time for your dish.
As soon as you have selected your time, the light indicator will
illuminate to indicate the oven is functioning.
The oven will turn off automatically at the end of the selected
time and a bell will ring.
You can turn off manually your oven during cooking by turning the
timer button anti-clockwise to the OFF position.
Note : Your oven is equipped with internal lighting which will be switch on when you start
setting the timer.
4. Convection fan and/or rotisserie function button
This button allow you to select the convection fan and/or
rotisserie function at the same time than using selection your
preferred cooking method.
OFF button
Convection fan
Rotisserie
Convection fan and rotisserie

ENGLISH
4
How to use the convection fan and/or rotisserie function with the cooking method setting :
o Turn convection fan and/or rotisserie function button and select the function you want
to use. And turn the cooking selection button clockwise to select the suitable cooking
method for your dish.
Mode
Cooking type
+
Convection fan with upper heating position, perfect for toasting or grilling
some bread.
+
Convection fan with lower heating position, that position means the
heating of the lower heating elements.
+
Convection fan upper and lower heating position, that position means the
heating of the both heating elements, perfect for cooking pastries.
+
Rotisserie with upper heating position.
+
Rotisserie with lower heating position, that position means the heating of
the lower heating elements
+
Rotisserie with upper and lower heating position, that position means the
heating of the both heating elements.
+
Convection fan + rotisserie with upper heating position.
+
Convection fan + rotisserie with lower heating position, that position
means the heating of the lower heating elements.
+
Convection fan + rotisserie with upper and lower heating position, that
position perfect for roasting poultries.
Tips for better use of your oven:
Do not overload your oven.
Put your dish in the center of the oven.
Do not open too frequently your oven during the cooking to prevent heat loss.
Try to keep an eye from time to time when baking your dish.

ENGLISH
5
How to set up your rotisserie spit:
Never preheat your oven when using the rotisserie function to avoid getting burned !
Always use the rotisserie spit handle when pull out the cooked meal from the oven !
Place the tray on the lowest position of the oven (1).
Unscrew the forks and thread the tied-up chicken onto the rotisserie spit. Check that the
chicken is in the center and does not pass beyond points 2 and 3. Then slide in the two
forks and check also they do not pass beyong points 2 and 3 before screwing them firmly
on the spit.
Rest the spit on the two notches located on the center left and right side of the oven,
make sure it is well positioned into its notches before starting your cooking
5. Using the handles
Set the tray handle facing the gril wire,
center the handle and push towards
the tray. Make sure the tray is located
in between the top and the bottom of
the handle, see picture.

ENGLISH
6
Set the tray handle facing the tray,
center the handle and push towards
the tray. Make sure the tray is located
in between the top and the bottom of
the handle, see picture.
Set the spit handle facing the
rotisserie spit, center the handle and
put it below the spit. make sure it is
well positioned under the two spit
notches, see picture.
Warning : Ensure that the handle is well positioned before lifting it. For heavy loads, always use
kitchen gloves to pull out the dish from the oven.
CLEANING AND MAINTENANCE
Your oven is equipped with permanent self-cleaning coating that
automatically, cleans itself during normal operation. Any spattering that
occurs while cooking and spattering the self-cleaning coating is oxidized
during the cooking operation.

ENGLISH
7
To preserve the permanent self-coating, do not use a metallic scouring
pads, hard brush or any others harsh cleaners to avoid scratching or
damaging the interior surface of the oven.
At the end of your cooking, check you have turn off all the buttons.
Unplug the oven.
Always let the appliance to cool down for at least one hour before
starting any cleaning operation.
Take out the wire rack and the grill pan, wash them with a sponge
humidified with a neutral pH dishwashing liquid, rinse them under
clear water and dry them with clean cloth.
When cleaning, use a soft cloth (or sponge) and neutral cleaner on
the interior and exterior surfaces of the oven.
Do not use a hard brush or any others cleaners to avoid scratching or
damaging the interior surface of the oven, tray, wire rack and the
rotisserie fork.
To clean the door glass, use a damp cloth with a glass product cleaner
then dry the glass door with a clean cloth.
Never put the oven under the water.
To optimize your oven heating system, clean regularly your oven to
take off the dirts, grease and food stains.
TECHNICAL INFORMATION
Model
MO21-SFE
Capacity
44L
Rated voltage
220V-240V ~50Hz/60Hz
Rated power input
2000W
WARNING: Always let your oven unplugged and cool down for at least one
hour before any cleaning operation! Do not use any toxic, solvent, industrial
or harsh cleaning products.

ENGLISH
8
ENVIRONMENT AND RECYCLING
Disposal of old electrical appliances
The European Directive on Waste Electrical and Electronic Equipment (WEEE)
requires that old household electrical appliances must not be disposed of in the
normal unsorted municipal waste stream. Old appliances must be collected
separately in order to optimize the recovery and recycling of the materials they contain, and
reduce the impact on human health and the environment.
The crossed out “wheeled bin” symbol on the product reminds you of your obligation, that when
you dispose of the appliance, it must be separately collected.
Consumers should contact their local authority or retailer for information concerning the correct
disposal of their old appliance.
Imported by Vestel France, 17 rue de la Couture – 94563 Rungis CEDEX
This manual instruction is available on the following website: http://pieces-detachees.sogedis.fr/
Pour en savoir plus :
www.quefairedemesdechets.fr

HORNO ELÉCTRICO DE SOBREMESA 44 l
MO21-SFE

ESPAÑOL
INSTRUCCIONES DE SEGURIDAD
LEA OBLIGATORIAMENTE ESTE MANUAL DE INSTRUCCIONES Y
CONSÉRVELO PARA CONSULTAS POSTERIORES. RECUERDE
ENTREGAR ESTA RESEÑA BREVE CON EL APARATO EN CASO DE
DEJARLO EN MANOS DE UN TERCERO.
ESTE APARATO ESTÁ DISEÑADO PARA SER UTILIZADO EN
APLICACIONES DOMÉSTICAS Y ANÁLOGAS TALES COMO:
o COCINAS RESERVADAS PARA EL PERSONAL DE TIENDAS,
OFICINAS Y OTROS AMBIENTES PROFESIONALES;
o GRANJAS;
o EL USO POR PARTE DE CLIENTES DE HOTELES Y MOTELES ASÍ
COMO DE OTROS ENTORNOS DE CARÁCTER RESIDENCIAL;
o ESTABLECIMIENTOS DE TIPO HOTELERO.
SE PROHÍBE CUALQUIER OTRO USO DEL PREVISTO PARA ESTE
APARATO, COMO POR EJEMPLO, UN USO COMERCIAL. LA
UTILIZACIÓN QUE NO CUMPLA CON EL MODO DE USO EXIMIRÁ
A LA MARCA DE CUALQUIER RESPONSABILIDAD Y
COMPRENDERÁ LA PÉRDIDA DE LA GARANTÍA.
ESTE APARATO PUEDE SER UTILIZADO POR NIÑOS MAYORES DE
8 AÑOS Y POR PERSONAS CON FACULTADES FÍSICAS,
SENSORIALES O INTELECTUALES REDUCIDAS O POR QUIENES NO
TENGAN LA EXPERIENCIA Y CONOCIMIENTOS NECESARIOS,
SIEMPRE QUE DICHAS PERSONAS SE ENCUENTREN
SUPERVISADAS O HAYAN RECIBIDO INSTRUCCIONES RELATIVAS
AL USO SEGURO DEL APARATO Y COMPRENDAN LOS RIESGOS
QUE CONLLEVA EL MISMO. MANTENGA EL APARATO Y SU CABLE
FUERA DEL ALCANCE DE LOS NIÑOS MENORES DE 8 AÑOS.
LIMPIEZA Y MANTENIMIENTO DEL USUARIO NO SERÁN HECHOS

ESPAÑOL
POR LOS NIÑOS A MENOS QUE SEAN MAYORES DE 8 Y
SUPERVISADO.
LOS NIÑOS NO DEBEN JUGAR CON EL APARATO.
SI EL CABLE DE ALIMENTACIÓN SE ENCUENTRA DAÑADO, ÉSTE
DEBE SER REEMPLAZADO POR EL FABRICANTE, SU SERVICIO
POSVENTA O POR UNA PERSONA COMPETENTE CON
CUALIFICACIÓN SIMILAR PARA EVITAR CUALQUIER DAÑO.
ESTE APARATO NO HA SIDO DISEÑADO PARA SER PUESTO EN
MARCHA MEDIANTE UN TEMPORIZADOR EXTERNO O POR UN
SISTEMA DE MANDO A DISTANCIA SEPARADO.
LAS SUPERFICIES SON SUSCEPTIBLES DE CALENTARSE
DURANTE EL USO.
EN RELACIÓN AL MODO DE LIMPIAR LAS SUPERFICIES EN
CONTACTO CON LOS ALIMENTOS, CONSULTE LA SECCIÓN
«LIMPIEZA Y MANTENIMIENTO».
EN LO QUE CONCIERNE A LA DURACIÓN DE FUNCIONAMIENTO Y
LOS AJUSTES DE COCCIÓN, REFIÉRASE AL PÁRRAFO QUE SIGUE A
CONTINUACIÓN DE LA RESEÑA BREVE «PUESTA EN MARCHA Y
UTILIZACIÓN».
PRECAUCIONES DE SEGURIDAD
DESPUÉS DE DESEMBALAR EL APARATO, COMPRUEBE
INMEDIATAMENTE QUE NO SE ENCUENTRA DAÑADO. EN CASO
DE DUDA, NO UTILICE EL APARATO Y CONSULTE A UNA PERSONA
COMPETENTE.
NUNCA UTILICE ACCESORIOS O PIEZAS DE OTRO FABRICANTE. EL
USO DE ESTE TIPO DE ACCESORIOS O PIEZAS IMPLICA LA
ANULACIÓN DE LA GARANTÍA.

ESPAÑOL
NO DEBE UTILIZAR EL APARATO SI SE HA CAÍDO, SI PRESENTA
DAÑOS APARENTES, SI TIENE FUGAS O PRESENTA ANOMALÍAS
EN EL FUNCIONAMIENTO.
DESENCHUFE SIEMPRE EL PRODUCTO EN CASO DE UN LARGO
PERÍODO DE INUTILIZACIÓN.
RETIRE CORRECTAMENTE TODOS LOS ELEMENTOS DEL
EMBALAJE Y NO DEJE DICHOS ELEMENTOS TALES COMO BOLSAS
DE PLÁSTICO, POLIESTIRENO O ELÁSTICOS AL ALCANCE DE LOS
NIÑOS. DICHOS ELEMENTOS PODRÍAN RESULTAR PELIGROSOS
PARA ELLOS.
TRAS DESEMBALAR EL APARATO, ASEGÚRESE DE COLOCARLO
SOBRE UNA SUPERFICIE PLANA, ESTABLE Y RESISTENTE AL CALOR.
ASEGÚRESE DE QUE EL AIRE CIRCULE LIBREMENTE ALREDEDOR
DE SU APARATO. RESPETE UNA DISTANCIA MÍNIMA, ENTRE EL
APARATO Y CUALQUIER ELEMENTO ARQUITECTÓNICO, DE 50
CM RESPECTO A LA VERTICAL Y DE 50 CM RESPECTO A LOS LADOS.
ESTE APARATO DEBE CONECTARSE A UN ENCHUFE CON TOMA
DE TIERRA. SI DEBE UTILIZAR UN ALARGADOR, USE
OBLIGATORIAMENTE UN MODELO EQUIPADO CON UNA TOMA
DE TIERRA.
COMPRUEBE QUE EL VOLTAJE INDICADO EN LA PLACA
DESCRIPTIVA SE CORRESPONDE CON EL DE SU INSTALACIÓN. SI
NO ES EL CASO, NO UTILICE EL APARATO Y CONSULTE A UNA
PERSONA COMPETENTE.
COMPRUEBE QUE LA INSTALACIÓN ELÉCTRICA RESULTA
SUFICIENTE PARA ALIMENTAR UN APARATO DE ESTA POTENCIA.
TOME TODAS LAS PRECAUCIONES NECESARIAS PARA EVITAR
QUE UNA PERSONA PISE EL CABLE O SU ALARGADOR.

ESPAÑOL
ANTES DE CUALQUIER OPERACIÓN DE LIMPIEZA, DESENCHUFE Y
DEJE ENFRIAR COMPLETAMENTE EL APARATO.
NUNCA SUMERJA EL APARATO, SU CABLE Y SU TOMA DE
CORRIENTE EN AGUA U OTRO LÍQUIDO.
NO LO COLOQUE ENCIMA DE OTROS APARATOS.
POR SU SEGURIDAD, LE RECOMENDAMOS QUE NUNCA DEJE EL
APARATO EN UN LUGAR EXPUESTO A LA INTEMPERIE Y LA
HUMEDAD.
NUNCA UTILICE EL APARATO COMO CALEFACCIÓN.
NO DEJE ENCHUFADO EL APARATO SIN UTILIZAR.
SE ACONSEJA EXAMINAR DE MANERA REGULAR EL CABLE DE
ALIMENTACIÓN PARA DETECTAR CUALQUIER SIGNO DE
DETERIORO EVENTUAL, EL APARATO NO DEBE SER UTILIZADO SI
EL CABLE ESTÁ DAÑADO.
NO PERMITA QUE EL CABLE DE ALIMENTACIÓN CUELGUE DE LA
MESA O DE LA ENCIMERA SOBRE LA QUE HA DEJADO EL
PRODUCTO.
NO ENCHUFE EL APARATO NI PULSE LOS BOTONES DEL PANEL DE
COMANDOS SI TIENE LAS MANOS HÚMEDAS.
NO UTILICE EL APARATO CON LOS PIES DESCALZOS O HÚMEDOS.
ANTES DE CUALQUIER OPERACIÓN DE LIMPIEZA O DE
MANTENIMIENTO, DESENCHUFE EL APARATO PARA CORTAR LA
CORRIENTE ELÉCTRICA.
DURANTE SU FUNCIONAMIENTO, EVITE MOVER EL APARATO.
NO UTILICE EL APARATO CERCA DE CORTINAS, MOBILIARIOS
TEXTILES O PRODUCTOS INFLAMABLES.

ESPAÑOL
ANTES DE UTILIZAR EL APARATO, PROCURE DEPOSITAR EL
APARATO SOBRE UNA SUPERFICIE PLANA Y ESTABLE RESISTENTE
AL CALOR.
LA TEMPERATURA DE LAS SUPERFICIES AUMENTA DURANTE EL
FUNCIONAMIENTO DEL APARATO, LO QUE PUEDE PROVOCAR
QUEMADURAS. NO TOQUE LAS SUPERFICIES CALIENTES DEL
APARATO (PARTES METÁLICAS ACCESIBLES Y VENTANA DE CRISTAL).
DURANTE LA UTILIZACIÓN DEL APARATO, PROCURE USAR
SIEMPRE EL ASA Y UN PAR DE GUANTES PARA ABRIRLO.
NO CALIENTE LOS ALIMENTOS CONTENIDOS EN BOTELLAS O
RECIPIENTES NO ADAPTADOS A LA COCCIÓN AL HORNO; LOS
RECIPIENTES NO ADECUADOS SON SUSCEPTIBLES A ROMPERSE Y
PODRÍAN OCASIONARLE QUEMADURAS.
MANIPULE CON CUIDADO LA PUERTA ACRISTALADA DE SU
APARATO: LOS GOLPES BRUSCOS Y LOS CHOQUES TÉRMICOS
EXCESIVOS PODRÍAN OCASIONAR LA RUPTURA DEL VIDRIO.
EN CASO DE QUE LLEGARAN A ARDER ALGUNAS PARTES DEL
APARATO O ALGÚN ALIMENTO DURANTE EL CURSO DE LA
COCCIÓN, NO INTENTE NUNCA APAGAR LAS LLAMAS CON AGUA.
SOFOQUE LAS LLAMAS CON UN TRAPO HÚMEDO O UTILICE UN
EXTINTOR ORIENTANDO EL DISPARO HACIA EL APARATO EN EL
SENTIDO DEL VIENTO.
NO DEJE PRODUCTOS INFLAMABLES CERCA O DEBAJO DEL MUEBLE
DONDE SE ENCUENTRE EL APARATO. NO PONGA EL APARATO EN
FUNCIONAMIENTO CERCA DE MATERIALES INFLAMABLES TALES
COMO ESTORES, CORTINAS, PERSIANAS, ETC.
NUNCA COLOQUE PAPEL, CARTÓN O PLÁSTICO EN O SOBRE EL
APARATO.

ESPAÑOL
NO INTRODUZCA NADA EN LAS RENDIJAS DE VENTILACIÓN Y
EVITE SU OBSTRUCCIÓN.
ANTES DE CUALQUIER OPERACIÓN DE LIMPIEZA, PROCURE
ESPERAR SIEMPRE COMO MÍNIMO UNA HORA PARA QUE EL
APARATO SE HAYA ENFRIADO Y DESCONECTADO.
NO LEVANTE NI MUEVA EL APARATO DURANTE EL
FUNCIONAMIENTO PARA EVITAR CUALQUIER RIESGO DE
QUEMADURA.
NORMAS DE SEGURIDAD
ESTE APARATO SE CONFORMA A LAS DIRECTIVAS YA LAS NORMAS
VIGENTES.

ESPAÑOL
RESUMEN
DESCRIPCIÓN .............................................................................................. 1
PUESTA EN MARCHA Y UTILIZACIÓN .......................................................... 2
Antes de utilizar por primera vez ............................................................. 2
Utilización de su aparato .......................................................................... 2
LIMPIEZA Y MANTENIMIENTO .................................................................... 7
INFORMACIÓN TÉCNICA ............................................................................. 8
MEDIO AMBIENTE Y RECICLAJE .................................................................. 8

ESPAÑOL
1
DESCRIPCIÓN
1. Asa
2. Puerta acristalada
3. Resistencias de calentamiento
4. Bases
5. Botón de selección de las funciones asador
y circulación de aire
6. Botón de selección del termostato
7. Indicador luminoso de funcionamiento
8.
8. Botón de selección del modo de cocción
9. Botón temporizador
10. Bandeja de goteo
11. Parrilla
12. Asa para la bandeja de goteo o parrilla
13. Asador
14. Asa para el asador

ESPAÑOL
2
PUESTA EN MARCHA Y UTILIZACIÓN
Antes de utilizar por primera vez
1. Una vez instalado el aparato sobre una superficie plana y estable.
2. Retire todas las etiquetas, los plásticos de protección y todos los elementos de
sujeción así como los adhesivos que se encuentran encima y dentro del
aparato.
3. Enchufe el aparato a una toma de tierra.
4. Antes de utilizar por primera vez, es imperativo poner en marcha el aparato
vacío con el fin de quemar la grasa de protección y evitar a futuro el
desprendimiento de humo y olores que se generan por lo general en un
aparato nuevo. Las etapas siguientes indican el procedimiento a seguir:
a. Introduzca la parrilla y la bandeja de goteo en el horno
b. Gire el botón del termostato a 200°C
c. Gire el botón de selección del modo de cocción y seleccione .
d. Ajuste el temporizador a 10 minutos.
e. El indicador luminoso de funcionamiento se enciende para indicarle que
el aparato se está calentando.
f. Airee la estancia durante esta operación.
g. Cuando escuche que el temporizador haya indicado la finalización de la
cocción, apague todos los mandos del aparato.
h. Deje que el horno se enfríe antes de limpiarlo con un paño húmedo y
lave los accesorios (parrilla y bandeja de goteo) con una esponja
humedecida con líquido para lavar platos.
OBSERVACIÓN: Durante los primeros usos pueden producirse olores y partículas. Es
normal y dejará de ocurrir rápidamente.
Utilización de su aparato
Compruebe que el aparato esté bien conectado a una toma de corriente con
toma de tierra. Coloque su preparación en el horno haciendo uso de los
accesorios adecuados y luego siga las etapas descritas a continuación:

ESPAÑOL
3
1. Ajuste del termostato
A fin de ajustar la temperatura de cocción, gire el
botón del termostato en sentido de las agujas del reloj
y seleccione la temperatura adecuada en función del
plato a preparar.
Temperatura
Horno a temperatura muy
suave
100° - 110°
Horno a temperatura suave
110° - 150°
Horno a temperatura media
150° - 200°
Horno a alta temperatura
210°
Horno a muy alta
temperatura
230°
2. Botón de selección del modo de cocción
A fin de ajustar el modo de cocción, gire el botón de
selección del modo de cocción en sentido de las agujas del
reloj y seleccione el modo adecuado en función del plato a
preparar.
Posición de apagado
Posición de cocción mediante la resistencia superior
para dorar y asar la superficie de los alimentos
Posición de cocción en la que solo funciona la
resistencia inferior
Posición de cocción mediante ambas resistencias,
superior e inferior
3. Botón temporizador
El botón temporizador le permite establecer el tiempo de cocción
de 0 a 60 minutos. Para ajustar el tiempo de cocción, gire el botón
temporizador en sentido de las agujas del reloj y seleccione el
tiempo de cocción apropiado en función del plato a preparar. Al
activar el temporizador, el testigo luminoso de funcionamiento se
encenderá para indicar que el horno se ha puesto en marcha. Una
vez transcurrido el tiempo programado, el temporizador emitirá
un sonido para avisar que la cocción ha finalizado y el horno se
apagará automáticamente. Puede apagar el horno manualmente
durante la cocción girando el temporizador en sentido contrario a
las agujas del reloj hasta alcanzar la posición 0.
Observación: Su minihorno está provisto de luz interior. Esta se activa al accionar el botón
temporizador.

ESPAÑOL
4
4. Botón de selección de la función de circulación de aire y/o asador
Este botón le permite utilizar la función de circulación de aire y/o
asador simultáneamente en combinación con los distintos
modos de cocción.
Posición de apagado
Posición de circulación
de aire
Posición asador
Posición de circulación de aire y asador
Utilizar la función de circulación de aire y/o asador en combinación con los distintos modos de
cocción:
o Gire el botón de selección de función de circulación de aire y/o asador; seleccione la
posición de función deseada. Luego ajuste el modo de cocción girando el botón de
selección del modo de cocción en sentido de las agujas del reloj y seleccione el modo
adecuado en función del plato a preparar.
Selección del
modo
Tipo de cocción
+
Circulación de aire y posición de cocción mediante la resistencia superior
para dorar y asar la superficie de los alimentos con una mejor distribución
del calor.
+
Circulación de aire y posición de cocción en la que solo funciona la resistencia
inferior para una mejor distribución del calor.
+
Circulación de aire y posición de cocción mediante ambas resistencias,
superior e inferior, para una mejor distribución del calor.
+
Función asador y posición de cocción mediante la resistencia superior para
dorar y asar la superficie de los alimentos.
+
Función asador y posición de cocción en la que solo funciona la resistencia
inferior.
+
Función asador y posición de cocción mediante ambas resistencias, superior
e inferior.

ESPAÑOL
5
+
Circulación de aire con función asador y posición de cocción mediante la
resistencia superior para dorar y asar la superficie de los alimentos con una
mejor distribución del calor.
+
Circulación de aire con función asador y posición de cocción en la que solo
funciona la resistencia inferior para una mejor distribución del calor.
+
Circulación de aire con función asador y posición de cocción mediante ambas
resistencias, superior e inferior, para una mejor distribución del calor.
Algunos consejos para obtener los mejores resultados al usar su horno:
No sobrecargue el horno.
Coloque los alimentos en el centro del aparato.
No abra la puerta con demasiada frecuencia durante la cocción a fin de evitar la pérdida
de calor.
Supervise de vez en cuando los alimentos durante su cocción.
Utilizar la función de circulación de aire y/o asador en combinación con los distintos
modos de cocción:
Colocación del asador:
¡Nunca precaliente el horno a fin de evitar el riesgo de quemaduras! Y utilice siempre
el asa del asador para sacar la carne del horno.
Introduzca primeramente la bandeja de goteo en el horno a nivel de las hendiduras más
bajas (1).
Desatornille los dos estoques de la varilla del asador y ensarte el pollo al centro del asador,
cuidando que no sobrepase las marcas 2 y 3. Asegúrese de que el pollo esté bien sujetado.
Vuelva a colocar los estoques, haga que atraviesen la carne y atornille firmemente,
teniendo cuidado que no sobrepasen las marcas 2 y 3.
Coloque el asador haciéndolo entrar en sus dos muescas y compruebe que quede bien
enganchado antes de iniciar la cocción.

ESPAÑOL
6
5. Utilización de las asas
Coloque los ganchos de la parte
inferior del asa en el centro de la
parrilla (tal como muestra la foto
contigua).
Coloque los ganchos de la parte
superior del asa en el centro de la
parrilla (tal como muestra la foto
contigua).
Coloque las muescas del asa en los
lugares previstos en el asador (tal
como muestra la foto contigua).
ATENCIÓN: Asegúrese de colocar el asa en el centro a fin de evitar una situación que entrañe
peligro y manipule con precaución.
Para las preparaciones pesadas, le aconsejamos utilizar una manopla de cocina en sustitución
del asa, a fin de extraer los alimentos.

ESPAÑOL
7
LIMPIEZA Y MANTENIMIENTO
Su horno está equipado de paredes internas autolimpiantes que se
activan automáticamente en cada uso. Cualquier salpicadura que se
produzca durante la cocción y que entre en contacto con el recubrimiento
autolimpiante se oxidará durante el curso de la cocción.
Nota: A fin de no dañar el recubrimiento autolimpiante, evite el uso de
esponjas metálicas y de productos de limpieza abrasivos.
Compruebe que ningún control de su horno se encuentre activado.
Desconecte el aparato del enchufe.
Deje siempre que el aparato se enfríe como mínimo una hora
antes de empezar con la limpieza.
Retire la parrilla y la bandeja de goteo, lávelas con una esponja
empapada en líquido para lavar platos de pH neutro y luego
enjuáguelas con agua antes de secarlas (al aire libre o con un paño).
Limpie la superficie interior y exterior con un paño suave o una
esponja empapada con un producto de Ph neutro. Nunca utilice
esponjas metálicas, objetos cortantes o punzantes para retirar los
depósitos dentro del aparato.
Para limpiar la puerta acristalada, use un paño empapado con un
producto especial para vidrios y luego seque el cristal con un paño
seco y limpio.
No pase nunca el horno bajo el chorro de agua de un grifo.
Limpie regularmente su horno a fin de eliminar los depósitos de
comida y grasa sobre las paredes y mantener así un funcionamiento
óptimo.
ATENCIÓN: ¡Antes de proceder a cualquier operación de limpieza manual, desconecte
el aparato y espere siempre como mínimo una hora para que el equipo se enfríe! No utilice
productos tóxicos y agresivos, como alcohol, decapantes industriales y solventes, para
limpiar su horno ya que éstos podrían dañarlo.

ESPAÑOL
8
INFORMACIÓN TÉCNICA
Modelo
MO21-SFE
Capacidad
44L
Tensión de la corriente
220V-240V ~50Hz/60Hz
Potencia
2000W
MEDIO AMBIENTE Y RECICLAJE
La directiva europea sobre los Desechos de Equipos Eléctricos y Electrónicos (DEEE),
exige que los aparatos domésticos utilizados no sean desechados mediante el flujo
normal de desechos municipales. Los aparatos utilizados deberán ser recogidos de
manera separada para optimizar la tasa de recuperación y el reciclaje de los
materiales que lo componen, y reducir el impacto sobre la salud humana y el medio ambiente.
El símbolo del contenedor tachado está incorporado en todos los productos para recordar las
obligaciones de la recogida separada. Los consumidores deberán contactar con las autoridades
locales o con su vendedor con motivo del procedimiento a seguir para la retirada de su antiguo
aparato.
Cuando deje de funcionar, no lo tire en la basura convencional, deposítelo en un centro de
recogida autorizado para que pueda ser reciclado. De esta manera contribuirá a la protección
del medio ambiente.
Importado por Vestel France, 17 rue de la Couture – 94563 Rungis CEDEX
Este manual se encuentra también disponible en el siguiente enlace:
http://pieces-detachees.sogedis.fr/
Pour en savoir plus :
www.quefairedemesdechets.fr

NEDERLANDS
ELEKTRISCHE OVEN 44L
MO21-SFE

NEDERLANDS
VEILIGHEIDSVOORSCHRIFTEN
LEES DEZE GEBRUIKSHANDLEIDING ZORGVULDIG DOOR EN
BEWAAR DEZE VOOR LATERE RAADPLEGING. WANNEER U DIT
APPARAAT AAN DERDEN OVERDRAAGT, MOET DEZE
HANDLEIDING BIJ HET APPARAAT WORDEN GEVOEGD.
DIT APPARAAT IS BESTEMD VOOR HUISHOUDELIJK EN
GELIJKAARDIG GEBRUIK ZOALS:
o DE KEUKENHOEK VOOR HET PERSONEEL IN WINKELS,
KANTOREN EN ANDERE WERKOMGEVINGEN;
o BOERDERIJEN;
o HOTEL- EN MOTELKAMERS EN ANDERE OMGEVINGEN MET
EEN RESIDENTIEEL KARAKTER;
o GASTENKAMERS EN GELIJKAARDIGE OMGEVINGEN.
DIT APPARAAT MAG NIET WORDEN GEBRUIKT VOOR ANDERE
TOEPASSINGEN DAN WAARVOOR HET BEDOELD IS (BV
COMMERCIEEL GEBRUIK). BIJ GEBRUIK DAT NIET
OVEREENSTEMT MET DE GEBRUIKSHANDLEIDING IS HET MERK
NIET MEER AANSPRAKELIJK EN VERVALT DE GARANTIE.
DIT APPARAAT MAG WORDEN GEBRUIKT DOOR KINDEREN
OUDER DAN 8 JAAR EN DOOR PERSONEN MET VERMINDERDE
LICHAMELIJKE, ZINTUIGLIJKE OF GEESTELIJKE VERMOGENS OF
PERSONEN MET EEN GEBREK AAN ERVARING EN KENNIS, OP
VOORWAARDE DAT DEZE PERSONEN ONDER TOEZICHT STAAN
OF INSTRUCTIES HEBBEN GEKREGEN OVER HET VEILIGE GEBRUIK
VAN HET APPARAAT EN DAT ZE DE GEVAREN BIJ HET GEBRUIK
ERVAN KENNEN. HOUD HET APPARAAT EN HET NETSNOER
BUITEN HET BEREIK VAN KINDEREN JONGER DAN 8 JAAR.
SCHOONMAAK EN ONDERHOUD GEBRUIKER ZAL NIET WORDEN

NEDERLANDS
GEMAAKT DOOR KINDEREN, TENZIJ ZE OUDER ZIJN DAN 8 EN
TOEZICHT.
KINDEREN MOGEN NIET MET HET APPARAAT SPELEN.
DIT APPARAAT IS NIET BESTEMD OM TE WORDEN
INGESCHAKELD DOOR MIDDEL VAN EEN EXTERNE TIMER OF EEN
APART AFSTANDSBEDIENINGSSYSTEEM.
ALS HET NETSNOER BESCHADIGD IS, MOET HET WORDEN
VERVANGEN DOOR DE FABRIKANT, ZIJN KLANTENDIENST OF
GELIJKAARDIG BEVOEGDE PERSONEN OM ALLE GEVAAR UIT TE
SLUITEN.
OPPERVLAKKEN ZIJN AANSPRAKELIJK WARM TE
KRIJGEN TIJDENS HET GEBRUIK.
WAT HET REINIGEN VAN OPPERVLAKKEN DIE IN CONTACT
KOMEN MET VOEDINGSMIDDELEN BETREFT, ZIE HET
HOOFDSTUK "REINIGING EN ONDERHOUD".
WAT DE WERKINGSDUUR EN DE BAKINSTELLINGEN BETREFT, ZIE
DE HIERNAVOLGENDE PARAGRAAF VAN DE HANDLEIDING
"REINIGING EN ONDERHOUD".
VEILIGHEID WAARSCHUWINGEN
VERGEWIS U ERVAN, NADAT U HET APPARAAT HEBT UITGEPAKT,
DAT HET NIET BESCHADIGD IS. GEBRUIK HET APPARAAT NIET IN
GEVAL VAN TWIJFEL EN RAADPLEEG EEN BEVOEGD PERSOON.
GEBRUIK NOOIT ACCESSOIRES OF ONDERDELEN VAN EEN ANDER
FABRIKANT. BIJ GEBRUIK VAN ZULKE ACCESSOIRES OF
ONDERDELEN VERVALT DE GARANTIE.

NEDERLANDS
HET APPARAAT MAG NIET WORDEN GEBRUIKT ALS HET IS
GEVALLEN, ALS HET ZICHTBARE SCHADE VERTOONT, ALS HET
LEKT OF BEDRIJFSSTORINGEN VERTOONT.
HAAL HET NETSNOER ALTIJD UIT HET STOPCONTACT WANNEER
HET APPARAAT LANGDURIG NIET ZAL WORDEN GEBRUIKT.
VERWIJDER ZORGVULDIG ALLE VERPAKKINGSMATERIAAL EN
LAAT GEEN ZAKEN ALS PLASTIC ZAKKEN, POLYSTYREEN OF
ELASTIEKEN BINNEN HET BEREIK VAN KINDEREN LIGGEN. DIE
ZAKEN KUNNEN VOOR HEN GEVAARLIJK ZIJN.
PLAATS HET APPARAAT NADAT HET IS UITGEPAKT OP EEN VLAK,
STABIEL EN HITTEBESTENDIG OPPERVLAK. ZORG DAT ER VRIJE
LUCHTCIRCULATIE RONDOM HET HELE APPARAAT MOGELIJK IS.
NEEM TUSSEN HET APPARAAT EN DE WAND EEN AFSTAND VAN 50
CM AAN DE BOVENKANT EN 50 CM AAN DE ZIJKANTEN IN ACHT.
DIT APPARAAT MOET WORDEN AANGESLOTEN OP EEN
GEAARD STOPCONTACT. ALS U EEN VERLENGSNOER MOET
GEBRUIKEN, NEEM ER DAN ZEKER EEN MET AARDING.
CONTROLEER OF DE NETSPANNING OP HET TYPEPLAATJE
OVEREENKOMT MET DIE VAN UW INSTALLATIE. IS DAT NIET HET
GEVAL, GEBRUIK HET APPARAAT DAN NIET EN RAADPLEEG EEN
BEVOEGD PERSOON.
VERGEWIS U ERVAN DAT DE ELEKTRISCHE INSTALLATIE
VOLDOENDE KRACHTIG IS VOOR EEN APPARAAT MET DIT
VERMOGEN.
NEEM ALLE NODIGE VOORZORGEN OM TE VOORKOMEN DAT
IEMAND OVER HET NETSNOER OF HET VERLENGSNOER
STRUIKELT.

NEDERLANDS
ALVORENS HET APPARAAT TE REINIGEN MOET U HET NETSNOER
UIT HET STOPCONTACT HALEN EN HET APPARAAT VOLLEDIG
LATEN AFKOELEN.
DOMPEL HET APPARAAT, HET NETSNOER EN DE STEKKER NOOIT
IN WATER OF EEN ANDERE VLOEISTOF.
PLAATS HET NIET BOVEN OP ANDERE APPARATEN.
VOOR UW VEILIGHEID WORDT AANBEVOLEN HET APPARAAT
NOOIT BLOOT TE STELLEN AAN SLECHTE
WEERSOMSTANDIGHEDEN EN VOCHT.
GEBRUIK HET APPARAAT NOOIT ALS HULPVERWARMING.
LAAT DE STEKKER VAN UW APPARAAT NIET IN HET
STOPCONTACT ZITTEN WANNEER HET NIET WORDT GEBRUIKT.
HET WORDT AANBEVOLEN HET NETSNOER REGELMATIG TE
CONTROLEREN OP EVENTUELE TEKENEN VAN BESCHADIGING,
EN HET APPARAAT MAG NIET WORDEN GEBRUIKT ALS HET
NETSNOER BESCHADIGD IS.
LAAT HET NETSNOER NIET VAN DE TAFEL OF HET WERKBLAD
HANGEN WAAROP HET PRODUCT STAAT.
SLUIT HET PRODUCT NIET AAN EN DRUK NIET OP DE KNOPPEN
VAN HET BEDIENINGSPANEEL ALS UW HANDEN VOCHTIG ZIJN.
GEBRUIK HET APPARAAT NIET BLOOTSVOETS OF MET VOCHTIGE
VOETEN.
HAAL DE STEKKER VAN HET APPARAAT UIT HET STOPCONTACT
OM DE ELEKTRISCHE VOEDING UIT TE SCHAKELEN ALVORENS
HET APPARAAT TE REINIGEN OF ONDERHOUD AAN HET
APPARAAT TE VERRICHTEN.
VERPLAATS HET APPARAAT NIET TERWIJL HET IN WERKING IS.

NEDERLANDS
GEBRUIK HET APPARAAT NIET IN DE BUURT VAN GORDIJNEN,
MEUBELSTOFFERING OF BRANDBARE PRODUCTEN.
ZORG DAT HET APPARAAT VÓÓR GEBRUIK OP EEN STABIEL EN
HITTEBESTENDIG OPPERVLAK STAAT.
DE TEMPERATUUR VAN DE OPPERVLAKKEN LOOPT HOOG OP
TIJDENS DE WERKING VAN HET APPARAAT, WAT
BRANDWONDEN KAN VEROORZAKEN. RAAK DE HEET
GEWORDEN OPPERVLAKKEN VAN HET APPARAAT (BV.
BEREIKBARE METALEN ONDERDELEN EN GLASPLAAT) NIET AAN.
VERGEET NIET OM TIJDENS HET GEBRUIK VAN UW APPARAAT
STEEDS DE HANDGREEP TE GEBRUIKEN EN OVENWANTEN TE
DRAGEN OM HET APPARAAT TE OPENEN.
VERWARM GEEN VOEDINGSMIDDELEN IN EEN FLES OF DOOS DIE
NIET GESCHIKT IS VOOR GEBRUIK IN DE OVEN; ZIJ KUNNEN
BREKEN EN BRANDWONDEN VEROORZAKEN.
WEES VOORZICHTIG BIJ HET OPENEN EN SLUITEN VAN DE
GLAZEN DEUR VAN UW APPARAAT: HARDE SCHOKKEN OF
BUITENSPORIGE THERMISCHE SCHOKKEN KUNNEN GLASBREUK
VEROORZAKEN.
PROBEER BEPAALDE DELEN VAN HET APPARAAT OF BEPAALDE
VOEDINGSMIDDELEN DIE TIJDENS DE BEREIDING IN HET
APPARAAT VUUR HEBBEN GEVAT, NOOIT MET WATER TE
BLUSSEN. DOOF DE VLAMMEN MET EEN VOCHTIGE DOEK OF
GEBRUIK EEN BRANDBLUSSER EN RICHT DE STRAAL OP HET
APPARAAT IN DE RICHTING VAN DE WIND.
PLAATS GEEN BRANDBARE PRODUCTEN IN DE BUURT VAN OF
ONDER HET MEUBEL WAAROP HET APPARAAT STAAT. GEBRUIK
HET APPARAAT NIET IN DE BUURT VAN BRANDBARE STOFFEN
ZOALS JALOEZIEËN, GORDIJNEN, OVERGORDIJNEN ENZ.

NEDERLANDS
LEG NOOIT PAPIER, KARTON OF PLASTIC IN OF OP HET APPARAAT.
STEEK NIETS IN DE VENTILATIEROOSTERS EN SLUIT DEZE NIET AF.
WACHT ALVORENS HET APPARAAT TE REINIGEN ALTIJD TEN
MINSTE EEN UUR TOTDAT HET VOLLEDIG IS AFGEKOELD EN HAAL
DE STEKKER UIT HET STOPCONTACT.
TIL HET PRODUCT NIET OP EN VERPLAATS HET NIET TIJDENS HET
GEBRUIK OM RISICO OP VERBRANDING TE VOORKOMEN.
VEILIGHEIDSNORMEN
DIT APPARAAT IS GELIJKVORMIG AAN DE HUIDIGE RICHTLIJNEN EN
NORMEN.

NEDERLANDS
INHOUDSOPGAVE
BESCHRIJVING ............................................................................................ 1
INBEDRIJFSTELLING EN GEBRUIK ................................................................ 2
Vóór het eerste gebruik ........................................................................... 2
Uw apparaat gebruiken ............................................................................ 2
REINIGING EN ONDERHOUD ....................................................................... 6
TECHNISCHE INFORMATIE .......................................................................... 7
MILIEU EN RECYCLAGE ............................................................................... 8

NEDERLANDS
1
BESCHRIJVING
1. Handgreep
2. Glazen deur
3. Verwarmingsweerstanden
4. Voetjes
5. Keuzeknop hetelucht- en draaispitfuncties
6. Thermostaatknop
7. Werkingsindicatielampje
8. Keuzeknop bereidingswijze
9. Timerknop
10. Braadslee
11. Rooster
12. Handgreep voor rooster of braadslee
13. Draaispit
14. Handgreep voor draaispit

NEDERLANDS
2
INBEDRIJFSTELLING EN GEBRUIK
Vóór het eerste gebruik
1. Plaats uw apparaat op een vlak en stabiel oppervlak.
2. Verwijder alle etiketten, beschermfolies en steunstukken evenals de
zelfklevers op en in het apparaat.
3. Sluit het apparaat aan op een geaard stopcontact.
4. Vóór de allereerste ingebruikname van het apparaat moet het in lege toestand
worden ingeschakeld om het beschermend vet te verbranden en de rook en
geur die een nieuw apparaat normaal afgeeft te doen verdwijnen. Ga daarbij
als volgt te werk:
a. Plaats het rooster en de braadslee in de oven
b. Draai de thermostaatknop op 200 °C
c. Draai de keuzeknop voor de bereidingswijze en selecteer .
d. Zet de timer op 10 minuten.
e. Het werkingsindicatielampje gaat branden als verwittiging dat het
apparaat aan het verwarmen is.
f. Verlucht intussen de kamer.
g. Zodra u het timersignaal hoort dat het einde van de baktijd aangeeft, zet
u alle bedieningselementen van het apparaat uit.
h. Laat het apparaat afkoelen alvorens de oven met een vochtige doek te
reinigen en de accessoires (rooster en braadslee) af te wassen met een
vochtige spons gedrenkt in vloeibaar afwasmiddel.
OPMERKING: Tijdens de eerste keren dat u het apparaat gebruikt kunnen geurtjes
en stofdeeltjes voorkomen die afkomstig zijn van het apparaat. Dit is normaal en zal
snel ophouden.
Uw apparaat gebruiken
Zorg dat het apparaat zorgvuldig aangesloten is op een geaard stopcontact.
Zet uw gerecht met de bijbehorende accessoires in de oven en volg dan de
hieronder aangegeven stappen:

NEDERLANDS
3
1. Instellen van de thermostaat
Om de baktemperatuur in te stellen draait u de
thermostaatknop met de wijzers van de klok mee en
selecteert u de juiste temperatuur afhankelijk van het
gerecht dat u gaat bereiden.
Temperatuur
Lauwwarme oven
100 ° - 110 °
Matig warme oven
110 ° - 150 °
Vrij warme oven
150 ° - 200 °
Warme oven
210 °
Zeer warme oven
230 °
2. Keuzeknop bereidingswijze
Om de bereidingswijze in te stellen draait u deze keuzeknop
met de wijzers van de klok mee en selecteert u de juiste
bereidingswijze afhankelijk van het gerecht dat u gaat
bereiden.
Stopstand
Bereidingsstand boven om uw voedingsmiddelen
aan de bovenkant een mooie bruine kleur te geven
of te grilleren
Bereidingsstand onder door middel van de
weerstand onderaan
Bereidingsstand boven en onder door middel van beide
weerstanden
3. Timerknop
Met de timerknop kunt u uw baktijd tussen 0 en 60 min. instellen.
Om de baktijd in te stellen draait u de timerknop met de wijzers
van de klok mee en selecteert u de juiste baktijd afhankelijk van
het gerecht dat u gaat bereiden. Zodra u de timerknop activeert,
gaat het werkingsindicatielampje branden om aan te geven dat de
oven in werking is. Wanneer de ingestelde tijd is verstreken,
produceert de timer een geluidssignaal om het einde van de
baktijd aan te geven en wordt de oven automatisch uitgeschakeld.
U kunt de oven tijdens het bereiden handmatig uitschakelen door
de timer tegen de wijzers van de klok in op stand 0 te zetten.
Opmerking: Uw minioven is uitgerust met een binnenverlichting. Deze wordt geactiveerd
wanneer de timerknop wordt ingeschakeld.

NEDERLANDS
4
4. Keuzeknop hetelucht- en/of draaispitfunctie
Met deze knop kunt u de hetelucht- en/of draaispitfunctie
gelijktijdig met de verschillende bereidingswijzen gebruiken.
Stopstand
Heteluchtstand
Draaispitstand
Draaispit- en heteluchtstand
Gebruik van de hetelucht- en/of draaispitfunctie met de verschillende bereidingswijzen:
o Draai de keuzeknop hetelucht- en/of draaispitfunctie; selecteer de gewenste functiestand.
Stel dan de bereidingswijze in door de keuzeknop van de bereidingswijze met de wijzers
van de klok mee te draaien en selecteer de juiste bereidingswijze afhankelijk van het
gerecht dat u gaat bereiden
Selecteren van de
bereidingswijze
Type bereiding
+
Hete lucht en positie van de bereiding boven om uw voedingsmiddelen aan
de bovenkant een mooi bruin kleurtje te geven of te grilleren voor een betere
verdeling van de warmte.
+
Hete lucht en positie van de bereiding onder door middel van de weerstand
onderaan voor een betere verdeling van de warmte.
+
Hete lucht en positie van de bereiding boven en onder door middel van beide
weerstanden voor een betere verdeling van de warmte.
+
Draaispitfunctie en bereidingsstand boven om uw voedingsmiddelen aan de
bovenkant een mooi bruin kleurtje te geven of te grilleren
+
Draaispitfunctie en bereidingsstand onder door middel van de weerstand
onderaan.
+
Draaispitfunctie en bereidingsstand boven en onder door middel van beide
weerstanden
+
Hete lucht met draaispitfunctie en positie van de bereiding boven om uw
voedingsmiddelen aan de bovenkant een mooi bruin kleurtje te geven of te
grilleren voor een betere verdeling van de warmte.
+
Hete lucht met draaispitfunctie en positie van de bereiding onder door
middel van de weerstand onderaan voor een betere verdeling van de
warmte.

NEDERLANDS
5
+
Hete lucht met draaispitfunctie en positie van de bereiding boven en onder
door middel van beide weerstanden voor een betere verdeling van de
warmte.
Enkele adviezen om uw oven optimaal te gebruiken:
De oven niet overbelasten.
Plaats de voedingsmiddelen in het midden van het apparaat.
De deur tijdens het bakken niet te vaak openen om warmteverlies te voorkomen.
Werp af en toe een blik op uw gerechten tijdens de bereiding.
Gebruik van de hetelucht- en/of draaispitfunctie met de verschillende
bereidingswijzen:Plaatsen van uw draaispit:
Uw oven nooit voorverwarmen om verbrandingsgevaar te voorkomen! Gebruik altijd
de handgreep van het draaispit om het vlees uit de oven te halen.
Plaats eerst de braadslee in de oven in de laagste positie (1).
Schroef beide pennen van het draaispit los en rijg de kip zodanig in het midden van het
spit dat de kip niet voorbij punt 2 en 3 komt. Zorg dat de kip goed is samengebonden.
Plaats de twee pennen terug, prik ze in het vlees en schroef ze stevig vast en let erop dat
ze niet voorbij punt 2 en 3 komen.
Zet het draaispit in de oven door het in de twee inkepingen te plaatsen; zorg dat het spit
goed in de inkepingen zit alvorens het bakproces te starten.
5. Gebruik van de handgrepen
Plaats de haken van het onderste deel
van de handgreep op het midden van
het rooster (zoals op de foto
hiernaast).

NEDERLANDS
6
Plaats de haken van het bovenste deel
van de handgreep op het midden van
het rooster (zoals op de foto's
hiernaast).
Plaats de inkepingen van de
handgreep op de daartoe voorziene
punten in het draaispit (zoals op de
foto's hiernaast).
Opgelet: Zorg dat de handgreep in het midden zit om een gevaarlijke situatie te voorkomen en
ga voorzichtig te werk.
Bij zware schotels wordt aanbevolen een ovenwant in plaats van de handgreep te gebruiken om
uw schotel uit de oven te halen.
REINIGING EN ONDERHOUD
Uw oven is voorzien van zelfreinigende binnenwanden die bij elke
gebruiksbeurt automatisch worden geactiveerd. Alle spatten die tijdens
het bakken op de zelfreinigende bekleding terechtkomen worden tijdens
het bakken geoxideerd.

NEDERLANDS
7
Opmerking: Gebruik geen metalen schuursponsen en schurende
onderhoudsproducten om de zelfreinigende bekleding niet te beschadigen.
Controleer of alle bedieningselementen van uw oven zijn
uitgeschakeld
Trek de stekker uit het stopcontact.
Laat het apparaat altijd minstens een uur afkoelen voor u het begint
te reinigen.
Haal het rooster en de braadslee eruit, was ze af met een spons
gedrenkt in een pH-neutraal afwasmiddel en spoel ze dan af alvorens
ze af te drogen (vrije lucht of met een doek).
Reinig het apparaat aan de binnen- en buitenzijde met een zachte
doek of een spons gedrenkt in een pH-neutraal product. Gebruik
nooit een metalen schuurspons of een scherp of puntig voorwerp om
aanslag in de oven te verwijderen.
Gebruik voor het reinigen van de glazen deur een doek met een
speciaal product voor "Ruiten" en droog de glasplaat dan af met een
droge en schone doek.
Houd de oven nooit onder de waterstraal van de kraan.
Reinig uw oven regelmatig om de aanslag van voedingsmiddelen en
vet van de wanden te verwijderen voor een optimale werking van uw
apparaat.
TECHNISCHE INFORMATIE
Model
MO21-SFE
Inhoud
44L
Netspanning
220 V-240 V ~50 Hz/60 Hz
Vermogen
2000W
OPGELET: Wacht alvorens uw oven handmatig te reinigen altijd ten minste een uur
totdat de oven is afgekoeld en haal de stekker uit het stopcontact! Gebruik geen toxische
en agressieve producten zoals spiritus, industriële afbijtmiddelen of oplosmiddelen om uw
oven te reinigen want daarmee riskeert u de oven te beschadigen.

NEDERLANDS
8
MILIEU EN RECYCLAGE
Overeenkomstig Europese richtlijn betreffende Afgedankte Elektrische en
Elektronische Apparatuur (AEEA) mogen afgedankte huishoudelijke apparaten niet
met het gewone huisvuil worden meegegeven. Afgedankte apparaten moeten
gescheiden worden ingezameld om het hergebruik en de recyclage van de
bestanddelen ervan te optimaliseren en de impact op de gezondheid van de mens en het milieu
te verminderen.
Het symbool van de doorgestreepte vuilnisbak is op alle producten aangebracht om te
herinneren aan de verplichting tot gescheiden inzameling. Consumenten moeten contact
opnemen met de plaatselijke overheid of hun verkoper voor de inzamelmethode voor hun
afgedankte apparaat.
Wanneer het apparaat niet meer werkt, mag u het niet met het huisvuil weggooien maar moet
u het afleveren bij een erkend inzamelcentrum zodat het kan worden gerecycleerd. Zo levert u
een bijdrage aan de bescherming van het milieu.
Ingevoerd door Vestel France, 17 rue de la Couture – 94563 Rungis CEDEX
Deze gebruikshandleiding is ook beschikbaar op de volgende website:
http://pieces-detachees.sogedis.fr/
Pour en savoir plus :
www.quefairedemesdechets.fr
Transcripción de documentos
FOUR POSABLE ELECTRIQUE 44L MO21-SFE FRANÇAIS INSTRUCTIONS DE SÉCURITÉ LIRE IMPÉRATIVEMENT CE MODE D’EMPLOI ET LE CONSERVER AFIN DE POUVOIR LE CONSULTER ULTÉRIEUREMENT. DANS LE CAS OÙ VOUS CÉDEZ CET APPAREIL Á UN TIERS, N’OUBLIEZ PAS DE FOURNIR CETTE NOTICE AVEC L’APPAREIL. CET APPAREIL EST DESTINÉ Á ETRE UTILISÉ DANS DES APPLICATIONS DOMESTIQUES ET ANALOGUES TELLES QUE: o DES COINS CUISINES RÉSERVÉS AU PERSONNEL DANS DES MAGASINS, BUREAUX ET AUTRES ENVIRONNEMENTS PROFESSIONNELS; o DES FERMES; o L’UTILISATION PAR LES CLIENTS DES HÔTELS, MOTELS ET AUTRES ENVIRONNEMENTS Á CARACTERE RÉSIDENTIEL; o DES ENVIRONNEMENTS DE TYPE CHAMBRES D’HÔTES. TOUTE UTILISATION AUTRE QUE CELLE PRÉVUE POUR CET APPAREIL, PAR EXEMPLE UNE UTILISATION COMMERCIALE, EST INTERDITE. UNE UTILISATION NON CONFORME AU MODE D’EMPLOI DÉGAGERAIT LA MARQUE DE TOUTE RESPONSABILITÉ ET ENTRAÎNERAIT LA PERTE DE LA GARANTIE. CET APPAREIL PEUT ÊTRE UTILISÉ PAR DES ENFANTS AGÉS D'AU MOINS 8 ANS ET PAR DES PERSONNES AYANT DES CAPACITÉS PHYSIQUES, SENSORIELLES OU MENTALES RÉDUITES OU UN MANQUE D’EXPÉRIENCE ET DE CONNAISSANCES Á CONDITION QU’ELLES AIENT REÇU UNE SUPERVISION OU DES INSTRUCTIONS CONCERNANT L’UTILISATION DE L’APPAREIL EN TOUTE SÉCURITÉ ET QU’ELLES COMPRENNENT LES DANGERS ENCOURUS. LES ENFANTS NE DOIVENT PAS JOUER AVEC L’APPAREIL. LE NETTOYAGE ET L’ENTRETIEN NE DOIVENT PAS ÊTRE RÉALISÉS FRANÇAIS PAR DES ENFANTS, SAUF S’ILS ONT PLUS DE 8 ANS ET QU’ILS SONT SURVEILLÉS. MAINTENIR L’APPAREIL ET SON CORDON HORS DE PORTÉE DES ENFANTS DE MOINS DE 8 ANS. LES ENFANTS NE DOIVENT PAS JOUER AVEC L’APPAREIL. SI LE CÂBLE D’ALIMENTATION EST ENDOMMAGÉ, IL DOIT ÊTRE REMPLACÉ PAR LE FABRICANT, SON SERVICE APRÈS-VENTE OU DES PERSONNES DE QUALIFICATION SIMILAIRE AFIN D’ÉVITER UN DANGER. CET APPAREIL N’EST PAS DESTINÉ Á ÊTRE MIS EN FONCTIONNEMENT AU MOYEN D’UNE MINUTERIE EXTÉRIEURE OU PAR UN SYSTÈME DE COMMANDE Á DISTANCE SÉPARÉ. LES SURFACES SONT DE NATURE Á CHAUFFER PENDANT L'UTILISATION. EN CE QUI CONCERNE LA FAÇON DE NETTOYER LES SURFACES EN CONTACT AVEC LES ALIMENTS, RÉFÉREZ-VOUS AU PARAGRAPHE CI-APRES DE LA NOTICE « MAINTENANCE ET NETTOYAGE ». EN CE QUI CONCERNE LES DURÉES DE FONCTIONNEMENT ET LES RÉGLAGES DE CUISSON, RÉFÉREZ-VOUS AU PARAGRAPHE CIAPRÈS DE LA NOTICE « MISE EN SERVICE ET UTILISATION ». MISE EN GARDE APRÈS AVOIR DEBALLÉ VOTRE APPAREIL, ASSUREZ-VOUS D’ABORD QU’IL N’A PAS ÉTÉ ABIMÉ. SI VOUS AVEZ UN DOUTE, N’UTILISEZ PAS VOTRE APPAREIL, ET CONSULTEZ UNE PERSONNE COMPÉTENTE. FRANÇAIS N’UTILISEZ JAMAIS D’ACCESSOIRES OU DE PIÈCES D’UN AUTRE FABRICANT. L’UTILISATION DE CE TYPE D’ACCESSOIRES OU DE PIÈCES ENTRAÎNE L’ANNULATION DE LA GARANTIE. L’APPAREIL NE DOIT PAS ÊTRE UTILISÉ S’IL A CHUTÉ, S’IL PRÉSENTE DES DOMMAGES APPARENTS, S’IL FUIT OU PRÉSENTE DES ANOMALIES DE FONCTIONNEMENT. DÉBRANCHEZ TOUJOURS LE PRODUIT EN CAS DE LONGUE PÉRIODE SANS UTILISATION. ENLEVEZ BIEN TOUS LES ÉLÉMENTS DE L’EMBALLAGE, ET NE LAISSEZ PAS LES ÉLÉMENTS TELS QUE LES SACS PLASTIQUES, DU POLYSTYRÈNE OU DES ÉLASTIQUES Á PORTÉE DES ENFANTS. CES ÉLÉMENTS POURRAIENT ÊTRE DANGEREUX POUR EUX. APRÈS DÉBALLAGE DE L’APPAREIL, ASSUREZ-VOUS DE POSER L’APPAREIL SUR UNE SURFACE PLANE ET STABLE NE CRAIGNANT PAS LA CHALEUR. VÉRIFIEZ QUE VOUS LAISSEZ UNE LIBRE CIRCULATION DE L’AIR TOUT AUTOUR DE VOTRE APPAREIL. RESPECTEZ ENTRE L’APPAREIL ET TOUT PLAN MURAL, UNE DISTANCE DE 50CM VERS LE HAUT ET DE 50CM SUR LES COTÉS. CET APPAREIL DOIT ÊTRE CONNECTÉ Á UNE PRISE RELIÉE Á LA TERRE. SI VOUS DEVEZ UTILISER UNE RALLONGE, UTILISEZ IMPÉRATIVEMENT UN MODÈLE EQUIPÉ D’UNE PRISE DE TERRE. VÉRIFIEZ QUE LE VOLTAGE MARQUÉ SUR LA PLAQUE SIGNALÉTIQUE CORRESPOND BIEN Á CELUI DE VOTRE INSTALLATION. SI CE N’EST PAS LE CAS, N’UTILISEZ PAS VOTRE APPAREIL, ET CONSULTEZ UNE PERSONNE COMPÉTENTE. ASSUREZ-VOUS QUE L’INSTALLATION ÉLECTRIQUE EST SUFFISANTE POUR ALIMENTER UN APPAREIL DE CETTE PUISSANCE. FRANÇAIS PRENEZ TOUTES LES PRÉCAUTIONS NÉCESSAIRES POUR ÉVITER QU’UNE PERSONNE NE SE PRENNE LES PIEDS DANS LE CÂBLE OU SA RALLONGE. AVANT TOUTE OPÉRATION DE NETTOYAGE, DÉBRANCHEZ ET LAISSEZ REFROIDIR L’APPAREIL COMPLÈTEMENT. NE JAMAIS PLONGER L’APPAREIL, SON FIL ÉLECTRIQUE ET SA PRISE DE COURANT DANS L’EAU OU AUTRE LIQUIDE. NE LE METTEZ PAS SUR D’AUTRES APPAREILS. POUR VOTRE SECURITÉ, NOUS VOUS RECOMMANDONS DE NE JAMAIS LAISSER VOTRE APPAREIL DANS UN ENDROIT EXPOSÉ AUX INTEMPÉRIES ET A L’HUMIDITÉ. NE JAMAIS UTILISER L’APPAREIL COMME CHAUFFAGE D’APPOINT. NE LAISSEZ PAS VOTRE APPAREIL BRANCHÉ SANS L’UTILISER. IL EST CONSEILLÉ D’EXAMINER RÉGULIÈREMENT LE CÂBLE D’ALIMENTATION POUR DÉCELER TOUT SIGNE DE DÉTÉRIORATION ÉVENTUELLE, ET L’APPAREIL NE DOIT PAS ÊTRE UTILISÉ SI LE CABLE EST ENDOMMAGÉ. NE LAISSEZ PAS LE CORDON D’ALIMENTATION PENDRE DE LA TABLE OU DU PLAN DE TRAVAIL SUR LEQUEL LE PRODUIT EST POSÉ. NE BRANCHEZ PAS LE PRODUIT ET N’APPUYEZ PAS SUR LES BOUTONS DU PANNEAU DE COMMANDE SI VOS MAINS SONT MOUILLÉES. N’UTILISEZ PAS L’APPAREIL LES PIEDS NUS OU MOUILLÉS. AVANT TOUTE OPÉRATION DE NETTOYAGE OU D’ENTRETIEN, DÉBRANCHEZ L’APPAREIL POUR COUPER L’ALIMENTATION ÉLECTRIQUE. FRANÇAIS PENDANT SON FONCTIONNEMENT, ÉVITEZ DE DÉPLACER L’APPAREIL. N’UTILISEZ PAS L’APPAREIL PROCHE DES RIDEAUX, MOBILIERS TEXTILES OU PRODUITS INFLAMMABLES. AVANT D’UTILISER L’APPAREIL, ASSUREZ-VOUS DE POSER L’APPAREIL SUR UNE SURFACE STABLE NE CRAIGNANT PAS LA CHALEUR. LA TEMPÉRATURE DES SURFACES EST ÉLEVÉE PENDANT LE FONCTIONNEMENT DE L’APPAREIL, CE QUI PEUT PROVOQUER DES BRÛLURES. NE TOUCHEZ PAS LES SURFACES CHAUDES DE L’APPAREIL (PARTIES MÉTALLIQUES ACCESSIBLES ET VITRE EN VERRE). EN COURS D’UTILISATION DE VOTRE APPAREIL, VEUILLEZ PENSER Á TOUJOURS UTILISER LA POIGNÉE ET UNE PAIRE DE GANTS POUR OUVRIR L’APPAREIL. NE CHAUFFEZ PAS D’ALIMENTS EN BOUTEILLE OU EN BOÎTE NON ADAPTÉS Á LA CUISSON EN FOUR ; CAR CES RÉCIPIENTS POURRAIENT SE CASSER ET VOUS BRÛLER. MANIPULEZ AVEC PRÉCAUTION LA PORTE EN VERRE DE VOTRE APPAREIL : TOUT CHOC BRUTAL OU CHOCS THERMIQUES EXCESSIFS PEUVENT GÉNÉRER LA CASSE DE LA VITRE. S’IL ARRIVAIT QUE CERTAINES PARTIES DE L’APPAREIL OU QUE CERTAINS ALIMENTS EN COURS DE CUISSON DANS L’APPAREIL S’ENFLAMMENT ; NE TENTEZ JAMAIS DE LES ÉTEINDRE AVEC DE L’EAU. ÉTOUFFEZ LES FLAMMES AVEC UN LINGE HUMIDE OU UTILISEZ UN EXTINCTEUR EN ORIENTANT LE JET VERS L’APPAREIL DANS LE SENS DU VENT. FRANÇAIS NE RANGEZ PAS DE PRODUITS INFLAMMABLES Á PROXIMITÉ OU SOUS LE MEUBLE OÚ EST RANGÉ L’APPAREIL. NE FAITES PAS FONCTIONNER L’APPAREIL A PROXIMITÉ DE MATÉRIAUX INFLAMMABLES TELS QUE STORES, RIDEAUX, TENTURES, ETC. NE PLACEZ JAMAIS DE PAPIER, CARTON OU PLASTIQUE DANS L’APPAREIL AINSI QUE SUR SON DESSUS. N’INTRODUISEZ RIEN DANS LES GRILLES DE VENTILATION ET NE LES OBSTRUEZ PAS. AVANT TOUTE OPÉRATION DE NETTOYAGE, VEUILLEZ TOUJOURS ATTENDRE AU MINIMUM UNE HEURE QUE L’APPAREIL SOIT FROID ET DÉBRANCHÉ. NE SOULEVEZ PAS ET NE DÉPLACEZ PAS LE PRODUIT EN COURS D’UTILISATION POUR ÉVITER TOUT RISQUE DE BRÛLURE. NORMES DE SÉCURITÉ CET APPAREIL EST CONFORME AUX DIRECTIVES ET NORMES EN VIGUEURS. FRANÇAIS SOMMAIRE DESCRIPTION .............................................................................................. 1 MISE EN SERVICE ET UTILISATION .............................................................. 2 Avant toute première utilisation ...................................................... 2 Utiliser votre appareil ...................................................................... 2 NETTOYAGE ET ENTRETIEN......................................................................... 7 INFORMATION TECHNIQUE ........................................................................ 8 ENVIRONNEMENT ET RECYCLAGE .............................................................. 8 FRANÇAIS DESCRIPTION 1. 2. 3. 4. 5. Poignée Porte vitrée Résistances chauffantes Pieds Bouton sélecteur fonctions chaleur tournante et rôtisserie 6. Bouton sélecteur de thermostat 7. Indicateur lumineux de fonctionnement 8. 8. Bouton sélecteur mode de cuisson 9. Bouton minuteur 10. Plat lèchefrite 11. Grille 12. Poignée pour grille ou lèchefrite 13. Tournebroche 14. Poignée pour tournebroche 1 FRANÇAIS MISE EN SERVICE ET UTILISATION Avant toute première utilisation 1. Après avoir installé votre appareil sur une surface plate et stable. 2. Retirez toutes les étiquettes, les films de protection et tous les éléments de calage ainsi que l’autocollant qui se trouvent sur et dans l’appareil. 3. Branchez l’appareil à une prise terre. 4. Avant toute première utilisation il est impératif de faire chauffer l’appareil à vide afin de faire brûler la graisse de protection et d’éliminer les fumées et odeurs qui se dégagent normalement d’un appareil neuf. Les étapes suivantes vous indiquent la marche à suivre : a. Mettez la grille et le plat lèchefrite à l’intérieur du four b. Tournez le bouton de thermostat sur 200°C c. Tournez le bouton de sélecteur de mode de cuisson et sélectionnez . d. Mettez le minuteur sur 10 minutes. e. L’indicateur lumineux de fonctionnement s’illumine pour vous avertir que l’appareil est en cours de chauffe. f. Aérez la pièce pendant cette opération. g. Dès que vous entendez la minuterie indiquant la fin de la cuisson, éteignez toutes les commandes de l’appareil. h. Laissez refroidir l’appareil avant de nettoyer le four à l’aide d’un chiffon humide et laver les accessoires (grille et lèchefrite) avec une éponge humidifiée avec du liquide lave-vaisselle. A NOTER: Des odeurs et des particules peuvent provenir de l’appareil lors des premières utilisations. Ceci est normal et cessera rapidement. Utiliser votre appareil Vérifiez que l’appareil soit bien branché à une prise terre. Mettez votre préparation dans le four avec les accessoires adéquats puis suivez les étapes indiquées ci-dessous : 2 FRANÇAIS 1. Réglage du thermostat Pour régler la température de cuisson, tournez le bouton de thermostat dans le sens des aiguilles d'une montre et sélectionnez la température appropriée en fonction du plat que vous allez cuisiner. 2. Bouton sélecteur mode de cuisson Pour régler le mode de cuisson, tournez le bouton sélecteur mode de cuisson dans le sens des aiguilles d'une montre et sélectionnez le mode de cuisson approprié en fonction du plat que vous allez cuisiner. Position Arrêt Position cuisson voûte pour dorer, griller par le dessus vos aliments Position cuisson sole avec le fonctionnement de la résistance du bas Position cuisson voûte et sole fonctionnement des deux résistances avec le 3. Bouton minuterie Le bouton minuterie vous permet de régler votre temps de cuisson de 0 à 60 min. Pour régler le temps de cuisson, tournez le bouton minuterie dans le sens des aiguilles d'une montre et sélectionnez le temps de cuisson approprié en fonction du plat que vous allez cuisiner. Dès que vous activez le minuteur, le témoin indicateur de fonctionnement s’allume indiquant que le four est en marche. Lorsque le temps programmé est écoulé, le minuteur émet un son pour annoncer la fin de cuisson et le four s’arrêtera automatiquement de cuire. Vous pouvez éteindre le four manuellement pendant la cuisson en tournant le minuteur dans le sens inverse des aiguilles d’une montre jusqu’à la position 0. A noter : Votre mini four est équipé de l’éclairage intérieur. Ce dernier est activé lors de la mise en marche du bouton minuterie. 3 FRANÇAIS 4. Bouton sélecteur fonction chaleur tournante et /ou rôtisserie Ce bouton vous permet d’utiliser la fonction chaleur tournante et / ou rôtisserie en simultané avec les différents modes de cuisson. Position arrêt Position chaleur tournante Position rôtisserie Position rôtisserie et chaleur tournante Utiliser la fonction chaleur tournante et/ou rôtisserie avec les différents modes de cuisson : o Tournez le bouton sélecteur fonction chaleur tournante et / ou rôtisserie ; sélectionnez la position fonction désirée. Puis réglez le mode de cuisson en tournant le bouton sélecteur mode de cuisson dans le sens des aiguilles d'une montre et sélectionnez le mode de cuisson approprié en fonction du plat que vous allez cuisiner Sélection mode + Type de cuisson Chaleur tournante et position cuisson voûte pour dorer, griller par le dessus vos aliments pour une meilleure répartition de la chaleur. + Chaleur tournante et position cuisson sole avec le fonctionnement de la résistance du bas pour une meilleure répartition de la chaleur. + Chaleur tournante et position cuisson voûte et sole avec le fonctionnement des deux résistances pour une meilleure répartition de la chaleur. + + + + Fonction rôtissoire et position cuisson voûte pour dorer, griller par le dessus vos aliments. Fonction rôtissoire et position cuisson sole avec le fonctionnement de la résistance du bas. Fonction rôtissoire et position cuisson voûte et sole avec le fonctionnement des deux résistances. Chaleur tournante avec fonction rôtissoire et position cuisson voûte pour dorer, griller par le dessus vos aliments pour une meilleure répartition de la chaleur. 4 FRANÇAIS + Chaleur tournante avec fonction rôtissoire et position cuisson sole avec le fonctionnement de la résistance du bas pour une meilleure répartition de la chaleur. + Chaleur tournante avec fonction rôtissoire et position cuisson voûte et sole avec le fonctionnement des deux résistances pour une meilleure répartition de la chaleur. Quelques conseils pour obtenir un usage optimum de votre four : Ne pas surchargez le four. Bien placez les aliments au centre de l’appareil. N’ouvrez pas la porte trop fréquemment pendant la cuisson pour éviter les déperditions de chaleur. Jetez un coup d’œil de temps en temps à vos plats pendant cuisson. Utiliser la fonction chaleur tournante et/ou rôtisserie avec les différents modes de cuisson : Mise en place de votre tournebroche : Ne jamais préchauffer votre four pour éviter tout risque de brûlure ! Et toujours utiliser la poignée du tournebroche pour sortir la viande du four. Mettez d’abord le plat-lèchefrite dans le four au dernier cran à son niveau le plus bas (1). Dévisser les deux broches se situant sur le tournebroche et embrochez le poulet au centre du tournebroche en vérifiant qu’il ne dépasse pas les repères 2 et 3. Veillez à ce que le poulet soit bien ficelé. Remettez les deux broches, les piquer dans la viande et visser fermement tout en veillant à ce qu’elles ne dépassent pas les repères 2 et 3. Positionnez le tournebroche en le rentrant dans ses deux encoches ; vérifiez qu’il soit bien enclenché avant de démarrer votre cuisson. 5 FRANÇAIS 5. Utilisation des poignées Positionnez les crochets de la partie inférieure de la poignée sur le centre de la grille (comme sur la photo cicontre). Positionnez les crochets de la partie supérieure de la poignée sur le centre de la grille (comme sur les photos cicontre). Positionnez les encoches de la poignée au emplacement prévues du tournebroche (comme sur les photos ci-contre). Attention : Bien veillez à positionner la poignée au centre afin d’éviter un danger et manipulez avec précaution. Pour les plats lourds, nous vous conseillons d’utiliser un gant anti-chaleur à la place de la poignée, pour récupérer votre plat. 6 FRANÇAIS NETTOYAGE ET ENTRETIEN Votre four est équipé de parois internes autonettoyantes qui s’activent automatiquement à chaque fonctionnement. Toute éclaboussure survenant pendant la cuisson et entrant en contact avec le revêtement autonettoyant est oxydée en cours de cuisson. Note : Pour ne pas endommager le revêtement autonettoyant, évitez l’emploi des éponges métalliques et des produits d’entretiens abrasifs. Vérifiez que toutes les commandes de votre four sont en arrêt. Débranchez l’appareil de sa prise. Toujours laissez l’appareil refroidir au minimum une heure avant de démarrer l’opération de nettoyage. Retirez la grille et le plat-lèchefrite, les lavez avec une éponge imbibée de liquide lave-vaisselle à pH neutre puis les rincez à l’eau avant de les sécher (air libre ou avec un chiffon). Nettoyez la surface intérieure et extérieure avec un chiffon doux ou une éponge imbibée avec un produit à Ph neutre. N’utilisez jamais d’éponges métalliques, d’objets tranchants ou pointus pour retirer les dépôts dans le four. Pour nettoyer la porte vitrée, utilisez un chiffon imbibé avec un produit spécial « Vitres » puis séchez la vitre avec un chiffon sec et propre. Ne passez jamais le four sous l’eau du robinet. Pensez à nettoyer régulièrement votre four afin d’enlever les dépôts de nourriture et de graisse sur les parois pour optimiser son fonctionnement. ATTENTION : Avant toute opération de nettoyage manuelle, veuillez toujours attendre au minimum une heure que votre four soit froid et débranché ! N’utilisez pas de produits toxiques et agressifs tel que alcools à brûler, décapants industriels, solvants pour nettoyer votre four car ces derniers risquent de l’endommager. 7 FRANÇAIS INFORMATION TECHNIQUE Modèle Capacité Tension d’alimentation Puissance MO21-SFE 44L 220V-240V ~50Hz/60Hz 2000W ENVIRONNEMENT ET RECYCLAGE La directive européenne sur les Déchets des Equipements Electriques et Electroniques (DEEE), exige que les appareils ménagers usages ne soient pas jetés dans le flux normal des déchets municipaux. Les appareils usagés doivent être collectés séparément afin d'optimiser le taux de récupération et le recyclage des matériaux qui les composent, et réduire l'impact sur la santé humaine et l'environnement. Le symbole de la poubelle barrée est apposé sur tous les produits pour rappeler les obligations de collecte séparée. Les consommateurs devront contacter les autorités locales ou leur revendeur concernant la démarche à suivre pour l'enlèvement de leur vieil appareil. Lorsqu’il ne fonctionnera plus, ne jetez pas l’appareil avec les ordures ménagères mais déposezle dans un centre de collecte agréé afin qu’il puisse être recyclé. Vous contribuerez ainsi à la protection de l’environnement. Importé par Vestel France, 17 rue de la Couture – 94563 Rungis CEDEX Pour en savoir plus : www.quefairedemesdechets.fr Cette notice est aussi disponible sur le site suivant: http://pieces-detachees.sogedis.fr/ 8 OVEN 44L MO21-SFE ENGLISH SAFETY WARNINGS READ CAREFULLY THE INSTRUCTIONS BEFORE INSTALLING AND USING THIS APPLIANCE. IN THE CASE YOU RESELL THIS APPLIANCE, PLEASE MAKE SURE TO PROVIDE THIS INSTRUCTION MANUAL TO YOUR BUYER. THIS APPLIANCE IS INTENDED TO BE USED IN HOUSEHOLD AND SIMILAR APPLICATIONS SUCH AS: o STAFF KITCHEN AREAS IN SHOPS, OFFICES AND OTHER WORKING ENVIRONMENTS; o FARM HOUSES; o BY CLIENTS IN HOTELS, MOTELS AND OTHER RESIDENTIAL TYPE OF ENVIRONMENTS; o BED AND BREAKFAST TYPE ENVIRONMENTS. IT SHOULD NOT BE USED FOR ANY OTHER PURPOSE OR IN ANY OTHER APPLICATION, SUCH AS FOR NON-DOMESTIC USE OR IN A COMMERCIAL ENVIRONMENT. ANY COMMERCIAL USE, INAPPROPRIATE USE OR FAILURE TO COMPLY WITH THE INSTRUCTIONS, THE MANUFACTURER ACCEPTS NO RESPONSIBILITY AND THE GUARANTEE WILL NOT APPLY. THIS APPLIANCE CAN BE USED BY CHILDREN AGED FROM 8 YEARS AND ABOVE AND PERSONS WITH REDUCED PHYSICAL, SENSORY OR MENTAL CAPABILITIES OR LACK OF EXPERIENCE AND KNOWLEDGE IF THEY HAVE BEEN GIVEN SUPERVISION OR INSTRUCTION CONCERNING USE OF THE APPLIANCE IN A SAFE WAY AND UNDERSTAND THE HAZARDS INVOLVED. CHILDREN SHALL NOT PLAY WITH THE APPLIANCE. CLEANING AND USER MAINTENANCE SHALL NOT BE MADE BY CHILDREN UNLESS THEY ARE OLDER THAN 8 AND SUPERVISED. ENGLISH KEEP THE APPLIANCE AND ITS CORD OUT OF REACH OF CHILDREN LESS THAN 8 YEARS. CHILDREN SHALL NOT PLAY WITH THE APPLIANCE. IF THE SUPPLY CORD IS DAMAGED, IT MUST BE REPLACED BY THE MANUFACTURER, ITS SERVICE AGENT OR SIMILARLY QUALIFIED PERSONS IN ORDER TO AVOID A HAZARD. APPLIANCES ARE NOT INTENDED TO BE OPERATED BY MEANS OF AN EXTERNAL TIMER OR A SEPARATE REMOTE CONTROL SYSTEM. SURFACES ARE LIABLE TO GET HOT DURING USE. FOR THE DETAILS ON HOW TO CLEAN SURFACES IN CONTACT WITH FOOD, PLEASE SEE SECTION “CLEANING AND MAINTENANCE”. REGARDING THE INFORMATION FOR OPERATING TIMES AND SETTING, THANKS TO REFER TO THE BELOW PARAGRAPH OF THE MANUAL “SET-UP AND USE”. SAFETY CAUTIONS AFTER UNPACKING THE APPLIANCE, MAKE SURE IT IS NOT DAMAGED. IN CASE OF DOUBT, DO NOT USE THE APPLIANCE AND CONTACT YOUR SUPPLIER OR A QUALIFIED TECHNICIAN. THE USE OF ACCESSORY AND ATTACHMENTS NOT RECOMMENDED BY THE MANUFACTURER MAY CAUSE INJURIES. ALWAYS UNPLUG THE APPLIANCE IF NOT USING IT FOR A PERIOD OF TIME. THE APPLIANCE MUST NOT BE USED IF IT HAS BEEN DROPPED, IF IT HAS ANY VISIBLE DAMAGE, IF IT LEAKS OR IF IT FUNCTIONS ENGLISH ABNORMALLY IN ANY WAY. REMOVE ALL PACKAGING AND DO NOT LEAVE THE PACKAGING MATERIAL SUCH AS PLASTIC BAGS, POLYSTYRENE AND ELASTIC BANDS IN EASY REACH OF CHILDREN AS THEY MAY CAUSE SERIOUS INJURIES. AFTER UNPACKING YOUR APPLIANCE, MAKE SURE YOU HAVE PUT IT ON A FLAT, STABLE AND HEAT-RESISTANT WORK PLAN OR KITCHEN COUNTER WHICH CAN ALSO STAND A MINIMUM TEMPERATURE OF 90°C. CHECK YOU HAD LEAVE ENOUGH SPACE BETWEEN YOUR APPLIANCE AND SURROUNDING WALL TO LET THE AIR CIRCULATE AROUND THE OVEN, THERE SHOULD BE AT LEAST 50CM ON THE TOP AND 20CM ON SIDES. THIS APPLIANCE MUST BE EARTHED. IF YOU NEED TO USE AN EXTENSION LEAD, IT IS IMPORTANT THAT YOU USE A MODEL FITTED WITH AN EARTH PLUG. CHECK THAT THE VOLTAGE MARKED ON THE RATING PLATE MATCHES TO YOUR LOCAL SUPPLY. IF NOT THE CASE, DO NOT USE THE APPLIANCE AND SEEK FOR EXPERT ADVICE. CHECK THAT YOUR ELECTRICAL INSTALLATION IS SUFFICIENT FOR SUPPLYING AN APPLIANCE OF THIS WATTAGE. TAKE ALL NECESSARY MEASURE WITH CORDS AND EXTENSIONS TO AVOID ANY INJURIES WHILE IN USE. NEVER IMMERSE IN WATER OR ANY OTHER LIQUID THIS APPLIANCE, ITS ELECTRIC PLUG AND CORD. ALWAYS UNPLUG THE APPLIANCE AND LET IT COOL DOWN COMPLETELY BEFORE ANY CLEANING OPERATION. ENGLISH FOR YOUR OWN SAFETY, WE RECOMMEND YOU NEVER LEAVE THE APPLIANCE IN A PLACE THAT IS EXPOSED TO HUMIDITY OR INCLEMENT WEATHER CONDITION. NEVER USE APPLIANCE AS AN ADDITIONAL HEATING SOURCE. DO NOT PUT THIS APPLIANCE ON TOP OF OTHERS. NEVER LEAVE APPLIANCE PLUGGED IN WHEN NOT IN USE. THE SUPPLY CORD SHOULD BE REGULARLY EXAMINED FOR SIGNS OF DAMAGE AND THE APPLIANCE IS NOT TO BE USED IF THE CORD IS DAMAGED. NEVER PLUG THE APPLIANCE AND TOUCH THE THERMOSTAT WITH WET HANDS. NEVER USE THE APPLIANCE WITH BARE OR WET FEET. NEVER UNPLUG THE APPLIANCE BY PULLING THE POWER CABLE. ALWAYS UNPLUG THE APPLIANCE FROM THE MAINS SOCKET. NEVER MOVE THE APPLIANCE WHEN IN USE. DO NOT USE THE APPLIANCE CLOSE TO ANY FABRICS. WHEN IN USE, THE SURFACES OF YOUR APPLIANCE CAN REACH VERY HIGH TEMPERATURES, WHICH MAY CAUSE BURNS. DO NOT TOUCH THE HOT SURFACES OF THE APPLIANCE (ACCESSIBLE METAL PARTS AND GLASS DOOR). THE APPLIANCE MUST BE USED AND PLACED ON A FLAT, STABLE, HEAT AND WATER RESISTANT SURFACE. WHEN IN USE, ALWAYS THINK OF USING THE DOOR HANDLE AND A PAIR OF GLOVES TO OPEN THE DOOR. DO NOT REHEAT ANY FOOD PACKAGED IN GLASS BOTTLE OR TINS, THEY ARE NOT SUITABLE TO BE USED IN AN OVEN AND COULD BROKE INSIDE THE OVEN. HANDLE WITH CARE THE DOOR OF YOUR OVEN: ANY STRONG ENGLISH SHOCK OR EXCESSIVE THERMAL CONSTRAINTS MAY CAUSE THE GLASS TO BREAK. IN THE CASE OF SOME PARTS OF THE OVEN OR FOODS DURING THE COOKING CATCH FIRE, DO NOT ATTEMPT TO EXTINGUISH IT WITH WATER. USE A DAMP CLOTH OR A BLANKET TO CHOKE THE FLAMES OR USE AN EXTINGUISHER BY SPRAYING THE FOAMS TOWARDS THE OVEN AND ON THE SAME DIRECTION THAN THE WIND. DO NOT STORE ANY FLAMMABLE PRODUCTS CLOSE TO OR UNDER THE UNIT WHERE YOU PLACED THE OVEN. DO NOT PLACE AND USE THE OVEN CLOSE TO ANY FURNITURE WITH FABRICS, CURTAINS OR DRAPES. DO NOT PUT PAPER, CARDBOARD OR PLASTIC IN THE APPLIANCE AND DO NOT PLACE ANYTHING ON TOP (USTENSILS, RACKS, OBJECTS, ETC.). DO NOT PUT ANYTHING INTO THE VENTILATION SLITS, OR OBSTRUCT THEM. NEVER LEAVE THE OVEN UNATTENDED WHEN IN USE AND UNTIL IT HAS COOLED DOWN (AROUND 1 HOUR). BEFORE ANY CLEANING OPERATION, WAIT UNTIL THE APPLIANCE IS COMPLETELY COLD AND HAS BEEN UNPLUGGED FOR AT LEAST 1 HOUR. DO NOT LIFT OR MOVE THE APPLIANCE WHEN IN USE TO AVOID BURNS. STANDARDS THIS APPLIANCE IS CONFORMED TO CURRENT DIRECTIVES AND STANDARDS. ENGLISH TABLE OF CONTENTS DESCRIPTION .............................................................................................. 1 SET-UP AND USE ......................................................................................... 2 Before first use ......................................................................................... 2 Using your appliance ................................................................................ 2 CLEANING AND MAINTENANCE.................................................................. 6 TECHNICAL INFORMATION ......................................................................... 7 ENVIRONMENT AND RECYCLING ................................................................ 8 ENGLISH DESCRIPTION 1. 2. 3. 4. 5. Door handle Glass door Heating elements Feet Convector and/or rotisserie function button 6. Thermostat button 7. Light indicator 8. 8. Cooking method button 9. Timer button 10. Gril/roasting pan 11. Wire grill rack 12. Tray handle 13. Rotisserie spit 14. Rotisserie spit handle 1 ENGLISH SET-UP AND USE Before first use 1. 2. 3. 4. Place your appliance on a flat and stable surface. Remove any sticker, protective foil or storage cover on and inside the oven Plug your appliance into a earth socket. Before the firts use, always heat up the empty oven to burn the protective fat and to eliminate smells when you buy new appliances. Follow the below steps: a. Put the grill pan and the wire rack into the oven. b. Turn the thermostat button and select 200°C. c. Turn the cooking section button and choose . d. Set the timer at 10min. e. The light indicator illuminate to indicate the oven is functioning. f. Air the room during this operation. g. You will hear a buzz sound when it’s finished, turn off all the buttons. h. Let the oven cool down before starting to clean the oven with a damp cloth. To clean the accessories (wire rack and grill pan) you can use a sponge humidified with a dishwashing liquid. NOTE: It is normal that strange odor comes out from the unit for the first use. This will cease after a short while. Using your appliance Always check you have plugged your oven into an earth socket. Put your preparation into the oven, then follow the below steps: 1. Thermostat setting To set the suitable cooking temperature for your dish, turn the thermostat button clockwise then select the suitable temperature for your dish. 2 ENGLISH 2. Cooking method setting To set the suitable cooking method for your dish, turn the cooking selection button clockwise then select the suitable cooking method for your dish. OFF position Upper heating position, perfect for toasting or grilling some bread Lower heating position, that position means the heating of the lower heating elements Upper and lower heating position, that position means the heating of the both heating elements 3. Timer setting The timer button allows you to set up the correct time for your dish. To set the suitable time for your dish, turn the timer button clockwise then select the suitable time for your dish. As soon as you have selected your time, the light indicator will illuminate to indicate the oven is functioning. The oven will turn off automatically at the end of the selected time and a bell will ring. You can turn off manually your oven during cooking by turning the timer button anti-clockwise to the OFF position. Note : Your oven is equipped with internal lighting which will be switch on when you start setting the timer. 4. Convection fan and/or rotisserie function button This button allow you to select the convection fan and/or rotisserie function at the same time than using selection your preferred cooking method. OFF button Convection fan Rotisserie Convection fan and rotisserie 3 ENGLISH How to use the convection fan and/or rotisserie function with the cooking method setting : o Turn convection fan and/or rotisserie function button and select the function you want to use. And turn the cooking selection button clockwise to select the suitable cooking method for your dish. Mode Cooking type + Convection fan with upper heating position, perfect for toasting or grilling some bread. + Convection fan with lower heating position, that position means the heating of the lower heating elements. + Convection fan upper and lower heating position, that position means the heating of the both heating elements, perfect for cooking pastries. + Rotisserie with upper heating position. + Rotisserie with lower heating position, that position means the heating of the lower heating elements + Rotisserie with upper and lower heating position, that position means the heating of the both heating elements. + Convection fan + rotisserie with upper heating position. + Convection fan + rotisserie with lower heating position, that position means the heating of the lower heating elements. + Convection fan + rotisserie with upper and lower heating position, that position perfect for roasting poultries. Tips for better use of your oven: Do not overload your oven. Put your dish in the center of the oven. Do not open too frequently your oven during the cooking to prevent heat loss. Try to keep an eye from time to time when baking your dish. 4 ENGLISH How to set up your rotisserie spit: Never preheat your oven when using the rotisserie function to avoid getting burned ! Always use the rotisserie spit handle when pull out the cooked meal from the oven ! Place the tray on the lowest position of the oven (1). Unscrew the forks and thread the tied-up chicken onto the rotisserie spit. Check that the chicken is in the center and does not pass beyond points 2 and 3. Then slide in the two forks and check also they do not pass beyong points 2 and 3 before screwing them firmly on the spit. Rest the spit on the two notches located on the center left and right side of the oven, make sure it is well positioned into its notches before starting your cooking 5. Using the handles Set the tray handle facing the gril wire, center the handle and push towards the tray. Make sure the tray is located in between the top and the bottom of the handle, see picture. 5 ENGLISH Set the tray handle facing the tray, center the handle and push towards the tray. Make sure the tray is located in between the top and the bottom of the handle, see picture. Set the spit handle facing the rotisserie spit, center the handle and put it below the spit. make sure it is well positioned under the two spit notches, see picture. Warning : Ensure that the handle is well positioned before lifting it. For heavy loads, always use kitchen gloves to pull out the dish from the oven. CLEANING AND MAINTENANCE Your oven is equipped with permanent self-cleaning coating that automatically, cleans itself during normal operation. Any spattering that occurs while cooking and spattering the self-cleaning coating is oxidized during the cooking operation. 6 ENGLISH To preserve the permanent self-coating, do not use a metallic scouring pads, hard brush or any others harsh cleaners to avoid scratching or damaging the interior surface of the oven. At the end of your cooking, check you have turn off all the buttons. Unplug the oven. Always let the appliance to cool down for at least one hour before starting any cleaning operation. Take out the wire rack and the grill pan, wash them with a sponge humidified with a neutral pH dishwashing liquid, rinse them under clear water and dry them with clean cloth. When cleaning, use a soft cloth (or sponge) and neutral cleaner on the interior and exterior surfaces of the oven. Do not use a hard brush or any others cleaners to avoid scratching or damaging the interior surface of the oven, tray, wire rack and the rotisserie fork. To clean the door glass, use a damp cloth with a glass product cleaner then dry the glass door with a clean cloth. Never put the oven under the water. To optimize your oven heating system, clean regularly your oven to take off the dirts, grease and food stains. WARNING: Always let your oven unplugged and cool down for at least one hour before any cleaning operation! Do not use any toxic, solvent, industrial or harsh cleaning products. TECHNICAL INFORMATION Model Capacity Rated voltage Rated power input MO21-SFE 44L 220V-240V ~50Hz/60Hz 2000W 7 ENGLISH ENVIRONMENT AND RECYCLING Disposal of old electrical appliances The European Directive on Waste Electrical and Electronic Equipment (WEEE) requires that old household electrical appliances must not be disposed of in the normal unsorted municipal waste stream. Old appliances must be collected separately in order to optimize the recovery and recycling of the materials they contain, and reduce the impact on human health and the environment. The crossed out “wheeled bin” symbol on the product reminds you of your obligation, that when you dispose of the appliance, it must be separately collected. Consumers should contact their local authority or retailer for information concerning the correct disposal of their old appliance. Imported by Vestel France, 17 rue de la Couture – 94563 Rungis CEDEX Pour en savoir plus : www.quefairedemesdechets.fr This manual instruction is available on the following website: http://pieces-detachees.sogedis.fr/ 8 HORNO ELÉCTRICO DE SOBREMESA 44 l MO21-SFE ESPAÑOL INSTRUCCIONES DE SEGURIDAD LEA OBLIGATORIAMENTE ESTE MANUAL DE INSTRUCCIONES Y CONSÉRVELO PARA CONSULTAS POSTERIORES. RECUERDE ENTREGAR ESTA RESEÑA BREVE CON EL APARATO EN CASO DE DEJARLO EN MANOS DE UN TERCERO. ESTE APARATO ESTÁ DISEÑADO PARA SER UTILIZADO EN APLICACIONES DOMÉSTICAS Y ANÁLOGAS TALES COMO: o COCINAS RESERVADAS PARA EL PERSONAL DE TIENDAS, OFICINAS Y OTROS AMBIENTES PROFESIONALES; o GRANJAS; o EL USO POR PARTE DE CLIENTES DE HOTELES Y MOTELES ASÍ COMO DE OTROS ENTORNOS DE CARÁCTER RESIDENCIAL; o ESTABLECIMIENTOS DE TIPO HOTELERO. SE PROHÍBE CUALQUIER OTRO USO DEL PREVISTO PARA ESTE APARATO, COMO POR EJEMPLO, UN USO COMERCIAL. LA UTILIZACIÓN QUE NO CUMPLA CON EL MODO DE USO EXIMIRÁ A LA MARCA DE CUALQUIER RESPONSABILIDAD Y COMPRENDERÁ LA PÉRDIDA DE LA GARANTÍA. ESTE APARATO PUEDE SER UTILIZADO POR NIÑOS MAYORES DE 8 AÑOS Y POR PERSONAS CON FACULTADES FÍSICAS, SENSORIALES O INTELECTUALES REDUCIDAS O POR QUIENES NO TENGAN LA EXPERIENCIA Y CONOCIMIENTOS NECESARIOS, SIEMPRE QUE DICHAS PERSONAS SE ENCUENTREN SUPERVISADAS O HAYAN RECIBIDO INSTRUCCIONES RELATIVAS AL USO SEGURO DEL APARATO Y COMPRENDAN LOS RIESGOS QUE CONLLEVA EL MISMO. MANTENGA EL APARATO Y SU CABLE FUERA DEL ALCANCE DE LOS NIÑOS MENORES DE 8 AÑOS. LIMPIEZA Y MANTENIMIENTO DEL USUARIO NO SERÁN HECHOS ESPAÑOL POR LOS NIÑOS A MENOS QUE SEAN MAYORES DE 8 Y SUPERVISADO. LOS NIÑOS NO DEBEN JUGAR CON EL APARATO. SI EL CABLE DE ALIMENTACIÓN SE ENCUENTRA DAÑADO, ÉSTE DEBE SER REEMPLAZADO POR EL FABRICANTE, SU SERVICIO POSVENTA O POR UNA PERSONA COMPETENTE CON CUALIFICACIÓN SIMILAR PARA EVITAR CUALQUIER DAÑO. ESTE APARATO NO HA SIDO DISEÑADO PARA SER PUESTO EN MARCHA MEDIANTE UN TEMPORIZADOR EXTERNO O POR UN SISTEMA DE MANDO A DISTANCIA SEPARADO. LAS SUPERFICIES SON SUSCEPTIBLES DE CALENTARSE DURANTE EL USO. EN RELACIÓN AL MODO DE LIMPIAR LAS SUPERFICIES EN CONTACTO CON LOS ALIMENTOS, CONSULTE LA SECCIÓN «LIMPIEZA Y MANTENIMIENTO». EN LO QUE CONCIERNE A LA DURACIÓN DE FUNCIONAMIENTO Y LOS AJUSTES DE COCCIÓN, REFIÉRASE AL PÁRRAFO QUE SIGUE A CONTINUACIÓN DE LA RESEÑA BREVE «PUESTA EN MARCHA Y UTILIZACIÓN». PRECAUCIONES DE SEGURIDAD DESPUÉS DE DESEMBALAR EL APARATO, COMPRUEBE INMEDIATAMENTE QUE NO SE ENCUENTRA DAÑADO. EN CASO DE DUDA, NO UTILICE EL APARATO Y CONSULTE A UNA PERSONA COMPETENTE. NUNCA UTILICE ACCESORIOS O PIEZAS DE OTRO FABRICANTE. EL USO DE ESTE TIPO DE ACCESORIOS O PIEZAS IMPLICA LA ANULACIÓN DE LA GARANTÍA. ESPAÑOL NO DEBE UTILIZAR EL APARATO SI SE HA CAÍDO, SI PRESENTA DAÑOS APARENTES, SI TIENE FUGAS O PRESENTA ANOMALÍAS EN EL FUNCIONAMIENTO. DESENCHUFE SIEMPRE EL PRODUCTO EN CASO DE UN LARGO PERÍODO DE INUTILIZACIÓN. RETIRE CORRECTAMENTE TODOS LOS ELEMENTOS DEL EMBALAJE Y NO DEJE DICHOS ELEMENTOS TALES COMO BOLSAS DE PLÁSTICO, POLIESTIRENO O ELÁSTICOS AL ALCANCE DE LOS NIÑOS. DICHOS ELEMENTOS PODRÍAN RESULTAR PELIGROSOS PARA ELLOS. TRAS DESEMBALAR EL APARATO, ASEGÚRESE DE COLOCARLO SOBRE UNA SUPERFICIE PLANA, ESTABLE Y RESISTENTE AL CALOR. ASEGÚRESE DE QUE EL AIRE CIRCULE LIBREMENTE ALREDEDOR DE SU APARATO. RESPETE UNA DISTANCIA MÍNIMA, ENTRE EL APARATO Y CUALQUIER ELEMENTO ARQUITECTÓNICO, DE 50 CM RESPECTO A LA VERTICAL Y DE 50 CM RESPECTO A LOS LADOS. ESTE APARATO DEBE CONECTARSE A UN ENCHUFE CON TOMA DE TIERRA. SI DEBE UTILIZAR UN ALARGADOR, USE OBLIGATORIAMENTE UN MODELO EQUIPADO CON UNA TOMA DE TIERRA. COMPRUEBE QUE EL VOLTAJE INDICADO EN LA PLACA DESCRIPTIVA SE CORRESPONDE CON EL DE SU INSTALACIÓN. SI NO ES EL CASO, NO UTILICE EL APARATO Y CONSULTE A UNA PERSONA COMPETENTE. COMPRUEBE QUE LA INSTALACIÓN ELÉCTRICA RESULTA SUFICIENTE PARA ALIMENTAR UN APARATO DE ESTA POTENCIA. TOME TODAS LAS PRECAUCIONES NECESARIAS PARA EVITAR QUE UNA PERSONA PISE EL CABLE O SU ALARGADOR. ESPAÑOL ANTES DE CUALQUIER OPERACIÓN DE LIMPIEZA, DESENCHUFE Y DEJE ENFRIAR COMPLETAMENTE EL APARATO. NUNCA SUMERJA EL APARATO, SU CABLE Y SU TOMA DE CORRIENTE EN AGUA U OTRO LÍQUIDO. NO LO COLOQUE ENCIMA DE OTROS APARATOS. POR SU SEGURIDAD, LE RECOMENDAMOS QUE NUNCA DEJE EL APARATO EN UN LUGAR EXPUESTO A LA INTEMPERIE Y LA HUMEDAD. NUNCA UTILICE EL APARATO COMO CALEFACCIÓN. NO DEJE ENCHUFADO EL APARATO SIN UTILIZAR. SE ACONSEJA EXAMINAR DE MANERA REGULAR EL CABLE DE ALIMENTACIÓN PARA DETECTAR CUALQUIER SIGNO DE DETERIORO EVENTUAL, EL APARATO NO DEBE SER UTILIZADO SI EL CABLE ESTÁ DAÑADO. NO PERMITA QUE EL CABLE DE ALIMENTACIÓN CUELGUE DE LA MESA O DE LA ENCIMERA SOBRE LA QUE HA DEJADO EL PRODUCTO. NO ENCHUFE EL APARATO NI PULSE LOS BOTONES DEL PANEL DE COMANDOS SI TIENE LAS MANOS HÚMEDAS. NO UTILICE EL APARATO CON LOS PIES DESCALZOS O HÚMEDOS. ANTES DE CUALQUIER OPERACIÓN DE LIMPIEZA O DE MANTENIMIENTO, DESENCHUFE EL APARATO PARA CORTAR LA CORRIENTE ELÉCTRICA. DURANTE SU FUNCIONAMIENTO, EVITE MOVER EL APARATO. NO UTILICE EL APARATO CERCA DE CORTINAS, MOBILIARIOS TEXTILES O PRODUCTOS INFLAMABLES. ESPAÑOL ANTES DE UTILIZAR EL APARATO, PROCURE DEPOSITAR EL APARATO SOBRE UNA SUPERFICIE PLANA Y ESTABLE RESISTENTE AL CALOR. LA TEMPERATURA DE LAS SUPERFICIES AUMENTA DURANTE EL FUNCIONAMIENTO DEL APARATO, LO QUE PUEDE PROVOCAR QUEMADURAS. NO TOQUE LAS SUPERFICIES CALIENTES DEL APARATO (PARTES METÁLICAS ACCESIBLES Y VENTANA DE CRISTAL). DURANTE LA UTILIZACIÓN DEL APARATO, PROCURE USAR SIEMPRE EL ASA Y UN PAR DE GUANTES PARA ABRIRLO. NO CALIENTE LOS ALIMENTOS CONTENIDOS EN BOTELLAS O RECIPIENTES NO ADAPTADOS A LA COCCIÓN AL HORNO; LOS RECIPIENTES NO ADECUADOS SON SUSCEPTIBLES A ROMPERSE Y PODRÍAN OCASIONARLE QUEMADURAS. MANIPULE CON CUIDADO LA PUERTA ACRISTALADA DE SU APARATO: LOS GOLPES BRUSCOS Y LOS CHOQUES TÉRMICOS EXCESIVOS PODRÍAN OCASIONAR LA RUPTURA DEL VIDRIO. EN CASO DE QUE LLEGARAN A ARDER ALGUNAS PARTES DEL APARATO O ALGÚN ALIMENTO DURANTE EL CURSO DE LA COCCIÓN, NO INTENTE NUNCA APAGAR LAS LLAMAS CON AGUA. SOFOQUE LAS LLAMAS CON UN TRAPO HÚMEDO O UTILICE UN EXTINTOR ORIENTANDO EL DISPARO HACIA EL APARATO EN EL SENTIDO DEL VIENTO. NO DEJE PRODUCTOS INFLAMABLES CERCA O DEBAJO DEL MUEBLE DONDE SE ENCUENTRE EL APARATO. NO PONGA EL APARATO EN FUNCIONAMIENTO CERCA DE MATERIALES INFLAMABLES TALES COMO ESTORES, CORTINAS, PERSIANAS, ETC. NUNCA COLOQUE PAPEL, CARTÓN O PLÁSTICO EN O SOBRE EL APARATO. ESPAÑOL NO INTRODUZCA NADA EN LAS RENDIJAS DE VENTILACIÓN Y EVITE SU OBSTRUCCIÓN. ANTES DE CUALQUIER OPERACIÓN DE LIMPIEZA, PROCURE ESPERAR SIEMPRE COMO MÍNIMO UNA HORA PARA QUE EL APARATO SE HAYA ENFRIADO Y DESCONECTADO. NO LEVANTE NI MUEVA EL APARATO DURANTE EL FUNCIONAMIENTO PARA EVITAR CUALQUIER RIESGO DE QUEMADURA. NORMAS DE SEGURIDAD ESTE APARATO SE CONFORMA A LAS DIRECTIVAS YA LAS NORMAS VIGENTES. ESPAÑOL RESUMEN DESCRIPCIÓN .............................................................................................. 1 PUESTA EN MARCHA Y UTILIZACIÓN .......................................................... 2 Antes de utilizar por primera vez ............................................................. 2 Utilización de su aparato.......................................................................... 2 LIMPIEZA Y MANTENIMIENTO .................................................................... 7 INFORMACIÓN TÉCNICA ............................................................................. 8 MEDIO AMBIENTE Y RECICLAJE .................................................................. 8 ESPAÑOL DESCRIPCIÓN 1. 2. 3. 4. 5. Asa Puerta acristalada Resistencias de calentamiento Bases Botón de selección de las funciones asador y circulación de aire 6. Botón de selección del termostato 7. Indicador luminoso de funcionamiento 8. 8. Botón de selección del modo de cocción 9. Botón temporizador 10. Bandeja de goteo 11. Parrilla 12. Asa para la bandeja de goteo o parrilla 13. Asador 14. Asa para el asador 1 ESPAÑOL PUESTA EN MARCHA Y UTILIZACIÓN Antes de utilizar por primera vez 1. Una vez instalado el aparato sobre una superficie plana y estable. 2. Retire todas las etiquetas, los plásticos de protección y todos los elementos de sujeción así como los adhesivos que se encuentran encima y dentro del aparato. 3. Enchufe el aparato a una toma de tierra. 4. Antes de utilizar por primera vez, es imperativo poner en marcha el aparato vacío con el fin de quemar la grasa de protección y evitar a futuro el desprendimiento de humo y olores que se generan por lo general en un aparato nuevo. Las etapas siguientes indican el procedimiento a seguir: a. Introduzca la parrilla y la bandeja de goteo en el horno b. Gire el botón del termostato a 200°C c. Gire el botón de selección del modo de cocción y seleccione . d. Ajuste el temporizador a 10 minutos. e. El indicador luminoso de funcionamiento se enciende para indicarle que el aparato se está calentando. f. Airee la estancia durante esta operación. g. Cuando escuche que el temporizador haya indicado la finalización de la cocción, apague todos los mandos del aparato. h. Deje que el horno se enfríe antes de limpiarlo con un paño húmedo y lave los accesorios (parrilla y bandeja de goteo) con una esponja humedecida con líquido para lavar platos. OBSERVACIÓN: Durante los primeros usos pueden producirse olores y partículas. Es normal y dejará de ocurrir rápidamente. Utilización de su aparato Compruebe que el aparato esté bien conectado a una toma de corriente con toma de tierra. Coloque su preparación en el horno haciendo uso de los accesorios adecuados y luego siga las etapas descritas a continuación: 2 ESPAÑOL 1. Ajuste del termostato A fin de ajustar la temperatura de cocción, gire el botón del termostato en sentido de las agujas del reloj y seleccione la temperatura adecuada en función del plato a preparar. Horno a temperatura muy suave Horno a temperatura suave Horno a temperatura media Horno a alta temperatura Horno a muy alta temperatura Temperatura 100° - 110° 110° - 150° 150° - 200° 210° 230° 2. Botón de selección del modo de cocción A fin de ajustar el modo de cocción, gire el botón de selección del modo de cocción en sentido de las agujas del reloj y seleccione el modo adecuado en función del plato a preparar. Posición de apagado Posición de cocción mediante la resistencia superior para dorar y asar la superficie de los alimentos Posición de cocción en la que solo funciona la resistencia inferior Posición de cocción mediante ambas resistencias, superior e inferior 3. Botón temporizador El botón temporizador le permite establecer el tiempo de cocción de 0 a 60 minutos. Para ajustar el tiempo de cocción, gire el botón temporizador en sentido de las agujas del reloj y seleccione el tiempo de cocción apropiado en función del plato a preparar. Al activar el temporizador, el testigo luminoso de funcionamiento se encenderá para indicar que el horno se ha puesto en marcha. Una vez transcurrido el tiempo programado, el temporizador emitirá un sonido para avisar que la cocción ha finalizado y el horno se apagará automáticamente. Puede apagar el horno manualmente durante la cocción girando el temporizador en sentido contrario a las agujas del reloj hasta alcanzar la posición 0. Observación: Su minihorno está provisto de luz interior. Esta se activa al accionar el botón temporizador. 3 ESPAÑOL 4. Botón de selección de la función de circulación de aire y/o asador Este botón le permite utilizar la función de circulación de aire y/o asador simultáneamente en combinación con los distintos modos de cocción. Posición de apagado Posición de circulación de aire Posición asador Posición de circulación de aire y asador Utilizar la función de circulación de aire y/o asador en combinación con los distintos modos de cocción: o Gire el botón de selección de función de circulación de aire y/o asador; seleccione la posición de función deseada. Luego ajuste el modo de cocción girando el botón de selección del modo de cocción en sentido de las agujas del reloj y seleccione el modo adecuado en función del plato a preparar. Selección modo del Tipo de cocción + Circulación de aire y posición de cocción mediante la resistencia superior para dorar y asar la superficie de los alimentos con una mejor distribución del calor. Circulación de aire y posición de cocción en la que solo funciona la resistencia inferior para una mejor distribución del calor. + Circulación de aire y posición de cocción mediante ambas resistencias, superior e inferior, para una mejor distribución del calor. + + + + Función asador y posición de cocción mediante la resistencia superior para dorar y asar la superficie de los alimentos. Función asador y posición de cocción en la que solo funciona la resistencia inferior. Función asador y posición de cocción mediante ambas resistencias, superior e inferior. 4 ESPAÑOL + Circulación de aire con función asador y posición de cocción mediante la resistencia superior para dorar y asar la superficie de los alimentos con una mejor distribución del calor. + Circulación de aire con función asador y posición de cocción en la que solo funciona la resistencia inferior para una mejor distribución del calor. + Circulación de aire con función asador y posición de cocción mediante ambas resistencias, superior e inferior, para una mejor distribución del calor. Algunos consejos para obtener los mejores resultados al usar su horno: No sobrecargue el horno. Coloque los alimentos en el centro del aparato. No abra la puerta con demasiada frecuencia durante la cocción a fin de evitar la pérdida de calor. Supervise de vez en cuando los alimentos durante su cocción. Utilizar la función de circulación de aire y/o asador en combinación con los distintos modos de cocción: Colocación del asador: ¡Nunca precaliente el horno a fin de evitar el riesgo de quemaduras! Y utilice siempre el asa del asador para sacar la carne del horno. Introduzca primeramente la bandeja de goteo en el horno a nivel de las hendiduras más bajas (1). Desatornille los dos estoques de la varilla del asador y ensarte el pollo al centro del asador, cuidando que no sobrepase las marcas 2 y 3. Asegúrese de que el pollo esté bien sujetado. Vuelva a colocar los estoques, haga que atraviesen la carne y atornille firmemente, teniendo cuidado que no sobrepasen las marcas 2 y 3. Coloque el asador haciéndolo entrar en sus dos muescas y compruebe que quede bien enganchado antes de iniciar la cocción. 5 ESPAÑOL 5. Utilización de las asas Coloque los ganchos de la parte inferior del asa en el centro de la parrilla (tal como muestra la foto contigua). Coloque los ganchos de la parte superior del asa en el centro de la parrilla (tal como muestra la foto contigua). Coloque las muescas del asa en los lugares previstos en el asador (tal como muestra la foto contigua). ATENCIÓN: Asegúrese de colocar el asa en el centro a fin de evitar una situación que entrañe peligro y manipule con precaución. Para las preparaciones pesadas, le aconsejamos utilizar una manopla de cocina en sustitución del asa, a fin de extraer los alimentos. 6 ESPAÑOL LIMPIEZA Y MANTENIMIENTO Su horno está equipado de paredes internas autolimpiantes que se activan automáticamente en cada uso. Cualquier salpicadura que se produzca durante la cocción y que entre en contacto con el recubrimiento autolimpiante se oxidará durante el curso de la cocción. Nota: A fin de no dañar el recubrimiento autolimpiante, evite el uso de esponjas metálicas y de productos de limpieza abrasivos. Compruebe que ningún control de su horno se encuentre activado. Desconecte el aparato del enchufe. Deje siempre que el aparato se enfríe como mínimo una hora antes de empezar con la limpieza. Retire la parrilla y la bandeja de goteo, lávelas con una esponja empapada en líquido para lavar platos de pH neutro y luego enjuáguelas con agua antes de secarlas (al aire libre o con un paño). Limpie la superficie interior y exterior con un paño suave o una esponja empapada con un producto de Ph neutro. Nunca utilice esponjas metálicas, objetos cortantes o punzantes para retirar los depósitos dentro del aparato. Para limpiar la puerta acristalada, use un paño empapado con un producto especial para vidrios y luego seque el cristal con un paño seco y limpio. No pase nunca el horno bajo el chorro de agua de un grifo. Limpie regularmente su horno a fin de eliminar los depósitos de comida y grasa sobre las paredes y mantener así un funcionamiento óptimo. ATENCIÓN: ¡Antes de proceder a cualquier operación de limpieza manual, desconecte el aparato y espere siempre como mínimo una hora para que el equipo se enfríe! No utilice productos tóxicos y agresivos, como alcohol, decapantes industriales y solventes, para limpiar su horno ya que éstos podrían dañarlo. 7 ESPAÑOL INFORMACIÓN TÉCNICA Modelo Capacidad Tensión de la corriente Potencia MO21-SFE 44L 220V-240V ~50Hz/60Hz 2000W MEDIO AMBIENTE Y RECICLAJE La directiva europea sobre los Desechos de Equipos Eléctricos y Electrónicos (DEEE), exige que los aparatos domésticos utilizados no sean desechados mediante el flujo normal de desechos municipales. Los aparatos utilizados deberán ser recogidos de manera separada para optimizar la tasa de recuperación y el reciclaje de los materiales que lo componen, y reducir el impacto sobre la salud humana y el medio ambiente. El símbolo del contenedor tachado está incorporado en todos los productos para recordar las obligaciones de la recogida separada. Los consumidores deberán contactar con las autoridades locales o con su vendedor con motivo del procedimiento a seguir para la retirada de su antiguo aparato. Cuando deje de funcionar, no lo tire en la basura convencional, deposítelo en un centro de recogida autorizado para que pueda ser reciclado. De esta manera contribuirá a la protección del medio ambiente. Importado por Vestel France, 17 rue de la Couture – 94563 Rungis CEDEX Pour en savoir plus : www.quefairedemesdechets.fr Este manual se encuentra también disponible en el siguiente enlace: http://pieces-detachees.sogedis.fr/ 8 NEDERLANDS ELEKTRISCHE OVEN 44L MO21-SFE NEDERLANDS VEILIGHEIDSVOORSCHRIFTEN LEES DEZE GEBRUIKSHANDLEIDING ZORGVULDIG DOOR EN BEWAAR DEZE VOOR LATERE RAADPLEGING. WANNEER U DIT APPARAAT AAN DERDEN OVERDRAAGT, MOET DEZE HANDLEIDING BIJ HET APPARAAT WORDEN GEVOEGD. DIT APPARAAT IS BESTEMD VOOR HUISHOUDELIJK EN GELIJKAARDIG GEBRUIK ZOALS: o DE KEUKENHOEK VOOR HET PERSONEEL IN WINKELS, KANTOREN EN ANDERE WERKOMGEVINGEN; o BOERDERIJEN; o HOTEL- EN MOTELKAMERS EN ANDERE OMGEVINGEN MET EEN RESIDENTIEEL KARAKTER; o GASTENKAMERS EN GELIJKAARDIGE OMGEVINGEN. DIT APPARAAT MAG NIET WORDEN GEBRUIKT VOOR ANDERE TOEPASSINGEN DAN WAARVOOR HET BEDOELD IS (BV COMMERCIEEL GEBRUIK). BIJ GEBRUIK DAT NIET OVEREENSTEMT MET DE GEBRUIKSHANDLEIDING IS HET MERK NIET MEER AANSPRAKELIJK EN VERVALT DE GARANTIE. DIT APPARAAT MAG WORDEN GEBRUIKT DOOR KINDEREN OUDER DAN 8 JAAR EN DOOR PERSONEN MET VERMINDERDE LICHAMELIJKE, ZINTUIGLIJKE OF GEESTELIJKE VERMOGENS OF PERSONEN MET EEN GEBREK AAN ERVARING EN KENNIS, OP VOORWAARDE DAT DEZE PERSONEN ONDER TOEZICHT STAAN OF INSTRUCTIES HEBBEN GEKREGEN OVER HET VEILIGE GEBRUIK VAN HET APPARAAT EN DAT ZE DE GEVAREN BIJ HET GEBRUIK ERVAN KENNEN. HOUD HET APPARAAT EN HET NETSNOER BUITEN HET BEREIK VAN KINDEREN JONGER DAN 8 JAAR. SCHOONMAAK EN ONDERHOUD GEBRUIKER ZAL NIET WORDEN NEDERLANDS GEMAAKT DOOR KINDEREN, TENZIJ ZE OUDER ZIJN DAN 8 EN TOEZICHT. KINDEREN MOGEN NIET MET HET APPARAAT SPELEN. DIT APPARAAT IS NIET BESTEMD OM TE WORDEN INGESCHAKELD DOOR MIDDEL VAN EEN EXTERNE TIMER OF EEN APART AFSTANDSBEDIENINGSSYSTEEM. ALS HET NETSNOER BESCHADIGD IS, MOET HET WORDEN VERVANGEN DOOR DE FABRIKANT, ZIJN KLANTENDIENST OF GELIJKAARDIG BEVOEGDE PERSONEN OM ALLE GEVAAR UIT TE SLUITEN. OPPERVLAKKEN ZIJN AANSPRAKELIJK WARM TE KRIJGEN TIJDENS HET GEBRUIK. WAT HET REINIGEN VAN OPPERVLAKKEN DIE IN CONTACT KOMEN MET VOEDINGSMIDDELEN BETREFT, ZIE HET HOOFDSTUK "REINIGING EN ONDERHOUD". WAT DE WERKINGSDUUR EN DE BAKINSTELLINGEN BETREFT, ZIE DE HIERNAVOLGENDE PARAGRAAF VAN DE HANDLEIDING "REINIGING EN ONDERHOUD". VEILIGHEID WAARSCHUWINGEN VERGEWIS U ERVAN, NADAT U HET APPARAAT HEBT UITGEPAKT, DAT HET NIET BESCHADIGD IS. GEBRUIK HET APPARAAT NIET IN GEVAL VAN TWIJFEL EN RAADPLEEG EEN BEVOEGD PERSOON. GEBRUIK NOOIT ACCESSOIRES OF ONDERDELEN VAN EEN ANDER FABRIKANT. BIJ GEBRUIK VAN ZULKE ACCESSOIRES OF ONDERDELEN VERVALT DE GARANTIE. NEDERLANDS HET APPARAAT MAG NIET WORDEN GEBRUIKT ALS HET IS GEVALLEN, ALS HET ZICHTBARE SCHADE VERTOONT, ALS HET LEKT OF BEDRIJFSSTORINGEN VERTOONT. HAAL HET NETSNOER ALTIJD UIT HET STOPCONTACT WANNEER HET APPARAAT LANGDURIG NIET ZAL WORDEN GEBRUIKT. VERWIJDER ZORGVULDIG ALLE VERPAKKINGSMATERIAAL EN LAAT GEEN ZAKEN ALS PLASTIC ZAKKEN, POLYSTYREEN OF ELASTIEKEN BINNEN HET BEREIK VAN KINDEREN LIGGEN. DIE ZAKEN KUNNEN VOOR HEN GEVAARLIJK ZIJN. PLAATS HET APPARAAT NADAT HET IS UITGEPAKT OP EEN VLAK, STABIEL EN HITTEBESTENDIG OPPERVLAK. ZORG DAT ER VRIJE LUCHTCIRCULATIE RONDOM HET HELE APPARAAT MOGELIJK IS. NEEM TUSSEN HET APPARAAT EN DE WAND EEN AFSTAND VAN 50 CM AAN DE BOVENKANT EN 50 CM AAN DE ZIJKANTEN IN ACHT. DIT APPARAAT MOET WORDEN AANGESLOTEN OP EEN GEAARD STOPCONTACT. ALS U EEN VERLENGSNOER MOET GEBRUIKEN, NEEM ER DAN ZEKER EEN MET AARDING. CONTROLEER OF DE NETSPANNING OP HET TYPEPLAATJE OVEREENKOMT MET DIE VAN UW INSTALLATIE. IS DAT NIET HET GEVAL, GEBRUIK HET APPARAAT DAN NIET EN RAADPLEEG EEN BEVOEGD PERSOON. VERGEWIS U ERVAN DAT DE ELEKTRISCHE INSTALLATIE VOLDOENDE KRACHTIG IS VOOR EEN APPARAAT MET DIT VERMOGEN. NEEM ALLE NODIGE VOORZORGEN OM TE VOORKOMEN DAT IEMAND OVER HET NETSNOER OF HET VERLENGSNOER STRUIKELT. NEDERLANDS ALVORENS HET APPARAAT TE REINIGEN MOET U HET NETSNOER UIT HET STOPCONTACT HALEN EN HET APPARAAT VOLLEDIG LATEN AFKOELEN. DOMPEL HET APPARAAT, HET NETSNOER EN DE STEKKER NOOIT IN WATER OF EEN ANDERE VLOEISTOF. PLAATS HET NIET BOVEN OP ANDERE APPARATEN. VOOR UW VEILIGHEID WORDT AANBEVOLEN HET APPARAAT NOOIT BLOOT TE STELLEN AAN SLECHTE WEERSOMSTANDIGHEDEN EN VOCHT. GEBRUIK HET APPARAAT NOOIT ALS HULPVERWARMING. LAAT DE STEKKER VAN UW APPARAAT NIET IN HET STOPCONTACT ZITTEN WANNEER HET NIET WORDT GEBRUIKT. HET WORDT AANBEVOLEN HET NETSNOER REGELMATIG TE CONTROLEREN OP EVENTUELE TEKENEN VAN BESCHADIGING, EN HET APPARAAT MAG NIET WORDEN GEBRUIKT ALS HET NETSNOER BESCHADIGD IS. LAAT HET NETSNOER NIET VAN DE TAFEL OF HET WERKBLAD HANGEN WAAROP HET PRODUCT STAAT. SLUIT HET PRODUCT NIET AAN EN DRUK NIET OP DE KNOPPEN VAN HET BEDIENINGSPANEEL ALS UW HANDEN VOCHTIG ZIJN. GEBRUIK HET APPARAAT NIET BLOOTSVOETS OF MET VOCHTIGE VOETEN. HAAL DE STEKKER VAN HET APPARAAT UIT HET STOPCONTACT OM DE ELEKTRISCHE VOEDING UIT TE SCHAKELEN ALVORENS HET APPARAAT TE REINIGEN OF ONDERHOUD AAN HET APPARAAT TE VERRICHTEN. VERPLAATS HET APPARAAT NIET TERWIJL HET IN WERKING IS. NEDERLANDS GEBRUIK HET APPARAAT NIET IN DE BUURT VAN GORDIJNEN, MEUBELSTOFFERING OF BRANDBARE PRODUCTEN. ZORG DAT HET APPARAAT VÓÓR GEBRUIK OP EEN STABIEL EN HITTEBESTENDIG OPPERVLAK STAAT. DE TEMPERATUUR VAN DE OPPERVLAKKEN LOOPT HOOG OP TIJDENS DE WERKING VAN HET APPARAAT, WAT BRANDWONDEN KAN VEROORZAKEN. RAAK DE HEET GEWORDEN OPPERVLAKKEN VAN HET APPARAAT (BV. BEREIKBARE METALEN ONDERDELEN EN GLASPLAAT) NIET AAN. VERGEET NIET OM TIJDENS HET GEBRUIK VAN UW APPARAAT STEEDS DE HANDGREEP TE GEBRUIKEN EN OVENWANTEN TE DRAGEN OM HET APPARAAT TE OPENEN. VERWARM GEEN VOEDINGSMIDDELEN IN EEN FLES OF DOOS DIE NIET GESCHIKT IS VOOR GEBRUIK IN DE OVEN; ZIJ KUNNEN BREKEN EN BRANDWONDEN VEROORZAKEN. WEES VOORZICHTIG BIJ HET OPENEN EN SLUITEN VAN DE GLAZEN DEUR VAN UW APPARAAT: HARDE SCHOKKEN OF BUITENSPORIGE THERMISCHE SCHOKKEN KUNNEN GLASBREUK VEROORZAKEN. PROBEER BEPAALDE DELEN VAN HET APPARAAT OF BEPAALDE VOEDINGSMIDDELEN DIE TIJDENS DE BEREIDING IN HET APPARAAT VUUR HEBBEN GEVAT, NOOIT MET WATER TE BLUSSEN. DOOF DE VLAMMEN MET EEN VOCHTIGE DOEK OF GEBRUIK EEN BRANDBLUSSER EN RICHT DE STRAAL OP HET APPARAAT IN DE RICHTING VAN DE WIND. PLAATS GEEN BRANDBARE PRODUCTEN IN DE BUURT VAN OF ONDER HET MEUBEL WAAROP HET APPARAAT STAAT. GEBRUIK HET APPARAAT NIET IN DE BUURT VAN BRANDBARE STOFFEN ZOALS JALOEZIEËN, GORDIJNEN, OVERGORDIJNEN ENZ. NEDERLANDS LEG NOOIT PAPIER, KARTON OF PLASTIC IN OF OP HET APPARAAT. STEEK NIETS IN DE VENTILATIEROOSTERS EN SLUIT DEZE NIET AF. WACHT ALVORENS HET APPARAAT TE REINIGEN ALTIJD TEN MINSTE EEN UUR TOTDAT HET VOLLEDIG IS AFGEKOELD EN HAAL DE STEKKER UIT HET STOPCONTACT. TIL HET PRODUCT NIET OP EN VERPLAATS HET NIET TIJDENS HET GEBRUIK OM RISICO OP VERBRANDING TE VOORKOMEN. VEILIGHEIDSNORMEN DIT APPARAAT IS GELIJKVORMIG AAN DE HUIDIGE RICHTLIJNEN EN NORMEN. NEDERLANDS INHOUDSOPGAVE BESCHRIJVING ............................................................................................ 1 INBEDRIJFSTELLING EN GEBRUIK ................................................................ 2 Vóór het eerste gebruik ........................................................................... 2 Uw apparaat gebruiken............................................................................ 2 REINIGING EN ONDERHOUD....................................................................... 6 TECHNISCHE INFORMATIE .......................................................................... 7 MILIEU EN RECYCLAGE ............................................................................... 8 NEDERLANDS BESCHRIJVING 1. 2. 3. 4. 5. 6. 7. Handgreep Glazen deur Verwarmingsweerstanden Voetjes Keuzeknop hetelucht- en draaispitfuncties Thermostaatknop Werkingsindicatielampje 8. Keuzeknop bereidingswijze 9. Timerknop 10. Braadslee 11. Rooster 12. Handgreep voor rooster of braadslee 13. Draaispit 14. Handgreep voor draaispit 1 NEDERLANDS INBEDRIJFSTELLING EN GEBRUIK Vóór het eerste gebruik 1. Plaats uw apparaat op een vlak en stabiel oppervlak. 2. Verwijder alle etiketten, beschermfolies en steunstukken evenals de zelfklevers op en in het apparaat. 3. Sluit het apparaat aan op een geaard stopcontact. 4. Vóór de allereerste ingebruikname van het apparaat moet het in lege toestand worden ingeschakeld om het beschermend vet te verbranden en de rook en geur die een nieuw apparaat normaal afgeeft te doen verdwijnen. Ga daarbij als volgt te werk: a. Plaats het rooster en de braadslee in de oven b. Draai de thermostaatknop op 200 °C c. Draai de keuzeknop voor de bereidingswijze en selecteer . d. Zet de timer op 10 minuten. e. Het werkingsindicatielampje gaat branden als verwittiging dat het apparaat aan het verwarmen is. f. Verlucht intussen de kamer. g. Zodra u het timersignaal hoort dat het einde van de baktijd aangeeft, zet u alle bedieningselementen van het apparaat uit. h. Laat het apparaat afkoelen alvorens de oven met een vochtige doek te reinigen en de accessoires (rooster en braadslee) af te wassen met een vochtige spons gedrenkt in vloeibaar afwasmiddel. OPMERKING: Tijdens de eerste keren dat u het apparaat gebruikt kunnen geurtjes en stofdeeltjes voorkomen die afkomstig zijn van het apparaat. Dit is normaal en zal snel ophouden. Uw apparaat gebruiken Zorg dat het apparaat zorgvuldig aangesloten is op een geaard stopcontact. Zet uw gerecht met de bijbehorende accessoires in de oven en volg dan de hieronder aangegeven stappen: 2 NEDERLANDS 1. Instellen van de thermostaat Om de baktemperatuur in te stellen draait u de thermostaatknop met de wijzers van de klok mee en selecteert u de juiste temperatuur afhankelijk van het gerecht dat u gaat bereiden. Lauwwarme oven Matig warme oven Vrij warme oven Warme oven Zeer warme oven Temperatuur 100 ° - 110 ° 110 ° - 150 ° 150 ° - 200 ° 210 ° 230 ° 2. Keuzeknop bereidingswijze Om de bereidingswijze in te stellen draait u deze keuzeknop met de wijzers van de klok mee en selecteert u de juiste bereidingswijze afhankelijk van het gerecht dat u gaat bereiden. Stopstand Bereidingsstand boven om uw voedingsmiddelen aan de bovenkant een mooie bruine kleur te geven of te grilleren Bereidingsstand onder weerstand onderaan door Bereidingsstand boven en onder middel van de door middel van beide weerstanden 3. Timerknop Met de timerknop kunt u uw baktijd tussen 0 en 60 min. instellen. Om de baktijd in te stellen draait u de timerknop met de wijzers van de klok mee en selecteert u de juiste baktijd afhankelijk van het gerecht dat u gaat bereiden. Zodra u de timerknop activeert, gaat het werkingsindicatielampje branden om aan te geven dat de oven in werking is. Wanneer de ingestelde tijd is verstreken, produceert de timer een geluidssignaal om het einde van de baktijd aan te geven en wordt de oven automatisch uitgeschakeld. U kunt de oven tijdens het bereiden handmatig uitschakelen door de timer tegen de wijzers van de klok in op stand 0 te zetten. Opmerking: Uw minioven is uitgerust met een binnenverlichting. Deze wordt geactiveerd wanneer de timerknop wordt ingeschakeld. 3 NEDERLANDS 4. Keuzeknop hetelucht- en/of draaispitfunctie Met deze knop kunt u de hetelucht- en/of draaispitfunctie gelijktijdig met de verschillende bereidingswijzen gebruiken. Stopstand Heteluchtstand Draaispitstand Draaispit- en heteluchtstand Gebruik van de hetelucht- en/of draaispitfunctie met de verschillende bereidingswijzen: o Draai de keuzeknop hetelucht- en/of draaispitfunctie; selecteer de gewenste functiestand. Stel dan de bereidingswijze in door de keuzeknop van de bereidingswijze met de wijzers van de klok mee te draaien en selecteer de juiste bereidingswijze afhankelijk van het gerecht dat u gaat bereiden Selecteren van de Type bereiding bereidingswijze Hete lucht en positie van de bereiding boven om uw voedingsmiddelen aan de bovenkant een mooi bruin kleurtje te geven of te grilleren voor een betere + verdeling van de warmte. Hete lucht en positie van de bereiding onder door middel van de weerstand + onderaan voor een betere verdeling van de warmte. + + + + + + Hete lucht en positie van de bereiding boven en onder door middel van beide weerstanden voor een betere verdeling van de warmte. Draaispitfunctie en bereidingsstand boven om uw voedingsmiddelen aan de bovenkant een mooi bruin kleurtje te geven of te grilleren Draaispitfunctie en bereidingsstand onder door middel van de weerstand onderaan. Draaispitfunctie en bereidingsstand boven en onder door middel van beide weerstanden Hete lucht met draaispitfunctie en positie van de bereiding boven om uw voedingsmiddelen aan de bovenkant een mooi bruin kleurtje te geven of te grilleren voor een betere verdeling van de warmte. Hete lucht met draaispitfunctie en positie van de bereiding onder door middel van de weerstand onderaan voor een betere verdeling van de warmte. 4 NEDERLANDS + Hete lucht met draaispitfunctie en positie van de bereiding boven en onder door middel van beide weerstanden voor een betere verdeling van de warmte. Enkele adviezen om uw oven optimaal te gebruiken: De oven niet overbelasten. Plaats de voedingsmiddelen in het midden van het apparaat. De deur tijdens het bakken niet te vaak openen om warmteverlies te voorkomen. Werp af en toe een blik op uw gerechten tijdens de bereiding. Gebruik van de hetelucht- en/of draaispitfunctie met de verschillende bereidingswijzen:Plaatsen van uw draaispit: Uw oven nooit voorverwarmen om verbrandingsgevaar te voorkomen! Gebruik altijd de handgreep van het draaispit om het vlees uit de oven te halen. Plaats eerst de braadslee in de oven in de laagste positie (1). Schroef beide pennen van het draaispit los en rijg de kip zodanig in het midden van het spit dat de kip niet voorbij punt 2 en 3 komt. Zorg dat de kip goed is samengebonden. Plaats de twee pennen terug, prik ze in het vlees en schroef ze stevig vast en let erop dat ze niet voorbij punt 2 en 3 komen. Zet het draaispit in de oven door het in de twee inkepingen te plaatsen; zorg dat het spit goed in de inkepingen zit alvorens het bakproces te starten. 5. Gebruik van de handgrepen Plaats de haken van het onderste deel van de handgreep op het midden van het rooster (zoals op de foto hiernaast). 5 NEDERLANDS Plaats de haken van het bovenste deel van de handgreep op het midden van het rooster (zoals op de foto's hiernaast). Plaats de inkepingen van de handgreep op de daartoe voorziene punten in het draaispit (zoals op de foto's hiernaast). Opgelet: Zorg dat de handgreep in het midden zit om een gevaarlijke situatie te voorkomen en ga voorzichtig te werk. Bij zware schotels wordt aanbevolen een ovenwant in plaats van de handgreep te gebruiken om uw schotel uit de oven te halen. REINIGING EN ONDERHOUD Uw oven is voorzien van zelfreinigende binnenwanden die bij elke gebruiksbeurt automatisch worden geactiveerd. Alle spatten die tijdens het bakken op de zelfreinigende bekleding terechtkomen worden tijdens het bakken geoxideerd. 6 NEDERLANDS Opmerking: Gebruik geen metalen schuursponsen en schurende onderhoudsproducten om de zelfreinigende bekleding niet te beschadigen. Controleer of alle bedieningselementen van uw oven zijn uitgeschakeld Trek de stekker uit het stopcontact. Laat het apparaat altijd minstens een uur afkoelen voor u het begint te reinigen. Haal het rooster en de braadslee eruit, was ze af met een spons gedrenkt in een pH-neutraal afwasmiddel en spoel ze dan af alvorens ze af te drogen (vrije lucht of met een doek). Reinig het apparaat aan de binnen- en buitenzijde met een zachte doek of een spons gedrenkt in een pH-neutraal product. Gebruik nooit een metalen schuurspons of een scherp of puntig voorwerp om aanslag in de oven te verwijderen. Gebruik voor het reinigen van de glazen deur een doek met een speciaal product voor "Ruiten" en droog de glasplaat dan af met een droge en schone doek. Houd de oven nooit onder de waterstraal van de kraan. Reinig uw oven regelmatig om de aanslag van voedingsmiddelen en vet van de wanden te verwijderen voor een optimale werking van uw apparaat. OPGELET: Wacht alvorens uw oven handmatig te reinigen altijd ten minste een uur totdat de oven is afgekoeld en haal de stekker uit het stopcontact! Gebruik geen toxische en agressieve producten zoals spiritus, industriële afbijtmiddelen of oplosmiddelen om uw oven te reinigen want daarmee riskeert u de oven te beschadigen. TECHNISCHE INFORMATIE Model Inhoud Netspanning Vermogen MO21-SFE 44L 220 V-240 V ~50 Hz/60 Hz 2000W 7 NEDERLANDS MILIEU EN RECYCLAGE Overeenkomstig Europese richtlijn betreffende Afgedankte Elektrische en Elektronische Apparatuur (AEEA) mogen afgedankte huishoudelijke apparaten niet met het gewone huisvuil worden meegegeven. Afgedankte apparaten moeten gescheiden worden ingezameld om het hergebruik en de recyclage van de bestanddelen ervan te optimaliseren en de impact op de gezondheid van de mens en het milieu te verminderen. Het symbool van de doorgestreepte vuilnisbak is op alle producten aangebracht om te herinneren aan de verplichting tot gescheiden inzameling. Consumenten moeten contact opnemen met de plaatselijke overheid of hun verkoper voor de inzamelmethode voor hun afgedankte apparaat. Wanneer het apparaat niet meer werkt, mag u het niet met het huisvuil weggooien maar moet u het afleveren bij een erkend inzamelcentrum zodat het kan worden gerecycleerd. Zo levert u een bijdrage aan de bescherming van het milieu. Ingevoerd door Vestel France, 17 rue de la Couture – 94563 Rungis CEDEX Pour en savoir plus : www.quefairedemesdechets.fr Deze gebruikshandleiding is ook beschikbaar op de volgende website: http://pieces-detachees.sogedis.fr/ 8-
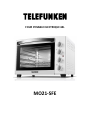 1
1
-
 2
2
-
 3
3
-
 4
4
-
 5
5
-
 6
6
-
 7
7
-
 8
8
-
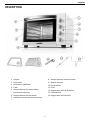 9
9
-
 10
10
-
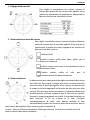 11
11
-
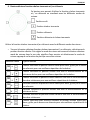 12
12
-
 13
13
-
 14
14
-
 15
15
-
 16
16
-
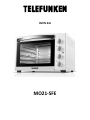 17
17
-
 18
18
-
 19
19
-
 20
20
-
 21
21
-
 22
22
-
 23
23
-
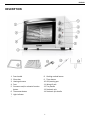 24
24
-
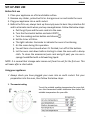 25
25
-
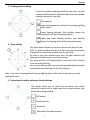 26
26
-
 27
27
-
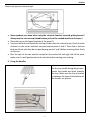 28
28
-
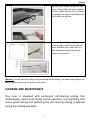 29
29
-
 30
30
-
 31
31
-
 32
32
-
 33
33
-
 34
34
-
 35
35
-
 36
36
-
 37
37
-
 38
38
-
 39
39
-
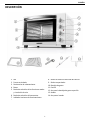 40
40
-
 41
41
-
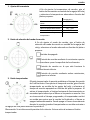 42
42
-
 43
43
-
 44
44
-
 45
45
-
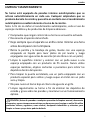 46
46
-
 47
47
-
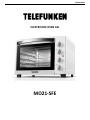 48
48
-
 49
49
-
 50
50
-
 51
51
-
 52
52
-
 53
53
-
 54
54
-
 55
55
-
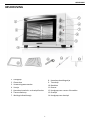 56
56
-
 57
57
-
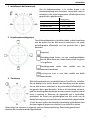 58
58
-
 59
59
-
 60
60
-
 61
61
-
 62
62
-
 63
63


Telefunken MO21-SFE 44L CTL El manual del propietario
- Tipo
- El manual del propietario
en otros idiomas
Otros documentos
-
Valberg VG-MF45EK1LC noir El manual del propietario
-
Brandt FC350MUB-01 El manual del propietario
-
-
-
-
-
-
-
-