Windsor Recover 12 El manual del propietario
- Categoría
- Aspiradoras
- Tipo
- El manual del propietario

English 3
Français 9
Español 15
Recover 12
5.962-241.0 07/10

2
1
1
2
1
2
3
2
1
4
5
6
7

English 3
Inform your dealer immediately if there
is any shipping damage.
Completely remove the accessories
from the box.
The suction unit is not suitable for suck-
ing up hazardous dusts as asbestos.
Please consult your Windsor branch or
your Windsor dealer with regard to such
applications.
Only operate the vacuum from a
grounded outlet. Refer to the Technical
data for the necessary main fuse.
When using an electrical machine, basic
precautions should always be followed, in-
cluding the following: This vacuum is in-
tended for commercial use.
1 DISCONNECT VACUUM CLEANER
FROM POWER CIRCUIT before re-
moving the cover, performing mainte-
nance work, and when not in use.
2 DO NOT LEAVE the machine unattend-
ed when plugged in.
3 ALWAYS CHECK THE POWER SUP-
PLY CORD for damage or signs of any
aging before each use.
4 DO NOT PULL OR CARRY VACUUM
CLEANER BY CORD. Do not close
door on cord or pull cord around sharp
edges.
5 KEEP CORD AWAY FROM HEAT AND
OIL. Do not leave cord lying around af-
ter job is complete. It can become a trip-
ping hazard.
6 DO NOT RUN VACUUM OVER CORD.
7 TURN SWITCH TO OFF before unplug-
ging power supply cord.
8 DO NOT UNPLUG BY PULLING
CORD. To unplug, grasp plug, not cord.
9 DO NOT GRASP PLUG WITH WET
HANDS.
10 A DAMAGED CORD OR PLUG should
only be replaced by an authorized serv-
ice center representative. DO NOT AT-
TEMPT TO REPAIR POWER CORD.
11 TO AVOID SHOCK, do not expose to
rain. Store indoors.
12 USE ONLY AS RECOMMENDED BY
THIS MANUAL. Use only with recom-
mended attachments.
13 KEEP HAIR, CLOTHING, LOOSE
JEWELRY, FINGERS and all parts of
the body away from openings and mov-
ing parts.
14 DO NOT BLOCK OR OBSTRUCT
OPENINGS. Keep openings free of lint,
hair, dust, and anything that restricts air
flow.
15 DO NOT PICK UP ANYTHING THAT IS
BURNING, smoldering, or smoking
such as matches, cigarettes, or hot ash-
es.
16 DO NOT USE TO VACUUM COMBUS-
TIBLE EXPLOSIVE MATERIALS, such
as coal, grain, and other finely divided
combustible material.
17 DO NOT USE TO VACUUM COMBUS-
TIBLE, hazardous, toxic, or carcinogen-
ic materials, including gasoline, diesel
fuel, acetone, paint thinner, heating oils,
undiluted acids and solvents, pesti-
cide,and asbestos.
18 USE RECOMMENDED FILTERS when
vacuuming drywall materials.
19 DO NOT USE WITHOUT FILTER and/
or dust bag in proper place.
20 DO NOT ALLOW VACUUM CLEANER
TO BE USED AS A TOY. Keep children
away from Vacuum Cleaner.
21 DO NOT LEAVE UNATTENDED while
Vacuum Cleaner is running.
22 DO NOT USE IF CORD, PLUG, FIL-
TER, OR VACUUM CLEANER IS IN
POOR CONDITION. If the Vacuum
Cleaner has been dropped, damaged,
exposed to weather, or dropped into
water; have it checked by an authorized
service .
IMPORTANT SAFETY IN-
STRUCTIONS
READ ALL INSTRUCTIONS BEFORE US-
ING THIS MACHINE.

4 English
23 ALWAYS USE EYE PROTECTION
when operating Vacuum Cleaner.
24 USE EXTRA CAUTION when operating
on stairs.
25 STAY ALERT! Do not use Vacuum
Cleaner when you are tired or under the
influence of drugs, alcohol or medica-
tion.
In a double-insulated machine, two sys-
tems of insulation are provided instead of
grounding. No grounding means is provid-
ed on a double-insulated machine, nor
should a means for grounding be added to
the machine. Servicing a double-insulated
machine requires extreme care and knowl-
edge of the system, and should be done
only by qualified service personnel. Re-
placement parts for a double-insulated ma-
chine must be identical to the parts they
replace.
SAVE THESE INSTRUCTIONS
This vacuum is intended for commercial
use.
Servicing of double-insulated machines

English 5
Please read and comply with
these instructions prior to the
initial operation of your appliance. Retain
these operating instructions for future refer-
ence or for subsequent possessors.
– The non-compliance of the operating
and safety instructions may lead to
damages of the machine and to dan-
gers for the operator and other persons.
– In case of shipping damage inform ven-
dor immediately.
Environmental protection 5
Proper use 5
Start up 5
Operations 7
Shutting down 7
Maintenance and care 7
Troubleshooting 8
Accessories and Spare Parts 8
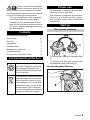
– The machine is meant for dry and wet
cleaning of floors and walls.
– This machine is suited for the commer-
cial use, e.g. in hotels, schools, hospi-
tals, factories, shops, offices, and rental
companies.
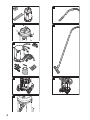
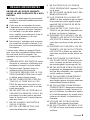
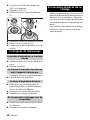
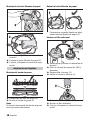
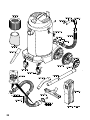
– For sweeping, always fix cartridge filter
(1).
– To vacuum fine dust, you can also use
an additional paper filter bag (2).
Contents
Environmental protection
The packaging material can be
recycled. Please do not throw
the packaging material into
household waste; please send
it for recycling.
Old machines contain valuable
materials that can be recycled;
these should be sent for recy-
cling. Batteries, oil, and similar
substances must not enter the
environment. Please dispose
of your old machines using ap-
propriate collection systems.
Proper use
Start up
Dry vacuum cleaning
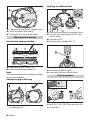
Inserting the paper filter bag

6 English
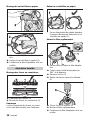
Release and remove the vacuum head.
Insert the paper filter bag (2).
Insert and lock the vacuum head.
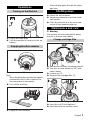
Remove the brush strips (4).
Insert the squeegee blades (5).
Note
The structured side of the squeegee blades
must point outwards.
– To vacuum wet dirt, first remove the pa-
per filter bag (2).
Release and remove the vacuum head.
Turn the vacuum basket by 180° and
keep it aside.
Loosen nut (3).
Remove the cartridge filter (1).
Insert the nut (3) and tighten it.
Install the additional filter.
Insert and lock the vacuum head.
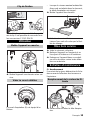
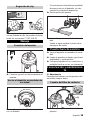
The vacuum hose is equipped with a clip
system. All C-35/C-DN-35 accessories can
be connected.
Wet vacuum cleaning
Inserting the squeegee blades
Remove the paper filter bag
Installing an additional filter
Clip connection

English 7
Plug in the main plug.
Turn the machine on and put it into op-
eration.
The vacuum canal (6) is equipped with a
float.
– When the dirt water reaches the highest
permissible level in the container, the
vacuum power is interrupted.
Turn off the machine.
Empty the dirt container.
Drain off dirty water through the drain-
age hose.
Empty the dirt container.
Vacuum and wipe the machine inside
and outside.
Place the machine in a dry room and
secure it from unauthorized use.
몇 Warning
First remove the main plug before doing
any job on the vacuum cleaner.
Release and remove the vacuum head.
Turn the vacuum basket by 180° and
keep it aside.
Loosen nut (3).
Remove the cartridge filter (1).
Insert the new cartridge filter (1).
Insert the nut (3) and tighten it.
Insert and lock the vacuum head.
Operations
Turning on the Machine
Emptying the dirt container
Shutting down
Maintenance and care
Change cartridge filter

8 English
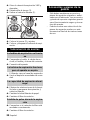
Check cables, plugs, fuse, and socket.
Turn on the machine.
– Float is blocking the vacuum canal.
Empty the dirt container.
Remove choking of vacuum nozzle,
vacuum tube, vacuum hose, or car-
tridge filter.
Exchange the paper filter bag.
Change cartridge filter.
Check the proper installation of the car-
tridge filter.
Change cartridge filter.
– Only use accessories and spare parts
which have been approved by the man-
ufacturer. The exclusive use of original
accessories and original spare parts
ensures that the machine can be oper-
ated safely and troublefree.
– At the end of the operating instructions
you will find a selected list of spare parts
that are often required.
Troubleshooting
Vacuum motor does not run
Vaccum motor is running but the
machine is not vacuuming in dust/
dirt
Vacuum capacity decreases
Dust comes out while vacuuming
Accessories and Spare Parts

Français 9
En cas de dommages dus au transport,
veuillez en informer immédiament votre
revendeur.
Sortir tous les accessoires du carton.
L’aspirateur ne convient pas pour aspi-
rer des poussières nocvives comme p.
ex. l’amiante. Pour de telles applica-
tions, veuillez vous adresser à votre re-
présentation Windsor ou à votre
revendeur Windsor.
Ne brancher l’ aspirateur qu’à une prise
de courant de sécurité conforme. Fusi-
ble nécessaire, voir les caractéristiques
techniques.
Lorsque vous utilisez un appareil électri-
que, vous devez prendre certains précau-
tions de base, dont la suivante: Cet
aspirateur est concu pour l’usage profes-
sionnel.
1 DÉBRANCHER L’ASPIRATEUR avant
d’enlever le couvercle, d’effectuer tout
entretien et lorsqu’il n’est pas utilisé.
2 Ne laissez pas l’appareil sans sur-
veillance tant qu’il est branché.
3 TOUJOURS VÉRIFIER QUE LE COR-
DON D’ALlMENTATlON n’est ni vieilli,
ni abîmé‚ avant chaque usage.
4 NE PAS TRANSPORTER L’ASPIRA-
TEUR OU LE TIRER PAR LE COR-
DON. Ne pas fermer de portes sur le
cordon ou faire passer celui-ci sur des
bords tranchants.
5 NE PAS METTRE LE CORDON À LA
CHALEUR OU DANS DE L’HUILE. Ne
pas laisser le cordon traîner par terre
après la fin du travail. Il pourrait provo-
quer une chute.
6 NE PAS PASSER L’ASPIRATEUR
SUR LE CORDON.
7 METTRE L’INTERRUPTEUR SUR
avant de débrancher l’appareil.
8 NE PASTIRER SUR LE CORDON
POUR DÈBRANCHER l’appareil. Tirer
sur la prise.
9 NE PAS SAISIR LA PRISE AVEC DES
MAINS MOUILLÉES.
10 SI LE CORDON OU LA PRISE EST
ABÎMÉ, le faire remplacer par un agent
d’un centre de service agréé unique-
ment.NE PAS ESSAYER DE RÉPA-
RER SOI-MÊME.
11 POUR ÉVITER TOUT CHOC ÉLEC-
TRIQUE, ne pas laisser l’appareil sous
la pluie. Le stocker à l’intérieur.
12 ÉLOIGNER LES CHEVEUX, LES VÊ-
TEMENTS, LES BIJOUX FLOTTANTS,
LES DOIGTS et toutes les parties du
corps des ouvertures et des pièces mo-
biles.
13 ÉLOIGNER LES CHEVEUX, LES VÊ-
TEMENTS, LES BIJOUX FLOTTANTS,
LES DOIGTS et toutes les parties du
corps des ouvertures et des pièces mo-
biles
14 NE PAS FERMER OU OBSTRUER
LES OUVERTURES. Enlever les pelu-
ches, cheveux, poussières et tout ce
qui pourrait gêner le passage de l’air.
15 NE PAS ASPIRER D’OBJETS EN FEU,
rougissants ou dégageant de la fumée
tels que des allumettes, des cigarettes
ou des cendres chaudes.
16 NE PAS ASPIRER DE MATÉRIAUX
COMBUSTIBLES EXPLOSIFS, tels
que charbon, grains et autres matériaux
combustibles finement divisés.
17 NE PAS ASPIRER DE MATÉRIAUX
COMBUSTIBLES, dangereux, toxiques
ou cancérigènes comme l’essence, le
gas-oil, l’acétone, les diluants à peintu-
re, le fuel domestique, les acides et les
solvants non dilués, les pesticides et
l’amiante.
18 UTILISER LES FILTRES RECOM-
MANDÉS pour aspirer les solides.
19 NE PAS UTILISER L’APPAREIL SI LE
FILTRE ou le sac à poussière n’est pas
en place.
RÈGLES IMPORTANTES
OBSERVEZ LES POINTS SUIVANTS
AVANT LA MISE EN SERVICE DE L’ASPI-
RATEUR.

10 Français
20 INTERDIRE DE JOUER AVEC L’ASPI-
RATEUR. En tenir les enfants éloignés.
21 NE PAS LAISSER L’ASPIRATEUR
SANS SURVEILLANCE pendant le
fonctionnement.
22 NE PAS L’UTILISER SI LE CORDON,
LA PRISE, LE FILTRE OU L’ASPIRA-
TEUR EST EN MAUVAIS ÉTAT. Si
l’aspirateur est tombé, a été abîmé, a
été exposé‚ aux intempéries ou est tom-
bé dans de l’eau, fe faire vérifier par un
agent de service
23 TOUJOURS PORTER UNE PROTEC-
TION OCULAIRE lors de l’utilisation de
l’aspirateur.
24 REDOUBLER DE PRUDENCE pour
l’utilisation dans un escalier.
25 RESTER VIGILANT! Ne pas utiliser
l’aspirateur quand on est fatigué ou
aprés avoir pris de la drogue, de l’alcool
ou des médicaments.
Dans un appareil à double isolation, deux
isolations distinctes remplacement la mise
à la terre. L’appareil à double isolation n’est
pourvu d’aucun dispositif de mise à la terre
et un tel dispositif ne doit pas être ajouté.
L’entretien d’un appareil à double isolation
dermande beaucoup de soins ainsi qu’une
bonne connaissance du système et net de-
vrait être effectué que par un technicien
d’entretien qualifié.
Les pièces de rechange d’un appareil à
double isolation doivent être identiques aux
pièces originales.
CONSERVEZ CES INSTRUCTIONS
Cet aspirateur est concu pour l’usage
professionnel.
ENTRETIEN DES APPAREILS À DOU-
BLE-ISOLATION

Français 11
Lisez attentivement ce mode
d’emploi avant la première uti-
lisation de l’appareil et respectez les con-
seils y figurant. Conservez ce mode
d’emploi pour une utilisation ultérieure ou
un éventuel repreneur de votre matériel.
– En cas de non-respect des instructions
de service et des consignes de sécuri-
té, l'appareil risque de subir des dom-
mages matériel et l'utilisateur ainsi que
toute tierce personne sont exposés à
des dangers potentiels.
– Contactez immédiatement le revendeur
en cas d'avarie de transport.
Protection de l’environnement 11
Utilisation conforme 11
Mise en service 11
Utilisation 13
Mise hors service 13
Entretien et maintenance 13
Consignes de dépannage 14
Accessoires et pièces de rechange 14
– Cet appareil est destiné au nettoyage à
sec et au nettoyage par voie humide
des sols et des murs.
– Cet appareil convient à un usage indus-
triel, par exemple dans le cadre d'hô-
tels, d'écoles, d'hôpitaux, d'usines, de
magasins, de bureaux et d'agences de
location.
– Pour l'aspiration de poussières, la car-
touche filtrante (1) doit impérativement
être montée.
– Pour l'aspiration de poussières fines, il
est possible d'utiliser de surcroît un sa-
chet filtre en papier (2).
Table des matières
Protection de l’environne-
ment
Les matériaux constitutifs de
l’emballage sont recyclables.
Ne pas jeter les emballages
dans les ordures ménagères,
mais les remettre à un système
de recyclage.
Les appareils usés contiennent
des matériaux précieux recy-
clables lesquels doivent être
apportés à un système de re-
cyclage. Il est interdit de jeter
les batteries, l'huile et les subs-
tances similaires dans l'envi-
ronnement. Pour cette raison,
utiliser des systèmes de collec-
te adéquats afin d'éliminer les
appareils hors d'usage.
Utilisation conforme
Mise en service
Aspiration de poussières

12 Français
Déverrouiller et retirer la tête d'aspira-
tion.
Insérer le sachet filtre en papier (2).
Positionner la tête d'aspiration et la ver-
rouiller.
Démonter les brosses (4).
Monter les lèvres en caoutchouc (5).
Remarque
La face structurée des lèvres en caout-
chouc doit être tournée vers l'extérieur.
– En cas d'aspiration de saletés humides,
il convient de toujours démonter le sa-
chet filtre en papier (2).
Déverrouiller et retirer la tête d'aspira-
tion.
Faire tourner la tête d'aspiration de
180 ° et la déposer.
Dévisser l'écrou (3).
Retirer l'ancienne cartouche filtrante
(1).
Placer l'écrou e revisser (3).
Monter le filtre supllémentaire.
Positionner la tête d'aspiration et la ver-
rouiller.
Montage du sachet filtre en papier
Aspiration humide
Montage des lèvres en caoutchouc
Retirer le sachet filtre en papier.
Monter le filtre supllémentair

Français 13
Le flexible d'aspiration est doté d'un systè-
me à clip. Il est possible de raccorder tous
les accessoires C-35/C-DN-35.
Brancher la fiche secteur.
Mettre l'appareil sous tension et en ser-
vice.
Le canal d'aspiration (6) est équipé d'un
flotteur.
– Lorsque le niveau maximal admissible
d'eau sale est atteint dans le réservoir,
le débit d'aspiration est stoppé.
Mettre l’appareil hors tension.
Vider le réservoir collecteur.
Laisser l'eau sale s'écouler par le flexi-
ble de vidange.
Vider le réservoir collecteur.
Nettoyer l'appareil en l'aspirant et en
l'essuyant à l'intérieur et à l'extérieur.
Entreposer l’appareil dans un endroit
sec et le sécuriser contre toute utilisa-
tion non autorisée.
몇 Avertissement
Il convient de toujours débrancher la fiche
réseau avant d'effectuer des travaux sur
l'aspirateur.
Déverrouiller et retirer la tête d'aspira-
tion.
Clip de fixation
Utilisation
Mettre l'appareil en marche
Vider La cuve à détritus
Mise hors service
Entretien et maintenance
Remplacement de la cartouche fil-
trante

14 Français
Faire tourner la tête d'aspiration de
180 ° et la déposer.
Dévisser l'écrou (3).
Retirer l'ancienne cartouche filtrante
(1).
Installer la cartouche filtrante (1) neuve.
Placer l'écrou e revisser (3).
Positionner la tête d'aspiration et la ver-
rouiller.
Vérifier le câble, la fiche, le fusible et la
prise.
Allumer l’appareil.
– Le flotteur obture le canal d'aspiration.
Vider le réservoir collecteur.
Déboucher la buse d'aspiration, le
tuyau d'aspiration, le flexible d'aspira-
tion ou la cartouche filtrante.
Remplacer le sachet filtre en papier.
Remplacer la cartouche filtrante.
Vérifier le positionnement de la cartou-
che filtrante.
Remplacer la cartouche filtrante.
– Utiliser uniquement des accessoires et
des pièces de rechange autorisés par le
fabricant. Des accessoires et des piè-
ces de rechange d’origine garantissent
un fonctionnement sûr et parfait de l’ap-
pareil.
– Une sélection des pièces de rechange
utilisées le plus se trouve à la fin du
mode d'emploi.
Consignes de dépannage
La turbine d'aspiration ne fonction-
ne pas
La turbine d'aspiration fonctionne
mais l'appareil n'aspire pas.
La force d'aspiration diminue
De la poussière s'échappe lors de
l'aspiration
Accessoires et pièces de re-
change

Español 15
Si al desembalar el aparato comproba-
ra Vd. algún daño o desperfecto en el
mismo atribuible al transporte, rogamos
se dirija inmediatamente al distribuidor
en donde adquirió el aparato.
Extraiga la totalidad de las piezas y ac-
cessorios del aparato que se encuen-
tran en el recipiente del mismo o en la
caja de cartón del embalaje.
El aparato no es aspropiado para la as-
piración de polvos nocivos para la sa-
lud, como por ejemplo amianto. Para
este tipo de aplicaciones deberá poner-
se en contacto con su Distribuidor o la
Delegación Nacional de Windsor.
El aspirador sólo se deberá conectar a
tomas de corriente instaladas correcta-
mente y provistas de una puesta a tie-
rra reglamentaria. Los datos necesarios
para el fusible de la red figuran en el
apartado <<Características Técni-
cas>>.
En caso de utilizar herramientas eléctricas
acopladas al aparato, deberán observarse
estrictamente todas las normas de seguri-
dad básicas, a fin de prevenir cualquier
riesgo de incendio, descargas eléctricas o
daños o lesiones del personal encargado
de manipular los mismos: Esta aspiradora
está diseñada para uso comercial.
1 DESCONECTE LA ASPIRADORA DEL
CIRCUITO DE ALIMENTACIÓN antes
de quitar la tapa, antes de realizar tra-
bajo de mantenimiento y cuando no la
esté utilizando.
2 NO DEJAR EL APARATO sin vigilan-
cia, mientras esté enchufado.
3 SIEMPRE VERIFIQUE QUE EL CA-
BLE ELECTRICO no esté dañado o
desperfecto antes de usar la Aspirado-
ra.
4 NO TIRE (Jale) O LLEVE LA ASPIRA-
DORA POR EL CABLE ELECTRICO.
Tampoco debe pellizcarlo con una
puerta o estirarlo por ningún canto (bor-
de) agudo.
5 NO EXPONGA EL CABLE A LO CA-
LIENTE NI A ACEITES. Para prevenir
un tropiezo, no deje el cable suelto des-
pués de usarlo.
6 NO PASE LA ASPIRADORA POR EN-
CIMA DEL CABLE DE ALIMENTA-
CIÓN.
7 PONGA EL SELECTOR EN LA POSI-
CION DE <<OFF>> antes de desen-
chufar la Aspiradora.
8 NO DESENCHUFE EL CABLE DE UN
TIRON (Jalón). Para desenchufarle
agarre la clavija (enchufe) no el cable.
9 NO AGARRE LA CLAVIJA (ENCHUFE)
CON LAS MANOS MOJADAS.
10 EL CABLE ELECTRICO (O LA CLAVI-
JA) sólo debe ser reemplazado por un
representante de un Centro de Servicio
Autorizado. SE NINGUNA MANERA
DEBE INTENTAR LA REPARACION
DEL CABLE ELECTRICO.
11 PARA PREVENIR CHOQUES ELEC-
TRICOS, no exponga la herramienta a
la lluvia. Guárdela en un luger seco.
12 SOLO USE LA ASPIRADORA COMO
ESTA RECOMENDADO EN ESTE MA-
NUAL. También use únicamente los ac-
cesorios recomendados.
13 MANTENGA ALEJADOS EL CABE-
LLO (PELO), ROPA, ALHAJAS SUEL-
TAS, DEDOS o cualquier otra parte del
cuerpo, de las aberturas y partes móvi-
les de la máquina.
14 NO CUBRA NI OBSTRUYA LAS
ABERTURAS. Mantenga las aberturas
libres de pelusa, pelo, polvo y cualquier
cosa que limite la circulación del aire.
ADVERTENCIAS IMPORTAN-
TES
ANTES DE LA PRIMERA
PUESTA EN MARCHA DEL APARATO
DEBERÁN OBSERVARSE LOS SIGUIEN-
TES PUNTOS.

16 Español
15 NO ASPIRE NINGUNA COSA QUE SE
ESTE QUEMANDO, ardiendo sin llama
o echando humo, tal como cigarrillos
(cigarros), fósforos (cerillos) o cenizas
calientes.
16 NO ASPIRE MATERIALES COMBUS-
TIBLES O EXPLOSIVOS, tal como car-
bón de piedra, cereales (o su polvo) u
otra sustancia fina y combustible.
17 NO ASPIRE MATERIALES COMBUS-
TIBLES, peligrosos, tóxicos o carcinó-
genos por ejemplo: gasolina, gasoil
(petróleo para diesel), acetona, diluente
para pintura, aceite combustible, ácidos
y disolventes no diluidos, pesticidas y
amianto (asbesto).
18 USE LOS FILTROS RECOMENDA-
DOS para limpiar (aspirar) materiales
de paredes en seco o paneles de yeso.
19 NO OPERE LA ASPIRADORA SIN FIL-
TRO ni sin instalar la bolsa de polvo.
20 NO DEJE QUE LA ASPIRADORA SEA
USADA COMO JUGUETE. No permita
que se acerquen niños a la Aspiradora.
21 NO DEJE LA ASPIRADORA EN MAR-
CHA sin personal para cuidarla.
22 NO OPERE LA MAQUINA SI EL CA-
BLE, EL ENCHUFE (La Clavija), EL
FILTRO O LA PROPIA ASPIRADORA
ESTA EN MALA CONDICION. Si la As-
piradora se ha caído o ha sido dañada
o expuesta a la intemperie o si se ha
caído en el agua, mándela o llévela a
un representante de servicio autorizado
para que el mismo verifique su funcio-
namiento.
23 SIEMPRE USE PROTECCION PARA
LOS OJOS cuando opere la Aspirado-
ra.
24 USE EXTREMA PRECAUCION al lim-
piar escaleras.
25 MANTENGASE ALERTA! No use la
Aspiradora cuando esté cansado o bajo
la influencia de medicación, alcohol o
drogas.
Un aparato dotado de doble aislamiento in-
corpora dos sistemas de aislamiento en lu-
gar de la puesta a tierra. Es decir, los
equipos dotatos de doble aislamiento no in-
corporan ningún conductor ni dispositivo
de puesta a tierra ni hay que acoplar a di-
cionalmente a los mismos una puesta a tie-
rra. Los trabajos de mantenimiento de un
equipo dotado de un sistema de doble ais-
lamiento requieren unos conocimientos
particularmente amplios y completos de di-
cho dispositivo y del aparato en cuestión,
debiendo ser ejecutados exclusivamente
por personal especializado del Servicio
Técnico Postventa Oficial.
En caso de tener que sustituir piezas o
componentes defectuosos del sistema de
doble aislamiento, las piezas de repuesto
deberán ser idénticas a las piezas defec-
tuosas.
GUARDE ESTAS INSTRUCCIONES
Esta aspiradora está diseñada para uso
comercial.
Mantenimiento de los equipos dotados
de doble aislamiento

Español 17
Antes de poner en marcha por
primera vez el aparato, lea el
presente manual de instrucciones y siga
las instrucciones que figuran en el mismo.
Conserve estas instrucciones para su uso
posterior o para propietarios ulteriores.
– El incumplimiento de las instrucciones
de uso y de las indicaciones de seguri-
dad puede provocar daños en el apara-
to y poner en peligro al usuario y a otras
personas.
– En caso de daños de transporte infor-
me inmediatamente al fabricante.
Protección del medio ambiente 17
Uso previsto 17
Puesta en marcha 17
Manejo 19
Puesta fuera de servicio 19
Conservación y mantenimiento 19
Subsanación de averías 20
Accesorios y piezas de repuesto 20
– El aparato está diseñado para la limpie-
za de pisos y superficies murales.
– Este aparato es apto para el uso en
aplicaciones industriales, como en ho-
teles, escuelas, hospitales, fábricas,
tiendas, oficinas y negocios de alquiler.
– Durante la aspiración en seco se debe
colocar siempre un cartucho filtrante
(1).
– Para la aspiración de polvo fino tam-
bién se puede utilizar una bolsa filtrante
de papel (2).
Índice de contenidos
Protección del medio ambien-
te
Los materiales empleados
para el embalaje son recicla-
bles y recuperables. No tire el
embalaje a la basura domésti-
ca y entréguelo en los puntos
oficiales de recogida para su
reciclaje o recuperación.
Los aparatos viejos contienen
materiales valiosos reciclables
que deberían ser entregados
para su aprovechamiento pos-
terior. Evite el contacto de ba-
terías, aceites y materias
semejantes con el medioam-
biente. Por este motivo, entre-
gue los aparatos usados en los
puntos de recogida previstos
para su reciclaje.
Uso previsto
Puesta en marcha
Aspiración en seco

18 Español
Desbloquear y extraer el cabezal de as-
piración.
Encajar la bolsa filtrante de papel (2).
Colocar y bloquear el cabezal de aspi-
ración.
Desmontar las tiras de cepillo (4).
Montar el borde de goma (5).
Nota
El lateral estructurado del borde de goma
tiene que estar para afuera.
– Para aspirar suciedad líquida se debe
retirar la bolsa filtrante de papel (2).
Desbloquear y extraer el cabezal de as-
piración.
Girar el cabezal de aspiración 180º y
depositar.
Desatornillar la tuerca (3).
Retirar el cartucho filtrante (1).
Colocar la tuerca (3) y ajustar.
Montar un filtro adicional.
Colocar y bloquear el cabezal de aspi-
ración.
Montaje de la bolsa filtrante de papel
Aspiración de líquidos
Montaje del borde de goma
Retirar la bolsa filtrante de papel
Montar un filtro adicional

Español 19
La manguera de aspiración está equipada
con un sistema de clip. Se pueden conectar
todos los accesorios C-35/C-DN-35.
Enchufe la clavija de red.
Conectar y poner en funcionamiento el
aparato.
El canal de aspiración (6) está equipado
con un flotador.
– Si se alcanza el nivel máximo permitido
de agua sucia en el depósito, se inte-
rrumpe la corriente de aspiración.
Desconexión del aparato
Vacíe el depósito acumulador de sucie-
dad.
Suelte el agua residual a través de la
manguera de salida.
Vacíe el depósito acumulador de sucie-
dad.
Limpie el aparato por dentro y por fuera
aspirándolo y enjuagándolo.
Coloque el aparato en un cuarto seco y
protéjalo frente a un uso no autorizado.
몇 Advertencia
Para efectuar trabajos en el aspirador, des-
enchúfelo siempre antes.
Desbloquear y extraer el cabezal de as-
piración.
Enganche de clip
Manejo
Conexión del aparato
Vaciar el depósito acumulador de
suciedad.
Puesta fuera de servicio
Conservación y mantenimien-
to
Cambio del filtro de cartucho

20 Español
Girar el cabezal de aspiración 180º y
depositar.
Desatornillar la tuerca (3).
Retirar el cartucho filtrante (1).
Colocar un cartucho filtrante nuevo (1).
Colocar la tuerca (3) y ajustar.
Colocar y bloquear el cabezal de aspi-
ración.
Compruebe el cable, la clavija de en-
chufe, el fusible y la toma de corriente.
Conexión del aparato
– El flotador cierra el canal de aspiración.
Vacíe el depósito acumulador de sucie-
dad.
Eliminar las obstrucciones de la boqui-
lla, tubo o manguera de aspiración y
cartucho filtrante.
Cambiar la bolsa filtrante de papel.
Cambiar el filtro de cartucho.
Comprobar si el cartucho de filtro está
montado correctamente.
Cambiar el filtro de cartucho.
– Sólo deben emplearse accesorios y
piezas de repuesto originales o autori-
zados por el fabricante. Los accesorios
y piezas de repuesto originales garanti-
zan el funcionamiento seguro y sin ave-
rías del aparato.
– Podrá encontrar una selección de las
piezas de repuesto usadas con más
frecuencia al final de las instrucciones
de uso.
Subsanación de averías
La turbina de aspiración no funcio-
na
La turbina de aspiración funciona,
pero el aparato no aspira.
La capacidad de aspiración dismi-
nuye.
Pérdida de polvo durante la aspira-
ción
Accesorios y piezas de re-
puesto

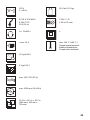
21
120 V
1~ 60 Hz
SJTW-A 2/16 AWG
6.949-775.0
39 ft (12 m)
L
pA
: 72 dB(A)
I nom: 10 A
13.0 gal (48 l)
9.2 gal (35 l)
max. 142 CFM (67 l/s)
max. 2000 mm (19.6 kPa)
19.5 in x 15.5 in x 30.5 in
(490 mm x 390 mm x
780 mm)
[V~]
EN 60704-2-1
29.2 lbs (13.3 kg)
C-DN / C-ID
1.38 in (35 mm)
II
max. 104 °F (+40 °C)
Umgebungstemperatur,
Ambient température,
Température ambiante

22

Windsor warrants new machines against
defects in material and workmanship under
normal use and service to the original
purchaser. Any statutory implied warran-
ties, including any warranty of merchanta-
bility or fitness for a particular purpose, are
expressly limited to the duration of this writ-
ten warranty. Windsor will not be liable for
any other damages, including but not li-
mited to indirect or special consequential
damages arising out of or in connection
with the furnishing, performance, use or in-
ability to use the machine. This remedy
shall be the exclusive remedy of the buyer.
The warranty period is subject to the condi-
tions stated below.
Subject to conditions outlined below, Wind-
sor warrants rotationally molded PE hou-
sings and parts on all of its machines to be
free from defects in material and workman-
ship, under normal use and service for ten
(10) years to the original owner.
Under this warranty we guarantee the per-
formance of non-polyethylene parts and
components to be free from defects for up
to three (3) years to the original end user.
Parts replaced or repaired under this war-
ranty are guaranteed for the remainder of
the original warranty period. (See table be-
low)
Service labor charges are covered for up to
three (3) years from the date of purchase
through authorized Windsor service provi-
der. No travel coverage is extended for
cord-electric models. See table below for
each general product model warranty cove-
rage.
Normal wear items not limited to brushes,
foot pedal, cords, clutches, filters, gaskets,
hoses, and bearings will be warranted for
manufacturing defects for 90 days from the
purchase date. All other items are 1 year
parts and labor.
WINDSOR INDUSTRIES
North American New Machine Warranty
Effective on all products shipped AFTER March 31, 2010
Limited Warranty
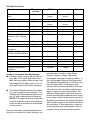
10 / 3 Warranty: 10 Years Polyethylene
(PE) Housings, 3 Years Parts, and Ser-
vice Labor
Upright Vacuums:
Product Non- PE Parts Service Labor
Versamatic® / Flexa-
matic® / Axcess
Belts Lifetime 1 year
Vacuum Motor, Swivel Neck and
Chassis
3 years 3 years
Brush Motor and Bag Housing 5 years 5 years
SENSOR® Belts Lifetime 1 year
Vacuum Motor and Chassis 2 years 2 years
Bag Housing 5 years 5 years
Upright Vacuums Exceptions and Exclusions:

Extractor brush motors, ALL pump mo-
tors, ALL PC boards and electronics,
ALL Vacuum motors, ALL pumps, and
diaphragms/Tank bags carry a one (1)
year parts and service labor warranty.
The Eagle-Robin® engines have three
(3) year manufacturer’s warranty. The
Honda® and Kawasaki® engines have
two (2) year manufacturer’s warranty.
NOTE: The engine warranty is adminis-
tered through the engine manufacturer
and must be repaired at an authorized
service center.
Normal wear items and accessories inclu-
ding, but not limited to, belts, brushes, car-
bon brushes, clutches, cords, filters,
finishes, gaskets, hoses, light bulbs,
squeegees, bearings, actuating cables, ti-
res, and propane tanks will be warranted
for manufacturing defects for 90-days from
the purchase date. The warranty com-
mences on the purchase date by the origi-
nal end user from an authorized Windsor
agent, subject to proof of purchase. The
Machine Registration Card must be com-
pleted and returned immediately at the time
of purchase. If proof of purchase cannot be
identified, the warranty start date is 90 days
after the date of sale to an authorized Wind-
sor distributor. Parts replaced or repaired
under warranty are guaranteed for the re-
mainder of the original warranty period.
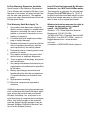
All Other Products:
Product PE Housing
& Parts
Non- PE Parts Service Labor Travel
Rider / Stand up Scrub-
bers
10 years 3 years or 2000
hours
3 years or 2000
hours
6 Months
Rider Sweepers 10 years 3 years 3 years 6 Months
Walk Behind Scrubbers 10 years 3 years or 2500
hours
3 years or 2500
hours
6 Months
Walk Behind Sweepers 10 years 3 years 3 years 6 Months
Battery Burnishers 10 years 3 years 3 years 6 Months
Extractors / Compass 10 years 3 years 3 years -
Polishers / Elec. Bur-
nishers / GH / iCapsol
Mini
10 years 3 years 3 years -
Wide Areas Vacuums 10 years 3 years 3 years -
VacPak Vacuums 10 years 1 year 1 year -
Tracer/Flex Sweepers/
Scrubbers
10 years 3 years 3 months 90 days
Air Movers / Dri-matic /
TITAN
TM
/Rombus/Priza
1 year 1 year 1 year -
Canister Vacuum 1 year 1 year 1 year -
Wet/Dry Vacuum 1 year 1 year 1 year -
Broom 1 year 1 year 1 year -
Steamer 1 year 1 year 1 year -
Propane Burnishers /
Strippers
- 2 years 1 year -
Product exceptions and Exclusions:

Upon receipt of the Machine Registration
Card, Windsor will extend by 90 days, from
the date of purchase, all items included un-
der the one-year provision. This applies
only to one-year items and does not include
90-day wear items.
1 Any product that has been subject to
abuse, misuse, neglect or unauthorized
alteration (including the use of incom-
patible or corrosive chemicals or over-
loading of capacity).
2 Products that have experienced ship-
ping or freight damage.
3 Repairs necessary to correct any failure
due to improper pre-delivery service
and inspection by the selling dealer.
4 Excessive time for cleaning units in pre-
paration for repair.
5 Any repairs resulting from poor initial
service work or improper diagnosis.
6 Tune-up parts such as plugs, plug wires
and condensers.
7 Any design alterations performed by an
organization not authorized or specified
by Windsor.
8 Battery and charger warranties are
handled directly with the manufacturer
(Trojan® batteries and Lester® char-
gers).
9 High-pressure washing
10 Electrical components exposed to
moisture.
If difficulty develops during the warranty pe-
riod, contact the authorized Windsor agent
from whom the product was purchased.
Windsor Industries, Inc. may elect to re-
quire the return of components to validate a
claim. Any defective part to be returned
must be shipped freight prepaid to an au-
thorized Windsor Distributor/Service Cen-
ter or to the Windsor factory.
This warranty is valid only for all products
Shipped/Sold AFTER March 31, 2010. A
product sold before that date shall be cove-
red by the limited warranty in effect at the
date of sale to the original purchaser.
Windsor Industries reserves the right to
change its warranty policy without
notice – 86019540 Rev 107
Windsor - 1351 West Stanford Avenue -
Englewood, CO 80110 USA
Tel 800-444-7654 • Financial Service 800-
804-6804 • Fax 866-271-0520 • email: in-
[email protected] • www.windso-
rind.com
A member of KÄRCHER North America
90 Day Warranty Extension Available
This Warranty Shall Not Apply To:
Use Of Parts Not Approved By Windsor
Industries, Inc. Will Void All Warranties

5950-583.book Seite 98 Donnerstag, 13. Februar 2003 3:55 15

5950-583.book Seite 98 Donnerstag, 13. Februar 2003 3:55 15

5950-583.book Seite 98 Donnerstag, 13. Februar 2003 3:55 15
-
 1
1
-
 2
2
-
 3
3
-
 4
4
-
 5
5
-
 6
6
-
 7
7
-
 8
8
-
 9
9
-
 10
10
-
 11
11
-
 12
12
-
 13
13
-
 14
14
-
 15
15
-
 16
16
-
 17
17
-
 18
18
-
 19
19
-
 20
20
-
 21
21
-
 22
22
-
 23
23
-
 24
24
-
 25
25
-
 26
26
-
 27
27
-
 28
28


Windsor Recover 12 El manual del propietario
- Categoría
- Aspiradoras
- Tipo
- El manual del propietario
En otros idiomas
- français: Windsor Recover 12 Le manuel du propriétaire
- English: Windsor Recover 12 Owner's manual
Documentos relacionados
-
Windsor 12 Manual de usuario
-
-
-
Kärcher Versamatic® HEPA 14 El manual del propietario
-
-
-
-
-
Otros documentos
-
-
-
Kärcher NT 40/1 Tact Instructions Manual
-
Bosch Appliances 3931A Manual de usuario
-
Milwaukee 8955 Manual de usuario
-
 Shop Vac CH87-650C Manual de usuario
-
 Shop Vac BLB series Manual de usuario
-
 Versamatic VS18 Operating Instructions Manual


