
Bedienungsanleitung
Assembly & Instruction Manual
Manual de instrucciones
Instructions de montage
Manuale di assemblaggio e istruzioni
Montagehandleiding
Instrukcja montażu i obsługi
Manual de Instruções & Montagem
DE ROBOTERIGEL REAGIERT AUF GERÄUSCHE
EN ROBOTIC HEDGEHOG SOUND DETECTING ROBOT
ES ERIZO ROBÓTICO ROBOT QUE REACCIONA AL SONIDO
FR ROBOT HÉRISSON ROBOT CONTRÔLÉ PAR LE SON
IT ROBOT RICCIO ROBOT CHE RIVELA IL SUONO
NL ROBOT-EGEL GELUIDGESTUURDE ROBOT
PL ROBOTYCZNY JEŻ ROBOT WYKRYWAJĄCY DŹWIĘK
PT OURIÇO-ROBOT ROBOT DETECTOR DE SOM
KSR21


LIEFERUMFANG / CONTENTS / INCLUYE / CONTENU
INDICE / INHOUD / SPIS TREŚCI / INCLUI
Einführung / Product Introduction / Introducción / Introduction / Introduzione / Inleiding / Opis produktu
Apresentação do Produto
Benötigte Werkzeuge / Tools You May Need / Herramientas necesarias / Outillage nécessaire
Attrezzi che potrebbero servire / Benodigde gereedschappen / Niezbędne narzędzia
Ferramentas Que Vai Necessitar
Liste mit mechanischen Teilen / Mechanical Parts List / Lista de componentes mecánicos
Liste des composants mécaniques / Elenco delle parti meccaniche / Lijst met mechanische onderdelen
Lista części mechanicznych / Lista das Peças Mecânicas
Kunststoffteile / Plastic Parts / Piezas de plástico / Pièces en plastique / Parti in plastica / Plastic onderdelen
Elementy plastikowe / Peças em Plástico
Hinweis: Schneiden Sie die Grate vor Montage ab / Tip: Cut Off The Burrs Before Assembly
Consejo: Corte las rebabas antes del montaje. / Conseil : Couper les ébarbures des pièces avant le montage
Suggerimento: Tagliare via le sbavature prima di assemblare / Tip: Knip de bramen af voor de montage
Wskazówka: Przed montażem usunąć pozostałości ramki
Sugestão: Cortar as Rebarbas Antes da Montagem.
1
1
1
3
3
4
Montage der Getriebe-Box / Gear Box Assembly / Montar el engranaje / Monter la boîte de transmission
Assemblaggio della scatola degli ingranaggi / De tandwielen monteren / Montaż zespołu przekładni
Caixa de Velocidades
Achtung / Warning / Advertencia / Avertissement / Avvertenza / Waarschuwing / Uwaga / Advertência
Wie funktioniert das Gerät / How To Play / Funcionamiento / Jouer / Come giocare / Spelen / Używanie robota
Como Divertir-se
Die hintere Getriebebox testen / Rear Gear Box Testing / Probar el engranaje trasero
Tester la boîte de transmission arrière / Test della scatola degli ingranaggi posteriore
Het achterste tandwiel testen / Test tylnego zespołu przekładni / Testar a Caixa de Velocidades
Körper montieren / Body Assembly / Montar el cuerpo / Monter le corps / Assemblaggio della corazza
De romp monteren / Montaż pancerza / Montagem do Corpo
8
17
24
28
29
Die Batterien austauschen / How To Replace Batteries / Reemplazar las pilas / Remplacer les piles
Come sostituire le batterie / De batterijen vervangen / Wymiana baterii / Como Substituir As Pilhas 33
Problemlösung / Trouble Shooting / Solución de problemas / Problèmes et solutions / Risoluzione dei problemi
Probleemoplossing / Wykrywanie i usuwanie usterek / Resolução de Problemas 35
Kopf montieren / Head Assembly / Montar la cabeza / Monter la tête / Assemblaggio della testa
De kop monteren / Montaż głowy / Montagem da Cabeça

Einführung / Product Introduction / Introducción / Introduction / Presentazione del prodotto / Inleiding
Opis produktu / Apresentação do Produto
Liste mit mechanischen Teilen / Mechanical Parts List / Lista de componentes mecánicos
Liste de pièces mécaniques / Elenco delle parti Meccaniche / Lijst met mechanische onderdelen
Lista części mechanicznych / Lista das Peças Mecânicas
Das Produkt enthält scharfe Ecken und Spitzen. / Product contains functional edges and sharp points. / El producto incluye bordes funcionales y puntos afilados.
Certaines pièces sont pointues ou coupantes. / Il prodotto presenta bordi e spigoli appuntiti. / Dit product bevat functionele scherpe hoeken en punten.
Produkt zawiera ostre krawędzie i zakończenia. / O produto tem arestas funcionais e pontos afiados.
ROBOTER-IGEL / ROBOTIC HEDGEHOG / ERIZO ROBÓTICO / ROBOT HÉRISSON
ROBOT RICCIO / ROBOT-EGEL / ROBOTYCZNY JEŻ / OURIÇO-ROBOT
1
Alkali-Mangan-Batterien empfohlen
Alkaline batteries are Recommended
Pilas alcalinas recomendadas
Les piles alcalines sont
Si consigliano batterie alcaline
Seitenschneider / Diagonal Cutter
Alicates de corte en diagonal
Pince coupante / Tronchesino
Zijkniptang / Obcinak boczny
Cortador Diagonal
AAA-Batterie x 4 / Battery(AAA) x 4
Pila (AAA) x 4 / Pile AAA x 4
4 Batterie (AAA) / 4 x AAA-batterij
4 baterie (AAA) / 4 pilhas (AAA)
Schraubendreher / Screwdriver
Destornillador / Tournevis
Cacciavite / Schroevendraaier
Wkrętak / Chave de Fendas
P1 - Ritzel (weiß) x 1
P1 - Pinion Gear (White) Qty 1
P1 - Piñon (blanco) x 1
P1 - Pignon-engrenage (blanc) x
P1 - Ingranaggio a pignone (bianco) Q.tà 1
P1 - Rondsel (wit) x 1
P1 - Wałek zębaty (biały) 1 szt.
P1 - Pinhão (Branco) Quant. 1
P2 - Zahnrad (gelb) x 3
P2 - Gear (Yellow) Qty 3
P2 - Corona (amarillo) x 3
P2 - Engrenage (Jaune) x 3
P2 - Ruota dentata (gialla) Q.tà 3
P2 - Tandwiel (geel) x 3
P2 - Koło zębate (żółte) 3 szt.
P2 - Engrenagem (Amarelo) Quant. 3
P3 - Zahnrad (schwarz) x 1
P3 - Gear (Black) Qty 1
P3 - Corona (negro) x 1
P3 - Engrenage (Noir) x 1
P3 - Ruota dentata (nera) Q.tà 1
P3 - Tandwiel (zwart) x 2
P3 - Koło zębate (czarne) 1 szt.
P3 - Engrenagem (Amarelo) Quant. 1
Textmarker (fein) / Marker Pen (Fine)
Marcador (fino) / Feutre (Fin)
Evidenziatore (a punta fine)
Markeerstift (fijn) / Cienkopis
Marcador (Fino)
Lineal / Ruler / Regla / Règle
Righello / Liniaal / Linijka
Régua
Erleben Sie viel Lern- und Spielspaß mit diesem
interaktiven Igel. Im Gegensatz zu einem echten Igel rollt
dieser sich bei Gefahr nicht zusammen, um sich so vor
Feinden zu schützen. Dieser interaktive Igel ist ein
liebevoller Spielgefährte, der jede Menge Spaß machen
wird! Er verfügt über einen integrierten Schallsensor, der auf
Händeklatschen reagiert. Klatschen Sie in die Hände, dann
wird der Igel einige tolle Bewegungen ausführen: Abhängig
von wie viel Mal Sie in die Hände klatschen, wird er die
Stacheln aufrichten, sich zusammenrollen oder eine Rolle
rückwärts ausführen. Dieser Roboter-Igel verfügt über 3
verschiedene Betriebsmodi.
Have fun learning and playing with your Robotic Hedgehog.
Thankfully, it’s unlike a real Hedgehog, being defensive and
rolling up in a prickly ball all the time. This robotic pet is
friendly and will provide you hours of fun and fascination.
The roly-poly Hedgehog robot has a built-in sound sensor
which responds to claps. When a clap sound is detected,
the hedgehog goes into the programmed mode and carries
out extraordinary movements. Following different clapping
commands, the Hedgehog will extend its spines, curl its
body, or perform a perfectly executed backward roll.
There are 3 different ways to interact and play with this
amazing AI Robotic Hedgehog.
Aprenda y diviértase jugando con este erizo robótico.
A gran diferencia de un erizo de verdad, este no se
enrollará sobre sí mismo formando una bola de púas
cuando se vea amenazado. Esta encantadora mascota
robot hará las delicias de grandes y pequeños.
Lleva un sensor que reacciona ante las palmadas. Al dar
unas palmadas el erizo realizará movimientos divertidos:
Dependiendo del número de palmadas, el erizo sacará sus
púas, se enrollará sobre sí mismo efectuará una perfecta
voltereta hacia atrás. Este erizo robótico lleva 3 modos de
funcionamiento.
Apprenez en vous amusant avec ce hérisson interactif.
Heureusement, contrairement à un vrai hérisson, le robot
hérisson ne se roule pas en boule pour se protéger. Cet
animal robot est gentil et vous offrira des heures de plaisir.
Le robot hérisson potelé intègre un capteur sonore qui
réagit au battement de mains. Tapez dans vos mains et le
hérisson répond avec des mouvements rigolos. Le hérisson
dresse ses épines, se roule en boule ou fait une roulade
arrière en fonction du nombre de battements de mains. Le
robot hérisson AI dispose de 3 différents modes de jeu.
Divertiti ad imparare e a giocare con il tuo robot riccio.
Fortunatamente non si comporta come un vero riccio, che
sta sempre in posizione difensiva appallottolandosi in una
pallina pungente. Questo animale robotico amichevole è
una garanzia di tante ore di divertimento e diletto. Il
simpatico e rotondeggiante robot riccio è dotato di un
sensore acustico integrato che risponde ai battiti delle mani.
Quando rileva un battito delle mani, il riccio imposta la
modalità programmata e compie movimenti divertenti. A
seconda dei comandi impartiti con il battito delle mani, il
riccio drizzerà le spine, arriccerà il corpo o eseguirà una
perfetta capriola all'indietro. Ci sono i tre modi diversi per
giocare con questo fantastico robot riccio.
Beleef veel leer- en speelplezier met deze interactieve egel.
In tegenstelling tot een echte egel rolt deze zich niet op tot
een stekelige bol om zich te verdedigen. Dit robotdiertje is
lief en zorgt voor urenlang speelplezier. De rollende
robot-egel heeft een ingebouwde geluidssensor die reageert
op handgeklap. De egel maakt grappige bewegingen en zal,
afhankelijk van het aantal keren dat u in uw handen klapt ,
zijn stekels recht zetten, zich oprollen of een achterwaartse
koprol maken.
Er zijn 3 verschillende modi om met deze AI robot-egel te
communiceren en te spelen.
Nauka i zabawa robotycznym jeżem to świetna rozrywka.
Na szczęście nie zachowuje się jak prawdziwy jeż, który
ciągle przyjmuje pozycję obronną i zwija się w kłującą kulkę.
Ten przyjacielski robotyczny zwierzak gwarantuje
użytkownikowi wiele godzin zabawy i rozrywki. Okrąglutki
robot-jeż ma wbudowany czujnik akustyczny, który reaguje
na klaskanie. Po wykryciu
dźwięku klaskania jeżyk przechodzi w zaprogramowany tryb
i zaczyna wykonywać śmieszne ruchy W zależności od
rodzaju klaśnięcia, jeżyk może wysunąć kolce, zwinąć się
lub wykonać doskonały technicznie przewrót do tyłu.
Z tym niesamowitym robotycznym jeżykiem można bawić
się na 3 różne sposoby.
Divirta-se e aprendendo e brincando com o seu Ouriço-Robot.
Felizmente, não é parecido com um verdadeiro ouriço, sempre
desconfiado e enrolando-se numa bola de espinhos o tempo
todo. Este animal de estimação robótico é amigável e
proporcionará horas de diversão e deslumbramento. Este
rechonchudo Ouriço-robot tem um sensor de som embutido que
responde o bater das palmas. Sempre que detecta o som do
bater da palmas, o ouriço entra num dos modos programados e
executa movimentos extraordinários. Seguindo as várias ordens
através das palmas, o Ouriço irá levantar os espinhos, enrolar o
corpo ou executar uma perfeita cambalhota para trás.
Existem 3 diferentes formas de interagir e de brincar com este
extraordinário Ouriço Robótico AI.
Benötigte Werkzeuge / Tools You May Need / Herramientas necesarias / Outillage nécessaire / Attrezzi che potrebbero
servire / Benodigde gereedschappen / Niezbędne narzędzia / Ferramentas Que Pode Necessitar
Alkalinebatterijen zijn
Zalecane są baterie
Recomenda-se a utilização de
pilhas alcalinas.

1:1 1:1
1:1
1:1
1:1
2
DC 6V
P16 - Batteriehalter mit Anschluss (DC 6V)
P16 - Battery Holder With Connector DC 6V
P16 - Portapilas con conector (DC 6V)
P16 - Porte-piles avec connecteur (DC 6C)
P16- Presa per batterie con connettore DC 6V
P16 - Batterijhouder met connector (DC 6 V)
P16 - Uchwyt do baterii ze złączem DC 6V
P16 - Suporte de Bateria Com Conetor DC 6V
P17 - Motor mit Anschluss
P17 - Motor With Connector
P17 - Motor con conector
P17 - Moteur avec connecteur
P17 - Motore con connettore
P17 - Motor met connector
P17 - Silnik ze złączem
P17 - Motor Com Conetor
P4 - Zahnrad (grün) x 1
P4 - Gear (Green) Qty 1
P4 - Corona (verde) x 1
P4 - Engrenage (Vert) x 1
P4 - Ruota dentata (verde) Q.tà 1
P4 - Tandwiel (groen) x 1
P4 - Koło zębate (zielone) 1 szt.
P4 - Engrenagem (Verde) Quant. 1
P7 - Blechschraube
P7 - Tapping Screw
P7 - Tornillo autoroscante
P7 - Vis taraudeuse
P7 - Vite autofilettante
P7 - Zelftappende schroef
P7 - Wkręt samogwintujący
P7 - Parafuso de Rosca
P8 - Blechschraube
P8 - Tapping Screw
P8 - Tornillo autoroscante
P8 - Vis taraudeuse
P8 - Vite autofilettante
P8 - Zelftappende schroef
P8 - Wkręt samogwintujący
P8 - Parafuso de Rosca
P9 - Runde Welle / P9 - Round Shaft
P9 - Eje redondo / P9 - Arbre rond
P9 - Rullo rotondo / P9 - Ronde as
P9 - Okrągły wałek / P9 - Eixo Redondo
P10 - Sechskantwelle (kurz) / P10 - Hex Shaft (Short)
P10 - Eje hexagonal (corto) / P10 - Arbre hexagonal (court)
P10 - Rullo esagonale (corto) / P10 - Zeskant-as (Kort)
P10 - Wałek sześciokątny (krótki) / P10 - Eixo Hexagonal (Curto)
P12 - Feder / P12 - Spring
P12 - Resorte / P12 - Ressort
P12 - Molla / P12 - Veer
P12 - Sprężyna / P12 - Mola
P13 - Torsionsfeder / P13 - Torsion Spring
P13 - Resorte de torsión / P13 - Ressort de torsion
P13 - Molla di torsione / P13 - Torsieveer
P13 - Sprężyna skrętna / P13 - Mola de Torção
P14 - Metallteil (Würfel) / P14 - Iron Bar (Cube)
P14 - Pieza metálica (cubo) / P14 - Cube métallique
P14 - Elemento di metallo (blocco) / P14 - Metalen blokje
P14 - Element metalowy (bloczek) / P14 - Barra de Ferro (Cubo)
P15 - Metallteil (Zylinder) / P15 - Iron Bar (Cylinder)
P15 - Pieza metálica (cilindro) / P15 - Cylindre métallique
P15 - Elemento di metallo (rullo) / P15 - Metalen cilinder
P15 - Element metalowy (walec) / P15 - Barra de Ferro (Cilindro)
P11 - Sechskantwelle (lang) / P11 - Hex Shaft (Long)
P11 - Eje hexagonal (Largo) / P11 - Arbre hexagonal (long)
P11 - Rullo esagonale (lungo) / P11 - Zeskant-as (Lang)
P11 - Wałek sześciokątny (długi) / P11 - Eixo Hexagonal (Comprido)
P5 - Zahnrad (rot) x 1
P5 - Gear (Red) Qty 1
P5 - Corona (rojo) x 1
P5 - Engrenage (Rouge) x 1
P5 - Ruota dentata (rossa) Q.tà 1
P5 - Tandwiel (rood) x 1
P5 - Koło zębate (czerwone) 1 szt.
P5 - Engrenagem (Vermelho) Quant. 1
P6 - Zahnrad mit Welle x 1
P6 - Gear With Shaft Qty 1
P6 - Corona con eje x 1
P6 - Engrenage avec arbre x 1
P6 - Ruota dentata con rullo Q.tà 1
P6 - Tandwiel met as x 1
P6 - Koło zębate z wałkiem 1 szt.
P6 - Engrenagem Com Eixo Quant. 1
P18 - Kunststoffstreifen (Ersatzteil : 1 St.)
P18 - PP Plastic Sheet (Spare part : 1 pc)
P18 - Tira de plástico (pieza de repuesto :1 ud.)
P18 - Bandes de fixation en plastique (pièce de rechange : 1 pc)
P18 - Striscia in plastica PP (parte di ricambio)
P18 - plastic strips (reserveonderdeel : 1 x)
P18 - Pasek plastikowy PP (część zamienna : 1 szt.)
P18 - Folha em Plástico PP (reposição :1 peça)
P19 - Platine
P19 - PC Board
P19 - Circuito impreso
P19 - PCB
P19 - Circuito stampato
P19 - PCB
P19 - Płytka drukowana
P19 - Placa de Circuitos
Impressos

2
2 1
E
F
12
3
MADE IN TAIWAN
B
1 5
6
18
13
10
14 15 16
17 21
19
11
12
20
8
9
2
3
74
MADE IN TAIWAN
A
1312
23 24
20 21
22
25 26 27
87
6
5
4
1 3
2
MADE IN TAIWAN
11
17 18
19
15 1614
10
9
D
1
1
10 12
16
14
11 13
17
15 18
20
19
2 4
5
6 8 9
7
3
MADE IN TAIWAN
C
31 31
31 31 31
31
31
33
33
15 30
35 36
37
34
32
32
1 2 3 4 5 6 7 8 9
MADE IN TAIWAN
10 11 12 13 14
16 17 18 19 20 21 22 23 24 25 26 27 28 29
Kunststoffteile / Plastic Parts / Piezas de plástico / Pièces en plastique / Parti in plastica
Plastic onderdelen / Części plastikowe / Peças Plásticas
3
Schneiden Sie gegebenenfalls die Kunststoffteile. Schneiden Sie diese aber nicht im Voraus.
Cut the plastic parts when they are required. Do not cut them in advance.
Si fuera necesario, corte las piezas de plástico, pero no las corte de antemano.
Couper les pièces en plastique au fur et à mesure du montage. Ne pas couper les pièces en avance.
Tagliare le parti in plastica quando necessario. Non tagliarle in anticipo.
Knip de plastic onderdelen pas uit op het moment dat u ze nodig hebt. Knip de onderdelen niet uit op voorhand uit.
Części plastikowe należy wycinać w momencie, gdy są potrzebne. Nie wycinać z wyprzedzeniem.
Corte as peças em plástico quando for recomendado. Não as corte antecipadamente.
Hinweis: Schneiden Sie die Grate vor Montage ab.
Tip: Cut off the burrs before assembly
Consejo: Corte las rebabas antes del montaje
Conseil : Couper les ébarbures des pièces avant le montage
Suggerimento: tagliare via le sbavature prima di assemblare
Tip: Knip de bramen af voor de montage
Wskazówka: Przed montażem usunąć pozostałości ramki
Sugestão: Corte as rebarbas antes da montagem.
Grat
Burr
Rebaba
Ebarbure
Sbavatura
Braam
Pozostałość
Rebarba
Grat
Burr
Rebaba
Ebarbure
Sbavatura
Braam
Pozostałość
Rebarba
Grat
Burr
Rebaba
Ebarbure
Sbavatura
Braam
Pozostałość
Rebarba

EINDRÜCKEN / PUSH DOWN
PRESIONAR / PRESSER
PREMERE / INDRUKKEN
WCISNĄĆ / EMPURRE PARA BAIXO
4
1
B5
P9x2
P6
P2
P2
P2
P1
A24
P5
P10
P4
P17
P3
EINSTECKEN! / !PUSH IN
¡INTRODUCIR! / PRESSER
INFILARE! / ! INDRUKKEN
WETKNĄĆ! / EMPURRE
Montage der Getriebe-Box / Gear Box Assembly / Montar el engranaje / Monter la boîte de transmission
Assemblaggio della scatola degli ingranaggi / De versnellingsbak monteren / Montaż zespołu przekładni / Caixa de Velocidades
Schwarz / Black
Negro / Noir
Nero / Zwart
Czarne / Preto
gelb / Yellow
amarillo / Jaune
giallo / Geel
żółte / Amarelo
Gelb / Yellow
Amarillo / Jaune
Giallo / Geel
Żółte / Amarelo
Schwarz / Black
Negro / Noir
Nero / Zwart
Czarne / Preto
Rot
Red
Rojo
Rouge
Rosso
Rood
Czerwone
Vermelho
Falsch / Incorrect
Incorrecto / Incorrect
Non corretto / Fout
Nieprawidłowo
Incorreto
Falsch / Incorrect
Incorrecto / Incorrect
Non corretto / Fout
Nieprawidłowo
Incorreto
Korrekt / Correct
Correcto / Correct
Corretto / Goed
Prawidłowo / Correto
Korrekt / Correct
Correcto / Correct
Corretto / Goed
Prawidłowo / Correto
Gelb / Yellow
Amarillo / Jaune
Giallo / Geel
Żółte / Amarelo
Rot / Red
Rojo / Rouge
Rosso / Rood
Czerwone / Vermelho
grün / Green
verde / Vert
verde / Groen
zielone / Verde
Kurz / Short
Corto / Court
Corto / Kort
Krótki / Curto

Falsch / Incorrect
Incorrecto / Incorrect
Non corretto / Fout
Nieprawidłowo / Incorreto
Korrekt / Correct
Correcto / Correct
Corretto / Goed
Prawidłowo / Correto
P16
AAA(x4)
˙Das Herausnehmen oder Austauschen der Batterien sollte nur
von einer erwachsenen Person oder unter Aufsicht einer
erwachsenen Person durchgeführt werden.
˙Vermeiden Sie einen Kurzschluss der Kontaktpunkte des
Batteriefachs oder der Batterien.
˙Mischen Sie keine alten und neuen Batterien oder Batterien
unterschiedlicher Typen.
˙Mischen Sie weder Alkali-Mangan, Standard (Karbon-Zink),
noch wiederaufladbare (Nickel-Cadmium) Batterien.
˙Legen Sie die Batterien immer polungsrichtig ein.
Versuchen Sie niemals, nichtaufladbare Batterien wieder
aufzuladen.
˙Entfernen Sie leere Batterien.
˙La rimozione e la sostituzione delle batterie deve essere
eseguita da un adulto o sotto la supervisione di un adulto.
˙Evitare di cortocircuitare i contatti nel vano batterie o i
terminali delle batterie.
˙Non mescolare batterie usate e batterie nuove o batterie di tipi
diversi.
˙Non mescolare batterie alcaline, standard (zinco-carbonio) o
ricaricabili (nichel-cadmio).
˙Le batterie devono essere inserite secondo la polarità corretta.
Non tentare di ricaricare batterie non ricaricabili.
˙Rimuovere le batterie esaurite dal prodotto per evitare perdite.
˙Removals and replacement of batteries should be carried out
by adults or under adult supervision.
˙Avoid short circuiting the contacts in the battery compartment
or the battery terminals.
˙Do not mix used batteries and new batteries or batteries of
different types.
˙Do not mix alkaline, standard (carbon-zinc), or rechargeable
(nickel-cadmium) batteries.
˙Batteries are to be inserted with the correct polarity.
Do not attempt to recharge non-rechargeable batteries.
˙Remove exhausted batteries from the product to avoid leakage.
˙Het verwijderen en vervangen van batterijen dient door of
onder toezicht van een volwassene te worden uitgevoerd.
˙Vermijd kortsluiting bij de contactpunten in het batterijvak of
van de batterij.
˙Gebruik geen oude (lege) en nieuwe of batterijen door elkaar.
˙Gebruik geen alkalische, standaard (carbon-zink) of
oplaadbare (nikkel-cadmium) batterij door elkaar.
˙De batterijen moeten volgens de juiste polariteit worden
geplaatst.Herlaad geen alkalinebatterijen.
˙ Verwijder lege batterijen uit het product.
˙Las pilas sólo deben ser quitadas o reemplazadas por un
adulto o bajo su supervisión.
˙Evite los cortocircuites en los contactos del compartimiento
de pilas o las pilas.
˙Nunca mezcle pilas agotadas y pilas nuevas o pilas de
diferentes tipos.
˙No mezcle pilas alcalinas, estándar (carbón-zinc) o baterías
recargables (níquel-cadmio).
˙Introduzca las pilas correctamente. Compruebe siempre la
polaridad.Nunca intente recargar pilas no recargables.
˙Saque las pilas agotadas para evitar derrames.
˙Wyjmowanie i wymiana baterii powinny być dokonywane przez
osoby dorosłe lub pod ich nadzorem.
˙Unikać zwierania styków w gnieździe baterii lub końcówek
baterii.
˙Nie stosować jednocześnie zużytych i nowych baterii, ani
baterii różnych typów.
˙Nie należy łączyć baterii alkalicznych ze standardowymi
(węglowo-cynkowymi) ani z bateriami doładowywanymi
(niklowo-kadmowymi).
˙Podczas montażu baterii należy zwrócić uwagę na
biegunowość. Nie ładować baterii, które nie są akumulatorami.
˙Zużyte baterie należy wyjąć z produktu, aby nie dopuścić do
wycieku.
˙L'enlèvement et le remplacement des piles doivent être
effectués par un adulte ou sous sa surveillance.
˙Eviter de court-circuiter les contacts du compartiment à piles
ou les bornes des piles.
˙Ne pas utiliser simultanément des piles neuves et des piles
usagées, de même que des piles différentes.
˙Ne pas mélanger les piles alcalines, standard (carbone-zinc) et
rechargeables (nickel-cadmium).
˙Les piles doivent être insérées en respectant la polarité.
Ne jamais recharger des piles alcalines.
˙Oter les piles usagées du produit.
˙Retirar e substituir as pilhas deve ser sempre feito por um
adulta, ou sob a supervisão de um adulto.
˙Evite provocar curto-circuitos no compartimento das pilhas ou
nos terminais das mesmas.
˙Não não misture pilhas gastas e pilhas novas ou pilhas de
tipos diferentes
˙Não misture pilhas alcalinas, vulgares (carbono-zinco), ou
recarregáveis (níquel-cádmio).
˙As pilhas têm de ser colocadas respeitando sempre a
polaridade.Não tente recarregar baterias não recarregáveis
˙Retire as pilhas gastas do aparelho para evitar que comecem a
derramar.
5
3
2
P3
P4
P2
P2
P2
P6
A24
B6
B16
grün / Green
verde / Vert
verde / Groen
zielone / Verde
weiß / White
blanco / Blanc
bianco / Wit
białe / Branco
Gelb / Yellow
Amarillo / Jaune
Giallo / Geel
Żółte / Amarelo
Gelb / Yellow
Amarillo / Jaune
Giallo / Geel
Żółte / Amarelo
Gelb / Yellow
Amarillo / Jaune
Giallo / Geel
Żółte / Amarelo
Schwarz / Black
Negro / Noir
Nero / Zwart
Czarne / Preto
Draufsicht
Top View
Vista desde arriba
Vue supérieure
Vista superiore
Bovenkant
Widok z góry
Vista de Cima

P16
Textmarker (fein) / Marker Pen (Fine) / Marcador (fino) / Feutre (Fin)
Evidenziatore (a punta fine) / Markeerstift (Fijn) / Cienkopis
Marcador (Fino)
1 2 3 4 5 6 7 8 9 12 13 14 15 16 17 18 19 20 21 22 23 24 25 26 27 28 29 3010
cm
4.5 cm
16.5 cm
5
DRÜCKEN / PUSH / PRESIONAR / PRESSER / SPINGERE / INDRUKKEN / WCISNĄĆ / PUSH
Befestigen Sie das Kabel so, dass die Markierung mit der gestrichelten Linie übereinstimmt.
Align the mark with the dashed line
Coloque el cable de tal manera que la marca coincida con la línea discontinua.
Aligner le câble avec la ligne en pointillés.
Inserire il contrassegno rispettivamente alla
Leg de kabel zo dat de markering op één lijn ligt met de stippellijn
Oznaczenie musi znajdować się równo z linią przerywaną
Alinhe a marca com a linha tracejada
12
Markierung
Mark
Marca
Marquage
Contrassegno
Markering
Oznaczenie
Marca
Falsch / Incorrect
Incorrecto / Incorrect
Non corretto / Fout
Nieprawidłowo
Incorreto
Korrekt / Correct
Correcto / Correct
Corretto / Goed
Prawidłowo / Correto
6
4Messen und markieren / Measuring & making a mark
Medir y marcar / Mesurer & marquer
Misurazione e contrassegno / Meten & markeren
Pomiar i oznaczenie / Medir & marcar
Batteriehalter mit Anschluss
Battery Holder With Connector
Portapilas con conector
Porte-piles avec connecteur / Presa per batterie con connettore / Batterijhouder met connector / Uchwyt do baterii ze złączem / Suporte de Bateria Com Conetor
Skala 1:1 / Scale 1:1
Escala 1:1 / Échelle 1:1
Scala 1:1 / Schaal 1:1
Skala 1:1 / Escala 1:1

P7x3
Scale 1:1
8
P8
Skala 1:1
Scale 1:1
Escala 1:1
Échelle 1:1
Scala 1:1
Schaal 1:1
Skala 1:1
Escala 1:1
Skala 1:1
Scale 1:1
Escala 1:1
Échelle 1:1
Scala 1:1
Schaal 1:1
Skala 1:1
Escala 1:1
Klicken / Click
Clic / Clic
Clic / Klik
Klik / Clicar
Klicken / Click
Clic / Clic
Clic / Klik
Klik / Clicar
7
6 7
A23
B7

8
Die hintere Getriebebox testen / Rear Gear Box Testing / Probar el engranaje trasero
Tester la boîte de transmission arrière / Test della scatola degli ingranaggi posteriore
De achterste versnellingsbak testen / Test tylnego zespołu przekładni
Testar a Caixa de Velocidades
Verbinden Sie die zwei Kabel mit der Platine (siehe Abb.).
Insert two terminals into the PC board, as shown in the picture.
Conecte los dos cables al circuito impreso (véase fig.).
Connecter les deux câbles au PCB (voir ill.).
Allacciare i due connettori al circuito stampato, come dimostrato
nell’immagine.
Sluit de twee kabels aan op de printplaat (zie afb.).
Podłączyć dwa złącza do płytki drukowanej, jak pokazano na ilustracji.
Insira dois terminais na placa de circuitos impressos, conforme
indicado na imagem.
Lassen Sie das Getriebe während 10 Sekunden funktionieren. Klatschen Sie
dann ein Mal in die Hände. Das Getriebe dreht nun gegen den Uhrzeigersinn.
After the gear started running 10 seconds, clap your hands once.
It is considered normal if the gear runs reversely.
Deje que el engranaje funcione durante 10 segundos. Luego, dé una sola
palmada. Ahora, el engranaje girará en sentido contrario a las agujas del reloj.
Laisser tourner l'engrenage pendant 10 secondes et taper une fois dans vos
mains. Il est normal que l'engrenage tourne dans le sens inverse.
Dopo 10 minuti di funzionamento della scatola di ingranaggi, battere le mani una
volta. La scatola di ingranaggi cambierà la direzione di lavoro, che è un
fenomeno normale.
Laat het tandwiel gedurende 10 seconden draaien en klap éénmaal in uw
handen. Het is normaal dat het tandwiel in de omgekeerde richting draait.
Po 10 sekundach pracy zespołu przekładni, jednokrotnie klasnąć w dłonie.
Zespół przekładni zmieni kierunek pracy, co jest zjawiskiem normalnym.
Após a engrenagem estar a funcionar durante uns 10 segundos, bata as palmas
uma vez. Considera-se normal se esta começar a funcionar no sentido inverso.
1. Halten Sie die schwarze Taste (Platine) während 2 Sekunden gedrückt. Die
LEDs (Auge) leuchten.
2. Drücken Sie die Taste wieder und die LEDs leuchten grün und orange.
1. Long-press the black switch in the middle of PC board for 2 seconds.
Hedgehog eyes (LED) will light up.
2. Press the button again and LED (green & orange) will light up.
1. Mantenga pulsado el botón negro (circuito impreso) durante 2 segundos.
Los ojos del erizo (LEDs) se iluminarán.
2. Vuelve a pulsar brevemente el botón y los LEDs se iluminarán en verde y
naranja.
1. Maintenir enfoncé le bouton sur le PCB pendant 2 secondes. Les yeux
(LED) du hérisson s'allument.
2. Appuyer à nouveau sur le bouton et la LED (vert & orange) s'allume
1. Premere per due minuti il tasto nero che si trova in mezzo al circuito
stampato. Gli occhi del riccio si illumineranno (diodi LED).
2. Premere il tasto di nuovo – si illumineranno i diodi LED (verde e
arancione).
1. Houd de zwarte knop op de printplaat gedurende 2 seconden ingedrukt. De
ogen (leds) van de egel lichten op.
2. Druk nogmaals kort op de knop en de leds (groen & oranje) lichten op.
1. Wcisnąć i przytrzymać przez 2 sekundy czarny przycisk znajdujący się na
środku płytki drukowanej. Zaświecą się oczy jeżyka (diody LED).
2. Nacisnąć przycisk ponownie - zaświecą się diody LED (zielona i
pomarańczowa).
1. Pressione o interruptor preto da placa de circuitos impressos durante 2
segundos. Os olhos (LED) do ouriço acendem.
2. Pressione o botão novamente e o LED (verde & laranja) acende.
12
2
2
2
2
2
2
2
3
3
3
3
3
3
3
3
1
1
1
1
1
1
1
Reverse
LED
LED

9
10
9
C36
B17
B17
B18
1
B21
1
2
2
E1
D19

10
11
12
A6
P13
12
Führen Sie diesen Schritt sorgfältig aus.
Please execute this step accurately.
Efectúe con cuidado este paso.
Effectuer cette étape correctement.
Occorre eseguire questo passaggio con precisione.
Voer deze stap nauwkeurig uit.
Należy dokładnie wykonać ten krok.
Execute este passo com a maior precisão.
Korrekt / Correct
Correcto / Correct
Corretto / Goed
Prawidłowo / Correto
Falsch / Incorrect
Incorrecto / Incorrect
Non corretto / Fout
Nieprawidłowo / Incorreto
Falsch / Incorrect
Incorrecto / Incorrect
Non corretto / Fout
Nieprawidłowo / Incorreto

8
11
13
14
15
A1
A2
Schneiden Sie die Grate vor Montage ab.
Cut off the burrs before assembly.
Corte las rebabas antes del montaje.
Couper les ébarbures des pièces avant le montage.
Eliminare le sbavature prima dell'assemblaggio.
Knip de bramen af voor de montage.
Przed montażem usunąć pozostałości ramki.
Cortar as rebarbas antes da montagem.
P7x2
A7
A19
A26
B3
P12
1
2
Korrekt / Correct
Correcto / Correct
Corretto / Goed
Prawidłowo / Correto
Falsch / Incorrect
Incorrecto / Incorrect
Non corretto / Fout
Nieprawidłowo / Incorreto
Falsch / Incorrect
Incorrecto / Incorrect
Non corretto / Fout
Nieprawidłowo / Incorreto
Korrekt / Correct
Correcto / Correct
Corretto / Goed
Prawidłowo / Correto
Skala 1:1
Scale 1:1
Escala 1:1
Échelle 1:1
Scala 1:1
Schaal 1:1
Skala 1:1
Escala 1:1
Grat / Burr
Rebaba / Ebarbure
Sbavatura / Braam
Pozostałość / Rebarba
Grat
Burr
Rebaba
Ebarbure
Sbavatura
Braam
Pozostałość
Rebarba

17
P8
B2
C32
P11
D9
12
16
1
1
2
2
Skala 1:1
Scale 1:1
Escala 1:1
Échelle 1:1
Scala 1:1
Schaal 1:1
Skala 1:1
Escala 1:1
Klicken / Click
Clic / Clic
Clic / Klik
Klik / Clicar
DRÜCKEN
PUSH
PRESIONAR
PRESSER
SPINGERE
INDRUKKEN
WCISNĄĆ
PUSH
Lang
Long
Largo
Long
Lungo
Lang
Długi
Comprido
Korrekt / Correct
Correcto / Correct
Corretto / Goed
Prawidłowo / Correto
Falsch / Incorrect
Incorrecto / Incorrect
Non corretto / Fout
Nieprawidłowo / Incorreto
Falsch / Incorrect
Incorrecto / Incorrect
Non corretto / Fout
Nieprawidłowo / Incorreto

P8
A4
13
18
19 20
B17
Scale 1:1
D17
E2
B14
B1
A20
B12
Falsch / Incorrect
Incorrecto / Incorrect
Non corretto / Fout
Nieprawidłowo
Incorreto
Falsch / Incorrect
Incorrecto / Incorrect
Non corretto / Fout
Nieprawidłowo
Incorreto
Korrekt / Correct
Correcto / Correct
Corretto / Goed
Prawidłowo / Correto
Skala 1:1 / Scale 1:1
Escala 1:1 / Échelle 1:1
Scala 1:1 / Schaal 1:1
Skala 1:1 / Escala 1:1

Klicken / Click
Clic / Clic
Clic / Klik
Klik / Clicar
14
A18
B15
B9
A15
B9
C35
B9x2
A5
D18
E2
B9 C35
A15
A18
B9
B9
B15
1
2
Grat
Burr
Rebaba
Ebarbure
Sbavatura
Braam
Pozostałość
Rebarba
Grat / Burr / Rebaba
Ebarbure / Sbavatura
Braam / Pozostałość
Rebarba
Grat / Burr / Rebaba
Ebarbure / Sbavatura
Braam / Pozostałość
Rebarba
Grat / Burr / Rebaba
Ebarbure / Sbavatura
Braam / Pozostałość
Rebarba
Grat
Burr
Rebaba
Ebarbure
Sbavatura
Braam
Pozostałość
Rebarba
Schneiden Sie die Grate vor Montage ab.
Cut off the burrs before assembly.
Corte las rebabas antes del montaje.
Couper les ébarbures des pièces avant le montage.
Eliminare le sbavature prima dell'assemblaggio.
Knip de bramen af voor de montage.
Przed montażem usunąć pozostałości ramki.
Cortar as rebarbas antes da montagem.
Korrekt / Correct
Correcto / Correct
Corretto / Goed
Prawidłowo / Correto
Korrekt / Correct
Correcto / Correct
Corretto / Goed
Prawidłowo / Correto
Korrekt / Correct
Correcto / Correct
Corretto / Goed
Prawidłowo / Correto
Korrekt / Correct
Correcto / Correct
Corretto / Goed
Prawidłowo / Correto
21
Schneiden Sie die Grate vor Montage ab.
Cut off the burrs before assembly.
Corte las rebabas antes del montaje.
Couper les ébarbures des pièces avant le
montage.
Eliminare le sbavature prima dell'assemblaggio.
Knip de bramen af voor de montage.
Przed montażem usunąć pozostałości ramki.
Cortar as rebarbas antes da montagem.
Falsch / Incorrect
Incorrecto / Incorrect
Non corretto / Fout
Nieprawidłowo
Incorreto
Falsch / Incorrect
Incorrecto / Incorrect
Non corretto / Fout
Nieprawidłowo
Incorreto
Falsch / Incorrect
Incorrecto / Incorrect
Non corretto / Fout
Nieprawidłowo
Incorreto
Falsch / Incorrect
Incorrecto / Incorrect
Non corretto / Fout
Nieprawidłowo
Incorreto
Schneiden Sie die Grate vor Montage ab.
Cut off the burrs before assembly.
Corte las rebabas antes del montaje.
Couper les ébarbures des pièces avant le montage.
Eliminare le sbavature prima dell'assemblaggio.
Knip de bramen af voor de montage.
Przed montażem usunąć pozostałości ramki.
Cortar as rebarbas antes da montagem.
Grat
Burr
Rebaba
Ebarbure
Sbavatura
Braam
Pozostałość
Rebarba
Grat
Burr
Rebaba
Ebarbure
Sbavatura
Braam
Pozostałość
Rebarba
Grat
Burr
Rebaba
Ebarbure
Sbavatura
Braam
Pozostałość
Rebarba

Korrekt / Correct
Correcto / Correct
Corretto / Goed
Prawidłowo / Correto
Falsch / Incorrect
Incorrecto / Incorrect
Non corretto / Fout
Nieprawidłowo
Incorreto
Falsch / Incorrect
Incorrecto / Incorrect
Non corretto / Fout
Nieprawidłowo
Incorreto
P8
C32
8
15
23
24
24
25
B4
A8
B2
D8
A22
P8
P7
P7
B17
Skala 1:1 / Scale 1:1
Escala 1:1 / Échelle 1:1
Scala 1:1 / Schaal 1:1
Skala 1:1 / Escala 1:1
Skala 1:1 / Scale 1:1
Escala 1:1 / Échelle 1:1
Scala 1:1 / Schaal 1:1
Skala 1:1 / Escala 1:1
22
Skala 1:1
Scale 1:1
Escala 1:1
Échelle 1:1
Scala 1:1
Schaal 1:1
Skala 1:1
Escala 1:1

A26
P8
B2 B2
28
27
B11
A9
26
A21
ENTFERNEN!
REMOVE
iQUITAR!
!RETIRER
RIMUOVERE!
!VERWIJDER
USUNĄĆ!
!RETIRAR
ENTFERNEN!
REMOVE
iQUITAR!
!RETIRER
RIMUOVERE!
!VERWIJDER
USUNĄĆ!
!RETIRAR
16
Skala 1:1
Scale 1:1
Escala 1:1
Échelle 1:1
Scala 1:1
Schaal 1:1
Skala 1:1
Escala 1:1
Korrekt / Correct
Correcto / Correct
Corretto / Goed
Prawidłowo / Correto
Falsch / Incorrect
Incorrecto / Incorrect
Non corretto / Fout
Nieprawidłowo
Incorreto
Falsch / Incorrect
Incorrecto / Incorrect
Non corretto / Fout
Nieprawidłowo
Incorreto

Körper 01
Body 01
Cuerpo 01
Corps 01
Corazza 01
Romp 01
Pancerz 01
Corpo 01
Korrekt / Correct
Correcto / Correct
Corretto / Goed
Prawidłowo / Correto
Falsch / Incorrect
Incorrecto / Incorrect
Non corretto / Fout
Nieprawidłowo
Incorreto
Grat / Burr / Rebaba
Ebarbure / Sbavatura
Braam / Pozostałość
Rebarba
17
1
1
1
2
2
3
3
4
45
5
C12
C27
C28
C29 C14
C15
C30
C13
C11
C26
D10
A13
C32
C32
D6
D7
A3
A3
A3
D10
D10
D10 D10
D10
Körper montieren / Body Assembly / Montar el cuerpo / Monter le corps / Assemblaggio della corazza
De romp monteren / Montaż pancerza / Montagem do Corpo
Falsch / Incorrect
Incorrecto / Incorrect
Non corretto / Fout
Nieprawidłowo
Incorreto
Bemerkung: die Löcher von D6 und D7 sind nicht
ganz rund. Stecken Sie A3 richtig in die Löcher.
Please note the marked holes at the edge of D6
and D7 are not completely circular. Kindly place A3
in a right position to precisely connect to the holes.
Observación: los agujeros de D6 y D7 no son
completamente redondos. Introduzca A3
correctamente en los agujeros. corte las rebabas
Noter que les trous marqués dans D6 et D7 ne sont
pas complètement ronds. Positionner A3 de façon
à ce que les extrémités sont alignées avec les
trous.
Notate che i buchi marcati sul bordo D6 e D7 non
sono rotondi. Mettere A3 in posizione giusta, per
collegare precisamente con i buchi.
Merk op dat de gemarkeerde gaten in D6 en D7
niet helemaal rond zijn. Plaats A3 zodanig dat de
uiteinden uitgelijnd zijn met de gaten.
Należy zwrócić uwagę, że otwory zaznaczone na
krawędzi D6 i D7 nie są okrągłe. Umieścić A3 we
właściwej pozycji, aby dokładnie połączyć z
otworami.
Repare que os furos
marcados na borda de
D6 e D7 não são
completamente
circulares. Coloque o A3
na posição correta para
uma conexão perfeita
com os furos.
Schneiden Sie die Grate vor Montage ab.
Cut off the burrs before assembly.
Corte las rebabas antes del montaje.
Couper les ébarbures des pièces avant le montage.
Eliminare le sbavature prima dell'assemblaggio.
Knip de bramen af voor de montage.
Przed montażem usunąć pozostałości ramki.
Cortar as rebarbas antes da montagem.

18
2
C32
D4 D5
C32
A11
A12
C9
C8
11
2
2
3
3
4
45
5
C7 C6 C21 C22
C23
C24
C25
C10
Körper 02
Body 02
Cuerpo 02
Corps 02
Corazza 02
Romp 02
Pancerz 02
Corpo 02

Körper 03
Body 03
Cuerpo 03
Corps 03
Corazza 03
Romp 03
Pancerz 03
Corpo 03
19
3
A10
A12
P12
C4
C17
D14
A10
D15
A25
C3 C18
C1 C16
C2
C19
C5 C20
11
22
3 3
44
55
Korrekt / Correct
Correcto / Correct
Corretto / Goed
Prawidłowo / Correto
Falsch / Incorrect
Incorrecto / Incorrect
Non corretto / Fout
Nieprawidłowo
Incorreto

Body 03 Body 02
B8x4
P18
P18
20
4
5
Kunststoffstreifen / PP Plastic Sheets
Tiras de plástico / Bandes de fixation (plastique)
Strisce in plastica PP / Plastic strips
Paski plastikowe PP / Folhas em Plástico PP
Achtung! / Attention!
iAdvertencia! / Attention !
Attenzione! / Opgelet!
Uwaga! / Atenção!
Biegen Sie die Kunststoffstreifen nicht (siehe Seite
18). Dies kann eine Fehlfunktion verursachen.
Please do not bend PP plastic sheets shown on P18,
or it may lead to malfunction of the hedgehog’s
spines.
No pliegue las tiras de plástico (véase p. 18). Esto
podría causar un funcionamiento incorrecto.
Ne pas plier les bandes en plastique (voir P18), cela
pourrait causer un dysfonctionnement des épines.
Non piegare le strisce in plastica presentate in P18,
perché possa provocare un funzionamento scorretto
delle spine del riccio.
Plooi de plastic strips (zie P18) niet, dit kan ervoor
zorgen dat de stekels van de egel niet rechtop gaan
staan.
Nie zginać pasków plastikowych pokazanych na P18,
gdyż może to prowadzić do nieprawidłowego
działania kolców jeża.
Por favor, não dobre as folhas de plástico PP
mostradas em P18, pois isso pode causar mau
funcionamento dos espinhos do ouriço.
Körper 03 / Body 03
Cuerpo 03 / Corps 03
Corazza 03 / Romp 03
Pancerz 03 / Corpo 03 Körper 01 / Body 01
Cuerpo 01 / Corps 01
Corazza 01 / Romp 01
Pancerz 01 / Corpo 01
Körper 02 / Body 02
Cuerpo 02 / Corps 02
Corazza 02 / Romp 02
Pancerz 02 / Corpo 02
Die beiden Streifen haben eine andere Form. Verwechseln Sie diese Teile nicht.
Please pay attention to the shapes of parts below. They are different and should not be mixed.
Las dos tiras no son idénticas. Asegúrese de no intercambiarlas.
Faire attention à la positon des bandes. Ces pièces sont de différente taille. Attention à ne pas les mélanger !
Occorre prestare attenzione alla forma della parte di sotto. Differiscono tra di loro e non si possono mescolare.
Let op de correcte positie van de strips. Deze onderdelen zijn verschillend en mogen niet door elkaar gebruikt worden.
Należy zwrócić uwagę na kształt części poniżej. Różnią się od siebie i nie należy ich mieszać.
Preste atenção ao formato das peças abaixo. Estas são diferentes e não podem ser trocadas.

21
6
2 2
11
44
7
99
7
33
6
8
8
6
5
C37
C34
C31
C31
C31
34
34
Klicken / Click
Clic / Clic
Clic / Klik
Klik / Clicar
Klicken / Click
Clic / Clic
Clic / Klik
Klik / Clicar
Klicken / Click
Clic / Clic
Clic / Klik
Klik / Clicar
Klicken / Click
Clic / Clic
Clic / Klik
Klik / Clicar Klicken / Click
Clic / Clic
Clic / Klik
Klik / Clicar
Klicken / Click
Clic / Clic
Clic / Klik
Klik / Clicar
Teil mit der Nummer
Number indicator
Pieza con el número
Plaque numérotée
Indicazione numerica
Plaatje met nummer
van het onderdeel
Oznaczenie liczbowe
Indicador do número
Entfernen Sie vor Montage den Teil mit der
Nummer.
Cut off the number indicator before assembly.
Antes del montaje, quite la pieza con el número.
Couper la plaque numérotée avant le montage.
Rimuovere l’elemento marcato dal numero prima
dell’assemblaggio!
Verwijder het plaatje met het nummer van het onderdeel
voor de montage.
Przed montażem usunąć
element oznaczony
numerem!
Corte o indicador do
número antes da
montagem!
Körper 01
Body 01
Cuerpo 01
Corps 01
Corazza 01
Romp 01
Pancerz 01
Corpo 01
Körper 02
Body 02
Cuerpo 02
Corps 02
Corazza 02
Romp 02
Pancerz 02
Corpo 02
Körper 03
Body 03
Cuerpo 03
Corps 03
Corazza 03
Romp 03
Pancerz 03
Corpo 03

2
2
1
1
22
7
11 11
12
10 10
C31
C33
33
33
Klicken / Click
Clic / Clic
Clic / Klik
Klik / Clicar
Klicken / Click
Clic / Clic
Clic / Klik
Klik / Clicar
Klicken / Click
Clic / Clic
Clic / Klik
Klik / Clicar
Klicken / Click
Clic / Clic
Clic / Klik
Klik / Clicar
Klicken / Click
Clic / Clic
Clic / Klik
Klik / Clicar
Klicken / Click
Clic / Clic
Clic / Klik
Klik / Clicar
Entfernen Sie vor Montage den Teil
mit der Nummer.
Cut off the number indicator before
assembly.
Antes del montaje, quite la pieza con el número.
Couper la plaque numérotée avant le montage.
Rimuovere l’elemento marcato dal numero
prima dell’assemblaggio!
Verwijder het plaatje met het nummer van het
onderdeel voor de montage.
Przed montażem usunąć element oznaczony
numerem!
Corte o indicador do número antes da
montagem!
Teil mit der Nummer
Number indicator
Pieza con el número
Plaque numérotée
Indicazione numerica
Plaatje met nummer
van het onderdeel
Oznaczenie liczbowe
Indicador do número
Führen Sie diesen Schritt sorgfältig aus.
Please execute this step accurately.
Efectúe con cuidado este paso.
Effectuer cette étape correctement.
Occorre eseguire questo passaggio con precisione!
Voer deze stap nauwkeurig uit.
Należy dokładnie wykonać ten krok!
!Execute este passo com a maior precisão.

23
8
9
C31
C31
A21
B11
C31
C33
11
2
2
3
3
4
4
7
6
6
5
5
A20
B12
33
33
Click
Clic
Klicken / Click
Clic / Clic
Clic / Klik
Klik / Clicar
Klicken / Click
Clic / Clic
Clic / Klik
Klik / Clicar
Klicken / Click
Clic / Clic
Clic / Klik
Klik / Clicar
Klicken / Click
Clic / Clic
Clic / Klik
Klik / Clicar
Klicken / Click
Clic / Clic
Clic / Klik
Klik / Clicar Klicken / Click
Clic / Clic
Clic / Klik
Klik / Clicar
Klicken / Click
Clic / Clic
Clic / Klik
Klik / Clicar
Klicken / Click
Clic / Clic
Clic / Klik
Klik / Clicar Klicken / Click
Clic / Clic
Clic / Klik
Klik / Clicar
Klicken / Click
Clic / Clic
Clic / Klik
Klik / Clicar
Entfernen Sie vor Montage den Teil mit der Nummer.
Cut off the number indicator before assembly.
Antes del montaje, quite la pieza con el número.
Couper la plaque numérotée avant le montage.
Rimuovere l’elemento marcato dal numero prima
dell’assemblaggio!
Verwijder het plaatje met het nummer van het
onderdeel voor de montage.
Przed montażem usunąć element oznaczony
numerem!
Corte o indicador do número antes da montagem!
Teil mit der Nummer / Number indicator
Pieza con el número / Plaque numérotée
Indicazione numerica
Plaatje met nummer van het onderdeel
Oznaczenie liczbowe / Indicador do número

Kopf montieren / Head Assembly / Montar la cabeza / Monter la tête / Assemblaggio della testa
De kop monteren / Montaż głowy / Montagem da Cabeça
1
2
3
P14
C32
D2
B19
F3
A16
A27
P13
F2
A14
24
Korrekt / Correct
Correcto / Correct
Corretto / Goed
Prawidłowo / Correto
Falsch / Incorrect
Incorrecto / Incorrect
Non corretto / Fout
Nieprawidłowo
Incorreto
Falsch / Incorrect
Incorrecto / Incorrect
Non corretto / Fout
Nieprawidłowo
Incorreto

Skala 1:1
Scale 1:1
Escala 1:1
Échelle 1:1
Scala 1:1
Schaal 1:1
Skala 1:1
Escala 1:1
P7x2
D16
P19
P15
B20
A17
F1
P14
D3
Beachten Sie, dass Sie P19 und D16 richtig befestigen.
Please ensure parts P19 and D16 are accurately assembled .
Asegúrese de fijar P19 y D16 de manera correcta.
S'assurer que les pièces P19 et D16 sont montées correctement.
Occorre assicurarsi che gli elementi P19 e D16 sono correttamente montati!
Zorg ervoor dat de onderdelen P19 en D16 correct gemonteerd zijn.
Należy upewnić się, że części P19 i D16 są dokładnie zmontowane!
Verifique se as peças P19 e D16 estão montadas corretamente
25
4
56
Falsch / Incorrect
Incorrecto / Incorrect
Non corretto / Fout
Nieprawidłowo
Incorreto

26
7 8
9
D13
A17 A14
D1
D1
10
3
2
1

Korrekt / Correct
Correcto / Correct
Corretto / Goed
Prawidłowo / Correto
Falsch / Incorrect
Incorrecto / Incorrect
Non corretto / Fout
Nieprawidłowo
Incorreto
27
12
D20
B10
B13
D12
11
D11
Ausführung / Finish / Acabado / Prêt / Fine / Klaar / Koniec
Acabamento
D20
1
1
2
2

28
Nicht für unebenen Untergrund oder Teppich geeignet.
Do not play on uneven ground or rugs.
No apto para el uso sobre superficies desniveladas o alfombras.
Ne pas utiliser sur une surface inégale ou un tapis
Non si deve giocare con il riccio su un terreno irregolare o sui tappeti.
Gebruik niet op een oneffen ondergrond of tapijt.
Nie należy bawić się jeżykiem na nierównym podłożu ani na dywanach.
Não brinque em terrenos irregulares ou em cima de tapetes.
Achtung / Warning / Advertencia / Avertissement
Avvertenza / Waarschuwing / Ostrzeżenie / Atenção
Korrekt / Correct
Correcto / Correct
Corretto / Goed
Prawidłowo / Correto
Korrekt / Correct
Correcto / Correct
Corretto / Goed
Prawidłowo / Correto
Korrekt / Correct
Correcto / Correct
Corretto / Goed
Prawidłowo / Correto
Falsch / Incorrect
Incorrecto / Incorrect
Non corretto / Fout
Nieprawidłowo
Incorreto
Falsch / Incorrect
Incorrecto / Incorrect
Non corretto / Fout
Nieprawidłowo
Incorreto
Falsch / Incorrect
Incorrecto / Incorrect
Non corretto / Fout
Nieprawidłowo
Incorreto
Falsch / Incorrect
Incorrecto / Incorrect
Non corretto / Fout
Nieprawidłowo
Incorreto
Falsch / Incorrect
Incorrecto / Incorrect
Non corretto / Fout
Nieprawidłowo
Incorreto

Spielen / How To Play / Jugar / Jouer / Uso Del Robot / Spelen / Używanie Robota / Como Jogar
29
1Einschalten – Standby-Modus / Power On “Standby” Phase / Encendido – Modo de espera (standby)
Allumer et mode 'Veille' / Alimentazione accesa – fase di ‘standby’ / Inschakelen en Stand-bymodus
Zasilanie włączone - faza "gotowości" / Ligado – Fase « Standby »
Bemerkung: Lassen Sie den Igel nicht zu lange warten, sonst wird er trampeln.
Nach 60 Sekunden Inaktivität schaltet sich der Igel automatisch aus.
Note: Do not keep the Hedgehog waiting too long. It will start stamping its foot to remind you.
If “Standby” phase stays more than 60
seconds
without mode selection,
the
Hedgehog will power off automatically.
Observación: No deje que el erizo tenga que esperar demasiado tiempo. Si lo hace, le avisará dando golpecitos con el pie.
Después de 60 segundos de inactividad el erizo se desactivará automáticamente.
Note : Tant que vous n'avez pas sélectionné un mode, le hérisson bouge ses pattes.
Après 60 secondes d'inactivité en mode veille, le hérisson s'éteint automatiquement.
Nota: Quando l’attesa si estende, il riccio diventa ansioso. Inizia a pestare il zampino per ricordare la sua presenza.
Se l’attesa dura più di 60 secondi senza la scelta di un modo, il riccio si spegne automaticamente.
Opmerking: Zolang u geen modus geselecteerd hebt, trappelt de egel ongeduldig met zijn pootjes.
Na 60 seconden inactiviteit in stand-bymodus schakelt de egel automatisch uit.
Uwaga: Jeżyk zaczyna się niecierpliwić, gdy oczekiwanie przedłuża się. Zaczyna tupać nóżką, aby przypomnieć o sobie.
Jeśli oczekiwanie trwa dłużej niż 60 sekund bez wyboru trybu, jeżyk wyłączy się automatycznie.
Observação: Não deixe o Ouriço à espera durante muito tempo. Ele começa a bater o pé para o lembrar de que está à espera.
Se a fase "Standby" durar mais de 60 segundos sem que selecione o modo, o Ouriço desliga-se automaticamente.
1. Drücken Sie die Taste während 2 Sekunden. Die LEDs leuchten (grün).
2. Die LEDs blinken. Der Igel befindet sich im Standby-Modus. Wählen Sie den gewünschten Modus aus
1. Long press the button for 2 seconds. The Hedgehog's LED eyes (green) will light up.
2. LED flashes Enter ”Standby” phase Select playing modes.
1. Pulse el botón durante 2 segundos. Los LEDs se iluminarán (verde).
2. Los LEDs parpadearán. El erizo está en el modo de espera (standby). Seleccione el modo de funcionamiento deseado.
1. Maintenir enfoncé pendant 2 secondes. Les yeux (LED) du hérisson s'allument (vert).
2. Le hérisson est en mode veille. Sélectionner un mode.
1. Premere il tasto per 2 secondi Gli occhi del riccio si illumineranno (diodi LED).
2. Lampeggiamento del diodo LED> passaggio nel modo ‘Standby’ > scegliere il modo del gioco.
1. Houd de knop gedurende 2 seconden ingedrukt. De ogen van de egel lichten (groen) op.
2. De egel is nu in stand-bymodus. Selecteer een modus.
1. Nacisnąć i przytrzymać przycisk przez 2 sekundy. Zaświecą się oczy jeżyka (zielone diody LED).
2. Miganie diody LED > przejście w tryb "Gotowości" > wybrać tryb zabawy.
1. Pressione o botão durante 2 segundos. Os olhos LED do Ouriço (verde) acendem.
2. O LED fica intermitente. O Ouriço está no modo "Standby". Escolha um dos modos de funcionamento.

30
2Drei Betriebsmodi / Three Interactive Modes / Tres modos de funcionamiento / Trois modes interactifs / Tre modi interattivi:
Drie interactieve modi / Trzy tryby interaktywne: / Três Modos Interativos
EINE ROLLE MACHEN / SINGLE ROLLOVER
EFECTUAR UNA VOLTERETA / UNE ROULADE
CAPRIOLA SINGOLA / ÉÉN KOPROL
POJEDYNCZA PRZEWROTKA / UMA CAMBALHOTA
Modus 1 / Funway 1 / Modo 1 / Mode 1
Modo Funway 1
Modus 1 / Tryb Funway 1 / Funway 1
MEHRERE ROLLEN MACHEN / MULTIPLE ROLLOVERS
EFECTUAR VARIAS VOLTERETAS / MULTIPLES ROULADES
PARECCHIE CAPRIOLE / MEERDERE KOPROLLEN
KILKA PRZEWROTEK / VÁRIAS CAMBALHOTAS
Modus 2 / Funway 2 / Modo 2 / Mode 2
Modo Funway 2
Modus 2 / Tryb Funway 2 / Funway 2
APPLAUDIEREN / CHEER UP / APLAUDIR
Applaudir / APPLAUSO / APPLAUDISEREN
APLAUZ / ANIMAÇÃO
Modus 3 / Funway 3 / Modo 3 / Mode 3
Modo Funway 3
Modus 3 / Tryb Funway 3 / Funway 3
Mit einer Taste können Sie zwischen den verschiedenen Betriebsmodi schalten ( Modus 1 / Modus 2 / Modus 3 ).
Beispiele:
Die Taste ein Mal drücken – die LEDs leuchten grün und orange. Modus 1 wird aktiviert.
Nochmals drücken – die LEDs leuchten grün. Modus 2 wird aktiviert.
Nochmals drücken – die LEDs leuchten orange. Modus 3 wird aktiviert.
One single button to switch between 3 different modes ( Funway 1 / Funway 2 / Funway 3 ) alternatively.
Examples:
Press the button once – LED (green & orange) light up Goes into mode “ Funway 1 ”.
Redo (press the button again) – LED (green) light up Goes into mode “ Funway 2 ”.
Redo (press the button again) – LED (orange) light up Goes into mode “ Funway 3 ”.
Lleva un solo botón para conmutar entre los 3 modos de funcionamiento ( Modo 1 / Modo 2 / Modo 3 ).
Ejemplos:
Pulsar el botón una vez – Los LEDs se iluminarán en verde y naranja. Modo 1 está activado.
Volver a pulsar – Los LEDs se iluminarán en verde Modo. 2 está activado.
Volver a pulsar – Los LEDs se iluminarán en naranja. Modo 3 está activado.
Un bouton pour commuter entre les 3 différents modes.
Exemples :
Appuyer une fois sur le bouton – la LED (vert & orange) s'allume et le mode 1 est activé.
Appuyer à nouveau sur le bouton – la LED (vert) s'allume et LED (green) et le mode 2 est activé.
Appuyer à nouveau sur le bouton. – la LED (orange) s'allume et le mode 3 est activé.
Un solo tasto serve a scambiare tre modi diversi (Funway 1 / Funway 2 / Funway 3)
Esempi:
Premere il tasto una volta – si illuminano i diodi LED (verde e arancione) e il modo ‘Funway 1’ viene attivato.
Ripetere (premere il tasto di nuovo) - si illumina il diodo LED (verde) e il modo ‘Funway 2’ viene attivato.
Ripetere (premere il tasto di nuovo) - si illumina il diodo LED (arancione) e il modo ‘Funway 3’ viene attivato.
1 knop om te schakelen tussen de 3 verschillende modi
Voorbeelden:
Druk eenmaal op de knop. – de led (groen & oranje) licht op en modus 1 wordt geactiveerd.
Druk nogmaals op de knop. – de led (groen) licht op en modus 2 wordt geactiveerd.
Druk nogmaals op de knop. – de led (oranje) licht op en modus 3 wordt geactiveerd.
Do przełączania trzech różnych trybów (Funway 1 / Funway 2 / Funway 3)
Przykłady:
Nacisnąć przycisk jednokrotnie – zapalają się diody LED (zielona i pomarańczowa) i aktywowany jest tryb „Funway 1”.
Powtórzyć (ponownie wcisnąć przycisk) – zapala się dioda LED (zielona) i aktywowany jest tryb „Funway 2”.
Powtórzyć (ponownie wcisnąć przycisk) – zapala się dioda LED (pomarańczowa) i aktywowany jest tryb „Funway 3”
Apenas um único botão para alternar entre 3 modos diferentes ( Funway 1 / Funway 2 / Funway 3 )
Exemplos:
Pressione o botão uma vez – LED (verde & laranja) acende e entra no modo “ Funway 1 ”.
Refazer (pressione o botão novamente) – LED (verde) acende e entra no modo “ Funway 2 ”.
Refazer (pressione o botão novamente) – LED (laranja) acende e entra no modo “ Funway 3 ”.
Grün / Green
verde / Vert
verde / Groen
zielony / Verde
Grün / Green
verde / Vert
verde / Groen
zielony / Verde
Orange / orange
naranja / orange
arancione / oranje
pomarańczowy
laranja
Orange / orange
naranja / orange
arancione / oranje
pomarańczowy
laranja

31
EINE ROLLE MACHEN / SINGLE ROLLOVER / EFECTUAR UNA VOLTERETA / UNE ROULADE
CAPRIOLA SINGOLA / EEN ROLBEWEGING / POJEDYNCZA PRZEWROTKA / UMA CAMBALHOTA
x3
1 Rolle rückwärts KLATSCHEN x 1
1 Backward Roll CLAPS X1 time
1 Voltereta hacia atrás PALMADA x 1
1 Roulade arrière Taper 1 fois dans les mains
1 Capriola indietro Battere le mani una volta
1 Achterwaarts rollen 1 x klappen
1 Przewrotka do tyłu KLASNĄĆ 1-krotnie
1 Cambalhota Para Trás PALMAS 1 vez
2 Schlafen KLATSCHEN x 2
2 Sleeping CLAPS X21 time
2 Dormir PALMADA x 2
2 S'endormir Taper 2 fois dans les mains
2 Veglia Battere le mani due volte
2 Slapen 2 x klappen
2 Uśpienie KLASNĄĆ 2-krotnie
2 Dormir PALMAS 2 vezes
3 Aufwachen KLATSCHEN x 3
3 Wake-Up CLAPS X3 time
3 Despertarse PALMADA x 3
3 Se réveiller Taper 3 fois dans les mains
3 Sveglia Battere le mani tre volte
3 Ontwaken 3 x klappen
3 Pobudka KLASNĄĆ 3-krotnie
3 Acordar PALMAS 3 vezes
times
Bemerkung: der Igel kann weder wenn er zusammengerollt ist, noch wenn er eine Rolle ausführt,
Befehle befolgen.
Er kann nur Befehle befolgen, wenn er ganz ausgestreckt ist.
Please note the Hedgehog cannot comply with commands while it’s body is rolling or rolled into a ball.
It can detectclapping only when its body is fully stretched out.
Observación: El erizo no puede obedecer cuando está haciendo una voltereta o enrollado sobre sí
mismo.
Reaccionará solo a palmadas cuando está en su posición normal.
Noter que le hérisson ne peut pas effectuer les commandes en mode enroulé ou déroulé.
Le hérisson ne réagit qu'aux battements des mains en mode déroulé.
Bisogna ricordarsi che il riccio non può seguire le istruzioni quando si rotola o quando sta
appallottolato
Robot rivela l’applauso soltanto in posizione completamente estesa.
Merk op dat de egel de commando's niet kan uitvoeren als deze aan het rollen of opgerold is.
De egel reageert alleen op handgeklap als hij ontrolt is.
Należy pamiętać, że jeżyk nie może stosować się do poleceń, gdy się turla lub gdy jest zwinięty w
kulkę.
Robot wykrywa klaskanie, gdy jest w pozycji całkowicie rozciągniętej.
Lembre-se que o Ouriço não pode executar as suas ordens enquanto estiver a rebolar ou enrolado.
Este só consegue detectar o som das palmas quando tem o corpo totalmente esticado.
Modus 1 / Funway 1 / Modo 1 / Mode 1 / Modo Funway 1 / Modus 1 / Tryb Funway 1 / Funway 1

3Das Gerät ausschalten / Power off / Desactivar el aparato / Eteindre / Alimentazione spenta / Uitschakelen
Zasilanie wyłączone / Desligar
32
x3
MEHRERE ROLLEN MACHEN / MULTIPLE ROLLOVERS
EFECTUAR VARIAS VOLTERETAS / MULTIPLES ROULADES
PARECCHIE CAPRIOLE / MEERDERE ROLBEWEGINGEN
KILKA PRZEWROTEK / VÁRIAS CAMBALHOTAS
APPLAUDIEREN / CHEER UP / APLAUDIR / APPLAUDIR
APPLAUSO / APPLAUDISEREN / APLAUZ / DIVERSÃO
Modus 2 / Funway 2 / Modo 2 / Mode 2
Modo Funway 2 / Modus 2 / Tryb Funway 2 / Funway 2
Modus 3 / Funway 3 / Modo 3 / Mode 3
Modo Funway 3 / Modus 3 / Tryb Funway 3 / Funway 3
Die Anzahl hängt davon ab, wie viel Mal Sie in die Hände klatschen.
Max. Anzahl: 5.
Continuous roll-overs according to how many times players clap.
Maximum is five times.
El número de volteretas dependerá del número de veces que dé una
palmada.
Número máx.: 5.
Effectuer des roulades en continue en fonction du nombre de fois que
vous tapez dans vos mains.
Le nombre maximal est 5.
Fa le capriole rispettivamente alla quantità di battimani.
Al massimo cinque volte.
De egel maakt rolbewegingen, afhankelijk van het aantal keren dat u in
uw handen klapt.
Het maximumaantal is 5.
Wykonuje przewrotki w zależności od ilości klaśnięć.
Maksymalnie pięciokrotnie.
Cambalhotas sucessivas tantas quantas as vezes que os jogadores
baterem as palmas.
O máximo são 5 vezes.
Klatschen Sie in die Hände, bis der Igel sich zusammenrollt.
Keep clapping until the, Hedgehog rolls up into a ball.
Dé palmadas hasta que el erizo se enrolle sobre sí mismo.
Taper dans vos mains jusqu'à ce que le hérisson s'enroule en boule.
Battere le mani affinché il riccio si appallottoli in una pallina.
Blijf klappen totdat de egel zich oprolt tot een bol.
Klaskać do momentu, aż jeżyk zwinie się w kulkę.
Tente bater as palmas por cima da testa do ouriço.
Rolle rückwärts KLATSCHEN x 1~5(Max.)
Backward Roll CLAPS X1~5(Max) time
Voltereta hacia atrás PALMADA x 1~5(máx.)
Roulade arrière Taper 5 fois dans les mains(Max.) de fois
Capriola indietro Battere le mani 1~volte(massimo)
Achterwaarts rollen 1-5 x klappen(Max.) aantal
Przewrotka do tyłu KLASNĄĆ 1~5-krotnie(maks.)
Cambalhota Para Trás PALMAS 1~5 vezes(Máx) vezes
Sich zusammenrollen SCHNELL UND UNUNTERBROCHEN KLATSCHEN
Rolling up into a ball CLAP CONTINUOUSLY
Enrollarse sobre sí mismo DAR PALMADAS DE MANERA CONTINUA Y RÁPIDA
S'enrouler en boule TAPER DANS VOS MAINS EN CONTINU
Appallottolarsi in una pallina BATTERE LE MANI IN MODO CONTINUO
In een bol oprollen BLIJF KLAPPEN
Zwijanie się w kulkę KLASKAĆ W SPOSÓB CIĄGŁY
Correto Nunca mantenha as mãos demasiado afastadas do Ouriço.
Drücken Sie die Taste während 2 Sekunden. Die LEDs erlöschen langsam und der Igel rollt sich zusammen. Der Igel ist nun ganz ausgeschaltet.
Long press the button for 2 seconds. LED light will gradually go off, followed by the Hedgehog rolling into a ball. By now the Hedgehog is completely powered off.
Pulse el botón durante 2 segundos. Los LEDs se apagarán y el erizo se enrollará sobre sí mismo. Ahora, el erizo está apagado.
Maintenir enfoncé le bouton pendant 2 secondes. La LED s'éteint progressivement, le hérisson s'enroule en boule. Maintenant, le hérisson est complètement
éteint.
Premere il tasto per 2 secondi I diodi LED si spegneranno gradualmente e poi il riccio si appallottolerà in una pallina. Fino a questo punto si spegnerà
completamente.
Houd de knop gedurende 2 seconden ingedrukt. De led schakelt langzaam uit en de egel rolt zich op. De egel is nu volledig uitgeschakeld.
Nacisnąć i przytrzymać przycisk przez 2 sekundy. Diody LED będą stopniowo się wyłączać, a następnie jeżyk zwinie się w kulkę. Do tego czasu jeżyk całkowicie
się wyłączy.
Pressione o botão durante 2 segundos. O LED vai desligando gradualmente, ao mesmo tempo que o Ouriço se enrola numa bola. O Ouriço está agora
completamente desligado.

Hinweis: / Tip: / Consejo: / Conseil : / Suggerimento: / Tip: / Wskazówka: / Dica:
Halten Sie die Hände möglichst nahe am Kopf des Igels.
Try to clap right above, hedgehog’s forehead.
Dé palmadas justo sobre la frente del erizo.
Taper dans vos mains juste au-dessus de la tête du
hérisson.
Battere le mani proprio sopra la fronte del riccio.
Probeer vlak boven de kop van de egel te klappen.
Klasnąć tuż nad czołem jeżyka.
Tente bater as palmas por cima da testa do ouriço.
Halten Sie die Hände nicht zu weit entfernt.
Do not keep your hands too far from the Hedgehog.
Mantenga las manos lo más cerca posible de su frente.
Ne pas garder vos mains trop loin du hérisson.
Non si deve tenere le mani troppo lontano dal riccio.
Houd uw handen niet te ver van de egel.
Nie należy trzymać rąk zbyt daleko od jeżyka.
Nunca mantenha as mãos demasiado afastadas do Ouriço.
Bestimmen Sie vor einem Batteriewechsel, ob sich der Igel zusammengerollt hat oder völlig ausgestreckt ist und befolgen Sie die entsprechenden Anweisungen.
As the body of the hedgehog might be either stretched out or rolled up as a ball when you intend to replace batteries, please firstly identify which scenario it is and
follow the instruction respectively.
Antes de reemplazar las pilas, compruebe si el erizo está enrollado sobre sí mismo o si está extendido y siga las instrucciones correspondientes.
Puisque le corps du hérisson peut être déroulé ou enroulé pour remplacer les piles, identifier d'abord l'état dans lequel il se trouve, puis procéder comme indiqué.
Il corpo del riccio può essere sia esteso che appallottolato durante la sostituzione delle batterie, dunque prima occorre determinare la sua posizione e seguire
l’istruzione adatta.
De egel kan zowel ontrold of opgerold zijn bij het vervangen van de batterijen. Bepaal eerst of de egel ontrold of opgerold is en volg de instructies op.
Podczas wymiany baterii ciało jeżyka może być rozciągnięte lub zwinięte w kulkę, dlatego wcześniej należy ustalić jego pozycję i postępować zgodnie z
odpowiednią instrukcją.
Uma vez que o corpo do ouriço tanto pode estar esticado com enrolado numa bola, quando pretender substituir as pilhas, identifique primeiro o estado em que ele
se encontra, e depois proceda em conforme as instruções.
Die Batterien austauschen / How to replace the battery / Reemplazar las pilas / Remplacer les piles / Come sostituire le batterie
De batterijen vervangen / Wymiana baterii / Como substituir as pilhas
Position 1 / Scenario 1 / Posibilidad 1 / Scénario 1 / Situazione 1 / Scenario 1 / Sytuacja 1 / Cenário 1
Die Batterien sind leer und der Igel ist ganz ausgestreckt. Folgen Sie diesen Schritten, um einen Batteriewechsel durchzuführen:
1. Lösen Sie die Schrauben des Batteriefachs.
2. Drücken Sie die Taste während 2 Sekunden, um den Igel neu zu starten. Er befindet sich nun im Standby-Modus und ist betriebsbereit.
The hegdehog runs out of battery completely when its body is fully stretched out. Please follow the steps below to replace batteries:
1. Loosen the screws that secure battery case to replace batteries.
2. Press the button 2 seconds to reboot the hedgehog after replacing batteries. By now it should have entered “ stand by ” mode and be able to operate normally.
Las pilas están agotadas y el erizo está extendido. Siga los siguientes pasos para reemplazar las pilas:
1. Desatornille los tornillos del compartimiento de pilas.
2. Pulse el botón durante 2 segundos para volver a activar el erizo. Entrará en el modo de espera y está listo para su uso.
Les piles sont complètement déchargées lorsque le hérisson est en état déroulé. Suivre les étapes suivantes pour remplacer les piles :
1. Desserrer les vis du compartiment à piles et remplacer les piles.
2. Maintenir enfoncé le bouton pendant 2 secondes pour redémarrer le hérisson. Le hérisson passe en mode veille et fonctionne normalement.
De batterijen zijn helemaal leeg terwijl de egel ontrold is. Volg de onderstaande stappen om de batterijen te vervangen.
1. Draai de schroeven van het batterijvak los en vervang de batterijen.
2. Houd de knop gedurende 2 seconden ingedrukt om de egel opnieuw in te schakelen. De egel schakelt over in stand-bymodus en functioneert normaal.
La batteria del riccio si è scaricata mentre stava esteso. Sostituire le batterie seguendo le indicazioni di sopra:
1. Allentare le viti che proteggono il portabatterie, per sostituire le batterie.
2. Premere il tasto per 2 secondi, per accendere il riccio di nuovo dopo la sostituzione delle batterie. Il riccio dovrebbe passare in modo ‘Standby’ ed
essere pronto a un funzionamento normale.
33
4
Korrekt / Correct
Correcto / Correct
Corretto / Goed
Prawidłowo / Correto
Falsch / Incorrect
Incorrecto / Incorrect
Non corretto / Fout
Nieprawidłowo
Incorreto

Lösen Sie den Clip. / Loosen the buckle. / Suelte el clip. / Desserrer la bande / Allentare la fibbia. / Maak de clip los.
Poluzować klamrę. / Desaperte a fivela.
1
3
4
P8
B11
A21 B12 A20
Position 2 / Scenario 2 / Posibilidad 2 / Scénario 2 / Situazione 2 / Scenario 2 / Sytuacja 2 / Cenário 2
Position 3 / Scenario 3 / Posibilidad 3 / Scénario 3 / Situazione 3 / Scenario 3 / Sytuacja 3 / Cenário 3
Bateria jeżyka wyczerpała się, gdy był całkowicie rozciągnięty. Wymienić baterie, postępując zgodnie z poniższymi wytycznymi:
1. Odkręcić śruby zabezpieczające gniazdo baterii, aby wymienić baterie.
2. Nacisnąć i przytrzymać przycisk przez 2 sekundy, aby po wymianie baterii ponownie uruchomić jeżyka. Jeżyk powinien przejść w tryb „gotowości” i być
przygotowany do normalnego działania.
O ouriço fica sem pilhas no momento em que o seu corpo está totalmente esticado. Siga os passos abaixo para substituir as pilhas:
1. Desaperte os parafusos que seguram o compartimento das pilhas para substituir as mesmas.
2. Pressione o botão durante 2 segundos para reiniciar o ouriço depois de substituir as pilhas. Nessa altura já deverá estar no modo “ standby ” e será
capaz de funcionar normalmente.
Die Batterien sind noch nicht ganz leer. Drücken Sie die Taste während 7 Sekunden, um in den Wartungsmodus zu gelangen.
Der Igel wird sich nun ganz ausstrecken und die LEDs erlöschen. Folgen Sie oben erwähnten Schritten (Siehe "Position 1").
There is still surplus electricity in the batteries. Regardless of current shape of the hedgehog (rolled up or stretched out), please direct it to “ maintenance mode ”
first by pressing the button 7 seconds to allow it fully stretch out as well as LED light go completely faded.
Follow steps as scenario1 to finish battery replacement.
Las pilas no están completamente agotadas. Sea cual sea su posición, pulse el botón durante 7 segundos para entrar en el modo de mantenimiento.
El erizo se extenderá completamente ylos LEDs se apagarán. Siga los pasos mencionados arriba (véase "Posición 1").
Les piles ne sont pas complètement déchargées. Quel que soit l'état du hérisson (enroulé ou déroulé), activer d'abord le " mode maintenance " en appuyant
sur le bouton pendant 7 secondes.
Le hérisson se déroule et la LED s'éteint complètement. Suivre les étapes du scénario 1 pour remplacer les piles.
Le batterie rimangono parzialmente caricate. Nonostante la posizione attuale del riccio (appallottolato o esteso) prima bisogna attivare ‘il modo di
manutenzione’ premendo il tasto per 7 secondi per estendere completamente il riccio (i diodi LED si spegneranno completamente).
Seguire le istruzioni dalla situazione 1 per finire la sostituzione delle batterie.
De batterijen zijn nog niet helemaal leeg. Ongeacht de positie van de egel (opgerold of ontrold), moet u eerst de "onderhoudsmodus" activeren door de knop
zeven seconden ingedrukt te houden.
In deze modus ontrolt de egel zich en schakelt de led langzaam uit. Volg dezelfde stappen uit zoals beschreven in scenario 1 om de batterijen te vervangen.
W bateriach wciąż pozostaje pewna ilość energii. Bez względu na aktualną pozycję jeżyka (zwinięty lub rozciągnięty) należy najpierw aktywować
„tryb konserwacji”, naciskając przycisk przez 7 sekund, aby całkowicie rozciągnąć jeżyka (diody LED całkowicie zgasną).
Postępować zgodnie z wytycznymi podanymi dla sytuacji 1, aby zakończyć wymianę baterii.
As pilhas ainda têm alguma carga. Independentemente do estado atual do ouriço (enrolado ou esticado), por favor, aceda ao "modo de manutenção"
primeiro pressionando o botão 7 segundos para permitir que este fique totalmente esticado e que o LED comece a apagar-se.
Siga os passos indicados para o cenário 1 para finalizar a substituição das pilhas.
Rollt sich der Igel zusammen (siehe Abb.) und reagiert er nicht nachdem Sie die Taste gedrückt haben, so folgen Sie diesen Schritten.
When your hedgehog rolls into a ball as illustration below with no reaction to your long press to the button, please follow steps below to replace batteries.
Si el erizo se enrolla sobre sí mismo (véase fig.) y no reacciona después de haber pulsado el botón, siga los siguientes pasos.
Lorsque le hérisson est enroulé en boule (voir ill.) et ne réagit pas à une longe pression sur le bouton, suivre les étapes ci-dessous pour remplacer les piles.
Quando il riccio si appallottola in una pallina come nell’immagine sotto senza reagire a una durevole pressione del tasto , bisogna seguire i passaggi di sotto
per sostituire le batterie.
Wanneer de egel zich oprolt (zie afb.) en niet reageert bij het indrukken van de knop, ga dan als volgt te werk.
Gdy jeżyk zwija się w kulkę, jak na ilustracji poniżej, i nie reaguje na długie naciśnięcie przycisku, należy postępować zgodnie z poniższymi krokami, aby
wymienić baterie.
Se o ouriço ficar enrolado numa bola, como na ilustração abaixo, sem reação à pressão longa no botão, siga as etapas abaixo para substituir as baterias.
34
2

5. Funktionieren die Stacheln nicht richtig, folgen Sie dann diesen Schritten.
5.1 Stellen Sie sicher, dass Sie Schritt 6, 7 und 8 (S. 20, 21 und 22) richtig
ausgeführt haben.
5.2 Stellen Sie sicher, dass Sie Schritt 7 (S. 21) richtig ausgeführt haben.
5. If the spines do not operate properly, follow steps below to fix them.
5.1 Ensure steps 6 to 8, shown on page 20 to page 22, are correctly
executed.
5.2 Ensure step 7 on page 21 is correctly executed.
5. Si las púas no funcionan correctamente, siga los siguientes pasos.
5.1 Asegúrese de haber efectuado los pasos 6, 7 y 8 (p. 20, 21 y 22) de
manera correcta.
5.2 Asegúrese de haber efectuado el paso 7 (p. 21) de manera correcta.
5. Si les épines ne fonctionnent pas correctement, suivre les étapes suivantes
pour les fixer.
5.1 S'assurer que les étapes 6 à 8 (pages 20-22) ont été effectuées
correctement.
5.2 S'assurer que l'étape 7 (page 21) a été effectuée correctement.
5. Se le spine non funzionano in modo corretto, bisogna eseguire i passaggi
sottoindicati per riparare il guasto.
35
Problemlösung / Trouble Shooting / Solución de problemas / Problèmes et solutions / Risoluzione dei problemi
Probleemoplossing / Wykrywanie i usuwanie usterek / Resolução de Problemas
1. Stellen Sie sicher, dass Sie die Batterien richtig eingelegt haben.
(Siehe Seite 5, Schritt 3)
1. Ensure batteries are placed in correct polarity. (refer to page 5, step 3)
1. Asegúrese de que las pilas estén introducidas correctamente.
(consulte la página 5, paso 3)
1. S'assurer que les piles sont installées correctement. (voir page 5, étape 3)
1. Assicurarsi che le batterie sono inserite rispettando la corretta polarità.
(vedi p. 5, passaggio 3)
1. Zorg ervoor dat de batterijen correct geplaatst zijn. (zie pagina 5, stap 3)
1. Upewnić się, że baterie umieszczono z zachowaniem prawidłowej
biegunowości. (patrz str. 5, krok 3)
1. Verifique se as pilhas estão colocadas respeitando a polaridade.
(consulte a página 5, passo 3)
2. Stellen Sie sicher, dass Sie die Kabel richtig verbunden haben
2. Ensure all wirings are connected firmly
(refer to page 25 , step 7 wire illustration).
2. Asegúrese de que los cables estén conectados correctamente
(consulte la página 25, paso 7)
2. S'assurer que les câbles sont connectés correctement.
2. Assicurarsi che tutte le connessioni sono corrette
(vedi p. 25, passaggio 7 – lo schema delle connessioni)
2. Zorg ervoor dat de kabels correct aangesloten zijn (zie pagina 25, stap 7).
2. Upewnić się, że wszystkie połączenia są poprawne
(patrz str. 25, krok 7 - schemat połączeń)
2. Verifique se todos os fios estão conectados firmemente
(consulte a página 25, passo 7, diagrama dos fios).
Ist der Igel eingeschaltet und liegt er auf dem Rücken, dann blinken die LEDs
(orange und grün). Drehen Sie ihn wieder um und drücken Sie die Taste 7
Sekunden, bis er ganz ausgestreckt ist und die LEDs erlöscht sind. Drücken
Sie die Taste danach während 2 Sekunden, um den Igel neu zu starten.
When the power is on but the body is put upside down, the Hedgehog's LED
eyes will flash orange and green simultaneously to remind users of wrong
posture. Please set it right and press the button 7 seconds until the Hedgehog
fully stretches out as well as LED light is completed faded.
Long press the button 2 seconds to reboot.
Si el erizo está activado y está bocarriba, los ojos LED parpadearán (naranja y
verde).
Coloque el erizo sobre sus patas y pulse el botón durante 7 segundos hasta
que esté completamente extendido y hasta que los LEDs estén apagados.
Luego, pulse el botón durante 2 segundos para volver a activarlo.
Lorsque le hérisson est allumé mais que le corps est à l'envers, les yeux
commencent à clignotent simultanément en orange et vert pour indiquer que la
positon n'est pas correcte. Redresser le et maintenir enfoncé le bouton pendant
7 secondes jusqu'à ce que le hérisson se déroule et que la LED s'éteint
complètement. Maintenir enfoncé le bouton pendant 2 secondes pour
redémarrer.
Quando l’alimentazione è accesa e il riccio sta sdraiato sul dorso, gli occhi con i
diodi LED del riccio diventeranno più chiari e lampeggeranno nello stesso
tempo di arancione e verde per prestate attenzione dell’utente alla posizione
inadeguata. Metterlo nella posizione corretta e premere il tasto per 7 secondi
affinché il riccio si stenda pienamente e i diodi LED si spengano
completamente. Premere il tasto per due secondi per accenderlo di nuovo.
Wanneer de egel ingeschakeld is en op zijn rug ligt, dan
knipperen de ogen groen en oranje om aan te geven dat deze zich in een
verkeerde positie bevindt. Zet de egel weer op zijn pootjes en houd de knop
gedurende 7 seconden ingedrukt totdat de egel zich helemaal ontrolt en de led
helemaal uitschakelt. Houd de knop gedurende 2 seconden ingedrukt om de
egel opnieuw in te schakelen.
Gdy zasilanie jest włączone, a jeżyk jest przewrócony na grzbiet, oczy z
diodami LED jeżyka będą jednocześnie migać na pomarańczowo i zielono, aby
zwrócić uwagę użytkowników na niewłaściwe położenie. Ustawić go we
właściwej pozycji oraz nacisnąć i przytrzymać przycisk przez 7 sekund do
momentu całkowitego rozciągnięcia się jeżyka i wygaszenia diod LED.
Nacisnąć i przytrzymać przycisk przez 2 sekundy, aby uruchomić ponownie.
Quando o Ouriço está ligado mas o corpo está de cabeça para baixo, os olhos
LED do Ouriço começam a piscar em laranja e verde, simultaneamente, para
lembrar os utilizadores que a postura está errada. Coloque-o na posição
correta e pressione o botão durante 7 segundos até que o Ouriço se estique
completamente e a luz LED comece a desvanecer-se. Pressione o botão
durante 2 segundos para reiniciar.
4. Blinken die LEDs nach dem Einschalten orange und grün, dann haben Sie
ihn falsch montiert.
4.1 Beachten Sie, dass B2 entfernt ist. Für mehr Informationen, siehe
Schritt 28, Seite 15.
4.2 Stellen Sie sicher, dass Sie Schritt 7 (Seite 21) richtig ausgeführt haben.
4.3 Um den Igel wieder zu montieren, gehen Sie zur Seite 23.
4. At the very first time you assemble the Hedgehog (or in any chance you
intend to reassemble it), it refers to an incorrect installation if the LED eyes
flash orange and green simultaneously upon activation (before you press
the button to swtich the modes).
4.1 Ensure part B2 is removed. Details are shown on page15 step 28.
4.2 Ensure step 7 on page 21 is correctly executed.
4.3 Go back to page 23 for reassembly.
4. Si los LEDs parpadean en naranja y verde después de haber activado el
erizo, no lo habrá montado correctamente.
4.1 Asegúrese de haber quitado B2. Para más información, consulte el
paso 18 (p.15).
4.2 Asegúrese de haber efectuado el paso 7 (p. 21) de manera correcta.
4.3 Para volver a montar el erizo, vuelva a la página 23.
4. Si les yeux LED clignotent simultanément en vert et orange après la
première mise sous tension (avant de sélectionner un mode), cela indique
que le hérisson n'a pas été monté correctement.
4.1 S'assurer de retirer la pièce B2. Voir page 15, étape 28.
4.2 S'assurer que l'étape 7 (page 21) a été effectuée correctement.
4.3 Retourner à la page 23 pour remonter.
4. Se al primo assemblaggio del riccio (nel caso di un riassemblaggio), gli
occhi con diodi LED lampeggiano nello stesso tempo di arancione e verde
dopo averlo acceso (prima di premere i tasto del cambio di modi), ciò
significa un assemblaggio inadatto.
4.1 Assicurarsi che la parte B2 è rimossa. I dettagli sono presentati sulla p.
15, passaggio 28.
4.2 Assicurarsi che il passaggio 7 sulla p. 21 è eseguito correttamente.
4.3 Tornare alla p. 23 per riassemblare.
4. Als de ogen oranje en groen knipperen na de eerste inbedrijfstelling (voor
het selecteren van een modus), dan is de egel niet correct gemonteerd.
4.1 Zorg ervoor dat het onderdeel B2 is verwijderd. Zie pagina 15, stap 28.
4.2 Zorg ervoor dat stap 7 (pagina 21) correct is uitgevoerd.
4.3 Zie pagina 23
4. Przy pierwszym montażu jeżyka (lub w przypadku ponownego montażu),
jeśli oczy z diodami LED migają jednocześnie na pomarańczowo i zielono
po włączeniu (przed naciśnięciem przycisku przełączenia trybów), oznacza
to nieprawidłowy montaż.
4.1 Upewnić się, że usunięto część B2. Szczegóły przedstawiono na str. 15,
krok 28.
4.2 Upewnić się, że wykonano prawidłowo krok 7 na str. 21.
4.3 Cofnąć się do str. 23, aby powtórzyć montaż.
4. Na primeira vez que montar o Ouriço (ou se por alguma razão pretender
voltar a montá-lo), este indica-lhe que a instalação está incorreta fazendo
os olhos LED piscarem em laranja e verde, simultaneamente, após a
ativação (antes de pressionar o botão para alternar os modos).
4.1 Verifique se a peça B2 foi retirada. Informação detalhada na página 15,
passo 28.
4.2 Certifique-se de que o passo 7, indicado na página 21, foi executado
corretamente.
4.3 Volte para a página 23 para repetir a montagem.
3.
3.
3.
3.
3.
3.
3.
3.

36
6. Kann der Igel keine Rückwärtsrolle machen, folgen Sie dann diesen Schritten.
6.1 Stellen Sie sicher, dass Sie Schritt 9 (S. 22) richtig ausgeführt haben.
6.2 Stellen Sie sicher, dass Sie Schritt 4 (S. 19) richtig ausgeführt haben.
6.3 Stellen Sie sicher, dass Sie Schritt 17 und 18 (S. 11 und 12) richtig
ausgeführt haben. Stellen Sie sicher, dass Sie Schritt 25, 26 und 27 (S. 14
und 15) richtig ausgeführt haben.
6. If the Hedgehog cannot do backward roll properly, follow steps below to
complete the assembly process fully.
6.1 Ensure step 9 on page 22 is correctly executed.
6.2 Ensure step 4 on page 19 is correctly executed.
6.3 Ensure steps 17 and 18, shown on page 11 and page 12, are correctly
executed. Ensure steps 25 to 27, shown on page 14 and page 15, are
correctly executed.
6.
Si el erizo no puede efectuar una voltereta hacia atrás, siga los siguientes pasos.
6.1 Asegúrese de haber efectuado el paso 9 (p. 22) de manera correcta.
6.2 Asegúrese de haber efectuado el paso 4 (p. 19) de manera correcta.
6.3 Asegúrese de haber efectuado los pasos 17 y 18 (p. 11 y 12) de manera
correcta. Asegúrese de haber efectuado los pasos 25, 26 y 27 (p. 14 y 15)
de manera correcta.
6. Si le hérisson ne peut pas faire une roulade arrière, suivre les étapes
ci-dessous pour compléter le processus de montage.
6.1 S'assurer que l'étape 9 (page 22) a été effectuée correctement.
6.2 S'assurer que l'étape 4 (page 19) a été effectuée correctement.
6.3 S'assurer que les étapes 17 à 18 (pages 11-12) ont été effectuées
correctement. S'assurer que les étapes 25 à 27 (pages 14-15) ont été
effectuées correctement.
6. Se il riccio non riesce a fare correttamente una capriola indietro, bisogna
seguire i passi indicati sotto per compiere pienamente il processo
dell’assemblaggio.
6.1 Assicurarsi che il passaggio 9 sulla p. 22 è eseguito correttamente.
6.2 Assicurarsi che il passaggio 4 sulla p. 19 è eseguito correttamente.
6.3 Assicurarsi che i passaggi 17 e 18 presentati sulle pagine 11 e 12 sono
eseguiti correttamente. Assicurarsi che i passaggi 25 e 27 presentati sulle
pagine 14 e 15 sono eseguiti correttamente.
6. Als de egel geen correcte rolbewegingen maakt, volg dan de onderstaande
stappen op de montage te voltooien.
6.1 Zorg ervoor dat stap 9(pagina 22) correct is uitgevoerd.
6.2 Zorg ervoor dat stap 4 (pagina 19) correct is uitgevoerd.
6.3 Zorg ervoor dat de stappen 17-18 (zie pagina 11-12) correct zijn
uitgevoerd. Zorg ervoor dat de stappen 25-27 (zie pagina 14-15) correct
zijn uitgevoerd.
6. Jeśli jeżyk nie może prawidłowo wykonać przewrotu do tyłu, należy wykonać
poniższe kroki, aby w pełni ukończyć proces montażu.
6.1 Upewnić się, że wykonano prawidłowo krok 9 na str. 22.
6.2 Upewnić się, że wykonano prawidłowo krok 4 na str. 19.
6.3 Upewnić się, że wykonano prawidłowo kroki 17 i 18 przedstawione na
stronie 11 i 12. Upewnić się, że wykonano prawidłowo kroki od 25 do 27
przedstawione na stronach 14 i 15.
6. Se o Ouriço não conseguir fazer a cambalhota para trás como deve ser, siga
os passos abaixo para concluir o processo de montagem totalmente.
6.1 Certifique-se de que o passo 9, indicado na página 22, foi executado
corretamente.
6.2 Certifique-se de que o passo 4, indicado na página 19, foi executado
corretamente.
6.3 Certifique-se de que os passos 17 e 18, indicados nas páginas 11 e 12,
foram executados corretamente. Certifique-se de que os passos 25 e 27,
indicados nas páginas 14 e 15, foram executados corretamente.
7. Funktioniert der Hebel (Unterseite des Igels) nicht richtig, folgen Sie dann
diesen Schritten. Stellen Sie sicher, dass Sie Schritt 11, 12 und 13 (S. 9 und
10) richtig ausgeführt haben.
7. If the lever underneath the Hedgehog's abdomen does not lift properly,
follow steps below to complete the assombly propess fully. Ensure steps 11
to 13 , shown on page 9 and page 10, are correctly executed.
7. Si la palanca (parte inferior del erizo) no funciona correctamente, siga los
siguientes pasos. Asegúrese de haber efectuado los pasos 11, 12 y 13 (p. 9
y 10) de manera correcta.
7. Si le levier sur le ventre du hérisson ne fonctionne pas correctement, suivre
les étapes ci-dessous pour compléter le processus d'assemblage. S'assurer
que les étapes 11 à 13 (pages 9-10) ont été effectuées correctement.
7. Se la leva che si trova nella parte inferiore del riccio non si alza in modo
corretto, bisogna seguire i passaggi di cui sotto per compiere pienamente il
processo dell’assemblaggio. Assicurarsi che i passaggi da 11 a 13
presentati sulle pagine 9 e 10 sono eseguiti correttamente.
7. Functioneert de hendel aan de onderkant van de egel niet correct, volg dan
de onderstaande stappen om de montage te voltooien. Zorg ervoor dat de
stappen 11-13 (zie pagina 9-10) correct zijn uitgevoerd.
7. Jeżeli dźwignia znajdująca się na spodzie jeżyka nie podnosi się
prawidłowo, należy wykonać poniższe kroki, aby w pełni ukończyć proces
montażu. Upewnić się, że wykonano prawidłowo kroki od 11 do 13
przedstawione na stronach 9 i 10.
7. Se a alavanca por cima da barriga do Ouriço não levantar corretamente,
siga os passos abaixo para concluir devidamente o processo de montagem.
Certifique-se de que os passos 11 e 13, indicados nas páginas 9 e 10,
foram executados corretamente.
8. In den folgenden Fällen sind die Batterien leer. Siehe "Die Batterien
austauschen" (S. 27).
8.1 Der Igel schaltet automatisch aus.
8.2 Der Igel reagiert nicht auf einen Tastendruck.
8.3 Der Igel kehrt automatisch zum Standby-Modus zurück.
8.4 Der Igel kann sich weder zusammenrollen noch ganz ausstrecken.
8. Scenarios below refer to low battery. Please replace batteries according to
battery replacement steps on page 27.
8.1 The Hedgehog powers off automatically.
8.2 No response to the button.
8.3 The Hedgehog returns to “ Standby Mode ” automatically.
8.4 The Hedgehog cannot roll up or stretch out completely as usual.
8. En los siguientes casos, las pilas están agotadas. Consulte el capítulo
"Reemplazar las pilas" (p. 27).
8.1 El erizo se apaga automáticamente.
8.2 El erizo no reacciona después de haber pulsado el botón.
8.3 El erizo vuelve automáticamente al modo de espera (standby).
8.4 El erizo no puede enrollarse sobre sí mismo y no puede extenderse
completamente.
8. Les scénarios ci-dessous peuvent indiquer une pile faible. Pour remplacer
les piles, suivre les étapes à la page 27.
8.1 Le hérisson s'éteint automatiquement.
8.2 Pas de réaction à l'appui sur le bouton.
8.3 Le hérisson revient automatiquement en mode veille.
8.4 Le hérisson ne peut pas se dérouler ou s'enrouler en boule.
8. I problemi di cui sotto si riferiscono a un basso livello delle batterie.
Sostituire le batterie seguendo il procedimento della sostituzione delle
batterie sulla p. 27.
8.1 Il riccio si spegnerà automaticamente.
8.2 Mancata risposta alla pressione del tasto.
8.3 Il riccio ritorna al ‘modo Standby’ automaticamente.
8.4 I
l riccio non riesce ad appallottolarsi o estendersi pienamente come prima.
8. Scenario's bij lege batterijen. Vervang de batterijen (zie pagina 27).
8.1 De egel wordt automatisch uitgeschakeld.
8.2 Geen reactie bij het indrukken van de knop.
8.3 De egel keert automatisch terug naar de stand-bymodus.
8.4 De egel kan zich niet oprollen of ontrollen.
8. Poniższe problemy dotyczą niskiego poziomu baterii. Wymienić baterie
zgodnie z procedurą wymiany baterii na str. 27.
8.1 Jeżyk wyłącza się automatycznie.
8.2 Brak odpowiedzi po naciśnięciu przycisku.
8.3 Jeżyk powraca automatycznie do „trybu gotowości”.
8.4 Jeżyk nie może się zwijać ani całkowicie rozciągać jak dotychczas.
8. Os cenários abaixo referidos podem indicar pilha fraca. Volte a colocar as
pilhas seguindo os passos indicados na página 27.
8.1 O Ouriço desliga-se automaticamente.
8.2 Não responde ao botão.
8.3 O Ouriço volta ao "Modo Standby" automaticamente.
8.4 O Ouriço não consegue enrolar-se ou esticar-se completamente como
costumava fazer.
5.1 Assicurarsi che i passaggi da 6 a 8 presentati sulle pagine da 20 a 22
sono eseguiti correttamente.
5.2 Assicurarsi che il passaggio 7 sulla p. 21 è eseguito correttamente.
5. Als de stekels niet correct functioneren, volg dan de onderstaande stappen
om deze te bevestigen.
5.1 Zorg ervoor dat de stappen 6-8 (pagina 20-22) correct zijn uitgevoerd.
5.2 Zorg ervoor dat stap 7 (pagina 21) correct is uitgevoerd.
5. Jeśli kolce nie działają prawidłowo, należy wykonać poniższe kroki, aby
naprawić usterkę.
5.1 Upewnić się, że wykonano prawidłowo kroki od 6 do 8 przedstawione na
stronach od 20 do 22.
5.2 Upewnić się, że wykonano prawidłowo krok 7 na str. 21.
5. Se os espinhos não funcionam corretamente, siga os passos abaixo para
reparar a situação.
5.1 Certifique-se de que os passos 6 e 8, indicados nas páginas 20 a 22,
foram executados corretamente.
5.2 Certifique-se de que o passo 7, indicado na página 21, foi executado
corretamente.

KSR21
37

38

39

40

41

42

44

45

46

47

48


● Das Herausnehmen oder Austauschen der Batterien sollte nur von einer erwachsenen Person oder unter Aufsicht einer erwachsenen
Person durchgeführt werden.
● Vermeiden Sie einen Kurzschluss der Kontaktpunkte des Batteriefachs oder der Batterien.
● Entfernen Sie leere Batterien.
● Mischen Sie keine alten und neuen Batterien oder Batterien unterschiedlicher Typen.
● Mischen Sie weder Alkali-Mangan, Standard (Karbon-Zink), noch wiederaufladbare (Nickel-Cadmium) Batterien.
● Legen Sie die Batterien immer polungsrichtig ein.
● Versuchen Sie niemals, nichtaufladbare Batterien wieder aufzuladen.
● Das Aufladen von wiederaufladbaren Batterien sollte nur unter der Aufsicht einer erwachsenen Person durchgeführt werden.
● Zum Wiederaufladen der Batterien, diese aus dem Gerät nehmen.
● Removal and replacement of batteries should be carried out by adult or under adult supervision.
● Avoid short circuiting the contacts in the battery compartment or the battery terminals.
● Remove exhausted batteries from the product to avoid leakage.
● Do not mix used batteries and new batteries or batteries of different types.
● Do not mix alkaline, standard (carbon-zinc), or rechargeable (nickel-cadmium) batteries.
● Batteries are to be inserted with the correct polarity.
● Do not attempt to recharge non-rechargeable batteries.
● Rechargeable batteries are only to be charged under adult supervision.
● Rechargeable batteries are to be removed from the toy before being charged.
● Las pilas sólo deben ser quitadas o reemplazadas por un adulto o bajo su supervisión.
● Evite los cortocircuites en los contactos del compartimiento de pilas o las pilas.
● Saque las pilas agotadas para evitar derrames.
● Nunca mezcle pilas agotadas y pilas nuevas o pilas de diferentes tipos.
● No mezcle pilas alcalinas, estándar (carbón-zinc) o baterías recargables (níquel-cadmio).
● Introduzca las pilas correctamente. Compruebe siempre la polaridad.
● Nunca intente recargar pilas que no sean recargables.
● La recarga de las baterías recargables sólo debe hacerse bajo la supervisión de un adulto.
● Quite las baterías recargables del producto antes de recargarlas.
● L'enlèvement et le remplacement des piles doivent être effectués par un adulte ou sous sa surveillance.
● Eviter de court-circuiter les contacts du compartiment à piles ou les bornes des piles.
● Oter les piles usagées du produit.
● Ne pas utiliser simultanément des piles neuves et des piles usagées, de même que des piles différentes.
● Ne pas mélanger les piles alcalines, standard (carbone-zinc) et rechargeables (nickel-cadmium).
● Les piles doivent être insérées en respectant la polarité.
● Ne jamais recharger des piles non rechargeables.
● Le chargement des piles rechargeables doit être effectué sous la surveillance d'un adulte.
● Les piles rechargeables doivent être enlevées du produit avant le rechargement.
● La rimozione e la sostituzione delle batterie deve essere eseguita da un adulto o sotto la supervisione di un adulto.
● Evitare di cortocircuitare i contatti nel vano batterie o i terminali delle batterie.
● Rimuovere le batterie esaurite dal prodotto per evitare perdite.
● Non mescolare batterie usate e batterie nuove o batterie di tipi diversi.
● Non mescolare batterie alcaline, standard (zinco-carbonio) o ricaricabili (nichel-cadmio).
● Le batterie devono essere inserite secondo la polarità corretta.
● Non provare a ricaricare batterie non ricaricabili.
● Le batterie ricaricabili devono essere ricaricate solo sotto la supervisione di un adulto.
● Le batterie ricaricabili devono essere rimosse dal giocattolo prima di essere ricaricate.
● Het verwijderen en vervangen van batterijen dient door of onder toezicht van een volwassene te worden uitgevoerd.
● Vermijd kortsluiting bij de contactpunten in het batterijvak of van de batterij.
● Verwijder lege batterijen uit het product.
● Gebruik geen oude (lege) en nieuwe of batterijen door elkaar.
● Gebruik geen alkalische, standaard (carbon-zink) of oplaadbare (nikkel-cadmium) batterij door elkaar.
● De batterijen dienen volgens de juiste polariteit geplaatst te worden.
● Herlaad geen niet-oplaadbare batterijen.
● Oplaadbare batterijen mogen alleen onder toezicht van een volwassene opgeladen worden.
● Oplaadbare batterijen moeten voor het opladen uit het speelgoed verwijderd worden.
● Wyjmowanie i wymiana baterii powinny być dokonywane przez osobę dorosłą lub pod jej nadzorem.
● Unikać zwierania styków w gnieździe baterii lub końcówek baterii.
● Zużyte baterie należy wyjąć z produktu, aby nie dopuścić do wycieku.
● Nie stosować jednocześnie zużytych i nowych baterii, ani baterii różnych typów.
● Nie należy łączyć baterii alkalicznych ze standardowymi (węglowo-cynkowymi) ani z bateriami doładowywanymi (niklowo-kadmowymi).
● Podczas montażu baterii należy zwrócić uwagę na biegunowość.
● Nie ładować baterii, które nie są akumulatorami.
● Akumulatory powinny być ładowane wyłącznie pod nadzorem dorosłych.
● Przed rozpoczęciem ładowania akumulatory należy wyjąć z zabawki.
● O retirar e substituir das pilhas deve ser sempre feito por um adulto ou sob a supervisão de um adulto.
● Evite curto-circuitos nos contatos no compartimento da pilha ou nos terminais das pilha.
● Retire as pilhas gastas do aparelho para evitar que derramem.
● Não misture pilhas gastas com pilhas novas, ou pilhas de diferentes tipos.
● Não misture pilhas alcalinas, padrão (carbono-zinco) com pilhas recarregáveis (níquel-cádmio).
● As pilhas devem ser instaladas respeitando sempre a polaridade.
● Não tente recarregar pilhas que não sejam recarregáveis.
● As pilhas recarregáveis só devem ser carregadas sob a supervisão de um adulto.
● As pilhas recarregáveis devem ser retiradas do brinquedo antes de serem carregadas.

KSR21I
Copyright © 2019 CIC. Alle Rechte vorbehalten
Copyright © 2019 CIC. All rights reserved
Copyright © 2019 CIC. Todos los derechos reservados
Droits d'auteur © 2019 CIC. Tous droits réservés
Copyright © 2019 CIC. Tutti i diritti riservati
Auteursrecht © 2019 CIC. Alle rechten voorbehouden
Copyright © 2019 CIC. Wszystkie prawa zastrzeżone
Copyright © 2019 CIC. Todos os direitos reservados.
DE ROBOTERIGEL REAGIERT AUF GERÄUSCHE
EN ROBOTIC HEDGEHOG SOUND DETECTING ROBOT
ES ERIZO ROBÓTICO ROBOT QUE REACCIONA AL SONIDO
FR ROBOT HÉRISSON ROBOT CONTRÔLÉ PAR LE SON
IT ROBOT RICCIO ROBOT CHE RIVELA IL SUONO
NL ROBOT-EGEL GELUIDGESTUURDE ROBOT
PL ROBOTYCZNY JEŻ ROBOT WYKRYWAJĄCY DŹWIĘK
PT OURIÇO-ROBOT ROBOT DETECTOR DE SOM
KSR21
ACHTUNG:
ERSTICKUNGSGEFAHR
Nicht für Kinder unter
3 Jahren geeignet
Kleinteile
WARNING :
CHOKING HAZARD
Not for children under
3 years
Small parts
ADVERTENCIA:
RIESGO DE ASFIXIA
No apto para niños
menores de 3 años
Pequeñas piezas
AVERTISSEMENT :
RISQUE D'ÉTOUFFEMENT
Ne convient pas aux
enfants de moins de 3 ans
Partie arrière
AVVERTENZA:
PERICOLO DI SOFFOCAMENTO
Non adatto a bambini di
età inferiore a 3 anni
Parti piccole
WAARSCHUWING:
VERSTIKKINGSGEVAAR
Niet geschikt voor kinderen
jonger dan 3 jaar
Kleine onderdelen
OSTRZEŻENIE:
NIEBEZPIECZEŃSTWO ZADŁAWIENIA
Nie nadaje się dla dzieci
w wieku poniżej 3 lat.
Małe części
ATENÇÃO:
RISCO DE ASFIXIA
Não é indicado para crianças
com menos de 3 anos
Peças pequenas
-
 1
1
-
 2
2
-
 3
3
-
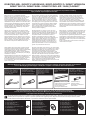 4
4
-
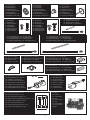 5
5
-
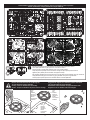 6
6
-
 7
7
-
 8
8
-
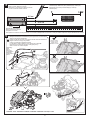 9
9
-
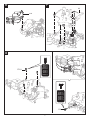 10
10
-
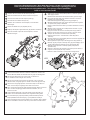 11
11
-
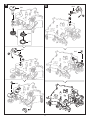 12
12
-
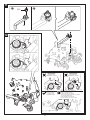 13
13
-
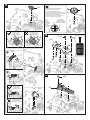 14
14
-
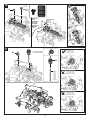 15
15
-
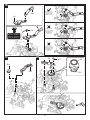 16
16
-
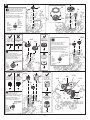 17
17
-
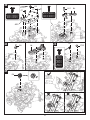 18
18
-
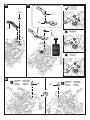 19
19
-
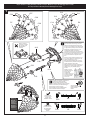 20
20
-
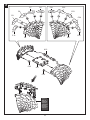 21
21
-
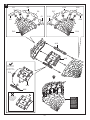 22
22
-
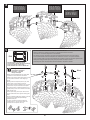 23
23
-
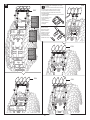 24
24
-
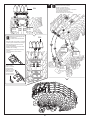 25
25
-
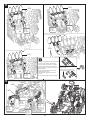 26
26
-
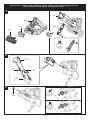 27
27
-
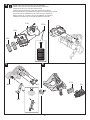 28
28
-
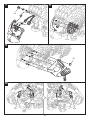 29
29
-
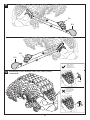 30
30
-
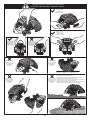 31
31
-
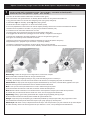 32
32
-
 33
33
-
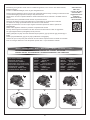 34
34
-
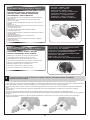 35
35
-
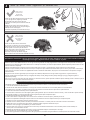 36
36
-
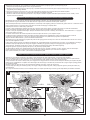 37
37
-
 38
38
-
 39
39
-
 40
40
-
 41
41
-
 42
42
-
 43
43
-
 44
44
-
 45
45
-
 46
46
-
 47
47
-
 48
48
-
 49
49
-
 50
50
-
 51
51
-
 52
52
-
 53
53
-
 54
54
-
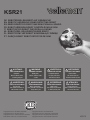 55
55


en otros idiomas
- français: Velleman KSR21 Manuel utilisateur
- italiano: Velleman KSR21 Manuale utente
- Deutsch: Velleman KSR21 Benutzerhandbuch
- Nederlands: Velleman KSR21 Handleiding
- português: Velleman KSR21 Manual do usuário
- polski: Velleman KSR21 Instrukcja obsługi