ELDOM ID5901 IDEAL Manual de usuario
- Categoría
- Aspiradoras
- Tipo
- Manual de usuario

1

2
2
1
3
4
5

3
WSKAZÓWKI BEZPIECZEŃSTWA
Przed pierwszym użyciem należy uważnie zapoznać
się z całością treści niniejszej instrukcji.
Zachowaj wszystkie ostrzeżenia i wskazówki dotyczące
bezpieczeństwa, aby móc skorzystać z nich w przyszłości.
1. Przewód przyłączeniowy należy podłączyć do sieci
elektrycznej o parametrach zgodnych z podanymi
na tabliczce znamionowej.
2. Należy zwrócić uwagę na to, by do jednego obiegu prądu nie
włączać za dużo odbiorników.
3. Kabel zasilający należy trzymać z dala od rozgrzanych powierzchni.
4. Sprzęt tylko do użytku domowego, przy eksploatacji
przemysłowej, niezgodnej z przeznaczeniem lub wbrew
niniejszej instrukcji sprzedawca nie ponosi żadnej
odpowiedzialności, a uprawnienia z tytułu gwarancji wygasają.
5. Niniejszy sprzęt może być użytkowany przez dzieci w wieku
co najmniej 8 lat i przez osoby o obniżonych możliwościach
fizycznych, umysłowych i osoby o braku doświadczenia
i znajomości sprzętu, jeżeli zapewniony zostanie nadzór lub
instruktaż odnośnie do użytkowania sprzętu w bezpieczny
sposób, tak aby związane z tym zagrożenia były zrozumiałe.
Dzieci nie powinny bawić się sprzętem. Dzieci bez nadzoru
nie powinny wykonywać czyszczenia i konserwacji sprzętu.
6. Nie używać na wolnym powietrzu.
7. Nie odkurzać odkurzaczem ludzi ani zwierząt, a w szczególności
nie przybliżać końcówek ssących do oczu i uszu.
8. Nie wolno używać odkurzacza do odkurzania mokrej
powierzchni dywanów np. Po praniu szamponami piorącymi.
Należy odczekać do pełnego wyschnięcia piany i wysuszenia
odkurzanej powierzchni.
9. Przenosić odkurzacz korzystając z uchwytu (nie należy ciągnąć za wąż).
10. Odkurzaczem nie wolno zbierać gorącego popiołu, niedopałków
papierosów i zapałek, ostrych przedmiotów (odłamków szkła), gipsu,
cementu, pyłu kamiennego i mąki itp., gruzu, wody i innych cieczy.
11. Nie chwytać urządzenia mokrymi rękami.

4
12. Nie zanurzać urządzenia w wodzie lub innych cieczach.
13. Odkurzacz należy chronić przed wilgocią, nie należy też
stawiać na nim naczyń z płynem.
14. Nigdy nie pozostawiać włączonego odkurzacza bez nadzoru.
15. Aby wyłączyć urządzenie z sieci nigdy nie ciągnąć za przewód,
zawsze używać wtyczki.
16. Wyłączyć urządzenie z sieci, jeśli nie jest już ono używane oraz
przed jego czyszczeniem.
17. Przed włączeniem urządzenia należy się upewnić czy
wszystkie jego elementy są odpowiednio zamontowane.
W żadnym wypadku nie włączać urządzenia przed złożeniem.
18. Nie stawać na wężu ssącym, ani nie stawiać na wężu ssącym
ciężkich przedmiotów.
19. Nie blokować otworu wlotowego.
20. Używać tylko z oryginalnie dołączonymi akcesoriami.
21. Przed każdym czyszczeniem i opróżnianiem pojemnika
odłączyć urządzenie od sieci.
22. Nie używać w przypadku uszkodzenia przewodu zasilającego
lub gdy urządzenie zostało uszkodzone w inny sposób.
Naprawę urządzenia należy powierzyć autoryzowanemu
serwisowi; informacja o sposobie serwisowania zawarta jest
w sekcji „Gwarancja” oraz na stronie www.eldom.eu
23. Napraw sprzętu może dokonać jedynie autoryzowany punkt
serwisowy. Wszelkie modernizacje lub stosowanie innych niż
oryginalne części zamiennych lub elementów urządzenia jest
zabronione i zagraża bezpieczeństwu użytkowania.
24. Firma Eldom Sp. z o. o. nie ponosi odpowiedzialności
za ewentualne szkody powstałe w wyniku niewłaściwego
używania urządzenia.
OSTRZEŻENIE: Niewłaściwe użytkowanie urządzenia może
spowodować obrażenia ciała.
UWAGA: Woreczek foliowy może stanowić niebezpieczeństwo
– aby uniknąć uduszenia workiem należy przechowywać
go z daleka od niemowląt i małych dzieci.

5
GWARANCJA
Producent zapewnia dobrą jakość i dobre działanie sprzętu, którego dotyczy niniejsza gwarancja w okresie 24
miesięcy od daty sprzedaży zapisanej w dowodzie zakupu.
W przypadku wystąpienia wady lub ujawnienia uszkodzenia sprzętu w okresie gwarancji, sprzęt będzie
naprawiony bezpłatnie na terenie RP w terminie 14 dni roboczych od daty dostarczenia niesprawnego urządzenia
do sprzedawcy wraz z dowodem zakupu.
Przesyłka na adres sprzedawcy (wskazany w dokumencie zakupu) powinna być należycie zabezpieczona (zaleca
się użycie oryginalnego opakowania). Przed wysłaniem urządzenia należy skontaktować się ze sprzedawcą.
Termin naprawy urządzenia, w przypadku dostarczenia go na adres sprzedawcy wysyłką pocztową lub za innym
pośrednictwem ulegnie przedłużeniu o czas niezbędny do dostarczenia i odbioru sprzętu.
Gwarancją nie są objęte uszkodzenia powstałe w wyniku niewłaściwego lub niezgodnego z instrukcją jego
użytkowania, przechowywania, konserwacji, samowolnego zrywania plomb, wszelkich uszkodzeń
mechanicznych oraz na skutek naturalnego, częściowego lub całkowitego zużycia zgodnie z właściwościami
lub przeznaczeniem towaru.
Gwarancja nie obejmuje żarówek, baterii i akumulatorów.
Gwarancja nie wyłącza, nie ogranicza ani nie zawiesza uprawnień kupującego wynikających z przepisów Ustawy
z dnia 30.05.2014r. o prawach konsumenta oraz innych powszechnie obowiązujących przepisów prawa
regulujących sprzedaż i odpowiedzialność producenta/sprzedawcy za towar.
Sprzęt przeznaczony jest wyłącznie dla konsumenta do prywatnego użytku w gospodarstwie domowym,
w przypadku innego użytkowania traci gwarancję.
Eldom sp. z o. o, tel: 32 253 04 13, e-mail: serwis@edom.eu

6
INSTRUKCJA OBSŁUGI
ODKURZACZ ID5901
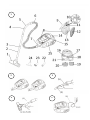
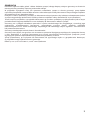
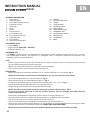
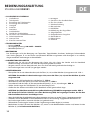
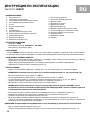
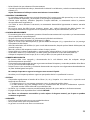
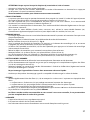
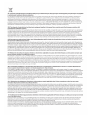
• OPIS OGÓLNY
1. Szczotka duża
2. Rura teleskopowa
3. Regulacja rury teleskopowej
4. Regulacja przepływu powietrza
5. Rączka
6. Wąż
7. Gniazdo
8. Pojemnik na kurz
9. Pokrywa pojemnika
10. Blokada pokrywy pojemnika na kurz
11. Element zabezpieczający
12. Filtr wewnętrzny
13. Miejsce na filtr zewnętrzny
• DANE TECHNICZE
- moc: 700 W
- napięcie zasilania: 220-240V~ 50-60Hz
- pojemność zbiornika na kurz: 1,5 l
• PRZEZNACZENIE
Odkurzacz ID5901 przeznaczony jest do czyszczenia z kurzu dywanów, wykładzin dywanowych, firanek, zasłon,
mebli tapicerowanych. Wyposażony jest w przeźroczysty pojemnik, dzięki czemu łatwo kontrolować ilość
nagromadzonego w nim kurzu.
• PRZYGOTOWANIE URZĄDZENIA
- Przed przystąpieniem do użytkowania urządzenia należy się upewnić czy urządzenie, wtyczka i przewód
zasilający są sprawne i czy usunięto wszystkie części opakowania.
- Przed użyciem należy sprawdzić czy urządzenie jest kompletne i nie jest uszkodzone.
- Odkurzacz można przenosić używając uchwytu (14).
• OBSŁUGA
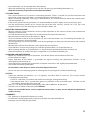
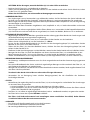
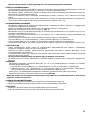
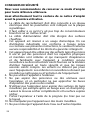
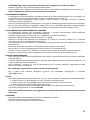
- Przed rozpoczęciem pracy należy sprawdzić czy filtry (12, 19) oraz pojemnik (8) są zamontowane – rys. 1.
UWAGA. Nie wolno korzystać z odkurzacza bez założonych filtrów (12, 19) oraz pojemnika (8).
- Włożyć końcówkę węża (6) w gniazdo (7) – rys 2.
- Następnie końcówkę (5) połączyć z rurą teleskopową (2) - rys. 3.
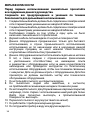
- Na drugim końcu rury (2) zamontować odpowiednią końcówkę (1, 22, 23, 24) – rys. 4.
- Wyregulować długość rury teleskopowej (2) za pomocą przycisku (3).
- Chwycić za wtyczkę i wyciągnąć przewód zasilający na żądaną długość.
UWAGA. Przewód można wyciągnąć maksymalnie do żółtego znacznika (YELLOW) – rys. 5.
W żadnym przypadku nie wyciągać przewodu do czerwonego znacznika (RED), ponieważ można
w ten sposób uszkodzić mechanizm zwijacza przewodu.
- Jeżeli przewód zostanie wyciągnięty poza żółty znacznik (YELLOW), należy go zwinąć przy pomocy
przycisku (17).
- Włączyć przewód zasilający do gniazdka o parametrach zgodnych z podanymi w instrukcji.
- Odkurzacz rozpoczyna pracę po wciśnięciu włącznika (16).
- W trakcie odkurzania można zmieniać siłę ssania regulatorem (4).
- Należy obserwować stan zapełnienia pojemnika (8), jeżeli został osiągnięty poziom 2/3 wysokości pojemnika,
pojemnik (8) należy opróżnić (patrz OPRÓŻNIANIE POJEMNIKA).
UWAGA. Nie wolno odkurzać, jeśli osiągnięty został poziom 2/3 wysokości pojemnika (8).
14. Uchwyt
15. Blokada pojemnika na kurz
16. Włącznik
17. Zwijacz przewodu
18. Gniazdo na szczotkę
19. Filtr wylotowy
20. Pokrywa filtra wylotowego
21. Miejsce na filtr wylotowy
22. Ssawka dwufunkcyjna
23. Ssawka okrągła
24. Szczotka mała
25. Korpus
PL

7
- Aby zakończyć pracę urządzenia należy wcisnąć przycisk (16).
- Po zakończeniu pracy przewód odłączyć od sieci i zwinąć, dociskając i przytrzymując przycisk (17).
Należy mocno trzymać przewód, aby zapobiec jego niekontrolowanym ruchom.
• PORADY I WSKAZÓWKI
- Odkurzacz można przechowywać w pozycji poziomej. Z tylu urządzenia znajduje się uchwyt (18)
umożliwiający zaparkowanie rury ssącej, a na szczotce (1) znajduje się odpowiedni zaczep.
- W przypadku odkurzania obić, małych dywaników lub delikatnych tkanin zaleca się zmniejszenie siły ssącej
regulatorem (4).
- W przypadku zacięcia przewodu podczas zwijania, zaleca się nieznaczne rozwinięcie go i ponowną próbę
zwinięcia.
- Do odkurzania trudno dostępnych miejsc (narożników, szczelin itp.) należy używać dwufunkcyjnej końcówki
(16). Końcówka ta wyposażona jest także w szczotkę umożliwiającą usuwanie kurzu z mebli, książek itp.
• OPRÓŻNIANIE POJEMNIKA
Regularne opróżnianie pojemników zapewnia prawidłową pracę odkurzacza oraz utrzymanie optymalnej
siły ssącej.
- Wyłączyć urządzenie przyciskiem (16) i odłączyć przewód od sieci.
- końcówkę węża (6) wyjąć z gniazda (7) – rys. 2.
- Chwycić za uchwyt w pokrywie pojemnika (9), wcisnąć przycisk blokady (15) i trzymając za uchwyt (14) wyjąć
pojemnik (8) z korpusu.
- Nad koszem wyciągnąć z pojemnika filtr (12), a następnie nacisnąć przycisk blokady (10) i ściągnąć
pokrywę (9).
- Z pojemnika usunąć śmieci, a następnie założyć pokrywę i zamknąć.
- Filtr (12) należy oczyścić nad koszem, a następnie umieścić w pojemniku (8) w miejscu na filtr (13).
- Podczas zakładania filtra (12), element (11) powinien być wciśnięty w pokrywę pojemnika (9).
- Pojemnik (8) z założoną pokrywą (9) i zamontowanym filtrem (12) umieścić w korpusie (25).
• CZYSZCZENIE I KONSERWACJA
- Przed wszelkimi czynnościami obsługowymi albo naprawczymi należy wyłączyć urządzenie i odłączyć
je od zasilania.
- Prawidłową pracę urządzenia gwarantuje regularne czyszczenie i wymiana filtrów (12, 19) oraz opróżnianie
pojemnika (8).
- Obudowę, elementy wyposażenia i przewód zasilający należy czyścić miękką, lekko zwilżoną szmatką
z odrobiną środka do mycia naczyń.
Nie wolno zanurzać urządzenia w wodzie innej płynnej substancji.
- Do mycia nie używać żadnych ostrych środków czyszczących mogących spowodować uszkodzenie
powierzchni obudowy.
• FILTRY
- Należy regularnie sprawdzać stan filtrów (12, 19) i w razie konieczności je wyczyścić. Odkurzacz wyposażony
jest w dwa filtry:
§ filtr wewnętrzny – wlotowy (12) chroni m.in. silnik przed uszkodzeniami.
§ filtr zewnętrzny (19), to ochrona przed zanieczyszczeniem powietrza w odkurzanych pomieszczeniach.
Dostęp do filtra możliwy jest po otwarciu pokrywy filtra (20).
- Filtry (12, 19) należy okresowo wymieniać (po około 100 godzinach pracy).
- Zestaw filtrów jest dostępny pod symbolem IDF5901.
Filtry są elementami eksploatacyjnymi i ulegają naturalnemu zużyciu, dlatego nie podlegają
wymianie w ramach gwarancji.

8
SAFETY INSTRUCTIONS
Before first use, please thoroughly read the entire manual.
It is recommended to keep this instructions manual
for future reference.
1. The connection cable must be connected to an electrical
network with the parameters as indicated on the rating plate.
2. Care must be taken to ensure that too many consumers are
not switched on to a single circuit.
3. Keep the power cable away from heated surfaces.
4. This equipment is for domestic use only, in the event
of industrial operation, not in accordance with the intended
use or contrary to these instructions, the vendor assumes
no responsibility and warranty entitlements lapse.
5. This equipment may be used by children of at least 8 years of
age and by people with reduced physical and mental
capabilities and lack of experience and familiarity with the
equipment, if supervision or instruction is provided on how
to use the equipment safely so that the associated risks are
understood. Children should not play with the equipment.
Unsupervised children should not carry out cleaning
or maintenance of the equipment.
6. Do not use outdoors.
7. Do not vacuum people or animals with the hoover,
and in particular do not bring the suction nozzles close to
eyes or ears.
8. Do not use the hoover to vacuum wet carpet surfaces
e.g. after washing with laundry shampoos. Allow the foam to
fully dry and the vacuumed surface to dry.
9. Carry the hoover using the handle (do not pull on the hose).

9
10. Do not use the hoover to pick up hot ash, cigarette butts and
matches, sharp objects (glass shards), plaster, cement, stone
dust and flour etc., debris, water and other liquids.
11. Do not handle the appliance with wet hands.
12. Do not immerse the appliance in water or other liquids.
13. Protect the hoover from moisture and do not place vessels
with liquids on it.
14. Never leave the hoover switched on unattended.
15. To disconnect the appliance from the mains never pull on the
cord, always use the plug.
16. Unplug the appliance from the mains when it is no longer
in use and before cleaning it.
17. Before switching on the appliance, make sure that all its
components are properly assembled. Never switch on the
appliance before it is assembled.
18. Do not stand on the suction hose or place heavy objects
on the suction hose.
19. Do not block the inlet opening.
20. Only use with the originally supplied accessories.
21. Unplug the appliance from the mains before every cleaning
and emptying of the container.
22. Do not use if the power cord is damaged or if the appliance
is damaged in any other way. Have your appliance repaired
by an authorised service centre.
23. Repairs to the equipment may only be carried out by an
authorised service centre. Any upgrading or use of other than
original spare parts or components of the appliance
is forbidden and endangers the safety of use.
24. Eldom Sp. z o. o. company shall not be held liable for any
damage resulting from improper use of the appliance.
WARNING: Improper use of the appliance may cause injury.
WARNING: Plastic bag can be dangerous, to avoid danger
of suffocation keep this bag away from babies and children.

10
INSTRUCTION MANUAL
VACUUM CLEANER
ID5901
• GENERAL DESCRIPTION
1. Large brush
2. Telescopic tube
3. Telescopic tube adjustment
4. Adjusting air flow
5. Hand grip
6. Hose
7. Socket
8. Dust container
9. Dust container lid
10. Dust container lid lock
11. Safety element
12. Internal filter
13. Space for external filter
• TECHNICAL DATA
- power: 700 W
- supply voltage: 220-240V~ 50-60Hz
- container capacity: 1,5 l
• INTENDED USE
The ID5901 vacuum cleaner is intended to clean dust from carpets, padded carpets, sheer curtains, curtains,
and upholstered furniture. The appliance is equipped with a transparent container that enables easy
monitoring of the accumulated dust.
• USE
- Before using the device, make sure that the device, plug and power cord are in working order and that
all parts of the packaging have been removed.
- Before use, check that the device is complete and not damaged.
- The vacuum cleaner can be carried using the handle (14).
• OPERATION
- Before starting work, check that the filters (12, 19) and the container (8) are installed - fig. 1.
NOTE. Do not use the vacuum cleaner without filters (12, 19) and container (8) installed.
- Insert the end of the hose (6) into the socket (7) - fig. 2.
- Then connect the tip (5) to the telescopic tube (2) - fig. 3.
- On the other end of the pipe (2), install the corresponding tip (1, 22, 23, 24) - fig. 4.
- Adjust the length of the telescopic tube (2) with the button (3).
- Grab the plug and pull the power cord to the desired length.
NOTE. The cable can be pulled out to the maximum up to the yellow marker - fig. 5.
In no case pull the cable out to the red marker, because you can damage the cable retractor
mechanism in this way.
- If the cable is pulled beyond the yellow marker, retract it using the button (17).
- Plug the power cord into an outlet with the parameters as specified in the instructions.
- The vacuum cleaner starts working after pressing the switch (16).
- During vacuuming, you can change the suction power with the regulator (4).
- Observe the state of filling of the container (8), if the level of 2/3 of the height of the container has been
reached, the container (8) should be emptied (see EMPTYING THE CONTAINER).
NOTE. Do not vacuum if the level of 2/3 of the height of the container (8) has been reached.
14. Handle
15. Dust container lock
16. Switch
17. Cord retractor
18. Socket for brush
19. Exhaust filter
20. Exhaust filter cover
21. Outlet filter slot
22. Dual-function nozzle
23. Round brush
24. Small brush
25. Body
EN

11
- Press the button (16) to stop operation of the device,
- When finished working, unplug the cord and coil it by pressing and holding the button (17).
Hold the cord firmly to prevent uncontrolled movement.
• TIPS AND TRICKS
- The vacuum cleaner can be stored in a horizontal position. There is a handle (18) on the back of the unit
to park the suction tube, and there is a corresponding clip on the brush (1).
- When vacuuming upholstery, small rugs or delicate fabrics, it is recommended to reduce the suction power
with the regulator (4).
- If the cord is jammed during retraction, it is recommended to unroll it slightly and try to retract it again
- Use the dual-function nozzle (16) to vacuum hard-to-reach areas (corners, crevices, etc.). This tip is also
equipped with a brush for removing dust from furniture, books, etc.
• EMPTYING THE CONTAINER
- Regular emptying of the containers ensures proper operation of the vacuum cleaner and maintenance
of optimal suction power.
- Turn off the device with the button (16) and disconnect the cord from the mains.
- Remove the hose end (6) from the socket (7) - fig. 2.
- Grasp the handle in the lid of the container (9), press the lock button (15) and, holding the handle (14),
remove the container (8) from the body.
- Over the garbage can, pull out the filter (12) from the garbage can, then press the lock button (10) and pull
off the lid (9).
- Remove the trash from the container, then replace the lid and close it.
- Clean the filter (12) over the garbage can, and then place the filter (13) in the container (8).
- When inserting the filter (12), the element (11) should be pressed into the lid of the container (9).
- Place the container (8) with the lid (9) on and the filter (12) installed in the body (25).
• CLEANING AND MAINTENANCE
- Before any maintenance or repair operations, turn off the device and disconnect it from the
- it from the power supply.
- Proper operation of the device is guaranteed by regular cleaning and replacement of filters (12,19)
and emptying the container (8).
- Clean the housing, equipment components and power cord with a soft, slightly dampened cloth
- with a little dishwashing detergent.
Do not immerse the device in water of another liquid substance.
- Do not use any harsh cleaning agents for cleaning that may damage the surface of the housing.
• FILTERS
- Check the condition of the filters (12, 19) regularly and clean them if necessary. The vacuum cleaner
is equipped with two filters:
§ internal - inlet filter (12) protects the motor from damage, among other things.
§ the external filter (19), is a protection against air pollution in the vacuumed rooms. The filter can be
accessed by opening the filter cover (20).
- Filters (12, 19) should be replaced periodically (after about 100 hours of operation).
- The filter set is available under the symbol IDF5901.
Filters are consumable items and are subject to natural wear, so they are not subject to replacement
under warranty.
• WARRANTY
- This appliance is designed for domestic use only.
- It cannot be used for professional purposes or for other than the intended use.
- Improper use will nullify the guarantee.

12
SICHERHEITSANWEISUNGEN
Bitte lesen Sie vor dem ersten Gebrauch sorgfältig
den gesamten Inhalt dieses Handbuchs sorgfältig durch.
Bewahren Sie alle Warn und Sicherheitshinweise
zum späteren Nachschlagen auf.
1. Das Anschlusskabel muss an ein Stromnetz mit den auf dem
Typenschild angegebenen Parametern angeschlossen werden.
2. Es ist darauf zu achten, dass nicht zu viele Verbraucher auf
einen Stromkreis aufgeschaltet werden.
3. Halten Sie das Netzkabel von erhitzten Oberflächen fern.
4. Dieses Gerät ist nur für den Hausgebrauch bestimmt. Bei
gewerblicher Nutzung, nicht bestimmungsgemäßem Gebrauch
oder bei Zuwiderhandlung gegen diese Anleitung übernimmt der
Verkäufer keine Verantwortung und die Garantieansprüche verfallen.
5. Dieses Gerät kann von Kindern im Alter von mindestens 8 Jahren und
von Personen mit eingeschränkten körperlichen und geistigen
Fähigkeiten sowie mangelnder Erfahrung und Vertrautheit mit dem
Gerät benutzt werden, wenn eine Beaufsichtigung oder eine
Einweisung in die sichere Benutzung des Geräts erfolgt, so dass die
damit verbundenen Risiken verstanden werden. Kinder sollten nicht
mit dem Gerät spielen. Unbeaufsichtigte Kinder sollten keine
Reinigungs- oder Wartungsarbeiten an den Geräten durchführen.
6. Verwenden Sie das Gerät nicht im Freien.
7. Saugen Sie keine Menschen oder Tiere mit dem Staubsauger
ab, und bringen Sie insbesondere die Saugdüsen nicht in die
Nähe von Augen oder Ohren.
8. Verwenden Sie den Staubsauger nicht zum Saugen nasser
Teppichoberflächen, z. B. nach dem Waschen mit
Wäscheshampoos. Lassen Sie den Schaum vollständig
trocknen und die gesaugte Fläche trocknen.
9. Tragen Sie den Staubsauger am Griff (ziehen Sie nicht am Schlauch).
10. Nehmen Sie mit dem Staubsauger keine heiße Asche,
Zigarettenstummel und Streichhölzer, scharfe Gegenstände
(Glasscherben), Gips, Zement, Steinstaub und Mehl usw.,
Schutt, Wasser und andere Flüssigkeiten auf.

13
11. Fassen Sie das Gerät nicht mit nassen Händen an.
12. Tauchen Sie das Gerät nicht in Wasser oder andere Flüssigkeiten ein.
13. Schützen Sie den Staubsauger vor Feuchtigkeit und stellen
Sie keine Gefäße mit Flüssigkeiten auf ihn.
14. Lassen Sie den Staubsauger niemals unbeaufsichtigt eingeschaltet.
15. Um das Gerät vom Netz zu trennen, ziehen Sie niemals am
Kabel, sondern immer am Stecker.
16. Ziehen Sie den Netzstecker, wenn das Gerät nicht mehr
benutzt wird und bevor Sie es reinigen.
17. Vergewissern Sie sich vor dem Einschalten des Geräts, dass
alle Teile richtig zusammengebaut sind. Schalten Sie das
Gerät niemals ein, bevor es zusammengebaut ist.
18. Stellen Sie sich nicht auf den Saugschlauch und legen Sie
keine schweren Gegenstände auf den Saugschlauch.
19. Die Ansaugöffnung darf nicht blockiert werden.
20. Verwenden Sie das Gerät nur mit dem ursprünglich
gelieferten Zubehör.
21. Trennen Sie das Gerät vor jeder Reinigung und Entleerung
des Behälters vom Stromnetz.
22. Benutzen Sie das Gerät nicht, wenn das Netzkabel beschädigt
ist oder wenn das Gerät anderweitig beschädigt ist. Lassen
Sie Ihr Gerät von einer autorisierten Kundendienststelle
reparieren.
23. Reparaturen am Gerät dürfen nur von einer autorisierten
Kundendienststelle durchgeführt werden. Jegliche
Nachrüstung oder Verwendung von nicht originalen
Ersatzteilen oder Komponenten des Geräts ist verboten und
gefährdet die Sicherheit des Gebrauchs.
24. Die Firma Eldom Sp. z o. o. haftet nicht für Schäden, die durch
unsachgemäßen Gebrauch des Geräts entstehen.
WARNUNG: Die unsachgemäße Verwendung des Geräts kann zu
Verletzungen führen.
VORSICHT! Plastiktüten können gefährlich sein!
Erstickungsgefahr! Bewahren Sie die Tüte sicher vor Kindern auf!

14
BEDIENUNGSANLEITUNG
STAUBSAUGER ID5901
• ALLGEMEINE BESCHREIBUNG
1. Große Bürste
2. Teleskoprohr
3. Einstellung des Teleskoprohrs
4. Einstellung des Luftstroms
5. Handgriff
6. Schlauch
7. Steckdose
8. Staubbehälter
9. Deckel des Staubbehälters
10. Verschluss des Staubbehälterdeckels
11. Sicherheitselement
12. Interner Filter
13. Platz für externen Filter
• TECHNISCHE DATEN
- Leistung: 700 W
- Versorgungsspannung: 220-240V~ 50-60Hz
- Behälterkapazität 1,5 l
• BESTIMMUNG
Der Staubsauger ist für die Reinigung von Teppichen, Teppichböden, Gardinen, Vorhängen, Polstermöbeln
vom Staub geeignet. Er ist mit einem transparenten Behälter ausgestattet und deswegen ist es einfach,
die gesammelten Staubmengen zu kontrollieren.
• VORBEREITUNG DES GERÄTES
- Vergewissern Sie sich vor der Benutzung des Geräts, dass das Gerät, der Stecker und das Netzkabel
funktionstüchtig sind und dass alle Teile der Verpackung entfernt wurden.
- Vergewissern Sie sich vor dem Gebrauch, dass das Gerät vollständig und nicht beschädigt ist.
- Der Staubsauger kann am Griff (14) getragen werden.
• GERÄTEGEBRAUCH
- Überprüfen Sie vor der Inbetriebnahme, ob die Filter (12, 19) und der Behälter (8) eingesetzt sind - Abb. 1.
ACHTUNG: Verwenden Sie den Staubsauger nicht, wenn die Filter (12, 19) und der Behälter (8) nicht
eingesetzt sind.
- Stecken Sie das Schlauchende (6) in die Buchse (7) - Abb. 2.
- Verbinden Sie dann die Spitze (5) mit dem Teleskoprohr (2) - Abb. 3.
- Am anderen Ende des Rohrs (2) die entsprechende Spitze (1, 22, 23, 24) anbringen - Abb. 4.
- Stellen Sie die Länge des Teleskoprohrs (2) mit dem Knopf (3) ein.
- Greifen Sie den Stecker und ziehen Sie das Netzkabel auf die gewünschte Länge.
ACHTUNG: Das Kabel kann maximal bis zur gelben Markierung (YELLOW) herausgezogen werden - Abb. 5.
Auf keinen Fall darf das Kabel bis zur roten Markierung (RED) herausgezogen werden, da dies den
Kabelaufrollmechanismus beschädigen kann.
- Wenn das Kabel über die gelbe Markierung hinausgezogen wird, muss es mit der Taste (17) eingezogen werden.
- Schließen Sie das Netzkabel an eine Steckdose mit den in der Anleitung angegebenen Parametern an.
- Der Staubsauger läuft an, wenn der Schalter (16) gedrückt wird.
- Während des Staubsaugens können Sie die Saugleistung mit dem Regler (4) variieren.
- Beobachten Sie den Füllstand des Behälters (8), wenn 2/3 der Behälterhöhe erreicht sind, leeren Sie den
Behälter (8) (siehe Entleeren des Behälters).
14. Handgriff
15. Verschluss des Staubbehälters
16. Ein-/Ausschalter
17. Kabelaufwicklung
18. Bürstenhalter
19. Abluftfilter
20. Abdeckung des Abgasfilters
21. Abgasfilterfach
22. Doppelfunktion-Saugdüse
23. Runde Bürste
24. Kleine Bürste
25. Gehäuse
DE

15
ACHTUNG: Nicht absaugen, wenn der Behälter (8) 2/3 seiner Höhe erreicht hat.
- Drücken Sie die Taste (16), um den Betrieb zu beenden.
- Ziehen Sie nach Beendigung der Arbeit den Stecker aus der Steckdose und ziehen Sie das Kabel ein, indem
Sie die Taste (17) gedrückt halten.
Halten Sie das Kabel fest, um unkontrollierte Bewegungen zu vermeiden.
• HINWEISE UND TIPPS
- Der Staubsauger kann in horizontaler Lage aufbewahrt werden. Auf der Rückseite des Geräts befindet sich
ein Griff (18) zum Abstellen des Saugrohrs, und an der Bürste (1) ist ein entsprechender Clip angebracht.
- Beim Saugen von Polstern, kleinen Teppichen oder empfindlichen Stoffen empfiehlt es sich, die Saugleistung
mit dem Regler (4) zu reduzieren.
- Wenn das Kabel beim Einziehen eingeklemmt wird, empfiehlt es sich, es leicht abzuwickeln und erneut
einzuziehen.
- Zum Saugen von schwer zugänglichen Stellen (Ecken, Ritzen usw.) verwenden Sie die Doppelfunktionsdüse
(16). Diese Düse ist auch mit einer Bürste ausgestattet, um Staub von Möbeln, Büchern usw. zu entfernen.
• STAUBBEHÄLTER ENTLEEREN
- Regelmäßiges Entleeren des Behälters gewährleistet den ordnungsgemäßen Betrieb des Staubsaugers und
die Aufrechterhaltung einer optimalen Saugleistung.
- Schalten Sie das Gerät mit der Taste (16) aus und ziehen Sie den Stecker aus der Steckdose.
- Ziehen Sie die Schlauchtülle (6) aus der Steckdose (7) - Abb. 2.
- Fassen Sie den Griff des Behälterdeckels (9), drücken Sie den Verriegelungsknopf (15) und ziehen Sie den
Behälter (8) am Griff (14) aus dem Gehäuse.
- Ziehen Sie den Filter (12) über dem Behälter heraus, drücken Sie dann den Verriegelungsknopf (10) und
ziehen Sie den Deckel (9) ab.
- Entfernen Sie die Verunreinigungen aus dem Behälter, setzen Sie den Deckel wieder auf und schließen Sie ihn.
- Reinigen Sie den Filter (12) über dem Behälter und setzen Sie dann den Filter (13) in den Behälter (8) ein.
- Beim Einsetzen des Filters (12) muss das Element (11) in den Deckel des Behälters (9) gedrückt werden.
- Stellen Sie den Behälter (8) mit aufgesetztem Deckel (9) und eingesetztem Filter (12) in das Gehäuse (25).
• REINIGUNG UND KONSERVIERUNG
- Vor Wartungs- und Reparaturarbeiten muss das Gerät ausgeschaltet und von der Stromversorgung getrennt
werden.
- Der einwandfreie Betrieb des Geräts wird durch regelmäßiges Reinigen und Auswechseln der Filter (12, 19)
und Entleeren des Behälters (8) gewährleistet.
- Reinigen Sie das Gehäuse, die Armaturen und das Netzkabel mit einem weichen, leicht angefeuchteten Tuch
und etwas Geschirrspülmittel.
Tauchen Sie das Gerät nicht in Wasser oder andere flüssige Substanzen.
- Verwenden Sie zur Reinigung keine scharfen Reinigungsmittel, die die Oberfläche des Gehäuses
beschädigen könnten.
• FILTER
- Kontrollieren Sie regelmäßig den Zustand der Filter (12, 19) und reinigen Sie sie bei Bedarf. Der Staubsauger
ist mit zwei Filtern ausgestattet:
§ einem Innenfilter (12), der unter anderem den Motor vor Schäden schützt.
§ einen Außenfilter (19), der vor Luftverschmutzung in den gesaugten Räumen schützt. Der Filter ist durch
Öffnen des Filterdeckels (20) zugänglich.
- Die Filter (12, 19) sollten in regelmäßigen Abständen (nach ca. 100 Betriebsstunden) ausgetauscht werden.
- Der Filtersatz ist unter dem Symbol IDF5901 erhältlich.
Die Filter sind Verbrauchsmaterial und unterliegen einem natürlichen Verschleiß, daher können
sie nicht im Rahmen der Garantie ersetzt werden.
• GARANTIE
- Das Gerät ist für den Privatgebrauch im Haushalt bestimmt.
- Es darf nicht für berufliche Zwecke benutzt werden.
- Bei unrichtiger Bedienung erlischt die Garantie.

16
МЕРЫ БЕЗОПАСНОСТИ
Перед первым использованием внимательно прочитайте
все содержание данного руководства.
Сохраните все предупреждения и указания по технике
безопасности для дальнейшего использования.
1. Соединительный кабель должен быть подключен к электрической
сети с параметрами, указанными на заводской табличке.
2. Соединительный кабель должен быть подключен к электрической
сети с параметрами, указанными на заводской табличке.
3. Необходимо следить за тем, чтобы в одну цепь не было
включено слишком много потребителей.
4. Держите кабель питания вдали от нагретых поверхностей.
5. Данное оборудование предназначено только для бытового
использования, в случае промышленного использования,
использования не по назначению или в нарушение данной
инструкции продавец не несет никакой ответственности,
а гарантийные обязательства утрачиваются.
6. Данное оборудование может использоваться детьми не моложе
8 лет, а также людьми с ограниченными физическими
и умственными способностями, не имеющими опыта
и знакомства с оборудованием, если за ними осуществляется
наблюдение или проводится инструктаж по безопасному
использованию оборудования, чтобы они понимали связанные
с ним риски. Дети не должны играть с оборудованием. Дети без
присмотра не должны выполнять чистку или техническое
обслуживание оборудования.
7. Не используйте пылесос на открытом воздухе.
8. Не пылесосьте людей или животных, в частности,
не приближайте всасывающие насадки к глазам или ушам.
9. Не используйте пылесос для уборки влажных ковровых покрытий,
например, после стирки с использованием шампуней для белья.
Дайте пене полностью высохнуть, а пропылесошенной
поверхности - высохнуть.
10. Переносите пылесос за ручку (не тяните за шланг).
11. Не работайте с прибором мокрыми руками.
12. Не погружайте прибор в воду или другие жидкости.

17
13. Не используйте пылесос для уборки горячей золы, окурков
и спичек, острых предметов (осколков стекла), штукатурки,
цемента, каменной пыли, муки и т.п., мусора, воды и других
жидкостей.
14. Защищайте пылесос от влаги и не ставьте на него емкости
с жидкостями.
15. Никогда не оставляйте включенный пылесос без присмотра.
16. Для отключения прибора от сети никогда не тяните за шнур,
всегда используйте вилку.
17. Отключайте прибор от сети, когда он больше не используется,
а также перед его чисткой.
18. Перед включением прибора убедитесь, что все его компоненты
правильно собраны.
19. Никогда не включайте прибор до его сборки.
20. Не становитесь на всасывающий шланг и не ставьте на него
тяжелые предметы.
21. Не перекрывайте входное отверстие.
22. Используйте только оригинальные принадлежности.
23. Перед каждой чисткой и опорожнением контейнера
отключайте прибор от сети.
24. Не используйте прибор, если поврежден шнур питания или если
прибор имеет другие повреждения. Отдавайте прибор в ремонт
в авторизованный сервисный центр.
25. Ремонт оборудования может производиться только
в авторизованном сервисном центре. Любая модернизация или
использование не оригинальных запасных частей или
компонентов прибора запрещены и ставят под угрозу
безопасность использования.
26. Компания Eldom Sp. z o. o. не несет ответственности за ущерб,
возникший в результате ненадлежащего использования
прибора.
ПРЕДУПРЕЖДЕНИЕ:
Неправильное использование прибора может привести
к травмам.
ВНИМАНИЕ! Полиэтиленовый пакет может быть опасным –
чтобы избежать удушения мешком, необходимо хранить его
в недосягаемом для младенцев и маленьких детей месте.

18
ИНСТРУКЦИЯ ПО ЭКСПЛУАТАЦИИ
ПЫЛЕСОС ID5901
• ОБЩЕЕ ОПИСАНИЕ
1. Большая щетка
2. Телескопическая трубка
3. Регулировка телескопической трубки
4. Регулировка воздушного потока
5. Ручка
6. Всасывающий шланг
7. Муфта
8. Пылесборник
9. Крышка контейнера для пыли
10. Замок крышки контейнера для пыли
11. Защитный элемент
12. Внутренний фильтр
13. Внешний отсек фильтра
• ТЕХНИЧЕСКИЕ ДАННЫЕ
- мощность: 700W
- напряжение питания: 220-2401V~ 50-60Hz
- вместимость контейнера: 1,5 л
• НАЗНАЧЕНИЕ
Пылесос ID5901 предназначен для очистки от пыли ковров, ковровых покрытий, штор, мягкой мебели.
Он оснащен прозрачным контейнером, что облегчает контролировать количество пыли, накопленной в нем.
• ПОДГОТОВКА ПРИБОРА К РАБОТЕ
- Перед использованием прибора убедитесь, что прибор, вилка и шнур питания находятся в рабочем
состоянии и что все части упаковки удалены.
- Перед использованием убедитесь, что прибор укомплектован и не имеет повреждений.
- Переносить пылесос можно с помощью ручки (14).
• ЭКСПЛУАТАЦИЯ
- Перед началом работы убедитесь, что фильтры (12, 19) и контейнер (8) установлены - рис. 1.
ВНИМАНИЕ: Не используйте пылесос без установленных фильтров (12, 19) и контейнера (8).
- Вставьте конец шланга (6) в гнездо (7) - рис. 2.
- Затем подсоедините наконечник (5) к телескопической трубке (2) - рис. 3.
- На другой конец трубки (2) установите соответствующий наконечник (1, 22, 23, 24) - рис. 4.
- Отрегулируйте длину телескопической трубки (2) с помощью кнопки (3).
- Возьмитесь за вилку и вытяните шнур питания на нужную длину.
ВНИМАНИЕ: Кабель может быть вытянут максимум до желтого маркера (YELLOW) - рис. 5.
Ни в коем случае не вытягивайте кабель до красного маркера (RED), так как это может привести
к повреждению механизма втягивания кабеля.
- Если кабель вытянут за желтый маркер, его необходимо втянуть с помощью кнопки (17).
- Подключите шнур питания к розетке с параметрами, указанными в инструкции.
- Пылесос запускается при нажатии выключателя (16).
- Во время работы пылесоса можно изменять мощность всасывания с помощью регулятора (4).
- Следите за уровнем заполнения контейнера (8), при достижении 2/3 высоты контейнера опорожните
контейнер (8) (см. опорожнение контейнера).
ВНИМАНИЕ: Не производите вакуумирование, когда контейнер (8) достигнет 2/3 своей высоты.
- Для остановки работы нажмите кнопку (16).
- По окончании работы отсоедините шнур от сети и втяните его, нажав и удерживая кнопку (17).
14. Ручка для переноски
15. Замок контейнера для пыли
16. Выключатель
17. Втягиватель шнура
18. Держатель щетки
19. Выхлопной фильтр
20. Крышка фильтра выхлопных газов
21. Отсек для фильтра выхлопных газов
22. Насадка двойного назначения
23. Круглая щетка
24. Маленькая щетка
25. Корпус
RU

19
Держите шнур крепко, чтобы предотвратить его неконтролируемое движение.
• СОВЕТЫ И РЕКОМЕНДАЦИИ
- Пылесос можно хранить в горизонтальном положении. На задней стороне прибора имеется ручка (18)
для парковки всасывающей трубки, а на щетке (1) - соответствующий зажим.
- При уборке обивки, небольших ковров или деликатных тканей рекомендуется уменьшить мощность
всасывания с помощью регулятора (4).
- Если при втягивании шнур заклинило, рекомендуется слегка размотать его и попытаться втянуть
снова.
- Для уборки труднодоступных мест (углов, щелей и т.д.) используйте двухфункциональную насадку (16).
Эта насадка также оснащена щеткой для удаления пыли с мебели, книг и т.д.
• ОПОРОЖНЕНИЕ КОНТЕЙНЕРА
- Регулярное опорожнение контейнера обеспечивает правильную работу пылесоса и поддержание
оптимальной мощности всасывания.
- Выключите прибор с помощью кнопки (16) и отсоедините шнур от электросети.
- Извлеките шланговую насадку (6) из гнезда (7) - рис. 2.
- Возьмитесь за ручку на крышке контейнера (9), нажмите кнопку фиксации (15) и, держась за ручку (14),
вытащите контейнер (8) из корпуса.
- Находясь над контейнером, вытащите из него фильтр (12), затем нажмите кнопку блокировки (10)
и снимите крышку (9).
- Удалите мусор из контейнера, затем установите крышку на место и закройте ее.
- Очистите фильтр (12) над контейнером, а затем установите фильтр (13) в контейнер (8).
- При установке фильтра (12) элемент (11) должен быть вдавлен в крышку контейнера (9).
- Установите контейнер (8) так, чтобы крышка (9) была на месте, а фильтр (12) был вставлен в корпус (25).
• ЧИСТКА И УХОД
- Перед проведением любых работ по техническому обслуживанию или ремонту необходимо
выключить прибор и отключить его от электросети.
- Правильная работа прибора обеспечивается регулярной очисткой и заменой фильтров (12,19)
и опорожнением контейнера (8).
- Очищайте корпус, арматуру и шнур питания мягкой, слегка влажной тканью с небольшим количеством
средства для мытья посуды.
- Не погружайте прибор в воду или любую другую жидкую субстанцию.
- Не используйте для чистки агрессивные чистящие средства, которые могут повредить поверхность
корпуса.
• ФИЛЬТРЫ
- Регулярно проверяйте состояние фильтров (12, 19) и при необходимости очищайте их. Пылесос
оснащен двумя фильтрами:
§ внутренний - впускной фильтр (12), защищающий, в частности, двигатель от повреждений.
§ внешний фильтр (19), защищающий от загрязнения воздуха в пылесосимых помещениях.
Доступ к фильтру осуществляется путем открытия крышки фильтра (20).
- Фильтры (12, 19) необходимо периодически заменять (примерно через 100 часов работы).
- Комплект фильтров поставляется под обозначением IDF5901.
Фильтры являются расходными материалами и подвержены естественному износу, поэтому не
подлежат замене по гарантии.
• ЗАЩИТА ОКРУЖАЮЩЕЙ СРЕДЫ
- Прибор изготовлен из материалов, которые могут использованы вторично.
- Передайте прибор в специализированный пункт для дальнейшей утилизации.
• ГАРАНТИЯ
- Устройство предназначено только для домашнего использования.
- В случае неправильной эксплуатации гарантия не является ействительной.

20
MEDIDAS DE SEGURIDAD
Antes del primer uso se debe leer atentamente todo
el contenido del manual.
Se recomienda conservar este manual de instrucciones para
futuras consultas.
1. El cable de conexión debe conectarse a una red eléctrica con
los parámetros indicados en la placa de características.
2. Debe procurarse que no se conecten demasiados
consumidores a un mismo circuito.
3. Mantenga el cable de alimentación alejado de superficies
calientes.
4. Este equipo es de uso exclusivamente doméstico, en caso
de funcionamiento industrial, no conforme al uso previsto
o contrario a estas instrucciones, el vendedor no asume
ninguna responsabilidad y se extinguen los derechos
de garantía.
5. Este equipo puede ser utilizado por niños de al menos 8 años
de edad y por personas con capacidades físicas y mentales
reducidas y falta de experiencia y familiaridad con el equipo,
si se proporciona supervisión o instrucción sobre cómo
utilizar el equipo de forma segura para que se comprendan
los riesgos asociados. Los niños no deben jugar con el equipo.
Los niños no supervisados no deben realizar tareas
de limpieza o mantenimiento del equipo.
6. No lo utilice al aire libre.
7. No aspire personas o animales con la aspiradora y, en particular,
no acerque las boquillas de aspiración a los ojos o los oídos.
8. No utilice la aspiradora para aspirar moquetas mojadas, por
ejemplo, después de lavarlas con champú. Deje que la espuma
se seque completamente y que la superficie aspirada se seque.
9. Transporte la aspiradora por el asa (no tire de la manguera).
10. No manipule el aparato con las manos mojadas.
11. No sumerja el aparato en agua u otros líquidos.

21
12. No utilice la aspiradora para recoger ceniza caliente, colillas
de cigarrillos y cerillas, objetos afilados (fragmentos
de cristal), yeso, cemento, polvo de piedra y harina, etc.,
residuos, agua y otros líquidos.
13. Proteja la aspiradora de la humedad y no coloque recipientes
con líquidos sobre ella.
14. No deje nunca el aspirador encendido sin vigilancia.
15. Para desconectar el aparato de la red eléctrica no tire nunca
del cable, utilice siempre el enchufe.
16. Desenchufe el aparato de la red eléctrica cuando ya no lo utilice
y antes de limpiarlo.
17. Antes de encender el aparato, asegúrese de que todos sus
componentes están correctamente montados. No encienda
nunca el aparato antes de que esté montado.
18. No se pare sobre la manguera de aspiración ni coloque
objetos pesados sobre ella.
19. No bloquee la abertura de entrada.
20. Utilícelo sólo con los accesorios suministrados originalmente.
21. Desenchufe el aparato de la red eléctrica antes de cada
limpieza y vaciado del recipiente.
22. No lo utilice si el cable de alimentación está dañado
o si el aparato presenta cualquier otro tipo de desperfecto.
Haga reparar su aparato por un centro de servicio autorizado.
23. Las reparaciones del aparato sólo pueden ser realizadas
por un centro de servicio autorizado. Cualquier mejora o utilización
de piezas de recambio o componentes del aparato que no sean
originales está prohibida y pone en peligro la seguridad de uso.
24. La empresa Eldom Sp. z o. o. no se hace responsable de los
daños derivados de un uso inadecuado del aparato.
ADVERTENCIA:
El uso inadecuado del aparato puede causar lesiones personales.
NOTA: La bolsa de plástico puede suponer un peligro: para evitar
el riesgo de asfixia, la bolsa debe guardarse fuera del alcance
de los bebés y niños pequeños.

22
INSTRUCCIONES DE USO
ASPIRADORA ID5901
• DESCRIPCIÓN GENERAL
1. Cepillo grande
2. Tubo telescópico
3. Ajuste del tubo telescópico
4. Ajuste del flujo de aire
5. Empuñadura
6. Manguera
7. Enchufe
8. Contenedor de polvo
9. Tapa del depósito de polvo
10. Cierre de la tapa del depósito de polvo
11. Elemento de seguridad
12. Filtro interior
13. Compartimento del filtro interno
• ESPECIFICACIONES TÉCNICAS
- potencia: 700 W
- tensión de alimentación: 220-240V~ 50-60Hz
- capacidad de la bolsa: 1,5 l
• FINALIDAD DEL DISPOSITIVO
La aspiradora está destinada para limpieza de polvo de alfombras, moquetas, visillos, cortinas, muebles
tapizados. Está equipada con un contenedor transparente gracias a lo que es fácil controlar la cantidad de polvo
acumulada.
• PREPARACIÓN DEL APARATO
- Antes de utilizar el aparato, asegúrese de que el aparato, el enchufe y el cable de alimentación funcionan
correctamente y de que se han retirado todas las piezas del embalaje.
- Antes de utilizarlo, compruebe que el aparato esté completo y no presente daños.
- La aspiradora puede transportarse utilizando el asa (14).
• USO
- Antes de utilizarlo, compruebe que los filtros (12, 19) y el recipiente (8) estén colocados - fig. 1.
NOTA. No utilice la aspiradora sin los filtros (12, 19) y el recipiente (8) colocados.
- Introduzca el extremo de la manguera (6) en la toma (7) - fig. 2.
- A continuación, conecte la punta (5) al tubo telescópico (2) - fig. 3.
- En el otro extremo del tubo (2), coloque la punta adecuada (1, 22, 23, 24) - fig. 4.
- Ajuste la longitud del tubo telescópico (2) con el botón (3).
- Sujete el enchufe y tire del cable de alimentación hasta la longitud deseada.
NOTA. Se puede tirar del cable hasta un máximo de la marca amarilla (YELLOW) - fig. 5.
Bajo ninguna circunstancia se debe tirar del cable hasta la marca roja (RED), ya que se podría dañar
el mecanismo de retracción del cable.
- Si el cable se estira más allá de la marca amarilla, debe retraerse mediante el botón (17).
- Enchufe el cable de alimentación a una toma de corriente con los parámetros indicados en las instrucciones.
- La aspiradora se pone en marcha al pulsar el interruptor (16).
- Durante la aspiración, puede variar la potencia de succión con el regulador (4).
- Observe el nivel de llenado del recipiente (8), si se alcanzan 2/3 de la altura del recipiente, vacíe el recipiente
(8) (véase vaciado del recipiente).
NOTA. No aspire cuando el recipiente (8) haya alcanzado 2/3 de su altura.
14. Manija
15. Cierre del depósito de polvo
16. Interruptor
17. Retractor de cable
18. Portaescobillas
19. Filtro de escape
20. Tapa del filtro de escape
21. Compartimento del filtro de escape
22. Boquilla de doble uso
23. Cepillo redondo
24. Cepillo pequeño
25. Cuerpo
ES

23
- Pulse el botón (16) para detener el funcionamiento.
- Cuando haya terminado de trabajar, desenchufe el cable de la red eléctrica y retírelo manteniendo pulsado
el botón (17).
Sujete firmemente el cable para evitar movimientos incontrolados.
• CONSEJOS Y SUGERENCIAS
- La aspiradora puede guardarse en posición horizontal. En la parte trasera del aparato hay un asa (18) para
aparcar el tubo de aspiración, y en el cepillo (1) hay el clip correspondiente.
- Cuando aspire tapicerías, alfombras pequeñas o tejidos delicados, se recomienda reducir la potencia
de aspiración con el regulador (4).
- Si el cable se atasca durante la retracción, se recomienda desenrollarlo ligeramente e intentar retraerlo
de nuevo.
- Para aspirar zonas de difícil acceso (esquinas, grietas, etc.), utilice la boquilla de doble función (16).
Esta boquilla también está equipada con un cepillo para eliminar el polvo de muebles, libros, etc.
• VACIADO DEL RECIPIENTE
- El vaciado regular de los recipientes garantiza el buen funcionamiento de la aspiradora y el mantenimiento
de una potencia de aspiración óptima.
- Apague el aparato con el botón (16) y desconecte el cable de la red eléctrica.
- Retire el extremo de la manguera (6) de la toma (7) - fig. 2.
- Agarre el asa de la tapa del recipiente (9), pulse el botón de bloqueo (15) y, sujetando el asa (14), extraiga
el recipiente (8) del cuerpo.
- Sobre el contenedor, tire del filtro (12) para sacarlo del contenedor, después pulse el botón de bloqueo (10)
y tire de la tapa (9).
- Retire los residuos del recipiente, vuelva a colocar la tapa y ciérrela.
- Limpie el filtro (12) sobre el contenedor y, a continuación, coloque el filtro (13) en el contenedor (8).
- Al introducir el filtro (12), el elemento (11) debe quedar presionado en la tapa del contenedor (9).
- Coloque el recipiente (8) con la tapa (9) en su sitio y el filtro (12) encajado en el cuerpo (25).
• LIMPIEZA DEL APARATO
- El aparato debe estar apagado y desconectado de la red eléctrica antes de cualquier trabajo
de mantenimiento o reparación.
- El correcto funcionamiento del aparato se garantiza mediante la limpieza y sustitución periódica de los filtros
(12, 19) y el vaciado del recipiente (8).
- Limpie la carcasa, los accesorios y el cable de alimentación con un paño suave ligeramente humedecido con
un poco de detergente lavavajillas.
No sumerja el aparato en agua ni en ninguna otra sustancia líquida.
- No utilice para la limpieza productos agresivos que puedan dañar la superficie de la carcasa.
• FILTROS
- Compruebe regularmente el estado de los filtros (12, 19) y límpielos si es necesario. La aspiradora está
equipada con dos filtros:
§ un filtro interno (12), que protege, entre otras cosas, el motor de posibles daños.
§ un filtro externo (19), para proteger contra la contaminación del aire en las habitaciones aspiradas.
Se puede acceder al filtro abriendo la tapa del filtro (20).
- Los filtros (12, 19) deben sustituirse periódicamente (después de aprox. 100 horas de funcionamiento).
- El juego de filtros está disponible con el símbolo IDF5901.
Los filtros son elementos consumibles y están sujetos al desgaste natural, por lo que no pueden
sustituirse en garantía.
• GARANTÍA
- El aparato está destinado para un uso privado doméstico.
- No se puede utilizar para nes profesionales.
- La garantía se anula en caso de un uso incorrecto.

24
CONSIGNES DE SÉCURITÉ
Nous vous recommandons de conserver ce mode d’emploi
pour toute référence ultérieure.
Lisez attentivement tout le contenu de ce notice d’emploi
avant la première utilisation.
1. Le câble de raccordement doit être connecté à un réseau
électrique dont les paramètres sont indiqués sur la plaque
signalétique.
2. Il faut veiller à ce qu'il n'y ait pas trop de consommateurs
branchés sur un même circuit.
3. Le câble d'alimentation doit être éloigné des surfaces
chauffées.
4. Cet appareil est réservé à un usage domestique. En cas
d'utilisation industrielle non conforme à l'usage prévu
ou contraire aux présentes instructions, le vendeur n'assume
aucune responsabilité et les droits à la garantie s'éteignent.
5. Cet appareil peut être utilisé par des enfants âgés d'au moins
8 ans et par des personnes dont les capacités physiques
et mentales sont réduites et qui manquent d'expérience
et de familiarité avec l'appareil, à condition qu'une
surveillance ou des instructions soient fournies sur la manière
d'utiliser l'appareil en toute sécurité et que les risques
associés soient compris. Les enfants ne doivent pas jouer
avec l'équipement. Les enfants non surveillés ne doivent pas
procéder au nettoyage ou à l'entretien de l'équipement.
6. Ne pas utiliser l'appareil à l'extérieur.
7. Ne pas aspirer des personnes ou des animaux avec
l'aspirateur, et en particulier ne pas approcher les buses
d'aspiration des yeux ou des oreilles.
8. N'utilisez pas l'aspirateur pour aspirer des surfaces de tapis
mouillées, par exemple après un lavage avec un shampoing.
Laissez la mousse sécher complètement et la surface aspirée
sécher.
9. Portez l'aspirateur à l'aide de la poignée (ne tirez pas sur
le tuyau).
10. Ne manipulez pas l'appareil avec des mains mouillées.
11. Ne pas immerger l'appareil dans l'eau ou d'autres liquides.

25
12. N'utilisez pas l'aspirateur pour ramasser des cendres chaudes,
des mégots de cigarettes et des allumettes, des objets
pointus (éclats de verre), du plâtre, du ciment, de la poussière
de pierre, de la farine, etc.
13. Protégez l'aspirateur de l'humidité et ne placez pas
de récipients contenant des liquides dessus.
14. Ne laissez jamais l'aspirateur allumé sans surveillance.
15. Pour débrancher l'appareil, ne tirez jamais sur le cordon,
utilisez toujours la fiche.
16. Débranchez l'appareil lorsqu'il n'est plus utilisé et avant
de le nettoyer.
17. Avant d'allumer l'appareil, assurez-vous que tous ses
composants sont correctement assemblés. Ne mettez jamais
l'appareil en marche avant qu'il ne soit assemblé.
18. Ne vous tenez pas sur le tuyau d'aspiration et ne placez pas
d'objets lourds sur le tuyau d'aspiration.
19. Ne pas obstruer l'orifice d'entrée.
20. N'utilisez que les accessoires fournis à l'origine.
21. Débrancher l'appareil avant chaque nettoyage et vidange
du réservoir.
22. N'utilisez pas l'appareil si le cordon d'alimentation est
endommagé ou si l'appareil est endommagé d'une autre
manière. Faites réparer votre appareil par un centre
d'assistance agréé.
23. Les réparations de l'appareil ne peuvent être effectuées que
par un centre de service agréé. Toute amélioration
ou utilisation de pièces de rechange ou de composants
de l'appareil autres que ceux d'origine est interdite et met
en péril la sécurité d'utilisation.
24. La société Eldom Sp. z o. o. ne peut être tenue pour
responsable des dommages résultant d'une mauvaise
utilisation de l'appareil.
AVERTISSEMENT: Une utilisation incorrecte de l’appareil peut
entraîner des blessures corporelles.
NOTE : Un sac en plastique peut être dangereux – pour éviter
la strangulation le sac doit être tenu hors de portée des bébés
et des jeunes enfants.

26
ANUEL D’UTILISATION
ASPIRATEUR ID5901
• DESCRIPTION GÉNÉRALE
1. Grande brosse
2. Tube télescopique
3. Réglage du tube télescopique
4. Réglage du débit d'air
5. Poignée
6. Tuyau d'aspiration
7. Douille
8. Bac à poussière
9. Couvercle du réservoir à poussière
10. Verrouillage du couvercle du réservoir à poussière
11. Élément de sécurité
12. Filtre interne
13. Compartiment du filtre interne
• CARACTÉRISTIQUES TECHNIQUES
- puissance : 700 W
- tension d’alimentation : 220-240 V~ 50-60 Hz
- capacité du bac à poussière : 1,5 l
• DESTINATION
L'aspirateur ID5901 est conçu pour dépoussiérer les tapis, moquettes, rideaux, rideaux et meubles rembourrés.
Il est équipé d'un bac à poussière transparent, grâce auquel il est facile de contrôler la quantité de poussière
qui s'y accumule.
• PRÉPARATION DE L'APPAREIL
- Avant d'utiliser l'appareil, assurez-vous que l'appareil, la prise et le cordon d'alimentation sont en état
de marche et que toutes les parties de l'emballage ont été retirées.
- Avant d'utiliser l'appareil, vérifiez qu'il est complet et qu'il n'est pas endommagé.
- L'aspirateur peut être transporté à l'aide de la poignée (14).
• UTILISATION
- Avant d'utiliser l'appareil, vérifiez que les filtres (12, 19) et le réservoir (8) sont montés - fig. 1.
ATTENTION : Ne pas utiliser l'aspirateur sans les filtres (12, 19) et le réservoir (8).
- Insérez l'extrémité du tuyau (6) dans la prise (7) - fig. 2.
- Raccordez ensuite l'embout (5) au tube télescopique (2) - fig. 3.
- A l'autre extrémité du tube (2), placer l'embout approprié (1, 22, 23, 24) - fig. 4.
- Réglez la longueur du tube télescopique (2) à l'aide du bouton (3).
- Saisir la fiche et tirer le cordon d'alimentation jusqu'à la longueur souhaitée.
ATTENTION : Le câble peut être tiré jusqu'au maximum du repère jaune (YELLOW) - fig. 5.
Le câble ne doit en aucun cas être tiré jusqu'au repère rouge (RED), car cela pourrait endommager
le mécanisme de rétraction du câble.
- Si le câble est tiré au-delà du repère jaune, il doit être rétracté à l'aide du bouton (17).
- Branchez le cordon d'alimentation sur une prise dont les paramètres sont indiqués dans les instructions.
- L'aspirateur démarre lorsque l'on appuie sur l'interrupteur (16).
- Pendant l'aspiration, vous pouvez varier la puissance d'aspiration à l'aide du régulateur (4).
- Observez le niveau de remplissage du récipient (8), si les 2/3 de la hauteur du récipient sont atteints, videz
le récipient (8) (voir vider le récipient).
14. Poignée de transport
15. Verrouillage du bac à poussière
16. Interrupteur marche/arrêt
17. Rétracteur de cordon
18. Porte-brosse
19. Filtre d'échappement
20. Couvercle du filtre d'échappement
21. Compartiment du filtre d'échappement
22. Buse à double usage
23. Brosse ronde
24. Petite brosse
25. Corps de l'appareil
FR

27
ATTENTION : Ne pas aspirer lorsque le récipient (8) a atteint les 2/3 de sa hauteur.
- Appuyez sur le bouton (16) pour arrêter l'opération.
- Lorsque vous avez fini de travailler, débranchez le cordon d'alimentation et rétractez-le en appuyant
sur le bouton (17) et en le maintenant enfoncé.
Tenez fermement le cordon pour éviter tout mouvement incontrôlé.
• TRUCS ET ASTUCES
- L'aspirateur peut être rangé en position horizontale. Une poignée (18) située à l'arrière de l'appareil permet
de ranger le tube d'aspiration, et un clip correspondant se trouve sur la brosse (1).
- Lors de l'aspiration de tissus d'ameublement, de petits tapis ou de tissus délicats, il est recommandé
de réduire la puissance d'aspiration à l'aide du régulateur (4).
- Si le cordon est coincé pendant la rétractation, il est recommandé de le dérouler légèrement et d'essayer
de le rétracter à nouveau.
- Pour aspirer les zones difficiles d'accès (coins, crevasses, etc.), utilisez le suceur double fonction (16).
Cet embout est également équipé d'une brosse pour dépoussiérer les meubles, les livres, etc.
• VIDANGE DU BAC
- La vidange régulière du réservoir assure le bon fonctionnement de l'aspirateur et le maintien d'une puissance
d'aspiration optimale.
- Éteignez l'appareil à l'aide du bouton (16) et débranchez le cordon d'alimentation.
- Retirez l'embout du tuyau (6) de la prise (7) - fig. 2.
- Saisir la poignée du couvercle du conteneur (9), appuyer sur le bouton de verrouillage (15) et, en tenant
la poignée (14), retirer le conteneur (8) du corps de l'appareil.
- Au-dessus de la poubelle, tirez le filtre (12) hors de la poubelle, puis appuyez sur le bouton de verrouillage
(10) et retirez le couvercle (9).
- Retirez les débris du conteneur, puis remettez le couvercle en place et fermez.
- Nettoyez le filtre (12) au-dessus du bac, puis placez le filtre (13) dans le bac (8).
- Lors de l'insertion du filtre (12), l'élément (11) doit être pressé dans le couvercle du conteneur (9).
- Placer le conteneur (8) avec le couvercle (9) en place et le filtre (12) inséré dans le corps (25).
• NETTOYAGE DE L'APPAREIL
- L'appareil doit être éteint et débranché avant toute opération d'entretien ou de réparation.
- Le bon fonctionnement de l'appareil est garanti par le nettoyage et le remplacement réguliers des filtres
(12,19) et la vidange du réservoir (8).
- Nettoyez le boîtier, les raccords et le cordon d'alimentation à l'aide d'un chiffon doux, légèrement humide
et d'un peu de détergent à vaisselle.
Ne pas immerger l'appareil dans l'eau ou dans toute autre substance liquide.
- N'utilisez pas de produits de nettoyage agressifs susceptibles d'endommager la surface du boîtier.
• FILTRES
- Vérifiez régulièrement l'état des filtres (12, 19) et nettoyez-les si nécessaire. L'aspirateur est équipé de deux
filtres :
§ un filtre interne - d'admission (12) qui protège notamment le moteur des dommages.
§ un filtre externe (19), qui protège contre la contamination de l'air dans les pièces aspirées.
Le filtre est accessible en ouvrant le couvercle du filtre (20).
- Les filtres (12, 19) doivent être remplacés périodiquement (après environ 100 heures de fonctionnement).
- Le jeu de filtres est disponible sous le symbole IDF5901.
Les filtres sont des articles consommables et sont soumis à une usure naturelle ; ils ne peuvent donc
pas être remplacés dans le cadre de la garantie.
• GARANTIE
- L'appareil est destiné à un usage domestique privé.
- Il ne peut être utilisé à des fins professionnelles.
- Une utilisation abusive ou en contradiction avec ce mode d’emploi annule la garanti.

28
ISTRUZIONI DI SICUREZZA
Si consiglia di conservare il presente manuale d’uso
per il futuro riferimento. Prima del primo utilizzo leggere
attentamente tutto il contenuto del presente manuale d’uso.
1. Il cavo di collegamento deve essere collegato a una rete
elettrica con i parametri indicati sulla targhetta.
2. Si deve fare attenzione a non inserire troppe utenze
in un unico circuito.
3. Tenere il cavo di alimentazione lontano da superfici riscaldate.
4. Questo apparecchio è destinato esclusivamente all'uso
domestico; in caso di funzionamento industriale, non conforme
all'uso previsto o contrario alle presenti istruzioni, il venditore non
si assume alcuna responsabilità e i diritti di garanzia decadono.
5. Questa apparecchiatura può essere utilizzata da bambini
di almeno 8 anni di età e da persone con ridotte capacità
fisiche e mentali e con scarsa esperienza e familiarità con
l'apparecchiatura, a condizione che venga fornita una
supervisione o un'istruzione su come utilizzare
l'apparecchiatura in modo sicuro, in modo da comprendere
i rischi associati. I bambini non devono giocare con
l'attrezzatura. I bambini senza supervisione non devono
effettuare la pulizia o la manutenzione dell'attrezzatura.
6. Non utilizzare all'aperto.
7. Non aspirare persone o animali con l'aspirapolvere e,
in particolare, non avvicinare le bocchette di aspirazione agli
occhi o alle orecchie.
8. Non utilizzare l'aspirapolvere per aspirare superfici
di moquette bagnate, ad esempio dopo il lavaggio con
shampoo per bucato. Lasciare asciugare completamente
la schiuma e la superficie aspirata.
9. Trasportare l'aspirapolvere utilizzando l'impugnatura (non
tirare il tubo).
10. Non maneggiare l'apparecchio con le mani bagnate.
11. Non immergere l'apparecchio in acqua o altri liquidi.

29
12. Non utilizzare l'aspirapolvere per raccogliere cenere calda,
mozziconi di sigaretta e fiammiferi, oggetti appuntiti
(frammenti di vetro), intonaco, cemento, polvere di pietra
e farina ecc.
13. Proteggere l'aspirapolvere dall'umidità e non appoggiarvi
sopra recipienti contenenti liquidi.
14. Non lasciare mai l'aspirapolvere acceso senza sorveglianza.
15. Per scollegare l'apparecchio dalla rete elettrica non tirare mai
il cavo, ma utilizzare sempre la spina.
16. Scollegare l'apparecchio dalla rete elettrica quando non
viene più utilizzato e prima di pulirlo.
17. Prima di accendere l'apparecchio, accertarsi che tutti i suoi
componenti siano correttamente assemblati. Non accendere
mai l'apparecchio prima che sia stato montato.
18. Non stare in piedi sul tubo di aspirazione e non appoggiare
oggetti pesanti sul tubo di aspirazione.
19. Non ostruire l'apertura di aspirazione.
20. Utilizzare solo gli accessori forniti in origine.
21. Scollegare l'apparecchio dalla rete elettrica prima di ogni
pulizia e svuotamento del contenitore.
22. Non utilizzare l'apparecchio se il cavo di alimentazione
è danneggiato o se l'apparecchio è danneggiato in altro modo.
Far riparare l'apparecchio da un centro di assistenza autorizzato.
23. Le riparazioni dell'apparecchio possono essere effettuate solo da
un centro di assistenza autorizzato. Qualsiasi modifica o utilizzo
di parti di ricambio o componenti dell'apparecchio diversi
da quelli originali è vietata e mette a rischio la sicurezza dell'uso.
24. La società Eldom Sp. z o. o. non è responsabile di eventuali
danni derivanti da un uso improprio dell'apparecchio.
AVVERTENZA: L'uso improprio dell'apparecchio può causare
lesioni.
ATTENZIONE: Il sacchetto di plastica può essere pericoloso:
per evitare il soffocamento con il sacchetto, tenerlo lontano
da neonati e piccoli bambini.

30
MANUALE DI ISTRUZIONI
ASPIRAPOLVERE ID5901
• DESCRIZIONE GENERALE
1. Spazzola grande
2. Tubo telescopico
3. Regolazione del tubo telescopico
4. Regolazione del flusso d'aria
5. Impugnatura
6. Tubo di aspirazione
7. Presa di corrente
8. Contenitore della polvere
9. Coperchio del contenitore della polvere
10. Blocco del coperchio del contenitore della polvere
11. Elemento di sicurezza
12. Filtro interno
13. Vano filtro interno
• DATI TECNICI
- potenza: 700 W
- tensione di alimentazione: 220-240V~ 50-60Hz
- capacità del contenitore della polvere: 1,5 l
• DESTINAZIONE
L'aspirapolvere ID5901 è destinato alla pulizia dalla polvere di tappeti, moquette, tende e mobili imbottiti.
È dotato di un contenitore trasparente, grazie al quale è facile controllare la quantità di polvere accumulata.
• PREPARAZIONE DELL'APPARECCHIO
- Prima di utilizzare l'apparecchio, accertarsi che l'apparecchio, la spina e il cavo di alimentazione siano
funzionanti e che tutte le parti dell'imballaggio siano state rimosse.
- Prima dell'uso, verificare che l'apparecchio sia completo e non danneggiato.
- L'aspirapolvere può essere trasportato con la maniglia (14).
• GARANZIA
- Prima dell'utilizzo, verificare che i filtri (12, 19) e il contenitore (8) siano montati - fig. 1.
ATTENZIONE: non utilizzare l'aspirapolvere senza i filtri (12, 19) e il contenitore (8).
- Inserire l'estremità del tubo flessibile (6) nella presa (7) - fig. 2.
- Collegare quindi il puntale (5) al tubo telescopico (2) – fig. 3.
- Sull'altra estremità del tubo (2), montare il puntale appropriato (1, 22, 23, 24) - fig. 4.
- Regolare la lunghezza del tubo telescopico (2) con il pulsante (3).
- Afferrare la spina e tirare il cavo di alimentazione alla lunghezza desiderata.
ATTENZIONE: Il cavo può essere tirato fino a un massimo dell'indicatore giallo (YELLOW) - fig. 5.
In nessun caso il cavo deve essere tirato fino all'indicatore rosso (RED), per evitare di danneggiare il
meccanismo di riavvolgimento del cavo.
- Se il cavo viene tirato oltre l'indicatore giallo, deve essere ritratto utilizzando il pulsante (17).
- Collegare il cavo di alimentazione a una presa di corrente con i parametri indicati nelle istruzioni.
- L'aspirapolvere si avvia quando si preme l'interruttore (16).
- Durante l'aspirazione, è possibile variare la potenza di aspirazione con il regolatore (4).
- Osservare il livello di riempimento del contenitore (8); se si raggiungono i 2/3 dell'altezza del contenitore,
svuotare il contenitore (8) (vedere SVUOTAMENTO DEL CONTENITORE DELLA POLVERE).
14. Maniglia di trasporto
15. Blocco del contenitore della polvere
16. Interruttore On/Off
17. Avvolgitore del cavo
18. Porta spazzole
19. Filtro di scarico
20. Coperchio del filtro di scarico
21. Vano del filtro di scarico
22. Bocchetta a doppio uso
23. Spazzola rotonda
24. Spazzola piccola
25. Corpo
IT

31
ATTENZIONE: Non aspirare quando il contenitore (8) ha raggiunto i 2/3 della sua altezza.
- Premere il pulsante (16) per interrompere il funzionamento.
- Al termine del lavoro, scollegare il cavo dalla rete elettrica e riavvolgerlo tenendo premuto il pulsante (17).
Tenere saldamente il cavo per evitare movimenti incontrollati.
• SUGGERIMENTI E CONSIGLI
- L'aspirapolvere può essere riposto in posizione orizzontale. Sul retro dell'apparecchio c'è una maniglia (18)
per parcheggiare il tubo di aspirazione e una clip corrispondente sulla spazzola (1).
- Quando si aspirano tappezzerie, piccoli tappeti o tessuti delicati, si consiglia di ridurre la potenza
di aspirazione con il regolatore (4).
- Se il cavo si inceppa durante il riavvolgimento, si consiglia di srotolarlo leggermente e provare a riavvolgerlo.
- Per aspirare le aree difficili da raggiungere (angoli, fessure, ecc.), utilizzare la bocchetta a doppia funzione
(16). Questa bocchetta è dotata anche di una spazzola per rimuovere la polvere da mobili, libri, ecc.
• SVUOTAMENTO DEL CONTENITORE DELLA POLVERE
- Lo svuotamento regolare del contenitore garantisce il corretto funzionamento dell'aspirapolvere
e il mantenimento di una potenza di aspirazione ottimale.
- Spegnere l'apparecchio con il pulsante (16) e scollegare il cavo dalla rete elettrica.
- Rimuovere l'ugello del tubo flessibile (6) dalla presa (7) - fig. 2.
- Afferrare la maniglia del coperchio del contenitore (9), premere il pulsante di blocco (15) e, tenendo
la maniglia (14), estrarre il contenitore (8) dal corpo.
- Sopra il contenitore, estrarre il filtro (12) dal contenitore, quindi premere il pulsante di blocco (10) ed estrarre
il coperchio (9).
- Rimuovere i detriti dal contenitore, quindi riposizionare il coperchio e chiuderlo.
- Pulire il filtro (12) sopra il contenitore e poi inserire il filtro (13) nel contenitore (8).
- Quando si inserisce il filtro (12), l'elemento (11) deve essere premuto nel coperchio del contenitore (9).
- Posizionare il contenitore (8) con il coperchio (9) in posizione e il filtro (12) inserito nel corpo (25).
• PULIZIA E MANUTENZIONE
- Prima di qualsiasi intervento di manutenzione o riparazione, l'apparecchio deve essere spento e scollegato
dalla rete elettrica.
- Il corretto funzionamento dell'apparecchio è garantito dalla regolare pulizia e sostituzione dei filtri (12, 19)
e dallo svuotamento del contenitore (8).
- Pulire l'involucro, i raccordi e il cavo di alimentazione con un panno morbido e leggermente umido
con un po' di detersivo per piatti.
Non immergere l'apparecchio in acqua o in altre sostanze liquide.
- Per la pulizia non utilizzare detergenti aggressivi che potrebbero danneggiare la superficie
dell'alloggiamento.
• FILTRI
- Controllare regolarmente lo stato dei filtri (12, 19) e, se necessario, pulirli. L'aspirapolvere è dotato di due filtri:
§ un filtro interno (12) che protegge, tra l'altro, il motore da eventuali danni.
§ un filtro esterno (19), per proteggere dalla contaminazione dell'aria nei locali aspirati.
Il filtro è accessibile aprendo il coperchio del filtro (20).
- I filtri (12, 19) devono essere sostituiti periodicamente (dopo circa 100 ore di funzionamento).
- Il set di filtri è disponibile con il simbolo IDF5901.
I filtri sono articoli di consumo e sono soggetti a usura naturale, pertanto non possono essere sostituiti
in garanzia.
• GARANZIA
- Questo prodotto è stato concepito per il solo uso domestico, in privato.
- Non deve essere usato per scopi professionali.
- La garanzia garanzia decade in caso di trattamento.

32
-
 1
1
-
 2
2
-
 3
3
-
 4
4
-
 5
5
-
 6
6
-
 7
7
-
 8
8
-
 9
9
-
 10
10
-
 11
11
-
 12
12
-
 13
13
-
 14
14
-
 15
15
-
 16
16
-
 17
17
-
 18
18
-
 19
19
-
 20
20
-
 21
21
-
 22
22
-
 23
23
-
 24
24
-
 25
25
-
 26
26
-
 27
27
-
 28
28
-
 29
29
-
 30
30
-
 31
31
-
 32
32


ELDOM ID5901 IDEAL Manual de usuario
- Categoría
- Aspiradoras
- Tipo
- Manual de usuario
en otros idiomas
- français: ELDOM ID5901 IDEAL Manuel utilisateur
- italiano: ELDOM ID5901 IDEAL Manuale utente
- Deutsch: ELDOM ID5901 IDEAL Benutzerhandbuch
- polski: ELDOM ID5901 IDEAL Instrukcja obsługi
Otros documentos
-
Hoover SYNUA Manual de usuario
-
-
-
Grundig VCC 7570 A Manual de usuario
-
Solac AS3241 Instrucciones de operación
-
-
-
-
-
SEVERIN BR-7946 El manual del propietario