
Istruzioni di montaggio
Installation instructions Montageanleitung Instructions de montage
Instrucciones de montaje Инструкция по монтажу
L00926 - 2 SPRAYS - Monocomando
Single lever - Einhebelbatterie - Monocommande
Monomando - -
L00930 - 2 SPRAYS - Termostatico
Thermostatic - Thermostatmischer - Thermostatique
Termostático - -
L00928 - 3 SPRAYS - Monocomando
Single lever - Einhebelbatterie - Monocommande
Monomando - -
L00932 - 3 SPRAYS - Termostatico
Thermostatic - Thermostatmischer - Thermostatique
Termostático - -
AR
MANHATTAN PANEL FLAT

2
2
2.5
10
94
1
11
12
5
6
8
7
13
14
2
3
15
4
6
16
17

3
Contenuto della confezione
Package content - Inhalt der Verpackung - Contenu de l’emballage - Contenido del embalaje - -
Item Descrizione
Description - Beschreibung - Description - Descripción - O - Q.Ty
1
Scatola da incasso
Concealed box of the shower panel - Einbaugehäuse des Duschpaneeels - Boîtier à encastrer du panne-
au douche - Caja empotrada del panel ducha - -
1
2Viti M8x60 - Screws - Schraube - Vis - Tornillo - - 6
3
Dado di ssaggio
Fastening nut - Tuerca de jación - Ĕcrou de xation - Befestigungsmutter - - 6
4Tasselli - Plugs - Dübel- Cheville - Tacos - - 6
5
Staffa di fissaggio
Attachment bracket - Befestigungswinkel - Support de xation - Soporte de jación -
- 1
6Viti - Screw - Schrauben- Vis - Tornillos - - 6
7
Corpo soffione
Showerhead - Duschkörper - Bloc douche de tête - Cuerpo del rociador -
- 1
8
Coperchio soffione
Showerhead cover - Cubierta de cabezal de ducha - Couvercle douche de tête - Abdeckung
Duschkopf - - 1
9Viti M4x10 - Screws - Schraube - Vis - Tornillo - - 8
10 Raccordo presa acqua - Water inlet fitting - Wasserzulauf Verbindung- Raccord d'entrée
d'eau - Conexión de entrada de agua - - 1
11
Telaio colonna doccia
Shower column frame - Bastidor de columna de ducha - Corps colonne de douche - Rahmen
Duschsäule - -
1
12 Presa Acqua - Water Supply Elbow - Wandanschlussbogen - Sortie Murale - Toma de agua
- водорозетка - 1
13
Grano Filettato - Fastening dowels - Stifte - Grains - Tornillos prisioneros - винты -
1
14
Tubo Flessibile - Flexible hose - Brauseschlauch - Flexible de douche - Flexible - Шланг -
1
15 Doccia - Handshower - Brause - Douchette - Ducha - дуШ - 1
16-17 Chiave a brugola - Hex key - Sechskantschlüssel - Clé Allen - Llave Allen - -
1
LEGGERE ATTENTAMENTE IL PRESENTE LIBRETTO DI INSTALLAZIONE E MANUTENZIONE.
READ THIS INSTALLATION AND CARE MANUAL CAREFULLY.
DIE VORLIEGENDE MONTAGE- UND WARTUNGSANLEITUNG AUFMERKSAM DURCHLESEN.
LIRE ATTENTIVEMENT CETTE NOTICE D’INSTALLATION ET D'ENTRETIEN.
LEA ATENTAMENTE ESTE MANUAL DE INSTALACIÓN Y MANTENIMIENTO.READ THIS
,
INDOSSARE I DISPOSITIVI DI PROTEZIONE INDIVIDUALI.
PUT ON INDIVIDUAL PROTECTION DEVICES.
INDIVIDUELLE SCHUTZGERÄTE ÜBERZIEHEN.
METTRE DES DISPOSITIFS DE PROTECTION INDIVIDUELS.
PONER DISPOSITIVOS DE PROTECCIÓN INDIVIDUAL.
.

CARATTERISTICHE TECNICHE:
Indice alimentazione calda: a sinistra colore Rosso
Indice alimentazione fredda: a destra colore blu
ATTENZIONE : non invertire il collegamento acqua calda e fredda.
Pulsante di blocco a 38° per evitare manovre errate verso la richiesta di acqua calda non
desiderata MISCELATORE TERMOSTATICO
LIMITI DI IMPIEGO RACCOMANDATI DA UNI EN 1111 (MISCELATORI TERMOSTATICI) ED UNI
EN 817 (MISCELATORI MECCANICI) PER IL BUON FUNZIONAMENTO
Pressione: min 1 bar max 5 bar
Temperatura acqua calda: 55°C ≤ T ≤ 65°C
Temperatura acqua fredda: T ≤ 25°C
NOTA: in caso di pressioni superiori a 5 bar si raccomanda di installare un riduttore
di pressione.
TECHNISCHE EIGENSCHAFTEN:
Warmwasseranzeige: links rot
Kaltwasseranzeige: rechts blau
ACHTUNG: Warm- und Kaltwasseranschluss nicht austauschen.
Blockierungsknopf bei 38°C, um falsche Handhabung zur Anforderung von nicht erwünschtem
Warmwasser zu verhindern (THERMOSTATMISHER)
GRENZWERTE NACH UNI EN 1111 (FÜR THERMOSTAT-ARMATUREN) UND UNI EN 817 (FÜR
MECHANISCHE ARMATUREN) UM EINE OPTIMALE BETRIEBSWEISE ZU HABEN
Betriebsdruck: Min. 1 bar max. 5 bar
Warmwassertemperatur: 55°C ≤ T ≤ 65°C
Kaltwassertemperatur: T ≤ 25°C
HINWEIS: Bei Wasser Drück mehr als 5 bar, wird es empfohlen, einen Druckminderer
zu installieren.
TECHNICAL CHARACTERISTICS:
Hot water indicator: on the left in Red
Cold water indicator: to the right in Blue
CAUTION: do not invert the hot/cold water connections.
Lock button at 38°C to prevent accidental adjustment to very hot temperatures THERMOSTATIC
MIXER
LIMITS RECOMMENDED BY UNI EN 1111 THERMOSTATIC MIXERS AND UNI 817
MECHANICAL MIXERS FOR GOOD FUNCTIONING
Min. Pressure 1 bar max. 5 bar
Hot water temp.: 55°C ≤ T ≤ 65°C
Cold water temp.: T ≤ 25°C
NOTE: In case of pressures above 5 bar it is recommended to install a pressure reducer.
4
D
I
Caratteristiche Tecniche
Technical features - Caractéristiques techniques - Technische Eigenschaften
Características técnicas - -

CARACTERISTIQUES TECHNIQUES:
Indicateur alimentation eau chaude : à gauche, couleur rouge
Indicateur alimentation eau froide : à droite, couleur bleue
ATTENTION : ne pas intervertir le raccordement de l’eau chaude et de l’eau froide.
Bouton de verrouillage à 38°C pour éviter toute fausse manœuvre vers une demande d’eau chaude
non souhaitée (MITIGEUR THERMOSTATIQUE
LIMITES D’UTILISATION RECOMMANDEES PAR LA NORME UNI EN 1111 MITIGEURS
THERMOSTATIQUES ET UNI 817 MITIGEURS MÉCANIQUES POUR UN BON
FONCTIONNEMENT
Pression : min. 1 bar, max. 5 bar
Température de l’eau chaude : 55°C ≤ T ≤ 65°C
Température de l’eau froide : T ≤ 25°C
REMARQUE: En cas de pressions supérieures à 5 bar, il est recommandé d'installer un réducteur de
pression.
CARACTERÍSTICAS TÉCNICAS:
Indicación para la salida de agua caliente: a la izquierda, distintivo de color rojo
Indicación para la salida de agua fría: a la derecha, distintivo de color azul
ATENCIÓN: no invierta las entradas del agua caliente y fría.
Pulsador de bloqueo en 38°C para evitar maniobras equivocadas en la solicitud de agua caliente no
deseada GRIFO TERMOSTÁTICO
LÍMITE DE USO RECOMENDADO POR LA NORMA UNI EN 1111 GRIFOS TERMOSTÁTICOS Y UNI
817 GRIFOS MECÁNICOS PARA EL BUEN FUNCIONAMIENTO
Presión: mín. 1 bar máx. 5 bar
Temperatura del agua caliente: 55°C ≤ T ≤ 65°C
Temperatura del agua fría: T ≤ 25°C
NOTA: En caso de presiones superiores a 5 bar, se recomienda instalar un reductor de presión.
:
:
:
Внимание: НЕ ПЕРЕПУТАЙТЕ трубы подведения горячего и холодного
водоснабжения к смесителю
38°C ,
( )
,
, : UNI EN 1111 ( )
UNI EN 817 ( )
: . 1 . 5
: 55°C ≤ T ≤ 65°C
: T ≤ 25°C
ВАЖНО: в случае, когда давление превышает 5 бар, рекомендуется установить
ограничитель давления.
AR
5
F
E
RUS

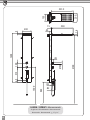
313 100
63
1205
200
5
45
82
38
1.5
24
500
49
Ø52
155
200
501.5
2100
945
1300
L00926 - 2 SPRAYS - Monocomando
Single lever - Einhebelbatterie - Monocommande
Monomando - -
6

5
200
1205
63 100313
59.5
Ø52
500
24
1.5
38
82
501.5
200
155
45
2100
945
1300
L00930 - 2 SPRAYS - Termostatico
Thermostatic - Thermostatmischer - Thermostatique
Termostático - -
7

313 100
63
1205
200
5
82
38
1.5
24
500
49
Ø52
155
200
501.5
2100
945
1300
45
L00928 - 3 SPRAYS - Monocomando
Single lever - Einhebelbatterie - Monocommande
Monomando - -
8

5
200
1205
63 100313
59.5
Ø52
500
24
1.5
38
82
501.5
200
155
45
2100
945
1300
L00932 - 3 SPRAYS - Termostatico
Thermostatic - Thermostatmischer - Thermostatique
Termostático - -
9

10
2100 mm
945 mm
PREDISPOSIZIONE SUGGERITA E POSIZIONE SPACCO A MURO
SUGGESTED ARRANGEMENT AND WALL RECESS POSITION
VORGESCHLAGENE ANORDNUNG UND STELLUNG DER WANDAUSSPARUNG
ARRANGEMENT SUGGÉRÉ ET POSITION D'ÉVIDEMENT DU MUR
DISPOSICIÓN SUGERIDA Y POSICIÓN DE EMPOTRAMIENTO EN LA PARED

11
0 mm
- 7 mm MAX
> 0 mm
Muro
Wall
Wand
Mur
Pared
Стена
Rivestimento
Tiling
Fliesen
Carrelage
Azulejo
Отделка
A
ATTENZIONE: prima di incassare la scatola occorre valutare lo spessore del rivestimento.
A rivestimento ultimato, la scatola non dovrà assolutamente sporgere (potrà essere incassata sotto il livello
del rivestimento no ad un max di 7 mm).
WARNING: Before installing the concealed box, the thickness of the tiling must be carefully calculated. After
tiling set up, the box must not stick out from the external surface of the tiling (but it can be concealed until
7 mm under the external surface of the tiling).
VORSICHT: Bevor das Unterputz Körper im Wand versenken, muss die Dicke der Fliesen berechnet werden.
Nach dem Fliesenaufstellung muss das Unterputz Körper nicht von der Fliesenaußenäche herausstehen (es
kann aber bis 7 mm unter der Fliesenaußenäche versenkt sein).
ATTENTION: Avant d'installer la partie à encastrer, on doit calculer soigneusement l'épaisseur du carrelage.
Après la pose du carrelage, la partie encastrée ne doit pas dépasser de la surface extérieure du carrelage (mais
elle peut être encastrée jusqu'à 7 mm sous la surface extérieure du carrelage).
ADVERTENCIA: antes de instalar la parte empotrada, se debe calcular cuidadosamente el espesor del azulejo.
Después la instalación de los azulejos, la parte empotrada no debe sobresalir de la supercie externa del
azulejo (pero puede ser empotrada hasta 7 mm por debajo de la supercie externa del azulejo).
ВАЖНО:
,
( , , 7 ).
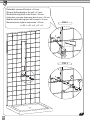
1

12
B
x 6
13 mm
13 mm
60 mm
STEP 1
STEP 2
STEP 3
3
2
1

13
945 mm
xx mm
45 mm
155 mm
1178.5 mm
Per profondità incasso vedere Figura A
Look at picture A for recessing depth
Bild A für die Einbautiefe anschauen
Regarder l'image A pour la profondeur d'encastrement
Mirar la imagen A para profundidad de empotramiento
Глубину встройки см. на рис. А
100 mm 489 mm 489 mm
C
1
1
A

14
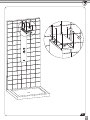
D
1
945 mm

15
E
20 mm MAX
90 mm
Acqua calda
Hot water
Warmwasser
Eau chaude
Agua caliente
Горячая вода
Acqua fredda
Cold water
Kaltwasser
Eau froide
Agua fria
Холодная вода

16
F

17
G

18
H
Ø 8mm
STEP 1
STEP 2
Profondità minima di foratura = 55 mm
Minimal drilling depth in the wall = 55 mm
Mindestbohrungstiefe in der Wand = 55 mm
Profondeur minimale de perçage dans le mur = 55 mm
Medida mínima del agujero en la pared = 55 mm
Минимальная глубина сверления = 55 мм
10
4
6

19
PER MANHATTAN PANEL FLAT L00928 - L00932 PROSEGUIRE DA PAG. 26
FOR MANHATTAN PANEL FLAT L00928 L00932 CONTINUE FROM PAGE 26
FÜR MANHATTAN PANEL FLAT L00928 L00932 VON SEITE 26 WEITERGEHEN
POUR MANHATTAN PANEL FLAT L00928 L00932 CONTINUER DE LA PAGE 26
PARA MANHATTAN PANEL FLAT L00928 L00932 CONTINUAR DESDE LA PÁGINA 26
MANHATTAN PANEL FLAT L00928 - L00932 . 26
MANHATTAN PANEL FLAT
L00926 - L00930
2 SPRAYS
Ø 8mm
STEP 1
STEP 2
STEP 3
Profondità minima di foratura = 55 mm
Minimal drilling depth in the wall = 55 mm
Mindestbohrungstiefe in der Wand = 55 mm
Profondeur minimale de perçage dans le mur = 55 mm
Medida mínima del agujero en la pared = 55 mm
Минимальная глубина сверления = 55 мм
I
4
5
6

20
L
11
5
11
11
10

21
M

22
N
STEP 1
STEP 2
STEP 3
7
9

23
O
8
9

24
P
STEP 1
STEP 2
2
12
13
16

25
Q
15
14

26
MANHATTAN PANEL FLAT
L00928 - L00932
3 SPRAYS
I1
Ø 8mm
STEP 1
STEP 2
STEP 3
Profondità minima di foratura = 55 mm
Minimal drilling depth in the wall = 55 mm
Mindestbohrungstiefe in der Wand = 55 mm
Profondeur minimale de perçage dans le mur = 55 mm
Medida mínima del agujero en la pared = 55 mm
Минимальная глубина сверления = 55 мм
4
5
6

27
L1
12
1
2
11
5
11
11
10

28
M1

29
N1
STEP 1
STEP 2
STEP 3
7
9

30
O1
8
9

31
P1
STEP 1
STEP 2
2
12
13
16

32
Q1
15
14

L00926 - 2 SPRAYS - Monocomando
Single lever - Einhebelbatterie - Monocommande
Monomando - -
L00928 - 3 SPRAYS - Monocomando
Single lever - Einhebelbatterie - Monocommande
Monomando - -
33
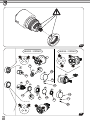
Sostituzione/manutenzione cartucce
Cartridge replacement/maintenance - Auswechseln/Wartung der Kartuschen - Substitution/entretien des cartouches
- Sustitución y mantenimiento de los cartuchos - -
18
19 20
21
22
23
24
25
26
27
28

34
Contenuto della confezione Package content -
Inhalt der Verpackung -
Contenu de l’emballage -
Contenido del
embalaje -
-
Item Descrizione - Description - Beschreibung - Description - Descripción - O - Q.Ty
18
Cartuccia deviatore
Diverter cartridge - Umstellkartusche - Cartouche d'inverseur - Cartucho desviador
- -
1
19
Ghiera serraggio cartuccia deviatore
Diverter cartridge tightening ring nut - Umstellkartuschen-Druckhülse - Bague de
serrage de cartouche d'inverseur - Cápsula de sujeción del cartucho desviador -
-
1
20
Maniglia deviatore
Supply handle - Einschaltgri - Poignée de diusion - Manija de suministro -
-
1
21
Grano fissaggio maniglie
Grub screw for fixing handles - Stift zur Gribefestigun - Vis sans tête pour xation des
poignées - Grano para fijar manijas - -
1
22 Tappo
Cap - Abdeckstopfen - Pastille - Tapón - - 1
23
Cartuccia miscelatore
Mixer cartridge - Mischkartusche - Cartouche mitigeur - Cartucho mezclador -
-
1
24
Ghiera serraggio cartuccia miscelatore - Mixer cartridge lock nut - Gewindering zur
Befestigung der Mischkartusche - Ecrou de serrage cartouche mitigeur - Tuerca de jación del
cartucho mezclador - -
1
25
Coprighiera
Mixer cartridge lock nut - Gewindering zur Befestigung der Mischkartusche - Ecrou de
serrage cartouche mitigeur - Tuerca de jación del cartucho mezclador -
-
1
26
Maniglia di controllo temperatura
Temperature control handle - Temperaturwählgri - Poignée de contrôle de la température -
Manija de control de temperatura - -
1
27
Grano fissaggio maniglie
Grub screw for fixing handles - Stift zur Gribefestigun - Vis sans tête pour xation des
poignées - Grano para fijar manijas - -
1
28
Leva per maniglie
Lever for handles -Grihebel - Levier pour poignées - Palanca para manijas -
-
1

35
25
32
2.5
2.5
26
27 26
25
22
21
28
24
19
25
20
20
R1 R2
R3
17
17

36
L00928 - 3 SPRAYS L00926 - 2 SPRAYS
25
7 Nm
32
12 Nm
18
18
23
24
25
20
R4
R5
19 21
22
23
26
27
28

37
18
19 20
21
22
23 24
28
21
22
25 26 27
Sostituzione/manutenzione cartucce
Cartridge replacement/maintenance - Auswechseln/Wartung der Kartuschen - Substitution/entretien des cartouches
- Sustitución y mantenimiento de los cartuchos - -
L00930 - 2 SPRAYS - Termostatico
Thermostatic - Thermostatmischer - Thermostatique
Termostático - -
L00932 - 3 SPRAYS - Termostatico
Thermostatic - Thermostatmischer - Thermostatique
Termostático - -

38
Contenuto della confezione Package content -
Inhalt der Verpackung -
Contenu de l’emballage -
Contenido del
embalaje -
-
Item Descrizione - Description - Beschreibung - Description - Descripción - O - Q.Ty
18
Cartuccia deviatore
Diverter cartridge - Umstellkartusche - Cartouche d'inverseur - Cartucho desviador
- -
1
19
Ghiera serraggio cartuccia deviatore
Diverter cartridge tightening ring nut - Umstellkartuschen-Druckhülse - Bague de
serrage de cartouche d'inverseur - Cápsula de sujeción del cartucho desviador -
-
1
20
Maniglia deviatore
Supply handle - Einschaltgri - Poignée de diusion - Manija de suministro -
-
1
21
Grano fissaggio maniglie
Grub screw for fixing handles - Stift zur Gribefestigun - Vis sans tête pour xation des
poignées - Grano para fijar manijas - -
2
22 Tappo
Cap - Abdeckstopfen - Pastille - Tapón - - 2
23
Cartuccia termostatica
Thermostatic cartridge -Thermomischkartusche - Cartouche thermostatique -
Cartucho termostático - -
1
24
Ghiera serraggio cartuccia termostatica
Thermostatic cartridge tightening ring nut - Thermomischkartuschen-Druckhülse - Bague
de serrage de cartouche thermostatique - Cápsula de sujeción de cartucho termostático
- -
1
25
Leva ON/OFF
Lever for handles -Grihebel - Levier pour poignées - Palanca para manijas -
-
1
26 Anello antifrizione - Anti-friction ring - Anti-Reibungsring - Anneau anti-friction - Anillo
anti-fricción - антифрикционное кольцо - 1
27
Camma con fermo 38°
Hot limit safety stop at 38°C - Nocken mit Feststellmöglichkeit 38° - Came avec arrêt à
38°C - Leva con retén 38°C - 38°C -
1
28
Maniglia di controllo temperatura
Temperature control handle - Temperaturwählgri - Poignée de contrôle de la température -
Manija de control de temperatura - -
1

39
25
36
2.5
2.5
28
28
25
22
21
23
18
20
20
S1 S2
S3
22
21
26 27
24
19
17
17

40
25
7 Nm
L00932 - 3 SPRAYS L00930 - 2 SPRAYS
36
10 Nm
18
24
25
20
S4
S5
19
21
22
23
26
27
28
21
22

41
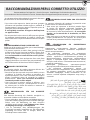
Un corretto utilizzo del prodotto Vi consentirà di evitare
possibili danni al vostro ambiente bagno.
* Per evitare che impurità o detriti possano giungere
all’interno del prodotto dando origine a problemi di
funzionamento, spurgare sempre l’impianto prima di
collegare i tubi di alimentazione.
É consigliabile installare all’ingresso dell’impianto
un apposito filtro.
* Per evitare che il calcare intasi il diffusore, consigliamo
di strofinare periodicamente gli ugelli in silicone per
liberarli dal calcare e per mantenere il diffusore sempre
pulito.
RECOMMENDATIONS FOR PROPER USE
Proper use of this product will allow you to avoid damages
to the bathroom environment.
* To prevent impurities or debris from getting inside the
product and causing functional problems, always flush
out the system before connecting it to the supply pipes.
It is recommended to install the filter at the system’s
water intake.
* To keep the diffuser clean and prevent lime scales from
clogging the diffuser, we advise that you periodically rub
the silicone nozzles to free them of the lime deposits.
CONSEILS D’ENTRETIEN
Un entretien régulier du produit permettra d’éviter des
éventuels dégâts dans votre salle de bains.
* Pour éviter que des impuretés ou que des débris puissent
se déposer à l’intérieur du produit et provoquer des
dysfonctionnements, nous vous conseillons de toujours
purger l’installation avant de raccorder les conduits
d’alimentation. Nous vous conseillons d’installer à
l’entrée du produit un filtre adapté.
* Pour éviter que le calcaire obstrue le diffuseur, nous
vous conseillons d’essuyer périodiquement les buses
en silicone pour les libérer du calcaire et maintenir le
diffuseur toujours propre.
EMPFEHLUNGEN FÜR DIE KORREKTE
BENUTZUNG
Eine korrekte Benutzung des Produkts ermöglicht es,
eventuelle Schäden in Ihrem Bad zu vermeiden.
* Um zu verhindern, dass Schmutz und Ablagerungen ins
Innere des Produkts gelangen und zu Funktionsstörungen
führen, muss die Rohrleitung vor dem Anschluss
sorgfältig gespült werden. Das Einbauen eines Filters
am Eingang der Anlage ist zu empfehlen.
* Um zu verhindern, dass Kalkablagerungen den
Duschstrahl verstopfen, empfehlen wir, die Silikondüsen
regelmäßig mit einem Tuch zu reinigen, damit der
Duschkopf immer sauber bleibt.
RECOMENDACIONES PARA UNA UTILIZACIÓN
CORRECTA
La correcta utilización del producto le permitirá evitar
posibles daños a su ambiente de baño.
* Para evitar que impurezas o desechos puedan llegar
al interior del producto originando problemas de
funcionamiento, purgue siempre la instalación antes
de conectar los tubos de alimentación. Es aconsejable
instalar, en la entrada de la instalación, un filtro
adecuado.
* Para evitar que la cal atasque el difusor, aconsejamos
limpiar periódicamente las boquillas de silicona para
eliminar la cal y mantener el difusor siempre limpio.
РЕКОМЕНДАЦИИ ПО КОРРЕКТНОМУ
ИСПОЛЬЗОВАНИЮ
.
* ,
,
,
, ,
,
*
,
,
.
RACCOMANDAZIONI PER IL CORRETTO UTILIZZO
Recommendations For Proper Use - Conseils D’entretien - Empfehlungen Für Die Korrekte Benutzung
Recomendaciones Para Una Utilización Correcta - -
AR

42
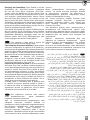
Per conservare il più a lungo possibile l’aspetto del
materiale, è necessario osservare alcune regole.
Per la pulizia parti metalliche: l’acqua contiene calcio
che si deposita sulla superficie dei prodotti e forma
macchie sgradevoli. Per la normale pulizia del prodotto
è sufficiente utilizzare un panno umido con un po’ di
sapone, sciacquare ed asciugare. E’ possibile quindi
evitare la formazione di macchie di calcare asciugandolo
dopo ogni uso.
Nota importante: si consiglia di usare solamente
detergenti a base di sapone. Non impiegare mai
detergenti o disinfettanti abrasivi o contenenti alcool,
acido cloridrico o acido fosforico, Candeggina, Cloro etc.
Pulizia degli ugelli in silicone: il soffione è dotato del
sistema “Easy-Clean” con ugelli in silicone. Il calcare è il
peggiore nemico delle docce per questo Bossini propone
il sistema “Easy-Clean”. Questi ugelli in silicone, sono
estremamente resistenti al calore e proprio con l’acqua
calda si dilatano facendo così staccare il primo strato di
calcare. Inoltre, flettendo periodicamente con la mano,
gli ugelli in silicone, le insenature si liberano facilmente
dal calcare. Con un semplice gesto la vostra doccia è
sempre perfetta.
Caro cliente, le ricordiamo che, la garanzia sulla superficie
dei nostri prodotti non è valida se, il materiale ha subito
un trattamento diverso da quello da noi suggerito.
La garanzia non copre danni causati da deposito di
calcare o impurità.
Congratulations for choosing a Bossini product
and we thank you for the trust you have given us.
To keep the material’s appearance as long as possible, a few
guidelines must be followed.
Cleaning metal parts: water contains calcium that
deposits on surfaces and forms unpleasant spots. For
routine cleaning, simply use a damp cloth with a little soap,
rinse and dry. Calcium spots can therefore be avoided by
drying after use.
Important note: Using only a soap-based detergent
is recommended. Never use abrasive detergents or
disinfectants or those containing alcohol, hydrochloric acid
or phosphoric acid, Bleach, chlorine etc
Cleaning the rubber nozzles: the showerhead is equipped
with the “Easy-Clean” system with silicon nozzles. Calcium
is a shower’s worst enemy and that is why Bossini proposes
theEasy-Clean” system. These silicon nozzles are extremely
heat resistant and with hot water they dilate, thus detaching
the first layer of calcium. Moreover, periodically rubbing the
silicon nozzles manually easily gets rid of calcium. With one
simple gesture, your shower is always perfect.
Dear Customer, we would like to remind you that the
warranty on our product’s surface is not valid if the material
undergoes treatment different than that suggested. The
warranty does not cover any damage due to deposits of
calcium or impurities.
Pour que le matériel conserve le plus longtemps
possible son aspect d’origine, nous vous invitons à respecter
quelques règles simples.
Nettoyage des parties métalliques: l’eau contient du
calcaire qui se dépose à la surface du produit et forme des
taches inesthétiques. Pour le nettoyage normal du produit,
utiliser un chiffon humide avec un peu de savon, rincer
et sécher. Il est possible d’éviter la formation de taches de
calcaire en l’essuyant après chaque utilisation.
Remarque importante: il est recommandé d’utiliser
uniquement des détergents à base de savon. Ne jamais
faire usage de détergents ou de désinfectants abrasifs ou
contenant de l’alcool, de l’acide chlorhydrique ou de l’acide
phosphorique, Eau de Javel, Chlore, etc.
Nettoyage des buses en caoutchouc: votre plafond de
douche est munie du système “Easy-Clean” avec des buses
(modules) en silicone . Le calcaire est le pire ennemi des
douches et c’est pour cela que Bossini propose le système
“Easy-Clean”. Ces modules en silicone sont extrêmement
résistants à la chaleur et se dilatent sous l’action de l’eau
chaude, permettant ainsi à la première couche de calcaire
de se décrocher. En outre, il suffit d’appuyer régulièrement
avec la main sur les modules en silicone pour libérer le
calcaire présent dans les orifices. Un simple geste suffit pour
que votre douche soit toujours en parfait état.
Cher client, nous vous rappelons que la garantie sur la
surface de nos produits ne s’applique pas si le matériel a subi
un traitement autre que celui que nous recommandons. La
garantie ne couvre pas les dommages causés par les dépôts
de calcaire ou de saletés.
Wir gratulieren Ihnen zum Kauf dieses Produktes
der Firma Bossini und danken Ihnen für das Vertrauen, das
Sie uns entgegengebracht haben. Um die Materialien so gut
wie möglich zu schützen, müssen einige grundlegende
Regeln befolgt werden.
Reinigung der Metallteile: Unser Wasser enthält Kalk, das
sich auf der Oberfläche des Produktes absetzt und unschöne
Flecken bildet. Um die Brause einer normalen Reinigung zu
unterziehen,
reicht es aus, diese mit einem feuchten Tuch und etwas Seife
zu säubern, mit Wasser abzuspülen und abzutrocknen. Um
die Bildung von Kalkflecken zu vermeiden, genügt es also,
die Brause nach jedem Gebrauch gut abzutrocknen.
Wichtige Anmerkung: Wir empfehlen, ausschließlich
Reinigungsmittel auf Seifenbasis zu benutzen. Benutzen
Sie auf keinen Fall Reinigungs- oder Desinfektionsmittel,
welche die Oberfläche zerkratzen bzw. Alkohol, Salz- oder
Phosphorsäure, Bleichmittel, Chlor usw enthalten.
Pulizia
Cleaning - Nettoyage - Die Reinigung - Para La Limpieza - -

43
Reinigung der Gummidüsen: Dieses Produkt ist mit den
Gummidüsen des „Easy-Clean“-Systems ausgestattet.
Das von der Firma Bossini eingesetzte „Easy-Clean“-
System schützt die Kopfbrause vor dem ärgsten Feind
aller Duschen: dem Kalk. Die Gummidüsen dieses Systems
sind besonders hitzebeständig.Sobald warmes Wasser
durch die Düsen läuft, dehnen sie sich, wodurch sich die
oberste Schicht Kalk ablöst. Darüber hinaus sollte man die
Silikondüsen regelmäßig mit der Hand zusammendrücken,
da sie hierdurch problemlos vom Kalk befreit werden. Es
genügt also eine kleine Handbewegung, um Ihre Dusche in
einem stets perfekten Zustand zu halten.
Lieber Kunde, liebe Kundin: Wir möchten Sie daran erinnern,
dass die Garantie für die Oberflächen unserer Produkte
verfällt, wenn das Material einer anderen, als der von uns
empfohlenen Behandlung unterzogen wurde. Von der
Garantie werden keine durch Kalkablagerungen oder
Verunreinigungen verursachte Schäden gedeckt.
Para mantener a largo plazo el aspecto del
material, es necesario observar algunas reglas.
Para la limpieza de las partes metálicas: el agua contiene
calcio que se deposito en la superficie de los productos y
forma manchas desagradables. Para la limpieza normal del
producto se debe utilizar un paño húmedo con un poco de
jabón, enjuagarlo y secarlo. Se puede evitar la formación
de manchas de cal secando el producto luego de cada uso.
Nota importante: se aconseja usar únicamente
detergentes a base de jabón. No emplee detergentes o
desinfectantes abrasivos o que contengan alcohol, ácido
clorhídrico o ácido fosfórico, Lejía, cloro , etc.
Limpieza de los tetones de goma: la ducha está dotada
del sistema “Easy-clean” con tetones (módulos) de goma. La
cal es el peor enemigo de las duchas, por este motivo, Bossini
propone el sistema “Easy-Clean”.Estos módulos de goma,
son extremadamente resistentes al calor y precisamente
se dilatan con el agua caliente permitiendo, de este modo,
que se desprenda la primera capa de cal. Además, doblando
periódicamente con la mano, los módulos de silicona, las
acanaladuras se liberan fácilmente del calcáreo. Con un
simple gesto vuestra ducha está siempre perfecta.
Estimado cliente, le recordamos que, la garantía sobre
la superficie de nuestros productos pierde su validez si
el material ha sufrido un tratamiento distinto de aquel
sugerido por nosotros. La garantía no cubre los daños
causados por la acumulación de cal o suciedad.
,
.
:
,
.
,
,
;
.
,
.
:
.
, ,
.
:
“Easy-Clean”
(). -
,
“Easy-Clean”.
,
.
,
,
.
, ,
,
,
.
, -
.
AR

44
Gentile Cliente,
ci complimentiamo con lei per aver scelto
un prodotto Bossini e la ringraziamo per la
fiducia accordataci.
Il prodotto è garantito 2 anni contro vizi o
difetti di fabbricazione.
La garanzia non copre danni causati
da: installazione e/o utilizzo impropri,
un’errata concezione dell’impianto, la
normale usura, i danni causati da deposito
di calcare o impurità, l’impiego di prodotti
di pulizia e manutenzione diversi da quelli
specificatamente indicati nelle presenti
istruzioni. Inoltre Bossini non risponde
dei costi di manodopera e/o danni, anche
accidentali o conseguenti, occorsi durante
l’installazione, riparazione o sostituzione del
prodotto.
Le richieste di sostituzione in garanzia
potranno essere avanzate solo presentando
un documento datato comprovante
l’acquisto del prodotto. La garanzia
si riferisce unicamente ai difetti di
fabbricazione e dà diritto esclusivamente
alla riparazione o alla fornitura gratuita
del pezzo riconosciuto difettoso. Il pezzo
difettoso dovrà essere restituito a Bossini in
porto franco, accompagnato da un rapporto
di descrizione del difetto. Bossini si riserva il
diritto di ispezionare il pezzo contestato per
valutare l’applicabilità della garanzia.
La garanzia decorre dalla data di acquisto del
prodotto, comprovata da documentazione
riscontrabile (fattura, scontrino fiscale) e
non è rinnovabile. Per ulteriori informazioni
potete contattare Bossini o il rivenditore di
zona.
Dear Customer,
We congratulate you and thank you for
choosing a Bossini quality product. The
product is covered by 2 Years warranty against
any defects due to manufacturing faults.
The warranty does not cover damages caused
by improper installation or use, neglect,
incorrect plumbing, normal fair wear and
tear, damages caused by limescale deposits
or impurities, the use of detergents and
maintenance products other than those
specifically recommended in our instructions
manual. Furthermore Bossini is not responsible
for labour costs and/or damages, whether
accidental or consequent to the installation,
repairing or replacement of the product.
The request for replacement under the terms of
this warranty must be made in a letter setting
out the date and place of purchase and giving
a brief explanation of the problem. The letter
must be received by us within the warranty
period and must be accompanied by proof of
the purchase date (e.g. a receipt). The warranty
only covers production faults / defects
and is strictly limited to the repair or free
replacement of the parts which are recognised
to be defective. The defective parts have to be
returned to Bossini carriage free with a report
describing the defect. Bossini reserves the
right to inspect the part alleged to be faulty or
defective and to evaluate the applicability of
the warranty terms.
The warranty period commences on the date
the product is purchased, evidenced by the
relevant purchase document (e.g. receipt,
invoice, cash voucher) and it is NOT renewable.
For further information please contact Bossini
or its distributor.
Condizioni di Garanzia
Warranty Terms - Conditions de Garantie - Garantiebedingungen - Condiciones de Garantía -
-

45
Cher Client,
Nous vous félicitons et remercions d’avoir
choisi un produit de qualité Bossini.
Le produit est garanti 2 années contre tout
défaut de production.
Sont exclus de la garantie les dommages causés
par utilisation non conforme, conception
de l’installation de l’eau erronée, l’usure, les
dommages causés par les dépôts de calcaire et
impuretés, l’utilisation de produits détergents
et d’entretien différents de ceux recommandés
dans nos instructions.
En outre la garantie ne couvre aucun coût
de main d’œuvre et/ou dommages même
accidentels ou conséquents, arrivés lors de
l’installation, réparation ou remplacement du
produit.
Les demandes de remplacement en garantie
doivent être accompagnées par un document
daté témoignant l’achat du produit. La
garantie couvre seulement les défauts de
fabrication et est strictement limitée à la
réparation ou remplacement du matériel
reconnu défectueux. Le produit défectueux
doit être retourné au fabricant en franco de
port, accompagné par une description du
défaut. Bossini se réserve le droit d’examiner
les pièces reçues pour valider l’application de
la garantie.
La garantie est valable à compter de la date
d’achat du produit, certifiée par un document
d’achat (facture, quittance) et n’est pas
renouvelable.
Pour toute information complémentaire
veuillez contacter Bossini ou vous adresser au
distributeur.
Sehr geehrter Kunde!
Wir gratulieren Ihnen zum Kauf eines Bossini-
Produkts und danken Ihnen für das uns
entgegengebrachte Vertrauen.
Sie haben auf dieses Produkt zwei Jahre
Garantie gegen Herstellungsfehler.
Die Garantie gilt nicht für Schäden, die auf
unsachgemäße/n Installation und/oder
Gebrauch oder mangelhafte Montage, den
gewöhnlichen Verschleiß, Ablagerungen
von Kalk bzw. Verunreinigungen oder
den Gebrauch von anderen als in der
Gebrauchsanweisung eigens angeführten
Reinigungs- und Pflegemitteln zurückzuführen
sind. Darüber hinaus haftet Bossini
nicht für Instandhaltungskosten und/
oder unvorhergesehene Schäden oder
Folgeschäden, die während der Installation,
der Reparatur oder des Austausches des
Produkts auftreten.
Ein Ersatz des Produkts erfolgt nur gegen Vorlage
eines mit Datum versehenen Kaufbelegs. Die
Garantie gilt nur für Herstellungsfehler. Sie
haben ausschließlich das Recht auf Reparatur
oder kostenlosen Ersatz des mängelbehafteten
Teils. Dieses ist mit einer Fehlerbeschreibung
an Bossini portofrei zurückzusenden. Bossini
behält sich das Recht vor, das beanstandete
Teil zu überprüfen, um den Garantieanspruch
zu beurteilen.
Die Garantie gilt ab dem Kaufdatum des
Produkts (als Nachweis gilt die Rechnung oder
der Kassenzettel) und ist nicht erneuerbar.
Wenn Sie weitere Informationen wünschen,
wenden Sie sich an Bossini oder den
Fachhändler in Ihrer Nähe.

46
Estimado Cliente,
Le felicitamos por haber elegido un producto
Bossini y le agradecemos la confirnza
depistada en nuestra firma.
El producto está garantizado 2 años contra
cualquier vicio o defecto de fabricación.
La garantía no cubre daños causados por:
instalación y/o uso impropio, un fallo de
conexión de la instalación, el uso de productos
de limpieza y mantenimiento diferentes
de los especificamente indicados en las
instrucciones presentes. A parte, Bossini no
responde de los costes de mano de obra y/o
daños, aunque accidentales o a consecuencia,
ocurridos durante la instalación, reparación, o
sustitución del producto.
Los pedidos de sustitución en garantía podrán
ser enviados solo si se presenta un documento
que demuestre la adquisición del producto. La
garantía se refiere unicamente a los defectos
de fabricación y da derecho exclusivamente a
la reparación o a la entrega gratuita de la pieza
reconocido defectuoso. La pieza defectuosa
deberá entregarse a Bossini a portes pagados,
acompañado de un rapor de descripción
del defecto. Bossini se reeserva el derecho de
inspeccionar la pieza en cuestión para evaluar
la aplicabilidad de la garantía.
La garantía cuenta a partir de la adquisición
del producto, verificada la documentación de
adquisición (factura, albarán o dato fiscal) ) y
no es renovable.
Para más información pueden contactar
Bossini o el distribuidor de la zona.
,
Bossini
.
2
, .
, :
,
, ,
,
,
. ,
Bossini
,
.
.
,
, ,
.
Bossini,
. Bossini
,
,
.
,
(-, ).
.
Bossini
.

47
AR

Made in Italy
2MXFI03260001
Distribuito da / Distributed by
www.bossini.it
info@bossini.itt
-
 1
1
-
 2
2
-
 3
3
-
 4
4
-
 5
5
-
 6
6
-
 7
7
-
 8
8
-
 9
9
-
 10
10
-
 11
11
-
 12
12
-
 13
13
-
 14
14
-
 15
15
-
 16
16
-
 17
17
-
 18
18
-
 19
19
-
 20
20
-
 21
21
-
 22
22
-
 23
23
-
 24
24
-
 25
25
-
 26
26
-
 27
27
-
 28
28
-
 29
29
-
 30
30
-
 31
31
-
 32
32
-
 33
33
-
 34
34
-
 35
35
-
 36
36
-
 37
37
-
 38
38
-
 39
39
-
 40
40
-
 41
41
-
 42
42
-
 43
43
-
 44
44
-
 45
45
-
 46
46
-
 47
47
-
 48
48


Bossini L00930 Instrucciones de operación
- Tipo
- Instrucciones de operación
en otros idiomas
- français: Bossini L00930 Mode d'emploi
- italiano: Bossini L00930 Istruzioni per l'uso
Artículos relacionados
-
Bossini L10012 Instrucciones de operación
-
-
-
-
-
-
Bossini L00824 Instrucciones de operación
-
-
-