
20
17
6
15
16
13
14
11
12
22
2
8
10
3
4
7
13
14
21
1
5
19
1
18
11
12
9
S-310/320
�
�
16
3 -
17
18
19
20
2 -
l
m
21
j
4 -
320
22
310, 320
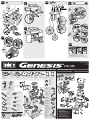
Cookbox Assembly - 1
89467 US z11/23/09
LP
US ENGLISH
Front Panel - 1 Drip Tray - 1 Shroud - 1 Right Side Table - 1 Left Side Table - 1 Door Handle - 2 Left Door Panel - 1 Right Door Panel - 1
Left Frame - 1 Right Frame - 1
Locking Caster - 2
Caster - 2
Rear Frame Support - 1
Bottom Tray - 1
Rear Panel - 1
Cooking Grate - 2
Knob - 3
Catch-Pan - 1
Disposable
Drip Pan - 2
Flavorizer
®
Bar - 5
HARDWARE •
Catch-Pan Holder - 1
Left Trim Assembly - 1
Side Burner - 1
Right Front Trim
Assembly - 1
Left Front Trim
Assembly - 1
Right Trim Assembly - 1
Warming Rack - 1
m
IMPORTANT: TO PROPERLy ALIGN fRAME
AND DOORS, ASSEMbLE GRILL ON A fLAT
AND LEVEL SURfACE.
TOOLS NEEDED:
Front Frame Support - 1
UNPACKING INSTRUCTIONS • ASSEMbLy INSTRUCTIONS •
• Refer to Owner’s Manual for clip installation warning.
Ensemble du boîtier
de cuisson - 1
Panneau avant - 1
Plateau de recueil
des gouttes - 1
Structure - 1
Tablette latérale droite - 1
Tablette latérale
gauche - 1
Poignée de porte - 2
Panneau de porte
gauche - 1
Panneau de porte
droit - 1
Coffrage gauche - 1
Coffrage droit - 1
Ecrou de
verrouillage - 2
Ecrou - 2
Support du
châssis arrière - 1
Plateau inférieur - 1
Panneau arrière - 1
Grille de cuisson - 2
Bouton - 3
Egouttoir - 1
Egouttoir jetable - 2
Barre Flavorizer
®
- 5
MATÉRIEL
Support de l’égouttoir - 1
Ensemble de
garniture gauche - 1
Brûleur latéral - 1
Garniture avant
droite ensemble - 1
Garniture avant
gauche ensemble - 1
Ensemble de
garniture droit - 1
Grille de maintien
au chaud - 1
OUTILS NECESSAIRES:
m
IMPORTANT: POUR ALIGNER
CORRECTEMENT LE CHASSIS ET LES
PORTES, ASSEMbLEZ LE GRILL SUR UNE
SURfACE PLANE ET A NIVEAU.
INSTRUCTIONS POUR LE DEbALLAGE
INSTRUCTIONS DE MONTAGE
Support du
châssis avant - 1
• Veuillez consulter le Manuel du Propriétaire pour l’installation de la pince.
Ensamble de la caja
de cocción - 1
Panel delantero - 1 Bandeja de goteo - 1 Defensa - 1 Mesa lateral derecha - 1 Mesa lateral
izquierda - 1
Asa de la puerta - 2 Panel de la puerta
izquierda - 1
Panel de la puerta
derecha - 1
Bastidor izquierdo - 1 Bastidor derecho - 1
Rueda loca
con traba - 2
Rueda loca - 2
Soporte posterior
del bastidor -1
Bandeja del fondo - 1
Panel trasero - 1
Parrilla de cocción - 2
Perilla - 3
Plato recolector - 1
Bandeja de goteo
desechable - 2
Barra Flavorizer
®
- 5
HERRAJES •
Sostenedor del
plato recolector - 1
Ensamble de la
moldura izquierda - 1
Quemador lateral - 1
Moldura derecha
delantera ensamble - 1
Moldura izquierda
delantera ensamble - 1
Ensamble de la
moldura derecha - 1
Rejilla para
calentar - 1
HerramientaERRAMIENTAS REQUERIDAS:
m
IMPORTANTE: PARA ALINEAR
CORRECTAMENTE EL bASTIDOR y LAS
PUERTAS, ARME LA bARbACOA SObRE
UNA SUPERfICIE PLANA y HORIZONTAL.
Soporte delantero
del bastidor -1
INSTRUCCIONES DESEMPAQUETAR •
INSTRUCCIONES DE MONTAJE
•
• Refiérase al Manual del Propietario para la advertencia referente a la
instalación de la presilla.

R
L
n
6 -
3A
320
1
2
m
S-310/320
d
o
a
n
6 - 1 -
1
2
2 - 2 -
3b
4 -
b
e
3C
a
4
4 -
b
e
5A
2 -
f
5b
3 -
k
6
7
2 -
g
h
1 -
a
8
4 -
i
2 -
11
4 -
d
a
12
4 -
c
2 -
d
e
a
13
14
2 -
k
15
320
9
1
2
1
2
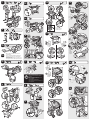
• Flip over frame assembly so the casters are
on a flat surface.
• To adjust door:
• Angled edge
Before installing component,
remove protective film from the stainless
steel part..
10
a
• Retournez l’ensemble du châssis de sorte que les
roues reposent sur une surface plane et à niveau.
• Pour ajuster la porte:
• Extrémité
anguleuse
Avant d’installer le composant,
retirez la pellicule protectrice de la pièce en
acier inoxydable.
• Voltee el ensamble del bastidor de manera que
las ruedas locas queden sobre una superficie
plana y horizontal.
• Para ajustar la puerta:
• Borde
angulado
Antes de instalar el componente,
retire la película protectora de la pieza de
acero inoxidable.
Transcripción de documentos
16 3- 20 18 2- l m 21 4- j 320 S-310/320 � � 19 17 22 • Refer to Owner’s Manual for clip installation warning. • Refiérase al Manual del Propietario para la advertencia referente a la instalación de la presilla. • Veuillez consulter le Manuel du Propriétaire pour l’installation de la pince. 89467 US z11/23/09 LP 310, 320 UNPACKING INSTRUCTIONS • Instrucciones DESEMPAQUETAR • INSTRUCTIONS POUR LE DEBALLAGE Cookbox Assembly - 1 Ensamble de la caja de cocción - 1 Ensemble du boîtier de cuisson - 1 Front Panel - 1 Panel delantero - 1 Panneau avant - 1 Drip Tray - 1 Bandeja de goteo - 1 Plateau de recueil des gouttes - 1 Shroud - 1 Defensa - 1 Structure - 1 Right Side Table - 1 Mesa lateral derecha - 1 Tablette latérale droite - 1 Left Side Table - 1 Mesa lateral izquierda - 1 Tablette latérale gauche - 1 Door Handle - 2 Asa de la puerta - 2 Poignée de porte - 2 Left Door Panel - 1 Panel de la puerta izquierda - 1 Panneau de porte gauche - 1 US ENGLISH assembly INSTRUCTIONS • Instrucciones de montaje • Instructions de montage TOOLS NEEDED: HeaE mientr RRAMIENTAS REQUERIDAS: OUTILS NECESSAIRES: Right Door Panel - 1 Panel de la puerta derecha - 1 Panneau de porte droit - 1 20 Locking Caster - 2 Rueda loca con traba - 2 Ecrou de verrouillage - 2 Caster - 2 Rueda loca - 2 Ecrou - 2 17 Left Frame - 1 Right Frame - 1 Bastidor izquierdo - 1 Coffrage gauche - 1 Bastidor derecho - 1 Coffrage droit - 1 Front Frame Support - 1 Soporte delantero del bastidor -1 Catch-Pan Holder - 1 Sostenedor del plato recolector - 1 Support de l’égouttoir - 1 Cooking Grate - 2 Parrilla de cocción - 2 Grille de cuisson - 2 Support du châssis avant - 1 21 Left Trim Assembly - 1 13 Ensamble de la moldura izquierda - 1 6 14 Ensemble de garniture gauche - 1 7 Knob - 3 Rear Frame Support - 1 Soporte posterior del bastidor -1 Support du châssis arrière - 1 Bottom Tray - 1 Bandeja del fondo - 1 Plateau inférieur - 1 Rear Panel - 1 Panel trasero - 1 Panneau arrière - 1 Perilla - 3 Bouton - 3 Side Burner - 1 Quemador lateral - 1 Brûleur latéral - 1 Catch-Pan - 1 Plato recolector - 1 Egouttoir - 1 Right Front Trim Assembly - 1 Disposable Drip Pan - 2 Bandeja de goteo desechable - 2 Egouttoir jetable - 2 Flavorizer® Bar - 5 Barra Flavorizer® - 5 Barre Flavorizer® - 5 HARDWARE • HERRAJES • MATÉRIEL Moldura derecha delantera ensamble - 1 Garniture avant droite ensemble - 1 Left Front Trim Assembly - 1 1 11 12 1 19 4 5 18 3 22 9 Moldura izquierda delantera ensamble - 1 Garniture avant gauche ensemble - 1 Right Trim Assembly - 1 Ensamble de la moldura derecha - 1 Ensemble de garniture droit - 1 Warming Rack - 1 Rejilla para calentar - 1 Grille de maintien au chaud - 1 m IMPORTANT: to properly align frame and doors, Assemble GRILL ON A FLAT AND LEVEL SURFACE. m IMPORTANTE: para alinear correctamente el bastidor y las puertas, arme la BARBACOA SOBRE UNA SUPERFICIE PLANA Y HORIZONTAL. m IMPORTANT: POUR ALIGNER CORRECTEMENT LE CHASSIS ET LES PORTES, AssembleZ LE GRILL SUR UNE SURFACE PLANE ET A NIVEAU. 13 14 16 8 10 2 11 12 15 1 6- o d 1- n a 5A 2- 10 f 13 a 1 m 2 2 5B 2 2- 3- k 1 • • • 2- 11 6 d a 2 L 320 3A 4- To adjust door: Para ajustar la puerta: Pour ajuster la porte: R 1 6- n 320 3B 3C • Flip over frame assembly so the casters are on a flat surface. • Voltee el ensamble del bastidor de manera que las ruedas locas queden sobre una superficie plana y horizontal. • Retournez l’ensemble du châssis de sorte que les roues reposent sur une surface plane et à niveau. 4- b e a 7 2- g 1- h a 12 4- c 2- d e a • • Angled edge Borde angulado • Extrémité anguleuse 14 Before installing component, remove protective film from the stainless steel part.. Antes de instalar el componente, retire la película protectora de la pieza de acero inoxidable. Avant d’installer le composant, retirez la pellicule protectrice de la pièce en acier inoxydable. 4 4- b e 8 4- i 2- 15 s-310/320 9 2- k-
 1
1
-
 2
2


Weber Genesis 89487 Manual de usuario
- Tipo
- Manual de usuario
- Este manual también es adecuado para
en otros idiomas
- français: Weber Genesis 89487 Manuel utilisateur