Alfa Network 2622 Instruction book
- Categoría
- Máquinas de coser
- Tipo
- Instruction book

MANUAL DE INSTRUCCIONES
MANUAL DE INSTRUÇÃO
LIVRET D’INSTRUCTIONS
INSTRUCTION BOOK
BEDIENUNGSANLEITUNG
2622

1
ÍNDICE
SECCIÓN 1. PIEZAS ESENCIALES
Nombres de las Piezas ........................................................................................................................... 2
SECCIÓN 2. PREPARACIÓN PARA COSER
Mesa Supletoria ...................................................................................................................................... 3
Accesorios Estándar ............................................................................................................................... 3
Caja de Accesorios ................................................................................................................................. 3
Conexión de la Máquina a la Fuente de Alimentación ............................................................................ 3
Pedal ....................................................................................................................................................... 4
Palanca de Elevación del Pie Prensatelas.............................................................................................. 5
Montaje y Extracción del Pie Prensatelas ............................................................................................... 5
Cambio de la Aguja ................................................................................................................................. 6
Tabla de Hilos y Agujas........................................................................................................................... 6
Preparación de los Pasadores Portacarretes.......................................................................................... 7
Extracción o Inserción de la Caja de Bobina........................................................................................... 7
Devanado de la Canilla ........................................................................................................................... 8
Enhebrado de la Caja de Bobina ............................................................................................................ 8
Enhebrado de la Máquina ....................................................................................................................... 9
Enhebrador de Agujas........................................................................................................................... 10
Tracción Hacia Arriba del Hilo de la Canilla .......................................................................................... 10
Compensación de la Tensión del Hilo de la Aguja................................................................................ 11
Ajuste de la Tensión del Hilo de la Canilla ............................................................................................ 11
Botón Selector de Puntada ................................................................................................................... 12
Botón Selector de Longitud de Puntada................................................................................................ 12
Botón Selector de Ancho de Puntada ................................................................................................... 12
Botón de Cosido hacia atrás (Remate) ................................................................................................. 13
Descenso del Corretelas (Dientes de transporte) .................................................................................13
SECCIÓN 3. COSTURA BÁSICA
Costura de Puntada Recta .................................................................................................................... 14
Cambio de Dirección de Costura .......................................................................................................... 14
Utilización de las Guías de Costura de la Placa de Aguja .................................................................... 15
Esquinas en Ángulo Recto .................................................................................................................... 15
Posición de Aguja Variable ................................................................................................................... 15
Puntadas en Zigzag .............................................................................................................................. 16
SECCIÓN 4. COSTURA DE USO GENERAL
Sobrehilado ........................................................................................................................................... 16
Zigzag en Punto .................................................................................................................................... 17
Puntada Formada.................................................................................................................................. 17
Puntada Elástica Recta ......................................................................................................................... 18
Coser Botones....................................................................................................................................... 19
Ojales ............................................................................................................................................... 20-21
Ojal de Relieve con Cordón .................................................................................................................. 22
Cosido de Cremalleras......................................................................................................................... 23
Dobladillos con Puntada Invisible.......................................................................................................... 24
Dobladillo Enrollado .............................................................................................................................. 25
SECCIÓN 5. COSTURA DECORATIVA
Puntada de Ondas ................................................................................................................................ 26
Puntada Elástica ................................................................................................................................... 26
Nido de Abeja........................................................................................................................................ 27
Puntada de Caja.................................................................................................................................... 27
Aplicaciones .......................................................................................................................................... 28
Puntada de Realce Decorativa.............................................................................................................. 28
SECCIÓN 6. CUIDADO DE SU MÁQUINA
Desmontaje y Montaje - Pista de la Lanzadera..................................................................................... 29
Limpieza del Corretelas (Dientes de transporte)................................................................................... 29
Lámpara de Costura.............................................................................................................................. 30
Localización y Solución de Averías....................................................................................................... 31

2
2
3
4
5
6
78
9
10
11
12
13
14
15
16
17
18
19
20
21
22
23
24
25
26
27
SECCIÓN 1. PIEZAS ESENCIALES
Nota : Las especificaciones están sujetas a
modificaciones sin previo aviso.
1
Nombres de las Piezas
1 Botón de cosido hacia atrás (Remate)
2 Botón selector de puntada
3 Botón selector de longitud de puntada
4 Botón selector de ancho de puntada
5 Tope del canillero
6 Eje del canillero
7 Pasadores Portacarretes
8 Guiahilos del canillero
9 Guiahilos
10 Palanca para levantar el hilo (Tirahilos)
11 Botón selector de tensión del hilo
12 Tapa frontal
13 Cortahilos
14 Enhebrador de agujas
15 Placa de Aguja
16 Soporte de pie prensatelas
17 Pieza de sujeción de la aguja
18 Aguja
19 Pie prensatelas
20 Mesa supletoria
21 Asa de transporte
22 Volante
23 Interruptor de alimentación
24 Enchufe hembra de la máquina
25 Brazo libre
26 Palanca para ojales
27 Palanca de elevación del pie prensatelas

3
1
2
3
4
5
7
1
2
3
4
5
6
7
9
9
8
8
6
SECCIÓN 2. PREPARACIÓN PARA
COSER
Mesa supletoria
La mesa supletoria proporciona una superficie de costura
añadida y puede desmontarse fácilmente para coser con el
brazo libre.
Desmontaje de la mesa:
Separe la mesa de la máquina.
Montaje de la mesa:
Empuje la mesa supletoria hasta que encaje en la máquina.
•Ventajas y usos de la costura con brazo libre:
- Evite que se amontone la tela alrededor de la aguja
al hacer refuerzos para aumentar la resistencia de
bolsillos, aberturas y cinturas.
- Para coser mangas, cinturillas, perneras de
pantalones o cualquier área circular de una prenda.
- Para zurcir calcetines o remendar rodillas, codos o
áreas de desgaste en las prendas infantiles.
Accesorios Estándar
Pie prensatelas para cremalleras
Pie prensatelas para dobladillos
Pie prensatelas para ojales automático
Canillas
Juego de agujas
Cortaojales
Destornillador
Guía para dobladillos
Caja de Accesorios
Los accesorios de costura están cómodamente situados en
la mesa supletoria.
Caja de accesorios

4
1
2
3
4
5
6
1
2
3
4
5
6
Conexión de la Máquina a la Fuente de
Alimentación
Advertencia : No coloque nada sobre el pedal, de lo
contrario la máquina se pondrá en marcha
involuntariamente.
Antes de conectar el cable de alimentación, asegúrese que
la tensión y frecuencia que se indican en la máquina
coincidan con su corriente eléctrica.
1. Apague el interruptor de alimentación
2. Introduzca el enchufe macho de la máquina en el
enchufe hembra de la máquina
3. Introduzca el enchufe macho de alimentación en la
toma de corriente.
4. Encienda el interruptor de alimentación para
conectar la corriente y la lámpara de costura.
Enchufe macho de Interruptor de
alimentación alimentación
Toma de corriente Enchufe hembra de la
Enchufe macho de la máquina
máquina Pedal
Pedal
La velocidad de costura se puede variar mediante el pedal.
Cuanto más fuerte pise el pedal, más rápido funcionará la
máquina.

5
1
2
1
2
Palanca de Elevación del Pie Prensatelas
La palanca de elevación del pie prensatelas sube y baja el
pie prensatelas. Puede elevarlo unos 0,6 cm (1/4”) por
encima de la posición alzada normal para extraer fácilmente
el pie prensatelas o para ayudarle a colocar telas gruesas
bajo el pie.
Posición elevada normal
Posición superior
Montaje y Extracción del Pie Prensatelas
Extracción
Gire el volante hacia usted para subir la aguja a su posición
más alta.
Suba el pie prensatelas.
Apriete la palanca situada en la parte posterior del soporte
del pie prensatelas.
El pie prensatelas se desprenderá.
Montaje
Coloque el pie prensatelas de manera que el pasador del
pie prensatelas se quede justo bajo la ranura del soporte de
pie prensatelas.
Baje el soporte del pie prensatelas para que el pie
prensatelas quede bloqueado en su lugar.

6
Cambio de la Aguja
Suba la aguja girando el volante hacia usted y baje el pie
prensatelas.
Suelte el tornillo de fijación de la aguja girándolo en el
sentido contrario a las agujas del reloj.
Saque la aguja de la pieza de sujeción.
Introduzca la aguja nueva en la pieza de sujeción con el
lado plano en sentido opuesto a usted.
Cuando meta la aguja en la pieza de sujeción, empújela
hacia arriba tanto como pueda y apriete el tornillo de fijación
firmemente con un destornillador.
* Compruebe sus agujas frecuentemente por si las puntas
estuvieran arponadas o romas. Los enganchones y las
carreras en géneros de punto, sedas finas y géneros
similares a la seda son permanentes y casi siempre son
causados por una aguja dañada.
Para comprobar la aguja
Coloque el lado plano de la aguja sobre algo plano (placa
de aguja, cristal, etc.). La distancia libre entre la aguja y la
superficie plana deberá uniforme. No utilice nunca una
aguja doblada o roma.
Tabla de Hilos y Agujas
* En general, se utilizan agujas e hilos finos para coser
telas finas, y se utilizan agujas e hilos más gruesos
para coser telas gruesas. Pruebe siempre el tamaño
de la aguja y el hilo en un trozo pequeño de la misma
tela que vaya a utilizarse realmente para coser.
* Emplee el mismo hilo para la aguja y la canilla.
* Cuando cosa géneros sintéticos, muy finos y
elásticos, utilice una aguja de PUNTA AZUL. La aguja
de punta azul evita eficazmente los saltos de puntada.
* Cuando cosa telas muy finas, cosa sobre un papel
para evitar eficazmente el fruncido de las costuras.
Géneros
Hilo
Tamaño
de Aguja
Ligero
Crep de China,
Gasa, Linón,
Organdí,
Crep Georget,
Malla
Seda Fina
Algodón Fino
Sintético Fino
Algodón Fino
Poliéster
Recubierto
9
u
11
Peso
Medio
Mahón, Tweed,
Gabardina,
Géneros para
Tapicería,
Cortinas y
Revestimiento
Linos, Algodón,
Piqué, Sarga,
Géneros de Punto
sin Revés,
Percal
Seda 50
Algodón de 50 a
80, Poliéster
Recubierto de
Algodón Sintético
de 50 a 60
Pesado Seda 50
Algodón de 40 a
50, Poliéster
Recubierto de
Algodón Sintético
de 40 a 50
14
16
11
ó
14

7
1
2
3
3
2
1
1
2
3
1
1
2
3
Preparación de los Pasadores Portacarretes
Los pasadores portacarretes se utilizan para sujetar el
carrete de hilo con objeto de alimentar hilo a la máquina.
Para utilizarlos, levante los pasadores portacarretes.
Empújelos hacia abajo para el almacenamiento.
Hilo superior
Agujero
Enredo
Nota : Cuando utilice hilo que tenga tendencia a
enredarse alrededor del pasador portacarrete,
enhébrelo a través del agujero del pasador
portacarrete según se muestra.
El agujero deberá estar frente al carrete de hilo.
Extracción o Inserción de la Caja de Bobina
Tapa de la lanzadera
Abra la tapa de la lanzadera..
Pestillo
Cuando introduzca la caja de bobina, encaje el saliente en
el rebaje de la pista de la lanzadera.
Levante la aguja girando el volante hacia usted. Saque la
caja de bobina sujetando el pestillo.
Saliente

8
1
2
3
4
5
6
7
3
2
1
Devanado de la Canilla
Saque el volante hacia fuera.
Suelte hilo del carrete.
Guíe el hilo alrededor del guiahilos del canillero.
Inserte el hilo a través del agujero de la canilla, de
dentro a fuera.
Inserte la canilla en el eje del canillero.
Empújelo hacia a la derecha.
Pise de nuevo el pedal.
Cuando la canilla esté totalmente enrollada, pare la
máquina. Vuelva a colocar el eje del canillero en su
posición original desplazándolo a la izquierda, y
corte el hilo.
Con el extremo libre del hilo en la mano, pise el
pedal.
Pare la máquina cuando haya hecho unos pocas
vueltas y corte el hilo cerca del agujero de la canilla.
Empuje el volante a la izquierda (posición original).
Nota : Vuelva a colocar el eje del canillero en su sitio
cuando se pare la máquina
Enhebrado de la Caja de Bobina
Introduzca la canilla en la caja de bobina
Asegúrese de que el hilo se devane en la dirección
de la flecha.
Meta el hilo en la ranura de la caja de bobina.
Tire del hilo por debajo del muelle tensor y e
introdúzcalo en el ojo de salida.
* Deje unos 10 cm (4”) de hilo suelto.
1
2
3
4
5
6
7
1
2
3

9
Enhebrado de la Máquina
Suba la palanca para levantar el hilo a su posición más alta
girando el volante hacia usted.
Levante el pie prensatelas.
Coloque un carrete de hilo en el pasador portacarrete según se
muestra, viniendo el hilo de la parte trasera del carrete de hilo.
Inserte el hilo en el guiahilos utilizando ambas manos.
1
2
3
A continuación, tire del hilo hacia abajo e introdúzcalo
en el guiahilos inferior.
Tire del hilo hacia abajo e insértelo en el guiahilos de
la barra de agujas.
Enhebre el ojo de la aguja de delante a atrás.
4
5
6
1
3
2
4
5
6
1
2
3
4
5
6
Mientras sujeta el hilo cerca del carrete, tire del hilo
hacia abajo al área de tensión y, a continuación,
alrededor del soporte del muelle de retenida.
Tire firmemente del hilo hacia arriba y a través de la
palanca para levantar el hilo de derecha a izquierda.
* Véase la página 10 para obtener información sobre el
enhebrador de agujas incorporado.
Nota : Corte el extremo del hilo con unas tijeras afiladas
para enhebrar la aguja con mayor facilidad.

10
1
2
3
1
2
3
4
Enhebrador de Agujas
Gire la perilla en la dirección de la flecha indicada en la
ilustración. A continuación, introduzca el Gancho en el
ojo de la aguja. Conduzca el hilo alrededor de la Guía y
por debajo del Gancho.
Gire la perilla en la dirección de la flecha que se
muestra en la ilustración, haciendo pasar el bucle de
hilo a través de la aguja.
Tire del hilo a través del ojo de la aguja.
Levante la aguja a su posición más alta.
Tire hacia debajo de la perilla del enhebrador de
agujas todo lo que se pueda.
* El enhebrador de agujas se puede utilizar con una aguja
de Nº11 a Nº16 o una aguja de punta Azul . Un tamaño de
hilo de 50 a 100 también funcionará bien.
Tracción Hacia Arriba del Hilo de la Canilla
Suba el pie prensatelas y sujete el hilo de la aguja
ligeramente con su mano izquierda.
Gire el volante lentamente hacia usted con su mano
derecha hasta que la aguja baje, y siga girando el
volante hasta que la palanca para levantar el hilo esté
en su posición más alta.
Tire ligeramente hacia arriba del hilo de la aguja,
formando un bucle con el hilo de la canilla.
Tire de ambos hilos 15 cm (6”) hacia atrás y por debajo
del pie prensatelas.
1
2
3
4
1
2
3

11
1
2
3
4
5
6
1
2
3
Compensación de la Tensión del Hilo de la
Hilo de la aguja (hilo superior)
Hilo de la canilla (hilo inferior)
Lado del derecho (lado superior) de la tela
Revés (lado inferior) de la tela
Botón selector de la tensión del hilo
Índice de regulación
Aguja
Tensión Correcta
La tensión del hilo se ajusta según los materiales
de costura, las capas de tela y el método de
costura.
La tensión del hilo de la aguja es
demasiado floja
El hilo de la aguja (hilo superior) aparecerá en el
revés (lado inferior) de la tela. Apriete la tensión del
hilo de la aguja moviendo el botón selector a un
número más alto.
Ajuste de la Tensión del Hilo de la Canilla
Para la costura general no es necesario ajustar la tensión
del hilo de la canilla. Sin embargo, puede ajustar la tensión
del hilo de la canilla para una necesidad de costura
específica.
Gire el tornillo de ajuste a la derecha para incrementar la
tensión, o a la izquierda para reducirla.
La tensión del hilo de la aguja es
demasiado alta
El hilo de la canilla (hilo inferior) aparecerá en el
derecho (lado superior) de la tela. Afloje la tensión
del hilo de la aguja moviendo el botón selector a un
número más bajo.
1
2
3
4
5
6
2
3
* La puntada recta ideal entrelaza los hilos entre dos
capas de tela, según se ilustra (ampliado para mostrar
el detalle).
* En una puntada en zigzag ideal, el hilo de la canilla no
se de por el derecho (lado superior) de la tela, y el
hilode la aguja se ve ligeramente por el revés (lado
inferior) de la tela.
1

12
1
1
1
S.S.
1
1
1
A
C
D
E F
G H I
J
K L
A
1
2
3
4
0
1
2
3
4
0
1
2
4
3
5
0
Botón Selector de Puntada
Suba la aguja y el pie prensatelas. Gire el botón selector de
puntada para ajustar el símbolo correspondiente al modelo
deseado en el índice de regulación
Índice de regulación
Botón Selector de Longitud de Puntada
Gire el botón selector de longitud de puntada para ajustar la
longitud de puntada deseada en el índice de regulación.
Cuando más alto sea el número, más larga será la longitud
de puntada.
Índice de regulación
“ ” es el ajuste recomendado para puntadas de
ojales
Ajuste el botón selector en el intervalo 0,5-4 cuando
cosa la puntada en zigzag.
Ajuste el botón selector en “S.S” para coser el modelo
de puntada elástica.
Si el modelo de puntada elástica no es uniforme, gire
el botón selector de longitud de puntada en la
dirección “-“ para reducirla, o “+” para ampliarla.
Botón Selector de Ancho de Puntada
Gire el botón selector de ancho de puntada para
establecer el ancho de puntada deseado en el índice de
regulación.
Cuanto más alto sea el número, más ancha será la
puntada.
Índice de regulación
Nota : Levante la aguja sobre la tela cuando gire el
botón selector de ancho de puntada.

13
1
2
2
1
1
2
3
2
Botón de Cosido Hacia Atrás
Mientras mantenga pulsado el botón de cosido hacia atrás, la
máquina coserá hacia atrás.
Descenso del Corretelas(Dientes de transporte)
Abra la tapa de la lanzadera.
Tapa de la lanzadera
Para bajar el corretelas(dientes) tire hacia abajo de la
palanca de descenso y desplácela a la derecha,
según se ilustra.
Palanca de descenso
Para levantar el corretelas(dientes) tire hacia abajo de
la palanca de descenso y desplácela a la izquierda,
según se ilustra.
* El corretelas (los dientes) debe estar levantado para la
costura normal.
* El corretelas (los dientes) volverá a la posición de
levantado cuando la máquina comience a funcionar.
1
2
3

14
1
2
3
4
4
1
2
3
5
5
3
1
2
AB
SECCIÓN 3. COSTURA BÁSICA
Selector de Puntada: A ó B
Pie prensatelas: Prensatelas para zigzag
Tensión de hilo: 2-6
Longitud de puntada: 1,5-4
Ancho de puntada: (0) ó (5)
Costura de Puntada Recta
Levante el pie prensatelas y coloque la tela con su
borde alineado con una línea de guía de costura de la
placa de aguja.
Baje la aguja a la tela.
Baje el pie prensatelas y alise los hilos hacia atrás. Pise
el pedal.
Guíe suavemente la tela a lo largo de la línea de guía,
dejando que la tela corra por sí misma.
Para fijar el extremo de las costuras, pulse el botón de
cosido hacia atrás(Remate) y cosa varias puntadas
hacia atrás.
Levante el pie prensatelas y saque la tela, tirando de
los hilos hacia atrás.
Tire de los hilos hacia arriba y al cortahilos.
Los hilos se cortan a su longitud apropiada para iniciar
la siguiente costura.
Cambio de Dirección de Costura
Pare la máquina y gire el volante hacia usted para introducir la
aguja en la tela.
Levante el pie prensatelas.
Gire la tela en torno a la aguja para cambiar de dirección de
costura según se desee. Baje el pie prensatelas y continúe
cosiendo.
1
2
3
1
2
3
4
0
1
2
4
3
5
0

15
1
2
3
4
5
2
1
2
3
4
5
2
1
2
4
3
5
0
Utilización de las Guías de Costura de la
Placa de Aguja
Las guías de costura de la placa de aguja le ayudan a medir
el ancho de las costuras.
* Los números indican la distancia entre la posición de
aguja central y la línea de guía..
Líneas de guía
Guía para esquinas
Placa de aguja
Agujero de la placa de aguja
Ancho de costura desde la posición de aguja central
Esquinas en Ángulo Recto
Para hacer una esquina en ángulo recto a 1,6 cm (5/8”)
desde el borde de la tela:
Cuando el borde de la tela situado frente a usted esté
alineado con la guía de esquinas según se ilustra, deje de
dar puntadas y baje la aguja girando el volante hacia usted.
Levante el pie prensatelas y gire la tela para alinear el
borde con la guía de costura de 1,6 cm (5/8”)
Baje el pie prensatelas y comience a coser en la nueva
dirección.
Posición de Aguja Variable
Cuando se selecciona la puntada recta (modelo A), puede
desplazar la aguja entre las posiciones de aguja central e
izquierda girando el botón selector de ancho de puntada.
Guía de esquinas
20 6/8"5/8"4/8"3/8"
1.3 1.6 1.91.01.0
10 15
1.5 2.0
Números en la placa de aguja
Distancia en centímetros

16
1 2
3
4
4
1
2
3
4
1
2
3
1
2
3
4
5
5
5
5
C
Puntadas en Zigzag
Selector de Puntada:
Pie prensatelas:
Tensión de hilo:
Longitud de puntada:
Ancho de puntada:
C
Prensatelas para zigzag
2-5
0,5-4
1,5
Las puntadas en zigzag simple se utilizan ampliamente
para sobrehilar, coser botones, etc.
SECCIÓN 4. COSTURA DE USO
GENERAL
Sobrehilado
Selector de Puntada:
Pie prensatelas:
Tensión de hilo:
Longitud de puntada:
Ancho de puntada:
C
Prensatelas para zigzag
1-4
1-2
5
La puntada en zigzag se utiliza en el margen de la costura
para impedir que la tela se deshilache en los bordes sin
rematar.
G
1
2
3
4
0
1
2
4
3
5
0
1
2
3
4
0
1
2
4
3
5
0

17
1
2
3
4
1
2
3
4
4
1
2
3
4
1
2
3
5
5
5
5
D
G
Zigzag en Punto
Selector de Puntada:
Pie prensatelas:
Tensión de hilo:
Longitud de puntada:
Ancho de puntada:
D
Prensatelas para zigzag
1-4
0,5-1,5
5
Esta puntada se utiliza para acabar el margen de la costura
en telas sintéticas y otros géneros que tienden a fruncirse.
Coloque la tela de manera que permita una costura a 1,6
cm (5/8”).
Recorte el margen de la costura después de coser.
Nota : Tengan cuidado de no cortar las puntadas.
También es útil para zurcir y remendar desgarrones.
Puntada Formada
Selector de Puntada:
Pie prensatelas:
Tensión de hilo:
Longitud de puntada:
Ancho de puntada:
G
Prensatelas para zigzag
1-4
S.S.
5
Esta puntada formada es ideal para coser prendas de baño
y terciopelo elástico porque proporciona la máxima
elasticidad y resistencia.
Coloque la tela de manera que permita una costura a 1,6
cm (5/8”).
Recorte el margen de la costura después de coser.
Nota : Tenga cuidado de no recortar las puntadas.
1
2
3
4
0
1
2
4
3
5
0
1
2
3
4
0
1
2
4
3
5
0

18
1 2
3
4
4
1
2
3
5
5
BA
Puntada Elástica Recta
Selector de Puntada:
Pie prensatelas:
Tensión de hilo:
Longitud de puntada:
Ancho de puntada:
A ó B
Prensatelas para zigzag
2-6
1,5-4
(0) ó (5)
Se cose con dos puntadas hacia delante y una puntada hacia
atrás, formando una costura que no se rasga fácilmente.
1
2
3
4
0
1
2
4
3
5
0

19
1
2
3
4
1
2
3
5
4 5
6
6
1 2
3
4 5
C
Coser Botones
Selector de Puntada: C
Pie prensatelas: Prensatelas para zigzag
Tensión de hilo: 1-3
Longitud de puntada: Cualquiera
Ancho de puntada: Ajuste según sea
Corretelas: Bajado
necesario
Ajuste el ancho de puntada, y gire el volante para
comprobar si la aguja entra en cada agujero del
botón.
Baje el pie prensatelas para sujetar el botón en su
sitio.
Los agujeros del botón deberán alinearse con la
ranura del pie prensatelas.
Se puede poner un alfiler en el pie prensatelas para
formar un tallo.
Asegúrese de que la aguja entre en ambos
agujeros del botón.
Cosa unas 10 puntadas y corte los hilos superior e
inferior, dejando una longitud de hilo de 20 cm (8”).
Pase los hilos de la aguja (superiores) entre el
botón y la tela a través de los agujeros del botón.
Tire de los hilos superiores para traer los hilos
inferiores al derecho de la tela.
Dé vueltas a los hilos alrededor del botón para
formar un tallo y átelos entre sí.
Levante el corretelas(Los dientes) después de
1
2
3
4
5
1
2
3
4
0
1
2
4
3
5
0

20
1
2
3
4
5
6
1 2 3
4
5
6 7
4
1
2
3
4
1 2
3
5
5
8
1
2
3
4
5
6
BH
Ojales
Nota : Asegúrese de que no haya ningún huelgo entre la
corredera y el soporte del muelle. Si hay un huelgo,
la longitud de las hileras será diferente, según se
muestra.
Selector de Puntada: (BH)
Pie prensatelas: Pie prensatelas para ojales
* El tamaño del ojal se ajusta automáticamente
poniendo el botón en el pie prensatelas para
ojales automático.
*El soporte de botón del pie prensatelas sirve para
un tamaño de botón de hasta 2,5 cm (1”) de
diámetro.
* Haga un ojal de prueba en una muestra con la
misma tela, superficies de contacto y costuras de
la prenda verdadera.
* Ponga el botón en la muestra de tela y marque la
parte superior y la parte inferior para determinar la
posición del ojal.
*Utilice entretela en telas elásticas.
Tensión de hilo: 1-5
Longitud de puntada: (0,5-1)
Ancho de puntada: 5
automático
Gire el volante hacia usted para levantar la aguja a
la posición más alta.
Suba la palanca para levantar el pie prensatelas.
Seleccione el modelo “BH” girando el botón selector
de puntadas.
Si ya se ha seleccionado el modelo BH, reposicione
el botón selector una vez según el procedimiento
descrito en 12
Monte el pie prensatelas para ojales automático.
Tire del soporte de botón hacia atrás y ponga el
botón en él. Vuelva a empujar el soporte de botón
hacia usted todo lo que pueda.
Baje la palanca de ojales todo lo que pueda.
Palanca de ojales
Introduzca la tela debajo del prensatelas.
Gire el volante lentamente hacia usted con la mano
derecha hasta que la aguja baje, y continúe girando
el volante hasta que la palanca para levantar el hilo
esté en su posición más alta.
Retire la tela hacia la izquierda para sacar ambos
hilos hacia la izquierda.
Introduzca la prenda bajo del prensatelas, y baje la
aguja al punto de partida.
A continuación, baje el pie prensatelas para ojales
automático.
1
2
3
5
4
Punto de partida
Corredera
No deberá haber ningún huelgo
Soporte del muelle
Diferencia
6
7
8
1
2
3
4
0
1
2
4
3
5
0

21
9
10 11
12
13
1
2
3
4
0
Cosa lentamente y pare la máquina cuando termine
un ojal.
* La máquina cose primero el refuerzo delantero y
la hilera izquierda. y, a continuación, el refuerzo
trasero y la hilera derecha.
Corte los hilos superior e inferior dejando una
longitud de hilo de unos 10 cm (4”).
Saque el hilo de la aguja (superior) por el revés de la
tela tirando del hilo inferior.
A continuación, anude los hilos.
Ponga un alfiler en la parte interior del refuerzo.
A continuación, corte la abertura con el cortaojales.
Tenga cuidado de no cortar las puntadas.
Para repetir la costura de ojales, gire el selector de
puntadas a ; a continuación, de nuevo a ,
según se muestra.
Ahora, simplemente pise el pedal para coser un ojal
idéntico.
Cuando termine de coser ojales, empuje la palanca
de ojales hacia arriba todo lo que pueda.
9
10
11
12
13
Para ajustar la densidad de puntadas de ojales:
La densidad de puntada de la costura de ojales se deberá
ajustar dentro de la marca “ ” del botón selector de
longitud de puntada.

22
4
1
2
3
4
1
2
3
5
5
1
1
1
2
3
BH
Ojal de Relieve con Cordón
Selector de Puntada: (BH)
Pie prensatelas: Pie prensatelas para
ojales automático
Tensión de hilo: 1-5
Longitud de puntada: (0,5-1)
Ancho de puntada: 5
Utilice el mismo procedimiento que para el ojal
automático.
* Fije el ancho de puntada que se coincida con el
grosor del cordón utilizado.
Con el prensatelas para ojales levantado, enganche
el cordón de relleno en la espuela situada en la parte
posterior del prensatelas para ojales.
Traiga los extremos hacia usted por debajo del
prensatelas para ojales, dejando libre el extremo
delantero.
Enganche el cordón de relleno en las horquillas
situadas en la parte delantera del prensatelas para
ojales automático para sujetarlos juntos.
Baje la aguja a la prenda en el punto en que
comenzará el ojal, y baja el pie.
Espuela
1
2
Pise el pedal suavemente y cosa el ojal. Cada lado del
ojal y los refuerzos se coserán sobre el cordón.
Retire la tela de la máquina y corte sólo los hilos de
coser.
Tire del extremo izquierdo del cordón de relleno para
apretarlo. Enhebre el extremo en una aguja de zurcir,
sáquelo por el revés de la tela y córtelo.
* Para cortar la abertura del ojal, véanse las
instrucciones en la página 21.
3
1
2
3
4
0
1
2
4
3
5
0

23
1
2
3
4
4
1
2
3
5
5
A
Aplicación de Cremalleras
Selector de Puntada: A
Pie prensatelas: Pie prensatelas para
cremalleras
Tensión de hilo: 3-6
Longitud de puntada: 1,5-4
Ancho de puntada: 5
Prenda con alfileres o hilvane la cinta de la cremallera a la
tela y colóquela bajo el prensatelas. Estire los hilos hacia
atrás y baje el pie prensatelas.
Para coser el lado izquierdo de la cremallera, guíe los
dientes de la cremallera a lo largo del borde del pie
prensatelas y cosa a través de la prenda y la cinta de la
cremallera.
De la vuelta a la tela y cosa el otro lado de la cremallera de
la misma manera que hizo con el lado izquierdo.
1
2
3
4
0
1
2
4
3
5
0

24
1
2
4
1
2
4
3
4
1
2
3
3
2
1
5
2
1
[A] [B]
3
4
5
1
2
5
3
4
5
6
6
E
F
Dobladillos con Puntada Invisible
Levante el prensatelas y coloque la tela bajo del pie
prensatelas de manera que el pliegue blando se apoye
contra la pared de la guía de dobladillos.
Baje el pie prensatelas. A continuación, cosa
lentamente para un control mejor de manera que las
puntadas en zigzag caigan sobre el margen del
dobladillo y perforen el pliegue blando. Mientras cosa,
asegúrense de que el pliegue discurra a lo largo de la
pared de la guía de dobladillos.
Selector de Puntada: E o F
Pie prensatelas: Prensatelas para zigzag
Tensión de hilo: 2-4
Longitud de puntada: 1-3
Ancho de puntada: 5
Guía de Dobladillos
Doble el dobladillo hacia arriba y vuélvalo a doblar
dejando un margen de 0,4 a 0,7 cm (1/4”) según se
ilustra.
Revés de la tela
de 0,4 a 0,7 cm (1/4”)
[A] Telas pesadas
[B] Telas finas o de peso medio
Baje el pie prensatelas. A continuación, afloje el tornillo
del soporte del prensatelas para colocar la guía de
dobladillos entre el tornillo y la caña del soporte del
prensatelas.
Apriete el tornillo asegurándose de que la pared de la
guía de dobladillos se sitúe en el medio de las garras
del pie prensatelas.
Tornillo
Guía de dobladillos
Abra el pliegue por completo.
Derecho de la tela.
* Si la aguja baja muy a la izquierda, las puntadas se verán
por el derecho de la tela.
1
2
3
4
1
2
3
4
0
1
2
4
3
5
0

25
4
1
2
3
5
1
2
3
4
5
1
2
3
4
2
1
2
1
3
4
A
Dobladillo Enrollado
Selector de Puntada: A
Pie prensatelas: Pie prensatelas para
dobladillos
Tensión de hilo: 2-6
Longitud de puntada: 1,5-4
Ancho de puntada: 5
Recorte en la esquina de la tela 0,8 cm (5/16”) x 1,5
cm (3,16”) para evitar que el dobladillo abulte en la
esquina.
Pliegue el borde de la tela dos veces 0,3 cm (1/8”) de
ancho y 6 cm (2 3/8”) de largo.
Envés de la tela
0,5 cm
0,8 cm
Hélice del pie prensatelas
Coloque la tela alineando el borde del dobladillo con la
guía del pie prensatelas. Baje el pie prensatelas y cosa
varias puntadas al mismo tiempo que tira de ambos
hilos hacia atrás. Pare la máquina con la aguja en la
tela y levante el prensatelas. Introduzca la parte
doblada de la tela en el la hélice del pie prensatelas.
Baje el pie prensatelas y cosa al mismo tiempo que
levanta el borde que siga avanzando suave y
uniformemente.
1
2
1
2
3
4
0
1
2
4
3
5
0

26
4
1
2
3
4
1
2
3
4
1
2
3
4
1
2
3
5
5
5
5
A
C
D
E F
G H
B
I
J
K L
G
SECCIÓN 5. COSTURA DECORATIVA
Longitud de puntada: S.S.
Ancho de puntada: 5
Puntada de Ondas
Selector de Puntada: G
Pie prensatelas: Pie prensatelas para
zigzag
Tensión de hilo: 6-8
Longitud de puntada: 2-3
Ancho de puntada: 5
Coloque el borde doblado a lo largo de la ranura del pie
prensatelas.
La aguja deberá bajar fuera del borde de la tela a la
derecha formando un pliegue.
Puntada Elástica
Si el avance hacia delante y hacia atrás se descompensa
debido al tipo de tela, compénselo girando el botón selector
de longitud de puntada de la manera siguiente:
Si los modelos se comprimen, gire el botón selector hacia
“+”.
Si los modelos se estiran, gire el botón selector hacia “-“.
(Véase la página 12).
Selector de Puntada: A - L
Pie prensatelas: Pie prensatelas para
zigzag
Tensión de hilo: 1-4
1
2
3
4
0
1
2
4
3
5
0
1
2
3
4
0
1
2
4
3
5
0

27
4
1
2
3
4
1 2
3
4
1
2
3
4
1
2
3
5
5
5
1
1
5
D
H
Nido de Abeja
Longitud de puntada: 0,5-2.
Ancho de puntada: 5
Selector de Puntada: D
Pie prensatelas: Pie prensatelas para
zigzag
Tensión de hilo: 1-4
Longitud de puntada: S.S.
Ancho de puntada: 5
Con la longitud de puntada en “4”, cosa líneas de puntadas
rectas con una separación de 1 cm (3/8”), a través del área
a bordar.
Anude los hilos a lo largo de un borde. Tire de los hilos de
la canilla y distribuya los frunces uniformemente.
Fije los hilos en el otro extremo.
Cosa con una puntada decorativa entre las puntadas de
frunce.
Saque las puntadas de fruncir.
Nota : Afloje la tensión del hilo de la aguja (superior) para
hacer más fácil el fruncido.
1 cm (3/8”)
Puntada de Caja
Selector de Puntada: H
(Pie prensatelas: Pie prensatelas para
zigzag
Tensión de hilo: 1-4
Utilice este puntada para unir telas pesadas.
Solape dos bordes sin sobrehilar juntos y utilice esta
puntada para unirlos.
1
2
3
4
0
1
2
4
3
5
0
1
2
3
4
0
1
2
4
3
5
0

28
4
1
2
3
5
2
3
1
4
5
C
4
1
2
3
5
1
2
3
4
5
J
K
L
Aplicaciones
Longitud de puntada: 0,5-1
Ancho de puntada: 5
Selector de Puntada: C
Pie prensatelas: Pie prensatelas para zigzag
Tensión de hilo: 1-4
Longitud de puntada: 0,5-1
Ancho de puntada: 5
Hilvane (o pegue con adhesivo para plancha) piezas de
aplicación sobre la tela. Cosa alrededor de la aplicación
asegurándose de que la aguja caiga a lo largo del borde
exterior de la aplicación. Cuando cosa esquinas, introduzca la
aguja en la tela. Levante el pie prensatelas y gire la tela a la
derecha o la izquierda.
Puntada de Realce Decorativa
Selector de Puntada: J-L
Pie prensatelas: Pie prensatelas para zigzag
Tensión de hilo: 1-4
Para una presentación delicada sobre géneros tales como la
muselina de seda, utilice una sola capa con un refuerzo
despegable, si fuese necesario.
1
2
3
4
0
1
2
4
3
5
0
1
2
3
4
0
1
2
4
3
5
0

29
1
2
3
4
5
6
7
1
2
3
4
5
6
7
SECCIÓN 6. CUIDADO DE SU
MÁQUINA
Para montar la pista de la lanzadera:
Sujete la lanzadera por el pasador central y móntela
cuidadosamente de nuevo en la pista de la lanzadera,
formando un círculo perfecto con el impulsor de lanzadera.
Monte el anillo de la pista de la lanzadera asegurándose de
que el pasador inferior encaje en la ranura.
Bloquee el anillo de la pista de la lanzadera girando los
elementos de sujeción de nuevo a su sitio. Introduzca la caja de
bobina.
Desmontaje y Montaje
Pista de la Lanzadera
Nota : Apague el interruptor de alimentación y/o desenchufe la
máquina.
Para desmontar la pista de la lanzadera:
Levante la aguja a su posición más alta y abra la tapa de la
lanzadera. Abra el pestillo articulado de la caja de bobina y
sáquela de la máquina.
Abra los elementos de sujeción de la pista de la lanzadera y
saque el anillo de la pista de la lanzadera.
* Limpie la pista de la lanzadera con un cepillo y un trapo
seco y suave.
Limpieza del Corretelas (Dientes de
Transporte)
Nota : Apague el interruptor de alimentación y/o desenchufe la
máquina antes de limpiar el corretelas..
Desmonte la aguja y el pie prensatelas.
Saque el tornillo de fijación de la placa de aguja y desmonte la
placa de aguja.
Con un cepillo, limpie el polvo y la pelusa que obstruyan los
dientes del corretelas. Vuelva montar la placa de aguja.
Pasador
Ranura
Saque la lanzadera.
Caja de bobina
Elemento de sujeción de la pista de la lanzadera
Anillo de la pista de la lanzadera
Lanzadera
Pista de la lanzadera

30
(A)
(B)
(100V)
(200V)
Lámpara de Costura
La lámpara de costura está situada detrás de la tapa frontal.
Para cambiar la bombilla, extraiga la chapa frontal de la
máquina de coser sacando el tornillo de fijación.
(A) Para desmontar ……….. Gire a la izquierda.
Para montar ……........... Gire a la derecha.
(B) Para desmontar ………. Empuje y gire a la
izquierda.
Para montar …….......... Empuje y gire a la
derecha.
* Desenchufe la fuente de alimentación antes de cambiar la
bombilla.
* No desmonte la máquina de un modo distinto al que se
explica en este manual.
Advertencia : La bombilla podría estar CALIENTE. Proteja
sus dedos cuando la manipule.

31
Localización y Solución de Averías
Situación Referencia
Véase la Página 9
Véase la Página 11
Véase la Página 6
Véase la Página 6
Véase la Página 14
Véase la Página 6
El hilo de la aguja
(superior) se rompe
1. El hilo de la aguja no está enhebrado correctamente.
2. La tensión del hilo de la aguja es demasiado alta.
3. La aguja está doblada o sin punta.
4. La aguja está montada incorrectamente.
5. La tela no corre hacia atrás al terminar de coser.
6. El hilo es demasiado grueso o demasiado fino para la
aguja.
El hilo de la canilla
(inferior) se rompe
1. El hilo inferior no está enhebrado correctamente en la caja de
bobina.
2. Se ha acumulado pelusa en la caja de bobina.
3. La canilla está dañada y no gira uniformemente.
Véase la Página 8
Limpie la caja de
bobina
Cambie la canilla.
La aguja se rompe
1. La aguja está montada incorrectamente.
2. La aguja está doblada o sin punta.
3. El tornillo de fijación de la aguja está flojo.
4. La tensión del hilo de la aguja es demasiado grande.
5. La tela no corre hacia atrás al terminar de coser.
6. La aguja es demasiado fina para la tela que se está cosiendo.
7. El botón selector de puntada se ha girado mientras la aguja
estaba en el material.
Véase la Página 6
Véase la Página 6
Véase la Página 6
Véase la Página 11
Véase la Página 14
Véase la Página 6
Véase la Página 12
Saltos de puntada
1. La aguja está montada incorrectamente.
2. La aguja está doblada o sin punta.
3. La aguja y/o los hilos no son adecuados para la labor que se
está cosiendo.
4. No se está utilizando una aguja de PUNTA AZUL para coser
géneros sintéticos y telas muy finas y elásticas.
5. El hilo de la aguja no está enhebrado correctamente.
Véase la Página 6
Véase la Página 6
Véase la Página 6
Véase la Página 6
Véase la Página 9
Fruncido de la costura
1. La tensión del hilo de la aguja es demasiado grande.
2. La máquina no esté enhebrada correctamente.
3. La aguja es demasiado gruesa para la tela que se está
cosiendo.
4. Las puntadas son demasiado gruesas para la tela que se
está cosiendo con nueva línea.
* Cuando cosa materiales muy ligeros, coloque un papel bajo
de la tela.
Véase la Página 11
Véase la Página 9
Véase la Página 6
Haga las puntadas
más densas.
Las puntadas forman
bucles por debajo de la
labor
La prenda no avanza
uniformemente
La máquina no marcha
uniformemente y hace
mucho ruido
La máquina no
funciona
Véase la Página 11
Véase la Página 6
1. El corretelas está obstruido con pelusa.
2. Las puntadas son demasiado finas.
Véase la Página 29
Haga las puntada
más gruesas.
1. La máquina no está enchufada.
2. Hay hilo atrapado en la pista de la lanzadera.
3. El volante se ha desengranado para el devanado de la canilla.
Véase la Página 4
Véase la Página 29
Véase la Página 8
1. Hay hilos atrapados en el mecanismo de la lanzadera.
2. El corretelas está obstruido con pelusa.
Véase la Página 29
Véase la Página 29
Causa
1. La tensión del hilo de la aguja es demasiado floja.
2. La aguja es demasiado gruesa o demasiado fina para el hilo.

1
ÍNDICE
SECÇÃO 1. PEÇAS ESSENCIAIS
Nomes das peças ............................................................................................................................. 2
SECÇÃO 2. PREPARAÇÃO PARA COSER
Mesa suplementar ............................................................................................................................3
Acessórios standard .........................................................................................................................3
Caixa de acessórios .........................................................................................................................3
Ligação da máquina à fonte de alimentação .................................................................................... 3
Pedal .................................................................................................................................................4
Palanca de elevação da alavanca .................................................................................................... 5
Montagem e extracção da alavanca ................................................................................................. 5
Mudança da agulha ..........................................................................................................................6
Tabela de fios e agulhas ...................................................................................................................6
Preparação dos porta-bobinas .........................................................................................................7
Extracção ou Inserção da Caixa da Bobina ...................................................................................... 7
Bobinagem da Canela ......................................................................................................................8
Enfiamento da Caixa da Bobina ....................................................................................................... 8
Enfiamento da Máquina .................................................................................................................... 9
Enfiador de Agulhas .......................................................................................................................10
Tracção para cima do fio da canela ................................................................................................10
Compensação da regulação do fio da agulha ................................................................................ 11
Ajuste da Regulação do fio da Canela ...........................................................................................11
Botão Selector de ponto .................................................................................................................12
Botão Selector do tamanho do ponto .............................................................................................12
Botão Selector da largura do ponto ................................................................................................ 12
Botão de costura para trás .............................................................................................................13
Descida da alavanca ......................................................................................................................13
SECÇÃO 3. A COSTURA BÁSICA
Costura de ponto direito .................................................................................................................14
Mudança do sentido da costura ......................................................................................................14
Utilização das guias de costura da placa da agulha....................................................................... 15
Esquinas em ângulo recto ..............................................................................................................15
Posição da agulha variável ............................................................................................................. 15
Pontos em ziguezague ...................................................................................................................16
SECÇÃO 4. A COSTURA DE USO GERAL
Alinhavar ......................................................................................................................................... 17
Ziguezague em ponto ..................................................................................................................... 17
Ponto formado ................................................................................................................................ 17
Ponto elástico recto ........................................................................................................................18
Coser botões ..................................................................................................................................19
Botoeiras ................................................................................................................................. 20 - 21
Botoeira de relevo com cordão ....................................................................................................... 22
Aplicação de fecho éclair ................................................................................................................ 23
Bainhas com ponto invisível ...........................................................................................................24
Bainha enrolada ..............................................................................................................................25
SECÇÃO 5. A COSTURA DECORATIVA
Ponto de ondas ...............................................................................................................................26
Ponto elástico .................................................................................................................................26
Ninho de abelha ..............................................................................................................................27
Ponto de caixa ................................................................................................................................ 27
Aplicações ......................................................................................................................................28
Ponto de realce decorativo ............................................................................................................. 28
SECÇÃO 6. O CUIDADO DA SUA MÁQUINA
Desmontagem e montagem - pista da lançadeira ..........................................................................29
Limpeza da alavanca ...................................................................................................................... 29
Lâmpada de costura ....................................................................................................................... 30
Localização e solução das avarias ................................................................................................. 31

2
SECÇÃO 1. PEÇAS ESSENCIAIS
Nomes das Peças
1 Botão de costura para trás (remate)
2 Botão selector de ponto
3 Botão selector de tamanho do ponto
4 Botão selector de largura do ponto
5 Tope da bobinadeira
6 Eixo da bobinadeira
7 Porta-bobinas
8 Guia fios da bobinadeira
9 Guia fios
10 Alavanca para levantar o fio (tira-fios)
11 Botão selector de regulação do fio
12 Chapa frontal
13 Corta fios
14 Enfiador de agulhas
15 Placa de agulha
16 Suporte da alavanca
17 Peça de sujeição da agulha
18 Agulha
19 Alavanca
20 Mesa suplementar
21 Asa de transporte
22 Volante
23 Interruptor de alimentação
24 Tomada fêmea da máquina
25 Braço livre
26 Alavanca para botoeiras
27 Alavanca de elevação da alavanca
1
2
3
4
5
6
78
9
10
11
12
13
14
15
16
17
18
19
20
21
22
23
24
25
26
Nota:
As especificações estão sujeitas a modificações sem
aviso prévio.
27

3
Mesa suplementar
A mesa suplementar aumenta a superfície de costura e pode
ser desmontada facilmente para coser com o braço livre.
Desmontagem da mesa:
Separe a mesa da máquina.
Montagem da mesa:
Puxe a mesa suplementar até a encaixar na máquina.
Vantagens e usos da costura com braço livre:
- Evite amontoar o tecido à volta da agulha quando fizer
reforços para aumentar a resistência de bolsos,
aberturas e cinturas.
- Para coser mangas, cós, pernas de calças ou qualquer
zona circular da roupa.
- Para passajar meias ou remendar joelheiras, cotovelos
ou áreas de desgaste na roupa das crianças.
Acessórios standard
Pé alavanca para fecho éclair
Pé alavanca para bainhas
Pé alavanca para botoeiras automático
Canelas
Jogo de agulhas
Corta botoeiras
Chave de parafusos
Guia para bainhas
1
2
3
4
5
7
1
2
3
4
5
6
7
SECÇÃO 2. PREPARAÇÃO PARA COSER
Caixa de acessórios
Caixa de acessórios
Os acessórios de costura estão comodamente situados na
mesa suplementar.
9
9
8
8
6

4
Ligação da máquina à corrente
Antes de ligar o fio de alimentação, assegure-se de que a
tensão e a frequência indicadas na máquina coincidem com a
sua corrente eléctrica.
1. Apague o interruptor de alimentação
2. Introduza a tomada macho da máquina na tomada fêmea
3. Introduza a tomada macho de alimentação na tomada de
corrente.
4. Acenda o interruptor de alimentação para conectar a
corrente e a lâmpada de costura.
Pedal
A velocidade de costura pode-se variar com o pedal.
Quanto mais fortemente pisar o pedal, mais rápido funcionará a
máquina.
1
2
3
4
5
6
1
Tomada macho de alimentação Interruptor de alimentação
Tomada de corrente Tomada fêmea da máquina
Tomada macho da máquina Pedal
2
3
4
5
6
Advertência:
Não coloque nada sobre o pedal, para evitar a máquina
se pôr em marcha involuntariamente.

5
Montagem e extracção da alavanca
Extracção
Gire o volante para si para subir a agulha à posição mais
alta.
Suba a alavanca.
Aperte a alavanca situada na parte posterior do suporte da
alavanca.
A alavanca desprende-se.
Montagem
Coloque a alavanca de maneira que a cavilha da alavanca
fique justo debaixo da ranhura do suporte da alavanca.
Baixe o suporte da alavanca para bloqueá-la no seu lugar.
Palanca de elevação da alavanca
A palanca de elevação da alavanca sobe e baixa a
alavanca. Pode levantá-la uns 0,6 cm (1/4”) por cima da
posição levantada normal para tirar facilmente a alavanca
ou para ajudar a colocar tecidos grossos debaixo do pé.
1
2
1
2
Posição elevada normal
Posição superior

6
Tabela de fios e agulhas
- Em geral, utilizam-se agulhas e fios finos para coser
tecidos finos, e agulhas e fios mais grossos para coser
tecidos grossos. Prove sempre o tamanho da agulha e
do fio num troço pequeno do tecido que vai utilizar.
- Utilize o mesmo fio para a agulha e a canela.
- Quando coser tecidos sintéticos, muito finos e elásticos,
utilize uma agulha de PONTA AZUL. A agulha de ponta
azul evita eficazmente os saltos de ponto.
- Quando coser tecidos muito finos, aplique um papel
encima para evitar franzir as costuras.
Mudança da Agulha
Suba a agulha girando o volante para si e baixe a alavanca.
Solte o parafuso de fixação da agulha girando-o para o
sentido contrário às agulhas de um relógio.
Tire a agulha da peça de sujeição.
Introduza a agulha nova na peça de sujeição com o lado
plano para o lado oposto a si.
Quando puser a agulha na peça de sujeição, empurre para
cima ao máximo e aperte o parafuso de fixação firmemente
com uma chave de parafusos.
* Verifique as agulhas frequentemente para ver se as
pontas estão estragadas. Os enganches e as
rasgaduras nos tecidos de malha, sedas finas e tecidos
similares à seda são permanentes e sempre causados
por uma agulha em mau estado.
Para verificar a agulha
Coloque o lado plano da agulha sobre algo plano (placa de
agulha, vidro, etc.). A distância livre entre a agulha e a
superfície plana deve ser uniforme. Não utilize nunca uma
agulha dobrada ou romba.
Tecidos
Fio
Tamanho
de
Agulha
Ligeiro
Peso
médio
Pesado
Crepe de China,
gaza, cambraia,
organdi, crepe
Georgette malha
Seda fina Algodão
fino Sintético fino
Algodão fino,
poliéster recoberto
9
ou
11
Linhos, algodão,
piqué, sarja,
tecidos de malha
sem avesso,
percal
Seda 50 Algodão
de 50 a 80,
poliéster recoberto
de algodão
sintético de 50 a
60
11
ou
14
Nanquim, tweed,
gabardina,
tecidos para
tapeçaria,
cortinas e
revestimento
Seda 50, algodão
de 40 a 50,
poliéster
recoberto de
algodão sintético
de 40 a 50
14
16

7
Extracção ou inserção da caixa da bobina
Abra a tampa da lançadeira.
Levante a agulha girando o volante para si. Tire a caixa
da bobina sujeitando o loquete.
Quando introduzir a caixa da bobina, encaixe o saliente no
borde da pista da lançadeira.
Tampa da lançadeira
Loquete
Saliente
1
2
3
3
2
1
Preparação dos porta-bobinas
Os porta-bobinas utilizam-se para sujeitar a bobina de fio
para alimentar fio à máquina.
Para utilizá-los, levante os porta-bobinas. Empurre para
baixo para guardá-los.
1
2
3
Fio superior
Buraco
Emaranhado
Nota:
Quando utilizar um fio com tendência a se emaranhar à
volta do porta-bobina, enfio-o através do buraco do
porta-bobina, como se vê no desenho.
O buraco deverá estar diante da bobina de fio.
1
1
2
3

8
Enfiamento da caixa da bobina
1 Introduza a canela na caixa da bobina
Verifique que o fio se bobine na direcção da seta.
2 Meta o fio na ranhura da caixa da bobina.
3 Tire o fio por baixo da mola tensora e introduza-o no
buraco de saída.
* Deixe uns 10 cm (4”) de fio solto.
Bobinagem da canela
1 Tire o volante para fora.
2 Solte fio da bobina.
Guie o fio à volta do guia fios da bobinadeira.
3 Insere o fio através do buraco da canela, de dentro
para fora.
Insere a canela no eixo da bobinadeira.
4 Empurre para a direita.
5 Com o extremo livre do fio na mão, pise o pedal.
Pare a máquina depois de fazer umas voltas e corte o
fio perto do buraco da canela.
6 Pise de novo o pedal.
Quando a canela estiver totalmente enrolada, pare a
máquina. Volte a colocar o eixo da bobinadeira na sua
posição original deslocando-o para a esquerda, e corte
o fio.
7 Puxe o volante para esquerda (posição original).
Nota:
Volte a colocar o eixo da bobinadeira no seu sítio
quando parar a máquina
1
2
3
4
5
6
7
3
2
1

9
Enfiamento da máquina
Suba a alavanca para levantar o fio para a sua posição
mais alta, girando o volante para si.
Levante a alavanca.
Coloque uma bobina de fio no porta-bobina segundo
mostrado no desenho, (o fio vem da parte traseira da
bobina).
1 Com as duas mãos, insere o fio no guia fios.
2 Enquanto sujeita o fio perto da bobina, tire-o para
baixo da zona de tensão e depois à volta do suporte
da mola de retenção.
3 Tire firmemente o fio para cima e através da alavanca
para levantar o fio da direita para a esquerda.
4 Agora tire o fio para baixo e introduza-o no guia fios
inferior.
5 Tire o fio para baixo e insere-o no guia fios da barra de
agulhas.
6 Enfie a agulha de diante para trás.
Nota:
Corte o extremo do fio com uma tesoura afilada para
enfiar a agulha com maior facilidade.
1
3
2
4
5
6
1
2
3
4
5
6
* Veja na página 10 para obter informação sobre o
enfiador de agulhas incorporado.

10
Tracção para cima do fio da canela
1 Suba a alavanca e sujeite o fio da agulha ligeiramente
com a mão esquerda.
2 Gire o volante lentamente para si com a mão direita
até a agulha baixar, e siga girando o volante até a
alavanca de levantar o fio estar na posição mais alta.
Tire ligeiramente para cima o fio da agulha, formando
um anel com o fio da canela.
3 Tire os dois fios 15 cm (6”) para trás e por baixo da
alavanca.
1
2
3
Enfiador de agulhas
1 Levante a agulha até à posição mais alta.
Tire para baixo o enfiador de agulhas o máximo possível.
2 Gire o bobinador de agulha para o sentido da seta
indicada na ilustração. Depois, introduza o Gancho na
agulha. Leve o fio à volta da Guia e por baixo do
Gancho.
3 Gire o enfiador de agulha para o sentido da seta que
se mostra na ilustração, fazendo passar o anel do fio a
través da agulha.
4 Tire o fio através da agulha.
*O enfiador de agulhas pode-se utilizar com agulhas
Nº11 a Nº16 ou com uma agulha de ponta Azul
Jenome. Um tamanho de fio de 50 a 100 também
funcionará bem.
1
2
3
4

11
Compensação da regulação do fio da agulha
1
2
3
4
5
6
1 Tensão correcta
A regulação do fio ajusta-se segundo os materiais de
costura, as capas de tecido e o método de costura.
•O ponto direito ideal entrelaça os fios entre duas
capas de tela, segundo mostrado no desenho
(ampliado para mostrar o detalhe).
• Num ponto em ziguezague ideal, o fio da canela não
se dá pelo o direito (lado superior) do tecido, e o fio da
agulha vê-se ligeiramente pelo avesso (lado inferior)
do tecido.
2 A regulação do fio da agulha é alta demais
O fio da canela (fio inferior) aparece pelo direito (lado
superior) do tecido. Afrouxe a regulação do fio da
agulha mudando o botão selector a um número mais
baixo.
3 A regulação do fio da agulha é frouxa demais
O fio da agulha (fio superior) aparecerá no avesso
(lado inferior) do tecido. Aperte a regulação do fio da
agulha mudando o botão selector a um número mais
alto.
1
Fio da agulha (fio superior)
Fio da canela (fio inferior)
Lado do direito (lado superior) do tecido
Avesso (lado inferior) do tecido
Botão selector da regulação do fio
Índice de regulação
2
3
4
5
6
1
2
3
Ajuste da Regulação do fio da Canela
Para a costura em geral não é necessário ajustar a
regulação do fio da canela. No entanto, pode ajustar a
regulação do fio da canela para alguma necessidade de
costura específica.
Gire o parafuso de ajuste à direita para aumentar a tensão,
ou à esquerda para reduzi-la.

12
Botão Selector de Ponto
Botão selector do tamanho do ponto
•“ ” é o ajuste recomendado paro pontos de
botoeiras
• Ajuste o botão selector no intervalo 0,5-4 quando coser
o ponto em ziguezague.
• Ajuste o botão selector em “S.S” para coser o modelo
de ponto elástico.
• Se o modelo de ponto elástico não for uniforme, gire o
botão selector de tamanho do ponto para a direcção “-“
para reduzir ou “+” para aumentar.
Botão selector da largura do ponto
Nota:
Levante a agulha sobre o tecido quando girar o botão
selector de tamanho do ponto.
1
1
1
S.S.
Suba a agulha e a alavanca. Gire o botão selector de ponto
para ajustar o símbolo correspondente ao modelo desejado
no índice de regulação
Índice de regulação
Gire o botão selector de tamanho do ponto para ajustar o
tamanho do ponto desejado no índice de regulação.
Quando mais alto for o número, maior será o tamanho do
ponto.
Índice de regulação
Gire o botão selector da largura do ponto para estabelecer
o tamanho do ponto desejado no índice de regulação.
Quanto mais alto for o número, mais grande será o ponto.
Índice de regulação
1
1
1
A
C
D
E F
G H
B
I
J
K L
B/C
D
E
F
G
H
I
J
K
L
A
1
2
3
4
0
1
2
3
4
0
1
2
4
3
5
0

13
Botão de costura para trás
Enquanto manter carregado o botão de costura para trás, a
máquina coserá para trás.
Descida da alavanca
1 Abra a tampa da lançadeira.
1
2
2 Para baixar a alavanca, tire para baixo a alavanca de
descida e desloque-a para a direita, segundo mostrado no
desenho.
3 Para levantar a alavanca, tire para baixo a alavanca de
descida e desloque-a para esquerda, segundo se mostra
no desenho.
*A alavanca deve estar levantada para a costura normal.
*A alavanca volta à posição levantada quando a máquina
começar a funcionar.
Tampa da lançadeira
Alavanca de descida
2
1
1
2
3
2

14
Selector de Ponto: A ou B
Alavanca: Alavanca para ziguezague
Tensão de fio: 2-6
Tamanho do ponto: 1,5-4
Largura do ponto: (0) ou (5)
SECÇÃO 3. COSTURA BÁSICA
Costura de ponto direito
1 Levante a alavanca e coloque o tecido com o borde
alinhado com uma linha de guia de costura da placa da
agulha.
Baixe a agulha até ao tecido.
Baixe a alavanca e alise os fios para trás. Pise o pedal.
Guie suavemente o tecido pela linha de guia,
deixando-o correr sozinho.
2 Para fixar o extremo das costuras, carregue no botão
de costura para trás e cosa vários pontos para trás.
Levante a alavanca e tire o tecido, tirando os fios para
trás.
3 Tire os fios para cima e para o corta-fios.
Os fios cortam-se ao tamanho necessário para
começar a seguinte costura.
Mudança de direcção da costura
Pare a máquina e gire o volante para si para introduzir a
agulha na tela.
Levante a alavanca.
Gire o tecido à volta da agulha para mudar o sentido da
costura como desejar. Baixe a alavanca e continue a coser.
1
2
3
4
4
1
2
3
5
5
3
1
2
B/C
D
E
F
G
H
I
J
K
L
A
1
2
3
4
0
1
2
4
3
5
0
AB

15
Utilização das guias de costura da placa de agulha
As guias de costura da placa de agulha servem para medir a
largura das costuras.
* Os números indicam a distância entre a posição da agulha
central e a linha de guia.
Números na placa da agulha
Distância em centímetros
15 2010
1.3 1.6 1.9
6/8"5/8"4/8"3/8"
2.01.51.0 1.0
Linhas de guia
Guia para esquinas
Placa da agulha
Buraco da placa da agulha
Largura da costura desde a posição da agulha central
Canto em ângulo recto
Para fazer um canto em ângulo recto a 1,6 cm (5/8”) desde
o borde do tecido:
Quando o borde do tecido situado em frente de si estiver
alinhado com a guia de esquinas (segundo desenho), pare
de dar pontos e baixe a agulha girando o volante para si.
Levante a alavanca e gire o tecido para alinhar o borde com
a guia de costura de 1,6 cm (5/8”)
Baixe a alavanca e comece a coser para o novo sentido.
Guia de cantos
1
2
3
4
5
2
1
2
3
4
5
2
Posição de agulha variável
Quando se selecciona o ponto direito (modelo A), pode-se
deslocar a agulha entre as posições de agulha central e
esquerda girando o botão selector de largura do ponto.
1
2
4
3
5
0

16
Pontos em ziguezague
Os pontos em ziguezague simples utilizam-se bastante para
alinhavar, coser botões, etc.
Selector de Ponto: C
Alavanca: Alavanca para ziguezague
Tensão de fio: 2-5
Tamanho do ponto: 0,5-4
Largura do ponto: 1,5
1 2
3
4
4
1
2
3
SECÇÃO 4. COSTURA DE USO GERAL
Alinhavar
O ponto em ziguezague utiliza-se para rematar o tecido
para evitar que se desfie nos bordes.
Selector de Ponto: C
Alavanca: Alavanca para ziguezague
Tensão de fio: 1-4
Tamanho do ponto: 1-2
Largura do ponto: 5
4
1
2
3
1
2
3
4
5
5
5
5
B/C
D
E
F
G
H
I
J
K
L
A
1
2
3
4
0
1
2
4
3
5
0
B/C
D
E
F
G
H
I
J
K
L
A
1
2
3
4
0
1
2
4
3
5
0
C
C

17
1
2
3
4
1
2
3
4
Ziguezague em ponto
Selector de Ponto: D
Alavanca: Alavanca para ziguezague
Tensão do fio: 1-4
Tamanho do ponto: 0,5-1,5
Largura do ponto: 5
4
1
2
3
Ponto formado
Selector de Ponto: G
Alavanca: Alavanca para ziguezague
Tensão de fio: 1-4
Tamanho do ponto: S.S.
Largura do ponto: 5
4
1
2
3
Este ponto utiliza-se para acabar o borde da costura nos
tecidos sintéticas e outros que têm tendência em franzir.
Coloque o tecido de maneira que permita uma costura a 1,6
cm (5/8”).
Recorte o borde da costura depois de coser.
5
5
5
5
Nota:
Tenha cuidado de não cortar os pontos.
Também é útil para passajar e remendar rasgões.
O ponto formado é ideal para coser roupa de banho e
veludo elástico, porque proporciona a máxima elasticidade
e resistência.
Coloque o tecido de maneira que permita uma costura a 1,6
cm (5/8”).
Recorte o borde da costura depois de coser.
Nota:
Tenha cuidado de não cortar os pontos.
B/C
D
E
F
G
H
I
J
K
L
A
1
2
3
4
0
1
2
4
3
5
0
B/C
D
E
F
G
H
I
J
K
L
A
1
2
3
4
0
1
2
4
3
5
0
D
G

18
1 2
3
4
Ponto elástico direito
Selector de Ponto: A ou B
Alavanca: Alavanca para ziguezague
Tensão de fio: 2-6
Tamanho do ponto: 1,5-4
Largura do ponto: (0) ou (5)
4
1
2
3
Coser com dois pontos para a frente e um ponto para trás,
formando uma costura que não se rasga facilmente.
5
5
B/C
D
E
F
G
H
I
J
K
L
A
1
2
3
4
0
1
2
4
3
5
0
BA

19
Coser botões
1
2
3
Selector de Ponto: C
Alavanca: Alavanca para ziguezague
Tensão de fio: 1-3
Tamanho do ponto: qualquer
Largura do ponto: Ajuste segundo necessário
Alavanca: Baixada
4
1
2
3
5
4 5
6
6
1 2
3
4 5
1 Ajuste a largura do ponto, e gire o volante para ver se
a agulha entra em cada buraco do botão.
2 Baixe a alavanca para sujeitar o botão no seu lugar.
Os buracos do botão devem alinhar-se com a ranhura
da alavanca.
3 Pode-se pôr um alfinete na alavanca para formar um
pé.
Assegure-se de que a agulha entre nos dois buracos
do botão.
Cosa uns 10 pontos e corte os fios superior e inferior,
deixando 20 cm (8”) de fio.
4 Passe os fios da agulha (superiores) entre o botão e o
tecido através dos buracos do botão.
Tire os fios superiores para levar os fios inferiores ao
direito do tecido.
Dê voltas aos fios à volta do botão para formar um pé
e ate-os.
5 Levante a alavanca depois de coser.
B/C
D
E
F
G
H
I
J
K
L
A
1
2
3
4
0
1
2
4
3
5
0
C

20
1
2
3
4
5
6
1 Gire o volante para si para levantar a agulha para a
posição mais alta.
Levanta a alavanca.
2 Seleccione o modelo “BH” girando o botão selector de
pontos.
Se já seleccionou o modelo BH, reposicione o botão
selector uma vez segundo o procedimento descrito em 12
3 Monte a alavanca para botoeiras automáticas.
4 Tire o suporte do botão para trás e coloque o botão. Volte a
empurrar o suporte do botão para si ao máximo.
5 Baixe a alavanca de botoeiras ao máximo.
Alavanca de botoeiras
6 Introduza o tecido por baixo da alavanca.
Gire o volante lentamente para si com a mão direita até a
agulha baixar e continue a girar o volante até a alavanca de
levantar o fio estar na posição mais alta.
7 Tire o tecido para a esquerda para tirar os dois fios para a
esquerda.
8 Introduza o tecido por baixo da alavanca, e baixe a agulha
ao ponto de partida.
Agora baixe a alavanca para botoeiras automáticas.
Nota:
Verifique que não há nenhuma folga entre a corrediça e o
suporte da mola. Se houver folga, o comprimento das filas
será diferente, segundo se mostra no desenho.
Ponto de partida
Corrediça
Não deve de haver nenhuma folga
Suporte da mola
Diferencia
1 2 3
4
5
Botoeiras
6 7
Selector de Ponto: (BH)
Alavanca: pé alavanca para botoeiras
automático
Tensão do fio: 1-5
Tamanho do ponto: (0,5-1)
Largura do ponto: 5
4
1
2
3
4
1 2
3
5
5
*O tamanho da botoeira ajusta-se automaticamente
pondo o botão na alavanca para botoeiras automáticas.
*O suporte de botão da alavanca serve para um
tamanho de botão de até 2,5 cm (1”) de diâmetro.
* Faça uma botoeira de prova numa mostra com o
mesmo tecido e a mesma superfície de contacto e
costuras do tecido que vai utilizar.
* Ponha o botão na mostra de tecido e marque a parte
superior e a parte inferior para determinar a posição da
botoeira.
* Utilize uma entretela se trabalhar com tecidos elásticos.
8
1
2
3
4
5
6
B/C
D
E
F
G
H
I
J
K
L
A
1
2
3
4
0
1
2
4
3
5
0
BH

21
9 Cosa lentamente e pare a máquina quando terminar
uma botoeira.
*A máquina cose primeiro o reforço dianteiro e a fila
esquerda e depois o reforço traseiro e a fila direita.
10 Corte os fios superior e inferior deixando uns 10 cm (4”)
de fio.
Tire o fio da agulha (superior) pelo avesso do tecido
tirando o fio inferior.
Faça um nó com os fios.
11 Ponha um alfinete na parte interior do reforço.
Depois corte a abertura com o corta botoeiras.
Tenha cuidado de não cortar os pontos.
12 Para repetir a costura das botoeiras, gire o selector de
pontos para ; depois novamente para segundo
mostrado no desenho.
Agora, pise o pedal para coser uma botoeira idêntica.
13 Quando terminar de coser botoeiras, puxe a alavanca
de botoeiras para cima ao máximo.
9
10 11
12
13
A densidade do ponto da costura de botoeiras deve-se
ajustar dentro da marca “ ” do botão selector de
tamanho do ponto.
Para ajustar a densidade dos pontos de botoeiras:
B/C
D
E
F
G
H
I
J
K
L
A
B/C
D
E
F
G
H
I
J
K
L
A
1
2
3
4
0

22
Botoeira de relevo com cordão
4
1
2
3
Selector de Ponto: (BH)
Alavanca: pé alavanca para botoeiras
automáticas
Tensão de fio: 1-5
Tamanho do ponto: (0,5-1)
Largura do ponto: 5
4
1
2
3
5
5
1 Utilize o mesmo procedimento que para a botoeira
automática.
* Fixe a largura do ponto que coincida com a grossura do
cordão utilizado.
Com a alavanca para botoeiras levantado, enganche o
cordão no esporão situado na parte traseira da alavanca
para botoeiras.
Leve os extremos para si por baixo da alavanca para
botoeiras, deixando livre o extremo dianteiro.
Enganche o cordão nas forquilhas situadas na parte
dianteira da alavanca para botoeiras automáticas para
sujeitá-los juntos.
Baixe a agulha até ao tecido no ponto em que vai
começar a botoeira, e baixe o pé.
Esporão
2 Pise o pedal suavemente e cosa a botoeira. Os lados da
botoeira e os reforços cosem-se sobre o cordão.
Retire o tecido da máquina e corte só os fios de coser.
3 Tire o extremo esquerdo do cordão para o apertar. Enfie o
extremo numa agulha de passajar, tire-o pelo avesso do
tecido e corte.
* Para cortar a abertura da botoeira, veja as instruções na
página 21.
1
1
1
2
3
B/C
D
E
F
G
H
I
J
K
L
A
1
2
3
4
0
1
2
4
3
5
0
BH

23
Para coser um fecho éclair
Ponha alfinetes ou alinhave o fecho éclair no tecido e
coloque-o por baixo da alavanca. Ponha os fios para trás e
baixe a alavanca.
Para coser o lado esquerdo do fecho, guie os dentes do
fecho pelo borde da alavanca e cosa no tecido o fecho
éclair.
Volte o tecido e cosa o outro lado do fecho como o fez para
o lado esquerdo.
1
2
3
4
Selector de Ponto: A
Alavanca: pé alavanca para fecho éclair
Tensão de fio: 3 – 6
Tamanho do ponto: 1,5 – 4
Largura do ponto: 5
4
1
2
3
5
5
B/C
D
E
F
G
H
I
J
K
L
A
1
2
3
4
0
1
2
4
3
5
0
A

24
Bainhas com ponto invisível
1
2
4
1
2
4
3
Selector de Ponto: E ou F
Alavanca: Alavanca para ziguezague
Tensão de fio: 2 – 4
Tamanho do ponto: 1 – 3
Largura do ponto: 5
Guia de Bainhas
4
1
2
3
3
2
1
5
2
1
[A] [B]
3
4
5
1 Dobre a bainha para cima e volte a dobrar deixando
um borde de 0,4 a 0,7 cm (1/4”) segundo mostrado no
desenho.
1
2
Avesso do tecido
de 0,4 a 0,7 cm (1/4”)
[A] tecidos pesados
[B] tecidos finos ou de peso médio
4 Abra a dobra por completo.
Direita do tecido.
* Se a agulha baixar muito à esquerda, os pontos vão-se
ver pelo direito do tecido.
5
3
4
2 Baixe a alavanca. Desaperte o parafuso do suporte da
alavanca para colocar a guia de bainhas entre o
parafuso e a haste do suporte da alavanca.
Aperte o parafuso assegurando-se de que a parede da
guia de bainhas está no meio das garras da alavanca.
3 Levante a alavanca e coloque o tecido por baixo da
mesma, para que a dobra mole se apoie contra a
parede da guia de bainhas.
Baixe a alavanca. Cosa lentamente para ter melhor
controlo, para os pontos em ziguezague se fazerem no
borde da bainha e perfurarem a dobra mole. Durante a
costura, verifique que a dobra se faz bem pela parede
da guia de bainhas.
Parafuso
Guia de bainhas
5
B/C
D
E
F
G
H
I
J
K
L
A
1
2
3
4
0
1
2
4
3
5
0
6
6
E
F

25
Bainha enrolada
Selector de Ponto: A
Alavanca: pé alavanca para bainhas
Tensão de fio: 2 – 6
Tamanho do ponto: 1,5 – 4
Largura do ponto: 5
4
1
2
3
5
1
2
3
4
5
B/C
D
E
F
G
H
I
J
K
L
A
1
2
3
4
0
1
2
4
3
5
0
1 Recorte na esquina do tecido 0,8 cm (5/16”) x 1,5 cm
(3,16”) para evitar que a bainha faça vultos na esquina.
Dobre o borde do tecido duas vezes 0,3 cm (1/8”) de
largura e 6 cm (2 3/8”) de comprimento.
1
2
Avesso do tecido
0,5 cm
0,8 cm
Hélice da alavanca
3
4
2 Coloque o tecido alinhando o borde da bainha com a
guia da alavanca. Baixe a alavanca e cosa vários pontos
tirando dos dois fios para trás ao mesmo tempo. Pare a
máquina com a agulha no tecido e levante a alavanca.
Introduza a parte dobrada do tecido na hélice da
alavanca. Baixe a alavanca e enquanto coser levante o
borde que continua a avançar suave e uniformemente.
2
1
2
1
3
4
A

26
Ponto de ondas
Selector de Ponto: G
Alavanca: pé alavanca para
ziguezague
Tensão de fio: 6 – 8
Tamanho do ponto: 2 – 3
Largura do ponto: 5
4
1
2
3
SECÇÃO 5. COSTURA DECORATIVA
4
1
2
3
4
1
2
3
Ponto Elástica
Selector de Ponto: A - L
Alavanca: pé alavanca para
ziguezague
Tensão de fio: 1 – 4
Tamanho do ponto: S.S.
Largura do ponto: 5
4
1
2
3
Coloque o borde dobrado ao longo da ranhura da
alavanca.
A agulha deverá baixar fora do borde do tecido à direita
formando uma dobra.
Se o avanço para diante e para trás se descompensar a
causa do tipo de tecido, compense girando o botão selector
de tamanho do ponto da maneira seguinte:
Se os modelos se comprimem, ponha o botão selector em
“+”.
Se os modelos se estiram, ponha o botão selector em “-“.
(Veja a página 12).
5
5
5
5
B/C
D
E
F
G
H
I
J
K
L
A
1
2
3
4
0
1
2
4
3
5
0
A
C
D
E F
G H
B
I
J
K L
B/C
D
E
F
G
H
I
J
K
L
A
1
2
3
4
0
1
2
4
3
5
0
G

27
Ninho de abelha
Selector de Ponto: D
Alavanca: pé alavanca para
ziguezague
Tensão de fio: 1 – 4
Tamanho do ponto: S.S.
Largura do ponto: 5
4
1
2
3
Com o tamanho do ponto em “4”, cosa linhas de pontos
direitos com uma separação de 1 cm (3/8”), através da zona
a bordar.
Ate os fios por um borde. Tire os fios da canela e distribua o
franzido uniformemente.
Fixe os fios no outro extremo.
Cosa com um ponto decorativa entre os pontos do franzido.
Tire os pontos de franzir.
Nota:
Afrouxe a regulação do fio da agulha (superior) para ser
mais fácil franzir.
4
1 2
3
Ponto de caixa
Selector de Ponto: H
Alavanca: pé alavanca para
ziguezague
Tensão de fio: 1 – 4
Tamanho do ponto: 0,5 - 2.
Largura do ponto: 5
4
1
2
3
4
1
2
3
Utilize este ponto para unir tecidos pesados.
Ponha os bordes um sobre o outro sem alinhavar e utilize
este ponto para os unir.
1 cm (3/8”)
5
5
5
1
1
5
B/C
D
E
F
G
H
I
J
K
L
A
1
2
3
4
0
1
2
4
3
5
0
D
H
B/C
D
E
F
G
H
I
J
K
L
A
1
2
3
4
0
1
2
4
3
5
0

28
B/C
D
E
F
G
H
I
J
K
L
A
1
2
3
4
0
1
2
4
3
5
0
Aplicações
Selector de Ponto: C
Alavanca: pé alavanca para ziguezague
Tensão de fio: 1 – 4
Tamanho do ponto: 0,5-1
Largura do ponto: 5
4
1
2
3
5
Alinhave (ou cole com adesivo para ferro) peças de
aplicação sobre a tela. Cosa à volta da aplicação
assegurando-se de que a agulha cai ao longo do borde
exterior da aplicação. Quando coser cantos, introduza a
agulha na tela. Levante a alavanca e gire o tecido para a
direita ou para a esquerda.
2
3
1
4
5
C
B/C
D
E
F
G
H
I
J
K
L
A
1
2
3
4
0
1
2
4
3
5
0
Ponto de realce decorativo
Selector de Ponto: J-L
Alavanca: pé alavanca para ziguezague
Tensão de fio: 1 – 4
Tamanho do ponto: 0,5-1
Largura do ponto: 5
4
1
2
3
5
1
2
3
4
5
J
K
L
Para uma apresentação delicada sobre tecidos como
musselina de seda, utilize só uma capa com um reforço
desdobrável se for necessário.

29
Limpeza da alavanca
Desmonte a agulha e a alavanca.
Tire o parafuso de fixação da placa da agulha e desmonte-a.
Com uma escova, limpe o pó e os pelúcia que possam
obstruir os dentes da alavanca. Monte novamente a placa
da agulha.
Nota:
Apague o interruptor de alimentação e/ou desligue a
máquina antes de limpar a alavanca.
Desmontagem e montagem da pista da
lançadeira
Nota:
Apague o interruptor de alimentação e/ou desligue a
máquina.
Para desmontar a pista da lançadeira:
Ponha a agulha na posição mais alta e abra a tampa da
lançadeira. Abra o fecho articulado da caixa da bobina e
tire-a da máquina.
Abra os elementos de sujeição da pista da lançadeira e tire
o anel da pista da lançadeira.
Tire a lançadeira.
* Limpe a pista da lançadeira com uma escova e um
trapo seco e suave.
Caixa da bobina
Elemento de sujeição da pista da lançadeira
Anel da pista da lançadeira
Lançadeira
Pista da lançadeira
1
2
3
4
5
Para montar a pista da lançadeira:
Sujeite a lançadeira pela cavilha central e monte-a
cuidadosamente de novo na pista da lançadeira, formando um
círculo perfeito com o impulsor de lançadeira.
Monte o anel da pista da lançadeira assegurando-se de que a
cavilha inferior encaixe na ranhura.
Bloqueie o anel da pista da lançadeira pondo novamente os
elementos de sujeição no seu lugar. Introduza a caixa da
bobina.
Cavilha
Ranhura
6
7
1
2
3
4
5
6
7
SECÇÃO 6. O CUIDADO DA SUA MÁQUINA

30
Lâmpada de costura
A lâmpada de costura está situada atrás da chapa frontal.
Para mudar a lâmpada, tire o parafuso que sujeita a chapa
frontal da máquina de coser e tire a chapa.
* Desligue a corrente antes de mudar a lâmpada.
* Não desmonte a máquina de outra maneira que não seja a
indicada neste manual.
(A) • Para desmontar ……….. gire para a esquerda.
• Para montar ……........ gire para a direita.
(B) • Para desmontar ………. puxe e gire para a esquerda.
• Para montar .......…… puxe e gire para a direita.
(A)
(B)
(100V)
(200V)
Advertência:
A lâmpada pode estar QUENTE. Proteja os dedos para
tirá-la.

31
1. O fio da agulha não está enfiado correctamente.
2. A regulação do fio da agulha é alta demais.
3. A agulha está dobrada ou sem ponta.
4. A agulha não está bem montada.
5. Não se deve tirar para trás do tecido quando se acabar de coser.
6. O fio é muito grosso ou muito fino para a agulha.
Ver página 9
Ver página 11
Ver página 6
Ver página 6
Ver página 14
Ver página 6
Localização e solução de avarias
Situação
Causa
Referência
O fio da agulha
(superior) parte-se
1. O fio inferior não está enfiado correctamente na caixa da bobina.
2. Acumularam-se pelúcia na caixa da bobina.
3. A canela está estragada e não gira uniformemente.
Ver página 8
Limpe a caixa da
bobina
Mude a canela.
O fio da canela
(inferior) parte-se
A agulha parte-se
1. A agulha não está bem montada.
2. A agulha está dobrada ou sem ponta.
3. O parafuso de fixação da agulha está frouxo.
4. A regulação do fio da agulha é muito grande.
5. Não se deve tirar para trás do tecido quando se acabar de coser.
6. A agulha é muito fina para o tecido.
7. O botão selector de ponto girou-se quando a agulha estava no
material.
Ver página 6
Ver página 6
Ver página 6
Ver página 11
Ver página 14
Ver página 6
Ver página 12
Saltos de ponto
1. A agulha não está bem montada.
2. A agulha está dobrada ou sem ponta.
3. A agulha e/ou os fios não são adequados para o trabalho.
4. Não se está a utilizar uma agulha de PONTA AZUL para coser
tecidos sintéticos e tecidos muito finos e elásticos.
5. O fio da agulha não está enfiado correctamente.
Ver página 6
Ver página 6
Ver página 6
Ver página 6
Ver página 9
Costura franzida
1. A regulação do fio da agulha é muito grande.
2. A máquina não está bem enfiada.
3. A agulha é muito grossa para o tecido.
4. Os pontos são muito grossos para o tecido.
* Para coser materiais muito ligeiros, coloque um papel por baixo
do tecido.
Ver página 11
Ver página 9
Ver página 6
Faça pontos
mais densos.
Os pontos formam
anéis debaixo da
costura.
1. A regulação do fio da agulha é frouxa demais.
2. A agulha é muito grossa ou muito fina para o fio.
Ver página 11
Ver página 6
O tecido não avança
uniformemente
1. A alavanca está obstruída com pelúcia.
2. Os pontos são muito finos.
Ver página 29
Faça ponto mais
grossos.
A máquina não
funciona
1. A máquina não está ligada.
2. Há fios na pista da lançadeira.
3. O volante não está engrenado para a bobinagem da canela.
Ver página 4
Ver página 29
Ver página 8
A máquina não
funciona
uniformemente e faz
muito barulho
1. Há fios no mecanismo da lançadeira.
2. A alavanca está obstruída com pelúcia.
Ver página 29
Ver página 29

1
INDICE
VOLET 1. PIÈCES ESSENTIELLES
Nom des pièces................................................................................................................ 2
VOLET 2. PRÉPARATION POUR COMMENCER LA COUTURE
Table supplémentaire....................................................................................................... 3
Accessoires standard ....................................................................................................... 3
Boîte d’accessoires .......................................................................................................... 3
Branchement de la machine à la source d’alimentation.................................................. 3
Pédale .............................................................................................................................. 4
Levier pour lever le pied de biche .................................................................................... 5
Montage et démontage du pied de biche ......................................................................... 5
Changement d’aiguille...................................................................................................... 6
Table des de fils et des aiguilles ...................................................................................... 6
Préparation des porte-bobines ......................................................................................... 7
Extraction ou Insertion de la boîte de la bobine ............................................................... 7
Bobinage de la canette..................................................................................................... 8
Enfilage de la boîte de la bobine ...................................................................................... 8
Enfilage de la machine ..................................................................................................... 9
Enfileur d’aiguilles .......................................................................................................... 10
Tirage vers le haut du fil de la canette ........................................................................... 10
Compensation de la régulation du fil de l’aiguille ........................................................... 11
Ajustage de la régulation du fil de la canette.................................................................. 11
Bouton sélecteur de point............................................................................................... 12
Bouton sélecteur de la dimension du point .................................................................... 12
Bouton sélecteur de la largeur du point.......................................................................... 12
Bouton de couture en arrière.......................................................................................... 13
Descente du pied de biche............................................................................................. 13
VOLET 3. COUTURE DE BASE
Couture au point droit..................................................................................................... 14
Changement du sens de la couture ............................................................................... 14
Utilisation des guidages de couture de la plaque l’aiguille ............................................. 15
Coins en angle droit ....................................................................................................... 15
Position de l’aiguille variable .......................................................................................... 15
Points en zigzag ............................................................................................................. 16
VOLET 4. COUTURE GENERALE
Faufiler ........................................................................................................................... 16
Point zigzag....................................................................................................................17
Point formé .....................................................................................................................17
Point élastique droit........................................................................................................ 18
Coudre des boutons ....................................................................................................... 19
Boutonnières ............................................................................................................. 20-21
Boutonnière en relief avec cordon.................................................................................. 22
Coudre une de fermeture éclair...................................................................................... 23
Ourlets avec point invisible............................................................................................. 24
Ourlet enroulé................................................................................................................. 25
VOLET 5. COUTURE DECORATIVE
Point de vagues.............................................................................................................. 26
Point élastique................................................................................................................ 26
Nids d’abeilles ................................................................................................................ 27
Point de boîte ................................................................................................................. 27
Applications ....................................................................................................................28
Point en relief décoratif................................................................................................... 28
VOLET 6. LE SOIN DE VOTRE MACHINE
Démontage et montage - piste de la navette ................................................................. 29
Nettoyage du pied de biche............................................................................................ 29
Lampe ............................................................................................................................ 30
Localisation et solution des problèmes .......................................................................... 31

2
1
2
3
4
5
6
78
9
10
11
12
13
14
15
16
17
18
19
20
21
22
23
24
25
26
27
VOLET 1. PIÈCES ESSENTIELLES
Nom des pièces
1 Bouton de couture en arrière (finition)
2 Bouton sélecteur de point
3Bouton sélecteur de la dimension du point
4 Bouton sélecteur de la largeur du point
5 Butée du bobineur
6 Axe du bobineur
7 Porte-bobines
8 Guide-fils du bobineur
9 Guide-fils
10 Pied de biche pour lever le fil (tire-fils)
11 Bouton sélecteur de régulation du fil
12 Plaque avant
13 Coupe-fils
14 Enfileur d’aiguilles
15 Plaque de l’aiguille
16 Support du pied de biche
17 Pièce de serrage de l’aiguille
18 Aiguille
19 Pied de biche
20 Tablette supplémentaire
21 Poignée de transport
22 Volant
23 Interrupteur d’alimentation
24 Prise femelle de la machine
25 Bras libre
26 Pied de biche pour boutonnières
27 Levier d’élévation du pied de biche
Nota : Les spécifications sont soumises à des
modifications sans préavis.

3
1
2
3
4
5
7
1
2
3
4
5
6
7
9
9
8
8
6
VOLET 2. PRÉPARATION POUR
COMMENCER À COUDRE
Tablette supplémentaire
La tablette supplémentaire augmente la surface de couture
et peut être démontée facilement pour piquer avec le bras
libre.
Démontage de la table :
Séparez la table de la machine.
Montage de la table :
Appuyez sur la table supplémentaire pour l’emboîter dans la
machine.
•Avantages et utilisations de la couture avec le
bras libre :
Evitez d’amonceler le tissu autour de l’aiguille quand
vous faites des renforts pour augmenter la résistance
des poches, des ouvertures et des ceintures.
Les accessoires de couture sont situés dans la table
supplémentaire et on y accède très aisément.
Pour coudre des manches, des ceintures, des
jambes de pantalons ou une zone circulaire.
Pour repriser des chaussettes ou réparer des
genouillères, des coudes ou des zones d’usure dans
Accessoires standard
Pied de biche pour fermeture éclair
Pied de biche pour ourlets
Pied de biche pour boutonnières automatique
Canettes
Jeu d’aiguilles
Coupe boutonnières
Tournevis
Guidage pour ourlets
Boîte d’accessoires
-
-
-
les vêtements des enfants.
Boîte d’accessoires

4
1
2
3
4
5
6
1 2
3 4
5
6
Branchement de la machine
Avant de brancher le fil d’alimentation, vérifiez si la tension
et la fréquence indiquées sur la machine coïncident avec
votre courant électrique.
1. Eteignez l’interrupteur d’alimentation
2. Introduisez la prise mâle de la machine dans la prise
femelle
3. Introduisez la prise mâle d’alimentation dans la prise
de courant.
4. Allumez l’interrupteur d’alimentation pour brancher le
courant et la lampe de la machine.
Prise mâle
d’alimentation
Prise de courant
Prise mâle de la
machine
Interrupteur
d’alimentation
Prise femelle de la
machine
pédale
Pédale
La vitesse de la couture peut être variée avec la pédale.
Plus vous appuierez sur la pédale, plus la machine ira vite.
Avertissement : Ne posez rien sur la pédale, pour éviter
de mettre la machine en marche
involontairement.

5
1
2
1
2
Levier d’élévation du pied de biche
Position élevée normale
Position supérieure
Montage et démontage du pied de biche
Démontage
Tournez le volant vers vous pour faire monter l’aiguille à la
position la plus haute.
Faites monter le pied de biche.
Serrez le pied de biche situé dans la partie arrière du
support du pied de biche.
Le pied de biche se détache.
Montage
Mettez le pied de biche de sorte que la clavette de celui-ci
soit juste sous la rainure de son support.
Baissez le support du pied de biche pour le bloquer à sa
place.
Le levier d’élévation du pied de biche sert à lever et à
baisser le pied de biche. Vous pouvez le lever env. 0,6 cm
(1/4”) au-dessus de la position haute normale pour pouvoir
enlever facilement le pied de biche ou pour aider à placer
des gros tissus sous le pied.

6
Changement d’aiguille
Montez l’aiguille en tournant le volant vers vous et
baissez le pied de biche.
Enlevez la vis de fixation de l’aiguille en la tournant dans
le sens inverse à celui des aiguilles d’une montre.
Enlevez l’aiguille de la pièce de fixation.
Introduisez la nouvelle aiguille dans la pièce de fixation
avec le côté plat vers le côté opposé à vous.
Lorsque vous mettrez l’aiguille dans la pièce de fixation,
poussez vers le haut au maximum et serrez la vis de
fixation fermement avec un tournevis.
Vérifiez les aiguilles assez souvent pour voir si les
pointes sont abîmées. Les accrochages et les
déchirures dans les tissus de maille, les soies fines et
tissus similaires à la soie sont permanents et ils sont
toujours provoqués par une aiguille en mauvais état.
Vérification de l’aiguille
Mettez le côté plat de l’aiguille sur une surface plane
(plaque de l’aiguille, verre, etc.). La distance entre
l’aiguille et la surface plane doit être uniforme. N’utilisez
jamais une aiguille pliée ou émoussée.
Table des fils et des aiguilles
En général on utilise des aiguilles et des fils fins pour
coudre des tissus fins, et des aiguilles et des fils plus
épais pour coudre des tissus épais. Faites toujours un
essai de dimension de l’aiguille et du fil sur un petit
morceau du tissu que vous allez utiliser.
Utilisez le même fil pour l’aiguille et la canette.
Pour coudre des tissus synthétiques, très fins et
élastiques, utilisez une aiguille à POINTE BLEUE, qui
évite efficacement que les points sautent.
Pour coudre des tissus très fins, appliquez un papier
dessus pour éviter de froncer les coutures.
*
*
*
*
*
Tissus Fil
Dimension
des
aiguilles
Léger
Crêpe de
Chine, gaze,
cambrai,
organdi,
crêpe
Georgette
maille
Soie fine
Coton fin
Synthétique fin
Coton fin,
polyester
recouvert
9
ou
11
Poids
moyen
Lins, coton,
piqué, serge,
tissus de maille
sans
envers,
percale
11
ou
14
Lourd
Nankin,
tweed,
gabardine,
tissus pour
tapisserie,
rideaux et
housses
Soie 50,
coton de 40 à 50,
polyester
recouvert de
coton synthétique
de 40 à 50
14
16
Soie 50
Coton de 50 à 80
polyester
recouvert de
coton synthétique
de 50 à 60

7
1
2
3
3
2
1
1
2
3
1
1
2
3
Préparation des porte-bobines
Les porte-bobines s’utilisent pour serrer la bobine de fil qui
alimente le fil à la machine.
Pour les utiliser, levez les porte-bobines. Tirez par en
dessous pour les garder.
Fil supérieur
Trou
Emmêlement
Nota : Quand on utilise un fil ayant tendance à s’emmêler
autour du porte-bobine, enfilez-le à travers le trou du
porte-bobine, comme indiqué sur le dessin.
Le trou doit se trouver devant la bobine de fil.
Pour enlever ou mettre la boîte de la bobine
Ouvrez le couvercle de la navette.
Couvercle de la navette
Levez l’aiguille en tournant le volant vers vous. Tirez la boîte
de la bobine en retenant le loquet.
Loquet
Lorsque vous introduirez la boîte de la bobine, emboîtez la
partie saillante au bord de la piste de la navette.
Partie saillante

8
1
2
3
4
5
6
7
3
2
1
Bobinage de la canette
Tirez le volant vers l’extérieur.
Enlevez fil de la bobine.
Guidez le fil autour du guidage de fils du bobineur.
Passez le fil à travers le trou de la canette, de
l’intérieur vers l’extérieur.
Mettez la canette dans l’axe du bobineur.
Poussez vers la droite.
Avec le bout libre du fil dans la main, appuyez sur la
pédale.
Arrêtez la machine après avoir réalisé quelques tours
et coupez le fil près du trou de la canette.
Appuyez de nouveau sur la pédale.
Lorsque la canette sera entièrement enroulée, arrêtez
la machine. Remettez l’axe du bobineur dans sa
position originale en le déplaçant à gauche et coupez
le fil.
Poussez le volant vers la gauche (position originale).
Nota : Remettez l’axe du bobineur à sa place lorsque vous
arrêterez la machine.
Enfilage de la boîte de la bobine
Introduisez la canette dans la boîte de la bobine
Vérifiez si le fil se bobine dans le sens de la flèche.
Mettez le fil dans la rainure de la boîte de la bobine.
Tirez le fil sous le ressort de tension et introduisez-le
dans le trou de sortie.
Laissez environ 10 cm (4”) de fil libre.
2
1
6
3
4
5
7
1
2
3
*

9
1
3
2
4
5
6
1
2
3
4
5
6
Enfilage de la machine
Montez le pied de biche pour lever le fil à la position la plus
haute, en tournant le volant vers vous.
Levez le pied de biche.
Mettez une bobine de fil dans le porte-bobine comme
indiqué sur le dessin, (le fil vient de l’arrière de la bobine).
Avec les deux mains, passez le fil dans le guide-fils.
Tout en retenant le fil près de la bobine, tirez-le sous
la zone de tension et ensuite autour du support du
ressort de retenue.
Tirez fermement le fil vers le haut et à travers le pied
de biche pour lever le fil de droite à gauche.
Maintenant, tirez le fil en dessous et introduisez-le
dans le guide-fils inférieur.
Tirez le fil dessous et passez-le dans le guide-fils de la
barre d’aiguilles.
Enfilez l’aiguille de l’avant vers l’arrière.
Voir page 10 pour obtenir des renseignements sur
l’enfileur d’aiguilles incorporé.
.
Nota : Coupez l’extrémité du fil avec des ciseaux affûtés
pour enfiler l’aiguille plus facilement.
1
2
3
4
5
6
*

10
1
2
3
1
2
3
4
Enfileur d’aiguilles
Levez l’aiguille à la position la plus haute.
Tirez vers le bas l’enfileur d’aiguilles au maximum.
Tournez l’enfileur d’aiguille dans le sens de la flèche,
comme indiqué sur le dessin. Ensuite, introduisez le
crochet dans l’aiguille. Mettez le fil autour du guidage
et sous le crochet.
Tournez l’enfileur d’aiguille dans le sens de la flèche,
comme indiqué sur le dessin, en faisant passer
l’anneau du fil à travers l’aiguille.
Tirez le fil à travers l’aiguille.
L’enfileur d’aiguilles peut être utilisé avec des aiguilles
Nº11 à Nº16 ou avec une aiguille à pointe bleue
Janome. Une dimension de fil de 50 à 100 ira très bien
également.
Tirage vers le haut du fil de la canette
Montez le pied de biche et retenez le fil de l’aiguille
légèrement avec la main gauche.
Tournez le volant lentement vers vous avec la main
droite jusqu’à ce que l’aiguille descende et continuez
de tourner le volant jusqu’à ce que le pied de biche
soit dans la position la plus haute.
Tirez les deux fils 15 cm (6”) en arrière et sous le pied
de biche.
1
2
3
4
1
2
3
*

11
1
2
3
4
5
6
1
2
3
1
2
3
4
5
6
Compensation de la régulation du fil de
l’aiguille
Tension correcte
La régulation du fil s’ajuste suivant le matériel, les
épaisseurs de tissu et la méthode de couture.
*
Le point droit idéal entrelace les fils entre deux
épaisseurs de tissu, comme indiqué sur le dessin
(agrandi pour que l’on voie les détails).
*
Pour un point en zigzag idéal, le fil de la canette ne va
pas à l’endroit (côté supérieur) du tissu, et le fil de
l’aiguille se voit légèrement à l’envers (côté inférieur)
du tissu.
Fil de la canette (fil inférieur)
Côté endroit (côté supérieur) du tissu
Fil de l’aiguille (fil supérieur)
Envers (côté inférieur) du tissu
Bouton sélecteur de la régulation du fil
Indice de régulation
La régulation du fil de l’aiguille est trop haute
Le fil de la canette (fil inférieur) se voit à l’endroit (côté
supérieur) du tissu. Baissez la régulation du fil de
l’aiguille en mettant le bouton sélecteur sur un
numéro plus bas.
La régulation du fil de l’aiguille est trop
desserrée
Le fil de l’aiguille (fil supérieur) se voit à l’envers (côté
inférieur) du tissu. Serrez la régulation du fil de
l’aiguille en mettant le bouton sélecteur sur un
numéro plus haut.
Ajustage de la Régulation du fil de la Canette
Pour la couture en général il n’est pas nécessaire d’ajuster
la régulation du fil de la canette. Mais vous pouvez l’ajuster
pour un travail de couture spécifique.
Tournez la vis d’ajustage à droite pour augmenter à tension,
ou à gauche pour la baisser.
3
2
1

12
1
1
1
S.S.
1
1
1
A
C
D
E F
G H I
J
K L
A
1
2
3
4
0
1
2
3
4
0
1
2
4
3
5
0
Montez l’aiguille et le pied de biche. Tournez le bouton
sélecteur de point pour ajuster le symbole correspondant
au modèle souhaité de l’indice de régulation.
Bouton Sélecteur de Point
Indice de régulation
Bouton sélecteur de la dimension du point
Tournez le bouton sélecteur de la dimension du point
pour ajuster la dimension du point souhaité de l’indice de
régulation.
Plus le numéro sera haut, plus le point sera grand.
Indice de régulation
“ ” ajustage recommandé pour les boutonnières
Ajuster le bouton sélecteur dans l’intervalle 0,5-4
pour le point en zigzag.
Ajustage du bouton sélecteur en “S.S” pour le point
élastique.
Si le point élastique n’est pas uniforme, tournez le
bouton sélecteur de dimension du point sur “-“ pour
réduire ou sur “+” pour augmenter.
Bouton sélecteur de la largeur du point
Tournez le bouton sélecteur de la largeur du point pour
établir la dimension du point souhaité de l’indice de
régulation.
Plus le numéro sera haut, plus le point sera grand.
Indice de régulation
Nota : Levez l’aiguille sur le tissu lorsque vous
tournerez le bouton sélecteur de dimension du
point.

13
1
2
2
1
1
2
3
2
Bouton de couture en arrière
En maintenant appuyé le bouton de couture en arrière, la
machine coud en arrière.
Descente du pied de biche
Ouvrez le couvercle de la navette.
Couvercle de la navette
Pour baisser le pied de biche, tirez-le vers le bas et
déplacez-le vers la droite, comme indiqué sur le
dessin.
Pied de biche de descente
Pour lever le pied de biche, tirez-le vers le bas et
déplacez-le vers la gauche, comme indiqué sur le
dessin.
Le pied de biche doit être levé pour la couture
normale.
Le pied de biche retourne à la position levée lorsque
la machine commence à marcher.
1
2
3
*
*

14
1
2
3
4
4
1
2
3
5
5
3
1
2
AB
1
2
3
4
0
1
2
4
3
5
0
VOLET 3. COUTURE DE BASE
Couture au point droit
Sélecteur de Point :
Pied de biche :
Tension du fil :
Dimension du point :
Largeur du point :
A ou B
Pied de biche pour zigzag
2-6
1,5-4
(0) ou (5)
Levez le pied de biche et placez le tissu avec le bord
aligné avec la ligne guidage de couture de la plaque
d’aiguille.
Faites descendre l’aiguille jusqu’au tissu.
Baissez le pied de biche et tirez les fils en arrière.
Appuyez sur la pédale.
Guidez doucement le tissu sur la ligne guidage, en le
laissant passer tout seul.
Pour fixer l’extrémité des coutures, appuyez sur le
bouton de couture en arrière et cousez plusieurs points
en arrière.
Levez le pied de biche, tirez le tissu et mettez les fils
en arrière.
Tires les fils vers le haut et vers le coupe-fils.
Les fils se coupent à la dimension nécessaire pour
commencer le travail suivant.
Changement de sens de la couture
Arrêtez la machine et tournez le volant vers vous pour
introduire l’aiguille dans le tissu.
Levez le pied de biche.
Tournez le tissu autour de l’aiguille pour changer le sens de
la couture. Baissez le pied de biche et continuez votre
couture.
1
2
3

15
20
1,3 1,6 1,9
6/8"5/8"4/8"3/8"
2,01,5 1,0
1
2
3
4
5
2
1
2
3
4
5
2
1
2
4
3
5
0
Utilisation des guidages de couture de la
plaque d’aiguille
Les guidages de couture de la plaque de l’aiguille servent à
mesurer la largeur des coutures.
Les numéros indiquent la distance entre la position
centrale de l’aiguille et la ligne de guidage.
Lignes de guidage
Guidage pour coins
Plaque de l’aiguille
Trou de la plaque de l’aiguille
Largeur de la couture, de la position centrale de
l’aiguille
Angle droit
Pour faire un angle droit à 1,6 cm (5/8”) du bord du tissu :
Après avoir aligné le bord du tissu situé devant vous avec le
guid-coins (voir dessin), arrêter de piquer et baissez
l’aiguille en tournant le volant vers vous.
Levez le pied de biche et tournez le tissu pour aligner le
bord avec le guidage couture de 1,6 cm (5/8”)
Baissez le pied de biche et commencez à piquer dans
l’autre sens.
Guidage d’angles
Position d’aiguille variable
Quand on sélectionne le point droit (modèle A), on peut
déplacer l’aiguille entre les positions d’aiguille centrale et
gauche, en tournant le bouton sélecteur de largeur du point.
Numéros de la plaque de
l’aiguille
Distance en centimètres
10 15
1,0
*

16
1 2
3
4
4
1
2
3
4
1
2
3
1
2
3
4
5
5
5
5
1
2
3
4
0
1
2
4
3
5
0
1
2
3
4
0
1
2
4
3
5
0
C
Points en zigzag
Sélecteur de Point :
Pied de biche :
Tension du fil :
Dimension du point :
Largeur du point :
C
Pied de biche pour zigzag
2-5
0,5-4
1,5
Les points en zigzag simples s’utilisent pour faufiler, coudre
des boutons, etc.
VOLET 4. LA COUTURE LA PLUS
USUELLE
Faufiler
Sélecteur de Point :
Pied de biche :
Tension du fil :
Dimension du point :
Largeur du point :
C
Pied de biche pour zigzag
1-4
1-2
5
Le point en zigzag s’utilise pour faufiler le tissu, pour éviter
l’effilochement des bords.
G

17
1
2
3
4
1
2
3
4
4
1
2
3
4
1
2
3
5
5
5
5
1
2
3
4
0
1
2
4
3
5
0
1
2
3
4
0
1
2
4
3
5
0
D
G
Point Zigzag
Sélecteur de point :
Pied de biche :
Tension du fil :
Dimension du point :
Largeur du point :
D
Pied de biche pour zigzag
1-4
0,5-1,5
5
Ce point s’utilise pour terminer le bord de la couture dans
les tissus synthétiques et autres ayant tendance à froncer.
Mettez le tissu de sorte à pouvoir faire une couture de 1,6
cm (5/8”).
Coupez le bord de la couture quand vous aurez terminé.
Nota : Faites attention de ne pas couper les points.
Ce point s’utilise également pour repriser et coudre des
déchirures.
Point formé
Sélecteur de Point :
Pied de biche :
Tension du fil :
Dimension du point :
Largeur du point :
G
Pied de biche pour zigzag
1-4
S.S.
5
Le point formé est idéal pour coudre des maillots de bain et
du velours élastique, parce qu’il offre une grande élasticité
et résistance.
Placez le tissu de sorte à pouvoir faire une couture à 1,6 cm
(5/8”).
Coupez ensuite le bord de la couture.
Nota : Faites attention de ne pas couper les points.

18
1 2
3
4
4
1
2
3
5
5
BA
1
2
3
4
0
1
2
4
3
5
0
Point élastique droit
Sélecteur de Point :
Pied de biche :
Tension du fil :
Dimension du point :
Largeur du point :
La ou B
Pied de biche pour zigzag
2-6
1,5-4
(0) ou
(5)
Piquez deux points à l’endroit et un point à l’envers, pour
faire une couture qui ne se déchire pas facilement.

19
1
2
3
4
1
2
3
5
4 5
6
6
1 2
3
4 5
1
2
3
4
0
1
2
4
3
5
0
C
Pour coudre des boutons
Sélecteur de Point : C
Pied de biche : Pied de biche pour zigzag
Tension du fil : 1-3
Dimension du point : au choix
Largeur du point : ajuster suivant besoins
Pied de biche : baissé
Ajustez la largeur du point, et tournez le volant pour
s’assurer que l’aiguille entre dans chaque trou du
bouton.
Baissez le pied de biche pour maintenir le bouton à sa
place.
Les trous du bouton doivent s’aligner avec la rainure
du pied de biche.
Vous pouvez mettre une épingle sur le pied de biche
pour former un pied.
Vérifiez que l’aiguille entre bien dans les deux trous du
bouton.
Faites une dizaine de points et coupez les fils
supérieur et inférieur, en laissant 20 cm (8”) de fil.
Passez les fils de l’aiguille (supérieures) entre le
bouton et le tissu à travers des trous du bouton.
Tirez les fils supérieurs pour mettre les fils inférieurs à
l’endroit du tissu.
Tournez les fils autour du bouton pour former un pied
et nouez-les.
Levez le pied de biche après la couture.
1
2
3
4
5

20
1
2
3
4
5
6
1 2 3
4
5
6 7
4
1
2
3
4
1 2
3
5
5
8
1
2
3
4
5
6
1
2
3
4
0
1
2
4
3
5
0
BH
Boutonnières
Sélecteur de Point : (BH)
Pied de biche : pied de biche pour boutonnières
automatiques
Tension du fil : 1-5
Dimension du point : (0,5-1)
Largeur du point : 5
La dimension de la boutonnière s’ajuste
automatiquement en mettant le bouton dans le pied
de biche pour boutonnières automatiques.
Le support de bouton du pied de biche sert pour des
boutons jusqu’à 2,5 cm (1”) de diamètre.
Faites une boutonnière d’essai avec le même tissu,
la même surface de contact et les mêmes points
qu’avec le tissu utilisé.
Mettez le bouton sur l’échantillon de tissu et
marquez la partie supérieure et la partie inférieure
pour déterminer la position de la boutonnière.
Utilisez une toile pour les tissus élastiques.
Tournez le volant vers vous pour lever l’aiguille à sa
position la plus haute.
Levez le pied de biche.
Sélectionnez le modèle “BH” en tournant le bouton
sélecteur de points.
Si vous avez sélectionné le modèle BH,
repositionnez le bouton sélecteur une fois suivant le
procédé indiqué au point 12
Montez le pied de biche pour boutonnières
automatiques.
Tirez sur le support du bouton en arrière et placez le
bouton. Poussez de nouveau le support du bouton
vers vous à fond.
Baissez le pied de biche pour boutonnières à fond.
Pied de biche pour boutonnières
Introduisez le tissu sous le pied de biche.
Tournez le volant lentement vers vous avec la main
droite jusqu’à ce que l’aiguille descende et continuez
de tourner le volant jusqu’à ce que le pied de biche
de lever le fil se trouve dans la position la plus haute.
Tirez le tissu vers la gauche et tirez les deux fils vers
la gauche.
Introduisez le tissu sous le pied de biche, et baissez
l’aiguille sur le point de départ.
Baissez le pied de biche pour boutonnières
automatiques.
Nota : Vérifiez qu’il n’y a pas de jeu entre la glissière et le
support du ressort. S’il y a du jeu, la longueur des fils
sera différente, (voir dessin).
Point de départ
Glissière
Il ne doit pas y avoir de jeu
Support du ressort
Différence
*
*
*
*
*
1
2
3
4
5
6
7
8

21
9
10 11
12
13
1
2
3
4
0
Piquez lentement et arrêtez la machine quand vous
aurez terminé une boutonnière.
La machine pique d’abord le renforcement avant et la
file de gauche, ensuite le renfort arrière et la file de
droite.
Coupez les fils supérieur et inférieur en laissant
environ 10 cm (4”) de fil.
Tirez le fil de l’aiguille (supérieur) sur l’envers du tissu
en tirant sur le fil inférieur.
Nouez les fils.
Mettez une épingle dans la partie intérieure du renfort.
Coupez l’ouverture avec le coupe boutonnières.
Faites attention de ne pas couper les points.
Pour répéter la couture des boutonnières, tournez le
sélecteur de points sur ; et de nouveau vers (—
) , (voir dessin).
Appuyez maintenant sur la pédale pour faire une
boutonnière identique.
Quand vous aurez fini de faire des boutonnières, levez
le pied de biche des boutonnières à fond.
Pour ajuster la densité des points des boutonnières :
La densité du point pour les boutonnières s’ajuste sur
“ ” du bouton sélecteur de la dimension du point.
9
10
11
12
13

22
4
1
2
3
4
1
2
3
5
5
1
1
1
2
3
1
2
3
4
0
1
2
4
3
5
0
BH
Boutonnière en relief avec cordon
Sélecteur de Point : (BH)
Pied de biche : pied de biche pour boutonnières
Tension du fil : 1-5
Dimension du point : (0,5-1)
Largeur du point : 5
Utilisez le même procédé que pour une boutonnière
automatique.
Fixez la largeur du point de sorte qu’elle coïncide avec
l’épaisseur du cordon utilisé.
Avec le pied de biche pour boutonnières levé, mettez le
cordon dans l’éperon dans la partie arrière du pied de
biche pour boutonnières.
Levez les extrémités vers vous sous le pied de biche
pour boutonnières, en laissant libre l’extrémité avant.
Accrochez le cordon dans les fourches situées à
l’avant du pied de biche pour boutonnières
automatiques pour pouvoir les serrer ensemble.
Baissez l’aiguille jusqu’au tissu à l’endroit où vous allez
commencer la boutonnière, et baissez le pied.
Eperon
Appuyez doucement sur la pédale et faites la
boutonnière. Les côtés de la boutonnière et les renforts
se cousent sur le cordon.
Enlevez le tissu de la machine et coupez uniquement
les fils.
Tirez l’extrémité gauche du cordon et serrez-le. Enfilez
l’extrémité dans une aiguille à repriser, tirez-le sur
l’envers du tissu et coupez-le.
1
2
3
*
*
automatiques
Pour couper l’ouverture de la boutonnière, reportez-vous
aux instructions de la page 21.

23
1
2
3
4
4
1
2
3
5
5
1
2
3
4
0
1
2
4
3
5
0
A
Pour coudre une fermeture éclair
Sélecteur de Point : A
Pied de biche : pied de biche pour fermeture éclair
Tension du fil : 3-6
Dimension du point : 1,5-4
Largeur du point : 5
Epinglez la fermeture éclair ou faufilez-la et mettez-la sous
le pied de biche. Mettez les fils en arrière et baissez le pied
de biche.
Pour coudre le côté gauche de la fermeture, guidez les
dentes de la fermeture le long du bord du pied de biche et
piquez la fermeture éclair sur le tissu.
Tournez le tissu et piquez l’autre côté de la fermeture
comme pour le côté gauche.

24
1
2
4
1
2
4
3
4
1
2
3
3
2
1
5
2
1
[A] [B]
3
4
5
1
2
5
3
4
5
1
2
3
4
0
1
2
4
3
5
0
6
6
E
F
Ourlets au point invisible
Sélecteur de Point : E ou F
Pied de biche : Pied de biche pour zigzag
Tension du fil : 2-4
Dimension du point : 1-3
Largeur du point : 5
Guidage d’ourlets
Pliez l’ourlet vers le haut et pliez-le de nouveau en
laissant un bord de 0,4 à 0,7 cm (1/4”) (voir dessin).
Envers du tissu
de 0,4 à 0,7 cm (1/4”)
[A] tissus lourds
[B] tissus fins ou d’un poids moyen
Baissez le pied de biche. Desserrez la vis du support
du pied de biche pour mettre le guidage d’ourlets entre
la vis et la tige du support du pied de biche.
Serrez la vis en vous assurant que le guidage
d’ourlets est au milieu des griffes du pied de biche.
Vis
Guidage d’ourlets
Levez le pied de biche et mettez le tissu dessous pour
que le pli souple s’appuie contre le guidage d’ourlets.
Baissez le pied de biche. Piquez lentement pour
pouvoir contrôler et pour que les points en zigzag se
fassent au bord de l’ourlet et perforent le pli souple.
Vérifiez en même temps pendant que vous cousez
que le pli se fait en suivant le guidage d’ourlets.
Ouvrez complètement le pli.
Endroit du tissu.
*
1
2
3
4
Si l’aiguille descend trop à gauche, les points seront
visibles à l’endroit du tissu.

25
4
1
2
3
5
1
2
3
4
5
1
2
3
4
0
1
2
4
3
5
0
1
2
3
4
2
1
2
1
3
4
A
Ourlet enroulé
Sélecteur de point : A
Pied de biche : pied de biche pour ourlets
Tension du fil : 2-6
Dimension du point : 1,5-4
Largeur du point : 5
Coupez dans un coin du tissu 0,8 cm (5/16”) x 1,5
cm (3,16”) pour éviter que l’ourlet se boudine dans
les coins.
Pliez le bord du tissu deux fois 0,3 cm (1/8”) en
largeuret 6 cm (2 3/8”) en longueur.
Envers du tissu
0,5 cm
0,8 cm
Hélice du pied de biche
Placez le tissu en alignant le bord de l’ourlet avec le
guidage du pied de biche. Baissez le pied de biche
et piquez plusieurs points en tirant des deux fils en
arrière en même temps. Arrêtez la machine avec
l’aiguille dans le tissu et levez le pied de biche.
Introduisez à partie pliée du tissu dans l’hélice du
pied de biche. Baissez le pied de biche et pendant
que vous cousez, levez le bord qui continue
d’avancer doucement et
uniformément.
1
2

26
4
1
2
3
4
1
2
3
4
1
2
3
4
1
2
3
5
5
5
5
1
2
3
4
0
1
2
4
3
5
0
A
C
D
E F
G H
B
I
J
K L
G
VOLET 5. COUTUREDECORATIVE
Point de vagues
Sélecteur de Point : G
Pied de biche : pied de biche pour zigzag
Tension du fil : 6-8
Dimension du point : 2-3
Largeur du point : 5
Mettre le bord plié le long de la rainure du pied de biche.
L’aiguille doit baisser hors du bord du tissu à droite en
formant un pli.
Point Elastique
Sélecteur de Point : A - L
Pied de biche : pied de biche pour zigzag
Tension du fil : 1-4
Dimension du point : S.S.
Largeur du point : 5
Si le point en avant et en arrière se décompense à cause
du type de tissu, faire la compensation en tournant le
bouton sélecteur de dimension du point du mode
suivant :
Si les modèles se compriment, mettez le bouton
sélecteur en “+”.
Si les modèles s’étirent, mettez le bouton sélecteur en “-
“. (Voir page 12).
1
2
3
4
0
1
2
4
3
5
0

27
4
1
2
3
4
1 2
3
4
1
2
3
4
1
2
3
5
5
5
1
1
5
D
H
Nids d’abeilles
Sélecteur de point : D
Pied de biche : pied de biche pour zigzag
Tension du fil : 1-4
Dimension du point : S.S.
Largeur du point : 5
Mettez la dimension du point sur “4” et piquez des lignes de
points droits avec une séparation de 1 cm (3/8”), sur la
zone à broder.
Attachez les fils sur un bord. Tirez les fils de la canette et
froncez uniformément.
Fixez les fils à l’autre extrémité.
Enlevez les points de froncement.
Piquez avec un point décoratif entre les points du froncement.
Nota : Baissez la régulation du fil de l’aiguille (supérieur)
pour pouvoir froncer plus facilement.
Point de boîte
1 cm (3/8”)
Sélecteur de Point : H
Pied de biche : pied de biche pour zigzag
Tension du fil : 1-4
Dimension du point : 0,5-2.
Largeur du point : 5
Utilisez ce point pour unir des gros tissus.
Mettez les bordes l’un sur l’autre sans faufiler et utilisez ce point
pour les unir.
1
2
3
4
0
1
2
4
3
5
0
1
2
3
4
0
1
2
4
3
5
0

28
4
1
2
3
5
2
3
1
4
5
C
4
1
2
3
5
1
2
3
4
5
J
K
L
Applications
Sélecteur de Point : C
Pied de biche : pied de biche pour zigzag
Tension du fil : 1-4
Dimension du point : 0,5-1
Largeur du point : 5
Faufilez (ou collez avec un adhésif pour fer à repasser) des
pièces d’application sur le tissu. Piquez tout autour de
l’application en vous assurant que l’aiguille pique tout le long
du bord extérieur de l’application. Pour coudre des angles,
introduisez l’aiguille dans la toile, levez le pied de biche et
tournez le tissu à droite ou à gauche.
Point en relief décoratif
Sélecteur de Point : J-L
Pied de biche : pied de biche pour zigzag
Tension du fil : 1-4
Dimension du point : 0,5-1
Largeur du point : 5
Pour une présentation délicate sur des tissus comme la
mousseline de soie, utilisez seulement un morceau de tissu
avec un renfort dépliable en cas de besoin.
1
2
3
4
0
1
2
4
3
5
0
1
2
3
4
0
1
2
4
3
5
0

29
1
2
3
4
5
6
7
1
2
3
4
5
6
7
VOLET 6. LE SOINDEVOTREMACHINE
Démontage et montage de la piste de la
navette
Nota : Eteignez l’interrupteur d’alimentation e/ou
débranchez-la.
Pour démonter la piste de la navette :
Mettez l’aiguille sur la position plus haute et ouvrez couvercle
de la navette. Ouvrez la fermeture articulée de la boîte de la
bobine et sortez-la de la machine.
Ouvrez les éléments de fixation de la piste de la navette et
enlevez l’anneau de la piste de la navette.
Enlevez la navette.
Nettoyez la piste de la navette avec une brosse et un
chiffon doux sec.
Boîte de la bobine
Elément de fixation de la piste de la navette
Anneau de la piste de la navette
Navette
Piste de la navette
*
Pour monter la piste de la navette :
Serrez la navette avec la clavette centrale et montez-la avec
soin de nouveau dans la piste de la navette, en formant un
cercle parfait avec le poussoir de navette.
Montes l’anneau de la piste de la navette en vérifiant que la
clavette inférieure s’emboîte dans la rainure.
Bloquez l’anneau de la piste de la navette et remontez les
éléments de fixation à leur place. Introduisez la boîte de la
bobine.
Clavette
Rainure
Nettoyage du pied de biche
Nota : Eteignez l’interrupteur d’alimentation e/ou débranchez
la machine avant de nettoyer le pied de biche.
Démontez l’aiguille et le pied de biche.
Tirez la vis de fixation de la plaque l’aiguille et démontez-la.
Avec une brosse, nettoyez la poussière et les peluches qui
peuvent obstruer les dentes du pied de biche. Remontez la
plaque de l’aiguille.

30
(A)
(B)
(100V)
(200V)
Lampe de couture
La lampe de couture se trouve derrière la plaque avant.
Pour changer la lampe, enlevez la vis qui retient la plaque avant
de la machine à coudre et enlevez la plaque.
* Débranchez le courant avant de changer la lampe.
* Ne démontez pas la machine d’une autre manière que
celle indiquée dans cette brochure.
Attention : La lampe peut être CHAUDE. Protégez vos
(B)
(A)
Pour démonter .................... tournez à gauche.
Para monter ........................ tournez à droite.
Pour démonter .................... tirez et tournez à
gauche.
Para monter ........................ tirez et tournez à droite.
doigts pour l’enlever.

31
Localisation et solution des pannes
Situation
Cause
Référence
1. L’aiguille n’est pas bien enfilée.
2. La régulation du fil de l’aiguille est trop haute.
3. L’aiguille est pliée ou émoussée.
4. L’aiguille n’est pas bien montée.
5. Le tissu ne va pas en arrière à la fin de la couture.
6. Le fil est très épais ou très fin pour l’aiguille.
Voir page 9
Voir page 11
Voir page 6
Voir page 6
Voir page 14
Voir page 6
Le fil de l’aiguille
(supérieur) se casse
Le fil de la canette
(inférieur) se casse
1. Le fil inférieur n’est pas bien enfilé dans la boîte de la bobine.
2. Accumulation de peluche dans la boîte de la bobine.
3. La canette est abîmée et ne tourne pas uniformément.
Voir page 8
Nettoyez la boîte
de la bobine
Changez la
canette.
L’aiguille se casse
1. L’aiguille n’est pas bien montée.
2. L’aiguille est pliée ou émoussée.
3. La vis de fixation de l’aiguille est desserrée.
4. La régulation du fil de l’aiguille est trop grande.
5. Le tissu ne va pas en arrière à la fin de la couture.
6. L’aiguille est trop fine pour le tissu.
7. Le bouton sélecteur de point a tourné avec l’aiguille dans le
tissu.
Voir page 6
Voir page 6
Voir page 6
Voir page 11
Voir page 14
Voir page 6
Voir page 12
Les points sautent
1. L’aiguille n’est pas bien montée.
2. L’aiguille est pliée ou émoussée.
3. L’aiguille e/ou les fils ne sont pas adaptés au travail.
4. On n’utilise pas une aiguille de POINTE BLEUE pour coudre
des tissus synthétiques et des tissus très fins et élastiques.
5. L’aiguille n’est pas enfilée correctement.
Voir page 6
Voir page 6
Voir page 6
Voir page 6
Couture froncée
1. La régulation du fil de l’aiguille est trop grande.
2. La machine n’est pas bien enfilée.
3. L’aiguille est trop grosse pour le tissu.
4. Les points sont trop épais pour le tissu.
* pour coudre des matériels très légers, mettez un papier sous le
tissu.
Voir page 11
Voir page 9
Voir page 6
Faites des points
plus gros.
Les points forment des
boucles sous la
couture
1. La machine n’est pas branchée.
2. Il y a fils dans la piste de la navette.
3. Le volant n’est pas engrené pour le bobinage de la canette.
1. La régulation du fil de l’aiguille est trop lâche.
2. L’aiguille est trop grosse ou trop fine pour le fil.
Voir page 11
Voir page 6
Le tissu n’avance pas
uniformément
1. Le pied de biche est bouché par de la peluche.
2. Les points sont trop fins.
Voir page 29
Faites des points
plus gros.
La machine ne marche
pas
Voir page 4
Voir page 29
Voir page 8
La machine ne marche
pas uniformément et
elle fait du bruit
1. Il y a des fils dans le mécanisme de la navette.
2. Le pied de biche est bouché par de la peluche.
Voir page 29
Voir page 29
Voir page 9

1
TABLE OF CONTENTS
SECTION 1. ESSENTIAL PARTS
Name of Parts.................................................................................................................................... 2
SECTION 2. GETTING READY TO SEW
Extension Table ................................................................................................................................. 3
Standard Accessories........................................................................................................................ 3
Accessories Storage Box................................................................................................................... 3
Connecting the Machine to the Power Supply................................................................................... 4
Foot Control ....................................................................................................................................... 4
Presser Foot Lifter ............................................................................................................................. 5
To Attach and Remove the Presser Foot .......................................................................................... 5
Changing Needle ............................................................................................................................... 6
Thread and Needle Chart .................................................................................................................. 6
Setting Spool Pins ............................................................................................................................. 7
Removing or Inserting the Bobbin Case ............................................................................................ 7
Winding the Bobbin............................................................................................................................ 8
Threading Bobbin Case ..................................................................................................................... 8
Threading the Machine ...................................................................................................................... 9
Needle Threader................................................................................................................................ 10
Drawing Up Bobbin Thread ............................................................................................................... 10
Balancing Needle Thread Tension .................................................................................................... 11
Adjusting Bobbin Thread Tension...................................................................................................... 11
Pattern Selector Dial.......................................................................................................................... 12
Stitch Length Dial............................................................................................................................... 12
Stitch Width Dial ................................................................................................................................ 12
Reverse Stitch Button ........................................................................................................................ 13
Dropping the Feed Dog ..................................................................................................................... 13
SECTION 3. BASIC SEWING
Straight Stitch Sewing........................................................................................................................ 14
To Change Sewing Direction ............................................................................................................. 14
Using the Seam Guides on the Needle Plate .................................................................................... 15
Turning Square Corners .................................................................................................................... 15
Variable Needle Position ................................................................................................................... 15
Zigzag Stitching ................................................................................................................................. 16
SECTION 4. UTILITY STITCHING
Overcasting........................................................................................................................................ 16
Tricot Stitch........................................................................................................................................ 17
Knit Stitch........................................................................................................................................... 17
Straight Stretch Stitch ........................................................................................................................ 18
Sewing on Buttons............................................................................................................................. 19
Buttonhole..........................................................................................................................................20-21
Corded Buttonhole............................................................................................................................. 22
Zipper Application .............................................................................................................................. 23
Blind Stitch Hemming ........................................................................................................................ 24
Rolled Hem ........................................................................................................................................ 25
SECTION 5. DECORATIVE STITCHING
Shell Tuck .......................................................................................................................................... 26
Stretch Stitch Patterns ....................................................................................................................... 26
Smocking ........................................................................................................................................... 27
Box Stitching...................................................................................................................................... 27
Applique............................................................................................................................................. 28
Decorative Satin Stitch Pattern.......................................................................................................... 28
SECTION 6. CARE OF YOUR MACHINE
Dismantling and Assembling Hook Race Unit ................................................................................... 29
Cleaning the Feed Dog...................................................................................................................... 29
Sewing Light ...................................................................................................................................... 30
Troubleshooting ................................................................................................................................. 31

2
2
3
4
5
6
78
9
10
11
12
13
14
15
16
17
18
19
20
21
22
23
24
25
26
27
1
SECTION 1. ESSENTIAL PARTS
Name of Parts
1 Reverse stitch button
2 Pattern selector dial
3 Stitch length dial
4 Stitch width dial
5 Bobbin winder stopper
6 Bobbin winder spindle
7 Spool pins
8 Bobbin winder thread guide
9 Thread guide
10 Thread take-up lever
11 Thread tension dial
12 Face plate
13 Thread cutter
14 Needle Threader
15 Needle plate
16 Presser foot holder
17 Needle clamp
18 Needle
19 Presser foot
20 Extension table
21 Carrying handle
22 Handwheel
23 Power switch
24 Machine socket
25 Free arm
26 Buttonhole lever
27 Presser foot lifter
Note : The specifications are subject to change without prior
notice.

3
1
2
3
4
5
6
7
9
8
Extension Table
The extension table provides added sewing surface and can
be easily removed for free arm sewing.
Detaching the table:
Pull the table away from the machine.
Attaching the table:
Push the extension table until it snaps into the machine.
Advantages and uses of free arm sewing:
– Avoid fabric bunching around the needle when
bartacking to reinforce pockets, plackets and waistlines.
– For stitching sleeves, waistbands, pant legs or any
circular garment area
– For darning socks or mending knees, elbows or areas
of wear in children's clothes
Standard Accessories
Zipper foot
Hemmer foot
Automatic buttonhole foot
Bobbins
Set of needles
Seam ripper
Screwdriver
Hem guide
SECTION 2. GETTING READY TO SEW
Accessories storage box
Accessories Storage Box
Sewing accessories are conveniently located in the extension
table.
1
2
3
4
5
6
7
8
9

4
1
2
3
4
5
6
Connecting the Machine to the Power Supply
Before connecting the power cord, make sure the voltage and
frequency shown on the machine conform to your electrical power.
1. Turn off the power switch.
2. Insert the machine plug into the machine socket.
3. Insert the power supply plug into the outlet .
4. Turn on the power switch to turn on the power and sewing
light.
Foot control
Sewing speed can be varied by the foot control.
The harder you press on the control, the faster the machine runs.
1
Power supply plug Power switch
Outlet Machine socket
Machine plug Foot control
2
3
4
5 6
Caution : Do not place anything on the foot contorol, otherwise
the machine will start advertently.

5
1
2
To Attach and Remove the Presser Foot
To remove
Turn the handwheel toward you to raise the needle to its highest
position.
Raise the presser foot.
Press the lever on the back of the foot holder.
The presser foot will drop off.
To attach
Place the presser foot so the pin on the foot lies just under the
groove of the foot holder.
Lower the foot holder to lock the foot in place.
Presser Foot Lifter
The presser foot lifter raises and lowers your presser foot.
You can raise it about 0.6 cm (1/4") higher than the normal up
position for easy removal of the presser foot or to help you to
place heavy fabric under the foot.
Normal up position
Highest position
1
2

6
Fabrics Thread
Crepe de Chine, Voile, Fine Silk 9
Lawn, Organdy, Fine Cotton or
Georgette,
Fine Synthetic 11
Tricot Fine Cotton
Covered
Polyester
Linens, Cotton, Pique, 50 silk 11
Serge, Double Knits,
50 to 80 Cotton or
Percale 50 to 60
14
Synthetic
Cotton Covered
Polyester
Denim, Tweed, 50 silk 14
Gabardine,
Coating, Drapery and 40 to 50 Cotton
Upholstery Fabric 40 to 50 16
Synthetic
Cotton Covered
Polyester
Light
weight
Medium
weight
Heavy
weight
Thread and Needle Chart
* In general, fine threads and needles are used for sewing
thin fabrics, and thicker threads and needles are used for
sewing heavy fabrics. Always test thread and needle size
on a small piece of fabric which will be used for actual sewing.
* Use the same thread for needle and bobbin.
* When sewing stretch, very fine fabrics and synthetics,use
a BLUE TIPPED needle.
The blue tipped needle effectively prevents skipped stitches.
*When sewing very fine fabrics, sew over a piece of paper
to prevent seam puckering.
Changing Needle
Raise the needle by turning the handwheel toward you and
lower the presser foot.
Loosen the needle clamp screw by turning it counterclockwise.
Remove the needle from the clamp.
Insert the new needle into the clamp with the flat side away
from you.
When inserting the needle into the clamp, push it up as far as
it will go and tighten the clamp screw firmly with the screwdriver.
* Check your needles frequently for barbed or blunted points.
Snags and runs in knits, fine silks and silk-like fabrics are
permanent and are almost always caused by a damaged
needle.
To check the needle
Place the flat side of the needle on something flat (needle
plate, glass etc.). The clearance between the needle and flat
surface should be consistent. Never use a bent or blunt needle.

7
3
2
1
1
1
2
3
Removing or Inserting the Bobbin Case
Open the hook cover.
Raise the needle by turning the handwheel toward you.
Take out the bobbin case by holding the latch.
When inserting the bobbin case, place the horn into the recess
of the hook race.
Hook cover
Latch
Horn
1
2
3
Setting Spool Pins
The spool pins are used for holding the spool of thread in order
to feed thread to the machine.
To use, pull up the spool pin. Push down for storage.
1
2
3
Upper thread
Hole
Tangle
Note : When using thread which has tendency to tangle
around spool pin, thread through the hole of spool
pin as shown.
The hole should face the thread spool.

8
1
2
3
4
5
6
7
3
2
1
Threading Bobbin Case
1Place the bobbin into the bobbin case.
Make sure the thread unwinds in the direction of arrow.
2 Pull the thread into the bobbin case slot.
3Draw the thread under the tension spring and into the
delivery eye.
* Leave about 10 cm (4") of free thread.
Winding the Bobbin
1 Pull the handwheel out.
2 Draw the thread from spool.
Guide the thread around the bobbin winder thread guide.
3 Insert the thread through the hole in the bobbin from
the inside to the outside.
Put the bobbin on the bobbin winder spindle.
4 Push it to the right.
5 With the free end of the thread held in your hand,
depress the foot control.
Stop the machine when it has made a few turns, and
cut the thread close to the hole in the bobbin.
6 Depress the foot control again.
When the bobbin is fully wound, stop the machine.
Return the bobbin winder spindle to its original position
by moving the spindle to the left, and cut the thread.
7 Push the handwheel to the left. (original position).
Note : Return the bobbin winder spindle when the machine
stops.

9
1
3
2
4
5
6
1
2
3
4
5
6
Threading the Machine
Raise the take–up lever to its highest position by turning the
handwheel toward you.
Raise the presser foot.
Place a spool on the spool pin as shown, with thread coming
from back of the spool.
1 Draw the thread into thread guide using both hands.
2 While holding the thread near spool, draw thread down
into the tension area and then around the check spring
holder.
3Firmly draw the thread up and through the take–up
lever from right to left.
4Then draw the thread down and slip it into the lower
thread guide.
5 Draw the thread down and slip it into needle bar thread
guide on the left.
6 Thread the needle eye from front to back.
Note : You may want to cut the end of thread with sharp
scissors for easier needle threading.
* Refer to page 10 for the built-in needle threader.

10
1
2
3
1
2
3
4
Drawing Up Bobbin Thread
1 Raise the presser foot and hold the needle thread
lightly with your left hand.
2 Turn the handwheel slowly toward you with your right
hand until the needle goes down and continue turning
the handwheel until the take–up lever is at its highest
position.
Lightly draw up the needle thread forming a loop of
the bobbin thread.
3 Pull 15 cm (6") of both threads back and under the
presser foot.
Needle Threader
1 Raise the needle to its highest position.
Pull down the needle threader knob as far as it will go.
2 Turn the knob in the direction of the arrow in the
illustration, then insert Hook into the needle eye.
Lead the thread around Guide and under Hook.
3 Turn the knob in the direction of the arrow in the
illustration, drawing the thread loop through the needle.
4Pull the thread through the needle eye.
* The needle threader can be used with a #11 to #16 needle
or a Janome Blue tipped needle. Thread size 50 to 100
should also work well.

11
1
2
3
4
5
6
1
2
3
Balancing Needle Thread Tension
1 Correct tension
The thread tension is adjusted depending on the
sewing materials, layers of fabric and sewing method.
* The ideal straight stitch has threads looked between two
layers of fabric, as illustrated (magnifies to show detail).
* For an ideal zigzag stitch, the bobbin thread does not
show on the right side (top side) of the fabric, and the needle
thread shows slightly on the wrong side (bottomside) of
the fabric.
2
Needle thread tension is too tight
The bobbin thread (bottom thread) will appear on the
right side (top side) of the fabric.......Loosen the needle
thread tension by moving the dial to a lower number.
3
Needle thread tension is too loose
The needle thread (top thread) will appear on the wrong
side (bottom side) of the fabric.......Tighten the needle
thread tension by moving the dial to a higher number.
1
Needle thread (Top thread)
Bobbin thread (Bottom thread)
Right side (Top side) of fabric
Wrong side (Bottom side) of fabric
Thread tension dial
Setting mark
2
3
4
5
6
Adjusting Bobbin Thread Tension
For general sewing, the bobbin thread tension does not need
to adjust. However, you can adjust the bobbin thread tension
for a specific sewing need.
Turn the adjusting screw to the right to tighten or, to the left to
loosen the tension.

12
1
1
1
S.S.
A
C
D
E F
G H I
J
K L
A
1
2
3
4
0
1
2
3
4
0
1
2
4
3
5
0
Pattern Selector Dial
Stitch Length Dial
" " is the recommended setting for buttonhole stitching.
Adjust the dial in the 0.5–4 range when you sew the zigzag
stitch.
Set the dial at "S.S." to sew the stretch stitch pattern.
If the stretch stitch pattern is not even, turn the stitch length
dial in the direction of "–" to compress it, or "+" to expand
it.
Stitch Width Dial
Note : Raise the needle above the fabric, when you turn the
stitch width dial.
Raise the needle and presser foot. Turn the pattern selector
dial to set the symbol corresponding to the desired pattern at
the setting mark.
Setting mark
Turn the stitch length dial to set the desired stitch length at the
setting mark.
The higher the number, the longer the stitch length
Setting mark
Turn the stitch width dial to set the desired stitch width at the
setting mark .
The higher the number, the wider the stitch width
Setting mark
1
1
1

13
2
1
1
2
3
2
Reverse Stitch Button
As long as you keep the reverse stitch button depressed, the
machine sews backwards.
Dropping the Feed Dog
1 Open the hook cover.
1
2
2 To drop the feed dog, pull down the drop lever and
move it to the right, as illustrated.
3 To raise the feed dog, pull down the drop lever and
move it to the left, as illustrated.
* The feed dog must be up for normal sewing.
* The feed dog will return to the up position when the
machine starts running.
Hook cover
Drop lever

14
1
2
3
4
5
3
1
2
AB
1
2
3
4
0
1
2
4
3
5
0
Pattern selector: A or B
Presser foot: Zigzag foot
Thread tension: 2–6
Stitch length: 1.5–4
Stitch width: (0) or (5)
SECTION 3. BASIC SEWING
Straight Stitch Sewing
1 Raise the presser foot and position the fabric with its
edge lining up with a seam guide line on the needle
plate.
Lower the needle into the fabric.
Lower the presser foot and smooth the threads toward
the back. Depress the foot control.
Gently guide the fabric along the guide line letting the
fabric feed by itself.
2 For fastening the end of seams, press the reverse stitch
button and sew several reverse stitches.
Raise the presser foot and remove the fabric, drawing
the threads to the back.
3 Draw the threads up and into the thread cutter.
The threads are cut the proper length for starting the
next seam.
To Change Sewing Direction
Stop the machine and turn the handwheel toward you to bring
the needle down into the fabric.
Raise the presser foot.
Pivot the fabric around the needle to change sewing direction
as desired. Lower the presser foot and continue sewing.
4
1
2
3
5

15
1
2
3
4
5
2
1
2
4
3
5
0
Using the Seam Guides on the Needle Plate
The seam guides on the needle plate help you to measure
seam width.
* The numbers indicate the distance between the center
needle position and the guide line.
Numbers on the needle plate
Distance in centimeters
15 2010
1.3 1.6 1.9
6/8"5/8"4/8"3/8"
2.01.51.0 1.0
Guide lines
Cornering guide
Needle plate
Needle plate hole
Seam width from the center needle position
Turning Square Corners
To turn a square corner 1.6 cm (5/8") from the fabric edge.
When the fabric edge facing you lines up with the cornering
guide as illustrated, stop stitching and lower the needle by
turning the handwheel towards you.
Raise the presser foot and turn the fabric to line the edge with
the 1.6 cm (5/8") seam guide.
Lower the presser foot and begin stitching in the new direction.
Cornering guide
1
2
3
4
5
2
Variable Needle Position
When the straight stitch (pattern A) is selected, you can move
the needle between center and left needle position by turning
the stitch width dial.

16
1 2
3
4
1
2
3
4
5
5
C
G
1
2
3
4
0
1
2
4
3
5
0
1
2
3
4
0
1
2
4
3
5
0
Zigzag Stitching
Simple zigzag stitching is widely used for overcasting, sewing
on buttons etc.
Pattern selector: C
Presser foot: Zigzag foot
Thread tension: 2–5
Stitch length: 0.5–4
Stitch width: 1-5
4
1
2
3
SECTION 4. UTILITY STITCHING
Overcasting
The zigzag stitch is used on the seam allowance to prevent
fabric from fraying at raw edges.
Pattern selector: C
Presser foot: Zigzag foot
Thread tension: 1–4
Stitch length: 1–2
Stitch width: 5
4
1
2
3
5
5

17
1
2
3
4
1
2
3
4
5
5
D
G
1
2
3
4
0
1
2
4
3
5
0
1
2
3
4
0
1
2
4
3
5
0
Tricot Stitch
Pattern selector: D
Presser foot: Zigzag foot
Thread tension: 1–4
Stitch length: 0.5–1.5
Stitch width: 5
4
1
2
3
Knit Stitch
Pattern selector: G
Presser foot: Zigzag foot
Thread tension: 1–4
Stitch length: S.S.
Stitch width: 5
4
1
2
3
This stitch is used to finish the seam allowance on synthetics
and other fabrics that tend to pucker.
Place your fabric to allow a 1.6 cm (5/8") seam.
Trim the seam allowance after sewing.
5
5
Note : Be careful not to cut the stitches.
This knit stitch is ideal for sewing swimwear and stretch velour
because it provides the greatest amount of elasticity and
strength.
Place your fabric to allow a 1.6 cm (5/8") seam.
Trim the seam allowance after sewing.
Note : Be careful not to cut the stitches.
It is also handy for darning and mending tears.

18
1 2
3
4
5
BA
1
2
3
4
0
1
2
4
3
5
0
Straight Stretch Stitch
Pattern selector: A or B
Presser foot: Zigzag foot
Thread tension: 2–6
Stitch length: S.S.
Stitch width: (0) or (5)
4
1
2
3
The stitch is sewn with two stitches forward and one stitch
backward forming a seam that does not rip easily.
5

19
1
2
3
4 5
6
1 2
3
4 5
C
1
2
3
4
0
1
2
4
3
5
0
Sewing on Buttons
Pattern selector: C
Presser foot: Zigzag foot
Thread tension: 1–3
Stitch length: Any
Stitch width: Adjust as necessary
Feed dog: Dropped
4
1
2
3
5
6
1 Adjust the stitch width, and turn the handwheel to check
if the needle enters into each hole on the button.
2Lower the foot to hold the button in place.
The holes on the button should align with the slot of
the foot.
3A pin can be placed on the foot to form a shank.
Make sure to check if the needle enters into both holes
on the button.
Sew about 10 stitches and cut the needle and bobbin
threads, leaving 20cm (8") tail.
4 Bring the needle threads between the button and fabric
through the holes on the button.
Pull the needle threads to pick bobbin threads up to
the right side of the fabric.
Wind the threads to from a shank and tie them together.
5 Raise the feed dog after sewing.

20
1 2 3
4
5
6 7
4
1 2
3
5
8
1
2
3
4
5
6
BH
1
2
3
4
0
1
2
4
3
5
0
1
2
3
4
5
6
1 Turn the handwheel toward you to raise the needle to
its highest position.
Raise the presser foot lifter.
2 Select the pattern "BH" by turning the pattern selector
dial.
If the BH pattern is already selected, reset the dial once
according to the procedure in 12 .
3 Attach the automatic buttonhole foot.
4 Pull the button holder to the back, and place the button
in it. Push back the button holder toward you as far as
it will go.
5 Pull the buttonhole lever downward as far as it will go.
Buttonhole lever
6 Insert fabric under the foot.
Turn the handwheel slowly towards you with your right
hand until the needle goes down and continue turning
handwheel until the take-up lever is at its highest position.
7 Remove the fabric to the left to draw both threads to
the left.
8 Insert the garment under the foot, and lower the needle
at the starting point.
Then lower the automatic buttonhole foot.
Note : Make sure there is no gap between the slider and the
spring holder. If there is a gap, the length of the rows
will be different, as shown.
Starting point
Slider
There should be no gap
Spring holder
Difference
Buttonhole
Pattern selector: (BH)
Presser foot: Automatic buttonhole foot
Thread tension: 1–5
Stitch length: (0.5 –1)
Stitch width: 5
4
1
2
3
5
* The size of buttonhole is automatically set by placing
the button in the automatic buttonhole foot.
* The button holder of the foot takes a button size up to
2.5 cm (1") in diameter.
* Make a test buttonhole on a sample duplicating the
fabric, interfacing and seams of the actual garment.
* Place the button on the fabric sample and mark the
top and bottom to determine the position of buttonhole.
* Use interfacing on stretch fabrics.

21
9
10 11
12
13
1
2
3
4
0
9 Sew slowly and stop the machine when a buttonhole is
completed.
* The machine sews the front bartack and left row first,
then the back bartack and right row.
10 Cut both needle and bobbin threads leaving about 10 cm
(4") thread ends.
Draw the needle thread to wrong side of fabric by pulling
the bobbin thread.
Then, knot the threads.
11 Insert a pin inside the bartack.
Then cut the opening with seam ripper.
Take care not to cut the stitches.
12 To repeat buttonhole sewing, turn the stitch selector to
, then back to again, as shown.
Now, simply step on the foot control to sew an identical
buttonhole.
13 When buttonhole sewing is finished, push the buttonhole
lever upward as far as it will go.
Stitch density of buttonhole sewing should be adjusted within the
mark " " on the stitch length dial.
To adjust buttonhole stitch density :

22
4
1
2
3
5
1
1
2
3
BH
1
2
3
4
0
1
2
4
3
5
0
Corded Buttonhole
Pattern selector: (BH)
Presser foot: Automatic buttonhole foot
Thread tension: 1 – 5
Stitch length: (0.5 – 1)
Stitch width: 5
4
1
2
3
5
1Use the same procedure as automatic buttonhole.
* Set the stitch width to match with the thickness of the
cord used.
With the buttonhole foot raised, hook the filler cord on
the spur at the back of the buttonhole foot.
Bring the ends toward you under the buttonhole foot,
clearing the front end.
Hook the filler cord into the forks on the front of the
automatic buttonhole foot to hold them tight.
Lower the needle into the garment where the buttonhole
will start and lower the foot.
Spur
2 Depress the foot control gently and sew the buttonhole.
Each side of the buttonhole and the bartacks will be
sewn over the cord.
Remove the fabric from the machine and cut the sewing
threads only.
3 Pull the left end of the filler cord to tighten it.
Thread the end through a darning needle, draw to the
wrong side of the fabric and cut.
* To cut the buttonhole opening, refer to the Instructions on
page 21.
1

23
1
2
3
4
5
A
1
2
3
4
0
1
2
4
3
5
0
Zipper Application
Pin or baste zipper tape to fabric and place it under the foot.
Smooth the threads toward the back and lower the foot.
To sew the left side of the zipper, guide the zipper teeth along
the edge of the foot and stitch through the garment and zipper
tape.
Turn the fabric and sew the other side of the zipper in the
same way as you did the left side.
Pattern selector: A
Presser foot: Zipper foot
Thread tension: 3 – 6
Stitch length: 1.5 – 4
Stitch width: 5
4
1
2
3
5

24
1
2
4
1
2
4
3
3
2
1
5
2
1
[A] [B]
3
4
5
6
E
F
1
2
3
4
0
1
2
4
3
5
0
Blind Stitch Hemming
Pattern selector: E or F
Presser foot: Zigzag foot
Thread tension: 2–4
Stitch length: 1–3
Stitch width: 5
Hem guide
4
1
2
3
1 Fold up the hem and fold it back to from a 0.4 to 0.7cm
(1/4") allowance as illustrated.
1
2
Wrong side of the fabric
0.4 to 0.7 cm (1/4")
[A] Heavy weight fabrics
[B] Fine or medium weight fabrics
4 Open the fold flat.
Right side of the fabric
* If the needle drops far left, the stitches will show on the
right side of the fabric.
5
3
4
2 Lower the presser foot, then loosen the foot holder
screw to place the hem guide between the screw and
the shank of foot holder.
Tighten the screw making sure the wall of hem guide
is placed in the middle of the toes of the presser foot.
3 Raise the presser foot and place the fabric under the
foot so that the soft fold rests against the wall of hem
guide.
Lower the foot, then stitch slowly for better control so
that the zigzag stitches fall on the hem allowance and
pierce the soft fold. While sewing, make sure the fold
runs along the wall of hem guide.
Screw
Hem guide
5
6

25
1
2
3
4
5
2
1
2
1
3
4
A
1
2
3
4
0
1
2
4
3
5
0
Rolled Hem
Pattern selector: A
Presser foot: Hemmer foot
Thread tension: 2–6
Stitch length: 1.5–4
Stitch width: 5
4
1
2
3
5
1 Trim off the corner of the fabric 1.5 cm (3/16") by
0.8 cm (5/16") to avoid a bulkiness of the hem at
the corner.
Fold the fabric edge twice 0.3 cm (1/8") wide and
6 cm (2 3/8") long.
1
2
Wrong side of the fabric
0.5 cm
0.8 cm
Curl of the foot
3
4
2 Place the fabric aligning the hem edge with the
guide on the foot. Lower the foot and sew several
stitches while pulling both threads to the back.
Stop the machine with the needle in the fabric
and raise the presser foot. Insert the folded
portion of the fabric into the curl of the foot.
Lower the foot and sew while litting up the edge
to keep it feeding smoothly and evenly.

26
4
1
2
3
4
1
2
3
5
5
A
C
D
E F
G H
B
I
J
K L
G
1
2
3
4
0
1
2
4
3
5
0
1
2
3
4
0
1
2
4
3
5
0
Shell Tuck
Pattern selector: G
Presser foot: Zigzag foot
Thread tension: 6–8
Stitch length: 2–3
Stitch width: 5
4
1
2
3
SECTION 5. DECORATIVE STITCHING
Stretch Stitch Patterns
Pattern selector: A–L
Presser foot: Zigzag foot
Thread tension: 1–4
Stitch length: S.S.
Stitch width: 5
4
1
2
3
Place the folded edge along the slot of foot.
The needle should fall off the edge of the fabric on the
right forming a tuck.
If forward and reverse feeds become unbalanced due to
the type of fabric, adjust the balance by turning the stitch
length dial as follows:
If patterns are compressed, turn the dial toward " + ".
If patterns are drawn, turn the dial toward " – ".
(See page 12 )
5
5

27
4
1 2
3
4
1
2
3
5
5
1
D
H
1
2
3
4
0
1
2
4
3
5
0
1
2
3
4
0
1
2
4
3
5
0
Smocking
Pattern selector: D
Presser foot: Zigzag foot
Thread tension: 1–4
Stitch length: S.S.
Stitch width: 5
4
1
2
3
With the stitch length at "4", sew straight stitching lines 1 cm
(3/8") apart, across the area to be smocked.
Knot the threads along one edge. Pull the bobbin threads and
distribute the gathers evenly.
Secure the threads at the other end.
Sew the decorative stitch between the gathering stitches.
Pull out the gathering stitches.
Note : Loosen the needle thread tension to make gathering
easier.
Box Stitching
Pattern selector: H
Presser foot: Zigzag foot
Thread tension: 1–4
Stitch length: 0.5–2
Stitch width: 5
4
1
2
3
Use this stitch to join heavy weight fabrics.
Overlap two raw edges together and use this stitch to join
them.
1 cm (3/8")
5
1
5

28
2
3
1
4
5
C
1
2
3
4
5
J
K
L
1
2
3
4
0
1
2
4
3
5
0
1
2
3
4
0
1
2
4
3
5
0
Applique
Pattern selector: C
Presser foot: Zigzag foot
Thread tension: 1–4
Stitch length: 0.5–1
Stitch width: 5
4
1
2
3
5
Baste (or fuse with iron-on fabric joiner) applique pieces
on the fabric. Stitch around the applique making sure
the needle falls along the outer edge of the applique.
When sewing corners, lower the needle down into the
fabric. Raise the presser foot and pivot fabric to the right
or left.
Decorative Satin Stitch Pattern
Pattern selector: J–L
Presser foot: Zigzag foot
Thread tension: 1–4
Stitch length: 0.5–1
Stitch width: 5
4
1
2
3
5
For a delicate appearance on fabric such as chiffon, use a
single layer with a tear-away backing, if necessary.

29
1
2
3
4
5
6
7
Cleaning the Feed Dog
Remove the needle and the presser foot.
Remove the needle plate set screw and remove the needle
plate.
With a brush, clean out dust and lint clogging the feed dog teeth.
Reset the needle plate.
Note : Turn off the power switch and/or unplug the machine
before cleaning the feed dog.
Dismantling and Assembling
Hook Race Unit
Note : Turn off the power switch and/or unplug the machine.
To dismantle hook race unit:
Raise the needle to its highest position and open the hook cover.
Open the hinged latch of bobbin case and take it out of the
machine.
Open the hook race ring holders and remove the hook race ring.
Remove the hook.
*Clean the hook race with a brush and a soft dry cloth.
Bobbin case
Hook race ring holder
Hook race ring
Hook
Hook race
1
2
3
4
5
To assemble hook race unit:
Hold the hook by the center pin and fit it carefully back into the
hook race, forming a perfect circle with the shuttle driver.
Attach the hook race ring making sure the bottom pin fits into the
notch.
Lock the hook race ring by turning the holders back into position.
Insert the bobbin case.
Pin
Notch
6
7
SECTION 6. CARE OF YOUR MACHINE

30
(A)
(B)
(100V)
(200V)
Sewing Light
The sewing light is located behind the face plate.
To change the bulb, take the face plate off the sewing machine
by removing the setscrew.
* Unplug the power supply before changing the bulb.
* Do not dismantle the machine other than explained in this
manual.
(A) To remove ........Turn to the left.
To replace ........Turn to the right.
(B) To remove ........Push and twist to the left.
To replace ........Push and twist to the right.
Warning : The bulb could be HOT. Protect your fingers when
handle it.

31
See Page 9
See Page 11
See Page 6
See Page 6
See Page 14
See Page 6
See Page 8
Clean the bobbin case.
Exchange bobbin.
See Page 6
See Page 6
See Page 6
See Page 11
See Page 14
See Page 6
See Page 12
See Page 6
See Page 6
See Page 6
See Page 6
See Page 9
See Page 11
See Page 9
See Page 6
Make the
stitches denser.
See Page 11
See Page 6
See Page 29
Make the
stitches coarser.
See Page 4
See Page 29
See Page 8
See page 29
See Page 29
1. The needle thread is not threaded properly.
2. The needle thread tension is too tight.
3. The needle is bent or blunt.
4. The needle is incorrectly inserted.
5. The fabric is not being drawn to the back when sewing is finished.
6. The thread is either too heavy or too fine for the needle.
1. The bobbin thread is not threaded properly in the bobbin case.
2. Lint has collected in the bobbin case.
3. The bobbin is damaged and doesn't turn smoothly.
1. The needle is incorrectly inserted.
2. The needle is bent or blunt.
3. The needle clamp screw is loose.
4. The tension of the needle thread is too tight.
5. The fabric is not drawn to the back when sewing is finished.
6. The needle is too fine for the fabric being sewn.
7. The pattern selector dial had been turned while the needle was
in the material.
1. The needle is incorrectly inserted.
2. The needle is bent or blunt.
3. The needle and/or threads are not suitable for the work being
sewn.
4. A BLUE TIPPED needle is not being used for sewing stretch, very
fine fabrics and synthetics.
5. The needle thread is not threaded properly.
1. The needle thread tension is too tight.
2. The machine is not threaded correctly.
3. The needle is too heavy for the fabric being sewn.
4. The stitches are too coarse for the fabric being new line sewn.
*When sewing extremely light weight materials, place a sheet
of paper underneath the fabric.
1. The needle thread tension is too loose.
2. The needle is either too heavy or too fine for the thread.
1. The feed dog is packed with lint.
2. The stitches are too fine.
1. The machine is not plugged in.
2. Thread is caught in the hook race.
3. Handwheel has been disengaged for bobbin winding.
1. Threads have been caught in hook mechanism.
2. The feed dog is packed with lint.
Troubleshooting
Condition
The needle thread
breaks.
The bobbin thread
breaks.
The needle breaks.
Skipped stitches
Seam puckering
Stitches form loops
below the work
The cloth is not
feeding smoothly.
The machine does not
work.
The machine does not
run smoothly and is
noisy.
Reference
Cause

1
INHALTSVERZEICHNIS
ABSCHNITT 1. HAUPTTEILE
Teilenan ...................................................................................................................................................2
ABSCHNITT 2. VORBEREITUNG ZUM NÄHEN
Zusatztisch...............................................................................................................................................3
Standardzubehör .....................................................................................................................................3
Zubehörkasten.........................................................................................................................................3
Netzanschluss der Maschine ………………………........................................... ......................................3
Pedal........................................................................................................................................................4
Nähfuß-Lüfterhebel..................................................................................................................................5
Ein- und Ausbau des Nähfußes...............................................................................................................5
Nadelwechsel ..........................................................................................................................................6
Garn- und Nadeltabelle............................................................................................................................6
Vorbereitung der Garnrollenstifte.............................................................................................................7
Herausnehmen oder Einsetzen der Spulenkapsel ..................................................................................7
Garn aufspulen ........................................................................................................................................8
Einfädeln der Spulenkapsel .....................................................................................................................8
Einfädeln der Maschine ...........................................................................................................................9
Nadeleinfädler........................................................................................................................................10
Spulenfaden hochziehen .......................................................................................................................10
Ausgleich der Nadelfadenspannung......................................................................................................11
Spannungseinstellung des Spulenfadens..............................................................................................11
Stichsteller .............................................................................................................................................12
Stichlängeneinstellung...........................................................................................................................12
Stichbreiteneinstellung...........................................................................................................................12
Rückwärtsnähknopf ...............................................................................................................................13
Absenken des Stoffschiebers ................................................................................................................13
ABSCHNITT 3. NORMALES NÄHEN
Nähen mit Steppstich.............................................................................................................................14
Nährichtungswechsel.............................................................................................................................14
Einsatz der Nahtführungen auf der Nadelplatte.....................................................................................15
Rechtecke nähen...................................................................................................................................15
Variable Nadelstellung...........................................................................................................................15
Zick-Zack-Stich ......................................................................................................................................16
ABSCHNITT 4. ALLGEMEINE NÄHTECHNIKEN
Versäubern ............................................................................................................................................16
Zick-Zack-Stich für Trikotwaren .............................................................................................................17
Formstich ...............................................................................................................................................17
Stretch-Steppstich .................................................................................................................................18
Knöpfe annähen ....................................................................................................................................19
Knopflöcher.......................................................................................................................................20-21
Kordelknopfloch .....................................................................................................................................22
Einnähen von Reißverschlüssen ...........................................................................................................23
Blindstichsäumen...................................................................................................................................24
Rollsaum ................................................................................................................................................25
ABSCHNITT 5. ZIERSTICH NÄHEN
Wellenstich ...........................................................................................................................................26
Stretchstich ............................................................................................................................................26
Smocken................................................................................................................................................27
Kastenstich ............................................................................................................................................27
Applikationen .........................................................................................................................................28
Erhabener Zierstich ...............................................................................................................................28
ABSCHNITT 6. PFLEGE IHRER MASCHINE
Ein- und Ausbau – Greiferbahn .............................................................................................................29
Reinigung des Stoffschiebers ................................................................................................................29
Nählampe ..............................................................................................................................................30
Fehlersuche und Abhilfe ........................................................................................................................31

2
1 Rückwärtsnähknopf (vernähen)
2 Stichsteller
3 Stichlängeneinstellung
4 Stichbreiteneinstellung
5 Spuleranschlag
6 Spulerachse
7 Garnrollenstift
8 Spulerfadenführung
9 Fadenführung
10 Fadenhebel
11 Fadenspannungseinstellung
12 Vordere Abdeckung
13 Fadentrenner
14 Nadeleinfädler
15 Nadelplatte
16 Nähfußhalter
17 Nadelhalter
18 Nadel
19 Nähfuß
20 Zusatztisch
21 Tragegriff
22 Handrad
23 Netzschalter
24 Maschinenstecker
25 Armwelle
26 Knopflochhebel
27 Nähfuß-Lüfterhebel
1
2
3
4
5
6
78
9
10
11
12
13
14
15
16
17
18
19
20
21
22
23
24
25
26
27
ABSCHNITT 1. HAUPTTEILE
Teilenamen
Hinweis : Die Spezifikationen können ohne vorherigen
Hinweis geändert werden.

3
Nähfuß für Reißverschlüsse
1
2
3
4
5
7
1
2
3
4
5
6
7
9
9
8
8
6
ABSCHNITT 2. VORBEREITUNG ZUM
• Vorteile und Einsatz des freien Arms:
Standardzubehör
Nähfuß für Säume
Automatischer Nähfluss für Knopflöcher
Spulen
Satz Nadeln
Knopflochschneider
Schraubenzieher
Saumführung
Zubehörkasten
Beim Verstärken von Taschen, Öffnungen und
Gürteln sammelt sich kein Stoff um die Nadel.
-
Beim Einnähen von Ärmeln, Gurtband, Hosenbeinen
oder runden Teilen eines Kleidungsstücks.
Beim Stopfen von Socken oder Ausbessern von
Kniestücken, Ellbogen oder Verschleißteilen von
Kinderkleidung.
-
-
Zusatztisch
Der Zusatztisch verschafft eine zusätzliche Nähfläche und
kann problemlos abgenommen werden, um mit dem freien
Arm zu nähen.
Abbau des Tisches:
Nehmen Sie den Tisch von der Maschine.
Anbau des Tisches:
Schieben Sie den Zusatztisch bis zum Anschlag an die
Maschine.
NÄHEN
Das Nähzubehör ist bequem im Zusatztisch untergebracht.
Zubehörkasten

4
1
2
3
4
5
6
1
Netzstecker Netzschalter
2
3
4
5
6
Netzanschluss der Maschine
Bevor Sie das Netzkabel anschließen, stellen Sie sicher,
dass die auf dem Typenschild der Maschine angegebene
Spannung und Frequenz mit Ihren Netzwerten
übereinstimmen.
1. Schalten Sie den Netzschalter aus.
2. Stecker Sie den Maschinenstecker in die
Pedal
Die Nähgeschwindigkeit kann durch das Pedal oder den
Fußhebel verändert werden.
Je stärker der Druck auf das Pedal ist, desto schneller
näht die Maschine.
Vorsicht : Legen Sie bitte keine Gegenstände auf das
Netzsteckdose
Maschinensteckanschluss
Maschinenstecker Pedal
Maschinensteckanschluss.
3. Stecken Sie den Netzstecker in die Netzsteckdose.
4. Schalten Sie den Netzschalter für den Stromanschluss
und die Maschinenbeleuchtung ein.
Pedal. Die Maschine könnte sonst
unbeabsichtigt anlaufen.

5
Der Nähfuß-Lüfterhebel hebt und senkt den Nähfuß. Er
kann ihn ca. 0,6 cm (1/4”) über der normalen Hubstellung
heben, um den Nähfuß leichter herausnehmen oder um
dicke Stoffteile leichter unter den Nähfuß schieben zu
können.
Normale Hubstellung
Oberste Stellung
1
2
1
2
Nähfuß-Lüfterhebel
Ein- und Ausbau des Nähfußes
Ausbau
Drehen Sie das Handrad nach vorn, um die Nadel in ihre
höchste Stellung zu bringen.
Drücken Sie auf den hinter der Nähfußhalter liegenden
Hebel.
Der Nähfuß löst sich.
Einbau
Plazieren Sie den Nähfluss so, dass der Nähfußstift genau
unter der länglichen Aussparung der Nähfußhalter liegt.
Senken Sie den Nähfußhalter ab, damit der Nähfuß an Ort
und Stelle arretiert wird.
Heben Sie den Nähfuß.

6
Needle SizeGarn-und Nadeltabelle
Nadelwechsel
Heben Sie die Nadel durch Drehen des Handrads nach
vorn und senken Sie den Nähfuß ab.
Lockern Sie die Nadelbefestigungsschraube entgegen
dem Uhrzeigersinn.
Lösen Sie die Nadel aus der Befestigung.
Schieben Sie die neue Nadel in die Befestigung, und
zwar mit der flachen Seite nach vorn.
Führen Sie die Nadel so weit wie möglich in die
Befestigung ein und ziehen Sie dann die
Befestigungsschraube mit einem Schraubenzieher fest.
So prüfen Sie den Zustand der Nadel
-
* Prüfen Sie Ihre Nadeln häufig auf Gratbildung und
stumpfe Spitzen. Hängenbleiben und Laufmaschen bei
Strickwaren, feinen Seiden und ähnlichen Textilien
kommen ständig vor und sind fast immer die Folge
einer schadhaften Nadel.
Legen Sie die Nadel mit de flachen Seite auf eine flache
Unterlage (Nadelplatte, Glas usw.). Der freie Abstand
zwischen der Nadel und der Fläche muss gleichmäßig
sein. Benutzen Sie niemals eine verbogene oder stumpfe
Nadel.
Leicht
Crêpe de
Chine, Gaze,
Linon,
Organdy,
Crêpe
Georgette,
Tricot
Feine Nähseide
Feine Baumwolle
Feine
Synthetikware
Feine Baumwolle
Polyester, kaschiert
9
oder
11
Mittel-
schwer
Leinen,
Baumwolle,
Pikee, Serge,
Strickwaren
ohne linke
Seite,
Perkal
Nähseide 50
Baumwolle 50-80,
Polyester kaschiert
mit synthetischer
Baumwolle 50-60
11
oder
14
Schwer
Nanking,
Tweed,
Gabardine,
Bezugs- und
Gardinenstoff
und
Kaschierungen
Nähseide 50
Baumwolle 40- 50,
Polyester kaschiert
mit synthetischer
Baumwolle 40-50
14
16
Nadel-
größe
Stoffsorten Garn
Zum Nähen von feinen Stoffen werden feine
Nadeln und Garne, dickere Nadeln und dickere Garne
für dickere Stoffe eingesetzt. Probieren Sie die
Nadelgröße und die Garnstärke an einem kleinen
Stück des Stoffes aus, den Sie tatsächlich verarbeiten
möchten.
-
Benutzen Sie das gleiche Garn für die Nadel und die
Spule.
-
Zum Nähen von sehr feinen und elastischen
Synthetikstoffen benutzen Sie am besten eine Nadel
mit BLAUER SPITZE. Mit Nadeln mit blauer Spitze
werden Stichsprünge wirksam unterbunden.
-
Sehr feine Stoffe nähen Sie am besten, wenn Sie ein
Papier darunter legen. Damit verhindern Sie krause
Nähte.

7
1
2
3
3
2
1
1
2
3
1
1
2
3
Vorbereitung der Garnrollenstifte
Herausnehmen oder Einsetzen der Spulenkapsel
Öffnen Sie den Greiferdeckel.
Heben Sie die Nadel, indem Sie das Handrad nach vorn
drehen. Nehmen Sie die Spulenkapsel heraus und halten
Sie dabei die Sperrklinke fest.
Überstand
Hinweis : Wenn Sie Nähgarn verwenden, das sich leicht
Greiferdeckel
Sperrklinke
Beim Einsetzen der Spulenkapsel lassen Sie den Überstand in
die Aussparung der Greiferbahn einrasten.
NichtbOberfaden
Öhr
Verwicklung
Die Garnrollenstifte halten die Garnspulen, die die Maschine
mit Nähgarn versorgen.
Um sie zu benutzen, ziehen Sie die Garnspulen heraus; bei
Nichtbenutzung drücken Sie sie ein.
um den Garnrollenstift verwickelt, fädeln Sie es,
wie dargestellt, durch das Öhr des
Garnrollenstiftes ein. Das Öhr muss der Garnrolle
gegenüber liegen.

8
1
2
3
4
5
6
7
3
2
1
Garnaufspulen
Zie hen Sie das Handrad heraus.
Ziehen Sie Garn von der Garnrolle.
Fädeln Sie den Faden durch das Spulenöhr von
innen nach außen ein.
Schieben Sie die Spule auf die Spulenachse.
Mit dem freien Fadenende in der Hand drücken Sie
Drücken Sie nun erneut den Fußhebel.
Wenn die Spule ganz voll ist, stoppen Sie die
Maschine. Bringen Sie die Spulenachse wieder in
ihre Ausgangsstellung, indem Sie sie nach links
verschieben und schneiden Sie den Faden ab.
Schieben Sie das Handrad nach links
(Ausgangsstellung).
Hinweis : Bringen Sie die Spulenachse wieder an Ort und
Einfädeln der Spulenkapsel
Legen Sie die Spule in die Spulenkapsel. Achten Sie
darauf, dass der Faden in Pfeilrichtung abläuft.
Legen Sie den Faden in die an der Spulenkapsel
vorhandene Rille.
Führen Sie den Faden um die Fadenführung der
Schieben Sie sie nun nach rechts.
auf den Fußhebel.
Nach einigen wenigen Windungen stoppen Sie die
Maschine und schneiden Sie den Faden nahe am
Spulenöhr ab.
Ziehen Sie den Faden unter der Spannfeder heraus
und fädeln Sie ihn in das Ausgangsöhr ein.
Stelle, sobald die Maschine
ausgesetzt hat.
Spule.
*
Lassen Sie ca. 10 cm (4”) Faden frei.
1
2
3
1
2
3
4
5
6
7

9
1
3
2
4
5
6
1
2
3
4
5
6
Einfädeln der Maschine
Heben Sie den Fadenheber bis in die höchste Stellung,
indem Sie das Handrad nach vorn drehen.
Nähfuß heben.
Legen Sie eine Garnrolle wie dargestellt auf den
Garnrollenstift. Dabei muss der Faden von hinten von der
Garnrolle abgerollt werden.
Legen Sie den Faden mit beiden Händen in die
Fadenführung.
Während Sie den Faden in der Nähe der Spule
festhalten, ziehen Sie den Faden herunter bis in den
Spannungsbereich und führen ihn anschließend um
die Lagerung der Haltefeder.
Ziehen Sie den Faden fest nach oben und von rechts
nach links durch den Fadenheber.
Nun ziehen Sie den Faden nach unten und führen
ihn in die untere Fadenführung ein.
Fädeln Sie den Faden von vorn nach hinten in das
Nadelöhr.
* Näheres zum eingebauten Nadeleinfädler, sieheauch
Seite 10.
.
Hinweis: Schneiden Sie das Fadenende mit einer
Ziehen Sie den Faden weiter nach unten und legen
Sie ihn in die Fadenführung der Nadelstange.
scharfen Schere ab. Sie erleichtern sich
damit das Einfädeln der Nadel.
1
2
3
4
5
6

10
1
2
3
1
2
3
4
Nadeleinfädler
Heben Sie die Nadel bis in die höchste Stellung.
Ziehen Sie den Drehknopf des Nadeleinfädlers so
weit Sie können nach unten.
Drehen Sie den Knopf in Pfeilrichtung wie in der
Abbildung dargestellt. Dann führen Sie den Haken in das
Nadelöhr. Führen Sie den Faden um die Führung herum
und unter dem Haken her.
Drehen Sie den Drehknopf in Pfeilrichtung wie dargestellt
und führen Sie die Fadenschlinge durch die Nadel.
Ziehen Sie den Faden durch das Nadelöhr.
*
Spulenfaden hochziehen
Nun ziehen Sie beide Fäden 15 cm (6”) nach hinten
unter dem Nähfuß her.
Der Nadeleinfädler ist für eine Nadel Nr. 11 bis Nr. 16
oder eine Nadel mit blauer Jenomespitze einsetzbar. Er
eignet sich auch gut für Garnstärken 50-100.
Heben Sie den Nähfuß und halten Sie den Nadelfaden
locker mit der linken Hand.
Drehen Sie das Handrad mit der rechten Hand langsam
nach vorn, bis sich die Nadel einsenkt. Drehen Sie das
Handrad weiter, bis sich der Fadenheber in der höchsten
Stellung befindet. Ziehen Sie den Nadelfaden dann
etwas nach oben, bis sich mit dem Spulenfaden eine
Schlinge bildet.
1
2
3
4
1
2
3

11
1
2
3
4
5
6
Die Nadelfadenspannung ist zu hoch
Der Spulenfaden (Unterfaden) ist auf der rechten
Seite (Oberseite) des Stoffes zu sehen. Lockern Sie
die Nadelfadenspannung, in dem Sie den
Fadenspannungseinstellung eine Zahl tiefer stellen.
1
2
3
Ausgleich der Nadelfadenspannung
Korrekte Spannung
*
Nadelfaden (Oberfaden)
Spulenfaden (Unterfaden)
Rechte Seite (Oberseite) des Stoffes
Linke Seite (Unterseite) des Stoffes
Fadenspannungseinstellung
Stellpunkt
Nadelfadenspannung ist zu locker
Der Nadelfaden (Oberfaden) ist auf der linken Seite
(Unterseite) des Stoffes zu sehen. Spannen Sie den
Nadelfaden etwas mehr, indem Sie den
Beim normalen Nähen ist eine Nachstellung der
Spulenfadenspannung nicht erforderlich. Bei spezifischen
Näharbeiten kann die Spannung des Spulenfadens jedoch
nachgestellt werden.
Drehen Sie die Stellschraube nach rechts zum Erhöhen und
nach links zum Reduzieren der Spannung.
Die Fadenspannung richtet sich nach dem
Nähmaterial, der Anzahl Stofflagen und der
Nähtechnik.
Der ideale Stepptisch verschlingt die Fäden zwischen
zwei Stofflagen wie dargestellt (vergrößert zur
detaillierten Darstellung).
*
Beim ideal Zick-Zack-Stich ist der Spulenfaden auf
der rechten Stoffseite (Oberseite) nicht zu sehen, der
Nadelfaden ist auf der linken Stoffseite (Unterseite)
etwas zu sehen.
Spannungseinstellung des Spulenfadens
1
2
3
Fadenspannungseinstellung eine Zahl höher stellen.
1
2
3
4
5
6

12
1
1
1
S.S.
1
1
1
A
C
D
E F
G H I
J
K L
A
1
2
3
4
0
1
2
3
4
0
1
2
4
3
5
0
Stichsteller
Heben Sie Nadel und Nähfuß. Drehen Sie den
Stichsteller bis die Markierung über den gewünschten
Stichsymbol steht.
Markierung
.
Stichlängeneinstellung
Drehen Sie den Stellknopf zum Einstellen der Stichlänge,
bis die gewünschte Stichlänge über der Markierung steht.
Markierung
Fällt der Elastikstich nicht einheitlich aus, drehen Sie
die Stichlängeneinstellung in Richtung “-“ zur
Reduzierung oder “+” zur Verlängerung.
Stichbreiteneinstellung
Stichbreitenstellknopf drehen, bis die gewünschte
Stichbreite über der Markierung steht.
Je höher die Zahl, desto breiter der Stich.
Je höher die Zahl, desto länger wird der Stich.
“ ” entspricht der empfohlenen Einstellung für
Knopflochstich
Stellen Sie den Knopf auf das Intervall 0,5-4, wenn
Sie mit Zick-Zack-Stich nähen.
Stellen Sie den Knopf auf “S.S”, wenn Sie mit
Elastikstich nähen.
Hinweis: Heben Sie die Nadel vom Stoff ab, wenn
Markierung
Sie die Stichbreiteneinstellung betätigen

13
1
2
2
1
1
2
3
2
Rückwärtsnähknopf
Während Sie den Rückwärtsnähknopf gedrückt halten, näht die
Maschine rückwärts.
Absenken des Stoffschiebers
Öffnen Sie den Greiferdeckel.
Absenkhebel
Greiferdeckel
Zum Absenken des Stoffschiebers ziehen Sie den
Absenkhebel nach unten und schieben Sie ihn dann
nach rechts wie dargestellt.
*
Zum Heben des Stoffschiebers ziehen Sie den
Absenkhebel nach unten und schieben Sie ihn dann
nach links wie abgebildet.
*
1
2
3
Für normalen Stoppstich muss der Stoffschieber gehoben
sein.
Sobald die Maschine zu nähen beginnt, kehrt der
Stoffschieber in die gehobene Stellung zurück.

14
1
2
3
4
4
1
2
3
5
5
3
1
2
AB
1
2
3
4
0
1
2
4
3
5
0
ABSCHNITT 3. NORMALES NÄHEN
Nähen mit Steppstic
Stichsteller: A ó B
Nähfuß: Zick-Zack-Nähfuß
Fadenspannung: 2-6
Stichlänge: 1,5-4
Stichbreite: (0) ó (5)
1 Heben Sie den Nähfuß und legen Sie das Nähgut,
2 Zum Vernähen der Nahtenden drücken Sie den
Rückwärtsnähknopf und nähen einige Stiche rückwärts.
Nährichtungswechsel
Stoppen Sie die Maschine und drehen Sie das Handrad nach
vorn, um die Nadel in den Stoff zu stechen.
Heben Sie den Nähfuß.
Drehen Sie den Stoff um die Nadel herum in die gewünschte
Nährichtung. Senken Sie den Nähfuß wieder ab und nähen Sie
weiter.
dessen Rand mit der Nähführungslinie der Nadelplatte
fluchten muss.
Senken Sie die Nadel auf den Stoff.
Senken Sie den Nähfuß ab und legen Sie die Fäden glatt
nach hinten. Drücken Sie das Pedal.
Führen Sie das Nähgut locker an der Führungslinie
entlang und lassen Sie dem Stoff möglichst freien Lauf.
Die Fäden werden lang genug abgeschnitten, um die
nächste Naht zu beginnen.
Heben Sie den Nähfuß, ziehen Sie den Stoff ab, indem
Sie die Fäden nach hinten ziehen.
3 Ziehen Sie die Fäden nach oben zum Fadentrenner.

15
20 6/8"5/8"4/8"3/8"
1
2
3
4
5
2
1
2
3
4
5
2
1
2
4
3
5
0
Einsatz der Nahtführungen auf derNadelplatte
Zahlen auf der Nadelplatte
Die Nahtführungen auf der Nadelplatte helfen Ihnen, die
* Die Zahlen geben den Abstand zwischen der zentralen
Nadelstellung und der Führungslinie an.
Abstand in Zentimetern
Führungslinien
Eckenführung
Nadelplatte
Nadelplattenöffnung
Nahtbreite ab der zentralen Nadelstellung
Rechtecke nähen
Nahtbreite zu messen.
Zur Herstellung eines Rechtecks in 1,6 cm (5/8”) zum
Stoffrand:
Wenn der Ihnen gegenüber liegende Stoffrand, wie
abgebildet, mit der Eckenführung fluchtet, unterbrechen Sie
das Steppen und senken Sie die Nadel durch Drehen des
Handrads nach vorn.
Nähfuß heben und Stoff drehen, bis der Rand mit der 1,6
cm (5/8”)-Nahtführung fluchtet.
Nähfuß absenken und in der neuen Richtung weiternähen.
Eckenführung
Variable Nadelstellung
Wenn mit Steppstich (Ausführung A) gearbeitet wird, kann
die Nadel zwischen den Nadelstellungen Mitte und links
verstellt werden. Das geschieht durch Drehen der
Stichbreiteneinstellung.
1.3 1.6 1.91.01.0
10 15
1.5 2.0

16
1 2
3
4
4
1
2
3
4
1
2
3
1
2
3
4
5
5
5
5
1
2
3
4
0
1
2
4
3
5
0
1
2
3
4
0
1
2
4
3
5
0
C
Zick-Zack-Stich
Stichsteller:
Nähfuß:
Fadenspannung:
Stichlänge:
Stichbreite:
Zick-Zack-Nähfuß
2-5
0,5-4
1,5
C
Der einfache Zick-Zack-Stich wird am häufigsten zum
Versäubern von Nähten, Knöpfe annähen usw. verwendet.
ABSCHNITT 4. ALLGEMEINE
NÄHTECHNIKEN
Versäubern
Stichsteller: C
Nähfuß: Zick-Zack-Nähfuß
Fadenspannung: 1-4
Stichlänge: 1-2
Stichbreite: 5
Mit dem Zick-Zack-Stich werden unvernähte Nahtränder
versäubert, damit sie nicht ausfasern.
G

17
1
2
3
4
1
2
3
4
4
1
2
3
4
1
2
3
5
5
5
5
1
2
3
4
0
1
2
4
3
5
0
1
2
3
4
0
1
2
4
3
5
0
D
G
Zick-Zack-Stich für Trikotware
Zick-Zack-Nähfuß
1-4
0,5-1,5
5
Mit diesem Stich werden Nahtränder von Synthetikstoffen
und anderen zum Kräuseln neigenden Stoffe versäubert.
Legen Sie den Stoff so ein, dass eine Naht von 1,6 cm (5/
8”) ermöglicht wird.
Beschneiden Sie den Nahtrand nach dem Nähen.
Hinweis: Vorsicht, nicht in Stiche einschneiden!
Zick-Zack-Stich eignet sich auch sehr gut zum Stopfen und
Ausbessern von Rissen.
Stichsteller: D
Nähfuß:
Fadenspannung:
Stichlänge:
Stichbreite:
Formstich
Stichsteller:
Nähfuß:
Fadenspannung:
Stichlänge:
Stichbreite:
G
Zick-Zack-Nähfuß
1-4
S.S.
5
Dieser Formstich ist wegen seiner großen Elastizität und
Stärke ideal zum Nähen von Badeanzügen und Stretch-
Samt.
Legen Sie den Stoff so ein, dass eine 1,6 cm (5/8”)-Naht
ermöglicht wird.
Beschneiden Sie den Nahtrand nach dem Nähen.
Hinweis : Vorsicht, nicht in Stiche einschneiden!

18
1 2
3
4
4
1
2
3
5
5
BA
1
2
3
4
0
1
2
4
3
5
0
Stretch-Steppstich
Stichsteller:
Nähfuß:
Fadenspannung:
Stichlänge:
Stichbreite:
A oder B
Zick-Zack-Nähfuß
2-6
1,5-4
(0) oder (5)
Genäht wird mit zwei Stichen vorwärts und einem Stich
rückwärts. Es entsteht dann eine Naht, die nicht leicht reißt.

19
1
2
3
4
1
2
3
5
4 5
6
6
1 2
3
4 5
1
2
3
4
0
1
2
4
3
5
0
C
Knöpfe annähen
Stichsteller: C
Nähfuß: Zick-Zack-Nähfuß
Fadenspannung: 1-3
Stichlänge: beliebig
Stichbreite: Einstellung nach Bedarf
Stoffschieber: Abgesenkt
Stellen Sie die Stichbreite ein und drehen Sie das
Handrad nach vorn, um zu prüfen, ob die Nadel auf jedes
Loch des Knopfes trifft.
Senken Sie nun den Nähfuß ab, um den Knopf an Ort
und Stelle zu halten.
Die Löcher des Knopfes müssen mit der länglichen
Aussparung des Nähfußes fluchten.
1
2
3
4
5
Um einen Steg zu bilden, kann eine Stecknadel auf den
Nähfuß gesetzt werden.
Achten Sie darauf, dass die Nadel in beide Löcher des
Knopfes eindringt.
Nähen Sie 110 Stiche und schneiden Sie Ober- und
Unterfaden in einer Länge von 20 cm (8”) ab.
Ziehen Sie die Nadelfäden (Oberfäden) zwischen Knopf
und Stoff durch die Löcher des Knopfes.
Ziehen Sie an den Oberfäden, um die Unterfäden auf die
rechte Stoffseite hochzuziehen.
Drehen Sie die Fäden um den Knopf, um einen Steg zu
bilden und verknoten Sie sie dann.
Heben Sie den N ähfuß nach dem Nähen.

20
1
2
3
4
5
6
1 2 3
4
5
6 7
4
1
2
3
4
1 2
3
5
5
8
1
2
3
4
5
6
1
2
3
4
0
1
2
4
3
5
0
BH
Knopflöcher
* Die Knopflochgröße wird automatisch eingestellt,
Stichsteller: (BH)
Nähfuß: Automatischer
Fadenspannung: 1-5
Knopflochnähfuß
Stichbreite: 5
Stichlänge: (0,5-1)
* Der Knopfhalter des Nähfußes eignet sich für eine
wenn der Knopf in den automatischen
Knopflochnähfuß eingelegt wird.
Knopfgröße bis 2,5 cm (1”) Durchmesser.
* Fertigen Sie zunächst an einer Probe des gleichen
Stoffs, mit den gleichen Auflageflächen und mit
Nähten wie die des echten Kleidungsstücks ein
Probeknopfloch an.
* Legen Sie den Knopf auf das Stoffmuster und
markieren Sie den oberen und unteren Teil, um die
Position des Knopflochs festzulegen.
* Verwenden Sie bei Stretchstoffen Steifleinen.
1 Drehen Sie das Handrad nach vorn, um die Nadel in
die höchste Position zu bringen.
Heben Sie den Lüfterhebel zum Heben des
Nähfußes.
2 Stellen Sie den Stichsteller auf “BH”.
Sie den Knopf ein. Schieben Sie den Knopfhalter
Ist BH bereits eingestellt, setzen Sie den Steller wie
unter Punkt 12 beschrieben zurück.
3 Montieren Sie den Knopflochnähfuß.
4 Schieben Sie den Knopfhalter nach hinten und legen
dann so weit es geht wieder nach vorn.
5 Drücken Sie den Knopflochhebel so weit
wie möglich nach unten.
Knopflochhebel
6 Schieben Sie den Stoff unter den Nähfuß.
Drehen Sie das Handrad mit der rechten Hand
langsam nach vorn, bis die Nadel abgesenkt wird;
drehen Sie das Handrad dann weiter, bis sich der
Fadenheberhebel in der höchsten Stellung befindet.
7 Schieben Sie den Stoff nach links, um beide Fäden
nach links herauszuziehen.
8 Schieben Sie das Nähgut unter den Nähfuß und
senken Sie die Nadel bis zum Ausgangspunkt.
Senken Sie dann den automatischen
Knopflochnähfuß.
Hinweis : Achten Sie darauf, dass zwischen Schieber und
Federhalter kein Hohlraum entsteht. Ist ein
Hohlraum vorhanden, dann ergibt sich, wie
dargestellt, eine andere Reihenlänge
Ausgangspunkt
Schieber
Es darf kein Hohlraum vorhanden sein
Federhalter
Differenz

21
9
10 11
12
13
1
2
3
4
0
9 Nähen Sie langsam und stoppen Sie die Maschine,
wenn ein Knopfloch fertig ist.
* Die Maschine näht zuerst die vordere Verstärkung
und die linke Reihe und anschließend die hintere
Verstärkung und die rechte Reihe.
13 Wenn alle Knopflöcher genäht sind, schieben Die
10 Schneiden Sie Ober- und Unterfaden auf eine Länge
von ca. 10 cm (4”) ab.
Ziehen Sie den Nadelfaden (Oberfaden) unter der
linken Stoffseite hindurch und ziehen Sie gleichzeitig
den Unterfaden hoch.
Dann verknoten Sie beide Fäden.
11 Stechen Sie eine Stecknadel in den unteren Teil der
Verstärkung.
Dann schneiden Sie die Öffnung mit dem
Knopflochschneider auf.
Vorsicht! Nicht in die Stiche schneiden!
12 Zum Wiederholen des Knopflochnähens stellen Sie
den Stichsteller zurück auf ; dann wieder, wie
dargestellt, auf .
Nun brauchen Sie nur noch den Fußhebel zu
bedienen, um ein neues Knopfloch zu nähen.
den Knopflochhebel so weit wie möglich nach oben.
Einstellung der Knopflochstichdichte:
Die Stichdichte zum Nähen von Knopflöchern muss
innerhalb der Markierung “ ” der Stichlängeneinstellung
liegen.

22
4
1
2
3
4
1
2
3
5
5
1
1
2
3
1
2
3
4
0
1
2
4
3
5
0
BH
Kordelknopfloch
Knopflochnähfuß
Fadenspannung: 1-5
Stichlänge: (0,5-1)
Stichbreite: 5
Stichsteller: (BH)
Nähfuß: Automatischer
Die Vorgehensweise ist die gleiche wie beim
automatischen Knopfloch.
Stellen Sie die Stichbreite so ein, dass sie mit der
verwendeten Kordelbreite übereinstimmt.
Bei angehobenem Knopflochnähfuß haken Sie die
Füllkordel in den hinten am Knopflochnähfuß
angeordneten Sporn ein.
Holen Sie die Enden unter dem Knopflochnähfuß her
nach vorn und lassen Sie das vordere Ende frei hängen.
Legen Sie die Füllkordel in die vor dem automatischen
Knopflochnähfuß angeordneten Gabeln, um sie
zusammen zu befestigen.
Senken Sie die Nadel auf das Nähgut ab und zwar an
dem Punkt, an dem das Knopfloch beginnt und danken
Sie anschließend den Nähfuß ab.
*
1
*
2
3
Sporn
Drücken Sie vorsichtig auf den Fußhebel und nähen
Sie das Knopfloch. Jede Knopflochseite und die
Verstärkungen werden auf der Kordel genäht.
Ziehen Sie den Stoff aus der Maschine und
schneiden Sie die Nähfäden ab.
Ziehen Sie die Kordel an ihrem linken Ende fest.
Fädeln Sie das Ende in eine Stopfnadel und ziehen
Sie es auf der linken Seite aus dem Stoff und
schneiden Sie es ab.
Zum Aufschneiden der Knopflochöffnung, siehe
Anweisungen auf Seite 21.
1

23
1
2
3
4
4
1
2
3
5
5
1
2
3
4
0
1
2
4
3
5
0
A
Einnähen von Reißverschlüssen
Stichsteller: A
Nähfuß: Nähfuß für Reißverschlüsse
Fadenspannung: 3 - 6
Stichlänge: 1,5 - 4
Stichbreite: 5
Heften Sie das Reißverschlussband mit Stecknadeln oder
Reihfaden und legen Sie es unter den Nähfuß. Ziehen Sie
die Fäden nach unten und senken Sie den Nähfuß ab.
Zum Nähen der linken Reißverschlusseite führen Sie die
Reißverschlusszähne am Rand des Nähfußes entlang und
nähen Sie durch den Stoff und das Reißverschlussband.
Drehen Sie das Nähgut und nähen Sie die auf die andere
Seite wie die bereits fertige linke Seite.

24
1
2
4
1
2
4
3
4
1
2
3
3
2
1
5
2
1
[A] [B]
3
4
5
1
2
5
3
4
5
1
2
3
4
0
1
2
4
3
5
0
6
6
E
F
Blindstichsäumen
Stichsteller: E oder F
Nähfuß: Zick-Zack-Nähfuß
Fadenspannung: 2 - 4
Stichlänge: 1 - 3
Stichbreite: 5
Saumführung
Falten Sie den Saum nach oben, dann noch einmal mit einer
Faltenbreite von 0,4 a 0,7 cm (1/4”), wie dargestellt
Linke Stoffseite
0,4 bis 0,7 cm (1/4”)
[A] Schwere Stoffe
[B] Feine oder mittelschwere Stoffe
Senken Sie den Nähfuß ab. Dann lockern Sie die
Befestigungsschraube des Nähfußhalters, um
Nähfußhalterschaft die Saumführung einzulegen.
Ziehen Sie die Schraube wieder an und achten Sie
darauf, dass die Wand der Saumführung zwischen den
Nähfußpratzen liegt.
Schraube
Saumführung
Heben Sie den Nähfuß und legen Sie den gefalteten
Stoff so darunter, dass die weiche Falte an die Wand
der Saumführung stößt.
Senken Sie den Nähfuß und nähen Sie dann langsam
so, dass die Zick-Zack-Stiche auf den Saumrand fallen
und die weiche Falte durchstechen. Achten Sie beim
Nähen darauf, dass die Falte exakt an der Wand der
Saumführung entlang läuft.
Öffnen Sie nun die Falte ganz.
3
4
Rechte Stoffseite.
* Wenn die Nadel sehr stark nach links abgesenkt wird,
dann sind die Stiche auf der rechten Stoffseite sichtbar.
1
2

25
4
1
2
3
5
1
2
3
4
5
1
2
3
4
0
1
2
4
3
5
0
1
2
3
4
2
1
2
1
3
4
A
Rollsaum
Stichsteller: A
Nähfuß: Nähfuß für Säume
Fadenspannung: 2 - 6
Stichlänge: 1,5 - 4
Stichbreite: 5
Schneiden von der Stoffecke 0,8 cm (5/16”) x 1,5 cm
(3,16”) ab, damit der Saum an der Ecke keinen Wulst
bildet.
Falten Sie den Stoffrand zwei Mal 0,3 cm (1/8”) breit
und 6 cm (2 3/8”) lang.
Linke Stoffseite
0,5 cm
0,8 cm
Nähfußwendel
Legen Sie den Stoff so ein, dass der Saumrand mit der
Nähfußführung fluchtet. Senken Sie nun den Nähfuß
ab und näheren einige Stiche, wobei Sie gleichzeitig
beide Nähfäden nach hinten ziehen. Stoppen Sie die
Maschine mit der Nadel im Stoff und heben Sie den
Nähfuß. Legen Sie den gefalteten Teil des Stoffes in
die Nähfußwendel. Senken Sie den Nähfuß, nähen Sie
und heben Sie gleichzeitig den Rand etwas an, damit
er gleichmäßig und sanft durchläuft.
1
2

26
4
1
2
3
4
1
2
3
4
1
2
3
5
5
5
1
2
3
4
0
1
2
4
3
5
0
A
C
D
E F
G H
B
I
J
K L
1
2
3
4
0
1
2
4
3
5
0
G
ABSCHNITT 5. ZIERSTICH NÄHEN
Wellenstich
Legen Sie den gefalteten Rand an die längliche
Nähfußöffnung.
Die Nadel muss außerhalb des Stoffrandes rechts
einstechen und eine Falte bilden.
Stretchstich
Stichsteller: G
Nähfuß: Zick-Zack-Nähfuß
Fadenspannung: 6 - 8
Stichlänge: 2 - 3
Stichbreite: 5
4
1
2
3
5
Stichsteller: A - L
Nähfuß: Zick-Zack-Nähfuß
Fadenspannung: 1 - 4
Stichlänge: S.S.
Stichbreite: 5
Wenn Vorschub vor und zurück wegen der Stoffsorte
unausgeglichen ist, gleichen Sie ihn aus, indem Sie die
Stichlängeneinstellung wie folgt drehen:
Wenn sich die Vorlagen zusammenziehen, drehen Sie die
Einstellung auf “+”.
Wenn sich die Vorlagen strecken, drehen Sie die
Einstellung auf “-“. (Siehe auch Seite 12).

27
4
1
2
3
4
1 2
3
4
1
2
3
4
1
2
3
5
5
5
1
1
5
1
2
3
4
0
1
2
4
3
5
0
D
H
1
2
3
4
0
1
2
4
3
5
0
Smoken
Stichsteller: D
Nähfuß: Zick-Zack-Nähfuß
Fadenspannung: 1 - 4
Stichlänge: S.S.
Stichbreite: 5
Legen Sie mit der Stichlänge “4” gerade Steppnähte im
Abstand von 1 cm (3/8”) durch den gesamten Stickbereich..
Knoten Sie die Fäden über die Länge eines Randes.
Ziehen Sie an den Spulenfäden und verteilen Sie die Falten
gleichmäßig.
Befestigen Sie die Fäden am anderen Ende.
Nähen Sie mit einem Zierstich zwischen den
Kräuselstichen.
Ziehen Sie die Kräuselstiche heraus.
Hinweis : Lockern Sie die Spannung des Nadelfadens
1 cm (3/8”)
(Oberfaden) etwas; das Kräuseln geht dann
etwas leichter.
Kastenstich
Stichsteller: H
Nähfuß: Zick-Zack-Nähfuß
Fadenspannung: 1 - 4
Stichlänge: 0,5 - 2.
Stichbreite: 5
Verwenden Sie diesen Stich zum Zusammennähen von
schweren Stoffen.
Überlappen Sie zwei unversäuberte Ränder und verwenden
Sie diesen Stich zum Zusammennähen.

28
1
2
3
4
0
1
2
4
3
5
0
4
1
2
3
5
2
3
1
4
5
C
1
2
3
4
0
1
2
4
3
5
0
4
1
2
3
5
1
2
3
4
5
J
K
L
Applikationen
Stichsteller: C
Nähfuß: Zick-Zack-Nähfuß
Fadenspannung: 1 - 4
Stichlänge: 0,5-1
Stichbreite: 5
Heften Sie mit Reihfaden (oder kleben Sie mit
Bügeleisenkleber) Applikationen auf den Stoff. Umnähen Sie die
Applikation und achten Sie darauf, dass die Nadel genau auf
dem Außenrand der Applikation einsticht. An den Ecken
stechen Sie die Nadel in den Stoff. Heben Sie den Nähfuß und
drehen Sie den Stoff nach rechts oder links.
Erhabener Stich
Stichsteller: J-L
Nähfuß: Zick-Zack-Nähfuß
Fadenspannung: 1 - 4
Stichlänge: 0,5-1
Stichbreite: 5
Zum besseren Aussehen sollte bei Bedarf auf empfindlichen
Stoffen, wie Seidenmusselin, nur eine Lage mit einer
Verstärkung angebracht werden, die später entfernt werden
kann.

29
1
2
3
4
5
6
7
1
2
3
4
5
6
7
ABSCHNITT 6. PFLEGE IHRER
MASCHINE
Aus- und Einbau
Greiferbahn
Hinweis : Schalten Sie die Maschine aus und/oder ziehen Sie
den Netzstecker.
So bauen Sie die Greiferbahn aus:
Heben Sie die Nadel bis in ihrer höchste Stellung und öffnen
Spulenkapsel
Greiferbahnbefestigung
Greiferbahnring
Greifer
Greiferbahn
Sie die Greiferplatte. Öffnen Sie die Gelenkklinke der
Spulenkapel und nehmen Sie sie aus der Maschine. Lösen Sie
die Befestigungsteile der Greiferbahn und ziehen Sie den Ring
aus der Greiferbahn.
Nehmen Sie den Greifer heraus.
* Reinigen Sie die Greiferbahn mit einer Bürste und einem
weichen, trockenen Tuch.
Halten Sie den Greifer am Mittelstift fest und legen Sie ihn
vorsichtig wieder in die Greiferbahn; dabei muss mit dem
Greiferantrieb ein optimaler Kreis gebildet werden.
Legen Sie den Greiferbahnring ein und achten Sie darauf, dass
der Innenstift in die Rille einrastet.
Blockieren Sie die Greiferbahn und drehen Sie die
Befestigungsteile wieder an ihren Platz. Legen Sie die
Spulenkapsel wieder ein.
So bauen Sie die Greiferbahn ein:
Stift
Rille
Reinigung des Stoffschiebers
Hinweis: Schalten Sie die Maschine aus und/oder ziehen Sie
den Netzstecker, bevor Sie den Stoffschieber
reinigen.
Nehmen Sie die Nadel und den Nähfuß ab.
Drehen Sie die Befestigungsschraube der Nadelplatte heraus
und nehmen Sie die Nadelplatte ab.
Entfernen Sie mit einer Bürste Staub und Flusen, die die
Verzahnung des Stoffschieber verstopfen und setzen Sie die
Nadelplatte wieder ein.

30
(A)
(B)
(100V)
(200V)
Nählampe
Die Nählampe befindet sich hinter der Frontplatte.
Um die Glühbirne auszuwechseln, nehmen Sie die Frontplatte
der Nähmaschine ab, indem Sie die Befestigungsschraube
lösen.
* Unterbrechen Sie die Stromversorgung, bevor Sie die Birne
wechseln.
* Weichen Sie beim Ausbau von Maschinenteilen nicht von den
Anweisungen dieses Handbuchs ab.
(A) Zum Ausbauen ……….. Nach links drehen.
Zum Einbauen ……....... Nach rechts drehen.
(B) Zum Ausbauen ………. Drücken und nach
links drehen
Zum Einbauen ............. Drücken und nach
rechts drehen
Vorsicht : Die Glühbirne kann HEISS sein. Schützen Sie also
Ihre Händen beim Manipulieren.

31
Fehlersuche und Abhilfe
Der Nadelfaden
(Oberfaden ) reißt
1. Nadelfaden falsch eingefädelt.
2. Spannung des Nadelfadens zu hoch.
3. Nadel verbogen oder stumpf.
4. Nadel falsch eingesetzt.
5. Stoff wird nach dem Nähen nicht nach hinten geschoben
6. Faden zu dick oder zu dünn für die Nadel.
Siehe Seite 9
Siehe Seite 11
Siehe Seite 6
Siehe Seite 6
Siehe Seite 14
Siehe Seite 6
Spulenfaden
(Unterfaden) reißt
1. Unterfaden falsch in die Spulenkapsel eingefädelt.
2. In der Spulenkapsel haben sich Flusen angesammelt
3. Die Spule ist schadhaft und dreht nicht gleichmäßig.
Siehe Seite 8
Spulenkapsel
reinigen
Spule wechseln.
Die Nadel bricht Siehe Seite 6
Siehe Seite 6
Siehe Seite 6
Siehe Seite 11
Siehe Seite 14
Siehe Seite 6
Siehe Seite 12
Stiche übersprungen 1. Nadel falsch eingesetzt.
2. Nadel verbogen oder stumpf.
3. Nadel und/oder Garn sind für das Nähgut ungeeignet.
4. Zum Nähen von Synthetik- und sehr feinen Stoffen und
Stretchstoffen wird keine Nadel mit BLAUER SPITZE verwendet.
5. Nadelfaden falsch eingefädelt.
Siehe Seite 6
Siehe Seite 6
Siehe Seite 6
Siehe Seite 6
Siehe Seite 9
Krause Naht
1. Spannung des Nadelfadens zu hoch.
2. Maschine falsch eingefädelt.
3. Nadel ist für das Nähgut zu dick.
4. Die Stiche sind für das verarbeitete Nähgut zu dick.
* Wenn Sie sehr leichte Stoffe verarbeiten, legen Sie Papier unter
den Stoff.
Siehe Seite 11
Siehe Seite 9
Siehe Seite 6
Arbeiten Sie mit
dichteren Stichen.
Die Stiche bilden
Schlingen unter dem
Nähgut
1. Nadelfadenspannung ist zu locker.
2. Nadel zu dick oder zu fein für das Garn.
Siehe Seite 11
Siehe Seite 6
Das Nähgut wird nicht
gleichmäßig
transportiert
1. Stoffschieber durch Flusen verstopft.
2. Zu feine Stiche.
Siehe Seite 29
Arbeiten Sie mit
dickeren Stichen.
Maschine näht nicht 1. Die Maschine ist nicht ans Stromnetz angeschlossen
2. In der Greiferbahn hat sich Garn festgesetzt.
3. Handrad wurde zum Aufspulen außer Eingriff gesetzt.
1. Im Greifermechanismus hat sich Garn festgesetzt.
2. Stoffschieber durch Flusen verstopft.
Siehe Seite 29
Siehe Seite 29
Störung Ursache
Hinweis
1. Nadel falsch eingesetzt.
2. Nadel verbogen oder stumpf.
3. Befestigungsschraube der Nadel gelockert.
4. Nadelfadenspannung zu hoch.
5. Stoff wird nach dem Nähen nicht nach hinten geschoben.
6. Die Nadel ist für das verarbeitete Nähgut zu fein.
7. Der Stichsteller wurde gedreht, als sich die Nadel im Stoff
befand.
Siehe Seite 4
Siehe Seite 29
Siehe Seite
Die Maschine arbeitet
ungleichmäßig und
sehr laut

Impreso en Tailandia
Impresso en Tailândia
Imprimé en Thailande
Printed in Thailand
Gedruckt in Thailänd
305-800-002 (S/P/F/E/G)
Transcripción de documentos
MANUAL DE INSTRUCCIONES MANUAL DE INSTRUÇÃO LIVRET D’INSTRUCTIONS INSTRUCTION BOOK BEDIENUNGSANLEITUNG 2622 ÍNDICE SECCIÓN 1. PIEZAS ESENCIALES Nombres de las Piezas ........................................................................................................................... 2 SECCIÓN 2. PREPARACIÓN PARA COSER Mesa Supletoria ...................................................................................................................................... 3 Accesorios Estándar ............................................................................................................................... 3 Caja de Accesorios ................................................................................................................................. 3 Conexión de la Máquina a la Fuente de Alimentación ............................................................................ 3 Pedal ....................................................................................................................................................... 4 Palanca de Elevación del Pie Prensatelas .............................................................................................. 5 Montaje y Extracción del Pie Prensatelas ............................................................................................... 5 Cambio de la Aguja ................................................................................................................................. 6 Tabla de Hilos y Agujas ........................................................................................................................... 6 Preparación de los Pasadores Portacarretes .......................................................................................... 7 Extracción o Inserción de la Caja de Bobina ........................................................................................... 7 Devanado de la Canilla ........................................................................................................................... 8 Enhebrado de la Caja de Bobina ............................................................................................................ 8 Enhebrado de la Máquina ....................................................................................................................... 9 Enhebrador de Agujas ........................................................................................................................... 10 Tracción Hacia Arriba del Hilo de la Canilla .......................................................................................... 10 Compensación de la Tensión del Hilo de la Aguja ................................................................................ 11 Ajuste de la Tensión del Hilo de la Canilla ............................................................................................ 11 Botón Selector de Puntada ................................................................................................................... 12 Botón Selector de Longitud de Puntada ................................................................................................ 12 Botón Selector de Ancho de Puntada ................................................................................................... 12 Botón de Cosido hacia atrás (Remate) ................................................................................................. 13 Descenso del Corretelas (Dientes de transporte) ................................................................................. 13 SECCIÓN 3. COSTURA BÁSICA Costura de Puntada Recta .................................................................................................................... 14 Cambio de Dirección de Costura .......................................................................................................... 14 Utilización de las Guías de Costura de la Placa de Aguja .................................................................... 15 Esquinas en Ángulo Recto .................................................................................................................... 15 Posición de Aguja Variable ................................................................................................................... 15 Puntadas en Zigzag .............................................................................................................................. 16 SECCIÓN 4. COSTURA DE USO GENERAL Sobrehilado ........................................................................................................................................... 16 Zigzag en Punto .................................................................................................................................... 17 Puntada Formada .................................................................................................................................. 17 Puntada Elástica Recta ......................................................................................................................... 18 Coser Botones ....................................................................................................................................... 19 Ojales ............................................................................................................................................... 20-21 Ojal de Relieve con Cordón .................................................................................................................. 22 Cosido de Cremalleras ......................................................................................................................... 23 Dobladillos con Puntada Invisible .......................................................................................................... 24 Dobladillo Enrollado .............................................................................................................................. 25 SECCIÓN 5. COSTURA DECORATIVA Puntada de Ondas ................................................................................................................................ 26 Puntada Elástica ................................................................................................................................... 26 Nido de Abeja ........................................................................................................................................ 27 Puntada de Caja .................................................................................................................................... 27 Aplicaciones .......................................................................................................................................... 28 Puntada de Realce Decorativa .............................................................................................................. 28 SECCIÓN 6. CUIDADO DE SU MÁQUINA Desmontaje y Montaje - Pista de la Lanzadera ..................................................................................... 29 Limpieza del Corretelas (Dientes de transporte) ................................................................................... 29 Lámpara de Costura .............................................................................................................................. 30 Localización y Solución de Averías ....................................................................................................... 31 1 SECCIÓN 1. PIEZAS ESENCIALES Nombres de las Piezas 10 8 9 7 6 5 4 11 3 12 2 13 1 14 15 20 16 17 18 19 21 1 2 Botón de cosido hacia atrás (Remate) Botón selector de puntada 3 4 Botón selector de longitud de puntada Botón selector de ancho de puntada 5 6 Tope del canillero Eje del canillero 7 8 9 Pasadores Portacarretes Guiahilos del canillero Guiahilos 10 11 Palanca para levantar el hilo (Tirahilos) Botón selector de tensión del hilo 12 13 14 Tapa frontal Cortahilos Enhebrador de agujas 15 16 17 18 19 20 21 22 23 24 25 26 27 Placa de Aguja Soporte de pie prensatelas Pieza de sujeción de la aguja Aguja Pie prensatelas Mesa supletoria Asa de transporte Volante Interruptor de alimentación Enchufe hembra de la máquina Brazo libre Palanca para ojales Palanca de elevación del pie prensatelas 27 22 26 25 Nota : Las especificaciones están sujetas a modificaciones sin previo aviso. 23 24 2 SECCIÓN 2. PREPARACIÓN PARA COSER Mesa supletoria La mesa supletoria proporciona una superficie de costura añadida y puede desmontarse fácilmente para coser con el brazo libre. Desmontaje de la mesa: Separe la mesa de la máquina. Montaje de la mesa: Empuje la mesa supletoria hasta que encaje en la máquina. •Ventajas y usos de la costura con brazo libre: - - Evite que se amontone la tela alrededor de la aguja al hacer refuerzos para aumentar la resistencia de bolsillos, aberturas y cinturas. Para coser mangas, cinturillas, perneras de pantalones o cualquier área circular de una prenda. Para zurcir calcetines o remendar rodillas, codos o áreas de desgaste en las prendas infantiles. Accesorios Estándar 1 2 3 4 5 6 1 Pie prensatelas para cremalleras 2 Pie prensatelas para dobladillos 3 Pie prensatelas para ojales automático 4 Canillas 5 Juego de agujas 6 Cortaojales 7 Destornillador 8 Guía para dobladillos 8 7 Caja de Accesorios Los accesorios de costura están cómodamente situados en la mesa supletoria. 9 9 3 Caja de accesorios Conexión de la Máquina a la Fuente de Alimentación 3 2 Antes de conectar el cable de alimentación, asegúrese que la tensión y frecuencia que se indican en la máquina coincidan con su corriente eléctrica. 1. 2. Apague el interruptor de alimentación Introduzca el enchufe macho de la máquina en el enchufe hembra de la máquina 3. Introduzca el enchufe macho de alimentación en la toma de corriente. 4. Encienda el interruptor de alimentación para conectar la corriente y la lámpara de costura. 1 4 5 1 6 Enchufe macho de alimentación 3 Toma de corriente 2 5 Enchufe macho de la máquina Interruptor de alimentación 4 Enchufe hembra de la 6 máquina Pedal Pedal La velocidad de costura se puede variar mediante el pedal. Cuanto más fuerte pise el pedal, más rápido funcionará la máquina. Advertencia : No coloque nada sobre el pedal, de lo contrario la máquina se pondrá en marcha involuntariamente. 4 Palanca de Elevación del Pie Prensatelas La palanca de elevación del pie prensatelas sube y baja el pie prensatelas. Puede elevarlo unos 0,6 cm (1/4”) por encima de la posición alzada normal para extraer fácilmente el pie prensatelas o para ayudarle a colocar telas gruesas bajo el pie. 2 1 Posición elevada normal 2 Posición superior 1 Montaje y Extracción del Pie Prensatelas Extracción Gire el volante hacia usted para subir la aguja a su posición más alta. Suba el pie prensatelas. Apriete la palanca situada en la parte posterior del soporte del pie prensatelas. El pie prensatelas se desprenderá. Montaje Coloque el pie prensatelas de manera que el pasador del pie prensatelas se quede justo bajo la ranura del soporte de pie prensatelas. Baje el soporte del pie prensatelas para que el pie prensatelas quede bloqueado en su lugar. 5 Cambio de la Aguja Suba la aguja girando el volante hacia usted y baje el pie prensatelas. Suelte el tornillo de fijación de la aguja girándolo en el sentido contrario a las agujas del reloj. Saque la aguja de la pieza de sujeción. Introduzca la aguja nueva en la pieza de sujeción con el lado plano en sentido opuesto a usted. Cuando meta la aguja en la pieza de sujeción, empújela hacia arriba tanto como pueda y apriete el tornillo de fijación firmemente con un destornillador. * Compruebe sus agujas frecuentemente por si las puntas estuvieran arponadas o romas. Los enganchones y las carreras en géneros de punto, sedas finas y géneros similares a la seda son permanentes y casi siempre son causados por una aguja dañada. Para comprobar la aguja Coloque el lado plano de la aguja sobre algo plano (placa de aguja, cristal, etc.). La distancia libre entre la aguja y la superficie plana deberá uniforme. No utilice nunca una aguja doblada o roma. Géneros Hilo Seda Fina Algodón Fino Sintético Fino Algodón Fino Crep Georget, Poliéster Malla Recubierto Seda 50 Linos, Algodón, Peso Algodón de 50 a Piqué, Sarga, Medio Géneros de Punto 80, Poliéster Recubierto de sin Revés, Algodón Sintético Percal de 50 a 60 Pesado Mahón, Tweed, Seda 50 Gabardina, Algodón de 40 a Géneros para 50, Poliéster Tapicería, Recubierto de Ligero Crep de China, 9 Gasa, Linón, Organdí, u Cortinas y Revestimiento Tabla de Hilos y Agujas Tamaño de Aguja * En general, se utilizan agujas e hilos finos para coser telas finas, y se utilizan agujas e hilos más gruesos para coser telas gruesas. Pruebe siempre el tamaño de la aguja y el hilo en un trozo pequeño de la misma tela que vaya a utilizarse realmente para coser. 11 11 * Emplee el mismo hilo para la aguja y la canilla. ó * Cuando cosa géneros sintéticos, muy finos y elásticos, utilice una aguja de PUNTA AZUL. La aguja de punta azul evita eficazmente los saltos de puntada. 14 14 * Cuando cosa telas muy finas, cosa sobre un papel para evitar eficazmente el fruncido de las costuras. 16 Algodón Sintético de 40 a 50 6 Preparación de los Pasadores Portacarretes Los pasadores portacarretes se utilizan para sujetar el carrete de hilo con objeto de alimentar hilo a la máquina. Para utilizarlos, levante los pasadores portacarretes. Empújelos hacia abajo para el almacenamiento. 1 Hilo superior 2 Agujero 1 3 Enredo 2 Nota : Cuando utilice hilo que tenga tendencia a 1 enredarse alrededor del pasador portacarrete, enhébrelo a través del agujero del pasador portacarrete según se muestra. El agujero deberá estar frente al carrete de hilo. 3 Extracción o Inserción de la Caja de Bobina Abra la tapa de la lanzadera.. 1 Tapa de la lanzadera 1 Levante la aguja girando el volante hacia usted. Saque la caja de bobina sujetando el pestillo. 2 Pestillo 2 Cuando introduzca la caja de bobina, encaje el saliente en 3 el rebaje de la pista de la lanzadera. 3 Saliente 7 Devanado de la Canilla 1 1 Saque el volante hacia fuera. 2 Suelte hilo del carrete. Guíe el hilo alrededor del guiahilos del canillero. 3 3 Inserte el hilo a través del agujero de la canilla, de dentro a fuera. Inserte la canilla en el eje del canillero. 2 4 Empújelo hacia a la derecha. 5 Con el extremo libre del hilo en la mano, pise el pedal. Pare la máquina cuando haya hecho unos pocas vueltas y corte el hilo cerca del agujero de la canilla. 6 6 5 Pise de nuevo el pedal. Cuando la canilla esté totalmente enrollada, pare la máquina. Vuelva a colocar el eje del canillero en su posición original desplazándolo a la izquierda, y corte el hilo. 4 7 Empuje el volante a la izquierda (posición original). 7 Nota : Vuelva a colocar el eje del canillero en su sitio cuando se pare la máquina Enhebrado de la Caja de Bobina 1 1 Introduzca la canilla en la caja de bobina Asegúrese de que el hilo se devane en la dirección de la flecha. 2 Meta el hilo en la ranura de la caja de bobina. 3 Tire del hilo por debajo del muelle tensor y e introdúzcalo en el ojo de salida. 2 3 * 8 Deje unos 10 cm (4”) de hilo suelto. Enhebrado de la Máquina 3 1 Suba la palanca para levantar el hilo a su posición más alta girando el volante hacia usted. Levante el pie prensatelas. Coloque un carrete de hilo en el pasador portacarrete según se muestra, viniendo el hilo de la parte trasera del carrete de hilo. 4 2 5 6 1 Inserte el hilo en el guiahilos utilizando ambas manos. 2 Mientras sujeta el hilo cerca del carrete, tire del hilo hacia abajo al área de tensión y, a continuación, alrededor del soporte del muelle de retenida. 3 Tire firmemente del hilo hacia arriba y a través de la palanca para levantar el hilo de derecha a izquierda. 4 A continuación, tire del hilo hacia abajo e introdúzcalo en el guiahilos inferior. 5 Tire del hilo hacia abajo e insértelo en el guiahilos de la barra de agujas. 6 Enhebre el ojo de la aguja de delante a atrás. 1 2 3 4 5 * Véase la página 10 para obtener información sobre el enhebrador de agujas incorporado. 6 Nota : Corte el extremo del hilo con unas tijeras afiladas para enhebrar la aguja con mayor facilidad. 9 Enhebrador de Agujas 1 1 Levante la aguja a su posición más alta. Tire hacia debajo de la perilla del enhebrador de agujas todo lo que se pueda. 2 2 Gire la perilla en la dirección de la flecha indicada en la ilustración. A continuación, introduzca el Gancho en el ojo de la aguja. Conduzca el hilo alrededor de la Guía y por debajo del Gancho. 3 3 Gire la perilla en la dirección de la flecha que se muestra en la ilustración, haciendo pasar el bucle de hilo a través de la aguja. 4 Tire del hilo a través del ojo de la aguja. 4 * El enhebrador de agujas se puede utilizar con una aguja de Nº11 a Nº16 o una aguja de punta Azul . Un tamaño de hilo de 50 a 100 también funcionará bien. Tracción Hacia Arriba del Hilo de la Canilla 1 2 1 Suba el pie prensatelas y sujete el hilo de la aguja ligeramente con su mano izquierda. 2 Gire el volante lentamente hacia usted con su mano derecha hasta que la aguja baje, y siga girando el volante hasta que la palanca para levantar el hilo esté en su posición más alta. Tire ligeramente hacia arriba del hilo de la aguja, formando un bucle con el hilo de la canilla. 3 3 Tire de ambos hilos 15 cm (6”) hacia atrás y por debajo del pie prensatelas. 10 Compensación de la Tensión del Hilo de la Aguja 1 1 5 4 La tensión del hilo se ajusta según los materiales 3 1 Tensión Correcta de costura, las capas de tela y el método de costura. * La puntada recta ideal entrelaza los hilos entre dos 6 capas de tela, según se ilustra (ampliado para mostrar el detalle). * En una puntada en zigzag ideal, el hilo de la canilla no se de por el derecho (lado superior) de la tela, y el 2 hilo de la aguja se ve ligeramente por el revés (lado inferior) de la tela. Hilo de la aguja (hilo superior) Hilo de la canilla (hilo inferior) 3 Lado del derecho (lado superior) de la tela 4 Revés (lado inferior) de la tela 5 Botón selector de la tensión del hilo 6 Índice de regulación 1 2 2 2 La tensión del hilo de la aguja es demasiado alta El hilo de la canilla (hilo inferior) aparecerá en el derecho (lado superior) de la tela. Afloje la tensión del hilo de la aguja moviendo el botón selector a un número más bajo. 3 3 La tensión del hilo de la aguja es demasiado floja El hilo de la aguja (hilo superior) aparecerá en el revés (lado inferior) de la tela. Apriete la tensión del hilo de la aguja moviendo el botón selector a un número más alto. Ajuste de la Tensión del Hilo de la Canilla Para la costura general no es necesario ajustar la tensión del hilo de la canilla. Sin embargo, puede ajustar la tensión del hilo de la canilla para una necesidad de costura específica. Gire el tornillo de ajuste a la derecha para incrementar la tensión, o a la izquierda para reducirla. 11 Botón Selector de Puntada A D C A E F G H I J K Suba la aguja y el pie prensatelas. Gire el botón selector de puntada para ajustar el símbolo correspondiente al modelo deseado en el índice de regulación L 1 Índice de regulación 1 Botón Selector de Longitud de Puntada 1 Gire el botón selector de longitud de puntada para ajustar la longitud de puntada deseada en el índice de regulación. Cuando más alto sea el número, más larga será la longitud de puntada. 1 Índice de regulación “ ” es el ajuste recomendado para puntadas de ojales Ajuste el botón selector en el intervalo 0,5-4 cuando cosa la puntada en zigzag. Ajuste el botón selector en “S.S” para coser el modelo de puntada elástica. Si el modelo de puntada elástica no es uniforme, gire el botón selector de longitud de puntada en la dirección “-“ para reducirla, o “+” para ampliarla. 4 0 3 1 2 S.S. 1 4 0 2 3 Botón Selector de Ancho de Puntada Gire el botón selector de ancho de puntada para establecer el ancho de puntada deseado en el índice de 1 regulación. Cuanto más alto sea el número, más ancha será la puntada. 4 3 2 1 5 0 1 Índice de regulación Nota : Levante la aguja sobre la tela cuando gire el botón selector de ancho de puntada. 12 Botón de Cosido Hacia Atrás Mientras mantenga pulsado el botón de cosido hacia atrás, la máquina coserá hacia atrás. Descenso del Corretelas(Dientes de transporte) 1 1 Abra la tapa de la lanzadera. 1 Tapa de la lanzadera 2 1 Para bajar el corretelas(dientes) tire hacia abajo de la palanca de descenso y desplácela a la derecha, según se ilustra. 2 Palanca de descenso 3 2 3 Para levantar el corretelas(dientes) tire hacia abajo de la palanca de descenso y desplácela a la izquierda, según se ilustra. 2 * El corretelas (los dientes) debe estar levantado para la costura normal. * El corretelas (los dientes) volverá a la posición de levantado cuando la máquina comience a funcionar. 2 13 SECCIÓN 3. COSTURA BÁSICA 2 1 A Costura de Puntada Recta 3 B 4 5 5 4 3 3 1 2 1 0 0 2 4 1 2 3 1 Selector de Puntada: AóB 2 3 4 Pie prensatelas: Tensión de hilo: Longitud de puntada: Prensatelas para zigzag 2-6 1,5-4 5 Ancho de puntada: (0) ó (5) 1 Levante el pie prensatelas y coloque la tela con su borde alineado con una línea de guía de costura de la placa de aguja. Baje la aguja a la tela. Baje el pie prensatelas y alise los hilos hacia atrás. Pise el pedal. Guíe suavemente la tela a lo largo de la línea de guía, dejando que la tela corra por sí misma. 2 Para fijar el extremo de las costuras, pulse el botón de cosido hacia atrás(Remate) y cosa varias puntadas hacia atrás. Levante el pie prensatelas y saque la tela, tirando de los hilos hacia atrás. 3 Tire de los hilos hacia arriba y al cortahilos. Los hilos se cortan a su longitud apropiada para iniciar la siguiente costura. Cambio de Dirección de Costura Pare la máquina y gire el volante hacia usted para introducir la aguja en la tela. Levante el pie prensatelas. Gire la tela en torno a la aguja para cambiar de dirección de costura según se desee. Baje el pie prensatelas y continúe cosiendo. 14 Utilización de las Guías de Costura de la Placa de Aguja 1 Las guías de costura de la placa de aguja le ayudan a medir el ancho de las costuras. * Los números indican la distancia entre la posición de aguja central y la línea de guía.. 3 4 Números en la placa de aguja 10 15 20 3/8" 4/8" 5/8" 6/8" Distancia en centímetros 1.5 2.0 1.0 1.0 1.3 1.6 1.9 1 Líneas de guía 2 Guía para esquinas 3 Placa de aguja 2 4 Agujero de la placa de aguja 5 Ancho de costura desde la posición de aguja central Esquinas en Ángulo Recto Para hacer una esquina en ángulo recto a 1,6 cm (5/8”) desde el borde de la tela: Cuando el borde de la tela situado frente a usted esté alineado con la guía de esquinas según se ilustra, deje de dar puntadas y baje la aguja girando el volante hacia usted. Levante el pie prensatelas y gire la tela para alinear el borde con la guía de costura de 1,6 cm (5/8”) Baje el pie prensatelas y comience a coser en la nueva dirección. 5 2 Guía de esquinas 2 Posición de Aguja Variable Cuando se selecciona la puntada recta (modelo A), puede desplazar la aguja entre las posiciones de aguja central e 1 0 izquierda girando el botón selector de ancho de puntada. 5 4 3 2 15 1 Puntadas en Zigzag 2 C 3 2 3 Selector de Puntada: Pie prensatelas: Tensión de hilo: 4 5 Longitud de puntada: Ancho de puntada: 1 5 4 5 4 3 1 0 4 0 2 3 1 2 C Prensatelas para zigzag 2-5 0,5-4 1,5 Las puntadas en zigzag simple se utilizan ampliamente para sobrehilar, coser botones, etc. SECCIÓN 4. COSTURA DE USO GENERAL 2 1 Sobrehilado G 4 5 2 5 4 3 1 Selector de Puntada: 2 Pie prensatelas: 3 Tensión de hilo: 4 Longitud de puntada: 5 Ancho de puntada: 3 1 3 C Prensatelas para zigzag 1-4 1-2 5 1 0 0 2 4 La puntada en zigzag se utiliza en el margen de la costura para impedir que la tela se deshilache en los bordes sin rematar. 16 Zigzag en Punto 2 1 D 3 4 5 1 5 4 3 5 Ancho de puntada: D Prensatelas para zigzag 1-4 0,5-1,5 5 2 0 2 1 Selector de Puntada: 2 Pie prensatelas: 3 Tensión de hilo: 4 Longitud de puntada: 1 0 3 4 Esta puntada se utiliza para acabar el margen de la costura en telas sintéticas y otros géneros que tienden a fruncirse. Coloque la tela de manera que permita una costura a 1,6 cm (5/8”). Recorte el margen de la costura después de coser. Nota : Tengan cuidado de no cortar las puntadas. También es útil para zurcir y remendar desgarrones. Puntada Formada 1 2 G 3 1 Selector de Puntada: 2 Pie prensatelas: 3 Tensión de hilo: 4 Longitud de puntada: 5 Ancho de puntada: 5 4 5 4 3 G Prensatelas para zigzag 1-4 S.S. 5 2 1 4 1 0 0 2 Esta puntada formada es ideal para coser prendas de baño y terciopelo elástico porque proporciona la máxima elasticidad y resistencia. Coloque la tela de manera que permita una costura a 1,6 cm (5/8”). Recorte el margen de la costura después de coser. Nota : Tenga cuidado de no recortar las puntadas. 17 3 1 Puntada Elástica Recta 2 B 3 1 2 3 5 4 4 5 5 4 3 Selector de Puntada: Pie prensatelas: Tensión de hilo: Longitud de puntada: Ancho de puntada: AóB Prensatelas para zigzag 2-6 1,5-4 (0) ó (5) 2 1 4 1 0 0 2 3 A Se cose con dos puntadas hacia delante y una puntada hacia atrás, formando una costura que no se rasga fácilmente. 18 Coser Botones 2 1 3 C 4 5 5 2 1 4 3 0 Selector de Puntada: Pie prensatelas: Tensión de hilo: Longitud de puntada: Ancho de puntada: 6 Corretelas: C Prensatelas para zigzag 1-3 Cualquiera Ajuste según sea necesario Bajado 4 0 3 1 2 1 2 3 4 5 6 1 1 Ajuste el ancho de puntada, y gire el volante para comprobar si la aguja entra en cada agujero del botón. 2 Baje el pie prensatelas para sujetar el botón en su sitio. Los agujeros del botón deberán alinearse con la ranura del pie prensatelas. 3 Se puede poner un alfiler en el pie prensatelas para formar un tallo. Asegúrese de que la aguja entre en ambos agujeros del botón. Cosa unas 10 puntadas y corte los hilos superior e inferior, dejando una longitud de hilo de 20 cm (8”). 4 Pase los hilos de la aguja (superiores) entre el botón y la tela a través de los agujeros del botón. 2 3 Tire de los hilos superiores para traer los hilos inferiores al derecho de la tela. 4 5 Dé vueltas a los hilos alrededor del botón para formar un tallo y átelos entre sí. 5 19 Levante el corretelas(Los dientes) después de 1 Ojales 2 3 BH 3 4 5 5 4 0 1 2 5 4 3 1 2 1 0 2 * 3 * 4 * 1 2 3 * * 1 4 2 3 4 5 5 6 1 7 8 6 7 8 3 Selector de Puntada: (BH) Pie prensatelas: Pie prensatelas para ojales automático Tensión de hilo: 1-5 Longitud de puntada: (0,5-1) Ancho de puntada: 5 El tamaño del ojal se ajusta automáticamente poniendo el botón en el pie prensatelas para ojales automático. El soporte de botón del pie prensatelas sirve para un tamaño de botón de hasta 2,5 cm (1”) de diámetro. Haga un ojal de prueba en una muestra con la misma tela, superficies de contacto y costuras de la prenda verdadera. Ponga el botón en la muestra de tela y marque la parte superior y la parte inferior para determinar la posición del ojal. Utilice entretela en telas elásticas. Gire el volante hacia usted para levantar la aguja a la posición más alta. Suba la palanca para levantar el pie prensatelas. Seleccione el modelo “BH” girando el botón selector de puntadas. Si ya se ha seleccionado el modelo BH, reposicione el botón selector una vez según el procedimiento descrito en 12 Monte el pie prensatelas para ojales automático. Tire del soporte de botón hacia atrás y ponga el botón en él. Vuelva a empujar el soporte de botón hacia usted todo lo que pueda. Baje la palanca de ojales todo lo que pueda. 1 Palanca de ojales Introduzca la tela debajo del prensatelas. Gire el volante lentamente hacia usted con la mano derecha hasta que la aguja baje, y continúe girando el volante hasta que la palanca para levantar el hilo esté en su posición más alta. Retire la tela hacia la izquierda para sacar ambos hilos hacia la izquierda. Introduzca la prenda bajo del prensatelas, y baje la aguja al punto de partida. A continuación, baje el pie prensatelas para ojales automático. Nota : Asegúrese de que no haya ningún huelgo entre la corredera y el soporte del muelle. Si hay un huelgo, 4 5 la longitud de las hileras será diferente, según se muestra. 2 Punto de partida 3 Corredera 4 No deberá haber ningún huelgo 5 Soporte del muelle 6 Diferencia 6 2 20 9 9 Cosa lentamente y pare la máquina cuando termine un ojal. * La máquina cose primero el refuerzo delantero y la hilera izquierda. y, a continuación, el refuerzo trasero y la hilera derecha. 10 11 10 Corte los hilos superior e inferior dejando una longitud de hilo de unos 10 cm (4”). Saque el hilo de la aguja (superior) por el revés de la 11 12 12 13 13 tela tirando del hilo inferior. A continuación, anude los hilos. Ponga un alfiler en la parte interior del refuerzo. A continuación, corte la abertura con el cortaojales. Tenga cuidado de no cortar las puntadas. Para repetir la costura de ojales, gire el selector de puntadas a ; a continuación, de nuevo a , según se muestra. Ahora, simplemente pise el pedal para coser un ojal idéntico. Cuando termine de coser ojales, empuje la palanca de ojales hacia arriba todo lo que pueda. Para ajustar la densidad de puntadas de ojales: La densidad de puntada de la costura de ojales se deberá ajustar dentro de la marca “ ” del botón selector de longitud de puntada. 1 2 3 4 0 21 Ojal de Relieve con Cordón 2 1 3 BH 4 0 5 1 2 Selector de Puntada: Pie prensatelas: 3 4 5 Tensión de hilo: Longitud de puntada: Ancho de puntada: (BH) Pie prensatelas para ojales automático 1-5 (0,5-1) 5 5 4 3 1 2 1 0 2 3 4 1 1 Utilice el mismo procedimiento que para el ojal automático. * Fije el ancho de puntada que se coincida con el grosor del cordón utilizado. 1 2 2 3 3 * 22 Con el prensatelas para ojales levantado, enganche el cordón de relleno en la espuela situada en la parte posterior del prensatelas para ojales. Traiga los extremos hacia usted por debajo del prensatelas para ojales, dejando libre el extremo delantero. Enganche el cordón de relleno en las horquillas situadas en la parte delantera del prensatelas para ojales automático para sujetarlos juntos. Baje la aguja a la prenda en el punto en que comenzará el ojal, y baja el pie. 1 Espuela Pise el pedal suavemente y cosa el ojal. Cada lado del ojal y los refuerzos se coserán sobre el cordón. Retire la tela de la máquina y corte sólo los hilos de coser. Tire del extremo izquierdo del cordón de relleno para apretarlo. Enhebre el extremo en una aguja de zurcir, sáquelo por el revés de la tela y córtelo. Para cortar la abertura del ojal, véanse las instrucciones en la página 21. Aplicación de Cremalleras 1 2 3 1 2 Selector de Puntada: Pie prensatelas: 4 5 3 4 2 5 4 3 5 Tensión de hilo: Longitud de puntada: Ancho de puntada: A Pie prensatelas para cremalleras 3-6 1,5-4 5 3 1 A 1 0 0 2 4 Prenda con alfileres o hilvane la cinta de la cremallera a la tela y colóquela bajo el prensatelas. Estire los hilos hacia atrás y baje el pie prensatelas. Para coser el lado izquierdo de la cremallera, guíe los dientes de la cremallera a lo largo del borde del pie prensatelas y cosa a través de la prenda y la cinta de la cremallera. De la vuelta a la tela y cosa el otro lado de la cremallera de la misma manera que hizo con el lado izquierdo. 23 Dobladillos con Puntada Invisible 2 1 F E 3 4 5 2 5 4 3 3 1 1 2 3 4 5 6 1 0 4 0 2 Selector de Puntada: Pie prensatelas: EoF Prensatelas para zigzag Tensión de hilo: Longitud de puntada: 2-4 1-3 Ancho de puntada: Guía de Dobladillos 5 6 1 [A] 1 Doble el dobladillo hacia arriba y vuélvalo a doblar dejando un margen de 0,4 a 0,7 cm (1/4”) según se ilustra. 1 Revés de la tela 2 de 0,4 a 0,7 cm (1/4”) [A] Telas pesadas [B] Telas finas o de peso medio 2 Baje el pie prensatelas. A continuación, afloje el tornillo del soporte del prensatelas para colocar la guía de dobladillos entre el tornillo y la caña del soporte del prensatelas. Apriete el tornillo asegurándose de que la pared de la guía de dobladillos se sitúe en el medio de las garras del pie prensatelas. 3 Tornillo 4 Guía de dobladillos 3 Levante el prensatelas y coloque la tela bajo del pie prensatelas de manera que el pliegue blando se apoye [B] 2 2 1 1 2 3 4 3 contra la pared de la guía de dobladillos. Baje el pie prensatelas. A continuación, cosa lentamente para un control mejor de manera que las puntadas en zigzag caigan sobre el margen del dobladillo y perforen el pliegue blando. Mientras cosa, asegúrense de que el pliegue discurra a lo largo de la pared de la guía de dobladillos. 4 Abra el pliegue por completo. 4 5 5 * Derecho de la tela. Si la aguja baja muy a la izquierda, las puntadas se verán por el derecho de la tela. 24 Dobladillo Enrollado 1 2 1 3 A 5 2 5 4 3 Selector de Puntada: Pie prensatelas: 3 4 5 Tensión de hilo: Longitud de puntada: Ancho de puntada: A Pie prensatelas para dobladillos 2-6 1,5-4 5 3 1 4 2 1 0 0 2 4 1 1 Pliegue el borde de la tela dos veces 0,3 cm (1/8”) de ancho y 6 cm (2 3/8”) de largo. 2 4 Recorte en la esquina de la tela 0,8 cm (5/16”) x 1,5 cm (3,16”) para evitar que el dobladillo abulte en la esquina. 3 1 Envés de la tela 2 0,5 cm 3 0,8 cm 4 Hélice del pie prensatelas 1 2 2 25 Coloque la tela alineando el borde del dobladillo con la guía del pie prensatelas. Baje el pie prensatelas y cosa varias puntadas al mismo tiempo que tira de ambos hilos hacia atrás. Pare la máquina con la aguja en la tela y levante el prensatelas. Introduzca la parte doblada de la tela en el la hélice del pie prensatelas. Baje el pie prensatelas y cosa al mismo tiempo que levanta el borde que siga avanzando suave y uniformemente. SECCIÓN 5. COSTURA DECORATIVA 2 1 Puntada de Ondas G 3 4 5 2 Selector de Puntada: Pie prensatelas: 3 4 Tensión de hilo: Longitud de puntada: Ancho de puntada: 5 3 1 5 4 3 1 2 G Pie prensatelas para zigzag 6-8 2-3 5 1 0 0 2 4 Coloque el borde doblado a lo largo de la ranura del pie prensatelas. La aguja deberá bajar fuera del borde de la tela a la derecha formando un pliegue. Puntada Elástica A B C D E G H F I J K L 1 1 3 2 2 3 4 5 5 4 Selector de Puntada: Pie prensatelas: Tensión de hilo: Longitud de puntada: Ancho de puntada: A-L Pie prensatelas para zigzag 1-4 S.S. 5 5 4 3 2 1 4 1 0 0 2 Si el avance hacia delante y hacia atrás se descompensa debido al tipo de tela, compénselo girando el botón selector de longitud de puntada de la manera siguiente: Si los modelos se comprimen, gire el botón selector hacia “+”. Si los modelos se estiran, gire el botón selector hacia “-“. (Véase la página 12). 26 3 1 Nido de Abeja 2 D 3 1 2 5 4 3 4 5 4 3 2 5 1 0 0 1 4 Selector de Puntada: D Pie prensatelas: Pie prensatelas para zigzag Tensión de hilo: 1-4 Longitud de puntada: S.S. Ancho de puntada: 5 2 Con la longitud de puntada en “4”, cosa líneas de puntadas rectas con una separación de 1 cm (3/8”), a través del área 3 1 a bordar. Anude los hilos a lo largo de un borde. Tire de los hilos de la canilla y distribuya los frunces uniformemente. Fije los hilos en el otro extremo. Cosa con una puntada decorativa entre las puntadas de frunce. Saque las puntadas de fruncir. Nota : Afloje la tensión del hilo de la aguja (superior) para hacer más fácil el fruncido. 1 1 Puntada de Caja 2 H 3 0 1 cm (3/8”) 1 Selector de Puntada: 2 (Pie prensatelas: 4 5 1 5 4 3 2 2 3 Tensión de hilo: 4 Longitud de puntada: 5 Ancho de puntada: 3 1 0 H Pie prensatelas para zigzag 1-4 0,5-2. 5 4 Utilice este puntada para unir telas pesadas. Solape dos bordes sin sobrehilar juntos y utilice esta puntada para unirlos. 27 1 Aplicaciones 2 C 3 1 4 5 1 5 4 3 3 4 5 2 0 2 2 3 1 0 Selector de Puntada: Pie prensatelas: Tensión de hilo: Longitud de puntada: Ancho de puntada: C Pie prensatelas para zigzag 1-4 0,5-1 5 4 Hilvane (o pegue con adhesivo para plancha) piezas de aplicación sobre la tela. Cosa alrededor de la aplicación asegurándose de que la aguja caiga a lo largo del borde exterior de la aplicación. Cuando cosa esquinas, introduzca la aguja en la tela. Levante el pie prensatelas y gire la tela a la derecha o la izquierda. J K L Puntada de Realce Decorativa 2 3 1 5 4 2 3 0 5 4 3 1 2 4 5 1 0 2 Selector de Puntada: Pie prensatelas: Tensión de hilo: Longitud de puntada: Ancho de puntada: J-L Pie prensatelas para zigzag 1-4 0,5-1 5 3 4 1 Para una presentación delicada sobre géneros tales como la muselina de seda, utilice una sola capa con un refuerzo despegable, si fuese necesario. 28 SECCIÓN 6. CUIDADO DE SU MÁQUINA Desmontaje y Montaje Pista de la Lanzadera Nota : Apague el interruptor de alimentación y/o desenchufe la máquina. 2 Para desmontar la pista de la lanzadera: Levante la aguja a su posición más alta y abra la tapa de la lanzadera. Abra el pestillo articulado de la caja de bobina y sáquela de la máquina. Abra los elementos de sujeción de la pista de la lanzadera y saque el anillo de la pista de la lanzadera. Saque la lanzadera. * Limpie la pista de la lanzadera con un cepillo y un trapo seco y suave. 1 5 1 2 3 4 5 4 3 Caja de bobina Elemento de sujeción de la pista de la lanzadera Anillo de la pista de la lanzadera Lanzadera Pista de la lanzadera Para montar la pista de la lanzadera: Sujete la lanzadera por el pasador central y móntela cuidadosamente de nuevo en la pista de la lanzadera, formando un círculo perfecto con el impulsor de lanzadera. Monte el anillo de la pista de la lanzadera asegurándose de que el pasador inferior encaje en la ranura. Bloquee el anillo de la pista de la lanzadera girando los elementos de sujeción de nuevo a su sitio. Introduzca la caja de bobina. 6 Pasador 7 Ranura 7 6 Limpieza del Corretelas (Dientes de Transporte) Nota : Apague el interruptor de alimentación y/o desenchufe la máquina antes de limpiar el corretelas.. Desmonte la aguja y el pie prensatelas. Saque el tornillo de fijación de la placa de aguja y desmonte la placa de aguja. Con un cepillo, limpie el polvo y la pelusa que obstruyan los dientes del corretelas. Vuelva montar la placa de aguja. 29 Lámpara de Costura La lámpara de costura está situada detrás de la tapa frontal. Para cambiar la bombilla, extraiga la chapa frontal de la máquina de coser sacando el tornillo de fijación. * Desenchufe la fuente de alimentación antes de cambiar la bombilla. * No desmonte la máquina de un modo distinto al que se explica en este manual. (A) (B) (A) Para desmontar ……….. Gire a la izquierda. (B) Para montar ……........... Gire a la derecha. Para desmontar ………. Empuje y gire a la izquierda. Para montar …….......... Empuje y gire a la derecha. (100V) Advertencia : La bombilla podría estar CALIENTE. Proteja (200V) sus dedos cuando la manipule. 30 Localización y Solución de Averías Situación El hilo de la aguja (superior) se rompe El hilo de la canilla Causa 1. 2. 3. 4. 5. 6. 1. (inferior) se rompe 2. La aguja se rompe Saltos de puntada El hilo de la aguja no está enhebrado correctamente. La tensión del hilo de la aguja es demasiado alta. La aguja está doblada o sin punta. La aguja está montada incorrectamente. La tela no corre hacia atrás al terminar de coser. El hilo es demasiado grueso o demasiado fino para la aguja. El hilo inferior no está enhebrado correctamente en la caja de bobina. Se ha acumulado pelusa en la caja de bobina. Referencia Véase la Página 9 Véase la Página 11 Véase la Página 6 Véase la Página 6 Véase la Página 14 Véase la Página 6 Véase la Página 8 Limpie la caja de bobina Cambie la canilla. 3. 1. 2. 3. 4. 5. 6. 7. La canilla está dañada y no gira uniformemente. La aguja está montada incorrectamente. La aguja está doblada o sin punta. El tornillo de fijación de la aguja está flojo. La tensión del hilo de la aguja es demasiado grande. La tela no corre hacia atrás al terminar de coser. La aguja es demasiado fina para la tela que se está cosiendo. El botón selector de puntada se ha girado mientras la aguja estaba en el material. 1. 2. 3. La aguja está montada incorrectamente. La aguja está doblada o sin punta. La aguja y/o los hilos no son adecuados para la labor que se está cosiendo. No se está utilizando una aguja de PUNTA AZUL para coser géneros sintéticos y telas muy finas y elásticas. El hilo de la aguja no está enhebrado correctamente. Véase la Página 6 Véase la Página 6 Véase la Página 6 Véase la Página 11 Véase la Página 9 Véase la Página 6 4. 5. Véase la Página 6 Véase la Página 9 Las puntadas forman bucles por debajo de la labor 1. 2. La tensión del hilo de la aguja es demasiado grande. La máquina no esté enhebrada correctamente. La aguja es demasiado gruesa para la tela que se está cosiendo. Las puntadas son demasiado gruesas para la tela que se está cosiendo con nueva línea. Cuando cosa materiales muy ligeros, coloque un papel bajo de la tela. La tensión del hilo de la aguja es demasiado floja. La aguja es demasiado gruesa o demasiado fina para el hilo. La prenda no avanza uniformemente 1. 2. El corretelas está obstruido con pelusa. Las puntadas son demasiado finas. Véase la Página 29 Haga las puntada más gruesas. La máquina no 1. 2. 3. La máquina no está enchufada. Hay hilo atrapado en la pista de la lanzadera. El volante se ha desengranado para el devanado de la canilla. Véase la Página 4 Véase la Página 29 Véase la Página 8 1. 2. Hay hilos atrapados en el mecanismo de la lanzadera. El corretelas está obstruido con pelusa. Véase la Página 29 Véase la Página 29 Fruncido de la costura 1. 2. 3. Véase la Página 6 Véase la Página 6 Véase la Página 6 Véase la Página 11 Véase la Página 14 Véase la Página 6 Véase la Página 12 4. * funciona La máquina no marcha uniformemente y hace mucho ruido 31 Haga las puntadas más densas. Véase la Página 11 Véase la Página 6 ÍNDICE SECÇÃO 1. PEÇAS ESSENCIAIS Nomes das peças ............................................................................................................................. 2 SECÇÃO 2. PREPARAÇÃO PARA COSER Mesa suplementar ............................................................................................................................ 3 Acessórios standard ......................................................................................................................... 3 Caixa de acessórios ......................................................................................................................... 3 Ligação da máquina à fonte de alimentação .................................................................................... 3 Pedal ................................................................................................................................................. 4 Palanca de elevação da alavanca .................................................................................................... 5 Montagem e extracção da alavanca ................................................................................................. 5 Mudança da agulha .......................................................................................................................... 6 Tabela de fios e agulhas ................................................................................................................... 6 Preparação dos porta-bobinas ......................................................................................................... 7 Extracção ou Inserção da Caixa da Bobina ...................................................................................... 7 Bobinagem da Canela ...................................................................................................................... 8 Enfiamento da Caixa da Bobina ....................................................................................................... 8 Enfiamento da Máquina .................................................................................................................... 9 Enfiador de Agulhas ....................................................................................................................... 10 Tracção para cima do fio da canela ................................................................................................ 10 Compensação da regulação do fio da agulha ................................................................................ 11 Ajuste da Regulação do fio da Canela ........................................................................................... 11 Botão Selector de ponto ................................................................................................................. 12 Botão Selector do tamanho do ponto ............................................................................................. 12 Botão Selector da largura do ponto ................................................................................................ 12 Botão de costura para trás ............................................................................................................. 13 Descida da alavanca ...................................................................................................................... 13 SECÇÃO 3. A COSTURA BÁSICA Costura de ponto direito ................................................................................................................. 14 Mudança do sentido da costura ...................................................................................................... 14 Utilização das guias de costura da placa da agulha ....................................................................... 15 Esquinas em ângulo recto .............................................................................................................. 15 Posição da agulha variável ............................................................................................................. 15 Pontos em ziguezague ................................................................................................................... 16 SECÇÃO 4. A COSTURA DE USO GERAL Alinhavar ......................................................................................................................................... 17 Ziguezague em ponto ..................................................................................................................... 17 Ponto formado ................................................................................................................................ 17 Ponto elástico recto ........................................................................................................................ 18 Coser botões .................................................................................................................................. 19 Botoeiras ................................................................................................................................. 20 - 21 Botoeira de relevo com cordão ....................................................................................................... 22 Aplicação de fecho éclair ................................................................................................................ 23 Bainhas com ponto invisível ........................................................................................................... 24 Bainha enrolada .............................................................................................................................. 25 SECÇÃO 5. A COSTURA DECORATIVA Ponto de ondas ............................................................................................................................... 26 Ponto elástico ................................................................................................................................. 26 Ninho de abelha .............................................................................................................................. 27 Ponto de caixa ................................................................................................................................ 27 Aplicações ...................................................................................................................................... 28 Ponto de realce decorativo ............................................................................................................. 28 SECÇÃO 6. O CUIDADO DA SUA MÁQUINA Desmontagem e montagem - pista da lançadeira .......................................................................... 29 Limpeza da alavanca ...................................................................................................................... 29 Lâmpada de costura ....................................................................................................................... 30 Localização e solução das avarias ................................................................................................. 31 1 SECÇÃO 1. PEÇAS ESSENCIAIS 10 8 9 Nomes das Peças 7 6 5 4 11 3 12 2 13 1 2 Botão de costura para trás (remate) Botão selector de ponto 3 4 5 Botão selector de tamanho do ponto Botão selector de largura do ponto Tope da bobinadeira 6 7 Eixo da bobinadeira Porta-bobinas 8 Guia fios da bobinadeira 9 Guia fios 10 Alavanca para levantar o fio (tira-fios) 1 11 Botão selector de regulação do fio 12 Chapa frontal 14 13 Corta fios 14 Enfiador de agulhas 15 15 16 17 18 19 20 21 22 23 24 25 26 27 20 16 17 18 19 21 Placa de agulha Suporte da alavanca Peça de sujeição da agulha Agulha Alavanca Mesa suplementar Asa de transporte Volante Interruptor de alimentação Tomada fêmea da máquina Braço livre Alavanca para botoeiras Alavanca de elevação da alavanca 27 22 26 25 23 Nota: As especificações estão sujeitas a modificações sem aviso prévio. 24 2 SECÇÃO 2. PREPARAÇÃO PARA COSER Mesa suplementar A mesa suplementar aumenta a superfície de costura e pode ser desmontada facilmente para coser com o braço livre. Desmontagem da mesa: Separe a mesa da máquina. Montagem da mesa: Puxe a mesa suplementar até a encaixar na máquina. Vantagens e usos da costura com braço livre: - Evite amontoar o tecido à volta da agulha quando fizer - reforços para aumentar a resistência de bolsos, aberturas e cinturas. Para coser mangas, cós, pernas de calças ou qualquer - zona circular da roupa. Para passajar meias ou remendar joelheiras, cotovelos ou áreas de desgaste na roupa das crianças. Acessórios standard 1 3 2 1 Pé alavanca para fecho éclair 2 Pé alavanca para bainhas 3 Pé alavanca para botoeiras automático 4 Canelas 5 Jogo de agulhas 6 Corta botoeiras 7 Chave de parafusos 8 Guia para bainhas 4 6 5 8 7 Caixa de acessórios Os acessórios de costura estão comodamente situados na mesa suplementar. 9 Caixa de acessórios 9 3 Ligação da máquina à corrente Antes de ligar o fio de alimentação, assegure-se de que a 3 2 tensão e a frequência indicadas na máquina coincidem com a sua corrente eléctrica. 1. 2. 3. Apague o interruptor de alimentação Introduza a tomada macho da máquina na tomada fêmea Introduza a tomada macho de alimentação na tomada de 4. corrente. Acenda o interruptor de alimentação para conectar a 1 corrente e a lâmpada de costura. 4 1 5 6 Tomada macho de alimentação 2 Interruptor de alimentação 4 Tomada fêmea da máquina 3 Tomada de corrente 5 Tomada macho da máquina 6 Pedal Pedal A velocidade de costura pode-se variar com o pedal. Quanto mais fortemente pisar o pedal, mais rápido funcionará a máquina. Advertência: Não coloque nada sobre o pedal, para evitar a máquina se pôr em marcha involuntariamente. 4 Palanca de elevação da alavanca A palanca de elevação da alavanca sobe e baixa a alavanca. Pode levantá-la uns 0,6 cm (1/4”) por cima da posição levantada normal para tirar facilmente a alavanca ou para ajudar a colocar tecidos grossos debaixo do pé. 1 Posição elevada normal 2 Posição superior 2 1 Montagem e extracção da alavanca Extracção Gire o volante para si para subir a agulha à posição mais alta. Suba a alavanca. Aperte a alavanca situada na parte posterior do suporte da alavanca. A alavanca desprende-se. Montagem Coloque a alavanca de maneira que a cavilha da alavanca fique justo debaixo da ranhura do suporte da alavanca. Baixe o suporte da alavanca para bloqueá-la no seu lugar. 5 Mudança da Agulha Suba a agulha girando o volante para si e baixe a alavanca. Solte o parafuso de fixação da agulha girando-o para o sentido contrário às agulhas de um relógio. Tire a agulha da peça de sujeição. Introduza a agulha nova na peça de sujeição com o lado plano para o lado oposto a si. Quando puser a agulha na peça de sujeição, empurre para cima ao máximo e aperte o parafuso de fixação firmemente com uma chave de parafusos. * Verifique as agulhas frequentemente para ver se as pontas estão estragadas. Os enganches e as rasgaduras nos tecidos de malha, sedas finas e tecidos similares à seda são permanentes e sempre causados por uma agulha em mau estado. Para verificar a agulha Coloque o lado plano da agulha sobre algo plano (placa de agulha, vidro, etc.). A distância livre entre a agulha e a superfície plana deve ser uniforme. Não utilize nunca uma agulha dobrada ou romba. Tecidos Ligeiro Crepe de China, Fio Seda fina Algodão fino Sintético fino gaza, cambraia, organdi, crepe Algodão fino, Georgette malha poliéster recoberto Peso médio Linhos, algodão, Seda 50 Algodão piqué, sarja, de 50 a 80, tecidos de malha poliéster recoberto sem avesso, de algodão percal sintético de 50 a Tabela de fios e agulhas Tamanho de Agulha - tecidos finos, e agulhas e fios mais grossos para coser tecidos grossos. Prove sempre o tamanho da agulha e do fio num troço pequeno do tecido que vai utilizar. 9 ou 11 11 Nanquim, tweed, Seda 50, algodão gabardina, de 40 a 50, tecidos para poliéster tapeçaria, recoberto de cortinas e algodão sintético revestimento - Utilize o mesmo fio para a agulha e a canela. - Quando coser tecidos sintéticos, muito finos e elásticos, utilize uma agulha de PONTA AZUL. A agulha de ponta ou 14 azul evita eficazmente os saltos de ponto. - 60 Pesado Em geral, utilizam-se agulhas e fios finos para coser 14 16 de 40 a 50 6 Quando coser tecidos muito finos, aplique um papel encima para evitar franzir as costuras. Preparação dos porta-bobinas Os porta-bobinas utilizam-se para sujeitar a bobina de fio para alimentar fio à máquina. Para utilizá-los, levante os porta-bobinas. Empurre para baixo para guardá-los. 1 Fio superior 2 Buraco 1 3 Emaranhado 2 Nota: 1 Quando utilizar um fio com tendência a se emaranhar à volta do porta-bobina, enfio-o através do buraco do porta-bobina, como se vê no desenho. 3 O buraco deverá estar diante da bobina de fio. Extracção ou inserção da caixa da bobina Abra a tampa da lançadeira. 1 Tampa da lançadeira 1 Levante a agulha girando o volante para si. Tire a caixa da bobina sujeitando o loquete. 2 Loquete 2 3 Quando introduzir a caixa da bobina, encaixe o saliente no borde da pista da lançadeira. 3 Saliente 7 Bobinagem da canela 1 1 Tire o volante para fora. 2 Solte fio da bobina. Guie o fio à volta do guia fios da bobinadeira. 3 Insere o fio através do buraco da canela, de dentro 3 para fora. Insere a canela no eixo da bobinadeira. 2 4 Empurre para a direita. 5 Com o extremo livre do fio na mão, pise o pedal. Pare a máquina depois de fazer umas voltas e corte o fio perto do buraco da canela. 6 5 6 Pise de novo o pedal. Quando a canela estiver totalmente enrolada, pare a máquina. Volte a colocar o eixo da bobinadeira na sua posição original deslocando-o para a esquerda, e corte o fio. 7 Puxe o volante para esquerda (posição original). 4 7 Nota: Volte a colocar o eixo da bobinadeira no seu sítio quando parar a máquina Enfiamento da caixa da bobina 1 1 Introduza a canela na caixa da bobina Verifique que o fio se bobine na direcção da seta. 2 Meta o fio na ranhura da caixa da bobina. 3 Tire o fio por baixo da mola tensora e introduza-o no buraco de saída. 2 3 * Deixe uns 10 cm (4”) de fio solto. 8 Enfiamento da máquina 3 Suba a alavanca para levantar o fio para a sua posição mais alta, girando o volante para si. Levante a alavanca. 1 Coloque uma bobina de fio no porta-bobina segundo mostrado no desenho, (o fio vem da parte traseira da bobina). 4 2 5 6 1 Com as duas mãos, insere o fio no guia fios. 2 Enquanto sujeita o fio perto da bobina, tire-o para baixo da zona de tensão e depois à volta do suporte da mola de retenção. 3 Tire firmemente o fio para cima e através da alavanca para levantar o fio da direita para a esquerda. 4 Agora tire o fio para baixo e introduza-o no guia fios 1 2 3 inferior. 4 5 6 5 Tire o fio para baixo e insere-o no guia fios da barra de agulhas. 6 Enfie a agulha de diante para trás. * Veja na página 10 para obter informação sobre o enfiador de agulhas incorporado. Nota: Corte o extremo do fio com uma tesoura afilada para enfiar a agulha com maior facilidade. 9 Enfiador de agulhas 1 1 Levante a agulha até à posição mais alta. Tire para baixo o enfiador de agulhas o máximo possível. 2 2 Gire o bobinador de agulha para o sentido da seta indicada na ilustração. Depois, introduza o Gancho na agulha. Leve o fio à volta da Guia e por baixo do Gancho. 3 3 4 4 * Gire o enfiador de agulha para o sentido da seta que se mostra na ilustração, fazendo passar o anel do fio a través da agulha. Tire o fio através da agulha. O enfiador de agulhas pode-se utilizar com agulhas Nº11 a Nº16 ou com uma agulha de ponta Azul Jenome. Um tamanho de fio de 50 a 100 também funcionará bem. Tracção para cima do fio da canela 1 2 1 Suba a alavanca e sujeite o fio da agulha ligeiramente com a mão esquerda. 2 Gire o volante lentamente para si com a mão direita até a agulha baixar, e siga girando o volante até a alavanca de levantar o fio estar na posição mais alta. Tire ligeiramente para cima o fio da agulha, formando um anel com o fio da canela. 3 3 Tire os dois fios 15 cm (6”) para trás e por baixo da alavanca. 10 Compensação da regulação do fio da agulha 1 1 5 4 Tensão correcta A regulação do fio ajusta-se segundo os materiais de 3 1 costura, as capas de tecido e o método de costura. O ponto direito ideal entrelaça os fios entre duas capas de tela, segundo mostrado no desenho • 6 (ampliado para mostrar o detalhe). Num ponto em ziguezague ideal, o fio da canela não • se dá pelo o direito (lado superior) do tecido, e o fio da agulha vê-se ligeiramente pelo avesso (lado inferior) do tecido. 2 1 2 3 Fio da agulha (fio superior) Fio da canela (fio inferior) 4 Lado do direito (lado superior) do tecido Avesso (lado inferior) do tecido 5 Botão selector da regulação do fio 6 Índice de regulação 2 2 A regulação do fio da agulha é alta demais O fio da canela (fio inferior) aparece pelo direito (lado superior) do tecido. Afrouxe a regulação do fio da agulha mudando o botão selector a um número mais baixo. 3 3 A regulação do fio da agulha é frouxa demais O fio da agulha (fio superior) aparecerá no avesso (lado inferior) do tecido. Aperte a regulação do fio da agulha mudando o botão selector a um número mais alto. Ajuste da Regulação do fio da Canela Para a costura em geral não é necessário ajustar a regulação do fio da canela. No entanto, pode ajustar a regulação do fio da canela para alguma necessidade de costura específica. Gire o parafuso de ajuste à direita para aumentar a tensão, ou à esquerda para reduzi-la. 11 Botão Selector de Ponto A D C B E F G H I J K Suba a agulha e a alavanca. Gire o botão selector de ponto para ajustar o símbolo correspondente ao modelo desejado L no índice de regulação 1 Índice de regulação 1 E D A B/C G F L K J Botão selector do tamanho do ponto I H 1 Gire o botão selector de tamanho do ponto para ajustar o tamanho do ponto desejado no índice de regulação. Quando mais alto for o número, maior será o tamanho do ponto. 1 Índice de regulação 4 0 3 1 2 • • • S.S. • 1 4 0 “ ” é o ajuste recomendado paro pontos de botoeiras Ajuste o botão selector no intervalo 0,5-4 quando coser o ponto em ziguezague. Ajuste o botão selector em “S.S” para coser o modelo de ponto elástico. Se o modelo de ponto elástico não for uniforme, gire o botão selector de tamanho do ponto para a direcção “-“ para reduzir ou “+” para aumentar. 2 3 Botão selector da largura do ponto 1 5 Gire o botão selector da largura do ponto para estabelecer o tamanho do ponto desejado no índice de regulação. Quanto mais alto for o número, mais grande será o ponto. 1 Índice de regulação 4 3 2 1 0 Nota: Levante a agulha sobre o tecido quando girar o botão selector de tamanho do ponto. 12 Botão de costura para trás Enquanto manter carregado o botão de costura para trás, a máquina coserá para trás. Descida da alavanca 1 1 Abra a tampa da lançadeira. 1 Tampa da lançadeira 2 1 Para baixar a alavanca, tire para baixo a alavanca de descida e desloque-a para a direita, segundo mostrado no desenho. 2 Alavanca de descida 3 2 3 Para levantar a alavanca, tire para baixo a alavanca de descida e desloque-a para esquerda, segundo se mostra no desenho. * * A alavanca deve estar levantada para a costura normal. A alavanca volta à posição levantada quando a máquina começar a funcionar. 2 2 13 SECÇÃO 3. COSTURA BÁSICA 2 1 A 3 B 4 A B/C 5 F 1 0 5 4 3 4 L K 0 E D 2 3 1 2 G Costura de ponto direito 1 Selector de Ponto: 2 Alavanca: A ou B Alavanca para ziguezague 3 Tensão de fio: 4 Tamanho do ponto: 5 Largura do ponto: 2-6 1,5-4 (0) ou (5) J 1 I H 1 Levante a alavanca e coloque o tecido com o borde alinhado com uma linha de guia de costura da placa da agulha. Baixe a agulha até ao tecido. Baixe a alavanca e alise os fios para trás. Pise o pedal. Guie suavemente o tecido pela linha de guia, deixando-o correr sozinho. 2 3 2 Para fixar o extremo das costuras, carregue no botão de costura para trás e cosa vários pontos para trás. Levante a alavanca e tire o tecido, tirando os fios para trás. 3 Tire os fios para cima e para o corta-fios. Os fios cortam-se ao tamanho necessário para começar a seguinte costura. Mudança de direcção da costura Pare a máquina e gire o volante para si para introduzir a agulha na tela. Levante a alavanca. Gire o tecido à volta da agulha para mudar o sentido da costura como desejar. Baixe a alavanca e continue a coser. 14 Utilização das guias de costura da placa de agulha 1 As guias de costura da placa de agulha servem para medir a largura das costuras. * Os números indicam a distância entre a posição da agulha 3 central e a linha de guia. Números na placa da agulha 10 15 20 3/8" 4/8" 5/8" 6/8" 1.0 1.5 2.0 1.0 Distância em centímetros 4 1.3 1.6 1.9 1 Linhas de guia 2 Guia para esquinas 3 Placa da agulha 2 4 Buraco da placa da agulha 5 Largura da costura desde a posição da agulha central Canto em ângulo recto Para fazer um canto em ângulo recto a 1,6 cm (5/8”) desde o borde do tecido: Quando o borde do tecido situado em frente de si estiver alinhado com a guia de esquinas (segundo desenho), pare de dar pontos e baixe a agulha girando o volante para si. Levante a alavanca e gire o tecido para alinhar o borde com a guia de costura de 1,6 cm (5/8”) Baixe a alavanca e comece a coser para o novo sentido. 5 2 Guia de cantos 2 Posição de agulha variável Quando se selecciona o ponto direito (modelo A), pode-se deslocar a agulha entre as posições de agulha central e 1 0 esquerda girando o botão selector de largura do ponto. 5 4 3 2 15 1 Pontos em ziguezague 2 C 3 5 4 B/C A 2 1 0 4 0 2 G F E 5 4 3 3 1 D 1 Selector de Ponto: 2 Alavanca: C Alavanca para ziguezague 3 Tensão de fio: 4 Tamanho do ponto: 2-5 0,5-4 5 Largura do ponto: 1,5 H L K I J Os pontos em ziguezague simples utilizam-se bastante para alinhavar, coser botões, etc. SECÇÃO 4. COSTURA DE USO GERAL Alinhavar 2 1 C 3 4 B/C A 5 2 C Alavanca para ziguezague 1-4 1-2 5 1 0 0 2 4 G F E 5 4 3 3 1 D 1 Selector de Ponto: 2 Alavanca: 3 Tensão de fio: 4 Tamanho do ponto: 5 Largura do ponto: H L K O ponto em ziguezague utiliza-se para rematar o tecido para evitar que se desfie nos bordes. 16 J I Ziguezague em ponto 2 1 D 3 4 1 5 4 3 0 2 D Alavanca para ziguezague 3 Tensão do fio: 4 Tamanho do ponto: 1-4 0,5-1,5 5 Largura do ponto: 5 2 A I 3 1 0 H G F E D B/C 5 1 Selector de Ponto: 2 Alavanca: 4 L K J Este ponto utiliza-se para acabar o borde da costura nos tecidos sintéticas e outros que têm tendência em franzir. Coloque o tecido de maneira que permita uma costura a 1,6 cm (5/8”). Recorte o borde da costura depois de coser. Nota: Tenha cuidado de não cortar os pontos. Também é útil para passajar e remendar rasgões. Ponto formado 1 2 G 3 5 4 1 4 1 0 3 I J 2 0 D B/C A K 5 4 3 E L G F G Alavanca para ziguezague 1-4 S.S. 5 2 H 1 Selector de Ponto: 2 Alavanca: 3 Tensão de fio: 4 Tamanho do ponto: 5 Largura do ponto: O ponto formado é ideal para coser roupa de banho e veludo elástico, porque proporciona a máxima elasticidade e resistência. Coloque o tecido de maneira que permita uma costura a 1,6 cm (5/8”). Recorte o borde da costura depois de coser. Nota: Tenha cuidado de não cortar os pontos. 17 1 Ponto elástico direito 2 A B 3 5 4 A 3 Tensão de fio: 4 Tamanho do ponto: 2-6 1,5-4 5 Largura do ponto: (0) ou (5) 2 3 F A ou B Alavanca para ziguezague 1 4 E 0 L K G 1 0 5 4 3 2 D B/C 1 Selector de Ponto: 2 Alavanca: Coser com dois pontos para a frente e um ponto para trás, formando uma costura que não se rasga facilmente. 18 J I H Coser botões 2 1 3 C 4 B/C A 2 0 5 2 1 4 3 0 C Alavanca para ziguezague 1-3 4 Tamanho do ponto: 5 Largura do ponto: 6 Alavanca: qualquer Ajuste segundo necessário Baixada 4 G F E 3 1 D 5 1 Selector de Ponto: 2 Alavanca: 3 Tensão de fio: H L K J I 6 1 1 Ajuste a largura do ponto, e gire o volante para ver se a agulha entra em cada buraco do botão. 2 Baixe a alavanca para sujeitar o botão no seu lugar. Os buracos do botão devem alinhar-se com a ranhura da alavanca. 3 Pode-se pôr um alfinete na alavanca para formar um pé. Assegure-se de que a agulha entre nos dois buracos do botão. Cosa uns 10 pontos e corte os fios superior e inferior, deixando 20 cm (8”) de fio. 4 Passe os fios da agulha (superiores) entre o botão e o tecido através dos buracos do botão. 2 3 4 Tire os fios superiores para levar os fios inferiores ao direito do tecido. Dê voltas aos fios à volta do botão para formar um pé 5 e ate-os. 5 19 Levante a alavanca depois de coser. 1 Botoeiras 2 1 Selector de Ponto: 2 Alavanca: 3 BH 5 4 L 0 3 Tensão do fio: 4 Tamanho do ponto: 5 Largura do ponto: 5 4 3 1 * 1 0 2 J B/C A (0,5-1) 5 2 K * O tamanho da botoeira ajusta-se automaticamente pondo o botão na alavanca para botoeiras automáticas. O suporte de botão da alavanca serve para um * tamanho de botão de até 2,5 cm (1”) de diâmetro. Faça uma botoeira de prova numa mostra com o I 3 H D (BH) pé alavanca para botoeiras automático 1-5 G F E 4 mesmo tecido e a mesma superfície de contacto e costuras do tecido que vai utilizar. 1 2 3 1 4 2 3 4 * Ponha o botão na mostra de tecido e marque a parte superior e a parte inferior para determinar a posição da botoeira. * Utilize uma entretela se trabalhar com tecidos elásticos. Gire o volante para si para levantar a agulha para a posição mais alta. Levanta a alavanca. Seleccione o modelo “BH” girando o botão selector de pontos. Se já seleccionou o modelo BH, reposicione o botão selector uma vez segundo o procedimento descrito em 12 Monte a alavanca para botoeiras automáticas. Tire o suporte do botão para trás e coloque o botão. Volte a empurrar o suporte do botão para si ao máximo. 5 Baixe a alavanca de botoeiras ao máximo. 1 Alavanca de botoeiras 6 Introduza o tecido por baixo da alavanca. Gire o volante lentamente para si com a mão direita até a agulha baixar e continue a girar o volante até a alavanca de 5 1 levantar o fio estar na posição mais alta. 7 6 7 8 8 Tire o tecido para a esquerda para tirar os dois fios para a esquerda. Introduza o tecido por baixo da alavanca, e baixe a agulha ao ponto de partida. Agora baixe a alavanca para botoeiras automáticas. 3 4 Nota: Verifique que não há nenhuma folga entre a corrediça e o 5 suporte da mola. Se houver folga, o comprimento das filas será diferente, segundo se mostra no desenho. 2 Ponto de partida 3 Corrediça 4 Não deve de haver nenhuma folga 5 Suporte da mola 6 Diferencia 6 2 20 9 9 Cosa lentamente e pare a máquina quando terminar uma botoeira. * A máquina cose primeiro o reforço dianteiro e a fila esquerda e depois o reforço traseiro e a fila direita. 10 11 10 Corte os fios superior e inferior deixando uns 10 cm (4”) de fio. Tire o fio da agulha (superior) pelo avesso do tecido tirando o fio inferior. Faça um nó com os fios. 11 Ponha um alfinete na parte interior do reforço. Depois corte a abertura com o corta botoeiras. Tenha cuidado de não cortar os pontos. 12 B/C A D B/C J K H I D I J E 12 Para repetir a costura das botoeiras, gire o selector de pontos para ; depois novamente para segundo mostrado no desenho. Agora, pise o pedal para coser uma botoeira idêntica. K L A L H G F G F E 13 Quando terminar de coser botoeiras, puxe a alavanca de botoeiras para cima ao máximo. 13 Para ajustar a densidade dos pontos de botoeiras: A densidade do ponto da costura de botoeiras deve-se ajustar dentro da marca “ ” do botão selector de tamanho do ponto. 1 2 3 4 0 21 Botoeira de relevo com cordão 2 1 3 1 Selector de Ponto: 2 Alavanca: BH 4 L 0 5 4 3 1 automáticas 1-5 (0,5-1) 5 2 K 1 0 2 J B/C A 3 Tensão de fio: 4 Tamanho do ponto: 5 Largura do ponto: 5 (BH) pé alavanca para botoeiras I D 3 H 4 G F E 1 1 Utilize o mesmo procedimento que para a botoeira automática. * Fixe a largura do ponto que coincida com a grossura do cordão utilizado. Com a alavanca para botoeiras levantado, enganche o cordão no esporão situado na parte traseira da alavanca para botoeiras. Leve os extremos para si por baixo da alavanca para botoeiras, deixando livre o extremo dianteiro. Enganche o cordão nas forquilhas situadas na parte dianteira da alavanca para botoeiras automáticas para sujeitá-los juntos. Baixe a agulha até ao tecido no ponto em que vai começar a botoeira, e baixe o pé. 1 Esporão 2 Pise o pedal suavemente e cosa a botoeira. Os lados da botoeira e os reforços cosem-se sobre o cordão. Retire o tecido da máquina e corte só os fios de coser. 1 2 3 3 Tire o extremo esquerdo do cordão para o apertar. Enfie o extremo numa agulha de passajar, tire-o pelo avesso do tecido e corte. * 22 Para cortar a abertura da botoeira, veja as instruções na página 21. Para coser um fecho éclair 1 2 3 A 1 2 5 4 3 pé alavanca para fecho éclair 3–6 4 Tamanho do ponto: 5 Largura do ponto: 1,5 – 4 5 0 4 1 0 E 2 D 5 A 3 A B/C 4 1 Selector de Ponto: 2 Alavanca: 3 Tensão de fio: G F L K J Ponha alfinetes ou alinhave o fecho éclair no tecido e coloque-o por baixo da alavanca. Ponha os fios para trás e baixe a alavanca. Para coser o lado esquerdo do fecho, guie os dentes do fecho pelo borde da alavanca e cosa no tecido o fecho éclair. Volte o tecido e cosa o outro lado do fecho como o fez para o lado esquerdo. 23 I H Bainhas com ponto invisível 2 1 F E 3 F E D 2 5 4 3 3 1 5 2 1 0 E ou F Alavanca para ziguezague 5 Largura do ponto: 6 Guia de Bainhas 5 2–4 1–3 J I 4 0 A H C G B/ 4 1 Selector de Ponto: 2 Alavanca: 3 Tensão de fio: 4 Tamanho do ponto: L K 6 1 1 [A] [B] 2 2 Dobre a bainha para cima e volte a dobrar deixando um borde de 0,4 a 0,7 cm (1/4”) segundo mostrado no desenho. 1 Avesso do tecido 2 de 0,4 a 0,7 cm (1/4”) [A] tecidos pesados [B] tecidos finos ou de peso médio 1 1 2 2 3 Baixe a alavanca. Desaperte o parafuso do suporte da alavanca para colocar a guia de bainhas entre o parafuso e a haste do suporte da alavanca. Aperte o parafuso assegurando-se de que a parede da guia de bainhas está no meio das garras da alavanca. 3 Parafuso 4 Guia de bainhas 4 3 3 Levante a alavanca e coloque o tecido por baixo da mesma, para que a dobra mole se apoie contra a parede da guia de bainhas. Baixe a alavanca. Cosa lentamente para ter melhor controlo, para os pontos em ziguezague se fazerem no borde da bainha e perfurarem a dobra mole. Durante a costura, verifique que a dobra se faz bem pela parede da guia de bainhas. 4 Abra a dobra por completo. 4 5 Direita do tecido. 5 * 24 Se a agulha baixar muito à esquerda, os pontos vão-se ver pelo direito do tecido. Bainha enrolada 1 2 1 Selector de Ponto: 2 Alavanca: 3 Tensão de fio: 4 Tamanho do ponto: 5 Largura do ponto: 3 A 5 2 5 4 3 5 2 D pé alavanca para bainhas 2–6 1,5 – 4 3 1 A B/C 4 A 0 E 1 0 4 G F L K J 1 I H 1 Recorte na esquina do tecido 0,8 cm (5/16”) x 1,5 cm (3,16”) para evitar que a bainha faça vultos na esquina. Dobre o borde do tecido duas vezes 0,3 cm (1/8”) de largura e 6 cm (2 3/8”) de comprimento. 2 4 3 1 Avesso do tecido 2 0,5 cm 3 0,8 cm 4 Hélice da alavanca 1 2 2 25 Coloque o tecido alinhando o borde da bainha com a guia da alavanca. Baixe a alavanca e cosa vários pontos tirando dos dois fios para trás ao mesmo tempo. Pare a máquina com a agulha no tecido e levante a alavanca. Introduza a parte dobrada do tecido na hélice da alavanca. Baixe a alavanca e enquanto coser levante o borde que continua a avançar suave e uniformemente. SECÇÃO 5. COSTURA DECORATIVA Ponto de ondas 2 1 G G F I 5 4 3 0 4 1 0 J 2 2 D B/C A K 5 3 E L 4 1 H 3 1 Selector de Ponto: 2 Alavanca: G 3 Tensão de fio: 4 Tamanho do ponto: 5 Largura do ponto: 6–8 2–3 5 pé alavanca para ziguezague Coloque o borde dobrado ao longo da ranhura da alavanca. A agulha deverá baixar fora do borde do tecido à direita formando uma dobra. B A C D E G H F I J K Ponto Elástica L 1 1 3 2 Selector de Ponto: Alavanca: 2 3 5 4 3 2 C G E D B/ F H J 1 4 1 0 0 A I 4 5 5 4 Tensão de fio: Tamanho do ponto: Largura do ponto: A-L pé alavanca para ziguezague 1–4 S.S. 5 2 Se o avanço para diante e para trás se descompensar a causa do tipo de tecido, compense girando o botão selector de tamanho do ponto da maneira seguinte: Se os modelos se comprimem, ponha o botão selector em “+”. Se os modelos se estiram, ponha o botão selector em “-“. (Veja a página 12). 26 3 L K 1 Ninho de abelha 2 D 3 5 4 E D B/C 3 Tensão de fio: 4 Tamanho do ponto: 5 Largura do ponto: 5 4 3 2 A H G F 1 Selector de Ponto: 2 Alavanca: 1 0 0 ziguezague 1–4 S.S. 5 I 1 4 D pé alavanca para 2 Com o tamanho do ponto em “4”, cosa linhas de pontos direitos com uma separação de 1 cm (3/8”), através da zona a bordar. L 3 K J 1 Ate os fios por um borde. Tire os fios da canela e distribua o franzido uniformemente. Fixe os fios no outro extremo. Cosa com um ponto decorativa entre os pontos do franzido. Tire os pontos de franzir. Nota: Afrouxe a regulação do fio da agulha (superior) para ser mais fácil franzir. 1 1 cm (3/8”) 1 Ponto de caixa 2 H 3 4 1 H G 0 I 5 2 1 0 3 H pé alavanca para ziguezague 1–4 0,5 - 2. 5 4 C E D B / 3 Tensão de fio: 4 Tamanho do ponto: 5 Largura do ponto: 5 4 3 2 F L K J 1 Selector de Ponto: 2 Alavanca: Utilize este ponto para unir tecidos pesados. Ponha os bordes um sobre o outro sem alinhavar e utilize este ponto para os unir. 27 A 1 Aplicações 2 C B/C A 4 5 1 Selector de Ponto: 2 Alavanca: C pé alavanca para ziguezague 1 5 4 3 3 Tensão de fio: 4 Tamanho do ponto: 1–4 0,5-1 5 Largura do ponto: 5 2 1 0 3 G F E 2 0 D 3 4 H L K I J Alinhave (ou cole com adesivo para ferro) peças de aplicação sobre a tela. Cosa à volta da aplicação assegurando-se de que a agulha cai ao longo do borde exterior da aplicação. Quando coser cantos, introduza a agulha na tela. Levante a alavanca e gire o tecido para a direita ou para a esquerda. J 1 K Ponto de realce decorativo 2 L 3 K J 0 I 5 4 3 1 2 H L 1 Selector de Ponto: 2 Alavanca: 3 Tensão de fio: 4 Tamanho do ponto: 5 Largura do ponto: 5 4 1 0 2 3 G F E J-L pé alavanca para ziguezague 1–4 0,5-1 5 4 Para uma apresentação delicada sobre tecidos como musselina de seda, utilize só uma capa com um reforço desdobrável se for necessário. 28 D B/C A SECÇÃO 6. O CUIDADO DA SUA MÁQUINA Desmontagem e montagem da pista da lançadeira Nota: Apague o interruptor de alimentação e/ou desligue a máquina. 2 Para desmontar a pista da lançadeira: Ponha a agulha na posição mais alta e abra a tampa da lançadeira. Abra o fecho articulado da caixa da bobina e tire-a da máquina. Abra os elementos de sujeição da pista da lançadeira e tire o anel da pista da lançadeira. Tire a lançadeira. * Limpe a pista da lançadeira com uma escova e um 1 trapo seco e suave. 1 Caixa da bobina 2 Elemento de sujeição da pista da lançadeira 5 4 3 Anel da pista da lançadeira 4 Lançadeira 5 Pista da lançadeira 3 Para montar a pista da lançadeira: Sujeite a lançadeira pela cavilha central e monte-a cuidadosamente de novo na pista da lançadeira, formando um círculo perfeito com o impulsor de lançadeira. Monte o anel da pista da lançadeira assegurando-se de que a cavilha inferior encaixe na ranhura. Bloqueie o anel da pista da lançadeira pondo novamente os elementos de sujeição no seu lugar. Introduza a caixa da bobina. 6 Cavilha 7 Ranhura 7 6 Limpeza da alavanca Nota: Apague o interruptor de alimentação e/ou desligue a máquina antes de limpar a alavanca. Desmonte a agulha e a alavanca. Tire o parafuso de fixação da placa da agulha e desmonte-a. Com uma escova, limpe o pó e os pelúcia que possam obstruir os dentes da alavanca. Monte novamente a placa da agulha. 29 Lâmpada de costura A lâmpada de costura está situada atrás da chapa frontal. Para mudar a lâmpada, tire o parafuso que sujeita a chapa frontal da máquina de coser e tire a chapa. * * Desligue a corrente antes de mudar a lâmpada. Não desmonte a máquina de outra maneira que não seja a indicada neste manual. (A) • Para desmontar ……….. gire para a esquerda. • Para montar ……........ gire para a direita. (B) • Para desmontar ………. puxe e gire para a esquerda. • Para montar .......…… puxe e gire para a direita. (A) (B) (100V) (200V) Advertência: A lâmpada pode estar QUENTE. Proteja os dedos para tirá-la. 30 Localização e solução de avarias Causa Situação Referência O fio da agulha 1. O fio da agulha não está enfiado correctamente. Ver página 9 (superior) parte-se 2. 3. A regulação do fio da agulha é alta demais. A agulha está dobrada ou sem ponta. Ver página 11 Ver página 6 4. 5. 6. A agulha não está bem montada. Não se deve tirar para trás do tecido quando se acabar de coser. O fio é muito grosso ou muito fino para a agulha. Ver página 6 Ver página 14 Ver página 6 1. 2. O fio inferior não está enfiado correctamente na caixa da bobina. Acumularam-se pelúcia na caixa da bobina. Ver página 8 Limpe a caixa da bobina 3. A canela está estragada e não gira uniformemente. Mude a canela. 1. 2. A agulha não está bem montada. A agulha está dobrada ou sem ponta. Ver página 6 Ver página 6 3. 4. 5. 6. 7. O parafuso de fixação da agulha está frouxo. A regulação do fio da agulha é muito grande. Não se deve tirar para trás do tecido quando se acabar de coser. A agulha é muito fina para o tecido. O botão selector de ponto girou-se quando a agulha estava no material. Ver página 6 Ver página 11 Ver página 14 Ver página 6 Ver página 12 1. 2. 3. 4. Ver página 6 Ver página 6 Ver página 6 Ver página 6 5. A agulha não está bem montada. A agulha está dobrada ou sem ponta. A agulha e/ou os fios não são adequados para o trabalho. Não se está a utilizar uma agulha de PONTA AZUL para coser tecidos sintéticos e tecidos muito finos e elásticos. O fio da agulha não está enfiado correctamente. 1. 2. 3. 4. * A regulação do fio da agulha é muito grande. A máquina não está bem enfiada. A agulha é muito grossa para o tecido. Os pontos são muito grossos para o tecido. Para coser materiais muito ligeiros, coloque um papel por baixo Ver página 11 Ver página 9 Ver página 6 do tecido. mais densos. O fio da canela (inferior) parte-se A agulha parte-se Saltos de ponto Costura franzida Ver página 9 Faça pontos Os pontos formam anéis debaixo da costura. 1. A regulação do fio da agulha é frouxa demais. Ver página 11 2. A agulha é muito grossa ou muito fina para o fio. Ver página 6 O tecido não avança uniformemente 1. A alavanca está obstruída com pelúcia. Ver página 29 2. Os pontos são muito finos. Faça ponto mais grossos. A máquina não funciona 1. A máquina não está ligada. Ver página 4 2. 3. Há fios na pista da lançadeira. O volante não está engrenado para a bobinagem da canela. Ver página 29 Ver página 8 A máquina não 1. Há fios no mecanismo da lançadeira. funciona uniformemente e faz muito barulho 2. A alavanca está obstruída com pelúcia. Ver página 29 Ver página 29 31 INDICE VOLET 1. PIÈCES ESSENTIELLES Nom des pièces ................................................................................................................ 2 VOLET 2. PRÉPARATION POUR COMMENCER LA COUTURE Table supplémentaire ....................................................................................................... 3 Accessoires standard ....................................................................................................... 3 Boîte d’accessoires .......................................................................................................... 3 Branchement de la machine à la source d’alimentation .................................................. 3 Pédale .............................................................................................................................. 4 Levier pour lever le pied de biche .................................................................................... 5 Montage et démontage du pied de biche ......................................................................... 5 Changement d’aiguille ...................................................................................................... 6 Table des de fils et des aiguilles ...................................................................................... 6 Préparation des porte-bobines ......................................................................................... 7 Extraction ou Insertion de la boîte de la bobine ............................................................... 7 Bobinage de la canette ..................................................................................................... 8 Enfilage de la boîte de la bobine ...................................................................................... 8 Enfilage de la machine ..................................................................................................... 9 Enfileur d’aiguilles .......................................................................................................... 10 Tirage vers le haut du fil de la canette ........................................................................... 10 Compensation de la régulation du fil de l’aiguille ........................................................... 11 Ajustage de la régulation du fil de la canette .................................................................. 11 Bouton sélecteur de point ............................................................................................... 12 Bouton sélecteur de la dimension du point .................................................................... 12 Bouton sélecteur de la largeur du point .......................................................................... 12 Bouton de couture en arrière .......................................................................................... 13 Descente du pied de biche ............................................................................................. 13 VOLET 3. COUTURE DE BASE Couture au point droit ..................................................................................................... Changement du sens de la couture ............................................................................... Utilisation des guidages de couture de la plaque l’aiguille ............................................. Coins en angle droit ....................................................................................................... Position de l’aiguille variable .......................................................................................... Points en zigzag ............................................................................................................. 14 14 15 15 15 16 VOLET 4. COUTURE GENERALE Faufiler ........................................................................................................................... 16 Point zigzag .................................................................................................................... 17 Point formé ..................................................................................................................... 17 Point élastique droit ........................................................................................................ 18 Coudre des boutons ....................................................................................................... 19 Boutonnières ............................................................................................................. 20-21 Boutonnière en relief avec cordon .................................................................................. 22 Coudre une de fermeture éclair ...................................................................................... 23 Ourlets avec point invisible ............................................................................................. 24 Ourlet enroulé ................................................................................................................. 25 VOLET 5. COUTURE DECORATIVE Point de vagues .............................................................................................................. Point élastique ................................................................................................................ Nids d’abeilles ................................................................................................................ Point de boîte ................................................................................................................. Applications .................................................................................................................... Point en relief décoratif ................................................................................................... 26 26 27 27 28 28 VOLET 6. LE SOIN DE VOTRE MACHINE Démontage et montage - piste de la navette ................................................................. Nettoyage du pied de biche ............................................................................................ Lampe ............................................................................................................................ Localisation et solution des problèmes .......................................................................... 1 29 29 30 31 VOLET 1. PIÈCES ESSENTIELLES 10 8 9 7 Nom des pièces 6 1 2 Bouton de couture en arrière (finition) Bouton sélecteur de point 4 3 4 Bouton sélecteur de la dimension du point Bouton sélecteur de la largeur du point 3 5 6 7 Butée du bobineur Axe du bobineur Porte-bobines 8 9 Guide-fils du bobineur Guide-fils 5 11 12 2 13 1 14 15 20 16 17 18 19 21 10 11 Pied de biche pour lever le fil (tire-fils) Bouton sélecteur de régulation du fil 12 13 14 Plaque avant Coupe-fils Enfileur d’aiguilles 15 16 17 18 19 20 21 22 23 24 25 26 27 Plaque de l’aiguille Support du pied de biche Pièce de serrage de l’aiguille Aiguille Pied de biche Tablette supplémentaire Poignée de transport Volant Interrupteur d’alimentation Prise femelle de la machine Bras libre Pied de biche pour boutonnières Levier d’élévation du pied de biche 27 22 26 25 23 Nota : Les spécifications sont soumises à des 24 modifications sans préavis. 2 VOLET 2. PRÉPARATION POUR COMMENCER À COUDRE Tablette supplémentaire La tablette supplémentaire augmente la surface de couture et peut être démontée facilement pour piquer avec le bras libre. Démontage de la table : Séparez la table de la machine. Montage de la table : Appuyez sur la table supplémentaire pour l’emboîter dans la machine. •Avantages et utilisations de la couture avec le bras libre : - Evitez d’amonceler le tissu autour de l’aiguille quand vous faites des renforts pour augmenter la résistance des poches, des ouvertures et des ceintures. - Pour coudre des manches, des ceintures, des jambes de pantalons ou une zone circulaire. - Pour repriser des chaussettes ou réparer des genouillères, des coudes ou des zones d’usure dans les vêtements des enfants. Accessoires standard 1 3 5 2 1 2 3 4 5 6 7 8 4 Pied de biche pour fermeture éclair Pied de biche pour ourlets Pied de biche pour boutonnières automatique Canettes Jeu d’aiguilles Coupe boutonnières Tournevis Guidage pour ourlets 6 8 7 Boîte d’accessoires Les accessoires de couture sont situés dans la table supplémentaire et on y accède très aisément. 9 9 3 Boîte d’accessoires Branchement de la machine Avant de brancher le fil d’alimentation, vérifiez si la tension et la fréquence indiquées sur la machine coïncident avec votre courant électrique. 3 2 1. Eteignez l’interrupteur d’alimentation 2. Introduisez la prise mâle de la machine dans la prise femelle 3. Introduisez la prise mâle d’alimentation dans la prise de courant. 4. Allumez l’interrupteur d’alimentation pour brancher le 1 courant et la lampe de la machine. 4 5 Prise mâle d’alimentation 3 Prise de courant 5 Prise mâle de la machine 1 6 Interrupteur d’alimentation 4 Prise femelle de la machine 6 pédale 2 Pédale La vitesse de la couture peut être variée avec la pédale. Plus vous appuierez sur la pédale, plus la machine ira vite. Avertissement : Ne posez rien sur la pédale, pour éviter de mettre la machine en marche involontairement. 4 Levier d’élévation du pied de biche Le levier d’élévation du pied de biche sert à lever et à baisser le pied de biche. Vous pouvez le lever env. 0,6 cm (1/4”) au-dessus de la position haute normale pour pouvoir enlever facilement le pied de biche ou pour aider à placer des gros tissus sous le pied. 2 1 Position élevée normale 2 Position supérieure 1 Montage et démontage du pied de biche Démontage Tournez le volant vers vous pour faire monter l’aiguille à la position la plus haute. Faites monter le pied de biche. Serrez le pied de biche situé dans la partie arrière du support du pied de biche. Le pied de biche se détache. Montage Mettez le pied de biche de sorte que la clavette de celui-ci soit juste sous la rainure de son support. Baissez le support du pied de biche pour le bloquer à sa place. 5 Changement d’aiguille Montez l’aiguille en tournant le volant vers vous et baissez le pied de biche. Enlevez la vis de fixation de l’aiguille en la tournant dans le sens inverse à celui des aiguilles d’une montre. Enlevez l’aiguille de la pièce de fixation. Introduisez la nouvelle aiguille dans la pièce de fixation avec le côté plat vers le côté opposé à vous. Lorsque vous mettrez l’aiguille dans la pièce de fixation, poussez vers le haut au maximum et serrez la vis de fixation fermement avec un tournevis. * Vérifiez les aiguilles assez souvent pour voir si les pointes sont abîmées. Les accrochages et les déchirures dans les tissus de maille, les soies fines et tissus similaires à la soie sont permanents et ils sont toujours provoqués par une aiguille en mauvais état. Vérification de l’aiguille Mettez le côté plat de l’aiguille sur une surface plane (plaque de l’aiguille, verre, etc.). La distance entre l’aiguille et la surface plane doit être uniforme. N’utilisez jamais une aiguille pliée ou émoussée. Tissus Léger Crêpe de Chine, gaze, cambrai, organdi, crêpe Georgette maille Poids Lins, coton, moyen piqué, serge, tissus de maille sans envers, percale Lourd Nankin, tweed, gabardine, tissus pour tapisserie, rideaux et housses Fil Soie fine Coton fin Synthétique fin Coton fin, polyester recouvert Dimension des aiguilles 9 Table des fils et des aiguilles * coudre des tissus fins, et des aiguilles et des fils plus épais pour coudre des tissus épais. Faites toujours un essai de dimension de l’aiguille et du fil sur un petit ou morceau du tissu que vous allez utiliser. 11 Soie 50 Coton de 50 à 80 polyester recouvert de coton synthétique de 50 à 60 11 Soie 50, coton de 40 à 50, polyester recouvert de coton synthétique de 40 à 50 14 En général on utilise des aiguilles et des fils fins pour * Utilisez le même fil pour l’aiguille et la canette. * Pour coudre des tissus synthétiques, très fins et élastiques, utilisez une aiguille à POINTE BLEUE, qui évite efficacement que les points sautent. * Pour coudre des tissus très fins, appliquez un papier dessus pour éviter de froncer les coutures. ou 14 16 6 Préparation des porte-bobines Les porte-bobines s’utilisent pour serrer la bobine de fil qui alimente le fil à la machine. Pour les utiliser, levez les porte-bobines. Tirez par en dessous pour les garder. 1 2 3 1 Fil supérieur Trou Emmêlement 2 Nota : Quand on utilise un fil ayant tendance à s’emmêler autour du porte-bobine, enfilez-le à travers le trou du porte-bobine, comme indiqué sur le dessin. 1 Le trou doit se trouver devant la bobine de fil. 3 Pour enlever ou mettre la boîte de la bobine Ouvrez le couvercle de la navette. 1 Couvercle de la navette 1 Levez l’aiguille en tournant le volant vers vous. Tirez la boîte de la bobine en retenant le loquet. 2 Loquet 2 3 Lorsque vous introduirez la boîte de la bobine, emboîtez la partie saillante au bord de la piste de la navette. 3 7 Partie saillante Bobinage de la canette 1 1 Tirez le volant vers l’extérieur. 2 Enlevez fil de la bobine. Guidez le fil autour du guidage de fils du bobineur. 3 Passez le fil à travers le trou de la canette, de 3 l’intérieur vers l’extérieur. Mettez la canette dans l’axe du bobineur. 2 4 Poussez vers la droite. 5 Avec le bout libre du fil dans la main, appuyez sur la pédale. Arrêtez la machine après avoir réalisé quelques tours et coupez le fil près du trou de la canette. 6 5 Appuyez de nouveau sur la pédale. 6 Lorsque la canette sera entièrement enroulée, arrêtez la machine. Remettez l’axe du bobineur dans sa position originale en le déplaçant à gauche et coupez le fil. 4 7 7 Poussez le volant vers la gauche (position originale). Nota : Remettez l’axe du bobineur à sa place lorsque vous arrêterez la machine. Enfilage de la boîte de la bobine 1 1 Introduisez la canette dans la boîte de la bobine Vérifiez si le fil se bobine dans le sens de la flèche. 2 Mettez le fil dans la rainure de la boîte de la bobine. 3 Tirez le fil sous le ressort de tension et introduisez-le 2 3 dans le trou de sortie. * 8 Laissez environ 10 cm (4”) de fil libre. Enfilage de la machine 3 1 Montez le pied de biche pour lever le fil à la position la plus haute, en tournant le volant vers vous. Levez le pied de biche. Mettez une bobine de fil dans le porte-bobine comme indiqué sur le dessin, (le fil vient de l’arrière de la bobine). 4 2 5 6 1 Avec les deux mains, passez le fil dans le guide-fils. 2 Tout en retenant le fil près de la bobine, tirez-le sous la zone de tension et ensuite autour du support du ressort de retenue. 1 2 3 Tirez fermement le fil vers le haut et à travers le pied de biche pour lever le fil de droite à gauche. 3 4 Maintenant, tirez le fil en dessous et introduisez-le dans le guide-fils inférieur. 5 Tirez le fil dessous et passez-le dans le guide-fils de la barre d’aiguilles. 4 6 Enfilez l’aiguille de l’avant vers l’arrière. * Voir page 10 pour obtenir des renseignements sur 5 l’enfileur d’aiguilles incorporé. 6 . Nota : Coupez l’extrémité du fil avec des ciseaux affûtés pour enfiler l’aiguille plus facilement. 9 Enfileur d’aiguilles 1 1 Levez l’aiguille à la position la plus haute. Tirez vers le bas l’enfileur d’aiguilles au maximum. 2 2 Tournez l’enfileur d’aiguille dans le sens de la flèche, comme indiqué sur le dessin. Ensuite, introduisez le crochet dans l’aiguille. Mettez le fil autour du guidage et sous le crochet. 3 3 Tournez l’enfileur d’aiguille dans le sens de la flèche, comme indiqué sur le dessin, en faisant passer l’anneau du fil à travers l’aiguille. 4 4 Tirez le fil à travers l’aiguille. * L’enfileur d’aiguilles peut être utilisé avec des aiguilles Nº11 à Nº16 ou avec une aiguille à pointe bleue Janome. Une dimension de fil de 50 à 100 ira très bien également. Tirage vers le haut du fil de la canette 1 2 1 Montez le pied de biche et retenez le fil de l’aiguille légèrement avec la main gauche. 2 Tournez le volant lentement vers vous avec la main droite jusqu’à ce que l’aiguille descende et continuez de tourner le volant jusqu’à ce que le pied de biche soit dans la position la plus haute. 3 3 Tirez les deux fils 15 cm (6”) en arrière et sous le pied de biche. 10 Compensation de la régulation du fil de l’aiguille 1 5 4 Tension correcte 1 La régulation du fil s’ajuste suivant le matériel, les 3 1 épaisseurs de tissu et la méthode de couture. 6 Le point droit idéal entrelace les fils entre deux épaisseurs de tissu, comme indiqué sur le dessin * (agrandi pour que l’on voie les détails). * 2 Pour un point en zigzag idéal, le fil de la canette ne va pas à l’endroit (côté supérieur) du tissu, et le fil de l’aiguille se voit légèrement à l’envers (côté inférieur) du tissu. 1 2 Fil de l’aiguille (fil supérieur) Fil de la canette (fil inférieur) Côté endroit (côté supérieur) du tissu Envers (côté inférieur) du tissu 5 Bouton sélecteur de la régulation du fil 6 Indice de régulation 3 4 2 2 La régulation du fil de l’aiguille est trop haute Le fil de la canette (fil inférieur) se voit à l’endroit (côté supérieur) du tissu. Baissez la régulation du fil de l’aiguille en mettant le bouton sélecteur sur un numéro plus bas. 3 3 La régulation du fil de l’aiguille est trop desserrée Le fil de l’aiguille (fil supérieur) se voit à l’envers (côté inférieur) du tissu. Serrez la régulation du fil de l’aiguille en mettant le bouton sélecteur sur un numéro plus haut. Ajustage de la Régulation du fil de la Canette Pour la couture en général il n’est pas nécessaire d’ajuster la régulation du fil de la canette. Mais vous pouvez l’ajuster pour un travail de couture spécifique. Tournez la vis d’ajustage à droite pour augmenter à tension, ou à gauche pour la baisser. 11 Bouton Sélecteur de Point A D C A E F G H I J K Montez l’aiguille et le pied de biche. Tournez le bouton sélecteur de point pour ajuster le symbole correspondant au modèle souhaité de l’indice de régulation. L 1 Indice de régulation 1 Bouton sélecteur de la dimension du point 1 Tournez le bouton sélecteur de la dimension du point pour ajuster la dimension du point souhaité de l’indice de régulation. Plus le numéro sera haut, plus le point sera grand. 1 4 0 3 1 2 “ Indice de régulation ” ajustage recommandé pour les boutonnières Ajuster le bouton sélecteur dans l’intervalle 0,5-4 pour le point en zigzag. Ajustage du bouton sélecteur en “S.S” pour le point élastique. Si le point élastique n’est pas uniforme, tournez le bouton sélecteur de dimension du point sur “-“ pour réduire ou sur “+” pour augmenter. S.S. 1 4 0 2 3 Bouton sélecteur de la largeur du point Tournez le bouton sélecteur de la largeur du point pour 1 5 établir la dimension du point souhaité de l’indice de régulation. Plus le numéro sera haut, plus le point sera grand. 4 3 2 1 0 1 Indice de régulation Nota : Levez l’aiguille sur le tissu lorsque vous tournerez le bouton sélecteur de dimension du point. 12 Bouton de couture en arrière En maintenant appuyé le bouton de couture en arrière, la machine coud en arrière. Descente du pied de biche 1 1 Ouvrez le couvercle de la navette. 1 2 1 Couvercle de la navette Pour baisser le pied de biche, tirez-le vers le bas et déplacez-le vers la droite, comme indiqué sur le dessin. 2 Pied de biche de descente 3 2 3 2 Pour lever le pied de biche, tirez-le vers le bas et déplacez-le vers la gauche, comme indiqué sur le dessin. * Le pied de biche doit être levé pour la couture normale. * Le pied de biche retourne à la position levée lorsque la machine commence à marcher. 2 13 VOLET 3. COUTURE DE BASE 2 1 A Couture au point droit 3 B 4 2 5 4 3 3 1 1 2 3 4 5 5 A ou B Pied de biche pour zigzag 2-6 1,5-4 (0) ou (5) 1 0 4 0 2 Sélecteur de Point : Pied de biche : Tension du fil : Dimension du point : Largeur du point : 1 1 Levez le pied de biche et placez le tissu avec le bord aligné avec la ligne guidage de couture de la plaque d’aiguille. Faites descendre l’aiguille jusqu’au tissu. Baissez le pied de biche et tirez les fils en arrière. Appuyez sur la pédale. Guidez doucement le tissu sur la ligne guidage, en le laissant passer tout seul. 2 2 Pour fixer l’extrémité des coutures, appuyez sur le bouton de couture en arrière et cousez plusieurs points en arrière. Levez le pied de biche, tirez le tissu et mettez les fils en arrière. 3 3 Tires les fils vers le haut et vers le coupe-fils. Les fils se coupent à la dimension nécessaire pour commencer le travail suivant. Changement de sens de la couture Arrêtez la machine et tournez le volant vers vous pour introduire l’aiguille dans le tissu. Levez le pied de biche. Tournez le tissu autour de l’aiguille pour changer le sens de la couture. Baissez le pied de biche et continuez votre couture. 14 Utilisation des guidages de couture de la plaque d’aiguille 1 Les guidages de couture de la plaque de l’aiguille servent à mesurer la largeur des coutures. 3 * Les numéros indiquent la distance entre la position centrale de l’aiguille et la ligne de guidage. Numéros de la plaque de l’aiguille Distance en centimètres 4 10 15 20 3/8" 4/8" 5/8" 6/8" 1,0 1,5 2,0 1,0 1,3 1,6 1,9 2 1 2 3 4 5 Lignes de guidage Guidage pour coins Plaque de l’aiguille Trou de la plaque de l’aiguille Largeur de la couture, de la position centrale de l’aiguille Angle droit Pour faire un angle droit à 1,6 cm (5/8”) du bord du tissu : Après avoir aligné le bord du tissu situé devant vous avec le guid-coins (voir dessin), arrêter de piquer et baissez l’aiguille en tournant le volant vers vous. Levez le pied de biche et tournez le tissu pour aligner le bord avec le guidage couture de 1,6 cm (5/8”) Baissez le pied de biche et commencez à piquer dans l’autre sens. 5 2 Guidage d’angles 2 Position d’aiguille variable Quand on sélectionne le point droit (modèle A), on peut déplacer l’aiguille entre les positions d’aiguille centrale et 1 0 gauche, en tournant le bouton sélecteur de largeur du point. 5 4 3 2 15 1 Points en zigzag 2 C 3 5 4 5 4 3 2 3 Pied de biche : 1 0 4 0 Sélecteur de Point : 4 5 2 3 1 2 1 Tension du fil : Dimension du point : Largeur du point : C Pied de biche pour zigzag 2-5 0,5-4 1,5 Les points en zigzag simples s’utilisent pour faufiler, coudre des boutons, etc. VOLET 4. LA COUTURE LA PLUS USUELLE Faufiler 2 1 G 3 4 5 2 5 4 3 Sélecteur de Point : Pied de biche : Tension du fil : Dimension du point : Largeur du point : C Pied de biche pour zigzag 1-4 1-2 5 3 1 1 2 3 4 5 1 0 0 2 4 Le point en zigzag s’utilise pour faufiler le tissu, pour éviter l’effilochement des bords. 16 Point Zigzag 2 1 D 3 4 5 1 5 4 3 D Pied de biche pour zigzag 1-4 5 Largeur du point : 5 0,5-1,5 2 0 2 1 Sélecteur de point : 2 Pied de biche : 3 Tension du fil : 4 Dimension du point : 1 0 3 4 Ce point s’utilise pour terminer le bord de la couture dans les tissus synthétiques et autres ayant tendance à froncer. Mettez le tissu de sorte à pouvoir faire une couture de 1,6 cm (5/8”). Coupez le bord de la couture quand vous aurez terminé. Nota : Faites attention de ne pas couper les points. Ce point s’utilise également pour repriser et coudre des déchirures. Point formé 1 2 G 3 5 4 5 4 3 1 Sélecteur de Point : 2 Pied de biche : G Pied de biche pour zigzag 3 Tension du fil : 4 Dimension du point : 5 Largeur du point : 1-4 2 5 1 0 0 1 4 S.S. 2 Le point formé est idéal pour coudre des maillots de bain et du velours élastique, parce qu’il offre une grande élasticité et résistance. Placez le tissu de sorte à pouvoir faire une couture à 1,6 cm (5/8”). Coupez ensuite le bord de la couture. Nota : Faites attention de ne pas couper les points. 17 3 1 Point élastique droit 2 B 3 5 4 5 4 3 1 Sélecteur de Point : 2 Pied de biche : La ou B Pied de biche pour zigzag 3 Tension du fil : 4 Dimension du point : 5 Largeur du point : 2-6 1,5-4 (0) ou (5) 2 1 4 1 0 0 2 3 A Piquez deux points à l’endroit et un point à l’envers, pour faire une couture qui ne se déchire pas facilement. 18 Pour coudre des boutons 2 1 3 C 4 5 5 2 1 4 3 0 C Pied de biche pour zigzag 1-3 4 Dimension du point : 5 Largeur du point : 6 Pied de biche : au choix ajuster suivant besoins baissé 4 0 3 1 2 1 Sélecteur de Point : 2 Pied de biche : 3 Tension du fil : 6 1 1 Ajustez la largeur du point, et tournez le volant pour s’assurer que l’aiguille entre dans chaque trou du bouton. 2 Baissez le pied de biche pour maintenir le bouton à sa place. Les trous du bouton doivent s’aligner avec la rainure du pied de biche. 3 Vous pouvez mettre une épingle sur le pied de biche pour former un pied. Vérifiez que l’aiguille entre bien dans les deux trous du bouton. Faites une dizaine de points et coupez les fils supérieur et inférieur, en laissant 20 cm (8”) de fil. 4 Passez les fils de l’aiguille (supérieures) entre le 2 3 bouton et le tissu à travers des trous du bouton. Tirez les fils supérieurs pour mettre les fils inférieurs à l’endroit du tissu. 4 Tournez les fils autour du bouton pour former un pied et nouez-les. 5 5 19 Levez le pied de biche après la couture. 1 Boutonnières 2 1 Sélecteur de Point : 3 BH 5 4 0 5 4 3 1 (BH) 2 Pied de biche : pied de biche pour boutonnières automatiques Tension du fil : 1-5 3 (0,5-1) 4 Dimension du point : 5 5 Largeur du point : 2 1 0 2 * 3 4 * * 1 2 * 3 * 4 La dimension de la boutonnière s’ajuste automatiquement en mettant le bouton dans le pied de biche pour boutonnières automatiques. Le support de bouton du pied de biche sert pour des boutons jusqu’à 2,5 cm (1”) de diamètre. Faites une boutonnière d’essai avec le même tissu, la même surface de contact et les mêmes points qu’avec le tissu utilisé. Mettez le bouton sur l’échantillon de tissu et marquez la partie supérieure et la partie inférieure pour déterminer la position de la boutonnière. Utilisez une toile pour les tissus élastiques. 1 Tournez le volant vers vous pour lever l’aiguille à sa position la plus haute. Levez le pied de biche. 2 Sélectionnez le modèle “BH” en tournant le bouton sélecteur de points. Si vous avez sélectionné le modèle BH, repositionnez le bouton sélecteur une fois suivant le procédé indiqué au point 12 3 4 5 5 Montez le pied de biche pour boutonnières automatiques. Tirez sur le support du bouton en arrière et placez le bouton. Poussez de nouveau le support du bouton vers vous à fond. Baissez le pied de biche pour boutonnières à fond. 1 Pied de biche pour boutonnières 6 1 Introduisez le tissu sous le pied de biche. Tournez le volant lentement vers vous avec la main droite jusqu’à ce que l’aiguille descende et continuez de tourner le volant jusqu’à ce que le pied de biche de lever le fil se trouve dans la position la plus haute. 6 7 8 3 4 5 7 Tirez le tissu vers la gauche et tirez les deux fils vers la gauche. 8 Introduisez le tissu sous le pied de biche, et baissez l’aiguille sur le point de départ. Baissez le pied de biche pour boutonnières automatiques. Nota : Vérifiez qu’il n’y a pas de jeu entre la glissière et le support du ressort. S’il y a du jeu, la longueur des fils sera différente, (voir dessin). 2 3 4 5 6 6 2 20 Point de départ Glissière Il ne doit pas y avoir de jeu Support du ressort Différence 9 9 Piquez lentement et arrêtez la machine quand vous aurez terminé une boutonnière. La machine pique d’abord le renforcement avant et la file de gauche, ensuite le renfort arrière et la file de droite. 10 Coupez les fils supérieur et inférieur en laissant environ 10 cm (4”) de fil. Tirez le fil de l’aiguille (supérieur) sur l’envers du tissu en tirant sur le fil inférieur. Nouez les fils. 11 Mettez une épingle dans la partie intérieure du renfort. Coupez l’ouverture avec le coupe boutonnières. 10 11 Faites attention de ne pas couper les points. 12 Pour répéter la couture des boutonnières, tournez le sélecteur de points sur ), (voir dessin). 12 ; et de nouveau vers (— Appuyez maintenant sur la pédale pour faire une boutonnière identique. 13 Quand vous aurez fini de faire des boutonnières, levez le pied de biche des boutonnières à fond. 13 Pour ajuster la densité des points des boutonnières : La densité du point pour les boutonnières s’ajuste sur “ ” du bouton sélecteur de la dimension du point. 1 2 3 4 0 21 Boutonnière en relief avec cordon 2 1 3 1 BH 2 4 0 3 4 5 5 5 4 3 1 Sélecteur de Point : (BH) Pied de biche : pied de biche pour boutonnières automatiques Tension du fil : 1-5 Dimension du point : Largeur du point : (0,5-1) 5 2 1 0 2 3 4 1 1 Utilisez le même procédé que pour une boutonnière automatique. * Fixez la largeur du point de sorte qu’elle coïncide avec l’épaisseur du cordon utilisé. Avec le pied de biche pour boutonnières levé, mettez le cordon dans l’éperon dans la partie arrière du pied de biche pour boutonnières. Levez les extrémités vers vous sous le pied de biche 1 pour boutonnières, en laissant libre l’extrémité avant. Accrochez le cordon dans les fourches situées à l’avant du pied de biche pour boutonnières automatiques pour pouvoir les serrer ensemble. Baissez l’aiguille jusqu’au tissu à l’endroit où vous allez commencer la boutonnière, et baissez le pied. 2 1 2 Eperon Appuyez doucement sur la pédale et faites la boutonnière. Les côtés de la boutonnière et les renforts se cousent sur le cordon. Enlevez le tissu de la machine et coupez uniquement les fils. 3 3 * Tirez l’extrémité gauche du cordon et serrez-le. Enfilez l’extrémité dans une aiguille à repriser, tirez-le sur l’envers du tissu et coupez-le. Pour couper l’ouverture de la boutonnière, reportez-vous aux instructions de la page 21. 22 1 Pour coudre une fermeture éclair 2 3 4 5 2 5 4 3 1 Sélecteur de Point : 2 3 4 5 Pied de biche : Tension du fil : A pied de biche pour fermeture éclair 3-6 Dimension du point : Largeur du point : 1,5-4 5 3 1 A 1 0 0 2 4 Epinglez la fermeture éclair ou faufilez-la et mettez-la sous le pied de biche. Mettez les fils en arrière et baissez le pied de biche. Pour coudre le côté gauche de la fermeture, guidez les dentes de la fermeture le long du bord du pied de biche et piquez la fermeture éclair sur le tissu. Tournez le tissu et piquez l’autre côté de la fermeture comme pour le côté gauche. 23 Ourlets au point invisible 2 1 F 3 4 5 2 5 4 3 1 2 3 4 5 6 3 1 E 2 1 0 4 0 Sélecteur de Point : Pied de biche : Tension du fil : E ou F Pied de biche pour zigzag 2-4 Dimension du point : Largeur du point : 1-3 5 Guidage d’ourlets 6 Pliez l’ourlet vers le haut et pliez-le de nouveau en 1 1 [A] laissant un bord de 0,4 à 0,7 cm (1/4”) (voir dessin). 1 Envers du tissu 2 de 0,4 à 0,7 cm (1/4”) [B] 2 2 [A] tissus lourds [B] tissus fins ou d’un poids moyen 1 1 2 2 Baissez le pied de biche. Desserrez la vis du support du pied de biche pour mettre le guidage d’ourlets entre la vis et la tige du support du pied de biche. Serrez la vis en vous assurant que le guidage d’ourlets est au milieu des griffes du pied de biche. 3 3 4 Vis Guidage d’ourlets 4 Levez le pied de biche et mettez le tissu dessous pour que le pli souple s’appuie contre le guidage d’ourlets. Baissez le pied de biche. Piquez lentement pour 3 3 pouvoir contrôler et pour que les points en zigzag se fassent au bord de l’ourlet et perforent le pli souple. Vérifiez en même temps pendant que vous cousez que le pli se fait en suivant le guidage d’ourlets. Ouvrez complètement le pli. 4 4 5 Endroit du tissu. 5 * 24 Si l’aiguille descend trop à gauche, les points seront visibles à l’endroit du tissu. Ourlet enroulé 1 2 1 Sélecteur de point : 2 Pied de biche : 3 Tension du fil : 4 Dimension du point : 5 Largeur du point : 3 A 5 2 5 4 3 5 3 1 4 A pied de biche pour ourlets 2-6 1,5-4 1 0 0 2 4 1 1 Coupez dans un coin du tissu 0,8 cm (5/16”) x 1,5 cm (3,16”) pour éviter que l’ourlet se boudine dans les coins. Pliez le bord du tissu deux fois 0,3 cm (1/8”) en largeuret 6 cm (2 3/8”) en longueur. 2 4 3 1 2 3 4 1 Envers du tissu 0,5 cm 0,8 cm Hélice du pied de biche 2 2 Placez le tissu en alignant le bord de l’ourlet avec le guidage du pied de biche. Baissez le pied de biche et piquez plusieurs points en tirant des deux fils en arrière en même temps. Arrêtez la machine avec l’aiguille dans le tissu et levez le pied de biche. Introduisez à partie pliée du tissu dans l’hélice du pied de biche. Baissez le pied de biche et pendant que vous cousez, levez le bord qui continue d’avancer doucement et uniformément. 25 VOLET 5. COUTUREDECORATIVE Point de vagues 2 1 G 3 5 2 5 4 3 Sélecteur de Point : G Pied de biche : pied de biche pour zigzag Tension du fil : 6-8 Dimension du point : 2-3 Largeur du point : 5 3 1 4 1 2 3 4 5 1 0 0 2 4 Mettre le bord plié le long de la rainure du pied de biche. L’aiguille doit baisser hors du bord du tissu à droite en formant un pli. Point Elastique A B C D E G H F I J K L 1 1 2 3 4 5 3 2 5 4 Sélecteur de Point : Pied de biche : Tension du fil : Dimension du point : Largeur du point : A-L pied de biche pour zigzag 1-4 S.S. 5 5 4 3 2 1 4 1 0 0 2 Si le point en avant et en arrière se décompense à cause du type de tissu, faire la compensation en tournant le bouton sélecteur de dimension du point du mode suivant : Si les modèles se compriment, mettez le bouton sélecteur en “+”. Si les modèles s’étirent, mettez le bouton sélecteur en ““. (Voir page 12). 26 3 1 Nids d’abeilles 2 D 3 1 2 3 4 5 5 4 5 4 3 Sélecteur de point : D Pied de biche : Tension du fil : Dimension du point : pied de biche pour zigzag 1-4 S.S. Largeur du point : 5 2 1 0 1 4 0 2 Mettez la dimension du point sur “4” et piquez des lignes de points droits avec une séparation de 1 cm (3/8”), sur la zone à broder. Attachez les fils sur un bord. Tirez les fils de la canette et froncez uniformément. Fixez les fils à l’autre extrémité. Piquez avec un point décoratif entre les points du froncement. Enlevez les points de froncement. 3 1 Nota : Baissez la régulation du fil de l’aiguille (supérieur) pour pouvoir froncer plus facilement. 1 1 1 cm (3/8”) Point de boîte 2 H 3 4 0 1 1 2 3 4 5 5 5 4 3 2 2 Sélecteur de Point : Pied de biche : Tension du fil : Dimension du point : Largeur du point : H pied de biche pour zigzag 1-4 0,5-2. 5 1 0 3 4 Utilisez ce point pour unir des gros tissus. Mettez les bordes l’un sur l’autre sans faufiler et utilisez ce point pour les unir. 27 1 2 Applications C 3 4 5 1 5 4 3 2 0 2 3 1 0 1 Sélecteur de Point : 2 Pied de biche : C pied de biche pour zigzag 3 Tension du fil : 4 Dimension du point : 5 Largeur du point : 1-4 0,5-1 5 4 Faufilez (ou collez avec un adhésif pour fer à repasser) des pièces d’application sur le tissu. Piquez tout autour de l’application en vous assurant que l’aiguille pique tout le long du bord extérieur de l’application. Pour coudre des angles, introduisez l’aiguille dans la toile, levez le pied de biche et tournez le tissu à droite ou à gauche. J K L Point en relief décoratif 2 3 1 5 4 2 3 0 5 4 3 1 2 4 5 1 0 2 Sélecteur de Point : Pied de biche : Tension du fil : Dimension du point : Largeur du point : J-L pied de biche pour zigzag 1-4 0,5-1 5 3 4 1 Pour une présentation délicate sur des tissus comme la mousseline de soie, utilisez seulement un morceau de tissu avec un renfort dépliable en cas de besoin. 28 VOLET 6. LE SOINDEVOTREMACHINE Démontage et montage de la piste de la navette Nota : Eteignez l’interrupteur d’alimentation e/ou débranchez-la. 2 Pour démonter la piste de la navette : Mettez l’aiguille sur la position plus haute et ouvrez couvercle de la navette. Ouvrez la fermeture articulée de la boîte de la bobine et sortez-la de la machine. 1 Ouvrez les éléments de fixation de la piste de la navette et enlevez l’anneau de la piste de la navette. Enlevez la navette. * Nettoyez la piste de la navette avec une brosse et un chiffon doux sec. 5 4 1 Boîte de la bobine 2 Elément de fixation de la piste de la navette 3 Anneau de la piste de la navette 4 Navette 5 Piste de la navette 3 Pour monter la piste de la navette : Serrez la navette avec la clavette centrale et montez-la avec soin de nouveau dans la piste de la navette, en formant un cercle parfait avec le poussoir de navette. Montes l’anneau de la piste de la navette en vérifiant que la clavette inférieure s’emboîte dans la rainure. Bloquez l’anneau de la piste de la navette et remontez les éléments de fixation à leur place. Introduisez la boîte de la bobine. 7 6 6 Clavette 7 Rainure Nettoyage du pied de biche Nota : Eteignez l’interrupteur d’alimentation e/ou débranchez la machine avant de nettoyer le pied de biche. Démontez l’aiguille et le pied de biche. Tirez la vis de fixation de la plaque l’aiguille et démontez-la. Avec une brosse, nettoyez la poussière et les peluches qui peuvent obstruer les dentes du pied de biche. Remontez la plaque de l’aiguille. 29 Lampe de couture La lampe de couture se trouve derrière la plaque avant. Pour changer la lampe, enlevez la vis qui retient la plaque avant de la machine à coudre et enlevez la plaque. * Débranchez le courant avant de changer la lampe. * Ne démontez pas la machine d’une autre manière que celle indiquée dans cette brochure. (A) (B) (100V) (200V) (A) Pour démonter .................... tournez à gauche. Para monter ........................ tournez à droite. (B) Pour démonter .................... tirez et tournez à gauche. Para monter ........................ tirez et tournez à droite. Attention : La lampe peut être CHAUDE. Protégez vos doigts pour l’enlever. 30 Localisation et solution des pannes Cause Situation 1. L’aiguille n’est pas bien enfilée. Le fil de l’aiguille 2. La régulation du fil de l’aiguille est trop haute. (supérieur) se casse 3. L’aiguille est pliée ou émoussée. Référence Voir page 9 Voir page 11 Voir page 6 4. L’aiguille n’est pas bien montée. 5. Le tissu ne va pas en arrière à la fin de la couture. Voir page 6 Voir page 14 6. Le fil est très épais ou très fin pour l’aiguille. Voir page 6 Le fil de la canette 1. Le fil inférieur n’est pas bien enfilé dans la boîte de la bobine. Voir page 8 (inférieur) se casse 2. Accumulation de peluche dans la boîte de la bobine. Nettoyez la boîte de la bobine Changez la 3. La canette est abîmée et ne tourne pas uniformément. L’aiguille se casse 1. L’aiguille n’est pas bien montée. 2. 3. 4. 5. 6. 7. Les points sautent Couture froncée L’aiguille est pliée ou émoussée. La vis de fixation de l’aiguille est desserrée. La régulation du fil de l’aiguille est trop grande. Le tissu ne va pas en arrière à la fin de la couture. L’aiguille est trop fine pour le tissu. Le bouton sélecteur de point a tourné avec l’aiguille dans le tissu. 1. 2. 3. 4. canette. Voir page 6 Voir page 6 Voir page 6 Voir page 11 Voir page 14 Voir page 6 Voir page 12 L’aiguille n’est pas bien montée. L’aiguille est pliée ou émoussée. L’aiguille e/ou les fils ne sont pas adaptés au travail. On n’utilise pas une aiguille de POINTE BLEUE pour coudre des tissus synthétiques et des tissus très fins et élastiques. 5. L’aiguille n’est pas enfilée correctement. Voir page 6 Voir page 6 Voir page 6 1. 2. 3. 4. * Voir page 11 Voir page 9 Voir page 6 La régulation du fil de l’aiguille est trop grande. La machine n’est pas bien enfilée. L’aiguille est trop grosse pour le tissu. Les points sont trop épais pour le tissu. pour coudre des matériels très légers, mettez un papier sous le tissu. Voir page 6 Voir page 9 Faites des points plus gros. 1. La régulation du fil de l’aiguille est trop lâche. 2. L’aiguille est trop grosse ou trop fine pour le fil. Voir page 11 Le tissu n’avance pas uniformément 1. Le pied de biche est bouché par de la peluche. 2. Les points sont trop fins. Voir page 29 Faites des points plus gros. La machine ne marche 1. La machine n’est pas branchée. Voir page 4 pas 2. Il y a fils dans la piste de la navette. 3. Le volant n’est pas engrené pour le bobinage de la canette. Voir page 29 Voir page 8 La machine ne marche pas uniformément et 1. Il y a des fils dans le mécanisme de la navette. 2. Le pied de biche est bouché par de la peluche. Voir page 29 Voir page 29 Les points forment des boucles sous la Voir page 6 couture elle fait du bruit 31 TABLE OF CONTENTS SECTION 1. ESSENTIAL PARTS Name of Parts .................................................................................................................................... 2 SECTION 2. GETTING READY TO SEW Extension Table ................................................................................................................................. Standard Accessories ........................................................................................................................ Accessories Storage Box ................................................................................................................... Connecting the Machine to the Power Supply ................................................................................... Foot Control ....................................................................................................................................... Presser Foot Lifter ............................................................................................................................. To Attach and Remove the Presser Foot .......................................................................................... Changing Needle ............................................................................................................................... Thread and Needle Chart .................................................................................................................. Setting Spool Pins ............................................................................................................................. Removing or Inserting the Bobbin Case ............................................................................................ Winding the Bobbin ............................................................................................................................ Threading Bobbin Case ..................................................................................................................... Threading the Machine ...................................................................................................................... Needle Threader ................................................................................................................................ Drawing Up Bobbin Thread ............................................................................................................... Balancing Needle Thread Tension .................................................................................................... Adjusting Bobbin Thread Tension ...................................................................................................... Pattern Selector Dial .......................................................................................................................... Stitch Length Dial ............................................................................................................................... Stitch Width Dial ................................................................................................................................ Reverse Stitch Button ........................................................................................................................ Dropping the Feed Dog ..................................................................................................................... 3 3 3 4 4 5 5 6 6 7 7 8 8 9 10 10 11 11 12 12 12 13 13 SECTION 3. BASIC SEWING Straight Stitch Sewing ........................................................................................................................ To Change Sewing Direction ............................................................................................................. Using the Seam Guides on the Needle Plate .................................................................................... Turning Square Corners .................................................................................................................... Variable Needle Position ................................................................................................................... 14 14 15 15 15 Zigzag Stitching ................................................................................................................................. 16 SECTION 4. UTILITY STITCHING Overcasting ........................................................................................................................................ 16 Tricot Stitch ........................................................................................................................................ 17 Knit Stitch ........................................................................................................................................... 17 Straight Stretch Stitch ........................................................................................................................ 18 Sewing on Buttons ............................................................................................................................. 19 Buttonhole .......................................................................................................................................... 20-21 Corded Buttonhole ............................................................................................................................. 22 Zipper Application .............................................................................................................................. 23 Blind Stitch Hemming ........................................................................................................................ 24 Rolled Hem ........................................................................................................................................ 25 SECTION 5. DECORATIVE STITCHING Shell Tuck .......................................................................................................................................... Stretch Stitch Patterns ....................................................................................................................... Smocking ........................................................................................................................................... Box Stitching ...................................................................................................................................... Applique ............................................................................................................................................. Decorative Satin Stitch Pattern .......................................................................................................... 26 26 27 27 28 28 SECTION 6. CARE OF YOUR MACHINE Dismantling and Assembling Hook Race Unit ................................................................................... Cleaning the Feed Dog ...................................................................................................................... Sewing Light ...................................................................................................................................... Troubleshooting ................................................................................................................................. 1 29 29 30 31 SECTION 1. ESSENTIAL PARTS 10 8 9 Name of Parts 7 6 5 4 11 3 12 2 13 1 14 15 20 16 17 18 19 21 1 2 3 Reverse stitch button Pattern selector dial Stitch length dial 4 5 Stitch width dial Bobbin winder stopper 6 7 8 Bobbin winder spindle Spool pins Bobbin winder thread guide 9 10 Thread guide Thread take-up lever 11 12 13 Thread tension dial Face plate Thread cutter 14 15 16 17 18 19 20 21 22 23 24 25 26 27 Needle Threader Needle plate Presser foot holder Needle clamp Needle Presser foot Extension table Carrying handle Handwheel Power switch Machine socket Free arm Buttonhole lever Presser foot lifter 27 22 26 25 23 Note : The specifications are subject to change without prior 24 notice. 2 SECTION 2. GETTING READY TO SEW Extension Table The extension table provides added sewing surface and can be easily removed for free arm sewing. Detaching the table: Pull the table away from the machine. Attaching the table: Push the extension table until it snaps into the machine. Advantages and uses of free arm sewing: – Avoid fabric bunching around the needle when – bartacking to reinforce pockets, plackets and waistlines. For stitching sleeves, waistbands, pant legs or any – circular garment area For darning socks or mending knees, elbows or areas of wear in children's clothes Standard Accessories 1 2 3 4 5 6 1 Zipper foot 2 Hemmer foot 3 Automatic buttonhole foot 4 Bobbins 5 Set of needles 6 Seam ripper 7 Screwdriver 8 Hem guide 8 7 Accessories Storage Box Sewing accessories are conveniently located in the extension table. 9 Accessories storage box 9 3 Connecting the Machine to the Power Supply Before connecting the power cord, make sure the voltage and 3 2 frequency shown on the machine conform to your electrical power. 1. Turn off the power switch. 2. Insert the machine plug into the machine socket. 3. Insert the power supply plug into the outlet . 4. Turn on the power switch to turn on the power and sewing light. 1 4 5 1 6 Power supply plug Outlet 2 Power switch 3 5 Machine plug 6 Foot control 4 Machine socket Foot control Sewing speed can be varied by the foot control. The harder you press on the control, the faster the machine runs. Caution : Do not place anything on the foot contorol, otherwise the machine will start advertently. 4 Presser Foot Lifter The presser foot lifter raises and lowers your presser foot. You can raise it about 0.6 cm (1/4") higher than the normal up position for easy removal of the presser foot or to help you to place heavy fabric under the foot. 1 2 2 Normal up position Highest position 1 To Attach and Remove the Presser Foot To remove Turn the handwheel toward you to raise the needle to its highest position. Raise the presser foot. Press the lever on the back of the foot holder. The presser foot will drop off. To attach Place the presser foot so the pin on the foot lies just under the groove of the foot holder. Lower the foot holder to lock the foot in place. 5 Changing Needle Raise the needle by turning the handwheel toward you and lower the presser foot. Loosen the needle clamp screw by turning it counterclockwise. Remove the needle from the clamp. Insert the new needle into the clamp with the flat side away from you. When inserting the needle into the clamp, push it up as far as it will go and tighten the clamp screw firmly with the screwdriver. * Check your needles frequently for barbed or blunted points. Snags and runs in knits, fine silks and silk-like fabrics are permanent and are almost always caused by a damaged needle. To check the needle Place the flat side of the needle on something flat (needle plate, glass etc.). The clearance between the needle and flat surface should be consistent. Never use a bent or blunt needle. Fabrics Light weight Crepe de Chine, Voile, Lawn, Organdy, Georgette, Tricot Fine Silk Fine Cotton Fine Synthetic Fine Cotton Covered Polyester Medium Linens, Cotton, Pique, 50 silk Serge, Double Knits, 50 to 80 Cotton weight Percale 50 to 60 Synthetic Cotton Covered Polyester Heavy weight Denim, Tweed, Gabardine, Coating, Drapery and Upholstery Fabric Thread and Needle Chart Thread 50 silk 40 to 50 Cotton 40 to 50 Synthetic Cotton Covered Polyester 9 or 11 * In general, fine threads and needles are used for sewing thin fabrics, and thicker threads and needles are used for sewing heavy fabrics. Always test thread and needle size on a small piece of fabric which will be used for actual sewing. * Use the same thread for needle and bobbin. 11 or 14 * When sewing stretch, very fine fabrics and synthetics,use a BLUE TIPPED needle. The blue tipped needle effectively prevents skipped stitches. * When sewing very fine fabrics, sew over a piece of paper to prevent seam puckering. 14 16 6 Setting Spool Pins The spool pins are used for holding the spool of thread in order to feed thread to the machine. To use, pull up the spool pin. Push down for storage. 1 Upper thread 2 Hole 1 3 Tangle 2 Note : When using thread which has tendency to tangle 1 around spool pin, thread through the hole of spool pin as shown. 3 The hole should face the thread spool. Removing or Inserting the Bobbin Case Open the hook cover. 1 Hook cover 1 Raise the needle by turning the handwheel toward you. Take out the bobbin case by holding the latch. 2 Latch 2 3 When inserting the bobbin case, place the horn into the recess of the hook race. 3 Horn 7 Winding the Bobbin 1 1 Pull the handwheel out. 2 Draw the thread from spool. Guide the thread around the bobbin winder thread guide. 3 Insert the thread through the hole in the bobbin from 3 the inside to the outside. Put the bobbin on the bobbin winder spindle. 2 4 Push it to the right. 5 With the free end of the thread held in your hand, depress the foot control. Stop the machine when it has made a few turns, and cut the thread close to the hole in the bobbin. 6 5 6 Depress the foot control again. When the bobbin is fully wound, stop the machine. Return the bobbin winder spindle to its original position by moving the spindle to the left, and cut the thread. 7 Push the handwheel to the left. (original position). 4 7 Note : Return the bobbin winder spindle when the machine stops. Threading Bobbin Case 1 1 Place the bobbin into the bobbin case. Make sure the thread unwinds in the direction of arrow. 2 Pull the thread into the bobbin case slot. 3 Draw the thread under the tension spring and into the delivery eye. 2 3 * Leave about 10 cm (4") of free thread. 8 Threading the Machine 3 1 Raise the take–up lever to its highest position by turning the handwheel toward you. Raise the presser foot. Place a spool on the spool pin as shown, with thread coming from back of the spool. 4 2 5 6 1 Draw the thread into thread guide using both hands. 2 While holding the thread near spool, draw thread down into the tension area and then around the check spring holder. 3 Firmly draw the thread up and through the take–up lever from right to left. 4 Then draw the thread down and slip it into the lower thread guide. 5 Draw the thread down and slip it into needle bar thread 1 2 3 4 guide on the left. 6 5 Thread the needle eye from front to back. * Refer to page 10 for the built-in needle threader. 6 Note : You may want to cut the end of thread with sharp scissors for easier needle threading. 9 Needle Threader 1 1 Raise the needle to its highest position. Pull down the needle threader knob as far as it will go. 2 2 Turn the knob in the direction of the arrow in the illustration, then insert Hook into the needle eye. Lead the thread around Guide and under Hook. 3 Turn the knob in the direction of the arrow in the illustration, drawing the thread loop through the needle. 4 Pull the thread through the needle eye. 3 4 * The needle threader can be used with a #11 to #16 needle or a Janome Blue tipped needle. Thread size 50 to 100 should also work well. Drawing Up Bobbin Thread 1 2 1 Raise the presser foot and hold the needle thread lightly with your left hand. 2 Turn the handwheel slowly toward you with your right hand until the needle goes down and continue turning the handwheel until the take–up lever is at its highest position. Lightly draw up the needle thread forming a loop of the bobbin thread. 3 3 Pull 15 cm (6") of both threads back and under the presser foot. 10 Balancing Needle Thread Tension 1 1 5 4 The thread tension is adjusted depending on the sewing materials, layers of fabric and sewing method. 3 1 Correct tension 6 * The ideal straight stitch has threads looked between two layers of fabric, as illustrated (magnifies to show detail). * For an ideal zigzag stitch, the bobbin thread does not show on the right side (top side) of the fabric, and the needle thread shows slightly on the wrong side (bottomside) of the fabric. 2 1 Needle thread (Top thread) 2 Bobbin thread (Bottom thread) 3 Right side (Top side) of fabric 4 Wrong side (Bottom side) of fabric 5 Thread tension dial 6 Setting mark 2 2 Needle thread tension is too tight The bobbin thread (bottom thread) will appear on the right side (top side) of the fabric.......Loosen the needle thread tension by moving the dial to a lower number. 3 3 Needle thread tension is too loose The needle thread (top thread) will appear on the wrong side (bottom side) of the fabric.......Tighten the needle thread tension by moving the dial to a higher number. Adjusting Bobbin Thread Tension For general sewing, the bobbin thread tension does not need to adjust. However, you can adjust the bobbin thread tension for a specific sewing need. Turn the adjusting screw to the right to tighten or, to the left to loosen the tension. 11 Pattern Selector Dial A D C A E F G H I J K Raise the needle and presser foot. Turn the pattern selector dial to set the symbol corresponding to the desired pattern at L the setting mark. 1 Setting mark 1 Stitch Length Dial 1 Turn the stitch length dial to set the desired stitch length at the setting mark. The higher the number, the longer the stitch length 1 Setting mark 4 0 3 1 2 " " is the recommended setting for buttonhole stitching. Adjust the dial in the 0.5–4 range when you sew the zigzag stitch. Set the dial at "S.S." to sew the stretch stitch pattern. If the stretch stitch pattern is not even, turn the stitch length dial in the direction of "–" to compress it, or "+" to expand it. S.S. 1 4 0 2 3 Stitch Width Dial 1 5 Turn the stitch width dial to set the desired stitch width at the setting mark . The higher the number, the wider the stitch width 1 Setting mark 4 3 2 1 0 Note : Raise the needle above the fabric, when you turn the stitch width dial. 12 Reverse Stitch Button As long as you keep the reverse stitch button depressed, the machine sews backwards. Dropping the Feed Dog 1 1 Open the hook cover. 1 Hook cover 2 1 To drop the feed dog, pull down the drop lever and move it to the right, as illustrated. 2 Drop lever 3 2 3 To raise the feed dog, pull down the drop lever and move it to the left, as illustrated. * The feed dog must be up for normal sewing. * The feed dog will return to the up position when the machine starts running. 2 2 13 SECTION 3. BASIC SEWING 2 1 A 3 B 4 1 5 2 2 3 5 4 3 4 3 1 Straight Stitch Sewing 1 0 4 0 2 5 1 1 Pattern selector: Presser foot: A or B Zigzag foot Thread tension: Stitch length: Stitch width: 2–6 1.5–4 (0) or (5) Raise the presser foot and position the fabric with its edge lining up with a seam guide line on the needle plate. Lower the needle into the fabric. Lower the presser foot and smooth the threads toward the back. Depress the foot control. Gently guide the fabric along the guide line letting the fabric feed by itself. 2 2 For fastening the end of seams, press the reverse stitch button and sew several reverse stitches. Raise the presser foot and remove the fabric, drawing the threads to the back. 3 3 Draw the threads up and into the thread cutter. The threads are cut the proper length for starting the next seam. To Change Sewing Direction Stop the machine and turn the handwheel toward you to bring the needle down into the fabric. Raise the presser foot. Pivot the fabric around the needle to change sewing direction as desired. Lower the presser foot and continue sewing. 14 Using the Seam Guides on the Needle Plate The seam guides on the needle plate help you to measure seam width. * The numbers indicate the distance between the center 1 3 needle position and the guide line. 4 Numbers on the needle plate 10 15 20 3/8" 4/8" 5/8" 6/8" Distance in centimeters 1.5 2.0 1.0 1.0 1.3 1.6 1.9 1 Guide lines 2 Cornering guide 3 Needle plate 2 4 Needle plate hole 5 Seam width from the center needle position Turning Square Corners To turn a square corner 1.6 cm (5/8") from the fabric edge. When the fabric edge facing you lines up with the cornering guide as illustrated, stop stitching and lower the needle by turning the handwheel towards you. Raise the presser foot and turn the fabric to line the edge with the 1.6 cm (5/8") seam guide. Lower the presser foot and begin stitching in the new direction. 5 2 Cornering guide 2 Variable Needle Position 1 0 5 4 3 2 When the straight stitch (pattern A) is selected, you can move the needle between center and left needle position by turning the stitch width dial. 15 1 Zigzag Stitching 2 C 3 2 3 Pattern selector: Presser foot: Thread tension: C Zigzag foot 2–5 4 5 Stitch length: Stitch width: 0.5–4 1-5 1 5 4 5 4 3 1 0 4 0 2 3 1 2 Simple zigzag stitching is widely used for overcasting, sewing on buttons etc. SECTION 4. UTILITY STITCHING Overcasting 2 1 G 3 4 5 2 3 2 5 4 3 4 5 3 1 1 C Zigzag foot 1–4 1–2 5 1 0 4 0 2 Pattern selector: Presser foot: Thread tension: Stitch length: Stitch width: The zigzag stitch is used on the seam allowance to prevent fabric from fraying at raw edges. 16 Tricot Stitch 2 1 D 3 4 5 4 3 4 Thread tension: Stitch length: 1–4 0.5–1.5 5 Stitch width: 5 2 0 2 D Zigzag foot 2 3 5 1 Pattern selector: Presser foot: 1 1 0 3 4 This stitch is used to finish the seam allowance on synthetics and other fabrics that tend to pucker. Place your fabric to allow a 1.6 cm (5/8") seam. Trim the seam allowance after sewing. Note : Be careful not to cut the stitches. It is also handy for darning and mending tears. Knit Stitch 1 2 G 3 1 2 3 5 4 4 5 4 3 5 Pattern selector: Presser foot: Thread tension: Stitch length: Stitch width: G Zigzag foot 1–4 S.S. 5 2 1 4 1 0 0 2 This knit stitch is ideal for sewing swimwear and stretch velour because it provides the greatest amount of elasticity and strength. Place your fabric to allow a 1.6 cm (5/8") seam. Trim the seam allowance after sewing. Note : Be careful not to cut the stitches. 17 3 1 Straight Stretch Stitch 2 B 3 Pattern selector: Presser foot: A or B Zigzag foot 4 Thread tension: Stitch length: 2–6 S.S. 5 Stitch width: 1 2 3 5 4 5 4 3 2 (5) 1 0 0 1 4 (0) or 2 3 A The stitch is sewn with two stitches forward and one stitch backward forming a seam that does not rip easily. 18 Sewing on Buttons 2 1 3 1 C 2 3 4 5 5 2 1 4 3 0 C Zigzag foot 1–3 Stitch length: Stitch width: Any Adjust as necessary Feed dog: Dropped 4 0 3 1 2 4 5 6 Pattern selector: Presser foot: Thread tension: 6 1 1 Adjust the stitch width, and turn the handwheel to check if the needle enters into each hole on the button. 2 Lower the foot to hold the button in place. The holes on the button should align with the slot of the foot. 3 A pin can be placed on the foot to form a shank. Make sure to check if the needle enters into both holes on the button. Sew about 10 stitches and cut the needle and bobbin threads, leaving 20cm (8") tail. 4 Bring the needle threads between the button and fabric through the holes on the button. 2 3 Pull the needle threads to pick bobbin threads up to the right side of the fabric. 4 5 Wind the threads to from a shank and tie them together. 5 19 Raise the feed dog after sewing. 1 Buttonhole 2 3 BH 5 4 0 1 Pattern selector: 2 3 Presser foot: Thread tension: Stitch length: Automatic buttonhole foot 1–5 (0.5 –1) Stitch width: 5 4 5 (BH) 5 4 3 1 2 1 0 2 3 * The size of buttonhole is automatically set by placing the button in the automatic buttonhole foot. * The button holder of the foot takes a button size up to 2.5 cm (1") in diameter. 4 * Make a test buttonhole on a sample duplicating the fabric, interfacing and seams of the actual garment. * Place the button on the fabric sample and mark the 1 2 top and bottom to determine the position of buttonhole. * Use interfacing on stretch fabrics. 3 1 4 2 3 4 5 5 6 1 7 6 7 8 8 3 4 Turn the handwheel toward you to raise the needle to its highest position. Raise the presser foot lifter. Select the pattern "BH" by turning the pattern selector dial. If the BH pattern is already selected, reset the dial once according to the procedure in 12 . Attach the automatic buttonhole foot. Pull the button holder to the back, and place the button in it. Push back the button holder toward you as far as it will go. Pull the buttonhole lever downward as far as it will go. 1 Buttonhole lever Insert fabric under the foot. Turn the handwheel slowly towards you with your right hand until the needle goes down and continue turning handwheel until the take-up lever is at its highest position. Remove the fabric to the left to draw both threads to the left. Insert the garment under the foot, and lower the needle at the starting point. Then lower the automatic buttonhole foot. Note : Make sure there is no gap between the slider and the spring holder. If there is a gap, the length of the rows will be different, as shown. 5 2 Starting point 3 Slider 4 There should be no gap 5 Spring holder 6 Difference 6 2 20 9 9 10 11 Sew slowly and stop the machine when a buttonhole is completed. * The machine sews the front bartack and left row first, then the back bartack and right row. 10 Cut both needle and bobbin threads leaving about 10 cm (4") thread ends. Draw the needle thread to wrong side of fabric by pulling 12 11 12 13 13 the bobbin thread. Then, knot the threads. Insert a pin inside the bartack. Then cut the opening with seam ripper. Take care not to cut the stitches. To repeat buttonhole sewing, turn the stitch selector to , then back to again, as shown. Now, simply step on the foot control to sew an identical buttonhole. When buttonhole sewing is finished, push the buttonhole lever upward as far as it will go. To adjust buttonhole stitch density : Stitch density of buttonhole sewing should be adjusted within the mark " " on the stitch length dial. 1 2 3 4 0 21 Corded Buttonhole 2 1 3 1 BH 2 3 4 0 4 5 5 Pattern selector: Presser foot: (BH) Automatic buttonhole foot Thread tension: Stitch length: 1–5 Stitch width: 5 (0.5 – 1) 5 4 3 1 2 1 0 2 3 4 1 1 Use the same procedure as automatic buttonhole. * Set the stitch width to match with the thickness of the cord used. With the buttonhole foot raised, hook the filler cord on the spur at the back of the buttonhole foot. Bring the ends toward you under the buttonhole foot, clearing the front end. Hook the filler cord into the forks on the front of the automatic buttonhole foot to hold them tight. Lower the needle into the garment where the buttonhole will start and lower the foot. 1 Spur 1 2 2 Depress the foot control gently and sew the buttonhole. Each side of the buttonhole and the bartacks will be sewn over the cord. Remove the fabric from the machine and cut the sewing threads only. 3 3 Pull the left end of the filler cord to tighten it. Thread the end through a darning needle, draw to the wrong side of the fabric and cut. * To cut the buttonhole opening, refer to the Instructions on page 21. 22 Zipper Application 1 2 3 1 Pattern selector: A 4 5 2 3 Presser foot: Thread tension: Zipper foot 3–6 4 2 5 4 3 Stitch length: Stitch width: 1.5 – 4 5 5 3 1 A 1 0 0 2 4 Pin or baste zipper tape to fabric and place it under the foot. Smooth the threads toward the back and lower the foot. To sew the left side of the zipper, guide the zipper teeth along the edge of the foot and stitch through the garment and zipper tape. Turn the fabric and sew the other side of the zipper in the same way as you did the left side. 23 Blind Stitch Hemming 2 1 F E 3 4 2 3 4 5 2 5 4 3 5 6 3 1 1 1 0 4 0 2 Pattern selector: Presser foot: E or F Zigzag foot Thread tension: Stitch length: 2–4 1–3 Stitch width: Hem guide 5 6 1 1 Fold up the hem and fold it back to from a 0.4 to 0.7cm (1/4") allowance as illustrated. [A] [B] 2 1 Wrong side of the fabric 2 0.4 to 0.7 cm (1/4") 2 1 [A] Heavy weight fabrics [B] Fine or medium weight fabrics 1 2 2 3 Lower the presser foot, then loosen the foot holder screw to place the hem guide between the screw and the shank of foot holder. Tighten the screw making sure the wall of hem guide is placed in the middle of the toes of the presser foot. 3 Screw 4 Hem guide 4 3 3 Raise the presser foot and place the fabric under the foot so that the soft fold rests against the wall of hem guide. Lower the foot, then stitch slowly for better control so that the zigzag stitches fall on the hem allowance and pierce the soft fold. While sewing, make sure the fold runs along the wall of hem guide. 4 4 Open the fold flat. 5 Right side of the fabric 5 * If the needle drops far left, the stitches will show on the right side of the fabric. 24 Rolled Hem 1 2 1 Pattern selector: A 2 3 4 Presser foot: Thread tension: Stitch length: Hemmer foot 2–6 1.5–4 5 Stitch width: 5 3 A 5 2 5 4 3 3 1 4 1 0 0 2 4 1 1 the corner. Fold the fabric edge twice 0.3 cm (1/8") wide and 6 cm (2 3/8") long. 2 4 Trim off the corner of the fabric 1.5 cm (3/16") by 0.8 cm (5/16") to avoid a bulkiness of the hem at 3 1 Wrong side of the fabric 2 0.5 cm 3 0.8 cm 4 Curl of the foot 1 2 2 Place the fabric aligning the hem edge with the guide on the foot. Lower the foot and sew several stitches while pulling both threads to the back. Stop the machine with the needle in the fabric and raise the presser foot. Insert the folded portion of the fabric into the curl of the foot. Lower the foot and sew while litting up the edge to keep it feeding smoothly and evenly. 25 SECTION 5. DECORATIVE STITCHING 2 1 G Shell Tuck 3 4 5 2 3 1 5 4 3 1 0 0 2 4 1 Pattern selector: G 2 3 Presser foot: Thread tension: Zigzag foot 6–8 4 5 Stitch length: Stitch width: 2–3 5 Place the folded edge along the slot of foot. The needle should fall off the edge of the fabric on the right forming a tuck. A B C D E G H F I J K Stretch Stitch Patterns L 1 1 Pattern selector: 2 Presser foot: 3 Thread tension: 4 Stitch length: 5 Stitch width: 3 2 5 4 A–L Zigzag foot 1–4 S.S. 5 5 4 3 2 1 4 1 0 0 2 If forward and reverse feeds become unbalanced due to the type of fabric, adjust the balance by turning the stitch length dial as follows: If patterns are compressed, turn the dial toward " + ". If patterns are drawn, turn the dial toward " – ". (See page 12 ) 26 3 1 Smocking 2 D 3 1 2 5 4 3 4 5 5 4 3 Pattern selector: Presser foot: D Zigzag foot Thread tension: Stitch length: 1–4 S.S. Stitch width: 5 2 1 0 1 4 0 2 With the stitch length at "4", sew straight stitching lines 1 cm (3/8") apart, across the area to be smocked. Knot the threads along one edge. Pull the bobbin threads and 3 1 distribute the gathers evenly. Secure the threads at the other end. Sew the decorative stitch between the gathering stitches. Pull out the gathering stitches. Note : Loosen the needle thread tension to make gathering easier. 1 1 1 cm (3/8") Box Stitching 2 H 3 2 4 0 1 1 5 3 4 5 5 4 3 2 Pattern selector: Presser foot: Thread tension: Stitch length: Stitch width: H Zigzag foot 1–4 0.5–2 5 2 1 0 3 4 Use this stitch to join heavy weight fabrics. Overlap two raw edges together and use this stitch to join them. 27 1 Applique 2 C 3 1 4 5 1 5 4 3 3 4 5 2 0 2 2 3 1 0 Pattern selector: Presser foot: C Zigzag foot Thread tension: Stitch length: 1–4 0.5–1 Stitch width: 5 4 Baste (or fuse with iron-on fabric joiner) applique pieces on the fabric. Stitch around the applique making sure the needle falls along the outer edge of the applique. When sewing corners, lower the needle down into the fabric. Raise the presser foot and pivot fabric to the right or left. J K L Decorative Satin Stitch Pattern 2 3 1 5 4 2 3 0 5 4 3 1 2 4 5 1 0 2 Pattern selector: Presser foot: Thread tension: Stitch length: Stitch width: J–L Zigzag foot 1–4 0.5–1 5 3 4 1 For a delicate appearance on fabric such as chiffon, use a single layer with a tear-away backing, if necessary. 28 SECTION 6. CARE OF YOUR MACHINE Dismantling and Assembling Hook Race Unit Note : Turn off the power switch and/or unplug the machine. 2 To dismantle hook race unit: Raise the needle to its highest position and open the hook cover. Open the hinged latch of bobbin case and take it out of the machine. Open the hook race ring holders and remove the hook race ring. 1 Remove the hook. * Clean the hook race with a brush and a soft dry cloth. 1 Bobbin case 5 2 Hook race ring holder 4 3 Hook race ring 3 4 Hook 5 Hook race To assemble hook race unit: 7 6 Hold the hook by the center pin and fit it carefully back into the hook race, forming a perfect circle with the shuttle driver. Attach the hook race ring making sure the bottom pin fits into the notch. Lock the hook race ring by turning the holders back into position. Insert the bobbin case. 6 Pin 7 Notch Cleaning the Feed Dog Note : Turn off the power switch and/or unplug the machine before cleaning the feed dog. Remove the needle and the presser foot. Remove the needle plate set screw and remove the needle plate. With a brush, clean out dust and lint clogging the feed dog teeth. Reset the needle plate. 29 Sewing Light The sewing light is located behind the face plate. To change the bulb, take the face plate off the sewing machine by removing the setscrew. * Unplug the power supply before changing the bulb. * Do not dismantle the machine other than explained in this manual. (A) (B) (100V) (200V) (A) To remove ........ Turn to the left. To replace ........ Turn to the right. (B) To remove ........ Push and twist to the left. To replace ........ Push and twist to the right. Warning : The bulb could be HOT. Protect your fingers when handle it. 30 Troubleshooting Cause Condition The needle thread breaks. 1. The needle thread is not threaded properly. 2. The needle thread tension is too tight. 3. The needle is bent or blunt. 4. The needle is incorrectly inserted. Reference See Page 9 See Page 11 See Page 6 See Page 6 5. The fabric is not being drawn to the back when sewing is finished. See Page 14 6. The thread is either too heavy or too fine for the needle. See Page 6 The bobbin thread breaks. The needle breaks. 1. The bobbin thread is not threaded properly in the bobbin case. 2. Lint has collected in the bobbin case. See Page 8 Clean the bobbin case. 3. The bobbin is damaged and doesn't turn smoothly. Exchange bobbin. 1. The needle is incorrectly inserted. 2. The needle is bent or blunt. 3. The needle clamp screw is loose. See Page 6 See Page 6 4. The tension of the needle thread is too tight. 5. The fabric is not drawn to the back when sewing is finished. 6. The needle is too fine for the fabric being sewn. 7. The pattern selector dial had been turned while the needle was in the material. See Page 6 See Page 11 See Page 14 See Page 6 See Page 12 1. The needle is incorrectly inserted. 2. The needle is bent or blunt. 3. The needle and/or threads are not suitable for the work being sewn. 4. A BLUE TIPPED needle is not being used for sewing stretch, very fine fabrics and synthetics. 5. The needle thread is not threaded properly. See Page 6 See Page 6 See Page 6 Seam puckering 1. The needle thread tension is too tight. 2. The machine is not threaded correctly. 3. The needle is too heavy for the fabric being sewn. 4. The stitches are too coarse for the fabric being new line sewn. * When sewing extremely light weight materials, place a sheet of paper underneath the fabric. See Page 11 See Page 9 See Page 6 Make the stitches denser. Stitches form loops See Page 11 below the work 1. The needle thread tension is too loose. 2. The needle is either too heavy or too fine for the thread. The cloth is not 1. The feed dog is packed with lint. See Page 29 feeding smoothly. 2. The stitches are too fine. Make the stitches coarser. The machine does not work. 1. The machine is not plugged in. 2. Thread is caught in the hook race. 3. Handwheel has been disengaged for bobbin winding. See Page 4 See Page 29 The machine does not run smoothly and is 1. Threads have been caught in hook mechanism. 2. The feed dog is packed with lint. Skipped stitches noisy. 31 See Page 6 See Page 9 See Page 6 See Page 8 See page 29 See Page 29 INHALTSVERZEICHNIS ABSCHNITT 1. HAUPTTEILE Teilenan ................................................................................................................................................... 2 ABSCHNITT 2. VORBEREITUNG ZUM NÄHEN Zusatztisch ............................................................................................................................................... 3 Standardzubehör ..................................................................................................................................... 3 Zubehörkasten ......................................................................................................................................... 3 Netzanschluss der Maschine ………………………........................................... ...................................... 3 Pedal ........................................................................................................................................................ 4 Nähfuß-Lüfterhebel .................................................................................................................................. 5 Ein- und Ausbau des Nähfußes ............................................................................................................... 5 Nadelwechsel .......................................................................................................................................... 6 Garn- und Nadeltabelle ............................................................................................................................ 6 Vorbereitung der Garnrollenstifte ............................................................................................................. 7 Herausnehmen oder Einsetzen der Spulenkapsel .................................................................................. 7 Garn aufspulen ........................................................................................................................................ 8 Einfädeln der Spulenkapsel ..................................................................................................................... 8 Einfädeln der Maschine ........................................................................................................................... 9 Nadeleinfädler ........................................................................................................................................ 10 Spulenfaden hochziehen ....................................................................................................................... 10 Ausgleich der Nadelfadenspannung ...................................................................................................... 11 Spannungseinstellung des Spulenfadens .............................................................................................. 11 Stichsteller ............................................................................................................................................. 12 Stichlängeneinstellung ........................................................................................................................... 12 Stichbreiteneinstellung ........................................................................................................................... 12 Rückwärtsnähknopf ............................................................................................................................... 13 Absenken des Stoffschiebers ................................................................................................................ 13 ABSCHNITT 3. NORMALES NÄHEN Nähen mit Steppstich ............................................................................................................................. 14 Nährichtungswechsel ............................................................................................................................. 14 Einsatz der Nahtführungen auf der Nadelplatte ..................................................................................... 15 Rechtecke nähen ................................................................................................................................... 15 Variable Nadelstellung ........................................................................................................................... 15 Zick-Zack-Stich ...................................................................................................................................... 16 ABSCHNITT 4. ALLGEMEINE NÄHTECHNIKEN Versäubern ............................................................................................................................................ 16 Zick-Zack-Stich für Trikotwaren ............................................................................................................. 17 Formstich ............................................................................................................................................... 17 Stretch-Steppstich ................................................................................................................................. 18 Knöpfe annähen .................................................................................................................................... 19 Knopflöcher ....................................................................................................................................... 20-21 Kordelknopfloch ..................................................................................................................................... 22 Einnähen von Reißverschlüssen ........................................................................................................... 23 Blindstichsäumen ................................................................................................................................... 24 Rollsaum ................................................................................................................................................ 25 ABSCHNITT 5. ZIERSTICH NÄHEN Wellenstich ........................................................................................................................................... 26 Stretchstich ............................................................................................................................................ 26 Smocken ................................................................................................................................................ 27 Kastenstich ............................................................................................................................................ 27 Applikationen ......................................................................................................................................... 28 Erhabener Zierstich ............................................................................................................................... 28 ABSCHNITT 6. PFLEGE IHRER MASCHINE Ein- und Ausbau – Greiferbahn ............................................................................................................. 29 Reinigung des Stoffschiebers ................................................................................................................ 29 Nählampe .............................................................................................................................................. 30 Fehlersuche und Abhilfe ........................................................................................................................ 31 1 ABSCHNITT 1. HAUPTTEILE 10 8 9 Teilenamen 7 6 5 4 11 3 12 2 13 1 14 15 20 16 17 18 19 21 1 2 3 Rückwärtsnähknopf (vernähen) Stichsteller Stichlängeneinstellung 4 5 Stichbreiteneinstellung Spuleranschlag 6 7 Spulerachse Garnrollenstift 8 9 10 Spulerfadenführung Fadenführung Fadenhebel 11 12 Fadenspannungseinstellung Vordere Abdeckung 13 14 15 Fadentrenner Nadeleinfädler Nadelplatte 16 17 18 19 20 21 22 23 24 25 26 27 Nähfußhalter Nadelhalter Nadel Nähfuß Zusatztisch Tragegriff Handrad Netzschalter Maschinenstecker Armwelle Knopflochhebel Nähfuß-Lüfterhebel 27 22 26 25 Hinweis : Die Spezifikationen können ohne vorherigen Hinweis geändert werden. 23 24 2 ABSCHNITT 2. VORBEREITUNG ZUM NÄHEN Zusatztisch Der Zusatztisch verschafft eine zusätzliche Nähfläche und kann problemlos abgenommen werden, um mit dem freien Arm zu nähen. Abbau des Tisches: Nehmen Sie den Tisch von der Maschine. Anbau des Tisches: Schieben Sie den Zusatztisch bis zum Anschlag an die Maschine. • Vorteile und Einsatz des freien Arms: - Beim Verstärken von Taschen, Öffnungen und Gürteln sammelt sich kein Stoff um die Nadel. - Beim Einnähen von Ärmeln, Gurtband, Hosenbeinen oder runden Teilen eines Kleidungsstücks. - Beim Stopfen von Socken oder Ausbessern von Kniestücken, Ellbogen oder Verschleißteilen von Kinderkleidung. Standardzubehör 1 3 2 4 1 Nähfuß für Reißverschlüsse 2 3 4 Nähfuß für Säume Automatischer Nähfluss für Knopflöcher Spulen Satz Nadeln Knopflochschneider Schraubenzieher Saumführung 5 6 7 8 5 6 8 7 Zubehörkasten Das Nähzubehör ist bequem im Zusatztisch untergebracht. 9 9 3 Zubehörkasten Netzanschluss der Maschine 3 2 Bevor Sie das Netzkabel anschließen, stellen Sie sicher, dass die auf dem Typenschild der Maschine angegebene Spannung und Frequenz mit Ihren Netzwerten übereinstimmen. 1. Schalten Sie den Netzschalter aus. 2. Stecker Sie den Maschinenstecker in die Maschinensteckanschluss. 1 3. Stecken Sie den Netzstecker in die Netzsteckdose. 4. Schalten Sie den Netzschalter für den Stromanschluss und die Maschinenbeleuchtung ein. 4 5 Netzstecker Netzsteckdose 5 Maschinenstecker 1 3 6 Netzschalter Maschinensteckanschluss 6 Pedal 2 4 Pedal Die Nähgeschwindigkeit kann durch das Pedal oder den Fußhebel verändert werden. Je stärker der Druck auf das Pedal ist, desto schneller näht die Maschine. Vorsicht : Legen Sie bitte keine Gegenstände auf das Pedal. Die Maschine könnte sonst unbeabsichtigt anlaufen. 4 Nähfuß-Lüfterhebel Der Nähfuß-Lüfterhebel hebt und senkt den Nähfuß. Er kann ihn ca. 0,6 cm (1/4”) über der normalen Hubstellung heben, um den Nähfuß leichter herausnehmen oder um dicke Stoffteile leichter unter den Nähfuß schieben zu können. 2 1 1 Normale Hubstellung 2 Oberste Stellung Ein- und Ausbau des Nähfußes Ausbau Drehen Sie das Handrad nach vorn, um die Nadel in ihre höchste Stellung zu bringen. Heben Sie den Nähfuß. Drücken Sie auf den hinter der Nähfußhalter liegenden Hebel. Der Nähfuß löst sich. Einbau Plazieren Sie den Nähfluss so, dass der Nähfußstift genau unter der länglichen Aussparung der Nähfußhalter liegt. Senken Sie den Nähfußhalter ab, damit der Nähfuß an Ort und Stelle arretiert wird. 5 Nadelwechsel Heben Sie die Nadel durch Drehen des Handrads nach vorn und senken Sie den Nähfuß ab. Lockern Sie die Nadelbefestigungsschraube entgegen dem Uhrzeigersinn. Lösen Sie die Nadel aus der Befestigung. Schieben Sie die neue Nadel in die Befestigung, und zwar mit der flachen Seite nach vorn. Führen Sie die Nadel so weit wie möglich in die Befestigung ein und ziehen Sie dann die Befestigungsschraube mit einem Schraubenzieher fest. * Prüfen Sie Ihre Nadeln häufig auf Gratbildung und stumpfe Spitzen. Hängenbleiben und Laufmaschen bei Strickwaren, feinen Seiden und ähnlichen Textilien kommen ständig vor und sind fast immer die Folge einer schadhaften Nadel. So prüfen Sie den Zustand der Nadel Legen Sie die Nadel mit de flachen Seite auf eine flache Unterlage (Nadelplatte, Glas usw.). Der freie Abstand zwischen der Nadel und der Fläche muss gleichmäßig sein. Benutzen Sie niemals eine verbogene oder stumpfe Nadel. Stoffsorten Crêpe de Chine, Gaze, Linon, Organdy, Crêpe Georgette, Tricot Mittel- Leinen, schwer Baumwolle, Pikee, Serge, Strickwaren ohne linke Seite, Perkal Schwer Nanking, Tweed, Gabardine, Bezugs- und Gardinenstoff und Kaschierungen Leicht Garn Feine Nähseide Feine Baumwolle Feine Synthetikware Feine Baumwolle Polyester, kaschiert Needle SizeGarn-und Nadeltabelle Nadelgröße 9 - oder 11 Nähseide 50 Baumwolle 50-80, Polyester kaschiert mit synthetischer Baumwolle 50-60 11 Nähseide 50 Baumwolle 40- 50, Polyester kaschiert mit synthetischer Baumwolle 40-50 14 Zum Nähen von feinen Stoffen werden feine Nadeln und Garne, dickere Nadeln und dickere Garne für dickere Stoffe eingesetzt. Probieren Sie die Nadelgröße und die Garnstärke an einem kleinen Stück des Stoffes aus, den Sie tatsächlich verarbeiten möchten. - Benutzen Sie das gleiche Garn für die Nadel und die Spule. oder - 14 16 Zum Nähen von sehr feinen und elastischen Synthetikstoffen benutzen Sie am besten eine Nadel mit BLAUER SPITZE. Mit Nadeln mit blauer Spitze werden Stichsprünge wirksam unterbunden. Sehr feine Stoffe nähen Sie am besten, wenn Sie ein Papier darunter legen. Damit verhindern Sie krause Nähte. 6 Vorbereitung der Garnrollenstifte Die Garnrollenstifte halten die Garnspulen, die die Maschine mit Nähgarn versorgen. Um sie zu benutzen, ziehen Sie die Garnspulen heraus; bei Nichtbenutzung drücken Sie sie ein. 1 1 2 2 NichtbOberfaden Öhr 3 Verwicklung Hinweis : Wenn Sie Nähgarn verwenden, das sich leicht um den Garnrollenstift verwickelt, fädeln Sie es, wie dargestellt, durch das Öhr des 1 3 Garnrollenstiftes ein. Das Öhr muss der Garnrolle gegenüber liegen. Herausnehmen oder Einsetzen der Spulenkapsel Öffnen Sie den Greiferdeckel. 1 Greiferdeckel 1 Heben Sie die Nadel, indem Sie das Handrad nach vorn drehen. Nehmen Sie die Spulenkapsel heraus und halten Sie dabei die Sperrklinke fest. 2 Sperrklinke 2 3 Beim Einsetzen der Spulenkapsel lassen Sie den Überstand in die Aussparung der Greiferbahn einrasten. 3 7 Überstand Garnaufspulen 1 3 1 Zie hen Sie das Handrad heraus. 2 Ziehen Sie Garn von der Garnrolle. Führen Sie den Faden um die Fadenführung der Spule. 3 Fädeln Sie den Faden durch das Spulenöhr von innen nach außen ein. Schieben Sie die Spule auf die Spulenachse. 4 Schieben Sie sie nun nach rechts. 5 Mit dem freien Fadenende in der Hand drücken Sie 2 auf den Fußhebel. Nach einigen wenigen Windungen stoppen Sie die Maschine und schneiden Sie den Faden nahe am Spulenöhr ab. 6 5 6 4 7 Drücken Sie nun erneut den Fußhebel. Wenn die Spule ganz voll ist, stoppen Sie die Maschine. Bringen Sie die Spulenachse wieder in ihre Ausgangsstellung, indem Sie sie nach links verschieben und schneiden Sie den Faden ab. Schieben Sie das Handrad nach links (Ausgangsstellung). 7 Hinweis : Bringen Sie die Spulenachse wieder an Ort und Stelle, sobald die Maschine ausgesetzt hat. Einfädeln der Spulenkapsel 1 2 1 Legen Sie die Spule in die Spulenkapsel. Achten Sie darauf, dass der Faden in Pfeilrichtung abläuft. 2 Legen Sie den Faden in die an der Spulenkapsel vorhandene Rille. 3 3 Ziehen Sie den Faden unter der Spannfeder heraus und fädeln Sie ihn in das Ausgangsöhr ein. * Lassen Sie ca. 10 cm (4”) Faden frei. 8 Einfädeln der Maschine 3 1 Heben Sie den Fadenheber bis in die höchste Stellung, indem Sie das Handrad nach vorn drehen. Nähfuß heben. Legen Sie eine Garnrolle wie dargestellt auf den Garnrollenstift. Dabei muss der Faden von hinten von der Garnrolle abgerollt werden. 4 2 5 6 1 Legen Sie den Faden mit beiden Händen in die Fadenführung. 2 Während Sie den Faden in der Nähe der Spule festhalten, ziehen Sie den Faden herunter bis in den Spannungsbereich und führen ihn anschließend um die Lagerung der Haltefeder. 3 Ziehen Sie den Faden fest nach oben und von rechts nach links durch den Fadenheber. 4 Nun ziehen Sie den Faden nach unten und führen ihn in die untere Fadenführung ein. 5 Ziehen Sie den Faden weiter nach unten und legen Sie ihn in die Fadenführung der Nadelstange. 6 Fädeln Sie den Faden von vorn nach hinten in das 1 2 3 4 Nadelöhr. * Näheres zum eingebauten Nadeleinfädler, sieheauch Seite 10. . 5 Hinweis: Schneiden Sie das Fadenende mit einer 6 scharfen Schere ab. Sie erleichtern sich damit das Einfädeln der Nadel. 9 Nadeleinfädler 1 1 Heben Sie die Nadel bis in die höchste Stellung. Ziehen Sie den Drehknopf des Nadeleinfädlers so weit Sie können nach unten. 2 2 Drehen Sie den Knopf in Pfeilrichtung wie in der Abbildung dargestellt. Dann führen Sie den Haken in das Nadelöhr. Führen Sie den Faden um die Führung herum und unter dem Haken her. 3 3 Drehen Sie den Drehknopf in Pfeilrichtung wie dargestellt und führen Sie die Fadenschlinge durch die Nadel. 4 Ziehen Sie den Faden durch das Nadelöhr. * Der Nadeleinfädler ist für eine Nadel Nr. 11 bis Nr. 16 oder eine Nadel mit blauer Jenomespitze einsetzbar. Er eignet sich auch gut für Garnstärken 50-100. 4 Spulenfaden hochziehen 1 2 1 Heben Sie den Nähfuß und halten Sie den Nadelfaden locker mit der linken Hand. 2 Drehen Sie das Handrad mit der rechten Hand langsam nach vorn, bis sich die Nadel einsenkt. Drehen Sie das Handrad weiter, bis sich der Fadenheber in der höchsten Stellung befindet. Ziehen Sie den Nadelfaden dann etwas nach oben, bis sich mit dem Spulenfaden eine Schlinge bildet. 3 3 10 Nun ziehen Sie beide Fäden 15 cm (6”) nach hinten unter dem Nähfuß her. Ausgleich der Nadelfadenspannung 1 1 5 4 Die Fadenspannung richtet sich nach dem Nähmaterial, der Anzahl Stofflagen und der Nähtechnik. 3 1 Korrekte Spannung 6 * Der ideale Stepptisch verschlingt die Fäden zwischen zwei Stofflagen wie dargestellt (vergrößert zur detaillierten Darstellung). * 2 Beim ideal Zick-Zack-Stich ist der Spulenfaden auf der rechten Stoffseite (Oberseite) nicht zu sehen, der Nadelfaden ist auf der linken Stoffseite (Unterseite) etwas zu sehen. 2 2 1 Nadelfaden (Oberfaden) 2 3 4 5 6 Spulenfaden (Unterfaden) Rechte Seite (Oberseite) des Stoffes Linke Seite (Unterseite) des Stoffes Fadenspannungseinstellung Stellpunkt Die Nadelfadenspannung ist zu hoch Der Spulenfaden (Unterfaden) ist auf der rechten Seite (Oberseite) des Stoffes zu sehen. Lockern Sie die Nadelfadenspannung, in dem Sie den Fadenspannungseinstellung eine Zahl tiefer stellen. 3 3 Nadelfadenspannung ist zu locker Der Nadelfaden (Oberfaden) ist auf der linken Seite (Unterseite) des Stoffes zu sehen. Spannen Sie den Nadelfaden etwas mehr, indem Sie den Fadenspannungseinstellung eine Zahl höher stellen. Spannungseinstellung des Spulenfadens Beim normalen Nähen ist eine Nachstellung der Spulenfadenspannung nicht erforderlich. Bei spezifischen Näharbeiten kann die Spannung des Spulenfadens jedoch nachgestellt werden. Drehen Sie die Stellschraube nach rechts zum Erhöhen und nach links zum Reduzieren der Spannung. 11 Stichsteller A D C A E F G H I J K Heben Sie Nadel und Nähfuß. Drehen Sie den Stichsteller bis die Markierung über den gewünschten Stichsymbol steht. 1 Markierung L 1 . Stichlängeneinstellung 1 Drehen Sie den Stellknopf zum Einstellen der Stichlänge, bis die gewünschte Stichlänge über der Markierung steht. Je höher die Zahl, desto länger wird der Stich. 3 1 2 Markierung “ ” entspricht der empfohlenen Einstellung für Knopflochstich Stellen Sie den Knopf auf das Intervall 0,5-4, wenn Sie mit Zick-Zack-Stich nähen. Stellen Sie den Knopf auf “S.S”, wenn Sie mit Elastikstich nähen. Fällt der Elastikstich nicht einheitlich aus, drehen Sie die Stichlängeneinstellung in Richtung “-“ zur Reduzierung oder “+” zur Verlängerung. 4 0 1 S.S. 1 4 0 2 3 Stichbreiteneinstellung 1 5 Stichbreitenstellknopf drehen, bis die gewünschte Stichbreite über der Markierung steht. Je höher die Zahl, desto breiter der Stich. 4 3 2 1 0 1 Markierung Hinweis: Heben Sie die Nadel vom Stoff ab, wenn Sie die Stichbreiteneinstellung betätigen 12 Rückwärtsnähknopf Während Sie den Rückwärtsnähknopf gedrückt halten, näht die Maschine rückwärts. Absenken des Stoffschiebers 1 Öffnen Sie den Greiferdeckel. 1 1 Greiferdeckel Zum Absenken des Stoffschiebers ziehen Sie den Absenkhebel nach unten und schieben Sie ihn dann nach rechts wie dargestellt. 2 1 2 Absenkhebel 3 2 3 Zum Heben des Stoffschiebers ziehen Sie den Absenkhebel nach unten und schieben Sie ihn dann nach links wie abgebildet. 2 * Für normalen Stoppstich muss der Stoffschieber gehoben sein. * Sobald die Maschine zu nähen beginnt, kehrt der Stoffschieber in die gehobene Stellung zurück. 2 13 ABSCHNITT 3. NORMALES NÄHEN 2 1 A Nähen mit Steppstic 3 B 4 2 2 3 5 4 3 4 3 1 1 5 1 0 4 0 2 5 1 1 Stichsteller: Nähfuß: Fadenspannung: AóB Zick-Zack-Nähfuß 2-6 Stichlänge: Stichbreite: 1,5-4 (0) ó (5) Heben Sie den Nähfuß und legen Sie das Nähgut, dessen Rand mit der Nähführungslinie der Nadelplatte fluchten muss. Senken Sie die Nadel auf den Stoff. Senken Sie den Nähfuß ab und legen Sie die Fäden glatt nach hinten. Drücken Sie das Pedal. Führen Sie das Nähgut locker an der Führungslinie entlang und lassen Sie dem Stoff möglichst freien Lauf. 2 3 2 Zum Vernähen der Nahtenden drücken Sie den Rückwärtsnähknopf und nähen einige Stiche rückwärts. Heben Sie den Nähfuß, ziehen Sie den Stoff ab, indem Sie die Fäden nach hinten ziehen. 3 Ziehen Sie die Fäden nach oben zum Fadentrenner. Die Fäden werden lang genug abgeschnitten, um die nächste Naht zu beginnen. Nährichtungswechsel Stoppen Sie die Maschine und drehen Sie das Handrad nach vorn, um die Nadel in den Stoff zu stechen. Heben Sie den Nähfuß. Drehen Sie den Stoff um die Nadel herum in die gewünschte Nährichtung. Senken Sie den Nähfuß wieder ab und nähen Sie weiter. 14 Einsatz der Nahtführungen auf derNadelplatte Die Nahtführungen auf der Nadelplatte helfen Ihnen, die Nahtbreite zu messen. 1 * 3 4 Die Zahlen geben den Abstand zwischen der zentralen Nadelstellung und der Führungslinie an. Zahlen auf der Nadelplatte 10 15 20 3/8" 4/8" 5/8" 6/8" Abstand in Zentimetern 1.5 2.0 1.0 1 2 2 1.0 1.3 1.6 Führungslinien 4 Eckenführung Nadelplatte Nadelplattenöffnung 5 Nahtbreite ab der zentralen Nadelstellung 3 1.9 Rechtecke nähen Zur Herstellung eines Rechtecks in 1,6 cm (5/8”) zum Stoffrand: Wenn der Ihnen gegenüber liegende Stoffrand, wie abgebildet, mit der Eckenführung fluchtet, unterbrechen Sie das Steppen und senken Sie die Nadel durch Drehen des Handrads nach vorn. Nähfuß heben und Stoff drehen, bis der Rand mit der 1,6 cm (5/8”)-Nahtführung fluchtet. 5 Nähfuß absenken und in der neuen Richtung weiternähen. 2 Eckenführung 2 Variable Nadelstellung 1 0 5 4 3 2 Wenn mit Steppstich (Ausführung A) gearbeitet wird, kann die Nadel zwischen den Nadelstellungen Mitte und links verstellt werden. Das geschieht durch Drehen der Stichbreiteneinstellung. 15 1 Zick-Zack-Stich 2 C 3 1 5 4 5 4 3 1 0 4 0 4 5 2 3 1 2 2 3 Stichsteller: Nähfuß: C Fadenspannung: Stichlänge: Stichbreite: 2-5 0,5-4 1,5 Zick-Zack-Nähfuß Der einfache Zick-Zack-Stich wird am häufigsten zum Versäubern von Nähten, Knöpfe annähen usw. verwendet. ABSCHNITT 4. ALLGEMEINE NÄHTECHNIKEN Versäubern 2 G 4 5 2 5 4 3 1 Stichsteller: 2 Nähfuß: 3 Fadenspannung: 4 Stichlänge: 5 Stichbreite: 3 1 3 C Zick-Zack-Nähfuß 1-4 1-2 5 2 1 0 4 0 1 Mit dem Zick-Zack-Stich werden unvernähte Nahtränder versäubert, damit sie nicht ausfasern. 16 Zick-Zack-Stich für Trikotware 2 1 D 3 4 5 1 5 4 3 Stichsteller: D 2 3 Nähfuß: Fadenspannung: Zick-Zack-Nähfuß 4 Stichlänge: Stichbreite: 5 1-4 0,5-1,5 5 2 0 2 1 1 0 3 4 Mit diesem Stich werden Nahtränder von Synthetikstoffen und anderen zum Kräuseln neigenden Stoffe versäubert. Legen Sie den Stoff so ein, dass eine Naht von 1,6 cm (5/ 8”) ermöglicht wird. Beschneiden Sie den Nahtrand nach dem Nähen. Hinweis: Vorsicht, nicht in Stiche einschneiden! Zick-Zack-Stich eignet sich auch sehr gut zum Stopfen und Ausbessern von Rissen. 1 Formstich 2 G 3 1 2 3 5 4 4 5 4 3 5 2 G Zick-Zack-Nähfuß 1-4 S.S. 5 1 0 0 1 4 Stichsteller: Nähfuß: Fadenspannung: Stichlänge: Stichbreite: 2 Dieser Formstich ist wegen seiner großen Elastizität und Stärke ideal zum Nähen von Badeanzügen und StretchSamt. Legen Sie den Stoff so ein, dass eine 1,6 cm (5/8”)-Naht ermöglicht wird. Beschneiden Sie den Nahtrand nach dem Nähen. Hinweis : Vorsicht, nicht in Stiche einschneiden! 17 3 1 Stretch-Steppstich 2 B 3 5 4 5 4 3 1 Stichsteller: 2 3 4 Nähfuß: Fadenspannung: Stichlänge: 5 Stichbreite: A oder B Zick-Zack-Nähfuß 2-6 1,5-4 (0) oder (5) 2 1 4 1 0 0 2 3 A Genäht wird mit zwei Stichen vorwärts und einem Stich rückwärts. Es entsteht dann eine Naht, die nicht leicht reißt. 18 Knöpfe annähen 2 1 3 C 4 5 5 2 1 4 3 0 C Zick-Zack-Nähfuß 1-3 4 Stichlänge: 5 Stichbreite: 6 Stoffschieber: beliebig Einstellung nach Bedarf Abgesenkt 4 0 3 1 2 1 Stichsteller: 2 Nähfuß: 3 Fadenspannung: 6 1 1 Stellen Sie die Stichbreite ein und drehen Sie das Handrad nach vorn, um zu prüfen, ob die Nadel auf jedes Loch des Knopfes trifft. 2 Senken Sie nun den Nähfuß ab, um den Knopf an Ort und Stelle zu halten. Die Löcher des Knopfes müssen mit der länglichen Aussparung des Nähfußes fluchten. 3 Um einen Steg zu bilden, kann eine Stecknadel auf den Nähfuß gesetzt werden. Achten Sie darauf, dass die Nadel in beide Löcher des Knopfes eindringt. Nähen Sie 110 Stiche und schneiden Sie Ober- und Unterfaden in einer Länge von 20 cm (8”) ab. 4 Ziehen Sie die Nadelfäden (Oberfäden) zwischen Knopf und Stoff durch die Löcher des Knopfes. 2 3 Ziehen Sie an den Oberfäden, um die Unterfäden auf die rechte Stoffseite hochzuziehen. Drehen Sie die Fäden um den Knopf, um einen Steg zu 4 5 bilden und verknoten Sie sie dann. 5 19 Heben Sie den N ähfuß nach dem Nähen. 1 Knopflöcher 2 3 BH 5 4 0 5 4 3 1 2 3 4 2 3 1 4 2 3 4 5 5 6 1 7 8 6 7 Stichsteller: Nähfuß: 3 4 5 Fadenspannung: Stichlänge: Stichbreite: (BH) Automatischer Knopflochnähfuß 1-5 (0,5-1) 5 * Die Knopflochgröße wird automatisch eingestellt, wenn der Knopf in den automatischen Knopflochnähfuß eingelegt wird. * Der Knopfhalter des Nähfußes eignet sich für eine Knopfgröße bis 2,5 cm (1”) Durchmesser. * Fertigen Sie zunächst an einer Probe des gleichen Stoffs, mit den gleichen Auflageflächen und mit Nähten wie die des echten Kleidungsstücks ein Probeknopfloch an. * Legen Sie den Knopf auf das Stoffmuster und markieren Sie den oberen und unteren Teil, um die Position des Knopflochs festzulegen. * Verwenden Sie bei Stretchstoffen Steifleinen. 1 0 2 1 1 2 8 3 4 Drehen Sie das Handrad nach vorn, um die Nadel in die höchste Position zu bringen. Heben Sie den Lüfterhebel zum Heben des Nähfußes. Stellen Sie den Stichsteller auf “BH”. Ist BH bereits eingestellt, setzen Sie den Steller wie unter Punkt 12 beschrieben zurück. Montieren Sie den Knopflochnähfuß. Schieben Sie den Knopfhalter nach hinten und legen Sie den Knopf ein. Schieben Sie den Knopfhalter dann so weit es geht wieder nach vorn. Drücken Sie den Knopflochhebel so weit wie möglich nach unten. 1 Knopflochhebel Schieben Sie den Stoff unter den Nähfuß. Drehen Sie das Handrad mit der rechten Hand langsam nach vorn, bis die Nadel abgesenkt wird; drehen Sie das Handrad dann weiter, bis sich der Fadenheberhebel in der höchsten Stellung befindet. Schieben Sie den Stoff nach links, um beide Fäden nach links herauszuziehen. Schieben Sie das Nähgut unter den Nähfuß und senken Sie die Nadel bis zum Ausgangspunkt. Senken Sie dann den automatischen Knopflochnähfuß. Hinweis : Achten Sie darauf, dass zwischen Schieber und Federhalter kein Hohlraum entsteht. Ist ein 5 Hohlraum vorhanden, dann ergibt sich, wie dargestellt, eine andere Reihenlänge 2 Ausgangspunkt 3 Schieber 4 Es darf kein Hohlraum vorhanden sein 5 Federhalter 6 Differenz 6 2 20 9 9 Nähen Sie langsam und stoppen Sie die Maschine, wenn ein Knopfloch fertig ist. * Die Maschine näht zuerst die vordere Verstärkung und die linke Reihe und anschließend die hintere Verstärkung und die rechte Reihe. 10 11 10 11 12 12 13 13 Schneiden Sie Ober- und Unterfaden auf eine Länge von ca. 10 cm (4”) ab. Ziehen Sie den Nadelfaden (Oberfaden) unter der linken Stoffseite hindurch und ziehen Sie gleichzeitig den Unterfaden hoch. Dann verknoten Sie beide Fäden. Stechen Sie eine Stecknadel in den unteren Teil der Verstärkung. Dann schneiden Sie die Öffnung mit dem Knopflochschneider auf. Vorsicht! Nicht in die Stiche schneiden! Zum Wiederholen des Knopflochnähens stellen Sie den Stichsteller zurück auf ; dann wieder, wie dargestellt, auf . Nun brauchen Sie nur noch den Fußhebel zu bedienen, um ein neues Knopfloch zu nähen. Wenn alle Knopflöcher genäht sind, schieben Die den Knopflochhebel so weit wie möglich nach oben. Einstellung der Knopflochstichdichte: Die Stichdichte zum Nähen von Knopflöchern muss innerhalb der Markierung “ ” der Stichlängeneinstellung liegen. 1 2 3 4 0 21 Kordelknopfloch 2 1 3 BH 4 5 1 2 Stichsteller: Nähfuß: 3 4 Fadenspannung: Stichlänge: Stichbreite: 5 0 (BH) Automatischer Knopflochnähfuß 1-5 (0,5-1) 5 5 4 3 1 2 1 0 2 3 4 1 1 Die Vorgehensweise ist die gleiche wie beim automatischen Knopfloch. * Stellen Sie die Stichbreite so ein, dass sie mit der verwendeten Kordelbreite übereinstimmt. Bei angehobenem Knopflochnähfuß haken Sie die Füllkordel in den hinten am Knopflochnähfuß angeordneten Sporn ein. Holen Sie die Enden unter dem Knopflochnähfuß her nach vorn und lassen Sie das vordere Ende frei hängen. Legen Sie die Füllkordel in die vor dem automatischen Knopflochnähfuß angeordneten Gabeln, um sie zusammen zu befestigen. Senken Sie die Nadel auf das Nähgut ab und zwar an dem Punkt, an dem das Knopfloch beginnt und danken Sie anschließend den Nähfuß ab. 1 2 1 2 3 Sporn Drücken Sie vorsichtig auf den Fußhebel und nähen Sie das Knopfloch. Jede Knopflochseite und die Verstärkungen werden auf der Kordel genäht. Ziehen Sie den Stoff aus der Maschine und schneiden Sie die Nähfäden ab. 3 Ziehen Sie die Kordel an ihrem linken Ende fest. Fädeln Sie das Ende in eine Stopfnadel und ziehen Sie es auf der linken Seite aus dem Stoff und schneiden Sie es ab. * 22 Zum Aufschneiden der Knopflochöffnung, siehe Anweisungen auf Seite 21. 1 Einnähen von Reißverschlüssen 2 3 1 Stichsteller: A 4 5 2 3 Nähfuß: Fadenspannung: Nähfuß für Reißverschlüsse 3-6 4 2 5 4 3 Stichlänge: Stichbreite: 1,5 - 4 5 5 3 1 A 1 0 0 2 4 Heften Sie das Reißverschlussband mit Stecknadeln oder Reihfaden und legen Sie es unter den Nähfuß. Ziehen Sie die Fäden nach unten und senken Sie den Nähfuß ab. Zum Nähen der linken Reißverschlusseite führen Sie die Reißverschlusszähne am Rand des Nähfußes entlang und nähen Sie durch den Stoff und das Reißverschlussband. Drehen Sie das Nähgut und nähen Sie die auf die andere Seite wie die bereits fertige linke Seite. 23 Blindstichsäumen 2 1 F 3 4 5 2 5 4 3 1 2 3 4 5 6 3 1 E 1 0 4 0 2 Stichsteller: E oder F Nähfuß: Fadenspannung: Zick-Zack-Nähfuß 2-4 Stichlänge: Stichbreite: Saumführung 1-3 5 6 1 1 [A] Falten Sie den Saum nach oben, dann noch einmal mit einer Faltenbreite von 0,4 a 0,7 cm (1/4”), wie dargestellt [B] 2 1 Linke Stoffseite 2 0,4 bis 0,7 cm (1/4”) [A] Schwere Stoffe [B] Feine oder mittelschwere Stoffe 2 1 1 2 2 Senken Sie den Nähfuß ab. Dann lockern Sie die Befestigungsschraube des Nähfußhalters, um Nähfußhalterschaft die Saumführung einzulegen. Ziehen Sie die Schraube wieder an und achten Sie darauf, dass die Wand der Saumführung zwischen den Nähfußpratzen liegt. 3 Schraube 4 Saumführung 3 Heben Sie den Nähfuß und legen Sie den gefalteten Stoff so darunter, dass die weiche Falte an die Wand 3 4 3 der Saumführung stößt. Senken Sie den Nähfuß und nähen Sie dann langsam so, dass die Zick-Zack-Stiche auf den Saumrand fallen und die weiche Falte durchstechen. Achten Sie beim Nähen darauf, dass die Falte exakt an der Wand der Saumführung entlang läuft. 4 Öffnen Sie nun die Falte ganz. 4 5 5 * 24 Rechte Stoffseite. Wenn die Nadel sehr stark nach links abgesenkt wird, dann sind die Stiche auf der rechten Stoffseite sichtbar. 1 Rollsaum 2 3 1 Stichsteller: A 4 5 2 3 4 Nähfuß: Fadenspannung: Stichlänge: Nähfuß für Säume 2-6 1,5 - 4 5 Stichbreite: 5 2 5 4 3 3 1 A 1 0 0 2 4 1 1 (3,16”) ab, damit der Saum an der Ecke keinen Wulst bildet. Falten Sie den Stoffrand zwei Mal 0,3 cm (1/8”) breit und 6 cm (2 3/8”) lang. 2 4 Schneiden von der Stoffecke 0,8 cm (5/16”) x 1,5 cm 3 1 Linke Stoffseite 2 0,5 cm 3 0,8 cm 4 Nähfußwendel 1 2 2 25 Legen Sie den Stoff so ein, dass der Saumrand mit der Nähfußführung fluchtet. Senken Sie nun den Nähfuß ab und näheren einige Stiche, wobei Sie gleichzeitig beide Nähfäden nach hinten ziehen. Stoppen Sie die Maschine mit der Nadel im Stoff und heben Sie den Nähfuß. Legen Sie den gefalteten Teil des Stoffes in die Nähfußwendel. Senken Sie den Nähfuß, nähen Sie und heben Sie gleichzeitig den Rand etwas an, damit er gleichmäßig und sanft durchläuft. ABSCHNITT 5. ZIERSTICH NÄHEN Wellenstich 2 1 G 3 4 5 2 Stichsteller: Nähfuß: G Zick-Zack-Nähfuß 3 4 Fadenspannung: Stichlänge: Stichbreite: 6-8 2-3 5 5 3 1 5 4 3 1 2 1 0 0 2 4 Legen Sie den gefalteten Rand an die längliche Nähfußöffnung. Die Nadel muss außerhalb des Stoffrandes rechts einstechen und eine Falte bilden. A B C D E G H F I J K Stretchstich L 1 1 3 2 3 4 2 5 4 5 Stichsteller: Nähfuß: Fadenspannung: Stichlänge: Stichbreite: A-L Zick-Zack-Nähfuß 1-4 S.S. 5 5 4 3 2 1 4 1 0 0 2 Wenn Vorschub vor und zurück wegen der Stoffsorte unausgeglichen ist, gleichen Sie ihn aus, indem Sie die Stichlängeneinstellung wie folgt drehen: Wenn sich die Vorlagen zusammenziehen, drehen Sie die Einstellung auf “+”. Wenn sich die Vorlagen strecken, drehen Sie die Einstellung auf “-“. (Siehe auch Seite 12). 26 3 1 Smoken 2 D 3 5 4 5 4 3 1 Stichsteller: D 2 3 Nähfuß: Fadenspannung: Zick-Zack-Nähfuß 1-4 4 5 Stichlänge: Stichbreite: S.S. 5 2 1 0 1 4 0 2 Legen Sie mit der Stichlänge “4” gerade Steppnähte im Abstand von 1 cm (3/8”) durch den gesamten Stickbereich.. Knoten Sie die Fäden über die Länge eines Randes. 3 1 Ziehen Sie an den Spulenfäden und verteilen Sie die Falten gleichmäßig. Befestigen Sie die Fäden am anderen Ende. Nähen Sie mit einem Zierstich zwischen den Kräuselstichen. Ziehen Sie die Kräuselstiche heraus. Hinweis : Lockern Sie die Spannung des Nadelfadens 1 1 Kastenstich 2 H 3 4 0 1 (Oberfaden) etwas; das Kräuseln geht dann etwas leichter. 1 cm (3/8”) 1 2 5 3 4 5 5 4 3 2 Stichsteller: Nähfuß: Fadenspannung: Stichlänge: Stichbreite: H Zick-Zack-Nähfuß 1-4 0,5 - 2. 5 2 1 0 3 4 Verwenden Sie diesen Stich zum Zusammennähen von schweren Stoffen. Überlappen Sie zwei unversäuberte Ränder und verwenden Sie diesen Stich zum Zusammennähen. 27 1 Applikationen 2 C 3 1 4 5 1 5 4 3 2 3 4 5 2 0 2 3 1 0 Stichsteller: Nähfuß: C Zick-Zack-Nähfuß Fadenspannung: Stichlänge: Stichbreite: 1-4 0,5-1 5 4 Heften Sie mit Reihfaden (oder kleben Sie mit Bügeleisenkleber) Applikationen auf den Stoff. Umnähen Sie die Applikation und achten Sie darauf, dass die Nadel genau auf dem Außenrand der Applikation einsticht. An den Ecken stechen Sie die Nadel in den Stoff. Heben Sie den Nähfuß und drehen Sie den Stoff nach rechts oder links. J K L Erhabener Stich 2 3 1 5 4 2 3 0 5 4 3 1 2 4 5 1 0 2 Stichsteller: Nähfuß: Fadenspannung: Stichlänge: Stichbreite: J-L Zick-Zack-Nähfuß 1-4 0,5-1 5 3 4 1 Zum besseren Aussehen sollte bei Bedarf auf empfindlichen Stoffen, wie Seidenmusselin, nur eine Lage mit einer Verstärkung angebracht werden, die später entfernt werden kann. 28 ABSCHNITT 6. PFLEGE IHRER MASCHINE Aus- und Einbau Greiferbahn 2 Hinweis : Schalten Sie die Maschine aus und/oder ziehen Sie den Netzstecker. So bauen Sie die Greiferbahn aus: Heben Sie die Nadel bis in ihrer höchste Stellung und öffnen Sie die Greiferplatte. Öffnen Sie die Gelenkklinke der 1 Spulenkapel und nehmen Sie sie aus der Maschine. Lösen Sie die Befestigungsteile der Greiferbahn und ziehen Sie den Ring aus der Greiferbahn. Nehmen Sie den Greifer heraus. * Reinigen Sie die Greiferbahn mit einer Bürste und einem weichen, trockenen Tuch. 5 1 Spulenkapsel 2 Greiferbahnbefestigung 4 3 3 Greiferbahnring 4 Greifer 5 Greiferbahn So bauen Sie die Greiferbahn ein: Halten Sie den Greifer am Mittelstift fest und legen Sie ihn vorsichtig wieder in die Greiferbahn; dabei muss mit dem Greiferantrieb ein optimaler Kreis gebildet werden. Legen Sie den Greiferbahnring ein und achten Sie darauf, dass der Innenstift in die Rille einrastet. Blockieren Sie die Greiferbahn und drehen Sie die Befestigungsteile wieder an ihren Platz. Legen Sie die Spulenkapsel wieder ein. 6 Stift 7 Rille 7 6 Reinigung des Stoffschiebers Hinweis: Schalten Sie die Maschine aus und/oder ziehen Sie den Netzstecker, bevor Sie den Stoffschieber reinigen. Nehmen Sie die Nadel und den Nähfuß ab. Drehen Sie die Befestigungsschraube der Nadelplatte heraus und nehmen Sie die Nadelplatte ab. Entfernen Sie mit einer Bürste Staub und Flusen, die die Verzahnung des Stoffschieber verstopfen und setzen Sie die Nadelplatte wieder ein. 29 Nählampe Die Nählampe befindet sich hinter der Frontplatte. Um die Glühbirne auszuwechseln, nehmen Sie die Frontplatte der Nähmaschine ab, indem Sie die Befestigungsschraube lösen. * Unterbrechen Sie die Stromversorgung, bevor Sie die Birne wechseln. * Weichen Sie beim Ausbau von Maschinenteilen nicht von den Anweisungen dieses Handbuchs ab. (A) Zum Ausbauen ……….. Nach links drehen. Zum Einbauen ……....... Nach rechts drehen. (A) (B) (B) Zum Ausbauen ………. Drücken und nach links drehen Zum Einbauen ............. Drücken und nach rechts drehen Vorsicht : Die Glühbirne kann HEISS sein. Schützen Sie also (100V) Ihre Händen beim Manipulieren. (200V) 30 Fehlersuche und Abhilfe Störung Der Nadelfaden (Oberfaden ) reißt Ursache 1. Nadelfaden falsch eingefädelt. 2. Spannung des Nadelfadens zu hoch. 3. Nadel verbogen oder stumpf. 4. Nadel falsch eingesetzt. 5. Stoff wird nach dem Nähen nicht nach hinten geschoben 6. Faden zu dick oder zu dünn für die Nadel. Hinweis Siehe Seite 9 Siehe Seite 11 Siehe Seite 6 Siehe Seite 6 Siehe Seite 14 Siehe Seite 6 Spulenfaden 1. Unterfaden falsch in die Spulenkapsel eingefädelt. Siehe Seite 8 (Unterfaden) reißt 2. In der Spulenkapsel haben sich Flusen angesammelt Spulenkapsel reinigen 3. Die Spule ist schadhaft und dreht nicht gleichmäßig. Spule wechseln. 1. Nadel falsch eingesetzt. 2. Nadel verbogen oder stumpf. Siehe Seite 6 Die Nadel bricht 3. 4. 5. 6. 7. Stiche übersprungen Krause Naht 5. Befestigungsschraube der Nadel gelockert. Nadelfadenspannung zu hoch. Stoff wird nach dem Nähen nicht nach hinten geschoben. Die Nadel ist für das verarbeitete Nähgut zu fein. Der Stichsteller wurde gedreht, als sich die Nadel im Stoff befand. Nadel falsch eingesetzt. Nadel verbogen oder stumpf. Nadel und/oder Garn sind für das Nähgut ungeeignet. Zum Nähen von Synthetik- und sehr feinen Stoffen und Stretchstoffen wird keine Nadel mit BLAUER SPITZE verwendet. Nadelfaden falsch eingefädelt. 1. 2. 3. 4. Spannung des Nadelfadens zu hoch. Maschine falsch eingefädelt. Nadel ist für das Nähgut zu dick. Die Stiche sind für das verarbeitete Nähgut zu dick. 1. 2. 3. 4. Siehe Seite 6 Siehe Seite 6 Siehe Seite 11 Siehe Seite 14 Siehe Seite 6 Siehe Seite 12 Siehe Seite 6 Siehe Seite 6 Siehe Seite 6 Siehe Seite 6 Siehe Seite 9 Siehe Seite 11 Siehe Seite 9 Siehe Seite 6 Arbeiten Sie mit dichteren Stichen. * Wenn Sie sehr leichte Stoffe verarbeiten, legen Sie Papier unter den Stoff. Die Stiche bilden Schlingen unter dem Nähgut Das Nähgut wird nicht gleichmäßig 1. Nadelfadenspannung ist zu locker. 2. Nadel zu dick oder zu fein für das Garn. Siehe Seite 11 Siehe Seite 6 1. Stoffschieber durch Flusen verstopft. 2. Zu feine Stiche. Siehe Seite 29 Arbeiten Sie mit transportiert Maschine näht nicht Die Maschine arbeitet ungleichmäßig und dickeren Stichen. 1. Die Maschine ist nicht ans Stromnetz angeschlossen 2. In der Greiferbahn hat sich Garn festgesetzt. Siehe Seite 4 Siehe Seite 29 3. Handrad wurde zum Aufspulen außer Eingriff gesetzt. Siehe Seite 1. Im Greifermechanismus hat sich Garn festgesetzt. 2. Stoffschieber durch Flusen verstopft. Siehe Seite 29 sehr laut 31 Siehe Seite 29 Impreso en Tailandia Impresso en Tailândia Imprimé en Thailande Printed in Thailand Gedruckt in Thailänd 305-800-002 (S/P/F/E/G)-
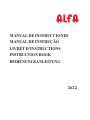 1
1
-
 2
2
-
 3
3
-
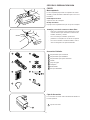 4
4
-
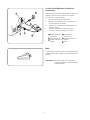 5
5
-
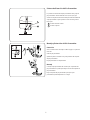 6
6
-
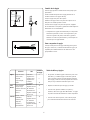 7
7
-
 8
8
-
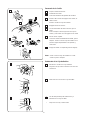 9
9
-
 10
10
-
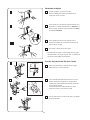 11
11
-
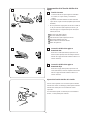 12
12
-
 13
13
-
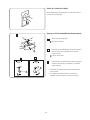 14
14
-
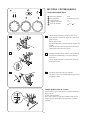 15
15
-
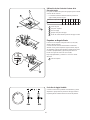 16
16
-
 17
17
-
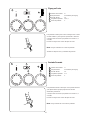 18
18
-
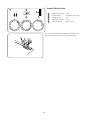 19
19
-
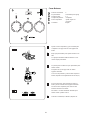 20
20
-
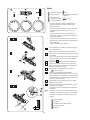 21
21
-
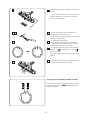 22
22
-
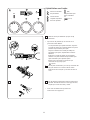 23
23
-
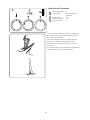 24
24
-
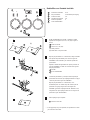 25
25
-
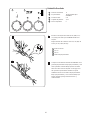 26
26
-
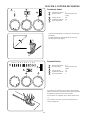 27
27
-
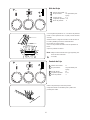 28
28
-
 29
29
-
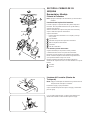 30
30
-
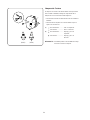 31
31
-
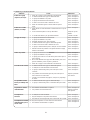 32
32
-
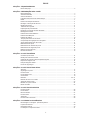 33
33
-
 34
34
-
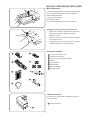 35
35
-
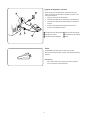 36
36
-
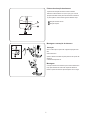 37
37
-
 38
38
-
 39
39
-
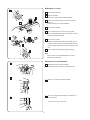 40
40
-
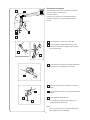 41
41
-
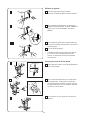 42
42
-
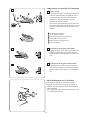 43
43
-
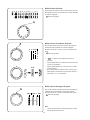 44
44
-
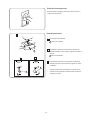 45
45
-
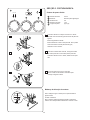 46
46
-
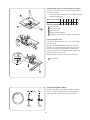 47
47
-
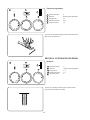 48
48
-
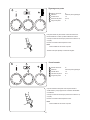 49
49
-
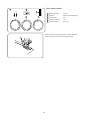 50
50
-
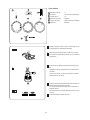 51
51
-
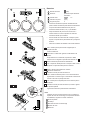 52
52
-
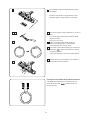 53
53
-
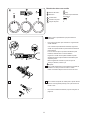 54
54
-
 55
55
-
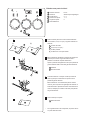 56
56
-
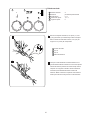 57
57
-
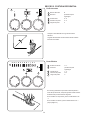 58
58
-
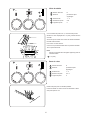 59
59
-
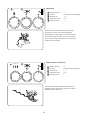 60
60
-
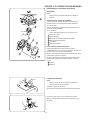 61
61
-
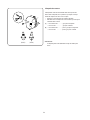 62
62
-
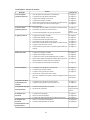 63
63
-
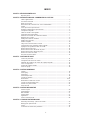 64
64
-
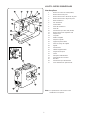 65
65
-
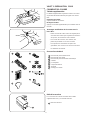 66
66
-
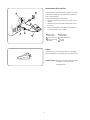 67
67
-
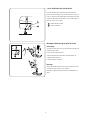 68
68
-
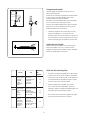 69
69
-
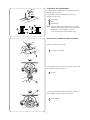 70
70
-
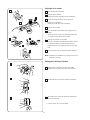 71
71
-
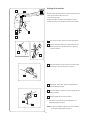 72
72
-
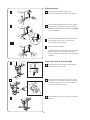 73
73
-
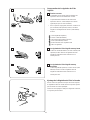 74
74
-
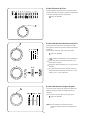 75
75
-
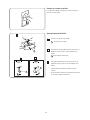 76
76
-
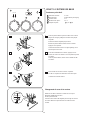 77
77
-
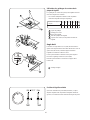 78
78
-
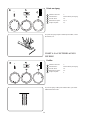 79
79
-
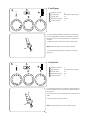 80
80
-
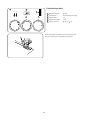 81
81
-
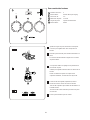 82
82
-
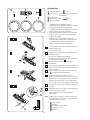 83
83
-
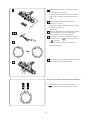 84
84
-
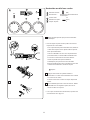 85
85
-
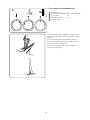 86
86
-
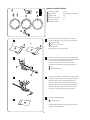 87
87
-
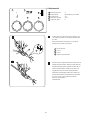 88
88
-
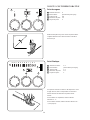 89
89
-
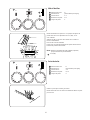 90
90
-
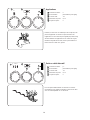 91
91
-
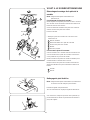 92
92
-
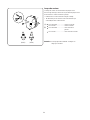 93
93
-
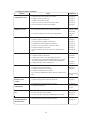 94
94
-
 95
95
-
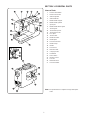 96
96
-
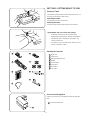 97
97
-
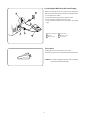 98
98
-
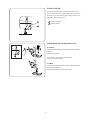 99
99
-
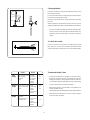 100
100
-
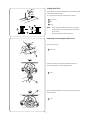 101
101
-
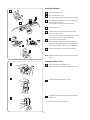 102
102
-
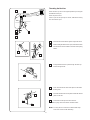 103
103
-
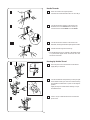 104
104
-
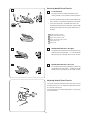 105
105
-
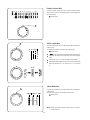 106
106
-
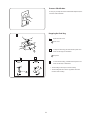 107
107
-
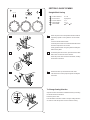 108
108
-
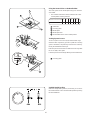 109
109
-
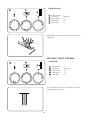 110
110
-
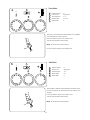 111
111
-
 112
112
-
 113
113
-
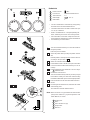 114
114
-
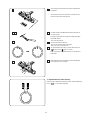 115
115
-
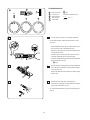 116
116
-
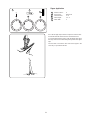 117
117
-
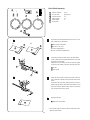 118
118
-
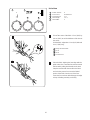 119
119
-
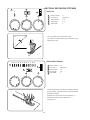 120
120
-
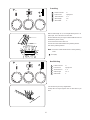 121
121
-
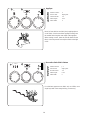 122
122
-
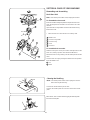 123
123
-
 124
124
-
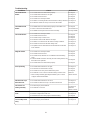 125
125
-
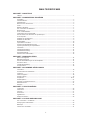 126
126
-
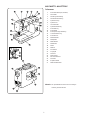 127
127
-
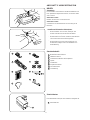 128
128
-
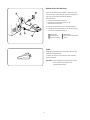 129
129
-
 130
130
-
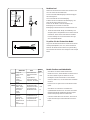 131
131
-
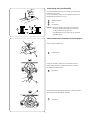 132
132
-
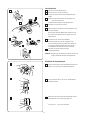 133
133
-
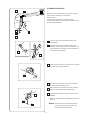 134
134
-
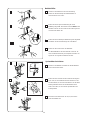 135
135
-
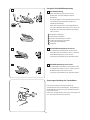 136
136
-
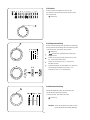 137
137
-
 138
138
-
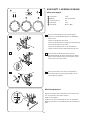 139
139
-
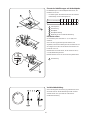 140
140
-
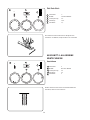 141
141
-
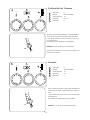 142
142
-
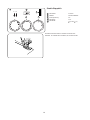 143
143
-
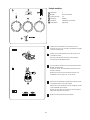 144
144
-
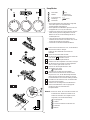 145
145
-
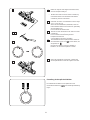 146
146
-
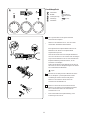 147
147
-
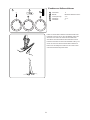 148
148
-
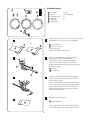 149
149
-
 150
150
-
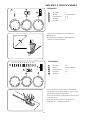 151
151
-
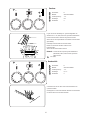 152
152
-
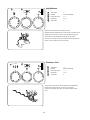 153
153
-
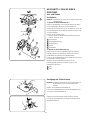 154
154
-
 155
155
-
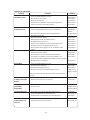 156
156
-
 157
157


Alfa Network 2622 Instruction book
- Categoría
- Máquinas de coser
- Tipo
- Instruction book
En otros idiomas
- français: Alfa Network 2622
- English: Alfa Network 2622
- Deutsch: Alfa Network 2622
- português: Alfa Network 2622
Documentos relacionados
Otros documentos
-
JANOME 2206 El manual del propietario
-
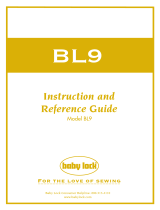 Baby Lock BL9 El manual del propietario
-
JANOME Hello Kitty hk15822 El manual del propietario
-
Baby Lock Zest Manual de usuario
-
JANOME 2222 El manual del propietario
-
Kenmore 38515718500 El manual del propietario
-
-
Brother Innov-is 4750D Manual de usuario
-
-
 Duerkopp Adler 120 El manual del propietario

