
OWNER'S MANUAL
16-CHANNEL TRUE DIVERSITY
UHF WIRELESS SYSTEM

Copyright 2013, Samson Technologies Corp.
v3
Samson Technologies Corp.
45 Gilpin Ave
Hauppauge, NY 11788
www.samsontech.com

3
Concert 88 Wireless System
ENGLISH
FRANÇAISDEUTSCHEESPAÑOLITALIANO
Important Safety Information
CAUTION: TO REDUCE THE RISK OF ELECTRIC SHOCK, DO NOT
REMOVE COVER (OR BACK). NO USER-SERVICEABLE PARTS IN-
SIDE. REFER SERVICING TO QUALIFIED SERVICE PERSONNEL.
This lightning flash with arrowhead symbol within an equilateral triangle
is intended to alert the user to the presence of non-insulated “danger-
ous voltage” within the product’s enclosure that may be of sufficient
magnitude to constitute a risk of electric shock.
The exclamation point within an equilateral triangle is intended to alert
the user to the presence of important operating and maintenance in-
structions in the literature accompanying the appliance.
ATTENTION
RISQUE D’ÉLECTROCUTION !
NE PAS OUVRIR !
WARNING
TO PREVENT FIRE OR SHOCK HAZARD. DO NOT USE THIS PLUG WITH AN EXTENSION
CORD, RECEPTACLE OR OTHER OUTLET UNLESS THE BLADES CAN BE FULLY INSERT-
ED TO PREVENT BLADE EXPOSURE. TO PREVENT FIRE OR SHOCK HAZARD. DO NOT
EXPOSE THIS APPLIANCE TO RAIN OR MOISTURE. TO PREVENT ELECTRICAL SHOCK,
MATCH WIDE BLADE PLUG TO WIDE SLOT AND FULLY INSERT.
If you want to dispose this product, do not mix it with general household waste. There is
a separate collection system for used electronic products in accordance with legislation
that requires proper treatment, recovery and recycling.
Private household in the 28 member states of the EU, in Switzerland and Norway may
return their used electronic products free of charge to designated collection facilities or to a
retailer (if you purchase a similar new one).
For Countries not mentioned above, please contact your local authorities for a correct method of
disposal.
By doing so you will ensure that your disposed product undergoes the necessary treatment, re-
covery and recycling and thus prevent potential negative effects on the environment and human
health.

4
Important Safety Information
1. Read these instructions.
2. Keep these instructions.
3. Heed all warnings.
4. Follow all instructions.
5. Do not use this apparatus near
water.
6. Clean only with dry cloth.
7. Do not block any ventilation open-
ings. Install in accordance with the
manufacturer’s instructions.
8. Do not install near any heat sourc-
es such as radiators, heat registers,
stoves, or other apparatus (includ-
ing amplifiers) that produce heat.
9. Do not defeat the safety purpose
of the polarized or grounding type
plug. A polarized plug has two
blades with one wider than the
other. A grounding type plug has
two blades and a third ground-
ing prong. The wide blade or the
third prong are provided for your
safety. If the provided plug does
not fit into your outlet, consult an
electrician for replacement of the
obsolete outlet.
10. Protect the power cord from being
walked on or pinched particularly
at the plugs, convenience recep-
tacles, and at the point where they
exit from the apparatus.
11. Only use attachments/accessories
specified by the manufacturer.
12. Use only with the cart, stand,
tripod, bracket, or table specified
by the manufacturer, or sold with
the apparatus. When a cart is
used, use caution when moving
the cart/apparatus combination
to avoid injury from tip-over.
13. Unplug the apparatus during light-
ening storms, or when unused for
long periods of time.
14. Refer all servicing to qualified per-
sonnel. Service is required when
the apparatus has been damaged
in any way, such as power supply
cord or plug is damaged, liquid
has been spilled or objects have
fallen into the apparatus has been
exposed to rain or moisture, does
not operate normally, or has been
dropped.
15. This appliance shall not be
exposed to dripping or splashing
water and that no object filled
with liquid such as vases shall be
placed on the apparatus.
16. Caution-to prevent electrical shock,
match wide blade plug wide slot
fully insert.
17. Please keep a good ventilation en-
vironment around the entire unit.
18. The direct plug-in adapter is used
as disconnect device, the discon-
nect device shall remain readily
operable.
19. Batteries (battery pack or batteries
installed) shall not be exposed to
excessive heat such as sunshine,
fire or the like.

5
Concert 88 Wireless System
ENGLISH
FRANÇAISDEUTSCHEESPAÑOLITALIANO
Table of Contents
Introduction. . . . . . . . . . . . . . . . . . . . . . . . . . . 6
System Features. . . . . . . . . . . . . . . . . . . . . . . . . 7
System Components . . . . . . . . . . . . . . . . . . . . . . . 7
Guided Tour - CR88 Receiver . . . . . . . . . . . . . . . . . . 8
Guided Tour - CB88 Belt Pack Transmitter . . . . . . . . . . . .10
Guided Tour - CH88 Handheld Transmitter . . . . . . . . . . . .12
Quick Start - Single System Setup . . . . . . . . . . . . . . . .13
Quick Start - Multiple System Setup . . . . . . . . . . . . . . .17
Rack Mounting . . . . . . . . . . . . . . . . . . . . . . . . .19
Concert 88 Channel Plans . . . . . . . . . . . . . . . . . . . .20
Troubleshooting . . . . . . . . . . . . . . . . . . . . . . . . .21
Specifications. . . . . . . . . . . . . . . . . . . . . . . . . .22

6
Congratulations on purchasing the Samson Concert 88 wireless system. The Concert
88 is the ideal solution for the active performer who needs a reliable, great sounding
system for wireless applications. Featuring simple operation, with 16 available chan-
nels and infrared set for the transmitter channel, the Concert 88 can quickly be up
and running out of the box. The Concert 88 system ensures clear, interruption-free
performance by combining tone-key with auto-mute. This configuration allows only
the transmitter’s audio to pass through the receiver, and mutes the output if there is
any interference.
The Concert 88 comes in four configurations. The vocal handheld system includes
the CH88 handheld transmitter and Q6 dynamic microphone capsule. The CB88
belt pack system can be configured with either the HS5 headset microphone, LM5
lavalier microphone, or a ¼" instrument cable. For travel or permanent installation,
the Concert 88 includes a standard 19" rackmount kit.
In these pages, you’ll find a detailed description of the features of the Concert 88
wireless system, as well as a guided tour through its control panel, step-by-step
instructions for its setup and use, and full specifications. If your wireless system
was purchased in the United States, you’ll also find a warranty card enclosed—don’t
forget to fill it out and mail it in so that you can receive online technical support and
so that we can send you updated information about this and other Samson products
in the future. Also, be sure to check out our website (www.samsontech.com) for com-
plete information about our full product line.
We recommend you keep the following records for reference, as well as a copy of your
sales receipt.
Receiver Serial number: _________________________________________
Transmitter Serial number: ______________________________________
Date of purchase: ______________________________________________
Dealer name: __________________________________________________
With proper care and maintenance, your Concert 88 wireless system will operate
trouble-free for many years. Should your wireless system ever require servicing, a
Return Authorization (RA) number must be obtained before shipping your unit to
Samson. Without this number, the unit will not be accepted. Please call Samson
at 1-800-3SAMSON (1-800-372-6766) for an RA number prior to shipping your
unit. Please retain the original packing materials and, if possible, return the unit in
its original carton. If your Concert 88 system was purchased outside of the United
States, contact your local distributor for warranty details and service information.
Introduction

7
Concert 88 Wireless System
ENGLISH
FRANÇAISDEUTSCHEESPAÑOLITALIANO
System Components
System Features
All systems
CR88 receiver
Power Supply
¼" to ¼" audio cable
Rack Accessories Long rack ear, short rack ear, two receiver adaptor
Owner's Manual
Handheld system
CH88 handheld transmitter with Q6 dynamic microphone capsule
Headset system
CB88 belt pack transmitter
HS5 headset microphone with mini-XLR connector
Lavalier System
CB88 belt pack transmitter
LM5 lavalier microphone with mini-XLR connector
Tie clip
Instrument System
CB88 belt pack transmitter
¼" to mini-XLR instrument cable
• Professional wireless system for use in both live sound and sound contracting
applications
• True diversity technology maximizes active range (up to 300 feet) and reduces
potential interference
• 16 available channels operating in the UHF band designed for maximum system
compatibility in the same location without interference
• The CR88 receiver is a half-rack unit that can be used freestanding or can be
mounted in any standard 19" rack using the included rack kit, making it easy to
integrate into any traveling or fixed installation audio system
• Tone-key and auto-mute ensures clear, interruption-free performance allowing
only the transmitter’s audio to pass through the receiver, and mutes the output if
there is any interference
• Up to 300-foot range (line-of-sight)
• Up to eight hours of battery life, using two standard AA batteries

8
1. Antennas - The antenna mountings allow full rotation for optimum placement. In
normal operation, both antennas should be placed in a vertical position. Both
antennas can be folded inward for convenience when transporting the CR88.
2. VOLUME Control - This knob sets the level of the audio signal being output
through both the balanced and unbalanced output jacks on the rear panel.
Reference level is obtained when the knob is turned fully clockwise (to its “10”
setting).
3. READY Indicator - This indicator lights green when the CR88 is receiving RF sig-
nal and the system is ready to use.
4. PEAK Indicator - This indicator lights red when the transmitted audio signal is
overloaded.
5. LED Display - The 7-segment LED display shows the receiver's current operating
channel. The CR88 channels are indicated by 0-9 and A-F.
6. IR Transmitter - During “IR SET” an infrared light is used to set the transmitter
channel.
7. SELECT Button - Press this button to cycle through the receiver's operating chan-
nels. Press and hold this button to send the channel information to the transmit-
ter via infrared transmission.
8. POWER Switch - Use this to turn the CR88 power on and off.
Guided Tour - CR88 Receiver

9
Concert 88 Wireless System
ENGLISH
FRANÇAISDEUTSCHEESPAÑOLITALIANO
This device complies with Part 15 of the
FCC Rules. Operation is subject to the
following two conditions:
(1) This device may not cause harmful
interference, and
(2) this device must accept any
interference received, including
interference that may cause
undesired operation.
FREQ:
542-566MHz
Using the strain relief: Gather up a loop of wire and pass
it through the strain relief, then pass the adapter plug
through the loop in order to create a knot.
Guided Tour - CR88 Receiver
1. DC Input - Connect the supplied power adapter here, using the strain relief as
shown in the illustration below. WARNING: Do not substitute any other kind of
power adapter. Doing so can cause severe damage to the CR88 and will void your
warranty.
2. BALANCED OUTPUT - Use this electronically balanced low impedance (600 Ohm)
XLR jack when connecting the CR88 to professional (+4dBu) audio equipment.
Pin wiring is as follows: Pin 1 ground, Pin 2 high (hot), and Pin 3 low (cold).
3. UNBALANCED OUTPUT - Use this unbalanced high impedance (5K Ohm) ¼" jack
when connecting the CR88 to consumer (-10dBV) audio equipment. Wiring is as
follows: tip hot, sleeve ground.

10
1. Input Connector - Connect the input device via the mini-XLR connector. The CB88
is supplied with either a lavalier, headset microphone or ¼" instrument cable.
2. Status Indicator - This LED displays the operation mode:
GREEN Normal Operation
RED Mute
Flashing GREEN Low Battery
3. Power/Mute Switch - Press and hold to turn the unit on or off. Press and release
to mute or unmute the transmitter.
4. Belt Clip - Use this clip to fasten the CB88 transmitter to a belt or guitar strap.
5. Battery Cover Release - Push in both sides and pull back to open the CB88 bat-
tery cover.
6. Antenna - This permanently attached transmitter antenna should be fully extend-
ed during normal operation.
Guided Tour - CB88 Belt Pack Transmitter

11
Concert 88 Wireless System
ENGLISH
FRANÇAISDEUTSCHEESPAÑOLITALIANO
7. Input GAIN Control - This control adjusts the transmitter input sensitivity to work
with microphone and instruments inputs. For optimal performance, using the
included screwdriver, set the input GAIN control to where you see the CR88
PEAK indicator start to light under high levels, then turn down slowly until the
PEAK light stops lighting.
8. Battery Holder - Insert two standard AA (LR6) batteries here, being sure to
observe the plus and minus polarity markings shown. Although rechargeable
Ni-Cad batteries can be used, they do not supply adequate current for more than
four hours. WARNING: Do not insert the batteries backwards; doing so can cause
severe damage to the CB88 and will void your warranty.
9. IR Lens - This window is used to capture the infrared signal sent from the CR88
during the IR SET to channelize the transmitter.
10. Plastic Screwdriver - Designed for use in adjusting the CB88 input GAIN (#7)
control.
Guided Tour - CB88 Belt Pack Transmitter

12
1. Status Indicator - This LED displays the
operation mode:
GREEN Normal Operation
RED Mute
Flashing GREEN Low Battery
2. Power/Mute Switch - Press and hold to
turn the unit on or off. Press and release
to mute or unmute the transmitter.
3. Battery Cover - Unscrew the battery cover
and slide down to open the CH88 battery
compartment.
4. Battery Holder - Open the battery holder
by pressing the tab and lifting the cover.
Insert two standard AA (LR6) batteries
here, being sure to observe the plus and
minus polarity markings shown. Although
rechargeable Ni-Cad batteries can be
used, they do not supply adequate cur-
rent for more than four hours. WARNING:
Do not insert the batteries backwards;
doing so can cause severe damage to the
CH88 and will void your warranty.
5. Input GAIN Control - This control adjusts
the transmitter input sensitivity. For
optimal performance, using the included
screwdriver, set the input GAIN control to where you see the CR88 PEAK indica-
tor start to light under high levels, then turn down until the PEAK light stops
lighting.
6. IR Lens - This window is used to capture the infrared signal sent from the CR88
during the IR SET to channelize the transmitter. The battery cover must be open
and the IR Lens facing towards the receiver to load the selected channel.
7. Plastic Screwdriver - Designed for use in adjusting the CB88 input GAIN control
(See #5 Input GAIN Control HH).
Guided Tour - CH88 Handheld Transmitter

13
Concert 88 Wireless System
ENGLISH
FRANÇAISDEUTSCHEESPAÑOLITALIANO
Quick Start - Single System Setup
In order for your wireless system to work correctly, both the receiver and transmitter
must be set to the same channel.
Follow this basic procedure for setting up and using your Concert 88 wireless
system:
Physically place the CR88 receiver where it will be used, and extend the anten-
nas vertically. The general rule of thumb is to maintain “line of sight” between the
receiver and transmitter so that the person using or wearing the transmitter can see
the receiver.
With the Power switch on and the CR88 power off, connect the included power
adapter. Turn the CR88 on momentarily to confirm that the unit is receiving power.
You’ll see the LED display light up. Then turn the CR88 power off.
This device complies with Part 15 of the
FCC Rules. Operation is subject to the
following two conditions:
(1) This device may not cause harmful
interference, and
(2) this device must accept any
interference received, including
interference that may cause
undesired operation.
FREQ:
542-566MHz
This device complies with Part 15 of the
FCC Rules. Operation is subject to the
following two conditions:
(1) This device may not cause harmful
interference, and
(2) this device must accept any
interference received, including
interference that may cause
undesired operation.
FREQ:
542-566MHz
3. Plug in receiver 4. Turn on receiver
5. Plug receiver into audio system 6. Press Select button to change channel 9. Press and hold SELECT button to IR set 10. Adjust Volume control7. Install batteries 8. Press button on transmitter to turn on
9. Press and hold Select button to IR set7. Install batteries 8. Turn on belt pack transmitter
This device complies with Part 15 of the
FCC Rules. Operation is subject to the
following two conditions:
(1) This device may not cause harmful
interference, and
(2) this device must accept any
interference received, including
interference that may cause
undesired operation.
FREQ:
542-566MHz
This device complies with Part 15 of the
FCC Rules. Operation is subject to the
following two conditions:
(1) This device may not cause harmful
interference, and
(2) this device must accept any
interference received, including
interference that may cause
undesired operation.
FREQ:
542-566MHz
3. Plug in receiver 4. Turn on receiver
5. Plug receiver into audio system 6. Press Select button to change channel 9. Press and hold SELECT button to IR set 10. Adjust Volume control7. Install batteries 8. Press button on transmitter to turn on
9. Press and hold Select button to IR set7. Install batteries 8. Turn on belt pack transmitter
With your amplifier or mixer off and volume control all the way down, connect the
CR88 receiver output jack to the mic or line level input of a mixer or amplifier using
the balanced XLR output or unbalanced ¼" line level output. Turn the Level knob on
the CR88 completely counterclockwise, then turn its power on.

14
Quick Start - Single System Setup
With the transmitter powered off, install two fresh AA batteries into the CB88 belt
pack or CH88 handheld transmitter. Leave the battery compartment open.
This device complies with Part 15 of the
FCC Rules. Operation is subject to the
following two conditions:
(1) This device may not cause harmful
interference, and
(2) this device must accept any
interference received, including
interference that may cause
undesired operation.
FREQ:
542-566MHz
This device complies with Part 15 of the
FCC Rules. Operation is subject to the
following two conditions:
(1) This device may not cause harmful
interference, and
(2) this device must accept any
interference received, including
interference that may cause
undesired operation.
FREQ:
542-566MHz
3. Plug in receiver 4. Turn on receiver
5. Plug receiver into audio system 6. Press Select button to change channel 9. Press and hold SELECT button to IR set 10. Adjust Volume control7. Install batteries 8. Press button on transmitter to turn on
9. Press and hold Select button to IR set7. Install batteries 8. Turn on belt pack transmitter
This device complies with Part 15 of the
FCC Rules. Operation is subject to the
following two conditions:
(1) This device may not cause harmful
interference, and
(2) this device must accept any
interference received, including
interference that may cause
undesired operation.
FREQ:
542-566MHz
This device complies with Part 15 of the
FCC Rules. Operation is subject to the
following two conditions:
(1) This device may not cause harmful
interference, and
(2) this device must accept any
interference received, including
interference that may cause
undesired operation.
FREQ:
542-566MHz
3. Plug in receiver 4. Turn on receiver
5. Plug receiver into audio system 6. Press Select button to change channel 9. Press and hold SELECT button to IR set 10. Adjust Volume control7. Install batteries 8. Press button on transmitter to turn on
9. Press and hold Select button to IR set7. Install batteries 8. Turn on belt pack transmitter
Turn on the power to the transmitter by pressing and holding Power switch; the indi-
cator LED will light green.
This device complies with Part 15 of the
FCC Rules. Operation is subject to the
following two conditions:
(1) This device may not cause harmful
interference, and
(2) this device must accept any
interference received, including
interference that may cause
undesired operation.
FREQ:
542-566MHz
This device complies with Part 15 of the
FCC Rules. Operation is subject to the
following two conditions:
(1) This device may not cause harmful
interference, and
(2) this device must accept any
interference received, including
interference that may cause
undesired operation.
FREQ:
542-566MHz
3. Plug in receiver 4. Turn on receiver
5. Plug receiver into audio system 6. Press Select button to change channel 9. Press and hold SELECT button to IR set 10. Adjust Volume control7. Install batteries 8. Press button on transmitter to turn on
9. Press and hold Select button to IR set7. Install batteries 8. Turn on belt pack transmitter

15
Concert 88 Wireless System
ENGLISH
FRANÇAISDEUTSCHEESPAÑOLITALIANO
Quick Start - Single System Setup
This device complies with Part 15 of the
FCC Rules. Operation is subject to the
following two conditions:
(1) This device may not cause harmful
interference, and
(2) this device must accept any
interference received, including
interference that may cause
undesired operation.
FREQ:
542-566MHz
This device complies with Part 15 of the
FCC Rules. Operation is subject to the
following two conditions:
(1) This device may not cause harmful
interference, and
(2) this device must accept any
interference received, including
interference that may cause
undesired operation.
FREQ:
542-566MHz
3. Plug in receiver 4. Turn on receiver
5. Plug receiver into audio system 6. Press Select button to change channel 9. Press and hold SELECT button to IR set 10. Adjust Volume control7. Install batteries 8. Press button on transmitter to turn on
9. Press and hold Select button to IR set7. Install batteries 8. Turn on belt pack transmitter
This device complies with Part 15 of the
FCC Rules. Operation is subject to the
following two conditions:
(1) This device may not cause harmful
interference, and
(2) this device must accept any
interference received, including
interference that may cause
undesired operation.
FREQ:
542-566MHz
This device complies with Part 15 of the
FCC Rules. Operation is subject to the
following two conditions:
(1) This device may not cause harmful
interference, and
(2) this device must accept any
interference received, including
interference that may cause
undesired operation.
FREQ:
542-566MHz
3. Plug in receiver 4. Turn on receiver
5. Plug receiver into audio system 6. Press Select button to change channel 9. Press and hold SELECT button to IR set 10. Adjust Volume control7. Install batteries 8. Press button on transmitter to turn on
9. Press and hold Select button to IR set7. Install batteries 8. Turn on belt pack transmitter
Position the transmitter about 6-12" (15-30 cm) from the front of the CR88 with
the transmitter's IR window facing the IR transmitter on the front panel of the CR88
receiver.
This device complies with Part 15 of the
FCC Rules. Operation is subject to the
following two conditions:
(1) This device may not cause harmful
interference, and
(2) this device must accept any
interference received, including
interference that may cause
undesired operation.
FREQ:
542-566MHz
This device complies with Part 15 of the
FCC Rules. Operation is subject to the
following two conditions:
(1) This device may not cause harmful
interference, and
(2) this device must accept any
interference received, including
interference that may cause
undesired operation.
FREQ:
542-566MHz
3. Plug in receiver 4. Turn on receiver
5. Plug receiver into audio system 6. Press Select button to change channel 9. Press and hold SELECT button to IR set 10. Adjust Volume control7. Install batteries 8. Press button on transmitter to turn on
9. Press and hold Select button to IR set7. Install batteries 8. Turn on belt pack transmitter
This device complies with Part 15 of the
FCC Rules. Operation is subject to the
following two conditions:
(1) This device may not cause harmful
interference, and
(2) this device must accept any
interference received, including
interference that may cause
undesired operation.
FREQ:
542-566MHz
This device complies with Part 15 of the
FCC Rules. Operation is subject to the
following two conditions:
(1) This device may not cause harmful
interference, and
(2) this device must accept any
interference received, including
interference that may cause
undesired operation.
FREQ:
542-566MHz
3. Plug in receiver 4. Turn on receiver
5. Plug receiver into audio system 6. Press Select button to change channel 9. Press and hold SELECT button to IR set 10. Adjust Volume control7. Install batteries 8. Press button on transmitter to turn on
9. Press and hold Select button to IR set7. Install batteries 8. Turn on belt pack transmitter
Press and hold the CR88 SELECT button to set the
transmitter to the same channel as the receiver via
infrared transmission
Press the SELECT button on the front of the CR88
receiver to choose an available channel. The channel
number will increase by one digit, from 0-9 then A-F.
Once the last channel has been reached, the count will
cycle back to 0.

16
Turn on your connected amplifier or mixer, but keep
the volume all the way down. Set the Volume knob
on the CR88 fully clockwise (to its “10” setting).
This is unity gain.
Speak or sing into the microphone, or if you are using the transmitter with a con-
nected instrument, play the instrument at normal performance level. Slowly raise the
volume of your amplifier or mixer until the desired level is reached.
If you find the system has noticeable dropouts, reduced overall working range, or
unexpected noise bursts, change the operating channel of the system using the steps
above.
This device complies with Part 15 of the
FCC Rules. Operation is subject to the
following two conditions:
(1) This device may not cause harmful
interference, and
(2) this device must accept any
interference received, including
interference that may cause
undesired operation.
FREQ:
542-566MHz
This device complies with Part 15 of the
FCC Rules. Operation is subject to the
following two conditions:
(1) This device may not cause harmful
interference, and
(2) this device must accept any
interference received, including
interference that may cause
undesired operation.
FREQ:
542-566MHz
3. Plug in receiver 4. Turn on receiver
5. Plug receiver into audio system 6. Press Select button to change channel 9. Press and hold SELECT button to IR set 10. Adjust Volume control7. Install batteries 8. Press button on transmitter to turn on
9. Press and hold Select button to IR set7. Install batteries 8. Turn on belt pack transmitter
This device complies with Part 15 of the
FCC Rules. Operation is subject to the
following two conditions:
(1) This device may not cause harmful
interference, and
(2) this device must accept any
interference received, including
interference that may cause
undesired operation.
FREQ:
542-566MHz
This device complies with Part 15 of the
FCC Rules. Operation is subject to the
following two conditions:
(1) This device may not cause harmful
interference, and
(2) this device must accept any
interference received, including
interference that may cause
undesired operation.
FREQ:
542-566MHz
3. Plug in receiver 4. Turn on receiver
5. Plug receiver into audio system 6. Press Select button to change channel 9. Press and hold SELECT button to IR set 10. Adjust Volume control7. Install batteries 8. Press button on transmitter to turn on
9. Press and hold Select button to IR set7. Install batteries 8. Turn on belt pack transmitter
Quick Start - Single System Setup
When the transmission is complete, the CR88 will
receive RF signal and the tone key from the transmit-
ter. The READY indicator will light on the front panel of
the CR88 receiver.

17
Concert 88 Wireless System
ENGLISH
FRANÇAISDEUTSCHEESPAÑOLITALIANO
To change the operating channel of a system, press
the SELECT button on the front of the CR88 receiver.
The channel number will increase by one digit, from
0-9 then A-F. Once the last channel has been reached,
the count will cycle back to 0.
Quick Start - Multiple System Setup
When using multiple systems, each system must be set to a different operating channel.
Transmitter and receiver pairs must be on the same channel plan in order to work
together (See "Concert 88 Channel Plans" on page 20).
When setting an additional transmitter, make sure to close all other transmitter bat-
tery compartments to ensure that the IR Lens is covered.
This device complies with Part 15 of the
FCC Rules. Operation is subject to the
following two conditions:
(1) This device may not cause harmful
interference, and
(2) this device must accept any
interference received, including
interference that may cause
undesired operation.
FREQ:
542-566MHz
This device complies with Part 15 of the
FCC Rules. Operation is subject to the
following two conditions:
(1) This device may not cause harmful
interference, and
(2) this device must accept any
interference received, including
interference that may cause
undesired operation.
FREQ:
542-566MHz
3. Plug in receiver 4. Turn on receiver
5. Plug receiver into audio system 6. Press Select button to change channel 9. Press and hold SELECT button to IR set 10. Adjust Volume control7. Install batteries 8. Press button on transmitter to turn on
9. Press and hold Select button to IR set7. Install batteries 8. Turn on belt pack transmitter
Turn on the power to the transmitter by pressing and holding the Power switch; the
indicator LED will light green.
This device complies with Part 15 of the
FCC Rules. Operation is subject to the
following two conditions:
(1) This device may not cause harmful
interference, and
(2) this device must accept any
interference received, including
interference that may cause
undesired operation.
FREQ:
542-566MHz
This device complies with Part 15 of the
FCC Rules. Operation is subject to the
following two conditions:
(1) This device may not cause harmful
interference, and
(2) this device must accept any
interference received, including
interference that may cause
undesired operation.
FREQ:
542-566MHz
3. Plug in receiver 4. Turn on receiver
5. Plug receiver into audio system 6. Press Select button to change channel 9. Press and hold SELECT button to IR set 10. Adjust Volume control7. Install batteries 8. Press button on transmitter to turn on
9. Press and hold Select button to IR set7. Install batteries 8. Turn on belt pack transmitter
This device complies with Part 15 of the
FCC Rules. Operation is subject to the
following two conditions:
(1) This device may not cause harmful
interference, and
(2) this device must accept any
interference received, including
interference that may cause
undesired operation.
FREQ:
542-566MHz
This device complies with Part 15 of the
FCC Rules. Operation is subject to the
following two conditions:
(1) This device may not cause harmful
interference, and
(2) this device must accept any
interference received, including
interference that may cause
undesired operation.
FREQ:
542-566MHz
3. Plug in receiver 4. Turn on receiver
5. Plug receiver into audio system 6. Press Select button to change channel 9. Press and hold SELECT button to IR set 10. Adjust Volume control7. Install batteries 8. Press button on transmitter to turn on
9. Press and hold Select button to IR set7. Install batteries 8. Turn on belt pack transmitter

18
Position the transmitter about 6-12" (15-30 cm) from the front of the CR88 with the
transmitter's IR window facing the receiver's IR transmitter.
This device complies with Part 15 of the
FCC Rules. Operation is subject to the
following two conditions:
(1) This device may not cause harmful
interference, and
(2) this device must accept any
interference received, including
interference that may cause
undesired operation.
FREQ:
542-566MHz
This device complies with Part 15 of the
FCC Rules. Operation is subject to the
following two conditions:
(1) This device may not cause harmful
interference, and
(2) this device must accept any
interference received, including
interference that may cause
undesired operation.
FREQ:
542-566MHz
3. Plug in receiver 4. Turn on receiver
5. Plug receiver into audio system 6. Press Select button to change channel 9. Press and hold SELECT button to IR set 10. Adjust Volume control7. Install batteries 8. Press button on transmitter to turn on
9. Press and hold Select button to IR set7. Install batteries 8. Turn on belt pack transmitter
This device complies with Part 15 of the
FCC Rules. Operation is subject to the
following two conditions:
(1) This device may not cause harmful
interference, and
(2) this device must accept any
interference received, including
interference that may cause
undesired operation.
FREQ:
542-566MHz
This device complies with Part 15 of the
FCC Rules. Operation is subject to the
following two conditions:
(1) This device may not cause harmful
interference, and
(2) this device must accept any
interference received, including
interference that may cause
undesired operation.
FREQ:
542-566MHz
3. Plug in receiver 4. Turn on receiver
5. Plug receiver into audio system 6. Press Select button to change channel 9. Press and hold SELECT button to IR set 10. Adjust Volume control7. Install batteries 8. Press button on transmitter to turn on
9. Press and hold Select button to IR set7. Install batteries 8. Turn on belt pack transmitter
When the transmission is complete, and the CR88 is
receiving RF signal from the transmitter, the READY
indicator will light on the front panel of the CR88
receiver.
If you find the system has noticeable dropouts, reduced overall working range, or
unexpected noise bursts, change the operating channel of the system using the steps
above.
This device complies with Part 15 of the
FCC Rules. Operation is subject to the
following two conditions:
(1) This device may not cause harmful
interference, and
(2) this device must accept any
interference received, including
interference that may cause
undesired operation.
FREQ:
542-566MHz
This device complies with Part 15 of the
FCC Rules. Operation is subject to the
following two conditions:
(1) This device may not cause harmful
interference, and
(2) this device must accept any
interference received, including
interference that may cause
undesired operation.
FREQ:
542-566MHz
3. Plug in receiver 4. Turn on receiver
5. Plug receiver into audio system 6. Press Select button to change channel 9. Press and hold SELECT button to IR set 10. Adjust Volume control7. Install batteries 8. Press button on transmitter to turn on
9. Press and hold Select button to IR set7. Install batteries 8. Turn on belt pack transmitter
Quick Start - Multiple System Setup
Press and hold the CR88 SELECT button to synch
the transmitter to the same channel as the receiver
via infrared transmission.

19
Concert 88 Wireless System
ENGLISH
FRANÇAISDEUTSCHEESPAÑOLITALIANO
The CR88 receiver can be installed into a standard 19” rack for transport or per-
manent installation using the included rack ears. Follow the simple steps below to
mount the CR88:
Attach the included rack ears by sliding each rack
ear into the groove on either side of the CR88 until
they lock into place, and the receiver flush with the
front panel.
Position the CR88 receiver into an
available rack space and slide in
until the rack ears are touching the
rails of the rack case and are aligned
with the rack rail holes.
Mount the receiver into the rack using the appropriate size rack screws (not includ-
ed). To ensure equal tension and balance when installing the receiver, you should
secure screws in a crisscross pattern of opposite corners: top left -> bottom right ->
top right -> bottom left.
In order to mount two CR88 receiv-
ers in one rack space, the system
includes a center connection piece.
Slide the center connection piece
into the groove of each receiver and
attach the short rack ears to each
receiver. Mount the receivers into
the rack using the crisscross pattern
described above.
Rack Mounting

20
Group C
638-662 MHz
Group D
542-566 MHz
Group F*
606-630 MHz
Group G*
863-865 MHz
Ch Freq Ch Freq Ch Freq Ch Freq
0 638.125 0 542.125 0 606.125 0 863.050
1 639.625 1 543.625 1 607.625 1 863.250
2 641.050 2 545.05 2 609.05 2 863.550
3 642.425 3 546.425 3 610.425 3 863.750
4 642.900 4 546.900 4 610.900 4 864.050
5 645.525 5 549.525 5 613.525 5 864.250
6 647.100 6 551.100 6 615.100 6 864.550
7 648.475 7 552.475 7 616.475 7 864.750
8 650.000 8 554.000 8 618.000 8 864.950
9 652.075 9 556.075 9 620.075
A 654.975 A 558.975 A 622.975
B 655.975 B 559.975 B 623.975
C 657.050 C 561.050 C 625.050
D 658.975 D 562.975 D 626.975
E 660.425 E 564.425 E 628.425
F 661.975 F 565.975 F 629.975
Concert 88 Channel Plans
* Not for use in the USA and Canada. For questions regarding available channels in
your area contact your local Samson distributor.

21
Concert 88 Wireless System
ENGLISH
FRANÇAISDEUTSCHEESPAÑOLITALIANO
Troubleshooting
Issue Solutions
No Audio
Make sure that the transmitter and receiver are both
powered on.
Ensure the transmitter’s batteries are installed correctly.
Check that the transmitter is not muted.
Confirm that the CR88 adaptor is correctly connected and
plugged into an electrical outlet.
Turn on the CR88 receiver.
Make sure the CR88 audio output connections are se-
curely connected.
Ensure that the receiver and transmitter are in line of
sight with one another.
Check the receiver and audio input device level controls.
Ensure that the transmitter and receiver are set to the
same operating channel. If unsure, reset the channel by
performing an IR set.
Distorted Audio
The receiver output level or audio input device level may
be too high.
Check the transmitters batteries, and replace if low.
The input gain on the transmitter (CB88) or audio source
level may be too high.
Audio Dropout
The transmitter may be too far away from the receiver.
Move it closer to the receiver, or reposition the antennas.
Remove any sources that may cause RF interference such
as cell phones, cordless phones, lighting equipment, com-
puters, metal structures, etc.
Receiver will not
power on
Check the adaptor to ensure it is properly connected and
plugged into an outlet providing power.
Transmitter will not
power on (LED lights
RED)
Replace the transmitter batteries.
Unwanted noise or
interference
If using multiple systems, make sure none of the systems
are operating on the same channel. If the problem per-
sists, change one or all of the systems channels.

22
Specifications
System
Working Range 300' (100m) line of sight
Audio Frequency Response 50 Hz - 15 kHz
T.H.D. (Overall) <1% (@AF 1 kHz, RF 46 dBu)
Dynamic Range >100 dB A-weighted
Signal to Noise >90 dB
Operating Temperature –10°C (14°F) to +60°C (+140°F)
Tone Key Frequency 32.768 kHz
CB88 Belt pack Transmitter
Input Connector Mini-XLR (P3)
Input Impedance 1MΩ
Input Gain Range 38 dB
RF Power 10 mW EIRP
Power Requirements Two AA (LR6) alkaline batteries
Battery Life 8 hours
Dimensions (HxLxD) 3.75" x 2.44" x 0.75"
96mm x 62mm x 18.5mm
Weight 0.2 lb / 93 g
CH88 Handheld Transmitter
Microphone Element Q6 Dynamic
Input Gain Range 28 dB
RF Power 10 mW EIRP
Power Requirements Two AA (LR6) alkaline batteries
Battery Life 8 hours
Dimensions (HxØ) 10.23" x 2.1"
260mm x 54mm
Weight 0.48 lb / 218 g
CR88 Receiver
Audio Output Level - Unbalanced +14 dBu
Audio Output Level - Balanced +9 dBu
Audio Output Impedance - Unbalanced 810 Ohms
Audio Output Impedance - Balanced 240 Ohms
Sensitivity -100 dBm / 30 dB sinad
Image Rejection >50 dB
Operating Voltage 15 VDC 200mA
Dimensions (LxWxH) 8.25" x 4.9" x 1.75"
210mm x 125mm x 44mm
Weight 0.85 lb / 388 g
At Samson, we are continually improving our products, therefore specifications and
images are subject to change without notice.

23
Concert 88 Wireless System
ENGLISH
FRANÇAISDEUTSCHEESPAÑOLITALIANO
FCC Rules and Regulations
Samson wireless receivers are certified under FCC Rules part 15 and transmit-
ters are certified under FCC Rules part 74.
Licensing of Samson equipment is the user’s responsibility and licensability
depends on the user’s classification, application and frequency selected.
This device complies with RSS-210 of
Industry & Science Canada.
Operation is subject to the following two conditions:
(1) this device may not cause harmful interference and (2) this device must
accept any interference received, including interference that may cause
undesired operation.
Hereby, Samson Technologies Corp., declares that this CR88, CH88, CB88 is
in compliance with the essential requirements and other relevant provisions of
Directive 1999/5/EC. The declaration of conformity may be consulted at
http://www.samsontech.com/site_media/support/manuals/Concert_88_DOC.pdf
NOTE: This equipment has been tested and found to comply with the limits for
a Class B digital device, pursuant to Part 15 of the FCC Rules. These limits are
designed to provide reasonable protection against harmful interference in a
residential installation. This equipment generates, uses and can radiate radio
frequency energy and, if not installed and used in accordance with the instruc-
tions, may cause harmful interference to radio communications. However, there
is no guarantee that interference will not occur in a particular installation. If
this equipment does cause harmful interference to radio or television recep-
tion, which can be determined by turning the equipment off and on, the user is
encouraged to try to correct the interference by one or more of the following
measures:
• Reorient or relocate the receiving antenna.
• Increase the separation between the equipment and receiver.
• Connect the equipment into an outlet on a circuit different from that to which
the receiver is connected.
• Consult the dealer or an experienced Radio/TV technician for help.
WARNING: Changes or modifications not expressly approved by the party respon-
sible for compliance could void the user’s authority to operate the equipment.

24
CET APPAREIL EST CONFORME À LA PARTIE 15 DU RÈGLEMENT
DE LA FCC, CLASSE B. LE FONCTIONNEMENT EST SOUMIS AUX
DEUX CONDITIONS SUIVANTES : (1) CET APPAREIL NE PEUT
CAUSER D'INTERFÉRENCES NUISIBLES ET (2) IL DOIT ACCEPTER
TOUTE INTERFÉRENCE REÇUE, NOTAMMENT CELLES POUVANT
ENTRAÎNER UN DYSFONCTIONNEMENT. IDÉAL POUR TOUTE
UTILISATION AU BUREAU OU À DOMICILE.
Consignes de sécurité importantes
ATTENTION: POUR ÉVITER TOUT RISQUE D'ÉLECTROCUTION, N'ÔTEZ PAS LE COUVERCLE
(NI LE DOS) DU BOITIER. CET APPAREIL NE CONTIENT AUCUNE PIÈCE REMPLAÇABLE
PAR L'UTILISATEUR. CONFIEZ TOUTES LES RÉPARATIONS À DU PERSONNEL QUALIFIÉ.
Le signe avec un éclair dans un triangle prévient l’utilisateur de la pré-
sence d’une tension dangereuse et non isolée dans l’appareil. Cette ten-
sion constitue un risque d’électrocution.
Le signe avec un point d’exclamation dans un triangle prévient l’utili-
sateur d’instructions importantes relatives à l’utilisation et à la mainte-
nance du produit.
ATTENTION
RISQUE D’ÉLECTROCUTION !
NE PAS OUVRIR !
AVERTISSEMENT
POUR EVITER LES RISQUES D'INCENDIE OU DE DECHARGE ELECTRIQUE, NE PAS UTI-
LISEZ CETTE PRISE DE COURANT AVEC UN FIL D'EXTENTION ; PRISE DE CONTACT OU
ADDITIONNEZ L'AUTRE SORTIE SAUF QUE LES TRANCHANTS PEUVENT ÊTRE COMPLÈ-
TEMENT INSÉRÉS POUR PRÉVENIR L'EXPOSITION DE TRANCHANT. POUR EVITER LES
RISQUES D'INCENDIE OU DE DECHARGE ELECTRIQUE, N'EXPOSEZ PAS CET APPAREIL
A LA PLUIE OU L'HUMIDITE POUR PREVENIR LES CHOCS ELECTRIQUES, N'INSEREZ LA
LAME LARGE DE LA FICHE QUE DANS LA FENTE DE LARGE DE LA PRISE.
Si vous souhaitez éliminer ce produit, ne le mettez pas aux ordures ménagères. Le
ramassage des équipements électroniques se fait séparément pour assurer le recyclage
correct de ces équipements.
Les ménages résidant dans les 28 Etats membres de l’U.E., en Suisse et en Norvège
peuvent retourner gratuitement leurs appareils électroniques usagés aux déchetteries agréées ou
à un commerçant (en cas d’achat d’un appareil neuf similaire).
Pour les pays non cités, n'hésitez pas à contacter votre collectivité locale pour vous renseigner
sur le mode d'élimination en vigueur.
En agissant ainsi, vous serez assuré que votre appareil sera traité, récupéré et recyclé dans les
règles, prévenant ainsi les effets néfastes potentiels sur l’environnement et la santé humaine.

25
Système sans fil Concert 88
ENGLISH
FRANÇAISDEUTSCHEESPAÑOLITALIANO
Consignes de sécurité importantes
1. Lisez ces instructions.
2. Conservez ces instructions.
3. Respectez tous les avertissements.
4. Suivez les instructions..
5. N'utilisez pas cet appareil à proximi-
té d'un point d'eau.
6. Nettoyez-le avec un chiffon sec.
7. N'obstruez en aucun cas les orifices
d'aération. Installez en respectant
les consignes du fabricant.
8. Ne l'installez pas à proximité d'une
source de chaleur telle qu'un
radiateur, une bouche de chaleur,
un poêle ou d'autres appareils (dont
les amplificateurs) produisant de la
chaleur.
9. Ne détériorez pas la sécurité de
la fiche polarisée ou de la fiche
de terre. Une prise polarisée est
composée de deux fiches dont l'une
est plus large que l'autre. Une fiche
de terre comporte deux lames et une
troisième broche de mise à la terre.
La lame la plus large ou la troi-
sième broche assure la sécurité de
l'utilisateur. Si la prise de l'appareil
ne rentre pas dans la prise d'alimen-
tation secteur de votre installation,
veuillez consulter un électricien
agréé pour le remplacement de la
prise secteur.
10. Placez le cordon d'alimentation
de sorte qu'il ne soit ni piétiné ni
comprimé, en particulier au niveau
de la fiche de connexion, de la prise
de courant et du point de sortie de
l'appareil.
11. Utilisez uniquement les accessoires
et le matériel de fixation recomman-
dés par le fabricant.
12. Utilisez uniquement le chariot, le
pied, le trépied, le support ou la
table recommandé par le fabricant
ou fourni avec l'appareil. Lors de
l'utilisation d'un chariot, veuillez
faire attention lors du déplacement
de l'ensemble chariot/appareil afin
d'éviter toute blessure en cas de
renversement.
13. Débranchez cet appareil pendant les
orages ou au cours des périodes de
non-utilisation prolongée.
14. Faites effectuer toutes les répara-
tions nécessaires par du person-
nel qualifié. Des réparations sont
nécessaires si l'appareil est endom-
magé d'une façon quelconque, par
exemple : cordon ou prise d'alimen-
tation endommagé, liquide renver-
sé ou objet tombé à l'intérieur de
l'appareil, exposition de l'appareil à
la pluie ou à l'humidité, appareil qui
ne marche pas normalement ou que
l'on a fait tomber.
15. Cet appareil ne doit pas être exposé
à des éclaboussures ou des gouttes
d'eau et aucun objet rempli de
liquide comme un vase ne doit se
trouver à proximité.
16. Attention - Pour prévenir les chocs
électriques, n'insérez la lame large
de la fiche que dans la fente large
de la prise.
17. Veillez à ce que la zone autour de
l'unité soit bien aérée.
18. L'adaptateur à tête enfichable est
utilisé comme dispositif de débran-
chement et doit toujours être prêt à
fonctionner.
19. Les batteries (module batterie ou
piles en place) ne doivent pas être
exposées à une chaleur excessive
telle que celle du soleil, d'un feu ou
d'une source similaire.

26
Table des matières
Introduction. . . . . . . . . . . . . . . . . . . . . . . . . . .27
Caractéristiques du système . . . . . . . . . . . . . . . . . . .28
Composants du système . . . . . . . . . . . . . . . . . . . . .28
Visite guidée du Récepteur CR88 . . . . . . . . . . . . . . . .29
Visite guidée - Emetteur CB88 à porter à la ceinture. . . . . . . .31
Visite guidée - Emetteur portatif CH88 . . . . . . . . . . . . . .33
Configuration rapide - Installation d'un seul système . . . . . . .34
Configuration rapide - Installation de plusieurs systèmes. . . . . .38
Montage sur baie . . . . . . . . . . . . . . . . . . . . . . . .40
Plans de fréquences du Concert 88. . . . . . . . . . . . . . . .41
Dépannage . . . . . . . . . . . . . . . . . . . . . . . . . . .42
Spécifications. . . . . . . . . . . . . . . . . . . . . . . . . .43

27
Système sans fil Concert 88
ENGLISH
FRANÇAISDEUTSCHEESPAÑOLITALIANO
Merci d'avoir choisi ce système sans fil Samson Concert 88. Le Concert 88 est la
solution idéale pour l'artiste actif à la recherche d'un système de sonorisation fiable
pour les applications sans fil. D'un fonctionnement simple, disposant de 16 voies et
d'un groupe à infrarouges pour le canal de l'émetteur, le Concert 88 est très vite prêt-
à-l'emploi à la sortie de son emballage. Le système Concert 88 garantit une audition
limpide ininterrompue en associant la touche Tone à la fonction Auto-mute (Mise en
sourdine automatique). Cette configuration permet de ne faire passer que le son de
l'émetteur par le récepteur, en coupant la sortie à la moindre interférence.
Le système Concert 88 se présente en quatre configurations. Le système vocal
portatif comprend l'émetteur portatif CH88 et la capsule de micro dynamique Q6.
Le système de ceinture CB88 peut être configuré avec le micro-casque HS5, le
micro-cravate LM5, ou un câble instrument à jack standard ¼". Que ce soit pour une
sonorisation mobile ou fixe, le Concert 88 comporte un kit sur bâti standard19".
Dans ces pages, vous trouverez une présentation détaillée des caractéristiques du
système sans fil Concert 88, une présentation du panneau de commande, les notices
d’installation et d’utilisation, ainsi que les caractéristiques techniques. Si vous avez
acheté votre micro aux Etats-Unis, vous trouverez une carte de garantie — n'oubliez
pas de la remplir et de la renvoyer pour bénéficier de l’assistance technique en ligne
et recevoir les informations sur les produits Samson. Pensez également à consulter
notre site Internet (www.samsontech.com) pour obtenir des informations détaillées
sur toute notre gamme de produits.
Nous vous recommandons de garder les références suivantes pour vous y reporter
ultérieurement ainsi qu'une copie de votre preuve d'achat.
Numéro de série du récepteur: _________________________________________
Numéro de série de l'émetteur: ______________________________________
Date d'achat: ______________________________________________
Nom du revendeur: __________________________________________________
Avec un entretien adapté, votre système sans fil Concert 88 vous donnera satisfaction
pendant de
nombreuses années. Pour faire réparer votre système sans fil, vous devez tout d’abord
obtenir un numéro de retour (RA) auprès de Samson. Sans ce numéro, l’appareil ne
sera pas accepté. Appelez Samson au 1-800-3SAMSON (1-800-372-6766) pour ob-
tenir ce numéro avant de renvoyer votre appareil. Conservez, si possible, l’emballage
d’origine afin de l’utiliser en cas de retour. Si vous avez acheté votre système Concert
88 ailleurs qu'aux Etats-Unis, contactez votre distributeur pour obtenir les détails sur
la garantie et le service après vente.
Introduction

28
Composants du système
Caractéristiques du système
Tous systèmes
Récepteur du CR88
Alimentation
Câble audio de ¼" à ¼"
Accessoires pour Rack : patte longue pour rack, patte courte pour rack, adapta-
teur 2 récepteurs
Guide d'utilisation
Système portable
Emetteur portable CH88 à capsule de micro dynamique Q6
Système micro-casque
Emetteur à clip de ceinture CB88
Micro-casque HS5 à connecteur mini-XLR
Système micro-cravate
Emetteur à clip de ceinture CB88
Micro-cravate LM5 à connecteur mini-XLR
Clip de cravate
Système pour instrument
Emetteur à clip de ceinture CB88
Jack ¼" vers câble pour instrument à mini-XLR
• Ce système sans fil professionnel trouvera une application aussi bien dans la
sonorisation de salles de concerts improvisées que dans la sonorisation profes-
sionnelle.
• La technologie True Diversity maximise la gamme active (jusqu'à 300 pieds ou
90 m) et atténue les interférences potentielles
• 16 canaux disponibles fonctionnant dans la bande UHF, conçue pour le maxi-
mum de compatibilité du système au même endroit sans interférences
• Le récepteur du CR88 est une unité demi-rack qui peut s'utiliser sur pied ou
s'intégrer à n'importe quel rack standard de 19" au moyen du kit rack fourni,
facilitant son intégration à n'importe quel système audio, qu'il s'agisse d'une ins-
tallation mobile ou d'une installation fixe.
• La touche Tone et la fonction Auto-mute garantit une audition limpide ininter-
rompue en ne faisant passer que le son de l'émetteur par le récepteur et en cou-
pant la sortie à la moindre interférence.
• Portée : jusqu'à 90 mètres (en ligne droite sans obstacle)
• Autonomie : jusqu'à huit heures, avec deux piles AA standard

29
Système sans fil Concert 88
ENGLISH
FRANÇAISDEUTSCHEESPAÑOLITALIANO
1. Antennes - Les embases d’antennes permettent leur rotation complète pour un
positionnement optimum. En utilisation normale, les deux antennes devront être
verticales. Les deux antennes peuvent être rabattues vers l’intérieur pour faciliter
le transport du CR88.
2. VOLUME - Tournez le bouton pour régler le niveau de sortie du signal audio par
les jacks de sortie symétriques et asymétriques situés sur le panneau arrière. Le
niveau de référence s'obtient en tournant le bouton à fond dans le sens horaire
(sur “10”).
3. Témoin READY - Ce témoin s'allume en vert lorsque le CR88 reçoit un signal HF
et que le système est prêt-à-l'emploi.
4. Témoin PEAK - Ce témoin s'allume en rouge lorsque le signal audio émis est satu-
ré.
5. Afficheur LED - L'afficheur à 7segments LED indique le canal en fonctionnement
actuel du récepteur. Les canaux du CR88 sont indiqués par les chiffres de 0à 9
et les lettres de Aà F.
6. Emetteur par IR - Pendant la phase “IR SET”, une lumière infrarouge sert à régler
le canal émetteur.
7. Bouton SELECT - Appuyez sur ce bouton pour faire défiler les canaux en service
du récepteur. Maintenez ce bouton enfoncé pour envoyer les informations rela-
tives au canal à l'émetteur par transmission infrarouge.
8. Interrupteur MARCHE/ARRET - Appuyez pour mettre le CR88 sous/hors tension.
Visite guidée du Récepteur CR88

30
This device complies with Part 15 of the
FCC Rules. Operation is subject to the
following two conditions:
(1) This device may not cause harmful
interference, and
(2) this device must accept any
interference received, including
interference that may cause
undesired operation.
FREQ:
542-566MHz
Pour utiliser le passe-câble: formez une boucle de fil et
faites-la passer par le passe-câble, puis faites passer la
fiche mâle de l'adaptateur par la boucle pour obtenir un
noeud.
Visite guidée du Récepteur CR88
1. Embase DC - Branchez ici l'adaptateur joint à la livraison en vous servant du col-
lier de serrage, comme indiqué sur l'illustration ci-dessous. AVERTISSEMENT Ne
le remplacez par aucun autre modèle d'adaptateur. Ceci endommagerait grave-
ment le CR88 et annulerait la garantie.
2. SORTIE SYMETRIQUE - Utilisez ce jack XLR de faible impédance (600 Ohm)
symétrique électronique en reliant le CR88 à un équipement audio professionnel
(à +4dBu). Le câblage des broches est le suivant: Broche 1 terre, Broche 2
positif (+), et Broche 3 négatif (-).
3. SORTIE DISSYMETRIQUE - Utilisez ce jack XLR dissymétrique ¼" à haute impé-
dance (5 k-ohm) en reliant le CR88 à un équipement audio grand public (à
-10dBV). Le câblage s'effectue de la façon suivante: pointe +, tige masse.

31
Système sans fil Concert 88
ENGLISH
FRANÇAISDEUTSCHEESPAÑOLITALIANO
1. Connecteur d'entrée - Relier le dispositif d'entrée via le connecteur mini-XLR. Le
CB88 est livré accompagné soit d'un micro-cravate, soit d'un micro-casque ou
d'un câble à instruments ¼".
2. Témoin d'état - Ce témoin LED indique le mode de fonctionnement:
VERT Fonctionnement normal
ROUGE Son coupé
VERT clignotant Batterie faible
3. Interrupteur Marche-Arrêt/Coupure - Appuyez et maintenez enfoncé pour mettre
l'appareil en marche/à l'arrêt. Appuyez et relâchez pour couper ou rétablir le son
de l'émetteur.
4. Clip de ceinture - Utilisez ce clip pour accrocher l'émetteur CB88 à la ceinture ou
à une lanière de guitare..
5. Pour ouvrir le cache de batterie - Appuyez des deux côtés, puis tirez pour ouvrir le
cache de batterie.
6. Antenne - Cette antenne d'émetteur fixée en permanence devra être sortie à fond
en utilisation normale.
Visite guidée - Emetteur CB88 à porter à la ceinture

32
7. Réglage du GAIN à l'entrée - Ce réglage permet d'ajuster la sensibilité à l'entrée de
l'émetteur pour fonctionner avec les entrées du micro et des instruments. Pour
des performances optimales, à l'aide du tournevis ci-joint, positionnez le réglage
du GAIN à l'entrée là où vous voyez le témoin PEAK du CR88 se mettre à s'allu-
mer à des niveaux suffisamment élevés, puis réduisez lentement jusqu'à ce que
le témoin PEAK s'éteigne.
8. Support de piles (batteries) - Introduisez deux piles AA (LR6) standard ici en
respectant bien les pôles + et - indiqués. Bien que vous puissiez utiliser des
accumulateurs rechargeables au Ni-Cad, ceux-ci ne fonctionnent que pendant
4 heures. AVERTISSEMENT Veillez à ne pas insérer les piles à l’envers ; ceci
endommagerait sérieusement le CB88 et annulerait la garantie.
9. Lentiille infra-rouge - Cette fenêtre sert à capter le signal infrarouge émis par le
CR88 pendant le REGLAGE IR pour découper l'émetteur en canaux.
10. Tournevis en plastique - Conçu pour servir à ajuster le réglage du GAIN (#7) à
l'entrée du CB88.
Visite guidée - Emetteur CB88 à porter à la ceinture

33
Système sans fil Concert 88
ENGLISH
FRANÇAISDEUTSCHEESPAÑOLITALIANO
1. Témoin d'état - Ce témoin LED indique le
mode de fonctionnement:
VERT Fonctionnement
normal
ROUGE Son coupé
VERT clignotant Batterie faible
2. Interrupteur Marche-Arrêt/Coupure -
Appuyez et maintenez enfoncé pour
mettre l'appareil en marche/à l'arrêt.
Appuyez et relâchez pour couper ou réta-
blir le son de l'émetteur.
3. Cache du logement à piles - Dévissez le
cache du logement à piles, puis décou-
vrez le logement à piles du CH88.
4. Boîtier à piles - Ouvrez le boîtier à piles
en appuyant sur la languette et en sou-
levant le couvercle. Introduisez deux
piles AA (LR6) standard ici en respectant
bien la polarité +/- indiquée. Bien que
vous puissiez utiliser des accumula-
teurs rechargeables au Ni-Cad, ceux-ci
ne fonctionnent que pendant 4 heures.
AVERTISSEMENT Veillez à ne pas insérer
les piles à l’envers ; ceci endommagerait
sérieusement le CH88 et annulerait la
garantie.
5. Réglage du GAIN à l'entrée - Ce réglage permet d'ajuster la sensibilité à l'entrée de
l'émetteur. Pour des performances optimales, à l'aide du tournevis ci-joint, posi-
tionnez le réglage du GAIN à l'entrée là où vous voyez le témoin PEAK du CR88
s'allumer à des niveaux suffisamment élevés, puis réduisez lentement jusqu'à ce
que le témoin PEAK s'éteigne.
6. Lentiille infra-rouge - Cette fenêtre sert à capter le signal infra-rouge émis par le
CR88 pendant le REGLAGE IR pour découper l'émetteur en canaux. Le cache du
logement à piles doit être ouvert et la Lentille infra-rouge doit être tournée vers
le récepteur pour to charger le canal sélectionné.
7. Tournevis en plastique - Conçu pour servir à ajuster le réglage du GAIN à l'entrée
du CB88 (voir #5 Réglage du GAIN à l'Entrée HH).
Visite guidée - Emetteur portatif CH88

34
Configuration rapide - Installation d'un seul système
Pour que votre système sans fil fonctionne bien, le récepteur et l'émetteur doivent tous
les deux être réglés sur le même canal.
Procédez comme suit pour installer et utiliser votre système sans fil Concert 88 :
Disposez physiquement le récepteur du CR88 là où il sera utilisé, puis sortez les
antennes à la verticale. Pensez à conserver une ligne de mire directe sans obstacle
entre le récepteur et l’émetteur, c'est-à-dire que le porteur de l'émetteur doit voir le
récepteur.
L'interrupteur général étant sur Marche et le CR88 sur Arrêt, branchez l'adaptateur
joint à la livraison. Mettez momentanément en marche le CR88 pour vérifier que
l'appareil reçoit bien du courant. Vous verrez l'afficheur LED s'allumer. Ensuite, met-
tez le CR88 sur Arrêt.
This device complies with Part 15 of the
FCC Rules. Operation is subject to the
following two conditions:
(1) This device may not cause harmful
interference, and
(2) this device must accept any
interference received, including
interference that may cause
undesired operation.
FREQ:
542-566MHz
This device complies with Part 15 of the
FCC Rules. Operation is subject to the
following two conditions:
(1) This device may not cause harmful
interference, and
(2) this device must accept any
interference received, including
interference that may cause
undesired operation.
FREQ:
542-566MHz
3. Plug in receiver 4. Turn on receiver
5. Plug receiver into audio system 6. Press Select button to change channel 9. Press and hold SELECT button to IR set 10. Adjust Volume control7. Install batteries 8. Press button on transmitter to turn on
9. Press and hold Select button to IR set7. Install batteries 8. Turn on belt pack transmitter
This device complies with Part 15 of the
FCC Rules. Operation is subject to the
following two conditions:
(1) This device may not cause harmful
interference, and
(2) this device must accept any
interference received, including
interference that may cause
undesired operation.
FREQ:
542-566MHz
This device complies with Part 15 of the
FCC Rules. Operation is subject to the
following two conditions:
(1) This device may not cause harmful
interference, and
(2) this device must accept any
interference received, including
interference that may cause
undesired operation.
FREQ:
542-566MHz
3. Plug in receiver 4. Turn on receiver
5. Plug receiver into audio system 6. Press Select button to change channel 9. Press and hold SELECT button to IR set 10. Adjust Volume control7. Install batteries 8. Press button on transmitter to turn on
9. Press and hold Select button to IR set7. Install batteries 8. Turn on belt pack transmitter
L'amplificateur ou la console de mixage étant hors tension et le volume réglé au
minimum, reliez le jack de sortie du récepteur CR88 à l'entrée de niveau mic ou line
d'une console de mixage ou d'un amplificateur à l'aide de la sortie XLR symétrique
ou de la sortie de niveau LINE ¼" asymétrique. Tournez à fond en sens horaire le
bouton de Niveau du CR88, puis mettez-le sous tension.

35
Système sans fil Concert 88
ENGLISH
FRANÇAISDEUTSCHEESPAÑOLITALIANO
Configuration rapide - Installation d'un seul système
L'émetteur étant hors tension, mettez en place deux piles AA neuves dans le clip de
ceinture CB88 ou dans l'émetteur portatif CH88. Laissez le logement à piles ouvert.
This device complies with Part 15 of the
FCC Rules. Operation is subject to the
following two conditions:
(1) This device may not cause harmful
interference, and
(2) this device must accept any
interference received, including
interference that may cause
undesired operation.
FREQ:
542-566MHz
This device complies with Part 15 of the
FCC Rules. Operation is subject to the
following two conditions:
(1) This device may not cause harmful
interference, and
(2) this device must accept any
interference received, including
interference that may cause
undesired operation.
FREQ:
542-566MHz
3. Plug in receiver 4. Turn on receiver
5. Plug receiver into audio system 6. Press Select button to change channel 9. Press and hold SELECT button to IR set 10. Adjust Volume control7. Install batteries 8. Press button on transmitter to turn on
9. Press and hold Select button to IR set7. Install batteries 8. Turn on belt pack transmitter
This device complies with Part 15 of the
FCC Rules. Operation is subject to the
following two conditions:
(1) This device may not cause harmful
interference, and
(2) this device must accept any
interference received, including
interference that may cause
undesired operation.
FREQ:
542-566MHz
This device complies with Part 15 of the
FCC Rules. Operation is subject to the
following two conditions:
(1) This device may not cause harmful
interference, and
(2) this device must accept any
interference received, including
interference that may cause
undesired operation.
FREQ:
542-566MHz
3. Plug in receiver 4. Turn on receiver
5. Plug receiver into audio system 6. Press Select button to change channel 9. Press and hold SELECT button to IR set 10. Adjust Volume control7. Install batteries 8. Press button on transmitter to turn on
9. Press and hold Select button to IR set7. Install batteries 8. Turn on belt pack transmitter
Mettez l'émetteur sous tension (Marche) en maintenant l'interrupteur Power (Marche/
Arrêt) enfoncé; le témoin LED s'allumera en vert.
This device complies with Part 15 of the
FCC Rules. Operation is subject to the
following two conditions:
(1) This device may not cause harmful
interference, and
(2) this device must accept any
interference received, including
interference that may cause
undesired operation.
FREQ:
542-566MHz
This device complies with Part 15 of the
FCC Rules. Operation is subject to the
following two conditions:
(1) This device may not cause harmful
interference, and
(2) this device must accept any
interference received, including
interference that may cause
undesired operation.
FREQ:
542-566MHz
3. Plug in receiver 4. Turn on receiver
5. Plug receiver into audio system 6. Press Select button to change channel 9. Press and hold SELECT button to IR set 10. Adjust Volume control7. Install batteries 8. Press button on transmitter to turn on
9. Press and hold Select button to IR set7. Install batteries 8. Turn on belt pack transmitter

36
Configuration rapide - Installation d'un seul système
This device complies with Part 15 of the
FCC Rules. Operation is subject to the
following two conditions:
(1) This device may not cause harmful
interference, and
(2) this device must accept any
interference received, including
interference that may cause
undesired operation.
FREQ:
542-566MHz
This device complies with Part 15 of the
FCC Rules. Operation is subject to the
following two conditions:
(1) This device may not cause harmful
interference, and
(2) this device must accept any
interference received, including
interference that may cause
undesired operation.
FREQ:
542-566MHz
3. Plug in receiver 4. Turn on receiver
5. Plug receiver into audio system 6. Press Select button to change channel 9. Press and hold SELECT button to IR set 10. Adjust Volume control7. Install batteries 8. Press button on transmitter to turn on
9. Press and hold Select button to IR set7. Install batteries 8. Turn on belt pack transmitter
This device complies with Part 15 of the
FCC Rules. Operation is subject to the
following two conditions:
(1) This device may not cause harmful
interference, and
(2) this device must accept any
interference received, including
interference that may cause
undesired operation.
FREQ:
542-566MHz
This device complies with Part 15 of the
FCC Rules. Operation is subject to the
following two conditions:
(1) This device may not cause harmful
interference, and
(2) this device must accept any
interference received, including
interference that may cause
undesired operation.
FREQ:
542-566MHz
3. Plug in receiver 4. Turn on receiver
5. Plug receiver into audio system 6. Press Select button to change channel 9. Press and hold SELECT button to IR set 10. Adjust Volume control7. Install batteries 8. Press button on transmitter to turn on
9. Press and hold Select button to IR set7. Install batteries 8. Turn on belt pack transmitter
Positionnez l'émetteur à environ 6 à 12" (15 à 30 cm) de la face avant du CR88, la
fenêtre infra-rouge de l'émetteur étant tournée vers l'émetteur infra-rouge situé sur la
face avant du récepteur CR88.
This device complies with Part 15 of the
FCC Rules. Operation is subject to the
following two conditions:
(1) This device may not cause harmful
interference, and
(2) this device must accept any
interference received, including
interference that may cause
undesired operation.
FREQ:
542-566MHz
This device complies with Part 15 of the
FCC Rules. Operation is subject to the
following two conditions:
(1) This device may not cause harmful
interference, and
(2) this device must accept any
interference received, including
interference that may cause
undesired operation.
FREQ:
542-566MHz
3. Plug in receiver 4. Turn on receiver
5. Plug receiver into audio system 6. Press Select button to change channel 9. Press and hold SELECT button to IR set 10. Adjust Volume control7. Install batteries 8. Press button on transmitter to turn on
9. Press and hold Select button to IR set7. Install batteries 8. Turn on belt pack transmitter
This device complies with Part 15 of the
FCC Rules. Operation is subject to the
following two conditions:
(1) This device may not cause harmful
interference, and
(2) this device must accept any
interference received, including
interference that may cause
undesired operation.
FREQ:
542-566MHz
This device complies with Part 15 of the
FCC Rules. Operation is subject to the
following two conditions:
(1) This device may not cause harmful
interference, and
(2) this device must accept any
interference received, including
interference that may cause
undesired operation.
FREQ:
542-566MHz
3. Plug in receiver 4. Turn on receiver
5. Plug receiver into audio system 6. Press Select button to change channel 9. Press and hold SELECT button to IR set 10. Adjust Volume control7. Install batteries 8. Press button on transmitter to turn on
9. Press and hold Select button to IR set7. Install batteries 8. Turn on belt pack transmitter
Maintenez le bouton SELECT du CR88 enfoncé pour
régler l'émetteur sur le même canal que le récepteur
par transmission infra-rouge.
Appuyez sur le bouton SELECT situé à l'avant du
récepteur CR88 pour choisir un canal disponible. Le
numéro du canal augmentera de un, de 0 à 9 puis de
A à F. Une fois parvenu au dernier canal, le sens de
comptage s'inversera pour revenir à 0.

37
Système sans fil Concert 88
ENGLISH
FRANÇAISDEUTSCHEESPAÑOLITALIANO
Après l'avoir connecté(e), mettez l’amplificateur
ou la console de mixage sous tension, en mainte-
nant son volume au minimum. Réglez le bouton de
Volume du CR88 à fond en sens horaire (sur “10”).
Il s'agit du gain unitaire.
Parlez ou chantez dans le micro ou, si vous utilisez l'émetteur en ayant branché un
instrument, jouez de l'instrument au niveau normal adopté pendant le spectacle.
Augmentez lentement le volume de votre amplificateur ou de votre table de mixage
jusqu'à ce que le niveau désiré soit atteint.
Si vous estimez que le système présente des décrochages notables, une plage de
fonctionnement globale réduite ou des pointes de bruit inattendues, modifiez le
canal en fonctionnement du système en suivant les étapes exposées ci-dessus.
This device complies with Part 15 of the
FCC Rules. Operation is subject to the
following two conditions:
(1) This device may not cause harmful
interference, and
(2) this device must accept any
interference received, including
interference that may cause
undesired operation.
FREQ:
542-566MHz
This device complies with Part 15 of the
FCC Rules. Operation is subject to the
following two conditions:
(1) This device may not cause harmful
interference, and
(2) this device must accept any
interference received, including
interference that may cause
undesired operation.
FREQ:
542-566MHz
3. Plug in receiver 4. Turn on receiver
5. Plug receiver into audio system 6. Press Select button to change channel 9. Press and hold SELECT button to IR set 10. Adjust Volume control7. Install batteries 8. Press button on transmitter to turn on
9. Press and hold Select button to IR set7. Install batteries 8. Turn on belt pack transmitter
This device complies with Part 15 of the
FCC Rules. Operation is subject to the
following two conditions:
(1) This device may not cause harmful
interference, and
(2) this device must accept any
interference received, including
interference that may cause
undesired operation.
FREQ:
542-566MHz
This device complies with Part 15 of the
FCC Rules. Operation is subject to the
following two conditions:
(1) This device may not cause harmful
interference, and
(2) this device must accept any
interference received, including
interference that may cause
undesired operation.
FREQ:
542-566MHz
3. Plug in receiver 4. Turn on receiver
5. Plug receiver into audio system 6. Press Select button to change channel 9. Press and hold SELECT button to IR set 10. Adjust Volume control7. Install batteries 8. Press button on transmitter to turn on
9. Press and hold Select button to IR set7. Install batteries 8. Turn on belt pack transmitter
Configuration rapide - Installation d'un seul système
Lorsque la transmission est terminée, le CR88 recevra
un signal HF et le code de tonalité de l'émetteur. Le
témoin READY s'allumera sur la façade avant du récep-
teur CR88.

38
Pour modifier le canal en fonctionnement d'un sys-
tème, appuyez sur le bouton SELECT à l'avant du
récepteur du CR88. Le numéro du canal augmentera
de un, de 0 à 9 puis de A à F. Une fois parvenu au
dernier canal, le sens de comptage s'inversera pour
revenir à 0.
Configuration rapide - Installation de plusieurs systèmes
Lorsqu'on utilise plusieurs systèmes, chaque système doit être réglé sur un canal en fonction-
nement différent. Les paires d'émetteurs et de récepteurs doivent être sur le même plan
de canaux pour fonctionner ensemble (voir "Concert 88 Channel Plans" on page 41).
En mettant en place un émetteur supplémentaire, faites en sorte de bien fermer tous
les autres compartiments à piles de l'émetteur pour s'assurer que la Lentille infra-
rouge soit masquée.
This device complies with Part 15 of the
FCC Rules. Operation is subject to the
following two conditions:
(1) This device may not cause harmful
interference, and
(2) this device must accept any
interference received, including
interference that may cause
undesired operation.
FREQ:
542-566MHz
This device complies with Part 15 of the
FCC Rules. Operation is subject to the
following two conditions:
(1) This device may not cause harmful
interference, and
(2) this device must accept any
interference received, including
interference that may cause
undesired operation.
FREQ:
542-566MHz
3. Plug in receiver 4. Turn on receiver
5. Plug receiver into audio system 6. Press Select button to change channel 9. Press and hold SELECT button to IR set 10. Adjust Volume control7. Install batteries 8. Press button on transmitter to turn on
9. Press and hold Select button to IR set7. Install batteries 8. Turn on belt pack transmitter
Mettre l'émetteur sous tension (Marche) en maintenant l'interrupteur Power (Marche/
Arrêt) enfoncé; le témoin LED s'allumera en vert.
This device complies with Part 15 of the
FCC Rules. Operation is subject to the
following two conditions:
(1) This device may not cause harmful
interference, and
(2) this device must accept any
interference received, including
interference that may cause
undesired operation.
FREQ:
542-566MHz
This device complies with Part 15 of the
FCC Rules. Operation is subject to the
following two conditions:
(1) This device may not cause harmful
interference, and
(2) this device must accept any
interference received, including
interference that may cause
undesired operation.
FREQ:
542-566MHz
3. Plug in receiver 4. Turn on receiver
5. Plug receiver into audio system 6. Press Select button to change channel 9. Press and hold SELECT button to IR set 10. Adjust Volume control7. Install batteries 8. Press button on transmitter to turn on
9. Press and hold Select button to IR set7. Install batteries 8. Turn on belt pack transmitter
This device complies with Part 15 of the
FCC Rules. Operation is subject to the
following two conditions:
(1) This device may not cause harmful
interference, and
(2) this device must accept any
interference received, including
interference that may cause
undesired operation.
FREQ:
542-566MHz
This device complies with Part 15 of the
FCC Rules. Operation is subject to the
following two conditions:
(1) This device may not cause harmful
interference, and
(2) this device must accept any
interference received, including
interference that may cause
undesired operation.
FREQ:
542-566MHz
3. Plug in receiver 4. Turn on receiver
5. Plug receiver into audio system 6. Press Select button to change channel 9. Press and hold SELECT button to IR set 10. Adjust Volume control7. Install batteries 8. Press button on transmitter to turn on
9. Press and hold Select button to IR set7. Install batteries 8. Turn on belt pack transmitter

39
Système sans fil Concert 88
ENGLISH
FRANÇAISDEUTSCHEESPAÑOLITALIANO
Positionnez l'émetteur à environ 6 à 12" (15 à 30 cm) de l'avant du CR88, la fenêtre
infra-rouge de l'émetteur étant tournée vers l'ouverture infra-rouge du récepteur.
This device complies with Part 15 of the
FCC Rules. Operation is subject to the
following two conditions:
(1) This device may not cause harmful
interference, and
(2) this device must accept any
interference received, including
interference that may cause
undesired operation.
FREQ:
542-566MHz
This device complies with Part 15 of the
FCC Rules. Operation is subject to the
following two conditions:
(1) This device may not cause harmful
interference, and
(2) this device must accept any
interference received, including
interference that may cause
undesired operation.
FREQ:
542-566MHz
3. Plug in receiver 4. Turn on receiver
5. Plug receiver into audio system 6. Press Select button to change channel 9. Press and hold SELECT button to IR set 10. Adjust Volume control7. Install batteries 8. Press button on transmitter to turn on
9. Press and hold Select button to IR set7. Install batteries 8. Turn on belt pack transmitter
This device complies with Part 15 of the
FCC Rules. Operation is subject to the
following two conditions:
(1) This device may not cause harmful
interference, and
(2) this device must accept any
interference received, including
interference that may cause
undesired operation.
FREQ:
542-566MHz
This device complies with Part 15 of the
FCC Rules. Operation is subject to the
following two conditions:
(1) This device may not cause harmful
interference, and
(2) this device must accept any
interference received, including
interference that may cause
undesired operation.
FREQ:
542-566MHz
3. Plug in receiver 4. Turn on receiver
5. Plug receiver into audio system 6. Press Select button to change channel 9. Press and hold SELECT button to IR set 10. Adjust Volume control7. Install batteries 8. Press button on transmitter to turn on
9. Press and hold Select button to IR set7. Install batteries 8. Turn on belt pack transmitter
Lorsque l'émission sera terminée et que le CR88 recevra
un signal radio de l'émetteur, le témoin READY s'allumera
sur la façade avant du récepteur du CR88.
Si vous estimez que le système présente des décro-
chages notables, une plage de fonctionnement globale réduite ou des pointes de bruit,
modifiez le canal en fonctionnement du système en suivant les étapes ci-dessus.
This device complies with Part 15 of the
FCC Rules. Operation is subject to the
following two conditions:
(1) This device may not cause harmful
interference, and
(2) this device must accept any
interference received, including
interference that may cause
undesired operation.
FREQ:
542-566MHz
This device complies with Part 15 of the
FCC Rules. Operation is subject to the
following two conditions:
(1) This device may not cause harmful
interference, and
(2) this device must accept any
interference received, including
interference that may cause
undesired operation.
FREQ:
542-566MHz
3. Plug in receiver 4. Turn on receiver
5. Plug receiver into audio system 6. Press Select button to change channel 9. Press and hold SELECT button to IR set 10. Adjust Volume control7. Install batteries 8. Press button on transmitter to turn on
9. Press and hold Select button to IR set7. Install batteries 8. Turn on belt pack transmitter
Configuration rapide - Installation de plusieurs systèmes
Maintenez le bouton SELECT du CR88 enfoncé pour
synchroniser l'émetteur sur le même canal que le
récepteur par émission d'infra-rouges.

40
Le récepteur du CR88 peut s'installer dans une baie 19” standard en vue du trans-
port ou d'une installation permanente en se servant des pattes de baies ci-jointes.
Suivez les différentes phases ci-dessous pour installer le CR88:
Fixez les pattes de baie ci-jointes en faisant cou-
lisser chaque patte de baie dans la rainure située
de chaque côté du CR88 jusqu'à ce qu'elles se
mettent en place et se bloquent, puis le récepteur
de manière à ce qu'il affleure parfaitement avec la
façade avant.
Positionnez le récepteur du CR88
dans un logement de rack dispo-
nible, puis faites-le coulisser à
l'intérieur jusqu'à ce que les pattes
du rack touchent les glissières du
boîtier de rack et soient alignées sur
les trous des glissières du rack.
Introduisez le récepteur dans le rack à l'aide des vis de rack appropriées (non jointes
à la livraison). Pour garantir une tension égale et un bon équilibre en installant le
récepteur, vous devrez fixer les vis en croix : en haut à gauche, puis en bas à droite,
puis en haut à droite et enfin en bas à gauche.
Pour installer deux récepteurs de
CR88 dans un seul espace de rack,
le système comporte un raccord
central. Faites coulisser le raccord
central dans la rainure de chaque ré-
cepteur, puis fixez les pattes courtes
du rack sur chaque récepteur.
Installez les récepteurs dans le rack
suivant le schéma en croix présenté
plus haut.
Montage sur baie

41
Système sans fil Concert 88
ENGLISH
FRANÇAISDEUTSCHEESPAÑOLITALIANO
Groupe C
638-662 MHz
Groupe D
542-566 MHz
Groupe F*
606-630 MHz
Groupe G*
863-865 MHz
Canal Fréq. Canal Fréq. Canal Fréq. Canal Fréq.
0 638,125 0 542,125 0 606,125 0 863,050
1 639,625 1 543,625 1 607,625 1 863,250
2 641,050 2 545,05 2 609,05 2 863,550
3 642,425 3 546,425 3 610,425 3 863,750
4 642,900 4 546,900 4 610,900 4 864,050
5 645,525 5 549,525 5 613,525 5 864,250
6 647,100 6 551,100 6 615,100 6 864,550
7 648,475 7 552,475 7 616,475 7 864,750
8 650,000 8 554,000 8 618,000 8 864,950
9 652,075 9 556,075 9 620,075
A 654,975 A 558,975 A 622,975
B 655,975 B 559,975 B 623,975
C 657,050 C 561,050 C 625,050
D 658,975 D 562,975 D 626,975
E 660,425 E 564,425 E 628,425
F 661,975 F 565,975 F 629,975
Plans de fréquences du Concert 88
* A utiliser ailleurs qu'aux Etats-Unis et au Canada. Pour les questions concernant
les canaux disponibles dans votre secteur, contactez le distributeur Samson le plus
proche de chez vous.

42
Dépannage
Problème Solutions
Pas de signal audio
Vérifiez que l'émetteur et le récepteur sont bien tous les
deux sous tension.
Vérifiez que les piles de l’émetteur sont correctement
mises en place
Vérifiez que l'émetteur n'est pas coupé.
Vérifiez que l’adaptateur secteur du CR88 est correcte-
ment connecté et branché sur une prise secteur.
Mettez le récepteur du CR88 sous tension.
Vérifiez que les sorties audio du CR88 sont correctement
connectées.
Vérifiez que le récepteur et l'émetteur sont bien en ligne
directe, sans obstacle.
Vérifiez le réglage de niveau sur le récepteur et sur la
console de mixage.
Vérifiez que l'émetteur et le récepteur sont bien réglés sur
le même canal en service. Dans le doute, réinitialisez le
canal en effectuant un réglage de l'infra-rouge.
Distorsion audio
Le niveau de sortie du récepteur ou le niveau du dispositif
d'entrée son est peut-être trop élevé.
Contrôlez les piles des émetteurs. Remplacez-les si besoin est.
Le gain à l'entrée sur l'émetteur (CB88) ou le niveau de la
source audio est peut-être trop fort.
Décrochages audio
L’émetteur est trop loin du récepteur. Rapprochez-le du
récepteur, ou essayez de modifier la position des an-
tennes.
Eloignez toutes les sources qui peuvent causer des inter-
férences HF, comme les téléphones portables, sans fil,
équipements d’éclairage, ordinateurs, ossatures métal-
liques, etc.
Le récepteur ne sera
pas sous tension.
Examinez l'adaptateur pour vérifier qu'il est correctement
relié et branché sur une prise d'alimentation secteur.
L'émetteur ne se
mettra pas sous ten-
sion (témoins LED en
ROUGE)
Remplacez les piles de l'émetteur.
Bruit ou interférences
indésirables
Si vous utilisez plusieurs systèmes, vérifiez qu'aucun des sys-
tèmes ne fonctionne sur le même canal. Si le problème per-
siste, modifiez un seul ou la totalité des canaux du système.

43
Système sans fil Concert 88
ENGLISH
FRANÇAISDEUTSCHEESPAÑOLITALIANO
Spécifications
Système
Portée 300' (100m) en ligne directe
Réponse en fréquence : 50 Hz à 15 kHz
T.H.D. (Distorsion Harmonique) (totale) <1% (@AF 1 kHz, RF 46 dBu)
Gamme dynamique >100 dB pondéré A
Rapport signal/bruit >90 dB
Température de fonctionnement –10°C (14°F) à +60°C (+140°F)
Fréquence de manipulation en tonalité 32,768 kHz
Emetteur à clip de ceinture CB88
Connecteur d'entrée Mini-XLR (P3)
Impédance d'entrée 1MΩ
Gamme de gain à l'entrée 38 dB
Puissance RF 10 mW de puissance isotrope rayonnée
équivalente
Alimentation deux pilesalcalines AA (LR6)
Autonomie des piles 8 heures
Dimensions (h x l x p) 3.75" x 2.44" x 0.75"
96mm x 62mm x 18,5mm
Poids 0.2 lb / 93 g
Emetteur portatif CH88
Élément de micro Q6 dynamique
Gamme de gain à l'entrée 28 dB
Puissance RF 10 mW de puissance isotrope rayonnée
équivalente
Alimentation deux pilesalcalines AA (LR6)
Autonomie des piles 8 heures
Dimensions (h x Ø) 10.23" x 2.1"
260mm x 54mm
Poids 0.48 lb / 218 g
Récepteur CR88
Niveau de sortie audio - Dissymétrique +14 dBu
Niveau de sortie audio - Symétrique +9 dBu
Impédance de sortie audio - Dissymétrique 810 Ohms
Impédance de sortie audio - Symétrique 240 Ohms
Sensibilité -100 dBm / 30 dB sinad
Réjection d’image >50 dB
Tension de fonctionnement 15 V= 200mA
Dimensions (l x p x h) 8.25" x 2.44" x 1.75"
210mm x 125mm x 44mm
Poids 0.85 lb / 388 g
Chez Samson, nous améliorons nos produits en permanence, certaines images et
spécifications sont donc susceptibles de changer sans notification préalable.

44
Régulations FCC
Les systèmes Samson répondent aux normes FCC, alinéa 15 et les émetteurs
répondent aux normes FCC, alinéa 74.
L’obtention des licences pour l’utilisation des produits Samson est de la res-
ponsabilité du client et dépend du pays d’utilisation.
Cet appareil est conforme à RSS-310
de l'industrie canadienne.
Le fonctionnement du dispositif est soumis aux deux conditions suivantes:
(1) cet appareil ne doit pas causer d’interférences et (2) cet appareil doit
fonctionner en présence d’interférences externes, ce qui comprend les inter-
ferences qui peuvent générer un dysfonctionnement.
Par les présentes, Samson Technologies Corp. déclare que ce matériel CR88,
CH88, CB88 est conforme aux règles essentielles et autres dispositions en
vigueur de la Directive 1999/5/CE. La déclaration de conformité est consul-
table sur le site
http://www.samsontech.com/site_media/support/manuals/Concert_88_DOC.pdf
REMARQUE: Cet équipement a été testé et déclaré conforme aux limites
pour appareils numériques de classe B, selon la section 15 des règlements
de la FCC. Ces restrictions visent à garantir une protection suffisante contre
les interférences nuisibles dans une installation à domicile. Cet appareil
génère et utilise un rayonnement de fréquence radio et peut causer des inter-
férences nuisibles aux communications radio s'il n'est pas installé ou utilisé
conformément aux instructions. Cependant, il n'existe aucune garantie contre
ces interférences sur une installation particulière. Si cet appareil cause des
interférences nuisibles à la réception des signaux de radio ou de télévision,
ce qui peut être déterminé en allumant et en éteignant l'appareil, l'utilisateur
peut tenter de résoudre le problème de l'une des façons suivantes:
- Réorientez ou repositionnez l'antenne de réception.
- Augmentez la distance séparant l'équipement du récepteur.
• Branchez l'appareil sur un circuit différent de celui du récepteur.
• Demandez conseil à un fournisseur ou technicien radio/TV spécialisé.
AVERTISSEMENT Les changements ou les modifications non expressément
approuvées par le fabricant peuvent annuler l'autorisation de l'utilisateur à
faire fonctionner l'équipement.

45
Concert 88 Kabelloses System
ENGLISH
FRANÇAISDEUTSCHEESPAÑOLITALIANO
DIESES GERÄT ENTSPRICHT DEM TEIL 15 DER VERORDNUNGEN DER
KLASSE B. DER BETRIEB UNTERLIEGT FOLGENDEN ZWEI BEDINGUN-
GEN: (1) DIESES GERÄT DARF KEINE GEFÄHRLICHEN STÖRUNGEN
VERURSACHEN UND (2) DIESES GERÄT MUSS STÖRUNGEN AKZEP-
TIEREN, DIE EINEN UNERWÜNSCHTEN BETRIEB DIESES GERÄTS
VERURSACHEN KÖNNEN. GEEIGNET FÜR DEN EINSATZ ZU HAUSE
UND IM BÜRO.
Wichtige Sicherheitshinweise
ACHTUNG: UM DAS RISIKO EINES ELEKTRISCHEN SCHLAGS ZU REDUZIEREN ÖFFNEN SIE
NICHT DIE HINTERE ABDECKUNG. ES ENTHÄLT KEINE VOM BENUTZER ZU WARTENDEN
TEILE. ÜBERGEBEN SIE DAS GERÄT NUR QUALIFIZIERTEM PERSONAL ZUR REPARATUR.
Dieser Blitz mit einem Pfeil als Symbol in einem gleichseitigen Dreieck
soll den Benutzer auf das Vorhandensein von "gefährlicher Spannung” im
Gehäuse des Produkts hinweisen. Diese Spannung ist unter Umständen
groß genug, um ein Risiko für einen elektrischen Schlag darzustellen.
Das Ausrufungszeichen in einem gleichseitigen Dreieck soll den Be-
nutzer in der mit dem Gerät mitgelieferten Dokumentation auf eine
wichtige Betriebs- oder Wartungsanweisung hinweisen.
ACHTUNG
GEFAHR VON ELEKTRISCHEN SCHOCKS
NICHT ÖFFNEN
WARNUNG
UM EINEN ELEKTRISCHEN SCHOCK ZU VERMEIDEN, BENUTZEN SIE DEN GEPOLTEN
STECKER NICHT MIT EINER VERLÄNGERUNGSSCHNUR, EINER STECKDOSE ODER AN-
DEREN STECKERN, ES SEI DENN, DIE KONTAKTE KÖNNEN VOLLKOMMEN HINEINGESTECKT
WERDEN. UM BRANDGEFAHR UND GEFAHREN EINES SCHOCKS ZU VERMEIDEN, SETZEN
SIE DAS GERÄT WEDER WASSER NOCH FEUCHTIGKEIT AUS. UM EINEN ELEKTRISCHEN
SCHOCK ZU VERMEIDEN, MUSS DER BREITE FLACHKONTAKT VOLLKOMMEN IN DIE BREITE
BUCHSE EINGEFÜHRT WERDEN.
Wenn Sie das Produkt entsorgen möchten, geben Sie es nicht in den Hausmüll. In
Übereinstimmung mit der Gesetzgebung existiert ein separates Sammelsystem für elek-
trische und elektronische Produkte. Diese Gesetze fordern eine angemessene Behan-
dlung, Verwertung und Wiederaufbereitung solcher Geräte.
Private Haushalte in den 28 Mitgliedsstaaten der EU, in der Schweiz und Norwegen können
ihre elektronischen Produkte kostenlos an eine Sammelstelle oder den Händler abgeben (wenn
Sie ein ähnliches Produkt wieder erwerben).
Verbraucher in Ländern, die nicht oben genannt werden, kontaktieren bitte ihre lokalen Behör-
den, um Informationen über eine korrekte Entsorgung zu erhalten.
Sie werden so sicherstellen, dass Ihr Produkt der notwendigen Behandlung, Verwertung und
Wiederaufbereitung unterzogen wird und eventuelle negative Auswirkungen auf die Umwelt und
die Gesundheit vermieden werden.

46
Sicherheitshinweise
1. Lesen Sie diese Anweisungen.
2. Bewahren Sie diese Anweisungen
auf.
3. Beachten Sie alle Warnungen.
4. Folgen Sie allen Anweisungen.
5. Benutzen Sie das Gerät nicht in der
Nähe von Wasser.
6. Reinigen Sie es nur mit einem trock-
enen Tuch.
7. Verschließen Sie keine Ventilation-
söffnungen. Installieren Sie das
Gerät gemäß den Anweisungen des
Herstellers.
8. Installieren Sie es nicht in der Nähe
von Wärmequellen wie Radiatoren,
Heizkörpern, Öfen oder anderen
Geräten (einschließlich Verstärker),
die Hitze erzeugen.
9. Umgehen Sie nicht die Sicherhe-
itsfunktion des polarisierten oder
geerdeten Steckers. Ein polarisierter
Stecker besteht aus zwei Flachkon-
takten, wobei einer breiter ist als
der andere. Ein Stecker mit Erdung
besteht aus zwei Flachkontakten und
einem dritten runden Erdungsstift.
Der breite Flachkontakt und der
Erdungsstift werden aus Sicher-
heitsgründen integriert. Wenn der
mitgelieferte Stecker nicht in Ihre
Steckdose passt, bitten Sie einen
Elektriker, die obsolete Steckdose
auszutauschen.
10. Schützen Sie das Stromversorgung-
skabel davor, dass man darauf tritt
und dass es geknickt wird, vor allem
an den Steckern, Buchsenteilen und
an den Punkten, an denen das Kabel
aus dem Gerät kommt.
11. enutzen Sie nur die vom Hersteller
spezifizierten Zubehörteile.
12. Benutzen Sie nur Wagen, Ständer,
Stative, Halter oder Tische, die vom
Hersteller angegeben werden oder
passend zum Gerät erhältlich sind.
Wenn ein Wagen
eingesetzt wird,
sollten Sie vorsich-
tig sein, wenn Sie
den Wagen und das
Gerät bewegen, um
Verletzungen durch
Umkippen zu vermeiden.
13. Ziehen Sie den Stecker des Geräts
bei Gewittern oder wenn es längere
Zeit nicht benutzt wird aus der Steck-
dose.
14. Übergeben sie das Gerät zur Repa-
ratur nur qualifiziertem Personal.
Wenn das Gerät in irgendeiner Weise
beschädigt wurde, zum Beispiel wenn
das Stromversorgungskabel oder der
Stecker beschädigt sind, Flüssigkeit
ausgelaufen ist oder ein Objekt in
das Gerät gefallen ist oder das Gerät
Regen oder Feuchtigkeit ausgesetzt
wurde, es nicht normal funktioniert
oder gefallen ist, muss es von einer
Fachkraft werden.
15. Dieses Gerät darf nicht Wasser-
spritzern oder einem Wasserstrahl
ausgesetzt werden und es darf keine
Vase oder ein mit Wasser gefülltes
Objekt auf das Gerät gestellt werden.
16. Achtung - um einen elektrischen
Schock zu vermeiden, muss der bre-
ite Flachkontakt vollkommen in die
breite Buchse eingeführt werden.
17. Bitte achten Sie darauf, dass die
gesamte Umgebung um das Gerät gut
gelüftet ist.
18. Der Hauptstecker ist als Abschaltein-
richtung ausgelegt. Die Abschaltein-
richtung muss immer betriebsbereit
sein.
19. Die Batterie (Batterie oder Batterien
oder Batteriepaket) darf keiner Hitze
etwa Sonneneinstrahlung, Feuer oder
ähnlichen Einwirkungen ausgesetzt
werden.

47
Concert 88 Kabelloses System
ENGLISH
FRANÇAISDEUTSCHEESPAÑOLITALIANO
Inhaltsverzeichnis
Einführung . . . . . . . . . . . . . . . . . . . . . . . . . . .48
Systemfunktionen . . . . . . . . . . . . . . . . . . . . . . . .49
Systemkomponenten . . . . . . . . . . . . . . . . . . . . . .49
Einführende Tour - CR88 Receiver . . . . . . . . . . . . . . . .50
Einführende Tour - CB88 Sender mit Gürtelhalter . . . . . . . . .52
Einführende Tour - CH88 Tragbarer Sender . . . . . . . . . . . .54
Kurzanleitung - Einstellung eines einzelnen Systems . . . . . . .55
Kurzanleitung - Einstellung eines mehrfachen Systems . . . . . .59
Rack Montage. . . . . . . . . . . . . . . . . . . . . . . . . .61
Concert 88 Kanal-Auflistung . . . . . . . . . . . . . . . . . . .62
Fehlerbehebung . . . . . . . . . . . . . . . . . . . . . . . . .63
Spezifikationen . . . . . . . . . . . . . . . . . . . . . . . . .64

48
Herzlichen Glückwunsch für den Kauf des Samson Concert 88 Kabellosen Systems!
Das Concert 88 ist die ideale Lösung für den aktiven Performer, der ein zuverlässiges,
gut klingendes System für drahtlose Anwendungen benötigt. Mit einer einfachen
Bedienung, 16 verfügbaren Kanälen und Infrarot Set für den Sendekanal kann das
Concert 88 System schnell und problemlos eingesetzt werden. Das Concert 88 System
sorgt für eine klare, störungsfreie Performance durch die Kombination von Tone Key
mit Auto-Mute. Diese Konfiguration ermöglicht, dass nur das Audio Signal des Senders
den Receiver erreicht und schaltet den Ausgang ab, wenn es irgendeine Störung geben
sollte.
Das Concert 88 ist in vier Konfigurationen erhältlich. Das tragbare Vokal- System
umfasst den tragbare CH88 Sender und die dynamische Q6 Mikrofonkapsel. Das CB88
System mit Gürtelhalter kann entweder mit dem HS5 Headset Mikrofon, LM5 Lavalier
Mikrofon oder einem 1/4" Instrumentenkabel konfiguriert werden. Für unterwegs oder
eine Festinstallation enthält das Concert 88 System eine Standard 19" Rackmount Kit.
Auf diesen Seiten werden Sie eine detaillierte Beschreibung der Eigenschaften und
Funktionen des Concert 88 Kabellosen Systems sowie eine Tour durch das Bedienfeld,
eine Schritt-für-Schritt Anleitung durch das Setup und den Betrieb vorfinden sowie
eine umfangreiche Liste der Spezifikationen. Wenn Sie Ihr Mikrofon in den Vereinigten
Staaten erworben haben, werden Sie ebenfalls im Lieferumfang eine Garantiekarte
finden — vergessen Sie bitte nicht, sie auszufüllen und einzusenden, so dass Sie
Online-Support in Anspruch nehmen können und wir Ihnen aktualisierte Informationen
über dieses und andere Samson Produkte zusenden können. Besuchen Sie ebenfalls
unsere Website (www.samsontech.com) um Informationen über unser komplettes
Produktangebot zu erhalten.
Wir empfehlen Ihnen, die folgenden Daten sowie eine Kopie der Kaufquittung gut
aufzubewahren.
Seriennummer Empfänger: _________________________________________
Seriennummer Sender: ______________________________________
Kaufdatum: ______________________________________________
Name des Händlers: __________________________________________________
Mit der richtigen Pflege und Wartung wird Ihr Concert 88 Kabelloses System viele
Jahre lang problemlos eingesetzt werden können. Falls Ihre kabelloses System je eine
Reparatur benötigen sollte, ist eine Return Authorization (RA) Nummer [Rücksende-
Genehmigungsnummer] erforderlich, bevor Sie Ihr Gerät an die Samson schicken.
Ohne diese Nummer wird das Gerät nicht angenommen. Bitte rufen Sie Samson unter
1-800-3SAMS0N (1-800-372-6766) an und erbitten Sie eine RA Nummer, bevor Sie
die Einheit einschicken. Bitte bewahren Sie das originale Verpackungsmaterial auf
und schicken Sie das Gerät wenn möglich in der originalen Verpackung ein. Wenn Ihr
Concert 88 System außerhalb der Vereinigten Staaten erworben wurde, kontaktieren
Sie bitte Ihren lokalen Händler bezüglich der Details zur Garantie und für Service- und
Wartungsinformationen.
Einführung

49
Concert 88 Kabelloses System
ENGLISH
FRANÇAISDEUTSCHEESPAÑOLITALIANO
Systemkomponenten
Systemfunktionen
Alle Systeme
CR88 Receiver
Stromversorgung 1/4" nach 1/4" Audio Kabel
Rack Zubehör Long Rack Griff, Short Rack Griff, zwei Receiver Adapter
Benutzerhandbuch
Tragbares System
Tragbarer CH88 Sender mit Q6 dynamischer Q6 Mikrofonkapsel
Headset System
CB88 Sender mit Gürtelhalter
HS5 Headset Mikrofon mit Mini- XLR Anschluss
Lavalier System
CB88 Sender mit Gürtelhalter
LM5 Lavier Mikrofon mit Mini- XLR Anschluss
Klammer
Instrument System
CB88 Sender mit Gürtelhalter
1/4" an mini-XLR Instrumentenkabel
• Profi Funksystem für den Einsatz sowohl in Live-Sound als auch
Beschallungsanwendungen
• True Diversity Technologie maximiert die aktive Reichweite (bis zu 300 Fuß /
100m) und reduziert potenzielle Störungen
• 16 verfügbare Kanäle im UHF Band, ausgelegt für eine maximale
Systemkompatibilität am gleichen Ort ohne Störung
• Die CR88 Empfänger ist ein Half-Rack Einheit, die freistehend oder mit Hilfe
des mitgelieferten Rack-Kit in einem beliebigen Standard 19" montiert ver-
wendet werden kann, so dass sie leicht auf jeder Reise als Festeinbau Audio-
System integriert werden kann
• Tone Key und Auto Mute ermöglichen, dass nur das Audio Signal des Senders
den Receiver erreicht und schalten den Ausgang ab, wenn es irgendeine Störung
geben sollte.
• Bis zu 300 Meter Reichweite (Sichtlinie)
• Bis zu acht Stunden Akkulaufzeit, mit zwei Standard-AA-Batterien

50
1. Antennen - Der Antennenhalter ermöglicht eine volle Umdrehung, um die opti-
male Stellung für den Empfang einstellen zu können. Bei normalem Betrieb
sollen sich beide Antennen in vertikaler Position befinden. Die Antennen können
für den Transport des CR88 nach innen geklappt werden.
2. VOLUME Regler - Dieser Knopf stellt den Pegel des Ausgangssignals für sowohl
unsymmetrische als auch symmetrische Ausgangsstecker auf der Rückseite
des Geräts ein. Den Referenzpegel erhält man, wenn der Regler ganz im
Uhrzeigersinn gedreht wird (auf seine Einstellung “10”).
3. READY Indikator - Diese Anzeige leuchtet grün, wenn der CR88 empfängt HF-
Signal empfängt und das System einsatzbereit ist.
4. PEAK Indikator - Diese Anzeige leuchtet rot, wenn das übertragene Audiosignal
überlastet ist.
5. LED Display - Die 7-Segment LED Anzeige zeigt den aktuellen Betriebskanal des
Empfängers an. Die CR88 Kanäle werden durch 0-9 und A-F angegeben.
6. IR Sender - Während “IR SET” wird ein Infrarot Licht verwendet, um den Sender
Kanal einzustellen.
7. SELECT Knopf - Drücken Sie diese Taste, um zwischen den Arbeitskanälen
des Empfängers umzuschalten. Drücken und halten Sie diese Taste, um die
Kanalinformationen via Infrarot Übertragung zum Sender zu schicken.
8. POWER Schalter - Betätigen Sie ihn, um den CR88 ein- oder auszuschalten.
Einführende Tour - CR88 Receiver

51
Concert 88 Kabelloses System
ENGLISH
FRANÇAISDEUTSCHEESPAÑOLITALIANO
This device complies with Part 15 of the
FCC Rules. Operation is subject to the
following two conditions:
(1) This device may not cause harmful
interference, and
(2) this device must accept any
interference received, including
interference that may cause
undesired operation.
FREQ:
542-566MHz
Einführende Tour - CR88 Receiver
1. DC Input - Schließen Sie dort den mitgelieferten Netzadapter an und verwenden
Sie die Zugentlastung, wie in der Abbildung unten gezeigt. WARNUNG: Ersetzen
Sie ihn nicht durch irgendein anderes Netzteil. Dies kann schwere Schäden am
CR88 verursachen und die Garantie wird dadurch ungültig.
2. BALANCED OUTPUT - Verwenden Sie diese elektronisch symmetrische XLR-Buchse
mit niedriger Impedanz (600 Ohm), wenn Sie das CR88 an professionelle
(4dBu) Audio Geräte anschließen möchten. Die Pinbelegung ist wie folgt: Pin 1
Masse, Pin 2 High (hot) und Pin 3 Low (cold).
3. UNBALANCED OUTPUT - Verwenden Sie diese elektronisch unsymmetrische 1/4"
Buchse mit hoher Impedanz (5K Ohm), wenn Sie das CR88 an Heim Audio
Geräte (-10dBV) anschließen möchten. Die Verkabelung ist wie folgt: Spitze
Plus, Hülse Minus.
Verwendung der Zugentlastung: Erstellen Sie mit
dem Kabel eine Schleife und führen Sie sie durch die
Zugentlastung. Führe Sie dann den Adapter Stecker durch
die Schlaufe, um einen Knoten zu erzeugen.

52
1. Anschluss Eingang - Schließen Sie das Eingabegerät über den Mini-XLR
Anschluss an. Die CB88 wird entweder mit einem Lavalier , Headset Mikrofon
oder 1/4 " Instrumentenkabel geliefert.
2. Status Indikator - Diese LED zeigt den Betriebsmodus an:
GRÜN Normaler Betrieb
ROT Mute (Ton aus)
GRÜN blinkend Batterie schwach
3. Power/Mute Schalter - Betätigen Sie ihn, um das Gerät ein- oder auszuschalten.
Drücken Sie die Mute Taste und lassen Sie sie los, um den Sender stummzus-
chalten oder wieder zu aktivieren.
4. Gürtel- Clip - Verwenden Sie es, um den CB88 Sender an einem Gürtel oder
Gitarrengurt zu befestigen.
5. Arretierung der Batterieabdeckung - Drücken Sie sie auf beiden Seiten und ziehen
Sie sie nach hinten, um die CB88 Batterieabdeckung zu öffnen.
6. Antenne - Diese dauerhaft befestigte Senderantenne sollte im Normalbetrieb voll
ausgefahren werden.
Einführende Tour - CB88 Sender mit Gürtelhalter

53
Concert 88 Kabelloses System
ENGLISH
FRANÇAISDEUTSCHEESPAÑOLITALIANO
7. Eingangspegel Regler - Dieser Regler bestimmt die Eingangsempfindlichkeit des
Senders, um mit Mikrofon und Instrumenten-Eingänge betrieben zu werden.
Um eine optimale Leistung zu erreichen, stellen Sie mit dem mitgelieferten
Schraubendreher den Eingangspegel Regler, bis die CR88 PEAK Anzeige bis
zu hohen Niveaus ausschlägt. Drehen Sie den Regler herunter, bis die PEAK
Anzeige nicht mehr aufleuchtet.
8. Batteriehalter - Setzen Sie hier zwei Standard AA (LR6) Batterien ein. Achten
Sie darauf, dass Sie dabei die dargestellten Polaritätsmarkierungen einhalten.
Obwohl aufladbare Ni-Cad Batterien eingesetzt werden können, liefern diese
nicht ausreichend Energie für mehr als vier Stunden. WARNUNG: Setzen Sie die
Batterie nicht umgekehrt ein; Dies kann schwere Schäden am CR88 verursa-
chen und die Garantie wird dadurch ungültig.
9. IR Fenster - Dieses Fenster wird verwendet, um das Infrarotsignal zu empfangen,
das von der CR88 Einheit während des IR-SET verschickt wird, um den Kanal
des Sender einzustellen.
10. Kunststoff Schraubendreher - Dieser wird zur Einstellung des Eingangspegel
Reglers an der CB88 Einheit verwendet (Siehe #7 Eingangspegel Regler)
Einführende Tour - CB88 Sender mit Gürtelhalter

54
1. Status Indikator - Diese LED zeigt den
Betriebsmodus an:
GRÜN Normaler Betrieb
ROT Mute (Ton aus)
GRÜN blinkend Batterie schwach
2. Power/Mute Schalter - Betätigen Sie ihn,
um das Gerät ein- oder auszuschalten.
Drücken Sie die Mute Taste und lassen
Sie sie los, um den Sender stummzus-
chalten oder wieder zu aktivieren.
3. Arrettierung der Batterieabdeckung -
Drücken Sie sie auf beiden Seiten und
ziehen Sie sie nach hinten, um die CB88
Batterieabdeckung zu öffnen.
4. Batteriehalter - Öffnen Sie das
Batteriefach, indem Sie die Registerkarte
und die Abdeckung. Setzen Sie hier
zwei Standard AA (LR6) Batterien ein.
Achten Sie darauf, dass Sie dabei die
dargestellten Polaritätsmarkierungen
einhalten. Obwohl aufladbare Ni-Cad
Batterien eingesetzt werden können,
liefern diese nicht ausreichend Energie
für mehr als vier Stunden. WARNUNG:
Setzen Sie die Batterie nicht umgekehrt
ein; Dies kann schwere Schäden am
CR88 verursachen und die Garantie wird dadurch ungültig.
5. Eingangspegel Regler - Dieser Regler stellt die Eingangsempfindlichkeit des
Senders ein. Um eine optimale Leistung zu erreichen, stellen Sie mit dem mit-
gelieferten Schraubendreher den Eingangspegel Regler, bis die CR88 PEAK
Anzeige bis zu hohen Niveaus ausschlägt. Drehen Sie den Regler herunter, bis
die PEAK Anzeige nicht mehr aufleuchtet.
6. IR Fenster - Dieses Fenster wird verwendet, um das Infrarotsignal zu emp-
fangen, das von der CR88 Einheit während des IR-SET verschickt wird, um den
Kanal des Sender einzustellen. Der Batteriefach Deckel muss geöffnet sein und
das IR Fenster in Richtung des Empfängers gerichtet sein, um den ausgewählten
Kanal zu laden.
7. Kunststoff Schraubendreher - Dieser wird zur Einstellung des Eingangspegel
Reglers an der CB88 Einheit verwendet (Siehe #5 Eingangspegel Regler)
Einführende Tour - CH88 Tragbarer Sender

55
Concert 88 Kabelloses System
ENGLISH
FRANÇAISDEUTSCHEESPAÑOLITALIANO
Kurzanleitung - Einstellung eines einzelnen Systems
Damit Ihre Wireless System einwandfrei funktioniert, müssen sowohl Sender und als auch
Empfänger auf den gleichen Kanal eingestellt werden.
Folgen Sie diesen grundlegenden Vorgehensweisen zur Einstellung und den Einsatz
Ihres kabellosen Concert 88 Systems.
Platzieren Sie den CR88 Empfänger dort, wo es verwendet wird, und richten Sie die
Antennen vertikal aus. Allgemeine Daumenregel ist dabei, die “Sichtverbindung”
zwischen dem Empfänger und dem / den Sender(n) zu halten, so dass die Person /
Personen, die Sender nutzen, den Empfänger sehen können.
Schalten Sie mit dem Power Schalter das CR88 Gerät an und wieder aus und
schließen Sie dann das mitgelieferte Netzteil an. Schalten Sie das CR88 Gerät
kurzzeitig ein um zu bestätigen, dass das Gerät mit Strom versorgt wird. Dabei sollte
die LED Anzeige aufleuchten. Schalten Sie dann das CR88 wieder aus.
This device complies with Part 15 of the
FCC Rules. Operation is subject to the
following two conditions:
(1) This device may not cause harmful
interference, and
(2) this device must accept any
interference received, including
interference that may cause
undesired operation.
FREQ:
542-566MHz
This device complies with Part 15 of the
FCC Rules. Operation is subject to the
following two conditions:
(1) This device may not cause harmful
interference, and
(2) this device must accept any
interference received, including
interference that may cause
undesired operation.
FREQ:
542-566MHz
3. Plug in receiver 4. Turn on receiver
5. Plug receiver into audio system 6. Press Select button to change channel 9. Press and hold SELECT button to IR set 10. Adjust Volume control7. Install batteries 8. Press button on transmitter to turn on
9. Press and hold Select button to IR set7. Install batteries 8. Turn on belt pack transmitter
This device complies with Part 15 of the
FCC Rules. Operation is subject to the
following two conditions:
(1) This device may not cause harmful
interference, and
(2) this device must accept any
interference received, including
interference that may cause
undesired operation.
FREQ:
542-566MHz
This device complies with Part 15 of the
FCC Rules. Operation is subject to the
following two conditions:
(1) This device may not cause harmful
interference, and
(2) this device must accept any
interference received, including
interference that may cause
undesired operation.
FREQ:
542-566MHz
3. Plug in receiver 4. Turn on receiver
5. Plug receiver into audio system 6. Press Select button to change channel 9. Press and hold SELECT button to IR set 10. Adjust Volume control7. Install batteries 8. Press button on transmitter to turn on
9. Press and hold Select button to IR set7. Install batteries 8. Turn on belt pack transmitter
Schalten Sie Ihren Verstärker aus und drehen Sie die Lautstärkeregler vollkommen
herab. Schließen Sie dann die CR88 Empfänger Ausgangsbuchse an den Mikrofon-
oder Line-Pegel Eingang eines Mischpults oder Verstärkers mit dem symmetrischen
XLR Ausgang oder asymmetrische 1/4" Line-Level Ausgang. Drehen Sie den Level-
Regler auf des CR88 Geräts ganz nach links und schalten Sie das Gerät ein.

56
Kurzanleitung - Einstellung eines einzelnen Systems
Schalten Sie den Sender aus. Legen Sie zwei neue AA Batterien in die CB88
Gürteltasche oder den tragbaren CH88 Sender. Lassen Sie das Batteriefach geöffnet.
This device complies with Part 15 of the
FCC Rules. Operation is subject to the
following two conditions:
(1) This device may not cause harmful
interference, and
(2) this device must accept any
interference received, including
interference that may cause
undesired operation.
FREQ:
542-566MHz
This device complies with Part 15 of the
FCC Rules. Operation is subject to the
following two conditions:
(1) This device may not cause harmful
interference, and
(2) this device must accept any
interference received, including
interference that may cause
undesired operation.
FREQ:
542-566MHz
3. Plug in receiver 4. Turn on receiver
5. Plug receiver into audio system 6. Press Select button to change channel 9. Press and hold SELECT button to IR set 10. Adjust Volume control7. Install batteries 8. Press button on transmitter to turn on
9. Press and hold Select button to IR set7. Install batteries 8. Turn on belt pack transmitter
This device complies with Part 15 of the
FCC Rules. Operation is subject to the
following two conditions:
(1) This device may not cause harmful
interference, and
(2) this device must accept any
interference received, including
interference that may cause
undesired operation.
FREQ:
542-566MHz
This device complies with Part 15 of the
FCC Rules. Operation is subject to the
following two conditions:
(1) This device may not cause harmful
interference, and
(2) this device must accept any
interference received, including
interference that may cause
undesired operation.
FREQ:
542-566MHz
3. Plug in receiver 4. Turn on receiver
5. Plug receiver into audio system 6. Press Select button to change channel 9. Press and hold SELECT button to IR set 10. Adjust Volume control7. Install batteries 8. Press button on transmitter to turn on
9. Press and hold Select button to IR set7. Install batteries 8. Turn on belt pack transmitter
Schalten Sie den Sender ein, indem Sie den Netzschalter betätigen und halten; die
Indikator LED leuchtet grün auf.
This device complies with Part 15 of the
FCC Rules. Operation is subject to the
following two conditions:
(1) This device may not cause harmful
interference, and
(2) this device must accept any
interference received, including
interference that may cause
undesired operation.
FREQ:
542-566MHz
This device complies with Part 15 of the
FCC Rules. Operation is subject to the
following two conditions:
(1) This device may not cause harmful
interference, and
(2) this device must accept any
interference received, including
interference that may cause
undesired operation.
FREQ:
542-566MHz
3. Plug in receiver 4. Turn on receiver
5. Plug receiver into audio system 6. Press Select button to change channel 9. Press and hold SELECT button to IR set 10. Adjust Volume control7. Install batteries 8. Press button on transmitter to turn on
9. Press and hold Select button to IR set7. Install batteries 8. Turn on belt pack transmitter

57
Concert 88 Kabelloses System
ENGLISH
FRANÇAISDEUTSCHEESPAÑOLITALIANO
Kurzanleitung - Einstellung eines einzelnen Systems Kurzanleitung - Einstellung eines einzelnen Systems
This device complies with Part 15 of the
FCC Rules. Operation is subject to the
following two conditions:
(1) This device may not cause harmful
interference, and
(2) this device must accept any
interference received, including
interference that may cause
undesired operation.
FREQ:
542-566MHz
This device complies with Part 15 of the
FCC Rules. Operation is subject to the
following two conditions:
(1) This device may not cause harmful
interference, and
(2) this device must accept any
interference received, including
interference that may cause
undesired operation.
FREQ:
542-566MHz
3. Plug in receiver 4. Turn on receiver
5. Plug receiver into audio system 6. Press Select button to change channel 9. Press and hold SELECT button to IR set 10. Adjust Volume control7. Install batteries 8. Press button on transmitter to turn on
9. Press and hold Select button to IR set7. Install batteries 8. Turn on belt pack transmitter
This device complies with Part 15 of the
FCC Rules. Operation is subject to the
following two conditions:
(1) This device may not cause harmful
interference, and
(2) this device must accept any
interference received, including
interference that may cause
undesired operation.
FREQ:
542-566MHz
This device complies with Part 15 of the
FCC Rules. Operation is subject to the
following two conditions:
(1) This device may not cause harmful
interference, and
(2) this device must accept any
interference received, including
interference that may cause
undesired operation.
FREQ:
542-566MHz
3. Plug in receiver 4. Turn on receiver
5. Plug receiver into audio system 6. Press Select button to change channel 9. Press and hold SELECT button to IR set 10. Adjust Volume control7. Install batteries 8. Press button on transmitter to turn on
9. Press and hold Select button to IR set7. Install batteries 8. Turn on belt pack transmitter
Positionieren Sie den Sender etwa 6-12" (15-30 cm) von der Vorderseite des CR88
entfernt, wobei das IR Fenster des Senders auf den IR Sender an der Frontplatte des
CR88 Empfängers gerichtet ist.
This device complies with Part 15 of the
FCC Rules. Operation is subject to the
following two conditions:
(1) This device may not cause harmful
interference, and
(2) this device must accept any
interference received, including
interference that may cause
undesired operation.
FREQ:
542-566MHz
This device complies with Part 15 of the
FCC Rules. Operation is subject to the
following two conditions:
(1) This device may not cause harmful
interference, and
(2) this device must accept any
interference received, including
interference that may cause
undesired operation.
FREQ:
542-566MHz
3. Plug in receiver 4. Turn on receiver
5. Plug receiver into audio system 6. Press Select button to change channel 9. Press and hold SELECT button to IR set 10. Adjust Volume control7. Install batteries 8. Press button on transmitter to turn on
9. Press and hold Select button to IR set7. Install batteries 8. Turn on belt pack transmitter
This device complies with Part 15 of the
FCC Rules. Operation is subject to the
following two conditions:
(1) This device may not cause harmful
interference, and
(2) this device must accept any
interference received, including
interference that may cause
undesired operation.
FREQ:
542-566MHz
This device complies with Part 15 of the
FCC Rules. Operation is subject to the
following two conditions:
(1) This device may not cause harmful
interference, and
(2) this device must accept any
interference received, including
interference that may cause
undesired operation.
FREQ:
542-566MHz
3. Plug in receiver 4. Turn on receiver
5. Plug receiver into audio system 6. Press Select button to change channel 9. Press and hold SELECT button to IR set 10. Adjust Volume control7. Install batteries 8. Press button on transmitter to turn on
9. Press and hold Select button to IR set7. Install batteries 8. Turn on belt pack transmitter
Drücken und halten Sie die CR88 SELECT Taste, um
den Sender über Infrarot Übertragung auf den glei-
chen Kanal wie den Empfänger zu stellen.
Betätigen Sie die SELECT Taste auf der Vorderseite
des CR88 Empfängers, um einen verfügbaren Kanal zu
wählen. Die Kanalnummer wird um eine Stelle erhöht,
von 0-9 AF. Sobald der letzte Kanal erreicht wurde,
wird der Zähler wieder auf 0 zurückspringen.

58
Schalten Sie den angeschlossenen Verstärker
und / oder Mixer ein, halten Sie dabei jedoch die
Lautstärke niedrig. Drehen Sie den Volume Knopf
am CR88 vollkommen im Uhrzeigersinn (auf seine
Position "10”). Dies ist Einsverstärkung.
Sprechen oder singen Sie in das Mikrofon, oder wenn Sie den Sender mit einem
Gerät verbunden haben, spielen Sie das Instrument bei normalem Leistungsniveau.
Heben Sie dann langsam die Lautstärke des Verstärkers oder des Mischpults an, bis
der gewünschte Pegel erreicht ist.
Wenn beim System Aussetzer zu hören sind, reduzierten Sie die Übertragungsdistanz
oder unerwartete plötzliche Geräusche, ändern Sie den Betriebskanal des Systems
mit Hilfe der oben beschriebenen Schritte.
This device complies with Part 15 of the
FCC Rules. Operation is subject to the
following two conditions:
(1) This device may not cause harmful
interference, and
(2) this device must accept any
interference received, including
interference that may cause
undesired operation.
FREQ:
542-566MHz
This device complies with Part 15 of the
FCC Rules. Operation is subject to the
following two conditions:
(1) This device may not cause harmful
interference, and
(2) this device must accept any
interference received, including
interference that may cause
undesired operation.
FREQ:
542-566MHz
3. Plug in receiver 4. Turn on receiver
5. Plug receiver into audio system 6. Press Select button to change channel 9. Press and hold SELECT button to IR set 10. Adjust Volume control7. Install batteries 8. Press button on transmitter to turn on
9. Press and hold Select button to IR set7. Install batteries 8. Turn on belt pack transmitter
This device complies with Part 15 of the
FCC Rules. Operation is subject to the
following two conditions:
(1) This device may not cause harmful
interference, and
(2) this device must accept any
interference received, including
interference that may cause
undesired operation.
FREQ:
542-566MHz
This device complies with Part 15 of the
FCC Rules. Operation is subject to the
following two conditions:
(1) This device may not cause harmful
interference, and
(2) this device must accept any
interference received, including
interference that may cause
undesired operation.
FREQ:
542-566MHz
3. Plug in receiver 4. Turn on receiver
5. Plug receiver into audio system 6. Press Select button to change channel 9. Press and hold SELECT button to IR set 10. Adjust Volume control7. Install batteries 8. Press button on transmitter to turn on
9. Press and hold Select button to IR set7. Install batteries 8. Turn on belt pack transmitter
Kurzanleitung - Einstellung eines einzelnen Systems
Wenn die Übertragung abgeschlossen ist, wird der
CR88 Empfänger HF Signale und den Ton Key des
Senders empfangen. Die READY Anzeige auf der
Frontplatte des CR88 Empfängers wird dann aufleu-
chten.

59
Concert 88 Kabelloses System
ENGLISH
FRANÇAISDEUTSCHEESPAÑOLITALIANO
Um das Betriebskanal eines Systems zu ändern,
drücken Sie die SELECT Taste auf der Vorderseite des
CR88 Empfängers. Die Kanalnummer wird um eine
Stelle erhöht, von 0-9 AF. Sobald der letzte Kanal
erreicht wurde, wird der Zähler wieder auf 0 zurück-
springen.
Kurzanleitung - Einstellung eines mehrfachen Systems
Bei der Verwendung von mehreren Systemen muss jedes System auf einen anderen
Betriebskanal eingestellt werden. Sender und Empfänger Paare müssen auf dem glei-
chen Kanal eingestellt werden, um zusammen zu arbeiten (siehe "Concert 88 Kanal-
Auflistung" auf Seite 62).
Stellen Sie bei der Einstellung eines zusätzlichen Senders sicher, dass alle anderen
Sender Batteriefächer geschlossen sind, damit alle IR
Fenster abgedeckt sind.
This device complies with Part 15 of the
FCC Rules. Operation is subject to the
following two conditions:
(1) This device may not cause harmful
interference, and
(2) this device must accept any
interference received, including
interference that may cause
undesired operation.
FREQ:
542-566MHz
This device complies with Part 15 of the
FCC Rules. Operation is subject to the
following two conditions:
(1) This device may not cause harmful
interference, and
(2) this device must accept any
interference received, including
interference that may cause
undesired operation.
FREQ:
542-566MHz
3. Plug in receiver 4. Turn on receiver
5. Plug receiver into audio system 6. Press Select button to change channel 9. Press and hold SELECT button to IR set 10. Adjust Volume control7. Install batteries 8. Press button on transmitter to turn on
9. Press and hold Select button to IR set7. Install batteries 8. Turn on belt pack transmitter
Schalten Sie den Sender ein, indem Sie den Netzschalter betätigen und halten; die
Indikator LED leuchtet grün auf.
This device complies with Part 15 of the
FCC Rules. Operation is subject to the
following two conditions:
(1) This device may not cause harmful
interference, and
(2) this device must accept any
interference received, including
interference that may cause
undesired operation.
FREQ:
542-566MHz
This device complies with Part 15 of the
FCC Rules. Operation is subject to the
following two conditions:
(1) This device may not cause harmful
interference, and
(2) this device must accept any
interference received, including
interference that may cause
undesired operation.
FREQ:
542-566MHz
3. Plug in receiver 4. Turn on receiver
5. Plug receiver into audio system 6. Press Select button to change channel 9. Press and hold SELECT button to IR set 10. Adjust Volume control7. Install batteries 8. Press button on transmitter to turn on
9. Press and hold Select button to IR set7. Install batteries 8. Turn on belt pack transmitter
This device complies with Part 15 of the
FCC Rules. Operation is subject to the
following two conditions:
(1) This device may not cause harmful
interference, and
(2) this device must accept any
interference received, including
interference that may cause
undesired operation.
FREQ:
542-566MHz
This device complies with Part 15 of the
FCC Rules. Operation is subject to the
following two conditions:
(1) This device may not cause harmful
interference, and
(2) this device must accept any
interference received, including
interference that may cause
undesired operation.
FREQ:
542-566MHz
3. Plug in receiver 4. Turn on receiver
5. Plug receiver into audio system 6. Press Select button to change channel 9. Press and hold SELECT button to IR set 10. Adjust Volume control7. Install batteries 8. Press button on transmitter to turn on
9. Press and hold Select button to IR set7. Install batteries 8. Turn on belt pack transmitter

60
Positionieren Sie den Sender etwa 6-12" (15-30 cm) von der Vorderseite des CR88
entfernt, wobei das IR Fenster des Senders auf den IR Sender des Empfängers geri-
chtet ist.
This device complies with Part 15 of the
FCC Rules. Operation is subject to the
following two conditions:
(1) This device may not cause harmful
interference, and
(2) this device must accept any
interference received, including
interference that may cause
undesired operation.
FREQ:
542-566MHz
This device complies with Part 15 of the
FCC Rules. Operation is subject to the
following two conditions:
(1) This device may not cause harmful
interference, and
(2) this device must accept any
interference received, including
interference that may cause
undesired operation.
FREQ:
542-566MHz
3. Plug in receiver 4. Turn on receiver
5. Plug receiver into audio system 6. Press Select button to change channel 9. Press and hold SELECT button to IR set 10. Adjust Volume control7. Install batteries 8. Press button on transmitter to turn on
9. Press and hold Select button to IR set7. Install batteries 8. Turn on belt pack transmitter
This device complies with Part 15 of the
FCC Rules. Operation is subject to the
following two conditions:
(1) This device may not cause harmful
interference, and
(2) this device must accept any
interference received, including
interference that may cause
undesired operation.
FREQ:
542-566MHz
This device complies with Part 15 of the
FCC Rules. Operation is subject to the
following two conditions:
(1) This device may not cause harmful
interference, and
(2) this device must accept any
interference received, including
interference that may cause
undesired operation.
FREQ:
542-566MHz
3. Plug in receiver 4. Turn on receiver
5. Plug receiver into audio system 6. Press Select button to change channel 9. Press and hold SELECT button to IR set 10. Adjust Volume control7. Install batteries 8. Press button on transmitter to turn on
9. Press and hold Select button to IR set7. Install batteries 8. Turn on belt pack transmitter
Wenn die Übertragung abgeschlossen ist und der
CR88 Empfänger HF-Signal vom Sender empfängt,
wird die READY-Anzeige auf der Frontplatte der CR88
Empfänger leuchten.
Wenn beim System Aussetzer zu hören sind, reduzierten Sie die Übertragungsdistanz
oder unerwartete plötzliche Geräusche, ändern Sie den Betriebskanal des Systems
mit Hilfe der oben beschriebenen Schritte.
This device complies with Part 15 of the
FCC Rules. Operation is subject to the
following two conditions:
(1) This device may not cause harmful
interference, and
(2) this device must accept any
interference received, including
interference that may cause
undesired operation.
FREQ:
542-566MHz
This device complies with Part 15 of the
FCC Rules. Operation is subject to the
following two conditions:
(1) This device may not cause harmful
interference, and
(2) this device must accept any
interference received, including
interference that may cause
undesired operation.
FREQ:
542-566MHz
3. Plug in receiver 4. Turn on receiver
5. Plug receiver into audio system 6. Press Select button to change channel 9. Press and hold SELECT button to IR set 10. Adjust Volume control7. Install batteries 8. Press button on transmitter to turn on
9. Press and hold Select button to IR set7. Install batteries 8. Turn on belt pack transmitter
Kurzanleitung - Einstellung eines mehrfachen Systems
Drücken und halten Sie die CR88 SELECT Taste, um
den Sender über Infrarot Übertragung auf den glei-
chen Kanal wie den Empfänger zu stellen.

61
Concert 88 Kabelloses System
ENGLISH
FRANÇAISDEUTSCHEESPAÑOLITALIANO
Der CR88 Empfänger kann in einen Standard 19” Rack für den Transport oder die
permanente Installation montiert werden. Benutzen Sie dazu die enthaltenen Rack
Laschen. Folgen Sie den unten angegebenen einfachen Schritten, um den CR88 in
einem Rack zu montieren:
Montieren Sie die beinhalteten Rack Laschen,
indem Sie jede Lasche auf die Schiene einer jeden
Seite des CR88 schieben, bis die Laschen einras-
ten und flach mit der Vorderseite abschließen.
Setzen Sie den CR88 Empfänger in
ein freies Rack Fach und schieben
Sie in hinein, bis die Laschen die
Schienen des Gehäuses berühren
und mit den Löchern der Rack-
Schiene ausgerichtet sind.
Montieren Sie die Empfänger im Rack, indem Sie ihn mit den passenden Rack-
Schrauben (nicht beinhaltet) festziehen. Um gleiche Spannung und Balance sicher-
zustellen, wenn Sie den Empfänger montieren, sollten Sie die Schrauben über Kreuz,
jeweils die schräg gegenüber liegenden Schrauben anziehen: oben links -> unten
rechts -> oben rechts -> unten links.
Um zwei CR88 Empfänger in einem
Rack zu montieren, enthält das
System ein Center Anschlussstück.
Schieben Sie das Center An-
schlussstück in die Nut eines jeden
Empfängers und befestigen Sie die
kurzen Montagewinkel an jedem
Empfänger. Montieren Sie die
Empfänger in das Rack und ziehen
Sie die Schrauben im wie oben
beschriebenen Kreuzmuster an.
Rack Montage

62
Gruppe C
638-662 MHz
Gruppe D
542-566 MHz
Gruppe F*
606-630 MHz
Gruppe G*
863-865 MHz
Kan Freq Kan Freq Kan Freq Kan Freq
0 638.125 0 542.125 0 606.125 0 863.050
1 639.625 1 543.625 1 607.625 1 863.250
2 641.050 2 545.05 2 609.05 2 863.550
3 642.425 3 546.425 3 610.425 3 863.750
4 642.900 4 546.900 4 610.900 4 864.050
5 645.525 5 549.525 5 613.525 5 864.250
6 647.100 6 551.100 6 615.100 6 864.550
7 648.475 7 552.475 7 616.475 7 864.750
8 650.000 8 554.000 8 618.000 8 864.950
9 652.075 9 556.075 9 620.075
A 654.975 A 558.975 A 622.975
B 655.975 B 559.975 B 623.975
C 657.050 C 561.050 C 625.050
D 658.975 D 562.975 D 626.975
E 660.425 E 564.425 E 628.425
F 661.975 F 565.975 F 629.975
Concert 88 Kanal-Auflistung
* Nicht für die Verwendung in den USA und Kanada. Wenden Sie sich bei Fragen
zu verfügbaren Kanälen in Ihrer Region an Ihren lokalen Samson Händler.

63
Concert 88 Kabelloses System
ENGLISH
FRANÇAISDEUTSCHEESPAÑOLITALIANO
Fehlerbehebung
Problem Lösungen
Kein Audio
Vergewissern Sie sich, dass der Sender und Empfänger einge-
schaltet sind. the transmitter and receiver are both powered on.
Vergewissern Sie sich, dass die Batterien des Senders kor-
rekt eingelegt sind.
Stellen Sie sicher, dass der Ton nicht abgeschaltet ist.
Prüfen Sie, ob das CR88 Netzteil korrekt eingesteckt ist
und richtig mit einer Steckdose verbunden ist.
Schalten Sie den CR88 Empfänger ein.
Vergewissern Sie sich, dass der CR88 Ausgang und Audio
Eingangsanschlüsse sicher verbunden sind.
Vergewissern Sie sich, dass sich der Empfänger und der
Sender untereinander in Sichtlinie befinden.
Prüfen Sie die Lautstärken des Empfängers und des Audio Eingangs.
Stellen Sie sicher, dass der Sender und der Empfänger
auf den gleichen Kanal eingestellt sind. Wenn Sie nicht
sicher sind, stellen Sie den Kanal zurück, indem Sie eine
IR Einstellung vornehmen.
Verzerrter Ton
Die Empfänger-Ausgangspegel oder Audio-Eingangspegel
kann zu hoch sein.
Prüfen Sie die Batterien und ersetzen Sie sie, falls sie
schwach sein sollten.
Die Eingangsverstärkung am Sender (CB88) oder Audio
Pegel der Quelle kann zu hoch sein.
Audio Aussetzer
Der Sender kann ist eventuell zu weit vom Empfänger
entfernt. Bewegen Sie ihn näher an den Empfänger oder
positionieren Sie die Antennen neu.
Entfernen oder vermeiden Sie Quellen, die RF Interferen-
zen verursachen könnten, wie etwa Mobiltelefone, kabellose
Telefone, Lichtequipment, Computer, Metallstrukturen, etc.
Receiver lässt sich
nicht einschalten
Überprüfen Sie den Adapter, um sicherzustellen, dass er
richtig angeschlossen und mit einer Steckdose zur Strom-
versorgung verbunden ist.
Sender lässt sich
nicht einschalten
(LED leuchtet RED)
Ersetzen Sie die Batterien des Senders.
Unerwünschte Geräus-
che oder Störungen
Stellen Sie bei Verwendung mehrerer Systeme sicher,
dass keines der Systeme auf dem gleichen Kanal arbeitet.
Wenn das Problem weiterhin besteht, ändern Sie eine oder
alle Kanäle der Systeme.

64
Spezifikationen
System
Arbeitsbereich 300' (100m) Sichtlinie
Audio Frequenzgang 50 Hz - 15 kHz
T.H.D. (Insgesamt) <1% (@AF 1 kHz, RF 46 dBu)
Dynamischer Bereich >100 dB A-bewertet
Störabstand >90 dB
Betriebstemperatur -10°C (14°F) bis +60°C (+140°F)
Tone Key Frequenz 32.768 kHz
CB88 Sender mit Gürtelhalter
Eingangsanschlüsse Mini-XLR (P3)
Eingangsimpedanz 1MΩ
Eingangsverstärkung 38 dB
RF Leistung 10 mW EIRP
Erforderlich Stromversorgung Zwei AA (LR6) Alkaline Batterien
Batterie Lebensdauer 8 Stunden
Dimensionen (HxLxT) 3.75" x 2.44" x 0.75"
96mm x 62mm x 18.5mm
Gewicht 0.2 lb / 93 g
CH88 Tragbarer Sender
Mikrofon Element Q6 Dynamik
Eingangsverstärkung 28 dB
RF Leistung 10 mW EIRP
Erforderlich Stromversorgung Zwei AA (LR6) Alkaline Batterien
Batterie Lebensdauer 8 Stunden
Dimensionen (HxLxT) 10.23" x 2.1"
260mm x 54mm
Gewicht 0.48 lb / 218 g
CR88 Empfänger
Audio Ausgangslevel - Unsymmetrisch +14 dBu
Audio Ausgangslevel - Symmetrisch +9 dBu
Audio Ausgangsimpedanz - Unsymmetrisch 810 Ohm
Audio Ausgangsimpedanz - Symmetrisch 240 Ohm
Empfindlichkeit -100 dBm / 30 dB sinad
Spiegelfrequenz >50 dB
Betriebsspannung 15 VDC 200mA
Dimensionen (LxBxH) 8.25" x 4.9" x 1.75"
210mm x 125mm x 44mm
Gewicht 0.85 lb / 388 g
Wir bei Samson verbessern ständig unsere Produkte. Daher können Spezifikationen
und Bilder ohne vorherige Ankündigung geändert werden.

65
Concert 88 Kabelloses System
ENGLISH
FRANÇAISDEUTSCHEESPAÑOLITALIANO
FCC Verordnungen und Regelungen
Samson Funkempfänger werden nach FCC, Teil 15 zertifiziert und die Sender
sind nach FCC Teil 74 zertifiziert.
Die Lizenzierung von Samson Ausrüstung liegt in der Verantwortung des
Benutzers. Die Erteilung einer Lizenz hängt von der Klassifizierung des
Benutzers, der Anwendung und der gewählten Frequenz ab.
Dieses Gerät entspricht RSS-210 der
Industrie & Wissenschaft Kanadas.
Der Betrieb unterliegt folgenden beiden Bedingungen:
(1) dieses Gerät darf keine gefährlichen Störungen verursachen und
(2) dieses Gerät muss Störungen akzeptieren, die einen unerwünschten
Betrieb dieses Geräts verursachen können.
Samson Technologies Corp. erklärt hiermit, dass diese Geräte,
CR88, CH88, CB88, den grundlegenden Anforderungen und anderen relevant-
en Vorschriften der Richtlinie 1999/5/EC entsprechen.
Die Konformitätserklärung kann aufgerufen werden unter
http://www.samsontech.com/site_media/support/manuals/Concert_88_DOC.pdf
ANMERKUNG:
Dieses Equipment wurde getestet und entsprechend der FCC
Regelungen, Teil 15, als mit der Class B Digital Device Grenzen konform eingestuft.
Diese Grenzen wurden festgelegt, um einen angemessenen Schutz gegen gefährli-
che Interferenzen in einer Haushalts-Umgebung zu bieten. Dieses Equipment
generiert, benutzt und kann Radiofrequenzen ausstrahlen und, wenn nicht entspre-
chend der Anweisungen installiert, kann es schädliche Interferenzen bei Radio-
Kommunikationsgeräten hervorrufen. Bei keiner Installation können Störungen
jedoch völlig ausgeschlossen werden. Wenn das Equipment starke Interferenzen
bei Radio- und Fernseh-Equipment hervorruft, was durch Aus- und Einschalten des
Equipments geprüft werden kann, wird dem Benutzer empfohlen, die Interferenzen
durch eine oder mehrere der folgenden Maßnahmen zu unterbinden:
• Die Position oder die Richtung der Empfängerantenne ändern.
• Den Abstand zwischen Equipment und Receiver erhöhen.
• Das Equipment mit einer Steckdose eines anderen internen Kreises
verbinden als den, mit dem der Empfänger verbunden ist.
• Fragen Sie Ihren Händler oder bitten Sie einen erfahrenen Radio- und
Fernsehtechniker um Hilfe.
WARNUNG: Änderungen oder Modifikationen, die nicht ausdrücklich von
der Institution genehmigt wurden, die für die Konformität mit den geltenden
Verordnungen verantwortlichen ist, können zum Verlust der Betriebserlaubnis
des Geräts führen.

66
ESTE DISPOSITIVO CUMPLE EL APARTADO 15 DE LAS NORMAS DE
LA FCC – CLASE B. SU USO ESTÁ SUJETO AL CUMPLIMIENTO DE LAS
DOS CONDICIONES SIGUIENTES: (1) ESTE DISPOSITIVO NO DEBE
PROVOCAR INTERFERENCIAS, Y (2) ESTE DISPOSITIVO DEBE ACEP-
TAR CUALQUIER INTERFERENCIA QUE RECIBA, INCLUIDAS LAS
INTERFERENCIAS QUE PUEDAN PROVOCAR UN FUNCIONAMIENTO
NO DESEADO. ADECUADO PARA EL USO EN VIVIENDAS Y OFICINAS.
Información de Seguridad Importante
PRECAUCIÓN: CON EL FIN DE REDUCIR EL PELIGRO DE SACUDIDA ELÉCTRICA, NO RETIRE LA TAPA (O LA PARTE POSTERIOR). NO HAY
PIEZAS CUYA REPARACIÓN PUEDA SER EFECTUADA POR EL USUARIO EN EL INTERIOR DEL APARATO. ENCARGUE LAS REPARACIONES A
PERSONAL TÉCNICO DEBIDAMENTE CUALIFICADO.
Este símbolo de un relámpago con cabeza de flecha situado en el interior de un
triángulo equilátero tiene como objeto alertar al usuario de la presencia de “ten-
sión peligrosa” no aislada en el interior del alojamiento del producto que podría
tener la magnitud suficiente para presentar un riesgo de sacudida eléctrica.
El símbolo de un signo de exclamación situado en el interior de un triángulo equiláte-
ro tiene como objeto alertar al usuario de la presencia de instrucciones de operación
y mantenimiento importantes en la documentación que acompaña al aparato.
ATENCIÓN
¡RIESGO DE DESCARGA ELÉCTRICA!
¡NO ABRIR!
ADVERTENCIA
PARA EVITAR EL RIESGO DE INCENDIO O DESCARGA ELÉCTRICA. NO UTILICE EL ENCHUFE
DE ESTE APARATO CON UN CABLE ALARGADOR, RECEPTÁCULO O SALIDA DE CORRIENTE A
MENOS QUE LAS PATILLAS DEL ENCHUFE QUEDEN COMPLETAMENTE INTRODUCIDAS Y NO
QUEDEN PARTES DE LAS MISMAS AL DESCUBIERTO. PARA EVITAR EL RIESGO DE INCENDIO
O DESCARGA ELÉCTRICA. NO PERMITA QUE ESTE APARATO QUEDE EXPUESTO A LA LLUVIA
O LA HUMEDAD. PARA EVITAR EL RIESGO DE DESCARGA ELÉCTRICA, COLOQUE E INTRO-
DUZCA CORRECTAMENTE EL ENCHUFE EN LA UNIDAD.
A la hora de deshacerse de este aparato al final de su vida de servicio, no lo elimine
junto con la basura doméstica general. Existe un procedimiento específico para la elimi-
nación de los aparatos electrónicos usados de manera conforme a la legislación actual
que requiere el tratamiento, la recuperación y el reciclaje apropiados de los mismos.
Los usuarios no profesionales residentes en uno de los 28 estados miembro de la UE, en Suiza
y en Noruega pueden devolver sus aparatos electrónicos usados, sin coste alguno, al comercio
en el que fueron adquiridos (si se adquiere allí otro aparato similar) o a determinados centros
designados para la recogida de residuos eléctricos y electrónicos.
En el caso de los países no indicados arriba, póngase en contacto con las autoridades locales
para determinar el método de eliminación correcto.
Mediante la eliminación correcta de su aparato usado se asegurará de que éste se someta al
tratamiento, la recuperación y el reciclaje apropiados, evitándose así los efectos adversos sobre
el medio ambiente y la salud humana.

67
Sistema Inalámbrico Concert 88
ENGLISH
FRANÇAISDEUTSCHEESPAÑOLITALIANO
Información de Seguridad Importante
1. Lea cuidadosamente estas instruc-
ciones.
2. Conserve estas instrucciones para
cualquier consulta en el futuro.
3. Siga cuidadosamente todas las
advertencias.
4. Observe y siga todas las instruccio-
nes del fabricante.
5. No utilice este aparato cerca del
agua.
6. Limpie el aparato solo con un trapo
seco.
7. No bloquee las aperturas de ventila-
ción. Instale el aparato de acuerdo
con las instrucciones del fabricante.
8. No instale el aparato cerca de
fuentes de calor como, por ejemplo,
rejillas de calefacción, estufas u
otros aparatos (incluyendo amplifica-
dores) que produzcan calor.
9. No anule el sistema de seguridad
del enchufe de tipo polarizado o con
toma de tierra. Un enchufe polariza-
do tiene dos patillas, una más ancha
que la otra. Un enchufe con toma
de tierra tiene dos patillas normales
y una tercera para la conexión a
tierra. La patilla ancha o la tercera
patilla se incluyen como medida de
seguridad. Si el enchufe no encajara
en su toma de corriente, llame a un
electricista para que le cambie su
toma anticuada.
10. Evite que el cable de corriente que-
de en una posición en la que pueda
ser pisado o aplastado, especial-
mente en los enchufes, receptáculos
y en el punto en el que sale de la
unidad.
11. Utilice solo las conexiones/acceso-
rios especificados por el fabricante.
12. Utilice solo el soporte de carro, el
soporte de trípode o la mesa especi-
ficados por el fabricante o vendidos
junto con el aparato. Si utiliza un
carro, es necesario
que proceda con
precaución a la hora
de mover el conjunto
del carro/aparato
con el fin de evitar
que vuelque y las
lesiones personales que ello podría
acarrearle.
13. Desenchufe este aparato durante las
tormentas eléctricas o cuando no
vaya a utilizarlo durante un período
de tiempo prolongado.
14. Dirija cualquier posible reparación
solo a personal técnico debidamente
cualificado. Deberá hacer que su
aparato sea reparado cuando esté
dañado de cualquier manera, como
por ejemplo si el cable de corriente
o el enchufe están dañados, o si
se han derramado líquidos, o se
ha introducido algún objeto dentro
de la unidad, si ésta ha quedado
expuesta a la lluvia o la humedad,
si no funciona normalmente o si ha
caído al suelo.
15. Este aparato no debe exponerse al
goteo o a las salpicaduras de líqui-
dos. Tampoco deben colocarse sobre
él objetos llenos de líquidos, como
por ejemplo jarrones.
16. Atención - para evitar descargas
eléctricas, introduzca totalmente las
patillas del enchufe en las ranuras
de la toma.
17. Mantenga este aparato en un entor-
no con buena ventilación.
18. El adaptador de corriente se utiliza
como sistema de desconexión, por
lo que debe colocarlo de forma que
pueda accederse fácilmente a él.
19. Las baterías (pila, pilas o batería) no
deben exponerse a un calor exce-
sivo, como por ejemplo la luz solar
directa, el fuego, etc.

68
Índice
Introducción . . . . . . . . . . . . . . . . . . . . . . . . . .69
Características del Sistema . . . . . . . . . . . . . . . . . . .70
Componentes del Sistema . . . . . . . . . . . . . . . . . . . .70
Recorrido Guiado - Receptor CR88 . . . . . . . . . . . . . . . .71
Recorrido Guiado - Transmisor de Petaca CB88 . . . . . . . . . .73
Recorrido Guiado - Transmisor Manual CH88 . . . . . . . . . . .75
Inicio Rápido - Configuración de Sistema Simple . . . . . . . . .76
Inicio Rápido - Configuración de Sistemas Múltiples. . . . . . . .80
Montaje en Rack . . . . . . . . . . . . . . . . . . . . . . . .82
Planes de Canales del Concert 88 . . . . . . . . . . . . . . . .83
Localización de Fallos . . . . . . . . . . . . . . . . . . . . . .84
Especificaciones . . . . . . . . . . . . . . . . . . . . . . . .85

69
Sistema Inalámbrico Concert 88
ENGLISH
FRANÇAISDEUTSCHEESPAÑOLITALIANO
Le felicitamos por haber adquirido el sistema inalámbrico Concert 88 de Samson.
El Concert 88 es la solución ideal para el intérprete activo que necesite un sistema
fiable y que ofrezca un sonido extraordinario para aplicaciones inalámbricas. De sen-
cillo manejo, con 16 canales disponibles y set de infrarrojos para el canal transmisor,
los preparativos necesarios para comenzar a utilizar el Concert 88 tan solo le llevarán
algunos minutos. El sistema Concert 88 asegura una actuación con un sonido nítido
y libre de interrupciones gracias a la combinación de clave de tono con silenciador
automático. Esta configuración permite que solo pase el audio del transmisor a través
del receptor, silenciando la salida si hay alguna interferencia.
El Concert 88 viene en cuatro configuraciones. El sistema manual vocal incluye el
transmisor manual CH88 y la cápsula de micrófono dinámico Q6. El sistema de peta-
ca CB88 puede configurarse con el micrófono de diadema HS5, el micrófono Lavalier
LM5 o un cable de instrumento de ¼" . Para la instalación permanente o móvil, el
Concert 88 incluye un kit de montaje en rack de 19" estándar.
En estas páginas, encontrará una descripción detallada de las características del
Concert 88, así como un recorrido guiado por su panel de
control, instrucciones paso-a-paso para su configuración y uso y las especificaciones
técnicas completas del dispositivo. Si ha adquirido su sistema inalámbrico en los
Estados Unidos, también encontrará una tarjeta de garantía – no olvide rellenarla y
enviárnosla por correo para que pueda recibir soporte técnico online y para que le
podamos ofrecer información actualizada sobre éste y otros productos de Samson en
el futuro. Además, no deje de visitar nuestra web (www.samsontech.com) para ver
toda la información sobre nuestra línea de productos.
Le recomendamos que anote los datos indicados en las líneas siguientes y los conser-
ve junto con una copia de su factura de compra.
Número de Serie del Receptor: _________________________________________
Número de Serie del Transmisor: ______________________________________
Fecha de compra: ______________________________________________
Nombre del distribuidor: __________________________________________________
Con unos cuidados y mantenimiento adecuados, su sistema inalámbrico Concert 88
funcionará sin ningún problema durante muchos años. En el caso improbable de que
en algún momento tuviera que reparar este aparato, deberá solicitarnos un número
de Autorización de Devolución (RA) para poder enviar su unidad a Samson. Sin este
número no se aceptará el aparato. Póngase en contacto con Samson en el núme-
ro 1-800- 3SAMSON (1-800-372-6766) para que le facilitemos este número de
autorización de devolución antes de enviarnos la unidad. Si fuera posible, conserve el
embalaje original y los materiales de protección para devolvernos la unidad dentro de
ellos. Si compró su unidad fuera de los Estados Unidos, póngase en contacto con su
distribuidor en lo relativo a los detalles de la garantía y la información de servicio.
Introducción

70
Componentes del Sistema
Características del Sistema
Todos los sistemas
Receptor CR88
Alimentación
Cable de audio ¼" a ¼"
Accesorios de Rack - Orejeta de rack larga, orejeta de rack corta, dos adaptado-
res para receptor
Manual del Usuario
Sistema manual
Transmisor manual CH88 con cápsula de micrófono dinámico Q6
Sistema de diadema
Transmisor de petaca CB88
Micrófono de diadema HS5 con conector mini-XLR
Sistema Lavalier
Transmisor de petaca CB88
Micrófono Lavalier LM5 con conector mini-XLR
Pinza para corbata
Sistema de instrumento
Transmisor de petaca CB88
Cable de instrumento ¼" a mini-XLR
• Sistema inalámbrico profesional para el uso tanto en aplicaciones de sonido en
directo como de estudio.
• La tecnología True Diversity maximiza el rango activo (hasta 100 metros) y redu-
ce los posibles problemas de interferencias.
• 16 canales disponibles, todos ellos funcionando en el ancho de banda UHF,
para la máxima compatibilidad de sistemas en la misma ubicación sin interfe-
rencias
• El receptor CR88 es una unidad con un tamaño de medio rack que puede ser
utilizado solo o bien montado en cualquier rack de 19” estándar, haciendo que
sea más fácil integrarlo en cualquier instalación de sistema de sonido fijo o
móvil
• La clave de tono y el silenciador automático aseguran una actuación con un soni-
do nítido y libre de interrupciones, permitiendo que solo pase el audio del trans-
misor a través del receptor y silenciando la salida si hay alguna interferencia
• Rango operativo de hasta 100 metros (línea de visión)
• Hasta ocho horas de vida de las pilas, utilizando dos pilas AA estándar

71
Sistema Inalámbrico Concert 88
ENGLISH
FRANÇAISDEUTSCHEESPAÑOLITALIANO
1. Antenas - Las monturas de las antenas permiten la rotación completa de las mis-
mas para un posicionamiento óptimo. Durante el funcionamiento normal de la
unidad, las dos antenas deben colocarse en posición vertical. Las dos antenas
pueden plegarse para facilitar el transporte del CR88.
2. Control de VOLUMEN - Este mando ajusta el nivel de la señal audio que está sien-
do transmitida a través tanto de los conectores de salida balanceados como no
balanceados del panel trasero. El nivel de referencia se obtiene cuando se gira
el mando completamente en el sentido de las agujas del reloj (hasta su posición
“10”).
3. Indicador READY (PREPARADO) - Este indicador se ilumina en color verde cuando
el CR88 recibe la señal de RF y el sistema está listo para ser utilizado.
4. Indicador PEAK (PICO) - Este indicador se ilumina en color rojo cuando se produce
una sobrecarga de la señal de audio transmitida.
5. Visualización LED - La visualización LED de 7 segmentos indica el canal operativo
actual del receptor. Los canales del CR88 se indican mediante 0-9 y A-F.
6. Transmisor IR - Durante el "AJUSTE IR", se utiliza una luz infrarroja para ajustar
el canal del transmisor.
7. Botón SELECT (SELECCIÓN) - Pulse este botón para seleccionar el canal operati-
vo del receptor que desee. Pulse y mantenga pulsado este botón para enviar la
información del canal al transmisor mediante transmisión infrarroja.
8. Interruptor de ENCENDIDO - Utilice este interruptor para encender y apagar el
CR88.
Recorrido Guiado - Receptor CR88

72
This device complies with Part 15 of the
FCC Rules. Operation is subject to the
following two conditions:
(1) This device may not cause harmful
interference, and
(2) this device must accept any
interference received, including
interference that may cause
undesired operation.
FREQ:
542-566MHz
Uso de la pestaña anti-tirones: Forme un bucle con parte
del cable y páselo a través de la pestaña. A continuación,
pase el conector del adaptador a través del bucle para
hacer un nudo.
Recorrido Guiado - Receptor CR88
1. Entrada de CC - Conecte aquí el adaptador de corriente incluido, utilizan-
do la pestaña anti-tirones tal como se muestra en la ilustración de abajo.
ADVERTENCIA: No utilice nunca un adaptador de alimentación de otro tipo, ya
que ello podría provocar daños graves en el CR88 y la anulación de la garantía.
2. SALIDA BALANCEADA - Utilice este conector XLR balanceado electrónicamente y
de baja impedancia (600 Ohmios) cuando conecte el CR88 a aparatos de audio
profesional (+4dBu). El cableado de las puntas es el siguiente: Punta 1 masa,
Punta 2 alto (vivo o activo) y punta tres bajo (frío o pasivo).
3. SALIDA NO BALANCEADA - Utilice este conector de ¼" no balanceado de alta
impedancia (5K Ohmios) cuando conecte el CR88 a aparatos de sonido no profe-
sionales (-10dBV). El cableado es el siguiente: punta-vivo, lateral-masa.

73
Sistema Inalámbrico Concert 88
ENGLISH
FRANÇAISDEUTSCHEESPAÑOLITALIANO
1. Conector de Entrada - Conecte el dispositivo de entrada a través del conector
mini-XLR. El CB88 se suministra con un micrófono Lavalier, un micrófono de
diadema o un cable de instrumento de ¼".
2. Indicador de Estado - Este LED indica el modo de funcionamiento:
VERDE Funcionamiento
Normal
ROJO Silenciado
VERDE Parpa-
deante
Batería Baja
3.
4. Interruptor de Encendido/Silenciador - Pulse y mantenga pulsado este botón para
encender y apagar la unidad. Púlselo sin mantenerlo pulsado para activar o des-
activar el modo de silencio del transmisor.
5. Pinza para Correa - Utilice esta pinza para fijar el transmisor CB88 al cinturón o
a la correa de una guitarra.
6. Mecanismo de Apertura de la Tapa de la Pila - Empuje en ambos lados de la tapa
de la pila y tire de ella hacia fuera para abrirla.
7. Antena - Esta antena de transmisión fijada permanentemente a la unidad debe
extenderse completamente durante el funcionamiento normal.
Recorrido Guiado - Transmisor de Petaca CB88

74
8. Control de GANANCIA de Entrada - Este control ajusta la sensibilidad de entrada
del transmisor para del funcionamiento con las entradas de micrófono e instru-
mentos. Para un rendimiento óptimo, utilizando el destornillador incluido ajuste
el control de GANANCIA de entrada en el punto en el que vea que el indicador
PEAK del CR88 comienza a iluminarse a niveles altos y redúzcalo lentamente a
continuación hasta que la luz de PEAK se apague.
9. Receptáculo de las Pilas - Inserte aquí dos pilas AA (LR6) estándar asegurándose
de colocar correctamente los polos positivo y negativo según las marcas. Si bien
es posible utilizar también pilas de níquel-cadmio recargables, tenga en cuen-
ta que este tipo de pilas no suministran la corriente adecuada durante más de
cuatro horas. ADVERTENCIA: No coloque las pilas al revés; ello podría provocar
daños graves en el CR88 y la anulación de la garantía.
10. Lente IR - Esta ventana se utiliza para capturar la señal infrarroja enviada desde
el CR88 durante el AJUSTE IR para ajustar el canal del transmisor.
11. Destornillador de Plástico - Diseñado para utilizarse en el ajuste del control de
GANANCIA de entrada del CB88 (Consultar # Input GAIN Control 13).
Recorrido Guiado - Transmisor de Petaca CB88

75
Sistema Inalámbrico Concert 88
ENGLISH
FRANÇAISDEUTSCHEESPAÑOLITALIANO
1. Indicador de Estado - Este LED indica el
modo de funcionamiento:
VERDE Funcionamiento
Normal
ROJO Silenciado
VERDE
Parpadeante
Batería Baja
2. Interruptor de Encendido/Silenciador -
Pulse y mantenga pulsado este botón
para encender y apagar la unidad.
Púlselo sin mantenerlo pulsado para acti-
var o desactivar el modo de silencio del
transmisor.
3. Tapa de las Pilas - Desatornille la tapa de
la pilas y deslícela hacia abajo para abrir
el compartimento de las pilas del CH88.
4. Receptáculo de las Pilas - Abra el receptá-
culo de las pilas presionando la lengüeta
y levantando la tapa. Inserte dos pilas AA
(LR6) estándar asegurándose de colocar
correctamente los polos positivo y nega-
tivo según las marcas. Si bien es posible
utilizar también pilas de níquel-cadmio
recargables, tenga en cuenta que este
tipo de pilas no suministran la corriente
adecuada satisfactoria durante más de
cuatro horas. ADVERTENCIA: No coloque las pilas al revés; ello podría provocar
daños graves en el CH88 y la anulación de la garantía.
5. Control de GANANCIA de Entrada- Este control ajusta la sensibilidad de entrada
del transmisor. Para un rendimiento óptimo, utilizando el destornillador incluido
ajuste el control de GANANCIA de entrada en el punto en el que vea que el indi-
cador PEAK del CR88 comienza a iluminarse a niveles altos y redúzcalo lenta-
mente a continuación hasta que la luz de PEAK se apague.
6. Lente IR - Esta ventana se utiliza para capturar la señal infrarroja enviada desde
el CR88 durante el AJUSTE IR para ajustar el canal del transmisor. La tapa de
la batería debe estar abierta y la Lente IR debe estar orientada hacia el receptor
para cargar el canal seleccionado.
7. Destornillador de Plástico - Diseñado para utilizarse en el ajuste del control
de GANANCIA de entrada del CB88 (Consultar #5 Control de GANANCIA de
Entrada HH).
Recorrido Guiado - Transmisor Manual CH88

76
Inicio Rápido - Configuración de Sistema Simple
Para que su sistema inalámbrico funcione correctamente, el receptor y el transmisor
deben estar ajustados en el mismo canal.
Siga el procedimiento básico que se indica a continuación para configurar y utilizar
su sistema inalámbrico Concert 88:
Coloque físicamente el receptor del CR88 en el lugar en el que vaya a utilizarse y
extienda las antenas verticalmente. La regla general es que se debe intentar mante-
ner la “línea de visión” entre el receptor y el transmisor, de tal forma que la persona
que utilice o lleve el transmisor pueda ver en todo momento el receptor.
Con el interruptor de Encendido encendido y con la alimentación del CR88 desco-
nectada, conecte el adaptador de corriente incluido. Encienda el CR88 momentánea-
mente para confirmar que la unidad reciba alimentación. Verá que la visualización
LED se ilumina. A continuación apague el CR88.
This device complies with Part 15 of the
FCC Rules. Operation is subject to the
following two conditions:
(1) This device may not cause harmful
interference, and
(2) this device must accept any
interference received, including
interference that may cause
undesired operation.
FREQ:
542-566MHz
This device complies with Part 15 of the
FCC Rules. Operation is subject to the
following two conditions:
(1) This device may not cause harmful
interference, and
(2) this device must accept any
interference received, including
interference that may cause
undesired operation.
FREQ:
542-566MHz
3. Plug in receiver 4. Turn on receiver
5. Plug receiver into audio system 6. Press Select button to change channel 9. Press and hold SELECT button to IR set 10. Adjust Volume control7. Install batteries 8. Press button on transmitter to turn on
9. Press and hold Select button to IR set7. Install batteries 8. Turn on belt pack transmitter
This device complies with Part 15 of the
FCC Rules. Operation is subject to the
following two conditions:
(1) This device may not cause harmful
interference, and
(2) this device must accept any
interference received, including
interference that may cause
undesired operation.
FREQ:
542-566MHz
This device complies with Part 15 of the
FCC Rules. Operation is subject to the
following two conditions:
(1) This device may not cause harmful
interference, and
(2) this device must accept any
interference received, including
interference that may cause
undesired operation.
FREQ:
542-566MHz
3. Plug in receiver 4. Turn on receiver
5. Plug receiver into audio system 6. Press Select button to change channel 9. Press and hold SELECT button to IR set 10. Adjust Volume control7. Install batteries 8. Press button on transmitter to turn on
9. Press and hold Select button to IR set7. Install batteries 8. Turn on belt pack transmitter
Con su amplificador o mezclador apagado y con el control de volumen en el nivel
mínimo, conecte el conector de salida del receptor CR88 a la entrada de nivel de
línea o micro de un mezclador o amplificador utilizando la salida XLR balanceada o
la salida de nivel de línea de ¼" no balanceada. Gire el mando de Nivel del CR88
totalmente en el sentido contrario a las agujas del reloj y desconecte a continuación
su alimentación.

77
Sistema Inalámbrico Concert 88
ENGLISH
FRANÇAISDEUTSCHEESPAÑOLITALIANO
Inicio Rápido - Configuración de Sistema Simple
Con el transmisor apagado, instale dos pilas AA nuevas en el transmisor de petaca
CB88 o en el transmisor manual CH88. Deje el compartimento de las pilas abierto.
This device complies with Part 15 of the
FCC Rules. Operation is subject to the
following two conditions:
(1) This device may not cause harmful
interference, and
(2) this device must accept any
interference received, including
interference that may cause
undesired operation.
FREQ:
542-566MHz
This device complies with Part 15 of the
FCC Rules. Operation is subject to the
following two conditions:
(1) This device may not cause harmful
interference, and
(2) this device must accept any
interference received, including
interference that may cause
undesired operation.
FREQ:
542-566MHz
3. Plug in receiver 4. Turn on receiver
5. Plug receiver into audio system 6. Press Select button to change channel 9. Press and hold SELECT button to IR set 10. Adjust Volume control7. Install batteries 8. Press button on transmitter to turn on
9. Press and hold Select button to IR set7. Install batteries 8. Turn on belt pack transmitter
This device complies with Part 15 of the
FCC Rules. Operation is subject to the
following two conditions:
(1) This device may not cause harmful
interference, and
(2) this device must accept any
interference received, including
interference that may cause
undesired operation.
FREQ:
542-566MHz
This device complies with Part 15 of the
FCC Rules. Operation is subject to the
following two conditions:
(1) This device may not cause harmful
interference, and
(2) this device must accept any
interference received, including
interference that may cause
undesired operation.
FREQ:
542-566MHz
3. Plug in receiver 4. Turn on receiver
5. Plug receiver into audio system 6. Press Select button to change channel 9. Press and hold SELECT button to IR set 10. Adjust Volume control7. Install batteries 8. Press button on transmitter to turn on
9. Press and hold Select button to IR set7. Install batteries 8. Turn on belt pack transmitter
Conecte la alimentación al transmisor pulsando y mantenimiento pulsado el interrup-
tor de Encendido; el LED indicador se iluminará en color verde.
This device complies with Part 15 of the
FCC Rules. Operation is subject to the
following two conditions:
(1) This device may not cause harmful
interference, and
(2) this device must accept any
interference received, including
interference that may cause
undesired operation.
FREQ:
542-566MHz
This device complies with Part 15 of the
FCC Rules. Operation is subject to the
following two conditions:
(1) This device may not cause harmful
interference, and
(2) this device must accept any
interference received, including
interference that may cause
undesired operation.
FREQ:
542-566MHz
3. Plug in receiver 4. Turn on receiver
5. Plug receiver into audio system 6. Press Select button to change channel 9. Press and hold SELECT button to IR set 10. Adjust Volume control7. Install batteries 8. Press button on transmitter to turn on
9. Press and hold Select button to IR set7. Install batteries 8. Turn on belt pack transmitter

78
Inicio Rápido - Configuración de Sistema Simple
This device complies with Part 15 of the
FCC Rules. Operation is subject to the
following two conditions:
(1) This device may not cause harmful
interference, and
(2) this device must accept any
interference received, including
interference that may cause
undesired operation.
FREQ:
542-566MHz
This device complies with Part 15 of the
FCC Rules. Operation is subject to the
following two conditions:
(1) This device may not cause harmful
interference, and
(2) this device must accept any
interference received, including
interference that may cause
undesired operation.
FREQ:
542-566MHz
3. Plug in receiver 4. Turn on receiver
5. Plug receiver into audio system 6. Press Select button to change channel 9. Press and hold SELECT button to IR set 10. Adjust Volume control7. Install batteries 8. Press button on transmitter to turn on
9. Press and hold Select button to IR set7. Install batteries 8. Turn on belt pack transmitter
This device complies with Part 15 of the
FCC Rules. Operation is subject to the
following two conditions:
(1) This device may not cause harmful
interference, and
(2) this device must accept any
interference received, including
interference that may cause
undesired operation.
FREQ:
542-566MHz
This device complies with Part 15 of the
FCC Rules. Operation is subject to the
following two conditions:
(1) This device may not cause harmful
interference, and
(2) this device must accept any
interference received, including
interference that may cause
undesired operation.
FREQ:
542-566MHz
3. Plug in receiver 4. Turn on receiver
5. Plug receiver into audio system 6. Press Select button to change channel 9. Press and hold SELECT button to IR set 10. Adjust Volume control7. Install batteries 8. Press button on transmitter to turn on
9. Press and hold Select button to IR set7. Install batteries 8. Turn on belt pack transmitter
Coloque el transmisor a una distancia de aproximadamente 15-30 cm de la parte
frontal del CR88 con la ventana IR del transmisor orientada hacia el transmisor IR
del panel frontal del receptor CR88.
This device complies with Part 15 of the
FCC Rules. Operation is subject to the
following two conditions:
(1) This device may not cause harmful
interference, and
(2) this device must accept any
interference received, including
interference that may cause
undesired operation.
FREQ:
542-566MHz
This device complies with Part 15 of the
FCC Rules. Operation is subject to the
following two conditions:
(1) This device may not cause harmful
interference, and
(2) this device must accept any
interference received, including
interference that may cause
undesired operation.
FREQ:
542-566MHz
3. Plug in receiver 4. Turn on receiver
5. Plug receiver into audio system 6. Press Select button to change channel 9. Press and hold SELECT button to IR set 10. Adjust Volume control7. Install batteries 8. Press button on transmitter to turn on
9. Press and hold Select button to IR set7. Install batteries 8. Turn on belt pack transmitter
This device complies with Part 15 of the
FCC Rules. Operation is subject to the
following two conditions:
(1) This device may not cause harmful
interference, and
(2) this device must accept any
interference received, including
interference that may cause
undesired operation.
FREQ:
542-566MHz
This device complies with Part 15 of the
FCC Rules. Operation is subject to the
following two conditions:
(1) This device may not cause harmful
interference, and
(2) this device must accept any
interference received, including
interference that may cause
undesired operation.
FREQ:
542-566MHz
3. Plug in receiver 4. Turn on receiver
5. Plug receiver into audio system 6. Press Select button to change channel 9. Press and hold SELECT button to IR set 10. Adjust Volume control7. Install batteries 8. Press button on transmitter to turn on
9. Press and hold Select button to IR set7. Install batteries 8. Turn on belt pack transmitter
Pulse y mantenga pulsado el botón SELECT del
CR88 para ajustar el transmisor en el mismo canal
que el receptor mediante transmisión infrarroja.
Pulse el botón SELECT en la parte frontal del receptor
CR88 para seleccionar un canal disponible. El número
de canal se incrementará un dígito, de 0 a 9, y des-
pués de A a F. Cuando se haya alcanzado el último
canal, el número de canal volverá a situarse en 0.

79
Sistema Inalámbrico Concert 88
ENGLISH
FRANÇAISDEUTSCHEESPAÑOLITALIANO
Encienda su amplificador o mezclador conectado,
pero mantenga el volumen en el nivel mínimo. Gire
el mando de Volumen del CR88 totalmente en el
sentido contrario a las agujas del reloj (hasta su
posición “10”). Ésta es la ganancia unitaria.
Hable o cante al micrófono o, si está utilizando el transmisor con un instrumento
conectado, toque el instrumento con una intensidad del sonido normal. Suba lenta-
mente el volumen de su amplificador o mezclador hasta alcanzar el nivel deseado.
Si observa que el sistema sufre interrupciones evidentes, su rango operativo es menor
del que debiera o se producen estallidos sonoros imprevistos, cambie el canal opera-
tivo del sistema siguiendo los pasos indicados anteriormente.
This device complies with Part 15 of the
FCC Rules. Operation is subject to the
following two conditions:
(1) This device may not cause harmful
interference, and
(2) this device must accept any
interference received, including
interference that may cause
undesired operation.
FREQ:
542-566MHz
This device complies with Part 15 of the
FCC Rules. Operation is subject to the
following two conditions:
(1) This device may not cause harmful
interference, and
(2) this device must accept any
interference received, including
interference that may cause
undesired operation.
FREQ:
542-566MHz
3. Plug in receiver 4. Turn on receiver
5. Plug receiver into audio system 6. Press Select button to change channel 9. Press and hold SELECT button to IR set 10. Adjust Volume control7. Install batteries 8. Press button on transmitter to turn on
9. Press and hold Select button to IR set7. Install batteries 8. Turn on belt pack transmitter
This device complies with Part 15 of the
FCC Rules. Operation is subject to the
following two conditions:
(1) This device may not cause harmful
interference, and
(2) this device must accept any
interference received, including
interference that may cause
undesired operation.
FREQ:
542-566MHz
This device complies with Part 15 of the
FCC Rules. Operation is subject to the
following two conditions:
(1) This device may not cause harmful
interference, and
(2) this device must accept any
interference received, including
interference that may cause
undesired operation.
FREQ:
542-566MHz
3. Plug in receiver 4. Turn on receiver
5. Plug receiver into audio system 6. Press Select button to change channel 9. Press and hold SELECT button to IR set 10. Adjust Volume control7. Install batteries 8. Press button on transmitter to turn on
9. Press and hold Select button to IR set7. Install batteries 8. Turn on belt pack transmitter
Inicio Rápido - Configuración de Sistema Simple
Una vez finalizada la transmisión, el CR88 recibirá
la señal de RF y la clave de tono del transmisor. El
indicador READY se iluminará en el panel frontal del
receptor CR88.

80
Para cambiar el canal operativo de un sistema, pulse el
botón SELECT en la parte frontal de receptor CR88. El
número de canal se incrementará un dígito, de 0 a 9, y
después de A a F. Cuando se haya alcanzado el último
canal, el número de canal volverá a situarse en 0.
Inicio Rápido - Configuración de Sistemas Múltiples
Cuando se utilicen múltiples sistemas, cada sistema debe ajustarse en un canal operativo
diferente. Los pares de transmisor y receptor deben estar en el mismo canal para ope-
rar juntos (Consultar "Planes de Canales del Concert 88" en la página 83).
Cuando se ajuste un transmisor adicional, es necesario cerrar los compartimentos de
la pilas de todos los demás transmisores para asegurar que la Lente IR esté cubierta.
This device complies with Part 15 of the
FCC Rules. Operation is subject to the
following two conditions:
(1) This device may not cause harmful
interference, and
(2) this device must accept any
interference received, including
interference that may cause
undesired operation.
FREQ:
542-566MHz
This device complies with Part 15 of the
FCC Rules. Operation is subject to the
following two conditions:
(1) This device may not cause harmful
interference, and
(2) this device must accept any
interference received, including
interference that may cause
undesired operation.
FREQ:
542-566MHz
3. Plug in receiver 4. Turn on receiver
5. Plug receiver into audio system 6. Press Select button to change channel 9. Press and hold SELECT button to IR set 10. Adjust Volume control7. Install batteries 8. Press button on transmitter to turn on
9. Press and hold Select button to IR set7. Install batteries 8. Turn on belt pack transmitter
Conecte la alimentación al transmisor pulsando y mantenimiento pulsado el interrup-
tor de Encendido; el LED indicador se iluminará en color verde.
This device complies with Part 15 of the
FCC Rules. Operation is subject to the
following two conditions:
(1) This device may not cause harmful
interference, and
(2) this device must accept any
interference received, including
interference that may cause
undesired operation.
FREQ:
542-566MHz
This device complies with Part 15 of the
FCC Rules. Operation is subject to the
following two conditions:
(1) This device may not cause harmful
interference, and
(2) this device must accept any
interference received, including
interference that may cause
undesired operation.
FREQ:
542-566MHz
3. Plug in receiver 4. Turn on receiver
5. Plug receiver into audio system 6. Press Select button to change channel 9. Press and hold SELECT button to IR set 10. Adjust Volume control7. Install batteries 8. Press button on transmitter to turn on
9. Press and hold Select button to IR set7. Install batteries 8. Turn on belt pack transmitter
This device complies with Part 15 of the
FCC Rules. Operation is subject to the
following two conditions:
(1) This device may not cause harmful
interference, and
(2) this device must accept any
interference received, including
interference that may cause
undesired operation.
FREQ:
542-566MHz
This device complies with Part 15 of the
FCC Rules. Operation is subject to the
following two conditions:
(1) This device may not cause harmful
interference, and
(2) this device must accept any
interference received, including
interference that may cause
undesired operation.
FREQ:
542-566MHz
3. Plug in receiver 4. Turn on receiver
5. Plug receiver into audio system 6. Press Select button to change channel 9. Press and hold SELECT button to IR set 10. Adjust Volume control7. Install batteries 8. Press button on transmitter to turn on
9. Press and hold Select button to IR set7. Install batteries 8. Turn on belt pack transmitter

81
Sistema Inalámbrico Concert 88
ENGLISH
FRANÇAISDEUTSCHEESPAÑOLITALIANO
Coloque el transmisor a una distancia de aproximadamente 15-30 cm de la parte
frontal del CR88 con la ventana IR del transmisor orientada hacia el transmisor IR
del receptor.
This device complies with Part 15 of the
FCC Rules. Operation is subject to the
following two conditions:
(1) This device may not cause harmful
interference, and
(2) this device must accept any
interference received, including
interference that may cause
undesired operation.
FREQ:
542-566MHz
This device complies with Part 15 of the
FCC Rules. Operation is subject to the
following two conditions:
(1) This device may not cause harmful
interference, and
(2) this device must accept any
interference received, including
interference that may cause
undesired operation.
FREQ:
542-566MHz
3. Plug in receiver 4. Turn on receiver
5. Plug receiver into audio system 6. Press Select button to change channel 9. Press and hold SELECT button to IR set 10. Adjust Volume control7. Install batteries 8. Press button on transmitter to turn on
9. Press and hold Select button to IR set7. Install batteries 8. Turn on belt pack transmitter
This device complies with Part 15 of the
FCC Rules. Operation is subject to the
following two conditions:
(1) This device may not cause harmful
interference, and
(2) this device must accept any
interference received, including
interference that may cause
undesired operation.
FREQ:
542-566MHz
This device complies with Part 15 of the
FCC Rules. Operation is subject to the
following two conditions:
(1) This device may not cause harmful
interference, and
(2) this device must accept any
interference received, including
interference that may cause
undesired operation.
FREQ:
542-566MHz
3. Plug in receiver 4. Turn on receiver
5. Plug receiver into audio system 6. Press Select button to change channel 9. Press and hold SELECT button to IR set 10. Adjust Volume control7. Install batteries 8. Press button on transmitter to turn on
9. Press and hold Select button to IR set7. Install batteries 8. Turn on belt pack transmitter
Cuando haya finalizado la transmisión y el CR88 esté
recibiendo la señal de RF del transmisor, el indicador
READY se iluminará en el panel frontal del receptor
CR88.
Si observa que el sistema sufre interrupciones evidentes, su rango operativo es menor
del que debiera o se producen estallidos sonoros imprevistos, cambie el canal opera-
tivo del sistema siguiendo los pasos indicados anteriormente.
This device complies with Part 15 of the
FCC Rules. Operation is subject to the
following two conditions:
(1) This device may not cause harmful
interference, and
(2) this device must accept any
interference received, including
interference that may cause
undesired operation.
FREQ:
542-566MHz
This device complies with Part 15 of the
FCC Rules. Operation is subject to the
following two conditions:
(1) This device may not cause harmful
interference, and
(2) this device must accept any
interference received, including
interference that may cause
undesired operation.
FREQ:
542-566MHz
3. Plug in receiver 4. Turn on receiver
5. Plug receiver into audio system 6. Press Select button to change channel 9. Press and hold SELECT button to IR set 10. Adjust Volume control7. Install batteries 8. Press button on transmitter to turn on
9. Press and hold Select button to IR set7. Install batteries 8. Turn on belt pack transmitter
Inicio Rápido - Configuración de Sistemas Múltiples
Pulse y mantenga pulsado el botón SELECT del
CR88 para ajustar el transmisor en el mismo canal
que el receptor mediante transmisión infrarroja.

82
El receptor CR88 puede instalarse en un rack de 19" estándar para el transporte o
la instalación permanente utilizando las orejetas de rack incluidas. Siga los pasos
sencillos que se indican a continuación para montar el CR88:
Fije las orejetas de rack incluidas introduciendo
cada una de ellas en la ranura de cada lado del
CR88 hasta que queden bloqueadas en su posición
y el receptor esté alineado con el panel frontal.
Coloque el receptor CR88 en un
espacio de rack disponible y deslí-
celo hasta que las orejetas entren
en contacto con los rieles de la caja
de rack y estén alineadas con los
agujeros del riel de rack.
Monte el receptor en el rack utilizando tornillos de rack del tamaño apropiado (no
incluidos). Para asegurar el equilibrio y la distribución uniforme de las tensiones al
instalar el receptor, apriete los tornillos siguiendo un patrón cruzado de esquinas
opuestas: superior izquierda -> inferior derecha -> superior derecha -> inferior
izquierda.
Para montar dos receptores CR88
en un espacio de rack, el sistema in-
cluye una pieza de conexión central.
Introduzca la pieza de conexión cen-
tral en la ranura de cada receptor y
fije las orejetas de rack cortas a cada
receptor. Monte los receptores en el
rack utilizando el patrón de apriete
cruzado indicado anteriormente.
Montaje en Rack

83
Sistema Inalámbrico Concert 88
ENGLISH
FRANÇAISDEUTSCHEESPAÑOLITALIANO
Grupo C
638-662 MHz
Grupo D
542-566 MHz
Grupo F*
606-630 MHz
Grupo G*
863-865 MHz
Canal Frec. Canal Frec. Canal Frec. Canal Frec.
0 638,125 0 542,125 0 606,125 0 863,050
1 639,625 1 543,625 1 607,625 1 863,250
2 641,050 2 545,05 2 609,05 2 863,550
3 642,425 3 546,425 3 610,425 3 863,750
4 642,900 4 546,900 4 610,900 4 864,050
5 645,525 5 549,525 5 613,525 5 864,250
6 647,100 6 551,100 6 615,100 6 864,550
7 648,475 7 552,475 7 616,475 7 864,750
8 650,000 8 554,000 8 618,000 8 864,950
9 652,075 9 556,075 9 620,075
A 654,975 A 558,975 A 622,975
B 655,975 B 559,975 B 623,975
C 657,050 C 561,050 C 625,050
D 658,975 D 562,975 D 626,975
E 660,425 E 564,425 E 628,425
F 661,975 F 565,975 F 629,975
Planes de Canales del Concert 88
* No para el uso en Estados Unidos y Canadá. Para cualquier pregunta en lo relati-
vo a los canales disponibles en su área, póngase en contacto con su distribuidor de
Samson local.

84
Localización de Fallos
Problema Soluciones
No Hay Audio
Compruebe que el transmisor y el receptor estén encendidos.
Compruebe que las pilas del transmisor estén instaladas
correctamente.
Compruebe que el transmisor no esté silenciado.
Compruebe que el adaptador del CR88 esté bien conectado
y enchufado a una toma eléctrica.
Encienda el receptor CR88.
Compruebe que las conexiones de salida de audio del CR88
estén bien conectadas.
Compruebe que el receptor y el transmisor mantengan la
línea de visión entre ellos.
Compruebe los controles de nivel del receptor y del dispositi-
vo de entrada de audio.
Compruebe que el transmisor y el receptor estén ajustados
en el mismo canal operativo. En caso de duda, restaure el
canal efectuando un ajuste IR.
Audio Distorsionado
El nivel de salida del receptor o el nivel del dispositivo de
entrada de audio podría ser demasiado alto.
Compruebe las pilas del transmisor y reemplácelas si fuera
necesario.
La ganancia de entrada del transmisor (CB88) o el nivel de
la fuente de audio podría ser demasiado alto.
Pérdidas de Audio
El transmisor podría estar demasiado lejos del receptor.
Acérquelo al receptor o modifique la posición de las antenas.
Elimine las fuentes que pudieran causar interferencias,
como por ejemplo teléfonos móviles, teléfonos inalámbricos,
equipos de iluminación, ordenadores, estructuras metálicas,
etc.
El Receptor no se
Enciende
Compruebe que el adaptador esté bien conectado y enchufa-
do a una toma eléctrica que suministre alimentación.
El transmisor no se
enciende (el LED
se ilumina en color
ROJO).
Cambie las pilas del transmisor.
Ruidos o Interferencias Si se están utilizando múltiples canales, asegúrese de que
no haya sistemas que estén operando en el mismo canal. Si
el problema persiste, cambie uno o todos los canales de los
sistemas.

85
Sistema Inalámbrico Concert 88
ENGLISH
FRANÇAISDEUTSCHEESPAÑOLITALIANO
Especificaciones
Sistema
Rango Operativo 100 m (línea de visión)
Respuesta de Frecuencia de Audio 50 Hz - 15 kHz
T.H.D. (Global) <1% (@AF 1 kHz, RF 46 dBu)
Rango Dinámico >100 dB ponderado A
Señal a Ruido >90 dB
Temperatura de Funcionamiento –10°C (14°F) a +60°C (+140°F)
Frecuencia de Clave de Tono 32,768 kHz
Transmisor de Petaca CB88
Conector de Entrada Mini-XLR (P3)
Impedancia de Entrada 1MΩ
Rango de Ganancia de Entrada 38 dB
Potencia de RF 10 mW EIRP
Requisitos de Alimentación Dos pilas alcalinas AA (LR6)
Vida de las Pilas 8 horas
Dimensiones (A x L x F) 96mm x 62mm x 18,5mm
(3,75" x 2,44" x 0,75")
Peso 93 g / 0,2 libras
Transmisor Manual CH88
Elemento de Micrófono Q6 Dinámico
Rango de Ganancia de Entrada 28 dB
Potencia de RF 10 mW EIRP
Requisitos de Alimentación Dos pilas alcalinas AA (LR6)
Vida de las Pilas 8 horas
Dimensiones (A x Ø) 260mm x 54mm (10,23" x 2,1")
Peso 218 g / 0,48 libras
Receptor CR88
Nivel de Salida de Audio +14 dBu no balanceado
Nivel de Salida de Audio +9 dBu balanceado
Impedancia de Salida de Audio 810 Ohmios no balanceado
Impedancia de Salida de Audio 240 Ohmios balanceado
Sensibilidad -100 dBm / 30 dB sinad
Rechazo de Imagen >50 dB
Tensión de Funcionamiento 15 V CC 200mA
Dimensiones (A x L x F) 210mm x 125mm x 44mm
(8,25" x 4,9" x 1,75")
Peso 388 g / 0,85 libras
En Samson mejoramos continuamente nuestros productos y debido a ello las especi-
ficaciones y las imágenes pueden ser objeto de cambios sin previo aviso.

86
Normas y Regulaciones de la FFC
Los receptores inalámbricos de Samson están certificados de acuerdo con el
apartado 15 de las Normas de la FCC y los transmisores están certificados de
acuerdo con el apartado 74 de las Normas de la FCC.
La obtención de las licencias de operación para los equipos de Samson es
responsabilidad del usuario y la otorgabilidad de las licencias dependerá de
la clasificación y la aplicación del usuario y de la frecuencia seleccionada.
Este dispositivo cumple la Norma RSS-210 de
Industry & Science Canada.
Su funcionamiento está sujeto a las dos condiciones siguientes:
(1) este dispositivo no debe provocar interferencias y (2) este dispositivo
debe aceptar cualquier interferencia que reciba, incluidas las interferencias
que puedan provocar un funcionamiento no deseado.
Por el presente, Samson Technologies Corp.,declara que los aparatos CR88,
CH88 y CB88 cumplen los requisitos esenciales y otras disposiciones rele-
vantes de la Directiva 1999/5/CE. La declaración de conformidad puede con-
sultarse en
http://www.samsontech.com/site_media/support/manuals/Concert_88_DOC.pdf
NOTA: Se ha verificado que este aparato cumple con los límites estableci-
dos para un dispositivo digital de Clase B, de acuerdo a lo establecido en la
Sección 15 de las Normas FCC. Estos límites han sido diseñados para ofrecer
una protección razonable contra las interferencias molestas en instalaciones
residenciales. Este aparato genera, utiliza y puede emitir energía de radiofre-
cuencia y, si no se instala y utiliza de acuerdo con las instrucciones, puede
producir interferencias molestas en las comunicaciones de radio. No obstante,
no está garantizado que estas interferencias no se produzcan en una instala-
ción concreta. Si este aparato produce interferencias molestas en la recepción
de la radio o la televisión, lo cual podrá comprobar fácilmente apagando y
encendiendo este aparato, el usuario será el responsable de tratar de corregir
dichas interferencias por medio de una o más de las siguientes medidas:
• Reoriente o reubique la antena receptora.
• Aumente la distancia de separación entre este aparato y el receptor.
• Conecte este aparato a una salida de corriente o regleta distinta a la que
esté conectado el receptor.
• Pida consejo a un técnico especialista en radio/TV o en el establecimiento
en el que adquirió el producto.
ADVERTENCIA: Los cambios o modificaciones no aprobados expresamente por
el responsable del cumplimiento normativo podrían anular la autorización del
usuario para utilizar el equipo.

87
Sistema wireless Concert 88
ENGLISH
FRANÇAISDEUTSCHEESPAÑOLITALIANO
IL PRESENTE DISPOSITIVO È CONFORME CON LA PARTE 15 DELLE
NORME FCC CLASSE B. IL FUNZIONAMENTO È SOGGETTO ALLE
SEGUENTI DUE CONDIZIONI: (1) IL DISPOSITIVO NON DEVE
CAUSARE INTERFERENZE DANNOSE E (2) IL DISPOSITIVO DEVE
ACCETTARE QUALSIASI INTERFERENZA RICEVUTA, COMPRESE
QUELLE CHE POTREBBERO PROVOCARNE IL FUNZIONAMENTO
INDESIDERATO. ADATTO PER USO DOMESTICO O IN UFFICIO.
Informazioni importanti sulla sicurezza
ATTENZIONE: PER RIDURRE IL RISCHIO DI FOLGORAZIONE NON ASPORTARE IL COPERCHIO (O
LA PARTE POSTERIORE). IL DISPOSITIVO NON CONTIENE COMPONENTI RIPARABILI DALL'U-
TENTE. PER LE RIPARAZIONI RIVOLGERSI A PERSONALE DI ASSISTENZA QUALIFICATO.
Il simbolo del fulmine con la punta a forma di freccia all'interno di un
triangolo equilatero ha lo scopo di avvisare l'utente della presenza di
"tensioni pericolose" non isolate nella cassa del prodotto, di ampiezza
sufficiente a costituire un rischio di folgorazione.
Il punto esclamativo all'interno di un triangolo equilatero ha lo scopo di
avvisare l'utente della presenza di importanti istruzioni di funzionamen-
to e manutenzione nella documentazione a corollario dell'apparecchio.
ATTENZIONE
RISCHIO DI FOLGORAZIONE!
NON APRIRE!
AVVERTIMENTO
PER SCONGIURARE IL PERICOLO DI INCENDI O FOLGORAZIONI NON UTILIZZARE QUE-
STA SPINA CON UNA PROLUNGA, UNA PRESA DI CORRENTE O ALTRE USCITE A MENO
CHE LE LAME NON POSSANO ESSERE INSERITE COMPLETAMENTE PER EVITARNE
L'ESPOSIZIONE. PER SCONGIURARE IL PERICOLO DI INCENDI O FOLGORAZIONI NON
ESPORRE L'APPARECCHIO ALLA PIOGGIA O ALL'UMIDITÀ. PER EVITARE FOLGORAZIONI
INSERIRE COMPLETAMENTE LA LAMA LARGA DELLA SPINA NELLA FESSURA LARGA
DELLA PRESA.
Se si desidera smaltire il prodotto, non gettarlo con i rifiuti domestici generici. Esiste un
sistema di raccolta separato per i prodotti elettronici usati conformemente alla normati-
va che richiede un trattamento, un recupero e un riciclo corretti.
Gli utenti privati residenti nei ventotto stati membri dell'UE, in Svizzera e in Norvegia
possono portare gratuitamente i propri prodotti elettronici usati presso strutture di raccolta a ciò
preposte o a un rivenditore (se si acquista un apparecchio nuovo analogo).
Per i Paesi non ricordati sopra, contattare le autorità locali per conoscere il metodo di smalti-
mento corretto.
Facendo ciò si garantirà che il prodotto smaltito sia sottoposto al trattamento, al recupero e al
riciclo necessari, evitando così possibili conseguenze negative per l'ambiente e la salute umana.

88
Informazioni importanti sulla sicurezza
1. Leggere le presenti istruzioni.
2. Conservare le presenti istruzioni.
3. Prestare attenzione a tutte le avver-
tenze.
4. Seguire tutte le istruzioni.
5. Non utilizzare l'apparecchio vicino
all'acqua.
6. Pulire unicamente con un panno
asciutto.
7. Non bloccare alcuna delle aperture
di ventilazione. Eseguire l'installa-
zione conformemente alle istruzioni
della società produttrice.
8. Non installare nei pressi di sorgenti
di calore come termosifoni, registri
di calore, stufe o altri apparecchi
(compresi gli amplificatori) che
producono calore.
9. Non ignorare lo scopo di sicurezza
della spina polarizzata o con messa
a terra. Una spina polarizzata ha due
lame, una più ampia dell'altra. Una
spina con messa a terra ha due lame
e un terzo connettore di messa a
terra. La lama larga, o il terzo polo,
è inserita/o per la sicurezza dell'u-
tente. Se la spina in dotazione non è
adatta per la propria presa, consul-
tare un elettricista per sostituire la
presa obsoleta.
10. Proteggere il cavo di alimentazione
in modo che non venga calpestato o
schiacciato, soprattutto in corrispon-
denza delle spine, dei connettori e
del punto in cui esce dall'apparec-
chio.
11. Usare soltanto dispositivi/accessori
specificati dalla società produttrice.
12. Usare unicamente con il carrello,
la base, il treppiede, il sostegno o
il tavolo specificati dalla società
produttrice o venduti con l'apparec-
chio. Quando si utilizza un carrello,
fare attenzione nello spostamento
dell'insieme carrello/apparecchio
per evitare lesioni da ribaltamento.
13. Staccare la spina dell'apparecchio
dalla presa di corrente all'imper-
versare di temporali con fulmini o
quando non è utilizzato per lunghi
periodi di tempo.
14. Per qualsiasi riparazione rivolgersi a
personale di assistenza qualificato.
Eventuali riparazioni sono necessarie
se l'apparecchio è stato danneggiato
in qualche modo, come nel caso di
guasti al cavo di alimentazione o alla
spina, danni provocati dal rovescia-
mento di liquido o dalla caduta di
oggetti sull'apparecchio, esposizio-
ne alla pioggia o all'umidità, o se
l'apparecchio non funziona in modo
normale o è stato fatto cadere.
15. L'apparecchio non dovrà essere
esposto a sgocciolamento o schizzi
di acqua e su di esso non deve esse-
re posato alcun oggetto contenente
liquido, come per esempio un vaso.
16. Fare attenzione ad evitare folgorazio-
ni, inserire completamente la lama
larga della spina nella fessura larga
della presa.
17. Mantenere una corretta ventilazione
attorno all'intera unità.
18. L'adattatore a inserimento diretto
viene utilizzato come dispositivo di
disconnessione, si dovrà sempre es-
sere in condizione di poterlo mettere
prontamente in funzione.
19. Le batterie (pacco batterie o batterie
installate) non dovranno essere
esposte a un calore eccessivo come
quello della luce del sole, del fuoco
o similare.

89
Sistema wireless Concert 88
ENGLISH
FRANÇAISDEUTSCHEESPAÑOLITALIANO
Indice
Introduzione . . . . . . . . . . . . . . . . . . . . . . . . . .90
Caratteristiche del sistema . . . . . . . . . . . . . . . . . . . .91
Componenti del sistema . . . . . . . . . . . . . . . . . . . . .91
Tour guidato - funzioni del ricevitore CR88 . . . . . . . . . . . .92
Tour guidato - funzioni del trasmettitore belt pack CB88 . . . . . .94
Tour guidato - funzioni del trasmettitore portatile CH88 . . . . . .96
Guida introduttiva - Configurazione di un sistema singolo . . . . .97
Guida introduttiva - Configurazione di sistemi multipli . . . . . .101
Montaggio su rack . . . . . . . . . . . . . . . . . . . . . . .103
Schemi dei canali del sistema Concert 88 . . . . . . . . . . . 104
Localizzazione guasti . . . . . . . . . . . . . . . . . . . . . 105
Specifiche . . . . . . . . . . . . . . . . . . . . . . . . . . 106

90
Congratulazioni per aver acquistato il sistema wireless Concert 88 di Samson. Il
modello Concert 88 è la soluzione ideale per artisti dinamici che hanno bisogno di
un sistema affidabile, dal suono eccellente per applicazioni senza filo. Caratterizzato
da un funzionamento semplice, con sedici canali disponibili e una porta a infrarossi
per il canale del trasmettitore, il Concert 88 può essere velocemente messo in fun-
zione non appena tolto dalla confezione. Il sistema Concert 88 garantisce prestazioni
dal suono pulito, prive di interruzioni grazie alla combinazione del tone key con la
funzione di silenziamento automatico. Questa configurazione consente il passaggio
attraverso il ricevitore soltanto dell'audio proveniente dal trasmettitore e silenzia
l'uscita in presenza di eventuali interferenze.
Il sistema Concert 88 è disponibile in quattro configurazioni. Il sistema vocale
portatile comprende il trasmettitore portatile CH88 e la capsula microfonica portatile
dinamica Q6. Il sistema belt pack CB88 può essere configurato con la combinazione
cuffie-microfono HS5, con il microfono lavalier LM5 o con un cavo per strumenti da
¼". Per installazioni itineranti o a carattere permanente, il Concert 88 include un kit
per il montaggio su rack standard da 19".
In queste pagine troverete una descrizione dettagliata delle caratteristiche del
sistema wireless Concert 88, oltre a un tour guidato attraverso il suo pannello di
controllo, istruzioni passo per passo riguardo alla sua configurazione e al suo utilizzo
e le specifiche complete del sistema. Se il sistema senza filo è stato acquistato negli
Stati Uniti, troverete anche un certificato di garanzia — vi preghiamo di compilarlo
e spedirlo in modo da poter ricevere assistenza tecnica on-line e da permetterci di
inviarvi informazioni aggiornate su questo e altri prodotti Samson in futuro. Vi invitia-
mo inoltre a consultare il nostro sito web
(www.samsontech.com) per ottenere informazioni complete su tutta la nostra linea di
prodotti.
Vi consigliamo di conservare come riferimento i seguenti dati, oltre a una copia dello
scontrino certificante l'acquisto.
Numero di serie del ricevitore: _________________________________________
Numero di serie del trasmettitore: ______________________________________
Data di acquisto: ______________________________________________
Nome del rivenditore: ________________________________________________
Con le dovute cure e manutenzione, il sistema wireless Concert 88 funzionerà senza
problemi per molti anni. Se il sistema senza filo dovesse necessitare riparazioni,
bisognerà ottenere un numero di autorizzazione al reso (RA) prima di spedire l'unità a
Samson. Senza questo numero, l'unità non sarà accettata. Vi preghiamo di contattare
Samson allo 1-800-3SAMSON (1-800-372-6766) per ottenere un numero RA prima
di spedire la vostra unità. Conservare la confezione originale e, se possibile, effettua-
re il reso dell'unità nel suo imballaggio originario. Se il sistema Concert 88 è stato
acquistato fuori dal territorio degli Stati Uniti, contattare il distributore locale per
dettagli sulla garanzia e informazioni sull'assistenza.
Introduzione

91
Sistema wireless Concert 88
ENGLISH
FRANÇAISDEUTSCHEESPAÑOLITALIANO
Componenti del sistema
Caratteristiche del sistema
Tutti i sistemi
Ricevitore CR88
Alimentazione
Cavo audio da ¼" a ¼"
Accessori per rack aletta per montaggio a rack lunga, aletta per montaggio a
rack corta, due adattatori per ricevitore
Manuale di istruzioni
Sistema portatile
Trasmettitore portatile CH88 con capsula microfonica dinamica Q6
Sistema con cuffie
Trasmettitore belt pack CB88
Microfono con cuffie HS5 con connettore mini-XLR
Sistema lavalier
Trasmettitore belt pack CB88
Microfono lavalier LM5 con connettore mini-XLR
Gancio per indumenti
Sistema per strumento
Trasmettitore belt pack CB88
Cavo per strumento da ¼" a mini-XLR
• Sistema wireless professionale per utilizzo in applicazioni con audio dal vivo e
sound contracting
• La tecnologia true diversity eleva al massimo la portata attiva (fino a 91,44 m,
300 piedi) e riduce le potenziali interferenze
• Sedici canali disponibili operanti nella banda UHF progettati per ottenere la
compatibilità massima del sistema nella medesima posizione senza interferenze
• Il ricevitore CR88 è un'unità half-rack che può essere usata senza piedistallo/
non fissata al muro oppure può essere montata su qualsiasi rack standard da 19"
facendo ricorso al kit per rack in dotazione, il che ne semplifica l'integrazione in
qualsiasi impianto audio destinato ad essere spostato o a far parte di un'installa-
zione fissa
• Il tone key e la funzione di silenziamento automatico garantiscono prestazioni
dal suono pulito, prive di interruzioni, dal momento che consentono il passaggio
attraverso il ricevitore soltanto dell'audio proveniente dal trasmettitore e silenzia-
no l'uscita in presenza di eventuali interferenze.
• Portata fino a 91,44 m / 300 piedi (linea di vista)
• Fino a otto ore di durata della carica della batteria, facendo ricorso a due batte-
rie AA standard

92
1. Antenne - I supporti delle antenne ne consentono una rotazione completa per un
posizionamento ottimale. In condizioni di funzionamento normale, entrambe le
antenne dovrebbero essere posizionate in verticale. Durante il trasporto del rice-
vitore CR88 entrambe le antenne possono essere piegate all'interno per comodi-
tà.
2. Comando VOLUME - Questa manopola imposta il livello del segnale audio in uscita
attraverso i jack di uscita bilanciato e sbilanciato situati sulla parte posteriore
del pannello. Il livello di riferimento si ottiene quando la manopola è interamen-
te ruotata in senso orario (sulla sua impostazione “10”).
3. Spia indicante lo stato di PRONTO - La spia si accende assumendo colore verde
quando il CR88 sta ricevendo il segnale RF e il sistema è pronto per l'uso.
4. Spia indicante lo stato di PICCO - La spia si accende assumendo colore rosso
quando il segnale audio trasmesso è sovraccarico.
5. Display con LED - Il display con LED a sette segmenti mostra il canale in uso sul
ricevitore in un dato momento. I canali del ricevitore CR88 sono indicati con 0-9
e A-F.
6. Trasmettitore IR - Durante la “CONFIGURAZIONE IR” viene utilizzata della luce a
infrarossi per impostare il canale del trasmettitore.
7. Tasto SELEZIONE - Premere questo tasto per effettuare un ciclo attraverso i canali
funzionanti del ricevitore. Premere il tasto e tenerlo premuto per inviare le infor-
mazioni relative al canale al trasmettitore mediante trasmissione a infrarossi.
8. Interruttore di ACCENSIONE - Utilizzare per spegnere o accendere il ricevitore
CR88.
Tour guidato - funzioni del ricevitore CR88

93
Sistema wireless Concert 88
ENGLISH
FRANÇAISDEUTSCHEESPAÑOLITALIANO
This device complies with Part 15 of the
FCC Rules. Operation is subject to the
following two conditions:
(1) This device may not cause harmful
interference, and
(2) this device must accept any
interference received, including
interference that may cause
undesired operation.
FREQ:
542-566MHz
Fare ricorso al pressacavo: avvolgere il filo ad anello e
farlo passare nel pressacavo, poi passare la spina dell'a-
dattatore attraverso l'anello creando un nodo.
Tour guidato - funzioni del ricevitore CR88
1. Ingresso in c.c. - Collegare in questo punto l'adattatore in dotazione, facen-
do ricorso al pressacavo come mostrato nell'illustrazione sottostante.
AVVERTIMENTO: non sostituire con adattatori di nessun altro tipo. Farlo può
provocare gravi danni al ricevitore CR88 e ne renderà invalida la garanzia.
2. USCITA BILANCIATA - Usare questo jack XLR a bassa impedenza (600 Ohm) bilan-
ciato elettronicamente quando si collega il ricevitore CR88 ad apparecchiature
audio professionali (+4dBu). La configurazione dei contatti per il cablaggio è la
seguente: contatto 1 terra, contatto 2 alto (caldo) e contatto 3 basso (freddo).
3. USCITA SBILANCIATA - Usare questo jack da ¼" sbilanciato e ad alta impedenza
(5K Ohm) quando si collega il ricevitore CR88 ad apparecchiature audio di tipo
consumer (-10dBV). Il cablaggio è il seguente: punta caldo, manica terra.

94
1. Connettore di ingresso - Collegare il dispositivo di ingresso attraverso il connettore
mini-XLR. Il trasmettitore CB88 è fornito con un microfono lavalier, una combi-
nazione cuffia - microfono o un cavo per strumenti da ¼".
2. Spia indicante lo stato - Questo LED indica la modalità di funzionamento:
VERDE Funzionamento normale
ROSSO Silenziamento
VERDE lampeggiante Poca carica restante della batteria
3. Interruttore di accensione/silenziamento - Premere e mantenere premuto per spe-
gnere o accendere l'unità. Premere e rilasciare per silenziare il trasmettitore o
togliergli il silenziamento.
4. Gancio per fissaggio alla cintura - Utilizzare questo gancio per fissare il trasmetti-
tore CB88 a una cintura o alla tracolla della chitarra.
5. Apertura del coperchio del vano batteria - Premere su entrambi i lati e tirar indie-
tro per aprire il coperchio del vano batteria del trasmettitore CB88.
6. Antenna - Questa antenna fissa del trasmettitore dovrà essere estesa completa-
mente durante il normale funzionamento.
Tour guidato - funzioni del trasmettitore belt pack CB88

95
Sistema wireless Concert 88
ENGLISH
FRANÇAISDEUTSCHEESPAÑOLITALIANO
7. Controllo del GUADAGNO in ingresso - Questo comando regola la sensibilità d'in-
gresso del trasmettitore in modo che possa interfacciarsi con gli ingressi di
microfono e strumenti. Per ottenere delle prestazioni ottimali, facendo uso del
cacciavite in dotazione, impostare il controllo del GUADAGNO in ingresso nel
punto in cui si vede la spia indicante il PICCO del CR88 iniziare ad accendersi
a fronte di livelli alti, poi abbassare lentamente fino a che la luce indicante una
condizione di PICCO smette di essere accesa.
8. Vano batterie - Inserire due batterie AA (LR6) standard in questo vano, accer-
tandosi di rispettare i contrassegni "più" e "meno" della polarità come indicati.
Anche se è possibile fare uso di batterie Ni-Cad ricaricabili esse non forniscono
un quantitativo adeguato di corrente per più di quattro ore. AVVERTIMENTO: non
inserire le batterie a rovescio; farlo può provocare gravi danni al trasmettitore
CB88 e ne renderà invalida la garanzia.
9. Lente IR - Questa apertura è utilizzata per catturare il segnale infrarosso inviato
dal ricevitore CR88 durante la CONFIGURAZIONE IR in cui vengono configurati i
canali del trasmettitore.
10. Cacciavite in plastica - Ha lo scopo di essere utilizzato per regolare il controllo del
GUADAGNO (#7) in ingresso del trasmettitore CB88.
Tour guidato - funzioni del trasmettitore belt pack CB88

96
1. Spia indicante lo stato - Questo LED indica la
modalità operativa:
VERDE Funzionamento
normale
ROSSO Silenziamento
VERDE
lampeggiante
Poca carica restante
della batteria
2. Interruttore di accensione/silenziamento -
Premere e mantenere premuto per spegnere
o accendere l'unità. Premere e rilasciare per
silenziare il trasmettitore o togliergli il silen-
ziamento.
3. Coperchio del vano batteria - Svitare le viti del
coperchio del vano batteria e farlo scorrere
per aprire il vano che ospita le batterie del
trasmettitore CH88.
4. Vano batterie - Aprire il vano batterie eserci-
tando una pressione sulla linguetta e solle-
vando il coperchio. Inserire due batterie AA
(LR6) standard in questo vano, accertandosi
di rispettare i contrassegni "più" e "meno"
della polarità come indicati. Anche se è
possibile fare uso di batterie Ni-Cad ricari-
cabili esse non forniscono un quantitativo
adeguato di corrente per più di quattro ore.
AVVERTIMENTO: non inserire le batterie a
rovescio; farlo può provocare gravi danni al trasmettitore CH88 e ne renderà invalida la
garanzia.
5. Controllo del GUADAGNO in ingresso - Questo comando regola la sensibilità d'ingresso del
trasmettitore. Per ottenere delle prestazioni ottimali, facendo uso del cacciavite in dota-
zione, impostare il controllo del GUADAGNO in ingresso nel punto in cui si vede la spia
indicante il PICCO del CR88 iniziare ad accendersi a fronte di livelli alti, poi abbassare
lentamente fino a che la luce indicante una condizione di PICCO smette di essere accesa.
6. Lente IR - Questa apertura è utilizzata per catturare il segnale infrarosso inviato dal rice-
vitore CR88 durante la CONFIGURAZIONE IR in cui vengono configurati i canali del
trasmettitore. Per caricare il canale selezionato il coperchio del vano batterie deve essere
aperto e la lente IR rivolta verso il ricevitore.
7. Cacciavite in plastica - Ha lo scopo di essere utilizzato per regolare il controllo del
GUADAGNO in ingresso del trasmettitore CB88 (V. #5 Controllo del GUADAGNO in
ingresso HH).
Tour guidato - funzioni del trasmettitore portatile CH88

97
Sistema wireless Concert 88
ENGLISH
FRANÇAISDEUTSCHEESPAÑOLITALIANO
Guida introduttiva - Configurazione di un sistema singolo
Affinché il sistema wireless funzioni correttamente sia il ricevitore sia il trasmettitore
devono essere impostati sul medesimo canale.
Seguire questa procedura base per configurare e utilizzare il sistema wireless
Concert 88:
Posizionare fisicamente il ricevitore CR88 dove esso sarà utilizzato ed estendere le
antenne in senso verticale. Il generico principio basilare da applicare è mantenere la
"linea di vista" tra ricevitore e trasmettitore in modo che la persona che usa o indossa
il trasmettitore possa vedere il ricevitore.
Con l'interruttore di accensione acceso e l'alimentazione del ricevitore CR88 disatti-
vata, collegare l'adattatore in dotazione. Accendere un istante il ricevitore CR88 per
accertarsi che l'unità stia ricevendo alimentazione. Si vedrà il display a LED accen-
dersi. Poi spegnere il ricevitore CR88.
This device complies with Part 15 of the
FCC Rules. Operation is subject to the
following two conditions:
(1) This device may not cause harmful
interference, and
(2) this device must accept any
interference received, including
interference that may cause
undesired operation.
FREQ:
542-566MHz
This device complies with Part 15 of the
FCC Rules. Operation is subject to the
following two conditions:
(1) This device may not cause harmful
interference, and
(2) this device must accept any
interference received, including
interference that may cause
undesired operation.
FREQ:
542-566MHz
3. Plug in receiver 4. Turn on receiver
5. Plug receiver into audio system 6. Press Select button to change channel 9. Press and hold SELECT button to IR set 10. Adjust Volume control7. Install batteries 8. Press button on transmitter to turn on
9. Press and hold Select button to IR set7. Install batteries 8. Turn on belt pack transmitter
This device complies with Part 15 of the
FCC Rules. Operation is subject to the
following two conditions:
(1) This device may not cause harmful
interference, and
(2) this device must accept any
interference received, including
interference that may cause
undesired operation.
FREQ:
542-566MHz
This device complies with Part 15 of the
FCC Rules. Operation is subject to the
following two conditions:
(1) This device may not cause harmful
interference, and
(2) this device must accept any
interference received, including
interference that may cause
undesired operation.
FREQ:
542-566MHz
3. Plug in receiver 4. Turn on receiver
5. Plug receiver into audio system 6. Press Select button to change channel 9. Press and hold SELECT button to IR set 10. Adjust Volume control7. Install batteries 8. Press button on transmitter to turn on
9. Press and hold Select button to IR set7. Install batteries 8. Turn on belt pack transmitter
Con l'amplificatore o il mixer spenti e il volume completamente abbassato, collegare
il jack di uscita del ricevitore CR88 all'ingresso del microfono o a quello a livello di
linea di un mixer o di un amplificatore utilizzando l'uscita XLR bilanciata o l'uscita
sbilanciata a livello di linea da ¼" . Ruotare completamente in senso antiorario la
manopola del livello sul ricevitore CR88 poi accenderlo.

98
Guida introduttiva - Configurazione di un sistema singolo
Con il trasmettitore spento inserire due batterie AA nuove nel trasmettitore belt pack
CB88 o nel trasmettitore portatile CH88. Lasciare il vano batterie aperto.
This device complies with Part 15 of the
FCC Rules. Operation is subject to the
following two conditions:
(1) This device may not cause harmful
interference, and
(2) this device must accept any
interference received, including
interference that may cause
undesired operation.
FREQ:
542-566MHz
This device complies with Part 15 of the
FCC Rules. Operation is subject to the
following two conditions:
(1) This device may not cause harmful
interference, and
(2) this device must accept any
interference received, including
interference that may cause
undesired operation.
FREQ:
542-566MHz
3. Plug in receiver 4. Turn on receiver
5. Plug receiver into audio system 6. Press Select button to change channel 9. Press and hold SELECT button to IR set 10. Adjust Volume control7. Install batteries 8. Press button on transmitter to turn on
9. Press and hold Select button to IR set7. Install batteries 8. Turn on belt pack transmitter
This device complies with Part 15 of the
FCC Rules. Operation is subject to the
following two conditions:
(1) This device may not cause harmful
interference, and
(2) this device must accept any
interference received, including
interference that may cause
undesired operation.
FREQ:
542-566MHz
This device complies with Part 15 of the
FCC Rules. Operation is subject to the
following two conditions:
(1) This device may not cause harmful
interference, and
(2) this device must accept any
interference received, including
interference that may cause
undesired operation.
FREQ:
542-566MHz
3. Plug in receiver 4. Turn on receiver
5. Plug receiver into audio system 6. Press Select button to change channel 9. Press and hold SELECT button to IR set 10. Adjust Volume control7. Install batteries 8. Press button on transmitter to turn on
9. Press and hold Select button to IR set7. Install batteries 8. Turn on belt pack transmitter
Accendere il trasmettitore premendo e mantenendo premuto l'interruttore di accen-
sione; la spia a LED si accenderà assumendo colore verde.
This device complies with Part 15 of the
FCC Rules. Operation is subject to the
following two conditions:
(1) This device may not cause harmful
interference, and
(2) this device must accept any
interference received, including
interference that may cause
undesired operation.
FREQ:
542-566MHz
This device complies with Part 15 of the
FCC Rules. Operation is subject to the
following two conditions:
(1) This device may not cause harmful
interference, and
(2) this device must accept any
interference received, including
interference that may cause
undesired operation.
FREQ:
542-566MHz
3. Plug in receiver 4. Turn on receiver
5. Plug receiver into audio system 6. Press Select button to change channel 9. Press and hold SELECT button to IR set 10. Adjust Volume control7. Install batteries 8. Press button on transmitter to turn on
9. Press and hold Select button to IR set7. Install batteries 8. Turn on belt pack transmitter

99
Sistema wireless Concert 88
ENGLISH
FRANÇAISDEUTSCHEESPAÑOLITALIANO
Guida introduttiva - Configurazione di un sistema singolo
This device complies with Part 15 of the
FCC Rules. Operation is subject to the
following two conditions:
(1) This device may not cause harmful
interference, and
(2) this device must accept any
interference received, including
interference that may cause
undesired operation.
FREQ:
542-566MHz
This device complies with Part 15 of the
FCC Rules. Operation is subject to the
following two conditions:
(1) This device may not cause harmful
interference, and
(2) this device must accept any
interference received, including
interference that may cause
undesired operation.
FREQ:
542-566MHz
3. Plug in receiver 4. Turn on receiver
5. Plug receiver into audio system 6. Press Select button to change channel 9. Press and hold SELECT button to IR set 10. Adjust Volume control7. Install batteries 8. Press button on transmitter to turn on
9. Press and hold Select button to IR set7. Install batteries 8. Turn on belt pack transmitter
This device complies with Part 15 of the
FCC Rules. Operation is subject to the
following two conditions:
(1) This device may not cause harmful
interference, and
(2) this device must accept any
interference received, including
interference that may cause
undesired operation.
FREQ:
542-566MHz
This device complies with Part 15 of the
FCC Rules. Operation is subject to the
following two conditions:
(1) This device may not cause harmful
interference, and
(2) this device must accept any
interference received, including
interference that may cause
undesired operation.
FREQ:
542-566MHz
3. Plug in receiver 4. Turn on receiver
5. Plug receiver into audio system 6. Press Select button to change channel 9. Press and hold SELECT button to IR set 10. Adjust Volume control7. Install batteries 8. Press button on transmitter to turn on
9. Press and hold Select button to IR set7. Install batteries 8. Turn on belt pack transmitter
Posizionare il trasmettitore a circa 15-30 cm (6-12") di distanza dalla parte anteriore
del ricevitore CR88 con l'apertura IR del trasmettitore di fronte al dispositivo trasmit-
tente a raggi infrarossi situato sul pannello frontale del ricevitore CR88.
This device complies with Part 15 of the
FCC Rules. Operation is subject to the
following two conditions:
(1) This device may not cause harmful
interference, and
(2) this device must accept any
interference received, including
interference that may cause
undesired operation.
FREQ:
542-566MHz
This device complies with Part 15 of the
FCC Rules. Operation is subject to the
following two conditions:
(1) This device may not cause harmful
interference, and
(2) this device must accept any
interference received, including
interference that may cause
undesired operation.
FREQ:
542-566MHz
3. Plug in receiver 4. Turn on receiver
5. Plug receiver into audio system 6. Press Select button to change channel 9. Press and hold SELECT button to IR set 10. Adjust Volume control7. Install batteries 8. Press button on transmitter to turn on
9. Press and hold Select button to IR set7. Install batteries 8. Turn on belt pack transmitter
This device complies with Part 15 of the
FCC Rules. Operation is subject to the
following two conditions:
(1) This device may not cause harmful
interference, and
(2) this device must accept any
interference received, including
interference that may cause
undesired operation.
FREQ:
542-566MHz
This device complies with Part 15 of the
FCC Rules. Operation is subject to the
following two conditions:
(1) This device may not cause harmful
interference, and
(2) this device must accept any
interference received, including
interference that may cause
undesired operation.
FREQ:
542-566MHz
3. Plug in receiver 4. Turn on receiver
5. Plug receiver into audio system 6. Press Select button to change channel 9. Press and hold SELECT button to IR set 10. Adjust Volume control7. Install batteries 8. Press button on transmitter to turn on
9. Press and hold Select button to IR set7. Install batteries 8. Turn on belt pack transmitter
Premere e tenere premuto il tasto SELEZIONE del
CR88 per impostare il trasmettitore sul medesimo
canale del ricevitore attraverso la trasmissione a
infrarossi
Premere il tasto SELEZIONE sul lato anteriore del rice-
vitore CR88 e scegliere un canale disponibile. Il nume-
ro di canale aumenterà di una cifra, da 0 a 9 poi da A
ad F. Quando l'ultimo canale è stato raggiunto, il ciclo
del conteggio tornerà a 0.

100
Accendere l'amplificatore o il mixer collegato,
ma tenerne il volume completamente abbassato.
Ruotare la manopola del volume sul CR88 comple-
tamente in senso orario (sull'impostazione “10” ).
Ciò comporta un guadagno unitario.
Parlare o cantare nel microfono oppure, se si sta usando il trasmettitore con uno
strumento collegato, suonare lo strumento al normale livello che si avrebbe durante
una performance. Alzare lentamente il volume dell'amplificatore o del mixer fino a
raggiungere il livello desiderato.
Se si riscontra che il sistema ha dei drop-out considerevoli, un ridotto range di eser-
cizio complessivo o improvvise manifestazioni di rumore, modificare il canale su cui
il sistema funziona effettuando le operazioni sopra elencate.
This device complies with Part 15 of the
FCC Rules. Operation is subject to the
following two conditions:
(1) This device may not cause harmful
interference, and
(2) this device must accept any
interference received, including
interference that may cause
undesired operation.
FREQ:
542-566MHz
This device complies with Part 15 of the
FCC Rules. Operation is subject to the
following two conditions:
(1) This device may not cause harmful
interference, and
(2) this device must accept any
interference received, including
interference that may cause
undesired operation.
FREQ:
542-566MHz
3. Plug in receiver 4. Turn on receiver
5. Plug receiver into audio system 6. Press Select button to change channel 9. Press and hold SELECT button to IR set 10. Adjust Volume control7. Install batteries 8. Press button on transmitter to turn on
9. Press and hold Select button to IR set7. Install batteries 8. Turn on belt pack transmitter
This device complies with Part 15 of the
FCC Rules. Operation is subject to the
following two conditions:
(1) This device may not cause harmful
interference, and
(2) this device must accept any
interference received, including
interference that may cause
undesired operation.
FREQ:
542-566MHz
This device complies with Part 15 of the
FCC Rules. Operation is subject to the
following two conditions:
(1) This device may not cause harmful
interference, and
(2) this device must accept any
interference received, including
interference that may cause
undesired operation.
FREQ:
542-566MHz
3. Plug in receiver 4. Turn on receiver
5. Plug receiver into audio system 6. Press Select button to change channel 9. Press and hold SELECT button to IR set 10. Adjust Volume control7. Install batteries 8. Press button on transmitter to turn on
9. Press and hold Select button to IR set7. Install batteries 8. Turn on belt pack transmitter
Guida introduttiva - Configurazione di un sistema singolo
Quando la trasmissione è completa, il ricevitore CR88
riceverà il segnale in RF e il tone key dal trasmettitore.
Sul pannello frontale del ricevitore CR88 lampeggerà la
spia indicante lo stato di PRONTO.

101
Sistema wireless Concert 88
ENGLISH
FRANÇAISDEUTSCHEESPAÑOLITALIANO
Per modificare il canale di funzionamento di un siste-
ma, premere il tasto SELEZIONE posto sul lato ante-
riore del ricevitore CR88. Il numero di canale aumen-
terà di una cifra, da 0 a 9 poi da A ad F. Quando
l'ultimo canale è stato raggiunto, il ciclo del conteggio
tornerà a 0.
Guida introduttiva - Configurazione di sistemi multipli
Quando si usano sistemi multipli, ciascun sistema deve essere impostato su un canale di
funzionamento diverso. Gli accoppiamenti di trasmettitore e ricevitore devono essere
sul piano del medesimo canale affinché i dispositivi possano lavorare insieme (V.
"Concert 88 Channel Plans" on page 104).
Quando si imposta un trasmettitore aggiuntivo, accertarsi di chiudere i vani batteria
di tutti gli altri trasmettitori per garantire che la lente
IR sia coperta.
This device complies with Part 15 of the
FCC Rules. Operation is subject to the
following two conditions:
(1) This device may not cause harmful
interference, and
(2) this device must accept any
interference received, including
interference that may cause
undesired operation.
FREQ:
542-566MHz
This device complies with Part 15 of the
FCC Rules. Operation is subject to the
following two conditions:
(1) This device may not cause harmful
interference, and
(2) this device must accept any
interference received, including
interference that may cause
undesired operation.
FREQ:
542-566MHz
3. Plug in receiver 4. Turn on receiver
5. Plug receiver into audio system 6. Press Select button to change channel 9. Press and hold SELECT button to IR set 10. Adjust Volume control7. Install batteries 8. Press button on transmitter to turn on
9. Press and hold Select button to IR set7. Install batteries 8. Turn on belt pack transmitter
Accendere il trasmettitore premendo e mantenendo premuto l'interruttore di accen-
sione; la spia a LED si accenderà assumendo colore verde.
This device complies with Part 15 of the
FCC Rules. Operation is subject to the
following two conditions:
(1) This device may not cause harmful
interference, and
(2) this device must accept any
interference received, including
interference that may cause
undesired operation.
FREQ:
542-566MHz
This device complies with Part 15 of the
FCC Rules. Operation is subject to the
following two conditions:
(1) This device may not cause harmful
interference, and
(2) this device must accept any
interference received, including
interference that may cause
undesired operation.
FREQ:
542-566MHz
3. Plug in receiver 4. Turn on receiver
5. Plug receiver into audio system 6. Press Select button to change channel 9. Press and hold SELECT button to IR set 10. Adjust Volume control7. Install batteries 8. Press button on transmitter to turn on
9. Press and hold Select button to IR set7. Install batteries 8. Turn on belt pack transmitter
This device complies with Part 15 of the
FCC Rules. Operation is subject to the
following two conditions:
(1) This device may not cause harmful
interference, and
(2) this device must accept any
interference received, including
interference that may cause
undesired operation.
FREQ:
542-566MHz
This device complies with Part 15 of the
FCC Rules. Operation is subject to the
following two conditions:
(1) This device may not cause harmful
interference, and
(2) this device must accept any
interference received, including
interference that may cause
undesired operation.
FREQ:
542-566MHz
3. Plug in receiver 4. Turn on receiver
5. Plug receiver into audio system 6. Press Select button to change channel 9. Press and hold SELECT button to IR set 10. Adjust Volume control7. Install batteries 8. Press button on transmitter to turn on
9. Press and hold Select button to IR set7. Install batteries 8. Turn on belt pack transmitter

102
Posizionare il trasmettitore a circa 15-30 cm (6-12") di distanza dalla parte anteriore
del ricevitore CR88 con l'apertura IR del trasmettitore di fronte al dispositivo trasmit-
tente a raggi infrarossi del ricevitore.
This device complies with Part 15 of the
FCC Rules. Operation is subject to the
following two conditions:
(1) This device may not cause harmful
interference, and
(2) this device must accept any
interference received, including
interference that may cause
undesired operation.
FREQ:
542-566MHz
This device complies with Part 15 of the
FCC Rules. Operation is subject to the
following two conditions:
(1) This device may not cause harmful
interference, and
(2) this device must accept any
interference received, including
interference that may cause
undesired operation.
FREQ:
542-566MHz
3. Plug in receiver 4. Turn on receiver
5. Plug receiver into audio system 6. Press Select button to change channel 9. Press and hold SELECT button to IR set 10. Adjust Volume control7. Install batteries 8. Press button on transmitter to turn on
9. Press and hold Select button to IR set7. Install batteries 8. Turn on belt pack transmitter
This device complies with Part 15 of the
FCC Rules. Operation is subject to the
following two conditions:
(1) This device may not cause harmful
interference, and
(2) this device must accept any
interference received, including
interference that may cause
undesired operation.
FREQ:
542-566MHz
This device complies with Part 15 of the
FCC Rules. Operation is subject to the
following two conditions:
(1) This device may not cause harmful
interference, and
(2) this device must accept any
interference received, including
interference that may cause
undesired operation.
FREQ:
542-566MHz
3. Plug in receiver 4. Turn on receiver
5. Plug receiver into audio system 6. Press Select button to change channel 9. Press and hold SELECT button to IR set 10. Adjust Volume control7. Install batteries 8. Press button on transmitter to turn on
9. Press and hold Select button to IR set7. Install batteries 8. Turn on belt pack transmitter
Quando la trasmissione è completa e il CR88 sta rice-
vendo il segnale RF dal trasmettitore, sul pannello
anteriore del ricevitore CR88 si accenderà la spia indi-
cante lo stato di PRONTO.
Se si riscontra che il sistema ha dei drop-out considerevoli, un ridotto range di eser-
cizio complessivo, o improvvise manifestazioni di rumore, modificare il canale su cui
il sistema funziona effettuando le operazioni sopra elencate.
This device complies with Part 15 of the
FCC Rules. Operation is subject to the
following two conditions:
(1) This device may not cause harmful
interference, and
(2) this device must accept any
interference received, including
interference that may cause
undesired operation.
FREQ:
542-566MHz
This device complies with Part 15 of the
FCC Rules. Operation is subject to the
following two conditions:
(1) This device may not cause harmful
interference, and
(2) this device must accept any
interference received, including
interference that may cause
undesired operation.
FREQ:
542-566MHz
3. Plug in receiver 4. Turn on receiver
5. Plug receiver into audio system 6. Press Select button to change channel 9. Press and hold SELECT button to IR set 10. Adjust Volume control7. Install batteries 8. Press button on transmitter to turn on
9. Press and hold Select button to IR set7. Install batteries 8. Turn on belt pack transmitter
Guida introduttiva - Configurazione di sistemi multipli
Premere e tenere premuto il tasto SELEZIONE del
CR88 per sincronizzare il trasmettitore sul medesi-
mo canale del ricevitore attraverso la trasmissione a
infrarossi.

103
Sistema wireless Concert 88
ENGLISH
FRANÇAISDEUTSCHEESPAÑOLITALIANO
Nell'ambito di installazioni itineranti o permanenti il ricevitore CR88 può essere
installato su un rack standard da 19” facendo uso delle alette per montaggio a rack
incluse. Per montare il ricevitore CR88 eseguire le semplici operazioni indicate di
seguito:
Collegare le alette per montaggio a rack in dotazio-
ne facendo scorrere ciascuna aletta nella scanala-
tura posizionata su ciascun lato del ricevitore CR88
fino a che si insedia in posizione corretta con uno
scatto e il ricevitore è a filo con il pannello frontale.
Posizionare il ricevitore CR88 in
uno spazio del rack disponibile e
farlo scorrere sino a che le alette per
montaggio a rack toccano le guide
della struttura del rack e sono alline-
ate con i fori delle guide stesse.
Montare il ricevitore nel rack facendo ricorso alle viti per rack della dimensione
adeguata (non comprese). Per garantire una tensione e un equilibrio uguali quando
si installa il ricevitore, bisognerebbe fissare le viti secondo uno schema incrociato di
angoli opposti: alto sinistra -> basso destra -> alto destra -> basso sinistra.
Per montare due ricevitori CR88 in
un unico spazio del rack, il sistema
comprende un elemento di col-
legamento centrale. Far scorrere
l'elemento di collegamento centrale
nella scanalatura di ciascun ricevito-
re e collegare le alette per montag-
gio a rack corte a ciascun ricevitore.
Montare i ricevitori nel rack facendo
ricorso allo schema di collegamento
incrociato sopra descritto.
Montaggio su rack

104
Gruppo C
638-662 MHz
Gruppo D
542-566 MHz
Gruppo F*
606-630 MHz
Gruppo G*
863-865 MHz
Canale Frequenza Canale Frequenza Canale Frequenza Canale
Frequenza
0 638.125 0 542.125 0 606.125 0 863.050
1 639.625 1 543.625 1 607.625 1 863.250
2 641.050 2 545.05 2 609.05 2 863.550
3 642.425 3 546.425 3 610.425 3 863.750
4 642.900 4 546.900 4 610.900 4 864.050
5 645.525 5 549.525 5 613.525 5 864.250
6 647.100 6 551.100 6 615.100 6 864.550
7 648.475 7 552.475 7 616.475 7 864.750
8 650.000 8 554.000 8 618.000 8 864.950
9 652.075 9 556.075 9 620.075
A 654.975 A 558.975 A 622.975
B 655.975 B 559.975 B 623.975
C 657.050 C 561.050 C 625.050
D 658.975 D 562.975 D 626.975
E 660.425 E 564.425 E 628.425
F 661.975 F 565.975 F 629.975
Schemi dei canali del sistema Concert 88
* Da non utilizzare negli USA e in Canada. Per domande inerenti ai canali disponi-
bili nella propria zona contattare il distributore Samson locale.

105
Sistema wireless Concert 88
ENGLISH
FRANÇAISDEUTSCHEESPAÑOLITALIANO
Localizzazione guasti
Problema Soluzioni
Assenza di audio
Accertarsi che tanto il trasmettitore quanto il ricevitore
siano accesi.
Accertarsi che le batterie del trasmettitore siano installate
correttamente.
Controllare che il trasmettitore non sia silenziato.
Confermare che l'adattatore per il CR88 sia correttamente
collegato e inserito in una presa elettrica.
Accendere il ricevitore CR88.
Accertarsi che le connessioni di uscita audio del ricevitore
CR88 siano collegate in modo sicuro.
Assicurarsi che il ricevitore e il trasmettitore siano nella
linea di vista l'uno con l'altro.
Controllare i comandi del livello del ricevitore e del dispo-
sitivo di ingresso audio.
Accertarsi che il trasmettitore e il ricevitore siano impostati
sul medesimo canale di funzionamento Se non si è sicuri,
reimpostare il canale effettuando una configurazione IR.
Audio distorto
Il livello di uscita audio del ricevitore o di ingresso audio
del dispositivo potrebbe essere troppo alto.
Controllare le batterie del trasmettitore e sostituirle se il
livello di carica è basso.
Il guadagno in ingresso sul trasmettitore (CB88) o il livello
della sorgente audio potrebbero essere troppo alti.
Breve interruzione
nella trasmissione
audio (drop out)
Il trasmettitore potrebbe essere troppo lontano dal ricevi-
tore. Avvicinarlo al ricevitore o riposizionare le antenne.
Eliminare tutte le sorgenti che potrebbero causare interferen-
ze in radiofrequenza, come telefoni cellulari, cordless, dispo-
sitivi di illuminazione, computer, strutture metalliche ecc.
Il ricevitore non si
accende
Controllare l'adattatore per accertarsi che sia collegato
correttamente e inserito in una presa che fornisca alimen-
tazione.
Il trasmettitore non si
accende (il LED si ac-
cende assumendo una
colorazione ROSSA)
Sostituire le batterie del trasmettitore.
Rumore o interferenze
indesiderati
Se si usano sistemi multipli, accertarsi che nessuno di
essi stia funzionando sullo stesso canale su cui funziona
un altro sistema. Se il problema persiste, cambiare uno o
tutti i canali dei sistemi.

106
Specifiche
Sistema
Range di esercizio 300' (100 m circa) linea di vista
Risposta in audiofrequenza 50 Hz -15 kHz
Distorsione armonica totale (Complessiva) <1% (AF 1 kHz, RF 46 dBu)
Gamma dinamica >100 dB ponderata A
Da segnale a rumore >90 dB
Temperatura di esercizio –10°C (14°F) to +60°C (+140°F)
Frequenza Tone Key 32.768 kHz
Trasmettitore belt pack CB88
Connettore d'ingresso Mini-XLR (P3)
Impedenza d'ingresso 1MΩ
Range di guadagno in ingresso 38 dB
Potenza in RF 10 mW EIRP
Requisiti di alimentazione Due batterie alcaline AA (LR6)
Durata della carica della batterie 8 ore
Dimensioni (H x L x P) 3,75" x 2,44" x 0,75"
96 mm x 62 mm x 18,5 mm
Peso 0,2 lb / 93 g
Trasmettitore portatile CH88
Elemento microfono Q6 dinamico
Range di guadagno in ingresso 28 dB
Potenza in RF 10 mW EIRP
Requisiti di alimentazione Due batterie alcaline AA (LR6)
Durata della carica della batterie 8 ore
Dimensioni (H x Ø) 10,23" x 2,1"
260 mm x 54 mm
Peso 0,48 lb / 218 g
Ricevitore CR88
Livello uscita audio - Sbilanciato +14 dBu
Livello uscita audio - Bilanciato +9 dBu
Impedenza uscita audio - Sbilanciata 810 dBu
Impedenza uscita audio - Bilanciata 240 dBu
Sensibilità -100 dBm / 30 dB sinad
Reiezione di immagine >50 dB
Tensione di esercizio 15 V c.c. 200 mA
Dimensioni (Lungh. x Largh. x H) 8,25" x 4,9" x 1,75"
210 mm x 125 mm x 44 mm
Peso 0,85 lb / 388 g
In Samson, il miglioramento dei prodotti è ininterrotto, pertanto specifiche
e immagini sono soggette a modifica senza preavviso.

107
Sistema wireless Concert 88
ENGLISH
FRANÇAISDEUTSCHEESPAÑOLITALIANO
Regole e normativa FCC
I ricevitori senza fili Samson sono certificati in virtù della parte 15 delle
regole FCC, mentre gli apparecchi trasmittenti sono certificati in virtù della
parte 74 delle regole FCC.
La concessione di licenze relative ad attrezzature Samson è di responsabilità
dell'utente e la licenziabilità dipende dalla classificazione, dall'applicazione
e dalla frequenza selezionate dall'utente.
Il dispositivo è conforme alla RSS-210 di
Industry & Science Canada.
Il funzionamento è soggetto alle seguenti due condizioni:
(1) l'apparecchio non può causare interferenze dannose e (2) l'apparecchio
deve accettare tutte le interferenze ricevute, ivi comprese quelle che potreb-
bero provocarne il funzionamento indesiderato.
Con il presente documento, Samson Technologies Corp., dichiara che i dispo-
sitivi CR88, CH88, CB88 sono conformi ai requisiti essenziali e alle altre
disposizioni pertinenti della Direttiva 1999/5/CE. La dichiarazione di confor-
mità può essere consultata all'indirizzo
http://www.samsontech.com/site_media/support/manuals/Concert_88_DOC.pdf
NOTA: l'apparecchio è stato testato e ritenuto confacente ai limiti applicabi-
li ai dispositivi digitali di Classe B, conformemente alla Parte 15 delle norme
FCC. Questi limiti hanno lo scopo di assicurare una protezione ragionevole
dalle interferenze dannose negli impianti domestici. L'apparecchio genera,
usa e può irradiare energia in radiofrequenza e, se non installato e utilizzato
conformemente alle istruzioni, potrebbe causare delle interferenze dannose
alle comunicazioni radio. Tuttavia non ci sono garanzie che in impianti par-
ticolari non si producano interferenze. Se questo apparecchio effettivamente
dovesse causare interferenze dannose al ricevimento di segnali radio o tele-
visivi, che potrebbero essere determinate dal suo spegnimento e dalla sua
accensione, l'utente è invitato a cercare di correggere le interferenze met-
tendo in atto una o più delle seguenti misure:
• Orientare o posizionare nuovamente l'antenna ricevente.
• Aumentare la separazione tra l'apparecchio e il ricevitore.
• Collegare l'apparecchio a una presa collocata su un circuito diverso da
quello a cui il ricevitore è collegato.
• Chiedere assistenza al rivenditore o a un tecnico radio/TV esperto.
AVVERTIMENTO: variazioni o modifiche non espressamente approvate dal
soggetto responsabile per la conformità potrebbero rendere nulla l'autorizza-
zione all'utilizzo dell'apparecchio da parte dell'utente.

Samson Technologies
45 Gilpin Avenue
Hauppauge, New York 11788-8816
Phone: 1-800-3-SAMSON (1-800-372-6766)
Fax: 631-784-2201
www.samsontech.com
-
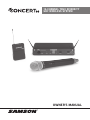 1
1
-
 2
2
-
 3
3
-
 4
4
-
 5
5
-
 6
6
-
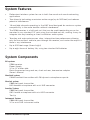 7
7
-
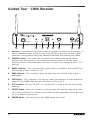 8
8
-
 9
9
-
 10
10
-
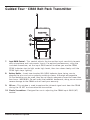 11
11
-
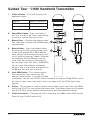 12
12
-
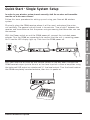 13
13
-
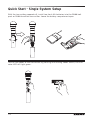 14
14
-
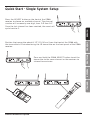 15
15
-
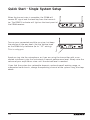 16
16
-
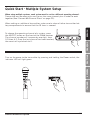 17
17
-
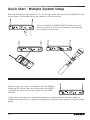 18
18
-
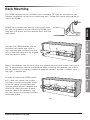 19
19
-
 20
20
-
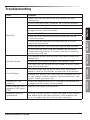 21
21
-
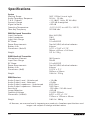 22
22
-
 23
23
-
 24
24
-
 25
25
-
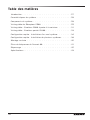 26
26
-
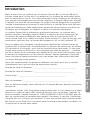 27
27
-
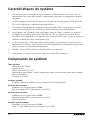 28
28
-
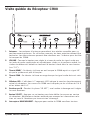 29
29
-
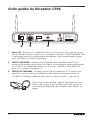 30
30
-
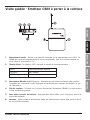 31
31
-
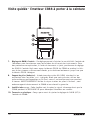 32
32
-
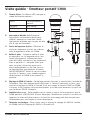 33
33
-
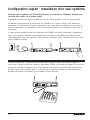 34
34
-
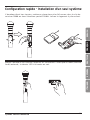 35
35
-
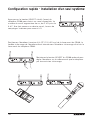 36
36
-
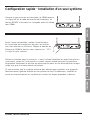 37
37
-
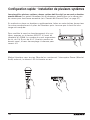 38
38
-
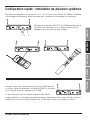 39
39
-
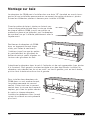 40
40
-
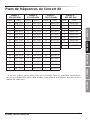 41
41
-
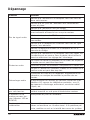 42
42
-
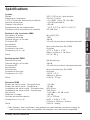 43
43
-
 44
44
-
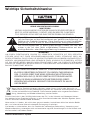 45
45
-
 46
46
-
 47
47
-
 48
48
-
 49
49
-
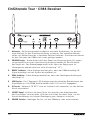 50
50
-
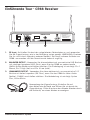 51
51
-
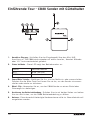 52
52
-
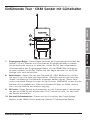 53
53
-
 54
54
-
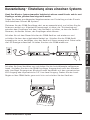 55
55
-
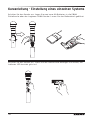 56
56
-
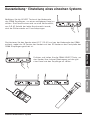 57
57
-
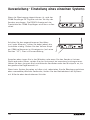 58
58
-
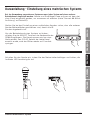 59
59
-
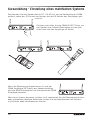 60
60
-
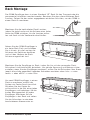 61
61
-
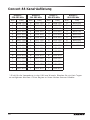 62
62
-
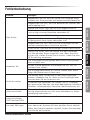 63
63
-
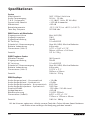 64
64
-
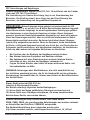 65
65
-
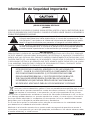 66
66
-
 67
67
-
 68
68
-
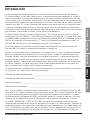 69
69
-
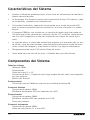 70
70
-
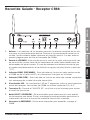 71
71
-
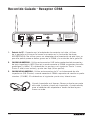 72
72
-
 73
73
-
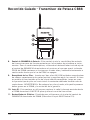 74
74
-
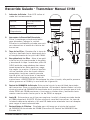 75
75
-
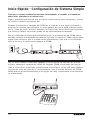 76
76
-
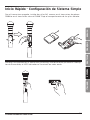 77
77
-
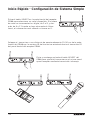 78
78
-
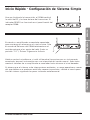 79
79
-
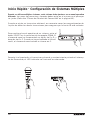 80
80
-
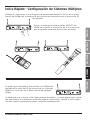 81
81
-
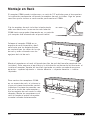 82
82
-
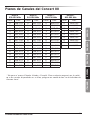 83
83
-
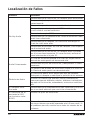 84
84
-
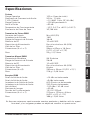 85
85
-
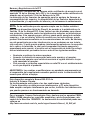 86
86
-
 87
87
-
 88
88
-
 89
89
-
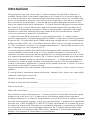 90
90
-
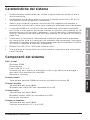 91
91
-
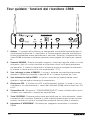 92
92
-
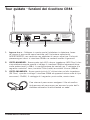 93
93
-
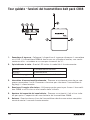 94
94
-
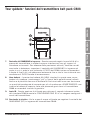 95
95
-
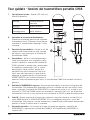 96
96
-
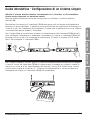 97
97
-
 98
98
-
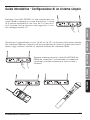 99
99
-
 100
100
-
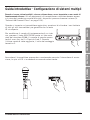 101
101
-
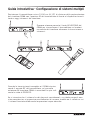 102
102
-
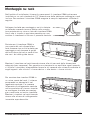 103
103
-
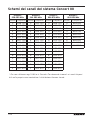 104
104
-
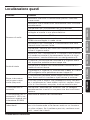 105
105
-
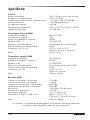 106
106
-
 107
107
-
 108
108


Samson Headphones Concert 88 Manual de usuario
- Tipo
- Manual de usuario
- Este manual también es adecuado para
en otros idiomas
Artículos relacionados
-
Samson Technologies XP106W Manual de usuario
-
Samson Samson XP-25i Manual de usuario
-
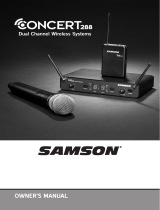 Samson Technologies SWC288HQ6-H Manual de usuario
-
Samson V466 Manual de usuario
-
-
 Samson Technologies Stage v266 Manual de usuario
-
 Samson Technologies Stage v266 Manual de usuario
-
Samson Technologies Airline 77 AL1 Manual de usuario
-
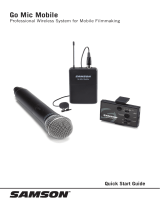 Samson Technologies Go Mic Mobile Manual de usuario


Otros documentos
-
Alesis MicLink Wireless El manual del propietario
-
Shure BLX288/PG58 Funkmikrofon System Frequenzbereich S8 Manual de usuario
-
 Alto Professional Stealth 1 Wireless Stereo System Guía del usuario
-
Shure BLX188/CVL-J10 Guía del usuario
-
Yamaha HS5 El manual del propietario
-
