Yamaha AN200 El manual del propietario
- Categoría
- Instrumentos musicales
- Tipo
- El manual del propietario

Important Notices
The AN200 Editor is a comprehensive editing software program specially designed for
the AN200 Desktop Control Synthesizer — providing an easy, intuitive way to edit and
create your own original Patterns for the AN200.
IMPORTANT:
• Do not use any of the panel controls on the AN200 while editing the Patterns with the AN200
Editor, since this may inadvertently change the settings of the AN200.
Copyright Notices
• The software and this owner’s manual are the exclusive copyrights of Yamaha Corporation.
• Copying of the software or reproduction of this manual in whole or in part by any means is
expressly forbidden without the written consent of the manufacturer.
• Copying of the commercially available music sequence data and/or digital audio files is
strictly prohibited except for your personal use.
Trade Marks and Registered Trade Marks
• The company names and product names in this Owner’s Manual are the trademarks or regis-
tered trademarks of their respective companies.
Notices
• Yamaha makes no representations or warranties with regard to the use of the software and
documentation and cannot be held responsible for the results of the use of this manual and
the software.
• The windows and illustrations in this manual are for instructional purposes only, and may be
slightly different from the ones shown on your software.
Copyright © 2001 Yamaha Corporation. All rights reserved.
January, 2001
YAMAHA CORPORATION
AN200 Editor
Manual

2
About the AN200 Editor
The AN200 Editor is a full-featured editing software program for the AN200 Desktop
Control Synthesizer, providing an exceptionally simple, convenient and intuitive way to
edit and control all of the AN200 parameters. Virtual "knobs," "buttons" and a special
"LCD display" let you change parameters just as if you were operating an actual synthe-
sizer control panel!
The AN200 Editor lets you save your edits as an original User pattern and store up to
128 User. Naturally, you can save the data to floppy disks or your hard disk drive as
AN200 Files. The AN200 Editor also features a convenient, easy-to-use AN200 Librar-
ian that lets you organize your User patterns.
For general instructions and explanations on how to use the AN200 Editor, see Setting
and Changing Parameter Values and Toolbar. For information on specific, commonly
used operations, see Operations.

3
Operations
Selecting an AN200 pattern is the important first step in editing. You can select a pat-
tern from the Preset 1, Preset 2, or User banks (each of which contains 128 patterns).
Once you’ve edited a pattern you can store it to the User bank as your original pattern
and save it to a floppy disk/hard disk drive with other patterns as an AN200 File.
AN200 patterns can be selected from either the Edit Panel window or the main control
panel window.
• Make sure to store your edits to a pattern before selecting another pattern. If you’ve edited
the AN200 Editor parameters and then select a different pattern, all your edited parameters
will be initialized to the default values of the newly selected pattern.
z
Select “AN200 Pattern List.”
Click the PATTERN button at the bottom right of the main control panel.
You can also quickly call up this dialog box by clicking any inactive part of the win-
dow pressing control key and clicking "AN200 Pattern List" in the pop-up menu. Or,
you can click "Edit" on the menu bar, then select "AN200 Pattern List."
x
Select the desired pattern.
Click on the desired pattern, then close the dialog box (click the close button) to
return to the main control panel window. (You can also do this by clicking anywhere
on the main control panel.)
Selecting an AN200 Pattern

4
Operations /
Editing an AN200 Pattern
z
Select the desired pattern.
Refer to Selecting an AN200 Pattern.
x
Edit the pattern parameters as desired from the main control
panel.
The main window of the AN200 Editor provides a "virtual" control panel with knobs
and buttons, and lets you edit the patterns much as you would if you were operating
an actual hardware synthesizer.
c
Store the edited settings as a User pattern, then save it with
other edited patterns as an AN200 File.
Use the Store operation to store your newly edited pattern. Then use the Save
operation to save that edited pattern with other User patterns to an AN200 File.
Both the Store and Save operations are necessary to ensure that your pattern is
saved properly. Failing to do so would be roughly similar to writing a letter but not
putting it in an envelope and sending it. Make sure to execute both operations
when you wish to keep a pattern you’ve edited.
Editing an AN200 Pattern

5
Operations /
Initializing an AN200 Pattern to the Default Settings
This function allows you to reset all the parameters of the selected pattern to the factory
"initial pattern" default values. This gives you a "blank slate" from which you can create
your own pattern.
Keep in mind that this operation automatically erases all the settings of the selected pat-
tern. If you wish to save the pattern for future recall, use the Store and Save functions.
z
Select “AN200 Pattern List.”
Click the PATTERN button at the bottom right of the main control panel.
You can also quickly call up this dialog box by clicking any inactive part of the win-
dow pressing control key and clicking "AN200 Pattern List" in the pop-up menu. Or,
you can click "Edit" on the menu bar, then select "AN200 Pattern List."
x
Select the User bank and the desired pattern to be initialized.
Click on the User bank button, then click on the desired pattern.
c
Initialize the pattern.
Click the "Pattern Init" button in the dialog box. The specified pattern is initialized
and automatically selected for editing.
To return to the main control panel window, close the dialog box (click the close but-
ton). (You can also do this by clicking anywhere on the main control panel.)
• If you want to initialize all User patterns, then click on the "INIT ALL" button in the AN200
Librarian window.
Initializing an AN200 Pattern to the Default Settings

6
Operations /
Storing an AN200 Pattern
This operation lets you store your pattern edits as a User pattern.
• To ensure that your new pattern is available for future recall, make sure to also save the pat-
tern (with other patterns) to an AN200 File.
z
Select “AN200 Store.”
Click the red STORE button at the bottom right of the main control panel.
You can also quickly call up this dialog box by clicking any inactive part of the win-
dow pressing control key and clicking "AN200 Store" in the pop-up menu. Or, click
"Edit" on the menu bar, then select "AN200 Store."
x
Select the destination pattern.
Click on the desired pattern in the dialog box. Keep in mind that this pattern will be
erased and replaced with the newly edited pattern.
c
Store the pattern.
Click the "Store" button in the dialog box. The newly edited pattern is stored to the
selected location.
• This operation deletes the original pattern data at the destination.
• Keep in mind that this operation stores your pattern data only into the User pattern memory
of the AN200 Editor and sends the current pattern’s bulk data to the AN200. The current pat-
tern bulk data will be lost if you select another pattern on the panel of the AN200. If you want
to select a pattern on the panel of the AN200, you should first transmit the User Pattern.
(Refer to Transmit AN200 Bulk Dump Data.) There is no need to transmit AN200 Bulk Dump
Data if you select a pattern in the Pattern List of the AN200 Editor, since the current pattern
bulk data is sent with that operation.
Storing an AN200 Pattern

7
Operations /
Saving data to an AN200 File
Once you’ve edited an AN pattern and pattern to your satisfaction you can save it to an
AN200 File. Each AN200 File can contain up to 128 patterns, and these can be called
up at any time with the Open function. (Also see Calling Up Data from an AN200 File.)
Additional AN200 files (each with 128 User patterns) can be saved to floppy disks or
your hard disk drive --- giving you unlimited storage for your original patterns. For orga-
nizing the patterns in the AN200 Files, use the convenient AN200 Librarian function.
z
Select “Save AN200 File.”
Click "File" on the menu bar, then select "Save AN200 File".
• "Save AN200 File" can also be selected from the toolbar.
x
Select the desired folder, type in the file name, and click “Save.”
Once you’ve saved a set of User patterns and to one or more AN200 Files (see Saving
Patterns), you can instantly call up the desired patterns with this command.
To create a new AN200 File, use the New command.
z
Select “Open AN200 File.”
Click "File" on the menu bar, then select "Open AN200 File." Open AN200 File is
also available on the toolbar.
x
Select the desired folder and file name, then click “Open.”
• Keep in mind that this operation loads the User pattern data only into the User pattern mem-
ory of the AN200 Editor. After opening a file, if you want to play these Patterns on the AN200
separate from the AN200 Editor, you should transmit the User pattern data. (Refer to Trans-
mit AN Bulk Dump Data.) There is no need to transmit AN200 Bulk Dump Data if you select a
pattern in the Pattern List of the AN200 Editor, since the current pattern bulk data is sent with
that operation.
Saving data to an AN200 File
Calling Up data from an AN200 File (Open)

8
Parameters
Most of the AN200 Editor parameters for editing the AN200 patterns are contained in
the virtual "main control panel" screen. From this main panel, you can also jump to
other windows for controlling additional AN200 functions (such as the Control Matrix,
Free EG, and Step Sequencer).
This is the main control panel for the AN200 Editor, and is comprised of the virtual
"panel" controls, the toolbar (at the top), and the virtual "LCD display" at the bottom.
The master menu (which includes AN200 Pattern List, Store, and the Display Option)
can also be selected from the main screen by clicking pressing control key any inactive
part of the front panel.
To jump to explanations for the desired parameter, click on the appropriate block in the
illustration below.
• Main Screen
• Master Menu
Click while pressing control key in an inactive area to call up the master menu.
AN200 Editor Main Window

9
Parameters /
AN200 Editor Main Window
• Toolbar
The toolbar gives you quick access to some important functions and controls. These
buttons let you easily execute the desired function without having to select a menu or
leave the AN200 Editor window.
Open AN200 File
This is the same as the corresponding command in the File menu. It lets you select and
open an existing AN200 File. (See File Menus, Open AN200 File.)
Save AN200 File
This is the same as the corresponding command in the File menu. It lets you save the
current AN200 Editor settings as a parameter file for future recall. (See File Menus, Save
AN200 File.)
AN200 Editor Setup
This is the same as the corresponding command in the Setup menu. It lets you make
various important settings for configuring the AN200 Editor with the AN200. (See Setup
Menus, AN200 Editor Setup.)
Setup AN200 Display Option
This convenient feature lets you change the display of the main control panel to indicate
the current status of certain signal routings within the AN200. (See Setup Menus, AN200
Display Option.)
Transmit AN200 Bulk Dump Data
This is the same as the corresponding command in the Setup menu. It lets you transmit
the current AN200 Editor settings as MIDI data to the AN200. (See Setup Menus, Trans-
mit AN200 Bulk Dump Data.)
Receive AN200 Bulk Dump Data
This is the same as the corresponding command in the Setup menu. It lets you receive
the pattern from a connected AN200. (See Setup Menus, Receive AN200 Bulk Dump
Data.)

10
Parameters /
AN200 Editor Main Window
• LCD Display
This virtual "LCD" functions just like the display on an actual synthesizer's front panel.
• PATTERN Button
Pressing the PATTERN button calls up the AN200 Pattern List dialog box, allowing you
to select the desired pattern bank and pattern. It also allows you to reorganize the pat-
terns of a selected bank, as well as initialize a pattern --- in other words, this resets all
parameters to their normal values, giving you a "blank slate" pattern to work with.
To select a bank, click on the desired bank button: Preset 1, Preset 2, or User. Each
bank contains 128 patterns. To select a pattern, click on the desired pattern in the
combo box. For a complete list of available patterns, see the Pattern List in the AN200
Owner's Manual.
• Each pattern name is preceded by a two-letter category abbreviation that indicates the gen-
eral instrument group to which the pattern belongs. For example, "Ld" indicates "lead," "Ba"
indicates "bass," "Pd" indicates "pad," and so on.
Indicates the current pattern's bank/num-
ber as well as its category and name.
Full name of the currently
selected parameter.
Indicates the currently selected parameter's value or setting.
By clicking on this third line, you can also directly change the
value by typing it on the computer keyboard. (See Computer
Keyboard.)

11
Parameters /
AN200 Editor Main Window
• STORE Button
Pressing the STORE button calls up the AN200 Store dialog box, allowing you to store
the desired pattern to the User bank. It also lets you enter a name and category
abbreviation for the pattern.
To name the pattern, click on the Pattern Name box, and type in the desired name. To
specify a category, click the Category combo box, and click the desired category
abbreviation. (The "0: ---" setting indicates no category.) To store the newly named
pattern, click "Store." For a complete list of available patterns and descriptions of the
category abbreviations, see the Pattern List in the AN200 Owner's Manual.
• Each pattern name is preceded by a two-letter category abbreviation that indicates the gen-
eral instrument group to which the pattern belongs. For example, "Ld" indicates "lead," "Ba"
indicates "bass," "Pd" indicates "pad," and so on.

12
Parameters /
AN200 Editor Main Window
■
Setting and Changing Parameter Values ...................
• For panel knobs:
Click on the knob and drag horizontally or vertically as desired. Dragging to the left or
down decreases the value, and dragging right or up increases it. The knob "rotates" as
you drag it, and the parameter value (shown just above each knob) changes accordingly.
Any parameter changes are output as MIDI data, both to the AN200 and the XGworks
sequencer.
Operation of the knobs can also be set so that moving the mouse in a circular direction --
- as if you were actually rotating the knob --- changes the parameter value. (See Param-
eter Knob Operation.)
• The panel knob operation can be changed to let you "rotate" the knob, instead of moving it
horizontally or vertically. (See the Others tab in AN200 Editor Setup.)
• For buttons:
Simply click on the desired button to turn on/off or to select the appropriate setting. On/
off buttons (such as UNISON) have virtual "lamps" that light when the function is on.
• Combo boxes
For combo boxes (such as Control Source in the Control Matrix Parameter tab), click the
down arrow to expand the box, then highlight the desired setting.
• DATA DEC (Decrease) and INC (Increase) buttons
Click on the desired parameter, then click either of these buttons to decrease the value/
setting (DEC) or increase it (INC). In some cases (e.g., VCO 1 WAVE), these buttons can
be used to select values/settings that are not otherwise available.

13
Parameters /
AN200 Editor Main Window
• Computer keyboard
All of the value parameters in the main control panel can be directly changed by typing in
the appropriate numbers from the computer keyboard. Click on the desired parameter,
then click the third (bottom) line in the virtual LCD and type in the desired value. Press
[enter] to enter the value.
A few parameters (such as Unison Detune and LFO 1 Delay in the Detail Parameters
tab) can be directly changed by clicking on the desired parameter, then typing in the
desired value and pressing [ENTER].
• Computer keyboard shortcuts:
• Moving around the panel
Pressing the arrow keys by themselves lets you select parameters by moving around
the panel in the respective direction (up, down, left, right).
• Rapidly adjusting values
You can also use the arrow keys to adjust the parameter values. Select a parameter
then simultaneously hold down [shift] on the computer keyboard and press or hold
one of the arrow keys. The up or right keys increase the value while the down or left
keys decrease it. Holding down [shift] and the appropriate arrow key rapidly increases
or decreases the value.
The Page Up and Page Down keys on the computer keyboard can also be used.
Press Page Up to increase the value, and Page Down to decrease it. Hold down the
appropriate button to rapidly increase or decrease the value.
• Value charts
A few parameters (such as VCF Velocity) have pop-up "value charts," from which you can
select the desired value. Simply click on the parameter's button, highlight the desired
value, then click on the value.

14
Parameters /
AN200 Editor Main Window
•Initialize
If you need to initialize a specific parameter to its default value, you can quickly call up a
pop-up menu for this by clicking pressing control key on the appropriate parameter con-
trol in the display.
For example, if you've changed the LFO 1 Speed setting and want to restore the param-
eter to its original value, move the cursor to the LFO 1 SPEED knob and click pressing
control key.
Click on "Init" to restore the original setting or value of the parameter.
"Init" will be ghosted and unavailable if no edits have been made to the selected parame-
ter. Initialize is completely independent for each parameter.
■
AN200 Parameters .......................................................
The various parameters are arranged in "blocks" according to their general functions.
These correspond to the basic modules of sound generation or control in the AN200.
PEG (Pitch EG) Parameter Block
The PEG parameters determine how the pitch of the pattern changes over time. This lets
you produce subtle or pronounced pitch changes as a note is played.
The PEG can also be used as a control source (in PWM Source, Sync Pitch Control Source,
FM Source, etc.), giving you even greater editing flexibility.

15
Parameters /
AN200 Editor Main Window
• ATTACK (PEG Attack Time)
Range: 0 ... 127
This determines the Attack Time of the PEG, or how long it takes for the pitch to change,
according to the PEG Depth setting. This parameter has no effect unless the DEPTH
parameter is set to an appropriate value (except when the PEG is used as a control
source — for example, in PWM Source, etc.).
• DECAY (PEG Decay Time)
Range: 0 ... 127
This determines the Decay Time of the PEG, or how long it takes for the pitch to return to
normal. This parameter has no effect unless the DEPTH parameter is set to an appropri-
ate value (except when the PEG is used as a control source — for example, in PWM
Source, etc.).
• When the Decay Time is set to the maximum value of 127, the pitch (as set in PEG Depth) is
held indefinitely without changing.
• DEPTH (PEG Depth)
Range: -64 ... +63
This determines the depth of the pitch change for the PEG (in semitones). This can be
set independently for either the VCO 1 or VCO 2, or both (with the PEG Switch parame-
ter). This must be set to an appropriate value for the PEG to have an effect on the sound.
• PEG Switch – VCO 1/ VCO 2
Settings: VCO 1, VCO 2, Both
This switch determines which VCO will be affected by the PEG Depth parameter. When
this is set to "Both," the VCO 1 and VCO 2 will be affected together (both lamps light).
OCT (Octave Shift)
Range: -2 ... +2
This determines the octave setting of the selected pattern. The octave setting is also
indicated by the lamps.
CTRL MATRIX (Control Matrix)
The Control Matrix is a highly flexible, complex function that lets you use up to 15 differ-
ent MIDI controllers to control 15 separate AN200 parameters, in real time. The source
controllers can be a modulation wheel, data entry slider, foot controller, key velocity, key
scaling, or any of the controllers in the MIDI specification. These can be used to control
any of 46 different destination parameters, such as VCF Cutoff, Resonance, FEG Depth,
and a wide variety of others.
This gives you the freedom to configure a completely different set of sources and desti-
nation parameters for each pattern. You can, for example, configure the AN200 to use
After Touch to apply vibrato, or the Modulation Wheel to change the resonance while you
play, determine the range for both Pitch Bend up and down, and much more.
For information on the Control Matrix settings, see the Ctrl Matrix Parameters tab.
• DETAIL Page (Control Matrix Parameters)

16
Parameters /
AN200 Editor Main Window
FREE EG
The 4-track Free EG lets you record complex control movements, in order to "hand draw"
filter, resonance, LFO and many other available parameters over time---and have them
play back automatically by simply playing a pattern. A variety of drawing and editing
tools are available for creating unique, continuous parameter changes that would be
impossible to achieve with conventional EGs.
Up to four different parameters can be controlled independently, each recorded into its
own Free EG track. Ideal for those times when you wish you had an extra couple of pairs
of hands, the Free EG lets you build up an incredibly complex, completely unique pattern.
The display windows (1 - 4) indicate the parameters controlled by each Free EG track.
• DETAIL Page (Free EG Parameters)
STEP SEQ. (Step Sequencer) Block
The Step Sequencer block features four basic controls for the Step Sequencer --- a pow-
erful functions that let you trigger complex Sequences in real time, at the press of a key.
For more information, see the Step Sequencer DETAIL Page.
• DETAIL Page (Step Sequencer Parameters)
• TEMPO
Range: 20.0 - 300.0 bpm (beats per minute)
This determines the speed of the Step Sequencer. If you want the clock of an external
MIDI sequencer or drum machine to control the tempo of the AN200's Step Sequencer,
set the Tempo to "MIDI" so that the two devices will play in synchronization with each
other.
• When the Free EG LENGTH is set so that the Free EG synchronizes with Tempo, this Tempo
setting affects the speed of the Free EG.
• [PLAY]/[STOP] buttons
Click the [PLAY] button to start the Sequence. The Sequence repeats (loops) until you
click the [STOP] button to stop it.

17
Parameters /
AN200 Editor Main Window
LFO Parameter Blocks
The LFO parameters allow you to create a wide variety of modulation effects, using a low
frequency signal to regularly change the pitch, volume or timbre of the pattern. The LFO
can be used to make the sound warmer and more natural, or can be used to produce
wild special effects.
LFO 1 and LFO 2 can also be used as control sources (in PWM Source, Sync Pitch Control
Source, FM Source, etc.), giving you even greater editing flexibility.
• Depending on the setting of the selected pattern's Assign Group parameter, the LFO 1 and
LFO 2 blocks in the display may be different, with different sets of parameters. All LFO
parameters below are available on either LFO 1 or LFO 2; however, some parameters will only
be available on one of the LFO blocks, while the other block will have a limited parameter set.
• LFO 1 / LFO 2 DETAIL Page
• LFO 1 / LFO 2 WAVE
Settings:
Sine,
Sine Ofst1 (Offset 1), Sine Ofst2, Sine180 Ofst1, Sine180 Ofst2
Triangle,
Triangle Ofst1, Triangle Ofst2, Triangle180 Ofst1, Triangle180 Ofst2
Square,
Square Ofst2, Square180 Ofst2
Saw Down,
Saw Down Ofst2, Saw Up, Saw Up Ofst2
S/H (Sample & Hold),
S/H Ofst2, S/H2, S/H2 Ofst2
• Parameter settings in italics above can only be selected by using the DATA DEC/INC buttons,
or by holding [shift] on the computer keyboard and using the cursor keys.
This determines the type of wave for LFO 1 or LFO 2. (The same settings are available
for both.) The wave set here determines the characteristics of the modulation applied to
the VCO (vibrato), VCF (wah) and VCA (tremolo).
• LFO 1 / LFO 2 SPEED
Range: 1 ... 256
This determines the speed of LFO 1 or LFO 2. (This parameter is the same for both.)
Higher values result in a faster LFO modulation. This is a global control in that it affects
all modulation destinations (VCO 1/2, VCA, VCF) equally.
• LFO 1 / LFO 2 VCO1
(LFO 1 / LFO 2 to VCO 1 – Oscillator 1 Pitch Modulation Depth)
• LFO 1 / LFO 2 VCO2
(LFO 1 / LFO 2 to VCO 2 – Oscillator 2 Pitch Modulation Depth)
Range: -127 ... +127
This determines the degree to which the LFO 1 or LFO 2 affects the selected oscillator's
pitch. This produces a vibrato effect, or a quavering, vibrating sound in the pattern, by
regularly modulating the pitch. Higher values result in a stronger, more pronounced
vibrato sound.

18
Parameters /
AN200 Editor Main Window
• LFO 1 / LFO 2 VCA
(LFO 1 / LFO 2 to VCA – Amplitude Modulation Depth)
Range: -64 ... +63
This determines the depth of the amplitude modulation of the VCA by LFO 1 or LFO 2.
Amplitude Modulation adds a cyclical change to the volume level to create a tremolo
effect. Higher values (in the positive range) widen the range of the volume change. Neg-
ative values reverse the phase of the LFO by 180 degrees.
• LFO 1 / LFO 2 VCF (LFO 1 / LFO 2 to VCF – Filter Modulation Depth)
Range: -64 ... +63
This determines the depth of the filter modulation of the VCF by LFO 1 or LFO 2. Filter
Modulation adds a cyclical change to the filter cutoff frequency to create a wah effect.
Higher values (in the positive range) widen the range of the cutoff frequency change.
Negative values reverse the phase of the LFO by 180 degrees.
VCF / FEG Parameter Block
VCF Parameters
The VCF is a filter that allows a specific range of frequencies to pass, while muting all
others. Movement of the filter through various frequencies as well as the use of Reso-
nance allows you to create exceptionally dynamic, dramatic changes in the sound. The
VCF can be controlled by the filter EG (FEG) parameters, allowing you to have the timbre
of the sound change automatically over time.
• VELOCITY (FEG Velocity Sensitivity)
Range: -64 ... +63
This determines how the filter EG responds to key velocity. For positive values, playing
the keys with greater strength results in a wider, more dynamic filter EG (greater filter
changes). For negative values, the relationship is inverse: a softer key touch results in a
wider, more dynamic filter EG. A setting of "0" results in no change of the filter by playing
strength.
To set this, click the VELOCITY button and highlight the desired value in the pop-up
chart. When a value other than "0" is set, the VELOCITY lamp lights.

19
Parameters /
AN200 Editor Main Window
• HPF (HPF Cutoff)
Range: 0 ... 127
This determines the cutoff frequency of the High Pass Filter (-6 dB/Oct). Frequencies
above the setting are passed while those below are cut off. Higher values increase the
HPF Cutoff frequency, resulting in a brighter sound.
To set this, click the HPF button and highlight the desired value in the pop-up chart.
When a value other than "0" is set, the HPF lamp lights.
• This High Pass Filter is applied to the signal after the mixer, and is different than the one
available in the VCF Type parameter.
• TYPE (VCF Filter Type)
Settings: LPF24, LPF18, LPF12, BPF, HPF12, BEF
• When "LPF18" is selected, both the LPF24 and LPF12 lamps light together.
This determines the type of filter used by the VCF. The VCF passes only a specified
range of frequencies while cutting off the rest, to give you versatile control over the tim-
bre. The six filter types are described below.
LPF24, LPF18, LPF12
The Low Pass Filter passes only those frequencies below the specified cutoff point.
Cutoff curves of 24dB/octave (LPF24), 18dB/octave (LPF18) and 12dB/octave (LPF12)
can be selected.

20
Parameters /
AN200 Editor Main Window
BPF
The Band Pass Filter passes only those frequencies in the specified range, with a cut-
off curve of 12dB/octave.
HPF12
The High Pass Filter passes only those frequencies above the specified cutoff point,
with a cutoff curve of 12dB/octave.
BEF
The Band Eliminate Filter passes only those frequencies outside the specified fre-
quency range. The Resonance setting (below) determines the eliminated range.
• The filters listed above apply to the signal output from the HPF located between the Mixer and
VCA. For more information about the signal path, see AN200 Display Option.

21
Parameters / AN200 Editor Main Window
• CUTOFF (VCF Cutoff Frequency)
Range: 0 ... 127
This determines the cutoff frequency of the VCF (filter). For example, when the filter type
is set to Low Pass Filter, the VCF mutes all frequencies higher than the cutoff point and
"passes" the lower frequencies. Lower cutoff values create a deeper, more rounded
tone, while higher values create a brighter tone.
• RES. (VCF Resonance)
Range: -12 ... +102
This determines the amount of resonance boost, or emphasis of harmonics near the cut-
off frequency. Higher values produce a higher resonant peak (producing sharper high
tones), while lower values produce a relatively flat response. A setting of "0" applies no
resonance.

22
Parameters /
AN200 Editor Main Window
• KEY TRK (VCF Keyboard Tracking)
Range: -32 ... +63
This determines the degree to which the VCF "tracks" or follows the keyboard. In other
words, the higher the notes played on the keyboard, the more the cutoff frequency is
raised (or lowered). When Keyboard Tracking is applied, the cutoff range shifts accord-
ingly at every note, with C3 as the base. Positive values will cause higher notes to have
a higher cutoff point. Negative values cause higher notes to have a lower cutoff fre-
quency. A value setting of "0" results in no key tracking.
• When this is set to "+32," the change in the cutoff frequency matches (or is directly propor-
tional) with the change in the keyboard notes.
FEG (Filter EG) Parameters
The FEG parameters determine how the timbre of the pattern changes over time. This
lets you produce subtle or pronounced filter effects (such as wah, for example).
The EG DEPTH parameter (in the VCF block) must be set to a proper level for the FEG
parameters to have an effect on the sound.
• The FEG can also be used as a control (in PWM Source, Sync Pitch Control Source, FM
Source, etc.), giving you even greater sound-shaping flexibility.
• DEPTH (Filter EG Depth)
Range: -128 ... +127
This determines the range of movement of the cutoff frequency. This must be set to a
proper level for the FEG parameters (Attack, Decay, Sustain, and Release) to have an
effect on the sound. Positive values increase the Filter EG Depth. Negative values
reverse the shape of the envelope.

23
Parameters / AN200 Editor Main Window
• ATTACK (Filter EG Attack Time)
Range: 0 ... 127
This determines the attack time of the FEG, which is the time it takes for the signal to
reach its maximum cutoff frequency level after a key is pressed (key on). Higher values
produce a longer Attack time. (See illustration below.)
• DECAY (Filter EG Decay Time)
Range: 0 ... 127
This determines the decay time of the FEG, which is the time it takes for the signal to
reach its sustain level from the maximum level while a key is held. Higher values produce
a longer Decay time. (See illustration below.)
• SUSTAIN (Filter EG Sustain Level)
Range: 0 ... 127
This determines the level of sustain of the FEG, which is the fixed level of the cutoff fre-
quency maintained as long as the key is held. Higher values increase the Sustain level.
(See illustration below.)
• RELEASE (Filter EG Release Time)
Range: 0 ... 127
This determines the release time of the FEG, which is the time it takes for the filter to
reach its initial level after a key is released (key off). Higher values increase the Release
time. (See illustration below.)

24
Parameters /
AN200 Editor Main Window
SYNC Block
The AN200 features two oscillator sections: VCO 1 and VCO 2. As on conventional ana-
log synthesizers, the Sync block lets you synchronize the two waveforms to create a
more complex sound, with more harmonics. However, the AN200 takes the sonic possi-
bilities even further. Since the VCO 1 oscillator itself actually contains two separate oscil-
lators, these two "internal" oscillators can be synchronized and then layered with VCO 2
to produce sounds of even greater complexity. (For more about the VCOs and Oscillator
Sync, see the AN200 Owner’s Manual.)
To see an indication of the Oscillator Sync path, enable the Oscillator Sync Routing in the
Display Option window.
• MODE
Settings: Off, VCO 1 Master > Slave (VCO 1 master into slave),
VCO 2 > 1 (VCO 2 into VCO 1)
This determines the on/off status of Sync, as well as its mode. When this is set to "VCO
1 Master > Slave," the two VCO 1 oscillators are separated inside of the VCO1 and syn-
chronized, with one designated as the controlling "master" and the other the "slave."
When this is set to "VCO 2>1," the VCO 1 is synchronized to VCO 2, with the VCO 2 des-
ignated as the "master."
• The Master oscillator determines the overall pitch of the sound, and the Slave oscillator con-
trols the tone by adding harmonics.
• SRC (Sync Pitch Control Source)
Settings: Fixed, PEG, FEG, LFO1, LFO2
The Sync Pitch Control Source setting determines the source which applies the modula-
tion over time to the slave oscillator. When this is set to "Fixed," there is no change in
modulation over time.
• DEPTH (Sync Pitch Control Depth)
Range: -64 ... +63
This determines the amount of depth of control from the Sync Control Pitch Source
(determined by the Sync Pitch Control Source setting above) over time. Higher values
increase the Depth. When Sync Mode is set to Off, this parameter has no effect.

25
Parameters / AN200 Editor Main Window
FM Block
The Frequency Modulation (FM) function gives you additional modulation control over the
sound, letting you apply the FM signal (called the "modulator") to the VCO 1 (here called
the "carrier"), letting you dramatically change the harmonic complexity of the sound. In
the FM block, the Depth of the modulation can be controlled; however, additional detailed
parameters are available in the Details page. The lamps (VCO 2, VCO 1, OTHER) indi-
cate the modulator (source) for the FM signal, determined in the Src2 parameter. To see
an indication of the FM modulation path, enable the FM Routing in the Display Option
window.
• FM DETAIL Page
• DEPTH
Range: -64 ... +63
This determines the amount of modulation created by the FM function. Higher values
result in greater modulation depth. Although the overall sound depends on the setting of
the FM parameters in the Details page, higher Depth values generally result in a more
clangorous sound.
• This parameter differs from that in FM Synthesis (such as used by DX-series synthesizers).
Extreme settings will change the pitch of the pattern.
• When the VCO1 Wave is set to "Multi Saw," the Depth setting has no effect.
MIXER Block
As its name implies, the Mixer module lets you control the levels of the various sound
sources of the AN200.
• VCO 1 (VCO 1 Level)
Range: 0 ... 127
This determines the balance of the VCO 1 level in relation to the VCO 2, Ring Modulator,
Feedback, and Noise levels. Higher values result in a higher VCO 1 level. When not
using VCO1, set the value to "0."
• VCO 2 (VCO 2 Level)
Range: 0 ... 127
This determines the balance of the VCO 2 level in relation to the VCO 1, Ring Modulator,
Feedback, and Noise levels. Higher values result in a higher VCO 2 level. When not
using VCO2, set the value to "0."

26
Parameters /
AN200 Editor Main Window
• NOISE (Noise Level)
Range: 0 ... 127
This determines the balance of the Noise signal in relation to the VCO 1, VCO 2, Ring
Modulator, and Feedback levels. The higher the value, the greater the Noise Level.
When not using Noise, set the value to "0."
• By mixing in Noise and using the AN200 Editor to select an appropriate Filter Type (such as
VCF, HPF, etc.), you can create a wide variety of unique "special effect" sounds.
• RING MOD (Ring Modulator Level)
Range: 0 ... 127
This determines the balance of the Ring Modulator level in relation to the VCO 1, VCO 2,
Noise, and Feedback levels. The higher the value, the greater the Ring Modulator level.
When not using the Ring Modulator, set this value to "0."
• The Ring Modulator combines the VCO 1 and VCO 2. It is particularly effective for producing
dissonant interval sounds with a clangorous, or metallic effect.
• F.B. (Feedback Level)
Range: 0 ... 127
This determines the balance of the Feedback level in relation to the VCO 1, VCO 2,
Noise, and Ring Modulator levels. Feedback returns the VCA output signal back to the
input, creating a feedback "loop." The higher the value, the greater the Feedback level.
When not using Feedback, set this value to "0."
• Be careful when adjusting this parameter, since the higher settings could result in exces-
sively loud sounds that may inadvertently damage the connected audio equipment (and your
ears!).

27
Parameters / AN200 Editor Main Window
VCO 1 / VCO 2 Blocks
The VCO (voltage controlled oscillator) modules 1 and 2 are where the basic sounds for
the AN200 are generated. In these blocks, you can determine the waveform, its pitch,
and adjust the pulse width settings for the oscillator.
• VCO 1 WAVE
Settings: Available waves depend on the current SYNC status (on/off).
When SYNC is off:
Saw, Saw 2, Pulse, Mix, Multi Saw
When SYNC is on (set to "VCO 1 Master > Slave" or "VCO 2 > 1"):
Saw, Pulse, Inner1, Inner2, Inner3, Square, Noise
• Parameter settings in italics above can only be selected by using the DATA DEC/INC buttons,
or by holding [shift] on the computer keyboard and using the cursor keys.
This determines the waveform for the VCO 1 oscillator.
• The difference between saw/pulse Sync on and Sync off (when Saw or Pulse is selected) is
only a slight nuance in sound which becomes especially distinctive when the Pulse Width is
set to a value other than 64.
Saw (Sawtooth)
The Saw (sawtooth) wave derives its name from its shape, and is used to create a
trumpet or violin sound. Since it contains all harmonics in the spectrum, it produces a
full, rich sound. When used with the Pulse Width function, increasing the even harmon-
ics can raise the pitch to a maximum of a full octave.

28
Parameters /
AN200 Editor Main Window
Pulse
The Pulse wave is used to make woodwind (clarinet-type) sounds. Its spectrum is sim-
ilar to a sawtooth wave, but since every second (even-numbered) harmonic is missing,
the waveform contains only odd-numbered harmonics when Pulse Width is set to "64".
Saw2 (Sawtooth2)
The spectrum of the Saw2 wave is created by a sawtooth wave combined with a pulse
wave, and therefore is slightly different than the Saw wave. When the Pulse Width is
set to 64, the shape of the wave is the same as Saw. Even if you increase the even-
numbered harmonics by the Pulse Width, the basic pitch remains the same.
Mix
The mix wave is formed by a combination of saw and pulse waves.
Multi Saw
This wave behaves like multiple saw waves combined together with their pitches
detuned from each other. When Multi Saw is selected, all of the VCO 1 PWM parame-
ters are unavailable, and are replaced with special VCO 1 Detune and Mix parameters.

29
Parameters / AN200 Editor Main Window
Inner1, Inner2, Inner3
When SYNC is set to "on," three "inner" waves are available. This wave is effective
when used with Pulse Width.
Square
Basically, this is the same as a Pulse wave. Changing the Pulse Width does not alter
the width of the wave (this is maintained at 50%), but instead changes its shape
slightly, making it more complex.
Noise
This produces random fluctuations in sound, equally across the entire spectrum,
resulting in noise, or a "hissing" sound.
• Using Oscillator Sync Pitch to control the Noise wave over time results in a unique non-
pitched sound in which the harmonics are shifted.
• VCO 1 PITCH (Pitch Coarse)
Range: -64 ... +63
This determines the pitch of the VCO 1 in semitones. A value of "0" is normal pitch.
• VCO 1 FINE
Range: -50 ... +50
This determines the pitch of the VCO 1 in 1-cent steps over a range of 100 cents, or one
semitone.
• VCO 1 SYNC PITCH
Range: -64 ... +63
This determines the pitch of the slave oscillator in semitones, available only when Sync
Mode is set to on. This lets you create a difference in pitch between master and slave
oscillators and control the resulting harmonic interval.
At the "0" setting, the pitch is the same as the master oscillator. Higher values increase
the interval, and negative values result in a softer sound.
• To achieve a discernible result, make sure the VCO 1 Level (in the MIXER block) is turned up
high enough.

30
Parameters /
AN200 Editor Main Window
• VCO 1 EDGE
Range: 0 ... 127
This determines the sharpness or smoothness of the edge of the VCO1 wave. Higher
values produce a sharper wave, resulting in a harsher sound. Lower values produce a
rounder wave, resulting in a softer sound. A value of "0" results in a sine wave.
VCO 1 PWM (Pulse Width Modulation) Parameters
• The PWM parameters are not available when Sync Mode is set to "off" and the VCO 1 WAVE is
set to "Multi Saw."
• VCO 1 PWM SRC (Pulse Width Modulation Source)
Settings: Fixed, PEG, FEG, LFO 1, LFO 2, LFO 2 Phase, LFO 2 Fast, VCO 2
This determines the source wave which changes the VCO1's pulse width over time, thus
determining the behavior of the pulse width. When this is set to "Fixed," there is no
change in modulation over time.
• VCO 1 PWM DEPTH (Pulse Width Modulation Depth)
Range: -64 ... +63
This determines the amount of depth of the pulse width modulation of the VCO 1, based
on the PWM Source wave parameter (above). Higher (positive) values produce a deeper
modulation.

31
Parameters / AN200 Editor Main Window
• VCO 1 PWM PW (Pulse Width)
Range: 0 ... 64 ... 127
This determines the width of the VCO 1 pulse wave. Higher (positive) values produce
more harmonics, resulting in a fatter sound. In general, pulse width is used to control the
pulse wave; however, the AN200 can use PW with other waves as well, for a wider possi-
ble variety of sounds than usual.
• VCO 1 Detune (Multi Saw wave only)
Range: 0 ... 127
The Multi Saw wave combines multiple saw waves. Each of these individual waves can
be detuned with respect to the others. This parameter determines the amount of pitch
difference among the waves. Higher values produce a greater amount of detuning.
This parameter is available only when SYNC is set to "off" and the VCO 1 WAVE is set to
"Multi Saw."
• VCO 1 Mix (Multi Saw wave only)
Range: 0 ... 127
The Multi Saw wave combines multiple saw waves. The levels of these individual waves
are mixed together. This parameter determines the difference in volume among the
waves. A value of "0" results in the output of the basic wave (the wave at normal pitch),
while a value of "127" results in all waves having the same volume.
This parameter is available only when SYNC is set to "off" and the VCO 1 WAVE is set to
"Multi Saw."
• VCO 2 WAVE
Settings: Saw, Pulse, Saw 2, Mix, Triangle, Sine
The Sine wave (in italics above) can only be selected by using the DATA DEC/INC but-
tons.
This determines the waveform for the VCO 1 oscillator.

32
Parameters /
AN200 Editor Main Window
Saw (Sawtooth)
The Saw (sawtooth) wave derives its name from its shape, and is used to create a
trumpet or violin sound. Since it contains all harmonics in the spectrum, it produces a
full, rich sound. When used with the Pulse Width function, increasing the even harmon-
ics can raise the pitch to a maximum of a full octave.
Pulse
The Pulse wave is used to make woodwind (clarinet-type) sounds. Its spectrum is sim-
ilar to a sawtooth wave, but since every second (even-numbered) harmonic is missing,
the waveform contains only odd-numbered harmonics when Pulse Width is set to "64".
Saw2 (Sawtooth2)
The spectrum of the Saw2 wave is created by a sawtooth wave combined with a pulse
wave, and therefore is slightly different than the Saw wave. When the Pulse Width is
set to 64, the shape of the wave is the same as Saw. Even if you increase the even-
numbered harmonics by the Pulse Width, the basic pitch remains the same.

33
Parameters / AN200 Editor Main Window
Mix
The mix wave is formed by a combination of saw and pulse waves.
Triangle
This is a conventional triangle wave. When Triangle is selected, all of the VCO 2 PWM
parameters are unavailable, and are replaced with the X-MOD parameters.
Sine
This is a conventional sine wave.
When Sine is selected, all of the VCO 2 PWM parameters are unavailable, and are
replaced with the X-MOD parameters.
• VCO 2 PITCH
• VCO 2 FINE
• VCO 2 EDGE
These parameters are the same as those of VCO 1.
• When the VCO 2 Wave is set to "Triangle" or "Sine," the VCO 2 EDGE parameter has no effect.

34
Parameters /
AN200 Editor Main Window
VCO 2 PWM (Pulse Width Modulation) Parameters
• The PWM parameters are not available when the VCO 2 WAVE is set to "Triangle" or "Sine."
• VCO 2 PWM SRC (Pulse Width Modulation Source)
Settings: Fixed, PEG, FEG, LFO 1, LFO 2, LFO 2 Phase, LFO 2 Fast, VCO 1
• Parameter settings in italics above can only be selected by using the DATA DEC/INC buttons,
or by holding [shift] on the computer keyboard and using the cursor keys.
With the exception of "VCO 1" (VCO 2 cannot be used to modulate itself!), these settings
are the same as those of VCO 1 PWM SRC.
• VCO 2 PWM DEPTH (Pulse Width Modulation Depth)
• VCO 2 PWM PW (Pulse Width)
These parameters are the same as those of VCO 1.
• When the VCO 2 Wave is set to "Triangle" or "Sine," the VCO 2 PWM PW parameter has no
effect.
X-MOD Parameters
The X-MOD (cross-modulation) parameters are available only when the VCO 2 WAVE is
set to "Triangle" or "Sine." Whereas the PWM parameters use a source to modulate the
pulse width of the oscillator, X-MOD is similar to FM in that it modulates the frequency of
the oscillator, generating a complex set of harmonics. The control source for the Depth of
the modulation can be selected from: PEG, FEG, LFO 1, or LFO 2. The actual modulator
for cross-modulation is fixed to VCO1.
• The harmonics that X-MOD generates are different from those of FM because of the method
used: FM modulates in a logarithmic fashion, while X-MOD modulates in a linear fashion.
• X-MOD SRC (Cross-modulation Depth Control Source)
Settings: Fixed, PEG, FEG, LFO 1, LFO 2
This determines the source wave which changes the Cross Modulation Depth over time.
When this is set to "Fixed," there is no change in modulation depth over time. This
parameter is available only when the VCO 2 WAVE is set to "Triangle" or "Sine."
• X-MOD DEPTH
Range: -64 ... +63
This determines the amount of depth of the cross-modulation of the VCO 2. Higher (pos-
itive) values produce a deeper modulation of the frequency. This parameter is available
only when the VCO 2 WAVE is set to "Triangle" or "Sine."

35
Parameters / AN200 Editor Main Window
VCA Block
The VCA parameters give you control the overall volume or level of the AN200 pattern.
• VELOCITY (VCA Velocity Sensitivity)
Range: -64 ... +63
This determines how the VCA (pattern level) responds to key velocity. For positive val-
ues, playing the keys with greater strength results in higher volume. For negative values,
the relationship is inverse: a softer key touch results in a higher volume. A setting of "0"
results in no change in volume by playing strength.
To set this, click the VELOCITY button and highlight the desired value in the pop-up
chart. When a value other than "0" is set, the VELOCITY lamp lights.
• VOLUME
Range: 0 ... 127
The VOLUME setting determines the overall output level from the VCA before the signal
passes to the Effect block.
AEG (Amplitude Envelope Generator) Parameters
The AEG parameters allow you to shape the sound of the AN200 pattern. In other
words, it lets you set how the level of the pattern changes over time.
• AEG ATTACK (Amplitude EG Attack Time)
Range: 0 ... 127
This determines the Attack Time of the AEG, or how long it takes for the sound to reach
full volume when a note is played. Higher values produce a longer Attack time. (See
illustration below.)
• AEG DECAY (Amplitude EG Decay Time)
Range: 0 ... 127
This determines the Decay Time of the EG, or how rapidly the sound dies out (or goes
down to the Sustain Level) as a note is held. Higher values produce a longer Decay time.
(See illustration below.)
• AEG SUSTAIN (Amplitude EG Sustain Level)
Range: 0 ... 127
This determines the level of sustain of the AEG, which is the level at which the volume
will be maintained as long as the key is held. Higher values increase the Sustain level.
(See illustration below.)

36
Parameters /
AN200 Editor Main Window
• AEG RELEASE (Amplitude EG Release Time)
Range: 0 ... 127
This determines the Release Time of the AEG, or how long the sound sustains after a
note is released. Higher values increase the Release time. (See illustration below.)
DIST (Distortion) / EQ Block
The Distortion and EQ parameters give you further sonic control over the AN200 pattern,
letting you apply and adjust distortion, and make detailed equalization settings.
• DIST / EQ DETAIL Page
• DIST DRIVE (Distortion Drive)
Range: 0 ... 100
This determines the amount of distortion "drive" for the guitar amplifier simulation effect
block. The higher the value, the greater the degree of distortion in the sound.
• DIST DRY/WET (Distortion Dry/Wet Balance)
Range: D63>W ... D=W ... D<63
This determines the level balance of the unprocessed (dry) original sound of the pattern,
and the distortion processed (wet) sound. A setting of D=W results in an equal balance
of dry and wet sound. (In the display, "D" indicates "dry," and "W" indicates "wet.")
• EQ LO (Low Frequency Gain)
Range: -12 ... +12 (dB)
This determines the gain or level of the low frequency band. Positive values boost the
level of the frequency and negative values attenuate it. (The specific frequency to be
adjusted can be set with the Low Freq. parameter in the DETAIL page.)

37
Parameters / AN200 Editor Main Window
• EQ MID (Mid Frequency Gain)
Range: -12 ... +12 (dB)
This determines the gain or level of the mid frequency band. Positive values boost the
level of the frequency and negative values attenuate it. (The specific frequency to be
adjusted can be set with the Mid Freq. parameter in the DETAIL page.)
• EQ HI (High Frequency Gain)
Range: -12 ... +12 (dB)
This determines the gain or level of the high frequency band. Positive values boost the
level of the frequency and negative values attenuate it. (The specific frequency to be
adjusted can be set with the High Freq. parameter in the DETAIL page.)
COMMON Parameters
• COMMON DETAIL Page
• KEY.M (Key Assign Mode)
Settings: POLY (polyphonic) , MONO (monophonic), LEGATO
This determines how the tone generator sounds in response to the MIDI input.
POLY
Tone generator is played polyphonically. The maximum simultaneous polyphony is 5
notes.
MONO
Tone generator is played monophonically. The maximum simultaneous polyphony is 1
note. This setting is good for creating fat and powerful bass and lead sounds.
LEGATO
Tone generator is played monophonically. The maximum simultaneous polyphony is 1
note. For this setting, successively played notes do not retrigger the PEG, FEG or
AEG --- resulting in a smoother note-to-note sound.
• This setting overrides the Key Assign setting. Even if it is set to "POLY," the voice will only
play monophonically (with up to four voices sounding together) when Legato is set to on.

38
Parameters /
AN200 Editor Main Window
• UNISON (Unison Switch)
Settings: ON, OFF
This determines whether the Unison mode is on or off. Setting this to on is an instant
way to get a "fat" analog-like lead sound. When Unison is on, the selected pattern is lay-
ered with slightly detuned copies of itself, and set to play monophonically (one note at a
time). The amount of detuning can be set with the Unison Detune parameter (in the
DETAIL page).
• This setting overrides the Key Assign setting. Even if it is set to "POLY," the voice will only
play monophonically (with up to four voices sounding together) when Unison Switch is set to
on.
Portamento
Portamento is a pitch change effect commonly employed by singers and instrumentalists
to smoothly "glide" from one pitch to another. Portamento has been a common feature in
synthesizers as well, and can be used subtly for a natural pitch glide, or can be used to
produce wild special effects.
• TIME (Portamento Time)
Range: 0 ... 127
This determines the time of the Portamento effect, or how long it takes to glide the pitch
from one note to the next. Higher values result in a longer pitch glide time.

39
Parameters / Detail Parameter Tab
This window is called up anytime you click on one of the DETAIL buttons in the main
control panel window. (This includes all but the DETAIL buttons of the FREE EG and
STEP SEQ. sections, each of which have their own separate windows.)
■ Detail Parameter Tab ....................................................
Setup Detail Parameter Window

40
Parameters /
Detail Parameter Tab
Common Parameters
• Category
This is used with Pattern Name below to give a custom name to your edited pattern. The
category is a two-letter code that indicates the basic instrument type of the pattern (see
chart below). Specifying the category makes it easier to recognize the application or use
of each particular pattern; it also makes it easy to organize your patterns according to
their character or application. Set this to "0: --" if you wish to leave the category blank.
For a complete list of the category abbreviations and their descriptions, see the Pattern
List in the AN200 Owner's Manual.
Category List
0: -- No category
1: Pf Piano
2: Cp Chromatic Percussion
3: Or Organ
4: Gt Guitar
5: Ba Bass
6: St Strings/Orchestral
7: En Ensemble
8: Br Brass
9: Rd Reed
10: Pi Pipe
11: Ld Synth Lead
12: Pd Synth Pad
13: Fx Synth Effect
14: Et Ethnic
15: Pc Percussive
16: Se Sound Effect
17: Dr Drums
18: Sc Synth Comp
19: Vo Vocal
20: Co Combination
21: Wv Material Wave
22: Sq Sequence
• Pattern Name
This is used with Category above to give a custom name to your edited pattern. Click on
the box and type in the desired pattern name from the computer keyboard.
• Clicking while pressing control key on the box calls up a set of basic text editing functions
(Undo, Cut, Copy, Paste, Delete, Select All), along with the indicated keyboard shortcuts.

41
Parameters / Detail Parameter Tab
• Unison Detune
Range: 1 ... 32
When the UNISON switch is on, multiple sounds are played, with the pitch of each sound
slightly detuned. Unison Detune adjusts the detuning of the VCO pitch in fine incre-
ments, letting you create an even thicker Unison sound by applying higher settings; how-
ever, be careful not to apply too much or you'll change the basic pitch of the pattern.
• You can also adjust the value of this parameter with the left and right mouse buttons. Click
on the parameter box, then click the left button to decrease the value, or the right button to
increase it.
• Portamento Mode
Settings:
When Key Mode is set to "POLY":
Normal: Normal portamento play.
Sustain Key: With this setting, the Hold tone (by a sustain pedal) is specified as
the starting pitch of the portamento.
When Key Mode is set to "MONO" or "LEGATO":
Full Time: Portamento is always enabled.
Fingered: Portamento is only enabled by legato performance.
This determines the characteristics of the portamento (sometimes called glissando), or
how the tone glides from one tone to the next through all the intermediate pitches, when
the Portamento Time is set to a value other than "0". Available parameters depend on the
Key Mode setting.
If the Portamento Time parameter is set to "0", Portamento will have no effect.
Distortion Parameters
The Distortion effect lets you create a wide variety of distortion sounds, from subtle,
warm overdrive-type sounds to very heavy, metallic distortion.
• Keep in mind that many of these parameters (as well as the ones on the main control panel)
are interrelated, and you may not hear any distortion effect unless they are set to appropriate
values. This is especially true of Drive, Dry/Wet Balance, and Output Level.
• Guitar Amp. Type
Settings: Off, Stack, Combo, Tube
This determines the type of guitar amplifier simulated by the Distortion effect. Each pro-
duces a slightly different distortion sound, recreating the characteristics of an actual
amplifier. "Stack" simulates a separate amp and speaker setup, "Combo" simulates a
single cabinet transistor amp and speaker, and "Tube" simulates a single cabinet tube
amp and speaker. When this is set to "Off," some of the guitar amplifier simulation effect
is cancelled (however, Distortion Drive and LPF are still applied to the sound).

42
Parameters /
Detail Parameter Tab
• LPF
Range: 1.0 kHz ... 18.0 kHz, Thru
This determines the frequency of the low pass filter that is applied to the distortion sound.
Depending on the Guitar Amp. Type setting, this parameter can be used to "fatten" the
sound or make it piercing and brittle. When this is set to "Thru," no filtering is applied to
the distortion sound.
• Output Level
Range: 0 ... 100
This determines the output volume of the distortion sound. Keep in mind that this may
not have any effect unless the Dry/Wet Balance is set to an appropriate value.
LFO Parameters
• Assign Group
Settings:
LFO1 (All)
LFO1 (VCO1, VCO2, VCA) - LFO2 (VCF)
LFO1 (VCO1, VCO2) - LFO2 (VCA, VCF)
LFO1 (VCO1) - LFO2 (VCO2, VCA, VCF)
LFO2 (All)
This determines the destination choices for the LFO 1 and LFO 2 modulation. When one
of the "(All)" settings is selected, all of the available destinations (VCO1, VCO2, VCA, and
VCF) are grouped to the selected LFO, 1 or 2. The LFO blocks in the main panel control
automatically change when this parameter is set. The basic parameters of Wave and
Speed (as well as the Detail page) remain intact for both LFOs, no matter what setting is
made here.
• LFO 1 Delay
Range: 0 ... 127
The LFO 1 Delay setting determines the delay time of the modulation. Lower values
result in shorter LFO 1 Delay times, and higher values result in longer Delay times.

43
Parameters / Detail Parameter Tab
• Key On Resett
Settings:
Off: LFO 1 and LFO 2 do not reset, but modulate continuously.
On: LFO 1 and LFO 2 reset every time a key is pressed.
This determines the start point of the LFO 1 and LFO 2 cycle.
• Sync Pmod Sw.
Settings: Master, Slave, Both
The Sync Pitch Modulation Switch setting determines which oscillator (master, slave, or
both) is modulated by the LFO 1 or LFO 2. Depth rate is determined by the LFO1/LFO2
VCO1 setting. This parameter is effective when the SYNC MODE is set to “VCO1 Master
> Slave.”
EQ Parameters
• Low Freq. (Low Frequency)
Range: 32 Hz ... 2.0 kHz
This determines the frequency which is boosted or cut with the EQ LO parameter in the
main control panel.
• High Freq. (High Frequency)
Range: 500 Hz ... 16.0 kHz
This determines the frequency which is boosted or cut with the EQ HI parameter in the
main control panel.
• Mid Freq. (Mid Frequency)
Range: 100 Hz ... 10.0 kHz
This determines the frequency which is boosted or cut with the EQ MID parameter in the
main control panel.
• Mid Resonance
Range: 1.0 ... 12.0
This determines the width of the frequency band which is boosted or cut with the EQ MID
parameter in the main panel. The central frequency is set with the Mid Frequency
parameter (above). Higher values result in a narrower band width.

44
Parameters /
Detail Parameter Tab
FM Parameters
• Algorithm
Settings: Both, Master, Slave
This determines how the two VCO1 oscillators (master and slave) are connected in rela-
tion to the FM signal. There are three types of connections, or "algorithms," as shown in
the diagrams below.
Both
FM is applied to both master and Slave oscillators.
Master
FM is applied to the master oscillator.
Slave
FM is applied to the slave oscillator. When this is set to "Slave," the overall pitch is
determined by the Sync Pitch setting. This allows you to set the correct pitch for the
overall sound, even when the FM Depth is set to extreme values.
This parameter is effective when the SYNC MODE is set to "VCO1 Master > Slave."

45
Parameters / Detail Parameter Tab
• Src1 (FM Depth Ctrl)
Settings: Fixed, PEG, FEG, LFO1, LFO2
This determines the modulation source which controls the FM Depth. When this is set to
"Fixed," there is no change in modulation over time.
• Src2 (Modulator)
Settings: VCO2 Frequency, VCO1, VCO1 Sub Osc. (sub oscillator), PEG,
FEG, LFO1, LFO2, VCO2 Output
This determines the source wave which modulates the VCO1 wave.
• For the most part, the above settings should be self-explanatory. If necessary, refer to the rel-
evant sections (for example, VCO1, PEG, FEG, LFO1/2). The other settings are explained
below.
VCO2 Frequency : This modulation uses a sine wave which is set to the same frequency as
that of the VCO 2’s pitch.
VCO1 Sub Osc. : This modulation uses a wave of either half or double the frequency of the
VCO 1 (depending on the selected VCO 1 waveform).
VCO2 Output : This uses the actual VCO 2 output waveform for modulation, resulting in
an FM synthesis-like sound.
Output Gain
Settings: +0 dB, +6 dB, +12 dB
This determines the overall level gain of the output signal of the selected pattern. Use
this parameter together with the hardware VOLUME control on the tone generator to set
the desired pattern level.
• Be careful when using the higher settings, since you may inadvertently damage the con-
nected audio equipment (and your ears!) if the pattern is too loud.

46
Parameters /
Ctrl (Control) Matrix Parameter Tab
■ Ctrl (Control) Matrix Parameter Tab ............................
Many of the AN200's parameters can be controlled in real time. The Control Matrix pro-
vides an extraordinarily comprehensive and flexible way to control these parameters. Up
to 15 different controllers can be used simultaneously to control 15 separate parameters.
The particular physical controllers used depend on the connected MIDI instrument.
Among the more commonly used controllers are: Velocity, Modulation Wheel, After
Touch, and Foot Controller. Since any of the MIDI Control Change numbers can be used
for control sources, you can set up highly complex routings.
The Control Matrix settings determine which "source" (i.e., MIDI Control Change num-
bers, Modulation Wheel, Foot Controller, etc.) is used to control which AN200 "destina-
tion" parameter (i.e., VCF Cutoff, Resonance, FEG Depth, etc.).
This gives you the freedom to configure a completely different set of sources and desti-
nation parameters for each pattern. You can, for example, configure the AN1x to use
After Touch to apply vibrato, or the Modulation Wheel to change the resonance while you
play, determine the range for both Pitch Bend up and down, and much more.
The Control Matrix provides 15 sets of control setup parameters. The Depth of the con-
troller effect can also be set independently for each of the 15 sets.

47
Parameters / Ctrl (Control) Matrix Parameter Tab
• Ctrl (Control) Source
Settings: Off, CC No., After Touch, Pitch Bend, Key Track, Velocity, Key
Random, Mod Wheel, Foot Vol, Foot Ctrl, Foot Sw, Ribbon X, Ribbon Z, AN
AC 1 — 8
This determines which MIDI controller is assigned to control the corresponding Parame-
ter. You can set the source by Control Change number or by controller name, as
described below. Special Key Track and Key Random controllers are included for added
flexibility.
Off
No controller assigned.
CC No. 1, 2, 4, 6, 11 — 14, 20, 21, 23, 24 — 27, 30, 32, 33, 36 — 38,
40 — 47, 52 — 56, 58, 60 — 67, 69, 70, 76 — 79, 84 — 87, 90 — 95
Selects the Source controller according to Control Change number, when received by
incoming MIDI messages. (Unavailable Control Change numbers are "ghosted.")
After Touch
For controlling with keyboard After Touch.
Pitch Bend
For controlling with a Pitch Bend wheel.
Key Track
For controlling with note number messages generated by pressing the keys. Higher
keys result in higher controller values.
Velocity
For controlling with keyboard velocity, or the strength with which you strike the keys.
Key Random
For this setting, a random note number messages is automatically generated for each
key you press, or for each MIDI note message received.
Mod Wheel
For controlling with the Modulation Wheel, and/or by incoming MIDI messages of Con-
trol Change number 1.
Foot Volume
For controlling with a connected Foot Volume controller, and/or by incoming MIDI mes-
sages of Control Change number 7.
Foot Control
For controlling with a connected foot controller, and/or by incoming MIDI messages of
Control Change number 4.
Footswitch
For controlling with a connected Footswitch, and/or by incoming MIDI messages of
Control Change number 64.

48
Parameters /
Ctrl (Control) Matrix Parameter Tab
Ribbon Controller-X (for AN1x data compatibility)
For controlling with X-axis motion on a ribbon controller (left-right), and/or by incoming
MIDI messages of Control Change number 13. When Ribbon Controller-X is used, the
control change (default of 13) is treated as a "Center-Base-Controller" (center = 64).
Ribbon Controller-Z (for AN1x data compatibility)
For controlling with Z-axis motion on a ribbon controller (push-release), and/or by
incoming MIDI messages of Control Change number 12.
AN AC 1 - 8
For controlling with a specified Assignable Controller. (Refer to the instructions on
using Assignable Controllers in the owner's manual of your particular tone generator.
• The available Source for assignment may differ, depending on the selected Parameter. For
details of available parameters, see the table of Control Matrix parameters in the AN200
Owner's Manual.
• You cannot assign the same Source controller and Parameter to more than one set. If you
attempt to do so, lower-numbered sets will take priority.
• The control change numbers for AN AC 1-4 can be set with the AN Native parameters (on the
panel of the AN200). Each Preset Pattern has four pre-assigned control change numbers
using this function (refer to the AN Pattern List in the AN200 Owner’s Manual).
• The Control Change numbers for the Mod Wheel, Foot Volume, Foot Control, Footswitch, Rib-
bon Controller-X, Ribbon Controller-Z and AN AC 5-8 can be set from the AN1x System
Parameters (refer to the MIDI Data Format section in the AN200 Owner’s Manual).
• Parameter
Settings:
For a complete list of the Control Matrix's Parameters, see the AN200 Owner's Manual.
When this is set to "Off," the assigned controller has no effect. (Unavailable parameters
are "ghosted.")
• Depth
Settings:
The available settings may differ, depending on the selected Parameter. For details, see
the table of Control Matrix parameters in the AN200 Owner's Manual.
This determines the control range of the Source controller. When this is set to "Direct,"
you can directly adjust/edit the parameter assigned to the controller within its original
range.
• Pitch Bend Range Up
• Pitch Bend Range Down
Range: -24 ... +24
These two parameters let you set independently set the Pitch Bend Range for up and
down motion of the pitch bend wheel on a connected MIDI keyboard. In other words, this
allows you to set pitch bend so that moving the wheel up can make a greater (or lesser)
pitch change than moving the wheel down.

49
Parameters / Ctrl (Control) Matrix Parameter Tab
The Free EG function gives you four independent tracks to which you can record com-
plex real-time parameter changes, over a specified length of time, either in measures or
seconds.
In this window, you can draw a custom Free EG "curve" for each track that controls a
single selectable parameter (such as filter, resonance, LFO, etc.) over time. Four of
these curves --- each affecting a different parameter --- can be played back automati-
cally by simply playing the pattern. A variety of drawing and editing tools are available
for creating unique, continuous parameter changes that would be impossible to achieve
with conventional EGs.
Naturally, Free EG parameters and data are stored as pattern data, allowing each pat-
tern to have its own Free EG settings.
Individual Track Parameters
These parameters apply to each individual track (1 - 4) of the Free EG function. Each
track can have its own EG "curve" and parameter. When a pattern is played, all Free EG
tracks playback simultaneously, controlling the assigned parameters in real time.
• EDIT SELECT
Settings: Track 1, Track 2, Track 3, Track 4
This determines the particular track for editing.
FREE EG Window

50
Parameters /
Ctrl (Control) Matrix Parameter Tab
• TRACK PARAMETER Switch
Settings: ON, OFF
This determines whether the specified track is active (ON) or not (OFF). This must be set
to "ON" for the Free EG of the track to have any effect.
When this is set to "ON," two pink dotted lines appear in the Free EG display. These rep-
resent the range over which the selected parameter (set in Track Parameter below) can
be changed by the Free EG curve. The position of these two lines depends on the partic-
ular parameter and its current value or setting. A Free EG curve can extend above or
below these lines; however, the portions that extend will have no further effect on the
parameter (beyond the values represented by the lines).
• TRACK PARAMETER
For a complete list of the Control Matrix's Parameters, see the AN200 Owner's Manual.
This determines which AN200 parameter will be played by the EG "curve" in the selected
Free EG track. Only one parameter can be selected for a track.
• VALUE Display
This shows the current value or setting for the selected Track Parameter. Keep in mind
that this is only a display indication; the value/setting cannot be changed here, but must
be changed from the appropriate parameter in the main control panel window (or the
Details page).
• TRACK Display Buttons 1 - 4
Click on each of these to display the Free EG curves of two or more tracks simulta-
neously. Each track’s curve is shown in a different color, making it easy to distinguish
between the tracks.
TRACK COMMON PARAMETERS
• LENGTH
Settings:
1/2, 1, 3/2, 2, 3, 4, 6, 8 bars (number of measures)
1.0 ... 16.0 sec (seconds)
The Length setting determines the time for recording and play of the Free EG sequence.
There are two Length types, including length determined by number of measures (bars)
or by absolute time (seconds).
• Setting the Length to a number of bars automatically causes the Free EG to be affected by
Tempo.

51
Parameters / Ctrl (Control) Matrix Parameter Tab
• TRIGGER
Settings: Free, MIDI In Notes, All Notes, Seq Start
This determines how the Free EG track playback is triggered, as described below.
Free
After selecting a pattern, the first key pressed on the keyboard triggers the Free EG.
MIDI in Notes
The Free EG is triggered by a note on message from a connected MIDI instrument or
sequencer.
All Notes
The Free EG is triggered by either a Note On message from a connected MIDI instru-
ment or sequencer, or from the first recorded Step of the Step Sequencer.
Seq Start
The Free EG is triggered by the start of the Step Sequencer.
• LOOP TYPE
Settings: Off, Forward, Forward Half, Alternate, Alternate Half
This determines the type of loop for play of the Free EG sequence, as described below.
Off
The Free EG sequence plays once but does not loop. The parameter settings at the
end of the Free EG sequence remain in effect.
Forward
The Free EG sequence loops from start to end.
Forward Half
The Free EG sequence loops from the middle to the end.
Alternate
The Free EG sequence loops from start to end, then end to start.
Alternate Half
The Free EG sequence loops from middle to end, then end to middle.

52
Parameters /
Ctrl (Control) Matrix Parameter Tab
• TEMPO
Range: 20 - 300 bpm (beats per minute)
This determines the tempo or speed at which the selected Free EG track plays back.
• The Tempo setting also affects the Step Sequencer patterns.
Edit Tools
The toolbar at the left of the Free EG window contains the Edit tools. They are divided
into two basic types: the Drawing tools (which include special wave tools) and the Trans-
form tools.
Using the Drawing Tools
1) Click on the desired Drawing tool.
For details on each tool, refer to the descriptions in step #2 below.
2) Hold down the left mouse button at the desired start point, and simul-
taneously drag the mouse to draw the curve. Release the button to
stop drawing.
For the pencil tool, the curve is immediately changed. For the other tools, a "ghost"
curve temporarily appears (along with the original one) while you are drawing to
indicate the new curve. Release the mouse button, and after a slight pause, the
newly drawn curve replaces the old one. However, for any area left undrawn, the
original curve remains.
pencil
The "pencil" tool lets you draw the desired curve in freehand.
straight
The "straight" tool lets you draw a perfectly straight line by "pulling" the cursor away
from the starting point.

53
Parameters / Ctrl (Control) Matrix Parameter Tab
pulse
triangle
sine
These three wave tools let you easily draw the respective waveforms. The example
illustrations below (using the sine wave) show how dragging the mouse affects the
wave.
• Dragging the mouse up or down increases the amplitude of the wave, or the
degree to which the parameter value will change.
• Dragging up creates a waveform of normal phase.
• Dragging down reverses the phase by 180 degrees.
• Dragging to the right decreases the frequency, or makes the parameter value
change slower, while dragging to the left increases the frequency.

54
Parameters /
Ctrl (Control) Matrix Parameter Tab
Using the Transform Tools
1) Click on the "cursor" button.
2) Highlight (define) the area you wish to transform.
Move the cursor to the beginning point of the desired area, then hold down the left
mouse button and drag the mouse to the right, highlighting or defining the area to be
changed. Release the button to set the highlight end point.
• The Transform tools are "ghosted" unless an area is defined.
3) Click on the desired Transform tool.
For the "smooth" and "random" tools, clicking on the respective button starts the
operation. After a short pause, the Free EG curve changes according to the trans-
form.
smooth
As its name suggests, this transform "smooths" jagged edges in the curve. Use this
repeatedly to make the edges as round as desired.
random
This transform randomly assigns different values at successive points in the curve.
To a certain extent, this is the opposite of "smooth" above, since it produces jagged
jumps and edges in the curve.
4) If using "scale" or "move," use the mouse to adjust the setting as
desired.
For the "scale" and "move" tools, hold down the left mouse button and drag the
mouse in the appropriate direction, releasing it at the desired point.
scale
This useful tool lets you compress or expand the overall "dynamic range" of the
curve. For example, if the changes in the Free EG are too sudden or dramatic, use
this to compress the curve and make the changes more subtle. Dragging away from
the central axis expands the range; dragging toward the axis compresses it. Drag-
ging up maintains the original phase; dragging it down reverses the phase by 180
degrees.
move
This is a combination copy-and-paste operation, allowing you to "grab" a defined
section of the curve and move it to another place. The copied section can be moved
freely in any direction, and it replaces the original curve at the destination.

55
Parameters / Ctrl (Control) Matrix Parameter Tab
The Step Sequencer is a powerful, versatile feature that allows you to quickly and easily
create sophisticated looped Sequences. It's also highly interactive, since it can be trig-
gered from the keyboard in a variety of ways, and can be used with the various real-time
controls of the AN200. Each individual step event (Note, Velocity, Gate Time, and Con-
trol Change) can be accessed and edited by a specific "panel knob," over a maximum of
16 steps. The Step Sequencer features extensive memory as well, letting you save one
sequence pattern with each pattern (128 total).
The Step Sequencer share a set of "Common" parameters for added flexibility and con-
trol.
STEP SEQUENCER Window

56
Parameters /
Ctrl (Control) Matrix Parameter Tab
Effect Block
• PARAM (Parameter)
Settings: 0 ... 127
This determines the degree for the effect selected in Type below.
• TYPE
Settings: Delay 1-3, Reverb, Flanger 1-2, Chorus, Phaser 1-3,
AmpSim(Amp Simulator) 1-3
Determines the Effect type.
COMMON Block
• TEMPO
Settings: 20 ... 300 bpm (beats per minute)
The Tempo setting determines the tempo for the AN200's internal clock in beats per
minute (BPM), between a range of 20 and 300 BPM. The Tempo setting controls both
Step Sequencer playback.
• When the Free EG Length parameter is set to one of the "bar" values, the Free EG sequence
will be synchronized with the Tempo set here.
• BEAT
Settings: 8, 12, 16
Determines the number of steps in the selected Sequence for playback.
• SWING
Settings: 50 ... 83%
The Swing parameter lets you apply a Swing rate to the Sequence to slightly shift certain
beats in order to create a “swing” feel. A setting of “50%” produces no Swing and “83%”
produces maximum Swing. For information about how the Swing levels affect the rhythm
of the Sequence, see the illustration below.
• REVERSE
Setting: On, Off
This function lets you completely turn the Sequence around, and play all the notes back-
wards.

57
Parameters / Ctrl (Control) Matrix Parameter Tab
• GATE TM (Gate Time)
Settings: 1 ... 200%
This is an offset contol and determines the note length of the notes of the Sequence,
making all notes either shorter or longer, as a percentage of the original. This lets you, for
example, set the note to play staccato, so that its sound switches off well before its step
time is over. Or you can have the note hold right up to the start of the subsequent step so
that it slurs (legato) into the next note. A setting of "100%" maintains the original relation-
ship between notes. Lower values decrease the Gate Time, and higher values increase
it.
• When the combined value of any individual note’s Gate Time (as set from the Gate Time Bank
knobs) and the offset Gate Time (set here) exceeds 100%, the note is played legato.
TRACK PARAMETER block
• CUTOFF (Cutoff Frequency)
Settings: Synth track 0 ... 127
Rhythm 1—3 track -64 ... 63
Determines the frequency at which the Filter effect starts of each track. The higher the
value, the higher the frequency.
• RES (Resonance)
Settings: Synth track -12 ... 102
Rhythm 1—3 track -64 ... 63
Determines the emphasis of the resonant peak of the Filter (at the Cutoff frequency) of
each track.
• VOLUME
Settings: 0 ... 127
Controls the volume level of each track.
•PAN
Settings: Synth track C, L63 ... C ... R63
Rhythm 1—3 track RND (Random), L63 ... C ... R63
Determines the panning position (the left or right placement in the stereo image) of each
track. The Random setting (available only for Rhythm tracks) automatically and randomly
specifies a Pan position for each instrument sound.
•WET
Settings: 0 ... 127
Changes the depth or degree of the Effect of each track. When set to the 0 (all the way
left), the Effect sound cannot be heard.
PLAY/STOP buttons
Click the [PLAY] button to start the Sequence. The Sequence repeats (loops) until you
click the [STOP] button to stop it.

58
Parameters /
Ctrl (Control) Matrix Parameter Tab
NOTE NO./INST.SELECT/VELOCITY/GATE TIME/PITCH
The Step Sequencer allows you to enter notes and other parameter settings to a
Sequence one-by-one.
• NOTE NO. (Note Number) Bank (Synth track only)
Range: C-2 ... G8 (MIDI note numbers 0 ... 127)
This bank of 16 virtual "knobs" lets you set the note number for each step of the
Sequence. To set the note, adjust the parameter normally by "turning" the appropriate
knob, or click on the value window above the knob to call up the pop-up value list, and
click the desired note number.
• INST. SELECT Bank (Rhythm tracks only)
Settings: Refer to "Inst List" of the AN200 Owner’s Manual.
This bank of 16 virtual "knobs" lets you select the instrument sound (drums, percussion,
bass, sound effects) for each step of the Sequence. To set the inst, adjust the parameter
normally by "turning" the appropriate knob, or click on the instrument window above the
knob to call up the pop-up list, and click the desired instrument.
• VELOCITY Bank
Range: Rest, 1 ... 127
This bank of 16 virtual "knobs" lets you set the note velocity for each step of the Step
Sequencer pattern. To set the velocity, you can use one of these methods:
• Adjust the parameter normally by "turning" the appropriate knob.
• Move the cursor to the value window above the knob and use the right/left mouse
buttons to step up or down through the available values.
• Use [shift] and the cursor keys to step or fast-forward/-reverse through the values.
• Enter the value directly from the computer keyboard.
When set to "Rest," a rest (no sound) is inserted for the step.
• GATE TIME Bank
Range: 1 ... 1600%
This bank of 16 virtual "knobs" lets you set the gate time (or note length) for each step of
the Step Sequencer pattern. To set the gate time, you can use one of these methods:
• Adjust the parameter normally by "turning" the appropriate knob.
• Move the cursor to the value window above the knob and use the right/left mouse
buttons to step up or down through the available values.
• Use [shift] and the cursor keys to step or fast-forward/-reverse through the values.
• Enter the value directly from the computer keyboard.
Keep in mind that the final gate time of all the notes in the pattern is also determined by
the Common Gate Time control.

59
Parameters / Ctrl (Control) Matrix Parameter Tab
• PITCH Bank (Rhythm tracks only)
Range: -64 ... +24
This bank of 16 virtual "knobs" lets you set the pitch for each step of the Step Sequencer
pattern. To set the pitch, adjust the parameter normally by "turning" the appropriate
knob, or move the cursor to the value window above the knob and use the right/left
mouse buttons to step up or down through the available, or enter the value directly from
the computer keyboard.
• Step Mute buttons
These determine whether the individual step of the track is on (sounded) or off (muted).

60
File Menus
When the AN200 Editor is active and selected, the following functions appear in the File
menu:
• New
• Open AN200 File
• Save AN200 File
• Save AN200 File As
These are used for creating, saving, and opening your original AN200 Files. Using the
Save (or Save As) command here saves all 128 User patterns to a selected AN200 File.
(The special .ANS extension allows you to easily organize the files.)
By keeping a library of your original patterns as AN200 Files, you can easily call up the
settings you need (with the Open command) and quickly transmit them to your tone gen-
erator/sound card.
• Before saving a set of User patterns as an AN200 File, make sure to store the pattern cur-
rently being edited. If a pattern is not properly stored, it will not be contained in the AN200
File data.
Use this function to create a new AN200 File.
If you've edited the current settings of the AN200 Editor at all, the display then prompts
you to store the pattern. (See Storing an AN200 Pattern.) Creating a new AN200 File
cancels the current panel settings and resets all parameters to their normal values.
Creating a new AN200 File resets the User Patterns back to the defaults, the same data
as those when the power is turned on.
• See AN200 Librarian information on initializing the User Pattern.
• This operation loads a new file of User Pattern into only the User pattern memory of the
AN200 Editor. If you want to play with these Patterns separate from the AN200 Editor, you
should transmit the User Pattern. (Refer to Transmit AN200 Bulk Dump Data.) There is no
need to transmit AN200 Bulk Dump Data if you select a pattern in the Pattern List of the
AN200 Editor, since the current pattern bulk data is sent with that operation.
New

61
File Menus / Open AN200 File
Use this function to open an existing AN200 File.
• The available file types include:
AN200 Data file (*.AN2)
User patterns created with the AN200 Editor.
AN Expert Data file (*.ANS)
User voices and user sequencer patterns created with the AN Expert Editor.
AN1x Editor*** Data file (*.AN1)
User voices and user sequencer patterns created on the AN1x Control Synthesizer.
*** AN1x Editor
• These are data files of the AN1x Editor software, which was previously available as freeware
on CD-ROM and floppy disk when the AN1x was first sold. It is currently available at the
Yamaha website (http://www.yamaha.co.uk).
• Files created with the Macintosh version of the AN1x Editor can be opened here if the exten-
sion ".AN1" is added to the end of the file name.
• "Open AN200 File" can also be selected from the toolbar.
• Keep in mind that this operation loads the User Pattern only into the User pattern memory of
the AN200 Editor. After opening a file, if you want to play with these Patterns separate from
the AN200 Editor, you should transmit the User Pattern. (Refer to Transmit AN200 Bulk Dump
Data.) There is no need to transmit AN200 Bulk Dump Data if you select a pattern in the Pat-
tern List of the AN200 Editor, since the current pattern bulk data is sent with that operation.
Open AN200 File
Selects the desired folder.
Selects the desired file name.
Selects the desired file type.

62
File Menus /
Save AN200 File / Save AN200 File As
Use these commands to save the current AN200 Editor settings to an AN200 File. (The
"Save As" command lets you specify a different file name than the original one.)
• "Save AN200 File" can also be selected from the toolbar.
Save AN200 File / Save AN200 File As
Selects the desired folder.
Creates a new folder.
Selects the file name.
Type the desired name here.
Selects the desired file type.

63
Edit Menus
When the AN200 is active and selected, the following functions appear in the Edit menu:
• AN200 Store
• AN200 Pattern List
• AN200 Librarian
Use the AN200 Store dialog box to store the pattern currently being edited to one of the
User pattern memory spaces. Once a pattern or patterns have been stored in this way,
you can save the entire set of 128 User patterns to an AN200 File.
• "AN200 Store"can also be selected from the master menu by clicking any inactive part of the
main control panel pressing control key, or by clicking on the STORE button.
To store a pattern:
1) Click the desired location for the newly edited pattern.
2) Click "Store" to store the pattern to the selected location. Keep in
mind that this replaces (and erases) the pattern at the location with
the newly edited one.
• Keep in mind that this operation stores your pattern data only into the User pattern memory
of the AN200 Editor and sends the current pattern’s bulk data to the AN200. The current pat-
tern bulk data will be lost if you select another pattern on the panel of the AN200. If you want
to select a pattern on the panel of the AN200, you should first transmit the User Pattern.
(Refer to Transmit AN200 Bulk Dump Data.) There is no need to transmit AN200 Bulk Dump
Data if you select a pattern in the Pattern List of the AN200 Editor, since the current pattern
bulk data is sent with that operation.
AN200 Store

64
Edit Menus /
AN200 Pattern List
In the AN200 Pattern List dialog box you can:
• Select a pattern from the Preset 1, Preset 2, User pattern banks for editing.
• Initialize a User pattern to the default settings.
• Copy or swap patterns in the User pattern banks.
• "AN200 Pattern List" can also be selected from the master menu by clicking on any inactive
part of the window pressing control key, or by clicking on the PATTERN button.
• Preset 1, Preset 2, User Buttons
Click on one of these to select the desired pattern bank: Preset 1, Preset 2, or User.
• Pattern List Combo Box
Select a pattern by clicking on the desired pattern name in the list.
Copying a pattern to another pattern location
1) Set Drag Mode to "Copy."
2) Click the desired pattern and drag it to the desired location. Keep in mind that this
replaces (and erases) the pattern at the location.
Swapping the location of two patterns
1) Set Drag Mode to "Swap."
2) Click the desired pattern and drag it to the pattern you wish to swap it with. This sim-
ply moves the pattern to the selected location; it does not affect the actual data.
Copy and Swap operations can also be executed from the AN200 Librarian dialog box.
• Pattern Init
Click this to initialize the selected pattern to its default parameter values. This gives you
a "blank slate" from which to create a new pattern.
AN200 Pattern List

65
Edit Menus / AN200 Librarian
• Drag Mode
In the Pattern List combo box, a pattern can be dragged to another pattern location. This
setting determines the result of that operation: whether the pattern is copied to the new
location, or swapped with the pattern at the new location.
• The Pattern Init and Drag Mode functions are only effective when the User pattern bank is
selected.
The Librarian dialog box gives you a set of convenient, easy-to-use tools for organizing
the User patterns of your AN200 Files.
The Source box shows User patterns contained in the opened AN200 File (see Open
AN200 File below). The Destination box contains the set of User patterns currently in
the AN200 Editor, and represents the new AN200 File to be created.
First copy the desired patterns from the Source to the Destination, then exit the Librar-
ian and save the new set of patterns as a AN200 File. You can open different AN200
Files one by one, and freely copy the desired patterns to the Destination before saving.
Copying a pattern from the Source box to the Destination box:
1) Click the desired pattern in the Source box. (This is the pattern you will be copying.)
2) Drag the highlighted pattern to the Destination box, and drop it at the desired number.
(This is the location to which the pattern will be copied. The previous pattern at the
location is erased and replaced with the new one.)
3) Click "OK" to exit the Librarian.
4) Save the newly created set of User patterns as a AN200 File.
AN200 Librarian

66
Edit Menus /
AN200 Librarian
• Open AN200 File
Click this to select and open an existing AN200 File. (See Open AN200 File.) The pat-
terns of the opened AN200 File are shown in the Source box.
• Copy All
Clicking this button copies all the patterns listed in the Source box to the Destination box.
• This operation erases all previous patterns in the Destination box and replaces them with the
Source patterns.
• Init. All
Clicking this button initializes all the Destination patterns to their default settings. (See
Initial Pattern Default Settings.) This function allows you to reset all the parameters of the
selected pattern to the factory initial pattern with default values. This gives you a blank
slate from which you can create your own pattern.
• This operation erases all previous patterns in the Destination box and replaces them with
identical initialized patterns.
•OK
Click this to actually execute any of the Librarian operations and exit from the Librarian
box.
• Cancel
Click this to exit the Librarian box without executing any of the Librarian operations.

67
Setup Menus
When the AN200 Editor is active and selected, the following functions appear in the
Setup menu:
• AN200 Editor Setup
• AN200 Display Option
• Transmit AN200 Bulk Dump Data
• Receive AN200 Bulk Dump Data
This window lets you make a variety of basic and detailed settings for the AN200 Editor.
These are contained in two tabs: MIDI and Others.
• "AN200 Editor Setup" can also be selected from the toolbar.
MIDI Tab
• MIDI CH (Channel)
Range: 1 ... 16
This determines which MIDI channel is used for sending AN200 Editor data. Set this to
match the receive channel for the Part you wish to control.
AN200 Editor Setup

68
Setup Menus /
AN200 Editor Setup
• Device No. (Number)
Range: 1 ... 16
This determines which tone generator the AN200 Editor will send data to. This should be
set to same number as the Device Number of the tone generator/sound card to which the
AN200 is installed. If you have multiple tone generators in your MIDI setup and each is
set to a different Device Number, this parameter lets you select which tone generator will
be affected by the AN200 Editor. If you are using only one tone generator, this should be
set to "1."
• Output when edited
When this is checked, any edits that you make with the AN200 Editor are instantly and
automatically transmitted to the AN200. This ensures that you can audition edits as soon
as you make them.
•OK
Click this to apply all the settings you’ve made in the three tabs.
• Cancel
Click this to return to the main AN200 Editor window without changing any of the settings.
Others Tab
• Parameter Knob Operation
Rotate
When this is selected, the parameter values (of the panel "knobs") are changed by
moving the mouse in a circular direction.
Up/down or left/right
When this is selected, the parameter values (of the panel "knobs") are changed by
moving the mouse vertically or horizontally.
•OK
Click this to apply all the settings you’ve made in the three tabs.
• Cancel
Click this to return to the main AN200 Editor window without changing any of the settings.

69
Setup Menus / AN200 Display Option
This convenient feature lets you change the display of the main control panel to indicate
the current status of certain signal routings within the AN200. When one of the options
is enabled (a check mark appears), color-coded highlights, arrows and lines appear to
show how the relevant blocks and parameters affect each other. Any or all of the three
options below can be enabled.
• Main Signal Flow
When this is checked, the signal flow of the main blocks (e.g., VCO blocks into MIXER,
MIXER into VCF, etc.) is shown.
• Relation of Osc. Sync.
When this is checked, the master/slave relationship of the Oscillator Sync feature is
shown.
• Relation of FM
When this is checked, the modulation routing of the FM feature is shown.
• Although the AN200 Display Option can also be selected from the master menu, you may
want to use this slightly quicker, more convenient way of changing the display: Open the
AN200 Display Option box in the conventional way (from the Setup menu), and drag the box to
an open space on the screen. Then, when you want to change the setting, simply move the
cursor to the box and click --- the display changes instantly to your preference.
AN200 Display Option

70
Setup Menus /
Transmit AN200 Bulk Dump Data
This is used for directly transmitting the AN200 Editor pattern data as MIDI bulk dump
data to the AN200.
• Transmit Method
1 Pattern
When this is selected, only the data for the currently selected pattern will be transmit-
ted.
User Patterns
When this is selected, User patterns will be transmitted.
Bulk Dump Interval
Range: 0msec ... 1.5sec
This parameter is available when "User Patterns" above is selected. Bulk Dump Inter-
val determines the amount of time (in clocks) that separates each data transmission. If
the tone generator or card "chokes" on the incoming MIDI data, or XGworks has trou-
ble sending all the data properly, or some other trouble occurs, try setting the Interval
to a higher number.
• Transmit AN200 Bulk Dump
Start
First, click this button to start transmission of the data. Then start transmitting the bulk
data.
Transmit AN200 Bulk Dump Data

71
Setup Menus / Receive AN200 Bulk Dump Data
•OK
Click this to exit from the dialog box once all data has been transmitted.
• "Transmit AN200 Bulk Dump Data" can also be selected from the toolbar.
This is used for importing AN pattern data from the AN200. All current settings will be
replaced by the received data.
• Receive Method
1 (Pattern/Voice)
When this is selected, only the data for one pattern/voice will be received. This data is
loaded into the edit buffer (temporary memory storage).
• Make sure to store the received pattern/voice after executing this operation. Otherwise the
data will be lost upon selecting a different pattern/voice.
All User (Patterns/Voices)
When this is selected, the data for 128 User patterns/voices will be received.
Receive AN200 Bulk Dump Data

72
Setup Menus /
Receive AN200 Bulk Dump Data
• Select Model
AN200
Click this when receiving data from the AN200.
AN1x
Click this when receiving data from the AN1x.
• Receive AN200 Bulk Dump
Start
First, click this button to start reception of the data. Then start transmitting the bulk data
from AN200.
The various data types that can be sent/received are abbreviated on the AN1x as fol-
lows:
1 Pattern : “1 ptn”
All User Patterns : “all ptn*”
The progress bar indicates how much data has been received. When the bar is com-
pletely filled, all data has been received.
•OK
Click this to exit from the dialog box once all data has been received.
• Make sure that the MIDI OUT jack of the AN1x is properly connected to the computer/interface
MIDI IN jack, and that all settings are appropriate — both on the AN1x and on the XGworks
software.
Transcripción de documentos
AN200 Editor Manual Important Notices The AN200 Editor is a comprehensive editing software program specially designed for the AN200 Desktop Control Synthesizer — providing an easy, intuitive way to edit and create your own original Patterns for the AN200. IMPORTANT: • Do not use any of the panel controls on the AN200 while editing the Patterns with the AN200 Editor, since this may inadvertently change the settings of the AN200. Copyright Notices • The software and this owner’s manual are the exclusive copyrights of Yamaha Corporation. • Copying of the software or reproduction of this manual in whole or in part by any means is expressly forbidden without the written consent of the manufacturer. • Copying of the commercially available music sequence data and/or digital audio files is strictly prohibited except for your personal use. Trade Marks and Registered Trade Marks • The company names and product names in this Owner’s Manual are the trademarks or registered trademarks of their respective companies. Notices • Yamaha makes no representations or warranties with regard to the use of the software and documentation and cannot be held responsible for the results of the use of this manual and the software. • The windows and illustrations in this manual are for instructional purposes only, and may be slightly different from the ones shown on your software. Copyright © 2001 Yamaha Corporation. All rights reserved. January, 2001 YAMAHA CORPORATION About the AN200 Editor The AN200 Editor is a full-featured editing software program for the AN200 Desktop Control Synthesizer, providing an exceptionally simple, convenient and intuitive way to edit and control all of the AN200 parameters. Virtual "knobs," "buttons" and a special "LCD display" let you change parameters just as if you were operating an actual synthesizer control panel! The AN200 Editor lets you save your edits as an original User pattern and store up to 128 User. Naturally, you can save the data to floppy disks or your hard disk drive as AN200 Files. The AN200 Editor also features a convenient, easy-to-use AN200 Librarian that lets you organize your User patterns. For general instructions and explanations on how to use the AN200 Editor, see Setting and Changing Parameter Values and Toolbar. For information on specific, commonly used operations, see Operations. 2 Operations Selecting an AN200 Pattern Selecting an AN200 pattern is the important first step in editing. You can select a pattern from the Preset 1, Preset 2, or User banks (each of which contains 128 patterns). Once you’ve edited a pattern you can store it to the User bank as your original pattern and save it to a floppy disk/hard disk drive with other patterns as an AN200 File. AN200 patterns can be selected from either the Edit Panel window or the main control panel window. • Make sure to store your edits to a pattern before selecting another pattern. If you’ve edited the AN200 Editor parameters and then select a different pattern, all your edited parameters will be initialized to the default values of the newly selected pattern. z Select “AN200 Pattern List.” Click the PATTERN button at the bottom right of the main control panel. You can also quickly call up this dialog box by clicking any inactive part of the window pressing control key and clicking "AN200 Pattern List" in the pop-up menu. Or, you can click "Edit" on the menu bar, then select "AN200 Pattern List." x Select the desired pattern. Click on the desired pattern, then close the dialog box (click the close button) to return to the main control panel window. (You can also do this by clicking anywhere on the main control panel.) 3 Operations / Editing an AN200 Pattern Editing an AN200 Pattern z Select the desired pattern. Refer to Selecting an AN200 Pattern. x Edit the pattern parameters as desired from the main control panel. The main window of the AN200 Editor provides a "virtual" control panel with knobs and buttons, and lets you edit the patterns much as you would if you were operating an actual hardware synthesizer. c Store the edited settings as a User pattern, then save it with other edited patterns as an AN200 File. Use the Store operation to store your newly edited pattern. Then use the Save operation to save that edited pattern with other User patterns to an AN200 File. Both the Store and Save operations are necessary to ensure that your pattern is saved properly. Failing to do so would be roughly similar to writing a letter but not putting it in an envelope and sending it. Make sure to execute both operations when you wish to keep a pattern you’ve edited. 4 Operations / Initializing an AN200 Pattern to the Default Settings Initializing an AN200 Pattern to the Default Settings This function allows you to reset all the parameters of the selected pattern to the factory "initial pattern" default values. This gives you a "blank slate" from which you can create your own pattern. Keep in mind that this operation automatically erases all the settings of the selected pattern. If you wish to save the pattern for future recall, use the Store and Save functions. z Select “AN200 Pattern List.” Click the PATTERN button at the bottom right of the main control panel. You can also quickly call up this dialog box by clicking any inactive part of the window pressing control key and clicking "AN200 Pattern List" in the pop-up menu. Or, you can click "Edit" on the menu bar, then select "AN200 Pattern List." x Select the User bank and the desired pattern to be initialized. Click on the User bank button, then click on the desired pattern. c Initialize the pattern. Click the "Pattern Init" button in the dialog box. The specified pattern is initialized and automatically selected for editing. To return to the main control panel window, close the dialog box (click the close button). (You can also do this by clicking anywhere on the main control panel.) • If you want to initialize all User patterns, then click on the "INIT ALL" button in the AN200 Librarian window. 5 Operations / Storing an AN200 Pattern Storing an AN200 Pattern This operation lets you store your pattern edits as a User pattern. • To ensure that your new pattern is available for future recall, make sure to also save the pattern (with other patterns) to an AN200 File. z Select “AN200 Store.” Click the red STORE button at the bottom right of the main control panel. You can also quickly call up this dialog box by clicking any inactive part of the window pressing control key and clicking "AN200 Store" in the pop-up menu. Or, click "Edit" on the menu bar, then select "AN200 Store." x Select the destination pattern. Click on the desired pattern in the dialog box. Keep in mind that this pattern will be erased and replaced with the newly edited pattern. c Store the pattern. Click the "Store" button in the dialog box. The newly edited pattern is stored to the selected location. • This operation deletes the original pattern data at the destination. • Keep in mind that this operation stores your pattern data only into the User pattern memory of the AN200 Editor and sends the current pattern’s bulk data to the AN200. The current pattern bulk data will be lost if you select another pattern on the panel of the AN200. If you want to select a pattern on the panel of the AN200, you should first transmit the User Pattern. (Refer to Transmit AN200 Bulk Dump Data.) There is no need to transmit AN200 Bulk Dump Data if you select a pattern in the Pattern List of the AN200 Editor, since the current pattern bulk data is sent with that operation. 6 Operations / Saving data to an AN200 File Saving data to an AN200 File Once you’ve edited an AN pattern and pattern to your satisfaction you can save it to an AN200 File. Each AN200 File can contain up to 128 patterns, and these can be called up at any time with the Open function. (Also see Calling Up Data from an AN200 File.) Additional AN200 files (each with 128 User patterns) can be saved to floppy disks or your hard disk drive --- giving you unlimited storage for your original patterns. For organizing the patterns in the AN200 Files, use the convenient AN200 Librarian function. z Select “Save AN200 File.” Click "File" on the menu bar, then select "Save AN200 File". • "Save AN200 File" can also be selected from the toolbar. x Select the desired folder, type in the file name, and click “Save.” Calling Up data from an AN200 File (Open) Once you’ve saved a set of User patterns and to one or more AN200 Files (see Saving Patterns), you can instantly call up the desired patterns with this command. To create a new AN200 File, use the New command. z Select “Open AN200 File.” Click "File" on the menu bar, then select "Open AN200 File." Open AN200 File is also available on the toolbar. x Select the desired folder and file name, then click “Open.” • Keep in mind that this operation loads the User pattern data only into the User pattern memory of the AN200 Editor. After opening a file, if you want to play these Patterns on the AN200 separate from the AN200 Editor, you should transmit the User pattern data. (Refer to Transmit AN Bulk Dump Data.) There is no need to transmit AN200 Bulk Dump Data if you select a pattern in the Pattern List of the AN200 Editor, since the current pattern bulk data is sent with that operation. 7 Parameters Most of the AN200 Editor parameters for editing the AN200 patterns are contained in the virtual "main control panel" screen. From this main panel, you can also jump to other windows for controlling additional AN200 functions (such as the Control Matrix, Free EG, and Step Sequencer). AN200 Editor Main Window This is the main control panel for the AN200 Editor, and is comprised of the virtual "panel" controls, the toolbar (at the top), and the virtual "LCD display" at the bottom. The master menu (which includes AN200 Pattern List, Store, and the Display Option) can also be selected from the main screen by clicking pressing control key any inactive part of the front panel. To jump to explanations for the desired parameter, click on the appropriate block in the illustration below. • Main Screen • Master Menu Click while pressing control key in an inactive area to call up the master menu. 8 Parameters / AN200 Editor Main Window • Toolbar The toolbar gives you quick access to some important functions and controls. These buttons let you easily execute the desired function without having to select a menu or leave the AN200 Editor window. Open AN200 File This is the same as the corresponding command in the File menu. It lets you select and open an existing AN200 File. (See File Menus, Open AN200 File.) Save AN200 File This is the same as the corresponding command in the File menu. It lets you save the current AN200 Editor settings as a parameter file for future recall. (See File Menus, Save AN200 File.) AN200 Editor Setup This is the same as the corresponding command in the Setup menu. It lets you make various important settings for configuring the AN200 Editor with the AN200. (See Setup Menus, AN200 Editor Setup.) Setup AN200 Display Option This convenient feature lets you change the display of the main control panel to indicate the current status of certain signal routings within the AN200. (See Setup Menus, AN200 Display Option.) Transmit AN200 Bulk Dump Data This is the same as the corresponding command in the Setup menu. It lets you transmit the current AN200 Editor settings as MIDI data to the AN200. (See Setup Menus, Transmit AN200 Bulk Dump Data.) Receive AN200 Bulk Dump Data This is the same as the corresponding command in the Setup menu. It lets you receive the pattern from a connected AN200. (See Setup Menus, Receive AN200 Bulk Dump Data.) 9 Parameters / AN200 Editor Main Window • LCD Display This virtual "LCD" functions just like the display on an actual synthesizer's front panel. Indicates the current pattern's bank/number as well as its category and name. Full name of the currently selected parameter. Indicates the currently selected parameter's value or setting. By clicking on this third line, you can also directly change the value by typing it on the computer keyboard. (See Computer Keyboard.) • PATTERN Button Pressing the PATTERN button calls up the AN200 Pattern List dialog box, allowing you to select the desired pattern bank and pattern. It also allows you to reorganize the patterns of a selected bank, as well as initialize a pattern --- in other words, this resets all parameters to their normal values, giving you a "blank slate" pattern to work with. To select a bank, click on the desired bank button: Preset 1, Preset 2, or User. Each bank contains 128 patterns. To select a pattern, click on the desired pattern in the combo box. For a complete list of available patterns, see the Pattern List in the AN200 Owner's Manual. • Each pattern name is preceded by a two-letter category abbreviation that indicates the general instrument group to which the pattern belongs. For example, "Ld" indicates "lead," "Ba" indicates "bass," "Pd" indicates "pad," and so on. 10 Parameters / AN200 Editor Main Window • STORE Button Pressing the STORE button calls up the AN200 Store dialog box, allowing you to store the desired pattern to the User bank. It also lets you enter a name and category abbreviation for the pattern. To name the pattern, click on the Pattern Name box, and type in the desired name. To specify a category, click the Category combo box, and click the desired category abbreviation. (The "0: ---" setting indicates no category.) To store the newly named pattern, click "Store." For a complete list of available patterns and descriptions of the category abbreviations, see the Pattern List in the AN200 Owner's Manual. • Each pattern name is preceded by a two-letter category abbreviation that indicates the general instrument group to which the pattern belongs. For example, "Ld" indicates "lead," "Ba" indicates "bass," "Pd" indicates "pad," and so on. 11 Parameters / AN200 Editor Main Window ■ Setting and Changing Parameter Values ................... • For panel knobs: Click on the knob and drag horizontally or vertically as desired. Dragging to the left or down decreases the value, and dragging right or up increases it. The knob "rotates" as you drag it, and the parameter value (shown just above each knob) changes accordingly. Any parameter changes are output as MIDI data, both to the AN200 and the XGworks sequencer. Operation of the knobs can also be set so that moving the mouse in a circular direction -- as if you were actually rotating the knob --- changes the parameter value. (See Parameter Knob Operation.) • The panel knob operation can be changed to let you "rotate" the knob, instead of moving it horizontally or vertically. (See the Others tab in AN200 Editor Setup.) • For buttons: Simply click on the desired button to turn on/off or to select the appropriate setting. On/ off buttons (such as UNISON) have virtual "lamps" that light when the function is on. • Combo boxes For combo boxes (such as Control Source in the Control Matrix Parameter tab), click the down arrow to expand the box, then highlight the desired setting. • DATA DEC (Decrease) and INC (Increase) buttons Click on the desired parameter, then click either of these buttons to decrease the value/ setting (DEC) or increase it (INC). In some cases (e.g., VCO 1 WAVE), these buttons can be used to select values/settings that are not otherwise available. 12 Parameters / AN200 Editor Main Window • Computer keyboard All of the value parameters in the main control panel can be directly changed by typing in the appropriate numbers from the computer keyboard. Click on the desired parameter, then click the third (bottom) line in the virtual LCD and type in the desired value. Press [enter] to enter the value. A few parameters (such as Unison Detune and LFO 1 Delay in the Detail Parameters tab) can be directly changed by clicking on the desired parameter, then typing in the desired value and pressing [ENTER]. • Computer keyboard shortcuts: • Moving around the panel Pressing the arrow keys by themselves lets you select parameters by moving around the panel in the respective direction (up, down, left, right). • Rapidly adjusting values You can also use the arrow keys to adjust the parameter values. Select a parameter then simultaneously hold down [shift] on the computer keyboard and press or hold one of the arrow keys. The up or right keys increase the value while the down or left keys decrease it. Holding down [shift] and the appropriate arrow key rapidly increases or decreases the value. The Page Up and Page Down keys on the computer keyboard can also be used. Press Page Up to increase the value, and Page Down to decrease it. Hold down the appropriate button to rapidly increase or decrease the value. • Value charts A few parameters (such as VCF Velocity) have pop-up "value charts," from which you can select the desired value. Simply click on the parameter's button, highlight the desired value, then click on the value. 13 Parameters / AN200 Editor Main Window •Initialize If you need to initialize a specific parameter to its default value, you can quickly call up a pop-up menu for this by clicking pressing control key on the appropriate parameter control in the display. For example, if you've changed the LFO 1 Speed setting and want to restore the parameter to its original value, move the cursor to the LFO 1 SPEED knob and click pressing control key. Click on "Init" to restore the original setting or value of the parameter. "Init" will be ghosted and unavailable if no edits have been made to the selected parameter. Initialize is completely independent for each parameter. ■ AN200 Parameters ....................................................... The various parameters are arranged in "blocks" according to their general functions. These correspond to the basic modules of sound generation or control in the AN200. PEG (Pitch EG) Parameter Block The PEG parameters determine how the pitch of the pattern changes over time. This lets you produce subtle or pronounced pitch changes as a note is played. The PEG can also be used as a control source (in PWM Source, Sync Pitch Control Source, FM Source, etc.), giving you even greater editing flexibility. 14 Parameters / AN200 Editor Main Window • ATTACK (PEG Attack Time) Range: 0 ... 127 This determines the Attack Time of the PEG, or how long it takes for the pitch to change, according to the PEG Depth setting. This parameter has no effect unless the DEPTH parameter is set to an appropriate value (except when the PEG is used as a control source — for example, in PWM Source, etc.). • DECAY (PEG Decay Time) Range: 0 ... 127 This determines the Decay Time of the PEG, or how long it takes for the pitch to return to normal. This parameter has no effect unless the DEPTH parameter is set to an appropriate value (except when the PEG is used as a control source — for example, in PWM Source, etc.). • When the Decay Time is set to the maximum value of 127, the pitch (as set in PEG Depth) is held indefinitely without changing. • DEPTH (PEG Depth) Range: -64 ... +63 This determines the depth of the pitch change for the PEG (in semitones). This can be set independently for either the VCO 1 or VCO 2, or both (with the PEG Switch parameter). This must be set to an appropriate value for the PEG to have an effect on the sound. • PEG Switch – VCO 1/ VCO 2 Settings: VCO 1, VCO 2, Both This switch determines which VCO will be affected by the PEG Depth parameter. When this is set to "Both," the VCO 1 and VCO 2 will be affected together (both lamps light). OCT (Octave Shift) Range: -2 ... +2 This determines the octave setting of the selected pattern. The octave setting is also indicated by the lamps. CTRL MATRIX (Control Matrix) The Control Matrix is a highly flexible, complex function that lets you use up to 15 different MIDI controllers to control 15 separate AN200 parameters, in real time. The source controllers can be a modulation wheel, data entry slider, foot controller, key velocity, key scaling, or any of the controllers in the MIDI specification. These can be used to control any of 46 different destination parameters, such as VCF Cutoff, Resonance, FEG Depth, and a wide variety of others. This gives you the freedom to configure a completely different set of sources and destination parameters for each pattern. You can, for example, configure the AN200 to use After Touch to apply vibrato, or the Modulation Wheel to change the resonance while you play, determine the range for both Pitch Bend up and down, and much more. For information on the Control Matrix settings, see the Ctrl Matrix Parameters tab. • DETAIL Page (Control Matrix Parameters) 15 Parameters / AN200 Editor Main Window FREE EG The 4-track Free EG lets you record complex control movements, in order to "hand draw" filter, resonance, LFO and many other available parameters over time---and have them play back automatically by simply playing a pattern. A variety of drawing and editing tools are available for creating unique, continuous parameter changes that would be impossible to achieve with conventional EGs. Up to four different parameters can be controlled independently, each recorded into its own Free EG track. Ideal for those times when you wish you had an extra couple of pairs of hands, the Free EG lets you build up an incredibly complex, completely unique pattern. The display windows (1 - 4) indicate the parameters controlled by each Free EG track. • DETAIL Page (Free EG Parameters) STEP SEQ. (Step Sequencer) Block The Step Sequencer block features four basic controls for the Step Sequencer --- a powerful functions that let you trigger complex Sequences in real time, at the press of a key. For more information, see the Step Sequencer DETAIL Page. • DETAIL Page (Step Sequencer Parameters) • TEMPO Range: 20.0 - 300.0 bpm (beats per minute) This determines the speed of the Step Sequencer. If you want the clock of an external MIDI sequencer or drum machine to control the tempo of the AN200's Step Sequencer, set the Tempo to "MIDI" so that the two devices will play in synchronization with each other. • When the Free EG LENGTH is set so that the Free EG synchronizes with Tempo, this Tempo setting affects the speed of the Free EG. • [PLAY]/[STOP] buttons Click the [PLAY] button to start the Sequence. The Sequence repeats (loops) until you click the [STOP] button to stop it. 16 Parameters / AN200 Editor Main Window LFO Parameter Blocks The LFO parameters allow you to create a wide variety of modulation effects, using a low frequency signal to regularly change the pitch, volume or timbre of the pattern. The LFO can be used to make the sound warmer and more natural, or can be used to produce wild special effects. LFO 1 and LFO 2 can also be used as control sources (in PWM Source, Sync Pitch Control Source, FM Source, etc.), giving you even greater editing flexibility. • Depending on the setting of the selected pattern's Assign Group parameter, the LFO 1 and LFO 2 blocks in the display may be different, with different sets of parameters. All LFO parameters below are available on either LFO 1 or LFO 2; however, some parameters will only be available on one of the LFO blocks, while the other block will have a limited parameter set. • LFO 1 / LFO 2 DETAIL Page • LFO 1 / LFO 2 WAVE Settings: Sine, Sine Ofst1 (Offset 1), Sine Ofst2, Sine180 Ofst1, Sine180 Ofst2 Triangle, Triangle Ofst1, Triangle Ofst2, Triangle180 Ofst1, Triangle180 Ofst2 Square, Square Ofst2, Square180 Ofst2 Saw Down, Saw Down Ofst2, Saw Up, Saw Up Ofst2 S/H (Sample & Hold), S/H Ofst2, S/H2, S/H2 Ofst2 • Parameter settings in italics above can only be selected by using the DATA DEC/INC buttons, or by holding [shift] on the computer keyboard and using the cursor keys. This determines the type of wave for LFO 1 or LFO 2. (The same settings are available for both.) The wave set here determines the characteristics of the modulation applied to the VCO (vibrato), VCF (wah) and VCA (tremolo). • LFO 1 / LFO 2 SPEED Range: 1 ... 256 This determines the speed of LFO 1 or LFO 2. (This parameter is the same for both.) Higher values result in a faster LFO modulation. This is a global control in that it affects all modulation destinations (VCO 1/2, VCA, VCF) equally. • LFO 1 / LFO 2 VCO1 (LFO 1 / LFO 2 to VCO 1 – Oscillator 1 Pitch Modulation Depth) • LFO 1 / LFO 2 VCO2 (LFO 1 / LFO 2 to VCO 2 – Oscillator 2 Pitch Modulation Depth) Range: -127 ... +127 This determines the degree to which the LFO 1 or LFO 2 affects the selected oscillator's pitch. This produces a vibrato effect, or a quavering, vibrating sound in the pattern, by regularly modulating the pitch. Higher values result in a stronger, more pronounced vibrato sound. 17 Parameters / AN200 Editor Main Window • LFO 1 / LFO 2 VCA (LFO 1 / LFO 2 to VCA – Amplitude Modulation Depth) Range: -64 ... +63 This determines the depth of the amplitude modulation of the VCA by LFO 1 or LFO 2. Amplitude Modulation adds a cyclical change to the volume level to create a tremolo effect. Higher values (in the positive range) widen the range of the volume change. Negative values reverse the phase of the LFO by 180 degrees. • LFO 1 / LFO 2 VCF (LFO 1 / LFO 2 to VCF – Filter Modulation Depth) Range: -64 ... +63 This determines the depth of the filter modulation of the VCF by LFO 1 or LFO 2. Filter Modulation adds a cyclical change to the filter cutoff frequency to create a wah effect. Higher values (in the positive range) widen the range of the cutoff frequency change. Negative values reverse the phase of the LFO by 180 degrees. VCF / FEG Parameter Block VCF Parameters The VCF is a filter that allows a specific range of frequencies to pass, while muting all others. Movement of the filter through various frequencies as well as the use of Resonance allows you to create exceptionally dynamic, dramatic changes in the sound. The VCF can be controlled by the filter EG (FEG) parameters, allowing you to have the timbre of the sound change automatically over time. • VELOCITY (FEG Velocity Sensitivity) Range: -64 ... +63 This determines how the filter EG responds to key velocity. For positive values, playing the keys with greater strength results in a wider, more dynamic filter EG (greater filter changes). For negative values, the relationship is inverse: a softer key touch results in a wider, more dynamic filter EG. A setting of "0" results in no change of the filter by playing strength. To set this, click the VELOCITY button and highlight the desired value in the pop-up chart. When a value other than "0" is set, the VELOCITY lamp lights. 18 Parameters / AN200 Editor Main Window • HPF (HPF Cutoff) Range: 0 ... 127 This determines the cutoff frequency of the High Pass Filter (-6 dB/Oct). Frequencies above the setting are passed while those below are cut off. Higher values increase the HPF Cutoff frequency, resulting in a brighter sound. To set this, click the HPF button and highlight the desired value in the pop-up chart. When a value other than "0" is set, the HPF lamp lights. • This High Pass Filter is applied to the signal after the mixer, and is different than the one available in the VCF Type parameter. • TYPE (VCF Filter Type) Settings: LPF24, LPF18, LPF12, BPF, HPF12, BEF • When "LPF18" is selected, both the LPF24 and LPF12 lamps light together. This determines the type of filter used by the VCF. The VCF passes only a specified range of frequencies while cutting off the rest, to give you versatile control over the timbre. The six filter types are described below. LPF24, LPF18, LPF12 The Low Pass Filter passes only those frequencies below the specified cutoff point. Cutoff curves of 24dB/octave (LPF24), 18dB/octave (LPF18) and 12dB/octave (LPF12) can be selected. 19 Parameters / AN200 Editor Main Window BPF The Band Pass Filter passes only those frequencies in the specified range, with a cutoff curve of 12dB/octave. HPF12 The High Pass Filter passes only those frequencies above the specified cutoff point, with a cutoff curve of 12dB/octave. BEF The Band Eliminate Filter passes only those frequencies outside the specified frequency range. The Resonance setting (below) determines the eliminated range. • The filters listed above apply to the signal output from the HPF located between the Mixer and VCA. For more information about the signal path, see AN200 Display Option. 20 Parameters / AN200 Editor Main Window • CUTOFF (VCF Cutoff Frequency) Range: 0 ... 127 This determines the cutoff frequency of the VCF (filter). For example, when the filter type is set to Low Pass Filter, the VCF mutes all frequencies higher than the cutoff point and "passes" the lower frequencies. Lower cutoff values create a deeper, more rounded tone, while higher values create a brighter tone. • RES. (VCF Resonance) Range: -12 ... +102 This determines the amount of resonance boost, or emphasis of harmonics near the cutoff frequency. Higher values produce a higher resonant peak (producing sharper high tones), while lower values produce a relatively flat response. A setting of "0" applies no resonance. 21 Parameters / AN200 Editor Main Window • KEY TRK (VCF Keyboard Tracking) Range: -32 ... +63 This determines the degree to which the VCF "tracks" or follows the keyboard. In other words, the higher the notes played on the keyboard, the more the cutoff frequency is raised (or lowered). When Keyboard Tracking is applied, the cutoff range shifts accordingly at every note, with C3 as the base. Positive values will cause higher notes to have a higher cutoff point. Negative values cause higher notes to have a lower cutoff frequency. A value setting of "0" results in no key tracking. • When this is set to "+32," the change in the cutoff frequency matches (or is directly proportional) with the change in the keyboard notes. FEG (Filter EG) Parameters The FEG parameters determine how the timbre of the pattern changes over time. This lets you produce subtle or pronounced filter effects (such as wah, for example). The EG DEPTH parameter (in the VCF block) must be set to a proper level for the FEG parameters to have an effect on the sound. • The FEG can also be used as a control (in PWM Source, Sync Pitch Control Source, FM Source, etc.), giving you even greater sound-shaping flexibility. • DEPTH (Filter EG Depth) Range: -128 ... +127 This determines the range of movement of the cutoff frequency. This must be set to a proper level for the FEG parameters (Attack, Decay, Sustain, and Release) to have an effect on the sound. Positive values increase the Filter EG Depth. Negative values reverse the shape of the envelope. 22 Parameters / AN200 Editor Main Window • ATTACK (Filter EG Attack Time) Range: 0 ... 127 This determines the attack time of the FEG, which is the time it takes for the signal to reach its maximum cutoff frequency level after a key is pressed (key on). Higher values produce a longer Attack time. (See illustration below.) • DECAY (Filter EG Decay Time) Range: 0 ... 127 This determines the decay time of the FEG, which is the time it takes for the signal to reach its sustain level from the maximum level while a key is held. Higher values produce a longer Decay time. (See illustration below.) • SUSTAIN (Filter EG Sustain Level) Range: 0 ... 127 This determines the level of sustain of the FEG, which is the fixed level of the cutoff frequency maintained as long as the key is held. Higher values increase the Sustain level. (See illustration below.) • RELEASE (Filter EG Release Time) Range: 0 ... 127 This determines the release time of the FEG, which is the time it takes for the filter to reach its initial level after a key is released (key off). Higher values increase the Release time. (See illustration below.) 23 Parameters / AN200 Editor Main Window SYNC Block The AN200 features two oscillator sections: VCO 1 and VCO 2. As on conventional analog synthesizers, the Sync block lets you synchronize the two waveforms to create a more complex sound, with more harmonics. However, the AN200 takes the sonic possibilities even further. Since the VCO 1 oscillator itself actually contains two separate oscillators, these two "internal" oscillators can be synchronized and then layered with VCO 2 to produce sounds of even greater complexity. (For more about the VCOs and Oscillator Sync, see the AN200 Owner’s Manual.) To see an indication of the Oscillator Sync path, enable the Oscillator Sync Routing in the Display Option window. • MODE Settings: Off, VCO 1 Master > Slave (VCO 1 master into slave), VCO 2 > 1 (VCO 2 into VCO 1) This determines the on/off status of Sync, as well as its mode. When this is set to "VCO 1 Master > Slave," the two VCO 1 oscillators are separated inside of the VCO1 and synchronized, with one designated as the controlling "master" and the other the "slave." When this is set to "VCO 2>1," the VCO 1 is synchronized to VCO 2, with the VCO 2 designated as the "master." • The Master oscillator determines the overall pitch of the sound, and the Slave oscillator controls the tone by adding harmonics. • SRC (Sync Pitch Control Source) Settings: Fixed, PEG, FEG, LFO1, LFO2 The Sync Pitch Control Source setting determines the source which applies the modulation over time to the slave oscillator. When this is set to "Fixed," there is no change in modulation over time. • DEPTH (Sync Pitch Control Depth) Range: -64 ... +63 This determines the amount of depth of control from the Sync Control Pitch Source (determined by the Sync Pitch Control Source setting above) over time. Higher values increase the Depth. When Sync Mode is set to Off, this parameter has no effect. 24 Parameters / AN200 Editor Main Window FM Block The Frequency Modulation (FM) function gives you additional modulation control over the sound, letting you apply the FM signal (called the "modulator") to the VCO 1 (here called the "carrier"), letting you dramatically change the harmonic complexity of the sound. In the FM block, the Depth of the modulation can be controlled; however, additional detailed parameters are available in the Details page. The lamps (VCO 2, VCO 1, OTHER) indicate the modulator (source) for the FM signal, determined in the Src2 parameter. To see an indication of the FM modulation path, enable the FM Routing in the Display Option window. • FM DETAIL Page • DEPTH Range: -64 ... +63 This determines the amount of modulation created by the FM function. Higher values result in greater modulation depth. Although the overall sound depends on the setting of the FM parameters in the Details page, higher Depth values generally result in a more clangorous sound. • This parameter differs from that in FM Synthesis (such as used by DX-series synthesizers). Extreme settings will change the pitch of the pattern. • When the VCO1 Wave is set to "Multi Saw," the Depth setting has no effect. MIXER Block As its name implies, the Mixer module lets you control the levels of the various sound sources of the AN200. • VCO 1 (VCO 1 Level) Range: 0 ... 127 This determines the balance of the VCO 1 level in relation to the VCO 2, Ring Modulator, Feedback, and Noise levels. Higher values result in a higher VCO 1 level. When not using VCO1, set the value to "0." • VCO 2 (VCO 2 Level) Range: 0 ... 127 This determines the balance of the VCO 2 level in relation to the VCO 1, Ring Modulator, Feedback, and Noise levels. Higher values result in a higher VCO 2 level. When not using VCO2, set the value to "0." 25 Parameters / AN200 Editor Main Window • NOISE (Noise Level) Range: 0 ... 127 This determines the balance of the Noise signal in relation to the VCO 1, VCO 2, Ring Modulator, and Feedback levels. The higher the value, the greater the Noise Level. When not using Noise, set the value to "0." • By mixing in Noise and using the AN200 Editor to select an appropriate Filter Type (such as VCF, HPF, etc.), you can create a wide variety of unique "special effect" sounds. • RING MOD (Ring Modulator Level) Range: 0 ... 127 This determines the balance of the Ring Modulator level in relation to the VCO 1, VCO 2, Noise, and Feedback levels. The higher the value, the greater the Ring Modulator level. When not using the Ring Modulator, set this value to "0." • The Ring Modulator combines the VCO 1 and VCO 2. It is particularly effective for producing dissonant interval sounds with a clangorous, or metallic effect. • F.B. (Feedback Level) Range: 0 ... 127 This determines the balance of the Feedback level in relation to the VCO 1, VCO 2, Noise, and Ring Modulator levels. Feedback returns the VCA output signal back to the input, creating a feedback "loop." The higher the value, the greater the Feedback level. When not using Feedback, set this value to "0." • Be careful when adjusting this parameter, since the higher settings could result in excessively loud sounds that may inadvertently damage the connected audio equipment (and your ears!). 26 Parameters / AN200 Editor Main Window VCO 1 / VCO 2 Blocks The VCO (voltage controlled oscillator) modules 1 and 2 are where the basic sounds for the AN200 are generated. In these blocks, you can determine the waveform, its pitch, and adjust the pulse width settings for the oscillator. • VCO 1 WAVE Settings: Available waves depend on the current SYNC status (on/off). When SYNC is off: Saw, Saw 2, Pulse, Mix, Multi Saw When SYNC is on (set to "VCO 1 Master > Slave" or "VCO 2 > 1"): Saw, Pulse, Inner1, Inner2, Inner3, Square, Noise • Parameter settings in italics above can only be selected by using the DATA DEC/INC buttons, or by holding [shift] on the computer keyboard and using the cursor keys. This determines the waveform for the VCO 1 oscillator. • The difference between saw/pulse Sync on and Sync off (when Saw or Pulse is selected) is only a slight nuance in sound which becomes especially distinctive when the Pulse Width is set to a value other than 64. Saw (Sawtooth) The Saw (sawtooth) wave derives its name from its shape, and is used to create a trumpet or violin sound. Since it contains all harmonics in the spectrum, it produces a full, rich sound. When used with the Pulse Width function, increasing the even harmonics can raise the pitch to a maximum of a full octave. 27 Parameters / AN200 Editor Main Window Pulse The Pulse wave is used to make woodwind (clarinet-type) sounds. Its spectrum is similar to a sawtooth wave, but since every second (even-numbered) harmonic is missing, the waveform contains only odd-numbered harmonics when Pulse Width is set to "64". Saw2 (Sawtooth2) The spectrum of the Saw2 wave is created by a sawtooth wave combined with a pulse wave, and therefore is slightly different than the Saw wave. When the Pulse Width is set to 64, the shape of the wave is the same as Saw. Even if you increase the evennumbered harmonics by the Pulse Width, the basic pitch remains the same. Mix The mix wave is formed by a combination of saw and pulse waves. Multi Saw This wave behaves like multiple saw waves combined together with their pitches detuned from each other. When Multi Saw is selected, all of the VCO 1 PWM parameters are unavailable, and are replaced with special VCO 1 Detune and Mix parameters. 28 Parameters / AN200 Editor Main Window Inner1, Inner2, Inner3 When SYNC is set to "on," three "inner" waves are available. This wave is effective when used with Pulse Width. Square Basically, this is the same as a Pulse wave. Changing the Pulse Width does not alter the width of the wave (this is maintained at 50%), but instead changes its shape slightly, making it more complex. Noise This produces random fluctuations in sound, equally across the entire spectrum, resulting in noise, or a "hissing" sound. • Using Oscillator Sync Pitch to control the Noise wave over time results in a unique nonpitched sound in which the harmonics are shifted. • VCO 1 PITCH (Pitch Coarse) Range: -64 ... +63 This determines the pitch of the VCO 1 in semitones. A value of "0" is normal pitch. • VCO 1 FINE Range: -50 ... +50 This determines the pitch of the VCO 1 in 1-cent steps over a range of 100 cents, or one semitone. • VCO 1 SYNC PITCH Range: -64 ... +63 This determines the pitch of the slave oscillator in semitones, available only when Sync Mode is set to on. This lets you create a difference in pitch between master and slave oscillators and control the resulting harmonic interval. At the "0" setting, the pitch is the same as the master oscillator. Higher values increase the interval, and negative values result in a softer sound. • To achieve a discernible result, make sure the VCO 1 Level (in the MIXER block) is turned up high enough. 29 Parameters / AN200 Editor Main Window • VCO 1 EDGE Range: 0 ... 127 This determines the sharpness or smoothness of the edge of the VCO1 wave. Higher values produce a sharper wave, resulting in a harsher sound. Lower values produce a rounder wave, resulting in a softer sound. A value of "0" results in a sine wave. VCO 1 PWM (Pulse Width Modulation) Parameters • The PWM parameters are not available when Sync Mode is set to "off" and the VCO 1 WAVE is set to "Multi Saw." • VCO 1 PWM SRC (Pulse Width Modulation Source) Settings: Fixed, PEG, FEG, LFO 1, LFO 2, LFO 2 Phase, LFO 2 Fast, VCO 2 This determines the source wave which changes the VCO1's pulse width over time, thus determining the behavior of the pulse width. When this is set to "Fixed," there is no change in modulation over time. • VCO 1 PWM DEPTH (Pulse Width Modulation Depth) Range: -64 ... +63 This determines the amount of depth of the pulse width modulation of the VCO 1, based on the PWM Source wave parameter (above). Higher (positive) values produce a deeper modulation. 30 Parameters / AN200 Editor Main Window • VCO 1 PWM PW (Pulse Width) Range: 0 ... 64 ... 127 This determines the width of the VCO 1 pulse wave. Higher (positive) values produce more harmonics, resulting in a fatter sound. In general, pulse width is used to control the pulse wave; however, the AN200 can use PW with other waves as well, for a wider possible variety of sounds than usual. • VCO 1 Detune (Multi Saw wave only) Range: 0 ... 127 The Multi Saw wave combines multiple saw waves. Each of these individual waves can be detuned with respect to the others. This parameter determines the amount of pitch difference among the waves. Higher values produce a greater amount of detuning. This parameter is available only when SYNC is set to "off" and the VCO 1 WAVE is set to "Multi Saw." • VCO 1 Mix (Multi Saw wave only) Range: 0 ... 127 The Multi Saw wave combines multiple saw waves. The levels of these individual waves are mixed together. This parameter determines the difference in volume among the waves. A value of "0" results in the output of the basic wave (the wave at normal pitch), while a value of "127" results in all waves having the same volume. This parameter is available only when SYNC is set to "off" and the VCO 1 WAVE is set to "Multi Saw." • VCO 2 WAVE Settings: Saw, Pulse, Saw 2, Mix, Triangle, Sine The Sine wave (in italics above) can only be selected by using the DATA DEC/INC buttons. This determines the waveform for the VCO 1 oscillator. 31 Parameters / AN200 Editor Main Window Saw (Sawtooth) The Saw (sawtooth) wave derives its name from its shape, and is used to create a trumpet or violin sound. Since it contains all harmonics in the spectrum, it produces a full, rich sound. When used with the Pulse Width function, increasing the even harmonics can raise the pitch to a maximum of a full octave. Pulse The Pulse wave is used to make woodwind (clarinet-type) sounds. Its spectrum is similar to a sawtooth wave, but since every second (even-numbered) harmonic is missing, the waveform contains only odd-numbered harmonics when Pulse Width is set to "64". Saw2 (Sawtooth2) The spectrum of the Saw2 wave is created by a sawtooth wave combined with a pulse wave, and therefore is slightly different than the Saw wave. When the Pulse Width is set to 64, the shape of the wave is the same as Saw. Even if you increase the evennumbered harmonics by the Pulse Width, the basic pitch remains the same. 32 Parameters / AN200 Editor Main Window Mix The mix wave is formed by a combination of saw and pulse waves. Triangle This is a conventional triangle wave. When Triangle is selected, all of the VCO 2 PWM parameters are unavailable, and are replaced with the X-MOD parameters. Sine This is a conventional sine wave. When Sine is selected, all of the VCO 2 PWM parameters are unavailable, and are replaced with the X-MOD parameters. • VCO 2 PITCH • VCO 2 FINE • VCO 2 EDGE These parameters are the same as those of VCO 1. • When the VCO 2 Wave is set to "Triangle" or "Sine," the VCO 2 EDGE parameter has no effect. 33 Parameters / AN200 Editor Main Window VCO 2 PWM (Pulse Width Modulation) Parameters • The PWM parameters are not available when the VCO 2 WAVE is set to "Triangle" or "Sine." • VCO 2 PWM SRC (Pulse Width Modulation Source) Settings: Fixed, PEG, FEG, LFO 1, LFO 2, LFO 2 Phase, LFO 2 Fast, VCO 1 • Parameter settings in italics above can only be selected by using the DATA DEC/INC buttons, or by holding [shift] on the computer keyboard and using the cursor keys. With the exception of "VCO 1" (VCO 2 cannot be used to modulate itself!), these settings are the same as those of VCO 1 PWM SRC. • VCO 2 PWM DEPTH (Pulse Width Modulation Depth) • VCO 2 PWM PW (Pulse Width) These parameters are the same as those of VCO 1. • When the VCO 2 Wave is set to "Triangle" or "Sine," the VCO 2 PWM PW parameter has no effect. X-MOD Parameters The X-MOD (cross-modulation) parameters are available only when the VCO 2 WAVE is set to "Triangle" or "Sine." Whereas the PWM parameters use a source to modulate the pulse width of the oscillator, X-MOD is similar to FM in that it modulates the frequency of the oscillator, generating a complex set of harmonics. The control source for the Depth of the modulation can be selected from: PEG, FEG, LFO 1, or LFO 2. The actual modulator for cross-modulation is fixed to VCO1. • The harmonics that X-MOD generates are different from those of FM because of the method used: FM modulates in a logarithmic fashion, while X-MOD modulates in a linear fashion. • X-MOD SRC (Cross-modulation Depth Control Source) Settings: Fixed, PEG, FEG, LFO 1, LFO 2 This determines the source wave which changes the Cross Modulation Depth over time. When this is set to "Fixed," there is no change in modulation depth over time. This parameter is available only when the VCO 2 WAVE is set to "Triangle" or "Sine." • X-MOD DEPTH Range: -64 ... +63 This determines the amount of depth of the cross-modulation of the VCO 2. Higher (positive) values produce a deeper modulation of the frequency. This parameter is available only when the VCO 2 WAVE is set to "Triangle" or "Sine." 34 Parameters / AN200 Editor Main Window VCA Block The VCA parameters give you control the overall volume or level of the AN200 pattern. • VELOCITY (VCA Velocity Sensitivity) Range: -64 ... +63 This determines how the VCA (pattern level) responds to key velocity. For positive values, playing the keys with greater strength results in higher volume. For negative values, the relationship is inverse: a softer key touch results in a higher volume. A setting of "0" results in no change in volume by playing strength. To set this, click the VELOCITY button and highlight the desired value in the pop-up chart. When a value other than "0" is set, the VELOCITY lamp lights. • VOLUME Range: 0 ... 127 The VOLUME setting determines the overall output level from the VCA before the signal passes to the Effect block. AEG (Amplitude Envelope Generator) Parameters The AEG parameters allow you to shape the sound of the AN200 pattern. In other words, it lets you set how the level of the pattern changes over time. • AEG ATTACK (Amplitude EG Attack Time) Range: 0 ... 127 This determines the Attack Time of the AEG, or how long it takes for the sound to reach full volume when a note is played. Higher values produce a longer Attack time. (See illustration below.) • AEG DECAY (Amplitude EG Decay Time) Range: 0 ... 127 This determines the Decay Time of the EG, or how rapidly the sound dies out (or goes down to the Sustain Level) as a note is held. Higher values produce a longer Decay time. (See illustration below.) • AEG SUSTAIN (Amplitude EG Sustain Level) Range: 0 ... 127 This determines the level of sustain of the AEG, which is the level at which the volume will be maintained as long as the key is held. Higher values increase the Sustain level. (See illustration below.) 35 Parameters / AN200 Editor Main Window • AEG RELEASE (Amplitude EG Release Time) Range: 0 ... 127 This determines the Release Time of the AEG, or how long the sound sustains after a note is released. Higher values increase the Release time. (See illustration below.) DIST (Distortion) / EQ Block The Distortion and EQ parameters give you further sonic control over the AN200 pattern, letting you apply and adjust distortion, and make detailed equalization settings. • DIST / EQ DETAIL Page • DIST DRIVE (Distortion Drive) Range: 0 ... 100 This determines the amount of distortion "drive" for the guitar amplifier simulation effect block. The higher the value, the greater the degree of distortion in the sound. • DIST DRY/WET (Distortion Dry/Wet Balance) Range: D63>W ... D=W ... D<63 This determines the level balance of the unprocessed (dry) original sound of the pattern, and the distortion processed (wet) sound. A setting of D=W results in an equal balance of dry and wet sound. (In the display, "D" indicates "dry," and "W" indicates "wet.") • EQ LO (Low Frequency Gain) Range: -12 ... +12 (dB) This determines the gain or level of the low frequency band. Positive values boost the level of the frequency and negative values attenuate it. (The specific frequency to be adjusted can be set with the Low Freq. parameter in the DETAIL page.) 36 Parameters / AN200 Editor Main Window • EQ MID (Mid Frequency Gain) Range: -12 ... +12 (dB) This determines the gain or level of the mid frequency band. Positive values boost the level of the frequency and negative values attenuate it. (The specific frequency to be adjusted can be set with the Mid Freq. parameter in the DETAIL page.) • EQ HI (High Frequency Gain) Range: -12 ... +12 (dB) This determines the gain or level of the high frequency band. Positive values boost the level of the frequency and negative values attenuate it. (The specific frequency to be adjusted can be set with the High Freq. parameter in the DETAIL page.) COMMON Parameters • COMMON DETAIL Page • KEY.M (Key Assign Mode) Settings: POLY (polyphonic) , MONO (monophonic), LEGATO This determines how the tone generator sounds in response to the MIDI input. POLY Tone generator is played polyphonically. The maximum simultaneous polyphony is 5 notes. MONO Tone generator is played monophonically. The maximum simultaneous polyphony is 1 note. This setting is good for creating fat and powerful bass and lead sounds. LEGATO Tone generator is played monophonically. The maximum simultaneous polyphony is 1 note. For this setting, successively played notes do not retrigger the PEG, FEG or AEG --- resulting in a smoother note-to-note sound. • This setting overrides the Key Assign setting. Even if it is set to "POLY," the voice will only play monophonically (with up to four voices sounding together) when Legato is set to on. 37 Parameters / AN200 Editor Main Window • UNISON (Unison Switch) Settings: ON, OFF This determines whether the Unison mode is on or off. Setting this to on is an instant way to get a "fat" analog-like lead sound. When Unison is on, the selected pattern is layered with slightly detuned copies of itself, and set to play monophonically (one note at a time). The amount of detuning can be set with the Unison Detune parameter (in the DETAIL page). • This setting overrides the Key Assign setting. Even if it is set to "POLY," the voice will only play monophonically (with up to four voices sounding together) when Unison Switch is set to on. Portamento Portamento is a pitch change effect commonly employed by singers and instrumentalists to smoothly "glide" from one pitch to another. Portamento has been a common feature in synthesizers as well, and can be used subtly for a natural pitch glide, or can be used to produce wild special effects. • TIME (Portamento Time) Range: 0 ... 127 This determines the time of the Portamento effect, or how long it takes to glide the pitch from one note to the next. Higher values result in a longer pitch glide time. 38 Parameters / Detail Parameter Tab Setup Detail Parameter Window This window is called up anytime you click on one of the DETAIL buttons in the main control panel window. (This includes all but the DETAIL buttons of the FREE EG and STEP SEQ. sections, each of which have their own separate windows.) ■ Detail Parameter Tab .................................................... 39 Parameters / Detail Parameter Tab Common Parameters • Category This is used with Pattern Name below to give a custom name to your edited pattern. The category is a two-letter code that indicates the basic instrument type of the pattern (see chart below). Specifying the category makes it easier to recognize the application or use of each particular pattern; it also makes it easy to organize your patterns according to their character or application. Set this to "0: --" if you wish to leave the category blank. For a complete list of the category abbreviations and their descriptions, see the Pattern List in the AN200 Owner's Manual. Category List 0: 1: 2: 3: 4: 5: 6: 7: 8: 9: 10: 11: 12: 13: 14: 15: 16: 17: 18: 19: 20: 21: 22: -Pf Cp Or Gt Ba St En Br Rd Pi Ld Pd Fx Et Pc Se Dr Sc Vo Co Wv Sq No category Piano Chromatic Percussion Organ Guitar Bass Strings/Orchestral Ensemble Brass Reed Pipe Synth Lead Synth Pad Synth Effect Ethnic Percussive Sound Effect Drums Synth Comp Vocal Combination Material Wave Sequence • Pattern Name This is used with Category above to give a custom name to your edited pattern. Click on the box and type in the desired pattern name from the computer keyboard. • Clicking while pressing control key on the box calls up a set of basic text editing functions (Undo, Cut, Copy, Paste, Delete, Select All), along with the indicated keyboard shortcuts. 40 Parameters / Detail Parameter Tab • Unison Detune Range: 1 ... 32 When the UNISON switch is on, multiple sounds are played, with the pitch of each sound slightly detuned. Unison Detune adjusts the detuning of the VCO pitch in fine increments, letting you create an even thicker Unison sound by applying higher settings; however, be careful not to apply too much or you'll change the basic pitch of the pattern. • You can also adjust the value of this parameter with the left and right mouse buttons. Click on the parameter box, then click the left button to decrease the value, or the right button to increase it. • Portamento Mode Settings: When Key Mode is set to "POLY": Normal: Normal portamento play. Sustain Key: With this setting, the Hold tone (by a sustain pedal) is specified as the starting pitch of the portamento. When Key Mode is set to "MONO" or "LEGATO": Full Time: Portamento is always enabled. Fingered: Portamento is only enabled by legato performance. This determines the characteristics of the portamento (sometimes called glissando), or how the tone glides from one tone to the next through all the intermediate pitches, when the Portamento Time is set to a value other than "0". Available parameters depend on the Key Mode setting. If the Portamento Time parameter is set to "0", Portamento will have no effect. Distortion Parameters The Distortion effect lets you create a wide variety of distortion sounds, from subtle, warm overdrive-type sounds to very heavy, metallic distortion. • Keep in mind that many of these parameters (as well as the ones on the main control panel) are interrelated, and you may not hear any distortion effect unless they are set to appropriate values. This is especially true of Drive, Dry/Wet Balance, and Output Level. • Guitar Amp. Type Settings: Off, Stack, Combo, Tube This determines the type of guitar amplifier simulated by the Distortion effect. Each produces a slightly different distortion sound, recreating the characteristics of an actual amplifier. "Stack" simulates a separate amp and speaker setup, "Combo" simulates a single cabinet transistor amp and speaker, and "Tube" simulates a single cabinet tube amp and speaker. When this is set to "Off," some of the guitar amplifier simulation effect is cancelled (however, Distortion Drive and LPF are still applied to the sound). 41 Parameters / Detail Parameter Tab • LPF Range: 1.0 kHz ... 18.0 kHz, Thru This determines the frequency of the low pass filter that is applied to the distortion sound. Depending on the Guitar Amp. Type setting, this parameter can be used to "fatten" the sound or make it piercing and brittle. When this is set to "Thru," no filtering is applied to the distortion sound. • Output Level Range: 0 ... 100 This determines the output volume of the distortion sound. Keep in mind that this may not have any effect unless the Dry/Wet Balance is set to an appropriate value. LFO Parameters • Assign Group Settings: LFO1 (All) LFO1 (VCO1, VCO2, VCA) - LFO2 (VCF) LFO1 (VCO1, VCO2) - LFO2 (VCA, VCF) LFO1 (VCO1) - LFO2 (VCO2, VCA, VCF) LFO2 (All) This determines the destination choices for the LFO 1 and LFO 2 modulation. When one of the "(All)" settings is selected, all of the available destinations (VCO1, VCO2, VCA, and VCF) are grouped to the selected LFO, 1 or 2. The LFO blocks in the main panel control automatically change when this parameter is set. The basic parameters of Wave and Speed (as well as the Detail page) remain intact for both LFOs, no matter what setting is made here. • LFO 1 Delay Range: 0 ... 127 The LFO 1 Delay setting determines the delay time of the modulation. Lower values result in shorter LFO 1 Delay times, and higher values result in longer Delay times. 42 Parameters / Detail Parameter Tab • Key On Resett Settings: Off: On: LFO 1 and LFO 2 do not reset, but modulate continuously. LFO 1 and LFO 2 reset every time a key is pressed. This determines the start point of the LFO 1 and LFO 2 cycle. • Sync Pmod Sw. Settings: Master, Slave, Both The Sync Pitch Modulation Switch setting determines which oscillator (master, slave, or both) is modulated by the LFO 1 or LFO 2. Depth rate is determined by the LFO1/LFO2 VCO1 setting. This parameter is effective when the SYNC MODE is set to “VCO1 Master > Slave.” EQ Parameters • Low Freq. (Low Frequency) Range: 32 Hz ... 2.0 kHz This determines the frequency which is boosted or cut with the EQ LO parameter in the main control panel. • High Freq. (High Frequency) Range: 500 Hz ... 16.0 kHz This determines the frequency which is boosted or cut with the EQ HI parameter in the main control panel. • Mid Freq. (Mid Frequency) Range: 100 Hz ... 10.0 kHz This determines the frequency which is boosted or cut with the EQ MID parameter in the main control panel. • Mid Resonance Range: 1.0 ... 12.0 This determines the width of the frequency band which is boosted or cut with the EQ MID parameter in the main panel. The central frequency is set with the Mid Frequency parameter (above). Higher values result in a narrower band width. 43 Parameters / Detail Parameter Tab FM Parameters • Algorithm Settings: Both, Master, Slave This determines how the two VCO1 oscillators (master and slave) are connected in relation to the FM signal. There are three types of connections, or "algorithms," as shown in the diagrams below. Both FM is applied to both master and Slave oscillators. Master FM is applied to the master oscillator. Slave FM is applied to the slave oscillator. When this is set to "Slave," the overall pitch is determined by the Sync Pitch setting. This allows you to set the correct pitch for the overall sound, even when the FM Depth is set to extreme values. This parameter is effective when the SYNC MODE is set to "VCO1 Master > Slave." 44 Parameters / Detail Parameter Tab • Src1 (FM Depth Ctrl) Settings: Fixed, PEG, FEG, LFO1, LFO2 This determines the modulation source which controls the FM Depth. When this is set to "Fixed," there is no change in modulation over time. • Src2 (Modulator) Settings: VCO2 Frequency, VCO1, VCO1 Sub Osc. (sub oscillator), PEG, FEG, LFO1, LFO2, VCO2 Output This determines the source wave which modulates the VCO1 wave. • For the most part, the above settings should be self-explanatory. If necessary, refer to the relevant sections (for example, VCO1, PEG, FEG, LFO1/2). The other settings are explained below. VCO2 Frequency : VCO1 Sub Osc. : VCO2 Output : This modulation uses a sine wave which is set to the same frequency as that of the VCO 2’s pitch. This modulation uses a wave of either half or double the frequency of the VCO 1 (depending on the selected VCO 1 waveform). This uses the actual VCO 2 output waveform for modulation, resulting in an FM synthesis-like sound. Output Gain Settings: +0 dB, +6 dB, +12 dB This determines the overall level gain of the output signal of the selected pattern. Use this parameter together with the hardware VOLUME control on the tone generator to set the desired pattern level. • Be careful when using the higher settings, since you may inadvertently damage the connected audio equipment (and your ears!) if the pattern is too loud. 45 Parameters / Ctrl (Control) Matrix Parameter Tab ■ Ctrl (Control) Matrix Parameter Tab ............................ Many of the AN200's parameters can be controlled in real time. The Control Matrix provides an extraordinarily comprehensive and flexible way to control these parameters. Up to 15 different controllers can be used simultaneously to control 15 separate parameters. The particular physical controllers used depend on the connected MIDI instrument. Among the more commonly used controllers are: Velocity, Modulation Wheel, After Touch, and Foot Controller. Since any of the MIDI Control Change numbers can be used for control sources, you can set up highly complex routings. The Control Matrix settings determine which "source" (i.e., MIDI Control Change numbers, Modulation Wheel, Foot Controller, etc.) is used to control which AN200 "destination" parameter (i.e., VCF Cutoff, Resonance, FEG Depth, etc.). This gives you the freedom to configure a completely different set of sources and destination parameters for each pattern. You can, for example, configure the AN1x to use After Touch to apply vibrato, or the Modulation Wheel to change the resonance while you play, determine the range for both Pitch Bend up and down, and much more. The Control Matrix provides 15 sets of control setup parameters. The Depth of the controller effect can also be set independently for each of the 15 sets. 46 Parameters / Ctrl (Control) Matrix Parameter Tab • Ctrl (Control) Source Settings: Off, CC No., After Touch, Pitch Bend, Key Track, Velocity, Key Random, Mod Wheel, Foot Vol, Foot Ctrl, Foot Sw, Ribbon X, Ribbon Z, AN AC 1 — 8 This determines which MIDI controller is assigned to control the corresponding Parameter. You can set the source by Control Change number or by controller name, as described below. Special Key Track and Key Random controllers are included for added flexibility. Off No controller assigned. CC No. 1, 2, 4, 6, 11 — 14, 20, 21, 23, 24 — 27, 30, 32, 33, 36 — 38, 40 — 47, 52 — 56, 58, 60 — 67, 69, 70, 76 — 79, 84 — 87, 90 — 95 Selects the Source controller according to Control Change number, when received by incoming MIDI messages. (Unavailable Control Change numbers are "ghosted.") After Touch For controlling with keyboard After Touch. Pitch Bend For controlling with a Pitch Bend wheel. Key Track For controlling with note number messages generated by pressing the keys. Higher keys result in higher controller values. Velocity For controlling with keyboard velocity, or the strength with which you strike the keys. Key Random For this setting, a random note number messages is automatically generated for each key you press, or for each MIDI note message received. Mod Wheel For controlling with the Modulation Wheel, and/or by incoming MIDI messages of Control Change number 1. Foot Volume For controlling with a connected Foot Volume controller, and/or by incoming MIDI messages of Control Change number 7. Foot Control For controlling with a connected foot controller, and/or by incoming MIDI messages of Control Change number 4. Footswitch For controlling with a connected Footswitch, and/or by incoming MIDI messages of Control Change number 64. 47 Parameters / Ctrl (Control) Matrix Parameter Tab Ribbon Controller-X (for AN1x data compatibility) For controlling with X-axis motion on a ribbon controller (left-right), and/or by incoming MIDI messages of Control Change number 13. When Ribbon Controller-X is used, the control change (default of 13) is treated as a "Center-Base-Controller" (center = 64). Ribbon Controller-Z (for AN1x data compatibility) For controlling with Z-axis motion on a ribbon controller (push-release), and/or by incoming MIDI messages of Control Change number 12. AN AC 1 - 8 For controlling with a specified Assignable Controller. (Refer to the instructions on using Assignable Controllers in the owner's manual of your particular tone generator. • The available Source for assignment may differ, depending on the selected Parameter. For details of available parameters, see the table of Control Matrix parameters in the AN200 Owner's Manual. • You cannot assign the same Source controller and Parameter to more than one set. If you attempt to do so, lower-numbered sets will take priority. • The control change numbers for AN AC 1-4 can be set with the AN Native parameters (on the panel of the AN200). Each Preset Pattern has four pre-assigned control change numbers using this function (refer to the AN Pattern List in the AN200 Owner’s Manual). • The Control Change numbers for the Mod Wheel, Foot Volume, Foot Control, Footswitch, Ribbon Controller-X, Ribbon Controller-Z and AN AC 5-8 can be set from the AN1x System Parameters (refer to the MIDI Data Format section in the AN200 Owner’s Manual). • Parameter Settings: For a complete list of the Control Matrix's Parameters, see the AN200 Owner's Manual. When this is set to "Off," the assigned controller has no effect. (Unavailable parameters are "ghosted.") • Depth Settings: The available settings may differ, depending on the selected Parameter. For details, see the table of Control Matrix parameters in the AN200 Owner's Manual. This determines the control range of the Source controller. When this is set to "Direct," you can directly adjust/edit the parameter assigned to the controller within its original range. • Pitch Bend Range Up • Pitch Bend Range Down Range: -24 ... +24 These two parameters let you set independently set the Pitch Bend Range for up and down motion of the pitch bend wheel on a connected MIDI keyboard. In other words, this allows you to set pitch bend so that moving the wheel up can make a greater (or lesser) pitch change than moving the wheel down. 48 Parameters / Ctrl (Control) Matrix Parameter Tab FREE EG Window The Free EG function gives you four independent tracks to which you can record complex real-time parameter changes, over a specified length of time, either in measures or seconds. In this window, you can draw a custom Free EG "curve" for each track that controls a single selectable parameter (such as filter, resonance, LFO, etc.) over time. Four of these curves --- each affecting a different parameter --- can be played back automatically by simply playing the pattern. A variety of drawing and editing tools are available for creating unique, continuous parameter changes that would be impossible to achieve with conventional EGs. Naturally, Free EG parameters and data are stored as pattern data, allowing each pattern to have its own Free EG settings. Individual Track Parameters These parameters apply to each individual track (1 - 4) of the Free EG function. Each track can have its own EG "curve" and parameter. When a pattern is played, all Free EG tracks playback simultaneously, controlling the assigned parameters in real time. • EDIT SELECT Settings: Track 1, Track 2, Track 3, Track 4 This determines the particular track for editing. 49 Parameters / Ctrl (Control) Matrix Parameter Tab • TRACK PARAMETER Switch Settings: ON, OFF This determines whether the specified track is active (ON) or not (OFF). This must be set to "ON" for the Free EG of the track to have any effect. When this is set to "ON," two pink dotted lines appear in the Free EG display. These represent the range over which the selected parameter (set in Track Parameter below) can be changed by the Free EG curve. The position of these two lines depends on the particular parameter and its current value or setting. A Free EG curve can extend above or below these lines; however, the portions that extend will have no further effect on the parameter (beyond the values represented by the lines). • TRACK PARAMETER For a complete list of the Control Matrix's Parameters, see the AN200 Owner's Manual. This determines which AN200 parameter will be played by the EG "curve" in the selected Free EG track. Only one parameter can be selected for a track. • VALUE Display This shows the current value or setting for the selected Track Parameter. Keep in mind that this is only a display indication; the value/setting cannot be changed here, but must be changed from the appropriate parameter in the main control panel window (or the Details page). • TRACK Display Buttons 1 - 4 Click on each of these to display the Free EG curves of two or more tracks simultaneously. Each track’s curve is shown in a different color, making it easy to distinguish between the tracks. TRACK COMMON PARAMETERS • LENGTH Settings: 1/2, 1, 3/2, 2, 3, 4, 6, 8 bars (number of measures) 1.0 ... 16.0 sec (seconds) The Length setting determines the time for recording and play of the Free EG sequence. There are two Length types, including length determined by number of measures (bars) or by absolute time (seconds). • Setting the Length to a number of bars automatically causes the Free EG to be affected by Tempo. 50 Parameters / Ctrl (Control) Matrix Parameter Tab • TRIGGER Settings: Free, MIDI In Notes, All Notes, Seq Start This determines how the Free EG track playback is triggered, as described below. Free After selecting a pattern, the first key pressed on the keyboard triggers the Free EG. MIDI in Notes The Free EG is triggered by a note on message from a connected MIDI instrument or sequencer. All Notes The Free EG is triggered by either a Note On message from a connected MIDI instrument or sequencer, or from the first recorded Step of the Step Sequencer. Seq Start The Free EG is triggered by the start of the Step Sequencer. • LOOP TYPE Settings: Off, Forward, Forward Half, Alternate, Alternate Half This determines the type of loop for play of the Free EG sequence, as described below. Off The Free EG sequence plays once but does not loop. The parameter settings at the end of the Free EG sequence remain in effect. Forward The Free EG sequence loops from start to end. Forward Half The Free EG sequence loops from the middle to the end. Alternate The Free EG sequence loops from start to end, then end to start. Alternate Half The Free EG sequence loops from middle to end, then end to middle. 51 Parameters / Ctrl (Control) Matrix Parameter Tab • TEMPO Range: 20 - 300 bpm (beats per minute) This determines the tempo or speed at which the selected Free EG track plays back. • The Tempo setting also affects the Step Sequencer patterns. Edit Tools The toolbar at the left of the Free EG window contains the Edit tools. They are divided into two basic types: the Drawing tools (which include special wave tools) and the Transform tools. Using the Drawing Tools 1) Click on the desired Drawing tool. For details on each tool, refer to the descriptions in step #2 below. 2) Hold down the left mouse button at the desired start point, and simultaneously drag the mouse to draw the curve. Release the button to stop drawing. For the pencil tool, the curve is immediately changed. For the other tools, a "ghost" curve temporarily appears (along with the original one) while you are drawing to indicate the new curve. Release the mouse button, and after a slight pause, the newly drawn curve replaces the old one. However, for any area left undrawn, the original curve remains. pencil The "pencil" tool lets you draw the desired curve in freehand. straight The "straight" tool lets you draw a perfectly straight line by "pulling" the cursor away from the starting point. 52 Parameters / Ctrl (Control) Matrix Parameter Tab pulse triangle sine These three wave tools let you easily draw the respective waveforms. The example illustrations below (using the sine wave) show how dragging the mouse affects the wave. • Dragging the mouse up or down increases the amplitude of the wave, or the degree to which the parameter value will change. • Dragging up creates a waveform of normal phase. • Dragging down reverses the phase by 180 degrees. • Dragging to the right decreases the frequency, or makes the parameter value change slower, while dragging to the left increases the frequency. 53 Parameters / Ctrl (Control) Matrix Parameter Tab Using the Transform Tools 1) Click on the "cursor" button. 2) Highlight (define) the area you wish to transform. Move the cursor to the beginning point of the desired area, then hold down the left mouse button and drag the mouse to the right, highlighting or defining the area to be changed. Release the button to set the highlight end point. • The Transform tools are "ghosted" unless an area is defined. 3) Click on the desired Transform tool. For the "smooth" and "random" tools, clicking on the respective button starts the operation. After a short pause, the Free EG curve changes according to the transform. smooth As its name suggests, this transform "smooths" jagged edges in the curve. Use this repeatedly to make the edges as round as desired. random This transform randomly assigns different values at successive points in the curve. To a certain extent, this is the opposite of "smooth" above, since it produces jagged jumps and edges in the curve. 4) If using "scale" or "move," use the mouse to adjust the setting as desired. For the "scale" and "move" tools, hold down the left mouse button and drag the mouse in the appropriate direction, releasing it at the desired point. scale This useful tool lets you compress or expand the overall "dynamic range" of the curve. For example, if the changes in the Free EG are too sudden or dramatic, use this to compress the curve and make the changes more subtle. Dragging away from the central axis expands the range; dragging toward the axis compresses it. Dragging up maintains the original phase; dragging it down reverses the phase by 180 degrees. move This is a combination copy-and-paste operation, allowing you to "grab" a defined section of the curve and move it to another place. The copied section can be moved freely in any direction, and it replaces the original curve at the destination. 54 Parameters / Ctrl (Control) Matrix Parameter Tab STEP SEQUENCER Window The Step Sequencer is a powerful, versatile feature that allows you to quickly and easily create sophisticated looped Sequences. It's also highly interactive, since it can be triggered from the keyboard in a variety of ways, and can be used with the various real-time controls of the AN200. Each individual step event (Note, Velocity, Gate Time, and Control Change) can be accessed and edited by a specific "panel knob," over a maximum of 16 steps. The Step Sequencer features extensive memory as well, letting you save one sequence pattern with each pattern (128 total). The Step Sequencer share a set of "Common" parameters for added flexibility and control. 55 Parameters / Ctrl (Control) Matrix Parameter Tab Effect Block • PARAM (Parameter) Settings: 0 ... 127 This determines the degree for the effect selected in Type below. • TYPE Settings: Delay 1-3, Reverb, Flanger 1-2, Chorus, Phaser 1-3, AmpSim(Amp Simulator) 1-3 Determines the Effect type. COMMON Block • TEMPO Settings: 20 ... 300 bpm (beats per minute) The Tempo setting determines the tempo for the AN200's internal clock in beats per minute (BPM), between a range of 20 and 300 BPM. The Tempo setting controls both Step Sequencer playback. • When the Free EG Length parameter is set to one of the "bar" values, the Free EG sequence will be synchronized with the Tempo set here. • BEAT Settings: 8, 12, 16 Determines the number of steps in the selected Sequence for playback. • SWING Settings: 50 ... 83% The Swing parameter lets you apply a Swing rate to the Sequence to slightly shift certain beats in order to create a “swing” feel. A setting of “50%” produces no Swing and “83%” produces maximum Swing. For information about how the Swing levels affect the rhythm of the Sequence, see the illustration below. • REVERSE Setting: On, Off This function lets you completely turn the Sequence around, and play all the notes backwards. 56 Parameters / Ctrl (Control) Matrix Parameter Tab • GATE TM (Gate Time) Settings: 1 ... 200% This is an offset contol and determines the note length of the notes of the Sequence, making all notes either shorter or longer, as a percentage of the original. This lets you, for example, set the note to play staccato, so that its sound switches off well before its step time is over. Or you can have the note hold right up to the start of the subsequent step so that it slurs (legato) into the next note. A setting of "100%" maintains the original relationship between notes. Lower values decrease the Gate Time, and higher values increase it. • When the combined value of any individual note’s Gate Time (as set from the Gate Time Bank knobs) and the offset Gate Time (set here) exceeds 100%, the note is played legato. TRACK PARAMETER block • CUTOFF (Cutoff Frequency) Settings: Synth track 0 ... 127 Rhythm 1—3 track -64 ... 63 Determines the frequency at which the Filter effect starts of each track. The higher the value, the higher the frequency. • RES (Resonance) Settings: Synth track -12 ... 102 Rhythm 1—3 track -64 ... 63 Determines the emphasis of the resonant peak of the Filter (at the Cutoff frequency) of each track. • VOLUME Settings: 0 ... 127 Controls the volume level of each track. • PAN Settings: Synth track C, L63 ... C ... R63 Rhythm 1—3 track RND (Random), L63 ... C ... R63 Determines the panning position (the left or right placement in the stereo image) of each track. The Random setting (available only for Rhythm tracks) automatically and randomly specifies a Pan position for each instrument sound. • WET Settings: 0 ... 127 Changes the depth or degree of the Effect of each track. When set to the 0 (all the way left), the Effect sound cannot be heard. PLAY/STOP buttons Click the [PLAY] button to start the Sequence. The Sequence repeats (loops) until you click the [STOP] button to stop it. 57 Parameters / Ctrl (Control) Matrix Parameter Tab NOTE NO./INST.SELECT/VELOCITY/GATE TIME/PITCH The Step Sequencer allows you to enter notes and other parameter settings to a Sequence one-by-one. • NOTE NO. (Note Number) Bank (Synth track only) Range: C-2 ... G8 (MIDI note numbers 0 ... 127) This bank of 16 virtual "knobs" lets you set the note number for each step of the Sequence. To set the note, adjust the parameter normally by "turning" the appropriate knob, or click on the value window above the knob to call up the pop-up value list, and click the desired note number. • INST. SELECT Bank (Rhythm tracks only) Settings: Refer to "Inst List" of the AN200 Owner’s Manual. This bank of 16 virtual "knobs" lets you select the instrument sound (drums, percussion, bass, sound effects) for each step of the Sequence. To set the inst, adjust the parameter normally by "turning" the appropriate knob, or click on the instrument window above the knob to call up the pop-up list, and click the desired instrument. • VELOCITY Bank Range: Rest, 1 ... 127 This bank of 16 virtual "knobs" lets you set the note velocity for each step of the Step Sequencer pattern. To set the velocity, you can use one of these methods: • Adjust the parameter normally by "turning" the appropriate knob. • Move the cursor to the value window above the knob and use the right/left mouse buttons to step up or down through the available values. • Use [shift] and the cursor keys to step or fast-forward/-reverse through the values. • Enter the value directly from the computer keyboard. When set to "Rest," a rest (no sound) is inserted for the step. • GATE TIME Bank Range: 1 ... 1600% This bank of 16 virtual "knobs" lets you set the gate time (or note length) for each step of the Step Sequencer pattern. To set the gate time, you can use one of these methods: • Adjust the parameter normally by "turning" the appropriate knob. • Move the cursor to the value window above the knob and use the right/left mouse buttons to step up or down through the available values. • Use [shift] and the cursor keys to step or fast-forward/-reverse through the values. • Enter the value directly from the computer keyboard. Keep in mind that the final gate time of all the notes in the pattern is also determined by the Common Gate Time control. 58 Parameters / Ctrl (Control) Matrix Parameter Tab • PITCH Bank (Rhythm tracks only) Range: -64 ... +24 This bank of 16 virtual "knobs" lets you set the pitch for each step of the Step Sequencer pattern. To set the pitch, adjust the parameter normally by "turning" the appropriate knob, or move the cursor to the value window above the knob and use the right/left mouse buttons to step up or down through the available, or enter the value directly from the computer keyboard. • Step Mute buttons These determine whether the individual step of the track is on (sounded) or off (muted). 59 File Menus When the AN200 Editor is active and selected, the following functions appear in the File menu: • • • • New Open AN200 File Save AN200 File Save AN200 File As These are used for creating, saving, and opening your original AN200 Files. Using the Save (or Save As) command here saves all 128 User patterns to a selected AN200 File. (The special .ANS extension allows you to easily organize the files.) By keeping a library of your original patterns as AN200 Files, you can easily call up the settings you need (with the Open command) and quickly transmit them to your tone generator/sound card. • Before saving a set of User patterns as an AN200 File, make sure to store the pattern currently being edited. If a pattern is not properly stored, it will not be contained in the AN200 File data. New Use this function to create a new AN200 File. If you've edited the current settings of the AN200 Editor at all, the display then prompts you to store the pattern. (See Storing an AN200 Pattern.) Creating a new AN200 File cancels the current panel settings and resets all parameters to their normal values. Creating a new AN200 File resets the User Patterns back to the defaults, the same data as those when the power is turned on. • See AN200 Librarian information on initializing the User Pattern. • This operation loads a new file of User Pattern into only the User pattern memory of the AN200 Editor. If you want to play with these Patterns separate from the AN200 Editor, you should transmit the User Pattern. (Refer to Transmit AN200 Bulk Dump Data.) There is no need to transmit AN200 Bulk Dump Data if you select a pattern in the Pattern List of the AN200 Editor, since the current pattern bulk data is sent with that operation. 60 File Menus / Open AN200 File Open AN200 File Use this function to open an existing AN200 File. • The available file types include: AN200 Data file (*.AN2) User patterns created with the AN200 Editor. AN Expert Data file (*.ANS) User voices and user sequencer patterns created with the AN Expert Editor. AN1x Editor*** Data file (*.AN1) User voices and user sequencer patterns created on the AN1x Control Synthesizer. *** AN1x Editor • These are data files of the AN1x Editor software, which was previously available as freeware on CD-ROM and floppy disk when the AN1x was first sold. It is currently available at the Yamaha website (http://www.yamaha.co.uk). • Files created with the Macintosh version of the AN1x Editor can be opened here if the extension ".AN1" is added to the end of the file name. Selects the desired file name. Selects the desired folder. Selects the desired file type. • "Open AN200 File" can also be selected from the toolbar. • Keep in mind that this operation loads the User Pattern only into the User pattern memory of the AN200 Editor. After opening a file, if you want to play with these Patterns separate from the AN200 Editor, you should transmit the User Pattern. (Refer to Transmit AN200 Bulk Dump Data.) There is no need to transmit AN200 Bulk Dump Data if you select a pattern in the Pattern List of the AN200 Editor, since the current pattern bulk data is sent with that operation. 61 File Menus / Save AN200 File / Save AN200 File As Save AN200 File / Save AN200 File As Use these commands to save the current AN200 Editor settings to an AN200 File. (The "Save As" command lets you specify a different file name than the original one.) Selects the desired folder. Creates a new folder. Selects the desired file type. Selects the file name. Type the desired name here. • "Save AN200 File" can also be selected from the toolbar. 62 Edit Menus When the AN200 is active and selected, the following functions appear in the Edit menu: • AN200 Store • AN200 Pattern List • AN200 Librarian AN200 Store Use the AN200 Store dialog box to store the pattern currently being edited to one of the User pattern memory spaces. Once a pattern or patterns have been stored in this way, you can save the entire set of 128 User patterns to an AN200 File. • "AN200 Store"can also be selected from the master menu by clicking any inactive part of the main control panel pressing control key, or by clicking on the STORE button. To store a pattern: 1) Click the desired location for the newly edited pattern. 2) Click "Store" to store the pattern to the selected location. Keep in mind that this replaces (and erases) the pattern at the location with the newly edited one. • Keep in mind that this operation stores your pattern data only into the User pattern memory of the AN200 Editor and sends the current pattern’s bulk data to the AN200. The current pattern bulk data will be lost if you select another pattern on the panel of the AN200. If you want to select a pattern on the panel of the AN200, you should first transmit the User Pattern. (Refer to Transmit AN200 Bulk Dump Data.) There is no need to transmit AN200 Bulk Dump Data if you select a pattern in the Pattern List of the AN200 Editor, since the current pattern bulk data is sent with that operation. 63 Edit Menus / AN200 Pattern List AN200 Pattern List In the AN200 Pattern List dialog box you can: • Select a pattern from the Preset 1, Preset 2, User pattern banks for editing. • Initialize a User pattern to the default settings. • Copy or swap patterns in the User pattern banks. • "AN200 Pattern List" can also be selected from the master menu by clicking on any inactive part of the window pressing control key, or by clicking on the PATTERN button. • Preset 1, Preset 2, User Buttons Click on one of these to select the desired pattern bank: Preset 1, Preset 2, or User. • Pattern List Combo Box Select a pattern by clicking on the desired pattern name in the list. Copying a pattern to another pattern location 1) Set Drag Mode to "Copy." 2) Click the desired pattern and drag it to the desired location. Keep in mind that this replaces (and erases) the pattern at the location. Swapping the location of two patterns 1) Set Drag Mode to "Swap." 2) Click the desired pattern and drag it to the pattern you wish to swap it with. This simply moves the pattern to the selected location; it does not affect the actual data. Copy and Swap operations can also be executed from the AN200 Librarian dialog box. • Pattern Init Click this to initialize the selected pattern to its default parameter values. This gives you a "blank slate" from which to create a new pattern. 64 Edit Menus / AN200 Librarian • Drag Mode In the Pattern List combo box, a pattern can be dragged to another pattern location. This setting determines the result of that operation: whether the pattern is copied to the new location, or swapped with the pattern at the new location. • The Pattern Init and Drag Mode functions are only effective when the User pattern bank is selected. AN200 Librarian The Librarian dialog box gives you a set of convenient, easy-to-use tools for organizing the User patterns of your AN200 Files. The Source box shows User patterns contained in the opened AN200 File (see Open AN200 File below). The Destination box contains the set of User patterns currently in the AN200 Editor, and represents the new AN200 File to be created. First copy the desired patterns from the Source to the Destination, then exit the Librarian and save the new set of patterns as a AN200 File. You can open different AN200 Files one by one, and freely copy the desired patterns to the Destination before saving. Copying a pattern from the Source box to the Destination box: 1) Click the desired pattern in the Source box. (This is the pattern you will be copying.) 2) Drag the highlighted pattern to the Destination box, and drop it at the desired number. (This is the location to which the pattern will be copied. The previous pattern at the location is erased and replaced with the new one.) 3) Click "OK" to exit the Librarian. 4) Save the newly created set of User patterns as a AN200 File. 65 Edit Menus / AN200 Librarian • Open AN200 File Click this to select and open an existing AN200 File. (See Open AN200 File.) The patterns of the opened AN200 File are shown in the Source box. • Copy All Clicking this button copies all the patterns listed in the Source box to the Destination box. • This operation erases all previous patterns in the Destination box and replaces them with the Source patterns. • Init. All Clicking this button initializes all the Destination patterns to their default settings. (See Initial Pattern Default Settings.) This function allows you to reset all the parameters of the selected pattern to the factory initial pattern with default values. This gives you a blank slate from which you can create your own pattern. • This operation erases all previous patterns in the Destination box and replaces them with identical initialized patterns. • OK Click this to actually execute any of the Librarian operations and exit from the Librarian box. • Cancel Click this to exit the Librarian box without executing any of the Librarian operations. 66 Setup Menus When the AN200 Editor is active and selected, the following functions appear in the Setup menu: • • • • AN200 Editor Setup AN200 Display Option Transmit AN200 Bulk Dump Data Receive AN200 Bulk Dump Data AN200 Editor Setup This window lets you make a variety of basic and detailed settings for the AN200 Editor. These are contained in two tabs: MIDI and Others. • "AN200 Editor Setup" can also be selected from the toolbar. MIDI Tab • MIDI CH (Channel) Range: 1 ... 16 This determines which MIDI channel is used for sending AN200 Editor data. Set this to match the receive channel for the Part you wish to control. 67 Setup Menus / AN200 Editor Setup • Device No. (Number) Range: 1 ... 16 This determines which tone generator the AN200 Editor will send data to. This should be set to same number as the Device Number of the tone generator/sound card to which the AN200 is installed. If you have multiple tone generators in your MIDI setup and each is set to a different Device Number, this parameter lets you select which tone generator will be affected by the AN200 Editor. If you are using only one tone generator, this should be set to "1." • Output when edited When this is checked, any edits that you make with the AN200 Editor are instantly and automatically transmitted to the AN200. This ensures that you can audition edits as soon as you make them. • OK Click this to apply all the settings you’ve made in the three tabs. • Cancel Click this to return to the main AN200 Editor window without changing any of the settings. Others Tab • Parameter Knob Operation Rotate When this is selected, the parameter values (of the panel "knobs") are changed by moving the mouse in a circular direction. Up/down or left/right When this is selected, the parameter values (of the panel "knobs") are changed by moving the mouse vertically or horizontally. • OK Click this to apply all the settings you’ve made in the three tabs. • Cancel Click this to return to the main AN200 Editor window without changing any of the settings. 68 Setup Menus / AN200 Display Option AN200 Display Option This convenient feature lets you change the display of the main control panel to indicate the current status of certain signal routings within the AN200. When one of the options is enabled (a check mark appears), color-coded highlights, arrows and lines appear to show how the relevant blocks and parameters affect each other. Any or all of the three options below can be enabled. • Main Signal Flow When this is checked, the signal flow of the main blocks (e.g., VCO blocks into MIXER, MIXER into VCF, etc.) is shown. • Relation of Osc. Sync. When this is checked, the master/slave relationship of the Oscillator Sync feature is shown. • Relation of FM When this is checked, the modulation routing of the FM feature is shown. • Although the AN200 Display Option can also be selected from the master menu, you may want to use this slightly quicker, more convenient way of changing the display: Open the AN200 Display Option box in the conventional way (from the Setup menu), and drag the box to an open space on the screen. Then, when you want to change the setting, simply move the cursor to the box and click --- the display changes instantly to your preference. 69 Setup Menus / Transmit AN200 Bulk Dump Data Transmit AN200 Bulk Dump Data This is used for directly transmitting the AN200 Editor pattern data as MIDI bulk dump data to the AN200. • Transmit Method 1 Pattern When this is selected, only the data for the currently selected pattern will be transmitted. User Patterns When this is selected, User patterns will be transmitted. Bulk Dump Interval Range: 0msec ... 1.5sec This parameter is available when "User Patterns" above is selected. Bulk Dump Interval determines the amount of time (in clocks) that separates each data transmission. If the tone generator or card "chokes" on the incoming MIDI data, or XGworks has trouble sending all the data properly, or some other trouble occurs, try setting the Interval to a higher number. • Transmit AN200 Bulk Dump Start First, click this button to start transmission of the data. Then start transmitting the bulk data. 70 Setup Menus / Receive AN200 Bulk Dump Data • OK Click this to exit from the dialog box once all data has been transmitted. • "Transmit AN200 Bulk Dump Data" can also be selected from the toolbar. Receive AN200 Bulk Dump Data This is used for importing AN pattern data from the AN200. All current settings will be replaced by the received data. • Receive Method 1 (Pattern/Voice) When this is selected, only the data for one pattern/voice will be received. This data is loaded into the edit buffer (temporary memory storage). • Make sure to store the received pattern/voice after executing this operation. Otherwise the data will be lost upon selecting a different pattern/voice. All User (Patterns/Voices) When this is selected, the data for 128 User patterns/voices will be received. 71 Setup Menus / Receive AN200 Bulk Dump Data • Select Model AN200 Click this when receiving data from the AN200. AN1x Click this when receiving data from the AN1x. • Receive AN200 Bulk Dump Start First, click this button to start reception of the data. Then start transmitting the bulk data from AN200. The various data types that can be sent/received are abbreviated on the AN1x as follows: 1 Pattern : All User Patterns : “1 ptn” “all ptn*” The progress bar indicates how much data has been received. When the bar is completely filled, all data has been received. • OK Click this to exit from the dialog box once all data has been received. • Make sure that the MIDI OUT jack of the AN1x is properly connected to the computer/interface MIDI IN jack, and that all settings are appropriate — both on the AN1x and on the XGworks software. 72-
 1
1
-
 2
2
-
 3
3
-
 4
4
-
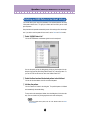 5
5
-
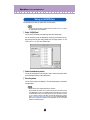 6
6
-
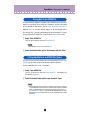 7
7
-
 8
8
-
 9
9
-
 10
10
-
 11
11
-
 12
12
-
 13
13
-
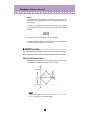 14
14
-
 15
15
-
 16
16
-
 17
17
-
 18
18
-
 19
19
-
 20
20
-
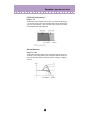 21
21
-
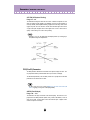 22
22
-
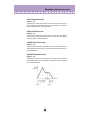 23
23
-
 24
24
-
 25
25
-
 26
26
-
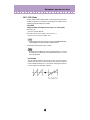 27
27
-
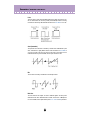 28
28
-
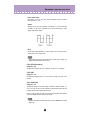 29
29
-
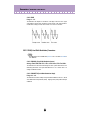 30
30
-
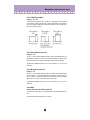 31
31
-
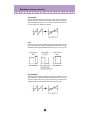 32
32
-
 33
33
-
 34
34
-
 35
35
-
 36
36
-
 37
37
-
 38
38
-
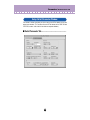 39
39
-
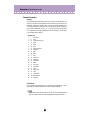 40
40
-
 41
41
-
 42
42
-
 43
43
-
 44
44
-
 45
45
-
 46
46
-
 47
47
-
 48
48
-
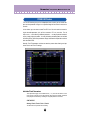 49
49
-
 50
50
-
 51
51
-
 52
52
-
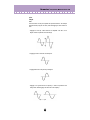 53
53
-
 54
54
-
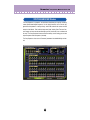 55
55
-
 56
56
-
 57
57
-
 58
58
-
 59
59
-
 60
60
-
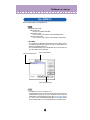 61
61
-
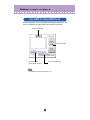 62
62
-
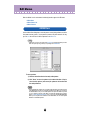 63
63
-
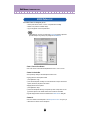 64
64
-
 65
65
-
 66
66
-
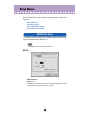 67
67
-
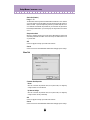 68
68
-
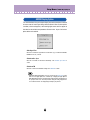 69
69
-
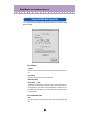 70
70
-
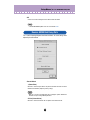 71
71
-
 72
72


Yamaha AN200 El manual del propietario
- Categoría
- Instrumentos musicales
- Tipo
- El manual del propietario
en otros idiomas
- français: Yamaha AN200 Le manuel du propriétaire
- italiano: Yamaha AN200 Manuale del proprietario
- English: Yamaha AN200 Owner's manual
- Deutsch: Yamaha AN200 Bedienungsanleitung
- русский: Yamaha AN200 Инструкция по применению
- Nederlands: Yamaha AN200 de handleiding
- português: Yamaha AN200 Manual do proprietário
- dansk: Yamaha AN200 Brugervejledning
- polski: Yamaha AN200 Instrukcja obsługi
- čeština: Yamaha AN200 Návod k obsluze
- svenska: Yamaha AN200 Bruksanvisning
- Türkçe: Yamaha AN200 El kitabı
- suomi: Yamaha AN200 Omistajan opas
- română: Yamaha AN200 Manualul proprietarului
Artículos relacionados
-
Yamaha CS-5 El manual del propietario
-
-
-
-
-
-
Yamaha PLG150-AN El manual del propietario
-
-
-