Lenco CR-650BK Manual de usuario
- Categoría
- Radios
- Tipo
- Manual de usuario

1
Model: CR-650BK
User manual – DAB+/FM clock radio with Bluetooth and wireless charging
Gebruikershandleiding - DAB+/FM-wekkerradio met bluetooth en draadloos opladen
Bedienungsanleitung – DAB+-/UKW-Radiowecker mit Bluetooth und kabelloser Aufladung
Mode d’emploi – radio-réveil DAB+/FM avec Bluetooth et recharge sans fil
Manual de usuario. Radio reloj DAB+/FM con Bluetooth y carga inalámbrica

2
Index:
ENGLISH ......................................................................................................................................... 3
NEDERLANDS................................................................................................................................ 21
DEUTSCH ...................................................................................................................................... 39
FRANÇAIS ..................................................................................................................................... 59
ESPAÑOL ....................................................................................................................................... 77
Version: 1.0

3
ENGLISH
CAUTION:
Usage of controls or adjustments or performance of procedures other than those specified herein
may result in hazardous radiation exposure.
PRECAUTIONS BEFORE USE
KEEP THESE INSTRUCTIONS IN MIND:
1. Do not cover or block any ventilation openings. When placing the device on a shelf,
leave 5 cm (2”) free space around the whole device.
2. Install in accordance with the supplied user manual.
3. Keep the device away from heat sources such as radiators, heaters, stoves, candles and
other heat-generating products or naked flame. The device can only be used in moderate
climates. Extremely cold or warm environments should be avoided. Working
temperature between 0° and 35°C.
4. Avoid using the device near strong magnetic fields.
5. Electrostatic discharge can disturb normal usage of this device. If so, simply reset and
restart the device following the instruction manual. During file transmission, please
handle with care and operate in a static-free environment.
6. Warning! Never insert an object into the product through the vents or openings.
High voltage flows through the product and inserting an object can cause electric shock
and/or short circuit internal parts. For the same reason, do not spill water or liquid on
the product.
7. Do not use in wet or moist areas such as bathrooms, steamy kitchens or near swimming
pools.
8. The device shall not be exposed to dripping or splashing and make sure that no objects
filled with liquids, such as vases, are placed on or near the apparatus.

4
9. Do not use this device when condensation may occur. When the unit is used in a warm
wet room with damp, water droplets or condensation may occur inside the unit and the
unit may not function properly; let the unit stand in power OFF for 1 or 2 hours before
turning on the power: the unit should be dry before getting any power.
10. Although this device is manufactured with the utmost care and checked several times
before leaving the factory, it is still possible that problems may occur, as with all electrical
appliances. If you notice smoke, an excessive build-up of heat or any other unexpected
phenomena, you should disconnect the plug from the main power socket immediately.
11. This device must operate on a power source as specified on the specification label. If you
are not sure of the type of power supply used in your home, consult your dealer or local
power company.
12. Keep away from animals. Some animals enjoy biting on power cords.
13. To clean the device, use a soft dry cloth. Do not use solvents or petrol based fluids. To
remove severe stains, you may use a damp cloth with dilute detergent.
14. The supplier is not responsible for damage or lost data caused by malfunction, misuse,
modification of the device or battery replacement.
15. Do not interrupt the connection when the device is formatting or transferring files.
Otherwise, data may be corrupted or lost.
16. If the unit has USB playback function, the USB memory stick should be plugged into the
unit directly. Don’t use an USB extension cable because it can cause interference
resulting in failing of data.
17. The rating label has been marked on the bottom or back panel of the device.
18. This device is not intended for use by people (including children) with physical, sensory
or mental disabilities, or a lack of experience and knowledge, unless they’re under
supervision or have received instructions about the correct use of the device by the
person who is responsible for their safety.
19. This product is intended for non professional use only and not for commercial or
industrial use.

5
20. Make sure the unit is adjusted to a stable position. Damage caused by using this product
in an unstable position vibrations or shocks or by failure to follow any other warning or
precaution contained within this user manual will not be covered by warranty.
21. Never remove the casing of this device.
22. Never place this device on other electrical equipment.
23. Do not allow children access to plastic bags.
24. Only use attachments/accessories specified by the manufacturer.
25. Refer all servicing to qualified service personnel. Servicing is required when the device
has been damaged in any way, such as the power supply cord or the plug, when liquid
has been spilled or objects have fallen into the device, when the device has been
exposed to rain or moisture, does not operate normally, or has been dropped.
26. Long exposure to loud sounds from personal music players may lead to temporary or
permanent hearing loss.
27. If the product is delivered with power cable or AC power adaptor:
⚫ If any trouble occur, disconnect the AC power cord and refer servicing to
qualified personnel.
⚫ Don’t step on or pinch the power adaptor. Be very careful, particularly near the
plugs and the cable’s exit point. Do not place heavy items on the power adaptor,
which may damage it. Keep the entire device out of children’s reach! When
playing with the power cable, they can seriously injure themselves.
⚫ Unplug this device during lightning storms or when unused for a long period.
⚫ The socket outlet must be installed near the equipment and must be easily
accessible.
⚫ Do not overload ac outlets or extension cords. Overloading can cause fire or
electric shock.
⚫ Devices with class 1 construction should be connected to a main socket outlet
with a protective earthed connection.
⚫ Devices with class 2 construction do not require a earthed connection.

6
⚫ Always hold the plug when pulling it out of the main supply socket. Do not pull
the power cord. This can cause a short circuit.
⚫ Do not use a damaged power cord or plug or a loose outlet. Doing so may result
in fire or electric shock.
28. If the product contains or is delivered with a remote control containing coin/cell
batteries:
Warning:
⚫ “Do not ingest battery, Chemical Burn Hazard” or equivalent working.
⚫ [The remote control supplied with] This product contains a coin/button cell
battery. If the battery is swallowed, it can cause severe internal burns in just 2
hours and can lead to death.
⚫ Keep new and used batteries away from children.
⚫ If the battery compartment does not close securely, stop using the product and
keep it away from children.
⚫ If you think batteries might have been swallowed or placed inside any part of
the body, seek immediate medical attention.
29. Caution about the use of Batteries:
⚫ Danger of explosion if battery is incorrectly replaced. Replace only with the
same or equivalent type.
⚫ Battery cannot be subjected to high or low extreme temperatures, low air
pressure at high altitude during use, storage or transportation.
⚫ Replacement of a battery with an incorrect type that can result in an explosion
or the leakage of flammable liquid or gas.
⚫ Disposal of a battery into fire or a hot oven, or mechanically crushing or cutting
of a battery, that can result in an explosion.
⚫ Leaving a battery in an extremely high temperature surrounding environment
that can result in an explosion or that leakage of flammable liquid or gas.

7
⚫ A battery subjected to extremely low air pressure that may result in an
explosion or the leakage of flammable liquid or gas.
⚫ Attention should be drawn to the environmental aspects of battery disposal.
INSTALLATION
• Unpack all parts and remove protective material.
• Do not connect the unit to the mains before checking the mains voltage and before all
other connections have been made.
Power supply adaptor
Use only the power supply listed in the user instructions
Information
Value and precision
Manufacturers name or trade mark,
commercial registration and address
Manufacture: DongguanDongsong Electronic Co., Ltd.
Address: No.19, Xintian Street, BaizhoubianVillage,
East District, Dongguan, Guangdong, P.R. China
Value and precision
Model Identifier
DYS818-050200W-K
Input voltage
100-240V
Input AC frequency
50/60 Hz
Output voltage
5.0 V
Output current
2.0 A
Output power
10.0 W
Average active efficiency
80.98%
Efficiency at low load (10%)
--
No load Power consumption
0.06W

8
WARNING: When participating in the traffic listening to a personal
music player can make the listener less aware of potential dangers such
as approaching cars.
WARNING: To prevent possible hearing damage, do not listen at high
volume levels for long periods.

9
Controls and Indicator
Product Front
Product Back

10
Product Top
1: LCD Display
4: USB play jack
2: DAB/FM Antenna
5: AUX in jack
3: TF/MicroSD slot
6: DC in jack (DC 5V/2000mA)

11
7: Wireless Charge
8: Menu/info/Back button
9: Alarm 1 and Radio preset 1 button
11: Radio Preset 3 button
13: Radio Preset 5 button
15: previous button
17: Enter button
19: SNOOZE and Black Light setting
21: Radio preset/memory button
23: Power ON/OFF button and Play mode
10: Alarm 2 and Radio preset 2 button
12: Radio Preset 4 button
14: Sleep and NAP function button
16: Play/Pause/Mute/Radio scan button
18: Next button
20: Volume - button
22: Volume + button
Listening to DAB Radio
1: Plug the mains power and then press and hold the button to power on the unit. The unit
will automatically enter into the DAB mode.
2: Press the button to choose the DAB mode and perform auto scan function.
3: During the scan the display will show “Scanning ………” together with a slide bar that indicates
the progress of the scan and the number stations that have been found so far.
4: Once the scan has finished, the unit will select the first alphanumerically found station.
5: Press the / button to enter station list.
6: When you find a station that you would like to listen to, press the enter button to confirm.
NOTE: If no stations are found after auto scan, Press the enter button to enter into “Station Scan”,
press the to select “Full Scan” or “Manual Scan” modes for stations.
DAB Full Scan
The full scan will search for the entire DAB Band III channels. After the scan has finished, the first
alphanumerically found station will be automatically selected.
1: To activate full scan, Hold the button to enter into the station scan, then Press the
/ button to select “Full Scan”, and press the enter button to confirm. the display will show
“Scanning ………” together with a slide bar that indicates the progress of the scan and the
number stations that have been found so far.
2: All the stations that have been found will be stored automatically. Press the / button to
choose the station you prefer and Press the enter button to confirm.

12
DAB Manual Tune
As well as the full scan function, you can manually tune the
radio. This can help if you know your radio has missed
stations. You will need to know which multiples the missing
radio station is in.
1: Press and hold the button and enter into “Station
Scan”, Press the / button to select the Manual mode,
press the enter button to confirm.
2: Press the / button to cycle through the DAB
channels, which are number from 5A to13F.
3: After your desired channel number is selected, press the
enter button to enter the current multiplex, it will now
display the multiplex and below you will see the signal
strength.
4: You will not see any new radio stations or hearing anything while in manual tune. To find the
newly tuned in stations search through the station list.
Preset/Memory Setting
Store the current radio station as a preset
1: Hold the to enter the station memory function
2: Press the / button to select the preset number of your choice and press the enter button
to store the station.
You can also do a quick save the current station to one of the 5 top preset buttons by
longpressing one of the preset buttons.

13
Listening to FM Radio
1: Press and hold the button to power on the unit. The unit will automatically enter into the
DAB mode.
2: Press the button to choose the FM mode. Press the / button to select the desired
station.
3: Hold the / button to auto scan to the next available radio station
4: Press and hold the button to enter auto scan mode which stores the channels found as
preset. During the scan the display will show “Scanning…”
5: Once the scan has finished, the unit will select the first alphanumerically found station.
6: To explore the stations found, press the 1.2.3.4.5 to choose the first 5 memory stations and
press the button and Press the / button to enter station list.
7: When you find a station that you would like to listen to, press the enter button to confirm.
8: Press the / to adjust the volume
9: Press the to mute the FM station, the volume mark will flash.
Preset/Memory Setting
Store the current radio station as a preset
- Hold the to enter the station memory function
- Press the / button to select the preset number of your choice and press the
enter button to store the station.
You can also do a quick save the current station to one of the 5 top preset buttons by long
pressing one of the preset buttons.
Listening to Bluetooth Music
If you are using a Bluetooth audio device, make sure the working distance is within 30 ft, different
environment may have effect on the working distance.
1: Plug the power adaptor, hold the to power on the unit, press the to choose the
Bluetooth mode, The "Bluetooth mode" will flash on the display.
2: Turn on the Bluetooth on your audio device.
3: Searching Devices choose “Lenco CR-650”, no password is required. If your device does require
a password, type “0000”, (After paired, the "Bluetooth mode" will stay on.)
4: Press the to adjust the volume
5: Press the to play/pause, hold for disconnect the Bluetooth device
6: Press the / button to choose the previous song/next song

14
Note: “This product has a bluetooth reception function, you can’t transmit any bluetooth sound
with it: this means that you can only receive wirelessly a bluetooth sound signal from an external
source like a smartphone.”
Listening to USB music
1: Plug a (FAT-32 formatted) USB memory stick at the back of the unit.
2: Hold the to power on the unit, press the to choose the USB mode
3: Press the to adjust the volume
4: Press the to play/pause
5: Press the / button to choose the previous song/next song
Note: Please turn up the volume of your connected Bluetooth device and CR-650
Listening to Micro SD Card music
1: Plug the Micro SD Card (FAT-32 formatted) into the TF/microSD slot at the back
2: Hold the to power on the unit, press the to choose the Micro SD card mode
3: Press the to adjust the volume
4: Press the to play/pause
5: Press the / button to choose the previous song/next song
Listening to Aux in
1: Plug the AUX cable at the back of the unit (audio cable not included)
2: Hold the to power on the unit, press the to choose the AUX mode
3: Press the to adjust the volume
4: Press the to mute the sound.
Listening to Natural sound (Sleep therapy mode)
1: Hold the to power on the unit, press the to choose the Sleep Therapy mode
2: When you choose sleep therapy mode, sleep function will start automatically, the default
timing is 15 minutes, press the sleep button to choose the different time.
3: Press the / button to choose 10 different nature sound
4: Press the to adjust the volume

15
5: Press the to mute the sound.
Time Setting
1: Hold the to power on the unit.
2: Hold the button and enter the menu. Press the / button to find System, press
enter button to enter system and you will find the “Time setup” option
3: Press the enter button and then press the / button to set the time according to the
guide.
Setting Alarm
The alarms can be set in standby mode.
1: Press alarm 1 or alarm 2 and press Enter
2: Press the / button to choose the option you would like to change and press Enter
Editable options:
Alarm on/off (turn the alarm on/off
Time: Alarm time
Days: which days the alarm should work
Duration of the alarm
Mode: Which alarm tone (FM/DAB/buzzer/Sleep therapy sounds)
Volume: Max volume of the alarm tone (minimum is 1)
Preset: choose which preset should be used for the alarm
Save: Save the changes you made
Note: if you don’t change any settings within 10 seconds, the clock will return to normal time
mode and your settings won’t be saved.
If you choose ‘weekdays’ in the ‘days’ menu, a ‘5’ is shown on the right off the alarm symbol,
meaning the 5 working days of the week.
If you choose ‘weekends’ in the ‘days’ menu, a ‘2’ is shown on the right off the alarm symbol,
meaning the 2 days of the weekend.
If you choose ‘Daily’ in the ‘days’ menu, a ‘2’ and a ‘5’ is shown on the right off the alarm symbol,
meaning 7 days of the week.

16
SLEEP Setting
1: When powered on, press the button to activate the SLEEP function
2: Press the button to choose the SLEEP time 15/30/45/60/75/90 and press enter
Or wait a few seconds to use the selected sleep time.
The unit will power off, when the selected sleep time is over
Note:
1. If you want to check the remaining sleep time, short press the Sleep button once when the
sleep timer is active
2. If you want to reset the Sleep timer, press the Sleep button twice when the sleep timer is
active
NAP Setting
1: When the device is powered off, press the button to active the NAP function
2: Press the button to choose the nap time 15/30/45/60/75/90 and press enter or wait a
few seconds to use the selected nap time.
3: The unit will power off when the chosen nap time is over.
Note:
1. If you want to check the remaining nap time, short press the nap button once when the nap
time is active
2. If you want to reset the nap timer, press the nap button twice when the nap timer is active.
Preset/Memory Setting
1: In FM/DAB mode, hold the to enter the station memory function
2: Press the / button to choose the station number and press the enter button to store the
station.
3: In FM/DAB mode, press the to enter the memory station list
4: Press the / button to choose the station you like.
Backlight Setting
1: Set the backlight in the menu or press the SNOOZE/DIMMER button setting the
backlight level of the display
BACK UP Batteries

17
Inserting/replacing batteries:
1. Remove the battery compartment cover located at the bottom of the device.
2. Insert 4 new AA/LR6 batteries (not included) into the battery compartment and ensure that the
polarity of each battery corresponds to the symbols (+ and -) in the battery compartment.
3. Close the battery compartment again.
Please note:
- Inserting batteries into the device is optional. The batteries are only for memorizing time and
the date settings when the event of a power failure.
- Without the batteries, the date and time will be reset to the factory default values in the case
of a power failure.
- The other settings including the alarm settings and the Radio preset stations will always be
memorized in the event of a power failure.

18
Trouble shooting guide
Symptom
Possible cause
Solution
Your clock radio does not
turn on.
You have not plugged in your
device
Plug the device’s AC adapter into an electrical
outlet.
The electrical outlet is not
supplied with electricity.
Plug another device into the same electrical
outlet to perform a cross test
No sound
The volume is set to the
minimum
Adjust the volume by pressing the volume
button.
Bad FM reception
The antenna is not fully
extended.
Fully extend the antenna.
There is interference from
nearby electrical devices
(microwave oven, TV, etc.)
Move your clock radio further away from
possible sources of interference.
Bad DAB reception
The antenna is not fully
extended
Fully extend the antenna.
Your area is not covered by DAB.
Check the DAB coverage in your area.
No playback from a USB
drive or microSD card
The audio format is not
supported by your clock radio
Ensure that your audio has been correctly
saved in the removable medium in MP3 format.
Ensure that the USB drive or microSD card is
correctly connected to or inserted into the USB
port or the microSD card slot on the back of
your clock radio.
A Bluetooth* connection
with another device
cannot be established.
Your Bluetooth* playback device
is not in pairing mode.
Consult the user manual for your Bluetooth*
playback device and try again.
Make sure your clock radio and your
Bluetooth* playback device are less than 8
metres apart and no walls or other electronic
devices are blocking or interfering with the
Bluetooth* transmission.
No sound when playing
from Bluetooth
connected device
Turn up the volume from the clock and the
Bluetooth device.
The phone placed on the
wireless charging pad is
not charging.
- Ensure your clock radio is powered by the AC
adapter.
- Make sure your phone is Qi* enabled
(equipped with the Qi* wireless charging
technology).
- Remove the case/protective cover from your
phone.
- Restart your phone.
- Ensure you have enabled wireless charging in
your phone settings, if this option is there.
- Update your phone’s system software.
- Contact your phone's manufacturer for
advice.

19
Technical Specifications
Input power (power adapter)
AC 100-240V ~ 50/60Hz
Music output power
2 x 5 W RMS + passive
DAB Frequency range
174.928 - 239.200 MHz
FM Frequency range
87.5 - 108 MHz
Bluetooth Frequency range:
Bluetooth Version:
2402 - 2480MHz
V5.0
Power consumption
Max 13W
Power consumption (standby)
< 1W
Operating Temperature
0°C-35°C
Operating position
Horizontal
Dimensions of the unit
170x 170 x 74mm
Weight
0,9KG (without batteries)
This product is suited for this purpose within all EU Countries.
Guarantee
Lenco offers service and warranty in accordance to European law, which means that in case of
repairs (both during and after the warranty period) you should contact your local dealer.
Important note: It is not possible to send products that need repairs to Lenco directly.
Important note: If this unit is opened or accessed by a non-official service center in any way, the
warranty expires.
This device is not suitable for professional use. In case of professional use, all warranty obligations
of the manufacturer will be voided.
Disclaimer
Updates to Firmware and/or hardware components are made regularly. Therefore some of the
instruction, specifications and pictures in this documentation may differ slightly from your
particular situation. All items described in this guide for illustration purposes only and may not
apply to particular situation. No legal right or entitlements may be obtained from the description
made in this manual.

20
Disposal of the Old Device
This symbol indicates that the relevant electrical product or battery
should not be disposed of as general household waste in Europe. To
ensure the correct waste treatment of the product and battery,
please dispose them in accordance to any applicable local laws of
requirement for disposal of electrical equipment or batteries. In so
doing, you will help to conserve natural resources and improve
standards of environmental protection in treatment and disposal of
electrical waste (Waste Electrical and Electronic Equipment
Directive).
CE Marking
Hereby, Commaxx B.V. Wiebachstraat 37, 6466NG Kerkrade, The Netherlands, declares that this
product is in compliance with the essential EU directive requirements.
The declaration of conformity may be consulted via [email protected]
Service
For more information and helpdesk support, please visit www.lenco.com
Commaxx B.V. Wiebachstraat 37, 6466NG Kerkrade, The Netherlands

21
NEDERLANDS
OPGELET:
Het gebruik van bedieningen of afstellingen of het uitvoeren van procedures anders dan hierin
gespecificeerd, kan leiden tot blootstelling aan gevaarlijke straling.
VOORZORGSMAATREGELEN VÓÓR GEBRUIK
NEEM MET DE VOLGENDE INSTRUCTIES IN ACHT:
1. Bedek of blokkeer geen van de ventilatieopeningen. Als u het apparaat op een schap
plaatst, dient u voor 5 cm (2”) vrije ruimte rondom het gehele apparaat te zorgen.
2. Installeer in overeenstemming met de meegeleverde gebruikshandleiding.
3. Houd het apparaat uit de buurt van warmtebronnen zoals radiatoren, kachels, fornuizen,
kaarsen en andere warmtegenererende producten of open vuur. Het apparaat kan alleen
worden gebruikt in gematigde klimaten. Extreem koude of warme omgevingen dienen te
worden vermeden. Bedrijfstemperatuur tussen 0° en 35°C.
4. Gebruik het apparaat niet in de buurt van krachtige magnetische velden.
5. Elektrostatische ontlading kan de normale werking van dit apparaat verstoren. In dit
geval kunt u het apparaat gewoon resetten en opnieuw starten volgens de
gebruiksaanwijzingen. Wees voorzichtig tijdens bestandsoverdracht en voer dit uit in een
omgeving zonder statische interferentie.
6. Waarschuwing! Steek geen voorwerpen in het product via de ventilatie- of andere
openingen. Er is hoge spanning aanwezig in het product en als u er een voorwerp
insteekt, kan dat tot elektrische schokken en/of kortsluiting van de interne onderdelen
leiden. Laat om dezelfde reden geen water of vloeistof op het product terechtkomen.
7. Gebruik het apparaat niet in natte of vochtige ruimtes zoals badkamers, keukens met
veel stoom of in de buurt van zwembaden.
8. Stel het apparaat niet bloot druppels of spetters en zorg ervoor dat er geen met vloeistof
gevulde voorwerpen, zoals vazen, op of in de buurt van het apparaat worden geplaatst.

22
9. Gebruik dit apparaat niet als er condensatie kan optreden. Wanneer het apparaat in een
warme en vochtige kamer wordt gebruikt, dan kunnen er waterdruppeltjes of
condensatie binnenin het apparaat worden gevormd waardoor het apparaat mogelijk
niet meer goed werkt; houd en apparaat 1 of 2 uur op UIT staan voordat u de voeding
weer inschakelt: het apparaat dient droog te zijn voordat deze stroom ontvangt.
10. Al is dit apparaat met de grootste zorg vervaardigd en meerdere keren gecontroleerd
voordat deze de fabriek verlaat, is het toch mogelijk dat er problemen optreden, zoals bij
alle elektrische apparaten. Als u rook, overmatige warmteontwikkeling of andere
onverwachte verschijnselen constateert, dient u onmiddellijk de stekker uit het
stopcontact te trekken.
11. Dit apparaat moet van stroom worden voorzien door een bron zoals gespecificeerd op
het nominale specificatielabel. Als u niet zeker weet welk type stroomvoorziening in uw
huis wordt gebruikt, neem dan contact op met uw dealer of het plaatselijke
energiebedrijf.
12. Houd uit de buurt van dieren. Sommige dieren knauwen graag aan voedingskabels.
13. Gebruik een zachte, droge doek om het apparaat schoon te maken. Gebruik geen
oplosmiddelen of vloeistoffen op benzinebasis. U kunt een vochtige doek met verdund
schoonmaakmiddel gebruiken om hardnekkige vlekken te verwijderen.
14. De leverancier is niet verantwoordelijk voor schade of verlies van gegevens veroorzaakt
door storing, misbruik, modificatie van het apparaat of vervanging van de batterij.
15. Zorg ervoor de verbinding niet te verbreken terwijl het apparaat bezig is met formatteren
of bestandsoverdracht. Gegevens kunnen anders corrupt of verloren raken.
16. Als het apparaat een USB-afspeelfunctie heeft, moet de USB-geheugenstick rechtstreeks
in het apparaat worden gestoken. Gebruik geen USB-verlengsnoer, omdat deze
interferentie kan veroorzaken waardoor uw gegevens verloren kunnen gaan.
17. Het nominale specificatielabel is te vinden op het onder- of achterpaneel van het
apparaat.

23
18. Dit product is niet bestemd voor gebruik door personen (waaronder kinderen) met
verminderde fysieke, zintuiglijke of mentale capaciteiten, of met een tekort aan kennis
en ervaring, tenzij een persoon verantwoordelijk voor hun veiligheid toezicht houdt of
instructies heeft gegeven voor het correcte gebruik van het apparaat.
19. Dit product is uitsluitend bedoeld voor niet-professioneel gebruik en niet voor
commercieel of industrieel gebruik.
20. Zorg ervoor dit apparaat op een stabiele plek te plaatsen. Beschadigingen veroorzaakt
door het gebruik van dit apparaat in een onstabiele positie, trillingen of schokken of door
het niet opvolgen van andere waarschuwingen of voorzorgsmaatregelen beschreven in
deze gebruikshandleiding, worden niet gedekt door de garantie.
21. Verwijder nooit de behuizing van dit apparaat.
22. Plaats dit apparaat nooit op andere elektrische apparatuur.
23. Houd plastic zakken uit de buurt van kinderen.
24. Gebruik alleen uitbreidingen/accessoires gespecificeerd door de fabrikant.
25. Laat alle reparaties over aan bevoegd onderhoudspersoneel. Reparatie is vereist
wanneer het apparaat op enigerlei wijze is beschadigd, zoals een beschadigde
voedingskabel of stekker, wanneer vloeistof is gemorst of voorwerpen in het apparaat
zijn gevallen, wanneer het apparaat is blootgesteld aan regen of vocht, niet normaal
functioneert of is gevallen.
26. Langdurige blootstelling aan harde geluiden van persoonlijke muziekspelers kan leiden
tot tijdelijk of permanent gehoorverlies.
27. Als het product wordt geleverd met een voedingskabel of AC-stroomadapter:
⚫ Als er problemen optreden, koppel de AC-voedingskabel dan los en laat
reparaties over aan bevoegd personeel.

24
⚫ Niet op de stroomadapter gaan staan of deze indrukken. Wees zeer voorzichtig,
vooral in de buurt van de stekkers en waar de kabel uit het apparaat komt.
Plaats geen zware voorwerpen op de stroomadapter, om beschadiging ervan te
voorkomen. Houd het gehele apparaat buiten bereik van kinderen! Wanneer
kinderen met de voedingskabel spelen, kunnen zij ernstig letsel oplopen.
⚫ Koppel dit apparaat los tijdens onweer of wanneer deze voor een lange periode
niet wordt gebruikt.
⚫ Het stopcontact moet in de buurt van de apparatuur zijn geïnstalleerd en
eenvoudig te bereiken zijn.
⚫ Zorg ervoor stopcontacten of verlengsnoeren niet te overbelasten.
Overbelasting kan tot brand of elektrische schokken leiden.
⚫ Apparaten met een klasse 1 constructie moeten worden aangesloten op een
stopcontact met een beschermende aardeverbinding.
⚫ Apparaten met een klasse 2 constructie vereisen geen aardeverbinding.
⚫ Houd altijd de stekker vast wanneer u deze uit het stopcontact trekt. Trek niet
aan de voedingskabel. Dit kan anders een kortsluiting veroorzaken.
⚫ Gebruik geen beschadigde voedingskabel of stekker of een los stopcontact.
Dit kan anders leiden tot brand of elektrische schokken.
28. Als het product een afstandsbediening met knoop-/celbatterijen bevat of daarmee wordt
geleverd:
Waarschuwing:
⚫ "Batterij niet inslikken, gevaar op chemische brandwonden" of soortgelijke
werking.
⚫ [De afstandsbediening meegeleverd met] Dit product bevat een
knoop-/celbatterij. Als de batterij wordt ingeslikt, kan deze in slechts 2 uur
ernstige en zelfs fatale interne brandwonden veroorzaken.
⚫ Houd zowel nieuwe als verbruikte batterijen uit de buurt van kinderen.

25
⚫ Als het batterijvak niet goed sluit, gebruik het product dan niet langer en houd
het uit de buurt van kinderen.
⚫ Als u denkt dat batterijen zijn ingeslikt of in een lichaamsdeel zijn geplaatst,
dient u onmiddellijk medische hulp in te roepen.
29. Waarschuwing m.b.t. het gebruik van batterijen:
⚫ Risico op ontploffing als de batterij incorrect is geïnstalleerd. Vervang alleen
door hetzelfde of een gelijkwaardig type.
⚫ Stel de batterij niet bloot aan extreem hoge of lage temperaturen of een lage
luchtdruk op grote hoogte tijdens gebruik, opslag of transport.
⚫ Vervanging van een batterij door een incorrect type kan leiden tot een
ontploffing of de lekkage van ontvlambare vloeistoffen of gas.
⚫ Verwijdering van een batterij in vuur of een hete oven of het mechanisch
verpletteren of snijden van een batterij kan leiden tot een ontploffing.
⚫ Laat een batterij nooit achter in omgevingen met extreem hoge temperaturen,
anders kan dit leiden tot een ontploffing of de lekkage van ontvlambare
vloeistoffen of gas.
⚫ Stel een batterij nooit bloot aan een extreem lage luchtdruk, anders kan dit
leiden tot een ontploffing of de lekkage van ontvlambare vloeistoffen of gas.
⚫ Houd rekening met de impact op het milieu bij het afdanken van batterijen.
INSTALLATIE
• Pak alle onderdelen uit en verwijder het beschermende materiaal.
• Sluit het apparaat niet aan op het lichtnet voordat de correcte netspanning is geverifieerd
en alle andere aansluitingen tot stand zijn gebracht.

26
Stroomadapter
Gebruik uitsluitend de voeding vermeld in de gebruikshandleiding
Informatie
Waarde en precisie
Naam of handelsmerk van de fabrikant,
handelsregistratie en adres
Fabrikant: DongguanDongsong Electronic Co., Ltd.
Address: Nr.19, Xintian Street, BaizhoubianVillage,
East District, Dongguan, Guangdong, China
Waarde en precisie
Model-ID
DYS818-050200W-K
Ingangsspanning
100-240 V
AC-ingangsfrequentie
50/60 Hz
Uitgangsspanning
5,0 V
Uitgangsstroom
2,0 A
Uitgangsvermogen
10,0 W
Gemiddelde actieve efficiëntie
80,98%
Efficiëntie bij lage belasting (10%)
--
Stroomverbruik bij geen belasting
0,06 W
Waarschuwing: Bij deelname aan het verkeer kan het luisteren naar
muziek de luisteraar minder bewust maken van potentiële gevaren
zoals naderende auto's.
Waarschuwing: Luister niet gedurende lange perioden op een hoog
volume om mogelijke gehoorbeschadiging te voorkomen.

27
Bedieningen en indicator
Vooraanzicht
Achteraanzicht

28
Bovenaanzicht
1: Lcd-Scherm
4: USB-aansluiting
2: DAB/FM-antenne
5: AUX IN-aansluiting
3: TF-/microSD-sleuf
6: DC in-aansluiting

29
7: Draadloos opladen
8: Menu/info/terug-knop
(DC 5V /2000 mA)
9: Alarm 1 en voorkeuzezender 1-knop
11: Voorkeuzezender 3-knop
13: Voorkeuzezender 5-knop
15: Vorige-knop
17: Enter-knop
19: Sluimeren/achtergrondverlichting instellen
21: Voorkeuzezender/geheugen-knop
23: Aan/uit-knop en afspeelmodus
10: Alarm 2 en voorkeuzezender 2-knop
12: Voorkeuzezender 4-knop
14: Slaap en dutje-knop
16: Afspelen/pauzeren/dempen/radio
scannen-knop
18: Volgende-knop
20: Volume - knop
22: Volume + knop
Naar DAB-radio luisteren
1: Steek de stekker in een stopcontact en houd vervolgens de -knop ingedrukt om het
apparaat in te schakelen. Het apparaat schakelt automatisch in met de DAB-modus geactiveerd.
2: Druk op de -knop om de DAB-modus te selecteren en de automatische scanfunctie uit te
voeren.
3: Tijdens het scannen verschijnt op het scherm "Scanning .........(Scannen .........)", samen met een
schuifbalk die de voortgang van het scannen en het aantal zenders dat gevonden is aangeeft .
4: Zodra de scan is voltooid, kiest het apparaat de eerst gevonden alfanumerieke zender.
5: Druk op de / -knop om de zenderlijst te openen.
6: Wanneer u een zender heeft gevonden waarnaar u wilt luisteren, druk op de enter-knop om te
bevestigen.
OPMERKING: als er na de automatische scan geen zenders worden gevonden, druk u op de
enter-knop om naar "Station Scan (Scannen naar zenders)" te gaan en druk op de -knop om te
selecteren voor "Full Scan (Volledig scannen)" of "Manual Scan (Handmatig scannen)" van zenders.
Volledige scan DAB
De volledige scan doorzoekt alle kanalen op de DAB-band III. Nadat de scan is voltooid wordt
automatisch de eerst gevonden alfanumerieke zender geselecteerd.
1: Om de volledige scan te activeren, houd de -knop ingedrukt om het scannen naar
zenders te activeren, druk vervolgens op de / -knop om "Full Scan (Volledige scan)” te
selecteren en druk op de enter-knop om te bevestigen. Op het scherm wordt
"Scanning ………(Scannen ………)" weergegeven, samen met een schuifbalk die de voortgang van
het scannen en het aantal zenders dat gevonden is aangeeft .
2: Alle gevonden zenders worden automatisch opgeslagen. Druk op de / -knop de zender van
uw voorkeur te selecteren en druk vervolgens op de enter-knop om te bevestigen.

30
Handmatig afstemmen DAB
Naast de volledige scanfunctie kunt u de radio ook handmatig
afstemmen. Dit kan helpen als u weet dat uw radio zenders
gemist heeft. U moet weten op welke multiplex de
ontbrekende zender zit.
1: Houd de -knop ingedrukt en ga naar "Station Scan
(Scannen naar zenders)", druk op de / -knop om de
modus handmatig afstemmen te selecteren en druk
vervolgens op de enter-knop om te bevestigen.
2: Druk op de / -knop om door de DAB-kanalen te
bladeren, welke genummerd zijn van 5A tot 13F.
3: Selecteer het gewenste kanaal, druk op de enter-knop om
de huidige multiplex in te voeren. De multiplex wordt
vervolgens weergegeven met daaronder de signaalsterkte.
4: U ziet geen nieuw zenders of u hoort niets als de modus handmatig afstemmen actief is. Zoek
in de zenderlijst om de nieuw afgestemde zenders te vinden.
Voorkeuze/geheugen instelen
Sla de huidige zender op als voorkeuzezender
1: Houd de knop ingedrukt om de zendergeheugenfunctie te activeren.
2: Druk op de / -knop om het voorkeuzenummer van uw keuze te selecteren en druk op de
enter-knop om de zender op te slaan.
U kunt de huidige zender ook snel opslaan in een van de 5 bovenste
voorkeuzezenderselectieknoppen door een van de knoppen ingedrukt te drukken.

31
Naar FM-radio luisteren
1: Houd de -knop ingedrukt om het apparaat in te schakelen. Het apparaat schakelt
automatisch in met de DAB-modus geactiveerd.
2: Druk op de -knop om de FM-modus te selecteren. Druk op de / -knop om de
gewenste zender te selecteren.
3: Houd de / -knop ingedrukt om automatisch naar de volgende beschikbare zender te
scannen
4: Houd de -knop ingedrukt om de modus automatische scannen te activeren die de gevonden
kanalen als voorkeuzezender opslaat. Tijdens het scannen wordt op het scherm
"Scanning...(Scannen...)" weergegeven.
5: Zodra de scan is voltooid, kiest het apparaat de eerst gevonden alfanumerieke zender.
6: Om de gevonden zender te verkennen, druk u op 1.2.3.4.5 om de eerste 5 voorkeuzezenders te
selecteren, druk op de -knop en druk vervolgens op de / -knop om de zenderlijst te
openen.
7: Wanneer u een zender heeft gevonden waarnaar u wilt luisteren, druk op de enter-knop om te
bevestigen.
8: Druk op de / -knop om het volume te regelen.
9: Druk op de -knop om de zender te dempen, de volumemarkering zal knipperen.
Voorkeuze/geheugen instelen
Sla de huidige zender op als voorkeuzezender
- Houd de -knop ingedrukt om de zendergeheugenfunctie te activeren.
- Druk op de / -knop om het voorkeuzenummer van uw keuze te selecteren en
druk op de enter-knop om de zender op te slaan.
U kunt de huidige zender ook snel opslaan in een van de 5 bovenste
voorkeuzezenderselectieknoppen door een van de knoppen ingedrukt te drukken.
Luisteren naar muziek via bluetooth
Als u een audioapparaat met bluetooth gebruikt, moet u ervoor zorgen dat de werkafstand
minder dan 9 meter is. Een andere omgeving kan van invloed zijn op de werkafstand.
1: Steek de stekker in een stopcontact, houd de -knop ingedrukt om het apparaat in te
schakelen en druk vervolgens op de -knop om de bluetooth-modus te selecteren. Op het
scherm zal "Bluetooth Mode (Bluetooth-modus)" worden weergegeven en knipperen.
2: Schakel bluetooth in op uw audioapparaat.

32
3: Zoek naar apparaten en selecteer "Lenco CR-650", er is geen wachtwoord nodig. Indien uw
apparaat een wachtwoord vereist, typ dan "0000" in. (Na het koppelen blijft de "Bluetooth
mode( Bluetooth-modus) " ingeschakeld.)
4: Druk op de / -knop om het volume te regelen.
5: Druk op de -knop om af te spelen/te pauzeren, houd de knop ingedrukt om de verbinding
met het bluetooth-apparaat te verbreken.
6: Druk op de / -knop om het vorige nummer/volgende nummer te selecteren.
Opmerking: “Dit product heeft een bluetooth ontvangstfunctie, u kunt geen bluetooth-geluid
ermee verzenden: dit betekent dat u draadloos een bluetooth-geluidssignaal kunt ontvangen van
een externe bron, zoals een smartphone.”
Luisteren naar muziek via USB
1: Steek een USB-stick (geformatteerd in FAT-32) in de achterkant van het apparaat.
2: Houd de -knop ingedrukt om het apparaat in te schakelen en druk vervolgens op de
-knop om de USB-modus te selecteren.
3: Druk op de / -knop om het volume te regelen.
4: Druk op de -knop om af te spelen/te pauzeren.
5: Druk op de / -knop om het vorige nummer/volgende nummer te selecteren.
Opmerking: zet het volume harder van uw aangesloten bluetooth-apparaat en de CR-650.
Luisteren naar muziek op een microSD-kaart
1: Steek de microSDkaart (geformatteerd in FAT-32) in de TF-/microSD-sleuf aan de achterkant
van het apparaat.
2: Houd de -knop ingedrukt om het apparaat in te schakelen en druk vervolgens op de
-knop om de MicroSD-kaartmodus te selecteren.
3: Druk op de / -knop om het volume te regelen.
4: Druk op de -knop om af te spelen/te pauzeren.
5: Druk op de / -knop om het vorige nummer/volgende nummer te selecteren.
Luisteren naar muziek via AUX IN
1: Sluit de AUX-kabel aan op de achterkant van het apparaat (audiokabel niet meegeleverd)
2: Houd de -knop ingedrukt om het apparaat in te schakelen en druk vervolgens op de
-knop om de AUX-modus te selecteren.
3: Druk op de / -knop om het volume te regelen.

33
4: Druk op de -knop om het geluid te dempen.
Luisteren naar natuurlijk geluid (slaaptherapiemodus)
1: Houd de -knop ingedrukt om het apparaat in te schakelen en druk vervolgens op de
-knop om de slaaptherapiemodus te selecteren.
2: Wanneer u de slaaptherapiemodus kiest, start de slaapfunctie automatisch.
De standaardtijd is 15 minuten, druk op de slaapknop om een andere tijd te selecteren.
3: Druk op de / -knop om uit 10 verschillende natuurgeluiden te kiezen.
4: Druk op de / -knop om het volume te regelen.
5: Druk op de -knop om het geluid te dempen.
De tijd instellen
1: Houd de -knop ingedrukt om het apparaat in te schakelen.
2: Houd de -knop en open het menu. Druk op de / -knop en zoek "System (Systeem)"
op, druk op de enter-knop om het systeem te openen en zoek de optie "Time setup (Tijd
instellen)" op
3: Druk op de enter-knop en vervolgens op de / -knop om de tijd in te stellen volgens de
handleiding.
De wekker instellen
De alarmen kunnen worden ingesteld in de stand-bymodus.
1: Druk op alarm 1 of alarm 2 en druk op de enter-knop.
2: Druk op de / -knop om de optie te selecteren die u wilt wijzigen en druk op de enter-knop.
Bewerkbare opties:
Alarm on/off (Alarm aan/uit): zzet het alarm aan/uit.
Time (Tijd): alarmtijd.
Days (Dagen): op welke dagen het alarm moet afgaan.
Duur van het alarm.
Mode (Modus): welke alarmtoon
(FM/DAB/zoemer/slaaptherapiegeluiden).
Volume: maximumvolume van de alarmtoon (minimum is 1).
Preset (Voorkeuzezender): selecteer welke voorkeuzezender als alarm
gebruikt moet worden.
Save (Opslaan): sla de aangebrachte wijzigingen op.
Opmerking: als u binnen 10 seconden geen instellingen wijzigt, keert de klok terug naar de
normale tijdmodus en worden uw instellingen niet opgeslagen.
Als u "Weekdays (Weekdagen)" in het menu "Days (Dagen)" selecteert, wordt rechts van het

34
wekkersymbool een "5" weergegeven, wat de 5 werkdagen van de week betekent.
Als u "Weekend" in het menu "Days (Dagen)" selecteert, verschijnt rechts van het wekkersymbool
een "2", wat de 2 dagen van het weekend betekent.
Als u "Daily (Dagelijks)" in het menu "Days (Dagen)" selecteert, wordt rechts van het
alarmsymbool een "2" en een "5" weergegeven, wat 7 dagen van de week betekent.
De slaaptijd instellen
1: Druk als het als het apparaat ingeschakeld is op de -knop om de slaapfunctie te
activeren.
2: Druk op de -knop om de slaaptijd te selecteren (15/30/45/60/75/90 minuten) en druk op
de enter-knop.
Of wacht een paar seconden tot automatische de geselecteerde slaaptijd wordt gebruikt.
Het apparaat wordt uitgeschakeld wanneer de geselecteerde slaaptijd verstreken is.
Opmerking:
1. als u de resterende slaaptijd wilt bekijken, druk dan eenmaal kort op de slaap-dutje/knop
wanneer de slaaptimer actief is.
2. Als u de slaaptimer wilt resetten, druk dan tweemaal op de slaap-dutje/knop wanneer de
slaaptimer actief is
De dutjetijd instellen
1: Druk als het als het apparaat uitgeschakeld is op de -knop om de dutjefunctie te
activeren.
2: Druk op de -knop om de dutjetijd (15/30/45/60/75/90 minuten) te selecteren en druk op
de enter-knop. Of wacht een paar seconden tot automatische de geselecteerde dutjetijd wordt
gebruikt.
3: Het apparaat wordt uitgeschakeld wanneer de geselecteerde dutjetijd verstreken is.
Opmerking:
1. als u de resterende dutjetijd wilt bekijken, druk dan eenmaal kort op de slaap-dutje/knop
wanneer de dutjetimer actief is.
2. Als u de dutjetimer wilt resetten, druk dan tweemaal op de slaap-dutje/knop wanneer de
dutjetimer actief is.
Voorkeuze/geheugen instelen
1: Houd in de FM-/DAB-modus de -knop ingedrukt om de zendergeheugenfunctie te
activeren
2: Druk op de / -knop om het zendernummer te selecteren en druk op de enter-knop om de

35
zender op te slaan.
3: Druk in de FM-/DAB-modus op de -knop om de geheugenzenderlijst te openen.
4: Druk op de / -knop om de gewenste zender te selecteren.
De achtergrondverlichting instellen
1: Stel de achtergrondverlichting in het menu in of druk op de SNOOZE/DIMMER-knop om
het niveau van de achtergrondverlichting van het scherm in te stellen
Back-upbatterijen
Plaatsen/vervangen van batterijen:
1. Verwijder het klepje van het batterijvak dat zich aan de onderkant van het apparaat bevindt.
2. Plaats 4 nieuwe AA/LR6-batterijen (niet meegeleverd) in het batterijvak en let erop dat de
polariteit van elke batterij overeenkomt met de symbolen (+ en -) in het batterijvak.
3. Sluit het klepke van het batterijvak weer.
Opmerking:
- Het gebruik van batterijen in het apparaat is optioneel. De batterijen dienen alleen voor het
opslaan van de tijd- en datuminstellingen in geval van een stroomonderbreking.
- Zonder batterijen worden de tijd- en datuminstellingen bij een stroomonderbreking teruggezet
naar de fabrieksinstellingen.
- De overige instellingen, waaronder de alarminstellingen en de voorkeuzezenders, blijven een
stroomonderbreking altijd in het geheugen opgeslagen.

36
Probleemoplossing
Symptoom
Mogelijke oorzaak
Oplossing
De wekkerradio gaat
niet aan.
U heeft uw apparaat niet aangesloten.
Steek de stekker van het apparaat in een
stopcontact.
Het stopcontact wordt niet van stroom
voorzien.
Sluit een ander apparaat aan op hetzelfde
stopcontact om het te stopcontact te testen.
Geen geluid.
Het volume is ingesteld op het min
imum.
Regel het volume door op de volumetoets te
drukken.
Slechte
FM-ontvangst.
De antenne is niet volledig
uitgeschoven.
Schuif de antenne volledig uit.
Er is storing door elektrische apparaten
in de buurt (magnetron, tv, enz.).
Plaats de wekkerradio verder weg van
mogelijke storingsbronnen.
Slechte
DAB-ontvangst.
De antenne is niet volledig
uitgeschoven.
Schuif de antenne volledig uit.
Uw regio wordt niet gedekt door DAB.
Controleer de DAB-dekking in uw regio.
Er wordt geen muziek
afgespeeld vanaf een
USB-stick of microSD-kaart.
Het audioformaat wordt niet
ondersteund door de
wekkerradio.
Zorg ervoor dat de bestanden op de verwisselbare
media in Mp3-formaat zijn.
Zorg ervoor dat de USB-stick correct in de
USB-poort is gestoken of dat de correct in de
TF-/microSD-sleuf is gestoken aan de achterkant
van de wekkerradio.
Er kan geen
bluetooth*-verbinding met
een ander apparaat tot
stand worden gebracht.
De koppelingsmodus op het
bluetooth*-afspeelapparaat
is niet geactiveerd.
Raadpleeg de gebruikershandleiding van het
bluetooth*-afspeelapparaat en probeer het
opnieuw.
Zorg ervoor dat de wekkerradio en het
bluetooth*-afspeelapparaat minder dan 8 meter
van elkaar verwijderd zijn en dat er geen muren of
andere elektronische apparaten zijn die de
bluetooth*-transmissie blokkeren of storen.
Geen geluid bij afspelen
vanaf bluetooth-apparaat.
Zet het volume van de wekkerradio en het
bluetooth-apparaat hoger.
De telefoon die op de pad
voor draadloos opladen ligt,
wordt niet opgeladen.
- Zorg ervoor dat de voedingsadapter van de
wekkerradio is aangesloten.
- Zorg ervoor dat de telefoon geschikt is voor Qi*
(uitgerust met de draadloze oplaadtechnologie
van Qi*).
- Verwijder het hoesje van de telefoon.
- Start de telefoon opnieuw op.
- Zorg ervoor dat u draadloos opladen is
ingeschakeld in de telefooninstellingen, als deze
optie aanwezig is.
- Werk de systeemsoftware van De telefoon bij.
- Neem contact op met de fabrikant van de
telefoon voor advies.

37
Technische specificaties
Ingangsvermogen (voedingsadapter)
AC 100-240 V ~ 50/60Hz
Uitgangsvermogen muziek
2 x 5 W RMS + passief
DAB-frequentiebereik
174,928 - 239,200 MHz
FM-frequentiebereik
87,5 - 108 MHz
Bluetooth-frequentiebereik:
Bluetooth-versie:
2402-2480 MHz
V5.0
Stroomverbruik
Max. 13 W
Stroomverbruik (in stand-by)
< 1 W
Bedrijfstemperatuur
0 °C - 35 °C
Werkingspositie
Horizontaal
Afmetingen van het apparaat
170 X 170 x 74 mm
Gewicht
0,9 kg (zonder batterijen)
Dit product is geschikt voor dit doel in alle EU-Landen.
Garantie
Lenco verleent service en garantie in overeenstemming met de Europese wetgeving, wat betekent
dat u bij reparaties (zowel tijdens als na de garantieperiode) contact dient op te nemen met uw
lokale dealer.
Belangrijke opmerking: Het is niet mogelijk om te repareren producten direct naar Lenco te
sturen.
Belangrijke opmerking: Als dit apparaat op enigerlei wijze wordt geopend door de gebruiker of
een niet-officieel servicecentrum, komt de garantie te vervallen.
Dit apparaat is niet geschikt voor professioneel gebruik. In het geval professioneel gebruik, komen
alle garantieverplichtingen van de fabrikant te vervallen.
Disclaimer
Er worden regelmatig updates voor de firmware en/of hardwarecomponenten uitgegeven.
Daarom kunnen sommige instructies, specificaties en afbeeldingen in deze documentatie
enigszins afwijken van uw specifieke situatie. Alle items beschreven in deze handleiding, zijn
alleen bestemd ter illustratie en zijn mogelijk niet van toepassing op een bepaalde situatie. Aan de
beschrijving in deze handleiding kunnen geen wettelijke rechten of aanspraken worden ontleend.

38
Het oude apparaat afdanken
Dit symbool geeft aan dat het betreffende elektrische product of de
batterij in Europa niet als algemeen huishoudelijk afval mag worden
afgevoerd. Om ervoor te zorgen dat het product en de batterij op
de juiste manier worden verwerkt, dient u deze af te danken in
overeenstemming met de toepasselijke lokale wetgeving met
betrekking tot de verwijdering van elektrische apparatuur of
batterijen. U helpt hierdoor natuurlijke hulpbronnen te behouden
en de normen voor milieubescherming bij de behandeling en
verwijdering van elektrisch afval te verbeteren (richtlijn afgedankte
elektrische en elektronische apparatuur).
CE-markering
Commaxx B.V. Wiebachstraat 37, 6466 NG Kerkrade, Nederland, verklaart hierbij dat dit product in
overeenstemming is met de essentiële vereisten van EU-richtlijnen.
De verklaring van conformiteit is te vinden op [email protected]
Service
Bezoek voor meer informatie en helpdeskondersteuningwww.lenco.com
Commaxx B.V. Wiebachstraat 37, 6466 NG Kerkrade, Nederland

39
DEUTSCH
ACHTUNG:
Eine andere als die hier beschriebene Benutzung der Bedienelemente oder Einstellung oder
Durchführung von Abläufen kann zu einer Aussetzung gefährlicher Strahlung führen.
VORSICHTSMASSNAHMEN VOR DER BENUTZUNG
BEFOLGEN SIE IMMER FOLGENDE ANWEISUNGEN:
1. Blockieren oder bedecken Sie keine Lüftungsöffnungen. Wenn Sie das Gerät auf ein Regal
stellen, lassen Sie um das gesamte Gerät 5 cm (2”) Freiraum.
2. Stellen Sie das Gerät entsprechend den Anweisungen der mitgelieferten
Bedienungsanleitung auf.
3. Halten Sie das Gerät von Hitzequellen wie Radiatoren, Heizern, Öfen, Kerzen oder
anderen hitzeerzeugenden Produkten oder offenen Flammen fern. Das Gerät darf nur bei
gemäßigtem Klima verwendet werden. Sehr kalte oder heiße Umgebungen sind zu
vermeiden. Die Betriebstemperatur liegt zwischen 0 °C und 35 °C.
4. Meiden Sie bei der Benutzung des Produkts die Nähe starker Magnetfelder.
5. Elektrostatische Entladungen können die normale Benutzung dieses Gerätes stören.
Sollte dies geschehen, führen Sie einfach einen Reset aus und starten Sie dann das Gerät
entsprechend den Anweisungen dieser Bedienungsanleitung neu. Gehen Sie besonders
bei Datenübertragungen mit dem Gerät vorsichtig um und führen Sie diese nur in einer
anti-elektrostatischen Umgebung aus.
6. Warnung! Niemals Gegenstände durch die Lüftungsschlitze oder Öffnungen in das Gerät
stecken. In diesem Gerät fließt Hochspannung und das Hineinstecken von Gegenständen
kann zu Stromschlag und/oder Kurzschluss interner elektrischer Bauteile führen.
Spritzen/gießen Sie aus dem gleichen Grund weder Wasser ncoh andere Flüssigkeiten auf
das Gerät.

40
7. Benutzen Sie das Gerät nicht in nasser oder feuchter Umgebung wie Bad, Dampfküche
oder in der Nähe von Schwimmbecken.
8. Das Gerät darf weder Tropf- noch Spritzwasser ausgesetzt werden und es dürfen keine
mit Flüssigkeit gefüllten Behälter wie z. B. Vasen auf das Gerät oder in der Nähe des
Gerätes gestellt werden.
9. Benutzen Sie das Gerät nicht, wenn Kondensation entstehen kann. Wenn Sie das Gerät in
einem warmen, feuchten Raum mit Dampf benutzen, können Wassertropfen oder
Kondensation in das Gerät eindringen und u. U. zu Fehlfunktionen des Gerätes führen.
Schalten Sie in diesem Fall das Gerät für 1 bis 2 Stunden aus, bevor Sie es erneut
einschalten, wobei Sie darauf achten sollten, dass das Gerät vollständig getrocknet ist,
bevor Sie es wieder einschalten.
10. Obwohl dieses Gerät unter größter Sorgfalt hergestellt und vor Auslieferung mehrmals
überprüft wurde, können trotzdem wie bei jedem anderen elektrischen Gerät auch
Probleme auftauchen. Trennen Sie das Gerät bei Rauchentwicklung, starker
Hitzeentwicklung oder jeder anderen unnatürlichen Erscheinung sofort vom Stromnetz.
11. Dieses Gerät ist durch eine Stromquelle wie auf dem Typenschild angegeben zu
betreiben. Halten Sie bei Unsicherheiten über die Art Ihrer Stromversorgung in Ihrer
Wohnung Rücksprache mit Ihrem Händler oder Ihrem Stromversorger.
12. Halten Sie das Gerät von Haustieren fern. Einige Nagetiere lieben es, an Netzkabeln zu
nagen.
13. Benutzen Sie für die Reinigung ein weiches, trockenes Tuch. Benutzen Sie niemals
Lösungsmittel oder Flüssigkeiten auf Ölbasis. Benutzen Sie zum Entfernen hartnäckiger
Flecken ein feuchtes Tuch mit mildem Reinigungsmittel.
14. Der Hersteller haftet nicht für Beschädigungen oder Datenverluste aufgrund von
Fehlfunktion, Zweckentfremdung oder Modifikation des Gerätes oder aufgrund des
Wechselns der Batterie.
15. Unterbrechen Sie die Verbindung nicht während einer Formatierung oder einer
Datenübertragung. Bei Unterbrechung drohen Datenverlust und Datenbeschädigung.

41
16. Wenn das Gerät eine USB-Wiedergabefunktion besitzt, stecken Sie den USB-Stick direkt
in das Gerät. Verwenden Sie kein USB-Verlängerungskabel, weil die erhöhte
Störungsanfälligkeit zu Datenverlust führen kann.
17. Das Typenschild befindet sich an der Unter- oder Rückseite des Gerätes.
18. Dieses Gerät ist nicht zur Benutzung durch Personen (einschließlich Kinder) mit
physischen, sensorischen oder mentalen Beeinträchtigungen oder ohne ausreichende
Erfahrung vorgesehen, es sei denn, sie werden durch eine für ihre Sicherheit
verantwortliche Person beaufsichtigt oder wurden in die ordnungsgemäße Bedienung
des Gerätes durch eine für ihre Sicherheit verantwortliche Person eingewiesen.
19. Dieses Produkt ist nur für den nicht-professionellen Gebrauch und nicht für gewerbliche
oder industrielle Zwecke bestimmt.
20. Stellen Sie sicher, dass das Gerät in einer stabilen Position aufgestellt ist. Schäden, die
durch Verwendung dieses Produkts in einer instabilen Position, durch Vibrationen, Stöße
oder Nichtbeachtung der anderen in diesem Handbuch enthaltenen Warnungen und
Sicherheitsmaßnahmen entstehen, werden nicht durch die Garantie abgedeckt.
21. Entfernen Sie niemals das Gehäuse dieses Gerätes.
22. Stellen Sie dieses Gerät niemals auf andere elektrische Geräte.
23. Halten Sie Kinder von den Plastiktüten fern.
24. Benutzen Sie nur vom Hersteller spezifizierte Erweiterungen/Zubehörteile.
25. Lassen Sie alle Wartungs-/Reparaturarbeiten von qualifiziertem Servicepersonal
ausführen. Reparatur/Wartung wird notwendig, wenn das Gerät in irgendeiner Weise
wie beispielsweise am Netzkabel oder am Netzstecker beschädigt wurde oder wenn
Flüssigkeit in das Gerät gelangt ist bzw. Gegenstände in das Gerät gefallen sind, das Gerät
Regen oder Feuchtigkeit ausgesetzt war, es heruntergefallen ist oder nicht
ordnungsgemäß funktioniert.
26. Langes Hören lauter Töne aus einem Musikgerät kann zu zeitweiligem oder
permanentem Hörverlust führen.

42
27. Wenn zum Lieferumfang des Produkts ein Netzkabel oder ein Netzadapter gehört:
⚫ Wenn irgendwelche Probleme auftreten, trennen Sie das Gerät vom Stromnetz
und setzen Sie sich anschließend mit einer qualifizierten Fachkraft in
Verbindung.
⚫ Treten Sie nicht auf den Netzadapter und klemmen Sie ihn auch nicht ein. Seien
Sie besonders im näheren Bereich des Netzsteckers und an der Stelle vorsichtig,
an der das Netzkabel aus dem Gerät herausgeführt wird. Stellen Sie keine
schweren Gegenstände auf den Netzadapter, da er dadurch beschädigt werden
kann. Halten Sie das gesamte Gerät außerhalb der Reichweite von Kindern!
Durch Spielen mit dem Netzkabel können sie sich ernsthafte Verletzungen
zuziehen.
⚫ Trennen Sie das Gerät während eines Gewitters oder bei längerer
Nichtbenutzung vom Stromnetz.
⚫ Die Netzsteckdose muss sich in der Nähe des Gerätes befinden und einfach zu
erreichen sein.
⚫ Überlasten Sie Steckdosen und Verlängerungsleitungen nicht. Eine Überlastung
kann zu Brandgefahr bzw. Stromschlag führen.
⚫ Geräte der Schutzklasse 1 müssen Sie an eine Netzsteckdose mit Schutzleiter
anschließen.
⚫ Geräte der Schutzklasse 2 benötigen keinen Schutzleiteranschluss.
⚫ Greifen Sie beim Abziehen von der Netzsteckdose am Netzstecker. Ziehen Sie
ihn nicht durch Zerren am Kabel heraus. Das kann zu einem Kurzschluss führen.
⚫ Verwenden Sie weder ein beschädigtes Netzkabel noch einen beschädigten
Netzstecker oder eine lockere Steckdose. Missachtung kann zu Brand oder
Stromschlag führen.

43
28. Wenn das Produkt mit einer Fernbedienung mit Batterien/Knopfzellen geliefert wird
oder das Produkt eine derartige Fernbedienung umfasst:
Warnung:
⚫ Die Batterie nicht verschlucken – Verätzungsgefahr.
⚫ Die mit diesem Produkt gelieferte Fernbedienung enthält eine Knopfzelle. Das
Verschlucken der Batterie kann innerhalb von nur 2 Stunden zu schwersten
inneren Verbrennungen mit Todesfolge führen.
⚫ Halten Sie neue und gebrauchte Batterien von Kindern fern.
⚫ Falls sich das Batteriefach nicht richtig schließen lässt, stellen Sie die Benutzung
des Gerätes ein und halten Sie es von Kindern fern.
⚫ Wenn Sie vermuten, dass Batterien verschluckt oder in eine Körperöffnung
eingeführt worden sind, suchen Sie umgehend eine(n) Ärztin/Arzt auf.
29. Warnhinweise bzgl. der Verwendung von Batterien:
⚫ Es besteht Explosionsgefahr, wenn die Batterie nicht ordnungsgemäß ersetzt
wird. Tauschen Sie die Batterie nur gegen eine Batterie des gleichen Typs aus.
⚫ Die Batterie darf während der Benutzung, Aufbewahrung oder des Transports
weder sehr hohen oder sehr niedrigen Temperaturen noch niedrigem Luftdruck
in großen Höhenlagen ausgesetzt werden.
⚫ Die Auswechslung der Batterie mit einem falschen Batterietyp kann zum
Explodieren der Batterie oder zum Entweichen von entflammbarem Gas oder
Auslaufen von entflammbarer Flüssigkeit aus der Batterie führen.
⚫ Die Entsorgung der Batterie in Feuer oder einem heißen Ofen oder das
mechanische Zerkleinern oder Zerteilen der Batterie kann zu Explosionen
führen.
⚫ Das Verbleiben der Batterie in einer Umgebung mit sehr hohen Temperaturen
kann zum Explodieren der Batterie oder zum Entweichen von entflammbarem
Gas oder zum Auslaufen von entflammbarer Flüssigkeit aus der Batterie führen.

44
⚫ Eine einem sehr niedrigen Luftdruck ausgesetzte Batterie kann explodieren
oder es kann aus einer einem sehr niedrigen Luftdruck ausgesetzten Batterie
entflammbares Gas entweichen oder entflammbare Flüssigkeit auslaufen.
⚫ Legen Sie besonderes Augenmerk auf den ökologischen Aspekt der
Batterieentsorgung.
AUFSTELLEN
• Packen Sie alle Teile aus und entfernen Sie danach die Schutzmaterialien.
• Schließen Sie das Gerät erst an das Stromnetz an, nachdem Sie die Netzspannung
überprüft haben und alle anderen notwendigen Anschlüsse hergestellt sind.
Netzadapter
Benutzen Sie nur die in der Bedienungsanleitung angegebene Stromversorgung
Information
Wert und Genauigkeit
Name des Herstellers oder der
Handelsmarke, kommerzielle Zulassung
und Anschrift
Fertigung: DongguanDongsong Electronic Co., Ltd.
Adresse: No.19, Xintian Street, BaizhoubianVillage,
East District, Dongguan, Guangdong, P.R. China
Wert und Genauigkeit
Modellidentifikator
DYS818-050200W-K
Eingangsspannung
100 – 240 V
Wechselstromfrequenz des AC-Eingangs
50/60 Hz
Ausgangsspannung
5,0 V
Ausgangsstrom
2,0 A
Ausgangsleistung
10,0 W
Durchschnittliche Effizienz bei Normallast
80,98 %
Effizienz bei Niederlast (10 %)
–-
Leistungsaufnahme bei Nulllast
0,06 W

45
WARNUNG: Bei der Teilnahme am Straßenverkehr kann das Hören von
Musik über ein Musikgerät von möglichen Gefahren, wie sich
annähernden Fahrzeugen, ablenken.
WARNUNG: Hören Sie nicht für längere Zeit mit einem hohen
Lautstärkepegel, um dauerhaften Hörschäden vorzubeugen.

46
Bedienelemente und Anzeige
Produktvorderseite
Produktrückseite

47
Produktoberseite
1: LCD-Anzeige
4: USB-Wiedergabe-Taste
2: DAB-/UKW-Antenne
5: AUX-Eingang
3: MicroSD-Kartenschlitz
6: Gleichspannungseingang

48
7: Kabellose Aufladung
8: Menü-/info-/Zurück-Taste
(5 V Gleichspannung/2000 mA)
9: Alarm-1- und Funkvoreinstellung-1-Taste
11: Funkvoreinstellung-3-Taste
13: Funkvoreinstellung-5-Taste
15: Vorheriger Titel
17: Enter-Taste
19: Schlummern- und
Hintergrundbeleuchtung-Taste
21: Radiovoreinstellung-/Speichertaste
23: Ein-/Austaste und Wiedergabemodus
10: Alarm-2- und Radiovoreinstellung-2-Taste
12: Radiovoreinstellung-4-Taste
14: Schlaf- und Nickerchen-Taste
16: Wiedergabe-/Pause-/Stumm-/Sendersuche-Taste
18: Vor-Taste
20: Leiser-Taste
22: Lauter-Taste
DAB-Radio hören
1: Schließen Sie das Gerät an die Stromversorgung an und halten Sie zum Einschalten des Gerätes
die Taste gedrückt. Das Gerät ruft automatisch den DAB-Modus auf.
2: Wählen Sie mit den DAB-Modus und führen Sie die automatische Suchfunktion durch.
3: Während der Suche zeigt das Display „Scanning...“ (Suche...) gemeinsam mit einer
Fortschrittsleiste der Suche und der Anzahl der bislang gefundenen Sender.
4: Sobald die Suche beendet ist, wählt das Gerät den ersten gefundenen Radiosender in
alphanumerischer Reihenfolge.
5: Drücken sie zum Aufrufen der Senderliste / .
6: Wenn Sie einen Sender gefunden haben, den Sie hören möchten, drücken Sie zur Bestätigung
die Enter-Taste.
HINWEIS: Wenn durch die automatische Suche keine Sender gefunden wurden, drücken Sie zum
Aufrufen von „Station Scan“ (Sendersuche) die Enter-Taste, wählen Sie dann mit oder
„Full Scan“ (Vollständige Suche) oder „Manual Scan“ (Manuelle Suche).
Vollständige DAB-Suche
Die vollständige Suche sucht alle Sender im DAB-Band III. Nach Abschluss der Suche wird
automatisch der erste gefundene Sender in alphanumerischer Reihenfolge ausgewählt.
1: Aktivieren Sie die vollständige Suche, indem Sie zum Aufrufen der Sendersuche die Taste
gedrückt halten. Drücken Sie dann zur Auswahl von „Full Scan“ (Vollständige Suche) die
Tasten / und bestätigen Sie mit der Enter-Taste. Das Display zeigt „Scanning...“ (Suche...)
gemeinsam mit einer Fortschrittsleiste und der Anzahl der bislang gefundenen Sender.
2: Alle Sender, die gefunden wurden, werden automatisch gespeichert. Drücken Sie zur Auswahl
des gewünschten Senders / und drücken Sie zur Bestätigung die Enter-Taste.

49
Manuelle DAB-Suche
Neben der vollständigen Suchfunktion können Sie auch
manuell Sender einstellen. Dies kann hilfreich sein, wenn Sie
wissen, dass Ihrem Radio einige Sender verlorengegangen
sind. Sie müssen wissen, in welchem Multiplex sich die
fehlenden Sender befinden.
1: Halten Sie die Taste gedrückt und rufen Sie
„Station Scan“ (Sendersuche) auf. Wählen Sie mit /
„Manual Mode“ (Manueller Modus) und drücken Sie zum
Bestätigen die Enter-Taste.
2: Schalten Sie mit / durch die DAB-Sender, die von
5A bis 13F nummeriert sind.
3: Drücken Sie nach Auswahl der gewünschten
Sendernummer die Enter-Taste, um den aktuellen
Multiplex aufzurufen. Nun wird der Multiplex angezeigt
und darunter sehen Sie die Signalstärke.
4: Während der manuellen Suche sehen Sie keine neuen Radiosender und hören auch nichts.
Durchsuchen Sie die Senderliste nach den neu eingestellten Sendern.
Voreinstellung/Speichereinstellung
Aktuellen Radiosender als Voreinstellung speichern
1: Halten Sie zum Aufrufen der Senderspeicherfunktion die Taste gedrückt.
2: Drücken Sie zur Auswahl der gewünschten Voreinstellungsnummer die Taste / und
drücken Sie zum Speichern des Senders die Enter-Taste.
Sie können den aktuellen Sender schnell auf einer der 5 Top-Voreinstellungstasten speichern,
indem Sie eine der Voreinstellungstasten lange drücken.

50
UKF-Radio hören
1: Halten Sie zum Einschalten des Gerätes die Taste gedrückt. Das Gerät ruft automatisch
den DAB-Modus auf.
2: Drücken Sie zur Auswahl des UKW-Modus die Taste . Drücken Sie die Taste / , um den
gewünschten Sender zu wählen.
3: Halten Sie zur automatischen Suche nach dem nächsten verfügbaren Radiosender die Taste
/ gedrückt.
4: Halten Sie zum Aufrufen des automatischen Suchmodus die Taste gedrückt. Dieser Modus
speichert die gefundenen Sender als Voreinstellungen. Während der Suche zeigt das Display
„Scanning...“ (Suche...).
5: Sobald die Suche beendet ist, wählt das Gerät den ersten gefundenen Radiosender in
alphanumerischer Reihenfolge.
6: Drücken Sie zum Stöbern durch die gefundene Sender 1, 2, 3, 4 oder 5 zur Auswahl der ersten
5 gespeicherten Sender. Drücken Sie die Taste und rufen Sie mit / die Senderliste
auf.
7: Wenn Sie einen Sender gefunden haben, den Sie hören möchten, drücken Sie zur Bestätigung
die Enter-Taste.
8: Drücken Sie zum Anpassen der Lautstärke die Taste / .
9: Drücken Sie zum Stummschalten des UKW-Senders die Taste . Dadurch blinkt das
Lautstärkesymbol.
Voreinstellung/Speichereinstellung
Aktuellen Radiosender als Voreinstellung speichern
- Halten Sie zum Aufrufen der Senderspeicherfunktion die Taste gedrückt.
- Drücken Sie zur Auswahl der gewünschten Voreinstellungsnummer die Taste
/ und drücken Sie zum Speichern des Senders die Enter-Taste.
Sie können den aktuellen Sender schnell auf einer der 5 Top-Voreinstellungstasten speichern,
indem Sie eine der Voreinstellungstasten lange drücken.
Musik über Bluetooth hören
Wenn Sie ein Bluetooth-Audiogerät verwenden, müssen Sie sicherstellen, dass es sich innerhalb
der Betriebsreichweite von 9 Metern befindet. Je nach Umgebungsbedingungen kann die
Betriebsreichweite unterschiedlich ausfallen.
1: Schließen Sie das Netzteil an, halten Sie zum Einschalten des Gerätes die Taste gedrückt

51
und wählen Sie mit den Bluetooth-Modus. „Bluetooth mode“ (Bluetooth-Modus) blinkt
am Display.
2: Schalten Sie die Bluetooth-Funktion an Ihrem Audiogerät ein.
3: Suchen Sie nach Geräten und wählen Sie anschließend „Lenco CR-650“. Es ist kein Passwort
erforderlich. Falls Ihr Gerät ein Passwort abfragt, geben Sie „0000“ ein (nach der Kopplung
bleibt der Bluetooth-Modus eingeschaltet).
4: Drücken Sie zum Anpassen der Lautstärke oder .
5: Drücken Sie zum Wiedergeben/Anhalten, halten Sie die Taste zur Trennung des
Bluetooth-Gerätes gedrückt.
6: Wählen Sie mit / den vorherigen/nächsten Titel.
Hinweis: „Dieses Produkt besitzt eine bluetooth-Empfangsfunktion. Sie können mit diesem Gerät
kein bluetooth-Audio an andere Geräte senden, sondern nur bluetooth-Audiosignale von
externen Signalquellen wie beispielsweise einem Smartphone empfangen.“
Musik über USB hören
1: Schließen Sie einen (FAT-32-formatierten) USB-Speicherstick an der Rückseite des Gerätes an.
2: Halten Sie zum Einschalten des Gerätes gedrückt und drücken Sie zur Auswahl des
USB-Modus .
3: Drücken Sie zum Anpassen der Lautstärke oder .
4: Drücken Sie zum Wiedergeben/Anhalten .
5: Wählen Sie mit / den vorherigen/nächsten Titel.
Hinweis: Bitte erhöhen Sie die Lautstärke an Ihrem verbundenen Bluetooth-Gerät und CR-650
Musik auf einer microSD-Karte hören
1: microSD-Karte (FAT-32-Format) in den microSD-Kartenschlitz an der Rückseite einstecken
2: Halten Sie die Taste zum Einschalten des Gerätes gedrückt und drücken Sie zur Auswahl
des microSD-Kartenmodus .
3: Drücken Sie zum Anpassen der Lautstärke oder .
4: Drücken Sie zum Wiedergeben/Anhalten .
5: Wählen Sie mit / den vorherigen/nächsten Titel.
Musik über AUX-Eingang hören
1: Schließen Sie das AUX-Kabel an der Rückseite des Gerätes an (Audiokabel nicht im

52
Lieferumfang enthalten).
2: Halten Sie zum Einschalten des Gerätes gedrückt und drücken Sie zur Auswahl des
AUX-Modus .
3: Drücken Sie zum Anpassen der Lautstärke oder .
4: Drücken Sie zum Stummschalten des Tons .
Naturgeräusche hören (Schlaftherapie-Modus)
1: Halten Sie zum Einschalten des Gerätes gedrückt und drücken Sie zur Auswahl des
Schlaftherapie-Modus .
2: Wenn Sie den Schlaftherapie-Modus wählen, beginnt die Schlaffunktion automatisch. Die
Standard-Zeiteinstellung sind 15 Minuten. Drücken Sie zur Anpassung der Zeit die Schlaf-Taste.
3: Wählen Sie mit / zwischen 10 verschiedenen Naturgeräuschen.
4: Drücken Sie zum Anpassen der Lautstärke oder .
5: Drücken Sie zum Stummschalten des Tons .
Timereinstellung
1: Halten Sie zum Einschalten des Gerätes gedrückt.
2: Halten Sie die Taste gedrückt, um das Menü aufzurufen. Suchen Sie mit / die
Option System, drücken Sie zum Aufrufen von System die Enter-Taste und navigieren Sie zur
Option „Time setup“ (Zeiteinrichtung).
3: Drücken Sie die Enter-Taste, drücken Sie dann zum Einstellen der Zeit entsprechend der
Anleitung / .
Einstellen des Weckers
Die Alarme können im Bereitschaftsmodus eingestellt werden.
1: Drücken Sie Alarm 1 oder Alarm 2 und dann Enter.
2: Wählen Sie mit / die Option, die Sie ändern möchten, und drücken Sie Enter.
Einstellbare Optionen:
Alarm on/off (Alarm ein/aus): Zum Ein-/Ausschalten des Alarms
Time (Uhrzeit): Alarmzeit
Days (Tage): An welchen Tagen der Alarm aktiv sein soll
Dauer des Alarms
Modus: Alarmton (UKW/DAB/Summer/Schlaftherapie-Geräusche)
Lautstärke: Max. Lautstärke des Alarmtons (Minimum ist 1)
Preset (Voreinstellung): Wählen Sie, welche Voreinstellung für den
Alarm genutzt werden soll
Save (Speichern): Zum Speichern der vorgenommenen Änderungen

53
Hinweis: Wenn Sie nicht innerhalb von 10 Sekunden Einstellungen vornehmen, kehrt die Uhr in
den normalen Zeitmodus zurück und Ihre Einstellungen werden nicht gespeichert.
Wenn Sie „weekdays“ (Wochentage) im Menü „days“ (Tage) wählen, wird eine „5“ rechts neben
dem Alarmsymbol angezeigt, was die 5 Werktage der Woche darstellt.
Wenn Sie „weekends“ (Wochenenden) im Menü „days“ (Tage) wählen, wird eine „2“ rechts neben
dem Alarmsymbol angezeigt, was die 2 Tage des Wochenendes darstellt.
Wenn Sie „Daily“ (Täglich) im Menü „days“ (Tage) wählen, werden eine „2“ und eine „5“ rechts
neben dem Alarmsymbol angezeigt, was die 7 Tage der Woche darstellt.
Schlaf-Timer einstellen
1: Drücken Sie im Betriebsmodus zum Aktivieren des Schlaf-Timers die Taste .
2: Wählen Sie mit der Taste einen Schlaf-Timer (15/30/45/60/75/90) und drücken Sie
Enter.
Alternativ können Sie zur Verwendung des ausgewählten Schlaf-Timers einige Sekunden
warten.
Das Gerät schaltet sich aus, sobald der ausgewählte Schlaf-Timer abgelaufen ist.
Hinweis:
1. Wenn Sie die verbleibende Zeit des Schlaf-Timers prüfen möchten, drücken Sie bei aktivem
Schlaf-Timer einmal kurz die Schlaf-Taste.
2. Wenn Sie den Schlaf-Timer zurücksetzen möchten, drücken Sie bei aktivem Schlaf-Timer
zweimal die Schlaf-Taste.
Nickerchen-Timer einstellen
1: Drücken Sie im abgeschalteten Modus zum Aktivieren der Nickerchen-Funktion die Taste .
2: Wählen Sie mit den Nickerchen-Timer (15/30/45/60/75/90) und drücken Sie Enter oder
warten Sie einige Sekunden, um den ausgewählten Nickerchen-Timer zu verwenden.
3: Das Gerät schaltet sich aus, sobald der ausgewählte Nickerchen-Timer abgelaufen ist.
Hinweis:
1. Wenn Sie die verbleibende Zeit des Nickerchen-Timers prüfen möchten, drücken Sie bei
aktivem Nickerchen-Timer einmal kurz die Nickerchen-Taste.
2. Wenn Sie den Nickerchen-Timer zurücksetzen möchten, drücken Sie bei aktivem
Nickerchen-Timer zweimal die Nickerchen-Taste.
Voreinstellung/Speichereinstellung
1: Halten Sie im UKW-/DAB-Modus zum Aufrufen der Senderspeicherfunktion die Taste
gedrückt.
2: Drücken Sie zur Auswahl der Sendernummer / und zum Speichern des Senders die

54
Enter-Taste.
3: Drücken Sie im UKW-/DAB-Modus zum Aufrufen der Speichersenderliste die Taste .
4: Wählen Sie mit / den gewünschten Sender.
Hintergrundbeleuchtung einstellen
1: Stellen Sie die Hintergrundbeleuchtung im Menü ein oder drücken Sie zur Einstellung die
Taste SNOOZE/DIMMER.
Reservebatterien
Batterien einsetzen/auswechseln:
1. Entfernen Sie die Batteriefachabdeckung an der Unterseite des Gerätes.
2. Legen Sie 4 neue AA/LR6-Batterien (nicht im Lieferumfang enthalten) in das Batteriefach ein
und vergewissern Sie sich, dass die Batteriepole mit den Symbolen (+ und -) im Batteriefach
übereinstimmen.
3. Schließen Sie das Batteriefach dann wieder.
Bitte beachten Sie:
- Es müssen keine Batterien in das Gerät eingesetzt werden. Die Batterien dienen nur der
Speicherung der Zeit- und Datumseinstellungen bei einem Stromausfall.
- Ohne Batterien werden Datum und Zeit nach einem Stromausfall auf die werkseitigen
Standardwerte zurückgesetzt.
- Andere Einstellungen, wie Alarmeinstellungen und voreingestellte Radiosender, bleiben bei
einem Stromausfall immer gespeichert.

55
Anleitung zur Fehlerbehebung
Symptom
Mögliche Gründe
Lösung
Ihr Radiowecker
schaltet sich nicht ein.
Sie haben Ihr Gerät nicht angeschlossen
Schließen Sie das Netzteil des Gerätes an
eine Steckdose an.
Die Steckdose liefert keinen Strom.
Schließen Sie zu Testzwecken ein anderes
Gerät an die Steckdose an
Kein Ton
Die Lautstärke ist auf das Minimum
eingestellt
Passen Sie die Lautstärke an , indem Sie
die Lautstärketaste drücken
Schlechter
UKW-Empfang
Die Antenne ist nicht vollständig
ausgezogen.
Ziehen Sie die Antenne vollständig aus.
In der Nähe befindliche Geräte
(Mikrowellen, Fernseher usw.) verursachen
Störungen.
Vergrößern Sie den Abstand zwischen
Radiowecker und möglichen Störquellen.
Schlechter
DAB-Empfang
Die Antenne ist nicht vollständig ausgezogen
Ziehen Sie die Antenne vollständig aus.
In Ihrer Region gibt es keine
DAB-Abdeckung.
Prüfen Sie die DAB-Abdeckung in Ihrer
Region.
Keine Wiedergabe von
einem USB-Laufwerk
oder einer
microSD-Karte
Das Audioformat wird von Ihrem
Radiowecker nicht unterstützt
Stellen Sie sicher, dass Ihr Audioinhalt
richtig im MP3-Format auf dem
Wechseldatenträger gespeichert wurde.
Vergewissern Sie sich, dass USB-Laufwerk
oder microSD-Karte richtig mit dem
USB-Anschluss oder dem
microSD-Kartenschlitz auf der Rückseite
Ihres Radioweckers verbunden bzw.
eingesteckt ist.
Es kann keine
Bluetooth*-Verbindung
zu einem anderen Gerät
hergestellt werden.
Ihr Bluetooth*-Wiedergabegerät befindet
sich nicht im Kopplungsmodus.
Beachten Sie die Bedienungsanleitung
Ihres Bluetooth*-Wiedergabegerätes und
versuchen Sie es erneut.
Stellen Sie sicher, dass sich Ihr
Radiowecker und Ihr
Bluetooth*-Wiedergabegerät weniger als
8 Meter zueinander befinden. Es dürfen
keine Wände oder anderen
elektronischen Geräte die
Bluetooth*-Übertragung blockieren oder
stören.
Kein Ton bei
Wiedergabe vom per
Bluetooth verbundenen
Gerät
Erhöhen Sie die Lautstärke über den
Wecker und das Bluetooth-Gerät.

56
Das auf dem kabellosen
Ladepad platzierte
Telefon wird nicht
aufgeladen.
- Stellen Sie sicher, dass Ihr Radiowecker
über das Netzteil angeschlossen ist.
- Stellen Sie sicher, dass Ihr Telefon
Qi*-fähig ist (mit der Qi*-Technologie
zur kabellosen Aufladung
ausgestattet).
- Entfernen Sie die
Hülle/Schutzabdeckung von Ihrem
Telefon.
- Starten Sie Ihr Telefon neu.
- Stellen Sie sicher, dass Sie die kabellose
Aufladung in Ihren
Telefoneinstellungen aktiviert haben,
sofern es diese Option dort gibt.
- Aktualisieren Sie die Systemsoftware
Ihres Telefons.
- Wenden Sie sich für Rat an den
Hersteller Ihres Telefons.
Technische Daten
Eingangsspannung (Netzteil)
100 – 240 V~, 50/60 Hz
Musikausgangsleistung
2 x 5 W RMS + passiv
DAB-Frequenzbereich
174,928 – 239,200 MHz
UKW-Frequenzbereich
87,5 – 108 MHz
Bluetooth Frequenzbereich:
Bluetooth-Version:
2402 – 2480 MHz
V5.0
Leistungsaufnahme
Max. 13 W
Leistungsaufnahme (Standby)
<1 W
Betriebstemperatur
0 °C – 35 °C
Betriebslage
Horizontal
Abmessungen des Gerätes
170 x 170 x 74 mm
Gewicht
0,9 kg (ohne Batterien)
Dieses Produkt eignet sich für diesen Zweck in allen EU-Ländern.

57
Garantie
Lenco bietet Leistungen und Garantien im Einklang mit Europäischem Recht. Setzen Sie sich
deshalb im Falle von Reparaturen (sowohl während als auch nach Ablauf der Garantiezeit) mit
Ihrem Fachhändler in Verbindung.
Wichtiger Hinweis: Es ist nicht möglich, Produkte für Reparaturen direkt an Lenco zu schicken.
Wichtiger Hinweis: Wenn dieses Gerät aus welchem Grund auch immer durch ein nicht offizielles
Servicezentrum geöffnet oder durch dieses Servicezentrum darauf zugegriffen wurde, erlischt die
Garantie.
Dieses Gerät ist nicht für professionelle Zwecke geeignet. Falls das Gerät für professionelle Zwecke
eingesetzt wird, erlöschen alle Garantieverpflichtungen seitens des Herstellers.
Haftungsausschluss
Aktualisierungen der Firmware und/oder Hardware-Komponenten werden regelmäßig
durchgeführt. Aus diesem Grund können einige der Anweisungen, Spezifikationen und
Abbildungen in dieser Dokumentation von dem Ihnen vorliegenden Gerät geringfügig abweichen.
Alle in diesem Handbuch beschriebenen Elemente dienen nur zur Illustration und treffen auf Ihre
individuelle Situation möglicherweise nicht zu. Aus der in diesem Handbuch getätigten
Beschreibung können keine Rechtsansprüche oder Leistungsanforderungen geltend gemacht
werden.
Entsorgung des Altgeräts
Dieses Symbol zeigt an, dass das entsprechende Produkt oder
dessen Akku/Batterie in Europa nicht mit dem normalen Hausmüll
entsorgt werden darf. Um die ordnungsgemäße Abfallbehandlung
des Produkts und dessen Akku/Batterie zu gewährleisten, müssen
diese im Einklang mit allen anwendbaren örtlichen Vorschriften zur
Entsorgung von Elektrogeräten und Akkus/Batterien entsorgt
werden. Dadurch helfen Sie, natürliche Ressourcen zu schonen und
Umweltschutzstandards zur Verwertung und Entsorgung von
Altgeräten aufrecht zu halten (Richtlinie über Entsorgung
Elektrischer und Elektronischer Altgeräte).

58
CE-Kennzeichen
Hiermit erklärt Commaxx B.V., Wiebachstraat 37, 6466NG Kerkrade, Niederlande, dass dieses
Produkt den grundsätzlichen Anforderungen der EU-Richtlinien entspricht.
Die Konformitätserklärung kann unter folgendem Link abgerufen werden:
Service
Besuchen Sie bitte für weitere Informationen und unseren Kundendienst unsere Homepage
www.lenco.com
Commaxx B.V. Wiebachstraat 37, 6466NG Kerkrade, Die Niederlande

59
FRANÇAIS
ATTENTION :
L’utilisation de commandes ou réglages, ou l’exécution de procédures autres que ceux spécifiés
dans ce manuel peut entraîner une exposition à des rayonnements dangereux.
PRÉCAUTIONS AVANT UTILISATION
GARDEZ CES INSTRUCTIONS À L’ESPRIT :
1. Ne couvrez ni n’obturez aucune ouverture de ventilation. Lorsque l’appareil est placé sur
une étagère, laissez un espace libre de 5 cm (2”) autour de l’appareil.
2. L’installation doit être effectuée conformément au guide d’utilisation fourni.
3. Gardez l’appareil à l’écart des sources de chaleur telles que radiateurs, chauffages,
cuisinières, bougies et autres équipements générant de la chaleur ou une flamme nue.
L’appareil ne doit être utilisé que dans un climat modéré. Les environnements
extrêmement froids ou chauds doivent être évités. La température de fonctionnement
est entre 0 et 35 °C.
4. Évitez d’utiliser l’appareil à proximité de champs magnétiques puissants.
5. Des décharges électrostatiques peuvent perturber le fonctionnement normal de cet
appareil. Dans ce cas, réinitialisez et redémarrez l’appareil en suivant le guide
d’utilisation. Pendant le transfert de fichiers, manipulez l’appareil avec précaution dans
un environnement privé d’électricité statique.
6. Avertissement ! N’introduisez jamais un objet dans l’appareil par les ouvertures et fentes
de ventilation. Des tensions élevées sont présentes dans l’appareil, l’insertion d’un objet
peut entraîner une électrocution ou court-circuiter certains composants. Pour les mêmes
raisons, ne renversez pas d’eau ou de liquide sur l’appareil.
7. N’utilisez pas l’appareil dans des endroits humides tels que salle de bain, cuisine pleine
de vapeur ou à proximité d’une piscine.

60
8. L’appareil ne doit pas être exposé à des écoulements ou des éclaboussures et aucun
objet contenant un liquide, tel qu’un vase, ne doit être posé sur ou près de l’appareil.
9. N’utilisez pas cet appareil lorsque de la condensation est possible. Lorsque l’appareil est
utilisé dans une pièce chaude humide, des gouttelettes d’eau ou de la condensation
peuvent se produire et entrainer un mauvais fonctionnement. Laissez l’appareil éteint
pendant 1 ou 2 heures avant de l’allumer : il doit être sec avant d’être allumé.
10. Cet appareil est fabriqué avec le plus grand soin et vérifié plusieurs fois avant de quitter
l’usine, cependant il est toujours possible, comme pour tout appareil électrique, que des
problèmes surviennent. Si l’appareil émet de la fumée ou s’il y a une accumulation de
chaleur excessive ou un phénomène inattendu, débranchez immédiatement la fiche
d’alimentation du secteur.
11. Cet appareil doit fonctionner avec la source d’alimentation indiquée sur la plaque
signalétique. Si vous n’êtes pas sûr de votre type d’alimentation électrique, contactez le
revendeur ou la compagnie d’électricité locale.
12. Gardez l’appareil à l’écart des animaux. Certains animaux aiment ronger les cordons
d’alimentation.
13. Pour nettoyer l’appareil, utilisez un chiffon doux et sec. N’utilisez ni solvant ni liquide à
base de pétrole. Pour enlever les taches tenaces, utilisez un chiffon humide imbibé d’une
solution de détergent diluée.
14. Le fournisseur n’est pas responsable des dommages ou pertes de données causés par un
dysfonctionnement, une utilisation abusive, une modification de l’appareil ou un
remplacement de la batterie.
15. Ne coupez aucune connexion lorsque l’appareil effectue un formatage ou transfert de
fichiers. Autrement, les données risquent d’être corrompues ou perdues.
16. Si l’appareil offre la lecture USB, il faut brancher la clé USB directement dans l’appareil.
N’utilisez pas de câble de rallonge USB, car cela peut provoquer des interférences
provoquant la perte de données.
17. La plaque signalétique se situe en dessous ou à l’arrière de l’appareil.

61
18. Cet appareil n’est pas destiné à être utilisé par des personnes (enfants compris) souffrant
de handicaps physiques, sensoriels ou mentaux, ou manquant d’expérience et de
connaissances, sauf si elles sont sous surveillance ou ont reçu des instructions sur
l’utilisation correcte de l’appareil par la personne qui est responsable de leur sécurité.
19. Cet appareil est réservé à un usage non professionnel, et non pas à un usage commercial
ou industriel.
20. Vérifiez que l’appareil est en position stable. La garantie ne couvre pas les dégâts
occasionnés par l’utilisation de cet appareil en position instable, soumis à des vibrations
ou chocs, ou par le non-respect de tout autre avertissement ou précaution contenus
dans ce guide d’utilisation.
21. N’ouvrez jamais cet appareil.
22. Ne placez jamais cet appareil sur un autre appareil électrique.
23. Ne laissez pas les sacs en plastique à la portée des enfants.
24. N’utilisez que des pièces/accessoires recommandés par le fabricant.
25. Confiez tout entretien à un personnel service qualifié. Une réparation est nécessaire
lorsque l’appareil a été endommagé de quelque façon que ce soit, par exemple lorsque le
cordon d’alimentation ou sa fiche est endommagée, lorsqu’un liquide a été renversé ou
des objets ont été introduits dans l’appareil, lorsqu’il a été exposé à la pluie ou à
l’humidité, ne fonctionne pas correctement ou s’il est tombé.
26. Une exposition prolongée à des sons puissants produits par des lecteurs personnels de
musique peut entraîner une perte auditive temporaire ou permanente.
27. Si l’appareil est livré avec un câble d’alimentation ou un adaptateur secteur :
⚫ En cas de problème, débranchez le cordon d’alimentation secteur et confiez
l’entretien à un personnel qualifié.

62
⚫ Ne marchez pas ni ne pincez l’adaptateur secteur. Faites très attention, en
particulier près des fiches et du point de sortie du câble. Ne placez aucun objet
lourd sur l’adaptateur secteur, il pourrait l’endommager. Gardez l’appareil hors
de portée des enfants ! Les enfants pourraient se blesser gravement s’ils jouent
avec le cordon d’alimentation.
⚫ Débranchez cet appareil pendant les orages ou lorsqu’il n’est pas utilisé
pendant une longue durée.
⚫ La prise secteur doit être installée près de l’appareil et doit être facilement
accessible.
⚫ Ne surchargez pas les prises de courant ou les rallonges. Une surcharge peut
entraîner un incendie ou une électrocution.
⚫ Un appareil étant de classe 1 doit être branché dans une prise secteur
disposant d’une mise à la terre.
⚫ Les appareils de classe 2 ne nécessitent pas de mise à la terre.
⚫ Tirez toujours sur la fiche lorsque vous la retirez de la prise d’alimentation
secteur. Ne tirez pas sur le cordon d’alimentation. Cela pourrait provoquer un
court-circuit.
⚫ N’utilisez ni cordon, ni fiche endommagés, ni une prise desserrée. Cela pourrait
entraîner une électrocution ou un incendie.
28. Si l’appareil contient ou est livré avec une télécommande contenant des piles
boutons/piles :
Avertissement :
⚫ « Ne pas avaler les piles ! Risque de brûlure chimique » ou équivalent.
⚫ [La télécommande fournie avec] cet appareil contient une pile bouton/pile.
Si la pile bouton est avalée, elle peut causer des brûlures internes graves en
seulement 2 heures et peut conduire à la mort.
⚫ Gardez les piles neuves et usées hors de la portée des enfants.

63
⚫ Si le compartiment à pile ne se ferme pas correctement, cessez d’utiliser
l’appareil et le garder hors de la portée des enfants.
⚫ Si vous pensez que les piles ont été avalées ou placées à l’intérieur d’une partie
du corps, consultez un médecin immédiatement.
29. Avertissements sur l’utilisation des piles :
⚫ Risque d’explosion si la pile n’est pas remplacée correctement. Ne les remplacez
que par des piles du même type ou d’un type équivalent.
⚫ Les piles ne doivent pas être soumises à des températures extrêmement
élevées ou basses, à une faible pression d’air à haute altitude pendant
l’utilisation, le stockage ou le transport.
⚫ Tout remplacement de pile par un type incorrect peut entraîner une explosion
ou une fuite de liquide ou de gaz inflammable.
⚫ L’élimination de pile dans un feu, four chaud, équipement d’écrasement ou de
coupure mécanique, peut entraîner une explosion.
⚫ Laisser une pile dans un environnement à température extrêmement élevée
peut entraîner une explosion ou une fuite de liquide ou de gaz inflammable.
⚫ Une pile soumise à une pression d’air extrêmement basse peut entraîner une
explosion ou une fuite de liquide ou de gaz inflammable.
⚫ Une attention particulière doit être portée sur les aspects environnementaux
d’élimination des piles.
INSTALLATION
• Déballez tous les composants et enlevez les matériaux de protection.
• Ne branchez pas l’appareil sans avoir vérifié la tension secteur et sans avoir effectué
toutes les autres connexions.

64
Adaptateur d’alimentation
Utilisez uniquement l’alimentation électrique indiquée dans le guide d’utilisation
Informations
Valeurs et précision
Nom ou marque du fabricant,
enregistrement commercial et adresse
Fabricant : DongguanDongsong Electronic Co., Ltd.
Adresse : No.19, Xintian Street, BaizhoubianVillage,
East District, Dongguan, Guangdong, R.P. Chine
Valeurs et précision
Identifiant du modèle
DYS818-050200W-K
Tension d'entrée
100-240 V
Fréquence secteur d’entrée
50/60 Hz
Tension de sortie
5,0 V
Courant en sortie
2,0 A
Puissance de sortie
10,0 W
Efficacité active moyenne
80,98 %
Efficacité à faible charge (10 %)
--
Pas de consommation d’énergie à vide
0,06 W
Avertissement : L'auditeur qui écoute un lecteur de musique personnel,
en cours de route, peut être moins conscient des dangers potentiels tels
que la proximité d'une voiture.
Avertissement : Pour éviter d'éventuels dommages auditifs, n’écoutez
pas de la musique à des niveaux de volume élevés pendant de longues
périodes.

65
Commandes et témoins
Façade du produit
Arrière du produit

66
Dessus du produit
1 : Affichage LCD
4 : Prise jack de lecture USB
2 : Antenne DAB/FM
5 : Prise jack d’entrée auxiliaire
3 : Logement de
carte TF/Micro SD

67
7 : Recharge sans fil
8 : Touche Menu/Info/Retour
6 : Prise d’entrée CC
(5 VCC/2 000 mA)
9 : Touche de l’alarme n° 1 et de la
présélection radio n° 1
11 : Touche de la présélection radio n° 3
13 : Touche de la présélection radio n° 5
15 : touche Précédent
17 : Touche Entrée
19 : Réglage du rappel d’alarme et du
rétroéclairage
21 : Touche de présélection/mémorisation
radio
23 : Touche marche/arrêt et mode lecture
10 : Touche de l’alarme n° 2 et de la
présélection radio n° 2
12 : Touche de la présélection radio n° 4
14 : Touche des fonctions sommeil et NAP
16 : Touche lecture/pause/sourdine/
recherche de radio
18 : Touche Suivant
20 : Touche du volume -
22 : Touche du volume +
Écoute de la radio DAB
1: Branchez l’alimentation secteur, puis maintenez la touche enfoncée pour allumer
l’appareil. L’appareil passera automatiquement en mode DAB.
2: Appuyez sur la touche pour choisir le mode DAB et effectuer la fonction de recherche
automatique.
3: Lors de la recherche, l’écran affiche « Scanning… (Recherche en cours…) » ainsi qu’une barre de
défilement qui indique la progression de la recherche et le nombre de stations trouvées.
4: Une fois la recherche terminée, l’appareil sélectionne la première station trouvée de manière
alphanumérique.
5: Appuyez sur la touche / pour accéder à la liste des stations.
6: Lorsque vous trouvez une station que vous souhaitez écouter, appuyez sur la touche Entrée
pour confirmer.
REMARQUE : Si aucune station n’est trouvée après la recherche automatique, appuyez sur la
touche ENTER pour accéder à « Station Scan (Recherche de stations) », appuyez sur la touche
ou pour sélectionner les modes « Full Scan (Recherche complète) » ou « Manual Scan
(Recherche manuelle) » pour rechercher les stations.
Recherche DAB complète
La recherche complète recherchera l’ensemble des canaux de la bande III en mode DAB. Une fois
la recherche terminée, la radio sélectionnera automatiquement la première station trouvée par
ordre alphanumérique.
1: Pour activer la recherche complète, maintenez la touche enfoncée pour accéder à la
recherche de stations, puis appuyez sur la touche/pour sélectionner « Recherche complète »,
puis appuyez sur la touche / pour confirmer. L’écran affiche « Scanning… (Recherche en
cours…) » avec une barre coulissante qui indique la progression de la recherche et le nombre

68
de stations trouvées jusque là.
2: Toutes les stations trouvées seront automatiquement enregistrées. Appuyez sur la touche /
pour choisir la station que vous préférez puis sur la touche Entrée pour confirmer.
Syntonisation manuelle DAB
En plus de la fonction de recherche complète, vous pouvez
syntoniser manuellement la radio. Cela peut aider si vous
savez que votre radio a manqué des stations. Vous aurez
besoin de connaître le multiplex dans lequel se trouve la
station de radio manquante.
1: Maintenez la touche enfoncée et accédez à
« Station Scan (Recherche de stations) ». Appuyez sur la
touche / pour sélectionner le mode manuel, appuyez
sur la touche Entrée pour confirmer.
2: Appuyez sur la touche / pour faire défiler les canaux
DAB qui vont des numéros 5A à 13F.
3: Une fois que votre numéro de canal souhaité est
sélectionné, appuyez sur la touche Entrée pour accéder au
multiplex actuel, il sera affiché avec l’intensité du signal
au-dessous.
4: Vous ne verrez aucune nouvelle station de radio ni n’entendrez de son pendant la syntonisation
manuelle. Pour trouver les stations nouvellement syntonisées, effectuez une recherche dans la
liste des stations.
Présélection/Réglage de la mémoire
Mettez la station radio actuelle en mémoire sous forme de présélection.
1: Maintenez la touche enfoncée pour accéder à la fonction de mise en mémoire des

69
stations.
2: Appuyez sur la touche / pour sélectionner le numéro de la présélection de votre choix,
puis sur la touche Entrée pour mettre la station en mémoire.
Vous pouvez également enregistrer rapidement la station actuelle sur l’une des 5 touches de
présélection en appuyant longuement sur l’une des touches de présélection.
Écoute de la radio FM
1: Maintenez la touche enfoncée pour allumer l’appareil. L’appareil passera
automatiquement en mode DAB.
2: Appuyez sur la touche pour sélectionner le mode FM. Appuyez sur la touche / pour
sélectionner la station souhaitée.
3: Maintenez la touche / pour rechercher automatiquement la prochaine station de radio
disponible
4: Maintenez la touche enfoncée pour accéder au mode de recherche automatique qui met
en mémoire les canaux présélectionnés. Pendant la recherche, l’écran affiche « Scanning…
(Recherche en cours…) »
5: Une fois la recherche terminée, l’appareil sélectionne la première station trouvée de manière
alphanumérique.
6: Pour explorer les stations trouvées, appuyez sur les touches 1/2/3/4/5 pour sélectionner les
5 premières stations en mémoire, puis sur la touche . Appuyez sur la touche / pour
accéder à la liste des stations.
7: Lorsque vous trouvez une station que vous souhaitez écouter, appuyez sur la touche Entrée
pour confirmer.
8: Appuyez sur la touche / pour régler le volume.
9: Appuyez sur la touche pour couper le son de la station FM, le symbole du volume se mettre
à clignoter.
Présélection/Réglage de la mémoire
Mettez la station radio actuelle en mémoire sous forme de présélection.
- Maintenez la touche enfoncée pour accéder à la fonction de mise en
mémoire des stations.
- Appuyez sur la touche / pour sélectionner le numéro de la présélection de
votre choix, puis sur la touche Entrée pour mettre la station en mémoire.
Vous pouvez également enregistrer rapidement la station actuelle avec l’une des 5 touches de
présélection en appuyant longuement sur l’une d’elles.

70
Écoute de la musique Bluetooth
Si vous utilisez un appareil audio Bluetooth, assurez-vous d’avoir une distance de fonctionnement
de moins de 9 m. Un environnement différent peut avoir un effet sur la distance de
fonctionnement.
1: Branchez l’adaptateur d’alimentation, maintenez la touche enfoncée pour allumer
l’appareil, appuyez sur la touche pour choisir le mode Bluetooth. « Bluetooth mode (Mode
Bluetooth) » se mettra à clignoter à l’écran.
2: Activez Bluetooth sur votre appareil audio.
3: Dans la recherche des appareils, choisissez « Lenco CR-650 », aucun mot de passe n’est requis.
Si votre appareil nécessite un mot de passe, tapez « 0000 », (après l’appairage, le « mode
Bluetooth » restera activé.)
4: Appuyez sur la touche ou pour régler le volume.
5: Appuyez sur la touche pour lire/mettre en pause, maintenez-la enfoncée pour déconnecter
l’appareil Bluetooth.
6: Appuyez sur la touche / pour sélectionner le morceau précédent/suivant.
Remarque : « Ce produit est doté d’une fonction de réception bluetooth, vous ne pouvez pas
l’utiliser pour transmettre un son bluetooth : cela signifie que vous pouvez recevoir sans fil un
signal sonore bluetooth d’une source externe comme un smartphone. »
Écoute de la musique USB
1: Branchez une clé USB (au format FAT-32) à l’arrière de l’appareil.
2: Maintenez la touche enfoncée pour allumer l’appareil, appuyez sur la touche pour
sélectionner le mode USB.
3: Appuyez sur la touche ou pour régler le volume.
4: Appuyez sur la touche pour lire/mettre en pause.
5: Appuyez sur la touche / pour sélectionner le morceau précédent/suivant.
Remarque : Veuillez augmenter le volume de votre appareil Bluetooth connecté et du CR-650
Écoute de la musique sur carte Micro SD
1: Branchez la carte Micro SD (au format FAT-32) dans le logement TF/microSD à l’arrière
2: Maintenez la touche pour allumer l’appareil, puis appuyez sur la touche pour choisir
le mode carte Micro SD.
3: Appuyez sur la touche ou pour régler le volume.

71
4: Appuyez sur la touche pour lire/mettre en pause.
5: Appuyez sur la touche / pour sélectionner le morceau précédent/suivant.
Écoute de l’entrée auxiliaire
1: Branchez le câble auxiliaire à l’arrière de l’appareil (câble audio non fourni).
2: Maintenez la touche enfoncée pour allumer l’appareil, puis appuyez sur la touche
pour choisir le mode auxiliaire.
3: Appuyez sur la touche ou pour régler le volume.
4: Appuyez sur la touche pour couper le son.
Écoute de sons naturels (mode Thérapie du sommeil)
1: Maintenez la touche enfoncée pour allumer l’appareil, appuyez sur la touche pour
choisir le mode Thérapie du sommeil.
2: Lorsque vous choisissez le mode Thérapie du sommeil, la fonction de sommeil démarre
automatiquement, la durée par défaut est de 15 minutes, appuyez sur la touche de sommeil
pour choisir une durée différente.
3: Appuyez sur la touche / pour choisir parmi 10 sons différents de la de nature.
4: Appuyez sur la touche ou pour régler le volume.
5: Appuyez sur la touche pour couper le son.
Réglage de l’heure
1: Maintenez la touche enfoncée pour allumer l’appareil.
2: Maintenez la touche enfoncée et accédez au menu. Appuyez sur la touche / pour
trouver Système, puis sur la touche Entrée pour accéder au système où vous trouverez l’option
« Time setup (Réglage de l’heure) »
3: Appuyez sur la touche Entrée, puis sur la touche / pour régler l’heure conformément au
mode d’emploi.
Réglage des alarmes
Les alarmes peuvent être réglées en mode veille.
1: Appuyez sur la touche Alarme 1 ou Alarme 2, puis sur la touche Entrée.
2: Appuyez sur la touche / pour choisir l’option que vous souhaitez modifier et appuyez sur
Entrée.
Options modifiables :
Alarm on/off (Alarme activée/désactivée) (active/désactive l’alarme)
Time (Heure) : Heure de l’alarme
Days (Jours) : jours où l’alarme doit être activée
Durée de l’alarme
Mode : Type de sonnerie de l’alarme (FM/DAB/Sonnerie/Thérapie du
sommeil)
Volume : volume maximal de la sonnerie d’alarme (le minimum est 1)
Preset (Présélection) : permet de choisir la présélection à utiliser pour

72
l’alarme
Save (Enregistrer) : enregistre les modifications que vous avez apportées
Remarque : si vous ne modifiez aucun réglage dans les 10 secondes, l’horloge reviendra au mode
normal de l’heure et vos réglages ne seront pas enregistrés.
Si vous choisissez « weekdays (en semaine) » dans le menu « days (jours) », un « 5 » s’affiche à
droite du symbole d’alarme, ce qui signifie les 5 jours ouvrables de la semaine.
Si vous choisissez « week-ends (weekends) » dans le menu « days (jours) », un « 2 » s’affiche à
droite du symbole d’alarme, ce qui signifie les 2 jours du week-end.
Si vous choisissez « Daily (Quotidien) » dans le menu « Days (Jours) », un « 2 » et un « 5 »
s’affichent à droite du symbole d’alarme, ce qui signifie les 7 jours de la semaine.
Réglage de la mise en veille
1: Lorsque l’appareil est allumé, appuyez sur la touche pour activer la fonction de veille.
2: Appuyez sur le touche pour régler le délai de mise en veille 15/30/45/60/75/90, puis sur
Entrée.
Ou attendez quelques secondes pour utiliser le délai de mise en veille sélectionné.
L’appareil s’éteindra une fois que le délai de mise de veille sélectionné sera écoulé.
Remarque :
1. Si vous souhaitez vérifier le délai qui reste avant la mise en veille, appuyez brièvement sur le
touche Sleep une fois que le délai de mise en veille est actif.
2. Si vous souhaitez réinitialiser le délai de mise de veille, appuyez à eux reprises sur le touche
Sleep lorsque le délai de mise en veille est actif.
Réglage de la sieste
1: Lorsque l’appareil est éteint, appuyez sur la touche pour activer la fonction de sieste.
2: Appuyez sur la touche pour choisir la durée de sieste 15/30/45/60/75/90, puis sur
Entrée ou attendez quelques secondes pour utiliser la durée de sieste sélectionnée.
3: L’appareil s’éteint lorsque la durée de sieste choisie est écoulée.
Remarque :
1. Si vous souhaitez vérifier le temps de sieste restant, appuyez brièvement sur la touche NAP une
fois que la durée de la sieste est activée.

73
2. Lorsque la minuterie de sieste est active, appuyez à deux reprises sur la touche NAP si vous
souhaitez la réinitialiser.
Présélection/Réglage de la mémoire
1: En mode FM/DAB, maintenez la touche enfoncée pour accéder à la fonction de mise en
mémoire des stations.
2: Appuyez sur la touche / pour choisir le numéro de station, puis sur la touche Entrée pour
mettre la station en mémoire.
3: En mode FM/DAB, appuyez sur la touche pour accéder à la liste des stations en
mémoire.
4: Appuyez sur la touche / pour choisir la station de votre choix.
Réglage du rétroéclairage
1: Réglez le rétroéclairage dans le menu ou appuyez sur la touche SNOOZE/DIMMER pour
régler le niveau de rétroéclairage de l’écran
Piles de secours
Insertion/remplacement des piles :
1. Retirez le couvercle du compartiment à piles à l’arrière de l’appareil.
2. Insérez 4 nouvelles piles AA/LR6 (non fournies) dans le compartiment à piles et assurez-vous
que la polarité de chaque pile correspond aux symboles (+ et -) qui s’y trouvent.
3. Refermez-le à nouveau.
Remarque :
- L’insertion de piles dans l’appareil est facultative. Les piles ne sont utilisées que pour
mémoriser les réglages de l’heure et de la date en cas de panne de courant.
- Sans les piles, la date et l’heure seront réinitialisées aux valeurs par défaut de l’usine en cas de
panne de courant.
- Les autres réglages, y compris les réglages d’alarme et les stations radio présélectionnées,
resteront toujours en mémoire en cas de panne de courant.

74
Guide de dépannage
Symptôme
Cause possible
Solution
Votre radio-réveil
ne s’allume pas.
Vous n’avez pas branché votre appareil
Branchez l’adaptateur secteur de l’appareil
dans une prise électrique.
La prise électrique n’est pas sous tension.
Branchez un autre appareil dans la même
prise électrique pour effectuer un test croisé.
Aucun son
Le volume est réglé au minimum.
Réglez le volume en appuyant sur la touche
de volume.
Mauvaise
réception FM
L’antenne n’est pas complètement déployée.
Déployez complètement l’antenne.
Il y a des interférences provenant d’appareils
électriques à proximité (four à micro-ondes,
téléviseur, etc.)
Éloignez votre radio-réveil des sources
d’interférence possibles.
Mauvaise
réception DAB
L’antenne n’est pas complètement déployée.
Déployez complètement l’antenne.
Votre région n’est pas couverte par DAB.
Vérifiez la couverture DAB dans votre région.
Pas de lecture à partir
d’une clé USB ou d’une
carte Micro SD
Le format audio n’est
pas pris en charge par
votre radio-réveil.
Assurez-vous que votre audio a été correctement
enregistré sur le support amovible au format MP3.
Assurez-vous que la clé USB ou la carte Micro SD est
correctement connectée ou insérée dans le port USB ou le
logement de la carte Micro SD à l’arrière de votre
radio-réveil.
Une connexion Bluetooth*
avec un autre appareil ne
peut pas être établie.
Votre appareil de
lecture Bluetooth* n’est
pas en mode
d’appairage.
Consultez le mode d’emploi de votre appareil de lecture
Bluetooth* et réessayez.
Assurez-vous que votre radio-réveil et votre appareil de
lecture Bluetooth* sont à moins de 8 mètres l’un de l’autre
et qu’aucun mur ou autre appareil électronique ne bloque
ou n’interfère avec la transmission Bluetooth*.
Pas de son lors de la
lecture à partir d’un
appareil Bluetooth
connecté
Augmentez le volume de l’horloge et de l’appareil
Bluetooth.
Le téléphone placé sur le
bloc de charge sans fil ne
se charge pas.
- Assurez-vous que votre radio-réveil est alimenté par
l’adaptateur secteur.
- Assurez-vous que votre téléphone est compatible Qi*
(équipé de la technologie de charge sans fil Qi*).
- Retirez la coque/l’étui de protection de votre téléphone.
- Redémarrez votre téléphone.
- Assurez-vous d’avoir activé la recharge sans fil dans les
réglages de votre téléphone, si cette option est
disponible.
- Mettez à jour le logiciel de votre téléphone.
- Contactez le fabricant de votre téléphone pour obtenir
des conseils.

75
Spécifications techniques
Alimentation d’entrée (adaptateur secteur)
100-240 V CA ~ 50/60 Hz
Puissance en sortie de la musique
2 x 5W RMS + puissance passive
Plage de fréquences DAB
174,928 à 239,200 MHz
Plage de fréquences FM
87,5 à 108 MHz
Plage de fréquence Bluetooth :
Version Bluetooth :
2 402 à 2 480 MHz
V 5.0
Consommation
13 W max.
Puissance consommée (veille)
< 1 W
Température de fonctionnement
0 °C à 35 °C
Position de fonctionnement
Horizontal
Dimensions de l’appareil
170 x 170 x 74 mm
Poids
0,9 kg (sans piles)
Ce produit convient à cet usage pour tous les pays de I’UE.
Garantie
Lenco propose un service et une garantie conformément à la législation européenne, ce qui
signifie qu’en cas de besoin de réparation (aussi bien pendant et après la période de garantie),
vous pouvez contacter le revendeur le plus proche.
Remarque importante : Il n’est pas possible de renvoyer l’appareil pour réparation directement à
Lenco.
Remarque importante : Si l’appareil est ouvert ou modifié de quelque manière que ce soit par un
réparateur non agréé, la garantie est annulée.
Cet appareil ne convient pas à une utilisation professionnelle. En cas d’utilisation professionnelle,
les obligations de garantie du fabricant sont annulées.
Clause de non-responsabilité
Des mises à jour du micrologiciel ou des composants matériels sont régulièrement effectuées.
Ainsi, certaines instructions, spécifications et images de la présente documentation peuvent être
légèrement différentes. Tous les éléments décrits dans ce manuel sont donnés uniquement à des
fins d’illustration et peuvent ne pas s’appliquer à une situation particulière. Aucun droit juridique
ou légal ne peut être obtenu à partir de la description faite dans ce manuel.

76
Mise au rebut de l’appareil usagé
Ce symbole indique que le produit électrique concerné ainsi que les
piles ne doivent pas être jetés avec les autres déchets ménagers en
Europe. Pour assurer le traitement correct des déchets de l’appareil
et des piles, il faut les éliminer conformément aux lois locales
applicables sur l’élimination des équipements électriques et des
piles. En faisant cela, vous contribuez à la conservation des
ressources naturelles et à l’amélioration des normes de protection
de l’environnement dans le traitement et l’élimination des déchets
électriques (Directive sur les déchets d’équipements électriques et
électroniques).
Marquage CE
Par la présente, Commaxx B.V. Wiebachstraat 37, 6466NG Kerkrade, Pays-Bas, déclare que ce
produit est conforme aux exigences principales des directives européennes.
Réparation
Pour plus d’informations et le service d’assistance, rendez-vous sur www.lenco.com
Commaxx B.V. Wiebachstraat 37, 6466NG Kerkrade, Pays-Bas

77
ESPAÑOL
PRECAUCIÓN:
Un uso de los controles, unos ajustes o un rendimiento de los procedimientos distintos a los
especificados aquí puede resultar en una exposición peligrosa a la radiación.
PRECAUCIONES PREVIAS AL USO
TENGA ESTAS INSTRUCCIONES EN CUENTA:
1. No cubra ni obstruya las aberturas de ventilación. Si coloca el dispositivo sobre una
estantería, deje una separación de 5 cm (2”) alrededor de todo el dispositivo.
2. Instálelo en conformidad con el manual del usuario incluido.
3. Mantenga el dispositivo apartado de fuentes de calor como radiadores, calentadores,
estufas, velas y otros productos que generen calor o llamas abiertas. El dispositivo solo
puede utilizarse en climas moderados. Deben evitarse los entornos muy fríos o cálidos.
La temperatura de funcionamiento es de entre 0 °C y 35 °C.
4. Evite utilizar el dispositivo cerca de campos magnéticos intensos.
5. Las descargas electrostáticas pueden perturbar el uso normal de este dispositivo. En tal
caso, solo tiene que seguir el manual de instrucciones para restablecer y reiniciar el
dispositivo. Durante la transmisión de archivos, por favor manéjelo con cuidado y
opérelo en un entorno libre de electricidad estática.
6. ¡Advertencia! Nunca introduzca objetos en las aberturas o conductos de ventilación del
producto. Alto voltaje fluye a través del producto e insertar un objeto puede provocar
una descarga eléctrica o un cortocircuito en sus componentes internos. Por el mismo
motivo, no derrame agua ni líquidos sobre el producto.
7. No lo utilice en áreas mojadas o húmedas, como cuartos de baño, cocinas con mucho
vapor o cerca de piscinas.
8. No se debe exponer el dispositivo a goteos ni salpicaduras y debe asegurarse de que no
haya objetos llenos de líquidos, como jarrones, encima ni cerca del aparato.

78
9. No utilice este dispositivo si puede haber condensación. Cuando se utilice la unidad en
una sala cálida y húmeda, pueden aparecer gotas de agua o condensación dentro de la
unidad y esta puede no funcionar correctamente; deje la unidad apagada durante
1 o 2 horas antes de encender la alimentación: la unidad debe estar seca antes de
encenderla.
10. Aunque este dispositivo está fabricado con el máximo cuidado y se ha comprobado
varias veces antes de salir de fábrica, todavía es posible que se puedan producir
problemas, igual que con todos los aparatos eléctricos. Si detecta humo, una
acumulación excesiva de calor o cualquier otro fenómeno inesperado, deberá
desconectar inmediatamente el enchufe de la toma de corriente.
11. Este dispositivo debe estar conectado a una fuente de alimentación conforme a lo
indicado en la etiqueta de especificaciones. Si no está seguro del tipo de fuente de
alimentación de su hogar, consulte con su distribuidor o su empresa eléctrica local.
12. Manténgalo alejado de los animales. Algunos animales muerden los cables eléctricos.
13. Utilice un trapo suave y húmedo para limpiar el dispositivo. No utilice disolventes ni
líquidos con base de gasolina. Puede usar un paño húmedo con detergente diluido para
eliminar las manchas persistentes.
14. El proveedor no asume ninguna responsabilidad por daños o datos perdidos como
consecuencia de un funcionamiento incorrecto, uso incorrecto, modificación del
dispositivo o sustitución de la batería.
15. No interrumpa la conexión mientras se formatea el dispositivo o esté transfiriendo
archivos. De lo contrario, los datos podrían quedar dañados o perderse.
16. Si la unidad tiene una función de reproducción USB, se debe conectar directamente el
dispositivo de memoria USB a la unidad. No utilice cables de extensión USB ya que
pueden crear interferencias que causen una pérdida de datos.
17. La etiqueta de clasificación está marcada en el panel inferior o trasero del dispositivo.

79
18. Este aparato no está diseñado para su uso por personas (incluyendo niños) con
discapacidades físicas, sensoriales o mentales o con falta de experiencia o conocimientos,
salvo que estén bajo supervisión o hayan recibido formación sobre el uso correcto del
dispositivo por parte de una persona responsable de su seguridad.
19. Este producto está destinado únicamente al uso no profesional y no al uso comercial ni
industrial.
20. Compruebe que la unidad está ajustada en una posición estable. Los daños causados por
las vibraciones o sacudidas derivadas del uso del producto en una posición inestable o el
incumplimiento de otras advertencias o precauciones incluidas en este manual del
usuario no estarán cubiertos por la garantía.
21. Nunca retire la carcasa del dispositivo.
22. Nunca coloque el dispositivo sobre otros equipos eléctricos.
23. No permita que los niños accedan a las bolsas de plástico.
24. Utilice solo los accesorios especificados por el fabricante.
25. Solicite todo el trabajo de mantenimiento a personal de servicio cualificado. El
dispositivo deberá ser reparado cuando quede dañado de cualquier forma, por ejemplo,
si el cable de alimentación o el enchufe están dañados, se ha derramado líquido o han
caído objetos sobre él, ha quedado expuesto a la lluvia o a la humedad, no funciona con
normalidad, o se ha caído al suelo.
26. La exposición prolongada a sonidos fuertes de reproductores personales de música
puede provocar una pérdida temporal o permanente de audición.
27. Si el producto incluye un cable de alimentación o un adaptador de CA:
⚫ Si hubiera algún problema, desconecte el cable de CA y solicite su
mantenimiento al personal cualificado.

80
⚫ No pise ni pellizque el adaptador de corriente. Tenga mucho cuidado, en
especial cerca de los enchufes y el punto de salida del cable. No coloque
objetos pesados sobre el adaptador de corriente, ya que podría dañarlo.
¡Mantenga todo el dispositivo fuera del alcance de los niños! Si juegan con el
cable de alimentación, pueden sufrir lesiones graves.
⚫ Desenchufe el dispositivo durante tormentas eléctricas o si no se utiliza durante
largos periodos.
⚫ La toma debe estar instalada cerca del equipo y ser fácilmente accesible.
⚫ No sobrecargue las tomas de CA ni los cables de extensión. Una sobrecarga
podría provocar un incendio o una descarga eléctrica.
⚫ Los dispositivos con una construcción de clase 1 deben estar conectados a una
toma eléctrica con conexión a tierra protectora.
⚫ Los dispositivos con una construcción de clase 2 no requieren una conexión a
tierra.
⚫ Sujete siempre el enchufe cuando lo extraiga de la toma de corriente. No estire
del cable eléctrico. Podría provocar un cortocircuito.
⚫ No utilice cables de alimentación o enchufes deteriorados o tomas sueltas.
Podría provocar un incendio o descarga eléctrica.
28. Si el producto contiene o se entrega con un mando a distancia que contiene pilas de
botón:
Advertencia:
⚫ «No ingiera la pila, existe riesgo de quemaduras químicas» o equivalente.
⚫ [Mando a distancia incluido] Este producto contiene una pila de botón.
En caso de ingesta de la pila, puede provocar quemaduras internas graves en
menos de 2 horas que pueden provocar la muerte.
⚫ Mantenga las pilas nuevas y usadas fuera del alcance de los niños.
⚫ Si el compartimento de las pilas no cierra bien, deje de usar el producto y
manténgalo fuera del alcance de los niños.

81
⚫ Si cree que puede haber ingerido una pila, solicite inmediatamente atención
médica.
29. Precauciones sobre el uso de las pilas:
⚫ Existe peligro de explosión si se sustituye la pila por una de tipo incorrecto.
Sustitúyalas únicamente por pilas del mismo tipo o equivalentes.
⚫ No se puede someter las pilas a temperaturas muy altas o bajas, ni a presiones
de aire bajas a altitudes altas durante el uso, almacenamiento o transporte.
⚫ La sustitución de una pila por una de tipo incorrecto puede resultar en una
explosión o fuga del líquido o gas inflamable.
⚫ Arrojar una pila al fuego o a un horno caliente, o aplastarla o cortarla con
medios mecánicos, puede resultar en una explosión.
⚫ Dejar una pila en un entorno con temperaturas muy altas puede resultar en una
explosión o fuga del líquido o gas inflamable.
⚫ Someter una pila a presiones de aire muy bajas puede resultar en una explosión
o la fuga del líquido o gas inflamable.
⚫ Se debe prestar atención a los aspectos medioambientales sobre la eliminación
de baterías.
INSTALACIÓN
• Desempaquete todas las piezas y retire el material protector.
• No conecte la unidad a la corriente sin comprobar la tensión eléctrica y que se han hecho
todas las demás conexiones.

82
Adaptador eléctrico
Use únicamente la alimentación descrita en las instrucciones de usuario
Información
Valor y precisión
Nombre de los fabricantes o marcas
registradas, registro comercial y
dirección
Fabricante: DongguanDongsong Electronic Co., Ltd.
Dirección: No 19, Xintian Street, Baizhoubian Village,
East District, Dongguan, Guangdong, P.R. China
Valor y precisión
Identificador de modelo
DYS818-050200W-K
Tensión de entrada
100-240 V
Frecuencia CA de entrada
50/60 Hz
Tensión de salida
5,0 V
Corriente de salida
2,0 A
Potencia de salida
10,0 W
Eficiencia activa media
80,98 %
Eficiencia con carga baja (10 %)
--
Consumo energético sin carga
0,06 W
Advertencia: Utilizar un reproductor de música mientras conduce
puede hacer que sea menos consciente de los potenciales peligros,
como los coches que se acercan.
Advertencia: Para evitar posibles daños auditivos, no utilice el volumen
alto durante mucho tiempo.

83
Controles e indicadores
Parte delantera
Parte trasera

84
Parte superior
1: Pantalla LCD
4: Conector USB
2: Antena DAB/FM
5: Conector de entrada AUX
3: Ranura de tarjeta TF/microSD
6: Conector de entrada de CC

85
7: Carga inalámbrica
8: Botón de menú/
información/atrás
(CC de 5 V/2000 mA)
9: Botón de alarma 1 y radio programada 1
11: Botón de radio programada 3
13: Botón de radio programada 5
15: Botón de retroceso
17: Botón de aceptar
19: Configuración de repetición y
retroiluminación
21: Botón de programación de radio /
memoria
23: Botón de encendido/apagado y modo
reproducción
10: Botón de alarma 2 y radio programada 2
12: Botón de radio programada 4
14: Botón de función de sueño y siesta
16: Botón de reproducción / pausa / silencio /
búsqueda de radio
18: Botón de avance
20: Botón de volumen -
22: Botón de volumen +
Cómo escuchar la radio DAB
1: Conecte la fuente de alimentación y luego mantenga pulsado el botón para encender la
unidad. Esta entrará automáticamente en el modo DAB.
2: Pulse el botón para elegir el modo DAB y realizar una búsqueda automática.
3: Durante la búsqueda, la pantalla mostrará «Scanning ……… (Buscando)» junto con una barra
que indica el progreso de la búsqueda y el número de emisoras que se han encontrado hasta el
momento.
4: Cuando la búsqueda haya terminado, la unidad seleccionará la primera emisora por orden
alfanumérico.
5: Pulse el botón / para acceder a la lista de emisoras.
6: Cuando encuentre la emisora que quiere escuchar, pulse el botón Enter para confirmar.
NOTA: Si no se ha encontrado ninguna emisora, pulse el botón Enter para acceder a «Station Scan
(Búsqueda de emisoras)» y luego el botón / para seleccionar «Full Scan (Búsqueda
completa)» o «Manual Scan (Búsqueda manual)».
Búsqueda completa de DAB
Esta función buscará todos los canales de la Banda III de DAB. Cuando haya finalizado, se
seleccionará la primera emisora por orden alfanumérico.
1: Para activar la búsqueda completa, mantenga pulsado el botón para acceder a la
búsqueda de emisoras, luego pulse el botón / para seleccionar «Full Scan (Búsqueda
completa)» y el botón Enter para confirmar. La pantalla mostrará «Scanning ……… (Buscando)»
junto con una barra que indica el progreso de la búsqueda y el número de emisoras que se han
encontrado hasta el momento.
2: Todas las emisoras que se hayan encontrado se almacenarán automáticamente. Pulse el botón
/ para elegir la estación que prefiera y luego el botón Enter para confirmar.

86
Sintonización manual de DAB
Además de hacer una búsqueda completa, puede sintonizar
manualmente la radio, lo que le puede ser de ayuda si sabe
que faltan emisoras. Tendrá que saber en qué múltiplex está
la emisora de radio que falta.
1: Mantenga pulsado el botón y acceda a «Station
Scan (Búsqueda de emisoras)», pulse el botón / para
seleccionar el modo manual y luego el botón Enter para
confirmar.
2: Pulse el botón / para cambiar entre los diferentes
canales de DAB, numerados del 5A al 13F.
3: Cuando haya seleccionado el canal deseado, pulse el
botón Enter para introducir el múltiplex correspondiente,
entonces se mostrará el múltiplex y, debajo, la intensidad
de la señal.
4: No verá ninguna emisora de radio nueva ni escuchará nada durante la sintonización manual.
Para encontrar la nueva emisora sintonizada, busque en la lista de emisoras.
Configuración de la programación/memoria
Almacena la emisora actual como programada.
1: Mantenga pulsado el botón para acceder a la función de memoria de emisoras.
2: Pulse el botón / para seleccionar el número de programa que desee y luego el botón
Enter para almacenar la emisora.
También puede guardar rápido la emisora actual en uno de los 5 botones de programa con una
pulsación larga de uno de dichos botones.

87
Cómo escuchar la radio FM
1: Mantenga pulsado el botón para encender la unidad. Esta entrará automáticamente en el
modo DAB.
2: Pulse el botón para elegir el modo FM, luego pulse el botón / para seleccionar la
emisora deseada.
3: Mantenga pulsado el botón / para ir automáticamente a la siguiente emisora disponible.
4: Mantenga pulsado el botón para acceder al modo de búsqueda automática que almacena
los canales encontrados como programados. Durante la búsqueda, la pantalla mostrará
«Scanning… (Buscando)».
5: Cuando la búsqueda haya terminado, la unidad seleccionará la primera emisora por orden
alfanumérico.
6: Para explorar las emisoras encontradas, use los botones 1.2.3.4.5 para elegir las 5 primeras
emisoras de la memoria y pulse el botón ; luego pulse el botón / para acceder a la
lista de emisoras.
7: Cuando encuentre la emisora que quiere escuchar, pulse el botón Enter para confirmar.
8: Pulse el botón / para ajustar el volumen.
9: Pulse el botón para silenciar la radio FM; el icono del volumen parpadeará.
Configuración de la programación/memoria
Almacena la emisora actual como programada.
- Mantenga pulsado el botón para acceder a la función de memoria de
emisoras.
- Pulse el botón / para seleccionar el número de programa que desee y luego
el botón Enter para almacenar la emisora.
También puede guardar rápido la emisora actual en uno de los 5 botones de programa con una
pulsación larga de uno de dichos botones.
Cómo escuchar música por Bluetooth
Si usa un dispositivo de audio Bluetooth, asegúrese de que no esté a más de 9 m de la radio; un
entorno diferente puede afectar a la distancia de funcionamiento.
1: Enchufe el adaptador de corriente, mantenga pulsado el botón para encender la unidad y
pulse el botón para elegir el modo Bluetooth; en la pantalla parpadeará «Bluetooth mode
(Modo Bluetooth)».
2: Encienda el Bluetooth en su dispositivo de audio.

88
3: En la búsqueda de dispositivos, elija «Lenco CR-650», no se necesita contraseña. Si su
dispositivo solicita una contraseña, escriba «0000» (cuando esté emparejado, «Bluetooth
mode» se quedará encendido en la pantalla).
4: Pulse el botón / para ajustar el volumen.
5: Pulse el botón para reproducir/pausar; manténgalo pulsado para desconectar el
dispositivo Bluetooth.
6: Pulse el botón / para elegir la canción anterior o la siguiente.
Nota: «Este producto tiene una función de recepción de Bluetooth, no puede transmitir sonido
por Bluetooth con él: esto significa que solo puede recibir una señal de sonido por Bluetooth
desde una fuente externa, como un smartphone».
Cómo escuchar música por USB
1: Conecte una memoria USB (en formato FAT-32) en la parte posterior de la unidad.
2: Mantenga pulsado el botón para encender la unidad y pulse el botón para elegir el
modo USB.
3: Pulse el botón / para ajustar el volumen.
4: Pulse el botón para reproducir/pausar.
5: Pulse el botón / para elegir la canción anterior o la siguiente.
Nota: Suba el volumen del dispositivo Bluetooth conectado y el CR-650.
Cómo escuchar música por microSD
1: Inserte la tarjeta microSD (en formato FAT-32) en la ranura de tarjeta TF/microSD de la parte
posterior.
2: Mantenga pulsado el botón para encender la unidad y pulse el botón para elegir el
modo de tarjeta microSD.
3: Pulse el botón / para ajustar el volumen.
4: Pulse el botón para reproducir/pausar.
5: Pulse el botón / para elegir la canción anterior o la siguiente.

89
Cómo usar la entrada AUX
1: Conecte el cable AUX a la parte posterior de la unidad (cable de audio no incluido)
2: Mantenga pulsado el botón para encender la unidad y pulse el botón para elegir el
modo AUX.
3: Pulse el botón / para ajustar el volumen.
4: Pulse el botón para silenciar el sonido.
Cómo escuchar los sonidos naturales (modo de terapia del sueño)
1: Mantenga pulsado el botón para encender la unidad y pulse el botón para elegir el
modo «Sleep Therapy (Terapia del sueño)».
2: Cuando elija el modo de terapia del sueño, la función de sueño comenzará automáticamente;
el tiempo predeterminado es de 15 minutos, pulse el botón Sleep para elegir un tiempo
diferente.
3: Pulse el botón / para elegir entre 10 sonidos naturales diferentes.
4: Pulse el botón / para ajustar el volumen.
5: Pulse el botón para silenciar el sonido.
Configuración horaria
1: Mantenga pulsado el botón para encender la unidad.
2: Mantenga pulsado el botón para acceder al menú. Pulse el botón / para encontrar
«System (Sistema)» y luego el botón Enter para entrar; allí encontrará la opción «Time setup»
(configuración del tiempo).
3: Pulse el botón Enter y luego el botón / para establecer el tiempo según la guía.
Configuración de la alarma
Es posible establecer la alarma en modo de espera.
1: Pulse el botón de alarma 1 o el de alarma 2 y luego el botón Enter.
2: Pulse el botón / para elegir la opción que quiera cambiar y luego pulse el botón Enter.
Opciones editables:
Alarm on/off (Enciende o apaga la alarma
Time (Hora): Hora de la alarma
Days (Días): En qué días debe funcionar la alarma
Duración de la alarma
Mode(Modo): Elije el tono de alarma (FM/DAB/timbre/Sonidos de
terapia del sueño)
Volume (Volumen): El volumen máximo del tono de alarma
(el mínimo es 1)
Preset (Programa): elije qué programa se debería usar para la alarma
Save (Guardar): Guarda los cambios realizados

90
Nota: Si no realiza ningún cambio en 10 segundos, el reloj volverá al modo de tiempo normal y no
se guardarán los cambios.
Si elige «Weekdays (Días de la semana)» en el menú «Days (Días)», se mostrará un «5» a la
derecha del símbolo de la alarma, lo que representa los 5 días de la semana.
Si elige «Weekends (Fines de semana)» en el menú «Days (Días)», se mostrará un «2» a la derecha
del símbolo de la alarma, lo que representa los 2 días del fin de semana.
Si elige «Daily (A diario)» en el menú «Days (Días)», se mostrarán un «2» y un «5» a la derecha del
símbolo de la alarma, lo que representa los 7 días de la semana.
Configuración de la función sueño
1: Cuando encienda la unidad, pulse el botón para activar la función sueño.
2: Pulse el botón para elegir el tiempo de sueño entre 15/30/45/60/75/90 minutos y luego
el botón Enter,
o espere unos segundos para usar el tiempo de sueño seleccionado.
La unidad se apagará cuando el tiempo seleccionado se acabe.
Nota:
1. Si quiere comprobar cuánto tiempo queda, pulse el botón Sleep (Sueño) una vez mientras el
temporizador está activo.
2. Si quiere reiniciar el temporizador, pulse el botón Sleep (Sueño) dos veces mientras el
temporizador está activo.
Configuración de la función siesta
1: Cuando la unidad está apagada, pulse el botón para activar la función siesta.
2: Pulse el botón para elegir el tiempo de siesta entre 15/30/45/60/75/90 minutos y luego
el botón Enter, o espere unos segundos para usar el tiempo de siesta seleccionado.
3: La unidad se apagará cuando el tiempo de siesta elegido se acabe.
Nota:
1. Si quiere comprobar cuánto tiempo queda, pulse el botón Nap una vez mientras el
temporizador está activo.
2. Si quiere reiniciar el temporizador, pulse el botón Nap dos veces mientras el temporizador está
activo.
Configuración de la programación/memoria
1: En el modo FM/DAB, mantenga pulsado el botón para acceder a la función de memoria
de emisoras.
2: Pulse el botón / para elegir el número de la emisora y luego el botón Enter para
almacenarla.
3: En el modo FM/DAB, pulse el botón para acceder a la lista de emisoras de la memoria.
4: Pulse el botón / para elegir la emisora que desee.

91
Configuración de la retroiluminación
1: Configure la retroiluminación en el menú o pulse el botón SNOOZE/DIMMER para
ajustar el nivel de luz de la pantalla.
Pilas de respaldo
Insertar/reemplazar las pilas:
1. Retire la tapa del compartimento para las pilas ubicado en la parte inferior del aparato.
2. Inserte 4 nuevas pilas AA/LR6 (no incluidas) y asegúrese de que la polaridad de cada pila se
corresponde con los símbolos (+ y -) del compartimento.
3. Vuelva a cerrar el compartimento.
Tenga en cuenta:
- Ponerle pilas al aparato es opcional, ya que solo se usan para memorizar la hora y la fecha
establecidas en caso de fallo eléctrico.
- Sin las pilas, la fecha y la hora se reiniciarían a los valores de fábrica al producirse un fallo
eléctrico.
- El resto de la configuración, incluidas la alarma y las emisoras de radio programadas, siempre
se guardarán en el caso de un fallo eléctrico.

92
Guía de resolución de problemas
Síntoma
Posible causa
Solución
No se enciende la
radio reloj.
No ha enchufado el aparato
Enchufe el adaptador de CA del aparato en
una toma de corriente.
La toma de corriente no recibe electricidad.
Enchufe otro aparato a la misma toma de
corriente para realizar una prueba cruzada
No hay sonido
El volumen está al mínimo
Ajuste el volumen pulsando el botón de
volumen.
Mala recepción
de FM
La antena no está completamente extendida.
Extienda por completo la antena.
Hay interferencia con un aparato eléctrico
cercano (un microondas, una televisión, etc.)
Aleje la radio reloj de posibles fuentes de
interferencia.
Mala recepción
de DAB
La antena no está completamente extendida
Extienda por completo la antena.
Su área no tiene cobertura DAB.
Compruebe la cobertura DAB en su área.
No se puede reproducir
desde una memoria USB o
tarjeta microSD
La radio reloj no soporta el
formato de audio
Asegúrese de que las pistas de audio se han grabado en
formato MP3.
Asegúrese de que la memoria USB o la tarjeta microSD
están conectadas correctamente a sus respectivos
puertos de la parte trasera de la radio reloj.
No se puede establecer
una conexión Bluetooth*
con otro dispositivo.
El dispositivo Bluetooth*
no está en el modo de
emparejamiento.
Consulte el manual del dispositivo Bluetooth* y vuelva
a intentarlo.
Asegúrese de que la radio reloj y el dispositivo
Bluetooth* están a menos de 8 metros y de que no hay
paredes u otros aparatos electrónicos bloqueando o
interfiriendo con la transmisión de Bluetooth*.
No hay sonido cuando se
reproduce desde un
dispositivo conectado por
Bluetooth
Suba el volumen de la radio y del dispositivo Bluetooth
El teléfono colocado en el
panel de carga inalámbrica
no se carga.
- Asegúrese de que la radio reloj recibe corriente del
adaptador de CA.
- Asegúrese de que el teléfono está habilitado para Qi*
(está equipado con la tecnología de carga
inalámbrica Qi*).
- Retire la funda del teléfono.
- Reinicie el teléfono.
- Asegúrese de tener habilitada la carga inalámbrica en
la configuración de teléfono, si está la opción.
- Actualice el software del sistema de su teléfono.
- Contacte con el fabricante de su teléfono para que le
aconseje.

93
Especificaciones técnicas
Potencia de entrada (adaptador de corriente)
CA 100 - 240 V ~ 50/60 Hz
Potencia de salida de la música
2 x 5 W RMS + pasivo
Rango de frecuencia DAB
174,928 - 239,200 MHz
Rango de frecuencia FM
87,5 - 108 MHz
Rango de frecuencia Bluetooth:
Versión del Bluetooth:
2402 - 2480 MHz
5,0 V
Consumo de energía
Máx. 13 W
Consumo de energía (en espera)
<1 W
Temperatura de funcionamiento
0 °C - 35 °C
Posición de funcionamiento
Horizontal
Dimensiones de la unidad
170 x 170 x 74 mm
Peso
0,9 kg (sin pilas)
Este producto es adecuado para este propósito en todos los países de la UE.
Garantía
Lenco ofrece servicio y garantía en conformidad con las leyes europeas, por lo que en caso de
requerir una reparación (tanto durante como después del periodo de garantía) debe ponerse en
contacto con su distribuidor local.
Nota importante: No es posible enviar directamente a Lenco los productos que necesiten
reparación.
Nota importante: Si se abre la unidad o se accede a su interior en modo alguno en un centro de
mantenimiento no oficial, la garantía quedará anulada.
El dispositivo no es adecuado para un uso profesional. En caso de realizar un uso profesional,
todas las obligaciones de garantía del fabricante quedarán anuladas.
Aviso legal
Se realizan actualizaciones del firmware y/o componentes de hardware de manera periódica. Por
tanto, algunas instrucciones, especificaciones e imágenes de estos documentos podrían diferir
ligeramente de su modelo concreto. Todos los elementos descritos en esta guía son únicamente
para fines ilustrativos y pueden no corresponderse a su modelo concreto. Las descripciones de
este manual no otorgarán ningún derecho legal.

94
Eliminación de un dispositivo usado
Este símbolo indica que el producto eléctrico o batería pertinente
no debe eliminarse con los residuos domésticos generales en
Europa. Para garantizar un tratamiento correcto de los residuos del
producto y las pilas, elimínelos en conformidad con las leyes locales
vigentes para la eliminación de equipos eléctricos y pilas. Al hacerlo,
ayudará a preservar los recursos naturales y mejorar los niveles de
protección del medio ambiente en el tratamiento y eliminación de
residuos eléctricos (Directiva sobre residuos de aparatos eléctricos y
electrónicos).
Marca CE
Por la presente, Commaxx B.V. Wiebachstraat 37, 6466NG Kerkrade, Países Bajos, declara que este
producto cumple los requisitos fundamentales de las directivas de la UE.
Puede consultar la declaración de conformidad a través de [email protected]
Servicio
Para más información y atención al cliente, visite www.lenco.com
Commaxx B.V. Wiebachstraat 37, 6466NG Kerkrade, Países Bajos
-
 1
1
-
 2
2
-
 3
3
-
 4
4
-
 5
5
-
 6
6
-
 7
7
-
 8
8
-
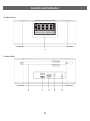 9
9
-
 10
10
-
 11
11
-
 12
12
-
 13
13
-
 14
14
-
 15
15
-
 16
16
-
 17
17
-
 18
18
-
 19
19
-
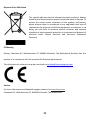 20
20
-
 21
21
-
 22
22
-
 23
23
-
 24
24
-
 25
25
-
 26
26
-
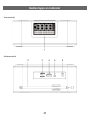 27
27
-
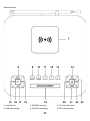 28
28
-
 29
29
-
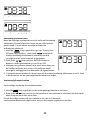 30
30
-
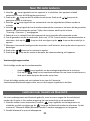 31
31
-
 32
32
-
 33
33
-
 34
34
-
 35
35
-
 36
36
-
 37
37
-
 38
38
-
 39
39
-
 40
40
-
 41
41
-
 42
42
-
 43
43
-
 44
44
-
 45
45
-
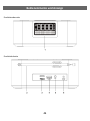 46
46
-
 47
47
-
 48
48
-
 49
49
-
 50
50
-
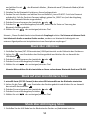 51
51
-
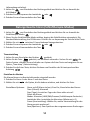 52
52
-
 53
53
-
 54
54
-
 55
55
-
 56
56
-
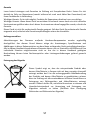 57
57
-
 58
58
-
 59
59
-
 60
60
-
 61
61
-
 62
62
-
 63
63
-
 64
64
-
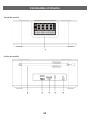 65
65
-
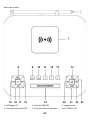 66
66
-
 67
67
-
 68
68
-
 69
69
-
 70
70
-
 71
71
-
 72
72
-
 73
73
-
 74
74
-
 75
75
-
 76
76
-
 77
77
-
 78
78
-
 79
79
-
 80
80
-
 81
81
-
 82
82
-
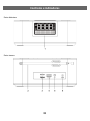 83
83
-
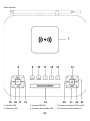 84
84
-
 85
85
-
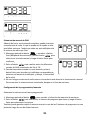 86
86
-
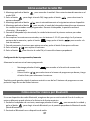 87
87
-
 88
88
-
 89
89
-
 90
90
-
 91
91
-
 92
92
-
 93
93
-
 94
94


Lenco CR-650BK Manual de usuario
- Categoría
- Radios
- Tipo
- Manual de usuario
en otros idiomas
- français: Lenco CR-650BK Manuel utilisateur
- English: Lenco CR-650BK User manual
- Deutsch: Lenco CR-650BK Benutzerhandbuch
- Nederlands: Lenco CR-650BK Handleiding
