La página se está cargando...

FC
-
WR
JP
2
EN
INSTRUCTIONS
18
FR
MODE D’EMPLOI
34
ES
INSTRUCCIONES
50
DE
BEDIENUNGSANLEITUNG
66
KR
사용설명서
80
CHT 94
TH
คําแนะนําการใชงาน
108
VI
CÁC HƯỚNG DẪN
122
Model No.: IM012

2
JP
FC-WR

3
JP
1
a
0
b
c
d
2
3
4
7
8
9
55
6
1
A/B/C .............P. 8
2
MODE ..............................P. 9
3
TEST ...............................P. 8
4
.....................P. 3
5
ON/OFF ........................... P. 6
6
...................................P. 4
7
OK ...................................P. 8
8
.........................P. 5
9
...............................P. 5
/
0
................................P. 8, 11
a
a
/ /
H
............................... P. 9, 10
b
MENU/
b
/
G
..................................P. 11
c
F
d
Ch /
I
..................................... P. 8
421 3
9
MODE
A
B
C
0.0
0.0
1/8
TTL
TTL
M
FPRATIO CH
1
Off
1/8
1/4
1/2
6
8
7
5
1
MODE
2
+/- /RATIO
3
FP FP
4
CH
5
RATIO
6
A
7
B
8
C
9
d

4
JP
• 4 2
• 4 2
x
4
1
2
•
+
/
-
3

5
JP
x
x
1
1
2
2
3
1

6
JP
ON/OFF
1
ON/OFF
x
q
ON/OFF
//
•
• 60
ON/OFF

7
JP
3
+
B
A
C
30m
•
•
2.4GHz

8
JP
OK
Ch
MODE
TEST
1
•
2
3
• P. 9 10
x
2 Off
4
Ch CH
OK
• SCAN* 1 15
*
OK
5
6
7
TEST

9
JP
TTL TTL
TTL
1
MODE
TTL OK
MODE
A
B
C
FP CH
0.0
1
RATIO
0.0
1/128
TTL
TTL
M
Off
2
+/-
a
+/-RATIO
• -5 +5
OK
M
1
MODE
M OK
MODE
A
B
C
FP CH
0.0
1
RATIO
0.0
1/100
TTL
TTL
M
Off
2
RATIO
a
RATIO
• 1/1 1/128 *
1
*1 1/2 1/3EV P. 12
*2
t u
OK
MODE
A
B
C
ZOOM LED
0.0
RATIO
0.0
1/100
TTL
TTL
M
1/32
1/64
1/128
*
2

10
JP
FP TTL /FP M
TTL M
1
MODE TTL M
OK
2
HIF
FP
On
MODE
A
B
C
FP CH
0.0
1
RATIO
0.0
1/128
TTL
TTL
M
On
FP
FP
FP
3
+/- FP TTL
a
+/-RATIO
• -5 +5
OK
RATIO FP M
a
+/-RATIO
• 1/1 1/128 *
1
*1 1/2 1/3EV P. 12
*2
t u
OK
MODE
A
B
C
ZOOM LED
0.0
RATIO
0.0
1/100
TTL
TTL
M
FP
FP
FP
1/32
1/64
1/128
*
2

11
JP
MENU/
b
1
d
MENU/
b
•
d
MENU/
b
MODE
A
B
C
FP CH
0.0
1
0.0
1/8
TTL
M
Off
TTL
RATIO
OK
F
MENU/
G
EV step 1/3
Back light mode
Value Set
Back light timer
Auto
5sec
DIAL OK
1
MENU
2
FG
3
OK

12
JP
EV step
#
+/- /
1/3 1/2
Back light mode
Auto On Off
Back light timer
1sec 5sec 15sec
•
•
•
•
•
• AF
•

13
JP
•
•
•
•
•
•
•
•
•
•
•
•

14
JP
1
2
3
2.4GHz DSSS
10m
• 15cm

15
JP
*
1
30m
2.4GHz
15
3 :
TTL MANUAL FP TTL FP MANUAL
1/3 1/2 5
1/3 1/2 1/1 1/128
*
1
6.4 4
4 2 /
4 2
1 IPX1
/ *
2
-10ºC 40ºC / 30 90%
/ -20ºC 60ºC / 10 90%
59.5 x 51.0 x 67.4 mm
73g
*1
*2

16
JP

17
MEMOMEMO

18
EN
Thank you for purchasing this Olympus product.
To ensure your safety, please read this instruction manual carefully before use.
In addition, please keep the manual handy for future reference.
Be sure to read the instruction manuals for the fl ash and the wireless receiver as
well.
If you use the product outside the country or region of purchase, you may violate
local regulations. Olympus accepts no liability in this case.
Checking the Contents of the Package
Pouch
Instructions (This manual)
Wireless radiowave commander:
FC-WR
Warranty card

19
EN
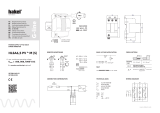
Names of Parts
1
a
0
b
c
d
2
3
4
7
8
9
55
6
1 Group buttons (A/B/C) ..................P. 24
2 MODE button ................................P. 25
3 TEST button ..................................P. 24
4 Control panel ................................P. 19
5 ON/OFF button .............................P. 22
6 Battery compartment cover ...........P. 20
7 OK button ......................................P. 24
8 Latch release button .....................P. 21
9 Latch ............................................. P. 21
Dial/Arrow pad
0 Dial ..........................................P. 24, 27
a a (fl ash compensation/fl ash intensity)/
H button .................................P. 25, 26
b MENU/b (key locking)/G button
......................................................P. 27
c F button
d Ch (communication channel)/
I button .......................................P. 24
Display (control panel) Display (control panel)
421 3
9
MODE
A
B
C
0.0
0.0
1/8
TTL
TTL
M
FPRATIO CH
1
Off
1/8
1/4
1/2
6
8
7
5
1 MODE (fl ash control mode)
2 +/- (fl ash compensation)/
RATIO (fl ash intensity)
3 FP (Super FP) fl ash
4 CH (communication channel)
5 RATIO (fl ash intensity)
6 Group A setting
7 Group B setting
8 Group C setting
9 d (key lock mode)

20
EN
Preparing the Commander
Inserting the batteries (sold separately)Inserting the batteries (sold separately)
Batteries to use
Choose from the following batteries.
• AAA NiMH batteries (x 2)
• AAA alkaline dry-cell batteries (x 2)
x
AAA manganese batteries are not usable.
Inserting the batteries
1
Open the battery compartment cover.
2
Insert the batteries.
• Make sure that the polarity (+/-) is correct.
3
Close the battery compartment cover.

21
EN
Attaching the commander to the camera Attaching the commander to the camera
x
Make sure that both the commander and the camera are turned off.
x
Dirt or moisture on the electrical contacts may cause a malfunction. Wipe off any
dirt or moisture before you attach the commander to the camera.
1
Hold down the latch release button (
1
),
and slide the latch in the direction of the
arrow (
2
).
Latch
Latch release button
2
Insert the commander all the way into the
hot shoe.
Hot shoe
Electrical contacts
3
Slide the latch in the direction of the
arrow.
Removing the commander
Perform Step 1 of the above procedure and remove the commander from the hot
shoe.

22
EN
Turning on the Power
ON/OFF button
1
Press the ON/OFF button.
x
If the q mark appears in the center of the control panel, the batteries are running
very low. Replace the batteries as soon as possible.
Turning off the powerTurning off the power
Press the ON/OFF button.
Sleep mode/Automatic power offSleep mode/Automatic power off
• With some cameras, the commander will automatically enter the sleep mode
when the camera enters the sleep mode.
• If approximately 60 minutes elapse with no operations, the power will turn off
automatically. Press the ON/OFF button when you want to use the commander
again.

23
EN
Radio Wireless Shooting
You can use this wireless commander to control multiple receivers through radio
communications. This function only works with Olympus products that support the
radio wireless function.
Refer to the Olympus website for information on products that support the radio
wireless function.
Group controlGroup control
You can control up to three groups of receivers. Within each group, the fl ashes
will fi re with the same settings. This function allows you to shoot with a variety of
lighting effects.
Wireless commander
Flash
(sold separately)
+
Wireless receiver
(sold separately)
Flash with radio
wireless function
(sold separately)
Flash with
radio wireless
function
(sold separately)
Group B
Group A
Group C
Flash with
radio wireless
function
(sold separately)
Communication distanceCommunication distance
The maximum distance for radio wireless communications with this wireless
commander is approx. 30 meters (98.4 ft.) (under Olympus measurement
conditions).
• This distance assumes that there are no obstacles, shielding materials, or
radio interference from other devices.
• The communication distance may be shorter depending on the positions of the
devices, the surrounding environment, weather conditions, and other factors.
FrequencyFrequency
This product uses the 2.4 GHz band for wireless communications. However,
other wireless devices may use the same frequency.

24
EN
Setup
OK button
Dial
Ch button
MODE button
TEST button
Group button
1
Set a fl ash mode on the camera.
• Refer to the camera manual for details.
2
Press the group button to select a communication group.
3
Select a fl ash control mode and adjust the settings.
• For details, refer to the explanations of the fl ash control modes (P. 25 to
26).
x
If you do not want to use this communication group, select “Off.”
4
Press the Ch button to highlight CH. Then, turn the dial to select a
communication channel. Press the OK button to confi rm.
• You can select SCAN* or a channel from 1 to 15.
* Select this setting when the communication conditions are poor due to interference from
other devices. When an unused channel appears automatically, press the OK button
again to confi rm.
5
Match the receiver channel to the commander channel.
6
Set the group on the receiver.
7
Press the TEST button to check the fl ash.

25
EN
Shooting with Automatic Flash Control
(TTL Mode)
The TTL mode adjusts the fl ash level according to the brightness through the
camera lens. You can use this mode with cameras that support the Olympus TTL
mode. Refer to the Olympus website for a list of compatible cameras.
1
Press the MODE button. Then, turn the dial to
select TTL. Press the OK button to confi rm.
MODE
A
B
C
FP CH
0.0
1
RATIO
0.0
1/128
TTL
TTL
M
Off
2
Set the fl ash compensation (+/-).
Press the a button to highlight +/- RATIO. Then, turn the dial to adjust the
setting.
• You can set a fl ash compensation from -5 to +5.
Press the OK button.
Manually Setting the Flash Intensity
(M Mode)
The fl ash will fi re at the selected intensity. You can use this mode with cameras
that do not support the Olympus communication feature.
1
Press the MODE button. Then, turn the dial to
select M. Press the OK button to confi rm.
MODE
A
B
C
FP CH
0.0
1
RATIO
0.0
1/100
TTL
TTL
M
Off
2
Set the fl ash intensity (RATIO).
Press the a button to highlight RATIO. Then, turn
the dial to adjust the setting.
• You can set a fl ash ratio from 1/1 to 1/128.*
1
*1 You can select 1/2 EV or 1/3 EV for the adjustment
increment. (P. 28)
*2 On the scale display, t is the current selection. u is the
previous setting.
Press the OK button.
MODE
A
B
C
ZOOM LED
0.0
RATIO
0.0
1/100
TTL
TTL
M
1/32
1/64
1/128
Scale display*
2

26
EN
Firing the Flash at a High Shutter Speed
(FP TTL Mode / FP M Mode)
You can shoot with the fl ash at shutter speeds faster than the fl ash sync
speed. These modes are useful when you want to shoot a portrait with a blurry
background by widening the aperture, or when you want to use a high shutter
speed to reduce blown-out highlights in the background.
The guide number is lower than in the regular TTL mode or M mode.
1
Press the MODE button. Then, turn the dial to select TTL or M. Press
the OK button to confi rm.
2
Press HIF on the arrow pad to highlight FP.
Then, turn the dial to select “On.”
MODE
A
B
C
FP CH
0.0
1
RATIO
0.0
1/128
TTL
TTL
M
On
FP
FP
FP
3
Adjust the settings.
Setting the fl ash compensation (+/-) in the FP TTL mode
Press the a button to highlight +/- RATIO. Then, turn the dial to adjust the
setting.
• You can set a fl ash compensation from -5 to +5.
Press the OK button.
Setting the fl ash intensity (RATIO) in the FP M mode
Press the a button to highlight +/- RATIO. Then,
turn the dial to adjust the setting.
• You can set a fl ash ratio from 1/1 to 1/128.*
1
*1 You can select 1/2 EV or 1/3 EV for the adjustment
increment. (P. 28)
*2 On the scale display, t is the current selection. u is the
previous setting.
Press the OK button.
MODE
A
B
C
ZOOM LED
0.0
RATIO
0.0
1/100
TTL
TTL
M
FP
FP
FP
1/32
1/64
1/128
Scale display*
2

27
EN
Other settingsOther settings
MENU/b button
Preventing accidental operation (key lock mode)
You can prevent accidental operation of the buttons and dial during shooting.
1
Hold down the MENU/b button until d appears
on the control panel.
• To cancel the mode, hold down the MENU/b
button until d disappears from the control panel.
MODE
A
B
C
FP CH
0.0
1
0.0
1/8
TTL
M
Off
TTL
RATIO
Settings on the MENU Screen
You can confi gure various functions to make the wireless commander easier to
use.
Setup procedure Setup procedure
OK button
F on the arrow
pad
MENU/G button
Dial
EV step 1/3
Back light mode
Value Set
Back light timer
Auto
5sec
DIAL OK
Menu
Function name Setting
1
Press the MENU button.
2
Press the FG on the arrow pad and select a function name.
3
Turn the dial to select a setting, and press the OK button to confi rm.

28
EN
Confi gurable functionsConfi gurable functions
indicates the default setting.
EV step: You can change the adjustment increment for #+/- (fl ash
compensation/fl ash intensity).
1/3 / 1/2
Back light mode: You can set the back light of the control panel.
Auto (The back light turns on during operation.) /
On (The back light is always on.) / Off (The back light is always off.)
Back light timer: You can set when to turn off the back light of the control
panel.
You can select the time (in seconds) until the back light turns off automatically
when there is no operation.
From 1sec to 5sec to 15sec
Safety Precautions
Read WARNINGS and CAUTIONS thoroughly to ensure safe usage. These
safety precautions protect the users and others and prevent property damage.
WARNING
Failure to observe the precautions indicated by this symbol
may result in injury or death.
• Do not use fl ash in places where it may be exposed to fl ammable or explosive
gas. Otherwise, fi re ignition or explosion may result.
• Do not directly solder the product or modify, remodel, or disassemble.
• Do not cover the light emitting area of the fl ash with your hand, and do not
touch the light emitting area after continuous fi ring. It may burn your skin.
• Water and foreign matter inside of the device may cause fi re or electric shock.
If the device is immersed in or exposed to water or foreign matter is found
inside of the device, turn off the power immediately and remove batteries with
care. Contact your dealer or consult an Olympus Authorized Service Station.
• To prevent a traffi c accident, do not direct the fl ash at a person operating a
motor vehicle.
• Do not use the fl ash or AF illuminator in close proximity to others (especially
infants). Keep the fl ash out of reach of children. Light from the fl ash can cause
visual impairment.
• To prevent a short circuit, do not use batteries with a damaged external seal
(insulation coating).

29
EN
• Do not mix old and new batteries, or batteries made by different
manufacturers.
• Do not connect substances such as metal to the (+) or (–) of batteries.
CAUTION
Failure to observe the precautions indicated by this symbol
may result in injury or property damage.
• If you notice any abnormalities such as odor, noise, or smoke, stop using this
device. Otherwise a fi re or burn may result. Remove the batteries carefully
to avoid burning yourself, and contact your dealer or consult an Olympus
Authorized Service Station.
• There is a risk of explosion if the battery is replaced with the incorrect battery
type.
• Do not operate with wet hands. This may cause malfunction or electric shock.
• Do not use or store batteries in areas exposed to extremely high temperatures,
such as in direct sunlight, in an enclosed vehicle on a sunny day, or near a
heater.
• Continuous repeated fi ring could lead to adverse health effects.
• Dirt or water on the contacts can cause malfunction. Remove dirt, water, and
other foreign matter before attaching the unit to the camera.
Using the radio wireless function
• When you use the radio wireless communication function, comply with all local
laws and regulations.
• If you use the product outside the region of purchase, you may violate local
regulations for radio waves. Olympus accepts no liability in this case.
• Turn off the product in hospitals and other locations where medical equipment
is present.
The radio waves from the product may adversely affect medical equipment,
causing a malfunction that results in an accident.
• Turn off the product when onboard aircraft.
Using wireless devices onboard may hinder safe operation of the aircraft.
FCC CautionFCC Caution
Changes or modifi cations not expressly approved by the party responsible for
compliance could void the user’s authority to operate the equipment.
This equipment must not be co-located or operated in conjunction with any other
antenna or equipment except Olympus wireless equipment whose RF exposure
was evaluated for this equipment. For the latest information, please visit the
Olympus website.
Website: https://cs.olympus-imaging.jp/en/support/imsg/digicamera/download/
notice/rfsimullist.cfm

30
EN
FCC NoticeFCC Notice
This equipment has been tested and found to comply with the limits for a Class
B digital device, pursuant to part 15 of the FCC Rules. These limits are designed
to provide reasonable protection against harmful interference in a residential
installation. This equipment generates, uses and can radiate radio frequency
energy and, if not installed and used in accordance with the instructions, may
cause harmful interference to radio communications. However, there is no
guarantee that interference will not occur in a particular installation. If this
equipment does cause harmful interference to radio or television reception, which
can be determined by turning the equipment off and on, the user is encouraged
to try to correct the interference by one or more of the following measures:
• Reorient or relocate the receiving antenna.
• Increase the separation between the equipment and receiver.
• Connect the equipment into an outlet on a circuit different from that to which
the receiver is connected.
• Consult the dealer or an experienced radio/TV technician for help.
Declaration of Conformity
Model Number : IM012
Trade Name : OLYMPUS
Responsible Party :
Address : 3500 Corporate Parkway, P. O. Box 610, Center Valley,
PA 18034-0610, USA
Telephone Number : 484-896-5000
Tested To Comply With FCC Standards
FOR HOME OR OFFICE USE
This device complies with part 15 of FCC Rules and Innovation, Science and
Economic Development Canada’s licence-exempt RSS(s). Operation is subject to
the following two conditions: (1) this device may not cause harmful interference,
and (2) this device must accept any interference received, including interference
that may cause undesired operation.
This equipment complies with FCC/ISED radiation exposure limits set forth for
an uncontrolled environment and meets the FCC radio frequency (RF) Exposure
Guidelines and RSS-102 of the ISED radio frequency (RF) Exposure rules as this
equipment has very low levels of RF energy.

31
EN
Simple Declaration of Conformity
Hereby, OLYMPUS CORPORATION declares that the radio equipment type
IM012 is in compliance with Directive 2014/53/EU.
The full text of the EU declaration of conformity is available at the following
internet address:
http://www.olympus-europa.com/
This symbol [crossed-out wheeled bin WEEE Annex IV] indicates
separate collection of waste electrical and electronic equipment in
the EU countries.
Please do not throw the equipment into the domestic refuse.
Please use the return and collection systems available in your
country for the disposal of this product.
Radio wireless communication function
Compatible
standard
IEEE 802.15.4
2405 - 2480 MHz
3 mW or less
Firmware Version 1.0 or later
Complies with
IMDA Standards
DB104634

32
EN
Specifi cations
Product type Wireless radiowave commander
Maximum
communication
distance*
1
Approx. 30 m (98.4 ft.)
Frequency 2.4 GHz band
Number of channels 15 (in the commander mode; with automatic channel setting
function)
Number of groups 3; maximum number of units: unlimited
Flash control modes TTL / MANUAL / FP TTL / FP MANUAL / Off
Flash compensation ±5 EV (Increment: 1/3 EV or 1/2 EV)
Manual fl ash intensity
adjustment
From 1/1 to 1/128 (Increment: 1/3 EV or 1/2 EV)
Operable duration*
1
Approx. 6.4 hours (when using AAA alkaline dry-cell
batteries)
Power supply AAA alkaline dry-cell batteries x 2 / AAA NiMH batteries x 2
Splash-proof function
(Type)
Class 1 (IPX1)
Operable temperature/
humidity*
2
From -10 to 40ºC (14 to 104ºF) / From 30 to 90%
Storage warranty
temperature/humidity
From -20 to 60ºC (-4 to 140ºF) / From 10 to 90%
Dimensions Approx. 59.5 (W) x 51.0 (H) x 67.4 (D) mm (2.3 x 2.0 x
2.7 in.) [excluding the projecting parts]
Weight 73 g (2.6 oz.) [excluding the batteries]
Specifi cations are subject to change without notice.
*1 Values are based on Olympus testing conditions and may vary according to the shooting
conditions. The values assume the use of new batteries or fully charged rechargeable
batteries.
*2 At low temperatures, warm the batteries before use. For example, place the batteries in your
pocket.

33
EN
Technical Support (U.S.A. / Canada)
24/7 online automated help: http://www.olympusamerica.com/support
Phone customer support: Tel.1-800-260-1625 (Toll-free)
Our phone customer support is available from 9 am to 9 pm (Monday to Friday) ET
E-Mail: [email protected]
European Technical Customer Support
Please visit our homepage
http://www.olympus-europa.com
or call: Tel. 00800 - 67 10 83 00 (Toll-free)
+49 40 - 237 73 899 (Charged)

34
FR
Nous vous remercions d’avoir acheté ce produit Olympus.
Pour assurer votre sécurité, veuillez lire attentivement ce manuel d’instructions
avant l’utilisation.
En outre, veuillez le conserver à portée de main pour vous y référer
ultérieurement.
Veillez à lire également les manuels d’instructions du fl ash et du récepteur sans
fi l.
Si vous utilisez le produit en dehors du pays ou de la région d’achat, vous risquez
d’enfreindre les réglementations locales. Olympus décline toute responsabilité à
cet égard.
Vérifi cation du contenu de l’emballage
Pochette
Instructions (le présent document)
Déclencheur radio sans fi l : FC-WR Carte de garantie

35
FR
Noms des pièces
1
a
0
b
c
d
2
3
4
7
8
9
55
6
1 Touches de groupe (A/B/C) ..........P. 40
2 Touche MODE ..............................P. 41
3 Touche TEST ................................P. 40
4 Écran de commande .....................P. 35
5 Touche ON/OFF ............................P. 38
6 Couvercle du compartiment des piles
......................................................P. 36
7 Touche OK ....................................P. 40
8 Bouton de déverrouillage ..............P. 37
9 Loquet ........................................... P. 37
Sélecteur/Pavé directionnel
0 Sélecteur .................................P. 40, 43
a Touche a (compensation du fl ash/
intensité du fl ash)/H ...............P. 41, 42
b Touche MENU/b (verrouillage des
touches)/G ...................................P. 43
c Touche F
d Touche Ch (canal de communication)/
I ..................................................P. 40
Affi chage (écran de commande) Affi chage (écran de commande)
421 3
9
MODE
A
B
C
0.0
0.0
1/8
TTL
TTL
M
FPRATIO CH
1
Off
1/8
1/4
1/2
6
8
7
5
1 MODE (mode de contrôle du fl ash)
2 +/- (compensation du fl ash)/
RATIO (intensité du fl ash)
3 Flash FP (Super FP)
4 CH (canal de communication)
5 RATIO (intensité du fl ash)
6 Réglage du groupe A
7 Réglage du groupe B
8 Réglage du groupe C
9 d (mode de verrouillage des touches)

36
FR
Préparation du déclencheur
Insertion des piles (vendues séparément)Insertion des piles (vendues séparément)
Piles à utiliser
Choisissez parmi les piles suivantes.
• Piles NiMH AAA (x 2)
• Piles sèches alcalines AAA (x 2)
x
Les piles au manganèse AAA ne peuvent pas être utilisées.
Insertion des piles
1
Ouvrez le couvercle du compartiment des piles.
2
Insérez les piles.
• Assurez-vous que la polarité (+/-) est correcte.
3
Fermez le couvercle du compartiment des piles.

37
FR
Fixation du déclencheur sur l’appareil photo Fixation du déclencheur sur l’appareil photo
x
Assurez-vous que le déclencheur et l’appareil photo sont tous les deux hors
tension.
x
La présence de saleté ou d’humidité sur les contacts électriques peut provoquer un
dysfonctionnement. Essuyez toute saleté ou humidité avant de fi xer le déclencheur
sur l’appareil photo.
1
Maintenez le bouton de déverrouillage
(
1
) enfoncé et faites glisser le loquet
dans le sens de la fl èche (
2
).
Loquet
Bouton de déverrouillage
2
Insérez le déclencheur complètement
dans la griffe.
Griffe
Contacts électriques
3
Faites glisser le loquet dans le sens de la
fl èche.
Retrait du déclencheur
Effectuez l’étape 1 de la procédure ci-dessus et retirez le déclencheur de la
griffe.

38
FR
Mise sous tension
Touche ON/OFF
1
Appuyez sur la touche ON/OFF.
x
Si le symbole q s’affi che au centre de l’écran de commande, les piles sont
presque épuisées. Remplacez les piles dès que possible.
Mise hors tensionMise hors tension
Appuyez sur la touche ON/OFF.
Mode de veille/Mise hors tension automatiqueMode de veille/Mise hors tension automatique
• Avec certains appareils photo, le déclencheur passe automatiquement en
mode veille lorsque l’appareil photo passe en mode veille.
• Si aucune opération n’est effectuée pendant environ 60 minutes, le fl ash se
met automatiquement hors tension. Appuyez sur la touche ON/OFF lorsque
vous souhaitez utiliser à nouveau le déclencheur.

39
FR
Prise de vue radio sans fi l
Vous pouvez utiliser ce déclencheur sans fi l pour contrôler plusieurs récepteurs
via des communications radio. Cette fonction est opérationnelle uniquement avec
des produits Olympus prenant en charge la fonction radio sans fi l.
Consultez le site Web d’Olympus pour plus d’informations sur les produits
prenant en charge la fonction radio sans fi l.
Contrôle de groupesContrôle de groupes
Vous pouvez contrôler jusqu’à trois groupes de récepteurs. Dans chaque groupe,
les fl ashs se déclencheront avec les mêmes réglages. Cette fonction vous
permet d’effectuer des prises de vue avec divers effets d’éclairage.
Déclencheur sans fi l
Flash
(vendu séparément)
+
Récepteur sans fi l
(vendu séparément)
Flash avec fonction
radio sans fi l (vendu
séparément)
Flash avec
fonction radio
sans fi l (vendu
séparément)
Groupe B
Groupe A
Groupe C
Flash avec
fonction radio
sans fi l (vendu
séparément)
Distance de communicationDistance de communication
La distance maximale pour les communications radio sans fi l avec ce
déclencheur sans fi l est d’environ 30 mètres (dans les conditions de mesure
d’Olympus).
• Cette distance suppose qu’il n’y a pas d’obstacles, de matériaux de blindage
ou d’interférences radio provenant d’autres appareils.
• La distance de communication peut être plus courte en fonction des positions
des appareils, de l’environnement, des conditions météorologiques et d’autres
facteurs.

40
FR
FréquenceFréquence
Ce produit utilise la bande 2,4 GHz pour les communications sans fi l. Cependant,
d’autres appareils sans fi l peuvent utiliser la même fréquence.
Confi guration
Touche OK
Sélecteur
Touche Ch
Touche MODE
Touche TEST
Touche de groupe
1
Réglez un mode de fl ash sur l’appareil photo.
• Reportez-vous au manuel de l’appareil pour en savoir plus.
2
Appuyez sur la touche de groupe pour sélectionner un groupe de
communication.
3
Sélectionnez un mode de contrôle du fl ash et ajustez les réglages.
• Pour en savoir plus, reportez-vous aux explications des modes de contrôle
du fl ash (P. 41 à 42).
x
Si vous ne souhaitez pas utiliser ce groupe de communication, sélectionnez
« Off ».
4
Appuyez sur la touche Ch pour mettre CH en surbrillance. Ensuite,
tournez le sélecteur pour sélectionner un canal de communication.
Appuyez sur la touche OK pour confi rmer.
• Vous pouvez sélectionner SCAN* ou un canal de 1 à 15.
* Sélectionnez ce réglage lorsque les conditions de communication sont mauvaises en
raison d’interférences provenant d’autres appareils. Lorsqu’un canal non utilisé s’affi che
automatiquement, appuyez sur la touche OK pour confi rmer.
5
Faites correspondre le canal du récepteur au canal du déclencheur.
6
Réglez le groupe sur le récepteur.
7
Appuyez sur la touche TEST pour vérifi er le fl ash.

41
FR
Prise de vue avec le contrôle du fl ash
automatique (mode TTL)
Le mode TTL permet de régler l’intensité du fl ash en fonction de la luminosité
à travers l’objectif de l’appareil photo. Vous pouvez utiliser ce mode avec les
appareils photo prenant en charge le mode TTL d’Olympus. Consultez le site
Web d’Olympus pour connaître la liste des appareils photo compatibles.
1
Appuyez sur la touche MODE. Ensuite, tournez
le sélecteur pour sélectionner TTL. Appuyez sur
la touche OK pour confi rmer.
MODE
A
B
C
FP CH
0.0
1
RATIO
0.0
1/128
TTL
TTL
M
Off
2
Réglez la compensation du fl ash (+/-).
Appuyez sur la touche a pour mettre +/- RATIO en surbrillance. Ensuite,
tournez le sélecteur pour ajuster le réglage.
• Vous pouvez régler une compensation de fl ash de -5 à +5.
Appuyez sur la touche OK.
Réglage manuel de l’intensité du fl ash (mode M)
Le fl ash se déclenche à l’intensité sélectionnée. Vous pouvez utiliser ce mode
avec les appareils photo ne prenant pas en charge la fonction de communication
d’Olympus.
1
Appuyez sur la touche MODE. Ensuite, tournez
le sélecteur pour sélectionner M. Appuyez sur
la touche OK pour confi rmer.
MODE
A
B
C
FP CH
0.0
1
RATIO
0.0
1/100
TTL
TTL
M
Off
2
Réglez l’intensité du fl ash (RATIO).
Appuyez sur la touche a pour mettre RATIO en
surbrillance. Ensuite, tournez le sélecteur pour
ajuster le réglage.
• Vous pouvez régler une puissance de fl ash de 1/1
à 1/128.*
1
*1 Vous pouvez sélectionner 1/2 EV ou 1/3 EV comme
incrément de réglage. (P. 44)
*2 Sur l’affi chage de l’échelle, t indique la sélection
actuelle. u indique le réglage précédent.
Appuyez sur la touche OK.
MODE
A
B
C
ZOOM LED
0.0
RATIO
0.0
1/100
TTL
TTL
M
1/32
1/64
1/128
Affi chage de l’échelle*
2

42
FR
Déclenchement du fl ash à une vitesse
d’obturation élevée (mode FP TTL / mode FP M)
Vous pouvez photographier avec le fl ash à des vitesses d’obturation plus rapides
que la vitesse de synchronisation du fl ash. Ces modes sont utiles lorsque
vous souhaitez prendre un portrait avec un arrière-plan fl ou en agrandissant
l’ouverture ou lorsque vous souhaitez utiliser une vitesse d’obturation élevée
pour réduire les surexpositions en arrière-plan.
Le nombre guide est inférieur à celui du mode TTL normal ou du mode M.
1
Appuyez sur la touche MODE. Ensuite, tournez le sélecteur pour
sélectionner TTL ou M. Appuyez sur la touche OK pour confi rmer.
2
Appuyez sur HIF sur le pavé directionnel
pour mettre FP en surbrillance. Ensuite,
tournez le sélecteur pour sélectionner « On ».
MODE
A
B
C
FP CH
0.0
1
RATIO
0.0
1/128
TTL
TTL
M
On
FP
FP
FP
3
Ajustez les réglages.
Réglage de la compensation du fl ash (+/-) en mode FP TTL
Appuyez sur la touche a pour mettre +/- RATIO en surbrillance. Ensuite,
tournez le sélecteur pour ajuster le réglage.
• Vous pouvez régler une compensation de fl ash de -5 à +5.
Appuyez sur la touche OK.
Réglage de l’intensité du fl ash (RATIO) en mode FP M
Appuyez sur la touche a pour mettre +/- RATIO
en surbrillance. Ensuite, tournez le sélecteur pour
ajuster le réglage.
• Vous pouvez régler une puissance de fl ash de 1/1
à 1/128.*
1
*1 Vous pouvez sélectionner 1/2 EV ou 1/3 EV comme
incrément de réglage. (P. 44)
*2 Sur l’affi chage de l’échelle, t indique la sélection
actuelle. u indique le réglage précédent.
Appuyez sur la touche OK.
MODE
A
B
C
ZOOM LED
0.0
RATIO
0.0
1/100
TTL
TTL
M
FP
FP
FP
1/32
1/64
1/128
Affi chage de l’échelle*
2

43
FR
Autres réglagesAutres réglages
Touche MENU/b
Protection contre le fonctionnement accidentel (mode de verrouillage des
touches)
Vous pouvez empêcher l’utilisation accidentelle des touches et du sélecteur
pendant la prise de vue.
1
Maintenez la touche MENU/b enfoncée
jusqu’à ce que d s’affi che sur l’écran de
commande.
• Pour annuler le mode, maintenez la touche
MENU/b enfoncée jusqu’à ce que d disparaisse
de l’écran de commande.
MODE
A
B
C
FP CH
0.0
1
0.0
1/8
TTL
M
Off
TTL
RATIO
Réglages sur l’écran MENU
Vous pouvez confi gurer diverses fonctions pour faciliter l’utilisation du
déclencheur sans fi l.
Procédure de confi guration Procédure de confi guration
Touche OK
F sur le pavé
directionnel
Touche MENU/G
Sélecteur
EV step 1/3
Back light mode
Value Set
Back light timer
Auto
5sec
DIAL OK
Menu
Nom de la fonction Réglage
1
Appuyez sur la touche MENU.
2
Appuyez sur FG sur le pavé directionnel et sélectionnez un nom de
fonction.
3
Tournez le sélecteur pour sélectionner un réglage, puis appuyez sur la
touche OK pour confi rmer.

44
FR
Fonctions confi gurablesFonctions confi gurables
indique le réglage par défaut.
EV step : Vous pouvez modifi er l’incrément de réglage de #+/-
(compensation du fl ash/intensité du fl ash).
1/3 / 1/2
Back light mode : Vous pouvez régler le rétroéclairage de l’écran de
commande.
Auto (le rétroéclairage s’allume pendant le fonctionnement.) /
On (le rétroéclairage est toujours allumé.) / Off (le rétroéclairage est
toujours éteint.)
Back light timer : Vous pouvez régler le moment de désactivation du
rétroéclairage de l’écran de commande.
Vous pouvez sélectionner la durée (en secondes) avant la désactivation
automatique du rétroéclairage lorsqu’aucune opération n’est effectuée.
De 1sec à 5sec à 15sec
Précautions de sécurité
Lisez attentivement les AVERTISSEMENTS et les PRÉCAUTIONS pour assurer
une utilisation sûre. Ces précautions de sécurité protègent les utilisateurs et les
autres personnes et permettent d’éviter la détérioration des biens.
AVERTISSEMENT
Si le produit est utilisé sans tenir compte de
l’information donnée sous ce symbole, des
blessures ou la mort risquent d’en résulter.
• Ne pas utiliser le fl ash dans des emplacements pouvant être sujets à des gaz
infl ammables ou explosifs. Sinon, une combustion ou une explosion risque de
se produire.
• Ne pas directement souder, modifi er, remodeler ou démonter le produit.
• Ne pas couvrir la zone d’émission de lumière du fl ash avec vos mains et
ne pas toucher la zone d’émission de lumière immédiatement après un
déclenchement continu. Vous pourriez vous brûler.
• De l’eau et des particules étrangères infi ltrées à l’intérieur de l’appareil
pourraient entraîner un incendie ou une électrocution. Si le dispositif est
immergé dans de l’eau ou exposé à de l’eau ou si des substances étrangères
sont présentes à l’intérieur du dispositif, mettez-le immédiatement hors tension
et retirez les piles avec soin. Contacter votre revendeur ou un centre de
réparation agréé Olympus.

45
FR
• Afi n d’éviter un accident de la route, ne pas diriger directement le fl ash sur une
personne conduisant un véhicule motorisé.
• Ne pas utiliser le fl ash ou l’illuminateur AF à proximité de personnes (en
particulier des enfants). Tenir le fl ash hors de la portée des enfants. La lumière
du fl ash peut provoquer des traumatismes oculaires.
• Pour éviter un court-circuit, n’utilisez pas de piles dont le joint externe
(revêtement isolant) est endommagé.
• Ne pas mélanger des piles usées et neuves ou des piles provenant de
fabricants différents.
• Ne pas raccorder de substances telles que du métal aux bornes (+) ou (–) des
piles.
ATTENTION
Le non-respect des précautions indiquées par ce symbole
peut entraîner des blessures ou des dommages matériels.
• Si vous remarquez des anomalies comme une odeur, du bruit ou de la fumée,
arrêtez d’utiliser l’appareil. Sinon, un incendie ou une brûlure pourrait résulter.
Retirez les piles précautionneusement en évitant de vous brûler et prenez
contact avec votre revendeur ou consultez un centre de réparation agréé
Olympus.
• Il existe un risque d’explosion si la batterie est remplacée avec une batterie de
type incorrect.
• Ne pas manipuler avec les mains mouillées. Risque de dysfonctionnement et
d’électrocution.
• N’utilisez pas les piles et ne les rangez pas dans des lieux exposés à des
températures extrêmement élevées, comme en plein soleil, dans un véhicule
fermé par une journée ensoleillée ou près d’un radiateur.
• Un déclenchement continu peut avoir des effets néfastes sur la santé.
• La présence de saletés ou d’eau sur les contacts peut provoquer un
dysfonctionnement. Retirez toute trace de saleté, d’eau ou autre avant de fi xer
le fl ash sur l’appareil photo.
Utilisation de la fonction radio sans fi l
• Lorsque vous utilisez la fonction de communication radio sans fi l, respectez
toutes les lois et réglementations locales.
• Si vous utilisez le produit en dehors de la région d’achat, vous risquez
d’enfreindre les réglementations locales relatives aux ondes radio. Olympus
décline toute responsabilité à cet égard.
• Éteignez le produit dans les hôpitaux et autres lieux abritant un équipement
médical.
Les ondes radio émises par le produit peuvent nuire à l’équipement médical et
entraîner un dysfonctionnement susceptible de provoquer un accident.

46
FR
• Éteignez le produit à bord d’un avion.
L’utilisation d’appareils sans fi l à bord d’un avion peut entraver le
fonctionnement sûr de l’avion.
Le présent appareil est conforme à la partie 15 des règles de la FCC et aux
normes des CNR d’Innovation, Sciences et Développement économique Canada
applicables aux appareils radio exempts de licence. L’exploitation est autorisée
aux deux conditions suivantes :
(1) l’appareil ne doit pas produire de brouillage, et
(2) l’appareil doit accepter tout brouillage subi, même si le brouillage est
susceptible d’en compromettre le fonctionnement.
Cet équipement est conforme aux limites d’exposition aux rayonnements
énoncées pour un environnement non contrôlé et respecte les règles les
radioélectriques (RF) de la FCC lignes directrices d’exposition et d’exposition aux
fréquences radioélectriques (RF) CNR-102 de l’ISDE puisque cet appareil a une
niveau très bas d’energie RF.
Declaration ue de conformite simplifi ee
Le soussigné, OLYMPUS CORPORATION, déclare que l’équipement
radioélectrique du type IM012 est conforme à la directive 2014/53/UE.
Le texte complet de la déclaration UE de conformité est disponible à l’adresse
internet suivante : http://www.olympus-europa.com/
Le symbole [poubelle sur roue barrée d’une croix WEEE annexe IV]
indique une collecte séparée des déchets d’équipements électriques
et électroniques dans les pays de l’UE.
Veuillez ne pas jeter l’équipement dans les ordures domestiques.
À utiliser pour la mise en rebut de ces types d’équipements
conformément aux systèmes de traitement et de collecte disponibles
dans votre pays.
Fonction de communication radio sans fi l
Norme compatible IEEE 802.15.4
2405 - 2480 MHz
3 mW ou moins
Firmware Version 1.0 ou supérieure

47
FR
Caractéristiques
Type de produit Déclencheur radio sans fi l
Distance de
communication
maximale*
1
Environ 30 m
Fréquence Bande 2,4 GHz
Nombre de canaux 15 (en mode déclencheur ; avec la fonction de réglage de
canal automatique)
Nombre de groupes 3 ; nombre maximal d’unités : illimité
Modes de contrôle
du fl ash
TTL / MANUAL / FP TTL / FP MANUAL / Off
Compensation du
fl ash
±5 EV (incrément : 1/3 EV ou 1/2 EV)
Réglage de l’intensité
du fl ash manuel
De 1/1 à 1/128 (incrément : 1/3 EV ou 1/2 EV)
Durée de
fonctionnement*
1
Environ 6,4 heures (lors de l’utilisation de piles sèches
alcalines AAA)
Source d’alimentation Piles sèches alcalines AAA x 2 / piles NiMH AAA x 2
Fonction anti-
éclaboussures (type)
Classe 1 (IPX1)
Température/humidité
de fonctionnement*
2
De -10 à 40 °C / De 30 à 90 %
Température/humidité
de stockage garantie
De -20 à 60 °C / De 10 à 90 %
Dimensions Environ 59,5 (L) x 51,0 (H) x 67,4 (P) mm [à l’exception des
parties saillantes]
Poids 73 g [sans piles]
Les caractéristiques sont sujettes à modifi cation sans préavis.
*1 Les valeurs sont basées sur les conditions de test d’Olympus et peuvent varier selon les
conditions de prise de vue. Les valeurs supposent l’utilisation de piles neuves ou de piles
rechargeables entièrement chargées.
*2 Lors de basses températures, réchauffez les piles avant de les utiliser. Par exemple, placez
les piles dans votre poche.

48
FR
Support technique (États-Unis / Canada)
Aide en ligne 24/24h, 7/7 jours : http://www.olympusamerica.com/support
Ligne téléphonique de support : Tél. 1-800-260-1625 (appel gratuit)
Notre centre d’appels clients est ouvert de de 9 h à 21 h (du lundi au vendredi)
Heure de l’Est
Email : [email protected]
Support technique européen
Visitez notre site à l’adresse
http://www.olympus-europa.com
ou appelez le : 00800 - 67 10 83 00 (appel gratuit)
+49 40 - 237 73 899 (appel payant)

49
MEMOMEMO

50
ES
Gracias por haber adquirido este producto Olympus.
Para garantizar su seguridad, lea cuidadosamente este manual de instrucciones
antes de utilizar el producto.
Le aconsejamos además que tenga el manual a mano para futuras consultas.
Asegúrese de leer también los manuales de instrucciones del fl ash y del receptor
inalámbrico.
Si utiliza el producto fuera del país o región donde lo adquirió, es posible que
contravenga alguna normativa local. Olympus no asume ninguna responsabilidad
en este caso.
Comprobación del contenido del paquete
Bolsa
Instrucciones (este manual)
Transmisor de ondas de radio
inalámbrico: FC-WR
Tarjeta de garantía

51
ES
Nombres de las piezas
1
a
0
b
c
d
2
3
4
7
8
9
55
6
1 Botones de grupos (A/B/C) ...........P. 56
2 Botón MODE .................................P. 57
3 Botón TEST .................................. P. 56
4 Panel de control ............................P. 51
5 Botón ON/OFF ..............................P. 54
6 Tapa del compartimento de las pilas
......................................................P. 52
7 Botón OK ......................................P. 56
8 Botón de liberación del anclaje .....P. 53
9 Sistema de anclaje .......................P. 53
Dial/teclas de control
0 Dial ..........................................P. 56, 59
a a (compensación de fl ash/intensidad
de fl ash)/botón H ...................P. 57, 58
b MENU/b (bloqueo de teclas)/
botón G........................................P. 59
c Botón F
d Ch (canal de comunicación)/
botón I ........................................P. 56
Pantalla (panel de control) Pantalla (panel de control)
421 3
9
MODE
A
B
C
0.0
0.0
1/8
TTL
TTL
M
FPRATIO CH
1
Off
1/8
1/4
1/2
6
8
7
5
1 MODE (modo de control de fl ash)
2 +/- (compensación de fl ash)/RATIO
(intensidad del fl ash)
3 Flash FP (Super FP)
4 CH (canal de comunicación)
5 RATIO (intensidad del fl ash)
6 Ajuste de grupo A
7 Ajuste de grupo B
8 Ajuste de grupo C
9 d (modo de bloqueo de teclas)

52
ES
Preparación del transmisor
Inserción de las pilas (se venden por separado)Inserción de las pilas (se venden por separado)
Pilas que se pueden utilizar
Elija entre las siguientes pilas:
• Pilas AAA NiMH (x 2)
• Pilas AAA alcalinas (x 2)
x
Las pilas AAA de manganeso no son válidas.
Inserción de las pilas
1
Abra la tapa del compartimento de las pilas.
2
Inserte las pilas.
• Asegúrese de que la polaridad (+/-) sea correcta.
3
Cierre la tapa del compartimento de las pilas.

53
ES
Colocación del transmisor en la cámara Colocación del transmisor en la cámara
x
Asegúrese de que tanto el transmisor como la cámara están apagados.
x
La suciedad o humedad en los contactos eléctricos puede ocasionar un mal
funcionamiento. Limpie cualquier suciedad o humedad antes de colocar el
transmisor en la cámara.
1
Mantenga pulsado el botón de liberación
del anclaje (
1
) y mueva el sistema de
anclaje en la dirección de la fl echa (
2
).
Sistema de anclaje
Botón de liberación del anclaje
2
Inserte el transmisor completamente en la
zapata.
Zapata
Contactos eléctricos
3
Mueva el sistema de anclaje en la
dirección de la fl echa.
Extracción del transmisor
Siga el paso 1 del procedimiento anterior y retire el transmisor de la zapata.

54
ES
Encendido
Botón ON/OFF
1
Pulse el botón ON/OFF.
x
Si la marca q aparece en el centro del panel de control, signifi ca que las pilas
se están acabando. Reemplace las pilas lo antes posible.
ApagadoApagado
Pulse el botón ON/OFF.
Modo de suspensión/apagado automáticoModo de suspensión/apagado automático
• Con algunas cámaras, el transmisor entrará automáticamente en modo de
suspensión cuando la cámara entre en modo de suspensión.
• Si transcurren 60 minutos aproximadamente sin ninguna actividad, el
dispositivo se apagará automáticamente. Pulse el botón ON/OFF cuando
quiera utilizar el transmisor otra vez.

55
ES
Toma inalámbrica por radio
Puede utilizar este transmisor inalámbrico para controlar varios receptores
mediante comunicaciones por radio. Esta función solamente funciona con
productos Olympus que admitan la función inalámbrica de radio.
Consulte el sitio web de Olympus para obtener información sobre productos que
admitan la función inalámbrica de radio.
Control grupalControl grupal
Puede controlar hasta tres grupos de receptores. Dentro de cada grupo, los
fl ashes se dispararán con los mismos ajustes. Esta función le permite tomar
imágenes con una variedad de efectos de iluminación.
Transmisor
inalámbrico
Flash
(se vende por separado)
+
Receptor inalámbrico
(se vende por separado)
Flash con función
inalámbrica de radio
(se vende por separado)
Flash con función
inalámbrica de
radio (se vende
por separado)
Grupo B
Grupo A
Grupo C
Flash con función
inalámbrica de
radio (se vende
por separado)
Distancia de comunicaciónDistancia de comunicación
La distancia máxima para las comunicaciones inalámbricas por radio con este
transmisor inalámbrico es de 30 metros aproximadamente (bajo las condiciones
de medición de Olympus).
• Esta distancia asume que no haya ningún obstáculo, materiales de protección
ni interferencias de radio de otros dispositivos.
• La distancia de comunicación podrá ser más corta dependiendo de las
posiciones de los dispositivos, el entorno circundante, las condiciones
meteorológicas y otros factores.

56
ES
FrecuenciaFrecuencia
Este producto utiliza la banda de 2,4 GHz para la comunicación inalámbrica.
Aunque es posible que otros dispositivos inalámbricos utilicen la misma
frecuencia.
Confi guración
Botón OK
Dial
Botón Ch
Botón MODE
Botón TEST
Botón de grupos
1
Ajuste un modo de fl ash en la cámara.
• Consulte el manual de la cámara para obtener más detalles.
2
Pulse el botón de grupos para seleccionar un grupo de comunicación.
3
Seleccione un modo de control de fl ash y confi gure los ajustes.
• Para obtener más detalles, consulte las explicaciones de los modos de
control de fl ash (P. 57 a 58).
x
Si no quiere utilizar este grupo de comunicación, seleccione “Off”.
4
Pulse el botón Ch para resaltar CH. A continuación, gire el dial para
seleccionar un canal de comunicación. Pulse el botón OK para
confi rmar.
• Puede seleccionar SCAN* o un canal del 1 al 15.
* Seleccione este ajuste cuando las condiciones de comunicación sean adversas a
causa de interferencias producidas por otros dispositivos. Cuando un canal no utilizado
aparezca automáticamente, pulse el botón OK otra vez para confi rmar.
5
Haga coincidir el canal del receptor con el canal del transmisor.
6
Ajuste el grupo en el receptor.
7
Pulse el botón TEST para comprobar el fl ash.

57
ES
Toma de imágenes con control de fl ash
automático (modo TTL)
El modo TTL ajusta el nivel del fl ash según el brillo a través del objetivo de la
cámara. Puede utilizar este modo con cámaras que admitan el modo TTL de
Olympus. Consulte la página web de Olympus para obtener una lista de cámaras
compatibles.
1
Pulse el botón MODE. A continuación, gire el
dial para seleccionar TTL. Pulse el botón OK
para confi rmar.
MODE
A
B
C
FP CH
0.0
1
RATIO
0.0
1/128
TTL
TTL
M
Off
2
Ajuste la compensación del fl ash (+/-).
Pulse el botón a para resaltar +/- RATIO. A continuación, gire el dial para
confi gurar el ajuste.
• Puede ajustar una compensación de fl ash de -5 a +5.
Pulse el botón OK.
Confi guración manual de la intensidad del
fl ash (modo M)
El fl ash se dispara con la intensidad seleccionada. Puede utilizar este modo con
cámaras que no admitan la función de comunicación de Olympus.
1
Pulse el botón MODE. A continuación, gire el
dial para seleccionar M. Pulse el botón OK para
confi rmar.
MODE
A
B
C
FP CH
0.0
1
RATIO
0.0
1/100
TTL
TTL
M
Off
2
Ajuste la intensidad del fl ash (RATIO).
Pulse el botón a para resaltar RATIO. A
continuación, gire el dial para confi gurar el ajuste.
• Puede ajustar una relación de fl ash de 1/1 a 1/128.*
1
*1 Puede seleccionar 1/2 EV o 1/3 EV para el incremento de
ajuste. (P. 60)
*2 En la visualización de la escala, t es la selección actual.
u es el ajuste anterior.
Pulse el botón OK.
MODE
A
B
C
ZOOM LED
0.0
RATIO
0.0
1/100
TTL
TTL
M
1/32
1/64
1/128
Visualización de la
escala*
2

58
ES
Disparo del fl ash a una velocidad de
obturación alta (modo FP TTL/modo FP M)
Puede realizar tomas con el fl ash a velocidades de obturación más rápidas que
la velocidad de sincronización del fl ash. Estos modos son útiles cuando quiera
tomar un retrato con un fondo borroso mediante la ampliación de la abertura, o
cuando quiera utilizar una velocidad de obturación alta para reducir las áreas
sobreexpuestas en segundo plano.
El número de guía es menor que en el modo M o TTL normal.
1
Pulse el botón MODE. A continuación, gire el dial para seleccionar TTL
o M. Pulse el botón OK para confi rmar.
2
Pulse HIF en las teclas de control para
resaltar FP. A continuación, gire el dial para
seleccionar “On”.
MODE
A
B
C
FP CH
0.0
1
RATIO
0.0
1/128
TTL
TTL
M
On
FP
FP
FP
3
Confi gure los ajustes.
Ajuste de la compensación del fl ash (+/-) en el modo FP TTL
Pulse el botón a para resaltar +/- RATIO. A continuación, gire el dial para
confi gurar el ajuste.
• Puede ajustar una compensación de fl ash de -5 a +5.
Pulse el botón OK.
Ajuste de la intensidad del fl ash (RATIO) en el modo FP M
Pulse el botón a para resaltar +/- RATIO. A
continuación, gire el dial para confi gurar el ajuste.
• Puede ajustar una relación de fl ash de 1/1 a 1/128.*
1
*1 Puede seleccionar 1/2 EV o 1/3 EV para el incremento del
ajuste. (P. 60)
*2 En la visualización de la escala, t es la selección actual.
u es el ajuste anterior.
Pulse el botón OK.
MODE
A
B
C
ZOOM LED
0.0
RATIO
0.0
1/100
TTL
TTL
M
FP
FP
FP
1/32
1/64
1/128
Visualización de la
escala*
2

59
ES
Otros ajustesOtros ajustes
Botón MENU/b
Prevención del uso accidental (modo de bloqueo de teclas)
Puede evitar un uso accidental de los botones y el dial durante la realización de
tomas.
1
Mantenga pulsado el botón MENU/b hasta
que aparezca d en el panel de control.
• Para cancelar el modo, mantenga pulsado el
botón MENU/b hasta que desaparezca d del
panel de control.
MODE
A
B
C
FP CH
0.0
1
0.0
1/8
TTL
M
Off
TTL
RATIO
Ajustes en la pantalla MENU
Puede confi gurar varias funciones para facilitar el uso del transmisor inalámbrico.
Procedimiento de confi guración Procedimiento de confi guración
Botón OK
F en las teclas
de control
Botón MENU/G
Dial
EV step 1/3
Back light mode
Value Set
Back light timer
Auto
5sec
DIAL OK
Menú
Nombre de función Ajuste
1
Pulse el botón MENU.
2
Presione las teclas de control FG y seleccione un nombre de función.
3
Gire el dial para seleccionar un ajuste y pulse el botón OK para
confi rmar.

60
ES
Funciones confi gurablesFunciones confi gurables
indica el ajuste predeterminado.
EV step: puede cambiar el incremento del ajuste para #+/- (compensación
del fl ash/intensidad del fl ash).
1/3 / 1/2
Back light mode: puede ajustar la iluminación posterior del panel de
control.
Auto (la luz de fondo se encenderá durante el uso). /
On (la luz de fondo estará siempre activada). / Off (la luz de fondo
estará siempre desactivada).
Back light timer: puede ajustar cuándo se apagará la iluminación de fondo
del panel de control.
Puede seleccionar el tiempo (en segundos) que tardará la luz de fondo en
apagarse automáticamente cuando no se realice ninguna operación.
De 1sec a 5sec a 15sec
Precauciones de seguridad
Lea detenidamente las ADVERTENCIAS y PRECAUCIONES para asegurar un
uso seguro. Estas precauciones de seguridad protegen a los usuarios y a terceros,
así como evitan daños materiales.
ADVERTENCIA
No cumplir con las precauciones indicadas por este
símbolo podría provocar lesiones o la muerte.
• No utilice el fl ash en ubicaciones expuestas a gases infl amables o explosivos.
De lo contrario, puede resultar en incendios o explosiones.
• No suelde el producto directamente ni lo modifi que, remodele o desmonte.
• No cubra la zona de emisión de luz del fl ash con su mano, y no toque la zona
de emisión de luz tras un disparo continuado. Si lo hiciera podría quemarse.
• El agua y materiales foráneos en el interior del dispositivo podrían provocar
un incendio o una descarga eléctrica. Si sumerge o expone el dispositivo
al agua o materias foráneas aparecen en el interior del mismo, apague
inmediatamente la alimentación y extraiga las pilas con cuidado. Póngase
en contacto con su distribuidor o consulte a un centro de servicio autorizado
Olympus.
• Para evitar accidentes de tráfi co, no apunte el fl ash directamente al conductor
de un vehículo.

61
ES
• No utilice el fl ash o el iluminador AF cerca de terceros (especialmente niños).
Mantenga el fl ash fuera del alcance de los niños. La luz proveniente del fl ash
puede causar discapacidades visuales.
• Para evitar un cortocircuito, no utilice pilas con el sello externo (capa de
aislamiento) dañado.
• No mezcle pilas nuevas y usadas ni pilas de distintos fabricantes.
• No conecte sustancias como metal a las polaridades (+) o (–) de las pilas.
PRECAUCIÓN
No cumplir con las precauciones indicadas por este
símbolo puede provocar lesiones o daños materiales.
• Si nota anormalidades como por ejemplo olores, ruidos o humo, deje de
utilizar este dispositivo. De lo contrario, puede provocar un incendio o
sufrir quemaduras. Extraiga las pilas cuidadosamente para evitar sufrir
quemaduras, y póngase en contacto con su proveedor o consulte a un centro
de servicio autorizado Olympus.
• Si la batería se sustituye por un tipo de batería no apropiado, podría
producirse una explosión.
• No manipule el dispositivo con las manos mojadas. Esto podría ocasionar un
fallo en el funcionamiento o una descarga eléctrica.
• No use ni guarde pilas en lugares expuestos a temperaturas extremadamente
altas como, por ejemplo, a la luz directa del sol, en un vehículo cerrado en un
día soleado, ni cerca de un calentador.
• La descarga repetitiva continua podría dar lugar a efectos adversos para la
salud.
• Suciedad o agua en los contactos pueden causar un mal funcionamiento.
Elimine la suciedad, el agua y otras materias extrañas antes de conectar la
unidad a la cámara.
Uso de la función inalámbrica de radio
• Cuando utilice la función de comunicación inalámbrica por radio, cumpla con
todas las leyes y reglamentos locales.
• Si utiliza el producto fuera de la región donde lo adquirió, es posible que
contravenga normativas locales para ondas de radio. Olympus no asume
ninguna responsabilidad en este caso.
• Apague el producto en hospitales y otros lugares en los que haya equipos
médicos.
Las ondas de radio del producto pueden afectar negativamente a los equipos
médicos, causando errores en el funcionamiento que podrían dar lugar a
accidentes.
• Apague el producto a bordo de aviones.
El uso de dispositivos inalámbricos a bordo de aviones puede interferir con el
correcto pilotaje de la aeronave.

62
ES
La operación de este equipo esta sujeta a las siguientes dos condiciones:
(1) es posible que este equipo o dispositivo no cause interferencia perjudicial y
(2) este equipo o dispositivo debe aceptar cualquier interferencia, incluyendo la
que pueda causar su operación no deseada.
Declaración ue de conformidad simplifi cada
Por la presente, OLYMPUS CORPORATION declara que el tipo de equipo
radioeléctrico IM012 es conforme con la Directiva 2014/53/UE.
El texto completo de la declaración UE de conformidad está disponible en la
dirección Internet siguiente: http://www.olympus-europa.com/
Este símbolo [un contenedor de basura tachado con una X en el
Anexo IV de WEEE] indica que la recogida de basura de equipos
eléctricos y electrónicos deberá tratarse por separado en los
países de la Unión Europea.
No tire este equipo a la basura doméstica.
Para el desecho de este tipo de equipos utilice los sistemas
de devolución al vendedor y de recogida que se encuentren
disponibles.
Función de comunicación inalámbrica por radio
Estándar compatible IEEE 802.15.4
2405 - 2480 MHz
3 mW o menos
Firmware Versión 1.0 o posterior

63
ES
Especifi caciones
Tipo de producto Transmisor de ondas de radio inalámbrico
Distancia de
comunicación
máxima*
1
Aprox. 30 metros
Frecuencia Banda de 2,4 GHz
Número de canales 15 (en el modo de transmisor; con función de ajuste de
canal automático)
Número de grupos 3; número máximo de unidades: ilimitada
Modos de control del
fl ash
TTL / MANUAL / FP TTL / FP MANUAL / Off
Compensación del
fl ash
±5 EV (incremento: 1/3 EV o 1/2 EV)
Ajuste manual de la
intensidad del fl ash
De 1/1 a 1/128 (incremento: 1/3 EV o 1/2 EV)
Duración*
1
Aprox. 6,4 horas (cuando se utilizan pilas secas AAA
alcalinas)
Suministro de
alimentación
Pilas secas AAA alcalinas x 2 / pilas AAA NiMH x 2
Función a prueba de
salpicaduras (tipo)
Clase 1 (IPX1)
Temperatura/humedad
de uso*
2
De -10 a 40ºC / De 30 a 90%
Temperatura/humedad
de almacenamiento
de la garantía
De -20 a 60ºC / De 10 a 90%
Dimensiones Aprox. 59,5 (An) x 51,0 (Al) x 67,4 (L) mm [excluyendo las
partes salientes]
Peso 73 g [excluyendo las pilas]
Las especifi caciones pueden variar sin previo aviso.
* 1 Los valores se basan en condiciones de prueba de Olympus y pueden variar según las
condiciones de la toma. Los valores asumen el uso de pilas nuevas o pilas recargables
completamente cargadas.
* 2 A bajas temperaturas, caliente las pilas antes de su uso. Por ejemplo, ponga las pilas en
su bolsillo.

64
ES
Asistencia técnica (EE.UU. / Canadá)
24/7 Ayuda automatizada en línea: http://www.olympusamerica.com/support
Soporte telefónico al cliente: Tel. 1-800-260-1625 (Llamada gratuita)
Nuestro teléfono de atención al cliente está disponible de 9 am a 9 pm (de lunes
a viernes) Hora del Este
Correo electrónico: [email protected]
Asistencia técnica al cliente en Europa
Visite nuestra página web
http://www.olympus-europa.com
o Ilame al: Tel. 00800 - 67 10 83 00 (Llamada gratuita)
+49 40 - 237 73 899 (Llamada con coste)

65
MEMOMEMO

66
DE
Wir danken Ihnen für den Kauf dieses Olympus-Produkts.
Um Ihre Sicherheit zu gewährleisten, lesen Sie bitte vor Gebrauch diese
Bedienungsanleitung aufmerksam durch.
Bitte bewahren Sie diese Anleitung außerdem für späteres Nachschlagen auf.
Lesen Sie unbedingt auch die Bedienungsanleitungen des Blitzgerätes und des
Drahtlosempfängers durch.
Falls Sie das Produkt außerhalb des Landes oder der Region des Kaufs
benutzen, können Sie örtliche Vorschriften verletzen. Olympus übernimmt in
diesem Fall keine Haftung.
Überprüfen des Paketinhalts
Tasche
Anleitung
(vorliegendes Handbuch)
Drahtloser Funkwellensender: FC-WR Garantiekarte

67
DE
Bezeichnung der Teile
1
a
0
b
c
d
2
3
4
7
8
9
55
6
1 Gruppentasten (A/B/C) .................S. 72
2 Taste MODE .................................S. 73
3 Taste TEST ...................................S. 72
4 Bedienfeld .....................................S. 67
5 Taste ON/OFF ...............................S. 70
6 Batteriefachdeckel ........................S. 68
7 Taste OK .......................................S. 72
8 Verriegelungsknopf .......................S. 69
9 Verriegelung ..................................S. 69
Einstellrad/Pfeiltastenfeld
0 Einstellrad ...............................S. 72, 75
a Taste a (Blitzkorrektur/Blitzstärke)/H
................................................S. 73, 74
b Taste MENU/b (Tastensperre)/G
......................................................S. 75
c Taste F
d Taste Ch (Kommunikationskanal)/I
......................................................S. 72
Display (Bedienfeld) Display (Bedienfeld)
421 3
9
MODE
A
B
C
0.0
0.0
1/8
TTL
TTL
M
FPRATIO CH
1
Off
1/8
1/4
1/2
6
8
7
5
1 MODE (Blitzsteuermodus)
2 +/- (Blitzkorrektur)/RATIO (Blitzstärke)
3 FP (Super FP) Blitz
4 CH (Kommunikationskanal)
5 RATIO (Blitzstärke)
6 Einstellung für Gruppe A
7 Einstellung für Gruppe B
8 Einstellung für Gruppe C
9 d (Tastensperrmodus)

68
DE
Vorbereiten des Senders
Einsetzen der Batterien (getrennt erhältlich)Einsetzen der Batterien (getrennt erhältlich)
Zu benutzende Batterien
Die folgenden Batterien stehen zur Auswahl.
• AAA NiMH-Batterien (× 2)
• AAA Alkali-Trockenbatterien (× 2)
x
AAA Manganbatterien sind nicht verwendbar.
Einlegen der Batterien
1
Öffnen Sie den Batteriefachdeckel.
2
Legen Sie die Batterien ein.
• Vergewissern Sie sich, dass die Polarität (+/-)
korrekt ist.
3
Schließen Sie den Batteriefachdeckel.

69
DE
Anbringen des Senders an der Kamera Anbringen des Senders an der Kamera
x
Vergewissern Sie sich, dass Sender und Kamera ausgeschaltet sind.
x
Schmutz oder Feuchtigkeit auf den elektrischen Kontakten können eine
Funktionsstörung verursachen. Wischen Sie Schmutz oder Feuchtigkeit ab, bevor
Sie den Sender an der Kamera anbringen.
1
Halten Sie den Verriegelungsknopf
(
1
) gedrückt, und schieben Sie die
Verriegelung in Pfeilrichtung (
2
).
Verriegelung
Verriegelungsknopf
2
Schieben Sie den Sender bis zum
Anschlag in den Blitzschuh ein.
Blitzschuh
Elektrische Kontakte
3
Schieben Sie die Verriegelung in
Pfeilrichtung.
Abnehmen des Senders
Führen Sie Schritt 1 des obigen Verfahrens durch, und nehmen Sie den Sender
vom Blitzschuh ab.

70
DE
Einschalten der Stromversorgung
Taste ON/OFF
1
Drücken Sie die Taste ON/OFF.
x
Falls das Zeichen q in der Mitte des Bedienfelds erscheint, sind die Batterien
sehr schwach. Wechseln Sie die Batterien so bald wie möglich aus.
Ausschalten der StromversorgungAusschalten der Stromversorgung
Drücken Sie die Taste ON/OFF.
Ruhemodus/AbschaltautomatikRuhemodus/Abschaltautomatik
• Bei einigen Kameras wird der Sender automatisch in den Ruhemodus
versetzt, wenn die Kamera in den Ruhemodus wechselt.
• Wenn ungefähr 60 Minuten ohne Bedienungsvorgänge abgelaufen sind,
schaltet sich die Stromversorgung automatisch aus. Drücken Sie die Taste
ON/OFF, wenn Sie den Sender wieder benutzen möchten.

71
DE
Drahtlose Funkauslösung
Sie können diesen Drahtlossender verwenden, um mehrere Empfänger durch
Funkkommunikation zu steuern. Diese Funktion ist nur mit Olympus-Produkten
wirksam, die die Funksteuerfunktion unterstützen.
Informationen über Produkte, die die Funksteuerfunktion unterstützen, fi nden Sie
auf der Olympus-Website.
GruppensteuerungGruppensteuerung
Sie können bis zu drei Gruppen von Empfängern steuern. Innerhalb jeder Gruppe
werden die Blitzgeräte mit denselben Einstellungen ausgelöst. Diese Funktion
ermöglicht es Ihnen, mit einer Vielfalt an Beleuchtungseffekten aufzunehmen.
Drahtlossender
Blitzgerät
(getrennt erhältlich)
+
Drahtlosempfänger
(getrennt erhältlich)
Blitzgerät mit
Funksteuerfunktion
(getrennt erhältlich)
Blitzgerät mit
Funksteuerfunktion
(getrennt erhältlich)
Gruppe B
Gruppe A
Gruppe C
Blitzgerät mit
Funksteuerfunktion
(getrennt erhältlich)
KommunikationsreichweiteKommunikationsreichweite
Die maximale Reichweite für Funkkommunikation mit diesem Drahtlossender
beträgt ca. 30 m (unter Olympus-Messbedingungen).
• Für diese Reichweite wird angenommen, dass keine Hindernisse,
Abschirmungsmaterialien oder Funkstörungen von anderen Geräten
vorhanden sind.
• Je nach den Positionen der Geräte, der Umgebung, den Wetterbedingungen
und anderen Faktoren kann die Kommunikationsreichweite kürzer sein.
FrequenzFrequenz
Dieses Produkt nutzt das 2,4-GHz-Band für Drahtloskommunikation. Es kann
allerdings sein, dass andere drahtlose Geräte dieselbe Frequenz nutzen.

72
DE
Einrichtung
Taste OK
Einstellrad
Taste Ch
Taste MODE
Taste TEST
Gruppentaste
1
Stellen Sie einen Blitzmodus an der Kamera ein.
• Einzelheiten entnehmen Sie bitte der Bedienungsanleitung der Kamera.
2
Drücken Sie die Gruppentaste, um eine Kommunikationsgruppe
auszuwählen.
3
Wählen Sie einen Blitzsteuermodus aus, und passen Sie die
Einstellungen an.
• Einzelheiten entnehmen Sie bitte den Erläuterungen der Blitzsteuermodi
(S. 73 bis 74).
x
Wenn Sie diese Kommunikationsgruppe nicht benutzen wollen, wählen Sie „Off“.
4
Drücken Sie die Taste Ch, um CH hervorzuheben. Drehen Sie dann das
Einstellrad, um einen Kommunikationskanal auszuwählen. Drücken Sie
die Taste OK zum Bestätigen.
• Sie können SCAN* oder einen Kanal von 1 bis 15 auswählen.
* Wählen Sie diese Einstellung, wenn die Kommunikationsbedingungen wegen
Störbeeinfl ussung von anderen Geräten schlecht sind. Wenn ein unbenutzter Kanal
automatisch erscheint, drücken Sie die Taste OK erneut zum Bestätigen.
5
Passen Sie den Empfängerkanal an den Senderkanal an.
6
Stellen Sie die Gruppe am Empfänger ein.
7
Drücken Sie die Taste TEST, um das Blitzgerät zu überprüfen.

73
DE
Aufnehmen mit automatischer
Blitzsteuerung (TTL-Modus)
Der TTL-Modus stellt die Blitzintensität entsprechend der Helligkeit durch das
Kameraobjektiv ein. Sie können diesen Modus mit Kameras verwenden, die den
Olympus TTL-Modus unterstützen. Eine Liste von kompatiblen Kameras fi nden
Sie auf der Olympus-Website.
1
Drücken Sie die Taste MODE. Drehen Sie dann
das Einstellrad um TTL auszuwählen. Drücken
Sie die Taste OK zum Bestätigen.
MODE
A
B
C
FP CH
0.0
1
RATIO
0.0
1/128
TTL
TTL
M
Off
2
Stellen Sie die Blitzkorrektur (+/-) ein.
Drücken Sie die Taste a, um +/- RATIO hervorzuheben. Drehen Sie dann
das Einstellrad, um die Einstellung vorzunehmen.
• Sie können eine Blitzkorrektur von -5 bis +5 einstellen.
Drücken Sie die Taste OK.
Manuelles Einstellen der Blitzstärke
(M-Modus)
Der Blitz wird mit der ausgewählten Stärke ausgelöst. Sie können diesen
Modus mit Kameras verwenden, die die Olympus Kommunikationsfunktion nicht
unterstützen.
1
Drücken Sie die Taste MODE. Drehen Sie dann
das Einstellrad um M auszuwählen. Drücken
Sie die Taste OK zum Bestätigen.
MODE
A
B
C
FP CH
0.0
1
RATIO
0.0
1/100
TTL
TTL
M
Off
2
Stellen Sie die Blitzstärke (RATIO) ein.
Drücken Sie die Taste a, um RATIO
hervorzuheben. Drehen Sie dann das Einstellrad,
um die Einstellung vorzunehmen.
• Sie können ein Blitzverhältnis von 1/1 bis 1/128
einstellen.*
1
*1 Sie können 1/2 EV oder 1/3 EV für die
Einstellungsschrittweite wählen. (S. 76)
*2 Auf der Skalenanzeige ist t die aktuelle Auswahl. u ist
die vorherige Einstellung.
Drücken Sie die Taste OK.
MODE
A
B
C
ZOOM LED
0.0
RATIO
0.0
1/100
TTL
TTL
M
1/32
1/64
1/128
Skalenanzeige*
2

74
DE
Auslösen des Blitzes bei einer kurzen
Verschlusszeit (FP TTL-Modus/FP M-Modus)
Sie können mit dem Blitz bei Verschlusszeiten aufnehmen, die kürzer als
die Blitzsynchronzeit sind. Diese Modi sind nützlich, wenn Sie ein Porträt
vor unscharfem Hintergrund durch Erweitern der Blende aufnehmen wollen,
oder wenn Sie eine kurze Verschlusszeit verwenden wollen, um ausgedünnte
Spitzlichter im Hintergrund zu reduzieren.
Die Leitzahl ist niedriger als im regulären TTL-Modus oder M-Modus.
1
Drücken Sie die Taste MODE. Drehen Sie dann das Einstellrad um TTL
oder M auszuwählen. Drücken Sie die Taste OK zum Bestätigen.
2
Drücken Sie HIF auf dem Pfeiltastenfeld,
um FP hervorzuheben. Drehen Sie dann das
Einstellrad um „On“ auszuwählen.
MODE
A
B
C
FP CH
0.0
1
RATIO
0.0
1/128
TTL
TTL
M
On
FP
FP
FP
3
Nehmen Sie die Einstellungen vor.
Einstellen der Blitzkorrektur (+/-) im FP TTL-Modus
Drücken Sie die Taste a, um +/- RATIO hervorzuheben. Drehen Sie dann
das Einstellrad, um die Einstellung vorzunehmen.
• Sie können eine Blitzkorrektur von -5 bis +5 einstellen.
Drücken Sie die Taste OK.
Einstellen der Blitzstärke (RATIO) im FP M-Modus
Drücken Sie die Taste a, um +/- RATIO
hervorzuheben. Drehen Sie dann das Einstellrad,
um die Einstellung vorzunehmen.
• Sie können ein Blitzverhältnis von 1/1 bis 1/128
einstellen.*
1
*1 Sie können 1/2 EV oder 1/3 EV für die
Einstellungsschrittweite wählen. (S. 76)
*2 Auf der Skalenanzeige ist t die aktuelle Auswahl. u ist
die vorherige Einstellung.
Drücken Sie die Taste OK.
MODE
A
B
C
ZOOM LED
0.0
RATIO
0.0
1/100
TTL
TTL
M
FP
FP
FP
1/32
1/64
1/128
Skalenanzeige*
2

75
DE
Sonstige EinstellungenSonstige Einstellungen
Taste MENU/b
Verhindern von versehentlicher Betätigung (Tastensperrmodus)
Sie können versehentliche Betätigung der Tasten und des Einstellrads während
der Aufnahme verhindern.
1
Halten Sie die Taste MENU/b gedrückt, bis d
auf dem Bedienfeld erscheint.
• Um den Modus aufzuheben, halten Sie die
Taste MENU/b gedrückt, bis d vom Bedienfeld
ausgeblendet wird.
MODE
A
B
C
FP CH
0.0
1
0.0
1/8
TTL
M
Off
TTL
RATIO
Einstellungen auf dem Bildschirm MENU
Sie können verschiedene Funktionen konfi gurieren, um den Drahtlossender
bedienungsfreundlicher zu machen.
Einrichtungsverfahren Einrichtungsverfahren
Taste OK
F auf dem
Pfeiltastenfeld
Taste MENU/G
Einstellrad
EV step 1/3
Back light mode
Value Set
Back light timer
Auto
5sec
DIAL OK
Menü
Funktionsname Einstellung
1
Drücken Sie die Taste MENU.
2
Drücken Sie FG auf dem Pfeiltastenfeld, und wählen Sie einen
Funktionsnamen aus.
3
Drehen Sie das Einstellrad um eine Einstellung auszuwählen, und
drücken Sie die Taste OK zum Bestätigen.

76
DE
Konfi gurierbare FunktionenKonfi gurierbare Funktionen
gibt die Standardeinstellung an.
EV step: Sie können die Einstellungsschrittweite für #+/- (Blitzkorrektur/
Blitzstärke) ändern.
1/3 / 1/2
Back light mode: Sie können die Hintergrundbeleuchtung des Bedienfelds
einstellen.
Auto (Die Hintergrundbeleuchtung wird während des Betriebs
eingeschaltet.) / On (Die Hintergrundbeleuchtung ist immer eingeschaltet.) /
Off (Die Hintergrundbeleuchtung ist immer ausgeschaltet.)
Back light timer: Sie können einstellen, wann die Hintergrundbeleuchtung
des Bedienfelds auszuschalten ist.
Sie können die Zeit (in Sekunden) bis zum automatischen Ausschalten der
Hintergrundbeleuchtung auswählen, wenn kein Bedienungsvorgang erfolgt.
Von 1sec bis 5sec bis 15sec
Sicherheitsmaßnahmen
Lesen Sie die Warnungs- und Vorsichtshinweise sorgfältig durch, um eine sichere
Handhabung zu gewährleisten. Diese Sicherheitsmaßnahmen schützen Benutzer
und Andere und beugen Sachbeschädigung vor.
WARNUNG
Die Missachtung der mit diesem Symbol gekennzeichneten
Hinweise kann zu Verletzungen oder Tod führen.
• Das Blitzgerät niemals an Orten verwenden, an denen entfl ammbare Dämpfe
oder Gase auftreten können. Andernfalls besteht Explosions- und Feuergefahr.
• Das Produkt nicht direkt löten, modifi zieren, umgestalten oder
auseinanderbauen.
• Bedecken Sie die lichtrefl ektierende Fläche des Blitzes nicht mit Ihrer Hand
und berühren Sie die lichtrefl ektierende Fläche nicht nach mehrfachem
Auslösen des Blitzes. Das kann zu Hautverbrennungen führen.
• Das Eintreten von Wasser und Fremdkörpern in das Innere des Geräts
kann Feuer oder Stromschläge verursachen. Wenn das Gerät in Wasser
eingetaucht oder Wasser ausgesetzt wird oder innerhalb des Geräts
unbekanntes Material gefunden wird, stellen Sie sofort den Strom ab und
entfernen Sie vorsichtig die Batterien. Wenden Sie sich an Ihren Fachhändler
oder eine von Olympus autorisierte Kundendienststelle.

77
DE
• Um einen Verkehrsunfall zu verhindern, richten Sie den Blitz nicht auf eine
Person, die ein motorisiertes Fahrzeug fährt.
• Verwenden Sie den Blitz oder das AF-Hilfslicht nicht in direkter Nähe Anderer
(besonders Kinder). Verwahren Sie den Blitz außerhalb der Reichweite von
Kindern. Blitzlicht kann zu Sehstörungen führen.
• Um einen Kurzschluss zu verhindern, verwenden Sie keine Batterien mit
beschädigter externer Dichtung (Isolierbeschichtung).
• Niemals gleichzeitig neue und gebrauchte Batterien oder Batterien
unterschiedlicher Hersteller verwenden.
• Berühren Sie die Pole (+) oder (–) der Batterie nicht mit Materialien wie Metall.
ACHTUNG
Nichtbeachtung der durch dieses Symbol gekennzeichneten
Vorsichtsmaßnahmen kann zu Verletzungen oder
Sachschäden führen.
• Wenn Sie irgendwelche Auffälligkeiten wie Geruch, Lärm oder Rauch
bemerken, hören Sie auf dieses Gerät zu benutzen. Es kann sonst Brand oder
Verbrennungen zur Folge haben. Entnehmen Sie vorsichtig die Batterien, um
zu verhindert, dass Sie sich verbrennen und wenden Sie sich an Ihren Händler
oder einen autorisierten Olympus Kundendienst.
• Es besteht das Risiko einer Explosion, wenn Sie den Akku durch ein
ungeeignetes Modell ersetzen.
• Nicht mit nassen Händen verwenden. Dies kann zu Betriebsstörungen oder
elektrischen Schlägen führen.
• Verwenden und lagern Sie Batterien oder Akkus nicht an Orten mit sehr
hohen Temperaturen, wie zum Beispiel im direkten Sonnenlicht, in einem
geschlossenen Fahrzeug an einem sonnigen Tag oder in der Nähe eines
Heizkörpers.
• Dauerhaftes wiederholtes Blitzen kann zu gesundheitlichen
Beeinträchtigungen führen.
• Schmutz oder Feuchtigkeit auf den Kontakten kann Fehlfunktionen
verursachen. Entfernen Sie Schmutz, Wasser und andere Fremdkörper, bevor
Sie das Blitzgerät auf der Kamera anbringen.
Verwendung der Funksteuerfunktion
• Wenn Sie die Funkkommunikationsfunktion verwenden, befolgen Sie alle
örtlichen Gesetze und Vorschriften.
• Falls Sie das Produkt außerhalb der Region des Kaufs benutzen, können Sie
örtliche Vorschriften für Funkwellen verletzen. Olympus übernimmt in diesem
Fall keine Haftung.
• Schalten Sie das Produkt in Krankenhäusern und an anderen Orten, wo
medizinische Geräte vorhanden sind, aus.
Die von dem Produkt abgegebenen Funkwellen können medizinische Geräte
beeinträchtigen und eine Funktionsstörung verursachen, die zu einem Unfall
führen kann.

78
DE
• Schalten Sie das Produkt an Bord eines Flugzeugs aus.
Die Verwendung von drahtlosen Geräten an Bord könnte die sichere
Steuerung des Flugzeugs beeinträchtigen.
Einfache Konformitätserklärung
Hiermit erklärt die OLYMPUS CORPORATION, dass sich das Funkanlagen-
Modell IM012 in Übereinstimmung mit der Richtlinie 2014/53/EU befi ndet.
Den vollständigen Text der EU-Konformitätserklärung können Sie unter der
folgenden Internetadresse abrufen: http://www.olympus-europa.com/
Dieses Symbol [durchgestrichene Mülltonne nach WEEE
Anhang IV] weist auf die getrennte Rücknahme elektrischer und
elektronischer Geräte in EU-Ländern hin.
Bitte werfen Sie das Gerät nicht in den Hausmüll.
Informieren Sie sich über das in Ihrem Land gültige
Rücknahmesystem und nutzen dieses zur Entsorgung.
Funkkommunikationsfunktion
Kompatibler Standard IEEE 802.15.4
2405 - 2480 MHz
3 mW oder weniger
Firmware Version 1.0 oder höher

79
DE
Technische Daten
Produkttyp Drahtloser Funkwellensender
Maximale
Kommunikations-
reichweite*
1
Ca. 30 m
Frequenz 2,4-GHz-Band
Anzahl von Kanälen 15 (im Sendermodus; mit automatischer
Kanaleinstellfunktion)
Anzahl von Gruppen 3; maximale Anzahl von Einheiten: unbegrenzt
Blitzsteuermodi TTL / MANUAL / FP TTL / FP MANUAL / Off
Blitzkorrektur ±5 EV (Schrittweite: 1/3 EV oder 1/2 EV)
Manuelle Einstellung
der Blitzstärke
Von 1/1 bis 1/128 (Schrittweite: 1/3 EV oder 1/2 EV)
Verfügbare
Betriebsdauer*
1
Ca. 6,4 Stunden (bei Verwendung von AAA Alkali-
Trockenbatterien)
Stromquelle AAA Alkali-Trockenbatterien × 2/AAA NiMH-Batterien × 2
Spritzwasser-
Schutzfunktion (Typ)
Klasse 1 (IPX1)
Betriebsfähige
Temperatur/
Luftfeuchtigkeit*
2
Von -10 bis 40ºC/von 30 bis 90 %
Lagerungsgarantie-
Temperatur/
Luftfeuchtigkeit
Von -20 bis 60ºC/von 10 bis 90 %
Abmessungen Ca. 59,5 (B) × 51,0 (H) × 67,4 (T) mm [ohne vorstehende
Teile]
Gewicht 73 g [ohne Batterien]
Änderung der technischen Daten vorbehalten.
*1 Die Werte basieren auf Olympus-Prüfbedingungen und können entsprechend den
Aufnahmebedingungen variieren. Die Werte setzen den Gebrauch neuer Batterien oder voll
aufgeladener wiederaufl adbarer Batterien voraus.
*2 Wärmen Sie die Batterien bei niedrigen Temperaturen vor Gebrauch auf. Legen Sie die
Batterien zum Beispiel in Ihre Tasche.
Technische Unterstützung für Kunden in Europa
Bitte besuchen Sie unsere Internetseite http://www.olympus-europa.com
oder wenden Sie sich telefonisch unter einer dieser Rufnummern an uns:
00800 - 67 10 83 00 (gebührenfrei)
+49 40 - 237 73 899 (gebührenpfl ichtig)

80
KR
Olympus 제품을 구입해 주셔서 감사합니다.
안전을 위해 사용하시기 전에 이 사용 설명서를 반드시 숙지하시기 바랍니다.
또한, 향후 참조를 위해 이 설명서를 사용하기 쉬운 곳에 보관하십시오.
플래시 및 무선 수신기 사용 설명서도 반드시 숙지하셔야 합니다.
구매 국가 또는 지역 이외에서 제품을 사용할 경우 현지 규정에 위배될 수도 있습니다.
Olympus는 이 경우 어떠한 책임이 지지 않습니다.
포장 내용물 확인
파우치
지침(설명서)
무선 전파 송신기: FC-WR
보증 카드

81
KR
부품 이름
1
a
0
b
c
d
2
3
4
7
8
9
55
6
1 그룹 버튼(A/B/C) ...................................P. 86
2 MODE 버튼 .............................................P. 87
3 TEST 버튼 .................................................P. 86
4 제어판 ........................................................P. 81
5 ON/OFF 버튼 ..........................................P. 84
6 배터리 컴파트먼트 커버 .....................P. 82
7 OK 버튼 .....................................................P. 86
8 래치 해제 버튼 .......................................P. 83
9 래치 ............................................................P. 83
다이얼/화살표 패드
0 다이얼 ................................................ P. 86, 89
a a(플래시 보정/플래시 강도)/
H 버튼 .............................................. P. 87, 88
b MENU/b(키 잠금)/G 버튼 ..............P. 89
c F 버튼
d Ch(통신 채널)/I 버튼 ........................P. 86
디스플레이(제어판) 디스플레이(제어판)
421 3
9
MODE
A
B
C
0.0
0.0
1/8
TTL
TTL
M
FPRATIO CH
1
Off
1/8
1/4
1/2
6
8
7
5
1 MODE(플래시 제어 모드)
2 +/-(플래시 보정)/
RATIO(플래시 강도)
3 FP(수퍼 FP) 플래시
4 CH(통신 채널)
5 RATIO(플래시 강도)
6 그룹 A 설정
7 그룹 B 설정
8 그룹 C 설정
9 d(키 잠금 모드)

82
KR
송신기 준비
배터리(별매품) 삽입배터리(별매품) 삽입
사용할 배터리
다음 배터리 중에서 선택합니다.
•
AAA NiMH 배터리(x 2)
•
AAA 알카라인 건식 셀 배터리(x 2)
x
AAA 망간 배터리는 사용할 수 없습니다.
배터리 삽입
1
배터리 컴파트먼트 커버를 엽니다.
2
배터리를 삽입합니다.
•
극성(+/-)이 올바른지 확인하십시오.
3
배터리 컴파트먼트 커버를 닫습니다.

83
KR
카메라에 송신기 부착 카메라에 송신기 부착
x
송신기와 카메라가 모두 꺼져 있는지 확인하십시오.
x
전기 접촉부에 먼지나 물기가 묻어 있으면 오작동이 발생할 수 있습니다. 송신기를
카메라에 부착하기 전에 먼지나 물기를 모두 닦아내십시오.
1
래치 해제 버튼(
1
)을 누른 상태로
유지하면서 화살표(
2
) 방향으로 래치를
밉니다.
래치
래치 해제 버튼
2
송신기를 핫슈 안으로 끝까지 삽입합니다.
핫슈
전기 접촉부
3
래치를 화살표 방향으로 밉니다.
송신기 분리
위 절차의 1단계를 수행하고 핫슈에서 송신기를 분리합니다.

84
KR
카메라 켜기
ON/OFF 버튼
1
ON/OFF 버튼을 누릅니다.
x
q
표시가 제어판의 중심에 나타나면 배터리 잔량이 매우 적은 것입니다.
가능한 빨리 배터리를 교체하십시오.
전원 끄기전원 끄기
ON/OFF 버튼을 누르십시오.
슬립 모드/자동 전원 끄기슬립 모드/자동 전원 끄기
•
일부 카메라의 경우 카메라가 슬립 모드로 전환되면 송신기도 슬립 모드로
자동 전환됩니다.
•
아무런 작동 없이 약 60초가 경과되면 전원이 자동으로 꺼집니다. 송신기를
다시 사용하려면 ON/OFF(켜기/끄기) 버튼을 누릅니다.

85
KR
전파 무선 촬영
이 무선 송신기를 사용하여 전파 통신을 통해 여러 수신기를 제어할 수 있습니다. 이
기능은 전파 무선 기능을 지원하는 Olympus 제품에서만 작동합니다.
전파 무선 기능을 지원하는 제품에 대한 자세한 내용은 Olympus 웹 사이트를
참조하십시오.
그룹 제어그룹 제어
수신기 그룹을 최대 세 개까지 제어할 수 있습니다. 각 그룹 내에서 플래시는 동일한
설정으로 발광합니다. 이 기능을 통해 다양한 조명 효과를 사용하여 촬영할 수
있습니다.
무선 송신기
플래시(별매품)
+
무선 수신기(별매품)
전파 무선 기능이
있는 플래시
(별매품)
전파 무선 기능이
있는 플래시
(별매품)
그룹 B
그룹 A
그룹 C
전파 무선 기능이
있는 플래시
(별매품)
통신 거리통신 거리
이 무선 송신기와의 최대 전파 무선 통신 거리는 약 30미터(Olympus 측정
조건에서)입니다.
•
이 때, 장애물, 차폐물 또는 다른 장치와의 전파 간섭이 없다고 가정합니다.
•
통신 거리는 장치의 위치, 주변 환경, 기상 조건 및 기타 요인에 따라 더 짧아질
수도 있습니다.
주파수주파수
이 제품은 무선 통신용으로 2.4GHz 대역을 사용합니다. 하지만 이와 똑같은 주파수가
다른 무선 장치에 사용될 수도 있습니다.

86
KR
설정
OK 버튼
다이얼
Ch 버튼
MODE 버튼
TEST 버튼
그룹 버튼
1
카메라에서 플래시 모드를 설정합니다.
•
자세한 내용은 카메라 설명서를 참조하십시오.
2
그런 다음 그룹 버튼을 눌러서 통신 그룹을 선택합니다.
3
플래시 제어 모드를 선택하고 설정을 조정합니다.
•
자세한 내용은 플래시 제어 모드에 대한 설명(P. 87 ~ 88)을
참조하십시오.
x
이 통신 그룹을 사용하지 않으려면“Off”를 선택합니다.
4
Ch 버튼을 눌러서 CH를 강조 표시합니다. 그런 다음 다이얼을 돌려서
통신 채널을 선택합니다. OK 버튼을 눌러서 확인합니다.
•
SCAN*을 선택하거나 1 ~ 15의 채널을 선택할 수 있습니다.
* 다른 장치와의 간섭으로 인해 통신 상태가 좋지 않을 때 이 설정을 선택하십시오. 미사용
채널이 자동으로 나타나면 OK 버튼을 다시 한 번 눌러서 확인합니다.
5
수신기 채널을 송신기 채널에 맞춥니다.
6
수신기에서 그룹을 설정합니다.
7
TEST 버튼을 눌러서 플래시를 확인합니다.

87
KR
자동 플래시 제어 기능을 사용하여
촬영(TTL 모드)
TTL 모드는 카메라 렌즈를 통해 밝기에 따라 플래시 레벨을 조정합니다. Olympus TTL
모드를 지원하는 카메라에서는 이 모드를 사용할 수 있습니다. 호환 카메라 목록은
Olympus 웹 사이트를 참조하십시오.
1
MODE 버튼을 누릅니다. 그런 다음 다이얼을
돌려서 TTL을 선택합니다. OK 버튼을 눌러서
확인합니다.
MODE
A
B
C
FP CH
0.0
1
RATIO
0.0
1/128
TTL
TTL
M
Off
2
플래시 보정(+/-)을 설정합니다.
a
버튼을 눌러서 +/- RATIO를 강조 표시합니다. 그런 다음 다이얼을 돌려서
설정을 조정합니다.
•
플래시 보정은 -5 ~ +5 범위에서 설정할 수 있습니다.
OK 버튼을 누릅니다.
플래시 강도 수동 설정(M 모드)
플래시가 선택한 강도로 발광됩니다. Olympus 통신 기능을 지원하지 않는
카메라에서는 이 모드를 사용할 수 있습니다.
1
MODE 버튼을 누릅니다. 그런 다음 다이얼을
돌려서 M을 선택합니다. OK 버튼을 눌러서
확인합니다.
MODE
A
B
C
FP CH
0.0
1
RATIO
0.0
1/100
TTL
TTL
M
Off
2
플래시 강도(RATIO)를 설정합니다.
a
버튼을 눌러서 RATIO를 강조 표시합니다. 그런
다음 다이얼을 돌려서 설정을 조정합니다.
•
플래시 비율은 1/1 ~ 1/128*
1
범위에서 설정할 수
있습니다.
*1 조정 단위로 1/2EV 또는 1/3EV를 선택할 수 있습니다.
(P. 90)
*2 눈금 디스플레이에서
t
는 현재 선택된 설정입니다.
u
는 이전 설정입니다.
OK 버튼을 누릅니다.
MODE
A
B
C
ZOOM LED
0.0
RATIO
0.0
1/100
TTL
TTL
M
1/32
1/64
1/128
눈금 디스플레이*
2

88
KR
빠른 셔터 속도로 플래시 발광(FP TTL 모드/
FP M 모드)
플래시 동기화 속도보다 더 빠른 셔터 속도로 플래시를 사용하여 촬영할 수 있습니다.
이러한 모드는 조리개를 넓혀서 배경을 흐리게 한 상태로 인물 사진을 촬영하려는
경우 또는 빠른 셔터 속도를 사용하여 배경에 나타나는 블로운 아웃 하이라이트를
줄이려는 경우에 유용합니다.
일반 TTL 모드 또는 M 모드에서는 가이드 번호가 더 낮습니다.
1
MODE 버튼을 누릅니다. 그런 다음 다이얼을 돌려서 TTL 또는 M을
선택합니다. OK 버튼을 눌러서 확인합니다.
2
화살표 패드의 HIF를 눌러서 FP를 강조
표시합니다. 그런 다음 다이얼을 돌려서“On”을
선택합니다.
MODE
A
B
C
FP CH
0.0
1
RATIO
0.0
1/128
TTL
TTL
M
On
FP
FP
FP
3
설정을 조정합니다.
FP TTL 모드에서 플래시 보정(+/-) 설정
a
버튼을 눌러서 +/- RATIO를 강조 표시합니다. 그런 다음 다이얼을 돌려서
설정을 조정합니다.
•
플래시 보정은 -5 ~ +5 범위에서 설정할 수 있습니다.
OK 버튼을 누릅니다.
FP M 모드에서 플래시 강도(RATIO) 설정
a
버튼을 눌러서 +/- RATIO를 강조 표시합니다.
그런 다음 다이얼을 돌려서 설정을 조정합니다.
•
플래시 비율은 1/1 ~ 1/128*
1
범위에서 설정할 수
있습니다.
*1 조정 단위로 1/2EV 또는 1/3EV를 선택할 수 있습니다.
(P. 90)
*2 눈금 디스플레이에서
t
는 현재 선택된 설정입니다.
u
는 이전 설정입니다.
OK 버튼을 누릅니다.
MODE
A
B
C
ZOOM LED
0.0
RATIO
0.0
1/100
TTL
TTL
M
FP
FP
FP
1/32
1/64
1/128
눈금 디스플레이*
2

89
KR
기타 설정기타 설정
MENU/b 버튼
우발적인 작동 방지(키 잠금 모드)
촬영 중에 버튼이나 다이얼이 실수로 작동되지 않도록 할 수 있습니다.
1
d가 제어판에 나타날 때까지 MENU/b 버튼을
누른 상태로 유지합니다.
•
모드를 취소하려면 제어판에서 d가 사라질
때까지 MENU/b를 누른 상태로 유지합니다.
MODE
A
B
C
FP CH
0.0
1
0.0
1/8
TTL
M
Off
TTL
RATIO
MENU 화면의 설정
다양한 기능을 구성하여 무선 송신기를 더 쉽게 사용할 수 있습니다.
설정 절차 설정 절차
OK 버튼
F(화살표 패드)
MENU/G 버튼
다이얼
EV step 1/3
Back light mode
Value Set
Back light timer
Auto
5sec
DIAL OK
메뉴
기능 이름 설정
1
MENU 버튼을 누릅니다.
2
화살표 패드의 FG를 누르고 기능 이름을 선택합니다.
3
다이얼을 돌려서 설정을 선택한 다음, OK 버튼을 눌러서 확인합니다.

90
KR
구성 가능한 기능구성 가능한 기능
은 기본 설정을 나타냅니다.
EV step: #+/-(플래시 보정/플래시 강도) 조정량을 변경할 수 있습니다.
1/3 / 1/2
Back light mode: 제어판의 백라이트를 설정할 수 있습니다.
Auto(작동 시 백라이트가 켜짐.) /
On(백라이트가 항상 켜짐.) / Off(백라이트가 항상 꺼짐.)
Back light timer: 제어판의 백라이트 꺼짐 시점을 설정할 수 있습니다.
아무런 작동도 하지 않을 때 백라이트가 자동으로 꺼질 때까지의 시간(초)을 선택할 수
있습니다.
1sec ~ 5sec ~ 15sec
안전상의 주의
안전한 사용을 위해 경고와 주의를 꼼꼼히 읽어주십시오. 이 안전 주의사항은
사용자와 주변 사람들을 보호하고 재산상의 손실을 예방하기 위한 것입니다.
경고
이 기호가 표시된 주의사항을 지키지 않을 경우 부상이나 사망
사고로 이어질 수 있습니다.
•
플래시를 가연성 가스나 폭발성 가스 등이 대기 중에 존재할 위험이 있는
장소에서는 사용하지 마십시오. 인화, 폭발의 원인이 될 수 있습니다.
•
본 제품을 직접 납땜하거나 수정, 모델 변경 또는 분해하지 마십시오.
•
플래시의 발광 부분을 손으로 가리지 않도록 하고, 연속 사용 후에는 발광
부분을 만지지 마십시오. 화상을 입을 수 있습니다.
•
장치 내부에 물이나 이물질이 들어갈 경우 화재나 전기 쇼크를 야기할 수
있습니다. 장치가 물에 잠기거나 노출된 경우, 또는 내부에서 이물질이 발견된
경우에는 즉시 전원을 끄고 주의하여 배터리를 빼주십시오. 판매처 또는
Olympus 공식 서비스 센터에 문의하십시오.
•
교통사고를 예방하기 위해 차량 운전자를 향해 직접 플래시를 터뜨리지
마십시오.
•
플래시나 AF 보조광을 사람(특히 영유아)과 가까운 거리에서 사용하지
마십시오. 아이들의 손이 닿지 않는 곳에 보관하십시오. 플래시 빛이 시력
손상을 초래할 수 있습니다.
•
회로 단락을 방지하기 위해 외부 씰링(절연 코팅)이 손상된 배터리는 사용하지
마십시오.
•
오래된 배터리와 새 것, 또는 다른 제조업체의 배터리를 함께 사용하지
마십시오.
•
배터리의 (+)나 (-) 부분에 금속과 같은 물질을 연결하지 마십시오.

91
KR
주의
이 기호가 표시된 주의사항을 지키지 않을 경우 부상이나 사망
사고로 이어질 수 있습니다.
•
냄새나 소음 또는 연기 등 비정상적인 상태가 발견되면 사용을 중지하십시오.
그렇지 않으면 화재 또는 화상 사고가 발생할 수 있습니다. 화상을 입을 수도
있으므로 주의하여 배터리를 빼낸 후 판매처 또는 Olympus 공식 서비스
센터에 문의하십시오.
•
정품이 아닌 배터리를 사용할 경우 폭발의 위험이 있습니다.
•
젖은 손으로 작동하지 마십시오. 오작동 또는 전기 쇼크를 유발할 수
있습니다.
•
직사광선이 비추는 곳, 맑은 날의 밀폐된 차량 안, 히터 근처 등 고온에 노출된
장소에서 배터리를 사용하거나 보관하지 마십시오.
•
연속 반복된 발광은 건강에 좋지 않은 영향을 줄 수 있습니다.
•
접점에 먼지나 물이 있으면 고장의 원인이 될 수 있습니다. 플래시를 카메라에
연결하기 전에 먼지, 물 및 기타 이물질을 제거합니다.
전파 무선 기능 사용
•
전파 무선 통신 기능을 사용하는 경우 현지 법률 및 규정을 모두
준수하십시오.
•
구매 국가 이외에서 제품을 사용할 경우 전파 관련 현지 규정에 위배될 수도
있습니다. Olympus는 이 경우 어떠한 책임이 지지 않습니다.
•
의료 장비가 있는 병원 및 기타 장소에서는 제품을 끄십시오.
제품의 무선 전파가 의료 장비에 나쁜 영향을 미치면 오작동으로 인한 사고가
발생할 수 있습니다.
•
비행기에 탑승할 경우 제품을 끄십시오.
탑승 중에 무선 장치를 사용하면 안전한 항공기 운항을 저해할 수 있습니다.
기자재의 명칭: 특정소출력 무선기기(무선데이터통신시스템용 무선기기)
모델명: IM012
인증번호: R-C-OLY-IM012
인증받은 자의상호:
제조자:

92
KR
사양
제품 유형 무선 전파 송신기
최대 통신 거리*
1
약 30m
주파수 2.4GHz 대역
채널 수 15(송신기 모드 시, 자동 채널 설정 기능 제공)
그룹 수 3, 최대 장치 수: 무제한
플래시 제어 모드 TTL / MANUAL / FP TTL / FP MANUAL / Off
플래시 보정 ±5EV(단위: 1/3EV 또는 1/2EV)
수동 플래시 강도
조정
1/1 ~ 1/128(단위: 1/3EV 또는 1/2EV)
작동 가능 지속 시간*
1
약 6.4시간(AAA 알카라인 건식 셀 배터리 사용 시)
전원 공급 AAA 알카라인 건식 셀 배터리 x 2 / AAA NiMH 배터리 x 2
방수 기능(등급) 1급(IPX1)
작동 온도/습도*
2
-10 ~ 40ºC / 30 ~ 90%
보관 보장 온도/습도 -20 ~ 60ºC / 10 ~ 90%
크기 약 59.5(W) x 51.0(H) x 67.4(D)mm [돌출 부품 제외]
중량 73 g [배터리 제외]
사양은 예고 없이 변경될 수 있습니다.
*1 이러한 값은 Olympus 테스트 조건에 근거하며 촬영 조건에 따라 다를 수 있습니다. 이러한
값은 새 배터리 또는 완전히 충전된 충전식 배터리를 사용한다고 가정합니다.
*2 저온에서는 사용하기 전에 배터리를 예열하십시오. 예를 들면 배터리를 의복 주머니 안에
넣으십시오.

93
KR

94
CHT
感謝您購買這款 Olympus 產品。
為了確保您的安全,請在使⽤前仔細閱讀本使⽤⼿冊。
此外請保留⼿冊以便將來參考。
請務必要閱讀閃光燈以及無線接收器的使⽤⼿冊。
如果您在購買的國家或地區以外使⽤產品,可能會違反當地法規。在這種情況下,
Olympus 不承擔責任。
檢查包裝的內容
袋⼦
使⽤說明(本⼿冊)
無線的無線電波遙控器:FC-WR
保證卡

95
CHT
各部分名稱
1
a
0
b
c
d
2
3
4
7
8
9
55
6
1 群組按鈕(A/B/C) ......... 第 100 ⾴
2 MODE 按鈕 ................. 第 101 ⾴
3 TEST 按鈕 ................. 第 100 ⾴
4 控制⾯板 ................... 第 95 ⾴
5 ON/OFF 按鈕 ................ 第 98 ⾴
6 電池艙蓋 ................... 第 96 ⾴
7 OK 按鈕 ................... 第 100 ⾴
8 插銷釋放按鈕 ............... 第 97 ⾴
9 插銷 ....................... 第 97 ⾴
旋鈕 / 箭號鍵
0 旋鈕 ................. 第 100、103 ⾴
a a(閃光補償 / 閃光強度)/H 按鈕
.......................... 第 101 ⾴
b MENU/b(按鍵鎖定)/G 按鈕
.......................... 第 103 ⾴
c F 按鈕
d Ch(通訊頻道)/I 按鈕
.......................... 第 100 ⾴
顯⽰器(控制⾯板) 顯⽰器(控制⾯板)
421 3
9
MODE
A
B
C
0.0
0.0
1/8
TTL
TTL
M
FPRATIO CH
1
Off
1/8
1/4
1/2
6
8
7
5
1 MODE(閃光燈控制模式)
2 +/-(閃光補償)/
RATIO(閃光強度)
3 FP(超級 FP)閃光燈
4 CH(通訊頻道)
5 RATIO(閃光強度)
6 群組A設定
7 群組B設定
8 群組C設定
9 d(按鍵鎖定模式)

96
CHT
準備遙控器
插⼊電池(另售)插⼊電池(另售)
要使⽤的電池
請選擇下列電池。
•
AAA 鎳氫電池(×2)
•
AAA 鹼性乾電池(×2)
x
AAA 錳電池不能使⽤。
插⼊電池
1
打開電池艙蓋。
2
插⼊電池。
•
確認極性(+/-)正確。
3
關上電池艙蓋。

97
CHT
將遙控器安裝到相機上 將遙控器安裝到相機上
x
確認遙控器與相機都已經關閉。
x
電氣接點上的污垢或濕氣都可能造成故障。將遙控器安裝到相機上之前要擦掉所有污
垢或濕氣。
1
按住插銷釋放按鈕(
1
),然後將插銷往
箭頭⽅向(
2
)滑動。
插銷
插銷釋放按鈕
2
將遙控器完全插⼊熱靴中。
熱靴
電氣接點
3
將插銷往箭頭⽅向滑動。
拆卸遙控器
執⾏上述程序的步驟 1,將遙控器從熱靴拆卸下來。

98
CHT
開啟電源
ON/OFF 按鈕
1
按 ON/OFF 按鈕。
x
如果
q
符號出現在控制⾯板中央,表⽰電池的電量⾮常低。請儘快更換電池。
關閉電源關閉電源
按 ON/OFF 按鈕。
睡眠模式 / ⾃動關閉電源睡眠模式 / ⾃動關閉電源
•
在某些相機上,遙控器會在相機進⼊睡眠模式時⾃動進⼊睡眠模式。
•
如果⼤約 60 分鐘沒有操作,電源就會⾃動關閉。當您想要再使⽤遙控器時,請
按 ON/OFF 按鈕。

99
CHT
無線電無線拍攝
您可以⽤本無線遙控器透過無線電通訊控制多⽀接收器。這個功能只能⽤於⽀援無
線電無線功能的 Olympus 產品。
關於⽀援無線電無線功能的產品資訊,請參考 Olympus 網站。
群組控制群組控制
您最多可以控制三個群組的接收器。在各個群組內,閃光燈會以相同的設定閃光。
這個功能可以讓您以各種照明效果拍攝。
無線遙控器
閃光燈(另售)
+
無線接收器(另售)
有無線電無線功能
的閃光燈(另售)
有無線電無
線功能的閃
光燈(另售)
群組 B
群組 A
群組 C
有無線電無
線功能的閃
光燈(另售)
通訊距離通訊距離
本無線遙控器無線電無線通訊的最⼤距離約 30 m。(在 Olympus 的測量條件下)。
•
這個距離假設沒有障礙、隔離材料或來⾃其他裝置的無線電⼲擾。
•
通訊距離可能會⽐較短,要視裝置的位置、周圍環境、天氣狀況以及其他因素
⽽定。
頻率頻率
本產品採⽤ 2.4 GHz 頻帶進⾏無線通訊。不過,其他無線裝置可能使⽤相同的頻率。

100
CHT
設定
OK 按鈕
旋鈕
Ch 按鈕
MODE 按鈕
TEST 按鈕
群組按鈕
1
在相機上設定⼀種閃光燈模式。
•
詳情請參考相機的⼿冊。
2
按群組按鈕以選取⼀個通訊群組。
3
選取⼀個閃光燈控制模式並調整設定。
•
詳情請參考閃光燈控制模式的解說(第 101 ⾄ 102 ⾴)。
x
如果您不想使⽤這個通訊群組,選取“Off”。
4
按 Ch 按鈕以標⽰ CH。然後轉動旋鈕以選取⼀個通訊頻道。按 OK 按鈕確認。
•
您可以選取 SCAN
*
或者從1⾄15選取⼀個頻道。
*
通訊情況因為來⾃其他裝置的⼲擾⽽很差時選取這個設定。未使⽤的頻道⾃動出現時,再
度按 OK 按鈕確認。
5
接收器頻道要與遙控器頻道配合。
6
在接收器上設定群組。
7
按 TEST 按鈕以檢查閃光燈。

101
CHT
以⾃動閃光控制拍攝(TTL 模式)
TTL 模式會根據透過相機鏡頭的亮度調整閃光強度。您可以⽤⽀援 Olympus TTL 模
式的相機使⽤這個模式。關於相容相機清單,請參考 Olympus 網站。
1
按 MODE 按鈕。然後轉動旋鈕以選取 TTL。按 OK
按鈕確認。
MODE
A
B
C
FP CH
0.0
1
RATIO
0.0
1/128
TTL
TTL
M
Off
2
設定閃光補償(+/-)。
按
a
按鈕以標⽰ +/-RATIO。然後轉動旋鈕以調整設定。
•
您可以從 -5 ⾄ +5 設定⼀個閃光補償。
按OK按鈕。
⼿動設定閃光強度(M 模式)
閃光燈會以選定的強度閃光。您可以⽤不⽀援 Olympus 通訊功能的相機使⽤這個模
式。
1
按 MODE 按鈕。然後轉動旋鈕以選取 M。按 OK 按
鈕確認。
MODE
A
B
C
FP CH
0.0
1
RATIO
0.0
1/100
TTL
TTL
M
Off
2
設定閃光強度(RATIO)
按
a
按鈕以標⽰ RATIO。然後轉動旋鈕以調整設定。
•
您可以從 1/1 ⾄ 1/128
*1
設定⼀個閃光率。
*
1 您可以選取 1/2 EV 或 1/3 EV 作為調整增量。(第 104 ⾴)
*
2 在⽐例尺顯⽰上,
t
是⽬前的選擇。
u
是先前的設定。
按OK按鈕。
MODE
A
B
C
ZOOM LED
0.0
RATIO
0.0
1/100
TTL
TTL
M
1/32
1/64
1/128
⽐例尺顯⽰
*2

102
CHT
在⾼快⾨速度下讓閃光燈閃光(FP TTL 模式 /
FP M 模式)
您可以⽤⽐閃光同步速度更快的快⾨速度以閃光燈拍攝。當您想要放⼤光圈以模糊
背景拍攝⼈像時,或者當您想⽤⾼快⾨速度減少背景的⾼光過曝時,這些模式很有
⽤。
指數低於⼀般的 TTL 模式或 M 模式。
1
按 MODE 按鈕。然後轉動旋鈕以選取 TTL 或 M。按 OK 按鈕確認。
2
按箭號按鈕上的 HIF 以標⽰ FP。然後轉動旋
鈕以選取“On”。
MODE
A
B
C
FP CH
0.0
1
RATIO
0.0
1/128
TTL
TTL
M
On
FP
FP
FP
3
調整設定。
在 FP TTL 模式中設定閃光補償(+/-)
按
a
按鈕以標⽰ +/-RATIO。然後轉動旋鈕以調整設定。
•
您可以從 -5 ⾄ +5 設定⼀個閃光補償。
按OK按鈕。
在 FP M 模式中設定閃光強度(RATIO)
按
a
按鈕以標⽰ +/-RATIO。然後轉動旋鈕以調整設定。
•
您可以從 1/1 ⾄ 1/128
*1
設定⼀個閃光率。
*
1 您可以選取 1/2 EV 或 1/3 EV 作為調整增量。(第 104 ⾴)
*
2 在⽐例尺顯⽰上,
t
是⽬前的選擇。
u
是先前的設定。
按OK按鈕。
MODE
A
B
C
ZOOM LED
0.0
RATIO
0.0
1/100
TTL
TTL
M
FP
FP
FP
1/32
1/64
1/128
⽐例尺顯⽰
*2

103
CHT
其他設定其他設定
MENU/b 按鈕
防⽌意外的操作(按鍵鎖定模式)
您可以防⽌拍攝時意外的操作按鈕和旋鈕。
1
按住 MENU/b 按鈕直到 d 出現在控制⾯板上。
•
若要取消設定,按住 MENU/b 按鈕直到 d 從控制⾯
板消失。
MODE
A
B
C
FP CH
0.0
1
0.0
1/8
TTL
M
Off
TTL
RATIO
MENU 畫⾯上的設定
您可以配置各種功能,讓無線遙控器更容易使⽤。
設定程序 設定程序
OK 按鈕
箭號按鈕上的 F
MENU/G 按鈕
旋鈕
EV step 1/3
Back light mode
Value Set
Back light timer
Auto
5sec
DIAL OK
選單
功能名稱 設定
1
按 MENU 按鈕。
2
按箭號按鈕上的 FG 以選取⼀個功能名稱。
3
轉動旋鈕以選取⼀個設定,然後按 OK 按鈕確認。

104
CHT
可以設定的功能可以設定的功能
代表預設的設定。
EV step(EV 等級): 您可以變更 #+/-(閃光補償 / 閃光強度)的調整增量。
1/3/1/2
Back light mode(背光模式):您可以設定控制⾯板的背光。
Auto(背光會在操作時開啟。)/
On(背光⼀直開著。)/
Off(背光⼀直關著。)
Back light timer(背光計時器):您可以設定何時關閉控制⾯板的背光。
您可以選擇沒有操作時背光⾃動關閉的時間(以秒為單位)。
從 1sec ⾄ 5sec ⾄ 15sec

105
CHT
安全防範須知
請仔細閱讀警告和注意以確保安全使⽤。這些安全防範須知可以保護使⽤者和其他
⼈並避免財產損壞。
警告
如果不遵守本符號表⽰的防範指⽰,則可能會導致傷害或死亡。
•
請勿在空氣中存在易燃性或爆炸性氣體的場所使⽤閃光燈,否則可能造成起⽕、
爆炸等事故。
•
請勿直接焊接本產品或對其改造、重組或拆解。
•
請勿⽤⼿覆蓋閃光燈的發光區,也不要在連續閃光後觸摸發光區,否則可能燙
傷您的⽪膚。
•
請勿使該裝置進⽔或沾上異物,否則可能引發⽕災或觸電。萬⼀被⽔濺濕或落
於⽔中,或其內部沾上異物,請⽴即關閉電源並⼩⼼地取出電池,然後與經銷
商或 Olympus 維修中⼼聯絡。
•
不可對著駕駛員使⽤本產品閃光,否則可能釀成交通事故。
•
請勿近距離對其他⼈(尤其是嬰幼兒)使⽤閃光燈或 AF 補償發光器。請將閃光
燈放置在兒童接觸不到的地⽅。閃光燈光線可能造成視覺損傷。
•
請勿將電池存放於極⾼溫處,例如直曬的陽光、晴天的密閉⾞輛中或者靠近加
熱器的地⽅。
•
請勿將新舊電池、不同廠家⽣產的電池混⽤。
•
請勿將⾦屬等物品連接⾄電池的正負極。
注意
如果不遵守本符號表⽰的防範指⽰,則可能會導致傷害或財產損失。
•
如果發現有異味、異常聲⾳或者冒煙等異常現象,請⽴即停⽌使⽤,否則可能
造成⽕災或燙傷。請⼩⼼地取出電池,注意不要被燙傷,並與經銷商或 Olympus
維修中⼼聯絡。
•
如果使⽤的電池類型不正確,可能會有爆炸的危險。
•
請勿⽤濕⼿操作本產品,否則可能導致故障和觸電。
•
切勿在極其⾼溫的地⽅(⽐如直射陽光下,晴天密閉的⾞輛中或加熱器附近)
使⽤或存放電池。
•
持續反復閃光將可能損害⾝體健康。
•
接點上的灰塵或⽔滴會導致故障。將閃光燈安裝⾄照相機之前,請先清除灰塵、
⽔滴和其他異物。

106
CHT
使⽤無線電無線功能
•
使⽤無線電無線功能時,要遵守所有當地的法律與規定。
•
如果您在購買的地區以外使⽤產品,可能會違反當地的無線電波法規。在這種
情況下,Olympus 不承擔責任。
•
在醫院及其他有醫療設備的地⽅,要將本產品關閉。
來⾃本產品的無線電波可能會對設備產⽣負⾯影響,因⽽引起造成意外的故障。
•
搭⾶機時要關閉本產品。
在⾶機上使⽤無線裝置可能會妨礙⾶機的安全操作。
經型式認證合格之低功率射頻電機,⾮經許可,公司、商號或使⽤者均不得擅⾃變
更頻率、加⼤功率或變更原設計之特性及功能。
低功率射頻電機之使⽤不得影響⾶航安全及⼲擾合法通信;經發現有⼲擾現象時,
應⽴即停⽤,並改善⾄無⼲擾時⽅得繼續使⽤。前項合法通信,指依電信法規定作
業之無線電通信。低功率射頻電機須忍受合法通信或⼯業、科學及醫療⽤電波輻射
性電機設備之⼲擾。
⽣產國別:中国

107
CHT
規格
產品類型 無線的無線電波遙控器
最⼤通訊距離
*1
⼤約 30 m
頻率 2.4 GHz 頻帶
頻道數⽬ 15(在遙控器模式中,使⽤⾃動化頻道設定功能)
群組數⽬ 3,單元數⽬上限:無限
閃光燈控制模式 TTL/MANUAL/FP TTL/FP MANUAL/Off
閃光補償 ±5 EV(增量 :1/3 EV 或 1/2 EV)
⼿動閃光強度調整 從 1/1 ⾄ 1/128(增量 :1/3 EV 或 1/2 EV)
可操作時間
*1
⼤約 6.4 個⼩時(使⽤ AAA 鹼性乾電池時)
電源 AAA 鹼性乾電池 ×2/AAA 鎳氫電池 ×2
防潑⽔功能(類型) 1 級(IPX1)
可操作溫度 / 濕度
*2
從-10⾄40℃/從30⾄90%
保證的存放溫度 / 濕度 從 -20 ⾄ 60℃/從10⾄90%
尺⼨ ⼤約 59.5(寬)×51.0(⾼)×67.4(深)mm
[ 不含突出部分 ]
重量 73 g [ 不含電池 ]
規格可能變更⽽不另⾏通知。
*
1 數值以 Olympus 測試條件為依據,可能因為拍攝情況⽽異。這些數值假設採⽤的是新電池或
充滿電的充電電池。
*
2 低溫時請先將電池溫熱後使⽤。例如,將電池放在您的⼝袋中。
數碼相機維修服務中⼼:⾹港九⿓旺⾓亞皆⽼街 8 號朗豪坊辦公⼤樓 L-4207 室
客⼾服務熱線:+852-2376-2150
傳真:+852-2375-0630
E-mail: [email protected]
http://www.olympus.com.hk

108
TH
Olympus
Olympus
()
: FC-WR

109
TH
1
a
0
b
c
d
2
3
4
7
8
9
55
6
1 (A/B/C) ................... 114
2 MODE .................................. 115
3 TEST .................................... 114
4 ................................. 109
5 ON/OFF................................ 112
6
................... 110
7 OK ....................................... 114
8 .......................... 111
9 .......................................... 111
/
0 ............................. 114, 117
a a (/
)/H .......................... 115, 116
b MENU/b ( )/G ..... . 117
c F
d Ch (
)/I ............. 114
() ()
421 3
9
MODE
A
B
C
0.0
0.0
1/8
TTL
TTL
M
FPRATIO CH
1
Off
1/8
1/4
1/2
6
8
7
5
1 MODE ()
2 +/- ()/
RATIO ( )
3 FP ( FP)
4 CH (
)
5 RATIO ( )
6 A
7 B
8 C
9 d ( )

110
TH
()
()
• NiMH AAA (x 2)
• AAA (x 2)
x
AAA
1
2
• (+/-)
3

111
TH
x
x
1
(
1
)
(
2
)
2
3
1

112
TH
ON/OFF
1
ON/OFF
x
q
ON/OFF
/ /
•
•
60
ON/OFF

113
TH
Olympus
Olympus
()
+
()
()
()
B
A
C
()
30
(98.4 ) ( Olympus)
•
•
2.4 GHz

114
TH
OK
Ch
MODE
TEST
1
•
2
3
• (. 115 116)
x
“Off”
4
Ch CH
OK
• SCAN*
1 15
*
OK
5
6
7
TEST

115
TH
( TTL)
TTL
TTL Olympus
Olympus
1
MODE TTL
OK
MODE
A
B
C
FP CH
0.0
1
RATIO
0.0
1/128
TTL
TTL
M
Off
2
(+/-)
a +/- RATIO
• -5 +5
OK
( M)
Olympus
1
MODE M
OK
MODE
A
B
C
FP CH
0.0
1
RATIO
0.0
1/100
TTL
TTL
M
Off
2
(RATIO)
a RATIO
•
1/1
1/128*
1
*1 1/2 EV 1/3 EV
(. 118)
*2
t u
OK
MODE
A
B
C
ZOOM LED
0.0
RATIO
0.0
1/100
TTL
TTL
M
1/32
1/64
1/128
*
2

116
TH
( FP TTL / FP M)
TTL M
1
MODE TTL M OK
2
HIF FP
“On”
MODE
A
B
C
FP CH
0.0
1
RATIO
0.0
1/128
TTL
TTL
M
On
FP
FP
FP
3
(+/-) FP TTL
a +/- RATIO
• -5 +5
OK
(RATIO) FP M
a +/- RATIO
•
1/1
1/128*
1
*1 1/2 EV 1/3 EV
(. 118)
*2
t u
OK
MODE
A
B
C
ZOOM LED
0.0
RATIO
0.0
1/100
TTL
TTL
M
FP
FP
FP
1/32
1/64
1/128
*
2

117
TH
MENU/b
( )
1
MENU/b d
• MENU/b
d
MODE
A
B
C
FP CH
0.0
1
0.0
1/8
TTL
M
Off
TTL
RATIO
MENU
OK
F
MENU/G
EV step 1/3
Back light mode
Value Set
Back light timer
Auto
5sec
DIAL OK
1
MENU
2
FG
3
OK

118
TH
EV step:
#+/- (/
)
1/3 / 1/2
Back light mode:
Auto (
) /
On () / Off ()
Back light timer:
( )
1sec 5sec 15sec
•
•
•
•
Olympus
•
•
(
)
•
()
•
•
(+) (–)

119
TH
•
Olympus
•
•
•
•
•
•
•
Olympus
•
•

120
TH
*
1
30 .
2.4 GHz
15 (
)
3 :
TTL / MANUAL / FP TTL / FP MANUAL / Off
±5 EV (: 1/3 EV 1/2 EV)
1/1 1/128 (: 1/3 EV 1/2 EV)
*
1
6.4
(
AAA)
AAA x 2 /
NiMH AAA x 2
()
1 (IPX1)
/
*
2
-10 40ºC / 30 90%
/
-20 60ºC / 10 90%
59.5 ( .) x 51.0 (.) x 67.4 (.) .
[
]
73 []
*1 Olympus
*2

121
TH
ѠѨѯєјҙLPDJLQJRWK#RO\PSXVDSFRP

122
VI
Cám ơn bạn đã mua máy ảnh kỹ thuật số Olympus.
Vui lòng đọc kỹ hướng dẫn sử dụng này trước khi sử dụng để đảm bảo an toàn.
Ngoài ra, hãy giữ tài liệu hướng dẫn này ở nơi an toàn để tham khảo trong
tương lai.
Đảm bảo đọc kỹ hướng dẫn sử dụng đèn fl ash và bộ nhận tín hiệu không dây.
Nếu sử dụng sản phẩm bên ngoài quốc gia hoặc khu vực mua hàng, bạn có thể
vi phạm các quy định của địa phương. Olympus không chịu trách nhiệm trong
trường hợp này
.
Kiểm tra các phụ kiện trong hộp
Túi đựng
HƯỚNG DẪN (Tài liệu này)
Bộ điều khiển sóng radio không dây:
FC-WR
Phiếu bảo hành

123
VI
Tên các bộ phận
1
a
0
b
c
d
2
3
4
7
8
9
55
6
1 Các nút nhóm (A/B/C) .................P. 128
2 Nút MODE ..................................P. 129
3 Nút TEST ...................................P. 128
4 Bảng điều khiển ..........................P. 123
5 Nút ON/OFF ................................P. 126
6 Nắp đậy khoang gắn pin .............P. 124
7 Nút OK ........................................P. 128
8 Nút nhả chốt ...............................P. 125
9 Chốt ............................................ P. 125
Đĩa lệnh/Phím mũi tên
0 Đĩa lệnh ..............................P. 128, 131
a Nút a (bù trừ đèn fl ash/cường độ đèn
fl ash)/H .............................P. 129, 130
b Nút MENU/b (khóa phím)/G .....P. 131
c Nút F
d Nút Ch (kênh kết nối)/I .............P. 128
Hiển thị (bảng điều khiển) Hiển thị (bảng điều khiển)
421 3
9
MODE
A
B
C
0.0
0.0
1/8
TTL
TTL
M
FPRATIO CH
1
Off
1/8
1/4
1/2
6
8
7
5
1 MODE (chế độ điều khiển đèn fl ash)
2 +/- (bù trừ đèn fl ash)/
RATIO (cường độ đèn fl ash)
3 Đèn fl ash FP (Super FP)
4 CH (kênh kết nối)
5 RATIO (cường độ đèn fl ash)
6 Cài đặt Nhóm A
7 Cài đặt Nhóm B
8 Cài đặt Nhóm C
9 d (chế độ khóa phím)

124
VI
Chuẩn bị Bộ điều khiển
Lắp pin (bán riêng)Lắp pin (bán riêng)
Pin để sử dụng
Chọn các loại pin sau.
• Pin NiMH AAA (x 2)
• Pin kiềm khô AAA (x 2)
x
Không thể sử dụng pin mangan AAA.
Lắp pin
1
Mở nắp đậy khoang gắn pin.
2
Lắp pin vào.
• Đảm bảo lắp pin chính xác theo cực (+/-).
3
Đóng nắp đậy khoang gắn pin.

125
VI
Gắn bộ điều khiển vào máy ảnh Gắn bộ điều khiển vào máy ảnh
x
Đảm bảo cả bộ điều khiển và máy ảnh đều đã tắt.
x
Vết bẩn và hơi ẩm trên công tắc điện có thế gây ra hư hỏng. Lau sạch mọi vết bẩn
hay hơi ẩm trước khi bạn gắn bộ điều khiển vào máy ảnh.
1
Nhấn giữ nút nhả chốt (
1
), và trượt chốt
theo hướng mũi tên (
2
).
Chốt
Nút nhả chốt
2
Lắp bộ điều khiển vào ngàm hết mức.
Ngàm
Công tắc điện
3
Trượt chốt theo hướng mũi tên.
Tháo bộ điều khiển
Thực hiện Bước 1 theo trình tự như trên và tháo thiết bị điều khiển ra khỏi ngàm.

126
VI
Bật nguồn
Nút ON/OFF
1
Nhấn nút ON/OFF.
x
Nếu ký hiệu q xuất hiện ở giữa bảng điều khiển, có nghĩa là pin đang ở mức
rất thấp. Thay pin ngay khi có thể.
Tắt nguồnTắt nguồn
Nhấn nút ON/OFF.
Chế độ ngủ/Tắt nguồn tự độngChế độ ngủ/Tắt nguồn tự động
• Với một số máy ảnh, bộ điều khiển sẽ tự động chuyển sang chế độ ngủ khi
máy ảnh chuyển sang chế độ ngủ.
• Nếu khoảng 60 phút trôi qua mà máy không hoạt động, nguồn sẽ tự động tắt.
Nhấn nút ON/OFF khi bạn muốn sử dụng lại bộ điều khiển.

127
VI
Chụp bằng sóng radio không dây
Bạn có thể sử dụng bộ điều khiển không dây này để kiểm soát nhiều đầu thu
thông qua kết nối vô tuyến. Chức năng này chỉ hoạt động với các sản phẩm
Olympus có hỗ trợ chức năng radio không dây.
Tham khảo trang web Olympus để biết thông tin về sản phẩm có hỗ trợ chức
năng radio không dây.
Điều khiển theo nhómĐiều khiển theo nhóm
Bạn có thể điều khiển tối đa ba nhóm đầu thu. Trong mỗi nhóm, các đèn fl ash
sẽ sáng với cùng các cài đặt. Chức năng này cho phép bạn chụp với nhiều hiệu
ứng ánh sáng khác nhau.
Bộ điều khiển
không dây
Đèn fl ash (bán riêng)
+
Đầu thu không dây
(bán riêng)
Đèn fl ash có chức
năng radio không
dây (bán riêng)
Đèn fl ash có chức
năng radio không
dây (bán riêng)
Nhóm B
Nhóm A
Nhóm C
Đèn fl ash có chức
năng radio không
dây (bán riêng)
Khoảng cách kết nốiKhoảng cách kết nối
Khoảng cách tối đa để kết nối radio không dây với bộ điều khiển không dây này
là khoảng 30 mét (theo điều kiện đo Olympus).
• Khoảng cách này giả định rằng không có chướng ngại vật, vật liệu che chắn
hoặc nhiễu sóng radio từ các thiết bị khác.
• Khoảng cách kết nối có thể ngắn hơn tùy thuộc vào vị trí của thiết bị, môi
trường xung quanh, điều kiện thời tiết và các yếu tố khác.
Tần sốTần số
Sản phẩm này sử dụng băng tần 2,4 GHz cho kết nối không dây. Tuy nhiên, các
thiết bị không dây khác có thể sử dụng cùng tần số.

128
VI
Thiết lập
Nút OK
Đĩa lệnh
Nút Ch
Nút MODE
Nút TEST
Nút nhóm
1
Thiết lập chế độ đèn fl ash trên máy ảnh.
• Tham khảo hướng dẫn sử dụng máy ảnh để biết thêm chi tiết.
2
Nhấn nút nhóm để chọn nhóm kết nối.
3
Chọn chế độ điều khiển đèn fl ash và điều chỉnh cài đặt.
• Để biết chi tiết, vui lòng tham khảo phần giải thích về các chế độ điều khiển
đèn fl ash (P. 129 đến 130).
x
Nếu bạn không muốn sử dụng nhóm kết nối này, hãy chọn "Off".
4
Nhấn nút Ch để làm nổi bật CH. Sau đó, xoay đĩa lệnh để chọn kênh kết
nối. Nhấn nút OK để xác nhận.
• Bạn có thể chọn SCAN* hoặc một kênh từ 1 đến 15.
* Chọn cài đặt này khi điều kiện kết nối kém do bị nhiễu từ các thiết bị khác. Khi một kênh
không sử dụng tự động xuất hiện, hãy nhấn nút OK lần nữa để xác nhận.
5
Kết hợp kênh đầu thu với kênh điều khiển.
6
Đặt nhóm trên đầu thu.
7
Nhấn nút TEST để kiểm tra đèn fl ash.

129
VI
Chụp ảnh với Điều khiển đèn fl ash tự động
(Chế độ TTL)
Chế độ TTL điều chỉnh mức đèn fl ash tùy theo độ sáng đi qua ống kính máy ảnh.
Bạn có thể sử dụng chế độ này với máy ảnh có hỗ trợ chế độ TTL của Olympus.
Tham khảo trang web Olympus để biết danh sách các máy ảnh tương thích.
1
Nhấn nút MODE. Sau đó, xoay đĩa lệnh để
chọn TTL. Nhấn nút OK để xác nhận.
MODE
A
B
C
FP CH
0.0
1
RATIO
0.0
1/128
TTL
TTL
M
Off
2
Thiết lập chế độ bù trừ đèn fl ash (+/-).
Nhấn nút a để làm nổi bật +/- RATIO. Sau đó, xoay đĩa lệnh để điều chỉnh
cài đặt.
• Bạn có thể thiết lập bù trừ đèn fl ash từ -5 đến +5.
Nhấn nút OK.
Đặt cường độ fl ash theo cách thủ công
(Chế độ M)
Đèn fl ash sẽ đánh sáng ở cường độ đã chọn. Bạn có thể sử dụng chế độ này với
máy ảnh không hỗ trợ tính năng kết nối của Olympus.
1
Nhấn nút MODE. Sau đó, xoay đĩa lệnh để
chọn M. Bấm nút OK để xác nhận.
MODE
A
B
C
FP CH
0.0
1
RATIO
0.0
1/100
TTL
TTL
M
Off
2
Thiết lập cường độ đèn fl ash (RATIO).
Nhấn nút a để làm nổi bật RATIO. Sau đó, xoay
đĩa lệnh để điều chỉnh cài đặt.
• Bạn có thể đặt tỷ lệ đèn fl ash từ 1/1 đến 1/128.*
1
*1 Bạn có thể chọn 1/2 EV hoặc 1/3 EV để tăng điều chỉnh.
(P. 132)
*2 Trên màn hình hiển thị tỷ lệ, t là lựa chọn hiện tại. u là
cài đặt trước đó.
Nhấn nút OK.
MODE
A
B
C
ZOOM LED
0.0
RATIO
0.0
1/100
TTL
TTL
M
1/32
1/64
1/128
Hiển thị tỷ lệ*
2

130
VI
Đánh sáng fl ash ở tốc độ màn trập cao
(Chế độ FP TTL / Chế độ FP M)
Bạn có thể chụp với đèn fl ash ở tốc độ màn trập nhanh hơn tốc độ đồng bộ fl ash.
Các chế độ này rất hữu ích khi bạn muốn chụp chân dung với nền mờ bằng cách
mở rộng khẩu độ, hoặc khi bạn muốn sử dụng tốc độ màn trập cao để giảm các
vùng highlights bị vỡ hạt trong nền.
Số hướng dẫn sẽ thấp hơn ở chế độ TTL
hoặc chế độ M thông thường.
1
Nhấn nút MODE. Sau đó, xoay đĩa lệnh để chọn TTL hoặc M. Bấm nút
OK để xác nhận.
2
Nhấn HIF trên phím mũi tên để làm nổi bật
FP. Sau đó, xoay đĩa lệnh để chọn "On".
MODE
A
B
C
FP CH
0.0
1
RATIO
0.0
1/128
TTL
TTL
M
On
FP
FP
FP
3
Điều chỉnh các cài đặt.
Cài đặt bù trừ đèn fl ash (+/-) trong chế độ FP TTL
Nhấn nút a để làm nổi bật +/- RATIO. Sau đó, xoay đĩa lệnh để điều chỉnh
cài đặt.
• Bạn có thể thiết lập bù trừ đèn fl ash từ -5 đến +5.
Nhấn nút OK.
Cài đặt cường độ đèn fl ash (RATIO) trong chế độ FP M
Nhấn nút a để làm nổi bật +/- RATIO. Sau đó,
xoay đĩa lệnh để điều chỉnh cài đặt.
• Bạn có thể đặt tỷ lệ đèn fl ash
từ 1/1 đến 1/128.*
1
*1 Bạn có thể chọn 1/2 EV hoặc 1/3 EV để tăng điều chỉnh.
(P. 132)
*2 Trên màn hình hiển thị tỷ lệ, t là lựa chọn hiện tại. u là
cài đặt trước đó.
Nhấn nút OK.
MODE
A
B
C
ZOOM LED
0.0
RATIO
0.0
1/100
TTL
TTL
M
FP
FP
FP
1/32
1/64
1/128
Hiển thị tỷ lệ*
2

131
VI
Các cài đặt khácCác cài đặt khác
Nút MENU/b
Tránh những thao tác ngoài ý muốn (chế độ khóa phím)
Bạn có thể ngăn ngừa những thao tác ngoài ý muốn của các nút và đĩa lệnh
trong suốt quá trình chụp.
1
Nhấn giữ nút MENU/b cho đến khi d xuất hiện
trên bảng điều khiển.
• Để hủy chế độ, nhấn giữ nút MENU/b cho đến
khi d biến mất khỏi bảng điều khiển.
MODE
A
B
C
FP CH
0.0
1
0.0
1/8
TTL
M
Off
TTL
RATIO
Cài đặt trên Màn hình MENU
Bạn có thể cấu hình các chức năng khác nhau để bộ điều khiển không dây dễ sử
dụng hơn.
Quy trình thiết lập Quy trình thiết lập
Nút OK
F trên phím
mũi tên
Nút MENU/G
Đĩa lệnh
EV step 1/3
Back light mode
Value Set
Back light timer
Auto
5sec
DIAL OK
Menu
Tên chức năng Cài đặt
1
Nhấn nút MENU.
2
Nhấn FG trên phím mũi tên và chọn tên chức năng.
3
Xoay đĩa lệnh để chọn cài đặt và nhấn nút OK để xác nhận.

132
VI
Các chức năng có thể cấu hìnhCác chức năng có thể cấu hình
cho biết cài đặt mặc định.
EV step: Bạn có thể thay đổi tăng điều chỉnh cho #+/- (bù trừ đèn fl ash /
cường độ đèn fl ash).
1/3 / 1/2
Back light mode: Bạn có thể đặt đèn nền của bảng điều khiển.
Auto (Đèn nền bật trong suốt quá trình hoạt động.) /
On (Đèn nền luôn bật.) / Off (Đèn nền luôn tắt.)
Back light timer: Bạn có thể đặt thời điểm tắt đèn nền của bảng điều khiển.
Bạn có thể chọn thời gian (tính bằng giây) cho đến khi đèn nền tự động tắt khi
không hoạt động.
Từ 1sec đến 5sec đến 15sec
Các biện pháp an toàn
Đọc kỹ các CẢNH BÁO và THẬN TRỌNG để đảm bảo sử dụng an toàn. Các
biện pháp an toàn này bảo vệ người dùng và những người khác, ngăn chặn thiệt
hại về tài sản.
CẢ NH BÁ O
Việc không tuân thủ các biện pháp được biểu thị bằng biểu
tượng này có thể dẫn đến chấn thương hoặc tử vong.
• Không sử dụng đèn fl ash ở những nơi có thể tiếp xúc với khí dễ cháy, nổ. Nếu
không, có thể xảy ra hỏa hoạn hoặc cháy nổ.
• Không được trực tiếp hàn sản phẩm hoặc chỉnh sửa, sửa đổi hoặc tháo rời.
• Không che khu vực phát sáng của đèn fl ash
bằng tay, và không chạm vào khu
vực phát sáng sau khi đèn hoạt động liên tục. Vì có thể làm bỏng da bạn.
• Nước và dị vật bên trong thiết bị có thể gây cháy hoặc điện giật. Nếu thiết bị bị
ngâm hoặc tiếp xúc với nước, hoặc dị vật được tìm thấy bên trong thiết bị, hãy
tắt nguồn ngay lập tức và cẩn thận tháo pin ra. Liên hệ với đại lý của bạn hoặc
tham khảo ý kiến từ
Trung tâm dịch vụ được ủy quyền của Olympus.
• Để ngăn ngừa tai nạn giao thông, không được chiếu đèn fl ash vào người
đang điều khiển xe cơ giới.
• Không sử dụng đèn fl ash hoặc đèn chiếu sáng AF gần với người khác (đặc
biệt là trẻ sơ sinh). Giữ đèn fl ash ngoài tầm tay của trẻ em. Ánh sáng từ đèn
fl ash có thể gây suy giảm thị giác.
• Để ngăn ngừa đoản mạch, không sử dụng pin có lớp niêm phong bên ngoài bị
hỏng (lớp phủ cách điện).

133
VI
• Không được trộn lẫn pin cũ và mới, hoặc pin được sản xuất bởi các nhà sản
xuất khác nhau.
• Không kết nối các chất như kim loại với (+) hoặc (–) của pin.
THẬN TRỌNG
Việc không tuân thủ các biện pháp được biểu thị bằng
biểu tượng này có thể dẫn đến chấn thương hoặc hư
hỏng tài sản.
• Nếu bạn nhận thấy bất kỳ bất thường nào như mùi, tiếng ồn hoặc khói, hãy
ngừng sử dụng thiết bị này. Nếu không, có thể xảy ra hỏa hoạn hoặc bỏng.
Tháo pin cẩn thận để tránh làm bỏng chính mình, và liên hệ với đại lý của bạn
hoặc tham khảo ý kiến từ
Trung tâm dịch vụ được ủy quyền của Olympus.
• Có nguy cơ gây nổ nếu thay thế pin bằng loại pin không đúng.
• Không vận hành bằng tay ướt. Điều này có thể gây ra sự cố hoặc điện giật.
• Không sử dụng hoặc bảo quản pin ở những nơi tiếp xúc với nhiệt độ cực cao,
chẳng hạn như dưới ánh sáng mặt trời trực tiếp, trong xe đóng kín vào ngày
nắng hoặc gần lò sưởi.
• V
iệc kích hoạt liên tục lặp đi lặp lại có thể dẫn đến những ảnh hưởng xấu đến
sức khỏe.
• Vết bẩn hoặc nước trên bề mặt tiếp xúc có thể gây trục trặc. Loại bỏ bụi bẩn,
nước và các vật lạ khác trước khi gắn thiết bị vào máy ảnh.
Sử dụng chức năng radio không dây
• Khi
bạn sử dụng chức năng kết nối radio không dây, hãy tuân thủ tất cả các
luật và quy định của địa phương.
• Nếu sử dụng sản phẩm bên ngoài quốc gia hoặc khu vực mua hàng, bạn có
thể vi phạm các quy định của địa phương. Olympus không chịu trách nhiệm
trong trường hợp này.
• Tắt sản phẩm tại bệnh viện và các địa điểm khác có trang thiết bị y tế.
Sóng vô tuyến từ sản phẩm có thể ảnh hưởng xấu đến thiết bị y tế, gây ra trục
trặc dẫn đến tai nạn.
• Tắt sản phẩm khi đang trên máy bay
.
Sử dụng các thiết bị không dây trên máy bay có thể cản trở hoạt động an toàn
của máy bay.

134
VI
Thông số kỹ thuật
Loại sản phẩmBộ điều khiển sóng radio không dây
Khoảng cách kết nối
tối đa*
1
Xấp xỉ 30 m
Tần số Băng tần 2,4 GHz
Số kênh 15 (ở chế độ điều khiển; với chức năng cài đặt kênh tự động)
Số nhóm 3; số lượng đơn vị tối đa: không giới hạn
Chế độ điều khiển
đèn fl ash
TTL / MANUAL / FP TTL / FP MANUAL / Off
Bù trừ đèn fl ash ±5 EV (Mức tăng: 1/3 EV hoặc 1/2 EV)
Điều chỉnh cường độ
đèn fl ash
thủ công
Từ 1/1 đến 1/128 (Mức tăng: 1/3 EV hoặc 1/2 EV)
Thời gian hoạt động*
1
Xấp xỉ 6,4 giờ (khi sử dụng pin kiềm khô AAA)
Nguồn điện Pin kiềm khô AAA x 2 / Pin NiMH AAA x 2
Chức năng chống dội
nước (Loại)
Loại 1 (IPX1)
Nhiệt độ / độ ẩm có
thể hoạt động*
2
Từ -10 đến 40ºC / Từ 30 đến 90%
Nhiệt độ / độ ẩm đảm
bảo lưu trữ
Từ -20 đến 60ºC / Từ 10 đến 90%
Kích thướcXấp xỉ 59,5 (Rộng) x 51,0 (Cao) x 67,4 (Sâu) mm
[Không bao gồm các bộ phận chiếu]
Khối lượng 73 g [Không bao gồm pin]
Thông số kỹ thuật có thể thay đổi mà không cần thông báo.
*1 Giá trị dựa trên điều kiện thử nghiệm của Olympus và có thể thay đổi tùy theo điều kiện
chụp. Các giá trị khi giả sử rằng sử dụng pin mới hoặc pin sạc đầy.
*2 Ở nhiệt độ thấp, hãy làm ấm pin trước khi sử dụng. Ví dụ, đặt pin vào túi quần áo của bạn.

135
MEMOMEMO

136
MEMOMEMO

137
MEMOMEMO

138
MEMOMEMO

139
MEMOMEMO

© 2018
WD507800
Printed in China
date of issue 2018.10.
The following importer description applies to products imported
into the EU directly by OLYMPUS EUROPA SE & Co. KG only.
OLYMPUS EUROPA SE & Co. KG
Wendenstrasse 14-18, 20097 Hamburg, Germany
Manufactured by OLYMPUS CORPORATION
2951 Ishikawa-machi, Hachioji-shi, Tokyo 192-8507, Japan
/