Denon Car Stereo System DCM-370 Manual de usuario
- Categoría
- Reproductores de CD
- Tipo
- Manual de usuario
Este manual también es adecuado para

STEREO CD PLAYER
DCM-370/270
OPERATING INSTRUCTIONS
MODE D’EMPLOI
INSTRUCCIONES DE OPERACION

2
IMPORTANT TO SAFETY
WARNING:
TO PREVENT FIRE OR SHOCK HAZARD, DO NOT EXPOSE THIS
APPLIANCE TO RAIN OR MOISTURE.
CAUTION:
1. Handle the power supply cord carefully
Do not damage or deform the power supply cord. If it is damaged or
deformed, it may cause electric shock or malfunction when used. When
removing from wall outlet, be sure to remove by holding the plug
attachment and not by pulling the cord.
2. Do not open the top cover
In order to prevent electric shock, do not open the top cover.
If problems occur, contact your DENON dealer.
3. Do not place anything inside
Do not place metal objects or spill liquid inside the CD player.
Electric shock or malfunction may result.
Please, record and retain the Model name and serial number of your set shown
on the rating label.
Model No. DCM-370/270 Serial No.
CAUTION
RISK OF ELECTRIC SHOCK
DO NOT OPEN
CAUTION: TO REDUCE THE RISK OF ELECTRIC SHOCK, DO NOT
REMOVE COVER (OR BACK). NO USER-SERVICEABLE PARTS INSIDE.
REFER SERVICING TO QUALIFIED SERVICE PERSONNEL.
The lightning flash with arrowhead symbol, within an
equilateral triangle, is intended to alert the user to the
presence of uninsulated “dangerous voltage” within the
product’s enclosure that may be of sufficient magnitude to
constitute a risk of electric shock to persons.
The exclamation point within an equilateral triangle is
intended to alert the user to the presence of important
operating and maintenance (servicing) instructions in the
literature accompanying the appliance.
• FOR U.S.A. & CANADA MODEL ONLY
CAUTION
TO PREVENT ELECTRIC SHOCK DO NOT USE THIS (POLARIZED) PLUG
WITH AN EXTENSION CORD, RECEPTACLE OR OTHER OUTLET UNLESS
THE BLADES CAN BE FULLY INSERTED TO PREVENT BLADE
EXPOSURE.
• POUR LES MODELES AMERICAINS ET CANADIENS UNIQUEMENT
ATTENTION
POUR PREVENIR LES CHOCS ELECTRIQUES NE PAS UTILISER CETTE
FICHE POLARISEE AVEC UN PROLONGATEUR UNE PRISE DE COURANT
OU UNE AUTRE SORTIE DE COURANT, SAUF SI LES LAMES PEUVENT
ETRE INSEREES A FOND SANS EN LAISSER AUCUNE PARTIE A
DECOUVERT.
This device complies with Part 15 of the FCC Rules. Operation is subject to
the following two conditions: (1) This device may not cause harmful
interference, and (2) this device must accept any interference received,
including interference that may cause undesired operation.
This Class B digital apparatus meets all requirements of the Canadian
Interference-Causing Equipment Regulations.
Cet appareil numérique de la classe B respecte toutes les exigences du
Règlement sur le matériel brouilleur du Canada.
NOTE:
This CD player uses the semiconductor laser. To allow you to enjoy music at a
stable operation, it is recommended to use this in a room of 10°C (50°F) ~
35°C (95°F).
LABELS (for U.S.A. model only)
CERTIFICATION
THIS PRODUCT COMPLIES WITH DHHS RULES 21CFR SUBCHAPTER J
APPLICABLE AT DATE OF MANUFACTURE.
CAUTION:
USE OF CONTROLS OR ADJUSTMENTS OR PERFORMANCE OF
PROCEDURES OTHER THAN THOSE SPECIFIED HEREIN MAY RESULT IN
HAZARDOUS RADIATION EXPOSURE.
THE COMPACT DISC PLAYER SHOULD NOT BE ADJUSTED OR REPAIRED
BY ANYONE EXCEPT PROPERLY QUALIFIED SERVICE PERSONNEL.

3
SAFETY INSTRUCTIONS
1. Read Instructions – All the safety and operating
instructions should be read before the appliance is
operated.
2. Retain Instructions – The safety and operating instructions
should be retained for future reference.
3. Heed Warnings – All warnings on the appliance and in the
operating instructions should be adhered to.
4. Follow Instructions – All operating and use instructions
should be followed.
5. Water and Moisture – The appliance should not be used
near water – for example, near a bathtub, washbowl,
kitchen sink, laundry tub, in a wet basement, or near a
swimming pool, and the like.
6. Carts and Stands – The appliance should be used only with
a cart or stand that is recommended by the manufacturer.
6A. An appliance and cart
combination should be
moved with care.
Quick stops, excessive
force, and uneven
surfaces may cause
the appliance and cart
combination to overturn.
7. Wall or Ceiling Mounting – The appliance should be
mounted to a wall or ceiling only as recommended by the
manufacturer.
8. Ventilation – The appliance should be situated so that its
location or position does not interfere with its proper
ventilation. For example, the appliance should not be
situated on a bed, sofa, rug, or similar surface that may
block the ventilation openings; or, placed in a built-in
installation, such as a bookcase or cabinet that may
impede the flow of air through the ventilation openings.
9. Heat – The appliance should be situated away from heat
sources such as radiators, heat registers, stoves, or other
appliances (including amplifiers) that produce heat.
10. Power Sources – The appliance should be connected to a
power supply only of the type described in the operating
instructions or as marked on the appliance.
11. Grounding or Polarization – Precautions should be taken so
that the grounding or polarization means of an appliance is
not defeated.
12. Power-Cord Protection – Power-supply cords should be
routed so that they are not likely to be walked on or
pinched by items placed upon or against them, paying
particular attention to cords at plugs, convenience
receptacles, and the point where they exit from the
appliance.
14. Cleaning – The appliance should be cleaned only as
recommended by the manufacturer.
15. Power Lines – An outdoor antenna should be located away
from power lines.
16. Outdoor Antenna Grounding – If an outside antenna is
connected to the receiver, be sure the antenna system is
grounded so as to provide some protection against voltage
surges and built-up static charges. Article 810 of the
National Electrical Code, ANSI/NFPA 70, provides
information with regard to proper grounding of the mast
and supporting structure, grounding of the lead-in wire to
an antenna-discharge unit, size of grounding conductors,
location of antenna-discharge unit, connection to grounding
electrodes, and requirements for the grounding electrode.
See Figure A.
17. Nonuse Periods – The power cord of the appliance should
be unplugged from the outlet when left unused for a long
period of time.
18. Object and Liquid Entry – Care should be taken so that
objects do not fall and liquids are not spilled into the
enclosure through openings.
19. Damage Requiring Service – The appliance should be
serviced by qualified service personnel when:
A. The power-supply cord or the plug has been damaged;
or
B. Objects have fallen, or liquid has been spilled into the
appliance; or
C. The appliance has been exposed to rain; or
D. The appliance does not appear to operate normally or
exhibits a marked change in performance; or
E. The appliance has been dropped, or the enclosure
damaged.
20. Servicing – The user should not attempt to service the
appliance beyond that described in the operating
instructions. All other servicing should be referred to
qualified service personnel.
FIGURE A
EXAMPLE OF ANTENNA GROUNDING
AS PER NATIONAL
ELECTRICAL CODE
ANTENNA
LEAD IN
WIRE
GROUND
CLAMP
ELECTRIC
SERVICE
EQUIPMENT
ANTENNA
DISCHARGE UNIT
(NEC SECTION 810-20)
GROUNDING CONDUCTORS
(NEC SECTION 810-21)
GROUND CLAMPS
POWER SERVICE GROUNDING
ELECTRODE SYSTEM
(NEC ART 250, PART H)
NEC - NATIONAL ELECTRICAL CODE

4
NOTE ON USE / OBSERVATIONS RELATIVES A L’UTILISATION / NOTAS SOBRE EL USO

5
ENGLISH
Thank you for purchasing the DENON compact disc player. Read the Operating
Instructions thoroughly, and operate this player properly.
— TABLE OF CONTENTS —
FEATURES ……………………………………………………………………………5
CAUTIONS DURING USE …………………………………………………………5
NAMES OF PARTS AND THEIR FUNCTIONS …………………………………6, 7
OPENING AND CLOSING THE DRAWER AND
LOADING A DISC ………………………………………………………………8
CONNECTIONS ………………………………………………………………………9
NORMAL PLAY ………………………………………………………………………9
OTHER PLAY METHODS………………………………………………………10~13
INSTALLATION PRECAUTIONS …………………………………………………14
PLAY USING THE REMOTE CONTROL UNIT ………………………………14, 15
COMPACT DISCS …………………………………………………………………16
TROUBLE? CHECK THE PLAYER TO FIND
WHAT’S WRONG ………………………………………………………………16
SPECIFICATIONS ……………………………………………………………………16
In addition to the CD Player unit, please check to make sure the following
items are included in the packing box.
(1) Operating Instructions ……………………………………………………1
(2) Connection Cords …………………………………………………………1
(3) Remote Control Unit RC-258 ……………………………………………1
(4) R6P (AA size) Dry batteries ………………………………………………2
FEATURES
(1) HDCD
®
(High Definition Compatible Digital) decoder (DCM-
370)
HDCD is an encoding/decoding technology that greatly reduces the
distortion occurring at the time of digital recording while maintaining
compatibility with the conventional CD format. HDCD allows 20-bit data to
be converted into the 16-bit data of current CDs with no loss in sound
quality.
The use of this HDCD decoder makes it possible to achieve the high
resolution and low distortion characteristic of HDCD when playing HDCD-
compatible discs, and DENON’s digital technology optimizes the high
sound quality possibilities of HDCD technology. Furthermore, normal CDs
and HDCD-compatible CDs are automatically identified, and the optimum
digital signal processing for that type of disc used.
(2) High performance digital filter
The DCM-370/270 uses high precision 8-times oversampling digital filters.
(3) Simple Playback of 8cm CD Singles
8cm CD singles can be played without using an adaptor.
(4) Programming of up to 32 tracks
All of the tracks on a CD can be programmed to play in any order.
Programming in units of discs (all tracks on a disc) is also possible.
(5) Newly developed carousel-type changer mechanism
included
This mechanism can house five discs, and while one disc is playing the
remaining four discs can be changed. In addition, the carousel can be
rotated either clockwise or counterclockwise, so searching between discs
is fast.
(6) Wireless Remote Control Accessory
In addition to general operations such as Play, Stop and Pause, this
remote control unit enables direct selection, direct programming, and
other functions. Use of the remote control unit adds greatly to the
operating ease of the DCM-370/270, enhancing its outstanding features.
CAUTIONS DURING USE
• This compact disc player is capable of playing discs
which have the mark at right.
• During track selection, during search and when the
player sustains a strong impact, the disc’s rotational
speed changes greatly, causing a small noise to be
emitted. This is not a malfunction of the player.
• If the CD player is operated while an FM or AM broadcast is being received,
there may be noise in the FM or AM reception. Please switch the power to
the CD player off at such times.
• The DCM-370/270 has a broad dynamic range. Please exercise caution
when turning up the volume on the amplifier in cases when the playback
volume is low. If the volume is turned up too high, it could damage the
speakers.
• Do not use any discs but exclusive audio discs with this CD player.
• Placing this player or its connection cords near a TV or other audio device
could cause a humming sound to be emitted. If this occurs, relocate the
player or reroute the connection cords.
• Be sure to remove the disc from the player before moving it. The disc could
be damaged if left in the player while it is being moved.
• Do not place any object in the tray in the position where the disc is loaded,
or open and close the tray with anything inside. Foreign objects in the tray
could damage the play mechanism.
• Do not move the player from a cold place to a warm place suddenly. If the
player is cold when brought into a warm room, condensation could form,
preventing proper operation of the player. If condensation does form on the
player when it is brought into a warm room, wait at least 30 minutes before
use.
CAUTION:
1. Always remove all discs from the trays when moving the set. Failure to do
so may damage the set.
2. When the power is turned off, the varied level will be cleared and be set to
0 dB.
C
IMPORTANT
(CANADIAN MODEL ONLY)
This digital apparatus does not exceed the Class B limits for radio noise
emissions from digital apparatus setout in the Radio Interference
Regulations of the Canadian Department of Communication.

6
ENGLISH
NAMES OF PARTS AND THEIR FUNCTIONS
FRONT PANEL
REAR PANEL
OPEN/CLOSE
DISC SKIP
5 DISC AUTOMATIC DISC LOADING SYSTEM
STOP
PAUSE
PLAY
PROG
PHONES
REPEAT
DCM-370
PCM AUDIO TECHNOLOGY / CD AUTO CHANGER
REMOTE
SENSOR
HDCD
£¢ ON OFF
qwertyuio!0 !1
!5
!4
!3 !2
TRACK
1
5
234
678
9101112
13141516
DISC
MIN
SEC
¤
‚
⁄
‚
‹fi
‚
1
2
3
4
5
COAXIAL
DIGITAL OUT
LINE OUT
VARIABLE
CONTROL
OUT
IN
SYNCHRO
!7 !8
@0
@1
!9
OPEN/CLOSE
DISC SKIP
STOP
PAUSE
PLAY
PROG
PHONES
REPEAT
5 DISC AUTOMATIC DISC LOADING SYSTEM
DCM-370
PCM AUDIO TECHNOLOGY / CD AUTO CHANGER
REMOTE
SENSOR
HDCD
£¢ ON OFF
TRACK
1
5
234
678
9101112
13141516
DISC
MIN
SEC
¤
‚
⁄
‚
‹
fi
‚
1
2
3
4
5
!6
DISPLAY
PROGRAM
RANDOM
TRACK
R
1
5
234
678
9101112
13141516
DISC
MIN
SEC
REPEAT ALL
1
DISC
REMAIN
°
°
°
°
°°
°
1
2
3
4
5
CAROUSEL
Play Indicator
Pause Indicator
Disc Indicator
Disc Number
Track Number
Time
minute
second
Repeat Indicator
Random Indicator
Program Indicator
Remote control signal
Receive Indicator
16-track music calendar
DCM-370 only
DCM-370 only

7
ENGLISH
q
Power Switch (POWER)
• Press this button to switch on the power.
w
Remote Control Receptor (REMOTE SENSOR)
• This receptor receives infrared signals from the wireless remote
control unit.
• Aim the wireless remote control unit at this receptor window when
operating it.
e
HDCD Indicator (DCM-370 only)
• This lights when an HDCD-compatible disc is playing.
r
Display Window
• The Disc No., Track No., playing time and other information are
displayed in the display window.
t
Repeat Button (REPEAT)
• Press this button for repeated playback. The indicator
appears on the display. The following three types of repeat modes are
available.
• When pressed once, the and indicators light and the track
currently playing is repeated.
• When pressed again, the and indicators light and all
the tracks on the disc currently playing are repeated.
• When pressed again, the , and indicators light
and all the discs currently set on the tray are repeated.
• When pressed again, the
,
and indicators turn off
and the repeat mode is cancelled.
The repeat function can also be used during programmed and random
playback, but in this case only the all repeat ( and
indicator) mode is available.
(Refer to page 11 for details.)
y
Program Button (PROG)
• Press this button when you want to enter tracks for programmed
playback. (Refer to page 10 for details.)
u
Automatic/Manual Search Reverse Button
(
8/6)
• Press this button to return the pickup to the beginning of the present
track. Press again to return to other tracks.
• By pressing the button a number of times, the pickup will move back
the corresponding number of tracks.
• Keep on pressing this button for more than 0.5 seconds during
playback for fast reverse search. As long as the button is kept
pressed, music signals are played back faster than normal.
• Keep on pressing this button for more than 5 seconds, reverse search
becomes approximately 4 times faster.
i
Automatic/Manual Search Forward Button
(
7/9)
• Press this button to move the pickup forward to the beginning of the
next track. Press again to move ahead to other tracks.
• By pressing the button a number of times, the pickup will advance the
corresponding number of tracks.
• Keep on pressing this button for more than 0.5 seconds during
playback for fast forward search. As long as the button is kept
pressed, music signals are played back faster than normal.
• Keep on pressing this button for more than 5 seconds, forward search
becomes approximately 4 times faster.
o
Stop Button (2 STOP)
• Press this button to stop play.
DISCALL
DISCALLREPEAT
DISCALLREPEAT
1 DISCREPEAT
1REPEAT
REPEAT
!0
Pause Button (3 PAUSE)
• Press this button to stop play temporarily.
• Pressing the Pause button during play stops play temporarily. The
indicator goes off and the indicator lights up.
• To cancel the Pause state, press either the Play button
!1 or the
Pause button
!0 a second time.
!1
Play Button (1 PLAY)
• Press this button to play a disc.
The indicator lights up when the button is pressed, the number of
the disc and the track being played is displayed by the Disc Number
and Track No. indicator, and the amount of elapsed time for the
current track is displayed by the Time indicator.
• The indicator goes off after playing of the final track of the final
disc is finished and the player stops.
!2
Disc Skip Button (DISC SKIP)
• Each time this button is pressed, the carousel will rotate in a
clockwise direction to the next tray position. This allows for loading or
unloading of discs.
This button is also used to select the next disc, in the normal play
continuously.
!3
Open/Close Button (5 OPEN/CLOSE)
• Press this button when opening.
• The drawer is opened toward the front.
• Press the button again to close the drawer.
!4
Loading Drawer
• Discs can be loaded and unloaded when this drawer is open. Do not
force the drawer closed by hand.
!5
Headphone Jack (PHONES)
• Insert the jack of the headphones when desiring to listen to a disc
privately. (Headphones are sold separately.)
!6
Disc Trays (1 ~ 5)
• One disc per tray can be loaded.
!7
Output Terminal (LINE OUT)
• Connect the connection cords from these terminals to the amplifier’s
input terminals. (Refer to page 9 for connections.)
!8
SYNCHRO Jack (SYNCHRO)
• To make a synchronized recording, this jack must be connected to the
SYNCHRO jack of the deck with a connection cord. (Refer to page 9
for connections.)
!9
Control Input Connector (CONTROL IN) (DCM-370 only)
• This is the input connector for wired remote control.
Consult your DENON dealer if you wish to use this connector.
@0
Control Output Connector (CONTROL OUT)
(DCM-370 only)
• This is the output connector for wired remote control.
Consult your DENON dealer if you wish to use this connector.
@1
Digital Audio Output Connector (COAXIAL)
(DCM-370 only)
• Connect a commercially available 75 Ω/ohms pin-plug cord.
• Digital data is output from this connector.
1
1
3
1
Continuous Button Operation
If the automatic/manual search reverse button
u or the automatic/manual
search forward button
i are held in, the function of that button will be
repeated.

8
ENGLISH
OPENING AND CLOSING THE DRAWER AND LOADING A DISC
Opening and closing the drawer (This operation only works while the power
is on.)
1. Press the power switch (POWER) to turn on the power.
2. Press the open/close button (
5 OPEN/CLOSE).
How to load a disc
• Make sure the drawer is completely open.
• Hold the disc by the edges and place it on the disc tray. (Do not touch the
signal surface, i.e., the glossy side.)
• Set the disc properly in the tray according to its size.
Set 8 cm discs in the center hole.
Set 12 cm discs in the outer hole.
• When the drawer is opened during the stop mode, discs can be loaded in
the 3 disc trays. If the DISC SKIP button is pressed, the carousel turns and a
disc can be loaded in the another disc tray.
When the drawer is opened during the play mode, it is possible to load and
unload discs in all of the disc trays other than the one whose disc is
currently playing. 3 discs can be replaced and press the DISC SKIP button to
switch the other disc tray that can be replaced.
• Press the open/close button (
5 OPEN/CLOSE) to close the drawer.
Caution:
• The player will not operate properly and the disc may even be damaged if it
is not set correctly.
• If your finger should get caught in the drawer when it closes, press the
open/close button (
5 OPEN/CLOSE).
• Do not place any foreign objects on the disc tray, and do not place more
than one disc on the tray at a time. Otherwise malfunction may occur.
• Do not push in the disc tray manually when the power is off as this may
cause malfunction and damage the CD player.
• Do not touch the carousel while it is turning. Also, do not turn the carousel
by hand when it is stopped. Doing so could damage it.
• Do not insert disc where indicated by arrow.
This could damage the internal mechanism in the unit.
OPEN/CLOSE
DISC SKIP
STOP
PAUSE
PLAY
PROG
PHONES
REPEAT
5 DISC AUTOMATIC DISC LOADING SYSTEM
DCM-370
PCM AUDIO TECHNOLOGY / CD AUTO CHANGER
REMOTE
SENSOR
HDCD
£¢ ON OFF
TRACK
1
5
234
678
9101112
13141516
DISC
MIN
SEC
¤
‚
⁄
‚
‹
fi
‚
1
2
3
4
5
OPEN/CLOSE
DISC SKIP
STOP
PAUSE
PLAY
PROG
PHONES
REPEAT
5 DISC AUTOMATIC DISC LOADING SYSTEM

9
ENGLISH
CONNECTIONS
(1) Connecting the Output Terminal
• Connect one end of the connection cord supplied with the CD Player to
the output terminals, left (L) and right (R) of the CD Player, and the other
end to the CD, AUX or TAPE PLAY input terminals, left (L) and right (R), of
the amplifier.
(3) SYNCHRO Jack Connections
• Connect the SYNCHRO jack with a DENON cassette deck which is
equipped with a SYNCHRO jack, then make a synchronized recording. Use
the connection cord supplied with the cassette deck.
• To make use of this function, also connect the output jacks and make the
settings so that a recording can be made from the CD player to the
cassette deck.
COAXIAL
DIGITAL OUT
LINE OUT
VARIABLE
CONTROL
OUT
IN
SYNCHRO
AC OUTLET
PHONO CD TUNER AUX
TAPE-1
/DAT
TAPE-2
/MD
TAPE-1
/DAT
TAPE-2
/MD
L
R
PB REC
SIGNAL
GND
INPUTS
L
R
RL
SPEAKER SYSTEMS
A
B
(Amplifier)
Power supply outlet
DCM-370/270
OPEN/CLOSE
DISC SKIP
5 DISC AUTOMATIC DISC LOADING SYSTEM
STOP
PAUSE
PLAY
PROG
PHONES
REPEAT
DCM-370
PCM AUDIO TECHNOLOGY / CD AUTO CHANGER
REMOTE
SENSOR
HDCD
£¢ ON OFF
TRACK
1
5
234
678
9101112
13141516
DISC
MIN
SEC
¤
‚
⁄
‚
‹fi
‚
1
2
3
4
5
( 1 PLAY )
NORMAL PLAY
Follow the steps below to get an understanding of the disc play
procedure.
1. Turn the power switch on and press the open/close (
5 OPEN/CLOSE)
button to open the drawer.
2. Set the disc to be played in the front side tray.
3. Press the play button (
1).
4. The drawer closes and the disc just loaded is played.
5. The disc number, track number and elapsed time, etc., for the disc
currently playing appear on the display window.
6. If the open/close (
5 OPEN/CLOSE) button is pressed while a disc is
playing, playback continues, but the drawer opens and four discs can be
replaced. The disc that can be replaced switches when the DISC SKIP
button is pressed.
Press the open/close (
5 OPEN/CLOSE) button again to close the drawer.
(1) Starting Playback
(2) Stopping Playback
OPEN/CLOSE
DISC SKIP
5 DISC AUTOMATIC DISC LOADING SYSTEM
STOP
PAUSE
PLAY
PROG
PHONES
REPEAT
DCM-370
PCM AUDIO TECHNOLOGY / CD AUTO CHANGER
REMOTE
SENSOR
HDCD
£¢ ON OFF
TRACK
1
5
234
678
9101112
13141516
DISC
MIN
SEC
¤
‚
⁄
‚
‹fi
‚
1
2
3
4
5
( 2 STOP )
1. Press the stop button (2 STOP) to stop playback.
2. To replace discs, press the open/close (
5 OPEN/CLOSE) button.
The disc which was playing switches over to the front side and the drawer
opens.
OPEN/CLOSE
DISC SKIP
STOP
PAUSE
PLAY
PROG
PHONES
REPEAT
5 DISC AUTOMATIC DISC LOADING SYSTEM
DCM-370
PCM AUDIO TECHNOLOGY / CD AUTO CHANGER
REMOTE
SENSOR
HDCD
£¢ ON OFF
TRACK
1
5
234
678
9 101112
13141516
DISC
MIN
SEC
¤
‚
⁄
‚
‹
fi
‚
1
2
3
4
5
• Set the disc you want to
played in the front side.
COAXIAL
DIGITAL OUT
LINE OUT
VARIABLE
CONTROL
OUT
IN
SYNCHRO
(Cassette Deck)
Power supply outlet
DCM-370/270
(2) Connecting the Digital Output Jack (COAXIAL) (DCM-370 only)
• Use a 75 Ω/ohm pin cord to connect the digital output jack (COAXIAL) of
the DCM-370 to the digital input jack (COAXIAL) on a digital processor or
MD recorder, available in stores.
COAXIAL
DIGITAL OUT
LINE OUT
VARIABLE
CONTROL
OUT
IN
SYNCHRO
DIGITAL INPUT
COAXIAL
OPTICAL
Power supply outlet
DCM-370/270
Digital processor or MD recorder

10
ENGLISH
OTHER PLAY METHODS
In addition to normal play, the following methods can be used when playing a disc.
q To Play the Desired Disc and
Desired Track ………………………………………………
Direct Selection
(Remote control only)

11
ENGLISH
(1) Programming (when using the remote control unit)
2
4
3
1
( PROG / DIRECT )
( DISC SELECT )
( 1 ~ 10 )
( 1 ~ 5 )
• Press the PROG/DIRECT button. The indicator lights. Use the
DISC SELECT, number and +10 buttons to select the disc to be
programmed.
For example, to program the 3rd track on the 2nd disc and the 12 track on
the 5th disc, press , , , , , ,
and .
2+10
5DISC SELECT32DISC SELECTPROG/DIRECT
PROGRAM
(2) Programming (when using the buttons on the main unit)
OPEN/CLOSE
DISC SKIP
5 DISC AUTOMATIC DISC LOADING SYSTEM
STOP
PAUSE
PLAY
PROG
PHONES
REPEAT
DCM-370
PCM AUDIO TECHNOLOGY / CD AUTO CHANGER
REMOTE
SENSOR
HDCD
£¢ ON OFF
TRACK
1
5
234
678
9101112
13141516
DISC
MIN
SEC
¤
‚
⁄
‚
‹fi
‚
1
2
3
4
5
( PROG )
• Press the PROGRAM (PROG) button. The indicator flashes. Use
the DISC SKIP, Automatic/Manual search reverse (
8 /6 ),
Automatic/Manual search forward (
7/9) buttons to select the disc to
be programmed.
For example, to program the 3rd track on the 2nd disc and the 12 track on
the 5th disc, press the PROGRAM (PROG) button, DISC SKIP button to
select the 2nd disc, Automatic/Manual search reverse (
8 /6 ) or
Automatic/Manual search forward (
7/9) button to select the 3rd track,
then press the PROGRAM (PROG) button.
In the same way, select the 12th track on the 5th disc using the DISC SKIP
and Automatic/Manual search buttons, then press the PROGRAM (PROG)
button.
PROGRAM
(3) To Check the Programmed Tracks (Remote control only)
( CALL )
• Press the call button on the wireless remote control unit.
The contents of the program are displayed in order one item at a time each
time the Call button is pressed.
(4) To Play a Program
OPEN/CLOSE
DISC SKIP
5 DISC AUTOMATIC DISC LOADING SYSTEM
STOP
PAUSE
PLAY
PROG
PHONES
REPEAT
DCM-370
PCM AUDIO TECHNOLOGY / CD AUTO CHANGER
REMOTE
SENSOR
HDCD
£¢ ON OFF
TRACK
1
5
234
678
9101112
13141516
DISC
MIN
SEC
¤
‚
⁄
‚
‹fi
‚
1
2
3
4
5
( 1 PLAY )
( 1 PLAY )
• Press the Play (1 PLAY) button to play the programmed selections in the
order in which they were programmed.
(5) To clear the entire program
• Pressing the PROG/DIRECT button once more erases the entire program.
Pressing the open/close (
5 OPEN/CLOSE) button also erases the contents
of a program.
• Pressing the PROG/DIRECT button while a program is being played cancels
the program. Play will then be continuous to the end of the disc currently
being played, after which the player will stop automatically.
Cautions
• If a program is run during playing of a track or from the Pause state, the
track which is currently being played becomes the 1st track in the program.
• Direct selection cannot be done while a program is being played. Inputting
the track number of a desired track with the Track Number buttons adds the
input track to the end of the program.
• When programming, do not program a track number which is not recorded
on the disc. If such a number is programmed by mistake, the player ignore
the program.
y To Repeat Play of All Tracks …………………………………
Repeat Play
• Press the Repeat (REPEAT) button. The indicator will light up.
Steps q and w can be done in any order, with the same results.
REPEAT
OPEN/CLOSE
DISC SKIP
5 DISC AUTOMATIC DISC LOADING SYSTEM
STOP
PAUSE
PLAY
PROG
PHONES
REPEAT
DCM-370
PCM AUDIO TECHNOLOGY / CD AUTO CHANGER
REMOTE
SENSOR
HDCD
£¢ ON OFF
TRACK
1
5
234
678
9 101112
13141516
DISC
MIN
SEC
¤
‚
⁄
‚
‹fi
‚
1
2
3
4
5
1
2
( 1 PLAY )
( REPEAT )
• When the repeat button is pressed once, the and indicators
light. In this mode, the track currently playing is repeated.
1REPEAT
REPEAT
REPEAT
1
Track
Track Track

12
ENGLISH
• If the repeat button is pressed again, the and indicators
light, and the disc currently playing is repeated.
1 DISCREPEAT
REPEAT
REPEAT
1 DISC
1st disc
(ALL TRACKS)
2nd disc
(ALL TRACKS)
5th disc
(ALL TRACKS)
• If the repeat button is pressed again, the , and
indicators light, and all the discs currently loaded are repeated.
DISCALLREPEAT
REPEAT
REPEAT
ALL DISC
1st disc
(ALL TRACKS)
2nd disc
(ALL TRACKS)
5th disc
(ALL TRACKS)
• Pressing the Repeat (REPEAT) button during play will also cause the player
to repeat play (of all tracks).
• To cancel repeat play, press the Repeat (REPEAT) button once more.
• Pressing the Repeat (REPEAT) button while a program is being played will
cause the tracks in the program to be played again in order.
• Pressing the Repeat (REPEAT) button during Random play will cause the
tracks to be played again at random.
u Letting the Player Select the
Order of Play …………………………………………………
Random Play
(Remote control only)
(1) Full Random Play
1
2
( 1 PLAY )
( RANDOM )
• Press the Random button, then press the Play button. The microcomputer
will then start play of the tracks on the 5 discs at random.
(2) Program Random Play
5
3
4
6
1
2
( 1 PLAY )
( RANDOM )
( PROG / DIRECT )
( DISC SELECT )
( 1 ~ 5 )
( 1 ~ 10 )
• After pressing the PROG/DIRECT button and inputting a program (See item
t on page 10 and 11), press the Random button, then the Play button. The
microcomputer will then select tracks from the program at random and play
them.
(3) Disc Sequential Random Play
1
3
4
2
( 1 PLAY )
( RANDOM )
( DISC SELECT )
( 1 ~ 5 )
• Press the RANDOM button and specify the disc numbers (1 to 5) with the
DISC SELECT button and the number buttons. A press of the PLAY (
1
PLAY) button will result in the player randomly selecting and playing tracks
on the disc in the order of specified discs.
Up to 5 discs can be selected, and the same disc can be selected, two or
more times. Disc sequential random play is cancelled when play ends.
(4) To Cancel Random Play
• Pressing the Random button once more cancels the Random function. Play
will then proceed from the track currently being played to the end of the last
track on the disc, then stop.
Pressing the open/close (
5 OPEN/CLOSE) button also cancels the Random
function.
Cautions
• Pressing the Random button during normal play starts full random play.
• Pressing the Random button during Program play starts random play of the
tracks in the program, including the tracks which have already been played.
• During random play, the player may display the number of disc which is not
loaded in the tray. In such a case, the player will read the disc information,
then reset automatically to correct. This is not a malfunction.

13
ENGLISH
o Audible quick search ………………………………………
Manual Search
• Using this function, you can cue to a desired point within a track, either in
the forward or reverse direction.
• Release the Automatic/Manual search button (
8/6 or 7/9) when
the desired point has been reached. Normal playback then continues.
(1) Manual Search Forward
OPEN/CLOSE
DISC SKIP
5 DISC AUTOMATIC DISC LOADING SYSTEM
STOP
PAUSE
PLAY
PROG
PHONES
REPEAT
DCM-370
PCM AUDIO TECHNOLOGY / CD AUTO CHANGER
REMOTE
SENSOR
HDCD
£¢ ON OFF
TRACK
1
5
234
678
9101112
13141516
DISC
MIN
SEC
¤
‚
⁄
‚
‹fi
‚
1
2
3
4
5
( 7/9 )
1. Keep on pressing the Automatic/Manual search forward button (7/9)
for more than 0.5 seconds during playback. Playback of the track is sped
up.
• As a reference, the current track number and elapsed playback time within
the track are displayed.
• Manual search forward is approximately 4 times faster when the
Automatic/Manual search forward button (
7/9) is kept on pressing
more than 5 seconds.
• If the Automatic/Manual search forward button (
7/9) is kept pressed
after the end of the final track on the disc is reached, ( ) is displayed and
manual search stops. To return to another point, press the
Automatic/Manual search reverse button (
8/6) until ( ) disappears.
• If the Automatic/Manual search forward button (
7/9) is kept on
pressing and the end of the current track is reached during random play or
programmed play, the next track is searched and playback starts.
1. Keep on pressing the Automatic/Manual search reverse button (8/6)
for more than 0.5 seconds during playback. Reverse playback of the track is
sped up.
• As a reference, the current track number and elapsed playback time within
the track are displayed.
• Manual search in reverse is approximately 4 times faster when the
Automatic/Manual search reverse button (
8/6) is kept on pressing
more than 5 seconds.
• If the Automatic/Manual search reverse button (
8/6) is kept pressed
after the beginning of the first track on the disc is reached, ( ) is displayed
and manual search stops. To return to another point, press the
Automatic/Manual search forward button (
7/9) until ( ) disappears.
• If the Automatic/Manual search reverse button (
8/6) is kept on
pressing and the beginning of the current track is reached during random
play or programmed play, the manual search in reverse is canceled and
playback starts.
!0 To Cue and Stop Play …………………………………………………
Pause
(Remote control only)
(1) Cuing by Direct Selection
• Cuing by direct selection, then entering the Pause state, is convenient for
practicing vocals with background music.
1
2
( 3 PAUSE )
( 1 ~ 10 )
1. Press the Track Number buttons to set the number of the desired track.
2. Press the Pause (
3 PAUSE) button.
• To start play, press the Play (
1 PLAY) button or the Pause (3 PAUSE)
button.
(2) Cuing by Program Selection
• After setting the desired track selections in a program, press the Pause (
3
PAUSE) button. The player will advance to the beginning of the 1st track in
program memory and wait in the Pause state.
!1 Synchronized Recording
Function ……………………………
Synchronized Recording Function
Connecting the SYNCHRO jack with a DENON cassette deck which is
equipped with a SYNCHRO jack will allow synchronized recordings to be made.
• To use this function, be sure to connect the SYNCHRO jacks as well as the
output terminal (LINE OUT). (Refer to page 9 for connections.) Then, load a
disc.
• With the CD player in the stop or pause condition, starting a synchronized
recording at the cassette deck side will automatically cause the CD player to
start playing. (This is synchronized play.)
• The remote control indicator of the display will blink during synchronized
play.
NOTES:
• Synchronized play is also possible in the program mode.
• The repeat mode are cancelled when synchronized play is started.
• Except for the Stop (
2 STOP), Play (1 PLAY) and TIME buttons, the buttons
will not operate during synchronized play.
• In the play condition, even if you start a synchronized recording at the
cassette deck side, CD player will not synchronize with the cassette deck
and the cassette deck becomes synchronized pause condition. In this case
push the Stop (
2 STOP) button of the cassette deck, set the CD player in
the stop or pause condition and start a synchronized recording at the
cassette deck side again.
• For further details, see the owner’s manual for the cassette deck that has
been connected.
i To Stop Play Temporarily ……………………………………………
Pause
OPEN/CLOSE
DISC SKIP
5 DISC AUTOMATIC DISC LOADING SYSTEM
STOP
PAUSE
PLAY
PROG
PHONES
REPEAT
DCM-370
PCM AUDIO TECHNOLOGY / CD AUTO CHANGER
REMOTE
SENSOR
HDCD
£¢ ON OFF
TRACK
1
5
234
678
9101112
13141516
DISC
MIN
SEC
¤
‚
⁄
‚
‹fi
‚
1
2
3
4
5
( 3 PAUSE )
• Pressing the Pause button during play stops play at that point.
Pressing the Pause button once more starts play again from the same point.
1. Press the Pause (
3 PAUSE) button.
4th Track
5th Track 6th Track
Pause
2. Press the Play (1 PLAY) button or the Pause (3 PAUSE) button to start
play.
(2) Manual Search in Reverse
OPEN/CLOSE
DISC SKIP
5 DISC AUTOMATIC DISC LOADING SYSTEM
STOP
PAUSE
PLAY
PROG
PHONES
REPEAT

14
ENGLISH
INSTALLATION PRECAUTIONS
The CD player uses a microcomputer for controlling internal electronic circuits.
In the event that the player is used while a near-by tuner or TV is turned on,
although unlikely, interference could occur either in the sound from the tuner
or the picture of the TV. To avoid this, please take the following precautions.
• Keep the CD player as far away from the tuner or TV set as possible.
• Keep the power cable and connecting cable of the CD player separate from
the antenna wires of the tuner and TV.
• Interference is particular likely to occur when an indoor antenna or a 300
Ω/ohms feeder cable is used. Thus, use of an outdoor antenna and 75
Ω/ohms coaxial cable is strongly recommended.
300 Ω/ohms feeder
cable
75 Ω/ohms coaxial
cable
PLAY USING THE REMOTE CONTROL UNIT
The DCM-370/270 CD Player can be controlled from across the room using the accessory Remote Control Unit.
(1) Inserting the Dry Battery
1. Remove the cover on the back of the remote control unit.
RC-258
2. Insert two R6P (AA size) batteries in the RC-258, following the
indications on the battery compartment.
3. Replace the cover on the back of the remote control unit.
Cautions Concerning Dry Batteries
• Use R6P batteries in the RC-258 remote control unit.
• Depending on the frequency of use, the dry batteries should be replaced
approximately once per year.
• If the remote control unit fails to control the CD Player, even before a year
has passed, replace the dry batteries with new ones.
• Be sure to follow polarity indications inside the case of the remote control
unit, inserting the + end and – end of each battery in the directions
indicated.
• Batteries may become damaged or leak under the following conditions.
Using new batteries together with old ones.
Using different types of batteries together.
Do not short batteries, take them apart, subject them to heat or throw
them into a fire.
• When the remote control unit is not used for a long period of time, remove
the dry batteries.
• If fluid leaks from the batteries, be sure to wipe up all battery fluid inside the
battery case and replace the batteries with new ones.
(2) Using the Remote Control Unit
• Aim the remote control unit toward the light receptor in the front of the CD
Player, as shown in the drawing below.
• The remote control unit can be used up to a distance of 8 meters in a
straight line from the CD Player. However, this distance will be shortened if
there is some obstruction between the remote control unit and the light
receptor, or if the beam of light is slanted.
REMOTE SENSOR
Left 30°
Right 30°
• The remote control unit has the same functions as the main unit, but the
following operations cannot be done.
Switching the power on and off.
Cautions During Use
• Do not press the operating buttons on the main unit and the remote control
unit at the same time. This could cause a malfunction.
• Operation of the remote control unit will be hindered if a strong light from
the sun or a light fixture is shining on the REMOTE SENSOR, or if there is
an obstruction between the remote control unit and the CD player unit.

15
ENGLISH
REMOTE CONTROL UNIT RC-258
Setting to the Program Mode
• For program search, press the PROG/DIRECT button then the track number
buttons (1 through 10 and +10).
• The remote control unit is normally set to the direct mode.
Drawer Open / Close Button
(
5 OPEN / CLOSE)
Random Button (RANDOM)
Repeat Button (REPEAT)
Track Number Button (1 ~ 10)
Play Button (1 PLAY)
Pause Button (3 PAUSE)
Stop Button (
2 STOP)
Automatic Search Forward Button (
8)
Automatic Search Reverse Button (
9)
Time Button (TIME)
Program/Direct Button (PROG/DIRECT)
Disc Select Button (DISC SELECT)
Call Button (CALL)
+10 Button (+10)
Disc Skip + Button (DISC SKIP +)
Disc Skip – Button (DISC SKIP –)
Volume + buttons (VOLUME +)
Volume – buttons (VOLUME –)
Manual Search Forward Button (
7)
Manual Search Reverse Button (
6)
Use this to adjust the output level output of the
VARIABLE.
The volume increases when the (+) button is pressed,
decreases when the (–) button is pressed.
• Disc Selection
Use the DISC SELECT and number buttons to select the number of the disc
to be played.
“–” appears on the disc number section of the display for 2 seconds when
the DISC SELECT button is pressed. Press the number button
corresponding to the number of the disc to be played while “–” is displayed
to select the disc number.
Track numbers are selected if the number buttons are pressed while “–” is
not displayed on the disc number section of the display.
• Direct Selection
Normally, direct search is possible simply by pressing the desired number
buttons.
• Program Selection (During playback, the track which is currently
playing is programmed as the 1st track.)
Press the PROG/DIRECT button, then press the number buttons.
For example, to program tracks number 3, 11, and 5, press
PROG/DIRECT
/ 3 / +10 and 1 / 5.
To cancel the program, press the PROG/DIRECT button.
• Inputting the Track Numbers
For track numbers below 10, simply press the corresponding button. For
track numbers of 11 and greater, press the +10 then the number buttons.
For example, for track number 22 press +10 twice then 2.
• Volume
The volume control on the unit will operate when the volume buttons are
pressed. The volume can be checked by looking at the position of the
control.
• Skipping Discs
The Disc Skip button (DISC SKIP +, –) will not function in the random and program modes.
During disc sequential random playback, when the Disc Skip + button is pressed, the following disc is played in random order.
• Volume
The output level of the VARIABLE output terminal can be changed.
When the volume button is pressed, “–” appears in the TIME M (minutes) section of the display window and the level appears in the S (seconds) section. The
volume can be changed between a maximum of “00” and a minimum of “–12” in 12 steps, by approximately 1.5 dB per step.
• The Time indicator indicates the amount of elapsed time for the track currently being played, the amount of time remaining for the current track and the
amount of time remaining for all tracks yet to be played.
Normally, the amount of elapsed time for the current track is displayed. Pressing this button once causes the indicator to light up, displaying the
amount of time remaining for the current track. Pressing the button once more turns the indicator off and causes the indicator to light up, displaying
the number and the time remaining for all tracks yet to be played on the disc. Pressing the button once again turns the indicator off and causes the
indicator to display the elapsed time for the current track.
• During playback, the total remaining time is the remaining time for the disc. For programmed playback, the remaining time for the program is only displayed
when the programmed tracks are all on the same disc.
“– – – –” is displayed when tracks on more than one disc are programmed.
• In the case that the total playing time of programmed tracks becomes more than 99:59, “– –: – –” is displayed.
REMAIN
–DISC
REMAIN

16
ENGLISH
COMPACT DISCS
1. Cautions in Handling Compact Discs
• Do not get fingerprints, oil, dirt or other substances on the compact disc.
If the disc becomes dirty, wipe it off with a dry, soft cloth.
• Do not clean compact discs with benzene, paint thinner, water, record
spray, anti-static agent, silicon cloth or similar substances.
• Take particular care to prevent scratches to the back side of the compact
disc when removing it from the case and when inserting it in its case.
• Do not bend compact discs.
• Do not apply to compact discs.
• Do not attempt to enlarge the center hole of the disc.
• Do not write on the label (printed) side of the disc with a ball point pen or
pencil.
• Bringing a CD into a warm room from a cold place could cause moisture
to condense on the disc surface. Do not attempt to dry the disc with a
hair dryer, etc.
TROUBLE? CHECK THE PLAYER TO FIND WHAT’S WRONG
Even when it appears that there is trouble, check the following points carefully.
SPECIFICATIONS
AUDIO
Number of Channels: 2 Channels
Frequency Characteristics: 2 ~ 20,000 Hz
Dynamic Range: 100 dB 098 dB
S N Ratio: 112 dB 108 dB
High Frequency Distortion: 0.0025% (1kHz) 0.003%
Separation: 98 dB 96 dB
Wow and Flutter: Less than the measuring
(±0.001% W. peak)
Output Voltage: Variable 0.2 ~ 2.0 V
DISC USED Audio compact discs are used
12 cm (5 in) and 8 cm (3 in)
OVERALL
Power Supply: 60 Hz
Voltage is shown on rating label
Power Consumption: 15 W
External Dimensions: 434 (W) x 115 (H) x 392 (D) mm
(17-3/32” x 4-17/32” x 15-7/16”)
Weight: 5.7 kg (12.6 lbs.) 5.7 kg (12.6 lbs)
DCM-270DCM-370
FUNCTIONS AND DISPLAY
Functions: Five discs can be used,
Direct Track Selection,
Program Selection,
Random Play, etc.
Displays: Disc No., Track No.,
Time (min., sec.),
Play, Pause, Repeat, Random, etc.
Other: Headphone Jack (Level Variable)
REMOTE CONTROL UNIT RC-258
Remote Control Method: Infrared Pulse system
Power Supply: 3 V DC Two R6P (standard SIZE AA)
External Dimensions: 50 (W) x 175 (H) x 18 (D) mm
(1-31/32” x 6-57/64” x 45/64”)
Weight: 100g (approx. 3 oz)
(Includes batteries)
HDCD
®
and High Definition Compatible Digital
®
are registered trademarks of Pacific Microsonics, Inc.
* Design and specifications are subject to change without notice in the course of product improvement.
2. Storage of Compact Discs
• After play, be sure to remove the disc from the player.
• To prevent dust, scratches, deformation, etc., be sure to store compact
discs in their case.
• Do not store compact discs in the following locations.
1. Places where direct sunlight strikes for long periods of time.
2. Places with a high humidity or a lot of dust.
3. Places reached by heat from a heater or similar appliance.
The drawer won’t open/close when the Open/Close button (
5
OPEN/CLOSE) is pressed.
• Is the Power switch on?
After a disc is loaded (0 00 00
M
00
S
) is displayed in the display window.
• Is the disc loaded correctly? ………………………………See page 8, 9, 16.
Play does not begin when the Play button (
1 PLAY) is pressed.
• Is the disc dirty or scratched? …………………………………See page 16.
There is no sound, or the sound is distorted.
• Is the output cord connected correctly
to the amplifier? …………………………………………………See page 8.
• Does the sound return to normal when the
amplifier’s knobs are adjusted or the proper
input device is selected?
The player won’t go to the place specified in the search.
• Is the disc dirty or scratched? …………………………………See page 16.
A program cannot be played.
• Is the method used to make a program and
run it correct? ……………………………………………………See page 10.
The player won’t operate correctly when the remote control unit is used.
• Are the dry batteries in the
remote control unit dead? ………………………………………See page 14.
• Is the remote control unit located too far
from the CD Player unit? ………………………………………See page 14.

FRANCAIS
17
FRANCAIS
Nous vous remercoins d’avoir acheté de lecteur de disque compact DENON.
Nous vous prions de lire attentivement le Mode d’emploi afin d’utiliser
correctement cet appareil.
— TABLE DES MATIERES —
CARACTERISTIQUES ………………………………………………………………17
PRECAUTIONS A PRENDRE PENDANT L’UTILISATION ………………………17
DESIGNATION DES PIECES ET LEURS FONCTIONS………………………18, 19
OUVERTURE ET FERMETURE DU TIROIR DE DISQUE COMPACT
ET CHARGEMENT D’UN DISQUE ……………………………………………20
CONNEXIONS ………………………………………………………………………21
LECTURE NORMALE ………………………………………………………………21
AUTRES METHODES DE LECTURE …………………………………………22~25
PRECAUTIONS D’INSTALLATION…………………………………………………26
LECTURE EN UTILISANT L’UNITE DE TELECOMMANDE ………………26, 27
COMPACT DISCS …………………………………………………………………28
DES PROBLEMES? VERIFIER LE LECTEUR POUR
EN DETERMINER LA CAUSE …………………………………………………28
CARACTERISTIQUES TECHNIQUES ……………………………………………28
En plus du lecteur CD, vérifier que les éléments suivants se trouvent bien
dans le carton d’emballage
(1) Mode d’emploi ……………………………………………………………1
(2) Cordon de connexion ………………………………………………………1
(3) Unité de télécommande RC-258 …………………………………………1
(4) Piles sèches (format R6P/AA) ……………………………………………2
CARACTERISTIQUES
(1) Décodeur (DCM-370) HDCD
®
(High Definition Compatible
Digital, Compatible Digital Haute Définition)
Le HDCD est une technologie de codage/décodage qui réduit
considérablement la distorsion survenant lors des enregistrements
digitaux, tout en restant compatible avec le format CD conventionnel. Le
HDCD permet aux données 20-bit d’être converties en données 16-bit des
CD courants sans perte de qualité de son.
L’utilisation de ce HDCD permet d’atteindre la haute résolution et la basse
distorsion caractéristiques du HDCD lors de la lecture de disques
compatibles HDCD, et la technologie digitale de DENON optimise les
possibilités de haute qualité de son de la technologie du HDCD. De plus,
les CD normaux et les CD compatibles HDCD sont identifiés
automatiquement, et le traitement de signal digital optimum pour ce type
de disque est utilisé.
(2) Filtre numérique de haute performance
Le DCM-370/270 utilise des filtres numériques de haute précision de
suréchantillonnage octuple.
(3) Lecture simnple des CD simples 8 cm
Les CD simples 8 cm peuvent être utilisés sans adaptateur.
(4) Programmation jusqu’à 32 plages
Toutes les plages d’un disque compact peuvent être programmées pour la
lecture dans n’importe quel ordre. La programmation en unités de disque
(de toutes les plages sur le disque) est également possible.
(5) Mécanisme de changeur de type carrousel nouvellement
développé fourni
Ce mécanisme peut contenir cinq disques et pendant qu’un disque est en
cours de lecture, les quatre disques restants peuvent être changés. De
plus, le carrousel peut tourner soit dans le sens des aiguilles d’une
montre, soit dans le sens contraire des aiguilles d’une montre, ainsi la
recherche entre disques est rapide.
(6) Télécommande sans fil accessoire
Outre les fonctions générales comme la lecture, l’arrêt et la pause, cette
unité de télécommande permet une sélection directe, une programmation
directe, une lecture aléatoire et d’autres fonctions. L’unité de
télécommande facilite énormément l’utilisation du DCM-370/270,
améliorant sa souplesse d’emploi.
IMPORTANT
(Uniquement modèle pour le marché Canada)
Le présent appareil numérique n’émet pas de bruites radioélectriques
dépassant les limites applicables aux appareils numériques de la Class B
prescrites dans le Réglement sur le brouillage redio- électrique édicté par le
ministére des Communications du Canada.
NOTE:
Ce lecteur CD utilise un laser semi-conducteur. Il est recommandé de l’utiliser
dans une pièce où la température est de 10°C (50°F) à 35°C (95°F) pour obtenir
un fonctionnement stable et apprécier au maximum la musique.
PRECAUTIONS A PRENDRE PENDANT L’UTILISATION
• Ce lecteur de compact disc peut reproduire les discs
qui portent la marque indiquée à droite.
• Pendant la sélection de piste, pendant la recherche et
lorsque le lecteur subit un choc violent, la vitesse de
rotation du disc change de manière importante,
provoquant l’émission d’un petit bruit. Cela n’est pas
un fonctionnement défectueux du lecteur.
• Si le lecteur CD est utilisé pendant qu’une émission FM ou AM est reçue,
celle-ci peut être parasitée. Couper l’alimentation du lecteur CD dans ce cas.
• La gamme dynamique du DCM-370/270 est large. Prendre des précautions
lorsque le volume de l’amplificateur est augmenté pendant que le volume
de reproduction est bas. Si le volume est réglé trop haut, les haut-parleurs
pourraient être endommagés.
• Ne pas utiliser de discs autres que des discs audio exclusifs avec ce lecteur
CD.
• L’installation du lecteur ou de ses cordons de connexion près d’un téléviseur
ou autre dispositif audio pourrait provoquer un ronflement. Dans ce cas,
changer l’emplacement du lecteur ou des cordons de connexion.
• Toujours retirer le disc du lecteur avant de déplacer celui-ci. Le disc pourrait
être endommagé s’il est laissé dans le lecteur pendant qu’il est déplacé.
• Ne pas placer d’objet dans le tiroir dans la position de chargement de disque
ou ne pas ouvrir et refermer le tiroir avec quelque chose à l’intérieur. Des
objets étrangers dans le tiroir pourraient endommager le mécanisme.
• Ne pas déplacer brusquement le lecteur d’un endroit froid à un endroit
chaud. Si le lecteur est froid lorsqu’il est apporté dans une pièce chaude, de
la condensation pourrait se former, empêchant un fonctionnement correct
du lecteur. Si de la condensation se forme dans le lecteur lorsqu’il est
apporté dans une pièce chaude, attendre au moins 30 minutes avant de
l’utiliser.
ATTENTION:
1. Toujours retier les disques du plateau avant toute manipulation. En cas
contraire l’appareil pourrait être endommagé.
2. Lorsque le lecteur est éteint, le niveau varié est effacé et remis à 0 dB.
C
• FOR U.S.A. & CANADA MODEL ONLY
CAUTION
TO PREVENT ELECTRIC SHOCK DO NOT USE THIS (POLARIZED) PLUG
WITH AN EXTENSION CORD, RECEPTACLE OR OTHER OUTLET UNLESS
THE BLADES CAN BE FULLY INSERTED TO PREVENT BLADE
EXPOSURE.
• POUR LES MODELES AMERICAINS ET CANADIENS UNIQUEMENT
ATTENTION
POUR PREVENIR LES CHOCS ELECTRIQUES NE PAS UTILISER CETTE
FICHE POLARISEE AVEC UN PROLONGATEUR UNE PRISE DE COURANT
OU UNE AUTRE SORTIE DE COURANT, SAUF SI LES LAMES PEUVENT
ETRE INSEREES A FOND SANS EN LAISSER AUCUNE PARTIE A
DECOUVERT.

FRANCAIS
PROGRAM
RANDOM
TRACK
R
1
5
234
678
9101112
13141516
DISC
MIN
SEC
REPEAT ALL
1
DISC
REMAIN
°
°
°
°
°°
°
1
2
3
4
5
18
DESIGNATION DES PIECES ET LEURS FONCTIONS
PANNEAU AVANT
PANNEAU ARRIERE
OPEN/CLOSE
DISC SKIP
5 DISC AUTOMATIC DISC LOADING SYSTEM
STOP
PAUSE
PLAY
PROG
PHONES
REPEAT
DCM-370
PCM AUDIO TECHNOLOGY / CD AUTO CHANGER
REMOTE
SENSOR
HDCD
£¢ ON OFF
qwertyuio!0 !1
!5
!4
!3 !2
TRACK
1
5
234
678
9101112
13141516
DISC
MIN
SEC
¤
‚
⁄
‚
‹fi
‚
1
2
3
4
5
COAXIAL
DIGITAL OUT
LINE OUT
VARIABLE
CONTROL
OUT
IN
SYNCHRO
!7 !8
@0
@1
!9
OPEN/CLOSE
DISC SKIP
STOP
PAUSE
PLAY
PROG
PHONES
REPEAT
5 DISC AUTOMATIC DISC LOADING SYSTEM
DCM-370
PCM AUDIO TECHNOLOGY / CD AUTO CHANGER
REMOTE
SENSOR
HDCD
£¢ ON OFF
TRACK
1
5
234
678
9101112
13141516
DISC
MIN
SEC
¤
‚
⁄
‚
‹
fi
‚
1
2
3
4
5
!6
AFFICHAGE
CARROUSEL
Indicateur de lecture
Indicateur de
pause
Indicateur de disc
Numéro de disque
Numéro de plage
Temps
minute
seconde
Indicateur de répétition
Indicateur de lecture aléatoire
Indicateur de
programme
Signal de télécommande
Indicateur de réception
Calendrier musical à 16 pistes.
Indicateur de reste
DCM-370 seulement
DCM-370 seulement

FRANCAIS
19
q
Interrupteur d’alimentation (POWER)
• Appuyer sur cet interrupteur pour mettre l’appareil sous tension.
w
Récepteur de télécommande (REMOTE SENSOR)
• Ce récepteur reçoit les signaux infrarouges de l’unité de
télécommande sans fil.
• Pointer l’unité de télécommande vers cette fenêtre de réception.
e
Indicateur HDCD (DCM-370 seulement)
• Ceci s’allume quand un disque compatible avec les HDCD est joué.
r
Fenêtre d’affichage
• Le No. de disc, le No. de piste, la durée de lecture et autres
informations sont affichés dans la fenêtre d’affichage.
t
Touche de répétition (REPEAT)
• Appuyer sur cette touche pour une lecture répétée. L’indicateur de
répétition apparaît sur l’affichage. Les trois types suivants de
modes de répétition sont disponibles:
• Lorsqu’il est pressé une fois, les indicateurs de répetition et
s’allume et la plage en cours de lecture est répetée.
• Lorsqu’il est de nouveau pressé, les indicateurs de répetition
et 1 disque s’allument, et toutes les plages sur le disque en
cours de lecture sont lues répetées.
• Lorsqu’il est de nouveau pressé, les indicateurs de répetition ,
totalité et disque s’allument, et les disques actuellement
sur le plateau sont répetés.
• Lorsqu’il est de nouveau pressé, les indicateurs de répetition ,
Totalité et disque s’éteignent, et le mode de répetition
est annulé.
La fonction de répétition peut aussi être utilisée pendant une lecture
d’un programme et une lecture aléatoire, mais dans ce cas seul le
mode répétition du disque (l’indicateur et ) est disponible.
(Se réferer à la page 23 pour les détails.)
y
Touche de programme (PROG)
• Appuyez sur cette touche pour saisir des plages pour la reproduction
programmée. (Se réferer à la page 22 pour les détails.)
u
Touche de recherche en arrière
automatique/manuelle (
8/6)
• Appuyez sur cette touche pour faire revenir l’endroit de reproduction
jusqu’au commencement de la plage en cours de reproduction.
Appuyez encore une fois pour retourner jusqu’à d’autres plages.
• En appuyant sur cette touche un certain nombre de fois, l’endroit de
reproduction sera déplacé en arrière du même nombre de plages.
• Maintenir cette touche enfoncée pendant plus de 0,5 seconde
pendant la lecture pour effectuer une recherche rapide en arrière.
Aussi longtemps que la touche est maintenue enfoncée, les signaux
musicaux sont lus plus rapidement qu’en cas normal.
• Maintenez votre doigt sur cette touche pendant plus de 5 secondes,
la recherche arrière devient approximativement 4 fois plus rapide.
i
Touche de recherche en avant
automatique/manuelle (
7/9)
• Appuyer sur cette touche pour déplacer le capteur vers le début de la
plage suivante. Appuyer de nouveau sur cette touche pour avancer
vers d’autres plages.
• En appuyant plusieurs fois sur cette touche, le capteur avance le
nombre correspondant de plages.
• Maintenir enfoncée cette touche pendant plus de 0,5 secondes
pendant la lecture pour effectuer une recherche rapide en avant.
Aussi longtemps que la touche est maintenue enfoncée, les signaux
musicaux sont lus plus rapidement qu’en cas normal.
• Maintenez votre doigt sur cette touche pendant plus de 5 secondes,
la recherche avant devient approximativement 4 fois plus rapide.
o
Touche d’arrêt (2 STOP)
• Appuyer sur cette touche pour arrêter la lecture.
DISCALL
DISCALL
REPEAT
DISCALL
REPEAT
1 DISC
REPEAT
1
REPEAT
REPEAT
!0
Touche de pause (3 PAUSE)
• Appuyer sur cette touche pour arrêter provisoirement la lecture.
• Une pression sur la touche de pause pendant la lecture l’arrête
provisoirement. L’indicateur s’éteint et l’indicateur s’allume.
• Pour arrêter le temps de pause, appuyez soit sur la touche lecture
!1,
soit sur la touche pause
!0 une seconde fois.
!1
Touche de lecture (1 PLAY)
• Appuyer sur cette touche pour lire un disque.
L’indicateur s’allume lorsque la touche est enfoncée, le numéro
du disque et la plage en cours de lecture sont affichés par l’indicateur
de numéro de disque et de No. de plage et le temps écoulé de a
plage actuelle est affiché par l’indicateur de temps.
• L’indicateur s’éteint après la fin de la lecture de la dernière plage
du dernier disque et le lecteur s’arrête.
!2
Touche de saut de disque (DISC SKIP)
• Chaque fois que cette touche est enfoncée, le carrousel tourne dans
la direction des aiguilles d’une montre vers la position du tiroir suivant.
Ceci permet le chargement et déchargement de disques.
Cette touche est également utilisée pour sélectionner le disque
suivant en lecture normale en continu.
!3
Touche d’ouverture/fermeture (5 OPEN/CLOSE)
• Appuyer sur cette touche pour ouvrir.
• Le tiroir est ouvert vers l’avant.
• Appuyer de nouveau sur la touche pour refermer le tiroir.
!4
Tiroir de chargement
• Les disques peuvent être chargés et déchargés quand ce tiroir est
ouvert. Ne pas forcer le tiroir à la main pour le fermer.
!5
Jack de casque (PHONES)
• Insérer la fiche du casque dans ce jack pour une écoute privée de
compact disc. (Le casque est vendu séparément).
!6
Tiroirs de disque (1 ~ 5)
• Un disque par tiroir peut être chargé.
!7
Borne de sortie (LINE OUT)
• Raccorder les cordons de connexion de ces bornes aux bornes
d’entrée de l’amplificateur. (Se réferer à la page 21 pour les
connections.)
!8
Prise de synchronisation (SYNCHRO)
• Pour effectuer un enregistrement synchronisé, cette prise doit être
connectée à la prise de synchronisation (SYNCHRO) de la platine avec
un cordon de connexion. (Se réferer à la page 21 pour les
connections.)
!9
Connecteur d’entrée de commande (CONTROL IN)
(DCM-370 seulement)
• Il s’agit du connecteur d’entrée pour télécommande par fil.
Consultez votre revendeur DENON si vous souhaitez utiliser ce
connecteur.
@0
Connecteur de sortie de commande (CONTROL OUT)
(DCM-370 seulement)
• Il s’agit du connecteur de sortie pour télécommande par fil.
Consultez votre revendeur DENON si vous souhaitez utiliser ce
connecteur.
@1
Connecteur de sortie digital audio (COAXIAL)
(DCM-370 seulement)
• Connecter un cordon 75 Ω/ohms à prise brochée disponible dans le
commerce.
• Les données digitales sont sorties par ce connecteur.
1
1
31
Opération en continu des touches
Si la touche d’inversion de recherche automatique
u ou la touche d’avance
de recherche automatique
i, sont enfoncées, la fonction de cette touche
se répétera.

FRANCAIS
20
OUVERTURE ET FERMETURE DU TIROIR DE DISQUE COMPACT ET CHARGEMENT D’UN DISQUE
Ouverture et fermeture du tiroir de disque compact (Cette fonction ne
fonctionne que lorsque l’alimentation est branchée)
1.Appuyez sur la touche d’alimentation (POWER) pour mettre l’appareil sous
tension.
2. Appuyez sur la touche d’ouverture/fermeture (
5 OPEN/CLOSE).
Comment charger un disque
• Assurez-vous que le tiroir soit complètement ouvert.
• Tenez le disque par les bords et placez-le sur le plateau de disque (ne
touchez pas la surface à signaux, c. à. d. le côté luisant).
• Placer le disque correctement dans le tiroir selon sa dimension.
Placer des disques de 8 cm sur le trou central.
Placer des disques de 12 cm dans le trou extérieur.
• Quand le tiroir est ouvert pendant le mode d’arrêt, les disque peuvent
chargés dans les 3 plateaux. Si on appuie sur la touche DISC SKIP, le
carrousel tourne et on peut charger un disque sur un autre plateau.
Lorsque le tiroir est ouvert pendant le mode de lecture, il est possible de
charger et retirer des disques de tous les tiroirs de disque sauf de celui du
disque en cours de lecture. 3 disques peuvent être remplacés et appuyer
sur la touche DISC SKIP pour commuter vers l’autre plateau du disque à
changer.
• Appuyez sur la touche d’ouverture/fermeture (
5 OPEN/CLOSE) pour fermer
le tiroir de disque.
Attention:
• Le lecteur ne fonctionne pas correctement et le disque peut même être
endommagé s’il n’est pas placé correctement.
• Si votre doigt reste coinçé dans le tiroir de disque celui-ci se ferme, appuyez
sur la touche d’ouverture/fermeture (
5 OPEN/CLOSE).
• Ne placez pas des objets sur le plateau de disque ni n’y placez plus d’un
disque à la fois sans quoi vous risquez d’obtenir un fonctionnement
défectueux.
• Ne poussez pas sur le disque à la main pour l’introduire lorsque
l’alimentation n’est pas branchée étant donné que ceci pourrait entraîner un
fonctionnement défectueux et endommager votre lecteur de disque
compact.
• Ne pas toucher le carrousel pendant sa rotation. Aussi, ne pas tourner le
carrousel à la main lorsqu’il est arrêté, car il pourrait être endommagé.
• N’insérez pas de disque à l’endroit indiqué par la flèche.
Ceci pourrait endommager le mécanisme interne de l’appareil.
OPEN/CLOSE
DISC SKIP
STOP
PAUSE
PLAY
PROG
PHONES
REPEAT
5 DISC AUTOMATIC DISC LOADING SYSTEM
DCM-370
PCM AUDIO TECHNOLOGY / CD AUTO CHANGER
REMOTE
SENSOR
HDCD
£¢ ON OFF
TRACK
1
5
234
678
9101112
13141516
DISC
MIN
SEC
¤
‚
⁄
‚
‹
fi
‚
1
2
3
4
5
OPEN/CLOSE
DISC SKIP
STOP
PAUSE
PLAY
PROG
PHONES
REPEAT
5 DISC AUTOMATIC DISC LOADING SYSTEM
DCM-370
PCM AUDIO TECHNOLOGY / CD AUTO CHANGER
REMOTE
SENSOR
HDCD
£¢ ON OFF
TRACK
1
5
234
678
9 101112
13141516
DISC
MIN
SEC
¤
‚
⁄
‚
‹
fi
‚
1
2
3
4
5
OPEN/CLOSE
DISC SKIP
STOP
PAUSE
PLAY
PROG
PHONES
REPEAT
5 DISC AUTOMATIC DISC LOADING SYSTEM
DCM-370
PCM AUDIO TECHNOLOGY / CD AUTO CHANGER
REMOTE
SENSOR
HDCD
£¢ ON OFF

FRANCAIS
21
CONNEXIONS
(1) Connexion des sortie
• Brancher une extrémité du cordon de connexion fourni avec le lecteur CD
aux bornes de sortie, gauche (L) et droite (R), du lecteur CD et l’autre
extrémité aux bornes d’entrée CD, AUX ou TAPE PLAY, gauche (L) et
droite (R), de l’amplificateur.
(3) Connexions de prise de synchronisation (SYNCHRO)
• Connecter la prise de synchronisation (SYNCHRO) à une platine cassette
DENON équipée d’une prise de synchronisation (SYNCHRO), effectuer
ensuite un enregistrement synchronisé. Utiliser le cordon de connexion
fourni avec la platine cassette.
• Pour utiliser cette fonction, connecter aussi les prises de sortie et faire les
réglages de telle sorte qu’un enregistrement puisse être effectué depuis
lecteur CD à la platine cassette.
COAXIAL
DIGITAL OUT
LINE OUT
VARIABLE
CONTROL
OUT
IN
SYNCHRO
AC OUTLET
PHONO CD TUNER AUX
TAPE-1
/DAT
TAPE-2
/MD
TAPE-1
/DAT
TAPE-2
/MD
L
R
PB REC
SIGNAL
GND
INPUTS
L
R
RL
SPEAKER SYSTEMS
A
B
(Amplificateur)
Prise secteur
DCM-370/270
OPEN/CLOSE
DISC SKIP
5 DISC AUTOMATIC DISC LOADING SYSTEM
STOP
PAUSE
PLAY
PROG
PHONES
REPEAT
DCM-370
PCM AUDIO TECHNOLOGY / CD AUTO CHANGER
REMOTE
SENSOR
HDCD
£¢ ON OFF
TRACK
1
5
234
678
9101112
13141516
DISC
MIN
SEC
¤
‚
⁄
‚
‹fi
‚
1
2
3
4
5
( 1 PLAY )
LECTURE NORMALE
Suivre les étapes ci-dessous pour comprendre la procédure de lecture d’un disc.
1. Mettre l’appareil sous tension et appuyer sur la touche d’ouverture /
fermeture (
5 OPEN/CLOSE) pour ouvrir le tiroir.
2. Mettez le disque qui va être joué dans le plateau avant.
3. Appuyer sur la touche de lecture (PLAY) (
1).
4. Le tiroir se ferme et le disque qui vient d’être chargé est lu.
5. Le numéro de disque, numéro de plage et le temps écoulé, etc. pour le
disque actuellement en cours de lecture apparaissent sur la fenêtre de
l’affichage.
6. Si la touche d’ouverture/fermeture (
5 OPEN/CLOSE) est enfoncée,
pendant qu’un disque est lu, la lecture continue, mais le tiroir s’ouvre et
quatre disques peuvent être remplacés. Le disque pouvant être remplacé
change lorque le touche DISC SKIP est pressé.
Appuyer de nouveau sur la touche d’ouverture/fermeture (
5 OPEN/CLOSE)
pour refermer le tiroir.
(1) Pour démarrer la lecture
(2) Pour arrêter la lecture
OPEN/CLOSE
DISC SKIP
5 DISC AUTOMATIC DISC LOADING SYSTEM
STOP
PAUSE
PLAY
PROG
PHONES
REPEAT
DCM-370
PCM AUDIO TECHNOLOGY / CD AUTO CHANGER
REMOTE
SENSOR
HDCD
£¢ ON OFF
TRACK
1
5
234
678
9101112
13141516
DISC
MIN
SEC
¤
‚
⁄
‚
‹fi
‚
1
2
3
4
5
( 2 STOP )
1. Appuyer sur la touche d’arrêt (2 STOP) pour arrêter la lecture.
2. Pour remplacer des disques, appuyer sur la touche d’ouverture/fermeture
(
5 OPEN/CLOSE).
Le disque qui était en train d’être joué passe à l’avant et le tiroir s’ouvre.
OPEN/CLOSE
DISC SKIP
STOP
PAUSE
PLAY
PROG
PHONES
REPEAT
5 DISC AUTOMATIC DISC LOADING SYSTEM
DCM-370
PCM AUDIO TECHNOLOGY / CD AUTO CHANGER
REMOTE
SENSOR
HDCD
£¢ ON OFF
TRACK
1
5
234
678
9 101112
13141516
DISC
MIN
SEC
¤
‚
⁄
‚
‹
fi
‚
1
2
3
4
5
• Mettez le disque que vous
voulez entendre à l’avant.
COAXIAL
DIGITAL OUT
LINE OUT
VARIABLE
CONTROL
OUT
IN
SYNCHRO
(Magnétocassette) Prise secteur
DCM-370/270
(2)
Connexions à la prise de sortie numérique (COAXIAL) (DCM-370 seulement)
•
Utiliser un cordon de 75 Ω/ohms pour connecter la prise de sortie numérique
(COAXIAL) du DCM-370 à la prise d’entrée numérique (COAXIAL) d’un
processeur numérique ou d’un lecteur MD, vendu en magasin.
COAXIAL
DIGITAL OUT
LINE OUT
VARIABLE
CONTROL
OUT
IN
SYNCHRO
DIGITAL INPUT
COAXIAL
OPTICAL
Prise secteur
DCM-370/270
Processur numérique ou lecteur MD

FRANCAIS
22
AUTRES METHODES DE LECTURE
Outre la lecture normale, les méthodes suivantes peuvent être utilisées pour reproduire un disc.
q Pour lire le disque désiré et
la plage désirée ……………………………………………
Sélection directe
(Seulement la télécommande)
1
3
2
( DISC SELECT )
( 1 ~ 10 )
( 1 ~ 5 )
1. Appuyer sur la touche de sélection de disque (DISC SELECT).
2. Utiliser les touches numériques (1 à 5) pour sélectionner le numéro de
disque à lire.
3. Ensuite, utiliser les touches numériques (1 à 10 et +10) pour sélectionner le
numéro de plage à lire.
• Par exemple, pour lire la 4ème plage sur le 3ème disque:
Appuyer sur la touche de sélection de disque , appuyer sur
et .
Pour lire la 12ème plage sur le 5ème disque:
Appuyer sur la touche de sélection de disque , appuyer sur ,
et .
La lecture commence à partir du numéro du disque et de la plage
sélectionnés.
2+10
5DISC SELECT
4
3DISC SELECT
w Pour aller vers le disque suivant
Pendant la lecture …………………………………………
Saut de disque
OPEN/CLOSE
DISC SKIP
5 DISC AUTOMATIC DISC LOADING SYSTEM
STOP
PAUSE
PLAY
PROG
PHONES
REPEAT

FRANCAIS
23
(1) Programmation (lors de l’utilisation des touches de la télécommande)
2
4
3
1
( PROG / DIRECT )
( DISC SELECT )
( 1 ~ 10 )
( 1 ~ 5 )
• Appuyer sur la touche de programme/directe (PROG/DIRECT). L’indicateur
de programme s’allume. Utiliser la touche de sélection de disque
(DISC SELECT), les touches numériques et +10 pour sélectionner le disque
à programmer.
Par exemple, pour programmer la 3ème plage sur le 2ème disque et la
12ème plage sur le 5ème disque, appuyer sur la touche de
programme/directe , sur la touche de sélection de disque
, sur , , sur la touche de sélection de disque ,
sur , et .
2+105
DISC SELECT32DISC SELECT
PROG/DIRECT
PROGRAM
(2) Progammation (lors de l’utilisation des touches de l’unité principale)
OPEN/CLOSE
DISC SKIP
5 DISC AUTOMATIC DISC LOADING SYSTEM
STOP
PAUSE
PLAY
PROG
PHONES
REPEAT
DCM-370
PCM AUDIO TECHNOLOGY / CD AUTO CHANGER
REMOTE
SENSOR
HDCD
£¢ ON OFF
TRACK
1
5
234
678
9101112
13141516
DISC
MIN
SEC
¤
‚
⁄
‚
‹fi
‚
1
2
3
4
5
( PROG )
• Appuyez sur la touche PROGRAM (PROG). L’indicateur clignote.
Utilisez les touches DISC SKIP, recherche arrière Automatique/ Manuelle
(
8 /6 ), recherche avant Automatique/Manuelle (7/9 ) pour
sélectionner le disque à programmer.
Par exemple, pour programmer la 3ème piste du 2ème disque et les 12
pistes du 5ème disque, appuyez sur la touche PROGRAM (PROG), la touche
DISC SKIP pour sélectionner le 2ème disque, les touches recherche arrière
Automatique/Manuelle (
8 /6 ) ou recherche avant Automatique/
Manuelle (
7/9) pour sélectionner la 3ème piste, puis appuyez sur la
touche PROGRAM (PROG).
De la même façon, sélectionner la 12ème piste sur le 5ème disque en
utilisant les touches DISC SKIP et recherche Automatique/Manuelle, puis
appuyez sur la touche PROGRAM (PROG).
PROGRAM
(3) Pour vérifier les pistes programmées (Seulement la télécommande)
( CALL )
• Appuyer sur la touche d’appel de la télécommande sans fil.
Le contenu du programme est affiché, dans l’ordre, un élément à la fois,
chaque fois que la touche de rappel est enfoncée.
(4) Pour effectuer une lecture programmée
OPEN/CLOSE
DISC SKIP
5 DISC AUTOMATIC DISC LOADING SYSTEM
STOP
PAUSE
PLAY
PROG
PHONES
REPEAT
DCM-370
PCM AUDIO TECHNOLOGY / CD AUTO CHANGER
REMOTE
SENSOR
HDCD
£¢ ON OFF
TRACK
1
5
234
678
9101112
13141516
DISC
MIN
SEC
¤
‚
⁄
‚
‹fi
‚
1
2
3
4
5

FRANCAIS
24
• Si la touche de répétition est de nouveau enfoncée, les indicateurs de
répétition et 1 tout le disque s’allument et le disque en
cours de lecture est répété.
1 DISCREPEAT
REPEAT
REPEAT
1 DISC
1er disque
(TOUTES LES PLAGES)
2ème disque
(TOUTES LES PLAGES)
5ème disque
(TOUTES LES PLAGES)
• Si le touche de répetition est de nouveau pressé, les indicateurs de
répetition , totalité etdisque s’allument, et tous les
disques actuellement chargés sont répetés.
DISCALLREPEAT
REPEAT
REPEAT
ALL DISC
1er disque
(TOUTES LES PLAGES)
2ème disque
(TOUTES LES PLAGES)
5ème disque
(TOUTES LES PLAGES)
• Une pression sur la touche de répétition (REPEAT) pendant la lecture active
la lecture répétée (de toutes les pistes).
• Pour annuler la lecture répétée, appuyer une seconde fois sur la touche de
répétition (REPEAT).
• Une pression sur la touche de répétition (REPEAT) pendant une lecture
programmée active la lecture répétée des pistes programmées, dans
l’ordre.
• Une pression sur la touche de répétition (REPEAT) pendant une lecture
aléatoire active la lecture répétée aléatoire des pistes.
u Pour laisser le lecteur sélectionner
l’ordre de lecture …………………………………………
Lecture aléatoire
(Seulement la télécommande)
(1) Lecture aléatoire totale
1
2
( 1 PLAY )
( RANDOM )
• Appuyez sur la touche Random, puis appuyez sur la touche Play, le micro
ordinateur commencera alors la lecture aléatoire des 5 disques.
(2) Lecture aléatoire programmée
5
3
4
6
1
2
( 1 PLAY )
( RANDOM )
( PROG / DIRECT )
( DISC SELECT )
( 1 ~ 5 )
( 1 ~ 10 )
• Après avoir enfoncé la touche de programme/directe (PROG/DIRECT) et
introduit un programme (Voir le point
t à la page 22 ,23), appuyer sur la
touche aléatoire, puis sur la touche de lecture. Le micro-ordinateur
sélectionne alors les plages du programme en ordre aléatoire et les lit.
(3) Lecture aléatoire séquentielle de disc
1
3
4
2
( 1 PLAY )
( RANDOM )
( DISC SELECT )
( 1 ~ 5 )
• Appuyer sur la touche RANDOM et spécifier le nombre de disques (de 1 à 5)
avec la touche DISC SELECT et les touches de numéro. En appuyant
ensuite sur la touche PLAY (
1 PLAY), l’appareil sélectionne et procède
casuellement à la lecture des pistes du disque et ce dans l’ordre des
disques spécifiés.
Jusqu’à 5 disques peuvent être sélectionnés et le même disque peut être
sélectionné, deux fois ou plus. La lecture aléatoire séquentielle de disque
est annulée lorsque la lecture est terminée.
(4) Pour annuler la lecture aléatoire
• Lorsque la touche aléatoire est de nouveau enfoncée, la fonction aléatoire
est annulée. La lecture procède alors à partir de la plage en cours de lecture
jusqu’à la fin de a dernière plage, puis s’arrête.
Lorsque la touche d’ouverture/fermeture (
5 OPEN/CLOSE) est enfoncée, la
fonction aléatoire est annulée.
Attention
• Lorsque la touche aléatoire est enfoncée pendant la lecture normale, la
lecture complètement aléatoire commence.
• Lorsque la touche aléatoire est enfoncée pendant la lecture de programme,
la lecture aléatoire des plages dans le programme y comprises les plages
qui ont déjà été lues commence.
• Pendant la lecture aléatoire, le lecteur peut afficher le numéro de disque qui
n’est pas chargé dans le tiroir. Dans un tel cas, le lecteur lit l’information sur
le disque, puis se réinitialise pour corriger automatiquement. Ceci n’est pas
un mauvais fonctionnement.

FRANCAIS
25
o Recherche rapide audible …………………………
Recherche manuelle
• A l’aide de cette fonction, vous pouvez repérer un endroit désiré dans une
plage, en avant ou en arrière.
• Relâcher la touche de recherche Automatique/Manuelle (
8/6 ou
7/9) lorsque le point désiré est atteint. La lecture normale continue.
(1) Recherche manuelle en sens avant
OPEN/CLOSE
DISC SKIP
5 DISC AUTOMATIC DISC LOADING SYSTEM
STOP
PAUSE
PLAY
PROG
PHONES
REPEAT
DCM-370
PCM AUDIO TECHNOLOGY / CD AUTO CHANGER
REMOTE
SENSOR
HDCD
£¢ ON OFF
TRACK
1
5
234
678
9101112
13141516
DISC
MIN
SEC
¤
‚
⁄
‚
‹fi
‚
1
2
3
4
5
( 7/9 )
1. Maintenir enfoncée la touche de recherche en avant Automatique/Manuelle
(
7/9) ) pendant plus de 0,5 seconde pendant la lecture. La lecture de
la bande est accélérée.
• Comme référence, le numéro de la plage en cours de reproduction et le
temps écoulé de la plage sont affichés.
• La recherche manuelle avant est approximativement 4 fois plus rapide
quand on appuie sur la touche de recherche avant Automatique/Manuelle
(
7/9) pendant plus de 5 secondes.
• Si la touche de recherche en avant Automatique/Manuelle (
7/9) est
maintenue enfoncée lorsque la fin de la dernière plage sur le disque est
atteint, ( ) est affiché et la recherche manuelle s’arrête. Pour revenir vers
un autre point, appuyer sur la touche de recherche de arrière Automatique/
Manuelle (
8/6) jusqu’à ce que ( ) disparaisse.
• Si on appuie sur la touche de recherche avant Automatique/Manuelle
(
7/9) et que l’on arrive à la fin de la piste parcourue pendant la lecture
aléatoire ou la lecture d’un programme, on passe à la piste suivante et la
lecture commence.
• La recherche manuelle arrière est approximativement 4 fois plus rapide
quand on appuie sur la touche de recherche arrière Automatique/Manuelle
(
8/6) pendant plus de 5 secondes.
• Si la touche de recherche en arrière Automatique/Manuelle (
8/6) est
maintenue enfoncée lorsque le début de la première plage sur le disque est
atteint, ( ) est affiché et la recherche manuelle s’arrête. Pour revenir vers
un autre point, appuyer sur la touche de recherche en avant
Automatique/Manuelle (
7/9) jusqu’à ce que (
)
disparaisse.
• Si on appuie sur la touche de recherche arrière Automatique/Manuelle
(
8/6) et que l’on arrive au début de la piste parcourue pendant la
lecture aléatoire ou la lecture d’un programme, la recherche manuelle arrière
est arrêtée et la lecture commence.
!0 Repérage et arrêt de la lecture ………………………………………
Pause
(Seulement la télécommande)
(1) Repérage par sélection directe
• Le repérage par sélection directe, puis le passage en mode de pause, est
pratique pour faire des exercices de chant avec une musique de fond.
1
2
( 3 PAUSE )
( 1 ~ 10 )
1. Appuyer sur les touches de numéro de plage pour régler le numéro de la
piste désirée.
2. Appuyer sur la touche de pause (
3 PAUSE).
• Pour démarrer la lecture, appuyer sur la touche de lecture (
1 PLAY) ou sur
la touche de pause (
3 PAUSE).
(2) Repérage par sélection programmée
• Après avoir programmé les pistes désirées, appuyer sur la touche de pause
(
3 PAUSE). Le capteur avance jusqu’au début de la 1ère piste programmée
et le lecteur passe dans le mode de pause.
!1 Fonction d’enregistrement
synchronisé……………………
Fonction d’enregistrement synchronisé
Le fait de connecter une prise de synchronisation (SYNCHRO) à une platine
cassette DENON équipée d’une prise de synchronisation (SYNCHRO), permet
d’effectuer des enregistrements synchronisés.
• Pour utiliser cette fonction, s’assurer de connecter les prises de
synchronisation (SYNCHRO) ainsi que les prises de sortie (LINE OUT). (Se
réferer à la page 21 pour les connections.) Ensuite, charger un disque.
• Avec le lecteur CD en mode d’arrêt ou de pause, le fait de commencer un
enregistrement synchronisé sur une platine cassette fait démarrer
automatiquement le lecteur CD. (Ceci est appelé la lecture synchronisée.)
• L’indicateur de réception de signal de télécommande de l’affichage clignote
pendant la lecture synchronisée.
REMARQUES:
• La lecture synchronisée est aussi possible en mode de programmation.
• Le mode répétion sont annulées lorsque la lecture synchronisée a
démarrée.
• Excepté pour la touche d’arrêt (
2 STOP), touche de reproduction (1 PLAY)
et la et touche de mode de temps (TIME), les touches ne fonctionnent pas
pendant la lecture synchronisée.
• En mode de lecture, même si un enregistrement synchronisé démarre sur la
platine cassette, le lecteur de CD n’est pas synchronisé avec la platine
cassette et la platine cassette entre em mode de pause de synchronisation.
Dans ce cas, enfoncer la touche d’arrêt (
2 STOP) de la platine cassette,
régler le lecteur de CD en mode d’arrêt ou de pause et recommencer un
enregistrement synchronisé sur la platine cassette.
• Pour des détails complémentaires, voir le mode d’emploi de la platine
cassette qui a été connectée.
i Pour arrêter provisoirement la lecture ……………………………
Pause
OPEN/CLOSE
DISC SKIP
5 DISC AUTOMATIC DISC LOADING SYSTEM
STOP
PAUSE
PLAY
PROG
PHONES
REPEAT
DCM-370
PCM AUDIO TECHNOLOGY / CD AUTO CHANGER
REMOTE
SENSOR
HDCD
£¢ ON OFF
TRACK
1
5
234
678
9101112
13141516
DISC
MIN
SEC
¤
‚
⁄
‚
‹fi
‚
1
2
3
4
5
( 3 PAUSE )
• Une pression sur la touche de pause pendant la lecture l’arrête à ce point.
Une seconde pression sur la touche de pause redémarre la lecture à partir
du même point.
1. Appuyer sur la touche de pause (
3 PAUSE).
4ème piste
5ème piste 6ème piste
Pause
2. Une pression sur la touche de lecture (1 PLAY) ou sur la touche de pause
(
3 PAUSE) redémarre la lecture.
(2) Recherche manuelle en arrière
OPEN/CLOSE
DISC SKIP
5 DISC AUTOMATIC DISC LOADING SYSTEM
STOP
PAUSE
PLAY
PROG
PHONES
REPEAT
DCM-370
PCM AUDIO TECHNOLOGY / CD AUTO CHANGER
REMOTE
SENSOR
HDCD
£¢ ON OFF
TRACK
1
5
234
678
9101112
13141516
DISC
MIN
SEC
¤
‚
⁄
‚
‹fi
‚
1
2
3
4
5
( 8/6 )
1. Maintenir enfoncée la touche de recherche en arrière
Automatique/Manuelle (
8/6) pendant plus de 0,5 seconde pendant la
lecture. La lecture en arrière de la plage est accélérée.
• Comme référence, le numéro de la plage en cours de reproduction et le
temps écoulé de la plage sont affichés.

FRANCAIS
26
PRECAUTIONS D’INSTALLATION
Le lecteur de disque compact contient un micro-ordinateur pour la commande
de circuits intérieurs. Au cas où le lecteur est utilisé près d’un syntoniseur ou
d’un téléviseur sous tension, des parasites peuvent, bien que ceci soit peu
probable, déranger le son du syntoniseur ou l’image du téléviseur. Pour éviter
ce risque, veuillez prendre les précautions suivantes.
• Gardez le lecteur de disque compact à une distance aussi grande que
possible du syntoniseur ou du téléviseur.
• Gardez le câble d’alimentation et celui de connexion du lecteur de disque
compact à l’écart des câbles d’antenne du syntoniseur et du téléviseur.
• Des interférences apparaîssent facilement quand une antenne intérieure ou
une ligne d’apport de 300Ω//ohms est employée; ainsi, l’utilisation d’une
antenne extérieure et d’un câble coaxial de 75 Ω/ohms est-elle
recommandée pour l’antenne.
ligne d’apport de
300 Ω/ohms
ligne d’apport de
75 Ω/ohms
LECTURE EN UTILISANT L’UNITE DE TELECOMMANDE
Le lecteur CD DCM-370/270 peut être commandé depuis l’autre bout de la pièce en utilisant l’unité de télécommande accessoire.
(1) Insertion de la pile
1. Retirer le couvercle se trouvant au dos de l’unité de télécommande.

FRANCAIS
27
TELECOMMANDE RC-258
Réglage du mode programme
• Pour rechercher un programme, enfoncer la touche de programmation / sélection
directe (PROG/DIRECT), puis les touches de numéro de plage (1 à 10 et +10).
• La télécommande est normalement réglée en mode direct.

FRANCAIS
28
COMPACT DISCS
1. Manipulation des compact discs
• Ne pas salir les compact discs avec des traces de doigts, de l’huile, de la
poussière ou d’autres substances. Si un disc est sale, l’essuyer avec un
chiffon sec et doux.
• Ne pas nettoyer des compact discs avec de la benzine, un diluant, de
l’eau, des produits pour disques en aérosol, des agents anti-statiques, un
chiffon au silicium ou substances similaires.
• Faire particulièrement attention de ne pas rayer la face arrière d’un
compact disc en le retirant de son boîtier ou en l’insérant dans son
boîtier.
• Ne pas courber les compact discs.
• Ne pas appliquer de force aux compact discs.
• Ne pas essayer d’agrandir le trou centreal d’un disc.
• Ne pas écrire sur la face (imprimée) portant l’étiquette du disc avec un
stylo ou un crayon.
• Si un CD est apporté dans une pièce chaude depuis un endroit froid, de la
condensation peut se former sur la surface du disc. Ne pas essayer de
sécher le disc avec un séchoir, etc.
DES PROBLEMES? VERIFIER LE LECTEUR POUR EN DETERMINER LA CAUSE
Même s’il semble qu’il y a un problème, vérifier soigneusement les points suivants.
CARACTERISTIQUES TECHNIQUES
AUDIO
Nombre de canaux: 2 canaux
Caractéristiques de fréquence: 2 ~ 20.000 Hz
Gamme dynamique: 100 dB 098 dB
Rapport S/B: 112 dB 108 dB
Distorsion de haute fréquence: 0,0025% (1kHz) 0,003%
Séparation: 98 dB 96 dB
Pleurage et scintillement: Inférieur aux limites mesurables
(±0,001% crête pondérée)
Tension de sortie: Variable 0,2 ~ 2,0 V
DISCS UTILISES Des disques compacts audio
12 cm et 8 cm sont utilisés.
GENERALITES
Alimentation: 60 Hz, la tension est indiquée sur
l’étiquette des caractéristiques techniques
Consommation en courant: 15 W
Dimensions extérieures: 434 (W) x 115 (H) x 392 (D) mm
(17-3/32” x 4-17/32” x 15-7/16”)
Poids: 5,7 kg (12,6 lbs.) 5,7 kg (12,6 lbs)
DCM-270DCM-370
FONCTIONS ET AFFICHAGES
Fonctions: Cinq disques peuvent être utilisés,
Sélection directe de plage,
Sélection de programme,
Lecture aléatoire, etc.
Affichages: No. de disc, No. de piste,
durée (mn., s.),
lecture, pause, répétition,
lecture aléatoire, etc.
Autre: Jack de casque (niveau variable)
UNITE DE TELECOMMANDE RC-258
Méthode de télécommande: Système à impulsions infrarouges
Alimentation: 3 V CC, deux piles R6P
(tamaño standard AA)
Dimensions extérieures: 50 (W) x 175 (H) x 18 (D) mm
(1-31/32” x 6-57/64” x 45/64”)
Poids: 100 g (3 oz) y compris les piles
(Includes batteries)
HDCD
®
et High Definition Compatible Digital
®
sont des marques déposées de Pacific Microsonics, Inc.
* Aux fins d’amélioration du produit, la conception et les caractéristiques techniques sont susceptibles de modification sans préavis.
2. Rangement des compact discs
• Après la lecture, toujours retirer le disc du lecteur.
• Pour éviter qu’un compact disc se salisse, se raye, se déforme, etc.,
toujours le ranger dans son boîtier.
• Ne pas ranger les compact discs dans les endroits suivants.
1. Endroits pendant longtemps sous les rayons directs du soleil.
2. Endroits où l’humidité est élevée ou très poussiéreux.
3. Endroits exposés à la chaleur provenant d’un chauffage ou appareil
similaire.
Le tiroir n’ouvre/ferme pas quand la touche d’ouverture/fermeture (
5
OPEN/CLOSE) est enfoncée.
• L’interrupteur d’alimentation est-il activé?
Après qu’un disc est chargé, l’affichage (0 00 00
M
00
S
) est activé.
• Le disc est-il correctement chargé? …………………Voir page 20, 21, 28.
La lecture ne commence pas lorsque la touche de lecture(
1 PLAY) est
enfoncée.
• Le disc est-il sale ou rayé? ………………………………………Voir page 28.
Il n’y a pas de son ou le son est déformé.
• Le cordon de sortie est-il correctement
raccordé à l’amplificateur? ………………………………………Voir page 20.
• Le son redevient-il normal lorsque les touches de
l’amplificateur sont réglés ou si le dispositif d’entrée
correct est sélectionné?
Le capteur ne passe pas au point spécifié pendant la recherche.
• Le disc est-il sale ou rayé? ………………………………………Voir page 28.
La lecture programmée est impossible.
• La méthode utilisée pour la programmation
et l’exécution est-elle correcte? ………………………………Voir pages 22.
Le lecteur ne fonctionne pas correctement lorsque l’unité de
télécommande est utilisée.
• Les piles dans l’unité de télécommande
sont-elles épuisées? ……………………………………………Voir page 26.
• L’unité de télécommande est-elle située
trop loin du lecteur CD? …………………………………………Voir page 26.

ESPAÑOL
29
Por favor verifique asegurandose de que los siguientes
artículos son empacados en la caja pero separados de la
unidad principal.
(1) Manual de instrucciones ………………………………1
(2) Cables de conexión ……………………………………1
(3) Unidad de control remoto RC-258 ……………………1
(4) Pilas secas R6P (tamaño AA) …………………………2
PRECAUCIONES
1. Maneje con cuidado el cordón abastecedor de
energía.
No dañe o deforme el cordón abastecedor de energía. Si
es dañado o deformado, podrá causar choque eléctrico o
mal funcionamiento cuando se use. Cuando lo retire del
enchufe de la pared, asegurese de retirarlo tomandolo del
cuerpo de la clavija y no lo jale del cordón.
2. No abra la cubierta superior
A fin de prevenir choques eléctricos, no abra la cubierta
superior. Si ocurren problemas, comuníquese a su
distribuidor DENON.
3. No coloque ningún objeto en el interior
No coloque objetos metálicos o derrame líquido dentro
del aparato CD. Puede resultar en choques eléctricos o
mal funcionamiento.
Nota:
Este aparato CD usa un semiconductor laser. Para permitir
disfrutar una operación estable se recomienda usar este en
un cuarto a temperaturas de 10°C ~ 35°C.

ESPAÑOL
30
NOMBRE Y FUNCIÓN DE LAS PARTES
PANEL DELANTERO
PANEL TRASERO
OPEN/CLOSE
DISC SKIP
5 DISC AUTOMATIC DISC LOADING SYSTEM
STOP
PAUSE
PLAY
PROG
PHONES
REPEAT
DCM-370
PCM AUDIO TECHNOLOGY / CD AUTO CHANGER
REMOTE
SENSOR
HDCD
£¢ ON OFF
qwertyuio!0 !1
!5
!4
!3 !2
TRACK
1
5
234
678
9101112
13141516
DISC
MIN
SEC
¤
‚
⁄
‚
‹fi
‚
1
2
3
4
5
COAXIAL
DIGITAL OUT
LINE OUT
VARIABLE
CONTROL
OUT
IN
SYNCHRO
!7 !8
@0
@1
!9
OPEN/CLOSE
DISC SKIP
STOP
PAUSE
PLAY
PROG
PHONES
REPEAT
5 DISC AUTOMATIC DISC LOADING SYSTEM
DCM-370
PCM AUDIO TECHNOLOGY / CD AUTO CHANGER
REMOTE
SENSOR
HDCD
£¢ ON OFF
TRACK
1
5
234
678
9101112
13141516
DISC
MIN
SEC
¤
‚
⁄
‚
‹
fi
‚
1
2
3
4
5

ESPAÑOL
31
q
Interruptor de alimentación (POWER)
• Presione este interruptor para activar la unidad.
w
Receptor de control remoto (REMOTE SENSOR)
• Este receptor recibe las señales infrarrojas provenientes de la unidad
de control remoto inalámbrica.
• Al operar la unidad de control remoto inalámbrica (RC-258), apúntela
hacia este receptor.
e
Indicador HDCD (solamente en el DCM-370)
• Se illumina cuando se está reproduciendo un disco compatible HDCD.
r
Ventanilla de indicación
• El n.° de disco, el n.° de pista, el tiempo de reproducción y otra
información, serán mostrados en la ventanilla de indicación.
t
Botón de repetición (REPEAT)
• Presione este botón para repetir la reproducción. El indicador de
repetición aparecerá en el visualizador. Esta unidad dispone
de las tres siguientes modalidades de repetición:.
• Al presionar el botón una vez, los indicadores y se
iluminarán, y la pista que esté siendo reproducida será repetida.
• Al volver a presionar el botón, los indicadores y se
iluminarán, y todas las pistas del disco que esté siendo reproducido
serán repetidas.
• Al presionar el botón por tercera vez, los indicadores , y
se iluminarán, y todos los discos cargados en la gaveta serán
repetidos.
• Al presionar el botón una vez más, los indicadores , y
se apagarán y el modo de repetición será cancelado.
La función repetición puede utilizarse también durante la reproducción
programada o al azar, pero en este caso sólo puede usarse el modo
repetir todo (indicadores y ). (Para más detalles, refiérase
a la página 34.)
y
Botón de programación (PROG)
• Presione este botón para cambiar entre las funciones de memoria de
programación y búsqueda directa. (Para más detalles, refiérase a la
página 34.)
u
Botón de búsqueda automática/manual en retroceso
(
8/6)
• Presione este botón para que el fonocaptor retroceda hasta el
principio de la pista que está siendo reproducida. Presiónelo
nuevamente para retroceder a pistas anteriores a la actual.
• Presione el botón una cantidad de veces correspondiente a la
cantidad de pistas que desea retroceder.
• Para iniciar la operación de búsqueda rápida en retroceso durante la
reproducción, mantenga este botón presionado por más de 0,5
segundos. Mientras el botón sea presionado, las señales musicales
serán reproducidas más rápido de lo normal.
• Mantenga presionado este botón durante más de 5 segundos; la
busqueda hacia atrás se hace 4 veces más rápida, aproximadamente..
i
Botón de búsqueda automática/manual en avance
(
7/9)
• Presione este botón para hacer que el transductor avance por el disco
hasta el principio de la próxima pista. Vuelva a presionarlo para
avanzar a las pistas subsiguientes.
• Presione este botón una cantidad de veces correspondiente al
número de pistas que desea avanzar.
• Para iniciar la operación de búsqueda rápida en avance durante la
reproducción, mantenga este botón presionado por más de 0,5
segundos. Mientras el botón sea presionado, las señales musicales
serán reproducidas más rápido de lo normal.
• Mantenga presionado este botón durante más de 5 segundos; la
busqueda hacia adelante se hace 4 veces más rápida, aproximada-
mente.
o
Botón de parada (2 STOP)
• Presione este botón para detener la reproducción.
DISCALL
DISC
ALLREPEAT
DISC
ALLREPEAT
1 DISCREPEAT
1REPEAT
REPEAT
!0
Botón de pausa (3 PAUSE)
• Presione este botón para detener temporalmente la reproducción.
• Si se presiona este botón durante el modo de reproducción, la repro-
ducción se detendrá temporalmente. El indicador de reproducción
se apagará y el indicador de pausa se encenderá.
• Para cancelar el estado Pausa, presione el bóton reproducción
!1 o el
botón pausa
!0 por segunda vez.
!1
Botón de reproducción (1 PLAY)
• Presione este botón para reproducir un disco.
Cuando el botón sea presionado, el indicador se iluminará, el
número del disco y de la pista que estén siendo reproducidos será
indicado en el indicador de número de disco y número de pista, y el
tiempo transcurrido de la pista que esté siendo reproducida será
exhibido en el indicador de tiempo.
• Una vez que la última pista del último disco haya sido reproducida y el
reproductor se haya detenido, el indicador se apagará.
!2
Botón de omisión de disco (DISC SKIP)
• Cada vez que este botón sea presionado, el carrousel girará en el
sentido de las agujas del reloj hasta la siguiente posición de bandeja.
Esto permite cargar o extraer discos.
Este botón también se emplea para seleccionar el siguiente disco, en
el modo de reproducción normal y continua.
!3
Botón de apertura/cierre (5 OPEN/CLOSE)
• Presione este botón para abrir.
• La gaveta se desliza hacia afuera.
• Vuelva a presionar el botón para cerrar la gaveta.
!4
Gaveta de carga
• Usted podrá cargar y extraer discos cuando esta gaveta esté abierta.
No cierre la gaveta por la fuerza (con la mano).
!5
Toma para audífonos (PHONES)
• Para escuchar en privado, conecte sus audífonos a esta toma. (Los
audífonos son vendidos separadamente.)
!6
Bandejas portadisco (DISC NO.) (1 ~ 5)
• Usted podrá cargar un disco en cada gaveta.
!7
Terminal de salida (LINE OUT)
• Conecte estos terminales a los terminales de entrada de su amplifi-
cador. (Para más informaciones sobre conexiones, refiérase a la
página 32.)
!8
Presa di registrazione sincronizzata (SYNCHRO)
• Para realizar una grabacion sincronizada ha de conectarse esta
hembrilla por medio de un cable a la hembrilla SYNCHRO de platina.
(Para más informaciones sobre conexiones, refiérase a la página 32.)
!9
Conector de entrada de control (CONTROL IN)
(solamente en el DCM-370)
• Este es el conector de entrada para el cable del control remoto.
Si desea utilizar este conector, consulte a su distribuidor DENON.
@0
Conector de salida de control (CONTROL OUT)
(solamente en el DCM-370)
• Este es el conector de salida para el cable del control remoto.
Si desea utilizar este conector, consulte a su distribuidor DENON.
@1
Conector de salida de audio digital (COAXIAL)
(solamente en el DCM-370)
• Conecte un cable con enchufe de pin de 75 Ω/ohmios disponible en el
comercio. (Para más informaciones sobre conexiones, refiérase a la
página 32.)
• Los datos digitales son emitidos desde este conector.
1
1
3
1
Operación contiuna
Si se mantiene presionado el botón de búsqueda automática en retroceso
u o el botón de búsqueda automática en avance i, la función del botón
que se presionado será repetida.

ESPAÑOL
32
APERTURA Y CIERRE DEL CAJON, Y CARGA DE UN DISCO
Apertura y cierre del cajón (esta operación sólo podrá ser efectuada mientras
la unidad esté activada)
1. Presione el interruptor de alimentación (POWER) para activar la unidad.
2. Presione el botón de apertura/cierre (
5 OPEN/CLOSE).
Cómo cargar un disco
• Asegúrese de que el cajón esté totalmente abierto.
• Tome el disco por los bordes y colóquelo sobre la bandeja portadisco. (No
toque la superficie que contiene las señales grabadas - el lado brillante.)
• Coloque el disco correctamente en la bandeja según su tamaño.
Coloque los discos de 8 cm en la circunferencia central.
Coloque los discos de 12 cm en la circunferencia exterior.
• Cuando se abre la unidad de disco mientras se está en el modo stop, se
pueden introducir discos en las bandejas de 3 discos. Si se pulsa el botón
DISC SKIP (salto de disco), el carrusel gira y se puede introducir un disco en
la otra bandeja de discos.
Cuando se abre el cajón durante el modo de reproducción, resulta posible
cargar y descargar discos en todas las bandejas de disco a excepción de
aquella bandeja cuyo disco se esté reproduciendo. Se pueden sustituir 3
discos y pulsar el botón DISC SKIP (salto de disco) para acceder a la otra
bandeja de discos que se pueden sustituir.
• Presione el botón de apertura/cierre (
5 OPEN/CLOSE) para cerrar el cajón.
Precaución:
• El reproductor no funcionará correctamente y los discos podrán resultar
dañados si no son cargados en forma correcta.
• Si sus dedos se atascasen en el cajón mientras éste se cierra, presione el
botón de apertura/cierre (
5 OPEN/CLOSE).
• No coloque objetos extraños en la bandeja portadisco ni cargue más de un
disco a la vez, pues de lo contrario podrá producirse mal funcionamiento.
• No empuje con la mano la bandeja portadisco cuando la unidad esté
desactivada, ya que esto podrá causar mal funcionamiento y daños al
reproductor de discos compactos.
• No toque el carrusel mientras esté girando. No toque tampoco el carrusel
con la mano cuando esté parado. Dichas acciones podrían dañarlo.
• No inserte disco alguno allí donde se indique mediante una flecha.
Ello podría dañar el mecanismo interno de la unidad.
OPEN/CLOSE
DISC SKIP
STOP
PAUSE
PLAY
PROG
PHONES
REPEAT
5 DISC AUTOMATIC DISC LOADING SYSTEM
DCM-370
PCM AUDIO TECHNOLOGY / CD AUTO CHANGER
REMOTE
SENSOR
HDCD
£¢ ON OFF
TRACK
1
5
234
678
9101112
13141516
DISC
MIN
SEC
¤
‚
⁄
‚
‹
fi
‚
1
2
3
4
5
OPEN/CLOSE
DISC SKIP
STOP
PAUSE
PLAY
PROG
PHONES
REPEAT
5 DISC AUTOMATIC DISC LOADING SYSTEM
DCM-370
PCM AUDIO TECHNOLOGY / CD AUTO CHANGER
REMOTE
SENSOR
HDCD
£¢ ON OFF
TRACK
1
5
234
678
9 101112
13141516
DISC
MIN
SEC
¤
‚
⁄
‚
‹
fi
‚
1
2
3
4
5
OPEN/CLOSE
DISC SKIP
STOP
PAUSE
PLAY
PROG
PHONES
REPEAT
5 DISC AUTOMATIC DISC LOADING SYSTEM
DCM-370
PCM AUDIO TECHNOLOGY / CD AUTO CHANGER
REMOTE
SENSOR
HDCD
£¢ ON OFF
TRACK
1
5
234
678
9 101112
13141516
DISC
MIN
SEC
¤
‚
⁄
‚
‹fi
‚
1
2
3
4
5

ESPAÑOL
33
REPRODUCCIÓN NORMAL
Siga las operaciones que se describen a continuación para familiarizarse con el procedimiento de reproducción.
(1) Para iniciar la reproducción
1. Active el interruptor de alimentación y presione el botón de (apertura/cierre)
(
5 OPEN/CLOSE) para hacer que el cajón se abra.
2. Coloque el disco a reproducir en la bandeja frontal.
3. Presione el botón de reproducción (
1).
4. El cajón se cerrará y el disco cargado será reproducido.
5. El número del disco, el número de la pista y el tiempo transcurrido, etc., del
disco que esté siendo reproducido, serán indicados en el visualizador.
6. Si el botón de apertura/cierre (
5 OPEN/CLOSE) es presionado mientras un
disco está siendo reproducido, la reproducción continuará, pero el cajón se
abrirá y usted podrá reemplazar cuatro discos. El disco que puede ser
reemplazado cambia cuando se pulsa el botón DISC SKIP.
Para cerrar el cajón, vuelva a presionar el botón de apertura/cierre (
5
OPEN/CLOSE).
(2) Para detener la reproducción
1. Para detener la reproducción, presione el botón de parada (
2 STOP).
2. Para reemplazar los discos, presione el botón de apertura/cierre (
5 OPEN/
CLOSE).
El disco que se estaba reproduciendo pasa a la parte frontal y la unidad de
disco se abre.
• Coloque en la parte frontal el disco que quiera reproducir.
OTROS MÉTODOS DE REPRODUCCIÓN
En adición al modo normal de reproducción, se dispone también de las siguientes funciones especiales para reproducir un disco.
q Para reproducir un disco y
una pista específicos …………………………………
Selección directa
(Control remoto solamente)
1. Presione el botón selector de disco (DISC SELECT).
2. Use los botones numéricos (1 a 5) para seleccionar el número del disco a
ser reproducido.
3. Luego, emplee los botones numéricos (1 a 10 y +10) para seleccionar el
número de la pista a ser reproducida.
• Por ejemplo, para reproducir la 4ª pista del 3º disco:
Presione , y .
Para reproducir la 12ª pista del 5º disco:
Presione , , y .
La reproducción comenzará desde el disco y la pista que sean selecciona-
dos.
2
+
10
5DISC SELECT
43DISC SELECT
w Para avanzar al siguiente disco
durante la reproducción ………………………………
1. Presione el botón de omisión de disco. El carrousel en el cajón girará y el
disco de la siguiente bandeja será reproducido.
Por ejemplo, si el disco número 3 está siendo reproducido, el disco número
4 será reproducido a continuación; si el disco número 5 está siendo
reproducido, el disco número 1 será reproducido a continuación.
2. Adicionalmente, cuando se presione el botón de salto de disco en la unidad
de control remoto RC-258, el carrusel girará en la dirección opuesta y se
reproducirá el disco previo.
e Para avanzar a la siguiente pista
durante la reproducción …………………………
Presione el botón de búsqueda automática/manual en avance (
7/9) por
menos de 0,5 segundos durante la reproducción.
• El fonocaptor avanzará hasta el principio de la siguiente pista, y la
reproducción continuará. Al presionar el botón varias veces, el fonocaptor
avanzará una cantidad de pistas equivalente a la cantidad de veces que el
botón sea presionado.
• Durante la operación de reproducción arbitraria o reproducción programada,
el transductor se desplazará al principio de la siguiente pista arbitraria o
programada.
Omisión de disco
Búsqueda automática
r Para retroceder al principio de la pista
que está siendo reproducida …………………
Búsqueda automática
Presione el botón de búsqueda automática/manual en retroceso (8/6) por
menos de 0,5 segundos durante la reproducción.
• El fonocaptor retrocederá hasta el principio de la pistaque esté siendo
reproducida, y la reproducción continuará. Al presionar el botón varias
veces, el fonocaptor retrocederá una cantidad de pistas equivalente a la
cantidad de veces que el botón sea presionado.
t Para reproducir ciertos discos y
pistas en un orden específico …………………
Selección de programa
• Usted podrá reproducir en cualquier orden deseado ciertas pistas de los
discos cargados en la unidad.
• Usted también podrá programar las pistas de un disco que haya sido
cargado en la unidad. Sin embargo, si usted intenta reproducir dicho disco,
el microprocesador determinará que no ha sido cargado en la unidad, y el
siguiente disco será reproducido automáticamente.
• Un programa podrá contener 32 pistas como máximo.
(1) Programación (cuando se usan los botones del control remoto)
• Presione el botón de programación/selección directa (PROG/DIRECT).
El indicador de programa se iluminará. Use el botón selector de
disco (DISC SELECT) junto con los botones numéricos y +10 para
seleccionar el disco a ser programado.
Por ejemplo, para programar la 3ª pista del 2º disco y la 12ª pista del 5º
disco, presione , , , , , ,
y .
(2) Programación (cuando se usan los botones de la unidad principal)
• Presione el botón PROGRAM (PROG). La indicación parpadea.
Utilice los botones DISC SKIP, búsqueda en reverso Automática/Manual
(
8/6), búsqueda en avance Automática/Manual (7/9 ) para
seleccionar el disco a programar.
Por ejemplo, para programar la 3ª pista del 2º disco y la 12ª pista del 5º
disco, presione el botón PROGRAM (PROG), el botón DISC SKIP para
seleccionar la 2º disco, el botón de búsqueda en reverso Automática/
Manual (
8/6) o el búsqueda en avance Automática/Manual (7/9)
para seleccionar la 3ª pista, y por último pulse el botón PROGRAM (PROG)
nuevamente.
De la misma forma, seleccione la pista 12 del disco 5 utilizando los botones
DISC SKIP y los Automática/Manual de búsqueda, y luego pulse el botón
PROGRAM (PROG).
(3)
Para verificar las pistas que se ha programado
(
Control
remoto solaente)
• Presione el botón de llamada de la unidad de control remoto inalámbrica
RC-258.
El contenido del programa será mostrado en orden, un ítem a la vez, cada
vez que se presione el botón de llamada (CALL).
(4) Para iniciar la reproducción programada
• Presione el botón de reproducción (
1 PLAY) para iniciar la reproducción.
Las pistas programadas serán reproducidas en el orden que hayan sido
registradas.
(5) Para borrar el programa completo
• Para borrar el programa completo, vuelva a presionar el botón de
programación/selección directa (PROG/DIRECT). Usted también podrá
borrar el contenido del programa presionando el botén de apertura/cierre (
5
OPEN/CLOSE).
•
Si se presiona el botón de programación/selección directa (PROG/DIRECT)
durante la reproducción programada, el programa será cancelado. La
reproducción continuará luego hasta llegar al final del disco que esté siendo
reproducido, depués de lo cual el reproductor se detendrá automáticamente.
PROGRAM
2
+
10
5DISC SELECT32DISC SELECTPROG
/
DIRECT
PROGRAM

ESPAÑOL
34
Precauciones
• Si se inicia la reproducción programada mientras la unidad se encuentra
reproduciendo una pista, o durante el modo de pausa, la pista que esté
siendo reproducida será contada como la primera pista del programa.
• No será posible seleccionar pistas directamente mientras un programa esté
siendo reproducido. Al seleccionar un número de pista usando los botones
de número de pista, la pista seleccionada será agregada al final del
programa.
• No programe números de pista que no estén presentes en el disco. Si
usted programa por equivocación un número de pista no contenido en el
disco, el reproductor ignorará el programa.
y Para repetir la reproducción
de todas las pistas ……………………
Repetición de la reproducción
• Presione el botón de repetición (REPEAT). El indicador de repetición
se encenderá.
Los pasos q y w podrán ser efectuados en cualquier orden, obteniéndose
el mismo resultado.
• Cuando el botón de repetición sea presionado una vez, los indicadores
y se iluminarán. En este modo de operación, la pista que esté
siendo reproducida será repetida.
• Si se vuelve a presionar el botón de repetición, los indicadores y
se iluminarán, y el disco que esté siendo reproducido será
repetido.
• Si se vuelve a presionar el botón de repetición, los indicadores
,
y se iluminarán, y todos los discos cargados en la unidad serán
repetidos.
• Al presionar el botón de repetición (REPEAT) durante la reproducción, todas
las pistas del disco serán repetidas.
• Para cancelar la función de repetición, presione nuevamente el botón de
repetición (REPEAT).
• Al presionar el botón de repetición (REPEAT) durante la reproducción de un
programa, todas las pistas del programa será reproducidas repetidamente
en orden.
• Al presionar el botón de repetición (REPEAT) durante la reproducción
arbitraria, las pistas serán reproducidas nuevamente al azar
(arbitrariamente).
DISCALL
REPEAT
1 DISC
REPEAT
1REPEAT
REPEAT
u Permitiendo al reproductor seleccionar
el orden de reproducción ……………………
Reproducción arbitraria
(Control remoto solamente)
(1) Reproducción totalmente arbitraria
• Presione el botón de reproducción arbitraria. El microcomputador iniciará la
reproducción de las pistas del 5 discos, en orden arbitrario.
(2) Reproducción arbitraria programada
• Después de presionar el botón de programación/selección directa
(PROG/DIRECT) y de ingresar un programa (refiérase a la página 33, punto
t), presione el botón de reproducción arbitraria y luego el botón de
reproducción. El microcomputador seleccionará pistas al azar del programa
y las reproducirá.
(3) Reproducción arbitraria secuencial
• Presione el botón RANDOM y especifique los números de disco (del 1 al 5)
con el botón DISC SELECT y los botones numéricos. Al presionar el botón
PLAY (
1 PLAY) el lector seleccionará al azar y reproducirá pistas del disco
según el orden de los discos especificados.
Usted podrá seleccionar hasta 5 discos. Un mismo disco podrá ser
seleccionado dos o más veces. El modo de reproducción arbitraria
secuencial será cancelado cuando la reproducción finalice.
(4) Para cancelar la reproducción arbitraria
• Para cancelar la operación de reproducción arbitraria, vuelva a presionar el
botón de reproducción arbitraria. La reproducción normal continuará desde
la pista que esté siendo reproducida hasta la última pista del disco.
Usted también podrá cancelar la operación de reproducción arbitraria
presionando el botón de apertura/cierre (
5 OPEN/CLOSE).
Precauciones
• Si el botón de reproducción arbitraria es presionado durante la reproducción
normal, todas las pistas de todos los discos serán reproducidas en forma
arbitraria.
• Si el botón de reproducción arbitraria es presionado durante la operación de
reproducción programada, todas las pistas programadas serán reproducidas
en forma arbitraria, incluyendo aquellas pistas que ya hayan sido
reproducidas.
• Durante la operación de reproducción arbitraria, el reproductor podrá indicar
el número de un disco que no haya sido cargado en la bandeja. En este
caso, el reproductor intentará leer la información del disco, corregirá
automáticamente la información errónea y reanudará su funcionamiento
normal. Esto no es una falla.
o Búsqueda rápida audible ……………………………
Búsqueda manual
• Usando esta función, usted podrá desplazarse a un punto deseado de una
pista, ya sea en la dirección de avance o en la de retroceso.
• Una vez que haya llegado al punto deseado, libere el botón de búsqueda
Automática/Manual (
8/6 o 7/9). La reproducción continuará.
(1) Búsqueda manual en avance
1. Mantenga presionado el botón de búsqueda Automática/Manual en avance
(
7/9) por más de 0,5 segundos durante la reproducción. La cinta será
reproducida a mayor velocidad.
• Como referencia, el número de la pista y el tiempo de reproducción
transcurrido de la misma, serán indicados.
• La búsqueda manual hacia adelante es aproximadamente 4 veces más
rapida cuando se mantiene pulsado durante más de 5 segundos el botón
Automática/Manual de búsqueda hacia adelante (
7/9).
• Si se mantiene presionado el botón de búsqueda Automática/Manual en
avance (
7/9) una vez que se ha llegado al final de la última pista del
disco, la indicación ( ) aparecerá en el visualizador y la operación de
búsqueda manual se detendrá. Para retornar a otro punto, presione el botón
de búsqueda Automática/Manual en retroceso (
8/6) hasta que la
indicación ( ) desaparezca.
• Si se mantiene pulsado el botón Automática/ Manual de búsqueda hacia
adelante (
7/9) y se llega al final de la pista que se está usando en
reproducción aleatoria o reproducción programada, se busca la pista
siguieme y comienza la reproducción.
(2) Búsqueda manual en retroceso
1. Presione por más de 0,5 segundos el botón de búsqueda Automática/
Manual en retroceso (
8/6) durante la reproducción. La reproducción
en dirección inversa de la pista tendrá lugar a mayor velocidad.
• Como referencia, el número de la pista y el tiempo de reproducción
transcurrido de la misma, serán indicados.
• La búsqueda manual hacia atrás es aproximadamente 4 veces más rápida
seçi se mantiene pulsado durante más de 5 segundos el botón Automática/
Manual de búsqueda hacia atrás (
8/6).
• Si se mantiene presionado el botón de búsqueda Automática/Manual en
retroceso (
8/6) una vez que se ha llegado al principio de la primera
pista del disco, la indicación ( ) aparecerá en el visualizador y la
operación de búsqueda manual se detendrá. Para retornar a otro punto,
presione el botón de búsqueda Automática/Manual en avance (
7/9)
hasta que la indicación ( ) desaparezca.
• Si se mantiene pulsado el botón Automática/Manual de búsqueda hacia
atrás (
8/6) y se llega al principio de la pista que se está usando
durante la reproducción al azar o reproducción programada, la búsqueda
manual hacia atrás se anula y comienza la reproducción.
i Para interrumpir tempralmente la reproducción ………………
Pausa
• Presione el botón de pausa durante la reproducción del disco para
interrumpir la reproducción en cualquier punto deseado.
Presione nuevamente el botón de pausa para reanudar la reproducción
desde el mismo punto de la pista.
1. Presione el botón de pausa (
3 PAUSE).
2. Presione el botón de reproducción (
1 PLAY) o el botón de pausa (3
PAUSE) para reanudar la reproducción.

ESPAÑOL
35
!1 Función de grebación
sincronizada ………………………
Función de grebación sincronizada
Conectando el conector de sincronización (SYNCHRO) al conector SYNCHRO
de un magnetófono de cassettes DENON, usted podrá realizar grabaciones
sincronizadas.
• Para usar esta funcion, asegúrese de conectar los conectores SYNCHRO y
los conectores de salida. (Para detalles acerca de las conexiones, consulte
la página 32.) Luego, cargar un disco.
• Cuando el reproductor CD se encuentre en modo de detención o pausa, al
iniciarse la grabación sincronizada en el magnetófono de cassettes, el
reproductor CD iniciará automáticamente la reproducción. (Reproducción
sincronizada.)
• Durante la operación de reproducción sincronizada, el indicador de
recepción de señales de control remoto destellará en el visualizador.
NOTA:
• La operación de reproducción sincronizada también puede efectuarse
durante los modos de programación.
• Cuando la operación de reproducción sincronizada sea inciada. los modos
de reproducción repetición serán cancelados.
• A excepción del botones de parada (
2 STOP), reproducción (1 PLAY) y
tiempo (TIME), los botones no funcionarán durante la operación de
reproducción sincronizada.
• Si usted inicia la operación de grabación sincronizada en el magnetófono de
cassettes, estando el reproductor CD en modo de reproducción, el
reproductor CD no se sincronizará con el magnetófono de cassettes, y este
último asumirá el modo de pausa de grabación sincronizada. En este caso,
presione el botón de parada (
2 STOP) del magnetófono de cassettes,
ponga el reproductor CD en modo de detención o pausa, y vuelva a iniciar
la operación de grabación sincronizada en el magnetófono de cassettes.
• Para mayores detalles, consulte el manual de instrucciones del magnetó-
fono de cassettes que haya conectado a la unidad.
!0 Detención temporal al principio de la melodía …………………
(Control remoto solamente)
(1) Detención temporal al principio de la melodía – selección directa
• Esta función le será de gran utilidad para cuando desea cantar con música
de fondo.
1. Usando los botones de número de pista, registre el número de la pista
deseada.
2. Presione el botón de pausa (
3 PAUSE).
• Para iniciar la reproducción, presione el botón de reproducción (
1 PLAY) o
el botón de pausa (
3 PAUSE).
(2) Detención temporal al principio de la melodía –
reproducción programada
• Luego de haber programado las selecciones deseadas, presione el botón
de pausa (
3 PAUSE). El reproductor avanzará hasta el principio de la 1ª
pista del programa y esperará en modo de pausa.
Pausa
REPRODUCCIÓN USANDO LA UNIDAD DE CONTROL REMOTO
La unidad de control remoto RC-258 (incluida como accesorio), le permite controlar el reproductor de discos compactos desde una conveniente distancia.
(1) Inserción de las pilas
1. Quite la tapa del compartimiento de las pilas, ubicada en la parte
posterior de la unidad de control remoto.
2. Inserte dos pilas R6P en la unidad RC-258, siguiendo las indicaciones
impresas en el compartimiento de las pilas.
3. Coloque la tapa del compartimiento de las pilas, ubicada en la parte
posterior de la unidad de control remoto.
Notas acerca de las pilas
• Use pilas R6P (AA) en la unidad de control remoto RC-258.
• Las pilas deberán ser reemplazadas aproximadamente una vez al año.
Dependiendo de la frecuencia con que la unidad de control remoto sea
usada, algunas veces podrá ser necesario reemplazar las pilas antes de que
transcurra un año.
• Si no fuese posible controlar el reproductor de discos compactos mediante
la unidad de control remoto desde una posición cercana, habiendo
transcurrido menos de un año desde que las pilas fueron insertadas,
significará que éstas están gastadas y que deben ser reemplazadas por pilas
nuevas.
• Inserte las pilas correctamente, siguiendo el diagrama de polaridad ilustrado
en el interior del compartimiento de las pilas. En otras palabras, asegúrese
de que los polos ( + ) y ( – ) queden correctamente alineados.
• Las pilas son propensas a sufrir pérdidas y daños.
Por lo tanto:
No use simultáneamente pilas nuevas y usadas.
No use simultáneamente pilas de distintos tipos.
No efectúe una conexión en puente entre los polos opuestos de las pilas.
Asegúrese también de no exponerlas al calor, abrirlas ni exponerlas al
fuego.
• Cuando la unidad de control remoto no vaya a ser usada por un período
prolongado de tiempo, extraiga las pilas.
• Si las pilas han sufrido pérdidas, elimine toda huella de líquido de pila en el
compartimiento de las pilas, limpiando cuidadosamente con un paño seco.
Luego, inserte pilas nuevas.
(2) Uso de la unidad de control remoto
• Al usar la unidad de control remoto, apúntela hacia el sensor de control
remoto del reproductor de discos compactos (vea abajo).
• La unidad puede ser usada a una distancia de hasta 8 metros, en línea recta
con respecto al reproductor de discos compactos. Esta distancia disminuirá
cuando haya obstáculos que interfieran con el recorrido de la señal, o
cuando la unidad de control remoto sea operada en una diagonal con
respecto al sensor de control remoto.
Sensor de
control remoto
Derecha 30°
Izquierda 30°
• La función de los botones de la unidad de control remoto es idéntica a la de
los botones equivalentes del reproductor de discos compactos.
Activación y desactivación de la unidad.
Precauciones durante el uso
• No presione simultáneamente botones que tengan la misma función en la
unidad de control remoto y en el reproductor de discos compactos. Esto
podrá causar mal funcionamiento.
• Si el sensor de control remoto fuese expuesto a luz intensa, como por
ejemplo a la luz directa del sol o a luz de lámparas fluorescentes, o si
hubiese obstáculos entre la unidad de control remoto y el sensor, es
probable que la operación a control remoto se torne difícil.

ESPAÑOL
36
UNIDAD DE CONTROL REMOTE RC-258
Ajuste al modo de programa
• Para la búsqueda de programa, presione el botón de programacion/selección
directa (PROG/DIRECT) y luego los botones de número de pista (1 a 10 y +10).
• La unidad de control remoto está normalmente ajustada en el modo directo.
Cajón abierto/cerrado (5 OPEN/CLOSE) del portadisco
Botón de reproducción arbitraria (RANDOM)
Botón de repetición (REPEAT)
Botones de número de pista (1 a 10)
Botón de reproducción (1 PLAY)
Botón de pausa (3 PAUSE)
Botón de parada (
2 STOP)
Botón de búsqueda automática en retroceso (
8)
Botón de búsqueda automática en avance (
9)
Botón selector de indicación de tiempo (TIME)
Botón de programación/selección directa (PROG/DIRECT)
Botón selector de disco (DISC SELECT)
Botón de llamada (CALL)
Botón +10
Botón de omisión de disco (DISC SKIP +)
Botón de omisión de disco (DISC SKIP –)
Botones de volumen (VOLUME +)
Botones de volumen (VOLUME –)
Botón de búsqueda manual en avance (
7)
Botón de búsqueda manual en retroceso (
6)
Para ajustar el nivel de salida variable (VARIABLE).
El volumen aumenta cuando el botón ( + ) es presionado,
y disminuye cuando el botón ( – ) es presionado.
• Selección de disco
Para seleccionar el número del disco a ser reproducido, use el botón
selector de disco (DISC SELECT) conjuntamente con los botones
numéricos.
Cuando el botón selector de disco (DISC SELECT) sea presionado, la
indicación “–” aparecerá en la sección de número de disco del visualizador
durante 2 segundos. Mientras la indicación “–” esté siendo mostrada,
presione el botón numérico que corresponda al número del disco a ser
reproducido.
Si usted presiona los botones numéricos sin que la indicación “–” esté
siendo mostrada en la sección de número de disco del visualizador, usted
seleccionará números de pista en vez de números de disco.
• Selección directa
Normalmente, para efectuar la operación de búsqueda directa, simplemente
presione los botones numéricos deseados.
• Selección de programa (Durante la reproducción, la pista que está
siendo reproducida es programada como la 1ª pista.)
Presione primero el botón de programación/directo (PROG/DIRECT), y luego
los botones numéricos.
Por ejemplo. para programar las pistas 3, 11 y 5, presione PROG/DIRECT
/ 3 / +10 y 1 / 5.
Para cancelar el programa, presione el botón de modo programación/directo
(PROG/DIRECT).
• Para especificar números de pista
Para números de pista inferiores a 10, simplemente presione el botón
correspondiente al número deseado. Para números de pista mayores o
iguales a 11, presione primero el botón +10, y luego los botones numéricos.
Por ejemplo, para la pista número 22, presione el botón +10 dos veces, y
luego el botón 2.
• Volumen
El control de volumen de la unidad funcionará cuando los botones de
volumen sean presionados. Para confirmar el nivel de volumen, observe la
posición del control.
• Salto de discos
El botón de omisión de disco (DISC SKIP + –), no funcionará en los modos al azar o programa.
Durante la reproducción de disco secuencial aleatoria, cuando se presione el botón de salto de disco + el disco siguiente se reproducirá de forma aleatoria.
• Volumen
Es posible cambiar el nivel de salida del terminal de salida variable (VARIABLE).
Al presionar el botón de volumen, aparecerá la indicación “–” en la sección de tiempo M (TIME M) (minutos) de la ventanilla indicadora, y el nivel aparecerá en la
sección S (segundos). Es posible cambiar el volumen entre un máximo de “00” y un mínimo de “–12” en 12 pasos, aproximadamente 1,5 dB por paso.
• El indicador de tiempo indica el tiempo transcurrido de la pista que está siendo reproducida, el tiempo de reproducción restante de la pista que está siendo
reproducida, y el tiempo total restante de todas las pistas que aún no han sido reproducidas.
Normalmente, se visualiza el tiempo que ha transcorrido de la pista que se está usando. Si se pulsa una vez este botón, el indicador se ilumina,
visualizándose el tiempo que queda de la pista que se está usando. Si se pulsa otra vez el botón, el indicador se apaga y hace que el indicador se
encienda, visualizándose el número de pistas totales que faltan por reproducirse en el disco y el tiempo que queda. Pulsando otra vez el botón se apaga el
indicador y el indicador visualiza el tiempo que ha pasado de la pista que se está reproduciendo.
• Durante la reproducción, el tiempo total restante corresponderá al tiempo restante de reproducción del disco. Para la operación de reproducción programada, el
tiempo restante del programa sólo será indicado cuando las pistas programadas pertenezcan todas a un mismo disco.
Cuando se programan pistas de más de un disco aparece la indicación “– – – –”.
• En caso de que el tiempo total de reproducción de las pistas programadas sea superior a 99:59, en la pantalla aparece el signo “– –: – –”.
REMAIN
–
DISC
REMAIN

ESPAÑOL
37
ESPECIFICACIONES
AUDIO
Número de canales 2 canales
Respuesta de frecuencia: 2 ~ 20.000 Hz
Intervalo dinámico: 100 dB 098 dB
Relación señal a ruido: 112 dB 108 dB
Distorsión de alta frecuencia:
0,0025% (1kHz) 0,003%
Separación: 98 dB 96 dB
Lloro y tremolación: Inferior a los límites medibles:
(±0,001%, valor de cresta ponderado)
Voltaje de salida: Variable 0,2 ~ 2,0 V
DISCOS Disco compacto de audio
12 cm (5 pulg.) y 8 cm (3 pulg.)
CARACTERÍSTICAS GENERALES
Fuente de alimentación: 60 Hz,
el voltaje se muestra en la etiqueta de rangos
Consumo: 15 W
Dimensiones: 434 (ancho) x 115 (alto) x 392 (prof.) mm
(17-3/32” x 4-17/32” x 15-7/16”)
Peso: 5,7 kg (12,6 lbs.) 5,7 kg (12,6 lbs)
DCM-270DCM-370
FUNCIONES E INDICACIÓN
Funciones: Se puede emplear cinco discos,
Selección directa de pista,
Selección de programa,
Reproducción arbitraria, etc.
Visualizadores: Número de disco, Número de pista,
Tiempo (min. y seg.), Reproducción,
Pausa, Repetición,
Reproducción arbitraria, etc.
Otros: Toma para audífonos (nivel variable)
UNIDAD DE CONTROL REMOTO RC-258
Sistema de control remoto: Sistema de rayos infrarrojos
Fuente de alimentación: 3 V DC; dos pilas secas x R6P
(tamaño standard AA)
Dimensiones: 50 (ancho) x 175 (alto) x 18 (prof.) mm
(1-31/32” x 6-57/64” x 45/64”)
Peso: 100 gr.
(incluyendo las pilas)
El HDCD
®
y High Definition Compatible Digital
®
son marcas registradas de Pacific Microsonics, Inc.
* Con el propósito de introducir mejoras, el diseño y las especificaciones del producto están sujetos a cambios sin previo aviso.

Printed in Taiwan R.O.C. 511 3431 008 901
14-14, AKASAKA 4-CHOME, MINATO-KU, TOKYO 107-8011, JAPAN
Telephone: (03) 3584-8111
Cable: NIPPON COLUMBIA TOKYO Telex: JAPANOLA J22591
-
 1
1
-
 2
2
-
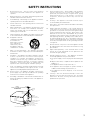 3
3
-
 4
4
-
 5
5
-
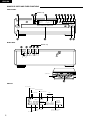 6
6
-
 7
7
-
 8
8
-
 9
9
-
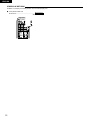 10
10
-
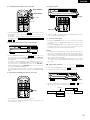 11
11
-
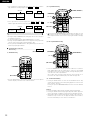 12
12
-
 13
13
-
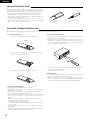 14
14
-
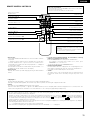 15
15
-
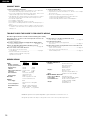 16
16
-
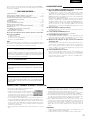 17
17
-
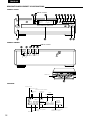 18
18
-
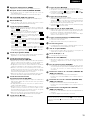 19
19
-
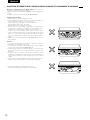 20
20
-
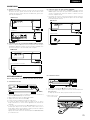 21
21
-
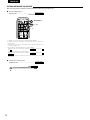 22
22
-
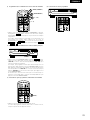 23
23
-
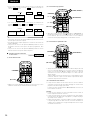 24
24
-
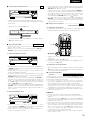 25
25
-
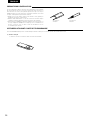 26
26
-
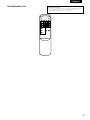 27
27
-
 28
28
-
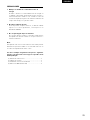 29
29
-
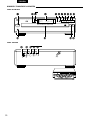 30
30
-
 31
31
-
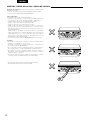 32
32
-
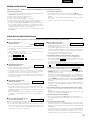 33
33
-
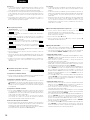 34
34
-
 35
35
-
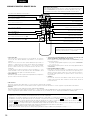 36
36
-
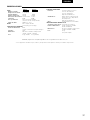 37
37
-
 38
38


Denon Car Stereo System DCM-370 Manual de usuario
- Categoría
- Reproductores de CD
- Tipo
- Manual de usuario
- Este manual también es adecuado para
en otros idiomas
Artículos relacionados
-
Denon DCM-35 Manual de usuario
-
Denon DCM-370 Manual de usuario
-
-
Denon DCM-27 Instrucciones de operación
-
Denon DCM-280 Manual de usuario
-
-
-
-
-
