iON 2AB3E-ISP56 Manual de usuario
- Categoría
- Bocinas portables
- Tipo
- Manual de usuario
Este manual también es adecuado para

Plunge
Quickstart Guide English ( 3 – 9 )
Guía de inicio rápido Español ( 10 – 15 )
Guide d'utilisation rapide Français ( 16 – 21 )
Guida rapida Italiano ( 22 – 27 )
Schnellstart-Anleitung Deutsch ( 28 – 33 )
Snelstartgids Nederlands ( 34 – 39 )


3
Quickstart Guide (English)
Introduction
1. Make sure all items listed in the Box Contents are included in the box.
2. READ THE SAFETY & WARRANTY MANUAL BEFORE USING THE PRODUCT.
3. MAKE SURE THE BATTERY IS COMPLETELY CHARGED PRIOR TO FIRST USE FOR
MAXIMUM BATTERY LIFE.
4. Study the connection diagram.
Box Contents
Plunge
Micro-USB Charging Cable
3.5mm (1/8”) to 3.5mm (1/8”) cable
Quickstart Guide
Safety & Warranty Manual
Support
For the latest information about this product (system requirements, compatibility information, etc.) and
product registration, visit ionaudio.com.
WARNING: Keep any non-water-resistant devices (phones, music players, etc.) in a dry place where
they will not be affected by water and cause a risk of electric shock.

4
Quick Setup
Connection Diagram
Items not listed under the Box Contents are sold separately.
Playing Music
Charging
AUXILIARY
AUDIO
SOURCE
TABLET or SMARTPHONE
USB POWER
(for charging)
USB POWER
(for charging)

5
Features
1. Auxiliary Input*: This stereo 3.5 mm (1/8”)
input can be used to connect a CD player,
MP3 player, or other audio source.
2. Micro USB Port*: Open the bottom cover to
access the USB port. Use the included USB
cable to connect this to a USB port on your
computer or phone charger to recharge
Plunge's battery.
Note: Make sure Plunge and connections are
dry before charging. Never charge when wet.
3. Bluetooth Button: Press and hold this
button to disconnect a paired Bluetooth
device.
4. Bluetooth LED: This blinks when Bluetooth
pairing or illuminates solid when connected
to a Bluetooth device.
5. Call Receive / Call End / Play /
Pause: Press to play or pause a track from a
connected Bluetooth device. When
Bluetooth-paired, press and release this
button to answer a phone call. The phone’s
ringtone will be heard through Plunge’s
speaker until the call is answered. When the
call has been disconnected, Plunge will
resume playing music. To reject an incoming
call, press and hold this button.
*IMPORTANT: Cover the Aux In and
the Micro USB port with the cap in the
locked position when using Plunge in
water.
1 2
3
4
5
6
7
8
9
10
10
11
11
12
12
Note: If the speaker fills with water,
the sound will be muffled until the
water has drained from the speaker.
Open the air-tight cap before
taking Plunge on a plane to prevent
speaker damage.

6
6. Power On/Off Switch: Press and hold this button to turn Plunge on/off. While Plunge is
connected to a power source, it does not need to be powered on to charge the battery.
Note: Plunge will power off after 10 minutes if there is no Bluetooth connection or no
audio signal being received.
7. Charging Indicator: The LED will slowly blink when the battery needs charging. The LED
is solid red when the battery is charging. When the power is on and the battery is fully
charged, this LED will be solid green.
8. Volume Up: Press this to increase the speaker volume on Plunge.
9. Volume Down: Press this to decrease the speaker volume on Plunge.
Note: Press the Volume Up and Volume Down buttons at the same time to enable or
disable voice prompts.
10. Next Track: Press and release this button to skip to the next Bluetooth track. Press and
hold this button for 2 seconds to enable your connected smartphone's voice assistant
(e.g. Siri
®
, Google
®
, etc), and then speak into the microphone.
11. Previous Track: Press and release this button once to go to the beginning of the track.
Note: With some apps, pressing the Previous Track button or Next Track button may
go to another playlist or music genre.
12. Microphone: Talk into this after receiving a call.
13. Tripod Mount (bottom panel): Attach a tripod to this 1/4” (6.35 mm)
threaded mount.
Pairing or Disconnecting a Bluetooth Device
1. Turn on your Bluetooth device.
2. Power on Plunge and it will automatically go into pairing mode to search for Bluetooth
devices. You will know you are in pairing mode when the Bluetooth icon is slowly
flashing.
3. Navigate to your Bluetooth device’s setup screen, find “Plunge” and connect.
Note: If your Bluetooth device prompts for a pairing code, enter “0000”.
4. Press and release the Bluetooth button to disconnect a paired Bluetooth device.
5. To connect to another Bluetooth device, repeat step 3.
Note: Maximum range will be achieved when using devices with Bluetooth 4.0.
13
13

7
Using the Phone
Note: You must power on and pair Plunge with your Bluetooth device before using it to listen
to music or as a speakerphone.
Using the Phone:
When you have an incoming call, Plunge’s speaker will play a ringtone.
1. To answer the call, press Plunge's Call Receive button.
Note: If you get an incoming call during music playback, the music will pause until you
end the call.
2. Speak into the microphone and adjust the call volume using the Volume buttons.
3. To end the call, press the Call End button.
4. To reject an incoming call, press and hold the Call Receive button.
Troubleshooting
If the sound is distorted: Try lowering the volume control of your sound source. Also, try to
reduce the overall volume of Plunge.
If there is too much bass: Try adjusting the tone or EQ control on your sound source to lower
the bass level. This will allow you to play the music louder before clipping (distortion) occurs.

8
Technical Specifications
Specifications are subject to change without notice.
* Bluetooth range is affected by walls, obstructions, and movement. For optimal performance, place the
product in your room at line of sight, so it is unaffected by walls, furniture, etc.
** Battery life may vary based on temperature, age, and volume usage of product.
RSS Statement for Canadian models: This device complies with Industry Canada licence-exempt RSS
standard(s). Operation is subject to the following two conditions: (1) this device may not cause interference,
and (2) this device must accept any interference, including interference that may cause undesired operation of
the device.
Dimensions
(Depth x Width x Height)
10.2” x 3.1” x 5.9”
260 mm x 80 mm x 150 mm
Weight
2lbs; 0.9kg
Output Power
13 W
Frequency Response
100 Hz
–
18 KHz
Water Resistance Class
IPX 7
Bluetooth Profile
A2DP, HFP, AVRCP
Bluetooth Range*
Up to 100’ / 30.4 m
Aux Input
3.5 mm (1/8”) line-level
Battery Life**
Up to 20 hours (when fully charged)
Recharge Time
Up to 4 hours
Charge Port
USB; +5V, 1
A

9
Trademarks and Licenses
ION Audio is a trademark of ION Audio, LLC, registered in the U.S. and other countries.
Google is a registered trademark of Google Inc.
Siri is a trademark of Apple Inc., registered in the U.S. and other countries.
The Bluetooth word mark and logos are owned by the Bluetooth SIG, Inc. and any use of such marks by ION Audio is under license.
All other product or company names are trademarks or registered trademarks of their respective owners.

10
Guía de inicio rápido (Español)
Introducción
1. Asegúrese de que todos los artículos indicados en "Contenido de la caja" estén incluidos en ella.
2. LEA EL MANUAL SOBRE LA SEGURIDAD Y LA GARANTÍA ANTES DE UTILIZAR EL
PRODUCTO.
3. PARA ASEGURAR UNA MÁXIMA VIDA ÚTIL DE LA BATERÍA, ASEGÚRESE DE QUE ESTÉ
COMPLETAMENTE CARGADA ANTES DE UTILIZARLA POR PRIMERA VEZ.
4. Estudie el diagrama de conexión.
Contenido de la caja
Plunge
Cable de carga micro USB
Cable de 1/8 pulg. (3,5 mm) a 1/8 pulg. (3,5 mm)
Guía de inicio rápido
Manual sobre la seguridad y garantía
Soporte
Para obtener la información más reciente acerca de este producto (requisitos de sistema, información
de compatibilidad, etc.) y registrarlo, visite ionaudio.com.
ADVERTENCIA: Coloque los dispositivos no resistentes al agua (teléfonos, reproductores de música,
etc.) en un lugar seco donde no sean afectados por el agua y causen un riesgo de electrocución.

11
Instalación rápida
Diagrama de conexión
Los elementos que no se enumeran en Contenido de la caja se venden por separado.
Reproducción de música
Carga
FUENTE DE AUDIO AUXILIAR
TABLETA u SMARTPHONE
USB
SUMINISTRO
ELÉCTRICO
(para carga)
USB
SUMINISTRO
ELÉCTRICO
(para carga)

12
Características
1. Entrada auxiliar*: Esta entrada de 3,5 mm
(1/8 pulg.) estéreo se puede usar para
conectar un reproductor de CD, MP3 u otra
fuente de audio.
2. Puerto micro USB*: Use el cable USB
incluido para conectar este puerto a un
puerto USB de su computadora o cargador
de teléfono para cargar la pila del Plunge.
Nota: Asegúrese de que Plunge y las
conexiones estén secas antes de cargarlo.
Nunca lo cargue si está húmedo.
3. Botón de Bluetooth: Mantenga pulsado
este botón para desconectar un dispositivo
Bluetooth apareado.
4. LED de Bluetooth: Parpadea durante el
apareamiento de Bluetooth o se ilumina con
luz fija cuando está conectado a un
dispositivo Bluetooth.
5. Recepción de llamada / Fin de llamada /
Reproducir/Pausa: Pulse para reproducir o
hacer pausa en una pista de un dispositivo
Bluetooth conectado. Con un dispositivo
Bluetooth apareado, pulse y suelte este
botón para atender una llamada. Se
escuchará el tono de llamada del teléfono a
través del altavoz del Plunge hasta que se
atienda la llamada. Cuando la llamada haya
finalizado, Plunge continuará reproduciendo
música. Para rechazar una llamada entrante,
mantenga pulsado este botón.
3
4
5
6
7
8
9
10
10
11
11
12
12
1 2
*IMPORTANTE: Cubra la entrada
auxiliar y el puerto micro USB con la
tapa en la posición trabada antes de
utilizar el Plunge en el agua.
Nota: Si el altavoz de llena de agua, el
sonido se oirá "tapado" hasta que se
drene el agua.
Abra la tapa hermética antes de
llevar el Plunge en un avión para evitar
daños en el altavoz.

13
6. Interruptor de encendido/apagado: Mantenga pulsado este botón para encender o
apagar el Plunge. Mientras el Plunge esté conectado a un suministro eléctrico, no es
necesario encenderlo para que cargue la batería.
Nota: Plunge se apagará después de 10 minutos sin recibir ninguna conexión de
Bluetooth o señal de audio.
7. Indicador de carga: El LED parpadeará lentamente cuando se necesite cargar la
batería. El LED se iluminará con luz roja permanente cuando la batería se esté cargando.
Cuando está encendido y la batería esté totalmente cargada, este LED se iluminará con
luz verde permanente.
8. Subir volumen: Pulse este botón para aumentar el volumen del altavoz del Plunge.
9. Bajar volumen: Pulse este botón para disminuir el volumen del altavoz del Plunge.
Nota: Pulse los botones de subir y bajar volumen al mismo tiempo para activar o
desactivar los indicativos de voz.
10. Next Track (Pista siguiente): Pulse y suelte este botón para pasar a la siguiente pista
Bluetooth. Mantenga pulsado este botón durante 2 segundos para activar el asistente de
voz de su teléfono inteligente (smartphone) (por ej., Siri
®
, Google
®
, etc.) y luego hable por
el micrófono.
11. Previous Track (Pista anterior): Pulse y suelte este botón una vez para ir al comienzo de
la pista.
Nota: En algunas aplicaciones, pulsar los
botones Previous Track (Pista anterior) o Next
Track (Pista siguiente) hará que vaya a otra lista
de reproducción o género musical.
12. Micrófono: Hable por él cuando recibe una
llamada.
13. Montaje para trípode (panel inferior): Sujete un
trípode a este montaje roscado de 6,35 mm
(1/4 pulg.).
13
13

14
Apareamiento o desconectarse de un dispositivo Bluetooth
1. Encienda su dispositivo Bluetooth.
2. Encienda el Plunge, que pasará automáticamente al modo de apareamiento para buscar
dispositivos Bluetooth. Se dará cuenta de que está en modo de apareamiento cuando el LED
está lentamente parpadear.
3. Navegue a la pantalla de configuración de su dispositivo Bluetooth, busque “Plunge” y
conecte.
Nota: Si su dispositivo Bluetooth solicita un código de apareamiento, ingrese “0000”.
4. Pulse Mantenga pulsado de Bluetooth el botón para desconectar un dispositivo Bluetooth
apareado.
5. Para conectarse a otro dispositivo Bluetooth, repita los paso 3.
Nota: El alcance máximo se logra cuando se utilizan dispositivos con Bluetooth 4.0 o superior.
Cómo utilizar el teléfono
Nota: Debe encender y aparear el Plunge con su dispositivo Bluetooth a fin de poder utilizarlo para
escuchar música o como teléfono manos libres.
Cómo utilizar el teléfono:
Cuando tiene una llamada entrante, el altavoz del Plunge reproduce un tono de llamada.
1. Para contestar la llamada, pulse el botón Call Receive (Recepción de llamada) del Plunge.
Nota: Si recibe una llamada entrante durante la reproducción de música, ésta se pondrá en
pausa hasta que termine la llamada.
2. Hable frente al micrófono y ajuste el volumen de la llamada con los botones Volume (Volumen).
3. Para terminar la llamada, pulse el botón Call End (Terminación de llamada).
4. Para rechazar una llamada entrante, mantenga pulsado el botón de Recibir llamada.
Solución de problemas
Si el sonido está distorsionado: trate de disminuir el volumen de su fuente de sonido. Pruebe
también reduciendo el volumen general del Plunge.
Si los graves son demasiado fuertes: intente ajustar el control de tono o ecualización de su fuente
de sonido para reducir el nivel de graves. De esta forma podrá reproducir la música con más volumen
antes de que se produzca el recorte (distorsión).

15
Especificaciones técnicas
Especificaciones sujetas a cambio sin previo aviso.
* El alcance de Bluetooth se ve afectado por paredes, obstrucciones y movimiento. Para lograr un rendimiento
óptimo, coloque el producto en la sala en donde pueda verlo de manera que no esté obstaculizado por
paredes, muebles, etc.
** La vida útil de la batería puede variar en función de la temperatura, la antigüedad y el volumen al que se usa
el producto.
Dimensiones
(Largo x Ancho x Alto)
260 mm x 80 mm x 150 mm
10,2 x 3,1 x 5,9 pulg
Peso
1,1 kg
2,4 lbs.
Potencia de salida
13 W
Respuesta en frecuencia
100 Hz
–
18 KHz
Clase resistente al agua
IPX 7
Perfil Bluetooth
A2DP, HFP, AVRCP
Alcance de Bluetooth*
Hasta 30,4 m / 100 pies *
Entrada auxiliary
3,5 mm (1/8 pulg.) de nivel de línea
Vida útil de la batería **
Hasta 20 horas
Tiempo de recarga
Aproximadamente 4 horas
Puerto de carga
USB; +5V, 1
A

16
Guide d'utilisation rapide (Français)
Présentation
1. Veuillez vous assurer que tous les articles énumérés dans le contenu de la boîte de ce guide sont
inclus dans la boîte.
2. VEUILLEZ LIRE LE LIVRET DES CONSIGNES DE SÉCURITÉ ET DES INFORMATIONS SUR
LA GARANTIE AVANT D'UTILISER LE PRODUIT.
3. VEUILLEZ VOUS ASSURER D'AVOIR COMPLÈTEMENT CHARGÉ LA BATTERIE AVANT LA
PREMIÈRE UTILISATION AFIN D’AUGMENTER SA DURÉE DE VIE.
4. Veuillez examiner le schéma de connexion.
Contenu de la boîte
Plunge
Câble de rechargement micro US
Câble 3,5 mm (1/8 po) à 3,5 mm (1/8 po)
Guide d'utilisation rapide
Consignes de sécurité et informations concernant la garantie
Assistance technique
Pour les toutes dernières informations concernant ce produit (configuration système, compatibilité,
etc.), veuillez visiter le site ionaudio.com.
MISE EN GARDE: Gargez tout appareil non étanche (téléphones, lecteurs, etc.) dans un endroit sec à
l’abri des éclaboussures et des risques de décharges électriques.

17
Installation
Schéma de connexion
Les articles qui ne figurent pas dans l’encadré Contenu de la boîte sont vendus séparément.
Faire la lecture de musique
Rechargement
SOURCE AUDIO AUXILIAIRE
TABLETTE ou SMARTPHONE
USB
ALIMENTATION
(rechargement
de la batterie)
USB
ALIMENTATION
(rechargement
de la batterie)

18
Caractéristiques
1. Entrée auxiliaire* : Cette entrée stéréo
3,5 mm permet de brancher un lecteur de
disques compacts, lecteur MP3 ou autres
sources audio.
2. Port micro USB* : Utilisez le câble USB
inclus pour relier ce port au port USB d’un
ordinateur ou d’un chargeur de téléphone
afin de recharger la pile du Plunge.
Remarque : Veuillez vous assurer que
l’appareil et ses connexions sont secs avant
de le recharger. Ne jamais recharger
l’appareil lorsqu’il est mouillé.
3. Touche Bluetooth : Pour déjumeler un
appareil Bluetooth, maintenir cette touche
enfoncée.
4. DEL Bluetooth : Cette DEL clignote lors du
jumelage et demeure allumée lorsque
connecté à un appareil Bluetooth.
5. Appel entrant / Mettre fin à l’appel /
Lancer/interrompre la lecture : Appuyez
sur cette touche pour lancer la lecture ou
interrompre une piste sur un périphérique
Bluetooth connecté. Une fois jumelé avec
votre téléphone, enfoncez et relâchez cette
touche pour prendre un appel. La sonnerie
du téléphone retentit par le haut-parleur du
Plunge jusqu'à ce que l'appel soit pris.
Lorsque l'appel est complété, Plunge
reprend la lecture de la musique. Pour rejeter
un appel entrant, maintenez cette touche
enfoncée.
3
4
5
6
7
8
9
10
10
11
11
12
12
1 2
*IMPORTANT : Remettre le bouchon
sur l’entrée auxiliaire et le port Micro
USB en position verrouillée lorsque
vous utilisez le Plunge dans l'eau.
Remarque : Si le haut-parleur se
remplit d'eau, le bruit sera étouffé
jusqu'à ce que l'eau se soit écoulée
du haut-parleur.
Retirez le bouchon hermétique
avant d’apporter le Plunge en avion
afin d’éviter d’endommager le
haut-parleur.

19
6. Interrupteur d’alimentation : Maintenez cette touche enfoncée afin de mettre le Plunge
sous et hors tension. Veuillez noter que lorsque le Plunge est branché à une source
d’alimentation, il peut recharger la batterie sans être allumé.
Remarque : Le Plunge s’éteint automatiquement après 10 minutes lorsqu'aucun
appareil Bluetooth n’est jumelé ou lorsqu’aucun signal audio n’est détecté.
7. Indicateur de charge : La DEL clignote lentement lorsque la batterie doit être rechargée.
La DEL devient rouge lors du rechargement de la batterie. Lorsque l'appareil est en
marche et que la batterie est complètement rechargée, la DEL est verte.
8. Volume + : Cette touche permet d’augmenter le volume du Plunge.
9. Volume - : Cette touche permet de diminuer le volume du Plunge.
Remarque : Appuyez sur les deux touches Volume simultanément afin d’activer ou
désactiver les invites vocales.
10. Piste suivante : Appuyez et relâchez cette touche pour passer à la piste Bluetooth
suivante. Maintenez cette touche enfoncée pendant 2 secondes afin d’activer l’assistant
vocal (Siri
®
, Google
®
, etc.) de votre smartphone jumelé, puis parlez dans le microphone.
11. Piste précédente : Appuyez et relâchez cette touche afin de revenir au début de la
piste.
Remarque : Dans certaines applications, les touches piste suivante et piste
précédente permettent de passer à la liste de lecture ou le genre de musique suivant ou
précédent.
12. Microphone : Parlez dans le microphone afin de communiquer
avec l’interlocuteur de l’appel entrant.
13. Point de fixation pour trépied (panneau inférieur) : Cette
embase filetée de 6,35 mm permet de fixer un trépied.
13
13

20
Jumelage ou déconnecter d'un périphérique Bluetooth
1. Mettez votre périphérique Bluetooth sous tension.
2. Mettez le Plunge sous tension et il passera automatiquement en mode jumelage afin de rechercher les
périphériques Bluetooth. Vous saurez que vous êtes en mode jumelage lorsque la DEL devient
lentement clignoter.
3. Accédez à l'écran de configuration de votre périphérique Bluetooth, recherchez « Plunge » et lancez le
jumelage.
Remarque : Si votre périphérique Bluetooth vous demande d’entrer un code de jumelage, entrez
« 0000 ».
4. Enfoncez puis relâchez la touche Bluetooth pour déconnecter le périphérique Bluetooth branché.
5. Pour jumeler un autre périphérique Bluetooth, répétez les étape 3.
Remarque : La plage maximale peut être atteinte avec l’utilisation d’appareils dotés de Bluetooth 4.0 ou de
versions ultérieures.
Utilisation du téléphone
Remarque : Vous devez mettre le Plunge sous tension et le jumeler avec votre appareil Bluetooth avant de
pouvoir écouter de la musique ou de prendre des appels.
Prendre des appels :
Lorsque vous recevez un appel, le haut-parleur du Plunge fera jouer la sonnerie de votre téléphone.
1. Pour prendre l’appel, appuyez sur la touche Appel entrant du Plunge.
Remarque : Si vous recevez un appel alors que la musique joue, la musique s’arrête jusqu’à ce que
vous mettiez fin à l’appel.
2. Parlez dans le microphone et réglez le volume à l’aide des touches Volume.
3. Pour mettre fin à l’appel, appuyez sur la touche Mettre fin à l’appel.
4. Pour rejeter un appel entrant, maintenez la touche Appel entrant enfoncée.
Guide de dépannage
Lorsqu’il y a de la distorsion : Essayez de diminuer le volume de votre appareil. Essayez également
d'abaisser le volume du Plunge.
Lorsqu’il y a trop de basses fréquences : Essayez de régler le niveau de tonalité et d’égalisation sur
l’appareil de source d’entrée audio afin de diminuer le niveau des basses fréquences. Cela vous permettra
d'augmenter le volume de la musique avant que l'écrêtage se produise.

21
Spécifications techniques
Toutes les spécifications sont susceptibles d'être modifiées sans préavis.
* La portée Bluetooth est affectée par les murs, les obstacles et le mouvement. Pour une performance optimale, placez le produit en
visibilité directe afin qu'il n’y ait aucune obstruction créée par des murs, des meubles, etc.
** La durée de vie de la batterie peut être affectée par la température, l’âge du produit, ainsi que le niveau du volume d’utilisation.
Énonce de CNR : Le présent appareil est conforme aux CNR d'Industrie Canada applicables aux appareils radio exempts de
licence. L'exploitation est autorisée aux deux conditions suivantes : (1) l'appareil ne doit pas produire de brouillage, et (2) l'utilisateur
de l'appareil doit accepter tout brouillage radioélectrique subi, même si le brouillage est susceptible d'en compromettre le
fonctionnement.
Dimensions
(longueur x largeur x hauteur)
260 mm x 80 mm x 150 mm
10,2 x 3,1 x 5,9 pulg
Poids
1,1 kg
2,4 lbs.
Puissance de sortie
13 W
Réponse en fréquence
100 Hz
–
18 KHz
Classe de résistance à l’eau
IPX 7
Profils Bluetooth
A2DP, HFP, AVRCP
Portée Bluetooth*
Jusqu'à 30,4 m (100 pi)
Entrée auxiliaire
Niveau ligne 3,5 mm (1/8 po)
Autonomie de la batterie **
Jusqu'à 20 heures
Temps de rechargement
Approximativement 4 heures
Port de rechargement
USB; +5V, 1
A

22
Guida rapida (Italiano)
Introduzione
1. Assicurarsi che tutti gli elementi elencati nel paragrafo “Contenuti della confezione” siano
contenuti nella confezione stessa.
2. LEGGERE ATTENTAMENTE IL LIBRETTO DI SICUREZZA E GARANZIA PRIMA DI
UTILIZZARE IL PRODOTTO.
3. PER GARANTIRE LA MASSIMA DURATA DELLA BATTERIA, ASSICURARSI DI AVERLA
CARICATA COMPLETAMENTE PRIMA DEL PRIMO UTILIZZO.
4. Studiare lo schema dei collegamenti.
Contenuti della confezione
Plunge
Cavo di ricarica Micro USB
Cavo da 3,5mm (1/8”) a 3,5mm (1/8”)
Guida rapida
Istruzioni di sicurezza e garanzia
Assistenza
Per le ultime informazioni in merito a questo prodotto (requisiti di sistema, informazioni sulla
compatibilità, ecc.) e per la registrazione del prodotto, recarsi alla pagina ionaudio.com.
AVVERTENZA: tenere qualsiasi dispositivo che non sia impermeabile (telefoni, lettori musicali, ecc.) in
un luogo asciutto in cui non vengano toccati dall'acqua causando un rischio di scossa elettrica.

23
Configurazione rapida
Schema dei collegamenti
Elementi non elencati sotto Contenuti della confezione sono venduti separatamente.
Riproduzione della musica
Ricarica
SORGENTE AUDIO AUSILIARI
A
TABLET o SMARTPHONE
USB
ALIMENTAZIONE
(rechargement
de la batterie)
USB
ALIMENTAZIONE
(rechargement
de la batterie)

24
Caratteristich
1. Ingresso ausiliario*: questo ingresso stereo
da 3,5mm (1/8”) può essere utilizzato per
collegare un lettore CD o altre fonti audio.
2. Porta Micro USB*: Servirsi del cavo USB in
dotazione per collegare questa porta ad una
porta USB del computer o del caricabatterie
per ricaricare la batteria del Plunge.
Nota bene: prima di effettuare la ricarica,
assicurarsi che il Plunge e le relative
connessioni siano asciutti. Mai caricare il
prodotto quando è bagnato.
3. Tasto Bluetooth: tenere premuto questo
tasto per scollegare un dispositivo Bluetooth
collegato.
4. LED Bluetooth: lampeggia di durante il
collegamento Bluetooth o si illumina di in
maniera fissa quando è collegato a un
dispositivo Bluetooth.
5. Call Receive / Call End / Play / Pause
(ricevi chiamata / termina chiamata /
riproduci / pausa): premere questo tasto per
riprodurre o mettere in pausa una traccia da
un dispositivo Bluetooth collegato. Una volta
collegato il Bluetooth, premere e rilasciare il
tasto per rispondere a una chiamata. La
suoneria del telefono si sentirà tramite
l'altoparlante del Plunger fino a quando non
si risponde alla chiamata. Quando la
chiamata viene scollegata, il Plunge
riprenderà a riprodurre la musica. Per
respingere una chiamata in arrivo, tenere
premuto questo tasto.
3
4
5
6
7
8
9
10
10
11
11
12
12
1 2
*IMPORTANTE: quando si utilizza il
Plunge in acqua, coprire la porta Aux
In e la porta Micro USB chiudendo gli
appositi cappucci protettivi.
Nota bene: se l'altoparlante si riempie
d'acqua, il suono sarà smorzato fino a
quando l'acqua non sarà drenata
dall'altoparlante.
Prima di portare il Plunge in
aereo, aprire i cappucci stagni per
evitare danni all'altoparlante.

25
6. Interruttore On/Off (accensione/spegnimento): tenere premuto questo tasto per
accendere e spegnere il Plunge. Quando il Plunge è collegato ad una fonte di
alimentazione, non deve essere necessariamente acceso per caricare la batteria.
Nota bene: in assenza di collegamento Bluetooth o in assenza di segnale audio, il
Plunge si spegnerà dopo 10 minuti.
7. Indicatori di carica: quando la batteria deve essere ricaricata il LED lampeggia
lentamente. Quando la batteria
è in ricarica il LED è di colore rosso fisso. Quando
l'alimentazione è accesa e la batteria è carica, il LED sarà verde.
8. Volume su: premere questo tasto per alzare il volume dell'altoparlante del Plunge.
9. Volume giù: premere questo tasto per abbassare il volume dell'altoparlante del Plunge.
Nota bene: premere contemporaneamente i tasti Volume su e Volume giù per abilitare o
disabilitare i messaggi vocali.
10. Traccia successiva: premere e rilasciare questo tasto per passare alla traccia Bluetooth
successiva. Tenere premuto questo tasto per 2 secondi per abilitare l'assistente vocale
del proprio smartphone (ad es. Siri
®
, Google
®
, ecc.), quindi parlare nel microfono.
11. Traccia precedente: premere e rilasciare questo tasto una volta per passare all'inizio
della traccia.
Nota bene: in alcune app, la pressione del tasto Previous
Track o Next Track può far passare a un'altra playlist o a un
altro genere musicale.
12. Microfono: parlare nel microfono quando si riceve una
chiamata.
13. Collegamento per tripode (pannello inferiore): fissare un
tripode a questo collegamento filettato da 1/4” (6,35 mm).
13
13

26
Accoppiamento or disconnessione di un dispositivo Bluetooth
1. Accendere il dispositivo Bluetooth.
2. Accendere il Plunge: entrerà automaticamente in modalità di accoppiamento per cercare
dispositivi Bluetooth. Siete in modalità di accoppiamento quando il LED è lentamente
lampeggiare.
3. Navigare nella schermata di configurazione del dispositivo Bluetooth, trovare “Plunge” e
collegarlo.
Nota bene: se il dispositivo Bluetooth richiede un codice, digitare “0000”.
4. Premere e rilasciare il tasto Bluetooth per scollegare di un dispositivo Bluetooth accoppiato.
5. Per collegarlo ad un altro dispositivo Bluetooth, ripetere i passaggio 3.
Nota bene: la portata massima si ottiene servendosi di dispositivi dotati di Bluetooth 4.0 o superiore.
Utilizzo del telefono
Nota bene: bisogna accendere e collegare il Plunge con il dispositivo Bluetooth prima di utilizzarlo
per ascoltare musica o come altoparlante del telefono.
Utilizzo del telefono:
Quando c'è una chiamata in arrivo, l'altoparlante del Plunge riprodurrà una suoneria.
1. Per rispondere alla chiamata, premere il tasto Call Receive del Plunge.
Nota bene: se si riceve una telefonata durante la riproduzione della musica, questa verrà
interrotta fino a quando non termina la chiamata.
2. Parlare nel microfono e regolare il volume della chiamata servendosi dei tasti Volume.
3. Per concludere la chiamata, premere il pulsante Call End (termina chiamata).
4. Per respingere una chiamata in arrivo, tenere premuto il tasto Call Receive (ricevi chiamata).
Risoluzione di problemi
Il suono è distorto: provare ad abbassare il volume a livello della fonte audio. Inoltre, provare a
ridurre il volume complessivo del Plunge.
Eccessivi bassi: provare a regolare la tonalità o il comando EQ a livello della fonte audio per
abbassare il livello dei bassi. Ciò permetterà di suonare la musica più forte prima che salti (che si
verifichi distorsione).

27
Specifiche tecniche
Le specifiche tecniche possono variare senza preavviso.
* La portata del Bluetooth è influenzata da pareti, ostacoli e movimento. Per ottenere prestazioni ottimali,
collocare il prodotto nella stanza con linea d'aria libera in modo che non sia ostacolato da pareti, mobili, ecc.
** La durata della batteria varia a seconda della temperatura, dell’età e del volume di utilizzo del prodotto.
Dimensioni (lunghezza x
larghezza x altezza)
260 mm x 80 mm x 150 mm
10,2” x 3,1” x 5,9”
Peso
1,1 kg
2,4 lbs.
Potenza di uscita
13 W
Risposta di frequenza
100 Hz
–
18 KHz
Classe di resistenza all'acqua IPX 7
Profilo Bluetooth
A2DP, HFP, AVRCP
Portata Bluetooth*
Fino a 30,4 m / 100' *
Ingresso Aux
3,5 mm (1/8”) livello di linea
Durata della batteria **
Fino a 20 ore
Tempo di ricarica
Circa 4 ore
Porta di ricarica
USB; +5V, 1
A

28
Schnellstart-Anleitung (Deutsch)
Einführung
1. Stellen Sie sicher, dass alle im Lieferumfang aufgelisteten Teile in der Verpackung enthalten sind.
2. LESEN SIE DIE SICHERHEITSHINWEISE & GARANTIEINFORMATIONEN BEVOR SIE DAS
PRODUKT VERWENDEN.
3. STELLEN SIE SICHER, DASS DER AKKU VOR DER ERSTEN VERWENDUNG VOLLSTÄNDIG
AUFGELADEN IST, UM EINE MAXIMALE AKKULEBENSDAUER ZU ERZIELEN.
4. Werfen Sie einen Blick auf die Anschlussübersicht.
Lieferumfang
Plunge
Micro USB-Ladekabel
3,5 mm (1/8") auf 3,5 mm (1/8") Kabel
Schnellstart-Anleitung
Sicherheitshinweise und Garantieinformationen
Kundendienst
Für die neuesten Informationen zu diesem Produkt (Systemanforderungen, Informationen zur
Kompatibilität etc.) und für die Produktregistrierung besuchen Sie ionaudio.com.
WARNUNG: Bewahren Sie alle nicht wasserdichten Geräte (Handys, Musik-Player etc.) an einem
trockenen Ort auf, wo sie nicht von der Feuchtigkeit beeinträchtigt werden können und kein Risiko
durch Stromschläge besteht.

29
Schnelles Einrichten
Anschlussdiagramm
Teile, die nicht im Lieferumfang angegeben sind, sind separat erhältlich.
Musik spielen
Aufladen
ZUSÄTZLICHE
A
UDIOQUELLE
TABLET oder SMARTPHONE
USB
STROM-
VERSORGUNG
(Zum
Aufladen)
USB
STROM-
VERSORGUNG
(Zum
Aufladen)

30
Funktionen
1. Aux-Eingang*: Dieser 3,5mm-Stereoeingang
(1/8”) kann dazu verwendet werden, einen
CD-Player, MP3-Player oder eine andere
Audioquelle anzuschließen.
2. Micro USB-Anschluss*: Verwenden Sie das
mitgelieferte USB-Kabel, um diesen
Anschluss mit einem USB-Anschluss auf
Ihrem Computer oder Handy-Ladegerät zu
verbinden, um den Akku des Plunge
aufzuladen.
Hinweis: Stellen Sie sicher, dass Plunge und
die Anschlüsse vor dem Laden trocken sind.
Laden Sie das Gerät nie auf, wenn es nass
ist.
3. Bluetooth-Taste: Halten Sie diese Taste
gedrückt, um ein gekoppeltes Bluetooth-
Gerät zu trennen.
4. Bluetooth-LED: Diese LED blinkt, wenn eine
Bluetooth-Verbindung hergestellt wird oder
leuchtet konstant, wenn eine Verbindung zu
einem Bluetooth-Gerät besteht.
3
4
5
6
7
8
9
10
10
11
11
12
12
1 2
* WICHTIG: Bedecken Sie den Aux In
und den Micro-USB-Anschluss mit
der Kappe in verriegelter Position,
wenn Sie Plunge im Wasser
verwenden.
Hinweis: Wenn der Lautsprecher mit
Wasser gefüllt ist, klingt er gedämpft,
bis das Wasser aus dem Lautsprecher
abgelassen wird.
Öffnen Sie vor Flugreisen die
luftdichte Kappe des Plunge, um
Schäden am Lautsprecher zu
vermeiden.

31
5. Anruf entgegennehmen / Anruf beenden / Wiedergabe / Pause: Drücken Sie diese
Taste, um einen Track vom angeschlossenen Bluetooth-Gerät abzuspielen oder zu
pausieren. Wenn eine Bluetooth-Verbindung hergestellt ist, drücken Sie kurz diese Taste,
um einen Anruf zu beantworten. Der Klingelton des Telefons wird über den Plunge-
Lautsprecher zu hören sein, bis der Anruf beantwortet wird. Wenn der Anruf beendet
wird, setzt Plunge die Musikwiedergabe fort. Um einen eingehenden Anruf abzuweisen,
halten Sie diese Taste gedrückt.
6. Ein-/Ausschalter: Halten Sie diese Taste gedrückt, um Plunge ein-/auszuschalten.
Während Plunge an eine Stromquelle angeschlossen ist, muss es nicht eingeschaltet
sein, um den Akku aufzuladen.
Hinweis: Wenn keine Bluetooth-Verbindung besteht oder kein Audiosignal empfangen
wird, schaltet sich Plunge nach 10 Minuten ab.
7. Ladeanzeigen: Die LED blinkt langsam, wenn der Akku aufgeladen werden muss. Die
LED leuchtet durchgehend rot, wenn der Akku aufgeladen wird. Wenn das Gerät
eingeschaltet ist und der Akku vollständig geladen ist, wird diese LED grün leuchten.
8. Lautstärke erhöhen: Drücken Sie diese Taste, um die Lautstärke des Plunge zu
erhöhen.
9. Lautstärke verringern: Drücken Sie diese Taste, um die Lautstärke des Plunge zu
verringern.
Hinweis: Drücken Sie gleichzeitig die Tasten Lautstärke erhöhen und Lautstärke
verringern, um die Sprachanweisungen zu aktivieren/deaktivieren.
10. Nächster Track: Drücken Sie diese Taste 2 Sekunden lang, um Ihren Smartphone-
Assistenten zu aktivieren (z.B. Siri
®
, Google
®
etc.) und sprechen dann ins Mikrofon.
11. Vorheriger Track: Drücken Sie einmal kurz auf diese Taste, um zum Anfang des Tracks
zu springen.
Hinweis: Bei einigen Apps kann durch Drücken der Taste Vorheriger Track oder
Nächster Track zu einer anderen Wiedergabeliste oder zu einem anderen Musikgenre
gewechselt werden.
12. Mikrofon: Sprechen Sie in dieses Mikrofon, wenn Sie einen
Anruf erhalten.
13. Stativgewinde (Bodenplatte): Schrauben Sie ein Stativ in
das 1/4" (6,35 mm) Gewinde.
13
13

32
Koppeln oder trennen Bluetooth-Geräts
1. Schalten Sie Ihr Bluetooth-Gerät ein.
2. Schalten Sie Plunge ein und das Gerät wird automatisch in den Koppel-Modus schalten, um
nach Bluetooth-Geräten zu suchen. Sie sind im Koppel-Modus, wenn die LED langsam blinken.
3. Navigieren Sie zum Setup-Bildschirm Ihres Bluetooth-Geräts, wählen Sie “Plunge” und stellen
Sie eine Verbindung her.
Hinweis: Wenn Ihr Bluetooth-Gerät die Eingabe eines Koppel-Codes anfordert, geben Sie
“0000” ein.
4. Drücken Sie kurz die Bluetooth-Taste, um ein angeschlossenes Bluetooth-Gerät zu trennen.
5. Um ein anderes Bluetooth-Gerät zu verbinden, wiederholen Sie die Schritt 3.
Hinweis: Die maximale Reichweite wird erreicht, wenn Sie Geräte mit Bluetooth 4.0 oder höher
verwenden.
Verwendung des Telefons
Hinweis: Sie müssen Plunge einschalten und mit Ihrem Bluetooth-Gerät koppeln, bevor Sie es als
Freisprecheinrichtung oder zum Musikhören verwenden können.
Verwendung des Telefons:
Wenn Sie einen Anruf erhalten, wird Plunge Ihren Klingelton über den Lautsprecher abspielen.
1. Um den Anruf entgegenzunehmen, drücken Sie am Plunge die Taste Anruf annehmen.
Hinweis: Wenn ein Anruf während der Musikwiedergabe eingeht, wird die Musikwiedergabe
pausiert, bis Sie den Anruf beendet haben.
2. Sprechen Sie in das Mikrofon und passen Sie die Gesprächslautstärke über die
Lautstärketasten an.
3. Drücken Sie die Taste Anruf beenden, um den Anruf zu beenden.
4. Um einen eingehenden Anruf abzulehnen, halten Sie die Taste Anruf entgegennehmen
gedrückt.
Fehlerbehebung
Der Ton klingt verzerrt: Reduzieren Sie die Lautstärke Ihrer Tonquelle oder Ihres Musikinstruments.
Versuchen Sie auch, das Gesamtvolumen des Plunges zu reduzieren.
Zu viel Bass: Versuchen Sie den Ton oder den EQ-Regler Ihrer Tonquelle anzupassen, um den Bass
zu verringern. Dies ermöglicht Ihnen, die Musik lauter abzuspielen, bevor der Klang verzerrt.

33
Technische Daten
Die Spezifikationen können ohne Ankündigung geändert werden.
* Die Bluetooth-Reichweite wird durch Wände, Hindernisse und Bewegungen beeinflusst. Um die optimale Leistung zu
erzielen, platzieren Sie das Produkt in Sichtlinie im Raum, so dass Wände, Möbel etc. nicht stören können.
** Die Akkulaufzeit des Produkts kann aufgrund von Faktoren wie Temperatur, Alter und gespielter Lautstärke variieren.
Allgemeinhinweis zur Konformitätserklärung: Hiermit erklären wir, daß sich das Gerät Plunge in
Übereinstimmung mit den grundlegenden Anforderungen der europäischen Richtlinie 1999/5/EG befindet. Die
vollständige EG Konformitätserklärung kann unter folgender Adresse angefordert werden:
inMusic GmbH
Harkortstrasse 12-32
40880 Ratingen
German
Abmessungen
(Länge x Breite x Höhe)
260 mm x 80 mm x 150 mm
10,2” x 3,1” x 5,9”
Gewicht
1,1 kg
2,4 lbs.
Ausgangsleistung
13 W
Frequenzgang
100 Hz – 18 KHz
Wasserdicht laut Klasse
IPX 7
Bluetooth-Profil
A2DP, HFP, AVRCP
Bluetooth-Reichweite*
Bis zu 30,4 m / 100' *
Aux-Eingang
3,5 mm (1/8") Line-Level
Akkulaufzeit **
Bis zu 20 Stunden
Ladezeit
Ca. 4 Stunden
Ladebuchse
USB; +5V, 1A

34
Snelstartgids (Nederlands)
Inleiding
1. Zorg ervoor dat alle artikelen, opgesomd in Inhoud van de doos, zich in de doos bevinden.
2. LEES DE HANDLEIDING VEILIGHEID EN GARANTIE VOORALEER HET PRODUCT TE
GEBRUIKEN.
3. ZORG ERVOOR DAT DE ACCU VOOR HET EERSTE GEBRUIK VOLLEDIG IS OPGELADEN,
VOOR EEN MAXIMALE LEVENSDUUR.
4. Bestudeer het aansluitschema.
Inhoud van de doos
Plunge
Micro USB-Oplaadkabel
Kabel 3,5mm (1/8”) - 3,5mm (1/8”)
Snelstartgids
Handleiding veiligheid en garantie
Ondersteuning
Voor de laatste informatie over dit product (systeemvereisten, informatie over compatibiliteit, enz.) en
productregistratie, ga naar: ionaudio.com.
WAARSCHUWING: Houd alle niet-waterbestendig apparaten (telefoons, muziekspelers, enz.) op een
droge plaats waar ze niet worden beïnvloed door water en een risico van een elektrische schok
veroorzaken.

35
Snelle opstelling
Aansluitschema
Artikelen die niet zijn opgesomd in Inhoud van de doos worden afzonderlijk verkocht.
Muziek afspelen
Opladen
EXTRA GELUIDSBRON
TABLET of SMARTPHONE
USB
VOEDING
(voor het
opladen)
USB
VOEDING
(voor het
opladen)

36
Kenmerken
1. Aux-ingang*: Deze stereo 3,5mm (1/8")-
ingang kan worden gebruikt om een cd-
speler, mp3-speler of andere geluidsbron
aan te sluiten.
2. Micro-USB-poort*: Gebruik de
meegeleverde USB-kabel om deze poort aan
te sluiten op een USB-poort op uw computer
of telefoon oplader om de Plunge batterij op
te laden.
Opmerking: Controleer of de Plunge en alle
verbindingen droog zijn voordat u start met
opladen. Nooit een nat apparaat opladen.
3. Bluetooth-knop: Deze knop indrukken en
vasthouden om een gekoppeld Bluetooth-
apparaat te verwijderen.
4. Bluetooth-LED: Gaat knipperen bij
Bluetooth-koppelen en blijft branden bij
verbinding met een Bluetooth-apparaat.
5. Oproep ontvangen / beëindigen/ Afspelen/
Pauzeren: Indrukken om een nummer vanaf
een verbonden Bluetooth-apparaat af te
spelen of te pauzeren. Deze knop indrukken
en loslaten om een oproep te beantwoorden
bij koppeling over Bluetooth. De beltoon van
de telefoon is hoorbaar door de luidspreker
van de Plunge tot de oproep wordt
beantwoord. Wanneer het gesprek is
afgelopen, hervat de Plunge het afspelen van
muziek. Druk deze knop in en houd deze
ingedrukt om een inkomende oproep te
weigeren.
3
4
5
6
7
8
9
10
10
11
11
12
12
1 2
*BELANGRIJK: De Aux In en micro-
usb-poort afdekken met het
beschermkapje in vergrendelde
positie wanneer u de Plunge in water
gebruikt.
Opmerking: Als de luidspreker gevuld
raakt met water zal het geluid
gedempt klinken tot al het water uit de
luidspreker is weggevloeid.
Het luchtdichte beschermkapje
openen voordat u met de Plunge aan
boord van een vliegtuig stapt, om
beschadiging van de luidspreker te
vermijden.

37
6. Aan/uitschakelaar: Deze knop indrukken en ingedrukt houden om de Plunge aan of uit
te zetten. Als de Plunge is aangesloten op een stroombron, moet hij niet worden
aangezet om de batterij op te laden.
Opmerking: De Plunge gaat uit na 10 minuten als er geen Bluetooth-verbinding is of als
er geen audiosignaal wordt ontvangen.
7. Oplaadindicator: De LED gaat traag knipperen wanneer de batterij moet worden
opgeladen. De LED blijft rood branden wanneer de batterij wordt opgeladen. Wanneer de
stroom aan staat en de batterij volledig is opgeladen, wordt deze LED groen.
8. Volume omhoog: Hierop drukken om het volume van de Plunge te verhogen.
9. Volume omlaag: Hierop drukken om het volume van de Plunge te verlagen.
Opmerking: Druk tegelijk op de knoppen Volume omhoog en Volume omlaag om
gesproken aanwijzingen te activeren of deactiveren.
10. Volgend nummer: Deze knop indrukken en loslaten om naar het volgende Bluetooth-
nummer te gaan. Houd deze knop 2 seconden lang ingedrukt om de stemassistent van
uw smartphone te activeren (bv. Siri
®
, Google
®
, enz.) en spreek vervolgens in de
microfoon.
11. Vorig nummer: Deze knop een keer indrukken en loslaten om naar het begin van het
nummer te navigeren.
Opmerking: In sommige apps kunnen de knoppen Vorig of
Volgend nummer een andere afspeellijst of muziekgenre
oproepen.
12. Microfoon: Praat hier nadat u een oproep hebt beantwoord.
13. Bevestiging voor statief (onderpaneel): Maak uw statief vast
op deze schroefdraadbevestiging van 1/4” (6,35 mm).
13
13

38
Een Bluetooth-apparaat koppelen van of verbreken
1. Zet uw Bluetooth-apparaat aan.
2. Bij het aanzetten van Plunge zet het zich automatisch in koppelmodus, om te zoeken naar
Bluetooth-apparaten. U merkt wanneer u zich in koppelingsmodus bevindt als de LED traag
knipperen.
3. Navigeer naar het instelscherm van uw Bluetooth-apparaat, zoek naar Plunge en maak
verbinding.
Opmerking: Als uw Bluetooth-apparaat om een koppelingscode verzoekt, voer dan “0000” in.
4. De Bluetooth-knop indrukken en loslaten om koppelen een gekoppeld Bluetooth-apparaat.
5. Om verbinding te maken met een ander Bluetooth-apparaat: herhaal stap 3.
Opmerking: Voor een maximumbereik moeten apparaten met Bluetooth 4.0 of hoger worden
gebruikt.
De telefoon gebruiken
Opmerking: U moet Plunge aanzetten en koppelen met uw Bluetooth-apparaat vooraleer u het kunt
gebruiken om naar muziek te luisteren of als luidsprekertelefoon.
De telefoon gebruiken:
De luidspreker van Plunge speelt bij een binnenkomende oproep een beltoon af.
1. Om de oproep te beantwoorden: druk op de knop Oproep beantwoorden op Plunge.
Opmerking: Wanneer u een binnenkomende oproep ontvangt tijdens het afspelen van muziek,
wordt de muziek onderbroken tot u de oproep beëindigt.
2. Spreek in de microfoon en pas met de volumeknop het oproepvolume aan.
3. Druk op de knop Oproep beëindigen om het gesprek te beëindigen.
4. Druk op de knop Oproep ontvangen en houd deze ingedrukt om een inkomende oproep te
weigeren.
Problemen oplossen
Het geluid is vervormd : Probeer het volumeniveau van uw geluidsbron te verlagen. Probeer ook het
algemeen volume van Plunge te verlagen.
Er zijn teveel bassen : Probeer op de toon- of EQ-bedieningsknoppen aan uw geluidsbron het niveau
van de lage tonen te verlagen. Dit stelt u in staat de muziek luider te zetten vooraleer “afgeknipte”
(vervormde) klanken optreden.

39
Technische specificaties
De specificaties kunnen zonder voorafgaande kennisgeving worden gewijzigd.
* Het Bluetooth-bereik wordt beïnvloed door muren, obstakels en beweging. Plaats het product voor optimale
prestaties in uw kamer binnen uw gezichtsveld, zodat het niet wordt belemmerd door muren, meubels, enz.
** De levensduur van de batterij kan variëren naargelang de temperatuur, ouderdom en het gebruiksvolume
van het product.
Afmetingen
(Lengte x Breedte x Hoogte)
260 mm x 80 mm x 150 mm
10,2” x 3,1” x 5,9”
Gewicht
1,1 kg
2,4 lbs.
Uitvoervermogen
13 W
Frequentiebereik
100 Hz
–
18 KHz
Waterbestendigheidsklasse
IPX 7
Bluetooth-profiel
A2DP, HFP, AVRCP
Bereik Bluetooth*
Tot 30,4 m
/
100' *
Aux-ingang
3,5 mm (1/8”) lijnniveau
Levensduur van de batterij **
Tot 20 uur
Oplaadtijd
Ongeveer 4 uur
Poort Opladen
USB; +5V, 1A

ionaudio.com
Manual Version 1.0
Transcripción de documentos
Plunge Quickstart Guide English ( 3 – 9 ) Guía de inicio rápido Español ( 10 – 15 ) Guide d'utilisation rapide Français ( 16 – 21 ) Guida rapida Italiano ( 22 – 27 ) Schnellstart-Anleitung Deutsch ( 28 – 33 ) Snelstartgids Nederlands ( 34 – 39 ) Quickstart Guide (English) Introduction 1. 2. 3. 4. Make sure all items listed in the Box Contents are included in the box. READ THE SAFETY & WARRANTY MANUAL BEFORE USING THE PRODUCT. MAKE SURE THE BATTERY IS COMPLETELY CHARGED PRIOR TO FIRST USE FOR MAXIMUM BATTERY LIFE. Study the connection diagram. Box Contents Plunge Micro-USB Charging Cable 3.5mm (1/8”) to 3.5mm (1/8”) cable Quickstart Guide Safety & Warranty Manual Support For the latest information about this product (system requirements, compatibility information, etc.) and product registration, visit ionaudio.com. WARNING: Keep any non-water-resistant devices (phones, music players, etc.) in a dry place where they will not be affected by water and cause a risk of electric shock. 3 Quick Setup Connection Diagram Items not listed under the Box Contents are sold separately. Playing Music TABLET or SMARTPHONE AUXILIARY AUDIO SOURCE Charging USB POWER (for charging) USB POWER (for charging) 4 Features 1. 2. 3. 4. 5. Auxiliary Input*: This stereo 3.5 mm (1/8”) input can be used to connect a CD player, MP3 player, or other audio source. Micro USB Port*: Open the bottom cover to access the USB port. Use the included USB cable to connect this to a USB port on your computer or phone charger to recharge Plunge's battery. Note: Make sure Plunge and connections are dry before charging. Never charge when wet. Bluetooth Button: Press and hold this button to disconnect a paired Bluetooth device. Bluetooth LED: This blinks when Bluetooth pairing or illuminates solid when connected to a Bluetooth device. Call Receive / Call End / Play / Pause: Press to play or pause a track from a connected Bluetooth device. When Bluetooth-paired, press and release this button to answer a phone call. The phone’s ringtone will be heard through Plunge’s speaker until the call is answered. When the call has been disconnected, Plunge will resume playing music. To reject an incoming call, press and hold this button. *IMPORTANT: Cover the Aux In and the Micro USB port with the cap in the locked position when using Plunge in water. Open the air-tight cap before taking Plunge on a plane to prevent speaker damage. Note: If the speaker fills with water, the sound will be muffled until the water has drained from the speaker. 1 2 9 8 3 6 11 4 7 5 10 12 5 6. 7. 8. 9. 10. 11. 12. 13. Power On/Off Switch: Press and hold this button to turn Plunge on/off. While Plunge is connected to a power source, it does not need to be powered on to charge the battery. Note: Plunge will power off after 10 minutes if there is no Bluetooth connection or no audio signal being received. Charging Indicator: The LED will slowly blink when the battery needs charging. The LED is solid red when the battery is charging. When the power is on and the battery is fully charged, this LED will be solid green. Volume Up: Press this to increase the speaker volume on Plunge. Volume Down: Press this to decrease the speaker volume on Plunge. Note: Press the Volume Up and Volume Down buttons at the same time to enable or disable voice prompts. Next Track: Press and release this button to skip to the next Bluetooth track. Press and hold this button for 2 seconds to enable your connected smartphone's voice assistant (e.g. Siri®, Google®, etc), and then speak into the microphone. Previous Track: Press and release this button once to go to the beginning of the track. Note: With some apps, pressing the Previous Track button or Next Track button may go to another playlist or music genre. Microphone: Talk into this after receiving a call. Tripod Mount (bottom panel): Attach a tripod to this 1/4” (6.35 mm) threaded mount. 13 Pairing or Disconnecting a Bluetooth Device 1. 2. Turn on your Bluetooth device. Power on Plunge and it will automatically go into pairing mode to search for Bluetooth devices. You will know you are in pairing mode when the Bluetooth icon is slowly flashing. 3. Navigate to your Bluetooth device’s setup screen, find “Plunge” and connect. Note: If your Bluetooth device prompts for a pairing code, enter “0000”. 4. Press and release the Bluetooth button to disconnect a paired Bluetooth device. 5. To connect to another Bluetooth device, repeat step 3. Note: Maximum range will be achieved when using devices with Bluetooth 4.0. 6 Using the Phone Note: You must power on and pair Plunge with your Bluetooth device before using it to listen to music or as a speakerphone. Using the Phone: When you have an incoming call, Plunge’s speaker will play a ringtone. 1. To answer the call, press Plunge's Call Receive button. Note: If you get an incoming call during music playback, the music will pause until you end the call. 2. Speak into the microphone and adjust the call volume using the Volume buttons. 3. To end the call, press the Call End button. 4. To reject an incoming call, press and hold the Call Receive button. Troubleshooting If the sound is distorted: Try lowering the volume control of your sound source. Also, try to reduce the overall volume of Plunge. If there is too much bass: Try adjusting the tone or EQ control on your sound source to lower the bass level. This will allow you to play the music louder before clipping (distortion) occurs. 7 Technical Specifications Dimensions (Depth x Width x Height) 10.2” x 3.1” x 5.9” 260 mm x 80 mm x 150 mm Weight 2 lbs; 0.9 kg Output Power 13 W Frequency Response 100 Hz – 18 KHz Water Resistance Class IPX 7 Bluetooth Profile A2DP, HFP, AVRCP Bluetooth Range* Up to 100’ / 30.4 m Aux Input 3.5 mm (1/8”) line-level Battery Life** Up to 20 hours (when fully charged) Recharge Time Up to 4 hours Charge Port USB; +5V, 1A Specifications are subject to change without notice. * Bluetooth range is affected by walls, obstructions, and movement. For optimal performance, place the product in your room at line of sight, so it is unaffected by walls, furniture, etc. ** Battery life may vary based on temperature, age, and volume usage of product. RSS Statement for Canadian models: This device complies with Industry Canada licence-exempt RSS standard(s). Operation is subject to the following two conditions: (1) this device may not cause interference, and (2) this device must accept any interference, including interference that may cause undesired operation of the device. 8 Trademarks and Licenses ION Audio is a trademark of ION Audio, LLC, registered in the U.S. and other countries. Google is a registered trademark of Google Inc. Siri is a trademark of Apple Inc., registered in the U.S. and other countries. The Bluetooth word mark and logos are owned by the Bluetooth SIG, Inc. and any use of such marks by ION Audio is under license. All other product or company names are trademarks or registered trademarks of their respective owners. 9 Guía de inicio rápido (Español) Introducción 1. 2. 3. 4. Asegúrese de que todos los artículos indicados en "Contenido de la caja" estén incluidos en ella. LEA EL MANUAL SOBRE LA SEGURIDAD Y LA GARANTÍA ANTES DE UTILIZAR EL PRODUCTO. PARA ASEGURAR UNA MÁXIMA VIDA ÚTIL DE LA BATERÍA, ASEGÚRESE DE QUE ESTÉ COMPLETAMENTE CARGADA ANTES DE UTILIZARLA POR PRIMERA VEZ. Estudie el diagrama de conexión. Contenido de la caja Plunge Cable de carga micro USB Cable de 1/8 pulg. (3,5 mm) a 1/8 pulg. (3,5 mm) Guía de inicio rápido Manual sobre la seguridad y garantía Soporte Para obtener la información más reciente acerca de este producto (requisitos de sistema, información de compatibilidad, etc.) y registrarlo, visite ionaudio.com. ADVERTENCIA: Coloque los dispositivos no resistentes al agua (teléfonos, reproductores de música, etc.) en un lugar seco donde no sean afectados por el agua y causen un riesgo de electrocución. 10 Instalación rápida Diagrama de conexión Los elementos que no se enumeran en Contenido de la caja se venden por separado. Reproducción de música TABLETA u SMARTPHONE FUENTE DE AUDIO AUXILIAR Carga USB SUMINISTRO ELÉCTRICO (para carga) USB SUMINISTRO ELÉCTRICO (para carga) 11 Características 1. 2. 3. 4. 5. Entrada auxiliar*: Esta entrada de 3,5 mm (1/8 pulg.) estéreo se puede usar para conectar un reproductor de CD, MP3 u otra fuente de audio. Puerto micro USB*: Use el cable USB incluido para conectar este puerto a un puerto USB de su computadora o cargador de teléfono para cargar la pila del Plunge. Nota: Asegúrese de que Plunge y las conexiones estén secas antes de cargarlo. Nunca lo cargue si está húmedo. Botón de Bluetooth: Mantenga pulsado este botón para desconectar un dispositivo Bluetooth apareado. LED de Bluetooth: Parpadea durante el apareamiento de Bluetooth o se ilumina con luz fija cuando está conectado a un dispositivo Bluetooth. Recepción de llamada / Fin de llamada / Reproducir/Pausa: Pulse para reproducir o hacer pausa en una pista de un dispositivo Bluetooth conectado. Con un dispositivo Bluetooth apareado, pulse y suelte este botón para atender una llamada. Se escuchará el tono de llamada del teléfono a través del altavoz del Plunge hasta que se atienda la llamada. Cuando la llamada haya finalizado, Plunge continuará reproduciendo música. Para rechazar una llamada entrante, mantenga pulsado este botón. *IMPORTANTE: Cubra la entrada auxiliar y el puerto micro USB con la tapa en la posición trabada antes de utilizar el Plunge en el agua. Abra la tapa hermética antes de llevar el Plunge en un avión para evitar daños en el altavoz. Nota: Si el altavoz de llena de agua, el sonido se oirá "tapado" hasta que se drene el agua. 1 2 9 8 3 6 11 4 7 5 10 12 12 6. 7. 8. 9. 10. 11. Interruptor de encendido/apagado: Mantenga pulsado este botón para encender o apagar el Plunge. Mientras el Plunge esté conectado a un suministro eléctrico, no es necesario encenderlo para que cargue la batería. Nota: Plunge se apagará después de 10 minutos sin recibir ninguna conexión de Bluetooth o señal de audio. Indicador de carga: El LED parpadeará lentamente cuando se necesite cargar la batería. El LED se iluminará con luz roja permanente cuando la batería se esté cargando. Cuando está encendido y la batería esté totalmente cargada, este LED se iluminará con luz verde permanente. Subir volumen: Pulse este botón para aumentar el volumen del altavoz del Plunge. Bajar volumen: Pulse este botón para disminuir el volumen del altavoz del Plunge. Nota: Pulse los botones de subir y bajar volumen al mismo tiempo para activar o desactivar los indicativos de voz. Next Track (Pista siguiente): Pulse y suelte este botón para pasar a la siguiente pista Bluetooth. Mantenga pulsado este botón durante 2 segundos para activar el asistente de voz de su teléfono inteligente (smartphone) (por ej., Siri®, Google®, etc.) y luego hable por el micrófono. Previous Track (Pista anterior): Pulse y suelte este botón una vez para ir al comienzo de la pista. Nota: En algunas aplicaciones, pulsar los botones Previous Track (Pista anterior) o Next Track (Pista siguiente) hará que vaya a otra lista de reproducción o género musical. Micrófono: Hable por él cuando recibe una llamada. Montaje para trípode (panel inferior): Sujete un trípode a este montaje roscado de 6,35 mm (1/4 pulg.). 13 12. 13. 13 Apareamiento o desconectarse de un dispositivo Bluetooth 1. 2. 3. 4. 5. Encienda su dispositivo Bluetooth. Encienda el Plunge, que pasará automáticamente al modo de apareamiento para buscar dispositivos Bluetooth. Se dará cuenta de que está en modo de apareamiento cuando el LED está lentamente parpadear. Navegue a la pantalla de configuración de su dispositivo Bluetooth, busque “Plunge” y conecte. Nota: Si su dispositivo Bluetooth solicita un código de apareamiento, ingrese “0000”. Pulse Mantenga pulsado de Bluetooth el botón para desconectar un dispositivo Bluetooth apareado. Para conectarse a otro dispositivo Bluetooth, repita los paso 3. Nota: El alcance máximo se logra cuando se utilizan dispositivos con Bluetooth 4.0 o superior. Cómo utilizar el teléfono Nota: Debe encender y aparear el Plunge con su dispositivo Bluetooth a fin de poder utilizarlo para escuchar música o como teléfono manos libres. Cómo utilizar el teléfono: Cuando tiene una llamada entrante, el altavoz del Plunge reproduce un tono de llamada. 1. Para contestar la llamada, pulse el botón Call Receive (Recepción de llamada) del Plunge. Nota: Si recibe una llamada entrante durante la reproducción de música, ésta se pondrá en pausa hasta que termine la llamada. 2. Hable frente al micrófono y ajuste el volumen de la llamada con los botones Volume (Volumen). 3. Para terminar la llamada, pulse el botón Call End (Terminación de llamada). 4. Para rechazar una llamada entrante, mantenga pulsado el botón de Recibir llamada. Solución de problemas Si el sonido está distorsionado: trate de disminuir el volumen de su fuente de sonido. Pruebe también reduciendo el volumen general del Plunge. Si los graves son demasiado fuertes: intente ajustar el control de tono o ecualización de su fuente de sonido para reducir el nivel de graves. De esta forma podrá reproducir la música con más volumen antes de que se produzca el recorte (distorsión). 14 Especificaciones técnicas Dimensiones (Largo x Ancho x Alto) 260 mm x 80 mm x 150 mm Peso 1,1 kg 2,4 lbs. Potencia de salida 13 W Respuesta en frecuencia 100 Hz – 18 KHz Clase resistente al agua IPX 7 Perfil Bluetooth A2DP, HFP, AVRCP Alcance de Bluetooth* Hasta 30,4 m / 100 pies * Entrada auxiliary 3,5 mm (1/8 pulg.) de nivel de línea Vida útil de la batería ** Hasta 20 horas Tiempo de recarga Aproximadamente 4 horas Puerto de carga USB; +5V, 1A 10,2 x 3,1 x 5,9 pulg Especificaciones sujetas a cambio sin previo aviso. * El alcance de Bluetooth se ve afectado por paredes, obstrucciones y movimiento. Para lograr un rendimiento óptimo, coloque el producto en la sala en donde pueda verlo de manera que no esté obstaculizado por paredes, muebles, etc. ** La vida útil de la batería puede variar en función de la temperatura, la antigüedad y el volumen al que se usa el producto. 15 Guide d'utilisation rapide (Français) Présentation 1. 2. 3. 4. Veuillez vous assurer que tous les articles énumérés dans le contenu de la boîte de ce guide sont inclus dans la boîte. VEUILLEZ LIRE LE LIVRET DES CONSIGNES DE SÉCURITÉ ET DES INFORMATIONS SUR LA GARANTIE AVANT D'UTILISER LE PRODUIT. VEUILLEZ VOUS ASSURER D'AVOIR COMPLÈTEMENT CHARGÉ LA BATTERIE AVANT LA PREMIÈRE UTILISATION AFIN D’AUGMENTER SA DURÉE DE VIE. Veuillez examiner le schéma de connexion. Contenu de la boîte Plunge Câble de rechargement micro US Câble 3,5 mm (1/8 po) à 3,5 mm (1/8 po) Guide d'utilisation rapide Consignes de sécurité et informations concernant la garantie Assistance technique Pour les toutes dernières informations concernant ce produit (configuration système, compatibilité, etc.), veuillez visiter le site ionaudio.com. MISE EN GARDE: Gargez tout appareil non étanche (téléphones, lecteurs, etc.) dans un endroit sec à l’abri des éclaboussures et des risques de décharges électriques. 16 Installation Schéma de connexion Les articles qui ne figurent pas dans l’encadré Contenu de la boîte sont vendus séparément. Faire la lecture de musique TABLETTE ou SMARTPHONE SOURCE AUDIO AUXILIAIRE Rechargement USB ALIMENTATION (rechargement de la batterie) USB ALIMENTATION (rechargement de la batterie) 17 Caractéristiques 1. 2. 3. 4. 5. Entrée auxiliaire* : Cette entrée stéréo 3,5 mm permet de brancher un lecteur de disques compacts, lecteur MP3 ou autres sources audio. Port micro USB* : Utilisez le câble USB inclus pour relier ce port au port USB d’un ordinateur ou d’un chargeur de téléphone afin de recharger la pile du Plunge. Remarque : Veuillez vous assurer que l’appareil et ses connexions sont secs avant de le recharger. Ne jamais recharger l’appareil lorsqu’il est mouillé. Touche Bluetooth : Pour déjumeler un appareil Bluetooth, maintenir cette touche enfoncée. DEL Bluetooth : Cette DEL clignote lors du jumelage et demeure allumée lorsque connecté à un appareil Bluetooth. Appel entrant / Mettre fin à l’appel / Lancer/interrompre la lecture : Appuyez sur cette touche pour lancer la lecture ou interrompre une piste sur un périphérique Bluetooth connecté. Une fois jumelé avec votre téléphone, enfoncez et relâchez cette touche pour prendre un appel. La sonnerie du téléphone retentit par le haut-parleur du Plunge jusqu'à ce que l'appel soit pris. Lorsque l'appel est complété, Plunge reprend la lecture de la musique. Pour rejeter un appel entrant, maintenez cette touche enfoncée. 18 *IMPORTANT : Remettre le bouchon sur l’entrée auxiliaire et le port Micro USB en position verrouillée lorsque vous utilisez le Plunge dans l'eau. Retirez le bouchon hermétique avant d’apporter le Plunge en avion afin d’éviter d’endommager le haut-parleur. Remarque : Si le haut-parleur se remplit d'eau, le bruit sera étouffé jusqu'à ce que l'eau se soit écoulée du haut-parleur. 1 2 9 8 3 6 11 4 7 5 10 12 6. 7. 8. 9. 10. 11. 12. 13. Interrupteur d’alimentation : Maintenez cette touche enfoncée afin de mettre le Plunge sous et hors tension. Veuillez noter que lorsque le Plunge est branché à une source d’alimentation, il peut recharger la batterie sans être allumé. Remarque : Le Plunge s’éteint automatiquement après 10 minutes lorsqu'aucun appareil Bluetooth n’est jumelé ou lorsqu’aucun signal audio n’est détecté. Indicateur de charge : La DEL clignote lentement lorsque la batterie doit être rechargée. La DEL devient rouge lors du rechargement de la batterie. Lorsque l'appareil est en marche et que la batterie est complètement rechargée, la DEL est verte. Volume + : Cette touche permet d’augmenter le volume du Plunge. Volume - : Cette touche permet de diminuer le volume du Plunge. Remarque : Appuyez sur les deux touches Volume simultanément afin d’activer ou désactiver les invites vocales. Piste suivante : Appuyez et relâchez cette touche pour passer à la piste Bluetooth suivante. Maintenez cette touche enfoncée pendant 2 secondes afin d’activer l’assistant vocal (Siri®, Google®, etc.) de votre smartphone jumelé, puis parlez dans le microphone. Piste précédente : Appuyez et relâchez cette touche afin de revenir au début de la piste. Remarque : Dans certaines applications, les touches piste suivante et piste précédente permettent de passer à la liste de lecture ou le genre de musique suivant ou précédent. Microphone : Parlez dans le microphone afin de communiquer avec l’interlocuteur de l’appel entrant. 13 Point de fixation pour trépied (panneau inférieur) : Cette embase filetée de 6,35 mm permet de fixer un trépied. 19 Jumelage ou déconnecter d'un périphérique Bluetooth 1. 2. 3. 4. 5. Mettez votre périphérique Bluetooth sous tension. Mettez le Plunge sous tension et il passera automatiquement en mode jumelage afin de rechercher les périphériques Bluetooth. Vous saurez que vous êtes en mode jumelage lorsque la DEL devient lentement clignoter. Accédez à l'écran de configuration de votre périphérique Bluetooth, recherchez « Plunge » et lancez le jumelage. Remarque : Si votre périphérique Bluetooth vous demande d’entrer un code de jumelage, entrez « 0000 ». Enfoncez puis relâchez la touche Bluetooth pour déconnecter le périphérique Bluetooth branché. Pour jumeler un autre périphérique Bluetooth, répétez les étape 3. Remarque : La plage maximale peut être atteinte avec l’utilisation d’appareils dotés de Bluetooth 4.0 ou de versions ultérieures. Utilisation du téléphone Remarque : Vous devez mettre le Plunge sous tension et le jumeler avec votre appareil Bluetooth avant de pouvoir écouter de la musique ou de prendre des appels. Prendre des appels : Lorsque vous recevez un appel, le haut-parleur du Plunge fera jouer la sonnerie de votre téléphone. 1. Pour prendre l’appel, appuyez sur la touche Appel entrant du Plunge. Remarque : Si vous recevez un appel alors que la musique joue, la musique s’arrête jusqu’à ce que vous mettiez fin à l’appel. 2. Parlez dans le microphone et réglez le volume à l’aide des touches Volume. 3. Pour mettre fin à l’appel, appuyez sur la touche Mettre fin à l’appel. 4. Pour rejeter un appel entrant, maintenez la touche Appel entrant enfoncée. Guide de dépannage Lorsqu’il y a de la distorsion : Essayez de diminuer le volume de votre appareil. Essayez également d'abaisser le volume du Plunge. Lorsqu’il y a trop de basses fréquences : Essayez de régler le niveau de tonalité et d’égalisation sur l’appareil de source d’entrée audio afin de diminuer le niveau des basses fréquences. Cela vous permettra d'augmenter le volume de la musique avant que l'écrêtage se produise. 20 Spécifications techniques Dimensions (longueur x largeur x hauteur) 260 mm x 80 mm x 150 mm Poids 1,1 kg 2,4 lbs. Puissance de sortie 13 W Réponse en fréquence 100 Hz – 18 KHz Classe de résistance à l’eau IPX 7 Profils Bluetooth A2DP, HFP, AVRCP Portée Bluetooth* Jusqu'à 30,4 m (100 pi) Entrée auxiliaire Niveau ligne 3,5 mm (1/8 po) Autonomie de la batterie ** Jusqu'à 20 heures Temps de rechargement Approximativement 4 heures Port de rechargement USB; +5V, 1A 10,2 x 3,1 x 5,9 pulg Toutes les spécifications sont susceptibles d'être modifiées sans préavis. * La portée Bluetooth est affectée par les murs, les obstacles et le mouvement. Pour une performance optimale, placez le produit en visibilité directe afin qu'il n’y ait aucune obstruction créée par des murs, des meubles, etc. ** La durée de vie de la batterie peut être affectée par la température, l’âge du produit, ainsi que le niveau du volume d’utilisation. Énonce de CNR : Le présent appareil est conforme aux CNR d'Industrie Canada applicables aux appareils radio exempts de licence. L'exploitation est autorisée aux deux conditions suivantes : (1) l'appareil ne doit pas produire de brouillage, et (2) l'utilisateur de l'appareil doit accepter tout brouillage radioélectrique subi, même si le brouillage est susceptible d'en compromettre le fonctionnement. 21 Guida rapida (Italiano) Introduzione 1. 2. 3. 4. Assicurarsi che tutti gli elementi elencati nel paragrafo “Contenuti della confezione” siano contenuti nella confezione stessa. LEGGERE ATTENTAMENTE IL LIBRETTO DI SICUREZZA E GARANZIA PRIMA DI UTILIZZARE IL PRODOTTO. PER GARANTIRE LA MASSIMA DURATA DELLA BATTERIA, ASSICURARSI DI AVERLA CARICATA COMPLETAMENTE PRIMA DEL PRIMO UTILIZZO. Studiare lo schema dei collegamenti. Contenuti della confezione Plunge Cavo di ricarica Micro USB Cavo da 3,5mm (1/8”) a 3,5mm (1/8”) Guida rapida Istruzioni di sicurezza e garanzia Assistenza Per le ultime informazioni in merito a questo prodotto (requisiti di sistema, informazioni sulla compatibilità, ecc.) e per la registrazione del prodotto, recarsi alla pagina ionaudio.com. AVVERTENZA: tenere qualsiasi dispositivo che non sia impermeabile (telefoni, lettori musicali, ecc.) in un luogo asciutto in cui non vengano toccati dall'acqua causando un rischio di scossa elettrica. 22 Configurazione rapida Schema dei collegamenti Elementi non elencati sotto Contenuti della confezione sono venduti separatamente. Riproduzione della musica TABLET o SMARTPHONE SORGENTE AUDIO AUSILIARIA Ricarica USB ALIMENTAZIONE (rechargement de la batterie) USB ALIMENTAZIONE (rechargement de la batterie) 23 Caratteristich 1. 2. 3. 4. 5. Ingresso ausiliario*: questo ingresso stereo da 3,5mm (1/8”) può essere utilizzato per collegare un lettore CD o altre fonti audio. Porta Micro USB*: Servirsi del cavo USB in dotazione per collegare questa porta ad una porta USB del computer o del caricabatterie per ricaricare la batteria del Plunge. Nota bene: prima di effettuare la ricarica, assicurarsi che il Plunge e le relative connessioni siano asciutti. Mai caricare il prodotto quando è bagnato. Tasto Bluetooth: tenere premuto questo tasto per scollegare un dispositivo Bluetooth collegato. LED Bluetooth: lampeggia di durante il collegamento Bluetooth o si illumina di in maniera fissa quando è collegato a un dispositivo Bluetooth. Call Receive / Call End / Play / Pause (ricevi chiamata / termina chiamata / riproduci / pausa): premere questo tasto per riprodurre o mettere in pausa una traccia da un dispositivo Bluetooth collegato. Una volta collegato il Bluetooth, premere e rilasciare il tasto per rispondere a una chiamata. La suoneria del telefono si sentirà tramite l'altoparlante del Plunger fino a quando non si risponde alla chiamata. Quando la chiamata viene scollegata, il Plunge riprenderà a riprodurre la musica. Per respingere una chiamata in arrivo, tenere premuto questo tasto. 24 *IMPORTANTE: quando si utilizza il Plunge in acqua, coprire la porta Aux In e la porta Micro USB chiudendo gli appositi cappucci protettivi. Prima di portare il Plunge in aereo, aprire i cappucci stagni per evitare danni all'altoparlante. Nota bene: se l'altoparlante si riempie d'acqua, il suono sarà smorzato fino a quando l'acqua non sarà drenata dall'altoparlante. 1 2 9 8 3 6 11 4 7 5 10 12 6. 7. 8. 9. 10. 11. 12. 13. Interruttore On/Off (accensione/spegnimento): tenere premuto questo tasto per accendere e spegnere il Plunge. Quando il Plunge è collegato ad una fonte di alimentazione, non deve essere necessariamente acceso per caricare la batteria. Nota bene: in assenza di collegamento Bluetooth o in assenza di segnale audio, il Plunge si spegnerà dopo 10 minuti. Indicatori di carica: quando la batteria deve essere ricaricata il LED lampeggia lentamente. Quando la batteria è in ricarica il LED è di colore rosso fisso. Quando l'alimentazione è accesa e la batteria è carica, il LED sarà verde. Volume su: premere questo tasto per alzare il volume dell'altoparlante del Plunge. Volume giù: premere questo tasto per abbassare il volume dell'altoparlante del Plunge. Nota bene: premere contemporaneamente i tasti Volume su e Volume giù per abilitare o disabilitare i messaggi vocali. Traccia successiva: premere e rilasciare questo tasto per passare alla traccia Bluetooth successiva. Tenere premuto questo tasto per 2 secondi per abilitare l'assistente vocale del proprio smartphone (ad es. Siri®, Google®, ecc.), quindi parlare nel microfono. Traccia precedente: premere e rilasciare questo tasto una volta per passare all'inizio della traccia. Nota bene: in alcune app, la pressione del tasto Previous Track o Next Track può far passare a un'altra playlist o a un altro genere musicale. 13 Microfono: parlare nel microfono quando si riceve una chiamata. Collegamento per tripode (pannello inferiore): fissare un tripode a questo collegamento filettato da 1/4” (6,35 mm). 25 Accoppiamento or disconnessione di un dispositivo Bluetooth 1. 2. 3. 4. 5. Accendere il dispositivo Bluetooth. Accendere il Plunge: entrerà automaticamente in modalità di accoppiamento per cercare dispositivi Bluetooth. Siete in modalità di accoppiamento quando il LED è lentamente lampeggiare. Navigare nella schermata di configurazione del dispositivo Bluetooth, trovare “Plunge” e collegarlo. Nota bene: se il dispositivo Bluetooth richiede un codice, digitare “0000”. Premere e rilasciare il tasto Bluetooth per scollegare di un dispositivo Bluetooth accoppiato. Per collegarlo ad un altro dispositivo Bluetooth, ripetere i passaggio 3. Nota bene: la portata massima si ottiene servendosi di dispositivi dotati di Bluetooth 4.0 o superiore. Utilizzo del telefono Nota bene: bisogna accendere e collegare il Plunge con il dispositivo Bluetooth prima di utilizzarlo per ascoltare musica o come altoparlante del telefono. Utilizzo del telefono: Quando c'è una chiamata in arrivo, l'altoparlante del Plunge riprodurrà una suoneria. 1. Per rispondere alla chiamata, premere il tasto Call Receive del Plunge. Nota bene: se si riceve una telefonata durante la riproduzione della musica, questa verrà interrotta fino a quando non termina la chiamata. 2. Parlare nel microfono e regolare il volume della chiamata servendosi dei tasti Volume. 3. Per concludere la chiamata, premere il pulsante Call End (termina chiamata). 4. Per respingere una chiamata in arrivo, tenere premuto il tasto Call Receive (ricevi chiamata). Risoluzione di problemi Il suono è distorto: provare ad abbassare il volume a livello della fonte audio. Inoltre, provare a ridurre il volume complessivo del Plunge. Eccessivi bassi: provare a regolare la tonalità o il comando EQ a livello della fonte audio per abbassare il livello dei bassi. Ciò permetterà di suonare la musica più forte prima che salti (che si verifichi distorsione). 26 Specifiche tecniche Dimensioni (lunghezza larghezza x altezza) x 260 mm x 80 mm x 150 mm 10,2” x 3,1” x 5,9” Peso 1,1 kg 2,4 lbs. Potenza di uscita 13 W Risposta di frequenza 100 Hz – 18 KHz Classe di resistenza all'acqua IPX 7 Profilo Bluetooth A2DP, HFP, AVRCP Portata Bluetooth* Fino a 30,4 m / 100' * Ingresso Aux 3,5 mm (1/8”) livello di linea Durata della batteria ** Fino a 20 ore Tempo di ricarica Circa 4 ore Porta di ricarica USB; +5V, 1A Le specifiche tecniche possono variare senza preavviso. * La portata del Bluetooth è influenzata da pareti, ostacoli e movimento. Per ottenere prestazioni ottimali, collocare il prodotto nella stanza con linea d'aria libera in modo che non sia ostacolato da pareti, mobili, ecc. ** La durata della batteria varia a seconda della temperatura, dell’età e del volume di utilizzo del prodotto. 27 Schnellstart-Anleitung (Deutsch) Einführung 1. 2. 3. 4. Stellen Sie sicher, dass alle im Lieferumfang aufgelisteten Teile in der Verpackung enthalten sind. LESEN SIE DIE SICHERHEITSHINWEISE & GARANTIEINFORMATIONEN BEVOR SIE DAS PRODUKT VERWENDEN. STELLEN SIE SICHER, DASS DER AKKU VOR DER ERSTEN VERWENDUNG VOLLSTÄNDIG AUFGELADEN IST, UM EINE MAXIMALE AKKULEBENSDAUER ZU ERZIELEN. Werfen Sie einen Blick auf die Anschlussübersicht. Lieferumfang Plunge Micro USB-Ladekabel 3,5 mm (1/8") auf 3,5 mm (1/8") Kabel Schnellstart-Anleitung Sicherheitshinweise und Garantieinformationen Kundendienst Für die neuesten Informationen zu diesem Produkt (Systemanforderungen, Informationen zur Kompatibilität etc.) und für die Produktregistrierung besuchen Sie ionaudio.com. WARNUNG: Bewahren Sie alle nicht wasserdichten Geräte (Handys, Musik-Player etc.) an einem trockenen Ort auf, wo sie nicht von der Feuchtigkeit beeinträchtigt werden können und kein Risiko durch Stromschläge besteht. 28 Schnelles Einrichten Anschlussdiagramm Teile, die nicht im Lieferumfang angegeben sind, sind separat erhältlich. Musik spielen TABLET oder SMARTPHONE ZUSÄTZLICHE AUDIOQUELLE Aufladen USB STROMVERSORGUNG (Zum Aufladen) USB STROMVERSORGUNG (Zum Aufladen) 29 Funktionen 1. 2. 3. 4. Aux-Eingang*: Dieser 3,5mm-Stereoeingang (1/8”) kann dazu verwendet werden, einen CD-Player, MP3-Player oder eine andere Audioquelle anzuschließen. Micro USB-Anschluss*: Verwenden Sie das mitgelieferte USB-Kabel, um diesen Anschluss mit einem USB-Anschluss auf Ihrem Computer oder Handy-Ladegerät zu verbinden, um den Akku des Plunge aufzuladen. Hinweis: Stellen Sie sicher, dass Plunge und die Anschlüsse vor dem Laden trocken sind. Laden Sie das Gerät nie auf, wenn es nass ist. Bluetooth-Taste: Halten Sie diese Taste gedrückt, um ein gekoppeltes BluetoothGerät zu trennen. Bluetooth-LED: Diese LED blinkt, wenn eine Bluetooth-Verbindung hergestellt wird oder leuchtet konstant, wenn eine Verbindung zu einem Bluetooth-Gerät besteht. * WICHTIG: Bedecken Sie den Aux In und den Micro-USB-Anschluss mit der Kappe in verriegelter Position, wenn Sie Plunge im Wasser verwenden. Öffnen Sie vor Flugreisen die luftdichte Kappe des Plunge, um Schäden am Lautsprecher zu vermeiden. Hinweis: Wenn der Lautsprecher mit Wasser gefüllt ist, klingt er gedämpft, bis das Wasser aus dem Lautsprecher abgelassen wird. 1 2 9 8 3 6 11 4 7 5 10 12 30 5. 6. 7. 8. 9. 10. 11. 12. 13. Anruf entgegennehmen / Anruf beenden / Wiedergabe / Pause: Drücken Sie diese Taste, um einen Track vom angeschlossenen Bluetooth-Gerät abzuspielen oder zu pausieren. Wenn eine Bluetooth-Verbindung hergestellt ist, drücken Sie kurz diese Taste, um einen Anruf zu beantworten. Der Klingelton des Telefons wird über den PlungeLautsprecher zu hören sein, bis der Anruf beantwortet wird. Wenn der Anruf beendet wird, setzt Plunge die Musikwiedergabe fort. Um einen eingehenden Anruf abzuweisen, halten Sie diese Taste gedrückt. Ein-/Ausschalter: Halten Sie diese Taste gedrückt, um Plunge ein-/auszuschalten. Während Plunge an eine Stromquelle angeschlossen ist, muss es nicht eingeschaltet sein, um den Akku aufzuladen. Hinweis: Wenn keine Bluetooth-Verbindung besteht oder kein Audiosignal empfangen wird, schaltet sich Plunge nach 10 Minuten ab. Ladeanzeigen: Die LED blinkt langsam, wenn der Akku aufgeladen werden muss. Die LED leuchtet durchgehend rot, wenn der Akku aufgeladen wird. Wenn das Gerät eingeschaltet ist und der Akku vollständig geladen ist, wird diese LED grün leuchten. Lautstärke erhöhen: Drücken Sie diese Taste, um die Lautstärke des Plunge zu erhöhen. Lautstärke verringern: Drücken Sie diese Taste, um die Lautstärke des Plunge zu verringern. Hinweis: Drücken Sie gleichzeitig die Tasten Lautstärke erhöhen und Lautstärke verringern, um die Sprachanweisungen zu aktivieren/deaktivieren. Nächster Track: Drücken Sie diese Taste 2 Sekunden lang, um Ihren SmartphoneAssistenten zu aktivieren (z.B. Siri®, Google ® etc.) und sprechen dann ins Mikrofon. Vorheriger Track: Drücken Sie einmal kurz auf diese Taste, um zum Anfang des Tracks zu springen. Hinweis: Bei einigen Apps kann durch Drücken der Taste Vorheriger Track oder Nächster Track zu einer anderen Wiedergabeliste oder zu einem anderen Musikgenre gewechselt werden. Mikrofon: Sprechen Sie in dieses Mikrofon, wenn Sie einen Anruf erhalten. Stativgewinde (Bodenplatte): Schrauben Sie ein Stativ in 13 das 1/4" (6,35 mm) Gewinde. 31 Koppeln oder trennen Bluetooth-Geräts 1. 2. 3. 4. 5. Schalten Sie Ihr Bluetooth-Gerät ein. Schalten Sie Plunge ein und das Gerät wird automatisch in den Koppel-Modus schalten, um nach Bluetooth-Geräten zu suchen. Sie sind im Koppel-Modus, wenn die LED langsam blinken. Navigieren Sie zum Setup-Bildschirm Ihres Bluetooth-Geräts, wählen Sie “Plunge” und stellen Sie eine Verbindung her. Hinweis: Wenn Ihr Bluetooth-Gerät die Eingabe eines Koppel-Codes anfordert, geben Sie “0000” ein. Drücken Sie kurz die Bluetooth-Taste, um ein angeschlossenes Bluetooth-Gerät zu trennen. Um ein anderes Bluetooth-Gerät zu verbinden, wiederholen Sie die Schritt 3. Hinweis: Die maximale Reichweite wird erreicht, wenn Sie Geräte mit Bluetooth 4.0 oder höher verwenden. Verwendung des Telefons Hinweis: Sie müssen Plunge einschalten und mit Ihrem Bluetooth-Gerät koppeln, bevor Sie es als Freisprecheinrichtung oder zum Musikhören verwenden können. Verwendung des Telefons: Wenn Sie einen Anruf erhalten, wird Plunge Ihren Klingelton über den Lautsprecher abspielen. 1. Um den Anruf entgegenzunehmen, drücken Sie am Plunge die Taste Anruf annehmen. Hinweis: Wenn ein Anruf während der Musikwiedergabe eingeht, wird die Musikwiedergabe pausiert, bis Sie den Anruf beendet haben. 2. Sprechen Sie in das Mikrofon und passen Sie die Gesprächslautstärke über die Lautstärketasten an. 3. Drücken Sie die Taste Anruf beenden, um den Anruf zu beenden. 4. Um einen eingehenden Anruf abzulehnen, halten Sie die Taste Anruf entgegennehmen gedrückt. Fehlerbehebung Der Ton klingt verzerrt: Reduzieren Sie die Lautstärke Ihrer Tonquelle oder Ihres Musikinstruments. Versuchen Sie auch, das Gesamtvolumen des Plunges zu reduzieren. Zu viel Bass: Versuchen Sie den Ton oder den EQ-Regler Ihrer Tonquelle anzupassen, um den Bass zu verringern. Dies ermöglicht Ihnen, die Musik lauter abzuspielen, bevor der Klang verzerrt. 32 Technische Daten Abmessungen (Länge x Breite x Höhe) 260 mm x 80 mm x 150 mm Gewicht 1,1 kg 2,4 lbs. Ausgangsleistung 13 W Frequenzgang 100 Hz – 18 KHz Wasserdicht laut Klasse IPX 7 Bluetooth-Profil A2DP, HFP, AVRCP Bluetooth-Reichweite* Bis zu 30,4 m / 100' * Aux-Eingang 3,5 mm (1/8") Line-Level Akkulaufzeit ** Bis zu 20 Stunden Ladezeit Ca. 4 Stunden Ladebuchse USB; +5V, 1A 10,2” x 3,1” x 5,9” Die Spezifikationen können ohne Ankündigung geändert werden. * Die Bluetooth-Reichweite wird durch Wände, Hindernisse und Bewegungen beeinflusst. Um die optimale Leistung zu erzielen, platzieren Sie das Produkt in Sichtlinie im Raum, so dass Wände, Möbel etc. nicht stören können. ** Die Akkulaufzeit des Produkts kann aufgrund von Faktoren wie Temperatur, Alter und gespielter Lautstärke variieren. Allgemeinhinweis zur Konformitätserklärung: Hiermit erklären wir, daß sich das Gerät Plunge in Übereinstimmung mit den grundlegenden Anforderungen der europäischen Richtlinie 1999/5/EG befindet. Die vollständige EG Konformitätserklärung kann unter folgender Adresse angefordert werden: inMusic GmbH Harkortstrasse 12-32 40880 Ratingen German 33 Snelstartgids (Nederlands) Inleiding 1. 2. 3. 4. Zorg ervoor dat alle artikelen, opgesomd in Inhoud van de doos, zich in de doos bevinden. LEES DE HANDLEIDING VEILIGHEID EN GARANTIE VOORALEER HET PRODUCT TE GEBRUIKEN. ZORG ERVOOR DAT DE ACCU VOOR HET EERSTE GEBRUIK VOLLEDIG IS OPGELADEN, VOOR EEN MAXIMALE LEVENSDUUR. Bestudeer het aansluitschema. Inhoud van de doos Plunge Micro USB-Oplaadkabel Kabel 3,5mm (1/8”) - 3,5mm (1/8”) Snelstartgids Handleiding veiligheid en garantie Ondersteuning Voor de laatste informatie over dit product (systeemvereisten, informatie over compatibiliteit, enz.) en productregistratie, ga naar: ionaudio.com. WAARSCHUWING: Houd alle niet-waterbestendig apparaten (telefoons, muziekspelers, enz.) op een droge plaats waar ze niet worden beïnvloed door water en een risico van een elektrische schok veroorzaken. 34 Snelle opstelling Aansluitschema Artikelen die niet zijn opgesomd in Inhoud van de doos worden afzonderlijk verkocht. Muziek afspelen TABLET of SMARTPHONE EXTRA GELUIDSBRON Opladen USB VOEDING (voor het opladen) USB VOEDING (voor het opladen) 35 Kenmerken 1. 2. 3. 4. 5. Aux-ingang*: Deze stereo 3,5mm (1/8")ingang kan worden gebruikt om een cdspeler, mp3-speler of andere geluidsbron aan te sluiten. Micro-USB-poort*: Gebruik de meegeleverde USB-kabel om deze poort aan te sluiten op een USB-poort op uw computer of telefoon oplader om de Plunge batterij op te laden. Opmerking: Controleer of de Plunge en alle verbindingen droog zijn voordat u start met opladen. Nooit een nat apparaat opladen. Bluetooth-knop: Deze knop indrukken en vasthouden om een gekoppeld Bluetoothapparaat te verwijderen. Bluetooth-LED: Gaat knipperen bij Bluetooth-koppelen en blijft branden bij verbinding met een Bluetooth-apparaat. Oproep ontvangen / beëindigen/ Afspelen/ Pauzeren: Indrukken om een nummer vanaf een verbonden Bluetooth-apparaat af te spelen of te pauzeren. Deze knop indrukken en loslaten om een oproep te beantwoorden bij koppeling over Bluetooth. De beltoon van de telefoon is hoorbaar door de luidspreker van de Plunge tot de oproep wordt beantwoord. Wanneer het gesprek is afgelopen, hervat de Plunge het afspelen van muziek. Druk deze knop in en houd deze ingedrukt om een inkomende oproep te weigeren. *BELANGRIJK: De Aux In en microusb-poort afdekken met het beschermkapje in vergrendelde positie wanneer u de Plunge in water gebruikt. Het luchtdichte beschermkapje openen voordat u met de Plunge aan boord van een vliegtuig stapt, om beschadiging van de luidspreker te vermijden. Opmerking: Als de luidspreker gevuld raakt met water zal het geluid gedempt klinken tot al het water uit de luidspreker is weggevloeid. 1 2 9 8 3 6 11 4 7 5 10 12 36 6. 7. 8. 9. 10. 11. 12. 13. Aan/uitschakelaar: Deze knop indrukken en ingedrukt houden om de Plunge aan of uit te zetten. Als de Plunge is aangesloten op een stroombron, moet hij niet worden aangezet om de batterij op te laden. Opmerking: De Plunge gaat uit na 10 minuten als er geen Bluetooth-verbinding is of als er geen audiosignaal wordt ontvangen. Oplaadindicator: De LED gaat traag knipperen wanneer de batterij moet worden opgeladen. De LED blijft rood branden wanneer de batterij wordt opgeladen. Wanneer de stroom aan staat en de batterij volledig is opgeladen, wordt deze LED groen. Volume omhoog: Hierop drukken om het volume van de Plunge te verhogen. Volume omlaag: Hierop drukken om het volume van de Plunge te verlagen. Opmerking: Druk tegelijk op de knoppen Volume omhoog en Volume omlaag om gesproken aanwijzingen te activeren of deactiveren. Volgend nummer: Deze knop indrukken en loslaten om naar het volgende Bluetoothnummer te gaan. Houd deze knop 2 seconden lang ingedrukt om de stemassistent van uw smartphone te activeren (bv. Siri®, Google®, enz.) en spreek vervolgens in de microfoon. Vorig nummer: Deze knop een keer indrukken en loslaten om naar het begin van het nummer te navigeren. Opmerking: In sommige apps kunnen de knoppen Vorig of Volgend nummer een andere afspeellijst of muziekgenre oproepen. 13 Microfoon: Praat hier nadat u een oproep hebt beantwoord. Bevestiging voor statief (onderpaneel): Maak uw statief vast op deze schroefdraadbevestiging van 1/4” (6,35 mm). 37 Een Bluetooth-apparaat koppelen van of verbreken 1. 2. 3. 4. 5. Zet uw Bluetooth-apparaat aan. Bij het aanzetten van Plunge zet het zich automatisch in koppelmodus, om te zoeken naar Bluetooth-apparaten. U merkt wanneer u zich in koppelingsmodus bevindt als de LED traag knipperen. Navigeer naar het instelscherm van uw Bluetooth-apparaat, zoek naar Plunge en maak verbinding. Opmerking: Als uw Bluetooth-apparaat om een koppelingscode verzoekt, voer dan “0000” in. De Bluetooth-knop indrukken en loslaten om koppelen een gekoppeld Bluetooth-apparaat. Om verbinding te maken met een ander Bluetooth-apparaat: herhaal stap 3. Opmerking: Voor een maximumbereik moeten apparaten met Bluetooth 4.0 of hoger worden gebruikt. De telefoon gebruiken Opmerking: U moet Plunge aanzetten en koppelen met uw Bluetooth-apparaat vooraleer u het kunt gebruiken om naar muziek te luisteren of als luidsprekertelefoon. De telefoon gebruiken: De luidspreker van Plunge speelt bij een binnenkomende oproep een beltoon af. 1. Om de oproep te beantwoorden: druk op de knop Oproep beantwoorden op Plunge. Opmerking: Wanneer u een binnenkomende oproep ontvangt tijdens het afspelen van muziek, wordt de muziek onderbroken tot u de oproep beëindigt. 2. Spreek in de microfoon en pas met de volumeknop het oproepvolume aan. 3. Druk op de knop Oproep beëindigen om het gesprek te beëindigen. 4. Druk op de knop Oproep ontvangen en houd deze ingedrukt om een inkomende oproep te weigeren. Problemen oplossen Het geluid is vervormd : Probeer het volumeniveau van uw geluidsbron te verlagen. Probeer ook het algemeen volume van Plunge te verlagen. Er zijn teveel bassen : Probeer op de toon- of EQ-bedieningsknoppen aan uw geluidsbron het niveau van de lage tonen te verlagen. Dit stelt u in staat de muziek luider te zetten vooraleer “afgeknipte” (vervormde) klanken optreden. 38 Technische specificaties Afmetingen (Lengte x Breedte x Hoogte) 260 mm x 80 mm x 150 mm Gewicht 1,1 kg 2,4 lbs. Uitvoervermogen 13 W Frequentiebereik 100 Hz – 18 KHz Waterbestendigheidsklasse IPX 7 Bluetooth-profiel A2DP, HFP, AVRCP Bereik Bluetooth* Tot 30,4 m / 100' * Aux-ingang 3,5 mm (1/8”) lijnniveau Levensduur van de batterij ** Tot 20 uur Oplaadtijd Ongeveer 4 uur Poort Opladen USB; +5V, 1A 10,2” x 3,1” x 5,9” De specificaties kunnen zonder voorafgaande kennisgeving worden gewijzigd. * Het Bluetooth-bereik wordt beïnvloed door muren, obstakels en beweging. Plaats het product voor optimale prestaties in uw kamer binnen uw gezichtsveld, zodat het niet wordt belemmerd door muren, meubels, enz. ** De levensduur van de batterij kan variëren naargelang de temperatuur, ouderdom en het gebruiksvolume van het product. 39 ionaudio.com Manual Version 1.0-
 1
1
-
 2
2
-
 3
3
-
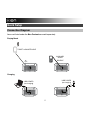 4
4
-
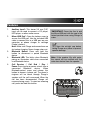 5
5
-
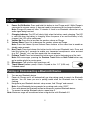 6
6
-
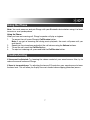 7
7
-
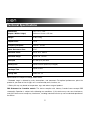 8
8
-
 9
9
-
 10
10
-
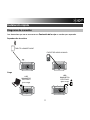 11
11
-
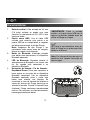 12
12
-
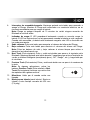 13
13
-
 14
14
-
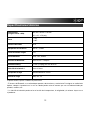 15
15
-
 16
16
-
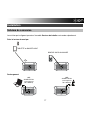 17
17
-
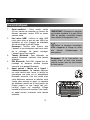 18
18
-
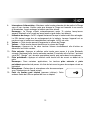 19
19
-
 20
20
-
 21
21
-
 22
22
-
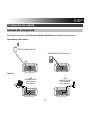 23
23
-
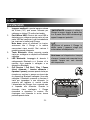 24
24
-
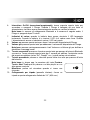 25
25
-
 26
26
-
 27
27
-
 28
28
-
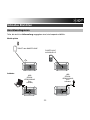 29
29
-
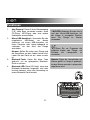 30
30
-
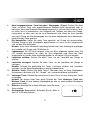 31
31
-
 32
32
-
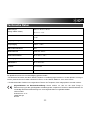 33
33
-
 34
34
-
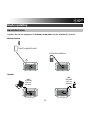 35
35
-
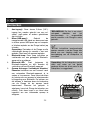 36
36
-
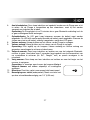 37
37
-
 38
38
-
 39
39
-
 40
40


iON 2AB3E-ISP56 Manual de usuario
- Categoría
- Bocinas portables
- Tipo
- Manual de usuario
- Este manual también es adecuado para
En otros idiomas
- français: iON 2AB3E-ISP56 Manuel utilisateur
- italiano: iON 2AB3E-ISP56 Manuale utente
- English: iON 2AB3E-ISP56 User manual
- Deutsch: iON 2AB3E-ISP56 Benutzerhandbuch
- Nederlands: iON 2AB3E-ISP56 Handleiding
