La página se está cargando...
La página se está cargando...

Models. HPColor LaserJet 3550: base model, includes 64MB of
SDRAM
Modèles. HPColor LaserJet 3550: modèle de base, inclut 64Mo
de mémoire SDRAM
Modelle. HPColor LaserJet 3550: Basismodell mit 64MB SDRAM
Modelli. HPColor LaserJet 3550: modello base, include 64MB di
SDRAM
Modelos. HPColor LaserJet 3550: modelo básico, incluye 64MB
de SDRAM.
Modellen. HPColor LaserJet 3550: basismodel, bevat 64MB
SDRAM
Modelos. HPColor LaserJet 3550: modelo base, inclui 64MB de
SDRAM
HPColor LaserJet 3550n: includes the features of the 3550, plus an
HPJetdirect en3700 external print server
HPColor LaserJet 3550n: inclut les caractéristiques du modèle
3550, ainsi qu’un serveur d’impression externe HPJetdirect en3700
HPColor LaserJet 3550n: bietet neben den Funktionen des Modells
3550 einen externen HPJetdirect en3700 Druckserver
HPColor LaserJet 3550n: include le funzioni della 3550, più un
server di stampa esterno HPJetdirect en3700
HPColor LaserJet 3550n: incorpora las características de la 3550,
además de un servidor de impresión externo HPJetdirect en3700.
HPColor LaserJet 3550n: bevat de functies van de 3550 plus een
HPJetdirect en3700 externe printserver
HPColor LaserJet 3550n: inclui os recursos da 3550, mais um
servidor de impressão externo HPJetdirect en3700
2
English Français Deutsch Italiano Español Nederlands Português

Minimum system requirements. See the outside of the box in
which the printer was shipped, or see the Install Notes on the CD-
ROM.
Configuration minimum du système. Consultez l’extérieur du
coffret d’expédition de l’imprimante ou reportez-vous aux notes
d’installation sur le CD-ROM.
Mindestsystemanforderungen. Informationen dazu finden Sie auf
der Außenseite der Verpackung, in der der Drucker geliefert wurde,
oder in den Installationshinweisen auf der CD-ROM.
Requisiti minimi di sistema. Vedere le istruzioni sull'esterno della
scatola in cui viene fornita la stampante oppure le note di
installazione nel CD-ROM.
Requisitos mínimos del sistema. Consulte la parte exterior de la
caja en la que venía la impresora o las notas de instalación en el
CD-ROM.
Minimumsysteemvereisten. Zie de buitenkant van de doos waarin
de printer is vervoerd of zie de opmerkingen over de installatie op
de cd-rom.
Requisitos mínimos do sistema. Veja a parte externa da caixa na
qual a impressora foi fornecida ou consulte as Notas de instalação
no CD-ROM.
Prepare the location. Select a sturdy, level surface in a well-
ventilated, dust-free area. Space requirements for the area around
the printer: front, 635mm (25inches); rear, 203mm (8inches);
sides, 229mm (9inches); top, 254mm (10inches)
Préparez l’emplacement. Sélectionnez une surface plane stable
dans un local correctement ventilé et libre de toute poussière.
Exigences d’espace pour la zone autour de l’imprimante: avant,
635mm; arrière, 203mm; côtés, 229mm; haut, 254mm
Bereiten Sie den Standort vor. Der Drucker sollte auf einer
stabilen, ebenen Fläche in einem gut belüfteten, staubfreien Raum
aufgestellt werden. Raumanforderungen für den den Drucker
umgebenden Bereich: vorne, 635mm; hinten, 203mm; an den
Seiten, 229mm; oben, 254mm
Preparazione dell'ubicazione di installazione della stampante.
Scegliere una superficie solida e piana in un'area ventilata e priva di
polvere. Requisiti di spazio per l'area circostante alla stampante:
parte anteriore, 635mm; parte posteriore, 203mm; lati, 229mm;
parte superiore, 254mm
Prepare la ubicación. Seleccione una superficie plana y firme en
una zona con buena ventilación y sin polvo. Requisitos de espacio
alrededor de la impresora: parte frontal, 635mm; parte posterior,
203mm; a los lados, 229mm; parte superior, 254mm.
Bereid de locatie voor. Plaats het apparaat op een stevig, egaal
oppervlak in een goed geventileerde ruimte zonder stof. Benodigde
ruimte rond de printer: voorkant 635mm, achterkant 203mm,
zijkanten 229mm, bovenkant 254mm.
Prepare o local. Escolha uma superfície plana e resistente em
uma área bem ventilada, sem poeira. Requisitos de espaço para a
área ao redor da impressora: parte frontal, 635mm; parte traseira,
203mm; laterais, 229mm; parte superior, 254mm
3
Português Nederlands Español Italiano Deutsch Français English

Measurements. HPColor LaserJet 3550 series printer: height,
467mm (18.4inches); depth, 447mm (17.6inches); width, 483mm
(19inches); weight, 32.5kg (71.5lbs)
Dimensions. Imprimante HPColor LaserJet 3550 series : hauteur,
467mm; profondeur, 447mm; largeur, 483mm; poids, 32,5kg
Abmessungen. Drucker der HPColor LaserJet 3550 Serie: Höhe,
467mm; Tiefe, 447mm; Breite, 483mm; Gewicht, 32,5kg
Dimensioni. Stampante HPColor LaserJet 3550 series: altezza,
467mm; profondità, 447mm; larghezza, 483mm; peso, 32,5kg
Dimensiones. Impresora HPColor LaserJet serie 3550: altura,
467mm; profundidad, 447mm; ancho, 483mm; peso, 32,5kg.
Afmetingen. HPColor LaserJet 3550 series printer: hoogte 467mm,
diepte 447mm, breedte 483mm, gewicht 32,5kg.
Medidas. Impressora HPColor LaserJet série 3550: altura,
467mm; profundidade, 447mm; largura, 483mm; peso, 32,5kg
Regulate the environment. Do not place the printer in direct
sunlight or an area that has abrupt temperature and humidity
changes. Recommended ranges: 17° to 25°C (62.6° to 77°F) and
20 to 60 percent relative humidity
Environnement ambiant. N’exposez pas l’imprimante à la lumière
directe du soleil et ne la placez pas dans un local sujet à des
changements brusques de température et d’humidité. Plages
recommandées : 17 à 25°C et 20 à 60% d’humidité relative
Regulieren Sie die Umgebungsbedingungen. Setzen Sie den
Drucker keiner direkten Sonnenstrahlung aus, und stellen Sie den
Drucker nicht an einem Ort auf, der plötzlichen Temperatur- oder
Luftfeuchtigkeitsänderungen unterliegt. Empfohlene Bereiche: 17°
bis 25°C und 20 bis 60 Prozent relative Luftfeuchtigkeit
Controllo dell'ambiente. Non esporre la stampante alla luce diretta
del sole o in un'area soggetta a bruschi sbalzi di temperatura o di
umidità. Intervalli consigliati: da 17° a 25°C e dal 20 al 60 percento
di umidità relativa
Regule el entorno. No exponga la impresora a la luz solar directa
ni la coloque en una zona sometida a cambios bruscos de
temperatura y humedad. Valores recomendados: de 17° a 25°C y
entre el 20 y el 60 por 100 de humedad relativa.
Zorg voor een geschikte omgeving. Plaats de printer niet in direct
zonlicht of op een plaats waar schommelingen in temperatuur en
luchtvochtigheid kunnen optreden. Aanbevolen bereiken: 17 tot
25°C en 20 tot 60 procent relatieve luchtvochtigheid
Ajuste o ambiente. Não coloque a impressora sob a luz direta do
sol ou em uma área que tenha alterações bruscas de temperatura e
umidade. Intervalos recomendados: 17 a 25°C e 20 a 60% de
umidade relativa.
4

Set up the printer. Place the printer in a prepared location.
WARNING! Two people must lift and move the printer to the
prepared location. Do not lift the printer by the Tray2 handle.
Installation de l’imprimante. Placez l’imprimante à un emplacement
préparé.
AVERTISSEMENT Le soulèvement et le déplacement de
l’imprimante vers l’emplacement préparé requièrent deux
personnes. Ne soulevez pas l’imprimante par la poignée du bac2.
Richten Sie den Drucker ein. Stellen Sie den Drucker am
vorbereiteten Standort auf.
ACHTUNG! Der Drucker muss von zwei Personen zum
vorbereiteten Standort getragen werden. Heben Sie den Drucker
nicht am Griff von Fach2 an.
Installazione della stampante. Posizionare la stampante in
un'apposita ubicazione.
AVVERTENZA Per posizionare la stampante nell'apposita
ubicazione, è necessario che venga sollevata e spostata da due
persone. Non sollevare la stampante dalla maniglia del cassetto2.
Instale la impresora. Coloque la impresora en la ubicación
preparada.
ADVERTENCIA Dos personas deben levantar la impresora y
trasladarla a la ubicación seleccionada. No levante la impresora
mediante el asa de la bandeja2.
Maak de printer gereed. Plaats de printer op een daarvoor
bestemde locatie.
WAARSCHUWING De printer moet door twee personen worden
opgetild en naar de daarvoor bestemde locatie worden verplaatst.
Til de printer niet op bij de handgreep van lade2.
Instale a impressora. Coloque a impressora em um local preparado.
AVISO! Para levantar e mover a impressora para o local preparado
são necessárias duas pessoas. Não levante a impressora pela alça
da Bandeja2.
Check the package contents. 1)HPColor LaserJet 3550 2)USB
cable 3)power cable 4)four print cartridges 5)CD-ROM (the CD-
ROM contains the user guide) 6)control panel overlay 7)getting
started guide
Examen du contenu du coffret. 1)HPColor LaserJet 3550 2)câble
USB 3)cordon d’alimentation 4)quatre cartouches d’impression
5)CD-ROM (contenant le manuel d’utilisation) 6)cache du panneau
de commande 7)guide de mise en route
Überprüfen Sie den Paketinhalt. 1)HPColor LaserJet 3550
2)USB-Kabel 3)Netzkabel 4)vier Druckpatronen 5)CD-ROM (die
CD-ROM enthält das Benutzerhandbuch) 6)Bedienfeldschablone
7)Leitfaden zur Inbetriebnahme
Verifica del contenuto della confezione. 1)HPColor LaserJet 3550
2)cavo USB 3)cavo di alimentazione 4)quattro cartucce di stampa
5)CD-ROM (il CD-ROM contiene la guida dell'utente)
6)mascherina del pannello di controllo 7)guida introduttiva
Compruebe el contenido del paquete. 1)HPColor LaserJet 3550
2)Cable USB 3)Cable de alimentación 4)Cuatro cartuchos de
impresión 5)CD-ROM (el CD-ROM contiene la guía del usuario)
6)Plantilla del panel de control 7)Guía de instalación inicial
Controleer de inhoud van de verpakking. 1)HPColor LaserJet
3550 2)USB-kabel 3)netsnoer 4)vier printcartridges 5)cd-rom (de
cd-rom bevat de gebruikershandleiding) 6)sjabloon voor het
bedieningspaneel 7)beknopte handleiding
Verifique o conteúdo do pacote. 1)HPColor LaserJet 3550
2)cabo USB 3)cabo de alimentação 4)quatro cartuchos de
impressão 5)CD-ROM (com o guia do usuário) 6)decalque do
painel de controle 7)guia de primeiros passos
5
Português Nederlands Español Italiano Deutsch Français English

1
2
3
Additional contents shipped with the HPColor LaserJet 3550n.
1)HPJetdirect en3700 external print server 2)power supply
3)network install guide
Note The items listed here are for the external print server
connection.
Matériel supplémentaire livré avec l’imprimante HPColor LaserJet
3550n. 1)serveur d’impression externe HPJetdirect en3700
2)module d’alimentation 3)guide d’installation réseau
Remarque Les éléments répertoriés ici sont destinés à la connexion
du serveur d’impression externe.
Zusätzliche Komponenten, die mit dem HPColor LaserJet 3550n
geliefert werden. 1)externer HPJetdirect en3700 Druckserver
2)Netzteil 3)Netzwerkinstallationsanleitung
Hinweis Die hier aufgeführten Komponenten sind für eine
Verbindung zum externen Druckserver gedacht.
Contenuto supplementare fornito con HPColor LaserJet 3550n.
1)server di stampa esterno HPJetdirect en3700 2)alimentatore
3)guida all'installazione di rete
Nota Gli elementi elencati sono per i collegamenti dei server di
stampa esterni.
Contenido adicional que acompaña a la impresora HPColor
LaserJet 3550n. 1)Servidor de impresión externo HPJetdirect
en3700 2)Fuente de alimentación 3)Guía de instalación en red
Nota Los elementos que se enumeran aquí son para la conexión
del servidor de impresión externo.
Extra onderdelen die worden geleverd bij de HPColor LaserJet
3550n: 1)HPJetdirect en3700 externe printserver 2)netsnoer
3)handleiding voor installatie via een netwerk
Opmerking De aangegeven onderdelen zijn voor het aansluiten van
de externe printserver.
Conteúdo adicional fornecido com a HPColor LaserJet 3550n.
1)servidor de impressão externo HPJetdirect en3700 2)fonte de
alimentação 3)guia de instalação de rede
Nota Os itens listados aqui são para a conexão do servidor de
impressão externo.
1
2
3
4
5
7
6
Locate the printer parts (front view). 1)on/off switch 2)Tray2
3)Tray1 4)front door 5)printer control panel 6)output bin extender
7)output bin
Repérage des composants de l’imprimante (vue avant).
1)interrupteur 2)bac2 3)bac1 4)porte avant 5)panneau de
commande de l’imprimante 6)rallonge du bac de sortie 7)bac de
sortie
Druckerkomponenten (Vorderansicht). 1)Ein-/Ausschalter
2)Fach2 3)Fach1 4)vordere Klappe 5)Druckerbedienfeld
6)Ausgabefachverlängerung 7)Ausgabefach
Individuazione dei componenti della stampante (vista anteriore).
1)interruttore di accensione 2)cassetto2 3)cassetto1 4)sportello
anteriore 5)pannello di controllo della stampante 6)estensione
dello scomparto di uscita 7)scomparto di uscita
Localice las partes de la impresora (vista frontal). 1)Interruptor de
encendido/apagado 2)Bandeja2 3)Bandeja1 4)Puerta frontal
5)Panel de control de la impresora 6)Extensor de la bandeja de
salida 7)Bandeja de salida
De onderdelen van de printer (vooraanzicht). 1)aan/uit-schakelaar
2)lade2 3)lade1 4)voorklep 5)bedieningspaneel van de printer
6)verlengstuk van de uitvoerbak 7)uitvoerbak
Localize as peças da impressora (vista frontal). 1)interruptor lig/
desl 2)Bandeja2 3)Bandeja1 4)porta frontal 5)painel de controle
da impressora 6)extensor do compartimento de saída
7)compartimento de saída
6

Locate the printer parts (back view). 1)upper rear door 2)lower rear
door (rear output bin) 3)USB connection 4)power connection
Repérage des composants de l’imprimante (vue arrière). 1)porte
arrière supérieure 2)porte arrière inférieure (bac de sortie arrière)
3)connexion USB 4)connexion d’alimentation
Druckerkomponenten (Rückansicht). 1)obere hintere Klappe
2)untere hintere Klappe (hinteres Ausgabefach) 3)USB-
Verbindung 4)Netzverbindung
Individuazione dei componenti della stampante (vista posteriore).
1)sportello posteriore superiore 2)sportello posteriore inferiore
(scomparto di uscita posteriore) 3)collegamento USB
4)collegamenti di alimentazione
Localice las partes de la impresora (vista trasera). 1)Puerta
superior trasera 2)Puerta inferior trasera (bandeja de salida
trasera) 3)Conexión USB 4)Conexión de alimentación
De onderdelen van de printer (achteraanzicht). 1)bovenklep aan de
achterzijde 2)onderklep aan de achterzijde (achteruitvoerbak)
3)USB-aansluiting 4)voedingsaansluiting
Localize as peças da impressora (vista traseira). 1)porta traseira
superior 2)porta traseira inferior (compartimento de saída traseiro)
3)conexão USB 4)conexão de alimentação
Understand the control panel. 1)help button 2)back arrow button
3)ready light 4)menu button 5)data light 6)attention light 7)stop
button 8)down arrow button 9)select button 10)up arrow button
11)print cartridge level indicators 12)display
Présentation du panneau de commande. 1)bouton aide 2)flèche
vers l’arrière 3)voyant prêt 4)bouton menu 5)voyant données
6)voyant attention 7)bouton arrêter 8)flèche vers le bas 9)bouton
sélectionner 10)flèche vers le haut 11)indicateurs de niveau des
cartouches d’impression 12)affichage
Das Bedienfeld. 1)Hilfe-Taste 2)Zurück-Taste 3)Bereit-LED
4)Menü-Taste 5)Daten-LED 6)Achtung-LED 7)Stopp-Taste
8)Nach-unten-Taste 9)Auswahltaste 10)Nach-oben-Taste
11)Füllstandsanzeigen der Druckpatronen 12)Anzeige
Informazioni sul pannello di controllo. 1)pulsante della guida
2)pulsante freccia indietro 3)spia pronto per la stampa 4)pulsante
menu 5)spia data 6)spia attenzione 7)pulsante stop 8)pulsante
freccia in basso 9)pulsante di selezione 10)pulsante freccia in
basso 11)indicatori del livello delle cartucce di stampa 12)display
Descripción del panel de control. 1)Botón Ayuda 2)Botón de
flecha atrás 3)Luz Preparado 4)Botón Menú 5)Luz Datos 6)Luz
Atención 7)Botón Detener 8)Botón de flecha abajo 9)Botón
Seleccionar 10)Botón de flecha arriba 11)Indicadores de nivel de
cartuchos de impresión12)Pantalla
Het bedieningspaneel. 1)helpknop 2)pijl terug-knop 3)Klaar-
lampje 4)menuknop5)Gegevens-lampje 6)Attentie-lampje
7)stopknop8)pijl omlaag-knop 9)selectieknop 10)pijl omhoog-
knop 11)niveau-aanduidingen van printcartridges 12)display
Entenda o painel de controle. 1)botão ajuda 2)botão seta para
trás 3)luz indicadora pronta 4)botão menu 5)luz indicadora dados
6)luz indicadora atenção 7)botão parar 8)botão seta para baixo
9)botão selecionar 10)botão seta para cima 11)indicadores de
nível do cartucho de impressão 12)visor
7
Português Nederlands Español Italiano Deutsch Français English

Remove the packing materials. 1)Remove all external orange
tape, orange protectors, and other packaging material.
Retrait des matériaux d’emballage. 1)Retirez la bande orange
externe, les éléments de protection oranges et tous les autres
matériaux d’emballage.
Entfernen des Verpackungsmaterials. 1)Entfernen Sie alle außen
angebrachten, orangefarbenen Klebestreifen, alle orangefarbenen
Transportsicherungen sowie alles andere Verpackungsmaterial.
Rimozione del materiale di imballaggio. 1)Rimuovere tutto il
materiale esterno, inclusi il nastro esterno e i rivestimenti di
protezione di colore arancione.
Retire el material de embalaje. 1)Retire la cinta y los protectores
de color naranja, así como el material de embalaje adicional.
Verwijder het verpakkingsmateriaal. 1)Verwijder alle externe
oranje tape, oranje beveiligingen en ander verpakkingsmateriaal.
Remova os materiais da embalagem. 1)Remova toda a fita
laranja externa, os protetores laranja e outros materiais de
embalagem.
2)Open Tray2, and remove the orange shipping lock and any other
packing material inside the tray.
2)Ouvrez le bac2, puis retirez le dispositif de sécurité d’expédition
orange dans le bac ainsi que tout autre matériel d’emballage.
2)Öffnen Sie Fach2, und entfernen Sie die orangefarbene
Transportsicherung sowie alles weitere Verpackungsmaterial im
Innern des Faches.
2)Aprire il cassetto2 e rimuovere il blocco per il trasporto di colore
arancione e altro materiale di imballaggio all'interno del cassetto.
2)Abra la bandeja2 y retire los bloqueos de transporte de color
naranja y cualquier otro material de embalaje del interior de la
bandeja.
2)Open lade2 en verwijder de oranje transportvergrendeling en het
overige verpakkingsmateriaal uit de lade.
2)Abra a Bandeja2 e remova a trava de transporte laranja e
qualquer outro material da embalagem dentro da bandeja.
8

3)Lift the front door handle, and pull down the front door.
3)Soulevez la poignée de la porte avant, puis abaissez la porte
avant.
3)Heben Sie den Griff der vorderen Klappe an, und ziehen Sie die
vordere Klappe nach unten.
3)Sollevare la maniglia dello sportello anteriore.
3)Levante el asa de la puerta frontal y tire hacia abajo de la puerta.
3)Trek de greep van de voorklep omhoog en trek de voorklep naar
beneden.
3)Levante a alça da porta frontal e puxe a porta para baixo.
CAUTION Do not place anything on the transfer unit. Do not touch
the top of the transfer unit or the contacts on the left side of the
transfer unit.
ATTENTION Ne placez aucun objet sur le module de transfert. Ne
touchez pas à la partie supérieure du module de transfert ou aux
contacts sur le côté gauche de ce dernier.
VORSICHT Legen Sie nichts auf die Transfereinheit. Berühren Sie
nicht die Oberseite der Transfereinheit oder die Kontakte an der
linken Seite der Transfereinheit.
ATTENZIONE Non posizionare nulla sull'unità di trasferimento. Non
toccare il lato superiore dell'unità di trasferimento o i contatti sul lato
sinistro dell'unità.
PRECAUCIÓN No coloque nada sobre la unidad de transferencia.
No toque la parte superior de la unidad de transferencia ni los
contactos del lateral izquierdo de ésta.
VOORZICHTIG Plaats geen objecten op de transfereenheid. Raak
de bovenkant van de transfereenheid of de contactpunten aan de
linkerkant van de transfereenheid niet aan.
CUIDADO Não coloque nada sobre a unidade de transferência.
Não toque na parte superior da unidade de transferência ou nos
contatos no lado esquerdo da unidade.
9
Português Nederlands Español Italiano Deutsch Français English

4)Remove the orange tape from the back, right and left sides of the
transfer unit.
4)Retirez le ruban adhésif orange de l’arrière et des côtés droit et
gauche du module de transfert.
4)Entfernen Sie die orangefarbenen Klebestreifen an der Rückseite
sowie an der rechten und linken Seite der Transfereinheit.
4)Rimuovere il nastro di imballaggio di colore arancione dalla parte
posteriore, destra e sinistra dell'unità di trasferimento.
4)Retire la cinta de color naranja de la parte posterior, derecha e
izquierda de la unidad de transferencia.
4)Verwijder de oranje tape van de achter-, rechter- en linkerkant
van de transfereenheid.
4)Remova a fita laranja da parte traseira e das laterais esquerda e
direita da unidade de transferência.
Install the print cartridges. 1)Remove a new print cartridge from
the bag.
Installation des cartouches d’impression. 1)Retirez une cartouche
d’impression neuve de son emballage.
Setzen Sie die Druckpatronen ein. 1)Nehmen Sie eine neue
Druckpatrone aus der Schutzverpackung.
Installazione delle cartucce di stampa. 1)Estrarre una nuova
cartuccia di stampa dalla confezione.
Instale los cartuchos de impresión. 1)Extraiga un cartucho de
impresión nuevo de la bolsa.
Installeer de printcartridges. 1)Haal de nieuwe printcartridge uit de
zak.
Instale os cartuchos de impressão. 1)Remova o novo cartucho de
impressão do invólucro.
10

2)Grasp both sides of the cartridge and distribute the toner by
gently rocking the cartridge from side to side.
2)Saisissez les deux côtés de la cartouche et distribuez le toner en
secouant délicatement la cartouche latéralement.
2)Halten Sie die Druckpatrone an beiden Seiten fest, und schütteln
Sie sie vorsichtig, um den Toner zu verteilen.
2)Afferrare la cartuccia dalle estremità e distribuire il toner agitando
lateralmente la cartuccia.
2)Sujete ambos lados del cartucho y distribuya el tóner moviendo
suavemente el cartucho de un lado a otro.
2)Pak beide uiteinden van de patroon vast en verspreid de toner
door de patroon voorzichtig heen en weer te schudden.
2)Segure as duas laterais do cartucho e agite-o suavemente de um
lado a outro para distribuir o toner.
3)Remove and discard the orange shipping tape and shipping locks
from the new print cartridge.
Note Discard the shipping tape and shipping locks according to
local regulations.
3)Retirez la bande et les dispositifs de sécurité d’expédition
oranges de la nouvelle cartouche d’impression.
Remarque Jetez la bande et les dispositifs de sécurité d’expédition
oranges en respectant les réglementations locales.
3)Entfernen Sie den orangefarbenen Klebestreifen und die
orangefarbenen Transportsicherungen von der neuen
Druckpatrone, und entsorgen Sie sie.
Hinweis Entsorgen Sie den Klebestreifen und die
Transportsicherungen entsprechend den lokalen Bestimmungen.
3)Rimuovere ed eliminare il nastro e i blocchi per il trasporto di
colore arancione dalla nuova cartuccia di stampa.
Nota Smaltire il nastro e i blocchi per il trasporto in conformità con
le norme locali.
3)Retire y deseche los bloqueos y la cinta de transporte de color
naranja del cartucho de impresión nuevo.
Nota Deseche la cinta y los bloqueos de transporte según la
normativa local.
3)Verwijder de oranje transporttape en de oranje
transportvergrendeling van de nieuwe printcartridge en gooi deze
weg.
Opmerking Gooi de transporttape en de transportvergrendeling weg
volgens de plaatselijke voorschriften.
3)Remova e descarte a fita de transporte e as travas de transporte
laranja do novo cartucho de impressão.
Nota Descarte a fita de transporte e as travas de transporte de
acordo com os regulamentos locais.
11
Português Nederlands Español Italiano Deutsch Français English

4)Locate the color slot for the print cartridge.
4)Repérez le logement couleur de la cartouche d’impression.
4)Suchen Sie den Farbschacht für die Druckpatrone.
4)Individuare l'alloggiamento a colori per la cartuccia di stampa.
4)Localice la ranura de color del cartucho de impresión.
4)Zoek de sleuf voor kleurenprintcartridges voor de printcartridge.
4)Localize o slot de cores para o cartucho de impressão.
5)Align the print cartridge with the tracks inside the printer and,
using the handle, insert the cartridge. 6)Repeat this procedure for
the remaining three print cartridges.
5)Alignez la cartouche d’impression sur les repères dans
l’imprimante puis, à l’aide de la poignée, introduisez la cartouche.
6)Répétez cette procédure pour les trois autres cartouches
d’impression.
5)Richten Sie die Druckpatrone an den Führungen im Drucker aus,
und schieben Sie die Patrone mithilfe des Griffes ein.
6)Wiederholen Sie dieses Verfahren für die drei verbleibenden
Druckpatronen.
5)Allineare la cartuccia di stampa con i binari all'interno della
stampante e inserirla utilizzando la maniglia. 6)Ripetere questa
procedura per le restanti tre cartucce di stampa.
5)Alinee el cartucho de impresión con las guías del interior de la
impresora y utilice el asa para introducir el cartucho. 6)Repita este
procedimiento para los tres cartuchos de impresión restantes.
5)Lijn de printcartridges uit met de geleiders in de printer en plaats
de patroon door gebruik te maken van de hendel. 6)Herhaal deze
procedure voor de overige drie printcartridges.
5)Alinhe o cartucho de impressão com os trilhos dentro da
impressora e, utilizando a alça, insira o cartucho. 6)Repita esse
procedimento para os três cartuchos de impressão restantes.
12

7)Firmly close the front door.
7)Fermez la porte avant.
7)Drücken Sie die vordere Klappe fest zu.
7)Chiudere saldamente lo sportello anteriore.
7)Cierre firmemente la puerta frontal.
7)Sluit de voorklep goed.
7)Feche firmemente a porta frontal.
Load paper into Tray2. 1)Pull Tray2 out of the printer.
Chargement de papier dans le bac2. 1)Sortez le bac2 de
l’imprimante.
Legen Sie Papier in Fach2 ein. 1)Ziehen Sie Fach2 aus dem
Drucker.
Caricare la carta nel cassetto2. 1)Estrarre il cassetto2 dalla
stampante.
Cargue papel en la bandeja2. 1)Extraiga la bandeja2 de la
impresora.
Plaats papier in lade2. 1)Trek lade2 uit de printer.
Carregue o papel na Bandeja2. 1)Puxe a Bandeja2 para fora da
impressora.
13
Português Nederlands Español Italiano Deutsch Français English

2)Move the side width guides until the blue arrows on the width
guides point to the size of paper you are loading.
2)Déplacez les guides de largeur latéraux jusqu’à ce que les
flèches bleues sur ceux-ci pointent vers le format de papier chargé.
2)Verschieben Sie die seitlichen Breitenführungen, bis die blauen
Pfeile an den Breitenführungen auf das eingelegte Papierformat
zeigen.
2)Spostare le guide della larghezza laterali fino a quando le frecce
blu sulle guide della larghezza puntano ai lati della carta che si sta
caricando.
2)Desplace las guías laterales de ancho del papel hasta que las
flechas azules apunten al tamaño de papel que está cargando.
2)Verschuif de breedtegeleiders totdat de blauwe pijlen op de
geleiders naar het formaat van het geplaatste papier wijzen.
2)Mova as guias de largura laterais até as setas azuis nas guias de
largura indicarem o tamanho do papel que você está carregando.
3)On the back of the tray, press the blue ridges and slide the length
guides until the arrow symbol points to the paper size you are
loading.
3)A l’arrière du bac, appuyez sur les arêtes bleues et faites glisser
les guides de longueur jusqu’à ce que le symbole de flèche pointe
vers le format de papier chargé.
3)Drücken Sie an der Rückseite des Fachs auf die blauen Rippen,
und verschieben Sie die Längenführungen so lange, bis das
Pfeilsymbol auf das einzulegende Papierformat zeigt.
3)Sulla parte posteriore del cassetto, premere le coste blu e far
scorrere le guide della lunghezza fino a quando il simbolo della
freccia punta al formato di carta che si sta caricando.
3)En la parte trasera de la bandeja, presione los salientes azules y
deslice las guías de longitud hasta que el símbolo de la flecha
apunte al tamaño que está cargando.
3)Druk op de blauwe randen aan de achterkant van de lade en
verschuif de lengtegeleiders totdat de pijl naar het geplaatste
papierformaat wijst.
3)Na parte traseira da bandeja, pressione os ressaltos azuis e
deslize as guias de comprimento até o símbolo de seta indicar o
tamanho de papel que você está carregando.
14

4)Load the paper into the tray. If this is special paper, such as
letterhead, load it with the side to be printed down and the top edge
toward the front of the tray.
Note Do not fan the paper before loading.
4)Chargez du papier dans le bac. S’il s’agit d’un papier spécial, tel
que du papier à en-tête, chargez-le la face imprimée vers le bas et
le bord supérieur vers l’avant du bac.
Remarque N’aérez pas le papier avant de le charger.
4)Legen Sie Papier in das Fach ein. Legen Sie Spezialpapier (wie
z.B. Briefkopfpapier) mit der zu bedruckenden Seite nach unten und
der Oberkante in Richtung Fachvorderseite ein.
Hinweis Fächern Sie das Papier vor dem Einlegen in das Fach nicht
auf.
4)Caricare la carta nel cassetto. Se questa è una carta speciale, ad
esempio carta intestata, caricarla con il lato da stampare verso il
basso e il margine superiore verso la parte anteriore del cassetto.
Nota Non sventolare la carta prima di caricarla.
4)Cargue el papel en la bandeja. Si se trata de papel especial,
como papel con membrete, cárguelo con la cara que se va a
imprimir boca abajo y el borde superior hacia la impresora.
Nota No abanique el papel antes de cargarlo.
4)Plaats het papier in de lade. Als dit speciaal papier is, zoals
briefpapier, plaatst u de kant die moet worden bedrukt naar
beneden met de bovenrand naar de voorkant van de lade gericht.
Opmerking Waaier het papier niet voordat u dit gaat plaatsen.
4)Carregue o papel na bandeja. Se for um papel especial, como
um papel timbrado, carregue-o com o lado a ser impresso para
baixo e a margem superior virada para a parte frontal da bandeja.
Nota Não folheie o papel antes de carregá-lo.
5)Push down on the stack of paper to lock the metal lift plate into
place. Make sure that the stack of paper is flat and that the paper is
below the height tabs.
5)Appuyez sur la pile de papier afin de verrouiller en place la
plaque métallique de soulèvement du papier. Assurez-vous que la
pile de papier est plane et située au-dessous des repères de
hauteur.
5)Drücken Sie den Papierstapel nach unten, um die Metall-
Hebevorrichtung zu verriegeln. Stellen Sie sicher, dass der
Papierstapel flach ist und das Papier nicht über die
Höhenmarkierungen hinausragt.
5)Spingere verso il basso la risma di carta per bloccare in
posizione la piastra di sollevamento metallica. Assicurarsi che la
risma di carta sia piatta e che la carta si trovi al di sotto delle
linguette dell'altezza.
5)Presione hacia abajo la pila de papel para encajar la placa
elevadora metálica en su sitio. Asegúrese de que la pila de papel
está plana y de que el papel se encuentra por debajo de las
pestañas de altura.
5)Duw de stapel papier naar beneden om de metalen hefplaat vast
te klikken. Controleer of de stapel papier vlak is en dat het papier
onder de hoogtemarkeringen zit.
5)Empurre para baixo a pilha de papéis para travar a placa de
elevação de metal no local. Verifique se a pilha de papéis está
uniforme e se o papel está abaixo das presilhas de altura.
15
Português Nederlands Español Italiano Deutsch Français English

6)Slide the tray back into the printer.
6)Faites glisser le bac dans l’imprimante.
6)Schieben Sie das Fach wieder in den Drucker.
6)Riposizionare il cassetto nella stampante facendolo scorrere.
6)Introduzca de nuevo la bandeja en la impresora.
6)Schuif de lade terug in de printer.
6)Deslize a bandeja de volta para a impressora.
Load paper into Tray1 (optional procedure). 1)Open Tray1.
Note If printing special media, such as envelopes, use Tray1.
Chargement de papier dans le bac1 (procédure facultative).
1)Ouvrez le bac1.
Remarque En cas d’impression sur un support spécial tel que des
enveloppes, utilisez le bac1.
Legen Sie Papier in Fach1 ein (optional). 1)Öffnen Sie Fach1.
Hinweis Verwenden Sie Fach1, wenn Sie Sondermedien wie
Umschläge bedrucken möchten.
Caricare la carta nel cassetto1 (procedura opzionale). 1)Aprire il
cassetto1.
Nota Per stampare su supporti speciali, ad esempio buste, utilizzare
il cassetto1.
Cargue papel en la bandeja1 (procedimiento opcional). 1)Abra la
bandeja1.
Nota Si está imprimiendo en sustratos especiales como, por
ejemplo, sobres, utilice la bandeja1.
Plaats het papier in lade1 (optionele procedure). 1)Open lade1.
Opmerking Gebruik lade1 als u wilt afdrukken op speciaal
afdrukmateriaal, zoals enveloppen.
Carregue papel na Bandeja1 (procedimento opcional). 1)Abra a
Bandeja1.
Nota Se estiver imprimindo em mídia especial, como envelopes,
utilize a Bandeja1.
16

2)Slide out the tray extender and, if necessary, open the additional
tray extender.
2)Etirez la rallonge du bac et, au besoin, ouvrez la rallonge
supplémentaire.
2)Ziehen Sie die Fachverlängerung heraus, und öffnen Sie bei
Bedarf die zusätzliche Fachverlängerung.
2)Aprire l'estensione del cassetto facendola scorrere e, se
necessario, aprire l'estensione aggiuntiva del cassetto.
2)Deslice hacia afuera el extensor de la bandeja y, si es necesario,
abra el extensor adicional de la bandeja.
2)Schuif het verlengstuk van de lade naar buiten en open, indien
nodig, het extra verlengstuk van de lade.
2)Deslize o extensor da bandeja para fora e, se necessário, abra o
extensor da bandeja adicional.
3)Slide the width guides slightly wider than the print media.
4)Remove any unused print media, and close the tray when
finished printing.
3)Faites glisser les guides de largeur un peu au-delà du support
d’impression. 4)Retirez tout support inutilisé, puis fermez le bac
une fois l’impression terminée.
3)Verschieben Sie die Breitenführungen so, dass sie etwas breiter
sind als die Druckmedien. 4)Entfernen Sie nicht benötigte
Druckmedien, und schließen Sie das Fach nach Beendigung des
Druckvorgangs.
3)Far scorrere le guide della larghezza allargandole leggermente di
più rispetto ai supporti di stampa. 4)Rimuovere eventuali supporti di
stampa inutilizzati, quindi chiudere il cassetto al termine della
stampa.
3)Deslice las guías de ancho y fíjelas de modo que no toquen el
sustrato de impresión. 4)Retire los sustratos de impresión no
utilizados y cierre la bandeja cuando finalice la impresión.
3)Schuif de breedtegeleiders iets verder uit elkaar dan het
afdrukmateriaal. 4)Verwijder ongebruikt afdrukmateriaal en sluit de
lade als het afdrukken is voltooid.
3)Deslize as guias de largura um pouco além da mídia de
impressão. 4)Remova qualquer mídia de impressão não usada e
feche a bandeja quando terminar de imprimir.
17
Português Nederlands Español Italiano Deutsch Français English

Connect the power cable and turn the printer on. After a minimum
of two minutes, the green ready light turns on.
CAUTION Do not connect the printer to the computer or to the
network at this time.
Connexion du cordon d’alimentation et mise sous tension de
l’imprimante. Après deux minutes au minimum, le voyant d’état
prêt vert s’allume.
ATTENTION Ne connectez pas encore l’imprimante à l’ordinateur
ou au réseau.
Schließen Sie das Netzkabel an, und schalten Sie
den Drucker ein. Nach mindestens zwei Minuten beginnt die grüne
Bereit-LED zu leuchten.
VORSICHT Verbinden Sie den Drucker noch nicht mit dem
Computer oder dem Netzwerk.
Collegare il cavo di alimentazione e accendere la stampante. Dopo
circa due minuti, la spia Pronto per la stampa verde si illumina.
ATTENZIONE Non collegare la stampante al computer o alla rete a
questo punto.
Conecte el cable de alimentación y encienda la impresora.
Después de un mínimo de dos minutos, se pondrá verde la luz
Preparado.
PRECAUCIÓN No conecte la impresora ni al ordenador ni a la red
en este momento.
Sluit het netsnoer aan en schakel de printer in. Na ongeveer twee
minuten, gaat het groene Klaar-lampje branden.
VOORZICHTIG Sluit de printer nog niet aan op de computer of het
netwerk.
Conecte o cabo de alimentação e ligue a impressora. Depois de
dois minutos, no mínimo, a luz verde indicadora Pronta acende.
CUIDADO Não conecte a impressora ao computador ou à rede
neste momento.
If prompted to select a control panel language, press or to
highlight the desired language. Press
to select it.
Si vous êtes invité à sélectionner une langue du panneau de
commande, appuyez sur
ou pour mettre en surbrillance la
langue souhaitée. Appuyez sur
pour la sélectionner.
Wenn Sie zur Auswahl einer Bedienfeldsprache aufgefordert
werden, drücken Sie
oder , um die gewünschte Sprache
auszuwählen. Drücken Sie dann
, um den Eintrag auszuwählen.
Se viene richiesto di selezionare la lingua del pannello di controllo,
premere
o per evidenziare la lingua desiderata. Premere il
per selezionarla.
Si se le solicita que seleccione un idioma del panel de control, pulse
la
o la para resaltar el idioma deseado. Para seleccionarlo,
pulse la
.
Als u wordt gevraagd om een taal voor het bedieningspaneel in te
stellen, drukt u op
of om de gewenste taal te markeren. Druk
op
om de taal te selecteren.
Se a seleção do idioma do painel de controle for solicitada,
pressione
ou para realçar o idioma desejado. Pressione
para selecioná-lo.
18

Print a demo page. 1)Press M
ENU
to enter the menus. 2)Press
to highlight INFORMATION, and then press to select it. 3)Press
to highlight PRINT DEMO, and then press to select it.
Impression d’une page de démonstration. 1)Appuyez sur M
ENU
pour accéder aux menus. 2)Appuyez sur pour mettre en
surbrillance INFORMATIONS, puis appuyez sur
pour sélectionner
l’option. 3)Appuyez sur
pour mettre en surbrillance IMPRIMER
PAGE DEMO, puis appuyez sur
pour sélectionner l’option.
Drucken Sie eine Testseite. 1)Drücken Sie M
ENÜ
, um die Menüs
aufzurufen. 2)Drücken Sie
, um INFORMATIONEN zu markieren,
und drücken Sie dann
, um den Eintrag auszuwählen. 3)Drücken
Sie
, um TESTSEITE DRUCKEN zu markieren, und drücken Sie
dann
, um den Eintrag auszuwählen.
Stampare una pagina dimostrativa. 1)Premere M
ENU
per accedere
ai menu. 2)Premere
per evidenziare INFORMAZIONI, quindi
premere il
per selezionarlo. 3)Premere per evidenziare
STAMPA PAGINA DIMOSTRATIVA, quindi premere il
per
selezionarlo.
Imprima una página de demostración. 1)Pulse M
ENÚ
para acceder
a los menús. 2)Pulse
para resaltar INFORMACIÓN y, a
continuación, pulse
para seleccionarlo. 3)Pulse para resaltar
IMPRIMIR DEMOSTRACIÓN y, a continuación, pulse
para
seleccionarlo.
Druk een demonstratiepagina af. 1)Druk op M
ENU
om naar de
menu's te gaan. 2)Druk op
om INFORMATIE te markeren en
druk vervolgens op
om deze optie te selecteren. 3)Druk op
om DEMO AFDRUKKEN te markeren en druk vervolgens op om
deze optie te selecteren.
Imprima uma página de demonstração. 1)Pressione M
ENU
para
entrar nos menus. 2)Pressione
para realçar INFORMAÇÕES e,
em seguida, pressione
para selecioná-la. 3)Pressione para
realçar IMPRIMIR DEMO e, em seguida, pressione
para
selecioná-la.
After printing the demo page, the printer control panel displays the
READY message.
Une fois la page de démonstration imprimée, le panneau de
commande de l’imprimante affiche le message PRET.
Nach dem Drucken der Testseite wird auf dem Druckerbedienfeld
die Meldung BEREIT angezeigt.
Dopo la stampa della pagina dimostrativa, sul pannello di controllo
della stampante viene visualizzato il messaggio PRONTO PER LA
STAMPA.
Después de imprimir la página de demostración, el panel de control
de la impresora mostrará el mensaje PREPARADO.
Als u de demonstratiepagina hebt afgedrukt, wordt op het
bedieningspaneel van de printer het bericht KLAAR weergegeven.
Depois de imprimir a página de demonstração, o painel de controle
da impressora exibirá a mensagem PRONTA.
19
Português Nederlands Español Italiano Deutsch Français English

Choose ONE installation method. To connect the printer directly to
a
Windows® PC
, go to step 16. To connect the printer directly to a
Macintosh computer
, go to step 18. To connect the HPColor
LaserJet 3550n to a
network
, go to step 19.
Choix d’une méthode d’installation. Pour connecter l’imprimante
directement à un
PC Windows®
, passez à l’étape16. Pour
connecter l’imprimante directement à un
Macintosh
, passez à
l’étape18. Pour connecter l’imprimante HPColor LaserJet 3550n à
un
réseau
, passez à l’étape19.
Wählen Sie EINE Installationsmethode. Fahren Sie mit Schritt 16
fort, wenn Sie den Drucker direkt mit einem
Windows®-PC
verbinden möchten. Fahren Sie mit Schritt 18 fort, wenn Sie den
Drucker direkt mit einem
Macintosh
verbinden möchten. Fahren Sie
mit Schritt 19 fort, wenn Sie den HPColor LaserJet 3550n an ein
Netzwerk
anschließen möchten.
Scegliere un solo metodo di installazione. Per collegare la
stampante direttamente a un PC
Windows®
, vedere il punto 16. Per
collegare la stampante direttamente a un computer
Macintosh
,
vedere il punto 18. Per collegare la stampante HPColor LaserJet
3550n a una
rete
, vedere il punto 19.
Seleccione UN método de instalación. Para conectar la impresora
directamente a un
PC con Windows®
, vaya al paso 16. Para
conectarla directamente a un
ordenador Macintosh
, vaya al paso
18. Para conectar la impresora HPColor LaserJet 3550n a una
red
,
vaya al paso 19.
Kies één installatiemethode. Ga naar stap 16 als u de printer
rechtstreeks wilt aansluiten op een
Windows®-computer
. Wilt u de
printer rechtstreeks aansluiten op een
Macintosh-computer
, dan
gaat u naar stap 18. Als u de HPColor LaserJet 3550n wilt
aansluiten op een
netwerk
, gaat u naar stap 19.
Escolha UM método de instalação. Para conectar a impressora
diretamente a um
PC Windows®
, vá para a etapa 16. Para
conectar a impressora diretamente a um
computador Macintosh
, vá
para a etapa 18. Para conectar a HPColor LaserJet 3550n a uma
rede
, vá para a etapa 19.
Connect the printer to a
Windows PC
. 1)Place the CD-ROM in the
CD-ROM drive.
Note Install the software from the CD-ROM before connecting the
cable to the printer. If you have already connected the cable and the
New Hardware Found message appears, go to step 17.
Connexion directe de l’imprimante à un
PC Windows
. 1)Placez le
CD-ROM dans le lecteur de CD-ROM.
Remarque Installez le logiciel à partir du CD-ROM avant de
raccorder le câble à l’imprimante. Si vous avez déjà connecté le
câble et que le message Nouveau matériel détecté s’affiche,
passez à l’étape17.
Schließen Sie den Drucker direkt an einen
Windows-PC
an.
1)Legen Sie die CD-ROM in das CD-ROM-Laufwerk ein.
Hinweis Installieren Sie die Software von der CD-ROM, bevor Sie
das Kabel an den Drucker anschließen. Wenn Sie das Kabel bereits
angeschlossen haben und die Meldung Neue
Hardwarekomponente angezeigt wird, fahren Sie mit Schritt 17 fort.
Collegare la stampante direttamente a un PC
Windows
.
1)Posizionare il CD-ROM nell'unità CD-ROM.
Nota Installare il software dal CD-ROM prima di collegare il cavo
alla stampante. Se il cavo è stato già collegato e viene visualizzato
il messaggio Nuovo componente hardware individuato, vedere il
punto 17.
Conecte la impresora a un
PC con Windows
. 1)Introduzca el
CD-ROM en la unidad de CD-ROM.
Nota Instale el software del CD-ROM antes de conectar el cable a
la impresora. Si ya ha conectado el cable y aparece el mensaje Se
ha encontrado hardware nuevo, vaya al paso 17.
Sluit de printer aan op een
Windows-computer
. 1)Plaats de
cd-rom in het cd-rom-station.
Opmerking Installeer de software vanaf de cd-rom voordat u de
kabel aansluit op de printer. Als u de kabel al hebt aangesloten en
het bericht Nieuwe hardware gevonden wordt weergegeven, gaat u
naar stap 17.
Conecte a impressora a um
PC Windows
. 1)Coloque o CD-ROM
na unidade de CD-ROM.
Nota Instale o software do CD-ROM antes de conectar o cabo à
impressora. Se já tiver conectado o cabo e aparecer a mensagem
Novo hardware encontrado, vá para a etapa 17.
20

2)On the welcome screen, click Install Printer. The Setup Wizard
appears.
Note If the welcome screen does not appear, click Start, and then
click Run. Type X:SETUP, replace X with the CD-ROM drive letter,
and then click OK.
2)Dans l’écran de bienvenue, cliquez sur Installer une imprimante.
L’assistant d’installation s’affiche.
Remarque Si l’écran de bienvenue ne s’affiche pas, cliquez sur
Démarrer, puis sur Exécuter. Entrez X:SETUP, remplacez X par la
lettre du lecteur de CD-ROM, puis cliquez sur OK.
2)Klicken Sie auf dem Begrüßungsbildschirm auf Drucker
installieren. Der Setup-Assistent wird aufgerufen.
Hinweis Wenn der Begrüßungsbildschirm nicht angezeigt wird,
klicken Sie zunächst auf Start und dann auf Ausführen. Geben Sie
X:SETUP ein. Setzen Sie für X den Laufwerkbuchstaben für das CD-
ROM-Laufwerk ein, und klicken Sie dann auf OK.
2)Sulla schermata di benvenuto, fare clic su Installa stampante.
Viene visualizzata l'installazione guidata.
Nota Se la schermata di benvenuto non viene visualizzata, fare clic
su Start, quindi fare clic su Esegui. Digitare X:SETUP, sostituire X
con la lettera dell'unità CD-ROM, quindi fare clic su OK.
2)En la pantalla de bienvenida, haga clic en Instalar impresora.
Aparecerá el Asistente para la instalación.
Nota Si la pantalla de bienvenida no aparece, haga clic en Inicio y
en Ejecutar. Escriba X:SETUP, sustituya X por la letra de la unidad
de CD-ROM y haga clic en Aceptar.
2)Klik op Printer installeren in het welkomstvenster. De Wizard
Setup verschijnt.
Opmerking Als het welkomstvenster niet wordt weergegeven, klikt u
op Start en vervolgens op Uitvoeren. Typ X:SETUP, vervang X met
de letter van het cd-rom-station en klik op OK.
2)Na tela de boas-vindas, clique em Instalar impressora. O
Assistente de instalação aparece.
Nota Se a tela de boas-vindas não aparecer, clique em Iniciar e, em
seguida, em Executar. Digite X:SETUP, substitua X pela letra da
unidade de CD-ROM e, em seguida, clique em OK.
3)Follow the on-screen instructions. When prompted, connect a
USB cable (recommended to optimize performance) between the
printer and the computer.
3)Suivez les instructions affichées à l’écran. A l’invite, connectez
un câble USB (recommandé pour l’optimisation des performances)
entre l’imprimante et l’ordinateur.
3)Befolgen Sie die Anweisungen auf dem Bildschirm. Schließen
Sie ein USB-Kabel (zur Optimierung der Leistung empfohlen)
zwischen Drucker und Computer an, wenn Sie dazu aufgefordert
werden.
3)Attenersi alle istruzioni sullo schermo. Quando richiesto,
collegare un cavo USB (consigliato per prestazioni ottimali) tra la
stampante e il computer.
3)Siga las instrucciones que aparecen en pantalla. Cuando se le
solicite, conecte un cable USB (recomendado para optimizar el
rendimiento) entre la impresora y el ordenador.
3)Volg de instructies op het scherm. Als u hierom wordt gevraagd,
sluit u een USB-kabel (wordt aanbevolen om de prestaties te
optimaliseren) aan tussen de printer en de computer.
3)Siga as instruções na tela. Quando solicitado, conecte um cabo
USB (recomendado para otimizar o desempenho) entre a
impressora e o computador.
21
Português Nederlands Español Italiano Deutsch Français English

4)Click Finish. If prompted, restart the PC. 5)Go to step 21.
4)Cliquez sur Terminer. Si vous y êtes invité, redémarrez
l’ordinateur. 5)Passez à l’étape21.
4)Klicken Sie auf Fertig stellen. Starten Sie den PC neu, wenn Sie
dazu aufgefordert werden. 5)Fahren Sie mit Schritt 21 fort.
4)Fare clic su Fine. Se richiesto, riavviare il PC. 5)Vedere il
punto21.
4)Haga clic en Finalizar. Si se le solicita, reinicie el PC. 5)Vaya al
paso 21.
4)Klik op Voltooien. Als u hierom wordt gevraagd, start u de
computer opnieuw op. 5)Ga naar stap 21.
4)Clique em Concluir. Se solicitado, reinicie o PC. 5)Vá para a
etapa 21.
Plug and Play. If the New Hardware Found message appears,
insert the CD-ROM. Follow the on-screen instructions, accept the
default selections, and then go to step 21.
Plug-and-Play. Si le message Nouveau matériel détecté s’affiche,
introduisez le CD-ROM. Suivez les instructions affichées à l’écran,
acceptez les sélections par défaut, puis passez à l’étape21.
Plug-and-Play. Wenn die Meldung Neue Hardwarekomponente
angezeigt wird, legen Sie die CD-ROM ein. Befolgen Sie die
Anweisungen auf dem Bildschirm, akzeptieren Sie die
Standardauswahl, und fahren Sie dann mit Schritt 21 fort.
Plug and Play. Se viene visualizzato il messaggio Nuovo
componente hardware individuato, inserire il CD-ROM. Attenersi
alle istruzioni sullo schermo, accettare le selezioni predefinite,
quindi vedere il punto 21.
Plug and Play. Si aparece el mensaje Se ha encontrado hardware
nuevo, introduzca el CD-ROM. Siga las instrucciones de la pantalla,
acepte las selecciones predeterminadas y vaya al paso 21.
Plug en Play. Als het bericht Nieuwe hardware gevonden wordt
weergegeven, plaatst u de cd-rom. Volg de instructies op het
scherm, accepteer de standaardinstellingen en ga naar stap 21.
Plug and Play. Se aparecer a mensagem Novo hardware
encontrado, insira o CD-ROM. Siga as instruções na tela, aceite as
seleções padrão e, em seguida, vá para a etapa 21.
22

Connect the printer to a
Macintosh computer
. 1)Connect a USB
cable between the USB port on the printer and the USB port on the
computer.
Connexion directe de l’imprimante à un
Macintosh
. 1)Connectez
un câble USB entre le port USB de l’imprimante et celui de
l’ordinateur.
Schließen den Drucker direkt an einen
Macintosh
an. 1)Schließen
Sie ein USB-Kabel zwischen dem USB-Anschluss des Druckers
und dem USB-Anschluss des Computers an.
Collegare la stampante a un computer
Macintosh
. 1)Collegare un
cavo USB tra la porta USB sulla stampante e la porta USB sul
computer.
Conecte la impresora a un
ordenador Macintosh
. 1)Conecte un
cable USB entre el puerto USB de la impresora y el del ordenador.
Sluit de printer aan op een
Macintosh-computer
. 1)Sluit een USB-
kabel aan tussen de USB-poort van de printer en de USB-poort van
de computer.
Conecte a impressora a um
computador Macintosh
. 1)Conecte
um cabo USB entre a porta USB na impressora e a porta USB no
computador.
2)Place the CD-ROM in the CD-ROM drive. For OS 9.1 to 9.2x, go
to step A. For OS X, go to step B.
2)Placez le CD-ROM dans le lecteur de CD-ROM. Pour OS 9.1 à
9.2x, passez à l’étape A. Pour OS X, passez à l’étape B.
2)Legen Sie die CD-ROM in das CD-ROM-Laufwerk ein. Wenn Sie
mit OS 9.1 bis 9.2x arbeiten, fahren Sie mit Schritt A fort. Wenn Sie
OSX verwenden, fahren Sie mit Schritt B fort.
2)Posizionare il CD-ROM nell'unità CD-ROM. Per OS 9.1 fino a
9.2x, vedere il punto A. Per OS X, vedere il punto B.
2)Introduzca el CD-ROM en la unidad de CD-ROM. Para OS 9.1 a
9.2x, vaya al paso A. Para OS X, vaya al paso B.
2)Plaats de cd-rom in het cd-rom-station. Ga naar stap A voor
OS9.1 tot en met 9.2x. Ga naar stap B voor OS X.
2)Coloque o CD-ROM na unidade de CD-ROM. Para o OS 9.1 a
9.2x, vá para a etapa A. Para o OS X, vá para a etapa B.
23
Português Nederlands Español Italiano Deutsch Français English

OS 9.1 to 9.2x: 1)Run the Installer. Complete a custom install.
2)For the custom install, select all options, including USB
Components (Classic). 3)When prompted, restart the computer.
OS 9.1 à 9.2x : 1)Exécutez le programme d’installation. Effectuez
une installation personnalisée. 2)Dans le cas d’une installation
personnalisée, sélectionnez toutes les options, y compris
Composants USB (Classic). 3)Lorsque vous y êtes invité,
redémarrez l’ordinateur.
OS 9.1 bis 9.2x: 1)Führen Sie das Installationsprogramm aus.
Führen Sie eine benutzerdefinierte Installation aus. 2)Wählen Sie
bei einer benutzerdefinierten Installation alle Optionen aus,
einschließlich USB Components (Classic) (USB-Komponenten
(Classic)). 3)Starten Sie den Computer neu, wenn Sie dazu
aufgefordert werden.
Da OS 9.1 a 9.2x: 1)Eseguire il programma di installazione.
Completare un'installazione personalizzata. 2)Per l'installazione
personalizzata, selezionare tutte le opzioni, inclusi i Componenti
USB (Classic). 3)Quando richiesto, riavviare il computer.
OS 9.1 a 9.2x: 1)Ejecute el instalador. Realice una instalación
sencilla. 2)Para la instalación personalizada, seleccione todas las
opciones, incluyendo USB Components (Classic) (Componentes
USB [Classic]). 3)Cuando se le solicite, reinicie el ordenador.
OS 9.1 tot en met 9.2x: 1)Voer het installatieprogramma uit. Voltooi
de speciale installatie. 2)Selecteer alle opties inclusief USB
Components (Classic) voor de aangepaste installatie. 3)Als u
hierom wordt gevraagd, start u de computer opnieuw op.
OS 9.1 a 9.2x: 1)Execute o Instalador. Complete uma instalação
personalizada. 2)Para a instalação personalizada, selecione todas
as opções, incluindo Componentes USB - Clássico. 3)Quando
solicitado, reinicie o computador.
4)Run the Apple Desktop Printer Utility from HD/Applications/
Utilities. 5)Double-click HP Printer (USB), and then click OK.
6)Next to USB Printer Selection, click Change.
4)Exécutez l’outil Apple Desktop Printer Utility à partir du dossier
HD/Applications/Utilitaires. 5)Cliquez deux fois sur Imprimante HP
(USB), puis cliquez sur OK. 6)En regard de Sélection d’imprimante
USB, cliquez sur Changer.
4)Führen Sie das Apple Desktop Printer Utility über HD/
Applications/Utilities aus. 5)Doppelklicken Sie auf HP Drucker
(USB), und klicken Sie dann auf OK. 6)Klicken Sie neben USB
Printer Selection (USB-Druckerauswahl) auf Ändern.
4)Eseguire l'Utility Stampante scrivania Apple dal percorso HD/
Applicazioni/Utilità. 5)Fare doppio clic su Stampante (USB), quindi
fare clic su OK. 6)Accanto a Selezione stampante USB, fare clic su
Modifica.
4)Ejecute la utilidad Apple Desktop Printer desde HD/Aplicaciones/
Utilidades. 5)Haga doble clic en HP Printer (USB) (Impresora HP
[USB]) y haga clic en Aceptar. 6)Junto a USB Printer Selection
(Selección de impresora USB), haga clic en Cambiar.
4)Voer de Desktop Printer Utility van Apple uit vanaf HD/
Programma's/Hulpprogramma's. 5)Dubbelklik op HP Printer (USB)
en klik op OK. 6)Klik naast Selectie USB-printer op Wijzig.
4)Execute o utilitário Apple Desktop Printer a partir de HD/
Aplicativos/Utilitários. 5)Clique duas vezes em Impressora HP -
USB e, em seguida, em OK. 6)Próximo a Seleção de impressora
USB, clique em Alterar.
24

7)Select the printer, and then click OK. 8)Next to PostScript®
Printer Description (PPD) File, click Auto Setup, and then click
Create. 9)Save the printer setup.
7)Sélectionnez l’imprimante, puis cliquez sur OK. 8)En regard de
Fichier PPD (PostScript® Printer Description), cliquez sur Réglage
auto, puis cliquez sur Créer. 9)Enregistrez la configuration de
l’imprimante.
7)Wählen Sie den Drucker aus, und klicken Sie dann auf OK.
8)Klicken Sie neben PostScript® Druckerbeschreibungsdatei
(PPD) auf Automatisch und dann auf Erstellen. 9)Speichern Sie die
Druckerkonfiguration.
7)Selezionare la stampante, quindi fare clic su OK. 8)Accanto al
file PostScript® Printer Description (PPD), fare clic su Impostazione
autom., quindi fare clic su Crea. 9)Salvare le impostazioni della
stampante.
7)Seleccione la impresora y haga clic en Aceptar. 8)Junto a
Archivo de descripción de impresora PostScript® (PPD), haga clic
en Auto Setup (Configuración automática) y, a continuación, en
Crear. 9)Guarde la configuración de la impresora.
7)Selecteer de printer en klik op OK. 8)Klik naast PostScript®-
printerbeschrijvingsbestand (PPD) op Automatische configuratie en
vervolgens op Maak aan. 9)Sla de printerconfiguratie op.
7)Selecione a impressora e, em seguida, clique em OK. 8)Ao lado
de Arquivo PPD, clique em Configuração automática e em Criar.
9)Salve a configuração da impressora.
10)On the desktop, highlight the printer. 11)Click the Printing
menu, and then click Set Default Printer. 12)Go to step 21.
10)Sur le bureau, mettez l’imprimante en surbrillance. 11)Cliquez
sur le menu Impression, puis cliquez sur Définir comme imprimante
par défaut. 12)Passez à l’étape21.
10)Markieren Sie den Drucker auf dem Desktop. 11)Klicken Sie
auf das Menü Drucken und dann auf Set Default Printer
(Standarddrucker festlegen). 12)Fahren Sie mit Schritt 21 fort.
10)Sul desktop, evidenziare la stampante. 11)Fare clic sul menu
Stampa, quindi su Imposta stampante default. 12)Vedere il
punto21.
10)En el escritorio, resalte la impresora. 11)Haga clic en el menú
Impresión y, a continuación, en Set Default Printer (Establecer
impresora predeterminada). 12)Vaya al paso 21.
10)Markeer de printer op het bureaublad. 11)Klik op het menu
Afdrukken en klik vervolgens op Stel standaardprinter in. 12)Ga
naar stap 21.
10)Na área de trabalho, realce a impressora. 11)Clique no menu
Impressão e, em seguida, em Definir impressora padrão. 12)Vá
para a etapa 21.
25
Português Nederlands Español Italiano Deutsch Français English

OS X: 1)Run the Installer. Complete an easy install.
Note If OS X and OS 9.1 (Classic) to 9.2x (Classic) are installed on
the same computer, the installer will show both the Classic and the
OS X installation options.
OS X : 1)Exécutez le programme d’installation. Effectuez une
installation standard.
Remarque Si OS X et OS 9.1 (Classic) à 9.2x (Classic) sont
installés sur le même ordinateur, le programme d’installation affiche
les options d’installation des systèmes Classic et OS X.
OS X: 1)Führen Sie das Installationsprogramm aus. Führen Sie
eine einfache Installation aus.
Hinweis Wenn OS X und 9.1 (Classic) bis 9.2x (Classic) auf
demselben Computer installiert sind, zeigt das
Installationsprogramm die Installationsoptionen der Classic- und der
OS X-Version an.
OS X: 1)Eseguire il programma di installazione. Completare
un'installazione facile.
Nota Se OS X e OS 9.1 (Classic) fino a 9.2x (Classic) sono installati
sullo stesso computer, nel programma di installazione vengono
visualizzate sia le opzioni di installazione Classic che OS X.
OS X: 1)Ejecute el instalador. Realice una instalación sencilla.
Nota Si OS X y OS 9.1 (Classic) a 9.2x (Classic) están instalados
en el mismo ordenador, el instalador mostrará las opciones de
instalación de ambos.
OS X: 1)Voer het installatieprogramma uit. Voltooi de
standaardinstallatie.
Opmerking Als OS X en OS 9.1 (Classic) tot en met 9.2x (Classic)
op dezelfde computer zijn geïnstalleerd, worden de installatie-opties
van Classic en OS X door het installatieprogramma weergegeven.
OS X: 1)Execute o Instalador. Complete uma instalação fácil.
Nota Se o OS X e o OS 9.1 (Classic) a 9.2x (Classic) estiverem
instalados no mesmo computador, o instalador mostrará ambas as
opções de instalação Classic e OS X.
2)From HD/Applications/Utilities/Print Center, start the Print Center.
3)If the printer appears in the Printer List, delete the printer. Click
Add. 4)On the next page, click the drop-down menu, and then
select USB.
2)Démarrez le Centre d’impression à partir du dossier HD/
Applications/Utilitaires/Centre d’impression. 3)Si l’imprimante
apparaît dans la Liste d’imprimantes, supprimez-la. Cliquez sur
Ajouter. 4)Sur la page suivante, cliquez sur le menu local, puis
sélectionnez USB.
2)Starten Sie das Print Center über HD/Applications/Utilities/Print
Center. 3)Löschen Sie den Drucker, wenn er in der Druckerliste
angezeigt wird. Klicken Sie auf Hinzufügen. 4)Klicken Sie auf der
nächsten Seite auf das Dropdown-Menü, und wählen Sie dann USB.
2)Avviare Centro Stampa da HD/Applicazioni/Utilità/Centro
Stampa. 3)Se la stampante viene visualizzata in Elenco Stampanti,
eliminare la stampante. Fare clic su Aggiungi. 4)Sulla pagina
successiva, fare clic sul menu a discesa, quindi selezionare USB.
2)Inicie el Centro de impresión desde HD/Aplicaciones/Utilidades/
Centro de impresión. 3)Si la impresora aparece en Lista de
impresoras, elimínela. Haga clic en Añadir. 4)En la página
siguiente, haga clic en el menú desplegable y seleccione USB.
2)Start Afdrukbeheer vanuit HD/Programma's/Hulpprogramma's/
Afdrukbeheer. 3)Als de printer wordt weergegeven bij Printers,
verwijdert u de printer. Klik op Voeg toe. 4)Klik op de volgende
pagina op het bovenste vervolgkeuzemenu en selecteer vervolgens
USB.
2)A partir de HD/Aplicativos/Utilitários/Print Center, inicie o Print
Center. 3)Se a impressora aparecer na Lista de impressoras,
exclua-a. Clique em Incluir. 4)Na próxima página, clique na lista de
seleção e selecione USB.
26

5)From the Printer Model drop-down list, select HP. 6)Under
Model Name, select the printer, and then click Add. 7)Go to step 21.
5)Dans la liste locale Modèle d’imprimante, sélectionnez HP.
6)Sous Nom du modèle, sélectionnez l’imprimante, puis cliquez sur
Ajouter. 7)Passez à l’étape21.
5)Wählen Sie in der Dropdown-Liste Druckermodell den Eintrag HP
aus. 6)Wählen Sie unter Modellname den gewünschten Drucker
aus, und klicken Sie dann auf Hinzufügen. 7)Fahren Sie mit Schritt
21 fort.
5)Dall'elenco a discesa Modello stampante, selezionare HP. 6)In
Nome del modello, selezionare la stampante, quindi fare clic su
Aggiungi. 7)Vedere il punto21.
5)En la lista desplegable Modelo de impresora, seleccione HP.
6)En Modelo, seleccione la impresora y haga clic en Añadir.
7)Vaya al paso 21.
5)Selecteer HP in de vervolgkeuzelijst Printermodel. 6)Selecteer
de printer bij Modelnaam en klik op Voeg toe. 7)Ga naar stap 21.
5)Na lista de seleção Modelo de impressora, selecione HP. 6)Em
Nome do modelo, selecione a impressora e, em seguida, clique em
Incluir. 7)Vá para a etapa 21.
HPColor LaserJet 3550n only: Connect to the network. 1)Attach
the HPJetdirect en3700 external print server to a 10Base-T or to a
100Base-T local network by plugging the network cable into the
network port on the rear panel.
HPColor LaserJet 3550n uniquement: Connexion au réseau.
1)Reliez le serveur d’impression externe HPJetdirect en3700 à un
réseau local 10Base-T ou 100Base-T en branchant le câble réseau
dans le port réseau sur le panneau arrière.
Nur HPColor LaserJet 3550n: Stellen Sie eine Verbindung zum
Netzwerk her. 1)Schließen Sie den externen HPJetdirect en3700
Druckserver an ein 10Base-T- oder ein 100Base-T-LAN an, indem
Sie das Netzwerkkabel mit dem Netzwerkanschluss auf der
Rückseite verbinden.
Solo per HPColor LaserJet 3550n: collegamento alla rete.
1)Collegare il server di stampa esterno HPJetdirect en3700 a una
rete locale 10Base-T o 100Base-T inserendo il cavo di rete nella
porta di rete sul pannello posteriore.
HPColor LaserJet 3550n: Conexión a la red. 1)Conecte el
servidor de impresión externo HPJetdirect en3700 a una red local
10Base-T o 100Base-T enchufando el cable de red al puerto de red
del panel trasero.
Uitsluitend voor HPColor LaserJet 3550n: sluit aan op het
netwerk. 1)Verbind de HPJetdirect en3700 externe printserver
met een 10Base-T of een 100Base-T lokaal netwerk door de
netwerkkabel op de netwerkpoort op het achterpaneel aan te sluiten.
HPColor LaserJet 3550n apenas: Conecte à rede. 1)Conecte o
servidor de impressão externo HPJetdirect en3700 a uma rede
local 10Base-T ou 100Base-T conectando o cabo de rede à porta
de rede no painel traseiro.
27
Português Nederlands Español Italiano Deutsch Français English

2)Attach the print server to the printer using the USB cable.
3)Insert the DC power cord from the power module into the power
connector on the rear panel, and then insert into a power outlet.
2)Reliez le serveur d’impression à l’imprimante à l’aide du câble
USB. 3)Branchez le cordon d’alimentation continue entre le module
d’alimentation et le connecteur d’alimentation sur le panneau
arrière, puis reliez-le à une prise de tension.
2)Schließen Sie den Druckserver über das USB-Kabel an den
Drucker an. 3)Schließen Sie das Gleichstromkabel des Netzmoduls
am Netzanschluss an der Rückseite an, und verbinden Sie es
anschließend mit einer Steckdose.
2)Collegare il server di stampa alla stampante utilizzando il cavo
USB. 3)Inserire il cavo di alimentazione DC dal modulo di
alimentazione nel connettore di alimentazione sul pannello
posteriore, quindi inserirlo in una presa elettrica.
2)Conecte el servidor de impresión a la impresora mediante el
cable USB. 3)Inserte el cable de alimentación de CC del módulo
de alimentación en el conector de alimentación del panel trasero y,
a continuación, en una salida de alimentación.
2)Sluit de printserver aan op de printer met de USB-kabel.
3)Sluit het snoer van de voedingsmodule aan op de
netvoedingsaansluiting op het achterpaneel en op het stopcontact.
2)Conecte o servidor de impressão à impressora utilizando o cabo
USB. 3)Conecte o cabo de alimentação CC no módulo ao conector
de alimentação no painel traseiro e, em seguida, insira-o em uma
tomada.
The 10 or the 100 LED turns on, indicating a network connection,
and the power/status LED blinks. After 15 seconds, the power/
status LED light and the USB printer LED light appear green. The
power/status LED will blink if there is network activity.
Le voyant 10 ou 100 s’allume, ce qui indique une connexion réseau,
et le voyant alimentation/état clignote. Après 15 secondes, le voyant
alimentation/état s’allume et le voyant d’imprimante USB s’allume
en vert. Le voyant alimentation/état clignote en cas d’une activité
réseau.
Die LED für 10Base-T oder 100Base-T beginnt zu leuchten, was
auf eine Netzwerkverbindung hinweist. Die Netz-/Status-LED blinkt.
Nach 15 Sekunden leuchten die Netz-/Status-LED und die USB-
Drucker-LED grün. Die Netz-/Status-LED blinkt bei Netzwerkaktivität.
Il LED 10 o 100 si accende, indicando una connessione di rete, e il
LED di accensione/stato lampeggia. Dopo 15 secondi, la spia del
LED di accensione/stato e del LED della stampante USB diventano
verdi. In caso di attività di rete, la spia del LED di accensione/stato
lampeggia.
El LED 10 ó 100 se encenderá, lo que indica una conexión de red,
y el LED de alimentación/estado parpadeará. Después de 15
segundos, el LED de alimentación/estado y el LED USB de la
impresora se iluminarán en verde. El LED de alimentación/estado
parpadeará si se registra actividad de red.
Het lampje voor 10 of 100 gaat branden, waarmee een
netwerkverbinding wordt aangegeven. Het lampje voor stroom/
status gaat knipperen. Na 15 seconden gaan het lampje voor
stroom/status en het lampje voor de USB-printer groen branden.
Het lampje voor stroom/status gaat knipperen als er geen
netwerkactiviteit is.
O LED 10 ou 100 acende, indicando uma conexão de rede e o LED
de alimentação/status pisca. Após 15 segundos, a luz indicadora do
LED de alimentação/status e a luz indicadora do LED da
impressora USB fica verde. O LED de alimentação/status piscará
se houver atividade de rede.
28

4)Press the test button on the back of the external print server to
print an HPJetdirect configuration page. 5)Note the IP address for
reference. This may take a few minutes depending on the network
connection.
4)Appuyez sur le bouton de test à l’arrière du serveur d’impression
externe pour imprimer une page de configuration HPJetdirect.
5)Notez l’adresse IP de l’imprimante pour référence. Cette
impression peut prendre quelques minutes en fonction de la
connexion réseau.
4)Drücken Sie die Testtaste an der Rückseite des externen
Druckservers, um eine HPJetdirect Konfigurationsseite zu drucken.
5)Notieren Sie die IP-Adresse für Referenzzwecke. Dies kann je
nach der Netzwerkverbindung einige Minuten dauern.
4)Premere il pulsante di test sulla parte posteriore del server di
stampa esterno per stampare una pagina di configurazione di
HPJetdirect. 5)Annotare l'indirizzo IP per riferimento. Potrebbe
essere necessario attendere qualche minuto, a seconda della
connessione di rete.
4)Pulse el botón de prueba que se encuentra en la parte posterior
del servidor de impresión externo para imprimir una página de
configuración de HPJetdirect. 5)Anote la dirección IP como
referencia. Esta operación puede tardar varios minutos
dependiendo de la conexión de red.
4)Druk op de testknop aan de achterkant van de externe printer om
een configuratiepagina van HPJetdirect af te drukken. 5)Noteer
het IP-adres voor referentie. Dit kan enige minuten in beslag
nemen, afhankelijk van de netwerkverbinding.
4)Pressione o botão de teste na parte traseira do servidor de
impressão externo para imprimir uma página de configuração do
HPJetdirect. 5)Anote o endereço IP para referência. Isso pode
levar alguns minutos dependendo da conexão de rede.
6)For a Windows PC network printer software install, see the
HPNetwork Install Guide
that is included with the printer. For a
Macintosh computer network printer software install, go to step 20.
6)Pour une installation du logiciel d’imprimante sur un réseau
Windows, reportez-vous au
guide d’installation réseauHP
inclus
avec l’imprimante. Pour une installation sur un réseau Macintosh,
passez à l’étape20.
6)Halten Sie sich bei der Installation von Windows PC-
Netzwerkdruckersoftware an die
HPNetzwerkinstallationsanleitung
,
die mit dem Drucker geliefert wird. Fahren Sie bei der Installation
von Macintosh-Netzwerkdruckersoftware mit Schritt 20 fort.
6)Per un'installazione del software della stampante di rete di un PC
Windows, vedere la
Guida all'installazione di rete HP
fornita con la
stampante. Per un'installazione del software della stampante di rete
di un computer Macintosh, vedere il punto 20.
6)Para la instalación del software de una impresora conectada en
red en un ordenador con Windows, consulte la
Guía de instalación
en red deHP
que se incluye con la impresora. Para la instalación
del software de una impresora conectada en red en un ordenador
Macintosh, vaya al paso 20.
6)Raadpleeg de
HPhandleiding voor installatie via een netwerk
die
bij de printer is geleverd voor meer informatie over de installatie van
software voor een netwerkprinter op een Windows-computer. Ga
naar stap 20 voor het installeren van software voor een
netwerkprinter op een Macintosh-computer.
6)Para a instalação do software de impressora de rede em um PC
Windows, consulte o
Guia de instalação de rede da HP
fornecido
com a impressora. Para a instalação do software de impressora de
rede em computador Macintosh, vá para a etapa 20.
29
Português Nederlands Español Italiano Deutsch Français English

Install the printer software (Macintosh). For OS 9.1 to 9.2x, go to
step A. For OS X, go to step B.
Installation du logiciel d’imprimante (Macintosh). Pour OS 9.1 à
9.2x, passez à l’étape A. Pour OS X, passez à l’étape B.
Installieren Sie die Druckersoftware (Macintosh). Wenn Sie mit OS
9.1 bis 9.2x arbeiten, fahren Sie mit Schritt A fort. Wenn Sie OSX
verwenden, fahren Sie mit Schritt B fort.
Installazione del software della stampante (Macintosh). Per OS 9.1
fino a 9.2x, vedere il punto A. Per OS X, vedere il punto B.
Instale el software de la impresora (Macintosh). Para OS 9.1 a
9.2x, vaya al paso A. Para OS X, vaya al paso B.
Installeer de printersoftware (Macintosh). Ga naar stap A voor
OS9.1 tot en met 9.2x. Ga naar stap B voor OS X.
Instale o software da impressora (Macintosh). Para o OS 9.1 a
9.2x, vá para a etapa A. Para o OS X, vá para a etapa B.
OS 9.1 to 9.2x: 1)Run the Installer. Complete an easy install, and
then restart the computer. 2)From HD/Applications/Utilities, use the
Apple Desktop Printer Utility to select the printer.
OS 9.1 à 9.2x : 1)Exécutez le programme d’installation. Effectuez
une installation standard, puis redémarrez l’ordinateur. 2)A partir
du dossier HD/Applications/Utilitaires, employez l’outil Apple
Desktop Printer Utility pour sélectionner l’imprimante.
OS 9.1 bis 9.2x: 1)Führen Sie das Installationsprogramm aus.
Führen Sie eine einfache Installation aus, und starten Sie den
Computer anschließend neu. 2)Verwenden Sie das Apple Desktop
Printer Utility über HD/Applications/Utilities, um den Drucker
auszuwählen.
Da OS 9.1 a 9.2x: 1)Eseguire il programma di installazione.
Completare un'installazione facile, quindi riavviare il computer.
2)Dal percorso HD/Applicazioni/Utilità, eseguire l'Utility Stampante
scrivania Apple.
OS 9.1 a 9.2x: 1)Ejecute el instalador. Realice una instalación
sencilla y reinicie el ordenador. 2)Desde HD/Aplicaciones/
Utilidades, emplee la utilidad Apple Desktop Printer para
seleccionar la impresora.
OS 9.1 tot en met 9.2x: 1)Voer het installatieprogramma uit. Voltooi
de standaardinstallatie en start de computer opnieuw op. 2)Gebruik
de Desktop Printer Utility van Apple vanuit HD/Programma's/
Hulpprogramma's om de printer te selecteren.
OS 9.1 a 9.2x: 1)Execute o Instalador. Complete uma instalação
fácil e, em seguida, reinicie o computador. 2)Em HD/Aplicativos/
Utilitários, utilize o utilitário Apple Desktop Printer para selecionar a
impressora.
30

3)Complete the printer setup using either the Printer (AppleTalk)
option or the Printer (LPR) option. 4)Go to step 21.
3)Exécutez la configuration de l’imprimante en utilisant l’option
Imprimante (AppleTalk) ou Imprimante (LPR). 4)Passez à l’étape21.
3)Führen Sie die Druckereinrichtung entweder mit der Option
Printer (AppleTalk) oder mit der Option Printer (LPR) aus. 4)Fahren
Sie mit Schritt 21 fort.
3)Completare l'installazione della stampante utilizzando l'opzione
Stampante (AppleTalk) oppure Stampante (LPR). 4)Vedere il
punto21.
3)Complete la configuración de la impresora mediante la opción
Impresora (AppleTalk) o Impresora (LPR). 4)Vaya al paso 21.
3)Voltooi de printerconfiguratie met de optie Printer (AppleTalk) of
de optie Printer (LPR). 4)Ga naar stap 21.
3)Complete a instalação da impressora utilizando a opção
Impressora - AppleTalk ou a opção Impressora – LPR. 4)Vá para a
etapa 21.
OS X: 1)Run the Installer. Complete an easy install.
Note If OS X and OS 9.1 (Classic) to 9.2x (Classic) are installed on
the same computer, the installer will show both the Classic and the
OS X installation options.
OS X : 1)Exécutez le programme d’installation. Effectuez une
installation standard.
Remarque Si OS X et OS 9.1 (Classic) à 9.2x (Classic) sont
installés sur le même ordinateur, le programme d’installation affiche
les options d’installation des systèmes Classic et OS X.
OS X: 1)Führen Sie das Installationsprogramm aus. Führen Sie
eine einfache Installation aus.
Hinweis Wenn OS X und 9.1 (Classic) bis 9.2x (Classic) auf
demselben Computer installiert sind, zeigt das
Installationsprogramm die Installationsoptionen der Classic- und der
OS X-Version an.
OS X: 1)Eseguire il programma di installazione. Completare
un'installazione facile.
Nota Se OS X e OS 9.1 (Classic) fino a 9.2x (Classic) sono installati
sullo stesso computer, nel programma di installazione vengono
visualizzate sia le opzioni di installazione Classic che OS X.
OS X: 1)Ejecute el instalador. Realice una instalación sencilla.
Nota Si OS X y OS 9.1 (Classic) a 9.2x (Classic) están instalados
en el mismo ordenador, el instalador mostrará las opciones de
instalación de ambos.
OS X: 1)Voer het installatieprogramma uit. Voltooi de
standaardinstallatie.
Opmerking Als OS X en OS 9.1 (Classic) tot en met 9.2x (Classic)
op dezelfde computer zijn geïnstalleerd, worden de installatie-opties
van Classic en OS X door het installatieprogramma weergegeven.
OS X: 1)Execute o Instalador. Complete uma instalação fácil.
Nota Se o OS X e o OS 9.1 (Classic) a 9.2x (Classic) estiverem
instalados no mesmo computador, o instalador mostrará ambas as
opções de instalação Classic e OS X.
31
Português Nederlands Español Italiano Deutsch Français English

2)From HD/Applications/Utilities/Print Center, start the Print Center.
3)If the printer appears in the Printer List, delete the printer. Click
Add.
2)Démarrez le Centre d’impression à partir du dossier HD/
Applications/Utilitaires/Centre d’impression. 3)Si l’imprimante
apparaît dans la Liste d’imprimantes, supprimez-la. Cliquez sur
Ajouter.
2)Starten Sie das Print Center über HD/Applications/Utilities/Print
Center. 3)Löschen Sie den Drucker, wenn er in der Druckerliste
angezeigt wird. Klicken Sie auf Hinzufügen.
2)Avviare Centro Stampa da HD/Applicazioni/Utilità/Centro
Stampa. 3)Se la stampante viene visualizzata in Elenco Stampanti,
eliminare la stampante. Fare clic su Aggiungi.
2)Inicie el Centro de impresión desde HD/Aplicaciones/Utilidades/
Centro de impresión. 3)Si la impresora aparece en Lista de
impresoras, elimínela. Haga clic en Añadir.
2)Start Afdrukbeheer vanuit HD/Programma's/Hulpprogramma's/
Afdrukbeheer. 3)Als de printer wordt weergegeven bij Printers,
verwijdert u de printer. Klik op Voeg toe.
2)A partir de HD/Aplicativos/Utilitários/Print Center, inicie o Print
Center. 3)Se a impressora aparecer na Lista de impressoras,
exclua-a. Clique em Incluir.
4)On the next page, click the drop-down menu, and then select
either the AppleTalk option or the IP Printing option. 5)From the
Printer Model drop-down list, select HP. 6)Under Model Name,
select the printer, and click Add. 7)Go to step 21.
4)Sur la page suivante, cliquez sur le menu local, puis sélectionnez
l’option AppleTalk ou Impression IP. 5)Dans la liste locale Modèle
d’imprimante, sélectionnez HP. 6)Sous Nom du modèle,
sélectionnez l’imprimante, puis cliquez sur Ajouter. 7)Passez à
l’étape21.
4)Klicken Sie auf der nächsten Seite auf das Dropdown-Menü, und
wählen Sie dann entweder die Option AppleTalk oder die Option IP
Printing. 5)Wählen Sie in der Dropdown-Liste Druckermodell den
Eintrag HP aus. 6)Wählen Sie unter Modellname den gewünschten
Drucker aus, und klicken Sie dann auf Hinzufügen. 7)Fahren Sie
mit Schritt 21 fort.
4)Sulla pagina successiva, fare clic sul menu a discesa, quindi
selezionare l'opzione AppleTalk oppure Stampa IP. 5)Dall'elenco a
discesa Modello stampante, selezionare HP. 6)In Nome del
modello, selezionare la stampante, quindi fare clic su Aggiungi.
7)Vedere il punto21.
4)En la página siguiente, haga clic en el menú desplegable y
seleccione la opción AppleTalk o IP Printing (Impresión IP). 5)En la
lista desplegable Modelo de impresora, seleccione HP. 6)En
Modelo, seleccione la impresora y haga clic en Añadir. 7)Vaya al
paso 21.
4)Op de volgende pagina klikt u op het vervolgkeuzemenu en
selecteert u de optie AppleTalk of de optie IP Printing. 5)Selecteer
HP in de vervolgkeuzelijst Printermodel. 6)Selecteer de printer bij
Modelnaam en klik op Voeg toe. 7)Ga naar stap 21.
4)Na próxima página, clique na lista de seleção e, em seguida,
selecione a opção AppleTalk ou a opção Impressão IP. 5)Na lista
de seleção Modelo de impressora, selecione HP. 6)Em Nome do
modelo, selecione a impressora e clique em Incluir. 7)Vá para a
etapa 21.
32

Test the software installation. Print a page from any program to
make sure the software is correctly installed.
Note If installation fails, reinstall the software.
Test de l’installation du logiciel. Imprimez une page à partir d’un
programme quelconque pour vérifier que le logiciel est
correctement installé.
Remarque En cas d’échec de l’installation, réinstallez le logiciel.
Testen Sie die Softwareinstallation. Drucken Sie eine Seite über
ein beliebiges Programm, um sicherzustellen, dass die Software
ordnungsgemäß installiert wurde.
Hinweis Wenn die Installation fehlschlägt, müssen Sie die Software
neu installieren.
Test dell'installazione del software. Stampare una pagina da un
programma qualsiasi per assicurarsi che il software sia installato
correttamente.
Nota Se l'installazione non è avvenuta correttamente, reinstallare il
software.
Compruebe la instalación del software. Imprima una página desde
cualquier programa para asegurarse de que el software se ha
instalado correctamente.
Nota Si la instalación falla, instale de nuevo el software.
Test de installatie van de software. Druk een pagina af van een
willekeurig programma om te controleren of de software correct is
geïnstalleerd.
Opmerking Als de installatie is mislukt, installeert u de software
opnieuw.
Teste a instalação do software. Imprima uma página a partir de
qualquer programa para verificar se o software foi instalado
corretamente.
Nota Se a instalação falhar, reinstale o software.
Congratulations! The printer is ready to use. The user guide is
located on the CD-ROM and in the HPtoolbox software.
Note Save the boxes and the packing materials in case you need to
transport the printer.
Félicitations ! L’imprimante est prête à l’emploi. Le manuel
d’utilisation est situé sur le CD-ROM et dans le logiciel Boîte à
outilsHP.
Remarque Conservez les cartons et les matériaux d’emballage en
cas de transport éventuel de l’imprimante.
Herzlichen Glückwunsch! Der Drucker ist jetzt einsatzbereit. Das
Benutzerhandbuch befindet sich auf der CD-ROM und in der
HPToolbox-Software.
Hinweis Bewahren Sie die Schachteln und das
Verpackungsmaterial auf, falls Sie den Drucker transportieren
müssen.
Congratulazioni. La stampante è pronta per l'uso. La guida
dell'utente è situata sul CD-ROM e nel software HPtoolbox.
Nota Conservare le confezioni e il materiale di imballaggio qualora
sia necessario trasportare la stampante.
¡Enhorabuena! La impresora está lista para su uso. La guía del
usuario se encuentra en el CD-ROM y en el software de la Caja de
herramientas deHP.
Nota Guarde las cajas y el material de embalaje por si necesita
transportar la impresora.
Gefeliciteerd! De printer is klaar voor gebruik. U vindt de
gebruikershandleiding op de cd-rom en in desoftware van de HP-
werkset.
Opmerking Bewaar de dozen en het verpakkingsmateriaal voor het
geval u de printer moet vervoeren.
Parabéns! A impressora está pronta para uso. O guia do usuário
está localizado no CD-ROM no software HPtoolbox.
Nota Guarde as caixas e os materiais de embalagem no caso de
precisar transportar a impressora.
33
Português Nederlands Español Italiano Deutsch Français English

For additional help for the HPColor LaserJet 3550 series printer, go
to http://www.hp.com/support/clj3550.
Pour obtenir une aide supplémentaire sur l’imprimante HPColor
LaserJet 3550 series, visitez le site http://www.hp.com/support/
clj3550.
Weitere Hilfe zum Drucker der HPColor LaserJet 3550 Serie finden
Sie unter http://www.hp.com/support/clj3550.
Per ulteriore assistenza per la stampante HPColor LaserJet 3550
series, visitare il sito Web all'indirizzo http://www.hp.com/support/
clj3550.
Para obtener ayuda adicional sobre la impresora HPColor LaserJet
serie 3550, visite http://www.hp.com/support/clj3550.
Ga naar http://www.hp.com/support/clj3550 voor meer informatie
over de HPColor LaserJet 3550 series printer.
Para obter ajuda adicional para a impressora HPColor LaserJet
3550 series, vá para http://www.hp.com/support/clj3550.
Register your printer. Register at http://www.register.hp.com. This is
the quickest and easiest way for you to register to receive the
following information: technical support updates, enhanced support
options, ideas and ways to use your new HP printer, and news on
emerging technologies.
Enregistrement de l’imprimante. Enregistrez l’imprimante sur le site
http://www.register.hp.com. Il s’agit de la méthode la plus simple et
la plus rapide pour enregistrer l’imprimante afin de recevoir les
informations suivantes : mises à jour de l’assistance technique,
options d’assistance avancées, idées et méthodes d’utilisation de
votre nouvelle imprimante HP, ainsi que des nouvelles sur les
technologies émergeantes.
Registrieren Sie Ihren Drucker. Registrieren Sie Ihren Drucker unter
http://www.register.hp.com. Dies ist die schnellste und einfachste
Registrierungsmethode, um folgende Informationen zu erhalten:
Updates zur technischen Unterstützung, erweiterte Unterstützung,
Vorschläge und Möglichkeiten zur Verwendung Ihres neuen HP
Druckers sowie aktuelle Informationen zu neuen Technologien.
Registrazione della stampante. Registrarsi al sito Web all'indirizzo
http://www.register.hp.com. È il modo più veloce e facile di
registrarsi e ricevere le seguenti informazioni: aggiornamenti su
assistenza tecnica, opzioni di assistenza avanzate, idee e modi di
utilizzare la nuova stampante HP e novità su tecnologie emergenti.
Registre la impresora. Regístrese en http://www.register.hp.com.
Éste es el modo más rápido y sencillo de registrarse para recibir la
siguiente información: actualizaciones del soporte técnico, opciones
de soporte mejoradas, ideas y modos de usar su nueva impresora
HP, además de novedades sobre las tecnologías emergentes.
Registreer de printer. Registreer de printer op
http://www.register.hp.com. Dit is de snelste en eenvoudigste
manier om uw printer te registreren zodat u de volgende informatie
krijgt: updates voor technische ondersteuning, geavanceerde
ondersteuningsopties, ideeën en manieren om de nieuwe HP-
printer te gebruiken en nieuws over technologieën die worden
ontwikkeld.
Registre a impressora. Registre-a em http://www.register.hp.com.
Essa é a forma mais rápida e fácil de registrá-la para receber as
seguintes informações: atualizações de suporte técnico, opções de
suporte avançado, idéias e formas de usar a nova impressora HP e
novidades sobre tecnologias emergentes.
34
La página se está cargando...
La página se está cargando...
La página se está cargando...
La página se está cargando...
La página se está cargando...
La página se está cargando...
La página se está cargando...
La página se está cargando...
La página se está cargando...
La página se está cargando...
La página se está cargando...
La página se está cargando...
La página se está cargando...
La página se está cargando...
La página se está cargando...
La página se está cargando...
La página se está cargando...
La página se está cargando...
La página se está cargando...
La página se está cargando...
La página se está cargando...
Transcripción de documentos
HP Color LaserJet 3550n: includes the features of the 3550, plus an HP Jetdirect en3700 external print server Modèles. HP Color LaserJet 3550 : modèle de base, inclut 64 Mo de mémoire SDRAM HP Color LaserJet 3550n : inclut les caractéristiques du modèle 3550, ainsi qu’un serveur d’impression externe HP Jetdirect en3700 Modelle. HP Color LaserJet 3550: Basismodell mit 64 MB SDRAM HP Color LaserJet 3550n: bietet neben den Funktionen des Modells 3550 einen externen HP Jetdirect en3700 Druckserver Modelli. HP Color LaserJet 3550: modello base, include 64 MB di SDRAM HP Color LaserJet 3550n: include le funzioni della 3550, più un server di stampa esterno HP Jetdirect en3700 Modelos. HP Color LaserJet 3550: modelo básico, incluye 64 MB de SDRAM. HP Color LaserJet 3550n: incorpora las características de la 3550, además de un servidor de impresión externo HP Jetdirect en3700. Modellen. HP Color LaserJet 3550: basismodel, bevat 64 MB SDRAM HP Color LaserJet 3550n: bevat de functies van de 3550 plus een HP Jetdirect en3700 externe printserver Modelos. HP Color LaserJet 3550: modelo base, inclui 64 MB de SDRAM HP Color LaserJet 3550n: inclui os recursos da 3550, mais um servidor de impressão externo HP Jetdirect en3700 English Models. HP Color LaserJet 3550: base model, includes 64 MB of SDRAM Français Deutsch Italiano Español Nederlands Português 2 English Français Deutsch Italiano Español Nederlands Português Minimum system requirements. See the outside of the box in which the printer was shipped, or see the Install Notes on the CDROM. Prepare the location. Select a sturdy, level surface in a wellventilated, dust-free area. Space requirements for the area around the printer: front, 635 mm (25 inches); rear, 203 mm (8 inches); sides, 229 mm (9 inches); top, 254 mm (10 inches) Configuration minimum du système. Consultez l’extérieur du coffret d’expédition de l’imprimante ou reportez-vous aux notes d’installation sur le CD-ROM. Préparez l’emplacement. Sélectionnez une surface plane stable dans un local correctement ventilé et libre de toute poussière. Exigences d’espace pour la zone autour de l’imprimante : avant, 635 mm ; arrière, 203 mm ; côtés, 229 mm ; haut, 254 mm Mindestsystemanforderungen. Informationen dazu finden Sie auf der Außenseite der Verpackung, in der der Drucker geliefert wurde, oder in den Installationshinweisen auf der CD-ROM. Bereiten Sie den Standort vor. Der Drucker sollte auf einer stabilen, ebenen Fläche in einem gut belüfteten, staubfreien Raum aufgestellt werden. Raumanforderungen für den den Drucker umgebenden Bereich: vorne, 635 mm; hinten, 203 mm; an den Seiten, 229 mm; oben, 254 mm Requisiti minimi di sistema. Vedere le istruzioni sull'esterno della scatola in cui viene fornita la stampante oppure le note di installazione nel CD-ROM. Preparazione dell'ubicazione di installazione della stampante. Scegliere una superficie solida e piana in un'area ventilata e priva di polvere. Requisiti di spazio per l'area circostante alla stampante: parte anteriore, 635 mm; parte posteriore, 203 mm; lati, 229 mm; parte superiore, 254 mm Requisitos mínimos del sistema. Consulte la parte exterior de la caja en la que venía la impresora o las notas de instalación en el CD-ROM. Prepare la ubicación. Seleccione una superficie plana y firme en una zona con buena ventilación y sin polvo. Requisitos de espacio alrededor de la impresora: parte frontal, 635 mm; parte posterior, 203 mm; a los lados, 229 mm; parte superior, 254 mm. Minimumsysteemvereisten. Zie de buitenkant van de doos waarin de printer is vervoerd of zie de opmerkingen over de installatie op de cd-rom. Bereid de locatie voor. Plaats het apparaat op een stevig, egaal oppervlak in een goed geventileerde ruimte zonder stof. Benodigde ruimte rond de printer: voorkant 635 mm, achterkant 203 mm, zijkanten 229 mm, bovenkant 254 mm. Requisitos mínimos do sistema. Veja a parte externa da caixa na qual a impressora foi fornecida ou consulte as Notas de instalação no CD-ROM. Prepare o local. Escolha uma superfície plana e resistente em uma área bem ventilada, sem poeira. Requisitos de espaço para a área ao redor da impressora: parte frontal, 635 mm; parte traseira, 203 mm; laterais, 229 mm; parte superior, 254 mm 3 Measurements. HP Color LaserJet 3550 series printer: height, 467 mm (18.4 inches); depth, 447 mm (17.6 inches); width, 483 mm (19 inches); weight, 32.5 kg (71.5 lbs) Regulate the environment. Do not place the printer in direct sunlight or an area that has abrupt temperature and humidity changes. Recommended ranges: 17° to 25° C (62.6° to 77° F) and 20 to 60 percent relative humidity Dimensions. Imprimante HP Color LaserJet 3550 series : hauteur, 467 mm ; profondeur, 447 mm ; largeur, 483 mm ; poids, 32,5 kg Environnement ambiant. N’exposez pas l’imprimante à la lumière directe du soleil et ne la placez pas dans un local sujet à des changements brusques de température et d’humidité. Plages recommandées : 17 à 25 °C et 20 à 60 % d’humidité relative Abmessungen. Drucker der HP Color LaserJet 3550 Serie: Höhe, 467 mm; Tiefe, 447 mm; Breite, 483 mm; Gewicht, 32,5 kg Regulieren Sie die Umgebungsbedingungen. Setzen Sie den Drucker keiner direkten Sonnenstrahlung aus, und stellen Sie den Drucker nicht an einem Ort auf, der plötzlichen Temperatur- oder Luftfeuchtigkeitsänderungen unterliegt. Empfohlene Bereiche: 17° bis 25° C und 20 bis 60 Prozent relative Luftfeuchtigkeit Dimensioni. Stampante HP Color LaserJet 3550 series: altezza, 467 mm; profondità, 447 mm; larghezza, 483 mm; peso, 32,5 kg Controllo dell'ambiente. Non esporre la stampante alla luce diretta del sole o in un'area soggetta a bruschi sbalzi di temperatura o di umidità. Intervalli consigliati: da 17° a 25° C e dal 20 al 60 percento di umidità relativa Dimensiones. Impresora HP Color LaserJet serie 3550: altura, 467 mm; profundidad, 447 mm; ancho, 483 mm; peso, 32,5 kg. Regule el entorno. No exponga la impresora a la luz solar directa ni la coloque en una zona sometida a cambios bruscos de temperatura y humedad. Valores recomendados: de 17° a 25° C y entre el 20 y el 60 por 100 de humedad relativa. Afmetingen. HP Color LaserJet 3550 series printer: hoogte 467 mm, diepte 447 mm, breedte 483 mm, gewicht 32,5 kg. Zorg voor een geschikte omgeving. Plaats de printer niet in direct zonlicht of op een plaats waar schommelingen in temperatuur en luchtvochtigheid kunnen optreden. Aanbevolen bereiken: 17 tot 25° C en 20 tot 60 procent relatieve luchtvochtigheid Medidas. Impressora HP Color LaserJet série 3550: altura, 467 mm; profundidade, 447 mm; largura, 483 mm; peso, 32,5 kg Ajuste o ambiente. Não coloque a impressora sob a luz direta do sol ou em uma área que tenha alterações bruscas de temperatura e umidade. Intervalos recomendados: 17 a 25 °C e 20 a 60% de umidade relativa. 4 Check the package contents. 1) HP Color LaserJet 3550 2) USB cable 3) power cable 4) four print cartridges 5) CD-ROM (the CDROM contains the user guide) 6) control panel overlay 7) getting started guide Français Installation de l’imprimante. Placez l’imprimante à un emplacement préparé. AVERTISSEMENT Le soulèvement et le déplacement de l’imprimante vers l’emplacement préparé requièrent deux personnes. Ne soulevez pas l’imprimante par la poignée du bac 2. Examen du contenu du coffret. 1) HP Color LaserJet 3550 2) câble USB 3) cordon d’alimentation 4) quatre cartouches d’impression 5) CD-ROM (contenant le manuel d’utilisation) 6) cache du panneau de commande 7) guide de mise en route Deutsch Richten Sie den Drucker ein. Stellen Sie den Drucker am vorbereiteten Standort auf. ACHTUNG! Der Drucker muss von zwei Personen zum vorbereiteten Standort getragen werden. Heben Sie den Drucker nicht am Griff von Fach 2 an. Überprüfen Sie den Paketinhalt. 1) HP Color LaserJet 3550 2) USB-Kabel 3) Netzkabel 4) vier Druckpatronen 5) CD-ROM (die CD-ROM enthält das Benutzerhandbuch) 6) Bedienfeldschablone 7) Leitfaden zur Inbetriebnahme Italiano Installazione della stampante. Posizionare la stampante in un'apposita ubicazione. AVVERTENZA Per posizionare la stampante nell'apposita ubicazione, è necessario che venga sollevata e spostata da due persone. Non sollevare la stampante dalla maniglia del cassetto 2. Verifica del contenuto della confezione. 1) HP Color LaserJet 3550 2) cavo USB 3) cavo di alimentazione 4) quattro cartucce di stampa 5) CD-ROM (il CD-ROM contiene la guida dell'utente) 6) mascherina del pannello di controllo 7) guida introduttiva Español Instale la impresora. Coloque la impresora en la ubicación preparada. ADVERTENCIA Dos personas deben levantar la impresora y trasladarla a la ubicación seleccionada. No levante la impresora mediante el asa de la bandeja 2. Compruebe el contenido del paquete. 1) HP Color LaserJet 3550 2) Cable USB 3) Cable de alimentación 4) Cuatro cartuchos de impresión 5) CD-ROM (el CD-ROM contiene la guía del usuario) 6) Plantilla del panel de control 7) Guía de instalación inicial Maak de printer gereed. Plaats de printer op een daarvoor bestemde locatie. WAARSCHUWING De printer moet door twee personen worden opgetild en naar de daarvoor bestemde locatie worden verplaatst. Til de printer niet op bij de handgreep van lade 2. Controleer de inhoud van de verpakking. 1) HP Color LaserJet 3550 2) USB-kabel 3) netsnoer 4) vier printcartridges 5) cd-rom (de cd-rom bevat de gebruikershandleiding) 6) sjabloon voor het bedieningspaneel 7) beknopte handleiding Instale a impressora. Coloque a impressora em um local preparado. AVISO! Para levantar e mover a impressora para o local preparado são necessárias duas pessoas. Não levante a impressora pela alça da Bandeja 2. Verifique o conteúdo do pacote. 1) HP Color LaserJet 3550 2) cabo USB 3) cabo de alimentação 4) quatro cartuchos de impressão 5) CD-ROM (com o guia do usuário) 6) decalque do painel de controle 7) guia de primeiros passos Português Nederlands English Set up the printer. Place the printer in a prepared location. WARNING! Two people must lift and move the printer to the prepared location. Do not lift the printer by the Tray 2 handle. 5 7 6 5 4 3 3 2 2 1 1 Additional contents shipped with the HP Color LaserJet 3550n. 1) HP Jetdirect en3700 external print server 2) power supply 3) network install guide Note The items listed here are for the external print server connection. Locate the printer parts (front view). 1) on/off switch 2) Tray 2 3) Tray 1 4) front door 5) printer control panel 6) output bin extender 7) output bin Matériel supplémentaire livré avec l’imprimante HP Color LaserJet 3550n. 1) serveur d’impression externe HP Jetdirect en3700 2) module d’alimentation 3) guide d’installation réseau Remarque Les éléments répertoriés ici sont destinés à la connexion du serveur d’impression externe. Repérage des composants de l’imprimante (vue avant). 1) interrupteur 2) bac 2 3) bac 1 4) porte avant 5) panneau de commande de l’imprimante 6) rallonge du bac de sortie 7) bac de sortie Zusätzliche Komponenten, die mit dem HP Color LaserJet 3550n geliefert werden. 1) externer HP Jetdirect en3700 Druckserver 2) Netzteil 3) Netzwerkinstallationsanleitung Hinweis Die hier aufgeführten Komponenten sind für eine Verbindung zum externen Druckserver gedacht. Druckerkomponenten (Vorderansicht). 1) Ein-/Ausschalter 2) Fach 2 3) Fach 1 4) vordere Klappe 5) Druckerbedienfeld 6) Ausgabefachverlängerung 7) Ausgabefach Contenuto supplementare fornito con HP Color LaserJet 3550n. 1) server di stampa esterno HP Jetdirect en3700 2) alimentatore 3) guida all'installazione di rete Nota Gli elementi elencati sono per i collegamenti dei server di stampa esterni. Individuazione dei componenti della stampante (vista anteriore). 1) interruttore di accensione 2) cassetto 2 3) cassetto 1 4) sportello anteriore 5) pannello di controllo della stampante 6) estensione dello scomparto di uscita 7) scomparto di uscita Contenido adicional que acompaña a la impresora HP Color LaserJet 3550n. 1) Servidor de impresión externo HP Jetdirect en3700 2) Fuente de alimentación 3) Guía de instalación en red Nota Los elementos que se enumeran aquí son para la conexión del servidor de impresión externo. Localice las partes de la impresora (vista frontal). 1) Interruptor de encendido/apagado 2) Bandeja 2 3) Bandeja 1 4) Puerta frontal 5) Panel de control de la impresora 6) Extensor de la bandeja de salida 7) Bandeja de salida Extra onderdelen die worden geleverd bij de HP Color LaserJet 3550n: 1) HP Jetdirect en3700 externe printserver 2) netsnoer 3) handleiding voor installatie via een netwerk Opmerking De aangegeven onderdelen zijn voor het aansluiten van de externe printserver. De onderdelen van de printer (vooraanzicht). 1) aan/uit-schakelaar 2) lade 2 3) lade 1 4) voorklep 5) bedieningspaneel van de printer 6) verlengstuk van de uitvoerbak 7) uitvoerbak Conteúdo adicional fornecido com a HP Color LaserJet 3550n. 1) servidor de impressão externo HP Jetdirect en3700 2) fonte de alimentação 3) guia de instalação de rede Nota Os itens listados aqui são para a conexão do servidor de impressão externo. Localize as peças da impressora (vista frontal). 1) interruptor lig/ desl 2) Bandeja 2 3) Bandeja 1 4) porta frontal 5) painel de controle da impressora 6) extensor do compartimento de saída 7) compartimento de saída 6 Understand the control panel. 1) help button 2) back arrow button 3) ready light 4) menu button 5) data light 6) attention light 7) stop button 8) down arrow button 9) select button 10) up arrow button 11) print cartridge level indicators 12) display Repérage des composants de l’imprimante (vue arrière). 1) porte arrière supérieure 2) porte arrière inférieure (bac de sortie arrière) 3) connexion USB 4) connexion d’alimentation Présentation du panneau de commande. 1) bouton aide 2) flèche vers l’arrière 3) voyant prêt 4) bouton menu 5) voyant données 6) voyant attention 7) bouton arrêter 8) flèche vers le bas 9) bouton sélectionner 10) flèche vers le haut 11) indicateurs de niveau des cartouches d’impression 12) affichage Druckerkomponenten (Rückansicht). 1) obere hintere Klappe 2) untere hintere Klappe (hinteres Ausgabefach) 3) USBVerbindung 4) Netzverbindung Das Bedienfeld. 1) Hilfe-Taste 2) Zurück-Taste 3) Bereit-LED 4) Menü-Taste 5) Daten-LED 6) Achtung-LED 7) Stopp-Taste 8) Nach-unten-Taste 9) Auswahltaste 10) Nach-oben-Taste 11) Füllstandsanzeigen der Druckpatronen 12) Anzeige Individuazione dei componenti della stampante (vista posteriore). 1) sportello posteriore superiore 2) sportello posteriore inferiore (scomparto di uscita posteriore) 3) collegamento USB 4) collegamenti di alimentazione Informazioni sul pannello di controllo. 1) pulsante della guida 2) pulsante freccia indietro 3) spia pronto per la stampa 4) pulsante menu 5) spia data 6) spia attenzione 7) pulsante stop 8) pulsante freccia in basso 9) pulsante di selezione 10) pulsante freccia in basso 11) indicatori del livello delle cartucce di stampa 12) display Localice las partes de la impresora (vista trasera). 1) Puerta superior trasera 2) Puerta inferior trasera (bandeja de salida trasera) 3) Conexión USB 4) Conexión de alimentación Descripción del panel de control. 1) Botón Ayuda 2) Botón de flecha atrás 3) Luz Preparado 4) Botón Menú 5) Luz Datos 6) Luz Atención 7) Botón Detener 8) Botón de flecha abajo 9) Botón Seleccionar 10) Botón de flecha arriba 11) Indicadores de nivel de cartuchos de impresión12) Pantalla De onderdelen van de printer (achteraanzicht). 1) bovenklep aan de achterzijde 2) onderklep aan de achterzijde (achteruitvoerbak) 3) USB-aansluiting 4) voedingsaansluiting Het bedieningspaneel. 1) helpknop 2) pijl terug-knop 3) Klaarlampje 4) menuknop5) Gegevens-lampje 6) Attentie-lampje 7) stopknop8) pijl omlaag-knop 9) selectieknop 10) pijl omhoogknop 11) niveau-aanduidingen van printcartridges 12) display Localize as peças da impressora (vista traseira). 1) porta traseira superior 2) porta traseira inferior (compartimento de saída traseiro) 3) conexão USB 4) conexão de alimentação Entenda o painel de controle. 1) botão ajuda 2) botão seta para trás 3) luz indicadora pronta 4) botão menu 5) luz indicadora dados 6) luz indicadora atenção 7) botão parar 8) botão seta para baixo 9) botão selecionar 10) botão seta para cima 11) indicadores de nível do cartucho de impressão 12) visor Português Nederlands Español Italiano Deutsch Français English Locate the printer parts (back view). 1) upper rear door 2) lower rear door (rear output bin) 3) USB connection 4) power connection 7 Remove the packing materials. 1) Remove all external orange tape, orange protectors, and other packaging material. 2) Open Tray 2, and remove the orange shipping lock and any other packing material inside the tray. Retrait des matériaux d’emballage. 1) Retirez la bande orange externe, les éléments de protection oranges et tous les autres matériaux d’emballage. 2) Ouvrez le bac 2, puis retirez le dispositif de sécurité d’expédition orange dans le bac ainsi que tout autre matériel d’emballage. Entfernen des Verpackungsmaterials. 1) Entfernen Sie alle außen angebrachten, orangefarbenen Klebestreifen, alle orangefarbenen Transportsicherungen sowie alles andere Verpackungsmaterial. 2) Öffnen Sie Fach 2, und entfernen Sie die orangefarbene Transportsicherung sowie alles weitere Verpackungsmaterial im Innern des Faches. Rimozione del materiale di imballaggio. 1) Rimuovere tutto il materiale esterno, inclusi il nastro esterno e i rivestimenti di protezione di colore arancione. 2) Aprire il cassetto 2 e rimuovere il blocco per il trasporto di colore arancione e altro materiale di imballaggio all'interno del cassetto. Retire el material de embalaje. 1) Retire la cinta y los protectores de color naranja, así como el material de embalaje adicional. 2) Abra la bandeja 2 y retire los bloqueos de transporte de color naranja y cualquier otro material de embalaje del interior de la bandeja. Verwijder het verpakkingsmateriaal. 1) Verwijder alle externe oranje tape, oranje beveiligingen en ander verpakkingsmateriaal. 2) Open lade 2 en verwijder de oranje transportvergrendeling en het overige verpakkingsmateriaal uit de lade. Remova os materiais da embalagem. 1) Remova toda a fita laranja externa, os protetores laranja e outros materiais de embalagem. 2) Abra a Bandeja 2 e remova a trava de transporte laranja e qualquer outro material da embalagem dentro da bandeja. 8 CAUTION Do not place anything on the transfer unit. Do not touch the top of the transfer unit or the contacts on the left side of the transfer unit. 3) Soulevez la poignée de la porte avant, puis abaissez la porte avant. ATTENTION Ne placez aucun objet sur le module de transfert. Ne touchez pas à la partie supérieure du module de transfert ou aux contacts sur le côté gauche de ce dernier. 3) Heben Sie den Griff der vorderen Klappe an, und ziehen Sie die vordere Klappe nach unten. VORSICHT Legen Sie nichts auf die Transfereinheit. Berühren Sie nicht die Oberseite der Transfereinheit oder die Kontakte an der linken Seite der Transfereinheit. 3) Sollevare la maniglia dello sportello anteriore. ATTENZIONE Non posizionare nulla sull'unità di trasferimento. Non toccare il lato superiore dell'unità di trasferimento o i contatti sul lato sinistro dell'unità. 3) Levante el asa de la puerta frontal y tire hacia abajo de la puerta. PRECAUCIÓN No coloque nada sobre la unidad de transferencia. No toque la parte superior de la unidad de transferencia ni los contactos del lateral izquierdo de ésta. 3) Trek de greep van de voorklep omhoog en trek de voorklep naar beneden. VOORZICHTIG Plaats geen objecten op de transfereenheid. Raak de bovenkant van de transfereenheid of de contactpunten aan de linkerkant van de transfereenheid niet aan. 3) Levante a alça da porta frontal e puxe a porta para baixo. CUIDADO Não coloque nada sobre a unidade de transferência. Não toque na parte superior da unidade de transferência ou nos contatos no lado esquerdo da unidade. Português Nederlands Español Italiano Deutsch Français English 3) Lift the front door handle, and pull down the front door. 9 4) Remove the orange tape from the back, right and left sides of the transfer unit. Install the print cartridges. 1) Remove a new print cartridge from the bag. 4) Retirez le ruban adhésif orange de l’arrière et des côtés droit et gauche du module de transfert. Installation des cartouches d’impression. 1) Retirez une cartouche d’impression neuve de son emballage. 4) Entfernen Sie die orangefarbenen Klebestreifen an der Rückseite sowie an der rechten und linken Seite der Transfereinheit. Setzen Sie die Druckpatronen ein. 1) Nehmen Sie eine neue Druckpatrone aus der Schutzverpackung. 4) Rimuovere il nastro di imballaggio di colore arancione dalla parte posteriore, destra e sinistra dell'unità di trasferimento. Installazione delle cartucce di stampa. 1) Estrarre una nuova cartuccia di stampa dalla confezione. 4) Retire la cinta de color naranja de la parte posterior, derecha e izquierda de la unidad de transferencia. Instale los cartuchos de impresión. 1) Extraiga un cartucho de impresión nuevo de la bolsa. 4) Verwijder de oranje tape van de achter-, rechter- en linkerkant van de transfereenheid. Installeer de printcartridges. 1) Haal de nieuwe printcartridge uit de zak. 4) Remova a fita laranja da parte traseira e das laterais esquerda e direita da unidade de transferência. Instale os cartuchos de impressão. 1) Remova o novo cartucho de impressão do invólucro. 10 3) Remove and discard the orange shipping tape and shipping locks from the new print cartridge. Note Discard the shipping tape and shipping locks according to local regulations. 2) Saisissez les deux côtés de la cartouche et distribuez le toner en secouant délicatement la cartouche latéralement. 3) Retirez la bande et les dispositifs de sécurité d’expédition oranges de la nouvelle cartouche d’impression. Remarque Jetez la bande et les dispositifs de sécurité d’expédition oranges en respectant les réglementations locales. 2) Halten Sie die Druckpatrone an beiden Seiten fest, und schütteln Sie sie vorsichtig, um den Toner zu verteilen. 3) Entfernen Sie den orangefarbenen Klebestreifen und die orangefarbenen Transportsicherungen von der neuen Druckpatrone, und entsorgen Sie sie. Hinweis Entsorgen Sie den Klebestreifen und die Transportsicherungen entsprechend den lokalen Bestimmungen. 2) Afferrare la cartuccia dalle estremità e distribuire il toner agitando lateralmente la cartuccia. 3) Rimuovere ed eliminare il nastro e i blocchi per il trasporto di colore arancione dalla nuova cartuccia di stampa. Nota Smaltire il nastro e i blocchi per il trasporto in conformità con le norme locali. 2) Sujete ambos lados del cartucho y distribuya el tóner moviendo suavemente el cartucho de un lado a otro. 3) Retire y deseche los bloqueos y la cinta de transporte de color naranja del cartucho de impresión nuevo. Nota Deseche la cinta y los bloqueos de transporte según la normativa local. 2) Pak beide uiteinden van de patroon vast en verspreid de toner door de patroon voorzichtig heen en weer te schudden. 3) Verwijder de oranje transporttape en de oranje transportvergrendeling van de nieuwe printcartridge en gooi deze weg. Opmerking Gooi de transporttape en de transportvergrendeling weg volgens de plaatselijke voorschriften. 2) Segure as duas laterais do cartucho e agite-o suavemente de um lado a outro para distribuir o toner. 3) Remova e descarte a fita de transporte e as travas de transporte laranja do novo cartucho de impressão. Nota Descarte a fita de transporte e as travas de transporte de acordo com os regulamentos locais. Português Nederlands Español Italiano Deutsch Français English 2) Grasp both sides of the cartridge and distribute the toner by gently rocking the cartridge from side to side. 11 4) Locate the color slot for the print cartridge. 5) Align the print cartridge with the tracks inside the printer and, using the handle, insert the cartridge. 6) Repeat this procedure for the remaining three print cartridges. 4) Repérez le logement couleur de la cartouche d’impression. 5) Alignez la cartouche d’impression sur les repères dans l’imprimante puis, à l’aide de la poignée, introduisez la cartouche. 6) Répétez cette procédure pour les trois autres cartouches d’impression. 4) Suchen Sie den Farbschacht für die Druckpatrone. 5) Richten Sie die Druckpatrone an den Führungen im Drucker aus, und schieben Sie die Patrone mithilfe des Griffes ein. 6) Wiederholen Sie dieses Verfahren für die drei verbleibenden Druckpatronen. 4) Individuare l'alloggiamento a colori per la cartuccia di stampa. 5) Allineare la cartuccia di stampa con i binari all'interno della stampante e inserirla utilizzando la maniglia. 6) Ripetere questa procedura per le restanti tre cartucce di stampa. 4) Localice la ranura de color del cartucho de impresión. 5) Alinee el cartucho de impresión con las guías del interior de la impresora y utilice el asa para introducir el cartucho. 6) Repita este procedimiento para los tres cartuchos de impresión restantes. 4) Zoek de sleuf voor kleurenprintcartridges voor de printcartridge. 5) Lijn de printcartridges uit met de geleiders in de printer en plaats de patroon door gebruik te maken van de hendel. 6) Herhaal deze procedure voor de overige drie printcartridges. 4) Localize o slot de cores para o cartucho de impressão. 5) Alinhe o cartucho de impressão com os trilhos dentro da impressora e, utilizando a alça, insira o cartucho. 6) Repita esse procedimento para os três cartuchos de impressão restantes. 12 Load paper into Tray 2. 1) Pull Tray 2 out of the printer. 7) Fermez la porte avant. Chargement de papier dans le bac 2. 1) Sortez le bac 2 de l’imprimante. 7) Drücken Sie die vordere Klappe fest zu. Legen Sie Papier in Fach 2 ein. 1) Ziehen Sie Fach 2 aus dem Drucker. 7) Chiudere saldamente lo sportello anteriore. Caricare la carta nel cassetto 2. 1) Estrarre il cassetto 2 dalla stampante. 7) Cierre firmemente la puerta frontal. Cargue papel en la bandeja 2. 1) Extraiga la bandeja 2 de la impresora. 7) Sluit de voorklep goed. Plaats papier in lade 2. 1) Trek lade 2 uit de printer. 7) Feche firmemente a porta frontal. Carregue o papel na Bandeja 2. 1) Puxe a Bandeja 2 para fora da impressora. Português Nederlands Español Italiano Deutsch Français English 7) Firmly close the front door. 13 2) Move the side width guides until the blue arrows on the width guides point to the size of paper you are loading. 3) On the back of the tray, press the blue ridges and slide the length guides until the arrow symbol points to the paper size you are loading. 2) Déplacez les guides de largeur latéraux jusqu’à ce que les flèches bleues sur ceux-ci pointent vers le format de papier chargé. 3) A l’arrière du bac, appuyez sur les arêtes bleues et faites glisser les guides de longueur jusqu’à ce que le symbole de flèche pointe vers le format de papier chargé. 2) Verschieben Sie die seitlichen Breitenführungen, bis die blauen Pfeile an den Breitenführungen auf das eingelegte Papierformat zeigen. 3) Drücken Sie an der Rückseite des Fachs auf die blauen Rippen, und verschieben Sie die Längenführungen so lange, bis das Pfeilsymbol auf das einzulegende Papierformat zeigt. 2) Spostare le guide della larghezza laterali fino a quando le frecce blu sulle guide della larghezza puntano ai lati della carta che si sta caricando. 3) Sulla parte posteriore del cassetto, premere le coste blu e far scorrere le guide della lunghezza fino a quando il simbolo della freccia punta al formato di carta che si sta caricando. 2) Desplace las guías laterales de ancho del papel hasta que las flechas azules apunten al tamaño de papel que está cargando. 3) En la parte trasera de la bandeja, presione los salientes azules y deslice las guías de longitud hasta que el símbolo de la flecha apunte al tamaño que está cargando. 2) Verschuif de breedtegeleiders totdat de blauwe pijlen op de geleiders naar het formaat van het geplaatste papier wijzen. 3) Druk op de blauwe randen aan de achterkant van de lade en verschuif de lengtegeleiders totdat de pijl naar het geplaatste papierformaat wijst. 2) Mova as guias de largura laterais até as setas azuis nas guias de largura indicarem o tamanho do papel que você está carregando. 3) Na parte traseira da bandeja, pressione os ressaltos azuis e deslize as guias de comprimento até o símbolo de seta indicar o tamanho de papel que você está carregando. 14 English Français Deutsch Italiano Español Nederlands Português 4) Load the paper into the tray. If this is special paper, such as letterhead, load it with the side to be printed down and the top edge toward the front of the tray. Note Do not fan the paper before loading. 5) Push down on the stack of paper to lock the metal lift plate into place. Make sure that the stack of paper is flat and that the paper is below the height tabs. 4) Chargez du papier dans le bac. S’il s’agit d’un papier spécial, tel que du papier à en-tête, chargez-le la face imprimée vers le bas et le bord supérieur vers l’avant du bac. Remarque N’aérez pas le papier avant de le charger. 5) Appuyez sur la pile de papier afin de verrouiller en place la plaque métallique de soulèvement du papier. Assurez-vous que la pile de papier est plane et située au-dessous des repères de hauteur. 4) Legen Sie Papier in das Fach ein. Legen Sie Spezialpapier (wie z.B. Briefkopfpapier) mit der zu bedruckenden Seite nach unten und der Oberkante in Richtung Fachvorderseite ein. Hinweis Fächern Sie das Papier vor dem Einlegen in das Fach nicht auf. 5) Drücken Sie den Papierstapel nach unten, um die MetallHebevorrichtung zu verriegeln. Stellen Sie sicher, dass der Papierstapel flach ist und das Papier nicht über die Höhenmarkierungen hinausragt. 4) Caricare la carta nel cassetto. Se questa è una carta speciale, ad esempio carta intestata, caricarla con il lato da stampare verso il basso e il margine superiore verso la parte anteriore del cassetto. Nota Non sventolare la carta prima di caricarla. 5) Spingere verso il basso la risma di carta per bloccare in posizione la piastra di sollevamento metallica. Assicurarsi che la risma di carta sia piatta e che la carta si trovi al di sotto delle linguette dell'altezza. 4) Cargue el papel en la bandeja. Si se trata de papel especial, como papel con membrete, cárguelo con la cara que se va a imprimir boca abajo y el borde superior hacia la impresora. Nota No abanique el papel antes de cargarlo. 5) Presione hacia abajo la pila de papel para encajar la placa elevadora metálica en su sitio. Asegúrese de que la pila de papel está plana y de que el papel se encuentra por debajo de las pestañas de altura. 4) Plaats het papier in de lade. Als dit speciaal papier is, zoals briefpapier, plaatst u de kant die moet worden bedrukt naar beneden met de bovenrand naar de voorkant van de lade gericht. Opmerking Waaier het papier niet voordat u dit gaat plaatsen. 5) Duw de stapel papier naar beneden om de metalen hefplaat vast te klikken. Controleer of de stapel papier vlak is en dat het papier onder de hoogtemarkeringen zit. 4) Carregue o papel na bandeja. Se for um papel especial, como um papel timbrado, carregue-o com o lado a ser impresso para baixo e a margem superior virada para a parte frontal da bandeja. Nota Não folheie o papel antes de carregá-lo. 5) Empurre para baixo a pilha de papéis para travar a placa de elevação de metal no local. Verifique se a pilha de papéis está uniforme e se o papel está abaixo das presilhas de altura. 15 6) Slide the tray back into the printer. Load paper into Tray 1 (optional procedure). 1) Open Tray 1. Note If printing special media, such as envelopes, use Tray 1. 6) Faites glisser le bac dans l’imprimante. Chargement de papier dans le bac 1 (procédure facultative). 1) Ouvrez le bac 1. Remarque En cas d’impression sur un support spécial tel que des enveloppes, utilisez le bac 1. 6) Schieben Sie das Fach wieder in den Drucker. Legen Sie Papier in Fach 1 ein (optional). 1) Öffnen Sie Fach 1. Hinweis Verwenden Sie Fach 1, wenn Sie Sondermedien wie Umschläge bedrucken möchten. 6) Riposizionare il cassetto nella stampante facendolo scorrere. Caricare la carta nel cassetto 1 (procedura opzionale). 1) Aprire il cassetto 1. Nota Per stampare su supporti speciali, ad esempio buste, utilizzare il cassetto 1. 6) Introduzca de nuevo la bandeja en la impresora. Cargue papel en la bandeja 1 (procedimiento opcional). 1) Abra la bandeja 1. Nota Si está imprimiendo en sustratos especiales como, por ejemplo, sobres, utilice la bandeja 1. 6) Schuif de lade terug in de printer. Plaats het papier in lade 1 (optionele procedure). 1) Open lade 1. Opmerking Gebruik lade 1 als u wilt afdrukken op speciaal afdrukmateriaal, zoals enveloppen. 6) Deslize a bandeja de volta para a impressora. Carregue papel na Bandeja 1 (procedimento opcional). 1) Abra a Bandeja 1. Nota Se estiver imprimindo em mídia especial, como envelopes, utilize a Bandeja 1. 16 3) Slide the width guides slightly wider than the print media. 4) Remove any unused print media, and close the tray when finished printing. 2) Etirez la rallonge du bac et, au besoin, ouvrez la rallonge supplémentaire. 3) Faites glisser les guides de largeur un peu au-delà du support d’impression. 4) Retirez tout support inutilisé, puis fermez le bac une fois l’impression terminée. 2) Ziehen Sie die Fachverlängerung heraus, und öffnen Sie bei Bedarf die zusätzliche Fachverlängerung. 3) Verschieben Sie die Breitenführungen so, dass sie etwas breiter sind als die Druckmedien. 4) Entfernen Sie nicht benötigte Druckmedien, und schließen Sie das Fach nach Beendigung des Druckvorgangs. 2) Aprire l'estensione del cassetto facendola scorrere e, se necessario, aprire l'estensione aggiuntiva del cassetto. 3) Far scorrere le guide della larghezza allargandole leggermente di più rispetto ai supporti di stampa. 4) Rimuovere eventuali supporti di stampa inutilizzati, quindi chiudere il cassetto al termine della stampa. 2) Deslice hacia afuera el extensor de la bandeja y, si es necesario, abra el extensor adicional de la bandeja. 3) Deslice las guías de ancho y fíjelas de modo que no toquen el sustrato de impresión. 4) Retire los sustratos de impresión no utilizados y cierre la bandeja cuando finalice la impresión. 2) Schuif het verlengstuk van de lade naar buiten en open, indien nodig, het extra verlengstuk van de lade. 3) Schuif de breedtegeleiders iets verder uit elkaar dan het afdrukmateriaal. 4) Verwijder ongebruikt afdrukmateriaal en sluit de lade als het afdrukken is voltooid. 2) Deslize o extensor da bandeja para fora e, se necessário, abra o extensor da bandeja adicional. 3) Deslize as guias de largura um pouco além da mídia de impressão. 4) Remova qualquer mídia de impressão não usada e feche a bandeja quando terminar de imprimir. Português Nederlands Español Italiano Deutsch Français English 2) Slide out the tray extender and, if necessary, open the additional tray extender. 17 Connect the power cable and turn the printer on. After a minimum of two minutes, the green ready light turns on. CAUTION Do not connect the printer to the computer or to the network at this time. If prompted to select a control panel language, press highlight the desired language. Press to select it. Connexion du cordon d’alimentation et mise sous tension de l’imprimante. Après deux minutes au minimum, le voyant d’état prêt vert s’allume. ATTENTION Ne connectez pas encore l’imprimante à l’ordinateur ou au réseau. Si vous êtes invité à sélectionner une langue du panneau de ou pour mettre en surbrillance la commande, appuyez sur langue souhaitée. Appuyez sur pour la sélectionner. Schließen Sie das Netzkabel an, und schalten Sie den Drucker ein. Nach mindestens zwei Minuten beginnt die grüne Bereit-LED zu leuchten. VORSICHT Verbinden Sie den Drucker noch nicht mit dem Computer oder dem Netzwerk. Wenn Sie zur Auswahl einer Bedienfeldsprache aufgefordert oder , um die gewünschte Sprache werden, drücken Sie auszuwählen. Drücken Sie dann , um den Eintrag auszuwählen. Collegare il cavo di alimentazione e accendere la stampante. Dopo circa due minuti, la spia Pronto per la stampa verde si illumina. ATTENZIONE Non collegare la stampante al computer o alla rete a questo punto. Se viene richiesto di selezionare la lingua del pannello di controllo, o per evidenziare la lingua desiderata. Premere il premere per selezionarla. Conecte el cable de alimentación y encienda la impresora. Después de un mínimo de dos minutos, se pondrá verde la luz Preparado. PRECAUCIÓN No conecte la impresora ni al ordenador ni a la red en este momento. Si se le solicita que seleccione un idioma del panel de control, pulse o la para resaltar el idioma deseado. Para seleccionarlo, la pulse la . Sluit het netsnoer aan en schakel de printer in. Na ongeveer twee minuten, gaat het groene Klaar-lampje branden. VOORZICHTIG Sluit de printer nog niet aan op de computer of het netwerk. Als u wordt gevraagd om een taal voor het bedieningspaneel in te of om de gewenste taal te markeren. Druk stellen, drukt u op op om de taal te selecteren. Conecte o cabo de alimentação e ligue a impressora. Depois de dois minutos, no mínimo, a luz verde indicadora Pronta acende. CUIDADO Não conecte a impressora ao computador ou à rede neste momento. Se a seleção do idioma do painel de controle for solicitada, ou para realçar o idioma desejado. Pressione pressione para selecioná-lo. 18 or to After printing the demo page, the printer control panel displays the READY message. Une fois la page de démonstration imprimée, le panneau de commande de l’imprimante affiche le message PRET. Français Impression d’une page de démonstration. 1) Appuyez sur MENU pour accéder aux menus. 2) Appuyez sur pour mettre en surbrillance INFORMATIONS, puis appuyez sur pour sélectionner l’option. 3) Appuyez sur pour mettre en surbrillance IMPRIMER PAGE DEMO, puis appuyez sur pour sélectionner l’option. Nach dem Drucken der Testseite wird auf dem Druckerbedienfeld die Meldung BEREIT angezeigt. Deutsch Drucken Sie eine Testseite. 1) Drücken Sie MENÜ, um die Menüs aufzurufen. 2) Drücken Sie , um INFORMATIONEN zu markieren, und drücken Sie dann , um den Eintrag auszuwählen. 3) Drücken Sie , um TESTSEITE DRUCKEN zu markieren, und drücken Sie dann , um den Eintrag auszuwählen. Italiano Stampare una pagina dimostrativa. 1) Premere MENU per accedere ai menu. 2) Premere per evidenziare INFORMAZIONI, quindi per evidenziare premere il per selezionarlo. 3) Premere STAMPA PAGINA DIMOSTRATIVA, quindi premere il per selezionarlo. Dopo la stampa della pagina dimostrativa, sul pannello di controllo della stampante viene visualizzato il messaggio PRONTO PER LA STAMPA. Después de imprimir la página de demostración, el panel de control de la impresora mostrará el mensaje PREPARADO. Español Imprima una página de demostración. 1) Pulse MENÚ para acceder a los menús. 2) Pulse para resaltar INFORMACIÓN y, a para resaltar continuación, pulse para seleccionarlo. 3) Pulse IMPRIMIR DEMOSTRACIÓN y, a continuación, pulse para seleccionarlo. Druk een demonstratiepagina af. 1) Druk op MENU om naar de menu's te gaan. 2) Druk op om INFORMATIE te markeren en druk vervolgens op om deze optie te selecteren. 3) Druk op om DEMO AFDRUKKEN te markeren en druk vervolgens op om deze optie te selecteren. Als u de demonstratiepagina hebt afgedrukt, wordt op het bedieningspaneel van de printer het bericht KLAAR weergegeven. Imprima uma página de demonstração. 1) Pressione MENU para entrar nos menus. 2) Pressione para realçar INFORMAÇÕES e, para em seguida, pressione para selecioná-la. 3) Pressione realçar IMPRIMIR DEMO e, em seguida, pressione para selecioná-la. Depois de imprimir a página de demonstração, o painel de controle da impressora exibirá a mensagem PRONTA. Português Nederlands English Print a demo page. 1) Press MENU to enter the menus. 2) Press to highlight INFORMATION, and then press to select it. 3) Press to highlight PRINT DEMO, and then press to select it. 19 Choose ONE installation method. To connect the printer directly to a Windows® PC, go to step 16. To connect the printer directly to a Macintosh computer, go to step 18. To connect the HP Color LaserJet 3550n to a network, go to step 19. Connect the printer to a Windows PC. 1) Place the CD-ROM in the CD-ROM drive. Note Install the software from the CD-ROM before connecting the cable to the printer. If you have already connected the cable and the New Hardware Found message appears, go to step 17. Choix d’une méthode d’installation. Pour connecter l’imprimante directement à un PC Windows®, passez à l’étape 16. Pour connecter l’imprimante directement à un Macintosh, passez à l’étape 18. Pour connecter l’imprimante HP Color LaserJet 3550n à un réseau, passez à l’étape 19. Connexion directe de l’imprimante à un PC Windows. 1) Placez le CD-ROM dans le lecteur de CD-ROM. Remarque Installez le logiciel à partir du CD-ROM avant de raccorder le câble à l’imprimante. Si vous avez déjà connecté le câble et que le message Nouveau matériel détecté s’affiche, passez à l’étape 17. Wählen Sie EINE Installationsmethode. Fahren Sie mit Schritt 16 fort, wenn Sie den Drucker direkt mit einem Windows®-PC verbinden möchten. Fahren Sie mit Schritt 18 fort, wenn Sie den Drucker direkt mit einem Macintosh verbinden möchten. Fahren Sie mit Schritt 19 fort, wenn Sie den HP Color LaserJet 3550n an ein Netzwerk anschließen möchten. Schließen Sie den Drucker direkt an einen Windows-PC an. 1) Legen Sie die CD-ROM in das CD-ROM-Laufwerk ein. Hinweis Installieren Sie die Software von der CD-ROM, bevor Sie das Kabel an den Drucker anschließen. Wenn Sie das Kabel bereits angeschlossen haben und die Meldung Neue Hardwarekomponente angezeigt wird, fahren Sie mit Schritt 17 fort. Scegliere un solo metodo di installazione. Per collegare la stampante direttamente a un PC Windows®, vedere il punto 16. Per collegare la stampante direttamente a un computer Macintosh, vedere il punto 18. Per collegare la stampante HP Color LaserJet 3550n a una rete, vedere il punto 19. Collegare la stampante direttamente a un PC Windows. 1) Posizionare il CD-ROM nell'unità CD-ROM. Nota Installare il software dal CD-ROM prima di collegare il cavo alla stampante. Se il cavo è stato già collegato e viene visualizzato il messaggio Nuovo componente hardware individuato, vedere il punto 17. Seleccione UN método de instalación. Para conectar la impresora directamente a un PC con Windows®, vaya al paso 16. Para conectarla directamente a un ordenador Macintosh, vaya al paso 18. Para conectar la impresora HP Color LaserJet 3550n a una red, vaya al paso 19. Conecte la impresora a un PC con Windows. 1) Introduzca el CD-ROM en la unidad de CD-ROM. Nota Instale el software del CD-ROM antes de conectar el cable a la impresora. Si ya ha conectado el cable y aparece el mensaje Se ha encontrado hardware nuevo, vaya al paso 17. Kies één installatiemethode. Ga naar stap 16 als u de printer rechtstreeks wilt aansluiten op een Windows®-computer. Wilt u de printer rechtstreeks aansluiten op een Macintosh-computer, dan gaat u naar stap 18. Als u de HP Color LaserJet 3550n wilt aansluiten op een netwerk, gaat u naar stap 19. Sluit de printer aan op een Windows-computer. 1) Plaats de cd-rom in het cd-rom-station. Opmerking Installeer de software vanaf de cd-rom voordat u de kabel aansluit op de printer. Als u de kabel al hebt aangesloten en het bericht Nieuwe hardware gevonden wordt weergegeven, gaat u naar stap 17. Escolha UM método de instalação. Para conectar a impressora diretamente a um PC Windows®, vá para a etapa 16. Para conectar a impressora diretamente a um computador Macintosh, vá para a etapa 18. Para conectar a HP Color LaserJet 3550n a uma rede, vá para a etapa 19. Conecte a impressora a um PC Windows. 1) Coloque o CD-ROM na unidade de CD-ROM. Nota Instale o software do CD-ROM antes de conectar o cabo à impressora. Se já tiver conectado o cabo e aparecer a mensagem Novo hardware encontrado, vá para a etapa 17. 20 English 3) Follow the on-screen instructions. When prompted, connect a USB cable (recommended to optimize performance) between the printer and the computer. Français 2) Dans l’écran de bienvenue, cliquez sur Installer une imprimante. L’assistant d’installation s’affiche. Remarque Si l’écran de bienvenue ne s’affiche pas, cliquez sur Démarrer, puis sur Exécuter. Entrez X:SETUP, remplacez X par la lettre du lecteur de CD-ROM, puis cliquez sur OK. 3) Suivez les instructions affichées à l’écran. A l’invite, connectez un câble USB (recommandé pour l’optimisation des performances) entre l’imprimante et l’ordinateur. 2) Klicken Sie auf dem Begrüßungsbildschirm auf Drucker installieren. Der Setup-Assistent wird aufgerufen. Hinweis Wenn der Begrüßungsbildschirm nicht angezeigt wird, klicken Sie zunächst auf Start und dann auf Ausführen. Geben Sie X:SETUP ein. Setzen Sie für X den Laufwerkbuchstaben für das CDROM-Laufwerk ein, und klicken Sie dann auf OK. 3) Befolgen Sie die Anweisungen auf dem Bildschirm. Schließen Sie ein USB-Kabel (zur Optimierung der Leistung empfohlen) zwischen Drucker und Computer an, wenn Sie dazu aufgefordert werden. Italiano 2) Sulla schermata di benvenuto, fare clic su Installa stampante. Viene visualizzata l'installazione guidata. Nota Se la schermata di benvenuto non viene visualizzata, fare clic su Start, quindi fare clic su Esegui. Digitare X:SETUP, sostituire X con la lettera dell'unità CD-ROM, quindi fare clic su OK. 3) Attenersi alle istruzioni sullo schermo. Quando richiesto, collegare un cavo USB (consigliato per prestazioni ottimali) tra la stampante e il computer. Español 2) En la pantalla de bienvenida, haga clic en Instalar impresora. Aparecerá el Asistente para la instalación. Nota Si la pantalla de bienvenida no aparece, haga clic en Inicio y en Ejecutar. Escriba X:SETUP, sustituya X por la letra de la unidad de CD-ROM y haga clic en Aceptar. 3) Siga las instrucciones que aparecen en pantalla. Cuando se le solicite, conecte un cable USB (recomendado para optimizar el rendimiento) entre la impresora y el ordenador. 2) Klik op Printer installeren in het welkomstvenster. De Wizard Setup verschijnt. Opmerking Als het welkomstvenster niet wordt weergegeven, klikt u op Start en vervolgens op Uitvoeren. Typ X:SETUP, vervang X met de letter van het cd-rom-station en klik op OK. 3) Volg de instructies op het scherm. Als u hierom wordt gevraagd, sluit u een USB-kabel (wordt aanbevolen om de prestaties te optimaliseren) aan tussen de printer en de computer. 2) Na tela de boas-vindas, clique em Instalar impressora. O Assistente de instalação aparece. Nota Se a tela de boas-vindas não aparecer, clique em Iniciar e, em seguida, em Executar. Digite X:SETUP, substitua X pela letra da unidade de CD-ROM e, em seguida, clique em OK. 3) Siga as instruções na tela. Quando solicitado, conecte um cabo USB (recomendado para otimizar o desempenho) entre a impressora e o computador. Português Nederlands Deutsch 2) On the welcome screen, click Install Printer. The Setup Wizard appears. Note If the welcome screen does not appear, click Start, and then click Run. Type X:SETUP, replace X with the CD-ROM drive letter, and then click OK. 21 4) Click Finish. If prompted, restart the PC. 5) Go to step 21. Plug and Play. If the New Hardware Found message appears, insert the CD-ROM. Follow the on-screen instructions, accept the default selections, and then go to step 21. 4) Cliquez sur Terminer. Si vous y êtes invité, redémarrez l’ordinateur. 5) Passez à l’étape 21. Plug-and-Play. Si le message Nouveau matériel détecté s’affiche, introduisez le CD-ROM. Suivez les instructions affichées à l’écran, acceptez les sélections par défaut, puis passez à l’étape 21. 4) Klicken Sie auf Fertig stellen. Starten Sie den PC neu, wenn Sie dazu aufgefordert werden. 5) Fahren Sie mit Schritt 21 fort. Plug-and-Play. Wenn die Meldung Neue Hardwarekomponente angezeigt wird, legen Sie die CD-ROM ein. Befolgen Sie die Anweisungen auf dem Bildschirm, akzeptieren Sie die Standardauswahl, und fahren Sie dann mit Schritt 21 fort. 4) Fare clic su Fine. Se richiesto, riavviare il PC. 5) Vedere il punto 21. Plug and Play. Se viene visualizzato il messaggio Nuovo componente hardware individuato, inserire il CD-ROM. Attenersi alle istruzioni sullo schermo, accettare le selezioni predefinite, quindi vedere il punto 21. 4) Haga clic en Finalizar. Si se le solicita, reinicie el PC. 5) Vaya al paso 21. Plug and Play. Si aparece el mensaje Se ha encontrado hardware nuevo, introduzca el CD-ROM. Siga las instrucciones de la pantalla, acepte las selecciones predeterminadas y vaya al paso 21. 4) Klik op Voltooien. Als u hierom wordt gevraagd, start u de computer opnieuw op. 5) Ga naar stap 21. Plug en Play. Als het bericht Nieuwe hardware gevonden wordt weergegeven, plaatst u de cd-rom. Volg de instructies op het scherm, accepteer de standaardinstellingen en ga naar stap 21. 4) Clique em Concluir. Se solicitado, reinicie o PC. 5) Vá para a etapa 21. Plug and Play. Se aparecer a mensagem Novo hardware encontrado, insira o CD-ROM. Siga as instruções na tela, aceite as seleções padrão e, em seguida, vá para a etapa 21. 22 English Français Deutsch Italiano 2) Place the CD-ROM in the CD-ROM drive. For OS 9.1 to 9.2x, go to step A. For OS X, go to step B. Connexion directe de l’imprimante à un Macintosh. 1) Connectez un câble USB entre le port USB de l’imprimante et celui de l’ordinateur. 2) Placez le CD-ROM dans le lecteur de CD-ROM. Pour OS 9.1 à 9.2x, passez à l’étape A. Pour OS X, passez à l’étape B. Schließen den Drucker direkt an einen Macintosh an. 1) Schließen Sie ein USB-Kabel zwischen dem USB-Anschluss des Druckers und dem USB-Anschluss des Computers an. 2) Legen Sie die CD-ROM in das CD-ROM-Laufwerk ein. Wenn Sie mit OS 9.1 bis 9.2x arbeiten, fahren Sie mit Schritt A fort. Wenn Sie OS X verwenden, fahren Sie mit Schritt B fort. Collegare la stampante a un computer Macintosh. 1) Collegare un cavo USB tra la porta USB sulla stampante e la porta USB sul computer. 2) Posizionare il CD-ROM nell'unità CD-ROM. Per OS 9.1 fino a 9.2x, vedere il punto A. Per OS X, vedere il punto B. Conecte la impresora a un ordenador Macintosh. 1) Conecte un cable USB entre el puerto USB de la impresora y el del ordenador. 2) Introduzca el CD-ROM en la unidad de CD-ROM. Para OS 9.1 a 9.2x, vaya al paso A. Para OS X, vaya al paso B. Sluit de printer aan op een Macintosh-computer. 1) Sluit een USBkabel aan tussen de USB-poort van de printer en de USB-poort van de computer. 2) Plaats de cd-rom in het cd-rom-station. Ga naar stap A voor OS 9.1 tot en met 9.2x. Ga naar stap B voor OS X. Conecte a impressora a um computador Macintosh. 1) Conecte um cabo USB entre a porta USB na impressora e a porta USB no computador. 2) Coloque o CD-ROM na unidade de CD-ROM. Para o OS 9.1 a 9.2x, vá para a etapa A. Para o OS X, vá para a etapa B. Português Nederlands Español Connect the printer to a Macintosh computer. 1) Connect a USB cable between the USB port on the printer and the USB port on the computer. 23 OS 9.1 to 9.2x: 1) Run the Installer. Complete a custom install. 2) For the custom install, select all options, including USB Components (Classic). 3) When prompted, restart the computer. 4) Run the Apple Desktop Printer Utility from HD/Applications/ Utilities. 5) Double-click HP Printer (USB), and then click OK. 6) Next to USB Printer Selection, click Change. OS 9.1 à 9.2x : 1) Exécutez le programme d’installation. Effectuez une installation personnalisée. 2) Dans le cas d’une installation personnalisée, sélectionnez toutes les options, y compris Composants USB (Classic). 3) Lorsque vous y êtes invité, redémarrez l’ordinateur. 4) Exécutez l’outil Apple Desktop Printer Utility à partir du dossier HD/Applications/Utilitaires. 5) Cliquez deux fois sur Imprimante HP (USB), puis cliquez sur OK. 6) En regard de Sélection d’imprimante USB, cliquez sur Changer. OS 9.1 bis 9.2x: 1) Führen Sie das Installationsprogramm aus. Führen Sie eine benutzerdefinierte Installation aus. 2) Wählen Sie bei einer benutzerdefinierten Installation alle Optionen aus, einschließlich USB Components (Classic) (USB-Komponenten (Classic)). 3) Starten Sie den Computer neu, wenn Sie dazu aufgefordert werden. 4) Führen Sie das Apple Desktop Printer Utility über HD/ Applications/Utilities aus. 5) Doppelklicken Sie auf HP Drucker (USB), und klicken Sie dann auf OK. 6) Klicken Sie neben USB Printer Selection (USB-Druckerauswahl) auf Ändern. Da OS 9.1 a 9.2x: 1) Eseguire il programma di installazione. Completare un'installazione personalizzata. 2) Per l'installazione personalizzata, selezionare tutte le opzioni, inclusi i Componenti USB (Classic). 3) Quando richiesto, riavviare il computer. 4) Eseguire l'Utility Stampante scrivania Apple dal percorso HD/ Applicazioni/Utilità. 5) Fare doppio clic su Stampante (USB), quindi fare clic su OK. 6) Accanto a Selezione stampante USB, fare clic su Modifica. OS 9.1 a 9.2x: 1) Ejecute el instalador. Realice una instalación sencilla. 2) Para la instalación personalizada, seleccione todas las opciones, incluyendo USB Components (Classic) (Componentes USB [Classic]). 3) Cuando se le solicite, reinicie el ordenador. 4) Ejecute la utilidad Apple Desktop Printer desde HD/Aplicaciones/ Utilidades. 5) Haga doble clic en HP Printer (USB) (Impresora HP [USB]) y haga clic en Aceptar. 6) Junto a USB Printer Selection (Selección de impresora USB), haga clic en Cambiar. OS 9.1 tot en met 9.2x: 1) Voer het installatieprogramma uit. Voltooi de speciale installatie. 2) Selecteer alle opties inclusief USB Components (Classic) voor de aangepaste installatie. 3) Als u hierom wordt gevraagd, start u de computer opnieuw op. 4) Voer de Desktop Printer Utility van Apple uit vanaf HD/ Programma's/Hulpprogramma's. 5) Dubbelklik op HP Printer (USB) en klik op OK. 6) Klik naast Selectie USB-printer op Wijzig. OS 9.1 a 9.2x: 1) Execute o Instalador. Complete uma instalação personalizada. 2) Para a instalação personalizada, selecione todas as opções, incluindo Componentes USB - Clássico. 3) Quando solicitado, reinicie o computador. 4) Execute o utilitário Apple Desktop Printer a partir de HD/ Aplicativos/Utilitários. 5) Clique duas vezes em Impressora HP USB e, em seguida, em OK. 6) Próximo a Seleção de impressora USB, clique em Alterar. 24 English Français Deutsch Italiano Español Nederlands Português 7) Select the printer, and then click OK. 8) Next to PostScript® Printer Description (PPD) File, click Auto Setup, and then click Create. 9) Save the printer setup. 10) On the desktop, highlight the printer. 11) Click the Printing menu, and then click Set Default Printer. 12) Go to step 21. 7) Sélectionnez l’imprimante, puis cliquez sur OK. 8) En regard de Fichier PPD (PostScript® Printer Description), cliquez sur Réglage auto, puis cliquez sur Créer. 9) Enregistrez la configuration de l’imprimante. 10) Sur le bureau, mettez l’imprimante en surbrillance. 11) Cliquez sur le menu Impression, puis cliquez sur Définir comme imprimante par défaut. 12) Passez à l’étape 21. 7) Wählen Sie den Drucker aus, und klicken Sie dann auf OK. 8) Klicken Sie neben PostScript® Druckerbeschreibungsdatei (PPD) auf Automatisch und dann auf Erstellen. 9) Speichern Sie die Druckerkonfiguration. 10) Markieren Sie den Drucker auf dem Desktop. 11) Klicken Sie auf das Menü Drucken und dann auf Set Default Printer (Standarddrucker festlegen). 12) Fahren Sie mit Schritt 21 fort. 7) Selezionare la stampante, quindi fare clic su OK. 8) Accanto al file PostScript® Printer Description (PPD), fare clic su Impostazione autom., quindi fare clic su Crea. 9) Salvare le impostazioni della stampante. 10) Sul desktop, evidenziare la stampante. 11) Fare clic sul menu Stampa, quindi su Imposta stampante default. 12) Vedere il punto 21. 7) Seleccione la impresora y haga clic en Aceptar. 8) Junto a Archivo de descripción de impresora PostScript® (PPD), haga clic en Auto Setup (Configuración automática) y, a continuación, en Crear. 9) Guarde la configuración de la impresora. 10) En el escritorio, resalte la impresora. 11) Haga clic en el menú Impresión y, a continuación, en Set Default Printer (Establecer impresora predeterminada). 12) Vaya al paso 21. 7) Selecteer de printer en klik op OK. 8) Klik naast PostScript®printerbeschrijvingsbestand (PPD) op Automatische configuratie en vervolgens op Maak aan. 9) Sla de printerconfiguratie op. 10) Markeer de printer op het bureaublad. 11) Klik op het menu Afdrukken en klik vervolgens op Stel standaardprinter in. 12) Ga naar stap 21. 7) Selecione a impressora e, em seguida, clique em OK. 8) Ao lado de Arquivo PPD, clique em Configuração automática e em Criar. 9) Salve a configuração da impressora. 10) Na área de trabalho, realce a impressora. 11) Clique no menu Impressão e, em seguida, em Definir impressora padrão. 12) Vá para a etapa 21. 25 OS X: 1) Run the Installer. Complete an easy install. Note If OS X and OS 9.1 (Classic) to 9.2x (Classic) are installed on the same computer, the installer will show both the Classic and the OS X installation options. 2) From HD/Applications/Utilities/Print Center, start the Print Center. 3) If the printer appears in the Printer List, delete the printer. Click Add. 4) On the next page, click the drop-down menu, and then select USB. OS X : 1) Exécutez le programme d’installation. Effectuez une installation standard. Remarque Si OS X et OS 9.1 (Classic) à 9.2x (Classic) sont installés sur le même ordinateur, le programme d’installation affiche les options d’installation des systèmes Classic et OS X. 2) Démarrez le Centre d’impression à partir du dossier HD/ Applications/Utilitaires/Centre d’impression. 3) Si l’imprimante apparaît dans la Liste d’imprimantes, supprimez-la. Cliquez sur Ajouter. 4) Sur la page suivante, cliquez sur le menu local, puis sélectionnez USB. OS X: 1) Führen Sie das Installationsprogramm aus. Führen Sie eine einfache Installation aus. Hinweis Wenn OS X und 9.1 (Classic) bis 9.2x (Classic) auf demselben Computer installiert sind, zeigt das Installationsprogramm die Installationsoptionen der Classic- und der OS X-Version an. 2) Starten Sie das Print Center über HD/Applications/Utilities/Print Center. 3) Löschen Sie den Drucker, wenn er in der Druckerliste angezeigt wird. Klicken Sie auf Hinzufügen. 4) Klicken Sie auf der nächsten Seite auf das Dropdown-Menü, und wählen Sie dann USB. OS X: 1) Eseguire il programma di installazione. Completare un'installazione facile. Nota Se OS X e OS 9.1 (Classic) fino a 9.2x (Classic) sono installati sullo stesso computer, nel programma di installazione vengono visualizzate sia le opzioni di installazione Classic che OS X. 2) Avviare Centro Stampa da HD/Applicazioni/Utilità/Centro Stampa. 3) Se la stampante viene visualizzata in Elenco Stampanti, eliminare la stampante. Fare clic su Aggiungi. 4) Sulla pagina successiva, fare clic sul menu a discesa, quindi selezionare USB. OS X: 1) Ejecute el instalador. Realice una instalación sencilla. Nota Si OS X y OS 9.1 (Classic) a 9.2x (Classic) están instalados en el mismo ordenador, el instalador mostrará las opciones de instalación de ambos. 2) Inicie el Centro de impresión desde HD/Aplicaciones/Utilidades/ Centro de impresión. 3) Si la impresora aparece en Lista de impresoras, elimínela. Haga clic en Añadir. 4) En la página siguiente, haga clic en el menú desplegable y seleccione USB. OS X: 1) Voer het installatieprogramma uit. Voltooi de standaardinstallatie. Opmerking Als OS X en OS 9.1 (Classic) tot en met 9.2x (Classic) op dezelfde computer zijn geïnstalleerd, worden de installatie-opties van Classic en OS X door het installatieprogramma weergegeven. 2) Start Afdrukbeheer vanuit HD/Programma's/Hulpprogramma's/ Afdrukbeheer. 3) Als de printer wordt weergegeven bij Printers, verwijdert u de printer. Klik op Voeg toe. 4) Klik op de volgende pagina op het bovenste vervolgkeuzemenu en selecteer vervolgens USB. OS X: 1) Execute o Instalador. Complete uma instalação fácil. Nota Se o OS X e o OS 9.1 (Classic) a 9.2x (Classic) estiverem instalados no mesmo computador, o instalador mostrará ambas as opções de instalação Classic e OS X. 2) A partir de HD/Aplicativos/Utilitários/Print Center, inicie o Print Center. 3) Se a impressora aparecer na Lista de impressoras, exclua-a. Clique em Incluir. 4) Na próxima página, clique na lista de seleção e selecione USB. 26 HP Color LaserJet 3550n only: Connect to the network. 1) Attach the HP Jetdirect en3700 external print server to a 10Base-T or to a 100Base-T local network by plugging the network cable into the network port on the rear panel. 5) Dans la liste locale Modèle d’imprimante, sélectionnez HP. 6) Sous Nom du modèle, sélectionnez l’imprimante, puis cliquez sur Ajouter. 7) Passez à l’étape 21. HP Color LaserJet 3550n uniquement : Connexion au réseau. 1) Reliez le serveur d’impression externe HP Jetdirect en3700 à un réseau local 10Base-T ou 100Base-T en branchant le câble réseau dans le port réseau sur le panneau arrière. 5) Wählen Sie in der Dropdown-Liste Druckermodell den Eintrag HP aus. 6) Wählen Sie unter Modellname den gewünschten Drucker aus, und klicken Sie dann auf Hinzufügen. 7) Fahren Sie mit Schritt 21 fort. Nur HP Color LaserJet 3550n: Stellen Sie eine Verbindung zum Netzwerk her. 1) Schließen Sie den externen HP Jetdirect en3700 Druckserver an ein 10Base-T- oder ein 100Base-T-LAN an, indem Sie das Netzwerkkabel mit dem Netzwerkanschluss auf der Rückseite verbinden. 5) Dall'elenco a discesa Modello stampante, selezionare HP. 6) In Nome del modello, selezionare la stampante, quindi fare clic su Aggiungi. 7) Vedere il punto 21. Solo per HP Color LaserJet 3550n: collegamento alla rete. 1) Collegare il server di stampa esterno HP Jetdirect en3700 a una rete locale 10Base-T o 100Base-T inserendo il cavo di rete nella porta di rete sul pannello posteriore. 5) En la lista desplegable Modelo de impresora, seleccione HP. 6) En Modelo, seleccione la impresora y haga clic en Añadir. 7) Vaya al paso 21. HP Color LaserJet 3550n: Conexión a la red. 1) Conecte el servidor de impresión externo HP Jetdirect en3700 a una red local 10Base-T o 100Base-T enchufando el cable de red al puerto de red del panel trasero. 5) Selecteer HP in de vervolgkeuzelijst Printermodel. 6) Selecteer de printer bij Modelnaam en klik op Voeg toe. 7) Ga naar stap 21. Uitsluitend voor HP Color LaserJet 3550n: sluit aan op het netwerk. 1) Verbind de HP Jetdirect en3700 externe printserver met een 10Base-T of een 100Base-T lokaal netwerk door de netwerkkabel op de netwerkpoort op het achterpaneel aan te sluiten. 5) Na lista de seleção Modelo de impressora, selecione HP. 6) Em Nome do modelo, selecione a impressora e, em seguida, clique em Incluir. 7) Vá para a etapa 21. HP Color LaserJet 3550n apenas: Conecte à rede. 1) Conecte o servidor de impressão externo HP Jetdirect en3700 a uma rede local 10Base-T ou 100Base-T conectando o cabo de rede à porta de rede no painel traseiro. Português Nederlands Español Italiano Deutsch Français English 5) From the Printer Model drop-down list, select HP. 6) Under Model Name, select the printer, and then click Add. 7) Go to step 21. 27 2) Attach the print server to the printer using the USB cable. 3) Insert the DC power cord from the power module into the power connector on the rear panel, and then insert into a power outlet. The 10 or the 100 LED turns on, indicating a network connection, and the power/status LED blinks. After 15 seconds, the power/ status LED light and the USB printer LED light appear green. The power/status LED will blink if there is network activity. 2) Reliez le serveur d’impression à l’imprimante à l’aide du câble USB. 3) Branchez le cordon d’alimentation continue entre le module d’alimentation et le connecteur d’alimentation sur le panneau arrière, puis reliez-le à une prise de tension. Le voyant 10 ou 100 s’allume, ce qui indique une connexion réseau, et le voyant alimentation/état clignote. Après 15 secondes, le voyant alimentation/état s’allume et le voyant d’imprimante USB s’allume en vert. Le voyant alimentation/état clignote en cas d’une activité réseau. 2) Schließen Sie den Druckserver über das USB-Kabel an den Drucker an. 3) Schließen Sie das Gleichstromkabel des Netzmoduls am Netzanschluss an der Rückseite an, und verbinden Sie es anschließend mit einer Steckdose. Die LED für 10Base-T oder 100Base-T beginnt zu leuchten, was auf eine Netzwerkverbindung hinweist. Die Netz-/Status-LED blinkt. Nach 15 Sekunden leuchten die Netz-/Status-LED und die USBDrucker-LED grün. Die Netz-/Status-LED blinkt bei Netzwerkaktivität. 2) Collegare il server di stampa alla stampante utilizzando il cavo USB. 3) Inserire il cavo di alimentazione DC dal modulo di alimentazione nel connettore di alimentazione sul pannello posteriore, quindi inserirlo in una presa elettrica. Il LED 10 o 100 si accende, indicando una connessione di rete, e il LED di accensione/stato lampeggia. Dopo 15 secondi, la spia del LED di accensione/stato e del LED della stampante USB diventano verdi. In caso di attività di rete, la spia del LED di accensione/stato lampeggia. 2) Conecte el servidor de impresión a la impresora mediante el cable USB. 3) Inserte el cable de alimentación de CC del módulo de alimentación en el conector de alimentación del panel trasero y, a continuación, en una salida de alimentación. El LED 10 ó 100 se encenderá, lo que indica una conexión de red, y el LED de alimentación/estado parpadeará. Después de 15 segundos, el LED de alimentación/estado y el LED USB de la impresora se iluminarán en verde. El LED de alimentación/estado parpadeará si se registra actividad de red. 2) Sluit de printserver aan op de printer met de USB-kabel. 3) Sluit het snoer van de voedingsmodule aan op de netvoedingsaansluiting op het achterpaneel en op het stopcontact. Het lampje voor 10 of 100 gaat branden, waarmee een netwerkverbinding wordt aangegeven. Het lampje voor stroom/ status gaat knipperen. Na 15 seconden gaan het lampje voor stroom/status en het lampje voor de USB-printer groen branden. Het lampje voor stroom/status gaat knipperen als er geen netwerkactiviteit is. 2) Conecte o servidor de impressão à impressora utilizando o cabo USB. 3) Conecte o cabo de alimentação CC no módulo ao conector de alimentação no painel traseiro e, em seguida, insira-o em uma tomada. O LED 10 ou 100 acende, indicando uma conexão de rede e o LED de alimentação/status pisca. Após 15 segundos, a luz indicadora do LED de alimentação/status e a luz indicadora do LED da impressora USB fica verde. O LED de alimentação/status piscará se houver atividade de rede. 28 6) For a Windows PC network printer software install, see the HP Network Install Guide that is included with the printer. For a Macintosh computer network printer software install, go to step 20. 4) Appuyez sur le bouton de test à l’arrière du serveur d’impression externe pour imprimer une page de configuration HP Jetdirect. 5) Notez l’adresse IP de l’imprimante pour référence. Cette impression peut prendre quelques minutes en fonction de la connexion réseau. 6) Pour une installation du logiciel d’imprimante sur un réseau Windows, reportez-vous au guide d’installation réseau HP inclus avec l’imprimante. Pour une installation sur un réseau Macintosh, passez à l’étape 20. 4) Drücken Sie die Testtaste an der Rückseite des externen Druckservers, um eine HP Jetdirect Konfigurationsseite zu drucken. 5) Notieren Sie die IP-Adresse für Referenzzwecke. Dies kann je nach der Netzwerkverbindung einige Minuten dauern. 6) Halten Sie sich bei der Installation von Windows PCNetzwerkdruckersoftware an die HP Netzwerkinstallationsanleitung, die mit dem Drucker geliefert wird. Fahren Sie bei der Installation von Macintosh-Netzwerkdruckersoftware mit Schritt 20 fort. Italiano 4) Premere il pulsante di test sulla parte posteriore del server di stampa esterno per stampare una pagina di configurazione di HP Jetdirect. 5) Annotare l'indirizzo IP per riferimento. Potrebbe essere necessario attendere qualche minuto, a seconda della connessione di rete. 6) Per un'installazione del software della stampante di rete di un PC Windows, vedere la Guida all'installazione di rete HP fornita con la stampante. Per un'installazione del software della stampante di rete di un computer Macintosh, vedere il punto 20. Español 4) Pulse el botón de prueba que se encuentra en la parte posterior del servidor de impresión externo para imprimir una página de configuración de HP Jetdirect. 5) Anote la dirección IP como referencia. Esta operación puede tardar varios minutos dependiendo de la conexión de red. 6) Para la instalación del software de una impresora conectada en red en un ordenador con Windows, consulte la Guía de instalación en red de HP que se incluye con la impresora. Para la instalación del software de una impresora conectada en red en un ordenador Macintosh, vaya al paso 20. 4) Druk op de testknop aan de achterkant van de externe printer om een configuratiepagina van HP Jetdirect af te drukken. 5) Noteer het IP-adres voor referentie. Dit kan enige minuten in beslag nemen, afhankelijk van de netwerkverbinding. 6) Raadpleeg de HP handleiding voor installatie via een netwerk die bij de printer is geleverd voor meer informatie over de installatie van software voor een netwerkprinter op een Windows-computer. Ga naar stap 20 voor het installeren van software voor een netwerkprinter op een Macintosh-computer. 4) Pressione o botão de teste na parte traseira do servidor de impressão externo para imprimir uma página de configuração do HP Jetdirect. 5) Anote o endereço IP para referência. Isso pode levar alguns minutos dependendo da conexão de rede. 6) Para a instalação do software de impressora de rede em um PC Windows, consulte o Guia de instalação de rede da HP fornecido com a impressora. Para a instalação do software de impressora de rede em computador Macintosh, vá para a etapa 20. Português Nederlands Deutsch Français English 4) Press the test button on the back of the external print server to print an HP Jetdirect configuration page. 5) Note the IP address for reference. This may take a few minutes depending on the network connection. 29 Install the printer software (Macintosh). For OS 9.1 to 9.2x, go to step A. For OS X, go to step B. OS 9.1 to 9.2x: 1) Run the Installer. Complete an easy install, and then restart the computer. 2) From HD/Applications/Utilities, use the Apple Desktop Printer Utility to select the printer. Installation du logiciel d’imprimante (Macintosh). Pour OS 9.1 à 9.2x, passez à l’étape A. Pour OS X, passez à l’étape B. OS 9.1 à 9.2x : 1) Exécutez le programme d’installation. Effectuez une installation standard, puis redémarrez l’ordinateur. 2) A partir du dossier HD/Applications/Utilitaires, employez l’outil Apple Desktop Printer Utility pour sélectionner l’imprimante. Installieren Sie die Druckersoftware (Macintosh). Wenn Sie mit OS 9.1 bis 9.2x arbeiten, fahren Sie mit Schritt A fort. Wenn Sie OS X verwenden, fahren Sie mit Schritt B fort. OS 9.1 bis 9.2x: 1) Führen Sie das Installationsprogramm aus. Führen Sie eine einfache Installation aus, und starten Sie den Computer anschließend neu. 2) Verwenden Sie das Apple Desktop Printer Utility über HD/Applications/Utilities, um den Drucker auszuwählen. Installazione del software della stampante (Macintosh). Per OS 9.1 fino a 9.2x, vedere il punto A. Per OS X, vedere il punto B. Da OS 9.1 a 9.2x: 1) Eseguire il programma di installazione. Completare un'installazione facile, quindi riavviare il computer. 2) Dal percorso HD/Applicazioni/Utilità, eseguire l'Utility Stampante scrivania Apple. Instale el software de la impresora (Macintosh). Para OS 9.1 a 9.2x, vaya al paso A. Para OS X, vaya al paso B. OS 9.1 a 9.2x: 1) Ejecute el instalador. Realice una instalación sencilla y reinicie el ordenador. 2) Desde HD/Aplicaciones/ Utilidades, emplee la utilidad Apple Desktop Printer para seleccionar la impresora. Installeer de printersoftware (Macintosh). Ga naar stap A voor OS 9.1 tot en met 9.2x. Ga naar stap B voor OS X. OS 9.1 tot en met 9.2x: 1) Voer het installatieprogramma uit. Voltooi de standaardinstallatie en start de computer opnieuw op. 2) Gebruik de Desktop Printer Utility van Apple vanuit HD/Programma's/ Hulpprogramma's om de printer te selecteren. Instale o software da impressora (Macintosh). Para o OS 9.1 a 9.2x, vá para a etapa A. Para o OS X, vá para a etapa B. OS 9.1 a 9.2x: 1) Execute o Instalador. Complete uma instalação fácil e, em seguida, reinicie o computador. 2) Em HD/Aplicativos/ Utilitários, utilize o utilitário Apple Desktop Printer para selecionar a impressora. 30 OS X: 1) Run the Installer. Complete an easy install. Note If OS X and OS 9.1 (Classic) to 9.2x (Classic) are installed on the same computer, the installer will show both the Classic and the OS X installation options. 3) Exécutez la configuration de l’imprimante en utilisant l’option Imprimante (AppleTalk) ou Imprimante (LPR). 4) Passez à l’étape 21. OS X : 1) Exécutez le programme d’installation. Effectuez une installation standard. Remarque Si OS X et OS 9.1 (Classic) à 9.2x (Classic) sont installés sur le même ordinateur, le programme d’installation affiche les options d’installation des systèmes Classic et OS X. 3) Führen Sie die Druckereinrichtung entweder mit der Option Printer (AppleTalk) oder mit der Option Printer (LPR) aus. 4) Fahren Sie mit Schritt 21 fort. OS X: 1) Führen Sie das Installationsprogramm aus. Führen Sie eine einfache Installation aus. Hinweis Wenn OS X und 9.1 (Classic) bis 9.2x (Classic) auf demselben Computer installiert sind, zeigt das Installationsprogramm die Installationsoptionen der Classic- und der OS X-Version an. 3) Completare l'installazione della stampante utilizzando l'opzione Stampante (AppleTalk) oppure Stampante (LPR). 4) Vedere il punto 21. OS X: 1) Eseguire il programma di installazione. Completare un'installazione facile. Nota Se OS X e OS 9.1 (Classic) fino a 9.2x (Classic) sono installati sullo stesso computer, nel programma di installazione vengono visualizzate sia le opzioni di installazione Classic che OS X. 3) Complete la configuración de la impresora mediante la opción Impresora (AppleTalk) o Impresora (LPR). 4) Vaya al paso 21. OS X: 1) Ejecute el instalador. Realice una instalación sencilla. Nota Si OS X y OS 9.1 (Classic) a 9.2x (Classic) están instalados en el mismo ordenador, el instalador mostrará las opciones de instalación de ambos. 3) Voltooi de printerconfiguratie met de optie Printer (AppleTalk) of de optie Printer (LPR). 4) Ga naar stap 21. OS X: 1) Voer het installatieprogramma uit. Voltooi de standaardinstallatie. Opmerking Als OS X en OS 9.1 (Classic) tot en met 9.2x (Classic) op dezelfde computer zijn geïnstalleerd, worden de installatie-opties van Classic en OS X door het installatieprogramma weergegeven. 3) Complete a instalação da impressora utilizando a opção Impressora - AppleTalk ou a opção Impressora – LPR. 4) Vá para a etapa 21. OS X: 1) Execute o Instalador. Complete uma instalação fácil. Nota Se o OS X e o OS 9.1 (Classic) a 9.2x (Classic) estiverem instalados no mesmo computador, o instalador mostrará ambas as opções de instalação Classic e OS X. Português Nederlands Español Italiano Deutsch Français English 3) Complete the printer setup using either the Printer (AppleTalk) option or the Printer (LPR) option. 4) Go to step 21. 31 2) From HD/Applications/Utilities/Print Center, start the Print Center. 3) If the printer appears in the Printer List, delete the printer. Click Add. 4) On the next page, click the drop-down menu, and then select either the AppleTalk option or the IP Printing option. 5) From the Printer Model drop-down list, select HP. 6) Under Model Name, select the printer, and click Add. 7) Go to step 21. 2) Démarrez le Centre d’impression à partir du dossier HD/ Applications/Utilitaires/Centre d’impression. 3) Si l’imprimante apparaît dans la Liste d’imprimantes, supprimez-la. Cliquez sur Ajouter. 4) Sur la page suivante, cliquez sur le menu local, puis sélectionnez l’option AppleTalk ou Impression IP. 5) Dans la liste locale Modèle d’imprimante, sélectionnez HP. 6) Sous Nom du modèle, sélectionnez l’imprimante, puis cliquez sur Ajouter. 7) Passez à l’étape 21. 2) Starten Sie das Print Center über HD/Applications/Utilities/Print Center. 3) Löschen Sie den Drucker, wenn er in der Druckerliste angezeigt wird. Klicken Sie auf Hinzufügen. 4) Klicken Sie auf der nächsten Seite auf das Dropdown-Menü, und wählen Sie dann entweder die Option AppleTalk oder die Option IP Printing. 5) Wählen Sie in der Dropdown-Liste Druckermodell den Eintrag HP aus. 6) Wählen Sie unter Modellname den gewünschten Drucker aus, und klicken Sie dann auf Hinzufügen. 7) Fahren Sie mit Schritt 21 fort. 2) Avviare Centro Stampa da HD/Applicazioni/Utilità/Centro Stampa. 3) Se la stampante viene visualizzata in Elenco Stampanti, eliminare la stampante. Fare clic su Aggiungi. 4) Sulla pagina successiva, fare clic sul menu a discesa, quindi selezionare l'opzione AppleTalk oppure Stampa IP. 5) Dall'elenco a discesa Modello stampante, selezionare HP. 6) In Nome del modello, selezionare la stampante, quindi fare clic su Aggiungi. 7) Vedere il punto 21. 2) Inicie el Centro de impresión desde HD/Aplicaciones/Utilidades/ Centro de impresión. 3) Si la impresora aparece en Lista de impresoras, elimínela. Haga clic en Añadir. 4) En la página siguiente, haga clic en el menú desplegable y seleccione la opción AppleTalk o IP Printing (Impresión IP). 5) En la lista desplegable Modelo de impresora, seleccione HP. 6) En Modelo, seleccione la impresora y haga clic en Añadir. 7) Vaya al paso 21. 2) Start Afdrukbeheer vanuit HD/Programma's/Hulpprogramma's/ Afdrukbeheer. 3) Als de printer wordt weergegeven bij Printers, verwijdert u de printer. Klik op Voeg toe. 4) Op de volgende pagina klikt u op het vervolgkeuzemenu en selecteert u de optie AppleTalk of de optie IP Printing. 5) Selecteer HP in de vervolgkeuzelijst Printermodel. 6) Selecteer de printer bij Modelnaam en klik op Voeg toe. 7) Ga naar stap 21. 2) A partir de HD/Aplicativos/Utilitários/Print Center, inicie o Print Center. 3) Se a impressora aparecer na Lista de impressoras, exclua-a. Clique em Incluir. 4) Na próxima página, clique na lista de seleção e, em seguida, selecione a opção AppleTalk ou a opção Impressão IP. 5) Na lista de seleção Modelo de impressora, selecione HP. 6) Em Nome do modelo, selecione a impressora e clique em Incluir. 7) Vá para a etapa 21. 32 Congratulations! The printer is ready to use. The user guide is located on the CD-ROM and in the HP toolbox software. Note Save the boxes and the packing materials in case you need to transport the printer. Test de l’installation du logiciel. Imprimez une page à partir d’un programme quelconque pour vérifier que le logiciel est correctement installé. Remarque En cas d’échec de l’installation, réinstallez le logiciel. Félicitations ! L’imprimante est prête à l’emploi. Le manuel d’utilisation est situé sur le CD-ROM et dans le logiciel Boîte à outils HP. Remarque Conservez les cartons et les matériaux d’emballage en cas de transport éventuel de l’imprimante. Deutsch Testen Sie die Softwareinstallation. Drucken Sie eine Seite über ein beliebiges Programm, um sicherzustellen, dass die Software ordnungsgemäß installiert wurde. Hinweis Wenn die Installation fehlschlägt, müssen Sie die Software neu installieren. Herzlichen Glückwunsch! Der Drucker ist jetzt einsatzbereit. Das Benutzerhandbuch befindet sich auf der CD-ROM und in der HP Toolbox-Software. Hinweis Bewahren Sie die Schachteln und das Verpackungsmaterial auf, falls Sie den Drucker transportieren müssen. Italiano Test dell'installazione del software. Stampare una pagina da un programma qualsiasi per assicurarsi che il software sia installato correttamente. Nota Se l'installazione non è avvenuta correttamente, reinstallare il software. Congratulazioni. La stampante è pronta per l'uso. La guida dell'utente è situata sul CD-ROM e nel software HP toolbox. Nota Conservare le confezioni e il materiale di imballaggio qualora sia necessario trasportare la stampante. Compruebe la instalación del software. Imprima una página desde cualquier programa para asegurarse de que el software se ha instalado correctamente. Nota Si la instalación falla, instale de nuevo el software. ¡Enhorabuena! La impresora está lista para su uso. La guía del usuario se encuentra en el CD-ROM y en el software de la Caja de herramientas de HP. Nota Guarde las cajas y el material de embalaje por si necesita transportar la impresora. Test de installatie van de software. Druk een pagina af van een willekeurig programma om te controleren of de software correct is geïnstalleerd. Opmerking Als de installatie is mislukt, installeert u de software opnieuw. Gefeliciteerd! De printer is klaar voor gebruik. U vindt de gebruikershandleiding op de cd-rom en in de software van de HPwerkset. Opmerking Bewaar de dozen en het verpakkingsmateriaal voor het geval u de printer moet vervoeren. Teste a instalação do software. Imprima uma página a partir de qualquer programa para verificar se o software foi instalado corretamente. Nota Se a instalação falhar, reinstale o software. Parabéns! A impressora está pronta para uso. O guia do usuário está localizado no CD-ROM no software HP toolbox. Nota Guarde as caixas e os materiais de embalagem no caso de precisar transportar a impressora. Português Nederlands Español Français English Test the software installation. Print a page from any program to make sure the software is correctly installed. Note If installation fails, reinstall the software. 33 For additional help for the HP Color LaserJet 3550 series printer, go to http://www.hp.com/support/clj3550. Register your printer. Register at http://www.register.hp.com. This is the quickest and easiest way for you to register to receive the following information: technical support updates, enhanced support options, ideas and ways to use your new HP printer, and news on emerging technologies. Pour obtenir une aide supplémentaire sur l’imprimante HP Color LaserJet 3550 series, visitez le site http://www.hp.com/support/ clj3550. Enregistrement de l’imprimante. Enregistrez l’imprimante sur le site http://www.register.hp.com. Il s’agit de la méthode la plus simple et la plus rapide pour enregistrer l’imprimante afin de recevoir les informations suivantes : mises à jour de l’assistance technique, options d’assistance avancées, idées et méthodes d’utilisation de votre nouvelle imprimante HP, ainsi que des nouvelles sur les technologies émergeantes. Weitere Hilfe zum Drucker der HP Color LaserJet 3550 Serie finden Sie unter http://www.hp.com/support/clj3550. Registrieren Sie Ihren Drucker. Registrieren Sie Ihren Drucker unter http://www.register.hp.com. Dies ist die schnellste und einfachste Registrierungsmethode, um folgende Informationen zu erhalten: Updates zur technischen Unterstützung, erweiterte Unterstützung, Vorschläge und Möglichkeiten zur Verwendung Ihres neuen HP Druckers sowie aktuelle Informationen zu neuen Technologien. Per ulteriore assistenza per la stampante HP Color LaserJet 3550 series, visitare il sito Web all'indirizzo http://www.hp.com/support/ clj3550. Registrazione della stampante. Registrarsi al sito Web all'indirizzo http://www.register.hp.com. È il modo più veloce e facile di registrarsi e ricevere le seguenti informazioni: aggiornamenti su assistenza tecnica, opzioni di assistenza avanzate, idee e modi di utilizzare la nuova stampante HP e novità su tecnologie emergenti. Para obtener ayuda adicional sobre la impresora HP Color LaserJet serie 3550, visite http://www.hp.com/support/clj3550. Registre la impresora. Regístrese en http://www.register.hp.com. Éste es el modo más rápido y sencillo de registrarse para recibir la siguiente información: actualizaciones del soporte técnico, opciones de soporte mejoradas, ideas y modos de usar su nueva impresora HP, además de novedades sobre las tecnologías emergentes. Ga naar http://www.hp.com/support/clj3550 voor meer informatie over de HP Color LaserJet 3550 series printer. Registreer de printer. Registreer de printer op http://www.register.hp.com. Dit is de snelste en eenvoudigste manier om uw printer te registreren zodat u de volgende informatie krijgt: updates voor technische ondersteuning, geavanceerde ondersteuningsopties, ideeën en manieren om de nieuwe HPprinter te gebruiken en nieuws over technologieën die worden ontwikkeld. Para obter ajuda adicional para a impressora HP Color LaserJet 3550 series, vá para http://www.hp.com/support/clj3550. Registre a impressora. Registre-a em http://www.register.hp.com. Essa é a forma mais rápida e fácil de registrá-la para receber as seguintes informações: atualizações de suporte técnico, opções de suporte avançado, idéias e formas de usar a nova impressora HP e novidades sobre tecnologias emergentes. 34-
 1
1
-
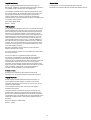 2
2
-
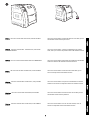 3
3
-
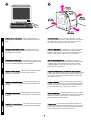 4
4
-
 5
5
-
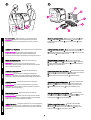 6
6
-
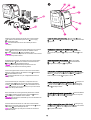 7
7
-
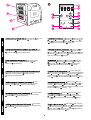 8
8
-
 9
9
-
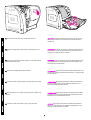 10
10
-
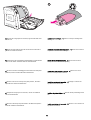 11
11
-
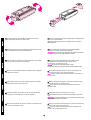 12
12
-
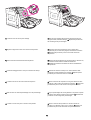 13
13
-
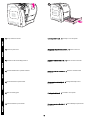 14
14
-
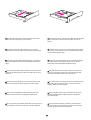 15
15
-
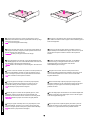 16
16
-
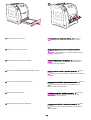 17
17
-
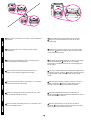 18
18
-
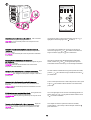 19
19
-
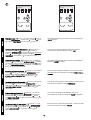 20
20
-
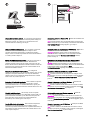 21
21
-
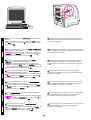 22
22
-
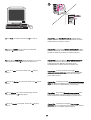 23
23
-
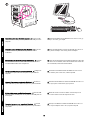 24
24
-
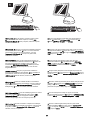 25
25
-
 26
26
-
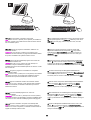 27
27
-
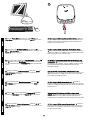 28
28
-
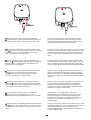 29
29
-
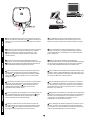 30
30
-
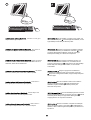 31
31
-
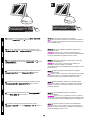 32
32
-
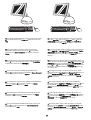 33
33
-
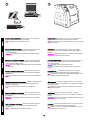 34
34
-
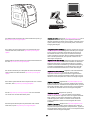 35
35
-
 36
36
-
 37
37
-
 38
38
-
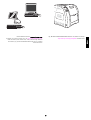 39
39
-
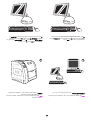 40
40
-
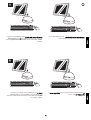 41
41
-
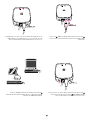 42
42
-
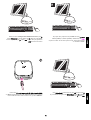 43
43
-
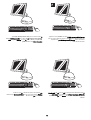 44
44
-
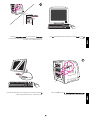 45
45
-
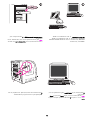 46
46
-
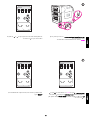 47
47
-
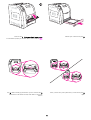 48
48
-
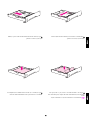 49
49
-
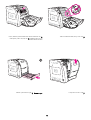 50
50
-
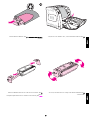 51
51
-
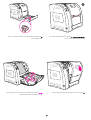 52
52
-
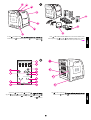 53
53
-
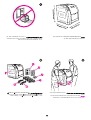 54
54
-
 55
55
-
 56
56


HP (Hewlett-Packard) 3550 Manual de usuario
- Tipo
- Manual de usuario
- Este manual también es adecuado para
en otros idiomas
- français: HP (Hewlett-Packard) 3550 Manuel utilisateur
- italiano: HP (Hewlett-Packard) 3550 Manuale utente
- English: HP (Hewlett-Packard) 3550 User manual
- Deutsch: HP (Hewlett-Packard) 3550 Benutzerhandbuch
- Nederlands: HP (Hewlett-Packard) 3550 Handleiding
- português: HP (Hewlett-Packard) 3550 Manual do usuário
Artículos relacionados
Otros documentos
-
 GYMAX GYM05081 Guía de instalación
-
HP Color LaserJet 3500 Printer series Guía de inicio rápido
-
Linksys WPSM54Gv1017 El manual del propietario
-
HP Deskjet D4100 Printer series Guía de instalación
-
-
HP LaserJet 1200n Manual de usuario
-
-
-
-
HP LASERJET 8150 Manual de usuario
