Kenmore 66569612990 El manual del propietario
- Categoría
- Microondas
- Tipo
- El manual del propietario
Este manual también es adecuado para

Owner's Guide
Guia del usuario
Microwave Hood Combination
Combinacibn Microondas Campana
Warranty .......................................... 2
Sears Service .................................. 2
F,_icrowave Oven Safety ................ 3.4
Installation Requirements ................ 5
Removing and Replacing the
Microwave Oven .............................. 6
Getting to Know Your
Microwave Oven .............................. 7
Using Your Microwave Oven ............ 1
Caring for Your Microwave Oven ...... 35
Cooking Guide .................................. 3_
Questions and Answers .................... _0
Troubleshooting ................................ Kl
Index .................................................. ,_
Secci6n en EspaRol .......................... ,_G
Sears Toll.Free Numbers .... G_cl_ Cov_r
Whirlpool Part # 8169709
4619-652-58596/8169531 sea,sRoebucka_ Co.Ho_m__s_:es.IL6017._u.sA MODEL/MODELO 69612/7/9

Microwave Oven Warranty
FULL ONE-YEAR WARRANTY ON MICROWAVE OVEN
For one year from the date of purchase, if this Kenmore Microwave Oven fails due to a defect in material or
workmanship, Sears will repair it free of charge.
FULL FIVE-YEAR WARRANTY ON THE MAGNETRON
For five years from the date of purchase, if the magnetron in this Kenmore Microwave Oven fails due to a
defect in material or workmanship, Sears will repair it free of charge.
The above warranty coverage applies only to Microwave Ovens which are used for private household purposes.
WARRANTY SERVICE IS AVAILABLE BY SIMPLY CONTACTING THE NEAREST SEARS STORE OR
SERVICE CENTER IN THE UNITED STATES.
This warranty applies only while this product is in use in the United States.
This warranty gives you specific legal rights, and you may also have other rights which vary from state to state.
Sears, Roebuck and Co., For service call:
Dept. 817WA, 1-800-4-REPAIR
Hoffman Estates, IL 60179 1-800-473-7247
Sears Service
"Vtre service What _._re se[[ '_
"We service what we sell" is our assurance to you that you can depend on Sears for service because Sears
Service is nationwide.
Your Sears Kenmore Microwave Oven has added value when you consider that Sears has a service unit near
you, staffed by Sears Trained Technicians - professional technicians specifically trained on Sears Kenmore
Microwave Ovens, having the parts, tools, and equipment to insure that we meet our pledge to you -
"We service what we sell["
Ta add to the v_[r/e Of _'O[_[* [_,,_.-! (,vy;._.
[;,[r_r _ Sears [v_airttG[_._r!.oc r,,-:.,-_..r-_.-:_:.'.
Sears Kenmore Microwave Ovens are designed, manufactured, and tested for years of dependable operation.
Yet, any modern appliance may require service from time to time, A Sears Maintenance Agreement is more
than an extension of the Warranty. It provides complete protection from unexpected repair bills and undue in-
convenience. It assures you of maximum efficiency from your Microwave Oven.
Here's a comparative Warranty and Maintenance Agreement chart showing you the benefits of a Sears
Microwave Oven Maintenance Agreement.
YEARS OF OWNERSHIP COVERAGE 1ST YR. 2ND YR. THRU 5TH YR.
Replacement of defective parts other than magnetron W MA
Replacement of magnetron W W
Annual preventative maintenance check at your request MA MA
W - WARRANTY
MA - MAINTENANCE AGREEMENT
Contact your Sears salesperson or local Sears Service Center today and purchase a Sears Maintenance
Agreement.
Keep this book and the sales slip together in a safe place for future reference.

Microwave Oven Safety
Your safety and the safety of others is very important.
We have provided many important safety messages in this manual and on your appliance. Always read and
obey all safety messages.
This is the safety alert symbol.
This symbol alerts you to hazards that can kill or hurt you and others.
All safety messages will be preceded by the safety alert symbol and the word "DANGER" or
'INARNING." These words mean:
You wil._Jbe killed or seriously injured if you don't
follow instructions.
You can be killed or seriously injured if you don't
follow instructions.
All safety messages will identify the hazard, tell you how to reduce the chance of injury, and tell you what can
happen if the instructions are not followed.
IMPORTANT SAFETY INSTRUCTIONS
When using electrical appliances basic safety precautions should be followed, including the following:
WARNING - To reduce the risk of burns,
electric shock, fire, injury to persons or exposure
to excessive microwave energy:
• Read all instructions before using the
microwave oven.
• Read and follow the specific "PRECAUTIONS TO
AVOID POSSIBLE EXPOSURE TO EXCESSIVE
MICROWAVE ENERGY', found in this section.
• The microwave oven must be grounded.
Connect only to properly grounded outlet. See
"GROUNDING INSTRUCTIONS" found at the end
of this section.
• Install or locate the microwave oven only in
accordance with the provided installation
instructions.
• Some products such as whole eggs and sealed
containers - for example, closed glass jars -
may explode and should not be heated in the
microwave oven.
• Use the microwave oven only for its intended use
as described in this manual. Do not use corrosive
chemicals or vapors in the microwave oven. This
type of oven is specifically designed to heat,
cook, or dry food. It is not designed for industrial
or laboratory use.
• As with any appliance, close supervision is
necessary when used by children.
• Do not operate the microwave oven if it has a
damaged cord or plug, if it is not working properly,
or if it has been damaged or dropped.
• The microwave oven should be serviced only by
qualified service personnel. Call an authorized
service company for examination, repair or
adjustment.
• Do not cover or block any openings on the
microwave oven.
• Do not store the microwave oven outdoors.
Do not use the microwave oven near water - for
example, near a kitchen sink, in a wet basement,
or near a swimming pool, and the like.
• Do not immerse cord or plug in water.
• Keep cord away from heated surfaces.
• Do not let cord hang over edge of table or counter.
• See door surface cleaning instructions in the
"Caring for Your Microwave Oven" section.
• Do not mount over a sink.
• Do not store anything directly on top of the
microwave oven when the microwave oven is
in operation.
- SAVE THESE INSTRUCTIONS -
continued on next page

IMPORTANT SAFETY INSTRUCTIONS
• To reduce the risk Of fire in the oven cavity:
- Do not overcook food. Carefully attend the
microwave oven if paper, plastic, or other
combustible materials are placed inside the
oven to facilitate cooking.
- Remove wire twist-ties from paper or plastic •
bags before placing bag in oven.
- If materials inside the oven should ignite, keep
oven door closed, turn oven off, and disconnect •
the power cord, or shut off power at the fuse
or circuit breaker panel.
- Do not use the cavity for storage purposes. Do
not leave paper products, cooking utensils, or
food in the cavity when not in use.
• Suitable for use above both gas and electric
cooking equipment.
• Intended to be used above ranges with maximum •
width of 36 inches.
• Clean Ventilating Hoods Frequently - Grease
should not be allowed to accumulate on hood
When flaming foods under the hood, turn the fan
on,
Use care when cleaning the vent-hood filter.
Corrosive cleaning agents, such as lye-based
oven cleaners, may damage the filter.
Oversized foods or oversized metal utensils should
not be inserted in the microwave oven as they may
create a fire or risk of electric shock.
Do not clean with metal scouring pads. Pieces can
burn off the pad and touch electrical parts involving
a risk of electric shock.
• Do not use paper products when appliance is
operated in the "PAN BROWN" mode.
• Do not store any materials, other than
manufacturer's recommended accessories in this
oven when not in use.
Do not cover racks or any other part of the oven
with metal foil. This will cause overheating of the
oven.
or filter.
- SAVE THESE INSTRUCTIONS -
PRECAUTIONS TO AVOID POSSIBLE EXPOSURE TO
EXCESSIVE MICROWAVE ENERGY
(a} Do not attempt to operate this oven with the
door open since open-door operation can result
in harmful exposure to microwave energy. It is
important not to defeat or tamper with the safety
interlocks.
(b) Do not place any object between the oven front
face and the door or allow soil or cleaner residue
to accumulate on sealing surfaces.
(c) Do not operate the oven if it is damaged. It is
particularly important that the oven door close
properly and that there is no damage to the:
(1) door (bent),
(2) hinges and latches (broken or loosened),
(3) door seals and sealing surfaces.
(d} The oven should not be adjusted or repaired by
anyone except properly qualified service personnel.
4

Installation Requirements
Before installing your microwave hood combination, make sure your location meets these requirements. See
the Installation Instructions for details.
Electrical requirements
Observe all governing codes and ordinances.
A 120-Volt, 60-Hz, AC-only, 15- or 20-amp fused
electrical supply is required. (A time-delay fuse is
recommended.) It is recommended that a separate
circuit serving only this appliance be provided.
Electrical Shock Hazard
Plug into a grounded 3 prong outlet.
Do not remove ground prong.-
Do not use an adapter.
Do not use an extension cord.
Failure to follow these instructions can
result in death, fire, or electrical shock.
GROUNDING INSTRUCTIONS
For all cord-connected appliances:
The microwave ovenmust be grounded.
In the event of an electrical short circuit, grounding
reduces the risk of electric shock by providing an
escape wire for the electric current. The microwave
oven is equipped with a cord having a grounding
wire with a grounding plug. The plug must be
#!-g_c_ into an outlet that is properly installed and
grounded.
WARNING: Improper use of the grounding
plug can result in a risk of electric shock.
Consult a qualified electrician or serviceman
if the grounding instructions are not completely
understood, or if doubt exists as to whether the
microwave oven is properly grounded.
Do not use an extension cord. If the power supply
cord is too short, have a qualified electrician or ser-
viceman install an outlet near the microwave oven.

Removing and Replacing
the Microwave uven
Excessive Weight Hazard I
I
Use two or more people to move and install
microwave oven.
Failure to do so can result in back or
other injury.
If you need to remove your Microwave Hood
Combination for any reason, follow these simple steps:
To remove:
1. Unplug microwave oven or disconnect power.
2. Remove filtersand
vent grille.
• Iffilters A are installed,
push in at the tab and
slide filter to the outside
-- edge to remove.
Remove the two
screws B from the
-_- top of the microwave
oven cabinet (the
screws located closest
to the front corners). Do not remove the screws
located towards the center of the cabinet.
• Remove the vent grille C. Set the screws and grille
aside. (if grille cannot be removed, see Step 4.)
3. After removing all oven
contents, including the
turntable and support,
tape the door in the
closed position. Then
remove the two bolts
D securing the
microwave oven to the
upper cabinet.
i
4. Hold microwave
hood combination in
place with one hand.
Pull hook E to release
microwave hood from
mounting plate. If grille
cannot be removed
(see Step 2), insert a
thin looped wire or
similar tool through an
opening in grille to
pull hook.
5. Grasp the microwave
oven cabinet. Rotate
the microwave oven
downward. (Be careful
that door does not
swing open.)
6. Lift off the support
tabs F at the bottom
of the mounting plate.
Set the microwave
oven aside on a
protected surface.
To replace:
1. Carefully lift microwave oven and hang it on the
support tabs at the bottom of the mounting plate.
2. Rotate the front of the microwave oven cabinet
downward. Thread the power supply cord through
the power supply cord hole in the bottom of the
upper cabinet.
3, Rotate the microwave oven towards the cabinet,
Push the microwave oven against the mounting
plate until locking latch snaps into the cabinet,
4. Replace the two boJts securing the microwave
oven to the upper cabinet.
5. Untape door and replace the turntable and support.
6. Replace the vent grille.
7. Replace the two screws in the top of microwave oven
cabinet (the screws located closest to front corners).
8. Tighten the two bolts securing the microwave hood
to the upper cabinet until there is no gap between the
upper cabinet and microwave hood.
9. Reinstall filters (see "Installing and caring for the
filters" in the "Caring for Your Microwave Oven"
section, if needed).
10. Plug in microwave oven or reconnect power.

Getting to Know Your
Microwave Oven
This section discusses the concepts behind microwave cooking. It also shows you the basics you need to
know to operate your microwave oven. Please read this information before you usa your microwave oven.
HOW your microwave oven works
Microwave ovens are safe. Microwave energy is
not hot. It causes food to make its own heat, and
it's this heat that cooks the food.
Microwaves are like TV waves or light waves. You
cannot see them, but you can see what they do.
A magnetron in the microwave oven produces
microwaves. The microwaves move into the oven
where they contact food as it turns on the
turntable.
Magnetron
/
\\
Oven cavity
The glass turntable of your microwave oven lets
microwaves pass through. Then they bounce off a
me,.ai floor, back through the glass turntable, and
are absorbed by the food.
Metal floor Glass turntable
continued on next page
7

How your microwave oven works (cont.}
Microwaves pass through most glass, paper, and
plastics without heating
them so food absorbs
the energy. Microwaves
bounce off metal
containers so food does
not absorb the energy.
Microwaves may not
reach the center of a
roast. The heat spreads
to the center from the
outer, cooked areas
just as in regular oven
cooking. This is one of
the reasons for letting
some foods (for
example, roasts
or baked potatoes)
stand for a while after cooking, or for stirring some
foods during the cooking time.
The microwaves disturb water molecuKes in the
food. As the molecules bounce around bumping
into each other, heat is made, like rubbing your
hands together. This is the heat that does the
cooking.
NOTE: Do not deep fry in the oven. Microwavable
cookware is not suitable and it isdifficult to
maintain appropriate deep frying temperatures.
For the best cooking results
• Always cook food for the shortest cooking time
recommended. Check to see how the food is
cooking. If needed, touch ADD ONE MINUTE while
the oven is operating or after the cooking cycle is
over (see the "Using ADD ONE MINUTE" section).
• To help make sure the food is evenly cooked, stir,
turn over, or rearrange the food about halfway
through the cooking time.
• If you do not have a cover for a dish, use wax
paper, or microwave-approved paper towels or
plastic wrap. Remember to turn back a corner of
the plastic wrap 1/4 to 1/2 inch to vent steam
during heating or cooking.
Using your microwave oven may cause interference
to your radio, TV, or similar equipment. When there
is interference, you can reduce it or remove it by:
• Cleaning the door and sealing surfaces of
the oven.
• Adjusting the receiving antenna of the radio
or television.
• Moving the radio or TV away from the microwave
oven.
• Plugging the microwave oven into a different
outlet so that the microwave oven and radio or TV
are on different branch circuits.
you[" w [e,
To test the oven put about 1 cup of cold water in a
glass container in the oven. Close
the door and make sure it latches.
Follow the directions in "Cooking at
high cook power" in the "Using Your
Microwave Oven" section to set the
oven to cook for 2 minutes. When the time is up,
the water should be heated.

Testing your dinnerware or cookware
Test dinnerware or
cookware before
using. To test a dish for
safe use, put it into the
oven with a cup of water
beside it. Cook at 100%
cook power for I minute.
If the dish gets hot and
water stays cool, do
not use it.
Some dishes (melamine, some ceramic dinnerware,
etc.) absorb microwave energy, becoming too hot to
handle and slowing cooking times. Cooking in metal
containers not designed for microwave use could
damage the oven, as could containers with hidden
metal (twist-ties, foil lining, staples, metallic glaze
or trim).
0 perating tips
Never lean on the
door or allow a child to
swing on it when the
door is open,
Do not start a
microwave oven when it
is empty. Product life
may be shortened.
If you practice
programming the oven,
put a container of water
in the oven.
Use hot pads.
Microwave energy does
not heat containers, but
the heat from the food
can make the container
hot.
Do not use newspaper
or other printed paper
in the oven.
Do not dry flowers,
fruit, herbs, wood,
pape5 gourds, or
clothes in the oven.
It is normal for the oven door to look wavy after the
oven has been running for a while.
Do not try to melt
paraffin wax in the oven.
Paraffin wax will not
melt in a microv,,_ve
oven because it allows
microwaves to pass
through it.
continued on next page

Operating tips (cont.)
Do not operate the
microwave oven unless
the glass turntable is
securely in place and
can rotate freely. The
turntable can rotate in
either direction.
Make sure the turntable is correct-side up in the
oven. Handle your turntable with care when
removing it from the oven to avoid possibly breaking
it. If your turntable cracks or breaks, contact Sears
for a replacement.
When you use a browning dish, the browning
dish bottom must be at least 3/16 inch (5 mm) above
the turntable. Follow the directions supplied with the
browning dish.
\\ \\
Never cook or reheat
a whole egg inside
the shell. Steam
buildup in whole eggs
may cause them to
burst, and possibly
damage the oven.
Slice hard-boiled eggs
before heating. In rare
cases, poached eggs
have been known to
explode. Cover poached eggs ahd allow a
standing time of 1 minute before cutting into them.
For best results, stir
any liquid several
times during heating
or reheating. Liquids
heated in certain
containers (especially
containers shaped like
cylinders) may become
overheated. The liquid
may splash out with a
loud noise during or
after heating or when adding ingredients (coffee
granules, tea bags, etc.). This can harm the oven.
Microwaves may not reach the center of a roast.
The heat spreads to the center from the outer,
cooked areas just as in regular oven cooking. This
is one of the reasons for letting some foods (for
example, roasts or baked potatoes) stand for a
while after cooking, or for stirring some foods
during the cooking time.
Do not deep fry in the oven. Microwavable
utensils are not suitable and it is difficult to maintain
appropriate deep-frying temperatures•
Do not overcook
potatoes. At the end
of the recommended
cooking time, potatoes
should be sfightly firm
because they will
continue cooking during
standing time. After
microwaving, let
potatoes stand for 5
minutes. They will finish
cooking while standing.
',(-: lca[ ¢o[1[tGot'[o•[1
Circuit breaker
or fuse box X
If your electric power
line or outlet voltage is
less than 110 volts,
cooking times may be
longer. Have a qualified
electrician check your
electrical system.

NHcrowave oven features
Your microwave oven is designed to make your 6.
cooking experience as enjoyable and productive as
possible. To help get you up and running quickly,
the following is a list of the oven's basic features: 7.
,. Door Handle. Pull to open door,
_. Door Safety Lock System. The oven will not
operate unless the door is securely closed. _,
_. Window with Metal Shield. Shield prevents
microwaves from escaping. It is designed as a
screen to allow you to view food as it cooks. £,.
z. Cooking Rack. Use for extra space when
cooking in more than ode container at the same -:_.
time. See Page 15 for more information.
5. Glass Turntable (PN 4393751) (not shown).
Included in oven cavity - see below for
11.
installation instructions. This turntable turns
food as it cooks for more even cooking. It must 12.
be in the oven during operation for best cooking ";3.
results. The turntable is sunken into the cavity -;_,
floor to give you more cooking space and better
cooking results. See Pages 7. 10, 35, 39, and 40
for more details.
Charcoal and Grease Filters. Included in oven
cavity. See Page 36 for installation instructions
and cleaning information.
Cooktop/Countertop Light. Turn on to light your
cooktop or countertop or turn on as a night light.
See Page 15 for more information.
Cooking Guide Label. Use as a quick reference
for Auto Cook, Auto Reheat and Auto Defrost.
Exhaust Fan and Cooktop Light Switches.
See Page 15 for more information.
Control Panel. Touch the pads on this panel to
perform all functions. See Pages 12-14 for more
information.
Vent Grille.
Oven Cavity Light.
Microwave Inlet Cover.
Model and Serial Number Plate. See Page 42
for more information.
To install turntable and support:
• Fit the hub (PN 4393754) onto the shaft.
Raised,
curved_
lines --___,_,___,
s"u;oor,qi-- )J
L2"_(_--- Shaft
• Place the support
(PN 4393752) on the
cavity bottom.
• Place the turntable on
the hub. Make sure the
raised, curved lines in
the center of the
turntable bottom are
between the three
"spokes" of the hub.
• The rollers (PN 4393753) on the support should fit
inside the ridge on the bottom of the turntable.
• The turntable turns both clockwise and
counterclockwise. This is normal.

Control panel features
1. Display. This display includes a clock and
indicators to tell you the time of day, cooking
time settings, and cooking functions you chose.
2. POPCORN. Touch this pad when popping
popcorn in your microwave oven.The oven will
automatically heat for a preset time at a preset
cook power. See Page 29 for more information.
3. BEVERAGE. Touch this pad to heat 1 or 2 cups
of a beverage. The oven will automatically heat for a
preset time at a preset cook power. See Page 30
for more information.
4. BAKED POTATO. Touch this pad to cook 1 to 4
potatoes. The oven will automatically cook for a
preset time at a preset cook power. See Page 31
for more information.
£. FROZEN VEGETABLE. Touch this pad to cook
1 to 4 cups of a frozen vegetable. The oven will
automatically cook for a preset time at a preset
cook power. See Page 32 for more information.
_, FROZEN ENTREE. Touch this pad to cook a
10- or 20-ounce frozen entree. The oven will
automatically cook for a preset time at a preset
cook power. See Page 33 for more information,
- HOLD WARM. Touch this pad to keep hot,
cooked foods safely warm in your microwave
oven for up to 99 minutes, 99 seconds, HOLD
WARM can be used by itself, or it can automatically
follow a cooking cycle. See Page 34
for more information.
• AUTO COOK. Touch this pad to cook
microwavable foods without entering times and
",C.
cook powers. See Page 24 for more information.
AUTO DEFROST. Touch this pad to defrost
frozen foods without entering times and cook
powers. See Page 26 for more information.
AUTO REHEAT. Touch this pad to reheat
microwavable foods without entering times and 17.
cook powers. See Page 25 for more information.
ADD ONE MINUTE. Touch this pad to cook for
1 minute, at 100% cook power, or to add an 18.
extra minute to your cooking cycle at the set
cook power. See Page 18 for more information. 19.
•: CLOCK. Touch this pad to enter the correct
time of day. See Page 16 for more information•
_ KITCHEN TIMER. Touch this pad to set the
Kitchen Timer. See Page 17 for more information. 20.
i_ Number pads. Touch Number pads to enter
cooking times, cook powers, quantities, weights,
or food categories.
i 5. COOKTIME. Touch this pad followed by Number
pads to set a cooking time. See Pages 19, 20, 21,
and 22 for more information.
®
OUICKTOUCH
\
POWER. Touch this pad after the cooking time
has been set, followed by a Number pad to set
the amount of microwave energy released to
cook the food. Also touch this pad to lengthen
or shorten a preset cooking time. See Pages 18
and 20 for more information.
TURNTABLE ON/OFF. Touch this Dad to turn
your turntable on and off. See Page 14 for more
information.
START/ENTER. Touch this pad to start a function.
See Page 13 for more information.
OFF/CANCEL. Touch this pad to erase an
incorrect command, cancel a program during
cooking, or to clear the display. See Page 13 for
more information.
EXHAUST FAN HIGH/LOW/OFF. Touch this pad
to turn on the tan at high or low speed. Also use
it to turn the fan off. See Page 15 for more
information.
21. LIGHT ON/NIGHT/OFF. Touch this pad to turn
the light or night light on or off. See Page 15 for
more information.
i2

Control panel features (cont.)
NOTES:
• If you have entered all settings for a function
but do not touch START/ENTER in 5 seconds,
the START? indicator light will show.
• If you open the door while the oven is on and
then shut the door, the START? indicator light
will show. Touch START/ENTER to continue.
• If you choose a function but do not press
another command pad within 1 minute, the
display returns to the time of day and you
have to start over.
Audible signals
Your microwave oven comes with audible
signals that can guide you when setting and
using your oven:
• _ A programming tone will sound each
time you touch a pad.
, _-J One long tone signals the end of a
I
Kitchen Timer countdown.
• Fourtonessignal theend
I
of a cooking cycle.
' [_[_J Two quick, short tones sound once
every minute for the first 15 minutes after an
end-of-cooking signal as a reminder if the
food has not been removed from the oven.
, [_] Two quick, short tones will sound
while entering and exiting from a hidden fea-
ture (for example, Child Lock) or time of day.
. Three tones sound if you have
made an incorrect entry.
To disable the programming tone:
TOUCH
r
and hold for 5 seconds
To turn the programming tone back on:
TOUCH
and hold for 5 seconds
To disable all audible signals except the
end-of-timer signal:
TOUCH
K?D
and hold for 5 seconds
To turn signals back on:
TOUCH
and hold for 5 seconds
NOTE: Two tones will sound when audible signals
are turned on or off.
Interrupting cooking
You can stop the oven during a cycle by opening
the door. The oven stops heating and the fan stops,
but the light stays on. To restart cooking, close the
door and
TOUCH
If you do not want to continue cooking:
' Close the door and the light goes off.
OR
' TOUCH
h'OTE: Before setting a function, touch
OFF/CANCEL to make sure no other
function is on.
continued on next page

Control panel features {cont.)
Heating more than one plate of food
When heating plates of food with a cook time that
you set, you can heat
two 10-inch plates side
by side or one plate
larger than the turntable.
You can heat 2 more
plates on the Cooking
Rack for a possible
total of 4 plates. For
best results, halfway
through cooking turn
the plates halfway
around until the food in the front is in the back.
Do the same when heating a larger (9- to 13-inch)
casserole. When heating 4 dinner plates turn as
described above and switch the top plates with
the bottom plates.
To heat 2 bottom plates together or
one larger plate, the turntable should
not be turning. You can shut the
turntable off by touching
TURNTABLE ON/OFF. "TURN TABLE OFF" appears
on the display. If you touch TURNTABLE ON/OFF
before starting to set the cooking function, your oven
will prompt you to enter a cooking time without you
needing to touch COOK TIME. Your turntable will be
turned back on when cooking is over or when you
touch OFF/CANCEL
NOTE: You cannot turn off the turntable when using
an "auto" function.
Using the child lock
The Child Lock locks the control panel so
children cannot use the microwave oven when
you do not want them to.
To lock the control panel:
TOUCH
I START_I
ENTER
and hold for 5 seconds
Two tones will sound and _ will appear on
the display. When the control panel is locked,
3 tones will sound and LOCK will appear when
you touch any pad except for EXHAUST FAN and
LIGHT, Number pads 1 and 2, and START/ENTER.
To unlock the control panel:
TOUCH
and hold for 5 seconds
Two tones will sound and PI will be cleared from
the display.
Using the demo/learning feature
You can set your microwave oven to display your
commands as you enter them without turning the
magnetron on. This feature helps you learn to use
your oven without actually cooking food.
To set the demo/learning feature:
TOUCH
and hold for 5 seconds
Two tones will sound and a small "d" will appear
on the display.
To cancel the demo/learning feature:
TOUCH
and hold for 5 seconds
Two tones will sound and the small "d" will
disappear from the display.
14

Using the cooking rack
The Cooking Rack gives you extra space when
cooking in more than one container at the same
time.
If you need a replacement rack, you can order
one from your Sears Service Center, or by calling
1-800-366-7278. Make sure to have your model
number when ordering.
Inserting the rack
Insert the rack
securely into the rack
supports on the side
walls of the oven.
NOTES:
• Use oven mitts to remove items from microwave
oven.
• Do not store the metal rack in the oven. Arcing
and damage to the oven could result if someone
accidentally starts the oven.
• Do not operate the oven with the metal rack
stored on the floor of the oven. Damage to the
interior finish will result.
• Use rack only in the microwave oven.
• Do not use rack with browning dish.
• Do not let food container on rack touch the top
or sides of the oven.
• Do not cook foods directly on rack. Put them in
microwave-safe containers first.
• Do not place a metal cooking container on rack.
• Use the Cooking Rack only when cooking at
more than one level.
U. ng the e):haus fan
The pad on the bottom left of the control panel
controls the 2-speed exhaust fan.
-,. Choose fan speed.
i"" '.:: If the temperature from the range or
cooktop below the oven gets too hot, the
exhaust fan in the vent hood will automatically
turn on at the HIGH setting to protect the oven.
It may stay on up to an hour to cool the oven.
When this occurs, the FAN pad will not turn
the fan off.
TOUCH
(once for high speed, twice for low speed)
.3. Turn off fan when desired.
TOUCH
11or 2 more times, depending on fan speed)
"L[te coo[ciop/¢out teI tol light
The pad on the bottom right of the control panel
controls the cooktop/countertop light.
" Turn on light.
2. Turn off light when desired.
TOUCH
(once for regular light, twice for night light)
TOUCH
(1 or 2 times, depending on light setting)

S tt[ng the clock
When your microwave oven is first plugged in, or
after a power failure, the display will flash ":". If a
time of day is not set, ":" will flash until you touch
any pad.
i. Touch CLOCK.
NOTES:
• If you touch in an inval d time and touch CLOCK,
3 tones will sound. Enter the correct time.
• If you touch OFF/CANCEL while setting the clock,
the display will show the last time of day set.
• To turn off the clock, touch CLOCK, Number pad
0, and CLOCK again, the set time will disappear
and ":" will show on the display.
TOUCH YOU SEE
2 Enter the time of day.
Example for 12:00:
Complete your entry.
TOUCH
TOUCH
OR
YOU SEE
YOU SEE

Using the kitchen timer
You can use your microwave oven as a kitchen
timer. Use the Kitchen Timer for timing up to
99 minutes, 99 seconds.
1. Touch KITCHEN TIMER.
NOTE: The oven can operate while the Kitchen Timer
is in use. To see the Kitchen Timer while the oven is
cooking, touch KITCHEN TIMER.
TOUCH
YOU SEE
2. Enter the time to be counted down.
Example for 1 minute, 30 seconds:
NOTE: If you enter more than 4 digits, the first
4 digits will disappear and the following digit(s)
will appear on the right side as you enter them.
TOUCH YOU SEE
3. Start the countdown.
_,:OTE: If you do not do this step within 5
seconds of doing Step 2, "START?" will appear.
You then have 1 minute to touch KITCHEN
TIMER or START/ENTER before the display
returns to the time of day.
At the end of the countdown:
TOUCH
OR
YOU SEE
YOU SEE
To cancel the kitchen timer:
During the countdown: TOUCH
OR
(one long tone will sound)
YOU SEE
(time of day)
17

Usirtg/ DD ONE Nt[NUTE
ADD ONE MINUTE lets you cook food for I minute
at 100% cook power or add an extra minute to your
cooking time cycle.You can also use it to extend
cooking time cycles in multiples of 1 minute, up to
99 minutes.
NOTES:
* To extend cooking time cycles in multiples of
1 minute, touch ADD ONE MINUTE repeatedly
during cooking.
, After closing the door, you can enter ADD ONE
MINUTE without having to touch START/ENTER.
• If you touch ADD ONE MINUTE during cooking,
the oven will cook at the currently selected cook
power. If you touch ADD ONE MINUTE after
cooking is over, the oven will cook at 100%
cook power. You can also change the cook power
after you touch ADD ONE MINUTE by touching
POWER, Number pads for the new cook power,
and START/ENTER.
• You can use ADD ONE MINUTE only for the cook
time functioo.
1. Make sure the food is in the oven.
2. Touch ADD ONE MINUTE.
Example for cooking for 1 minute:
TOUCH
YOU SEE
[*esGt coo1:[[ 9 tillage
If a preset cooking time is too long or too short, you
can lengthen or shor[en the cooking time after
choosing AUTO COOK, AUTO REHEAT, AUTO
DEFROST, POPCORN, BEVERAGE, BAKED POTATO,
FROZEN VEGETABLE, or FROZEN ENTREE. You can
only change cooking times before cooking starts.
For example, in AUTO REHEAT, after choosing the
type of food and entering the quantity:
To lengthen cooking time:
TOUCH
once
YOU SEE
To shorten cooking time: TOUCH
twice
(example for auto reheat)
YOU SEE
To reset to the original cooking time: TOUCH
three times
18
YOU SEE

Using Your Microwave Oven
This section gives you instructions for operating each function. Ptease read these instructions carefully.
Cooking at high cook power
1. Put your food in the oven and close the door.
2. Touch COOK TIME.
TOUCH
YOU SEE
3. Enter the cooking time.
Example for 1 minute, 30 seconds:
4. Start the oven.
TOUCH
L!J
TOUCH
f STAR, q
YOU SEE
YOU SEE
At the end of the cooking time:
C;Janging instructions
You can change the cooking time any time
during cooking by repeating Steps 2, 3, and 4.
YOU SEE
(four tones will sound)

Cooking at different cook powers
The following chart gives the percentage of cook
power each Number pad stands for, and the cook
power name usually used. It also tells you when to
use each cook power. Follow recipe or food package
instructions if available.
For best results, some recipes call for different cook
powers. The lower the cook power, the slower the
cooking. Each Number pad also stands for a
different percentage of cook power. Many
microwave cookbook recipes tell you by number,
percent, or name which cook power to use. NOTE: Refer to a reliable cookbook for cooking times.
COOK POWER NAME WHEN TO USE IT
10=t 00% offull power High * Quick heating many convenience foods and
(automatic) foods with high water content, such as soups
and beverages
• Cooking small tender pieces of meat, ground
meat, poultry pieces, fish fillets, and most
vegetables
9=90% of full power • Heating cream soups
8=80% of full power • Heating rice, pasta, or stirrable casseroles
7=70% of full power Medium-High ° Cooking and heating foods that need a cook
power lower than high (for example, whole fish
and meat loaf) or when food is cooking too fast
, Reheating a single serving of food
6=60% of full power , Cooking sensitive foods, such as cheese and egg
dishes, pudding, and custards
I
i , Cooking nonstirrable casseroles, such as lasagna
, 5=50% of full power Medium , Cooking ham, whole poultry, and pot roasts
i , Melting chocolate
I 4=40% of full power _ Simmering stews
• Heating pastries
3=30% of full power Medium-Low, , Defrosting foods, such as bread, fish, meats,
Defrost poultry, and precooked foods
2=20% of full power , Softening butter, cheese, and ice cream
1=10% of full power Low • Keeping food warm
, Taking chili out of fruit
I,'O'..-E:Once cook time has been entered you can also use the POWER pad as a second Kitchen Timer
by entering "0" for the cook power. The oven will count down the cooking time you set without cooking.

Cooking at different cook powers (cont.)
1. Put your food in the oven and close the door.
2. Touch COOK TIME.
TOUCH
YOU SEE
3. Enter the cooking time.
Example for 7 minutes, 30 seconds:
4. Set the cook power.
Example for 50% cook power:
5. Start the oven.
TOUCH
TOUCH
TOUCH
OR
(repeat until desired
cook power appears)
TOUCH
YOU SEE
YOU SEE
YOU SEE
YOU SEE
At the end of the cooking time:
Changing instructions
You can change the cooking time or cook power
any time during cooking by repeating Steps 2, 3
and/or 4 and 5.
YOU SEE
(four tones will sound)

Cooking in stages
For best results, some recipes call for one cook
power for a certain length of time, and another
cook power for another length of time. Your oven
can be set to change from one to another
automatically, for up to 3 stages.
You can set your chosen cook functions in any
order. However, if you use AUTO DEFROST it must
be the first stage.
NOTE: You cannot sensor cook with stages.
1. Put your food in the oven and close the door.
2. Touch COOK TIME. TOUCH YOU SEE
3. Enter the cooking time for the first stage. TOUCH YOU SEE
Example for 7 minutes, 30 seconds:
4. Set the cook power for the first stage. TOUCH
YOU SEE
Example for 50% cook power:
5. Repeat Steps 2, 3, and 4 to set the cooking time
and cook power for each additional stage.
TOUCH
OR
(repeat until desired
cook power appears}
22
YOU SEE

Cooking in stages (cont.)
6. Start the oven.
TOUCH
YOU SEE
After the first stage is over, the next stage(s)
will count down.
At the end of the cooking time:
(first stage, when cooking
with 2 stages)
YOU SEE
(four tones will sound)
Changing instructions
You can change cooking times or cook powers
for a stage any time after that stage starts by
repeating Steps 2, 3 and/or 4 and 5.

Using AUTO COOK
You can cook microwavable foods just by choosing
a category and quantity. AUTO COOK has preset
times and cook powers for 7 categories (see chart
below).
To use AUTO COOK, follow the steps below:
1. Touch
once
You see
3. Touch one or more Number pads to enter the
quantity.
Example
for 1 cup
You see
Example
for 1 cup
4. Touch
YOUsee
2. Touch AUTO COOK 1 to 7 times to choose the
type of food.
(countdown time
may vary)
Example
for rice
OR once
Touch a Number pad to choose the type of
food.
_ xample
for rice
You see
Example
for rice
NOTES:
• If you do not enter a quantity within 2 seconds,
AUTO COOK will prompt you to choose a
quantity. You then have 1 minute to enter a
quantity and to touch START/ENTER. If you do
not do so, AUTO COOK will be canceled.
c If you touch AUTO COOK 8 times, the display
returns to the Rice setting.
, If you need more or less time, do not touch
AUTO COOK again. Touch POWER before you
touch START/ENTER, (See "Changing preset
cooking times" in the "Getting to Know" section.)
, When cooking bacon, keep in mind that
differences in the amount of fat," meat, thickness
and curing process will affect how bacon is
cooked. Also, regular sliced bacon averages
about 16 slices per pound.
This chart shows you how to choose a type of food and the amounts
TOUCH OR TOUCH
FOOD AUTO COOK* NUMBER PAD
Rice once 1
Fresh Vegetables twice 2
Frozen Vegetables 3 times 3
Canned Vegetables 4 times 4
Bacon 5 times 5
Cereal (instant) 6 times 6
French Toast 7 times 7
you can choose for each type.
AMOUNTS YOU
CAN CHOOSE
0.5, 1, 1.5, or 2 cups**
(118 ml, 237 ml, 355 ml, or 473 ml)
1 to 4 cups (237 ml to 946 ml)
1 to 4 cups (237 ml to 946 ml)
1 to 4 cups (237 ml to 946 ml)
1 to 8 pieces, average thickness
1 to 4 servings
1 to 4 pieces
*You must touch AUTO COOK once before choosing the food type.
**Set 0,5 cup by touching "O" and "5" or only "0" or only "5/' Set 1,0 cup by touching
touching "1" and "5". Set 2.0 cups by touching "2" and "0" or only "2".
"1" and "0" or only "1." Set 1.5 cups by

Using AUTO REHEAT
You can reheat microwavabte foods just by
choosing a category and quantity. AUTO REHEAT
has preset times and cook powers for 5 categories
(see chart below).
To use AUTO REHEAT, follow the steps below:
1. Touch
once
You see
2. Touch AUTO REHEAT 1 to 5 times to choose the
type of food.
3. Touch a Number pad to enter the quantity.
Example for
1 slice
YOU see
Example for
1 slice
4. Touch
You see
(countdown
time may
vary)
_ Example for pizza
slice
once
OR
Touch a Number pad to choose the type
of food.
Example for pizzaslice
You see
Example for
pizza slice
NOTES:
• If you do not enter a quantity within 2 seconds,
AUTO REHEAT will prompt you to choose a
quantity. You then have 1 minute to enter a
quantity and to touch START/ENTER. If you do
not do so, AUTO REHEAT will be canceled.
• if you touch AUTO REHEAT 6 times, the display
returns to the Pizza Slice setting.
• If you need more or less time, do not touch
AUTO REHEAT again. Touch POWER before you
touch START/ENTER. (See "Changing preset
cooking times" in the "Getting to Know" section.)
• When reheating a large (4 oz) muffin or bagel
use the 2-piece setting. The 1-piece setting
bakes 1 regular-size muffin or bagel, or 2 smalt
dinner rolls.
This chart shows you how to choose a type of food and the amounts you can choose for each type.
TOUCH TOUCH AMOUNTS YOU
FOOD AUTO REHEAT* OR NUMBER PAD CAN CHOOSE
Pizza Slice once 1 1 to 3 slices, 5 oz (142 g) each
Soup/Sauce twice 2 1 to 4 cups (237 ml to 946 ml)
Casserole 3 times 3 1 to 4 cups (237 ml to 946 ml)
Baked Goods 4 times 4 1 to 6 pieces, 2 oz (57 g) each
Plate (of food) 5 times 5 1 serving (or 1 plate)
• You must touch AUTO REHEAT once before choosing the food type.
25

Using AUTO DEFROST
You can defrost food by choosing a category and
setting a weight. AUTO DEFROST has preset times
and cook powers for 3 categories (see chart below).
To use AUTO DEFROST, follow the steps below:
1. Touch
once
You see
2. Touch AUTO DEFROST 1 to 3 times to choose
the type of food.
Example for meats
once
OR
Touch a Number pad to choose the type
of food. _ Exampte for meats
You see
Example
for meats
4. Touch
You see
I STARTENTER-o)
(countdown
time may vary)
NOTES:
• If you do not enter a weight within 2 seconds,
AUTO DEFROST will prompt you to enter a weight.
You then have 1 minute to enter a weight and to
touch START/ENTER. If you do not do so, AUTO
DEFROST will be canceled.
• If you enter a weight higher than the highest weight
atlowed for your food setting, 3 tones will sound
and "RETRY" will appear on the display when you
touch START/ENTER.
• If you touch AUTO DEFROST 4 times, the display
returns to the Meats setting.
• If you need more or less defrosting time, do not
touch AUTO DEFROST again. Touch POWER
before you touch START/ENTER. (See "Changing
preset cooking times" in the "Getting to Know"
section.)
= See the "Auto defrost chart" later in this section
for defrosting directions for each food.
• To defrost items net listed in the "Auto defrost
chart," use 30% cook power. Refer to a reliable
cookbook for defrosting information.
3. Touch Number pad(s) to enter the weight.
Example for 1.1 Ibs
twice
You see
Example
for 1.1 Ibs
For even, complete defrosting
,- The shape of the package affects how quickly food
will defrost. Shallow packages will defrost more
quickly than a deep block.
• As food begins to defrost, separate the pleces.
Separated pieces defrost more evenly.
• Use small pieces of aluminum foil to shield parts
of food such as chicken wings, leg tips, fish tails,
or areas that start to get warm. Make sure the foil
does not touch the sides, top, or bottom of
the oven.
This chart shows you how to choose a type of food and the weights you can set for each type.
TOUCH OR TOUCH WEIGHTS YOU CAN SET
FOOD AUTO DEFROST* NUMBER PAD (tenths of a pound)
f eats once 1 .1 to 6.6 (45 g to 2994 g)
Poultry twice 2 .1 to 6.6 (45 g to 2994 g)
F
Fish 3 times 3 .1 to 4.4 (45 g to 1998 g).
I
You must touch AUTO DEFROST once before choosing the food type.
26

Auto defrost chart
Meat setting
FOOD
Beef
Ground Beef, Bulk
Ground Beef, Patties
Round Steak, Tenderloin Steak,
Pot Roast, Chuck Roast, Rib
Roast, Rolled Rump Roast
Stew Beef
Lamb
Cubes for Stew
Chops (1 inch [2.5 cm] thick)
Pork
Chops (1/2 inch [13 mm] thick),
Hot Dogs, Spareribs, Country-
Style Ribs, Loin Roast (Boneless),
Sausage, Links
Sausage, Bulk
SPECIAL INSTRUCTIONS
Meat of irregular shape and large, fatty cuts of meat should have the
narrow or fatty areas shielded with foil at the beginning of a defrost cycle.
Do not defrost less than 1/4 Ib (133 g).
Do not defrost less than two 4 oz (133 g) patties.
Place on a microwavable roasting rack.
Place in a microwavable baking dish.
Place in a microwavable baking dish.
Place on a microwavable roasting rack.
Place on a microwavable roasting rack.
Place in a microwavable baking dish.
Fish setting
FOOD
Fish
Fillets
Steaks
Whole
Shell Fish
Crabmeat,
Lobster Tails,
Shrimp, Scallops
SPECIAL INSTRUCTIONS
Place in a microwavable baking dish. Carefully separate fillets under
cold water.
Place in a microwavable baking dish. Run cold water over to finish defrosting.
Place in a microwavable baking dish. Cover head and tail with foil; do
not let foil touch sides of microwave oven. Finish defrosting by
immersing in cold water.
Place in a microwavable baking dish.
continued on next page

Auto defrost chart (cont.)
Poultry setting
FOOD SPECIAL INSTRUCTIONS
Chicken
Whole Place chicken breast-side up on a microwavable roasting rack. Finish defrosting
(up to 9-1/2 Ibs [4.3 kg]) by immersing in cold water. Remove giblets when chicken is partially defrosted.
Cut Up Place on a microwavable roasting rack.
Finish defrosting by immersing in cold water.
Cornish Hens
Whole Place on a microwavable roasting rack. Finish defrosting by immersing in cold water.
Turkey
Breast Place on a microwavabte roasting rack. Finish defrosting by immersing in cold water.
(under 6 Ibs [2.7 g])
Def['ost[ng tips
• When using AUTO DEFROST, you need to enter
the net weight (the weight of the food minus
the container). Enter the weight to the nearest
1/10 Ib (45 g).
• Only use AUTO DEFROST for raw food.
AUTO DEFROST gives best results when the
food to be thawed is completely frozen. If the
food is partially defrosted, always set a lower
food weight (for a shorter defrosting time) to
prevent cooking the food.
• For better results, a preset standing time is
included in the defrosting time. This may make the
defrosting time seem longer than expected. (For
more information on standing time, see the
"Microwave cooking tips" in the "Cooking Guide"
section.)
Weight conversion chart
You are probably used to food weig.hts as being in
"pounds _nd ounces that are fractio_ns of a pound
(for example 4 ounces equals 1/4 pound). However,
in order to enter food weight in AUTO DEFROST,
you must specify pounds and tenths of a pound.
If the weight on the food package is in fractions of a
pound, you can use the follqwing chart to convert the
weight to decimals.
I
DECIMAL WEIGHT EQUIVALENT OUNCE WEIGHT EQUIVALENT GRAM WEIGHT
.10 1.6 45
.20 3.2 91
.25 One-Quarter Pound 4.0 113
.30 4.8 136
.40 6.4 181
.50 One-Half Pound 8.0 227
.60 9.6 272
.70 11.2 318
.75 Three-Quarters Pound 12.0 340
.80 12.8 363
.90 14.4 408
1.00 One Pound 16.0 454
28

Using POPCORN
You can pop commercially packaged microwave
popcorn by touching just one pad. The number of
times you touch this pad determines which size
bag of popcorn your oven will pop.
For best results:
• Pop only 1 package at a time.
• If you are using a microwave popcorn popper,
follow manufacturer's instructions.
To use POPCORN, follow the steps below:
1. Place the bag in the center of the turntable.
2. Touch POPCORN 1 to 3 times to choose the
bag size.
Example for3.5 oz
once
You see
Example for
3.5 oz
NOTES:
• If you touch POPCORN 4 times, the display
returns to the 3.5 ounce (100 g) setting.
• You do not need to touch START/ENTER to start
the oven. The oven will start in 5 seconds.
• If you need more or less time, do not touch
POPCORN again. Touch POWER before the
oven starts cooking. (See "Changing preset
cooking times" in the "Getting to Know"
section.)
Popcorn brands make a difference
How well your popcorn cooks will depend on the
brand of popcorn and how much fat it has in it.
Try several brands to decide which pops the best.
For best results, use fresh bags of popcorn.
(countdown
time may
vary)
This chart shows you how to choose a bag size.
BAG SIZE TOUCH
i (ounces) POPCORN
l 3.5 (100 g) once
3,0 (85 g) twice
-. 1.75 !50 g) 3 times

Using BEVERAGE
You can heat one or two 8-ounce (227 g) cups of
a beverage by touching just one pad. The number
of times you touch this pad determines the number
of cups your oven will heat.
NOTES:
• Ifyou touch BEVERAGE 3 times, the display
returns to the 1-cup setting.
• You do not need to touch START/ENTER to start
the oven. The oven will start heating by itself
in 5 seconds.
• If you need more or less time, do not touch
BEVERAGE again. Touch POWER before the
oven starts cooking. (See "Changing preset
cooking times" in the "Getting to Know" section.)
1. Place your cup(s) of beverage in the oven and
close the door.
2. Touch BEVERAGE.
If you want to heat 1 cup, just wait 5 seconds
and the oven will start heating automatically
for 1 cup.
TOUCH
YOU SEE
3. Change to 2 cups, if desired.
After 5 seconds, the oven will start heating.
TOUCH
OR
C?D
YOU SEE
YOU SEE
At end of heating time:
(countdown time may vary
from above)
(example for 2 cups)
YOU SEE
(fourtones willsound)

Using BAKED POTATO
You can cook one to four baking potatoes (10 oz
[284 g] to 13 oz [369 g] each) by touching just one
pad. The number of times.you touch this pad deter-
mines the number of potatoes your oven will cook.
NOTES:
• If you touch BAKED POTATO 5 times, the display
returns to the 1-potato setting.
, You do not need to touch START/ENTER to start
the oven. The oven will start cooking by itself in
5 seconds.
• If you need more or less time, do not touch BAKED
POTATO again. Touch POWER before the oven
starts cooking. (See "Changing preset cooking
times" in the "Getting to Know" section.)
For a better baked potato
Before baking, remember to pierce the potato with
a fork several times. After cooking, let potatoes
stand 5 minutes to finish cooking.
1. Put pierced potato(es) in the oven and close
the door.
2. Touch BAKED POTATO.
If you want to cook 1 potato, just wait 5
seconds.
TOUCH
I BAKEDPOTATO
YOU SEE
3. Change to 2 to 4 potatoes, if desired.
Example for 2 potatoes:
After 5 seconds, the oven will start cooking.
Example for 2 potatoes:
TOUCH
I BAKED 1POTATO
OR
CSD
{aNumber pad)
YOU SEE
YOU SEE
At end of cooking time:
(countdown time may vary
from above)
YOU SEE
(four tones will sound)
5i

Using FROZEN VEGETABLE
You can cook 1 to 4 cups of a frozen vegetable by
touching just one pad. The number of times you
touch this pad determines the number of cups your
oven will cook.
NOTES:
• If you touch FROZEN VEGETABLE 5 times, the
display returns to the 1-cup setting.
• You do not need to touch START/ENTER to start
the oven. The oven will start cooking by itself
in 5 seconds.
• If you need more or less time, do not touch
FROZEN VEGETABLE again. Touch POWER before
the oven starts cooking. (See "Changing preset
cooking times" in the "Getting to Know" section.)
1, Put your vegetables in the oven and close
the door.
2, Touch FROZEN VEGETABLE. YOU SEE
If you want to cook 1 cup of vegetables,
just wait 5 seconds.
TOUCH
3. Change to 2 to 4 cups, if desired.
Example for 2 cups:
After 5 seconds, the oven will start cooking.
Example for 2 cups:
TOUCH
OR
CSD
(a Number pad)
YOU SEE
YOU SEE
At end of cooking time:
(countdown time may vary
from above)
YOU SEE
32
(four tones will sound)

Using FROZEN ENTREE
You can cook a 10- or 20-ounce (284 g or 568 g)
frozen entree by touching just one pad. The number
of times you touch this pad determines the size of
entree your oven will cook.
NOTES:
• If you touch FROZEN ENTREE 3 times, the display
returns to the 10-ounce (284 g) setting.
• You do not need to touch START/ENTER to
start the oven. The oven will start cooking by
itself in 5 seconds.
• If you need more or less time, do not touch
FROZEN ENTREE again. Touch POWER before
the oven starts cooking. (See "Changing preset
cooking times" in the "Getting to Know" section.)
1. Place your frozen entree on the turntable and
close the door.
2. Touch FROZEN ENTREE. YOU SEE
If you want to cook a 10-ounce (284 g) frozen
entree, just wait 5 seconds.
TOUCH
_ ROZENENTREE
2. Change to 20 ounces (568 g), if desired.
After 5 seconds, the oven will start cooking.
Example for 20 ounces:
TOUCH
I ROZENENTREE
OR
C,
YOU SEE
YOU SEE
At end of cooking time:
(countdown time may vary
from above)
YOU SEE
(four tones will sound)
33

Using HOLD WARM
You can safely keep hot, cooked food warm in
your microwave oven for up to 99 minutes,
99 seconds (about 1 hour, 40 minutes). You can
use HOLD WARM by itself, or to automatically
follow a cooking cycle.
NOTES:
• HOLD WARM operates for up to 99 minutes,
99 seconds.
• Opening the oven door cancels HOLD WARM.
Close the door and touch HOLD WARM, then
touch START/ENTER if additional HOLD WARM
• Food cooked covered should be covered during
HOLD WARM.
• Pastry items (pies, turnovers, etc.) should be
uncovered during HOLD WARM.
• Complete meals kept warm on a dinner plate
should be covered during HOLD WARM.
• Do not use more than one complete HOLD WARM
cycle (about 1 hour, 40 minutes). The quality of
some foods will suffer with extended time.
time is desired.
1. Put hot, cooked food in the oven and close
the door.
2. Touch HOLD WARM. TOUCH YOU SEE
3. Sta_ the oven.
TOUCH
YOU SEE
To make HOLD WAR M automatically
follow another cycle:
• While entering cooking instructions, touch
HOLD WARM before touching START/ENTER,
or during cooking.
, When the last cooking cycle is over, you will hear
two tones. "WARM" will come on while the oven
continues to run.
34

Caring for Your Microwave
ven
To make sure your microwave oven looks good and works well for a long time, you should maintain it properly.
For proper care, please follow these instructions carefully.
For interior surfaces:
Wash often with warm,
sudsy water and a
sponge or soft cloth.
Use only mild,
nonabrasive soaps or a
mild detergent. Be sure
to keep the areas
clean where the door
and oven frame touch
when closed. Wipe well
with clean water. Over time, stains can occur on the
surfaces as the result of food particles spattering
during cooking. This is normal.
For stubborn soil, boil
a cup of water in the
oven for 2 or 3
minutes. Steam will
soften the soil. To get
rid of odors inside the
oven, boil a cup of
water with some lemon
juice or vinegar in it.
Glass turntable
Turntable
support
To clean turntable and
turntable support, wash
in mild, sudsy water; for
heavily soiled areas use
a mild cleanser and
scouring sponge. The
turntable and turntable
support are dishwasher
safe.
Cleaning the cooking rack
• Wash by hand with a
mild detergent and a
soft sponge or nylon
scrub brush. Dry
completely.
f Do not use abrasive
scrubbers or cleansers
to clean rack.
• The rack is dishwasher
safe.
For exterior surfaces
and control panel: Use
a soft cloth with spray
glass cleaner. Apply the
spray glass cleaner to
the soft cloth; do not
spray directly on the
oven.
NOTE: Abrasive
cleansers, steel-wool
pads, gritty wash
cloths, some paper towels, etc., can damage the
control panel and the interior and exterior oven
surfaces.
3_

Installing and caring for the filters
The grease (silver aluminum) filters should be
removed and cleaned often, at least once a month.
The charcoal filter cannot be cleaned and
should be replaced every 6 to 12 months.
NOTE: Your microwave hood combination comes
with a charcoal (black fiber) filter installed behind the
aluminum grease filter. The charcoal filter helps
remove odors and provide clean recirculated air.
You may remove the charcoal filter if venting to the
outside.
You can order replacements (PN 4393690) from your
nearest Sears Service Center.
Electrical Shock Hazard
Disconnect power before removing filters.
Replace all panels before operating.
Failure to do so can result in death
or electrical shock.
Removing, cleaning, and replacing
1. Unplug microwave oven or disconnect power.
2. To remove the
grease (silver
aluminum) filters,
grasp tab and pull
filter towards the
opposite side. Pull
the filter downward
to remove.
Tabs
Charcoal filter
3. To remove the
charcoal (black
fiber) filters, gently
bend back the
metal tabs on the
back of the grease
filter and pull the
charcoal filter out.
Grease filter Tabs TO replace the
charcoal filters,
Align the charcoal
filter over the grease filter. Gently bend the metal
tabs on the back of the grease filter over the
charcoal filter.
NOTE: Use care in bending metal tabs so as not to
break them off.
: _1_ AMMONIA I I
CkEANER _ _
4. Soak grease filters in
hot water and a mild
detergent. Scrub and
swish to remove
embedded dirt and
grease. Rinse well
and shake to dry.
Do not use ammonia,
corrosive cleaning
agents such as lye-
based oven cleaners,
or place in a dishwasher. The filter will turn black
or could be damaged.
5. To replace the grease
filters, slide each filter
into the outer side of
the filter opening.
Make sure you are
sliding in the side of
the filter that does not
have the tab. Hold the
T,b, tab with your other
hand. Push up the tab
side of the filter and
slide the filter to the other side of the opening to
lock into place.
6. Reconnect power or plug in microwave oven.
NOTE: Do not operate the vent fan without the
filters in place.
36

Rep[acirtg the cooktop and oven lights
The cooktop light
1. Unplug microwave oven or disconnect power.
2. Remove the bulb
cover mounting screw
and carefully remove
the cover.
Mounting
screw
3. Replace bulb(s) with candelabra-base 30-waft
bulb(s) (PN 4393681) available from your
Sears Service Center.
4. Replace the bulb cover and mounting screw.
5. Plug in microwave oven or reconnect power.
The oven light
1. Unplug microwave oven or disconnect power.
2. Remove the two vent
grille mounting screws
located above the
cover (the two outer
screws).
5. Replace the bulb with a candelabra-base
30-watt bulb (PN 4393681) a_,ailable from your
Sears Service Center.
6. Close the bulb coven
I 7.
Slide the top of the vent
grille into place. Push
the bottom until it snaps
into place. Replace the
mounting screws.
3. Tip the grille forward,
then lift out to remove.
8. Plug in microwave oven or reconnect power.
4. Lift up the bulb cover.

Cooking Guide
Microwave cooking tips
Amount of food
• If you increase or decrease the amount of food
you prepare, the time it takes to cook that food
will also change. For example, if you double a
recipe, add a little more than half the original
cooking time. Check for doneness and, if
necessary, add more time in small increments.
Starting temperature of food
• The lower the temperature of the food being
put into the microwave oven, the longer it takes
to cook. Food at room temperature will be
reheated more quickly than food at refrigerator
temperature.
Composition of food
• Food with a lot of fat and sugar will be heated
faster than food containing a lot of water. Fat and
sugar will also reach a higher temperature than
water in the cooking process.
The more dense the food, the longer it takes
to heat. "Very dense" food like meat takes longer
to reheat than lighter, more porous food like
sponge cakes.
Size and shape
' Smaller pieces of food will cook faster than
larger pieces. Also, same-shaped pieces cook
more evenly than different-shaped pieces.
, With foods that have different thicknesses,
the thinner parts will cook faster than the thicker
parts. Place the thinner parts of chicken wings
and legs in the center of the dish.
Stirring, turning foods
0 Stirring and turning foods spreads heat quickly
to the center of the dish and avoids overcooking
at the outer edges of the food.
Covering food
Cover food to:
• Reduce splattering
• Shorten cooking times
• Keep food moist
You can use any covering that lets microwaves pass
through.
Releasing pressure in foods
• Several foods (for example: baked potatoes,
sausages, egg yolks, and some fruits) are tightly
covered by a skin or membrane. Steam can build
up under the membrane during cooking, causing
the food to burst. To relieve the pressure and to
prevent bursting, pierce these foods before
cooking with a fork, cocktail pick, or toothpick.
Using standing time
• Always allow food to stand after cooking.
Standing time after defrosting and cooking allows
the temperature to evenly spread throughout the
food, improving the cooking results.
, The length of the standing time depends on
how much food you are cooking and how dense
it is. Sometimes it can be as short as the time it
takes you to remove the food from the oven and
take it to the serving table. However, with larger,
denser food, the standing time may be as long
as 10 minutes.
continued on next page
38

rtqicrowave cooking tips (cont.)
Arranging food
For best results, place food evenly on the plate.
You can do this in several ways:
• If you are cooking several items of the same
food, such as baked potatoes, place them in a
ring pattern for uniform cooking.
• When cooking foods of uneven shapes or
thickness, such as chicken breasts, place the
smaller or thinner area of the food towards the
center of the dish where it will be heated last.
• Layer thin slices of meat on top of each other.
• When you cook or reheat whole fish, score
the skin - this prevents cracking.
• Do not let food or a container touch the top
or sides of the oven. This will prevent possible
arcing.
Using aluminum foil
Metal containers should not be used in a
microwave oven. There are, however, some
exceptions. If you have purchased food which is
prepackaged in an aluminum foil container, refer
to the instructions on the package. When using
aluminum foil containers, cooking times may be
longer because microwaves will only penetrate the
top of the food.
If you use aluminum containers without package
instructions, follow these guidelines:
• Place the container in a glass bowl and add some
water so that it covers the bottom of the container,
not more than 1/4 inch (6 mm) high. This ensures
even heating of the container bottom.
• Always remove the lid to avoid damage to
the oven.
• Use only undamaged containers.
• Do not use containers taller than 3/4 inch (19 mm).
• Container must be at least half tilled.
, To avoid arcing, there must be a minimum
1/4 inch (6 mm) between the aluminum container
and the walls of the oven and also between two
aluminum containers.
• Always place the container on the turntable.
• Reheating food in aluminum foil containers usually
takes up to double the time compared to reheating
in plastic, glass, china, or paper containers. The
time when food is ready will vary depending upon
the type of container you use.
, Let food stand for 2 to 3 minutes after heating so
that heat is spread evenly throughout container.
Cooking you should not do in your
microwave oven
' Do not do canning of foods in the oven. Closed
glass jars may explode, resulting in damage to
the oven or possible personal injury.
• Do not use the microwave oven to sterilize objects
(baby bottles, etc.). It is difficult to keep the oven at
the high temperature needed for safe sterilization.
39

Questions and Answers
QUESTIONS ANSWERS
Can I operate my microwave oven without the
turntable or turn the turntable over to hold a
large dish?
You can turn off the turntable to heat 2 dinner
plates side by side or one dish that's larger than
the turntable. However, if you only need to heat one
plate on the turntable, keep the turntable on for
best cooking results. Also, you should not turn over
the turntable. A plate used on the turntable must fit
on it when the turntable is correct side up.
Can I use a rack in my microwave oven so that I You can use a rack only if the rack is supplied
may reheat or cook on two levels at a time? with your microwave oven. If you use a rack not
supplied with the microwave oven, you can get poor
cooking performance and/or arcing.
Can I use either metal or aluminum pans in my You can use aluminum foil for shielding (use
microwave oven? small, flat pieces), smatl skewers, and shallow
foil trays (iftray is 3/4 inch [19 mm] deep or less
and at least half filled with food to absorb
microwave energy). Never allow metal to touch walls
or door. (For more information, see "Using aluminum
foil" in the "Cooking Guide" section.)
Is it normal for the turntable to turn in
either direction?
Yes. The turntable rotates clockwise or counter-
clockwise, depending on the rotation of the
motor when the cooking cycle begins.
Sometimes the door of my microwave oven
appears wavy. Is this normal?
This appearance is normal and does not affect the
operation of your oven.
What are the humming noises that I hear when my
microwave oven is operating?
You hear the sound of the transformer when the
magnetron tube cycles on.
Why does the dish become hot when I microwave
food in it? [ thought that this should not happen.
What does "standing time" mean?
As the food becomes hot it will conduct the heat
to the dish. Be prepared to use hot pads to remove
food after cooking.
"Standing time" means that food should be
removed from the oven and covered for additional
time to allow it to finish cooking. This frees the oven
for other cooking.
Why does steam come out of the air exhaust vent? Steam is normally produced during_cooking. The
microwave oven has been designed to vent this
steam out the vent.
Can I pop popcorn in my microwave oven? Yes. Pop packaged microwave popcorn
How do I get the best results? following manufacturer's guidelines or use the
sensor POPCORN pad. Do not use regular paper
bags. Use the "listening test" by stopping the
oven as soon as the popping slows to a "pop"
every 1 or 2 seconds. Do not repop unpopped
kernels. Do not pop popcorn in glass cookware.
4O

Troubleshooting
Most cooking problems often are caused by little things you can find and fix without tools of any kind. Check
the lists below and on the next page before calling for assistance or service. If you still need help, see the
"Sears Toll-Free Numbers" section on Back Cover.
Microwave oven does not work
PROBLEM CAUSE
Nothing works. • The power supply cord is not plugged into a live circuit with the proper
voltage. (See the "Electdcal requirements" section on page 4 and the
"Electrical connection" section on Page 10.)
• A household fuse has blown or a circuit breaker has tripped.
• The electric company has had a power failure.
The microwave oven
will not run.
• You are using the oven as a timer. Touch OFF/CANCEL to cancel the
Kitchen Timer.
• The door is not firmly closed and latched.
• You did not touch START/ENTER.
• You did not follow directions exactly.
• An operation that you set earlier is still running. Touch OFF/CANCEL to
cancel that operation.
PROBLEM CAUSE
Food is not cooked
enough.
• The electric supply to your home or wall outlets is low or lower than normal.
Your electric company can tell you if the line voltage is low, Your electrician
or service technician can tell you if the outlet voltage is low.
• The cook power is not at the recommended setting, Check the chart on
Page 20,
• You have not allowed enough cooking time for the amount of food being
cooked. Larger amounts of food need longer cooking times.
The display shows a time " The oven door is not closed completely.
counting down but the • You have set the controls as a kitchen timer. Touch OFF/CANCEL to cancel
oven is not cooking, the Kitchen Timer.

Turntable
PROBLEM
The turntable will
not turn.
CAUSE
• You have turned off the turntable. (See the "Heating more than one plate of
food" section on Page 14.)
• The turntable is not correctly in place. It should be correct-side up and
sitting firmly on the center shaft.
• The support is not operating correctly. Remove the turntable and restart the
oven. If the support still does not move, call an authorized service technician
for repair. Cooking without the turntable can give you poor results.
Tones
PROBLEM
You do not hear the
programming or
end-of-cycle tone.
CAUSE
• You have not entered the correct command.
• You have turned off the tone. See the "Audible signals" section on Page 13.
Display messages
I PROBLEM
The display is flashing ":".
CAUSE
• There has been a power interruption. Reset the clock. (See the "Setting the
clock" section on Page 16.)
If none of these items are causing your problem, see the "Sears Toll-Free Numbers" section on Back Cover.
Please record your model's information.
Whenever you call to request service for your appliance,
you need to know your complete model number and
serial number. You can find this information on the
model and serial number labeVplate (see "Microwave
oven features" in the "Getting to Know" section). Also,
record the other information shown in the next column.
Model Number
Serial Number
Purchase Date
Dealer Name
Dealer Address
Dealer Phone
42

Index
This index is alphabetical. It contains all the topics included in this manual, along with the page(s) on which
you can find each topic.
TOPIC PAGE
ALUMINUM FOIL ........................................................ 39
AUDIBLE SIGNALS .................................................. 13
CARING FOR YOUR MICROWAVE OVEN .............. 35
CHARTS
Auto cook ................................................................ 24
Auto defrost .............................................. 26, 27, 28
Auto reheat .......................................................... 25
Cook powers ........................................................ 20
Popcorn ................................................................ 29
Weight conversion ................................................ 28
CONTROL PANEL .............................................. 12-14
ADD ONE MINUTE ................................................ 18
AUTO COOK .......................................................... 24
AUTO DEFROST .................................................. 26
AUTO REHEAT ...................................................... 25
BAKED POTATO .................................................... 31
BEVERAGE ............................................................ 30
Changing preset cooking times ............................ 18
Child lock ................................................................ 14
CLOCK .................................................................... 16
Cooking at high cook power ................................ 19
Cooking at different cook powers .................... 20,21
COOK TIME .............................................. 19, 21, 22
Demo/learning feature .......................................... 14
Display .................................................................. 12
Fan ........................................................................ 15
FROZEN ENTREE .................................................. 33
FROZEN VEGETABLE .......................................... 32
HOLD WARM .......................................................... 34
Interrupting cooking .............................................. 13
Kitchen timer ........................................................ 17
Light ...................................................................... 15
Number pads ........................................................ 12
OFF/CANCEL ........................................................ 13
POPCORN ............................................................ 29
POWER .................................................... 20, 21, 22
Stage cooking ................................................ 22, 23
START/ENTER ...................................................... 13
TURNTABLE ON/OFF ............................................ 14
ELECTRICAL REQUIREMENTS ............................ 5, 10
EXHAUST FAN ........................................................ 15
TOPIC PAGE
FILTERS .................................................................... 36
HOW YOUR MICROWAVE OVEN WORKS .............. 7, 8
INSTALLATION REQUIREMENTS .............................. 5
LIGHTS
Replacing .............................................................. 37
Using .................................................................... 15
PARTS AND FEATURES
Cooking guide label .............................................. 11
Cooking rack .................................................... 11, 15
Door handle .......................................................... 11
Door safety lock system ........................................ 11
Magnetron ........................................................ 7, 40
Model and serial number plate ............................ 11
Turntable .................................... 7, 10, 11, 35, 40, 42
Vent grille .............................................................. 11
Window ................................................................ 11
QUESTIONS AND ANSWERS ................................ 40
RACK .................................................................. 15, 40
RADIO INTERFERENCE ............................................ 8
REPLACING COOKTOP AND OVEN LIGHTS ........37
SAFETY .......................................................... 3-5, 9-10
SERVICE .................................................................... 2
STANDING TIME .......................................... 28, 38, 40
TESTING.YOUR DINNERWARE
OR COOKWARE .......................................................... 9
TESTING YOUR MICROWAVE OVEN ........................ 8
TIPS
Baked potato .......................................................... 31
Cooking ............................................................ 41-42
Defrosting .............................................................. 28
Popcorn .................................................................. 29
TOLL-FREE NUMBERS ............................ Back Cover
TROUBLESHOOTING ........................................ 41-42
WARRANTY ................................................................ 2
_3

Guia. del usuario
\
Combinaci6n Microondas Campan_
Tabla de contenidos
Garantia ............................................... .45
Servicio Sears ..................................... .45
Seguridad del homo
de microondas ............................... .46-47
Requisitos de instalaci6n ................... .48
Desmontar y reinstalar el homo de
microondas ..................................... _9-50
Conozca su horno
de microondas ..................................... .51
C6mo utilizar su horno
de microondas ..................................... ._-5
C6mo cuidar su homo
de microondas ..................................... ,33
Guia de cocina ..................................... _G
Preguntas y respuestas ....................... _C
Soluci6n de problemas .................. _.....--_
|ndice ................................................... ,_
Llame sin costo ...................... _¢:_:_,_;:_
44

Garantia del horno de
microondas
GARANTfA TOTAL PeR UN AISle PARA HORNO DE MICROONDAS
Si en un per[ode de un aSo a partir de la fecha de compra, este Homo de Microondas Kenmore sufriera algu-
na falla debido a defectos en su material o mane de obra, Sears Io reparard sin cargo.
GARANT|A TOTAL PeR CINCO AI_IOS PARA EL MAGNETRON
Si en un periodo de cinco aSos a partir de la fecha de compra, el magnetrbn de este Homo de Microondas
Kenmore sufriera alguna falla debido a defectos en su material o mane de obra, Sears Io reparar& sin cargo.
La cobertura de esta garant_a incluye solamente hornos para use dom_stico.
PODRA HACER EFECTIVA ESTA GARANT[A CON SOLO PONERSE EN CONTACTO CON LA TIENDA
SEARS O EL CENTRe DE SERVICIO M_.S CERCANO EN LOS ESTADOS UNIDOS.
Esta garantia tiene validez siempre y cuando este producto est_ en use en los Estados Unidos.
Esta garantia le otorga derechos legales especificos que podr[an variar de un estado a otro.
Sears, Roebuck and Co., Para servicio Ilame al teldfono:"
Dept. 817WA, 1-800-4-REPAIR
Hoffman Estates, IL 60179 1-800-473-7247
Servicio Sears
"DarL_os se[%,[cio a [o que ve[ldemos"
"Damos servicio a Io que vendemos", es asl como le aseguramos que puede contar con Sears para cua[quier
servicio porque el Servicio Sears se ofrece a nivel nacional.
Su Homo de Microondas Kenmore de Sears adquiere un valor agregado coDsiderando que Sears tieDe una
unidad de servic{o cerca de usted, atendida pot t@cnicos capacitados por Sears - t_cnicos p[ofesionales
especializados en Homes de Microondas Kenmore de Sears y cuentan con tas partes, herramientas y equipo
para asegurar el cumplimiento de nuestro compromise con usted - "iDamos servicio a Io que vendemos!"
gregar valor a su horrto c{e microor c[as,
adq [era urt Corttrato martter imiertto Sears.
Los homes de microondas Kenmore de Sears est&n diseSados, fabricados y probados para durar ales de
oDeraciones confiables. Sin embargo, cualquier articulo moderno puede requerir mantenimiento ocasional-
rnente Un Contrato de mantenimiento Sears es m&s que una extensi6n de la garant[a. Proporciona protecciSn
total contra gastos imprevistos per reparaciones inesperadas y molestias innecesarias. Le asegura mdximo
rendimiento a su homo de microondas.
A continuaci6n le presentamos una tabla comparativa de Garant[a y Contrato de mantenimiento la cual le
muestra las ventajas del Contrato de mantenimiento Sears para hornos de microondas.
ANOS DE COBERTURA DE PROPIEDAD
Cambio de partes defectuosas que no sea el magnetr6n
Cambio del magnetr6n
Revisi6n anual de mantenimiento preventivo cuando usted Io solicite
1ER ANO
G
G
CM
Del 2_ AISle al 5° ANO
CM
G
CM
G - GARANT{A
CM - CONTRATO DE MANTENIMIENTO
Consulte a su representante de ventas Sears o a su Centro de servicio Sears local hoy mismo y adquiera un
Contrato de mantenimiento Sears.
Guarde este libra y la factura de venta juntos en alg_ln lugar seguro para
consultas futuras.
45

Seguridad del horno de
microondas
Su seguridad y la seguridad de los dem&s es muy importante.
Hemos incluido muchos mensajes importantes de seguridad en este manual yen su electrodom_stico. Lea
y obedezca siempre todos los mensajes de seguridad.
Este es el simbolo de advertencia de seguridad.
Este simbolo le llama la atencibn sobre peligros que pueden ocasionar la muerte o una 1esi6n
a usted y a los dem&s.
Todos los mensajes de seguridad ir&n precedidos por el simbolo de advertencia de seguridad
y la palabra "PELIGRO" o "ADVERTENCIA". Estas palabras significan:
SI no slgue las instrucciones, usted morir_
o sufrir& una lesi6n grave.
Si no slgue las instrucciones, usted euede
morir o sufrir una lesi6n_grave.
Todos los mensajes de seguridad identificar&n el peligro, le informar&n c6mo reducir las posibilidades
de sufrir una lesi6n y Io que puede suceder si no sigue las instrucciones.
[NSTRUCCIONES IMPORTANTES DE SEGURIDAD
AI usar aparatos electrodom6sticos deben seguirse precauciones b_sicas de seguridad, incluyendo las
siguientes:
ADVERTENCIA - Para reducir el riesgo de
quemaduras, choque el_ctrico, incendio, lesiones
a personas o exposici6n excesiva a la energia del
homo de microondas:
• Antes de usar su homo, lea cuidadosamente
todas las instrucciones.
• Lea y siga las "PRECAUCIONES PARA EVITAR
LA POSIBLE EXPOSICION EXCESIVA A LA
ENERG[A DEL HORNO DE MICROONDAS" que
se encuentra en esta seccibn.
• El homo de microondas debe estar conectado
a tierra. Con_ctelo Qnicamente en un
tomacorriente puesto a tierra. Ver
"INSTRUCCIONES DE CONEXION A TIERRA"
que se encuentran al final de esta seccibn.
, Instale o coloque el homo de microondas
0nicamente de acuerdo con las instrucciones de
instalaci6n provistas.
• Algunos productos tales coma los huevos
enteros en su c&scara y 1asrecipientes sellados
- par ejemplo, tarros de vidrio cerrados -
pueden explotar y no deben ser calentados en
el homo de microondas.
• Use el homo de microondas s61o para los fines
descritos en este manual No use substaneias
qu[micas ni vapores corr( ivos en el homo de
microondas. Este tipo de horno ha sido
diseSado especfficamente para calentar, coeinar
o secar los alimentos. No ha sido diseSado para
usa industrial o en laboratorios.
• Coma con cualquier aparato electrodomestico,
es neoesario supervisar rigurosamente e! usa
del homo de microondas par niBos.
• No opere el homo de microondas si tiene un
cable o enchufe daSado, si no funciona
debidamente, si ha sido daSado o si se ha
caido.
• $61o un miembro calificado del personal
de servicio puede reparar este homo de
microondas. Llame a una compaS[a de servicio
autorizada para examinar, reparar o regular este
homo de microondas.
• No cubra ni b!oquee ningL_norificio del homo de
microondas.
-GUARDE ESTAS INSTRUCClONES-
46

INSTRUCCIONES IMPORTANTES DE SEGURIDAD
• No guarde el homo de microondas al aire libre.
No Io use cerca del agua - por ejemplo, cerca
del fregadero, en un s6tano hl3medo, o cerca de
una piscina o lugares semejantes.
• No sumerja elcable o el enchufe en agua.
• Mantenga el cable de alimentaci6n alejado de
las superficies calientes.
• No deje que el cable cuelgue del borde de una
mesa o superficie.
* Vea las instrucciones de cbmo limpiar la
superficie de la puerta en la secci6n "C6mo
cuidar su homo de microondas".
• No Io instale sobre un fregadero.
• No guarde ning_n objeto directamente sobre la
parte superior del homo de microondas cuando
el homo de microondas est_ en funcionarniento.
• Para reducir el riesgo de incendio en la cavidad
del homo:
- No cocine demasiado los alimentos. Vigile
cuidadosamente el homo de microondas si se
coloca dentro de[ mismo, papel, pl&stico o
cualquier material combustible para facilitar
la cocciSn.
- Quite los alambres que sujetan.las bolsas de
papel o de pl&stico antes de colocadas en el
homo.
- Si los materiales dentro del homo prenden
fuego, mantenga cerrada la puer[a de[ homo,
ap_guelo y desconecte el cable de
alimentaci6n, o corte la energia en el panel de
fusibles o en el interruptor de circuitos.
- No use la cavidad del homo de microondas
para guardar objetos. No deje productos de
papel, utensilios de cocina o alimentos en la
cavidad cuando no est_ usando el aparato.
• Adecuado para uso sobre equipos de cocina de
gas y el_ctricos.
• Para usarse sobre cocinae con anchura m&xima
de 36 pulgadas.
• Limpie con frecuencia las campanas extractoras
- no debe dejarse que la grasa se acumule en la
campana o en el filtro.
• Cuando est_ cocinando alimentos con llama
debajo de la campana, encienda el ventilador.
• Limpie con cuidado el filtro de la campana
extractora. Los productos de limpieza
corrosivos, tales como los limpiadores de
'homo a base de lejia, pueden daSar el filtro.
• No se deben introducir en el homo de
microondas comidas voluminosas ni utensilios
met_.licos muy grandes ya que pueden producir
un incendio o riesgo de choque el6ctrico.
• No limpie el homo de microondas con esponjil[as
met&licas para fregar. Las piezas pueden quemar
la esponjilla y tocar partes el_ctricas Io que
irnplicaria riesgo de choque el_ctrico.
• No use productos de papel cuando el aparato
est_ en funcionamiento en el modo de "PAN
BROWN".
• No guarde en este homo, cuando no este en
funcionamiento, ningL_nmaterial que no sean los
accesorios recomendados por el fabricante.
• No cubra las rejillas nf ninguna otra parle del
homo con pape[ met&lico. Esto haria que el
homo se sobrecaliente.
-GUARDE ESTAS INSTRUCClONES-
PRECAUClONES PARA EVITAR LA POSlBLE
EXPOSlClON EXCESlVA A LA ENERGiA DE LAS
MICROONDAS
(a) No trate de poner en funcionamiento este homo
de microondas con la puerta abierta, pues esto
puede causar la exposici6n perjudicial a la
energia del microondas. Es importante no
desactivar ni forzar los intercierres de seguridad.
(b) No coloque ningt_n objeto entre la cara frontal
del homo y la puerta ni deje que se acumulen
residuos de polvo o de productos de limpieza en
las superficies de sellado.
(c) No use el homo siesta daSado. Es muy
importante que la puerta del homo se cierre
debidamente y que no esten daSados:
(1) La puerta (doblada),
(2) Las bisagras y pestillos (quebrados o flojos),
(3) Los cierres hermeticos de Ia puer_a o las
superficies de sellado.
(d) El homo no debe ser regulado ni reparado por
ninguna persona que no sea un miembro
calificado del personal de servicio.
_.7

Requisitos de instalaci6n
Antes de instalar la combinaci6n microondas campana, asegerese de que el lugar seleccionado cumpla con los
siguientes requisitos. Para detalles, consulte las instrucciones de instalaci6n.
Requisitos eldctricos
Cumpla con todos los c6digos y reglamentos
vigentes. Se requiere un suministro eldctrico de
120 voltios, 60 hertz, s61o de CA, 15 6 20 ampe-
rios con fusible. (Se recomienda un fusible de
retardo). Se recomienda el uso de un circuito el_c-
trico independiente para la alimentaci6n de este
aparato.
Peligro de Choque Eldctrico
Conecte a un contacto de pared de conexi6n
a tierra de 3 terminales,
No quite el terminal de conexi6n a tierra.
No use un adaptador.
No use un cable el_ctrico de extensi6n.
No seguir estas instrucciones puede
ocasionar la muerte, incendio o choque
eldctrico.
INSTRUCClONES DE CONEXlON A TIERRA
Para todos los aparatos electrodom6sticos
conectados con cable de alimentaciSn:
Este homo de microondas debe ser conectado a
tierra. En caso de un cortocircuito el_ctrico, la
conexiSn a tierra reduce el riesgo de un cheque
e!_ctrico al proporcionar un alambre de escape a la
corriente el_ctdca. El homo de microondas esta
equipado con un cable de alimentaciSn provisto de
una alambre de conexiSn a tierra con un enchufe
de conexiSn a tierra. El enchufe debe ser conecta-
do a un tomacorriente debidamente instalado y
conectado a tierra.
No use cordon de extensi6n. Si el cable de
alimentaci6n el_ctrica es muy corto, haga que un
electricista calificado o un tdcnico de servicio instale
un tomacorriente cerca del homo de microondas.
ADVERTENCIA: Elusoindebidcdela
conexi6n a tierra puede ocasionar riesgo de
choque el_ctrico.
Consulte con un electricista calificado c tecn{co de
servicio si no entiende comp]etamente las instruc-
ciones de conexi6n a tierra o si tiene dudas sobre
si el homo de microondas est& conectado a tierra
correctamente.
48

Desmontar y reinstalar el
horno de microondas
Peligro de Peso Excesivo
Use dos o mds personas para mover
o instalar el homo de microondas.
No seguir esta instrucci6n puede ocasionar
una herida a la espalda u otra herida.
Si necesita desmontar su Combinaci6n Microondas
Campana por algl3n motivo, siga estos sencillos
pasos:
1
Para desmontar"
1. Desenchufe el homo de microondas o
desconecte el suministro de energia.
Q
2. Quite los filtros y la
rejilla de ventilaci6n.
• Si los filtros A
est&n instalados,
presione hacia
dentro, empuje
la leng0eta y
deslice el filtro a la
orilla para quitarlo.
• Quite los dos tor
nillos B de la
parle superior del gabinete del homo de
microondas (los tornillos ubicados m&s cerca de
las esquinas del frente). No quite los tornillos que
se encuentran m&s hacia el centro del gabinete.
• Quite la rejilla de ventilaci6n C. Ponga a un lado
los tornil!os y la rejilla. (Si no se puede quitar la
rejilla, vea el paso 4).
3. Despu6s de vaciar
completamente el
interior del homo,
incluyendo el plato
giratorio y el
soporte, selle la
puerta con cinta
adhesiva. Quite los
dos pernos D que
aseguran el homo
de microondas a la
parte superior del
gabinete.
4. Sujete con la mano,
en su lugar, la
combinacibn
microondas
campana. Jale el
gancho E para
separar la campana
clel horno de la placa
de montaje. Si no se
puede quitar la rejilla
(ver el Paso 2), inserte
un alambre delgado enlazado o un instrumento
similar a trav6s de un orificio de la rejilla para jalar
el gancho.
5. Tome el gabinete
del horno de
microondas. Gire el
homo de microondas
hacia abajo. (Tenga
cuidado para evitar
qua la puerta se abra
de golpe.)
i
i 6. Levante las leng0etas
de soporte F en la
parte de abajo de la
placa donde se
monta. Ponga el
homo de microondas
en una superficie
protegida.
49

Desmontar y reinstalar el homo de microondas (cont,)
Para reinstalar:
1. Levante cuidadosamente el horno de microondas
y cu61guelo de las leng0etas de soporte en la
parte de abajo de la placa donde se monta.
2, Gire la pane del frente del gabinete del horno
de microondas hacia abajo. Pase el cable de
corriente a trav6s del orificio para el cable de
corriente al fondo del gabinete superior.
3. Gire el horno de microondas hacia el gabinete.
Empuje el horno de microondas contra la plata
de montaje hasta que los pernos de seguridad
produzcan un chasquido al entrar al gabinete.
4.Atornille los dos
pernos de seguridad del
horno de microondas
que Io sujetan al
gabinete superior.
5. Retire la cinta adhesiva, y coloque los soportes
y el plato giratorio en sus posiciones.
6. Coloque la rejilla de ventilacibn.
7. Coloque los dos tornillos en la parte superior
del gabinete del horno de microondas (los
tornillos ubicados m&s cerca de las esquinas
del frente).
8. Apriete los dos pernos que aseguran la
campana del homo de microondas al gabinete
superior hasta que no haya espacio entre el
gabinete superior y la campana del horno.
9, Reinstale los filtros (consulte "Cbmo instalar y
cuidar los filtros", en la seccibn "CSmo cuidar
su horno de microondas" en caso de ser
necesario).
10. Enchufe el horno de microondas o reconecte et
suministro de energ{a.
5O

Conozca su horno de
microondas
Esta secci6n trata acerca de lOSconceptos que encierra la cocina con microondas, mambi_n le muestra los
conceptos b&sicos que necesita conocer para operar su homo de microondas. Por favor, lea esta inforrnacibn
antes de utilizar su homo de microondas.
C6mo funciona su horrto de microondas
Los hornos de microondas son seguros. La
energia por microondas no ee caliente. Provoca
que la comida produzca su propio calory es este
calor el que cuece los alimentos.
Las microondas son como las ondas de TV o
como las ondas de luz. Usted no las puede ver,
pero si ve Io que hacen.
El magnetrbn en el homo de microondas pro-
duce microondas. Las microondas se mueven
haeia el interior del homo donde hacen contacto
con la comida mientras que _sta gira en el plato
giratorio.
Magnetrbn
Interior del homo
Ei p_alo giratorio de vidrio de su homo de
microondas permite pasar las microondas. Luego
rebotan contra la superficie met&lica, regresan al
plato giratorio de vidrio y despues las absorben
los alimentos.
Superficie de metal Plato giratorio
51

C6mo funciona su horno de microondas (cont.)
Las microondas pasan
a trav_s de la mayor[a
de los matedales de
vidrio, papel y pl_.stieo
sin calentarlos, as[ que
son los alimentos los
que absorben la energia.
Las microondas rebotan
contra los recipientes de
metal, asi que la comida
no Iogra absorber la
energ[a.
k.
AI rostizar, es posible
que las microondas no
alcancen el centre de la
pieza de came. El calor
se distribuye hacia el
centre desde las _.reas
extedores cocidas tal
y come sucede al
cocinar con hornos
tradicionales. Esta es
una de las razones para
dejar reposar algunes alimentos (per ejemplo,
piezas rostizadas o papas horneadas) un tiempo
despu_s de cocinarlos o para mover algunos
alimentos durante el tiempo de cocci6n.
Las microondas alteran las mol6culas del agua en
ta comida. AI rebotar las mol_culas unas contra
otras, se produce el calor, come cuando junta sus
manes y las frota. Este es el calor que cocina.
NOTA: No fria alimentos en el horno. Los recipientes
para mioroondas no son apropiados para freir y
adem&s resulta muy diffcil mantener ia temperatura
necesaria.
Para obtener mejores resultados al
cocinar
• Siempre cocine los alimentos en el tiempo minimo
recomendado. Revise cbmo se va cociendo ta
comida. Si es necesario, oprima el botbn ADD ONE
MINUTE (UN MINUTO M,_S) mientras el homo se
encuentra en operaci6n o despu_s de que haya
concluido el ciclo de coccibn (yea la secci6n
"Chino utilizar ADD ONE MINUTE"en la p_gina 64).
• Para asegurarse qua los alimentos est_n
completamente cocidos, remu6valos o volteelos
o reorganicetos a la mitad del tiempo de cocci6n.
• Si no tiene la tapa de un recipiente, use papel
encarado o toallas de papel para mieroondas o
envoituras de pl_stico para microondas. Recuerde
hacer un doblez de 1/4" a 1/2" (6 mm a 1.2 cm) en
una esquina de la envoltura de pl&stico para
ventilar el vapor al calentar o cocinar.
[ntcrferenc[a con ondas c[e radio
Alusar su homo de microondas, se puede pro-
ducir una interferencia en su radio, TV o equipos
similares. Cuando haya interferencia, la puede
reducir o eliminar haciendo uno o varies de los
siguientes movimientos:
, Limpie la puerta y los empaques del horno.
, Ajuste la antena receptora del radio o televisi6n.
, Aleje el radio o TV del homo de mictoondas.
, Conecte el homo de microondas en un
tomacorriente diferente para que el homo
de microondas y el radio o "IV est6n en
distintos circuitos el6ctricos.
C-6mo probar su hot'no de m[croonc[as
Para probar el homo ponga una taza de agua fria
en un recipiente de vidrio dentro del
horno. Cierre la puerta y asegQrese
de que cierre herm6ticamente. Siga
las instrucciones en "C6mo cocinar
a un nivel alto de energia" en la
p_gina 64 de la secci6n de "C6mo utilizar su homo
de microondas" para programar el homo a que
cocine per 2 minutes. Cuando el tiempo termine, el
agua debera estar caliente.
52

C6mo probar su vajilla y recipientes de cocina
Pruebe su vajilla y sus reclpientes antes de usados.
Para comprobar que
un plato se pueda usar
en el microondas,
cotbquelo dentro del
homo junto con una
taza de agua. Cocine
a1100% de la energfa
de cocciSn durante
1 minuto. Si el plato
se callenta y el agua
permanece frfa, no
Io use.
Algunos platos (de melamina, algunas vajillas de
cerdmica, etc.) absorben la energfa de microondas,
calentdndose demasiado, corno para manejarlos
y retardan los tiempos de coccibn. Elcocinar en
recipientes de metal no diseSados para uso en
microondas podrfa daSar el homo, al igual que los
recipientes con metal no visible (con alambres de
sujecibn, con recubrimientos de aluminio, grapas o
aros y decorados metdlicos).
r .edidas de seguridad de operaci6n
Nunca se recargue en
la puerta ni permita que
un niSo cuelgue de ella
cuando est_ abierta.
Use guantes
de c0qina.
La energia de
microondas no calienta
directamente los
recipientes, pero el
calor de los alimentos
puede hacer que el
recipiente se caliente.
No utilice periSdicos ni
ning0n otro papel con
impresi6n en el homo.
No seque flores, fruta,
hierbas, madera, papel,
jicaras, ni ropa en el
horno.
No encienda el homo de
microondas cuando est_
vacfo. La vida de este
producto podria
acortarse.
Si practica c6mo
programar el homo,
ponga un recipiente con
agua en el mismo.
Es com5n que la puerta del homo se vea ondufada
despu6s de haber funcionado durante cierto tiempo.
No trate de derretir cera
parafina en el homo. La
parafina no se derrite en
el homo porque p,_rmite
que las microondas la
traspasen.

hqedidas de seguridad de operaci6n {cont.)
No opere el homo de
microondas a menos
que el plato giratorio
est_ bien asegurado
en su lugar y pueda
girar libremente. El
plato giratorio debe
poder girar en cualquier
direccibn.
Asegdrese de que el plato giratorio se encuentre
correctamente cara arriba dentro del homo.
Maneje su plato giratorio cuidadosamente al
sacarlo del borne para evitar que se rompa. Si
su plato giratorio Ilegase a estrellarse o a romperse,
contacte a Sears para que se Io cambie.
Cuando utilice un recipiente para dorar, la
parte inferior de _ste deberd estar, al menos, a
3/16 pulgadas (5 ram) per arriba de1plato giratorio.
Siga las instrucciones que se incluyen en el plato .
para dorar.
I Nunca cocine o
recaliente un huevo
entero con todo y
cascar6n, La
acumulaci6n de vapor
dentro de un huevo
entero puede provocar
que explote y
posiblemente da_e el
homo. Rebane los
huevos cocidos
antes de calentados. Se ha sabido queen raras
ocasiones los huevos pochd explotan. Cubra los
huevos pochd y ddjelos reposar durante 1 minutes
antes de abrirlos.
Oorte) [Srt e[ ctrica
Si el voltaje de su linea de energia el_ctrica o
Interrupter de __' I tomacorriente es
los tiempos de coccibn
ser_n mayores. Haga
que un electricista cali-
ficado revise su insta-
lacidn el_ctrica.
54
I Para mejores
resultados, mueva
cualquier Ifquido
varias veces durante
el calentamiento o el
recalentamiento.
Los liquidos que se
calientan en ciertos
recipientes
(especialmente
recipientes en forma
de cilindro) pueden sobrecalentarse. El Iiquido
puede salpicar haciendo un fuerte ruido al
calentado o despu6s de hacerlo, o al agregar
ciertos ingredientes (granos de caf_, bolsas de t_,
etc.). Esto puede daSar el homo.
AI rostizar, es posible que las microondas no
alcancen el centre de la pieza de carne. El calor se
distribuye hacia el centre desde las &reas exteriores
cocidas tat y come sucede al cocinar con hornos
tradicienales. Esta es una de las razones para
dejar reposar algunos alimentos (per ejemplo,
piezas rostizadas o papas horneadas) un tiempo
despu6s de cocinarlos o para mover algunos
alimentos durante el tiempo de coccidn.
No frfa alimentos en el homo. Los recipientes
para microondas no son apropiados para fre[r y
adem&s resulta muy dificil mantener la temperatura
necesaria.
No cueza las papas
demasiado. Cuando
termine el tiempo de
cocci6n recomendado,
las papas deber_n
estar ligeramente
firmes porque se
seguir._n cocinando
durante el tiempo de
repose. Despu_s de
cocinarlas en el
microondas, d_jelas reposar durante 5 minutes.
Terminar&n de cocerse mientras reposan.

Funciones del horno de microondas
Su homo de microondas est& diseSado para
hacer que su experiencia en la cocina sea Io mas
placentera y productiva posible. Para ayudarle a
estar preparado y listo r&pidamente, la siguiente
es una lista de las funciones b&sicas de su homo
de microondas:
I. Asa de la puerta. Jale para abrir la puerLa.
7_Sistema de seguro para la puerta. El homo
no operar& a menos que la puerLa eet_ cerrada
o asegurada.
:-. Ventana con protecci6n de metal. La
protecci6n de metal evita que ee escapen
las microondas. EstA diseSada en forma de
ventana para permitirle ver los alimentos
mientras se cocinan.
4. Parrilla de coccibn. Uso de espacio extra
cuando cocina en m&s de un recipiente a
la vez. Vea la p_gina 60 para mayor
informaci6n.
C. Plato giratorio de vidrio (NQmero de parle
4393751) (no se muestra). Incluido en
el interior de1 homo, yea mas adelante las
instrucciones de instalaci6n. Este plato giratorio
da vuelta a los alimentos mientras los cocina
para una cocci6n m#,s uniforme. Para mejores
resultados, el plato deberA estar dentro del
homo mientras est_ operando. El plato giratorio
esta hundido en el piso del interior del homo
para darle un mayor espacio para cocinar y
obtener mejores resultados. Vea las p&ginas 51,
54, 57, 59, 81, 87 y 88 para mayores detalles.
0. Filtros de carb6n y grasa. Incluidos en el
interior del horno. Vea la p&gina 84 para
instrucciones de instalaci6n y limpieza.
7. Luz de la superficie para cocinar. Encienda la
luz para iluminar la superficie para cocinar o
utilicela como una luz nocturna. Vea la pagina 61
para mayor informaci6n.
8. Etiqueta de guia de cocina. Utilicela para
referencias r&pidas para Coccion autom&tica,
Recalentado autom_tico y Descongelado
autom&tico.
£. Interruptores del extractor y de la luz de la
superficie para cocinar. Vea la pagina 61 para
mayor informaci6n.
! 0. Panel de control. Optima los botonee en este
panel para realizar todas las funcionee. Vea
las paginas 56-59 para mayor informaci6n.
11. Rejilla de ventilaci6n.
12. Luz interior del horno.
13. Cubierta interna del horno de microondas.
14. Placa con modelo y nt3mero de serie. Vea la
p&gina 90 para mayor informacion.

Funciones del horno de microondas (cont,}
Para instalar el plato giratorio en
su soporte:
Lineascurvas
enrelieve _
• Inserte el centro
(NOmero de parte
4393754) en el eje.
• Coloque el soporte
(NOrnerode parte
4393752) en el fondo
de la cavidad.
• Coloque el plato
giratodo en el centro.
Cercibrese de que las
curvas en relieve del
centro de la parte inferior del plato giratorio est6n
entre los tres "rayos" del centro.
• Las rodillos (N_mero de parte 4393753) del soporte
deberdn entrar en el carril de la parte inferior del
plato giratodo.
• El plato giratorio rota Io mismo en el sentido de las
manecillas del reloj que en sentido contrario. Esto
es normal.
Partes del panel de control
1. Display (Pantalla). Esta pantalla incluye un reloj
e indicadores que le permiten saber ta hora, la
programaci6n del tiempo de cocci6n y las
funciones de cocci6n que usted elige.
_:. POPCORN (Palomitas de mafz). Presione este
bot6n pare preparar palomitas de malz. El
homo calentar& automa,ticamente pot un tiempo
preprogramado con una energia de cocci6n
preprogramada. Vea la p&gina 77 para mayor
informaci6n.
S BEVERAGE (Bebidas). Presione este bot6n
para calentar 1 6 2 tazas de una bebida. El
horno calentar& autom_,ticamente por un tiempo
preprogramado con una potencia de cocci6n
prepr:ogramada. Vea la p_gina 78 para mayor
informaciSn.
4. BAKED POTATO (Papas al horno). Presione
este boton para hornear de 1 a 4 papas. El
homo calentarA autom_ticamente por un tiempo
preprogramado con una potencia de cocci6n
preprogramada. Vea la p&gina 79 para mayor
informaci6n.
5. FROZEN VEGETABLE (Vegetales
congelados). Presione este bot6n pare cocinar
de 1 a 4 tezas (237 a 946 ml) de vegetales
congelados. El homo calentar& autom&ticamente
por un tiempo preprogramado con una potencia
de cocci6n preprogramada. Vea la p_gina 80
para mayor informaci6n.
@
5,3

Funciones del panel de control (cont.)
6. FROZEN ENTREE (Alimentos congelados).
Presione este botbn para cocinar de 10 u 20
onzas (284 o 567 gr) de alimentos congelados.
El horno calentar& autom&ticamente por un
tiempo preprogramado con una potencia de
cocci6n preprogramada. Vea la p_gina 81 para
mayor informacibn.
7. HOLD WARM (Mantener caliente). Presione
este bot6n para mantener calientes sus
alimentos en su horno de microondas hasta por
99 minutos, 99 segundos. HOLD WARM puede
utilizarse en forma independiente o puede seguir
autom_ticamente a un ciclo de coccibn. Vea la
p_.gina 82 para mayor informaci6n.
8. AUTO COOK (Coccibn autom_tiea). Presione
este botbn para cocina alimentos especiales
para microondas sin necesidad de introducir
tiempos o energias de cocci6n. Vea la p_.gina 70
para mayor informaci6n.
9. AUTO DEFROST (Descongelado autom_,tico).
Presione este bot6n para descongelar alimentos
sin necesidad de introducir tiempos o energfas
de coccibn. Vea la p&gina 73 para mayor
informaci6n.
i C. AUTO REHEAT (Recalentado autom_tico).
Presione este bot6n para recalentar alimentos
especiales para microondas sin necesidad de
introducir tiempos o energ{as de cocci6n.
Vea la p&gina 72 para mayor informaci6n.
1_. ADD ONE MINUTE (Un minuto mrs). Presione
este bot6n para cocinar por un minuto a1100%
de energia de cocci0n o para agregar un minuto
extra a su ciclo de coccibn en la energia de
cocci6n que usted haya programado. Vea la
p&gina 64 para mayor informaci6n.
I _. CLOCK (Reloj). Presione este bot6n para
introducir la hora correcta. Vea la p&gina 62
para mayor informaci6n.
",-, KITCHEN TIMER (Cron6metro de cocina).
Presione este bot6n para activar o cancelar el
cron6metro de cocina. Vea la p_gina 63 para
mayor informaci6n.
14. Botones num_ricos. Presione los botones
numericos para introducir tiempos de cocci6n,
energias de cocci6n, cantidades, pesos o
categorias de alimentos.
15. COOKTIME (Tiempo de coccibn). Presione
este bot6n seguido por los botones num_ricos
para programar un tiempo de cocci6n. Vea las
p#.ginas 65, 67, y 68 para mayor informaci6n.
16. POWER (Energ|a). Presione este bot6n
despu6s de que el tiempo de cocci6n haya sido
establecido, seguido de un botbn num6rico
para establecer la cantidad de energ_a de
microondas liberadas para cocinar los
alimentos. Tambi_n presione este bot6n para
aurnentar o disminuir un tiempo de cocci6n
preestablecido. Vea las p&ginas64 y 67 para
mayor informaci6n.
17. TURNTABLE ON/OFF (Encendido/apagado
de plato giratorio). Presione este botbn para
eneender o apagar el plato giratorio de su
horno. Vea la p&gina 59 para mayor
informaci6n.
18. START/ENTER (Encender/introducir).
Presione este bot6n para iniciar una funci6n.
Vea la p&gina 58 para mayor informaci6n.
19. OFF/CANCEL (Apagar/cancelar). Presione
este bot6n para borrar una ins[rucci6n
incorrecta, canoelar un programa durante la
coccibn o para borrar la pantalla. Vea la p&gina
58 para mayor informacibn.
20. EXHAUST FAN HIGH/LOW/OFF. (Extractor
alto/bajo/apagado). Presione este botbn para
encender el extractor a velocidad alta o baja y
para apagar el extractor. Ver p&gina 61 para
mayor informaci6n.
21. LIGHT ON/NIGHT/OFF (Encendido/apagado
de luz y luz nocturna). Presione este bot6n
para encender o apagar la luz y la luz nocturna.
Vea la p&gina 61 para mayor informaci6n.

Funciones de[ panel de control (cont.)
NOTAS:
• S[ introdujo los valores para una funci6n pero
no opdmi6 START/ENTER en 5 segundos,
aparecer& el indicador START? (INIClAR?).
• Si abra la puerta mientras el homo est&
funcionando y luego la cierra aparecer& el
indicador START? Oprima START/ENTER
para continuar.
, Si elige una funcibn pero no oprime otro bot6n
de comando en un minuto, la pantalla regresar&
a la hora del dia y tendr& que empezar de
nuevo.
Sefiales Sonoras
Su horno de microondas emite seSales sonoras
que le pueden guiar al programar o utilizar su
homo:
° [_ Un tono de programacibn sonar& cada vez
que oprima un bot6n
, _] Un tono largo indica que termin6 ta cuenta
regresiva de[ cron6metro de la cocina.
, _][_][_ Cuatro tonos indican que
termin6 el ciclo de cocci6n.
[_-]_-I Dos tonos cortos y r_.pidos suenan
cada minuto durante los primeros 15 minutos
despues de la seSal de fin de ciclo de cocci6n
como recordatorio si no se ban sacado los ali-
mentcs del homo.
'- _-]_-[ Dos tones cortos y r_pidos senar&n
al entrar y salir de una funci6n no visible, (por
ejemplo, seguro para nifios) o la, hora del dia.
, I1">1)ISonar&n trestonossi hizo una
entrada err6nea.
Para desactivar las sefiales sonoras:
OPRIMA
durante 5 segundos
Para activarlas de nuevo:
Para desaotivar todas las sefiales sonoras
excepto la de fin del cron6metro:
OPRIMA
durante 5 segundos
Para activar de nuevo las sefiales:
OPRIMA
durante 5 segundos
NOTA: Dos tonos eonar&n cuando se activen o
desactiven la sefiales sonoras.
C6mo interrumpir la cocci6n
Puede detener el funcionamiento del homo
durante un ciclo si abre la puerta. El homo deja
de calentar y se detiene el extractor pero la luz
permanece encendida. Para reiniciar la cocci6n
cierre la puerta y
OPRIMA
Si no desea continuar cocinando:
' Cierre la puerta y se apagara la luz.
O
' OPRIMA
NC,T/-.: Antes de programar una funci6=, oprima
OFF/CANCEL (APAGAR/CANCELAR) para
asegurarse de que no est_ activa ninguna otra
funci6n.
OPRIMA
durante 5 segundos
5_

Funciones del panel de control (cont.)
C6mo calentar mds de un plato con
alimentos
Cuando calienta platos con alimentos a un tiempo
de cocciSn de su
elecci6n, usted podr_.
calentar dos platos de
10 pulgadas (24.5 cm)
juntos o un plato m&s
grande que el plato
giratorio. Usted podrd
calentar 2 platos mds
en la parrilla de cocci6n
para tener un total
posible de 4 platos.
Para mejores resultados, a la mitad de la cocci6n
gire los platos de manera que los alimentos de
enfrente ahora se encuentren atr&s. Haga Io
mismo cuando caliente una cacerola m&s grande
(9 a 13 pulgadas [23 a 33 cm]). Cuando caliente
4 platos extendidos, gfrelos tal y como se describi6
anteriormente y cambie los dos platos de arriba
por los dos de abajo.
Para calentar 2 platos juntos en la parte de abajo
o un plato m&s grande, el plato
giratorio no deberd estar en
movimiento. Puede apagar el
plato giratorio con s61otocar
TURNTABLE ON/OFF. Aparecerd "TURN TABLE
OFF" en la pantalla. Si oprime TURNTABLE
ON/OFF antes de comenzar a programar la
funci6n de cocci6n, su homo le solicitar& que
introduzca un tiempo de cocci6n sin necesidad
de que usted oprima COOK TIME. Su plato
giratorio regresar_ a su posici6n original cuando
la cocci6n haya terminado o cuando oprima
OFF/CANCEL.
NOTA: No puede apagar el plato giratorio cuando
est_ usando una funci6n "autom&tica".
C6mo utilizar el seguro para niSos
El seguro para niSos bloquea el panel de control
para que los niSos no puedan utilizar el homo de
microondas si usted no desea que Io hagan.
Para bloquear el panel de control:
OPRIMA
durante 5 segundos
Se escuchar&n dos tonos y _ aparecer_, en la
pantalla. Cuando se haya bloqueado el panel,
_e _scuchar_.n 3 tonos y aparecer_L LOCK
(BLOQUEAR) cuando oprima cualesquiera
de los botones a excepci6n de EXHAUST
FAN y LIGHT, Io botones numdricos 1 a 2 y
START/ENTER.
Para desbloquear el panel de control:
OPRIMA
r sTA.T
durante 5 segundos
Se escucharfin dos tonos y _ se eliminarfi de
la pantaIla.
C6mo utilizar la funci6n
demostraci6n/aprendizaje
Puede programar su homo de microondas para
visualizar las instrucciones conforme las vaya
introduciendo sin tener que encender el magnetron.
Esta funci6n le ayudard a aprender c6mo utilizar
su homo sin necesidad de cocinar alimentos
realmente.
Para programar la funci6n demostracibn/
aprendizaje:
OPRIMA
durante 5 segundos
Sonar&n dos tonos y aparecer& una "d" peque_a
en la pantalla.
Para cancelar la funci6n demostraci6n/apren-
dizaje:
OPRIMA
durante 5 segundos
Se escuchar&n dos tonos y desaparecera la "d"
de la pantalla.

Cdmo ut[Hzar [a parril|a de cocci6n
La parrilla de cocci6n le proporciona un espacio
adicional para cocinar en m&s de un recipiente a
la vez.
Si necesita una parrilla de repuesto, puede
ordenar una a su Centro de Servicio Sears, o Ila-
mando al 1-800-366-7278 para EE.UU. AsegL_rese
de tener a la mano el nL_merode modelo cuando
ordene.
Cbmo colocar la parrilla
I } Coloque la parrilla
hasta que se encuen-
tre bien firme en los
soportes para la
parrilta que se
encuentran en las
paredes laterales del
horno.
NOTAS:
• Use guantes para hornos para sacar alimentos
del horno de microondas.
• No deje la parrilla met&lica en el horno. Podria
ocasionarse una descarga electrica o daSar
el horno si alguien enciende el homo
accidentalmente.
• No opere el homo con la parrilla met&lica en el
piso del horno. Esto daSaria el acabado interior.
• Utilice la parrilla solamente en el horno de
microondas.
• No utitice la parrilla con el recipiente para dorar.
• No permita queet recipiente con alimentos que
se encuentre en Taparrilla toque las partes
superior y laterales del homo.
• No cocine alimentos directamente sobre
ta parrilla. Colbquelos en-recipientes especiales
para hornos de microondas.
° No coloque recipientes met&t[cos para cocinar
sobre la parritla.
• Utilice la parrilla de cocci6n solamente cuando
cocine a m_s de un nivel.
6O

Como utilizar el extractor
El botSn en la pane inferior izuierda del panel de
control sirve para manejar el extractor de 2
velocidades.
1. Seleccione la velocidad del extractor.
NOTA: Si la temperatura procedente de las
hornillas o la superficie para preparar los
alimentos sube demasiado, debajo del homo,
el extractor en el conducto de ventilacibn se
encender& autom&ticamente en estado HIGH
(ALTO) para proteger el homo. El extractor
puede seguir trabajando hasta pot una hora
para enfriar el homo. Cuando esto suoeda, el
extractor no podr_i apagarse con el bot6n
FAN (EXTRACTOR}.
OPRIMA
(una vez para velocidad alto y dos
veces para velocidad baja)
2. Apague el extractor cuando Io desee.
OPRIMA
(16 2 veces re&s, dependiendo de la
velocidad del ventilador)
C6mo utilizar la luz para la superficie de preparac[Srz
de alimentos/encimera
El botSn en la pane inferior derecha del panel
de control regula la luz para la superficie de
preparaci6n de alimentos/encimera.
1. Encienda la luz.
2. Apague la luz cuando Io desee.
OPRIMA
(una vez para luz estdndar y dos
veces para luz nocturna)
OPRIMA
(1 6 2 veces, dependiendo de la
programacibn de la luz]

C6mo programar el reloj
Cuando conecte por primera vez su homo de
microondas o despu6s de una falla el6ctrica, la
pantalla desplegar_ el signo ":" de manera intermi-
tente. Si no se programa una hora, el signo ":",
destellar_ hasta que presione alg_n bot6n.
";. Optima CLOCK.
NOTAS:
• Si selecciona una hora no v&lida y oprime
CLOCK (RELOJ), se escuchar&n 3 tonos.
Introduzca la hora correcta.
• Si oprime OFF/CANCEL (APAGAR/CANCELAR)
al programar el reloj, la pantalla desplegar& la
51tima hora que se program6 del dia.
• Para apagar el reloj, optima CLOCK, el n6mero 0
y CLOCK nuevamente, la hora que se habfa pro-
gramado desaparecer_ y aparecer& el signo ":"
en la pantalla.
OPRIMA USTED VERA
2 Introduzca la hora del dia.
Ejemplo para las 12:00:
OPRIMA
Termine la programaci6n.
,1=
1L_Lj
CC)
CC)
LLJ
OPRIMA
0
ENIER
USTED VERA
USTED VERA

C6mo utilizar el cron6metro
Puede utilizar su horno de microondas como un
cronbmetro. Utilice el cron6metro para cronometrar
hasta 99 minutos y 99 segundos.
1. Oprima KITCHEN TIMER.
NOTA: El homo puede funcionar mientras se
utiliza el cron6metro. Para ver el cron6metro mien-
tras funciona el homo, oprima KITCHEN TIMER
(CRONOMErRO).
OPRIMA USTED VERA
2. Programe el tiempo a contar en forma regresiva.
Por ejemplo, para 1 minuto, 30 segundos:
NOT/-.: Si programa m&s de 4 digRos,
desaparecer&n los primeros 4 y aparecer_n
los siguientes digitos a la derecha a medida que
usted los va introduciendo.
"OPRIMA USTED VERA
3 inicie la cuenta regresiva.
OPRIMA
t'©T/%: Si no realiza este paso dentro de los { KITTCM_EN1
5 segundos despu_s de realizar el paso 2,
aparecer_ "START?(_,INICIAR?)". Despues O
tendr& 1 minuto para oprimir START/ENTER _ '_
START
(INICIAR/]NTRODUCIR) o para oprimir KITCHEN
/ /
TIMER (CRON6METRO) antes de que ta pantalia
vuelva a la hora del dia.
AI final de la cuenta regresiva:
USTED VERA
USTED VERA
Para cancelar el cron6metro:
Durante [a cuenta regresiva:
OPRIMA
o
CANCEL
(se escuchard un tono largo)
USTED VER/_
(hora del dfa)

C6mo utilizar ADD ONE MINUTE (UN MINUTO MAS)
ADD ONE MINUTE permite cocinar los alimentos
durante 1 minuto a un nivel de energia de cocci6n
de 100%, o bien, agregar un minuto extra al ciclo
de cocci6n. Tamb!_n Io puede utilizar para
prolongar los ciclos de cocci6n en m01tiplosde
1 minuto, hasta 99 minutos.
NOTAS:
• Para prolongar los ciolos de cocci6n en m_ltiplos
de 1 minuto, oprima ADD ONE MINUTE
repetidamente durante la cocci6n.
• DespuOs de cerrar la puerta, puede introducir
ADD ONE MINUTE sin tener que oprimir
START/ENTER (INICIAR/INTRODUCIR).
1oCerci6rese de que la comida est_ dentro del homo.
• Si oprime ADD ONE MINUTE durante la coccibn,
el homo cocinar_l al nivel de energia de coccibn
seleccionada previamente. Si oprime ADD ONE
MINUTE despu_s de haber terminado la coccibn,
el homo cocinar/I al nivel de energia de coccibn
del 100%. Puede cambiar la temperatura de
cocci6n si oprime POWER (ENERGfA), despu_s de
haber oprimido el botbn ADD ONE MINUTE, y
luego oprirnir los botones num6ricos para
determinar la nueva temperatura de cocci6n, y
finalmente START/ENTER (INICIAFVINTRODUCIR).
• Puede utilizar ADD ONE MINUTE s61opara la
funci6n de ciclo de cocci6n.
2. Oprima ADD ONE MINUTE.
Ejemplo, para cocinar durante 1 minuto:
OPRIMA
USTED VERA
Si el tiempo de cocci6n preestablecido es
demasiado largo o corto, puede aumentarlo o
disminuirlo despu_s de seleccionar AUTO COOK,
AUTO REHEAT, AUTO DEFROST, POPCORN,
BEVERAGE, BAKED POTATO, FROZEN
VEGETABLE, 6 FROZEN ENTREE. Usted s6lo puede
cambiar el tiempo de cocci6n antes de que inicle la
cocci6n.
Por ejemplo, en AUTO REHEAT, despu6s de OPRIMA
seleccionar el tipo de alimento e introducir la cantidad:
Para prolongar el tiempo de cocci6n:
una vez
Para reducir el tiempo de cocci6n:
OPRIMA
dos veces
USTED VERA
(ejemplo para recalentar
autom&ticamente)
USTED VERA
Para restablecer el tiempo de cocci6n original:
OPRIMA
tre$ veces
6_
USTED VERA

C6mo utilizar su horno de
microondas
Esta secci6n le proporciona las instrucciones para operar cada funci6n. Por favor, lea cuidadosamente estas
instrucciones.
•.,,)J_,o cocin=q]" a _.1_r_ive! a]to de energia
Coloque la comida dentro del homo y cierre
la puerta.
2. Oprima COOK TIME (TIEMPO DE COCCION). OPRIMA
USTED VERA
',L Introduzca el tiempo de cocci6n.
Ejemplo para 1 minuto, 30 segundos:
Encienda el homo.
OPRIMA
OPRIMA
USTED VEFL_
USTED VEFL_
AI terminar el tiempo de cocci6n:
C6mo cambiar las instrucciones
Puede cambiar el tiempo de cocci6n en
cualquier momento durante la cocci6n si
repite los pasos 2, 3 y 4.
USTED VERA
65

C6mo cocinar a diferentes niveles de energia de
cocci6n
Para mejores resultados, algunas recetas
requieren diferentes nivelea de energia de cocciSn.
Mientras menor sea la energfa de coccibn, m&s
lenta ser& _sta. Cada n_mero en el panel
corresponde tambi_n a un porcentaje distinto
de la energfa de coccibn. Muchas recetas en los
recetarios de homos de microondas le indican por
nL_mero,porcentaje o nombre, el nivel de energia
de coccibn que debe utitizar.
El siguiente esquema le proporciona el porcentaje
de energ|a de cocci6n para cada n_mero en el panel
correspondiente, asi como el nombre de la energia
de coocibn que se utiliza m&s comSnmente. Tambi_n
le indica cu&ndo utilizar cada uno de los niveles de
energia de coccibn. Siga las instrucciones de la
receta o del empaque, si las tiene.
NOTA: Consulte un recetario confiable para obtener
los tiempos de cocci6n.
ENERG|A DE COCCI6N NOMBRE CUANDO SE UTILIZA
10=100% de la energia total Alta • Para calentar r&pidamente muchos alimentos
(autom&tica) de fdcil preparaciSn y alimentes con alto con-
tenido de agua. tales como sopas y bebidas
, Para cooinar trozos pequeSos de came suave,
came molida, piezas de aves, filetes de
peseado y la mayoda de !as verduras
9=90% de la energia total , Para calentar sopas cremosas
8=80% de Ia energia total , Para calentar arroz, pasta o platillos al home
que se derraman
7=70% de la energfa total Media-Alta , Para cocinar y calentar alimentos que
necesiten una energla de cocci6n menor que
la alta (por ejemplo, pescado entero y pastel
de came) o cuando la comida se est_
cocinando demasiado r&pido.
, Para volver a calentar una sola porci6n de
comida
6=60% de la energ[a total , Para cocinar alimentos que requieran
cuidados especiales, tales como queso y
platillos a base de huevo, budines y natillas
, Para cocinar platillos que no se derraman,
tales como la lasaSa
i 5=50% de la energia total Media cocer jam6n, aves y a
(
Para
enteras
asados
fue9o lento
, Para derretir chocolate
4=40% de la energfa total , Para eoeer a fuego lento los estofados
, Para calentar pastas
3=30% de la energla total Media-Baja, • Para descongelar alimentos, tales como pan,
Deseongelar pescado, carnes, ayes y alimentos preeocidos
2=20% de la energia total , Para suavizar mantequilla, queso y helados
1=10% de la energia total Baja , Para mantener la comida caliente
, Para quitarle Io frio alas frutas
k_OTA:Despues de que haya introducido el tiernpo de cocci6n, tambien podr_ utilizar el bot6n de
POWER (ENERGJA) como un segundo cron6metro si introduce "0" como energia de coccion. El homo
contara en forma regresiva el tiempo de cocci6n que establecio sin cocinar.
66

C6mo cocinar a diferentes niveles de energias de
coccibn (cont,)
1. Coloque su comida en el horno y cierre la puerta.
2. Oprima COOK TIME (TIEMPO DE COCCI(_N).
OPRIMA USTED VERA
3. Introduzca el tiempo de coccJ6n.
Por ejemplo, para 7 minutos, 30 segundos:
4. Establezca el nivel de energia de coccibn.
OPRIMA
OPRIMA
USTED VEP_
USTED VERA
Por ejemplo, para un nivel de energfa de
cocci6n de150%:
USTED VERAOPRIMA
0
(repita esta operaci6n hasta
que aparezca el nivel de
energfa de cocci6n deseado)
67

C6mo cocinar a diferentes niveles de energ|as de
cocci6n (cont.)
5. Eneienda el homo. OPRIMA
USTED VEP_
AI terminar el tiempo de cocci6n:
C6mo cambiar las instrucciones
Puede cambiar el tiempo o la energfa de cocci6n
en cualquier momento si repite los pasos 2, 3
y/6 4 y 5.
C6mo cocinar pot" pasos
Para mejores resultados, algunas recetas requieren
una energ[a de cocci6n para un determinado lapso
de tiempo y otra energfa de cocci6n para otro lapso -
de tiempo. Puede programar su homo para cam-
biar de un nivel de energia a otro automa_ticamente
hasta tres pasos diferentes.
USTED VERA
(se escuchardn cuatro
tonos)
Puede programar sus funciones de cocci6n en
cualquier orden. Sin embargo, si uti?iza AUTO
DEFROST (DESCONGELADO AUTOMATICO),
_ste deber& ser el primer paso a realizar.
NOTA: No puede utilizar el sensor cuando cocina
por pasos.
1. Coloque la cornida en el homo y cierre la puerta.
2. Oprima COOK TIME (TIEMPO DE COCCION). OPRIMA
USTED VERA
3. Introduzca el tiempo de coccion para el
primer paso.
Por ejemplo, para 7 minutos, 30 segundos:
OPRIMA USTED VERA
G8

06: "]o cocinar pot pasos (cont.)
4. Establezca la energfa de cocci6n para el
primer paso.
OPRIMA
USTEDVERA
Ejemplo, para un nivel de energ[a de cocci6n
del 50%:
OPRIMA
O
(replta la operaci6n hasta
que aparezca la energfa
de coccl6n deseada)
USTED VERA
J. Repita los pasos 2, 3 y 4 para programar el tiempo
y la energia de cocci6n para cada paso adicional,
Encienda el homo. OPRIMA USTED VERA
Despu6s de haber completado el pnmer paso,
los siguientes se contar._n de manera regresiva.
AI terminar e] tiempo de cocci6n:
{el primer paso si cocina en
dos pasos)
USTED VERA
C6mo cambiar las instrucciones
Puede cambiar los tiempos de cocci6n o los
niveles de energl'a de un paso en cualquier
momento despu_s de que se inicie el proceso,
si repite los pasos 2, 3 y/6 4 y 5.
(se escuchardn 4 tonos)
69

C6mo utilizar AUTO COOK (COCC,ONAUTOM/_TICA)
Puede cocinar alimentoe preparados para hornos
de microondas seleccionando simplemente una
cantidad y categoda. AUTO COOK tiene tiempos y
niveles de energ{a de coccibn preestablecidos para
7 categorias (ver el esquema siguiente).
Para utilizar AUTO COOK, siga estos pasos:
1. Oprima
una vez
Usted
ver_
2. Oprima AUTO COOK de 1 a 7 veces para
seleccionar el tipo de alimento.
_ jemplo para
arroz
una vez
U
Oprima un n_mero del panel para seleccionar
el tipo de alimento.
_ Ejemplo para
8rroz
Usted
ver_
Ejemplo para
ar/oz
3. Opdma uno o m&s n_meros del panel para
introducir la cantidad.
Usted J ,I | Ejemplo para
vet& _ una taza
Ejemplo para
una taza
4. Oprima
Usted
verd
(la cuenta
regresiva
puede variar)
NOTAS:
• Si no introduce una cantidad en 2 segundos,
AUTO COOK le solicitar_, que elija una cantidad.
Tendrd 1 minuto para introducir la cantidad y para
oprimir START/ENTER. De no set asi, AUTO
COOK se cancelar_.
• Si oprime AUTO COOK 8 veces, la pantalla
volverd al programa para arroz.
• Si necesita m&s o menos tiempo de cocci6n, no
oprima el bot6n AUTO COOK nuevamente.
Oprima el bot6n POWER antes de oprimir
START/ENTER. (Vea "C6mo cambiar tiempos de
coccion preestablecidos" en la secci6n "Conozca
su homo de microondas").
• Cuando cocine tocino, tenga en cuenta que las
diferencias de grasa, came, espesor y procesos
de curado afectar&n la cocci6n del tocino.
Generalmente los trozos regulares de tocino
promedian aproximadamente 16 rebanadas
por libra.
7O

C6rno utilizar AUTO COOK (COCClbN AUTOMATICA) (cont.)
Este tabla le muestra cbmo seleccionar un tipo de alimento y las cantidades que puede elegir para cada tipo.
OPRIMA U OPRIMA EL NUMERO
ALIMENTO AUTO COOK* DEL PANEL CANTIDADES QUE PUEDE ELEGIR
Arroz unavez 1 0.5, 1, 1.56 2 tazas**
(118 ml, 237 ml,355 ml o 473 ml)
Vegetales frescos 2 veces 2 1 a 4 tazas(237 mla 946 ml)
Vegetales congelados 3 veces 3 1 a 4 tazas (237ml a 946 m])
Verduras enlatadas 4 veces 4 1 a 4 tazas (237 ml a 946 ml)
Tocino 5 veces 5 1 a 6 piezas, espesor normal
Cereal (instant:_neo) 6 veces 6 1 a 4 porciones
Tostadas a la francesa 7 veces 7 1 a 4 piezas
• Debe oprimir AUTO COOK una vez antes de elegir el tipo de ¢omida.
"" Programe 0.5 taza presionando "0" y "5" o s6]o "0" o solo "5". Programa 1 taza presionando "1" y "0" o s6]o "1". Programa 15
taza presionando "1" y "5". Programe 2 tazas presionando "2" y "0" o sblo "2".
71

C6mo utilizar AUTO REHEAT (RECALENTADO AUTOMATICO)
Puede volver a calentar alimentos preparados
para hornos de microondas simplemente
seleccionando una cantidad y categoria. AUTO
REHEAT tiene tiempos y niveles de energia de
coccibn preestablecidos para 5 categorias (ver la
tabla siguiente).
Para utilizar AUTO REHEAT, siga estos pasos:
1. Oprima
una vez
Usted
verd
2. Oprima AUTO REHEAT de 1 a 5 veces para
elegir el tipo de comida.
Ejemplo para
rebanada de pizza
1 vez
U
Oprima un n0mero del panel para elegir el tipo
de comida.
Ejemplo para
rebanada de pizza
Usted
verd
Ejemplo para
rebanada de
pizza
3. Opdma un n0mero del panel para introducir
la cantidad.
Ejemplo para
1 rebanada
Usted
ver&
Ejemplo para
1 rebanada
4. Optima
Usted
vet&
(la cuenta
regresiva puede
variar)
NOTAS:
• Si no introduce una cantidad en 2 segundos,
AUTO REHEAT le solicitard que elija una
cantidad. Tendra 1 minuto para introducir una
cantidad y pulsar START/ENTER
(INICIAR/INTRODUCIR). De no ser as{, AUTO
REHEAT se cancelar&.
• Si pulsa AUTO REHEAT 6 veces, la pantalla
volver_ al programa para rebanada de pizza.
• Si necesita mas, o menos tiempo de cocciSn, no
oprima AUTO REHEAT nuevamente. Oprima el
bot6n de POWER (ENERG{A) antes de oprimir
START/ENTER. (Vea "C6mo cambiar los tiempos
de cocci6n preestablecidos" en la secci6n
"Conozca su homo de microondas").
• Cuando caliente nuevamente un muffin o bagel
grande (4 onzas [113 gr]), utilice el programa para
2 piezas. El programa para 1 pieza calienta
1 muffin o bagel de tamaSo regular, 6 2 panes
de cenar pequeSos.
Esta tabla le mostrar& c6mo elegir el tipo de comida y las cantidades que puede seleccionsr para cadat!pc.
OPRIMA O OPRIMA UN CANTIDADES QUE PUEDE
COMIDA AUTO REHEAT* NUMERO DEL PANEL ELEGIR
Rebanada de pizza una vez 1 1 a 3 rebanadas, 5 onzas
(142 gr) cada una
Sopa/Salsa dos veces 2 1 a 4 tazas (237 ml a 946 ml)
Guisados 3 veces 3 1 a 4 tazas (237 ml a 946 ml)
&limentos horneados 4 veces 4 1 a 6 piezas, 2 onzas (57 gr)
cada una
Plato (de comida) 5 veces 5 1 servida (6 1 plato)
" Debe oprimir AUTO REHEAT una vez antes de elegir el tipo de comida.
72

C6mo utilizar AUTO DEFROST (DESCONGELADOAUTOM .TICO)
Puede descongelar alimentos si elige una cate- 4. Oprima
goda y estabtece un peso. AUTO DEFROST tiene
tiempos y niveles de energia de cocd6n
preestablecidos para 3 categor{as (vea la tabla
Usted
siguiente), ver_
Para utilizar AUTO DEFROST, realice los
siguientes pasos:
I. Oprima
una vez
Usted
ver_
2. Oprima AUTO DEFROST de 1 a 3 veces para
seleccionar el tipo de comida.
Ejemplo para
carries
una vez
U
Oprir_a un n_mero del panel para elegir el tipo
de comida.
Ejemplo para carnes
Usted
ver&
Ejemplo para
carnes
3. Oprima el(los) n_mero(s) de bot6n para
intrcducir el peso.
dos veces
Usted
ver;_
Ejemplo para 1.1 Ibs
Ejemplo para
1.1 Ibs
(cuenta regresiva
puede variar)
NOTAS:
• Si no introduce un peso en 2 segundos, AUTO
DEFROST le solicitar_ que introduzca un peso.
Tendril 1 minuto para introducir el peso y para
oprimir START/ENTER (INIClAR/INTRODUCIR).
De no ser asf, AUTO DEFROST se cancelar&.
• Si introduce un peso mayor que el peso m&s alto
permitido para su programaci6n de alimentos, se
escuchar&n 3 tonos y aparecer& en la pantalla
"RETRY" (REINTENTAR) cuando opdma
START/ENTER.
• Si oprime AUTO DEFROST 4 veces, la
pantalla volver& al programa para Carnes.
• Si necesita m_s o menos tiempo de
descongelado, no oprima AUTO DEFROST
nuevamente. Oprima el bot6n de POWER
(ENERGiA) antes de opnmir START/ENTER.
(Vea "Cbmo cambiar los niveles de energia
de cocci6n preestablecidos" en la secci6n
"Conozca su horno de microondas").
• Vea la "Tabla de descongelado automatico"
m&s adelante en esta secci6n para ver las
instrucciones para descongelar cada alimento.
• Para descongelar los articulos que no se
encuentren en la "Tabla de descongelado
autom&tico," utilice el 30% de la energia
de cocci6n. Consulte un recetario confiable
para obtener informaci6n acerca de la
descongelaci6n.
Para un descongelado parejo y
completo
• La forma del empaque afecta la rapidez con la
que se descongelar_n los alimentos. Los
empaques con poca profundidad se
descongerar_.n m&s r&pido que un envase
profundo.
• Separe [as piezas conforme empiecen a
descongelarse los alimentos. Las piezas
separadas se descongelan de manera m_s uni-
forme.
• Utilice pequeSos pedazos de papel aluminio para
proteger partes de los alimentos tales como alas
de polio, los extremos de fas patas, colas de
pescado o las areas que empiecen a calentarse.
Cerci6rese de que el papel aluminio no toque los
lados, el fondo o la parte superior de[ horno.
73

C6mo utilizar AUTO DEFROST (DESCONGELADO
AUTOMATICO) (cont.)
Esta tabla le indica la manera de elegir el tipo de comida y los pesos que puede establecer para cada tipo.
OPRiMA U OPRIMA EL NOMERO PESOS QUE PUEDE ESTABLECER
COMIDA AUTO DEFROST* DEL PANEL (en d6cimas de libra)
Carnes una vez 1 0.1 a 6.6 (45 gr a 2994 gr)
Aves dos veces 2 0.1 a 6.6 (45 gr a 2994 gr)
Pescado 3 veces 3 0.1 a 4.4 (45 gr a 1998 gr)
• Debe oprimir AUTODEFROSTunavezantesde elegir el tipo de comida.
Tabla de desconge|ado automdtico
Programacibn para carnes
ALIMENTO INSTRUCCIONES ESPECIALES
Carne de res
Came molida
Came molida, Tortitas
Medallones, Lomo en bisteces,
Estofado al homo, Estofado de
espaldilla, Estofado de came de
costiZlas, Estofado de rollos
de came
Estofado
Cordero
.Cubos para estofado
Chuletas (1 pulgada [2.5 cm]
de grueso)
Cerdo
Chuletas (1/2 pulgada [13 mini
de grueso), Hot Dogs, Costillas
de cerdo, CostiTlas estilo
campestre, Estofado de Iomo
(sin hueso), Salchicha
Salchich6n
Se deben cubrir con papel aluminio las partes grasosas o angostas de
carnes grandes de forma irregular y cortes de carne grasosa al inicio de
los ciclos de descongelado.
No descongele menos de 1/4 de libra (133 gr).
No descongele menos de dos tortitas de 4 onzas (133 gr).
Coloque en una parrilla para rostizar en microondas.
Coloque en un plat6n para hornear en microondas.
Coloque en un platbn para hornear en microondas.
Coloque en una parrilla para rostizar en microondas.
Coloque en una parrilla para rostizar en microondas.
Coloque en un plat6n para homear en microondas.

desconge], do au om tico (cont.)
Programaci6n para pescados
ALIMENTO
Pescados
Filetes
Bisteces
Entero
Mariecos
Cangrejo, Colas
de langosta,
Camar6n, Callo
de hacha
INSTRUCCIONES ESPEClALES
Co]oque en un platSn para hornear en microondae. Separe
cuidadosamente los filetes bajo agua fHa.
Coloque en un plat6n para hornear en microondas. Haga correr
agua fria sobre el pescado para terminar de descongelar.
Coloque en un plat6n para hornear en microondas. Cubra la cabeza
y la cola con papel aluminio. No deje que el papel toque los lados
del homo. Para terminar de descongelar sumerja en agua ffia.
Coloque en un plat6n para hornear en microondas.
Programacibn para ayes
ALIMENTO
Pono
Entero
(hasta 9-1/2 Ibs [4.3 Kg])
INDICACIQNES ESPECIALES
Coloque el polio con la pechuga hacia arriba en una parrilla especial
para rostizar para microondas. Termine de descongelarlo
sumergiendolo en agua fria. Retire las menudencias cuando el polio
est6 parcialmente descongelado.
En piezas Col6quelo en una parrilla para rostizar en microondas.
Termine de descongelarlo sumergi_ndolo en agua fria,
Codornices
Enteras Col6quelas en una parrilla para rostizar en microondas. Termine de
descongelarlas sumergi6ndolas en agua fria.
Pavo
Pechuga
_menos de 6 Ibs [2.7 g_)
Col6que[o en una parrilla para rostizar en microondas. Termine de
descongelarlo sumergi6ndolo en agua fr[a.
75

Consejos de descongelado
• Cuando utilice AUTO DEFROST,
(DESCONGELADO AUTOMATICO), necesita
introducir el peso neto (el peso del alimento
menos el del recipiente). Introduzca el peso Io
m&s cercano a 1/10 Ib (45 g).
• S61o utilice el AUTO DEFROST para alimentoa
crudos. AUTO DEFROST le brinda los mejores
resultados cuando el alimento a descongelar est&
completamente congelado. Si el alimento eat&
parcialmente descongelado, siempre programe
un peso menor (para un perfodo de desconge-
lamiento menor), para evitar que el alimento se
cueza.
• Para obtener mejores resuttados, se incluye un
tiempo de reposo preestablecido en el perfodo
de descongelamiento. Esto pudiera hacer que el
tiempo de descongelamiento parezca m&s largo
de Io esperado. (Para mayor informaci6n acerca
del per|odo de reposo, consulte la secci6n
"Consejos para cocinar con microondas," en la
seccfon "Guia de cocina").
Tabla de conversi6n de peso
Probablemente est_ usted acostumbrado a que el
peso de los alimentos se describa en libras y onzas
que son fracciones de 1 libra (por ejemplo 4 onzas
equivalen a 1/4 de libra). Sin embargo, para poder
programar el peso del alimento en el AUTO
DEFROST, debe especificarlo en libras y d_cimas
de libra.
Si el peso en el empaque del alimento se expresa
en fracciones de libra, usted puede utilizar la
slguiente tabla para convertir el peso a d_cimas.
PESO EN D_:DIMAS PESO EQUIVALENTE EN ONZAS PESO EOUIVALENTE EN GRAMOS
0.10 1.6 45
0.20 3.2 91
0.25 Un cuarto de libra 4,0 113
0.30 4.8 136
0.40 6.4 181
0.50 Media libra 8.0 227
0.60 9.6 272
0.70 11,2 318
0.75 Tres cuartos de libra 12.0 340
0.80 12.8 363
0.90 14.4 408
1.00 Una libra 16.0 454
,8

05;,-1o utiUzar POPCORN (PALOMITASDE N]AJz)
Usted puede preparar palomitas de mafz
empacadas comercjalmente para homo de
microondas con s61o oprimir un bot6n. La
cantidad de veces que optima el botSn determina
el tamafio de la bolsa de palomitas que su homo
cocinara.
Para obtener mejores resultados:
' Cocine s61o una bolsa a la vez.
• Si est& usando un recipiente especial para
preparar palomitas de ma[z en microondas, siga
las instrucciones del fabricante.
Para utilizar el botSn POPCORN siga los
siguientes pasos:
". Coloque la bolsa en el centre del plato
giraterio.
Cprima el bot6n POPCORN de 1 a 3 veces
para seleccionar el tamafio de la bolsa.
Ejemplo para
3.5 onzas
Una vez
Usted
verd
Ejemplo para
3.5 onzas
OBSERVACIONES:
• Si oprime el bot6n POPCORN 4 veces, la
pantalla regresar& al programa de 3.5 onzas
(100 gr).
• No necesita oprimir START/ENTER para iniciar
la operaci6n del homo. El homo iniciar_ la
operacibn en 5 segundos.
• Si necesita mayor o menor tiempo de cocci6n,
no optima el bot6n POPCORN de nuevo.
Optima el bot6n POWER antes de que el homo
empiece a cocinar. (Vea "Cbmo cambiar los
tiempes de coccibn preestablecidos" en la
secci6n "Conozca su homo de microondas").
Existen diferencias entre las distintas
marcas de palomitas de mafz
Qu6 tan bien se cocinen sus palomitas,
dependerd de la marca y de la cantidad de grasa
que tengan. Pruebe con varias marcas para
decidir cu_l se cocina me[or. Para obtener me[ores
resultados use bolsas nuevas de palomitas de
mafz.
(la cuenta
regresiva
puede variar)
Esta tabla le muestra come seleccionar un
tamafio de bolsa.
TAMAI_IO DE LA BOLSA OPRIMA EL
(onzas) BOT6N POPCORN
3.5 (100 gr) una vez
3.0 (85 gr) dos veces
1.75 (50 gr) 3 veces
77

C6mo utilizar BEVERAGE (BEBIDAS)
Puede calentar una o dos tazas de 8 onzas (227 gr)
de alguna bebida con s61o oprimir un botbn. La
cantidad de veces que optima este bot6n,
determinar& el n0mero de tazas que su homo
calentard.
OBSERVACIONES:
• Si oprime el bot6n BEVERAGE 3 veces, la pantalla
regresa a la programaci6n para una taza.
• No necesita opdmir el bot6n START/ENTER para
que el homo inicie su operaci6n. El homo
comenzard a calentar por s[ solo en 5 segundos.
• Si usted quiere mayor o menor tiempo de
calentamiento, no oprima el bot6n BEVERAGE
de nuevo. Optima el bot6n POWER antes de que
el horno empiece a cocinar. (Vea "C6mo cambiar
los tiempos de cocci6n preestablecidos" en la
secci6n "Conozca su homo de microondas".)
1. Coloque su(s) taza(s) de bebida(s) en el homo y
cierre la puerta.
2. Optima el bot6n BEVERAGE. OPRIMA USTED VER, &.
Si quiere calentar 1 taza, espere 5 segundos y
el horno comenzar_ a calentar autom_ticamente I ,,_,,r,,.,,_ ]
para 1 taza.
:_. Cambie a 2 tazas, si Io desea.
OPRIMA
0
USTED VERA
Despu6s de 5 segundos, el horno empezar_ a
calentar.
USTED VERA
AI finalizar el tiempo de calentado:
(la cuenta regresiva -
puede variar de la anterior)
(ejemplo para 2 tazas)
USTED VERA
78
(sonardn cuatro tones)

C,6mo utilizarBAKJSD POTATO (PAPASAL HORNO}
Puede cocinar de 1 a 4 papas para hornear
(10 onzas [284 gr] a 13 onzas [369 gr] carla una),
al presionar un sblo botbn. El nSmero de veces
que oprima este bot6n determinar& el nOmero de
papas que su homo cocinar&.
........ /.,_CIONES.
" Si oprime BAKED POTATO 5 veces, la pantalfa
regresa al programa para 1 papa.
• No necesita opdmir START/ENTER para que homo
inicie su operacibn. El homo empezar& a cocinar
por si s61o en 5 segundos.
• Si necesita mayor o menor tiempo de coccibn, no
oprima el botbn BAKED POTATO nuevamente.
Oprima el botSn POWER antes de que el homo
empiece a cocinar. (Vea "Cbmo cambiar los tiem-
pos de cocci6n preestablecidos" en la secciSn
"Conozca su homo de microondas").
Para obtener mejores papas al horno
Antes de hornear, recuerde picar las papas con
un tenedor varias veces. Despu_s de cocinarlas,
mantenga las papas en el horno 5 minutos m&s
para que terminen de cocinarse.
!. Coloque las papas perforadas en el horno y
cierre la puerta.
USTED VER/_
2. Oprima el bot6n BAKED POTATO.
Si desea cocinar 1 papa, sS]o espere 5 segun-
dos.
OPRIMA
POTATO
; Si Io desea puede cambiar esta opci6n
para 2 a 4 papas.
Ejemplo para 2 papas:
Despu_s de 5 segundos, el homo comenzar_
a cocinar.
Ejemplo para 2 papas:
OPRIMA
I BAKED 1POTATO
0
CSD
(un bot6n num_rico)
USTED VERA
USTED VERA
AI final del tiempo de cocci6n:
(la cuenta regresiva puede
variar de la anterior)
USTED VERA,
(sonar_n 4 tonos)
79

C6mo utilizar FROZEN VEGETABLE
(VERDURAS CONGELADAS)
Puede cocinar de I a 4 tazas de verduras congeladas • No necesita oprimir START/ENTER para que el
con s51o oprimir un bot6n. La cantidad de veces que
optima el botbn determinara el nOmero de tazas que
su homo cocinar&.
OBSERVACIONES:
• Si oprime el botbn FROZEN VEGETABLE 5 veces,
la pantalla regresar& al programa para 1 taza.
homo inicie su operaci6n. El horno comenzar& a
cooinar por sf solo en 5 segundos.
• Si necesita un mayor o menor tiempo de oocoibn,
no optima el bot6n FROZEN VEGETABLE nueva-
mente. Oprima el botbn POWER antes de
que el horno empiece a cocinar. (Vea "C6mo cam-
biar los tiempos de coccibn preestablecidos"
en la seccibn "Conozca su homo de microondas".)
1. Coloque las verduras en el homo y cierre
la puerta.
2. Oprima el bot6n FROZEN VEGETABLE. OPRIMA USTED VERP,
Si desea cocinar 1 taza de verduras,
s61o espere 5 segundos.
3. Cambie a 2 6 4 tazas si Jodesea.
Ejemplo para 2 tazas:
Despu_s de 5 segundos, el homo comenzara.
a cocinar.
Ejemplo para 2 tazas:
OPRIMA
O
(un botbn num_rico)
USTED VERA
USTED VERA
AI finalizar el tiempo de cocci6n:
(la cuenta regresiva puede
variar de la anterior)
USTED VERA
80
(sonardn cuatro tonos)

C6mo utilizar FROZEN ENTREE (PLATILLOSCONGELADOS}
Puede cocinar platillos congelados de 10 6 20 onzas • No necesita oprimir START/ENTER para que el
(284 gr 5 568 gr) Con s61ooprimir un botbn. La
cantidad de veces que optima el bot6n determinar&
el tamafio del platillo congelado que su homo cocine.
:._L;_.E,Q,V._CIONES:
, Si oprime el bot6n FROZEN ENTREE 3 veces, la
pantalla regresar_ al programa para 10 onzas
(284 gr).
homo inicie su operaci6n. El homo comenzar& a
cocinar por s{ s61o en 5 segundos.
, Si necesita un mayor o menor tiempo de cocci6n,
no optima el bot6n FROZEN ENTREE nuevamente.
Opdma el bot6n POWER antes de que el homo
empiece a cocinar. (Vea "Cbmo cambiar los
tiempos de coccibn preestablecidos" en la
seccibn "Conozca su homo de microondas").
_. CoJoque su platillo congelado en el plato
giratorio y cierre la puerta.
2. Optima el botbn FROZEN ENTREE. USTED VER/_
Si desea cocinar un platillo congelado de
10-onzas (284 gr), s61oespere 5 segundos.
OPRIMA
_.._[NFROZEN
TREE I
-',. Cambie a 20 onzas (568 gr), si asf Io desea.
DespQes de 5 segundos, e] homo comenzar_.
a cocinar.
Ejemplo para 20 onzas:
OPRIMA
I FROZEN1ENTREE
0
USTED VERA
USTED VERA
AI finalizar el tiempo de cocci6n:
(la cuenta regresiva puede
variar de la anterior)
USTED VERA
(sonar_n 4 tonos)
81

C6mo utilizar HOLD WARM (CONSERVAR CALIENTE)
Usted puede de manera segura conservar
calientes los alimentos cocinados en su homo de
microondas hasta por99 minutos, 99
segundos (alrededor de 1 hora, 40 minutos). Puede
utilizar HOLD WARM pot s[ solo, o bien seguido
autom&ticamente pot un ciclo de cocci6n.
OBSERVACIONES:
• HOLD WARM opera hasta por 99 minutos,
99 segundos.
• Abrir fa puerta del horno cancela HOLD WARM.
Cierre la puerta y oprima HOLD WARM; en
seguida, oprima START/ENTER
(IN]CIAR/INTRODUCIR) si requiere m&s tiempo
para la funci6n HOLD WARM.
• Los alimentos que se cocinen tapados deber&n
mantenerse cubiertos al utilizar HOLD WARM.
• En pasteleda, los pasteles, volteados, etc., deben
destaparse cuando se use HOLD WARM.
• Para mantener calientes los alimentos, deben
cubrirse cuando se use HOLD WARM.
• No utilice m&s de un ciclo de HOLD WARM
(alrededor de 1 hora, 40 minutos). La calidad de
algunos alimentos se deteriora si se excede de
este tiempo.
1. Ponga el alimento caliente cocinado en el homo
y cierre la puerta.
2. Oprima HOLD WARM. OPRIMA USTED VERA
I HOLD 1WARM
3. Encienda el homo.
OPRIMA
ENTER iC_
USTED VERA
Para hacer que HOLD WARM siga
autom&ticamente otro ciclo:
• Mientras est_ programando 1asinstrucciones para
cocinar, oprima HOLD WARM antes de oprimir
START/ENTER, o durante el ciclo.
• Cuando termine el Qltimo ciclo de cocci6n
escuchar& dos tonos. Aparecer& la palabra
"WARM" ("CALIENTE") mientras el homo
continQa trabajando.
82

C6mo cuidar su horno de
microondas
Para asegurarse de que su homo de microondas se yea y funcione bien por mucho tiempo, debe dade el
m=ntenimiento apropiado. Para un cuidado adecuado, por favor siga cuidadosamente estas instrucciones.
Para las superficies
interiores: Lave
frecuentemente con
agua tibia jabonosa y
una esponja o lienzo
suave. Utilice solamente
jabones suaves, no
abrasivos o un deter-
gente suave.
AsegCJrese de
mantener limpias las
_reas donde la puerta y el marco del horno
convergen cuando estd cerrado, Limpie bien con
agua limp0a. Con el tiempo pueden aparecer
manchas en las superficies debido a partlculas de
comida salpicadas al cocinar. Esto es normal.
Para manchas dificiles,
hierv_ una taza de agua
en el homo durante 2 5
3 mJnutos. El vapor
suavizar& las manchas.
Para eliminar olores
dentro del homo, hierva
una taza de agua con
jugo de ]imSn o vinagre.
Platog|ratorio
platogiratorlo
Para limpiar el plato
giratorio y el soporte del
plato giratofio, I&vese
con agua suave jabonosa;
para dreas muy
machadas, utilice un
limpiador suave y una
esponja para tallar. El
plato giratorio y el
soporte de/ptato giratorio
son resistentes a
lavavajillas.
Cbmo limpiar la parrilla de cocci6n
• Lavese a mano con
un detergente y
esponja suaves o un
cepil]0 de nylon.
S6quese por
compteto.
• No utilice fibras o
limpiadores abrasivos
para limpiar la parrilla.
• La parilla es resistente
a lavavajillas.
Para las superficies
exteriores y el panel
de control: UtilJee un
lienzo suave con
limpiador de cristales
en aerosol. Aplique eJ
limpiador de cristales
en aerosol en el lienzo
suave; no Io aplique
directamente en el
homo.
;'IOTA: Los limpiadores abrasivos, fibras de
acero o lana, trapos viejos, algunas toallas de
papel, etc., pueden daSar el panel de control y las
superficies interiores y exteriores del horno.
83

C6mo instalar y cuidar los filtros
Se deben quitar con frecuencia los filtros de grasa
(aluminio plateado) para limpiadoa, al menos una
vez al mes. El filtro de ¢arb6n no se puede
limpiar y debe reemplazarse siempre que
transcurran entre 6 a 12 meses.
NOTA: la combinaci6n microondas campana viene
con un filtro de carb6n (fibra negra) instalado detr&s
del filtro de grasa de aluminio. El filtro de carb6n
ayuda a eliminar olores y proporciona aire limpio
recirculado.
Usted puecle quitar el filtro de carbbn si el homo
tiene salida al exterior.
Usted puede pedir piezas de reemplazo
(PN 4393690) al Centro de Servicio Sears m&s
cercano.
Peligro de Choque EI6ctrico
Peligro de choque el6ctrico
Desconecte el suministro de energfa antes de
quitar los flltros.
Vuelva a colocar todos los paneles antes de
hacer funcionar el horno de microondas.
No seguir estas instrucciones puede
ocasionar la muerte o un choque el_ctrico.
C6mo quitar, limpiar y reinstalar los
filtros
1. Desenchufe el homo de microondas o
desconecte el suministro de energfa el6ctrica.
2. Para quitar los filtros
de grasa (aluminio
plateado), sujete la
leng0eta y jale el filtro
hacia el lado opuesto.
Jale el filtro hacia
abajo para quitarlo.
Filtro de carbon ] 3. Para quitar los
.L ] filtros de carb6n
(fibra negra), doble
hacia atr_s
suavemente las
leng0etas met_licas
en la parte posterior
del filtro de grasa y
jale el filtro de carb6n
Leng0eta$ para sacarlo.
Para volver a
colocar los filtros de
carb6n, alinee el filtro de carb6n sobre el filtro
de grasa. Doble suavemente las lengQetas de
metal en la parte trasera del filtro de grasa sobre
el filtro de carb6n.
Fittro de grasa
r.'OTA: Doble las leng0etas de metal con
cuidado para no quebrarilas.
JOVEN J AMMONtA OISHWASHER
CL_ANEA _
4. Remoje los filtros de
grasa en agua
caliente y un
detergente suave.
Restri_guelos y
agitelos para eliminar
la suciedad incrusta
da. Enju&gue!os bien
y sacQdalos para que
se sequen. No use
amonfaco, agentes
de limpieza corrosivos como limpiadores de
homo con base de lej[a ni los coloque en la
m&quina lavavajillas. El filtro se pondr_ negro
o podria da£mrse.
5. Para volver a
colocar los filtros de
grasa, deslice cada
filtro dentro del lado
exterior del orificio
para filtros. AsegQrese
de deslizar el lado del
filtro que no tiene la
Lt.g0etas ]eng0eta. Sujete la
lengQeta con la otra
mano. Empuje hacia
arriba el lado del filtro con la leng0eta y deslice
el fiitro hacia el otto lado de1 orificio para que
encaje en su lugar.
6. Vuelva a conectar el suministro de energia o
enchufe el homo de microondas.
NOTA: No haga funcionar el extractor sin que los
filtros est6n en su lugar.
84

_6_o cambiar las lutes del horno Y de ia super_=ic]e
p_;'_ pr._paracibn de alimentos
La luz de la superficie para
preparaci6n de alimentos
I. Deeenchufe el homo de microondas o
desconecte el suministro de energia.
2. Quite el tornillo de
montaje de la cubierta
del foco y retfrela con
cuidado.
Tornillo
de montaje
3. Cambie el(los) foco(s) por uno de 30 watts con
portal&mparas (N_mero de parte 4393681),
el cual puede conseguir en su centro de servicio
Sears m&s cercano.
4. Vuelva a colocar la cubierta del foco y el tornillo
de montaje.
5. Enchufe el homo de microondas o reconecte el
suministro de energfa.
La luz del horno
. Desenchufe et homo de microondas o
desconecte et suministro de energfa.
2. Quite los dos
tornirlos de montaje
de las rejillas de
ventilaci6n que se
encuentran
arriba de la cubierta
(los dos tornillos
exteriores}.
3. Recorra la rejilla
hacia adelante y
lev_.ntela para
quitarla.
4. Levante la cubierta
del foco.
5. Cambie el foco pot uno de 30 watts con
portal&mparas (N,',mero de parte 4393681),
el cual puede conseguir en su eentro de
servicio Sears m&s cercano.
6. Cierre la cubierta del foco.
I
7. Deslice la parte
superior de la rejilla de
ventilaci6n a su lugar.
Qprima la parte inferior
hasta que quede
perfectamente
colocada. Vuelva a
colocar los
tornillos de montaje.
8. Enchufe el homo de microondas o reconecte el
suministro de energ[a.
85

Gu|a de cocina
Consejos para cocinar con microondas
Cantidad de alimentos
• Si usted incrementa o disminuye la cantidad
de alimentos que prepara, el tiempo que toma
para cocinarlos tambi6n cambiar_. Por ejemplo,
si duplica las cantidades de una receta, agregue
un poco m&s de la mitad del tiempo original
para cocimiento. Verifique el t6rmino de
cocimiento y si es necesario incremente el
tiempo en periodos pequeSos.
Temperatura inicial de los alimentos
• Mientras m&s baja sea la temperatura de los
alimentos al momento de introducirlos al homo
de microondas, mayor ser& el tiempo de
cocci6n. Los alimentos a temperatura ambiente
se recalentar_.n con mayor rapidez que los
refrigerados.
Composici6n de los alimentos
• Los alimentos con mucha grasa y azt_car se
calentar_n con mayor rapidez que aquellos que
contengan mucha agua. La grasa y el az0car
tambi6n alcanzar&n una temperatura m&s alta
que el agua en el proceso de cocci6n.
• Mientras m;_s densos sean los alimentos,
mayor ser& su tiempo de calentamiento. "Los
alimentos muy densos" como la came, toman
m&s tiempo para volver a calentarse que otros
m&s ligeros, m&s porosos como los pasteles
esponjados.
TamaSo y forma
• Los pedazos m_s pequeSos de alimentos se
cocer&n mas r&pidamente que los grandes. De
igual manera, los pedazos con forma similar
entre si se cocinar&n m&s uniformemente que
los que tienen formas distintas.
• En alimentos que tienen distintos grosores,
las partes m&s delgadas se cocinar&n con
mayor rapidez que las m&s gruesas. Coloque
las partes m&s delgadas de las alas y piernas de
polio en el centro del plato.
Mover y voltear los alimentos
• AI mover y voltear los alimentos, el calor
se distribuye r&pidamente hacia el centro del
plato, con Io que se evita eJsobrecocimiento
en las orillas.
C6mo cubrir los alimentos
Cubra los alimentos para:
• Evitar que salpiquen
• Reducir los tiempos de coccibn
• Evitar que los alimentos se resequen
Cualquier cubierta que utilice para taparlos, debe
permitir el paso de las microondas.
C6mo liberar la presi6n en los
alimentos
• Algunos alimentos (por ejemplo: papas al
homo, salchichas, yemas de huevo, y algunas
frutas) estdn cubiertos firmemente por una piel
o membrana. Se podria formar vapor bajo la
membrana durante ;a cocci6n, Io que provocada
que los alimentos explotaran. Con el fin de
disminuir dicha presibn y evitar que exploten,
haga pequefias incisiones en los alimentos con
un tenedor o un palillo antes de cocinarlos.
C6mo utilizar el tiempo de reposo
• Siempre deje reposar los alimentos despu_s
de cocinarlos. El dejar reposar los alimentos
despu_s de haberse descongelado o cocinado
permite que la temperatura se distribuya
uniformemente para mejorar el resultado en la
cocci6n.
• El tiempo de reposo que destine depender& de
la cantidad de los alimentos que vaya a cocinar
as[ como de su densidad. Algunas veces este
tiempo puede ser tan breve como el que toma
para sacar los alimentos del homo y Ilevarlos a
la mesa. Sin embargo, en alimentos de mayor
densidad yen cantidades tambi_n mayo-3s, e!
tiempo de reposo puede Ilegar a ser hasta de
10 minutos.
86

Consejos para cocinar con microondas (cont.)
Acomodo de los alimentos
Para obtener mejores resultados, coloque los
alimentos uniformemente en el plato. Puede
hacerlo de distintas maneras:
• Si estd cocinando varios alimentos iguales,
tales como papas al homo, col6quelas en
forma circular para obtener un cocimiento
uniforme.
• Cuando cocine alimentos con formas o
grosores irregulares tales ¢omo pechugas de
polio, coloque las partes m&s pequefias o
delgadas de los alimentos hacia el centro del
plato, lugar al que el calor Ilegar&al final.
• Acomode las rebanadas delgadas de came
en capas una sobre la otra.
• Cuando cocine o recaliente un pescado
entero, haga cortes en la piel - para evitar
que se agriete.
• No permita que los alimentos o recipientes
toquen las paredes del horno. Esto es con el
fin de evitar posibles descargas el&ctricas.
C6mo utilizar el papel aluminio
No deber_n utilizarse recipientes de metal en un
homo de microondas. Aunque existen algunas
excepciones. Si se trata de alimentos
preempacados en alg0n recipiente de papel
aluminio siga las instrucciones impresas en el
empaque. Cuando se utilizan recipientes de papel
aluminio, los tiempos de cocciSn podr[an ser m_s
largos debido a que las microondas solamente
penetrar&n en la parte superior de los alimentos.
Si utiliza recipientes de aluminio sin instrucciones en
el empaque, tome en cuenta Io siguiente:
• Coloque el recipiente dentro de otro de vidrio y
aSada un poco de agua de tal manera que cubra
el fondo del mismo a no mAs de 1/4 de pulgada
(6 ram) de alto. Esto asegurar_ un calentamiento
uniforme hasta el fondo del recipiente.
• Quite siempre la tapa para evitar dafiar el
homo.
• Utilice solamente recipientes en buen estado.
• No utilice recipientes con una profundidad
mayor que 3/4 pulgada (19 ram).
• El recipiente debe estar Ileno pot Io menos
hasta la mitad.
• Para evitar descargas el6ctricas debe existir
un mfnimo de 1/4 pulgada (6ram) entre el
recipiente de aluminio y las paredes del horno,
Io mismo entre dos recipientes de aluminio.
• Coloque siempre el recipiente sobre el plato
giratorio.
• Generalmente toma el doble de tiempo
recalentar alimentos en recipientes de papel
aluminio comparado con el que toma el hacerlo
en recipientes de pl&stico_vidrio, porcelan_-
papeL El tiempo en que un alimento est& listo
variar& dependiendo del tipo de recipiente que
utilice.
• Deje reposar los alimentos de 2 a 3 minutos
despues de calentados para que el calor se
distribuya de manera uniforrne por todo el
recipiente.
Lo que no deber& cocinar en su
horno de microondas
•No elabore conservas en el horno. Los frascos
de vidrio cerrados pueden explotar y causar
da_os al homo o lastimar a alguien.
•No utilice el homo de microondas para
esterilizar objetos (biberones, etc), Es dificil
mantener el homo a la temperatura necesaria
para una esterilizacJSn segura.
87

Preguntas y respuestas
PREGUNTAS RESPUESTAS
&Puedo poner en operaci6n mi homo de
microondas sin el plato giratorio o voltear _ste
para colocar un plato rods grande?
Usted puede apagar el plato giratorio para calentar
dos platillos completos lado a lado o uno rods
grande que el plato giratorio. Sin embargo, si s61o
necesita calentar un platillo sobre el plato giratorio,
mant_ngalo en su lugar para obtener mejores
resultados. Adem_ls, no voltee el plato giratorio.
Un plato puesto sobre el plato giratorio debe quedar
dentro del mismo cuando el plato giratorio estd
correctamente con el lado hacia arriba.
sPuedo utilizar una parrilla en mi homo de
microondas para poder recalentar o cocinar en
dos niveles al mismo tiempo?
&Puedo utilizar cazuelos de metal o aluminio
indistintamente en mi homo de microondas?
Puede utilizar una parrilla s61o si 6sta forma parte
de su homo de microondas. Si utiliza una parrilla
ajena a su homo de microondas podda obtener
resultados poco satisfactorios y/o provocar una
descarga electdca.
Puede utilizar papel aluminio para protecci6n
(utilice pedazos pequeSos y sin arrugas), alambres
para brochetas y charolas de papel aluminio poco
profundas (si la charola tiene 3/4 de pulgada [19 mm]
de profundidad o menos, debe Ilenarse al menos
hasta la mitad con alimentes para absorber la
energ{a de las microondas). Nunca permita que
metal alguno toque tas paredes o la puerta. (Para
mayor informaci6n consulte "C6mo utilizar papel
aluminio" en la secci6n "Gufa para cocinar").
sEs normal que el plato giratorio se mueva en Si. El plato giratorio se mueve en el sentido de las
cualquier direccion? manecillas del reloj o en direcci6n contraria, esto
depends de la rotaci6n del motor al momento de
iniciarse el ciclo de cocci6n.
Algunas veces la puerta de mi homo de Esta apariencia es normal y no afecta el
microondas se ve ondulada. _,Es esto normal? funcionamiento de su homo.
_,Qu_ son esos zumbidos que se oyen cuando rni Lo que usted escucha es el ruido clef transformador
homo de microondas est& tuncionando? euando el tubo magnetr6n est& en movimiento.
sPor qu# se calienta el plato euando cocino en AI calentarse los alimentos _stos conduciran el calor
el? Pens6 que esto no deberia suceder, al plato. Tenga a la mano guantes o almohadillas
aislantes para saear los alimentos despu6s de
cocinarlos.
&Qu6 significa "tiempo de reposo"? "Tiempo de reposo" significa que los alimentos
deben retirarse del homo y cubrirse durante un
tiempo adicional para permitir que la cocci6n
termine. Esto deja libre el homo para cocinar otros
alimentos.
_Por que sale vapor por la salida del extractor? Es normal que se produzca vapor al cocinar. El
homo de microondas ha sido diser_ado para sacar
este vapor por la salida del extractor.
6Puedo hacer palomitas de ma[z en mi homo de SL Haga palomitas de ma[z especiales para homo de
microondas? _,C6mo puedo obtener los mejores microondas siguiendo las instrucciones del fabricante
resultados?
o utilizando el bot6n POPCORN (PALOMITAS). No
utilice bolsas de papel normales. Utilice la "prueba
de oido" deteniendo la operacion del homo tan
pronto como el sonido de los granos reventando "1'
decrezca a un "pop" cada 1 6 2 segundos. No
vuelva a cocinar los granos que no hayan reventado.
No haga palomitas en recipientes de vidrio.
88

Soluci6n de problemas
Muchos de los problemas al cocinar se deben generalmente a pequefios detalles que puede encontrar y
arreglar sin necesidad de herramientas de ning_n tipo. Verifiqua la lista que aparece en esta p&gina y la
siguiente antes de solicitar alg_n tipo de servicio. Si despu_s de esto todavfa necesita ayuda consulte la
secci6n "Llame sin costo de Sears" en Contratapa.
horno de microondas no funciona
PROBLEMA CAUSA
Nada funciona.
El horno de microondas
no funciona.
• El cable no est& conectado a un cimuito con el voltaje adecuado. (Consulte
las secciones: "Requisitos el6ctricos" en la p&gina 48 y "Conexi6n el_ctrica"
en la p&gina 54.)
• Se quemb un fusible dom_stico o se desconect6 un interruptor de circuitos.
• La compafi_a de luz tuvo una falla de energia.
•Est& utilizando el horno como cronbmetro. Optima el botbn OFF/CANCEL
(APAGAR/CANCELAR) para desactivar el cron6metro5 -
• La puerta no est& bien cerrada ni asegurada.
• No oprimi6 START/ENTER (INICIAR/INTRODUCIR).
• No sigui6 las instrucciones al pie de la letra.
• Una operaci6n que inici6 anteriormente todavfa'no termina. Oprima
OFF/CANCEL para cancelar la operaci6n.
de coccibn
PROBLEMA
La comida no est_
bien cocida.
La pantalla muestra
un conteo de tiempo
decreciente pero el
homo no cocina.
CAUSA
• El suministro de energfa el_ctrica de su casa o de los contactos en las
paredes es bajo, o m&s d6bil de Io normal, La compafifa de luz puede
decide si el voltaje de linea est_ bajo. Su electricista o t_cnico de servicio
pueden clecirle si el voltaje de salida est& bajo.
• El nivel de energia de cocci6n no se program6 segen las recomendaciones.
Verifique la table en la p&gina 66.
• No program5 el tiempo suficiente pare la cantidad de alimentos a cocinarse.
A cantidades mayores de alimentos, mayores tiempos de cocciSn.
• La puerta del homo no eat& completamente cerrada.
• Program6 los contro[es para la funci6n de cron6rnetro, Optima
OFF/CANCEL para cancelar el cron6metro.
continL_a en la siguiente p_gina
89

Plato giratorio
PROBLEMA
El plato giratorio
no gira.
CAUSA
• Ha apagado la funci6n del plato giratorio (TURNTABLE ON/OFF). (Consulte
la secoi6n "C6mo calentar mds de un plato con aTimentos" en la p_.gina
59).
• El plato giratorio no est_ colocado oorrectamente. Debe estar con el lado
correcto hacia arriba y descansar firmemente sobre el eje del centro.
• El soporte no funciona oorrectamente. Retire et plato giratorio y vuelva a
iniciar la operaci6n del homo. Si el soporte a5n no se mueve, ]lame al
t_onico autodzado para su reparaci6n. Cocinar sin el plato giratorio puede
producir resultados poco satisfactorios.
PROBLEMA CAUSA
No se escucha el tono
de programacibn o de
fin de ciclo.
• No introdujo la instrucci6n correcta.
• Desactiv6 el tono. (Ver la seccibn "Se_ales sonoras" en la pdgina 58.)
V[ u [[zar [ne sajes
PROBLEMA
La pantafla parpadea ":".
CAUSA
• Hubo una interrupci6n de energfa el_ctrica. Vue]va a programar el reloj.
(Vea la secci6n "C6mo programar el re]oj" en la p&gina 62.)
Si nada de Io anterior es la causa del problema yea la seccion "Llame sin costo a SEARS" en Contratapa.
Por favor, registre la informacibn de su modelo.
Siempre que Ilame para solicitar servicio para su N_mero de modelo
aparato, necesita tener a la mano los n_meros N_mero de serie
comoletos de mode]o y serie. Puede encontrar esta
,nformacibn en la placa/etiqueta del modelo y n0mero
de serie (vea "Funciones del homo de microondas" en
la secci6n "Conozca su homo de microondas").
Tambi_n registre la informaciSn adicional que aparece
en la siguiente columna.
Fecha de compra
Nombre del distribuidor
Direcci6n del distribuidor
Teldfono del dlstribuidor
9O

|ndice
Este fndioe se encuentra en orden alfab_tico. Contiene todos los temas incluidos en este manual, junto con
la(s) p&gina(s) en las cuales usted podr& encontrar cada tema.
TEMA P_.GINA
cOMO CAMBIAR LAS LUCES DEL HORNO Y
DE LA SUPERFiClE PARA PREPARACI(_N
DE ALIMENTOS ........................................................ 85
COMO CUIDAR SU HORNO
DE MICROONDAS .................................................... 83
COMO FUNCIONA SU HORNO
DE MICROONDAS ................................................ 51-52
COMO PROBAR SU HORNO
DE MICROONDAS .................................................... 52
COMO PROBAR SU VAJILLA O RECIPIENTES
DE COCINA ................................................................ 53
CONSEJOS
C6mo cocinar .......................................................... 85
C6mo descongelar ............................................ 73-76
Palomitas de maiz .................................................. 77
EXTRACTOR .............................................................. 61
FILTROS .................................................................... 84
GARANTiA .................................................................. 44
INSTRUCCIONES DE INSTALACION ................ 49-51
INTERFERENCIA DE RADIO .................................... 52
LUCES
C6mo reemplazarlas .............................................. 85
C6mo utilizarlas ...................................................... 61
LLAME SIN COSTO ...................................... Contratapa
PANEL DE CONTROL .......................................... 56-59
ADD ONE MINUTE (Un minuto ma.s) .................... 64
AUTO COOK (Cocci6n autom&tica) ........................ 70
AUTO DEFROST
(Deseongelado autom_tico) .................................... 73
AUTO REHEAT (Recalentado autom_tico) ............ 72
BAKED POTATO (Papas al homo) ........................ 79
BEVERAGE (Bebidas) ............................................ 78
Botones num_ricos ................................................ 57
C6mo cambiar los tiempos de cocci6n
pre-establecidos ...................................................... 64
C6mo cocinar a diferentes niveles
energfas de cocci6n .......................................... 66-88
Como coeinar a un nivel alto de energfa ................ 65
C6mo cocinar por pasos .................................... 68-69
C6mo interrumpir la cocci6n .................................. 59
Cron6metro ............................................................ 63
Extractor .................................................................. 61
TEMA P._,GINA
FROZEN ENTREE (Platillos congelados) .............. 81
FROZEN VEGETABLE (Verduras congeladas) ...... 80
Funci6n Demostraci6n/aprendizaje ........................ 59
HOLD WARM (Mantener caliente) .......................... 82
Luz .................................................................... 61, 85
OFF/CANCEL (Apagar/Cancelar) .......................... 58
Pantalla .................................................................. 56
POPCORN (Palomitas de maiz) ............................ 77
POWER (Energia) ...................................... 64, 66-68
RELOJ .................................................................... 62
Seguro para nidos .................................................. 59
START/ENTER (Activar/lntroducir) ........................ 58
TIEMPO DE COCCION; ............................. 65, 67, 68
TURNTABLE ON/OFF
(Activar/Desactivar el plato giratorio) ...................... 59
PAPEL ALUMINIO ...................................................... 87
PARRILLA ............................................................ 60, 88
PARTES Y FUNCIONES
Asa de la puerta .................................................... 55
Etiqueta de la gufa para cocinar ............................ 55
Magnetr6n ........................................................ 51,88
Parrilla de cocci6n ............................................ 55, 60
Placa con modelo y nQmero de serie .................... 55
Plato giratorio .............. 51, 54, 55, 57, 59, 81, 88, 90
Rejilla de ventilaci6n .............................................. 55
Sistema de seguro para la puerta .......................... 55
Ventana .................................................................. 55
PREGUNTAS Y RESPUESTAS .................................. 88
REQUISITOS ELI_CTRICOS ................................ 47, 54
SEGURIDAD .............................................. 46-48, 53-54
SEhIALES SONORAS ................................................ 58
SERVICIO .................................................................. 45
SOLUCION DE PROBLEMAS .............................. 89-90
TABLAS
Auto cook (Coccion autom&tica) ............................ 71
Auto defrost (Descongelado autom#.tico) .......... 74-75
Auto reheat (Recalentado autom&tico) .................. 72
Conversiones de peso ............................................ 76
Energ{as de cocci6n .............................................. 66
TIEMPO DE REPOSO .................................. 76, 86, 88
91

For the repair or replacement parts you need
Call 7 am - 7 pro, 7 days a week
Para las reparaciones o refacciones que usted necesita
Llame de 7 am - 7 pro, los 7 d[as de la semana
-8G0-366-PART
(1-800-366-7278)
For in-home major brand repair service
Call 24 hours a day, 7 days a week
Para servicios de reparaciones en
su hogar de las principales marcas
Llame las 24 horas del d[a, los 7 dias de la semana
=800=4-E Vo[ O& E-sM
(1-800-469-4663)
For the location of a Sears Parts and Service Center
in your area
Call 24 hoursa day,7 daysa week
Para localizar un Centro de
Refacciones y Servicio Sears en su _rea
Llama las24 horas del dfa, los 7 aliasde la samana
"[ QO 4 8:, 't 22:2
== .o° ......o.oooooooosoo.o.o.o • • m.o.oooooooooe
For information on purchasing a Sears Maintenance Agreement
or to inquire about an existing Agreement
Callgam - 5 pm,Monday- Saturday
Para informaci6n sobra la compra de un Contrato de
Mantenimiento Sears o para indagar sobre un Acuerdo existente
Llama de g am- 5 pro, de lunesa s_bado
't o80Q-827 G
HomeCentraF
Whirlpool Part # 8169709
............ 111111
The Service Side of Sears7
El lado de servicios de Sears."'
4619-652-58596/8169531 P,i,_t_,Ji_C_lr_Iri_,_oe_CPlln__'99 8'99
-
 1
1
-
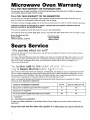 2
2
-
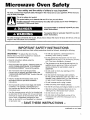 3
3
-
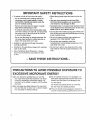 4
4
-
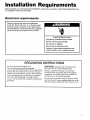 5
5
-
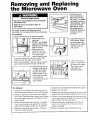 6
6
-
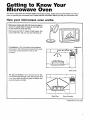 7
7
-
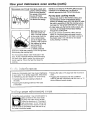 8
8
-
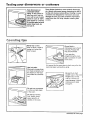 9
9
-
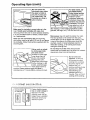 10
10
-
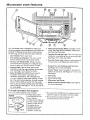 11
11
-
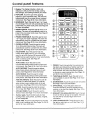 12
12
-
 13
13
-
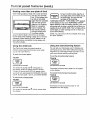 14
14
-
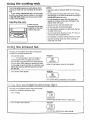 15
15
-
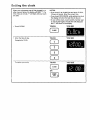 16
16
-
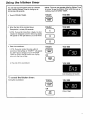 17
17
-
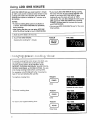 18
18
-
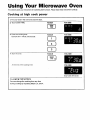 19
19
-
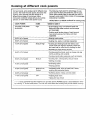 20
20
-
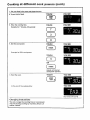 21
21
-
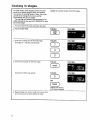 22
22
-
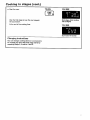 23
23
-
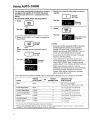 24
24
-
 25
25
-
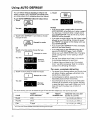 26
26
-
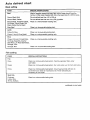 27
27
-
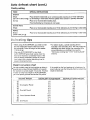 28
28
-
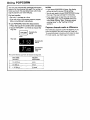 29
29
-
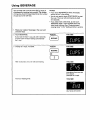 30
30
-
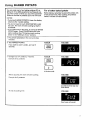 31
31
-
 32
32
-
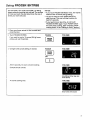 33
33
-
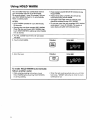 34
34
-
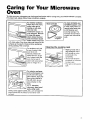 35
35
-
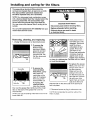 36
36
-
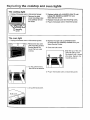 37
37
-
 38
38
-
 39
39
-
 40
40
-
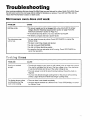 41
41
-
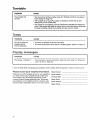 42
42
-
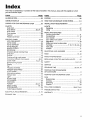 43
43
-
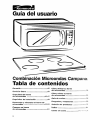 44
44
-
 45
45
-
 46
46
-
 47
47
-
 48
48
-
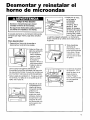 49
49
-
 50
50
-
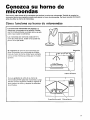 51
51
-
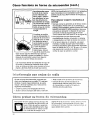 52
52
-
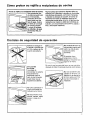 53
53
-
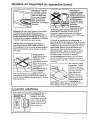 54
54
-
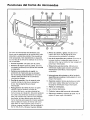 55
55
-
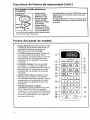 56
56
-
 57
57
-
 58
58
-
 59
59
-
 60
60
-
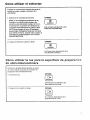 61
61
-
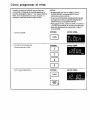 62
62
-
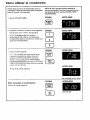 63
63
-
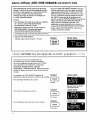 64
64
-
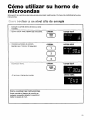 65
65
-
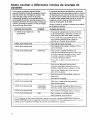 66
66
-
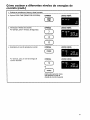 67
67
-
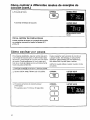 68
68
-
 69
69
-
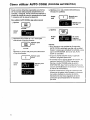 70
70
-
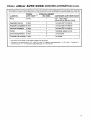 71
71
-
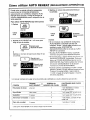 72
72
-
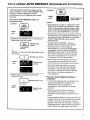 73
73
-
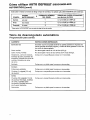 74
74
-
 75
75
-
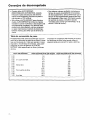 76
76
-
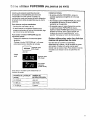 77
77
-
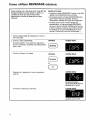 78
78
-
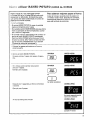 79
79
-
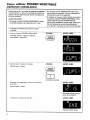 80
80
-
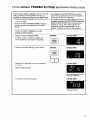 81
81
-
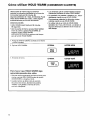 82
82
-
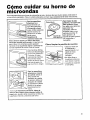 83
83
-
 84
84
-
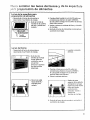 85
85
-
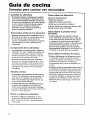 86
86
-
 87
87
-
 88
88
-
 89
89
-
 90
90
-
 91
91
-
 92
92


Kenmore 66569612990 El manual del propietario
- Categoría
- Microondas
- Tipo
- El manual del propietario
- Este manual también es adecuado para
en otros idiomas
- English: Kenmore 66569612990 Owner's manual
Artículos relacionados
-
Kenmore 66568602991 El manual del propietario
-
Kenmore 66568682890 El manual del propietario
-
-
-
-
-