Dolmar Fadenköpfe El manual del propietario
- Tipo
- El manual del propietario

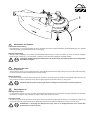
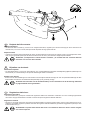
Nachstellen des Fadens:
Automatische Nachstellung
• Der Fadenkopf (1) hat eine automatische durch Fliehkraft gesteuerte Fadennachstellung (drehzahlabhängig). Die optimale
Fadenlänge steht im Normalbetrieb immer zur Verfügung.
Manuelle Nachstellung
• Wird die volle Fadenlänge vor Erreichen der Nachstelldrehzahl benötigt, so kann der Faden (2) durch ein leichtes Auftippen
(Pfeil) mit dem Fadenkopf (1) auf den Boden, jederzeit auf die optimale Fadenlänge eingestellt werden.
ACHTUNG: Die Reinigung des Fadenkopfes und das Erneuern des Fadens dürfen nur bei ausgeschal-
tetem Motor erfolgen!
Adjusting the line:
Automatic adjustment
• The line-trimmer head (1) uses centrifugal force to automatically adjust the line length (taking into account the rotational speed).
In normal operation the line will always be at the right length.
Manual adjustment
• If the full line length is required before the trimmer reaches its full speed (and can therefore automatically adjust the line), the
line (2) can be set to the right length at any time by lightly tapping the trimmer head (1) on the ground.
CAUTION: Always switch off the engine before cleaning the trimmer head or replacing the line!
Rajustage du l:
Rajustage automatique
• Ledispositifdecoupeàl(1)aunefonctionautomatiquederajustagedelàcommandecentrifuge(dépendantdelavitesse
derotation).Lalongueurdeloptimaleesttoujoursdisponibleenservicenormal.
Rajustage manuel
• Sitoutelalongueurdelestrequiseavantquelavitessederotationderajustagesoitatteint,ilestpossiblederégleràtout
momentlel(2)àlalongueuroptimaleentapantlégèrement(verslaèche)ledispositifdecoupeàlcontrelesol.
ATTENTION: Le nettoyage du dispositif de coupe à ls et le remplacement du l ne doivent être
qu'effectués à l'arrêt du moteur!
DE
GB
FR
ES
NL
IT
DE
GB
FR
ES
NL
IT
DE
GB
FR
ES
NL
IT

Reajuste del hilo cortante:
Reajuste automático
• La cabeza de hilos cortantes (1) cuenta con un reajuste automático, regulado por la fuerza centrífuga (en razón del número de
revoluciones). Con el uso normal, siempre estará disponible el largo óptimo del hilo.
Reajuste manual
• Cuando se necesite toda la longitud del hilo antes de alcanzadas las revoluciones de reajuste, el hilo (2) podrá ajustarse medi
-
anteunligerogolpecillo(echa)delacabezadehilossobreelsuelo,paraobtenerlalongitudóptimadelhilo.
ATENCION: ¡La limpieza de la cabeza de hilos cortantes y el recambio del hilo solamente deberán
efectuarse con el motor desconectado!
Bijstellen van de draad:
Automatisch bijstellen
• De draadtrommelkop (1) bezit een automatische, door centrifugaalkracht geregelde draadbijstelmogelijkheid (afhankelijk van
het toerental). In normaal bedrijf is de optimale draadlengte steeds voorhanden.
Bijstellen met de hand
• Indien men de volle draadlengte vóór het bereiken van het bijstel-toerental benodigt, kan men de optimale draadlengte te allen
tijde instellen doordat men de draadtrommelkop lichtelijk op de grond tipt (zie pijl).
ATTENT|E: Schoonmaken van de draadtrommelkop en het vernieuwen van de draad mag uitsluitend
bij uitgeschakelde motor geschieden!
Regolazione della fune:
Regolazione automatica
• La testina della fune (1) dispone di sistema di regolazione della fune automatico comandato con forza centrifuga (dipendente
del numero dei giri). Nell'esercizio normale si ottiene sempre la lunghezza ottimale della fune.
Regolazione manuale
• Nelcasoincuirisultinecessarioaverel'interalunghezzadellafuneprimadiraggiungereilnumerodigirisufcienteperlare
-
golazioneèpossibileregolareinqualsiasimomentolalunghezzaottimaledellafune(2)battendoleggermente(freccia)aterra
la testina della fune (1).
ATTENZIONE: La pulizia della testina della fune e la sostituzione della fune devono essere eseguite
solo a motore spento!
DE
GB
FR
ES
NL
IT
DE
GB
FR
ES
NL
IT
DE
GB
FR
ES
NL
IT

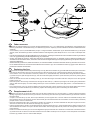
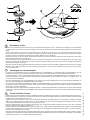
Faden erneuern:
• Schraube im Gehäusedeckel (2) mit Innen-Sechskantschlüssel 6 mm (1, im Lieferumfang) losschrauben (Linksgewinde) und
Bolzen (5) abnehmen. Gehäusedeckel (2) vom Gehäuse (4) trennen. Spule (3) aus dem Gehäuse nehmen und alte Fadenreste
entfernen.
• 2 neue Fäden (ø 3,0 mm, leiser Mähfaden) auf je 2 m Länge schneiden. Fadenenden (6) in die Fadenaufnahmen (7) der Spule
stecken, durch die Schlitze (8) ziehen und beide Fäden im Uhrzeigersinn (siehe Pfeil) bis auf ca. 10 cm fest auf die Spule wik
-
keln.
• Das kürzere Fadenende in die Montagehalterung (9) eindrücken, das längere Fadenende noch eine halbe Umdrehung aufwickeln
und in die gegenüberliegende Montagehalterung (10) eindrücken.
• Spule in das Gehäuse einsetzen, dabei die Fäden durch die Fadenführungen (11) einfädeln. Spule im Gehäuse festhalten und
an beiden Enden der Fäden ziehen, damit der Faden aus der Montagehalterung herausspringt (Einbaulage der Spulen beachten,
siehe linke Abbildung).
• Gehäusedeckel (2) aufsetzen, dabei leicht drehen, bis er deutlich fühlbar und höhrbar einrastet. Bolzen (5) einsetzen und Schrau-
be im Gehäusedeckel mit Innen-Sechskantschlüssel fest anziehen. Ggf. den vorhandenen Bolzen (5) gegen einen Bolzen mit
passendem Gewinde austauschen.
Replacing the line:
• Unscrew the screw (left-hand thread) in the housing cover (2) with the 6 mm Allen key (provided with the trimmer) and remove the
bolt. Remove the housing cover (2) from the housing (4). Take the spool (3) out of the housing and remove old pieces of line.
• Cut 2 sections of 2 m / 6.5 feet each of new line (3.0 mm / 0.12", silent trimmer line). Insert the line ends (6) into the line holders
(7) inside the spool, pull through the slot (8), and wind both lines tightly around the spool clockwise (see arrow), leaving about
10 cm / 4" free.
• Press the shorter line end into the holding notch (9), and wind the longer end another half-turn and press it into the opposite
holding notch (10).
• Place the spool in the housing. Feed the lines through the line holes (11). Hold the spool tight in the housing and pull both line
ends so that the lines jump out of the holding notches (be sure to install the spools in the right position - see the illustration on
the left).
• Putonthehousingcover(2),turningitslightlyuntilyoufeelandhearitcatch.Insertthebolt(5)andrmlytightenthescrewin
the housing cover with the Allen key. If necessary, replace the existing bolt (5) with a bolt having the same thread.
Remplacement du l:
• Dévisserlavisdanslecouvercleduboîtieravecuneclémâlecoudéepourvisàsixpanscreux(1,contenuedanslafourniture)
(letageàgauche)etenleverleboulon(5).Enleverlecouvercle(2)horsduboîtier(4).Retirerlabobine(3)duboîtieretenlever
lesrestesdel.
• Couper2nouveauxls(ø3,0mm,ldecoupesilencieux)àunelongueurde2mchacun.Placerlesextrémitésdel(6)dans
leslogementsdel(7)delabobine,lestirerdanslafente(8)etenroulerlesdeuxlssurlabobineensenshoraire(voirèche)
jusqu'à environ 10 cm en serrant bien.
• Enfoncerl'extrémitédullapluscourtedanslaxationdemontage(9),enroulerl'extrémitédullapluslongueencored'un
demi-touretl'enfoncerdanslaxationdemontage(10)opposée.
• Insérerlabobinedansleboîtier,enintroduisantleslsdanslesguidesdel(11).Tenirlabobinedansleboîtierettirersurles
deuxextrémitésdemanièreàcequelelsautedelaxationdemontage(respecterlapositiondemontagedesbobines,voir
guregauche).
• Poserlecouvercleduboîtier(2)enletournantlégèrementjusqu'àl'entendreetlesentirbiens'enclencher.Introduireleboulon
(5)etbienvisserlavisdanslecouvercleduboîtieraveclaclémâlecoudéepourvisàsixpanscreux.Remplacersinécessaire
leboulon(5)présentcontreunautreauletadéquat.
DE
GB
FR
ES
NL
IT
DE
GB
FR
ES
NL
IT
DE
GB
FR
ES
NL
IT

DE
GB
FR
ES
NL
IT
DE
GB
FR
ES
NL
IT
DE
GB
FR
ES
NL
IT
Recambiar el hilo:
• Desenroscar el tornillo en la tapa de la caja (2) con una llave hexagonal de 6 mm (1, incluida en el suministro) (rosca izquierda)
y quitar el perno (5). Separar la tapa de la caja (2) de la caja (4). Extraer la bobina (3) de la caja y eliminar los restos de hilos
viejos.
• Tomar 2 hilos nuevos (ø 3,0 mm, hilo cortante silencioso) y cortarlos a un largo de 2 m c/u. Introducir los extremos de los hilos
(6) en las recepciones de hilos (7) de la bobina, pasarlos por las ranuras (8) y bobinar ambos hilos en el sentido de las agujas
delreloj(verecha)rmementealrededordelabobina,dejandounos10cmlibres.
• Presionarelextremomáscortodentrodeldispositivojador(9)ybobinarelextremomáslargomediavueltamásypresionarlo
dentrodeldispositivojadoropuesto(10).
• Introducirlabobinaenlacaja,hilvanandoloshilosatravésdelosguíahilos(11).Sostenerlabobinadentrodelacajaytirar
deambosextremosdeloshilosparaqueelhilosaltedeldispositivojador(observarlaubicacióndemontajedelasbobinas
según indica la imagen izquierda).
• Colocar la tapa de la caja (2) girándola levemente hasta que encastre en forma sensible y audible. Montar el perno (5) y ajustar
rmementeeltornillodelatapadelacajaconlallavehexagonal.Encasonecesariocambiarelperno(5)porotroquetenga
una rosca adecuada.
Vervangen van de draadspoel:
• De schroef in trommeldeksel (2) met de meegeleverde 6 mm zeskantsleutel (1) losdraaien (linkse schroefdraad) en bout (5)
eruitnemen. Deksel (2) van trommel (4) afnemen. Spoel (3) uit de trommel nemen en oude draadresten verwijderen.
• 2 nieuwe draden (ø 3,0 mm, stille strimmerdraad) ieder op 2 m lengte snijden. De draaduiteinden (6) in de draadopnemers (7)
van de spoel steken, door sleuf (8) trekken en dan beide draden rechtsom (met de wijzers van de klok - zie pijl) tot op ca. 10
cm strak op de spoel wikkelen.
• Het korte draaduiteinde in de montageklemming (9) drukken, hat lange draaduiteinde nog een halve draaiing opwikkelen en
dan in de tegenoverliggende montageklemming (10) drukken.
• De spoel in de trommel leggen en daarbij de draden in de draadgeleidingen (11) doorhalen. De spoel in de trommel vasthouden
en aan beide einden van de draden trekken, zodat de draad uit de montageklemming springt (let op de juiste inzetpositie van
de spoelen - zie linkse afbeelding).
• Trommeldeksel (2) erop zetten en deze daarbij licht draaien, tot hij hoorbaar inklikt. Bout (5) aanbrengen en met de zeskantsleutel
de schroef in de trommeldeksel vast aandraaien. Indien nodig de bestaande bout (5) door een bout met passende schroefdraad
vervangen.
Come sostituire la fune:
• Svitarelavitenelcoperchiodellascatola(2)(lettaturasinistrosa)utilizzandounachiaveconincassaturaesagonaledi6mm(1,
fornita in dotazione) e rimuovere il bullone (5). Rimuovere il coperchio (2) dalla scatola (4). Estrarre la bobina (3) dalla scatola
ed allontanare i residui della vecchia fune.
• Tagliare2funinuove(diametro3,0mm,funedifalciaturasilenziosa),rispettivamentedi2mdilunghezza.Inlareleestremità
delle funi (6) nell'apposita presa delle bobine (7), tirarle attraverso le fessure (8) ed avvolgere bene entrambe le funi in senso
orariosullabobina(vederelafreccia),noalasciarecirca10cm.
• Promoro l'estremità più corta nel supporto di montaggio (9), avvolgere l'estremità più lunga ancora di mezzo giro e premerla
quindi nel supporto di montaggio opposto (10).
• Inserirelabobinanellascatola,inlandolefuninelleguide(11).Tenerfermalabobinanellascatolaetirarelafuneadentrambe
le estremità in modo tale che la fune fuoriesca dal supporto di montaggio (tenere presente la posizione in cui sono inserite le
bobine, vedere l'illustrazione a sinistra).
• Riporreilcoperchiodellascatola(2)girandololeggermentenoapercepireedasentirechiaramenteloscattodiarresto.Inserire
il bullone (5) e riavvitare bene la vite nel coperchio della scatola utilizzando la chiave con incassatura esagonale. Se necessario
sostituireilbullone(5)conunbullonedallalettaturaadatta.
Form: 995 711 008 (7.06 D, GB, F, E, NL, I)
-
 1
1
-
 2
2
-
 3
3
-
 4
4


Dolmar Fadenköpfe El manual del propietario
- Tipo
- El manual del propietario
en otros idiomas
- français: Dolmar Fadenköpfe Le manuel du propriétaire
- italiano: Dolmar Fadenköpfe Manuale del proprietario
- English: Dolmar Fadenköpfe Owner's manual
- Deutsch: Dolmar Fadenköpfe Bedienungsanleitung
- Nederlands: Dolmar Fadenköpfe de handleiding