Dell PowerVault 132T LTO/SDLT (Tape Library) Guía del usuario
- Tipo
- Guía del usuario

www.dell.com | support.dell.com
Dell™ PowerVault™ 132T LTO
Tape Library
Upgrading to LTO-3 Tape
Drive Modules
升级到 LTO-3
磁带驱动器模块
Mise à niveau vers des modules
de lecteurs de bande LTO-3
Upgrade auf LTO-3-Bandlaufwerkmodule
LTO-3 テープドライブモジュー
ルへのアップグレード
LTO-3 테이프 드라이브 모듈로
업그레이드
Actualización a módulos
de unidad de cinta LTO-3


www.dell.com | support.dell.com
Dell™ PowerVault™ 132T LTO
Tape Library
Upgrading to LTO-3 Tape
Drive Modules

Notes, Notices, and Cautions
NOTE: A NOTE indicates important information that helps you make better use of your computer.
NOTICE: A NOTICE indicates either potential damage to hardware or loss of data and tells you how to avoid
the problem.
CAUTION: A CAUTION indicates a potential for property damage, personal injury, or death.
____________________
Information in this document is subject to change without notice.
© 2005 Dell Inc. All rights reserved.
Reproduction in any manner whatsoever without the written permission of Dell Inc. is strictly forbidden.
Trademarks used in this text: Dell, the Dell logo, PowerEdge, and PowerVault are trademarks of Dell Inc.;
Microsoft and Windows are registered trademarks and Windows Server is a trademark of Microsoft Corporation.
Other trademarks and trade names may be used in this document to refer to either the entities claiming the marks and names
or their products. Dell Inc. disclaims any proprietary interest in trademarks and trade names other than its own.
July 2005 P/N CD513 Rev. A00

Upgrading to LTO-3 Tape Drive Modules 3
This document provides information about upgrading the Dell™ PowerVault™ 132T tape library
from LTO-1 or LTO-2 tape drives to LTO-3 tape drives. You must perform the following
procedures:
• Install drives
• Update the tape library firmware
• Configure the tape library (native Fibre Channel drives only)
Installing Drives
LTO-3 tape drives for the PV132T tape library are offered as SCSI drives or native Fibre Channel
(FC) drives. Configuration options will vary depending on the type of LTO-3 drive you have.
• SCSI drives — An LTO-3 tape drive may co-exist with an LTO-1 or LTO-2 tape drive in the
PV132T if the logical unit number (LUN) partitioning feature is enabled. See the system
documentation on
support.dell.com
for details on how to enable this feature.
• Native FC drives — These drives cannot be placed in the same library with SCSI drives;
therefore, when upgrading to a native FC LTO-3 drive, all existing LTO-1 or LTO-2 drives
must be removed from the tape library.
NOTE: If you are installing only one drive module in the library, that module must be in the centermost
drive bay. In addition, if partitioning was previously enabled, it must be disabled before replacing the
drive.
CAUTION: Before performing this procedure, read and follow the safety instructions in your Product
Information Guide.
To install drive modules, perform the following steps:
1
Turn off the tape library and disconnect the power cable.
2
Disconnect the SCSI cable that connects the tape library to the host system.
3
On the back of the library, remove the cover plate (see Figure 1-1) or the drive module
that you want to replace by loosening the thumbscrews.
NOTE: If you remove the cover plate, store it in a convenient place. The cover plate is required for
proper operation and cooling of the library if the optional drive is removed.

4 Upgrading to LTO-3 Tape Drive Modules
www.dell.com | support.dell.com
Figure 1-1. Removing the Drive Module Cover Plate
4
Carefully slide the new LTO-3 drive module into position. See Figure 1-2. The metal edge
on the drive module should be inserted into the plastic guide on the left side of the drive bay.
Figure 1-2. Inserting the Drive Module
5
Tighten the four thumbscrews on the drive module until it is flush with the chassis.
6
Recable the tape library.
• For SCSI, connect the drives to the host using SCSI cables and terminate the bus.
• For native FC, use an FC cable with an LC connector to attach the LTO-3 drive to an FC
host bus adapter or switch. Be sure that the connector on the other end of the FC cable
matches the device to which the LTO-3 drive is being attached.
7
Reconnect the tape library to an electrical outlet.

Upgrading to LTO-3 Tape Drive Modules 5
Updating the Tape Library Firmware
You can update the firmware using one of the following methods:
• Using the tape library serial port
• Using the remote management unit
You must download the latest firmware package from the Dell Support website at
support.dell.com
. After you extract the package, the firmware files will be located at
c:\dell\drivers\r
xxxxx
\Library\LTO\
, where
r
xxxxx
is the release number of the downloaded firmware
package.
NOTE: In addition to updating the tape library firmware, the firmware for the Remote Management Unit
(RMU) should be upgraded as well. Also, if you plan to connect your SCSI LTO-3 drives to a Storage Area
Network (SAN) using the PowerVault 132T Storage Network Controller (SNC), then the firmware for the
SNC module will need to be upgraded. The RMU and SNC firmware are included in the package you
downloaded. Follow the instructions included with the firmware package to upgrade these components
after the tape library firmware has been upgraded.
NOTE: After installing the drivers and updating the appropriate firmware, reboot the host server to
ensure proper device recognition. You may also need to reconfigure your backup software to recognize
the new LTO-3 drives. See your backup software documentation for device configuration instructions.
Updating Firmware Using the Tape Library Serial Port
1
Turn on the tape library.
An error message may appear on the LCD that reads
Drive Error
or
Drive Offline
.
Ignore this message, as this behavior is normal until the tape library firmware has been
updated.
2
Connect one end of a straight-through serial cable to the serial port of the tape library (not
the serial port for the RMU).
3
Connect the other end of the serial cable to a COM port on the system that has the updated
firmware that you downloaded.
4
Open a command prompt in the Microsoft
®
Windows
®
operating system and change to the
directory that contains the downloaded firmware file.
NOTE: The downloaded firmware file is located at c:\dell\drivers\rxxxxx\Library\LTO\, where rxxxxx is
the release number of the downloaded firmware package.
5
Type the following command at the command prompt:
PV132T_LTO_Update <COM#>
where <COM#> represents the COM port number on the system where the serial cable was
connected.

6 Upgrading to LTO-3 Tape Drive Modules
www.dell.com | support.dell.com
6
Press <Enter>.
The firmware update takes approximately 8
–
10 minutes. A summary of the firmware update
displays at the command prompt when the firmware update has completed.
7
Reboot the library after the firmware update completes.
Libraries with new native FC LTO-3 drives will display a SCSI Error message on the LCD.
Ignore this message, continue to the next step, and then follow the steps under "Configuring
the Tape Library".
8
Verify the new firmware level of the library. The firmware level can be verified via the library
front panel or by going to the main Web page of the remote management card. The firmware
version is listed in the
Library
Firmware
field.
Updating Firmware Using the Remote Management Unit
1
Turn on the tape library and wait for it to completely initialize.
An error message may appear on the LCD that reads
Drive Error
or
Drive Invalid
.
Ignore this message, as this behavior is normal until the tape library firmware has been
updated.
2
Open a Web browser on the system that contains the downloaded firmware files.
3
Enter the IP address of the RMU that is installed in the library that requires the firmware
update.
4
If you are using Internet Explorer on a Windows Server™ 2003 system, the RMU must be a
member of Internet Explorer’s list of trusted sites. If the device has not been added to the list
or you are not certain that it is on the list, perform the following substeps. If the RMU is
already on the list of trusted sites, or if another operating system or Web browser is being
used, skip to Step 5.
a
In Internet Explorer, select
Internet Options
from the
Tools
menu.
b
Select the
Security
tab.
c
Select
Trusted sites
.
d
Click the
Sites
button.
e
Add the IP address of the PowerVault 132T remote management card to the list of trusted
sites.
f
Click
Done
and then click
OK
to exit the Internet Options.
5
On the main page, click the
Firmware
tab.
6
Enter the administrator user name and password for the library. The default user name is
admin
and the default password is
password
.
7
Click
Update Library Firmware
in the
Select target for update
box that appears.

Upgrading to LTO-3 Tape Drive Modules 7
8
Click
Browse
and select the new firmware image that you downloaded.
NOTE: The downloaded firmware file is located at c:\dell\drivers\rxxxxx\Library\LTO\, where rxxxxx is
the release number of the downloaded firmware package. The firmware image filename will end in .lif.
9
Click
Update Firmware
to start the update. Do not power-cycle or reset the tape library until
the firmware update completes.
10
Reboot the library after the update completes.
Libraries with new native FC LTO-3 drives will display a SCSI Error message on the LCD.
Ignore this message, continue to the next step, and then follow the steps under "Configuring
the Tape Library."
11
Verify the new firmware level of the library. The firmware level can be verified via the library
front panel or by going to the main Web page of the remote management card. The firmware
version is listed in the
Library
Firmware
field.
Configuring the Tape Library
This section applies only to LTO-3 upgrades to native FC drives. For the library robotic controller
to be seen by hosts, the library configuration must be updated. Once the following steps have been
completed, the library controller will be presented to host systems across the same target ID as the
tape drive.
1
With the library powered on, navigate the Operator Panel to
Setup
Config Slots
.
2
Change the
Mode
setting to
Lun
.
If you have two FC tape drives and want to set the library up as two logical partitions, change
the
Mode
setting to
Lun-Lun
. See the system documentation on
support.dell.com
for
additional information about partitioning.
3
The library will automatically reboot to enable the new configuration.

8 Upgrading to LTO-3 Tape Drive Modules
www.dell.com | support.dell.com

www.dell.com | support.dell.com
Dell™ PowerVault™ 132T LTO
磁带库
升级到 LTO-3 磁带
驱动器模块

注、注意和警告
注:注表示可以帮助您更好地使用计算机的重要信息。
注意:注意表示可能会损坏硬件或导致数据丢失,并告诉您如何避免此类问题。
警告:警告表示可能会导致财产损失、人身伤害甚至死亡。
____________________
本文件中的信息如有更改,恕不另行通知。
© 2005 Dell Inc.
版权所有,翻印必究。
未经
Dell Inc.
书面许可,严禁以任何方式进行复制。
本文中使用的商标:
Dell
、
Dell
徽标、
PowerEdge
和
PowerVault
是
Dell Inc.
的商标;
Microsoft
和
Windows
是
Microsoft Corporation
的注册商标,
Windows Server
是
Microsoft Corporation
的商标。
本文件中述及的其它商标和产品名称是指拥有相应商标和名称的公司或其制造的产品。
Dell Inc.
对本公司的商标和产品名称之外的其它商标和产品名称不拥有任何专有权。
2005
年
7
月
P/N CD513 Rev. A00

升级到 LTO-3 磁带驱动器模块 11
本说明文件提供了有关将
Dell™ PowerVault™ 132T
磁带库从
LTO-1
或
LTO-2
磁带驱动器升
级到
LTO - 3
磁带驱动器的信息。必须执行以下步骤:
• 安装驱动器
• 更新磁带库固件
• 配置磁带库(仅限本机光纤信道驱动器)
安装驱动器
对于
PV132T
磁带库,配备
LTO - 3
磁带驱动器是为了将其作为
SCSI
驱动器或本机光纤信道
(FC)
驱动器。配置选项视您的
LTO-3
驱动器的类型而有所不同。
•
SCSI
驱动器
—
如果启用了逻辑单元号
(LUN)
分区功能,则
LTO-3
磁带驱动器可以与
LTO- 1
或
LTO-2
磁带驱动器共存于
PV132T
中。有关如何启用此功能的详请,请参阅
support.dell.com
上的系统说明文件。
• 本机
FC
驱动器
—
这些驱动器不能与
SCSI
驱动器放在同一个磁带库中;因此,当升级
到本机
FC LTO-3
驱动器时,必须从磁带库中卸下现有的全部
LTO-1
或
LTO - 2
驱动器。
注:如果磁带库中只安装一个驱动器模块,该模块必须位于驱动器托架最中心的位置。
另外,如果先前已启用分区功能,则在更换驱动器之前,必须禁用此功能。
警告:在执行此过程之前,请阅读并遵循《产品信息指南》中的安全说明。
要安装驱动器模块,请执行以下步骤:
1
关闭磁带库,并断开电源线。
2
断开将磁带库连接到主机系统的
SCSI
电缆。
3
在磁带库的背面,拧开指旋螺丝,卸下盖板(请参阅图
1-1
)或要更换的驱动器模块。
注:如果卸下了盖板,请将其存储在方便的地方。在卸下驱动器选件后,为确保磁带库正确运
行和获得适当的冷却,需要安装此盖板。

12 升级到 LTO-3 磁带驱动器模块
www.dell.com | support.dell.com
图
1-1.
卸下驱动器模块盖板
4
小心地将新的
LTO- 3
驱动器模块滑入到位。请参阅图
1-2
。应将驱动器模块的金属边缘
插入到驱动器托架左侧的塑料导向器中。
图
1-2.
插入驱动器模块
5
拧紧驱动器模块上的四个指旋螺钉,直至驱动器模块与机箱平齐。
6
重新为磁带库连接电缆。
•
对于
SCSI
,请使用
SCSI
电缆将驱动器连接至主机,并终结总线。
•
对于本机
FC
,使用一条具有
LC
连接器的
FC
电缆,将
LTO- 3
驱动器连接至
FC
主
机总线适配器或交换机。确保
FC
电缆另一端的连接器与要连接
LTO- 3
驱动器的设
备相匹配。
7
将磁带库重新连接至电源插座。

升级到 LTO-3 磁带驱动器模块 13
更新磁带库固件
可以使用下列方法之一更新固件:
• 使用磁带库串行端口
• 使用远程管理设备
您必须从
Dell
支持
Web
站点
support.dell.com
下载最新的固件软件包。在解压缩软件包之
后,固件文件将位于
c:\dell\drivers\rxxxxx\Library\LTO\
,其中
rxxxxx
是下载的固件软件包的
版本号。
注:除了更新磁带库固件之外,也应升级远程管理设备 (RMU) 的固件。此外,如果要使用
PowerVault 132T 存储网络控制器 (SNC) 将 SCSI LTO-3 驱动器连接至存储区域网络 (SAN),则需要
升级 SNC 模块的固件。下载的软件包中包含 RMU 和 SNC 固件。升级磁带库固件之后,按照固
件软件包附带的说明升级这些组件。
注:在安装驱动程序并更新相应固件之后,重新引导主机服务器,以确保正确识别设备。您可
能还需要重新配置备份软件才能识别新的 LTO-3 驱动器。有关设备配置说明,请参阅您的备份
软件说明文件。
使用磁带库串行端口更新固件
1
打开磁带存储库。
LCD
上将出现一条错误信息,显示
Drive Error
(驱动器错误)
或
Drive
Offline
(驱动器脱机)
。忽略此信息,因为在磁带库更新完成之前,出现这种现象是
正常的。
2
将直通串行电缆的一端连接到磁带库的串行端口(并非用于连接
RMU
的串行端口)。
3
将串行电缆的另一端连接到已更新了所下载固件的系统上的某个
COM
端口。
4
在
Microsoft
®
Windows
®
操作系统中打开命令提示符,并转到包含所下载固件文件的目
录。
注:下载的固件文件位于 c:\dell\drivers\rxxxxx\Library\L TO\,其中 rxxxxx 是下载的固件软件包的版
本号。
5
在命令提示符下键入以下命令:
PV132T_LTO_Update <COM#>
其中,
<COM#>
表示系统上的
COM
端口号,串行电缆连接到此端口。
6
按
<Enter>
键。
固件更新大概需要
8
-
10
分钟。固件更新完成后,命令提示符下将显示有关固件更新的摘
要信息。

14 升级到 LTO-3 磁带驱动器模块
www.dell.com | support.dell.com
7
在固件更新完成后,重新引导磁带库。
安装了新的本机
FC LTO-3
驱动器的磁带库将在
LCD
上显示
SCSI Error
(
SCSI
错误)
信息。请忽略此信息,继续执行下一步,然后执行“配置磁带库”中的步骤。
8
验证磁带库的新固件级别。固件级别可以通过磁带库前面板或访问远程管理卡的主页加
以验证。在
Library
Firmware
(磁带库固件)字段中列出了固件版本。
使用远程管理设备更新固件
1
打开磁带库电源并等待库完全初始化。
LCD
上将出现一条错误信息,显示
Drive Error
(驱动器错误)
或
Drive
Invalid
(驱动器无效)
。忽略此信息,因为在磁带库更新完成之前,出现这种现象是
正常的。
2
在包含已下载的固件文件的系统上打开
Web
浏览器。
3
对于需要进行固件更新的磁带库,输入其中所安装的
RMU
的
IP
地址。
4
如果是在
Windows Server™ 2003
系统上使用
Internet Explorer
,
RMU
必须是
Internet
Explorer
的可信站点列表的成员。如果设备尚未添加到列表中,或者您不能肯定设备是
否在列表中,请执行以下子步骤:如果
RMU
已经在可信站点列表中,或者如果使用的
是另一个操作系统或
Web
浏览器,请跳至步骤
5
。
a
在
Internet Explorer
中,从
Tools
(工具)菜单中选择
Internet Options
(
Internet
选项)。
b
选择
Security
(安全)选项卡。
c
选择
Trusted sites
(受信任的站点)。
d
单击
Sites
(站点)按钮。
e
将
PowerVault 132T
远程管理卡的
IP
地址添加到可信站点列表中。
f
单击
Done
(完毕),然后单击
OK
(确定)退出
Internet Options
(
Internet
选项)。
5
在主页上,单击
Firmware
(固件)选项卡。
6 输入磁带库的管理员用户名和密码。默认的用户名为
admin,默认的密码为
password。
7
在显示的
Select target for update
(选择更新目标)框中,单击
Update Library Firmware
(更新磁带库固件)。
8
单击
Browse
(浏览),然后选择已下载的新固件映像。
注:下载的固件文件位于 c:\dell\drivers\rxxxxx\Library\L TO\,其中 rxxxxx 是下载的固件软件包的版
本号。固件映像文件名将以 .lif 结尾。

升级到 LTO-3 磁带驱动器模块 15
9
单击
Update Firmware
(更新固件)以开始更新。在固件更新完成之前,请不要关闭并打
开电源或复位磁带库。
10
更新完成后,重新引导磁带库。
安装了新的本机
FC LTO-3
驱动器的磁带库将在
LCD
上显示
SCSI Error
(
SCSI
错误)
信息。请忽略此信息,继续执行下一步,然后执行“配置磁带库”中的步骤。
11
验证磁带库的新固件级别。固件级别可以通过磁带库前面板或访问远程管理卡的主页加
以验证。在
Library
Firmware
(磁带库固件)字段中列出了固件版本。
配置磁带库
本节仅适用于从
LTO-3
升级到本机
FC
驱动器。为使主机能够识别磁带库自动机械控制器
(Robotic Controller)
,必须更新磁带库的配置。在完成以下步骤之后,磁带库控制器将通过
与磁带驱动器相同的目标
ID
呈现给主机系统。
1
在磁带库电源打开时,将操作员面板导航至
Setup
(设置)
Config Slots
(配置插槽)。
2
将
Mode
(模式)设置为
Lun
(逻辑单元号)。
如果您有两个
FC
磁带驱动器,并要将磁带库设置为两个逻辑分区,则将
Mode
(模式)
设置为
Lun-Lun
(逻辑单元号
-
逻辑单元号)。有关分区的其它信息,请参阅
support.dell.com
上的系统说明文件。
3
磁带库将自动重新引导以启用新配置。

16 升级到 LTO-3 磁带驱动器模块
www.dell.com | support.dell.com

www.dell.com | support.dell.com
Bibliothèque de bandes LTO Dell™
PowerVault™ 132T
Mise à niveau vers des
modules de lecteurs
de bande LTO-3

Remarques, avis et précautions
REMARQUE : une REMARQUE indique des informations importantes qui peuvent vous aider à mieux utiliser
votre ordinateur.
AVIS : un AVIS vous avertit d'un risque de dommage matériel ou de perte de données et vous indique
comment éviter le problème.
PRÉCAUTION : une PRÉCAUTION indique un risque potentiel d'endommagement du matériel, de blessure corporelle
ou de mort.
____________________
Les informations contenues dans ce document peuvent être modifiées sans préavis.
© 2005 Dell Inc. Tous droits réservés.
La reproduction de ce document de quelque manière que ce soit sans l'autorisation écrite de Dell Inc. est strictement interdite.
Marques utilisées dans ce document : Dell, le logo DELL, PowerEdge et PowerVault sont des marques de Dell Inc ; Microsoft et Windows
sont des marques déposées de Microsoft Corporation ; Windows Server est une marque de Microsoft Corporation.
Tous les autres noms de marques et marques commerciales utilisés dans ce document se rapportent aux sociétés propriétaires des marques et
des noms de ces produits. Dell Inc. décline tout intérêt dans l'utilisation des marques déposées et des noms de marques ne lui appartenant pas.
Juillet 2005 P/N CD513 Rev. A00

Mise à niveau vers des modules de lecteurs de bande LTO-3 19
Ce document contient des informations sur l'installation de lecteurs de bande LTO-3 dans
une bibliothèque de bandes Dell™ PowerVault™ 132T équipée de lecteurs LTO-1 ou LTO-2.
Vous devez procéder aux opérations suivantes :
• Installation des lecteurs
• Mise à jour du micro-code de la bibliothèque de bandes
• Configuration de la bibliothèque de bandes (lecteurs Fibre Channel natifs uniquement)
Installation des lecteurs
Les lecteurs de bande LTO-3 pour la bibliothèque de bande PV132T sont disponibles sous forme
de lecteurs SCSI ou Fibre Channel natifs (FC). Les options de configuration varient en fonction
du type de lecteur LTO-3 dont vous disposez.
• Lecteurs SCSI : un lecteur de bande LTO-3 peut coexister avec un lecteur de bande LTO-1
ou LTO-2 dans le PV132T si la fonction de partitionnement des unités logiques (LUN)
est activée. Pour savoir comment activer cette fonction, reportez-vous à la documentation
du système disponible sur le site
support.dell.com
.
• Lecteurs Fibre Channel natifs : ces lecteurs ne peuvent pas coexister avec des lecteurs SCSI.
Avant l'installation d'un lecteur LTO-3 Fibre Channel, tous les lecteurs LTO-1 ou LTO-2
existants doivent être retirés de la bibliothèque.
REMARQUE : si vous installez un seul module de lecteur dans la bibliothèque, celui-ci doit se trouver
dans la baie la plus au centre. En outre, si le partitionnement était activé, il doit être désactivé avant
le remplacement du lecteur.
PRÉCAUTION : avant d'exécuter la procédure suivante, lisez attentivement les consignes de sécurité
qui se trouvent dans le Guide d'information sur le produit.
Pour installer les modules de lecteur, procédez comme suit :
1
Arrêtez la bibliothèque de bandes et débranchez le cordon d'alimentation.
2
Déconnectez le câble SCSI qui relie la bibliothèque de bandes au système hôte.
3
À l'arrière de la bibliothèque, desserrez les vis moletées pour retirer la plaque
(voir la figure 1-1) ou le module de lecteur à remplacer.
REMARQUE : si vous retirez la plaque, gardez-la à portée de main. Elle est nécessaire au bon
fonctionnement et au refroidissement de la bibliothèque en cas de retrait du lecteur en option.

20 Mise à niveau vers des modules de lecteurs de bande LTO-3
www.dell.com | support.dell.com
Figure 1-1. Retrait de la plaque de fermeture
4
Insérez doucement le nouveau module LTO-3 dans l'emplacement. Voir la figure 1-2.
Le rebord métallique du module doit s'emboîter sur le guide de plastique situé sur le côté
gauche de la baie.
Figure 1-2. Insertion du module
5
Serrez les quatre vis moletées sur le module de lecteur jusqu'à ce que ce dernier
soit totalement emboîté dans le châssis.
6
Procédez au câblage de la bibliothèque de bandes.
• Si vous utilisez des lecteurs SCSI, connectez-les à l'hôte à l'aide de câbles SCSI
et installez une terminaison sur le bus.
• Si vous utilisez des lecteurs FC natifs, utilisez un câble FC doté d'un connecteur LC
pour relier le lecteur LTO-3 à une carte adaptateur de bus hôte FC ou à un commutateur
de même type. Vérifiez que le connecteur situé à l'autre extrémité du câble FC
correspond au périphérique auquel le lecteur LTO-3 va être raccordé.
7
Rebranchez la bibliothèque de bandes sur une prise électrique.

Mise à niveau vers des modules de lecteurs de bande LTO-3 21
Mise à jour du micro-code de la bibliothèque de bandes
Pour mettre à jour le micro-code, vous disposez des méthodes suivantes :
• Utilisation du port série de la bibliothèque de bandes
• Utilisation de l'unité de gestion à distance
Vous devez télécharger la dernière version du micro-code à partir du site
support.dell.com
. Une fois
le module de mise à jour décompressé, les fichiers de micro-code se trouvent dans le répertoire
c:\dell\drivers\r
xxxxx
\Library\LTO\
, où
r
xxxxx
est le numéro de version du micro-code téléchargé.
REMARQUE : le micro-code de l'unité de gestion à distance doit également être mis à niveau.
En outre, si vous envisagez de connecter vos lecteurs SCSI LTO-3 à un réseau de stockage (SAN)
à l'aide du contrôleur de stockage réseau (SNC) du PowerVault 132T, vous devez également mettre
à jour le micro-code du module SNC. Le micro-code de l'unité de gestion à distance et du module SNC
sont inclus dans le package téléchargé. Suivez les instructions fournies dans ce package pour mettre
le micro-code de ces composants à jour après celui de la bibliothèque de bandes.
REMARQUE : une fois l'installation des pilotes et la mise à jour du micro-code effectuées, redémarrez
le serveur hôte pour vérifier que les périphériques sont détectés correctement. Il est possible que vous
deviez reconfigurer le logiciel de sauvegarde pour qu'il puisse reconnaître les nouveaux modules LTO-3.
Pour ce faire, reportez-vous à la documentation de ce logiciel.
Mise à jour du micro-code à l'aide du port série de la bibliothèque de bandes
1
Mettez la bibliothèque de bandes sous tension.
Un message d'erreur indiquant
Drive Error
(Erreur de lecteur) ou
Drive Offline
(Lecteur hors ligne) peut alors s'afficher sur l'écran LCD. N'en tenez pas compte. Cette
situation est normale jusqu'à la mise à jour du micro-code de la bibliothèque de bandes.
2
Connectez l'une des extrémités d'un câble série direct sur le port série de la bibliothèque
de bandes (et non sur le port série de l'unité de gestion à distance).
3
Connectez l'autre extrémité du câble série sur un port COM du système contenant
le nouveau micro-code téléchargé.
4
Ouvrez une invite de commandes Microsoft
®
Windows
®
et accédez au répertoire
où le fichier du micro-code est enregistré.
REMARQUE : ce fichier se trouve dans le répertoire c:\dell\drivers\rxxxxx\Library\LTO\,
où rxxxxx correspond au numéro de version du micro-code téléchargé.
5
Tapez la commande suivante dans l'invite :
PV132T_LTO_Update <COMn>
où <COMn> représente le numéro du port COM du système où le câble série a été connecté.
6
Appuyez sur <Entrée>.
La mise à jour du micro-code dure de 8 à 10 minutes. Un résumé de la mise à jour
du micro-code s'affiche à la fin de l'opération.

22 Mise à niveau vers des modules de lecteurs de bande LTO-3
www.dell.com | support.dell.com
7
Redémarrez la bibliothèque une fois la mise à jour terminée.
Les bibliothèques équipées de nouveaux lecteurs FC LTO-3 natifs affichent un message
d'erreur SCSI sur l'écran LCD. N'en tenez pas compte. Passez à l'étape suivante,
puis suivez les instructions de la section “Configuration de la bibliothèque de bandes”.
8
Vérifiez le nouveau niveau de micro-code de la bibliothèque. Pour ce faire, accédez
au panneau frontal de la bibliothèque ou utilisez la page Web principale de l'interface
de la carte de gestion à distance. La version de micro-code est indiquée dans le champ
Library Firmware
(Micro-code de la bibliothèque).
Mise à jour du micro-code via l'unité de gestion à distance
1
Mettez la bibliothèque de bandes sous tension et attendez la fin de l'initialisation.
Un message d'erreur indiquant
Drive Error
(Erreur de lecteur) ou
Drive Invalid
(Lecteur non valide) peut s'afficher sur l'écran LCD. N'en tenez pas compte. Cette
situation est normale jusqu'à la mise à jour du micro-code de la bibliothèque de bandes.
2
Ouvrez un navigateur Web sur le système contenant le micro-code téléchargé.
3
Entrez l'adresse IP de l'unité de gestion à distance installée sur la bibliothèque
de bandes à mettre à jour.
4
Si vous utilisez Internet Explorer avec Windows Server™ 2003, l'unité de gestion à distance
doit faire partie de la liste des sites de confiance du navigateur. Si tel n'est pas le cas,
ou si vous n'en êtes pas certain, vous devez effectuer la procédure suivante. Si l'unité fait
déjà partie de la liste des sites de confiance, ou si vous utilisez un autre système d'exploitation
ou navigateur, passez directement à l'étape 5.
a
Sous Internet Explorer, cliquez sur
Options Internet
dans le menu
Outils
.
b
Sélectionnez l'onglet
Sécurité
.
c
Cliquez sur
Sites de confiance
.
d
Cliquez sur le bouton
Sites
.
e
Ajoutez l'adresse IP de la carte de gestion à distance du PowerVault 132T à la liste
des sites de confiance.
f
Cliquez sur
Terminé
, puis sur
OK
pour quitter la fenêtre des options Internet.
5
Dans la page principale, cliquez sur l'onglet
Firmware
(Micro-code).
6
Entrez le nom d'utilisateur et le mot de passe de l'administrateur de la bibliothèque.
Les valeurs utilisées par défaut sont
admin
et
password
.

Mise à niveau vers des modules de lecteurs de bande LTO-3 23
7
Cliquez sur
Update Library Firmware
(Mettre à jour le micro-code de la bibliothèque)
dans la boîte de dialogue
Select target for update
(Sélectionner la cible de la mise à jour)
qui s'affiche.
8
Cliquez sur
Parcourir
et sélectionnez l'image du nouveau micro-code téléchargé.
REMARQUE : ce fichier se trouve dans le répertoire c:\dell\drivers\rxxxxx\Library\LTO\, où rxxxxx
correspond au numéro de version du micro-code téléchargé. Le nom du fichier contenant l'image du
micro-code se termine par .lif.
9
Cliquez sur
Update Firmware
(Mettre à jour le micro-code) pour lancer la mise à jour. Tant
qu'elle n'est pas terminée, vous ne devez pas réinitialiser la bibliothèque ni la mettre hors
tension.
10
Réinitialisez la bibliothèque une fois la mise à jour terminée.
Les bibliothèques équipées de nouveaux lecteurs FC LTO-3 affichent un message d'erreur
SCSI sur l'écran LCD. Ne tenez pas compte de ce message. Passez à l'étape suivante et suivez
les instructions de la section “Configuration de la bibliothèque de bandes”.
11
Vérifiez le nouveau niveau de micro-code de la bibliothèque. Pour ce faire, accédez au
panneau frontal de la bibliothèque ou utilisez la page Web principale de l'interface de la carte
de gestion à distance. La version de micro-code est indiquée dans le champ
Library
Firmware
(Micro-code de la bibliothèque).
Configuration de la bibliothèque de bandes
Cette section concerne uniquement les mises à jour de lecteurs LTO-3 vers des lecteurs FC natifs.
Pour que le contrôleur robotique de la bibliothèque soit détecté par les systèmes hôtes,
la configuration de la bibliothèque doit être mise à jour. Une fois les étapes suivantes effectuées,
ce contrôleur apparaîtra en tant que lecteur de bande pour les systèmes hôtes situés sur le même
ID cible.
1
La bibliothèque étant sous tension, utilisez le panneau de l'opérateur pour naviguer
jusqu'à
Setup
Config Slots
(Configuration ‡ Configurer les emplacements).
2
Modifiez le paramètre
Mode
pour lui attribuer la valeur
Lun
.
Si vous disposez de deux lecteurs de bande FC et souhaitez définir la bibliothèque comme
deux partitions logiques, modifiez le paramètre
Mode
en
Lun-Lun
. Pour plus de détails
sur le partitionnement, reportez-vous à la documentation du système accessible sur le site
support.dell.com
.
3
La bibliothèque redémarre automatiquement pour activer la nouvelle configuration.

24 Mise à niveau vers des modules de lecteurs de bande LTO-3
www.dell.com | support.dell.com

www.dell.com | support.dell.com
Dell™ PowerVault™
132T LTO-Bandbibliothek
Upgrade auf LTO-3-
Bandlaufwerkmodule

Anmerkungen, Hinweise und Warnungen
ANMERKUNG: Eine ANMERKUNG macht auf wichtige Informationen aufmerksam, die die Arbeit
mit dem Computer erleichtern.
HINWEIS: Ein HINWEIS warnt vor möglichen Beschädigungen der Hardware oder vor Datenverlust
und zeigt auf, wie derartige Probleme vermieden werden können.
VORSICHT: VORSICHT weist auf eine potentiell gefährliche Situation hin, die zu Sachschäden,
Verletzungen oder zum Tod führen könnte.
____________________
Irrtümer und technische Änderungen vorbehalten.
© 2005 Dell Inc. Alle Rechte vorbehalten.
Jegliche Reproduktion dieses Dokuments ohne schriftliche Genehmigung von Dell Inc. ist streng untersagt.
Marken in diesem Text: Dell, das Dell Logo, PowerEdge und PowerVault sind Marken von Dell Inc.; Microsoft und Windows sind eingetragene
Marken und Windows Server ist eine Marke von Microsoft Corporation.
Alle anderen in dieser Dokumentation genannten Marken und Handelsbezeichnungen sind Eigentum der jeweiligen Hersteller und Firmen.
Dell Inc. erhebt keinen Anspruch auf Marken und Handelsbezeichnungen mit Ausnahme der eigenen.
Juli 2005 P/N CD513 Rev. A00

Upgrade auf LTO-3-Bandlaufwerkmodule 27
Dieses Dokument enthält Informationen zum Upgrade der Dell™ PowerVault™ 132T
Bandbibliothek von LTO-1- oder LTO-2-Bandlaufwerken auf LTO-3-Bandlaufwerke.
Folgende Arbeiten sind durchzuführen:
• Installation von Laufwerken
• Aktualisieren der Bandbibliotheks-Firmware
• Konfiguration der Bandbibliothek (nur native Fibre-Channel-Laufwerke)
Installation von Laufwerken
LTO-3-Bandlaufwerke für die PV132T-Bandbibliothek werden als SCSI-Laufwerke oder native
FC-Laufwerke (Fibre-Channel) angeboten. Die Konfigurationsoptionen hängen vom Typ des
verwendeten LTO-3-Laufwerks ab.
• SCSI-Laufwerke – Ein LTO-3-Bandlaufwerk kann zusammen mit einem LTO-1- oder
LTO-2-Bandlaufwerk in der PV132T-Bandbibliothek betrieben werden, wenn die LUN-
Partitionierungsfunktion (Logical Unit Number) aktiviert ist. Informationen zum Aktivieren
dieser Funktion erhalten Sie unter
support.dell.com
.
• Native FC-Laufwerke – Diese Laufwerke lassen sich nicht in der gleichen Bandbibliothek
mit SCSI-Laufwerken einsetzen; daher müssen vor dem Upgrade auf ein natives FC-LTO-3-
Laufwerk alle vorhandenen LTO-1- oder LTO-2-Laufwerke aus der Bandbibliothek entfernt
werden.
ANMERKUNG: Wenn die Bibliothek nur über ein Laufwerkmodul verfügt, muss dieses im mittleren
Laufwerkschacht installiert werden. Außerdem muss vor dem Ersetzen des Laufwerks die
Partitionierung deaktiviert werden, falls diese zuvor aktiviert war.
VORSICHT: Bevor Sie mit diesem Vorgang beginnen, lesen und beachten Sie die Sicherheitshinweise
im Product Information Guide (Produktinformationshandbuch).
Gehen Sie zur Installation von Laufwerkmodulen wie folgt vor:
1
Schalten Sie die Bandbibliothek aus und trennen Sie das Netzstromkabel.
2
Entfernen Sie das SCSI-Kabel zwischen der Bandbibliothek und dem Hostsystem.
3
Lösen Sie die Rändelschrauben auf der Rückseite der Bandbibliothek, und entfernen Sie
die Abdeckplatte (siehe Abbildung 1-1) oder das Laufwerkmodul, das Sie ersetzen möchten.
ANMERKUNG: Bewahren Sie die Abdeckplatte gegebenenfalls so auf, dass Sie sie bei Bedarf
problemlos wiederfinden. Die Abdeckplatte ist zur Kühlung und somit zum korrekten Betrieb der
Bandbibliothek erforderlich, wenn das optionale Laufwerk entfernt wird.

28 Upgrade auf LTO-3-Bandlaufwerkmodule
www.dell.com | support.dell.com
Abbildung 1-1. Abdeckplatte des Laufwerkmoduls entfernen
4
Schieben Sie das neue LTO-3-Laufwerkmodul vorsichtig in Position. Siehe Abbildung 1-2.
Die Metallkante am Laufwerkmodul muss in die Kunststoffführung auf der linken Seite
des Laufwerkschachts eingeführt werden.
Abbildung 1-2. Laufwerkmodul einsetzen
5
Ziehen Sie die vier Rändelschrauben am Laufwerkmodul an, bis dieses bündig mit
dem Chassis abschließt.
6
Schließen Sie die Kabel an der Bandbibliothek an.
• Verbinden Sie bei SCSI die Laufwerke über SCSI-Kabel mit dem Host und schließen Sie
den Bus ab.
• Verbinden Sie bei Fibre-Channel das LTO-3-Laufwerk über ein FC-Kabel mit LC-Stecker
mit einem FC-Host-Bus-Adapter oder -Switch. Achten Sie darauf, dass der Anschluss
auf der anderen Seite des FC-Kabels zu dem Gerät passt, an dem das LTO-3-Laufwerk
angeschlossen wird.
7
Verbinden Sie die Bandbibliothek wieder mit dem Netzstrom.

Upgrade auf LTO-3-Bandlaufwerkmodule 29
Aktualisieren der Bandbibliotheks-Firmware
Zur Aktualisierung der Firmware stehen folgende Optionen zur Verfügung:
• Über die serielle Schnittstelle der Bandbibliothek
• Über die Fernverwaltungseinheit
Laden Sie die aktuelle Firmware von der Dell Support-Website unter
support.dell.com
herunter.
Nachdem Sie das Firmwarepaket extrahiert haben, befinden sich die Dateien im Verzeichnis
c:\dell\drivers\r
xxxxx
\Library\LTO\
, wobei
r
xxxxx
für die Versionsnummer der heruntergeladenen
Firmware steht.
ANMERKUNG: Zusätzlich zur Firmware-Aktualisierung für die Bandbibliothek sollte auch die Firmware
für die Fernverwaltungseinheit (Remote Management Unit, RMU) aktualisiert werden. Darüber hinaus
sollten Sie, falls die SCSI LTO-3-Laufwerke über einen PowerVault 132T-Speichernetzwerkcontroller
(SNC) mit einem Speicherbereichsnetzwerk (SAN) verbunden werden sollen, auch die Firmware für das
SNC-Modul aktualisieren. Die RMU- und SNC-Firmware sind in dem heruntergeladenen Softwarepaket
enthalten. Befolgen Sie zum Upgrade dieser Komponenten die Anweisungen aus dem Firmware-Paket,
nachdem Sie die Firmware der Bandbibliothek aktualisiert haben.
ANMERKUNG: Nachdem Sie die Treiber und die entsprechende Firmware aktualisiert haben, starten
Sie den Hostserver neu, damit die Geräte korrekt erkannt werden. Des Weiteren müssen Sie eventuell
die Datensicherungssoftware zur Erkennung der neuen LTO-3-Laufwerke neu konfigurieren.
Anweisungen zur Gerätekonfiguration erhalten Sie in der Dokumentation zur Datensicherungssoftware.
Firmware-Aktualisierung über die serielle Schnittstelle der Bandbibliothek
1
Schalten Sie die Bandbibliothek ein.
Auf der LCD-Anzeige erscheint möglicherweise die Fehlermeldung
Drive Error
(Laufwerkfehler) oder
Drive Offline
(Laufwerk offline). Sie können diese Meldung
ignorieren, denn dieses Verhalten ist normal, solange die Firmware der Bandbibliothek
noch nicht aktualisiert wurde.
2
Verbinden Sie ein Ende eines durchgehenden seriellen Kabels mit der seriellen Schnittstelle
der Bandbibliothek (nicht die serielle Schnittstelle der Fernverwaltungseinheit).
3
Verbinden Sie das andere Ende des seriellen Kabels mit einer COM-Schnittstelle des
Systems, auf dem sich die heruntergeladene neue Firmware befindet.
4
Öffnen Sie in Microsoft
®
Windows
®
eine Befehlszeile, und wechseln Sie zum Verzeichnis
mit der heruntergeladenen Firmwaredatei.
ANMERKUNG: Die heruntergeladene Firmwaredatei befindet sich im Verzeichnis
c:\dell\drivers\r
xxxxx\Library\LTO\, wobei rxxxxx für die Versionsnummer des heruntergeladenen
Firmwarepakets steht.

30 Upgrade auf LTO-3-Bandlaufwerkmodule
www.dell.com | support.dell.com
5
Geben Sie an der Eingabeaufforderung folgenden Befehl ein:
PV132T_LTO_Update <COM#>
Dabei steht <COM#> für die Nummer der COM-Schnittstelle des Systems,
an dem das serielle Kabel angeschlossen ist.
6
Drücken Sie die <Eingabetaste>.
Die Aktualisierung der Firmware dauert ca. 8-10 Minuten. Nach Abschluss der Aktualisierung
wird an der Befehlszeile eine Zusammenfassung angezeigt.
7
Starten Sie die Bibliothek nach Abschluss der Firmware-Aktualisierung neu.
Bei Bibliotheken mit neuen nativen FC-LTO-3-Laufwerken erscheint auf der LCD-Anzeige
eine SCSI-Fehlermeldung. Ignorieren Sie diese Meldung, fahren Sie mit dem nächsten
Schritt fort, und befolgen Sie dann die Anweisungen unter „Konfiguration der
Bandbibliothek“.
8
Überprüfen Sie die neue Firmwareversion der Bibliothek. Sie können die Firmwareversion
überprüfen, indem Sie sie am vorderen Bedienfeld ablesen oder die Hauptwebseite der
Fernverwaltungskarte aufrufen. Die Firmwareversion wird im Feld
Library Firmware
(Bibliotheks-Firmware) angezeigt.
Aktualisieren der Firmware über die Fernverwaltungseinheit
1
Schalten Sie die Bandbibliothek ein und warten Sie, bis die Bibliothek vollständig
initialisiert ist.
Auf der LCD-Anzeige erscheint möglicherweise die Fehlermeldung
Drive Error
(Laufwerkfehler) oder
Drive Invalid
(Laufwerk ungültig). Sie können diese Meldung
ignorieren, denn dieses Verhalten ist normal, solange die Firmware der Bandbibliothek noch
nicht aktualisiert wurde.
2
Öffnen Sie ein Browserfenster auf dem System mit den heruntergeladenen Firmwaredateien.
3
Geben Sie die IP-Adresse der Fernverwaltungseinheit in der Bandbibliothek ein, deren
Firmware Sie aktualisieren möchten.

Upgrade auf LTO-3-Bandlaufwerkmodule 31
4
Wenn Sie Internet Explorer auf einem Windows Server™ 2003-System verwenden, muss
die Fernverwaltungseinheit zu den vertrauenswürdigen Sites von Internet Explorer gehören.
Wenn das Gerät der Liste nicht hinzugefügt wurde oder Sie nicht sicher sind, ob es darin
enthalten ist, gehen Sie vor wie in den folgenden Unterpunkten beschrieben. Wenn die
Fernverwaltungseinheit bereits in der Liste der vertrauenswürdigen Sites aufgeführt ist
oder Sie ein anderes Betriebssystem oder einen anderen Browser verwenden, fahren Sie
mit Schritt 5 fort.
a
Wählen Sie im Internet Explorer im Menü
Extras
den Eintrag
Internetoptionen
.
b
Wählen Sie die Registerkarte
Sicherheit
.
c
Wählen Sie
Vertrauenswürdige Sites
.
d
Klicken Sie auf die Schaltfläche
Sites
.
e
Fügen Sie der Liste der vertrauenswürdigen Sites die IP-Adresse der PowerVault
132T-Fernverwaltungskarte hinzu.
f
Klicken Sie auf
Fertig
und danach auf
OK
, um die Internetoptionen zu schließen.
5
Klicken Sie auf der Hauptseite auf die Registerkarte
Firmware
.
6
Geben Sie Benutzernamen und Kennwort des Administrators für die Bandbibliothek ein.
Der Standardbenutzername lautet
admin
, und das Standardkennwort ist
password
.
7
Klicken Sie im danach angezeigten Feld
Select target for update
(Aktualisierungsziel
auswählen) auf
Update Library Firmware
(Bibliotheks-Firmware aktualisieren).
8
Klicken Sie auf
Durchsuchen
, und wählen Sie das neu heruntergeladene Firmware-Image aus.
ANMERKUNG: Die heruntergeladene Firmwaredatei befindet sich im Verzeichnis
c:\dell\drivers\r
xxxxx\Library\LTO\, wobei rxxxxx für die Versionsnummer des heruntergeladenen
Firmwarepakets steht. Der Dateiname des Firmware-Images endet mit .lif.
9
Starten Sie die Aktualisierung, indem Sie auf
Update Firmware
(Firmware aktualisieren)
klicken. Sie dürfen die Bandbibliothek auf keinen Fall ausschalten oder zurücksetzen,
bevor die Firmware-Aktualisierung vollständig abgeschlossen ist.
10
Starten Sie die Bibliothek nach Abschluss der Aktualisierung neu.
Bei Bibliotheken mit neuen nativen FC-LTO-3-Laufwerken erscheint auf der LCD-Anzeige
eine SCSI-Fehlermeldung. Ignorieren Sie diese Meldung, fahren Sie mit dem nächsten
Schritt fort, und befolgen Sie dann die Anweisungen unter „Konfiguration der
Bandbibliothek“.
11
Überprüfen Sie die neue Firmwareversion der Bibliothek. Sie können die Firmwareversion
überprüfen, indem Sie sie am vorderen Bedienfeld ablesen oder die Hauptwebseite der
Fernverwaltungskarte aufrufen. Die Firmwareversion wird im Feld
Library Firmware
(Bibliotheks-Firmware) angezeigt.

32 Upgrade auf LTO-3-Bandlaufwerkmodule
www.dell.com | support.dell.com
Konfiguration der Bandbibliothek
Dieser Abschnitt gilt nur für LTO-3-Upgrades auf native FC-Laufwerke. Damit der Robotik-
controller von Hosts erkannt wird, muss die Konfiguration der Bibliothek aktualisiert werden.
Sobald die folgenden Schritte abgeschlossen sind, wird Hostsystemen der Bibliothekscontroller
als Bandlaufwerk mit der gleichen Ziel-ID angezeigt.
1
Gehen Sie bei eingeschalteter Bibliothek auf der Bedienkonsole auf
Setup
Config Slots
(Schächte konfigurieren).
2
Ändern Sie die Einstellung
Mode
(Betriebsart) auf
Lun
.
Wenn Sie über zwei FC-Bandlaufwerke verfügen und die Bibliothek mit zwei logischen
Partitionen einrichten wollen, ändern Sie die Einstellung
Mode
(Betriebsart) auf
Lun-Lun
.
Weitere Informationen über das Partitionieren erhalten Sie in der Systemdokumentation
unter
support.dell.com
.
3
Die Bibliothek wird automatisch neu gestartet, um die neue Konfiguration zu aktivieren.

www.dell.com | support.dell.com
Dell™ PowerVault™ 132T LTO
テープライブラリ
LTO-3
テープドライブモジュー
ルへのアップグレード

メモ、注意、警告
メモ: コンピュータを使いやすくするための重要な情報を説明しています。
注意: ハードウェアの損傷やデータの損失の可能性を示し、その危険を回避するための方法を説明してい
ます。
警告: 物的損害、けが、または死亡の原因となる可能性があることを示します。
____________________
本書の内容は予告なく変更されることがあります。
© 2005 すべての著作権は Dell Inc. にあります。
Dell Inc. の書面による許可のない複製は、いかなる形態においても厳重に禁じられています。
本書で使用されている商標について:Dell、DELL ロゴ、PowerEdge、および PowerVault は Dell Inc. の商標です。Microsoft
および Windows は Microsoft Corporation の登録商標です。Windows Server は Microsoft Corporation の商標です。
本書では、必要に応じて上記以外の商標や会社名が使用されている場合がありますが、これらの商標や会社名は、
一切 Dell Inc. に所属するものではありません。
2005 年 7 月 P/N CD513 Rev. A00

LTO-3 テープドライブモジュールへのアップグレード 35
本書では、
Dell™ PowerVault™ 132T
テープライブラリを
LTO-1
または
LTO-2
テープドラ
イブから
LTO-3
テープドライブにアップグレードする手順を説明します。次の手順を実行
する必要があります。
•
ドライブの取り付け
•
テープライブラリファームウェアのアップデート
•
テープライブラリの設定(ネイティブファイバーチャネルドライブのみ)
ドライブの取り付け
PV132T
テープライブラリ用の
LTO-3
テープドライブは、
SCSI
ドライブまたはネイティブ
ファイバーチャネル(
FC
)ドライブとして提供されています。設定オプションは、
LTO-3
ドライブのタイプによって異なります。
•
SCSI
ドライブ
―
論理ユニット番号(
LUN
)のパーティション機能が有効に設定されて
いれば、
PV132T
内で
LTO-3
テープドライブと
LTO-1
または
LTO-2
テープドライブの
共存が可能です。この機能を有効にする方法の詳細については、
support.dell.com
でシステムマニュアルを参照してください。
•
ネイティブ
FC
ドライブ
―
ネイティブ
FC
ドライブは
SCSI
ドライブと同じライブラリ
に設置できません。したがって、ネイティブ
FC LTO-3
ドライブにアップグレードする
際には、既存の
LTO-1
または
LTO-2
ドライブをすべてテープライブラリから取り外す
必要があります。
メモ: ライブラリにドライブモジュールを 1 台のみ取り付ける場合は、真ん中のドライブベ
イに取り付ける必要があります。また、パーティション機能が有効に設定されている場合は、
ドライブを交換する前に無効にする必要があります。
警告: この手順を実行する前に、『製品情報ガイド』の安全にお使いいただくための注意を
よく読み、指示に従ってください。
ドライブモジュールを取り付けるには、次の手順を実行します。
1
テープライブラリの電源を切り、電源ケーブルを取り外します。
2
テープライブラリとホストシステムを接続する
SCSI
ケーブルを取り外します。
3
ライブラリの背面で、蝶ネジを緩め、カバープレート(図
1-1
)または交換するドラ
イブモジュールを取り外します。
メモ: カバープレートを取り外したら、カバープレートは適切な場所に保管します。カバー
プレートは、オプションのドライブを取り外した場合に、ライブラリの適切な動作と冷却効
果のために必要となります。

36 LTO-3 テープドライブモジュールへのアップグレード
www.dell.com | support.dell.com
図 1-1 ドライブモジュールカバープレートの取り外し
4
新しい
LTO-3
ドライブモジュールを慎重にスライドさせて所定の位置に挿入します。
図
1-2
を参照してください。ドライブモジュールの金属製のエッジをドライブベイの
左側のプラスティック製のガイドに差し込みます。
図 1-2 ドライブモジュールの挿入
5
ドライブモジュールの
4
本の蝶ネジを締めて、ドライブモジュールをシャーシの面に
揃えます。
6
テープライブラリのケーブルを接続します。
•
SCSI
の場合は、
SCSI
ケーブルを使用してドライブをホストに接続し、バスをター
ミネート処理します。
•
ネイティブ
FC
の場合は、
LC
コネクタ付きの
FC
ケーブルを使用して、
LTO-3
ドラ
イブを
FC
ホストバスアダプタまたはスイッチに接続します。
FC
ケーブルのもう
一方の端のコネクタが、
LTO-3
ドライブを取り付けるデバイスと一致しているこ
とを確認します。
7
テープライブラリを電源コンセントに接続します。

LTO-3 テープドライブモジュールへのアップグレード 37
テープライブラリファームウェアのアップデート
次のいずれかの方法で、ファームウェアをアップデートできます。
•
テープライブラリのシリアルポートを使用する
•
リモート管理ユニットを使用する
最新のファームウェアパッケージは、デルサポートサイト
support.dell.com
からダウン
ロードしてください。パッケージから解凍されたファームウェアファイルは、
c:\dell\drivers\r
xxxxx
\Library\LTO\
に入っています。
r
xxxxx
は、ダウンロードした
ファームウェアパッケージのリリースナンバーです。
メモ: テープライブラリのファームウェアをアップデートするほか、リモート管理ユニット
(RMU)のファームウェアもアップグレードする必要があります。また、PowerVault 132T スト
レージネットワークコントローラ(SNC)を使用して SCSI LTO-3 ドライブを SAN(Storage
Area Network)に接続する場合は、SNC モジュールのファームウェアをアップグレードする必
要があります。RMU と SNC のファームウェアは、ダウンロードしたパッケージに含まれてい
ます。テープライブラリのファームウェアをアップグレードしたら、ファームウェアのパッ
ケージに含まれている指示に従って、これらのコンポーネントをアップグレードします。
メモ: ドライバをインストールし、該当するファームウェアをアップデートした後で、ホス
トサーバーを再起動して、デバイスが正しく認識されていることを確認します。新しい LTO-3
ドライブを認識するには、バックアップソフトウェアの再設定が必要な場合もあります。デ
バイスの設定方法については、バックアップソフトウェアのマニュアルを参照してください。
テープライブラリのシリアルポートを使用したファームウェアのアップデート
1
テープライブラリの電源を入れます。
Drive Error
(ドライブエラー)または
Drive Offline
(ドライブオフライン)
というエラーメッセージが表示される場合があります。このメッセージは異常を示す
ものではなく、テープライブラリのファームウェアがアップデートされると表示が消
えますので、無視してください。
2
ストレートシリアルケーブルの一端をテープライブラリのシリアルポート
(
RMU
のシリアルポートではありません)に接続します。
3
シリアルケーブルのもう一端を、ダウンロードしてアップデートしたファームウェア
が存在するシステムの
COM
ポートに接続します。
4
Microsoft
®
Windows
®
オペレーティングシステムでコマンドプロンプトを開き、
ダウンロードしたファームウェアファイルがあるディレクトリに移動します。
メモ: ダウンロードしたファームウェアファイルは、c:\dell\drivers\rxxxxx\Library\LTO\ に入っ
ています。rxxxxx は、ダウンロードしたファームウェアパッケージのリリースナンバーです。
5
コマンドプロンプトに次のコマンドを入力します。
PV132T_LTO_Update <COM#>
ここで
<COM#>
は、シリアルケーブルが接続されたシステムの
COM
ポート番号を表
します。

38 LTO-3 テープドライブモジュールへのアップグレード
www.dell.com | support.dell.com
6
<Enter>
を押します。
ファームウェアのアップデートには
8
~
10
分ほどかかります。ファームウェアの
アップデートが完了すると、ファームウェアアップデートの概要がコマンドプロンプ
トに表示されます。
7
ファームウェアのアップデートが完了したら、ライブラリを再起動します。
新しいネイティブ
FC LTO-3
ドライブを取り付けたライブラリには、
LCD
に
SCSI
エ
ラーメッセージが表示されます。このメッセージは無視して次の手順に進み、「テープ
ライブラリの設定」の手順に従います。
8
ライブラリの新しいファームウェアレベルを確認します。ファームウェアレベルは、
ライブラリの正面パネルで確認できるほか、リモート管理カードのメインウェブペー
ジに移動して確認することもできます。ファームウェアバージョンは、
Library
Firmware
(ライブラリファームウェア)フィールドに表示されます。
リモート管理ユニットを使用したファームウェアのアップデート
1
テープライブラリの電源を入れ、テープライブラリが完全に初期化されるまで
待ちます。
Drive Error
(ドライブエラー)または
Drive Invalid
(ドライブ無効)という
エラーメッセージが表示される場合があります。このメッセージは異常を示すもので
はなく、テープライブラリのファームウェアがアップデートされると表示が消えます
ので、無視してください。
2
ダウンロードしたファームウェアファイルが入っているシステムでウェブブラウザを
開きます。
3
ファームウェアのアップデートを必要とするライブラリに取り付けられている
RMU
の
IP
アドレスを入力します。
4
Windows Server™ 2003
システムで
Internet Explorer
を使用する場合、
RMU
は
Internet Explorer
の信頼済みサイトの一覧に含まれている必要があります。デバイスが
一覧に追加されていないか、または一覧にあることが確認されていない場合は、以下の
手順を実行します。
RMU
がすでに信頼済みサイトの一覧にある場合、または別のオペ
レーティングシステムやウェブブラウザを使用している場合は、手順
5
に進みます。
a
Internet Explorer
で、
ツール
メニューから
インターネットオプション
を選択し
ます。
b
セキュリティ
タブを選択します。
c
信頼済みサイト
を選択します。
d
サイト
ボタンをクリックします。
e
信頼済みサイトの一覧に
PowerVault 132T
リモート管理カードの
IP
アドレスを追
加します。
f
Done
(完了)をクリックし、
OK
をクリックしてインターネットオプションを終
了します。

LTO-3 テープドライブモジュールへのアップグレード 39
5
メインページで
Firmware
(ファームウェア)タブをクリックします。
6
ライブラリの管理者ユーザー名とパスワードを入力します。デフォルトのユーザー名
は
admin
、デフォルトのパスワードは
password
です。
7
表示される
Select target for update
(アップデートのターゲットの選択)ダイア
ログボックスで、
Update Library Firmware
(ライブラリファームウェアのアップ
デート)をクリックします。
8
Browse
(参照)をクリックし、ダウンロードした新しいファームウェアイメージを
選択します。
メモ: ダウンロードしたファームウェアファイルは、c:\dell\drivers\rxxxxx\Library\LTO\ に入っ
ています。rxxxxx は、ダウンロードしたファームウェアパッケージのリリースナンバーです。
ファームウェアイメージのファイル名は、末尾が .lif です。
9
Update Firmware
(ファームウェアのアップデート)をクリックして、アップデー
トを開始します。ファームウェアのアップデートが完了するまで、テープライブラリ
の電源を入れ直したり、テーブライブラリをリセットしたりしないでください。
10
アップデートが完了したら、ライブラリを再起動します。
新しいネイティブ
FC LTO-3
ドライブを取り付けたライブラリには、
LCD
に
SCSI
エ
ラーメッセージが表示されます。このメッセージは無視して次の手順に進み、「テープ
ライブラリの設定」の手順に従います。
11
ライブラリの新しいファームウェアレベルを確認します。ファームウェアレベルは、
ライブラリの正面パネルで確認できるほか、リモート管理カードのメインウェブペー
ジに移動して確認することもできます。ファームウェアバージョンは、
Library
Firmware
(ライブラリファームウェア)フィールドに表示されます。
テープライブラリの設定
本項は、
LTO-3
をネイティブ
FC
ドライブにアップグレードする場合にのみ適用されます。
ライブラリのロボットコントローラをホストに表示するには、ライブラリの設定をアップ
デートする必要があります。以下の手順が完了したら、ライブラリコントローラがテープ
ドライブと同じターゲット
ID
を持つホストシステムに提示されます。
1
ライブラリに電源が入った状態で、オペレータパネルで
Setup
(セットアップ)→
Config Slots
(構成スロット)と進みます。
2
Mode
(モード)設定を
Lun
に変更します。
FC
テープドライブが
2
台あり、ライブラリを
2
つの論理パーティションとしてセット
アップする場合は、
Mode
(モード)設定を
Lun-Lun
に変更します。パーティション
分割の詳細については、
support.dell.com
でシステムマニュアルを参照し
てください。
3
ライブラリは自動的に再起動し、新しい設定が有効になります。

40 LTO-3 テープドライブモジュールへのアップグレード
www.dell.com | support.dell.com

www.dell.com | support.dell.com
Dell ™ PowerVault ™ 132T LTO
테이프 라이브러리
LTO-3
테이프
드라이브
모듈로
업그레이드

참고 , 알림 , 주의
참고: 참고는 컴퓨터를 보다 효율적으로 사용하는데 도움이 되는 중요 정보를 제공합니다.
주의사항: 알림은 하드웨어의 손상 또는 데이터 유실 위험을 설명하며, 이러한 문제를 방지할 수 있는 방법을
알려줍니다.
주의: 주의는 재산상의 피해나 심각한 부상 또는 사망을 유발할 수 있는 위험이 있음을 나타냅니다.
____________________
본 설명서에 수록된 정보는 사전 통보 없이 변경될 수 있습니다.
© 2005 Dell Inc. All rights reserved.
어떠한 경우에도 Dell Inc.의 사전 승인 없이 무단 복제하는 행위는 엄격하게 금지되어 있습니다.
본 설명서에 사용된 상표인 Dell, Dell 로고, PowerEdge 및 PowerVault는 Dell Inc.의 상표입니다. Microsoft와 Windows는 Microsoft
Corporation의 등록 상표이고 Windows Server는 Microsoft Corporation의 상표입니다.
본 설명서에서 특정 회사의 표시나 제품 이름을 지칭하기 위해 기타 상표나 상호를 사용할 수도 있습니다. Dell Inc.는 자사가 소유
하고 있는 것 이외에 기타 모든 등록 상표 및 상표 이름에 대한 어떠한 소유권도 보유하지 않습니다.
2005 년 7 월 P/N CD513 Rev. A00

LTO-3 테이프 드라이브 모듈로 업그레이드 43
본
설명서에서는
Dell™ PowerVault™ 132T
테이프
라이브러리를
LTO-1
또는
LTO-2
테이프
드
라이브에서
LTO- 3
테이프
드라이브로
업그레이드하는
방법에
대해
설명합니다
.
다음
절차를
수행해야
합니다
.
•
드라이브를
설치합니다
.
•
테이프
라이브러리
펌웨어를
업데이트합니다
.
•
테이프
라이브러리를
구성합니다
(
기본
Fibre Channel
드라이브만
).
드라이브 설치
PV132T
테이프
라이브러리의
LTO-3
테이프
드라이브는
SCSI
드라이브
또는
기본
Fibre
Channel (FC)
드라이브로
제공됩니다
.
구성
옵션은
보유하고
있는
LTO- 3
드라이브
유형에
따
라
다릅니다
.
•SCSI
드라이브
— LUN(Logical Unit Number)
파티셔닝
기능을
사용하는
경우에는
PV132T
에서
LTO-3
테이프
드라이브를
LTO -1
또는
LTO-2
테이프
드라이브와
함께
사용
할
수
있습니다
.
이
기능을
사용하는
방법에
대한
자세한
내용은
support.dell.com
에서
시
스템
설명서를
참조하십시오
.
•
기본
FC
드라이브
—
이
드라이브들은
SCSI
드라이브와
동일한
라이브러리에
위치할
수
없습니다
.
따라서
기본
FC LTO-3
드라이브로
업그레이드하는
경우에는
기존의
모든
LTO- 1
또는
LTO- 2
드라이브를
테이프
라이브러리에서
제거해야
합니다
.
참고: 라이브러리에 하나의 드라이브 모듈만 설치하려는 경우에는 해당 모듈은 가운데 있는 드
라이브 베이에 위치해야 합니다. 또한, 파티셔닝 기능을 이전에 활성화하였다면 드라이브를 교체
하기 전에 비활성화해야 합니다.
주의 : 이 절차를 수행하기 전에 제품 정보 설명서의 안전 지침 사항을 숙지하여 준수하십시오 .
드라이브
모듈을
설치하려면
다음
단계를
수행하십시오
.
1
테이프
라이브러리를
끄고
전원
케이블을
분리합니다
.
2
테이프
라이브러리를
호스트
시스템에
연결하는
SCSI
케이블을
분리합니다
.
3
라이브러리
뒷면에서
고정
나사를
풀어
교체할
드라이브
모듈
또는
덮개
플레이트
(
그림
1-1
참조
)
를
엽니다
.
참고: 제거한 덮개 플레이트를 편리한 곳에 두십시오. 선택 사양 드라이브를 제거하는 경우 라이
브러리의 올바른 작동 및 과열 방지를 위해서는 덮개 플레이트가 필요합니다.

44 LTO-3 테이프 드라이브 모듈로 업그레이드
www.dell.com | support.dell.com
그림 1-1. 드라이브 모듈 덮개 플레이트 제거
4
새
LTO-3
드라이브
모듈을
제
위치에
조심스럽게
밀어
넣습니다
.
그림
1-2
를
참조하십시
오
.
드라이브
모듈의
금속
가장자리를
드라이브
베이
좌측에
있는
플라스틱
가이드에
삽
입해야
합니다
.
그림 1-2. 드라이브 모듈 삽입
5
섀시와
수평이
될
때까지
드라이브
모듈에
있는
네
개의
고정
나사를
조입니다
.
6
테이프
라이브러리의
케이블을
다시
연결합니다
.
•SCSI
의
경우
SCSI
케이블을
사용하여
드라이브를
호스트에
연결하고
버스를
종결합
니다
.
•
기본
FC
의
경우
LC
커넥터와
FC
케이블을
사용하여
LTO- 3
드라이브를
FC
호스트
버스
어댑터
또는
스위치에
연결합니다
. FC
케이블의
다른
한
쪽
끝에
있는
커넥터가
LTO- 3
드라이브가
연결되어
있는
장치에
맞는지
확인하십시오
.
7
테이프
라이브러리를
전원
콘센트에
다시
연결합니다
.

LTO-3 테이프 드라이브 모듈로 업그레이드 45
테이프 라이브러리 펌웨어 업데이트
다음
방법
중
하나를
통해
펌웨어를
업데이트할
수
있습니다
.
•
테이프
라이브러리
직렬
포트
사용
•
원격
관리
장치
사용
Dell
지원
웹
사이트
(
support.dell.com
)
에서
최신
펌웨어
패키지를
다운로드해야
합니다
.
펌웨
어의
압축을
풀면
파일이
c:\dell\drivers\r
xxxxx
\Library\LTO\
(
여기서
r
xxxxx
는
다운로드된
펌웨어
패키지의
릴리즈
번호
)
에
저장됩니다
.
참고: 테이프 라이브러리 펌웨어 업데이트 외에도, 원격 관리 장치(RMU)의 펌웨어도 업데이트해
야 합니다. 또한, PowerVault 132T Storage Network Controller(SNC)를 사용하여 SCSI LTO-3 드라이브
를 Storage Area Network(SAN)에 연결하려는 경우에는 SNC 모듈용 펌웨어를 업그레이드해야 합
니다. RMU 및 SNC 펌웨어는 다운로드한 패키지에 포함되어 있습니다. 테이프 라이브러리 펌웨어
를 업그레이드한 후 펌웨어와 함께 제공된 지침에 따라 이들 구성요소를 업그레이드합니다.
참고: 드라이버를 설치하고 해당 펌웨어를 업데이트한 후에는 호스트 서버를 다시 부팅하여 장
치가 올바르게 인식되는지 확인하십시오. 또한 새 LTO-3 드라이브를 인식하도록 백업 소프트웨어
를 재구성해야 할 수도 있습니다. 장치 구성 방법은 백업 소프트웨어 설명서를 참조하십시오.
테이프 라이브러리 직렬 포트를 사용하여 펌웨어 업데이트
1
테이프
라이브러리의
전원을
켭니다
.
LCD
에
Drive Error(드라이브 오류)
또는
Drive Offline(드라이브 오프라인)
과
같은
오류
메시지가
표시될
수
있습니다
.
테이프
라이브러리
펌웨어가
업데이트될
때까지
는
이러한
동작은
정상적인
것이므로
이
메시지를
무시해도
됩니다
.
2
직렬
케이블의
한
쪽
끝을
테이프
라이브러리의
직렬
포트
(RMU
의
직렬
포트
아님
)
에
연결합니다
.
3
직렬
케이블의
다른
한
쪽
끝을
다운로드한
업데이트된
펌웨어가
있는
시스템의
COM
포트에
연결합니다
.
4
Microsoft
®
Windows
®
운영
체제의
명령
프롬프트를
열고
다운로드한
펌웨어
파일이
포함
된
디렉토리로
변경하십시오
.
참고: 다운로드된 펌웨어 파일은 c:\dell\drivers\rxxxxx\Library\LTO\(여기서 rxxxxx는 다운로드된
펌웨어 패키지의 릴리즈 번호)에 있습니다.
5
명령
프롬프트에
다음
명령을
입력합니다
.
PV132T_LTO_Update <COM#>
여기서
<COM#>
은
직렬
케이블이
연결된
시스템의
COM
포트
번호를
나타냅니다
.
6
<Enter>
를
누릅니다
.
펌웨어
업데이트에는
약
8
~
10
분이
소요됩니다
.
펌웨어
업데이트가
완료되면
명령
프롬
프트에
펌웨어
업데이트에
관한
요약
정보가
표시됩니다
.

46 LTO-3 테이프 드라이브 모듈로 업그레이드
www.dell.com | support.dell.com
7
펌웨어
업데이트가
완료된
후에
라이브러리를
다시
부팅합니다
.
새
기본
FC LTO-3
드라이브가
설치된
라이브러리의
LCD
에
SCSI
오류
메시지가
표시됩
니다
.
이
메시지를
무시하고
,
다음
단계로
진행한
후
"
테이프
라이브러리
구성
"
아래에
있
는
단계를
수행하십시오
.
8
라이브러리의
새
펌웨어
레벨을
확인합니다
.
펌웨어
레벨은
라이브러리
전면
패널을
사용
하거나
원격
관리
카드의
기본
웹
페이지로
이동하여
확인할
수
있습니다
.
펌웨어
버전은
Library
Firmware
(
라이브러리
펌웨어
)
필드에
표시됩니다
.
원격 관리 장치를 사용하여 펌웨어 업데이트
1
테이프
라이브러리의
전원을
켜고
완전히
초기화될
때까지
기다립니다
.
LCD
에
Drive Error(드라이브 오류)
또는
Drive Invalid (잘못된 드라이브)
와
같은
오류
메시지가
표시될
수
있습니다
.
테이프
라이브러리
펌웨어가
업데이트될
때까지
는
이러한
동작은
정상적인
것이므로
이
메시지를
무시해도
됩니다
.
2
다운로드된
펌웨어
파일이
들어
있는
시스템에서
웹
브라우저를
엽니다
.
3
펌웨어를
업데이트해야
하는
라이브러리에
설치되어
있는
RMU
의
IP
주소를
입력합니다
.
4
Windows Server™ 2003
시스템에서
Internet Explorer
를
사용하는
경우
RMU
는
Internet
Explorer
의
신뢰할
수
있는
사이트
목록의
구성원이어야
합니다
.
장치가
목록에
추가되지
않았거나
목록에
있는지
여부를
확실히
모르는
경우에는
다음의
하위
단계를
수행하십시
오
. RMU
가
이미
신뢰할
수
있는
사이트
목록에
있거나
또는
다른
운영
체제나
웹
브라우
저가
사용
중인
경우에는
5
단계로
건너뛰십시오
.
a
Internet Explorer
의
도구
메뉴에서
인터넷
옵션
을
선택합니다
.
b
보안
탭을
선택합니다
.
c
신뢰할
수
있는
사이트
를
선택합니다
.
d
사이트
단추를
클릭합니다
.
e
PowerVault 132T
원격
관리
카드의
IP
주소를
신뢰할
수
있는
사이트
목록에
추가합니다
.
f
완료
를
클릭한
후
확인
을
클릭하여
인터넷
옵션을
종료합니다
.
5
기본
페이지에서
Firmware
(
펌웨어
)
탭을
클릭합니다
.
6
라이브러리의
관리자
사용자
이름과
암호를
입력합니다
.
기본
사용자
이름은
admin
이고
기본
암호는
password
입니다
.
7
표시되는
Select target for update
(
업데이트할
대상
선택
)
상자에서
Update Library
Firmware
(
라이브러리
펌웨어
업데이트
)
를
클릭합니다
.
8
Browse
(
찾아보기
)
를
클릭하고
다운로드한
새
펌웨어
이미지를
선택합니다
.
참고: 다운로드된 펌웨어 파일은 c:\dell\drivers\rxxxxx\Library\LTO\(여기서 rxxxxx는 다운로드된
펌웨어 패키지의 릴리즈 번호)에 있습니다. 펌웨어 이미지 파일 이름은 .lif로 끝납니다.
9
Update Firmware
(
펌웨어
업데이트
)
를
클릭하여
업데이트를
시작합니다
.
펌웨어
업데이
트가
완료될
때까지
테이프
라이브러리를
재설정하거나
전원을
다시
껐다
켜지
마십시오
.

LTO-3 테이프 드라이브 모듈로 업그레이드 47
10
업데이트가
완료된
후에는
라이브러리를
다시
부팅합니다
.
새
기본
FC LTO-3
드라이브가
설치된
라이브러리의
LCD
에
SCSI
오류
메시지가
표시됩
니다
.
이
메시지를
무시하고
,
다음
단계로
진행한
후
"
테이프
라이브러리
구성
"
아래에
있
는
단계를
수행합니다
.
11
라이브러리의
새
펌웨어
레벨을
확인합니다
.
펌웨어
레벨은
라이브러리
전면
패널을
사용
하거나
원격
관리
카드의
기본
웹
페이지로
이동하여
확인할
수
있습니다
.
펌웨어
버전은
Library
Firmware
(
라이브러리
펌웨어
)
필드에
표시됩니다
.
테이프 라이브러리 구성
이
절은
LTO- 3
을
기본
FC
드라이브로
업그레이드하는
경우에만
적용됩니다
.
호스트에
라이브
러리
로보틱
컨트롤러가
표시되도록
하려면
라이브러리
구성을
업데이트해야
합니다
.
다음
단
계를
완료하면
테이프
드라이브와
동일한
대상
ID
상에
라이브러리
컨트롤러가
호스트
시스템
에
표시됩니다
.
1
라이브러리의
전원을
켠
상태에서
작동
패널을
Setup
(
설정
)
Config Slots
(
슬롯
구성
)
으로
이동합니다
.
2
Mode
(
모드
)
설정을
Lun
으로
변경하십시오
.
2
개의
FC
테이프
드라이브가
있고
라이브러리를
2
개의
논리적
파티션으로
설정하려는
경우에는
Mode
(
모드
)
설정을
Lun-Lun
으로
변경합니다
.
파티셔닝에
대한
자세한
내용은
support.dell.com
에서
시스템
설명서를
참조하십시오
.
3
새
구성을
적용하기
위해
라이브러리가
자동으로
재부팅됩니다
.

48 LTO-3 테이프 드라이브 모듈로 업그레이드
www.dell.com | support.dell.com

www.dell.com | support.dell.com
Biblioteca de cintas Dell™
PowerVault™ 132T LTO
Actualización a módulos
de unidad de cinta LTO-3

Notas, avisos y precauciones
NOTA: una NOTA proporciona información importante que le ayudará a utilizar mejor el ordenador.
AVISO: un AVISO indica la posibilidad de daños en el hardware o la pérdida de datos, e informa
de cómo evitar el problema.
PRECAUCIÓN: un mensaje de PRECAUCIÓN indica el riesgo de daños materiales, lesiones corporales
o incluso la muerte.
____________________
La información contenida en este documento puede modificarse sin previo aviso.
© 2005 Dell Inc. Reservados todos los derechos.
Queda estrictamente prohibida la reproducción de este documento en cualquier forma sin la autorización por escrito de Dell Inc.
Marcas comerciales utilizadas en este texto: Dell, el logotipo de Dell, PowerEdge y PowerVault son marcas comerciales de Dell Inc.;
Microsoft y Windows son marcas comerciales registradas y Windows Server es una marca comercial de Microsoft Corporation.
Otras marcas y otros nombres comerciales pueden utilizarse en este documento para hacer referencia a las entidades que los poseen
o a sus productos. Dell Inc. renuncia a cualquier interés sobre la propiedad de marcas y nombres comerciales que no sean los suyos.
Julio de 2005 P/N CD513 Rev. A00

Actualización a módulos de unidad de cinta LTO-3 51
En este documento se proporciona información sobre la actualización de la biblioteca de cintas
Dell™ PowerVault™ 132T de unidades de cinta LTO-1 o LTO-2 a LTO-3. Debe realizar
los siguientes procedimientos:
• Instalar las unidades
• Actualizar el firmware de la biblioteca de cintas
• Configurar la biblioteca de cintas (sólo unidades Fibre Channel nativas)
Instalación de unidades
Las unidades de cinta LTO-3 para la biblioteca de cintas PV132T se ofrecen como unidades SCSI
o unidades Fibre Channel (FC) nativas. Las opciones de configuración varían según el tipo de
unidad LTO-3 disponible.
• Unidades SCSI: una unidad de cinta LTO-3 puede coexistir con una unidad de cinta LTO-1
o LTO-2 en PV132T si se activa la función de partición de número de unidad lógica (LUN).
Para obtener más información sobre cómo activar esta función, consulte la documentación
del sistema en
support.dell.com
.
• Unidades FC nativas: estas unidades no pueden coexistir en la misma biblioteca con unidades
SCSI; por lo tanto, al actualizar a una unidad FC nativa LTO-3, deben retirarse
de la biblioteca de cintas todas las unidades LTO-1 o LTO-2 existentes.
NOTA: si sólo está instalando un módulo de unidad en la biblioteca, dicho módulo debe encontrarse
en el compartimiento para unidades central. Además, si el particionamiento está activado,
debe desactivarse antes de sustituir la unidad.
PRECAUCIÓN: antes de realizar este procedimiento, lea y siga las instrucciones de seguridad
incluidas en la Guía de información del producto.
Para instalar módulos de unidad, realice los pasos siguientes:
1
Apague la biblioteca de cintas y desconecte el cable de alimentación.
2
Desconecte el cable SCSI que conecta la biblioteca en cinta con el sistema host.
3
En la parte posterior de la biblioteca, afloje los tornillos de mariposa y retire la placa
de cubierta (vea la figura 1-1) o el módulo de unidad que desee sustituir.
NOTA: si retira la placa de cubierta, guárdela en un lugar adecuado. La placa de cubierta es necesaria
para el funcionamiento y refrigeración adecuados de la biblioteca si se retira la unidad opcional.

52 Actualización a módulos de unidad de cinta LTO-3
www.dell.com | support.dell.com
Figura 1-1. Extracción de la placa de cubierta del módulo de la unidad
4
Deslice cuidadosamente el módulo de unidad LTO-3 nuevo en su sitio. Vea la figura 1-2.
Debe introducir el borde metálico del módulo de unidad en la guía de plástico del lado
izquierdo del compartimiento para unidades.
Figura 1-2. Inserción del módulo de unidad
5
Apriete los cuatro tornillos de mano del módulo de unidad hasta que queden a ras del chasis.
6
Vuelva a cablear la biblioteca de cintas.
• Para SCSI, conecte las unidades al host usando cables SCSI y termine el bus.
• Para FC nativo, utilice un cable FC con un conector LC para conectar la unidad LTO-3
a un adaptador o conmutador de bus de host FC. Asegúrese de que el conector del otro
extremo del cable FC coincide con el dispositivo al que se está conectando la unidad
LTO- 3.
7
Vuelva a conectar la biblioteca de cintas a una toma eléctrica.

Actualización a módulos de unidad de cinta LTO-3 53
Actualización del firmware de la biblioteca de cintas
Puede actualizar el firmware mediante:
• El puerto serie de la biblioteca de cintas
• La unidad de administración remota
Debe descargar el paquete de firmware más reciente de la página Web de asistencia de Dell
(
support.dell.com
). Una vez que haya extraído el paquete, los archivos del firmware se encontrarán
en
c:\dell\drivers\r
xxxxx
\Library\LTO\
, donde
r
xxxxx
es el número de versión del paquete
de firmware descargado.
NOTA: además de actualizar el firmware de la biblioteca de cintas, también debe actualizarse
el firmware de la unidad de administración remota (RMU). Además, si va a conectar las unidades
SCSI LTO-3 a una red de área de almacenamiento (SAN) mediante la controladora de red de
almacenamiento (SNC) PowerVault 132T, también será necesario actualizar el firmware del módulo SNC.
El paquete que ha descargado incluye el firmware de la RMU y la SNC. Siga las instrucciones incluidas
con el paquete de firmware para actualizar estos componentes después de actualizar el firmware
de la biblioteca.
NOTA: una vez que haya instalado los controladores y haya actualizado el firmware apropiado,
reinicie el servidor host para comprobar que se reconoce correctamente el dispositivo. También
es posible que deba volver a configurar el software de copia de seguridad de modo que reconozca
las nuevas unidades LTO-3. Para ver las instrucciones de configuración del dispositivo, consulte la
documentación del software de copia de seguridad.
Actualización del firmware mediante el puerto serie de la biblioteca de cintas
1
Encienda la biblioteca de cintas.
Es posible que aparezca el mensaje de error
Drive Error
(Error de unidad) o
Drive
Offline
(Unidad desconectada) en la pantalla LCD. Ignore el mensaje, este
comportamiento es normal hasta que se actualiza el firmware de la biblioteca de cintas.
2
Conecte un extremo del cable serie directo al puerto serie de la biblioteca de cintas
(no al puerto serie de la RMU).
3
Conecte el otro extremo del cable serie a un puerto COM del sistema que contenga
el firmware actualizado que ha descargado.
4
Abra un indicador de comandos en el sistema operativo Microsoft
®
Windows
®
y cambie
al directorio que contenga el archivo de firmware descargado.
NOTA: el archivo del firmware descargado se encuentra en c:\dell\drivers\rxxxxx\Library\LTO\,
donde rxxxxx es el número de versión del paquete de firmware descargado.
5
Escriba lo siguiente en el indicador de comandos:
PV132T_LTO_Update <COM#>
donde <COM#> representa el número de puerto COM del sistema donde se conectó
el cable serie.

54 Actualización a módulos de unidad de cinta LTO-3
www.dell.com | support.dell.com
6
Pulse <Intro>.
La actualización del firmware tarda en realizarse entre 8
y
10 minutos aproximadamente.
Cuando ha terminado la actualización de firmware aparece un resumen en el indicador
de comandos.
7
Reinicie la biblioteca cuando haya terminado la actualización de firmware.
Las bibliotecas con las nuevas unidades LTO-3 FC nativas mostrarán un mensaje de error
SCSI en la pantalla LCD. Ignore este mensaje, continúe en el paso siguiente y después
siga los pasos de “Configuración de la biblioteca de cintas”.
8
Verifique el nuevo nivel de firmware de la biblioteca. El nivel del firmware puede verificarse
mediante el panel frontal de la biblioteca o en la página Web principal de la tarjeta
de administración remota. La versión de firmware aparece en el campo
Library
Firmware
(Firmware de la biblioteca).
Actualización del firmware mediante la unidad de administración remota
1
Encienda la biblioteca de cintas y espere a que se inicialice totalmente.
Es posible que aparezca el mensaje de error
Drive Error
(Error de unidad) o
Drive
Invalid
(Unidad no válida) en la pantalla LCD. Ignore el mensaje, este comportamiento
es normal hasta que se actualiza el firmware de la biblioteca de cintas.
2
Abra un explorador Web en el sistema que contiene los archivos de firmware descargados.
3
Introduzca la dirección IP de la RMU que está instalada en la biblioteca de cintas cuyo
firmware requiere una actualización.
4
Si utiliza Internet Explorer en un sistema Windows Server™ 2003, la RMU debe figurar en
la lista de sitios de confianza de Internet Explorer. Si el dispositivo no se ha añadido a la lista,
o no tiene la certeza de que esté en ella, realice los pasos que se describen a continuación.
Si la RMU ya está en la lista de sitios de confianza, o si utiliza otro sistema operativo o
explorador Web, vaya al paso 5.
a
En Internet Explorer, seleccione
Opciones de Internet
en el menú
Herramientas
.
b
Seleccione la ficha
Seguridad
.
c
Seleccione
Sitios de confianza
.
d
Haga clic en el botón
Sitios
.
e
Añada la dirección IP de la tarjeta de administración remota PowerVault 132T a la lista
de sitios de confianza.
f
Haga clic en
Realizado
y, después, en
Aceptar
para salir de Opciones de Internet.
5
En la página principal, haga clic en la ficha
Firmware
.
6
Introduzca el nombre de usuario del administrador y la contraseña para la biblioteca.
El nombre de usuario predeterminado es
admin
, y la contraseña predeterminada
es
password
.

Actualización a módulos de unidad de cinta LTO-3 55
7
En el cuadro
Select target for update
(Seleccionar destino para actualizar) que aparece,
haga clic en
Update Library Firmware
(Actualizar firmware de la biblioteca).
8
Haga clic en
Browse
(Examinar) y seleccione la imagen nueva del firmware que ha
descargado.
NOTA: el archivo del firmware descargado se encuentra en c:\dell\drivers\rxxxxx\Library\LTO\,
donde rxxxxx es el número de versión del paquete de firmware descargado. La extensión del archivo
de la imagen del firmware es .lif.
9
Haga clic en
Update Firmware
(Actualizar firmware) para iniciar la actualización. No
apague y vuelva a encender ni reinicie la biblioteca de cintas hasta que se haya completado
la actualización del firmware.
10
Reinicie la biblioteca cuando haya terminado la actualización.
Las bibliotecas con las nuevas unidades LTO-3 FC nativas mostrarán un mensaje de error
SCSI en la pantalla LCD. Ignore este mensaje, continúe en el paso siguiente y después
siga los pasos de “Configuración de la biblioteca de cintas”.
11
Verifique el nuevo nivel de firmware de la biblioteca. El nivel del firmware puede verificarse
mediante el panel frontal de la biblioteca o en la página Web principal de la tarjeta de
administración remota. La versión de firmware aparece en el campo
Library
Firmware
(Firmware de la biblioteca).
Configuración de la biblioteca de cintas
Esta sección sólo se aplica a actualizaciones de LTO-3 a unidades FC nativas. Para que los hosts
vean el controlador robótico de la biblioteca, la configuración de la biblioteca debe actualizarse.
Cuando se hayan completado los pasos siguientes, el controlador de la biblioteca se presentará
a los sistemas host por el mismo ID destino que la unidad de cinta.
1
Con la biblioteca encendida, desplace el panel del operador a
Setup
(Configuración)
Config Slots
(Configuración de ranuras).
2
Cambie la configuración de
Mode
(Modo) a
Lun
.
Si dispone de dos unidades de cinta FC y desea configurar la biblioteca como dos particiones
lógicas, cambie la configuración de
Mode
(Modo) a
Lun-Lun
. Consulte la documentación
del sistema en
support.dell.com
para obtener información adicional sobre particionamiento.
3
La biblioteca se reiniciará automáticamente para activar la configuración nueva.

56 Actualización a módulos de unidad de cinta LTO-3
www.dell.com | support.dell.com
-
 1
1
-
 2
2
-
 3
3
-
 4
4
-
 5
5
-
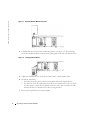 6
6
-
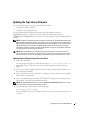 7
7
-
 8
8
-
 9
9
-
 10
10
-
 11
11
-
 12
12
-
 13
13
-
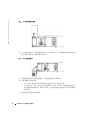 14
14
-
 15
15
-
 16
16
-
 17
17
-
 18
18
-
 19
19
-
 20
20
-
 21
21
-
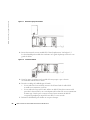 22
22
-
 23
23
-
 24
24
-
 25
25
-
 26
26
-
 27
27
-
 28
28
-
 29
29
-
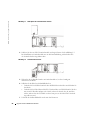 30
30
-
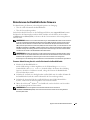 31
31
-
 32
32
-
 33
33
-
 34
34
-
 35
35
-
 36
36
-
 37
37
-
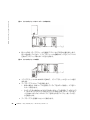 38
38
-
 39
39
-
 40
40
-
 41
41
-
 42
42
-
 43
43
-
 44
44
-
 45
45
-
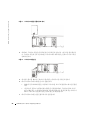 46
46
-
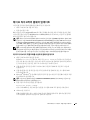 47
47
-
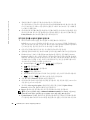 48
48
-
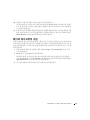 49
49
-
 50
50
-
 51
51
-
 52
52
-
 53
53
-
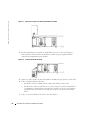 54
54
-
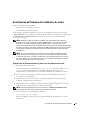 55
55
-
 56
56
-
 57
57
-
 58
58


