Celestron 51630 Manual de usuario

Categoría
Telescopios
Tipo
Manual de usuario

El Celestron 51630 es un buscador de punto rojo diseñado para ayudar a los astrónomos aficionados a localizar objetos celestes con facilidad y precisión. Con su lente frontal de alta calidad y su amplio campo de visión, el Celestron 51630 permite a los usuarios encontrar rápidamente objetos en el cielo nocturno, incluso en condiciones de poca luz. El buscador también cuenta con un sistema de ajuste fácil de usar que permite a los usuarios alinearlo rápidamente con su telescopio.

El Celestron 51630 es un buscador de punto rojo diseñado para ayudar a los astrónomos aficionados a localizar objetos celestes con facilidad y precisión. Con su lente frontal de alta calidad y su amplio campo de visión, el Celestron 51630 permite a los usuarios encontrar rápidamente objetos en el cielo nocturno, incluso en condiciones de poca luz. El buscador también cuenta con un sistema de ajuste fácil de usar que permite a los usuarios alinearlo rápidamente con su telescopio.

INSTRUCTION MANUAL
StarPointerTM Red-dot Finderscope
2 | ENGLISH
PARTS LIST
6
1
5
2
3
4
7
8 9
10
1. Front lens
2. Power/brightness knob
3. Altitude adjustment knob
4. Mounting screws
5. Azimuth adjustment knob
6. Small Schmidt-Cassegrain bracket
7. Large Schmidt-Cassegrain bracket
8. Mounting bracket for small telescopes with dovetails
9. Mounting bracket for small telescopes with screw holes
10. Metal pocket multi-tool
StarPointerTM Red-dot Finderscope
ENGLISH | 3
* SOLAR WARNING! Never attempt to view the Sun through this finderscope or any telescope without a solar filter!
O
11
44
2233
55
INSTALLING THE STARPOINTER FINDERSCOPE
3. Tighten the screws to secure the
bracket in place.
1. Loosen the two mounting screws near
the bottom of the finderscope.
4. If your bracket is the dovetail type,
loosen the setscrew on the telescope
mounting bracket, slide the base of
the finderscope into the bracket and
tighten the setscrew.
2. Choose the correct bracket for your
telescope, and attach it to the base of
the finder.
If your bracket is the screw-on type,
remove the two Phillips-head screws or
thumb screws from the telescope. Place
the finder over the screw holes or posts.
Tighten the screws or thumb screws
down to secure the finder in place.
5. A clear plastic tab prevents the battery
from discharging. Pull out the tab before
using your finderscope.
StarPointerTM Red-dot Finderscope
4 | ENGLISH
ALIGNING THE STARPOINTER FINDERSCOPE
The finderscope is one of the most important parts of your telescope. It helps you locate objects and center them in the eyepiece. The
first time you assemble your telescope, you’ll need to align the finderscope with the telescope’s main optics. It’s best to do this during the
day* using land-based targets.
* SOLAR WARNING! Never attempt to view the Sun through this finderscope or any telescope without a solar filter.
YOUR FINDERSCOPE IS NOW ALIGNED!
5. It should not require realignment unless
it is bumped or dropped. If you want
to test the alignment, point the red dot
at another land-based target. Then
verify the object is in the center of the
eyepiece’s field of view.
LOOK THROUGH THE FINDERSCOPE
3. With the object precisely centered
in the eyepiece, look through the
finderscope’s optical window and
locate the red dot.
20mm eyepiece
Focus Knobs
CENTER THE TARGET IN THE EYEPIECE
2. Look through the telescope using your
lowest power eyepiece. Move the
telescope until your chosen object lies
in the center of the view. If the image
is blurry, turn the focus knob until it
comes into sharp focus.
22
5533
Power knob
Altitude
adjustment knob
(up-and-down)
Azimuth
adjustment knob
(side-to-side)
CHOOSE A TARGET
1. Take the telescope outside during the day
and turn on the finderscope using the
power knob. Find an easily recognizable
object, such as a streetlight, car license
plate, or sign. The object should be
as far away as possible but at least a
quarter mile away.
ADJUST THE FINDERSCOPE
4. Without moving the telescope, use
the finderscope’s two adjustment
knobs to move it around until the red
dot appears over the object you are
observing in the eyepiece.
11
44
NOTE: Be sure to turn off the StarPointer finderscope when not in use to conserve battery power. New batteries can be purchased online or at watch/electronic stores.
StarPointerTM Red-dot Finderscope
ACCESSING THE FINDERSCOPE BATTERY
The StarPointer finderscope uses a long-life 3V lithium battery (#CR2032), which is located on the StarPointer’s top surface. If you plan
on not using your telescope for an extended period, we recommend removing the battery for storage. To remove or replace the battery,
follow these instructions:
2233
11
1. Using a Phillips-head screwdriver, loosen the
battery cover screw and flip the cover open.
2. If you are replacing the battery, install the new
one with the (+) terminal facing outward.
3. Place the cover back onto the finderscope
and retighten the screw with the Phillips-
head screwdriver.
SAFETY INSTRUCTIONS
There is a risk of explosion if the battery is replaced with an incorrect type.
The included battery is not rechargeable.
Only use the battery as originally intended to avoid a short circuit. Connecting the conductive material
directly to the battery’s positive and negative sides will cause a short circuit.
• Do not use a damaged battery.
Do not store the battery in an extremely cold or hot environment. Doing so can reduce battery life.
When replacing the battery, refer to the instruction manual and ensure the positive and negative sides are
oriented correctly.
Do not put the battery in fire.
• Dispose of the battery according to local regulations.
FCC NOTICE: This device complies with Part 15 of the FCC Rules. Operation is subject to the
following two conditions: (1) This device may not cause harmful interference, and (2) this device
must accept any interference received, including interference that may cause undesired operation.
www.celestron.com/pages/warranty
©2023 Celestron. Celestron and Symbol are trademarks of Celestron, LLC. • All rights reserved.
Celestron.com • 2835 Columbia Street, Torrance, CA 90503 USA
Product design and specifications are subject to change without prior notification.
This product is designed and intended for use by those 14 years of age and older.
Made in China 06-23
NOTE: You will need a small Philips-head screwdriver to replace the StarPointer finderscope’s battery
MODE D'EMPLOI
7 | FRANÇAIS
Chercheur à point rouge StarPointerTM
LISTE DES PIÈCES
6
1
5
2
3
4
7
8 9
10
1. Lentille frontale
2. Molette Alimentation/Luminosité
3. Molette de réglage d'altitude
4. Vis de monture
5. Molette de réglage d'azimut
6. Petite fixation pour Schmidt-Cassegrain
7. Grande fixation pour Schmidt-Cassegrain
8. Petite fixation pour télescopes de petite taille équipés d'une queue d’aronde
9. Grande fixation pour télescopes de petite taille équipés d'une queue d’aronde
10. Rangement métallique pour outil multifonction
FRANÇAIS | 8
Chercheur à point rouge StarPointerTM
* AVERTISSEMENT SUR LE SOLEIL! N’essayez jamais d’observer le soleil via ce chercheur ou un télescope de n’importe quel type sans utiliser de
filtre solaire!
OU
11
44
2233
55
INSTALLATION DU CHERCHEUR STARPOINTER
3. Serrez les vis de fixation pour attacher
fermement la fixation.
1. Desserrez les deux vis de montage
près du bas du chercheur.
4. Si la fixation est de type en queue
d’aronde, desserrez la vis de fixation
sur la monture du télescope. Faites
glisser le chercheur dans la monture et
serrez la vis.
2. Sélectionnez la fixation pour votre
télescope, et attachez-la à la base du
chercheur.
Si la fixation est de type vissée, retirez
les deux vis à tête cruciforme ou les vis à
main du télescope. Placez le chercheur
sur les deux trous de vis ou les tiges.
Serrez les vis de fixation ou les vis à main
pour fixer le chercheur.
5. Une languette de plastique
transparente est installée pour éviter
que la pile ne se décharge. Retirez la
languette avant d’utiliser le télescope.
9 | FRANÇAIS
Chercheur à point rouge StarPointerTM
ALIGNER LE CHERCHEUR STARPOINTER
Le chercheur est l'un des composants les plus importants de votre télescope. Il vous aide à localiser des objets et à les centrer dans
votre oculaire. La première fois que vous assemblez votre télescope, vous devez aligner le chercheur avec le système optique principal du
télescope. Il est préférable de faire ceci pendant la journée* en utilisant des cibles terrestres.
* AVERTISSEMENT SUR LE SOLEIL! N’essayez jamais d’observer le soleil via ce chercheur ou un télescope de n’importe quel type sans utiliser de filtre solaire!
VOTRE CHERCHEUR EST MAINTENANT
ALIGNÉ!
5. Il n'aura pas besoin d'être aligné de
nouveau tant qu'il n'aura pas subi
un choc ou qu'il sera tombé. Si vous
souhaitez tester l'alignement, pointez
le point rouge sur une autre cible
terrestre. Vérifiez ensuite que l'objet se
trouve au centre du champ de vision
de l'oculaire.
REGARDER DANS LE CHERCHEUR
3. Une fois l'objet centré avec précision
dans l'oculaire, regardez à travers
la fenêtre optique du chercheur et
localisez le point rouge.
Oculaire de
20mm
Molettes de mise au point
CENTRER LA CIBLE DANS L'OCULAIRE
2. Regardez dans le télescope en utilisant
votre oculaire de la plus basse basse
puissance. Déplacez le télescope
jusqu'à que l'objet choisi se trouve au
centre du champ de vision. Si l’image
est floue, faites doucement tourner la
molette de mise au point jusqu’à ce
que l’image soit nette.
22
5533
Molette d'alimentation
Bouton de
réglage d’altitude
(verticalement)
Molette de
réglage d'azimut
(horizontalement)
CHOISIR UNE CIBLE
1. Sortez le télescope pendant la journée
et allumez le chercheur à l'aide du
bouton d'alimentation. Trouvez un
objet facilement reconnaissable,
tel qu'un lampadaire, une plaque
d'immatriculation ou une enseigne.
L’objet doit se situer aussi loin que
possible, mais à au moins un quart de
mile de vous.
AJUSTER LE CHERCHEUR
4. Sans déplacer le télescope, utilisez
les deux molettes d’ajustement pour
déplacer le chercheur jusqu’à que le
point rouge s’aligne sur l’objet observé
dans l’oculaire.
11
44
REMARQUE: Assurez-vous de toujours éteindre le chercheur StarPointer lorsque vous ne vous en servez pas, pour économiser la pile. Vous pouvez acheter de
nouvelles piles en ligne ou dans les magasins de montres/d’électronique.
Chercheur à point rouge StarPointerTM
ACDER À LA PILE DU CHERCHEUR
Le chercheur StarPointer utilise une pile au lithium 3V longue durée (#CR2032), qui est située sur la surface supérieure du StarPointer.
Si vous prévoyez de ne pas utiliser votre télescope pendant une période prolongée, nous vous recommandons de retirer la batterie pour
le stockage. Pour retirer ou remplacer la pile, suivez ces instructions:
2233
11
1. À l'aide d'un tournevis cruciforme, desserrez
la vis du couvercle de la batterie et ouvrez
le couvercle.
2. Si vous remplacez la pile, installez la
nouvelle en orientant le pôle (+) vers
l'extérieur.
3. Remettez le couvercle sur le chercheur
et resserrez la vis avec le tournevis
cruciforme.
REMARQUE: Vous aurez besoin de vous munir d'un petit tournevis cruciforme pour remplacer la pile du chercheur StarPointer.
INSTRUCTIONS DE SÉCURITÉ
• Risque d’explosion si la pile est remplae par un type incorrect.
La pile incluse n’est pas rechargeable.
N’utilisez la pile que de la manière prévue pour éviter les court-circuits. Si un matériau conducteur met
directement en contact les pôles positifs et négatifs d’une pile, cela crée un court-circuit.
• N’utilisez pas une pile endommagée.
Ne stockez pas la pile dans un lieu extrêmement froid ou chaud. Ceci pourrait réduire sa durée de vie.
• Avant de remplacer la pile, consultez le mode d'emploi et faites attention au sens positif et négatif de la pile.
Ne jetez pas la pile au feu.
• Jetez la pile dans le respect de la réglementation
claration de la FCC Cet appareil respecte la section 15 des règles de la FCC. Son utilisation est sujette
aux deux conditions suivantes: (1) Cet appareil ne doit pas causer d'interférences nuisibles et (2) cet appareil
doit accepter toutes les interférences reçues, y compris celles pouvant entraîner un fonctionnement indésirable.
©2023 Celestron. Celestron et le logo sont des marques déposées de Celestron, LLC.
Tous droits réservés.
Celestron.com • 2835 Columbia Street, Torrance, CA 90503 États-Unis
La conception et les spécifications du produit sont susceptibles dêtre modifiées sans
notification préalable.
Ce produit est conçu et destiné à être utilisé par des personnes de 14 ans et plus.
Fabriqué en Chine
www.celestron.com/pages/warranty
06-23
BEDIENUNGSANLEI
TUNG
StarPointerTM Leuchtpunkt-Sucherfernrohr
11 | DEUTSCH
TEILELISTE
6
1
5
2
3
4
7
8 9
10
1. Vordere Linse
2. Ein-/Aus-/Helligkeitsregler
3. Knopf zur Höhenverstellung
4. Befestigungsschrauben
5. Azimut-Einstellknopf
6. Kleine Schmidt-Cassegrain-Klammer
7. Große Schmidt-Cassegrain-Klammer
8. Montagehalterung für kleine Teleskope mit Schwalbenschwanz
9. Montagehalterung für kleine Teleskope mit Schraubenlöchern
10. Taschen-Multitool aus Metall
StarPointerTM Leuchtpunkt-Sucherfernrohr
DEUTSCH | 12
* WARNUNG BEI SONNENBEOBACHTUNG! Versuchen Sie niemals, die Sonne ohne Sonnenfilter durch dieses Sucherfernrohr oder ein anderes
Teleskop zu betrachten!
ODE
11
44
2233
55
INSTALLIEREN DES STARPOINTER SUCHERFERNROHR
3. Ziehen Sie die Schrauben fest, um die
Halterung zu befestigen.
1. Lösen Sie die beiden
Befestigungsschrauben unten am
Sucherfernrohr.
4. Wenn es sich bei Ihrer Halterung um
eine Schwalbenschwanzhalterung
handelt, lösen Sie die Stellschraube
an der Teleskophalterung, schieben
die Basis des Sucherfernrohrs in die
Halterung und ziehen die Stellschraube
fest.
2. Wählen Sie die richtige Halterung für
Ihr Teleskop und befestigen Sie sie an
der Basis des Suchers.
Wenn es sich bei Ihrer Halterung um eine
Schraubhalterung handelt, entfernen
Sie die beiden Kreuzschlitzschrauben
oder Rändelschrauben vom Teleskop.
Setzen Sie den Sucher über die
Schraubenlöcher oder Stifte. Ziehen Sie
die Schrauben oder Rändelschrauben
fest, um den Sucher zu befestigen.
5. Eine durchsichtige Plastiklasche
verhindert, dass sich der Akku entlädt.
Ziehen Sie die Lasche heraus, bevor
Sie Ihr Sucherfernrohr verwenden.
StarPointerTM Leuchtpunkt-Sucherfernrohr
13 | DEUTSCH
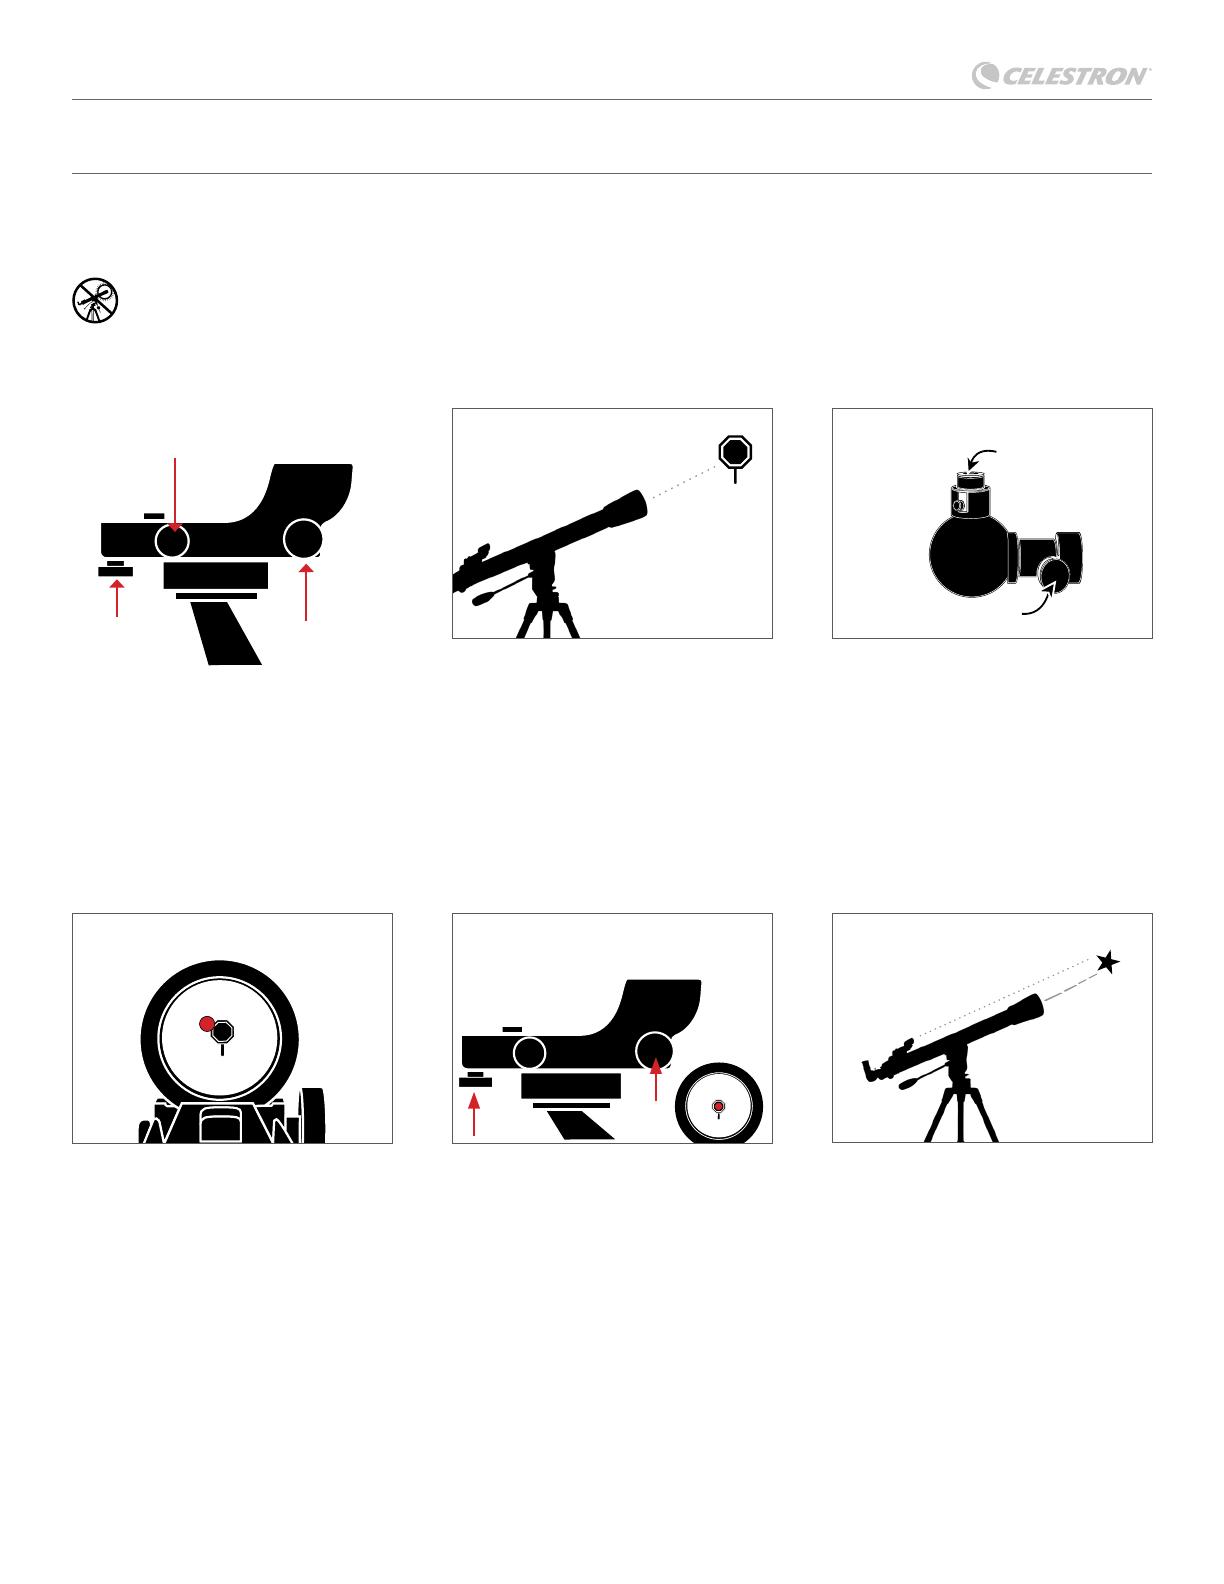
AUSRICHTEN DES STARPOINTER SUCHERFERNROHR
Der Sucher ist eines der wichtigsten Teile Ihres Teleskops. Es hilft Ihnen, Objekte zu suchen und im Okular zu zentrieren. Wenn Sie das
Teleskop zum ersten Mal zusammenbauen, müssen Sie das Sucherfernrohr nach der Hauptoptik des Teleskops ausrichten. Am besten tun
Sie dies tagsüber* mit Zielen auf der Erde.
* WARNUNG BEI SONNENBEOBACHTUNG! Versuchen Sie niemals, die Sonne ohne Sonnenfilter durch dieses Sucherfernrohr oder ein anderes Teleskop zu betrachten.
IHR SUCHERFERNROHR IST JETZT
AUSGERICHTET!
5. Es sollte keine Neuausrichtung
erforderlich sein, es sei denn, es wird
gestoßen oder fallen gelassen. Wenn
Sie die Ausrichtung testen möchten,
richten Sie den Leuchtpunkt auf ein
anderes Landziel. Überprüfen Sie
dann, ob sich das Objekt in der Mitte
des Sichtfelds des Okulars befindet.
DURCH DAS SUCHERFERNROHR
SCHAUEN
3. Schauen Sie mit genau zentriertem
Objekt im Okular durch das optische
Fenster des Sucherfernrohrs und
lokalisieren den Leuchtpunkt.
20-mm-Okular
Fokussierknöpfe
ZENTRIEREN SIE DAS ZIEL IM OKULAR
2. Schauen Sie mit Ihrem Okular mit der
niedrigsten Vergrößerung durch das
Teleskop. Bewegen Sie das Teleskop,
bis Ihr ausgewähltes Objekt in der
Mitte der Ansicht liegt. Wenn das
Bild unscharf ist, drehen Sie den
Fokussierknopf so lange, bis das Bild
scharf ist.
22
5533
Ein-/Aus-Knopf
Höheneinstellungs-
Knopf
(auf und ab)
Azimut-Einstellknopf
(von Seite zu Seite) WÄHLEN SIE EIN ZIEL
1. Nehmen Sie das Teleskop tagsüber
mit nach draußen und schalten Sie
das Sucherfernrohr mit dem Ein-/
Aus-Knopf ein. Suchen Sie nach
einem leicht erkennbaren Objekt,
beispielsweise einer Straßenlaterne,
einem Autokennzeichen oder einem
Schild. Das Objekt sollte so weit wie
möglich entfernt sein, mindestens 400
Meter entfernt.
SUCHERFERNROHR AUSRICHTEN
4. Ohne das Teleskop zu bewegen,
verwenden Sie die beiden
Einstellknöpfe des Sucherfernrohrs,
um es zu bewegen, bis der Leuchtpunkt
über dem Objekt erscheint, das Sie im
Okular beobachten.
11
44
HINWEIS: Schalten Sie das StarPointer-Sucherfernrohr unbedingt aus, wenn Sie es nicht verwenden, um die Batterien zu schonen. Neue Batterien können Sie online
oder in Uhren-/Elektronikgeschäften kaufen.
StarPointerTM Leuchtpunkt-Sucherfernrohr
AUF DIE BATTERIE DES SUCHERFERNROHRS ZUGREIFEN
Das StarPointer-Sucherfernrohr verwendet eine langlebige 3-V-Lithiumbatterie (#CR2032), die sich auf der Oberseite des StarPointer
befindet. Wenn Sie Ihr Teleskop über einen längeren Zeitraum nicht verwenden möchten, empfehlen wir Ihnen, die Batterie zur Lagerung
herauszunehmen. Um die Batterie zu entfernen oder auszutauschen, befolgen Sie diese Anweisungen:
2233
11
1. Lösen Sie mit einem
Kreuzschlitzschraubendreher die Schraube
der Batterieabdeckung und klappen die
Abdeckung auf.
2. Wenn Sie die Batterie austauschen, legen
Sie die neue Batterie so ein, dass der
(+)-Anschluss nach außen zeigt.
3. Setzen Sie die Abdeckung wieder auf das
Sucherfernrohr und ziehen die Schraube
mit dem Kreuzschlitzschraubendreher
wieder fest.
HINWEIS: Zum Ersetzen der Batterie des StarPointer-Sucherfernrohrs benötigen Sie einen kleinen Kreuzschlitzschraubendreher
SICHERHEITSHINWEISE
Es besteht eine Explosionsgefahr, wenn die Batterie durch einen falschen Batterietyp ersetzt wird.
Die mitgelieferte Batterie ist nicht wiederaufladbar.
Verwenden Sie die Batterie nur wie ursprünglich vorgesehen, um einen Kurzschluss zu vermeiden. Das
direkte Anschließen des leitenden Materials an die positiven und negativen Seiten der Batterie führt zu einem
Kurzschluss.
• Verwenden Sie keine beschädigte Batterie.
Lagern Sie die Batterie nicht in einer extrem kalten oder heißen Umgebung. Dies kann die Batterielebensdauer
verringern.
Beachten Sie beim Ersetzen der Batterie die Bedienungsanleitung und sorgen Sie dafür, dass die positiven
und negativen Pole richtig ausgerichtet sind.
Werfen Sie die Batterie nicht ins Feuer.
• Entsorgen Sie die Batterie gemäß den örtlichen Vorschriften.
FCC-HINWEIS: Dieses Gerät entspricht Teil 15 der FCC-Bestimmungen. Der Betrieb unterliegt folgenden
zwei Bedingungen: (1) Dieses Gerät darf keine schädlichen Störungen erzeugen und (2) dieses Gerät
muss Störungen von außen akzeptieren, dazu gehören solche Störungen, die einen unerwünschten Betrieb
verursachen.
©2023 Celestron. Celestron und Symbol sind Marken von Celestron, LLC. • Alle Rechte vorbehalten.
Celestron.com • 2835 Columbia Street, Torrance, CA 90503 USA
Produktdesign und Technische Daten können ohne vorherige Ankündigung geändert werden.
Dieses Produkt ist für die Verwendung durch Personen ab 14 Jahren konzipiert und vorgesehen.
Hergestellt in China
www.celestron.com/pages/warranty
06-23
MANUALE DI ISTRUZIONI
16 | ITALIANO
StarPointerTM Cercatore con mirino
ELENCO COMPONENTI
6
1
5
2
3
4
7
8 9
10
1. Lente anteriore
2. Manopola alimentazione/luminosità
3. Manopola regolazione altitudine
4. Viti di montaggio
5. Manopola regolazione azimut
6. Staffa piccola Schmidt-Cassegrain
7. Staffa grande Schmidt-Cassegrain
8. Staffa di montaggio per piccoli telescopi con coda di rondine
9. Staffa di montaggio per piccoli telescopi con fori per viti
10. Strumento multifunzione in metallo
ITALIANO | 17
StarPointerTM Cercatore con mirino
* AVVERTENZA SOLARE! Non provare mai a osservare il Sole attraverso il cercatore o il telescopio senza un filtro solare!
OPPUE
11
44
2233
55
INSTALLAZIONE DEL CERCATORE STARPOINTER
3. Serrare le viti per fissare la staffa in
posizione.
1. Allentare le due viti di montaggio vicino
alla base del cercatore.
4. Se si possiede un staffa della tipologia
a coda di rondine, allentare la vite di
fissaggio sulla staffa di montaggio del
telescopio, fare scorrere la base del
cercatore nella staffa e serrare la vite
di fissaggio.
2. Scegliere la staffa corretta in base al
proprio telescopio e fissarla alla base
del cercatore.
Se si possiede una staffa della tipologia
a vite, rimuovere le due viti a croce o viti
di bloccaggio dal telescopio. Sistemare
il cercatore sopra i fori delle viti o le aste.
Serrare le viti o le viti di bloccaggio per
fissare il cercatore in posizione.
5. Una linguetta di plastica trasparente
impedisce alla batteria di scaricarsi.
Rimuovere la linguetta prima di
utilizzare il cercatore.
18 | ITALIANO
StarPointerTM Cercatore con mirino
ALLINEAMENTO DEL CERCATORE STARPOINTER
Il cercatore è uno dei componenti più importanti del telescopio. Aiuta a localizzare gli oggetti e a centrarli nell'oculare. Al primo assemblaggio
del telescopio è necessario allineare il cercatore con le ottiche principali del telescopio. È preferibile eseguire questa operazione durante
il giorno* utilizzando degli oggetti terrestri.
* AVVERTENZA SOLARE! Non tentare mai di osservare il Sole attraverso il cercatore o il telescopio senza un filtro solare.
IL CERCATORE È ORA ALLINEATO!
5. Non occorre effettuare un nuovo
allineamento salvo colpi o cadute. Se
si desidera verificare l’allineamento,
puntare il mirino ad un altro obiettivo
terrestre. Quindi verificare che
l’oggetto si trovi al centro del campo
visivo dell’oculare.
GUARDARE ATTRAVERSO IL
CERCATORE
3. Con l’oggetto centrato precisamente
nell’oculare, osservare attraverso
la finestra ottica del cercatore e
individuare il mirino.
Oculare 20mm
Manopole messa a fuoco
CENTRARE L'OGGETTO NELL'OCULARE
2. Guardare attraverso il telescopio
utilizzando l’oculare con minor potenza.
Muovere il telescopio fino a quando
l'oggetto prescelto si trova al centro del
campo visivo. Se l'immagine è sfocata,
ruotare la manopola di messa a fuoco
fino a quando non è nitida.
22
5533
Manopola alimentazione
Manopola
regolazione
altitudine
(su e giù)
Manopola
regolazione
azimut
(laterale)
SCEGLIERE UN OGGETTO DA
OSSERVARE
1. Portare il telescopio all'esterno durante il
giorno e accendere il cercatore mediante
la manopola di alimentazione. Individuare
un oggetto facilmente riconoscibile,
come ad esempio un lampione, la
targa di un'auto o un cartello. L'oggetto
dovrebbe trovarsi il più lontano possibile,
minimo a 400 metri.
REGOLARE IL CERCATORE
4. Senza spostare il telescopio, utilizzare
le due manopole di regolazione del
cercatore per spostarlo fino a quando
il mirino appare sull’oggetto che si sta
osservando nell'oculare.
11
44
NOTA: Assicurarsi di spegnere il cercatore StarPointer quando non in uso per risparmiare batteria. È possibile acquistare nuove batterie online oppure presso
rivenditori di orologi/elettronica.
StarPointerTM Cercatore con mirino
ACCESSO ALLA BATTERIA DEL CERCATORE
Il cercatore StarPointer utilizza una batteria al litio a lunga durata da 3V (CR2032), posta sulla supercie superiore dello StarPointer. Se si
pensa di non utilizzare il telescopio per un periodo prolungato, si consiglia di rimuovere la batteria durante la conservazione. Per rimuovere
o sostituire la batteria, seguire le seguenti istruzioni:
2233
11
1. Mediante un cacciavite a croce, allentare la
vite del coperchio della batteria e aprire il
coperchio.
2. Se si sta sostituendo la batteria, installare la
nuova con il polo (+) rivolto verso l’esterno.
3. Posizionare nuovamente il coperchio sul
cercatore e serrare la vite con il cacciavite
a croce.
ISTRUZIONI DI SICUREZZA
Rischio di esplosione se la batteria è sostituita con un tipo di batteria non corretto.
La batteria in dotazione non è ricaricabile.
Utilizzare la batteria esclusivamente come previsto originariamente per evitare un corto circuito. Quando il materiale
conduttivo è in contatto diretto con il polo positivo e negativo della batteria si ha un corto circuito.
• Non usare una batteria danneggiata.
Non conservare la batteria in un ambiente eccessivamente freddo o caldo. Ciò può ridurre la durata della batteria.
Quando si sostituisce la batteria, consultare il manuale di istruzioni e assicurarsi che i poli positivo e negativo siano
orientati correttamente.
Non gettare la batteria nelle fiamme.
• Smaltire la batteria in conformità ai regolamenti locali.
NOTA FCC: Il presente dispositivo è conforme alla Parte 15 delle Norme FCC. L'utilizzo è soggetto alle
seguenti due condizioni: (1) Il presente dispositivo non deve causare interferenze dannose, e (2) il presente
dispositivo deve accettare qualsiasi interferenza ricevuta, comprese interferenze che potrebbero causare un
funzionamento indesiderato.
NOTA: È necessario un piccolo cacciavite a croce per sostituire la batteria del cercatore StarPointer.
©2023 Celestron. Celestron e Symbol sono marchi di fabbrica di Celestron, LLC.
Tutti i diritti riservati.
Celestron.com • 2835 Columbia Street, Torrance, CA 90503 Stati Uniti
Il design e le specifiche del prodotto sono soggetti a modifiche senza previa notifica.
Il prodotto è ideato e inteso per persone di età superiore ai 14 anni.
Fabbricato in Cina
www.celestron.com/pages/warranty
06-23
MANUAL DE INSTRUC
CIONES
21 | ESPAÑOL
Localizador de punto rojo StarPointerTM
LISTA DE PIEZAS
6
1
5
2
3
4
7
8 9
10
1. Lente anterior
2. Mando de encendido/brillo
3. Mando de ajuste de altitud
4. Tornillos de montaje
5. Mando de ajuste de azimut
6. Soporte Schmidt-Cassegrain pequeño
7. Soporte Schmidt-Cassegrain grande
8. Soporte de montaje para telescopios pequeños con machihembrado
9. Soporte de montaje para telescopios pequeños con huecos para tornillos
10. Multiherramienta de bolsillo metálica
ESPAÑOL | 22
Localizador de punto rojo StarPointerTM
* ¡AVISO SOLAR! ¡No intente nunca observar el Sol por este localizador ni ningún telescopio sin un filtro solar!
O
11
44
2233
55
INSTALAR EL LOCALIZADOR STARPOINTER
3. Apriete los tornillos para asegurar el
soporte en posición.
1. Afloje los dos tornillos de montaje cerca
de la parte inferior del localizador.
4. Si su soporte es de tipo
machihembrado, afloje el tornillo del
soporte de montaje del telescopio,
deslice la base del localizador en el
soporte y apriete el tornillo.
2. Seleccione el soporte correcto para su
telescopio e instálelo en la base del
localizador.
Si su soporte es de tipo atornillado,
retire los dos tornillos de cabezal Phillips
o tornillos manuales del telescopio.
Coloque el localizador sobre los
agujeros para tornillo o postes. Apriete
los tornillos o tornillos manuales para
asegurar el localizador en posición.
5. Una pestaña de plástico transparente
evita que se descargue la batería.
Retire esta pestaña antes de usar el
localizador.
23 | ESPAÑOL
Localizador de punto rojo StarPointerTM
ALINEAR EL LOCALIZADOR STARPOINTER
El localizador es una de las piezas más importantes de su telescopio. Le ayuda a localizar objetos y centrarlos en el ocular. La primera vez
que monte el telescopio, deberá alinear el localizador con la óptica principal del telescopio. Es preferible hacerlo de día* usando objetivos
terrestres.
* ¡AVISO SOLAR! No intente nunca observar el Sol por este localizador ni ningún telescopio sin un filtro solar.
SU LOCALIZADOR ESTÁ ALINEADO.
5. No debería necesitar realinearse, a
menos que reciba golpes o caiga. Si
quiere probar la alineación, apunte el
punto rojo a otro objetivo terrestre.
Compruebe que el objeto esté en el
centro del campo de visión del ocular.
MIRAR POR EL LOCALIZADOR
3. Con el objeto centrado con precisión
en el ocular, mire por la ventana óptica
del localizador y encuentre el punto
rojo.
Ocular de 20mm
Mandos de enfoque
CENTRAR EL OBJETO EN EL OCULAR
2. Mire por el telescopio usando el
ocular con menor potencia. Mueva el
telescopio hasta que el objeto elegido
quede en el centro de la vista. Si la
imagen está borrosa, gire suavemente
el mando de enfoque hasta que quede
bien enfocada.
22
5533
Mando de encendido
Mando de ajuste
de altitud
(arriba y abajo)
Mando de ajuste de
azimut (lado a lado) ELEGIR UN OBJETO
1. Saque el telescopio al exterior de día
y encienda el localizador con el mando
de encendido. Localice un objeto
fácilmente identificable, como una
farola, matrícula de coche o señal. El
objeto debe estar lo más lejos posible,
al menos a 400 m.
AJUSTAR EL LOCALIZADOR
4. Sin mover el telescopio, use los dos
mandos de ajuste del localizador
para moverlo hasta que el punto rojo
aparezca sobre el objeto que está
observando en el ocular.
11
44
NOTA: Asegúrese de apagar el localizador StarPointer cuando no lo use para conservar energía de las baterías. Puede adquirir nuevas baterías por Internet o en
tiendas de relojes/electrónica.
Localizador de punto rojo StarPointerTM
ACCEDER A LA BATERÍA DEL LOCALIZADOR
El localizador StarPointer usa una batería de litio de 3V de larga duración (#CR2032), situada en la superficie superior del StarPointer.
Si no va a usar su telescopio durante un tiempo prolongado, recomendamos retirar la batería para guardarlo. Para retirar o sustituir la
batería, siga estas instrucciones:
2233
11
1. Usando un destornillador con cabezal
Phillips, afloje el tornillo de la cubierta de la
batería y abra la tapa.
2. Si está sustituyendo la batería, instale la
nueva con el terminal (+) hacia fuera.
3. Vuelva a colocar la tapa en el localizador y
apriete el tornillo con el destornillador de
cabezal Phillips.
INSTRUCCIONES DE SEGURIDAD
Riesgo de explosión si se sustituye la batería por un tipo incorrecto.
La batea incluida no es recargable.
Use la batería exclusivamente del modo originalmente pretendido para evitar un cortocircuito. Cuando el
material conductor se conecte directamente al positivo y negativo de la batería causará un cortocircuito.
• No use una batería dañada.
No guarde la batería en un entorno extremadamente frío o cálido. Hacerlo puede reducir la duración de la
batería.
Cuando cambie la batería, consulte el manual de instrucciones y asegúrese de que los lados positivo y
negativo estén correctamente orientados.
No ponga las baterías en el fuego.
• Deseche la batería según la normativa local.
NOTIFICACIÓN FCC: Este dispositivo cumple con el apartado 15 de las normas FCC. Su uso está sujeto
a las dos condiciones siguientes: (1) este dispositivo no puede causar interferencias nocivas, y (2) este
dispositivo debe admitir cualquier interferencia recibida, incluidas las interferencias que puedan causar un
funcionamiento indeseado.
NOTA: Necesitará un destornillador de cabezal Phillips pequeño para sustituir la batería del localizador StarPointer
©2023 Celestron. Celestron y su símbolo son marcas comerciales de Celestron, LLC.
Todos los derechos reservados.
Celestron.com • 2835 Columbia Street, Torrance, CA 90503 EE.UU.
El diseño del producto y sus especificaciones esn sujetos a cambio sin previo aviso.
Este producto ha sido diseñado y está pensado para ser usado por personas de 14 o
más años de edad.
Fabricado en China
www.celestron.com/pages/warranty
06-23
  • Page 1 1
  • Page 2 2
  • Page 3 3
  • Page 4 4
  • Page 5 5
  • Page 6 6
  • Page 7 7
  • Page 8 8
  • Page 9 9
  • Page 10 10
  • Page 11 11
  • Page 12 12
  • Page 13 13
  • Page 14 14
  • Page 15 15
  • Page 16 16
  • Page 17 17
  • Page 18 18
  • Page 19 19
  • Page 20 20
  • Page 21 21
  • Page 22 22
  • Page 23 23
  • Page 24 24
  • Page 25 25

Celestron 51630 Manual de usuario

Categoría
Telescopios
Tipo
Manual de usuario

El Celestron 51630 es un buscador de punto rojo diseñado para ayudar a los astrónomos aficionados a localizar objetos celestes con facilidad y precisión. Con su lente frontal de alta calidad y su amplio campo de visión, el Celestron 51630 permite a los usuarios encontrar rápidamente objetos en el cielo nocturno, incluso en condiciones de poca luz. El buscador también cuenta con un sistema de ajuste fácil de usar que permite a los usuarios alinearlo rápidamente con su telescopio.