
1
PLEASE READ THIS MANUAL CAREFULLY BEFORE USING YOUR COMMERCIAL
GAS CHARBROILER AND KEEP IT FOR FUTURE REFERENCE.
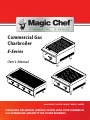
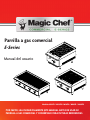
Commercial Gas
Charbroiler
E-Series
User's Manual
Model M16CB / M24CB / M36CB / M48CB / M60CB

2
PRODUCT REGISTRATION
Thank you for purchasing a Magic Chef Commercial product. The first step to protect your new product is to complete the
product registration on our website: www.mcappliance.com/register. The benefits of registering your product include the following:
1. Registering your product will allow us to contact you regarding a safety notification or product update.
2. Registering your product will allow for more efficient warranty service processing when warranty service is required.
3. Registering your product could act as your proof of purchase in the event of insurance loss.
Once again, thank you for purchasing a Magic Chef Commercial product.

3
CONTENTS
PRODUCT REGISTRATION . . . . . . . . . . . . . . . . . . . . . . . . . . . . . . . . . . . . . . . . . . . . . . . . . . . . . 2
PRECAUTIONS . . . . . . . . . . . . . . . . . . . . . . . . . . . . . . . . . . . . . . . . . . . . . . . . . . . . . . . . . . . . . . . .4
IMPORTANT SAFETY INSTRUCTIONS . . . . . . . . . . . . . . . . . . . . . . . . . . . . . . . . . . . . . . . . . . . 5
SPECIFICATIONS. . . . . . . . . . . . . . . . . . . . . . . . . . . . . . . . . . . . . . . . . . . . . . . . . . . . . . . . . . . . . . 7
INSTALLATION INSTRUCTIONS . . . . . . . . . . . . . . . . . . . . . . . . . . . . . . . . . . . . . . . . . . . . . . . . 8
OPERATING INSTRUCTIONS . . . . . . . . . . . . . . . . . . . . . . . . . . . . . . . . . . . . . . . . . . . . . . . . . . 10
CARE AND MAINTENANCE . . . . . . . . . . . . . . . . . . . . . . . . . . . . . . . . . . . . . . . . . . . . . . . . . . . . 12
TROUBLESHOOTING. . . . . . . . . . . . . . . . . . . . . . . . . . . . . . . . . . . . . . . . . . . . . . . . . . . . . . . . . . 13
LIMITED WARRANTY . . . . . . . . . . . . . . . . . . . . . . . . . . . . . . . . . . . . . . . . . . . . . . . . . . . . . . . . 14

4
PRECAUTIONS
EXPLANATION OF SYMBOLS
WARNING
Hazards or unsafe practices which COULD result in severe personal injury or death.
CAUTION
Hazards or unsafe practices which COULD result in minor personal injury or property damage.
WARNING: Read and understand all safety precautions. Failure to follow all instructions described in this user
manual may result in electric shock, fire and/or serious personal injury. The warnings, cautions and instructions
discussed in this user manual cannot cover all possible conditions and situations that may occur.
WARNING: If information in this manual is not followed exactly, a fire or explosion may result causing
property damage, personal injury or death. DO NOT store or use gasoline or other flammable vapors and liquids
in the vicinity of this or any other appliance.
WARNING: Gas Leak
• Gas leaks cannot always be detected by smell.
• Gas suppliers recommend that you use a gas detector approved by UL or CSA.
• For more information, contact your gas supplier.
• If a gas leak is detected, follow the “What to Do If You Smell Gas” section below.
WARNING: What to Do If You Smell Gas
• DO NOT try to turn on any appliance.
• DO NOT touch any electrical switch.
• DO NOT use any phones in the building.
• Immediately call your gas supplier from a phone outside of the building. (Ex: Go to a neighbor’s to call your
gas supplier or fire department.)
• If the gas supplier cannot be reached, call the fire department.
• Installation and service must be performed by a qualified installer or service agency.

5
IMPORTANT SAFETY INSTRUCTIONS
WARNING: When using gas appliances, basic safety precautions should be followed, including the following:
1. Read all instructions before using the appliance.
2. Any self-modification, improper installation, adjustment or maintenance can lead to property loss or
casualty. Please contact the manufacturer for any adjustment or maintenance, and have the work done by a
trained & qualified person.
3. The charbroiler should be used in accordance with ANSI Z223.1/NFPA 54 (latest edition) of the National Fuel
Gas Code, the National Gas Installation Code, CSA/B149.1 or the Propane Installation code, CSA/B149.1, as
applicable. Copies may be obtained from the American Gas Association, 1515 Wilson Blvd, Arlington, VA 22209.
4. Installation and maintenance should only be performed by certified professionals. Improper installation could
result in serious harm or death and may void your warranty.
5. DO NOT place the charbroiler by any liquid, gas or other object that is flammable or explosive.
6. This appliance should not be operated by those who have physiological, perceptual or mental disabilities or
those who have insufficient experience or knowledge (including children). Only in conditions of being given
sufficient supervise & guarantee of personal safety, as well as proper instructions & guidance, those who
were mentioned above can make some particular operation of this device.
7. Keep children away from the device.
8. Preserve this manual safely. When passing on/selling the device to a third party, the manuals must be
handed over along with the device. All users must operate the device complying with the user’s manual and
related safety guidelines.
9. If the appliance is placed near walls, partitions or kitchen furniture and the like, it is advisable to make
these facilities with non-combustible material, otherwise cover them with non-combustible heat-resistant
material, and pay attention to fire prevention regulations.
10. The appliance should be installed in a well-ventilated area with exhausting facilities, which may ensure that
all burnt gases produced during combustion process are completely exhausted.
11. The appliance is only applicable to low-pressure gas regulating valves. It may lead to loss and casualty if you
use other regulating valves.
12. DO NOT use the charbroiler if nothing is on the grates.
13. Fire warning: If you smell the gas, please keep away from fire. DO NOT light up any device or touch the
electronic switch. DO NOT use any phone in the building either. Close the main gas valve immediately and
call professional personnel to maintain it. Operating by the appliance by force or maintaining improperly
will lead to large gas leakage or deflagration easily. The manufacturer won’t bear any responsibility for fire
accidents caused by improper operation or maintenance.
14. Please keep the integrity of the appliance and remove the outer packing. If you have any questions, call the
specialist and stop using the appliance. Keep the packing materials away from children. (For the materials
are plastic bags, nails etc.)
15. When first using, the duration of ignition may be a little longer due to the air existing in the new pipe. If
the ignition cannot be lit up, turn off the ignition switch and turn on it 3 minutes later to prevent from
deflagration.
16. To avoid danger, please turn off the device when not in use.
17. This product is a commercial machine that needs to be operated by trained cooks, not applicable for home
use.

6
18. This device is for commercial use only, not applicable for other usage.
19. DO NOT dismantle or self-modify the device. Dismantlement and self-modification may cause casualty and
void the warranty.
20. DO NOT put any heavy objects onto the appliance. Abnormal operation may cause damage and danger.
21. DO NOT put any other object in the smoke vent of the heater. That may block the flue gas and cause harm.
22. High temperatures may cause scalding. DO NOT touch the appliance surface with hands directly due to high
temperature during or after operation.
23. DO NOT destroy the control panel with hard or sharp objects.
24. DO NOT spray water directly to the appliance. Clean the stainless steel surface regularly to prevent damage
caused by surface oxidation and chemical reaction.
READ AND FOLLOW THIS
SAFETY INFORMATION CAREFULLY
SAVE THESE INSTRUCTIONS

7
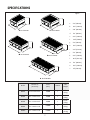
SPECIFICATIONS
Figure 1
a. 15.8” (401 mm)
b. 26.0” (660 mm)
c. 16.0” (406 mm)
d. 15.8” (401 mm)
e. 26.0” (660 mm)
f. 24.0” (610 mm)
g. 15.8” (401 mm)
h. 26.0” (660 mm)
i. 36.0” (914 mm)
j. 15.8” (401 mm)
k. 26.0” (660 mm)
l. 48.0” (1219 mm)
m. 15.8” (401 mm)
n. 26.0” (660 mm)
o. 60” (1524 mm)
a
b
▲Model M16CB
i
n
o
▲Model M60CB
c
h
g
Model Dimensions
(H x W x D)
Power
(BTU) Burners Net
Weight
M16CB 15.8" x 16.0" x 26.0” 30,000 1 95 lbs.
(43 kg)
M24CB 60,000 2119 lbs.
(54 kg)
90,000 3163 lbs.
(74 kg)
120,000 4244 lbs.
(111 kg)
150,000 5300 lbs.
(136 kg)
15.8" x 24.0" x 26.0”
M36CB 15.8" x 36.0" x 26.0”
M48CB 15.8" x 48.0" x 26.0”
M60CB 15.8" x 60.0" x 26.0”
▲ Model M36CB
d
e
▲Model M24CB
f
l
k
j
▲ Model M48CB
m

8
INSTALLATION INSTRUCTIONS
TRANSPORTATION AND STORAGE
During transportation, the cooking equipment should be carefully handled. DO NOT place it upside down. The
equipment should be stored in a well ventilated warehouse without corrosive gas. If it needs to be stored outside
temporarily, make sure it does not come in contact with rain.
NOTICE FOR INSTALLMENT
1. Installation should be operated by certified technicians.
2. Connection of the device should conform to provisions of gas safety, installation and usage.
3. The device can be used only when four legs are installed correctly.
4. The appliance should have a minimum clearance of 0” (0cm) from non-combustible substance (e.g. walls,
windows etc.), and 4” (10 cm) from combustible materials.
5. This appliance should be installed on a stable, level and non-combustible surface (e.g. cement, ceramic tile,
terrazzo and metal surface). Verify the requirements of local regulation. Paving metal or ceramic tile onto
combustible material does not conform to requirements of non-combustible surface regulation. Please
leave appropriate clearance for the ventilation vent in the cabinet to keep the appliance away from the
combustible surface nearby.
6. The mounting position should supply sufficient make-up air during normal combustion and installation
should not block the burning airflow and ventilation.
7. If the exhaust fan is used, pay special attention to avoid operations that interfere with the device, e.g.
ventilation and air demand of the device.
8. After installation, level the device and keep stable. DO NOT sway or tilt the device during operation.
9. DO NOT use gas that is not applicable to this device as fuel, DO NOT use high-pressure or medium-pressure
regulating valves. This device is can only be used with a low-pressure regulating valve.
10. A quick-acting switch-off gas valve should be installed upstream to the device where it is easy to reach
before installation.
11. Make sure the supplied gas is the same as the gas that the device allows to use. If not, please stop using.
12. Coat some dedicated pipe sealant for gas pipeline in all the pipe joints. The sealant used should have
durability for the gas action.
13. If the pipeline pressure is 10% higher or lower than the rated pressure, please install a pressure regulator to
adjust the gas pressure to reach the rated one.
14. Installation from the outlet end of the gas flow meter or service regulator to the gas pipe of the device
should be operated by professional technicians and qualified personnel. They should also use the cooking
equipment first and adjust it.
15. DO NOT block the ventilation of the device and interfere with the ventilation needed during normal
operation of the burners.
16. After connecting the appliance to the gas system, check for leaks at joints and pipe fittings; to do so, use
soapy water or a specific leak detector (spray).

9
INSTALLATION
1. Verify the gas type and pressure, and make sure that they conform to those marked on the rating label. If
incorrect gas type/pressure is connected, it may damage the performance of the device and create safety
hazards.
2. Before installing the gas pipeline, please install the appliance in an ultimate-use position. Adjust the height
of the appliance on all 4 leveling legs using a water level to make sure the device in a level state. After
installing the gas pipeline, check the level state of the device again.
3. According to requirement of local standard and strong recommendation of the manufacturer, a gas shut-off
valve may be needed between the gas supply pipeline and gas-pressure regulator. Whether the installation
of the gas shut-off valve has any requirements in the local standard should be judged by the gas installation
personnel.

10
OPERATING INSTRUCTIONS
Before operation, please read the user’s manual carefully. If the appliance has been immersed in water, please
stop using and call the technicians to check and repair or replace all the components that are immersed in the
water. Dry the wet burners before using. Before using, please make sure that the main burner, pilot light burner
and oil receiver are in correct installation.
1. Before igniting the pilot light, ensure there is no gas odor around the device. When first using or after
cutting off the gas supply, it may take several minutes to ignite the pilot light due to the air existing in the
pipeline or clearance of the inlet pipe.
2. The pilot light should be ignited manually. Remove the grate and rotate all the control knobs to the full
open position. The pilot light is near the burner, which can be reached from the top of the burner. Make
sure that the gas shut-off valve is on and the air in the pipeline is cleared. After turning on the gas valve,
ignite the pilot light with a match or igniter, DO NOT use lighter. Then re-install the grate.
3. After using, please turn off the main gas supply, all burner knobs and the pilot light.
4. The control knobs of this device have a continuous setting range from “ON” to “OFF”. Rotate the knob to
the “ON” position to ignite the burner until all parts of the burner become lit. Then set the control knob to
the desired position. The set value can be adjusted freely at any time.
NOTE: Control knobs of the burners can be operated manually only. DO NOT rotate it with tools. If it
cannot be rotated manually, DO NOT rotate or repair it with force. Force or improper maintenance may
cause fire or explosion.
5. If you are not going to use the appliance, please turn off the control knobs to save energy. The gas burner
can provide a large quantity of heat, therefore, DO NOT keep the appliance on if it is used intermittently.
ADJUSTING THE PILOT LIGHT
The pilot flame on the equipment has been factory adjusted. When adjustment is necessary, adjust the pilot
flames as small as possible but high enough to light the burner immediately when the burner valve is turned to
the highest setting. Access to the pilot flame adjustment screw is obtained through the holes in the front panel.
NOTE: There may be some smoke at the initial startup as the result of rust prevention coatings burning off.
This is normal. Please allow at least a 15 minute burn in period before using for the first time.
Figure 2

11
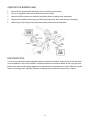
ADJUSTING THE BURNER FLAME
1. Remove all the control knobs, front panel, grates, and the heat radiant panel.
2. Turn on a single burner and unscrew the lock screw on the baffle.
3. Rotate the baffle to increase or reduce the ventilation volume according to the requirement.
4. Regulate the air baffle to make majority of the flame become blue. Then screw the lock screw tightly.
5. Before using, install the grate, front panel, heat radiant panel and all the knobs back.
DAILY INSPECTION
It is necessary to check the cooking equipment daily to avoid serious accidents. Stop using if user feels that there
are some problems in the circuit or machine. Check the condition of the machine before or after using every day.
Before using, make sure the cooking equipment isn’t tilted and that the control panel is intact. While using, ensure
there are no strange smells, light back, flameouts or vibrating noises and that the burner flame is normal.

12
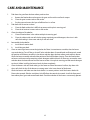
CARE AND MAINTENANCE
1. Take down the grate from the heat radiant panel to clean:
a. Remove the food residue and scraps on the grate surface with a steel brush scraper.
b. Clean the grate in water tank or dish washer.
c. Dry the grate and coat a thin layer of edible oil on its surface.
2. Take down the oil receiver to clean:
a. Clean the food residue that is difficult to remove with a plastic scouring pad.
b. Clean the oil receiver in water tank or dish washer.
3. Clean the cabinet of charbroiler:
a. Clean all food residues in the cabinet with plastic scouring pad.
b. Clean the cabinet with wet soft cloth or sponge containing neutral detergent, then rinse it with
soft cloth soaking in clear water and dry it with soft cloth.
4. Reassemble the charbroiler:
a. Install the oil receiver back.
b. Install the grate back.
5. If one or more single burner cannot be ignited or the flame is intermittent or unstable, then the burner
may need cleaning. Turn off the gas shut-off valve and take down all control knobs and front panel, record
the position of the burner assembly in the cabinet and take down the heat radiant panel and main burner.
Check the burner assembly and record the position of the baffle before cleaning. Clean the food residue
on burners with warm water containing neutral detergent and bristle brush. If necessary, unscrew the screw
and take down the heat reflector from the burner to clean. Use a plastic scouring pad and neutral detergent
to clean it. Before installing the burners back, dry them completely.
6. Clean the burners with soft cloth soaking in clear water and clean the external surfaces, dry them with
clean soft cloth. Air-dry all the burners to remove water in the inner channel of the burners.
7. Check the burners and make sure that the air baffle is in correct position. Install the burners back with
flame outlet upward. Slide the ventilation/air baffle from the control valve nozzle. Install the front panel,
heat radiant panel, grate and control knobs back. Check that whether all the burners can correctly operate.

13
TROUBLESHOOTING
Problem Possible Causes
Uneven heating,
sides burning
Burner valves improperly adjusted
Fluctuating gas pressure
Improperly adjusted burner
Too much top heat
Burner valves adjusted too high
Faulty ventilation
Overrated gas pressure
Pilot outage
Pilot flame is set too low. Adjust pilot to allow for gas flow
Obstruction in pilot orifice
Improperly adjusted burner
Low gas pressure
Yellow burner flames Open burner shutters until flames are blue
Lifting burner flames Close burner shutters until flames touch burner
Fluctuating gas pressure Check for clogged vent on regulator

14
LIMITED WARRANTY
MC Appliance Corporation warrants each new Commercial Gas Charbroiler to be free from defects in material and workmanship,
and agrees to remedy any such defect or to furnish a new part(s), at the company’s option, for any part(s) of the unit that has
failed during the warranty period. Parts and labor expenses are covered on this unit for a period of one year from the date of
purchase. A copy of the dated sales receipt or invoice is required to receive warranty service, replacement or refund.
In the event the unit requires replacement or refund under the terms of this warranty, the consumer is responsible for all
transportation expenses to return the unit to our factory prior to receiving a replacement unit or refund. A copy of the dated
sales receipt/invoice is required to receive warranty service, replacement or refund. A refund or replacement will be issued at
the discretion of MC Appliance Corporation.
This warranty covers appliances in use within the contiguous United States, Alaska, Hawaii and Puerto Rico. This warranty
does not cover the following:
• Damages due to shipping damage or improper installation.
• Damages due to misuse or abuse.
• Content losses due to failure of the unit.
• Inside components such as turntable, roller guide, light bulbs, etc.
• Repairs performed by unauthorized service agents.
• Service calls that do not involve defects in material and workmanship such as instructions on proper use of the
product or improper installation.
• Replacement or resetting of house fuses or circuit breakers.
• Failure of this product if used for other purposes than its intended purpose.
• Disposal costs for any failed unit not returned to our factory.
• Any delivery/installation costs incurred as the result of a unit that fails to perform as specified.
• Expenses for travel and transportation for product service if your appliance is located in a remote area where
service by an authorized service technician is not available.
• The removal and reinstallation of your appliance if it is installed in an inaccessible location or is not installed in
accordance with published installation instructions.
• Refunds for non repairable products are limited to the price paid for the unit per the sales receipt.
• This warranty is non transferable. This warranty applies only to the original purchaser and does not extend to any
subsequent owner(s).
LIMITATIONS OF REMEDIES AND EXCLUSIONS:
Product repair in accordance with the terms herein, is your sole and exclusive remedy under this limited warranty. Any and all
implied warranties including merchantability and fitness for a particular purpose are hereby limited to one year or the shortest
period allowed by law. MC Appliance Corporation is not liable for incidental or consequential damages and no representative or
person is authorized to assume for us any other liability in connection with the sale of this product. Under no circumstances is
the consumer permitted to return this unit to the factory without the prior written consent of MC Appliance Corporation.
Some states prohibit the exclusion or limitation of incidental or consequential damages, or limitations on implied warranties.
This warranty gives you specific legal rights, and you may also have other rights which vary from state to state.
Parts & Labor Type of Service
One Year In Field
One Year In Field
Model
M16CB
M24CB
M36CB
M48CB
M60CB
One Year In Field
For Service or Assistance please call 888-775-0202 or visit us on the web at www.mcappliance.com to request warranty
service or order parts.
One Year
One Year
In Field
In Field

CNA International, Inc. d/b/a MC Appliance Corporation. All rights reserved.
Magic Chef® logo is a registered trademark of CNA International, Inc.
www.mcappliance.com Printed in China

16
POR FAVOR, LEA CUIDADOSAMENTE ESTE MANUAL ANTES DE USAR SU
PARRILLA A GAS COMERCIAL Y CONSÉRVELO PARA FUTURAS REFERENCIAS.
Parrilla a gas comercial
E-Series
Manual del usuario
Modelos M16CB / M24CB / M36CB / M48CB / M60CB

17
REGISTRO DEL PRODUCTO
Gracias por comprar un producto comercial de Magic Chef. El primer paso para proteger su nuevo producto es completar
el registro del producto en nuestro sitio web: www.mcappliance.com/register. Los beneficios de registrar su producto incluyen
los siguientes:
1. Registrar su producto nos permitirá contactarlo en relación a un aviso de seguridad o actualización del producto.
2. Registrar su producto nos permitirá un proceso de servicio de garantía más eficiente, cuando sea requerido
un servicio de garantía.
3. Registrar su producto puede funcionar como su prueba de compra en el caso de que usted sufra una pérdida
que esté cubierta por un seguro.
Una vez más, gracias por comprar un producto comercial de Magic Chef.

18
ÍNDICE
REGISTRO DEL PRODUCTO . . . . . . . . . . . . . . . . . . . . . . . . . . . . . . . . . . . . . . . . . . . . . . . . . . . 17
PRECAUCIONES . . . . . . . . . . . . . . . . . . . . . . . . . . . . . . . . . . . . . . . . . . . . . . . . . . . . . . . . . . . . . 19
INSTRUCCIONES DE SEGURIDAD IMPORTANTES . . . . . . . . . . . . . . . . . . . . . . . . . . . . . . . . 20
ESPECIFICACIONES . . . . . . . . . . . . . . . . . . . . . . . . . . . . . . . . . . . . . . . . . . . . . . . . . . . . . . . . . . 22
INSTRUCCIONES DE INSTALACIÓN . . . . . . . . . . . . . . . . . . . . . . . . . . . . . . . . . . . . . . . . . . . . 23
INSTRUCCIONES DE FUNCIONAMIENTO. . . . . . . . . . . . . . . . . . . . . . . . . . . . . . . . . . . . . . . 25
CUIDADO Y MANTENIMIENTO . . . . . . . . . . . . . . . . . . . . . . . . . . . . . . . . . . . . . . . . . . . . . . . 27
SOLUCIÓN DE PROBLEMAS. . . . . . . . . . . . . . . . . . . . . . . . . . . . . . . . . . . . . . . . . . . . . . . . . . . 28
GARANTÍA LIMITADA . . . . . . . . . . . . . . . . . . . . . . . . . . . . . . . . . . . . . . . . . . . . . . . . . . . . . . . . 29

19
PRECAUCIONES
EXPLICACIÓN DE LOS SÍMBOLOS
ADVERTENCIA
Peligros o prácticas inseguras que PODRÍAN provocar lesiones personales graves o la muerte.
PRECAUCIÓN
Peligros o prácticas inseguras que PODRÍAN provocar lesiones personales leves o daños materiales.
ADVERTENCIA: Lea y comprenda todas las precauciones de seguridad. La inobservancia de todas las
instrucciones descritas en este manual del usuario podría derivar en descarga eléctrica, incendio y/o lesiones
personales graves. Las advertencias, precauciones e instrucciones planteadas en este manual del usuario no
cubren todas las eventuales condiciones y situaciones que podrían suscitarse.
ADVERTENCIA: Si la información en este manual no se sigue exactamente, un incendio o una explosión podría
resultar ocasionando daños materiales, lesiones personales o la muerte. NO guarde, ni utilice gasolina, u otro
vapor o líquido inflamable en las cercanías de éste o de cualquier otro aparato.
ADVERTENCIA: Fuga de Gas
• Las fugas de gas no siempre pueden ser detectadas por el olor.
• Los proveedores de gas recomiendan que usted utilice un detector de gas aprobado por UL o CSA.
• Para mayor información, comuníquese con su proveedor de gas.
• Si se detecta una fuga de gas, siga la sección “Qué hacer si huele a gas” a continuación.
ADVERTENCIA: Qué hacer si huele a gas
• NO trate de encender ningún aparato.
• NO toque ningún interruptor eléctrico.
• No utilice ningún teléfono en el edificio.
• Inmediatamente llame a su proveedor de gas desde un teléfono afuera de la casa. (Ej.: Vaya a la casa
del vecino para llamar a su proveedor de gas o al departamento de bomberos).
• Si el proveedor de gas no puede ser contactado, llame al departamento de bomberos.
• La instalación y el servicio deben ser ejecutados por un instalador calificado o una agencia de servicio.

20
INSTRUCCIONES DE SEGURIDAD IMPORTANTES
ADVERTENCIA: Cuando utilice aparatos de gas, debe seguir las precauciones básicas de seguridad, incluidas
las siguientes:
1. Lea todas las instrucciones antes de utilizar el aparato.
2. Cualquier modificación, instalación, ajuste o mantenimiento indebido puede provocar pérdida de bienes
o accidentes. Por favor, comuníquese con el fabricante para cualquier ajuste o mantenimiento necesario,
y deje que el trabajo lo realice una persona capacitada y calificada.
3. La parrilla debe utilizarse de conformidad con las normativas del Instituto Nacional de Normalización
Estadounidense (American National Standards Institute, ANSI) Z223.1/la Asociación Nacional de Protección
contra el Fuego (National Fire Protection Association, NFPA) 54 (edición más reciente) del Código Nacional
del Gas Combustible, el Código Nacional de Instalación de Gas CSA/B149.1 o el Código de Instalación de Gas
Propano CSA/B149.1 cuando correspondan. Se pueden obtener copias en la Asociación Americana de Gas,
ubicada en 1515 Wilson Blvd, Arlington, VA 22209.
4. La instalación y el mantenimiento solo deben realizarse por profesionales certificados. La instalación
incorrecta podría causar lesiones graves o la muerte, y puede anular la garantía.
5. No coloque la parrilla cerca de ningún líquido, gas u otro objeto que sea inflamable o explosivo.
6. Este aparato no debe ser operado por aquellas personas que tengan discapacidad fisiológica, perceptual
ni mental o por aquellos que no tengan suficiente experiencia o conocimiento (incluidos los niños). Solo
bajo condiciones en que se les proporcione suficiente supervisión y garantía de seguridad personal, al igual
que las instrucciones y la orientación adecuadas, aquellos que se mencionan anteriormente pueden utilizar
el dispositivo de forma especial.
7. Mantenga el dispositivo lejos del alcance de los niños.
8. Conserve este manual de manera segura. Al transferir/vender el dispositivo a un tercero, los manuales
deben entregarse junto con el dispositivo. Todos los usuarios deben operar el dispositivo de acuerdo con
el manual del usuario y las guías de seguridad relacionadas.
9. Si se coloca el aparato cerca de paredes, tabiques o muebles de la cocina, entre otros, se recomienda que
estas instalaciones estén hechas de material no inflamable; de otro modo, deben cubrirse con material no
inflamable resistente al calor y debe prestarse atención a las normas para la prevención de incendios.
10. El aparato debe instalarse en un área bien ventilada con instalaciones de evacuación las cuales pueden
garantizar que todos los gases quemados producidos durante la combustión se ventilen correctamente.
11. El aparato solo debe utilizarse con válvulas reguladoras de gas de baja presión. El uso de otras válvulas
reguladoras puede provocar pérdidas y accidentes.
12. No utilice la parrilla si no hay nada sobre las rejillas.
13. Advertencia de incendio: Si huele a gas, por favor, manténgase alejado del fuego. No encienda ningún
dispositivo ni toque un interruptor eléctrico. No utilice ningún teléfono en el edificio. Cierre
inmediatamente la válvula de gas principal y llame al personal profesional para que realice el
mantenimiento. La operación a la fuerza o el mantenimiento inadecuado del aparato puede provocar
grandes fugas o deflagraciones de gas. El fabricante no asume ninguna responsabilidad por accidentes de
incendio provocados por la operación
o el mantenimiento indebido.
14. Por favor, mantenga la integridad del aparato y retire el empaque exterior. Si tiene alguna pregunta, llame al
especialista y deje de utilizar el aparato. Mantenga los materiales de embalaje lejos del alcance de los niños.
(Debido a que los materiales son bolsas plásticas, uñas, etc.)

21
15. Cuando utilice por primera vez el dispositivo, puede tardar un poco más en encender debido al aire
existente en la nueva tubería. Apague el interruptor de encendido si no responde, y vuelva a encenderlo
3 minutos más tarde para evitar una deflagración.
16. Para evitar peligros, por favor, apague el dispositivo cuando no lo use.
17. Este producto es una máquina profesional que debe ser operada por cocineros capacitados y no está
diseñada para uso doméstico.
18. Este dispositivo es solamente para uso profesional, y no para otros fines.
19. NO desmonte ni modifique el dispositivo. Cualquier desmontaje o modificación puede ocasionar
accidentes y anular la garantía.
20. NO coloque objetos pesados sobre el aparato. La operación indebida puede provocar daños y peligros.
21. No coloque ningún objeto dentro del respiradero del calentador. Esto puede bloquear el conducto de gas
y causar lesiones.
22. Las altas temperaturas pueden causar quemaduras. NO toque la superficie del aparato directamente
con las manos debido a las altas temperaturas durante o después de la operación.
23. NO dañe el panel de control con objetos duros o afilados.
24. NO rocíe agua directamente sobre el aparato. Limpie la superficie de acero inoxidable, con regularidad,
para evitar daños causados por el óxido de la superficie y las reacciones químicas.
LEA Y SIGA CUIDADOSAMENTE
ESTA INFORMACIÓN DE SEGURIDAD
GUARDE ESTAS INSTRUCCIONES

22
ESPECIFICACIONES
ModeloDimensiones
(H x W x D)
Power
(BTU) Burners Net
Weight
M16CB 15.8" x 16.0" x 26.0” 30,000 1
M24CB 60,000 2
90,000 3
120,000 4
150,000 5
15.8" x 24.0" x 26.0”
M36CB 15.8" x 36.0" x 26.0”
M48CB 15.8" x 48.0" x 26.0”
M60CB 15.8" x 60.0" x 26.0”
Figura 1
a. 15.8” (401 mm)
b. 26.0” (660 mm)
c. 16.0” (406 mm)
d. 15.8” (401 mm)
e. 26.0” (660 mm)
f. 24.0” (610 mm)
g. 15.8” (401 mm)
h. 26.0” (660 mm)
i. 36.0” (914 mm)
j. 15.8” (401 mm)
k. 26.0” (660 mm)
l. 48.0” (1219 mm)
m. 15.8” (401 mm)
n. 26.0” (660 mm)
o. 60” (1524 mm)
95 lbs.
(43 kg)
119 lbs.
(54 kg)
163 lbs.
(74 kg)
244 lbs.
(111 kg)
300 lbs.
(136 kg)
a
b
▲Modelo M16CB
i
n
o
▲Modelo M60CB
c
h
g
▲ Modelo M36CB
d
e
▲Modelo M24CB
f
l
k
j
▲ Modelo M48CB
m

23
INSTRUCCIONES DE INSTALACIÓN
TRANSPORTE Y ALMACENAMIENTO
Durante el transporte, el equipo de cocina debe ser manejado cuidadosamente. NO lo coloque boca abajo. El equipo
debe ser almacenado en un depósito bien ventilado sin gas corrosivo. Si tiene que dejar el equipo en el exterior
temporalmente, asegúrese de que no entre en contacto con la lluvia.
AVISO DE INSTALACIÓN
1. La instalación debe realizarse por técnicos certificados.
2. La conexión del dispositivo debe ajustarse a las disposiciones de seguridad, instalación y uso del gas.
3. El dispositivo solo se puede utilizar cuando las cuatro patas estén instaladas correctamente.
4. El aparato debe tener un espacio mínimo de 0 “(0 cm) de sustancias no combustibles (por ejemplo,
paredes, ventanas, etc.) y de 4” (10 cm) de materiales combustibles.
5. Este aparato debe instalarse sobre una superficie estable, nivelada y no inflamable (por ejemplo, cemento,
baldosas cerámicas, terrazo y superficie metálica). Compruebe los requisitos de las normativas locales. La
pavimentación de azulejos metálicos o cerámicos sobre material inflamable no se ajusta a los
requerimientos de la normativa de superficie no inflamable. Por favor, deje suficiente espacio para el
respiradero en el gabinete a fin de mantener el aparato lejos de la superficie inflamable cercana.
6. La posición de instalación debe suministrar suficiente aire de reposición durante la combustión normal
y la instalación no debe bloquear el flujo de aire caliente y la ventilación.
7. Si se utiliza el extractor de aire, preste especial atención para evitar funcionamientos que interfieran con el
dispositivo, por ejemplo: demanda de aire y ventilación del dispositivo.
8. Después de la instalación, nivele el dispositivo y manténgalo estable. NO balancee ni incline el dispositivo
durante su operación.
9. NO utilice gas que no aplique a este dispositivo como combustible, NO utilice válvulas reguladoras de alta
presión ni de presión media . Este dispositivo solo puede utilizarse con una válvula reguladora de baja presión.
10. Antes de la instalación,debe colocarse una válvula de desconexión de gas de rápida acción y de fácil acceso
de manera ascendente en el dispositivo.
11. Asegúrese de que el gas suministrado es el mismo gas que el dispositivo permite usar. Si no lo es, por favor,
deje de usarlo.
12. Cubra con un poco de sellador de tubería destinada para gasoductos en todas las uniones de la tubería.
El sellador utilizado debe tener la durabilidad necesaria para la acción del gas.
13. Si la presión de la tubería de gas es un 10% mayor o menor que la presión nominal, por favor, instale un
regulador de presión para ajustar la presión del gas que alcance la presión nominal.
14. La instalación desde el extremo de salida del medidor de flujo de gas o del regulador de servicio al tubo de
gas del dispositivo debe ser realizada por técnicos profesionales y personal capacitado. También deben
probar el equipo de cocción primero y hacer cualquier ajuste que se requiera.
15. No bloquee la ventilación del dispositivo ni interfiera la ventilación necesaria durante el funcionamiento
normal de los quemadores.
16. Después de conectar el aparato al sistema de gas, verifique que no haya fugas en las uniones de la tubería;
para ello, utilice agua jabonosa o un detector de fugas específico (aerosol).

24
INSTALACIÓN
1. Compruebe la presión y el tipo de gas, y asegúrese de que se ajustan a las especificaciones marcadas en
la etiqueta de clasificación. Si se conecta una presión o tipo de gas incorrecto, puede dañar el rendimiento
del dispositivo y provocar riesgos a la seguridad.
2. Antes de instalar el gasoducto, por favor, instale el aparato en una posición de uso final. Ajuste la altura del
aparato sobre todas las 4 patas de nivelación usando un nivel de agua para asegurarse de que el dispositivo
está nivelado. Tras la instalación del gasoducto, compruebe el estado del nivel del dispositivo nuevamente.
3. De acuerdo con los requisitos de las normas locales y la estricta recomendación del fabricante, puede ser
necesaria una válvula de cierre de gas entre la tubería de suministro de gas y el regulador de presión de gas.
Si la instalación de una válvula de cierre de gas tiene algún requisito en las normas locales, el profesional
de instalación de gas deberá evaluarlo.

25
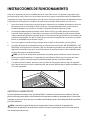
INSTRUCCIONES DE FUNCIONAMIENTO
Antes de su operación, por favor, lea cuidadosamente el manual del usuario. Si el aparato se sumergió en agua,
por favor, deje de usarlo y llame a los técnicos para que revisen y reparen o reemplacen todos los componentes
sumergidos en el agua. Seque los quemadores antes de usarlos. Por favor, asegúrese de que el quemador principal,
el quemador de la llama piloto y el recipiente de aceite están instalados correctamente, antes de su uso.
1. Antes de encender la llama piloto, asegúrese de que no haya olor a gas alrededor del dispositivo. Al usarlo
por primera vez o tras interrumpir el suministro de gas, la llama piloto puede tomar varios minutos en
encenderse debido al aire existente en la tubería o al espacio libre de la tubería de entrada.
2. La llama piloto debe encenderse de forma manual. Retire la rejilla y gire todas perillas de control hasta
la posición abierta completa. La llama piloto se encuentra cerca del quemador, y puede alcanzarse desde
la parte superior del quemador. Asegúrese de que la válvula de cierre de gas esté abierta y el aire dentro de
la tubería esté despejado. Tras abrir la válvula de gas, encienda la llama piloto con una cerilla o una mecha,
NO use un encendedor. Luego reinstale la rejilla.
3. Tras su uso, apague el suministro de gas principal, todas las perillas del quemador y la llama piloto.
4. Las perillas de control de este dispositivo tienen un rango de ajuste continuo de “ON” (ENCENDIDO) a “OFF”
(APAGADO). Gire la perilla hacia la posición “ON” para encender el quemador hasta que todas las partes del
quemador se enciendan. Luego ajuste la perilla de control a la posición deseada. El valor establecido puede
ajustarse libremente en cualquier momento.
NOTA: Las perillas de control de los quemadores solo pueden operarse de forma manual únicamente.
NO los gire usando herramientas. Si no pueden girar manualmente, NO los gire ni los repare con fuerza.
El manejo a la fuerza o el mantenimiento inadecuado pueden provocar incendio o explosión.
5. Si no piensa utilizar el aparato, por favor, cierre las perillas de control para ahorrar energía. El quemador
de gas puede suministrar una gran cantidad de calor, por lo tanto, NO mantenga el aparato encendido si no
se usa con regularidad.
AJUSTE DE LA LLAMA PILOTO
La llama del piloto en el equipo viene ajustada de fábrica. Cuando sea necesario ajustar, coloque la llama del
piloto lo más bajo posible pero lo suficientemente alta como para encender el quemador apenas la válvula del
quemador se pone en el ajuste más alto. Se accede al tornillo de ajuste de la llama del piloto desde los orificios
en el panel delantero.
NOTA: Puede haber un poco de humo en el arranque inicial como resultado de la quemadura de
recubrimientos de prevención de óxido. Esto es normal. Deje que se queme por lo menos 15 minutos antes de
usar el aparato por primera vez.
Figura 2

26
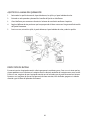
AJUSTE DE LA LLAMA DEL QUEMADOR
1. Retire todas las perillas de control, el panel delantero, las rejillas y el panel radiador de calor.
2. Encienda un solo quemador y destornille el tornillo de fijación en el deflector.
3. Gire el deflector para aumentar o disminuir el volumen de ventilación conforme al requisito.
4. Regule el deflector de aire para hacer que la mayor parte de la llama se torna azul. Luego atornille el tornillo
de fijación firmemente.
5. Previo a su uso, reinstale la rejilla, el panel delantero, el panel radiador de calor y todas las perillas.
INSPECCIÓN DE RUTINA
Es necesario revisar el equipo de cocción a diario para prevenir accidentes graves. Cese su uso si siente que hay
algunos problemas en el circuito o en la máquina. Revise a diario la condición de la máquina antes o tras usarlo.
Previo a su uso, asegúrese de que el equipo de cocción no esté inclinado y que el panel de control esté intacto.
Durante su uso, asegúrese de que no haya presencia de olores extraños, luces de fondo, apagones ni ruidos de
vibración y que la llama del quemador esté normal.

27
CUIDADO Y MANTENIMIENTO
1. Retire la rejilla del panel radiador de calor para su limpieza:
a. Elimine los residuos y las sobras de alimentos en la superficie de la rejilla con un cepillo de alambre
con espátula.
b. Limpie la rejilla en un tanque de agua o en un lavavajillas.
c. Seque la rejilla y cubra su superficie con una capa fina de aceite comestible.
2. Retire el recipiente de aceite para su limpieza:
a. Limpie los residuos de alimentos que sean difíciles de eliminar con un estropajo de plástico.
b. Limpie el recipiente de aceite en un tanque de agua o en un lavavajillas.
3. Limpie el gabinete de la parrilla:
a. Limpie todos los residuos de alimentos en el gabinete con un estropajo de plástico.
b. Limpie el gabinete con un paño suave y húmedo o una esponja que contenga detergente neutro,
luego enjuáguelo con un paño suave empapado de agua limpia y séquelo con un paño suave.
4. Vuelva a ensamblar la parrilla:
a. Reinstale el recipiente de aceite.
b. Reinstale la rejilla.
5. Si uno o más quemadores no pueden encenderse o si la llama es intermitente o inestable, entonces es
posible que necesite limpiar el quemador. Cierre la válvula de cierre de gas y retire todas las perillas de
control y el panel delantero, registre la posición del ensamblaje del quemador en el gabinete y retire
el panel radiador de calor y el quemador principal. Revise el ensamblaje del quemador y registre la
posición del deflector previo a su limpieza. Limpie los residuos de comida sobre los quemadores con
agua tibia que contenga detergente neutro y un cepillo de cerdas. De ser necesario, destornille el tornillo
y retire el reflector de calor del quemador para su limpieza. Use un estropajo y un detergente neutro
para limpiarlo. Antes de reinstalar los quemadores, séquelos completamente.
6. Limpie los quemadores con un paño suave empapado en agua limpia y limpie las superficies externas, séquelas
con un paño suave y limpio. Seque al aire todos los quemadores para extraer el agua dentro del canal interno
de los quemadores.
7. Revise los quemadores y asegúrese de que el deflector de aire se encuentre en la posición correcta. Reinstale
los quemadores con la salida de la llama hacia arriba. Deslice el deflector de aire/ventilación de la boquilla
de la válvula de control. Reinstale el panel delantero, el panel radiador de calor, la rejilla y las perillas de
control. Compruebe si todos los quemadores operan de manera correcta.

28
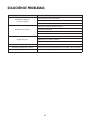
SOLUCIÓN DE PROBLEMAS
Calentamiento desparejo,
los lados se queman
Válvulas del quemador mal ajustadas
Presión de gas inestable
Quemador mal ajustado
Demasiado calor superior
Válvulas del quemador ajustadas muy alto
Ventilación inadecuada
Presión de gas aumentada
Apagado del piloto
Llama del piloto ajustada muy bajo. Ajuste el piloto para permitir el caudal de gas
Obstrucción en el orificio del piloto
Quemador mal ajustado
Baja presión de gas
Llamas amarillas en el quemador Abrir los inyectores del quemador hasta que las llamas estén azules
Llamas del quemador que se elevan
Cerrar los inyectores del quemador hasta que las llamas toquen el quemador
Presión de gas inestable Ventilación obstruida en el regulador
Problema Causas posibles

29
GARANTÍA LIMITADA
MC Appliance Corporation garantiza que cada Parrilla a gas comercial nueva carece de defectos en los materiales y en la mano
de obra, y conviene en remediar cualquier defecto o proporcionar las piezas nuevas, a opción de la compañía, de cualesquiera
piezas de la unidad que hayan fallado durante el período de garantía. Las piezas y los gastos de mano de obra están cubiertos en
esta unidad por un período de un año a partir de la fecha de compra. Es necesario presentar una copia del recibo o de la factura
de venta fechado, para recibir el servicio de garantía, reemplazo o reembolso.
El consumidor asume todos los gastos de traslado para devolver la unidad a nuestra fábrica antes de obtener una unidad
de reemplazo o un reembolso en caso de que deba sustituirse la unidad o efectuarse un reembolso de conformidad con
los términos de esta garantía. Es necesario presentar una copia del recibo o de la factura de venta fechado, para recibir servicio
de garantía, reemplazo o reembolso. Se emitirá un reembolso o reemplazo a discreción de MC Appliance Corporation.
Esta garantía cubre los aparatos en uso dentro de los Estados Unidos contiguos, Alaska, Hawái y Puerto Rico. Esta garantía
no cubre lo siguiente:
• Daños debido a daños sufridos durante el envío o por instalación incorrecta.
• Daños debidos a uso incorrecto o abuso.
• Pérdidas de contenido debido a fallas de la unidad.
• Los componentes internos como la mesa giratoria, el rodillo guía, las bombillas de luz, etc.
• Reparaciones llevadas a cabo por agentes de servicio no autorizados.
• Llamadas de servicio que no implican defectos en material y mano de obra tales como instrucciones sobre el uso
correcto del producto o instalación incorrecta.
• Reemplazo o reajuste de los fusibles de la casa o los interruptores.
• Falla de este producto si se usa para fines distintos para los que fue diseñado.
• Costos de eliminación de cualquier unidad defectuosa no devuelta a nuestra fábrica.
• Ninguno de los costos de entrega / instalación incurridos como resultado de una unidad que no funcione
según las especificaciones.
• Gastos de viaje y transporte para obtener servicio para el producto si su aparato está ubicado en una zona remota
donde el servicio por parte de un técnico de servicio autorizado no está disponible.
• El retiro y la nueva instalación de su aparato si está instalado en una ubicación inaccesible o no fue instalado
de acuerdo con las instrucciones de instalación publicadas.
• Rembolsos para los productos que no son reparables están limitados al precio pagado por la unidad conforme
a la factura de venta.
• Esta garantía es intransferible. Esta garantía aplica sólo al comprador original y no se extiende a cualquier
propietario o propietarios subsecuentes.
LIMITACIONES A LOS REMEDIOS Y EXCLUSIONES:
La reparación del producto de acuerdo con los términos aquí indicados, es su único y exclusivo remedio bajo esta garantía
limitada. Cualquiera y todas las garantías implícitas, incluyendo la comercialización y la idoneidad para un propósito particular
están limitadas por medio de la presente a un año o al período más corto permitido por la ley. MC Appliance Corporation no es
responsable por daños incidentales o emergentes y ningún representante o persona está autorizada para asumir por nuestra parte,
ninguna otra responsabilidad en relación con la venta de este producto. Bajo ninguna circunstancia el consumidor tiene permitido
devolver esta unidad a la fábrica sin la autorización previa por escrito suministrada por MC Appliance Corporation.
Algunos estados prohíben la exclusión o limitación de los daños incidentales o consecuenciales, o limitaciones en las garantías implícitas.
Esta garantía le otorga derechos legales específicos, y usted podría tener otros derechos que varían según el estado.
Pieza y mano de obra Tipo de servicio
Un año Reparación en el sitio
Un año Reparación en el sitio
Modelo
Un año Reparación en el sitio
Para Servicio o Asistencia por favor llame al 888-775-0202 o visítenos en el sitio web en www.mcappliance.com para solicitar
servicio de garantía u ordenar partes.
M16CB
M24CB
M36CB
M48CB
M60CB
Un año
Un año
Reparación en el sitio
Reparación en el sitio

CNA International, Inc., opera bajo el nombre comercial de MC Appliance
Corporation. Todos los derechos reservados. El logo de Magic Chef® es una marca
registrada de CNA International, Inc.
www.mcappliance.com Impreso en China
-
 1
1
-
 2
2
-
 3
3
-
 4
4
-
 5
5
-
 6
6
-
 7
7
-
 8
8
-
 9
9
-
 10
10
-
 11
11
-
 12
12
-
 13
13
-
 14
14
-
 15
15
-
 16
16
-
 17
17
-
 18
18
-
 19
19
-
 20
20
-
 21
21
-
 22
22
-
 23
23
-
 24
24
-
 25
25
-
 26
26
-
 27
27
-
 28
28
-
 29
29
-
 30
30


