
218 - 218 D/ 118 - 118 D
Pubbl. 68570005 - Set/2018
I
D
F
GB
E
SK
OWNER’S MANUAL
MANUALE USO E MANUTENZIONE
BETRIEBS- UND WARTUNGSANLEITUNG
MANUEL D’UTILISATION ET D’ENTRETIEN
MANUAL DE USO Y MANTENIMIENTO
NÁVOD NA POUŽITIE A ÚDRŽBU

2
ATTENZIONE!!! ACHTUNG!!!
RISCHIO DI DANNO UDITIVO
NELLE NORMALI CONDIZIONI DI UTILIZZO,
QUESTA MACCHINA PUÒ COMPORTARE
PER L’OPERATORE ADDETTO, UN LIVELLO DI
ESPOSIZIONE PERSONALE E GIORNALIERO
A RUMORE PARI O SUPERIORE A
85 dB(A)
HÖRSCHADEN - RISIKO
UNTER NORMALEN ANWENDUNGSBEDIGUNGEN
KANN DIESES GERÄT DIE BEDIENUNGSPERSON
EINEM TÄGLICHEN GERÄUSCHPEGEL VON
85 dB(A)
ODER MEHR AUSSETZEN
WARNING!!! ATENCION!!!
RISK OF DAMAGING HEARING
IN NORMAL CONDITIONS OF USE,
THIS MACHINE MAY INVOLVE A DAILY LEVEL
OF PERSONAL EXPOSURE TO NOISE
FOR THE OPERATOR EQUAL TO
OR GREATER THAN
85 dB(A)
RIESGO DE DAÑO AUDITIVO
EN NORMALES CONDICIONES DE UTILIZACIÓN,
ESTA MAQUINA PUEDE TOLERAR, PARA EL OPERADOR
ENCARGADO, UN NIVEL DE EXPOSICÍON
DIARIO A RUIDO EQUIVALENTE O SUPERIOR A
85 dB(A)
ATTENTION!!!
POZOR!!!
DANGER D’ATTEINTE A L’OUIE
L’OPERATEUR UTILISANT NORMALEMENT
CETTE MACHINE PEUTS S’EXPOSER
QUOTIDIENNEMENT A UN BRUIT
EGAL OU DEPASSANT
85 dB(A)
RIZIKO POŠKODENIA SLUCHU
ZA BEŽNÝCH PRACOVNÝCH PODMIENOK MÔŽE TENTO
STROJ PREDSTAVOVAŤ PRE PRACOVNÍKA VYSTAVENIE
DENNEJ HLADINE A OSOBNEJ HLADINE HLUKU
ROVNAJÚCEJ SA ALEBO VYŠŠEJ AKO
85 dB(A)
I
INTRODUZIONE
ISTRUZIONI ORIGINALI
Per un corretto impiego della motozappa e per evitare incidenti, non iniziare il lavoro senza aver
letto questo manuale con la massima attenzione. Su questo manuale sono indicate le spiegazioni di
funzionamento dei vari componenti e le istruzioni per i necessari controlli e per la manutenzione.
N.B. Le descrizioni e le illustrazioni contenute nel presente manuale si intendono non
rigorosamente impegnative. La Ditta si riserva il diritto di apportare eventuali modifiche senza
impegnarsi ad aggiornare di volta in volta questo manuale.
GB
INTRODUCTION
TRANSLATION OF ORIGINAL INSTRUCTIONS
To correctly use the motorhoe and prevent accidents, do not start work without having first carefully
read this manual. You will find explanations concerning the operation of the various parts plus
instructions for necessary checks and relative maintenance.
Note: Illustrations and specifications in this manual may vary according to Country requirements
and are subject to change without notice by the manufacturer.
F
INTRODUCTION
TRADUCTION DES INSTRUCTIONS ORIGINALES
Pour un emploi correct de la motobineuse et pour éviter les accidents, ne commencez pas le travail sans
avoir d’abord lu attentivement le manuel. Vous trouverez les descriptions du fonctionnement des divers
composants et les instructions pour les contrôles nécessaires et pour l’entretien.
N.B. Les descriptions et les illustrations contenues dans ce manuel n’engagent pas
rigoureusement le constructeur. La société se réserve le droit d’apporter d’éventuelles
modifications sans devoir mettre à jour à chaque fois le manuel.
D
EINLEITUNG
ÜBERSETZUNG DER ORIGINALANLEITUNGEN
Lesen Sie diese motorhacke vor Arbeitsbeginn aufmerksam durch, um mit der Erdbohrgeräts richtig
umgehen zu können und Unfälle zu vermeiden. In dieser Bedienungsanleitung finden Sie die Erklärung
der Funktionsweise der verschiedenen Bauteile und Hinweise zu den anfallenden Kontroll- und
Wartungsarbeiten.
Anm.: Die in dieser Broschüre enthaltenen Beschreibungen und Abbildungen sind unverbindlich.
Der Hersteller behält sich das Recht vor, eventuelle Veränderungen vorzunehmen, ohne jeweils
vorher eine Anpassung der vorliegenden Bedienungsanleitung vorzunehmen.
E
INTRODUCCION
TRADUCCIÓN DE LAS INSTRUCCIONES ORIGINALES
Para una correcta utilización de el motoazada y para evitar accidentes, no empiece a trabajar sin haber
leído atentamente este manual. Ud. encontrará las explicaciones de funcionamiento de los diferentes
componentes y las instruccciones para el control y mantenimiento de la motosierra.
P.D. Las descripciones contenidas en el presente manual no se consideran rigurosamente
obligatorias. La empresa se reserva el derecho de aportar eventuales modificaciones sin obligarse
a poner al día este manual.
SK
ÚVOD
PREKLAD POVODNYCH POKYNOV
Nezačinajte pracu, kym si pozorne neprečitate tento navod k použitiu, predidete tak
nehodam a dozviete sa informacie, ako preoravač spravne použivať. Najdete tu vysvetlenie
ako obsluhovať rozne časti stroja a inštrukcie na kontrolu a udržbu.
Poznamka: Ilustracie a špecifikacie uvedene v tomto navode nie su prisne zavazne.
Vyrobca si vyhradzuje pravo na vykonavanie zmien bez predchadzajuceho
upozornenia.

3
I
INDICE
D
INHALT
INTRODUZIONE __________________ 2
COMPONENTI DELLA MOTOZAPPA ___ 4
DICHIARAZIONE DI CONFORMITÀ ____ 5
SPIEGAZIONE SIMBOLI E
AVVERTENZE DI SICUREZZA _________ 6
NORME DI SICUREZZA _____________ 8
ASSEMBLAGGIO __________________ 14
AVVIAMENTO ____________________ 24
USO E SICUREZZA _________________ 36
ARRESTO MOTORE ________________ 42
MANUTENZIONE __________________ 44
DATI TECNICI _____________________ 54
TABELLA DI MANUTENZIONE ________ 56
RISOLUZIONE DEI PROBLEMI ________ 59
CERTIFICATO DI GARANZIA _________ 62
ENLEITUNG ______________________ 2
BAUTEILE DER MOTORHACKE _______ 4
KONFORMITATS-ERKLARUNG _______ 5
ERLAUTERUNG DER SYMBOLE UND
SICHERHEITSHINWEISE _____________ 6
SICHERHEITSVORKERUNGEN ________ 11
MONTAGE _______________________ 15
ANLASSEN _______________________ 25
BEDIENING UND SICHERHEIT ________ 37
MOTOR ABSTELLEN _______________ 43
WARTUNG _______________________ 45
TECHNISCHE ANGABEN ____________ 54
WARTUNGSTABELLE _______________ 57
STÖRUNGSBEHEBUNG _____________ 60
GARANTIE-ZERTIFICAT _____________ 63
GB
CONTENTS
E
INDICE
INTRODUCTION __________________ 2
MOTOROE COMPONENTS __________ 4
DECLARATION OF CONFORMITY _____ 5
EXPLANATION OF SYMBOLS AND
SAFETY WARNINGS ________________ 6
SAFETY PRECAUTION ______________ 9
ASEMBLY ________________________ 14
STARTING _______________________ 24
OPERATION AND SAFETY ___________ 36
STOPPING THE ENGINE _____________ 42
MAINTENANCE ___________________ 44
TECHNICAL DATA _________________ 54
MAINTENANCE CHART _____________ 56
TROUBLE SHOOTING CHART ________ 59
WARRANTY CERTIFICATE ___________ 62
INTRODUCCION __________________ 2
COMPONENTES DE LA MOTOAZADA _ 4
DECLARACION DE CONFORMIDAD ___ 5
EXPLICACION SIMBOLOS Y
ADVERTENCIÂS DE SEGURIDAD _____ 6
NORMAS DE SEGURIDAD ___________ 12
MONTAJE _______________________ 15
PUESTA EN MARCHA ______________ 25
FUNCIONAMIENTO Y SEGURIDAD ____ 37
PARADA DEL MOTOR ______________ 43
MANTENIMIENTO _________________ 45
DATOS TECNICOS _________________ 54
TABLA DE MANTENIMIENTO ________ 58
RESOLUCIÓN DE PROBLEMAS _______ 61
CERTIFICADO DE GARANTIA ________ 63
F
INDEX
SK
OBSAH
INTRODUCTION __________________ 2
COMPOSANTS DE LA MOTOBINEUSE _ 4
DECLARATION DE CONFORMITÉ _____ 5
EXPLICATION DES SYMBOLES ET
REGLES DE SECURITE ______________ 6
NORMES DE SECURITE _____________ 10
AZZEMBLAGE ____________________ 14
MISE IN ROUTE ___________________ 24
FONCTIONNEMENT ET SECURITE ____ 36
ARRET DU MOTEUR _______________ 42
ENTRETIEN ______________________ 44
DONNEES TECHNIQUES ____________ 54
TABLEAU D'ENTRETIEN _____________ 57
RÉSOLUTION DES PROBLÈMES_______ 60
CERTIFICAT DE GARANTIE __________ 62
ÚVOD ___________________________ 2
ČASTI PREORÁVAČ _________________ 4
VYHLÁSENIE O ZHODE ______________ 5
VYSVETLIVKY A BEZPEČNOSTNÉ
UPOZORNENIA ____________________ 6
PRAVIDLÁ BEZPEČNOSTI ____________ 13
MONTÁŽ _________________________ 15
ŠTARTOVANIE _____________________ 25
ČINNOSŤ A BEZPEČNOSŤ ____________ 37
ZASTAVENIE MOTORA ______________ 43
ÚDRŽBA _________________________ 45
TECHNICKÉ ÚDAJE _________________ 54
TABUĽKA ÚDRŽBY _________________ 58
RIEŠENIE PROBLÉMOV ______________ 61
ZÁRUČNÝ LIST ____________________ 63

4
I COMPONENTI DELLA MOTOZAPPA
1 - Interruttore di massa
2 - Manubrio
3 - Leva comando marcia
4 - Timone
5 - Carter protezione frese
6 - Ruota per il trasporto /
Cavalletto
7 - Utensili di lavoro
8 - Leva starter
9 - Leva comando cambio
10 - Regolazione verticale
del manubrio (stegole)
11 - Impugnatura
avviamento
12 - Leva acceleratore
13 - Rubinetto benzina
14 - Leve fermo comandi
15 - Leva regolazione
orizzontale del
manubrio
16 - Leva retromarcia
GB MOTORHOE COMPONENTS
1 - On/off switch
2 - Handle
3 - Drive control lever
4 - Jackleg
5 - Blade guard
6 - Transporting wheel /
Stand
7 - Rotating blade
assembly
8 - Choke lever
9 - Gearshift lever
10 - Vertical handlebar
adjustment
11 - Starter handle
12 - Throttle trigger
13 - Petrol tap
14 - Stop control levers
15 - Handlebar horizontal
adjustment lever
16 - Reverse lever
F COMPOSANTS DE LA MOTOBINEUSE
1 - Interrupteur de masse
2 - Guidon
3 - Levier de commande
sens de marche
4 - Timon
5 - Carter de protection des
fraises
6 - Roue pour le transport /
Chevalet
7 - Outils de travail
8 - Levier de starter
9 - Levier des vitesses
10 - Réglage vertical du
guidon (mancheron)
11 - Poignée démarrage
12 - Levier accélérateur
13 - Robinet essence
14 - Leviers d'arrêt des
commandes
uniquement
15 - Levier réglage horizontal
du guidon
16 - Levier de marche AR
D BAUTEILE DER MOTORHACKE
1 - Ein-/Aus-Schalter
2 - Griffholm
3 - Gangwahlhebel
4 - Hacksporn
5 - Frässchutzgehäuse
6 - Transporträd / Ständer
7 - Arbeitsutensilien
8 - Chokehebel
9 - Schalthebel
10 - Senkrechte
Lenkholmeinstellung
11 - Startergriff
12 - Gashebel
13 - Kraftstoffhahn
14 - Feststellhebel
15 - Hebel für Lenkholm-
Seitenverstellung
16 - Hebel für Rückwärtsfahrt
E COMPONENTES DE LA MOTOAZADA
1 - Interruptor de masa
2 - Manillar
3 - Palanca control marcha
4 - Timón
5 - Cárteres de protección
de las fresas
6 - Rueda para el
transporte / Caballete
7 - Herramientas de
trabajo
8 - Palanca cebador
9 - Palanca de cambio
10 - Regulación vertical del
manillar (manceras)
11 - Empuñadura del
arranque
12 - Palanca de acelerador
13 - Grifo de gasolina
14 - Palanca de bloqueo de
los mandos
15 - Palanca regulación
horizontal del manillar
16 - Palanca de marcha
atrás
SK ČASTI PREORÁVAČ
1 - Vypínač zapaľovania
2 - Rukoväť
3 - Páka ovládania
rýchlostných stupňov
4 - Kormidlo
5 - Ochranný kryt fréz
6 - Prepravné kolesá /
Stojan
7 - Pracovné pomôcky
8 - Páčka sýtiča
9 - Páka ovládania prevodu
10 - Vertikálna regulácia
dvojramenného držadla
(ramená rukoväte)
11 - Štartovacia rukoväť
12 - Páčka plynu
13 - Benzínový ventil
14 - Brzdové páky ovládačov
15 - Páka horizontálnej
regulácie držadla
16 - Páčka spiatočky
I -
VEDI MANUALE MOTORE
GB-
SEE THE ENGINE MANUAL
F -
CONSULTER LE LIVRET D’UTILISATION DU MOTEUR
D -
SIEHE MOTOR-HANDBUCH
E -
CONSULTAR EL MANUAL DE INSTRUCCIONES DEL MOTOR
SK-
POZRI NÁVOD NA POUŽITIE MOTORA

5
Fausto Bellamico - President
s.p.a.
EMAK spa via Fermi, 4 - 42011 Bagnolo in Piano (RE) ITALY
Bertolini 218 - 218 D / Nibbi 118 - 118 D
B61 XXX 0001 ÷ B61 XXX 9999
2006/42/EC - 2014/30/EU - 97/68/EC
(1)
- 2010/26/EC
(1)
- (EU) 2016/1628
(1)
- (EU) 2017/654
(1)
- (EU) 2017/656
(1)
EN 709: 1997 + A4: 2009 - EN ISO 14982:2009
DICHIARAZIONE DI
CONFORMITÁ
DECLARATION OF
CONFORMITY
DECLARATION DE
CONFORMITÈ
KONFORMITATS -
ERKLARUNG
DECLARACION DE
CONFORMIDAD
VYHLÁSENIE O
ZHODE
Italiano English Français Deutsch Español Slovensky
Il sottoscritto, The undersigned, Je soussigné, Der Unterzeichnende im Namen der, El abajo rmante,
Dolupodpísaný,
dichiara sotto la propria
responsabilità che la macchina:
declares under its own
responsibility that the machine:
déclare sous sa
propre responsabilité que la
machine:
erklärt auf eigene Verantwortung
daß die Maschine:
declara bajo su responsabilidad
que la máquina:
Vyhlasuje na svoju
výhradnú zodpovednosť, že stroj:
1. Genere:
motozappa
1. Type:
motorhoe
1. Catégorie:
motobineuse
1. Baurt:
motorhacke
1. Género:
motoazada
1. Typ:
preorávač
2. Marca: / Tipo: 2. Trademark: / Type: 2. Marque: / Type: 2. Marke: / Typ: 2. Marca: / Tipo:
2. Ochranná známka:
/ Typ:
3. identicazione di serie 3. serial identication 3. identication de série 3. Serien-Identizierung 3. identicación de serie 3. Identikácia série
è conforme alle prescrizioni della
Direttiva / Regolamento
complies with the requirements
established Directive / Regulation
est conforme aux prescriptions de la
directive / du règlement
entspricht den Anforderungen der
Richtlinie / Verordnung
cumple lo establecido por la
directiva / el reglamento
Spíňa požiadavky smernice/
nariadenia
è conforme alle disposizioni
delle seguenti norme armonizzate:
conforms with the provisions of the
following harmonised standards:
est conforme aux recommandations
des normes harmonisées suivantes:
ist konform mit den Bestimmungen
der folgenden harmonisierten
Normen:
cumple las siguientes normas
armonizadas:
Spíňa požiadavky nasledujúcich
harmonizovaných noriem:
Fatto a / Fait à / made at / Aufgesetzt in / Hecho en / Miesto výroby: Bagnolo in piano (RE) Italy - via Fermi, 4
Data / Date / Datum / Fecha / Dátum: 15/10/2018
Documentazione Tecnica depositata in Sede Amministrativa. - Direzione Tecnica
Technical documentation available by the administrative headquarter. - Technical Department
Documentation technique déposée auprès du Siège Administratif. - Direction Technique
Am Geschäftssitz hinterlegte technische Dokumentation. - Technische Leitung
Documentación técnica depositada en sede administrativa. - Dirección técnica
Technická dokumentácia je uložená v administratívnom sídle. - Technická správa
(1) In base alla data di fabbricazione. - Based on manufacturing date. - En fonction de sa date de fabrication. -
Je nach Baudatum. - Según la fecha de fabricación. - Podľa výrobných údajov.

6
2
1
4
3
I
1. Leggere il libretto uso e manutenzione prima di utilizzare questa
macchina.
2. Non avvicinare mani o piedi al carter della lama mentre il motore
è avviato.
ATTENZIONE! - Le lame rimangono in movimento per alcuni
secondi anche dopo che il motore è stato spento.
3. Innesto marcia
4. 0 = posizione di disinnesto
1 = innesto marcia avanti prima velocità
2 = innesto marcia avanti seconda velocità
3 = innesto marcia avanti terza velocità
-1 = innesto retromarcia
GB
1. Read operator’s instruction book before operating this machine.
2. When the engine is running, do not put hands or feet near or
under the mower deck.
WARNING! - Blades continue to rotate for little seconds after
machine is switched off.
3. Gear engagement
4. 0 = neutral position
1 = first forward speed
2 = second forward speed
3 = third forward speed
-1 = reverse gear
F
1. Lire le manuel avant d’utiliser cette machine.
2. Ne pas placer les mains ou les pieds à proximité du carter de lame
lorsque le moteur est en marche.
ATTENTION! - Les lames restent en movement pour quelques
secondes même après que le moteur a été éteint.
3. Enclenchement de la vitesse
4. 0 = Position de débrayage
1 = enclenchement marche avant 1° vitesse
2 = enclenchement marche avant 2° vitesse
3 = enclenchement marche avant 3° vitesse
-1 = Enclenchement marche arrière
D
1. Betriebsanleitung vor der Inbetriebsnahme lesen.
2. Wenn die Maschine läuft, Hände und Füße vom Mähwerkzeug
fernhalten.
ACHTUNG! - Die Messer bleiben auch nach dem Abschalten des
Motors noch einige Sekunden in Bewegung.
3. Gang einlegen
4. 0 = Leerlaufstellung
1 = 1. Vorwärtsgang einlegen
2 = 2. Vorwärtsgang einlegen
3 = 3. Vorwärtsgang einlegen
-1 = Rückwärtsgang einlegen
E
1. Antes de utilisar esta maquina, leer el manual de instrucciones.
2. No poner las manos o los ples proximos a la cuchilla hasta que el
motor este parado.
¡ATENCIÓN! - Las hojas permanecen en movimiento durante
algunos segundos incluso después de que el motor ha sido
apagado.
3. Embrague marcha
4. 0 = posición de desembrague
1 = embrague marcha adelante primera velocidad
2 = embrague marcha adelante segunda velocidad
3 = embrague marcha adelante tercera velocidad
-1= embrague marcha atrás
SK
1. Pred použitím tohto prístroja si prečítajte návod na použitie a
údržbu.
2. Nepribližujte ruky alebo chodidlá ku krytu noža, keď je motor
spustený.
POZOR! - Čepele zostanú v pohybe počas niekoľkých sekúnd, aj
potom, ako bol motor vypnutý.
3. Zaradenie rýchlostného stupňa
4. 0 = poloha vyradenia
1 = zaradenie prvého rýchlostného stupňa dopredu
2 = zaradenie druhého rýchlostného stupňa dopredu
3 = zaradenie tretieho rýchlostného stupňa dopredu
-1 = zaradenie spiatočky
I
SPIEGAZIONE SIMBOLI E AVVERTENZE DI SICUREZZA
D
ERLÄUTERUNG DER SYMBOLE-UND SICHERHEITSHINWEISE
GB
EXPLANATION OF SYMBOLS AND SAFETY WARNINGS
E
EXPLICACION SIMBOLOS Y ADVERTENCIAS DE SEGURIDAD
F
EXPLICATION DES SYMBOLES ET REGLES DE SECURITE
SK
VYSVETLIVKY A BEZPEČNOSTNÉ UPOZORNENIA

7
2016
8
9
5
66
8
7
I
5. Marchio e modello macchina.
6. Dati Tecnici.
7. Numero di serie.
8. Marchio CE di conformità.
9. Tipo di macchina: MOTOZAPPA.
10. Anno di fabbricazione
11. ATTENZIONE! - Non lasciare avvicinare nessuno durante il
lavoro.
12. Rotazione manubrio
13. Innesto retromarcia
GB
5. Machine brand and model
6. Specifications
7. Serial number
8. CE conformity marking
9. Type of machine: MOTORHOE.
10. Year of manufacture
11. WARNING! - Do not let anybody approach to the working area
12. Turning the handlebar
13. Reverse gear
F
5. Marque et modèle de la machine
6. Données techniques
7. Numéro de série
8. Label CE de conformité
9. Type de machine : MOTOBINEUSE.
10. Année de construction
11. ATTENTION! - Ne laisser s’approcher personne durant le travail.
12. Rotation guidon
13. Enclenchement marche AR
D
5. Marke und Maschinenmodell
6. Technische Daten
7. Seriennummer
8. CE-Zeichen
9. Gerät: MOTORHACKE.
10. Baujahr
11. ACHTUNG! - Das Annähern von Unbefugten an die Maschine
während der Arbeit ist untersagt .
12. Schwenken des Lenkholms
13. Rückwärtsgang einlegen
E
5. Marca y modelo de la máquina
6. Datos técnicos
7. Número de serie
8. Marcha CE de conformidad
9. Tipo de máquina: MOTOAZADA.
10. Año de fabricación
11. ¡ATENCIÓN! - No dejes que nadie se acerca a la zona de trabajo.
12. Rotación del manillar
13. Acoplamiento de la marcha atrás
SK
5. Značka a model stroja
6. Technické údaje
7. Číslo série
8. Značka zhody CE
9. Druh stroja: PREORÁVAČ
10. Rok výroby
11. POZOR! - Počas práce nenechajte nikoho priblížiť sa ku kosačke.
12. Otočenie držadla
13. Zaradenie spiatočky
I
SPIEGAZIONE SIMBOLI E AVVERTENZE DI SICUREZZA
D
ERLÄUTERUNG DER SYMBOLE-UND SICHERHEITSHINWEISE
GB
EXPLANATION OF SYMBOLS AND SAFETY WARNINGS
E
EXPLICACION SIMBOLOS Y ADVERTENCIAS DE SEGURIDAD
F
EXPLICATION DES SYMBOLES ET REGLES DE SECURITE
SK
VYSVETLIVKY A BEZPEČNOSTNÉ UPOZORNENIA

8
1 2 3 4
Italiano
NORME DI SICUREZZA
ATTENZIONE: l’esposizione alle vibrazioni provocate dall’uso
prolungato di strumenti manuali azionati da motori a
combustione interna può causare lesioni ai vasi sanguigni o ai
nervi delle dita, delle mani e dei polsi nelle persone soggette
a disturbi circolatori o gonori anomali. L’uso prolungato
in condizioni di bassa temperatura è stato associato alla
lesione dei vasi sanguigni negli individui altrimenti sani. Se
si manifestano sintomi quali insensibilità, dolore, perdita di
forza, variazioni nel colore o nella consistenza della cute o
perdita del tatto nelle dita, nelle mani o nei polsi, interrompere
l’uso di questo strumento e richiedere il parere di un medico.
ATTENZIONE - La motozappa, se ben usata, è uno strumento
di lavoro rapido, comodo ed ecace; se usata in modo non
corretto o senza le dovute precauzioni potrebbe diventare
un attrezzo pericoloso. Perchè il vostro lavoro sia sempre
piacevole e sicuro, rispettare scrupolosamente le norme di
sicurezza riportate qui di seguito e nel corso del manuale.
ATTENZIONE: Il sistema di accensione della vostra unità,
produce un campo elettromagnetico di intensità molto
bassa. Questo campo può interferire con alcuni pacemaker.
Per ridurre il rischio di lesioni gravi o mortali, le persone
con pacemaker dovrebbero consultare il proprio medico
e il costruttore del pacemaker prima di utilizzare questa
macchina.
ATTENZIONE! – Regolamenti nazionali possono limitare l’uso
della macchina.
1 - Leggere attentamente questo manuale in modo da
comprendere completamente e rispettare tutte le norme di
sicurezza, le precauzioni e le istruzioni prima di procedere
all’uso dell’unità.
2 - L’uso della motozappa è riservato a operatori adulti in
grado di comprendere e rispettare le norme di sicurezza, le
precauzioni e le istruzioni contenute in questo manuale. L’uso
della motozappa da parte di minorenni non deve essere mai
consentito.
3 - Non maneggiare né utilizzare la motozappa in condizioni di
affaticamento fisico, malattia o agitazione o sotto l’effetto
di alcool, droghe o farmaci. È necessario essere in buone
condizioni fisiche e rimanere vigili. L’uso della motozappa
è faticoso. Se si è soggetti a disturbi che possono essere
aggravati da lavori faticosi, richiedere il parere di un medico
prima di procedere all’uso della motozappa (Fig.1). Prestare
maggiore attenzione prima delle pause e verso la fine del
proprio turno di lavoro.
4 - Tenere bambini, astanti e animali a una distanza di almeno
15 metri dall’area di lavoro. Non consentire ad altre persone
o animali di avvicinarsi alla motozappa quando questo viene
avviato o utilizzato (Fig.2).
5 - Quando si lavora con la motozappa, usare sempre un
abbigliamento protettivo di sicurezza omologato. Non
indossare abiti, sciarpe, cravatte o monili che potrebbero
impigliarsi nella sterpaglia. Raccogliere i capelli lunghi
e proteggerli (ad esempio, con un foulard, un berretto, un
casco, ecc.). Indossare calzature di sicurezza munite di
suole antisdrucciolo e lamine antiperforazione. Indossare
gli occhiali o la visiera protettivi. Adottare misure di
protezione contro il rumore: ad esempio, cuffie o tappi per
le orecchie. Indossare guanti che permettano il massimo
assorbimento delle vibrazione (Fig.3-4-5-6).
6 - Consentire l’uso della motozappa soltanto a persone che
hanno letto questo manuale di uso e manutenzione o che
hanno ricevuto istruzioni adeguate per un uso sicuro e
appropriato della motozappa.
7 - Controllare giornalmente la motozappa per assicurarsi che
ogni dispositivo, di sicurezza e non, sia funzionante.
8 - Non utilizzare mai la motozappa danneggiata, modificata o
riparata/assemblata in maniera inadeguata. Non rimuovere,
danneggiare o rendere inefficace alcun dispositivo di
sicurezza. Sostituire sempre immediatamente gli accessori da
taglio o i dispositivi di sicurezza se risultano danneggiati, rotti
o altrimenti inadeguati.
9 - Pianificare preventivamente il lavoro. Non iniziare a tagliare se
l’area di lavoro non è sgombra, se non sono presenti punti di
appoggio saldi per i piedi.
10 - Tutti gli interventi sulla motozappa, diversi da quelli indicati
nel presente manuale, devono essere effettuati da personale
competente.
11 - La motozappa è un prodotto destinato esclusivamente a
frantumare zolle e dissodare il terreno. Non è consigliabile
tagliare altri tipi di materiale. Ogni altro impiego, diverso da
quello indicato in queste istruzioni, può recare danno alla
macchina e costituire serio pericolo per le persone e le cose.
12 - Non ammesso collegare all’unità strumenti o accessori non
specificati dal costruttore.
13 - Non usare la macchina senza il carter di protezione degli
attrezzi rotanti.
14 - È responsabilità dell’operatore valutare i rischi potenziali del
terreno da lavorare e prendere tutte le precauzioni necessarie
per garantire la propria sicurezza, in particolare sui pendii, sui
terreni accidentati, scivolosi o mobili.
15 - Sui pendii agire sempre con cautela, operando in senso
trasversale, mai in salita o in discesa. Non utilizzare la
motozappa su terreni con pendenza superiore a 10° (17 %).
16 - Ricordare che il proprietario o l’operatore è responsabile degli
incidenti o dei rischi subiti da terzi o da beni di loro proprietà.
17 - Al momento di azionare le frese rotanti, accertarsi che non ci
sia nessuno davanti o nelle vicinanze della macchina. Tenere
saldamente il manubrio che tende ad abbassarsi al momento
dell’azionamento.
18 - Durante il lavoro, mantenere la distanza di sicurezza dalle frese
rotanti; questa distanza equivale alla lunghezza del manubrio.
19 - In caso di uso su terreni scoscesi, l’operatore deve assicurarsi
che non ci sia nessuno entro un raggio di 20 metri intorno
alla macchina. L’operatore deve assolutamente rimanere ai
comandi.
20 - La macchina può essere equipaggiata con diversi accessori. È
responsabilità del proprietario accertarsi che questi attrezzi o
accessori siano omologati conformemente alla normativa di
sicurezza europea in vigore. L’uso di accessori non omologati
può nuocere alla vostra sicurezza.
21 - Mantenere tutte le etichette con i segnali di pericolo e di
sicurezza in perfette condizioni. In caso di danneggiamenti o
deterioramenti occorre sostituirle tempestivamente
(Vedi pag. 6-7).
22 - Non utilizzare la macchina per usi diversi da quelli indicati dal
manuale (vedi pag. 36).
23 - Tenere sempre il manuale a portata di mano. In caso di
smarrimento del manuale richiederne una copia.
ATTENZIONE: non utilizzare mai un’unità con funzioni di
sicurezza difettose. Le funzioni di sicurezza dell’unità devono
essere sottoposte a verica e manutenzione in base alle
istruzioni fornite in questa sezione. Se l’unità non supera
queste veriche, rivolgersi a un’ocina autorizzata per farla
riparare.

9
5 6
English
SAFETY PRECAUTIONS
WARNING: exposure to the vibrations generated during
prolonged use of hand held tools driven by an internal
combustion engine can damage blood vessels or nerve
tissue damage in the fingers, hands, and wrists of
persons prone to circulation disorders or abnormal
swellings. Prolonged use in cold weather has been
linked to blood vessel damage in otherwise healthy
people. If symptoms occur such as numbness, pain, loss
of strength, change in skin colour or texture, or loss of
feeling in the fingers, hands, or wrists, discontinue the
use of this tool and seek medical attention.
WARNING - If correctly used, the motorhoe is a quick,
easy to handle and efficient tool; if used improperly or
without the due precautions it could become a
dangerous tool. For pleasant and safe work,always
strictly comply with the safety rules that follow and
throughout this manual.
WARNING: The ignition system of your machine
produces an electromagnetic field of very low
intensity. This field could interfere with certain
pacemakers. To reduce the risk of serious or fatal
injury, persons with pacemakers should consult their
doctor or the manufacturer of the pacemaker before
using this machine.
WARNING: – National regulations could limit use of the
machine.
1 - Read this manual carefully until you completely
understand and can follow all safety rules, precautions,
and operating instructions before attempting to use the
unit.
2 - Restrict the use of your motorhoe to adult users who
understand and can follow safety rules, precautions, and
operating instructions found in this manual. Minors should
never be allowed to use a motorhoe.
3 - Do not handle or operate a motorhoe when you are
fatigued, ill, or upset, or if you have taken alcohol, drugs,
or medication. You must be in good physical condition
and mentally alert. Motorhoe work is strenuous. If you
have any condition that might be aggravated by strenuous
work, check with your doctor before operating a motorhoe
(Fig.1). Be more cautious before rest periods and towards
the end of your shift.
4 - Keep children, bystanders, and animals a minimum of
15 meters away from the work area. Do not allow other
people or animals to be near the motorhoe when starting
or operating the motorhoe (Fig.2).
5 - While working with the motorhoe, always use safety
protective approved clothing. Do not wear clothes,
scarves, ties or bracelets that may get stuck into twigs.
Tie up and protect long hair (example with foulards, cap,
helmets, etc.). Safety boots having skid-proof sole and
anti-piercing insert. Wear protective goggles or face
screens. Use protections against noise: for example,
noise reduction ear guards or earplugs. Wear gloves
that permit the maximum absorption of vibrations
(Fig. 3-4-5-6).
6 - Only allow others to use this motorhoe who have read this
Operator’s Manual or received adequate instructions for
the safe and proper use of this motorhoe.
7 - Check the motorhoe each day to ensure that each device,
whether for safety or otherwise, is functional.
8 - Never use a damaged, modified, or improperly repaired
or assembled motorhoe. Do not remove, damage or
deactivate any of the safety devices. Always replace
cutting tools or safety devices immediately if it becomes
damaged, broken or is otherwise removed.
9 - Carefully plan your operation in advance. Do not start
cutting until you have a clear work area, secure footing.
10 - All motorhoe service, other than the operations shown in
the present manual, have to be performed by competent
personnel.
11 - The motorhoe is a product designed exclusively for
breaking up and tilling soil. It is unadvisable to cut other
types of material. Any other usage not indicated in these
instructions could be dangerous and damage the machine.
12 - It is prohibited to hitch tools or applications to the PTO
that are not specified by the manufacturer.
13 - Do not use the machine without the protective cover of
the rotating blades.
14 - It is the user’s responsibility to evaluate the potential risks
that may arise in the area to be worked on. It is also the
user’s responsibility to take all the necessary precautions
to ensure his/her safety, particularly on slopes, uneven or
slippery land and loose ground.
15 - Make sure you have a firm foothold when working
on slopes. Work across slopes, never ascending or
descending. Do not use the motorhoe on land with a
gradient of more than 10° (17 %).
16 - Please note that the owner or the user is responsible for
any accidents or damage to third parties or their property.
17 - When you engage the rotating blade assembly, make sure
nobody is in front of or close to the machine. Take a firm
grip of the handlebars as they tend to lower when the
rotor assembly is engaged.
18 - When using the machine, maintain a safe distance from
the rotating blades. This is approximately the same
distance as the length of the handlebars.
19 - When operating the machine on steep slopes, the user
must ensure that nobody is located within a 20 metre
radius of the machine. The user must be in complete
control of the machine.
20 - The machine can be fitted with different accessories. It
is the owner’s responsibility to ensure that these tools
or accessories conform to applicable European safety
regulations. Using non-certified accessories can jeopardise
your safety.
21 - All labels with health hazards must be kept in good conditions.
In case of damage or deterioration, immediately substitute
them (see pag.6-7).
22 - Do not utilize the machine for uses different from the ones
specified in the manual (see pag. 36).
23 - Always keep the manual nearby so that you can refer to it as
needed. If the manual gets lost, request a new one.
WARNING: Never use a machine with faulty safety
equipment. The machine’s safety equipment must be
checked and maintained as described in this section. If
your machine fails any of these checks contact your
service agent to get it repaired.

10
1 2 3 4
Français
NORMES DE SECURITE
ATTENTION : l’exposition aux vibrations dues à l’utilisation
prolongée des instruments manuels actionnés par des
moteurs à combustion interne peut engendrer des lésions
aux vaisseaux sanguins ou aux nerfs des doigts, des mains
et des poignets des personnes présentant des problèmes
circulatoires (enflures anormales). En outre, il a été
démontré que l’utilisation prolongée par temps froid
entraînait des lésions des vaisseaux sanguins chez les
personnes saines. En cas d’apparitions de symptômes tels
que des engourdissements douleurs, pertes de force,
changements de la couleur ou de la texture de la peau ou
pertes de sensation au niveau des doigts, des mains ou des
poignets, interrompez immédiatement l’utilisation de la
machine et consultez un médecin.
ATTENTION - Si vous utilisez correctement la motobineuse,
vous aurez un instrument de travail rapide, pratique et
efficace; utilisé de façon non correcte ou sans adopter les
précautions nécessaires, cet instrument pourrait s’avérer
dangereux. Pour que votre travail soit toujours agréable et
sûr, respectez scrupuleusement les mesures de sécurité
reportées ici et au cours du manuel.
ATTENTION : Le système de mise en marche de l'unité
produit un champ électromagnétique de très basse
intensité. Ce champ peut créer des interférences avec
certains pacemakers. Pour réduire le risque de lésions
graves ou mortelles, les porteurs de pacemaker devraient
consulter leur médecin et le fabricant du pacemaker avant
d'utiliser cette machine.
ATTENTION ! – Certains règlements nationaux pourraient
limiter l'utilisation de la motobineuse.
1 - Lisez attentivement le présent manuel jusqu’à ce que vous ayez
intégralement compris les règles de sécurité, les mesures de
précaution et les instructions relatives au fonctionnement, et
que soyez en mesure de les appliquer avant toute utilisation de
la machine.
2 - Limitez l’utilisation de la motobineuse à des utilisateurs adultes
capables de comprendre et d’appliquer les règles de sécurité,
les mesures de précaution et les instructions relatives au
fonctionnement indiquées par le présent manuel. L’utilisation
de la machine par des mineurs est fortement déconseillée.
3 - Ne manipulez pas la motobineuse ou ne l’utilisez pas lorsque
vous êtes fatigué, malade ou perturbé, ou sous l’emprise de
l’alcool, de drogues ou de médicaments. Vous devez être en
bonne forme physique et en pleine possession de vos capacités
mentales. L’utilisation d’une motobineuse est ardue. Si vous
présentez un état susceptible d’être aggravé par une tâche
physiquement exigeante, consultez préalablement votre
médecin (Fig.1). Soyez plus vigilant avant les périodes de repos
et à la fin de la période de travail.
4 - Maintenez les enfants, les passants et les animaux à une
distance minimale de 15 mètres de la zone de travail. Ne
tolérez la présence d’aucune personne ou animal à proximité
immédiate de la motobineuse lors du démarrage ou en
utilisation (Fig.2).
5 - Portez en permanence des équipements de sécurité
homologués lorsque vous utilisez la motobineuse. Ne portez
pas de vêtements, écharpes, cravates ou bracelets susceptibles
d’être happés. Nouez les cheveux longs et protégez-les (par
exemple, à l’aide d’un foulard, d’une casquette, d’un casque,
etc.). Optez pour des chaussures ou bottes de sécurité
coquées et équipées de semelles antidérapantes et coquées.
Portez des lunettes de protection ou un masque. Utilisez des
protections antibruit, notamment, un casque antibruit ou
des protège-tympan. Portez des gants capables d’absorber
au maximum les vibrations (Fig.3-4-5-6).
6 - Limitez l’utilisation de la motobineuse aux personnes ayant
préalablement lu le présent manuel d’utilisation ou ayant pris
connaissance des instructions appropriées à une utilisation
correcte et en toute sécurité de cette machine.
7 - Contrôlez quotidiennement votre motobineuse afin de
garantir que chaque dispositif de sécurité ou autre fonctionne
correctement.
8 - Ne travaillez jamais avec une motobineuse endommagée,
modifiée, mal réparée ou mal montée. Ne démontez,
endommagez ou neutralisez jamais l’un des dispositifs de
sécurité. Remplacez immédiatement les outils de coupe ou les
dispositifs de sécurité endommagés, cassés ou de quelque autre
façon démontés.
9 - Élaborez toujours votre plan de coupe à l’avance. Ne débutez
aucun tâche avant d’avoir une zone de travail dégagée, une
assise stable.
10 - Adressez-vous à un professionnel qualifié pour toute autre
intervention ne figurant pas dans le présent manuel.
11 - La motobineuse est un outil permettant exclusivement de
briser les blocs de terre et de défricher le terrain. Il est fortement
déconseillé de couper un autre type de matériau. Tout autre
emploi différent de celui indiqué ici risque d’endommager la
machine et représente un danger pour les personnes et les
biens.
12 - Il est fortement interdit de raccorder tout outil ou accessoire non
spécifié par le fabricant.
13 - Ne pas utiliser la machine sans le carter de protection des outils
rotatifs.
14 - L’opérateur doit être en mesure d’évaluer les risques potentiels
du terrain à préparer et devra prendre toutes les précautions
nécessaires pour garantir sa propre sécurité, surtout en cas de
terrains en pente, accidentés, glissants et meubles.
15 - En pente, toujours travailler avec précaution, dans le sens
transversal, jamais en montant et en descendant directement.
Ne pas utiliser la motobineuse sur des terrains dont l’inclinaison
dépasse 10° (17 %).
16 - Se rappeler que le propriétaire ou l’opérateur sont responsables
des accidents ou des dommages à tiers, aux biens de leur
propriété.
17 - Avant d’actionner les fraises rotatives, s’assurer que personne ne
se trouve devant ou à proximité de la machine. Tenir solidement
le guidon qui tend à s'abaisser en phase d'actionnement.
18 - Durant le travail, maintenir la distance de sécurité par rapport
aux fraises rotatives ; cette distance correspond à la longueur du
guidon.
19 - En cas d’utilisation sur terrains accidentés, l’opérateur doit
s’assurer qu’il n’y a personne dans un rayon de 20 m autour de
la machine. L’opérateur doit absolument rester aux commandes.
20 - La machine peut être équipée de plusieurs accessoires. Le
propriétaire doit s’assurer que ces outils ou accessoires sont
homologués conformément à la norme de sécurité européenne
en vigueur. L’utilisation d’accessoires non homologués peut
nuire à votre sécurité.
21 - Veillez à ce que les étiquettes portant les signaux de danger et
de sécurité soient toujours en parfait état. Si elles sont
détériorées, remplacez-les sans délai (voir pag.6-7).
22 - N'utilisez pas la machine dans un but autre que ceux indiqués
dans le manuel (voir pag. 36).
23 - S'assurer de toujours avoir le manuel à portée de la main. En cas
de perte, en demander un double.
AVERTISSEMENT : n’utilisez jamais la machine si l’un des
dispositifs de sécurité est défectueux. Les dispositifs de
sécurité de la machine doivent faire l’objet d’un contrôle et
d’un entretien spécifiques, comme décrit dans la présente
section. Si le résultat de ces vérifications est insatisfaisant,
contactez le service après-vente pour faire réparer votre
machine.

11
5 6
Deutsch
SICHERHEITSVORKERUNGEN
VORSICHT: Vibrationen infolge längeren Gebrauchs von
durch Verbrennungsmotoren handbetriebenen Geräten
können bei Personen mit Kreislaufstörungen Schäden an
Blutgefäßen sowie an den Nervensträngen von Fingern,
Händen und Armgelenken oder Schwellungen verursachen.
Auch bei Gesunden können bei längerem Gebrauch in kalter
Witterung Schädigungen von Blutgefäßen auftreten. Wenn
Symptome wie Taubheit, Schmerzen, Kraftverlust,
Veränderungen der Hautfarbe oder -struktur oder
Empfindungsverlust in Fingern, Händen oder
Handgelenken auftreten, arbeiten Sie nicht mehr mit
diesem Gerät und suchen Sie einen Arzt auf.
ACHTUNG - Bei richtiger Anwendung ist die motorhacke ein
schnelles, bequemes und wirkungsvolles Arbeitsgerät; falls
Sie sie falsch oder ohne die nötige Vorsicht einsetzen, kann
sie zu einer Gefahr werden. Beachten Sie bitte daher
unbedingt die Sicherheitsvorschriften die Sie nachstehend
in der Betriebsanleitung finden, damit ihre Arbeit immer
angenehm und sicher ist.
ACHTUNG: Das Zündsystem Ihres Geräts erzeugt ein
elektromagnetisches Feld geringer Stärke. Dieses Feld kann
unter Umständen Herzschrittmacher beeinflussen. Um die
Gefahr ernster oder gar tödlicher Unfälle zu reduzieren,
sollten Personen mit Herzschrittmachern vor Benutzung
dieser Maschine ihren Arzt und den Hersteller des
Herzschrittmachers zu Rate ziehen.
ACHTUNG! – Nationale Verordnungen können den
Gebrauch des Geräts einschränken.
1 - Lesen Sie dieses Handbuch sorgfältig, bis Sie alle
Sicherheitsvorschriften, Vorsichtsmaßnahmen und
Bedienungsanweisungen vollständig verstanden haben und
befolgen können, bevor Sie mit dem Gerät arbeiten.
2 - Die Verwendung des Motorhacke darf nur Erwachsenen erlaubt
werden, die die Sicherheitsvorschriften, Vorsichtsmaßnahmen
und Bedienungsanweisungen in diesem Handbuch verstanden
haben und befolgen können. Minderjährige dürfen niemals mit
einem Motorhacke arbeiten.
3 - Arbeiten Sie niemals mit einem Motorhacke, wenn Sie müde,
krank oder aufgeregt sind oder unter Einfluss von Alkohol,
Drogen oder Medikamenten stehen. Sie müssen sich in guter
körperlicher Verfassung befinden und geistig frisch sein.
Arbeiten mit einem Motorhacke ist anstrengend. Wenn Sie sich
in einer Verfassung befinden, die durch anstrengende Arbeit
verschlimmert werden könnte, wenden Sie sich an einen Arzt,
bevor Sie mit einem Motorhacke arbeiten (Abb.1) Seien Sie vor
Ruhezeiten und gegen Ende Ihrer Schicht besonders vorsichtig.
4 - Kinder, Umstehende und Tiere müssen mindestens 15 m
Sicherheitsabstand zum Arbeitsbereich halten. Halten Sie
andere Personen oder Tiere beim Starten und Gebrauch des
Motorhacke in einem ausreichenden Sicherheitsabstand
(Abb.2).
5 - Tragen Sie beim Arbeiten mit dem Motorhacke stets
zugelassene Schutzkleidung. Tragen Sie keine Kleider, Schals,
Halstücher oder Armbänder, die sich in Zweigen verfangen
können. Binden Sie langes Haar hoch und bedecken Sie es
(zum Beispiel mit einem Tuch, einer Kappe, einem Helm
usw.) Sicherheitsschuhe mit rutschfester Sohle und
durchtrittsicherer Einlage. Tragen Sie eine Schutzbrille oder
einen Gesichtsschutz. Verwenden Sie einen Lärmschutz wie
zum Beispiel, einen Kapselgehörschutz oder Ohrstöpsel.
Tragen Sie Handschuhe, mit denen Vibrationen möglichst
gut gedämpft werden (Abb.3-4-5-6).
6 - Lassen Sie nur Personen mit diesem Motorhacke arbeiten,
die dieses Bedienungshandbuch gelesen haben oder
entsprechende Anweisungen für den sicheren und
ordnungsgemäßen Betrieb dieses Motorhacke erhalten haben.
7 - Prüfen Sie den Motorhacke täglich, um zu überprüfen, ob alle
Vorrichtungen hinsichtlich der Sicherheit oder in sonstiger
Hinsicht einwandfrei arbeiten.
8 - Arbeiten Sie niemals mit einem beschädigten, veränderten
oder nicht sachgemäß reparierten oder zusammengebauten
Motorhacke. Entfernen Sie keine Sicherheitsvorrichtungen
und beschädigen oder deaktivieren Sie sie nicht. Ersetzen
Sie Schneidwerkzeuge und Sicherheitsvorrichtungen sofort,
die beschädigt oder gebrochen sind oder in sonstiger Weise
entfernt wurden.
9 - Planen Sie die Arbeitsweise sorgfältig im Voraus. Sorgen Sie
vor Beginn der Arbeit dafür, dass sich im Arbeitsbereich keine
Hindernisse befinden. Achten Sie auf sicheren Stand.
10 - Wartungsarbeiten am Motorhacke mit Ausnahme der in
diesem Handbuch dargestellten Verrichtungen dürfen nur von
Fachpersonal durchgeführt werden.
11 - Die Motorhacke ist ausschließlich zum Zerkleinern und Lockern
des Bodens ausgelegt. Es wird davon abgeraten, andere
Materialien zu schneiden. Jede andere, nicht in dieser Anleitung
ausgewiesene Verwendungsart kann Schäden an der Maschine
verursachen und Personen sowie Sachen ernsthaft gefährden.
12 - An die Motorhacke dürfen ausschließlich Arbeitsgeräte und
Zubehör lt. Herstellerspezifikationen angeschlossen werden.
13 - Benutzen Sie die Maschine niemals ohne das Schutzgehäuse
der Drehwerkzeuge.
14 - Der Bediener ist dafür verantwortlich, die potenziellen
Gefahren bei der Bearbeitung des Bodens abzuwägen und in
diesem Sinne, besonders in Hanglage und auf unwegsamem,
rutschigem oder lockerem Gelände, sämtliche Vorkehrungen
zur Gewährleistung der eigenen Sicherheit zu treffen.
15 - Im Gefälle müssen Sie besonders vorsichtig und stets quer zum
Hang arbeiten, niemals auf- bzw. abwärts. Verwenden Sie die
Motorhacke nicht auf Böden mit einem Gefälle über 10° (17 %).
16 - Der Besitzer bzw. Bediener ist in jedem Fall für die Unfälle oder
Risiken gegenüber Dritten oder deren Besitz verantwortlich.
17 - Vergewissern Sie sich beim Einschalten der Fräswerkzeuge, dass
sich niemand vor oder im nahen Umfeld der Maschine befindet.
Beim Anlaufen der Fräswerkzeuge sollten Sie den Lenkholm fest
umklammern.
18 - Halten Sie sich bei der Arbeit in einem Sicherheitsabstand zu
den Fräswerkzeugen auf; dieser Abstand entspricht der Länge
des Lenkholms.
19 - Beim Einsatz auf abschüssigem Gelände muss der Bediener
darauf achten, dass sich niemand in einem Umkreis von
20 Metern zur Maschine aufhält. Der Bediener darf die
Steuerungen auf keinen Fall verlassen.
20 - Die Maschine kann mit verschiedenem Zubehör ausgerüstet
werden. Der Besitzer ist dafür verantwortlich, die Zulassung
von Arbeitsgeräten oder Zubehör nach den einschlägigen
europäischen Sicherheitsvorschriften nachzuweisen. Der Einsatz
nicht zugelassenen Zubehörs kann Ihre Sicherheit gefährden.
21 - Sämtliche Schilder mit den Gefahrensymbolen und
Sicherheitszeichen müssen sich in einwandfreiem Zustand
befinden. Bei Beschädigung oder Unleserlichkeit müssen sie
rechtzeitig ersetzt werden (siehe Seite 6-7).
22 - Das Gerät darf ausschließlich für die in der Betriebsanleitung
angegebenen Zwecke verwendet werden (siehe seite 37).
23 - Halten Sie die Betriebsanleitung stets griffbereit. Fordern Sie bei
Verlust der Betriebsanleitung eine Kopie derselben an.
VORSICHT: Benutzen Sie niemals eine Maschine mit
fehlerhafter Sicherheitsausstattung. Die
Sicherheitsausstattung der Maschine muss wie in diesem
Abschnitt beschrieben überprüft und gewartet werden.
Wenn Ihre Maschine eine dieser Prüfungen nicht besteht,
wenden Sie sich an den Kundendienst, um sie reparieren zu
lassen.

12
1 2 3 4
Español
NORMAS DE SEGURIDAD
ATENCIÓN: la exposición prolongada a las vibraciones
generadas por las herramientas manuales con motor de
combustión interna puede causar lesiones en los vasos
sanguíneos o en los nervios de los dedos, manos y
muñecas a las personas que sufren de problemas
circulatorios o edemas anómalos. El uso prolongado en
climas fríos se ha relacionado con daños en los vasos
sanguíneos de personas sanas. Si aparecen síntomas tales
como pérdida de sensibilidad, dolor, pérdida de fuerza,
cambio en la textura o color de la piel, o pérdida de
sensibilidad en dedos, manos o muñecas, deje de utilizar
esta herramienta y acuda a un médico.
ATENCION - La motoazada, si se emplea bien, es un
instrumento de trabajo cómodo y eficaz; si se usa
incorrectamente o sin las debidas precauciones puede
convertirse en un instrumento peligroso. Para que su
trabajo sea siempre agradable y seguro, respete
escrupulosamente las normas de seguridad indicadas a
continuación en el presente manual.
ATENCIÓN: El sistema de encendido de su unidad produce
un campo electromagnético de muy baja intensidad. Este
campo puede interferir con algunos marcapasos. Para
reducir el riesgo de lesiones graves o mortales, las
personas con marcapasos deberían consultar a su médico y
al fabricante del marcapasos antes de utilizar esta
máquina.
¡ATENCIÓN! – El uso de la máquina puede estar limitado
por reglamentos nacionales.
1 - Antes de utilizar la unidad, lea este manual atentamente hasta
que comprenda por completo todas las reglas de seguridad,
precauciones e instrucciones de manejo y sepa cómo seguirlas.
2 - La motoazada es para uso exclusivo de adultos que
comprendan y puedan seguir las reglas de seguridad,
precauciones e instrucciones de manejo indicadas en este
manual. Nunca se debe permitir que los menores utilicen una
motoazada.
3 - No maneje ni utilice la motoazada si está cansado, enfermo o
indispuesto. Tampoco la utilice si ha tomado alcohol, drogas o
medicamentos. Debe encontrarse en buen estado físico y con
la mente despierta. Trabajar con una motoazada es agotador.
Si tiene algún problema que se pueda agravar a causa de
este tipo de trabajo, consulte a su médico antes de utilizar la
motoazada (Fig.1). Preste más atención antes de las pausas
para descansar y hacia el final del turno de trabajo.
4 - Los niños, transeúntes y animales deben mantenerse a una
distancia mínima de 15 metros del lugar de trabajo. No
permita que se acerquen a la motoazada personas ni animales
cuando la arranque o la utilice (Fig.2).
5 - Mientras trabaje con la motoazada, utilice siempre prendas
protectoras de seguridad homologadas. Evite el uso de
prendas sueltas, bufandas, corbatas o pulseras que puedan
quedar atrapadas entre las ramas. Si tiene el pelo largo,
recójaselo y protéjaselo (por ejemplo, con un pañuelo,
gorra, casco, etc.). Utilice botas de seguridad con suelas
antideslizantes y refuerzos antiperforación. Utilice gafas
protectoras o protectores faciales. Utilice protecciones
contra el ruido: por ejemplo, protectores que reduzcan
el nivel de ruido o tapones para los oídos. Póngase
guantes protectores con el máximo poder de absorción de
vibraciones (Fig.3-4-5-6).
6 - Permita únicamente utilizar esta motoazada a aquellas
personas que hayan leído este manual del operador o que
hayan recibido las instrucciones adecuadas sobre al uso
correcto de la motoazada.
7 - Compruebe la motoazada a diario para asegurarse de que
todos sus dispositivos se encuentran en perfecto estado de
funcionamiento.
8 - No utilice nunca la motoazada si está dañada, si se ha
modificado o si se ha reparado o montado incorrectamente.
No desmonte, dañe ni desactive ninguno de los dispositivos
de seguridad. Sustituye de inmediato las herramientas de
corte o los dispositivos de seguridad que se hayan deteriorado,
roto o desmontado.
9 - Planifique previamente y con cuidado el trabajo. No se ponga
a cortar hasta que el área de trabajo esté despejada y el suelo
en el que vaya a trabajar sea seguro.
10 - Sólo personal competente puede realizar trabajos de
mantenimiento en la motoazada, excepto los indicados en
este manual.
11 - La motoazada es un producto destinado exclusivamente a
triturar terrones y roturar el terreno. No se aconseja cortar
otros tipos de material. Cualquier empleo diferente del
indicado en estas instrucciones puede causar daños en la
máquina y constituir graves peligros para las personas y los
bienes.
12 - No está permitido conectar a la máquina herramientas o
accesorios no especificados por el fabricante.
13 - No utilizar la máquina sin el cárter de protección de las
herramientas giratorias.
14 - Es responsabilidad del usuario evaluar los riesgos potenciales
del terreno por labrar y tomar todas las precauciones
necesarias para garantizar su propia seguridad, especialmente
en cuestas y en suelos irregulares, resbaladizos o inestables.
15 - Sobre las cuestas hay que trabajar con cautela, en sentido
transversal, nunca en subida o en bajada. No utilizar la
motoazada en terrenos con pendiente superior a 10° (17 %).
16 - El propietario o el usuario es responsable de los riesgos y
accidentes sufridos por terceros y de los daños sufridos por
bienes.
17 - En el momento de accionar las fresas giratorias, comprobar
que no haya nadie delante o cerca de la máquina. Sostener
firmemente el manillar, ya que tiende a bajarse en el momento
del accionamiento.
18 - Durante el trabajo, mantener la distancia de seguridad con
respecto a las fresas giratorias; esta distancia equivale a la
longitud del manillar.
19 - En caso de uso en terrenos escarpados, el usuario debe
asegurarse de que no haya nadie en un radio de 20 metros
alrededor de la máquina. Es indispensable que el usuario
permanezca al mando.
20 - La máquina puede estar equipada con diferentes accesorios.
Es responsabilidad del propietario comprobar que las
herramientas y los accesorios estén homologados conforme
a la normativa de seguridad europea vigente. El uso de
accesorios no homologados puede perjudicar su seguridad.
21 - Mantenga todas las etiquetas con las señales de peligro y
seguridad en perfectas condiciones. Si alguna se estropea,
sustitúyala de inmediato (vea pag.6-7).
22 - No utilice la máquina para una aplicación distinta de las que se
indican en el manual (vea pag. 37).
23 - Tener siempre el manual al alcance de la mano. Si se extravía el
manual, pedir otro ejemplar.
ADVERTENCIA: Nunca utilice una máquina con dispositivos
de seguridad defectuosos. Las operaciones de
comprobación y mantenimiento de los dispositivos de
seguridad se describen en esta sección. Si detecta
problemas en la máquina durante las comprobaciones,
póngase en contacto con el agente del servicio de
reparación.

13
5 6
Slovensky
PRAVIDLÁ BEZPEČNOSTI
POZOR: vystavenie sa vibráciám vznikajúcich pri
dlhodobom používaní manuálnych motorových strojov
s vnútorným spaľovaním môže spôsobiť poškodenie ciev
alebo nervov prstov, rúk a zápästí u osôb, u ktorých sa
prejavujú problémy s obehom krvi a anomálne opuchy.
Dlhodobé pracovanie v studenom počasí môže viesť
k poškodeniu ciev aj u zdravých ľudí. Ak spozorujete
symptómy ako tŕpnutie, bolesť, stratu citlivosti, zmeny
farby pokožky alebo jej vzhľadu, prípadne stratu citlivosti
prstov, rúk alebo zápästia, okamžite prestaňte stroj
používať a vyhľadajte lekára.
UPOZORNENIE: Pokiaľ je správne používaná je preorávač
píla rýchlym pomocníkom a účinným nástrojom. Pokiaľ
je používaná nesprávne alebo bez správnych pravidiel
bezpečnosti, môže sa stať nebezpečným nástrojom. Aby
bola vaša práca vždy príjemná a bezpečná, dodržujte vždy
prísne bezpečnostné pravidlá, ktoré sú uvedené v tomto
návode na použitiu.
POZOR: Štartovací systém jednotky produkuje
elektromagnetické pole veľmi nízkej intenzity. Toto pole
môže rušiť činnosť niektorých pacemakerov. Na zníženie
rizika vážnych alebo smrteľných poranení, by sa osoby s
pacemakerom mali poradiť so svojím lekárom a výrobcom
pacemakera ešte pred používaním tohto stroja.
UPOZORNENIE! – Používanie stroja môžu obmedzovať
vnútroštátne predpisy.
1 - Prečítajte si pozorne tento návod tak, aby ste ho dokonale
pochopili ešte pred používaním stroja a mohli dodržiavať
všetky bezpečnostné predpisy, opatrenia a pokyny na obsluhu
stroja.
2 - Preorávač môžu používať iba dospelé osoby, ktoré pochopili
a môžu dodržiavať bezpečnostné predpisy, opatrenia a
pokyny na obsluhu uvedené v tomto návode. Nedovoľte, aby
preorávač používali deti a mladiství.
3 - S preorávač nemanipulujte, ani ho nepoužívajte, ak ste
unavení, chorí alebo rozrušení alebo ak ste požili alkohol,
drogy alebo lieky. Váš fyzický a duševný stav musí byť dobrý
a musíte byť ostražití. Práca s preorávač je namáhavá. Ak ste
v stave, ktorý by sa mohol namáhavou prácou zhoršiť, pred
prácou s preorávač sa poraďte s vaším lekárom (Obr.1). Pred
prestávkami a pred ukončením vašej práce zvýšte pozornosť.
4 - Nedovoľte deťom, iným osobám, alebo zvieratám, aby sa
priblížili na viac ako 15 metrov od pracovnej oblasti. Nedovoľte
iným osobám, ani zvieratám, aby boli pri štarotvaní alebo práci
s preorávač v jeho blízkosti (Obr.2).
5 - Počas práce s preorávač vždy používajte homologizovaný
ochranný bezpečnostný odev. Nenoste odev, šály, viazanky,
ani náramky, ktoré sa môžu zachytiť do konárov. Ak máte dlhé
vlasy, zopnite ich a chráňte ich (napríklad šatkou, čiapkou,
prilbou a pod.). Bezpečnostná obuv musí mať protišmykovú
podrážku a vložku proti prerezaniu. Noste ochranné
okuliare alebo štít na ochranu tváre. Používajte ochranné
prostriedky sluchu: napríklad, slúchadlá na zníženie
hluku alebo zátky do uší. Noste rukavice, ktoré maximálne
pohlcujú vibrácie (Obr. 3-4-5-6).
6 - Iným osobám dovoľte používať tento preorávač iba ak si
prečítali tento návod na použitie alebo boli dostatočne
vyškolení, aby ho mohli používať bezpečným a správnym
spôsobom.
7 - Preorávač kontrolujte každý deň, aby ste zaistili, že všetky jeho
zariadenia a iné časti z hľadiska bezpečnosti, boli funkčné.
8 - Nikdy nepoužívajte poškodený, modifikovaný alebo
nesprávne opravený, či zmontovaný preorávač. Nevyberajte,
nepoškodzujte, ani nevyraďujte z činnosti žiadne
bezpečnostné zariadenie. Rezné nástroje alebo bezpečnostné
zariadenia vymeňte vždy ak sa poškodia, zlomia alebo budú
odmontované.
9 - Prácu si starostlivo vopred naplánujte. Nezačínajte kopať, kým
nevyčistíte pracovnú plochu a ak nemáte pevné body pre
nohy.
10 - Všetky opravy preorávač, okrem operácií uvedených v tomto
návode, musia vykonať vyškolení pracovníci servisu.
11 - Motorový preorávač je stroj určený výhradne na drvenie hrúd
a preorávanie terénu. Neodporúča sa používať ho na vyžínanie
iných materiálov. Akékoľvek iné použitie odlišné od použitia
uvedeného v tomto návode môže spôsobiť poruchu stroja a
predstavovať vážne nebezpečenstvo pre osoby a majetok.
12 - Nie je dovolené zapojiť k jednotke iné nástroje alebo
príslušenstvo, ktoré nie sú odporúčané výrobcom.
13 - Spotrebič neštartujte, ak na ňom nie je ochranný kryt
pohyblivých častí.
14 - Za zhodnotenie rizika vyplývajúceho z opracovania
určitého terénu a za vykonanie všetkých ochranných
opatrení nevyhnutných na zaručenie vlastnej bezpečnosti,
predovšetkým na svahoch, na nerovnomerných, šmykľavých
alebo pohyblivých terénoch, nesie zodpovednosť obsluhujúci
pracovník.
15 - V prípade preorávania svahov naplňte palivovú nádrž na
menej ako do polovice, aby ste predišli únikom benzínu. Na
svahoch pracujte vždy opatrne, postupujte priečne, nikdy v
stúpaní alebo klesaní. Preorávač nepoužívajte na terénoch so
sklonom prevyšujúcim 10° (17 %).
16 - Nezabudnite, že majiteľ alebo obsluhujúci pracovník nesú
zodpovednosť za úrazy alebo riziká pre iné osoby, ako aj za ich
majetok.
17 - Pri spustení rotujúcich lopatiek skontrolujte, či nikto nie je
pred preorávačom alebo v jeho blízkosti. Držte riadidlá, ktorý
inklinuje k pádu na ovládanie.
18 - Počas práce udržiavajte bezpečnostnú vzdialenosť od
otáčajúcich sa fréz; táto vzdialenosť sa rovná dĺžke rukoväte.
19 - V prípade práce na strmých terénoch sa obsluhujúci pracovník
musí uistiť, že sa nikto nepriblíži do vzdialenosti bližšej ako
20 metrov od stroja. Obsluhujúci pracovník musí ostať pri
ovládaní stroja.
20 - Stroj môže byť vybavený rôznymi doplnkami. Za splnenie
požiadaviek homologácie doplnkov stroja podľa platných
bezpečnostných európskych predpisov zodpovedá majiteľ.
Používanie nehomologovaných doplnkov môže byť
nebezpečné.
21 - Všetky štítky a nálepky s výstražnou signalizáciou udržiavajte v
dokonalom stave. V prípade poškodenia alebo opotrebovania
ich treba včas vymeniť (Pozrite str. 6-7).
22 - Stroj nepoužívajte na iné účely ako sú uvedené v návode
(pozrite ods. 37).
23 - Návod na použitie majte vždy v blízkosti. V prípade straty
návodu si vyžiadajte jeho kópiu.
POZOR: Nikdy nepoužívajte stroj, ak jeho bezpečnostné
zariadenia nefungujú správne. Bezpečnostné zariadenia
musíte kontrolovať a udržiavať podľa popisu v tejto časti.
Ak stroj nezodpovedá podmienkam podľa popisu
kontroly, zavolajte servis alebo autorizované stredisko a
dajte stroj opraviť.

14
1 2 3 4
Italiano English Français
ASSEMBLAGGIO ASSEMBLY ASSEMBLAGE
MONTAGGIO TIMONE
Inserire il supporto timone (A, Fig.1) in corrispondenza del foro
centrale (K, Fig.1) della staffa. Fissare il supporto timone con
l’apposito perno B bloccandolo con la copiglia C (Fig.1).
Inserire il timone E (Fig.2) nel foro del supporto timone (Y, Fig.2)
e bloccarlo con il perno F e la copiglia G (Fig.2).
La profondità del timone (E, Fig.2) può essere regolata in 8
posizioni sbloccando il perno F dalla copiglia G (Fig.2). Una
volta trovata la giusta altezza reinserire il perno F e bloccarlo
con la copiglia G (Fig.2).
È possibile regolare anche l’oscillazione del timone utilizzando
le viti D (Fig.2).
MONTAGGIO RUOTA DI TRASFERIMENTO (Solo per motori
a benzina)
Montare la ruota di trasferimento (H, Fig.3) sul telaio allineando
i due fori P e utilizzando il bullone, rondella e dado I.
Per bloccare la ruota in posizione di trasporto allineare il foro
L (Fig.3) della ruota con il foro M (Fig.4) della staffa e inserire il
perno N bloccandolo con la copiglia O (Fig.4)
Alla fine del montaggio la ruota risulterà come in Fig.4.
Per bloccare la ruota in posizione di lavoro allineare il foro L
(Fig.3) della ruota con il foro T (Fig.5) della staffa e inserire il
perno N bloccandolo con la copiglia O (Fig.5)
Alla fine del montaggio la ruota risulterà come in Fig.5.
CAVALLETTO (Solo per motori diesel)
Attenzione! Durante il lavoro il cavalletto (T, Fig.7) deve
essere in posizione rialzata (Fig.8)!
MONTAGGIO PIANTONE (Fig.6)
Inserire il piantone S sul perno Q del supporto e bloccarlo con
la vite R.
AVVERTENZA - Ingrassare le parti prima del montaggio.
ASSEMBLING THE JACKLEG
Offer the jackleg mounting (A, Fig.1) to the central hole (K,
Fig.1) of the bracket. Secure the mounting with the relative pin
B, locking in position with the R-clip C (Fig.1).
Fit the jackleg E (Fig.2) to the socket of the mounting (Y, Fig.2)
and secure with the pin F and the R-clip G (Fig.2).
The height of the jackleg (E, Fig.2) is adjustable through 8
positions, releasing the pin F from the R-clip G (Fig.2). Once the
leg is set at the right height, insert the pin F again and secure
with the R-clip G (Fig.2).
The side-to-side movement of the jackleg can also be adjusted
by means of screws D (Fig.2).
ASSEMBLING THE WHEELS (Petrol engines only)
Fit the transport wheel (H, Fig.3) to the frame, aligning the two
holes P and securing in place with the bolt, washer and nut I.
To lock the wheel in the transport position, align the hole L
(Fig.3) of the wheel with hole M (Fig.4) on the bracket and
insert the pin N, securing with the R-clip O (Fig.4)
Once it is installed, the wheel will appear as shown in Fig.4.
To lock the wheel in the operating position, align the hole L
(Fig.3) of the wheel with hole T (Fig.5) on the bracket and insert
the pin N, securing with the R-clip O (Fig.5)
At the end of the assembly process the wheel will appear as
shown in Fig.5.
STAND (Diesel engines only)
Warning! When operating the machine, the stand (T,
Fig.7) must be in the raised position (Fig.8)!
ASSEMBLING THE STEERING COLUMN (Fig.6)
Insert steering column S over boss Q on the support and
secure with screw R.
IMPORTANT - Grease the parts prior to assembly.
MONTAGE DU TIMON
Insérer le support du timon (A, Fig.1) dans l'orifice central (K,
Fig.1) de l'étrier. Fixer le support du timon à l'aide de l'axe B en
le bloquant avec la goupille C (Fig.1).
Insérer le timon E (Fig.2) dans l'orifice du support du timon (Y,
Fig.2) et le bloquer à l'aide de l'axe F et de la goupille G (Fig.2).
Possibilité de régler la profondeur du timon (E, Fig.2) sur 8
positions en débloquant l'axe F de la goupille G (Fig.2). Reposer
l'axe F et le bloquer à l'aide de la goupille G (Fig.2) après avoir
trouvé la hauteur de travail.
Il est également possible de régler l’oscillation du timon à l'aide
des vis D (Fig.2).
MONTAGE DE LA ROUE DE DÉPLACEMENT (Seulement pour
moteurs à essence)
Monter la roue de transport (H, Fig.3) sur le châssis en alignant
les deux orifices P et en utilisant le boulon, la rondelle et
l'écrou I.
Pour bloquer la roue en position de transport, aligner l'orifice L
(Fig.3) de la roue avec l'orifice M (Fig.4) de l'étrier et introduire
l'axe N puis le bloquer à l'aide de la goupille O (Fig.4)
Une fois le montage terminé, la roue doit être positionnée
comme le montre la Fig.4.
Pour bloquer la roue en position de travail, aligner l'orifice L
(Fig.3) de la roue avec l'orifice T (Fig.5) de l'étrier et introduire
l'axe N puis le bloquer à l'aide de la goupille O (Fig.5)
Une fois le montage terminé, la roue doit être positionnée
comme le montre la Fig.5.
CHEVALET (Seulement pour moteurs diesel)
Attention ! Durant le travail, soulever le chevalet (T,
Fig.7) doit être en position haute (Fig.8) !
MONTAGE DE LA COLONNE (Fig.6)
Insérer la colonne S sur l'axe Q du support et le bloquer avec
la vis R.
AVERTISSEMENT - Graisser les parties avant le montage.

15
5 6 7 8
Deutsch Español Slovensky
MONTAGE MONTAJE MONTÁŽ
EINBAU DES HACKSPORNS
Setzen Sie den Halter des Hacksporns (A, Abb.1) in die mittlere
Bohrung (K, Abb.1) des Bügels ein. Befestigen Sie den Halter des
Hacksporn mit Stift B und Sicherungssplint C (Abb.1).
Stecken Sie den Hacksporn E (Abb.2) in die Bohrung des Halters
(Y, Abb.2) und sichern Sie ihn mit dem Stift F und dem Splint G
(Abb.2).
Die Tiefeneinstellung des Hacksporns (E, Abb.2) ist durch Lösen
des Stifts F vom Sicherungssplint G (Abb.2) in 8 Positionen
möglich. Setzen Sie dann bei richtiger Höheneinstellung den Stift
F ein und arretieren Sie ihn mit dem Sicherungssplint G (Abb.2).
Mit den Schrauben D kann auch die Neigung des Hacksporns
eingestellt werden (Abb.2).
EINBAU DES STÜTZRADS (Nur für Benzinmotoren)
Montieren Sie das Stützrad (H, Abb.3) mit Schraubenbolzen,
Unterlegscheibe und Mutter I am Rahmen. Die zwei Bohrungen
P müssen hierzu gefluchtet werden.
Um das Rad in Transportstellung zu blockieren, fluchten Sie
die Bohrung L (Abb.3) des Rads mit der Bohrung M (Abb.4) des
Bügels, stecken Sie den Stift N ein und sichern Sie diesen mit dem
Splint O (Abb.4)
Nach erfolgtem Einbau muss das Rad aussehen wie auf Abb.4
gezeigt.
Um das Rad in Arbeitsstellung zu blockieren, fluchten Sie die
Bohrung L (Abb.3) des Rads mit der Bohrung T (Abb.5) des Bügels,
stecken Sie den Stift N ein und sichern Sie diesen mit dem Splint
O (Abb.5)
Nach erfolgtem Einbau muss das Rad aussehen wie auf Abb.5
gezeigt.
STÄNDER (Nur für Dieselmotoren)
Achtung! Bei der Arbeit muss der Ständer (T, Abb.7)
angehoben werden (Abb.8)!
EINBAU DER LENKSÄULE (Abb.6)
Setzen Sie Lenksäule S auf den Bolzen Q der Halterung und
sichern Sie sie mit der Schraube R.
WARNHINWEIS - Schmieren Sie die Teile vor dem Einbau.
MONTAJE DEL TIMÓN
Inserte el soporte del timón (A, Fig. 1) de modo que el cilindro
terminal quede alineado con los dos orificios (K, Fig. 1) de la
guía. Fije el soporte del timón con el perno B y bloquéelo con
el pasador C (Fig. 1).
Introduzca el timón (E, Fig. 2) en el orificio del soporte (Y, Fig. 2)
y bloquéelo con el perno F y el pasador G (Fig. 2).
La profundidad del timón (E, Fig. 2) se puede regular en
ocho posiciones, previa extracción del pasador G y del perno
F (Fig. 2). Una vez encontrada la altura adecuada, coloque
nuevamente el perno F y bloquéelo con el pasador G (Fig. 2).
La oscilación el timón también se puede regular con los
tornillos (D, Fig. 2).
MONTAJE DE LA RUEDA DE TRANSPORTE (Solo para
motores de gasolina)
Monte la rueda de transporte (H, Fig. 3) en el bastidor. Para
ello, alinee los dos orificios P y fije el conjunto con el perno, la
arandela y la tuerca I.
Para bloquear la rueda en la posición de transporte, alinee el
orificio (L, Fig. 3) de la rueda con el orificio (M, Fig. 4) del soporte,
inserte el perno N y bloquéelo con el pasador (O, Fig. 4).
Al final del montaje la rueda resultará como en la Fig. 4.
Para bloquear la rueda en la posición de trabajo, alinee el orificio
(L, Fig. 3) de la rueda con el orificio (T, Fig. 5) del soporte, inserte
el perno N y bloquéelo con el pasador (O, Fig. 5).
Al final del montaje la rueda resultará como en la Fig. 5.
CABALLETE (Solo para motores diésel)
¡Atención! Durante la labor, el caballete (T, Fig. 7)
debe estar levantado (Fig. 8).
MONTAJE DE LA COLUMNA (fig. 6)
Encaje la columna S en el vástago Q del soporte y bloquéela
con el tornillo R.
ADVERTENCIA - Engrase las piezas antes del montaje.
MONTÁŽ KORMIDLA
Vsuňte držiak kormidla (A, Obr.1) v mieste stredného otvoru (K,
Obr.1) na konzolu. Držiak kormidla upevnite príslušný čapom
B zablokovaním so závlačkou C (Obr.1).
Vsuňte kormidlo E (Obr. 2) do otvoru držiaka kormidla (Y, Obr.
2) a zaistite ho čapom F a závlačkou G (Obr. 2).
Hĺbka kormidla (E, Obr. 2) sa dá nastaviť v 8 polohách po
uvoľnení čapu F zo závlačky G (Obr. 2). Po zistení správnej
výšky znovu vsuňte čap F a zablokujte ho závlačkou G (Obr.2).
Dá sa regulovať aj oscilácia kormidla, a to pomocou skrutiek
D (Obr.2).
MONTÁŽ PREMIESTŇOVACIEHO KOLESA (Iba pre
benzínové motory)
Namontujte prepravné koleso (H, Obr.3) na rám, pričom
zarovnajte dva otvory P a použite skrutku, podložku a maticu I.
Ak chcete zablokovať koleso v prepravnej polohe, zarovnajte
otvor L (Obr.3) kolesa s otvorom M (Obr.4) konzoly a vsuňte
čap N zablokovaním závlačkou O (Obr.4).
Na konci montáže bude koleso ako na Obr.4.
Ak chcete zablokovať koleso v pracovnej polohe, zarovnajte
otvor L (Obr.3) kolesa s otvorom T (Obr.5) konzoly a vsuňte
čap N zablokovaním závlačkou O (Obr.5).
Po montáži bude koleso ako na obr.5.
STOJAN (Iba pre dieselové motory)
Pozor! Pri práci musí byť stojan (T, obr. 7) v zdvihnutej
polohe (obr. 8)!
MONTÁŽ STĹPIKA RIADENIA (Obr.6)
Vsuňte stĺpik riadenia S na čap Q držiaka a zaistite ho skrutkou R.
UPOZORNENIE - Pred montážou diely namažte.

16
9 10 11 12
Italiano English Français
ASSEMBLAGGIO ASSEMBLY ASSEMBLAGE
MONTAGGIO MANUBRIO (STEGOLE)
Abbassare la leva di regolazione verticale (F, Fig.9) e
posizionare il manubrio (D, Fig.9) nella sede del piantone.
Fissare il manubrio con i due morsetti (T, Fig.10) e i quattro
dadi (U, Fig.10).
ATTENZIONE! - Serrare i dadi in modo tale da permettere
la rotazione del manubrio ed evitarne il bloccaggio
(regolazione verticale).
Montare la cover di protezione (N, Fig.11) utilizzando le
apposite viti autofilettanti (O, Fig.11).
MONTAGGIO OTTURATORE
Introdurre l’otturatore (V, Fig.12) nell’apposito foro sul piantone
e bloccarlo tramite la ghiera filettata (Z, Fig.12).
AVVERTENZA - Ingrassare le parti prima del montaggio.
MONTAGGIO COFANO MOTORE
Per il montaggio del cofano motore è necessario inserire i 4
perni del cofano (D, Fig.13) all’intero dei 4 fori dei tamponi in
gomma sul telaio (E, Fig.13).
Per agevolare il rifornimento, il cofano può essere aperto
sganciando solamente i 2 perni (F, Fig.14) lato operatore.
MONTAGGIO ANELLI DI BLOCCO ALBERO FRESE
Inserire i 2 anelli (A, Fig.15) sull’albero frese con il centraggio Q
rivolto verso il cambio e allineando i fori B. Fissare gli anelli con
le apposite viti C (Fig.15).
ASSEMBLING THE HANDLEBAR
Lower the vertical adjustment lever (F, Fig.9) and position the
handlebar (D, Fig.9) in its seat on the steering column. Secure
the handlebar with the two U-bolts (T, Fig.10) and four nuts
(U, Fig.10).
NOTE! - Tighten the nuts sufficiently to allow the handlebar
to rotate, without locking it (vertical adjustment).
Fit the cover (N, Fig.11) using the supplied self-tapping screws
(O, Fig.11).
ASSEMBLING THE OBTURATOR
Insert the obturator (V, Fig.12) into the bore in the steering
column and secure it with the plug nut (Z, Fig.12).
IMPORTANT - Grease the parts prior to assembly.
FITTING THE ENGINE HOOD
To fit the engine hood, the 4 pins of the hood (D, Fig.13) must
be located in the 4 holes of the rubber mounts on the frame
(E, Fig.13).
For ease of refuelling, the hood can be opened by releasing
only the 2 pins (F, Fig.14) on the operator side.
FITTING THE ROTOR SHAFT LOCK RINGS
Position the 2 rings (A, Fig.15) on the rotor shaft with the spigot
Q directed toward the gearbox and the holes B aligned. Secure
the rings with the relative screws (Fig.15).
MONTAGE DU GUIDON (MANCHERONS)
Abaisser le levier de réglage vertical (F, Fig.9) et positionner
le guidon (D, Fig.9) dans le logement de la colonne. Fixer le
guidon à l'aide des deux étriers de fixation (T, Fig.10) et les
quatre écrous (U, Fig.10).
ATTENTION ! - Serrer les écrous de manière à pouvoir
pivoter le guidon sans qu'il se bloque (réglage vertical).
Monter le carter de protection (N, Fig.11) avec les vis
autotaraudeuses appropriées (O, Fig.11).
MONTAGE DE L'OBTURATEUR
Introduire l'obturateur (V, Fig.12) dans le trou approprié sur la
colonne et le bloquer avec la bague filetée (Z, Fig.12).
AVERTISSEMENT - Graisser les parties avant le montage.
MONTAGE DU CAPOT MOTEUR
Pour monter le capot moteur, faire passer les 4 axes du capot
(D, Fig.13) dans les 4 orifices des tampons en caoutchouc sur
le châssis (E, Fig.13).
Pour faciliter le ravitaillement, il est possible d'ouvrir le capot
en détachant seulement les 2 axes (F, Fig.14) côté opérateur.
MONTAGE ANNEAUX DE BLOCAGE ARBRE DES FRAISES
Introduire les 2 anneaux (A, Fig.15) sur l’arbre des fraises en
tournant le point de centrage Q vers la boîte de vitesses et
en alignant les orifices B. Fixer les anneaux à l'aide des vis C
(Fig.15).

17
13 14
15
Deutsch Español Slovensky
MONTAGE MONTAJE MONTÁŽ
EINBAU DES LENKHOLMS
Senken Sie den senkrechten Einstellhebel (F, Abb.9) und setzen
Sie den Lenkholm (D, Abb.9) in die Aufnahme der Lenksäule
ein. Befestigen Sie den Lenkholm mit den beiden Klemmen (T,
Abb.10) und den vier Muttern (U, Abb.10).
ACHTUNG! - Ziehen Sie die Muttern so fest, dass der
Lenkholm freigängig gedreht werden kann und nicht gesperrt
ist (senkrechte Einstellung).
Bringen Sie die Schutzabdeckung (N, Abb.11) mit den
selbstschneidenden Schrauben (O, Abb.11) P an.
EINBAU DES VERSCHLUSSES
Führen Sie den Verschluss (V, Abb.12) in die entsprechende
Bohrung an der Lenksäule ein und sichern Sie ihn mit dem
Gewindering (Z, Abb.12).
WARNHINWEIS - Schmieren Sie die Teile vor dem Einbau.
EINBAU DER MOTORHAUBE
Zum Einbau der Motorhaube müssen Sie die 4 Stifte (D,
Abb.13) in die 4 Bohrungen der Gummipuffer am Rahmen (E,
Abb.13) einstecken.
Um den Tankvorgang zu erleichtern, kann die Motorhaube
einfach durch Ausrasten der 2 Stifte (F, Abb.14) an
Bedienerseite geöffnet werden.
EINBAU DER SPERRRINGE DER FRÄSENWELLE
Schieben Sie die 2 Ringe (A, Abb.15) mit der zum Getriebe
gerichteten Zentrierung Q auf die Fräsenwelle und richten Sie
dazu die Bohrungen B aus. Befestigen Sie die Ringe mit den
entsprechenden Schrauben C (Abb.15).
MONTAJE DEL MANILLAR (BRAZOS)
Baje la palanca de regulación vertical (F, fig. 9) y ubique el
manillar (D, fig. 9) en el alojamiento de la columna. Fije el
manillar con las dos grapas (T, fig. 10) y las cuatro tuercas (U,
fig. 10).
ATENCIÓN - Apriete las tuercas de modo tal que el
manillar pueda girar sin bloquearse (regulación vertical).
Aplique la protección (N, fig. 11) con los tornillos
autorroscantes (O, fig. 11).
MONTAJE DEL OBTURADOR
Introduzca el obturador (V, fig. 12) en el orificio
correspondiente de la columna y bloquéelo con la tuerca (Z,
fig. 12).
ADVERTENCIA - Engrase las piezas antes del montaje.
MONTAJE DE LA CARCASA
Introduzca los cuatro pernos de la carcasa (D, Fig. 13) en los
cuatro orificios de los tacos de goma del bastidor (E, Fig. 13).
Para facilitar el repostaje, la carcasa se puede abrir
desenganchando solamente los dos pernos (F, Fig. 14) del
lado del operador.
MONTAJE DE LOS ANILLOS DE BLOQUEO DEL EJE DE LAS
FRESAS
Coloque los dos anillos (A, Fig. 15) en el eje de las fresas con el
elemento de centrado Q orientado hacia el cambio y alineando
los orificios B. Fije los anillos con los tornillos (C, Fig. 15).
MONTÁŽ DVOJRAMENNÉHO DRŽADLA (RAMENÁ
DRŽADLA)
Znížte páku na vertikálnu reguláciu (F, Obr.9) a umiestnite
držadlo (D, Obr.9) na miesto riadiaceho stĺpika. Upevnite
držadlo dvoma svorkami (T, Obr.10) a štyrmi maticami (U,
Obr.10).
POZOR! - Utiahnite matice tak, aby ste umožnili otočenie
držadla a zabránili jeho zablokovaniu (vertikálna regulácia).
Namontujte ochranný kryt (N, Obr. 11) pomocou príslušným
samorezných skrutiek (O. Obr. 11).
MONTÁŽ UZÁVERU
Vsuňte uzáver (V, Obr.12) do príslušného otvoru na riadiacom
stĺpiku a zablokujte ho objímkou so závitom (Z, Obr.12).
UPOZORNENIE - Pred montážou diely namažte.
MONTÁŽ KAPOTY MOTORA
Pri montáži kapoty motora bude nevyhnutné vsunúť 4 čapy
kapoty (D, Obr.13) do 4 otvorov gumených tlmičov na ráme
(E, Obr.13).
Dopĺňania sa uľahčí, ak kapotu otvoríte uvoľnením iba 2 čapov
(F, Obr.14) na strane pracovníka obsluhy.
MONTÁŽ BLOKOVACÍCH PRSTENCOV HRIADEĽA FRÉZ
Vsuňte 2 prstence (A, Obr.15) na hriadeľ fréz s centrovaním
Q obráteným smerom k prevodovke a zarovnaním otvorov B.
Prstence upevnite príslušnými skrutkami C (Obr.15).

18
17 18 19
Italiano English Français
ASSEMBLAGGIO ASSEMBLY ASSEMBLAGE
MONTAGGIO FRESE
Larghezza taglio 100:
L’albero porta attrezzi è realizzato con un profilo esagonale
per consentire l’istallazione rapida delle frese:
• Ingrassare imboccatura fresa e montare verificando che
i due fori di fissaggio A siano correttamente allineati
(Fig.17).
• Inserire (1) il perno (B, Fig.18) nel foro (A, Fig.17). Ruotare
(2) la molla di blocco del perno, nel senso contrario alla
rotazione della marcia avanti (vedi freccia A) delle zappe,
fissandolo al perno (C, Fig.18) per evitarne la fuoriuscita.
• Ingrassare imboccatura della prolunga fresa e
montare verificando che i due fori di fissaggio L siano
correttamente allineati (Fig.19).
• Inserire (1) il perno (B, Fig.18) nel foro (A, Fig.17). Ruotare
(2) la molla di blocco del perno, nel senso contrario alla
rotazione della marcia avanti (vedi freccia A) delle zappe,
fissandolo al perno (C, Fig.18) per evitarne la fuoriuscita.
ATTENZIONE! In caso di montaggio non corretto del
perno, questo si può sganciare compromettendo il
funzionamento della macchina dando luogo a danni
alla stessa e a rischi per la sicurezza dell’operatore!
ATTENZIONE – Montare le frese verificando che il
tagliente delle zappette sia sempre rivolto nella
direzione di marcia (vedi freccia A Fig.20)
ATTENZIONE – Nel montaggio fasare la fresa come
rappresentato in Fig.20.
FITTING THE ROTORS
100 cm tillage width:
The toolholder has a hexagonal cross-section to enable quick
installation of the rotors:
• Grease the rotor opening and fit the rotor, making sure
that the two fixing holes "A" are correctly aligned (Fig.17).
• Insert (1) the pin (B, Fig.18) into the hole (A, Fig.17). Rotate
(2) the pin locking spring in the direction opposite to
the forward rotation direction (see arrow A) of the rotor,
securing it to the pin (C, Fig.18) to prevent dislocation.
• Grease the socket that houses the rotor shaft extension
and proceed to fit the rotor, making certain that the two
fixing holes L are correctly aligned (Fig.19).
• Insert (1) the pin (B, Fig.18) into the hole (A, Fig.17). Rotate
(2) the pin locking spring in the direction opposite to
the forward rotation direction (see arrow A) of the rotor,
securing it to the pin (C, Fig.18) to prevent dislocation.
WARNING! If the pin is fitted incorrectly, it may
become detached and impair operation of the
machine with resulting damage to the machine and
operator safety risks!
WARNING – When fitting the rotors ensure blades
cutting edge is always facing the direction of travel
(see arrow "A" Fig.20)
WARNING – When fitting the rotor, adjust it as shown
in Fig.20.
MONTAGE DES FRAISES
Largeur de coupe 100 :
Le profil de l’arbre porte-outils est hexagonal pour permettre
d'installer les fraises plus rapidement :
• Graisser l'emmanchement de la fraise et la monter en
s'assurant que les deux orifices de fixation A sont alignés
correctement (Fig.17).
• Insérer (1) l'axe (B, Fig.18) dans l'orifice (A, Fig.17). Tourner
(2) le ressort de retenue de l'axe dans le sens inverse à
celui de rotation de la marche avant (voir flèche A) des
houes, et le fixer sur l'axe (C, Fig.18) pour éviter qu'il ne
dépasse.
• Graisser l'emmanchement de la rallonge de la fraise et le
monter en s'assurant que les deux orifices de fixation L
sont alignés correctement (Fig.19).
• Insérer (1) l'axe (B, Fig.18) dans l'orifice (A, Fig.17). Tourner
(2) le ressort de retenue de l'axe dans le sens inverse à
celui de rotation de la marche avant (voir flèche A) des
houes, et le fixer sur l'axe (C, Fig.18) pour éviter qu'il ne
dépasse.
ATTENTION ! Si l'axe n'est pas monté correctement,
il pourrait se détacher et compromettre le
fonctionnement de la machine, entraînant des
dommages matériels et mettant en danger la
sécurité de l'opérateur !
ATTENTION – Monter les fraises en s'assurant que le
tranchant des houes est toujours tourné dans le sens
de marche (voir flèche A Fig.20)
ATTENTION – Lors du montage, caler la fraise comme
le montre la Fig.20.

19
20
Deutsch Español Slovensky
MONTAGE MONTAJE MONTÁŽ
EINBAU DER FRÄSEN
Schnittbreite 100:
Die Werkzeugwelle ist mit Sechskantprofil zum Schnelleinbau
der Fräsen ausgeführt:
• Fetten Sie die Fräsenaufnahme und achten Sie beim Einbau
auf die Fluchtung der beiden Befestigungsbohrungen A
(Abb.17).
• Stecken Sie (1) den Stift (B, Abb.18) in die Öffnung (A,
Abb.17). Drehen Sie (2) die Sperrfeder des Stiftes gegen die
Drehrichtung im Vorwärtsgang (siehe Pfeil A) der Hacken
und befestigen Sie ihn am Stift (C, Abb.18), damit er nicht
herausfallen kann.
• Fetten Sie die Aufnahme der Fräsverbreiterung und
überprüfen Sie die perfekte Fluchtung der beiden
Befestigungsbohrungen L (Abb.19).
• Stecken Sie (1) den Stift (B, Abb.18) in die Öffnung (A,
Abb.17). Drehen Sie (2) die Sperrfeder des Stiftes gegen die
Drehrichtung im Vorwärtsgang (siehe Pfeil A) der Hacken
und befestigen Sie ihn am Stift (C, Abb.18), damit er nicht
herausfallen kann.
ACHTUNG! Wenn der Stift nicht korrekt eingebaut
wird, kann er sich lösen und den Betrieb der Maschine
beeinträchtigen. Dadurch kann die Maschine
beschädigt und die Sicherheit des Bedieners
gefährdet werden!
ACHTUNG – Beim Einbau der Fräsen muss die
Messerschneide in Fahrtrichtung ausgerichtet sein
(siehe Pfeil A Abb.20).
ACHTUNG – Führen Sie beim Einbau die
Phaseneinstellung der Fräse gemäß Abb.20 durch.
MONTAJE DE LAS FRESAS
Ancho de corte 100 cm:
El eje soporte herramientas tiene un perfil hexagonal para
permitir la instalación rápida de las fresas:
• Engrasar la boca de la fresa e instalar comprobando que los
dos agujeros de fijación A están alineados correctamente
(Fig. 17).
• Introducir (1) el perno (B, Fig. 18) en el orificio (A, Fig. 17).
Girar (2) el muelle de bloqueo del perno en el sentido
contrario a la rotación en marcha adelante de las palas (ver
flecha A), y fijarlo al perno (C, Fig. 18) para evitar que este
se salga.
• Engrase la embocadura de la prolongación de la fresa
y realice el montaje, verificando que los dos orificios de
fijación (L, Fig. 19) estén correctamente alineados.
• Introducir (1) el perno (B, Fig. 18) en el orificio (A, Fig. 17).
Girar (2) el muelle de bloqueo del perno en el sentido
contrario a la rotación en marcha adelante de las palas (ver
flecha A), y fijarlo al perno (C, Fig. 18) para evitar que este
se salga.
¡ATENCIÓN! Si el perno no está bien montado, se
puede desenganchar con riesgo de causar daño a la
máquina y lesiones al usuario.
ATENCIÓN – Montar las fresas comprobando que el
corte de las azadillas quede siempre orientado en la
dirección de marcha (ver flecha A Fig.20)
ATENCIÓN – En el montaje, poner en fase la fresa como
ilustrado en la Fig. 20.
MONTAŽA REZIL
Šírka záberu 100 cm:
Nosný hriadeľ nástrojov je vyrobený s hexagonálnym profilom,
čo umožňuje rýchlu montáž fréz:
• Namažte ústie frézy a namontujte ho, pričom skontrolujte,
či sú správne zarovnané dva upevňovacie otvory A (Obr.17).
• Vsuňte (1) čap (B, obr.18) do otvoru (A, obr.17). Otočte (2)
pružinu blokujúcu čap v smere proti otáčaniu chodu motýk
dopredu (pozrite šípku A), pričom upevnite čap (C, obr.18),
aby sa nevyvliekol.
• Namažte ústie nadstavca frézy a namontujte ho, pričom
skontrolujte, či sú správne zarovnané dva upevňovacie
otvory L (Obr.19)
• Vsuňte (1) čap (B, obr.18) do otvoru (A, obr.17). Otočte (2)
pružinu blokujúcu čap v smere proti otáčaniu chodu motýk
dopredu (pozrite šípku A), pričom upevnite čap (C, obr.18),
aby sa nevyvliekol.
POZOR! V prípade nesprávnej montáže čapu sa čap
môže uvoľniť a ohroziť správnu funkčnosť stroja,
spôsobiť jeho poškodenie a ohroziť bezpečnosť
pracovníka!
POZOR – Pri montáži fréz dávajte pozor, aby rezná časť
lopatiek bola otočená v smere postupu (pozrite šípku
A Obr.20)
POZOR – Pri montáži upravte fázy frézy ako na Obr.20.

20
21 21A 22 23
Italiano English Français
ASSEMBLAGGIO ASSEMBLY ASSEMBLAGE
È possibile l’utilizzo di questa macchina con una minor
larghezza di fresatura (80 cm):
• Smontare prolunga fresa D dalla fresa togliendo il perno
(F, Fig.21)
• Smontare disco di protezione E dalla prolunga fresa D
togliendo il perno (G, Fig.21)
• Montare il disco di protezione sulla fresa verificando che
i due fori di fissaggio H siano correttamente allineati
(Fig.21A).
• Bloccare il disco di protezione utilizzando l’apposito perno
(G, Fig.21A). Fissare poi il perno con il gancio per evitarne
la fuoriuscita.
MONTAGGIO CAVO COMANDO TRAZIONE (Fig.22)
• Togliere il dado e la rondella B dal nottolino A;
• Inserire la molla P nel foro della vite C;
• Montare la parte filettata del nottolino A nel foro della leva
comando innesto frizione I e bloccarlo con la rondella e
dado B.
ATTENZIONE! La leva è ha già una regolazione di
fabbrica. Se dopo il montaggio del cavo innesto frizione non
funziona correttamente, vedere capitolo “Regolazione leva
comando marcia” (paragrafo “MANUTENZIONE”).
MONTAGGIO CAVO INNESTO RETROMARCIA (Fig.23)
• Inserire la parte terminale del cavo innesto retromarcia
L nell’alloggiamento della leva comando innesto
retromarcia M sul cambio;
• Inserire la guaina N nel nottolino di fermo guaina O
montato sul cambio.
ATTENZIONE! La leva è ha già una regolazione di
fabbrica. Se dopo il montaggio del cavo della retromarcia
non funziona correttamente, rivolgersi ad un Centro di
Assistenza Autorizzato.
The machine can be set to a narrower tillage width
(80 cm):
• Remove rotor extension "D" from rotor by removing pin
(F Fig.21)
• Remove disc "E" from rotor extension"D" by removing pin
(G Fig.21)
• Fit the safety disc to the rotor, making sure that the two
fixing holes "H" are correctly aligned (Fig.21A).
• Secure safety disc using the pin (G Fig.21A) provided. Now
secure the pin with the catch to prevent it from dropping
out.
ASSEMBLY OF DRIVE CONTROL CABLE (Fig.22)
• Remove the nut and washer B from the pivot bolt A;
• Insert the spring P in the hole of the stud screw C;
• Insert the threaded part of the pivot bolt A through the
hole of the clutch control lever I and secure with the
washer and nut B.
WARNING! The lever is already factory-adjusted. Should
the clutch control cable fail to work as it should following
assembly, refer to the heading “Adjustment of drive control
lever” (under “MAINTENANCE”).
ASSEMBLY OF REVERSE DRIVE CONTROL CABLE (Fig.23)
• Locate the button end of the reverse drive control cable
L in the slot of the reverse drive control lever M on the
gearbox;
• Locate the end of the sheath N in the stop O mounted on
the gear box.
WARNING! The lever is already factory-adjusted. Should
the reverse drive control cable fail to work as it should
following assembly, contact an Authorized Service Centre.
Il est possible d'utiliser cette machine avec une largeur
de coupe réduite (80 cm) :
• Démonter la rallonge de la fraise D après avoir ôté l'axe
(F, Fig.21)
• Démonter le disque de protection E de la rallonge de la
fraise D après avoir ôté l'axe (G, Fig.21)
• Monter le disque de protection sur la fraise en s'assurant
que les deux orifices de fixation H sont alignés
correctement (Fig.21A).
• Bloquer le disque de protection à l'aide l'axe
correspondants (G, Fig.21A). Fixer l'axe à l'aide du crochet
pour éviter qu'il ne s'échappe.
MONTAGE DU CÂBLE DE COMMANDE DE TRACTION (Fig.22)
• Ôter l'écrou et la rondelle B du cliquet A ;
• Introduire le ressort P dans l'orifice de la vis C ;
• Monter la partie filetée du cliquet A dans l'orifice du levier
d'embrayage I et le bloquer à l'aide de la rondelle et de
l'écrou B.
ATTENTION ! Le levier est réglé en usine. Si, une
fois monté, le câble d'embrayage ne fonctionne pas
correctement, consulter le chapitre « Réglage du levier de
vitesses » (paragraphe « ENTRETIEN »).
MONTAGE DU CÂBLE DE COMMANDE DE MARCHE AR
(Fig.23)
• Introduire l'embout du câble d'embrayage de marche
arrière L dans le logement du levier de commande de
marche arrière M sur la boîte de vitesses ;
• Introduire la gaine N dans le cliquet d'arrêt de la gaine O
monté sur la boîte de vitesses.
ATTENTION ! Le levier est réglé en usine. Si, une
fois monté, le câble de marche AR ne fonctionne pas
correctement, s'adresser à un centre d'assistance agréé.

21
Deutsch Español Slovensky
MONTAGE MONTAJE MONTÁŽ
Der Einsatz dieses Gerät ist auch mit geringerer
Arbeitsbreite möglich (80 cm):
• Entfernen Sie Stift und bauen Sie die Fräsverbreiterung D
von der Fräse aus (F, Abb.21).
• Entfernen Sie Stift und bauen Sie die Schutzscheibe E von
der Fräsverbreiterung D aus (G, Abb.21).
• Bringen Sie die Schutzscheibe an der Fräse an und
überprüfen Sie die perfekte Fluchtung der beiden
Befestigungsbohrungen (Abb.21A).
• Fixieren Sie die Schutzscheibe mit Stift (G, Abb.21A). Sichern
Sie dann den Stift mit der Klammer gegen Lockerung.
MONTAGE DES FAHRANTRIEB-BOWDENZUGS (Abb.22)
• Entfernen Sie Mutter und Unterlegscheibe B vom Nippel A;
• Setzen Sie die Feder P in die Bohrung der Schraube C ein;
• Montieren Sie den Gewindeteil des Nippels A in die
Bohrung des Kupplungshebels I und sichern Sie diesen
mit Unterlegscheibe und Mutter B.
ACHTUNG! Der Hebel ist werkseitig voreingestellt.
Sollte nach Einbau des Kupplunghebels keine korrekte
Funktion gewährleistet sein, siehe Kapitel “Einstellung des
Gangwahlhebels” (Abschnitt “WARTUNG”).
MONTAGE DES RÜCKWÄRTSFAHRT-BOWDENZUGS
(Abb.23)
• Setzen Sie das Ende des Bowdenzugs für Rückwärtsfahrt L
in die Aufnahme des Schalthebels für den Rückwärtsgang
M am Getriebe ein;
• Schieben Sie die Hülle N auf den am Getriebe
angebrachten Festellnippel O.
ACHTUNG! Der Hebel ist werkseitig voreingestellt.
Sollte nach Einbau des Rückwärtsfahrt-Bowdenzugs keine
korrekte Funktion gewährleistet sein, wenden Sie sich an ein
autorisiertes Servicezentrum.
Esta máquina puede ser utilizada con un ancho de fresado
inferior (80 cm):
• Desmontar de la fresa la alargadera de fresa D quitando el
perno (F, Fig.21)
• Desmontar de la alargadera el disco de protección E
quitando el perno (G.Fig.21)
• Montar el disco de protección sobre la fresa, comprobando
que los dos horificios de sujección H estén alineados
correctamente (Fig.21A)
• Sujetar el disco de protección por medio del perno
apropiado (G.Fig.21A). Luego, sujetar el perno por el gancho
para evitar su salida.
MONTAJE DEL CABLE DE TRACCIÓN (Fig. 22)
• Quite la tuerca y la arandela B del bloque A;
• Enganche el resorte P en el orificio del tornillo C;
• Monte la parte roscada del bloque A en el orificio de la
palanca del embrague I, y bloquee con la arandela y la
tuerca B.
¡ATENCIÓN! La palanca se suministra ya regulada.
Si, tras el montaje, el cable del embrague no funciona
correctamente, vea el capítulo Regulación de la palanca de
control de la marcha (apartado MANTENIMIENTO).
MONTAJE DEL CABLE DE MARCHA ATRÁS (Fig. 23)
• Introduzca la parte terminal del cable de la marcha atrás
L en el alojamiento de la palanca de marcha atrás M
practicado en el cambio;
• Introduzca la funda N en el bloque de retención O
montado en el cambio.
¡ATENCIÓN! La palanca se suministra ya regulada. Si,
tras el montaje, el cable de la marcha atrás no funciona
correctamente, contacte con un centro de asistencia
autorizado.
Tento stroj sa dá použiť aj s menšou šírkou frézovania
(80 cm):
• Odmontujte predĺženie frézy D z frézy odmontovaním
čapom (F, Obr.21)
• Odmontujte ochranný disk E z predĺženia frézy D
odmontovaním čapom (G, Obr.21)
• Namontujte ochranný disk na frézu, pričom skontrolujte,
či sú správne zarovnané upevňovacie otvory H (Obr.21A).
• Zaistite ochranný disk príslušnou čapom (G, Obr.21A).
Potom čap zaistite hačikom, aby sa nemohol vyvliecť.
MONTÁŽ LANKA NA OVLÁDANIE POHONU (Obr.22)
• Odmontujte maticu a podložku B z čapu A;
• Vsuňte pružinu P do otvoru skrutky C;
• Namontujte závitovú časť čapu A do otvoru na ovládaciu
páku spojky I a zablokujte ju podložkou a maticou B.
POZOR! Páka je nastavená už z výroby. Ak sa po montáži
lanka zaradenie spojky nefunguje správne, pozrite si kapitolu
„Regulácia páky na ovládanie chodu“ (odsek „ÚDRŽBA“).
MONTÁŽ LANKA NA ZARADENIE SPIATOČKY (Obr.23)
• Koncovú časť lanka na zaradenie spiatočky L vsuňte
do miesta na ovládaciu páku zaradenia spiatočky M na
prevodovke;
• Vsuňte puzdro N do čapu zarážky puzdra O
namontovaného na prevodovke.
POZOR! Páka je nastavená už z výroby. Ak po
namontovaní lanka spiatočky niečo nefunguje, požiadajte o
pomoc autorizované servisné stredisko.

22
24 25 26 27
Italiano English Français
ASSEMBLAGGIO ASSEMBLY ASSEMBLAGE
MONTAGGIO CARTER DI PROTEZIONE
Per montare i carter di protezione frese:
• Allineare i fori B e montare la staffa di supporto A
utilizzando le viti, le rondelle e i dadi C (Fig.24).
• Montare le due staffe di supporto laterali D ed E utilizzando
le apposite viti e rondelle F (Fig.25).
ATTENZIONE: Non serrare completamente i dadi
delle stae di supporto per permettere una maggior
semplicità nel montaggio dei carter di protezione
frese.
• Allineare i fori delle staffe di supporto I ed L con i rispettivi
fori dei carter di protezione (Fig.26).
• Fissare i carter di protezione frese (G, fig.27) con le apposite
viti, rondelle e dadi H.
ATTENZIONE: Ricordarsi una volta completato il
montaggio dei carter di protezione frese di serrare
completamente i dadi delle stae di supporto.
FITTING THE SAFETY GUARDS
To fit the rotor safety guards:
• Align the holes B and fit the bracket A using the screws,
washers and nuts C (Fig.24).
• Fit the two side brackets D and E with the relative screws
and washers F (Fig.25).
WARNING: Do not completely tighten the bracket nuts
to facilitate installation of the rotor guards.
• Align the bracket holes "I" and "L" with the respective holes
in the guards (Fig.26).
• Secure the rotors safety guards (G, Fig.15) using screws,
washers and nuts "H".
WARNING: Remember to fully tighten the bracket nuts
once the rotor guards have been installed.
MONTAGE DES CARTERS DE PROTECTION
Pour monter les carters de protection des fraises :
• Aligner les orifices B et monter l'étrier de support A en
utilisant les vis, les rondelles et les écrous C (Fig.24).
• Monter les deux étriers de support latéraux D et E à l'aide
des vis et des rondelles F (Fig.25).
ATTENTION : Ne pas serrer les écrous des étriers de
support à fond pour faciliter le montage des carters de
protection des fraises.
• Aligner les orifices des étriers de support I et L par rapport
aux orifices correspondants sur les carters de protection
(Fig.26).
• Fixer les carters de protection des fraises (G, Fig.27) à l'aide
des vis, des rondelles et des écrous H.
ATTENTION : Après avoir monté les carters de
protection des fraises, se rappeler de serrer à fond les
écrous des étriers de support.
PREPARAZIONE PER IL LAVORO PREPARING FOR WORK PRÉPARATION DU TRAVAIL
Manubrio
Per trovare la corretta posizione di lavoro dell’operatore, il
manubrio può essere regolato nelle tre posizioni orizzontali
utilizzando la leva di regolazione orizzontale del manubrio
(I, Fig. 28) e nelle 5 posizioni in altezza utilizzando la leva di
regolazione verticale del manubrio (P, Fig. 28).
Handlebar
To find the most comfortable working position for the
operator, the handlebar can be adjusted through three
horizontal positions, using the horizontal adjustment
lever (I, Fig. 28), and 5 height positions, using the vertical
adjustment lever (P, Fig. 28).
Guidon
Pour trouver la position correcte de travail de l'opérateur, le
guidon peut être réglé dans les 3 positions horizontales à
l'aide du levier de réglage horizontal du guidon (I, Fig. 28) et
dans les 5 positions en hauteur à l'aide du levier de réglage
vertical du guidon (P, Fig. 28).

23
28
Deutsch Español Slovensky
MONTAGE MONTAJE MONTÁŽ
EINBAU DES SCHUTZGEHÄUSES
Einbau der Fräsen-Schutzgehäuse:
• Fluchten Sie die Bohrungen B und montieren Sie den
Haltebügel A mit den Schrauben, Unterlegscheiben und
Muttern C (Abb.24).
• Bauen Sie die beiden seitlichen Haltebügel D und E mithilfe
der entsprechenden Schrauben und Unterlegscheiben F ein
(Abb.25).
ACHTUNG: Die Muttern der Haltebügel nicht ganz
anziehen, damit sich die Fräsen-Schutzgehäuse
einfacher montieren lassen.
• Die Bohrungen der Haltebügel I und L mit den jeweiligen
Bohrungen der Schutzgehäuse ausrichten (Abb. 26).
• Die Schutzgehäuse (G, Abb. 27) mit den entsprechenden
Schrauben, Unterlegscheiben und Muttern H anbringen.
ACHTUNG: Nach Montage der Fräsen-Schutzgehäuse
nicht vergessen, die Muttern der Haltebügel anzuziehen.
MONTAJE DE LOS CÁRTERES DE PROTECCIÓN
Para montar los cárteres de protección de las fresas:
• Alinee los orificios B y monte el soporte A con los tornillos,
las arandelas y las tuercas C (Fig. 24).
• Monte los dos soportes laterales D y E y fíjelos con los
tornillos y tuercas F (Fig. 25).
ATENCIÓN: Para facilitar el montaje de los cárteres de
protección de las fresas, no apriete a fondo las tuercas
de los soportes.
• Alinee los orificios de los soportes I y L con los orificios
correspondientes de los cárteres de protección (Fig. 26).
• Fije los cárteres de protección de las fresas (G, Fig. 27) con
los tornillos, arandelas y tuercas H.
ATENCIÓN: Después de montar los cárteres de
protección de las fresas, recuerde apretar a fondo las
tuercas de los soportes.
MONTÁŽ OCHRANNÉHO KRYTU
Pri montáži ochranných krytov fréz:
• Zarovnajte otvory B a namontujte podpornú konzolu A
skrutkami, podložkami a maticami C (Obr.24).
• Namontujte dve bočné podporné konzoly D a E vhodnými
skrutkami a podložkami F (Obr.25).
POZOR: Matice konzol neuťahujte úplne, uľahčíte si
tým montáž ochranných krytov fréz.
• Zarovnajte otvory podporných konzol I a L s príslušnými
otvormi na ochranných krytoch (Obr. 26).
• Upevnite ochranný kryt fréz (G, Obr. 27) príslušnými
skrutkami, podložkami a maticami H.
POZOR: Po ukončení montáže ochranných krytov fréz
nezabudnite úplne dotiahnuť matice podporných
konzol.
VORBEREITUNG AUF DIE ARBEIT PREPARACIÓN PARA LA LABOR PRÍPRAVA NA PRÁCU SO STROJOM
Lenkholm
Der Lenkholm mit dem waagrechten Einstellhebel (I, Abb.28)
3-fach seitlich und mit dem senkrechten Einstellhebel
(P, Abb. 28) 5-fach in der Höhe auf die arbeitsgerechte
Position verstellt werden.
Manillar
Para mayor comodidad del conductor, el manillar se puede
ajustar en tres posiciones horizontales mediante la palanca
(I, Fig. 28) y en 5 posiciones verticales con la palanca
(P, Fig. 28).
Držadlo
Aby ste našli správnu pracovnú polohu pre pracovníka
možno držadlo nastaviť do troch vodorovných polôh
pomocou páky vodorovnej regulácie držadla (I, Obr. 28) a
do 5 výškových polôh pomocou páky vertikálnej regulácie
držadla (P, Obr. 28).

24
Italiano English Français
AVVIAMENTO STARTING MISE EN ROUTE
LEGGERE ATTENTAMENTE ANCHE IL MANUALE DEL MOTORE.
CARBURANTE
ATTENZIONE: la benzina e il diesel sono carburanti
altamente infiammabili. Prestare estrema attenzione
durante l’uso di benzina o diesel. Non fumare né portare
fonti di fuoco o fiamme in prossimità del carburante o
della motozappa.
ATTENZIONE: il carburante e le relative esalazioni possono
causare gravi lesioni se inalate o se portate a contatto
con la cute. Per tale motivo, prestare attenzione durante
il maneggiamento del carburante e accertarsi che sia
disponibile una ventilazione adeguata.
ATTENZIONE: prestare attenzione al rischio di
avvelenamento da monossido di carbonio.
- Conservare e trasportare la benzina o il diesel in contenitori
omologati per tale uso.
- Maneggiare il carburante all’aperto, in assenza di scintille o
fiamme.
- Scegliere un terreno libero, arrestare la motozappa e attendere il
raffreddamento del motore prima di procedere al rifornimento.
- Svitare lentamente il tappo del serbatoio in modo da liberare la
pressione interna ed evitare che il carburante fuoriesca dai lati del
tappo.
- Avvitare saldamente il tappo del serbatoio al termine del
rifornimento. Se il tappo del serbatoio non viene avvitato
adeguatamente, le vibrazioni provocate dall’unità possono
causare lo svitamento o la caduta del tappo e la fuoriuscita di
quantità di carburante.
- Con un panno eliminare dall’unità le tracce di carburante e
attendere che le altre quantità fuoriuscite evaporino. Allontanarsi
di 3 m dal luogo del rifornimento prima di riavviare il motore.
- Non tentare mai di incendiare le quantità di carburante
fuoriuscito.
- Conservare il carburante in un luogo fresco, asciutto e
adeguatamente ventilato.
- Non collocare mai la motozappa in aree con materiale
infiammabile, ad esempio, foglie secche, paglia, carta ecc.
- Conservare l’unità e il carburante in un’area in cui le esalazioni del
carburante non possano venire a contatto con scintille o fiamme
esposte provenienti da bollitori, motori o interruttori elettrici,
caldaie ecc.
- Non togliere mai il tappo del serbatoio con il motore in funzione.
- Non usare mai il carburante per le operazioni di pulizia.
- Prestare attenzione a non sporcare i propri indumenti con il
carburante. In caso di versamento di carburante sui propri
indumenti, sostituirli. Lavare le parti del corpo venute a contatto
con il carburante. Utilizzare acqua e sapone.
- Non esporre il serbatoio del carburante alla luce diretta del sole.
- Tenere il carburante fuori dalla portata dei bambini.
CAREFULLY READ THE ENGINE INSTRUCTION MANUAL.
FUEL HANDLING
WARNING: gasoline and diesel are extremely flammable
fuels. Exercise extreme caution when handling gasoline
or diesel fuel. Do not smoke or bring any fire or flame near
the fuel or the motorhoe.
WARNING: Fuel and fuel fumes can cause serious injury
when inhaled or allowed to come in contact with the skin.
For this reason observe caution when handling fuel and
make sure there is adequate ventilation.
WARNING: Beware of carbon monoxide poisoning.
- Store and transport gasoline or diesel fuel only in containers
approved specifically for the purpose.
- Handle fuel outdoors where there are no sparks or flames.
- Select bare ground, stop engine, and allow to cool before
refuelling.
- Loosen fuel cap slowly to release pressure and to keep fuel from
escaping around the cap.
- Tighten fuel cap securely after refuelling. Unit vibration can cause
an improperly tightened fuel cap to loosen or come off and spill
quantities of fuel.
- Wipe spilled fuel from the unit and allow remaining fuel to
evaporate. Move 3 m away from refuelling site before starting
engine.
- Never attempt to burn off spilled fuel under any circumstances.
- Store fuel in a cool, dry, well ventilated place.
- Never place the motorhoe in a combustible area such as dry
leaves, straw, paper, etc.
- Store the unit and fuel in an area where fuel vapours cannot reach
sparks or open flames from water heaters, electric motors or
switches, furnaces, etc.
- Never take the cap off the tank when the engine is running.
- Never use fuel for cleaning operations.
- Take care not to get fuel on your clothing. If you have spilt fuel on
yourself or your clothes, change your clothes. Wash any part of
your body that has come in contact with fuel. Use soap and water.
- Don’t expose fuel tank to direct sunlight.
- Keep fuel out of reach of children.
LIRE ATTENTIVEMENT LE MANUEL DU MOTEUR.
MANIPULATION DU CARBURANT
AVERTISSEMENT : Essence et Diesel sont des carburants
hautement inflammables. Manipuler l'essence ou le
Diesel avec une extrême précaution. Ne fumez pas ou
ne produisez pas de source de flamme à proximité du
carburant ou de la motobineuse.
AVERTISSEMENT : la respiration de vapeurs de carburant
ou leur contact avec la peau peut provoquer des blessures
graves. Il convient donc de manipuler le carburant avec
précaution et de s’assurer d’opérer dans des endroits bien
aérés.
AVERTISSEMENT : soyez vigilant face au risque
d’empoisonnement au monoxyde de carbone.
- Conserver et transporter l'essence ou le Diesel dans des bidons
homologués pour cet usage.
- Manipulez le carburant à l’extérieur, en l’absence de toute source
d’étincelles ou de flammes.
- Choisissez une surface dégagée, coupez le moteur et laissez
refroidir avant de faire le plein.
- Dévissez lentement le bouchon de carburant afin de libérer la
pression et d’empêcher le carburant de s’écouler par le bouchon.
- Resserrez fermement le bouchon de carburant après remplissage.
Sous l’effet des vibrations de la machine, un bouchon mal refermé
peut se desserrer, voire s’ouvrir, entraînant un déversement du
carburant.
- Essuyez toute trace de carburant sur la motobineuse et attendez
quelques secondes pour que les traces résiduelles s’évaporent.
Éloignez-vous de 3 m de la zone de remplissage avant de
démarrer le moteur.
- Ne tentez en aucun cas de brûler le carburant déversé.
- Entreposez le carburant dans un endroit sec, frais et suffisamment
ventilé.
- Ne placez jamais la motobineuse sur un matériau facilement
inflammable, notamment sur des feuilles mortes, de la paille, du
papier, etc.
- Entreposez la machine et le carburant dans un endroit à l’abri de
toute source d’étincelles ou de flammes nues, de chauffe-eau, de
moteurs électriques, d’interrupteurs, de fours, etc., susceptibles
d’enflammer les vapeurs de carburant.
- Ne retirez jamais le bouchon du réservoir de carburant lorsque le
moteur tourne.
- N’utilisez jamais le carburant pour le nettoyage.
- Veillez à ne pas souiller vos vêtements de carburant. Si du
carburant est déversé sur une partie de votre corps ou sur vos
vêtements, changez-vous immédiatement. Rincez à l’eau et au
savon la partie de votre corps sur laquelle le carburant. s’est
déversé.
- N’exposez pas le réservoir de carburant directement au soleil.
- Maintenez le carburant hors de la portée des enfants.

25
Deutsch Español Slovensky
ANLASSEN PUESTA EN MARCHA ŠTARTOVANIE
LESEN SIE EBENFALLS DIE BETRIEBSANLEITUNG DES MOTORS
DURCH.
UNGANG MIT KRAFTSTOFF
VORSICHT: Benzin und Diesel sind leicht entzündliche
Kraftstoffe. Bei der Handhabung von Benzin oder Diesel
ist daher größte Vorsicht geboten. Rauchen Sie nicht, und
halten Sie Feuer und offenes Licht von Kraftstoff und dem
Motorhacke fern.
VORSICHT: Kraftstoff und Kraftstoffdämpfe können
beim Einatmen oder bei Kontakt mit der Haut schwere
Verletzungen verursachen. Seien Sie daher beim Umgang
mit Kraftstoff vorsichtig und sorgen Sie für gute Belüftung.
VORSICHT: Achten Sie auf die Gefahr einer
Kohlenstoffmonoxidvergiftung.
- Lagern und befördern Sie Benzin oder Diesel in für diesen Zweck
zugelassenen Behältern.
- Bleiben Sie beim Umgang mit Kraftstoff im Freien und abseits von
Funken und offenem Licht.
- Wählen Sie einen bewuchsfreien Untergrund, stellen Sie die
Maschine ab und lassen Sie sie vor dem Tanken abkühlen.
- Lösen Sie den Kraftstoffverschluss langsam, um Druck abzubauen
und damit kein Kraftstoff im Bereich um den Verschluss austritt.
- Schrauben Sie den Kraftstoffverschluss nach dem Tanken wieder
fest auf. Durch die Vibrationen des Geräts kann es dazu kommen,
dass ein nicht ausreichend festgeschraubter Kraftstoffdeckel sich
löst oder abfällt und Kraftstoff verschüttet wird.
- Wischen Sie ausgetretenen Kraftstoff vom Gerät ab und lassen
Sie restlichen Kraftstoff verdunsten. Entfernen Sie sich 3 m vom
Tankplatz, bevor Sie den Motor wieder anwerfen.
- Versuchen Sie unter keinen Umständen, verschütteten Kraftstoff
wegzubrennen.
- Lagern Sie Kraftstoff an einem kühlen, trockenen, gut belüfteten
Ort.
- Halten Sie den Motorhacke fern von Bereichen mit brennbaren
Stoffen wie Laub, Stroh, Papier usw.
- Bewahren Sie das Gerät und den Kraftstoff in einem Bereich auf,
in dem Kraftstoffdämpfe nicht mit Funken und offenem Licht aus
Boilern, Elektromotoren, Schaltern, Öfen usw. in Kontakt kommen
können.
- Nehmen Sie niemals bei laufendem Motor den Tankverschluss ab.
- Verwenden Sie niemals Kraftstoff zum Reinigen.
- Achten Sie darauf, dass kein Kraftstoff auf Ihre Kleidung gelangt.
Wenn Kraftstoff auf Ihren Körper oder auf Ihre Kleider gelangt
ist, wechseln Sie die Kleider. Waschen Sie Körperteile, die mit
Kraftstoff in Kontakt gekommen sind. Verwenden Sie hierzu Seife
und Wasser.
- Setzen Sie den Kraftstofftank nicht direkter Sonnenbestrahlung
aus.
- Bewahren Sie Kraftstoff außerhalb der Reichweite von Kindern
auf.
LEER ATENTAMENTE EL MANUAL DEL MOTOR.
MANEJO DEL COMBUSTIBILE
ADVERTENCIA: la gasolina y el gasóleo son combustibles
altamente inflamables. Tenga mucho cuidado durante el
uso de gasolina o gasóleo. No fume ni acerque llamas o
fuego al combustible o a la motoazada.
ADVERTENCIA: El combustible y las emanaciones de
combustible pueden causar lesiones graves por inhalación
o por contacto con la piel. Por este motivo, es preciso
adoptar precauciones para manejar combustible y
asegurarse de que existe una ventilación adecuada.
ADVERTENCIA: Existe peligro de envenenamiento por
monóxido de carbono.
- Conserve y transporte la gasolina o el gasóleo en recipientes
homologados para este uso.
- Maneje el combustible al aire libre y en lugares donde no haya
chispas ni llamas.
- Seleccione un solar, pare el motor y deje que se enfríe antes de
volver a cargar combustible.
- Afloje lentamente el tapón del depósito de combustible para
liberar la presión y evitar que el combustible se escape alrededor
del tapón.
- Apriete firmemente el tapón del depósito de combustible
después de cargar el combustible. Si el tapón del depósito
no está correctamente apretado, las vibraciones de la unidad
pueden provocar que el tapón se afloje o se salga y se derrame
combustible.
- Elimine de la unidad el combustible que se haya derramado
y deje que se evapore el restante. Antes de arrancar el motor,
aléjese unos 3 metros del lugar donde ha repostado.
- No queme nunca el combustible que se haya derramado.
- Guarde el combustible en un lugar fresco, seco y bien ventilado.
- No coloque nunca la motoazada en un lugar donde haya
elementos combustibles, como hojas secas, paja, papel, etc.
- Guarde la unidad y el combustible en un lugar donde los vapores
del combustible no puedan entrar en contacto con chispas
o llamas de calentadores de agua, motores o interruptores
eléctricos, hornos, etc.
- No quite nunca el tapón del depósito con el motor en
funcionamiento.
- No utilice nunca combustible para operaciones de limpieza.
- Tenga cuidado para que el combustible no entre en contacto con
su ropa. Si el combustible llegara a impregnar la ropa o la piel,
cámbiese de ropa y lávese a fondo hasta eliminar cualquier resto
de combustible, con agua y jabón.
- No exponga el depósito de combustible a la luz solar directa.
- Mantenga el combustible fuera del alcance de los niños.
POZORNE SI PREČÍTAJTE AJ PRÍRUČKU MOTORA.
Manipulácia s palivom
POZOR: benzín a nafta sú veľmi horľavé palivá. Pri
manipulácii s benzínom alebo naftou dávajte veľký
pozor. V blízkosti paliva, ani preorávač nefajčte, ani sa
nepribližujte s otvoreným ohňom.
POZOR: Palivo a spaliny môžu po vdýchnutí alebo po
kontakte s pokožkou spôsobiť vážne zranenia. Z tohto
dôvodu buďte pri manipulácii s palivom mimoriadne
opatrný a zabezpečte dostatočné vetranie.
POZOR: Dávajte pozor na ochranu pred otravou oxidom
uhoľnatým.
- Benzín alebo naftu skladujte a prepravujte v nádobách vhodných
na daný účel.
- S palivom manipulujte vonku, kde nehrozí nebezpečenstvo
vzniku iskier alebo otvoreného plameňa.
- Pred doplnením paliva položte stroj na netrávnatý povrch (napr.
betón, dlažba,....), zastavte motor a nechajte ho vychladnúť.
- Pomaly uvoľnite viečko palivovej nádrže, aby sa uvoľnil tlak a aby
neunikalo palivo.
- Po doplnení paliva viečko pevne utiahnite. Vibrácie jednotky
môžu spôsobiť uvoľnenie nesprávne utiahnutého viečka alebo
únik veľkého množstva paliva.
- Utrite palivo, ktoré sa vylialo na preorávač a zvyšky paliva
nechajte odpariť. Pred naštartovaním motora presuňte stroj 3 m
od miesta, kde sa dopĺňalo palivo.
- Za žiadnych okolností sa nepokúšajte vyliate palivo spáliť.
- Palivo skladujte na chladnom, suchom a dobre vetranom mieste.
- Preorávač nikdy neklaďte na miesto, kde sa nachádza horľavý
materiál (hrozí vznik vzplanutia), ako suché lístie, slama, papier a
pod.
- Preorávač a palivo skladujte na mieste, kde výpary paliva
nemôžu prísť do styku s iskrami alebo s otvoreným plameňom
z ohrievačov vody, plynových kotlov, elektrických motorov a
vypínačov, sporákov a pod.
- Viečko palivovej nádrže nikdy neuvoľňujte, kým je motor v chode.
- Palivo nikdy nepoužívajte na čistenie stroja.
- Dávajte pozor, aby sa vám palivo nedostalo na odev. Ak sa vám
palivo vylialo na pokožku umyte si všetky zasiahnuté miesta
vodou a mydlom. Ak palivo zasiahlo odev - prezlečte si ho.
- Nádrž na benzín nevystavujte priamemu slnečnému svetlu.
- Palivo uskladňujte mimo dosahu detí.

26
Italiano English Français
AVVIAMENTO STARTING MISE EN ROUTE
ATTENZIONE: Indossare sempre guanti protettivi durante
le operazioni di manutenzione.
Carburante (non fumare) (Fig. 28)
Questa unità è dotata di un motore a quattro tempi. Conservare il
carburante in contenitori puliti, omologati per tale uso (Fig. 29).
MOTORI A BENZINA
CARBURANTE CONSIGLIATO: QUESTO MOTORE È CERTIFICATO PER
ESSERE ALIMENTATO DA BENZINA SENZA PIOMBO PER VEICOLI CON
UN NUMERO DI OTTANI DI 89 ([R + M] / 2) O SUPERIORE (Fig. 30).
Non utilizzare mai benzina vecchia o sporca o miscele olio/
benzina. Evitare l’introduzione di sporco o acqua nel serbatoio del
carburante.
MOTORI DIESEL
- Utilizzare solo combustibile diesel raccomandato. L’uso di
combustibile non raccomandato potrebbe danneggiare il
motore.
- Il combustibile potrebbe avere un numero di cetano
superiore a 45, ciò al fine di evitare difficoltà di accensione
ed emissione di fumo di scarico bianco.
- Non si raccomandano combustibili sostitutivi del
gasolio, in quanto potrebbero danneggiare i componenti
dell’apparato d’iniezione.
- Il combustibile deve essere privo di impurità ed acqua, i
quali potrebbero causare gravi problemi agli iniettori e alla
pompa d’iniezione.
Riempimento del serbatoio
ATTENZIONE: Attenersi alle istruzioni di sicurezza relative
all’uso del carburante. Arrestare sempre il motore prima di
eseguire il rifornimento. Non aggiungere mai il carburante
all’unità quando il motore è in funzione o è ancora caldo.
Allontanarsi di almeno 3 m dal luogo del rifornimento
prima di riavviare il motore. NON FUMARE.
1. Pulire le superfici intorno al tappo del serbatoio per evitare
contaminazioni.
2. Svitare lentamente il tappo del serbatoio.
3. Versare con cautela il carburante nel serbatoio. Evitare
versamenti.
4. Prima di riapplicare il tappo del serbatoio, pulire e ispezionare la
guarnizione.
5. Riapplicare immediatamente il tappo del serbatoio e stringerlo
con le mani. Eliminare con un panno le eventuali tracce di
carburante versato.
ATTENZIONE: verificare che non vi siano perdite di
carburante; se viene rilevata una perdita, eliminarla prima
di utilizzare l’unità. Se necessario, rivolgersi a un’officina
autorizzata.
WARNING: Always wear protective gloves when
performing maintenance.
Fueling (Do Not Smoke!) (Fig. 28)
This product is powered by a 4-cycle engine. Store and transport
fuel in a clean container approved for the purpose (Fig. 29).
GASOLINE ENGINES
RECOMMENDED FUEL: THIS ENGINE IS CERTIFIED TO OPERATE ON
UNLEADED GASOLINE INTENDED FOR AUTOMOTIVE USE WITH AN
OCTANE RATING OF 89 ([R + M] / 2) OR HIGHER (Fig. 30).
Never use stale or contaminated gasoline or an oil/gasoline mixture.
Avoid getting dirt or water in the fuel tank.
DIESEL ENGINES
- Use only recommended diesel fuel. The use of non-
recommended fuel could cause damage to the engine.
- The fuel in question could have a cetane number higher
than 45, in order to avoid ignition problems and prevent
the emission of white exhaust gas.
- Fuels offered as alternatives to diesel are not
recommended, as they could cause damage to the
components of the injection system.
- The fuel must be free of impurities and water, which could
cause serious problems to the fuel injectors and the fuel
injection pump.
Filling the Tank
WARNING: Follow safety instruction for fuel handling.
Always shut off engine before fuelling. Never add fuel to
a machine with a running or hot engine. Move at least 3 m
from refuelling site before starting engin. DO NOT SMOKE!
1. Clean surface around fuel cap to prevent contamination.
2. Loosen fuel cap slowly.
3. Carefully pour fuel into the tank. Avoid spillage.
4. Prior to replacing the fuel cap, clean and inspect the gasket.
5. Immediately replace fuel cap and hand tighten. Wipe up any fuel
spillage.
WARNING: Check for fuel leaks, if any are found, correct
before use. Contact a Servicing Dealer if necessary.
AVERTISSEMENT : Il convient donc de toujours porter des
gants de protection avant toute intervention.
Alimentation en carburant (ne pas fumer !) (Fig. 28)
Ce produit est équipé d’un moteur à 4 temps. Conserver le
carburant dans des récipients propres homologués pour cet usage
(Fig. 29).
MOTEUR À ESSENCE
CARBURANT RECOMMANDÉ :CE MOTEUR EST CERTIFIÉ POUR
FONCTIONNER AVEC DE L’ESSENCE SANS PLOMB POUR USAGE
AUTOMOBILE PRÉSENTANT UN INDICE D’OCTANE DE 89 ([R + M] / 2)
OU SUPÉRIEUR (Fig. 30).
N’utilisez jamais d’essence éventée ou souillée, ni de mélange huile/
essence. Evitez de laisser pénétrer des impuretés ou de l’eau dans le
réservoir d’essence.
MOTEURS DIESEL
- Utiliser exclusivement le type de Diesel recommandé.
L'utilisation de carburant non recommandé risque
d'endommager le moteur.
- Le carburant pourrait avoir un indice de cétane supérieur à
45 pour éviter les difficultés à l'allumage et le dégagement
de fumée blanche à l'échappement.
- Il est préférable de ne pas utiliser de carburants de
substitution du gazole qui risquent d'endommager les
composants du système d'injection.
- Le carburant doit être limpide et sans trace d'eau, éléments
qui pourraient endommager sérieusement les injecteurs et
la pompe d'injection.
Remplissage du réservoir
AVERTISSEMENT : Respectez les mesures de sécurité pour
la manipulation du carburant. Coupez toujours le moteur
avant d’approvisionner la machine en carburant. Ne faites
jamais l’appoint de carburant alors que le moteur tourne
ou s’il est encore chaud. Déplacez-vous à au moins 3 mètres
de la zone de remplissage avant de démarrer le moteur. NE
FUMEZ PAS !
1. Nettoyez la surface autour du bouchon de carburant afin d’éviter
toute contamination.
2. Dévissez lentement le bouchon de carburant.
3. Versez soigneusement le carburant dans le réservoir. Évitez de
renverser du carburant.
4. Avant de remonter le bouchon de carburant, nettoyez et
inspectez le joint d’étanchéité.
5. Remontez et serrez immédiatement le bouchon de carburant.
Essuyez tout déversement de carburant.
AVERTISSEMENT : contrôlez la présence éventuelle de
fuites de carburant, et rectifiez le cas échéant. Contactez
un réparateur agréé si nécessaire.

27
Deutsch Español Slovensky
ANLASSEN PUESTA EN MARCHA ŠTARTOVANIE
VORSICHT: Tragen Sie bei Wartungsarbeiten stets
Schutzhandschuhe.
Tanken (nicht rauchen!) (Abb. 28)
Dieses Produkt wird von einem Viertaktmotor angetrieben. Lagern
Sie den Kraftstoff in sauberen und für diesen Zweck zugelassenen
Behältern (Abb. 29).
BENZINMOTOREN
EMPFOHLENER KRAFTSTOFF: DIESER MOTOR IST FÜR DEN
BETRIEB MIT BLEIFREIEM BENZIN FÜR KRAFTFAHRZEUGE MIT EINER
OKTANZAHL VON 89 ([R + M] / 2) ODER HÖHER ZUGELASSEN
(Abb. 30).
Verwenden Sie niemals überlagertes oder verschmutztes Benzin
oder ein Zweitaktgemisch. Lassen Sie keinen Schmutz und kein
Wasser in den Tank gelangen.
DIESELMOTOREN
- Nur empfohlenen Diesel-Kraftstoff verwenden. Durch die
Verwendung von nicht empfohlenem Kraftstoff könnte der
Motor beschädigt werden.
- Der Kraftstoff könnte eine Cetanzahl über 45 haben, um
Zündschwierigkeiten und weiße Abgase zu vermeiden.
- Diesel-Ersatzkraftstoffe werden nicht empfohlen, da sie die
Komponenten des Einspritzsystems beschädigen könnten.
- Der Kraftstoff muss frei von Schmutz und Wasser sein, da
dadurch ernste Probleme an den Einspritzern und an der
Einspritzpumpe verursacht werden könnten.
Tanken
VORSICHT: Beachten Sie die Sicherheitsvorschriften für
den Umgang mit Kraftstoff Stellen Sie vor dem Tanken
stets den Motor ab. Füllen Sie niemals bei laufendem
oder heißem Motor Kraftstoff nach. Entfernen Sie sich
mindestens 3 m vom Tankplatz, bevor Sie den Motor
wieder anwerfen. NICHT RAUCHEN!
1. Reinigen Sie den Bereich um den Tankverschluss, um eine
Verschmutzung zu vermeiden.
2. Lösen Sie den Tankverschluss langsam.
3. Füllen Sie vorsichtig Kraftstoff in den Tank. Vermeiden Sie ein
Verschütten.
4. Reinigen und säubern Sie vor dem Aufsetzen des Tankdeckels
das Sieb.
5. Setzen Sie den Tankverschluss sofort wieder auf und ziehen Sie
ihn von Hand fest. Wischen Sie verschütteten Kraftstoff auf.
VORSICHT: Achten Sie vor der Verwendung auf eventuelle
Kraftstofflecks und beseitigen Sie diese. Wenden Sie sich
ggf. an einen Wartungsbetrieb.
ADVERTENCIA: Lleve siempre guantes protectores cuando
realice operaciones de mantenimiento.
Alimentación de combustible (¡No fume!) (Fig. 28)
Este producto funciona mediante un motor de 4 ciclos. Conserve el
combustible en recipientes limpios y homologados para este uso
(Fig. 29).
MOTORES DE GASOLINA
COMBUSTIBLE RECOMENDADO: ESTE MOTOR CUENTA CON LA
CERTIFICACIÓN PARA FUNCIONAR CON GASOLINA SIN PLOMO
DESTINADA A SU USO EN AUTOMOCIÓN CON UN ÍNDICE DE
OCTANO DE 89 ([R + M] / 2) O MÁS (Fig. 30).
Jamás utilice gasolina pasada o sucia ni mezcle gasolina y aceite.
Evite la entrada de suciedad o agua en el depósito de combustible.
MOTORES DIÉSEL
- Utilice solo el combustible diésel indicado. El uso de un
combustible distinto del indicado puede dañar el motor.
- El combustible puede tener un índice de cetano superior
a 45, a fin de evitar dificultades de arranque y emisión de
humo de escape blanco.
- Se recomienda no utilizar otros combustibles en
sustitución del gasóleo, ya que podrían dañar los
componentes del sistema de inyección.
- El combustible no debe contener impurezas ni agua, las
cuales podrían dañar seriamente los inyectores y la bomba
de inyección.
Llenado del depósito
ADVERTENCIA: Siga las instrucciones de seguridad
relativas al manejo de combustible. Apague siempre el
motor antes de repostar. No añada nunca combustible
a una máquina mientras el motor esté en marcha o
caliente. Aléjese al menos 3 metros del lugar de recarga de
combustible antes de arrancar el motor. ¡NO FUME!
1. Limpie la superficie alrededor del tapón del depósito de
combustible para evitar la contaminación.
2. Afloje lentamente el tapón del depósito de combustible.
3. Vierta con el combustible en el depósito con mucho cuidado.
Evite que el combustible se derrame.
4. Antes de volver a poner el tapón del depósito, limpie e
inspeccione la junta.
5. Vuelva a poner inmediatamente el tapón del depósito y apriételo
con la mano. Limpie el combustible que se haya derramado.
ADVERTENCIA: Compruebe la existencia de fugas de
combustible; si detecta alguna, corríjala antes de utilizar
la unidad. Póngase en contacto con un concesionario de
servicio si es necesario.
POZOR: Pri vykonávaní údržby noste vždy ochranné
rukavice.
Dopĺňanie paliva (Nefajčite!) (Obr.28)
Tento stroj je poháňaný 4-taktným motorom. Palivo skladujte v
nádobách vhodných na daný účel (Obr.29).
BENZÍNOVÉ MOTORY
ODPORÚČANÉ PALIVO: TENTO MOTOR JE URČENÝ NA PRÁCU
S BEZOLOVNATÝM BENZÍNOM URČENÝM PRE AUTOMOBILY, S
OKTÁNOVÝM ČÍSLOM 89 ([R + M] / 2) ALEBO VYŠŠÍM (Obr.30).
Nikdy nepoužívajte starý alebo znečistený benzín alebo zmes oleja a
benzínu. Nedovoľte, aby sa do palivovej nádrže dostala špina alebo
voda.
DIESELOVÉ MOTORY
- Pouћívajte iba odporúčanú motorovú naftu. Pouћitie
neodporučeného paliva by mohlo poškodiť motor.
- Cetánové číslo paliva by mohlo presiahnuť hodnotu 45 s
účelom predchádzať problémom so zapaľovaním a s emisiou
bieleho dymu z výfuku.
- Neodporúča sa pouћiť náhradné palivo za naftu, pretoћe
by mohlo poškodiť komponenty vstrekovacieho zariadenia.
- Palivo nesmie obsahovať nečistoty ani vodu, pretoћe by
to mohlo spôsobiť váћne problémy na vstrekovačoch a na
vstrekovacom čerpadle.
Plnenie nádrže
POZOR: Pri manipulácii s palivom dodržiavajte
bezpečnostné pokyny. Pred dopĺňaním paliva vždy vypnite
motor. Palivo nikdy nedopĺňajte, keď je motor v chode alebo
keď je horúci. Pred naštartovaním motora premiestnite stroj
aspoň 3 m od miesta doplnenia paliva. NEFAJČITE!
1. Aby ste zabránili znečisteniu paliva v nádrži, očistite najprv povrch
nádrže okolo uzáveru.
2. Uzáver nádrže pomaly uvoľnite.
3. Pomaly nalejte palivo do nádrže. Zabráňte rozliatiu.
4. Pred vrátením uzáveru nádrže na miesto očistite a skontrolujte
tesnenie.
5. Uzáver okamžite vráťte na miesto a utiahnite rukou. Akékoľvek
rozliate zvyšky paliva poutierajte.
POZOR: Skontrolujte úniky paliva, ak palivo niekde uniká,
odstráňte to ešte pred použitím stroja. V prípade potreby
sa obráťte na autorizované servisné stredisko.

28
28 29 30 31
p.n. 4175169
Italiano English Français
AVVIAMENTO STARTING MISE EN ROUTE
LEGGERE ATTENTAMENTE ANCHE IL MANUALE DEL
MOTORE.
ATTENZIONE! La macchina viene fornita senza olio
nel motore: leggere il manuale di uso e manutenzione
del motore.
Serbatoio dell’olio motore
Livello dell’olio motore
AVVISO: il funzionamento del motore con un livello
d’olio insufficiente può causare gravi danni al
motore. Esaminare il motore posizionandolo su una
superficie orizzontale dopo averlo arrestato.
1. Rimuovere il tappo del serbatoio dell’olio e verificare il
livello dell’olio.
2. Se il livello è basso, riempire il serbatoio con l’olio
consigliato. VEDI MANUALE MOTORE.
Versare l’olio per motore lentamente per evitare che
trabocchi, in quanto la capacità del serbatoio dell’olio è
piccola.
Se il motore viene utilizzato in maniera continua, verificare
il livello dell’olio motore e aggiungere l’olio ogni 10 ore di
utilizzo.
Utilizzare olio per motore a quattro tempi o un altro olio di
qualità equivalente altamente detergente omologato per
rispettare o superare i requisiti dei costruttori di automobili
statunitensi nelle classificazioni SG, SF. Sui contenitori
degli olii per motore classificati SG o SF, è indicata tale
designazione. Per un uso generico, a tutte le temperature,
si consiglia SAE10W-30 (diesel) e SAE15W-40 (benzina) (Fig.
31).
AVVISO: l’uso di un olio non detergente o per motori
a due tempi può ridurre la durata del motore.
L’intervallo di temperature di funzionamento per questo
motore è compreso tra -20°C e 30°C (diesel) / -10°C e 40°C
(benzina)
CAREFULLY READ THE ENGINE INSTRUCTION MANUAL.
WARNING! The machine is supplied without oil in the
engine: read the engine operating and maintenance
manual.
Engine Oil Tank
Engine oil level
CAUTION: Running the engine with insufficient
oil can cause serious engine damage. Be sure to
check the engine on a level surface with the engine
stopped.
1. Remove the oil filler cap and check the oil level.
2. If the level is low, fill to the top with the recommended oil.
SEE THE ENGINE MANUAL.
Add the engine oil slowly to avoid overflowing, as the engine
oil tank capacity is small.
If the engine is operated continuously, check the engine oil
level every 10 hours.
Use 4-stroke, or an equivalent high detergent, premium
quality motor oil certified to meet or exceed U.S. automobile
manufacturer’s requirements for service classifications SG,
SF. Motor oils classified SG, SF will show this designation on
the container. SAE10W-30 (diesel) and SAE15W-40 (gasoline)
(Fig. 31) is recommended for general, all temperature use.
CAUTION: Using nondetergent oil or 2-stroke engine
oil could shorten the engine’s service life.
The recommended operating range of this engine is -20°C
and 30°C (diesel) / -10°C and 40°C (gasoline)
LIRE ATTENTIVEMENT LE MANUEL DU MOTEUR.
ATTENTION ! À la livraison, le moteur ne contient pas
d'huile : lire le manuel d'utilisation et d'entretien du
moteur.
Réservoir d’huile moteur
Niveau d’huile moteur
MISE EN GARDE : le fonctionnement du moteur avec
une quantité d’huile insuffisante peut l’endommager
gravement. Ne manquez pas de vérifier le moteur sur
une surface plane, moteur arrêté.
1. Retirez le bouchon de remplissage d’huile et vérifiez le
niveau d’huile.
2. Remplir le réservoir avec l'huile préconisée dès que le
niveau est bas. CONSULTER LE LIVRET D’UTILISATION
DU MOTEUR.
Ajoutez l’huile moteur lentement pour éviter tout
débordement, car le réservoir d’huile du moteur est de petite
capacité.
Si le moteur tourne plusieurs heures de suite, vérifier le
niveau de l'huile toutes les 10 heures.
Utilisez de l’huile moteur 4-temps, ou une huile moteur haut
de gamme et de qualité détergente équivalente certifiée
égale ou supérieure aux exigences des classifications de
service SG, SF des constructeurs automobiles U.S. Les huiles
moteur classées SG, SF indiquent cette mention sur le bidon.
SAE10W-30 (diesel) et SAE15W-40 (essence) (Fig. 31) est
recommandée pour utilisation générale toutes températures.
MISE EN GARDE : l’utilisation d’huile non détergente
ou d’huile pour moteur 2 temps peut réduire la
longévité du moteur.
La plage de fonctionnement recommandée pour ce moteur se
situe entre -20°C et 30°C (diesel) / -10°C et 40°C (essence).

29
Deutsch Español Slovensky
ANLASSEN PUESTA EN MARCHA ŠTARTOVANIE
LESEN SIE EBENFALLS DIE BETRIEBSANLEITUNG DES
MOTORS DURCH.
ACHTUNG! Die Maschine wird ohne Ölfüllung
im Motor geliefert: Lesen Sie das Betriebs- und
Wartungshandbuch des Motors.
Motoröltank
Ölstand
ACHTUNG: Betrieb des Motors mit zu niedrigem
Ölstand kann zu schweren Schäden am Motor führen.
Prüfen Sie den Motor im Stillstand auf einer ebenen
Fläche.
1. Nehmen Sie den Deckel des Öltanks ab und prüfen Sie den
Ölstand.
2. Füllen Sie den Behälter bei niedrigem Ölstand mit der
vorgeschriebenen Sorte auf. SIEHE MOTOR-HANDBUCH.
Füllen Sie das Motoröl langsam nach, um ein Überlaufen zu
vermeiden; das Fassungsvermögen des Öltanks ist gering.
Bei Langzeiteinsatz des Motors ist der Ölstand alle 10
Betriebsstunden zu überprüfen.
Verwenden Sie Viertaktöl oder ein gleichwertiges hoch
waschaktives hochwertiges Motoröl, das mindestens die
Forderungen der US-amerikanischen Automobilhersteller
für die Klassifikationen SG und SF erfüllt. Motoröle der Klas-
sifikation SG und SF sind auf dem Behälter entsprechend
gekennzeichnet. SAE10W-30 (diesel) und SAE15W-40 (ben-
zin) (Abb. 31) wird für die allgemeine Verwendung bei allen
Temperaturen empfohlen.
ACHTUNG: Die Verwendung von nicht waschaktivem
Öl oder Zweitaktgemisch kann die Lebensdauer des
Motors verkürzen.
Der empfohlene Betriebsbereich für diesen Motor liegt
zwischen -20°C und 30°C (diesel) / -10°C und 40°C (benzin).
LEER ATENTAMENTE EL MANUAL DEL MOTOR.
¡ATENCIÓN! La máquina se suministra sin aceite en el
motor: consultar el manual de uso y mantenimiento del
motor.
Depósito de aceite del motor
Nivel de aceite del motor
PRECAUCIÓN: Hacer funcionar el motor con aceite
insuficiente puede dañarlo seriamente. El motor
debe comprobarse siempre estando parado y sobre
una superficie nivelada.
1. Extraiga el tapón de llenado del aceite y compruebe el
nivel.
2. Si el nivel de aceite es bajo, llenar el depósito con el
aceite recomendado. CONSULTAR EL MANUAL DE
INSTRUCCIONES DEL MOTOR.
Añada el aceite del motor lentamente para evitar que rebose;
la capacidad del depósito de aceite es reducida.
Si el motor se utiliza de manera continua, controlar el nivel
del aceite cada 10 horas de uso.
Utilice aceite para motores de 4 tiempos, o cualquier otro
de alto grado detergente y máxima calidad con certificado
de que cumple o supera los requisitos de los fabricantes
de automóviles para la clasificación de servicio SG, SF.
Los aceites de motor SG, SF llevan esta designación en el
recipiente. El aceite SAE10W-30 (gasóleo) – SAE15W-40
(gasolina) (Fig. 31) es el recomendado para usos generales a
cualquier temperatura.
PRECAUCIÓN: El uso de un aceite sin detergente o
para motores de 2 tiempos puede llegar a acortar la
vida útil del motor.
El margen de funcionamiento recomendado para este motor
es de -20°C a 30°C (gasóleo) / -10°C a 40°C (gasolina).
POZORNE SI PREČÍTAJTE AJ PRÍRUČKU MOTORA.
POZOR! Stroj sa dodáva bez oleja v motore: prečítajte
si návod na používanie a údržbu motora.
Olejová nádrž
Hladina oleja
UPOZORNENIE: Chod motora s nedostatočným
množstvom oleja môže spôsobiť vážne poruchy
motora. Hladinu oleja kontrolujte iba vtedy, keď je
motor vypnutý.
1. Odstráňte uzáver na plniacom otvore oleja a skontrolujte
hladinu oleja.
2. Ak je úroveň nízka, naplňte nádrž odporúčaným olejom.
POZRI NÁVOD NA POUŽITIE MOTORA.
Motorový olej lejte pomaly, aby ste predišli preplneniu, pretože
kapacita nádrže oleja je malá.
Ak sa motor používa nepretržite, overte si úroveň oleja vždy po
10 hodinách používania.
Použite olej pre 4-taktné motory alebo ekvivalentný vysoko
detergentný olej vysokej kvality, ktorý vyhovuje alebo
presahuje požiadavky výrobcov automobilov v USA na
klasifikáciu SG, SF. Motorové oleje klasifikované ako SG, SF
majú uvedené označenie aj na nádobe. SAE10W-30 (nafta)
– SAE15W-40 (benzín) (Obr.31) sa odporúča na všeobecné
použitie pri všetkých teplotách.
UPOZORNENIE: Použitie nedetergentného oleja, alebo
oleja pre 2-taktné motory by mohlo skrátiť životnosť
motora.
Odporúčaný interval teplôt na prácu motora je -20°C až 30°C
(nafta) / -10°C až 40°C (benzín).

30
33 34A 34B 35
Italiano English Français
AVVIAMENTO STARTING MISE EN ROUTE
LEGGERE ATTENTAMENTE ANCHE IL MANUALE DEL MOTORE.
AVVIAMENTO DEL MOTORE
ATTENZIONE! La macchina viene fornita senza olio nel
gruppo trasmissione: vedi capitolo MANUTENZIONE –
Olio gruppo trasmissione.
ATTENZIONE - Non stringere mai la leva
dell’acceleratore durante la messa in moto del
motore. Stringendo la leva dell’acceleratore si
fa prendere velocità al motore, con il conseguente
movimento delle frese rotanti della macchina con il
rischio di incidenti o lesioni. Non avvolgere mai la
fune di avviamento intorno alla mano.
CAUTELA – Per avviare la macchina, dovete
obbligatoriamente posizionarvi nella zona tratteggiata
(Fig. 33).
• Per motore diesel portare la leva (G, Fig. 34A) in posizione «I».
• Portare la leva comando cambio in posizione di disinnesto
0 (Fig.34B)
• Posizionare l’interruttore/acceleratore (E, Fig.35) su “MAX”,
posizione di avviamento.
Solo per motori a benzina
• Portare la leva starter (F, Fig.36) in posizione chiusa.
• A motore avviato, riportare la leva starter (F, Fig.37) in
posizione aperta.
ATTENZIONE – PER TUTTO IL RESTO RIGUARDANTE
LA PROCEDURA DI AVVIAMENTO LEGGERE
ATTENTAMENTE IL MANUALE DEL MOTORE
CAREFULLY READ THE ENGINE INSTRUCTION MANUAL.
STARTING THE ENGINE
WARNING! The machine is supplied without oil in the
gearbox: see MAINTENANCE chapter – Gearbox oil.
WARNING - Never pull the throttle trigger while
you are starting the engine. If you pull the throttle
trigger the engine will pick up speed and the blades
will start to rotate. This could cause an accident or
injury. Never wrap the starter cord around your
hand.
CAUTION - To start up the machine, you must stand in
the area indicated in Fig.33.
• For diesel engine set the lever (G, Fig. 34A) to "I".
• Move the gearshift lever to the neutral position 0 (Fig.34B)
• Set the switch/throttle lever (E, Fig.35) to “MAX” (engine
start position).
Petrol engines only
• Set choke lever (F, Fig.36) to the closed position.
• When the engine has started, return the choke lever (F,
Fig.37) to the open position.
WARNING – FOR FURTHER INFORMATION ON THE
START-UP PROCEDURE, READ THE ENGINE MANUAL
CAREFULLY
LIRE ATTENTIVEMENT LE MANUEL DU MOTEUR.
DÉMARRAGE DU MOTEUR
ATTENTION ! À la livraison, le groupe de
transmission ne contient pas d'huile : consulter le
chapitre ENTRETIEN – Huile groupe de transmission.
ATTENTION - Ne jamais serrer le levier de
l’accélérateur au moment de la mise en marche
du moteur. En serrant le levier de l’accélérateur, le
moteur prend de la vitesse et entraîne les fraises
rotatives de la machine, ce qui risque de provoquer
des accidents ou des blessures. N’enroulez jamais le
lanceur autour de votre main.
PRUDENCE – Pour mettre la machine en marche,
placez-vous impérativement sur la zone hachurée
(Fig.33).
• Pour les moteurs diesel placer le levier (G, Fig. 34A) sur «I».
• Mettre le levier de vitesses en position de
désenclenchement 0 (Fig.34B)
• Mettre l'interrupteur/accélérateur (E, Fig.35) sur la
position << MAX >>, position de démarrage.
Seulement pour moteurs à essence
• Mettre le levier starter (F, Fig.36) à l'horizontale (levier
abaissé).
• Moteur démarré, ramener le levier starter (F, Fig.37) à la
verticale (levier relevé).
ATTENTION – POUR TOUT CE QUI CONCERNE LA
PROCÉDURE DE DÉMARRAGE, LIRE ATTENTIVEMENT
LE MANUEL DU MOTEUR

31
36 37
Deutsch Español Slovensky
ANLASSEN PUESTA EN MARCHA ŠTARTOVANIE
LESEN SIE EBENFALLS DIE BETRIEBSANLEITUNG DES MOTORS
DURCH.
ANLASSEN DES MOTORS
ACHTUNG! Die Maschine wird ohne Ölfüllung
im Getriebe geliefert: siehe Kapitel WARTUNG –
Getriebeöl.
ACHTUNG - Drücken Sie beim Anlassen des Motors
niemals den Gashebel. Beim Drücken des Gashebels
beschleunigen Sie den Motor und setzen dadurch
die Fräswerkzeuge der Maschine mit der Gefahr von
Unfällen oder Verletzungen in Drehung. Wickeln Sie
niemals das Anwerfseil um die Hand.
VORSICHT – Zum Start der Maschine müssen Sie sich
unbedingt im schraffierten Bereich aufstellen (Abb.33).
• Stellen Sie bei Dieselmotoren den Hebel (G, Abb. 34A)
auf «I»
• Stellen Sie den Schalthebel auf Leerlauf 0 (Abb.34B)
• Stellen Sie den Ein-/Aus-Schalter/Gashebel (E, Abb.35)
auf “MAX” in Anlassstellung.
Nur für Benzinmotoren
• Schließen Sie den Chokehebel (F, Abb.36).
• Bringen Sie den Chokehebel (F, Abb.37) bei
angelassenem Motor in Stellung offen.
ACHTUNG – LESEN SIE HINSICHTLICH DER WEITEREN
ANLASSVORGÄNGE DIE BETRIEBSANLEITUNG DES
MOTORS DURCH
LEER ATENTAMENTE EL MANUAL DEL MOTOR.
PUESTA EN MARCHA
¡ATENCIÓN! La máquina se suministra sin aceite en el
grupo transmisión: ver el capítulo MANTENIMIENTO –
Aceite del grupo transmisión.
ATENCIÓN - No apretar nunca la palanca del
acelerador durante el arranque del motor. Al apretar
el acelerador se acelera el motor, y el consiguiente
movimiento de las fresas giratorias de la máquina
puede provocar accidentes o lesiones. No se enrolle
la cuerda del motor de arranque en la mano.
PRECAUCIÓN – Para poner la máquina en marcha es
obligatorio situarse en la zona punteada (Fig.33).
• Con motor diésel, ponga la palanca (G, Fig. 34A) en la
posición "I".
• Poner la palanca de cambio en posición de
desembrague 0 (Fig.34B)
• Ponga el interruptor/acelerador (E, fig. 35) en la posición
de arranque “MAX”.
Solo para motores de gasolina
• Ponga la palanca del estárter (F, fig. 36) en la posición de
cerrado.
• Cuando arranque el motor, ponga nuevamente la
palanca del estárter (F, fig. 37) en la posición de abierto.
ATENCIÓN – PARA CUALQUIER INFORMACIÓN MAS
SOBRE LAS MODALIDADES DE ARRANQUE, LEER
ATENTAMENTE EL MANUAL DEL MOTOR
POZORNE SI PREČÍTAJTE AJ PRÍRUČKU MOTORA.
Štartovanie motora
POZOR! Stroj sa dodáva bez olej v prevodovej
jednotke: pozrite si kapitolu ÚDRŽBA – Olej prevodovej
jednotky.
POZOR - Počas štartovania motora nikdy netlačte
plynovú páčku. Stlačením plynovej páčky sa zvýši
rýchlosť motora, následkom čoho sa začnú otáčať
frézy stroja, čím vznikne riziko úrazov a poranení.
Nikdy si neotáčajte štartovacie lanko okolo ruky.
UPOZORNENIE – Pri štartovaní stroja musíte stáť v oblasti
naznačenej prerušovaniu čiarou (obr.33).
• U dieselovych motorov presuňte paku (G, Obr. 34A) do
polohy "I"
• Presuňte radiacu páku do neutrálnej polohy 0 (Obr. 34B)
• Umiestnite vypínač/akcelerátor (E, Obr.35) do polohy „MAX”,
do polohy naštartovania.
Iba pre benzínové motory
• Prepnite páčku štartéra (F, Obr.36) do zatvorenej polohy.
• S naštartovaným motorom presuňte páku štartéra (F,
Obr.37) do otvorenej polohy.
POZOR – ZVYŠOK POKYNOV O NAŠTARTOVANÍ
MOTORA NÁJDETE V NÁVODE NA POUŽITIE MOTORA

32
38 39 40
Italiano English Français
AVVIAMENTO STARTING MISE EN ROUTE
COMANDI
Per azionare la leva di comando marcia (A, Fig. 38) è necessario
disimpegnare la stessa, premendo la leva blocco comandi di
sicurezza (C).
CAUTELA – Per evitare il precoce logorio delle cinghie di
trasmissione, tirare a fondo la leva di comando.
CAMBIO MARCIA
ATTENZIONE! – Rilasciare sempre la leva di comando
marcia (A, Fig.38) e portare la leva acceleratore (E, Fig. 39)
al minimo prima di effettuare il cambio marcia!
RETROMARCIA
• Rilasciare la leva di comando marcia (A, Fig.38);
• Portare la leva comando cambio (B, Fig.40) in posizione di
disinnesto 0 (-1);
• Premere la leva di blocco comandi di sicurezza (F, Fig.40) e
azionare la leva retromarcia (D);
• Premere la leva di blocco comandi di sicurezza (C, Fig.38) e
azionare la leva di comando marcia (A).
CAUTELA: Prestare attenzione quando si utilizza la
macchina in retromarcia. Non tentare manovre in
retromarcia se non si è sicuri di avere lo spazio adeguato.
CONTROLS
To activate the drive control lever (A, Fig.38), first disengage it
by pressing the safety lever (C).
CAUTION – To prevent premature wear of the drive
belts, pull the control lever all the way.
CHANGING GEAR
WARNING! – Always release the drive control lever
(A, Fig.38) and set the throttle lever (E, Fig. 39) to the
idle position before changing gear!
REVERSE DRIVE
• Release the drive control lever (A, Fig.38);
• Move the gearshift lever (B, Fig.40) to the neutral position 0 (-1);
• Press the safety catch (F, Fig.40) and operate the reverse gear
lever (D);
• Press the safety catch (C, Fig.38) and operate the drive control
lever (D).
CAUTION: Take particular care when using the
machine with reverse drive engaged. Do not attempt
any manoeuvre in reverse without first making
certain there is sufficient room.
COMMANDES
Pour actionner le levier de commande de sens de marche
(A, Fig.38), le dégager en appuyant sur le levier de blocage
des commandes de sécurité (C).
ATTENTION – Pour éviter d'user rapidement
les courroies de transmission, tirer le levier de
commande à fond.
CHANGEMENT DU SENS DE MARCHE
ATTENTION ! – Toujours relâcher le levier de
commande sens de marche (A, Fig.38) et mettre
le levier d'accélérateur (E, Fig. 39) au ralenti avant
d'effectuer le changement du sens de marche!
MARCHE ARRIÈRE
• Relâcher le levier de vitesses (A, Fig.38) ;
• Mettre le levier de vitesses (B, Fig.40) en position de
désenclenchement 0 (-1) ;
• Appuyer sur le levier de blocage des commandes de sûreté (F,
Fig.40) et actionner le levier de marche AR (D) ;
• Appuyer sur le levier de blocage des commandes de sûreté (C,
Fig.38) et actionner le levier de vitesses (A).
AVERTISSEMENT : Faire particulièrement attention
en utilisant la machine en marche AR. Ne tenter
aucune manœuvre en marche AR si l'espace risque
de ne pas être suffisant.

33
Deutsch Español Slovensky
ANLASSEN PUESTA EN MARCHA ŠTARTOVANIE
BEDIENELEMENTE
Zur Betätigung des Gangwahlhebels (A, Abb.38) müssen Sie
diesen durch Drücken des Feststellers (C) ausrücken.
VORSICHT – Zum Schutz vor frühzeitigem Verschleiß
der Keilriemen ziehen Sie den Schalthebel ganz
durch.
GANGWECHSEL
ACHTUNG! – Lassen Sie vor dem Gangwechsel immer
den Gangwahlhebel (A, Abb.38) los und stellen Sie
den Gashebel (E, Abb. 39) auf Mindestdrehzahl!
RÜCKWÄRTSGANG
• Lassen Sie den Gangwahlhebel los (A, Abb.38);
• Stellen Sie den Schalthebel (B, Abb.40) auf Leerlauf 0 (-1);
• Drücken Sie den Feststellhebel (F, Abb.40) und betätigen Sie
den Hebel für Rückwärtsfahrt (D);
• Drücken Sie den Feststellhebel (C, Abb.38) und betätigen Sie
den Gangwahlhebel (A).
VORSICHT: Achten Sie beim Fahren der Maschine
im Rückwärtsgang. Versuchen Sie keine Manöver
im Rückwärtsgang, wenn Sie sicher sind, dass dafür
ausreichend Platz vorhanden ist.
MANDOS
Para accionar la palanca de mando marcha (A, Fig. 38) hace
falta desembragarla, apretando la palanca de bloqueo
mandos de seguridad (C).
CUIDADO – Para evitar desgaste anticipado de las
correas de transmisión, tirar a fondo la palanca de
mando.
CAMBIO DE MARCHA
ATENCIÓN – ¡Soltar siempre la palanca de mando
marcha (A, Fig. 38) y poner la palanca del acelerador
(E, Fig. 39) al mínimo antes de cambiar de marcha!
MARCHA ATRÁS
• Suelte la palanca de control de la marcha (A, Fig. 38).
• Ponga la palanca del cambio (B, Fig. 40) en la posición de
punto muerto 0 (-1).
• Presione la palanca de seguridad de bloqueo de los mandos (F,
Fig. 40) y accione la palanca de la marcha atrás (D).
• Presione la palanca de seguridad de bloqueo de los mandos
(C, Fig. 38) y accione la palanca de control de la marcha (A).
PRECAUCIÓN: Preste especial atención cuando
utilice la máquina en marcha atrás. No intente hacer
una maniobra en marcha atrás si no está seguro de
tener espacio suficiente.
OVLÁDAČE
Aby ste aktivovali páku radenia rýchlostných stupňov
(A, Obr.38), bude nevyhnutné uvoľniť ju potlačením páky na
zablokovanie bezpečnostných ovládačov (C).
UPOZORNENIE – Aby ste predišli predčasnému
opotrebovaniu prevodových remeňov, ovládaciu páku
potiahnite nadoraz.
RADENIE RÝCHLOSTNÝCH STUPŇOV
POZOR! – Vždy uvoľnite radiacu páku (A, Obr.38) a
presuňte páku akcelerátora (E, Obr. 39) na minimum,
až potom zmeňte rýchlostný stupeň!
SPIATOČKA
• Uvoľnite ovládaciu páku rýchlostného stupňa (A, Obr. 38);
• Presuňte radiacu páku (B, Obr.40) do polohy uvoľnenia 0 (-1);
• Stlačte páku na zablokovanie bezpečnostných ovládačov (F,
Obr.40) a aktivujte páku spiatočky (D);
• Stlačte páku na zablokovanie bezpečnostných ovládačov (C,
Obr.38) a aktivujte páku riadenia chodu (A).
UPOZORNENIE: Pri používaní stroja v spiatočke
dávajte pozor. Pokiaľ nemáte istotu, že máte dosť
miesta, nesnažte sa o spiatočku.

34
Italiano English Français
AVVIAMENTO STARTING MISE EN ROUTE
Uso ad alta quota
Alle altitudini elevate, la normale miscela aria-benzina del
carburatore risulta eccessivamente ricca. Le prestazioni
peggiorano, mentre il consumo di carburante aumenta.
Per migliorare le prestazioni alle altitudini elevate, è possibile
apportare particolari modifiche al carburatore. Se il motore
viene utilizzato sempre ad altitudini superiori a 1.500 m
sul livello del mare, richiedere a un’officina autorizzata di
effettuare tali modifiche al carburatore.
Anche con un getto idoneo del carburatore, la potenza del
motore diminuisce di circa il 3,5% per ogni 300 m di aumento
di altitudine. L’effetto dell’altitudine sulla potenza del motore
sarà maggiore se non vengono apportate modifiche al
carburatore.
AVVISO: l’uso del motore a un’altitudine minore
di quella per la quale è stato registrato il getto del
carburatore può comportare prestazioni ridotte,
surriscaldamento e gravi danni al motore causati da
una miscela aria-benzina troppo povera.
Rodaggio del motore
Il motore raggiunge la sua massima potenza dopo le prime 5÷8
ore di lavoro.
Durante questo periodo di rodaggio, non lasciare inutilmente
il motore a pieno regime, per evitare una sollecitazione di
funzionamento eccessiva.
Avviamento difficile (o avviamento del motore ingolfato)
Il motore può ingolfarsi e riempirsi di carburante se non
viene avviato dopo 10 tentativi di accensione. La quantità di
carburante in eccesso può essere rimossa dal motore ingolfato
con la procedura di avviamento del motore a caldo descritta
sotto. Accertarsi che l’interruttore/acceleratore (E, Fig.35) sia
in posizione “MAX”. L’avviamento può comportare la necessità
di tirare più volte l’impugnatura della fune di avviamento a
seconda del livello di ingolfamento del motore.
Motore ingolfato (Solo per motori a benzina)
- Posizionare l’interruttore/acceleratore (E, Fig.43) su “STOP”
- Chiudere il rubinetto della benzina (G, Fig.44).
- Applicare uno strumento idoneo al cappuccio della candela.
- Sollevare il cappuccio della candela.
- Svitare e asciugare la candela.
- Aprire completamente la farfalla.
- Tirare diverse volte la fune di avviamento per svuotare la
camera di combustione.
- Riapplicare la candela e collegare il cappuccio premendolo
con decisione; riassemblare le altre parti.
- Posizionare l’interruttore/acceleratore (E, Fig.43) su “MAX”,
posizione di avviamento.
- Aprire il rubinetto della benzina (G, Fig.45).
- Portare la leva starter (F, Fig. 45) nella posizione OPEN,
anche se il motore è freddo.Avviare ora il motore.
High Altitude Operation
At high altitude, the standard carburettor air-fuel mixture
will be excessively rich. Performance will decrease, and fuel
consumption will increase.
High altitude performance can be improved by specific
modifications to the carburetor. If you always operate the
engine at altitudes higher than 1.500 m above sea level,
have your authorized dealer perform these carburettor
modifications.
Even with suitable carburettor jetting, engine horse power
will decrease approximately 3.5% for each 300 m increase
in altitude. The effect of altitude on the horse power will be
greater than this if no carburettor modification is made.
CAUTION: Operation of the engine at an altitude
lower than the carburettor is jetted for may result
in reduced performance, overheating, and serious
engine damage caused by an excessively lean air /
fuel mixture.
Breaking-in the Engine
The engine reaches maximum power after the rst 5-8 hours
of activity.
During this period of breaking-in do not make the machine
function idly at full throttle, to avoid excessive functioning
stress.
Difficult Starting (or starting a flooded engine)
The engine may be flooded with too much fuel if it has not
started after 10 pulls. Flooded engines can be cleared of
excess fuel by following the warm engine starting procedure
listed above. Make sure the throttle lever (E, Fig.35) is set to
the “MAX” position. Starting could require pulling the starter
rope handle many times depending on how badly the unit is
flooded.
Engine is Flooded (Petrol engines only)
- Set the switch/throttle lever (E, Fig.43) to “STOP”
- Close the fuel stop-cock (G, Fig.44).
- Engage a suitable tool in the spark plug boot.
- Pry off the spark plug boot.
- Unscrew and dry off the spark plug.
- Open the throttle wide.
- Pull the starter rope several times to clear the combustion
chamber.
- Refit the spark plug and connect the spark plug boot,
press it down firmly – reassemble the other parts.
- Set the switch/throttle lever (E, Fig.43) to “MAX” (engine
start position).
- Open the fuel stop-cock (G, Fig.45).
- Set the choke lever (F, Fig. 45) to OPEN position – even if
engine is cold.
- Now start the engine.
Fonctionnement en haute altitude
En haute altitude, le mélange air-carburant standard du
carburateur sera trop riche. Les performances seront réduites
pour une consommation supérieure.
Les performances en haute altitude peuvent être améliorées
grâce à des modifications spécifiques du carburateur. Si
vous utilisez toujours le moteur à des altitudes supérieures
à 1500 m, demandez à votre revendeur agréé de réaliser ces
modifications du carburateur.
Même équipé d’un gicleur approprié, la puissance du moteur
diminue d’environ 3,5 % pour chaque tranche de 300 mètres
d’altitude. L’effet de l’altitude sur la puissance développée est
plus important si le carburateur n’est pas modifié.
MISE EN GARDE : le fonctionnement du moteur à
une altitude inférieure à celle correspondant au
gicleur peut produire des performances réduites,
une surchauffe et des dégâts importants du moteur
provoqués par un mélange air-carburant trop pauvre.
Rodage du moteur
Le moteur atteint sa puissance maximale au bout des 5÷8
premières heures de travail.
Au cours de cette période de rodage, ne laissez pas tourner
la machine à vide à plein régime de façon à éviter toute
contrainte inutile.
Démarrage difficile (ou démarrage d’un moteur noyé)
Vous pouvez noyer le moteur par une alimentation en
carburant trop importante si le moteur ne démarre pas
après avoir actionné 10 fois le lanceur. Il est possible
d’éliminer l’excès de carburant d’un moteur noyé en suivant
la procédure de démarrage d’un moteur chaud décrite ci-
dessus. S'assurer que l'interrupteur/accélérateur (E, Fig.35)
est bien positionné sur << MAX >>. Le démarrage peut
nécessiter un grand nombre d’actionnements du lanceur en
fonction de l’importance du noyage du moteur.
Moteur noyé (Seulement pour moteurs à essence)
- Mettre l'interrupteur/accélérateur (E, Fig.43) sur la position <<STOP>>
- Fermer le robinet d'essence (G, Fig.44).
- Insérez un outil adapté dans la coiffe de bougie.
- Faites levier sur la coiffe de bougie et retirez-la.
- Dévissez et séchez la bougie.
- Ouvrez l’accélérateur à fond.
- Actionnez le lanceur à plusieurs reprises de façon à vider la
chambre de combustion.
- Remontez la bougie et connectez la coiffe en l’enfonçant
fermement– remontez les autres pièces.
- Mettre l'interrupteur/accélérateur (E, Fig.43) sur la position
<<MAX>>, position de démarrage.
- Ouvrir le robinet d'essence (G, Fig.45).
- Passez le levier d’étrangleur (F, Fig. 45) sur la position OUVRIR,
même si le moteur est froid.
- Démarrez à présent le moteur.

35
Deutsch Español Slovensky
ANLASSEN PUESTA EN MARCHA ŠTARTOVANIE
Betrieb in großen Höhen
In großen Höhen ist das normale Kraftstoff-Luft-Gemisch zu
fett. Dadurch sinkt die Leistung, während gleichzeitig der
Kraftstoffverbrauch steigt.
Die Leistung in großen Höhen kann durch entsprechende
Einstellungen am Vergaser verbessert werden. Wenn Sie
die Maschine regelmäßig in Höhen über 1500 m einsetzen,
lassen Sie diese Vergasereinstellungen von Ihrem -Händler
vornehmen.
Trotz entsprechender Einstellungen am Vergaser sinkt jedoch
die Leistung des Motors je 300 m Höhenunterschied um etwa
3,5%. Ohne entsprechende Vergasereinstellungen ist jedoch
die Auswirkung der Höhe auf die Leistung noch größer.
ACHTUNG: Betrieb des Motors in einer Höhe unterhalb
derjenigen, für die der Vergaser eingestellt ist, kann
zu einer Reduzierung der Leistung, Überhitzung
und schweren Schäden am Motor aufgrund eines zu
mageren Kraftstoffgemischs führen.
EINLAUFEN LASSEN DES MOTORS
Der Motor erreicht seine volle Leistungsstärke nach den ersten
5÷8 Arbeitsstunden.
Lassen Sie während dieser Zeit die Maschine nicht mit voller
Drehzahl im Leerlauf laufen, um sie nicht zu überlasten.
Startprobleme (bzw. Anwerfen eines ersoffenen Motors)
Der Motor kann ersoffen sein, wenn er nach zehn
Startversuchen nicht angesprungen ist. Überschüssiger
Kraftstoff kann mithilfe des oben aufgeführten
Warmstartverfahrens entfernt werden. Stellen Sie sicher,
dass der Ein-/Aus-Schalter/Gashebel (E, Abb.35) auf “MAX”
steht. Je nachdem, wie stark der Motor ersoffen ist, kann es
notwendig sein, das Anwerfseil viele Male zu ziehen.
Motor ist ersoffen (Nur für Benzinmotoren)
- Stellen Sie den Ein-/Aus-Schalter/Gashebel (E, Abb.43) auf
“STOP”
- Schließen Sie den Benzinhahn (G, Abb.44).
- Setzen Sie ein geeignetes Werkzeug in die Fassung der
Zündkerze ein.
- Hebeln Sie die Zündkerzenfassung ab.
- Schrauben Sie die Zündkerze heraus und trocknen Sie sie.
- Ziehen Sie den Gashebel bis zum Anschlag.
- Ziehen Sie das Anwerfseil mehrmals durch, um die
Vergaserkammer zu lüften.
- Setzen Sie die Zündkerze wieder ein und setzen Sie die
Zündkerzenfassung auf; drücken Sie sie fest nach unten.–
Bringen Sie die übrigen Teile wieder an.
- Stellen Sie den Ein-/Aus-Schalter/Gashebel (E, Abb.43) auf
“MAX” in Anlassstellung.
- Öffnen Sie den Benzinhahn (G, Abb.45).
- Bringen Sie den Chokehabel (F, Abb. 45)in der Stellung
OFFEN, und zwar auch bei kaltem Motor.
- Werfen Sie jetzt den Motor wieder an.
Funcionamiento en altitudes elevadas
En zonas muy altas, la mezcla normal de aire y combustible
en el carburador será excesivamente rica, por lo que
disminuirá el rendimiento y aumentará el consumo de
combustible.
Para mejorar el rendimiento en estas circunstancias
es necesario realizar modificaciones específicas en
el carburador. Si el motor funciona siempre en altitudes
superiores a 1500 metros sobre el nivel del mar, pida a su
concesionario autorizado que realice estas modificaciones
en el carburador.
Incluso con un suministro apropiado del carburador, la
potencia del motor se reducirá aproximadamente en un
3,5% por cada 300 metros de aumento en altitud. El efecto
de la altitud en la potencia del motor será aún mayor si no se
modifica el carburador.
PRECAUCIÓN: El funcionamiento de la bomba en
una altitud inferior a la que se ajusta el surtidor del
carburador puede reducir el rendimiento del motor,
sobrecalentarlo y ocasionar daños graves causados
por el excesivo paso de mezcla de aire y combustible.
Rodaje del motor
El motor alcanza su máxima potencia después de las primeras
5÷8 horas de trabajo.
Durante este período de rodaje, no acelere al máximo
la máquina si no está cortando a fin de evitar tensiones de
funcionamiento excesivas.
Arranque difícil (o arranque de un motor ahogado)
Si el motor no arranca tras 10 tirones, es posible que se haya
ahogado a causa del exceso de combustible. El exceso de
combustible se puede eliminar siguiendo el procedimiento
de arranque del motor en caliente indicado anteriormente.
Controle que el interruptor/acelerador (E, fig. 35) esté en la
posición “MAX”. Para arrancar puede que sea necesario tirar
varias veces de la empuñadura de la cuerda del motor de
arranque, dependiendo de cuánto se haya ahogado el motor.
Motor ahogado (Solo para motores de gasolina)
- Ponga el interruptor/acelerador (E, fig. 43) en “STOP”.
- Cierre el grifo de la gasolina (G, fig. 44).
- Acople una herramienta adecuada en la funda de la bujía.
- Haga palanca para sacar la funda de la bujía.
- Desenrosque la bujía y séquela.
- Abra el acelerador por completo.
- Tire de la cuerda del motor de arranque varias veces para
desahogar la cámara de combustión.
- Vuelva a poner la bujía y conecte su funda; presione
firmemente hacia abajo y monte de nuevo las demás
piezas.
- Ponga el interruptor/acelerador (E, fig. 43) en la posición
de arranque “MAX”.
- Abra el grifo de la gasolina (G, fig. 45).
- Ponga la palanca de estrangulación (F, fig. 45) en la
posición OPEN, aunque el motor esté frío.
- Ahora, arranque el motor.
Práca vo vysokej nadmorskej výške
Vo vysokej nadmorskej výške bude štandardná zmes vzduch-palivo
veľmi bohatá. Výkonnosť sa zníži a zvýši sa spotreba paliva.
Výkonnosť vo vysokej nadmorskej výške môžete zlepšiť špecifickou
modifikáciou karburátora. Ak motor pracuje vždy v nadmorskej
výške presahujúcej 1500 m nad hladinou mora vyžiadajte u
autorizovaného predajcu úpravu karburátora.
Aj pri vhodnom nastavení vstrekovania karburátora sa výkon
motora zníži približne o 3,5% každých 300 m výšky. Vplyv
nadmorskej výšky na výkon bude vyšší, ak karburátor nebude
nastavený pre tieto účely.
UPOZORNENIE: Práca motora v nižšej nadmorskej
výške vzhľadom na nastavenie karburátora môže mať
za následok zníženie výkonnosti, prehriatie a vážne
poškodenie motora spôsobené mimoriadne chudobnou
zmesou vzduch / palivo.
Zábeh motora
Motor dosiahne svoj maximálny výkon po prvých 5÷8
hodinách práce.
Počas tejto zábehovej doby nenechávajte stroj bežať voľne pri plne
stlačenej plynovej páčke, aby ste predišli mimoriadnemu zaťaženiu.
Obtiažne štartovanie (alebo štartovanie zahlteného motora)
Motor sa môže zahltiť veľkým množstvom paliva, ak sa
nenaštartoval po 10 potiahnutiach lanka. Zahltené motory môžete
očistiť od nadmerného množstva paliva tak, že vykonáte štartovaciu
procedúru teplého motora popísanú hore. Uistite sa, že vypínač/
akcelerátor (E, Obr.35) je v polohe „MAX”. Štartovanie by mohlo
vyžadovať veľký počet potiahnutí štartovacieho lanka, v závislosti
od toho, ako je motor zahltený.
Motor je zahltený (Iba pre benzínové motory)
- Presuňte vypínač/akcelerátor (E, Obr.43) do polohy „STOP”
- Zatvorte kohútik benzínu (G, Obr.44).
- Vsuňte vhodný nástroj pod koncovku sviečky.
- Vypáčte koncovku sviečky.
- Sviečku odskrutkujte a osušte.
- Plynovú páčku úplne stlačte.
- Potiahnite štartovacie lanko niekoľkokrát, aby sa vyčistila
spaľovacia komora.
- Upevnite sviečku späť a zapojte koncovku sviečky, zatlačte
koncovku pevne – zmontujte ostatné časti.
- Umiestnite vypínač/akcelerátor (E, Obr.43) do polohy „MAX”, do
polohy naštartovania.
- Otvorte kohútik benzínu (G, Obr.45).
- Páčku sýtiča nastavte do OTVORENEJ polohy (F, Obr.45) – aj keď
je motor studený.
- Teraz naštartujte motor.

36
Italiano English Français
USO E SICUREZZA OPERATION AND SAFETY FONCTIONNEMENT ET SÉCURITÉ
ATTENZIONE: afferrare sempre la motozappa con
entrambe le mani quando il motore è in funzione. Stringere
saldamente tra i pollici e le altre dita l’impugnatura della
motozappa.
- Lavorare il terreno solamente alla luce del giorno.
- Camminare, non correre mai con la macchina.
- Esercitare un’estrema cautela nel cambio di direzione ed in
particolare sui pendii.
- Usare la massima precauzione nel tirare verso se stessi la
macchina.
- Non modificare la taratura del regolatore di velocità di rotazione
del motore.
- Avviare il motore con cautela secondo le istruzioni, tenendo i
piedi ben distanti dagli utensili.
- Non mettete le mani od i piedi vicino o sotto le parti in rotazione.
- Non sollevare o trasportare mai una macchina quando il motore è
in funzione.
- Arrestare il motore ogni qualvolta ci si allontana dalla macchina,
prima di fare rifornimento di carburante e prima di ogni
manutenzione o pulizia.
- Ridurre la velocità del motore prima del suo spegnimento.
- Arrestare la motozappa se le frese colpiscono un corpo estraneo.
Esaminare la motozappa e riparare le eventuali parti danneggiate.
- Trasportare sempre la motozappa a motore fermo e con la
marmitta lontana dal proprio corpo. Durante il trasporto
all’interno di un veicolo, fissare adeguatamente la motozappa per
evitare il ribaltamento, la fuoriuscita di carburante o altri danni.
- Prima di avviare il motore, assicurarsi che l’apparato di taglio non
sia a contatto con alcun oggetto.
- Non lasciare incustodito la motozappa con il motore in funzione.
- Mantenere l’impugnatura pulita, asciutta e priva di tracce di olio o
miscela carburante.
- Accertarsi di potere muoversi e rimanere in piedi in maniera
sicura. Verificare l’eventuale presenza di ostacoli nell’area di lavoro
(radici, pietre, rami, fossi ecc.).
- Prestare particolare attenzione se si indossano cuffie protettive
poiché queste possono limitare la capacità di udire rumori che
segnalano pericoli (telefonate, sirene, allarmi ecc).
ATTENZIONE: Non sporgersi oltre la protezione
dell’apparato di taglio. Pietre, frammenti e altro
potrebbero colpire gli occhi e causare cecità o gravi lesioni.
Se si avvicina una persona, arrestare immediatamente
l’unità.
ATTENZIONE: In presenza di situazioni in cui non si sa con
certezza come procedere, consultare un esperto. Rivolgersi
al rivenditore o all’officina autorizzata locale. Evitare di
eseguire operazioni che non si ritengono alla propria
portata.
WARNING: Always hold the motorhoe with both hands
when the engine is running. Use a firm grip with thumbs
and fingers encircling the motorhoe handles.
- Only work in daylight.
- Always walk. Never run with the machine.
- Take great care when changing direction, especially when
working on slopes.
- Take great care when pulling the machine towards you.
- Do not modify the calibration of the engine rotation speed
control device.
- Follow the instructions carefully when starting the engine. Keep
your feet well away from the blades.
- Keep hands and feet well clear of the rotating blades.
- Never lift or transport the machine when the engine is running.
- Stop the engine whenever you move away from the machine. It
should also be stopped before refuelling, before any maintenance
work is carried out or before cleaning the machine.
- Slow down the engine when you turn it off.
- Stop the motorhoe if the blades strike a foreign object. Examine
the motorhoe and repair any damaged parts.
- Always carry the motorhoe with the engine stopped and the
muffler away from your body. When transporting in a vehicle,
properly secure your motorhoe to prevent turnover, fuel spillage
and damage.
- Before you start the engine, make sure the cutting attachment is
not contacting any object.
- Do not leave the engine running unattended.
- Keep the handles dry, clean, and free of oil or fuel mixture.
- Make sure you can move and stand safely. Check the area around
you for possible obstacles (roots, rocks, branches, ditches, etc.).
- Be particularly cautious and alert while wearing hearing
protection because such equipment may restrict your ability to
hear sounds indicating danger (calls, signals, warnings, etc).
WARNING: Never lean over the cutting attachment guard.
Stones, rubbish, etc. can be thrown up into the eyes
causing blindness or serious injury. Stop the machine
immediately if anyone approaches.
WARNING: If you encounter a situation where you are
uncertain how to proceed you should ask an expert.
Contact your dealer or your service workshop. Avoid all
usage which you consider to be beyond your capability.
AVERTISSEMENT : tenez toujours la motobineuse à deux
mains lorsque le moteur tourne. Enserrez fermement les
poignées de la motobineuse entre les doigts et les pouces.
- Travaillez exclusivement le terrain en plein jour.
- Marchez, ne courez jamais avec la machine.
- Soyez extrêmement prudent lors des changements de direction,
surtout sur les terrains en pente.
- Soyez extrêmement prudent lorsque vous devez tirer la machine
vers vous.
- Ne modifiez pas les valeurs à partir desquelles le régulateur du
régime moteur a été étalonné.
- Démarrez le moteur avec prudence en suivant les instructions, en
tenant les pieds loin des outils.
- Ne mettez pas les mains ou les pieds à côté ou sous les pièces en
rotation.
- Ne soulevez pas ou ne transportez jamais une machine si son
moteur tourne.
- Arrêtez le moteur chaque fois que vous vous éloignez de la
machine, avant un ravitaillement et avant toute opération
d’entretien ou de nettoyage.
- Réduisez la vitesse du moteur avant de le couper.
- Arrêtez la motobineuse si les fraises touchent un corps
étranger. Examinez attentivement la motobineuse et réparez
éventuellement toute pièce endommagée.
- Transportez toujours la motobineuse moteur coupé et en plaçant
le silencieux d’échappement à distance de votre corps. Pour le
transport à bord d’un véhicule, fixez correctement la motobineuse
afin d’éviter qu’elle ne se renverse, que le carburant ne s’écoule ou
que la machine ne soit endommagée.
- Avant de démarrer le moteur, vérifiez que l’outil de coupe n’est en
contact avec aucun objet.
- Ne laissez pas le moteur tourner sans surveillance.
- Tenez vos mains au sec, propres et exemptes d’huile ou de
carburant.
- Assurez-vous de toujours pouvoir vous mouvoir en toute sécurité.
Inspectez la zone de travail et dégagez tout obstacle éventuel
(racines, rochers, branches, fossés, etc.).
- Soyez particulièrement vigilant lorsque vous portez des
protections antibruit car de tels équipements réduisent la
capacité d’entendre les signaux sonores d’avertissement en cas
de danger (tels que cris, alarmes et avertissements, etc.).
AVERTISSEMENT : Ne vous penchez jamais au-dessus de
la protection de l’outil de coupe. Des pierres ou des débris
peuvent être projetés au niveau des yeux, ce qui peut
entraîner des blessures graves, voire la cécité. À l’approche
d’un tiers, arrêtez immédiatement la machine.
AVERTISSEMENT : Si vous vous trouvez dans une situation
pour laquelle vous avez des doutes quant à la technique
à adopter, demandez conseil auprès d’un spécialiste.
Contactez votre distributeur ou le service d’assistance.
N’entreprenez pas un travail que vous jugez au-delà de vos
capacités.

37
Deutsch Español Slovensky
BEDIENUNG UND SICHERHEIT FUNCIONAMIENTO Y SEGURIDAD ČINNOSŤ A BEZPEČNOSŤ
VORSICHT: Halten Sie den Motorhacke mit beiden Händen
fest, wenn der Motor läuft. Daumen und Finger müssen
den Griff des Motorhacke fest umfassen.
- Arbeiten Sie nur bei Tageslicht.
- Gehen Sie mit der Maschine, rennen Sie nicht.
- Führen Sie Richtungswechsel besonders in Hanglage äußerst
vorsichtig aus.
- Ziehen Sie die Maschine nur mit größter Vorsicht zu sich.
- Verstellen Sie auf keinen Fall den Drehzahlregler des Motors.
- Starten Sie den Motor vorsichtig und anweisungsgemäß, halten
Sie dabei die Füße von den Arbeitsutensilien entfernt.
- Führen Sie Hände oder Füße nicht in bzw. unter Drehteile ein.
- Heben oder befördern Sie die Maschine niemals bei laufendem
Motor.
- Stellen Sie den Motor immer dann ab, wenn Sie die Maschine
unbeaufsichtigt lassen, bevor Sie tanken oder Wartungs- sowie
Reinigungseingriffe ausführen.
- Drosseln Sie die Motordrehzahl beim Abstellen.
- Halten Sie die Motorhacke an, falls die Fräsen gegen Fremdkörper
stoßen. Überprüfen Sie die Motorhacke und reparieren Sie ggf.
beschädigte Teile.
- Tragen Sie den Motorhacke nur bei abgestelltem Motor und so,
dass der Schalldämpfer von Ihnen wegweist. Lassen Sie beim
Transport in einem Fahrzeug, befestigen Sie den Motorhacke in
geeigneter Weise, um ein Umkippen, Auslaufen von Kraftstoff und
Beschädigung zu vermeiden.
- Achten Sie vor dem Starten des Motors darauf, dass die
Schneidvorrichtung nicht an Gegenständen anliegt.
- Lassen Sie den Motor nicht unbeaufsichtigt laufen.
- Halten Sie die Griffe trocken und sauber und frei von Öl und
Kraftstoffgemisch.
- Sorgen Sie dafür, dass Sie sich sicher bewegen und sicher stehen
können. Prüfen Sie Ihre Umgebung auf mögliche Hindernisse
(Wurzeln, Steine, Zweige, Gräben usw.).
- Seien Sie besonders vorsichtig und wachsam, wenn Sie
einen Gehörschutz tragen, weil Sie mit solcher Ausrüstung
möglicherweise Warnungen überhören (Rufe, Signale usw.).
VORSICHT: Beugen Sie sich niemals über die Abdeckung
des Schneidwerkzeugs. Es können Steine, Schutt usw.
aufgewirbelt und in die Augen geschleudert werden,
was zur Erblindung und anderen schweren Verletzungen
führen kann. Stellen Sie die Maschine sofort ab, wenn sich
jemand nähert.
VORSICHT: Wenn Sie in eine Situation geraten, in der Sie
nicht wissen, wie Sie sich verhalten sollen, wenden Sie
sich an einen Fachmann. Wenden Sie sich an Ihren Händler
oder den Kundendienst: Unterlassen Sie alle Arbeiten, die
Sie sich nicht zutrauen.
ADVERTENCIA: Agarre siempre la motoazada con las dos
manos cuando el motor esté en funcionamiento. Sujete
firmemente la motoazada colocando los pulgares y los
dedos alrededor de la empuñadura.
- Trabajar el terreno sólo a la luz del día.
- Caminar; no correr nunca con la máquina.
- Tener mucho cuidado al cambiar de dirección, especialmente
sobre las cuestas.
- Prestar la máxima atención al tirar de la máquina hacia uno
mismo.
- No modificar el calibrado del regulador de velocidad de rotación
del motor.
- Arrancar el motor con cautela siguiendo las instrucciones,
manteniendo los pies bien distantes de las herramientas.
- No acercar las manos o los pies a las partes en rotación.
- No levantar o transportar la máquina con el motor en
funcionamiento.
- Parar el motor antes de alejarse de la máquina, antes de llenar
el depósito de combustible y antes de cada mantenimiento o
limpieza.
- Reducir la velocidad del motor durante el apagado.
- Parar la motoazada si las fresas dan contra un cuerpo extraño.
Examinar la motoazada y reparar las partes dañadas, si las hay.
- Transporte siempre la motoazada con el motor parado y
el amortiguador alejado del cuerpo. Durante el transporte en
un vehículo, fije correctamente la motoazada para evitar que
vuelque, se derrame combustible y sufra daños.
- Antes de arrancar el motor, compruebe que el accesorio de corte
no toca ningún objeto.
- No deje el motor en marcha sin vigilancia.
- Mantenga las empuñaduras secas, limpias y sin mezclas de
combustible o aceite.
- Asegúrese de que puede moverse y mantener el cuerpo erguido
sin problemas. Examine el terreno circundante para detectar
obstáculos (raíces, rocas, ramas, zanjas, etc.).
- Esté especialmente atento cuando utilice protección para los
oídos, puesto que tal equipo puede limitar su capacidad para oír
sonidos que indiquen peligro (gritos, señales, advertencias, etc.).
ADVERTENCIA: No se apoye en el protector del accesorio
de corte. Piedras, residuos y otros materiales pueden saltar
a los ojos y causar daños graves o pérdida de visión. Pare
de inmediato la máquina cuando alguien se acerque.
ADVERTENCIA: Consulte a un experto en situaciones en
las que no esté seguro de cómo proceder. Póngase en
contacto con el concesionario o el taller. Evite utilizar la
herramienta cuando no se sienta capacitado para realizar
el trabajo.
POZOR: Keď je motor v chode, držte preorávač oboma
rukami. Rukoväte preorávač uchopte pevne palcom a
prstami.
- S preorávačom pracujte iba cez deň.
- Pri práci kráčajte, neponáhľajte sa.
- Dávajte veľký pozor pri zmene smeru a hlavne na svahoch.
- Mimoriadny pozor dávajte pti ťahaní stroja smerom k vám.
- Nemeňte nastavenie regulátora rýchlosti otáčok motora.
- Motor štartujte opatrne, podľa pokynov, pričom dbajte, aby ste
mali nohy ďaleko od nástrojov.
- Nikdy sa nepribližujte rukami ani nohami do blízkosti otáčajúcich
sa častí.
- Stroj nikdy nedvíhajte ani nepremiestňujte, kým je motor v
chode.
- Motor zastavte vždy, keď sa vzdialite od stroja, pred dopĺňaním
paliva a pred každým zásahom na údržbu alebo čistenie.
- Pri vypínaní motora znížte jeho rýchlosť.
- Keď frézy zasiahnu cudzí predmet, preorávač zastavte. Preorávač
skontrolujte a opravte prípadne poškodené časti.
- Preorávač so zastaveným motorom držte vždy tak, aby bol tlmič
výfuku ďaleko od tela. Počas prepravy vnútri vozidla, zabezpečte,
aby sa preorávač nemohol prevrátiť, čím predídete vyliatiu paliva
a poškodeniu stroja.
- Predtým, ako naštartujete motor, skontrolujte, či sa rezný nástroj
nedotýka nejakého predmetu.
- Nenechávajte motor v činnosti bez dozoru.
- Ruky majte vždy suché, čisté, nezašpinené olejom, ani palivovou
zmesou.
- Skontrolujte, či sa môžete bezpečne pohybovať a stáť.
Skontrolujte oblasť okolo, či v nej nie sú prekážky (korene, skaly,
vetvy, jamy a pod.) v prípade.
- Dávajte mimoriadny pozor a buďte ostražitý ak nosíte ochranné
prostriedky sluchu, pretože sa tým môže znížiť schopnosť počuť
zvuky upozorňujúce na nebezpečenstvo (volanie, signály,
upozornenia a pod.).
POZOR: Nikdy sa nenahýnajte nad ochranný štít. Kamene,
odpadky a pod. by mohli byť odmrštené smerom k očiam a
mohli by Vás oslepiť alebo vážne poraniť. Ak sa niekto priblíži,
stroj okamžite zastavte.
POZOR: Ak sa dostanete do situácie, v ktorej budete mať
pochybnosti ako pokračovať, poraďte sa s odborníkom.
Zavolajte predajcu alebo servisné stredisko. Nerobte nič,
čo presahuje vaše schopnosti.

38
Italiano English Français
USO E SICUREZZA OPERATION AND SAFETY FONCTIONNEMENT ET SÉCURITÉ
ATTENZIONE: non utilizzare l’unità se non si ha la
possibilità di richiedere soccorso in caso di incidente.
ATTENZIONE: non tentare di rimuovere il materiale tagliato
mentre il motore è in funzione o l’apparato di taglio è in
movimento per evitare di procurarsi gravi lesioni.
ATTENZIONE: può accadere talvolta che alcuni rami o
alcune sterpaglie rimangano bloccati tra la protezione e
l’apparato di taglio. Arrestare sempre il motore prima della
pulizia.
LAVORO CON LA MACCHINA
- Dopo aver avviato la macchina come indicato nel capitolo precedente,
accelerare e far lavorare le frese premendo leggermente sul manubrio
e facendo oscillare lievemente la macchina da sinistra a destra e da
destra a sinistra.
- Per controllare meglio l’avanzamento, premere in misura maggiore
o minore sul manubrio.
- Se la macchina tende ad avanzare rapidamente, per meglio
controllare l’avanzamento premere sul manubrio per permettere
al timone di aondare nel terreno e di agire da freno.
- Se gli attrezzi fendono il terreno ma la macchina non avanza, sollevare
alternativamente il manubrio sinistro e quello destro.
- Regolando l’altezza del timone e contrastando l’avanzamento della
macchina, si determina la profondità di lavoro.
- È consigliabile eettuare il lavoro in più passate, in questo modo
si otterrà un terreno nemente lavorato senza sovraccaricare la
macchina.
ATTENZIONE - La rotazione dell’utensile di lavoro provoca
l’avanzamento della motozappa.
ATTENZIONE - Durante la lavorazione del terreno, portare
le ruote di trasporto in posizione di riposo (verso l’alto).
USI VIETATI
- Non caricare mai l’attrezzo in funzione ponendogli sopra un peso
aggiuntivo.
- Non trascinare mai la motozappa su superfici dure o che
presentano dislivelli come pavimentazioni o scale.
- Non utilizzare la motozappa con una sola mano. L’uso con una
sola mano può provocare lesioni gravi all’operatore, agli assistenti,
agli astanti o a una combinazione di tali persone. La motozappa
è progettata per essere utilizzata con entrambe le mani.
- Utilizzare la motozappa soltanto in luoghi adeguatamente
ventilati, non utilizzarlo in ambienti esplosivi o infiammabili o in
ambienti chiusi. Prestare attenzione al rischio di avvelenamento
da monossido di carbonio.
- Non usare la macchina come mezzo di traino per accessori (tipo
rimorchio).
WARNING: Do not use the machine unless you are able to
call for help in the event of an accident.
WARNING: Neither the operator of the machine nor anyone
else may attempt to remove the cut material while the
engine is running or the cutting equipment is rotating, as
this can result in serious injury.
WARNING: Sometimes branches or grass get caught
between the guard and cutting attachment. Always stop
the engine before cleaning.
WORKING WITH THE MACHINE
- After starting your machine as indicated in the preceding paragraph,
accelerate and activate the blades by pressing gently on the
handlebars and by slowly swinging the machine from left to right,
and from right to left.
- For better control as you move forwards, apply more or less pressure
to the handlebars.
- If the machine has a tendency to advance too quickly, press down
on the handlebars for better control and dig the jackleg into the
ground so it works as a brake.
- If the blades dig into the ground and the machine does not move
forwards, lift the right and left side of the handlebars alternatively.
- The height of the jackleg and the propulsion can be adjusted to
determine how deep the machine works.
- We recommend you work the land with several passes. This will
produce nely ploughed land without overloading the machine.
WARNING - The rotation of the blades causes the motorhoe
to move forwards.
WARNING - Move the transporting wheels out of the way
(upwards) when using the machine.
PROHIBITED USE
- Never load the blade by putting a ballast weight on it.
- Never pull the motorhoe over hard surfaces or uneven surfaces
such as paving or steps.
- Do not operate a motorhoe with one hand! Serious injury to
the operator, helpers, bystanders, or any combination of these
persons may result from one-handed operation. A motorhoe is
intended for two-handed use.
- Only use the motorhoe in well-ventilated places, do not operate
the motorhoe in explosive or flammable atmospheres or in closed
environments. Beware of carbon monoxide poisoning.
- Do not use the machine as a means of traction for accessories (e.g.
towing).
AVERTISSEMENT : n’utilisez pas la machine si vous
n’êtes pas en mesure de pouvoir appeler à l’aide en cas
d’accident.
AVERTISSEMENT : ni l’utilisateur ni aucune autre personne
ne doit tenter de démonter l’outil de coupe lorsque le
moteur tourne ou que l’outil de coupe est en mouvement,
car des blessures graves peuvent en résulter.
AVERTISSEMENT : des branches ou de l’herbe peuvent
se bloquer entre la protection et l’outil de coupe. Arrêtez
toujours le moteur avant de procéder au nettoyage.
COMMENT TRAVAILLER AVEC LA MACHINE
- Après avoir mis la machine en marche en suivant les explications au
chapitre précédent, accélérer et faire tourner les fraises en appuyant
légèrement sur le guidon et en faisant osciller légèrement la machine
de gauche à droite et de droite à gauche.
- Pour mieux contrôler la marche, appuyer plus ou moins fort sur le
guidon.
- Si la machine tend à avancer rapidement, appuyer sur le guidon
pour mieux la contrôler an que le timon s’enfonce dans le terrain
et serve de frein.
- Si les outils s’enfoncent dans le terrain mais la machine n’avance
pas, soulever l’un après l’autre le guidon gauche puis le droit.
- Régler la hauteur du timon et contraster l’avancée de la machine
pour déterminer la profondeur de travail.
- Il est conseillé de passer plusieurs fois pour mieux labourer le terrain
sans surcharger la machine.
ATTENTION - La rotation de l’outil de travail fait avancer la
motobineuse.
ATTENTION - Durant le labour, mettre les roues de
transport en position de repos (vers le haut).
USAGES INTERDITS
- Ne chargez jamais l’outil en cours d’utilisation en lui posant
dessus un poids supplémentaire.
- Ne tirez jamais la motobineuse sur des surfaces dures ou
présentant des dénivellations tels des sols carrelés ou des
échelles.
- N’utilisez jamais la motobineuse d’une seule main ! Une
telle manipulation peut blesser gravement l’utilisateur ou les
personnes se tenant dans la zone de travail. Une motobineuse
s’utilise toujours à deux mains.
- Utilisez exclusivement la motobineuse dans une zone
suffisamment ventilée, ne l’utilisez pas dans un environnement
explosif ou inflammable ou dans des zones confinées. Soyez
vigilant face au risque d’empoisonnement au monoxyde de
carbone.
- Ne pas utiliser la machine comme système de remorquage pour
accessoires.

39
Deutsch Español Slovensky
BEDIENUNG UND SICHERHEIT FUNCIONAMIENTO Y SEGURIDAD ČINNOSŤ A BEZPEČNOSŤ
VORSICHT: Stellen Sie beim Arbeiten mit der Maschine
sicher, dass Sie im Notfall Hilfe rufen können.
VORSICHT: Weder die Bediener der Maschine noch andere
Personen dürfen versuchen, Schnittmaterial zu entfernen,
solange der Motor läuft oder sich das Schneidwerkzeug
dreht; dies kann zu schweren Verletzungen führen.
VORSICHT: Gelegentlich verfangen sich Zweige
oder Gras zwischen der Schutzabdeckung und dem
Schneidwerkzeug. Stellen Sie immer den Motor ab, bevor
Sie dieses entfernen.
ARBEITEN MIT DER MASCHINE
- Nachdem Sie die Maschine entsprechend den Anweisungen im
vorherigen Abschnitt gestartet haben, geben Sie Gas und lassen
Sie die Fräsen arbeiten, indem Sie leicht auf den Lenkholm drücken
und die Maschine sanft von links nach rechts und umgekehrt
schwenken.
- Für eine optimierte Führung üben Sie mehr oder weniger Druck auf
den Lenkholm aus.
- Drücken Sie bei schnellem Vorwärtslauf der Maschine auf den
Lenkholm, damit der Hacksporn in den Boden eindringt und die
Fahrt abbremst.
- Falls die Werkzeug den Boden umgraben, die Maschine hierbei aber
nicht voranläuft, heben Sie abwechselnd den linken oder rechten
Lenkholm.
- Durch die Höheneinstellung des Hacksporns und das Zurückhalten
des Maschinenvorlaufs wird die Arbeitstiefe festgelegt.
- Die Arbeit sollte in mehreren Durchgängen erfolgen, um einen fein
bearbeiteten Boden zu erhalten und dabei die Maschine nicht zu
überlasten.
ACHTUNG - Die Drehung des Werkzeugs verursacht die
Vorwärtsfahrt der Motorhacke.
ACHTUNG - Während der Bodenbearbeitung müssen sich
die Transporträder in Ruheposition (oben) befinden.
VERBOTENER EINSATZ
- Belasten Sie das Werkzeug bei der Arbeit niemals durch Auflegen
eines Zusatzgewichtes.
- Ziehen Sie die Motorhacke nicht auf harten bzw. unebenen
Oberflächen wie Pflastersteine oder Treppen.
- Bedienen Sie einen Motorhacke niemals einhändig!
Einhändiger Betrieb kann schwere Verletzungen beim Bediener,
Helfern, Umstehenden und sonstigen Personen verursachen. Ein
Motorhacke ist für beidhändigen Betrieb gedacht.
- Benützen Sie den Motorhacke nur an gut gelüfteten Orten.
Betreiben Sie den Motorhacke nicht in einer explosions-
oder brandgefährdeten Atmosphäre und nicht in
geschlossenen Räumen. Beachten Sie die Gefahr einer
Kohlenmonoxidvergiftung.
- Verwenden Sie die Maschine nicht als Zuggerät für Zubehör (zum
Beispiel Anhänger).
ADVERTENCIA: No utilice la máquina si no puede pedir
ayuda en caso de accidente.
ADVERTENCIA: Ni el operador de la máquina ni otras
personas deben intentar quitar el material cortado
mientras el motor está en marcha o cuando el equipo de
corte está girando, ya que pueden ocasionarse lesiones
graves.
ADVERTENCIA: A veces pueden quedar ramas o hierba
atrapadas entre el protector y el accesorio de corte. Pare el
motor para quitarlas.
TRABAJO CON LA MÁQUINA
- Poner la máquina en funcionamiento como se indica en el
capítulo anterior, acelerar y hacer funcionar las fresas presionando
el manillar apenas, y haciendo oscilar la máquina levemente de
izquierda a derecha y de derecha a izquierda.
- Para controlar mejor el avance hay que presionar el manillar en
mayor o menor medida.
- Si la máquina tiende a avanzar rápidamente, para controlar mejor
el avance hay que presionar el manillar de modo que el timón se
hunda en el terreno y actúe como freno.
- Si las herramientas se hunden en el terreno pero la máquina
no avanza, levantar de forma alternada el manillar izquierdo y
derecho.
- Regulando la altura del timón y contrarrestando el avance de la
máquina, se determina la profundidad de trabajo.
- Se recomienda efectuar el trabajo en varias pasadas para labrar el
terreno namente sin sobrecargar la máquina.
ATENCIÓN - La rotación de la herramienta de trabajo
provoca el avance de la motoazada.
ATENCIÓN - Durante la labranza del terreno las ruedas de
transporte tienen que estar en posición de reposo (hacia
arriba).
USOS NO ADMITIDOS
- No cargar la herramienta en funcionamiento añadiéndole peso
encima.
- No arrastrar la motoazada por superficies duras o con desniveles
como pavimentaciones o escaleras.
- No utilice la motoazada con una sola mano. En caso contrario,
el operador, sus ayudantes, los transeúntes y cualquier otra
persona pueden sufrir lesiones graves. La motoazada está
diseñada para utilizarse con las dos manos.
- Utilice la motoazada únicamente en lugares bien ventilados, y no
la emplee en atmósferas explosivas o inflamables ni en entornos
cerrados. Existe peligro de envenenamiento por monóxido de
carbono.
- No utilizar la máquina como medio de remolque de accesorios.
POZOR: Stroj nepoužívajte bez toho, že by ste neboli schopní
v prípade potreby zavolať pomoc.
POZOR: Obsluha stroja, ani iná osoba, sa nesmie pokúsiť
odstrániť pokosený materiál, kým je motor v chode, mohlo
by to spôsobiť veľmi vážne poranenie.
POZOR: Niekedy sa môžu medzi rezným kotúčom a štítom
zachytiť konáriky a tráva. Pred ich odstránením vždy
zastavte motor.
PRÁCA SO STROJOM
- Po naštartovaní stroja, podľa popisu v predchádzajúcej kapitole,
zrýchlite a začnite prácu s frézami, pričom mierne tlačte na rukoväť
a strojom mierne otáčajte zľava doprava a sprava doľava.
- Aby ste lepšie ovládali postup stroja vpred, pritlačte alebo uvoľnite
tlak na rukoväť.
- Ak by stroj postupoval rýchlo, na dosiahnutie lepšieho ovládania
stlačte rukoväť, aby sa kormidlo viac vnorilo do terénu a pôsobilo
na brzdu.
- Ak nástroje rozrážajú zem, ale preorávač nepostupujte, nadvihnite
striedavo ľavú a pravú rukoväť.
- Nastavením výšky kormidla a riadením postupu stroja sa určí hĺbka
pracovného záberu.
- Odporúča sa prejsť viackrát po jednom mieste, dosiahnete tak
jemne preoraný terén bez nadmerného namáhania stroja.
POZOR - Rotácia pracovného nástroja spôsobí postup
preorávača.
POZOR - Počas opracovania terénu premiestnite prepravné
kolesá do kľudovej polohy (smerom hore).
ZAKÁZANÉ POUŽITIE
- Stroj nezaťažujte tým, že naňho položíte ďalšiu záťaž.
- Preorávač nikdy neťahajte po tvrdom alebo nerovnom povrchu
ako dlažby a schody.
- S preorávač nepracujte tak, že ho budete držať len jednou
rukou! Pri práci jednou rukou možte vážne poraniť obsluhu,
pomocníka alebo okolostojace osoby, ako aj spoločne všetci.
Preorávač je určený na prácu s oboma rukami.
- Preorávač používajte iba na dobre vetraných miestach, nepracujte
s preorávač vo výbušnom, ani horľavom prostredí, alebo
uzavretých priestoroch. Chráňte sa pred otravou oxidom
uhoľnatým.
- Stroj nepoužívajte na premiestňovanie príslušenstva (ako príves).

40
41A 41B 42
Italiano English Français
USO E SICUREZZA OPERATION AND SAFETY FONCTIONNEMENT ET SÉCURITÉ
ALBERO PRESA DI FORZA
La motozappa dispone di un albero della presa di forza
per applicazioni supplementari (A, Fig.41A). Per utilizzare la
presa di forza togliere la copertura di protezione (B, Fig.41B)
svitando le apposite viti (C, Fig.41B).
ATTENZIONE – Per motivi di sicurezza, se non
utilizzato, l’albero della presa di forza deve essere
ricoperto dalla stessa protezione.
Le caratteristiche e il numero di giri dell’albero della presa di
forza sono riportati nella tabella tecnica (Fig.42)
POWER TAKE-OFF SHAFT
The motorhoe has a power take-off shaft for auxiliary
implements (A, Fig.41A). To use the power take-off, remove
the protective cover (B, Fig.41B) by undoing the screws (C,
Fig.41B).
WARNING – For safety reasons, the power take-off
shaft must be covered by the protective cover when
not in use.
The specifications and rotation speed of the PTO shaft are
indicated in the technical table (Fig.42)
ARBRE DE PRISE DE FORCE
La motobineuse dispose d'un arbre de prise de force pour
les applications supplémentaires (A, Fig.41A). Pour utiliser la
prise de force, enlever la protection (B, Fig.41B) en desserrant
les vis (C, Fig.41B).
ATTENTION – Pour des raisons de sécurité, si l'arbre
de prise de force n'est pas utilisé, le recouvrir avec sa
protection.
Les caractéristiques et le régime de l’arbre de la prise de force
sont mentionnés dans le tableau technique (Fig.42)

41
Deutsch Español Slovensky
BEDIENUNG UND SICHERHEIT FUNCIONAMIENTO Y SEGURIDAD ČINNOSŤ A BEZPEČNOSŤ
ZAPFWELLE
Die Motorhacke verfügt über eine Zapfwelle für zusätzliche
Anwendungen (A, Abb.41A). Zum Einsatz der Zapfwelle
müssen Sie das Schutzgehäuse (B, Abb.41B) durch Lösen der
Schrauben (C, Abb.41B) abnehmen.
ACHTUNG – Aus Sicherheitsgründen ist bei
Nichtverwendung der Zapfwelle unbedingt das
Schutzgehäuse wieder anzubringen.
Eigenschaften und Drehzahl der Zapfwelle finden Sie in der
Tabelle der technischen Daten (Abb.42)
EJE DE LA TOMA DE FUERZA
El eje de salida de la toma de fuerza (A, Fig. 41A) permite
accionar equipos suplementarios. Para utilizar la toma de
fuerza, desenroscar los tornillos (C, Fig. 41B) y desmontar la
carcasa (B, Fig. 41B).
ATENCIÓN – Por motivos de seguridad, cuando no
se lo utiliza, el eje de la toma de fuerza debe estar
cubierto con la carcasa.
Las características y la velocidad del eje de la toma de fuerza
se indican en la tabla de datos técnicos (Fig. 42).
HRIADEĽ HNACEJ ZÁSUVKY
Motorový preorávač má k dispozícii jeden hriadeľ hnacej
zásuvky pre doplnkové aplikácie (A, Obr. 41A). Aby ste
mohli používať hnaciu zásuvku, odoberte ochranný kryt (B,
Obr.41B) odskrutkovaním príslušných skrutiek (C, Obr.41B).
POZOR – Ak sa hriadeľ nepoužíva, z bezpečnostných
dôvodov treba hriadeľ hnacej zásuvky zakryť tým
istým ochranným krytom.
Charakteristiky a počet otáčok hriadeľa hnacej zásuvky sú
uvedené v technickej tabuľke (Obr.42)

42
43A 43B 44 45
Italiano English Français
ARRESTO MOTORE - TRASPORTO STOPPING THE ENGINE - TRANSPORTION ARRÊT DU MOTOR - TRANSPORT
LEGGERE ATTENTAMENTE ANCHE IL MANUALE DEL
MOTORE.
ARRESTO MOTORE
Per arrestare il motore, portare la leva interruttore/
acceleratore (E Fig.43A) sulla posizione “STOP”.
Per motore diesel portare la leva (G, Fig.43B) in posizione «O»
ATTENZIONE - A motore spento, per ragioni di
sicurezza (soprattutto in terreni con pendenza),
innestare la prima marcia di velocità come freno di
stazionamento.
Nel caso in cui la posizione "STOP" (OFF) dell’interruttore
non funzioni, portare la leva starter nella posizione CLOSE per
arrestare il motore.
Verifica preliminare
ATTENZIONE: L’APPARATO DI TAGLIO NON DEVE MAI
RUOTARE QUANDO IL MOTORE È AL MINIMO. Girare
in senso antiorario la vite “T” della velocità minima
per ridurre il numero di giri al minuto del regime
minimo, oppure rivolgersi a un’officina autorizzata
per la registrazione e non utilizzare l’unità fino a
quando non viene riparata.
La rotazione dell’apparato di taglio quando il motore
è al minimo può provocare lesioni personali gravi.
L’uso di una frizione danneggiata può causare la rotazione
dell’apparato di taglio alla velocità minima e l’aumento del
rischio di lesioni personali dovute alla perdita del controllo e
al contatto con il dispositivo di taglio.
TRASPORTO
Trasporto a spinta - Accendere la macchina e accelerare
leggermente, questa avanzerà lentamente sulla punta dei
denti senza rovinare i vialetti; non è tuttavia consigliabile
procedere su un terreno molto compatto, ad esempio un
suolo asfaltato o rivestito in cemento.
CAREFULLY READ THE ENGINE INSTRUCTION MANUAL.
STOPPING THE ENGINE
To stop the engine set the switch/throttle trigger (E, Fig.43A)
to “STOP”.
For diesel engine set the lever (G, Fig. 43B) to "O"
WARNING - When the engine is switched off, for
safety reasons (especially on sloping terrain) engage
first gear as a parking brake.
In the event that the "STOP" (OFF) position of the switch will
not function, pull the choke lever in the CLOSE position, to
stop the engine.
Pre-Operation Checking
WARNING: THE CUTTING ATTACHMENT SHOULD
NEVER TURN AT IDLE. Turn the idle speed screw “T”
counter-clockwise to reduce the idle RPM, or contact
a Servicing Dealer for adjustment and discontinue
use until the repair is made.
Serious personal injury may result from the cutting
attachment turning at idle.
A damaged clutch may cause a cutting attachment to rotate
at idle speed and increase the risk of personal injury from loss
of control and from contact with the cutting tool.
TRANSPORTATION
Transportation by pushing - Start the engine and gently
accelerate. The machine will slowly move forwards on the
end of the blade teeth, without damaging the path surface.
However, we recommend that you do not transport in this
way on very hard surfaces, e.g. tarmac and concrete.
LIRE ATTENTIVEMENT LE MANUEL DU MOTEUR.
ARRÊT DU MOTOR
Pour arrêter le moteur, mettre le levier interrupteur/
accélérateur (E, Fig.43A) sur la position « STOP ».
Pour les moteurs diesel placer le levier (G, Fig. 43B) sur «O»
ATTENTION - Par mesure de sécurité (surtout sur les
terrains en pente), enclencher la première vitesse en
guise de frein de stationnement moteur coupé.
Au cas où la position "STOP" (OFF) de l’interrupteur ne
fonctionnerait pas, coupez le moteur en ramenant le levier
d’accélérateur sur la position CLOSE (FERMER) pour arrêter le
moteur.
Contrôle avant utilisation
AVERTISSEMENT : L’OUTIL DE COUPE NE DOIT
JAMAIS TOURNER AU RALENTI. Tournez la vis de
réglage du ralenti “T” dans le sens anti-horaire
pour réduire le régime de ralenti ou contactez
un réparateur agréé pour procéder au réglage ;
n’utilisez pas la machine avant que la réparation
n’ait été effectuée.
Des blessures corporelles graves peuvent résulter du
fonctionnement au ralenti de l’outil de coupe.
Un embrayage défectueux peut être à l’origine du
mouvement au ralenti de l’outil de coupe et augmenter le
risque de blessure corporelle lié à la perte de contrôle de la
machine ou au contact accidentel avec l’outil de coupe.
TRANSPORT
Transport poussé - Mettre la machine en marche et
accélérer légèrement. La machine avance lentement sur le
bout des dents sans endommager les allées ; toutefois, il n’est
pas conseillé d’avancer sur un terrain très compact, tel qu’un
sol goudronné ou revêtu de ciment.

43
Deutsch Español Slovensky
MOTOR ABSTELLEN - TRANSPORT PARADA DEL MOTOR - TRANSPORTE ZASTAVENIE MOTORA - PREPRAVA
LESEN SIE EBENFALLS DIE BETRIEBSANLEITUNG DES
MOTORS DURCH.
MOTOR ABSTELLEN
Zum Abstellen des Motors den Schalter/Gashebel
(E, Abb.43A) auf “STOP”.
Stellen Sie bei Dieselmotoren den Hebel (G, Abb. 43B) auf «O»
ACHTUNG - Bei abgestelltem Motor legen Sie zur
Sicherheit (besonders an Hängen) den ersten Gang
als Feststellbremse ein.
Falls die Position "STOP" (OFF) des Schalters nicht funktioniert,
bringen Sie den Chokehebel in die Stellung CLOSE
(GESCHLOSSEN), um den Motor abzustellen.
Prüfung vor Beginn der Arbeit
VORSICHT: DAS SCHNEIDWERKZEUG DARF SICH IM
LEERLAUF NICHT DREHEN. Drehen Sie die Leerlauf-
Stellschraube “T” im Gegenuhrzeigersinn, um die
Leerlaufdrehzahl zu verringern, oder wenden Sie
sich an den Kundendienst und verwenden Sie die
Maschine nicht mehr, solange sie nicht repariert ist.
Es können schwere Verletzungen entstehen, wenn sich
das Schneidwerkzeug im Leerlauf dreht.
Schäden an der Kupplung können dazu führen, dass das
Schneidwerkzeug im Leerlauf läuft. Dies erhöht das Risiko von
Verletzungen aufgrund eines Verlusts der Beherrschbarkeit und
eines Kontakts mit dem Schneidwerkzeug.
TRANSPORT
Transport durch Schieben - Starten Sie die Maschine
und geben Sie etwas Gas. Somit fährt sie langsam auf den
Messerspitzen vorwärts, ohne die Wege zu beschädigen; vom
Transport auf äußerst kompaktem Boden, wie beispielsweise
Asphalt oder Zement wird allerdings abgeraten.
LEER ATENTAMENTE EL MANUAL DEL MOTOR.
PARADA DEL MOTOR
Para detener el motor, ponga la palanca interruptor/
acelerador (E, Fig. 43A) en la posición “STOP”.
Con motor diésel, ponga la palanca (G, Fig. 43B) en la
posición "O".
ATENCIÓN – De motor parado, para razones de
seguridad (sobretodo en terrenos con pendiente),
insertar la primera marcha como freno de
aparcamiento.
Si la posición "STOP" (OFF) del interruptor no funciona, lleve
la palanca de estrangulación hasta la posición CLOSE para
detener el motor.
Comprobación previa al funcionamiento
ADVERTENCIA: EL ACCESORIO DE CORTE NUNCA
DEBE GIRAR AL RALENTÍ. Gire el tornillo de
velocidad de ralentí “T” hacia la izquierda para
reducir las RPM de ralentí o póngase en contacto
con el concesionario de servicio para que lo ajuste;
no utilice la unidad hasta que se haya realizado la
reparación.
Cuando el accesorio de corte gira al ralentí se
pueden producir daños personales graves.
El accesorio de corte puede girar al ralentí cuando
el embrague está dañado, con lo que aumenta el riesgo
de lesiones por pérdida de control o por contacto con la
herramienta de corte.
TRANSPORTE
Transporte por empuje - Encender la máquina y acelerar
apenas; la máquina avanzará lentamente sobre la punta de
los dientes sin arruinar las hileras; se recomienda no avanzar
por un terreno demasiado compacto, asfaltado o revestido
en cemento.
POZORNE SI PREČÍTAJTE AJ PRÍRUČKU MOTORA.
Zastavenie motora
Aby ste motor zastavili, prepnite páčka plynu/vypínač (E,
Obr.43A) do polohy “STOP”.
U dieselovych motorov presuňte paku (G, Obr. 43B) do polohy "O"
POZOR - Z bezpečnostných dôvodov vypnite motor
(predovšetkým na teréne na svahu), zaraďte prvý
rýchlostný stupeň ako parkovaciu brzdu.
V prípade, že poloha "STOP" (OFF) vypínača nefunguje,
potiahnite štartovaciu páčku do ZATVORENEJ polohy, aby ste
motor zastavili.
Kontrola pred prácou
POZOR: PRI VOĽNOBEHU SA REZNÝ NÁSTROJ NESMIE
NIKDY OTÁČAŤ. Otočte skrutku voľnobehu “T” smerom
vľavo, aby ste znížili otáčky pri voľnobehu alebo
sa obráťte na autorizované servisné stredisko, aby
stroj nastavili. Stroj nepoužívajte, kým sa problém
neodstráni.
Otáčajúci sa rezný nástroj pri voľnobehu môže
spôsobiť vážne poranenia osôb.
Poškodená spojka môže spôsobiť, že sa bude rezný nástroj
otáčať aj pri voľnobehu, čím sa zvýši riziko poranenia osôb pri
strate kontroly a pri kontakte s rezacím nástrojom.
PREPRAVA
Preprava tlačením - Naštartujte stroj a mierne zrýchlite, stroj
bude pomaly postupovať po hrotoch zubov bez poškodenia
cestičiek; neodporúča sa však postupovať po veľmi tvrdom
teréne, napríklad po asfalte alebo betónovom povrchu.

44
Italiano English Français
MANUTENZIONE MAINTENANCE ENTRETIEN
CONFORMITÀ DELLE EMISSIONI GASSOSE
Questo motore, incluso il sistema di controllo delle emissioni,
deve essere gestito, utilizzato e sottoposto a manutenzione
in conformità alle istruzioni fornite nel manuale dell'utente
al fine di mantenere le prestazioni delle emissioni entro i
requisiti legali applicabili alle macchine mobili non stradali.
Non deve verificarsi alcuna manomissione intenzionale o uso
improprio del sistema di controllo delle emissioni del motore.
Il funzionamento, l'uso o la manutenzione errati del
motore o della macchina potrebbero comportare possibili
malfunzionamenti del sistema di controllo delle emissioni
fino al punto in cui i requisiti legali applicabili non sono
rispettati; in tal caso deve essere intrapresa un'azione
immediata per correggere i malfunzionamenti del sistema e
ripristinare i requisiti applicabili.
Esempi, non esaustivi, di funzionamento, uso o
manutenzione errati sono:
- Forzare o rompere i dispositivi per dosare il carburante;
- Uso di carburante e / o olio motore non rispondenti
alle caratteristiche indicate nel capitolo
AVVIAMENTO / CARBURANTE;
- Uso di pezzi di ricambio non originali, ad esempio
candele, ecc.;
- Mancanza o manutenzione inadeguata dell'impianto di
scarico, compresi intervalli di manutenzione errati per
marmitta, candela, filtro dell'aria, ecc.
ATTENZIONE - La manomissione di questo motore
rende la certificazione UE sulle emissioni non più
valida.
EMISSIONS COMPLIANCE
This engine, including the emissions control system, must
be operated, used and maintained in accordance with
the instructions provided in the user’s manual in order
to maintain the emissions performance within the legal
requirements applicable to non-road mobile machinery.
No deliberate tampering with or misuse of the engine
emissions control system has to take place.
Incorrect operation, use or maintenance of the engine or
of the non-road mobile machinery could result in possible
malfunctions of the emissions control system to a point
where the legal requirements applicable are not respected;
in such case a prompt action must be taken in order to
rectify the system’s malfunctions and restore the applicable
requirements.
Examples, not exhaustive, of incorrect operation, use or
maintenance are:
- Forcing or breaking the devices for metering the fuel;
- Use of fuel and/or engine oil not fulfilling the
characteristics shown in the chapter STARTER / FUELING;
- Use of not original spare parts, for example spark plug,
etc. ;
- Missing or improper maintenance of the exhaust system,
including incorrect timing of maintenance for muffler,
spark plug, air filter, etc.
WARNING – Tampering with this engine makes the
EU emissions certification no more valid.
CONFORMITÉ DES ÉMISSIONS GAZEUSES
Ce moteur, incorporé au système de contrôle des émissions,
doit être géré, utilisé et entretenu conformément aux
instructions citées dans le manuel de l'utilisateur de sorte
que les performances en matière d'émissions respectent les
lois applicables aux engins mobiles non routiers.
Le système de contrôle des émissions du moteur ne doit faire
l'objet d'aucune manipulation frauduleuse intentionnelle et
doit toujours être utilisé correctement.
Tout fonctionnement, utilisation et entretien incorrect de la
machine risque de compromettre le système de contrôle des
émissions au point de ne plus respecter les lois applicables
; dans ce cas, réparer immédiatement toute anomalie du
système et rétablir les conditions applicables.
Quelques exemples, incomplets, de fonctionnement,
utilisation ou entretien incorrects :
- Forcer ou casser les dispositifs de dosage du carburant ;
- Utiliser du carburant et/ou de l'huile moteur ne
répondant pas aux caractéristiques citées au chapitre
DÉMARRAGE/CARBURANT ;
- Utiliser des pièces de rechange non originales, par
exemple des bougies, etc. ;
- Ne pas procéder, ou procéder de façon incorrecte, à
l'entretien du système d'échappement ; ne pas respecter
les intervalles d'entretien du pot d'échappement, de la
bougie, du filtre à air, etc.
ATTENTION - Si ce moteur a fait l'objet d'une
manipulation frauduleuse, la certification UE sur les
émissions perd sa validité.

45
Deutsch Español Slovensky
INSTANDHALTUNG MANTENIMIENTO ÚDRŽBA
KONFORMITÄT DER ABGASEMISSIONEN
Dieser Motor, einschließlich seines Emissionskontrollsystems,
muss gemäß den Anweisungen der Betriebsanleitung
verwaltet, gebraucht und gewartet werden, um die
gesetzlich vorgeschriebenen Abgasgrenzwerte für
selbstfahrende Arbeitsmaschinen ohne Straßenzulassung
einzuhalten.
Jeder unbefugte Eingriff am Emissionskontrollsystem des
Motors bzw. dessen nicht bestimmungsgemäße Verwendung
ist untersagt.
Fehler bei Betrieb, Gebrauch oder Wartung des Motors oder
der Maschine können u.U. so schwere Funktionsstörungen
des Abgaskontrollsystems verursachen, dass die
anwendbaren Rechtsvorschriften nicht mehr erfüllt sind. In
diesem Fall sind sofortige Maßnahmen zu ergreifen, um die
Systemstörung zu beheben und die Emissionen wieder unter
die vorgeschriebenen Grenzwerte zu senken.
Einige Beispiele für falschen Betrieb, Gebrauch und falsche
Wartung sind u.a.:
- Überlasten oder Beschädigen der
Kraftstoffdosiervorrichtungen
- Verwendung von Kraftstoff bzw. Motoröl, deren
Eigenschaften nicht den Vorgaben im Kapitel
MOTORSTART / KRAFTSTOFF entsprechen
- Verwendung von Nicht-Originalteilen, z.B. Kerzen usw.
- mangelnde oder mangelhafte Wartung
der Auspuffanlage sowie Missachtung der
Wartungsintervalle für Auspuff, Kerze, Luftfilter usw.
ACHTUNG - Durch eigenmächtige Eingriffe an
diesem Motor verliert das EU-Emissionszertifikat
seine Gültigkeit.
CONFORMIDAD DE LAS EMISIONES GASEOSAS
Este motor, incluido el sistema de control de las emisiones,
debe gestionarse, utilizarse y someterse a mantenimiento en
conformidad con las instrucciones dadas en el manual del
usuario, a los fines de contener las emisiones dentro de los
límites legales aplicables a las máquinas móviles no viales.
No se debe hacer ningún intento de manipulación indebida
ni un uso inadecuado del sistema de control de las emisiones
del motor.
El funcionamiento, el uso o el mantenimiento incorrectos
del motor o de la máquina pueden causar fallos del sistema
de control de las emisiones hasta el punto de que no se
respeten los límites legales aplicables. En tal caso, se debe
actuar de inmediato para corregir los desperfectos del
sistema y restablecer los valores adecuados.
Algunos ejemplos, no exhaustivos, de funcionamiento, uso o
mantenimiento incorrectos son:
- forzamiento o rotura de los dispositivos de dosificación
del combustible;
- uso de combustible o aceite del motor que no
tengan las características indicadas en el capítulo
ARRANQUE / COMBUSTIBLE;
- uso de recambios no originales, por ejemplo, las bujías;
- mantenimiento inadecuado o nulo del sistema
de escape, incluida una frecuencia incorrecta de
mantenimiento del silenciador, de la bujía, del filtro de
aire, etc.
ATENCIÓN - La manipulación indebida de este motor
invalida la certificación UE sobre las emisiones.
SÚLAD PLYNOVÝCH EMISIÍ
Tento motor, vrátane kontrolného systému emisií, musíte
riadiť, používať a vykonávať na ňom údržbu podľa pokynov
uvedených v príručke používateľa s cieľom udržiavať hladinu
emisií v rámci požiadaviek právnych noriem platných pre
pojazdné stroje, ktoré nejazdia po ceste.
Na kontrolnom systéme emisií motora sa nesmie vykonávať
žiadna vedomá úprava ani sa s nim nesmie nesprávne
zaobchádzať.
Nesprávna prevádzka, používanie alebo údržba motora
alebo stroja by mohli spôsobiť závažné poruchy kontrolného
systému emisií, následkom ktorých sa môže porušiť
dodržiavanie platných predpisov. V takom prípade sa musia
poruchy systému ihneď napraviť a obnoviť dodržiavanie
požiadaviek platných predpisov.
Uvádzame niekoľko príkladov nesprávnej prevádzky,
používania alebo údržby:
- pôsobiť silou na zariadenia na dávkovanie paliva alebo
ich zlomiť;
- používať palivo a/alebo motorový olej, ktoré
nezodpovedajú charakteristikám uvedeným v kapitole
ŠTARTOVANIE/PALIVO;
- používanie neoriginálnych náhradných dielov, napríklad
sviečok a pod.;
- nevykonávanie údržby alebo nedostatočná údržba
zariadenia výfuku, vrátane nesprávnych intervalov
údržby výfuku, sviečky, vzduchového filtra a pod.
POZOR – Manipulácia motora spôsobí stratu
platnosti certifikátu EÚ na emisie.

46
Italiano English Français
MANUTENZIONE MAINTENANCE ENTRETIEN
LEGGERE ATTENTAMENTE ANCHE IL MANUALE DEL MOTORE.
Precauzioni di manutenzione
Se si interviene sulla macchina per manutenzione,
spegnere il motore e staccare il cappuccio della candela.
Utilizzare sempre i guanti.
ATTENZIONE: non utilizzare mai una motozappa
danneggiata, riparata in maniera inadeguata o assemblata
in maniera non del tutto completa e sicura.
Assicurarsi che l’apparato di taglio si arresti quando la leva
dell’acceleratore viene rilasciata. Se l’apparato di taglio continua a
funzionare alla velocità minima dopo la regolazione del carburatore,
rivolgersi a un’officina autorizzata e non utilizzare l’unità fino a
quando non viene riparata.
ATTENZIONE: tutti gli interventi sulla motozappa,
diversi da quelli indicati nel presente manuale di uso e
manutenzione, devono essere effettuati da personale
tecnico competente.
- Non modificare mai la motozappa in alcun modo.
ATTENZIONE: utilizzare soltanto accessori e parti di
ricambio omologate.
- Non toccare mai l’apparato di taglio né tentare di eseguire
operazioni di manutenzione sulla motozappa mentre il motore è
in funzione.
- Se la motozappa non è più utilizzabile, eliminarlo in maniera
appropriata senza inquinare l’ambiente consegnandolo al
rivenditore locale che provvederà alla corretta collocazione.
- Sostituire immediatamente i dispositivi di sicurezza danneggiati o
rotti. Sostituire le lame usurate o danneggiate per lotti completi.
ATTENZIONE: la marmitta e le altre parti del motore (ad
esempio, le alette del cilindro, la candela) si riscaldano
durante il funzionamento e continuano a rimanere calde
per un certo periodo di tempo dopo l’arresto del motore.
Per ridurre il rischio di ustioni, non toccare la marmitta e le
altre parti quando sono calde.
- Prestare attenzione alle parti calde della macchina come parti del
motore e l’albero di trasmissione.
- Mantenere serrati tutti i dadi, i bulloni e le viti per garantire il
funzionamento della macchina in condizioni di sicurezza.
- Non usate mai getti d’acqua o solventi per togliere lo sporco.
- Conservare la motozappa in luogo asciutto, con il serbatoio vuoto
e al di fuori della portata dei bambini.
CAREFULLY READ THE ENGINE INSTRUCTION MANUAL.
Maintenance precaution
Stop the engine and disconnect the spark plug cap before
any maintenance work. Always wear protective gloves.
WARNING: Never operate a motorhoe that is damaged,
improperly adjusted, or is not completely and securely
assembled.
Be sure that the cutting attachment stops moving when the throttle
control trigger is released. If the cutting attachment still moves at
idle speed after adjustment has been made, contact a Servicing
Dealer for adjustment and discontinue use until the repair is made.
WARNING: All motorhoe service, other than items in the
Operator’s Manual maintenance instructions, must be
performed by competent motorhoe service personnel.
- Never modify your motorhoe in any way.
WARNING: Use only recommended accessories and
replacement parts.
- Never touch the cutting attachment or attempt to service the
motorhoe while the engine is running.
- If your motorhoe is no longer usable, dispose of it properly
without damaging the environment by handing it in to your local
Dealer who will arrange for its correct disposal.
- Replace immediately any safety device when damaged or broken.
Replace worn or damaged blades as a complete set.
WARNING: The muffler and other parts of the engine
(e.g. fins of the cylinder, spark plug) become hot during
operation and remain hot for a while after stopping the
engine. To reduce risk of burns do not touch the muffler
and other parts while they are hot.
- Pay particular attention to parts such as the engine and drive
shaft as they could still be hot.
- Keep all nuts, bolts and screws tightened to guarantee safe
operating conditions.
- Never remove dirt with a water jet or solvents.
- Store the motorhoe in a dry place, out of the reach of children and
with the fuel tank empty.
LIRE ATTENTIVEMENT LE MANUEL DU MOTEUR.
Précaution d’entretien
Pour toute opération d’entretien, couper le moteur et
détacher le capuchon de la bougie. Toujours porter des
gants.
AVERTISSEMENT : n’utilisez jamais une motobineuse
endommagée, mal réglée, ou mal/partiellement montée.
Vérifier que l’outil de coupe s’arrête lorsque vous relâchez la
gâchette des gaz. Si le problème persiste après le réglage du
carburateur, contactez un réparateur et cessez d’utiliser la machine
jusqu’à sa réparation.
AVERTISSEMENT : hormis les instructions d’entretien
fournies par le Manuel d’utilisation, toutes les
interventions sur la motobineuse doivent être effectuées
par du personnel compétent.
- Ne modifiez en aucune façon les caractéristiques de votre
motobineuse.
AVERTISSEMENT : utilisez exclusivement des accessoires et
des pièces de rechange préconisés.
- Ne touchez jamais l’outil de coupe ou n’effectuez jamais
l’entretien sur la machine lorsque le moteur tourne.
- Lorsque la motobineuse atteint la fin de sa vie utile, mettez-
la au rebut conformément à la réglementation en vigueur en
matière de protection de l’environnement en la ramenant à votre
distributeur local qui suivra la procédure appropriée pour ce type
de machine.
- Remplacez immédiatement tout dispositif de sécurité
endommagé ou cassé. Remplacer les lames usées ou
endommagées par lots complets.
AVERTISSEMENT : le silencieux ainsi que d’autres pièces
du moteur (notamment les ailettes du cylindre, la bougie
d’allumage) atteignent des températures très élevées
en fonctionnement et après arrêt de la machine. Afin de
réduire les risques de brûlure, ne touchez pas le silencieux
ou les autres pièces lorsqu’elles sont encore chaudes.
- Faire attention aux parties chaudes de la machine tels que les
éléments du moteur et l’arbre de transmission.
- S’assurer que les écrous, boulons et vis sont toujours bien serrés
pour garantir le fonctionnement de la machine ainsi que ses
conditions de sécurité.
- Ne jamais utiliser de jets d’eau ou de solvants pour nettoyer la
machine.
- Conserver la motobineuse dans un endroit sec après avoir vidé le
réservoir ; ne pas la laisser à la portée des enfants.

47
Deutsch Español Slovensky
INSTANDHALTUNG MANTENIMIENTO ÚDRŽBA
LESEN SIE EBENFALLS DIE BETRIEBSANLEITUNG DES MOTORS
DURCH.
Verbeugende WartungsmaBnahmen
Stellen Sie bei Wartungseingriffen an der Maschine stets
den Motor ab und ziehen Sie den Kerzenstecker heraus.
Benutzen Sie stets Handschuhe.
VORSICHT: Arbeiten Sie nicht mit einem Motorhacke, der
beschädigt, falsch eingestellt oder nicht vollständig und
sicher zusammengebaut ist.
Achten Sie darauf, dass das Schneidwerkzeug sich nicht
weiterdreht, wenn der Gashebel losgelassen wird. Wenn sich das
Schneidwerkzeug auch nach der Neueinstellung weiterdreht, lassen
Sie das Gerät vom autorisierten Händler einstellen und verwenden
Sie es nicht mehr, solange es nicht repariert ist.
VORSICHT: Wartungsmaßnahmen am Motorhacke mit
Ausnahme der im Bedienungshandbuch genannten dürfen
nur von autorisiertem Motorhacke-Wartungspersonal
durchgeführt werden.
- Nehmen Sie am Motorhacke keine baulichen Veränderungen vor.
VORSICHT: Verwenden Sie nur empfohlenes Zubehör und
empfohlene Ersatzteile.
- Berühren Sie niemals das Schneidwerkzeug und versuchen Sie
nicht, den Motorhacke zu warten, während der Motor läuft.
- Wenn der Motorhacke unbrauchbar geworden ist, entsorgen Sie
ihn ordnungsgemäß und umweltfreundlich, indem Sie ihn ihrem
örtlichen Händler übergeben, die sich um eine ordnungsgemäße
Entsorgung kümmert.
- Ersetzen Sie Sicherheitsvorrichtungen sofort, wenn sie gebrochen
oder beschädigt sind. Für eine perfekte Ausbalancierung sollten
Sie abgenutzte oder beschädigte Messer immer als komplette.
VORSICHT: Der Auspuff und andere Teile des Motors (z. B.
Kühlrippen oder Zündkerzen) werden beim Betrieb heiß,
und es dauert eine Weile, bis sie nach dem Abstellen des
Motors abgekühlt sind. Berühren Sie zur Vermeidung von
Verbrennungen den Auspuff und andere heiße Teile nicht.
- Achten Sie auf heiße Maschinenteile wie bestimmte Motorstellen
und die Getriebewelle.
- Für einen sicheren Maschinenbetrieb müssen alle Schrauben und
Muttern fest angezogen sein.
- Entfernen Sie Schmutz niemals mit Wasserstrahlen oder
Lösemitteln.
- Bewahren Sie die Motorhacke an einem trockenen Ort mit leerem
Kraftstofftank und außerhalb der Reichweite von Kindern auf.
LEER ATENTAMENTE EL MANUAL DEL MOTOR.
Precauciones de manteniemiento
Si se interviene en la máquina por mantenimiento, apagar
el motor y quitar el capuchón de la bujía. Utilizar guantes
siempre.
ADVERTENCIA: No utilice nunca una motoazada que esté
dañada, mal ajustada o que no esté montada por completo
y de forma segura.
Asegúrese de que el accesorio de corte deja de moverse al soltar el
activador del control de aceleración. Si el accesorio de corte sigue
funcionando al ralentí después de ajustar el carburador, póngase en
contacto con el concesionario de servicio para solicitar su ajuste y
deje de utilizarlo hasta que esté reparado.
ADVERTENCIA: A excepción de lo especificado en las
instrucciones de mantenimiento del manual del operador,
la revisión de la motoazada, deberá ser llevada a cabo por
personal de servicio técnico competente.
- No modifique nunca la motoazada de ninguna manera.
ADVERTENCIA: Utilice sólo los accesorios y piezas de
repuesto recomendadas.
- No toque nunca el accesorio de corte ni intente revisar la
motoazada con el motor en marcha.
- Cuando la motoazada no sirva, tendrá que devolverla al
concesionario local para que la desechen de forma correcta y
ecológica.
- Sustituya inmediatamente los dispositivos de seguridad que
estén rotos o dañados. Sustituir las cuchillas desgastadas o
dañadas por lotes completos.
ADVERTENCIA: El amortiguador y otras piezas del motor
(por ejemplo, las aletas del cilindro y la bujía) se calientan
durante el funcionamiento y permanecen calientes algún
tiempo después de parar el motor. Para reducir el riesgo
de quemaduras, no toque el amortiguador ni otras piezas
mientras estén calientes.
- Prestar atención a las partes calientes de la máquina, como partes
del motor y eje de transmisión.
- Mantener apretadas todas las tuercas, los pernos y los tornillos
para garantizar el funcionamiento de la máquina en condiciones
de seguridad.
- No utilizar nunca chorros de agua o disolventes para eliminar la
suciedad.
- Conservar la motoazada en un lugar seco, con el depósito vacío y
fuera del alcance de los niños.
POZORNE SI PREČÍTAJTE AJ PRÍRUČKU MOTORA.
Opatrenia údržby
Ak na stroji bude nevyhnutný zásah údržby, vypnite
motor a odpojte viečko sviečky. Vždy používajte
rukavice.
POZOR: Nikdy nepoužívajte preorávač, ktorý je
poškodený, nesprávne nastavený, alebo ktorý nie je
úplne, či bezpečne zmontovaný.
Skontrolujte, či sa rezné nástroje po uvoľnení plynovej páčky
zastavia. Ak sa rezné nástroje otáčajú pri voľnobehu aj po
nastavení karburátora, kontaktujte autorizované servisné
stredisko, aby stroj opravili a stroj nepoužívajte, kým sa problém
neodstráni.
POZOR: Všetky opravy, okrem opráv uvedených v návode
na použitie, musia vykonať pracovníci autorizovaného
servisu.
- Preorávač nikdy žiadnym spôsobom neupravujte.
POZOR: Používajte iba odporúčané príslušenstvo a
náhradné diely.
- Nikdy sa nedotýkajte rezného nástroja, ani sa nepokúšajte
preorávač opraviť, pokiaľ je motor stále v činnosti.
- Ak preorávač nebude viac použiteľný, zlikvidujte ho bezpečne
a ekologicky, teda, aby nepoškodzoval životné prostredie -
odneste ho vášmu predajcovi, ktorý zabezpečí jeho likvidáciu.
- Každé bezpečnostné zariadenie, ktoré sa poškodilo alebo
zlomilo, okamžite vymeňte.
- Pri výmene opotrebovaných alebo poškodených čepelí
vymeňte celú súpravu.
POZOR: Tlmič výfuku a iné časti motora (napr. rebrá
valca, kábel sviečky) sa počas činnosti veľmi zohrejú a
ostanú horúce aj po zastavení motora. Aby ste znížili
nebezpečenstvo popálenia, nedotýkajte sa tlmiča výfuku a,
ani iných častí, kým sú horúce.
- Dávajte pozor na horúce časti stroja, ako časti motora a
prevodového hriadeľa.
- Matice a skrutky vždy udržiavajte utiahnuté, čím sa zaručí
bezpečný chod stroja.
- Pri odstraňovaní špiny nikdy nepoužívajte prúd vody pod
tlakom ani rozpúšťadlá.
- Motorový preorávač uložte na suchom mieste, s prázdnou
nádržou a mimo dosahu detí.

48
48 49
Italiano English Français
MANUTENZIONE MAINTENANCE ENTRETIEN
LEGGERE ATTENTAMENTE ANCHE IL MANUALE DEL MOTORE.
REGOLAZIONE DEL CARBURATORE
ATTENZIONE: Non modificare il carburatore. Ciò può
portare a violare le leggi sulle emissioni dei gas di
scarico.
AVVIAMENTO
ATTENZIONE: la molla elicoidale è sotto tensione e
potrebbe fuoriuscire causando gravi lesioni personali.
Non tentare mai di smontarla o di modificarla.
CAMBIO DELL’OLIO
NOTA: eliminare l’olio per motore usato, in conformità
alle norme per il rispetto dell’ambiente. Si suggerisce
di consegnare a un’officina autorizzata l’olio usato in un
contenitore sigillato. Non gettarlo nella spazzatura, né
versarlo sul terreno o in un lavandino.
OLIO GRUPPO TRASMISSIONE
Ogni 50 ore di lavoro controllare il livello dell’olio del gruppo di
trasmissione. Togliere il tappo A (Fig.48) e controllare il livello
dell’olio (Fig.49). Se necessario rabboccare con olio SAE 15W-40.
Cambio olio: Ogni 100 ore di lavoro è necessario cambiare l’olio
del gruppo trasmissione:
• Verificare che la macchina in posizione orizzontale
• Svitare tappo B e poi successivamente il tappo A (Fig.48)
• Lasciare svuotare il gruppo cambio dall’olio fino alla completa
fuoriuscita dello stesso.
• Rimontare il tappo B (Fig.48)
• Riempire il gruppo cambio con olio SAE 15W-40 fino a livello
(Fig.49)
• Rimontare tappo A (Fig.48)
CAREFULLY READ THE ENGINE INSTRUCTION MANUAL.
CARBURETOR ADJUSTMENT
WARNING: Do not modify the carburettor. This could
lead to violation of exhaust gas emission laws.
STARTER UNIT
WARNING: The coil spring is under tension and could fly
apart causing serious injuries. Never try to disassemble
or modify it.
OIL CHANGE
NOTE: Please dispose of used motor oil in a manner that
is compatible with the environment. We suggest you take
it in a sealed container to your local service station for
reclamation. Do not throw it in the trash, pour it on the
ground, or down a drain.
TRANSMISSION OIL
Check gearbox oil level every 50 hours of operation. Remove
plug "A" (Fig.48) and check oil level (Fig.49). Top up with SAE
15W-40 oil if necessary.
Oil change: After every 100 hours of operation it is necessary to
change the transmission oil:
• Check that the machine is in the horizontal position
• Unscrew plug B and then plug A (Fig.48)
• Let the oil drain out of the gearbox until it is completely
emptied.
• Refit plug B (Fig.48)
• Fill gearbox with SAE 15W-40 oil up to level (Fig.49)
• Refit plug "A" (Fig.48)
LIRE ATTENTIVEMENT LE MANUEL DU MOTEUR.
RÉGLAGE DU CARBURATEUR
AVERTISSEMENT : Ne pas modifier le carburateur.
Ceci représente une violation de la loi en matière
d'émissions des gaz d'échappement.
DÉMARREUR
AVERTISSEMENT : le ressort à enroulement est sous
tension et peut “sauter” à tout moment, entraînant de
graves blessures. Ne tentez jamais de le démonter ou
de le modifier.
VIDANGE DE L’HUILE
REMARQUE : éliminez l’huile moteur usagée d’une façon
compatible avec le respect de l’environnement. Nous
suggérons de la porter à une station de récupération dans
un récipient étanche. Ne la mettez pas à la poubelle et ne la
versez pas sur le sol ni dans un égout.
HUILE DU GROUPE DE TRANSMISSION
Contrôler le niveau d'huile de la transmission toutes les 50
heures de service. Enlever le bouchon A (Fig.48) et vérifier le
niveau d'huile (Fig.49). Si nécessaire, faire l'appoint avec de
l'huile SAE 15W-40.
Vidange d'huile : Vidanger l'huile de la transmission toutes les
100 heures de service :
• Pour cette opération, la motobineuse doit être parfaitement
horizontale
• Dévisser le bouchon B puis le bouchon A (Fig.48)
• Laisser s'écouler toute la quantité d'huile.
• Remonter le bouchon B (Fig.48)
• Ravitailler la transmission avec de l'huile SAE 15W-40 jusqu'au
niveau nécessaire (Fig.49)
• Remonter le bouchon A (Fig.48)

49
Deutsch Español Slovensky
INSTANDHALTUNG MANTENIMIENTO ÚDRŽBA
LESEN SIE EBENFALLS DIE BETRIEBSANLEITUNG DES MOTORS
DURCH.
VERGASEREINSTELLUNG
VORSICHT: Rüsten Sie den Vergaser nicht um. Dadurch
verstoßen Sie gegen die gesetzlichen Bestimmungen in
punkto Schadstoffemissionen.
ANWERFVORRICHTUNG
VORSICHT: Die Spiralfeder befindet sich unter
Spannung und kann auseinanderschnellen, wodurch
schwere Verletzungen entstehen können. Versuchen Sie
niemals, sie zu zerlegen oder zu ändern.
ÖLWECHSEL
ANMERKUNG: Entsorgen Sie Altöl umweltfreundlich.
Wir empfehlen, es in einem dichten Behälter zum
Wartungsbetrieb zur Wiederverwertung zu bringen. Werfen
Sie es nicht in den Müll, gießen Sie es nicht auf den Boden
und nicht in den Ausguss.
GETRIEBEÖL
Kontrollieren Sie den Getriebeölstand alle 50 Arbeitsstunden.
Nehmen Sie den Verschluss A (Abb.48) ab und kontrollieren Sie
den Ölstand (Abb.49). Füllen Sie bei Bedarf ÖL SAE 15W-40 nach.
Ölwechsel: Wechseln Sie das Getriebeöl alle 100
Arbeitsstunden:
• Das Gerät muss waagrecht stehen
• Drehen Sie den Verschluss B und anschließend den Verschluss
A (Abb.48) ab
• Lassen Sie die gesamte Ölfüllung aus dem Schaltgetriebe
abfließen.
• Drehen Sie den Verschluss B (Abb.48) wieder zu
• Füllen Sie die Getriebe-Baugruppe bis zur Markierung mit Öl
SAE 15W-40 (Abb.49)
• Drehen Sie den Verschluss A (Abb.48) wieder zu
LEER ATENTAMENTE EL MANUAL DEL MOTOR.
AJUSTE DEL CARBURADOR
ADVERTENCIA: No modificar el carburador. Una
modificación podría violar las leyes sobre las emisiones
de gases de escape.
PUESTA EN MARCHA
ADVERTENCIA: El resorte de la bobina está bajo tensión
y podría salir despedido provocando lesiones graves.
No intente desmontarlo ni alterarlo.
CAMBIO DE ACEITE
NOTA: Tire el aceite de motor usado conforme a las normas
medioambientales aplicables. Se aconseja llevarlo en un
recipiente cerrado a una gasolinera para que se deshagan de
él en la forma apropiada. No lo tire a la basura, no lo vierta
sobre el suelo ni lo arroje a una alcantarilla.
ACEITE DE LA TRANSMISIÓN
Cada 50 horas de trabajo controlar el nivel de aceite en el grupo
de transmisión. Quitar el tapón A (Fig. 48) y controlar el nivel del
aceite (Fig. 49). Si hace falta, rellenar con aceite SAE 15W-40.
Cambio de aceite: cambiar el aceite de la transmisión cada 100
horas de trabajo, del modo siguiente.
• Comprobar que la máquina está en posición horizontal
• Desatornillar el tapón B y luego el tapón A (Fig.48)
• Dejar que el aceite salga enteramente del grupo de cambio
• Reposicionar el tapón B (Fig.48)
• Llenar el grupo de cambio con aceite SAE 15W-40 hasta nivel
(Fig.49)
• Reposicionar el tapón A (Fig.48)
POZORNE SI PREČÍTAJTE AJ PRÍRUČKU MOTORA.
NASTAVENIE KARBURÁTORA
POZOR: Karburátor nemodifikujte. Mohlo by to
znamenať porušenie platných predpisov o emisiách
výfukových plynov.
ŠTARTÉR
POZOR: Pružina cievky štartovacieho lanka je
napnutá a uvoľnením by mohla spôsobiť vážne
poranenie. Nikdy sa nepokúšajte ju rozmontovať
alebo ju upravovať nejakým spôsobom.
VÝMENA OLEJA
POZNÁMKA: Použitý olej zlikvidujte v súlade s predpismi
o ochrane životného prostredia. Odporúčame vám
odviezť ho v dobre uzatvorenej nádobe do servisného
strediska. Nevyhadzujte ho do odpadu, nevylievajte ho
voľne, ani do kanalizácie.
OLEJ PREVODOVEJ JEDNOTKY
Vždy po 50 pracovných hodinách skontrolujte hladinu oleja
prevodového ústrojenstva. Odstráňte viečko A (Obr.48) a
skontrolujte hladinu oleja (Obr.49). Podľa potreby doplňte
olejom SAE 15W-40.
Výmena oleja: Vždy po 100 pracovných hodinách bude
nevyhnutné vymeniť prevodový olej:
• Overte si, že stroj je vo vodorovnej polohe
• Odskrutkujte viečko B a potom viečko A (Obr.48)
• Nechajte, aby sa vytiekol olej skupiny prevodu, až kým sa
úplne nevyprázdni.
• Opäť namontujte viečko B (Obr.48)
• Prevodovku opäť naplňte olejom SAE 15W-40 až na
potrebnú hladinu (Obr.49)
• Opäť namontujte viečko A (Obr.48)

50
56
Italiano English Français
MANUTENZIONE MAINTENANCE ENTRETIEN
LEGGERE ATTENTAMENTE ANCHE IL MANUALE DEL
MOTORE.
REGOLAZIONE LEVA COMANDO MARCIA
ATTENZIONE: La fresa deve iniziare a girare non prima
che la leva comando marcia (A, Fig.56) arrivi a metà della sua
corsa. In caso contrario è necessario intervenire sul registro
della leva comando (B, Fig.56). Se il registro non è sufficiente
ad ottenere le dette condizioni (il registro è arrivato a fondo
filettatura) contattare un centro di assistenza autorizzato.
Apparati di taglio
ATTENZIONE: Non saldare, raddrizzare o modificare
la forma di apparati di taglio danneggiati nel
tentativo di ripararli. Queste operazioni possono
determinare il distacco dell’apparato di taglio e
provocare lesioni gravi o letali.
PULIZIA DELLA MACCHINA
ATTENZIONE - Se si utilizza aria compressa per la
pulizia della macchina, è necessario proteggersi con
appositi occhiali e mascherina antipolvere.
CAUTELA: L’uso di getti d’acqua ad alte velocità per
la pulizia della macchina può danneggiare il motore
e il sistema elettrico
SOSTITUZIONE FRESE
Per la sostituzione delle frese vedere capitolo ASSEMBLAGGIO
CAREFULLY READ THE ENGINE INSTRUCTION MANUAL.
ADJUSTING THE DRIVE CONTROL LEVER
WARNING: The rotor must not start turning before the
drive control lever (A, Fig.56) is half-way through its full travel.
If the rotor starts turning sooner, the screw adjuster of the
control lever (B, Fig.56) requires attention. If the adjuster is
not able to guarantee the required conditions (set screw at
end of thread) contact an Authorized Service Centre.
Cutting apparatus
WARNING: Never repair damaged cutting
attachments by welding, straightening or modifying
the shape. This may cause parts of the cutting tool to
come off and result in serious or fatal injuries.
CLEANING THE MACHINE
WARNING - If using compressed air to clean the
machine, wear appropriate eye protection and a dust
mask.
WARNING - Cleaning the machine using high-power
water jets may damage the engine and the electrical
system
REPLACING THE BLADES
For replacement of the rotors, see the ASSEMBLY section.
LIRE ATTENTIVEMENT LE MANUEL DU MOTEUR.
RÉGLAGE DU LEVIER DE VITESSES
ATTENTION : La fraise ne doit pas commencer à tourner
avant que le levier de vitesses (A, Fig.56) ne se trouve à mi-
course. Dans le cas contraire, intervenir sur le dispositif de
réglage du levier de commande (B, Fig.56). Si le dispositif de
réglage ne permet pas d'obtenir ces conditions (le filetage
du dispositif de réglage a atteint la butée), s'adresser à un
centre d'assistance agréé.
Systèmes de coupe
AVERTISSEMENT : Ne tentez jamais de réparer un
outil de coupe endommagé en soudant, redressant
ou modifiant sa forme de quelque façon que ce soit.
Cela pourrait contribuer au délogement de l’outil
de coupe et provoquer des blessures graves, voire
mortelles.
NETTOYAGE DE LA MOTOBINEUSE
ATTENTION - Pour nettoyer la machine au jet d'air
comprimé, porter des lunettes de protection et un
masque contre la poussière.
AVERTISSEMENT : L’emploi de jets d'eau sous
pression risque d'endommager le moteur et le
système électrique
REMPLACEMENT DES FRAISES
Pour remplacer les fraises, consulter le chapitre ASSEMBLAGE

51
Deutsch Español Slovensky
INSTANDHALTUNG MANTENIMIENTO ÚDRŽBA
LESEN SIE EBENFALLS DIE BETRIEBSANLEITUNG DES
MOTORS DURCH.
EINSTELLUNG DES GANGWÄHLHEBELS
ACHTUNG: Die Drehung der Fräse darf erst einsetzen,
wenn der Gangwahlhebel (A, Abb.56) den halben
Laufweg erreicht hat. Andernfalls müssen Sie den Steller
am Gangwahlhebel (B, Abb.56) entsprechend regulieren.
Reicht der Regulierbereich des Stellers nicht aus, um diese
Bedingung zu erzielen (der Steller ist am Gewindeende),
kontaktieren Sie ein autorisiertes Servicezentrum.
Fräswerk
VORSICHT: Reparieren Sie beschädigte
Schneidwerkzeuge niemals durch Schweißen,
Richten oder Veränderung der Form. Dies kann
dazu führen, dass sich Teile des Schneidwerkzeugs
ablösen und schwere oder tödliche Verletzungen
verursachen.
REINIGUNG DES GERÄTS
ACHTUNG - Beim Einsatz von Druckluft zur
Reinigung des Geräts müssen Sie Schutzbrille und
Staubschutzmaske benutzen.
VORSICHT: Der Einsatz von
Hochdruckwasserstrahlen zur Reinigung des
Geräts kann den Motor und die elektrische Anlage
beschädigen
AUSTAUSCH DER FRÄSEN
Zum Austausch der Fräsen siehe Kapitel MONTAGE
LEER ATENTAMENTE EL MANUAL DEL MOTOR.
REGULACIÓN DE LA PALANCA DE MARCHA
ATENCIÓN: La fresa no debe comenzar a girar antes de
que la palanca de control de la marcha (A, Fig. 56) llegue a la
mitad de su carrera. En caso contrario, accione el ajustador de
la palanca (B, Fig. 56). Si el ajustador llega al final de la rosca
y no se ha obtenido la condición indicada, contacte con un
centro de asistencia autorizado
Aparatos de corte
ADVERTENCIA: No suelde, enderece ni modifique
la forma de los accesorios de corte dañados para
repararlos. Algunas partes de la herramienta
podrían separarse y ocasionar lesiones graves o
mortales.
LIMPIEZA DE LA MÁQUINA
ATENCIÓN - Si la máquina se limpia con aire
comprimido, es necesario protegerse con gafas y
máscara antipolvo.
PRECAUCIÓN: La limpieza de la máquina con chorros
de agua a presión puede hacer que se dañen el
motor y el sistema eléctrico.
SUSTITUCIÓN DE LAS FRESAS
Para la sustitución de las fresas, ver el capítulo ENSAMBLAJE.
POZORNE SI PREČÍTAJTE AJ PRÍRUČKU MOTORA.
NASTAVENIE PÁČKY OVLÁDANIA RÝCHLOSTNÝCH
STUPŇOV
POZOR: Fréza sa nesmie začať otáčať predtým, ako sa
páka na ovládanie chodu (A, Obr.56) dostane do polovice
svojho pohybu. V opačnom prípade bude nevyhnutné
zasiahnuť na regulátore ovládacej páky (B, Obr.56). Pokiaľ
sa uvedené podmienky nedajú dosiahnuť pomocou
regulátora (regulátor sa dostal na koniec závitu), kontaktujte
autorizované servisné stredisko.
Rezný mechanizmus
POZOR: Časti rezného mechanizmu pri pokuse
o opravu nikdy nezvárajte, nenarovnávajte ani
nemodifikujte. Môže to spôsobiť odlomenie rezného
mechanizmu, následkom čoho môže byť vážne alebo
aj smrteľné poranenie.
ČISTENIE STROJA
POZOR - Ak sa na čistenie stroja používa stlačený
vzduch, bude nevyhnutné chrániť si tvár vhodnými
okuliarmi a maskou proti prachu.
UPOZORNENIE: Používanie na čistenie stroja prúdu
vody s vysokou rýchlosťou môže poškodiť motor a
elektrický systém.
VÝMENA FRÉZ
Pri výmene fréz si pozrite kapitolu MONTÁŽ

52
Italiano English Français
MANUTENZIONE - RIMESSAGGIO MAINTENANCE - STORAGE ENTRETIEN - REMISSAGE
MANUTENZIONE STRAORDINARIA
È opportuno, a fine stagione se con uso intenso, ogni due
anni con uso normale provvedere ad un controllo generale
da eseguirsi con un tecnico specializzato della rete di
assistenza.
ATTENZIONE! – Tutte le operazioni di manutenzione
non riportate sul presente manuale devono essere
effettuate da un’officina autorizzata. Per garantire
un costante e regolare funzionamento della macchina,
ricordate che le eventuali sostituzioni delle parti di
ricambio dovranno essere effettuate esclusivamente con
RICAMBI ORIGINALI.
Eventuali modifiche non autorizzate e/o l’uso di
accessori non originali possono causare lesioni gravi
o mortali all’operatore o a terzi.
RIMESSAGGIO
Quando la macchina deve rimanere ferma per lunghi periodi:
- Togliere il carburante dal serbatoio e rimontare il tappo.
- Smaltire il carburante secondo le norme e rispettando
l’ambiente.
- Prestare attenzione alle parti calde della macchina come
parti del motore e l’albero di trasmissione.
- Non usate mai getti d’acqua o solventi per togliere lo
sporco.
- Conservare la motozappa in luogo asciutto, con il
serbatoio vuoto e al di fuori della portata dei bambini.
- Le procedure di messa in servizio dopo un rimessaggio
invernale sono le stesse che si effettuano durante l’avvio
normale della macchina (pag.24-34).
DEMOLIZIONE E SMALTIMENTO
Buona parte dei materiali impiegati nella costruzione della
macchina sono riciclabili; tutti i metalli (acciaio, alluminio,
ottone) si possono consegnare ad un normale ferro-recupero.
Per Informazioni rivolgersi al normale servizio di raccolta di
rifiuti della vostra zona.
Lo smaltimento dei rifiuti derivati dalla demolizione della
macchina dovrà essere eseguito nel rispetto ambientale,
evitando di inquinare suolo, aria e acqua.
In ogni caso dovranno essere rispettate le locali
legislazioni vigenti in materia.
All’atto della demolizione della macchina, dovrete
distruggere l'etichetta della marcatura CE assieme al presente
manuale.
EXTRA MAINTANANCE ADVISABLE
It is advisable to inspect the machine by a specialized
technician at an authorized service network at the end of
season, if used intensively, and every two years if with normal
use.
WARNING! – Any maintenance operations not
specifically dealt with in this manual must be carried
out by an authorised service centre. To ensure that
your machine continues to function correctly, use only
ORIGINAL REPLACEMENT PARTS.
Any unauthorized changes and/or use of non-
original replacement parts may result in serious
injury or death to the operator or third parties.
STORAGE
If the machine is to be stored for long periods:
- Empy the fuel tank and put the cap back on.
- Dispose of fuel according to the rules and respecting the
environment.
- Pay particular attention to parts such as the engine and
drive shaft as they could still be hot.
- Never remove dirt with a water jet or solvents.
- Store the motorhoe in a dry place, out of the reach of
children and with the fuel tank empty.
- The procedures for returning the machine to service
following winter storage are the same as for starting up
during everyday use (page 24-34).
DEMOLITION AND DISPOSAL
Many of the materials used to construct the machine are
recyclable; metals (steel, aluminum, and brass) can be
delivered to recycling station.
For further information contact a recycling station service of
your area.
Machine disposal must be executed in respect to the
environment, avoiding soil, air and water pollution.
Local legislation enforced in matter should be respected
in any case.
When the machine is scrapped also the CE mark label must
be destroyed together with this manual.
ENTRETIEN EXCEPTIONNEL
À la fin de la saison, si l'appareil a fait l'objet d'un usage
intense, ou tous les deux ans en cas d'usage normal, faites
contrôler l'appareil par un technicien spécialisé du réseau
d'assistance.
ATTENTION! – Les opérations de maintenance et
d’entretien non reprises dans le présent manuel
devront être effectuées par un agent agréé. Pour
garantir le fonctionnement régulier et constant de
l’appareil, veiller à ce que les éventuels remplacements
de pièces détachées soient effectués exclusivement
avec des PIÈCES DÉTACHÉES ORIGINALES.
Toute modification non autorisée et/ou utilisation
d'accessoires non originaux peut entraîner des
blessures graves ou mortelles à l'opérateur ou à des
tiers.
REMISSAGE
Lorsque l'appareil doit être entreposé pendant de longues
périodes:
- Otez le carburant du réservoir et remontez le bouchon.
- Éliminer le carburant conformément aux normes et en
respectant l'environnement.
- Faire attention aux parties chaudes de la machine tels que
les éléments du moteur et l’arbre de transmission.
- Ne jamais utiliser de jets d’eau ou de solvants pour
nettoyer la machine.
- Conserver la motobineuse dans un endroit sec après avoir
vidé le réservoir ; ne pas la laisser à la portée des enfants.
- Les procédures de mise en service après un remisage
hivernal sont les mêmes que pour le démarrage normal de
la machine (pages 24-34).
DÉMOLITION ET MISE AU REBUT
Une grande partie des matériaux utilisés pour la fabrication
du taille-haie sont recyclables ; tous les métaux (acier,
aluminium, laiton) peuvent être envoyés à la ferraille.
Pour tout renseignement, contactez votre service local de
collecte des déchets.
Les déchets dérivant de la démolition de l'appareil doivent
être éliminés en respectant l'environnement, en évitant de
polluer le sol, l'eau et l'air
Quoi qu'il en soit, il est obligatoire de respecter les
normes et législations locales en vigueur.
Lors de la démolition de la machine, détruire également
l'étiquette du marquage CE ainsi que le présent manuel.

53
Deutsch Español Slovensky
INSTANDHAL - LÄNGERUNG MANTENIMIENTO - ALMACENAJE ÚDRŽBA - SKLADOVANIE
AUSSERORDENTLICHE WARTUNG
Bei intensivem Gebrauch sollte am Ende der Saison bzw. bei
normalem Gebrauch alle zwei Jahre eine Generalinspektion
durch eine Fachkraft des Kundendienstnetzes ausgeführt
werden.
ACHTUNG! – Alle in dieser Anleitung beschriebenen
Wartungsarbeiten dürfen nur in einer autorisierten
Fachwerkstatt durchgeführt werden. Um einen
auf Dauer einwandfreien Betrieb des Geräts zu
garantieren, verwenden Sie zum Austausch defekter Teile
ausschließlich ORIGINALERSATZTEILE.
Nicht autorisierte Umrüstungen bzw. der Einsatz
von nicht originalem Zubehör können schwere oder
sogar tödliche Unfälle des Anwenders oder von
Drittpersonen verursachen.
LÄNGERUNG
Bei längerem Stillstand des Geräts:
- Den Krafstoff tank entleeren und den Deckel wieder
aufschrauben.
- Entsorgen Sie Kraftstoff umweltgerecht nach den
einschlägigen Bestimmungen.
- Achten Sie auf heiße Maschinenteile wie bestimmte
Motorstellen und die Getriebewelle.
- Entfernen Sie Schmutz niemals mit Wasserstrahlen oder
Lösemitteln.
- Bewahren Sie die Motorhacke an einem trockenen Ort mit
leerem Kraftstofftank und außerhalb der Reichweite von
Kindern auf.
- Gehen Sie zur Inbetriebnahme des Geräts nach der
Winterpause wie beim normalen Anlassen vor
(siehe S.25-35).
VERSCHROTTUNG UND ENTSORGUNG
Ein Großteil der zum Bau der Heckenschere verwendeten
Werkstoffe sind recycelbar; alle Metalle (Stahl, Aluminium,
Messing) können in einem normalen Schrotthandel
abgegeben werden.
Für Informationen wenden Sie sich bitte an den normalen
Müllentsorgungsdienst Ihres Gebietes.
Die Entsorgung der durch die Verschrottung des Gerätes
entstehenden Abfälle muss umweltgerecht ohne
Verunreinigung von Boden, Luft und Wasser erfolgen.
Die einschlägigen örtlichen Bestimmungen müssen in
jedem Fall beachtet werden.
Zerstören Sie bei der Verschrottung des Geräts das
CE-Kennzeichen auf dem Gerät und das vorliegende
Handbuch.
MANTENIMIENTO EXTRAORDINARIO
Se aconseja hacer revisar el equipo por un técnico
especializado del servicio de asistencia, todos los años si el
uso es intensivo o cada dos años si el uso es normal.
¡ATENCIÓN! - Todas las operaciones de mantenimiento
no indicadas en este manual deben ser realizadas por
un taller autorizado. Para garantizar un funcionamiento
constante y regular de la máquina, es indispensable
utilizar exclusivamente REPUESTOS ORIGINALES.
Eventuales modificaciones no autorizadas y/o el uso
de accesorios no originales pueden causar lesiones
graves o mortales al operador o a terceros.
ALMACENAJE
Si la máquina no se va a utilizar durante un tiempo
prolongado:
- Quite el combustible del depósito y coloque el tapón.
- Eliminar el combustible siguiendo las normas y respetando
el medio ambiente.
- Prestar atención a las partes calientes de la máquina,
como partes del motor y eje de transmisión.
- No utilizar nunca chorros de agua o disolventes para
eliminar la suciedad.
- Conservar la motoazada en un lugar seco, con el depósito
vacío y fuera del alcance de los niños.
- Para volver a utilizar la máquina después de la pausa
invernal, es suficiente realizar las mismas operaciones que
para la puesta en marcha habitual (pág.25-35).
DESGUACE Y DESECHO DEL EQUIPO
Gran parte de los materiales empleados en la construcción de
la máquina son reciclables; todos los metales (acero, aluminio,
latón) pueden entregarse a un depósito de chatarra.
Para información, consulte con el servicio de recolección de
residuos de su zona.
Deseche los restos de la máquina con arreglo a las normas de
protección medioambiental, evitando contaminar el suelo, el
aire y el agua.
En cualquier caso, respete la legislación en la materia.
En el momento de desechar la máquina, destruya la etiqueta
del marcado CE y también este manual.
MIMORIADNA ÚDRŽBA
Po ukončení sezóny, po intenzívnom používaní alebo vždy
po dvoch rokoch bežného používania zabezpečte generálnu
kontrolu, ktorú musí vykonať špecializovaný technik
autorizovaného strediska.
POZOR! - Všetky operácie údržby, ktoré nie sú
uvedené v tomto návode, musia byť vykonané
v autorizovanom servisnom stredisku. Aby
bola zaručená nepretržitá a správna činnosť stroja,
nezabudnite, že pri prípadnej výmene jeho dielov sa
musia použiť výhradne ORIGINÁLNE NÁHRADNÉ
DIELY.
Prípadne neautorizované modifikácie a/alebo
použitie neoriginálneho príslušenstva môžu
spôsobiť vážne alebo aj smrteľné zranenia
pracovníkov alebo tretích osôb.
USKLADNENIE
Ak ostane stroj bez používania dlhú dobu:
- Vyprázdnite palivovú nádrž a znovu nasaďte uzáver.
- Palivo zneškodnite v súlade s normami a predpismi na
ochranu životného prostredia.
- Dávajte pozor na horúce časti stroja, ako časti motora a
prevodového hriadeľa.
- Pri odstraňovaní špiny nikdy nepoužívajte prúd vody pod
tlakom ani rozpúšťadlá.
- Motorový preorávač uložte na suchom mieste, s prázdnou
nádržou a mimo dosahu detí.
- Operácie pri uvedení do chodu po zimnom uskladnení sú
rovnaké ako pri bežnom naštartovaní stroja (str. 25-35).
VYRADENIE Z ČINNOSTI A LIKVIDÁCIA
Veľká časť materiálov použitých na konštrukciu strojového
zariadenia sa dá recyklovať. Všetky kovy (oceľ, hliník, mosadz)
možno odovzdať v zbernom stredisku kovových odpadov.
Informácie dostanete v zberni odpadov v mieste vášho
bydliska.
Likvidáciu odpadov zo strojového zariadenia treba vykonať v
súlade s platnými predpismi na ochranu životného
prostredia, aby sa predišlo kontaminácii pozemkov, vzduchu
a vody.
V každom prípade bude treba dodržať platné predpisy.
Pri likvidácii stroja zničte štítok s označením CE spolu s týmto
návodom.

54
218 - 118 218 D - 118 D
Motore - Engine - Moteur -
Motor - Motor - Motor
4 tempi - 4 Stroke - 4 temps - Viertakt - 4 tiempos - 4-taktový
Trasmissione -
Transmission -
Transmission -
Getriebe -
Transmisión -
Prevod
Ad ingranaggi in bagno d’olio
With oil bath gears
À engrenages à bain d'huile
Zahnradgetriebe im Ölbad
De engranaje en baño de aceite
Pri prevodoch v olejovom kúpeli
Cambio meccanico (velocità) -
Mechanical gearbox (speed) -
Boîte de vitesses mécanique -
Mechanisches Schaltgetriebe (Gänge) -
Cambio mecánico (velocidades) -
Mechanická prevodovka (rýchlosť)
1 marcia avanti (58 rpm) – 2 marcia avanti (102 rpm) – 3 marcia avanti (140 rpm) – 1 marcia indietro (44 rpm) -
1 forward gear (58 rpm) – 2 forward gear (102 rpm) – 3 forward gear (140 rpm) –1 reverse gear (44 rpm) -
1 marche AV (58 rpm) – 2 marche AV (102 rpm) – 3 marche AV (140 rpm) – 1 marche AR (44 rpm) -
1 Vorwärtsgang (58 rpm) – 2 Vorwärtsgang (102 rpm) – 3 Vorwärtsgang (140 rpm) – 1 Rückwärtsgang (44 rpm) -
1 marcha adelante (58 rpm) – 2 marcha adelante (102 rpm) – 3 marcha adelante (140 rpm) – 1 marcha atrás (44 rpm) -
1 chod dopredu (58 rpm) – 2 chod dopredu (102 rpm) – 3 chod dopredu (140 rpm) – 1 chod dozadu (44 rpm)
Profondità di taglio - Cutting depth -
Profondeur de coupe - Schnitttiefe -
Profundidad de corte - Hĺbka rezu
cm
18
Larghezza di taglio - Cutting width -
Largeur de coupe - Schnittbreite -
Anchura de corte - Šírka rezu
cm
100
Dimensioni ingombro - Overall dimensions -
Dimensions hors tout - Abmessungen -
Medidas máximas - Vonkajšie rozmery
cm
150x105x110 170x105x110
Peso - Weight - Poids -
Gewith - Peso - Hmotnosť
kg
96 131
I
DATI TECNICI
GB
TECHNICAL DATA
F
DONNEES TECHNIQUES
D
TECHNISCHE ANGABEN
E
DATOS TECNICOS
SK
TECHNICKÉ ÚDAJE

55
I
DATI TECNICI
GB
TECHNICAL DATA
F
DONNEES TECHNIQUES
D
TECHNISCHE ANGABEN
E
DATOS TECNICOS
SK
TECHNICKÉ ÚDAJE
218 - 118 218 D - 118 D
Pressione acustica - Pressure level - Pression acoustique -
Schalldruck - Presión acustica - Akustická hladina hluku
dB (A)
EN 709
80.7 80.7
Incertezza - Uncertainty - Incertitude -
Unsicherheit - Incertidumbre - Neistota
dB (A)
1.6 1.6
Livello di potenza acustica misurato - Measured sound power level -
Niveau de puissance acoustique mesuré - Schallleistungspegel gemessen -
Nivel de potencia acústica medido - Nameraná úroveň zvukového výkonu
dB (A)
EN 709
94.1 99.4
Incertezza - Uncertainty - Incertitude -
Unsicherheit - Incertidumbre - Neistota
dB (A)
1.6 1.6
Livello potenza acustica garantita - Guaranteed sound power level
Niveau puissance acoustique assuré - Garantierter akustischer Schalleistungspegel -
Nivel potencia acústica garantizado - Zaručená hladina akustického hluku
dB (A)
EN 709
96 101
Livello di vibrazione - Vibration level - Niveau de vibration -
Vibrationspegel - Nivel de vibracion - Úroveň vibrácií
m/s
2
EN 709
7.0 (SX)
6.5 (DX)
3.1 (SX)
3.6 (DX)
Incertezza - Uncertainty - Incertitude -
Unsicherheit - Incertidumbre - Neistota
m/s
2
EN 12096
1.5 2.0

56
TABELLA DI MANUTENZIONE
Vi preghiamo di notare che i seguenti intervalli di manutenzione si applicano
solamente per le normali condizioni di funzionamento. Se il vostro lavoro quotidiano
è più gravoso rispetto al normale gli intervalli di manutenzione devono essere ridotti
di conseguenza.
Prima di ogni
utilizzo
Dopo ogni sosta
per il rifornimento
Mensilmente
Se danneggiato
o difettoso
Come richiesto
Macchina completa Ispezionare: perdite, crepe e usura
X
Controlli: interruttore, starter, leva
acceleratore e leva fermo acceleratore
Vericare il funzionamento
X
Serbatoio carburante Ispezionare: perdite, fessure e usura
X
Filtro carburante Ispezionare e pulire
X
Sostituire elemento ltrante
X
Ogni 6 mesi
Utensili Ispezionare: danni e usura
X
Sostituire
X
Frizione Ispezionare: (L’utensile non deve girare
al minimo)
X
Sostituire
X
Gruppo trasmissione Controllo lubricazione
Ogni 50 ore
Tutte le viti e i dadi accessibili (escluse
viti carburatore)
Ispezionare e riserrare
X
Filtro aria Pulire
X
Sostituire
X
Ogni 6 mesi
Alette cilindro e feritoie carter
avviamento
Pulire
X
Corda di avviamento Ispezionare: danni e usura
X
Sostituire
X
Carburatore Controllare il minimo (L’utensile non deve
girare al minimo)
X X
Candela Controllare distanza elettrodi
X
Sostituire
X
Ogni 6 mesi
MAINTENANCE CHART
Please note that the following maintenance intervals apply for normal operating
conditions only. If your daily work requires longer than normal or harsh cutting
conditions are present the suggested intervals should be shortened accordingly.
Before Each Use
After Each
Refueling Stop
Monthly
If Damaged or
Faulty
As Required
Complete Machine Inspect (Leaks, Cracks, and Wear)
X
Controls (Ignition Switch, Choke Lever,
Throttle Trigger, Trigger Interlock)
Check Operation
X
Fuel Tank Inspect (Leaks, Cracks, and Wear)
X
Fuel Filter Inspect and Clean
X
Replace Filter Element
X
Every 6
Months
Blade assembly Inspect (Damage, and Wear)
X
Replace
X
Clutch Drum Inspect (The blade assembly must not
rotate when the engine is idling)
X
Replace
X
Gearbox Lubrication check
Every 50 hrs
All Accessible Screws and Nuts (not
Adjusting Screws)
Inspect - Retighten
X
Air Filter Clean
X
Replace
X
Every 6
Months
Cylinder Fins and Starter System Vents Clean
X
Starter Rope Inspect (Damage, and Wear)
X
Replace
X
Carburetor Check Idle: (The blade assembly must not
rotate when the engine is idling)
X X
Spark Plug Check Electrode Gap
X
Replace
X
Every 6
Months

57
TABLEAU D'ENTRETIEN
Les intervalles d'entretien signalés ici sont valables exclusivement en cas de
conditions normales de fonctionnement. Si le travail quotidien s'avère plus
contraignant que prévu, réduire en conséquence les intervalles d'entretien.
Avant toute
utilisation
Après chaque
ravitaillement
Une fois par mois
En cas de dommage
ou de défaut
Comme prévu
Machine complète Vérier : fuites, craquelures et niveau
d'usure
X
Contrôles : interrupteur, starter, levier
d'accélérateur et levier de blocage
d'accélérateur
Vérier le fonctionnement
X
Réservoir à carburant Vérier: fuites, craquelures et niveau d'usure
X
Filtre à carburant Vérier et nettoyer
X
Remplacer l'élément ltrant
X
Tous les
6 mois
Outils Vérier: dommages et niveau d'usure
X
Remplacer
X
Embrayage Vérier : (L'outil ne doit pas tourner au
ralenti)
X
Remplacer
X
Groupe de transmission Contrôle lubrication
Toutes les 50
heures
Toute la visserie accessible (sauf vis de
carburateur)
Vérier et resserrer
X
Filtre à air Nettoyer
X
Remplacer
X
Tous les
6 mois
Ailettes cylindre et fentes du carter de
démarrage
Nettoyer
X
Corde de démarrage Vérier : dommages et niveau d'usure
X
Remplacer
X
Carburateur Contrôler le ralenti : (L'outil ne doit pas
tourner au ralenti)
X X
Bougie Contrôler la distance des électrodes
X
Remplacer
X
Tous les
6 mois
WARTUNGSTABELLE
Die folgenden Wartungsintervalls gelten ausschließlich bei Einsatz der Kettensäge
unter normalen Betriebsbedingungen. Falls Ihre tägliche Arbeit unter schwereren
Bedingungen als normal durchgeführt wird, müssen die Wartungsintervalle
entsprechend verkürzt werden.
Vor jedem
Gebrauch
Nach dem Betanken
Monatlich
Bei Schäden oder
Defekten
Nach Bedarf
Komplettes Gerät Inspektionen: Leckagen, Risse und Verschleiß
X
Kontrollen: Schalter, Starter, Gashebel
und Gasregler
Funktionsweise überprüfen
X
Tank Inspektionen: Leckagen, Risse und Verschleiß
X
Kraftstolter Überprüfen und reinigen
X
Filtereinsatz austauschen
X
Alle 6 Monate
Fräsen Inspektionen: Schäden und Verschleiß
X
Austauschen
X
Kupplung Inspektionen: (Fräse darf bei Leerlauf nicht
drehen)
X
Austauschen
X
Getriebe Kontrolle der Schmierung
Alle 50 Stun-
den
Alle frei liegenden Schrauben und
Muttern (nicht Vergaserschrauben)
Überprüfen und nachziehen
X
Luftlter Reinigen
X
Austauschen
X
Alle 6 Monate
Zylinderrippen und
Startgehäuseschlitze
Reinigen
X
Startseil Inspektionen: Schäden und Verschleiß
X
Austauschen
X
Vergaser Leerlaufdrehzahl überprüfen: (Fräse darf
bei Leerlauf nicht drehen)
X X
Zündkerze Elektrodenabstand überprüfen
X
Austauschen
X
Alle 6 Monate

58
TABLA DE MANTENIMIENTO
Las siguientes frecuencias de mantenimiento son aplicables sólo en condiciones de
funcionamiento normal. Si su trabajo cotidiano es más severo de lo normal, reduzca
los intervalos en consecuencia.
Antes de cada uso
Después de cada
pausa para el
reabastecimiento
Mensualmente
En caso de daños o
defectos
Según lo requerido
Máquina completa Inspeccionar: fugas, grietas, desgaste
X
Controles: interruptor, cebador, palanca
del acelerador y palanca de bloqueo
del acelerador
Vericar el funcionamiento
X
Depósito de combustible Inspeccionar: fugas, suras, desgaste
X
Filtro de combustible Inspeccionar y limpiar
X
Sustituir el elemento ltrante
X
Cada 6 meses
Herramientas Inspeccionar: daños y desgaste
X
Sustituir
X
Embrague Inspeccionar: (La herramienta no debe
girar al mínimo)
X
Sustituir
X
Grupo transmisión Control de la lubricación
Cada 50 horas
Todos los tornillos y tuercas accesibles
(menos los tornillos del carburador)
Inspeccionar y apretar
X
Filtro de aire Limpiar
X
Sustituir
X
Cada 6 meses
Aletas del cilindro y ranuras del cárter
de arranque
Limpiar
X
Cuerda de arranque Inspeccionar: daños y desgaste
X
Sustituir
X
Carburador Controlar el mínimo: (La herramienta no
debe girar al mínimo)
X X
Bujía Controlar la distancia de los electrodos
X
Sustituir
X
Cada 6 meses
TABUĽKA ÚDRŽBY
Prosím, nezabudnite, že nasledujúce intervaly údržby sa vzťahujú iba na normálne
pracovné podmienky. Ak je vaša každodenná práca namáhavejšia vzhľadom na bežné
podmienky, treba intervaly údržby primerane skrátiť.
Pred každým
použitím
Po každom
prerušení práce kvôli
doplneniu paliva
Mesačne
Pri poškodení alebo
pokazení
Podľa potreby
Celý stroj Skontrolovať: úniky, praskliny a opotrebovanie
X
Kontroly: vypínač, štartér, plynová páčka
a brzdiaca páčka
Overiť funkčnosť
X
Palivová nádrž Skontrolovať: úniky, pukliny a
opotrebovanie
X
Palivový lter Skontrolovať a vyčistiť
X
Vymeniť ltračný prvok
X
Každých 6
mesiacov
Nástroje Skontrolovať: poškodenie a opotrebovanie
X
Vymeniť
X
Spojka Skontrolovať: (Pri minimálnych otáčkach sa
nástroj nesmie otáčať)
X
Vymeniť
X
Prevodová jednotka Kontrola mazania
Každých 50
hodín
Všetky prístupné skrutky a matice
(okrem skrutiek karburátora)
Skontrolovať a utiahnuť
X
Vzduchový lter Vyčistiť
X
Vymeniť
X
Každých 6
mesiacov
Krídelká valca a otvory rebrovania krytu
štartovacej jednotky
Vyčistiť
X
Štartovacie lanko Skontrolovať: poškodenie a opotrebovanie
X
Vymeniť
X
Karburátor Skontrolovať minimálne otáčky (Pri
minimálnych otáčkach sa nástroj nesmie
otáčať)
X X
Sviečka Skontrolovať vzdialenosť elektród
X
Vymeniť
X
Každých 6
mesiacov

59
RISOLUZIONE DEI PROBLEMI
ATTENZIONE: fermare sempre l’unità e scollegare la candela prima di effettuare
tutte le prove correttive raccomandato nella tabella sottostante, tranne che venga
richiesto il funzionamento dell’unità.
Quando si sono verificate tutte le possibili cause e il problema non è risolto, consultare un
Centro Assistenza Autorizzato. Se si verifica un problema che non è elencato in questa tabella,
consultare un Centro Assistenza Autorizzato.
PROBLEMA POSSIBILI CAUSE SOLUZIONE
Il motore non si avvia o si
spegne solo dopo pochi
secondi dall’avvio.
(Assicurarsi che
l’interruttore sia in
posizione “ON”)
1. Non c’è scintilla.
2. Motore ingolfato.
1. Controllare la scintilla della candela. Se
non c’è la scintilla, ripetere il test con
una candela nuova.
2. Seguire la procedura di pag.34. Se il
motore non si avvia ancora, ripetere
la procedura con una candela
nuova.
Il motore parte, ma non
accelera correttamente o non
funziona correttamente ad
alta velocità.
Il carburatore deve essere
regolato.
Contattare un Centro Assistenza
Autorizzato per regolare il carburatore.
Il motore non raggiunge la
piena velocità e / o emette
fumo eccessivo.
1. Filtro aria sporco.
2. Il carburatore deve essere
regolato.
1. Pulire: vedi le istruzioni nel capitolo
Manutenzione filtro aria.
2. Contattare un Centro Assistenza
Autorizzato per regolare il
carburatore.
Il motore si avvia, gira e
accelera, ma non tiene il
minimo.
Il carburatore deve essere
regolato.
Contattare un Centro Assistenza
Autorizzato per regolare il carburatore.
Rottura precoce degli utensili Terreno sassoso Perlustrazione preventiva del terreno
Rumorosità della macchina o
del cambio
1. Utensili danneggiati, o
allentati
2. Carter protettivi allentati
3. Lubrificazione scarsa
1. Fissare gli utensili
2. Serrare i bulloni
3. Rabboccare olio a livello
Vibrazioni anomale 1. Utensili danneggiati
2. Elementi allentati
1. Sostituire
2. Serrare
TROUBLESHOOTING CHART
WARNING: Always stop unit and disconnect spark plug before performing all of
the recommended remedies below except remedies that require operation of the
unit.
When you have checked all the possible causes listed and you are still experiencing the
problem, see your Servicing Dealer. If you are experiencing a problem that is not listed in this
chart, see your Servicing Dealer for service.
PROBLEM POSSIBLE CAUSE SOLUTION
Engine will not start or will
run only a few seconds after
starting.
(Make sure Ignition switch is
in start position “ON”)
1. No spark
2. Flooded engine.
1. Watch for spark at spark plug tip. If
there is no spark, repeat test with a
new spark plug.
2. Follow procedure page 34 If engine
still fails to start, repeat procedure
with a new spark plug.
Engine starts but will not
accelerate properly or will not
run properly at high speed.
Carburetor requires
adjustment.
Contact a Servicing Dealer for
carburetor adjustment.
Engine does not reach full
speed and / or emits excessive
smoke
1. Air filter dirty.
2. Carburetor requires
adjustment.
1. Clean per instruction in Maintenance-
Air Filter Section.
2. Contact a Servicing Dealer for
carburetor adjustment.
Engine starts, runs and
accelerates but will not idle.
Carburetor requires
adjustment.
Contact a Servicing Dealer for
carburetor adjustment.
Premature breakage of the
blade assembly
Stony soil Preliminary inspection of the soil
Machine or gearbox
excessively noisy
1. Blade assembly damaged or
loose
2. Blade guards loose
3. Insufficient lubrication
1. Fit the blade assembly
2. Tighten the bolts
3. Top up the oil level
Abnormal vibrations 1. Blade assembly damaged
2. Elements loose
1. Change
2. Tighten

60
RÉSOLUTION DES PROBLÈMES
ATTENTION : toujours arrêter l'outil et débrancher la bougie avant d'intervenir
selon les indications du tableau ci-dessous, sauf indication contraire.
Si le problème persiste après avoir vérifié toutes les causes possibles indiquées, contacter un
Centre d'Assistance Agréé. En cas de problème non référencé dans ce tableau, contacter un
Centre d'Assistance Agréé.
PROBLÈME CAUSES PROBABLES SOLUTION
Le moteur ne démarre
pas ou s'arrête quelques
secondes après le démarrage.
(S'assurer que l'interrupteur
se trouve sur "ON")
1. Pas d'étincelle
2. Moteur noyé
1. Contrôler l'étincelle de la bougie. S'il
n'y a pas d'étincelle, répéter le test
avec une bougie neuve.
2. Suivre la procédure page 34. Si le
moteur ne démarre toujours pas,
répéter la procédure avec une
bougie neuve.
Le moteur démarre mais
n'accélère pas correctement
ou ne tourne pas correctement
à vitesse élevée.
Régler le carburateur. Contacter un Centre d'Assistance Agréé
pour régler le carburateur.
Le moteur n'atteint pas le
régime maxi et / ou dégage
trop de fumée.
1. Filtre à air encrassé.
2. Régler le carburateur.
1. Nettoyer : voir les instructions au
chapitre Entretien filtre de l'air.
2. Contacter un Centre d'Assistance Agréé
pour régler le carburateur.
Le moteur démarre, tourne et
accélère, mais ne tient pas le
ralenti.
Régler le carburateur. Contacter un Centre d'Assistance Agréé
pour régler le carburateur.
Rupture précoce des outils Terrain pierreux Vérification préventive du terrain
Niveau de bruit de la machine
ou de la boîte de vitesses
1. Outils endommagés ou
desserrés
2. Carters de protection desserrés
3. Lubrification défectueuse
1. Fixer les outils
2. Serrer les boulons
3. Faire l'appoint d'huile
Vibrations anormales 1. Outils endommagés
2. Éléments desserrés
1. Remplacer
2. Serrer
STÖRUNGSBEHEBUNG
ACHTUNG: Vor Durchführung aller in der untenstehenden Tabelle empfohlenen
Prüfungen das Gerät immer abstellen und die Zündkerze trennen, es sei denn, der
Betrieb des Geräts wird ausdrücklich verlangt.
Wenn alle möglichen Ursachen überprüft wurden, die Störung jedoch nicht behoben werden konnte,
wenden Sie sich bitte an eine autorisierte Kundendienststelle. Wenn ein Problem auftritt, dass nicht in
dieser Tabelle aufgeführt ist, wenden Sie sich bitte an eine autorisierte Kundendienststelle.
PROBLEM
MÖGLICHE URSACHEN
ABHILFE
Der Motor startet nicht oder
geht wenige Sekunden
nach dem Start wieder aus.
(Sicherstellen, dass der
Schalter auf "ON" steht)
1. Kein Zündfunke
2. Motor überflutet
1. Zündfunken der Kerze kontrollieren.
Wenn kein Zündfunken abgegeben
wird, den Test mit einer neuen Kerze
wiederholen.
2. Vorgehen wie auf Seite 35
beschrieben. Wenn der Motor
immer noch nicht anspringt, den
Vorgang mit einer neuen Zündkerze
wiederholen.
Der Motor springt zwar
an, beschleunigt aber nicht
korrekt, bzw. funktioniert
nicht korrekt mit hoher
Drehzahl.
Der Vergaser muss eingestellt
werden.
Vergaser bei einer autorisierten
Kundendienststelle einstellen lassen.
Der Motor erreicht die
Höchstgeschwindigkeit nicht
und/oder gibt übermäßig viel
Rauch ab.
1. Luftfilter verschmutzt.
2. Der Vergaser muss eingestellt
werden.
1. Reinigen; siehe Anleitungen im Kapitel
Wartung des Luftfilters.
2. Vergaser bei einer autorisierten
Kundendienststelle einstellen
lassen.
Der Motor startet, dreht und
beschleunigt, hält aber die
Leerlaufdrehzahl nicht.
Der Vergaser muss eingestellt
werden.
Vergaser bei einer autorisierten
Kundendienststelle einstellen lassen.
Vorzeitiger Bruch der Fräsen Steiniger Boden Vorabinspektion des Bodens
Starke Geräuschentwicklung
von Gerät und Schaltgetriebe
1. Fräsen beschädigt oder locker
2. Schutzgehäuse locker
3. Unzureichende Schmierung
1. Fräsen befestigen
2. Schrauben anziehen
3. Öl auffüllen
Ungewöhnliche Vibrationen 1. Fräsen beschädigt
2. Elemente locker
1. Austauschen
2. Anziehen

61
RESOLUCIÓN DE PROBLEMAS
ATENCIÓN: parar la unidad y desconectar la bujía antes de realizar todas las
pruebas correctivas recomendadas en la tabla siguiente, a no ser que sea
necesario el funcionamiento de la unidad.
Una vez verificadas todas las posibles causas, si el problema no se resuelve, llamar a un Centro
de Asistencia Autorizado. Si se observa un problema no listado en esta tabla, llamar a un
Centro de Asistencia Autorizado.
PROBLEMA POSIBLES CAUSAS SOLUCIÓN
El motor no arranca o se
apaga a los pocos segundos
del arranque. (Comprobar
que el interruptor esté en
"ON")
1. No hay chispa
2. Motor atascado
1. Controlar la chispa de la bujía. Si no
hay chispa, repetir la prueba con
una bujía nueva.
2. Seguir el procedimiento de la
pág.35. Si el motor no arranca,
repetir el procedimiento con una
bujía nueva.
El motor arranca, pero no
acelera correctamente o no
funciona correctamente a alta
velocidad.
Es necesario regular el
carburador.
Llamar a un Centro de Asistencia
Autorizado para regular el carburador.
El motor no alcanza la
máxima velocidad y/o emite
demasiado humo.
1. Filtro de aire sucio.
2. Es necesario regular el
carburador.
1. Limpiar; leer las instrucciones del
capítulo Mantenimiento del filtro
de aire.
2. Llamar a un Centro de Asistencia
Autorizado para regular el
carburador.
El motor arranca, gira y
acelera, pero no mantiene el
mínimo.
Es necesario regular el
carburador.
Llamar a un Centro de Asistencia
Autorizado para regular el carburador.
Rotura precoz de las
herramientas
Terreno pedregoso Inspección preventiva del terreno
Ruido de la máquina o del
cambio
1. Herramientas dañadas o
flojas
2. Cárteres de protección flojos
3. Lubricación escasa
1. Fijar las herramientas
2. Apretar los pernos
3. Restablecer el nivel del aceite
Vibraciones anómalas 1. Herramientas dañadas
2. Elementos flojos
1. Sustituir
2. Apretar
RIEŠENIE PROBLÉMOV
POZOR: jednotku vždy zastavte a odpojte sviečku, až potom urobte všetky
nápravné opatrenia podľa tabuľky dolu, samozrejme okrem tých, pri ktorých sa
vyžaduje, aby bola jednotka v chode.
Ak sa vám nepodarilo problém odstrániť ani po overení všetkých príčin, obráťte sa na
autorizovaný servis. Ak príčina problému nie je uvedená v tejto tabuľke, obráťte sa na
autorizovaný servis.
PROBLÉM MOŽNÉ PRÍČINY RIEŠENIE
Motor sa nenaštartuje alebo
zhasne už po niekoľkých
sekundách po naštartovaní.
(Uistite sa, že je vypínač v
polohe "ON")
1. Sviečka nevydáva iskru
2. Motor je zahltený
1. Skontrolujte iskru sviečky. Ak
sviečka nevydáva iskru, zopakujte
test s novou sviečkou.
2. Postupujte podľa pokynov na str.35.
Ak sa motor ani tak nenaštartuje,
zopakujte procedúru s novou
sviečkou.
Motor sa naštartuje, ale
nezrýchľuje správne alebo
pri vyššej rýchlosti nefunguje
správne.
Treba nastaviť karburátor. Zavolajte autorizovaný servis, aby vám
nastavili karburátor.
Motor nedosiahne plnú
rýchlosť a / alebo veľmi dymí.
1. Špinavý vzduchový filter.
2. Treba nastaviť karburátor
1. Vyčistite; pozrite pokyny v kapitole
Údržba vzduchového filtra.
2. Zavolajte autorizovaný servis, aby
vám nastavili karburátor.
Motor sa naštartuje, otáča sa
a zrýchľuje, ale pri minime
zhasne.
Treba nastaviť karburátor. Zavolajte autorizovaný servis, aby vám
nastavili karburátor.
Predčasné poškodenie
nástrojov
Kamenistá pôda Preventívna kontrola terénu
Hlučnosť stroja alebo
prevodovky
1. Poškodené alebo uvoľnené
nástroje
2. Uvoľnené ochranné kryty
3. Slabé mazanie
1. Upevnite nástroje
2. Utiahnite matice
3. Doplňte olej do správnej hladiny
Mimoriadne vibrácie 1. Poškodené nástroje
2. Uvoľnené prvky
1. Vymeniť
2. Utiahnuť

62
Italiano English Français
CERTIFICATO DI GARANZIA WARRANTY CERTIFICATE CERTIFICAT DE GARANTIE
Questa macchina è stata concepita e realizzata attraverso le più moderne
tecniche produttive. La Ditta costruttrice garantisce i propri prodotti per un
periodo di 24 mesi dalla data di acquisto per utilizzo privato e hobbistico. La
garanzia è limitata a 12 mesi in caso di uso professionale.
Condizioni generali di garanzia
1) La garanzia viene riconosciuta a partire dalla data d'acquisto. La Ditta
costruttrice tramite la rete di vendita ed assistenza tecnica sostituisce
gratuitamente le parti difettose dovute a materiale, lavorazioni e
produzione. La garanzia non toglie all'acquirente i diritti legali previsti
dal codice civile contro le conseguenze dei difetti o vizi causati dalla cosa
venduta.
2) Il personale tecnico interverrà il più presto possibile nei limiti di tempo
concessi da esigenze organizzative.
3) Per richiedere l'assistenza in garanzia è necessario esibire al
personale autorizzato il sotto riportato certificato di garanzia
timbrato dal rivenditore, compilato in tutte le sue parti e corredato
di fattura d'acquisto o scontrino fiscalmente obbligatorio
comprovante la data d'acquisto.
4) La garanzia decade in caso di:
- Assenza palese di manutenzione,
- Utilizzo non corretto del prodotto o manomissioni,
- Utilizzo di lubrificanti o combustibili non adatti,
- Utilizzo di parti di ricambio o accessori non originali,
- Interventi effettuati da personale non autorizzato.
5) La Ditta costruttrice esclude dalla garanzia i materiali di consumo e le
parti soggette ad un normale logorio di funzionamento.
6) La garanzia esclude gli interventi di aggiornamento e miglioramento del
prodotto.
7) La garanzia non copre la messa a punto e gli interventi di manutenzione
che dovessero occorrere durante il periodo di garanzia.
8) Eventuali danni causati durante il trasporto devono essere
immediatamente segnalati al trasportatore pena il decadere della
garanzia.
9) Per i motori di altre marche (Briggs & Stratton, Subaru, Honda, Kipor,
Lombardini, Kohler, ecc.) montati sulle nostre macchine, vale la garanzia
concessa dai costruttori del motore.
10) La garanzia non copre eventuali danni, diretti o indiretti, causati a
persone o cose da guasti della macchina o conseguenti alla forzata
sospensione prolungata nell'uso della stessa.
This machine has been designed and manufactured using the most modern
techniques. The manufacturer guarantees its products for 24 months from
the date of purchase, for private and hobby use. The warranty is limited to 12
months in case of professional use.
Limited warranty
1) The warranty period starts on the date of sale. The manufacturer,
acting through the sales and technical assistance network, shall replace
free of charge any parts proven defective in material, machining or
manufacturing. The warranty does not affect the purchaser's rights as
established under legislation governing the consequences of defects in
the machine.
2) Technical personnel will undertake the necessary repairs in the minimum
time possible, compatible with organisational needs.
3) To make any claim under the warranty, this certificate of warranty,
fully compiled, bearing the dealer's stamp, and accompanied by the
invoice or receipt showing the date of purchase, must be displayed
to the personnel authorised to approve work.
4) The warranty shall be null and void if:
- the machine has evidently not been serviced correctly,
- the machine has been used for improper purposes or has been
modified in any way,
- unsuitable lubricants and fuels have been used,
- non-original spare parts and accessories have been fitted,
- work has been done on the machine by unauthorised personnel.
5) The warranty does not cover consumables or parts subject to normal
wear.
6) The warranty does not cover work to update or improve the machine.
7) The warranty does not cover any preparation or servicing work required
during the warranty period.
8) Damage incurred during transport must be immediately brought to the
attention of the carrier: failure to do so shall render null and void the
warranty.
9) Engines of other manufacturers (Briggs & Stratton, Subaru, Honda,
Kipor, Lombardini, Kohler, etc.) fitted to our machines are covered by the
warranties of the engine manufacturer.
10) The warranty does not cover injury or damage caused directly or
indirectly to persons or things by defects in the machine or by periods of
extended disuse of the machine resulting from the said defects.
Cette machine a été conçue et réalisée avec les techniques de production les
plus modernes. Le fabricant garantit ses produits pendant une période de
24 mois à compter de la date d’achat, en cas d’usage privé ou d’activités de
bricolage. En cas d’usage professionnel, la garantie est limitée à 12 mois.
Conditions générales de garantie
1) La garantie est reconnue à compter de la date d'achat. Par le biais de
son réseau de vente et d'assistance technique, le fabricant remplace
gratuitement les pièces défectueuses dues au matériel, aux usinages et
à la production. La garantie n'élimine pas, pour l'acquéreur, les droits
légaux prévus par le Code Civil contre les conséquences des défauts ou
des anomalies dus à l'objet vendu.
2) Le personnel technique interviendra le plus vite possible dans les délais
liés aux exigences organisationnelles.
3) Pour demander l'assistance sous garantie, il est nécessaire
de présenter au personnel agréé le certificat de garantie
joint ci-dessous, qui devra être timbré par le revendeur, rempli
intégralement et accompagné de la facture ou du reçu de caisse qui
doit obligatoirement être remis pour prouver la date d'achat.
4) La garantie perd toute valeur en cas de :
- Manque évident d'entretien.
- Utilisation incorrecte ou transformations non autorisées du produit.
- Utilisation de lubrifiants ou de combustibles inappropriés.
- Utilisation de pièces de rechange ou d'accessoires non d'origine.
- Interventions effectuées par du personnel non autorisé à ce faire.
5) Le fabricant exclut de la garantie les pièces consommables et celles qui
sont soumises à une usure normale due au fonctionnement.
6) La garantie exclut les interventions de mise à jour et d'amélioration du
produit.
7) La garantie ne couvre pas la mise au point et les interventions
susceptibles de s'avérer nécessaires au cours de la période de garantie.
8) Tout dommage éventuellement subi au cours du transport doit être
signalé sans retard au transporteur sous peine d'annulation de la
garantie.
9) Pour les moteurs d'autres marques (Briggs & Stratton, Subaru, Honda,
Kipor, Lombardini, Kohler, etc.) montés sur nos machines, la garantie
appliquée sera celle qui est accordée par le fabricant du moteur en
question.
10) La garantie ne couvre pas les éventuels dommages directs ou indirects
subis par les personnes ou par les biens matériels à la suite de pannes de
la machine ou dépendant d'une longue suspension forcée de l'emploi de
cette dernière.
MODELLO - MODELL DATA - DATE MODELE DATE
SERIAL No SERIAL No
CONCESSIONARIO - DEALER REVENDEUR
ACQUISTATO DAL SIG. - BOUGHT BY Mr. ACHETE PAR MONSIEUR
Non spedire! Allegare solo all’eventuale richiesta di garanzia tecnica.
Do not send! Only attach to requests for technical warranties.
Ne pas expédier ! Ne joindre qu'en cas de demande d'assistance technique sous garantie.

63
Deutsch Español Slovensky
GARANTIE-ZERTIFICAT CERTIFICADO DE GARANTÍA ZÁRUČNÝ LIST
Diese Maschine wurde mit den modernsten Produktionstechniken konzipiert
und gebaut. Der Hersteller garantiert seine Produkte für einen Zeitraum
von 24 Monaten ab dem Kaufdatum bei Privat- und Heimwerkereinsatz.
Bei professionellem Gebrauch ist die Laufzeit der Garantie auf 12 Monate
beschränkt.
Allgemeine Garantiebedingungen
1) Die Garantie gilt ab Kaufdatum. Die Herstellerfirma sorgt über ihr
Verkaufs- und Kundendienstnetz für den kostenlosen Ersatz der Teile,
die sich infolge Material-, Bearbeitungs- und Fabrikationsfehler als
defekt erweisen. Durch die Garantie verliert der Käufer nicht die vom
Bürgerlichen Gesetzbuch vorgesehenen gesetzlichen Rechte gegen die
Folgen der von der der verkauften Sache verursachten Defekte oder
Mängel.
2) Soweit organisatorisch machbar greift das technische Personal so schnell
wie möglich ein.
3) Bei Anforderung eines Garantieeingriffs muss dem befugten
Personal der untenstehende, vom Verkäufer abgestempelte und
vollständig ausgefüllte Garantieschein zusammen mit der Rechnung
bzw. dem Kassenzettel zum Nachweis des Kaufdatums vorgelegt
werden.
4) In folgenden Fällen verfällt jeder Garantieanspruch:
- Bei offensichtlicher Unterlassung der Wartung,
- Bei nicht korrekter Verwendung oder Veränderungen des Produkts,
- Bei Benutzung von ungeeigneten Schmiermitteln oder Treibmitteln,
- Bei Benutzung von nicht originalen Zubehör- und Ersatzteilen
- Nach Eingriffen, die von unbefugtem Personal durchgeführt wurden.
5) Verbrauchsmaterial und die Teile, die einem normalen Verschleiß
durch Betrieb ausgesetzt sind, werden vom Hersteller von der Garantie
ausgeschlossen.
6) Von der Garantie ausgeschlossen sind Eingriffe zur Überholung und
Verbesserung des Produkts.
7) Die Garantie deckt nicht die während der Garantielaufzeit erforderlichen
Einstellungen und Wartungseingriffe.
8) Eventuelle Transportschäden müssen dem Spediteur unverzüglich
gemeldet werden, ansonsten verfällt der Garantieanspruch.
9) Für die Motoren anderer Marken (Briggs & Stratton, Subaru, Honda, Kipor,
Lombardini, Kohler, usw.), die an unseren Maschinen installiert werden,
gilt die vom Hersteller des Motors gewährte Garantie.
10) Die Garantie deckt keine eventuellen direkten oder indirekten Personen-
oder Sachschäden, die durch Defekte der Maschine oder deren
anhaltender Nichtbenutzung verursacht wurden.
Esta máquina ha sido proyectada y fabricada con las técnicas más modernas.
El fabricante garantiza sus productos durante 24 meses desde la fecha de
compra, siempre que el uso sea privado/aficionado. La garantía se limita a 12
meses en caso de uso profesional.
Condiciones generales de garantía
1) La garantía es válida a partir de la fecha de compra. El Fabricante
cambiará gratuitamente las piezas que presenten defectos en el material,
el trabajo o la producción, mediante su red de venta y asistencia técnica.
La garantía no anula los derechos legales del comprador, previstos por el
código civil, contra las consecuencias de defectos o vicios provocados por
el producto vendido.
2) El personal técnico efectuará las intervenciones lo antes posible y dentro
de los plazos impuestos por exigencias de organización.
3) Para solicitar la asistencia en garantía, es necesario mostrar el
certificado de garantía ilustrado a continuación, junto a la factura o
el tique que demuestren la fecha de compra, al personal autorizado;
asimismo, para que el certificado sea válido, se han de completar
todas sus partes y ha de estar debidamente timbrado por el
vendedor.
4) La garantía pierde su validez en los siguientes casos:
- Falta evidente de mantenimiento.
- Uso incorrecto o manipulación del producto.
- Uso de lubricantes o combustibles inadecuados.
- Uso de piezas de recambio o accesorios no originales.
- Intervenciones efectuadas por parte de personal no autorizado.
5) La garantía no incluye ni los materiales consumibles ni las piezas sujetas a
un desgaste normal de funcionamiento.
6) La garantía tampoco incluye las intervenciones de actualización o mejora
del producto.
7) La puesta a punto o las intervenciones de mantenimiento eventualmente
necesarias durante el periodo de garantía no están cubiertas por la
garantía.
8) Cualquier daño provocado durante el transporte tiene que ser señalado
de inmediato al transportista bajo pena de anulación de la garantía.
9) Para los motores de otras marcas (Briggs & Stratton, Subaru, Honda, Kipor,
Lombardini, Kohler, etc.) montados en nuestras máquinas, será válida la
garantía de los Fabricantes del motor.
10) La garantía no cubre los eventuales daños materiales o personales,
directos o indirectos, provocados por averías de la máquina o por la
interrupción forzada y prolongada del funcionamiento de la misma.
Tento prístroj bol navrhnutý a zrealizovaný pomocou najmodernejších
výrobných techník. Výrobca poskytuje na svoje výrobky 24 mesačnú záruku od
dátumu nákupu v prípade používania súkromnými osobami a pri používaní vo
voľnom čase. V prípade profesionálneho používania je záruka obmedzená na
12 mesiacov.
Podmienky záruky
1) Záruka sa uplatňuje od dátumu nákupu.
Výrobca, prostredníctvom predajnej siete a technického servisu, bezplatne
vymení časti, ktoré sú chybné v dôsledku chyby materiálu, opracovania
a výroby. Záruka neuberá kupujúcemu právne nároky vyplývajúce z
občianskeho zákonníka v prípade chýb alebo kazov spôsobených predanou
vecou.
2) Technický personál zasiahne čo najrýchlejšie v časových lehotách, ktoré
mu umožnia organizačné požiadavky.
3) Na vyžiadanie záručnej opravy je potrebné predložiť oprávnenému
personálu nižšie uvedený záručný listo pečiatkovaný predajcom,
vyplnený vo všetkých častiach a doplnený nákupnou faktúrou alebo
pokladničným blokom, povinným na daňové účely, na ktorom je
uvedený dátum nákupu.
4) Záruka sa neuplatňuje v prípade:
- Zjavnej absencie údržby.
- Nesprávneho používania výrobku alebo jeho poškodenia.
- Použitia nevhodných mazadiel alebo pohonných látok.
- Použitia neoriginálnych náhradných súčiastok alebo doplnkov
- Zásahov vykonaných neoprávnenými osobami.
5) Výrobca vyníma zo záruky spotrebné materiály a súčasti, ktoré
podliehajú bežnému funkčnému opotrebeniu.
6) Záruka sa nevzťahuje na zásahy modernizácie alebo vylepšenia výrobku
7) Záruka nepokrýva nastavovanie a údržbu, ktoré by mali byť potrebné
počas záručnej lehoty
8) Prípadné škody spôsobené prepravou musia byť ihneď nahlásené
prepravcovi, inak záruku nemožno uplatniť
9) Na motory ostatných značiek (Briggs & Stratton, Subaru, Honda, Kipor,
Lombardini, Kohler, atď.), namontované na naše prístroje, sa vzťahuje
záruka poskytnutá výrobcami motora.
10) Záruka nepokrýva prípadné škody, priame alebo nepriame, spôsobené
osobám alebo na veciach poruchami prístroja alebo ktoré sú následkom
núteného predĺženého pozastavenia jeho používania.
MODELLE DATUM MODELO - MODEL DATA - DÁTUM
SERIAL No
SERIAL No
VÝROBNÉ Č.
VERKAUFER DISTRIBUIDOR - PREDAJCA
GEKAUFT VON Hrn. COMPRADOR - KÚPENÉ OD P.
Nicht einsenden! Der Garantieschein muss nur bei einer eventuellen Anforderung eines Garantieeingriffs vorgelegt werden.
¡No enviar! Adjuntar sólo a la eventual solicitud de garantía técnica.
Neposielajte! Priložte iba k prípadnej žiadosti o technický servis.

Pubbl. 66100150 - Mar/2008
Emak S.p.A.
42011 Bagnolo in Piano (RE) Italy
www.myemak.com
www.youtube.it/EmakGroup
I
ATTENZIONE: Questo manuale deve accompagnare la macchina durante tutta la sua vita.
GB
WARNING: This owner’s manual must stay with the machine for all its life.
F
ATTENTION: Ce manuel doit accompagner le moteur tout au long de sa vie.
D
ACHTUNG: Bewahren Sie diese Anleitung für die gesamte Lebensdauer des Geräts auf
E
ATENCIÓN: Este manual debe acompañar a la máquina hasta su desguace.
SK
UPOZORNENIE - Tento návod musí sprevádzať prístroj po celú dobu jej životnosti.
-
 1
1
-
 2
2
-
 3
3
-
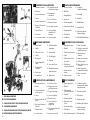 4
4
-
 5
5
-
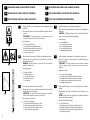 6
6
-
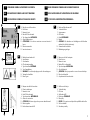 7
7
-
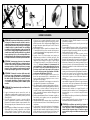 8
8
-
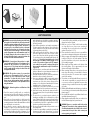 9
9
-
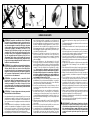 10
10
-
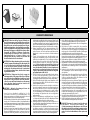 11
11
-
 12
12
-
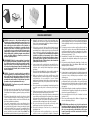 13
13
-
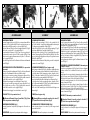 14
14
-
 15
15
-
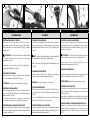 16
16
-
 17
17
-
 18
18
-
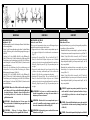 19
19
-
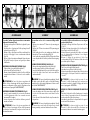 20
20
-
 21
21
-
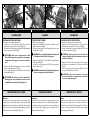 22
22
-
 23
23
-
 24
24
-
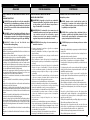 25
25
-
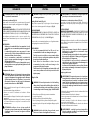 26
26
-
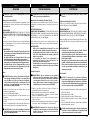 27
27
-
 28
28
-
 29
29
-
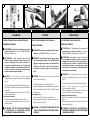 30
30
-
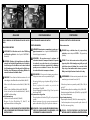 31
31
-
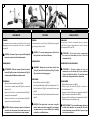 32
32
-
 33
33
-
 34
34
-
 35
35
-
 36
36
-
 37
37
-
 38
38
-
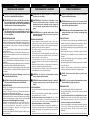 39
39
-
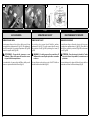 40
40
-
 41
41
-
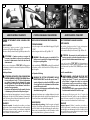 42
42
-
 43
43
-
 44
44
-
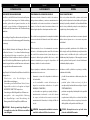 45
45
-
 46
46
-
 47
47
-
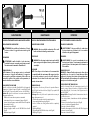 48
48
-
 49
49
-
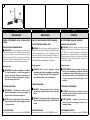 50
50
-
 51
51
-
 52
52
-
 53
53
-
 54
54
-
 55
55
-
 56
56
-
 57
57
-
 58
58
-
 59
59
-
 60
60
-
 61
61
-
 62
62
-
 63
63
-
 64
64


Bertolini 118 El manual del propietario
- Tipo
- El manual del propietario
- Este manual también es adecuado para
En otros idiomas
- français: Bertolini 118 Le manuel du propriétaire
- italiano: Bertolini 118 Manuale del proprietario
- Deutsch: Bertolini 118 Bedienungsanleitung
- slovenčina: Bertolini 118 Návod na obsluhu
Documentos relacionados
-
Oleo-Mac 105 El manual del propietario
-
Oleo-Mac 205 S El manual del propietario
-
Oleo-Mac MZ 2097 RKS El manual del propietario
-
Oleo-Mac MH 175 RKS El manual del propietario
-
Oleo-Mac 095 El manual del propietario
-
Oleo-Mac Efco MZ 2055 K El manual del propietario
-
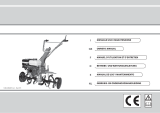 Bertolini 215 El manual del propietario
-
Nibbi 115 S El manual del propietario

