Ameriwood 9402328WP Assembly Instructions Manual
- Tipo
- Assembly Instructions Manual

B349402328WPT00
9402328WP
A Dorel Company
MERIWOOD
INDUSTRIES
TM
50 lbs.
22.6 kg.
35 lbs.
15.8 kg.
35 lbs.
15.8 kg.
35 lbs.
15.8 kg.
50 lbs.
22.6 kg.
no load
no carga
aucune charge
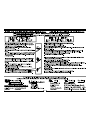
Need Parts or Assistance?
For prompt, reliable service please have your assembly manual ready.
Para obtener servicio rápido y confiable por favor tenga este manual a la mano.
1-800-489-3351
Recommended # of people needed for assembly: 1
(however it is always better to have an extra hand.)
Estimated assembly time is 1 hour.
or call toll free:
o llame a nuestra línea gratis
Si las partes están perdidas o dañadas Por favor visite nuestra página
de Internet o llame a nuestra línea de teléfono gratis de Servicio al
Cliente. Nosotros le enviaremos sus repuestos sin cargo adicional,
serán totalmente gratis.
DO NOT
RETURN PRODUCT TO THE STORE
Individual stores do not stock parts.
WWW.AMERIWOOD.COM/PARTS
STOP
ALTO
THIS INSTRUCTION BOOKLET CONTAINS IMPORTANT SAFETY
INFORMATION. PLEASE READ AND KEEP FOR FUTURE REFERENCE.
date of purchase / ferch de compa
___ / ___ / ___
Las tiendas no almacenan partes.
NO DEVUELVA ESTE PRODUCTO A LA TIENDA
If a part is missing or damaged, visit our website or call our toll-free
customer service line. We will gladly ship your replacement parts
FREE of charge.
¿Necesita partes o asistencia?
El numero recomendado de las personas necesito para la asamblea: 1
(sin embargo siempre es bueno tener una mano extra)
El tiempo de la asamblea estimado es 1 hora.
EL FOLLETO DE LA INSTRUCCION CONTIENE LE INFORMACION DE
SEGURIDAD IMPORTANTE
. POR FAVOR LEA Y GUARDE PARA LA
REFERENCIA FUTURA.
Visit our website for any assistance you should need
or call our toll free number:
Clean the product with your favorite furniture polish
and a soft cloth. DO NOT USE harsh chemicals or
abrasive cleaners.
Move your new furniture carefully with two people.
Lift and carry the unit. Never push or drag the unit.
Do not allow children to climb or play on the unit.
Failure to comply could result in severe injury.
This unit has been designed to support the maximum
loads shown. Exceeding these load limits could
cause unit sagging, instability, product collapse
and/or serious injury.
Additional parts are available for a nominal fee.
Llame a el numero gratuito para asistencia o
visitenos al correo electronico:
Limpie el producto con su favorito limpiador de
muebles con un trapo suave. NO UTILISE quimicos
asperos o limpiadores agresivos.
Mueva sus muebles con cuidado con dos personas.
Levante y mueva el mueble nunca empuje o jale.
No deje ninos subir o jugar en el mueble. Si no sigue
estos avisos puede resultar en un dano muy severo.
Este mueble esta disenado para soportar la carga
maxima como lo muestra la foto. Exidiendo estos
limites de cargo puede causar danos como
doblamiento, desaliniarlo, y el producto puede
caerse o causar danos severos.
Partes adicionales estan disponibles por un precio
nomino.
Please Recycle
Recicle Por Favor
WWW.AMERIWOOD.COM
1-800-489-3351
WWW.AMERIWOOD.COM
1-800-489-3351
0 29986 94029 2


B349402328WPT00
3 /8
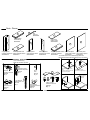
Parts - Piezas
2 upper panels
2 paneles superiores
39402328012
center shelf
estante centre
39402328092
kick
retroceso
3893328051
upper back panel
panel trasero superior
K940232811
A
C
D
E
F
G
I
J
2 fixed shelves
2 estantes fijo
3893328031
2 upper adjustable shelves
2 estantes ajustables
39402328101
lower adjustable shelf
estante ajustable inferior
3893328041
lower left panel
panel izquierdo inferior
39402328062
lower right panel
panel derecho inferior
39402328072
lower back panel
panel trasero inferior
K940232821
7b
7d
2
3
½ turn to fully
lock.
½ se vuelven a
totalmente
cerradura.
4
Tighten to fully seat. Do not over
tighten.
Apriétese a totalmente asiento. No
haga encima de apriétese.
Proper orientation of cam.
La orientación apropiada de leva.
1
Lock
Apretar
K
L
safety strap kit
estuche de cinturón
#A84000
Qty: 1
7c
7e
7a
This illustration showns how the CAM fastening system works.
Esta ilustración muestra el sistema de fijación de leva y como funciona.
1
2
3
4
6
5
cam lock
cerradura de la leva
#A22500
Qty: 8
cam bolt
perno de la leva
#A22510
Qty: 8
compression dowel
clavija de compresión
#A21520
Qty: 4
1-3/4" flat head
cabeza plano 1-3/4"
#A13410
Qty: 7
shelf support
soporte de estante
#A80250
Qty: 12
nail
clavo
#A21110
Qty: 40
Layout of hardware bag
Diseño de la bolsa de quincalla
Hardware - Quincalla

B349402328WPT00
4 /8
?? www.ameriwood.com ??
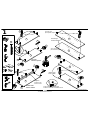
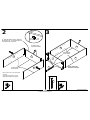
1
2
3
3
1
Approx.
7/16"
3
3
1
1
raw surface
superficie cruda
surface non-finie
finished edge
borde acabdo
2
2
1
1
finished edge
borde acabdo
A
A
F
G
upper left panel
panel izquierdo superior
upper right panel
panel derecho superior
Proper orientation of CAM LOCK
Posición correcta de la cerradura de leva.
I
3
7a
1
2
3
x8
x8
x3
x4
x1
x1
x1
7b
7c
7a
7b
7c
top shelf
estante superior
bottom shelf
estante inferior
C
C
E
1
6
6

B349402328WPT00
5 /8
?? www.ameriwood.com ??
2
3
finished edge
borde acabdo
A
A
finished surface
superficie acabado
"C" shelf with safety strap (7) attached.
El estante de "C" con la seguridad pone
entre paréntesis (7) adjunto.
A
A
finished edge
borde acabdo
upper assembly
asamblea superior
UNLOCK
LOCK
APRETAR
DESAPRETAR
Be sure cam locks (1) are fully inserted
into holes.
Asegúrese de cerraduras (1) están
plenamente insertados en agujeros.
C
C
x4
I
6
6

B349402328WPT00
6 /8
?? www.ameriwood.com ??
4
5
finished edge
borde acabdo
F
G
E
lower assembly
asamblea inferior
upper assembly
asamblea superior
finished edge
borde acabdo
finished edge
borde acabdo
F
G
E
A
A
UNLOCK
LOCK
APRETAR
DESAPRETAR
UNLOCK
LOCK
APRETAR
DESAPRETAR
Be sure cam locks (1) are fully
inserted into holes.
Asegúrese de cerraduras (1) están
plenamente insertados en agujeros.
C
C
C
IMPORTANT:
Do not stand unit up without back panels
attached.
Back panels will be attached in step 6.
IMPORTANTE:
No levante la unidad sin que los paneles
de atrás estén puestos.
Paneles traseros serán puestos en paso 6.
finished edge
borde acabdo
I

B349402328WPT00
7 /8
?? www.ameriwood.com ??
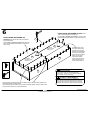
6
product collapse, and/or serious injury.
S’il-vous-plaît assurez-vous que les PANNEAUX
ARRIÈRES sont attachés solidement. Tous les clous
doivent être enfoncés perpendiculairement et solidement
dans les parties. Sinon le meuble peut devenir instable,
s’effondrer subitement et/ou causer des blessures graves.
tightened firmly. Failure to do so could cause instability,
All nails must be driven into the parts straight and
Please make sure that the Backs are attached securely.
AVERTISSEMENT
WARNING
-Flush the edge of the back panel with the bottom edge of the shelf. Align squarely and
nail straight through into back edges.
-Alinie el borde del panel trasero con el borde inferior del estante. Alinee en ángulo recto
y clave derecho dentro o en los bordes traseros.
Fasten LOWER BACK PANEL (K)
second.
Use 6 nails on each side and 4 nails at
the top and bottom.
Fije en PANEL TRASERO INFERIIOR (K) segundo.
Use 6 clavos adelante cada lateral Y 4 clavos a la
cima y fondo.
Fasten UPPER BACK PANEL (L) first. Use 8
nails on each side and 4 at the top only.
Fije el PANEL TRASERO SUPERIOR (L) primero. Use
8 clavos adelante cada lateral y 4 clavos a la cima sólo.
raw surface
superficie cruda
surface crue
raw surface
superficie cruda
surface crue
F
A
2nd
1st
L
K
x40
-Flush the edge of the
back panel with the top
edge of the shelf. Align
squarely and nail straight
through into back edges.
-Alinie el borde del panel
trasero con el borde
superior del estante.
Alinee en ángulo recto y
clave derecho dentro o
en los bordes traseros.
4
4

B349402328WPT00
8 /8
?? www.ameriwood.com ??
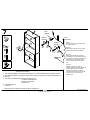
7
7d
Option 1
Opción 1
Option 2
Opción 2
D
stud
montante
wallboard
muro
hole
agujero
J
J
7c
7d
7e
7a
7a
7c
7d
7c
7e
x1
x1
x1
5
x12
5
Option 1:
Securely screw (7c) into solid area of
the wall as shown.
Opción 1:
Firmemente el tornillo (7c) en el área
sólida de la pared como mostrado.
Option 2:
Drill a 3/16" diameter hole (5mm) in
the wallboard. Tap the wall anchor(7d)
into the hole until it is flush. Fasten the
wall bracket (7a) to the wall anchor
(7e) with the screw (7d) and washer
(7c).
Opcion 2:
Taladre un agujero de 3/16" de
diámetro (5mm) en la pared. Golpea la
ancla de pared (7d) en el agujero
hasta que sea parejo. Abroche la
escuadra de pared (7a) al la ancla de
la pared (7e) con el tornillo (7d) y
arandela (7c).
Certificate of Conformity
1. This certificate applies to the Ameriwood Industries Inc. product identified by this instruction manual.
2. This certificate applies to compliance of this product with the CPSC Ban on Lead-Containing Paint (16
CFR 1303).
3. This product is distributed by: Ameriwood Industries Inc.
410 East First Street South
Wright City, MO 63390
636-745-3351
4. Site of Manufacture:
□ Tiffin OH
5. See front page of instruction manual for date of manufacture.
Transcripción de documentos
A Dorel Company MERIWOOD TM INDUSTRIES 0 29986 94029 Visit our website for any assistance you should need or call our toll free number: STOP ALTO DO NOT RETURN PRODUCT TO THE STORE Individual stores do not stock parts. NO DEVUELVA ESTE PRODUCTO A LA TIENDA Las tiendas no almacenan partes. 35 lbs. 15.8 kg. If a part is missing or damaged, visit our website or call our toll-free customer service line. We will gladly ship your replacement parts FREE of charge. 35 lbs. 15.8 kg. Si las partes están perdidas o dañadas Por favor visite nuestra página de Internet o llame a nuestra línea de teléfono gratis de Servicio al Cliente. Nosotros le enviaremos sus repuestos sin cargo adicional, serán totalmente gratis. Llame a el numero gratuito para asistencia o visitenos al correo electronico: 50 lbs. 22.6 kg. WWW.AMERIWOOD.COM 1-800-489-3351 Limpie el producto con su favorito limpiador de muebles con un trapo suave. NO UTILISE quimicos asperos o limpiadores agresivos. Mueva sus muebles con cuidado con dos personas. Levante y mueva el mueble nunca empuje o jale. No deje ninos subir o jugar en el mueble. Si no sigue estos avisos puede resultar en un dano muy severo. Este mueble esta disenado para soportar la carga maxima como lo muestra la foto. Exidiendo estos limites de cargo puede causar danos como doblamiento, desaliniarlo, y el producto puede caerse o causar danos severos. Partes adicionales estan disponibles por un precio nomino. 9402328WP no load no carga aucune charge WWW.AMERIWOOD.COM 1-800-489-3351 Clean the product with your favorite furniture polish and a soft cloth. DO NOT USE harsh chemicals or abrasive cleaners. Move your new furniture carefully with two people. Lift and carry the unit. Never push or drag the unit. Do not allow children to climb or play on the unit. Failure to comply could result in severe injury. This unit has been designed to support the maximum loads shown. Exceeding these load limits could cause unit sagging, instability, product collapse and/or serious injury. Additional parts are available for a nominal fee. 2 Need Parts or Assistance? ¿Necesita partes o asistencia? WWW.AMERIWOOD.COM/PARTS or call toll free: 35 lbs. 15.8 kg. For prompt, reliable service please have your assembly manual ready. Para obtener servicio rápido y confiable por favor tenga este manual a la mano. 50 lbs. 22.6 kg. THIS INSTRUCTION BOOKLET CONTAINS IMPORTANT SAFETY INFORMATION. PLEASE READ AND KEEP FOR FUTURE REFERENCE. EL FOLLETO DE LA INSTRUCCION CONTIENE LE INFORMACION DE SEGURIDAD IMPORTANTE. POR FAVOR LEA Y GUARDE PARA LA REFERENCIA FUTURA. o llame a nuestra línea gratis 1-800-489-3351 date of purchase / ferch de compa ___ / ___ / ___ Recommended # of people needed for assembly: 1 (however it is always better to have an extra hand.) Estimated assembly time is 1 hour. El numero recomendado de las personas necesito para la asamblea: 1 (sin embargo siempre es bueno tener una mano extra) El tiempo de la asamblea estimado es 1 hora. B349402328WPT00 Please Recycle Recicle Por Favor Parts - Piezas E C 2 fixed shelves 2 estantes fijo 3893328031 kick retroceso 3893328051 center shelf estante centre 39402328092 G F A I L K J D lower adjustable shelf 2 upper panels 2 paneles superiores estante ajustable inferior 3893328041 39402328012 lower right panel lower left panel upper back panel 2 upper adjustable shelves lower back panel panel trasero inferior panel trasero superior panel izquierdo inferior panel derecho inferior 2 estantes ajustables K940232821 39402328072 39402328062 K940232811 39402328101 This illustration showns how the CAM fastening system works. Esta ilustración muestra el sistema de fijación de leva y como funciona. Hardware - Quincalla 1 2 Tighten to fully seat. Do not over tighten. Apriétese a totalmente asiento. No haga encima de apriétese. Proper orientation of cam. La orientación apropiada de leva. 3 4 Layout of hardware bag Diseño de la bolsa de quincalla 1 3 cam lock cerradura de la leva #A22500 Qty: 8 4 compression dowel clavija de compresión #A21520 Qty: 4 nail clavo #A21110 Qty: 40 7a 7b 2 cam bolt perno de la leva #A22510 Qty: 8 6 1-3/4" flat head cabeza plano 1-3/4" #A13410 Qty: 7 7c 7d 7e ½ turn to fully lock. ½ se vuelven a totalmente cerradura. 5 safety strap kit estuche de cinturón #A84000 shelf support soporte de estante #A80250 Qty: 12 Lock Apretar Qty: 1 3 /8 B349402328WPT00 1 2 upper left panel panel izquierdo superior 1 I x8 finished edge borde acabdo 3 6 2 A x3 2 1 7b 7a x8 upper right panel panel derecho superior 7c C 1 3 x4 top shelf estante superior 3 A 3 7/16" Approx. 1 7a x1 7b x1 1 F 2 3 7c x1 6 finished edge borde acabdo E 1 C 1 3 G raw surface superficie cruda surface non-finie bottom shelf estante inferior Proper orientation of CAM LOCK Posición correcta de la cerradura de leva. 4 /8 ?? www.ameriwood.com ?? B349402328WPT00 2 3 "C" shelf with safety strap (7) attached. El estante de "C" con la seguridad pone entre paréntesis (7) adjunto. UNLOCK DESAPRETAR LOCK APRETAR finished surface superficie acabado C A finished edge borde acabdo A finished edge borde acabdo C I upper assembly asamblea superior 6 A A Be sure cam locks (1) are fully inserted into holes. Asegúrese de cerraduras (1) están plenamente insertados en agujeros. 6 x4 5 /8 ?? www.ameriwood.com ?? B349402328WPT00 4 LOCK APRETAR UNLOCK DESAPRETAR UNLOCK DESAPRETAR LOCK APRETAR G finished edge borde acabdo 5 C E F C A Be sure cam locks (1) are fully inserted into holes. Asegúrese de cerraduras (1) están plenamente insertados en agujeros. finished edge borde acabdo A I IMPORTANT: Do not stand unit up without back panels attached. Back panels will be attached in step 6. IMPORTANTE: No levante la unidad sin que los paneles de atrás estén puestos. Paneles traseros serán puestos en paso 6. G finished edge borde acabdo upper assembly asamblea superior F C E lower assembly asamblea inferior 6 /8 ?? www.ameriwood.com ?? finished edge borde acabdo B349402328WPT00 6 Fasten LOWER BACK PANEL (K) second. Use 6 nails on each side and 4 nails at Fasten UPPER BACK PANEL (L) first. Use 8 nails on each side and 4 at the top only. Fije el PANEL TRASERO SUPERIOR (L) primero. Use 8 clavos adelante cada lateral y 4 clavos a la cima sólo. 4 the top and bottom. Fije en PANEL TRASERO INFERIIOR (K) segundo. Use 6 clavos adelante cada lateral Y 4 clavos a la cima y fondo. L 1st raw surface superficie cruda surface crue K 2nd A raw surface superficie cruda surface crue -Flush the edge of the back panel with the top edge of the shelf. Align squarely and nail straight through into back edges. -Alinie el borde del panel trasero con el borde superior del estante. Alinee en ángulo recto y clave derecho dentro o en los bordes traseros. 4 x40 WARNING F Please make sure that the Backs are attached securely. All nails must be driven into the parts straight and tightened firmly. Failure to do so could cause instability, product collapse, and/or serious injury. AVERTISSEMENT -Flush the edge of the back panel with the bottom edge of the shelf. Align squarely and nail straight through into back edges. -Alinie el borde del panel trasero con el borde inferior del estante. Alinee en ángulo recto y clave derecho dentro o en los bordes traseros. 7 /8 ?? www.ameriwood.com ?? S’il-vous-plaît assurez-vous que les PANNEAUX ARRIÈRES sont attachés solidement. Tous les clous doivent être enfoncés perpendiculairement et solidement dans les parties. Sinon le meuble peut devenir instable, s’effondrer subitement et/ou causer des blessures graves. B349402328WPT00 7 hole agujero 5 x12 Option 2 Opción 2 J 7c Option 1 Opción 1 J 7c x1 7a 7d 5 stud montante 7e 7d 7c 7d x1 7a D 7e wallboard muro x1 Certificate of Conformity 1. This certificate applies to the Ameriwood Industries Inc. product identified by this instruction manual. 2. This certificate applies to compliance of this product with the CPSC Ban on Lead-Containing Paint (16 CFR 1303). 3. This product is distributed by: Ameriwood Industries Inc. 410 East First Street South Wright City, MO 63390 636-745-3351 4. Site of Manufacture: □ Tiffin OH 5. See front page of instruction manual for date of manufacture. 8 /8 ?? www.ameriwood.com ?? Option 1: Securely screw (7c) into solid area of the wall as shown. Opción 1: Firmemente el tornillo (7c) en el área sólida de la pared como mostrado. Option 2: Drill a 3/16" diameter hole (5mm) in the wallboard. Tap the wall anchor(7d) into the hole until it is flush. Fasten the wall bracket (7a) to the wall anchor (7e) with the screw (7d) and washer (7c). Opcion 2: Taladre un agujero de 3/16" de diámetro (5mm) en la pared. Golpea la ancla de pared (7d) en el agujero hasta que sea parejo. Abroche la escuadra de pared (7a) al la ancla de la pared (7e) con el tornillo (7d) y arandela (7c). B349402328WPT00-
 1
1
-
 2
2
-
 3
3
-
 4
4
-
 5
5
-
 6
6
-
 7
7
-
 8
8


Ameriwood 9402328WP Assembly Instructions Manual
- Tipo
- Assembly Instructions Manual
en otros idiomas
- English: Ameriwood 9402328WP
