Philips MC235B/12 Quick Installation Guide
- Tipo
- Quick Installation Guide

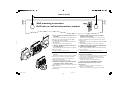
210 mm (8.26")
Speaker Right
Main Unit
Holes
Speaker Left
Wall mounting instructions
Drill holes on wall at hole positions marked.
1. Use screws to mount the main unit on
the wall.
•Position the bracket (supplied) on the wall (as shown
below) where you want to hang the main unit. Drill 2
holes slightly undersized for a firm fit.
• Secure the bracket on the wall using 2 dowels and 2
screws (supplied).
• Mount the main unit onto the wall bracket.
2. Use the stand to place the main unit
on a flat surface.
• Before operating the unit, please make sure you install the
unit and stand correctly.
• Side the stand into the slot as shown.
1. Fixez l'unité principale au mur à l'aide
de vis.
• Placez le cadre (fourni) au mur (comme il est indiqué
ci-dessous) où vous voulez monter l'unité principale.
• Accrochez bien le cadre au mur en utilisant les 2
chevilles et les 2 vis (fournies).
• Montez l'unité principale au cadre mural.
2. Utilisez le support pour placer l'unité
principale sur une surface plane.
• Avant utilisation, assurez-vous que l'unité et le support sont
installés correctement.
• Glissez le support dans le logement prévu à cet effet
(voir illustration).
1. Utilice tornillos para montar la unidad
principal en la pared.
• Coloque el soporte (suministrado) en la pared (según se
muestra a continuación) en la posición donde desee colgar la
unidad principal.
• Ajuste el soporte en la pared utilizando 2 clavijas y 2 tornillos
(suministrados).
• Instale la unidad principal sobre el soporte de la pared.
2. Utilice la base para colocar la unidad princi-
pal sobre una superficie plana.
• Antes de manejar la unidad, asegúrese de que instala la unidad y
la base correctamente.
• Deslice la base hacia la ranura tal como se muestra.
1. Befestigen Sie die Haupteinheit mithilfe von
Schrauben an der Wand.
•Positionieren Sie die Halterung (mitgeliefert) an der Stelle der Wand
(wie unten gezeigt), wo die Basisstation aufgehängt werden soll.
• Befestigen Sie die Halterung mithilfe von zwei Dübeln und zwei
Schrauben (mitgeliefert) an der Wand.
• Befestigen Sie die Basisstation an der Wandhalterung.
2. Verwenden Sie die Standhalterung zum
Aufstellen der Einheit auf einem ebenen
Untergrund.
• Stellen Sie vor dem Einsatz der Einheit sicher, dass Einheit und
Standhalterung korrekt installiert wurden.
• Schieben Sie die Standhalterung, wie abgebildet, in die Öffnung.
Wall Mounting-New 6/3/07, 18:061
La página se está cargando...
Transcripción de documentos
210 mm (8.26") Wall mounting instructions Drill holes on wall at hole positions marked. ft er ak pe S it Un in Ma e Sp er ak Ri t gh s ole H Le 1. Use screws to mount the main unit on the wall. 1. Utilice tornillos para montar la unidad principal en la pared. • Position the bracket (supplied) on the wall (as shown below) where you want to hang the main unit. Drill 2 holes slightly undersized for a firm fit. • Secure the bracket on the wall using 2 dowels and 2 screws (supplied). • Mount the main unit onto the wall bracket. • Coloque el soporte (suministrado) en la pared (según se muestra a continuación) en la posición donde desee colgar la unidad principal. • Ajuste el soporte en la pared utilizando 2 clavijas y 2 tornillos (suministrados). • Instale la unidad principal sobre el soporte de la pared. 2. Use the stand to place the main unit on a flat surface. 2. Utilice la base para colocar la unidad principal sobre una superficie plana. • Before operating the unit, please make sure you install the unit and stand correctly. • Side the stand into the slot as shown. • Antes de manejar la unidad, asegúrese de que instala la unidad y la base correctamente. • Deslice la base hacia la ranura tal como se muestra. 1. Fixez l'unité principale au mur à l'aide de vis. 1. Befestigen Sie die Haupteinheit mithilfe von • Placez le cadre (fourni) au mur (comme il est indiqué ci-dessous) où vous voulez monter l'unité principale. • Accrochez bien le cadre au mur en utilisant les 2 chevilles et les 2 vis (fournies). • Montez l'unité principale au cadre mural. 2. Utilisez le support pour placer l'unité principale sur une surface plane. • Avant utilisation, assurez-vous que l'unité et le support sont installés correctement. • Glissez le support dans le logement prévu à cet effet (voir illustration). Wall Mounting-New 1 6/3/07, 18:06 Schrauben an der Wand. • Positionieren Sie die Halterung (mitgeliefert) an der Stelle der Wand (wie unten gezeigt), wo die Basisstation aufgehängt werden soll. • Befestigen Sie die Halterung mithilfe von zwei Dübeln und zwei Schrauben (mitgeliefert) an der Wand. • Befestigen Sie die Basisstation an der Wandhalterung. 2. Verwenden Sie die Standhalterung zum Aufstellen der Einheit auf einem ebenen Untergrund. • Stellen Sie vor dem Einsatz der Einheit sicher, dass Einheit und Standhalterung korrekt installiert wurden. • Schieben Sie die Standhalterung, wie abgebildet, in die Öffnung.-
 1
1
-
 2
2


Philips MC235B/12 Quick Installation Guide
- Tipo
- Quick Installation Guide
en otros idiomas
- français: Philips MC235B/12
- italiano: Philips MC235B/12
- English: Philips MC235B/12
- Deutsch: Philips MC235B/12
- português: Philips MC235B/12
- slovenčina: Philips MC235B/12
- polski: Philips MC235B/12
- čeština: Philips MC235B/12
Artículos relacionados
-
Philips MC235B/37 Quick Setup Guide
-
-
-
Philips DCM2260/12 Quick Installation Guide
-
-
Philips DCM278/12 Quick Setup Guide
-
-
Philips DCM3060/12 Quick Setup Guide