Lo siento, pero la información que proporcionaste no contiene ninguna información sobre el Philips DC950/12. Por lo tanto, no puedo extraer los datos solicitados del contexto proporcionado.
Lo siento, pero la información que proporcionaste no contiene ninguna información sobre el Philips DC950/12. Por lo tanto, no puedo extraer los datos solicitados del contexto proporcionado.

142 mm (5.52")
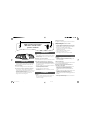
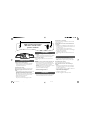
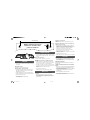
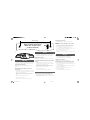
Wall mounting instructions
Drill holes on wall at hole
positions marked.*
1
22
1
ENGLISH
Remove the detachable stand before mounting
• As shown in figure 1, locate the latch on the bottom panel,
and press the latch to unlatch the stand, then take it out.
Note for mounting
To secure the mounting on wall, concrete wall is required.
Use screws to mount the main unit on the wall
• Use this sheet as a template. Mark the position where
you want to hang the unit on the wall (as shown above) and
then drill two 6mm diameter holes.
•
Secure the 2 dowels and 2 screws (both supplied) in the holes
respectively. Leave the screws 5mm proud of the wall.
• Hang the unit on the fastening screws.
FRANÇAIS
Retrait du support amovible avant la fixation au
mur
• Comme indiqué à la figure 1, recherchez le loquet de la face
inférieure, et appuyez sur celui-ci pour libérer le support
avant de le retirer.
Remarque concernant la fixation
Le système de fixation n'est pas conçu pour les murs en béton.
Fixez l'unité principale au mur à l'aide de vis
• Servez-vous de cette feuille comme modèle. Tracez des
repères à l'endroit où vous souhaitez suspendre l'appareil
sur le mur (comme illustré ci-dessus), puis forez deux trous
d'un diamètre de 6 mm.
• Placez les 2 chevilles et les 2 vis (fournies) dans chacun des
trous. Laissez les vis dépasser de 5 mm.
• Suspendez l'appareil aux vis de fixation.
* Instructions relatives à la fixation murale
Percez des trous dans le mur en respectant la position des
trous marquée.
ESPAÑOL
Retire el soporte desmontable antes de montar
el equipo
•Tal como se muestra en la figura 1, localice el pasador del
panel inferior, púlselo para desencajar el soporte y, a
continuación, extráigalo.
Nota para el montaje
Para garantizar un montaje seguro, la pared debe ser de cemento.
Utilice tornillos para montar la unidad
principal en la pared
• Utilice esta página como plantilla. Marque la posición en la
que desea colgar la unidad en la pared (como se muestra en
la imagen anterior) y perfore orificios de 6mm de diámetro.
• Fije los 2 tacos y 2 tornillos (ambos incluidos)
respectivamente en los agujeros. Los tornillos deben
sobresalir 5mm de la pared.
• Cuelgue la unidad en los tornillos de sujeción.
* Instrucciones de montaje en pared
Perfore agujeros en la pared en la posición deseada
DEUTSCH
Vor der Montage abnehmbaren Ständer
entfernen
• Drücken Sie den Riegel an der Unterseite wie in
Abbildung 1 angezeigt, um den Ständer zu entriegeln, und
nehmen Sie ihn heraus.
Hinweis zur Montage
Um eine sichere Befestigung zu gewährleisten, sollte das Gerät
an einer Betonwand angebracht werden.
Befestigen Sie die Haupteinheit mithilfe von
Schrauben an der Wand.
•Verwenden Sie dieses Blatt als Vorlage. Markieren Sie die
Stelle, an der Sie das Gerät an der Wand befestigen
möchten (wie oben abgebildet), und bohren Sie
anschließend zwei Löcher mit einem Durchmesser von
6 mm.
• Befestigen Sie jeweils einen Dübel und eine Schraube (beide
mitgeliefert) in den beiden Löchern. Lassen Sie die
Schrauben 5 mm aus der Wand hervorstehen.
• Hängen Sie das Gerät mithilfe der Befestigungsschrauben an
die Wand.
* Anweisungen zur Wandmontage
Bohren Sie an den markierten Stellen Löcher in die Wand.
DC910_12 Wall Mounting 8/22/08, 13:381
La página se está cargando...
La página se está cargando...
La página se está cargando...
Transcripción de documentos
Nota para el montaje 142 mm (5.52") Para garantizar un montaje seguro, la pared debe ser de cemento. Utilice tornillos para montar la unidad principal en la pared Wall mounting instructions Drill holes on wall at hole positions marked.* 1 • Utilice esta página como plantilla. Marque la posición en la que desea colgar la unidad en la pared (como se muestra en la imagen anterior) y perfore orificios de 6mm de diámetro. • Fije los 2 tacos y 2 tornillos (ambos incluidos) respectivamente en los agujeros. Los tornillos deben sobresalir 5mm de la pared. • Cuelgue la unidad en los tornillos de sujeción. * Instrucciones de montaje en pared Perfore agujeros en la pared en la posición deseada FRANÇAIS Retrait du support amovible avant la fixation au mur • 2 1 2 Comme indiqué à la figure 1, recherchez le loquet de la face inférieure, et appuyez sur celui-ci pour libérer le support avant de le retirer. Remove the detachable stand before mounting • As shown in figure 1, locate the latch on the bottom panel, and press the latch to unlatch the stand, then take it out. Note for mounting To secure the mounting on wall, concrete wall is required. Use screws to mount the main unit on the wall • Use this sheet as a template. Mark the position where you want to hang the unit on the wall (as shown above) and then drill two 6mm diameter holes. • Secure the 2 dowels and 2 screws (both supplied) in the holes respectively. Leave the screws 5mm proud of the wall. • Hang the unit on the fastening screws. Le système de fixation n'est pas conçu pour les murs en béton. Fixez l'unité principale au mur à l'aide de vis Hinweis zur Montage • Um eine sichere Befestigung zu gewährleisten, sollte das Gerät an einer Betonwand angebracht werden. Servez-vous de cette feuille comme modèle. Tracez des repères à l'endroit où vous souhaitez suspendre l'appareil sur le mur (comme illustré ci-dessus), puis forez deux trous d'un diamètre de 6 mm. • Placez les 2 chevilles et les 2 vis (fournies) dans chacun des trous. Laissez les vis dépasser de 5 mm. • Suspendez l'appareil aux vis de fixation. * Instructions relatives à la fixation murale Percez des trous dans le mur en respectant la position des trous marquée. ESPAÑOL Retire el soporte desmontable antes de montar el equipo • Tal como se muestra en la figura 1, localice el pasador del panel inferior, púlselo para desencajar el soporte y, a continuación, extráigalo. DC910_12 Wall Mounting 1 Vor der Montage abnehmbaren Ständer entfernen • Drücken Sie den Riegel an der Unterseite wie in Abbildung 1 angezeigt, um den Ständer zu entriegeln, und nehmen Sie ihn heraus. Remarque concernant la fixation ENGLISH DEUTSCH 8/22/08, 13:38 Befestigen Sie die Haupteinheit mithilfe von Schrauben an der Wand. • Verwenden Sie dieses Blatt als Vorlage. Markieren Sie die Stelle, an der Sie das Gerät an der Wand befestigen möchten (wie oben abgebildet), und bohren Sie anschließend zwei Löcher mit einem Durchmesser von 6 mm. • Befestigen Sie jeweils einen Dübel und eine Schraube (beide mitgeliefert) in den beiden Löchern. Lassen Sie die Schrauben 5 mm aus der Wand hervorstehen. • Hängen Sie das Gerät mithilfe der Befestigungsschrauben an die Wand. * Anweisungen zur Wandmontage Bohren Sie an den markierten Stellen Löcher in die Wand.-
 1
1
-
 2
2
-
 3
3
-
 4
4


Lo siento, pero la información que proporcionaste no contiene ninguna información sobre el Philips DC950/12. Por lo tanto, no puedo extraer los datos solicitados del contexto proporcionado.
en otros idiomas
- français: Philips DC950/12
- italiano: Philips DC950/12
- English: Philips DC950/12
- Deutsch: Philips DC950/12
- Nederlands: Philips DC950/12
- português: Philips DC950/12
- slovenčina: Philips DC950/12
- dansk: Philips DC950/12
- polski: Philips DC950/12
- čeština: Philips DC950/12
- svenska: Philips DC950/12
- suomi: Philips DC950/12
Artículos relacionados
-
Philips DCM278 Manual de usuario
-
Philips DCM276/37 Quick Setup Guide
-
-
Philips DCM278/12 Quick Setup Guide
-
-
-
-
Philips DCB2270/10 Quick Installation Guide
-
Philips BTM2060W/12 Quick Setup Guide
-