La página se está cargando...

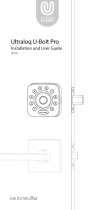
B 5/6"
(8 mm)
A 9/16"
(14 mm)
C 1/8"
(3 mm)
C 1/8"
(3 mm)
Cerrojo
Deadbolt
Chapetón exterior
Exterior cover plate
Chapetón interior
Interior cover plate
Contra
Strike
Tornillos
Screws
#2
#1
Desarmador
Screwdriver
Taladro
Power drill
5/16", 9/16", 1/8"
Broca
Drill bit
Caladora
Jigsaw
Exterior cover plate
Chapetón exterior
C
B
A
C
B
A
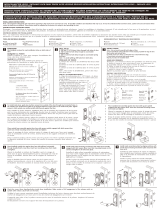
Preparación de la puerta
Door preparations
TEMPLATE
PLANTILLA
Plantilla
Template
Coloque la cerradura sobre los agujeros
hechos y fíjela con los tornillos
respectivos.
Place the lock over the holes previously
drilled and fasten.
Coloque la contra en el marco de la
puerta exactamente a la altura de la
cerradura de la puerta, marque el centro
de los agujeros y atornille.
Place the strike on the door frame at the
same height as the lock and mark center
of the holes and fasten.
Chapetón interior
Interior cover plate
Coloque el chapetón exterior y
el interior en forma vertical
sobre el agujero de la llave y
luego fije los tornillos
correspondientes.
Place exterior and interior
cover plate on vertical axis over
the keyhole and fasten the
screws.
Exterior
Outside
Interior
Inside
Exterior
Outside
Interior
Inside
MARCADO DE
PERFORACIONES
HOLE MARKING
PERFORACIONES
HOLES
Realice las
perforaciones en la
puerta con los
diámetros indicados en
la plantilla perforando
hasta la mitad
aproximádamente y
repita la operación en
el lado opuesto para
evitar dañar la puerta.
Drill the holes with the
indicated diameter on
the template
approximately half the
door thickness and
repeat the process on
the opposite side.
Ancho puerta 45 mm
Door width 1 3/4"
Ancho puerta 35 mm
Door width 1 3/8"
DOBLE SOBRE EL CANTO DE LA PUERTA
FOLD OVER THE DOOR RIM
Barrenos para
la contra
Strike center holes
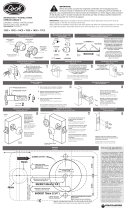
Dibujo detallado de partes
Detailed scheme parts Herramientas
Requeridas
Tools needed
NOTAS IMPORTANTES:
Deberán de usarse las partes originales contenidas en esta caja para el correcto armado e
instalación de la cerradura. Al sustituir partes se pierde la Garantía.
Lea completamente las instrucciones de instalación y si tiene alguna duda consulte al distribuidor que le vendió el producto.
Recuerde que esta cerradura puede instalarse en puertas de hasta 45mm (1 3/4") de espesor.
NOTES TO CONSIDER:
Original parts included on the box should be used to get proper set up of the lock.
By replacing parts in the lock the warranty will be void.
Read carefully the installation instructions and when doubt seek help from authorized dealer or in the store you bought this product.
Remember that this lock will fit any door up to 1 3/4" (45 mm) of thickness.
Marcar con un lápiz o
punzón los centros de
los agujeros según el
sentido de la puerta.
Mark holes with pencil or
awl the center according
to the door handling.
INSTRUCTIVO, INSTALACIÓN Y PLANTILLA PARA CERRADURA DE PERFIL ANGOSTO
LOCKSET NARROW PROFILE INSTALLATION INSTRUCTIONS AND TEMPLATE
Instalación de piezas interiores
Inner pieces installation
Instalación de piezas exteriores
Exterior pieces set-up
/