Cecotec 0 SERIES 0024 LED TV Manual de usuario
- Categoría
- Televisores LCD
- Tipo
- Manual de usuario

Manual de instrucciones
Instruction manual
Manuel d’instructions
Bedienungsanleitung
Manuale di istruzioni
Manual de instruções
Handleiding
Instrukcja obsługi
Návod k použití
TV 0 SERIES 0024/TV 0 SERIES 0032
Televisión LED con resolución HD/ LED TV with HD resolution

Instrucciones de seguridad 4
Safety instructions 8
Instructions de sécurité 12
Sicherheitshinweise 16
Istruzioni di sicurezza 21
Instruções de segurança 25
Veiligheidsinstructies 29
Instrukcje bezpieczeństwa 33
Bezpečnostní pokyny 38
ÍNDICE
1. Antes de usar 43
2. Instalación 43
3. Botones del mando e interfaz 45
4. Menús y modos 47
5. Mando a distancia 60
6. Resolución de problemas 62
7. Especicaciones técnicas 64
8. Reciclaje de aparatos eléctricos
y electrónicos 64
9. Garantía y SAT 64
10. Copyright 65
11. Declaración de conformidad simplicada 65
INDEX
1. Before use 66
2. Installation 66
3. Controller buttons and interface 68
4. Modes and Menus 70
5. Remote control 81
6. Troubleshooting 83
7. Technical specications 85
8. Disposal of old electrical a
nd electronic appliances 85
9. Technical support and warranty 85
10. Copyright 86
11. Simplied Declaration of Conformity 86
SOMMAIRE
1. Avant utilisation 87
2. Installation 87
3. Boutons de la télécommande et interface 89
4. Menus et modes 91
5. Télécommande sans l 104
6. Résolution de problèmes 106
7. Spécications techniques 108
8. Recyclage des équipements
électriques et électroniques 108
9. Garantie et SAV 109
10. Copyright 109
11. Déclaration de conformité simpliée 109
INHALT
1. Vor dem Gebrauch 110
2. Montage 110
3. Controller-Tasten und -Schnittstelle 113
4. Menüs und Modi 114
5. Fernbedienung 127
6. Problembehebung 130
7. Technische Spezikationen 132
8. Recycling von Elektro-
und Elektronikgeräten 132
9. Garantie und Kundendienst 132
10. Copyright 133
11. Vereinfachte Konformitätserklärung 133
INDICE
1. Prima dell’uso 134
2. Installazione 134
3. Tasti del telecomando e interfaccia 136
4. Menu e modalità 138
5. Telecomando 151
6. Risoluzione dei problemi 153
7. Speciche tecniche 155
8. Riciclaggio di apparecchiature
elettriche ed elettroniche 155
9. Garanzia e supporto tecnico 155
10. Copyright 156
11. Dichiarazione di conformità semplicata 156
ÍNDICE
1. Antes de usar 157
2. Instalação 157
3. Botões do controlo remoto e interface 159
4. Menu e modos 161
5. Controlo remoto 173
6. Resolução de problemas 175
7. Especicações técnicas 177
8. Reciclagem de produtos elétricos
e eletrónicos 177
9. Garantia e SAT 178
10. Copyright 178
11. Declaração de conformidade simplicada 178
INHOUD
1. Vóór u het apparaat gebruikt 179
2. Installatie 179
3. Knoppen van de afstandsbediening
en interface 181
4. Menu’s en modi 183
5. Afstandsbediening 196
6. Probleemoplossing 198
7. Technische specicaties 199
8. Recycling van elektrische
en elektronische apparatuur 200
9. Garantie en technische ondersteuning 200
10. Copyright 200
11. Vereenvoudigde verklaring
van overeenstemming 201
SPIS TREŚCI
1. Przed użyciem 202
2. Instalacja 202
3. Przyciski pilota i interfejs 205
4. Menu i tryby 206
5. Pilot zdalnego sterowania. 218
6. Rozwiązywanie problemów 220
7. Dane techniczne 222
8. Recykling urządzeń elektrycznych
i elektronicznych 222
9. Gwarancja i Serwis techniczny 222
10. Copyright 223
11. Uproszczona deklaracja zgodności 223
OBSAH
1. Před použitím 224
2. Instalace 224
3. Tlačítka a rozhraní ovladače 226
4. Nabídky a režimy 228
5. Dálkové ovládání 240
6. Řešení problémů 242
7. Technické specikace 243
8. Recyklace elektrických
a elektronických zařízení 244
9. Záruka a technický servis 244
10. Copyright 244
11. Zjednodušené prohlášení o shodě 244

54 TV 0 SERIES 0024/TV 0 SERIES 0032TV 0 SERIES 0024/TV 0 SERIES 0032
- Utilícelo únicamente con el soporte, mesa, etc. especicados
por el fabricante o vendidos con el aparato. Si usa una mesa
con ruedas, tenga cuidado al moverla para evitar lesiones.
- Desenchufe el aparato durante tormentas o si no piensa
utilizarlo durante largos periodos de tiempo.
- Cuidado: para reducir el riesgo de incendio o descarga
eléctrica, no exponga el aparato a la lluvia o a la humedad.
- Asegúrese de que la toma de red sea accesible y de que se
encuentre cerca del aparato.
- Este aparato no está diseñado para instalación empotrada,
a menos que se proporcione una ventilación adecuada o se
sigan las instrucciones del fabricante.
- No exponga el aparato a goteos ni salpicaduras y no coloque
objetos llenos de líquido (como jarrones) sobre el aparato.
- No coloque ningún objeto que pueda generar un peligro
encima del aparato (por ejemplo, objetos llenos de líquido,
velas encendidas, etc.).
- Montaje en la pared o en el techo - El aparato debe montarse
en la pared o en el techo solo según las recomendaciones
del fabricante.
- No coloque nunca el televisor, el mando a distancia o las
pilas cerca de llamas u otras fuentes de calor, incluida la
luz solar directa. Para evitar incendios, mantenga siempre
las velas u otras fuentes de fuego alejadas del televisor, el
mando a distancia y las pilas.
- El terminal USB acepta 0,5 A en condiciones normales de
funcionamiento.
- Guarde las instrucciones de mantenimiento para uso
por parte de personal autorizado. Para reducir el riesgo
de descarga eléctrica, no realice ninguna operación de
mantenimiento distinta de las incluidas en el manual de
instrucciones, a menos que esté cualicado para ello.
INSTRUCCIONES DE SEGURIDAD
Lea las siguientes instrucciones atentamente antes de usar
el producto. Guarde este manual para futuras referencias o
nuevos usuarios.
- PELIGRO: RIESGO DE DESCARGA ELÉCTRICA. NO ABRIR. Para
reducir el riesgo de descarga eléctrica, no desmonte el
televisor usted mismo y deje el mantenimiento en manos de
personal cualicado.
- Ante cualquier tipo de incidencia, avería, revisión o
mantenimiento, póngase en contacto con el Servicio de
Asistencia Técnica de Cecotec.
- Tenga particularmente en cuenta a la información
marcada con este símbolo: instrucciones importantes
de uso/funcionamiento.
- Advertencia: tenga particularmente en cuenta a la
información marcada con este símbolo: peligro de descarga
eléctrica.
- No use este aparato cerca al agua.
- Límpielo solo con un paño seco.
- No bloquee ninguna abertura de ventilación. Instale el
aparato de acuerdo con las instrucciones del fabricante.
- No lo instale cerca de fuentes de calor como radiadores,
estufas u otros aparatos que produzcan calor.
- No altere el sistema de protección del enchufe polarizado/
con toma de tierra del aparato. Un enchufe polarizado tiene
dos clavijas, una más ancha que la otra. Un enchufe con toma
de tierra tiene dos clavijas y una tercera con toma de tierra.
Si el enchufe no encaja en su toma de corriente, consulte a
un electricista para que sustituya la toma.
- Proteja el cable de alimentación para evitar que se dañe.
- Utilice únicamente los accesorios especicados por el
fabricante.

76 TV 0 SERIES 0024/TV 0 SERIES 0032TV 0 SERIES 0024/TV 0 SERIES 0032
cubrir o bloquear las aberturas de ventilación con objetos
como periódicos, manteles, cortinas, etc.
- Se debe poder acceder fácilmente al cable de corriente. No
coloque el televisor, ni ningún mueble, etc., sobre el cable
de corriente, ni lo pise. Un cable deteriorado puede causar
un incendio o provocarle una descarga eléctrica. Agarre el
cable de corriente por la clavija de enchufe; no desenchufe
el televisor tirando del cable de corriente. No toque nunca
el cable con las manos mojadas, pues podría causar un
cortocircuito o sufrir una descarga eléctrica. No haga
nunca un nudo en el cable ni lo empalme con otros cables.
Deberá sustituirlo cuando esté dañado, siendo únicamente
un profesional quien puede hacerlo. Si el cable o cualquier
otra parte del dispositivo presenta daños, contacte con el
Servicio de Asistencia Técnica de Cecotec.
- No exponga el televisor a goteos y salpicaduras de líquidos
y no coloque objetos que contengan líquidos, como oreros,
tazas, etc., o más sobre el televisor (por ej., en los estantes
por encima de TV). No exponga el televisor a la luz solar
directa ni llamas abiertas, tales como velas encendidas en
la parte superior o cerca del televisor. No coloque ninguna
fuente de calor como calentadores eléctricos, radiadores,
etc., cerca del televisor. No coloque el televisor en el suelo ni
en las supercies inclinadas.
- Para evitar el peligro de asxia, mantenga las bolsas de
plástico fuera del alcance de los bebés, los niños y los
animales domésticos.
- Ponga cuidadosamente el soporte al televisor. Si el soporte
está provisto de tornillos, apriete los tornillos rmemente
para evitar que el televisor se incline. No apriete demasiado
los tornillos y monte las gomas del soporte adecuadamente.
- No deseche las pilas en el fuego o con materiales peligrosos
o inamables.
- No exponga la batería a fuentes de calor excesivo como el
del sol, el fuego o similares.
- Este equipo es un aparato eléctrico de clase II o de doble
aislamiento. Se ha diseñado de tal forma que no requiere
una conexión de seguridad a tierra.
- La temperatura ambiente máxima de uso es de 45 grados.
La altitud máxima de uso es de 2000 metros.
- ATENCIÓN: PARA REDUCIR EL RIESGO DE DESCARGA
ELÉCTRICA NO RETIRE LA TAPA (O EL PANEL TRASERO). NO
CONTIENE PIEZAS QUE PUEDAN SER CAMBIADAS POR EL
USUARIO. PÓNGASE EN CONTACTO CON PERSONAL TÉCNICO
CUALIFICADO.
- En climas extremos (tormentas, relámpagos) y largos
periodos de inactividad (irse de vacaciones) desconecte el
televisor de la red eléctrica. El enchufe de corriente sirve
para desconectar el televisor de la electricidad y, por lo
tanto, siempre debe estar accesible. Si el televisor no se
desconecta de la red eléctrica, el dispositivo aún consumirá
energía para todas las situaciones, incluso si el televisor
está en modo de espera o apagado.
- ADVERTENCIA: este dispositivo está diseñado para ser
utilizado por personas (incluidos los niños) con capacidad /
experiencia en el funcionamiento de un dispositivo de este
tipo sin supervisión, a menos que hayan recibido supervisión
o instrucciones relativas al uso del aparato por una persona
responsable de su seguridad.
- Utilice este aparato de TV a una altura de menos de 5000
metros sobre el nivel del mar, en lugares secos y en regiones
con climas templados o tropicales. El televisor está diseñado
para uso doméstico y uso interior similar.
- Para facilitar la ventilación, deje al menos 5 cm de espacio
libre alrededor de la TV. La ventilación no debe impedirse al

98 TV 0 SERIES 0024/TV 0 SERIES 0032TV 0 SERIES 0024/TV 0 SERIES 0032
earthed prong. If the plug does not t your outlet, consult an
electrician to have the outlet replaced.
- Protect the power cable to prevent it from being damaged.
- Use only accessories specied by the manufacturer.
- Use only with stand, table, etc. specied by the manufacturer,
or sold with the appliance. If you use a table with wheels, be
careful when moving it to avoid injury.
- Unplug this appliance during lightning storms or when you
do not plan to use it for long periods of time.
- Caution: To reduce the risk of re or electric shock, do not
expose the appliance to rain or moisture.
- Make sure that the mains socket is accessible and close to
the appliance.
- This appliance is not intended for built-in installation unless
adequate ventilation is provided, or the manufacturer’s
instructions are followed.
- Do not expose the appliance to dripping or splashing and do
not place objects lled with liquids (such as vases) on the
appliance.
- Do not place any object that may create a hazard on top of
the appliance (for example, objects lled with liquid, lighted
candles, etc.)
- Wall or Ceiling Mounting - The appliance should be
mounted to the wall or ceiling only in accordance with the
manufacturer’s recommendations.
- Never place the TV, remote control or batteries near naked
ames or other sources of heat, including direct sunlight.
To prevent re, always keep candles or other sources of re
away from the TV, remote control and batteries.
- The USB terminal accepts 0.5 A under normal operating
conditions.
- Save maintenance instructions for use by authorized
- ADVERTENCIA: nunca exponga las pilas a una fuente de calor
excesiva como por ejemplo la luz solar, el fuego o similares.
MUY IMPORTANTE: NO DEBE dejar que nadie, especialmente
los niños, introduzcan ningún objeto por los agujeros, las
ranuras o por cualquier apertura del televisor.
- Un volumen excesivo podría provocar problemas de pérdida
de audición.
SAFETY INSTRUCTIONS
Read these instructions thoroughly before using the appliance.
Keep this instruction manual for future reference or new users.
- DANGER: RISK OF ELECTRIC SHOCK. DO NOT OPEN. To reduce
the risk of electric shock, do not remove the lid and refer
servicing to qualied personnel.
- In the event of any type of incident, breakdown, revision, or
maintenance, contact the Ocial Cecotec Technical Support
Service.
- Pay particular attention to the information marked with
this symbol: important instructions for use/operation.
- Warning: pay particular attention to the information
marked with this symbol: danger of electric shock.
- Do not use this appliance near water.
- Clean it only with a dry cloth.
- Do not block any ventilation openings. Install the appliance
with the specications of the manufacturer.
- Do not install it near sources of heat like radiators, heaters
or any other appliances that may produce heat.
- Do not tamper with the protection of the earthed plug on the
appliance. A polarized plug has two blades with one wider
than the other. An earthed plug has two prongs and a third

1110 TV 0 SERIES 0024/TV 0 SERIES 0032TV 0 SERIES 0024/TV 0 SERIES 0032
or blocking the ventilation openings with items such as
newspapers, tablecloths, curtains, etc.
- The power cable must be easily accessible. Do not place
the TV or any furniture etc. on the power cable or step on
it. A damaged cable may cause a re or give you an electric
shock. Grasp the power cable by the plug; do not unplug the
TV by pulling on the power cable. Never touch the cable with
wet hands, as this may cause a short circuit or give you an
electric shock. Never tie a knot in the cable or splice it with
other cables. You must replace it when it is damaged, being
only a professional who can do it. If the cable or any other
part of the device is damaged, contact the Ocial Cecotec
Technical Support Service.
- Do not expose the TV to dripping and splashing liquids, and
do not place objects lled with liquids, such as ower vases,
cups, etc., or more on the TV (e.g., on shelves above the TV).
Do not expose the TV to direct sunlight or open ames, such
as light candles on top of or near the TV. Do not place any
heat sources such as electric heaters, radiators, etc. near the
TV. Do not place the TV on the oor or on inclined surfaces.
- To avoid a suocation hazard, keep plastic bags out of the
reach of babies, children, and pets.
- Carefully attach the stand to the TV. If the stand is provided
with screws, tighten the screws rmly to prevent the TV
from tilting. Do not over-tighten the screws and mount the
bracket rubbers properly.
- Do not dispose of batteries in re or with hazardous or
ammable materials.
- WARNING: never expose batteries to excessive heat source
such as sunlight, re, or the like. VERY IMPORTANT: You MUST
NOT let anyone, especially children, insert any objects into
holes, slots or any opening on the TV.
personnel. To reduce the risk of electric shock, do not perform
any maintenance operations other than those included in
the instruction manual, unless you are qualied to do so.
- Do not expose the battery to excessive heat sources such as
sunshine, re or the like.
- This equipment is a class II or double insulated electrical
appliance. It has been designed in such a way that it does
not require a safety earthed connection.
- The maximum ambient temperature for use is 45 degrees.
The maximum altitude of use is 2000 meters.
- ATTENTION: TO REDUCE THE RISK OF ELECTRIC SHOCK DO
NOT REMOVE LID (OR BACK PAD). IT DOES NOT CONTAIN
PARTS THAT CAN BE CHANGED BY THE USER. CONTACT
QUALIFIED TECHNICAL PERSONNEL.
- In extreme weather (storms, lightning) and long periods
of inactivity (going on vacation) disconnect the television
from the mains. The mains plug is used to disconnect the
television from the electricity and must therefore always be
accessible. If the TV is not disconnected from the mains, the
device will still consume power for all situations, even if the
TV is in standby mode or switched o.
- WARNING: This device is intended for use by persons
(including children) with the ability/experience in operating
such a device without supervision unless they have been
given supervision or instruction concerning use of the
appliance by a person responsible for your safety.
- Please use this appliance at an altitude of less than 5000
meters above sea level, in dry places and in regions with
temperate or tropical climates. The TV is designed for
domestic and similar indoor use.
- To facilitate ventilation, leave at least 5 cm of free space
around the TV. Ventilation should not be impeded by covering

1312 TV 0 SERIES 0024/TV 0 SERIES 0032TV 0 SERIES 0024/TV 0 SERIES 0032
troisième prise de courant avec mise à la terre. Si la che
ne rentre pas dans votre prise, consultez un électricien pour
remplacer la prise.
- Protégez le câble d’alimentation pour éviter de l’endommager.
- N’utilisez que les accessoires spéciés par le fabricant.
- N’utilisez l’appareil qu’avec le support, la table, etc., spéciés
par le fabricant ou vendus avec l’appareil. Si vous utilisez une
table à roulettes, faites attention lorsque vous la déplacez
an d’éviter les blessures.
- Débranchez l’appareil en cas d’orage ou si vous prévoyez de
ne pas l’utiliser pendant de longues périodes.
- Attention : pour réduire les risques d’incendie ou de choc
électrique, n’exposez pas l’appareil à la pluie ou à l’humidité.
- Assurez-vous que la prise de courant est accessible et
proche de l’appareil.
- Cet appareil n’est pas destiné à être encastré, à moins que
la ventilation ne soit adéquate ou que les instructions du
fabricant ne soient respectées.
- N’exposez pas l’appareil à des gouttes ou à des éclaboussures
et ne placez pas d’objets remplis de liquides (par exemple
des vases) sur l’appareil.
- Ne placez pas d’objets qui pourraient endommager l’appareil
à proximité (par exemple, des objets remplis de liquides, des
bougies allumées, etc.)
- Montage au mur ou au plafond - L’appareil doit être monté au
mur ou au plafond uniquement selon les recommandations
du fabricant.
- Ne placez jamais le téléviseur, la télécommande ou les piles
à proximité d’une amme nue ou d’une autre source de
chaleur, y compris la lumière directe du soleil. Pour éviter les
incendies, éloignez toujours les bougies ou autres sources
de feu du téléviseur, de la télécommande et des piles.
- Excessive volume on headphones could cause hearing loss
problems.
INSTRUCTIONS DE SÉCURITÉ
Veuillez lire les instructions suivantes avec attention avant
d’utiliser l’appareil. Gardez bien ce manuel pour de futures
références ou pour tout nouvel utilisateur.
- DANGER: RISQUE DE DÉCHARGE ÉLECTRIQUE. N’OUVREZ PAS
L’APPAREIL. Pour éviter tout risque de choc électrique, ne
démontez pas le téléviseur vous-même et conez l’entretien
de l’appareil à un personnel qualié.
- Pour tout type d’incident, de panne ou d’entretien, veuillez
contacter le Service Après-Vente ociel de Cecotec.
- Veuillez faire particulièrement attention aux informations
marquées de ce symbole : instructions importantes
d’utilisation/fonctionnement.
- Avertissement : faites particulièrement attention aux
informations marquées de ce symbole ; risque de choc
électrique.
- N’utilisez pas cet appareil à proximité de l’eau.
- Nettoyez-le uniquement avec un chion sec.
- N’obstruez pas les ouvertures de ventilation. Installez
l’appareil conformément aux instructions du fabricant.
- N’installez pas l’appareil près de sources de chaleur telles
que des chauages ou radiateurs, des cuisinières ou d’autres
appareils qui produisent de la chaleur.
- Ne modiez pas le système de protection de la che
polarisée/entaillée de l’appareil. Une che polarisée
possède deux broches, l’une plus large que l’autre. Une prise
de courant avec mise à la terre possède deux ches et une

1514 TV 0 SERIES 0024/TV 0 SERIES 0032TV 0 SERIES 0024/TV 0 SERIES 0032
au-dessus du niveau de la mer, dans des endroits secs et
dans des régions au climat tempéré ou tropical. Le téléviseur
est conçu pour une utilisation domestique et intérieure.
- Pour faciliter la ventilation, laissez au moins 5 cm d’espace
libre autour du téléviseur. La ventilation ne doit pas être
obstruée par des objets tels que des journaux, des nappes,
des rideaux, etc.
- Le câble d’alimentation doit être facilement accessible.
Ne placez pas le téléviseur ou tout autre meuble sur le
câble d’alimentation et ne marchez pas dessus. Un câble
endommagé peut provoquer un incendie ou un choc
électrique. Saisissez le câble d’alimentation par la che ;
ne débranchez pas le téléviseur en tirant sur le câble. Ne
touchez jamais le câble avec des mains mouillées, car cela
pourrait provoquer un court-circuit ou un choc électrique.
Ne faites jamais de nœuds sur le câble et ne le reliez
jamais à d’autres câbles. Il doit être remplacé lorsqu’il est
endommagé, et seul un professionnel pourra le faire. Si le
câble ou toute autre partie de l’appareil est abîmé, contactez
le Service d’Assistance Technique de Cecotec.
- N’exposez pas le téléviseur aux gouttes et aux éclaboussures
de liquides et ne placez pas d’objets contenant des liquides,
tels que des vases, des tasses, etc., ou d’autres objets
au-dessus du téléviseur (par exemple, sur des étagères
au-dessus du téléviseur). N’exposez pas le téléviseur à
la lumière directe du soleil ou à des ammes nues, telles
que des bougies allumées sur le dessus ou à proximité du
téléviseur. Ne placez pas de sources de chaleur telles que
des chaue-eau électriques, des radiateurs, etc., à proximité
du téléviseur. Ne placez pas le téléviseur sur le sol ou sur
des surfaces inclinées.
- Pour éviter tout risque d’étouement, gardez les sacs en
- Le connecteur USB accepte 0,5 A dans des conditions de
fonctionnement normales.
- Conservez les instructions d’entretien pour le personnel
autorisé. Pour éviter tout risque d’électrocution, n’eectuez
aucune opération d’entretien autre que celle décrite dans ce
manuel d’instructions, sauf si vous êtes qualié pour le faire.
- N’exposez pas la batterie à des températures trop élevées
(soleil, feu, etc.).
- Cet appareil est un appareil électrique de classe II ou à
double isolation. Il a été conçu pour ne pas requérir de mise
à la terre de sécurité.
- La température ambiante maximale pour l’utilisation est
de 45 degrés. L’altitude maximale d’utilisation est de 2000
mètres.
- ATTENTION: POUR RÉDUIRE LE RISQUE DE CHOC ÉLECTRIQUE,
NE RETIREZ PAS LE COUVERCLE (OU LE PANNEAU ARRIÈRE). IL
NE CONTIENT AUCUNE PIÈCE RÉPARABLE PAR L’UTILISATEUR.
CONTACTEZ LE PERSONNEL TECHNIQUE QUALIFIÉ.
- En cas de conditions météorologiques extrêmes (orages,
éclairs) et d’inactivité prolongée (vacances), débranchez le
téléviseur. La prise qui permet de débrancher le téléviseur
doit toujours être accessible. Si le téléviseur n’est pas
débranché, l’appareil continuera à consommer de l’énergie
dans toutes les situations, même si le téléviseur est en mode
veille ou éteint.
- AVERTISSEMENT : cet appareil est destiné à être utilisé par
des personnes (y compris des enfants) capables d’utiliser un
tel appareil sans surveillance, à moins qu’elles n’aient reçu
une surveillance ou des instructions concernant l’utilisation
de l’appareil de la part d’une personne responsable de leur
sécurité.
- Utilisez ce téléviseur à une altitude inférieure à 5000 mètres

1716 TV 0 SERIES 0024/TV 0 SERIES 0032TV 0 SERIES 0024/TV 0 SERIES 0032
- Warnung: Achten Sie besonders auf die mit diesem
Symbol gekennzeichneten Informationen: Gefahr eines
elektrischen Schlages.
- Verwenden Sie das Gerät nicht in der Nähe von Wasser.
- Wischen Sie es nur mit einem trockenen Tuch ab.
- Blockieren Sie keine Lüftungsönungen. Installieren Sie das
Gerät gemäß den Anweisungen des Herstellers.
- Nicht in der Nähe von Wärmequellen wie Heizkörpern, Herden
oder anderen wärmeerzeugenden Geräten aufstellen.
- Das Schutzsystem des gepolten/geerdeten Steckers des
Geräts darf nicht manipuliert werden. Ein gepolter Stecker
hat zwei Stifte, von denen einer breiter ist als der andere.
Eine geerdete Steckdose hat zwei Stecker und eine dritte
geerdete Buchse. Wenn der Stecker nicht in Ihre Steckdose
passt, wenden Sie sich an einen Elektriker, um die Steckdose
auszutauschen.
- Schützen Sie das Netzkabel vor Beschädigungen.
- Verwenden Sie nur das vom Hersteller angegebene Zubehör.
- Nur mit dem vom Hersteller angegebenen oder mit dem
Gerät verkauften Ständer, Tisch usw. verwenden. Wenn Sie
einen Tisch auf Rollen verwenden, sollten Sie ihn vorsichtig
bewegen, um Verletzungen zu vermeiden.
- Ziehen Sie den Netzstecker bei Gewitter oder wenn Sie das
Gerät längere Zeit nicht benutzen wollen.
- Achtung: Um das Risiko eines Brandes oder elektrischen
Schlages zu verringern, setzen Sie das Gerät weder Regen
noch Feuchtigkeit aus.
- Vergewissern Sie sich, dass die Netzsteckdose zugänglich
ist und sich in der Nähe des Geräts bendet.
- Dieses Gerät ist nicht für den Einbau vorgesehen, es sei
denn, es ist für eine ausreichende Belüftung gesorgt oder es
werden die Anweisungen des Herstellers befolgt.
plastique hors de portée des bébés, des enfants et des
animaux domestiques.
- Fixez avec précaution le support au téléviseur. Si le support
est muni de vis, serrez-les fermement pour éviter que le
téléviseur ne bascule. Ne serrez pas trop les vis et installez
correctement les caoutchoucs du support.
- Ne jetez pas les piles au feu ou dans des matériaux dangereux
ou inammables.
- AVERTISSEMENT : n’exposez jamais les piles à une chaleur
excessive (soleil, feu, etc.). AVERTISSEMENT: vous NE DEVEZ
PAS laisser qui que ce soit, en particulier les enfants, insérer
des objets dans les trous, les fentes ou toute autre ouverture
du téléviseur.
- Un volume excessif pourrait entraîner des problèmes de
perte d’audition.
SICHERHEITSHINWEISE
Lesen Sie die folgenden Hinweise aufmerksam durch,
bevor Sie das Produkt verwenden. Bewahren Sie diese
Bedienungsanleitung zum Nachschlagen oder für neue
Benutzer auf.
- GEFAHR: GEFÄHRLICHER ELEKTRISCHER SPANNUNG. NICHT
ÖFFNEN. Um die Gefahr eines Stromschlags zu verringern,
entfernen Sie nicht die Gehäuseabdeckung und überlassen
Sie die Wartung qualiziertem Personal.
- Bei jeder Art von Störung, Panne, Inspektion oder Wartung
wenden Sie sich bitte an den technischen Kundendienst von
Cecotec.
- Beachten Sie insbesondere die mit diesem Symbol
gekennzeichneten Hinweise: wichtige Betriebsanleitung.

1918 TV 0 SERIES 0024/TV 0 SERIES 0032TV 0 SERIES 0024/TV 0 SERIES 0032
(ODER DIE RÜCKWAND). ENTHÄLT KEINE VOM BENUTZER ZU
WARTENDEN TEILE. WENDEN SIE SICH AN QUALIFIZIERTES
TECHNISCHES PERSONAL.
- Trennen Sie das Fernsehgerät bei extremen
Wetterbedingungen (Gewitter, Blitzschlag) und längerer
Nichtbenutzung (Urlaub) vom Stromnetz. Der Netzstecker
dient zum Trennen des Fernsehgerätes vom Stromnetz und
muss daher immer zugänglich sein. Wenn das Fernsehgerät
nicht vom Netz getrennt ist, verbraucht das Gerät in allen
Situationen Strom, auch wenn es sich im Standby-Modus
bendet oder ausgeschaltet ist.
- WARNUNG: Dieses Gerät ist für die Verwendung durch
Personen (einschließlich Kinder) bestimmt, die in der Lage
sind, ein solches Gerät ohne Aufsicht zu bedienen, es sei denn,
sie wurden von einer für ihre Sicherheit verantwortlichen
Person beaufsichtigt oder in die Benutzung des Geräts
eingewiesen.
- Verwenden Sie dieses Fernsehgerät in einer Höhe von
weniger als 5000 Metern über dem Meeresspiegel, an
trockenen Orten und in Regionen mit gemäßigtem oder
tropischem Klima. Das Fernsehgerät ist für den Gebrauch zu
Hause und in ähnlichen Räumen bestimmt.
- Um die Belüftung zu erleichtern, sollten Sie um das
Fernsehgerät herum mindestens 5 cm Freiraum lassen.
Die Belüftung sollte nicht durch Abdecken oder Blockieren
der Lüftungsönungen mit Gegenständen wie Zeitungen,
Tischdecken, Vorhängen usw. behindert werden.
- Das Netzkabel muss leicht zugänglich sein. Stellen Sie das
Fernsehgerät oder Möbelstücke usw. nicht auf das Netzkabel
und treten Sie nicht auf das Kabel. Ein beschädigtes Kabel
kann einen Brand oder Stromschlag verursachen. Fassen
Sie das Netzkabel am Stecker an; ziehen Sie nicht am
- Setzen Sie das Gerät keinen Tropfen oder Spritzern aus und
stellen Sie keine mit Flüssigkeiten gefüllten Gegenstände (z.
B. Vasen) auf das Gerät.
- Stellen Sie keine Gegenstände auf das Gerät, die eine
Gefahr darstellen könnten (z. B. mit Flüssigkeiten gefüllte
Gegenstände, brennende Kerzen usw.).
- Wand- oder Deckenmontage - Das Gerät sollte nur gemäß
den Empfehlungen des Herstellers an der Wand oder Decke
montiert werden.
- Stellen Sie das Fernsehgerät, die Fernbedienung oder
die Batterien niemals in die Nähe von oenen Flammen
oder anderen Wärmequellen, einschließlich direkter
Sonneneinstrahlung. Um Brände zu vermeiden, halten Sie
Kerzen oder andere Feuerquellen immer vom Fernsehgerät,
der Fernbedienung und den Batterien fern.
- Der USB-Anschluss verträgt unter normalen
Betriebsbedingungen 0,5 A.
- Bewahren Sie die Wartungsanleitung zur Verwendung durch
autorisiertes Personal auf. Um die Gefahr eines elektrischen
Schlages zu vermeiden, führen Sie keine anderen als die in
der Bedienungsanleitung beschriebenen Wartungsarbeiten
durch, es sei denn, Sie sind dafür qualiziert.
- Setzen Sie den Akku nicht übermäßiger Hitze wie
Sonnenschein, Feuer oder Ähnlichem aus.
- Dieses Gerät ist ein elektrisches Gerät der Klasse II oder
doppelt isoliert. Es ist so konzipiert, dass es keinen
Schutzleiteranschluss benötigt.
- Die maximale Umgebungstemperatur für den Einsatz
beträgt 45 Grad. Die maximale Einsatzhöhe beträgt 2000
Meter.
- WARNUNG: UM DIE GEFAHR EINES STROMSCHLAGS ZU
VERRINGERN, ENTFERNEN SIE NICHT DIE ABDECKUNG

2120 TV 0 SERIES 0024/TV 0 SERIES 0032TV 0 SERIES 0024/TV 0 SERIES 0032
erlauben, Gegenstände durch Löcher, Schlitze oder andere
Önungen des Fernsehers zu stecken.
- Eine zu hohe Lautstärke in Kopfhörern kann zu Hörschäden
führen.
ISTRUZIONI DI SICUREZZA
Leggere le seguenti istruzioni prima di usare l’apparecchio.
Conservare questo manuale per consultazioni future o nuovi
utenti.
- PERICOLO: RISCHIO DI SCOSSA ELETTRICA. NON APRIRE. Per
ridurre il rischio di scosse elettriche, non cercare di smontare
il televisore per conto proprio o aprirlo con la forza; adare
la manutenzione a personale qualicato.
- Per qualsiasi tipo di incidente, guasto, ispezione o
manutenzione, contattare il Servizio di Assistenza Tecnica di
Cecotec.
- Prestare particolare attenzione alle informazioni
contrassegnate da questo simbolo: istruzioni importanti
per l’uso.
- Attenzione: prestare particolare attenzione alle
informazioni contrassegnate da questo simbolo: pericolo di
scosse elettriche.
- Non utilizzare l’apparecchio in prossimità dell’acqua.
- Pulire l’apparecchio solo con un panno asciutto.
- Non ostruire le aperture di ventilazione dell’apparecchio.
Installarlo seguendo le istruzioni del produttore.
- Non installarlo in prossimità di fonti di calore come
termosifoni, fornelli o altri apparecchi che producono calore.
- Non manomettere il sistema di protezione della spina
polarizzata/con messa a terra dell’apparecchio. Una spina
Netzkabel, um den Netzstecker zu ziehen. Berühren Sie
das Kabel niemals mit nassen Händen, da dies zu einem
Kurzschluss oder Stromschlag führen kann. Knoten Sie das
Kabel nicht und spleißen Sie es nicht mit anderen Kabeln.
Wenn Sie beschädigt ist, müssen Sie ersetzt werden, was
nur von einem Fachmann durchgeführt werden kann. Wenn
das Kabel oder ein anderer Teil des Geräts beschädigt ist,
wenden Sie sich an den Technischen Support von Cecotec.
- Setzen Sie das Fernsehgerät keinen tropfenden oder
spritzenden Flüssigkeiten aus und stellen Sie keine
Gegenstände, die Flüssigkeiten enthalten, wie z. B. Vasen,
Tassen usw., oder andere Gegenstände auf das Fernsehgerät
(z. B. auf Regale über dem Fernsehgerät). Setzen Sie das
Fernsehgerät nicht direktem Sonnenlicht oder oenen
Flammen, wie z. B. brennenden Kerzen, auf oder in der Nähe
des Fernsehgeräts aus. Stellen Sie keine Wärmequellen
wie elektrische Heizungen, Heizkörper usw. in der Nähe des
Fernsehgeräts auf. Stellen Sie das Fernsehgerät nicht auf
den Boden oder auf schräge Flächen.
- Um die Gefahr des Verschluckens zu vermeiden, sollten Sie
Plastiktüten außerhalb der Reichweite von Babys, Kindern
und Haustieren aufbewahren.
- Bringen Sie die Halterung vorsichtig am Fernsehgerät an.
Wenn die Halterung mit Schrauben befestigt ist, ziehen Sie
die Schrauben fest an, damit das Fernsehgerät nicht kippt.
Ziehen Sie die Schrauben nicht zu fest an und montieren Sie
die Halterungsgummis richtig.
- Entsorgen Sie die Batterien nicht im Feuer oder mit
gefährlichen oder brennbaren Materialien.
- WARNUNG: Setzen Sie die Batterien niemals übermäßiger
Hitze wie Sonnenlicht, Feuer oder Ähnlichem aus. WICHTIGER
HINWEIS! Sie DÜRFEN NIEMANDEM, insbesondere Kindern,

2322 TV 0 SERIES 0024/TV 0 SERIES 0032TV 0 SERIES 0024/TV 0 SERIES 0032
candele o altre fonti di fuoco lontano dal televisore, dal
telecomando e dalle pile.
- Il terminale USB accetta 0,5 A in condizioni di funzionamento
normali.
- Conservare le istruzioni di manutenzione per l’uso da parte
di personale autorizzato. Per ridurre il rischio di scosse
elettriche, non eseguire interventi di manutenzione diversi
da quelli contenuti nel presente manuale di istruzioni, a
meno che non si sia qualicati per farlo.
- Non esporre la batteria a fonti di calore eccessive, quali sole,
fuoco o simili.
- Questo prodotto è un apparecchio elettrico di classe II o a
doppio isolamento. L’apparecchio è stato progettato in modo
da non richiedere un collegamento a terra di sicurezza.
- La temperatura ambiente massima di utilizzo è di 45 gradi.
L’altitudine massima di utilizzo è di 2000 metri.
- ATTENZIONE: PER RIDURRE IL RISCHIO DI SCOSSE
ELETTRICHE, NON RIMUOVERE IL COPERCHIO (O IL
PANNELLO POSTERIORE). L’APPARECCHIO NON CONTIENE
PARTI RIPARABILI DALL’UTENTE. RIVOLGERSI A PERSONALE
TECNICO QUALIFICATO.
- In caso di condizioni meteorologiche estreme (temporali,
fulmini, ecc.) e di lunghi periodi di inattività (vacanze),
scollegare il televisore dalla corrente. La spina serve a
scollegare il televisore dalla rete elettrica e deve quindi
essere sempre accessibile. Se il televisore non viene
scollegato dalla corrente, continuerà a consumare energia
in modo costante, anche in modalità standby o spento.
- ATTENZIONE: questo apparecchio non è destinato all’uso da
parte di persone con capacità siche, sensoriali o mentali
limitate o mancanza di esperienza e conoscenza, a meno
che non sia stata data loro supervisione o istruzioni sull’uso
polarizzata ha due poli maschio, uno più largo dell’altro. Una
spina con messa a terra ha due poli maschio e un terzo polo
con messa a terra. Se la spina non combacia con la presa di
corrente, rivolgersi a un elettricista per la sostituzione della
presa.
- Proteggere il cavo di alimentazione da eventuali danni.
- Utilizzare solo gli accessori specicati dal produttore.
- Utilizzare l’apparecchio solo con il supporto, il tavolo, ecc.
specicato dal produttore o fornito con l’apparecchio stesso.
Se si utilizza un tavolo su ruote, prestare attenzione quando
lo si sposta per evitare lesioni.
- Scollegare l’apparecchio durante temporali o se non lo si
utilizzerà per un periodo prolungato di tempo.
- Attenzione: per ridurre il rischio di incendio o di scosse
elettriche, non esporre l’apparecchio alla pioggia o
all’umidità.
- Assicurarsi che la presa di corrente sia accessibile e vicina
all’apparecchio.
- Questo apparecchio non è destinato all’installazione
a incasso, a meno che non si provveda a un’adeguata
ventilazione o si seguano le istruzioni del produttore.
- Non esporre l’apparecchio a gocce o spruzzi e non appoggiare
sull’apparecchio oggetti pieni di liquidi (ad es. vasi).
- Non collocare oggetti che possano costituire un pericolo se
appoggiati sull’apparecchio (ad es. oggetti pieni di liquido,
candele accese, ecc.).
- Montaggio a parete o a sotto: eettuare il montaggio
a parete o a sotto dell’apparecchio seguendo solo le
raccomandazioni del produttore.
- Non collocare mai il televisore, il telecomando o le pile in
prossimità di amme libere o altre fonti di calore, compresa
la luce solare diretta. Per evitare incendi, tenere sempre

2524 TV 0 SERIES 0024/TV 0 SERIES 0032TV 0 SERIES 0024/TV 0 SERIES 0032
- Fissare bene il televisore al supporto. Se il supporto è dotato
di viti, serrare saldamente le viti per evitare che il televisore
si inclini. Non serrare eccessivamente le viti e montare
correttamente i gommini del supporto.
- Non smaltire le pile nel fuoco o con materiali pericolosi o
inammabili.
- ATTENZIONE: non esporre mai le pile a calore eccessivo,
come la luce solare, il fuoco o simili. IMPORTANTE: non
permettere a NESSUNO, soprattutto ai bambini, di inserire
oggetti attraverso i fori, le fessure o le aperture del televisore.
- Usare le cue con un volume troppo eccessivo può causare
perdita dell’udito. Regolare il volume.
INSTRUÇÕES DE SEGURANÇA
Leia as seguintes instruções atentamente antes de usar o
aparelho. Guarde este manual para referências futuras ou
novos utilizadores.
- PERIGO: RISCO DE CHOQUE ELÉCTRICO NÃO ABRIR. Para
reduzir o risco de choque elétrico, não desmonte a TV por si
próprio e solicite a assistência de pessoal qualicado.
- Para qualquer tipo de incidente, avaria, inspeção ou
manutenção, contacte o Serviço de Assistência Técnica
Cecotec.
- Preste especial atenção às informações assinaladas com
este símbolo: instruções de utilização importantes.
- Advertência: preste especial atenção às informações
assinaladas com este símbolo: perigo de choque elétrico.
- Não use o aparelho perto da água.
- Limpe-o com um pano seco.
- Não bloqueie as aberturas de ventilação. Instale o aparelho
de acordo com as instruções do fabricante.
sicuro dell’apparecchio da una persona responsabile della
loro sicurezza.
- Utilizzare questo apparecchio a un’altitudine inferiore a
5000 metri sul livello del mare, in luoghi asciutti e in regioni
con clima temperato o tropicale. Il televisore è progettato
per l’uso domestico e per un uso interno simile.
- Per facilitare la ventilazione, lasciare almeno 5 cm di spazio
libero intorno al televisore. La ventilazione non deve essere
ostacolata coprendo o bloccando le aperture di ventilazione
con oggetti come giornali, tovaglie, tende, ecc.
- Il cavo di alimentazione deve essere facilmente accessibile.
Non appoggiare il televisore, i mobili, ecc. sul cavo di
alimentazione e non calpestarlo. Un cavo danneggiato
può causare incendi o scosse elettriche. Scollegare il cavo
di alimentazione tirando dalla spina; non scollegare il
televisore tirando dal cavo. Non toccare mai il cavo con le
mani bagnate per evitare cortocircuiti e scosse elettriche.
Non annodare mai il cavo né giuntarlo con altri cavi. Se
danneggiato, contattare un professionista qualicato. Se il
cavo o qualsiasi altra parte dell’apparecchio presentasse
danni, contattare il Servizio di Assistenza Tecnica di Cecotec.
- Non esporre il televisore a gocce o spruzzi di liquido e non
collocare oggetti contenenti liquidi, come vasi, tazze, ecc. o
altri oggetti sopra il televisore (ad esempio, su ripiani sopra il
televisore). Non esporre il televisore alla luce solare diretta o
a amme libere (come candele accese) vicine o soprastanti.
Non collocare fonti di calore come stufe elettriche, radiatori,
ecc. vicino al televisore. Non collocare il televisore sul
pavimento o su superci inclinate.
- Per evitare il rischio di soocamento, tenere gli elementi di
imballaggio in plastica fuori dalla portata di neonati, bambini
e animali domestici.

2726 TV 0 SERIES 0024/TV 0 SERIES 0032TV 0 SERIES 0024/TV 0 SERIES 0032
- Nunca coloque a TV, o controlo remoto ou as pilhas perto
de chamas ou outras fontes de calor, incluindo a luz solar
direta. Para evitar incêndios, mantenha sempre as velas ou
outras fontes de fogo afastadas da TV, do controlo remoto
e das pilhas.
- O terminal USB aceita 0,5 A em condições normais de
funcionamento.
- Conserve as instruções de manutenção para utilização por
pessoal autorizado. Para reduzir o risco de choque elétrico,
não efetue qualquer outra manutenção para além da contida
no manual de instruções, a menos que seja qualicado para
o fazer.
- Não exponha a bateria a calor excessivo, como a luz do sol,
o fogo ou outros.
- Este equipamento é um aparelho elétrico de classe II ou com
isolamento duplo. Foi concebido de forma a não necessitar
de uma ligação à terra de segurança.
- A temperatura ambiente máxima para utilização é de 45 ºC.
A altitude máxima de utilização é de 2000 metros.
- ATENÇÃO: PARA REDUZIR O RISCO DE CHOQUE ELÉTRICO, NÃO
RETIRE A TAMPA (O PAINEL TRASEIRO). NÃO HÁ PEÇAS QUE
PODAM SER SUBSTITUÍDAS PELO UTILIZADOR. CONTACTE
COM PESSOAL TÉCNICO QUALIFICADO.
- Em caso de condições meteorológicas extremas
(tempestades, relâmpagos) e de longos períodos de
inatividade (férias), desligue a TV da rede elétrica. A cha de
alimentação é utilizada para desligar a TV da rede elétrica e
deve, por isso, estar sempre acessível. Se a TV não estiver
desligada da rede elétrica, o aparelho continuará a consumir
energia em todas as situações, mesmo que esteja em modo
Standby ou desligado.
- AVISO: este aparelho destina-se a ser utilizado por pessoas
- Não o instale perto de fontes de calor, como radiadores,
fogões ou outros aparelhos que produzam calor.
- Não manipule o sistema de proteção da cha polarizada/
terminal do aparelho. Uma cha polarizada tem dois pinos,
um mais largo do que o outro. Uma tomada com ligação à
terra tem duas chas e uma terceira tomada com ligação
à terra. Se a cha não encaixar na tomada, consulte um
eletricista para substituir a tomada.
- Proteja o cabo de alimentação contra danos.
- Utilize apenas acessórios especicados pelo fabricante.
- Utilize apenas com o suporte, mesa, etc., especicado
pelo fabricante ou vendido com o aparelho. Se utilizar uma
mesa com rodízios, tenha cuidado ao deslocá-la para evitar
ferimentos.
- Desligue o aparelho da tomada durante trovoadas ou se não
tencionar utilizá-lo durante longos períodos de tempo.
- Atenção: para reduzir o risco de incêndio ou choque elétrico,
não exponha o aparelho à chuva ou à humidade.
- Certique-se de que a tomada de corrente está acessível e
próxima do aparelho.
- Este aparelho não se destina a ser instalado em espaços
interiores, exceto se for assegurada uma ventilação
adequada ou se forem seguidas as instruções do fabricante.
- Não exponha o aparelho a pingos ou salpicos e não coloque
objetos cheios de líquidos (por exemplo, vasos) sobre o
aparelho.
- Não coloque objetos que possam constituir um perigo em
cima do aparelho (por exemplo, objetos cheios de líquidos,
velas acesas, etc.).
- Montagem na parede ou no teto - O aparelho só deve
ser montado na parede ou no teto de acordo com as
recomendações do fabricante.

2928 TV 0 SERIES 0024/TV 0 SERIES 0032TV 0 SERIES 0024/TV 0 SERIES 0032
- Para evitar o risco de asxia, mantenha os sacos de plástico
fora do alcance de bebés, crianças e animais de estimação.
- Fixe cuidadosamente o suporte à TV. Se o suporte estiver
equipado com parafusos, aperte-os rmemente para evitar
que a TV se incline. Não aperte demasiado os parafusos e
monte corretamente as borrachas do suporte.
- Não deite as pilhas no fogo ou com materiais perigosos ou
inamáveis.
- AVISO: nunca exponha as pilhas a calor excessivo,
como a luz solar, o fogo ou outros fatores semelhantes.
MUITO IMPORTANTE: NÃO DEVE permitir que ninguém,
especialmente crianças, insira quaisquer objetos através de
orifícios, ranhuras ou quaisquer aberturas da TV.
- Um volume excessivo pode causar problemas de perda de
audição.
VEILIGHEIDSINSTRUCTIES
Lees de volgende instructies aandachtig voordat u het product
gebruikt. Bewaar deze handleiding voor toekomstig(e) gebruik
of gebruikers.
- GEVAAR: RISICO OP ELEKTRISCHE SCHOKKEN. NIET OPENEN.
Om het risico van elektrische schokken te beperken, mag
het deksel van de behuizing niet worden verwijderd en
moet onderhoud worden uitgevoerd door gekwaliceerd
personeel.
- Neem voor elk soort incident, storing, inspectie of onderhoud
contact op met de technische hulpdienst van Cecotec.
- Let vooral op de met dit symbool gemarkeerde informatie:
belangrijke gebruiksaanwijzingen.
- Waarschuwing: Let vooral op de met dit symbool
(incluindo crianças) capazes/experientes na utilização de
um aparelho deste tipo sem supervisão, exceto se tiverem
recebido supervisão ou instruções relativas à utilização do
aparelho por uma pessoa responsável pela sua segurança.
- Utilize este televisor a uma altitude inferior a 5000 metros
acima do nível do mar, em locais secos e em regiões com
climas temperados ou tropicais. A TV foi concebida para
utilização doméstica e semelhante em interiores.
- Para facilitar a ventilação, deixe pelo menos 5 cm de espaço
livre à volta da TV. A ventilação não deve ser impedida
cobrindo ou bloqueando as aberturas de ventilação com
objetos como jornais, toalhas de mesa, cortinas, etc.
- O cabo de alimentação deve ser facilmente acessível.
Não coloque a TV ou qualquer móvel, etc., sobre o cabo
de alimentação nem pise nele. Um cabo danicado pode
provocar um incêndio ou choque elétrico. Segure o cabo
de alimentação pela cha; não desligue a TV puxando pelo
cabo de alimentação. Nunca toque no cabo com as mãos
molhadas, pois isso pode provocar um curto-circuito ou
um choque elétrico. Nunca faça nós no cabo nem o junte a
outros cabos. Deve ser substituído quando danicado, e só
um prossional o pode fazer. Se o cabo ou qualquer outra
parte do dispositivo estiver danicada, entre em contacto
com o Serviço de Assistência Técnica da Cecotec.
- Não exponha a TV a pingos e salpicos de líquidos e não
coloque objetos que contenham líquidos, como vasos,
chávenas, etc., ou outros objetos em cima da TV (por
exemplo, em prateleiras por cima da TV). Não exponha a TV
à luz solar direta nem a chamas abertas, como velas acesas
em cima ou perto da TV. Não coloque fontes de calor, como
aquecedores elétricos, radiadores, etc., perto da TV. Não
coloque a TV no chão ou em superfícies inclinadas.

3130 TV 0 SERIES 0024/TV 0 SERIES 0032TV 0 SERIES 0024/TV 0 SERIES 0032
- Plaats geen voorwerpen die gevaar kunnen opleveren op
het apparaat (bijv. voorwerpen gevuld met vloeistoen,
brandende kaarsen, enz.)
- Wand- of plafondmontage - Het apparaat mag alleen
volgens de aanbevelingen van de fabrikant aan de wand of
het plafond worden gemonteerd.
- Plaats de TV, afstandsbediening of batterijen nooit in de
buurt van open vuur of andere warmtebronnen, inclusief
direct zonlicht. Houd kaarsen of andere vuurbronnen altijd
uit de buurt van de TV, de afstandsbediening en de batterijen
om brand te voorkomen.
- De USB-aansluiting accepteert 0,5 A onder normale
bedrijfsomstandigheden.
- Bewaar de onderhoudsinstructies voor gebruik door
bevoegd personeel. Om het risico van elektrische schokken
te verminderen, mag u geen ander onderhoud uitvoeren dan
dat wat in de handleiding staat, tenzij u daartoe bevoegd
bent.
- Stel de batterij niet bloot aan overmatige hitte zoals zonlicht,
vuur en dergelijke.
- Dit apparaat is een elektrisch apparaat van klasse II
of dubbel geïsoleerd. Het is zo ontworpen dat er geen
veiligheidsaarding nodig is.
- De maximale omgevingstemperatuur voor gebruik is 45
graden. De maximale gebruikshoogte is 2000 meter.
- PAS OP: VERWIJDER DE AFDEKKING (OF ACHTERPANEEL) NIET
OM HET RISICO VAN ELEKTRISCHE SCHOKKEN TE BEPERKEN.
BEVAT GEEN ONDERDELEN DIE DOOR DE GEBRUIKER
KUNNEN WORDEN ONDERHOUDEN. NEEM CONTACT OP MET
GEKWALIFICEERD TECHNISCH PERSONEEL.
- Bij extreem weer (storm, bliksem) en lange perioden van
inactiviteit (op vakantie gaan) dient u de TV van het lichtnet
gemarkeerde informatie: gevaar voor elektrische schokken.
- Gebruik dit apparaat niet in de buurt van water.
- Veeg het alleen af met een droge doek.
- Blokkeer geen ventilatieopeningen. Installeer het apparaat
volgens de instructies van de fabrikant.
- Niet installeren in de buurt van warmtebronnen zoals
radiatoren, fornuizen of andere warmteproducerende
apparaten.
- Knoei niet met het beschermingssysteem van de
gepolariseerde/geaarde stekker van het apparaat. Een
gepolariseerde stekker heeft twee pinnen, de ene breder
dan de andere. Een geaard stopcontact heeft twee stekkers
en een derde geaard stopcontact. Als de stekker niet in uw
stopcontact past, raadpleeg dan een elektricien om het
stopcontact te vervangen.
- Bescherm het netsnoer tegen beschadiging.
- Gebruik alleen door de fabrikant gespeciceerde accessoires.
- Gebruik alleen de standaard, tafel, enz. die door de fabrikant
is gespeciceerd of bij het apparaat is verkocht. Als u een
tafel op wieltjes gebruikt, wees dan voorzichtig bij het
verplaatsen om letsel te voorkomen.
- Haal de stekker uit het stopcontact bij onweer of als u het
apparaat langere tijd niet gebruikt.
- Let op: stel het apparaat niet bloot aan regen of vocht om
het risico van brand of elektrische schokken te beperken.
- Zorg ervoor dat het stopcontact toegankelijk is en zich dicht
bij het apparaat bevindt.
- Dit apparaat is niet bestemd voor inbouw, tenzij er voor
voldoende ventilatie wordt gezorgd of de instructies van de
fabrikant worden opgevolgd.
- Stel het apparaat niet bloot aan druipende of spattende
vloeistoen en plaats geen met vloeistof gevulde
voorwerpen (bijv. vazen) op het apparaat.

3332 TV 0 SERIES 0024/TV 0 SERIES 0032TV 0 SERIES 0024/TV 0 SERIES 0032
vazen, kopjes, enz. of andere voorwerpen boven op de TV
(bv. op planken boven de TV). Stel de TV niet bloot aan direct
zonlicht of open vuur, zoals brandende kaarsen op of bij de
TV. Plaats geen warmtebronnen zoals elektrische kachels,
radiatoren, enz. in de buurt van de TV. Plaats de TV niet op de
vloer of op hellende vlakken.
- Houd plastic zakken buiten het bereik van baby’s, kinderen
en huisdieren om verstikkingsgevaar te voorkomen.
- Bevestig de beugel voorzichtig aan de TV. Als de beugel
voorzien is van schroeven, draai de schroeven dan stevig
vast om te voorkomen dat de TV kantelt. Draai de schroeven
niet te strak aan en monteer de beugelrubbers op de juiste
wijze.
- Gooi batterijen niet in het vuur of bij gevaarlijke of
ontvlambare materialen.
- WAARSCHUWING: Stel batterijen nooit bloot aan overmatige
hitte zoals zonlicht, vuur en dergelijke. Waarschuwing:
Laat niemand, vooral kinderen, voorwerpen door de gaten,
sleuven of andere openingen in de TV te steken.
- Een te hoog volume in een hoofdtelefoon kan leiden tot
gehoorverlies.
INSTRUKCJE BEZPIECZEŃSTWA
Przed użyciem produktu należy uważnie przeczytać poniższe
instrukcje. Zachowaj tę instrukcję do wykorzystania w
przyszłości lub dla nowych użytkowników.
- ZAGROŻENIE: RYZYKO WYŁĄDOWANIA ELEKTRYCZNEGO.
NIE OTWIERAĆ. Aby zmniejszyć ryzyko porażenia prądem
elektrycznym, nie zdejmuj pokrywy obudowy i zleć naprawę
wykwalikowanemu personelowi.
los te koppelen. De netstekker wordt gebruikt om de TV los
te koppelen van de stroomvoorziening en moet daarom
altijd bereikbaar zijn. Als de TV niet van het lichtnet is
losgekoppeld, verbruikt het apparaat in alle situaties toch
stroom, zelfs als de TV in stand-by staat of is uitgeschakeld.
- WAARSCHUWING: Dit apparaat is bedoeld voor gebruik
door personen (inclusief kinderen) die in staat zijn/ervaring
hebben met het bedienen van een dergelijk apparaat zonder
toezicht, tenzij zij onder toezicht staan of instructies hebben
gekregen over het gebruik van het apparaat van een persoon
die verantwoordelijk is voor hun veiligheid.
- Gebruik deze TV op een hoogte van minder dan 5000 meter
boven zeeniveau, op droge locaties en in regio’s met een
gematigd of tropisch klimaat. De TV is ontworpen voor
huishoudelijk en soortgelijk gebruik binnenshuis.
- Laat ten minste 5 cm vrije ruimte rond de TV om de ventilatie te
vergemakkelijken. De ventilatie mag niet worden belemmerd
door het afdekken of blokkeren van ventilatieopeningen met
voorwerpen zoals kranten, tafelkleden, gordijnen, enz.
- De voedingskabel moet gemakkelijk toegankelijk zijn. Plaats
de TV of meubels e.d. niet op de kabel en stap er niet op.
Een beschadigd snoer kan brand of een elektrische schok
veroorzaken. Pak de kabel vast bij de stekker; trek de TV niet
los door aan de stekker te trekken. Raak de kabel nooit met
natte handen aan, omdat dit kortsluiting of een elektrische
schok kan veroorzaken. De kabel nooit knopen of splitsen
met andere kabels. Het moet worden vervangen wanneer
het beschadigd is, en alleen een vakman kan dit doen. Als de
kabel of een ander onderdeel van het apparaat beschadigd
is, neem dan contact op met de Klantenservice van Cecotec.
- Stel de TV niet bloot aan druipende of spattende vloeistoen
en plaats geen voorwerpen die vloeistoen bevatten, zoals

3534 TV 0 SERIES 0024/TV 0 SERIES 0032TV 0 SERIES 0024/TV 0 SERIES 0032
- Upewnij się, że gniazdko sieciowe jest dostępne i znajduje
się blisko urządzenia.
- To urządzenie nie jest przeznaczone do zabudowy, chyba że
zapewniona jest odpowiednia wentylacja lub przestrzegane
są instrukcje producenta.
- Nie narażaj urządzenia na kapanie lub zachlapanie i nie
stawiaj na urządzeniu przedmiotów wypełnionych płynami
(takich jak wazony).
- Nie umieszczaj na urządzeniu żadnych przedmiotów, które
mogłyby stanowić zagrożenie (na przykład przedmiotów
wypełnionych płynem, zapalonych świec itp.).
- Montaż na ścianie lub sucie - Urządzenie należy montować
na ścianie lub sucie wyłącznie zgodnie z zaleceniami
producenta.
- Nigdy nie umieszczaj telewizora, pilota ani baterii w
pobliżu otwartego ognia lub innych źródeł ciepła, w tym
bezpośredniego światła słonecznego. Aby zapobiec
pożarowi, zawsze trzymaj świece lub inne źródła ognia z
dala od telewizora, pilota i baterii.
- Terminal USB przyjmuje prąd 0,5 A w normalnych warunkach
pracy.
- Zachowaj instrukcje konserwacji do użytku przez
upoważniony personel. Aby zmniejszyć ryzyko porażenia
prądem, nie wykonuj żadnych czynności konserwacyjnych
innych niż opisane w instrukcji obsługi, chyba że masz do
tego kwalikacje.
- Nie wystawiaj baterii na działanie nadmiernych źródeł
ciepła, takich jak światło słoneczne, ogień itp.
- To urządzenie jest urządzeniem elektrycznym klasy II lub
podwójnie izolowanym. Został zaprojektowany w taki
sposób, że nie wymaga bezpiecznego podłączenia do
uziemienia.
- W przypadku jakiegokolwiek wypadku, awarii, przeglądu lub
konserwacji należy skontaktować się z Serwisem Pomocy
Technicznej Cecotec.
- Zwróć szczególną uwagę na informacje oznaczone tym
symbolem: ważne wskazówki dotyczące użytkowania/
obsługi.
- Ostrzeżenie: zwróć szczególną uwagę na informacje
oznaczone tym symbolem: niebezpieczeństwo porażenia
prądem.
- Nie używać tego urządzenia w pobliżu źródeł wody.
- Czyścić tylko suchą ściereczką.
- Nie blokować żadnych otworów wentylacyjnych. Zainstaluj
urządzenie zgodnie z instrukcjami producenta.
- Nie instaluj w pobliżu źródeł ciepła, takich jak kaloryfery,
piece lub inne urządzenia wytwarzające ciepło.
- Nie manipuluj przy zabezpieczeniu spolaryzowanej/
uziemionej wtyczki urządzenia. Spolaryzowana wtyczka ma
dwa bolce, z których jeden jest szerszy od drugiego. Wtyczka
z uziemieniem ma dwa bolce i trzeci bolec z uziemieniem.
Jeśli wtyczka nie pasuje do gniazdka, skonsultuj się z
elektrykiem w celu wymiany gniazdka.
- Chroń przewód zasilający, aby zapobiec jego uszkodzeniu.
- Używaj tylko akcesoriów określonych przez producenta.
- Używaj tylko ze stojakiem, stołem itp. określony przez
producenta lub sprzedawany z aparatem. Jeśli używasz
stołu z kółkami, zachowaj ostrożność podczas przenoszenia,
aby uniknąć obrażeń.
- Odłączaj to urządzenie podczas burzy z piorunami lub gdy
nie planujesz go używać przez dłuższy czas.
- Uwaga: w celu zmniejszenia ryzyka podpaleniem lub
wyładowaniem elektrycznym, nie wystawiaj urządzenia na
deszcz lub względną wilgoć.

3736 TV 0 SERIES 0024/TV 0 SERIES 0032TV 0 SERIES 0024/TV 0 SERIES 0032
- Przewód zasilający musi być łatwo dostępny. Nie
stawiaj telewizora ani żadnych mebli itp. na przewodzie
zasilającym ani nie stawaj na nim. Uszkodzony przewód
może spowodować pożar lub porażenie prądem. Chwyć
przewód zasilający za wtyczkę; nie odłączaj telewizora,
ciągnąc za przewód zasilający. Nigdy nie dotykaj kabla
mokrymi rękami, ponieważ może to spowodować zwarcie
lub porażenie prądem. Nigdy nie zawiązuj węzła na kablu
ani nie łącz go z innymi kablami. Musisz go wymienić, gdy
jest uszkodzony, będąc tylko profesjonalistą, który może
to zrobić. W przypadku uszkodzenia kabla lub jakiejkolwiek
innej części urządzenia należy skontaktować się z Serwisem
Pomocy Technicznej Cecotec.
- Nie narażaj telewizora na działanie kapiących i pryskających
płynów oraz nie umieszczaj na telewizorze przedmiotów
wypełnionych płynami, takich jak wazony z kwiatami,
liżanki itp. (np. na półkach nad telewizorem). Nie wystawiaj
telewizora na bezpośrednie działanie promieni słonecznych
ani otwartego ognia, takiego jak palące się świece na
telewizorze lub w jego pobliżu. Nie umieszczaj żadnych
źródeł ciepła, takich jak grzejniki elektryczne, kaloryfery itp.
w pobliżu telewizora. Nie ustawiaj telewizora na podłodze
ani na pochyłych powierzchniach.
- Aby uniknąć ryzyka uduszenia, plastikowe torby należy
przechowywać poza zasięgiem niemowląt, dzieci i zwierząt
domowych.
- Ostrożnie przymocuj podstawę do telewizora. Jeśli
podstawa jest wyposażona w śruby, dokręć je mocno, aby
zapobiec przechylaniu się telewizora. Nie dokręcaj śrub zbyt
mocno i prawidłowo zamontuj gumki wspornika.
- Nie wrzucaj baterii do ognia ani razem z niebezpiecznymi
lub łatwopalnymi materiałami.
- Maksymalna temperatura otoczenia podczas użytkowania
wynosi 45 stopni. Maksymalna wysokość użytkowania
wynosi 2000 metrów.
- UWAGA: ABY ZMNIEJSZYĆ RYZYKO PORAŻENIA PRĄDEM
NIE NALEŻY USUWAĆ POKRYWY (ANI TYŁU). NIE ZAWIERA
CZĘŚCI, KTÓRE MOGĄ BYĆ WYMIANY PRZEZ UŻYTKOWNIKA.
SKONTAKTUJ SIĘ Z WYKWALIFIKOWANYM PERSONELEM
TECHNICZNYM.
- W przypadku ekstremalnych warunków pogodowych
(burze, wyładowania atmosferyczne) oraz długich okresów
bezczynności (wyjazdy na wakacje) należy odłączyć
telewizor od sieci elektrycznej. Wtyczka sieciowa służy do
odłączania telewizora od prądu i dlatego musi być zawsze
dostępna. Jeśli telewizor nie zostanie odłączony od zasilania,
urządzenie nadal będzie pobierać energię we wszystkich
sytuacjach, nawet jeśli telewizor jest w trybie gotowości lub
jest wyłączony.
- OSTRZEŻENIE: To urządzenie jest przeznaczone do użytku
przez osoby (w tym dzieci) posiadające umiejętność/
doświadczenie w obsłudze takiego urządzenia bez
nadzoru, chyba że będą one nadzorowane lub zostaną
poinstruowane w zakresie użytkowania urządzenia przez
osobę odpowiedzialną za Twoje bezpieczeństwo.
- Proszę używać tego telewizora na wysokości mniejszej niż
5000 metrów nad poziomem morza, w suchych miejscach
oraz w regionach o klimacie umiarkowanym lub tropikalnym.
Telewizor jest przeznaczony do użytku domowego i
podobnych pomieszczeń.
- Aby ułatwić wentylację, należy pozostawić co najmniej 5 cm
wolnej przestrzeni wokół telewizora. Nie należy utrudniać
wentylacji przez zasłanianie lub blokowanie otworów
wentylacyjnych przedmiotami takimi jak gazety, obrusy,
zasłony itp.

3938 TV 0 SERIES 0024/TV 0 SERIES 0032TV 0 SERIES 0024/TV 0 SERIES 0032
- Nemanipulujte s ochranou polarizované/uzemňovací
zástrčky na spotřebiči. Polarizovaná zástrčka má dvě čepele,
přičemž jedna je širší než druhá. Uzemněná zástrčka má dva
kolíky a třetí uzemněný kolík. Pokud zástrčka nepasuje do
vaší zásuvky, poraďte se s elektrikářem, aby vám zásuvku
vyměnil.
- Chraňte napájecí kabel, aby nedošlo k jeho poškození.
- Používejte pouze příslušenství specikované výrobcem.
- Používejte pouze se stojanem, stolem atd. specikované
výrobcem nebo prodávané s přístrojem. Pokud používáte
stůl s kolečky, buďte při jeho přemisťování opatrní, abyste
se nezranili.
- Odpojte toto zařízení během bouřky nebo když jej neplánujete
delší dobu používat.
- Upozornění: Abyste snížili riziko požáru nebo úrazu
elektrickým proudem, nevystavujte zařízení dešti ani
vlhkosti.
- Ujistěte se, že síťová zásuvka je přístupná a blízko spotřebiče.
- Tento přístroj není určen k vestavěné instalaci, pokud není
zajištěno dostatečné větrání nebo nejsou dodržovány
pokyny výrobce.
- Nevystavujte přístroj kapající nebo stříkající vodě a
nepokládejte na přístroj předměty naplněné tekutinami
(jako jsou vázy).
- Nepokládejte na spotřebič žádné předměty, které by mohly
představovat nebezpečí (například předměty naplněné
tekutinou, zapálené svíčky atd.).
- Montáž na stěnu nebo strop - Spotřebič by měl být
namontován na stěnu nebo strop pouze v souladu s
doporučeními výrobce.
- Nikdy neumisťujte televizor, dálkový ovladač nebo baterie
do blízkosti otevřeného ohně nebo jiných zdrojů tepla,
- OSTRZEŻENIE: Nigdy nie wystawiaj baterii na działanie
nadmiernych źródeł ciepła, takich jak światło słoneczne,
ogień itp. BARDZO WAŻNE: NIE WOLNO pozwalać nikomu,
a zwłaszcza dzieciom, na wkładanie jakichkolwiek
przedmiotów do otworów, gniazd lub innych otworów w
telewizorze.
- Nadmierna głośność w słuchawkach może spowodować
problemy z utratą słuchu.
BEZPEČNOSTNÍ POKYNY
Před použitím přístroje si pozorně přečtěte následující
bezpečnostní pokyny. Uschovejte tento návod pro budoucí
použití nebo pro nové uživatele.
- NEBEZPEČÍ: NEBEZPEČÍ ÚRAZU ELEKTRICKÝM PROUDEM.
NEOTVÍRAT. Abyste snížili riziko úrazu elektrickým proudem,
neodstraňujte kryt skříně a svěřte servis kvalikovanému
personálu.
- V případě jakéhokoli typu incidentu, poruchy, revize nebo
údržby kontaktujte technickou asistenční službu Cecotec.
- Věnujte zvláštní pozornost informacím označeným tímto
symbolem: důležité pokyny k použití/provozu.
- Upozornění: věnujte zvláštní pozornost informacím
označeným tímto symbolem: nebezpečí úrazu elektrickým
proudem.
- Nepoužívejte toto zařízení v blízkosti vody.
- Čistěte jej pouze suchým hadříkem.
- Neblokujte žádné ventilační otvory. Nainstalujte spotřebič v
souladu s pokyny výrobce.
- Neinstalujte v blízkosti zdrojů tepla, jako jsou radiátory,
kamna nebo jiná zařízení produkující teplo.

4140 TV 0 SERIES 0024/TV 0 SERIES 0032TV 0 SERIES 0024/TV 0 SERIES 0032
- Používejte tento televizor v nadmořské výšce nižší než 5
000 metrů nad mořem, na suchých místech a v oblastech
s mírným nebo tropickým podnebím. Televizor je určen pro
domácí a podobné vnitřní použití.
- Pro usnadnění ventilace ponechejte kolem televizoru
alespoň 5 cm volného prostoru. Větrání by nemělo být
bráněno zakrýváním nebo blokováním větracích otvorů
předměty, jako jsou noviny, ubrusy, závěsy atd.
- Napájecí kabel musí být snadno přístupný. Nepokládejte
televizor ani žádný nábytek atd. na napájecí kabel ani na
něj nestoupejte. Poškozený kabel může způsobit požár
nebo úraz elektrickým proudem. Uchopte napájecí kabel za
zástrčku; neodpojujte televizor taháním za napájecí kabel.
Nikdy se nedotýkejte kabelu mokrýma rukama, mohlo by
dojít ke zkratu nebo k úrazu elektrickým proudem. Nikdy
na kabelu neuvazujte uzel ani jej nespojujte s jinými kabely.
Když je poškozen, musíte jej vyměnit, protože to může udělat
pouze profesionál. Pokud je kabel nebo jakákoli jiná část
zařízení poškozena, kontaktujte servisní středisko Cecotec.
- Nevystavujte televizor kapajícím a stříkajícím tekutinám a
nepokládejte na televizor předměty naplněné tekutinami,
jako jsou vázy s květinami, šálky atd., ani jiné předměty (např.
na police nad televizorem). Nevystavujte televizor přímému
slunečnímu záření nebo otevřenému ohni, jako jsou hořící
svíčky na televizoru nebo v jeho blízkosti. Nepokládejte
žádné zdroje tepla, jako jsou elektrická topidla, radiátory
atd. v blízkosti televizoru. Nepokládejte televizor na podlahu
nebo na nakloněný povrch.
- Abyste předešli nebezpečí udušení, uchovávejte plastové
sáčky mimo dosah kojenců, dětí a domácích zvířat.
- Opatrně připevněte stojan k televizoru. Pokud je stojan
opatřen šrouby, pevně je utáhněte, aby se televizor
včetně přímého slunečního záření. Abyste předešli požáru,
vždy udržujte svíčky nebo jiné zdroje ohně v dostatečné
vzdálenosti od televizoru, dálkového ovladače a baterií.
- Konektor USB přijímá 0,5 A za normálních provozních
podmínek.
- Návod na údržbu uschovejte pro použití oprávněným
personálem. Abyste snížili riziko úrazu elektrickým proudem,
neprovádějte žádnou jinou údržbu než ty, které jsou uvedeny
v návodu k použití, pokud k tomu nemáte kvalikaci.
- Nevystavujte baterii nadměrným zdrojům tepla, jako je
sluneční záření, oheň a podobně.
- Toto zařízení je elektrický spotřebič třídy II nebo s dvojitou
izolací. Byl navržen tak, aby nevyžadoval bezpečnostní
spojení se zemí.
- Maximální okolní teplota pro použití je 45 stupňů. Maximální
nadmořská výška použití je 2000 metrů.
- UPOZORNĚNÍ: ABYSTE SNÍŽILI RIZIKO ÚRAZU ELEKTRICKÝM
PROUDEM, NEODSTRAŇUJTE KRYT (NEBO ZADNÍ ČÁST).
NEOBSAHUJE DÍLY, KTERÉ MŮŽE UŽIVATEL VYMĚNIT.
KONTAKTUJTE KVALIFIKOVANÉHO TECHNICKÉHO
PERSONÁLU.
- V extrémním počasí (bouřky, blesky) a dlouhé době nečinnosti
(cesta na dovolenou) odpojte televizor od elektrické sítě.
Síťová zástrčka slouží k odpojení televizoru od elektřiny, a
proto musí být vždy přístupná. Pokud televizor není odpojen
od sítě, zařízení bude stále spotřebovávat energii ve všech
situacích, i když je televizor v pohotovostním režimu nebo je
vypnutý.
- VAROVÁNÍ: Toto zařízení je určeno pro použití osobami
(včetně dětí) se schopnostmi/zkušenostmi s ovládáním
takového zařízení bez dozoru, pokud jim nebyl poskytnut
dohled nebo nebyly poučeny o používání zařízení osobou
odpovědnou za vaši bezpečnost.

42 TV 0 SERIES 0024/TV 0 SERIES 0032TV 0 SERIES 0024/TV 0 SERIES 0032 43
ESPAÑOL
1. ANTES DE USAR
- Este aparato presenta un embalaje diseñado para protegerlo durante su transporte. Saque
el aparato de su caja y retire todo el material de embalaje. Puede guardar la caja original
y otros elementos del embalaje en un lugar seguro para prevenir daños en el aparato si
necesita transportarlo en el futuro. Si desea deshacerse del embalaje original, asegúrese
de reciclar todos los elementos correctamente.
- Asegúrese de que todas las piezas y componentes están incluidos y en buen estado. Si
faltara alguno o no estuviera en buen estado, contacte de forma inmediata con el Servicio
de Atención Técnica ocial de Cecotec.
Contenido de la caja:
- Televisor
- Mando a distancia
- 2 pilas AA
- Este manual de instrucciones
Nota:
Los grácos de este manual son representaciones esquemáticas y pueden no coincidir
exactamente con el producto.
2. INSTALACIÓN
Montaje del soporte
Para jar el televisor a la pared:
Fig. 1
1. Primero, coloque el televisor sobre la mesa, y ponga un paño suave sobre la mesa para
evitar arañazos en la pantalla.
2. Utilice el destornillador para quitar los tornillos que están jados al soporte inferior (como
se muestra en la gura 1); a continuación, quite el soporte inferior (quite los tornillos y el
soporte inferior con cuidado).
3. Escoja un soporte que pueda jarse a la pared de acuerdo con las medidas del televisor
como mostrado en las guras 2 y 3.
4. Taladre cuatro agujeros en la pared y coloque cuatro tornillos.
5. Utilice el destornillador para jar el tornillo de la parte posterior del televisor. A
continuación, cuelgue el televisor en la pared.
nepřevrátil. Šrouby příliš neutahujte a správně namontujte
gumy držáku.
- Nevhazujte baterie do ohně nebo s nebezpečnými nebo
hořlavými materiály.
- VAROVÁNÍ: Nikdy nevystavujte baterie nadměrným zdrojům
tepla, jako je sluneční záření, oheň a podobně. VELMI
DŮLEŽITÉ: NESMÍTE dovolit nikomu, zejména dětem, vkládat
jakékoli předměty do otvorů, štěrbin nebo jakéhokoli otvoru
v televizoru.
- Nadměrná hlasitost ve sluchátkách může způsobit problémy
se ztrátou sluchu.

TV 0 SERIES 0024/TV 0 SERIES 0032TV 0 SERIES 0024/TV 0 SERIES 0032 4544
ESPAÑOL ESPAÑOL
Consejo:
Para facilitar la instalación de la base y evitar daños, le aconsejamos que utilice un
destornillador de tipo PH2. Fig. 5
Primera instalación
Conecte un cable RF a la entrada “RF-In” del televisor y a la entrada de su antena TV.
Seleccionar el idioma
Pulse / para seleccionar el idioma del sistema.
Seleccionar el país
Pulse ▼ / ▲ para resaltar la opción “Country” (país).
Pulse / para seleccionar el país que desee.
Fig. 6
Fig. 7
Sintonización automática
Para sintonizar automáticamente su televisor, pulse “Menu” y el botón de echa izquierda para
saltar la sintonización ATV; haga lo mismo para saltar la sintonización DTV.
Fig. 8
ADVERTENCIA:
No coloque el televisor en un lugar inestable para evitar que se caiga y cause lesiones o daños.
Muchas lesiones pueden evitarse tomando precauciones básicas como:
1. Utilizar armarios o soportes recomendados por el fabricante del televisor.
2. Utilizar únicamente muebles que puedan soportar con seguridad el peso televisor.
3. Asegurarse de que el televisor no sobresalga del borde del mueble de apoyo.
4. No colocar el televisor sobre muebles altos (por ejemplo, armarios o librerías) sin jar
tanto el mueble como el televisor a un soporte adecuado.
5. No colocar manteles u otros materiales entre el televisor y el mueble de apoyo.
6. Educar a los niños sobre los peligros de subirse al mueble para alcanzar el televisor o el
mando.
Tenga en consideración lo especicado arriba si quiere mover el televisor a otro lugar.
3. BOTONES DEL MANDO E INTERFAZ
Botones del mando
Icono Mostrar/ocultar: cuando no aparezca el icono, pulse el botón correspondiente: el icono
del botón aparecerá como se muestra en la gura de arriba y se apagará automáticamente
después de 5 segundos de inactividad.
Leyenda Fig.1:
1. Pared
2. Soporte
3. Pared
4. Tornillo para pared
Nota:
1. El soporte de jación a la pared (VESA) no está incluido.
2. Cuando monte el televisor, asegúrese de mantenerlo a una distancia de seguridad de
otros aparatos.
3. Si necesario, acuda a un técnico competente para evitar peligros.
4. La gura es solo para referencia.
5. Siga las instrucciones del manual para jar bien el televisor al soporte.
6. Siga el estándar VESA para un montaje correcto del televisor al soporte.
Instalación y conexión del televisor
Conguración TV. Fig. 3
- Coloque el televisor en un lugar estable que pueda soportar su peso.
- Para evitar peligros, mantenga el televisor alejado de agua o fuentes de calor (como una
luz, una vela o un aparato de calefacción), y asegure una ventilación adecuada en la parte
posterior del televisor.
Conectar la antena y la alimentación
1. Conecte el cable de antena a la toma de antena situada en la parte posterior del televisor.
2. Para enchufar el cable de alimentación del televisor:
Encienda el televisor
3. Pulse el botón de encendido del televisor: la luz indicadora se iluminará de verde. Si el
televisor está en modo de espera (luz indicadora roja), pulse el botón de encendido del
mando para encender el televisor.
Leyenda de la gura 3:
1. Salida de la señal TV
Nota: La gura es solo para referencia.
Instalación del soporte
1. Saque el televisor, los accesorios y la base de la caja (algunos modelos no incluyen base).
Fig. 4
2. Para evitar dañar el televisor, póngalo sobre una tela o material suave apoyado en la
mesa y atornille el cuello de la base al televisor.
3. Fije adecuadamente la base al televisor para completar la instalación.

TV 0 SERIES 0024/TV 0 SERIES 0032TV 0 SERIES 0024/TV 0 SERIES 0032 4746
ESPAÑOL ESPAÑOL
Esquema de conexión de dispositivos externos
Consulte la gura 2.
Leyenda de la gura 2:
1. DVD
2. Set-Top Box
3. Conector de entrada AV
4. Conector de entrada HDMI
5. Conector USB
6. Conector TV
4. MENÚS Y MODOS
Menú principal
Menú CHANNEL (canal)
Pulse el botón MENU para visualizar el menú principal.
Pulse / para seleccionar CHANNEL en el menú principal. Fig. 9
1. Pulse ▼ / ▲ para seleccionar la opción que desea congurar en el menú CHANNEL.
2. Pulse Enter (conrmar) para conrmar la conguración.
3. Una vez realizada la conguración, pulse el botón Enter para guardar y volver al menú
anterior.
Sintonización automática
Pulse ▼ / ▲ para seleccionar “Auto Tuning” (sintonización automática); a continuación, pulse
Enter/ .
Fig. 10
Sintonización ATV manual
Canal actual
Conguración del número del canal.
Sistema de colores
Selección del sistema de colores.
(Sistemas disponibles: AUTO, PAL, SECAM)
Sistema de sonido
Selección del sistema de sonido.
Anamiento Ajuste no
Ajuste preciso de la frecuencia del canal.
Selección de iconos: pulse brevemente el botón correspondiente y desplácese a la derecha
para seleccionar el icono.
Selección de la función del icono: mantenga pulsado el botón para obtener la función del
icono seleccionado.
Descripción de los iconos:
Icono de apagado: Se corresponde con el botón “POWER” del mando a distancia.
Icono de menú: Se corresponde con el botón “MENU” del mando a distancia.
Icono de fuente: Se corresponde con el botón “SOURCE” del mando a distancia.
Icono CH+ (pasar al siguiente canal): Se corresponde con el botón “CH+” del mando a
distancia.
Icono CH- (volver al canal anterior): Se corresponde con el botón “CH-” del mando a distancia.
Icono Volumen+ (aumento del volumen) Se corresponde con el botón “VOL+” del mando a
distancia.
Icono Volumen- (reducción del volumen): Se corresponde con el botón “VOL-” del mando a
distancia.
Interfaz
Entrada AV
Entrada de señal AV externa y canal de sonido derecho/
izquierdo.
RANURA CI
La ranura para tarjetas CI (Common Interface, interfaz común)
requiere CAM (Conditional Access Module, módulo de acceso
condicional) para la televisión de pago.
Entrada HDMI
Entrada de señal digital desde el conector de vídeo HDMI.
ANT 75
Entrada para la conexión de la antena/cable (75/VHF/UHF).
Entrada USB
Inserte aquí un dispositivo USB para reproducir sus archivos
multimedia o grabar programas mediante la función PVR.
COAXIAL
Para conectar el receptor SPDIF.
Manténgase alejado, proteja y no toque los terminales HDMI y USB del televisor para
alargar la vida útil del mismo y garantizar un funcionamiento correcto.

TV 0 SERIES 0024/TV 0 SERIES 0032TV 0 SERIES 0024/TV 0 SERIES 0032 4948
ESPAÑOL ESPAÑOL
Lista de canales satélite Fig. 18
Sintonización automática
Pulse ▼ / ▲ para seleccionar “Auto Tuning” (sintonización automática); a continuación, pulse
Enter/ . Fig. 19
Conguración de la antena satélite
Pulse ▼ / ▲ para seleccionar “Dish Setup” (conguración de la antena satélite); a continuación,
pulse Enter/ para conrmar. Fig. 20
Menú Imagen
- Pulse el botón MENU para visualizar el menú principal.
- Pulse / para seleccionar PICTURE (imagen) en el menú principal. Fig. 21
Nota:
- Modo 120 Hz NO COMPATIBLE
- Modo 60 Hz COMPATIBLE
1. Pulse ▼ / ▲ para seleccionar la opción que desea congurar en el menú PICTURE.
2. Pulse OK para conrmar la conguración.
3. Una vez realizada la conguración, pulse el botón MENU para guardar y volver al menú
anterior.
Modo Imagen
- Pulse ▼ / ▲ para seleccionar “Picture Mode” (modo Imagen); a continuación, pulse OK
para acceder al submenú correspondiente.
- Puede cambiar el valor de contraste, brillo, color, nitidez y matiz cuando la imagen está en
modo Personal (personalizado).
Consejos: Puede pulsar el botón PMODE para cambiar directamente los ajustes de imagen.
Fig. 22
Contraste/brillo/color/nitidez/matiz
Pulse ▼ / ▲ para seleccionar el valor que desee; a continuación, pulse Enter/ para ajustar
el valor.
- Contraste: Resalta la luz de la imagen, pero la sombra no cambia.
- Brillo: Ajusta la salida de bra óptica; afecta los oscuros de la imagen.
- Color: Ajusta la saturación del color.
- Matiz: Se utiliza para compensar el cambio de color en transmisión NTSC.
- Nitidez: Ajusta el nivel de detalle de la imagen.
Buscar
Búsqueda de canales.
Fig. 11
Sintonización DTV manual
- Pulse ▼ / ▲ para seleccionar “DTV Manual Tuning” (sintonización DTV manual); a
continuación, pulse Enter para acceder al submenú correspondiente.
- Pulse / para seleccionar el canal; a continuación, pulse Enter para buscar el programa.
Fig. 12
Editar canales
Pulse ▼ / ▲ para seleccionar “Program Edit” (editar canales); a continuación, pulse Enter para
acceder al submenú correspondiente. Fig. 13
Los botones tricolores son los botones de acceso directo para la programación de canales.
Pulse primero ▼ / ▲ para resaltar el canal que desea seleccionar; a continuación:
- Pulse el botón rojo para borrar el canal de la lista.
- Pulse el botón amarillo para desplazar el canal en la lista.
- Pulse el botón azul para saltar el canal seleccionado.
- Pulse el botón “Fav” para añadir o eliminar un canal de su lista de favoritos (el televisor
saltará el canal automáticamente cuando pulse CH+/- para cambiar de canal).
Lista de programación
- Pulse ▼ / ▲ para seleccionar “Schedule List” (lista de programación); a continuación, pulse
Enter para acceder al submenú correspondiente. La lista de programación está disponible
para DTV y satélite. Fig. 14
- Pulse el botón amarillo para acceder a la interfaz de abajo. Fig. 15
- En caso de problemas con la programación, aparecerá un mensaje de aviso. Fig. 16
Información sobre la señal
Pulse ▼ / ▲ para seleccionar Signal Information (información sobre la señal): pulse el botón
Enter para ver la información detallada sobre la señal (disponible solo con señal en DTV). Fig.
17
Información sobre CI (Common Interface, interfaz común)
Pulse ▼ / ▲ para seleccionar “CI Information” (información sobre CI); a continuación, pulse el
botón Enter para ver los detalles de la tarjeta CI (si está insertada).
NOTA: tarjeta CI no incluida.

TV 0 SERIES 0024/TV 0 SERIES 0032TV 0 SERIES 0024/TV 0 SERIES 0032 5150
ESPAÑOL ESPAÑOL
Puede cambiar el valor de agudos y graves cuando el sonido está en modo personalizado.
Consejos: Pulse el botón SMODE del mando para cambiar directamente el modo de sonido.
Standard (estándar): Produce un sonido equilibrado en todos los entornos.
Music (música): Preserva el sonido original. Ideal para programas musicales.
Movie (película): Mejora los agudos y los graves para una mejor experiencia de sonido.
Sports (deporte): Mejora la claridad vocal para los deportes.
Personal (personalizado): Seleccione esta opción para personalizar los ajustes de imagen.
Nota: los agudos y los graves solo están disponibles en modo personalizado, y puede ajustarlos
a gusto.
Balance (equilibrado)
Pulse ▼ / ▲ para seleccionar esta opción; a continuación, pulse / para ajustar el valor.
Auto Volume level (volumen automático)
Pulse ▼ / ▲ para seleccionar esta opción; a continuación, pulse / para activarla o
desactivarla.
Modo SPDIF
Pulse ▼ / ▲ para seleccionar “SPDIF Mode” (modo SPDIF); a continuación, pulse / para
seleccionar entre O/PCM/Auto.
AD Switch
Pulse ▼ / ▲ para seleccionar esta opción; a continuación, pulse / para activarla o
desactivarla. El televisor dispone también de una función de audiodescripción para personas
invidentes.
AVISO:
Balance (equilibrado): Ajusta el audio de salida para una experiencia de sonido más equilibrada.
Auto Volume Level (volumen automático): Reduce automáticamente la diferencia entre el
volumen del canal y el del programa.
Menú de la hora
- Pulse el botón MENU para visualizar el menú principal.
- Pulse / para seleccionar TIME (hora) en el menú principal.
Fig. 28
Temperatura del color
- Modica la percepción de la gama cromática del televisor.
- Pulse ▼ / ▲ para seleccionar “Color Temperature” (temperatura del color); a continuación,
pulse OK para acceder al submenú correspondiente.
- Pulse ▼ / ▲ para seleccionar la opción que desee; temperatura del color: Cool (fría),
Medium (neutra), Warm (cálida).
Fig. 23
- Cool (fría): Aumenta la tonalidad azul y reduce el blanco.
- Medium (neutra): Aumenta los rosas y azules y reduce el blanco.
- Warm (cálida): Aumenta el rojo y reduce el blanco.
Reducción del sonido
Filtra y reduce el sonido y mejora la calidad de la imagen. Pulse ▼ / ▲ para seleccionar
“Noise Reduction” (reducción del sonido); a continuación, pulse OK para acceder al submenú
correspondiente. Fig. 24
- O (apagado): Seleccione esta opción para desactivar la detección del sonido
- Low (bajo): Detecta y reduce el sonido bajo.
- Middle (moderado): Detecta y reduce el sonido moderado.
- High (alto): Detecta y reduce el sonido alto.
- Default (predeterminado): Predeterminado.
Modo HDMI
- Pulse ▼ / ▲ para seleccionar “HDMI Mode” (modo HDMI); a continuación, pulse OK para
acceder al submenú correspondiente. Fig. 25
- Pulse ▼ / ▲ para seleccionar entre los modos de imagen disponibles: Auto/Video/PC.
Menú de sonido
- Pulse el botón MENU para visualizar el menú principal. Fig. 26
- Pulse / para seleccionar SOUND (sonido) en el menú principal.
1. Pulse / para seleccionar la opción que desea congurar en el menú SOUND.
2. Pulse Enter (conrmar) para conrmar la conguración.
3. Una vez realizada la conguración, pulse el botón Enter para guardar y volver al
menú anterior.
Fig. 27
Modo de sonido
Pulse ▼ / ▲ para seleccionar “Sound Mode” (modo de sonido); a continuación, pulse Enter
para acceder al submenú correspondiente. Pulse ▼ / ▲ para seleccionar entre las opciones
disponibles.

TV 0 SERIES 0024/TV 0 SERIES 0032TV 0 SERIES 0024/TV 0 SERIES 0032 5352
ESPAÑOL ESPAÑOL
Bloqueo del sistema
Pulse ▼ / ▲ para seleccionar “System Lock” (bloqueo del sistema); a continuación, pulse Enter
para acceder a las 3 siguientes opciones.
Fig. 34
La contraseña predeterminada es 0000. Si olvida de la contraseña, intente con “8899”.
Establecer la contraseña
Pulse ▼ / ▲ para seleccionar “Set Password” (establecer contraseña); a continuación, pulse
Enter para acceder al submenú correspondiente y establecer la contraseña.
Fig. 35
Bloqueo de canales
- Pulse ▼ / ▲ para seleccionar “Channel Lock” (bloqueo de canales); a continuación, pulse
Enter para acceder al submenú correspondiente.
- Pulse el botón verde para bloquear o desbloquear el canal que desee.
Fig. 36
Control parental
Pulse ▼ / ▲ para seleccionar “Parental Guidance” (control parental); a continuación, pulse
Enter para acceder al submenú correspondiente y seleccionar la edad de sus hijos/as. Fig. 37
Bloqueo de botones
Pulse ▼ / ▲ para seleccionar la opción “Key Lock” (bloqueo de botones); a continuación,
pulse / para activarla o desactivarla. Activando esta opción, los botones del mando se
bloquearán.
Modo Hotel (necesita compatibilidad)
Fig. 38
1. Pulse ▼ / ▲ del mando a distancia para seleccionar “Hotel Mode” (modo Hotel) en
el menú Lock (bloqueo).
2. Pulse el botón Enter del mando a distancia para acceder al submenú correspondiente.
3. Una vez realizada la conguración, pulse el botón MENU para guardar y volver al
menú anterior.
Modo Hotel
Pulse ▼ / ▲ para seleccionar la opción “Hotel Mode” (modo Hotel); a continuación, pulse /
para activarla o desactivarla.
Bloqueo de fuente
- Pulse ▼ / ▲ para seleccionar “Source Lock” (bloqueo de fuente); a continuación, pulse
Enter para acceder al submenú correspondiente.
1. Pulse el botón ▼ / ▲ para seleccionar la opción que desea congurar en el menú
TIME.
2. Pulse Enter para conrmar la conguración.
3. Una vez realizada la conguración, pulse el botón Enter para guardar y volver al
menú anterior.
Zona horaria
- Pulse ▼ / ▲ para seleccionar “Time Zone” (zona horaria); a continuación, pulse Enter para
acceder al submenú correspondiente. Fig. 29
- Pulse ▼ / ▲/ / para seleccionar la zona horaria.
Temporizador de apagado
- Pulse ▼ / ▲ para seleccionar “Sleep Timer” (temporizador de apagado); a continuación,
pulse Enter para acceder al submenú correspondiente. Fig. 30
- Pulse ▼ / ▲ para seleccionar entre las opciones disponibles:
- O (apagado), 15 min, 30 min, 45 min, 60 min, 90 min, 120 min, 240 min.
Modo de espera automático
- Pulse ▼ / ▲ para seleccionar “Auto Standby” (modo de espera automático); a continuación,
pulse Enter para acceder al submenú correspondiente. Fig. 31
- Pulse ▼ / ▲ para seleccionar entre las opciones disponibles.
Consejos: No realice ninguna operación con el mando durante el tiempo seleccionado; de lo
contrario, se restablecerá el tiempo.
Temporizador OSD
- Pulse ▼ / ▲ para seleccionar “OSD timer” (temporizador OSD); a continuación, pulse Enter
para acceder al submenú correspondiente. Fig. 32
- Pulse ▼ / ▲ para seleccionar entre las opciones disponibles.
Menú de bloqueo
Pulse el botón MENU para visualizar el menú principal. Pulse / para seleccionar LOCK
(bloqueo) en el menú principal.
Fig. 33
1. Pulse ▼ / ▲ para seleccionar la opción que desea congurar en el menú LOCK
SYSTEM.
2. Pulse Enter / para conrmar la conguración.
3. Una vez realizada la conguración, pulse el botón MENU para volver al menú anterior.

TV 0 SERIES 0024/TV 0 SERIES 0032TV 0 SERIES 0024/TV 0 SERIES 0032 5554
ESPAÑOL ESPAÑOL
Tiempo
Pulse ▼ / ▲ para seleccionar la opción TIME (tiempo); a continuación, pulse / para
activarla o desactivarla.
Bloqueo
Pulse ▼ / ▲ para seleccionar la opción LOCK (bloqueo); a continuación, pulse / para
activarla o desactivarla.
Conguración
Pulse ▼ / ▲ para seleccionar la opción SETUP (conguración); a continuación, pulse /
para activarla o desactivarla.
Borrar el ajuste
Pulse ▼ / ▲ para seleccionar “Clear Lock” (borrar ajuste); a continuación, pulse Enter para
deshacer el ajuste previo.
Importar base de datos
El administrador del hotel puede importar la información de los canales insertando en el
puerto un dispositivo USB.
Exportar base de datos
El administrador del hotel puede insertar el disco USB de importación en otros televisores.
Luego puede usar esta función para clonar todos los canales en los nuevos televisores.
Restaurar
Esta función restaura los valores predeterminados del modo Hotel.
Puede seleccionar el modo de hotel después de introducir la contraseña del sistema 8888 en
el bloqueo del menú principal (el requisito previo es que el software congure la función de
hotel para que se abra de forma predeterminada).
Fig. 39
Menú de conguración
- Pulse el botón MENU para visualizar el menú principal.
- Pulse / para seleccionar SETUP (conguración) en el menú principal. Fig. 40
1. Pulse el botón▼ / ▲ para seleccionar la opción que desea congurar en el menú
SETUP.
2. Pulse Enter (conrmar) para conrmar la conguración.
3. Una vez realizada la conguración, pulse el botón Enter para guardar y volver al
menú anterior.
- El administrador del hotel puede congurar el bloqueo de fuente como DTV/HDMI, AV, etc.
El usuario no puede seleccionar el bloqueo de fuente.
Fuente predeterminada
- Pulse ▼ / ▲ para seleccionar “Default Source” (fuente predeterminada); a continuación,
pulse Enter para acceder al submenú correspondiente.
- El administrador del hotel puede congurar la fuente predeterminada. La TV se encenderá
con la fuente predeterminada.
Programación predeterminada
- Pulse ▼ / ▲ para seleccionar “Default prog” (programación predeterminada); a
continuación, pulse / para realizar los ajustes que desee (disponible con “TV” como
fuente predeterminada).
- El administrador del hotel puede congurar la programación predeterminada. Sólo se
puede congurar la fuente predeterminada DTV/TV.
Volumen predeterminado
- Pulse ▼ / ▲ para seleccionar “Default Volume” (volumen predeterminado); a continuación,
pulse / para realizar los ajustes que desee.
- El administrador del hotel puede congurar el volumen predeterminado. El TV se encenderá
con el volumen predeterminado.
Volumen máximo
- Pulse ▼ / ▲ para seleccionar “Max Volume” (volumen máximo); a continuación, pulse /
para realizar los ajustes que desee.
- El administrador del hotel puede congurar el volumen máximo. El usuario puede ajustar
el volumen por debajo del nivel máximo congurado.
Canal
Pulse ▼ / ▲ para seleccionar la opción CHANNEL (canal); a continuación, pulse / para
activarla o desactivarla.
Imagen
Pulse ▼ / ▲ para seleccionar la opción PICTURE (imagen); a continuación, pulse / para
activarla o desactivarla.
Sonido
Pulse ▼ / ▲ para seleccionar la opción SOUND (sonido); a continuación, pulse / para
activarla o desactivarla.

TV 0 SERIES 0024/TV 0 SERIES 0032TV 0 SERIES 0024/TV 0 SERIES 0032 5756
ESPAÑOL ESPAÑOL
- Pulse ▼ / ▲ para seleccionar entre las relaciones de aspecto disponibles: Auto, 4:3,16:9,
Zoom1 y Zoom2.
Fig. 46
Pantalla azul
Pulse ▼ / ▲ para seleccionar la opción “Blue Screen” (pantalla azul); a continuación, pulse
Enter para activarla o desactivarla.
Primera instalación
Pulse ▼ / ▲ para seleccionar “First time installation” (primera instalación); a continuación,
pulse Enter para acceder.
Restablecer
Pulse ▼ / ▲ para seleccionar “Reset” (restablecer); a continuación, pulse Enter para acceder
al submenú correspondiente.
Actualización de software (USB)
Pulse ▼ / ▲ para seleccionar “Software Update (USB)” (actualización de software USB),
conecte su dispositivo USB en la ranura USB y, a continuación, pulse el botón Enter para
actualizar el software a la versión más reciente.
HDMI CEC (si compatible con la función HDMI CEC/ARC)
Pulse ▼ / ▲ para seleccionar “HDMI CEC”; a continuación, pulse Enter para acceder al submenú
correspondiente. Fig. 47
- HDMI CEC: Pulse / para activar/desactivar la opción HDMI CEC.
- HDMI ARC: Pulse / para activar/desactivar la opción HDMI ARC.
- Auto Standby (modo de espera automático): Pulse / para activar/desactivar la opción
Auto Standby.
- Device List (lista de dispositivos): Pulse Enter para abrir el menú principal del dispositivo.
Menú de pantalla
- Pulse el botón MENU para visualizar el menú principal.
- Pulse / para seleccionar SCREEN (pantalla) en el menú principal. Fig. 48
1. Pulse el botón / para seleccionar la opción que desea congurar en el menú
SCREEN.
2. Pulse Enter (conrmar) para conrmar la conguración.
3. Una vez realizada la conguración, pulse el botón Enter para guardar y volver al
menú anterior.
Idioma OSD
- Seleccione un idioma para el menú OSD. El idioma predeterminado es el inglés.
- Pulse ▼ / ▲ / / para seleccionar “Menu Language” (idioma de menú).
Fig. 41
Idioma de teletexto
- Pulse ▼ / ▲ para seleccionar “TT Language” (idioma de teletexto); a continuación, pulse
Enter para acceder al submenú correspondiente.
- Pulse ▼ / ▲ para seleccionar un idioma de teletexto.
Fig. 42
Idiomas de audio
- Pulse ▼ / ▲ para seleccionar “Audio Languages” (idiomas de audio); a continuación, pulse
Enter para acceder al submenú correspondiente.
- Pulse / para acceder a los idiomas de audio disponibles.
- Pulse ▼ / ▲ / / para seleccionar el idioma de audio que desee.
Fig. 43
Idioma de los subtítulos
- Pulse ▼ / ▲ para seleccionar “Subtitle Language” (idioma de los subtítulos); a continuación,
pulse Enter para acceder al submenú correspondiente.
- Pulse / para acceder a los idiomas de subtítulo disponibles.
- Pulse ▼ / ▲/ / para seleccionar el idioma de subtítulo que desee.
Fig. 44
Accesibilidad audio
Pulse ▼ / ▲ para seleccionar la opción “Hearing Impaired” (personas con deciencia auditiva);
a continuación, pulse Enter para activarla o desactivarla.
Sistema de archivos PVR
- Pulse ▼ / ▲ para seleccionar “PVR File System” (sistema de archivos PVR); a continuación,
pulse Enter para acceder al submenú correspondiente.
- Pulse ▼ / ▲ para seleccionar “Check PVR File System” (comprobar sistema de archivos
PVR); a continuación, pulse Enter para acceder al submenú correspondiente. Con esta
función se comprueba la velocidad USB.
Fig. 45
Relación de aspecto
- Pulse ▼ / ▲ para seleccionar “Aspect Ratio” (relación de aspecto); a continuación, pulse
Enter para acceder al submenú correspondiente.

TV 0 SERIES 0024/TV 0 SERIES 0032TV 0 SERIES 0024/TV 0 SERIES 0032 5958
ESPAÑOL ESPAÑOL
pulse el botón “Source” (fuente) para congurar la fuente de entrada Media.
Fig. 49
- Pulse ▼ / ▲ para seleccionar Media en el menú “Source” (fuente); a continuación, pulse
Enter.
- Pulse el botón / para seleccionar la opción que desea congurar en el menú Media; a
continuación, pulse Enter.
Menú de foto
- Pulse / para seleccionar PHOTO (foto) en el menú principal; a continuación, pulse Enter.
- Pulse Exit (salir) para volver al menú anterior; púlselo nuevamente para salir del todo.
Fig. 50
Pulse / para seleccionar el archivo que desea ver en el menú de selección de archivos; a
continuación, pulse Enter para mostrar la foto/imagen.
Al resaltar la opción seleccionada, la información del archivo aparecerá a la derecha y la
imagen se previsualizará en el centro. Fig. 51
Menú de música
- Pulse / para seleccionar MUSIC (música) en el menú principal; a continuación, pulse
Enter.
- Pulse Exit (salir) para volver al menú anterior; púlselo nuevamente para salir del todo.
Fig. 52
Fig. 53
- Pulse / para seleccionar la canción/disco que desea reproducir; a continuación, pulse
el botón Enter.
- Pulse / para seleccionar la opción de volver al menú anterior.
Fig. 54
Menú de películas
- Pulse / para seleccionar MOVIE (películas) en el menú principal; a continuación, pulse
Enter.
- Pulse Exit (salir) para volver al menú anterior; púlselo nuevamente para salir del todo.
Fig. 55
- Pulse / para seleccionar la película que desea reproducir; a continuación, pulse el
botón Enter.
- Pulse el botón Enter para reproducir la película seleccionada.
- Seleccione el menú multimedia al que desea acceder y pulse Enter. Pulse Exit (salir) para
volver al menú anterior; púlselo nuevamente para salir del todo.
Fig. 56
Ajuste automático
Pulse Enter ajustar automáticamente las siguientes opciones: H-Oset/V-Oset/Size/Phase.
H-Oset
- Desplazamiento horizontal de la imagen.
- Pulse ▼ / ▲ para seleccionar H-Oset (desplazamiento horizontal); a continuación, pulse
Enter para acceder al submenú correspondiente.
V-Oset
- Desplazamiento vertical de la imagen.
- Pulse ▼ / ▲ para seleccionar V-Oset (desplazamiento vertical); a continuación, pulse
Enter para acceder al submenú correspondiente.
Size
- Ajusta el tamaño de visualización.
- Pulse ▼ / ▲ para seleccionar Size (tamaño); a continuación, pulse Enter para acceder al
submenú correspondiente.
Phase
- Ajusta las líneas horizontales de interferencia.
- Pulse ▼ / ▲ para seleccionar Phase (fase); a continuación, pulse Enter para acceder al
submenú correspondiente.
Restablecer la posición
Pulse ▼ / ▲ para seleccionar Position Reset (restablecer posición); a continuación, pulse Enter
para restablecer la posición de la pantalla.
Avisos:
1. No se puede reducir el sonido para la opción PICTURE (imagen).
2. No se puede seleccionar “AD Switch” para la opción SOUND (sonido).
3. Las funciones de audiodescripción y de accesibilidad para personas con deciencia
auditiva son lo mismo.
4. Las opciones de bloqueo de canales y control parental no están disponibles en el
menú LOCK (bloqueo).
5. Las opciones de idioma de audio/subtítulo, accesibilidad para personas con
deciencia auditiva y sistema de archivos PVR no están disponibles en el menú
SETUP (conguración).
6. La opción PC no es compatible con el menú CHANNEL (canal).
Contenido multimedia
Nota: antes de acceder al menú Media (contenido multimedia), conecte el dispositivo USB y

TV 0 SERIES 0024/TV 0 SERIES 0032TV 0 SERIES 0024/TV 0 SERIES 0032 6160
ESPAÑOL ESPAÑOL
2. Control de tiempo en modo PVR o Media Player.
19. CANCEL:
1. Cuando se selecciona una página en modo Teletexto, es posible que tarde en estar
disponible; pulsando el botónCANCEL, volverá al modo TV. Cuando encuentre la página
deseada, el número de página aparecerá en la parte superior de la pantalla; pulse CANCEL
para volver al modo teletexto y navegar en la página.
2. Capítulo anterior en modo PVR o Media Player.
20. INDEX:
1. Pulse este botón para abrir la página Index (índice) en modo Teletexto.
2. Salga de la función de reproducción en modo PVR o Media Player.
21. SIZE: Pulse este botón para cambiar el tamaño de visualización en modo Teletexto.
22. REVEAL: Pulse este botón para mostrar u ocultar las palabras ocultas/mostradas.
23. BOTONES TRICOLORES: Control en modo Teletexto, selección de elementos en el menú y
MHEGS en el menú DVB.
24. CH+/CH-: Pulse estos botones para navegar por los canales.
25. FAV/LIST: pulse estos botones para abrir la lista de favoritos. A continuación, seleccione
un canal favorito.
26. ASPECT:
1. Pulse este botón para seleccionar la escala de la imagen.
2. Avance rápido en modo PVR o Media Player (reproductor multimedia).
27. FREEZE: pulse este botón para congelar la imagen.
28. SUB. PG:
1. Pulse este botón para acceder a la subpágina.
2. Capítulo siguiente en modo PVR o Media Player.
29. SUBTITLE: pulse este botón para mostrar y ajustar el idioma del canal DTV actual.
30. HOLD: pulse este botón para activar o desactivar la visualización de la página actual.
31. TEXT: Pulse este botón para activar o desactivar el teletexto.
32. RECLIST: Pulse este botón para mostrar la lista de grabaciones.
33. REC: pulse este botón para grabar en modo PVR.
Fig. 60
Instalación de las pilas:
- Deslice hacia abajo y tire hacia afuera la tapa del compartimento de las pilas en la parte
posterior del mando para retirarla. Introduzca dos pilas AAA en el compartimento de las
pilas respetando la polaridad (+/–) como se indica. No introduzca pilas nuevas y viejas o
diferentes tipos de pilas.
- Deslice la tapa hasta que la oiga encajar en su sitio.
Usar el mando a distancia:
- A menos que se indique lo contrario, con el mando a distancia se pueden controlar todas
las funciones del televisor.
Menú de texto
- Pulse / para seleccionar TEXT (texto) en el menú principal; a continuación, pulse Enter.
- Pulse Exit (salir) para volver al menú anterior; púlselo nuevamente para salir del todo.
- Fig. 57
- Pulse / para seleccionar el elemento que desee; a continuación, pulse el botón Enter.
- Pulse / para seleccionar la opción de volver al menú anterior.
Fig. 58
5. MANDO A DISTANCIA
Fig. 59
1. POWER (potencia): Encienda el televisor o póngalo en modo de espera.
2. MUTE (silencioso): Pulse para silenciar el sonido. Vuelva a pulsar o pulse VOL+ para volver
a activar el sonido.
3. 0 -9: Pulse 0-9 para seleccionar directamente un canal mientras ve la televisión. El canal
cambiará después de 2 segundos. Aplicable al modo teletexto, etc.
4. DTV/ATV: Pulse para cambiar entre TV analógica y digital.
5. : Pulse para volver al programa visualizado anteriormente.
6. S.MODE (modo de sonido): Pulse este botón para seleccionar entre los diferentes ajustes
de sonido.
7. SLEEP (modo de suspensión): Seleccione la cantidad de tiempo antes de que el televisor
se apague automáticamente.
8. MTS: Pulse para buscar los modos NICAM.
9. P.MODE (modo de imagen): Pulse este botón para seleccionar entre los diferentes ajustes
de imagen.
10. MENU: Permite navegar entre los menús del sistema.
11. SOURCE (fuente): Abra el menú principal y pulse para navegar entre las fuentes.
12. ▼▲ ENTER le permite navegar por los menús en pantalla y ajustar la conguración
del sistema según sus preferencias.
13. EXIT (salir): Pulse este botón para salir del menú o submenú y cancelar la función
correspondiente (si corresponde).
14. DISPLAY (pantalla): Pulse este botón para visualizar la información de la fuente y del canal.
15. VOL+/VOL-: Pulse para aumentar/disminuir el volumen.
16. TV/RADIO: Al ver un canal, permite cambiar entre los modos TV y Radio.
17. GUIDE:
1. Abra la EPG (Electronic Program Guide, guía electrónica de programas).
2. Retroceso rápido en modo PVR o Media Player (reproductor multimedia).
18. TIME SHIFT (control de tiempo):
1. Control de tiempo canales DTV.

TV 0 SERIES 0024/TV 0 SERIES 0032TV 0 SERIES 0024/TV 0 SERIES 0032 6362
ESPAÑOL ESPAÑOL
Aparecen líneas
partidas
en la pantalla.
Los aparatos eléctricos como secadores de pelo, aspiradoras,
etc., pueden interferir con el televisor. Apague este tipo de
aparatos.
El mando no funciona.
Retire el plástico que envuelve el mando. Pruebe a acercar el
mando al televisor y pulse cualquier botón. Asegúrese de que las
pilas están bien colocadas o intente utilizar pilas nuevas.
El televisor entrará en modo de espera si no recibe respuesta
pasados unos minutos.
No hay imagen (modo
PC).
Compruebe si el cable está conectado correctamente al puerto
HDMI o si está doblado.
Línea vertical
parpadeante (Modo
PC).
Entre en el menú principal y ajuste la colocación vertical de la
pantalla para eliminar la línea vertical.
Línea horizontal (modo
PC)
Ajuste la colocación horizontal de la pantalla para eliminar la
línea horizontal.
Pantalla demasiado
brillante u oscura
(modo PC)
Ajuste el brillo o el contraste en el menú principal.
No hay respuesta del
PC.
Compruebe si la resolución de la pantalla del PC está ajustada a
una resolución compatible con la del televisor.
Aparecen líneas al
conectar un dispositivo
al puerto RCA.
Asegúrese de utilizar un cable de buena calidad.
El problema persiste. Desenchufe el cable de alimentación, espere 30 segundos
y vuelva a conectarlo a la toma de corriente. Si el problema
persiste, no intente reparar el televisor por su cuenta. Póngase
en contacto con el Servicio de Asistencia Técnica ocial.
No deje el televisor mostrando una imagen estática, ya sea de un vídeo en pausa, una pantalla
de menú, etc. durante un periodo de tiempo prolongado para evitar el quemado de pantalla.
- Apunte siempre el mando directamente al sensor situado en la parte frontal del televisor.
PRECAUCIÓN: No ingiera las pilas, existe peligro de quemaduras químicas. Este producto
contiene pilas. Si ingiere las pilas pueden causar quemaduras internas graves en solo 2 horas
y provocar la muerte. Mantenga las pilas nuevas y usadas fuera del alcance de los niños. Si el
compartimiento de las pilas no cierra de forma segura, deje de usar el producto y manténgalo
fuera del alcance de los niños. Si cree que las pilas pueden haberse ingerido o colocado dentro
de cualquier parte del cuerpo, busque atención médica de inmediato.
6. RESOLUCIÓN DE PROBLEMAS
No hay suministro
eléctrico.
Compruebe si el cable de CA del televisor está conectado o no.
Si sigue sin haber corriente, desconecte el enchufe y vuelva a
conectarlo transcurridos 60 segundos. Vuelve a conectar la
alimentación.
El televisor no recibe la
señal correctamente.
Si hay edicios altos o montañas cerca de donde se encuentra el
televisor, es posible que la pantalla sufra de efecto fantasma o
que aparezcan imágenes dobles. Si fuera el caso, puede arreglar
la imagen manualmente ajustando la dirección de la antena
exterior.
Si utiliza una antena interior, es posible que capte más
difícilmente la señal. Ajuste la dirección de la antena para
asegurar una buena recepción. Si la recepción de la señal no
mejora, es posible que tenga que cambiar a una antena externa.
No hay imagen. Compruebe si la antena de la parte posterior del televisor está
bien conectada.
Vea otros canales para comprobar si el problema persiste.
No hay sonido. Pruebe a subir el volumen.
Compruebe si el sonido del televisor está silenciado o no.
Hay audio, pero no hay
imagen o la imagen
está descolorida.
Intente ajustar el contraste y el brillo.
El ruido estático afecta
a la calidad de vídeo y
audio.
Compruebe si la antena de la parte posterior del televisor está
bien conectada.

TV 0 SERIES 0024/TV 0 SERIES 0032TV 0 SERIES 0024/TV 0 SERIES 0032 6564
ESPAÑOL ESPAÑOL
Se recomienda que las reparaciones sean realizadas por personal cualicado.
Si detecta una incidencia con el producto o tiene alguna consulta, póngase en contacto con el
Servicio de Asistencia Técnica ocial de Cecotec a través del número de teléfono +34 96 321
07 28.
10. COPYRIGHT
Los derechos de propiedad intelectual sobre los textos de este manual pertenecen a CECOTEC
INNOVACIONES, S.L. Quedan reservados todos los derechos. El contenido de esta publicación no
podrá, ni en parte ni en su totalidad, reproducirse, almacenarse en un sistema de recuperación,
transmitirse o distribuirse por ningún medio (electrónico, mecánico, fotocopia, grabación o
similar) sin la previa autorización de CECOTEC INNOVACIONES, S.L.
11. DECLARACIÓN DE CONFORMIDAD SIMPLIFICADA
Por la presente, Cecotec Innovaciones declara que los televisores, modelos 02610_TV 0
Series 0024 y 02612_TV 0 Series 0032 son conformes con la Directiva 2014/53/EU de equipos
radioeléctricos.
El texto completo de la Declaración UE de conformidad está disponible en la siguiente dirección
de internet:
www.cecotec.es
7. ESPECIFICACIONES TÉCNICAS
Producto TV 0 Series 0024 TV 0 Series 0032
Referencia del producto 02610 02612
QR
Potencia 36 W 56 W
Voltaje 100 – 240 V
Frecuencia 50 / 60 Hz
Vida útil 60.000 horas (apróx.)
Los términos HDMI y HDMI High-Denition Multimedia Interface, y el logotipo HDMI son marcas
comerciales o marcas registradas de HDMI Licensing LLC en Estados Unidos y otros países
Las especicaciones técnicas pueden cambiar sin previo aviso para mejorar la calidad del
producto.
Fabricado en China | Diseñado en España
8. RECICLAJE DE APARATOS ELÉCTRICOS Y ELECTRÓNICOS
Este símbolo indica que, de acuerdo con las normativas aplicables, el
producto y/o la batería deberán desecharse de manera independiente de los
residuos domésticos. Cuando este producto alcance el nal de su vida útil,
deberás extraer las pilas/baterías/acumuladores y llevarlo a un punto de
recogida designado por las autoridades locales.
Para obtener información detallada acerca de la forma más adecuada
de desechar sus aparatos eléctricos y electrónicos y/o las correspondientes baterías, el
consumidor deberá contactar con las autoridades locales.
El cumplimiento de las pautas anteriores ayudará a proteger el medio ambiente.
9. GARANTÍA Y SAT
Cecotec responderá ante el usuario o consumidor nal por las faltas de conformidad que
existan en el momento de la entrega del producto en los términos, condiciones y plazos
establecidos por la normativa aplicable.

TV 0 SERIES 0024/TV 0 SERIES 0032TV 0 SERIES 0024/TV 0 SERIES 0032 6766
ENGLISH ENGLISH
Legend Fig.1:
1. Wall-mounted
2. Support
3. Wall-mounted
4. Wall screw
Note:
1. Thee Mounting ange (VESA) is not included.
2. When mounting the TV, be sure to keep it at a safe distance from other appliances.
3. If necessary, contact a competent technician to avoid danger.
4. The gure is for reference only.
5. Follow the instructions in the manual to securely secure the TV to the stand.
6. Follow the VESA standard for proper mounting of the TV to the bracket.
Installation and connection of the TV
TV Conguration. Fig. 3
- Place the TV on a stable place that can support its weight.
- To avoid danger, keep the TV away from water or heat sources (such as a light, candle, or
heating appliance), and ensure adequate ventilation at the back of the TV.
Connect the antenna and power.
1. Connect the antenna cable to the antenna socket on the back of the TV.
2. To plug in the TV’s power cable:
Turn on the TV:
3. Press the power button on the TV: the indicator light will turn green. If the TV is in standby
mode (red indicator light), press the power button on the remote to turn on the TV.
Fig. 3 key:
1. TV signal output
Note: The gure is for reference only.
Bracket installation
1. Take the TV, accessories, and base out of the box (some models do not include a base).
Fig. 4
2. To avoid damaging the TV, place it on a cloth or soft material supported on the table and
screw the neck of the base to the TV.
3. Properly secure the base to the TV to complete the installation.
Tip:
To ease the base installation and avoid damage, we advise you to use a PH2 type screwdriver.
1. BEFORE USE
- This appliance is packaged in a way as to protect it during transport. Take the appliance
out of its box and remove all packaging materials. You can keep the original box and other
packaging elements in a safe place. This will help you prevent damage to the appliance
when transporting it in the future. In case the original packaging is disposed of, make sure
all packaging materials are recycled accordingly.
- Make sure all parts and components are included and in good conditions. If there is any
piece missing or in bad conditions, contact the ocial Cecotec Technical Support Service
immediately.
Box content:
- TV
- Remote control
- AA cells (x2)
- Instruction manual
Note:
The graphics in this manual are schematic representations and may not exactly match the
appliance.
2. INSTALLATION
Assembling the stand
To x the TV to the wall:
Fig. 1
1. First, please put the TV on the table, and put a soft cloth on the table to avoid scratches
on the display.
2. Use the screwdriver to remove the screws that are attached to the bottom bracket (as
shown in gure 1); then remove the bottom bracket (remove screws and bottom bracket
carefully).
3. Choose a bracket that can be xed to the wall according to the measurements of the TV
as shown in gures 2 and 3.
4. Drill four holes in the wall and put four screws.
5. Use the screwdriver to x the screw on the back of the TV. Next, hang the TV on the wall.

TV 0 SERIES 0024/TV 0 SERIES 0032TV 0 SERIES 0024/TV 0 SERIES 0032 6968
ENGLISH ENGLISH
Icon Description:
Switch-o icon It corresponds to the “POWER” button on the remote control.
Menu icon: It corresponds to the “MENU” button on the remote control.
Source icon: It corresponds to the “SOURCE” button on the remote control.
CH+ icon (go to next channel): It corresponds to the “CH+” button on the remote control.
CH- icon (go back to the previous channel): It corresponds to the “CH-” button on the
remote control.
Volume icon+ (increase volume) Corresponds to the “VOL+” button on the remote control.
Volume icon- (decrease volume): It corresponds to the “VOL-” button on the remote control.
Interface
AV Input
External AV signal input and right/left sound channel
CI SLOT
Common Interface (CI) card slot requires Conditional Access
Module (CAM) for Pay TV.
HDMI Input
Digital signal input from the HDMI video connector
ANT 75
Input for the connection of the antenna/cable (75/VHF/UHF).
USB input
Insert a USB device here to play your media les or record
programs using the PVR function.
COAXIAL
To connect the SPDIF receiver.
Please keep away, protect, and do not touch the HDMI and USB terminals of the TV to
extend the life of the TV and ensure proper operation.
External device connection scheme
Check gure 2.
Fig. 2 key:
1. DVD
2. Set-Top Box
3. AV Input Connector
4. HDMI Input Connector
Fig. 5
First installation
Connect an RF cable to the “RF-In” input of the TV and to the input of your TV antenna.
Select Language
Press / to select the system language.
Select the Country
Press ▼ / ▲ to highlight the “Country” option.
Press / to select the country you want.
Fig. 6
Fig. 7
Automatic tuning
To automatically tune your TV, press “Menu” and left arrow button to skip ATV tuning; do the
same to skip DTV tuning.
Fig. 8
WARNING:
Do not place the TV in an unstable place to prevent it from falling and causing injury or damage.
Many injuries can be avoided by taking basic precautions such as:
1. Use cabinets or supports recommended by the manufacturer of the television.
2. Only use furniture that can safely support the weight of the TV.
3. Make sure that the television does not protrude from the edge of the supporting furniture.
4. Do not place the television on tall furniture (for example, cabinets or bookcases) without
securing both the furniture and the television to a suitable support.
5. Do not place tablecloths or other materials between the television and the supporting
furniture.
6. Educate children about the dangers of climbing on furniture to reach the TV or remote.
Consider the above if you want to move the TV to another place.
3. CONTROLLER BUTTONS AND INTERFACE
Controller buttons
Show/Hide Icon: When the icon is not displayed, please press the corresponding button: the
button icon will appear as shown in the gure above, and it will automatically turn o after 5
seconds of inactivity.
Icon selection: short press the corresponding button and move right to select the icon.
Icon function selection: long press the button to get the selected icon function.

TV 0 SERIES 0024/TV 0 SERIES 0032TV 0 SERIES 0024/TV 0 SERIES 0032 7170
ENGLISH ENGLISH
Channel edition
Press ▼ / ▲ to select “Program Edit”, then press Enter to access the corresponding submenu.
Fig. 13
The tricolour buttons are the direct access buttons for channel programming.
Press rst ▼ / ▲ to highlight the channel you want to select, then:
- Press the red button to delete the channel from the list.
- Press the yellow button to scroll the channel from the list.
- Press the blue button to skip the selected channel.
- Press “Fav” button to add or remove a channel from your favourite list (TV will skip channel
automatically when you press CH+/- to change channel).
Programming list
- Press ▼ / ▲ to select “Schedule List”, then press Enter to access the corresponding
submenu. The programming list is available for DTV and satellite. Fig. 14
- Press the yellow button to access the interface below. Fig. 15
- In case of programming problems, a warning message will appear. Fig. 16
Signal information
Press ▼ / ▲ to select Signal Information: press the button Enter to see the detailed information
about the signal (only available with DTV signal). Fig. 17
CI information (Common Interface)
Press ▼ / ▲ to select CI Information; then, press the Enter button to see the CI card details (if
inserted).
NOTE: CI card not included.
List of satellite channels Fig. 18
Automatic tuning
Press ▼ / ▲ to select “Auto Tuning” and then press Enter/ . Fig. 19
Satellite dish setup
Press ▼ / ▲ to select “Dish Setup”; then, press Enter/ to conrm. Fig. 20
Picture Menu
- Press the MENU button to display the main menu.
- Press / to select PICTURE in the main menu. Fig. 21
5. USB Connector
6. TV Connector
4. MODES AND MENUS
Main Menu
CHANNEL Menu
Press the MENU button to display the main menu.
Press / to select CHANNEL in the main menu. Fig. 9
1. Press ▼ / ▲ to select the option you want to set in the CHANNEL menu.
2. Press Enter to conrm the setting.
3. Once the setting is done, press the Enter button to save and return to the previous menu.
Automatic tuning
Press ▼ / ▲ to select “Auto Tuning” and then press Enter/ .
Fig. 10
Manual ATV Tuning
Actual channel
Channel number setting.
Colour System
Colour system selection.
(Available systems: AUTO, PAL, SECAM)
Sound system
Sound system selection.
Precise setting
Precise setting of the channel frequency.
Search
Channel search
Fig. 11
Manual DTV Tuning
- Press ▼ / ▲ to select “DTV Manual Tuning” and then press Enter to access the
corresponding submenu.
- Press / to select the channel; the press Enter to search the programme.
Fig. 12

TV 0 SERIES 0024/TV 0 SERIES 0032TV 0 SERIES 0024/TV 0 SERIES 0032 7372
ENGLISH ENGLISH
- Middle (moderate): Detects and reduces moderate sound.
- High: Detects and reduces high sound.
- Default: Default.
HDMI Mode
- Press ▼ / ▲ to select “HDMI Mode”, then press OK to access the corresponding submenu.
Fig. 25
- Press ▼ / ▲ to select between the available picture modes: Auto/Video/PC.
Sound Menu
- Press the MENU button to display the main menu. Fig. 26
- Press / to select SOUND in the main menu.
1. Press ▼ / ▲ to select the option you want to set in the SOUND menu.
2. Press Enter to conrm the setting.
3. Once the setting is done, press the Enter button to save and return to the previous menu.
Fig. 27
Sound Menu
Press ▼ / ▲ to select “Sound Mode”, then press Enter to access the corresponding submenu.
Press ▼ / ▲ to select to select from the available options.
You can change the treble and bass value when the sound is in custom mode.
Tips: Press the SMODE button on the remote to directly change the sound mode.
Standard: Produces balanced sound in all environments.
Music: Preserves the original sound. Ideal for musical programs.
Movie: Enhances treble and bass for a better sound experience.
Sports: Improves vocal clarity for sports.
Personal (custom): Select this option to customize the image settings.
Note: Treble and Bass are only available in custom mode, and you can adjust them as you like.
Balance
Press ▼ / ▲ to select the value you want; then press / to set the value.
Auto Volume Level (automatic volume)
Press ▼ / ▲ to select this option; then press / to turn it on or o.
Note:
- MODE 120 Hz NOT COMPATIBLE
- MODE 60 Hz NOT COMPATIBLE
1. Press ▼ / ▲ to select the option you want to set in the PICTURE menu.
2. Press OK to conrm the setting.
3. Once the setting is done, press the MENU button to save and return to the previous menu.
Picture Mode
- Press ▼ / ▲ to select “Picture Mode”, then press OK to access the corresponding submenu.
- You can change the contrast, brightness, colour, sharpness, and tint value when the image
is in Personal (custom) mode.
Tips: You can press the PMODE button to directly change the picture settings.
Fig. 22
Contrast/brightness/colour/sharpness/shade
Press ▼ / ▲ to select the value you want; then press Enter/ to set the value.
- Contrast: Highlights the images light but the shadow does not change.
- Brightness: Set the bber optic output; aects the darks of the image.
- Colour: Sets the colour saturation
- Shade: It is used to compensate for colour shift in NTSC broadcast.
- Sharpness: Sets the level of detail of the image.
Colour temperature
- Modies the perception of the colour range of the television.
- Press ▼ / ▲ to select “Colour Temperature”; to continue, press OK to access the
corresponding submenu.
- Press ▼ / ▲ to select the option you want; colour temperature: Cool (cold), Medium
(neutral), Warm (warm).
Fig. 23
- Cool: Increases the blue hue and reduces white.
- Medium (neutral): Increases pinks and blues and reduces white.
- Warm: Increases red and reduces white.
Noise reduction
Filters and reduces sound and improves image quality. Press ▼ / ▲ to select “Noise Reduction”;
then press OK to access the corresponding submenu. Fig. 24
- O (Switched-o): Select this option to disable sound detection.
- Low: Detects and reduces low sound.

TV 0 SERIES 0024/TV 0 SERIES 0032TV 0 SERIES 0024/TV 0 SERIES 0032 7574
ENGLISH ENGLISH
OSD timer
- Press ▼ / ▲ to select “OSD Timer”, then press Enter to access the corresponding submenu.
Fig. 32
- Press ▼ / ▲ to select from the available options.
Lock Menu
Press the MENU button to display the main menu. Press / to select LOCK in the main menu.
Fig. 33
1. Press ▼ / ▲ to select the option you want to set in the LOCK SYSTEM menu.
2. Press Enter / to conrm the setting.
3. Once the setting is done, press the MENU button to return to the previous menu.
System Lock
Press ▼ / ▲ to select “System Lock” then, press Enter to access the next 3 options.
Fig. 34
The default password is 0000. If you forget the password, try “8899”.
Set Password
Press ▼ / ▲ to select “Set Password”; then press enter to access the corresponding submenu
and set the password.
Fig. 35
Channel Lock
- Press ▼ / ▲ to select “Channel Lock”, then press Enter to access the corresponding
submenu.
- Press the green button to lock or unlock the channel you want.
Fig. 36
Parental guidance
Pulse ▼ / ▲ to select “Parental Guidance”; then press Enter to access the corresponding
submenu and select the age of your children. Fig. 37
Key lock
Press ▼ / ▲ to select the “Key Lock”; then press / to turn it on or o. By activating this
option, the remote buttons will be locked.
Hotel Mode
Fig. 38
1. Press ▼ / ▲ on the remote control to select “Hotel Mode” in the Lock menu.
SPDIF Mode
Press ▼ / ▲ to select “SPDIF Mode”; then press to select between O/PCM/Auto.
AD Switch
Press ▼ / ▲ to select this option; then press / to turn it on or o. The television also has
an audio description function for blind people.
NOTE:
Balance: Sets the output audio for a more balanced listening experience.
Auto Volume Level (automatic volume): Automatically reduces the dierence between the
volume of the channel and that of the program.
Time Menu
- Press the MENU button to display the main menu.
- Press / to select TIME in the main menu.
Fig. 28
1. Press ▼ / ▲ to select the option you want to set in the TIME menu.
2. Press Enter to conrm the setting.
3. Once the setting is done, press the Enter button to save and return to the previous menu.
Time zone
- Press ▼ / ▲ to select “Time zone”, then press Enter to access the corresponding submenu.
Fig. 29
- Press ▼ / ▲/ / to select the time zone.
Switch-o timer
- Press ▼ / ▲ to select “Sleep Timer”, then press Enter to access the corresponding
submenu. Fig. 30
- Press ▼ / ▲ to select from the available options:
- O, 15 min, 30 min, 45 min, 60 min, 90 min, 120 min, 240 min).
Auto Standby mode
- Press ▼ / ▲ to select “Auto Standby”, then press Enter to access the corresponding
submenu. Fig. 31
- Press ▼ / ▲ to select from the available options.
Tips: Do not perform any operations with the controller during the selected time; otherwise,
the time will be reset.

TV 0 SERIES 0024/TV 0 SERIES 0032TV 0 SERIES 0024/TV 0 SERIES 0032 7776
ENGLISH ENGLISH
Sound
Press ▼ / ▲ to select the SOUND option; then press / to turn it on or o.
Time
Press ▼ / ▲ to select the TIME option; then press / to turn it on or o.
Lock
Press ▼ / ▲ to select the LOCK option then press / to turn it on or o.
Conguration
Press ▼ / ▲ to select the SETUP option; then press / to turn it on or o.
Delete Setting
Press ▼ / ▲ to select “Clear Lock”, then press Enter to undo the previous setting.
Import Database
The hotel administrator can import channel information by inserting a USB device into the port.
Export Database
The hotel administrator can insert the import USB disk to other TVs. You can then use this
feature to clone all the channels to the new TVs.
Reset
This function restores the hotel mode defaults.
You can select the hotel mode after entering the 8888-system password in the main menu
lock (the prerequisite is that the software sets the hotel function to open by default).
Fig. 39
Settings menu
- Press the MENU button to display the main menu.
- Press / to select SETUP in the main menu. Fig. 40
1. Press the ▼ / ▲ button to select the option you want to set in the SETUP menu.
2. Press Enter to conrm the setting.
3. Once the setting is done, press the Enter button to save and return to the previous menu.
OSD Language
- Select a language for the OSD menu. The default language is English.
- Press ▼ / ▲ / / to select “Menu Language”.
Fig. 41
2. Press the Enter button on the remote control to access the corresponding submenu.
3. Once the setting is done, press the MENU button to save and return to the previous menu.
Hotel Mode
Press ▼ / ▲ to select the “Hotel Mode”; then press / to turn it on or o.
Source lock
- Press ▼ / ▲ to select “Source Lock”, then press Enter to access the corresponding
submenu.
- The hotel administrator can set the source block as DTV/HDMI, AV, etc. User cannot select
source lock.
Default source
- Press ▼ / ▲ to select “Default Source”, then press Enter to access the corresponding
submenu.
- The hotel administrator can set the default source. The TV will turn on with the default
source.
Default programming
- Press ▼ / ▲ to select “Default prog”, then press / to make the settings you want
(available with “TV” as the default source).
- The hotel administrator can set the default schedule. Only DTV/TV default source can be
set
Default volume
- Press ▼ / ▲ to select “Default Volume”; then press / to make the settings that you
want.
- The hotel administrator can set the default volume. The TV will turn on at the default
volume.
Maximum volume
- Press ▼ / ▲ to select “Max Volume”; then press / to make the settings that you want.
- The hotel administrator can set the maximum volume. The user can adjust the volume
below the set maximum level.
Channel
Press ▼ / ▲ to select the CHANNEL option; then press / to turn it on or o.
Image
Press ▼ / ▲ to select the PICTURE option; then press / to turn it on or o.

TV 0 SERIES 0024/TV 0 SERIES 0032TV 0 SERIES 0024/TV 0 SERIES 0032 7978
ENGLISH ENGLISH
Reset
Press ▼ / ▲ to select “Reset”, then press Enter to access the corresponding submenu.
Software update (USB)
Press ▼ / ▲ to select “Software Update (USB)” plug your USB device into the USB slot, and
then press the Enter button to update the software to the latest version.
HDMI CEC (compatible with HDMI CEC/ARC function)
Press ▼ / ▲ to select “HDMI CEC”, then press Enter to access the corresponding submenu. Fig.
47
- HDMI CEC: Press / to turn on or o the HDMI CEC option.
- HDMI ARC: Press / to turn on or o the HDMI ARC option.
- Auto Standby: Press / to turn on or o the Auto Standby option.
- Device List: Press Enter open the main menu of the device.
Display type
- Press the MENU button to display the main menu.
- Press / to select SCREEN in the main menu. Fig. 48
1. Press / button to select the option you want to set in the SCREEN menu.
2. Press Enter to conrm the setting.
3. Once the setting is done, press the Enter button to save and return to the previous menu.
Automatic setting
Press Enter to automatically adjust the following options: H-Oset/V-Oset/Size/Phase.
H-Oset
- Horizontal oset of the image.
- Press ▼ / ▲ to select “H-Oset”, then press Enter to access the corresponding submenu.
V-Oset
- Vertical oset of the image.
- Press ▼ / ▲ to select “V-Oset”, then press Enter to access the corresponding submenu.
Size
- Set the display size.
- Press ▼ / ▲ to select “Size”, then press Enter to access the corresponding submenu.
Phase
- Set the horizontal lines of interference.
- Press ▼ / ▲ to select “Phase”, then press Enter to access the corresponding submenu.
Teletext language
- Press ▼ / ▲to select “TT Language”, then press Enter to access the corresponding
submenu.
- Press ▼ / ▲ to select a teletext language.
Fig. 42
Audio languages
- Press ▼ / ▲ to select “Audio Languages”, then press Enter to access the corresponding
submenu.
- Press / to access the available audio languages.
- Press ▼ / ▲ / / to select the audio language that you want.
Fig. 43
Subtitle language
- Press ▼ / ▲ to select “Subtitle Language”, then press Enter to access the corresponding
submenu.
- Press / to access the available subtitle languages.
- Press ▼ / ▲ / / to select the subtitle language that you want.
Fig. 44
Audio accessibility
Press ▼ / ▲ to select the “Hearing Impaired” option; then press Enter to turn it on or o.
PVR le system
- Press ▼ / ▲ to select “PVR File System”, then press Enter to access the corresponding
submenu.
- Press ▼ / ▲ to select “Check PVR File System”, then press Enter to access the corresponding
submenu. This function checks the USB speed.
Fig. 45
Aspect ratio
- Press ▼ / ▲ to select “Aspect ratio”, then press Enter to access the corresponding
submenu.
- Press ▼ / ▲ to select among the available aspect ratios: Auto, 4:3,16:9, Zoom1 and Zoom2.
Fig. 46
Blue screen
Press ▼ / ▲ to select the “Blue Screen” option; then press Enter to turn it on or o.
First installation
Press ▼ / ▲ to select “First time installation”; then press enter to access.

TV 0 SERIES 0024/TV 0 SERIES 0032TV 0 SERIES 0024/TV 0 SERIES 0032 8180
ENGLISH ENGLISH
Movie Menu
- Press / to select MOVIE in the main menu; then press Enter.
- Press Exit to return to the previous menu; press it again to exit completely.
Fig. 55
- Press / to select the movie you want to play; then press the Enter button.
- Press the Enter button to play the selected movie.
- Select the media menu you want to access, and press Enter. Press Exit to return to the
previous menu; press it again to exit completely.
Fig. 56
Text Menu
- Press / to select TEXT in the main menu; then press Enter.
- Press Exit to return to the previous menu; press it again to exit completely.
- Fig. 57
- Press / to select the element you want to play; then press the Enter button.
- Press / to select the option to return to the previous menu.
Fig. 58
5. REMOTE CONTROL
Fig. 59
1. POWER: Turn on the TV or put it in standby mode.
2. MUTE: Press to mute the sound. Press again or press VOL+ to turn the sound back on.
3. 0 - 9: Press 0-9 to directly select a channel while watching TV. The channel will change
after 2 seconds. Applicable to teletext mode, etc.
4. DTV/ATV: Press to switch between analogue and digital TV.
5. : Press to return to the previously viewed program.
6. S. MODE: Press this button to select between the dierent sound settings.
7. SLEEP: Select the amount of time before the TV turns o automatically.
8. MTS: Press to browse NICAM modes.
9. P. MODE: Press this button to select between the dierent image settings.
10. MENU: Allows you to navigate between the system menus.
11. SOURCE: Open the main menu and tap to navigate between sources.
12. ▼ / ▲ ENTER allows you to navigate the on-screen menus and adjust system
settings to your preferences.
13. EXIT: Press this button to exit the menu or submenu and cancel the corresponding
function (if applicable).
14. DISPLAY: Press this button to display the source and channel information.
Reset Position
Press ▼ / ▲ to select Position reset then press Enter to reset the screen position.
Note:
1. You cannot reduce the sound for the PICTURE option.
2. You cannot select “AD Switch” for the SOUND option.
3. Audio Description and Hearing-Impaired Accessibility features are the same.
4. Channel lock and parental control options are not available in the LOCK menu.
5. Audio/Subtitle Language, Hearing Impaired Accessibility, and PVR File System options are
not available in the SETUP menu.
6. The PC option is not compatible with the CHANNEL menu.
Media content
Note: Before entering the Media menu, please connect the USB device and press the “Source”
button to set the Media input source.
Fig. 49
- Press ▼ / ▲ to select Media in the “Source” menu; then, press Enter.
- Press / button to select the option you want to set in the Media menu, press Enter.
Photo Menu
- Press / to select PHOTO in the main menu; then press Enter.
- Press Exit to return to the previous menu; press it again to exit completely.
Fig. 50
Press / to select the le that you want to see in the le selection menu; then press Enter
to display the photo/image.
By highlighting the selected option, the le information will appear on the right and the image
will be previewed in the centre. Fig. 51
Music Menu
- Press / to select MUSIC in the main menu; then press Enter.
- Press Exit to return to the previous menu; press it again to exit completely.
Fig. 52
Fig. 53
- Press / to select the song/disc you want to play; then press the Enter button.
- Press / to select the option to return to the previous menu.
Fig. 54

TV 0 SERIES 0024/TV 0 SERIES 0032TV 0 SERIES 0024/TV 0 SERIES 0032 8382
ENGLISH ENGLISH
remove it. Insert two AAA batteries into the battery compartment observing the polarity
(+/–) as indicated. Do not insert new and old batteries or dierent types of batteries.
- Slide the lid until you hear it click into place.
Using the remote control:
- Unless otherwise stated, the remote control can control all functions of the TV.
- Always point the remote directly at the sensor located on the front of the TV.
WARNING: Do not ingest batteries, there is a danger of chemical burns. This product contains
batteries. Swallowing batteries can cause severe internal burns in just 2 hours and can cause
death. Keep new and used batteries out of the reach of children. If the battery compartment
does not close securely, stop using the product and keep it out of the reach of children. If you
think batteries may have been swallowed or placed inside any part of the body, seek immediate
medical attention.
6. TROUBLESHOOTING
No power
Check whether the AC cable of the TV is connected or not. If
there is still no power, unplug the plug and plug it back in after
60 seconds. Reconnect power.
The TV is not receiving
the signal correctly.
If there are tall buildings or mountains near where the TV is
located, the screen may experience ghosting or double images.
If this is the case, you can x the picture manually by adjusting
the direction of the outdoor antenna.
If you use an indoor antenna, it may be more dicult to pick
up the signal. Set the direction of the antenna to ensure good
reception. If signal reception does not improve, you may need to
switch to an external antenna.
There is no image. Check if the antenna on the back of the TV is well connected.
Check other channels to see if the issue persists.
There is no audio. Try turning up the volume.
Check if the TV sound is muted or not.
There is audio, but there
is no picture, or the
picture is washed out.
Try adjusting the contrast and brightness.
15. VOL+/VOL-: Press to increase/decrease the volume.
16. TV/RADIO: When watching a channel, it allows you to switch between TV and Radio
modes.
17. GUIDE:
1. Open the EPG (Electronic Program Guide).
2. Fast backward in PVR or Media Player mode.
18. TIME SHIFT:
1. Time control DTV channels.
2. Time control in PVR or Media Player mode.
19. CANCEL:
1. When a page is selected in Teletext mode, it may take time for it to be available; pressing
CANCEL key will return to TV mode. When you nd the desired page, the page number will
appear at the top of the screen; press CANCEL to return to teletext mode and navigate on the
page.
2. Previous chapter in PVR or Media Player mode.
20. INDEX:
1. Press this button to request the Index page in Teletext mode.
2. Exit playback function in PVR or Media Player mode.
21. SIZE: Press this button to change the display size in Teletext mode.
22. REVEAL: Click this button to show or hide the hidden/shown words.
23. THREE-COLOR BUTTONS: Control in Teletext mode, selection of items in the menu and
MHEGS in the DVB menu.
24. CH+/CH-: Press these buttons to navigate through the channels.
25. FAV/LIST: Press these buttons to open the favourites list. Then select a favourite channel.
26. ASPECT:
1. Click this button to select the scale of the image.
2. Fast forward in PVR or Media Player mode.
27. FREEZE: Press this button to freeze the image.
28. SUB. PG:
1. Press this button to access the subpage.
2. Next chapter in PVR or Media Player mode.
29. SUBTITLE: Press this button to display and set the language of the current DTV channel.
30. HOLD: Press this button to turn the display of the current page on or o.
31. TEXT: Press this button to activate or deactivate teletext.
32. RECLIST: Press this button to display the list of recordings.
33. REC: Press this button to record in PVR mode.
Fig. 60
Battery Installation:
- Slide down and pull out the battery compartment lid on the back of the controller to

TV 0 SERIES 0024/TV 0 SERIES 0032TV 0 SERIES 0024/TV 0 SERIES 0032 8584
ENGLISH ENGLISH
7. TECHNICAL SPECIFICATIONS
Product TV 0 Series 0024 TV 0 Series 0032
Product reference 02610 02612
QR
Power 36 W 56 W
Voltage 100 – 240 V
Frequency 50 / 60 Hz
Shelf life 60.000 hours (approx.)
The terms HDMI and HDMI High-Denition Multimedia Interface, and the HDMI logo are
trademarks or registered trademarks of HDMI Licensing LLC in the United States and/or other
countries.
Technical specications may change without prior notice to improve product quality.
Made in China | Designed in Spain
8. DISPOSAL OF OLD ELECTRICAL AND ELECTRONIC APPLIANCES
This symbol indicates that, according to the applicable regulations, the
product and/or batteries must be disposed of separately from household
waste. When this product reaches the end of its shelf life, you should dispose
of the cells/batteries/accumulators and take them to a collection point
designated by the local authorities.
Consumers must contact their local authorities or retailer for information
concerning the correct disposal of old machines and/or their batteries.
Compliance with the above guidelines will help protecting the environment.
9. TECHNICAL SUPPORT AND WARRANTY
Cecotec shall be liable to the end user or consumer for any lack of conformity that exists at the
time of delivery of the product under the terms, conditions, and deadlines established by the
applicable regulations.
It is recommended that repairs are carried out by qualied personnel.
Static noise aects
video and audio quality.
Check if the antenna on the back of the TV is well connected.
Broken lines appear.
here on the screen.
Electrical devices such as hair dryers, vacuum cleaners, etc.
may interfere with the TV. Turn o these types of devices.
The remote doesn’t
work.
Remove the plastic that wraps the remote. Try moving the
remote closer to the TV and press any button. Make sure the
batteries are installed correctly or try using new batteries.
The TV will go into standby mode if there is no response after a
few minutes.
There is no image (PC
mode).
Check if the cable is connected to the HDMI port correctly or if it
is bent.
Flashing vertical line (PC
Mode).
Enter the main menu and adjust the vertical placement of the
screen to remove the vertical line.
Horizontal line (PC
mode)
Adjust the horizontal placement of the screen to remove the
horizontal line.
Screen too bright or
dark (PC mode)
Adjust the brightness or contrast in the main menu.
No response from PC. Check if the screen resolution of the PC is set to a resolution
that is compatible with that of the TV.
Lines appear when
connecting a device to
the RCA port.
Be sure to use a good quality cable.
The problem persists. Unplug the power cable wait 30 seconds and plug it back into
the power outlet. If the problem persists, do not try to repair
the TV yourself. Contact the ocial Technical Support Service of
Cecotec.
Do not leave the TV displaying a static image, be it a paused video, a menu screen, etc.
for an extended period to prevent screen burn-in.

TV 0 SERIES 0024/TV 0 SERIES 0032TV 0 SERIES 0024/TV 0 SERIES 0032 87
FRANÇAIS
86
ENGLISH
1. AVANT UTILISATION
- Cet appareil possède un emballage conçu pour le protéger pendant son transport. Sortez
l’appareil de sa boîte et retirez tout le matériel qui compose l’emballage. Rangez la boîte
d’origine et le reste des éléments provenant de l’emballage dans un endroit sûr pour éviter
d’endommager l’appareil si vous devez le transporter à l’avenir. Si vous devez vous défaire
de l’emballage d’origine, assurez-vous de recycler tous les éléments correctement.
- Assurez-vous que toutes les pièces et les composants sont inclus et en bon état. S’il
manque une pièce, une partie, un accessoire ou que l’appareil ou ses accessoires ne sont
pas en bon état, veuillez contacter le Service Après-Vente ociel de Cecotec.
Contenu de la boîte:
- Téléviseur
- Télécommande
- 2 piles AA
- Manuel d’instructions
Note
Les graphiques de ce manuel sont des représentations schématiques et peuvent ne pas
correspondre exactement à ceux du produit.
2. INSTALLATION
Montage du support
Pour xer le téléviseur au mur :
Img. 1
1. Placez d’abord le téléviseur sur une table, puis posez un chion doux sur la table pour
éviter de rayer l’écran.
2. Utilisez un tournevis pour retirer les vis xées au support inférieur (comme indiqué dans
l’image 1), puis retirez le support inférieur (retirez soigneusement les vis et le support
inférieur).
3. Choisissez un support qui peut être xé au mur en fonction des dimensions du téléviseur,
comme indiqué dans les images 2 et 3.
4. Percez quatre trous dans le mur et placez quatre vis.
5. Utilisez un tournevis pour xer la vis à l’arrière du téléviseur. Accrochez ensuite le
téléviseur au mur.
Img. 1:
If at any moment you detect any problem with your product or have any doubt, do not hesitate
to contact the ocial Cecotec Technical Support Service at +34 963 210 728.
10. COPYRIGHT
The intellectual property rights over the texts in this manual belong to CECOTEC INNOVACIONES,
S.L. All rights reserved. The contents of this publication may not, in whole or in part, be
reproduced, stored in a retrieval system, transmitted, or distributed by any means (electronic,
mechanical, photocopying, recording or similar) without the prior authorization of CECOTEC
INNOVACIONES, S.L.
11. SIMPLIFIED DECLARATION OF CONFORMITY
Hereby, Cecotec Innovaciones declares that the televisions, with model 02610_TV 0
Series 0024 and 02612_TV 0 Series 0032 are following Directive 2014/53/EU on radio
equipment.
The full text of the EU Declaration of Conformity can be found on the following website:
www.cecotec.es

TV 0 SERIES 0024/TV 0 SERIES 0032TV 0 SERIES 0024/TV 0 SERIES 0032 8988
FRANÇAIS FRANÇAIS
Conseil:
Pour faciliter l’installation de la base et éviter tout dommage, il est conseillé d’utiliser un
tournevis de type PH2. Img. 5
Première installation
Connectez un câble RF à l’entrée «RF-In» du téléviseur et à l’entrée de votre antenne TV.
Sélectionner la langue
Appuyez sur / pour sélectionner la langue du système.
Sélectionner le pays
Appuyez sur ▼ / ▲ pour sélectionner l’option «Country» (pays).
Appuyez sur / pour sélectionner le pays souhaité.
Img. 6
Img. 7
Syntonisation automatique
Pour régler automatiquement votre téléviseur, appuyez sur «Menu» et sur le bouton avec la
èche vers la gauche pour ignorer le réglage ATV ; faites de même pour ignorer le réglage DTV.
Img. 8
AVERTISSEMENT :
Ne placez pas le téléviseur dans un endroit instable an d’éviter qu’il ne tombe et ne provoque
des blessures ou des dommages. De nombreuses blessures peuvent être évitées en prenant
des précautions basiques :
1. Utilisez les meubles ou les supports recommandés par le fabricant du téléviseur.
2. N’utilisez que des meubles qui peuvent supporter le poids du téléviseur.
3. Veillez à ce que le téléviseur ne dépasse pas le bord du meuble.
4. Ne placez pas le téléviseur sur un meuble haut (par exemple une armoire ou une
bibliothèque) sans xer le meuble et le téléviseur sur un support approprié.
5. Ne placez pas de nappes ou d’autres matériaux entre le téléviseur et le meuble.
6. Informez les enfants des dangers de grimper sur les meubles pour atteindre le téléviseur
ou la télécommande.
Veillez à tenir compte de ce qui précède si vous souhaitez déplacer le téléviseur dans un autre
endroit.
3. BOUTONS DE LA TÉLÉCOMMANDE ET INTERFACE
Boutons de la télécommande
Icône Acher/masquer : lorsque l’icône n’apparaît pas, appuyez sur le bouton correspondant.
1. Mur
2. Support
3. Mur
4. Vis murale
Note
1. Le support de montage mural (VESA) n’est pas inclus.
2. Lorsque vous installez le téléviseur, veillez à le maintenir à une distance susante des
autres appareils.
3. Si nécessaire, consultez un technicien qualié an d’éviter tout danger.
4. Cette image n’est donnée qu’à titre indicatif.
5. Suivez les instructions du manuel pour xer le téléviseur au support.
6. Suivez la norme VESA pour un montage correct du téléviseur sur le support.
Installation et connexion du téléviseur
Conguration TV. Img. 3
- Placez le téléviseur dans un endroit stable qui peut supporter son poids.
- Pour éviter tout risque, éloignez le téléviseur de toute source d’eau ou de chaleur (comme
une lampe, une bougie ou un appareil de chauage) et assurez une ventilation adéquate à
l’arrière du téléviseur.
Raccordement de l’antenne et de l’alimentation
1. Raccordez le câble d’antenne à la prise d’antenne située à l’arrière du téléviseur.
2. Pour brancher le câble d’alimentation du téléviseur :
Allumez le téléviseur
3. Appuyez sur le bouton POWER du téléviseur : le témoin s’allumera en vert. Si le téléviseur
est en mode veille (témoin rouge), appuyez sur le bouton POWER pour allumer le
téléviseur.
Image 3
2. Sortie du signal TV
Note: cette image n’est donnée qu’à titre indicatif.
Installation du support
1. Retirez le téléviseur, les accessoires et la base de la boîte (certains modèles ne
comprennent pas de base). Img. 4
2. Pour éviter d’endommager le téléviseur, placez-le sur un chion ou un matériau doux sur
la table et vissez le pied/bras du support au téléviseur.
3. Fixez correctement la base au téléviseur pour terminer l’installation.

TV 0 SERIES 0024/TV 0 SERIES 0032TV 0 SERIES 0024/TV 0 SERIES 0032 9190
FRANÇAIS FRANÇAIS
1. DVD
2. Set-Top Box
3. Connecteur d’entrée AV
4. Connecteur d’entrée HDMI
5. Connecteur USB
6. Connecteur TV
4. MENUS ET MODES
Menu principal
Menu CHANNEL (chaîne)
Appuyez sur MENU pour acher le menu principal.
Appuyez sur / pour sélectionner CHANNEL dans le menu principal. Img. 9
1. Appuyez sur ▼ / ▲ pour sélectionner l’option que vous souhaitez régler dans le menu
CHANNEL.
2. Appuyez sur Enter (conrmer) pour conrmer le réglage.
3. Une fois les réglages eectués, appuyez sur le bouton Enter pour sauvegarder et revenir
au menu précédent.
Syntonisation automatique
Appuyez sur ▼ / ▲ pour sélectionner « Auto Tuning » (Syntonisation automatique), puis
appuyez sur Enter/ .
Img. 10
Syntonisation ATV manuelle
Chaîne actuelle
Réglage du numéro de la chaîne.
Système de couleurs
Sélection du système de couleurs.
(Systèmes disponibles : AUTO, PAL, SECAM)
Système de son
Sélection du système de son.
Réglage précis
Réglage précis de la fréquence de la chaîne.
Rechercher
Recherche de chaînes.
Img. 11
Sélection des icônes : appuyez brièvement sur le bouton correspondant et faites déler vers
la droite pour sélectionner l’icône.
Sélection de la fonction de l’icône : appuyez sur le bouton et maintenez-le appuyé pour
obtenir la fonction de l’icône sélectionnée.
Description des icônes:
Icône allumer/éteindre: correspond au bouton POWER de la télécommande.
Icône du menu : correspond au bouton MENU de la télécommande.
Icône de source : correspond au bouton SOURCE de la télécommande.
Icône CH+ (passer à la chaîne suivante) : correspond au bouton CH+ de la télécommande.
Icône CH- (retourner à la chaîne précédente) : correspond au bouton CH- de la télécommande.
Icône Volume+ (augmenter volume): correspond au bouton VOL+ de la télécommande.
Icône Volume- (réduire volume): correspond au bouton VOL- de la télécommande.
Interface
Entrée AV
Entrée du signal AV externe et canal audio droite/gauche.
MODULE CI
Le module pour les cartes CI (Common Interface, interface
commune) nécessite un module CAM (Conditional Access
Module) pour la télévision payante.
Entrée HDMI
Entrée du signal numérique à partir du connecteur vidéo HDMI.
ANT 75
Entrée pour la connexion de l’antenne/câble (75/VHF/UHF).
Entrée USB
Insérez ici un périphérique USB pour lire vos chiers multimédias
ou enregistrer des programmes à l’aide de la fonction PVR.
COAXIAL
Pour connecter le récepteur SPDIF.
Ne touchez pas les bornes HDMI et USB du téléviseur an de prolonger leur durée de vie
et d’en assurer le bon fonctionnement.
Schéma de connexion des appareils externes
Consultez l’image 2.
Image 2

TV 0 SERIES 0024/TV 0 SERIES 0032TV 0 SERIES 0024/TV 0 SERIES 0032 9392
FRANÇAIS FRANÇAIS
Liste des chaînes par satellite. Img. 18
Syntonisation automatique
Appuyez sur ▼ / ▲ pour sélectionner « Auto Tuning » (syntonisation automatique), puis
appuyez sur Enter/ . Img. 19
Conguration de l’antenne satellite
Appuyez sur ▼ / ▲ pour sélectionner «Dish Setup» (conguration de l’antenne satellite), puis
appuyez sur Enter/ pour conrmer. Img. 20
Menu Image
- Appuyez sur MENU pour acher le menu principal.
- Appuyez sur / pour sélectionner PICTURE (image) dans le menu principal. Img. 21
Note
- Mode 120 Hz NON COMPATIBLE
- Mode 60 Hz COMPATIBLE
1. Appuyez sur ▼ / ▲ pour sélectionner l’option que vous souhaitez régler dans le menu
PICTURE.
2. Appuyez sur OK pour conrmer le réglage.
3. Une fois les réglages eectués, appuyez sur le bouton MENU pour sauvegarder et revenir
au menu précédent.
Mode Image
- Appuyez sur ▼ / ▲ pour sélectionner «Picture Mode» (mode Image), puis appuyez sur OK
pour accéder au sous-menu correspondant.
- Vous pouvez modier le contraste, la luminosité, la couleur, la netteté et la teinte lorsque
l’image est en mode Personal (personnalisé).
Conseils : vous pouvez appuyer sur le bouton PMODE pour modier directement les paramètres
de l’image.
Img. 22
Contraste/luminosité/couleur/netteté/teinte
Appuyez sur ▼ / ▲ pour sélectionner la valeur souhaitée, puis appuyez sur Enter/ pour
régler la valeur.
- Contraste: permet de faire ressortir la lumière de l’image, mais l’ombre ne change pas.
- Luminosité: permet de régler la sortie de la bre optique ; aecte les couleurs foncées
de l’image.
- Couleur: permet de régler la saturation des couleurs.
- Teinte: permet de compenser le décalage des couleurs dans la transmission NTSC.
Syntonisation DTV manuelle
- Appuyez sur ▼ / ▲ pour sélectionner «DTV Manual Tuning» (syntonisation DTV manuelle),
puis appuyez sur Enter pour accéder au sous-menu correspondant.
- Appuyez sur / pour sélectionner la chaîne, puis appuyez sur Enter pour rechercher le
programme.
Img. 12
Éditer les chaînes
Appuyez sur ▼ / ▲ pour sélectionner «Program Edit» (éditer les chaînes), puis appuyez sur
Enter pour accéder au sous-menu correspondant. Img. 13
Les boutons tricolores sont les boutons d’accès direct à la programmation des chaînes.
Appuyez d’abord sur ▼ / ▲ pour sélectionner la chaîne de votre choix, puis :
- Appuyez sur le bouton rouge pour supprimer la chaîne de la liste.
- Appuyez sur le bouton jaune pour déplacer la chaîne dans la liste.
- Appuyez sur le bouton bleu pour sauter la chaîne sélectionnée.
- Appuyez sur le bouton «Fav» pour ajouter ou supprimer une chaîne de votre liste de favoris
(le téléviseur sautera automatiquement la chaîne lorsque vous appuierez sur CH+/- pour
changer de chaîne).
Liste des programmes
- Appuyez sur ▼ / ▲ pour sélectionner « Schedule List » (liste des programmes), puis
appuyez sur Enter pour accéder au sous-menu correspondant. La liste des programmes
est disponible pour la télévision numérique et satellite. Img. 14
- Appuyez sur le bouton jaune pour accéder à l’interface indiqué sur l’image. Img. 15
- En cas de problème avec la programmation, un message d’avertissement s’achera. Img.
16
Informations sur le signal
Appuyez sur ▼ / ▲ pour sélectionner «Signal Information» (informations sur le signal), puis
appuyez sur le bouton Enter pour acher les informations détaillées sur le signal (disponible
uniquement avec le signal DTV). Img. 17
Informations sur l’interface commune (CI)
Appuyez sur ▼ / ▲ pour sélectionner «CI Information» (Informations CI), puis appuyez sur le
bouton Enter pour acher les détails de la carte CI (si elle est insérée).
NOTE : la carte CI n’est pas incluse.

TV 0 SERIES 0024/TV 0 SERIES 0032TV 0 SERIES 0024/TV 0 SERIES 0032 9594
FRANÇAIS FRANÇAIS
Mode Son
Appuyez sur ▼ / ▲ pour sélectionner «Sound Mode» (mode Son), puis appuyez sur Enter pour
accéder au sous-menu correspondant. Appuyez sur ▼ / ▲ pour sélectionner parmi les options
disponibles.
Vous pouvez modier les valeurs des aigus et des basses lorsque le son est en mode
personnalisé.
Conseils : appuyez sur le bouton SMODE pour modier directement le mode de son.
Standard : produit un son équilibré dans tous les environnements.
Music (musique) : conserve le son original. Il est idéal pour les programmes musicaux.
Movie (lm) : améliore les aigus et les basses pour une meilleure expérience sonore.
Sports : améliore la qualité de la voix pour les sports.
Personal (personnalisé) : sélectionnez cette option pour personnaliser les paramètres du son.
Note : les aigus et les basses ne sont disponibles qu’en mode personnalisé et peuvent être
réglés selon vos préférences.
Balance
Appuyez sur ▼ / ▲ pour sélectionner cette option, puis appuyez sur / pour régler la valeur.
Auto Volume Level (volume automatique)
Appuyez sur ▼ / ▲ pour sélectionner cette option, puis appuyez sur / pour l’activer ou la
désactiver.
Mode SPDIF
Appuyez sur ▼ / ▲ pour sélectionner «SPDIF Mode» (mode SPDIF), puis appuyez sur /
pour sélectionner O/PCM/Auto.
AD Switch
Appuyez sur ▼ / ▲ pour sélectionner cette option, puis appuyez sur / pour l’activer ou
la désactiver. Le téléviseur dispose également d’une fonction de description audio pour les
personnes aveugles.
NOTES :
Balance : permet de régler la sortie audio pour une expérience sonore plus équilibrée.
Auto Volume Level (volume automatique) : réduit automatiquement la diérence entre le
volume de la chaîne et celui du programme.
- Netteté: permet de régler le niveau de détail de l’image.
Température de couleur
- Permet de modier la perception de la gamme de couleurs du téléviseur.
- Appuyez sur ▼ / ▲ pour sélectionner «Color Temperature» (température de couleur), puis
appuyez sur OK pour accéder au sous-menu correspondant.
- Appuyez sur ▼ / ▲ pour sélectionner l’option souhaitée ; température de couleur : Cool
(froide), Medium (neutre), Warm (chaude).
Img. 23
- Cool (froid) : augmente la teinte bleue et réduit le blanc.
- Medium (neutre) : augmente les roses et les bleus et réduit le blanc.
- Warm (chaud) : augmente le rouge et réduit le blanc.
Réduction du bruit
Cette option permet de ltrer et de réduire le bruit et d’améliorer la qualité de l’image. Appuyez
sur ▼ / ▲ pour sélectionner «Noise Reduction» (réduction du bruit), puis appuyez sur OK pour
accéder au sous-menu correspondant. Img. 24
- O (désactiver) : Sélectionnez cette option pour désactiver la détection du bruit.
- Low (Bas): détecte et réduit les sons faibles.
- Middle (Moyen): détecte et réduit les sons modérés.
- High (Haut): détecte et réduit les sons forts.
- Default (prédéterminé) : par défaut.
Mode HDMI
- Appuyez sur ▼ / ▲ pour sélectionner «HDMI Mode» (mode HDMI), puis appuyez sur OK
pour accéder au sous-menu correspondant. Img. 25
- Appuyez sur ▼ / ▲ pour sélectionner l’un des modes d’image disponibles : Auto/Vidéo/PC.
Menu Son
- Appuyez sur MENU pour acher le menu principal. Img. 26
- Appuyez sur / pour sélectionner SOUND (son) dans le menu principal.
1. Appuyez sur / pour sélectionner l’option que vous souhaitez régler dans le menu SOUND.
2. Appuyez sur Enter (conrmer) pour conrmer le réglage.
3. Une fois les réglages eectués, appuyez sur le bouton Enter pour sauvegarder et revenir au
menu précédent.
Img. 27

TV 0 SERIES 0024/TV 0 SERIES 0032TV 0 SERIES 0024/TV 0 SERIES 0032 9796
FRANÇAIS FRANÇAIS
2. Appuyez sur Enter / pour conrmer le réglage.
3. Une fois les réglages eectués, appuyez sur le bouton MENU pour revenir au menu
précédent.
Verrouillage du système
Appuyez sur ▼ / ▲ pour sélectionner «System Lock» (verrouillage du système), puis appuyez
sur Enter pour accéder aux 3 options suivantes.
Img. 34
Le mot de passe par défaut est 0000. Si vous oubliez le mot de passe, essayez 8899.
Dénir le mot de passe
Appuyez sur ▼ / ▲ pour sélectionner «Set Password» (dénir le mot de passe), puis appuyez
sur Enter pour accéder au sous-menu correspondant an de dénir le mot de passe.
Img. 35
Verrouillage des chaînes
- Appuyez sur ▼ / ▲ pour sélectionner «Channel Lock» (verrouillage des chaînes), puis
appuyez sur Enter pour accéder au sous-menu correspondant.
- Appuyez sur le bouton vert pour verrouiller ou déverrouiller la chaîne souhaitée.
Img. 36
Contrôle parental
Appuyez sur ▼ / ▲ pour sélectionner «Parental Guidance» (contrôle parental), puis appuyez
sur Enter pour accéder au sous-menu correspondant et sélectionner l’âge de votre ou vos
enfant(s). Img. 37
Verrouillage des boutons
Appuyez sur ▼ / ▲ pour sélectionner l’option «Key Lock» (verrouillage des boutons), puis
appuyez sur / pour l’activer ou le désactiver. En activant cette option, les boutons de la
télécommande seront verrouillés.
Mode Hôtel (compatibilité requise)
Img. 38
1. Appuyez sur le bouton ▼ / ▲ de la télécommande pour sélectionner « Hotel Mode »
(mode Hôtel) dans le menu Lock (verrouillage).
2. Appuyez sur Enter pour accéder au sous-menu correspondant.
3. Une fois les réglages eectués, appuyez sur le bouton MENU pour sauvegarder et revenir
au menu précédent.
Menu de l’heure
- Appuyez sur MENU pour acher le menu principal.
- Appuyez sur / pour sélectionner TIME (heure) dans le menu principal.
Img. 28
1. Appuyez sur ▼ / ▲ pour sélectionner l’option que vous souhaitez régler dans le menu TIME.
2. Appuyez sur Enter pour conrmer le réglage.
3. Une fois les réglages eectués, appuyez sur le bouton Enter pour sauvegarder et revenir au
menu précédent.
Fuseau horaire
- Appuyez sur ▼ / ▲ pour sélectionner «Time Zone» (fuseau horaire), puis appuyez sur
Enter pour accéder au sous-menu correspondant. Img. 29
- Appuyez sur ▼ / ▲/ / pour sélectionner le fuseau horaire.
Déconnexion automatique
- Appuyez sur ▼ / ▲ pour sélectionner «Sleep Timer» (minuterie veille), puis appuyez sur
Enter pour accéder au sous-menu correspondant. Img. 30
- Appuyez sur ▼ / ▲ pour sélectionner parmi les options disponibles :
- O (éteint), 15 min, 30 min, 45 min, 60 min, 90 min, 120 min, 240 min.
Mode veille automatique
- Appuyez sur ▼ / ▲ pour sélectionner «Auto Standby» (mode veille automatique), puis
appuyez sur Enter pour accéder au sous-menu correspondant. Img. 31
- Appuyez sur ▼ / ▲ pour sélectionner parmi les options disponibles.
Conseils : n’eectuez aucune opération avec la télécommande pendant le temps sélectionné,
sinon celui-ci sera réinitialisé.
Minuterie OSD
- Appuyez sur ▼ / ▲ pour sélectionner «OSD timer» (minuterie OSD), puis appuyez sur
Enter pour accéder au sous-menu correspondant. Img. 32
- Appuyez sur ▼ / ▲ pour sélectionner parmi les options disponibles.
Menu de verrouillage
Appuyez sur MENU pour acher le menu principal. Appuyez sur / pour sélectionner LOCK
(verrouillage) dans le menu principal.
Img. 33
1. Appuyez sur ▼ / ▲ pour sélectionner l’option que vous souhaitez régler dans le menu
LOCK SYSTEM.

TV 0 SERIES 0024/TV 0 SERIES 0032TV 0 SERIES 0024/TV 0 SERIES 0032 9998
FRANÇAIS FRANÇAIS
Image
Appuyez sur ▼ / ▲ pour sélectionner l’option PICTURE (image), puis appuyez sur / pour
l’activer ou la désactiver.
Son
Appuyez sur ▼ / ▲ pour sélectionner l’option SOUND (son), puis appuyez sur / pour
l’activer ou la désactiver.
Temps
Appuyez sur ▼ / ▲ pour sélectionner l’option TIME (temps), puis appuyez sur / pour
l’activer ou la désactiver.
Verrouillage
Appuyez sur ▼ / ▲ pour sélectionner l’option LOCK (verrouillage), puis appuyez sur l’icône
/ pour l’activer ou la désactiver.
Conguration
Appuyez sur ▼ / ▲ pour sélectionner l’option SETUP (conguration), puis appuyez sur /
pour l’activer ou la désactiver.
Supprimer le réglage
Appuyez sur ▼ / ▲ pour sélectionner «Clear Lock» (supprimer le réglage), puis appuyez sur
Enter pour annuler le réglage précédent.
Importer base de données
L’administrateur de l’hôtel peut importer les informations relatives aux chaînes en insérant
une clé USB dans le port.
Exporter base de données
L’administrateur de l’hôtel peut insérer le disque USB d’importation dans d’autres téléviseurs.
Cette fonction permet de cloner toutes les chaînes sur les nouveaux téléviseurs.
Rétablir
Cette fonction permet de rétablir les valeurs par défaut du mode Hôtel.
Vous pouvez sélectionner le mode Hôtel après avoir saisi le mot de passe du système 8888
dans le verrouillage du menu principal (la condition préalable est que le logiciel congure la
fonction Hôtel pour qu’elle soit ouverte par défaut).
Img. 39
Mode Hôtel
Appuyez sur ▼ / ▲ pour sélectionner l’option «Hotel Mode» (mode Hôtel), puis appuyez sur
/ pour l’activer ou le désactiver.
Verrouillage des sources
- Appuyez sur ▼ / ▲ pour sélectionner « Source Lock» (verrouillage des sources), puis
appuyez sur Enter pour accéder au sous-menu correspondant.
- L’administrateur de l’hôtel peut congurer le verrouillage de la source comme DTV/HDMI,
AV, etc. L’utilisateur ne peut pas sélectionner le verrouillage de la source.
Source prédéterminée
- Appuyez sur ▼ / ▲ pour sélectionner « Default Source» (source prédéterminée), puis
appuyez sur Enter pour accéder au sous-menu correspondant.
- L’administrateur de l’hôtel peut dénir la source prédéterminée. Le téléviseur s’allumera
avec la source prédéterminée.
Programmation prédéterminée
- Appuyez sur ▼ / ▲ pour sélectionner «Default prog» (programmation prédéterminée),
puis appuyez sur / pour eectuer les réglages souhaités (disponible avec « TV »
comme source par défaut).
- L’administrateur de l’hôtel peut dénir la programmation prédéterminée. Seule la source
TVD/TV par défaut peut être réglée.
Volume prédéterminé
- Appuyez sur ▼ / ▲ pour sélectionner « Default Volume» (volume prédéterminé), puis
appuyez sur / pour eectuer les réglages souhaités.
- L’administrateur de l’hôtel peut dénir le volume prédéterminé. Le téléviseur s’allumera
avec le volume prédéterminé.
Volume maximal
- Appuyez sur ▼ / ▲ pour sélectionner «Max Volume» (volume maximal), puis appuyez sur
/ pour eectuer les réglages souhaités.
- L’administrateur de l’hôtel peut dénir le volume maximal. L’utilisateur peut régler le
volume en dessous du niveau maximum conguré.
Chaîne
Appuyez sur ▼ / ▲ pour sélectionner l’option CHANNEL (chaîne), puis appuyez sur / pour
l’activer ou la désactiver.

TV 0 SERIES 0024/TV 0 SERIES 0032TV 0 SERIES 0024/TV 0 SERIES 0032 101100
FRANÇAIS FRANÇAIS
appuyez sur Enter pour accéder au sous-menu correspondant.
- Appuyez sur ▼ / ▲ pour sélectionner «Check PVR File System» (vérier le système de
chiers PVR), puis appuyez sur Enter pour accéder au sous-menu correspondant. Cette
fonction vérie la vitesse de l’USB.
Img. 45
Format d’image
- Appuyez sur ▼ / ▲ pour sélectionner «Aspect Ratio» (format d’image), puis appuyez sur
Enter pour accéder au sous-menu correspondant.
- Appuyez sur ▼ / ▲ pour sélectionner l’un des formats d’image disponibles : Auto, 4:3,16:9,
Zoom1 et Zoom2.
Img. 46
Écran bleu
Appuyez sur ▼ / ▲ pour sélectionner l’option «Blue Screen» (écran bleu), puis appuyez sur
Enter pour l’activer ou la désactiver.
Première installation
Appuyez sur ▼ / ▲ pour sélectionner «First time installation» (première installation), puis
appuyez sur Enter pour y accéder.
Rétablir
Appuyez sur ▼ / ▲ pour sélectionner «Reset» (rétablir), puis appuyez sur Enter pour accéder
au sous-menu correspondant.
Mise à jour du logiciel (USB)
Appuyez sur ▼ / ▲ pour sélectionner «Software Update (USB)» (mise à jour du logiciel USB),
branchez votre périphérique USB dans la fente USB, puis appuyez sur le bouton Enter pour
mettre à jour le logiciel à la dernière version.
HDMI CEC (si compatible avec la fonction HDMI CEC/ARC)
Appuyez sur ▼ / ▲ pour sélectionner «HDMI CEC», puis appuyez sur Enter pour accéder au
sous-menu correspondant. Img. 47
- HDMI CEC : Appuyez sur / pour activer/désactiver l’option HDMI CEC.
- HDMI ARC : Appuyez sur / pour activer/désactiver l’option HDMI ARC.
- Auto Standby (mode veille automatique) : Appuyez sur / pour activer/désactiver
l’option Auto Standby.
- Device List (liste des dispositifs) : Appuyez sur Enter pour ouvrir le menu principal de
l’appareil.
Menu de conguration
- Appuyez sur MENU pour acher le menu principal.
- Appuyez sur / pour sélectionner SETUP (conguration) dans le menu principal. Img. 40
1. Appuyez sur ▼ / ▲ pour sélectionner l’option que vous souhaitez régler dans le menu
SETUP.
2. Appuyez sur Enter (conrmer) pour conrmer le réglage.
3. Une fois les réglages eectués, appuyez sur le bouton Enter pour sauvegarder et revenir
au menu précédent.
Langue OSD
- Sélectionnez une langue pour le menu OSD. La langue par défaut est l’anglais.
- Appuyez sur ▼ / ▲ / / pour sélectionner «Menu Language» (langue du menu).
Img. 41
Langue du télétexte
- Appuyez sur ▼ / ▲ pour sélectionner «TT Language» (langue du télétexte), puis appuyez
sur Enter pour accéder au sous-menu correspondant.
- Appuyez sur ▼ / ▲ pour sélectionner la langue du télétexte.
Img. 42
Langue audio
- Appuyez sur ▼ / ▲ pour sélectionner «Audio Languages» (langue audio), puis appuyez
sur Enter pour accéder au sous-menu correspondant.
- Appuyez sur / pour accéder aux langues audio disponibles.
- Appuyez sur ▼ / ▲ / / pour sélectionner la langue audio souhaitée.
Img. 43
Langue des sous-titres
- Appuyez sur ▼ / ▲ pour sélectionner «Subtitle Language» (langue des sous-titres), puis
appuyez sur Enter pour accéder au sous-menu correspondant.
- Appuyez sur / pour accéder aux langues de sous-titres disponibles.
- Appuyez sur ▼ / ▲/ / pour sélectionner la langue de sous-titre souhaitée.
Img. 44
Accessibilité audio
Appuyez sur ▼ / ▲ pour sélectionner l’option «Hearing Impaired» (Accessibilité audio), puis
appuyez sur Enter pour l’activer ou la désactiver.
Système de chiers PVR
- Appuyez sur ▼ / ▲ pour sélectionner «PVR File System» (système de chiers PVR), puis

TV 0 SERIES 0024/TV 0 SERIES 0032TV 0 SERIES 0024/TV 0 SERIES 0032 103102
FRANÇAIS FRANÇAIS
4. Les options de verrouillage des chaînes et de contrôle parental ne sont pas disponibles
dans le menu LOCK (verrouillage).
5. Les options de langue audio/sous-titres, d’accessibilité pour les malentendants et de
système de chiers PVR ne sont pas disponibles dans le menu SETUP (conguration).
6. L’option PC n’est pas compatible avec le menu CHANNEL (chaîne).
Contenu multimédia
Remarque : avant d’accéder au menu Média (contenu multimédia), connectez le périphérique
USB et appuyez sur le bouton «Source» pour régler la source d’entrée Média.
Img. 49
- Appuyez sur ▼ / ▲ pour sélectionner «Media» dans le menu «Source», puis appuyez sur
Enter.
- Appuyez sur / pour sélectionner l’option que vous souhaitez régler dans le menu
«Media», puis appuyez sur Enter.
Menu Photo
- Appuyez sur / pour sélectionner PHOTO dans le menu principal, puis appuyez sur
Enter.
- Appuyez sur Exit (quitter) pour revenir au menu précédent ; appuyez à nouveau sur ce
bouton pour quitter complètement le menu.
Img. 50
Appuyez sur / pour sélectionner le chier que vous souhaitez visualiser dans le menu de
sélection des chiers, puis appuyez sur Enter pour acher la photo/l’image.
En sélectionnant l’option choisie, les informations sur le chier s’achent à droite et l’image
est prévisualisée au centre. Img. 51
Menu Musique
- Appuyez sur / pour sélectionner MUSIC (musique) dans le menu principal, puis
appuyez sur Enter.
- Appuyez sur Exit (quitter) pour revenir au menu précédent ; appuyez à nouveau sur ce
bouton pour quitter complètement le menu.
Img. 52
Img. 53
- Appuyez sur / pour sélectionner la chanson/disque que vous souhaitez lire, puis
appuyez sur le bouton Enter.
- Appuyez sur / pour sélectionner l’option permettant de revenir au menu précédent.
Img. 54
Menu de l’écran
- Appuyez sur MENU pour acher le menu principal.
- Appuyez sur / pour sélectionner SCREEN (écran) dans le menu principal. Img. 48
1. Appuyez sur / pour sélectionner l’option que vous souhaitez régler dans le menu
SCREEN.
2. Appuyez sur Enter (conrmer) pour conrmer le réglage.
3. Une fois les réglages eectués, appuyez sur le bouton Enter pour sauvegarder et revenir
au menu précédent.
Réglage automatique
Appuyez sur Enter pour dénir automatiquement les options suivantes : H-Oset/V-Oset/
Size/Phase.
H-Oset
- Déplacement horizontal de l’image.
- Appuyez sur ▼ / ▲ pour sélectionner « H-Oset» (déplacement horizontal), puis appuyez
sur Enter pour accéder au sous-menu correspondant.
V-Oset
- Déplacement vertical de l’image.
- Appuyez sur ▼ / ▲ pour sélectionner « V-Oset» (déplacement vertical), puis appuyez
sur Enter pour accéder au sous-menu correspondant.
Size
- Il permet de régler la taille de l’achage.
- Appuyez sur ▼ / ▲ pour sélectionner «Size» (taille), puis appuyez sur Enter pour accéder
au sous-menu correspondant.
Phase
- Cette option permet d’ajuster les lignes d’interférence horizontales.
- Appuyez sur ▼ / ▲ pour sélectionner «Phase», puis appuyez sur Enter pour accéder au
sous-menu correspondant.
Rétablir la position
Appuyez sur ▼ / ▲ pour sélectionner «Position Reset» (rétablir position), puis appuyez sur
Enter pour rétablir la position d’achage.
Avertissements :
1. Le son ne peut pas être réduit avec l’option PICTURE (image).
2. «AD Switch» ne peut pas être sélectionné pour l′option SOUND (son).
3. Les fonctions de l’audiodescription et de l’accessibilité pour les personnes malentendantes
sont identiques.

TV 0 SERIES 0024/TV 0 SERIES 0032TV 0 SERIES 0024/TV 0 SERIES 0032 105104
FRANÇAIS FRANÇAIS
9. P.MODE (mode Image) : permet de choisir entre diérents réglages de l’image.
10. MENU : permet de naviguer entre les menus du système.
11. SOURCE : ouvrez le menu principal et appuyez dessus pour naviguer entre les sources.
12. ▼ / ▲ ENTER vous permet de naviguer dans les menus à l’écran et de régler les
paramètres du système en fonction de vos préférences.
13. EXIT (sortir) : permet de quitter le menu ou le sous-menu et d’annuler la fonction
correspondante (le cas échéant).
14. DISPLAY (écran) : permet d′acher les informations sur la source et la chaîne.
15. VOL+/VOL- : permet d’augmenter/diminuer le volume.
16. TV/RADIO : lorsque vous regardez une chaîne, il vous permet de passer du mode TV au
mode Radio.
17. GUIDE :
1. Ouvrez l’EPG (Electronic Program Guide, guide électronique des programmes).
2. Retour rapide en mode PVR ou Media Player (lecteur multimédia).
18. TIME SHIFT (contrôle du temps):
1. Contrôle du temps des chaînes DTV.
2. Contrôle du temps en mode PVR ou Media Player.
19. CANCEL (annuler):
1. Lorsqu’une page est sélectionnée en mode Télétexte, elle peut prendre un certain temps
avant d’être disponible ; en appuyant sur le bouton CANCEL, vous reviendrez au mode TV.
Lorsque vous avez trouvé la page souhaitée, le numéro de la page s’ache en haut de l’écran ;
appuyez sur CANCEL pour revenir au mode télétexte et naviguer dans la page.
2. Chapitre précédent en mode PVR ou Media Player.
20. INDEX :
1. Appuyez sur ce bouton pour ouvrir la page Index en mode Télétexte.
2. Permet de quitter la fonction de lecture en mode PVR ou Media Player.
21. SIZE : permet de modier la taille de l’achage en mode télétexte.
22. REVEAL : permet d’acher ou de masquer les mots cachés/achés.
23. BOUTONS DE COULEUR : permet de contrôler le mode Télétexte et de sélectionner les
éléments de menu et les MHEGS dans le menu DVB.
24. CH+/CH- : permet de naviguer parmi les chaînes.
25. FAV/LIST : permet d’ouvrir la liste des favoris. Sélectionnez une chaîne favorite.
26. ASPECT :
1. Permet de sélectionner l’échelle de l’image.
2. Avance rapide en mode PVR ou Media Player (lecteur multimédia).
27. FREEZE : permet de ger l’image.
28. SUB. PG:
1. Permet d’accéder à la sous-page.
2. Chapitre suivant en mode PVR ou Media Player.
29. SUBTITLE : permet d’acher et de régler la langue de la chaîne DTV en cours.
30. HOLD : permet d’activer ou de désactiver l’achage de la page en cours.
Menu Films
- Appuyez sur / pour sélectionner MOVIE (lms) dans le menu principal, puis appuyez
sur Enter.
- Appuyez sur Exit (quitter) pour revenir au menu précédent ; appuyez à nouveau sur ce
bouton pour quitter complètement le menu.
Img. 55
- Appuyez sur / pour sélectionner le lm que vous souhaitez lire, puis appuyez sur le
bouton Enter.
- Appuyez sur le bouton Enter pour lire le lm sélectionné.
- Sélectionnez le menu multimédia auquel vous souhaitez accéder et appuyez sur Enter.
Appuyez sur Exit (quitter) pour revenir au menu précédent ; appuyez à nouveau sur ce
bouton pour quitter complètement le menu.
Img. 56
Menu texte
- Appuyez sur / pour sélectionner TEXT (texte) dans le menu principal, puis appuyez
sur Enter.
- Appuyez sur Exit (quitter) pour revenir au menu précédent ; appuyez à nouveau sur ce
bouton pour quitter complètement le menu.
- Img. 57
- Appuyez sur / pour sélectionner l’élément souhaité, puis appuyez sur le bouton Enter.
- Appuyez sur / pour sélectionner l’option permettant de revenir au menu précédent.
Img. 58
5. TÉLÉCOMMANDE SANS FIL
Img. 59
1. POWER (allumer/éteindre): permet d’allumer le téléviseur ou de le mettre en veille.
2. MUTE (mode silencieux): permet de couper le son. Appuyez à nouveau sur ce bouton ou
sur VOL+ pour réactiver le son.
3. 0 -9 : Appuyez sur 0-9 pour sélectionner directement une chaîne lorsque vous regardez la
télévision. La chaîne change après 2 secondes. Applicable au mode télétexte, etc.
4. DTV/ATV : permet de passer de la télévision analogique à la télévision numérique.
5. : permet de revenir au programme précédemment aché.
6. S.MODE (mode de son) : permet de choisir entre diérents réglages de son.
7. SLEEP (mode veille) : sélectionnez le temps qui doit s’écouler avant que le téléviseur ne
s’éteigne automatiquement.
8. MTS : permet de rechercher les modes NICAM.

TV 0 SERIES 0024/TV 0 SERIES 0032TV 0 SERIES 0024/TV 0 SERIES 0032 107106
FRANÇAIS FRANÇAIS
Pas d’image. Vériez que l’antenne située à l’arrière du téléviseur est
correctement connectée.
Regardez d’autres chaînes pour voir si le problème persiste.
Pas de son. Essayez d’augmenter le volume.
Vériez si le son du téléviseur est coupé ou non.
Il y a du son, mais il n’y a
pas d’image ou l’image
est décolorée.
Essayez d’ajuster le contraste et la luminosité.
Le bruit statique aecte
la qualité vidéo et audio.
Vériez que l’antenne située à l’arrière du téléviseur est
correctement connectée.
Des lignes de séparation
apparaissent
sur l’écran.
Les appareils électriques tels que les sèche-cheveux, les
aspirateurs, etc., peuvent interférer avec le téléviseur. Éteignez
ce type d’appareil.
La télécommande ne
fonctionne pas.
Retirez le lm plastique de la télécommande. Essayez
d’approcher la télécommande du téléviseur et appuyez
sur n’importe quel bouton. Assurez-vous que les piles sont
correctement insérées ou essayez d’utiliser des piles neuves.
Le téléviseur passera en mode veille si aucune réponse n’est
reçue après quelques minutes.
Pas d’image (mode PC). Vériez si le câble est correctement connecté au port HDMI ou
s’il est plié.
Ligne verticale
clignotante (mode PC).
Entrez dans le menu principal et ajustez le positionnement
vertical de l’écran pour supprimer la ligne verticale.
Ligne horizontale (mode
PC)
Ajustez le positionnement horizontal de l’écran pour éliminer
la ligne horizontale.
Écran trop lumineux ou
trop sombre (mode PC)
Réglez la luminosité ou le contraste dans le menu principal.
Pas de réponse du CP. Vériez que la résolution de l’écran de l’ordinateur est
compatible avec celle de l’écran du téléviseur.
Des lignes apparaissent
lors de la connexion d’un
appareil au port RCA.
Veillez à utiliser un câble de bonne qualité.
31. TEXT : permet d’activer ou de désactiver le télétexte.
32. RECLIST : permet d’acher la liste des enregistrements.
33. REC : permet d’enregistrer en mode PVR.
Img. 60
Installation des piles :
- Faites glisser vers le bas et tirez sur le couvercle du compartiment à piles à l’arrière de
la télécommande pour le retirer. Insérez deux piles AAA dans le compartiment à piles en
respectant la polarité (+/-) indiquée. N’insérez pas des piles neuves et des piles usagées
ou des piles de types diérents.
- Faites glisser le couvercle jusqu’à ce que vous l’entendiez s’enclencher.
Utiliser la télécommande:
- Sauf indication contraire, toutes les fonctions du téléviseur peuvent être contrôlées à
l’aide de la télécommande.
- Dirigez toujours la télécommande directement vers le capteur situé à l’avant du téléviseur.
PRÉCAUTION : n’avalez pas les piles, il existe un risque de brûlures chimiques. Ce produit
contient des piles. L’ingestion de piles peut provoquer de graves brûlures internes en
seulement 2 heures et peut entraîner la mort. Maintenez les piles hors de portée des enfants. Si
le compartiment à piles ne se ferme pas correctement, cessez d’utiliser le produit et gardez-le
hors de portée des enfants. En cas d’ingestion de piles, consultez immédiatement un médecin.
6. RÉSOLUTION DE PROBLÈMES
Il n’y a pas de distribution
électrique.
Vériez si le câble CA du téléviseur est connecté ou non. S’il n’y
a toujours pas de courant, débranchez la che et rebranchez-
la après 60 secondes. Rétablissez l’alimentation.
Le téléviseur ne
reçoit pas le signal
correctement.
Si des bâtiments élevés ou des montagnes se trouvent à
proximité du téléviseur, l’écran peut présenter des images
fantômes ou des images doubles. Si c’est le cas, vous pouvez
corriger l’image manuellement en ajustant la direction de
l’antenne externe.
Si vous utilisez une antenne intérieure, il peut être plus
dicile de capter le signal. Ajustez la direction de l’antenne
pour assurer une bonne réception. Si la réception du signal ne
s’améliore pas, il peut être nécessaire d’utiliser une antenne
externe.

TV 0 SERIES 0024/TV 0 SERIES 0032TV 0 SERIES 0024/TV 0 SERIES 0032 109108
FRANÇAIS FRANÇAIS
batteries correspondantes, vous devez contacter les autorités locales.
Le respect des directives susmentionnées contribuera à la protection de l’environnement.
9. GARANTIE ET SAV
Cecotec est responsable envers l’utilisateur nal ou le consommateur de tout défaut de
conformité existant au moment de la livraison du produit dans les termes, conditions et délais
établis par la réglementation applicable.
Il est recommandé que les réparations soient eectuées par du personnel qualié.
Si vous détectez un incident ou un problème avec le produit, vous devez contacter le Service
Après-Vente Ociel de Cecotec au +34 9 63 21 07 28.
10. COPYRIGHT
Les droits de propriété intellectuelle des textes de ce manuel appartiennent à CECOTEC
INNOVACIONES, S.L. Tous droits réservés. Le contenu de cette publication ne peut être,
en totalité ou en partie, reproduit, stocké dans un système de récupération de données,
transmis ou distribué par quelque moyen que ce soit (électronique, mécanique, photocopie,
enregistrement ou similaire) sans l’autorisation préalable de CECOTEC INNOVACIONES, S.L.
11. DÉCLARATION DE CONFORMITÉ SIMPLIFIÉE
Par la présente, Cecotec Innovaciones déclare que ces téléviseurs, modèles 02610_TV 0
Series 0024 et 02612_TV 0 Series 0032 sont conformes à la directive 2014/53/UE sur les
équipements radioélectriques.
Le texte intégral de la déclaration de conformité de l’UE peut être consulté sur le site web
suivant :
www.cecotec.es
Le problème persiste. Débranchez le câble d’alimentation, attendez 30 secondes et
rebranchez-le dans la prise de courant. Si le problème persiste,
n’essayez pas de réparer le téléviseur vous-même. Veuillez
contacter le Service Après-Vente ociel de Cecotec.
Ne laissez pas le téléviseur acher une image statique, qu’il s’agisse d’une vidéo en pause,
d’un écran de menu, etc., pendant une longue période an d’éviter que l’écran ne brûle.
7. SPÉCIFICATIONS TECHNIQUES
Produit TV 0 Séries 0024 TV 0 Séries 0032
Référence 02610 02612
QR
Puissance 36 W 56 W
Voltage 100 – 240 V
Fréquence 50 / 60 Hz
Durée de conservation 60000 heures (environ)
Les termes HDMI et HDMI High-Denition Multimedia Interface, ainsi que le logo HDMI sont
des marques commerciales ou des marques déposées de HDMI Licensing LLC aux États-Unis
et dans d’autres pays.
Les spécications techniques peuvent être modiées sans notication préalable an
d’améliorer la qualité du produit.
Produit fabriqué en Chine I Conçu en Espagne
8. RECYCLAGE DES ÉQUIPEMENTS ÉLECTRIQUES ET ÉLECTRONIQUES
Ce symbole indique que, conformément à la réglementation en vigueur,
le produit et/ou la batterie doivent être éliminés séparément des déchets
municipaux. Lorsque ce produit atteint la n de sa vie utile, vous devez retirer
les piles ou batteries et les apporter à un point de collecte désigné par les
autorités locales.
Pour obtenir des informations détaillées sur la manière la plus adéquate
de vous défaire de vos appareils électriques et électroniques et/ou des

TV 0 SERIES 0024/TV 0 SERIES 0032TV 0 SERIES 0024/TV 0 SERIES 0032 111110
DEUTSCH DEUTSCH
Legende Abb. 1:
1. Wand
2. Halterung
3. Wand
4. Wandschraube
Hinweis:
1. Die Wandhalterung (VESA) ist nicht im Lieferumfang enthalten.
2. Achten Sie bei der Montage des Fernsehgeräts darauf, es in sicherem Abstand zu anderen
Geräten zu halten.
3. Wenden Sie sich gegebenenfalls an einen kompetenten Techniker, um Gefahren zu
vermeiden.
4. Die Abbildung dient nur als Kundenreferenz.
5. Befolgen Sie die Anweisungen im Handbuch, um das Fernsehgerät sicher am Ständer zu
befestigen.
6. Befolgen Sie den VESA-Standard für die ordnungsgemäße Befestigung des Fernsehgeräts
an der Halterung.
Installation und Anschluss des Fernsehers
Tv Einstellung. Abb. 3
- Stellen Sie den Fernseher an einem stabilen Ort auf, der sein Gewicht tragen kann.
- Um Gefahren zu vermeiden, halten Sie das Fernsehgerät von Wasser oder Wärmequellen
(z. B. Licht, Kerzen oder Heizgeräten) fern und sorgen Sie für ausreichende Belüftung an
der Rückseite des Fernsehgeräts.
Schließen Sie die Antenne und die Stromversorgung an
1. Verbinden Sie das Antennenkabel mit der Antennenbuchse auf der Rückseite des
Fernsehers.
2. So schließen Sie das Netzkabel des Fernsehgeräts an:
Schalten Sie den Fernseher ein
3. Drücken Sie die Ein-/Aus-Taste am Fernseher: Die Kontrollleuchte leuchtet grün. Wenn
sich das Fernsehgerät im Standby-Modus bendet (rote Kontrollleuchte), drücken Sie die
Ein/Aus-Taste auf der Fernbedienung, um das Fernsehgerät einzuschalten.
Legende Abbildung 3:
3. TV-Signalausgang
Hinweis: Die Abbildung dient nur als Kundenreferenz.
Montage der Halterung
1. Nehmen Sie den Fernseher, das Zubehör und den Ständer aus der Verpackung (bei einigen
Modellen ist kein Ständer enthalten). Abb. 4
1. VOR DEM GEBRAUCH
- Dieses Gerät ist so verpackt, dass es während des Transports geschützt bleibt. Nehmen
Sie das Gerät aus dem Karton und entfernen Sie das gesamte Verpackungsmaterial.
Bewahren Sie die Verpackung an einem sicheren Ort auf, damit das Gerät nicht beschädigt
wird, wenn Sie ihn später transportieren müssen. Wenn Sie die Originalverpackung
entsorgen möchten, stellen Sie sicher, dass alle Artikel wiederverwerten.
- Prüfen Sie, ob die Lieferung vollständig und in gutem Zustand ist. Wenn die Lieferung fehlt
oder nicht in gutem Zustand sind, kontaktieren Sie den technischen Kundendienst von
Cecotec.
Vollständiger Inhalt:
- Fernseher
- Fernbedienung
- 2 AA-Batterien
- Bedienungsanleitung
Hinweis:
Die Graken in diesem Handbuch sind schematische Darstellungen und stimmen
möglicherweise nicht genau mit dem Produkt überein.
2. MONTAGE
Montage der Grundplatte
So befestigen Sie den Fernseher an der Wand:
Abb. 1
1. Stellen Sie bitte zuerst den Fernseher auf den Tisch und legen Sie ein weiches Tuch auf
den Tisch, um Kratzer auf dem Bildschirm zu vermeiden.
2. Verwenden Sie den Schraubendreher, um die Schrauben zu entfernen, die am Tretlager
befestigt sind (wie in Abbildung 1 gezeigt); Entfernen Sie dann das Tretlager (Schrauben
und Tretlager vorsichtig entfernen).
3. Wählen Sie eine Halterung, die gemäß den Abmessungen des Fernsehgeräts an der Wand
befestigt werden kann, wie in den Abbildungen 2 und 3 gezeigt.
4. Bohren Sie vier Löcher in die Wand und setzen Sie vier Schrauben ein
5. Verwenden Sie den Schraubendreher, um die Schraube auf der Rückseite des
Fernsehgeräts zu befestigen. Hängen Sie als nächstes den Fernseher an die Wand.

TV 0 SERIES 0024/TV 0 SERIES 0032TV 0 SERIES 0024/TV 0 SERIES 0032 113112
DEUTSCH DEUTSCH
6. Klären Sie Kinder über die Gefahren des Kletterns auf Möbel auf, um den Fernseher oder
die Fernbedienung zu erreichen.
Beachten Sie die oben genannten Punkte, wenn Sie den Fernseher an einen anderen Ort stellen
möchten.
3. CONTROLLER-TASTEN UND -SCHNITTSTELLE
Controller-Tasten
Symbol anzeigen/ausblenden: Wenn das Symbol nicht angezeigt wird, drücken Sie bitte die
entsprechende Taste: Das Tastensymbol wird wie in der Abbildung oben angezeigt und nach 5
Sekunden Inaktivität automatisch ausgeschaltet.
Symbolauswahl: Drücken Sie kurz die entsprechende Taste und bewegen Sie sich nach rechts,
um das Symbol auszuwählen.
Auswahl der Symbolfunktion: Drücken Sie lange auf die Taste, um die ausgewählte
Symbolfunktion zu erhalten.
Symbolbeschreibung:
Aus-Symbol: Es entspricht der „POWER“-Taste auf der Fernbedienung.
Menüsymbol: Es entspricht der „MENU“-Taste auf der Fernbedienung.
Quellensymbol: Es entspricht der „SOURCE“-Taste auf der Fernbedienung.
CH+-Symbol (zum nächsten Kanal gehen): Es entspricht der „CH+“-Taste auf der
Fernbedienung.
CH- Symbol (zurück zum vorherigen Kanal): Es entspricht der „CH-“-Taste auf der
Fernbedienung.
Volume+ (Lautstärke erhöhen) -Symbol entspricht der „VOL+“-Taste auf der Fernbedienung.
Symbol für Lautstärke (Lautstärkereduzierung): Es entspricht der „VOL-“-Taste auf der
Fernbedienung.
Interface
AV-Eingang
Externer AV-Signaleingang und rechter/linker Ton Kanal
CI-STECKPLATZ
Common Interface (CI)-Kartensteckplatz erfordert
Konditional Access Module (CAM) für Pay-TV.
HDMI-Eingang
Digitaler Signaleingang vom HDMI-Videoanschluss
2. Um Schäden am Fernseher zu vermeiden, legen Sie ihn auf ein Tuch oder weiches Material,
das auf dem Tisch liegt, und schrauben Sie den Hals des Ständers an den Fernseher.
3. Befestigen Sie den Ständer ordnungsgemäß am Fernseher, um die Installation
abzuschließen.
Tipp:
Um die Installation des Sockels zu erleichtern und Schäden zu vermeiden, empfehlen wir
Ihnen, einen Schraubendreher vom Typ PH2 zu verwenden. Abb. 5
Erste Einrichtung
Schließen Sie ein HF-Kabel an den „RF-In“-Eingang des Fernsehers und an den Eingang Ihrer
TV-Antenne an.
Sprache auswählen
Drücken Sie / um die Systemsprache auszuwählen.
Land auswählen
Drücken Sie ▼ / ▲ um die Option „Land“ zu markieren.
Drücken Sie / um das gewünschte Land auszuwählen.
Abb. 6
Abb. 7
Automatische Abstimmung
Um Ihr Fernsehgerät automatisch abzustimmen, drücken Sie „Menü“ und die linke Pfeiltaste,
um die ATV-Abstimmung zu überspringen; Gehen Sie genauso vor, um die DTV-Abstimmung
zu überspringen.
Abb. 8
WARNUNG:
Stellen Sie das Fernsehgerät nicht an einem instabilen Ort auf, um zu verhindern, dass
es herunterfällt und Verletzungen oder Schäden verursacht. Viele Verletzungen können
vermieden werden, indem grundlegende Vorsichtsmaßnahmen getroen werden, wie zum
Beispiel:
1. Verwenden Sie vom Hersteller des Fernsehgeräts empfohlene Schränke oder Halterungen.
2. Verwenden Sie nur Möbel, die das Gewicht des Fernsehers sicher tragen können.
3. Achten Sie darauf, dass der Fernseher nicht über die Kante der tragenden Möbel
hinausragt.
4. Stellen Sie das Fernsehgerät nicht auf hohe Möbel (z. B. Schränke oder Bücherregale),
ohne sowohl die Möbel als auch das Fernsehgerät an einer geeigneten Stütze zu
befestigen.
5. Legen Sie keine Tischdecken oder andere Materialien zwischen das Fernsehgerät und die
tragenden Möbel.

TV 0 SERIES 0024/TV 0 SERIES 0032TV 0 SERIES 0024/TV 0 SERIES 0032 115114
DEUTSCH DEUTSCH
Manuelles ATV-Tuning
Aktueller Kanal
Einstellung der Kanalnummer.
Farbsystem
Auswahl des Farbsystems.
(Verfügbare Systeme: AUTO, PAL, SECAM)
Soundsystem
Auswahl des Soundsystems.
Abstimmung Feineinstellung
Präzise Einstellung der Kanalfrequenz.
Suchen
Kanalsuche.
Abb. 11
Manuelle DTV-Abstimmung
- Drücken Sie ▼ / ▲ um „Manuelle DTV-Suche“ auszuwählen; Drücken Sie dann Enter, um
auf das entsprechende Untermenü zuzugreifen.
- Drücken Sie / , um den Kanal auszuwählen; Drücken Sie dann Enter, um das Programm
zu suchen.
Abb. 12
Kanäle bearbeiten
Drücken Sie ▼ / ▲, um „Program Edit“ (Kanäle bearbeiten) auszuwählen; Drücken Sie dann
Enter, um auf das entsprechende Untermenü zuzugreifen. Abb. 13
Die dreifarbigen Tasten sind die Direktzugristasten für die Kanalprogrammierung.
Drücken Sie zuerst ▼ / ▲, um den Kanal zu markieren, den Sie auswählen möchten; nächste:
- Drücken Sie die rote Taste, um den Kanal aus der Liste zu löschen.
- Drücken Sie die gelbe Taste, um den Kanal in der Liste zu scrollen.
- Drücken Sie die blaue Taste, um den ausgewählten Kanal zu überspringen.
- Drücken Sie die Taste „Fav“, um einen Kanal zu Ihrer Favoritenliste hinzuzufügen oder
daraus zu entfernen (der Fernseher überspringt den Kanal automatisch, wenn Sie CH+/-
drücken, um den Kanal zu wechseln).
ANT 75
Eingang für den Anschluss der Antenne/Kabel (75/VHF/UHF).
USB-Eingang
Stecken Sie hier ein USB-Gerät ein, um Ihre Mediendateien
abzuspielen oder Programme mit der PVR-Funktion
aufzunehmen.
COAXIAL
Zum Anschließen des SPDIF-Empfängers.
Bitte halten Sie die HDMI- und USB-Anschlüsse des Fernsehers fern, schützen Sie sie
und berühren Sie sie nicht, um die Lebensdauer des Fernsehers zu verlängern und einen
ordnungsgemäßen Betrieb zu gewährleisten.
Verbindungsschema für externe Geräte
Siehe Abbildung 2.
Legende Abbildung 2:
1. DVD
2. Set-Top Box
3. AV-Eingangsanschluss
4. HDMI-Eingangsanschluss
5. USB-Anschluss
6. TV-Anschluss
4. MENÜS UND MODI
Hauptmenü
Menü KANAL (Kanal)
Drücken Sie die MENU-Taste, um das Hauptmenü anzuzeigen.
Drücken Sie / um im Hauptmenü KANAL auszuwählen. Abb. 9
1. Drücken Sie ▼ / ▲, um die Option auszuwählen, die Sie im Menü KANAL einstellen
möchten.
2. Drücken Sie Enter (Bestätigen), um die Einstellung zu bestätigen.
3. Nachdem die Einstellung abgeschlossen ist, drücken Sie die Enter-Taste, um zu speichern
und zum vorherigen Menü zurückzukehren.
Automatische Abstimmung
Drücken Sie ▼ / ▲ um „Automatische Sendersuche“ auszuwählen; drücken Sie dann die
Enter/ .
Abb. 10

TV 0 SERIES 0024/TV 0 SERIES 0032TV 0 SERIES 0024/TV 0 SERIES 0032 117116
DEUTSCH DEUTSCH
Bildmodus
- Drücken Sie ▼ / ▲, um „Picture Mode“ (Kanäle bearbeiten) auszuwählen; Drücken Sie dann
OK, um auf das entsprechende Untermenü zuzugreifen.
- Sie können den Kontrast, die Helligkeit, die Farbe, die Schärfe und den Farbtonwert ändern,
wenn sich das Bild im persönlich Modus (benutzerdeniert) bendet.
Ratschläge: Sie können die PMODE-Taste drücken, um die Bildeinstellungen direkt zu ändern.
Abb. 22
Kontrast/Helligkeit/Farbe/Schärfe/Farbton
Drücken Sie ▼ / ▲ um den gewünschten Wert auszuwählen; Drücken Sie dann Enter/ um
den Wert anzupassen.
- Kontrast: Hebt das Licht im Bild hervor, aber der Schatten ändert sich nicht.
- Helligkeit: Passen Sie den Glasfaserausgang an; wirkt sich auf die Dunkelheit des Bildes
aus.
- Farbe: Passt die Farbsättigung an.
- Farbton: Es wird verwendet, um die Farbverschiebung in NTSC-Rundfunk zu kompensieren.
- Schärfe: Passt den Detaillierungsgrad des Bildes an.
Farbtemperatur:
- Verändert die Wahrnehmung des Farbbereichs des Fernsehers.
- Drücken Sie ▼ / ▲, um „Farbtemperatur“ auszuwählen; Drücken Sie dann OK, um auf das
entsprechende Untermenü zuzugreifen.
- Drücken Sie ▼ / ▲, um die gewünschte Option auszuwählen; Farbtemperatur: Cool (kalt),
Medium (neutral), Warm (warm).
Abb. 23
- Cool (kalt): Erhöht den Blauton und reduziert Weiß.
- Medium (neutral): Verstärkt Pinke und Blau und reduziert Weiß.
- Warm (warm): Erhöht Rot und reduziert Weiß.
Schalldämmung
Filtert und reduziert Ton und verbessert die Bildqualität. Drücken Sie ▼ / ▲, um
„Rauschunterdrückung“ auszuwählen; Drücken Sie dann OK, um auf das entsprechende
Untermenü zuzugreifen. Abb. 24
- O (ausgeschaltet): Wählen Sie diese Option, um die Tonerkennung zu deaktivieren
- Low (niedrig): Es erkennt und reduziert niedrige Geräusche.
- Middle (mäßig): Es erkennt und reduziert mäßig Geräusche.
- High (hoch): Es erkennt und reduziert Höhe Geräusche.
- Default (vorbestimmt): Vorbestimmt.
Programmliste
- Drücken Sie ▼ / ▲, um „Program Edit“ (Programmliste) auszuwählen; Drücken Sie dann
Enter, um auf das entsprechende Untermenü zuzugreifen. Die Programmliste ist für DTV
und Satellit verfügbar. Abb. 14
- Drücken Sie die gelbe Taste, um die untenstehende Benutzeroberäche aufzurufen. Abb.
15
- Bei Programmierproblemen erscheint eine Warnmeldung. Abb. 16
Informationen zum Signal
Drücken Sie ▼ / ▲, um Signalinformationen auszuwählen: Drücken Sie Enter, um detaillierte
Signalinformationen anzuzeigen (nur mit DTV-Signal verfügbar). Abb. 17
Informationen zu CI (Common Interface, gemeinsame Schnittstelle)
Drücken Sie ▼ / ▲, um „CI-Informationen“ auszuwählen; Drücken Sie dann Enter, um die
Details der CI-Karte (sofern eingesetzt) anzuzeigen.
HINWEIS: CI-Karte nicht im Lieferumfang enthalten.
Liste der Satellitenkanäle Abb. 18
Automatische Abstimmung
Drücken Sie ▼ / ▲ um „Automatische Sendersuche“ auszuwählen; drücken Sie dann Enter/
. Abb. 19
Satellitenschüssel einrichten
Drücken Sie ▼ / ▲, um „Dish Setup“ (Satellitenschüssel-Setup) auszuwählen; drücken Sie
dann Enter/ zur Bestätigung. Abb. 20
Bild Menü
- Drücken Sie die MENU-Taste, um das Hauptmenü anzuzeigen.
- Drücken Sie / um im Hauptmenü PICTURE (Bild) im Bild Menü auszuwählen. Abb. 21
Hinweis:
- 120-Hz-Modus NICHT UNTERSTÜTZT
- 60-Hz-Modus KOMPATIBEL
1. Drücken Sie ▼ / ▲, um die Option auszuwählen, die Sie im PICTURE-Menü einstellen
möchten.
2. Drücken Sie OK, um die Einstellung zu bestätigen.
3. Nachdem die Einstellung abgeschlossen ist, drücken Sie die MENÜ-Taste, um zu
speichern und zum vorherigen Menü zurückzukehren.

TV 0 SERIES 0024/TV 0 SERIES 0032TV 0 SERIES 0024/TV 0 SERIES 0032 119118
DEUTSCH DEUTSCH
SPDIF Modus
Drücken Sie ▼ / ▲ um „SPDIF Mode“ (SPDIF Modus) auszuwählen; Drücken Sie dann, um
zwischen O/PCM/Auto zu wählen.
AD Switch
Drücken Sie ▼ / ▲ um diese Option auszuwählen; Drücken Sie dann / um es ein- oder
auszuschalten. Der Fernseher hat auch eine Audiodeskriptionsfunktion für Blinde.
HINWEIS:
Balance (ausgewogen): Passt die Audioausgabe für ein ausgewogeneres Hörerlebnis an.
Auto Volume Level (automatische Lautstärke) Es reduziert automatisch den Unterschied
zwischen der Lautstärke des Kanals und der des Programms.
Zeit Menü
- Drücken Sie die MENU-Taste, um das Hauptmenü anzuzeigen.
- Drücken Sie / um im Hauptmenü TIME (Zeit) auszuwählen.
Abb. 28
1. Drücken Sie ▼ / ▲, um die Option auszuwählen, die Sie im TIME-Menü einstellen möchten.
2. Drücken Sie Enter, um die Einstellung zu bestätigen.
3. Nachdem die Einstellung abgeschlossen ist, drücken Sie die Enter-Taste, um zu speichern
und zum vorherigen Menü zurückzukehren.
Zeitzone
- Drücken Sie ▼ / ▲, um „Time Zone“ (Zeitzone) auszuwählen; Drücken Sie dann Enter, um
auf das entsprechende Untermenü zuzugreifen. Abb. 29
- Drücken Sie ▼ / ▲/ / um die Zeit Zone auszuwählen.
Abschalten-Timer
- Drücken Sie ▼ / ▲, um „Sleep Timer“ (Abschalten-Timer) auszuwählen; Drücken Sie dann
Enter, um auf das entsprechende Untermenü zuzugreifen. Abb. 30
- Drücken Sie ▼ / ▲ um aus den verfügbaren Optionen auszuwählen.
- O (ausgeschaltet), 15 min, 30 min, 45 min, 60 min, 90 min, 120 min, 240 min).
Automatischer Standby-Modus
- Drücken Sie ▼ / ▲, um „Auto Standby“ (Automatisches Standby-Modus) auszuwählen;
Drücken Sie dann Enter, um auf das entsprechende Untermenü zuzugreifen. Abb. 31
- Drücken Sie ▼ / ▲ um aus den verfügbaren Optionen auszuwählen.
Ratschläge: Führen Sie während der ausgewählten Zeit keine Operationen mit dem Controller
durch; andernfalls wird die Zeit zurückgesetzt.
HDMI-Modus
- Drücken Sie ▼ / ▲, um „HDMI-Mode“ (HDMI-Modus) auszuwählen; Drücken Sie dann OK,
um auf das entsprechende Untermenü zuzugreifen. Abb. 25
- Drücken Sie ▼ / ▲ so wählen Sie aus den verfügbaren Bild Modi aus: Auto/Video/PC.
Soundmenü
- Drücken Sie die MENU-Taste, um das Hauptmenü anzuzeigen. Abb. 26
- Drücken Sie / um im Hauptmenü KANAL (Kanal) auszuwählen.
1. Drücken Sie / , um die Option auszuwählen, die Sie im SOUND-Menü einstellen möchten.
2. Drücken Sie Enter (Bestätigen), um die Einstellung zu bestätigen.
3. Nachdem die Einstellung abgeschlossen ist, drücken Sie die Enter-Taste, um zu speichern
und zum vorherigen Menü zurückzukehren.
Abb. 27
Sound Modus
Drücken Sie ▼ / ▲, um „Sound Mode“ (Sound Modus) auszuwählen; Drücken Sie dann OK, um
auf das entsprechende Untermenü zuzugreifen. Drücken Sie ▼ / ▲ um aus den verfügbaren
Optionen auszuwählen.
Sie können den Höhen- und Bass wert ändern, wenn sich der Sound im benutzerdenierten
Modus bendet.
Ratschläge: Drücken Sie die SMODE Taste auf der Fernbedienung, um den Ton Modus direkt
zu ändern.
Standard (Standard): Erzeugt einen ausgewogenen Klang in allen Umgebungen.
Music (Musik): Es bewahrt den ursprünglichen Ton. Ideal für Musikprogramme.
Movie (Filme): Verbessert Höhen und Bässe für ein besseres Klangerlebnis.
Sports (Sport): Verbessert die Stimmklarheit beim Sport.
Personal (personalisiert): Wählen Sie diese Option, um die Bildeinstellungen personalisieren.
Hinweis: Höhen und Bässe sind nur im benutzerdenierten Modus verfügbar und können nach
Belieben angepasst werden.
Balance (ausgewogen):
Drücken Sie ▼ / ▲ um diese Option auszuwählen; Drücken Sie dann / um den Wert
anzupassen.
Auto Volume Level (automatische Lautstärke)
Drücken Sie ▼ / ▲ um diese Option auszuwählen; Drücken Sie dann / um es ein- oder
auszuschalten.

TV 0 SERIES 0024/TV 0 SERIES 0032TV 0 SERIES 0024/TV 0 SERIES 0032 121120
DEUTSCH DEUTSCH
Tastensperren
Drücken Sie ▼ / ▲ um die Option „Key Lock“ (Tastensperre) auszuwählen; Drücken Sie
dann / , um es ein- oder auszuschalten. Durch Aktivieren dieser Option werden die
Fernbedienungstasten gesperrt.
Hotelmodus (Kompatibilität erforderlich)
Abb. 38
1. Drücken Sie ▼ / ▲ auf der Fernbedienung, um „Hotel Mode“ (Hotel Modus) im Lock Menü
(Sperrung) auszuwählen.
2. Drücken Sie die Enter-Taste auf der Fernbedienung, um das entsprechende Untermenü
aufzurufen.
3. Nachdem die Einstellung abgeschlossen ist, drücken Sie die MENÜ-Taste, um zu speichern
und zum vorherigen Menü zurückzukehren.
Hotel Modus
Drücken Sie ▼ / ▲ um die Option „Hotel Mode“ (Hotel Modus) auszuwählen; Drücken Sie dann
/ , um es ein- oder auszuschalten.
Quellensperre
- Drücken Sie ▼ / ▲ „Source Lock“ (Quellensperre) auszuwählen; Drücken Sie dann Enter,
um auf das entsprechende Untermenü zuzugreifen.
- Der Hoteladministrator kann den Quellenblock auf DTV/HDMI, AV usw. einstellen. Der
Benutzer kann die Quellensperre nicht auswählen.
Standardquelle
- Drücken Sie ▼ / ▲ „Default Source“ (Standardquelle) auszuwählen; Drücken Sie dann
Enter, um auf das entsprechende Untermenü zuzugreifen.
- Der Hoteladministrator kann die Standardschrift festlegen. Der Fernseher schaltet sich
mit der Standardquelle ein.
Standardprogrammierung
- Drücken Sie ▼ / ▲ um „Default Prog“ (Standardprogrammierung) auszuwählen; Drücken
Sie dann / , um die gewünschten Einstellungen vorzunehmen (verfügbar mit „TV“ als
Standardquelle).
- Der Hoteladministrator kann den Standardzeitplan festlegen. Es kann nur die DTV/
TV-Standardquelle eingestellt werden
Standardlautstärke
- Drücken Sie ▼ / ▲ um „Default Volume“ (Standardlautstärke) auszuwählen; Drücken Sie
dann / , um die gewünschten Einstellungen vorzunehmen.
OSD Timer
- Drücken Sie ▼ / ▲, um „OSD Timer“ (OSD-Timer) auszuwählen; Drücken Sie dann Enter,
um auf das entsprechende Untermenü zuzugreifen. Abb. 32
- Drücken Sie ▼ / ▲ um aus den verfügbaren Optionen auszuwählen.
Sperren Menü
Drücken Sie die MENU-Taste, um das Hauptmenü anzuzeigen. Drücken Sie / um im
Hauptmenü LOCK (Sperren) auszuwählen.
Abb. 33
1. Drücken Sie ▼ / ▲, um die Option auszuwählen, die Sie im LOCK SYSTEM-Menü einstellen
möchten.
2. Drücken Sie Enter um die Einstellung zu bestätigen.
3. Nachdem die Einstellung abgeschlossen ist, drücken Sie
die MENÜ-Taste, um zum vorherigen Menü zurückzukehren.
System Sperrung
Drücken Sie ▼ / ▲ um „System Lock“ auszuwählen; Drücken Sie dann die Enter, um auf die
nächsten 3 Optionen zuzugreifen.
Abb. 34
Das Standardpasswort ist 0000. Wenn Sie das Passwort vergessen haben, versuchen Sie es
mit „8899“.
Passwort festlegen
Drücken Sie ▼ / ▲ um „Set Password“ auszuwählen; Drücken Sie dann Enter, um das
entsprechende Untermenü zum Festlegen des Passworts aufzurufen.
Abb. 35
Kanalsperre
- Drücken Sie ▼ / ▲ „Channel Lock“ (Kanalsperre) auszuwählen; Drücken Sie dann Enter, um
auf das entsprechende Untermenü zuzugreifen.
- Drücken Sie die grüne Taste, um den gewünschten Kanal zu sperren oder freizugeben.
Abb. 36
Elterliche Kontrolle
Drücken Sie ▼ / ▲ zur Auswahl von „Parental Guidance“ (Elterliche Kontrolle); Drücken Sie
dann Enter, um auf das entsprechende Untermenü zuzugreifen, und wählen Sie das Alter Ihrer
Kinder aus. Abb. 37

TV 0 SERIES 0024/TV 0 SERIES 0032TV 0 SERIES 0024/TV 0 SERIES 0032 123122
DEUTSCH DEUTSCH
Datenbank exportieren
Der Hotelmanager kann den Import-USB-Datenträger in andere Fernseher einstecken. Sie
können diese Funktion dann verwenden, um alle Kanäle auf die neuen Fernseher zu klonen.
Wiederherstellen
Diese Funktion Standardeinstellungen des Hotelmodus wiederherstellen
Den Hotelmodus können Sie nach Eingabe des Systempassworts 8888 im Hauptmenü Schloss
auswählen (Voraussetzung ist, dass die Software die Hotelfunktion standardmäßig auf Önen
setzt).
Abb. 39
Kongurationsmenü
- Drücken Sie die MENU-Taste, um das Hauptmenü anzuzeigen.
- Drücken Sie / um SETUP (Einstellung) im Hauptmenü auszuwählen. Abb. 40
1. Drücken Sie ▼ / ▲, um die Option auszuwählen, die Sie im SETUP-Menü einstellen
möchten.
2. Drücken Sie Enter (Bestätigen), um die Einstellung zu bestätigen.
3. Nachdem die Einstellung abgeschlossen ist, drücken Sie die Enter-Taste, um zu speichern
und zum vorherigen Menü zurückzukehren.
OSD-Sprache
- Wählen Sie eine Sprache für das OSD Menü Das Standardsprache ist Englisch
- Drücken Sie ▼ / ▲ / / um „Menüsprache“ auszuwählen.
Abb. 41
Teletext Sprache
- Drücken Sie ▼ / ▲, um „TT-Language“ (Teletext Sprache) auszuwählen; Drücken Sie dann
Enter, um auf das entsprechende Untermenü zuzugreifen.
- Drücken Sie ▼ / ▲ um ein Teletext Sprache auszuwählen.
Abb. 42
Audio Sprachen
- Drücken Sie ▼ / ▲, um „Audio Languages“ (Audio Sprachen) auszuwählen; Drücken Sie
dann Enter, um auf das entsprechende Untermenü zuzugreifen.
- Drücken Sie / um auf die verfügbaren Audiosprachen zuzugreifen.
- Drücken Sie ▼ / ▲ / / um die gewünschte Audiosprache auszuwählen.
Abb. 43
- Der Hoteladministrator kann die Standardlautstärke einstellen. Der Fernseher schaltet
sich mit der Standardlautstärke ein.
Maximale Lautstärke
- Drücken Sie ▼ / ▲ um „Max Volume“ (Maximales Lautstärke) auszuwählen; Drücken Sie
dann / , um die gewünschten Einstellungen vorzunehmen.
- Der Hoteladministrator kann die maximale Lautstärke einstellen. Der Benutzer kann die
Lautstärke unterhalb des eingestellten Höchstpegels einstellen.
Kanal
Drücken Sie ▼ / ▲ um die CHANNEL (Kanal) Option auszuwählen; Drücken Sie dann / um
es ein- oder auszuschalten.
Bild
Drücken Sie ▼ / ▲ um die PICTURE (Bild) Option auszuwählen; Drücken Sie dann / um es
ein- oder auszuschalten.
Laut
Drücken Sie ▼ / ▲ um die SOUND (Laut) Option auszuwählen; Drücken Sie dann / um es
ein- oder auszuschalten.
Zeit
Drücken Sie ▼ / ▲ um die TIME (Zeit) Option auszuwählen; Drücken Sie dann / um es ein-
oder auszuschalten.
Blockierung
Drücken Sie ▼ / ▲ um die Option SPERREN auszuwählen; Drücken Sie dann um es ein- oder
auszuschalten.
Einstellung
Drücken Sie ▼ / ▲ um die SETUP (Einstellung) Option auszuwählen; Drücken Sie dann / um es
ein- oder auszuschalten.
Einstellung löschen
Drücken Sie ▼ / ▲ zur Auswahl von „Clear Lock“ (Löscheinstellung); Drücken Sie dann Enter,
um die vorherige Einstellung rückgängig zu machen.
Datenbank importieren
Der Hotelmanager kann Kanalinformationen importieren, indem er ein USB-Gerät in den
Anschluss einsteckt.

TV 0 SERIES 0024/TV 0 SERIES 0032TV 0 SERIES 0024/TV 0 SERIES 0032 125124
DEUTSCH DEUTSCH
HDMI CEC (falls HDMI CEC/ARC-Funktion unterstützt)
Drücken Sie ▼ / ▲ „HDMI CEC“ auszuwählen; Drücken Sie dann Enter, um auf das entsprechende
Untermenü zuzugreifen. Abb. 47
- HDMI CEC: Drücken Sie / zum Aktivieren/deaktivieren der HDMI-CEC-Option.
- HDMI ARC: Drücken Sie / zum Aktivieren/deaktivieren der HDMI-CEC-Option
- Auto Standby (Automatisches Standby-Modus): Drücken Sie / zum Aktivieren/
deaktivieren der Auto Standby Option.
- Device List (Geräteliste): Drücken Sie Enter, um das Hauptmenü des Geräts zu önen.
Bildschirmmenü
- Drücken Sie die MENU-Taste, um das Hauptmenü anzuzeigen.
- Drücken Sie / um im Hauptmenü SCREEN (Bild) auszuwählen. Abb. 48
1. Drücken Sie / , um die Option auszuwählen, die Sie im Menü SCREEN einstellen
möchten.
2. Drücken Sie Enter (Bestätigen), um die Einstellung zu bestätigen.
3. Nachdem die Einstellung abgeschlossen ist, drücken Sie die Enter-Taste, um zu speichern
und zum vorherigen Menü zurückzukehren.
Automatische Anpassung
Drücken Sie Enter, um die folgenden Optionen automatisch anzupassen: H-Oset/V-Oset/
Size/Phase.
H-Oset
- Horizontaler Versatz des Bildes.
- Drücken Sie ▼ / ▲ „H-Oset“ (Horizontale Verschiebung) auszuwählen; Drücken Sie dann
Enter, um auf das entsprechende Untermenü zuzugreifen.
V-Oset
- Vertikaler Versatz des Bildes.
- Drücken Sie ▼ / ▲ „V-Oset“ (Vertikaler Verschiebung) auszuwählen; Drücken Sie dann
Enter, um auf das entsprechende Untermenü zuzugreifen.
SIZE
- Passen Sie die Anzeigegröße an.
- Drücken Sie ▼ / ▲ „Size“ (Größe) auszuwählen; Drücken Sie dann Enter, um auf das
entsprechende Untermenü zuzugreifen.
Phase
- Passen die horizontalen Interferenzlinien an.
- Drücken Sie ▼ / ▲ „Phase“ (Phase) auszuwählen; Drücken Sie dann Enter, um auf das
entsprechende Untermenü zuzugreifen.
Untertitle Sprache
- Drücken Sie ▼ / ▲, um „Subtitle Language“ (Untertitle Sprache) auszuwählen; Drücken Sie
dann Enter, um auf das entsprechende Untermenü zuzugreifen.
- Drücken Sie / um auf die verfügbaren Untertitel Sprache zuzugreifen.
- Drücken Sie ▼ / ▲ / / um die gewünschte Untertitel Sprache auszuwählen.
Abb. 44
Audio-Zugänglichkeit
Drücken Sie ▼ / ▲ um die Option „Hearing Impaired“ (Menschen mit Hörbehinderung)
auszuwählen; Drücken Sie dann Enter, um es ein- oder auszuschalten.
PVR-Dateisystem
- Drücken Sie ▼ / ▲ „PVR File System“ (PVR-Dateisystem) auszuwählen; Drücken Sie dann
Enter, um auf das entsprechende Untermenü zuzugreifen.
- Drücken Sie ▼ / ▲ „Check PVR File System“ (Überprüfen PVR-Dateisystem) auszuwählen;
Drücken Sie dann Enter, um auf das entsprechende Untermenü zuzugreifen. Diese
Funktion überprüft die USB-Geschwindigkeit.
Abb. 45
Seitenverhältnis
- Drücken Sie ▼ / ▲ „Aspect Ratio“ (Seitenverhältnis) auszuwählen; Drücken Sie dann
Enter, um auf das entsprechende Untermenü zuzugreifen.
- Drücken Sie ▼ / ▲ um aus den verfügbaren Seitenverhältnissen auszuwählen: Auto,
4:3,16:9, Zoom1 und Zoom2.
Abb. 46
Blauer Bildschirm
Drücken Sie ▼ / ▲ um die „Blue Screen“ (Blauer Bildschirm) Option auszuwählen; Drücken Sie
dann Enter /um es ein- oder auszuschalten.
Erste Einrichtung
Drücken Sie ▼ / ▲ um „Erstmalige Installation“ auszuwählen; Drücken Sie dann Enter, um
darauf zuzugreifen.
Zurücksetzen
Drücken Sie ▼ / ▲ „Reset“ (Zurücksetzen) auszuwählen; Drücken Sie dann Enter, um auf das
entsprechende Untermenü zuzugreifen.
Software-Update (USB)
Drücken Sie ▼ / ▲ um „Software Update (USB)“ auszuwählen, stecken Sie Ihr USB-Gerät in
den USB-Steckplatz und drücken Sie dann Enter, um die Software auf die neueste Version zu
aktualisieren.

TV 0 SERIES 0024/TV 0 SERIES 0032TV 0 SERIES 0024/TV 0 SERIES 0032 127126
DEUTSCH DEUTSCH
- Drücken Sie Exit (Beenden), um zum vorherigen Menü zurückzukehren; Drücken Sie sie
erneut, um vollständig zu beenden.
Abb. 52
Abb. 53
- Drücken Sie / , um den Song/die Disc auszuwählen, die Sie abspielen möchten; drücken
Sie dann Enter.
- Drücken Sie / , um die Option zum Zurückkehren zum vorherigen Menü auszuwählen.
Abb. 54
Film Menü
- Drücken Sie /, um MOVIE (Filme) im Hauptmenü auszuwählen; drücken Sie dann die
Enter.
- Drücken Sie Exit (Beenden), um zum vorherigen Menü zurückzukehren; Drücken Sie sie
erneut, um vollständig zu beenden.
Abb. 55
- Drücken Sie / , um den Film auszuwählen, den Sie abspielen möchten; drücken Sie
dann Enter.
- Drücken Sie die Eingabetaste, um den ausgewählten Film abzuspielen.
- Wählen Sie das Medienmenü aus, auf das Sie zugreifen möchten, und drücken Sie Enter.
Drücken Sie Exit (Beenden), um zum vorherigen Menü zurückzukehren; Drücken Sie sie
erneut, um vollständig zu beenden.
Abb. 56
Text Menü
- Drücken Sie / , um TEXT (Text) im Hauptmenü auszuwählen; drücken Sie dann Enter.
- Drücken Sie Exit (Beenden), um zum vorherigen Menü zurückzukehren; Drücken Sie sie
erneut, um vollständig zu beenden.
- Abb. 57
- Drücken Sie / , um das gewünschte Element auszuwählen; drücken Sie dann Enter.
- Drücken Sie / , um die Option zum Zurückkehren zum vorherigen Menü auszuwählen.
Abb. 58
5. FERNBEDIENUNG
Abb. 59
1. Power (Leistung): Schalten Sie den Fernseher ein oder versetzen Sie ihn in den Standby-
Modus.
Reset-Position
Drücken Sie ▼ / ▲, um Position Reset (Position zurücksetzen) auszuwählen; Drücken Sie dann
Enter, um die Bildschirmposition zurückzusetzen.
Hinweise:
1. Sie können den Ton für die PICTURE-Option nicht reduzieren.
2. Sie können „AD-Switch“ nicht für die SOUND-Option (Klang) auswählen.
3. Die Funktionen „Audiobeschreibung“ und „Barrierefreiheit für Hörgeschädigte“ sind
identisch.
4. Optionen für Kanalsperre und Kindersicherung sind im Menü LOCK (Sperren) nicht
verfügbar.
5. Die Optionen Audio/Untertitelsprache, Barrierefreiheit für Hörgeschädigte und
PVR-Dateisystem sind im SETUP-Menü (Einstellung) nicht verfügbar.
6. Die PC-Option ist nicht mit dem CHANNEL-Menü (Kanal) kompatibel.
Medieninhalt
Hinweis: Bevor Sie das Medienmenü aufrufen, schließen Sie bitte das USB-Gerät an und
drücken Sie die Taste „Source“ (Quelle), um die Medieneingangsquelle einzustellen.
Abb. 49
- Drücken Sie ▼ / ▲, um Medien im Menü „Source“ (Quelle) auszuwählen; drücken Sie dann
Enter.
- Drücken Sie die Taste / , um die Option auszuwählen, die Sie im Medienmenü einstellen
möchten; drücken Sie dann Enter.
Foto Menü
- Drücken Sie / , um PHOTO (Foto) im Hauptmenü auszuwählen; drücken Sie dann die
Enter.
- Drücken Sie Exit (Beenden), um zum vorherigen Menü zurückzukehren; Drücken Sie sie
erneut, um vollständig zu beenden.
Abb. 50
Drücken Sie / , um die Datei auszuwählen, die Sie im Dateiauswahlmenü anzeigen möchten;
Drücken Sie dann Enter, um das Foto/Bild anzuzeigen.
Durch Markieren der ausgewählten Option werden die Dateiinformationen rechts angezeigt
und das Bild wird in der Mitte in der Vorschau angezeigt. Abb. 51
Musikmenü
- Drücken Sie / , um MUSIC (Musik) im Hauptmenü auszuwählen; drücken Sie dann die
Enter.

TV 0 SERIES 0024/TV 0 SERIES 0032TV 0 SERIES 0024/TV 0 SERIES 0032 129128
DEUTSCH DEUTSCH
22. REVEAL: Klicken Sie auf diese Schaltäche, um die versteckten/angezeigten Wörter ein-
oder auszublenden.
23. DREIFARBIGE TASTEN: Steuerung im Teletext-Modus, Auswahl von Punkten im Menü
und MHEGS im DVB-Menü.
24. CH+/CH-: Drücken Sie diese Tasten, um durch die Kanäle zu navigieren.
25. FAV/LIST: Drücken Sie diese Tasten, um die Favoritenliste zu önen. Wählen Sie dann
einen Favoritenkanal aus.
26. ASPECT:
1. Klicken Sie auf diese Schaltäche, um den Maßstab des Bildes auszuwählen.
2. Schneller Vorlauf im PVR- oder Mediaplayer-Modus.
27. FREEZE: Drücken Sie diese Taste, um das Bild einzufrieren.
28. SUB. PG:
1. Drücken Sie diese Taste, um auf die Unterseite zuzugreifen.
2. Nächstes Kapitel im PVR- oder Mediaplayer-Modus.
29. SUBTITLE: Drücken Sie diese Taste, um die Sprache des aktuellen DTV-Kanals
anzuzeigen und einzustellen.
30. HOLD: Drücken Sie diese Taste, um die Anzeige der aktuellen Seite ein- oder auszuschalten.
31. TEXT: Drücken Sie diese Taste, um Videotext zu aktivieren oder zu deaktivieren.
32. RECLIST: Drücken Sie diese Taste, um die Liste der Aufnahmen anzuzeigen.
33. REC: Drücken Sie diese Taste, um im PVR-Modus aufzunehmen.
Abb. 60
Batterieinstallation:
- Schieben Sie die Batteriefachabdeckung auf der Rückseite des Controllers nach unten
und ziehen Sie sie heraus, um sie zu entfernen. Legen Sie zwei AAA-Batterien in das
Batteriefach ein und achten Sie dabei auf die angegebene Polarität (+/–). Legen Sie keine
neuen und alten Batterien oder unterschiedliche Batterietypen ein.
- Schieben Sie die Abdeckung, bis sie hörbar einrastet.
Verwendung der Fernbedienung:
- Sofern nicht anders angegeben, kann die Fernbedienung alle Funktionen des Fernsehgeräts
steuern.
- Richten Sie die Fernbedienung immer direkt auf den Sensor an der Vorderseite des
Fernsehers.
VORSICHTSMASSNAHME: Batterien nicht verschlucken, es besteht Verätzungsgefahr. Dieses
Produkt enthält Batterien. Das Verschlucken von Batterien kann innerhalb von nur 2 Stunden
schwere innere Verbrennungen verursachen und zum Tod führen. Bewahren Sie neue und
gebrauchte Batterien außerhalb der Reichweite von Kindern auf. Wenn das Batteriefach nicht
sicher schließt, verwenden Sie das Produkt nicht mehr und bewahren Sie es außerhalb der
2. MUTE (Lautlos): Drücken Sie, um den Ton stumm zu schalten Drücken Sie erneut oder
drücken Sie VOL+, um den Ton wieder einzuschalten.
3. 0-9: Drücken Sie 0-9, um beim Fernsehen direkt einen Kanal auszuwählen. Der Kanal
wechselt nach 2 Sekunden. Gilt für Teletext-Modus usw.
4. DTV/ATV: Drücken, um zwischen analogem und digitalem Fernsehen umzuschalten.
5. : Drücken Sie, um zum zuvor angesehenen Programm zurückzukehren.
6. S.MODE (Klangmodus): Drücken Sie diese Taste, um zwischen den verschiedenen
Klangeinstellungen zu wählen.
7. SLEEP (Standby Modus): Wählen Sie die Zeitspanne, nach der sich der Fernseher
automatisch ausschaltet.
8. MTS: Drücken, um die NICAM-Modi zu durchsuchen.
9. P.MODE (Bildmodus): Drücken Sie diese Taste, um zwischen den verschiedenen
Bildeinstellungen zu wählen.
10. MENÜ: Ermöglicht das Navigieren zwischen den Systemmenüs.
11. SOURCE (Quelle): Önen Sie das Hauptmenü und tippen Sie auf, um zwischen den Quellen
zu navigieren.
12. ▼ / ▲ ENTER ermöglicht Ihnen, durch die Bildschirmmenüs zu navigieren und die
Systemeinstellungen nach Ihren Wünschen anzupassen.
13. EXIT (hinausgehen): Drücken Sie diese Taste, um das Menü oder Untermenü zu verlassen
und die entsprechende Funktion (falls zutreend) abzubrechen.
14. DISPLAY (Bildschirm): Drücken Sie diese Taste, um die Quellen- und Kanalinformationen
anzuzeigen.
15. VOL+/VOL-: Drücken, um die Lautstärke zu erhöhen/verringern.
16. TV/RADIO: Beim Ansehen eines Senders können Sie zwischen TV- und Radiomodus
wechseln.
17. GUIDE:
1. Önen Sie den EPG (Elektronischer Programmführer).
2. Schneller Rücklauf im PVR- oder Mediaplayer-Modus.
18. TIME SCHIFT (Zeit Kontrolle)
1. Zeitsteuerung von DTV-Kanälen.
2. Zeitsteuerung im PVR- oder Mediaplayer-Modus.
19. CANCEL:
1. Wenn eine Seite im Teletext-Modus ausgewählt wird, kann es einige Zeit dauern, bis sie
verfügbar ist; Durch Drücken der CANCEL-Taste kehren Sie zum TV-Modus zurück. Wenn Sie die
gewünschte Seite gefunden haben, erscheint die Seitenzahl oben auf dem Bildschirm; Drücken
2. Sie CANCEL, um zum Videotextmodus zurückzukehren und auf der Seite zu navigieren.
Vorheriges Kapitel im PVR- oder Media Player-Modus.
20. INDEX:
1. Drücken Sie diese Taste, um die Index-Seite im Teletext-Modus anzufordern.
2. Beenden Sie die Wiedergabefunktion im PVR- oder Media Player-Modus.
21. SIZE: Drücken Sie diese Taste, um die Anzeigegröße im Teletext-Modus zu ändern.

TV 0 SERIES 0024/TV 0 SERIES 0032TV 0 SERIES 0024/TV 0 SERIES 0032 131130
DEUTSCH DEUTSCH
Unterbrochene Linien
erscheinen
Bildschirm angezeigt wird.
Elektrogeräte wie Haartrockner, Staubsauger etc. kann den
Fernseher stören. Schalten Sie diese Art von Geräten aus.
Die Fernbedienung
funktioniert nicht.
Entfernen Sie den Kunststo, der die Fernbedienung umhüllt.
Versuchen Sie, die Fernbedienung näher an das Fernsehgerät
heranzuführen, und drücken Sie eine beliebige Taste.
Vergewissern Sie sich, dass die Batterien richtig eingelegt
sind, oder versuchen Sie es mit neuen Batterien.
Der Fernseher wechselt in den Standby-Modus, wenn nach
einigen Minuten keine Reaktion erfolgt.
Es wird kein Bild angezeigt
(PC-Modus).
Überprüfen Sie, ob das Kabel richtig mit dem HDMI-
Anschluss verbunden oder geknickt ist.
Blinkende vertikale Linie
(PC-Modus).
Rufen Sie das Hauptmenü auf und passen Sie die vertikale
Platzierung des Bildschirms an, um die vertikale Linie zu
entfernen.
Horizontale Linie
(PC-Modus)
Passen Sie die horizontale Position des Bildschirms an, um
die horizontale Linie zu entfernen.
Bildschirm zu hell oder zu
dunkel (PC-Modus)
Passen Sie die Helligkeit oder den Kontrast im Hauptmenü an.
Keine Antwort des PCs. Überprüfen Sie, ob die Bildschirmauösung des PCs auf
eine Auösung eingestellt ist, die mit der des Fernsehers
kompatibel ist.
Beim Anschließen
eines Geräts an den
RCA-Anschluss werden
Linien angezeigt.
Achten Sie darauf, ein qualitativ hochwertiges Kabel zu
verwenden.
Das Problem besteht
weiterhin.
Ziehen Sie das Netzkabel ab, warten Sie 30 Sekunden und
stecken Sie es wieder in die Steckdose. Wenn das Problem
weiterhin besteht, versuchen Sie nicht, das Fernsehgerät
selbst zu reparieren. Kontaktieren Sie den oziellen
Technischen Kundendienst von Cecotec.
Lassen Sie das Fernsehgerät kein statisches Bild anzeigen, sei es ein angehaltenes Video, ein
Menübildschirm usw. über einen längeren Zeitraum, um ein Einbrennen des Bildschirms zu
verhindern.
Reichweite von Kindern auf. Wenn Sie glauben, dass Batterien verschluckt oder in irgendeinem
Körperteil eingeführt wurden, suchen Sie sofort einen Arzt auf.
6. PROBLEMBEHEBUNG
Es gibt keine
Energieversorgung
Überprüfen Sie, ob das Netzkabel des Fernsehers
angeschlossen ist oder nicht. Wenn immer noch kein
Strom vorhanden ist, ziehen Sie den Stecker und stecken
Sie ihn nach 60 Sekunden wieder ein. Schließen Sie die
Stromversorgung wieder an.
Der Fernseher empfängt
das Signal nicht richtig.
Wenn sich in der Nähe des Fernsehgeräts hohe Gebäude oder
Berge benden, kann es auf dem Bildschirm zu Geisterbildern
oder Doppelbildern kommen. In diesem Fall können Sie
das Bild manuell korrigieren, indem Sie die Ausrichtung der
Außenantenne anpassen.
Wenn Sie eine Zimmerantenne verwenden, kann es
schwieriger sein, das Signal zu empfangen. Passen Sie
die Ausrichtung der Antenne an, um einen guten Empfang
zu gewährleisten. Wenn sich der Signalempfang nicht
verbessert, müssen Sie möglicherweise zu einer externen
Antenne wechseln.
Es gibt kein Bild. Überprüfen Sie, ob die Antenne auf der Rückseite des
Fernsehgeräts richtig angeschlossen ist.
Überprüfen Sie andere Kanäle, um festzustellen, ob das
Problem weiterhin besteht.
Da ist kein Ton. Versuchen Sie, die Lautstärke zu erhöhen.
Überprüfen Sie, ob der Fernsehton stummgeschaltet ist oder
nicht.
Es gibt Ton, aber kein
Bild oder das Bild ist
verwaschen.
Versuchen Sie, den Kontrast und die Helligkeit einzustellen.
Statisches Rauschen
beeinträchtigt die Video-
und Audioqualität.
Überprüfen Sie, ob die Antenne auf der Rückseite des
Fernsehgeräts richtig angeschlossen ist.

TV 0 SERIES 0024/TV 0 SERIES 0032TV 0 SERIES 0024/TV 0 SERIES 0032 133132
DEUTSCH DEUTSCH
Vorschriften festgelegten Bedingungen und Fristen.
Es wird empfohlen, dass Reparaturen von qualiziertem Personal durchgeführt werden.
Sollte unerwartet eine Störung auftreten oder haben Sie Fragen über Ihrem Produkt, können
Sie sich mit dem Kundendienst in Verbindung setzen über die Telefonnummer: +34 963210728
10. COPYRIGHT
Die geistigen Eigentumsrechte an den Texten in dieser Bedienungsleitung liegen bei CECOTEC
INNOVACIONES, S.L. Alle Rechte vorbehalten. Der Inhalt dieser Veröentlichung darf weder ganz
noch teilweise ohne vorherige Genehmigung von CECOTEC INNOVACIONES, S.L. vervielfältigt, in
einem Datenabfragesystem gespeichert, übertragen oder auf irgendeine Weise (elektronisch,
mechanisch, durch Fotokopie, Aufzeichnung oder Ähnliches) verbreitet werden.
11. VEREINFACHTE KONFORMITÄTSERKLÄRUNG
Hiermit erklärt Cecotec Innovaciones, dass die Fernseher mit den Modellen 02610_
TV 0 Serie 0024 und 02612_TV 0 Serie 0032 der Richtlinie 2014/53/EU über Funkanlagen
entsprechen.
Der vollständige Text der EU-Konformitätserklärung ist unter folgender Internetadresse
abrufbar:
www.cecotec.es
7. TECHNISCHE SPEZIFIKATIONEN
Produkt TV 0 Series 0024 TV 0 Series 0032
Produktreferenz 02610 02612
QR
Leistung 36 W 56 W
Spannung 100 – 240 V
Frequenz 50 / 60 Hz
Nutzungsdauer 60.000 Stunden (ca.)
Die Begrie HDMI und HDMI High-Denition Multimedia Interface und das HDMI-Logo sind
Warenzeichen oder eingetragene Warenzeichen von HDMI Licensing LLC in den Vereinigten
Staaten und/oder anderen Ländern.
Die technischen Daten können ohne Vorankündigung geändert werden, um die Produktqualität
zu verbessern.
Hergestellt in China | Entworfen in Spanien
8. RECYCLING VON ELEKTRO- UND ELEKTRONIKGERÄTEN
Dieses Symbol weist darauf hin, dass das Produkt und/oder die Batterie
gemäß den geltenden Vorschriften getrennt vom Haushaltsabfall entsorgt
werden muss. Wenn dieses Produkt das Ende seiner Nutzungsdauer erreicht
hat, sollten Sie die Batterien/Akkus entfernen und es zu einer von den
örtlichen Behörden bestimmten Sammelstelle bringen.
Die Verbraucher müssen sich mit Ihren örtlichen Behörden oder
Einzelhändlern in Verbindung setzen, um Informationen über die ordnungsgemäße Entsorgung
ihrer Altgeräte und/ oder ihre Akkus zu erhalten.
Die Einhaltung der oben genannten Leitlinien trägt zum Schutz der Umwelt bei.
9. GARANTIE UND KUNDENDIENST
Cecotec haftet gegenüber dem Benutzer oder Endverbraucher für jegliche Konformitätsmängel,
die zum Zeitpunkt der Lieferung des Produkts bestehen, gemäß den in den geltenden

TV 0 SERIES 0024/TV 0 SERIES 0032TV 0 SERIES 0024/TV 0 SERIES 0032 135134
ITALIANO ITALIANO
Legenda Fig. 1:
1. Parete
2. Supporto
3. Parete
4. Vite per ssaggio a parete
Nota:
1. Il supporto di ssaggio a parete (VESA) non è incluso.
2. Quando si monta il televisore, assicurarsi di tenerlo a una distanza di sicurezza da altri
apparecchi.
3. Se necessario, consultare un tecnico competente per evitare pericoli.
4. La gura è solo di riferimento.
5. Seguire le istruzioni del manuale per ssare il televisore al supporto.
6. Seguire lo standard VESA per il corretto ssaggio del televisore al supporto.
Installazione e connessione del televisore
Congurazione. Fig. 3
- Collocare il televisore in una posizione stabile che possa sostenerne il peso.
- Per evitare rischi, tenere il televisore lontano dall’acqua o da fonti di calore (come luci,
candele o apparecchi di riscaldamento) e assicurare che il retro sia sucientemente
ventilato.
Collegamento dell’antenna e dell’alimentazione
1. Collegare il cavo dell’antenna alla presa dell’antenna sul retro del televisore.
2. Per collegare il cavo di alimentazione del televisore:
Accensione del televisore
3. Premere il tasto di accensione del televisore: la spia corrispondente si illuminerà di verde.
Se il televisore è in modalità Standby (spia rossa), premere il tasto di accensione del
telecomando per accendere il televisore.
Legenda della gura 3:
1. Uscita della segnale TV
Nota: La gura è solo di riferimento.
Installazione del supporto
1. Rimuovere il televisore, gli accessori e il supporto dalla scatola (alcuni modelli non
includono il supporto). Fig. 4
2. Per evitare di danneggiare il televisore, posizionarlo su un panno o un materiale morbido
sul tavolo e avvitare il collo della base al televisore.
3. Per completare l’installazione, ssare correttamente la base al televisore.
1. PRIMA DELL’USO
- Questo apparecchio ha un imballaggio progettato per proteggerlo durante il trasporto.
Estrarre l’apparecchio dalla scatola e rimuovere tutto il materiale presente nell’imballaggio.
Conservare la scatola originale e gli altri elementi in un luogo sicuro per prevenire danni
all’apparecchio in caso di necessità di trasportarlo in futuro. Se si desidera smaltire
l’imballaggio originale, assicurarsi di riciclare tutti gli elementi in modo appropriato.
- Vericare che tutte le parti e componenti siano inclusi e in buono stato. Se uno di essi
mancasse o non fosse in buone condizioni, contattare immediatamente il Servizio di
Assistenza Tecnica uciale di Cecotec.
Contenuto della scatola:
- Televisore
- Telecomando
- 2 pile AA
- Il presente manuale di istruzioni
Nota:
I graci di questo manuale sono rappresentazioni schematiche e potrebbero non corrispondere
esattamente all’apparecchio.
2. INSTALLAZIONE
Montaggio del supporto
Fissaggio a parete:
Fig. 1
1. Per prima cosa, posizionare il televisore sul tavolo e mettere un panno morbido tra il
televisore e il tavolo per evitare di graare lo schermo.
2. Utilizzare un cacciavite per rimuovere le viti ssate al supporto inferiore (come mostrato
nella gura 1), quindi rimuovere il supporto inferiore (rimuovere con cautela le viti e il
supporto inferiore).
3. Scegliere un supporto di ssaggio a parete adatto alle dimensioni del televisore, come
illustrato nelle gure 2 e 3.
4. Praticare quattro fori nella parete e inserire quattro viti.
5. Utilizzare il cacciavite per ssare la vite sul retro del televisore. Appendere quindi il
televisore alla parete.

TV 0 SERIES 0024/TV 0 SERIES 0032TV 0 SERIES 0024/TV 0 SERIES 0032 137136
ITALIANO ITALIANO
Selezione della funzione dell’icona: tenere premuto il tasto per ottenere la funzione dell’icona
selezionata.
Descrizione delle icone:
Icona di spegnimento: corrisponde al tasto rosso in alto a sinistra del telecomando
(“POWER”, alimentazione).
Icona di menu: corrisponde al tasto “MENU” del telecomando.
Icona di fonte: corrisponde al tasto “SOURCE” (sorgente) del telecomando.
Icona CH+ (passare al canale successivo): corrisponde al tasto “CH+” (freccia destra all’insù)
del telecomando.
Icona CH- (torna al canale precedente): corrisponde al tasto “CH-” (freccia destra all’ingiù)
del telecomando.
Icona VOL+ (aumento del volume): corrisponde al tasto “VOL+” (freccia sinistra all’insù) del
telecomando.
Icona VOL- (riduzione del volume): corrisponde al tasto “VOL-” (freccia sinistra all’ingiù) del
telecomando.
Interfaccia
Ingresso AV
Ingresso segnale AV esterno e canale audio sinistro/destro
Slot CI
Lo slot per schede CI (Common Interface, interfaccia comune)
richiede il modulo CAM (Conditional Access Module, modulo
di accesso condizionato) per la pay-TV.
Ingresso HDMI
Ingresso del segnale digitale dal connettore video HDMI.
ANT 75
Ingresso per il collegamento dell’antenna/cavo (75/VHF/
UHF).
Ingresso USB
Inserire qui un dispositivo USB per riprodurre le
multimediali o registrare programmi con la funzione PVR.
COAXIAL
Per il collegamento del ricevitore SPDIF.
Tenere lontano, proteggere e non toccare gli ingressi HDMI e USB del televisore per
prolungarne la durata e garantirne il corretto funzionamento.
Consiglio:
Per facilitare l’installazione della base ed evitare danni, si consiglia di utilizzare un cacciavite
di tipo PH2. Fig. 5
Prima installazione
Collegare un cavo RF all’ingresso “RF-In” del televisore e all’ingresso dell’antenna TV.
Selezione della lingua
Premere / per selezionare la lingua del sistema.
Selezione del paese
Premere ▼ / ▲ per evidenziare l’opzione “Country” (paese).
Premere / per selezionare il paese desiderato.
Fig. 6
Fig. 7
Sintonizzazione automatica
Per sintonizzare automaticamente il televisore, premere “Menu” e la freccia direzionale sinistra
per saltare la sintonizzazione ATV; fare lo stesso per saltare la sintonizzazione DTV.
Fig. 8
ATTENZIONE:
Collocare il televisore in una posizione stabile per evitare che cada e causi lesioni o danni.
Molte lesioni possono essere evitate adottando precauzioni base:
1. Utilizzare i mobili o i supporti consigliati dal produttore del televisore.
2. Utilizzare solo mobili in grado di sostenere in modo sicuro il peso del televisore.
3. Assicurarsi che il televisore non sporga oltre il bordo del mobile d’appoggio.
4. Non collocare il televisore su mobili alti (ad esempio, armadi o librerie) senza ssare sia il
mobile che il televisore a un supporto adeguato.
5. Non collocare tovaglie o altri materiali tra il televisore e il mobile.
6. Educare i bambini sui pericoli di arrampicarsi sui mobili per raggiungere il televisore o il
telecomando.
Tenere conto di quanto sopra se si desidera spostare il televisore in un’altra posizione.
3. TASTI DEL TELECOMANDO E INTERFACCIA
Tasti del telecomando
Icona Mostra/nascondi: se l’icona non appare, premere il tasto corrispondente: l’icona del
tasto apparirà e si spegnerà automaticamente dopo 5 secondi di inattività.
Selezione dell’icona: premere brevemente il tasto corrispondente e scorrere verso destra per
selezionare l’icona.

TV 0 SERIES 0024/TV 0 SERIES 0032TV 0 SERIES 0024/TV 0 SERIES 0032 139138
ITALIANO ITALIANO
Ricerca
Ricerca di canali.
Fig. 11
Sintonizzazione DTV manuale
- Premere ▼ / ▲ per selezionare “DTV Manual Tuning” (sintonizzazione DTV manuale),
quindi premere OK per accedere al sottomenu corrispondente.
- Premere / per selezionare il canale, quindi premere OK per cercare il programma.
Fig. 12
Modica dei canali
Premere ▼ / ▲ per selezionare “Program Edit” (modica dei canali), quindi premere OK per
accedere al sottomenu corrispondente. Fig. 13
I tasti tricolore sono i tasti di accesso diretto alla programmazione dei canali.
Premere prima ▼ / ▲ per evidenziare il canale che si desidera selezionare.
- Premere il tasto rosso per eliminare il canale dall’elenco.
- Premere il tasto giallo per spostare il canale nell’elenco.
- Premere il tasto blu per saltare il canale selezionato.
- Premere il tasto “FAV/LIST” per aggiungere o rimuovere un canale dall’elenco dei preferiti (il
televisore salterà automaticamente il canale quando si preme CH+/- per cambiare canale).
Elenco di programmazione
- Premere ▼ / ▲ per selezionare “Schedule List” (elenco di programmazione), quindi
premere OK per accedere al sottomenu corrispondente. L’elenco di programmazione è
disponibile per DTV e satellite. Fig. 14
- Premere il tasto giallo per accedere all’interfaccia corrispondente. Fig. 15
- In caso di problemi con la programmazione, verrà mostrato un messaggio di avvertimento.
Fig. 16
Informazioni sul segnale
Premere ▼ / ▲ per selezionare “Signal Information” (informazioni sul segnale): premere il
tasto OK per visualizzare informazioni dettagliate sul segnale (disponibili solo con il segnale
DTV). Fig. 17
Informazioni sul CI (Common Interface, interfaccia comune)
Premere ▼ / ▲ per selezionare “CI Information” (informazioni sul CI), quindi premere il tasto
OK per visualizzare i dettagli della scheda CI (se inserita).
NOTA: la scheda CI non è inclusa.
Schema di collegamento dei dispositivi esterni
Vedere la gura 2.
Legenda della gura 2:
1. DVD
2. Set-Top Box
3. Connettore di ingresso AV
4. Connettore di ingresso HDMI
5. Connettore USB
6. Connettore TV
4. MENU E MODALITÀ
Menu principale
Menu CHANNEL (canale)
Premere il tasto MENU per visualizzare il menu principale.
Premere / per selezionare CHANNEL nel menu principale. Fig. 9
1. Premere ▼ / ▲ per selezionare l’opzione che si desidera congurare nel menu CHANNEL.
2. Premere OK per confermare la congurazione.
3. Una volta eettuata la congurazione, premere OK per salvare le modiche e tornare al
menu precedente.
Sintonizzazione automatica
Premere ▼ / ▲ per selezionare “Auto Tuning” (sintonizzazione automatica), quindi premere
OK/ .
Fig. 10
Sintonizzazione ATV manuale
Canale corrente;
congurazione del numero del canale.
Sistema di colori
Selezione del sistema di colori
(sistemi disponibili: AUTO, PAL, SECAM).
Sistema audio
Selezione del sistema audio.
Regolazione di frequenza
Regolazione precisa della frequenza del canale.

TV 0 SERIES 0024/TV 0 SERIES 0032TV 0 SERIES 0024/TV 0 SERIES 0032 141140
ITALIANO ITALIANO
Temperatura del colore
- Modica la percezione della gamma cromatica del televisore.
- Premere ▼ / ▲ per selezionare “Color Temperature” (temperatura del colore), quindi
premere OK per accedere al sottomenu corrispondente.
- Premere ▼ / ▲ per selezionare l’opzione desiderata; temperatura colore: Cool (freddo),
Medium (neutro), Warm (caldo).
Fig. 23
- Cool (freddo): aumenta la tonalità del blu e riduce il bianco.
- Medium (neutro): aumenta i rosa e i blu e riduce il bianco.
- Warm (caldo): aumenta il rosso e riduce il bianco.
Riduzione dell’audio
Filtra e riduce l’audio e migliora la qualità dell’immagine. Premere ▼ / ▲ per selezionare
“Noise Reduction” (riduzione dell’audio), quindi premere OK per accedere al sottomenu
corrispondente. Fig. 24
- O (spento): selezionare questa opzione per disattivare il rilevamento audio.
- Low (basso): rileva e riduce i suoni bassi.
- Middle (moderato): rileva e riduce i suoni moderati.
- High (alto): rileva e riduce i suoni alti.
- Default (predenito): Impostazione predenita.
Modalità HDMI
- Premere ▼ / ▲ per selezionare “HDMI Mode” (modalità HDMI), quindi premere OK per
accedere al sottomenu corrispondente. Fig. 25
- Premere ▼ / ▲ per selezionare tra le modalità immagine disponibili: Auto/Video/PC.
Menu Audio
- Premere il tasto MENU per visualizzare il menu principale. Fig. 26
- Premere / per selezionare SOUND (audio) nel menu principale.
1. Premere / per selezionare l’opzione che si desidera congurare nel menu SOUND.
2. Premere OK per confermare la congurazione.
3. Una volta eettuata la congurazione, premere OK per salvare le modiche e tornare al
menu precedente.
Fig. 27
Modalità audio
Premere ▼ / ▲ per selezionare “Sound Mode” (modalità audio), quindi premere OK per accedere
al sottomenu corrispondente. Premere ▼ / ▲ per selezionare tra le opzioni disponibili.
Lista di canali satellitari. Fig. 18
Sintonizzazione automatica
Premere ▼ / ▲ per selezionare “Auto Tuning” (sintonizzazione automatica), quindi premere
OK/ . Fig. 19
Congurazione dell’antenna satellite
Premere ▼ / ▲ per selezionare “Dish Setup” (congurazione dell’antenna satellitare), quindi
premere OK/ per confermare. Fig. 20
Menu Immagine
- Premere il tasto MENU per visualizzare il menu principale.
- Premere / per selezionare PICTURE (immagine) nel menu principale. Fig. 21
Nota:
- Modalità 20 Hz NON COMPATIBILE
- Modalità 60 Hz NON COMPATIBILE
1. Premere ▼ / ▲ per selezionare l’opzione che si desidera congurare nel menu PICTURE.
2. Premere OK per confermare l’impostazione.
3. Una volta eettuata la congurazione, premere MENU per salvare le modiche e tornare
al menu precedente.
Modalità Immagine
- Premere ▼ / ▲ per selezionare “Picture Mode” (modalità Immagine), quindi premere OK
per accedere al sottomenu corrispondente.
- È possibile modicare il contrasto, la luminosità, il colore, la nitidezza e la tonalità quando
l′immagine è in modalità Personal (personalizzata).
Consigli: è possibile premere il tasto PMODE per congurare direttamente le impostazioni di
immagine.
Fig. 22
Contrasto/luminosità/colore/nitidezza/tonalità
Premere ▼ / ▲ per selezionare il valore desiderato, quindi premere OK/ per impostare il
valore.
- Contrasto: fa risaltare la luce nell’immagine, ma l’ombra rimane invariata.
- Luminosità: regola l’uscita della bre ottica; inuisce sugli scuri dell’immagine.
- Colore: regola la saturazione del colore.
- Nitidezza: compensa il cambio cromatico in trasmissione NTSC.
- Nitidezza: regola il livello di dettaglio dell’immagine.

TV 0 SERIES 0024/TV 0 SERIES 0032TV 0 SERIES 0024/TV 0 SERIES 0032 143142
ITALIANO ITALIANO
2. Premere OK per confermare l’impostazione.
3. Una volta eettuata la congurazione, premere OK per salvare le modiche e tornare al
menu precedente.
Fuso orario
- Premere ▼ / ▲ per selezionare “Time Zone” (fuso orario), quindi premere OK per accedere
al sottomenu corrispondente. Fig. 29
- Premere ▼ / ▲/ / per selezionare il fuso orario.
Timer di spegnimento
- Premere ▼ / ▲ per selezionare “Sleep Timer” (timer di spegnimento), quindi premere OK
per accedere al sottomenu corrispondente. Fig. 30
- Premere ▼ / ▲ per selezionare tra le opzioni disponibili:
- Spento (spento), 15 min, 30 min, 45 min, 60 min, 90 min, 120 min, 240 min.
Modalità Standby automatico
- Premere ▼ / ▲ per selezionare “Auto Standby” (modalità Standby automatico), quindi
premere OK per accedere al sottomenu corrispondente. Fig. 31
- Premere ▼ / ▲ per selezionare tra le opzioni disponibili.
Consigli: non eseguire alcuna operazione con il telecomando durante il tempo selezionato,
altrimenti verrà ripristinato.
Timer OSD
- Premere ▼ / ▲ per selezionare “OSD timer” (timer OSD), quindi premere OK per accedere
al sottomenu corrispondente. Fig. 32
- Premere ▼ / ▲ per selezionare tra le opzioni disponibili.
Menu di blocco
Premere il tasto MENU per visualizzare il menu principale. Premere / per selezionare LOCK
(blocco) nel menu principale.
Fig. 33
1. Premere ▼ / ▲ per selezionare l’opzione che si desidera congurare nel menu LOCK
SYSTEM.
2. Premere / per confermare la congurazione.
3. Una volta eettuata la congurazione, premere MENU per tornare al menu precedente.
Blocco del sistema
Premere ▼ / ▲ per selezionare “System Lock” (blocco del sistema), quindi premere OK per
accedere alle 3 opzioni successive.
Fig. 34
È possibile modicare i valori degli alti e dei bassi quando il suono è in modalità personalizzata.
Consigli: Premere il tasto SMODE del telecomando per cambiare direttamente la modalità
audio.
Standard: produce un suono equilibrato in tutti gli ambienti.
Music (musica): conserva il suono originale. Ideale per programmi musicali.
Movie (lm): migliora gli alti e i bassi per un’esperienza sonora migliorata.
Sports: migliora la chiarezza vocale per lo sport.
Personal (personalizzato): selezionare questa opzione per personalizzare le impostazioni
audio.
Nota: gli alti e i bassi possono essere regolati a piacere in modalità personalizzata.
Balance (equilibrato)
Premere ▼ / ▲ per selezionare questa opzione, quindi premere / per regolare il valore.
Auto Volume Level (volume automatico)
Premere ▼ / ▲ per selezionare questa opzione, quindi premere / per attivarla o
disattivarla.
Modalità SPDIF
Premere ▼ / ▲ per selezionare “SPDIF Mode” (modalità SPDIF), quindi premere / per
selezionare O/PCM/Auto.
AD Switch
Premere ▼ / ▲ per selezionare questa opzione, quindi premere / per attivarla o
disattivarla. Il televisore dispone anche di una funzione di audiodescrizione per non vedenti.
AVVISO:
Balance (equilibrato): regola l’audio in uscita per un’esperienza sonora più equilibrata.
Auto Volume Level (volume automatico): riduce automaticamente la dierenza tra il volume
del canale e quello del programma.
Menu dell’ora
- Premere il tasto MENU per visualizzare il menu principale.
- Premere / per selezionare TIME (ora) nel menu principale.
Fig. 28
1. Premere il tasto ▼ / ▲ per selezionare l’opzione che si desidera congurare nel menu TIME.

TV 0 SERIES 0024/TV 0 SERIES 0032TV 0 SERIES 0024/TV 0 SERIES 0032 145144
ITALIANO ITALIANO
Sorgente predenita
- Premere ▼ / ▲ per selezionare “Default Source” (sorgente predenita), quindi premere OK
per accedere al sottomenu corrispondente.
- La sorgente predenita può essere congurata dal responsabile di hotel. All’accensione,
verrà automaticamente selezionata la sorgente precongurata per impostazione
predenita.
Programmazione predenita
- Premere ▼ / ▲ per selezionare “Default prog” (programmazione predenita), quindi
premere / per eettuare le impostazioni desiderate (disponibili con “TV” come
sorgente predenita).
- La programmazione predenita può essere congurata dal responsabile di hotel. È
possibile impostare solo la sorgente DTV/TV predenita.
Volume predenito
- Premere ▼ / ▲ per selezionare “Default Volume”, quindi premere / per eettuare le
impostazioni desiderate.
- Il volume predenito può essere congurato dal responsabile di hotel. All’accensione, verrà
automaticamente selezionato il volume precongurato per impostazione predenita.
Volume massimo
- Premere ▼ / ▲ per selezionare “Max Volume” (volume massimo), quindi premere / per
eettuare le impostazioni desiderate.
- Il volume massimo può essere congurato dal responsabile di hotel. All’accensione,
verrà automaticamente selezionato il volume massimo precongurato per impostazione
predenita.
Canale
Premere ▼ / ▲ per selezionare l’opzione CHANNEL (canale), quindi premere / per attivarla
o disattivarla.
Immagine
Premere ▼ / ▲ per selezionare l’opzione PICTURE (immagine), quindi premere / per
attivarla o disattivarla.
Audio
Premere ▼ / ▲ per selezionare l’opzione SOUND (audio), quindi premere / per attivarla o
disattivarla.
Tempo
Premere ▼ / ▲ per selezionare l’opzione TIME (tempo), quindi premere / per attivarla o
disattivarla.
La password predenita è 0000. Se si dimentica la password, provare con “8899”.
Impostazione della password
Premere ▼ / ▲ per selezionare “Set Password” (imposta password), quindi premere OK per
accedere al sottomenu corrispondente e impostare la password.
Fig. 35
Blocco dei canali
- Premere ▼ / ▲ per selezionare “Channel Lock” (blocco dei canali), quindi premere OK per
accedere al sottomenu corrispondente.
- Premere il tasto verde per bloccare o sbloccare il canale desiderato.
Fig. 36
Controllo parentale
Premere ▼ / ▲ per selezionare “Parental Guidance” (controllo parentale), quindi premere OK
per accedere al sottomenu corrispondente e selezionare l’età dei gli. Fig. 37
Blocco dei tasti
Premere ▼ / ▲ per selezionare l’opzione “Key Lock” (blocco dei tasti), quindi premere / per
attivarla o disattivarla. Attivando questa opzione, i tasti del telecomando verranno bloccati.
Modalità Hotel (se compatibile)
Fig. 38
1. Premere ▼ / ▲ sul telecomando per selezionare “Hotel Mode” (modalità Hotel) nel menu
Lock (blocco).
2. Premere il tasto OK del telecomando per accedere al sottomenu corrispondente.
3. Una volta eettuata la congurazione, premere MENU per salvare le modiche e tornare
al menu precedente.
Modalità Hotel
Premere ▼ / ▲ per selezionare l’opzione “Hotel Mode” (modalità Hotel), quindi premere /
per attivarla o disattivarla.
Blocco sorgente
- Premere ▼ / ▲ per selezionare “Source Lock” (blocco sorgente), quindi premere OK per
accedere al sottomenu corrispondente.
- Il responsabile di hotel può impostare il blocco sorgente come DTV/HDMI, AV, ecc. L’utente
non può selezionare il blocco sorgente.

TV 0 SERIES 0024/TV 0 SERIES 0032TV 0 SERIES 0024/TV 0 SERIES 0032 147146
ITALIANO ITALIANO
Lingua televideo
- Premere▼ / ▲ per selezionare “TT Language” (lingua televideo), quindi premere OK per
accedere al sottomenu corrispondente.
- Premere ▼ / ▲ per selezionare la lingua del televideo.
Fig. 42
Lingua audio
- Premere▼ / ▲ per selezionare “Audio Languages” (lingue audio), quindi premere OK per
accedere al sottomenu corrispondente.
- Premere / per accedere alle lingue audio disponibili.
- Premere ▼ / ▲ / / per selezionare la lingua audio desiderata.
Fig. 43
Lingua sottotitoli
- Premere▼ / ▲ per selezionare “Subtitle Language” (lingua dei sottotitoli), quindi premere
OK per accedere al sottomenu corrispondente.
- Premere / per accedere alle lingue dei sottotitoli disponibili.
- Premere ▼ / ▲/ / per selezionare la lingua dei sottotitoli desiderata.
Fig. 44
Accessibilità audio
Premere ▼ / ▲ per selezionare l’opzione “Hearing Impaired” (non udenti), quindi premere OK
per attivarla o disattivarla.
Sistema le PVR
- Premere ▼ / ▲ per selezionare “PVR File System” (sistema le PVR), quindi premere OK
per accedere al sottomenu corrispondente.
- Premere ▼ / ▲ per selezionare “Check PVR File System” (controlla sistema le PVR),
quindi premere OK per accedere al sottomenu corrispondente. Questa funzione controlla
la velocità USB.
Fig. 45
Proporzione
- Premere ▼ / ▲ per selezionare “Aspect Ratio” (proporzione), quindi premere OK per
accedere al sottomenu corrispondente.
- Premere ▼ / ▲ per selezionare tra le proporzioni disponibili: Auto, 4:3, 16:9, Zoom1 e
Zoom2.
Fig. 46
Schermo blu
Premere ▼ / ▲ per selezionare l’opzione “Blue Screen” (schermo blu), quindi premere OK per
attivarla o disattivarla.
Blocco
Premere ▼ / ▲ per selezionare l’opzione LOCK (blocco), quindi premere / per attivarla o
disattivarla.
Congurazione
Premere ▼ / ▲ per selezionare l’opzione SETUP (congurazione), quindi premere / per
attivarla o disattivarla.
Cancellazione delle impostazioni
Premere ▼ / ▲ per selezionare “Clear Lock” (cancella impostazioni), quindi premere OK per
cancellare l’impostazione precedente.
Importazione informazioni
Il responsabile di hotel può importare le informazioni dei canali inserendo una chiavetta USB
nell’apposito ingresso.
Esportazione informazioni
Il responsabile di hotel può inserire la chiavetta USB d’importazione in altri televisori. Questa
funzione può quindi essere usata per clonare tutti i canali e trasferirli su nuovi televisori.
Ripristino
Questa funzione ripristina i valori predeniti della modalità Hotel.
È possibile selezionare la modalità Hotel dopo aver inserito la password di sistema 8888 nel
blocco del menu principale (è prima necessario che la funzione Hotel venga impostata come
funzione predenita nel sistema).
Fig. 39
Menu di congurazione
- Premere il tasto MENU per visualizzare il menu principale.
- Premere / per selezionare SETUP (congurazione) dal menu principale. Fig. 40
1. Premere il tasto▼ / ▲ per selezionare l’opzione che si desidera congurare nel menu
SETUP.
2. Premere OK per confermare la congurazione.
3. Una volta eettuata la congurazione, premere OK per salvare le modiche e tornare al
menu precedente.
Lingua OSD
- Selezionare una lingua per il menu OSD. La lingua predenita è l’inglese.
- Premere ▼ / ▲ / / per selezionare “Menu Language” (lingua di menu).
Fig. 41

TV 0 SERIES 0024/TV 0 SERIES 0032TV 0 SERIES 0024/TV 0 SERIES 0032 149148
ITALIANO ITALIANO
V-Oset
- Scorrimento verticale dell’immagine.
- Premere ▼ / ▲ per selezionare “V-Oset” (scorrimento verticale), quindi premere OK per
accedere al sottomenu corrispondente.
Dimensioni
- Regola le dimensioni dello schermo.
- Premere ▼ / ▲ per selezionare “Size” (dimensioni), quindi premere OK per accedere al
sottomenu corrispondente.
Phase
- Regola le linee di interferenza orizzontali.
- Premere ▼ / ▲ per selezionare “Phase” (fase), quindi premere OK per accedere al
sottomenu corrispondente.
Ripristino della posizione
Premere ▼ / ▲ per selezionare “Position Reset” (ripristina posizione), quindi premere OK per
ripristinare la posizione dello schermo.
Avvisi:
1. Non è possibile ridurre l’audio per l’opzione PICTURE (immagine).
2. Non è possibile selezionare “AD Switch” per l’opzione SOUND (audio).
3. Le funzioni di audiodescrizione e accessibilità per non vedenti sono identiche.
4. Le opzioni di blocco dei canali e di controllo parentale non sono disponibili nel menu LOCK
(blocco).
5. La lingua audio/sottotitoli, l’accessibilità per i non udenti e le opzioni del sistema le PVR
non sono disponibili nel menu SETUP (congurazione).
6. L’opzione PC non è compatibile con il menu CHANNEL (canale).
Contenuti multimediali
Nota: prima di accedere al menu “Media” (contenuti multimediali), collegare il dispositivo USB e
premere il tasto “Source” (sorgente) per impostare la sorgente multimediale di ingresso.
Fig. 49
- Premere ▼ / ▲ per selezionare “Media” nel menu “Source” (sorgente), quindi premere OK.
- Premere il tasto / per selezionare l’opzione che si desidera congurare nel menu
“Media”, quindi premere OK.
Menu foto
- Premere / per selezionare PHOTO (foto) nel menu principale, quindi premere OK.
- Premere Exit (esci) per tornare al menu precedente; premere nuovamente per uscire
completamente.
Prima installazione
Premere ▼ / ▲ per selezionare “First time installation” (prima installazione), quindi premere
OK per accedere.
Ripristino
Premere ▼ / ▲ per selezionare “Reset” (ripristino), quindi premere OK per accedere al
sottomenu corrispondente.
Aggiornamento del sistema (USB)
Premere ▼ / ▲ per selezionare “Software Update (USB)” (aggiornamento del sistema USB),
inserire il dispositivo USB nell’apposito ingresso e premere il tasto OK per aggiornare il sistema
alla versione più recente.
HDMI CEC (se compatibile con la funzione HDMI CEC/ARC)
Premere ▼ / ▲ per selezionare “HDMI CEC”, quindi premere OK per accedere al sottomenu
corrispondente. Fig. 47
- HDMI CEC: premere / per attivare/disattivare l’opzione HDMI CEC.
- HDMI ARC: premere / per attivare/disattivare l’opzione HDMI ARC.
- Auto Standby (modalità di standby automatico): Premere / per attivare/disattivare
l’opzione Auto Standby.
- Device List (elenco dispositivi): Premere OK per aprire il menu principale del dispositivo.
Menu di schermo
- Premere il tasto MENU per visualizzare il menu principale.
- Premere / per selezionare SCREEN (schermo) nel menu principale. Fig. 48
1. Premere il tasto / per selezionare l’opzione che si desidera congurare nel menu
SCREEN.
2. Premere OK per confermare la congurazione.
3. Una volta eettuata la congurazione, premere OK per salvare le modiche e tornare al
menu precedente.
Congurazione automatica
Premere OK per impostare automaticamente le seguenti opzioni: H-Oset/V-Oset/Size/
Phase.
H-Oset
- Scorrimento orizzontale dell’immagine.
- Premere ▼ / ▲ per selezionare “H-Oset” (scorrimento orizzontale), quindi premere OK
per accedere al sottomenu corrispondente.

TV 0 SERIES 0024/TV 0 SERIES 0032TV 0 SERIES 0024/TV 0 SERIES 0032 151150
ITALIANO ITALIANO
5. TELECOMANDO
Fig. 59
1. POWER (alimentazione): accendere il televisore o metterlo in Standby.
2. MUTE (silenzioso): premere per disattivare l’audio. Premere nuovamente o premere VOL+
per riattivare l’audio.
3. 0-9: premere 0-9 per selezionare direttamente un canale durante la visione. Il canale
cambierà dopo 2 secondi. Applicabile alla modalità televideo, ecc.
4. DTV/ATV: premere per passare dalla TV analogica a quella digitale e viceversa.
5. : premere per tornare al programma visualizzato in precedenza.
6. S.MODE (modalità audio): premere questo tasto per selezionare tra le diverse
impostazioni audio.
7. SLEEP (modalità di sospensione): congurare il tempo di sospensione prima che il
televisore si spenga automaticamente.
8. MTS: premere per cercare le modalità NICAM.
9. P.MODE (modalità immagine): premere questo tasto per selezionare tra le diverse
impostazioni di immagine.
10. MENU: consente di navigare tra i menu del sistema.
11. SOURCE (sorgente): aprire il menu principale e premere questo tasto per navigare tra le
sorgenti.
12. ▼ / ▲ OK consente di navigare tra i menu e di regolare le impostazioni di sistema in
base alle proprie preferenze.
13. EXIT (esci): premere questo tasto per uscire dal menu o dal sottomenu e annullare la
funzione corrispondente (se applicabile).
14. DISPLAY: premere questo tasto per visualizzare le informazioni sulla sorgente e sul
canale.
15. VOL+/VOL-: premere per aumentare/diminuire il volume.
16. TV/RADIO: consente di passare dalla modalità TV a quella Radio durante la visione di un
canale.
17. GUIDE:
1. Aprire l’EPG (Electronic Program Guide, guida di programma elettronica).
2. Riavvolgimento rapido in modalità PVR o Media Player (riproduttore multimediale).
18. TIME SHIFT (controllo del tempo):
1. Controllo del tempo dei canali DTV.
2. Controllo del tempo in modalità PVR o Media Player.
19. CANCEL (annulla):
1. Quando si seleziona una pagina in modalità Televideo, potrebbe impiegare un po’ ad essere
disponibile; premere il tasto CANCEL per tornare alla modalità TV. Una volta trovata la pagina
desiderata, il numero della pagina appare nella parte superiore dello schermo; premere
CANCEL per tornare alla modalità Televideo e navigare nella pagina.
2. Capitolo/le precedente in modalità PVR o Media Player.
Fig. 50
Premere / per selezionare il le che si desidera visualizzare nel menu di selezione dei le,
quindi premere OK per visualizzare la foto/immagine.
Evidenziando l’opzione selezionata, le informazioni sul le appariranno sulla destra e
l’immagine sarà visualizzata in anteprima al centro. Fig. 51
Menu musica
- Premere / per selezionare MUSIC (musica) nel menu principale, quindi premere OK.
- Premere Exit (esci) per tornare al menu precedente; premere nuovamente per uscire
completamente.
Fig. 52
Fig. 53
- Premere / per selezionare il brano/disco da riprodurre, quindi premere il tasto OK.
- Premere / per selezionare l’opzione per tornare al menu precedente.
Fig. 54
Menu lm
- Premere / per selezionare MOVIE (lm) nel menu principale, quindi premere OK.
- Premere Exit (esci) per tornare al menu precedente; premere
nuovamente per uscire completamente.
Fig. 55
- Premere / per selezionare il lm da riprodurre, quindi premere il tasto OK.
- Premere il tasto OK per riprodurre il lmato selezionato.
- Selezionare il menu multimediale a cui si desidera accedere e premere OK. Premere Exit
(esci) per tornare al menu precedente; premere nuovamente per uscire completamente.
Fig. 56
Menu testo
- Premere / per selezionare TEST (text) nel menu principale, quindi premere OK.
- Premere Exit (esci) per tornare al menu precedente; premere nuovamente per uscire
completamente.
- Fig. 57
- Premere / per selezionare l’elemento desiderato, quindi premere il tasto OK.
- Premere / per selezionare l’opzione per tornare al menu precedente.
Fig. 58

TV 0 SERIES 0024/TV 0 SERIES 0032TV 0 SERIES 0024/TV 0 SERIES 0032 153152
ITALIANO ITALIANO
apparecchio contiene pile. L’ingestione delle pile può causare gravi ustioni interne in appena 2
ore e può provocare la morte. Tenere le pile nuove e usate fuori dalla portata dei bambini. Se il
comparto pile non si chiude bene, smettere di usare il telecomando dell’apparecchio e tenerlo
fuori dalla portata dei bambini. Se si pensa che le pile possano essere state ingerite o inserite
in un’altra parte del corpo, rivolgersi immediatamente a un medico.
6. RISOLUZIONE DEI PROBLEMI
Non vi è corrente
elettrica.
Controllare se il cavo CA del televisore è collegato o meno. Se non
c’è ancora corrente, scollegare la spina e ricollegarla dopo 60
secondi. Ricollegare l’alimentazione.
Il televisore non riceve
correttamente il
segnale.
Se nelle vicinanze del televisore ci sono edici alti o montagne,
nello schermo potrebbe vericarsi un eetto ghosting o immagini
doppie. In questo caso, è possibile correggere l’immagine
manualmente regolando la direzione dell’antenna esterna.
Se si utilizza un’antenna per interni, potrebbe essere più dicile
assicurare una buona ricezione del segnale. Regolare la direzione
dell’antenna per garantire una buona ricezione. Se la ricezione
del segnale non migliora, potrebbe essere necessario passare a
un’antenna esterna.
Nessuna immagine. Vericare che l’antenna sul retro del televisore sia collegata
correttamente.
Controllare altri canali per vericare se il problema persiste.
Non c’è audio. Provare ad alzare il volume.
Controllare se l’audio del televisore è disattivato o meno.
C’è audio, ma non
c’è immagine o
quest’ultima è
sbiadita.
Provare a regolare il contrasto e la luminosità.
Il rumore statico
inuisce sulla qualità
video e audio.
Vericare che l’antenna sul retro del televisore sia collegata
correttamente.
Sullo schermo
appaiono
linee spezzate.
Apparecchi elettrici come asciugacapelli, aspirapolvere, ecc.
possono interferire con il televisore. Spegnere questo tipo di
apparecchi.
20. INDEX:
1. Premere questo tasto per richiedere la pagina Index (indice) in modalità Televideo.
2. Uscire dalla funzione di riproduzione in modalità PVR o Media Player.
21. SIZE: premere questo tasto per modicare le dimensioni dello schermo in modalità
Televideo.
22. REVEAL: premere questo tasto per mostrare o nascondere le parole nascoste/mostrate.
23. TASTI TRICOLORE: controllo in modalità Televideo, selezione delle voci di menu e MHEGS
nel menu DVB.
24. CH+/CH-: premere questi tasti per navigare tra i canali.
25. FAV/LIST: premere questi tasti per aprire l’elenco dei preferiti, quindi selezionare un
canale preferito.
26. ASPECT:
1. Premere questo tasto per selezionare la scala dell’immagine.
2. Avanzamento rapido in modalità PVR o Media Player.
27. FREEZE: premere questo tasto per congelare l’immagine.
28. SUB. PG:
1. Premere questo tasto per accedere alla sottopagina.
2. Capitolo/le successivo in modalità PVR o Media Player.
29. SUBTITLE: premere questo tasto per visualizzare e cambiare la lingua dei sottotitoli del
canale DTV corrente.
30. HOLD: premere questo tasto per attivare o disattivare la visualizzazione della pagina
corrente.
31. TEXT: premere questo tasto per attivare o disattivare il televideo.
32. RECLIST: premere questo tasto per visualizzare l’elenco delle registrazioni.
33. REC: premere questo tasto per registrare in modalità PVR.
Fig. 60
Inserimento delle pile
- Far scorrere verso il basso ed estrarre il coperchio del comparto pile sul retro del
telecomando per rimuoverlo. Inserire due pile AAA nel comparto pile rispettando la
polarità (+/-) come indicato. Non inserire una pila nuova e vecchia allo stesso tempo o tipi
diversi di pile.
- Far scorrere il coperchio no a sentire lo scatto in posizione.
Uso del telecomando
- Se non diversamente indicato, tutte le funzioni del televisore possono essere controllate
tramite il telecomando.
- Puntare sempre il telecomando direttamente verso il sensore sul fronte del televisore.
ATTENZIONE: non ingerire le pile per evitare ustioni chimiche. Il telecomando di questo

TV 0 SERIES 0024/TV 0 SERIES 0032TV 0 SERIES 0024/TV 0 SERIES 0032 155154
ITALIANO ITALIANO
7. SPECIFICHE TECNICHE
Prodotto TV 0 Serie 0024 TV 0 Serie 0032
Codice del prodotto 02610 02612
QR
Potenza 36 W 56 W
Tensione 100 - 240 V~
Frequenza 50 / 60 Hz
Vita utile 60.000 ore (circa)
I termini HDMI e HDMI High-Denition Multimedia Interface e il logo HDMI sono marchi o
marchi registrati di HDMI Licensing LLC negli Stati Uniti e in altri paesi.
Le speciche tecniche possono cambiare senza previo avviso per migliorare la qualità
dell’apparecchio.
Fabbricato in China | Progettato in Spagna
8. RICICLAGGIO DI APPARECCHIATURE ELETTRICHE ED ELETTRONICHE
Questo simbolo indica che, in conformità con le normative vigenti, il prodotto
e/o la batteria devono essere smaltiti separatamente dai riuti domestici.
Quando questo prodotto raggiunge la ne della sua vita utile, è necessario
rimuovere le pile/batterie/accumulatori e portarlo in un punto di raccolta
designato dalle autorità locali.
Per ottenere informazioni dettagliate sulla forma più adeguata per gettare
gli elettrodomestici e/o le corrispondenti batterie, il consumatore dovrà contattare le autorità
locali.
Il rispetto delle linee guida di cui sopra aiuterà a proteggere l’ambiente.
9. GARANZIA E SUPPORTO TECNICO
Cecotec sarà responsabile nei confronti dell’utente nale o del consumatore per difetti
di conformità esistente al momento della consegna del prodotto nei termini, condizioni e
scadenze stabilite dalla normativa vigente.
Il telecomando non
funziona.
Rimuovere l’involucro di plastica dal telecomando. Provare ad
avvicinare il telecomando al televisore e a premere un tasto
qualsiasi. Assicurarsi che le pile siano inserite correttamente o
provare a usarne di nuove.
Se non vi è alcuna risposta dopo alcuni minuti, il televisore passa
in modalità Standby.
Non c’è immagine
(modalità PC).
Controllare se il cavo è collegato correttamente all’ingresso HDMI
o se è piegato.
Linea verticale
lampeggiante
(modalità PC).
Accedere al menu principale e regolare il posizionamento
verticale dello schermo per eliminare la linea verticale.
Linea orizzontale
(modalità PC).
Regolare il posizionamento orizzontale dello schermo per
eliminare la linea orizzontale.
Schermo troppo
luminoso o troppo
scuro (modalità PC).
Regolare la luminosità o il contrasto nel menu principale.
Il PC non risponde. Controllare se la risoluzione di schermo selezionata del PC è
compatibile con quella del televisore.
Appaiono linee
quando si collega
un dispositivo
all’ingresso RCA.
Assicurarsi di utilizzare un cavo di buona qualità.
Il problema persiste. Scollegare il cavo di alimentazione, attendere 30 secondi e
ricollegarlo alla presa di corrente. Se il problema persiste, non
tentare di riparare il televisore per conto proprio. Contattare il
Servizio di Assistenza Tecnica uciale.
Non lasciare che il televisore mostri un’immagine in modo statico, che si tratti di un video
in pausa, di una schermata di menu, ecc. per un lungo periodo di tempo per evitare che lo
schermo si bruci.

TV 0 SERIES 0024/TV 0 SERIES 0032TV 0 SERIES 0024/TV 0 SERIES 0032 157
PORTUGUÊS
156
ITALIANO
1. ANTES DE USAR
- Este aparelho é acondicionado em embalagens concebidas para o proteger durante
o transporte. Retire o aparelho da sua caixa e remova todo o material de embalagem.
Pode manter a caixa original e outras embalagens num local seguro para evitar danos no
aparelho, caso necessite de o transportar no futuro. Se desejar descartar a embalagem
original, certique-se de reciclar todos os itens corretamente.
- Certique-se de que todas as peças e componentes estejam incluídos e em bom estado. Se
algum deles faltar ou não estiver em boas condições, contactar imediatamente o Serviço
de Assistência Técnica da Cecotec.
Conteúdo da caixa:
- TV
- Controlo remoto
- 2 pilhas AA
- Este manual de instruções
Nota:
Os grácos deste manual são representações esquemáticas e podem não corresponder
exatamente ao aparelho.
2. INSTALAÇÃO
Montagem do suporte
Para xar a TV à parede:
Fig. 1
1. Coloque a TV com um pano macio sobre uma mesa para evitar riscar o ecrã.
2. Utilize uma chave de fendas para quitar os parafusos xados ao suporte inferior. A seguir,
retire o supor inferior removendo os parafusos e o suporte inferior com cuidado.
3. Escolha um suporte que poda xar à parede de acordo com as dimensões da TV. Fig. 2-3 .
4. Perfure 4 orifícios na parede e coloque 4 parafusos.
5. Utilize a chave de fendas para xar o parafuso à parte posterior da TV. Depois, xe a TV
à parede.
Legenda gura 1:
1. Parede
2. Suporte
3. Parede
Si raccomanda che le riparazioni siano eettuate da personale qualicato.
Se si riscontra un problema con l’apparecchio o in caso di dubbi, si prega di contattare il Servizio
di Assistenza Tecnica uciale di Cecotec al numero +34 96 321 07 28.
10. COPYRIGHT
I diritti di proprietà intellettuale dei testi di questo manuale appartengono a CECOTEC
INNOVACIONES, S.L. Tutti i diritti riservati. Il contenuto di questa pubblicazione non può essere,
in tutto o in parte, riapparecchio, archiviato in un sistema di recupero, trasmesso o distribuito
con qualsiasi mezzo (elettronico, meccanico, fotocopia, registrazione o simile) senza la previa
autorizzazione di CECOTEC INNOVACIONES, S.L.
11. DICHIARAZIONE DI CONFORMITÀ SEMPLIFICATA
Cecotec Innovaciones dichiara che i televisori, modello 02610_TV 0 Series 0024 e
02612_TV 0 Series 0032, sono conformi alla Direttiva sulle apparecchiature radio
2014/53/UE.
Il testo completo della dichiarazione di conformità UE è disponibile nel seguente sito web:
www.cecotec.com

TV 0 SERIES 0024/TV 0 SERIES 0032TV 0 SERIES 0024/TV 0 SERIES 0032 159158
PORTUGUÊS PORTUGUÊS
Primeira instalação
Ligue um cabo RF à entrada “RF-In” da TV e à entrada da sua antena de TV.
Idioma
Prima / para selecionar o idioma do sistema.
Pais
Prima ▼ / ▲ para realçar a opção Country (País).
Prima / para selecionar o país que deseje.
Fig. 6
Fig. 7
Sintonização automática
Para sintonizar automaticamente a TV, prima MENU e o botão de seta para a esquerda para
saltar a sintonização ATV. Faça o mesmo para saltar a sintonização DTV.
Fig. 8
ADVERTÊNCIA:
Não coloque a TV num lugar instável para evitar que caia ou possa causar lesões ou danos.
Muitas lesões podem evitar-se se toma estas precauções básicas:
1. Utilize armários ou suportes recomendados pelo fabricante da TV.
2. Utilize apenas móveis que possam suportar o peso da TV com segurança.
3. Certique-se de que a TV não sobressai da borda do móvel de suporte.
4. Não coloque a TV sobre móveis altos (por exemplo, armários ou estantes) sem xar o
móvel e a TV num suporte adequado.
5. Não coloque toalhas de mesa ou outros materiais entre a TV e o armário.
6. Eduque as crianças sobre os perigos de subir para cima da mobília quando quiserem
alcançar a TV ou o controlo remoto.
Se pretender mudar a TV para outro local, tenha em consideração o acima exposto.
3. BOTÕES DO CONTROLO REMOTO E INTERFACE
Botões do controlo remoto
Ícone Mostrar/ocultar: quando o ícone não aparecer, prima o botão correspondente. O ícone
do botão aparecerá como indicado na gura acima e desligar-se-á automaticamente após 5
segundos de inatividade.
Seleção dos ícones: prima brevemente o botão correspondente e desloque-se para a direita
para selecionar o ícone.
Seleção da função do ícone: prima e mantenha premido o botão para obter a função do ícone
selecionado.
4. Parafuso para parede
Nota:
1. O suporte de xação à parede (VESA) não está fornecido.
2. Quando montar a TV, certique-se de mantê-la a uma distância de segurança de outros
aparelhos.
3. Se for preciso, procure um técnico qualicado para evitar riscos.
4. A gura serve apenas de referência.
5. Siga as instruções do manual para xar bem a TV ao suporte.
6. Siga o padrão VESA para a montagem correta da TV ao suporte.
Instalação e ligação
Conguração TV. Fig. 3
- Coloque a TV num lugar estável que posa suportar o peso.
- Para evitar qualquer risco, mantenha a TV afastada da água ou fontes de calor (luz, vela ou
um aquecedor), e certique uma ventilação adequada na parte posterior da TV.
Ligar a antena e a fonte de alimentação
1. Ligue o cabo da antena à tomada da antena na parte posterior da TV.
2. Para ligar o cabo de alimentação da TV:
Ligar a TV
3. Prima o botão Ligar da TV: a luz indicadora acender-se-á a verde. Se a TV estiver no modo
Standby (luz indicadora vermelha), prima o botão Ligar no controlo remoto para ligar a TV.
Legenda da gura 3:
1. Saída do sinal TV.
Nota: A gura serve apenas de referência.
Instalação de suportes
1. Retire a TV, os acessórios e o suporte da caixa (alguns modelos não incluem um suporte).
Fig. 4
2. Para evitar danicar a TV, coloque-a sobre um pano ou material macio na mesa e
aparafuse o suporte da base à TV.
3. Fixe adequadamente a base à TV para completar a instalação.
Dica:
Para facilitar a instalação da base e evitar danos, recomenda-se a utilização de uma chave de
fendas do tipo PH2. Fig. 5

TV 0 SERIES 0024/TV 0 SERIES 0032TV 0 SERIES 0024/TV 0 SERIES 0032 161160
PORTUGUÊS PORTUGUÊS
4. Conector de entrada HDMI
5. Conector USB
6. Conector TV
4. MENU E MODOS
Menu principal
Menu CHANNEL (canal)
Prima MENU para visualizar o menu principal.
Prima / para selecionar CHANNEL no menu principal. Fig. 9
1. Prima ▼ / ▲ para selecionar a opção que deseja congurar no menu CHANNEL.
2. Prima ENTER (conrmar) para conrmar à conguração.
3. Quando tiver completada a conguração, prima ENTER para salvar e voltar ao menu
anterior.
Sintonia automática
Prima ▼ / ▲ para selecionar Auto Tuning (sintonização automática); a seguir prima ENTER/
.
Fig. 10
Sintonização ATV manual
Canal atual.
Conguração do número do canal.
Sistema de cores
Seleção do sistema de cores.
(Sistemas disponíveis: AUTO, PAL, SECAM)
Sistema de som
Seleção do sistema de som.
Ajuste preciso
Ajuste exato da frequência do canal.
Pesquisar
Pesquisa de canais.
Fig. 11
Sintonia DTV manual
- Prima ▼ / ▲ para selecionar DTV Manual Tuning (sintonização DTV manual). A seguir,
Descrição dos ícones
Ícone Desligar: Corresponde ao botão POWER do controlo remoto.
Ícone Menu: Corresponde ao botão MENU do controlo remoto.
Ícone Fonte: Corresponde ao botão SOURCE do controlo remoto.
Ícone CH+ (seguinte canal): Corresponde ao botão CH+ do controlo remoto.
Ícone CH- (canal anterior): Corresponde ao botão CH- do controlo remoto.
Ícone Volume+ (aumentar o volume): Corresponde ao botão VOL+ do controlo remoto.
Ícone Volume- (diminuir o volume): Corresponde ao botão VOL- do controlo remoto.
Painel
Entrada AV
Entrada de sinal AV externo e canal de áudio direito/
esquerdo.
RANHURA CI
A ranhura para cartões CI (Common Interface, interface
comum) requer CAM (Conditional Access Module, Módulo de
Acesso Condicional) para a TV por assinatura.
Entrada HDMI
Entrada de sinal digital desde o conetor de vídeo HDMI.
ANT 75
Entrada para a ligação da antena/cabo (75/VHF/UHF).
Entrada USB
Insira um dispositivo USB aqui para reproduzir os seus
cheiros multimédia ou gravar programas utilizando a
função PVR.
COAXIAL
Para ligar o recetor SPDIF.
Mantenha-se afastado, proteja e não toque nos terminais HDMI e USB da TV para
prolongar a vida útil desta e garantir um funcionamento correto.
Esquema de ligação de dispositivos externos
Ver gura 2.
Legenda da gura 2:
1. DVD
2. Set-Top Box
3. Conector de entrada AV

TV 0 SERIES 0024/TV 0 SERIES 0032TV 0 SERIES 0024/TV 0 SERIES 0032 163162
PORTUGUÊS PORTUGUÊS
ENTER/ para conrmar. Fig. 20
Menu Imagem
- Prima MENU para visualizar o menu principal.
- Prima / para selecionar PICTURE (Imagem) no menu principal. Fig. 21
Nota:
- Modo 120 Hz NÃO COMPATÍVEL
- Modo 60 Hz NÃO COMPATÍVEL
1. Prima ▼ / ▲ para selecionar a opção que deseja congurar no menu PICTURE.
2. Prima OK para conrmar à conguração.
3. Quando tiver completada a conguração, prima MENU para salvar e voltar ao menu
anterior.
Modo Imagem
- Prima ▼ / ▲ para selecionar Picture Mode (Modo Imagem). A seguir, prima OK para aceder
ao submenu correspondente.
- Pode alterar o contraste, o brilho, a cor, a nitidez e a tonalidade quando a imagem está no
modo Personal (personalizado).
Dicas: Pode premir PMODE para alterar diretamente as denições de imagem.
Fig. 22
Contraste / brilho / cor / nitidez / matiz
Prima ▼ / ▲ para selecionar o valor desejado. A seguir, prima ENTER/ para denir o valor.
- Contraste: Realça a luz na imagem, mas a sombra não se altera.
- Brilho: Ajusta a saída de bra ótica; afeta os escuros da imagem.
- Cor: Ajusta a saturação da cor.
- Matiz: Utilizado para compensar a mudança de cor na transmissão NTSC.
- Nitidez: Dene o nível de detalhe da imagem.
Temperatura da cor
- Modica a perceção da gama de cores da TV.
- Prima ▼ / ▲ para selecionar Color Temperature (Temperatura da cor). A seguir, prima OK
para aceder ao submenu correspondente.
- Prima ▼ / ▲ para selecionar a opção desejada; temperatura da cor: Cool (fria), Medium
(neutra), Warm (quente).
Fig. 23
- Cool (fria): Aumenta a tonalidade azul e reduz o branco.
- Medium (neutra): Aumenta o cor-de-rosa e o azul e reduz o branco.
- Warm (quente): Aumenta o vermelho e reduz o branco.
prima ENTER para aceder ao submenu correspondente.
- Prima / para selecionar o canal. A seguir, prima ENTER para procurar o programa.
Fig. 12
Editar canais
Prima ▼ / ▲ para selecionar Program Edit (Editar canais). A seguir, prima ENTER para aceder
ao submenu correspondente. Fig. 13
Os botões de cores são os botões de acesso direto à programação de canais.
Primeiro, prima ▼ / ▲ para realçar o canal que pretende selecionar. A seguir:
- Prima o botão vermelho para remover o canal da lista.
- Prima o botão amarelo para mover o canal na lista.
- Prima o botão azul para saltar o canal selecionado.
- Prima FAV para adicionar ou remover um canal da sua lista de Favoritos (a TV saltará o
canal automaticamente quando premir CH+/- para mudar de canal).
Lista de programação
- Prima ▼ / ▲ para selecionar Lista de programação; a seguir, prima ENTER para aceder ao
submenu correspondente. A lista de programas está disponível para DTV e satélite. Fig. 14
- Prima o botão amarelo para aceder à interface abaixo. Fig. 15
- Se houver problemas com a programação, aparecerá uma noticação de aviso. Fig. 16
Informação sobre o sinal
Prima ▼ / ▲ para selecionar Signal Information (informação sobre o sinal). Prima ENTER para
ver a informação em detalhe sobre o sinal (disponível só com sinal DTV). Fig. 17
Informações sobre CI (Common Interface, Interface Comum)
Prima ▼ / ▲ para selecionar CI Information (Informação CI). A seguir, prima ENTER para ver os
detalhes do cartão CI (se estiver inserido).
NOTA: o cartão CI não está incluído.
Lista dos canais por satélite. Fig. 18
Sintonia automática
Prima ▼ / ▲ para selecionar Auto Tuning (sintonização automática). A seguir prima ENTER/
. Fig. 19
Conguração da antena parabólica
Prima ▼ / ▲ para selecionar Dish Setup (Conguração da antena parabólica). A seguir, prima

TV 0 SERIES 0024/TV 0 SERIES 0032TV 0 SERIES 0024/TV 0 SERIES 0032 165164
PORTUGUÊS PORTUGUÊS
Balance (equilibrado)
Prima ▼ / ▲ para selecionar esta opção. A seguir, prima ENTER/ para denir o valor.
Auto Volume Level (Volume automático)
Prima ▼ / ▲ para selecionar esta opção. A seguir, prima / para ativar/desativar.
Modo SPDIF
Prima ▼ / ▲ para selecionar SPDIF Mode (Modo SPDIF). A seguir, selecione entre O/PCM/
Auto.
AD Switch
Prima ▼ / ▲ para selecionar esta opção. A seguir, prima / para ativar/desativar. A TV tem
também uma função de áudio-descrição para pessoas invisuais.
AVISO:
Balance (equilibrado): Ajusta o áudio de saída para uma experiência de som mais equilibrada.
Auto Volume Level (Volume automático) Reduz automaticamente a diferença entre o volume
do canal e do programa.
Menu da hora
- Prima MENU para visualizar o menu principal.
- Prima / para selecionar TIME (hora) no menu principal.
Fig. 28
1. Prima ▼ / ▲ para selecionar a opção que deseja congurar no menu TIME.
2. Prima ENTER para conrmar à conguração.
3. Quando tiver completada a conguração, prima ENTER para salvar e voltar ao menu anterior.
Fuso horário
- Prima ▼ / ▲ para selecionar Time Zone (fuso horário). A seguir, prima OK para aceder ao
submenu correspondente. Fig. 29
- Prima ▼ / ▲/ / para selecionar o fuso horário.
Temporizador de desligado
- Prima ▼ / ▲ para selecionar Sleep Timer (temporizador de desligamento). A seguir, prima
OK para aceder ao submenu correspondente. Fig. 30
- Prima ▼ / ▲ para selecionar entre as opções disponíveis:
- O (desligado), 15 min, 30 min, 45 min, 60 min, 90 min, 120 min, 240 min.
Modo Standby automático
- Prima ▼ / ▲ para selecionar Auto Standby (modo Standby automático). A seguir, prima OK
para aceder ao submenu correspondente. Fig. 31
Diminuir o som
Filtra e reduz o som e melhora a qualidade da imagem. Prima ▼ / ▲ para selecionar Noise
Reduction (diminuir o som) e, em seguida, prima OK para aceder ao submenu correspondente.
Fig. 24.
- O (desligado): selecione esta opção para desativar a deteção do som.
- Low (baixo): deteta e reduz o som baixo.
- Middle (moderado): deteta e reduz o som moderado.
- High (alto): deteta e reduz o som alto.
- Default (pré-denido): pré-denido.
Modo HDMI
- Prima ▼ / ▲ para selecionar HDMI Mode (Modo HDMI). A seguir, prima OK para aceder ao
submenu correspondente. Fig. 25
- Prima ▼ / ▲ para selecionar entre os modos de imagem disponíveis: Auto/Video/PC.
Menu de som
- Prima MENU para visualizar o menu principal. Fig. 26
- Prima / para selecionar SOUND (som) no menu principal.
1. Prima / para selecionar a opção que deseja congurar no menu SOUND.
2. Prima ENTER (conrmar) para conrmar à conguração.
3. Quando tiver completada a conguração, prima ENTER para salvar e voltar ao menu anterior.
Fig. 27
Modo de som
Prima ▼ / ▲ para selecionar Sound Mode (Modo de som). A seguir, prima OK para aceder ao
submenu correspondente. Prima ▼ / ▲ para selecionar entre as opções disponíveis.
Pode alterar o valor dos agudos e dos graves quando o som está no modo Personalizado.
Dicas: Prima SMODE no controlo remoto para mudar diretamente o modo de som.
Standard (padrão): produz um som equilibrado em todos os ambientes.
Music (música): preserva o som original. Ideal para programas de música.
Movie (lme): ajusta os agudos e os graves para uma experiência de som melhorada.
Sports (deportos): melhora a nitidez vocal para os desportos.
Personal (personalizado): selecione esta opção para personalizar as denições de imagem.
Nota: os agudos e os graves só estão disponíveis no modo personalizado e podem ser
ajustados conforme desejado.

TV 0 SERIES 0024/TV 0 SERIES 0032TV 0 SERIES 0024/TV 0 SERIES 0032 167166
PORTUGUÊS PORTUGUÊS
Bloqueio dos botões
Prima ▼ / ▲ para selecionar a opção Key Lock (Bloqueio dos botões). A seguir, prima /
para ativar/desativar. Se ativar esta opção os botões do controlo remoto bloquear-se-ão.
Modo Hotel (compatibilidade necessária)
Fig. 38
1. Prima ▼ / ▲ no controlo remoto para selecionar Hotel Mode (Modo Motel) no menu Lock
(bloqueio).
2. Prima ENTER no controlo remoto para aceder ao submenu correspondente.
3. Quando tiver completada a conguração, prima MENU para salvar e voltar ao menu
anterior.
Modo Hotel
Prima ▼ / ▲ para selecionar a opção Hotel Mode (Modo Hotel). A seguir, prima / para
ativar/desativar.
Bloqueio da fonte
- Prima ▼ / ▲ para selecionar Source Lock (bloqueio da fonte). A seguir, prima ENTER para
aceder ao submenu correspondente.
- O administrador do hotel pode congurar o bloqueio de fonte como DTV/HDMI, AV, etc. O
utilizador não pode selecionar o bloqueio de fonte.
Fonte pré-denida
- Prima ▼ / ▲ para selecionar Default Source (fonte pré-denida). A seguir, prima ENTER
para aceder ao submenu correspondente.
- O administrador do hotel pode congurar a fonte pré-denida. A TV ligar-se-á com a fonte
pré-denida.
Programação pré-denida
- Prima ▼ / ▲ para selecionar Default prog (programação pré-denida). A seguir, prima
/ para realizar as denições que deseje (disponível com TV como fonte pré-denida).
- O administrador do hotel pode congurar a programação pré-denida. Só pode congurar
a fonte pré-denida DTV/TV.
Volume pré-denido
- Prima ▼ / ▲ para selecionar Default Volume (volume pré-denido). A seguir, prima /
para realizar as denições que deseje.
- O administrador do hotel pode congurar o volume pré-denido. A TV ligar-se-á com o
volume pré-denido.
- Prima ▼ / ▲ para selecionar entre as opções disponíveis.
Dicas: Não realize qualquer operação com o controlo remoto durante o tempo selecionado,
caso contrário o tempo será reposto.
Temporizador OSD
- Prima ▼ / ▲ para selecionar OSD Timer (temporizador OSD). A seguir, prima OK para
aceder ao submenu correspondente. Fig. 32
- Prima ▼ / ▲ para selecionar entre as opções disponíveis.
Menu de bloqueio
Prima MENU para visualizar o menu principal. Prima / para selecionar LOCK (bloqueio) no
menu principal.
Fig. 33
1. Prima ▼ / ▲ para selecionar a opção que deseja congurar no menu LOCK SYSTEM.
2. Prima ENTER / para conrmar à conguração.
3. Quando tiver completada a conguração, prima MENU para voltar ao menu anterior.
Bloqueio do sistema
Prima ▼ / ▲ para selecionar System Lock (Bloqueio do sistema). A seguir, prima ENTER para
aceder às 3 opções seguintes.
Fig. 34
A palavra-passe padrão é “0000”. Se se esquecer da palavra-passe, tente “8899”.
Denir a palavra-passe
Prima ▼ / ▲ para selecionar Denir palavra-passe; a seguir, prima ENTER para aceder ao
submenu correspondente e denir a palavra-passe.
Fig. 35
Bloqueio de canais
- Prima ▼ / ▲ para selecionar Channel Lock (bloqueio de canais). A seguir, prima ENTER
para aceder ao submenu correspondente.
- Prima o botão verde para bloquear ou desbloquear o canal que deseje.
Fig. 36
Controlo parental
Prima ▼ / ▲ para selecionar Parental Guidance (controlo parental). A seguir, prima ENTER
para aceder ao submenu correspondente e selecionar a idade dos seus lhos. Fig. 37

TV 0 SERIES 0024/TV 0 SERIES 0032TV 0 SERIES 0024/TV 0 SERIES 0032 169168
PORTUGUÊS PORTUGUÊS
Restabelecer
Esta função restabelece os valores padrão do modo Hotel.
É possível selecionar o modo Hotel depois de introduzir a palavra-passe do sistema 8888 no
bloqueio do menu principal (a condição prévia é que o software congure o modo Hotel para
ser aberta por defeito).
Fig. 39
Menu de conguração
- Prima MENU para visualizar o menu principal.
- Prima / para selecionar SETUP (Conguração) no menu principal. Fig. 40
1. Prima ▼ / ▲ para selecionar a opção que deseja congurar no menu SOUND.
2. Prima ENTER (conrmar) para conrmar à conguração.
3. Quando tiver completada a conguração, prima ENTER para salvar e voltar ao menu
anterior.
Idioma OSD
- Selecione um idioma para o menu OSD. O idioma padrão é inglês.
- Prima ▼ / ▲ / / para selecionar Menu Language (Idioma do menu).
Fig. 41
Idioma do teletexto
- Prima ▼ / ▲ para selecionar TT Language (Idioma do teletexto). A seguir, prima OK para
aceder ao submenu correspondente.
- Prima ▼ / ▲ para selecionar um idioma do teletexto.
Fig. 42
Idiomas do áudio
- Prima ▼ / ▲ para selecionar Audio Language (Idioma do áudio). A seguir, prima OK para
aceder ao submenu correspondente.
- Prima / para aceder aos idiomas de áudio disponíveis.
- Prima ▼ / ▲ / / para selecionar o idioma de áudio desejado.
Fig. 43
Idioma das legendas
- Prima ▼ / ▲ para selecionar Subtitle Language (Idioma das legendas). A seguir, prima OK
para aceder ao submenu correspondente.
- Prima / para aceder aos idiomas de legenda disponíveis.
- Prima ▼ / ▲ / / para selecionar o idioma de legenda desejado.
Fig. 44
Volume máximo
- Prima ▼ / ▲ para selecionar Max Volume (volume máximo). A seguir, prima / para
realizar as denições que deseje.
- O administrador do hotel pode congurar o volume máximo. O utilizador pode denir o
volume abaixo do nível congurado.
Canal
Prima ▼ / ▲ para selecionar a opção CHANNEL (Canal). A seguir, prima / para ativar/
desativar.
Imagem
Prima ▼ / ▲ para selecionar a opção PICTURE (imagem). A seguir, prima / para ativar/
desativar.
Som
Prima ▼ / ▲ para selecionar a opção SOUND (som). A seguir, prima / para ativar/desativar.
Tempo
Prima ▼ / ▲ para selecionar a opção TIME (tempo). A seguir, prima / para ativar/desativar.
Bloqueio
Prima ▼ / ▲ para selecionar a opção LOCK (Bloqueio). A seguir, prima o ícone / e para a
ativar/desativar.
Conguração
Prima ▼ / ▲ para selecionar a opção SETUP (Conguração). A seguir, prima ▼ / ▲ para ativar/
desativar.
Apagar a denição
Prima ▼ / ▲ para selecionar Clear Lock (apagar denição). A seguir, prima ENTER para anular
a denição anterior.
Importar base de dados
O administrador do hotel pode importar as informações do canal introduzindo uma pen USB
na porta.
Exportar base de dados
O administrador do hotel pode inserir o disco USB de importação noutras TVs. Pode então
utilizar esta função para clonar todos os canais em novos aparelhos de TV.

TV 0 SERIES 0024/TV 0 SERIES 0032TV 0 SERIES 0024/TV 0 SERIES 0032 171170
PORTUGUÊS PORTUGUÊS
- HDMI ARC: Prima / para ativar/desativar a opção HDMI ARC.
- Auto Standby (modo Standby automático): Prima / para ativar/desativar a opção Auto
Standby.
- Device List (lista de dispositivos): Prima ENTER para abrir o menu principal do dispositivo.
Menu do ecrã
- Prima MENU para visualizar o menu principal.
- Prima / para selecionar SCREEN (Ecrã) no menu principal. Fig. 48
1. Prima / para selecionar a opção que deseja congurar no menu SCREEN.
2. Prima ENTER (conrmar) para conrmar à conguração.
3. Quando tiver completada a conguração, prima ENTER para salvar e voltar ao menu
anterior.
Denição automática
Prima ENTER para denir automaticamente as seguintes opções: H-Oset/V-Oset/Size/
Phase.
H-Oset
- Deslocação horizontal da imagem.
- Prima ▼ / ▲ para selecionar H-Oset (Deslocação horizontal da imagem). A seguir, prima
ENTER para aceder ao submenu correspondente.
V-Oset
- Deslocação vertical da imagem.
- Prima ▼ / ▲ para selecionar V-Oset (Deslocação vertical da imagem). A seguir, prima
ENTER para aceder ao submenu correspondente.
Tamanho
- Ajusta o tamanho da imagem.
- Prima ▼ / ▲ para selecionar Size (Tamanho). A seguir, prima ENTER para aceder ao
submenu correspondente.
Fase
- Ajusta as linhas de interferência horizontais.
- Prima ▼ / ▲ para selecionar Phase (Fase). A seguir, prima ENTER para aceder ao submenu
correspondente.
Reiniciar a posição
Prima ▼ / ▲ para selecionar Position Reset (Reiniciar a posição). A seguir, prima ENTER para
repor a posição do ecrã.
Acessibilidade áudio
Prima ▼ / ▲ para selecionar a opção Hearing Impaired (Deciência auditiva). A seguir, prima
ENTER para a ativar/desativar.
Sistema de cheiros PVR
- Prima ▼ / ▲ para selecionar PVR File System (Sistema de cheiros PVR). A seguir, prima
ENTER para aceder ao submenu correspondente.
- Prima ▼ / ▲ para selecionar Check PVR File System (Vericar sistema de cheiros PVR).
A seguir, prima ENTER para aceder ao submenu correspondente. Esta função verica a
velocidade do USB.
Fig. 45
Proporção de ecrã
- Prima ▼ / ▲ para selecionar Aspect Ratio (Proporção de ecrã). A seguir, prima ENTER para
aceder ao submenu correspondente.
- Prima ▼ / ▲ para selecionar entre as proporções de ecrã disponíveis: Auto, 4:3,16:9,
Zoom1 e Zoom2.
Fig. 46
Tela azul
Prima ▼ / ▲ para selecionar a opção Blue Screen (Tela azul). A seguir, prima ENTER para
ativar/desativar.
Primeira instalação
Prima ▼ / ▲ para selecionar First time installation (Primeira instalação). A seguir, prima
ENTER para aceder.
Reiniciar
Prima ▼ / ▲ para selecionar Reset (Reiniciar). A seguir, prima ENTER para aceder ao submenu
correspondente.
Atualização de software (USB)
Prima ▼ / ▲ para selecionar Software Update (USB) (Atualização de software USB). Ligue
o seu dispositivo USB à porta USB e, a seguir, prima ENTER para atualizar o software para a
versão mais recente.
HDMI CEC (se compatível com a função HDMI CEC/ARC)
Prima ▼ / ▲ para selecionar HDMI CEC. A seguir, prima ENTER para aceder ao submenu
correspondente. Fig. 47
- HDMI CEC: Prima / para ativar/desativar a opção HDMI CEC.

TV 0 SERIES 0024/TV 0 SERIES 0032TV 0 SERIES 0024/TV 0 SERIES 0032 173172
PORTUGUÊS PORTUGUÊS
Menu de lmes
- Prima / para selecionar MOVIE (Filme) no menu principal. A seguir, prima ENTER.
- Prima EXIT (Sair) para regressar ao menu anterior e prima novamente para sair
completamente.
Fig. 55
- Prima / para selecionar o lme que quer reproduzir, a seguir, prima ENTER.
- Prima ENTER para reproduzir o lme selecionado.
- Selecione o menu multimédia a que que aceder e prima ENTER. Prima EXIT (Sair) para
regressar ao menu anterior e prima novamente para sair completamente.
Fig. 56
Menu de texto
- Prima / para selecionar TEXT (texto) no menu principal. A seguir, prima ENTER.
- Prima EXIT (Sair) para regressar ao menu anterior e prima novamente para sair
completamente.
- Fig. 57
- Prima / para selecionar o item que quer, a seguir, prima ENTER.
- Prima / para selecionar a opção para regressar ao menu anterior.
Fig. 58
5. CONTROLO REMOTO
Fig. 59
1. POWER (Ligar/Desligar): ligue a TV ou coloque-a no modo Standby.
2. MUTE (silencioso): prima para silenciar o som. Prima novamente ou prima VOL+ para
voltar a ligar o som.
3. 0 -9: prima 0-9 para selecionar diretamente um canal enquanto vê TV. O canal muda após
2 segundos. Aplicável ao modo de teletexto, etc.
4. DTV/ATV: prima para alternar entre TV analógica e digital.
5. : prima para voltar ao programa que estava a ver anteriormente.
6. S.MODE (Modo de som): prima este botão para selecionar entre as diferentes denições
de som.
7. SLEEP (Modo Standby): selecione o período de tempo antes de a TV se desligar
automaticamente.
8. MTS: prima para procurar os modos NICAM.
9. P.MODE (Modo de imagem): prima este botão para selecionar entre as diferentes
denições de imagem.
10. MENU: permite-lhe navegar entre os menus do sistema.
Avisos:
1. O som não pode ser reduzido para a opção PICTURE (imagem).
2. AD Switch não pode ser selecionado para a opção SOUND (som).
3. As funções da áudio-descrição e da acessibilidade para as pessoas com deciência
auditiva são a mesma coisa.
4. As opções de bloqueio de canais e controlo parental não estão disponíveis no menu LOCK
(bloqueio).
5. O idioma do áudio/subtítulo, a acessibilidade para pessoas com deciência auditiva e as
opções do sistema de cheiros PVR não estão disponíveis no menu SETUP (Conguração).
6. A opção PC não é compatível com o menu CHANNEL (Canal).
Conteúdo multimédia
Nota: Antes de aceder ao menu Media (Conteúdo multimédia), ligue o dispositivo USB e prima
SOURCE (fonte) para denir a fonte de entrada Media.
Fig. 49
- Prima ▼ / ▲ para selecionar MEDIA no menu SOURCE (Fonte) e, a seguir, prima ENTER.
- Prima / para selecionar a opção que deseja congurar no menu MEDIA. A seguir, prima
ENTER.
Menu de foto
- Prima / para selecionar PHOTO (Foto) no menu principal. A seguir, prima ENTER.
- Prima EXIT (Sair) para regressar ao menu anterior e prima novamente para sair
completamente.
Fig. 50
Prima / para selecionar o cheiro que pretende visualizar no menu de seleção de cheiros.
A seguir, prima ENTER para visualizar a foto/imagem.
Ao realçar a opção selecionada, a informação do cheiro aparecerá à direita e a imagem será
pré-visualizada no centro. Fig. 51
Menu de música
- Prima / para selecionar MUSIC (Música) no menu principal. A seguir, prima ENTER.
- Prima EXIT (Sair) para regressar ao menu anterior e prima novamente para sair
completamente.
Fig. 52
Fig. 53
- Prima / para selecionar a música/disco que quer reproduzir, a seguir, prima ENTER.
- Prima / para selecionar a opção para regressar ao menu anterior.
Fig. 54

TV 0 SERIES 0024/TV 0 SERIES 0032TV 0 SERIES 0024/TV 0 SERIES 0032 175174
PORTUGUÊS PORTUGUÊS
33. REC: prima este botão para gravar no modo PVR.
Fig. 60
Instalação das pilhas:
- Deslize para baixo e puxe a tampa do compartimento das pilhas na parte de trás do
controlo remoto para a retirar. Introduza duas pilhas AAA no compartimento das pilhas
respeitando a polaridade (+/-) como indicado. Não introduza pilhas novas e velhas ou
diferentes tipos de pilhas.
- Deslize a tampa até encaixá-la no lugar.
Utilizar o controlo remoto:
- Salvo indicação em contrário, todas as funções da TV podem ser controladas com o
controlo remoto.
- Aponte sempre o controlo remoto diretamente para o sensor na parte frontal da TV.
ATENÇÃO: não engula as pilhas, pois existe o risco de queimaduras químicas. Este produto
contém pilhas. A ingestão de pilhas pode causar queimaduras internas graves em menos
de 2 horas e pode resultar em morte. Mantenha as crianças fora do alcance das pilhas. Se o
compartimento das pilhas não fechar corretamente, pare de utilizar o aparelho e mantenha-o
fora do alcance das crianças. Se as pilhas forem engolidas, procure imediatamente assistência
médica.
6. RESOLUÇÃO DE PROBLEMAS
Sem alimentação
elétrica.
Verique se o cabo CA da TV está ligado ou não. Se continuar
a não haver energia, desligue a cha e volte a ligá-la após 60
segundos. Volte a ligar a corrente.
A TV não está a receber
o sinal corretamente.
Se houver edifícios altos ou montanhas perto da TV, o ecrã pode
apresentar imagens fantasma ou duplas. Se for esse o caso,
pode corrigir a imagem manualmente, ajustando a direção da
antena externa.
Se utilizar uma antena interior, poderá ser mais difícil captar o
sinal. Ajuste a direção da antena para garantir uma boa receção.
Se a receção do sinal não melhorar, poderá ser necessário
mudar para uma antena externa.
11. SOURCE (fonte): Abra o menu principal e prima para navegar entre as fontes.
12. ▼ / ▲ ENTER: permite-lhe navegar através dos menus no ecrã e congurar as
denições do sistema de acordo com as suas preferências.
13. EXIT (sair): prima este botão para sair do menu ou submenu e cancelar a função
correspondente (se aplicável).
14. DISPLAY (ecrã): prima este botão para visualizar as informações sobre a fonte e o canal.
15. VOL+/VOL-: prima para aumentar/diminuir o volume.
16. TV/RÁDIO: quando está a ver um canal, permite-lhe alternar entre os modos TV e Rádio.
17. GUIA:
1. Abra o EPG (Electronic Program Guide, Guia Eletrónico de Programas).
2. Retrocesso rápido no modo PVR ou Media Player (Leitor multimédia).
18. TIME SHIFT (controlo do tempo):
1. Controlo do tempo de canais DTV.
2. Controlo do tempo no modo PVR ou Media Player.
19. CANCEL:
1. Quando uma página é selecionada no modo Teletexto, pode demorar algum tempo a car
disponível. Se premir CANCEL, volta ao modo de TV. Quando a página pretendida for encontrada,
o número da página aparecerá na parte superior do ecrã. Prima CANCEL para regressar ao
modo de teletexto e navegar na página.
2. Capítulo anterior no modo PVR ou Media Player.
20. INDEX:
1. Prima este botão para abrir a página Índex (Índice) no modo Teletexto.
2. Saia da função de reprodução no modo PVR ou Media Player.
21. SIZE: prima este botão para alterar o tamanho do ecrã no modo de teletexto.
22. REVEAL: prima este botão para mostrar ou ocultar as palavras ocultas/apresentadas.
23. BOTÕES DE CORES: controlo no modo Teletexto, seleção de itens de menu e MHEGS no
menu DVB.
24. CH+/CH-: prima estes botões para navegar pelos canais.
25. FAV/LIST: prima estes botões para abrir a lista de favoritos. A seguir, selecione um canal
favorito.
26. ASPECT:
1. Prima este botão para selecionar a proporção da imagem.
2. Avanço rápido no modo PVR ou Media Player (leitor multimédia).
27. FREEZE: prima este botão para congelar a imagem.
28. SUB. PG:
1. Prima este botão para aceder à subpágina.
2. Capítulo próximo no modo PVR ou Media Player.
29. SUBTITLE: prima este botão para visualizar e ajustar o idioma do canal DTV atual.
30. HOLD: prima este botão para ativar /desativar a visualização da página atual.
31. TEXT: prima este botão para ativar/desativar o teletexto.
32. RECLIST: prima este botão para visualizar a lista de gravações.

TV 0 SERIES 0024/TV 0 SERIES 0032TV 0 SERIES 0024/TV 0 SERIES 0032 177176
PORTUGUÊS PORTUGUÊS
As linhas aparecem
quando se liga um
dispositivo à porta RCA.
Certique-se de que utiliza um cabo de boa qualidade.
O problema persiste. Desligue o cabo de alimentação, aguarde 30 segundos e volte
a ligá-lo à tomada elétrica. Se o problema persistir, não tente
reparar a TV por si próprio. Ponha-se em contacto com o
Serviço de Assistência Técnica da Cecotec.
Não deixe a TV a apresentar uma imagem estática, quer se trate de um vídeo em pausa, de
um ecrã de menu, etc., durante um longo período de tempo para evitar que o ecrã se queime.
7. ESPECIFICAÇÕES TÉCNICAS
Produto TV 0 Series 0024 TV 0 Series 0032
Referência do produto 02610 02612
QR
Potência 36 W 56 W
Tensão 100 – 240 V
Frequência 50 / 60 Hz
Vida útil 60.000 horas (apróx.)
Os termos HDMI e HDMI High-Denition Multimedia Interface, e o logótipo HDMI são marcas
comerciais ou marcas registadas da HDMI Licensing LLC nos Estados Unidos e noutros países.
As especicações técnicas podem ser alteradas sem noticação prévia para melhorar a
qualidade do produto.
Fabricado na China | Desenhado na Espanha
8. RECICLAGEM DE PRODUTOS ELÉTRICOS E ELETRÓNICOS
Este símbolo indica que, de acordo com os regulamentos aplicáveis, o produto
e/ou a bateria devem ser eliminados separadamente do lixo doméstico.
Quando este produto atingir o m da sua vida útil, deverá remover as pilhas/
baterias/acumuladores e levá-lo para um ponto de recolha designado pelas
autoridades locais.
Sem imagem. Verique se a antena na parte posterior da TV está
corretamente ligada.
Consulte outros canais para vericar se o problema persiste.
Sem som. Tente aumentar o volume.
Verique se o som da TV está silenciado ou não.
Há áudio, mas não há
imagem ou a imagem
está esbatida.
Tente ajustar o contraste e o brilho.
O ruído estático afeta a
qualidade do vídeo e do
áudio.
Verique se a antena na parte posterior da TV está
corretamente ligada.
Aparecem linhas
divididas
no ecrã.
Os aparelhos elétricos, como secadores de cabelo, aspiradores,
etc., podem interferir com a TV. Desligue este tipo de aparelho.
O controlo remoto não
funciona.
Retire o plástico envolvente do controlo remoto. Tente
aproximar o controlo remoto da TV e prima qualquer botão.
Certique-se de que as pilhas estão corretamente inseridas ou
tente utilizar pilhas novas.
A TV entrará no modo Standby se não for recebida qualquer
resposta após alguns minutos.
Sem imagem (Modo PC). Verique se o cabo está corretamente ligado à porta HDMI ou
se está dobrado.
Linha vertical
intermitente (Modo PC).
Entre no menu principal e ajuste o posicionamento vertical do
ecrã para remover a linha vertical.
Linha horizontal (Modo
PC)
Ajuste o posicionamento horizontal do ecrã para remover a
linha horizontal.
Ecrã demasiado claro
ou demasiado escuro
(Modo PC)
Ajuste o brilho ou o contraste no menu principal.
Não houve resposta
do PC.
Verique se a resolução do ecrã do PC está denida para uma
resolução compatível com a resolução do ecrã da TV.

TV 0 SERIES 0024/TV 0 SERIES 0032TV 0 SERIES 0024/TV 0 SERIES 0032 179
NEDERLANDS
178
PORTUGUÊS
1. VÓÓR U HET APPARAAT GEBRUIKT
- Dit apparaat heeft een verpakking die ontworpen is om het tijdens het transport te
beschermen. Haal het apparaat uit de doos en verwijder al het verpakkingsmateriaal.
U kunt de originele doos en andere verpakking op een veilige plaats bewaren om
beschadiging van het apparaat te voorkomen als u het in de toekomst moet vervoeren. Als
u de verpakking toch weggooit, zorg er dan voor een correcte recyclage.
- Controleer of alle onderdelen en componenten aanwezig en in goede staat zijn. Als een
van deze ontbreekt of niet in goede staat is, neem dan onmiddellijk contact op met de
Technische Dienst van Cecotec.
Inhoud van de doos:
- TV
- Afstandsbediening
- 2 AA-batterijen
- Handleiding
Opmerking:
De afbeeldingen in deze handleiding zijn schematische weergaven en komen mogelijk niet
exact overeen met het product.
2. INSTALLATIE
Beugelmontage
Om de TV aan de muur te bevestigen:
Fig. 1
1. Zet eerst de TV op tafel, en leg een zachte doek op de tafel om krassen op het scherm te
voorkomen.
2. Gebruik de schroevendraaier om de schroeven te verwijderen die aan de ondersteun zijn
bevestigd (zoals op guur 1), verwijder vervolgens de ondersteun (verwijder voorzichtig
de schroeven en de ondersteun).
3. Kies een beugel die aan de muur kan worden bevestigd overeenkomstig de afmetingen
van de TV zoals aangegeven in de guren 2 en 3.
4. Boor vier gaten in de muur en breng vier schroeven aan.
5. Gebruik de schroevendraaier om de schroef aan de achterkant van de TV vast te zetten.
Hang dan de TV aan de muur.
Para obter informação detalhada acerca da forma mais adequada de eliminar os seus
equipamentos elétricos e eletrónicos e/ou as correspondentes baterias, o consumidor deverá
contactar com as autoridades locais.
A conformidade com as diretrizes acima referidas ajudará a proteger o ambiente.
9. GARANTIA E SAT
A Cecotec será responsável perante o utilizador ou consumidor nal por qualquer falta de
conformidade que exista no momento da entrega do produto nos termos, condições e prazos
estabelecidos pelos regulamentos aplicáveis.
Manter crianças e animais de estimação afastados da máquina durante a sua utilização.
Se deteta uma ocorrência com o produto ou tem alguma consulta, entre em contacto com o
Serviço de Assistência Técnica da Cecotec através do número de telefone +34 96 321 07 28.
10. COPYRIGHT
Os direitos de propriedade intelectual dos textos deste manual pertencem à CECOTEC
INNOVACIONES, S.L. Todos os direitos reservados. O conteúdo desta publicação não pode, no
todo ou em parte, ser reproduzido, armazenado num sistema de recuperação, transmitido ou
distribuído por qualquer meio (eletrónico, mecânico, fotocópia, gravação ou similar) sem a
autorização prévia da CECOTEC INNOVACIONES, S.L.
11. DECLARAÇÃO DE CONFORMIDADE SIMPLIFICADA
A Cecotec Innovations declara que os aparelhos de TV, modelo 02610_TV 0 Series 0024
e 02612_TV 0 Series 0032, estão em conformidade com a Directiva de Equipamentos de Rádio
2014/53/UE.
O texto completo da Declaração de Conformidade da UE pode ser encontrado no seguinte
website:
www.cecotec.es

TV 0 SERIES 0024/TV 0 SERIES 0032TV 0 SERIES 0024/TV 0 SERIES 0032 181180
NEDERLANDS NEDERLANDS
Advies:
Om de installatie van de basis te vergemakkelijken en schade te voorkomen, adviseren wij u
een schroevendraaier van het type PH2 te gebruiken. Fig. 5
Eerste installatie
Sluit een RF-kabel aan op de “RF-In” ingang van de TV en op de ingang van uw TV-antenne.
Taal selecteren
Druk op / om de taal te selecteren.
Land selecteren
Druk op ▼ / ▲ om de optie “Country” te markeren.
Druk op / om een land te selecteren.
Fig. 6
Fig. 7
Automatische afstemming
Om uw TV automatisch af te stemmen, drukt u op “Menu” en de linker pijltoets om
ATV-afstemming over te slaan; doe hetzelfde om DTV-afstemming over te slaan.
Fig. 8
WAARSCHUWING:
Plaats de TV niet op een onstabiele plaats om te voorkomen dat hij valt en letsel of
schade veroorzaakt. Veel verwondingen kunnen worden voorkomen door elementaire
voorzorgsmaatregelen te nemen:
1. Gebruik kasten of beugels aanbevolen door de fabrikant van de TV.
2. Gebruik alleen meubels die het gewicht van de TV veilig kunnen dragen.
3. Zorg ervoor dat de TV niet over de rand van de kast uitsteekt.
4. Plaats de TV niet op hoge meubels (bijv. kasten of boekenkasten) zonder zowel het
meubel als de TV aan een geschikte steun te bevestigen.
5. Plaats geen tafelkleden of andere materialen tussen de TV en de kast.
6. Informeer kinderen over de gevaren van het klimmen op de meubels om bij de TV of de
afstandsbediening te komen.
Houd rekening met het bovenstaande als u de TV naar een andere locatie wilt verplaatsen.
3. KNOPPEN VAN DE AFSTANDSBEDIENING EN INTERFACE
Knoppen van de afstandsbediening
Tonen/verbergen pictogram: wanneer het pictogram niet verschijnt, druk op de
overeenkomstige knop: het pictogram van de knop verschijnt zoals in de bovenstaande guur
en gaat automatisch uit na 5 seconden inactiviteit.
Legende Fig. 1:
1. Muur
2. Steun
3. Muur
4. Muurschroef
Opmerking:
1. Montagebeugel (VESA) is niet inbegrepen.
2. Zorg ervoor dat de TV op veilige afstand van andere apparaten wordt gemonteerd.
3. Raadpleeg zo nodig een bevoegd technicus om gevaar te voorkomen. Het guur dient
alleen ter referentie.
4. Volg de instructies in de handleiding om de TV aan de beugel te bevestigen.
5. Volg de VESA-standaard voor een correcte montage van de TV op de beugel.
Installatie en aansluiting van de TV
Conguratie van de TV. Fig. 3
- Plaats de TV op een stabiele plaats die zijn gewicht kan dragen.
- Houd de TV uit de buurt van water- of warmtebronnen (zoals een lamp, kaars of
verwarmingstoestel) en zorg voor voldoende ventilatie aan de achterzijde van de TV om
gevaren te voorkomen.
Aansluiten van de antenne en stroom
1. Sluit de antennekabel aan op de antenneaansluiting aan de achterkant van de TV.
2. Om de stroomkabel van de TV aan te sluiten:
Zet de TV aan.
3. Druk op de aan/uit knop van de TV: het indicatielampje brandt groen. Als de TV in stand-by
staat (rood indicatielampje), drukt u op de aan/uit knop van de afstandsbediening om de
TV in te schakelen.
Legende guur 3:
1. TV-signaal uitgang
Opmerking: Het guur is alleen ter referentie.
Installatie van de ondersteuning
1. Haal de TV, accessoires en standaard uit de doos (sommige modellen hebben geen
standaard). Fig. 4
2. Om beschadiging van de TV te voorkomen, legt u deze op een doek of zacht materiaal op
tafel en schroeft u de hals van de basis aan de TV vast.
3. Bevestig de voet op de juiste wijze aan de TV om de installatie te voltooien.

TV 0 SERIES 0024/TV 0 SERIES 0032TV 0 SERIES 0024/TV 0 SERIES 0032 183182
NEDERLANDS NEDERLANDS
2. Set-Top Box
3. AV-ingangsaansluiting
4. HDMI ingangsaansluiting
5. USB-aansluiting
6. TV aansluiting
4. MENU’S EN MODI
Hoofdmenu
CHANNEL menu (kanaal)
Druk op de MENU knop om het hoofdmenu weer te geven.
Druk op / om CHANNEL te selecteren in het hoofdmenu. Fig. 9
1. Druk op ▼ / ▲ om de optie te kiezen die u in het menu CHANNEL wilt instellen.
2. Druk op Enter om de instellingen te bevestigen.
3. Zodra de instellingen zijn gemaakt, drukt u op Enter om ze op te slaan en terug te keren
naar het vorige menu.
Automatische afstemming
Pulse ▼ / ▲ om “Auto Tuning” te selecteren (automatisch afstemmen); en druk vervolgens op
Enter/ .
Fig. 10
Handmatige ATV-tuning
Huidig kanaal
Kanaal nummer instelling.
Kleurensysteem
Selectie van het kleurensysteem.
(Beschikbare systemen: AUTO, PAL, SECAM)
Geluidssysteem
Selectie van de geluidsinstallatie.
Fijnafstemming
Nauwkeurige aanpassing van de kanaalfrequentie.
Zoeken
Kanaal zoeken
Fig. 11
Pictogram keuze: Druk kort op de betreende knop en scroll naar rechts om het pictogram te
selecteren.
Pictogramfunctie selectie: Houd de knop ingedrukt om de functie van het geselecteerde
pictogram te krijgen.
Beschrijving van de pictogrammen:
Uit: Komt overeen met de knop “POWER” op de afstandsbediening.
Menu: Komt overeen met de knop “MENU” op de afstandsbediening.
Bron: Komt overeen met de knop “SOURCE” op de afstandsbediening.
CH+ Komt overeen met de knop “CH+” op de afstandsbediening.
CH- Komt overeen met de knop “CH-” op de afstandsbediening.
Volumen+ (volume verhogen) Komt overeen met de knop “VOL+” op de afstandsbediening.
Volumen- (volume verlagen): Komt overeen met de knop “VOL-” op de afstandsbediening.
Interface
AV ingang
Externe AV-signaalingang en rechts/links audiokanaal
CI gleuf
De CI (Common Interface) kaartgleuf vereist CAM (Conditional
Access Module) voor betaaltelevisie.
HDMI ingang
Digitale signaalinvoer van de HDMI-videoaansluiting
ANT 75
Ingang voor antenne-/kabelaansluiting (75/VHF/UHF).
USB ingang
Plaats hier een USB-apparaat om uw mediabestanden af te
spelen of programma’s op te nemen met de PVR-functie.
COAXIAL
Voor het aansluiten van de SPDIF-ontvanger.
Blijf uit de buurt van de HDMI- en USB-aansluitingen van de TV, bescherm ze en raak ze
niet aan om de levensduur van de TV te verlengen en een goede werking te garanderen.
Aansluitschema van externe apparaten
Zie guur 2.
Legende guur 2:
1. DVD

TV 0 SERIES 0024/TV 0 SERIES 0032TV 0 SERIES 0024/TV 0 SERIES 0032 185184
NEDERLANDS NEDERLANDS
Lijst van satellietkanalen. Fig. 18
Automatische afstemming
Druk op ▼ / ▲ om “Automatisch afstemmen” te selecteren en druk vervolgens op Enter/ .
Fig. 19
Conguratie van de satellietantenne
Druk op ▼ / ▲ om “Dish Setup” te selecteren en druk vervolgens op Enter/ om te bevestigen.
Fig. 20
Beeldmenu
- Druk op de MENU knop om het hoofdmenu weer te geven.
- Druk op / om PICTURE te kiezen in het hoofdmenu. Fig. 21
Opmerking:
- 120 Hz modus NIET COMPATIBEL
- 60 Hz modus COMPATIBEL
1. Druk op ▼ / ▲ om de optie te selecteren die u wilt instellen in het menu PICTURE.
2. Druk op OK om de instelling te bevestigen.
3. Zodra de instellingen zijn gemaakt, drukt u op de MENU knop om ze op te slaan en terug
te keren naar het vorige menu.
Beeldmodus
- Druk op ▼ / ▲ om “Picture Mode” te selecteren en druk vervolgens op OK om het
bijbehorende submenu te openen.
- U kunt het contrast, de helderheid, de kleur, de scherpte en de tint wijzigen wanneer het
beeld in de persoonlijke (aangepaste) modus staat.
Aanbevelingen: U kunt op de PMODE knop drukken om de beeldinstellingen direct te wijzigen.
Fig. 22
Contrast/helderheid/kleur/scherpte/tonen
Druk op ▼ / ▲ om de gewenste waarde te selecteren en druk vervolgens op Enter/ om de
waarde in te stellen.
- Contrast: Het brengt het licht in het beeld naar voren, maar de schaduw verandert niet.
- Helderheid: Past de glasvezeluitgang aan; beïnvloedt de donkere partijen in het beeld.
- Kleur: Past de kleurverzadiging aan.
- Tonen: Wordt gebruikt ter compensatie van kleurverschuiving bij NTSC-transmissie.
- Scherpte: Past het detailniveau van het beeld aan.
Handmatige DTV-afstemming
- Druk op ▼ / ▲ om “DTV Manual Tuning” te selecteren en druk vervolgens op Enter om het
bijbehorende submenu te openen.
- Druk op / om het kanaal te selecteren en druk vervolgens op Enter om het programma
te zoeken.
Fig. 12
Kanalen wijzigen
Druk op ▼ / ▲ om “Program Edit” te selecteren en druk vervolgens op Enter om het
bijbehorende submenu te openen. Fig. 13
De driekleurenknoppen zijn de directe toegangsknoppen voor de kanaalprogrammering.
Druk eerst op ▼ / ▲ om het kanaal te markeren dat u wilt selecteren:
- Druk op de rode knop om het kanaal uit de lijst te verwijderen.
- Druk op de gele knop om het kanaal in de lijst te verplaatsen.
- Druk op de blauwe knop om het geselecteerde kanaal over te slaan.
- Druk op de knop “Fav” om een kanaal toe te voegen aan of te verwijderen uit uw
favorietenlijst (de TV slaat het kanaal automatisch over wanneer u op CH+/- drukt om van
kanaal te veranderen).
Programma lijst
- Druk op ▼ / ▲ om “Schedule List” te selecteren en druk vervolgens op Enter om het
bijbehorende submenu te openen. De programmalijst is beschikbaar voor DTV en satelliet.
Fig. 14
- Druk op de gele knop om de onderstaande interface te openen. Fig. 15
- In geval van problemen met de programmering verschijnt een waarschuwingsbericht. Fig.
16
Signaalinformatie
Druk op ▼ / ▲ om Signaalinformatie te selecteren: Druk op de knop Enter om gedetailleerde
signaalinformatie te bekijken (alleen beschikbaar bij DTV-signaal). Fig. 17
Informatie over CI (Common Interface)
Druk op ▼/ ▲ om “CI Information” te selecteren en druk vervolgens op de knop Enter om de
details van de CI-kaart (indien ingestoken) te bekijken.
OPMERKING: CI-kaart niet inbegrepen.

TV 0 SERIES 0024/TV 0 SERIES 0032TV 0 SERIES 0024/TV 0 SERIES 0032 187186
NEDERLANDS NEDERLANDS
U kunt de treble en bass waarde veranderen wanneer het geluid in custom mode staat.
Aanbevelingen: Druk op de knop SMODE van de afstandsbediening om de geluidsmodus
rechtstreeks te wijzigen.
Standard: Produceert een evenwichtig geluid in alle omgevingen.
Music: Behoudt het originele geluid. Ideaal voor muziekprogramma’s.
Movie: Versterkt hoge en lage tonen voor een betere geluidservaring.
Sports: Verbetert de vocale helderheid voor sport.
Personal: Selecteer deze optie om de beeldinstellingen aan te passen.
Opmerking: Treble en bass zijn alleen beschikbaar in de custom modus, en kunnen naar wens
worden aangepast.
Balance
Druk op ▼ / ▲ om deze optie te selecteren en druk vervolgens op / om de waarde aan te
passen.
Auto Volume level
Druk op ▼ / ▲ om deze optie te selecteren en druk vervolgens op / om deze te activeren
of te deactiveren.
SPDIF modus
Druk op ▼ / ▲ om “SPDIF Mode” te selecteren en druk vervolgens op om O/PCM/Auto te
kiezen.
AD Switch
Druk op ▼ / ▲ om deze optie te selecteren en druk vervolgens op / om deze te activeren
of te deactiveren. De TV heeft ook een audiobeschrijvingsfunctie voor blinden.
Opmerking:
Balance: Past het uitgangsgeluid aan voor een evenwichtigere geluidservaring.
Auto Volume level: Vermindert automatisch het verschil tussen kanaal- en programmavolume.
Tijdsmenu
- Druk op de MENU knop om het hoofdmenu weer te geven.
- Druk op / om TIME te kiezen in het hoofdmenu.
Fig. 28
1. Druk op ▼ / ▲ om de optie te selecteren die u wilt instellen in het menu TIME.
2. Druk op Enter om de instelling te bevestigen.
Kleurtemperatuur:
- Wijzigt de perceptie van het kleurbereik van de TV.
- Druk op ▼ / ▲ om “Color Temperature” te selecteren en druk vervolgens op OK om het
bijbehorende submenu te openen.
- Druk op ▼ / ▲ om de gewenste optie te selecteren; kleurtemperatuur: Cool, Medium,
Warm.
Fig. 23
- Cool: Verhoogt de blauwe tint en vermindert het wit.
- Medium: Verhoogt roze en blauw en vermindert wit.
- Warm: Verhoogt rood en vermindert wit.
Geluidsreductie
Filtert en vermindert het geluid en verbetert de beeldkwaliteit. Druk op ▼ / ▲ om “Noise
Reduction” te selecteren en druk vervolgens op OK om het bijbehorende submenu te openen.
Fig. 24
- O: Selecteer deze optie om de geluidsdetectie uit te schakelen.
- Low: Detecteert en vermindert laag geluid.
- Middle: Detecteert en reduceert matig geluid.
- High: Detecteert en vermindert hard geluid.
- Default: Vooraf ingesteld.
HDMI modus
- Druk op ▼ / ▲ om “HDMI Mode” te selecteren en druk vervolgens op OK om het
bijbehorende submenu te openen. Fig. 25
- Druk op ▼ / ▲ om te kiezen tussen de beschikbare beeldmodi: Auto/Video/PC.
Geluidsmenu
- Druk op de MENU knop om het hoofdmenu weer te geven. Fig. 26
- Druk op / om SOUND te selecteren in het hoofdmenu.
1. Druk op / om de optie te selecteren die u wilt instellen in het menu SOUND.
2. Druk op Enter om de instellingen te bevestigen.
3. Zodra de instellingen zijn gemaakt, drukt u op Enter om ze op te slaan en terug te keren naar
het vorige menu.
Fig. 27
Geluidsmodus
Druk op ▼ / ▲ om “Sound Mode” te selecteren en druk vervolgens op Enter om het bijbehorende
submenu te openen. Druk op ▼/▲ om uit de beschikbare opties te kiezen.

TV 0 SERIES 0024/TV 0 SERIES 0032TV 0 SERIES 0024/TV 0 SERIES 0032 189188
NEDERLANDS NEDERLANDS
Het standaard wachtwoord is 0000. Als u het wachtwoord bent vergeten, probeer dan “8899”.
Het wachtwoord instellen
Druk op ▼ / ▲ om “Set Password” te selecteren en druk vervolgens op Enter om het
bijbehorende submenu te openen om het wachtwoord in te stellen.
Fig. 35
Kanaal blokkeren
- Druk op ▼ / ▲ om “Channel Lock” te selecteren en druk vervolgens op Enter om het
bijbehorende submenu te openen.
- Druk op de groene knop om het gewenste kanaal te vergrendelen of te ontgrendelen.
Fig. 36
Ouderlijk toezicht
Druk op ▼ / ▲ om “Parental Guidance” te selecteren en druk vervolgens op Enter om het
bijbehorende submenu te openen en de leeftijd van uw kinderen te selecteren. Fig. 37
Vergrendeling van de knoppen
Druk op ▼ / ▲ om de optie “Key Lock” te selecteren en druk vervolgens op / om deze in
of uit te schakelen. Door deze optie te activeren worden de knoppen op de afstandsbediening
vergrendeld.
Hotel modus (compatibiliteit vereist)
Fig. 38
1. Druk op ▼ / ▲ op de afstandsbediening om “Hotel Mode” te selecteren in het Lock menu.
2. Druk op Enter op de afstandsbediening om het bijbehorende submenu te openen.
3. Zodra de instellingen zijn gemaakt, drukt u op de MENU knop om ze op te slaan en terug
te keren naar het vorige menu.
Hotel modus
Druk op ▼ / ▲ om de optie “Hotel Mode” te selecteren en druk vervolgens op / om deze
in of uit te schakelen.
Bron vergrendeling
- Druk op ▼ / ▲ om “Source Lock” te selecteren en druk vervolgens op Enter om het
bijbehorende submenu te openen.
- De hotelbeheerder kan het de bron vergrendeling instellen als DTV/HDMI, AV, enz. De
gebruiker kan de bron vergrendeling niet selecteren.
3. Zodra de instellingen zijn gemaakt, drukt u op Enter om ze op te slaan en terug te keren naar
het vorige menu.
Tijdzone
- Druk op ▼ / ▲ om “Time zone” te selecteren en druk vervolgens op Enter om het
bijbehorende submenu te openen. Fig. 29
- Druk op ▼ / ▲/ / om een tijdszone te selecteren.
Sleep timer
- Druk op ▼ / ▲ om “Sleep Timer” te selecteren en druk vervolgens op Enter om het
bijbehorende submenu te openen. Fig. 30
- Druk op ▼/▲ om uit de beschikbare opties te kiezen:
- O, 15 min, 30 min, 45 min, 60 min, 90 min, 120 min, 240 min.
Automatische stand-by modus
- Druk op ▼ / ▲ om “Auto Stand-by” te selecteren en druk vervolgens op Enter om het
bijbehorende submenu te openen. Fig. 31
- Druk op ▼/▲ om uit de beschikbare opties te kiezen.
Aanbevelingen: Voer tijdens de geselecteerde tijd geen handelingen uit met de
bedieningseenheid, anders wordt de tijd opnieuw ingesteld.
OSD timer
- Druk op ▼ / ▲ om “OSD timer” te selecteren en druk vervolgens op Enter om het
bijbehorende submenu te openen. Fig. 32
- Druk op ▼/▲ om uit de beschikbare opties te kiezen.
Blokkeren
Druk op de MENU knop om het hoofdmenu weer te geven. Druk op / om LOCK te selecteren
in het hoofdmenu.
Fig. 33
1. Druk op ▼ / ▲ om de optie te selecteren die u wilt instellen in het menu LOCK SYSTEM.
2. Druk op Enter / om de instelling te bevestigen.
3. Zodra de instellingen zijn gemaakt, drukt u op MENU om terug te keren naar het vorige
menu.
Het systeem blokkeren
Druk op ▼ / ▲ om “System Lock” te selecteren en druk vervolgens op Enter om de volgende 3
opties te openen.
Fig. 34

TV 0 SERIES 0024/TV 0 SERIES 0032TV 0 SERIES 0024/TV 0 SERIES 0032 191190
NEDERLANDS NEDERLANDS
Vergrendeling
Druk op ▼ / ▲ om de optie LOCK te selecteren en druk vervolgens op / om deze te
activeren of te deactiveren.
Conguratie
Druk op ▼ / ▲ om de optie SETUP te selecteren en druk vervolgens op / om deze te activeren
of te deactiveren.
De instelling verwijderen
Druk op ▼ / ▲ om “Clear Lock” te selecteren en druk vervolgens op Enter om de vorige
instelling ongedaan te maken.
Databank importeren
De hotelmanager kan de kanaalinformatie importeren door een USB-stick in de poort te steken.
Databank exporteren
De hotelbeheerder kan de import USB-schijf in andere TV’s plaatsen. U kunt deze functie dan
gebruiken om alle kanalen op nieuwe TV’s te klonen.
Resetten
Deze functie herstelt de standaardwaarden van de hotelmodus.
U kunt de hotelmodus selecteren nadat u het systeemwachtwoord 8888 in het hoofdmenuslot
heeft ingevoerd (voorwaarde is dat de software de hotelfunctie standaard opent).
Fig. 39
Conguratiemenu
- Druk op de MENU knop om het hoofdmenu weer te geven.
- Druk op / om SETUP in het hoofdmenu te selecteren. Fig. 40
1. Druk op ▼ / ▲ om de optie te selecteren die u in het SETUP menu wilt instellen.
2. Druk op Enter om de instellingen te bevestigen.
3. Zodra de instellingen zijn gemaakt, drukt u op Enter om ze op te slaan en terug te keren
naar het vorige menu.
OSD taal
- Selecteer een taal voor het OSD-menu. De standaardtaal is Engels.
- Druk op ▼ / ▲ / / om “Menu Language” te selecteren.
Fig. 41
Standaard bron
- Druk op ▼ / ▲ om “Default Source” te selecteren en druk vervolgens op Enter om het
bijbehorende submenu te openen.
- De standaard bron kan worden ingesteld door de hotelbeheerder. De TV wordt ingeschakeld
met de standaard bron.
Standaardprogrammering
- Druk op ▼ / ▲ om “Default prog” te selecteren en druk vervolgens op / om de
gewenste instellingen te maken (beschikbaar met “TV” als standaard bron).
- Het standaard programma kan worden ingesteld door de hotelbeheerder. Alleen de
standaard DTV/TV-bron kan worden ingesteld.
Standaard volume
- Druk op ▼ / ▲ om “Default Volume” te selecteren en druk vervolgens op / om de
gewenste instellingen te maken.
- Het standaard volumen kan worden ingesteld door de hotelbeheerder. De TV gaat aan op
het standaard volume.
Maximaal volume
- Druk op ▼ / ▲ om “Max Volume” te selecteren en druk vervolgens op / om de gewenste
instellingen te maken.
- De hotelmanager kan het maximale volume instellen. De gebruiker kan het volume
aanpassen tot onder het gecongureerde maximumniveau.
Kanaal
Druk op ▼ / ▲ om de optie CHANNEL te selecteren en druk vervolgens op / om deze te
activeren of te deactiveren.
Afbeelding
Druk op ▼ / ▲ om de optie PICTURE te selecteren en druk vervolgens op / om deze te
activeren of te deactiveren.
Geluid
Druk op ▼ / ▲ om de optie SOUND te selecteren en druk vervolgens op / om deze te
activeren of te deactiveren.
Tijd
Druk op ▼ / ▲ om de optie TIME te selecteren en druk vervolgens op / om deze te activeren
of te deactiveren.

TV 0 SERIES 0024/TV 0 SERIES 0032TV 0 SERIES 0024/TV 0 SERIES 0032 193192
NEDERLANDS NEDERLANDS
Eerste installatie
Druk op ▼ / ▲ om “First time installation” te selecteren en druk vervolgens op Enter om in te
voeren.
Herstellen
Druk op ▼ / ▲ om “Reset” te selecteren en druk vervolgens op Enter om het bijbehorende
submenu te openen.
Software-update (USB)
Druk op ▼ / ▲ om “Software Update (USB)” te selecteren, sluit uw USB-apparaat aan op de
USB-sleuf en druk vervolgens op de knop Enter om de software bij te werken naar de laatste
versie.
HDMI CEC (indien compatibel met HDMI CEC/ARC functie)
Druk op ▼ / ▲ om “HDMI CEC”; te selecteren en druk vervolgens op Enter om het bijbehorende
submenu te openen. Fig. 47
- HDMI CEC: Druk op / om de HDMI CEC optie te activeren/deactiveren.
- HDMI ARC: Druk op / om de HDMI ARC optie te activeren/deactiveren.
- Auto Stand-by: Druk op / om de Auto Stand-by optie te activeren/deactiveren.
- Device List: Druk op Enter om het hoofdmenu van het apparaat te openen.
Menu weergeven
- Druk op de MENU knop om het hoofdmenu weer te geven.
- Druk op / om SCREEN te kiezen in het hoofdmenu. Fig. 48
1. Druk op / om de optie te selecteren die u wilt instellen in het menu SCREEN.
2. Druk op Enter (bevestigen) om de instelling te bevestigen.
3. Zodra de instellingen zijn gemaakt, drukt u op Enter om ze op te slaan en terug te keren
naar het vorige menu.
Automatische aanpassing
Druk op Enter om de volgende opties automatisch in te stellen: H-Oset/V-Oset/Size/Phase.
H-Oset
- Horizontaal scrollen van het beeld.
- Druk op ▼ / ▲ om “H-Oset” te selecteren en druk vervolgens op Enter om het
bijbehorende submenu te openen.
V-Oset
- Verticale verplaatsing van het beeld.
- Druk op ▼ / ▲ om “V-Oset” te selecteren en druk vervolgens op Enter om het bijbehorende
submenu te openen.
Teletekst taal
- Druk op ▼ / ▲ om “TT Language” te selecteren en druk vervolgens op Enter om het
bijbehorende submenu te openen.
- Druk op ▼ / ▲ om een teleteksttaal te kiezen.
Fig. 42
Audio talen
- Druk op ▼ / ▲ om “Audio Languages” te selecteren en druk vervolgens op Enter om het
bijbehorende submenu te openen.
- Druk op / om toegang te krijgen tot de beschikbare audiotalen.
- Druk op ▼ / ▲ / / om de gewenste audiotaal te kiezen.
Fig. 43
Ondertitelingstaal
- Druk op ▼ / ▲ om “Subtitle Language” te selecteren en druk vervolgens op Enter om het
bijbehorende submenu te openen.
- Druk op / om de beschikbare ondertitelingstalen te openen.
- Druk op ▼ / ▲ / / om de gewenste ondertitelingstaal te kiezen.
Fig. 44
Audio toegankelijkheid
Druk op ▼ / ▲ om “Hearing Impaired (mensen met gehoorproblemen)” te selecteren en druk
vervolgens op Enter om het bijbehorende submenu te openen.
PVR-bestandssysteem
- Druk op ▼ / ▲ om “PVR File System” te selecteren en druk vervolgens op Enter om het
bijbehorende submenu te openen.
- Druk op ▼ / ▲ om “Check PVR File System” te selecteren en druk vervolgens op Enter om
het bijbehorende submenu te openen. Deze functie controleert de USB-snelheid.
Fig. 45
Beeldverhouding
- Druk op ▼ / ▲ om “Aspect Ratio” te selecteren en druk vervolgens op Enter om het
bijbehorende submenu te openen.
- Druk op ▼ / ▲ om te kiezen uit de beschikbare beeldverhoudingen: Auto, 4:3, 16:9, Zoom1
en Zoom2.
Fig. 46
Blauw scherm
Druk op ▼ / ▲ om de optie “Blue Screen” te selecteren en druk vervolgens op Enter om deze
optie in of uit te schakelen.

TV 0 SERIES 0024/TV 0 SERIES 0032TV 0 SERIES 0024/TV 0 SERIES 0032 195194
NEDERLANDS NEDERLANDS
druk vervolgens op Enter om de foto/afbeelding weer te geven.
Door de geselecteerde optie te markeren, verschijnt rechts de bestandsinformatie en in het
midden een voorbeeld van de afbeelding. Fig. 51
Muziek menu
- Druk op / om MUSIC te selecteren in het hoofdmenu en druk dan op Enter.
- Druk op Exit om terug te keren naar het vorige menu; druk nogmaals op Exit om het menu
volledig te verlaten.
Fig. 52
Fig. 53
- Druk op / om het nummer/album te selecteren dat u wilt afspelen en druk dan op de
Enter knop.
- Druk op / om de optie te kiezen om terug te keren naar het vorige menu.
Fig. 54
Filmmenu
- Druk op / om MOVIE te selecteren in het hoofdmenu en druk dan op Enter.
- Druk op Exit om terug te keren naar het vorige menu; druk nogmaals
op Exit om het menu volledig te verlaten.
Fig. 55
- Druk op / om de lm te selecteren die u wilt afspelen en druk dan op de Enter knop.
- Druk op de knop Enter om de geselecteerde lm af te spelen.
- Selecteer het mediamenu dat u wilt openen en druk op Enter. Druk op Exit om terug te
keren naar het vorige menu; druk nogmaals op Exit om het menu volledig te verlaten.
Fig. 56
Tekstmenu
- Druk op / om TEXT te selecteren in het hoofdmenu en druk dan op Enter.
- Druk op Exit om terug te keren naar het vorige menu; druk nogmaals op Exit om het menu
volledig te verlaten.
- Fig. 57
- Druk op / om het gewenste item te selecteren en druk dan op de Enter knop.
- Druk op / om de optie te kiezen om terug te keren naar het vorige menu.
Fig. 58
Size
- Past de schermgrootte aan.
- Druk op ▼ / ▲ om “Size”; te selecteren en druk vervolgens op Enter om het bijbehorende
submenu te openen.
Phase
- Past de horizontale interferentielijnen aan.
- Druk op ▼ / ▲ om “Phase” te selecteren en druk vervolgens op Enter om het bijbehorende
submenu te openen.
Reset de positie
Druk op ▼ / ▲ om “Position Reset” te selecteren en druk vervolgens op Enter om de
displaypositie te resetten.
Opmerkingen:
1. Het geluid kan niet worden verminderd voor de optie PICTURE.
2. “AD Switch” kan niet worden geselecteerd voor de SOUND optie.
3. De functies van audiobeschrijving en toegankelijkheid voor slechthorenden zijn één en
dezelfde.
4. De opties voor kanaalvergrendeling en ouderlijk toezicht zijn niet beschikbaar in het menu
LOCK.
5. Audio/ondertitelingstaal, toegankelijkheid voor slechthorenden en PVR bestandssysteem
opties zijn niet beschikbaar in het SETUP menu.
6. De PC-optie is niet compatibel met het CHANNEL menu.
Multimedia inhoud
Opmerking: Voordat u het Media menu opent, sluit u het USB-apparaat aan en drukt u op de
knop “Source” om de ingangsbron Media in te stellen.
Fig. 49
- Druk op ▼ / ▲ om Media te selecteren in het menu “Source” en druk dan op Enter.
- Druk op / om de optie te selecteren die u wilt congureren in het Media menu en druk
dan op Enter.
Foto menu
- Druk op / om FOTO te selecteren in het hoofdmenu en druk dan op Enter.
- Druk op Exit om terug te keren naar het vorige menu; druk nogmaals op Exit om het menu
volledig te verlaten.
Fig. 50
Druk op / om het bestand dat u wilt bekijken te selecteren in het bestandsselectiemenu en

TV 0 SERIES 0024/TV 0 SERIES 0032TV 0 SERIES 0024/TV 0 SERIES 0032 197196
NEDERLANDS NEDERLANDS
22. REVEAL: Druk op deze knop om de verborgen/getoonde woorden te tonen of te verbergen.
23. DRIEKLEURIGE KNOPEN: Bediening in teletekstmodus, selectie van menu-items en
MHEGS in het DVB-menu.
24. CH+/CH-: Druk op deze knoppen om door de kanalen te zappen.
25. FAV/LIST: Druk op deze knoppen om de lijst met favorieten te openen. Selecteer
vervolgens een favoriet kanaal.
26. ASPECT:
1. Druk op deze knop om de beeldschaal te selecteren.
2. Snel vooruitspoelen in de modus PVR of Media Player.
27. FREEZE: Druk op deze knop om het beeld te bevriezen.
28. SUB. PG:
1. Klik op deze knop om de subpagina te openen.
2. Volgende hoofdstuk in PVR of Media Player modus.
29. SUBTITLE: Druk op deze knop om de taal van het huidige DTV-kanaal weer te geven en
aan te passen.
30. HOLD: Druk op deze knop om de weergave van de huidige pagina te activeren of te
deactiveren.
31. TEXT: Druk op deze knop om teletekst in of uit te schakelen.
32. RECLIST: Druk op deze knop om de lijst met opnamen weer te geven.
33. REC: Druk op deze knop om op te nemen in de PVR-modus.
Fig. 60
Installatie van batterijen:
- Schuif het deksel van het batterijvak aan de achterkant van de controller omlaag en
trek het eruit om het te verwijderen. Plaats twee AAA batterijen in het batterijvak en let
daarbij op de polariteit (+/-) zoals aangegeven. Plaats geen nieuwe en oude batterijen of
verschillende soorten batterijen.
- Schuif het deksel op zijn plaats.
Gebruik de afstandsbediening:
- Tenzij anders vermeld, kunnen alle TV-functies worden bediend met de afstandsbediening.
- Richt de afstandsbediening altijd rechtstreeks op de sensor aan de voorkant van de TV.
LET OP: Batterijen niet inslikken, er is kans op chemische brandwonden. Dit product bevat
batterijen. Het inslikken van batterijen kan binnen 2 uur ernstige inwendige brandwonden
veroorzaken en de dood tot gevolg hebben. Houd nieuwe en gebruikte batterijen buiten het
bereik van kinderen. Als het batterijvak niet goed sluit, moet u het product niet meer gebruiken
en buiten het bereik van kinderen houden. Als u denkt dat batterijen zijn ingeslikt of in een
lichaamsdeel zijn geplaatst, zoek dan onmiddellijk medische hulp.
5. AFSTANDSBEDIENING
Fig. 59
1. POWER: Zet de TV aan of zet hem in stand-by.
2. MUTE: Druk hierop om het geluid te dempen. Druk nogmaals op of druk op VOL+ om het
geluid weer aan te zetten.
3. 0-9: Druk op 0-9 om direct een kanaal te selecteren terwijl u TV kijkt. Het kanaal verandert
na 2 seconden. Van toepassing op teletekst, enz.
4. DTV/ATV: Druk hierop om te schakelen tussen analoge en digitale TV.
5. : Druk op om terug te keren naar het eerder weergegeven programma.
6. S.MODE (geluidsmodus): Druk op deze knop om te kiezen tussen de verschillende
geluidsinstellingen.
7. SLEEP: Selecteer de tijd voordat de TV automatisch wordt uitgeschakeld.
8. MTS: Druk hierop om te zoeken naar NICAM-modi.
9. P.MODE (beeldmodus): Druk op deze knop om te kiezen tussen de verschillende
beeldinstellingen.
10. MENU: Hiermee kunt u tussen de systeemmenu’s navigeren.
11. SOURCE (bron): Open het hoofdmenu en druk op om tussen de bronnen te navigeren.
12. Met de knoppen ▼ / ▲ ENTER kunt u door de menu’s op het scherm navigeren en de
systeeminstellingen aan uw voorkeuren aanpassen.
13. EXIT: Druk op deze knop om het menu of submenu te verlaten en de bijbehorende functie
te annuleren (indien van toepassing).
14. DISPLAY: Druk op deze knop om de bron- en kanaalinformatie weer te geven.
15. VOL+/VOL-: Druk hierop om het volume te verhogen/verlagen.
16. TV/RADIO: Wanneer u naar een kanaal kijkt, kunt u schakelen tussen TV en Radio.
17. GUIDE:
1. Open de EPG (elektronische programmagids).
2. Snel terugspoelen in de modus PVR of Media Player.
18. TIME SHIFT (tijdregeling):
1. Tijdcontrole DTV kanalen.
2. Tijdscontrole in PVR of Media Player modus.
19. CANCEL:
1. Wanneer een pagina in de teletekstmodus wordt geselecteerd, kan het enige tijd duren
voordat deze beschikbaar is; als u op CANCEL drukt, keert u terug naar de TV-modus. Wanneer
de gewenste pagina is gevonden, verschijnt het paginanummer bovenaan het scherm; druk op
CANCEL om terug te keren naar de teletekstmodus en de pagina te navigeren.
2. Vorig hoofdstuk in PVR of Media Player modus.
20. INDEX:
1. Druk op deze knop om de indexpagina in teletekstmodus op te vragen.
2. Sluit de afspeelfunctie in de PVR of Media Player modus af.
21. SIZE: Druk op deze knop om de weergavegrootte in de modus Teletekst te wijzigen.

TV 0 SERIES 0024/TV 0 SERIES 0032TV 0 SERIES 0024/TV 0 SERIES 0032 199198
NEDERLANDS NEDERLANDS
Geen beeld (PC-modus). Controleer of de kabel goed is aangesloten op de HDMI-
poort of dat deze gebogen is.
Knipperende verticale lijn
(PC-modus).
Ga naar het hoofdmenu en pas de verticale positionering
van het scherm aan om de verticale lijn te verwijderen.
Horizontale lijn (PC-modus) Pas de horizontale positionering van het scherm aan om de
horizontale lijn te elimineren.
Scherm te helder of te
donker (PC-modus)
Pas de helderheid of het contrast aan in het hoofdmenu.
De CP reageert niet. Controleer of de schermresolutie van de PC is ingesteld op
een resolutie die compatibel is met de schermresolutie van
de TV.
Er verschijnen lijnen bij het
aansluiten van een apparaat
op de RCA-poort.
Gebruik een kabel van goede kwaliteit.
Het probleem houdt aan. Haal de stekker uit het stopcontact, wacht 30 seconden en
steek de stekker weer in het stopcontact. Probeer de TV niet
zelf te repareren als het probleem aanhoudt. Neem contact
op met de Klantenservice.
Laat de TV niet gedurende lange tijd een statisch beeld weergeven, of het nu gaat om een
gepauzeerde video, een menuscherm enz.
7. TECHNISCHE SPECIFICATIES
Product TV 0 Series 0024 TV 0 Series 0032
Productreferentie 02610 02612
QR
Vermogen 36 W 56 W
Voltage 100 – 240 V
Frequentie 50 / 60 Hz
Geldigheid 60.000 uur (ongeveer)
6. PROBLEEMOPLOSSING
Geen stroomvoorziening.
Controleer of de AC-kabel van de TV is aangesloten. Als
er nog steeds geen stroom is, haalt u de stekker uit het
stopcontact en sluit u deze na 60 seconden weer aan. Zet
de stroom weer aan.
De TV ontvangt het signaal
niet goed.
Als er hoge gebouwen of bergen in de buurt van de TV
staan, kan het scherm last hebben van beeldschaduwen
of dubbele beelden. Als dit het geval is, kunt u het beeld
handmatig herstellen door de richting van de externe
antenne aan te passen.
Als u een binnenhuisantenne gebruikt, kan het moeilijker
zijn om het signaal te ontvangen. Pas de richting
van de antenne aan voor een goede ontvangst. Als
de signaalontvangst niet verbetert, moet u wellicht
overschakelen op een externe antenne.
Geen beeld. Controleer of de antenne aan de achterkant van de TV goed
is aangesloten.
Kijk op andere kanalen of het probleem aanhoudt.
Geen geluid. Probeer het volume harder te zetten.
Controleer of het geluid van de TV gedempt is of niet.
Er is geluid, maar er is
geen beeld of het beeld is
vervaagd.
Probeer het contrast en de helderheid aan te passen.
Statische ruis tast de video-
en audiokwaliteit aan.
Controleer of de antenne aan de achterkant van de TV goed
is aangesloten.
Gespleten lijnen verschijnen
op het scherm.
Elektrische apparaten zoals haardrogers, stofzuigers, enz.
kunnen de TV storen. Schakel dit type apparaat uit.
De afstandsbediening werkt
niet.
Verwijder de plasticfolie van de afstandsbediening. Probeer
de afstandsbediening dicht bij de TV te brengen en druk
op een willekeurige knop. Controleer of de batterijen juist
geplaatst zijn of probeer nieuwe batterijen te gebruiken.
De TV gaat in stand-by als na enkele minuten geen
antwoord wordt ontvangen.

TV 0 SERIES 0024/TV 0 SERIES 0032TV 0 SERIES 0024/TV 0 SERIES 0032 201200
NEDERLANDS NEDERLANDS
11. VEREENVOUDIGDE VERKLARING VAN OVEREENSTEMMING
Cecotec Innovaciones verklaart hierbij dat de TV-toestellen, model 02610_TV 0 Series
0024 en 02612_TV 0 Series 0032 in overeenstemming zijn met de Radio Equipment Directive
2014/53/EU.
De volledige tekst van de EU-verklaring van overeenstemming is beschikbaar op de volgende
website:
www.cecotec.es
De termen HDMI en HDMI High-Denition Multimedia Interface en het HDMI-logo zijn
handelsmerken of gedeponeerde handelsmerken van HDMI Licensing LLC in de Verenigde
Staten en andere landen.
Technische specicaties kunnen zonder kennisgeving worden gewijzigd om de kwaliteit van
het product te verbeteren.
Gemaakt in China / Ontworpen in Spanje.
8. RECYCLING VAN ELEKTRISCHE EN ELEKTRONISCHE APPARATUUR
Dit symbool geeft aan dat, volgens de geldende voorschriften, het product
en/of de batterij gescheiden van het huisvuil moeten worden afgevoerd.
Wanneer dit product het einde van zijn levensduur bereikt, dient u de
batterijen/accumulatoren te verwijderen en het naar een door de plaatselijke
autoriteiten aangewezen inzamelpunt te brengen.
Voor gedetailleerde informatie over de aangewezen manier om elektrische
apparaten en/of hun batterijen moet de consument de plaatselijke overheid contacteren.
Naleving van de bovenstaande richtsnoeren zal bijdragen tot de bescherming van het milieu.
9. GARANTIE EN TECHNISCHE ONDERSTEUNING
Cecotec is aansprakelijk tegenover de gebruiker of eindconsument voor elk gebrek aan
conformiteit dat bestaat op het moment van levering van het product onder de voorwaarden,
bepalingen en termijnen die zijn vastgelegd in de toepasselijke regelgeving.
Het wordt aanbevolen reparaties te laten uitvoeren door gekwaliceerd personeel.
Als u ooit een incident met het product ontdekt of vragen hebt, neem dan contact op met de
ociële Technische Assistentie van Cecotec via het telefoonnummer +34 96 321 07 28.
10. COPYRIGHT
De intellectuele eigendomsrechten op de teksten in deze handleiding behoren toe aan CECOTEC
INNOVACIONES, S.L. Alle rechten voorbehouden. De inhoud van deze publicatie mag niet, geheel
of gedeeltelijk, worden verveelvoudigd, opgeslagen in een geautomatiseerd gegevensbestand,
doorgegeven of verspreid op welke wijze dan ook (elektronisch, mechanisch, door fotokopieën,
opnamen en dergelijke) zonder voorafgaande toestemming van CECOTEC INNOVACIONES, S.L.

TV 0 SERIES 0024/TV 0 SERIES 0032TV 0 SERIES 0024/TV 0 SERIES 0032 203202
POLSKI POLSKI
Legenda Rys.1:
1. Ściana
2. Wsparcie
3. Ściana
4. Śruba naścienna
Uwaga:
1. Uchwyt do mocowania na ścianie (VESA) nie jest dołączony.
2. Podczas montażu telewizora należy zachować bezpieczną odległość od innych urządzeń.
3. W razie potrzeby skontaktuj się z kompetentnym technikiem, aby uniknąć
niebezpieczeństwa.
4. Rysunek służy wyłącznie jako odniesienie.
5. Postępuj zgodnie z instrukcjami zawartymi w instrukcji, aby bezpiecznie przymocować
telewizor do podstawy.
6. Postępuj zgodnie ze standardem VESA, aby prawidłowo zamontować telewizor na
uchwycie.
Instalacja i podłączenie telewizora
Konguracja TV. Rys. 3
- Umieść telewizor na stabilnym miejscu, które utrzyma jego ciężar.
- Aby uniknąć niebezpieczeństwa, trzymaj telewizor z dala od wody lub źródeł ciepła (takich
jak światło, świeca lub urządzenie grzewcze) i zapewnij odpowiednią wentylację z tyłu
telewizora.
Podłącz antenę i zasilanie
1. Podłącz kabel antenowy do gniazda antenowego z tyłu telewizora.
2. Aby podłączyć przewód zasilający telewizora:
Włącz telewizor
3. Naciśnij przycisk zasilania na telewizorze: lampka kontrolna zmieni kolor na zielony. Jeśli
telewizor jest w trybie gotowości (czerwona kontrolka), naciśnij przycisk zasilania na
pilocie, aby włączyć telewizor.
Legenda rysunek 3:
1. Wyjście sygnału telewizyjnego
Uwaga: Rysunek służy wyłącznie jako odniesienie.
Instalacja uchwytu
1. Weź telewizor, akcesoria i wyróżniaj się po wyjęciu z pudełka (niektóre modele nie
zawierają podstawy). Rys. 4
2. Aby uniknąć uszkodzenia telewizora, umieść go na szmatce lub miękkim materiale
1. PRZED UŻYCIEM
- To urządzenie jest zapakowane w opakowanie zaprojektowane w celu ochrony podczas
transportu. Wyjmij urządzenie z pudełka i usuń wszystkie materiały opakowaniowe.
Oryginalne pudełko i inne elementy opakowania można przechowywać w bezpiecznym
miejscu, aby zapobiec uszkodzeniu urządzenia w przypadku konieczności jego transportu
w przyszłości. Jeśli chcesz pozbyć się oryginalnego opakowania, pamiętaj o prawidłowym
recyklingu wszystkich jego elementów.
- Upewnij się, że wszystkie części i komponenty są dołączone i są w dobrym stanie. Jeśli
któregoś z nich brakuje lub jest w złym stanie, natychmiast skontaktuj się z ocjalnym
Serwisem Pomocy Technicznej Cecotec.
Zawartośćpudełka:
- Telewizor
- Pilot zdalnego sterowania
- 2 baterie AA
- Ta instrukcja obsługi
Uwaga:
Rysunki w tej instrukcji są schematyczne i mogą nie odpowiadać dokładnie produktowi.
2. INSTALACJA
Uchwyt montażowy
Aby przymocować telewizor do ściany:
Rys. 1
1. Najpierw połóż telewizor na stole i połóż na nim miękką ściereczkę, aby uniknąć
zarysowania ekranu.
2. Za pomocą śrubokręta odkręć śruby przymocowane do wspornika dolnego (jak pokazano
na rysunku 1); następnie zdejmij wspornik dolny (ostrożnie wykręć śruby i wspornik
dolny).
3. Wybierz wspornik, który można przymocować do ściany zgodnie z wymiarami telewizora,
jak pokazano na rysunkach 2 i 3.
4. Wywierć cztery otwory w ścianie i wkręć cztery śruby.
5. Za pomocą śrubokręta dokręć śrubę z tyłu telewizora. Następnie powieś telewizor na
ścianie.

TV 0 SERIES 0024/TV 0 SERIES 0032TV 0 SERIES 0024/TV 0 SERIES 0032 205204
POLSKI POLSKI
3. PRZYCISKI PILOTA I INTERFEJS
Przyciski pilota
Pokaż/ukryj ikonę: gdy ikona nie pojawi się, naciśnij odpowiedni przycisk: ikona przycisku
pojawi się jak na powyższym rysunku i wyłączy się automatycznie po 5 sekundach
bezczynności.
Wybór ikony: naciśnij krótko odpowiedni przycisk i przesuń w prawo, aby wybrać ikonę.
Wybór funkcji ikony: naciśnij długo przycisk, aby uzyskać wybraną funkcję ikony.
Opis ikony:
Ikona o: Odpowiada przyciskowi „POWER” na pilocie.
Ikona menu: Odpowiada przyciskowi „MENU” na pilocie.
Ikona źródła: Odpowiada przyciskowi „SOURCE” na pilocie.
Ikona CH+ (przejdź do następnego kanału): Odpowiada przyciskowi „CH+” pilota.
Ikona CH- (powrót do poprzedniego menu): Odpowiada przyciskowi „CH-” pilota zdalnego
sterowania.
Ikona Dźwięku+ (zwiększenie głośności) Odpowiada przyciskowi „VOL+” na pilocie.
Ikona Dźwięku- (zmniejszenie głośności Odpowiada przyciskowi „VOL-” na pilocie.
Interfejs
Wejście AV
Zewnętrzne wejście sygnału AV i prawy/lewy kanał
dźwiękowy
GNIAZDO CI
Gniazdo karty Common Interface (CI) wymaga modułu
dostępu warunkowego (CAM) dla płatnej telewizji.
Wejście HDMI
Wejście sygnału cyfrowego ze złącza wideo HDMI
ANT 75
Wejście do podłączenia anteny/kabla (75/VHF/UHF).
Wejście USB
Włóż tutaj urządzenie USB, aby odtwarzać pliki
multimedialne lub nagrywać programy za pomocą funkcji
PVR.
COAXIAL
W celu podłączenia sensora SPDIF.
opartym na stole i przykręć szyjkę podstawy do telewizora.
3. Prawidłowo przymocuj podstawę do telewizora, aby zakończyć instalację.
Wskazówka:
Aby ułatwić montaż podstawy i uniknąć uszkodzeń, zalecamy użycie wkrętaka typu PH2. Rys. 5
Pierwsza instalacja
Podłącz kabel RF do wejścia „RF-In” telewizora i do wejścia anteny telewizyjnej.
Wybierz język
Naciśnij / , aby wybrać język systemu.
Wybierz kraj
Naciśnij ▼ / ▲, aby podświetlić opcję „Kraj”.
Naciśnij / , aby wybrać żądany kraj.
Rys. 6
Rys. 7
Automatyczne strojenie
Aby automatycznie dostroić telewizor, naciśnij „Menu” i przycisk ze strzałką w lewo, aby
pominąć strojenie ATV; zrób to samo, aby pominąć strojenie DTV.
Rys. 8
OSTRZEŻENIE:
Nie umieszczaj telewizora w niestabilnym miejscu, aby nie spadł i nie spowodował obrażeń lub
uszkodzeń. Wielu urazów można uniknąć, stosując podstawowe środki ostrożności, takie jak:
1. Używaj szafek lub wsporników zalecanych przez producenta telewizora.
2. Używaj wyłącznie mebli, które bezpiecznie utrzymają ciężar telewizora.
3. Upewnij się, że telewizor nie wystaje poza krawędź mebla, na którym stoi.
4. Nie ustawiaj telewizora na wysokich meblach (takich jak szafki lub regały) bez
przymocowania zarówno mebli, jak i telewizora do odpowiedniego wspornika.
5. Nie umieszczaj obrusów ani innych materiałów między telewizorem a meblami, na
których stoi.
6. Poinformuj dzieci o niebezpieczeństwach związanych ze wspinaniem się po meblach w
celu dosięgnięcia telewizora lub pilota.
Weź pod uwagę powyższe, jeśli chcesz przenieść telewizor w inne miejsce.

TV 0 SERIES 0024/TV 0 SERIES 0032TV 0 SERIES 0024/TV 0 SERIES 0032 207206
POLSKI POLSKI
Szukanie
Szukanie kanałów.
Rys. 11
Ręczne strojenie DTV
- Naciśnij ▼ / ▲, aby wybrać “DTV Manual Tuning”; następnie naciśnij Enter, aby uzyskać
dostęp do odpowiedniego podmenu.
- Naciśnij / , aby wybrać kanał; następnie naciśnij Enter, aby wyszukać program.
Rys. 12
Edycja kanałów
Naciśnij ▼ / ▲, aby wybrać “Program Edit” (edycja kanałów); następnie naciśnij Enter, aby
uzyskać dostęp do odpowiedniego podmenu. Rys. 13
Trójkolorowe przyciski to przyciski bezpośredniego dostępu do programowania kanałów.
Najpierw naciśnij ▼ / ▲, aby podświetlić kanał, który chcesz wybrać; Następnie:
- Naciśnij czerwony przycisk, aby usunąć kanał z listy.
- Naciśnij żółty przycisk, aby usunąć kanał z listy.
- Naciśnij niebieski przycisk, aby usunąć kanał z listy.
- Naciśnij przycisk “Fav”, aby dodać lub usunąć kanał z listy ulubionych (telewizor
automatycznie pominie kanał po naciśnięciu przycisku CH+/- w celu zmiany kanału).
Lista programów
- Naciśnij ▼ / ▲, aby wybrać “Schedule List” (lista programów); następnie naciśnij Enter,
aby uzyskać dostęp do odpowiedniego podmenu. Lista programów jest dostępna dla
telewizji cyfrowej i satelitarnej. Rys. 14
- Naciśnij przycisk żółty , aby wejść do poniższego interfejsu. Rys. 15
- W przypadku problemów z programowaniem pojawi się komunikat ostrzegawczy. Rys. 16
Informacje o sygnale
Naciśnij ▼ / ▲, aby wybrać Informacje o sygnale: naciśnij przycisk Enter, aby wyświetlić
szczegółowe informacje o sygnale (dostępne tylko dla sygnału DTV). Rys. 17
Informacje na temat CI (Common Interface, wspólny interfejs)
Naciśnij ▼ / ▲, aby wybrać „Informacje CI”; następnie naciśnij przycisk Enter, aby wyświetlić
szczegóły karty CI (jeśli jest włożona).
UWAGA: Karta CI nie jest dołączona.
Trzymaj z dala, chroń i nie dotykaj złączy HDMI i USB telewizora, aby wydłużyć
żywotność telewizora i zapewnić jego prawidłowe działanie.
Schemat podłączenia urządzenia zewnętrznego
Patrz rysunek 2.
Legenda rysunek 2:
1. DVD
2. Set-Top Box
3. Wejście AV
4. Wejście HDMI
5. Wejście USB
6. Wejście TV
4. MENU I TRYBY
Menu główne
Menu CHANNEL (kanał)
Naciśnij przycisk MENU aby zobaczyć menu główne.
Naciśnij / , aby wybrać CHANNEL w menu głównym. Rys. 9
1. Naciśnij ▼ / ▲, aby wybrać opcję, którą chcesz ustawić w menu CHANNEL.
2. Naciśnij Enter, aby potwierdzić ustawienie.
3. Po ustawieniu naciśnij przycisk Enter, aby zapisać i powrócić do poprzedniego menu.
Automatyczne strojenie
Naciśnij ▼ / ▲, aby wybrać „Automatyczne strojenie”; następnie naciśnij Enter/ .
Rys. 10
Ręczne strojenie ATV
Aktualny kanał
Konguracja numeru kanału.
System kolorów
Wybór systemu kolorów.
(Dostępne systemy: AUTO, PAL, SECAM)
System dźwięku
Wybór systemu dźwięku.
Strojenie Precyzyjna regulacja
Precyzyjne strojenie częstotliwości kanału.

TV 0 SERIES 0024/TV 0 SERIES 0032TV 0 SERIES 0024/TV 0 SERIES 0032 209208
POLSKI POLSKI
- Naciśnij ▼ / ▲, aby wybrać “Color Temperature” ; następnie naciśnij OK, aby uzyskać
dostęp do odpowiedniego podmenu.
- Naciśnij ▼ / ▲, aby wybrać żądaną opcję; temperatura koloru: Cool (zimny), Medium
(neutralny), Warm (ciepły).
Rys. 23
- Cool (zimna): Zwiększa odcień niebieskiego i zmniejsza biel.
- Medium (neutralny): Zwiększa intensywność odcieni różu i błękitu oraz zmniejsza biel.
- Warm (ciepła): Zwiększa czerwień i zmniejsza biel.
Redukcja dźwięku
Filtruje i redukuje dźwięk oraz poprawia jakość obrazu. Naciśnij ▼ / ▲, aby wybrać “Noise
Reduction”(Redukcja dźwięku); następnie naciśnij OK, aby uzyskać dostęp do odpowiedniego
podmenu. Rys. 24
- O (wyłączony): Wybierz tę opcję, aby wyłączyć wykrywanie dźwięku
- Low (nisko): Wykryj i zredukuj niski dźwięk.
- Middle (umiarkowany): Wykrywaj i redukuj umiarkowany hałas.
- High (Wysoki): Wykryj i zredukuj głośny dźwięk.
- Default (Domyślny): Określony z góry.
Tryb HDMI
- Naciśnij ▼ / ▲, aby wybrać “HDMI Mode” ; następnie naciśnij OK, aby uzyskać dostęp do
odpowiedniego podmenu. Rys. 25
- Naciśnij ▼ / ▲, aby wybrać pomiędzy dostępnymi trybami obrazu: Auto/Video/PC.
Menu dźwiękowe
- Naciśnij przycisk MENU aby zobaczyć menu główne. Rys. 26
- Naciśnij / , aby wybrać SOUND (dźwięk) w menu głównym.
1. Naciśnij / , aby wybrać opcję, którą chcesz ustawić w menu DŹWIĘK.
2. Naciśnij Enter, aby potwierdzić ustawienie.
3. Po ustawieniu naciśnij przycisk Enter, aby zapisać i powrócić do poprzedniego menu.
Rys. 27
Tryb dźwięku
Naciśnij ▼ / ▲, aby wybrać „Tryb dźwięku”; następnie naciśnij Enter, aby uzyskać dostęp do
odpowiedniego podmenu. Naciśnij ▼ / ▲, aby wybrać jedną z dostępnych opcji.
Możesz zmienić wartość tonów wysokich i niskich, gdy dźwięk jest w trybie niestandardowym.
Porady: Naciśnij przycisk SMODE na pilocie, aby bezpośrednio zmienić tryb dźwięku.
Lista kanałów satelitarnych Rys. 18
Automatyczne strojenie
Naciśnij ▼ / ▲, aby wybrać “Auto Tuning” (automatyczne strojenie); następnie naciśnij Enter/
. Rys. 19
Konguracja anteny satelitarnej
Naciśnij ▼ / ▲, aby wybrać “Dish Setup” (Konguracja anteny satelitarnej); następnie naciśnij
Enter/, aby potwierdzić. Rys. 20
Menu Obraz
- Naciśnij przycisk MENU aby zobaczyć menu główne.
- Naciśnij / , aby wybrać PICTURE (obraz) w menu głównym. Rys. 21
Uwaga:
- Tryb 120 Hz NIE JEST OBSŁUGIWANY
- KOMPATYBILNY tryb 60 Hz
1. Naciśnij ▼ / ▲, aby wybrać opcję, którą chcesz ustawić w menu PICTURE.
2. Naciśnij OK, aby potwierdzić ustawienia.
3. Po ustawieniu naciśnij przycisk MENU, aby zapisać i powrócić do poprzedniego menu.
Tryb Obraz
- Naciśnij ▼ / ▲, aby wybrać „Tryb obrazu” (Tryb Obrazu); następnie naciśnij OK, aby uzyskać
dostęp do odpowiedniego podmenu.
- Możesz zmienić kontrast, jasność, kolor, ostrość i wartość odcienia, gdy obraz jest w trybie
Personal (spersonalizowany).
Porady: Możesz nacisnąć przycisk PMODE, aby bezpośrednio zmienić ustawienia obrazu.
Rys. 22
Kontrast/jasność/kolor/odcień
Naciśnij ▼ / ▲, aby wybrać żądaną wartość; następnie naciśnij Enter/ , aby dostosować
wartość.
- Kontrast: Podświetla światło na obrazie, ale cień się nie zmienia.
- Jasność: Dostosuj wyjście światłowodowe; wpływa na cienie obrazu.
- Kolor: Reguluje nasycenie kolorów.
- Odcień: Służy do kompensacji przesunięcia kolorów w transmisji NTSC.
- Ostrość: Dostosowuje poziom szczegółowości obrazu.
Temperatura koloru:
- Modykuje postrzeganie zakresu kolorów telewizora.

TV 0 SERIES 0024/TV 0 SERIES 0032TV 0 SERIES 0024/TV 0 SERIES 0032 211210
POLSKI POLSKI
- Naciśnij ▼ / ▲/ / , aby wybrać strefę czasową.
Wyłącznik czasowy
- Naciśnij ▼ / ▲, aby wybrać „Wyłącznik czasowy”; następnie naciśnij Enter, aby uzyskać
dostęp do odpowiedniego podmenu. Rys. 30
- Naciśnij ▼ / ▲, aby wybrać jedną z dostępnych opcji:
- O (Wyłączony), 15 min, 30 min, 45 min, 60 min, 90 min, 120 min, 240 min).
Automatyczny stan gotowości
- Naciśnij ▼ / ▲, aby wybrać “Auto Standby” ; następnie naciśnij Enter, aby uzyskać dostęp
do odpowiedniego podmenu. Rys. 31
- Naciśnij ▼ / ▲, aby wybrać jedną z dostępnych opcji.
Porady: Nie wykonuj żadnych operacji na sterowniku w wybranym czasie; w przeciwnym razie
czas zostanie zresetowany.
Czasomierz OSD
- Naciśnij ▼ / ▲, aby wybrać “OSD timer” (czasomierz OSD)następnie naciśnij Enter, aby
uzyskać dostęp do odpowiedniego podmenu. Rys. 32
- Naciśnij ▼ / ▲, aby wybrać jedną z dostępnych opcji.
Menu blokady
Naciśnij przycisk MENU, aby wyświetlić menu główne. Naciśni / , aby wybrać LOCK w menu
głównym.
Rys. 33
1. Naciśnij ▼ / ▲, aby wybrać opcję, którą chcesz ustawić w menu LOCK SYSTEM.
2. Naciśnij Enter / , aby potwierdzić ustawienie.
3. Po zakończeniu ustawień naciśnij przycisk MENU, aby powrócić do poprzedniego menu.
Awaria systemu
Naciśnij ▼ / ▲, aby wybrać “System Lock”; następnie (blokada systemu) naciśnij Enter, aby
uzyskać dostęp do kolejnych 3 opcji.
Rys. 34
Domyślne hasło to 0000. Jeśli zapomnisz hasła, spróbuj „8899”.
Ustawianie hasła
Naciśnij ▼ / ▲ , aby wybrać „Ustaw hasło”; następnie naciśnij Enter, aby wejść do
odpowiedniego podmenu i ustawić hasło.
Rys. 35
Standardowy (standardowy): Produkuje zrównoważony dźwięk we wszystkich środowiskach.
Music (muzyka): Zachowuje oryginalny dźwięk. Idealny do programów muzycznych.
Movie (lm): Wzmacnia tony wysokie i basy, zapewniając lepsze wrażenia dźwiękowe.
Sports : Poprawia klarowność głosu podczas uprawiania sportu.
Personal (spersonalizowany): Wybierz tę opcję, aby dostosować ustawienia obrazu.
Uwaga: Treble i Bass są dostępne tylko w trybie niestandardowym i możesz je dostosować
według własnego upodobania.
Balans (zrównoważony)
Naciśnij ▼ / ▲, aby wybrać tę opcję; następnie naciśnij / , aby dostosować wartość.
Auto Volume level (Automatyczna głośność)
Naciśnij ▼ / ▲, aby wybrać tę opcję; następnie naciśnij / , aby go włączyć lub wyłączyć.
Tryb SPDIF
Naciśnij ▼ / ▲, aby wybrać “SPDIF Mode” (Tryb SPDIF) następnie naciśnij , aby wybrać
pomiędzy Wył./PCM/Auto.
AD Switch
Naciśnij ▼ / ▲ aby wybrać tę opcję; następnie naciśnij / , aby włączyć lub
wyłącz to.Telewizor posiada również funkcję audiodeskrypcji dla osób niewidomych.
Ostrzeżenie
Balance (wyrównany): Dostosowuje wyjściowy dźwięk, aby uzyskać bardziej zrównoważone
wrażenia słuchowe.
Auto Volume level (Automatyczna głośność) Automatycznie zmniejsza różnicę między
głośnością kanału i programu.
Menu czasowe
- Naciśnij przycisk MENU aby zobaczyć menu główne.
- Naciśnij / , aby wybrać TIME w menu głównym.
Rys. 28
1. Naciśnij przycisk ▼ / ▲, aby wybrać opcję, którą chcesz ustawić w menu TIME.
2. Naciśnij Enter, aby potwierdzić ustawienie.
3. Po ustawieniu naciśnij przycisk Enter, aby zapisać i powrócić do poprzedniego menu.
Strefa czasowa
- Naciśnij ▼ / ▲, aby wybrać “Time Zone”; następnie naciśnij Enter, aby uzyskać dostęp do
odpowiedniego podmenu. Rys. 29

TV 0 SERIES 0024/TV 0 SERIES 0032TV 0 SERIES 0024/TV 0 SERIES 0032 213212
POLSKI POLSKI
Domyślna głośność
- Naciśnij ▼ / ▲ , aby wybrać “Default Volume” (domyślna głośność); następnie naciśnij /
, aby wprowadzić żądane ustawienia.
- Administrator hotelu może ustawić domyślną głośność. Telewizor włączy się z domyślną
głośnością.
Maksymalna głośność
- Naciśnij ▼ / ▲, aby wybrać “Max Volume” (maksymalna głośność); następnie naciśnij /
, aby wprowadzić żądane ustawienia.
- Administrator hotelu może ustawić maksymalną głośność. Użytkownik może wyregulować
głośność poniżej ustawionego poziomu maksymalnego.
Kanał:
Naciśnij ▼ / ▲, aby wybrać opcję CHANNEL (kanał); następnie naciśnij / , aby go włączyć
lub wyłączyć.
Imagen
Naciśnij ▼ / ▲ , aby wybrać opcję PICTURE (obraz); następnie naciśnij / , aby go włączyć
lub wyłączyć.
Dźwięk
Naciśnij ▼ / ▲, aby wybrać opcję DŹWIĘK; następnie naciśnij / , aby go włączyć lub
wyłączyć.
Czas
Naciśnij ▼ / ▲ , aby wybrać opcję CZAS; następnie naciśnij / , aby go włączyć lub wyłączyć.
Blokada
Naciśnij ▼ / ▲ , aby wybrać opcję LOCK (blokada); następnie kliknij opcję / przez ikonę, aby
włączyć lub wyłączyć tę opcję.
Konguracja
Naciśnij ▼ / ▲, aby wybrać tę opcję; następnie naciśnij /, aby go włączyć lub wyłączyć.
Wyczyść ustawienie
Naciśnij ▼ / ▲ , aby wybrać „Wyczyść blokadę” (wyczyść ustawienie); następnie naciśnij
Enter, aby cofnąć poprzednie ustawienie.
Importacja bazy danych
Kierownik hotelu może zaimportować informacje o kanale, podłączając urządzenie USB do
portu.
Blokada kanału
- Naciśnij ▼ / ▲, aby wybrać „Blokada kanału”; następnie naciśnij Enter, aby uzyskać dostęp
do odpowiedniego podmenu.
- Naciśnij zielony przycisk, aby zablokować lub odblokować żądany kanał.
Rys. 36
Kontrola rodzicielska
Naciśnij ▼ / ▲ , aby wybrać “Parental Guidance” (kontrola rodzicielska); następnie naciśnij
Enter, aby uzyskać dostęp do odpowiedniego podmenu i wybrać wiek dzieci. Rys. 37
Blokada przycisków
Naciśnij ▼ / ▲, aby wybrać opcję „Blokada klawiatury”; następnie naciśnij / , aby go
włączyć lub wyłączyć. Aktywacja tej opcji spowoduje zablokowanie przycisków pilota.
Tryb hotelowy (wymagana kompatybilność)
Rys. 38
1. Naciśnij ▼ / ▲ na pilocie, aby wybrać “Hotel Mode” w menu Lock (blokady).
2. Naciśnij przycisk Enter na pilocie, aby wejść do odpowiedniego podmenu.
3. Po ustawieniu naciśnij przycisk MENU, aby zapisać i powrócić do poprzedniego menu.
Tryb Hotel
Naciśnij ▼ / ▲ , aby wybrać opcję „Tryb hotelowy”; następnie naciśnij / , aby go włączyć
lub wyłączyć.
Blokada źródła
- Naciśnij ▼ / ▲, aby wybrać “Source Lock” (bloakda źródła); następnie naciśnij Enter, aby
uzyskać dostęp do odpowiedniego podmenu.
- Administrator hotelu może ustawić blokadę źródła jako DTV/HDMI, AV itp. Użytkownik nie
może wybrać blokady źródła.
Domyślna czcionka
- Naciśnij ▼ / ▲ , aby wybrać „“Default Source” (Źródło domyślne); następnie naciśnij Enter,
aby uzyskać dostęp do odpowiedniego podmenu.
- Administrator hotelu może ustawić domyślną czcionkę. Telewizor włączy się z domyślnym
źródłem.
Domyślny harmonogram
- Naciśnij ▼ / ▲, aby wybrać „Program domyślny”; następnie naciśnij / , aby wprowadzić
żądane ustawienia (dostępne z „TV” jako domyślnym źródłem).
- Administrator hotelu może ustawić domyślny harmonogram. Można ustawić tylko
domyślne źródło DTV/TV

TV 0 SERIES 0024/TV 0 SERIES 0032TV 0 SERIES 0024/TV 0 SERIES 0032 215214
POLSKI POLSKI
- Naciśnij▼ / ▲/ / , aby wybrać żądany język napisów.
Rys. 44
Dostępność dźwięku
Naciśnij▼ / ▲ , aby wybrać opcję “Hearing Impaired” (osoby z wadą słuchu); następnie naciśnij
Enter, aby go włączyć lub wyłączyć.
System plików PVR
- Naciśnij ▼ / ▲ , aby wybrać “PVR File System”; następnie naciśnij Enter, aby uzyskać
dostęp do odpowiedniego podmenu.
- Naciśnij ▼ / ▲, aby wybrać “Check PVR File System”; następnie naciśnij Enter, aby uzyskać
dostęp do odpowiedniego podmenu. Ta funkcja sprawdza prędkość USB.
Rys. 45
Współczynnik proporcji
- Naciśni ▼ / ▲ , aby wybrać „Aspect Ratio” (współczynnik proporcji); następnie naciśnij
Enter, aby uzyskać dostęp do odpowiedniego podmenu.
- Naciśnij ▼ / ▲ , aby wybrać spośród dostępnych współczynników proporcji: Auto, 4:3,16:9,
Zoom1 y Zoom2.
Rys. 46
Niebieski ekran
Naciśnij ▼ / ▲, aby wybrać opcję „Blue Screen”; następnie naciśnij Enter, aby go włączyć lub
wyłączyć.
Pierwsza instalacja
Naciśnij ▼ / ▲ , aby wybrać “First time installation” (Pierwsza instalacja); następnie naciśnij
Enter, aby uzyskać dostęp.
Przywrócić
Naciśni ▼ / ▲ , aby wybrać „Resetuj”; następnie naciśnij Enter, aby uzyskać dostęp do
odpowiedniego podmenu.
Aktualizacja oprogramowania (USB)
Naciśnij ▼ / ▲ , aby wybrać „Aktualizacja oprogramowania (USB)”, podłącz urządzenie USB
do gniazda USB, a następnie naciśnij przycisk Enter, aby zaktualizować oprogramowanie do
najnowszej wersji.
HDMI CEC (jeśli obsługuje funkcję HDMI CEC/ARC)
Naciśnij ▼ / ▲ , aby wybrać „HDMI CEC”; następnie naciśnij Enter, aby uzyskać dostęp do
odpowiedniego podmenu. Rys. 47
Eksportacja bazy danych
Kierownik hotelu może włożyć importowany dysk USB do innych telewizorów. Następnie
możesz użyć tej funkcji, aby sklonować wszystkie kanały do nowych telewizorów.
Przywracanie
Ta funkcja przywraca domyślne ustawienia trybu hotelowego
Tryb hotelowy można wybrać po wprowadzeniu hasła systemowego 8888 w zamku menu
głównego (warunkiem jest, aby oprogramowanie domyślnie włączało funkcję hotelową).
Rys. 39.
Menu ustawień
- Naciśnij przycisk MENU aby zobaczyć menu główne.
- Pulse / aby wybrać SETUP w menu głównym. Rys. 40.
1. Naciśnij przycisk ▼ / ▲, aby wybrać opcję, którą chcesz ustawić w menu SETUP.
2. Naciśnij Enter, aby potwierdzić ustawienie.
3. Po ustawieniu naciśnij przycisk Enter, aby zapisać i powrócić do poprzedniego menu.
Język OSD
- Wybierz język dla menu OSD. Domyślnym językiem jest angielski.
- Naciśnij▼ / ▲ / / , aby wybrać “Menu Language” (języl menu).
Rys. 41
Język telegazety
- Naciśnij ▼ / ▲ , aby wybrać „Język TT” (język telegazety); następnie naciśnij Enter, aby
uzyskać dostęp do odpowiedniego podmenu.
- Naciśnij ▼ / ▲ , aby wybrać język telegazety.
Rys. 42
Języki audio
- Naciśnij ▼ / ▲ , aby wybrać “Audio Languages” (języki audio); następnie naciśnij Enter, aby
uzyskać dostęp do odpowiedniego podmenu.
- Naciśnij / , aby uzyskać dostęp do dostępnych języków ścieżki dźwiękowej.
- Naciśnij ▼ / ▲ / / , aby wybrać żądany język ścieżki dźwiękowej.
Rys. 43
Język napisów
- Naciśnij ▼ / ▲ , aby wybrać „Język napisów” (język napisów); następnie naciśnij Enter, aby
uzyskać dostęp do odpowiedniego podmenu.
- Naciśnij / , aby uzyskać dostęp do dostępnych języków napisów.

TV 0 SERIES 0024/TV 0 SERIES 0032TV 0 SERIES 0024/TV 0 SERIES 0032 217216
POLSKI POLSKI
Ostrzeżenie:
1. Nie można zmniejszyć dźwięku dla opcji OBRAZ.
2. Nie można wybrać opcji „AD Switch” dla opcji SOUND.
3. Funkcje audiodeskrypcji i ułatwień dostępu dla niedosłyszących są takie same.
4. Blokada kanału i opcje kontroli rodzicielskiej nie są dostępne w menu LOCK.
5. Opcje Język audio/napisów, Dostęp dla niedosłyszących i System plików PVR nie są
dostępne w menu KONFIGURACJA.
6. Opcja PC nie jest kompatybilna z menu CHANNEL.
Zawartość mediów
Uwaga: Przed wejściem do menu Media podłącz urządzenie USB i naciśnij przycisk „Źródło”,
aby ustawić źródło wejścia Media.
Rys. 49
- Naciśnij ▼ / ▲ , aby wybrać Media w menu „Źródło”; następnie naciśnij Enter.
- Naciśnij przycisk / , aby wybrać opcję, którą chcesz ustawić w menu Media; następnie
naciśnij Enter.
Menu foto
- Naciśnij / , aby wybrać ZDJĘCIE w menu głównym; następnie naciśnij Enter.
- Naciśnij Wyjdź, aby powrócić do poprzedniego menu; naciśnij go ponownie, aby całkowicie
wyjść.
Rys. 50
Naciśni / , aby wybrać plik, który chcesz wyświetlić w menu wyboru pliku; następnie
naciśnij Enter, aby wyświetlić zdjęcie/obraz.
Po podświetleniu wybranej opcji informacje o pliku pojawią się po prawej stronie, a podgląd
obrazu pojawi się na środku. Rys. 51
Menu muzyki
- Naciśnij / , aby wybrać MUZYKA (muzyka) w menu głównym; następnie naciśnij Enter.
- Naciśnij Wyjdź, aby powrócić do poprzedniego menu; naciśnij go ponownie, aby całkowicie
wyjść.
Rys. 52
Rys. 53
- Naciśnij / , aby wybrać utwór/płytę, którą chcesz odtworzyć; następnie naciśnij
przycisk Enter.
- Naciśnij / , aby wybrać opcję powrotu do poprzedniego menu.
Rys. 54
- HDMI CEC: Naciśnij / , aby włączyć/wyłączyć opcję HDMI CEC.
- HDMI ARC: Naciśnij / , aby włączyć/wyłączyć opcję HDMI ARC.
- Auto Standby (automatyczny stan gotowości): Naciśnij / , aby włączyć/wyłączyć opcję
Auto Standby.
- Device List (Lista urządzeń:): Naciśnij Enter, aby otworzyć menu główne urządzenia.
Menu ekranowe
- Naciśnij przycisk MENU, aby wyświetlić menu główne.
- Naciśnij / , aby wybrać EKRAN w menu głównym. Rys. 48
1. Naciśnij przycisk / , aby wybrać opcję, którą chcesz ustawić w menu EKRAN.
2. Naciśnij Enter, aby potwierdzić ustawienie.
3. Po ustawieniu naciśnij przycisk Enter, aby zapisać i powrócić do poprzedniego menu.
Automatyczne dopasowanie
Naciśnij Enter, aby automatycznie dostosować następujące opcje: H-Oset/V-Oset/Size/
Phase.
H-Oset
- Poziome przesunięcie obrazu.
- Naciśnij ▼ / ▲ , aby wybrać Przesunięcie w poziomie (przesunięcie w poziomie); następnie
naciśnij Enter, aby uzyskać dostęp do odpowiedniego podmenu.
V-Oset
- Pionowe przesunięcie obrazu.
- Naciśnij ▼ / ▲, aby wybrać V-Oset (przesunięcie pionowe); następnie naciśnij Enter, aby
uzyskać dostęp do odpowiedniego podmenu.
Size
- Dostosuj rozmiar wyświetlacza.
- Naciśnij ▼ / ▲, aby wybrać Rozmiar; następnie naciśnij Enter, aby uzyskać dostęp do
odpowiedniego podmenu.
Phase
- Dopasowuje poziome linie interferencji.
- Naciśnij ▼ / ▲, aby wybrać Faza; następnie naciśnij Enter, aby uzyskać dostęp do
odpowiedniego podmenu.
Zresetować pozycję
Naciśnij ▼ / ▲ , aby wybrać Reset pozycji; następnie naciśnij Enter, aby zresetować pozycję
ekranu.

TV 0 SERIES 0024/TV 0 SERIES 0032TV 0 SERIES 0024/TV 0 SERIES 0032 219218
POLSKI POLSKI
12. ▼ / ▲ ENTER umożliwia poruszanie się po menu ekranowych i dostosowywanie
ustawień systemowych do własnych preferencji.
13. EXIT (wychodzić): Naciśnij ten przycisk, aby wyjść z menu lub podmenu i anulować
odpowiednią funkcję (jeśli dotyczy).
14. DISPLAY (ekran): Naciśnij ten przycisk, aby wyświetlić informacje o źródle i kanale.
15. VOL+/VOL-: Naciśnij, aby zwiększyć/zmniejszyć głośność.
16. TV/RADIO: Podczas oglądania kanału umożliwia przełączanie między trybami telewizji
i radia.
17. GUIDE:
1. Otwórz EPG (elektroniczny przewodnik po programach).
2. Szybkie przewijanie do tyłu w trybie PVR lub Media Player.
18. TIME SHIFT (kontrola czasu):
1. Sterowanie czasowe kanałów DTV.
2. Kontrola czasu w trybie PVR lub Media Player.
19. CANCEL:
1. Gdy strona jest wybrana w trybie telegazety, może upłynąć trochę czasu, zanim będzie
dostępna; naciśnięcie przycisku ANULUJ spowoduje powrót do trybu TV. Po znalezieniu
żądanej strony numer strony pojawi się u góry ekranu; naciśnij ANULUJ, aby powrócić do trybu
teletekstu i poruszać się po stronie.
2. Poprzedni rozdział w trybie PVR lub Media Player.
20. INDEX:
1. Naciśnij ten przycisk, aby wyświetlić stronę indeksu w trybie telegazety.
2. Wyjdź z funkcji odtwarzania w trybie PVR lub Media Player.
21. SIZE: Naciśnij ten przycisk, aby zmienić rozmiar wyświetlacza w trybie telegazety.
22. REVEAL: Kliknij ten przycisk, aby pokazać lub ukryć ukryte/pokazane słowa.
23. PRZYCISKI TRÓJKOLOROWE: Sterowanie w trybie telegazety, wybór pozycji w menu i
MHEGS w menu DVB.
24. CH+/CH-: Naciśnij te przyciski, aby poruszać się po kanałach.
25. FAV/LIST: naciśnij te przyciski, aby otworzyć listę ulubionych. Następnie wybierz ulubiony
kanał.
26. ASPECT:
1. Kliknij ten przycisk, aby wybrać skalę obrazu.
2. Szybkie przewijanie do przodu w trybie PVR lub Media Player.
27. FREEZE: naciśnij ten przycisk, aby zatrzymać obraz.
28. SUB. PG:
1. Naciśnij ten przycisk, aby uzyskać dostęp do podstrony.
2. Kolejny rozdział w trybie PVR lub Media Player.
29. SUBTITLE: naciśnij ten przycisk, aby wyświetlić i ustawić język bieżącego kanału DTV.
30. HOLD: naciśnij ten przycisk, aby włączyć lub wyłączyć wyświetlanie bieżącej strony.
31. TEXT: Naciśnij ten przycisk, aby włączyć lub wyłączyć teletekst.
32. RECLIST: Naciśnij ten przycisk, aby wyświetlić listę nagrań.
33. REC: naciśnij ten przycisk, aby nagrywać w trybie PVR.
Menu lmowe
- Naciśnij przycisk / , aby wybrać MOVIE (lmy) w menu głównym; następnie naciśnij
Enter.
- Naciśnij przycisk Enter, aby odtworzyć wybrany lm.
Rys. 55
- Naciśnij / , aby wybrać lm, który chcesz odtworzyć; następnie naciśnij przycisk Enter.
- Naciśnij przycisk Enter, aby odtworzyć wybrany lm.
- Wybierz menu multimediów, do którego chcesz uzyskać dostęp, i naciśnij Enter. Naciśnij
Wyjdź, aby powrócić do poprzedniego menu; naciśnij go ponownie, aby całkowicie wyjść.
Rys. 56
Menu tekstowe
- Naciśnij / , aby wybrać TEKST (tekst) w menu głównym; następnie naciśnij Enter.
- Naciśnij Wyjdź, aby powrócić do poprzedniego menu; naciśnij go ponownie, aby całkowicie
wyjść.
- Rys. 57
- Naciśnij / , aby wybrać żądany element; następnie naciśnij przycisk Enter.
- Naciśnij / , aby wybrać opcję powrotu do poprzedniego menu.
Rys. 58
5. PILOT ZDALNEGO STEROWANIA.
Rys. 59
1. POWER (moc): Włącz telewizor lub przełącz go w tryb gotowości.
2. MUTE (cichy): Naciśnij, aby wyciszyć dźwięk. Naciśnij ponownie lub naciśnij VOL+, aby
ponownie włączyć dźwięk.
3. 0 - 9 Naciśnij 0-9, aby bezpośrednio wybrać kanał podczas oglądania telewizji. Kanał
zmieni się po 2 sekundach. Dotyczy trybu teletekstu itp.
4. DTV/ATV: Naciśnij, aby przełączyć między telewizją analogową i cyfrową.
5. : Naciśnij, aby powrócić do poprzednio oglądanego programu.
6. S.MODE (tryb dźwięku): Naciśnij ten przycisk, aby wybrać pomiędzy różnymi ustawieniami
dźwięku.
7. SLEEP (tryb uśpienia): Wybierz czas, po którym telewizor wyłączy się automatycznie.
8. MTS: Naciśnij, aby przeglądać tryby NICAM.
9. P.MODE (tryb obrazu): Naciśnij ten przycisk, aby wybrać pomiędzy różnymi ustawieniami
obrazu.
10. MENU: Umożliwia nawigację między menu systemu.
11. SOURCE (źródło): Otwórz menu główne i dotknij, aby przechodzić między źródłami.

TV 0 SERIES 0024/TV 0 SERIES 0032TV 0 SERIES 0024/TV 0 SERIES 0032 221220
POLSKI POLSKI
Jest dźwięk, ale nie ma
obrazu lub obraz jest
wyblakły.
Spróbuj wyregulować kontrast i jasność.
Szum statyczny
wpływa na jakość
obrazu i dźwięku.
Sprawdź, czy antena z tyłu telewizora jest dobrze podłączona.
Pojawiają się
przerywane linie
na ekranie.
Urządzenia elektryczne, takie jak suszarki do włosów, odkurzacze
itp. mogą zakłócać działanie telewizora. Wyłącz tego typu
urządzenia.
Pilot nie działa.
Zdejmij plastikową osłonę pilota. Spróbuj zbliżyć pilota do
telewizora i nacisnąć dowolny przycisk. Upewnij się, że baterie są
prawidłowo zainstalowane lub spróbuj użyć nowych baterii.
Telewizor przejdzie w tryb czuwania, jeśli po kilku minutach nie
będzie żadnej reakcji.
Brak obrazu (tryb PC). Sprawdź, czy kabel jest prawidłowo podłączony do portu HDMI
lub czy nie jest zgięty.
Migająca pionowa linia
(tryb PC).
Wejdź do menu głównego i dostosuj pionowe położenie ekranu,
aby usunąć pionową linię.
Linia pozioma (tryb
PC)
Dostosuj poziome położenie ekranu, aby usunąć poziomą linię.
Zbyt jasny lub zbyt
ciemny ekran (tryb PC)
Dostosuj jasność lub kontrast w menu głównym.
Brak odpowiedzi z
komputera.
Sprawdź, czy rozdzielczość ekranu komputera jest ustawiona na
zgodną z rozdzielczością telewizora.
Podczas podłączania
urządzenia do portu
RCA pojawiają się linie.
Upewnij się, że używasz kabla dobrej jakości.
Problem nadal
występuje.
Odłącz przewód zasilający, odczekaj 30 sekund i podłącz go
ponownie do gniazdka elektrycznego. Jeśli problem będzie
się powtarzał, nie próbuj samodzielnie naprawiać telewizora.
Skontaktuj się z ocjalnym serwisem pomocy technicznej.
Nie pozostawiaj telewizora wyświetlającego statyczny obraz, czy to wstrzymane wideo, ekran
menu itp. przez dłuższy czas, aby zapobiec wypaleniu ekranu.
Rys. 60
Instalacja baterii:
- Przesuń w dół i wyciągnij pokrywę komory baterii z tyłu kontrolera, aby ją zdjąć. Włóż
dwie baterie AAA do komory baterii, zwracając uwagę na wskazaną polaryzację (+/–). Nie
wkładaj nowych i starych baterii ani różnych typów baterii.
- Przesuń pokrywę, aż usłyszysz kliknięcie.
Korzystanie z pilota:
- O ile nie określono inaczej, pilot może sterować wszystkimi funkcjami telewizora.
- Zawsze kieruj pilota bezpośrednio na czujnik znajdujący się z przodu telewizora.
UWAGA: Nie połykać baterii, istnieje niebezpieczeństwo oparzenia chemicznego. Ten produkt
zawiera baterie. Połknięcie baterii może spowodować poważne oparzenia wewnętrzne w
ciągu zaledwie 2 godzin i może spowodować śmierć. Przechowuj nowe i zużyte baterie poza
zasięgiem dzieci. Jeśli komora baterii nie zamyka się bezpiecznie, przestań używać produktu
i trzymaj go poza zasięgiem dzieci. Jeśli uważasz, że baterie mogły zostać połknięte lub
umieszczone w jakiejkolwiek części ciała, natychmiast zasięgnij porady lekarza.
6. ROZWIĄZYWANIE PROBLEMÓW
Brak zasilania.
Sprawdź, czy kabel zasilający telewizora jest podłączony, czy nie.
Jeśli nadal nie ma zasilania, odłącz wtyczkę i podłącz ją ponownie
po 60 sekundach. Ponownie podłącz zasilanie.
Telewizor nie odbiera
prawidłowo sygnału.
Jeśli w pobliżu miejsca, w którym znajduje się telewizor, znajdują
się wysokie budynki lub góry, na ekranie mogą pojawiać się smugi
lub podwójne obrazy. W takim przypadku można poprawić obraz
ręcznie, dostosowując kierunek anteny zewnętrznej.
Jeśli używasz anteny wewnętrznej, odbiór sygnału może być
trudniejszy. Dostosuj kierunek anteny, aby zapewnić dobry
odbiór. Jeśli odbiór sygnału nie poprawi się, może być konieczne
przełączenie się na antenę zewnętrzną.
Nie ma obrazu. Sprawdź, czy antena z tyłu telewizora jest dobrze podłączona.
Sprawdź inne kanały, aby zobaczyć, czy problem nadal występuje.
Nie ma dźwięku. Spróbuj zwiększyć głośność.
Sprawdź, czy dźwięk telewizora jest wyciszony, czy nie.

TV 0 SERIES 0024/TV 0 SERIES 0032TV 0 SERIES 0024/TV 0 SERIES 0032 223222
POLSKI POLSKI
Zaleca się, aby naprawy były przeprowadzane przez wykwalikowany personel.
Jeśli wykryjesz incydent z produktem lub masz jakiekolwiek pytania, skontaktuj się z ocjalnym
Serwisem Pomocy Technicznej Cecotec pod numerem telefonu +34 96 321 07 28.
10. COPYRIGHT
Prawa własności intelektualnej do tekstów tej instrukcji obsługi należą do CECOTEC
INNOVACIONES, S.L. Wszelkie prawa zastrzeżone. Treść niniejszej publikacji nie może
być w całości ani w części reprodukowana, przechowywana w systemie wyszukiwania,
przekazywana lub rozpowszechniana w jakikolwiek sposób (elektroniczny, mechaniczny,
fotokopiowany, nagrywany lub podobny) bez uprzedniej zgody CECOTEC INNOVACIONES, SL
11. UPROSZCZONA DEKLARACJA ZGODNOŚCI
Niniejszym Cecotec Innovaciones oświadcza, że telewizory z serii 02610_TV 0 0024
i 02612_TV 0 Series 0032 są zgodne z dyrektywą 2014/53/UE w sprawie urządzeń radiowych.
Pełny tekst deklaracji zgodności UE jest dostępny pod następującym adresem internetowym:
www.cecotec.es
7. DANE TECHNICZNE
Produkt TV 0 Series 0024 TV 0 Series 0032
Referencja produktu 02610 02612
QR
Moc 36 W 56 W
Napięcie 100 – 240 V
Częstotliwość 50 / 60 Hz
Żywotność 60.000 godzin (w przybliżeniu)
Terminy HDMI i HDMI High-Denition Multimedia Interface oraz logo HDMI są znakami
towarowymi lub zastrzeżonymi znakami towarowymi rmy HDMI Licensing LLC w Stanach
Zjednoczonych i/lub innych krajach.
Specykacje techniczne mogą ulec zmianie bez wcześniejszego powiadomienia w celu
poprawy jakości produktu.
Zaprojektowano w Hiszpanii | Wyprodukowano w Chinach
8. RECYKLING URZĄDZEŃ ELEKTRYCZNYCH I ELEKTRONICZNYCH
Ten symbol oznacza, że zgodnie z obowiązującymi przepisami produkt i/
lub baterię należy utylizować oddzielnie od odpadów domowych. Kiedy
ten produkt osiągnie koniec okresu użytkowania, należy wyjąć baterie/
akumulatory i przekazać go do punktu zbiórki wyznaczonego przez władze
lokalne.
Aby uzyskać szczegółowe informacje na temat najbardziej odpowiedniego
sposobu utylizacji sprzętu gospodarstwa domowego i / lub odpowiednich baterii, konsument
powinien skontaktować się z lokalnymi władzami.
Przestrzeganie powyższych wytycznych pomoże chronić środowisko.
9. GWARANCJA I SERWIS TECHNICZNY
Cecotec odpowie użytkownikowi końcowemu lub konsumentowi za wszelkie niezgodności
występujące w momencie dostawy produktu na warunkach i terminach określonych w
obowiązujących przepisach.

TV 0 SERIES 0024/TV 0 SERIES 0032TV 0 SERIES 0024/TV 0 SERIES 0032 225224 225224
ČEŠTINA ČEŠTINA
Legenda Obr.1:
1. Stěna
2. Podpora
3. Stěna
4. Nástěnný šroub
Poznámka:
1. Držák pro upevnění na stěnu (VESA) není součástí dodávky.
2. Při montáži televizoru jej udržujte v bezpečné vzdálenosti od ostatních spotřebičů.
3. V případě potřeby kontaktujte kompetentního technika, abyste předešli nebezpečí.
4. Obrázek je pouze orientační.
5. Pro bezpečné upevnění televizoru ke stojanu postupujte podle pokynů v návodu.
6. Pro správnou montáž televizoru na držák dodržujte standard VESA.
Instalace a připojení TV
Nastavení TV. Obr. 3
- Umístěte televizor na stabilní místo, které unese jeho váhu.
- Abyste předešli nebezpečí, udržujte televizor mimo dosah vody nebo zdrojů tepla (jako
je světlo, svíčka nebo topné zařízení) a zajistěte dostatečné větrání na zadní straně
televizoru.
Připojte anténu a napájení
1. Připojte kabel antény k anténní zásuvce na zadní straně televizoru.
2. Chcete-li připojit napájecí kabel televizoru:
Zapni televizi
3. Stiskněte tlačítko napájení na televizoru: kontrolka se rozsvítí zeleně. Pokud je televizor v
pohotovostním režimu (červená kontrolka), zapněte televizor stisknutím tlačítka napájení
na dálkovém ovladači.
Legenda k obrázku 3:
1. Výstup TV signálu
Poznámka: Obrázek je pouze orientační.
Instalace držáku
1. Vyjměte televizor, příslušenství a stojan z krabice (některé modely neobsahují stojan).
Obr. 4
2. Aby nedošlo k poškození televizoru, položte jej na látku nebo měkký materiál podepřený
stolem a přišroubujte hrdlo stojanu k televizoru.
3. Pro dokončení instalace řádně připevněte stojan k televizoru.
1. PŘED POUŽITÍM
- Tento spotřebič je zabalen v obalu, který jej chrání během přepravy. Tento spotřebič je
zabalen v obalu, který jej chrání během přepravy. Originální krabici a další obalové položky
můžete uschovat na bezpečném místě, abyste zabránili poškození zařízení v případě
potřeby přepravy v budoucnu. Pokud chcete obaly vyhodit, ujistěte se, že se jich zbavíte
správným způsobem.
- Ujistěte se, že všechny díly a součásti jsou zahrnuty a v dobrém stavu. Pokud některá chybí
nebo není v dobrém stavu, okamžitě kontaktujte ociální servisní službu Cecotec.
Obsah krabice:
- Televize
- Dálkové ovládání
- 2 baterie AA
- Tento návod k použití
Poznámka:
Graka v této příručce je schematickým znázorněním a nemusí přesně odpovídat Graka v této
příručce je schematická znázornění a nemusí přesně odpovídat produktu..
2. INSTALACE
Montáž držáku
Připevnění televizoru na stěnu:
Obr. 1
1. Nejprve prosím položte televizor na stůl a položte na stůl měkký hadřík, aby nedošlo k
poškrábání obrazovky.
2. Pomocí šroubováku odstraňte šrouby, které jsou připevněny ke spodnímu držáku (jak je
znázorněno na obrázku 1); poté sejměte spodní držák (opatrně odstraňte šrouby a spodní
držák).
3. Vyberte držák, který lze připevnit na stěnu podle rozměrů televizoru, jak je znázorněno
na obrázcích 2 a 3.
4. Vyvrtejte čtyři otvory do zdi a vložte čtyři šrouby.
5. Pomocí šroubováku upevněte šroub na zadní straně televizoru. Dále zavěste televizi na
zeď.

TV 0 SERIES 0024/TV 0 SERIES 0032TV 0 SERIES 0024/TV 0 SERIES 0032 227226 227226
ČEŠTINA ČEŠTINA
Výběr funkce ikony: dlouhým stisknutím tlačítka získáte vybranou funkci ikony.
Popis ikony:
Ikona vypnutí: Odpovídá tlačítku „POWER“ na dálkovém ovladači.
ikona menu: Odpovídá tlačítku „MENU“ na dálkovém ovladači.
Ikona písma: Odpovídá tlačítku „SOURCE“ na dálkovém ovladači.
Ikona CH+ (přechod na další kanál): Odpovídá tlačítku „CH+“ na dálkovém ovladači.
Ikona CH- (návrat na předchozí kanál):: Odpovídá tlačítku „CH-“ na dálkovém ovladači.
Ikona hlasitosti (zvýšení hlasitosti) Odpovídá tlačítku „VOL+“ na dálkovém ovladači.
Ikona hlasitosti (snížení hlasitosti): Odpovídá tlačítku „VOL-“ na dálkovém ovladači.
Rozhraní
AV vstup
Vstup externího AV signálu a pravý/levý zvukový kanál
CI SLOT
Slot karty Common Interface (CI) vyžaduje modul CAM
(Conditional Access Module) pro placenou televizi.
HDMI vstup
Vstup digitálního signálu z video konektoru HDMI
ANT 75
Vstup pro připojení antény/kabelu (75/VHF/UHF).
USB port
Sem vložte zařízení USB pro přehrávání mediálních souborů nebo
nahrávání programů pomocí funkce PVR.
COAXIAL
Pro připojení SPDIF přijímače.
Uchovávejte mimo dosah, chraňte a nedotýkejte se konektorů HDMI a USB televizoru,
abyste prodloužili životnost televizoru a zajistili správný provoz.
Schéma připojení externího zařízení
Viz obrázek 2.
Legenda k obrázku 2:
1. DVD
2. Set-top box
3. AV vstupní konektor
4. Vstupní konektor HDMI
Rady:
Pro usnadnění instalace základny a zabránění poškození vám doporučujeme použít šroubovák
typu PH2. Obr. 5
První instalace
Připojte RF kabel ke vstupu „RF-In“ na televizoru a ke vstupu vaší televizní antény.
Výběr jazyka
Stisknutím / vyberte jazyk systému.
Vyberte zemi
Stisknutím ▼ / ▲ zvýrazněte možnost „Country“ (země).
Stisknutím tlačítka / vyberte požadovanou zemi.
Obr. 6
Obr. 7
automatické ladění
Chcete-li automaticky naladit televizor, stiskněte „Menu“ a tlačítko se šipkou doleva pro
přeskočení ladění ATV; proveďte totéž pro přeskočení ladění DTV.
Obr. 8
UPOZORNĚNÍ:
Neumisťujte televizor na nestabilní místo, abyste zabránili jeho pádu a zranění nebo poškození.
Mnoha zraněním se lze vyhnout dodržováním základních opatření, jako jsou:
1. Používejte skříňky nebo podpěry doporučené výrobcem televizoru.
2. Používejte pouze nábytek, který bezpečně unese váhu televizoru.
3. Ujistěte se, že televizor nevyčnívá z okraje nosného nábytku.
4. Neumisťujte televizor na vysoký nábytek (např. skříně nebo knihovny), aniž byste nábytek
i televizi zajistili na vhodnou podpěru.
5. Mezi televizor a podpůrný nábytek nedávejte ubrusy ani jiné materiály.
6. Poučte děti o nebezpečích lezení na nábytek, aby dosáhly na televizi nebo dálkové
ovládání.
Pokud chcete televizor přemístit na jiné místo, zvažte výše uvedené.
3. TLAČÍTKA A ROZHRANÍ OVLADAČE
Tlačítka ovladače
Zobrazit/skrýt ikonu: Když se ikona nezobrazuje, stiskněte prosím příslušné tlačítko: ikona
tlačítka se zobrazí jako na obrázku výše a po 5 sekundách nečinnosti se automaticky vypne.
Výběr ikony: Krátce stiskněte odpovídající tlačítko a pohybem doprava vyberte ikonu.

TV 0 SERIES 0024/TV 0 SERIES 0032TV 0 SERIES 0024/TV 0 SERIES 0032 229228 229228
ČEŠTINA ČEŠTINA
Upravit kanály
Stiskněte ▼ / ▲ pro výběr „Program Edit“ (editace kanálů); poté stiskněte Enter pro přístup do
příslušné podnabídky. Obr. 13
Tříbarevná tlačítka jsou tlačítka přímého přístupu pro programování kanálů.
Nejprve stiskněte ▼ / ▲ pro zvýraznění kanálu, který chcete vybrat; další:
- Stisknutím Červené tlačítka vymažete kanál ze seznamu.
- Stisknutím žlutá tlačítka procházejte kanál v seznamu.
- Stisknutím modrý tlačítka přeskočíte vybraný kanál.
- Stisknutím tlačítka „Fav“ přidáte nebo odeberete kanál z vašeho seznamu oblíbených
(televizor kanál automaticky přeskočí, když pro změnu kanálu stisknete CH+/-).
Programovací seznam
- Stiskněte ▼ / ▲ pro výběr „Schedule List“; poté stiskněte Enter pro přístup do příslušné
podnabídky. Programový seznam je k dispozici pro DTV a satelit. Obr. 14
- Stisknutím žlutá tlačítka vstoupíte do níže uvedeného rozhraní. Obr. 15
- V případě problémů s programováním se zobrazí varovná zpráva. Obr. 16
Informace o signálu
Stisknutím ▼ / ▲ vyberte Signal Information (Informace o signálu): stisknutím tlačítka Enter
zobrazíte podrobné informace o signálu (dostupné pouze u signálu DTV). Obr. 17
Informace o CI (Common Interface)
Stisknutím ▼ / ▲ vyberte „CI Information“; poté stisknutím tlačítka Enter zobrazte podrobnosti
o kartě CI (pokud je vložena).
POZNÁMKA: Karta CI není součástí dodávky.
Seznam satelitních kanálů Obr. 18
Automatické ladění
Stiskněte ▼ / ▲ pro výběr „Auto Tuning“; poté stiskněte Enter/ . Obr. 19
Nastavení satelitní paraboly
Stisknutím ▼ / ▲ vyberte „Nastavení paraboly“ (Nastavení satelitní antény); poté stiskněte
Enter/ pro potvrzení. Obr. 20
Nabídka obrázků
- Stisknutím tlačítka MENU zobrazíte hlavní nabídku.
- Stisknutím / tlačítka / vyberte v hlavní nabídce OBRAZ. Obr. 21
5. USB konektor
6. TV konektor
4. NABÍDKY A REŽIMY
Hlavní menu
Nabídka CHANNEL (kanál)
Stisknutím tlačítka MENU zobrazíte hlavní nabídku.
Stiskněte / pro výběr CHANNEL v hlavní nabídce. Obr. 9
1. Stiskněte ▼ / ▲ pro výběr možnosti, kterou chcete nastavit v nabídce CHANNEL.
2. Stiskněte Enter (potvrdit) pro potvrzení nastavení.
3. Po nastavení stiskněte tlačítko Enter pro uložení a návrat do předchozí nabídky.
Automatické ladění
Stiskněte ▼ / ▲ pro výběr „Auto Tuning“; poté stiskněte Enter/ .
Obr. 10
Manuální ladění ATV
aktuální kanál
Nastavení čísla kanálu.
Barevný systém
Výběr barevného systému.
(Dostupné systémy: AUTO, PAL, SECAM)
Ozvučení
Výběr zvukového systému.
Tuning Jemné nastavení
Přesné nastavení frekvence kanálu.
Hledat
Vyhledávání kanálů.
Obr. 11
Ruční ladění DTV
- Stisknutím ▼ / ▲ vyberte „Ruční ladění DTV“; poté stiskněte Enter pro přístup do příslušné
podnabídky.
- Stisknutím / vyberte kanál; poté stiskněte Enter pro vyhledání programu.
Obr. 12

TV 0 SERIES 0024/TV 0 SERIES 0032TV 0 SERIES 0024/TV 0 SERIES 0032 231230 231230
ČEŠTINA ČEŠTINA
- Low (nízká): Detekce a snížení nízkého zvuku.
- Middle (střední): Detekce a snížení středního hluku.
- High (vysoký): Detekce a snížení hlasitého zvuku.
- Default (předem určený): Předurčeno.
Režim HDMI
- Stiskněte ▼ / ▲ pro výběr „HDMI Mode“; poté stiskněte OK pro vstup do příslušné
podnabídky. Obr. 25
- Stisknutím ▼ / ▲ vyberte mezi dostupnými režimy obrazu: Auto/Video/PC.
zvuková nabídka
- Stisknutím tlačítka MENU zobrazíte hlavní nabídku. Obr. 26
- Stisknutím / vyberte SOUND (zvuk) v hlavní nabídce.
1. Stisknutím / vyberte možnost, kterou chcete nastavit v nabídce ZVUK.
2. Stiskněte Enter (potvrdit) pro potvrzení nastavení.
3. Po nastavení stiskněte tlačítko Enter pro uložení a návrat do předchozí nabídky.
Obr. 27
Zvukový režim
Stiskněte ▼ / ▲ pro výběr „Sound Mode“; poté stiskněte Enter pro přístup do příslušné
podnabídky. Stiskněte ▼ / ▲ pro výběr z dostupných možností.
Když je zvuk v uživatelském režimu, můžete změnit hodnotu výšek a basů.
Rady: Stisknutím tlačítka SMODE na dálkovém ovládání přímo změníte režim zvuku.
Standard (standardní): Produkuje vyvážený zvuk ve všech prostředích.
Music (hudba): Preserva el sonido original. Ideální pro hudební programy.
Movie (lm): Vylepšuje výšky a basy pro lepší zvukový zážitek.
Sports (sport): Zlepšuje čistotu hlasu při sportu.
Personal (vlastní): Tuto možnost vyberte, chcete-li upravit nastavení obrazu.
Poznámka: Výšky a basy jsou dostupné pouze v uživatelském režimu a můžete je upravit, jak
chcete.
Balance (vyrovnaný)
Stiskněte ▼ / ▲ pro výběr této možnosti; poté stisknutím / upravte hodnotu.
Auto Volume level (automatická hlasitost)
Stiskněte ▼ / ▲ pro výběr této možnosti; poté stisknutím / zapněte nebo vypněte.
Poznámka:
- Režim 120 Hz NENÍ PODPOROVÁN
- Režim 60 Hz PODPOROVÁN
1. Stisknutím ▼ / ▲ vyberte možnost, kterou chcete nastavit v nabídce PICTURE.
2. Stiskněte OK pro potvrzení nastavení.
3. Po nastavení stiskněte tlačítko MENU pro uložení a návrat do předchozí nabídky.
Režim obrazu
- Stiskněte ▼ / ▲ pro výběr „Picture Mode“; poté stiskněte OK pro vstup do příslušné
podnabídky.
- Pokud je obraz v osobním (vlastním) režimu, můžete změnit kontrast, jas, barvu, ostrost
a odstín.
Rady: Stisknutím tlačítka PMODE můžete přímo změnit nastavení obrazu.
Obr. 22
Kontrast/jas/barva/ostrost/odstín
Stiskněte ▼ / ▲ pro výběr požadované hodnoty; poté stiskněte Enter/ pro úpravu hodnoty.
- Kontrast: Resalta la luz de la imagen, pero la sombra no cambia.
- Záře: Upravte výstup z optických vláken; ovlivňuje tmavé odstíny obrazu.
- Barva: Upravuje sytost barev.
- Odstín: Používá se ke kompenzaci barevného posunu ve vysílání NTSC.
- Ostrost: Upraví úroveň detailů obrazu.
Teplota barvy
- Upravuje vnímání barevného rozsahu televizoru.
- Stiskněte ▼ / ▲ pro výběr „Color Temperature“; poté stiskněte OK pro vstup do příslušné
podnabídky.
- Stiskněte ▼ / ▲ pro výběr požadované možnosti; teplota barvy: Chladný (studený), Střední
(neutrální), Teplý (teplý).
Obr. 23
- Cool (Studený): Zvyšuje modrý odstín a snižuje bílou.
- Medium (neutrální): Zvyšuje růžovou a modrou barvu a snižuje bílou.
- Warm (teplý): Zvyšuje červenou a snižuje bílou.
Redukce zvuku
Filtruje a snižuje zvuk a zlepšuje kvalitu obrazu. Stiskněte ▼ / ▲ pro výběr „Noise Reduction“;
poté stiskněte OK pro vstup do příslušné podnabídky. Obr. 24
- O (Vypnuto): Výběrem této možnosti deaktivujete detekci zvuku

TV 0 SERIES 0024/TV 0 SERIES 0032TV 0 SERIES 0024/TV 0 SERIES 0032 233232 233232
ČEŠTINA ČEŠTINA
- Stiskněte ▼ / ▲ pro výběr z dostupných možností.
Zamknout menu
Stisknutím tlačítka MENU zobrazíte hlavní nabídku. Stiskněte / pro výběr LOCK (bloking)
v hlavní nabídce.
Obr. 33
1. Stisknutím ▼ / ▲ vyberte možnost, kterou chcete nastavit v nabídce LOCK SYSTEM.
2. Stiskněte Enter / pro potvrzení nastavení.
3. Una vez realizada la conguración, pulse el botón MENU para volver al menú anterior.
Havárie systému
Stiskněte ▼ / ▲ pro výběr „System Lock“; poté stiskněte Enter pro přístup k dalším 3
možnostem.
Obr. 34
Výchozí heslo je 0000. Pokud zapomenete heslo, zkuste „8899“.
Nastavit heslo
Stiskněte ▼ / ▲ pro výběr “Set Password”; poté stiskněte Enter pro vstup do odpovídajícího
podnabídky pro nastavení hesla.
Obr. 35
Zámek kanálu
- Stiskněte ▼ / ▲ pro výběr „Channel Lock“; poté stiskněte Enter pro přístup do příslušné
podnabídky.
- Stisknutím zelená tlačítka zablokujete nebo odblokujete požadovaný kanál.
Obr. 36
Ovládání rodičovské
Stisknutím ▼ / ▲ vyberte „Parental Guidance“(kontrolní rodičovská); poté stiskněte Enter pro
přístup k odpovídající podnabídce a vyberte věk svých dětí. Obr. 37
Zámek tlačítka
Stiskněte ▼ / ▲ pro výběr možnosti „Key Lock“(zámek tlačítka); poté stisknutím / zapněte
nebo vypněte. Aktivací této možnosti se tlačítka dálkového ovládání zablokují.
Hotelový režim (vyžaduje kompatibilitu)
Obr. 38
1. Stisknutím ▼ / ▲na dálkovém ovladači vyberte „Hotel Mode“ v nabídce Lock (blokování).
2. Stisknutím tlačítka Enter na dálkovém ovladači otevřete odpovídající podnabídku.
Režim SPDIF
Stiskněte ▼ / ▲ pro výběr „SPDIF Mode“; poté stiskněte pro výběr mezi Vypnuto/PCM/Auto.
AD Switch
Stiskněte ▼ / ▲ pro výběr této možnosti; poté stisknutím / zapněte nebo vypněte. Televize
má také funkci zvukového popisu pro nevidomé.
UPOZORNĚNÍ:
Balance (vyrovnaný): Upraví výstupní zvuk pro vyváženější zážitek z poslechu.
Auto Volume Level (volumen automático): Automaticky snižuje rozdíl mezi hlasitostí kanálu
a programu.
Časové menu
- Stisknutím tlačítka MENU zobrazíte hlavní nabídku.
- Stisknutím / vyberte v hlavní nabídce TIME (Čas)
Obr. 28
1. Stisknutím tlačítka ▼ / ▲ vyberte možnost, kterou chcete nastavit v nabídce ČAS.
2. Stiskněte Enter pro potvrzení nastavení.
3. Po nastavení stiskněte tlačítko Enter pro uložení a návrat do předchozí nabídky.
Časové pásmo
- Stiskněte ▼ / ▲ pro výběr „Časové pásmo“; poté stiskněte Enter pro přístup do příslušné
podnabídky. Obr. 29
- Stisknutím ▼ / ▲/ / vyberte časové pásmo.
Vypnutí časovače
- Stiskněte ▼ / ▲ pro výběr „Časovač vypnutí“; poté stiskněte Enter pro přístup do příslušné
podnabídky. Obr. 30
- Stiskněte ▼ / ▲ pro výběr z dostupných možností:
- Vypnuto (apagádo), 15 min, 30 min, 45 min, 60 min, 90 min, 120 min, 240 min).
Automatický pohotovostní režim
- Pulse ▼ / ▲ para seleccionar “Auto Standby” (modo de espera automático); a continuación,
pulse Enter para acceder al submenú correspondiente. Obr. 31
- Stiskněte ▼ / ▲ pro výběr z dostupných možností.
Rady: Během zvolené doby neprovádějte s ovladačem žádné operace; jinak se čas vynuluje.
OSD časovač
- Stiskněte ▼ / ▲ pro výběr „OSD timer“; poté stiskněte Enter pro přístup do příslušné
podnabídky. Obr. 32

TV 0 SERIES 0024/TV 0 SERIES 0032TV 0 SERIES 0024/TV 0 SERIES 0032 235234 235234
ČEŠTINA ČEŠTINA
Zvuk
Stiskněte ▼ / ▲ pro výběr možnosti SOUND (zvuk); poté stisknutím / zapněte nebo
vypněte.
Čas
Stiskněte▼ / ▲ pro výběr možnosti TIME (čas); poté stisknutím / zapněte nebo vypněte.
Zablokování
Stiskněte ▼ / ▲ pro výběr možnosti LOCK(blokování); poté kliknutím na Shape, Arrow
/ jej zapněte nebo vypněte.
Nastavení
Stiskněte ▼ / ▲ pro výběr možnosti SETUP (nastavení); poté stisknutím / zapněte nebo
vypněte.
Vymazat nastavení
Stisknutím ▼ / ▲vyberte „Clear Lock“ (vymazat nastavení); poté stiskněte Enter pro zrušení
předchozího nastavení.
Importovat databázi
Manažer hotelu může importovat informace o kanálu vložením USB zařízení do portu.
Exportovat databázi
Manažer hotelu může vložit importovaný USB disk do jiných televizorů. Tuto funkci pak můžete
Obnovit
Tato funkce obnoví výchozí nastavení hotelového režimu
Hotelový režim můžete vybrat po zadání systémového hesla 8888 v zámku hlavní nabídky
(předpokladem je, že software nastaví funkci hotelu tak, aby se ve výchozím nastavení
otevřela).
Obr. 39
Menu nastavení
- Stisknutím tlačítka MENU zobrazíte hlavní nabídku.
- Stisknutím / vyberte SETUP v hlavní nabídce. Obr. 40
1. Stisknutím tlačítka n▼ / ▲vyberte položku, kterou chcete nastavit v nabídce SETUP.
2. Stiskněte Enter (potvrdit) pro potvrzení nastavení.
3. Po nastavení stiskněte tlačítko Enter pro uložení a návrat do předchozí nabídky.
Jazyk OSD
3. Po nastavení stiskněte tlačítko MENU pro uložení a návrat do předchozí nabídky.
Hotelový režim
Stiskněte ▼ / ▲ pro výběr možnosti „Hotel Mode“ (Režim hotelu); poté stisknutím /
zapněte nebo vypněte.
Zámek zdroje
- Stiskněte ▼ / ▲pro výběr „Sound Mode“ (zámek zdroje); poté stiskněte Enter pro přístup
do příslušné podnabídky.
- Správce hotelu může nastavit zdrojový blok jako DTV/HDMI, AV atd. Uživatel nemůže
vybrat zámek zdroje.
Výchozí písmo
- Stisknutím ▼ / ▲ vyberte „Výchozí zdroj“ (výchozí písmo); poté stiskněte Enter pro přístup
do příslušné podnabídky
- Správce hotelu může nastavit výchozí písmo. Televizor se zapne s výchozím zdrojem.
Výchozí rozvrh
- Stiskněte ▼ / ▲ pro výběr „Default prog“ (výchozí plán); poté stisknutím / proveďte
požadovaná nastavení (k dispozici s „TV“ jako výchozím zdrojem).
- Správce hotelu může nastavit výchozí plán. Lze nastavit pouze výchozí zdroj DTV/TV
Výchozí hlasitost
- Stisknutím ▼ / ▲ vyberte „Default Volume“ (výchozí hlasitost); poté stisknutím /
proveďte požadovaná nastavení.
- Správce hotelu může nastavit výchozí hlasitost. Televizor se zapne na výchozí hlasitost.
Maximální hlasitost
- Stiskněte ▼ / ▲ pro výběr „Max Volume“ (maximální hlasitost); poté stisknutím /
proveďte požadovaná nastavení.
- Správce hotelu může nastavit maximální hlasitost. Uživatel může upravit hlasitost pod
nastavenou maximální úroveň.
Kanál
Stiskněte ▼ / ▲ pro výběr možnosti CHANNEL (canal); poté stisknutím / zapněte nebo
vypněte.
Obrázek
Stiskněte ▼ / ▲ pro výběr možnosti PICTURE (imagen); poté stisknutím / zapněte nebo
vypněte.

TV 0 SERIES 0024/TV 0 SERIES 0032TV 0 SERIES 0024/TV 0 SERIES 0032 237236 237236
ČEŠTINA ČEŠTINA
Stiskněte ▼ / ▲ pro výběr možnosti „Modrá obrazovka“; poté jej zapněte nebo vypněte
stisknutím klávesy Enter.
První instalace
Stiskněte ▼ / ▲ pro výběr „První instalace“; poté stiskněte Enter pro přístup.
Obnovit
Stiskněte ▼ / ▲ pro výběr „Reset“; poté stiskněte Enter pro přístup do příslušné podnabídky.
Aktualizace softwaru (USB)
Stisknutím tlačítek ▼ / ▲ vyberte „Aktualizace softwaru (USB)“, zapojte zařízení USB do slotu
USB a poté stisknutím tlačítka Enter aktualizujte software na nejnovější verzi.
HDMI CEC (pokud podporuje funkci HDMI CEC/ARC)
Stiskněte ▼ / ▲ pro výběr „HDMI CEC“; poté stiskněte Enter pro přístup do příslušné
podnabídky. Obr. 47
- HDMI CEC: Stiskněte / pro zapnutí/vypnutí možnosti HDMI CEC.
- HDMI ARC: Stiskněte / pro zapnutí/vypnutí možnosti HDMI ARC.
- Auto Standby (automatický pohotovostní režim): Stisknutím / aktivujte/deaktivujte
možnost Auto Standby.
- Device List (seznam zařízení): Stisknutím klávesy Enter otevřete hlavní nabídku zařízení.
Menu obrazovky
- Stisknutím tlačítka MENU zobrazíte hlavní nabídku.
- Stiskněte / pro výběr SCREEN v hlavní nabídce. Obr. 48
1. Stisknutím tlačítka / vyberte možnost, kterou chcete nastavit v nabídce SCREEN.
2. Stiskněte Enter pro potvrzení nastavení.
3. Po nastavení stiskněte tlačítko Enter pro uložení a návrat do předchozí nabídky.
Automatické nastavení
Stisknutím klávesy Enter automaticky upravíte následující možnosti: H-Oset/V-Oset/Size/
Phase.
H-Oset
- Horizontální posun obrazu.
- Stiskněte ▼ / ▲ pro výběr H-Oset (horizontální oset); poté stiskněte Enter pro přístup
do příslušné podnabídky.
V-Oset
- Vyberte jazyk nabídky OSD. Výchozí jazyk je angličtina.
- Stisknutím▼ / ▲ / / vyberte „Jazyk nabídky“.
Obr. 41
Jazyk teletextu
- Stiskněte ▼ / ▲ pro výběr „TT Language“ (jazyk teletextu); poté stiskněte Enter pro přístup
do příslušné podnabídky.
- Stisknutím ▼ / ▲ vyberte jazyk teletextu.
Obr. 42
Jazyky zvuku
- Stiskněte ▼ / ▲ pro výběr „Jazyky zvuku“; poté stiskněte Enter pro přístup do příslušné
podnabídky.
- Stisknutím / získáte přístup k dostupným jazykům zvuku.
- Stisknutím ▼ / ▲ / / vyberte požadovaný jazyk zvuku.
Obr. 43
Jazyk titulků
- Stiskněte ▼ / ▲ pro výběr „Jazyk titulků“ (jazyk titulků); poté stiskněte Enter pro přístup
do příslušné podnabídky.
- Stiskněte / pro přístup k dostupným jazykům titulků.
- Stisknutím ▼ / ▲/ / vyberte požadovaný jazyk titulků.
Obr. 44
Přístupnost zvuku
Stiskněte ▼ / ▲ pro výběr možnosti „Sluchově postižení“; poté jej zapněte nebo vypněte
stisknutím klávesy Enter.
Souborový systém PVR
- Stiskněte ▼ / ▲ pro výběr „PVR File System“; poté stiskněte Enter pro přístup do příslušné
podnabídky.
- Stiskněte ▼ / ▲ pro výběr „Check PVR File System“; poté stiskněte Enter pro přístup do
příslušné podnabídky. Tato funkce kontroluje rychlost USB.
Obr. 45
Poměr stran
- Stiskněte ▼ / ▲ pro výběr „Aspect Ratio“; poté stiskněte Enter pro přístup do příslušné
podnabídky.
- Stiskněte ▼ / ▲ pro výběr z dostupných poměrů stran: Auto, 4:3, 16:9, Zoom1 a Zoom2.
Obr. 46
Modrá obrazovka

TV 0 SERIES 0024/TV 0 SERIES 0032TV 0 SERIES 0024/TV 0 SERIES 0032 239238 239238
ČEŠTINA ČEŠTINA
stiskněte Enter pro zobrazení fotograe/obrázku.
Po zvýraznění vybrané možnosti se vpravo zobrazí informace o souboru a uprostřed se zobrazí
náhled obrázku. Obr. 51
Hudební menu
- Stiskněte / pro výběr MUSIC (hudba) v hlavní nabídce; poté stiskněte Enter.
- Stiskněte Exit pro návrat do předchozí nabídky; dalším stisknutím jej úplně opustíte.
Obr. 52
Obr. 53
- Stisknutím / vyberte skladbu/disk, který chcete přehrát; potom stiskněte tlačítko
Enter.
- Stisknutím / vyberte možnost návratu do předchozí nabídky.
Obr. 54
Filmové menu
- Stiskněte / pro výběr MOVIE (lmy) v hlavní nabídce; poté stiskněte Enter.
- Stiskněte Exit pro návrat do předchozí nabídky; dalším stisknutím jej úplně opustíte.
Obr. 55
- Stisknutím / vyberte lm, který chcete přehrát; potom stiskněte tlačítko Enter.
- Stisknutím tlačítka Enter přehrajete vybraný lm.
- Vyberte nabídku médií, ke které chcete vstoupit, a stiskněte klávesu Enter. Stiskněte Exit
pro návrat do předchozí nabídky; dalším stisknutím jej úplně opustíte.
Obr. 56
Textové menu
- Stiskněte / pro výběr TEXT (text) v hlavní nabídce; poté stiskněte Enter.
- Stiskněte Exit pro návrat do předchozí nabídky; dalším stisknutím jej úplně opustíte.
- Obr. 57
- Stisknutím / vyberte požadovanou položku; potom stiskněte tlačítko Enter.
- Stisknutím / vyberte možnost návratu do předchozí nabídky.
Obr. 58
5. DÁLKOVÉ OVLÁDÁNÍ
- Vertikální posun obrazu.
- Stiskněte ▼ / ▲ pro výběr V-Oset (vertikální oset); poté stiskněte Enter pro přístup do
příslušné podnabídky.
Size
- Upravte velikost zobrazení.
- Stiskněte ▼ / ▲ pro výběr Velikost; poté stiskněte Enter pro přístup do příslušné
podnabídky.
Phase
- Upravuje vodorovné čáry rušení.
- Stiskněte ▼ / ▲ pro výběr Fáze; poté stiskněte Enter pro přístup do příslušné podnabídky.
resetovat polohu
Stiskněte ▼ / ▲ pro výběr Position Reset; poté stisknutím klávesy Enter resetujte polohu
obrazovky.
Upozornění:
1. U možnosti PICTURE nemůžete snížit zvuk.
2. Pro možnost SOUND nelze vybrat „AD Switch“.
3. Funkce Popis zvuku a Usnadnění pro sluchově postižené jsou stejné.
4. Možnosti zámku kanálu a rodičovské kontroly nejsou dostupné v nabídce LOCK.
5. V nabídce NASTAVENÍ nejsou dostupné možnosti Jazyk zvuku/titulků, Přístupnost pro
sluchově postižené a Systém souborů PVR.
6. Možnost PC není kompatibilní s nabídkou CHANNEL.
Mediální obsah
Poznámka: Před vstupem do nabídky Media připojte zařízení USB a stisknutím tlačítka „Source“
nastavte zdroj vstupu médií.
Obr. 49
- Stisknutím ▼ / ▲ vyberte Média v nabídce „Zdroj“; poté stiskněte Enter.
- Stisknutím tlačítka / vyberte možnost, kterou chcete nastavit v nabídce Média; poté
stiskněte Enter.
Foto menu
- Stiskněte / pro výběr FOTO v hlavní nabídce; poté stiskněte Enter.
- Stiskněte Exit pro návrat do předchozí nabídky; dalším stisknutím jej úplně opustíte.
Obr. 50
Stisknutím / vyberte soubor, který chcete zobrazit v nabídce výběru souboru; poté

TV 0 SERIES 0024/TV 0 SERIES 0032TV 0 SERIES 0024/TV 0 SERIES 0032 241240 241240
ČEŠTINA ČEŠTINA
DVB menu.
24. CH+/CH-: Pomocí těchto tlačítek můžete procházet kanály.
25. FAV/LIST: Stisknutím těchto tlačítek otevřete seznam oblíbených. Poté vyberte oblíbený
kanál.
26. ASPECT:
1. Klepnutím na toto tlačítko vyberete měřítko obrázku.
2. Rychlý posun vpřed v režimu PVR nebo Media Player.
27. FREEZE:stisknutím tohoto tlačítka zmrazíte obraz.
28. SUB. PG:
1. Stisknutím tohoto tlačítka otevřete podstránku.
2. Další kapitola v režimu PVR nebo Media Player.
29. SUBTITLE: Stisknutím tohoto tlačítka zobrazíte a nastavíte jazyk aktuálního kanálu DTV.
30. HOLD: Stisknutím tohoto tlačítka zapnete nebo vypnete zobrazení aktuální stránky.
31. TEXT: Stisknutím tohoto tlačítka aktivujete nebo deaktivujete teletext.
32. RECLIST: Stisknutím tohoto tlačítka zobrazíte seznam nahrávek.
33. REC: Stiskněte toto tlačítko pro záznam v režimu PVR.
Obr. 60
Instalace baterie:
- Posuňte dolů a vytáhněte kryt přihrádky na baterie na zadní straně ovladače a sejměte
jej. Vložte dvě baterie AAA do přihrádky na baterie, přičemž dodržujte polaritu (+/–), jak je
uvedeno. Nevkládejte nové a staré baterie nebo různé typy baterií.
- Posouvejte kryt, dokud neuslyšíte zacvaknutí na místo.
Pomocí dálkového ovládání:
- Pokud není uvedeno jinak, dálkové ovládání může ovládat všechny funkce televizoru.
- Dálkové ovládání vždy miřte přímo na senzor umístěný na přední straně televizoru.
POZOR: Baterie nepolykejte, hrozí nebezpečí poleptání chemikáliemi. Tento výrobek obsahuje
baterie. Spolknutí baterií může způsobit vážné vnitřní popáleniny Nové a použité baterie
uchovávejte mimo dosah dětí. Pokud nelze přihrádku na baterie bezpečně uzavřít, přestaňte
výrobek používat a uchovávejte jej mimo dosah dětí. Pokud si myslíte, že mohly být baterie
spolknuty nebo umístěny do jakékoli části těla, okamžitě vyhledejte lékařskou pomoc.
6. ŘEŠENÍ PROBLÉMŮ
Obr. 59
1. POWER (výkon): Zapněte televizor nebo jej uveďte do pohotovostního režimu.
2. MUTE (tichý): Stisknutím ztlumíte zvuk. Dalším stisknutím nebo stisknutím tlačítka VOL+
zvuk znovu zapnete.
3. 0 -9: Stisknutím 0-9 přímo vyberete kanál při sledování televize. Kanál se změní po 2
sekundách. Platí pro režim teletextu atd.
4. DTV/ATV: Stisknutím přepnete mezi analogovou a digitální TV.
5. : Stisknutím se vrátíte k předchozímu sledovanému programu.
6. S.MODE (režim zvuku): Stiskněte toto tlačítko pro výběr mezi různými nastaveními zvuku.
7. SLEEP (Pohotovostní): Vyberte dobu, po které se televizor automaticky vypne.
8. MTS: Stisknutím můžete procházet režimy NICAM.
9. P.MODE (režim obrazu): Stisknutím tohoto tlačítka vyberete mezi různými nastaveními
obrazu.
10. MENU: Umožňuje navigaci mezi systémovými nabídkami.
11. ZDROJ (zdroj): Otevřete hlavní nabídku a klepnutím na procházejte mezi zdroji.
12. ▼ / ▲ ENTER le permite navegar por los menús en pantalla y ajustar la conguración
del sistema según sus preferencias.
13. EXIT (exit): Stisknutím tohoto tlačítka opustíte nabídku nebo podnabídku a zrušíte
příslušnou funkci (je-li k dispozici).
14. DISPLAY (obrazovka): Stisknutím tohoto tlačítka zobrazíte informace o zdroji a kanálu.
15. VOL+/VOL-: Stisknutím zvýšíte/snížíte hlasitost.
16. TV/RADIO: Při sledování kanálu vám umožňuje přepínat mezi režimy TV a Rádio.
17. PRŮVODCE:
1. Otevřete EPG (Elektronický programový průvodce).
2. Rychle vzad v režimu PVR nebo Media Player.
18. TIME SHIFT (ovládání času):
1. Časové ovládání DTV kanálů.
2. Ovládání času v režimu PVR nebo Media Player.
19. ZRUŠENÍ:
1. Když je stránka vybrána v režimu teletextu, může chvíli trvat, než bude dostupná; stisknutím
tlačítka CANCEL se vrátíte do režimu TV. Když najdete požadovanou stránku, číslo stránky se
objeví v horní části obrazovky; stiskněte CANCEL pro návrat do režimu teletextu a procházení
stránky.
2. Předchozí kapitola v režimu PVR nebo Media Player.
20. INDEX:
1. Stisknutím tohoto tlačítka si vyžádáte stránku indexu v režimu teletextu.
2. Ukončete funkci přehrávání v režimu PVR nebo Media Player.
21. SIZE: Stisknutím tohoto tlačítka změníte velikost zobrazení v režimu teletextu.
22. REVEAL: Klepnutím na toto tlačítko zobrazíte nebo skryjete skrytá/zobrazená slova.
23. TŘÍBAREVNÁ TLAČÍTKA: Ovládání v režimu Teletext, výběr položek v menu a MHEGS v

TV 0 SERIES 0024/TV 0 SERIES 0032TV 0 SERIES 0024/TV 0 SERIES 0032 243242 243242
ČEŠTINA ČEŠTINA
Vodorovná čára (režim
PC)
Upravte vodorovné umístění obrazovky, abyste odstranili
vodorovnou čáru.
Obrazovka je příliš
světlá nebo tmavá
(režim PC)
Upravte jas nebo kontrast v hlavní nabídce.
Žádná odezva z PC. Zkontrolujte, zda je rozlišení obrazovky počítače nastaveno na
rozlišení, které je kompatibilní s rozlišením televizoru.
Při připojení zařízení
k portu RCA se objeví
čáry.
Ujistěte se, že používáte kvalitní kabel.
Problém přetrvává. Odpojte napájecí kabel, počkejte 30 sekund a zapojte jej zpět do
elektrické zásuvky. Pokud problém přetrvává, nepokoušejte se
televizor opravit sami. Kontaktujte ociální technickou asistenční
službu.
Nenechávejte na televizoru statický obraz, ať už jde o pozastavené video, obrazovku nabídky
atd. na delší dobu, aby se zabránilo vypálení obrazovky.
7. TECHNICKÉ SPECIFIKACE
Produkt TV 0 Series 0024 TV 0 Series 0032
Reference produktu 02610 02612
QR
Napájení 36 W 56 W
Napětí 100 – 240 V
Frekvence 50 / 60 Hz
Životnost 60 000 hodin (přibližně)
Termíny HDMI a HDMI High-Denition Multimedia Interface a logo HDMI jsou ochranné známky
nebo registrované ochranné známky společnosti HDMI Licensing LLC ve Spojených státech
amerických a/nebo jiných zemích.
Technické specikace se mohou změnit bez předchozího upozornění za účelem zlepšení
kvality produktu.
Není elektrický proud.
Zkontrolujte, zda je připojen AC kabel televizoru či nikoli. Pokud stále
není napájení, odpojte zástrčku a po 60 sekundách ji znovu zapojte.
Znovu připojte napájení.
Televizor nepřijímá
signál správně.
Pokud jsou v blízkosti místa, kde je televizor umístěn, vysoké budovy
nebo hory, může se na obrazovce objevit duch nebo zdvojený obraz.
V takovém případě můžete upravit obraz ručně nastavením směru
venkovní antény.
Pokud používáte pokojovou anténu, může být příjem signálu
obtížnější. Upravte směr antény, abyste zajistili dobrý příjem. Pokud
se příjem signálu nezlepší, možná budete muset přepnout na externí
anténu.
Neexistuje žádný
obrázek.
Zkontrolujte, zda je anténa na zadní straně televizoru dobře
připojena.
Zkontrolujte ostatní kanály a zjistěte, zda problém přetrvává.
Není slyšet žádný
zvuk.
Zkuste zvýšit hlasitost.
Zkontrolujte, zda je zvuk televizoru ztlumen nebo ne.
Je slyšet zvuk, ale není
žádný obraz nebo je
obraz vybledlý.
Zkuste upravit kontrast a jas.
Statický šum ovlivňuje
kvalitu obrazu a zvuku.
Zkontrolujte, zda je anténa na zadní straně televizoru dobře
připojena.
objevují se
přerušované čáry
na obrazovce.
Elektrické spotřebiče, jako jsou vysoušeče vlasů, vysavače atd. může
rušit TV. Vypněte tyto typy zařízení.
Dálkový ovladač
nefunguje.
Odstraňte plast, který obaluje ovladač. Zkuste přiblížit dálkový
ovladač k televizoru a stiskněte libovolné tlačítko. Ujistěte se, že jsou
baterie nainstalovány správně, nebo zkuste použít nové baterie.
Pokud po několika minutách nereaguje, televizor přejde do
pohotovostního režimu.
Neexistuje žádný
obraz (režim PC).
Zkontrolujte, zda je kabel správně připojen k portu HDMI nebo zda
není ohnutý.
Blikající svislá čára
(režim PC).
Vstupte do hlavní nabídky a upravte vertikální umístění obrazovky,
abyste odstranili vertikální čáru.

TV 0 SERIES 0024/TV 0 SERIES 0032
244244
ČEŠTINA
Vyrobeno v Číně | Navrženo ve Španělsku
8. RECYKLACE ELEKTRICKÝCH A ELEKTRONICKÝCH ZAŘÍZENÍ
Tento symbol označuje, že podle platných předpisů musí být výrobek a/nebo baterie
likvidovány odděleně od domovního odpadu. Po skončení životnosti tohoto výrobku byste měli
baterie/akumulátory vyjmout a odnést na sběrné místo určené místními úřady.
Podrobné informace o tom, jak správně likvidovat elektrická a elektronická
zařízení a/nebo baterie, by měli spotřebitelé získat od místních úřadů.
Dodržování výše uvedených pokynů přispěje k ochraně životního prostředí.
9. ZÁRUKA A TECHNICKÝ SERVIS
Společnost Cecotec odpovídá uživateli nebo konečnému spotřebiteli za jakýkoli nesoulad,
který existuje v době dodání výrobku za podmínek a ve lhůtách stanovených platnými předpisy.
Doporučuje se, aby opravy prováděl kvalikovaný personál.
Pokud zjistíte problém s výrobkem nebo máte jakékoli dotazy, obraťte se na ociální technickou
podporu společnosti Cecotec na čísle +34 96 321 07 28.
10. COPYRIGHT
Práva duševního vlastnictví k textům v této příručce patří společnosti CECOTEC INNOVACIONES,
S.L. Všechna práva jsou vyhrazena. Obsah této publikace nesmí být, zčásti nebo jako celek,
reprodukován, ukládán do systému obnovy, přenášen nebo distribuován žádnými prostředky
(elektronicky, mechanicky, fotokopírováním, nahráváním nebo podobným způsobem) bez
předchozího souhlasu společnosti CECOTEC INNOVACIONES, S.L.
11. ZJEDNODUŠENÉ PROHLÁŠENÍ O SHODĚ
Cecotec Innovaciones tímto prohlašuje, že televizory s modelem 02610_TV 0 Series
0024 a 02612_TV 0 Series 0032 jsou v souladu se směrnicí 2014/53/EU o rádiových zařízeních.
Úplné znění EU prohlášení o shodě je k dispozici na této internetové adrese:
www.cecotec.com

Fig./Img./Abb./Afb./ Rys./Obr. 1
1
2
4
3
12
3
4
5
6
Fig./Img./Abb./Afb./ Rys./Obr. 2
Fig./Img./Abb./Afb./ Rys./Obr. 3
1
Fig./Img./Abb./Afb./ Rys./Obr. 4
Fig./Img./Abb./Afb./ Rys./Obr. 5
Fig./Img./Abb./Afb./ Rys./Obr. 6 Fig./Img./Abb./Afb./ Rys./Obr. 7

Fig./Img./Abb./Afb./ Rys./Obr. 8
Fig./Img./Abb./Afb./ Rys./Obr. 9
Fig./Img./Abb./Afb./ Rys./Obr. 10 Fig./Img./Abb./Afb./ Rys./Obr. 11
Fig./Img./Abb./Afb./ Rys./Obr. 12 Fig./Img./Abb./Afb./ Rys./Obr. 13
Fig./Img./Abb./Afb./ Rys./Obr. 14 Fig./Img./Abb./Afb./ Rys./Obr. 15

Fig./Img./Abb./Afb./ Rys./Obr. 16 Fig./Img./Abb./Afb./ Rys./Obr. 17
Fig./Img./Abb./Afb./ Rys./Obr. 18
Fig./Img./Abb./Afb./ Rys./Obr. 19
Fig./Img./Abb./Afb./ Rys./Obr. 20
Fig./Img./Abb./Afb./ Rys./Obr. 21
Fig./Img./Abb./Afb./ Rys./Obr. 22 Fig./Img./Abb./Afb./ Rys./Obr. 23

Fig./Img./Abb./Afb./ Rys./Obr. 24 Fig./Img./Abb./Afb./ Rys./Obr. 25
Fig./Img./Abb./Afb./ Rys./Obr. 26
Fig./Img./Abb./Afb./ Rys./Obr. 27 Fig./Img./Abb./Afb./ Rys./Obr. 28
Fig./Img./Abb./Afb./ Rys./Obr. 29 Fig./Img./Abb./Afb./ Rys./Obr. 30
Fig./Img./Abb./Afb./ Rys./Obr. 31 Fig./Img./Abb./Afb./ Rys./Obr. 32
Fig./Img./Abb./Afb./ Rys./Obr. 33

Fig./Img./Abb./Afb./ Rys./Obr. 34 Fig./Img./Abb./Afb./ Rys./Obr. 35
Fig./Img./Abb./Afb./ Rys./Obr. 36 Fig./Img./Abb./Afb./ Rys./Obr. 37
Fig./Img./Abb./Afb./ Rys./Obr. 38
Fig./Img./Abb./Afb./ Rys./Obr. 39
Fig./Img./Abb./Afb./ Rys./Obr. 40
Fig./Img./Abb./Afb./ Rys./Obr. 41 Fig./Img./Abb./Afb./ Rys./Obr. 42

Fig./Img./Abb./Afb./ Rys./Obr. 43 Fig./Img./Abb./Afb./ Rys./Obr. 44
Fig./Img./Abb./Afb./ Rys./Obr. 45 Fig./Img./Abb./Afb./ Rys./Obr. 46
Fig./Img./Abb./Afb./ Rys./Obr. 47
Fig./Img./Abb./Afb./ Rys./Obr. 48
Fig./Img./Abb./Afb./ Rys./Obr. 49
Fig./Img./Abb./Afb./ Rys./Obr. 50

Fig./Img./Abb./Afb./ Rys./Obr. 51
Fig./Img./Abb./Afb./ Rys./Obr. 52
Fig./Img./Abb./Afb./ Rys./Obr. 53
Fig./Img./Abb./Afb./ Rys./Obr. 54
Fig./Img./Abb./Afb./ Rys./Obr. 55
Fig./Img./Abb./Afb./ Rys./Obr. 56

Fig./Img./Abb./Afb./ Rys./Obr. 57
Fig./Img./Abb./Afb./ Rys./Obr. 58
Fig./Img./Abb./Afb./ Rys./Obr. 59

Fig./Img./Abb./Afb./ Rys./Obr. 60

www.cecotec.es
Cecotec Innovaciones S.L.
Av. Reyes Católicos, 60
46910, Alfafar (Valencia), Spain
EA01230428
-
 1
1
-
 2
2
-
 3
3
-
 4
4
-
 5
5
-
 6
6
-
 7
7
-
 8
8
-
 9
9
-
 10
10
-
 11
11
-
 12
12
-
 13
13
-
 14
14
-
 15
15
-
 16
16
-
 17
17
-
 18
18
-
 19
19
-
 20
20
-
 21
21
-
 22
22
-
 23
23
-
 24
24
-
 25
25
-
 26
26
-
 27
27
-
 28
28
-
 29
29
-
 30
30
-
 31
31
-
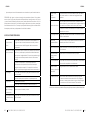 32
32
-
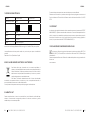 33
33
-
 34
34
-
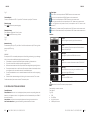 35
35
-
 36
36
-
 37
37
-
 38
38
-
 39
39
-
 40
40
-
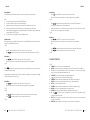 41
41
-
 42
42
-
 43
43
-
 44
44
-
 45
45
-
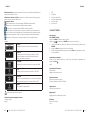 46
46
-
 47
47
-
 48
48
-
 49
49
-
 50
50
-
 51
51
-
 52
52
-
 53
53
-
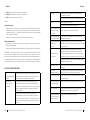 54
54
-
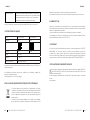 55
55
-
 56
56
-
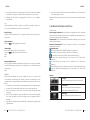 57
57
-
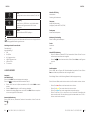 58
58
-
 59
59
-
 60
60
-
 61
61
-
 62
62
-
 63
63
-
 64
64
-
 65
65
-
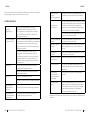 66
66
-
 67
67
-
 68
68
-
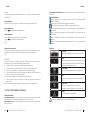 69
69
-
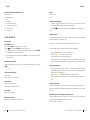 70
70
-
 71
71
-
 72
72
-
 73
73
-
 74
74
-
 75
75
-
 76
76
-
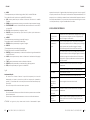 77
77
-
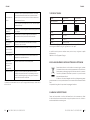 78
78
-
 79
79
-
 80
80
-
 81
81
-
 82
82
-
 83
83
-
 84
84
-
 85
85
-
 86
86
-
 87
87
-
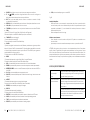 88
88
-
 89
89
-
 90
90
-
 91
91
-
 92
92
-
 93
93
-
 94
94
-
 95
95
-
 96
96
-
 97
97
-
 98
98
-
 99
99
-
 100
100
-
 101
101
-
 102
102
-
 103
103
-
 104
104
-
 105
105
-
 106
106
-
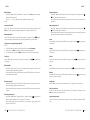 107
107
-
 108
108
-
 109
109
-
 110
110
-
 111
111
-
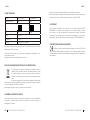 112
112
-
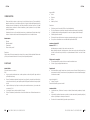 113
113
-
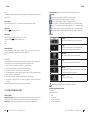 114
114
-
 115
115
-
 116
116
-
 117
117
-
 118
118
-
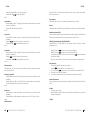 119
119
-
 120
120
-
 121
121
-
 122
122
-
 123
123
-
 124
124
-
 125
125
-
 126
126
-
 127
127
-
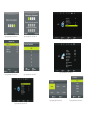 128
128
-
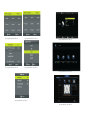 129
129
-
 130
130
-
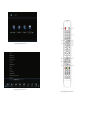 131
131
-
 132
132
-
 133
133


Cecotec 0 SERIES 0024 LED TV Manual de usuario
- Categoría
- Televisores LCD
- Tipo
- Manual de usuario
en otros idiomas
Otros documentos
-
Polaroid TVSAND El manual del propietario
-
-
-
Lenco CR-18 White El manual del propietario
-
-
Vorwerk kobold vc100 Manual de usuario
-
Denver LED-3271S Manual de usuario
-
Denver LDS-5070 Manual de usuario