Windsor MINI PRO El manual del propietario
- Categoría
- Depurador
- Tipo
- El manual del propietario

86401460-B 04/11/19
Mini Carpet Extractor (4 Gallon)
Extractor
Operating instructions (ENG)
MODELS:
MPRO
1.008-039.0

2
Warranty Registration
Thank you for purchasing a Kärcher North America product. Warranty registration is quick
and easy. Your registration will allow us to serve you better over the lifetime of the product.
To register your product go to :
http://warranty.karcherna.com/
For customer assistance:
1-800-444-7654
86401460 Operator’s Manual - Mini Carpet Extractor
Machine Data Label
Overview
The carpet extractor is a mains powered, portable extractor intended for commercial use. The appliance sprays
a cleaning solution onto the carpet, agitates the wet carpet, and then extracts the soiled solution back into the
unit’s recovery tank. The appliance can be fitted with an accessory tool for cleaning upholstery and stairs.

3
Table of Contents
Machine Data Label. . . . . . . . . . . . . . . . . . . . . . . . 2
Overview. . . . . . . . . . . . . . . . . . . . . . . . . . . . . . . . 2
Table of Contents . . . . . . . . . . . . . . . . . . . . . . . . . 3
How To Use This Manual . . . . . . . . . . . . . . . . . . . 4
Safety
IMPORTANT SAFETY INSTRUCTIONS . . . . . . . 5
CONSIGNES DE SÉCURITÉ IMPORTANTES . . 6
HAZARD INTENSITY LEVEL . . . . . . . . . . . . . . . . 7
NIVEAU D'INTENSITÉ DU DANGER. . . . . . . . . . 8
Grounding Instructions . . . . . . . . . . . . . . . . . . . . . 9
Safety Labels . . . . . . . . . . . . . . . . . . . . . . . . . . . 10
Technical Specifications . . . . . . . . . . . . . . . . . . . 11
Inspection . . . . . . . . . . . . . . . . . . . . . . . . . . . . . . 12
Chemicals . . . . . . . . . . . . . . . . . . . . . . . . . . . . . . 12
Controls & Components . . . . . . . . . . . . . . . . . . . 13
Filling The Solution Tank . . . . . . . . . . . . . . . . . . 14
Operating the Machine . . . . . . . . . . . . . . . . . . . . 15
Operating Machine With Accessory Tools . . . . . 16
Maintenance
Protect From Freezing . . . . . . . . . . . . . . . . . . . . 17
Daily Regular Maintenance. . . . . . . . . . . . . . . . . 17
Periodic Maintenance . . . . . . . . . . . . . . . . . . . . . 17
Brush Assembly . . . . . . . . . . . . . . . . . . . . . . . . . 18
Spray Jet. . . . . . . . . . . . . . . . . . . . . . . . . . . . . . . 18
Brush Motor Removal . . . . . . . . . . . . . . . . . . . . . 19
Pump Removal . . . . . . . . . . . . . . . . . . . . . . . . . . 19
Vacuum Motor Removal . . . . . . . . . . . . . . . . . . . 20
Troubleshooting . . . . . . . . . . . . . . . . . . . . . . . . . 21
Suggested Spare Parts. . . . . . . . . . . . . . . . . . . . 23
86401460 Operator’s Manual - Mini Carpet Extractor

4
How To Use This Manual
This manual contains the following sections:
• How To Use This Manual
• Safety
• Operations
• Maintenance
• Suggested Spare Parts
The HOW TO USE THIS MANUAL section will tell
you how to find important information for ordering
correct repair parts.
Parts may be ordered from authorized dealers. When
placing an order for parts, the machine model and
machine serial number are important. Refer to the
MACHINE DATA box which is filled out during the
installation of your machine. The MACHINE DATA
box is located on the inside of the front cover of this
manual.
The model and serial number of your machine is
located on the back of the machine.
The SAFETY section contains important information
regarding hazardous or unsafe practices of the
machine. Levels of hazards are identified that could
result in product damage, personal injury, or severe
injury resulting in death.
The OPERATIONS section is to familiarize the
operator with the operation and function of the
machine.
The MAINTENANCE section contains preventive
maintenance to keep the machine and its compo-
nents in good working condition. They are listed in
this general order:
• Storage
• Maintenance
• Troubleshooting
NOTE: If a service or option kit is installed on your
machine, be sure to keep the KIT INSTRUCTIONS
which came with the kit. It contains replacement
parts numbers needed for ordering future parts.
NOTE: The manual part number is located on the
lower right corner of the front cover.
Model:
Date of Purchase:
Serial Number:
Dealer:
Address:
Phone Number:
Sales Representative:
86401460 Operator’s Manual - Mini Carpet Extractor

5
Safety
IMPORTANT SAFETY INSTRUCTIONS
When using this machine, basic precaution
must always be followed, including the following:
READ ALL INSTRUCTIONS BEFORE USING THIS MACHINE.
To reduce the risk of fire, electric shock, or injury:
Connect to a properly grounded outlet. See Grounding Instructions.
Do not leave the machine unattended. Unplug machine from outlet when not in use and before maintenance or
service.
Use only indoors. Do not use outdoors or expose to rain.
Do not allow machine to be used as a toy. Close attention is necessary when used by or near children.
Use only as described in this manual. Use only manufacturer's recommended components and attachments.
Do not use damaged electrical cord or plug. Follow all instructions in this manual concerning grounding the
machine. If the machine is not working properly, has been dropped, damaged, left outdoors, or dropped into
water, return it to an authorized service center.
Do not pull or carry machine by electrical cord, use as a handle, close a door on cord, or pull cord around sharp
edges or corners.
Do not run machine over cord. Keep cord away from heated surfaces.
Do not unplug machine by pulling on cord. To unplug, grasp the electrical plug, not the electrical cord.
Do not handle the electrical plug or machine with wet hands.
Do not operate the machine with any openings blocked. Keep openings free of debris that may reduce airflow.
This machine is intended for cleaning carpet only.
Do not vacuum anything that is burning or smoking, such as cigarettes, matches, or hot ashes.
This machine is not suitable for picking up health endangering dust.
Turn off all controls before unplugging.
Do not operate this machine near flammable fluids, dust or vapors.
This machine is suitable for commercial use, for example in hotels, schools, hospitals, factories, shops and
offices for more than normal housekeeping purposes.
Maintenance and repairs must be done by qualified personnel.
If foam or liquid comes out of machine, switch off immediately.
READ AND SAVE THESE INSTRUCTIONS
86401460 Operator’s Manual - Mini Carpet Extractor

6
Safety
CONSIGNES DE SÉCURITÉ IMPORTANTES
Lors de l'utilisation de cette machine, des précautions de base
doivent toujours être prises, y compris les précautions suivantes :
LIRE TOUTES LES INSTRUCTIONS AVANT D'UTILISER CETTE MACHINE.
Pour réduire le risque d'incendie, d'électrocution ou de
blessure :
Raccordez l'appareil à une prise adéquatement reliée à la terre. Voir les Consignes de mise à la terre.
Ne laissez pas l'appareil sans surveillance lorsqu'il est branché. Débranchez l'appareil lorsqu'il n'est pas utilisé
et avant tout entretien.
Utilisez-le exclusivement dans des endroits fermés. Ne l'utilisez pas en plein air et ne le laissez pas sous la
pluie.
Ne pas permettre aux enfants dejouer avec l'appareil. Durant la manoeuvre de la machine, prendre garde aux
personnes environnantes et notamment aux enfants.
Utilisez-le exclusivement de la manière décrite dans ce manuel. Utilisez exclusivement les composants et les
fixations recommandés par le fabricant.
N'utilisez pas l'appareil si le cordon ou la fiche est endommagé(e). Observez toutes les consignes figurant dans
ce manuel au sujet de la mise à la terre de l'appareil. Si l'appareil ne fonctionne pas correctement, s'il est tombé
par terre, s'il est endommagé, s'il a été laissé dehors ou s'il a été plongé dans l'eau, veuillez le renvoyer à un
centre d'entretien agréé.
Ne tirez pas sur le cordon, ne portez pas l'appareil par le cordon, n'utilisez pas le cordon comme poignée, ne
fermez pas une porte sur le cordon, ne tirez pas sur le cordon dans des angles ou des coins pointus.
Ne faites pas passer l'appareil par-dessus le cordon. Maintenez le cordon à l'écart de surfaces chauffées..
Ne débranchez pas l'appareil en tirant sur le cordon. Pour le débrancher, empoignez la fiche, non pas le cordon.
Ne manipulez pas la fiche ou l'appareil les mains mouillées.
Ne faites pas fonctionner l'appareil si des ouvertures sont bouchées. Dégagez des ouvertures tous débris
susceptibles d'entraver le passage de l'air.
Cette machine est destinée pour nettoyer le tapis seulement.
Ne pas ramasser quelque chose qui brûle ou fume, comme des cigarettes, des allumettes ou des cendres
chaudes.
Cet appareil n'est pas conçu pour aspirer des poussières dangereuses.
Arrêtez toutes les commandes avant le débranchement.
Ne faites pas fonctionner cet appareil à proximité de fluides, de poussières ou de vapeurs inflammables.
Cet appareil est adapté à un usage commercial : par exemple dans les hôtels, les établissements scolaires, les
hôpitaux, les usines, les magasins et les bureaux, à des fins plus étendues qu'un simple entretien de la maison.
Les travaux de maintenance et de réparation doivent absolument être effectués par du personnel qualifié.
Si de la mousse ou du liquide s'échappe de la machine, éteignez-la immédiatement.
LIRE ET CONSERVER CES INSTRUCTIONS
86401460 Operator’s Manual - Mini Carpet Extractor

7
Safety
The following symbols are used throughout this guide as indicated in their descriptions:
HAZARD INTENSITY LEVEL
There are three levels of hazard intensity identified by signal words -WARNING and CAUTION and FOR
SAFETY. The level of hazard intensity is determined by the following definitions:
WARNING - Hazards or unsafe practices which COULD result in severe personal injury or death.
CAUTION - Hazards or unsafe practices which could result in minor personal injury or product or property
damage.
FOR SAFETY: To Identify actions which must be followed for safe operation of equipment.
Report machine damage or faulty operation immediately. Do not use the machine if it is not in proper operating
condition. Following is information that signals some potentially dangerous conditions to the operator or the
equipment. Read this information carefully. Know when these conditions can exist. Locate all safety devices on
the machine. Please take the necessary steps to train the machine operating personnel.
FOR SAFETY:
DO NOT OPERATE MACHINE:
Unless Trained and Authorized.
Unless Operation Guide is Read and understood.
In Flammable or Explosive areas.
In areas with possible falling objects
WHEN SERVICING MACHINE:
Avoid moving parts. Do not wear loose clothing; jackets, shirts, or sleeves when working on the machine. Use
manufacturer approved replacement parts.
86401460 Operator’s Manual - Mini Carpet Extractor

8
Safety
Les symboles suivants sont utilisés dans tout ce manuel, tels que décrits ici :
NIVEAU D'INTENSITÉ DU DANGER
Il existe trois niveaux d'intensité du danger, identifiés par des termes d'avertissement - AVERTISSEMENT,
ATTENTION et POUR VOTRE SÉCURITÉ. Le niveau d'intensité du danger est déterminé par les définitions
suivantes :
AVERTISSEMENT - Les dangers ou des pratiques contraires à la sécurité qui POURRAIENT entraîner des
blessures personnelles ou la mort.
ATTENTION - Les dangers ou des pratiques contraires à la sécurité qui pourraient entraîner des blessures
personnelles légères ou des dégâts sur le produit ou d'autres biens.
POUR DES RAISONS DE SÉCURITÉ : Pour identifier les actions qui doivent être exécutées pour un
fonctionnement sûr de l'équipement.
Signaler immédiatement tout dommage subi par la machine ou fonctionnement défectueux. Ne pas utiliser la
machine si elle ne fonctionne pas correctement. Ci-dessous se trouvent les informations indiquant les condi-
tions potentiellement dangereuses pour l'opérateur ou l'équipement. Lire attentivement ces informations. Être
conscient que ces conditions peuvent survenir. Repérer tous les dispositifs de sécurité sur la machine. Suivre
les étapes nécessaires de formation du personnel qui utilise la machine.
POUR DES RAISONS DE SÉCURITÉ :
NE PAS FAIRE FONCTIONNER LA MACHINE :
Sauf si le personnel est formé et autorisé.
Sauf si le manuel d'utilisation est lu et compris.
Dans des zones inflammables ou explosives.
Dans des zones contenant des objets susceptibles de tomber
LORS DE L'ENTRETIEN DE LA MACHINE :
Éviter les pièces mobiles. Ne pas porter de vêtements, vestes, chemises ou manches vagues lors de l'entretien
de la machine. Utiliser les pièces de rechange approuvées par le fabricant.
86401460 Operator’s Manual - Mini Carpet Extractor

9
Safety
THIS PRODUCT IS FOR COMMERCIAL
USE ONLY.
Electrical
In the USA this machine operates on a standard 15
amp 120V, 60 hz, A.C. power circuit. The amp, hertz,
and voltage are listed on the data label found on each
machine. Using voltages above or below those
indicated on the data label will cause serious damage
to the motors.
Extension Cords
If an extension cord is used, the wire size must be at
least one size larger than the power cord on the
machine, and must be limited to 50 feet (15.5m) in
length.
Grounding Instructions
This appliance must be grounded. If it should
malfunction or break down, grounding provides a path
of least resistance for electric current to reduce the
risk of electric shock. This appliance is equipped with
a cord having an equipment-grounding conductor and
grounding plug. The plug must be inserted into an
appropriate outlet that is properly installed and
grounded in accordance with all local codes and ordi-
nances.
120 Volt Models
This appliance is for use on a nominal 120-volt circuit,
and has a grounded plug that looks like the plug in
"Fig. A". A temporary adaptor that looks like the
adaptor in "Fig. C" may be used to connect this plug
to a 2-pole receptacle as shown in "Fig. B", if a
properly grounded outlet is not available. The
temporary adaptor should be used only until a
properly grounded outlet (Fig. A) can be installed by a
qualified electrician. The green colored rigid ear, lug,
or wire extending from the adaptor must be
connected to a permanent ground such as a properly
grounded outlet box cover. Whenever the adaptor is
used, it must be held in place by a metal screw.
Improper connection of the equipment-grounding
conductor can result in a risk of electric shock. Check
with a qualified electrician or service person if you are
in doubt as to whether the outlet is properly grounded.
Do not modify the plug provided with the appliance - if
it will not fit the outlet, have a proper outlet installed by
a qualified electrician.
Le raccordement incorrect du conducteur de terre
d'équipement peut entraîner des risques d'électrocu-
tion. Vérifiez auprès d'un électricien qualifié ou d'un
responsable de l'entretien si vous avez quelque doute
que ce soit quant au raccordement à la terre de votre
prise murale. Ne modifiez pas la fiche fournie avec
l'appareil : si elle ne correspond pas à la prise murale,
faites installer une prise adéquate par un électricien
qualifié.
86401460 Operator’s Manual - Mini Carpet Extractor
GROUNDING
PIN
GROUNDED
OUTLET
ADAPTER
METAL SCREW
TAB FOR
GROUNDING SCREW
GROUNDED
OUTLET BOX
(A) (B)
(C)

10
Safety
Safety Label Locations
The following WARNING LABEL(S) are found on your cleaning unit. These labels point out important Warnings
and Cautions which should be followed at all times. Failure to follow warnings and cautions could result in
fatality, personal injury to yourself and/or others, or property damage. Follow these instructions carefully!
DO NOT remove these labels.
NOTE: If at any time the labels become illegible, promptly replace them.
Les ÉTIQUETTES D'AVERTISSEMENT suivantes se trouvent sur votre unité de nettoyage. Ces étiquettes
signalent les avertissements et mises en garde importantes qui doivent être suivis en tout temps. Le non respect
des avertissements et mises en garde pourrait entraîner des dommages matériels, des blessures graves ou
même la mort. Suivez attentivement ces instructions ! NE PAS retirer ces étiquettes.
REMARQUE: Si, à tout moment, les étiquettes deviennent illisibles, remplacez-les rapidement.
WARNING LABEL
86220140
86401460 Operator’s Manual - Mini Carpet Extractor

11
Operations
Technical Specifications
This appliance is not intended for use by persons (including children) with reduced physical, sensory or mental
capabilities, or lack of experience and knowledge, unless they have been given supervision or instruction
concerning use of the appliance by a person responsible for their safety. Children should be supervised to
ensure that they do not play with the appliance.
Cet appareil n'est pas prévu à l'usage des personnes (enfants y compris) avec des possibilités physiques,
sensorielles ou mentales réduites, ou le manque d'expérience et de connaissance, à moins qu'ils aient été
donnés la surveillance ou l'instruction au sujet de l'utilisation de l'appareil par une personne chargée de leur
sûreté. Des enfants devraient être dirigés pour s'assurer qu'ils ne jouent pas avec l'appareil.
ITEM MEASURE
Vacuum Motor
(1) 3 stage, 1.5hp 100 cfm (2.8cubic meters/min.)
Waterlift - 120” (305cm)
Floating Brush 10” (25.4cm)
Main Jet Solution Pump Solenoid Style
Accessory Solution Pump Solenoid Style
Solution Capacity 4.6 Gal (17.3L)
Recovery Capacity 3.9 Gal (14.7L)
Brush Speed 1160 rpm
Wheels (2) 10” dia. (25cm) by 2” (5cm)
Vacuum Shoe 12” (30.48cm) cast aluminum
Solution Spray 1 quick change jet
Power cord 25’ (7.6m) (14 gauge)
Height 39 inches (100cm) (Handle adjusted to highest position)
Length 27 inches (69cm) (Handle adjusted to highest position)
Width 14 inches (36cm)
Weight 75 lbs. (34kg)
Electrical 115V, 15A, 60Hz
86401460 Operator’s Manual - Mini Carpet Extractor
Width
Length
Height

12
Operations
To avoid electric shock use indoors only. To reduce
risk of fire, do not use volatile substances. Use only
cleaners intended for carpet application.
Pour éviter une électrocution, utilisez la machine à
l'intérieur seulement. Pour réduire les risques
d'incendie, n'utilisez pas de substances volatiles.
Utilisez seulement des nettoyants destinés à être
appliqués sur les tapis.
Inspection
Carefully unpack and inspect your extractor for
shipping damage. Each unit is operated and thor-
oughly inspected before shipping, and any damage is
the responsibility of the carrier, who should be
notified immediately.
To avoid possible distortion of polyethylene solution/
recovery tanks, DO NOT USE WATER TEMPERA-
TURE THAT EXCEEDS 140°F (60° C).
Pour éviter toute distorsion possible aux réservoirs
de récupération /de la solution de polyéthylène,
N’UTILISEZ PAS D'EAU DONT LA TEMPÉRATURE
DÉPASSE 60° C (140° F).
Chemicals
Use only the suitable chemicals listed below. Using
incompatible chemicals will damage the machine.
Damages of this type are not covered under
warranty. Carefully read ingredients on manufac-
turer's label before using any product in this machine.
Suitable Chemicals Incompatible Chemicals
Alkalis Aldehydes; Butyls
Defoaming Agents Carbon Tetrachloride
Detergents Chlorinated Bleaches
Soaps Chlorinated Hydrocarbons
Vinegar Trichlorethylene
Hydroxides Phenols; Methyls (MEK)
Perchlorethylene (perc)
Aromatic Hydrocarbons
D-Limonene
86401460 Operator’s Manual - Mini Carpet Extractor

13
Operations
Controls & Components
1. Power and Operation Mode Switch
Turns accessory tool on or machine on.
2. Main Handle
3. Solution Button
Sprays solution on floor when pressed.
4. Brush Motor Circuit Breaker
Protects brush motor from overheating.
5. Vac Motor Circuit Breaker
Protects the vac motor from overheating
6. Handle Adjustment Lever
Adjusts handle position.
7. Solution Tank Drain Hose
8. Accessory Tool Connection
Solution connection for accessory tools.
9. Accessory Hose Connection
Hose connection for accessory tool.
10. Dome Clamp
11. Dome
12. Recovery Tank
13. Solution Tank
2
1
9
3
8
6
7
10
11
12
13
5
4
86401460 Operator’s Manual - Mini Carpet Extractor

14
Operations
Filling The Solution Tank
1. Release dome clamp.
2. Lift upper recovery tank from machine and set
aside.
3. Use a clean bucket, recovery tank or hose to fill
solution tank with hot water. The solution tank
holds 4 gallons (15.2 liters) of cleaning solution.
Add a non-foaming concentrate for use in hot
water extractors at the proportions noted on the
container.
NOTE: Periodically operate the extractor with only
hot water to remove chemical residue in carpet.
To avoid possible distortion of the polyethylene
solution/recovery tanks, DO NOT USE WATER WITH
A TEMPERATURE THAT EXCEEDS 140°F(60°C).
4. Place recovery tank back on machine.
Place dome on recovery tank. Make sure dome is
seated correctly to ensure proper vacuum seal.
Clamp dome securely to recovery tank.
Use only the suitable chemicals listed in the
Chemical Section. Using incompatible chemicals will
damage the machine. Carefully read ingredients on
manufacturer's label before using any product in this
machine.
Special Notes:
This appliance is not intended for use by persons
(including children) with reduced physical, sensory or
mental capabilities, or lack of experience and knowl-
edge, unless they have been given supervision or
instruction concerning use of the appliance by a
person responsible for their safety. Children should
be supervised to ensure that they do not play with the
appliance.
The sound pressure level at the operator's ear was
measured to be 73.7 dBA. This was a nearfield,
broad-band measurement taken in a typical industrial
environment on a tile floor. This appliance contains
no possible source of impact noise. The instanta-
neous sound pressure level is below 63 Pa.
The weighted root mean square acceleration at the
operator's arms was measured to be below 2.5m/s2.
This was a tri-axial, third-octave-band measurement
made during normal operation on a composite tile
floor. The measurement and related calculations
were made in accordance with ISO 5349-1.
86401460 Operator’s Manual - Mini Carpet Extractor

15
Operations
Operating the Machine
1. Vacuum the carpet and make sure it is cleared of
surface debris before cleaning.
2. Plug power cord into a grounded wall outlet.
NOTE: Defeating the grounding pin on the power
cord can result in a severe electrical shock.
3. Turn on the machine by pressing the switch in the
normal operation mode.
NOTE: The vacuum and the brush are protected by
circuit breakers located on the control panel, to the
right of the switch.
NOTE: If either motor does not respond to being
switched on, reset the circuit breakers by pressing
them in, and attempt to switch the machine on
again.
NOTE: If solution does not dispense in an even
pattern across the width of the machine, the spray
jet may be clogged. Tilt the machine back, check for
debris and clean surface of jet.
NOTE: Do not use pins, wire, etc. to clean spray jet
nozzle as this will deform the jet and destroy the
spray pattern.
4. To operate the machine, pull straight back without
pushing down on handle. Press the solution
spray button to apply cleaning solution.
5. While operating machine, check for excessive
foam buildup in the recovery tank. If excessive
foam is present, add a defoamer solution to
recovery tank, or empty tank.
6. Empty recovery tank when approximately 3/4 full.
If the recovery tank is overfilled, the water will
drain back onto the carpet when the vacuum is
switched off.
7. Ventilate area after carpet has been cleaned.
Keep children and pets away and do not walk on
carpet until it is dry.
An Airmover fan can be used to reduce drying time.
86401460 Operator’s Manual - Mini Carpet Extractor

16
Operations
Operating Machine With Accessory
Tools
This extractor is easily adapted for use with Windsor
accessory tools: Contact Customer Service for
details.
1. Disconnect vacuum hose at dome, insert hose
cuff into the dome, ensuring that there is a tight
fit. Dome must be clamped to recovery tank.
2. Attach the solution hose from accessory tool to
the brass solution fitting on the back of machine.
3. Turn on the switch in the accessory position. The
application of cleaning solution is now controlled
by the lever on the accessory tool.
NOTE: The solution pump is not intended to run
dry. When using the extractor for vacuum pick-up
only. Do not press the solution spray button.
This appliance is not suitable for picking up
hazardous dust.
Cet appareil n'est pas conçu pour aspirer des
poussières dangereuses.
86401460 Operator’s Manual - Mini Carpet Extractor

17
Maintenance
Protect From Freezing
If it becomes necessary to store in temperatures that
could drop below 40°F, the pumping system, hoses
and valves must be protected from freezing with a
methyl hydrate window washer antifreeze solution.
NOTE: Do not use ethylene glycol or cooling
system antifreezes.
1. Add one gallon of window washer antifreeze to
the supply tank.
2. Turn on pump switch and spray until the anti-
freeze solution fills the solution lines.
3. Drain the leftover antifreeze from the supply tank.
Always allow the unit to reach room temperature
before filling with hot water or operating.
4. Before operation be sure to flush system
completely. Failure to do so after winterizing
machine will damage carpet.
Daily Regular Maintenance
Before making any adjustments or repairs to the
machine, disconnect the power cord from the
electrical source.
1. Empty unused cleaning solution from the solution
tank.
2. Inspect and clean filter at solution tank fill port
and at the vacuum intake port in the dome.
3. Flush pumping system with 1 to 2 gallons of
clean, hot water.
4. Check spray jet for full spray pattern.
5. Empty the recovery tank and rinse with clean
water.
6. Check for and remove any lint or debris around
brush and vac shoe.
Periodic Maintenance
1. After every 25 hours of operation, flush a white
vinegar solution (ONE quart vinegar to two
gallons of water) or anti-browning solution (mixed
as directed) through the extractor. This will
prevent build-up of alkaline residue in the system.
2. If the spray jet becomes clogged, check for debris
and clean surface of jet.
NOTE: Do not use pins, wire, etc. to clean spray jet
nozzle as this will deform the jet and destroy the
spray pattern.
3. Periodically inspect all hoses, electrical cables,
filters, gaskets and connections on your machine.
Frayed or cracked hoses should be repaired or
replaced to eliminate vacuum or solution
pressure loss.
4. The electrical cable must be well insulated, if the
cable insulation is broken or frayed, repair or
replace it immediately. Don't take chances with
electrical fire or shock.
5. The filter in the bottom of the solution tank and at
the fill port must be clean to allow free flow of
cleaning solution. The screen filter on the
vacuum intake in the dome must be free of lint
buildup to ensure full vacuum strength.
The dome gasket must be properly seated and free of
damage to create the air seal needed to extract water.
86401460 Operator’s Manual - Mini Carpet Extractor

18
Maintenance
Maintenance Instructions
Remove machine power cord from electrical
source before making any adjustments or repairs
to the machine.
Retirez le cordon d'alimentation de la machine de
la source électrique avant de procéder à des
réparations ou des ajustements de la machine.
Only qualified maintenance personnel are to
perform repairs.
Seul le personnel d'entretien qualifié peut
effectuer des réparations.
Brush Assembly
1. Turn off switch and unplug machine.
2. Position the machine to have access to the
bottom. Remove screws (2) at the sides of the
machine holding the brush deck pivot axle.
3. Remove screw mounting belt cover and remove
belt cover.
4. Loosen the nuts (2) at brush motor and slide
motor forward to reduce belt tension. Remove
belt.
5. Loosen set screw on brush pulley. Remove
pulley.
6. Remove screws (4) mounting brush bearings to
frame. Slide bearing off brush axle.
7. Remove brush by lifting drive end out of frame
and sliding other end out of bearings mounted to
frame.
8. Inspect/replace brush and bearings as required.
The brush is equipped with yellow wear indicator
bristles. Replace the brush when it wears down
to the height of the yellow bristles.
9. Reverse the process to reinstall the brush and
bearings. Check belt for proper belt tension.
Only use the brushes provided with the appliance
or those specified in the instruction manual. The
use of other brushes may impair safety.
N'utilisez que les brosses fournies avec l'appareil
ou celles qui sont spécifiées dans le manuel
d'instructions. L'utilisation d'autres brosses peut
nuire à la sécurité.
Spray Jet
NOTE: To prevent a clogged jet due to alkali build-
up, the spray system should be flushed with 1 to 2
gallons of clean hot water at the end of each day.
1. Turn off switch and unplug machine.
2. Position the machine to have access to the
bottom. Remove screws (2) at the sides of the
machine holding the brush deck pivot axle.
3. Position the machine to have access to the
bottom.
4. Pull off the clip mounting the jet to the frame.
Push the jet and hose out of the mounting hole in
the frame.
5. Loosen the hose clamp and pull the jet out of the
hose.
6. Reverse the process to reinstall the jet. Be sure
to have jet rotated correctly before installing clip.
Clip tab must face back of machine.
NOTE: Do not use pins or wire to remove
obstruction if clogged, this may damage jet and
alter spray pattern.
86401460 Operator’s Manual - Mini Carpet Extractor

19
Maintenance
Brush Motor Removal
1. Turn off switch and unplug machine.
2. Set the machine in its upright position. Remove
the screws (2) in the back metal cover. Rotate the
cover down and slide back releasing the tab
under the machine from the main frame.
3. Remove the pump box cover. Remove screws (4)
at each leg of the cover.
4. To remove brush motor, position the machine to
have access to the bottom. Remove screws (2) at
the sides of the machine holding the brush deck
pivot axle.
5. Remove screw mounting belt cover and remove
belt cover.
6. Remove the nuts and washers (2) at brush motor
and slide motor forward to reduce belt tension.
Remove belt.
7. Remove pulley by loosening set screw and pull
off shaft.
8. Unplug the brush motor wires from the rectifier
located in the pump mount housing. Also, remove
the ground lug from the stud on the main frame
by removing the nut on the stud.
9. Reverse the process to reinstall the motor. Align
motor pulley with brush pulley. Check belt for
proper belt tension.
Pump Removal
1. Turn off switch and unplug machine.
2. Set the machine in its upright position. Remove
the screws (2) in the back metal cover. Rotate the
cover down and slide back releasing the tab
under the machine from the main frame.
3. Remove the pump box cover. Remove screws (4)
at each leg of the cover.
4. To remove either pump, loosen the hose clamp
and remove the hose from both ends of the
pump.
5. Remove screws and washers (4) that mount
pump housing.
6. Unscrew the hose fittings from each end of the
pump.
7. Flex the pump mounting housing to remove the
pump.
8. Remove the screw attaching the ground wire to
the pump. Remove the other two wire connectors
attached to the pump.
9. Reverse the process to reinstall
86401460 Operator’s Manual - Mini Carpet Extractor

20
Maintenance
Vacuum Motor Removal
1. Turn off switch and unplug machine.
2. Set the machine in its upright position. Remove
the screws (2) in the back metal cover. Rotate
the cover down and slide back releasing the tab
under the machine from the main frame.
3. Remove the pump box cover. Remove screws
(4) at each leg of the cover.
4. Remove vacuum hose, loosen hose clamp and
pull hose from bottom of vacuum motor.
5. Unplug wires (2) from main harness located in
pump mount housing. Remove ground from stud
on main frame.
6. To remove the vacuum motor, remove the
screws (2) in the back of the machine that mount
the plastic cover to the solution tank.
7. Remove the screws (3) that mount the vacuum
motor to the plastic cover. Pull the cover off the
vacuum motor.
8. Unscrew the ground wire from the vacuum
motor.
9. Reverse the process to reinstall the vacuum
motor.
NOTE: Make sure the excess wire lengths do not
get pinched between the vacuum motor and plastic
cover.
NOTE: The vac motor is protected by a circuit
breaker located in the switch panel. The breaker
will only trip under conditions of abuse.
86401460 Operator’s Manual - Mini Carpet Extractor
3
8
[9.5mm]
Vacuum Motor Carbon Brushes
Carbon
Brushes
End Cap
If armature commutator is grooved, extremely pitted or not
concentric, the motor will need to be replaced or sent to a
qualified service center.
Important:
These brushes wear quicker as the length shortens due to
increased heat. Spring inside brush housing will damage
motor if brushes are allowed to wear away completely.
Periodically check the length of the carbon brushes. Replace
both carbon brushes when either is less tan 3/8" (9.5mm)
long.

21
Maintenance
Troubleshooting
PROBLEM CAUSE SOLUTION
No power, nothing runs.
Is the cord plugged in. Plug in cord.
Circuit breaker tripped in building. Reset breaker.
Faulty switch. Call for service.
Faulty power cord or pigtail. Call for service.
Vacuum motor will not
run.
Vacuum circuit breaker tripped. Reset breaker.
Faulty main switch. Call for service.
Loose wiring. Call for service.
Faulty vac motor. Call for service.
Vacuum motor runs but
suction is poor.
Debris lodged in vac shoe. Remove debris from vac shoe.
Dome gasket defective or missing. Replace as necessary.
Vacuum hose cracked or hose cuff loose Replace or repair as necessary.
Recovery tank full.
Turn off vac motor. Drain and rinsere-
covery tank.
Poor or no water flow.
(carpet is streaky)
Switch to accessory mode. Turn to deep clean position.
Jets clogged or missing. Jets clogged or missing.
Solution filter clogged.
Drain solution tank and clean solution-
filter.
Faulty solution pump. Call for service.
Brush does not spin.
Switch in accessory mode. Turn to deep clean position.
Brush circuit breaker tripped. Reset circuit breaker.
Brush belt broken. Replace as necessary.
Faulty brush motor. Call for service.
Accessory tool fitting
difficult to connect
Corrosion on fitting.
Clean with steel wool. Remove and
soak in acetic acid (white vinegar).
Lubricate lightly with silicone base lubri-
cant.
86401460 Operator’s Manual - Mini Carpet Extractor

22
Operations
Troubleshooting
Problem Cause Solution
Worn brush bearings
Squealing or grinding sound in
brush housing.
Replace bearings.
Carpet not getting clean Severe soil conditions
Make several passes at right angles to each other.
Use a pre-spray.
Carpet too wet Worn spray jet Replace spray jet which is producing a fine mist.
Carpet not getting wet
Solution filter screen clogged.
Clean solution filter screen located inside lower
tank.
Spray jet clogged.
Clean or replace jet. Do not use a wire to clean
jet. Damaged jet will cause over-saturation.
Pump not running.
Check for and correct any loose wires. Repair or
replace.
Faulty solution switch. Replace switch in handle.
86401460 Operator’s Manual - Mini Carpet Extractor

Suggested Spare Parts
86401460 Operator’s Manual - Mini Carpet Extractor
98481760 CARBON BRUSH SET
VACUUM
86216040 BRUSH,
CHEVRON, 10 IN
86215260 BELT
86219580 JET
86224960 STRAINER


Lea las instrucciones antes de utilizar la máquina
86401460-B 04/11/19
MODELS: MPRO
1.008-039.0
Miniextractor de alfombras
(4 galones)
Instrucciones de Funcionamiento (ESP)

2 86401460 Operator’s Manual - Mini Carpet Extractor
Machine Data Label
Descripción General
El extractor de alfombras es un extractor que funciona con energía eléctrica y está diseñado para uso
comercial. La máquina pulveriza una solución de limpieza sobre la alfombra, produce un movimiento en la
alfombra húmeda y después envía la solución sucia al depósito de recogida de la unidad. La máquina puede
funcionar con una herramienta auxiliar para la limpieza de tapicería y escaleras.
Registro de Garantía
Gracias por comprar un producto de Kärcher North America. El registro de la garantía
es rápido y fácil. Su registro permitirá que le sirvamos mejor sobre el curso de la vida
del producto. Para colocar su producto vaya:
http://warranty.karcherna.com/
Para el servicio de atención al cliente llame al:
1-800-444-7654

3
Table of Contents
Machine Data Label . . . . . . . . . . . . . . . . . . . . . . . . 2
Descripción General . . . . . . . . . . . . . . . . . . . . . . . 2
Table of Contents . . . . . . . . . . . . . . . . . . . . . . . . . 3
How To Use This Manual . . . . . . . . . . . . . . . . . . . 4
Seguridad
INSTRUCCIONES DE SEGURIDAD
IMPORTANTES . . . . . . . . . . . . . . . . . . . . . . . . 5
Nivel De Intensidad De Riesgo . . . . . . . . . . . . . . . 6
Instrucciones Para Conectar El Equipo A Tierra . 7
Ubicación de etiquetas de seguridad.. . . . . . . . . . 8
Operaciones
Especificaciones técnicas . . . . . . . . . . . . . . . . . . . 9
Inspección. . . . . . . . . . . . . . . . . . . . . . . . . . . . . . 10
Sustancias químicas . . . . . . . . . . . . . . . . . . . . . . 10
Llenado del depósito para la solución. . . . . . . . . 12
Funcionamiento de la máquina. . . . . . . . . . . . . . 13
Funcionamiento de la máquina con herramientas
auxiliares. . . . . . . . . . . . . . . . . . . . . . . . . . . . . 14
Mantenimiento
Protección del congelamiento. . . . . . . . . . . . . . . 15
Mantenimiento diario habitual . . . . . . . . . . . . . . . 15
Mantenimiento periódico. . . . . . . . . . . . . . . . . . . 15
Montaje del cepillo . . . . . . . . . . . . . . . . . . . . . . . 16
Pulverizador . . . . . . . . . . . . . . . . . . . . . . . . . . . . 16
Extracción del motor de los cepillos . . . . . . . . . . 17
Remoción de la bomba . . . . . . . . . . . . . . . . . . . . 17
Extracción del motor de aspiración. . . . . . . . . . . 18
Resolución de problemas . . . . . . . . . . . . . . . . . . 19
Suggested Spare Parts. . . . . . . . . . . . . . . . . . . . 21
86401460 Operator’s Manual - Mini Carpet Extractor

4
How To Use This Manual
El manual contiene las siguientes secciones:
• CÓMO UTILIZAR EL MANUAL
• SEGURIDAD
• FUNCIONAMIENTO
•MANTENIMIENTO
• LISTA DE PIEZAS
La sección CÓMO UTILIZAR EL MANUAL le indica
el modo de encontrar información importante para
pedir las piezas de recambio correctas.
Las piezas deben ser solicitadas a distribuidores
autorizados. Al realizar el pedido de piezas, es
importante saber el modelo y el número de serie de
la máquina. Consulte el cuadro DATOS DE LA
MÁQUINA que se completa durante la instalación de
la máquina. Este cuadro está situado en la parte
interior de la cubierta frontal del manual.
El modelo y el número de serie de su máquina se
ubican en el panel posterior inferior.
La sección SEGURIDAD contiene información
importante acerca de los usos de la máquina que
pueden resultar peligrosos o poco seguros. Se
identifican niveles de riesgos que pueden ocasionar
lesiones personales o daños en el producto, o
lesiones graves que pueden provocar la muerte.
El objetivo de la sección FUNCIONAMIENTO es
familiarizar al operario con el manejo y el
funcionamiento de la máquina.
La sección MANTENIMIENTO incluye instrucciones
sobre mantenimiento preventivo para mantener la
máquina y sus componentes en buenas condiciones
de funcionamiento. Están clasificadas en el siguiente
orden general:
•Periódico
• Diario/Regular
• Resolución de problemas
NOTA: Si en la máquina se incluye un juego de
servicio u opciones, asegúrese de conservar las
INSTRUCCIONES DEL JUEGO que acompañan al
mismo. Éste contiene los números de piezas de
recambio necesarias para solicitar piezas en el
futuro.
NOTA: El número de pieza correspondiente al
manual está ubicado en la esquina inferior
derecha
de la tapa.
86401460 Operator’s Manual - Mini Carpet Extractor

5
Seguridad
INSTRUCCIONES DE SEGURIDAD IMPORTANTES
Al usar un aparato eléctrico, hay que tomar precauciones básicas entre las que
se incluyen las siguientes:
LEA TODAS LAS INSTRUCCIONES ANTES DE UTILIZAR LA MÁQUINA.
Esta máquina está diseñada para uso comercial
.Para reducir el riesgo de incendio, descargas eléctricas y lesiones:
Conecte a una toma conectada adecuadamente a tierra. Consulte las instrucciones de conexión a tierra.
No deje la máquina sin vigilancia. Desenchufe la máquina de la toma de corriente cuando no esté en uso y
antes de someterla a mantenimiento o reparaciones.
Utilice sólo en interiores. No utilice en el exterior ni exponga a la lluvia.
No permita que la máquina se emplee como juguete. Preste mucha atención cuando sea utilizada por niños o
cerca de ellos.
Utilícela sólo del modo descrito en este manual. Use sólo los componentes y accesorios recomendados por el
fabricante.
No use cables de alimentación ni enchufes dañados. Siga todas las instrucciones contenidas en el manual
referentes a la puesta a tierra de la máquina. Si la máquina no funciona adecuadamente, se ha caído, ha
sufrido daños, fue olvidada en el exterior, o ha caído al agua, llévela a un servicio técnico autorizado.
No tire de la máquina ni la arrastre utilizando el cable de alimentación, ni use éste como asa, cierre una puerta
sobre él, o tire del cable alrededor de bordes cortantes o esquinas.
No haga funcionar la máquina sobre el cable. Mantenga el cable alejado de superficies calientes.
No desenchufe la máquina tirando del cable. Para desenchufar, hágalo sujetando el enchufe de alimentación,
no el cable.
No manipule el enchufe de alimentación ni la máquina con las manos mojadas.
No haga funcionar la máquina con ninguna de sus aberturas bloqueadas. Mantenga las aberturas limpias de
residuos que puedan reducir el caudal de aire.
Esta máquina está diseñada únicamente para la limpieza de alfombras.
No aspire objetos que estén ardiendo o humeando, como cigarros, cerillas o cenizas calientes.
Esta máquina no es adecuada para recoger residuos peligrosos para la salud.
Desconecte todos los controles antes de desenchufar la máquina.
No maneje la máquina cerca de fluidos, polvo o vapores inflamables.
Esta máquina es adecuada para el uso comercial, por ejemplo en hoteles, colegios, hospitales, fábricas,
tiendas
y oficinas, cuando se trate de algo más que tareas domésticas normales.
Personal debidamente capacitado debe realizar el mantenimiento y las reparaciones.
Si sale espuma o líquido de la máquina, desconecte inmediatamente.
GUARDE ESTAS INSTRUCCIONES
86401460 Operator’s Manual - Mini Carpet Extractor

6
Seguridad
Los símbolos siguientes se usan a lo largo de la guía del modo indicado en sus descripciones:
Nivel de Intensidad de Riesgo
Hay tres niveles de intensidad de riesgo, identificados por palabras claves -ADVERTENCIA y
PRECAUCIÓN y POR SEGURIDAD. El nivel de intensidad de riesgo está determinado por las
siguientes definiciones:
ADVERTENCIA - Riesgos o prácticas poco seguras que PODRÍAN provocar graves lesiones perso-
nales o la muerte.
PRECAUCIÓN - Riesgos o prácticas poco seguras que podrían provocar lesiones menores a las
personas o daños en el producto o en la propiedad.
POR SEGURIDAD: Para identificar las acciones que deben seguirse para un manejo seguro
del equipo.
Informe inmediatamente de los daños en la máquina o de su mal funcionamiento. No utilice la
máquina si no está en buenas condiciones de funcionamiento. A continuación hay información que
indica algunas condiciones potencialmente peligrosas para el operario o el equipo. Lea esta
información con atención. Conozca cuándo pueden darse estas condiciones. Coloque todos los
dispositivos de seguridad en la máquina. Por favor, siga los pasos necesarios para instruir a los
operarios de la máquina.
POR SEGURIDAD:
NO UTILICE LA MÁQUINA:
Si no está instruido y autorizado para ello.
Si no ha leído y entendido el manual de instrucciones.
En áreas inflamables o explosivas.
En áreas en las que pueden caer objetos.
MIENTRAS REPARA LA MÁQUINA:
Evite el contacto con las piezas móviles. No lleve puesta ropa amplia (chaquetas, camisas,
o mangas) cuando trabaje en la máquina. Use piezas de repuesto aprobadas por el fabricante.
86401460 Operator’s Manual - Mini Carpet Extractor

7
Seguridad
Este Producto es Sólo Para
Uso Comercial:
Eléctrico
En Estados Unidos, esta máquina funciona con un
circuito eléctrico estándar de 15 amperes 120 voltios,
60 hz C.A. El amperaje, nivel de hertz y el voltaje
están mencionados en la etiqueta de datos que
contiene cada máquina. Si se utilizan voltajes
superiores o inferiores a los indicados en la etiqueta
de datos se le causará un daño serio a los motores.
Alargadores
Si se utiliza un alargador, el tamaño del cable debe
ser al menos de un tamaño mayor que el cable de
energía de la máquina y no debe medir más de 50
pies (15,5m) de longitud.
Instrucciones Para Conectar El Equipo A
Tierra
Este aparato debe estar conectado a tierra. En caso
de un mal funcionamiento o una avería, la conexión a
tierra brinda la posibilidad de una resistencia menor a
la corriente eléctrica para reducir el riesgo de
descarga eléctrica. Este aparato está equipado con
un cable que tiene un conductor con conexión a tierra
del equipo y un enchufe con conexión a tierra. El
enchufe debe ser insertado dentro de un tomaco-
rriente adecuado que esté debidamente instalado y
conectado a tierra de acuerdo con todos los códigos y
ordenanzas locales.
Modelos de 12 Voltios
Este aparato debe usarse en un circuito de 120 voltios
nominales y tiene un enchufe conectado a tierra
parecido al de la “Fig. A”. Se puede usar un adaptador
provisorio parecido al adaptador de la “Fig. C” para
conectar este enchufe a un receptáculo de 2 polos
como se indica en la “Fig. B”, si no se dispone de un
tomacorriente con conexión a tierra. El adaptador
provisorio sólo debe usarse hasta que un electricista
calificado pueda instalar un tomacorriente conectado a
tierra (Fig. A). La espiga rígida verde, la argolla o el
cable que se extienda desde el adaptador debe
conectarse a una conexión a tierra permanente como
una tapa de la caja de distribución que esté
adecuadamente conectada a tierra. Cuando se usa el
adaptador, se lo debe sujetar en su sitio mediante un
tornillo metálico.
Una conexión inadecuada del conductor con conexión
a tierra del equipo puede tener como resultado un
riesgo de descarga eléctrica. Si tiene alguna duda
acerca de si el tomacorriente está debidamente
conectado a tierra consulte con un electricista o
técnico calificado. No modifique el enchufe provisto
con el aparato- si no cabe en el tomacorriente
indíquele a un electricista calificado que le instale un
tomacorriente adecuado.
86401460 Operator’s Manual - Mini Carpet Extractor
TOMA CONECTADA
A TIERRA
CLAVIJA DE CONEXIÓN
A TIERRA
(A)
CAJA DE DISTRIBUCIÓN
CONECTADA A TIERRA
TORNILLO
METÁLICO
ADAPTADOR
LENGÜETA PARA
TORNILLO DE
CONEXIÓN A TIERRA
(B)
(C)

8
Seguridad
Ubicación de Etiquetas de Seguridad.
La unidad de limpieza tiene las siguientes ETIQUETAS DE ADVERTENCIA . Éstas indican Advertencias
y Precauciones que deben tenerse en cuenta en todo momento. El incumplimiento de las advertencias
y precauciones pueden causar la muerte, lesiones personales y/o a terceros o daños a la propiedad.
¡Siga estas instrucciones con cuidado! NO retire estas etiquetas.
NOTA: Si en un momento dado las etiquetas no se pueden leer, reemplácelas con rapidez
ETIQUETA DE ADVERTENCIA
NRO. DE PIEZA 86220140
86401460 Operator’s Manual - Mini Carpet Extractor

9
Operaciones
Especificaciones Técnicas
Este aparato no está diseñado para ser utilizado por personas (incluidos los niños) con habilidades físicas,
sensoriales o mentales reducidas, o falta de experiencia y conocimiento, a menos que hayan recibido super-
visión o instrucción sobre el uso del aparato por parte de una persona responsable de su seguridad. Los niños
deben estar supervisados para garantizar que no jueguen con el aparato.
ELEMENTO MEDIDA
Motor de aspiración
(1) 3 fases, 1,5hp 100 cfm (2,8metros cúbicos/min.)
Altura de agua - 120” (305cm)
Cepillo flotante 10” (25,4cm)
Bomba para la solución de boquilla
principal
Estilo solenoide
Bomba de solución auxiliar Estilo solenoide
Capacidad de solución 4,6 Gal (17,3L)
Capacidad de recogida 3,9 Gal (14,7L)
Velocidad de cepillado 1160 r.p.m.
Ruedas Ruedas (2) 10” de diámetro (25cm) por 2” (5cm)
Zapata de la aspiradora. aluminio fundido 12” (30,48cm)
Pulverización de solución 1 boquillas de cambio rápido.
Cable de energía 25’ (7,6m) (calibre 14)
Altura 39 pulgadas (100cm) (Manija ajustada en la posición más alta)
Longitud 27 pulgadas (69cm) (Manija ajustada en la posición más alta)
Anchura 14 pulgadas (36cm)
Peso 75 libras (34kg)
Eléctrico 115V, 15A, 60Hz
Altura
Anchura
Longitud
86401460 Operator’s Manual - Mini Carpet Extractor

10
Operaciones
Para evitar una descarga eléctrica utilice sólo en
interiores. Para reducir el riesgo de incendio no
utilice sustancias volátiles. Use los limpiadores
diseñados sólo para la aplicación en alfombras.
Inspección
Desembale el extractor con cuidado e inspecciónelo
para detectar daños durante el envío. Cada unidad
es operada e inspeccionada cuidadosamente antes
del envío y cualquier daño que pudiera encontrar es
responsabilidad de la empresa transportista, por lo
que ésta debe ser notificada de inmediato.
Para evitar una posible distorsión de los depósitos de
recogida de polietileno/solución, NO USE AGUA A
UNA TEMPERATURA SUPERIOR A 140°F (60° C).
Sustancias Químicas
Utilice sólo las sustancias químicas que se
mencionan a continuación. El uso de sustancias
químicas incompatibles dañará la máquina. La
garantía no cubre este tipo de daños. Lea con
cuidado los componentes en la etiqueta del
fabricante antes de emplear un producto en la
máquina.
Productos químicos
adecuados
Sustancias químicas
incompatibles
Álcalis Aldehídos; Butilos
Agentes
desespumantes
Tetracloruro
de carbono
Detergentes Lejías cloradas
Jabones Hidrocarburos clorados
Vinagre Tricloretileno
Hidróxidos Fenoles; Metilos (MEK)
Percloretileno (perc)
Hidrocarburos aromáticos
D-Limoneno
86401460 Operator’s Manual - Mini Carpet Extractor

11
Operaciones
Controles y Componentes
1. Interruptor del modo de energía
y funcionamiento
Enciende la herramienta auxiliar o la máquina.
2. Manija principal
3. Botón para la solución
Pulveriza la solución sobre el piso
cuando se presiona.
4. Disyuntor del motor de los cepillos
Proteje el motor de los cepillos de un
recalentamiento.
5. Disyuntor del motor de aspiración
6. Palanca de ajuste de la manija
Ajusta la posición de la manija.
7. Manguera de vaciado del depósito
para la solución
8. Conexión para la herramienta auxiliar
Conexión para la solución para
herramientas auxiliares.
9. Conexión para la manguera auxiliar
Conexión de la manguera para la
herramienta auxiliar.
10. Abrazadera de cubierta metálica
11. Cubierta
12. Depósito de recogida
13. Depósito para la solución
2
1
9
3
8
6
7
10
11
12
13
5
4
86401460 Operator’s Manual - Mini Carpet Extractor

12
Operaciones
Llenado Del Depósito Para La Solución
1. Suelte la abrazadera de la cubierta.
2. Levante el depósito de recogida superior de la
máquina y póngalo a un lado.
3. Utilice un balde limpio, depósito de recogida o
manguera para llenar el depósito de la solución
con agua caliente. El depósito para la solución
tiene una capacidad de 4 galones (15,2 litros) de
solución de limpieza.
Agregue un concentrado que no haga espuma y
que se utilice en extractores de agua caliente en
las proporciones indicadas en el recipiente.
NOTA: Haga funcionar el extractor periódicamente
sólo con agua caliente para eliminar los residuos
químicos en la alfombra.
Para evitar una posible distorsión de los depósitos de
recogida de polietileno/solución, NO USE AGUA A
UNA TEMPERATURA SUPERIOR A 140°F (60?).
4. Vuelva a colocar el depósito de recogida en la
máquina.
Coloque la cubierta sobre el depósito de
recogida. Asegúrese de que la cubierta esté
ubicada correctamente para garantizar un sello
al vacío adecuado. Sujete de manera segura la
cubierta al depósito de recogida.
Utilice sólo las sustancias químicas mencionadas en
la sección Sustancias Químicas. El uso de
sustancias químicas incompatibles dañará la
máquina. Lea con cuidado los componentes en la
etiqueta del fabricante antes de emplear un producto
en la máquina.
Notas Especiales:
Este aparato no está diseñado para ser utilizado por
personas (incluidos los niños) con habilidades
físicas, sensoriales o mentales reducidas, o falta de
experiencia y conocimiento, a menos que hayan
recibido supervisión o instrucción sobre el uso del
aparato por parte de una persona responsable de su
seguridad. Los niños deben estar supervisados para
garantizar que no jueguen con el aparato.
El nivel de presión acústica en el oído del operario se
midió en 73,7 dBA. Fue una medición en campo
cercano y de banda ancha realizada en un entorno
industrial típico sobre un piso de baldosas. Este
aparato no contiene ninguna fuente posible de ruido
de impacto. El nivel instantáneo de presión acústica
está por debajo de 63 Pa.
La aceleración media cuadrática ponderada en los
brazos del operario dio una medición por debajo de
2,5 m/s2. Se trata de una medición triaxial en la
banda de un tercio de octava, realizada durante el
funcionamiento normal sobre un piso de baldosa
compuesto. La medición y los cálculos relacionados
con ésta se realizaron de acuerdo con ISO 5349-1.
86401460 Operator’s Manual - Mini Carpet Extractor

13
Operaciones
Funcionamiento De La Máquina
1. Aspire la alfombra y asegúrese de que no haya
residuos en la superfice.
2. Enchufe el cable eléctrico en un tomacorriente de
la pared conectado a tierra.
NOTA: Desmontar la clavija de conexión a tierra
sobre el cable eléctrico puede ocasionar una fuerte
descarga eléctrica.
3. Encienda la máquina pulsando el interruptor en
el modo de operación normal.
NOTA: La aspiradora y el cepillo están protegidos
por disyuntores ubicados en el panel de control, a
la derecha del interruptor.
NOTA: Si ninguno de los motores responde al
encenderlos, restaure los disyuntores
presionándolos e intente encender la máquina
nuevamente.
NOTA: Si la solución no se esparce en un patrón
parejo a través del ancho de la máquina, es posible
que el pulverizador esté atascado. Incline la
máquina hacia atrás, verifique que no haya
residuos y la superficie de la boquilla esté limpia.
NOTA: No utilice clavijas, cables, etc para limpiar la
boquilla de pulverización ya que los mismos
destruirán el diseño del pulverizador.
4. Para hacer funcionar la máquina, estire derecho
hacia atrás sin empujar la manija para abajo.
Presione el botón de pulverización de la solución
para aplicar la solución de limpieza.
5. Mientras funciona la máquina, controle la
acumulación excesiva de espuma en el depósito
de recogida. Si hay un exceso de espuma,
agregue al depósito de recogida una solución
desespumante o vacíe el depósito.
6. Vacíe el depósito de recogida cuando aproxima-
damente 3/4 de éste se haya llenado. Si el
depósito de recogida se llenó excesivamente, el
agua drenará sobre la alfombra al apagar la aspi-
ración.
7. Ventile el área luego de haber limpiado la
alfombra.
Mantenga a los niños y las mascotas alejadas y no
camine sobre la alfombra hasta que se haya secado.
Se puede utilizar un ventilador Airmover para reducir
el tiempo de secado.
86401460 Operator’s Manual - Mini Carpet Extractor

14
Operaciones
Funcionamiento de la Máquina con
Herramientas Auxiliares
Este extractor se adapta fácilmente al uso con
herramientas auxiliares Windsor: Para mayores
detalles póngase en contacto con el servicio de
atención al cliente.
1. Desconecte la manguera de aspiración que está
en la cubierta, inserte el manguito de la
manguera en la cubierta y asegúrese de que
esté bien ajustado. La cubierta metálica debe
estar fijada al depósito de recogida.
2. Conecte la manguera de la solución desde la
herramienta auxiliar hasta el acoplamiento de
bronce de la solución en la parte posterior de la
máquina.
3. Encienda el interruptor en la posición de auxiliar.
La aplicación de solución de limpieza ahora se
controla mediante la palanca que está en la
herramienta auxiliar.
NOTA: La bomba de la solución no debe funcionar
en seco. El extractor sólo se utiliza para aspiración.
No pulse el botón de pulverización de la solución.
Esta máquina no es adecuada para aspirar
residuos peligrosos.
86401460 Operator’s Manual - Mini Carpet Extractor

15
Mantenimiento
Protección del Congelamiento
Si fuera necesario guardar la máquina bajo
temperaturas inferiores a 40°F, se debe proteger del
congelamiento el sistema de bombeo, las mangueras
y las válvulas con una solución anticongelante para
limpieza de ventanas a base de metil hidrato.
NOTA: No utilice etilenglicol o anticogelantes del
sistema de enfriamiento.
1. Agregue al depósito de abastecimiento un galón
de anticongelante para limpieza de ventanas.
2. Encienda el interruptor de la bomba y pulverice
hasta que la solución anticongelante llene las
líneas de la solución.
3. Vacíe el depósito de abastecimiento de
anticongelante remanente. Siempre deje que la
unidad alcance la temperatura ambiente antes de
llenarla con agua caliente o hacerla funcionar.
4. Antes del funcionamiento asegúrese de enjuagar
completamente el sistema. Si no se hace esto, se
dañará la alfombra luego de acondicionar la
máquina para el invierno.
Mantenimiento Diario Habitual
Antes de realizar algún ajuste o reparación en la
máquina, desconecte el cable de alimentación de
la fuente de energía.
1. Vacíe el depósito para la solución de solución
limpiadora sin usar.
2. Revise y limpie el filtro que está en el puerto de
llenado de solución y el puerto de entrada de
aspiración en la cubierta metálica.
3. Enjuague el sistema de bombeo con 1 ó 2
galones de agua caliente limpia.
4. Verifique que el pulverizador cuenta con el patrón
de pulverización completo.
5. Vacíe el depósito de recogida y enjuague con
agua limpia.
6. Verifique si hay pelusas o residuos alrededor de
la zapata de la aspiradora y el cepillo y
elimínelos.
Mantenimiento Periódico
1. Después de cada 25 horas de funcionamiento,
haga circular una solución de vinagre blanco (UN
cuarto de vinagre en dos galones de agua) o una
solución anti-oscurecimiento (mezclada tal como
se indica) a través del extractor. Esto evitará que
se acumulen residuos alcalinos en el sistema.
2. Si el pulverizador se atasca, verifique que no
haya residuos y limpie la superficie de la boquilla.
NOTA: No utilice clavijas, cables, etc para limpiar la
boquilla de pulverización ya que los mismos
destruirán el diseño del pulverizador.
3. Inspeccione periódicamente todas las
mangueras, cables eléctricos, filtros, juntas y
conexiones de su máquina. Las mangueras
deshilachadas o agrietadas deben repararse o
sustituirse para eliminar las pérdidas de presión
de la aspiración o de la solución.
4. El cable eléctrico debe estar bien aislado, si el
aislamiento del cable está roto o deshilachado
repárelo o sustitúyalo de inmediato. No se
arriesgue a la posibilidad de un incendio o una
descarga eléctrica.
5. El filtro que está en el fondo del depósito de la
solución y en el puerto de llenado debe estar
limpio para que la solución de limpieza fluya
libremente. El filtro de la criba en el puerto de
entrada de aspiración de la cubierta debe estar
libre de acumulación de peluzas para garantizar
una potencia de aspiración total.
6. La junta de la cubierta metálica debe estar
colocada adecuadamente y no tener ningún daño
para crear la hermeticidad necesaria para extraer
el agua.
86401460 Operator’s Manual - Mini Carpet Extractor

16
Mantenimiento
Instrucciones de Mantenimiento
Retire el cable de energía de la fuente eléctrica
antes de realizarle algún ajuste o reparación a la
máquina.
Sólo el personal de mantenimiento calificado
puede realizar reparaciones.
Montaje del Cepillo
1. Apague y desenchufe la máquina.
2. Ubique la máquina de manera de acceder a la
parte inferior. Retire los tornillos (2) en los
costados de la máquina que sostienen el eje de
pivotación de la plataforma de cepillado.
3. Retire el tornillo que ensambla la cubierta de la
correa y retire la cubierta.
4. Afloje las tuercas (2) en el motor de los cepillos y
deslícelo hacia adelante para reducir la tensión
de la correa. Retire la correa.
5. Afloje el tornillo de fijación sobre la polea de las
escobillas. Retire la polea.
6. Retire los tornillos (4) que montan los cojinetes
de los cepillos al marco. Deslice el cojinete fuera
del eje del cepillo.
7. Retire el cepillo levantando el extremo de
accionamiento fuera del marco y deslizando el
otro extremo fuera de los cojinetes montados al
marco.
8. Inspeccione/reemplace el cepillo y los cojinetes
según sea necesario. El cepillo está equipado
con cerdas amarillas que indican el desgaste.
Sustituya el cepillo cuando el desgaste llegue a
la altura de las cerdas amarillas.
9. Para reinstalar el cepillo y los cojinetes haga el
proceso a la inversa. Compruebe la tensión
adecuada de la correa.
Utilice sólo los cepillos provistos con el aparato
o aquellos especificados en el manual de instruc-
ciones. El uso de cualquier otro cepillo puede
dañar la seguridad del aparato.
Pulverizador
NOTA: Para evitar la obstrucción de la boquilla por
la acumulación de álcali, el sistema pulverizador
debe ser lavado con 1 o 2 galones de agua caliente
limpia al final de cada día.
1. Apague y desenchufe la máquina.
2. Ubique la máquina de manera de acceder a la
parte inferior. Retire los tornillos (2) en los
costados de la máquina que sostienen el eje de
pivotación de la plataforma de cepillado.
3. Ubique la máquina de manera de acceder a la
parte inferior.
4. Quite el sujetador que monta el pulverizador al
marco. Saque el pulverizador y la manguera
fuera del orificio de montaje en el bastidor.
5. Afloje la abrazadera de la manguera y saque el
pulverizador fuera de la manguera.
6. Para reinstalar el pulverizador, realice el proceso
inverso. Antes de instalar el sujetador asegúrese
de hacer rotar el pulverizador correctamente. La
lengüeta del sujetador debe estar orientada
hacia atrás de la máquina.
NOTA: En caso de obstrucción, no utilice clavijas o
alambre para despejarla, esto puede dañar el
pulverizador y alterar el patrón de pulverización.
86401460 Operator’s Manual - Mini Carpet Extractor

17
Mantenimiento
Extracción del Motor de los Cepillos
1. Apague y desenchufe la máquina.
2. Ponga la máquina en la posición vertical. Saque
los tornillos (2) en la cubierta de metal posterior.
Gire la cubierta hacia abajo y deslícela hacia
atrás soltando la lengüeta debajo de la máquina
desde el bastidor principal.
3. Retire la cubierta de la caja de la bomba. Retire
los tornillos (4) en cada pata de la cubierta.
4. Para retirar el motor de los cepillos, ubique la
máquina de manera de poder acceder a la parte
inferior. Retire los tornillos (2) en los costados de
la máquina que sostienen el eje de pivotación de
la plataforma de cepillado.
5. Retire el tornillo que ensambla la cubierta de la
correa y retire la cubierta.
6. Retire las tuercas y arandelas (2) en el motor de
los cepillos y deslice el motor hacia adelante para
reducir la tensión de la correa. Retire la correa.
7. Retire la polea aflojando el tornillo de sujeción y
saque el eje.
8. Desenchufe los cables del motor de los cepillos
del rectificador ubicado en el cuerpo de montaje
de la bomba. Retire, también, la argolla
conectada a tierra de la clavija en el bastidor
principal extrayendo la tuerca que está en la
clavija.
9. Para reinstalar el motor, realice el proceso
inverso. Alinee la polea del motor con la polea
del cepillo. Compruebe la tensión adecuada de la
correa.
Remoción de la Bomba
1. Apague y desenchufe la máquina.
2. Ponga la máquina en la posición vertical. Saque
los tornillos (2) en la cubierta de metal posterior.
Gire la cubierta hacia abajo y deslícela hacia
atrás soltando la lengüeta debajo de la máquina
desde el bastidor principal.
3. Retire la cubierta de la caja de la bomba. Retire
los tornillos (4) en cada pata de la cubierta.
4. Para retirar la bomba, afloje la abrazadera de la
manguera y retire la manguera de ambos
extremos de la bomba.
5. Saque los tornillos y arandelas (4) que montan el
cuerpo de la bomba.
6. Desatornille los adaptadores de manguera de
cada extremo de la bomba.
7. Flexione el alojamiento de montaje de la bomba
para sacar esta última.
8. Retire el tornillo que sujeta el cable de conexión
a tierra a la bomba. Retire los otros dos
conectores de cable sujetos a la bomba.
9. Para reinstalar, haga el proceso inverso.
86401460 Operator’s Manual - Mini Carpet Extractor

18
Maintenance
Extracción del Motor de Aspiración
1. Apague y desenchufe la máquina.
2. Ponga la máquina en la posición vertical. Saque
los tornillos (2) en la cubierta posterior de metal.
Haga girar la cubierta hacia abajo y deslícela
hacia atrás soltando la lengüeta debajo de la
máquina desde el bastidor principal.
3. Retire la cubierta de la caja de la bomba. Retire
los tornillos (4) en cada pata de la cubierta.
4. Retire la manguera de aspiración, afloje la
abrazadera de la manguera y saque la
manguera del fondo del motor de aspiración.
5. Desenchufe los cables (2) del armazón principal
ubicado en el alojamiento de montaje de la
bomba. Retire la conexión a tierra de la clavija
en el bastidor principal.
6. Para retirar el motor de aspiración, retire los
tornillos (2) en la parte posterior de la máquina
que sujetan la cubierta plástica al depósito de la
solución.
7. Retire los tornillos (3) que sujetan el motor de
aspiración a la cubierta plástica. Saque la
cubierta del motor de aspiración.
8. Desatornille el cable conectado a tierra del motor
de aspiración.
9. Para reinstalar el motor de aspiración, realice el
proceso inverso.
NOTA: Asegúrese de que las longitudes de cable
excedentes no queden atrapadas entre el motor de
aspiración y la cubierta plástica.
NOTA: El motor de aspiración está protegido por
un disyuntor ubicado en el panel del interruptor. El
disyuntor sólo se disparará bajo condiciones de
abuso.
86401460 Operator’s Manual - Mini Carpet Extractor
3
8
[9.5mm]
Motor de vacío Escobillas de carbón
Escobillas de carbón
Tapa
Si el conmutador del rotor no es concéntrico, o está
muy picado o estriado, el motor debe sustituirse o ser
enviado a un servicio técnico autorizado..
Importante:
Las escobillas se desgastan más deprisa cuando se
reduce su longitud, por aumento del calor El muelle
dentro del alojamiento de las escobillas puede dañar
el motor si éstas se desgastan por completo.
Compruebe la longitud de las escobillas de carbón
periódicamente Sustitúyalas cuando la longitud de
alguna de ellas sea menor de 9.5 mm (3/8").

19
Maintenance
Resolución de Problemas
PROBLEMA CAUSA SOLUCIÓN
No hay energía, nada
funciona
¿El cable está enchufado? Enchufe el cable.
Se dispara el disyuntor del edificio. Restaure el disyuntor.
Interruptor defectuoso. Llame al servicio de asistencia técnica.
Cable de alimentación o cable flexible de
conexión defectuoso.
Llame al servicio de asistencia técnica.
El motor de aspiración no
funciona
Disyuntor de aspiración disparado. Restaure el disyuntor.
Interruptor principal defectuoso. Llame al servicio de asistencia técnica.
Cables sueltos. Llame al servicio de asistencia técnica.
Motor de aspiración defectuoso. Llame al servicio de asistencia técnica.
El motor de aspiración
funciona pero la
aspiración es deficiente.
Hay residuos alojados en la zapata de la
aspiradora.
Retire los residuos de la zapata de la
aspiradora.
La junta de la cubierta está defectuosa o
falta.
Reemplácela si es necesario.
La manguera de aspiración está agrietada
o el manguito de la manguera está flojo.
Reemplácela o repárela según sea
necesario.
Depósito de recogida lleno.
Apague el motor de aspiración. Vacíe y
aclare el depósito de recogida.
Poco o ningún flujo de
agua.
(la alfombra es veteada)
Cambiar al modo de auxiliar. Girar a la posición de limpieza profunda.
Boquillas obstruidas o faltantes. Boquillas obstruidas o faltantes.
Filtro de la solución obstruido.
Drene el depósito para la solución y
limpie el filtro de la solución.
Bomba de solución defectuosa. Llame al servicio de asistencia técnica.
El cepillo no gira.
Cambiar al modo auxiliar. Girar a la posición de limpieza profunda.
Disyuntor del cepillo disparado. Restaure disyuntor.
Correa del cepillo rota. Reemplácela si es necesario.
Motor de cepillo defectuoso. Llame al servicio de asistencia técnica.
Acoplamiento de
herramienta auxiliar difícil
de conectar
Corrosión en el acoplamiento.
Limpie con lana de acero. Retire y
humedezca en ácido acético (vinagre
blanco). Lubrique ligeramente con
lubricante a base de silicona.
86401460 Operator’s Manual - Mini Carpet Extractor

20
Mantenimiento
Resolución de Problemas
Problema Causa Solución
Cojinetes de cepillo
desgastados
Sonidos de chirridos o
rechinamiento en el
alojamiento del cepillo.
Reemplace los cojinetes.
La alfombra no queda
limpia
Suelo muy sucio.
Efectue varias pasadas en los ángulos rectos
entre sí. Utilice un prepulverizador.
La alfombra está
demasiado húmeda.
El pulverizador está
desgastado.
Reemplace el pulverizador que produce una
niebla fina.
La alfombra no se
puede humedecer
Rejilla del filtro de solución
obstruida.
Limpie la rejilla del filtro de solución ubicada
dentro del depósito inferior.
Pulverizador atascado.
Limpie o sustituya el pulverizador. No use un
alambre para limpiarlo. El pulverizador dañado
causará una sobresaturación.
La bomba no funciona.
Verifique y corrija cualquier cable suelto. Repárelo
o reemplácelo.
Interruptor de solución
defectuoso.
Reemplace el interruptor en la manija.
86401460 Operator’s Manual - Mini Carpet Extractor

21
Suggested Spare Parts
98481760 CARBON BRUSH SET
VACUUM
86216040 BRUSH,
CHEVRON, 10 IN
86215260 BELT
86219580 JET
86224960 STRAINER
86401460 Operator’s Manual - Mini Carpet Extractor


86401470-B 11/29/17
Spare Parts List
1.008-039.0 MPRO
Mini Carpet Extractor
From Serial Number (Ref No1*)
*See Serial Number Page
or call manufacturer

Table of contents
Valid on 26.09.2018 Page 1 / 25
MINI PRO 120V 60HZ (1.008-039.0) 2
9040 BRUSH DECK 3
9050 CONTROL PANEL 5
9060 DECAL 7
9070 FRAME & WHEELS 9
9080 HANDLE 11
9090 SOLUTION 1 14
9100 SOLUTION 2 16
9110 TANK & DOME 18
9120 VACUUM 20
9130 WIRING DIAGRAM - CONTROL PANEL 115V 22
9140 WIRING D-VACUUM,BRUSH, MOTOR & PUMP 115V 24

MINI PRO 120V 60HZ (1.008-039.0)
Valid on 26.09.2018 Page 2 / 25
POS Description Quantity Unit
9040 BRUSH DECK 1.000 ST
9050 CONTROL PANEL 1.000 ST
9060 DECAL 1.000 ST
9070 FRAME & WHEELS 1.000 ST
9080 HANDLE 1.000 ST
9090 SOLUTION 1 1.000 ST
9100 SOLUTION 2 1.000 ST
9110 TANK & DOME 1.000 ST
9120 VACUUM 1.000 ST
9130 WIRING DIAGRAM - CONTROL PANEL 115V 1.000 ST
9140 WIRING D-VACUUM,BRUSH, MOTOR & PUMP 115V 1.000 ST

9040 BRUSH DECK
Valid on 26.09.2018 Page 3 / 25

9040 BRUSH DECK
Valid on 26.09.2018 Page 4 / 25
POS Article no. Description Quantity Unit
1 8.617-302.0 SCREW, M5 X 10 PNHMS SS ISO7045 5.000 ST
2 8.621-739.0 COVER, BELT GUARD 1.000 ST
3 8.621-526.0 BELT, HTD 5MM 69T 9 WIDE 1.000 ST
4 8.622-378.0 Threaded pin M4X8 2.000 ST
5 8.622-330.0 PULLEY, BRUSH 1.000 ST
6 8.621-497.0 AXLE, PIVOT, BRUSH DECK 1.000 ST
7 8.622-902.0 BEARING, BRUSH 2.000 ST
8 8.600-564.0 NUT, 10-32 HEX NYLOCK STL GR2 ZNPLT 2.000 ST
9 8.617-333.0 WASHER, M5 SS ISO7093 2.000 ST
10 8.624-711.0 MOTOR, 115V BRUSH DRIVE 1.000 ST
11 8.621-792.0 FRAME, BRUSH DRIVE MINIPRO 1.000 ST
12 8.622-349.0 RING, 10MM EXT SNAP, DIN 471 2.000 ST
13 8.621-643.0 BUSHING, BRUSH PRESSURE 2.000 ST
14 8.621-604.0 BRUSH, CHEVRON, 10 IN 1.000 ST
15 8.617-322.0 SCREW, M6-1 X 12 FLGBTNHMS SS 2.000 ST
16 8.622-335.0 PULLEY, MOTOR 1.000 ST
17 8.601-068.0 WASHER, 3/8 NYL 1.000 ST

9050 CONTROL PANEL
Valid on 26.09.2018 Page 5 / 25

9050 CONTROL PANEL
Valid on 26.09.2018 Page 6 / 25
POS Article no. Description Quantity Unit
1 8.600-720.0 Switch DPDT3-POSITION ROCKER 1.000 ST
2 8.600-201.0 BOOT, 3/8 CIRCUIT BREAKER 2.000 ST
3 8.617-314.0 SCREW, KA40 X 10 OVHCS STL WIN1412 ZNPLT 2.000 ST
4 8.621-741.0 COVER, CONTROLS TOP 1.000 ST
5 8.623-014.0 8.623-014.0 BREAKER, 1.5A CIRCUIT 1.000 ST
6 8.629-146.0 BREAKER, 11A VDE CIRCUIT 1.000 ST
7 8.629-230.0 SCREW, M4-.7 X 20 SLTDBTNHCS BLKOX 2.000 ST
8 8.617-335.0 WASHER, M5 FLT SS ISO7089 2.000 ST
9 8.621-630.0 BUMPER, CONSOLE 2.000 ST

9060 DECAL
Valid on 26.09.2018 Page 7 / 25

9060 DECAL
Valid on 26.09.2018 Page 8 / 25
POS Article no. Description Quantity Unit
1 8.634-713.0 LABEL, CTRL PNL, BRC 30/15 C 1.000 ST
2 8.639-586.0 LABEL, DOME ACCESSORY 1.000 ST
3 8.601-372.0 LABEL, MINIPRO INSTRUCTION 1.000 ST
4 8.639-540.0 LABEL, WINDSOR LOGO DOMED 1.000 ST
5 8.640-143.0 LABEL, MINI PRO SIDE 2.000 ST

9070 FRAME & WHEELS
Valid on 26.09.2018 Page 9 / 25

9070 FRAME & WHEELS
Valid on 26.09.2018 Page 10 / 25
POS Article no. Description Quantity Unit
1 8.621-583.0 BRKT, BRUSH HOUSING, 10 IN 1.000 ST
2 8.617-301.0 SCREW, M4 X 16 SCHCS SS ISO4762 6.000 ST
3 8.621-629.0 BUMPER, MINIPRO 1.000 ST
4 8.621-809.0 GASKET, VAC SHOE MINIPRO 1.000 ST
5 8.622-553.0 VAC SHOE, 12" 1.000 ST
6 8.617-263.0 NUT, M4X.7 LK ISO7040 SS 6.000 ST
7 8.617-322.0 SCREW, M6-1 X 12 FLGBTNHMS SS 6.000 ST
8 8.622-605.0 WHEEL, 9.75" X 1.5" 2.000 ST
9 8.601-188.0 WASHER, 16.2 X 23 X .6 STL ZNPLT 2.000 ST
10 8.621-498.0 AXLE, 5/8 WHEEL MINI PRO 1.000 ST
11 8.627-275.0 RING, 5/8 EXTERNAL SNAP 2.000 ST
12 8.630-007.0 HUBCAP, 9.75" WHEEL, BLACK 2.000 ST
13 8.629-113.0 BUMPER, BRUSH DECK 1.000 ST

9080 HANDLE
Valid on 26.09.2018 Page 11 / 25

9080 HANDLE
Valid on 26.09.2018 Page 12 / 25
POS Article no. Description Quantity Unit
1 8.617-314.0 SCREW, KA40 X 10 OVHCS STL WIN1412 ZNPLT 4.000 ST
2 8.629-715.0 HANDLE, GRIP, TOP 1.000 ST
3 8.629-879.0 WELMENT, HANDLE TUBE 1.000 ST
4 8.629-716.0 HANDLE, GRIP, BOTTOM 1.000 ST
5 8.622-514.0 SWITCH, MICRO TONELUCK 1.000 ST
6 8.622-465.0 SPRING, BUTTON 1.000 ST
7 8.621-647.0 BUTTON, SPRAY HANDLE 1.000 ST
8 8.621-946.0 HUB, HANDLE SPLINE 1.000 ST
9 8.629-662.0 WASHER, .M19.8 X 25 X .2 STL ZNPLT 1.000 ST
10 8.629-255.0 BUSHING, HANDLE LOCK 1.000 ST
11 8.629-661.0 LEVER, CAM HANDLE 1.000 ST
12 8.634-714.0 COVER, HANDLE HUB, LEFT, YLW 1.000 ST
13 8.627-760.0 SCREW, M4 X 20 PHMS SS ISO7045 3.000 ST
14 8.629-256.0 SHAFT, HANDLE LOCK 1.000 ST
15 8.626-663.0 WIRE, 5" ORG/14 3/8ST X 3/8ST 1.000 ST
16 8.626-608.0 TERM, 18G .25 FEMALE COUPLER 1.000 ST
17 8.622-234.0 NUT, M12 LK SS ISO7040 1.000 ST
18 8.625-943.0 WASHER, M12 FLT 1.000 ST
19 8.617-322.0 SCREW, M6-1 X 12 FLGBTNHMS SS 4.000 ST
20 8.622-493.0 STRAIN RELIEF, 14/3 STRAIGHT 1.000 ST
21 8.622-446.0 SPACER, HANDLE BUSHING 1.000 ST
22 8.622-414.0 SHAFT, HANDLE 1.000 ST
23 8.621-738.0 COVER, TUBE HUB RIGHT 1.000 ST
24 8.601-064.0 Washer #10 LOCK EXT STAR SS 2.000 ST
25 8.627-080.0 NUT, 10-32 HEX SS 1.000 ST
26 8.621-735.0 COVER, CONTROLS BOTTOM 1.000 ST
27 8.617-287.0 SCREW, M4 X 14 PHMS SS ISO7045 4.000 ST
28 8.621-552.0 BRACKET, HANDLE AXLE 1.000 ST
29 8.623-317.0 Clamp 3/8 NYLON UL/CSA 1.000 ST
30 8.621-714.0 CORD ASM, 14X3 SJTX25' MPRO 1.000 ST
31 8.617-303.0 SCREW, M4 X 6 PNHMS ISO7045 ZNPLT 3.000 ST
32 8.600-564.0 NUT, 10-32 HEX NYLOCK STL GR2 ZNPLT 1.000 ST
33 8.621-823.0 GASKET, CONTROL BOX RIGHT 1.000 ST

9080 HANDLE
Valid on 26.09.2018 Page 13 / 25
POS Article no. Description Quantity Unit
34 8.621-822.0 GASKET, CONTROL BOX LEFT 1.000 ST
35 8.601-373.0 SHIELD, MICROSWITCH 1.000 ST
36 8.617-332.0 WASHER, M4 FLT SS DIN125 3.000 ST
37 8.600-677.0 SCREW, 10-32 X .25 PHPNHTF STL ZNPLT 2.000 ST
38 8.628-868.0 WASHER, M5 RIVET BACKUP 4.000 ST

9090 SOLUTION 1
Valid on 26.09.2018 Page 14 / 25

9090 SOLUTION 1
Valid on 26.09.2018 Page 15 / 25
POS Article no. Description Quantity Unit
1 8.620-111.0 PUMP, 110/120 60HZ FLOJET 2.000 ST
2 8.624-052.0 HOSEBARB, 1/8MPT X 1/4 90D 4.000 ST
3 8.601-064.0 Washer #10 LOCK EXT STAR SS 2.000 ST
4 8.600-677.0 SCREW, 10-32 X .25 PHPNHTF STL ZNPLT 2.000 ST
5 8.621-545.0 BOX, PUMP MOUNT 1.000 ST
6 8.630-475.0 SHIELD, PUMP ENCLOSURE 1.000 ST

9100 SOLUTION 2
Valid on 26.09.2018 Page 16 / 25

9100 SOLUTION 2
Valid on 26.09.2018 Page 17 / 25
POS Article no. Description Quantity Unit
1 8.621-958.0 JET, RT ANG, 1/4 BARB 1.000 ST
2 8.621-681.0 Clamp shaft 9-12MM 1.000 ST
3 8.621-920.0 HOSEBARB, 3/8MPT,2X 1/4,1X 3/8 1.000 ST
4 8.617-295.0 SCREW, M5-.8 X 12 SHCS SS DIN912 4.000 ST
5 8.623-315.0 CLAMP, 3/8 HOSE (D-SLOT) 3.000 ST
6 8.621-909.0 HOSE, 3/8"ID X 432MM CLEAR 1.000 ST
7 8.620-082.0 Nipple 1/8 1.000 ST
8 8.621-907.0 HOSE, ASM, 6MM X 610MM NYBRAID 1.000 ST
9 8.637-773.0 HOSE, 6MM X 190MM NYLOBRAID 1.000 ST
10 8.623-309.0 CLAMP, 1/4 ID HOSE 6.000 ST
11 8.628-933.0 HOSEBARB, TEE 3/8X3/8X1/4 1.000 ST
12 8.621-905.0 HOSE, 6MM X 390MM NYLOBRAID 1.000 ST
13 8.624-043.0 HOSEBARB, 3/8 MPT X 3/8 NYLON 1.000 ST
14 8.601-268.0 HOSE, 3/8ID X 60MM NYLOBRD 1.000 ST
15 8.600-564.0 NUT, 10-32 HEX NYLOCK STL GR2 ZNPLT 1.000 ST
16 8.601-064.0 Washer #10 LOCK EXT STAR SS 1.000 ST
17 8.621-906.0 HOSE, 6MM X 420MM NYLOBRAID 1.000 ST
18 8.629-167.0 COVER, PUMP BOX 1.000 ST
19 8.637-774.0 HOSE, 6MM X 40MM NYLOBRAID 1.000 ST
20 8.634-941.0 CHECK VALVE, MINI 1.000 ST

9110 TANK & DOME
Valid on 26.09.2018 Page 18 / 25

9110 TANK & DOME
Valid on 26.09.2018 Page 19 / 25
POS Article no. Description Quantity Unit
1 8.634-711.0 TANK, SOL, GRY BRC 30/15 C 1.000 ST
2 8.600-239.0 Clamp 1.75" WORM GEAR X .312 2.000 ST
3 8.601-191.0 HOSE ASM, 1.5X34" VAC W/ELBOW 2.000 ST
4 8.629-123.0 GASKET, DOME, MINI PRO 1.000 ST
5 8.621-770.0 DOME, MINIPRO 2 HOSE 1.000 ST
6 8.629-117.0 DOME, PLATE INTERIOR 1.000 ST
7 8.629-119.0 SCREEN, VACUUM INTAKE 1.000 ST
8 8.600-797.0 Strainer 3/8 IN. NPT 60 MESH 1.000 ST
9 8.617-294.0 SCREW, KA40 X 10 PHOVHCS 6.000 ST
10 8.622-496.0 STRAINER, RECT, 80 MESH SS 1.000 ST
11 8.617-299.0 SCREW, M6 X 12 BTNHCS SS ISO7380 4.000 ST
12 8.621-853.0 HANDLE, RECOVERY TANK 1.000 ST
13 8.630-860.0 ASM, BRC 30/15 RECOVERY TANK 1.000 ST
14 8.621-677.0 CLAMP, DOME 1.000 ST
15 8.621-597.0 BRKT, DOME CLAMP 2.000 ST
16 8.617-335.0 WASHER, M5 FLT SS ISO7089 4.000 ST
17 8.629-118.0 DUCT, VACUUM INTAKE 1.000 ST
18 8.629-121.0 O-RING, 26MM ID X 2MM THICK 1.000 ST
19 8.617-300.0 SCREW, KA40 X 20 OVHCS WN1413 SS 2.000 ST
20 8.629-122.0 SCREW, KA40 X 16 FLT SS WN1413 2.000 ST
21 8.629-245.0 GASKET, DUCT 1.000 ST

9120 VACUUM
Valid on 26.09.2018 Page 20 / 25

9120 VACUUM
Valid on 26.09.2018 Page 21 / 25
POS Article no. Description Quantity Unit Remark
1 8.617-300.0 SCREW, KA40 X 20 OVHCS WN1413 SS 3.000 ST
2 8.622-548.0 VAC MOTOR, 120V 5.7 3ST W/TUBE 1.000 ST 115V ONLY
3 8.617-322.0 SCREW, M6-1 X 12 FLGBTNHMS SS 4.000 ST
4 8.621-742.0 COVER, VAC MOTOR 1.000 ST
5 8.621-737.0 COVER, SHEET METAL 1.000 ST
6 8.600-677.0 SCREW, 10-32 X .25 PHPNHTF STL ZNPLT 1.000 ST
7 8.601-064.0 Washer #10 LOCK EXT STAR SS 1.000 ST
8 8.629-168.0 GASKET, VAC MOTOR 1.000 ST

9130 WIRING DIAGRAM - CONTROL PANEL 115V
Valid on 26.09.2018 Page 22 / 25

9130 WIRING DIAGRAM - CONTROL PANEL 115V
Valid on 26.09.2018 Page 23 / 25
POS Article no. Description Quantity Unit
1 8.621-884.0 HARNESS, MAIN MPRO 1.000 ST
2 8.622-623.0 WIRE ASM, CNTRL PANEL JUMPER 1.000 ST
3 8.621-883.0 HARNESS, HANDLE MPRO 1.000 ST
4 8.622-625.0 WIRE, 14" BLACK/14 76010 1.000 ST

9140 WIRING D-VACUUM,BRUSH, MOTOR & PUMP 115V
Valid on 26.09.2018 Page 24 / 25

9140 WIRING D-VACUUM,BRUSH, MOTOR & PUMP 115V
Valid on 26.09.2018 Page 25 / 25
POS Article no. Description Quantity Unit
1 8.622-625.0 WIRE, 14" BLACK/14 76010 3.000 ST
2 8.622-346.0 RECTIFIER BRIGDE 50A 1000V 1.000 ST
3 8.630-367.0 WIRE ASM, 18GA GRN 76008/76040 1.000 ST
4 8.630-368.0 WIRE ASM, 18GA GRN 76008/76042 1.000 ST
Powered by TCPDF (www.tcpdf.org)
-
 1
1
-
 2
2
-
 3
3
-
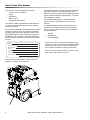 4
4
-
 5
5
-
 6
6
-
 7
7
-
 8
8
-
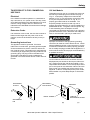 9
9
-
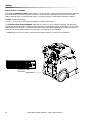 10
10
-
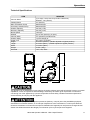 11
11
-
 12
12
-
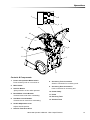 13
13
-
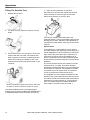 14
14
-
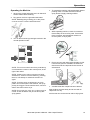 15
15
-
 16
16
-
 17
17
-
 18
18
-
 19
19
-
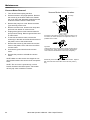 20
20
-
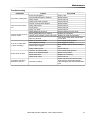 21
21
-
 22
22
-
 23
23
-
 24
24
-
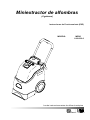 25
25
-
 26
26
-
 27
27
-
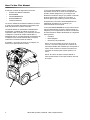 28
28
-
 29
29
-
 30
30
-
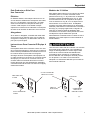 31
31
-
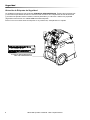 32
32
-
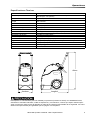 33
33
-
 34
34
-
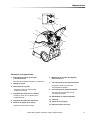 35
35
-
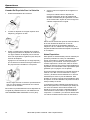 36
36
-
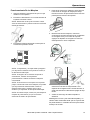 37
37
-
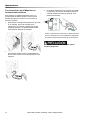 38
38
-
 39
39
-
 40
40
-
 41
41
-
 42
42
-
 43
43
-
 44
44
-
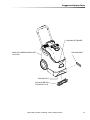 45
45
-
 46
46
-
 47
47
-
 48
48
-
 49
49
-
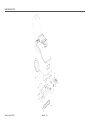 50
50
-
 51
51
-
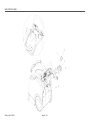 52
52
-
 53
53
-
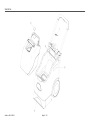 54
54
-
 55
55
-
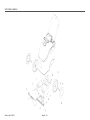 56
56
-
 57
57
-
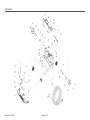 58
58
-
 59
59
-
 60
60
-
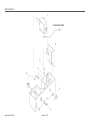 61
61
-
 62
62
-
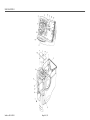 63
63
-
 64
64
-
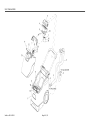 65
65
-
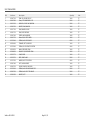 66
66
-
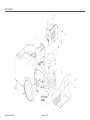 67
67
-
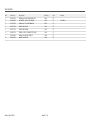 68
68
-
 69
69
-
 70
70
-
 71
71
-
 72
72


Windsor MINI PRO El manual del propietario
- Categoría
- Depurador
- Tipo
- El manual del propietario
en otros idiomas
- français: Windsor MINI PRO Le manuel du propriétaire
- English: Windsor MINI PRO Owner's manual
Artículos relacionados
Otros documentos
-
Clarke Image 20 IX Manual de usuario
-
Alto IMAGE 16 120V Manual de usuario
-
-
-
Alto Bext 300HV Manual de usuario
-
Alto Bext 300HV Manual de usuario
-
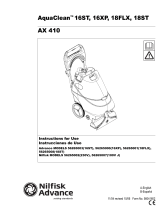 Nilfisk-Advance America ax 410 Manual de usuario
-
Nobles EX-SC-716 Instrucciones de operación
-
Viper CEX410-US El manual del propietario
-
