Bresser National Geographic FERNGLAS Binoculars Manual de usuario
- Tipo
- Manual de usuario

FERNGLAS
BINOCULARS
Bedienungsanleitung
Operating Instructions
Mode d’emploi
Handleiding
Istruzioni per l’uso
Instrucciones de uso
Instrukcja obsługi
Руководство по эксплуатации
DE
EN
FR
NL
ES
IT
PL
RU
https://tm.by
Интернет-магазин TM.by

22
OB
✔
✘
O1)
OD
OH
OG
OIOI
OFOF
OEOE
OC
ab
O
H
https://tm.by
Интернет-магазин TM.by

DEDE
33
Allgemeine Warnhinweise
ERBLINDUNGSGEFAHR!
Schauen Sie mit diesem Gerät
niemals direkt in die Sonne oder
in die Nähe der Sonne. Es besteht
ERBLINDUNGSGEFAHR!
• Setzen Sie das Gerät – speziell die Linsen
– keiner direkten Sonneneinstrahlung aus!
Durch die Lichtbündelung könnten Brände
verursacht werden.
• Bauen Sie das Gerät nicht auseinander!
Wenden Sie sich im Falle eines Defekts an
Ihren Fachhändler. Er nimmt mit dem Service-
Center Kontakt auf und kann das Gerät ggf.
zwecks Reparatur einschicken.
• Setzen Sie das Gerät keinen hohen Tempera-
turen aus.
SCHUTZ der Privatsphäre!
Das Fernglas ist für den Privatgebrauch
gedacht. Achten Sie die Privatsphäre
Ihrer Mitmenschen – schauen Sie mit
diesem Gerät zum Beispiel nicht in Woh-
nungen!
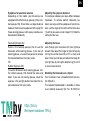
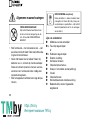
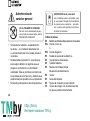
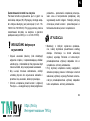
Teileverzeichnis
BFernglas-Mittelachse
C a Twist-Up-Augenmuscheln
oder
C b Gummiaugenmuscheln
DDioptrieneinstellung
EFernglaskörper
FObjektivtubus
GMitteltrieb (Scharfeinstellung)
HOkular
IObjektivlinse
JStativanschlussgewinde
1) Bildkreis, bei korrekt eingestelltem
Augenabstand
https://tm.by
Интернет-магазин TM.by

4
Brillenträger-Okular
Abhängig vom jeweiligen Modell ist Ihr Fernglas
entweder mit Twist-Up-Augenmuscheln (2a) oder
Gummiaugenmuscheln (2b) ausgestattet. Da bei
Brillenträgern grundsätzlich ein größerer Abstand
zwischen dem Okular des Fernglases und der Pu-
pille gegeben ist, können beide Augenmuschel-
Typen individuell eingestellt werden.
Twist-Up-Augenmuscheln (2a)
Wenn Sie mit einer Brille durch das Fernglas
schauen, drehen Sie die Twist-Up-Augenmu-
scheln ein (2a). Tragen Sie hingegen keine Brille,
drehen Sie die Augenmuscheln heraus, um den
notwendigen Pupillenabstand zu erreichen.
ODER
Gummiaugenmuscheln (2b)
Wenn Sie mit einer Brille durch das Fernglas
schauen, stülpen Sie die Gummiaugenmuscheln
(2b) seitlich nach unten um. Tragen Sie hingegen
keine Brille, belassen Sie die Augenmuscheln in
der aufrechten Position, um den notwendigen Pu-
pillenabstand zu erreichen.
Einstellen des Augenabstandes
Der Abstand der Augen ist von Person zu Person
verschieden. Um ein perfektes Zusammenspiel
zwischen Ihren Augen und dem Okular des Fern-
glases zu erreichen, sollten Sie das Fernglas so
um die Mittelachse einknicken (1), dass Sie beim
Durchblicken einen Bildkreis sehen (10). Bitte
merken Sie sich die Einstellung für die spätere
Benutzung.
Scharfeinstellung
Blicken Sie durch das Fernglas und schließen
Sie das rechte Auge. Stellen Sie nun das Bild für
das linke Auge durch drehen des Mitteltriebs (6)
scharf. Schließen Sie nun das linke Auge, und
stellen Sie das Bild für das rechte Auge durch
drehen am Dioptriering (3) scharf.
https://tm.by
Интернет-магазин TM.by

5
DE
Fernglas auf ein Stativ montieren
Ihr Fernglas ist mit einem Stativanschlussgewin-
de (9) ausgestattet. Der dazu erforderliche Sta-
tivadapter ist als optionales Zubehör im Handel
erhältlich (Art.-Nr. 19-16000 oder 19-16500).
Damit läßt sich Ihr Fernglas auf ein Stativ mit
DIN-Anschlussgewinde (z.B. Art.-Nr. 49-22100)
montieren.
HINWEISE zur Reinigung
• Reinigen Sie die Linsen (Okulare und/oder
Objektive) nur mit einem weichen und fussel-
freien Tuch (z. B. Microfaser). Das Tuch nicht
zu stark aufdrücken, um ein Verkratzen der Lin-
sen zu vermeiden.
• Zur Entfernung stärkerer Schmutzreste be-
feuchten Sie das Putztuch mit einer Brillen-
Reinigungsflüssigkeit und wischen damit die
Linsen mit wenig Druck ab.
• Schützen Sie das Gerät vor Staub und Feuch-
tigkeit! Lassen Sie es nach der Benutzung –
speziell bei hoher Luftfeuchtigkeit – bei Zim-
mertemperatur einige Zeit akklimatisieren, so
dass die Restfeuchtigkeit abgebaut werden
kann. Setzen Sie die Staubschutzkappen auf
und bewahren Sie es in der mitgelieferten Ta-
sche auf.
ENTSORGUNG
• Entsorgen Sie die Verpackungsmaterialien sor-
tenrein. Informationen zur ordnungsgemäßen
Entsorgung erhalten Sie beim kommunalen
Entsorgungsdienstleister oder Umweltamt.
• Beachten Sie bei der Entsorgung des Geräts
die aktuellen gesetzlichen Bestimmungen!
Informationen zur fachgerechten Entsorgung
erhalten Sie bei den kommunalen Entsor-
gungsdienstleistern oder dem Umweltamt.
https://tm.by
Интернет-магазин TM.by

6
Garantie und Garantiezeit-
verlängerung
Die Garantiezeit beträgt 2 Jahre und beginnt
am Tag des Kaufs. Bitte bewahren Sie die
Rechnung auf. Sie können die Garantiezeit
auf 5 Jahre verlängern, wenn Sie sich auf
www.bresser.de/garantie registrieren und den
kurzen Fragebogen ausfüllen. Zur Inanspruch-
nahme der 5-Jahre-Garantie müssen Sie die Re-
gistrierung innerhalb von 3 Monaten nach dem
Kauf (es gilt das Datum des Kaufbelegs) durch-
führen. Danach erlischt der Anspruch auf die ver-
längerte Garantie. Sollten Sie Probleme mit Ihrem
Gerät haben, wenden Sie sich bitte an unseren
Service. Bitte senden Sie uns keine Artikel ohne
vorherige telefonische Rücksprache.
Viele Probleme lassen sich bereits am Telefon
erledigen; falls nicht, kümmern wir uns um den
Transport. Sollte das Problem nach Ablauf der
Garantie auftreten, oder nicht von der Garantie
gedeckt sein, so erhalten Sie von uns kostenfrei
einen Kostenvoranschlag über die Reparaturkos-
ten.
Service Hotline: +49 (0) 2872 - 80 74-210
https://tm.by
Интернет-магазин TM.by

7
DE
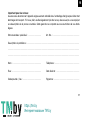
Wichtig bei Rücksendungen:
Um Transportschäden zu vermeiden achten Sie bitte darauf, dass das Gerät sorgfältig verpackt in der
Original-Verpackung zurückgegeben wird. Bitte den Kassenbon (oder eine Kopie) sowie die Fehler-
beschreibung beifügen. Ihre gesetzlichen Rechte werden durch diese Garantie nicht eingeschränkt.
Ihr Fachhändler: ......................................... Art. Nr.:.....................................................
Fehlerbeschreibung: ............................................................................................................
.........................................................................................................................................
.........................................................................................................................................
Name: ......................................................
Straße:......................................................
PLZ/Ort: ...................................................
Telefon:.....................................................
Kaufdatum:................................................
Unterschrift:...............................................
https://tm.by
Интернет-магазин TM.by

8
General Warning
Risk of blindness
Never use this device to look directly
at the sun or in the direct proximity
of the sun. This will result in a risk of
blindness.
• Do not place the device, particularly the
lenses, in direct sunlight.
The concentration of light could cause a fire.
• Do not disassemble the device. In the event
of a defect, please contact your dealer.
The dealer will contact the Service Centre
and can send the device in to be repaired, if
necessary.
• Do not expose the device to high tempera-
tures.
Privacy PROTECTION!
The binoculars are intended only for
private use. Please heed the privacy of
other people. Do not use them to look
into apartments, for example.
List of Parts
BCentre axle
C a Twist-up eyecups
or
C b Rubber eyecups
DDioptre adjustment
EBody of the binoculars
FLens tube
GCentral focussing wheel
HEyepiece
IObjective lens
JThreaded tripod connection
1) Image circle with correctly set eye distance
https://tm.by
Интернет-магазин TM.by

9
EN
Eyepieces for spectacle wearers
Depending on the model, your binoculars are
equipped with either twist-up eyecups (2a) or rub-
ber eyecups (2b). Since there is a larger distance
between the binocular eyepiece and the pupil for
those wearing glasses, both eyecup varieties can
be adjusted individually.
Twist-up Eyecups (2a)
Screw in the twist-up eyecups (2a) to use the
binoculars while wearing glasses. If you are not
wearing glasses, unscrew the eyecups to achieve
the required distance from your pupils.
OR
Rubber Eyecups (2b)
To use the binoculars while wearing glasses, turn
the rubber eyecups (2b) toward the sides and
down. If you are not wearing glasses, leave the
eyecups in the upright position to achieve the re-
quired distance from your pupils.
Adjusting the eyepiece distance
The distance between your eyes differs between
individuals. To achieve perfect interaction be-
tween your eyes and the eyepieces of your binoc-
ulars, set the angle at the centre of the binoculars
(1) so that you see a circular image (10). Note this
setting for later use.
Adjusting the focus
Look through your binoculars with your right eye
closed. Now adjust the image for your left eye by
turning the centre wheel (6) until it is sharp and
clear. Close your left eye and adjust the image for
your right eye by turning the dioptre ring (3) until it
is also sharp and clear.
Mounting the binoculars on a tripod
Your binoculars have a threaded tripod connec-
tion (9) built in.
The required tripod adapter is available in stores
as an optional accessory (Art. No. 19-16000 or
https://tm.by
Интернет-магазин TM.by

10
19-16500). With this accessory, you are able
to mount your binoculars on a tripod with a DIN
mounting thread (e.g. Art. No. 49-22100).
NOTES on cleaning
• Clean the eyepieces and lenses only with a
soft, lint-free cloth, like a microfibre cloth. Do
not apply excess pressure to the cloth to avoid
scratching the lenses.
• To remove more stubborn dirt, moisten the
cleaning cloth with an eyeglass-cleaning solu-
tion and wipe the lenses gently.
• Protect the device from dust and moisture.
After use, particularly in high humidity, let the
device acclimatize for a short period of time, so
that the residual moisture can dissipate before
storing. Remove the dust cover and store it in
the included bag during use.
DISPOSAL
• Dispose of the packaging materials properly,
according to their type, such as paper or card-
board. Contact your local waste-disposal ser-
vice or environmental authority for information
on the proper disposal.
• Please take the current legal regulations into
account when disposing of your device. You
can get more information on the proper dis-
posal from your local waste-disposal service or
environmental authority.
https://tm.by
Интернет-магазин TM.by

11
EN
Warranty and warranty term
extension
The warranty term is two years from the date of
purchase. Please keep your proof of purchase.
Register at www.bresser.de/warranty and fill
out a brief questionnaire to get your warranty
term extended to five years. Registration must
be completed within three months of purchase
(date of receipt) to validate the warranty. If you
register thereafter, the warranty term will not be
extended. If you have problems with your device,
please contact our customer service first. Do not
send any products without consulting us first by
telephone. Many problems with your device can
be solved over the phone.
If the problem cannot be resolved by phone, we
will take care of transporting your device to be re-
paired. If the problem occurred after the warranty
ended or it is not covered by our warranty terms,
you will receive an estimate of repair costs, free
of charge.
Service Hotline: +49 (0) 2872 - 80 74-210
https://tm.by
Интернет-магазин TM.by

12
Important for any returns:
Please make sure to return the device carefully packed in the original packaging in order to prevent
damage during transport. Also, please enclose your receipt for the device (or a copy) and a description
of the defect. This warranty does not imply any restriction of your statutory rights.
Your dealer:............................................... Art. No.:....................................................
Description of problem: ........................................................................................................
.........................................................................................................................................
.........................................................................................................................................
Name: ......................................................
Street: ......................................................
City/Postcode:...........................................
Telephone: ................................................
Date of purchase: .......................................
Signature: .................................................
https://tm.by
Интернет-магазин TM.by

13
FR
Consignes générales
de sécurité
RISQUE DE CECITE !
Ne jamais regarder directement le
soleil à travers cet appareil en le
pointant directement en sa direction.
L’observateur court un RISQUE DE
CECITE !
• Ne jamais orienter l’appareil – en particuliers
les lentilles – de manière à capter directe-
ment les rayons du soleil ! La focalisation de
la lumière peut déclencher des incendies.
• Ne pas démonter l’appareil ! En cas de dé-
faut, veuillez vous adresser à votre revendeur
spécialisé. Celui-ci prendra contact avec le
service client pour, éventuellement, envoyer
l’appareil en réparation.
• Ne pas exposer l’appareil à des températures
trop élevées.
PROTECTION de la sphère privée !
Les jumelles sont destinées à un usage
privé. Respectez la sphère privée de vos
concitoyens et n’utilisez pas ces jumelles
pour, par exemple, observer ce qui se
passe dans un appartement !
Liste des pièces
BAxe central des jumelles
C a Œilletons twist-up
ou
C b Œilletons en caoutchouc
DRéglage dioptrique
ECorps des jumelles
FObjectif
GMolette centrale (mise au point)
HLentille oculaire
ILentille d’objectif
JFilet de raccord pour le trépied
1) Cercle d’image, lorsque l’écart
interpupillaire est correctement réglé
https://tm.by
Интернет-магазин TM.by

14
Lentilles oculaires pour personnes portant
des lunettes
Selon le modèle que vous possédez, vos jumelles
sont équipées soit d’œilletons twist-up (2a) soit
d’œilletons en caoutchouc (2b). Étant donné que
chez les porteurs de lunettes il y a toujours un
écart plus grand entre l’oculaire des jumelles et
la pupille, ces deux types d’œilleton peuvent être
réglés de façon individuelle.
Œilletons twist-up (2a)
Si vous souhaitez utiliser les jumelles en portant
des lunettes, rabattez les œilletons twist-up (2a). Si
vous ne portez pas de lunettes, ressortez les œille-
tons afin d’obtenir l’écart interpupillaire nécessaire.
OU
Œilletons en caoutchouc (2b)
Si vous utilisez les jumelles en portant vos lu-
nettes, rabattez les œilletons en caoutchouc (2b)
latéralement vers le bas. Si vous ne portez pas
de lunettes, laissez les œilletons redressés afin
d’obtenir l’écart interpupillaire nécessaire.
Réglage de l’écart interpupillaire
L’écart interpupillaire diffère selon les personnes.
De façon à atteindre un accord parfait entre
vos yeux et la lentille oculaire des jumelles, il
est conseillé de plier les jumelles au niveau de
l’axe central (1) de façon à voir un cercle d’image
lorsque vous regardez dans les -jumelles. (10).
Souvenez-vous du réglage effectué pour l‘utilisa-
tion ultérieure.
Mise au point
Regardez dans les jumelles et fermez l’oeil droit.
Mettez maintenant au point l’image pour l’oeil
gauche à l’aide de la molette centrale (6). Fermez
l’oeil gauche et mettez au point l’image pour l’oeil
droit à -l’aide de l’anneau dioptrique (3).
Installer les jumelles sur un trépied
Vos jumelles sont équipées d’un filet de raccord
https://tm.by
Интернет-магазин TM.by

15
FR
pour le trépied (9). L’adaptateur de trépied néces-
saire est disponible en tant qu’accessoire en
option (n° d’art. 19-16000 ou 19-16500). Il vous
permettra de monter vos jumelles sur un trépied
avec filetage de raccordement DIN (par exemple
n° d’art. 49-22100).
REMARQUE concernant le
nettoyage
• Les lentilles (oculaires et/ou objectifs) ne
doivent être nettoyé qu’avec un chiffon doux et
ne peluchant pas (p. ex. microfibres). Le chif-
fon doit être passé sans trop le presser sur la
surface, afin d’éviter de rayer les lentilles.
• Pour éliminer les traces plus coriaces, le chif-
fon peut être humidifié avec un produit liquide
destiné au nettoyage de lunettes de vue avant
d’essuyer la lentille avec le chiffon en exerçant
une pression légère.
• Protégez l’appareil de la poussière et de l’hu-
midité ! Après usage, et en particulier lorsque
l’humidité de l’air est importante, il convient de
laisser l’appareil reposer quelques minutes à
température ambiante, de manière à ce que
l’humidité restante puisse se dissiper. Equipez
l’appareil des bouchons destinés à le protéger
de la poussière et ranger le dans son sac de
transport fournis.
ELIMINATION
• Eliminez l’emballage en triant les matériaux.
Pour plus d’informations concernant les règles
applicables en matière d’élimination de ce type
des produits, veuillez vous adresser aux ser-
vices communaux en charge de la gestion des
déchets ou de l’environnement.
https://tm.by
Интернет-магазин TM.by

16
• Lors de l’élimination de l’appareil, veuillez respec-
ter les lois applicables en la matière. Pour plus
d’informations concernant l’élimination des dé-
chets dans le respect des lois et réglementations
applicables, veuillez vous adresser aux services
communaux en charge de la gestion des déchets.
Garantie et extension de la durée
de la garantie
La durée de la garantie est de 2 ans et elle com-
mence au jour de l’achat. Le ticket de caisse doit
être conservé comme preuve d’achat. Afin de
pouvoir profiter d’une extension à 5 ans facul-
tative de la garantie, il vous suffit de vous enre-
gistrer sur notre site Internet sous le lien suivant
www.bresser.de/warranty et de répondre à
quelques questions. Pour pouvoir profiter de
cette garantie, vous devez vous enregistrer dans
les 3 mois qui suivent l’achat (date mentionnée
sur votre ticket de caisse). Après ce délai, vous
perdez votre droit à une extension de la garantie.
Si vous avez des problèmes avec votre appareil,
veuillez contacter d’abord notre service client -
S’il vous plaît, NE JAMAIS ENVOYER les produits
sans nous consulter au préalable par téléphone.
En général, de nombreux problèmes peuvent être
résolus par téléphone sinon nous nous occupons
du transport aller/retour. Si le problème survient
après la période de garantie ou que le problème
ne soit pas couvert par nos conditions de garan-
tie, vous recevrez un devis gratuit de notre part
sur les coûts de réparation.
Service Hotline: +49 (0) 2872 - 80 74-210
https://tm.by
Интернет-магазин TM.by

17
FR
Important pour les retours :
Assurez-vous de retourner l’appareil soigneusement emballé dans l’emballage d’origine pour éviter tout
dommage de transport. S’il vous plaît, veuillez également joindre le reçu de caisse (ou une copie) et
une description de la panne constatée. Cette garantie ne comporte aucune restriction de vos droits
légaux.
Votre revendeur spécialisé : ......................... Art. No. :...................................................
Description du problème :.....................................................................................................
.........................................................................................................................................
.........................................................................................................................................
Nom : .......................................................
Rue : ........................................................
Code postale / lieu : ...................................
Téléphone : ...............................................
Date d’achat : ............................................
Signature :.................................................
https://tm.by
Интернет-магазин TM.by

18
Algemene waarschuwingen
VERBLINDINGSGEVAAR!
Kijk met dit toestel nooit direct naar
de zon of naar de omgeving van de
zon. Er bestaat VERBLINDINGS-
GEVAAR!
• Stel het toestel – met name de lenzen – niet
aan direct zonlicht bloot! Door de lichtbunde-
ling kan brand ontstaan.
• Neem het toestel niet uit elkaar! Neem bij
defecten a.u.b. contact op met de verkoper.
Deze zal contact opnemen met een service-
center en kan het toestel indien nodig voor
reparatie terugsturen.
• Stel het apparaat niet bloot aan hoge tempe-
raturen.
BESCHERMING van privacy!
Deze verrekijker is alleen bedoeld voor
privé-gebruik. Houd altijd de privacy van
uw medemens in gedachten – kijk met dit
toestel bijvoorbeeld niet in de woningen
van anderen!
Lijst van onderdelen
BMiddenas van de verrekijker
C a Twist-Up oogschelpen
of
C b Rubberen oogschelpen
DDioptrie instelling
EVerrekijker lichaam
FObjectief optische buis
GGreep in het midden (scherpstelling)
HOculair
IObjectief lenzen
JSchroefdraad voor statiefaansluiting
1) Beeldcirkel bij correct ingestelde
oogafstand
https://tm.by
Интернет-магазин TM.by

19
NL
Oculairs voor brildragers
Afhankelijk van het model, is uw verrekijker uitge-
rust met Twist-Up oogschelpen (2a) of rubberen
oogschelpen (2b). Omdat de afstand tussen het
oculair van de verrekijker en de pupillen bij bril-
dragers in principe groter is, kunnen beide typen
oogschelpen individueel worden ingesteld.
Twist-Up oogschelpen (2a)
Kijk met uw een bril op door de verrekijker en
draai de Twist-UP oogschelpen (2a) vast. Als u
geen bril draagt, draai dan de oogschelpen los,
zodat de noodzakelijke pupillenafstand wordt be-
reikt.
OF
Rubberen oogschelpen (2b)
Kijk met uw een bril op door de verrekijker en sla
de rubberen oogschelpen (2b) zijwaarts om naar
beneden. Als u geen bril draagt, laat dan de oog-
schelpen in een rechte positie staan, zodat de
noodzakelijke pupillenafstand wordt bereikt.
Instellen van de oogafstand
De afstand tussen de ogen verschilt van persoon
tot persoon. Teneinde een perfect samenspel
tussen uw ogen en het oculair van de verrekijker
te bereiken, moet u de verrekijker zodanig rond
de middenas bewegen (1), dat u een cirkel ziet
als u erdoor kijkt (10). Maakt u alstublieft een
aantekening van deze instelling voor later gebruik.
Scherpstelling
Door de verrekijker kijken en uw rechteroog dicht
doen. Nu het beeld voor het linkeroog met de
middengreep (6) scherp instellen. Nu het linker-
oog dicht doen, en het beeld voor het rechteroog
met de dioptrie ring (3) scherp instellen.
Verrekijker op een statief monteren
Uw verrekijker is uitgerust met een schroefdraad
voor een statiefaansluiting (9). De hiervoor beno-
digde statiefadapter is als optioneel accessoire
verkrijgbaar (Art. Nr. 19-16000 of 19-16500).
https://tm.by
Интернет-магазин TM.by

20
Hiermee kunt u de verrekijker op een statief met
DIN-schroefdraad (b.v. Art. Nr. 49-22100) mon-
teren.
TIPS voor reiniging
• Reinig de lenzen (oculair en/of objectief) al-
leen met een zachte en pluisvrije doek (b. v.
microvezel). Druk niet te hard op de doek om
het bekrassen van de lens te voorkomen.
• Om sterke bevuiling te verwijderen kunt u de
poetsdoek met een brillenreinigingsvloeistof
bevochtigen en daarmee de lens poetsen zon-
der veel kracht te zetten.
• Bescherm het toestel tegen stof en vocht! Laat
het toestel na gebruik – zeker bij hoge lucht-
vochtigheid – enige tijd op kamertemperatuur
acclimatiseren zodat alle restvocht geëlimi-
neerd wordt. Plaats de stofkappen terug en
berg het toestel op in de meegeleverde tas.
AFVAL
• Scheid het verpakkingsmateriaal voordat u het
weggooit. Informatie over het correct scheiden
en weggooien van afval kunt u bij uw gemeen-
telijke milieudienst inwinnen.
• Let bij het weggooien van een apparaat altijd op
de huidige wet- en regelgeving. Informatie over
het correct scheiden en weggooien van afval
kunt u bij uw gemeentelijke milieudienst inwin-
nen.
https://tm.by
Интернет-магазин TM.by

21
NL
Garantie en garantie-uitbreiding
De garantietijd bedraagt 2 jaar en gaat in op het
datum van aankoop. Bewaar uw kassabon als be-
wijs van aankoop. Om van een vrijwillig verlengde
garantieperiode van 5 jaar te profiteren hoeft U
zich op www.bresser.de/warranty te registre-
ren en er een korte vragenlijst uit te vullen. Voor
het verkrijgen van deze service, is een registratie
binnen 3 maanden na aankoop (bewijs van de
datum van aankoop) uit te voeren. Bij een latere
aanmelding verliest U het recht op de uitgebreide
garantie. Als U problemen heeft met uw apparaat,
neem dan contact op met onze klantenservice
- Gelieve geen producten te sturen zonder een
voorafgaand overleg via de telefoon. In het alge-
meen zullen wij zorgen voor het vervoer naar en
van u, en veel problemen kunnen worden gedaan
via de telefoon. Als het probleem zich voordeed
na de garantieperiode, of niet worden gedekt
door de garantie, ontvangt u gratis een offerte op
de kosten van reparatie.
Service Hotline: +49 (0) 2872 - 80 74-210
https://tm.by
Интернет-магазин TM.by

22
Belangrijk voor retourzendingen:
Zorg ervoor dat de apparatuur zorgvuldig verpakt wordt teruggestuurd in de originele verpakking om
schade tijdens het transport te voorkomen! Gelieve uw kassabon (of kopie) en de fout beschrijving
bijvoegen. Uw wettelijke rechten worden niet beïnvloed door deze garantie.
Uw speciaalzaak:........................................ Art.nr.: ......................................................
Fout beschrijving: ................................................................................................................
.........................................................................................................................................
.........................................................................................................................................
Naam:.......................................................
Straat: ......................................................
Postcode/Plaats:........................................
Telefoon:...................................................
Aankoopdatum: ..........................................
Handtekening:............................................
https://tm.by
Интернет-магазин TM.by

23
IT
Avvertenze di sicurezza
generali
PERICOLO PER LA VISTA!
Mai utilizzare questo apparecchio per
fissare direttamente il sole o altri og-
getti nelle sue vicinanze. PERICOLO
PER LA VISTA!
• Non esporre l’apparecchio, in particolare le
lenti, ai raggi solari diretti. La compressione
della luce può provocare un incendio.
• Non smontare l’apparecchio! In caso di
guasto, rivolgersi al proprio rivenditore
specializzato. Egli provvederà a contattare
il centro di assistenza e se necessario a
spedire l’apparecchio in riparazione.
• Non esporre l’apparecchio a temperature
elevate.
PROTEZIONE della privacy!
Il binocolo è stata realizzato solo per
l’uso privato. Rispettare la privacy delle
altre persone: ad esempio non utilizzare
l’apparecchio per guardare negli appar-
tamenti altrui.
Elenco delle parti componenti
BAsse centrale del binocolo
C a Conchiglie oculari twist up
oppure
C b Conchiglie oculari in gomma
DRegolazione delle diottrie
ECorpo del binocolo
FTubo dell’obbiettivo
GVite (messa a fuoco)
HOculare
ILente obbiettivo
JAttacco filettato per treppiede
1) Cerchio di immagine con distanza
interpupillare correttamente regolata
https://tm.by
Интернет-магазин TM.by

24
Oculare per portatori di occhiali
A seconda del modello, il binocolo è dotato di
conchiglie oculari twist up (2a) o conchiglie ocula-
ri in gomma (2b). Poiché nel caso dei portatori di
occhiali, in linea di principio, la distanza tra l’ocu-
lare del binocolo e la pupilla è maggiore, entrambi
i tipi di conchiglie oculari possono essere regolati
in base alle esigenze individuali.
Conchiglie oculari twist up (2a)
Se si utilizza il binocolo con indosso gli occhia-
li, avvitare le conchiglie oculari twist up (2a). Se
invece non si indossano gli occhiali, svitare le
conchiglie oculari per ottenere la distanza inter-
pupillare necessaria.
OPPURE
Conchiglie oculari in gomma (2b)
Se si utilizza il binocolo con indosso gli occhiali,
ribaltare le conchiglie oculari in gomma (2b) late-
ralmente verso il basso. Se invece non si indos-
sano gli occhiali, lasciare le conchiglie oculari in
posizione diritta per ottenere la distanza interpu-
pillare necessaria.
Regolazione della distanza interoculare
La distanza tra gli occhi varia da persona a per-
sona. Per raggiungere un perfetto allineamento
tra gli occhi e l’oculare del binocolo agire sui
cannocchiali inclinandoli rispetto all’asse centrale
(1) finché, guardandovi dentro, non si vedrà un
unico campo circolare (10). RicordateVi della re-
golazione impostata per ogni uso successivo del
binocolo.
Regolazione della messa a fuoco
Guardate attraverso il binocolo e chiudete l’oc-
chio destro. Mettete ora a fuoco l’immagine per
l’occhio sinistro agendo sul sistema di messa a
fuoco centrale (6). Chiudete l’occhio sinistro e
mettete a fuoco l’immagine per l’occhio destro
agendo sulla ghiera di regolazione diottrica (3).
https://tm.by
Интернет-магазин TM.by

25
IT
Montaggio del binocolo sul treppiede
Il binocolo è dotato di un attacco filettato per trep-
piede (9). L’adattatore per treppiede necessario è
disponibile come accessorio opzionale (cod. art.
19-16000 o 19-16500). L’adattatore consente
di montare il binocolo su un treppiede dotato di
attacco filettato DIN (per esempio cod. art. 49-
22100).
NOTE per la pulizia
• Pulire le lenti (gli oculari e/o gli obiettivi) soltan-
to con un panno morbido e privo di pelucchi
(es. in microfibra). Non premere troppo forte il
panno per evitare di graffiare le lenti.
• Per rimuovere eventuali residui di sporco più
resistenti, inumidire il panno per la pulizia con
un liquido per lenti e utilizzarlo per pulire le lenti
esercitando una leggera pressione.
• Proteggere l’apparecchio dalla polvere e dall’u-
midità! Dopo l’uso, in particolare in presenza
di un’elevata percentuale di umidità dell’aria,
lasciare acclimatare l’apparecchio a tempera-
tura ambiente in modo da eliminare l’umidità re-
sidua. Applicare i copri-obiettivo e conservare
l’apparecchio nella borsa fornita.
SMALTIMENTO
• Smaltire i materiali di imballaggio in maniera dif-
ferenziata. Le informazioni su uno smaltimento
conforme sono disponibili presso il servizio di
smaltimento comunale o l’Agenzia per l’ambien-
te locale.
• Per lo smaltimento dell’apparecchio osservare
le disposizioni di legge attuali. Le informazioni
su uno smaltimento conforme sono disponibili
presso il servizio di smaltimento comunale o
l’Agenzia per l’ambiente locale.
https://tm.by
Интернет-магазин TM.by

26
Garanzia ed estensione della
garanzia
La durata della garanzia si estende per 2 anni
a partire dalla data di acquisto. Si raccomanda
di conservare lo scontrino fiscale come pro-
va d’acquisto. Per poter estendere il periodo di
garanzia a 5 anni, è sufficiente effettuare la re-
gistrazione in Internet e compilare un breve mo-
dulo. La registrazione va effettuata all’indirizzo
www.bresser.de/warranty. Per potersi avvalere
dell’estensione facoltativa della garanzia, la regi-
strazione va effettuata entro e non oltre 3 mesi
dalla data di acquisto del prodotto (fa fede la data
riportata sullo scontrino fiscale). Al termine della
suddetta scadenza non sarà più possibile avva-
lersi dell’estensione del periodo di garanzia. In
caso di problemi con il prodotto, contattare il no-
stro servizio clienti. Non inviare il prodotto senza
previa consultazione telefonica. Diversi problemi
possono essere risolti attraverso una consulenza
telefonica. Per la spedizione e la riparazione, ci
occupiamo del trasporto da e verso casa. Se il
difetto si verifica dopo la scadenza della garanzia,
o non rientra nella garanzia, riceverete una nostra
offerta gratuita per il costo della riparazione.
Servizio clienti: +49 (0) 2872 - 80 74-210
https://tm.by
Интернет-магазин TM.by

27
IT
Importante per il ritorno del prodotto:
Assicurarsi di inviare il prodotto accuratamente imballato nella confezione originale per evitare danni
durante la spedizione! Si prega di allegare la prova d’acquisto (copia) e una descrizione del difetto.
I vostri diritti legali non saranno danneggiati da questa garanzia.
Il vostro rivenditore specializzato: .................. Art. No.:....................................................
Descrizione di errore:...........................................................................................................
.........................................................................................................................................
.........................................................................................................................................
Name: ......................................................
Via: ..........................................................
CAP/Località: ............................................
Telefono:...................................................
Data di acquisto: ........................................
Firma:.......................................................
https://tm.by
Интернет-магазин TM.by

28
Advertencias de
carácter general
¡Existe PELIGRO DE CEGUERA!
No mire nunca directamente al sol o
cerca de él con este aparato. ¡Existe
PELIGRO DE CEGUERA!
• No exponer el aparato – especialmente
las lentes – a la radiación directa del sol.
La concentración de la luz puede provocar
incendios.
• No desmonte el aparato. En caso de que
exista algún defecto, le rogamos que se
ponga en contacto con su distribuidor
autorizado. Este se pondrá en contacto con
el centro de servicio técnico y, dado el caso,
podrá enviarle el aparato para su reparación.
• No exponga el aparato a altas temperaturas.
¡PROTECCIÓN de la privacidad!
Los prismáticos están concebidos para
el uso privado. Respete la privacidad de
las personas de su entorno – por ejem-
plo, no utilice este aparato para mirar en
el interior de viviendas.
Índice de piezas
BMando central de enfoque para los binoculares
C a Visores «twist up»
o
C b Visores de goma
DRueda de ajuste de las dioptr’as
ECuerpo de los binoculares
FTubo del objetivo
GMando central de enfoque
(dispositivo de focalización)
HOcular
ILente del objetivo
JRosca de conexión para el soporte
1) Círculo de imagen con la distancia entre
los ojos ajustada correctamente
https://tm.by
Интернет-магазин TM.by

29
ES
Oculares para usuarios de gafas
En función del respectivo modelo, sus prismáti-
cos están equipados con visores «twist up» (2a)
o visores de goma (2b). Dado que en el caso de
las personas con gafas existe una mayor distan-
cia entre el ocular de los prismáticos y la pupila,
ambos modelos de visores se pueden ajustar de
forma individualizada.
Visores «twist up» (2a)
Si realiza la observación con los prismáticos lle-
vando puestas gafas, gire los visores «twist up»
hacia dentro (2a). Por el contrario, si no lleva ga-
fas, gire los visores hacia fuera para alcanzar la
distancia necesaria con respecto a la pupila.
O
Visores de goma (2b)
Si realiza la observación con los prismáticos lle-
vando puestas gafas, dé la vuelta a los visores
de goma (2b) lateralmente hacia abajo. Por el
contrario, si no lleva gafas, deje los visores de pie
para alcanzar la distancia necesaria con respecto
a la pupila.
Ajuste de la distancia con el ojo
La distancia respecto al ojo varía de unas perso-
nas a otras. Para lograr una perfecta sintoniza-
ción entre los ojos y el ocular de los binoculares,
mueva éstos sobre el eje central (1) de modo que
al mirar a través de ellos vea una imagen circular
(10). Anote el ajuste para la próxima vez que lo
utilice.
Focalización
Mire a través de los binoculares y cierre el ojo de-
recho. Utilice ahora el mando central de enfoque
(6) para ajustar la imagen del ojo izquierdo. Cierre
el ojo izquierdo y ajuste la imagen del ojo derecho
utilizando la rueda de ajuste de dioptrías (3).
Montaje de los binoculares en el soporte
Los binoculares están equipados con una rosca
https://tm.by
Интернет-магазин TM.by

30
de conexión para el soporte (9). El adaptador de
soporte necesario a tal efecto se puede obtener
a modo de accesorio opcional (n.º de art. 19-
16000 o 19-16500). De este modo, puede mon-
tar sus binoculares sobre un soporte con rosca
de conexión DIN (p. ej., n.º de art. 49-22100).
INDICACIONES de limpieza
• Limpie las lentes (oculares y/o objetivos) exclu-
sivamente con un paño suave y sin hilachas (p.
ej. de microfibras). No presione el paño con
demasiada fuerza para evitar arañazos en las
lentes.
• Para retirar los restos de suciedad intensa, hu-
medezca el paño de limpieza con un producto
limpiador para gafas y frote las lentes ejercien-
do poca presión.
• ¡Proteja el aparato del polvo y la humedad!
Tras el uso a la temperatura del cuarto – es-
pecialmente en condiciones de humedad del
aire elevada – deje que se aclimate durante un
tiempo, de modo que se pueda eliminar la hu-
medad residual. Coloque la cobertura de pro-
tección contra el polvo y guárdelo en la bolsa
incluida en el envío.
ELIMINACIÓN
• Elimine los materiales de embalaje separados
por tipos. Obtendrá información sobre la eli-
minación reglamentaria en los proveedores
de servicios de eliminación comunales o en la
agencia de protección medioambiental.
• Por favor, tenga en cuenta las disposiciones
legales vigentes a la hora de eliminar el apara-
to. Obtendrá información sobre la eliminación
reglamentaria en los proveedores de servicios
de eliminación comunales o en la agencia de
protección medioambiental.
https://tm.by
Интернет-магазин TM.by

31
ES
Garantía y prolongación del
período de garantía
El período de garantía asciende a 2 años a partir
del día de la compra. Por favor, conserve el ticket
de compra como justificante.
Para poder disfrutar de un período de garan-
tía prolongado voluntariamente a 5 años, sólo
tiene que registrarse en Internet y rellenar un
breve cuestionario. Puede realizar el registro en
www.bresser.de/warranty. Para hacer uso de
la garantía es necesario realizar este registro den-
tro del plazo de 3 meses después de la compra
(para ello se utiliza como referencia el justificante
de compra). Si la inscripción se realiza con pos-
terioridad a dicha fecha, esto supone la pérdida
de su derecho a la prolongación de la garantía.
Si tiene problemas con el producto, póngase en
contacto con nuestro servicio al cliente primero
- por favor no envíe ningún producto sin consul-
ta previa por teléfono. En general, nosotros nos
encargamos del transporte desde y hacia usted,
y muchos problemas se pueden resolver por telé-
fono. Si el problema se produjo después de que
el periodo de garantía ha terminado, o no está
cubierto por los términos de nuestra garantía,
recibirá una presupuesto por nuestra parte de
forma gratuita del coste de reparación.
Servicio al cliente: +49 (0) 2872 - 80 74-210
https://tm.by
Интернет-магазин TM.by

32
Importante para cualquier devolución:
Asegúrese de devolver el producto cuidadosamente empaquetado en el embalaje original para evitar
daños durante el transporte. Por favor adjuntar el recibo de caja (o una copia) y una descripción del
defecto. Esta garantía no implica ninguna restricción de sus derechos legales.
Su tienda especializada: .............................. Art. No.:....................................................
Descripción del error: ..........................................................................................................
.........................................................................................................................................
.........................................................................................................................................
Nombre: ...................................................
Calle:........................................................
Código postal/Ciudad: ................................
Teléfono:...................................................
Fecha de compra: ......................................
Firma:.......................................................
https://tm.by
Интернет-магазин TM.by

33
PL
Ogólne ostrzeżenia
NIEBEZPIECZEŃSTWO UTRATY
WZROKU!
Nigdy nie patrzeć przez urządzenie bez-
pośrednio w kierunku słońca. Istnieje NIE-
BEZPIECZEŃSTWO UTRATY WZROKU!
• Nie narażać urządzenia – a w szczególności
soczewek – na bezpośrednie działanie
promieni słonecznych! Skupienie promieni
słonecznych może spowodować pożar.
• Nie rozmontowywać urządzenia! W przypadku
usterki zwrócić się do profesjonalnego
sprzedawcy. On skontaktuje się z centrum
obsługi i w razie potrzeby prześle urządzenie
do naprawy.
• Nie narażać urządzenia na działanie wysokich
temperatur.
OCHRONA sfery prywatnej!
Lornetka jest przeznaczona do użytku pry-
watnego. Należy szanować sferę prywatną
innych ludzi – np. nie należy przy pomocy
tego urządzenia zaglądać do mieszkań!
Spis części
BOś środkowa lornetki
C a Muszle oczne typu twist-up
lub
C b Gumowe muszle oczne
DUstawienie dioptrii
EKorpus lornetki
FTubus objektywu
GŚrodkowa pokrętka ruchu (ustawienie ostrości)
HOkular
ISoczewka objektywu
JGwint na końcówkę statywu
1) Pole widzenia, w przypadku prawidłowego
ustawienia dostosowanego do rozstawu oczu
https://tm.by
Интернет-магазин TM.by

34
Okular dla noszących okulary
W zależności od modelu Państwa lornetka
wyposażona jest w muszle oczne typu twist-
up (2a) lub gumowe (2b). Ponieważ u osób
noszących okulary zasadniczo odległość
pomiędzy okularem lornetki a źrenicą oka jest
większa, istnieje możliwość indywidualnego usta-
wienia obu typów muszli ocznych.
Muszle oczne typu twist-up (2a)
Przy korzystaniu z lornetki z założonymi okula-
rami należy wkręcić muszle oczne typu twist-
up (2a). Jeżeli nie noszą Państwo okularów,
należy wykręcić muszle oczne, tak aby otrzymać
potrzebną odległość źrenic od okularu lornetki.
LUB
Gumowe muszle oczne (2b)
Przy korzystaniu z lornetki z założonymi okulara-
mi, należy gumowe muszle oczne (2b) po bokach
odchylić do dołu. Jeżeli nie noszą Państwo oku-
larów, należy zostawić muszle oczne w prostej
pozycji, tak aby otrzymać potrzebną odległość
źrenic od okularu lornetki.
Ustawienie rozstawu oczu
Rozstaw oczu jest różny w zależności od oso-
by. Aby osiągnąć perfekcyjne zgranie pomiędzy
Państwa oczami i okularem lornetki, należy zgiąć
lornetkę wokół osi środkowej (1), tak aby przy
patrzeniu przez lornetkę ujrzeć obraz koła (10).
Proszę zapamiętać pozycję do późniejszego
użytku.
Ustawienie ostrości
Proszę spojrzeć przez lornetkę i zamknąć prawe
oko. Proszę ustawić teraz ostrość obrazu dla le-
wego oka przy pomocy środkowej pokrętki ruchu
(6). Proszę zamknąć lewe oko i ustawić ostrość
obrazu dla prawego oka przy pomocy obręczy
dioptrii (3).
https://tm.by
Интернет-магазин TM.by

35
PL
Zamontowanie lornetki na statywie
Państwa lornetka wyposażona jest w gwint na
końcówkę statywu (9). Wymagany do tego adap-
ter statywu dostępny jest jako opcja (nr art. 19-
16000 lub 19-16500). Przy jego pomocy można
zamontować lornetkę na statywie z gwintem
podłączeniowym DIN (np. nr art. 49-22100).
WSKAZÓWKI dotyczące
czyszczenia
•Czyścić soczewki (okulary i/lub obiektywy)
wyłącznie miękką i niepozostawiającą włókien
szmatką (np. z mikrowłókna). Nie przyciskać zbyt
mocno szmatki, aby nie porysować soczewek.
• Aby usunąć trwalsze zabrudzenia, zwilżyć
szmatkę płynem do czyszczenia okularów i
przetrzeć nią soczewki, lekko przyciskając.
• Chronić urządzenie przed kurzem i wilgocią!
Po użyciu – szczególnie przy dużej wilgotności
powietrza – pozostawić urządzenie przez pe-
wien czas w temperaturze pokojowej, aby
wyparowały resztki wilgoci. Nałożyć pokrywy
chroniące przed kurzem i przechowywać w
torbie dostarczonej wraz z urządzeniem.
UTYLIZACJA
• Materiały, z których wykonano opakowa-
nie, należy utylizować posortowane według
rodzaju. Informacje na temat właściwej
utylizacji uzyskają Państwo w komunalnym
przedsiębiorstwie utylizacji odpadów lub w
urzędzie ds. ochrony środowiska.
• Przy utylizacji urządzenia należy uwzględnić
aktualne przepisy prawne. Informacje na temat
właściwej utylizacji uzyskają Państwo w komu-
nalnym przedsiębiorstwie utylizacji odpadów
lub w urzędzie ds. ochrony środowiska.
https://tm.by
Интернет-магазин TM.by

36
Gwarancja i warunki gwarancji
rozszerzonej
Okres gwarancyjny obejmuje czas do dwóch
lat od daty zakupu. Proszę zachować dowód
zakupu. W celu przedłużenia okresu gwarancji
na pięć lat, proszę zarejestrować się na stronie
www.bresser.de/warranty i wypełnić krótki
kwestionariusz. Należy to zrobić w terminie do
trzech miesięcy od daty zakupu towaru. Jeżeli
rejestracja zostanie dokonana po upływie tego
terminu, gwarancja nie zostanie przedłużona.
Jeżeli w produkcie stwierdzisz problem, proszę
najpierw skontaktować się z naszym punktem
serwisowym. Proszę nie odsyłać produktów bez
wcześniejszej konsultacji telefonicznej. Wiele pro-
blemów może zostać rozwiązanych poprzez kon-
takt telefoniczny. Jeśli problemu nie uda się roz-
wiązać, pomożemy w zorganizowaniu transportu.
Jeżeli problem wystąpi po upływie gwarancji lub
jeżeli warunki gwarancji nie obejmują stwierdzo-
nego problemu, otrzymasz darmową wycenę
kosztów naprawy.
Telefoniczna linia serwisowa:
+49 (0) 2872 - 80 74-210
https://tm.by
Интернет-магазин TM.by

37
PL
Ważne uwagi dotyczące zwrotów:
Należy upewnić się, że zwracany produkt jest prawidłowo i bezpiecznie zapakowany w oryginalne pu-
dełko, aby uniknąć uszkodzeń w trakcie transportu. Z wysyłką trzeba również przesłać dowód zakupu
lub jego kopię oraz opis problemu technicznego. Prawo gwarancji nie ogranicza jakichkolwiek innych
praw nabywcy.
Dystrybutor:............................................... Nr artykułu:................................................
Opis problemu technicznego:................................................................................................
.........................................................................................................................................
.........................................................................................................................................
Imi i nazwisko:...........................................
Ulica:........................................................
Kod pocztowy / Miasto:...............................
Numer telefonu: .........................................
Data zakupu:..............................................
Podpis: .....................................................
https://tm.by
Интернет-магазин TM.by

38
Общие предупреждения
Опасность ПОТЕРИ ЗРЕНИЯ!
Ни в коем случае не смотрите
через этот прибор прямо на солнце
или в направлении солнца. Опас-
ность ПОТЕРИ ЗРЕНИЯ!
• Не прибор – в особенности линзы – под
прямыми солнечными лучами! Из-за
фокусировки солнечных лучей может
возникнуть пожар!
• Не разбирайте прибор! В случае
неисправности обращайтесь к дилеру.
Он свяжется с сервисным центром и
может переслать прибор для выполнения
ремонта.
• Не допускайте нагревания устройства до
высокой температуры.
ЗАЩИТА сферы личной жизни!
Бинокли предназначены для личного ис-
пользования. Соблюдайте права на лич-
ную жизнь окружающих Вас людей – не
используйте этот прибор, например, для
заглядывания в окна жилых помещений!
Перечень компонентов
BЦентральная ось бинокля
C a Навинчивающиеся окуляры
или
C b Резиновые окуляры
DМеханизм диоптрической наводки
EКорпус бинокля
FТубус объектива
GЦентральный привод (установка на резкость)
Hокуляр
IЛинза объектива
JРезьба для установки на штатив
1) Отображающая окружность при
правильно настроенной глазной базе
https://tm.by
Интернет-магазин TM.by

39
RU
Окуляр для пользователей в очках
В зависимости от модели бинокль оснащается
либо навинчивающимися окулярами (2a),
либо резиновыми окулярами (2b). Так как у
пользователей в очках расстояние между
окулярами бинокля и зрачками увеличено,
оба навинчивающихся окуляра могут
регулироваться по отдельности.
Навинчивающиеся окуляры (2а)
Если Вы смотрите через бинокль в очках,
вкрутите навинчивающиеся окуляры
(2а). Если вы не носите очки, выкрутите
навинчивающиеся окуляры для обеспечения
необходимого расстояния до зрачков.
ИЛИ
Резиновые окуляры (2b)
Если Вы смотрите через бинокль в очках,
отверните резиновые окуляры (2b) сбоку вниз.
Если вы не носите очки, оставьте окуляры в
вертикальном положении для обеспечения
необходимого расстояния до зрачков.
Настройка глазной базы
Расстояние между глазами является
индивидуальным для каждого человека.
Для обеспечения идеального согласования
глаз с окулярами бинокля его необходимо
согнуть относительно центральной оси (1)
таким образом, чтобы через него была видна
отображающая окружность (10). Запомните
настройку для использования в будущем.
Установка на резкость
Посмотрите через бинокль и закройте правый
глаз. Отрегулируйте изображение для левого
глаза с помощью центрального привода (6).
Закройте левый глаз и отрегулируйте резкость
изображения для правого глаза с помощью
диоптрийного кольца (3).
Установка бинокля на штатив
На бинокле имеется резьба для установки на
штатив (9). Необходимый для этого адаптер
https://tm.by
Интернет-магазин TM.by

40
штатива поставляется в качестве опции ((№
по каталогу 19-16000 или 19-16500). С его
помощью можно устанавливать бинокль на
штатив с присоединительной резьбой DIN
(напр., № по каталогу 49-22100).
УКАЗАНИЯ по чистке
• Используйте для чистки линз (окуляры и/
или объективы) только мягкую салфетку
из нетканого материала (например,
микроволокно). Не нажимайте на салфетку
слишком сильно, чтобы исключить
вероятность образования царапин на
линзах.
• Для удаления более сильных загрязнений
смочите чистящую салфетку в жидкости для
чистки очков и протрите линзы с небольшим
усилием.
• Защищайте прибор от пыли и влаги!
После использования – в особенности при
высокой влажности воздуха – подержите
прибор некоторое время при комнатной
температуре, чтобы дать испариться
остаточной влаге. Наденьте пылезащитные
колпачки и поместите прибор в сумку,
входящую в комплект поставки.
УТИЛИЗАЦИЯ
• Выполняйте утилизацию упаковочных
материалов по их типам. Информацию по
правильной утилизации можно получить
в коммунальной службе утилизации или в
отделе по защите окружающей среды.
• При утилизации прибора соблюдайте
действующие законодательные нормы.
Информацию по правильной утилизации
можно получить в коммунальной службе
утилизации или в отделе по защите
окружающей среды.
https://tm.by
Интернет-магазин TM.by

41
RU
Гарантия и продление
гарантийного срока
Гарантийный срок составляет два года со дня
покупки. Сохраняйте кассовый чек как под-
тверждение покупки. Для продления гарантии
еще на 3 года зарегистрируйтесь на веб-сайте
и заполните анкету: www.bresser.de/warranty.
Регистрацию необходимо пройти в течение
трех месяцев со дня покупки (дня, указанного
на чеке). Если вы зарегистрируетесь позже, га-
рантийный срок не будет продлен.
При обнаружении неисправности изделия об-
ратитесь сначала в нашу сервисную службу; не
следует отправлять нам изделие без предвари-
тельной консультации по телефону. Обычно мы
можем организовать доставку изделия от вас
и обратно, а многие проблемы можно решить
по телефону. Если неисправность возникла по-
сле окончания гарантийного срока или не по-
крывается условиями гарантии, мы бесплатно
оценим стоимость ремонта.
Сервисная служба онлайн:
+49 (0) 2872 - 80 74-210
https://tm.by
Интернет-магазин TM.by

42
При возврате изделия:
убедитесь, что изделие правильно и тщательно упаковано в оригинальную упаковку — это пре-
дотвратит повреждения изделия во время транспортировки. Приложите чек (или его копию) и
краткое описание неисправности. Данная гарантия не ограничивает ваши законные права.
Ваш дилер: ....................................................... Артикул №:.......................................................
Описание неисправности:......................................................................................................................
..................................................................................................................................................................
..................................................................................................................................................................
Имя: ..................................................................
Улица:................................................................
Индекс / Город: ................................................
Телефон: ...........................................................
Дата покупки: ...................................................
Подпись: ...........................................................
https://tm.by
Интернет-магазин TM.by

43
RU
https://tm.by
Интернет-магазин TM.by

FERNGLAS
BINOCULARS
© 2012 National Geographic Society
NATIONAL GEOGRAPHIC and Yellow Border Design
are trademarks of the National Geographic Society.
All rights reserved.
Experience the National Geographic Channel.
Visit our website: www.nationalgeographic.com
Meade Instruments Europe
GmbH & Co. KG
Gutenbergstr. 2 · DE-46414 Rhede
www.bresser.de · info@bresser.de
Irrtümer und technische Änderungen vorbehalten.
Errors and technical changes reserved.
ANLCFGMSP0113NG
https://tm.by
Интернет-магазин TM.by
-
 1
1
-
 2
2
-
 3
3
-
 4
4
-
 5
5
-
 6
6
-
 7
7
-
 8
8
-
 9
9
-
 10
10
-
 11
11
-
 12
12
-
 13
13
-
 14
14
-
 15
15
-
 16
16
-
 17
17
-
 18
18
-
 19
19
-
 20
20
-
 21
21
-
 22
22
-
 23
23
-
 24
24
-
 25
25
-
 26
26
-
 27
27
-
 28
28
-
 29
29
-
 30
30
-
 31
31
-
 32
32
-
 33
33
-
 34
34
-
 35
35
-
 36
36
-
 37
37
-
 38
38
-
 39
39
-
 40
40
-
 41
41
-
 42
42
-
 43
43
-
 44
44


Bresser National Geographic FERNGLAS Binoculars Manual de usuario
- Tipo
- Manual de usuario
en otros idiomas
- français: Bresser National Geographic FERNGLAS Binoculars Manuel utilisateur
- italiano: Bresser National Geographic FERNGLAS Binoculars Manuale utente
- Deutsch: Bresser National Geographic FERNGLAS Binoculars Benutzerhandbuch
- Nederlands: Bresser National Geographic FERNGLAS Binoculars Handleiding
- polski: Bresser National Geographic FERNGLAS Binoculars Instrukcja obsługi
Artículos relacionados
-
Bresser 1251052 Manual de usuario
-
Bresser Compact Binoculars Manual de usuario
-
-
Bresser 1210823 Manual de usuario
-
Bresser Hunter 8×21 Compact Binoculars Manual de usuario
-
Bresser 15-52081 Manual de usuario
-
Bresser NATIONAL GEOGRAPHIC 10x50 El manual del propietario
-
Bresser 4310000 Manual de usuario
Otros documentos
-
EINHELL GE-DP 7330 LL ECO Manual de usuario
-
National Geographic 8x21 Pocket Binoculars El manual del propietario
-
-
-
-
-
Duravit Starck 1 Manual de usuario
-
EINHELL GE-CG 18 1 Li Manual de usuario
-
Clatronic AKS 827 Manual de usuario