T-Fal OT8085002 Manual de usuario
- Categoría
- Barbacoas
- Tipo
- Manual de usuario
Este manual también es adecuado para

Réf : 5252
September 2004
Ref. : 3306879
Document subject to modification • Document sujet à modification • Documento sujeto a modificaciones
Réalisation : Espace Graphique

Instructions for use
Mode d’emploi
Modo de empleo
T-FAL Corporation, P. O. BOX 2001, PINE BROOK NJ 07058
Groupe SEB Canada Inc., 455 Finchdene Square, Scarborough, Ontario, M1X 1B7
G.S.E.B. Mexicana, S.A. de C.V. Goldsmith 38-401, Piso 4, Polanco Chapultepec,
Miguel Hidalgo - C.P. 11560 MEXICO D.F. RFC GSB 910719 5A0

2
3
4
5
6
a
7
g
h
d
1
f
e
c
b
i
9*
8*
11
10*
12*
14*
13*
*according to model - selon modèle - según modelo

Eng
1
SAFETY INSTRUCTIONS
• Safety of this appliance complies with the technical regulations and norms in force.
• Make sure that the network voltage corresponds to that indicated on the appliance.
• Considering the diversity of the norms in force, check whether the appliance is used in a coun-
try other than that in which it was purchased. Have it verified by an authorized service station.
• Use a stable work platform, protected from water projections.
• Do not carry or move the equipment when in use.
• Do not unplug the equipment by pulling the cord.
INSTRUCTIONS ON THE POWER CORD
• The electrical cord is short in a manner as to reduce the risks of injury that could occur if one
gets entangled or if one trips on a longer cord.
• This equipment has a polarized plug (one prong is wider than the other). In order to reduce the
risk of electric shock, this plug has been designed in such a manner that it can be connected
to the current socket in just one way. If the plug cannot be inserted into the current socket
properly, invert the pins. If the problem persists, call a qualified electrician.
Do not try to modify the socket in any way.
• Certain precautions are imposed if you are using an extension cord:
(a) Electric power of your extension cord should at least be equal to that of your toaster oven.
(b) The extension cord should be kept beyond the reach of children and should be kept in such
a way that no one trips on it or is injured by it.
(c) The extension should be equipped with a ground cable if the plug of the cable of your equip-
ment is equipped with a ground electrode.
IMPORTANT SAFEGUARDS
A certain number of basic rules, especially those mentioned below, should be respected
while using electrical appliances:
• Read all the usage instructions and follow them carefully.
• The appliance is not intended for use by young children or infirm persons without close supervision.
• Young children should be supervised to ensure that they do not play with the appliance.
• Do not keep the appliance within the reach of children.
• Never allow the appliance to be operated without supervision. Remain close to the oven when
it is in use.
• Do not use the appliance for a purpose other than that for which it has been designed.
• Do not touch the metallic or hot parts of the oven while it is in use. Use the buttons and the
handle. Use oven mitts, if necessary.
• Do not immerse the electrical cord, the current socket or the appliance in water or any other
liquid so as to avoid electric shocks.
• Always attach plug to appliance first, then plug cord into the wall outlet.
• To turn off the oven, press stop and unplug it.
• Unplug the appliance when not in use and before cleaning it. Wait for the equipment to cool
before cleaning or putting it away.
• Do not use the appliance if:
- it has a defective cord,
- the equipment falls and presents visible damages or functioning defects.
In all these cases, the equipment should be sent to the nearest after-sales service center autho-
rized by T-FAL, in order to avoid all risks.
Consult the guarantee card.

2
• This equipment has a polarized plug (one prong is larger than the other): in order to reduce the
risk of electric shock, this plug has been designed to connect to the current socket in just one-
way. If the plug cannot be inserted into the current socket properly, invert the pins. If the pro-
blem persists, call a qualified electrician. Do not try to modify the socket in any way.
• Use of accessories, not recommended by the manufacturer, may be dangerous.
• Do not allow the cord to hang from the table or working surface or touch the hot parts of the
appliance.
• Do not place the appliance on or close to a source of heat (cooking plate, oven, hot gas, elec-
tric burner, etc).
• Do not cover the appliance when in use.
• Bread may burn, therefore the toaster oven must not be used near or below curtains and other
combustible materials. It should be attended when in use.
• Do not operate the appliance under wall-mounted furniture, a shelf, or close to inflammable
materials such as: blinds, curtains, hangings...
• If some parts of the product catch fire, never try to extinguish flames with water.
Unplug the appliance and smother the flames with a damp cloth. Never try to open the oven’s
door in case of fire in the appliance.
• Do not keep inflammable products close to or under the furniture where the appliance is
placed.
• Oversize foods or metal ustensils must not be inserted in a toaster oven as they may create a
fire or risk of electric shock.
• Unplug the appliance: if a functioning defect occurs, after every use, before changing its posi-
tion and before washing it.
• Do not use metallic buffers or abrasive, cleaning agents. Metallic particles may come off and
touch the electrical parts of the equipment and lead to a short circuit.
• Use the appliance only indoors.
• While product is not in use, do not stock accessories other than those recommended by the
T-FAL manufacturer in the appliance. Extreme caution should be exercised when using contai-
ners constructed of other than metal or glass.
• Do not place any of the following materials in the oven: paper, cardboard or plastic.
• Do not use the appliance as a heat or drying source.
• The appliance should always be in an upright position, never horizontal, tilted or upside down.
• Do not insert anything in the ventilation inlets and do not block them.
• Remove the crumbs from the crumb tray regularly. Do not cover the crumb collector with alu-
minum sheets. This would lead the equipment to overheat. Do not cover the crumb tray or any
part of the oven with metal foil. This wil cause overheating of the oven.
• This appliance has been designed only for domestic usage. The manufacturer is not
responsible or liable for any kind of professional usage, which is inappropriate or non-
compliant with the recommended usage method.
• Any interventions other than cleaning and maintenance should be entrusted to the nearest,
authorized T-FAL service center (see the enclosed list).
• The user should not repair any part so as to eliminate the risk of domestic accident, fire or
electrocution. Only qualified personnel of the authorized T-FAL service center should carry out
repairs.
KEEP THESE INSTRUCTIONS
IN A SAFE PLACE
Eng

3
Eng
Appliance features
Advantages
1 Integrated handle in reheat oven door
2 Top heating element
3 Control panel
a) Display
b)Temperature setting button
c) Cooking time setting button
d)“+” or “-” adjustment button
e)BAKE function, baking/roasting
f)WARMER function (reheat
compartment)
g)BROIL function
h)TOAST function
i) START/STOP button
4 Ventilation holes
5 Bottom heating element
6 Crumb tray drawer
7 Integrated handle in main oven door
8 Bread tong*
9 Aluminium baking tray for top reheat
compartment*
10 Aluminium sides*
11 Shelf supports
12 Aluminium broiling tray*
13 Aluminium baking tray for main
compartment*
14 Reversible rack*
Your Avanté Elite toaster oven offers you the following advantages:
• 2 ovens for greater cooking flexibility and for reheating dishes of all kinds.
• 6-slice capacity for easy browning of your toast and bagels.
• A multifunction toaster oven for cooking, heating or grilling/broiling. The top oven is an
useful extra feature to help prepare complete meals!
• A reversible grilling rack and 2 shelf positions allow you to vary the grill height and position
your dishes or loaves perfectly for the desired cooking results.
• A thermostat that can be precisely adjusted from 150°F to 500°F (25°F increments).
• The crumb collector drawer is easy to remove using its push / pull exterior handle.
• Aluminium baking trays are suitable for all types of dishes.
• Aluminium baking tray for cooking of your meats and grilled foods.
• A user-friendly display for ease and precision in using the electronics.
*according to model

4
Eng
• Unpack the appliance and remove all self-adhesive stickers.
• Read the instructions for use and follow them carefully.
• Pull out all the accessories* (grill, broiling and baking trays) and
wash them in warm, soapy water. Rinse and dry carefully.
• Unroll the power cable completely.
• Wipe over the outside of the appliance with a damp cloth and
dry off any excess moisture.
• Plug in the toaster oven. It will beep.
To eliminate the “new” smell, run the appliance empty, with
open doors, for 15 minutes:
Select the temperature:
• Press the “BAKE” button. Pilot light in the “BAKE” button
appears.
• The default temperature of 350°F will be shown blinking on the
display.
• Press on “+” to select a temperature of 500°F.
Select the cooking time:
• Press the “TIME” button. Pilot light in the “TIME” button
appears. In so doing, the temperature setting is entered in the
system.
• The default setting of “0:30” (30 minutes) will appear blinking on
the display.
• Press on the “-” button until the cooking time is set to 15 minutes.
• Press “START”. The appliance will beep and the oven will start.
• The time will be counted down in one-minute intervals.
• At the end of the cooking time, the appliance will beep three
times and the oven will turn off.
You may well observe smoke escaping from the oven. This
is normal and will progressively disappear with use.
Before first use
*according to model

5
Eng
BAKE
(the two heating elements operate with temperature control)
To cook all your dishes:
• Place your dishes in the main oven at the desired height.
• Close the door.
Select the temperature:
• Press the “BAKE” button. Pilot light in the “BAKE” button
appears.
• The default temperature of “350°F” will be shown blinking on the
display.
• Press the “+” or “-” buttons to select your temperature. The
temperature can be changed in 25°F increments.
• The display will continue to blink.
Select the cooking time:
• Press the “TIME” button. Pilot light in the “TIME” button
appears. In so doing, the temperature setting is entered in the
system.
• The default setting of “0:30” (30 minutes) will appear blinking on
the display.
• Adjust the cooking time according to your recipe by pressing
the “+” or “-” buttons.
• Press “START”. The appliance will beep and cooking will start.
• The time will be counted down in one-minute intervals.
• At the end of the cooking time, the appliance will beep three
times and cooking will stop.
• You can stop the cooking at any time by pressing the “STOP”
button.
Changing the temperature before confirming the programming:
• After setting the cooking time, press the “TEMP” button. Pilot
light in the “TEMP” button appears.
• The temperature already selected is shown blinking on the
display.
• Press the “+” or “-” buttons to select the new temperature.
• The display will continue to blink.
• Press “START”; the appliance will beep and cooking will start.

6
Eng
Changing the temperature during cooking:
• The cooking time is counting down.
• Press the “TEMP” button; pilot light in the “TEMP” button
appears. The current temperature setting will be displayed.
• Cooking continues.
• Press the “+” or “-” buttons to select the new temperature.
• Press the “TEMP” button again to enter the temperature in the
system.
• The display will show the remaining cooking time.
Changing the time during cooking:
• The cooking time is counting down.
• Press the “TIME” button; pilot light in the “TIME” button
appears. The time display will start to blink.
• Cooking continues.
• Set the new cooking time as desired by pressing the “+” or “-”
buttons.
• Press the “TIME” button again to enter the new time in the
system.
• The display will show the new remaining cooking time.
When the main compartment is in use, the top oven is
hot!
When the top compartment is in use, the main oven is
hot!

7
Eng
BROIL/Grill function
(For this setting only the top heating element is used. There are two grill settings: fast grilling,
“HI”, and slow grilling, “LO”)
For healthier cooking of your meat, sausages, etc.
• Place the broiling tray in the baking pan with the four corner
dimples facing up, such that the broiling surface is raised away
from the baking pan.
• Arrange your food on top of the broiling tray.
• Place trays with food on the shelf grill. The shelf should be
adjusted for a minimum 1 inch space between the food and the
top element.
• Close the door.
Choosing the grill setting:
• If desired, press the “BROIL” button. Pilot light in the “BROIL”
button appears.
• The display will show “HI”, the fast, default setting of the grill.
• Press the “-” button to reduce the grill temperature and “LO” will
appear on the display.
• The display will blink.
Setting the cooking time:
• Press the “TIME” button to confirm the grill setting. Pilot light in
the “TIME” button appears.
• The default setting of “0:15” (15 minutes) will appear blinking on
the display.
• Adjust the cooking time according to your recipe by pressing
the “+” or “-” buttons.
• Press “START”. The appliance will beep and cooking will start.
• The time will be counted down in one-minute intervals.
• At the end of the cooking time, the appliance will beep three
times and cooking will stop.
• You can stop the cooking at any time by pressing the “STOP”
button.

8
Eng
Changing the grill setting before confirming the programming:
• The cooking time has been set and is shown blinking on the
display.
• Press the “TEMP” button. Pilot light in the “TEMP” button
appears. The display will show the current grill setting.
• If it shows “HI”, press “-” to select “LO” and vice versa.
• The display will blink.
• Press “START”. The appliance will beep and cooking will start.
Changing the grill setting during cooking:
• The cooking time is counting down.
• Press the “TEMP” button; pilot light in the “TEMP” button
appears. The current grill setting will be displayed.
• Cooking continues.
• If it shows “HI”, press “-” to select “LO” and vice versa.
• The display will blink.
• Press the “TEMP” button again to enter the temperature in the
system.
• The display will again show the remaining cooking time.
Changing the time during cooking:
• The cooking time is counting down.
• Press the “TIME” button; pilot light in the “TIME” button
appears. The time display will start to blink.
• Cooking continues.
• Adjust the cooking time as desired by pressing the “+” or “-”
buttons.
• Press the “TIME” button again to enter the new time in the
system.
• The display will again show the remaining cooking time.

9
Eng
To toast any kind of bread to your taste
• Place your bread on the shelf grill, with the oven rack in the
upper slot, the grill turned upwards.
• Close the door.
Setting the speed of toasting:
• Press the “TOAST” button. Pilot light in the “TOAST” button
appears.
• There are 9 possible settings to deliver a result exactly to your
taste.
• The default setting, “4” will appear on the display.
• Press the “+” or “-” buttons to modify to your desired toasting
setting.
• Press “START”; the appliance will beep and toasting will start.
• The remaining time will be counted down in one-second
intervals.
• At the end of the cooking time, the appliance will beep three
times and toasting will stop.
• You can stop the toasting at any time by pressing the “STOP”
button.
TOAST function
(both heating elements are used)

10
Eng
To warm up your buns, croissants or any kind of bread. Can also
be used to cook foods like eggs or bacon!
• Place the food on the tray in the top oven.
WARMER function/Use of top oven
(This cooking mode can be used separately by pressing the “Warmer” button or while using
one of the other 3 cooking modes)
Using the top oven on its own for cooking or reheating:
• With the Warmer function, you cannot choose the cooking
temperature.
• The top heating element of the main oven is used.
• Close the door.
Setting the cooking time:
• Press the “WARMER” button; pilot light in the “WARMER”
button appears. The default reheat time, “0:15”, will be shown
blinking on the display.
• Adjust the cooking time in one second steps by pressing the “+”
or “-” buttons.
• Press “START”; the appliance will beep and reheating or
cooking will start.
• The time will be counted down in one-minute intervals.
• At the end of the cooking time, the appliance will beep three
times and reheating or cooking will stop.
• You can stop the cooking at any time by pressing the “STOP”
button.
Changing the time during cooking:
• The cooking time is counting down.
• Press the “TIME” button; pilot light in the “TIME” button
appears. The time display will start to blink.
• Reheating or cooking continues.
• Adjust the cooking time as desired by pressing the “+” or “-”
buttons.
• Press the “TIME” button again to enter the new time in the
system.
• Reheating or cooking continues for the new time required.

11
Eng
Using the top oven for cooking or reheating at the same time as
one of the other three cooking modes:
• In this case, the cooking settings (time and temperature, grill or
toasting setting) for the food in the main oven must be chosen
first.
• For each of these cooking modes, the top heating element of
the main oven is used, so that the top oven is heated.
In this case, the cooking time is determined according to
the food being cooked in the main oven. The oven will stop at
the end of this cooking time.
You will therefore need to keep an eye on the cooking or
reheating of the food in the top oven to ensure that they are not
over-cooked or reheated for too long.
Although the warming compartment may be used with the
other three cooking modes, please avoid using the warming
compartment if you are baking delicate items such as soufflés,
etc.
When the main compartment is in use, the top oven is hot!

12
Eng
Do not allow grease to accumulate in the appliance.
• Before cleaning or maintenance, disconnect the appliance and
allow it to cool.
• A quick wipe with a sponge is sufficient to clean the outside of
the appliance.
• Do not use cleaning products intended for metals (stainless
steel, copper, etc.).
• Clean the door, lacquered surfaces and translucent parts with a
damp sponge and a mild detergent.
Do not use aggressive cleaning products (especially soda
based oven cleaners), scouring sponges or abrasive pads.
• All accessories* (shelf grill, broiling and baking trays) should be
cleaned with water and detergent.
Do not wash the crumb tray drawer in the dishwasher.
• Keep the crumb tray in the appliance when it is in use.
• Do not touch the metallic part of the crumb tray while in use or
just after having used it.
• The crumb tray drawer should be cleaned in warm soapy water.
Cleaning and maintenance
*according to model
Bread tong

13
Eng
Cooking guide
The temperatures and times indicated are given for information only.
Cooking results may vary according to recipes, ingredients and dishes used.
Ingredients Function - T° Time Shelf position
Buns / Rolls /
Croissants / Bagels
(reaheated)
WARMER 5 - 10 minutes
French toast WARMER 5 reheat + 8 + retur-
ning + 4 minutes
Bread TOAST Depending on taste
Bagels TOAST Depending on taste
Cake BAKE (350° F) 30 - 40 minutes
Brownies BAKE (375° F) 40 minutes
Cookies BAKE (450° F) 10 - 20 minutes
Frozen pizza (1/2 lb) BAKE (475° F) 15 minutes
Frozen pizza (1 lb) BAKE (475° F) 30 minutes
Pizza fresh dough BAKE (350° F) 22 - 30 minutes
Depending on taste
Pizza pre-cooked
(reheated)
TOAST Depending on taste
Chicken baked BAKE (450° F) 80 - 85 minutes
2 Chicken legs BAKE (475° F) 40 - 45 minutes
Grilled sausages BROIL (HI) 10 - 15 minutes
(turn over frequently)
Bacon BROIL (HI) 5 reheat + 3 + retur-
ning + 1 min 30
2 pork chops BROIL (HI) 25 - 30 minutes (turn
at half cooking time)
English muffins BROIL (LO) Depending on taste
2 scrambled eggs WARMER
(superior compartment)
5 reheat + 3 min 30
to 4 cooking minutes
2 eggs WARMER
(superior compartment)
5 reheat + 4 min 30
cooking
Frozen lasagna BAKE (450° F)
BROIL (HI)
45 minutes +
4 minutes
4 melt cheese BAKE (375° F)
BROIL (HI)
6 minutes +
4 minutes
2
2
2
2
2
2
1
2
2
2
2
1
1
1
2

14
ENVIRONMENTAL PROTECTION
The packaging of your product is made of recyclable materials. Do not throw it out with your
usual garbage; take advantage of your local recycling program.
The approved after-sales service centers will accept your used appliance in order to dispose of
it in an environmentally friendly manner or you can take it to a specialized collection center pro-
vided for this purpose.
GUARANTEE
Guarantee limited to 1 year:
T-Fal guarantees this product against any fault in manufacturing or materials for one (1) year from
the date of purchase. If you find any defect during the year following the date of purchase, this
is the procedure to follow under the guarantee:
In Canada:
1)Take your appliance with your proof of purchase to the retailer from whom you purchased it
or
2)Take your appliance with your proof of purchase to your regional T-Fal approved service center.
3)T-Fal Canada undertakes to repair or replace, as the case may be, the defective part or product
free of charge, provided that the product is sent, postage paid, to:
T-Fal Canada
Subsidiary of the Groupe Seb Canada Inc.
455 Finchdene Square
Scarborough, Ontario M1X 1B7
with a proof of purchase and a letter describing the defect. Ensure that the product is well
packaged before dispatch. Before taking any steps, you should contact T-Fal customer service
by mail or by phone at 800.418.3325, in case the defect can be corrected without returning
the product.
In the U.S.A:
Do not send the product back to the shop where you bought it or to an after-sales service center.
The following procedure must be duly followed:
1)Contact our customer service to advise us of the problem and ensure that your problem is
solved as quickly as possible.
2)You are likely to be asked to return your product, carriage paid, accompanied by the proof of
purchase and a letter describing the nature of the problem to:
T-Fal After Sales Service Department
2121 Eden Road - Millville, NJ 08332
Ensure that the product is well packaged before dispatch.
NOTE: Claims for lost packages will only be accepted if the package has been insured or it has
been sent by a means allowing its progress to be traced.
3)After inspection and according to the terms of this guarantee, T-Fal Corp. undertakes to repair
or replace the defective parts or the product free of charge. The guarantee does not apply to a
product that has been modified or to damage caused by negligence during use, to bad
packaging or to bad handling during transport. Repairs not covered by this guarantee will be
carried out at the current costs of parts and labor, in addition to the cost of return. This
guarantee gives you specific rights and you may have other rights that vary from state to state.
THANK YOU FOR CHOOSING T-FAL.
If a problem continues or for any other information, contact customer services:
in the USA: 800 395 8325
in Canada: 800 418 3325
or www.t-fal.com
Eng

CONSIGNES DE SÉCURITÉ
• La sécurité de cet appareil est conforme aux règles techniques et aux normes en vigueur.
• Vérifiez que la tension du réseau correspond bien à celle indiquée sur l'appareil.
• Compte-tenu de la diversité des normes en vigueur, si l'appareil est utilisé dans un pays différent
de celui où il a été acheté, faites-le vérifier par un centre de service agréé.
• Utilisez un plan de travail stable à l'abri des projections d'eau.
• Ne pas porter ou déplacer l'appareil pendant l'utilisation.
• Ne pas déconnecter l'appareil en tirant sur le cordon.
INSTRUCTIONS SUR LE
CORDON D'ALIMENTATION
• Le fil électrique est court : de façon à réduire les risques de blessures qui pourraient survenir si
l’on s’emmêle ou si l’on trébuche dans un cordon plus long.
• Cet appareil a une fiche polarisée (une des broches est plus large que l’autre). Afin de réduire le
risque de choc électrique, cette fiche a été conçue pour être connectée à une prise de courant
d’une seule manière. Si la fiche ne s’insère pas correctement dans la prise de courant, inversez
les broches, si le problème persiste appelez un électricien qualifié. N’essayez pas de modifier la
prise d’aucune façon.
• Si vous utilisez une rallonge, certaines précautions s'imposent :
(a) La puissance électrique de votre rallonge doit être au moins aussi grande que celle de votre
four.
(b) La rallonge doit être placée hors de la portée des enfants et de telle façon que personne ne tré-
buche ou ne se blesse.
(c) La rallonge doit être munie d'un fil de terre si la fiche du cordon de votre appareil est équipée
d'une prise de terre.
PRÉCAUTIONS IMPORTANTES
Lors d 'utilisation d 'appareils électriques, un certain nombre de règles élémentaires doivent être
respectées, en particulier les suivantes :
• Lisez entièrement le mode d'emploi et suivez attentivement les instructions d'utilisation.
• L'appareil ne doit pas être utilisé par de jeunes enfants ou par des personnes infirmes sans super-
vision.
• Les jeunes enfants doivent être surveillés afin de s'assurer qu'ils ne jouent pas avec l'appareil.
• Ne pas laisser l'appareil à la portée des enfants.
• Ne jamais laisser l'appareil fonctionner sans surveillance, restez à proximité de l'appareil pendant
son utilisation.
• Ne pas utiliser l'appareil pour tout autre usage que celui pour lequel il a été conçu.
• Ne pas toucher les parties métalliques ou chaudes de l'appareil en cours d'utilisation, utilisez les
boutons et la poignée. Utilisez des gants de cuisine si nécessaire.
• Afin d'éviter les chocs électriques, ne plongez pas dans l'eau ou tout autre liquide le fil électrique,
la prise de courant ou l'appareil.
• Reliez toujours le cordon d’alimentation en priorité à l’appareil, puis branchez la prise.
• Pour mettre l’appareil hors tension, appuyez sur stop et débranchez la prise du mur.
• Débranchez l'appareil quand il ne sert pas et avant de le nettoyer. Attendre qu'il refroidisse pour le
nettoyer ou avant de le ranger.
• Ne pas utiliser l'appareil si :
- celui-ci a un cordon défectueux ou endommagé.
- l’appareil est tombé et présente des détériorations visibles ou des anomalies de fonctionnement.
Dans chacun de ces cas, l'appareil doit être envoyé au centre de service après-vente T-FAL agréé
Fra
15

16
le plus proche, afin d'éviter tout danger. Consultez la garantie.
• Cet appareil a une fiche polarisée (une des broches est plus large que l’autre) : afin de réduire le
risque de choc électrique, cette fiche a été conçue pour être connectée à une prise de courant
d’une seule manière. Si la fiche ne s’insère pas correctement dans la prise de courant, inversez
les broches. Si le problème persiste appelez un électricien qualifié. N’essayez pas de modifier la
prise d’aucune façon.
• L'utilisation d'accessoires qui ne sont pas recommandés par le fabricant peut être dangereuse.
• Ne pas laisser le cordon pendre dans le vide ou toucher les parties chaudes de l'appareil.
• Ne pas placer l'appareil sur, ou à proximité d'une source de chaleur (plaque de cuisson, four, cui-
sinière à gaz ou électrique, ...).
• Ne pas couvrir l'appareil pendant son fonctionnement.
• Le pain peut brûler, aussi l'appareil ne doit pas être utilisé à proximité ou en dessous de rideaux et
autres matériaux combustibles (étagères, meubles...). L'appareil doit être utilisé sous surveillance.
• Ne pas faire fonctionner l'appareil sous un meuble mural, une étagère, ou à proximité de matériaux
inflammables tels que : stores, rideaux, tentures...
S'il arrivait que certaines parties du produit s'enflamment, ne tentez jamais d’éteindre les flammes
avec de l'eau.
Etouffez les flammes externes au produit avec un linge humide. Ne tentez jamais d’ouvrir la porte
du four en cas d’incendie de celui-ci.
• Ne pas ranger de produits inflammables à proximité ou sous le meuble où est placé l'appareil.
• Ne pas mettre d’aliments de trop grande taille ni d’ustensiles en métal dans le four grille-pain car
ils pourraient s’enflammer ou créer un court circuit.
• Prenez d’extrêmes précautions si vous utilisez des plats dans d’autres matériaux que du métal ou
du verre compatible au four.
• Débranchez l'appareil si une anomalie de fonctionnement se produisait, après chaque utilisation,
avant de le changer de place et avant de le nettoyer.
• Ne pas utiliser de tampons métalliques, de nettoyants abrasifs. Des particules métalliques pour-
raient se détacher et toucher des parties électriques de l’appareil et provoquer un court-circuit.
• N'utilisez pas l'appareil à l’extérieur.
• Lorsqu’il n’est pas en fonctionnement, ne pas stocker dans l’appareil des accessoires autres que
ceux recommandés par le constucteur T-FAL.
• Ne placer aucun des matériaux suivants dans le four : papier, carton ou plastique.
• Ne pas l'utiliser comme source de chaleur ou de séchage.
• L'appareil doit être exclusivement en position debout, jamais couché ni incliné ou à l'envers.
• Ne rien introduire dans les ouïes de ventilation, ne les obstruez pas.
• Enlevez régulièrement les miettes du plateau ramasse-miettes. Ne couvrez pas le ramasse miet-
tes avec une feuille d'aluminium, cela causerait une surchauffe de l'appareil.
• Cet appareil a été conçu pour un usage domestique uniquement, toute utilisation professionnelle,
non appropriée ou non conforme au mode d'emploi n'engage ni la responsabilité, ni la garantie du
fabricant.
• Toutes les interventions autres que le nettoyage et l'entretien doivent être confiées au centre de ser-
vice agréé T-FAL le plus proches (voir liste jointe).
• Afin d'éviter tout risque d'accident domestique, d'incendie ou d'électrocution, aucune pièce ne peut
être réparée par l'utilisateur. La réparation doit être effectuée uniquement par le personnel qualifié
d'un centre de service agréé T-FAL.
GARDEZ PRÉCIEUSEMENT
CES INSTRUCTIONS
Fra

17
Fra
Caractéristiques de l’appareil
Avantages
1 Poignée d’ouverture du compartiment
réchauffant
2 Résistance supérieure
3 Tableau de bord
a) Ecran
b)Réglage de la température
c) Réglage du temps de cuisson
d)Bouton de réglage “+” ou “-”
e)Fonction BAKE, cuisson
f) Fonction WARMER, compartiment
supérieur
g)Fonction BROIL, gril
h)Fonction TOAST, grille-pain
i) Bouton START/STOP, marche/arrêt
4 Ouïes de ventilation
5 Résistance inférieure
6 Tiroir ramasse-miettes
7 Poignée d’ouverture du compartiment
principal
8 Pince à pain*
9 Plaque aluminium*, compartiment
supérieur
10 Parois aluminium*
11 Emplacements pour la grille
12 Grilloir aluminium*
13 Plaque aluminium*, compartiment
principal
14 Grille réversible*
Votre four grille-pain Avanté Elite vous offre les avantages suivants :
• 2 compartiments, pour davantage de polyvalence dans la cuisson et le réchauffage de tout type
de plats.
• Une capacité de 6 tranches, pour griller facilement vos toasts et vos bagels.
• Un four grille-pain multifonctions, pour cuire, réchauffer ou griller. Le compartiment
supérieur est le complément indispensable pour la préparation de repas complets !
• 2 positions de grille et une grille réversible vous permettent de varier la hauteur des grilles
et de placer parfaitement vos plats ou pains pour obtenir les résultats de cuisson souhaités.
• Un thermostat réglable de façon précise de 150°F à 500°F (par tranches de 25°F).
• Le tiroir ramasse-miettes se retire facilement en pressant sur sa poignée puis en tirant.
• Des plaques de cuisson pour préparer tout type de plats.
• Un grilloir pour la cuisson de vos viandes et vos aliments grillés.
• Un écran convivial, pour une utilisation facile et précise de l'électronique.
*selon modèle

18
Fra
• Déballez l’appareil et enlevez tous les autocollants.
• Lisez le mode d’emploi et suivez attentivement les instructions
d’utilisation.
• Retirez tous les accessoires* (grille, plaque, grilloir) et lavez-les
à l’eau chaude savonneuse. Rincez et séchez soigneusement.
• Déroulez complètement le cordon d’alimentation.
• Avec un linge humide, essuyez l’extérieur de l’appareil et
séchez.
• Branchez le four grille-pain. Un bip retentit.
Pour éliminer l’odeur de neuf, faites fonctionner votre appareil à
vide, portes ouvertes pendant 15 minutes :
Sélectionnez la température :
• Appuyez sur la touche “BAKE”. Le voyant de la touche “BAKE”
apparaît.
• La température par défaut, qui est de “350°F”, apparaît en
clignotant sur l’écran.
• Appuyez sur “+” pour choisir la température de 500°F.
Sélectionnez le temps de cuisson :
• Appuyez sur la touche “TIME”. Le voyant de la touche “TIME”
apparaît. Cela enregistrera la température choisie.
• Le temps de cuisson par défaut de “0:30” (30 minutes) apparaît
en clignotant sur l’écran.
• Réglez le temps de cuisson à 15 minutes en appuyant sur la
touche “-”.
• Appuyez sur “START”. Un bip retentit et le four se met en
marche.
• Le décompte se fait par minute.
• A la fin du temps de cuisson, 3 bips retentissent, le four s'arrête.
Vous pouvez constater que de la fumée s’échappe du four.
Ceci est normal et disparaîtra progressivement en cours
d’utilisation.
Avant la première utilisation
*selon modèle

19
Fra
Fonction BAKE
(les 2 éléments chauffants fonctionnent, avec régulation de la température)
Pour cuire toutes vos préparations :
• Insérez vos préparations dans le compartiment inférieur à la
hauteur souhaitée.
• Fermez la porte.
Sélectionnez la température :
• Appuyez sur la touche “BAKE”. Le voyant de la touche “BAKE”
apparaît.
• La température “350°F” apparaît par défaut sur l’écran, en
clignotant.
• Appuyez sur la touche “+” ou “-” pour sélectionner la
température désirée. Elle défile par pas de 25°F.
• L’affichage continue à clignoter.
Sélectionnez le temps de cuisson :
• Appuyez sur la touche “TIME”. Le voyant de la touche “TIME”
apparaît. Cette opération enregistre la température choisie.
• Le temps de cuisson par défaut de “0:30” (30 minutes) apparaît
en clignotant sur l’écran.
• Réglez le temps de cuisson en appuyant sur les touches “+” ou
“-”, selon la recette choisie.
• Appuyez sur “START”. Un bip retentit et la cuisson commence.
• Le décompte se fait par minute.
• A la fin du temps de cuisson, 3 bips retentissent, indiquant que
la cuisson est terminée.
• Vous pouvez arrêter à tout moment la cuisson, en appuyant sur
la touche “STOP”.
Changement de la température avant de valider la programmation :
• Après avoir choisi le temps de cuisson, appuyez sur la touche
“TEMP”. Le voyant de la touche “TEMP” apparaît.
• La température précédemment sélectionnée s’affiche à l’écran
en clignotant.
• Appuyez sur la touche “+” ou “-” pour sélectionner la nouvelle
température.
• L’affichage continue à clignoter.
• Appuyez sur “START”, un bip retentit et la cuisson commence.

20
Fra
Changement de la température en cours de cuisson :
• Le décompte du temps de cuisson est en cours.
• Appuyez sur la touche “TEMP” et la température
précédemment choisie s’affiche à l’écran. Le voyant de la
touche “TEMP” apparaît.
• La cuisson continue.
• Appuyez sur la touche “+” ou “-” pour sélectionner la nouvelle
température.
• Appuyez à nouveau sur la touche “TEMP” pour enregistrer.
• Le temps de cuisson restant apparaît à l'écran.
Changement du temps en cours de cuisson :
• Le décompte du temps de cuisson est en cours.
• Appuyez sur la touche “TIME”, l’affichage du temps clignote.
• La cuisson continue. Le voyant de la touche “TIME” apparaît.
• Réglez le nouveau temps de cuisson en appuyant sur les
touches “+” ou “-”, tel que désiré.
• Appuyez à nouveau sur la touche “TIME” pour enregistrer.
• Le nouveau temps de cuisson restant apparaît à l'écran.
Lors de l’utilisation du compartiment principal, le
compartiment supérieur est chaud !
Lors de l’utilisation du compartiment supérieur, le
compartiment principal est chaud !

21
Fra
Fonction BROIL/Gril
(Seul l’élément chauffant supérieur fonctionne. Il y a 2 puissances de gril : “HI” pour un
grillage rapide et “LO” pour un grillage plus lent).
Pour cuisson plus saine de vos viandes, saucisses, etc.
• Mettez le plateau d'égouttage, aux quatre coins retroussés vers
le haut, dans le plat à griller, de sorte que la surface à griller ne
touche pas le plat.
• Disposez vos aliments sur le grilloir.
• Placez l’ensemble sur la grille du four grille-pain. L’écart entre les
aliments et la résistance supérieure doit être d’au moins 2 cm.
• Fermez la porte.
Réglage de la puissance de gril :
• Sélectionnez la touche “BROIL”. Le voyant de la touche “BROIL”
apparaît.
• Le réglage par défaut, “HI” (grillage rapide), s’affiche à l’écran.
• Si vous désirez réduire la température du gril, appuyez sur la
touche “-” et “LO” apparaît à l’écran.
• L’affichage clignote.
Réglage du temps de cuisson :
• Appuyez sur la touche “TIME” pour confirmer le niveau de
grillage. Le voyant de la touche “TIME” apparaît.
• Le temps de cuisson par défaut “0:15” (15 minutes) apparaît en
clignotant sur l’écran.
• Réglez le temps de cuisson en appuyant sur les touches “+” ou
“-” selon la recette choisie.
• Appuyez sur “START”. Un bip retentit, la cuisson commence.
• Le décompte se fait par minute.
• À la fin du temps de cuisson, 3 bips retentissent, indiquant que
la cuisson est terminée.
• Vous pouvez arrêter à tout moment la cuisson, en appuyant sur
la touche “STOP”.

22
Fra
Changement de la puissance de gril avant de valider la
programmation :
• Le temps de cuisson choisi clignote à l’écran.
• Appuyez sur la touche “TEMP” et la puissance de gril
précédemment choisie s’affiche à l’écran. Le voyant de la
touche “TEMP” apparaît.
• Si l’indicatif “HI” apparaît, appuyez sur “-” pour choisir “LO”, ou
vice-versa.
• L’affichage clignote.
• Appuyez sur “START”. Un bip retentit, la cuisson commence.
Changement de la puissance de gril pendant la cuisson :
• Le décompte du temps de cuisson est en cours.
• Appuyez sur la touche “TEMP” et la puissance de gril
précédemment choisie s’affiche à l’écran. Le voyant de la
touche “TEMP” apparaît.
• La cuisson continue.
• Si l’indicatif “HI” apparaît, appuyez sur “-” pour choisir “LO”, ou
vice-versa.
• L’affichage clignote.
• Appuyez à nouveau sur la touche “TEMP” pour enregistrer.
• Le temps de cuisson restant apparaît à l’écran.
Changement du temps pendant la cuisson :
• Le décompte du temps de cuisson est en cours.
• Appuyez sur la touche “TIME”, l’affichage du temps se met à
clignoter. Le voyant de la touche “TIME” apparaît.
• La cuisson continue.
• Réglez le temps de cuisson en appuyant sur les touches “+” ou
“-”, tel que désiré.
• Appuyez à nouveau sur la touche “TIME” pour enregistrer.
• Le temps de cuisson restant apparaît à l’écran.

23
Fra
Pour griller tout type de pains à votre goût
• Placez votre pain sur la grille, dans la glissière supérieure, grille
vers le haut.
• Fermez la porte.
Réglage du niveau de grillage :
• Sélectionnez la touche “TOAST”. Le voyant de la touche
“TOAST” apparaît.
• Il y a 9 niveaux de grillage, pour un résultat parfaitement adapté
à votre goût.
• Le niveau de grillage “4” apparaît par défaut. Appuyez sur la
touche “+” ou “-” pour sélectionner le niveau de grillage désiré.
• Appuyez sur “START”, un bip retentit, le grillage commence.
• Le décompte du temps restant se fait par seconde.
• A la fin du temps de cuisson, 3 bips retentissent, indiquant que
le grillage est terminé.
• Vous pouvez arrêter à tout moment le grillage, en appuyant sur
la touche “STOP”.
Fonction TOAST
(les 2 éléments chauffants fonctionnent)

24
Fra
Pour réchauffer vos petits pains, croissants et tous autres types
de pain. Vous pouvez également y cuire des aliments tels que des
œufs ou du bacon !
• Placez les aliments sur la plaque et placez celle-ci dans le
compartiment supérieur.
Fonction WARMER/Utilisation du compar-
timent supérieur
(Ce mode de cuisson peut être utilisé de façon indépendante, en appuyant sur la touche
Warmer, ou pendant l’utilisation de l'un des 3 autres modes de cuisson)
Utilisation indépendante du compartiment
supérieur pour cuire ou réchauffer :
• En fonction Warmer, vous ne pouvez pas choisir la température
de cuisson.
• L’élément chauffant supérieur du compartiment principal
fonctionne.
• Fermez la porte.
Réglage du temps de cuisson :
• Appuyez sur la touche “WARMER”, le temps de réchauffage
“0:15” clignote par défaut. Le voyant de la touche “WARMER”
apparaît.
• Réglez le temps de cuisson seconde par seconde en appuyant
sur les touches “+” ou “-”.
• Appuyez sur “START”, un bip retentit, le réchauffage ou la
cuisson commence.
• Réglez le temps de cuisson en appuyant sur les touches “+” ou
“-”, tel que désiré.
• A la fin du temps de cuisson, 3 bips retentissent, le réchauffage
ou la cuisson est terminé.
• Vous pouvez arrêter à tout moment la cuisson, en appuyant sur
la touche “STOP”.
Changement du temps pendant la cuisson :
• Le décompte du temps de cuisson est en cours.
• Appuyez sur la touche “TIME”, l’affichage du temps clignote.Le
voyant de la touche “TIME” apparaît.
• Le réchauffage ou la cuisson continue.
• Réglez le temps de cuisson en appuyant sur les touches “+” ou
“-” selon votre souhait.
• Appuyez à nouveau sur la touche “TIME” pour valider.
• Le réchauffage ou la cuisson reprend à partir du nouveau temps
demandé.

25
Fra
Utilisation du compartiment supérieur pour cuire ou réchauffer
pendant l’utilisation de l’un des 3 autres modes de cuisson :
• Dans ce cas il faut d’abord choisir les paramètres de cuisson
(temps et température, puissance de gril ou niveau de grillage)
en fonction de l’aliment qui sera placé dans le compartiment
principal.
• Pour chacun de ces modes de cuisson, l’élément chauffant
supérieur du compartiment principal fonctionne, et permet
donc de chauffer le compartiment supérieur.
Dans ce cas, le temps de cuisson est déterminé en
fonction de l’aliment placé dans le compartiment principal. Le
four s’arrêtera à la fin de ce temps de cuisson.
Veillez donc à surveiller la cuisson ou le réchauffage des
aliments placés dans le compartiment supérieur, afin qu’ils ne
soient pas trop cuits ou réchauffés.
Bien que le compartiment supérieur puisse être utilisé en même
temps que les trois autre modes de cuisson, soyez prudents si
vous utilisez le compartiment supérieur alors que vous cuisez
dans le compartiment principal des aliments délicats, par
exemple des soufflés.
Lors de l’utilisation du compartiment principal, le compartiment
supérieur est chaud !

26
Fra
Ne laissez pas la graisse s’accumuler dans l’appareil.
• Avant tout entretien ou nettoyage, débranchez et laissez
refroidir l’appareil.
• Un simple coup d’éponge suffit pour nettoyer l’extérieur de
l’appareil.
• N’utilisez pas de produits d’entretien destinés aux métaux (pour
l’acier inoxydable, le cuivre, etc.).
• Nettoyez la porte, les surfaces laquées et les pièces translucides
avec une éponge humide additionnée de détergent doux.
N’utilisez ni produit d’entretien agressif (notamment les
produits de nettoyage pour le four à base de bicarbonate de
soude), ni tampons métalliques ou abrasifs.
• Tous les accessoires* (grille, plat, grilloir) se nettoient à l'eau
additionnée de détergent.
Ne lavez pas le tiroir ramasse-miettes au lave-vaisselle.
• Laissez le tiroir ramasse-miettes en place pendant que l’appareil
est en marche.
• Ne touchez pas à la partie métallique du tiroir ramasse-miettes
pendant l’utilisation ou immédiatement après.
• Le tiroir ramasse-miettes se nettoie avec de l’eau chaude
savonneuse.
Nettoyage et entretien
*selon modèle
Pince à pain

27
Fra
Guide de cuisson
Les températures et temps indiqués sont donnés à titre indicatif.
Les résultats de cuisson varient selon les recettes, les plats utilisés ou les ingrédients.
Ingredients Fonction - T° Temps Niveau de grille
Buns / Rolls /
Croissants / Bagels
(réchauffage)
WARMER 5 - 10 minutes
Pain perdu WARMER 5 préchauffage + 8 +
retourner + 4 minutes
Pain TOAST Selon vos goûts
Bagels TOAST Selon vos goûts
Gâteau BAKE (350° F) 30 - 40 minutes
Brownies BAKE (375° F) 40 minutes
Cookies BAKE (450° F) 10 - 20 minutes
Pizza surgelée (1/2 lb) BAKE (475° F) 15 minutes
Pizza surgelée (1 lb) BAKE (475° F) 30 minutes
Pizza fraîche BAKE (350° F) 22 - 30 minutes
Selon vos goûts
Pizza précuite
(réchauffage)
TOAST Selon vos goûts
Poulet au four BAKE (450° F) 80 - 85 minutes
2 cuisses de poulet BAKE (475° F) 40 - 45 minutes
Saucisses grillées BROIL (HI) 10 - 15 minutes (tour-
nez régulièrement)
Lard BROIL (HI) 5 préchauffage + 3 +
retourner + 1 min 30
2 côtes de porc BROIL (HI) 25 - 30 minutes (tour-
nez à mi-cuisson)
Muffins à l’anglaise BROIL (LO) Selon vos goûts
2 œufs brouillés WARMER
(superior compartment)
5 préchauffage +
3 min 30 à 4 minutes
2 œufs sur le plat WARMER
(superior compartment)
5 préchauffage +
4 min 30 de cuisson
Lasagnes surgelées BAKE (450° F)
BROIL (HI)
45 minutes +
4 minutes
4 tranches
de fromage fondus
BAKE (375° F)
BROIL (HI)
6 minutes +
4 minutes
2
2
2
2
2
2
1
2
2
2
2
1
1
1
2

28
PROTECTION DE L'ENVIRONNEMENT
L’emballage de votre produit est composé de matériaux recyclables, ne le jetez pas dans votre
poubelle habituelle, mais apportez-le dans un centre de collecte sélective mis en place à proxi-
mité.
Les centres de service après-vente agréés vous reprendront votre appareil usagé afin de procé-
der à sa destruction dans le respect des règles de l’environnement ou apportez-le au point de
collecte spécialisé prévu à cet effet.
GARANTIE
Garantie limitée 1 an :
T-Fal garantit ce produit contre tout vice de fabrication et de matériaux pendant un (1) an à
partir de la date d'achat. Si vous découvrez une défectuosité pendant l’année suivant la date
d’achat, voici la démarche à suivre dans le cadre de la garantie :
Au Canada :
1)Rapportez votre appareil, avec votre preuve d’achat au détaillant qui vous l’a vendu.
Ou
2)Apportez votre appareil, avec votre preuve d’achat, au centre de service autorisé T-Fal de votre
région.
3)T-Fal Canada s’engage à réparer ou remplacer, selon le cas, la pièce ou le produit défectueux
sans frais à la condition que le produit soit envoyé en port payé à :
T-Fal Canada
Filiale du Groupe Seb Canada Inc.
455 Finchdene Square
Scarborough, Ontario M1X 1B7
avec une preuve d’achat et une lettre décrivant la nature de la défectuosité. Assurez-vous de bien
emballer le produit avant de l’expédier. Avant de prendre quelle que mesure que ce soit, vous
devriez communiquer avec le service à la clientèle de T-Fal, par courrier ou par téléphone, au cas
où il serait possible de corriger la défectuosité sans renvoyer le produit.
Aux États-Unis :
Ne renvoyez pas le produit dans le magasin ou vous l’avez acheté, ni dans un centre après-vente.
La procédure suivante doit être dûment respectée :
1)Contactez notre service à la clientèle afin de nous alerter et nous permettre d’assurer la solu-
tion la plus rapide à votre problème.
2)Il vous sera vraisemblablement demandé de retourner votre produit, avec tous les frais d’envois
prépayés, accompagné de la preuve d’achat et d’une lettre décrivant la nature du problème à :
T-Fal After Sales Service Department
2121 Eden Road - Millville, NJ 08332
Assurez-vous de bien emballer le produit lors de l’envoi.
NOTE : Les réclamations pour paquet perdu ne seront acceptées que si le paquet a été assuré
ou s’il a été expédié par un moyen permettant le suivi de l’envoi.
3)Après inspection, et selon les termes de cette garantie, T-Fal Corp. s’engage à réparer ou rem-
placer les pièces défectueuses ou le produit sans frais. La garantie ne s’applique pas à un pro-
duit modifié ou à des dommages dus à des négligences lors de l’utilisation, à un
mauvais emballage ou à une mauvaise manipulation durant le transport. Les réparations non
couvertes par cette garantie seront effectuées aux coûts en vigueur des pièces et de la
main-d’œuvre, en plus des frais de retour. Cette garantie vous donne des droits spécifiques et
vous pouvez avoir d’autres droits qui varient d’un État à l’autre.
MERCI D’AVOIR FAIT CONFIANCE A T-FAL.
Si un problème persiste, ou pour toute autre information, contactez le service clientèle :
aux États-Unis : 800 395 8325
au Canada : 800 418 3325
ou www.t-fal.com
Fra

CONSEJOS DE SEGURIDAD
• La seguridad de este aparato es conforme a las reglas técnicas y a las normas en vigor.
• Verifique que la tensión de la instalación eléctrica corresponda realmente a la indicada en el
aparato.
• Debido a la diversidad de las normas en vigor, si el aparato es utilizado en un país diferente
al de su compra, deberá probarlo en un Centro de Servicio Autorizado.
• Utilice una superficie de trabajo estable protegida de las salpicaduras de agua.
• No lleve o desplaze el aparato durante su utilización.
• No desconecte el aparato tirando del cable.
INSTRUCCIONES SOBRE EL
CABLE DE ALIMENTACIÓN
• El cable eléctrico es corto de manera que reduzca los riesgos de accidentes que podrían
producirse si nos enredáramos o tropezáramos con uno más largo.
• Este aparato tiene un enchufe polarizado (una de las patillas es más ancha que la otra). Para
reducir el riesgo de choque eléctrico, este enchufe ha sido diseñado para ser conectado a
una toma de corriente de un solo modo. Si el enchufe no encaja totalmente en la toma de
corriente, invierta el enchufe; si el problema persiste, póngase en contacto con un
electricista calificado. No intente modificar la toma de ninguna forma.
• Si utiliza un cable de extensión, son necesarias algunas precauciones:
(a) La tensión eléctrica del cable de extensión debe ser la misma que la de su aparato.
(b) El cable de extensión debe estar fuera del alcance de los niños, y de manera que nadie
tropiece o se lesione.
(c) La extensión debe tener un conductor de tierra, si el enchufe del cable de su aparato está
equipado con un enchufe de tierra.
PRECAUCIONES IMPORTANTES
Durante la utilización de aparatos eléctricos, se deben respetar un cierto número de reglas
elementales, especialmente las siguientes:
• Está prohibido el uso de este aparato por parte de niños y de personas incapaces sin la
oportuna vigilancia.
• Hay que prestar mucha atención cuando el aparato es utilizado por niños o está cerca de
ellos.
• Lea todo el modo de empleo y siga atentamente las instrucciones de uso.
• No deje el aparato al alcance de los niños.
• No deje nunca el aparato funcionando sin vigilar y quédese cerca del aparato durante su
uso.
• No utilice el aparato para otro uso que no sea para el que se ha diseñado.
• No toque las partes metálicas o calientes del aparato durante el uso, utilice los botones y el
asa. Utilice guantes de cocina si es necesario.
• Con el fin de evitar los choques eléctricos, no introduzca en el agua o en cualquier otro
líquido el cable eléctrico, la toma de corriente o el aparato.
• Conecte siempre primero el cable de alimentación al aparato, y enchufe la toma.
• Para desconectar el aparato, presionar en stop y desenchufe la toma de la pared.
• Desenchufe el aparato cuando no lo utilice y antes de limpiarlo. Esperar a que se enfríe
antes de limpiarlo y guardarlo.
• No utilice el aparato si:
- tiene un cable defectuoso,
- el aparato se ha caído y presenta deterioros visibles o anomalías de funcionamiento.
En este caso, se debe llevar el aparato al Centro de Servicio Autorizado postventa T-FAL más
Esp
29

30
próximo con el fin de evitar cualquier peligro.
Consultar la garantía.
• Este aparato tiene un enchufe polarizado (una de las patillas es más ancha que la otra): Para
reducir el riesgo de choque eléctrico, este enchufe se ha diseñado con el fin de conectarse a
una toma de corriente de un solo modo. Si el enchufe no encaja totalmente en la toma de
corriente, invierta el enchufe. Si el problema continúa llame a un electricista calificado. No
intente modificar la toma de ninguna manera.
• El uso de accesorios que no son recomendados por el fabricante puede ser peligroso.
• No deje el cable colgando en el vacío y que toque las partes calientes del aparato.
• No coloque el aparato sobre, o cerca de una fuente de calor (placa eléctrica, horno, quema-
dores caliente, eléctricos o de gas, ...).
• No tape el aparato durante su funcionamiento.
• El pan puede quemar, no utilice el aparato cerca o debajo de cortinas u otros materiales
combustibles (anaqueles, muebles…). Se debe prestar atención cuando el aparato es
utilizado.
• No haga funcionar el aparato bajo un mueble de pared, en una estantería o próximo a
materiales inflamables tales como: cortinas, estores, tapicerías...
• Si algunas partes del aparato se inflaman, no intente nunca apagarlas con agua.
• No guarde productos inflamables cerca o debajo del mueble donde se ha colocado el
aparato.
• No ponga alimentos demasiado grandes ni utensilios de metal en el horno toaster oven ya
que podrían inflamarse o crear un cortocircuito.
• Tome todas las precauciones necesarias si utiliza moldes de otros materiales que no sean
metal o cristal compatible con el horno.
• Desenchufe el aparato si una anomalía de funcionamiento ocurriese, después de cada
utilización, antes de cambiarlo de lugar y antes de limpiarlo.
• No utilice una esponja metálica o limpiadores abrasivos. Partículas metálicas podrían
despegarse y tocar las partes eléctricas del aparato provocando un cortocircuito.
• Solo utilice el aparato dentro de casa.
• Cuando no esté funcionando, no almacene en el aparato otros accesorios que no sean los
recomendados por el fabricante T-FAL.
• No coloque ninguno de las materiales siguientes en el horno: papel, cartón o plástico.
• No lo Utilice como fuente de calor o de secado.
• El aparato debe estar exclusivamente de pie, nunca tumbado, inclinado o al revés.
• No introduzca nada en las aperturas de ventilación, no deben ser obstruidas.
• Retire con frecuencia las migas de la bandeja recoge-migas. No cubra el recogemigas con
una hoja de aluminio, esto causaría un sobrecalentamiento del aparato.
• Este aparato ha sido fabricado solo para uso doméstico, cualquier uso profesional no
apropiado o no conforme al modo de empleo no compromete la responsabilidad ni la
garantía del fabricante.
• Todas las intervenciones que no sean la limpieza y el mantenimiento deben realizarse en el
Centro de Servicio Autorizado T-FAL más próximo (ver lista adjunta).
• Con el fin de evitar cualquier accidente doméstico, de incendio o de electrocución, el usuario
no debe reparar ninguna pieza. La reparación debe realizarla solamente el personal calificado
de un Centro de Servicio Autorizado T-FAL.
CONSERVE CUIDADOSAMENTE
ESTAS INSTRUCCIONES
Esp

31
Características del aparato
Ventajas
1 Asa de apertura integrada de la cavidad
de calentamiento
2 Resistencia superior
3 Cuadro de mandos
a) Pantalla
b)Ajuste de la temperatura
c) Ajuste del tiempo de cocción
d)Botón de ajuste “+” o “-”
e)Función BAKE, cocción
f) Función WARMER, cavidad superior
g)Función BROIL, parrilla
h)Función TOAST, tostar pan
i) Interruptor START/STOP
4 Entradas de ventilación
5 Resistencia inferior
6 Bandeja recoge-migas
7 Asa de apertura integrada de la cavidad
principal
8 Pinza*
9 Fuente aluminium*, cavidad superior
10 Paredes aluminium*
11 Ranura de parrilla
12 Gratinador aluminium*
13 Fuente aluminium*, cavidad principal
14 Parrilla reversible*
El tostador oven Avanté Elite le ofrece las siguientes ventajas:
• 2 cavidades, para mayor polivalencia en la cocción y el calentamiento de cualquier plato.
• Una capacidad 6 rebanadas, para tostar fácilmente las tostadas o bagels.
• Un tostador oven multifunciones, para cocer, calentar o tostar. La cavidad superior es el
complemento indispensable para comidas completas.
• 2 posiciones de parrilla, y una parrilla reversible: para adaptar perfectamente la posición de
sus platos o panes a los resultados de cocción deseados.
• Un termostato ajustable de manera precisa de 150°F a 500°F (precisión de 25°F).
• La bandeja recoge migas se retira facilmente presionando y sacando su asa.
• Fuentes de cocción para cualquier tipo de plato.
• Un gratinador para cocer carnes y parilladas.
• Una pantalla de fácil manejo, para un uso sencillo y preciso de la electrónica.
*según modelo
Esp

32
Esp
• Desembalar el aparato y quitar todos los adhesivos.
• Leer el modo de empleo y seguir atentamente las instrucciones
de uso.
• Retirar todos los accesorios* (parrilla, fuente, gratinador) y
lavarlos con agua caliente y jabón. Aclarar y secar
cuidadosamente.
• Desenrollar completamente el cable.
• Con un paño húmedo, limpiar el exterior del aparato y secar.
• Enchufar. Sonará un bip.
Para eliminar el olor a nuevo, poner en marcha el aparato en
vacío y con las puertas abiertas durante 15 minutos:
Seleccionar la temperatura:
• Presionar la tecla “BAKE”. El indicador luminoso de la tecla
“BAKE” se enciende.
• La temperatura “350°F” aparecerá por defecto parpadeando en
la pantalla.
• Presionar “+” para elegir la temperatura de 500°F.
Seleccionar el tiempo de cocción:
• Presionar la tecla “TIME”. El indicador luminoso de la tecla
“TIME” se enciende. Esta operación validará la temperatura.
• En la pantalla, “0:30” parpadeará por defecto (30 minutos).
• Ajustar el tiempo de cocción, presionando la tecla “-” hasta
15 minutos.
• Presionar en “START”. Sonará un bip y el horno se pondrá en
funcionamiento.
• El descuento se hace por minutos.
• Cuando el tiempo de cocción termine, sonarán 3 bips y el horno
se parará.
Podrá notar que sale humo del horno. Esto es normal y
desaparecerá progresivamente con el uso.
Antes del primer uso
*según modelo

33
Función BAKE
(les 2 elementos de calentamiento funcionan, con ajuste de temperatura)
Para cocer todas sus preparaciones:
• Introducir las preparaciones en la cavidad inferior a la altura
deseada.
• Cerrar la puerta.
Seleccionar la temperatura:
• Presionar la tecla “BAKE”. El indicador luminoso de la tecla
“BAKE” se enciende.
• La temperatura “350°F” aparecerá por defecto, parpadeando en
la pantalla.
• Presionar la tecla “+” o “-” para seleccionar la temperatura. Pasa
por unidades de 25°F.
• La imagen parpadeará.
Seleccionar el tiempo de cocción:
• Presionar la tecla “TIME”. El indicador luminoso de la tecla
“TIME” se enciende. Esta operación validará la temperatura.
• En la pantalla “0:30” parpadeará por defecto (30 minutos).
• Ajustar el tiempo de cocción, presionando las teclas “+” o “-”
según la receta.
• Presionar en “START”. Sonará un bip y empezará la cocción.
• El descuento se hace por minutos.
• Cuando el tiempo de cocción termine, sonarán 3 bips y la
cocción habrá terminado.
• Podrá parar en cualquier momento la cocción, presionando la
tecla “STOP”.
Cambio de la temperatura antes de validar la programación:
• El tiempo de cocción se determina presionando la tecla “TEMP”.
El indicador luminoso de la tecla “TEMP” se enciende.
• La temperatura seleccionada anteriormente se visualiza en la
pantalla parpadeando.
• Presionar la tecla “+” o “-” para seleccionar la nueva
temperatura.
• La imagen parpadeará.
• Presionar en “START”, sonará un bip y empezará la cocción.
Esp

34
Esp
Cambio de la temperatura durante la cocción:
• El descuento del tiempo de cocción está en curso.
• Presionar la tecla “TEMP”, el indicador luminoso de la tecla
“TEMP” se enciende. Entonces la temperatura seleccionada
anteriormente se visualizará.
• La cocción continuará.
• Presionar la tecla “+” o “-” para seleccionar la nueva
temperatura.
• Presionar de nuevo la tecla “TEMP” para validar.
• El tiempo de cocción restante aparece en la pantalla.
Cambio de tiempo durante la cocción:
• El descuento del tiempo de cocción está en curso.
• Presionar la tecla “TIME”, la imagen del tiempo parpadeará.
El indicador luminoso de la tecla “TIME” se enciende.
• La cocción continuará.
• Ajustar el nuevo tiempo de cocción a su elección, presionando
las teclas “+” o “-”.
• Presionar de nuevo la tecla “TIME” para validar.
• El nuevo tiempo de cocción restante aparecerá en la pantalla.
Cuando la cavidad principal es utilizada, la cavidad
superior está caliente !
Cuando la cavidad superior es utilizada, la cavidad
principal está caliente !

35
Función BROIL/Gril
(El elemento superior de calentamiento funciona. Tiene 2 potencias de parrilla: parrilla fuerte
“HI” y parrilla suave “LO”)
Para una cocción más sana de sus carnes, salchichas...
• Coloque la charola para asar sobre el molde para hornear, con
los cuatro orificios de las esquinas viendo hacia arriba;así la
superficie de asado se separa del molde.
• Poner los alimentos en el gratinador.
• Introducirlo todo en la parrilla. La distancia entre los alimentos y
la resistencia superior debe ser de 2 cm como mínimo.
• Cerrar la puerta.
Ajuste de la potencia de la parrilla:
• Seleccionar la tecla “BROIL”. El indicador luminoso de la tecla
“BROIL” se enciende.
• En la pantalla se visualizará “HI” que corresponde al nivel de
parrilla más fuerte, por defecto.
• Presionar la tecla “-” y aparecerá “LO” en la pantalla, para
reducir la temperatura de la parrilla.
• La imagen parpadeará.
Ajuste del tiempo de cocción:
• Presionar la tecla “TIME” para confirmar el nivel de tostación.
El indicador luminoso de la tecla “TIME” se enciende.
• En la pantalla “0:15” parpadeará por defecto (15 minutos).
• Ajustar el tiempo de cocción, presionando las teclas “+” o “-”
según la receta.
• Presionar en “START”. Sonará un bip y empezará la cocción.
• El descuento se hace por minutos.
• Cuando el tiempo de cocción termine, sonarán 3 bips y la
cocción habrá terminado.
• Podrá parar en cualquier momento la cocción, presionando la
tecla “STOP”.
Esp

36
Esp
Cambio de potencia de la parrilla antes de validar la
programación:
• El tiempo de cocción está determinado, parpadeará en la
pantalla.
• Presionar la tecla “TEMP”. El indicador luminoso de la tecla
“TEMP” se enciende. En la pantalla se visualizará la potencia de
la parrilla seleccionada anteriormente.
• Si el indicativo “HI” aparece, presionar “-” para elegir “LO”.
Y viceversa.
• La imagen parpadeará.
• Presionar en “START”. Sonará un bip y empezará la cocción.
Cambio de la potencia de la parrilla durante la cocción:
• El descuento del tiempo de cocción está en curso.
• Presionar la tecla “TEMP”, el indicador luminoso de la tecla
“TEMP” se enciende. Entonces la potencia de la parrilla
seleccionada anteriormente se visualizará.
• La cocción continuará.
• Si el indicativo “HI” aparece, presionar “-” para elegir “LO”.
Y viceversa.
• La imagen parpadeará.
• Presionar de nuevo la tecla “TEMP” para validar.
• El tiempo de cocción restante aparecerá en la pantalla.
Cambio del tiempo durante la cocción:
• El descuento del tiempo de cocción está en curso.
• Presionar la tecla “TIME”, la imagen del tiempo parpadeará. El
indicador luminoso de la tecla “TIME” se enciende.
• La cocción continua.
• Ajustar el tiempo de cocción a su elección, presionando las
teclas “+” o “-”.
• Presionar de nuevo la tecla “TIME” para validar.
• El tiempo de cocción restante aparecerá en la pantalla.

37
Para tostar cualquier pan que elija
• Colocar el pan en la parrilla, en la ranura superior, parrilla hacia
arriba.
• Cerrar la puerta.
Ajuste del nivel de tostado:
• Seleccionar la tecla “TOAST”. El indicador luminoso de la tecla
“TOAST” se enciende.
• Hay 9 niveles de tostado, para un resultado perfectamente
adaptado a su elección.
• El nivel de tostado “4” aparecerá por defecto. Presionar la tecla
“+” o “-” para seleccionar el nivel de tostado deseado.
• Presionar en “START”, sonará un bip y la tostación empezará.
• El tiempo restante se descuenta por segundos.
• Cuando el tiempo termine, sonarán 3 bips y el tostado habrá
terminado.
• Podrá parar el tostado en cualquier momento, presionando la
tecla “STOP”.
Función TOAST
(los 2 elementos de calentamiento funcionan)
Esp

38
Esp
Para calentar buns, croissants y cualquier tipo de pan. ¡También
puede cocinar alimentos como huevos o bacon!
• Poner los alimentos en la cavidad superior.
Función WARMER/Utilización de la cavidad
superior
(Este modo de cocción se puede utilizar de manera independiente, presionando la tecla
Warmer, o durante la utilización de uno de los 3 modos de cocción)
Utilización independiente de la cavidad superior para cocinar o
calentar:
• En función Warmer, no podrá elegir la temperatura de cocción.
• El elemento superior de calentamiento de la cavidad principal
funcionará.
• Cerrar la puerta.
Ajuste del tiempo de cocción:
• Presionar la tecla “WARMER”, el tiempo de calentamiento
“0:15” parpadeará por defecto. El indicador luminoso de la tecla
“WARMER” se enciende.
• Ajustar el tiempo de calentamiento presionando las teclas “+” o
“-”, pasa por segundo.
• Presionar en “START”, sonará un bip y el calentamiento o la
cocción empezará.
• El descuento se hace por minutos.
• Cuando termine el tiempo de cocción, sonarán 3 bips y el
calentamiento o la cocción habrá terminado.
• Podrá parar la cocción en cualquier momento, presionando la
tecla “STOP”.
Cambio del tiempo durante la cocción:
• El descuento del tiempo está en curso.
• Presione la tecla “TIME”, el indicador luminoso de la tecla
“TIME” se enciende. La visualización del tiempo parpadeará.
• El calentamiento o la cocción continuará.
• Ajustar el tiempo de cocción a su elección, presionando las
teclas “+” o “-” .
• Presionar de nuevo la tecla “TIME” para validar.
• El calentamiento o la cocción empezará de nuevo a partir del
tiempo solicitado.

39
Utilización de la cavidad superior para cocinar o calentar durante
la utilización de uno de los 3 modos de cocción:
• En este caso, habrá que elegir primero los parámetros de
cocción (tiempo y temperatura, potencia de parrilla o nivel de
tostación) en función del alimento que se ponga en la cavidad
principal.
• Para cada uno de estos modos de cocción, el elemento superior
de calentamiento de la cavidad principal funciona, y de este
modo permite calentar la cavidad superior.
En este caso, el tiempo de cocción se determina en
función del alimento colocado en la cavidad principal. El horno
se parará cuando termine este tiempo de cocción.
Deberá supervisar la cocción o el calentamiento de los
alimentos colocados en la cavidad superior, para que no se
cuezan o calienten demasiado.
El calentamiento de alimentos en la cavidad superior es posible
cualquiera que sea el modo de cocción; sin embargo cuidado
cuando se cocen en la cavidad principal productos fragiles tales
como soufflés, etc…
Cuando la cavidad principal es utilizada, la cavidad superior
está caliente !
Esp

40
Esp
No dejar que la grasa se acumule en el aparato.
• Antes de realizar cualquier operación de mantenimiento o
limpieza, desenchufar y dejar enfriar el aparato.
• Para limpiar la parte exterior del aparato, es suficiente con pasar
un estropajo.
• No utilizar productos de mantenimiento específicos para
metales (acero, cobre…).
• Limpie la puerta, y las superficies lacadas o las piezas
translúcidas con un estropajo húmedo y detergente suave.
No utilice productos de mantenimiento agresivos
(especialmente los decapantes a base de sosa), ni un estropajo
que rasque, ni un tampón abrasivo.
• Todos los accesorios* (parilla, fuente, gratinador) se limpian
con agua y detergente.
No limpiar el recoge-migas en el lavavajillas.
• Utilice el recoge-migas mientras está funcionando el aparato.
• No toque la parte metálica del recoge-migas durante su
utilización o justo después.
• El recoge-migas se limpia con agua caliente y detergente para
lavavajillas.
Limpieza y mantenimiento
*según modelo
Pinza de pan

41
Esp
Guía de cocción
Los tiempos y temperaturas indicados son proporcionados a título indicativo.
Los resultados de cocción pueden variar según las recetas, los ingredientes o los platos utilizados.
Ingredients Función - T° Tiempo Nivel de rejilla
Buns / Rolls /
Croissants / Bagels
(recalentamiento)
WARMER 5 - 10 minutos
torrijas WARMER 5 precalentamiento + 8
+ dar la vuelta + 4 min
Pan TOAST Según sus gustos
Bagels TOAST Según sus gustos
Pastel BAKE (350° F) 30 - 40 minutos
Brownies BAKE (375° F) 40 minutos
Cookies BAKE (450° F) 10 - 20 minutos
Pizza congelada (1/2lb) BAKE (475° F) 15 minutos
Pizza congelada (1 lb) BAKE (475° F) 30 minutos
Pizza de masa
fresca
BAKE (350° F) 22 - 30 minutos
Según sus gustos
Pizza precocida
(recalentar)
TOAST Según sus gustos
Pollo horneado BAKE (450° F) 80 - 85 minutos
2 ancas al horno BAKE (475° F) 40 - 45 minutos
Salchichas a la
parilla
BROIL (HI) 10 - 15 minutos (darles
la vuelta a menudo)
Tocino BROIL (HI) 5 precalentamiento + 3
+ dar la vuelta + 1’ 30
2 costillas de cerdo BROIL (HI) 25 - 30 minutos (darles la
vuelta a media cocción)
Muffins ingleses BROIL (LO) Según sus gustos
2 huevos revueltos WARMER
(superior compartment)
5 precalentamiento +
3 min 30 a 4 minutos
2 huevos WARMER
(superior compartment)
5 precalentamiento +
4 min 30 de cocción
Lasaña congelada BAKE (450° F)
BROIL (HI)
45 minutos +
4 minutos
4 lonchas de
queso fundido
BAKE (375° F)
BROIL (HI)
6 minutos +
4 minutos
2
2
2
2
2
2
1
2
2
2
2
1
1
1
2

42
PROTECCIÓN DEL MEDIO AMBIENTE
El embalaje del producto está compuesto por materiales reciclables, no lo tire a su basura
habitual, llévelo al centro de recogida selectiva más próximo.
Los servicios técnicos autorizados post-venta le recogerán el aparato usado para proceder a
su destrucción respetando las normas medioambientales o llévelo a un punto de recogida
especializada previsto para este efecto.
GARANTÍA
Garantía limitada 1 año:
T-Fal garantiza este producto contra cualquier defecto de fabricación y de materiales durante
un (1) año a partir de la fecha de compra. Si encontrará algún defecto durante el año siguiente
a la fecha de compra, deberá seguir las instrucciones que figuran en la garantía:
En Canadá:
1)Lleve el aparato, con la factura, a la tienda donde lo compró.
o
2)Lleve el aparato, con la factura, al servicio técnico autorizado T-Fal de su región.
3)T-Fal Canadá se compromete a reparar o sustituir, según el caso, la pieza o el producto
defectuoso sin gastos, a condición de que el producto se envíe a portes pagados a:
T-Fal Canadá
Filial del Groupe Seb Canada Inc.
455 Finchdene Square
Scarborough, Ontario M1X 1B7
con una factura y una carta que describa la naturaleza del defecto. Asegúrese de que el
producto esté bien embalado antes de enviarlo. Antes de tomar cualquier medida, deberá
ponerse en contacto con el servicio de atención al cliente de T-Fal, por correo o teléfono, en
el caso de que sea posible corregir el defecto sin reenviar el producto.
En USA:
No reenvíe el producto a la tienda donde lo haya comprado, ni a un centro post-venta.
Deberá respetar el siguiente procedimiento:
1)Contacte con nuestro servicio de atención al cliente para avisarnos y garantizar la solución
más rápida al problema.
2)Probablemente, se le pedirá que nos devuelva el producto, con todos los gastos de envío
prepagados, acompañado de la factura y de una carta que describa la naturaleza del problema,
a:
T-Fal After Sales Service Department
2121 Eden Road - Millville, NJ 08332
Asegúrese de que el producto esté bien embalado para el envío.
NOTA: Las reclamaciones por paquete perdido sólo se aceptarán si el paquete se ha
asegurado o si se ha enviado por un medio que permita el seguimiento del envío.
3)Después de la inspección, y según los términos de esta garantía, T-Fal Corp. se compromete a
reparar o sustituir las piezas defectuosas o el producto sin gastos. La garantía no se aplicará
en el caso de un producto modificado o de daños producidos por negligencias durante su
utilización, de un embalaje defectuoso o de una manipulación incorrecta durante el transporte.
Las reparaciones no cubiertas por esta garantía se efectuarán en base a los costes en vigor, de
las piezas y de la mano de obra, además de los gastos de devolución. Esta garantía le confiere
derechos específicos y puede tener otros derechos que varían de un estado a otro.
LE AGRADECEMOS LA CONFIANZA DEPOSITADA EN T-FAL.
Si un problema continúa, o para cualquier otra información, contacte con el servicio de
atención al cliente:
en USA: 800 395 8325
en Canadá: 800 418 3325
o www.t-fal.com
Esp

43

44

45
-
 1
1
-
 2
2
-
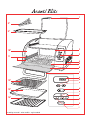 3
3
-
 4
4
-
 5
5
-
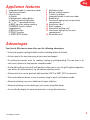 6
6
-
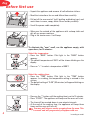 7
7
-
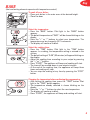 8
8
-
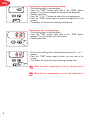 9
9
-
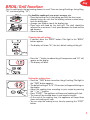 10
10
-
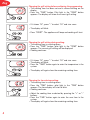 11
11
-
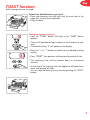 12
12
-
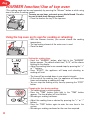 13
13
-
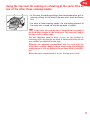 14
14
-
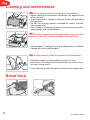 15
15
-
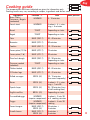 16
16
-
 17
17
-
 18
18
-
 19
19
-
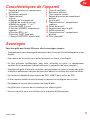 20
20
-
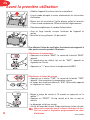 21
21
-
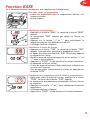 22
22
-
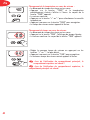 23
23
-
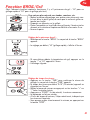 24
24
-
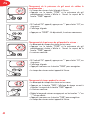 25
25
-
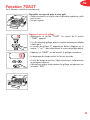 26
26
-
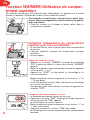 27
27
-
 28
28
-
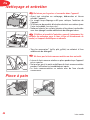 29
29
-
 30
30
-
 31
31
-
 32
32
-
 33
33
-
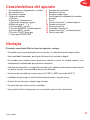 34
34
-
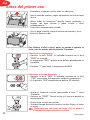 35
35
-
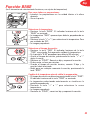 36
36
-
 37
37
-
 38
38
-
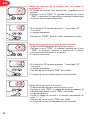 39
39
-
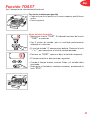 40
40
-
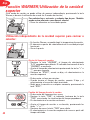 41
41
-
 42
42
-
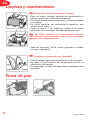 43
43
-
 44
44
-
 45
45
-
 46
46
-
 47
47
-
 48
48


T-Fal OT8085002 Manual de usuario
- Categoría
- Barbacoas
- Tipo
- Manual de usuario
- Este manual también es adecuado para
En otros idiomas
- français: T-Fal OT8085002 Manuel utilisateur
- English: T-Fal OT8085002 User manual
Documentos relacionados
Otros documentos
-
Krups FBC213 Manual de usuario
-
Bialetti 35047 Guía del usuario
-
Tefal TT542051 Manual de usuario
-
Cuisinart TOB-135N El manual del propietario
-
-
Hamilton Beach 31989 Manual de usuario
-
-
Oster 6239 Manual de usuario
-
-
Avanti TD-25 Manual de usuario