
WLAN 11g PCMCIA Card
WLAN 11g PCI Card
User Guide
ver 1.0

This product is in compliance with the essential requirements and other relevant
provisions of the R&TTE directive 1999/5/EC.
Product Name:
X-Micro WLAN 11g PCMCIA Card
X-Micro WLAN 11g PCI Card
Model Name :
XWL-11GPAR
XWL-11GCAR

1
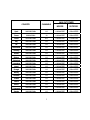
MAX. OUT POWER
COUNTRY CHANNELS
INDOOR
OUTDOOR
Spain
2400-2483.5 MHz 1-13 < 100 mW EIRP < 100 mW EIRP
France
2400
-
2454 MH
z
1
-
8
< 100 mW EIR
P
< 100 mW EIR
P
France
2454
-
2483.5 MH
z
9
-
1
3
< 100 mW EIR
P
< 10 mW EIR
P
Ital
y
2
400
-
2483.5 MH
z
1
-
1
3
< 100 mW EIR
P
< 100 mW EIR
P
U
K
2400
-
2483.5 MH
z
1
-
1
3
< 100 mW EIR
P
< 100 mW EIR
P
Netherlands
2400
-
2483.5 MH
z
1
-
1
3
< 100 mW EIR
P
< 100 mW EIR
P
German
y
2400
-
2483.5 MH
z
1
-
1
3
< 100 mW EIR
P
< 100 mW EIR
P
Austri
a
2400
-
2483.5 MH
z
1
-
1
3
< 100 mW EIR
P
< 100 mW EIR
P
Bel
g
iu
m
2400
-
2483.5 MH
z
1
-
1
3
< 100 mW EIR
P
< 100 mW EIR
P
Switzerlan
d
2400
-
2483.5 MH
z
1
-
1
3
< 100 mW EIR
P
< 100 mW EIR
P
Luxembur
g
2400
-
2483.5 MH
z
1
-
1
3
< 100 mW EIR
P
< 100 mW EIR
P
Irelan
d
2400
-
2483.5 MH
z
1
-
1
3
< 100 mW EIR
P
< 100 mW EIR
P
Portu
g
al
2400
-
2483.5 MH
z
1
-
1
3
< 100 mW EIR
P
< 100 mW EIR
P
Norwa
y
2400
-
2483.5 MH
z
1
-
1
3
< 100 mW EIR
P
< 100 mW EIR
P
Denmark
2400
-
2483.5 MH
z
1
-
1
3
< 100 mW EIR
P
< 100 mW EIR
P
Finlan
d
2400
-
2483.5 MH
z
1
-
1
3
< 100 mW EIR
P
< 100 mW EIR
P
Icelan
d
2400
-
2483
.
5 MH
z
1
-
1
3
< 100 mW EIR
P
< 100 mW EIR
P
Greece
2400
-
2483.5 MH
z
1
-
1
3
< 100 mW EIR
P
< 100 mW EIR
P
Lichtenstei
n
2400
-
2483.5 MH
z
1
-
1
3
< 100 mW EIR
P
< 100 mW EIR
P
Swede
n
2400
-
2483.5 MH
z
1
-
1
3
< 100 mW EIR
P
< 100 mW EIR
P

2
FCC INFORMATION
FCC Radiation Exposure Statement
This equipment complies with FCC radiation exposure limits set forth for an uncontrolled environment.
This equipment should be installed and operated with minimum distance 20cm between the
radiator & your body.
This transmitter must not be co-located or operating in conjunction with any other antenna or
transmitter.
The equipment has been tested and found to comply with the limits for a Class B Digital
Device, pursuant to part 15 of the FCC Rules. These limits are designed to provide reasonable
protection against harmful interference in a residential installation.
This equipment generates, uses and can radiate radio frequency energy and, if not installed
and used in accordance with the instruction, may cause harmful interference to radio communication.
However, there is no grantee that interference will not occur in a particular installation. If this equipment
dose cause harmful interference to radio or television reception, which can be determined by turning
the equipment off and on, the user is encouraged to try to correct the interference by one or more of the
following measures:
--Reorient or relocate the receiving antenna.
--Increase the separation between the equipment and receiver.
--Connect the equipment into an outlet on a circuit different from that to which the receiver is connected
--Consult the dealer or an experienced radio/TV technician for help.
Notice: The Part 15 radio device operates on a non-interference basis with other devices operating at
this frequency. Any changes or modification not expressly approved by the party responsible could void
the user’s authority to operate the device.
REGULATORY INFORMATION
X-Micro WLAN 11g PCMCIA Card and X-Micro WLAN 11g PCI Card must be installed and used in
strict accordance with the instructions. This device complies with the following radio frequency and
safety standards.
USA - Federal Communications Commission (FCC)
This device complies with Part 15 of FCC Rules. Operation is subject to the following two conditions:
1. This device may not cause harmful interference.
2. This device must accept any interference that may cause undesired operation.

3
Copyright
Copyright 2006 by X-Micro Technology Corp., All rights reserved. No part of this publication may
be reproduced, transmitted, transcribed, stored in a retrieval system, or translated into any
language or computer language, in any form or by any means, electronic, mechanical, magnetic,
optical, chemical, manual or otherwise, without the prior written permission of X-Micro Technology
Corp.
Disclaimer
X-Micro Technology Corp. makes no representations or warranties, either expressed or implied,
with respect to the contents hereof and specifically disclaims any warranties, merchantability or
fitness for any particular purpose. Any software described in this manual is sold or licensed "as is".
Should the programs prove defective following their purchase, the buyer (and not this company, its
distributor, or its dealer) assumes the entire cost of all necessary servicing, repair, and any incidental
or consequential damages resulting from any defect in the software. Further, X-Micro Technology
Corp., reserves the right to revise this publication and to make changes from time to time in the
contents hereof without obligation to notify any person of such revision or change.
All brand and product names mentioned in this manual are trademarks and/or registered
trademarks of their respective holders.

4
Index
English………………………………………………….…...………………………..P.5
German…………………….……………………………......………..………………P.11
French…………………………………………………………..……………………..P.17
Dutch………………………………………………………………………..…………………P.23
Italian……………………………………………………………………............….…P.30
Spanish……………………………………………………………………….....………….P.37
Portuguese…………..................................................………………………….………..P.44
Russian……………….................................................………………………….……….P.51
Traditional Chinese………………………………………………………………….……P.58

5
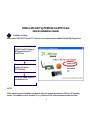
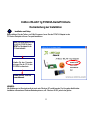
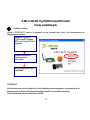
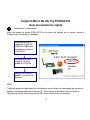
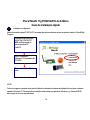
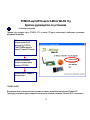
X-Micro WLAN 11g PCMCIA Card/PCI Card
Quick Installation Guide
Installation and Setup
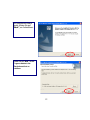
Before insert PCMCIA /PCI into the PC Card slot of your computer, please install the Driver&Utility Program first.
NOTE:
All the captured images of installation mentioned in this user’s manual were based on Windows XP operating
system. For installation on other Windows OS, e.g. Windows 98 SE, all the procedures remains the same.
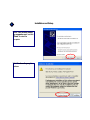
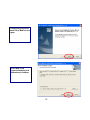
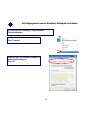
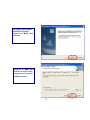
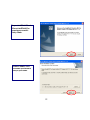
1
Make sure that the 11g WLAN
PCMCIA Card/PCI Adapter is
NOT inserted into the PC
Card/PCI slot.
Turn on the computer.
Insert the CD into the
CD-ROM Drive.
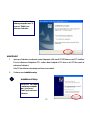
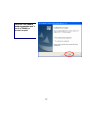
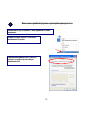
Click on the “Install” button on
the selection menu.

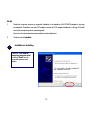
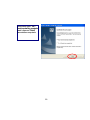
6
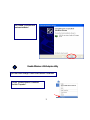
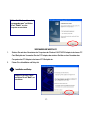
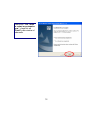
InstallShield Wizard starts. Clic
k
“Next” to continue.
Click “Next” to install the program
files in the default folder.

7
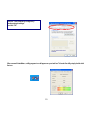
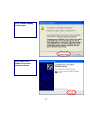
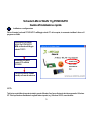
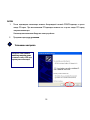
NOW.
1. After the computer restarted, insert the Wireless LAN PCMCIA Adapter into the empty PC Card slot. For
PCI Adapter user, please insert PCI Adapter into the empty PCI slot before restart computer.
Your PC should detect the new hardware automatically.
2. Continue with Installation setup.
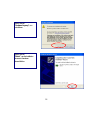
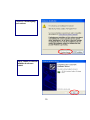
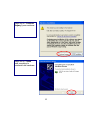
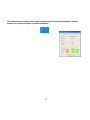
Select “
Y
es, I want to restart
my computer now.” and click
“Finish” to restart the
computer.

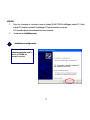
8
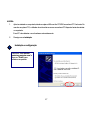
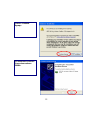
2
Click “Continue Anywa
y
” to
continue
Select “
Y
es, I want to restart
my computer now.” and click
“Finish” to restart the
computer.
Installation and Setup

9
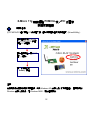
3
Click “Finis
h
” to complete new
hardware installation.
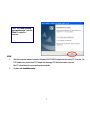
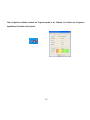
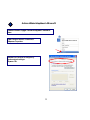
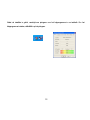
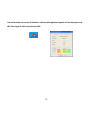
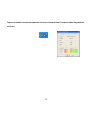
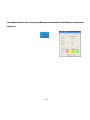
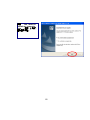
Open Start Menu>Settings>Control Panel>Network Connections.
Choose “Wireless Network Connection#”.
A
nd click “Properties” .
Enable Wireless LAN Adapter utility

10
After successful installation, a utility program icon will appear on your task bar. To launch the utility, simply double-click
the icon.
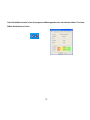
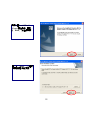
Remove “Use Windows to configure my
wireless netw
o
rk settings”.
A
nd click “OK”

11
X-Micro WLAN 11g PCMCIA-Karte/PCI-Karte
Kurzanleitung zur Installation
Installation und Setup
Bitte installieren Sie das Treiber- und Utility-Programm, bevor Sie den PCMCIA-Adapter in den
PC-Karten-Steckplatz in Ihrem Computer einstecken.
HINWEIS:
Alle Abbildungen im Benutzerhandbuch sind unter Windows XP erstellt worden. Das Vorgehen bleibt bei der
Installation unter anderen Windows-Betriebssystemen, z.B. Windows 98 SE, jedoch das gleiche
.
Stellen Sie sicher, dass sich die
11g WLAN PCMCIA-Karte
NICHT im Steckplatz für die
PC-Karte befindet.
Schalten Sie den Computer
ein.Legen Sie die CD in das
CD-ROM-Laufwerk ein.
Klicken Sie auf “Install” im
Auswahlmenü.
1

12
Der InstallShield Wizard
startet. Klicken Sie auf
“Next”, um fortzufahren.
Klicken Sie auf “Next
”
, um die
Programmdateien in das
Standardverzeichnis zu
installieren.

13
2
VERFAHREN SIE WIE FOLGT:
1. Stecken Sie nach dem Neustarten des Computers den Wireless LAN PCMCIA Adapter in den leeren PC
Card-Steckplatz ein. Verwenden Sie den PCI Adapter, dann stecken Sie bitte vor dem Neustarten des
Computers den PCI Adapter in den leeren PCI-Steckplatz ein.
2. Fahren Sie mit Installation und Setup fort.
Installation and Setup
Wählen Sie “Yes, I want to restart
my computer now.” und klicken
Sie auf “Finish”, um den
Computer neu zu starten.
Wählen Sie die erste Option
und klicken Sie auf “Next”, um
fortzufahren
.

14
Klicken Sie auf
“Continue Anyway”, um
fortzufahren.
Klicken Sie auf
“Finish”, um die Installation
der neuen Hardware
abzuschließen.

15
3
Öffnen Sie Startmenü > Einstellungen > Systemsteuerung >
Netzwerkverbindungen.
Wählen Sie „ Wireless Network Connection#“.
Klicken Sie auf „Properties “.
WLAN-Adapter-Dienstprogramm aktivieren
Im Register „Use Windows to configure my
wireless network settings„Windows zum
Konfigurieren der Einstellungen verwenden“.
Klicken Sie auf „OK“.

16
Nach erfolgreicher Installation erscheint ein Programmsymbol in der Taskleiste. Zum Starten des Programms
doppelklicken Sie einfach auf das Symbol.

17
Carte PCMCIA / Carte PCI X-Micro WLAN 11g
Guide d'installation rapide
Installation et configuration
Avant d'insérer la carte PCMCIA /PCI dans le logement pour PC Card de votre ordinateur, veuillez d'abord installer le
programme Pilote&Utilitaire.
REMARQUE:
Toutes les images capturées pour l'installation mentionnée dans ce manuel d'utilisation sont basées sur le système
d'exploitation Windows XP. Pour l'installation sur d'autres OS Windows, par exemple Windows 98 SE, toutes les
procédures restent identiques.
1
A
ssurez vous que l'adaptateur
PCI / la carte PCMCIA W LAN
11g N'est PAS insérée dans
le slot PC Card/PCI .
Turn on the computer.
Insert the CD into the
CD-ROM Drive.
Cliquez sur le bouton “Install”
du menu de sélection.

18
Cliquez sur “Next” pour installe
r
les fichiers du programme
dans le dossier par défaut.
InstallShield Wizard démarre.
Cliquez sur “Next” pour
continuer.

19
2
MAINTENANT.
1. Après que l'ordinateur a redémarré, insérer l'adaptateur LAN sans fil PCMCIA dans un slot PC Card libre.
Pour les utilisateurs d'adaptateurs PCI, veuillez utiliser l'adaptateur PCI dans un slot PCI libre avant de
redémarrer l'ordinateur.
Votre PC doit détecter automatiquement le nouveau matériel.
2. Continuez avec Installation setup.
Sélectionnez “
Y
es, I want to
restarmy computer now.” Et
cliquez sur “Finish” pour
redémarrer l'ordinateur.
Installation et Setup
Sélectionnez “
Y
es, I want
to restart my computer
now.” et cliquez sur
“Finish” pour redémarrer
l'ordinateur.

20
Cliquez sur “Ctinue Anywa
y
”
pour continuer
Cliquez “Finis
h
” pour terminer
l'installation du nouveau
matériel.

21
3
Ouvrir Menu Démarrer > Réglages > Panneau de configuration >Connexions de
réseau.
Choisir « Wireless Network Connection # »
Et cliquez sur « Pr operties».
Activer utilitaire Adaptateur LAN sans fil
Décocher « Use Windows to configure my
wireless network settings».
Cliquer sur « OK ».

22
Une fois l’installation terminée, l’icône d’un programme utilitaire apparaîtra dans votre barre des tâches. Pour lancer
l’utilitaire, double-cliquer sur l’icône.

23
X-Micro WLAN 11g PCMCIA-kaart/PCI-kaart
Snelle installatiegids
Installatie en instelling
Voordat u PCMCIA-/PCI -kaart in de kaartsleuf van uw computer stopt, moet u het stuurprogramma en
hulpprogramma installeren
OPMERKING:
Alle schermopnamen voor de installatie die in deze handleiding worden weergegeven, zijn gebaseerd op het
besturingssysteem Windows XP. Alle procedures blijven dezelfde voor installatie onder andere
Windows-besturingssystemen, zoals Windows 98 SE.
1
Zorg dat de 11g WLAN
PCMCIA-kaart/PCI-adapter
NOT in de PC-kaart-/PCI-sleuf
is geplaatst.
Schakel de computer in.
Plaats de cd in het
cd-romstation.
Kilk in het selectiemenu op de
knop “Install”.

24
Klik op “Next” om de
programmabestanden in de
standaardmap te installeren.
De InstallShield-wizard wordt
gestart. Klik op “Next” om door
te gaan.

25
Selecteer “
Y
es, I want to
restart my computer now.”
en klik op “Finish” om de
computer opnieuw op te
starten.

26
2
EN NU.
1. Nadat de computer opnieuw is opgestart, installeert u de draadloze LAN PCMCIA-adapter in de lege
pc-kaartsleuf. Gebruikers van een PCI-adapter moeten de PCI-adapter installeren in de lege PCI-sleuf
voordat de computer opnieuw wordt opgestart
Uw pc zou de nieuwe hardware automatisch moeten detecteren.
2. Ga door met de Installatie.
Selecteer “
Y
es, I want to
restart my computer now.”
en klik op “Finish” om de
computer opnieuw op te
starten.
Installatie en instelling

27
Klik op “Continue Anywa
y
”
om door te gaan
Klik op “Finis
h
” om de
installatie van de nieuwe
hardware te voltooien.

28
3
Open het menu Start >Instellingen>Configuratiescherm
>Netwerkverbindingen.
Kies “Wireless Network Connection#”.
Klik op "Properties".
Het hulpprogramma voor de draadloze LAN-adapter inschakelen
Schakel de optie “Use Windows to configure my
wireless network settings” uit.
Klik op “OK”

29
Nadat de installatie is gelukt, verschijnt een pictogram voor het hulpprogramma in uw taakbalk. Om het
hulpprogramma te starten, dubbelklikt u op het pictogram.

30
Scheda X-Micro WLAN 11g PCMCIA/PCI
Guida all'installazione rapida
Installazione e configurazione
Prima di inserire la scheda PCMCIA/PCI nell'alloggio scheda PC del computer, è necessario installare il driver ed il
programma d'utilità.
NOTA:
Tutte le immagini delle schermate riportate in questo Manuale d’uso fanno riferimento al sistema operativo Windows
XP. Tutte le procedure d’installazione sugli altri sistemi operativi, e.g. Windows 98 SE, sono identiche.
1
A
ssicurarsi che la scheda
WLAN 11g PCMCIA/PCI
NON sia inserita nell’alloggio
scheda PC/PCI.
A
ccendere il computer
.
Inserire il CD nell'unità
CD-ROM.
Fare clic sul pulsante "Install"
(Installa) nel menu di selezione.

31
Fare clic su "Next" per
installare i file del programma
nella cartella predefinita.
La procedura guidata
InstallShield Wizard si avvia.
Fare clic su "Next" per
continuare.

32
Selezionare "
Y
es, I want to
restart my computer now." e
fare clic su "Finish" per
riavviare il computer.

33
2
ADESSO.
1. Dopo che il computer si è riavviato, inserire la scheda WLAN PCMCIA nell’alloggio scheda PC. Utenti
schede PCI: inserire la scheda PCI nell’alloggio PCI prima di riavviare il computer.
Il PC dovrebbe rilevare automaticamente il nuovo hardware.
2. Continuare con Installation setup.
Selezionare "
Y
es, I want to
restart my computer now." e
fare clic su "Finish" per
riavviare il computer.
Installazione e configurazione

34
Fare clic su “Continue
Anyway” per continuare.
Fare clic su "Finis
h
" per
completare l'installazione del
nuovo hardware.

35
3
A
prire il menu Start>Impostazioni>Pannello di
controllo>Connessioni di rete.
Selezionare “Wireless Network Connection#”.
Fare clic su “Properties”.
Rimuovere “Use Windows to configure my
wireless network settings”.
Fare clic su “OK”
Abilitare l’utilità dell’adattatore LAN wireless

36
Una volta terminate con successo l’installazione, sulla barra delle applicazioni apparirà un'icona del programma di
utilità. Fare doppio clic sull’icona per lanciare l’utilità.

37
Tarjeta X-Micro WLAN 11g PCMCIA/PCI
Guía de instalación rápida
Instalación y Configuración
Antes de insertar la tarjeta PCMCIA/PCI en la ranura de tarjetas de su equipo, instale el
Programa de Controlador y Utilidades.
NOTE:
Todas las imágenes capturadas de la instalación que se relata en este manual de usuario se
basan en el sistema operativo Windows XP. Para realizar la instalación en otro Sistema
Operativo Windows, como Windows 98 SE, los procedimientos son similares.
1
A
segúrese de que el
A
daptador 11g WLAN
PCMCIA/PCI NO está
insertado en la ranura
PCMCIA/PCI.
Encienda su equipo.
Inserte el CD en la
unidad de CD-ROM
Haga clic en el botón
“Install” en el menú de
selección.

38
Haga clic en “Next” para
instalar los archivos de
programa en la carpeta
predeterminada.
Se iniciará el programa
InstallShield Wizard.
Haga clic en “Next” para
continuar.

39
Seleccione “
Y
es, I want
to restart my computer
now.” y haga clic en
“Finish” para reiniciar el
ordenador.

40
2
AHORA.
1. Después de reiniciar el equipo, inserte el Adaptador PCMCIA LAN Inalámbrico en la
ranura PC Card vacía. Para el usuario de Adaptador PCI, inserte el Adaptador PCI en
la ranura PCI vacía antes de reiniciar el equipo.
Su PC detectará automáticamente el hardware nuevo.
2. Continúe con la Instalación.
Seleccione “
Y
es, I want
to restart my computer
now.” y haga clic en
“Finish” para reiniciar el
ordenador.
Instalación y Configuración

41
Haga clic en "Continue
Anyway" para continuar
Haga clic en “Finish”
para completar la
instalación del hardware.

42
3
Abra el Menú Inicio>Configuración>Panel de
Seleccione “Wireless Network Connection#”.
Y haga clic en “Properties”.
Quite la marca de la opción “Use Windows to
configure my wireless network settings”.
Y haga clic en “OK”
Activar la utilidad de Adaptador LAN Inalámbrico

43
Después de instalarlo correctamente aparecerá un icono en su barra de tareas. Para abrir la utilidad, haga doble clic
en el icono.

44
Placa WLAN 11g PCMCIA/PCI da X-Micro
Guia de instalação rápida
Instalação e configuração
Antes de introduzir a placa PCMCIA /PCI na respectiva ranhura existente no seu computador, instale o Driver&Utility
Program.
NOTA:
Todas as imagens mostradas neste guia do utilizador e referentes às etapas de instalação têm por base o sistema
operativo Windows XP. Para proceder à instalação noutros sistemas operativos Windows, e.g. Windows 98 SE,
deve seguir os mesmos procedimentos.
1
Certifique-se de que a placa
WLAN 11g PCMCIA/PCI
NÃO está introduzida na
ranhura da placa PC
Card/PCI.
Ligue o computador.
Introduza o CD na unidade de
CD-ROM.
Clique no botão “Install” no
menu.

45
Clique em “Next” para instalar
os ficheiros do programa na
pasta predefinida.
O InstallShield Wizard é
apresentado. Clique em “Next”
para continuar.

46
Seleccione a opção “
Y
es, I
want to restart my computer
now.” e clique em “Finish”
para reiniciar o computador.

47
2
AGORA.
1. Após ter reiniciado o computador, introduza a placa LAN sem fios PCMCIA na ranhura PC Card vazia. No
caso de uma placa PCI, o utilizador deve introduzir a mesma na ranhura PCI disponível antes de reiniciar
o computador.
O seu PC deve detectar o novo hardware automaticamente.
2. Prossiga com a instalação.
Seleccione “
Y
es, I want to
restart my computer now.” e
clique em “Finish” para
reiniciar o computador.
Instalação e configuração

48
Clique em “Continue
Anyway” para prosseguir
Clique em “Finis
h
” para
concluir a instalação do novo
hardware.

49
3
Iniciar >Definições>Painel de controlo>Ligações de rede.
Escolha a opção “Wireless Network Connection #”.
De seguida, clique em “Pr opert ies”.
Retire o visto da opção “Use Windows to configure m
y
wireless network settings”.
Clique em "OK"
Activar o utilitário da placa LAN sem fios

50
Após a instalação ter sido feita com êxito, o ícone do programa utilitário aparece na sua barra de tarefas. Para abrir o utilitário, faça um duplo clique sobre o
respectivo ícone.

51
PCMCIA-карта/PCI-карта X-Micro WLAN 11g
Краткое руководство по установке
Установка и настройка
Прежде чем вставить карту PCMCIA /PCI в гнездо PC-карты компьютера, необходимо установить
программу Driver&Utility.
ПРИМЕЧАНИЕ.
Все приведенные иллюстрации окон установки основаны на операционной системе Windows XP.
Процедура установки в других операционных системах Windows, например, Windows 98 SE, не меняется.
Убедитесь, что
беспроводной WLAN
-адаптер 11g PCMCIA
Card/PCI НЕ вставлен в
гнездо PC-карты/PCI-гнездо.
Включите компьютер.
Вставьте компакт-диск в
дисковод CD-ROM.
Нажмите кнопку «Install» в
меню выбора.
1

52
Нажмите «Next», чтобы
установить приложение в
папку по умолчанию.
Запуск «InstallShield Wizard»
(Мастер InstallShield) Для
продолжения нажмите
кнопку «Next».

53
Выберите «
Y
es, I want t
o
restart my computer now»
и нажмите кнопку «ОК» для
перезапуска компьютера.

54
2
ЗАТЕМ
1. После перезапуска компьютера вставьте беспроводной сетевой PCMCIA-адаптер в пустое
гнездо PC-карты. При использовании PCI-адаптера вставьте его в пустое гнездо PCI перед
запуском компьютера.
Компьютер автоматически обнаружит новое устройство.
2. Продолжите процедуру установки.
Выберите «
Y
es, I want t
o
restart my computer now»
и нажмите кнопку «ОК» для
перезапуска компьютера.
Установка и настройка

55
Нажмите «Continue
Anyway».
Для завершения установки
оборудования нажмите
«Finish».

56
3
Вызовите меню «Пуск»>«Настройки»>«Панель управления»>«Сетевые
подключения».
Выберите «Wireless Network Connection#».
Затем нажмите «Properties».
Снимите флажок параметра «Use Windows to
configure my wireless network settings».
Затем нажмите «OK».
Включение служебной программы адаптера беспроводной сети.

57
После завершения установки в панели задач отобразится значок служебной программы. Дважды
щелкните этот значок для запуска служебной программы.

58
X-Micro 11g 無線網路 PCMCIA 卡/PCI 介面卡
快速安裝指南
安裝及設定
將 PCMCIA/PCI 插入電腦 PC 卡卡槽之前,請先安裝驅動程式及應用程式 (Driver&Utility)。
注意:
所有本使用手冊中使用的安裝圖像,均為 Windows XP 作業系統下的安裝畫面。 若要在其他
Windows 作業系統執行,如 Windows 98SE,操作程序同此。
請先確定您未將 WLAN
11g PCMCIA/PCI 卡插入
電腦 PC 卡槽內。
請先啟動電腦,再將 CD
置入光碟機。
按一下選單上的
「Install」按鈕。
1

59
按一下「Next」,將程式
安裝在預設資料夾內。
安裝精靈(InstallShield
Wizard)開始執行,請按一
下「Next」 後繼續安裝。

60
選擇 「
Y
es, I want to
restart my computer
now」,並按一下完成,
重新啟動電腦。

61
2
現在
1. 電腦重新啟動後,請將無線區域網卡插入電腦 PCMCIA 卡插槽內。
若您使用的是 PCI 卡,請在電腦重新啟動前,先將 PCI 卡插入 PCI 卡插槽內。
您的電腦將會自動偵測到新硬體。
2. 請繼續執行 Installation setup 的安裝設定。
選擇 「
Y
es, I want to
restart my computer
now」,並 按一下「Finish
」
重新啟動電腦。
安裝及設定

62
按一下 「Continue
Anyway」 繼續進行安裝
按一下「Finish」,以完
成安裝新硬體。

63
3
啟動”開始功能表 >設定>控制台>網路連線
選擇已安裝的無線網路連線,並選擇內容.
請取消”使用 Windows 來設定我的無線網路設定”
並按下確定生效.
啟動無線網路公用程式

64
安裝成功後,應用程式圖示將會顯示在右下角常駐程式列上。 在圖示上按兩下即可啟動該應用
程式。

www.x-micro.com
Transcripción de documentos
WLAN 11g PCMCIA Card WLAN 11g PCI Card User Guide ver 1.0 This product is in compliance with the essential requirements and other relevant provisions of the R&TTE directive 1999/5/EC. Product Name: Model Name : X-Micro WLAN 11g PCMCIA Card X-Micro WLAN 11g PCI Card XWL-11GPAR XWL-11GCAR COUNTRY CHANNELS MAX. OUT POWER INDOOR OUTDOOR Spain 2400-2483.5 MHz 1-13 < 100 mW EIRP < 100 mW EIRP France 2400-2454 MHz 1-8 < 100 mW EIRP < 100 mW EIRP France 2454-2483.5 MHz 9-13 < 100 mW EIRP < 10 mW EIRP Italy 2400-2483.5 MHz 1-13 < 100 mW EIRP < 100 mW EIRP UK 2400-2483.5 MHz 1-13 < 100 mW EIRP < 100 mW EIRP Netherlands 2400-2483.5 MHz 1-13 < 100 mW EIRP < 100 mW EIRP Germany 2400-2483.5 MHz 1-13 < 100 mW EIRP < 100 mW EIRP Austria 2400-2483.5 MHz 1-13 < 100 mW EIRP < 100 mW EIRP Belgium 2400-2483.5 MHz 1-13 < 100 mW EIRP < 100 mW EIRP Switzerland 2400-2483.5 MHz 1-13 < 100 mW EIRP < 100 mW EIRP Luxemburg 2400-2483.5 MHz 1-13 < 100 mW EIRP < 100 mW EIRP Ireland 2400-2483.5 MHz 1-13 < 100 mW EIRP < 100 mW EIRP Portugal 2400-2483.5 MHz 1-13 < 100 mW EIRP < 100 mW EIRP Norway 2400-2483.5 MHz 1-13 < 100 mW EIRP < 100 mW EIRP Denmark 2400-2483.5 MHz 1-13 < 100 mW EIRP < 100 mW EIRP Finland 2400-2483.5 MHz 1-13 < 100 mW EIRP < 100 mW EIRP Iceland 2400-2483.5 MHz 1-13 < 100 mW EIRP < 100 mW EIRP Greece 2400-2483.5 MHz 1-13 < 100 mW EIRP < 100 mW EIRP Lichtenstein 2400-2483.5 MHz 1-13 < 100 mW EIRP < 100 mW EIRP Sweden 2400-2483.5 MHz 1-13 < 100 mW EIRP < 100 mW EIRP 1 FCC INFORMATION FCC Radiation Exposure Statement This equipment complies with FCC radiation exposure limits set forth for an uncontrolled environment. This equipment should be installed and operated with minimum distance 20cm between the radiator & your body. This transmitter must not be co-located or operating in conjunction with any other antenna or transmitter. The equipment has been tested and found to comply with the limits for a Class B Digital Device, pursuant to part 15 of the FCC Rules. These limits are designed to provide reasonable protection against harmful interference in a residential installation. This equipment generates, uses and can radiate radio frequency energy and, if not installed and used in accordance with the instruction, may cause harmful interference to radio communication. However, there is no grantee that interference will not occur in a particular installation. If this equipment dose cause harmful interference to radio or television reception, which can be determined by turning the equipment off and on, the user is encouraged to try to correct the interference by one or more of the following measures: --Reorient or relocate the receiving antenna. --Increase the separation between the equipment and receiver. --Connect the equipment into an outlet on a circuit different from that to which the receiver is connected --Consult the dealer or an experienced radio/TV technician for help. Notice: The Part 15 radio device operates on a non-interference basis with other devices operating at this frequency. Any changes or modification not expressly approved by the party responsible could void the user’s authority to operate the device. REGULATORY INFORMATION X-Micro WLAN 11g PCMCIA Card and X-Micro WLAN 11g PCI Card must be installed and used in strict accordance with the instructions. This device complies with the following radio frequency and safety standards. USA - Federal Communications Commission (FCC) This device complies with Part 15 of FCC Rules. Operation is subject to the following two conditions: 1. This device may not cause harmful interference. 2. This device must accept any interference that may cause undesired operation. 2 Copyright Copyright 2006 by X-Micro Technology Corp., All rights reserved. No part of this publication may be reproduced, transmitted, transcribed, stored in a retrieval system, or translated into any language or computer language, in any form or by any means, electronic, mechanical, magnetic, optical, chemical, manual or otherwise, without the prior written permission of X-Micro Technology Corp. Disclaimer X-Micro Technology Corp. makes no representations or warranties, either expressed or implied, with respect to the contents hereof and specifically disclaims any warranties, merchantability or fitness for any particular purpose. Any software described in this manual is sold or licensed "as is". Should the programs prove defective following their purchase, the buyer (and not this company, its distributor, or its dealer) assumes the entire cost of all necessary servicing, repair, and any incidental or consequential damages resulting from any defect in the software. Further, X-Micro Technology Corp., reserves the right to revise this publication and to make changes from time to time in the contents hereof without obligation to notify any person of such revision or change. All brand and product names mentioned in this manual are trademarks and/or registered trademarks of their respective holders. 3 Index English………………………………………………….…...………………………..P.5 German…………………….……………………………......………..………………P.11 French…………………………………………………………..……………………..P.17 Dutch………………………………………………………………………..…………………P.23 Italian……………………………………………………………………............….…P.30 Spanish……………………………………………………………………….....………….P.37 Portuguese…………..................................................………………………….………..P.44 Russian……………….................................................………………………….……….P.51 Traditional Chinese………………………………………………………………….……P.58 4 X-Micro WLAN 11g PCMCIA Card/PCI Card Quick Installation Guide 1 Installation and Setup Before insert PCMCIA /PCI into the PC Card slot of your computer, please install the Driver&Utility Program first. Make sure that the 11g WLAN PCMCIA Card/PCI Adapter is NOT inserted into the PC Card/PCI slot. Turn on the computer. Insert the CD into the CD-ROM Drive. Click on the “Install” button on the selection menu. NOTE: All the captured images of installation mentioned in this user’s manual were based on Windows XP operating system. For installation on other Windows OS, e.g. Windows 98 SE, all the procedures remains the same. 5 InstallShield Wizard starts. Click “Next” to continue. Click “Next” to install the program files in the default folder. 6 Select “Yes, I want to restart my computer now.” and click “Finish” to restart the computer. NOW. 1. After the computer restarted, insert the Wireless LAN PCMCIA Adapter into the empty PC Card slot. For PCI Adapter user, please insert PCI Adapter into the empty PCI slot before restart computer. Your PC should detect the new hardware automatically. 2. Continue with Installation setup. 7 Installation and Setup 2 Select “Yes, I want to restart my computer now.” and click “Finish” to restart the computer. Click “Continue Anyway” to continue 8 Click “Finish” to complete new hardware installation. 3 Enable Wireless LAN Adapter utility Open Start Menu>Settings>Control Panel>Network Connections. Choose “Wireless Network Connection#”. And click “Properties” . 9 Remove “Use Windows to configure my wireless network settings”. And click “OK” After successful installation, a utility program icon will appear on your task bar. To launch the utility, simply double-click the icon. 10 X-Micro WLAN 11g PCMCIA-Karte/PCI-Karte Kurzanleitung zur Installation 1 Installation und Setup Bitte installieren Sie das Treiber- und Utility-Programm, bevor Sie den PCMCIA-Adapter in den PC-Karten-Steckplatz in Ihrem Computer einstecken. Stellen Sie sicher, dass sich die 11g WLAN PCMCIA-Karte NICHT im Steckplatz für die PC-Karte befindet. Schalten Sie den Computer ein.Legen Sie die CD in das CD-ROM-Laufwerk ein. Klicken Sie auf “Install” im Auswahlmenü. HINWEIS: Alle Abbildungen im Benutzerhandbuch sind unter Windows XP erstellt worden. Das Vorgehen bleibt bei der Installation unter anderen Windows-Betriebssystemen, z.B. Windows 98 SE, jedoch das gleiche. 11 Der InstallShield Wizard startet. Klicken Sie auf “Next”, um fortzufahren. Klicken Sie auf “Next”, um die Programmdateien in das Standardverzeichnis zu installieren. 12 Wählen Sie “Yes, I want to restart my computer now.” und klicken Sie auf “Finish”, um den Computer neu zu starten. VERFAHREN SIE WIE FOLGT: 1. Stecken Sie nach dem Neustarten des Computers den Wireless LAN PCMCIAAdapter in den leeren PC Card-Steckplatz ein. Verwenden Sie den PCI Adapter, dann stecken Sie bitte vor dem Neustarten des Computers den PCI Adapter in den leeren PCI-Steckplatz ein. 2. Fahren Sie mit Installation und Setup fort. 2 Installation and Setup Wählen Sie die erste Option und klicken Sie auf “Next”, um fortzufahren. 13 Klicken Sie auf “Continue Anyway”, um fortzufahren. Klicken Sie auf “Finish”, um die Installation der neuen Hardware abzuschließen. 14 3 WLAN-Adapter-Dienstprogramm aktivieren Öffnen Sie Startmenü > Einstellungen > Systemsteuerung > Netzwerkverbindungen. Wählen Sie „ Wireless Network Connection#“. Klicken Sie auf „Properties “. Im Register „Use Windows to configure my wireless network settings„Windows zum Konfigurieren der Einstellungen verwenden“. Klicken Sie auf „OK“. 15 Nach erfolgreicher Installation erscheint ein Programmsymbol in der Taskleiste. Zum Starten des Programms doppelklicken Sie einfach auf das Symbol. 16 Carte PCMCIA / Carte PCI X-Micro WLAN 11g Guide d'installation rapide 1 Installation et configuration Avant d'insérer la carte PCMCIA /PCI dans le logement pour PC Card de votre ordinateur, veuillez d'abord installer le programme Pilote&Utilitaire. Assurez vous que l'adaptateur PCI / la carte PCMCIA W LAN 11g N'est PAS insérée dans le slot PC Card/PCI . Turn on the computer. Insert the CD into the CD-ROM Drive. Cliquez sur le bouton “Install” du menu de sélection. REMARQUE: Toutes les images capturées pour l'installation mentionnée dans ce manuel d'utilisation sont basées sur le système d'exploitation Windows XP. Pour l'installation sur d'autres OS Windows, par exemple Windows 98 SE, toutes les procédures restent identiques. 17 InstallShield Wizard démarre. Cliquez sur “Next” pour continuer. Cliquez sur “Next” pour installer les fichiers du programme dans le dossier par défaut. 18 Sélectionnez “Yes, I want to restarmy computer now.” Et cliquez sur “Finish” pour redémarrer l'ordinateur. MAINTENANT. 1. Après que l'ordinateur a redémarré, insérer l'adaptateur LAN sans fil PCMCIA dans un slot PC Card libre. Pour les utilisateurs d'adaptateurs PCI, veuillez utiliser l'adaptateur PCI dans un slot PCI libre avant de redémarrer l'ordinateur. Votre PC doit détecter automatiquement le nouveau matériel. 2. Continuez avec Installation setup. 2 Installation et Setup Sélectionnez “Yes, I want to restart my computer now.” et cliquez sur “Finish” pour redémarrer l'ordinateur. 19 Cliquez sur “Ctinue Anyway” pour continuer Cliquez “Finish” pour terminer l'installation du nouveau matériel. 20 3 Activer utilitaire Adaptateur LAN sans fil OuvrirMenuDémarrer>Réglages>Panneaudeconfiguration>Connexionsde réseau. Choisir«Wireless Network Connection#» Etcliquezsur«Properties». Décocher«Use Windows to configure my wireless network settings». Cliquersur«OK». 21 Une fois l’installation terminée, l’icône d’un programme utilitaire apparaîtra dans votre barre des tâches. Pour lancer l’utilitaire, double-cliquer sur l’icône. 22 X-Micro WLAN 11g PCMCIA-kaart/PCI-kaart Snelle installatiegids 1 Installatie en instelling Voordat u PCMCIA-/PCI -kaart in de kaartsleuf van uw computer stopt, moet u het stuurprogramma en hulpprogramma installeren Zorg dat de 11g WLAN PCMCIA-kaart/PCI-adapter NOT in de PC-kaart-/PCI-sleuf is geplaatst. Schakel de computer in. Plaats de cd in het cd-romstation. Kilk in het selectiemenu op de knop “Install”. OPMERKING: Alle schermopnamen voor de installatie die in deze handleiding worden weergegeven, zijn gebaseerd op het besturingssysteem Windows XP. Alle procedures blijven dezelfde voor installatie onder andere Windows-besturingssystemen, zoals Windows 98 SE. 23 De InstallShield-wizard wordt gestart. Klik op “Next” om door te gaan. Klik op “Next” om de programmabestanden in de standaardmap te installeren. 24 Selecteer “Yes, I want to restart my computer now.” en klik op “Finish” om de computer opnieuw op te starten. 25 EN NU. 1. Nadat de computer opnieuw is opgestart, installeert u de draadloze LAN PCMCIA-adapter in de lege pc-kaartsleuf. Gebruikers van een PCI-adapter moeten de PCI-adapter installeren in de lege PCI-sleuf voordat de computer opnieuw wordt opgestart Uw pc zou de nieuwe hardware automatisch moeten detecteren. 2. Ga door met de Installatie. 2 Installatie en instelling Selecteer “Yes, I want to restart my computer now.” en klik op “Finish” om de computer opnieuw op te starten. 26 Klik op “Continue Anyway” om door te gaan Klik op “Finish” om de installatie van de nieuwe hardware te voltooien. 27 3 Het hulpprogramma voor de draadloze LAN-adapter inschakelen Open het menu Start >Instellingen>Configuratiescherm >Netwerkverbindingen. Kies “Wireless Network Connection#”. Klik op "Properties". Schakel de optie “Use Windows to configure my wireless network settings” uit. Klik op “OK” 28 Nadat de installatie is gelukt, verschijnt een pictogram voor het hulpprogramma in uw taakbalk. Om het hulpprogramma te starten, dubbelklikt u op het pictogram. 29 Scheda X-Micro WLAN 11g PCMCIA/PCI Guida all'installazione rapida 1 Installazione e configurazione Prima di inserire la scheda PCMCIA/PCI nell'alloggio scheda PC del computer, è necessario installare il driver ed il programma d'utilità. Assicurarsi che la scheda WLAN 11g PCMCIA/PCI NON sia inserita nell’alloggio scheda PC/PCI. Accendere il computer. Inserire il CD nell'unità CD-ROM. Fare clic sul pulsante "Install" (Installa) nel menu di selezione. NOTA: Tutte le immagini delle schermate riportate in questo Manuale d’uso fanno riferimento al sistema operativo Windows XP. Tutte le procedure d’installazione sugli altri sistemi operativi, e.g. Windows 98 SE, sono identiche. 30 La procedura guidata InstallShield Wizard si avvia. Fare clic su "Next" per continuare. Fare clic su "Next" per installare i file del programma nella cartella predefinita. 31 Selezionare "Yes, I want to restart my computer now." e fare clic su "Finish" per riavviare il computer. 32 ADESSO. 1. Dopo che il computer si è riavviato, inserire la scheda WLAN PCMCIA nell’alloggio scheda PC. Utenti schede PCI: inserire la scheda PCI nell’alloggio PCI prima di riavviare il computer. Il PC dovrebbe rilevare automaticamente il nuovo hardware. 2. Continuare con Installation setup. 2 Installazione e configurazione Selezionare "Yes, I want to restart my computer now." e fare clic su "Finish" per riavviare il computer. 33 Fare clic su “Continue Anyway” per continuare. Fare clic su "Finish" per completare l'installazione del nuovo hardware. 34 3 Abilitare l’utilità dell’adattatore LAN wireless Aprire il menu Start>Impostazioni>Pannello di controllo>Connessioni di rete. Selezionare “Wireless Network Connection#”. Fare clic su “Properties”. Rimuovere “Use Windows to configure my wireless network settings”. Fare clic su “OK” 35 Una volta terminate con successo l’installazione, sulla barra delle applicazioni apparirà un'icona del programma di utilità. Fare doppio clic sull’icona per lanciare l’utilità. 36 Tarjeta X-Micro WLAN 11g PCMCIA/PCI Guía de instalación rápida 1 Instalación y Configuración Antes de insertar la tarjeta PCMCIA/PCI en la ranura de tarjetas de su equipo, instale el Programa de Controlador y Utilidades. Asegúrese de que el Adaptador 11g WLAN PCMCIA/PCI NO está insertado en la ranura PCMCIA/PCI. Encienda su equipo. Inserte el CD en la unidad de CD-ROM Haga clic en el botón “Install” en el menú de selección. NOTE: Todas las imágenes capturadas de la instalación que se relata en este manual de usuario se basan en el sistema operativo Windows XP. Para realizar la instalación en otro Sistema Operativo Windows, como Windows 98 SE, los procedimientos son similares. 37 Se iniciará el programa InstallShield Wizard. Haga clic en “Next” para continuar. Haga clic en “Next” para instalar los archivos de programa en la carpeta predeterminada. 38 Seleccione “Yes, I want to restart my computer now.” y haga clic en “Finish” para reiniciar el ordenador. 39 AHORA. 1. Después de reiniciar el equipo, inserte el Adaptador PCMCIA LAN Inalámbrico en la ranura PC Card vacía. Para el usuario de Adaptador PCI, inserte el Adaptador PCI en la ranura PCI vacía antes de reiniciar el equipo. Su PC detectará automáticamente el hardware nuevo. 2. 2 Continúe con la Instalación. Instalación y Configuración Seleccione “Yes, I want to restart my computer now.” y haga clic en “Finish” para reiniciar el ordenador. 40 Haga clic en "Continue Anyway" para continuar Haga clic en “Finish” para completar la instalación del hardware. 41 3 Activar la utilidad de Adaptador LAN Inalámbrico Abra el Menú Inicio>Configuración>Panel de Seleccione “Wireless Network Connection#”. Y haga clic en “Properties”. Quite la marca de la opción “Use Windows to configure my wireless network settings”. Y haga clic en “OK” 42 Después de instalarlo correctamente aparecerá un icono en su barra de tareas. Para abrir la utilidad, haga doble clic en el icono. 43 Placa WLAN 11g PCMCIA/PCI da X-Micro Guia de instalação rápida 1 Instalação e configuração Antes de introduzir a placa PCMCIA /PCI na respectiva ranhura existente no seu computador, instale o Driver&Utility Program. Certifique-se de que a placa WLAN 11g PCMCIA/PCI NÃO está introduzida na ranhura da placa PC Card/PCI. Ligue o computador. Introduza o CD na unidade de CD-ROM. Clique no botão “Install” no menu. NOTA: Todas as imagens mostradas neste guia do utilizador e referentes às etapas de instalação têm por base o sistema operativo Windows XP. Para proceder à instalação noutros sistemas operativos Windows, e.g. Windows 98 SE, deve seguir os mesmos procedimentos. 44 O InstallShield Wizard é apresentado. Clique em “Next” para continuar. Clique em “Next” para instalar os ficheiros do programa na pasta predefinida. 45 Seleccione a opção “Yes, I want to restart my computer now.” e clique em “Finish” para reiniciar o computador. 46 AGORA. 1. Após ter reiniciado o computador, introduza a placa LAN sem fios PCMCIA na ranhura PC Card vazia. No caso de uma placa PCI, o utilizador deve introduzir a mesma na ranhura PCI disponível antes de reiniciar o computador. O seu PC deve detectar o novo hardware automaticamente. 2. 2 Prossiga com a instalação. Instalação e configuração Seleccione “Yes, I want to restart my computer now.” e clique em “Finish” para reiniciar o computador. 47 Clique em “Continue Anyway” para prosseguir Clique em “Finish” para concluir a instalação do novo hardware. 48 3 Activar o utilitário da placa LAN sem fios Iniciar >Definições>Painel de controlo>Ligações de rede. Escolhaaopção“Wireless Network Connection#”. Deseguida,cliqueem“Properties”. Retireovistodaopção“Use Windows to configure my wireless network settings”. Cliqueem"OK" 49 Apósainstalaçãotersidofeitacomêxito,oíconedoprogramautilitárioaparecenasuabarradetarefas.Paraabriroutilitário,façaumduplocliquesobreo respectivoícone. 50 PCMCIA-карта/PCI-карта X-Micro WLAN 11g Краткое руководство по установке 1 Установка и настройка Прежде чем вставить карту PCMCIA /PCI в гнездо PC-карты компьютера, необходимо установить программу Driver&Utility. Убедитесь, что беспроводной WLAN -адаптер 11g PCMCIA Card/PCI НЕ вставлен в гнездо PC-карты/PCI-гнездо. Включите компьютер. Вставьте компакт-диск в дисковод CD-ROM. Нажмите кнопку «Install» в меню выбора. ПРИМЕЧАНИЕ. Все приведенные иллюстрации окон установки основаны на операционной системе Windows XP. Процедура установки в других операционных системах Windows, например, Windows 98 SE, не меняется. 51 Запуск «InstallShield Wizard» (Мастер InstallShield) Для продолжения нажмите кнопку «Next». Нажмите «Next», чтобы установить приложение в папку по умолчанию. 52 Выберите «Yes, I want to restart my computer now» и нажмите кнопку «ОК» для перезапуска компьютера. 53 ЗАТЕМ 1. После перезапуска компьютера вставьте беспроводной сетевой PCMCIA-адаптер в пустое гнездо PC-карты. При использовании PCI-адаптера вставьте его в пустое гнездо PCI перед запуском компьютера. Компьютер автоматически обнаружит новое устройство. 2. 2 Продолжите процедуру установки. Установка и настройка Выберите «Yes, I want to restart my computer now» и нажмите кнопку «ОК» для перезапуска компьютера. 54 Нажмите «Continue Anyway». Для завершения установки оборудования нажмите «Finish». 55 3 Включениеслужебнойпрограммыадаптерабеспроводнойсети. Вызовитеменю«Пуск»>«Настройки»>«Панельуправления»>«Сетевые подключения». Выберите«Wireless Network Connection#». Затемнажмите«Properties». Снимитефлажокпараметра«Use Windows to configure my wireless network settings». Затемнажмите«OK». 56 После завершения установки в панели задач отобразится значок служебной программы. Дважды щелкните этот значок для запуска служебной программы. 57 X-Micro 11g 無線網路 PCMCIA 卡/PCI 介面卡 快速安裝指南 1 安裝及設定 將 PCMCIA/PCI 插入電腦 PC 卡卡槽之前,請先安裝驅動程式及應用程式 (Driver&Utility)。 請先確定您未將 WLAN 11g PCMCIA/PCI 卡插入 電腦 PC 卡槽內。 請先啟動電腦,再將 CD 置入光碟機。 按一下選單上的 「Install」按鈕。 注意: 所有本使用手冊中使用的安裝圖像,均為 Windows XP 作業系統下的安裝畫面。 若要在其他 Windows 作業系統執行,如 Windows 98SE,操作程序同此。 58 安裝精靈(InstallShield Wizard)開始執行,請按一 下「Next」 後繼續安裝。 按一下「Next」,將程式 安裝在預設資料夾內。 59 選擇 「Yes, I want to restart my computer now」,並按一下完成, 重新啟動電腦。 60 現在 1. 電腦重新啟動後,請將無線區域網卡插入電腦 PCMCIA 卡插槽內。 若您使用的是 PCI 卡,請在電腦重新啟動前,先將 PCI 卡插入 PCI 卡插槽內。 您的電腦將會自動偵測到新硬體。 2. 2 請繼續執行 Installation setup 的安裝設定。 安裝及設定 選擇 「Yes, I want to restart my computer now」 ,並按一下「Finish」 重新啟動電腦。 61 按一下 「Continue Anyway」 繼續進行安裝 按一下「Finish」,以完 成安裝新硬體。 62 3 啟動無線網路公用程式 啟動”開始功能表 >設定>控制台>網路連線 選擇已安裝的無線網路連線,並選擇內容. 請取消”使用Windows 來設定我的無線網路設定” 並按下確定生效. 63 安裝成功後,應用程式圖示將會顯示在右下角常駐程式列上。 在圖示上按兩下即可啟動該應用 程式。 64 www.x-micro.com-
 1
1
-
 2
2
-
 3
3
-
 4
4
-
 5
5
-
 6
6
-
 7
7
-
 8
8
-
 9
9
-
 10
10
-
 11
11
-
 12
12
-
 13
13
-
 14
14
-
 15
15
-
 16
16
-
 17
17
-
 18
18
-
 19
19
-
 20
20
-
 21
21
-
 22
22
-
 23
23
-
 24
24
-
 25
25
-
 26
26
-
 27
27
-
 28
28
-
 29
29
-
 30
30
-
 31
31
-
 32
32
-
 33
33
-
 34
34
-
 35
35
-
 36
36
-
 37
37
-
 38
38
-
 39
39
-
 40
40
-
 41
41
-
 42
42
-
 43
43
-
 44
44
-
 45
45
-
 46
46
-
 47
47
-
 48
48
-
 49
49
-
 50
50
-
 51
51
-
 52
52
-
 53
53
-
 54
54
-
 55
55
-
 56
56
-
 57
57
-
 58
58
-
 59
59
-
 60
60
-
 61
61
-
 62
62
-
 63
63
-
 64
64
-
 65
65
-
 66
66
-
 67
67


X-Micro XWL-11GCAR Manual de usuario
- Tipo
- Manual de usuario
- Este manual también es adecuado para
en otros idiomas
- français: X-Micro XWL-11GCAR Manuel utilisateur
- italiano: X-Micro XWL-11GCAR Manuale utente
- English: X-Micro XWL-11GCAR User manual
- русский: X-Micro XWL-11GCAR Руководство пользователя
- Nederlands: X-Micro XWL-11GCAR Handleiding
- português: X-Micro XWL-11GCAR Manual do usuário